

Page 1
Clothes
ryer
CD-3
Using the Controls ......... 3-4
..5
Accessories
Care & Cleaning ............. 6
Reversing the Door ........... 7
Form No. Y81907 A Part No. 2206675 Litho U.S.A. ¢ 2006 Maytag Appliances Sales Co
............... 5 Guide d'utilisation et
Troubleshooting .............. 9
........ 11
d'entretien ................. 12
Guia de uso y cuidado ....... 24
Page 2
ImportnntSnfet¥instructions
What You Need to Know About
Safety Instructions
Warning and Important Safety Instructions appearing in
this guide are not meant to cover all possible
conditions and situations that may occur. Common
sense, caution and care must be exercised when
installing, maintaining or operating appliance.
Always contact the manufacturer about problems or
conditions you do not understand.
Recognize Safety Symbols, Words,
Labels
1
Page 3
ImportnntSnfetyinstructions
1. Read all instructions before using the appliance.
2. To avoid the possibility of fire or explosion:
a. De net dry items that have been previously
cleaned in, washed in, soaked in, or spotted
with gasoline, dry-cleaning solvents, other
flammable or explosive substances as they give
off vapors that could ignite or explode. Any
material on which you have used a cleaning
solvent, or which is saturated with flammable
liquids or solids, should not be placed in the
dryer, until all traces of these flammable liquids
or solids and their fumes have been removed.
There are many highly flammable items used in
homes, such as: acetone, denatured alcohol,
gasoline, kerosene, some liquid household
cleaners, some spot removers, turpentine, waxes
and wax removers.
b. Items containing foam rubber (may be labeled
latex foam) or similarly textured rubber-like
materials must not be dried on a heat setting.
Foam rubber materials when heated, can under
certain circumstances produce fire by
spontaneous combustion.
3. Do net allow children or pets to play on, in, or in
front of the appliance. Close supervision is
necessary when the appliance is used near
children and pets.
4. Before the appliance is removed from service or
discarded, remove the door to the drying
compartment.
5. Do not reach into the appliance if the drum is
moving.
6. Do net install or store this appliance where it will
be exposed to the weathen
7. Do net tamper with controls.
8. Do net repair or replace any part of the appliance
or attempt any servicing urfless specifically
recommended in published user-repair instructions
that you understand and have the skills to carry out.
9. Do net use fabric softeners or products to
eliminate static unless recommended for dryer use
by the manufacturer of the fabric softener or
product.
10. Clean the lint screen before or after each load.
]1. Keep the area around the exhaust opening and
surrounding areas free from lint accumulation, dust
and dirt.
12. The interior of the dryer and exhaust duct should be
cleaned periodically by qualified service personnel.
13. This appliance must be properly grounded. Never
plug the appliance cord into a receptacle which is
not grounded adequately and in accordance with
local and national codes. See installation
instructions for grounding this appliance.
14. Do not sit on top of the clothes drye£
Important Safety
Notice & Warning
The California Safe Drinking Water and Toxic
Enforcement Act of 1986 (Proposition 65) requires the
Governor of California to publish a list of substances
known to the State of California to cause cancer or
reproductive harm, and requires businesses to warn
customers of potential exposures to such substances.
Users of this appliance are hereby warned that the
burning of gas can result in low-level exposure to
some of the listed substances, including benzene,
formaldehyde, and soot, due primarily to the
incomplete combustion of natural gas or liquid
petroleum (LP) fuels. Exhaust ducts should be kept
free of obstructions arid properly exhausted dryers will
minimize exposure.
Note: Because of continuing product
improvements, Maytag reserves the right to change
specifications without notice. For corr_plete details,
see the Installation Instructions packed with your
product before selecting cabinetry, making cutouts
or beginning installation.
SAVE THESE INSTRUCTIONS
2
Page 4

UsingtheControls
[CROSLEY 1
!;;i!i;+i!:i+i_;;ii¸ ;iiii_i;i!i;:;:+?_i_;+ii;_+!;:+!I;C!I
Select Temperature
To select the correct temperature, turn the temperature
control to Regular, Medium (select models), Low or Air
Fluff.
LOW MEDIUM
LOW HIGH
OFF
END OF CYCLE
Select Cycle
To select a cycle, rotate the control dial to the desired
setting. When using an Auto Dry!Sensor Dry cycle, the
control dial should point between More Dry and Less
Dry for most loads.
Regular Sturdy cottons or labels marked
Tumble Dry.
For permanent press, synthetics,
Medium lightweight cottons or items
(select models) labeled Tumble Dry Medium.
Low For heat sensitive items labeled
Tumble Dry Low.
Items which need fresherling.
Air Fluff Load tumbles with room
temperature air.
Select Signal
End of Cycle Signal
When the cycle is corr_plete, a signal will sound several
times. On select models the End of Cycle Signal
volume is adjustable. To adjust the volume, select any
setting between OFF and HIGH.
Loads of larger or bulkier size may require the More
Dry setting to completely dry the load. The Less Dry
setting is best suited for lightweight fabrics or for leaving
some moisture in the clothing at the end of the cycle.
Regular Fabrics
The Regular cycle is designed to dry most cottons and
linens. At the end of the cycle, the clothes are cooled
to reduce wrinkling.
Wrinkle-Free Fabrics
The Wrinkle-Free Fabrics cycle is designed to dry
wrinkle-free cottons, synthetic fabrics, double knits and
permanent press fabrics automatically.
Wrinkle Out (select models) is provided to minimize
wrinkles in the Wrinkle-Free Fabrics cycle. This feature
provides an extra 60 minutes of unheated tumble
action at the end of the cycle. Clothes can be removed
any time during this portion of the cycle. The additional
60 minutes can be cancelled by setting the knob to
OFF.
3
Page 5
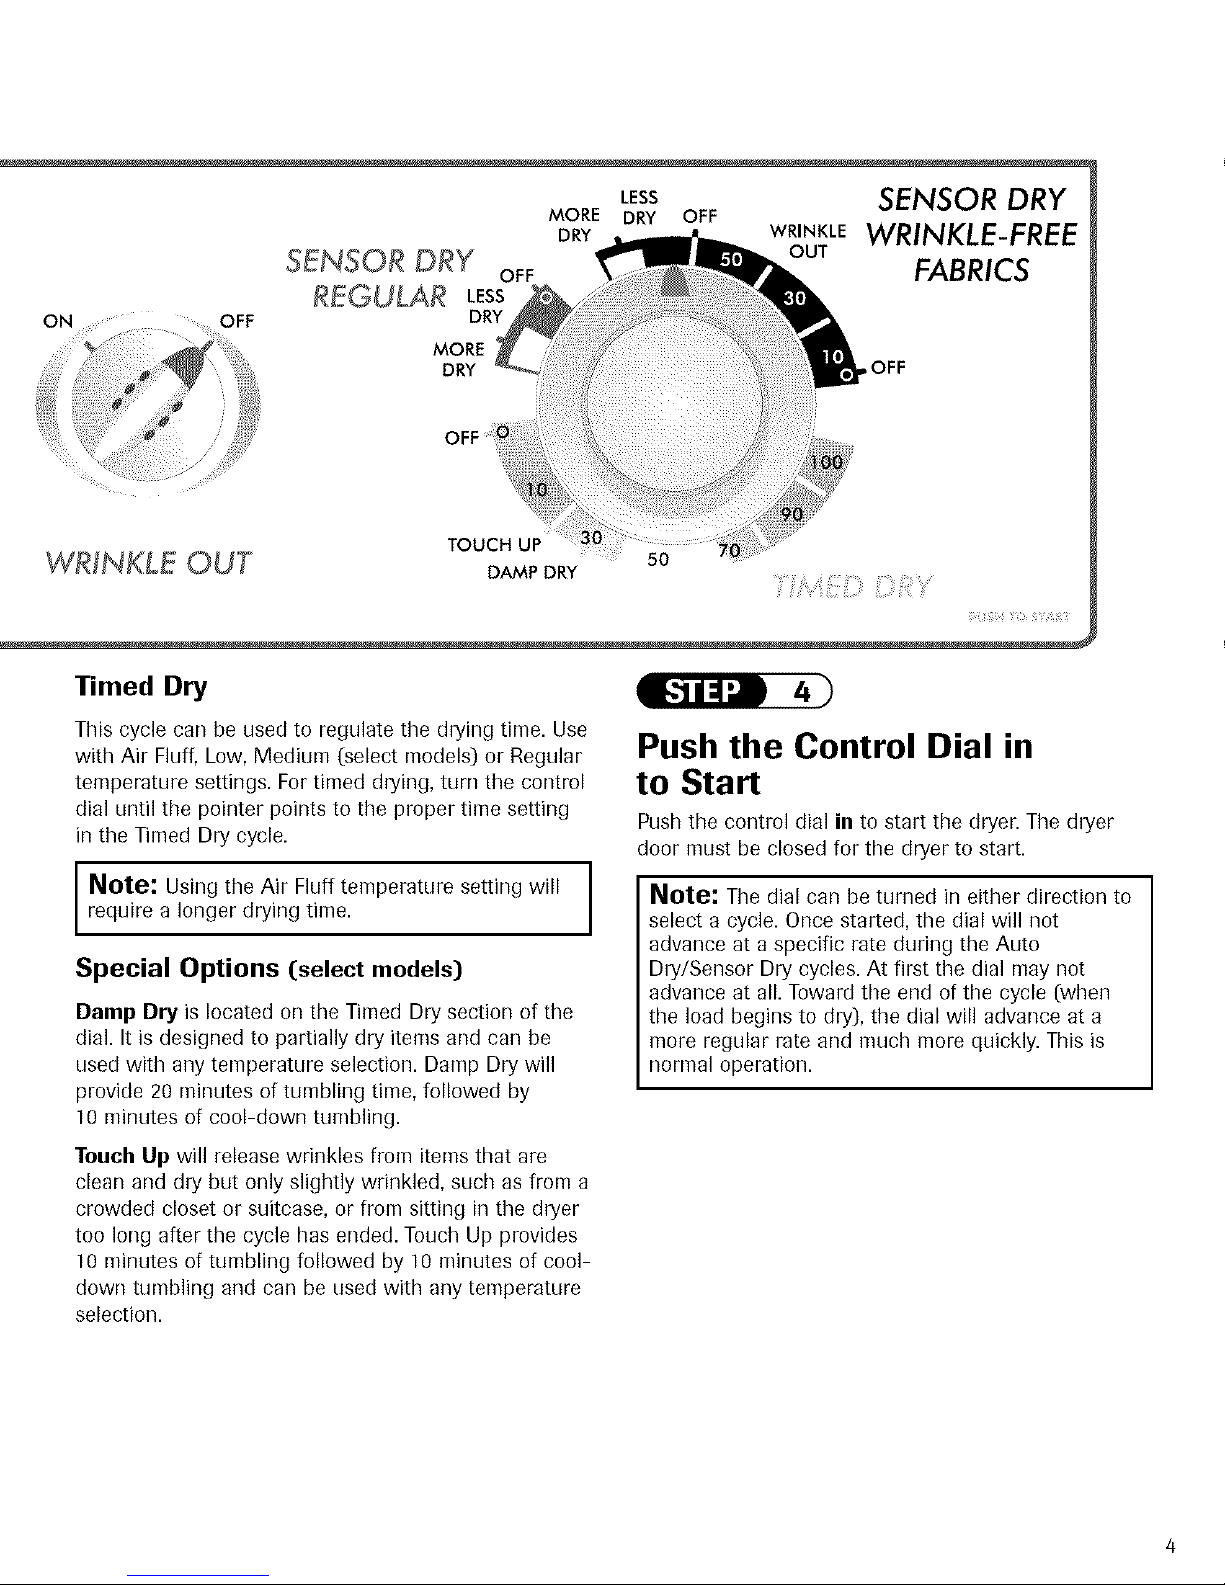
WRINKLE OUT
Timed Dry
SENSOR DRY
MORE
DRY ,OFF
OFF
TOUCH UP
OFF
LESS
DRY
DAMP DRY
MORE
DRY
LESS
DRY OFF
WRINKLE
OUT
SENSOR DRY
WRINKLE-FREE
FABRICS
This cycle can be used to regulate the drying time. Use
with Air Fluff, Low, Medium (select models) or Regular
temperature settings. For timed drying, turn the control
dial until the pointer points to the proper time setting
in the Timed Dry cycle.
Note: Using the Air Fluff temperature setting will
require a longer drying time.
Special Options (select models)
Damp Dry is located on the Timed Dry section of the
dial. It is designed to partially dry items and can be
used with any temperature selection. Damp Dry will
provide 20 minutes of tumbling time, followed by
10 minutes of cool-down tumbling.
Touch Up will release wrinkles from items that are
clean and dry but only slightly wrinkled, such as from a
crowded closet or suitcase, or from sitting in the dryer
too long after the cycle has ended. Touch Up provides
10 minutes of tumbling followed by 10 minutes of cool-
down tumbling and can be used with any temperature
selection.
Push the Control Dial in
to Start
Push the control dial in to start the dryer. The dryer
door must be closed for the dryer to start.
Note: The dial can be turned in either direction to
select a cycle. Once started, the dial will not
advance at a specific rate during the Auto
Dry/Sensor Dry cycles. At first the dial may not
advance at all. Toward the end of the cycle (when
the load begins to dry), the dial will advance at a
more regular rate and much more quickly. This is
normal operation.
Page 6
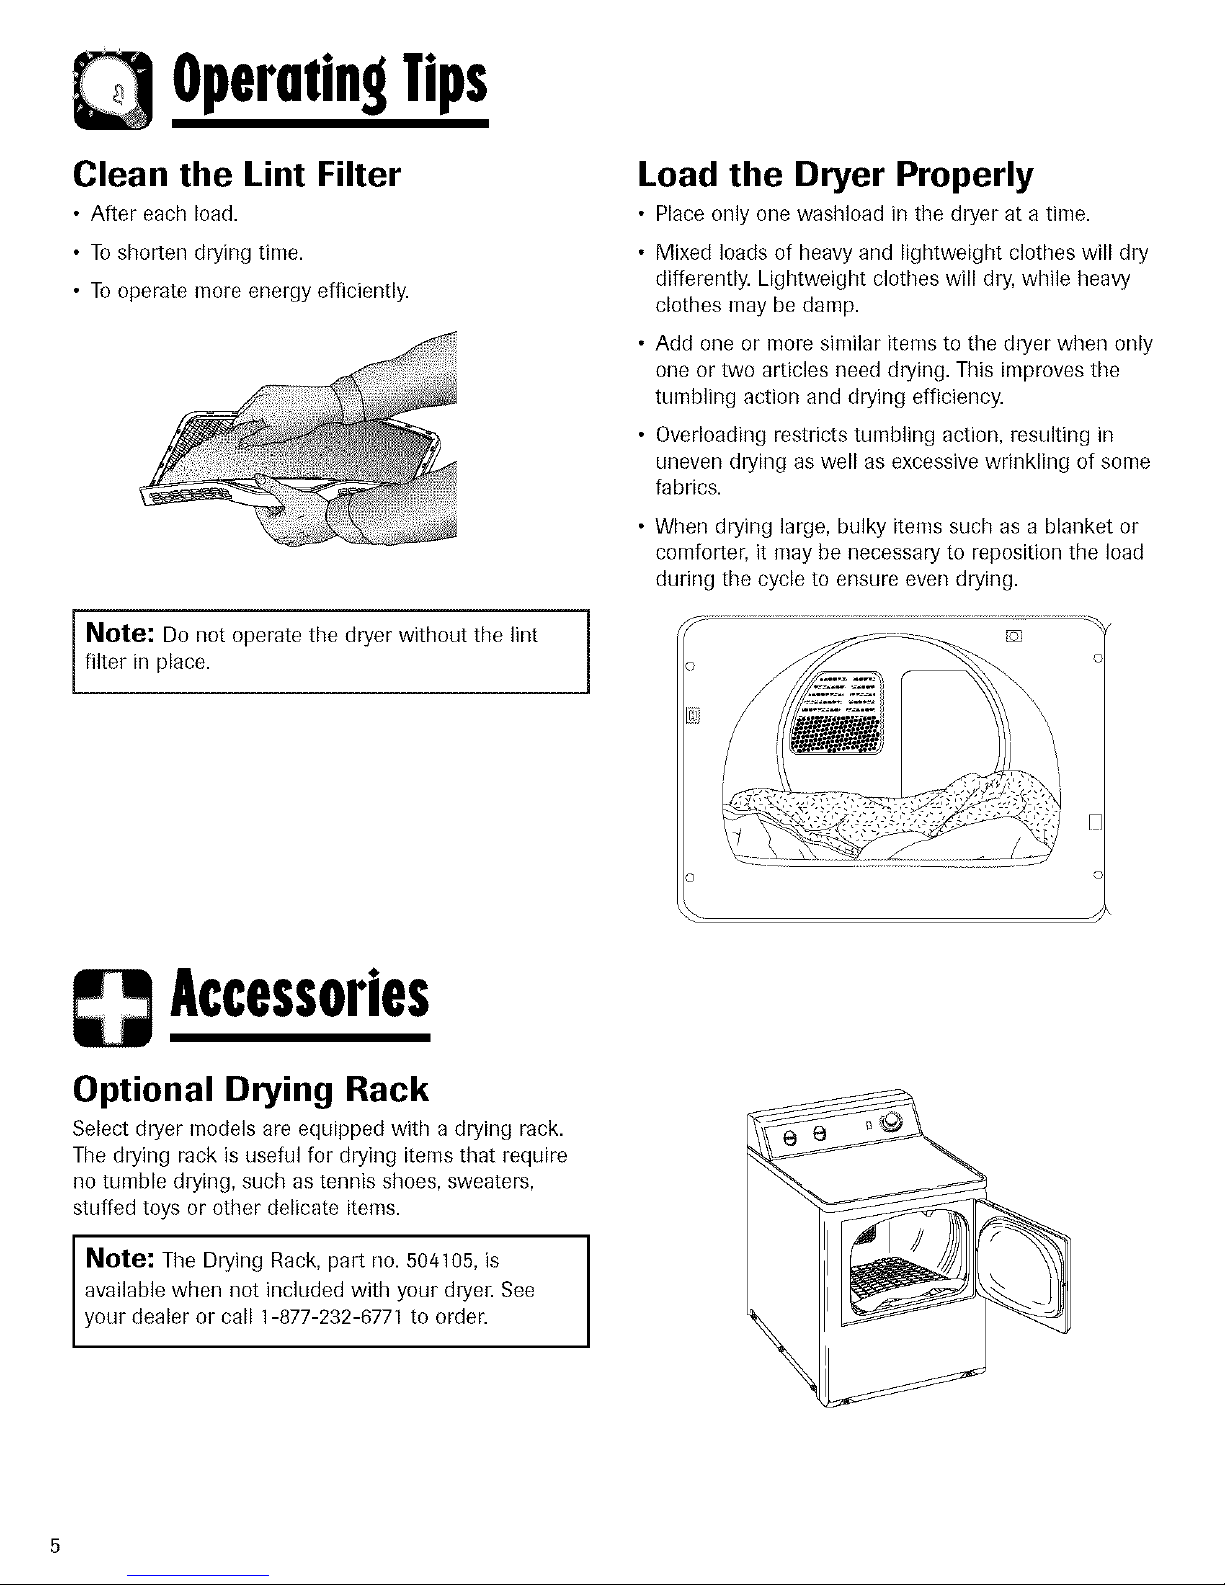
Opermin9Tips
Clean the Lint Filter
• After each load.
• To shorten drying time.
• To operate more energy efficiently.
Note: Do not operate the dryer without the lint
filter in place.
Load the Dryer Properly
• Place only one washload in the dryer at a time.
• Mixed loads of heavy and lightweight clothes will dry
differently. Lightweight clothes will dry, while heavy
clothes may be damp.
• Add one or more similar items to the dryer when only
one or two articles need drying. This irr_proves the
tumbling action and drying efficiency.
• Overloading restricts tumbling action, resulting in
uneven drying as well as excessive wrinkling of some
fabrics.
• When drying large, bulky items such as a blanket or
corrfforter, it may be necessary to reposition the load
during the cycle to ensure even drying.
]
Accessories
Optional Drying Rack
Select dryer models are equipped with a drying rack.
The drying rack is useful for drying items that require
no tumble drying, such as tennis shoes, sweaters,
stuffed toys or other delicate items.
Note: The Drying Rack, part no. 504105, is
available when not included with your dryer. See
your dealer or call 1-877-232-6771 to order.
5
I
Page 7

Care& Cleanin9
Control Panel
Clean with a soft, damp cloth. Do not use abrasive
substances.
Tumbler
Remove any stains such as crayon, ink pen or fabric
dye from new items (such as towels or jeans) with an
all-purpose cleaner. Then tumble old towels or rags to
remove any excess stain or cleaning substance. Once
these steps are done, stains may still be visible, but
should not transfer to subsequent loads.
Cabinet
Wipe off any marks with soap and water. Use an
appliance wax once a year if desired.
Dryer Exhaust System
Inspect and clean once a year to maintain optimum
performance. The outside exhaust hood should be
cleaned more frequently to ensure proper operation.
(Refer to the Installation Instructions for more
information.)
Special Laundry Tips
Please follow the care label or manufacturer's instructions for drying special items. If care label instructions are not
available, use the following information as a guide.
iii i i i i ii iiii [ iii !i!iii!¸ j
Bedspreads and
Comforters
• Follow the care label instructions or dry on the Regular cycle.
• Be sure the item is thoroughly dry before using or storing.
• May require repositioning to ensure even drying.
Blankets • Dry only one blanket at a time for best tumbling action.
Curtains and • Select the Wrinkle-Free Fabrics cycle to help minimize wrinkling.
Draperies • Dry in small loads for best results and remove as soon as possible.
Cloth Diapers • Select the Regular cycle for soft, fluffy diapers.
Down-Filled • Select the Regular cycle and a Delicate temperature setting.
Items Oackets, • Place a clean pair of sneakers in the dryer with the item to fluff the down comforters, etc.
sleepingbags, Adding a couple of dry towels shortens dry time and absorbs moisture.
comforters, etc.)
Foam Rubber • Do not dry on a heat setting. Select the Timed Dry cycle (no heat).
(rugbacks,stuffed • _ WARNING - Drying a rubber item with heat may damage it or be a fire hazard.
toys, certain shoulder
pads, etc.)
Pillows • Select the Regular cycle.
Plastics • Select the Timed Dry cycle on a Low or Air Fluff temperature depending on the
[sbowercurta#Ts, care label instructions.
outdoor furniture
covers, etc.)
• Be sure the item is thoroughly dry before using or storing.
• Do not dryer-dry kapok or foam pillows.
• Add a couple of dry towels and a pair of clean sneakers to help the tumbling action and
to fluff the item.
Page 8
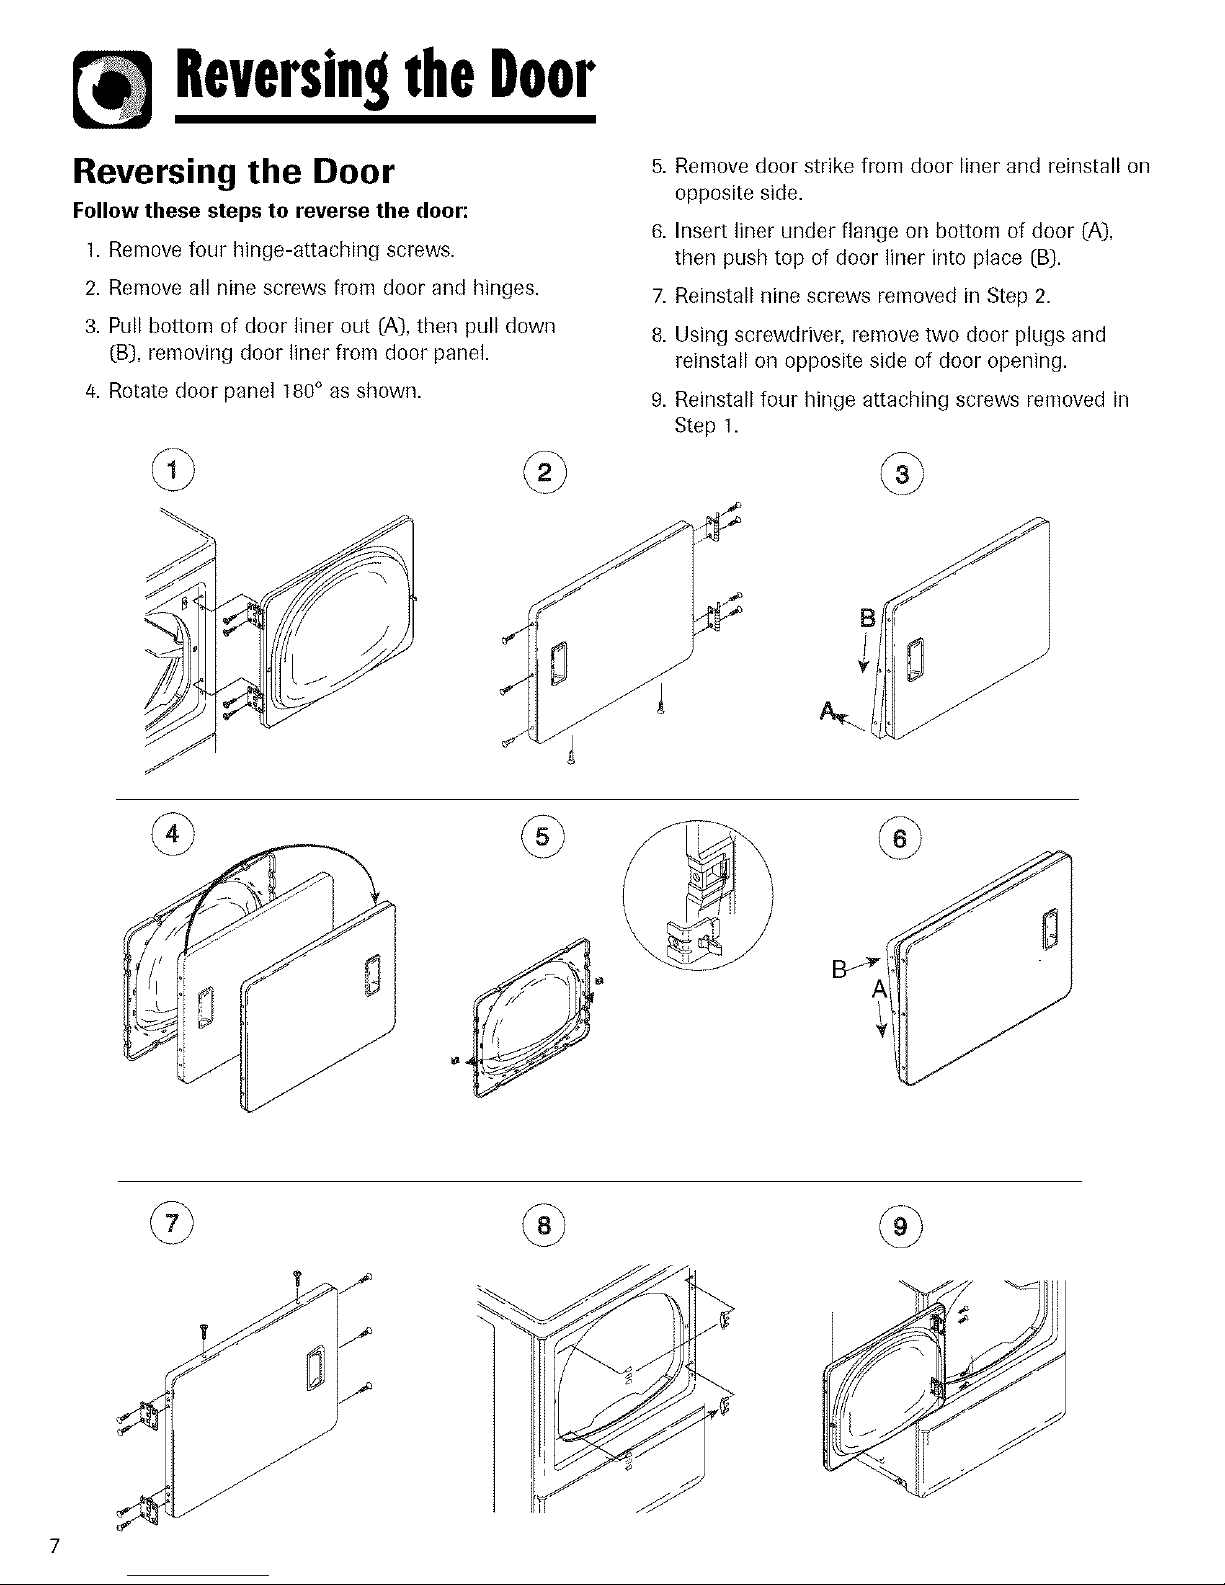
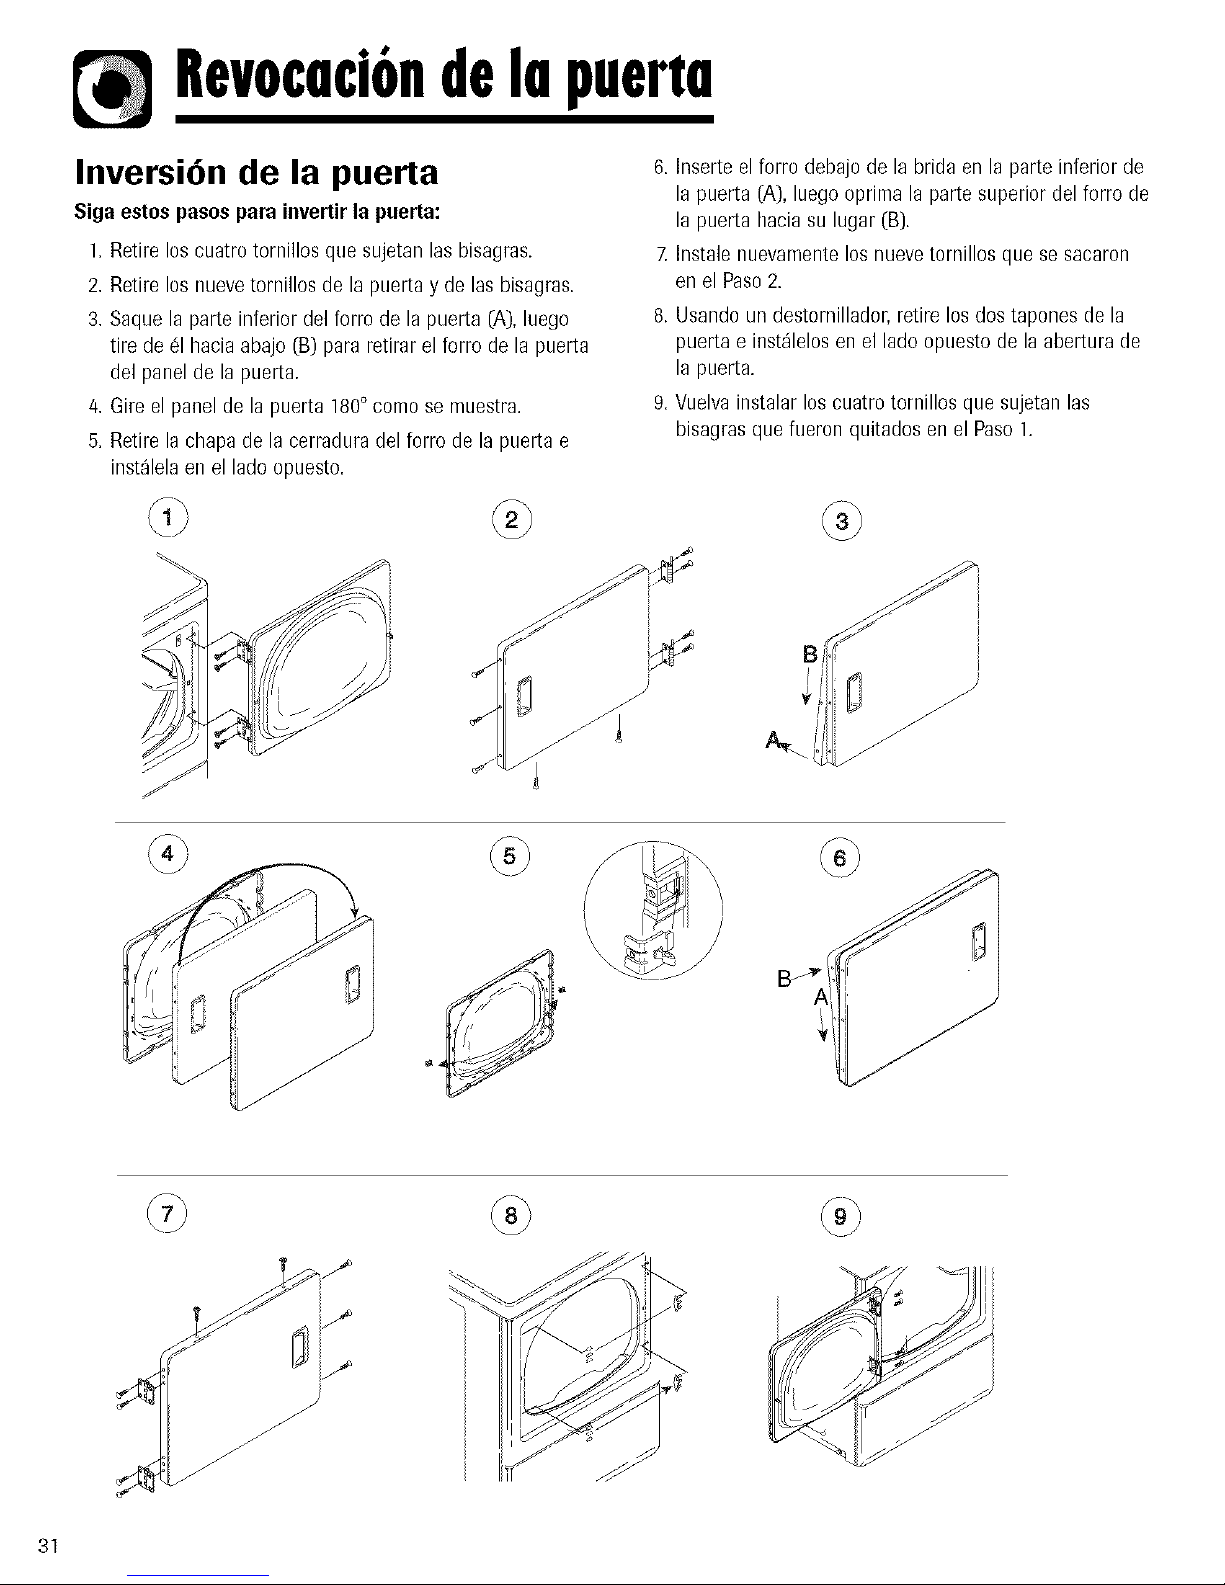
Reversin9theDoor
Reversing the Door
Follow these steps to reverse the door:
1. Remove four hinge-attaching screws.
2. Remove all nine screws from door and hinges.
3. Pull bottom of door liner out (A), then pull down
(B), removing door liner from door panel.
4. Rotate door panel ]80 ° as shown.
5. Remove door strike from door liner and reinstall on
opposite side.
6. Insert liner under flange on bottom of door (A),
therl push top of door liner into place (B).
7. Reinstall nine screws removed in Step 2.
8. Using screwdriver, remove two door plugs and
reinstall on opposite side of door opening.
9. Reinstall four hinge attaching screws removed in
Step 1.
@
B
v
7
Page 9
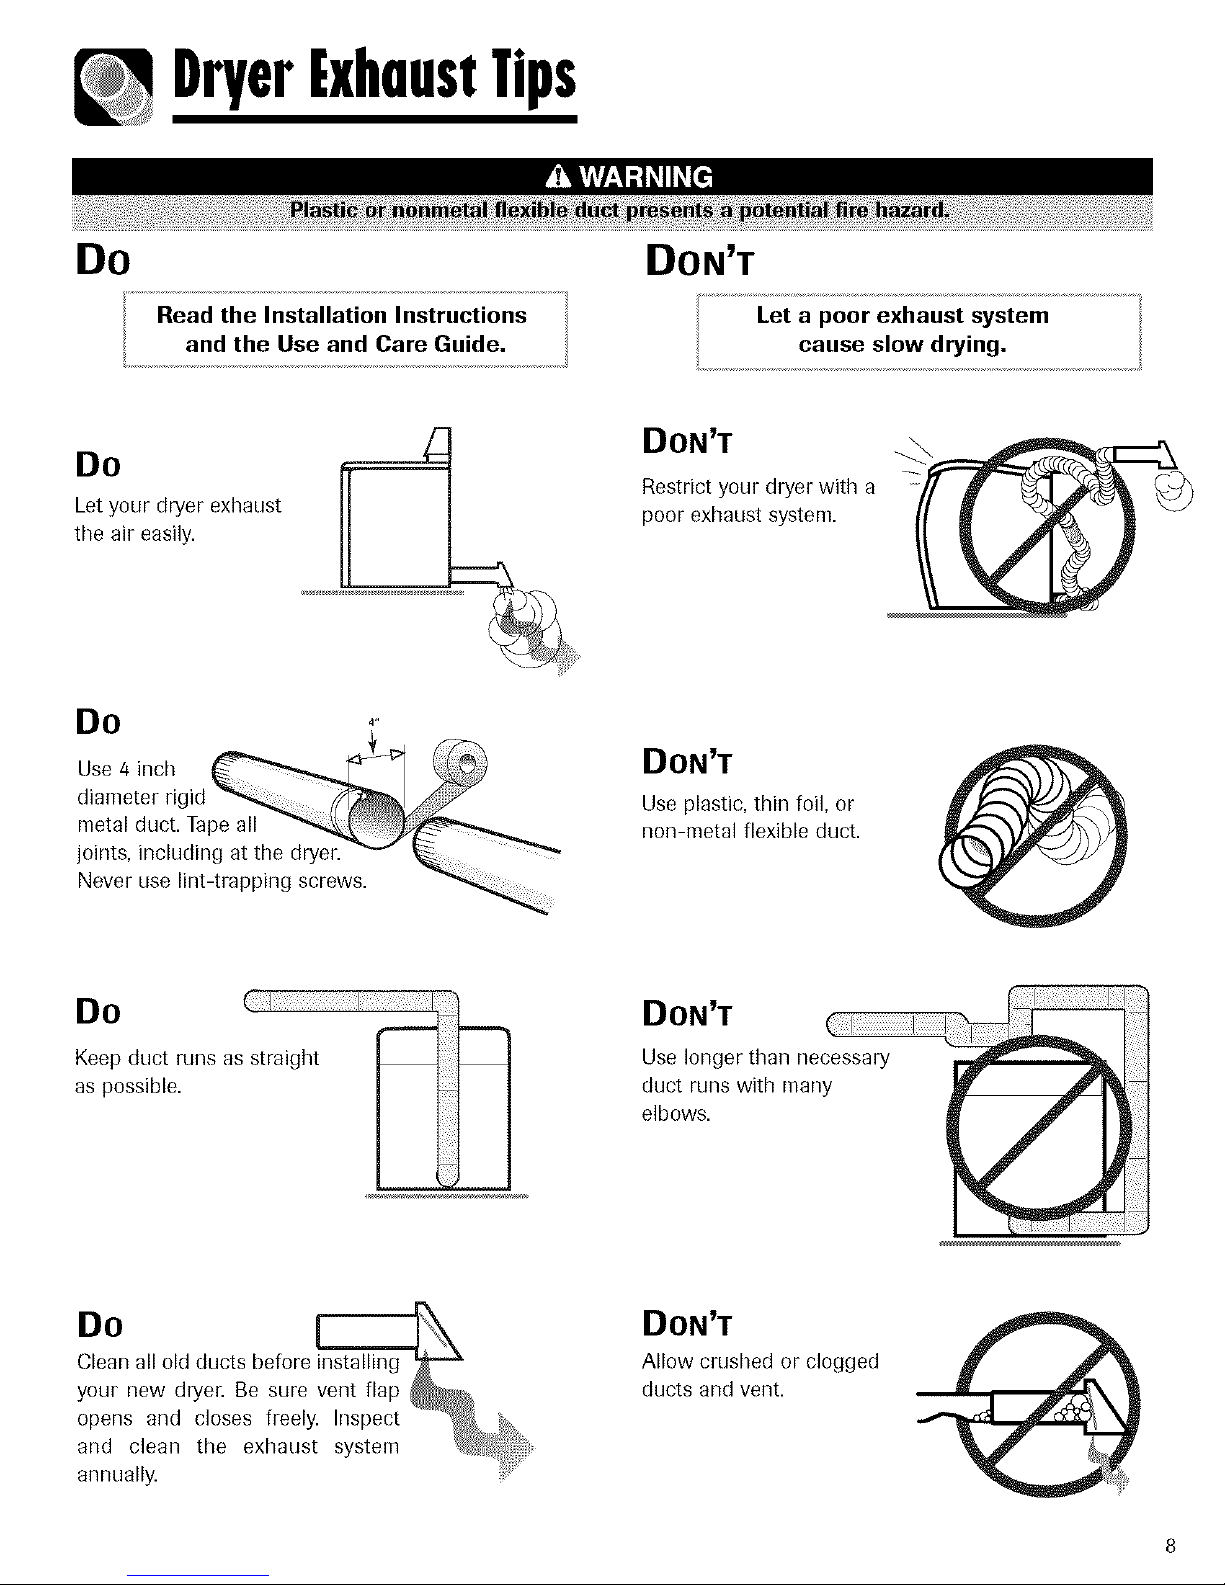
DryerixhnustTips
Do DON'T
DON'T
Do
Let your dryer exhaust
the air easily.
Restrict your dryer with a
poor exhaust system.
DO 4"
metal duct. Ta
joints, including at the dryer _ _
Never use lint
Do
Keep duct runs as straight
as possible.
DON'T
Use plastic, thin foil, or
non-metal flexible duct.
DON'T
Use longer than necessary
duct runs with many
elbows.
DO [
Clean all old ducts before installing
your new dryer. Be sure vent flap
opens and closes freely. Inspect
and clean the exhaust system
annually.
DON'T
Allow crushed or clogged
ducts and vent.
Page 10
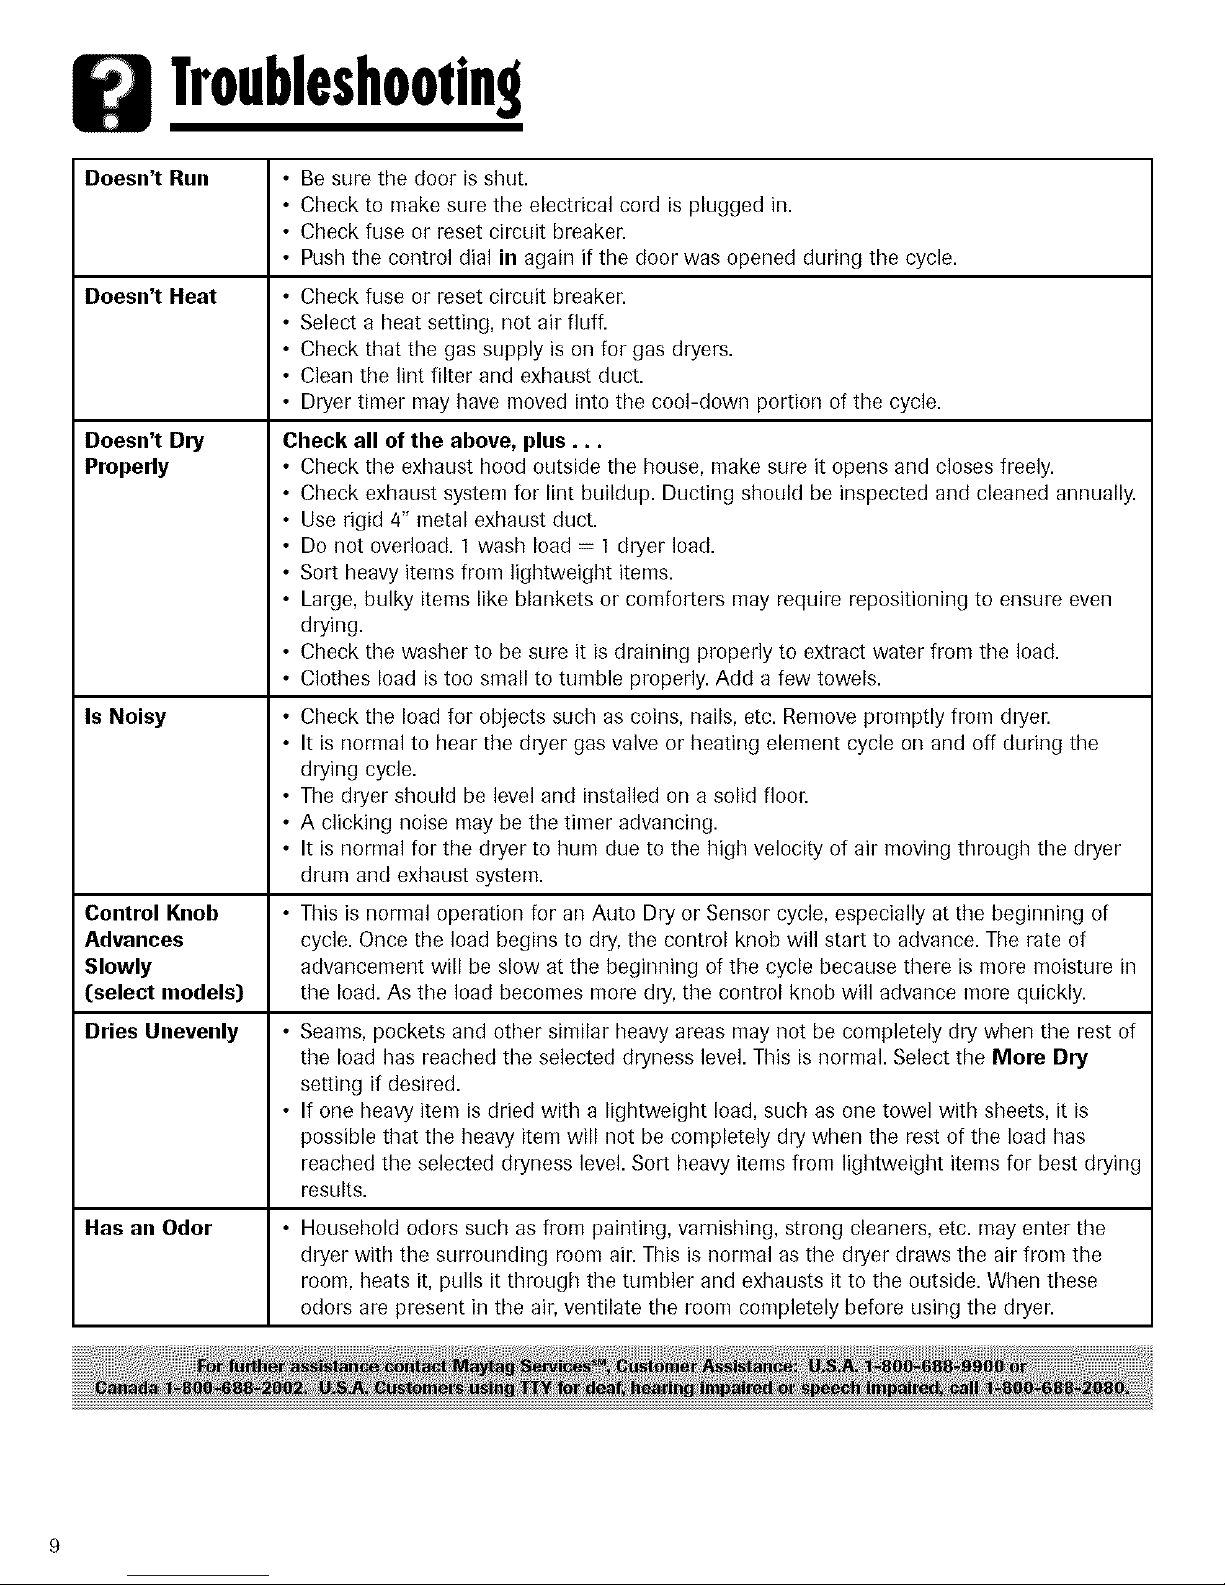
Troubleshooting
Doesn_ Run
Doesn't Heat
Doesn't Dry
Properly
Is Noisy
Control Knob
Advances
Slowly
[select models)
• Be sure the door is shut.
• Check to make sure the electrical cord is plugged in.
• Check fuse or reset circuit breaker
• Push the control dial in again if the door was opened during the cycle.
• Check fuse or reset circuit breaker.
• Select a heat setting, not air fluf/
• Check that the gas supply is on for gas dryers.
• Clean the lint filter and exhaust duct.
• Dryer timer may have moved into the cool-down portion of the cycle.
Check all of the above, plus...
• Check the exhaust hood outside the house, make sure it opens and closes freely.
• Check exhaust system for lint buildup. Ducting should be inspected and cleaned annually.
• Use rigid 4" metal exhaust duct.
• Do not overload. ] wash load = ] dryer load.
• Sort heavy items from lightweight items.
• Large, bulky items like blankets or comforters may require repositioning to ensure even
drying.
• Check the washer to be sure it is draining properly to extract water from the load.
• Clothes load is too small to tumble properly. Add a few towels.
• Check the load for objects such as coins, nails, etc. Remove promptly from dryer.
• It is normal to hear the dryer gas valve or heating element cycle on and off during the
drying cycle.
• The dryer should be level and installed on a solid floor.
• A clicking noise may be the timer advancing.
• It is normal for the dryer to hum due to the high velocity of air moving through the dryer
drum and exhaust system.
• This is normal operation for an Auto Dry or Sensor cycle, especially at the beginning of
cycle. Once the load begins to dry, the control knob will start to advance. The rate of
advancemerlt will be slow at the beginning of the cycle because there is more moisture in
the load. As the load becomes more dry, the control knob will advance more quickly.
Dries Unevenly
Has an Odor • Household odors such as from painting, varnishing, strong cleaners, etc. may enter the
9
• Seams, pockets and other similar heavy areas may not be completely dry when the rest of
the load has reached the selected dryness level. This is normal. Select the More Dry
setting if desired.
• If one heavy item is dried with a lightweight load, such as one towel with sheets, it is
possible that the heavy item will not be completely dry when the rest of the load has
reached the selected dryness level. Sort heavy items from lightweight items for best drying
results.
dryer with the surrourlding room air. This is normal as the dryer draws the air from the
room, heats it, pulls it through the tumbler and exhausts it to the outside. When these
odors are present in the air, ventilate the room completely before using the dryer.
Page 11

Notes
10
Page 12

Warranty&Service
What is Not Covered By These Warranties
I Conditions and damages resulting from any of the following:
a. Improper installation, delivery, or maintenance.
b. Any repair, modification, alteration, or adjustment not authorized by the
manufacturer or an authorized servicer.
c. Misuse, abuse, accidents, unreasonable use, or acts of God.
d. Incorrect electric current, voltage, electrical and/or gas supply.
e. Improper setting of any control.
2. Warranties are void if the original serial numbers have been removed, altered,
or cannot be readily determined.
3. Light bulbs, water filters and air filters.
4. Products purchased for commercial or industrial use.
5. The cost of service or service call to:
a. Correct installation errors. For products requiring ventilation, rigid metal
ducting must be used.
b. Instruct the user on the proper use of the product.
c. Transport the appliance to and from the servicen
6. Any food loss due to refrigerator or freezer product failures.
7. Expenses for travel and transportation for product service in remote locations.
8. Outside of the United States and Canada this warranty does not apply.
Contact your dealer to determine if another warranty applies.
CUSTOMER'S SOLE AN D EXCLUSIVE
REMEDY UNDER THIS LIMITED
WARRANTY SHALL BE PRODUCT REPAIR
AS PROVIDED HEREIN. IMPLIED
WARRANTIES, INCLUDING WARRANTIES
OF MERCHANTABILITY OR FITNESS FOR
A PARTICULAR PURPOSE,ARE LIMITED
TO ONE YEAR OR THE SHORTEST
PERIODALLOWED BY LAW. MAYTAG
CORPORATION SHALL NOT BELIABLE
FOR INCIDENTAL OR CONSEQUENTIAL
DAMAGES. SOME STATESAND
PROVINCES DO NOT ALLOW THE
EXCLUSION OR LIMITATION OF
INCIDENTAL OR CONSEQUENTIAL
DAMAGES, OR LIMITATIONS ON THE
DURATION OF IMPLIED WARRANTIES OF
MERCHANTABILITY OR FITNESS,SO
THESE EXCLUSIONS OR LIMITATIONS
MAY NOTAPPLY TO YOU. THIS
WARRANTY GIVES YOU SPECIFICLEGAL
RIGHTSAND YOU MAY ALSO HAVE
OTHER RIGHTS,WHICH VARY STATETO
STATEOR PROVINCETO PROVINCE
9. Consequential or incidental damages sustained by any person as a result of
any breach of these warranties. Some states do not allow the exclusion or
limitation of consequential or incidental damages, so the above exclusion may
not apply.
If You Need Service
First see the Troubleshooting section in your Use and Care Guide or call the
dealer from whom your appliance was purchased or call Maytag Services, LLC,
Customer Assistance at 1-800-688-9900 USA and 1-800-688-2002 Canada to
locate an authorized servicer.
Be sure to retain proof of purchase to verify warranty status. Refer to WARRANTY
for further information on owner's responsibilities for warranty service.
If the dealer or service company cannot resolve the problem, write to Maytag
Services, LLC,Attn: CAIR" Center, RO. Box 2370,Cleveland, TN 37320-2370,or call
1-800-688-9900 USA and 1-800-688-2002 Canada. U.S. customers using
TTY for deaf, hearing impaired or speech impaired, call 1-800-688-2080.
User's guides, service manuals and parts information are availablefrom Maytag
Services, LLC,Customer Assistance.
Notes: When writing or calling about a service problem, please include:
a. Your name, address and telephone number;
b. Model number and serial number;
c. Name and address of your dealer or servicer;
d. A clear description of the problem you are having;
e. Proof of purchase (sales receipt).
11
Page 13

CD-3
Seclt usee
Importantes consignes
de s_curit_ .............. 13-14
Utilisation des
commandes ............. 15-16
Fonctionnement ............ 17
_ Accessoires ................ 17
Nettoyage eL entretien ...... 18
Inversion de porte ........... 19
Recherche des pannes ...... 21
Garantie eL service
aprbs-vente ................ 23
Gufa de uso y cuidado ....... 24
Page 14

Importantesconsidnesdesecurite
Ce qu'il faut savoir _ propos
des consignes de sbcuritb
Lesconsignes de s_curit_ et les raises en garde pr6sent_es
dans ce guide ne couvrent pas toutes les situations
possibles. Faire preuve de jugement, de prudence et
d'attention Iors de I'installation, de I'entretien et de
I'utilisation de I'appareil.
Lorsque survient un probl_me ou une situation inhabituelle,
toujours communiquer avec le fabricant.
Reconnaissez les _tiquettes, phrases
ou symboles sur la securite
13
Page 15

Importantesconsidnesdesecurite
1. Lire toutes les instructions avant d'utiliser I'apparell.
2. Pour eviter les risques d'incendie ou d'explosion :
a. Ne pas s_cher d'articles qui ont auparavant _t_
nettoy_s ou laves a raide d'essence, de solvants de
nettoyage _-_sec ou d'autres produits explosifs ou
inflanlmables, ou qui en sont imbibes ou eclabousses,
car ces substances produisent des vapeurs qui
peuvent s'enflammer ou exploser. Tout tissu sur lequel
des solvants de nettoyage ont et_ utilis_s ou qui sont
satures de liquides ou solides inflammables ne doit
pas etre mis dans la s_cheuse avant que toute trace
et toute vapeur de ces liquides ou solides ne soient
completement elimin_es. De nombreux produits
extr_mement inflammables sont communement
utilises a la maison, entre autres I'ac_tone, I'alcool
denature, ressence, le keros_ne, certains produits de
nettoyage menagers, les d_tachants, la t_rebenthine,
les cires et les decapants de cire.
b. Les articles contenant du caoutchouc mousse
(l'_tiquette indique patrols : mousse de latex) ou tout
materiau de texture similaire ne doivent pas 6tre
seches sur un cycle utilisant de rair chaud. Lorsqu'ils
sont exposes a la chaleur, ces materiaux peuvent,
dans certaines conditions, s'enflammer par un
phenomene de combustion spontan_e.
3. Ne pas permettre aux enfants ou aux animaux familiers
de jouer sur rappareil, 9 I'interieur ou en face de celui-ci.
Une supervision etroite est necessaire Iorsque rappareil
est utilis6 9 proximite d'enfants ou d'animaux familiers.
/4.Avant de mettre I'appareil hors service ou au rebut,
retirer la porte du compartiment de sechage.
5. Ne pas mettre la main ou le bras dans rappareil si le
tan)Dour est en mouvement.
6. Ne pas installer ou remiser rappareil dans un endroit ot]
il est expos_ aux intemperies.
7. Ne pas modifier les m_canismes de commande.
8. Ne pas r@arer ou remplacer une piece de I'appareil ou
proc_der 9 un d@annage, sauf si les instructions
publi_es le recommandent et que la personne effectuant
la r@aration les comprend et poss_de les cennaissances
voulues pour les executer.
9. Ne pas utiliser d'assouplissant textile ni de produit visant
reduire I'electricite statique saul si le fabricant de ces
produits recommande leur usage dans la secheuse.
10. Nettoyer le filtre 9 charpie avant et apreschaque utilisation.
11. t_viterI'accumulation de charpie, de poussi_re et de
salete directement autour du conduit d'evacuation et
dans toute la zone environnante.
12. Faire nettoyer r_guli_rement I'interieur de la secheuse et
du conduit d'_vacuation par des techniciens qualifies.
13. Cet appareil doit 6tre correctement mis9 la terre. Ne
jamais brancher le cable _lectrique de rappareil sur une
prise murale non raise b la terre conformement aux
codes Iocaux et nationaux. Voir les instructions
d'installation pour la mise a la terre de cet appareil.
14. Ne pas s'asseoir sur la secheuse.
Mesures de sbcuritb
importantes
En application de la Ioi californienne concemant la salubrite
de I'eau et la protection centre les substances chimiques
California Safe Drinking Water and ToxicEnforcement Act de
1986 (Proposition 65], le gouverneur de Californie est tenu de
publier une liste des substances reconnues par I'etat de
Californie comme etant canc_rigenes ou pouvant etre cause
d'infertilite, et les commerces et industries sont tenus
d'avertir les consommateurs des risques potentiels
d'exposition _ de telles substances.
En consequence,les utilisateurs de I'appareilsont avertisque la
combustion de gaz peut entrafner une faible exposition
certaines des substancesnomenclatur_espar I'etatde Californie,
dont le benzene,le fomlaldehyde et la suie,principalementen
raisond'une combustion incomplete de gaz naturelou de gazde
p_trole liqudie (GPL).Lesconduits d'_vacuationne doivent pas
etre obstrueset rexpositionaces substances peut etre reduite
en assurant une ew)cuationd'air adequate.
Remarque: En raison des ameliorations apportees
regulierement _ ses produits, Maytag se reserve le droit
de modifier les specifications sans preavis. Pour de plus
amples renseignements, consulter les instructions
d'installation incluses avec votre appareil avant de choisir
des meubles de rangement, de faire du decoupage ou de
commencer rinstallation.
CONSERVER CES INSTRUCTIONS
14
Page 16
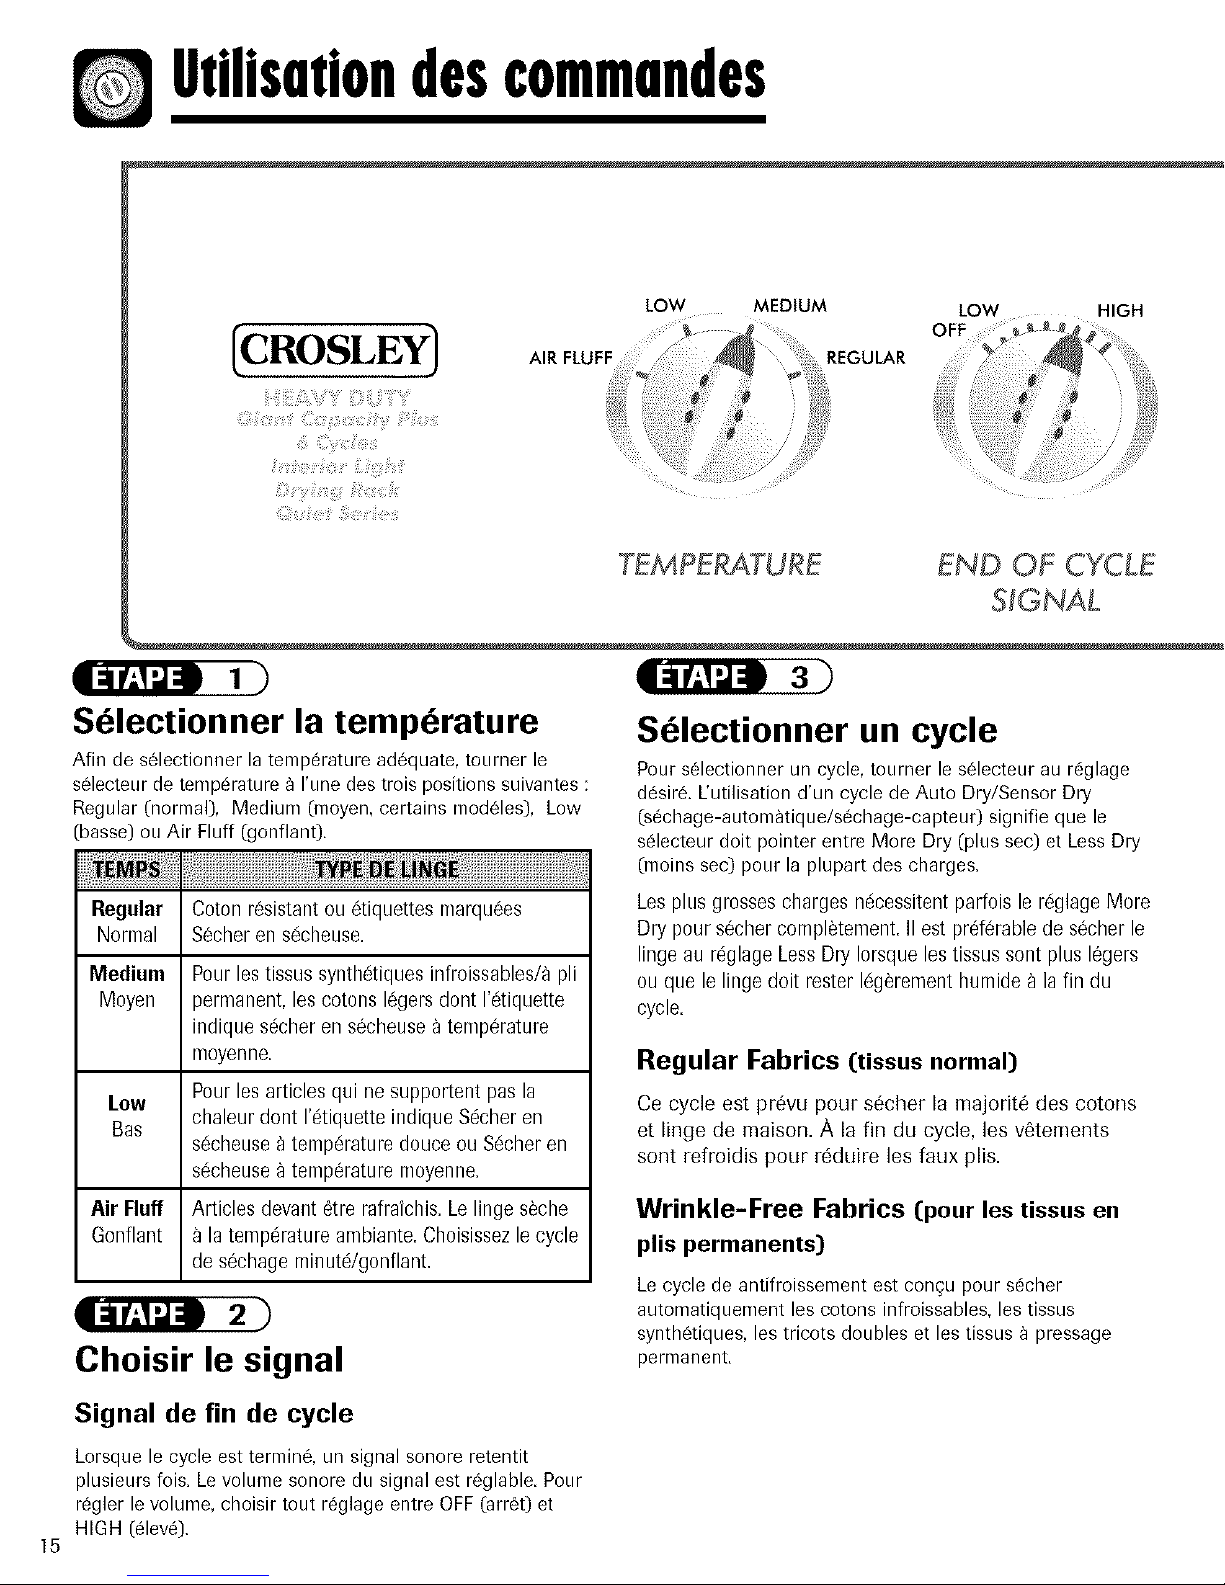
Utilisationdescommandes
Sblectionner la tempbrature
Afin de s61ectionner la temperature ad6quate, tourner le
s61ecteurde temperature b I'une des trois positions suivantes :
Regular (normal), Medium (moyen, certains mod61es), Low
(basse) ou Air Fluff (gonflan0.
Regular Coton r6sistant ou 6tiquettes marquees
Normal Secher en s6cheuse.
Medium Pour les tissus syntll_tiques infroissables/9 pli
Moyen permanent, les cotons I_gers dont 1'6tiquette
indique s_cher en s6cheuse 9 temperature
nloyenne.
low
Bas
Air Fluff Articles devant _tre rafrafchis. Le linge s_che
Gonflant a la temperature ambiante. Choisissez le cycle
Pour les articles qui ne supportent pas la
chaleur dont I'_tiquette indique S_cher en
s6cheuse _ temperature douce ou S6cher en
s_cheuse a temp6rature moyenne.
de s6chage minutdgonflant.
Choisir le signal
Selectionner un cycle
Pour s61ectionner un cycle, tourner le s61ecteur au r_glage
d6sir& L'utilisation d'un cycle de Auto Dry/Sensor Dry
(sechage-autom_tique/sechage-capteu0 signifie que le
selecteur doit pointer entre More Dry (plus sec) et Less Dry
(moins sec) pour la plupart des charges.
Les plus grosses charges n_cessitent parfois le r6glage More
Dry pour s6cher conlpletement. II est prd_rable de s6cher le
linge au r_glage Less Dry Iorsque les tissus sont plus 16gers
ou que le linge doit rester 16g_rement homide 9 la fin du
cycle.
Regular Fabrics (tissus normal)
Ce cycle est prevu pour s_cher la majorit_ des cotons
et linge de maison. A la fin du cycle, les v_tements
sont refroidis pour r_duire les faux plis.
Wrinkle-Free Fabrics (pour les tissus en
plis permanents)
Le cycle de antifroissement est con_u pour s_cher
automatiquement les cotons infroissables, les tissus
synth6tiques, les tricots doubles et les tissus 8 pressage
permanent.
Signal de fin de cycle
Lorsque le cycle est termin6, un signal sonore retentit
plusieurs lois. Le volume sonore du signal est r6glable. Pour
regler le volume, choisir tout reglage entre OFF (arr60 et
HIGH (eleve).
15
Page 17

ON OFF
WRINKLE OUT
SENSOR DRY
MORE
DRY ,OFF
TOUCH UP
OFF
LESS
DRY
DAMP DRY
MORE DRY OFF
LESS
DRY WRINKLE
OUT
iiii'_iiii':¢ii_;;;i_!iL_iiil;,_:ii%i!;:::;;i(y¸
SENSOR DRY
WRINKLE-FREE
FABRICS
Wrinkle Out (dbfroissage, certains modbles) Cette
option permet de r6duire le froissement au minimum Iorsque
le cycle Wrinkle-Free Fabrics est selectionn& Le linge
continue _ culbuter _ froid pendant 60 minutes _ la fin du
cycle. On peut enlever le linge _ tout moment de cette
portion du cycle. Les 60 minutes supplementaires peuvent
etre annulees si on met le bouton sur OFF (arr6t).
Timed Dry (s_chage minute)
Ce cycle peut 6tre utilis6 pour rninuter le s6chage. S'utilise
avec les reglages de temp6rature Air Fluff (gonflant), Low
(bas), Medium (moyen) ou Regular (normal). Pour un
sechage minute, tourner le selecteur darts le sens des
aiguilles d'une montre jusqu'_ ce que la fleche pointe vers la
dur6e de s6chage desiree pour le cycle s6chage minut&
I Remarque: I_'utilisation du reglage Air Fluffprolonge la dur6e du sechage.
Options sp_ciales (certains modbles)
Damp Dry (s6chage partiel) se trouve sur la partie
Timed Dry du selecteur. Cette option est congue pour secher
partiellement le linge et peut s'utiliser avec tousles reglages
de temperature. La s6cheuse fonctionne _ chaud pendant 20
minutes, puis passe L1une periode de culbutage de
refroidissement de 10 minutes.
Le reglage Touch Up (retouches) enleve les faux plis des
articles qui sont propres et secs, mais seulement 16gerement
froiss6s, comme sortis d'une armoire ou d'une valise bien
remplie, ou encore s'ils sont restes trop Iongtemps dans la
s6cheuse apres la fin du cycle. Ce r6glage procure 10
minutes de culbutage, suivies par 10 minutes de culbutage
avec refroidissement. II peut 6tre utilis6 avec tout r6glage de
temp6rature.
Pousser sur le s lecteur pour
mettre en marche
Pousser sur le selecteur pour mettre la s6cheuse en marche.
La porte de celle-ci doit d'abord 6tre ferm6e.
Remarque: Le s61ecteur peut etre tourne dans rune
ou rautre direction. II ne progresse pas _ vitesse reguli6re
pendant les cycles de Auto Dry/Sensor Dry (sechage-
autom_tique!s6chage-capteur). Au d@art, il peut rester
immobile sur le m6me point. Vers la fin du cycle (quand
le linge commence L1s_cher), il progresse L1un rythme
plus regulier et beaLmoup plus rapide. Ceci est normal.
16
Page 18

Fonctionnement
Nettoyer le filtre _ charpie
• Apres chaque utilisation.
• Pour reduire le temps de s6chage.
• Pour un fonctioneement plus 6conome en energie.
Remarque: Ne pas Dire fonctionner la s6cheuse sans I
que e fi tre soiten place.
Charger la sbcheuse
correctement
• En mettant une seule charge de laveuse _ la lois.
• En _vitant le tr_s petites charges ou le melange de
diff_rents types de liege.
En ajoutant un ou plusieurs articles de m_me type
Iorsqu'un ou deux articles seulement doivent etre
s_ch6s. Le liege tourne mieux dans la s_cheuse et
s_che plus efficacement.
•Toute surcharge nuit au fonctionnement de la
s#.cheuse, ce qui entrafne un s_chage in_gal, de
m_me qu'un exces de piis dans certains tissus.
I
I
Lors du sechage d'articles de grande tailie et
volumineux, corrm]e couvertures ou dessus de lit, il
peut _tre n_cessaire de redisposer la charge
pendant le cycle afin d'obtenir un s#.chage uniforme.
Accessoires
Grille de sbchage en option
Certains modules de secheuse comporte une grille de
sechage. La grille de sechage est utile pour les articles qui
n'ont pas besoin d'6tre culbut6s, comme chaussures de
tennis, chandails, jouets en peluche et autres articles
d61icats.
Remarque: Si I'accessoire grille de s_chage n'est
pas inclus avec la s6cheuse, prendre contact avec le
revendeur ou composer le 1-800-688-8408 (p/n 504105).
17
Page 19

#ettoyugeet|,tretie,
Tableau de commande Carrosserie
Nettoyer avec un chiffon doux et humide. Ne pas utiliser de Nettoyer toutes traces de salet_ _ I'eau et au savon. Si d_sire,
substances abrasives, appliquer de la cire pour appareils m6nagers une fois par an.
Tambour
Enlever toutes taches comme celles de crayon, de stylo ou de
teinture [des nouveaux articles comme serviettes ou jeans]
avec un nettoyant tout usage. Ensuite, faire secher par
culbutage avec de vieilles serviettes ou des chiffons pour
enlever tout exc_s de taches ou de substance de nettoyage.
A la suite de ces dtapes, les taches peuvent encore 6tre
visibles mais ne devraient pas affecter les charges suivantes.
Systbme d'bvacuation de I'air
Doit _tre inspecte et nettoyd enti_rement une fois par an
pour donner des r6sultats optimums. Lahotte se trouvant
rextdrieur de la r6sidence doit 6tre nettoyde plus
fr_quemment pour assurer son bon fonctionnement. (Voir les
instructions de d'installation pour plus de renseignements.)
Conseils de blanchissage
Suivre les indications de 1'6tiquette ou les instructions du fabricant pour sdcher certains articles d'un s6chage plus particulier. Si
rdtiquette d'entretien est absente, se guider sur les renseignements suivants.
Dessus de lit et • Suivre les indications de r6tiquette d'entretien ou s_cher en utilisant le cycle Regular.
douillettes • S'assurer que rarticle est parfaitement sec avant de I'utiliser ou le ranger.
• Peut exiger une redisposition pour assurer un s6chage uniforme.
Couvertures • S_cher une seule couverture _ la fois pour des r_sultats optimums.
• S'assurer qu'elle est parfaitement s_che avant de I'utiliser ou de la ranger.
Rideaux et • Utiliser le cycle Wrinkle-Free Fabrics pour limiter le froissement.
tentures • Pour des r6sultats optimums, s6cher par petites quantit_s et retirer de la s6cheuse d_s que possible.
Couches en tissu • Utiliser le cycle Regular pour des couches douces et gonflantes.
Articles eg duvet • Utiliser le cycle Regular et une temperature Delicate pour tissus fragiles.
(vestes,sacs de • Mettre une paire de chaussures de tennis propres dans la s6cheuse avec ces articles pour leur
couchage, donner plus de gonflant. L'ajout de 2 ou 3 serviettes s_ches r_duit le temps de s_chage et absorbe
douillettes, etc.) I'humidit&
Mousse de • Ne pas s_cher _ I'air chaud. Utiliser le cycle Time Dry, qui ne produit pas de chaleur.
caoutchouc (tapis • _AVERTISSEMENT ! S_cher un article en caoutchouc a la chaleur peut I'endommager ou creer
b dosen mousse, des risques d'incendie.
jouets en peluche ou
rembourres,certaines
#paulette_ etc.)
Oreillers • Ne pas s_cher les oreillers remplis de kapok ou de mousse.
• Utiliser le cycle Regular,
• Ajouter 2ou 3 serviettes s_ches et une paire de chaussures detennis propres pour an meilleur
culbutage et donner plus de gonflant aux oreillers.
Plastiques • Utiliser le cycle Time Dry (s6chage minute) et la temp6rature correspondant a I'option low (has)
(rideaux de douche, ou Air Fluff (gonflant), en fonction des indications fournies sur r_tiquette.
couvre-meubles
d'ext#rieur, etc.)
18
Page 20
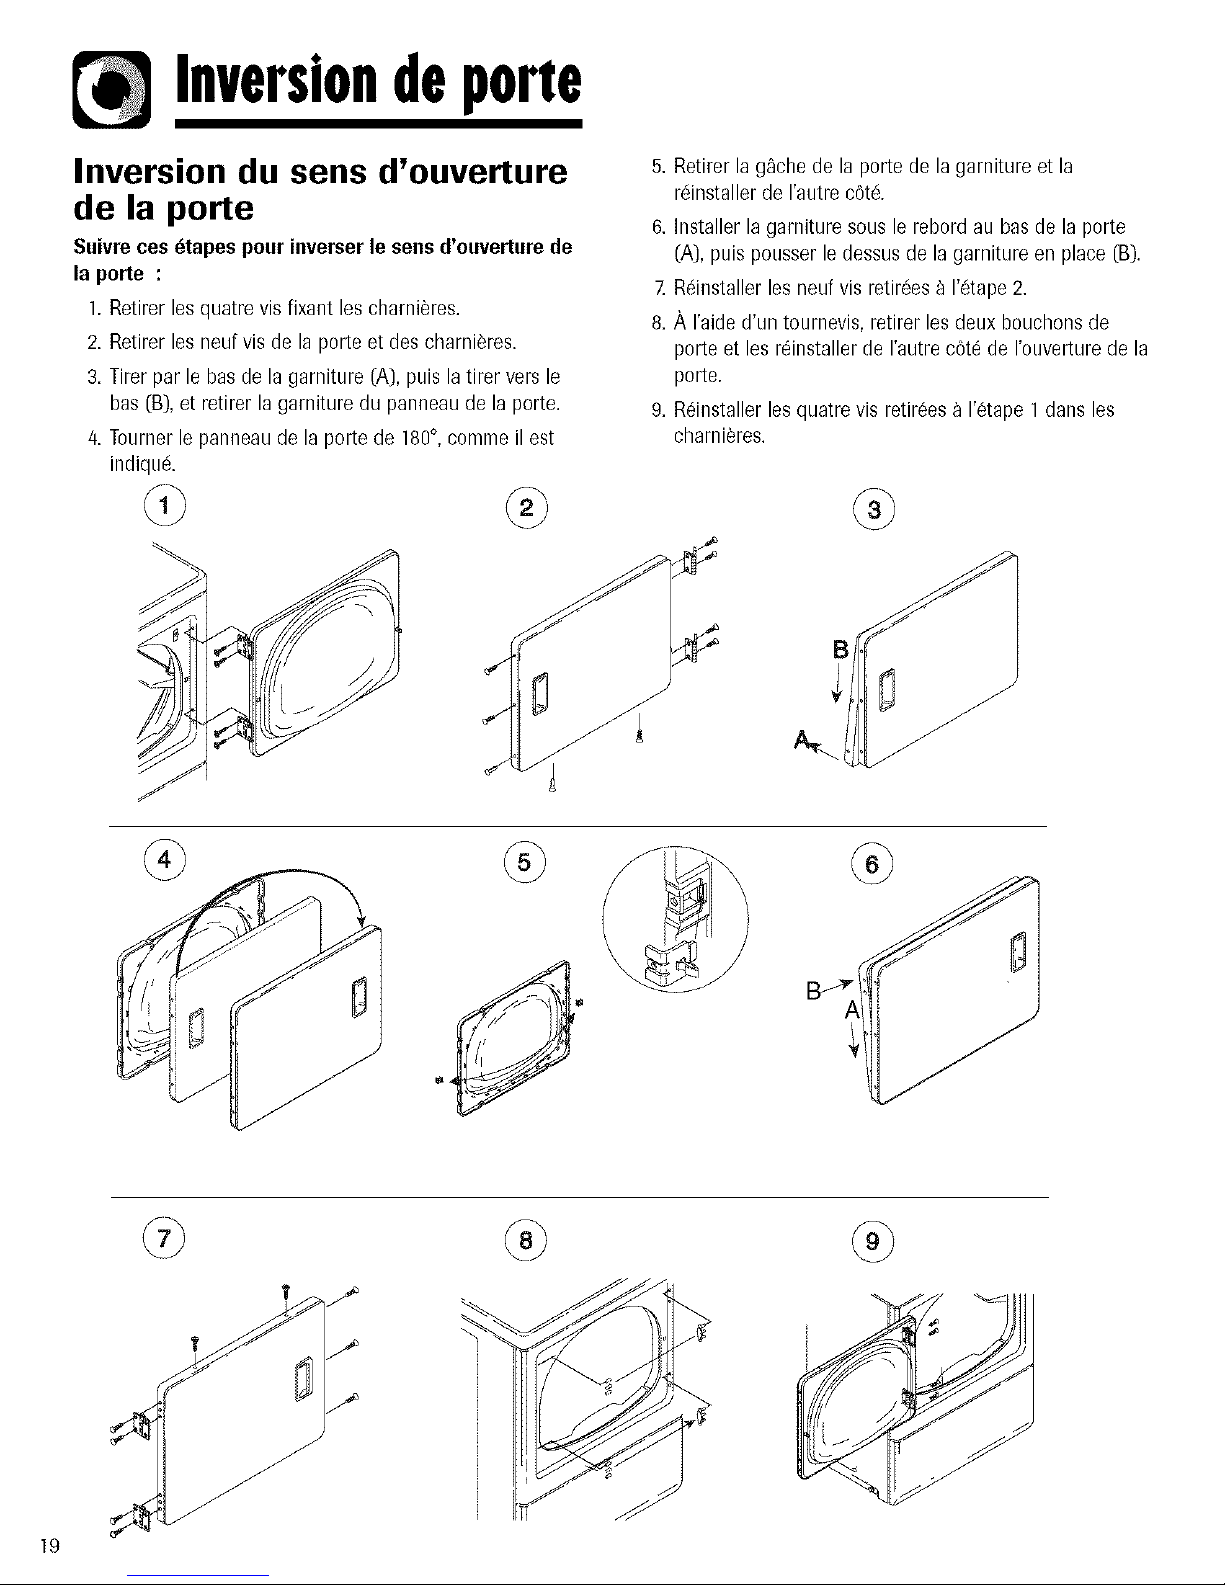
Inversiondeporte
Inversion du sens d'ouverture
de la porte
Suivre ces _tapes pour inverser le sens d'ouverture de
la porte :
1. Retirer les quatre vis fixaet les charni_res.
2. Retirer les neuf vis de la porte et des charnieres.
3. Tirer par le has de la garniture (A), puis la tirer vers le
has (B), et retirer la garniture du panneau de la porte.
/4.Tourner le panneau de la porte de 180°, eomme il est
indiqu&
@
5. Retirer la g_che de la porte de la garniture et la
r6installer de I'autre e6t&
6. Installer la garniture sous le rebord au bas de la porte
(A), puis pousser le dessus de la garniture en place (B).
7.R_installer les neuf vis retir6es a 1'6tape 2.
8. A I'aide d'un tournevis, retirer les deux bouchons de
porte et les r_installer de I'autre c6t_ de I'ouverture de la
porte.
g. R_installer les quatre vis retir6es a 1'6tape 1 dans les
charni_res.
B
@
19
Page 21
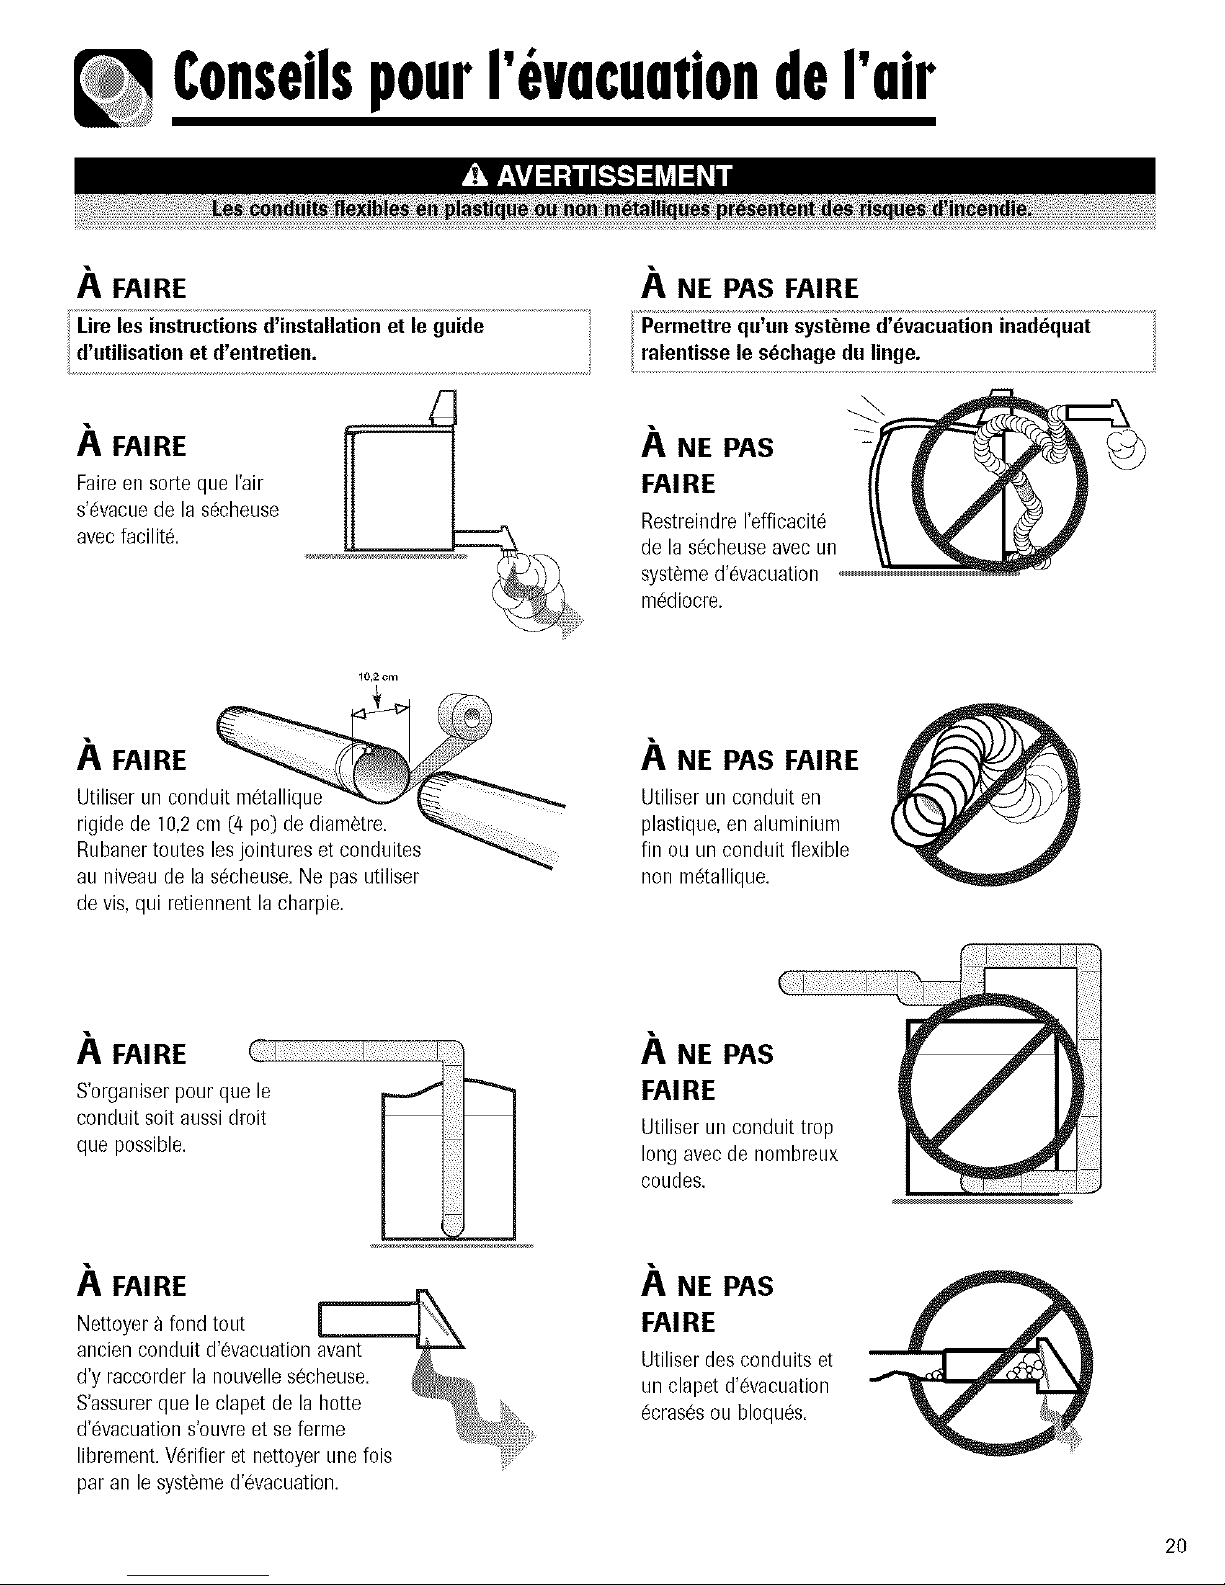
ConseilspourI'evacuationderair
A FAIRE
/............................................................................................................................................................................................................................................!i
Lire les instructions d'installation et le guide
d'utilisation et d'entretien.
A FAIRE
Faire eo sorte que I'air
s'_vacue de la s_cheuse
avec facilit&
10,2 Cm
A FAIRE
Utiliser un conduit metallique _ _.
rigide de 10,2cn
Rubaner toutes les jointures et conduites
au niveau de la s_cheuse. Ne pas utiliser
de vis, qui retiennent la charpie.
A NE PAS FAIRE
Permettre qu un systeme d evacuation madequat
FAIRE
RestreindreI'effieacit_
NE PAS
de la s_cheuse avec un
systeme d'evacuation
m6diocre.
A NE PAS FAIRE
Utiliser un conduit en
plastique, en aluminium
fin ou un conduit flexible
non m_tallique.
A FAIRE
S'organiser pour que le
conduit soit aussi droit
que possible.
A FAIRE
Nettoyer 9 fond tout
ancien conduit d'6vacuation avant
d'y raccorder la nouvelle secheuse.
S'assurer que le elapet de la hotte
d'@acuation s'ouvre et se ferme
librement. V@ifier et nettoyer une fois
par an le syst_me d'evacuation.
..___r__i!liii!iiiijiiii!ijliijii!iijii!iijii!iijiiiii!il!!i_
, i!_ili!ii_i!iiiii_iiiliii!ii!i!iiii_ii_iiiill ]_
A.E.As
Utiliser un conduit trop , ._" 1_--I
long avecde nombreux _ J I
coudes. ]
A NE PAS
FAIRE
Utiliser des conduits et
un clapet d'6vacuation
_cras6s ou bloqu6s.
20
Page 22
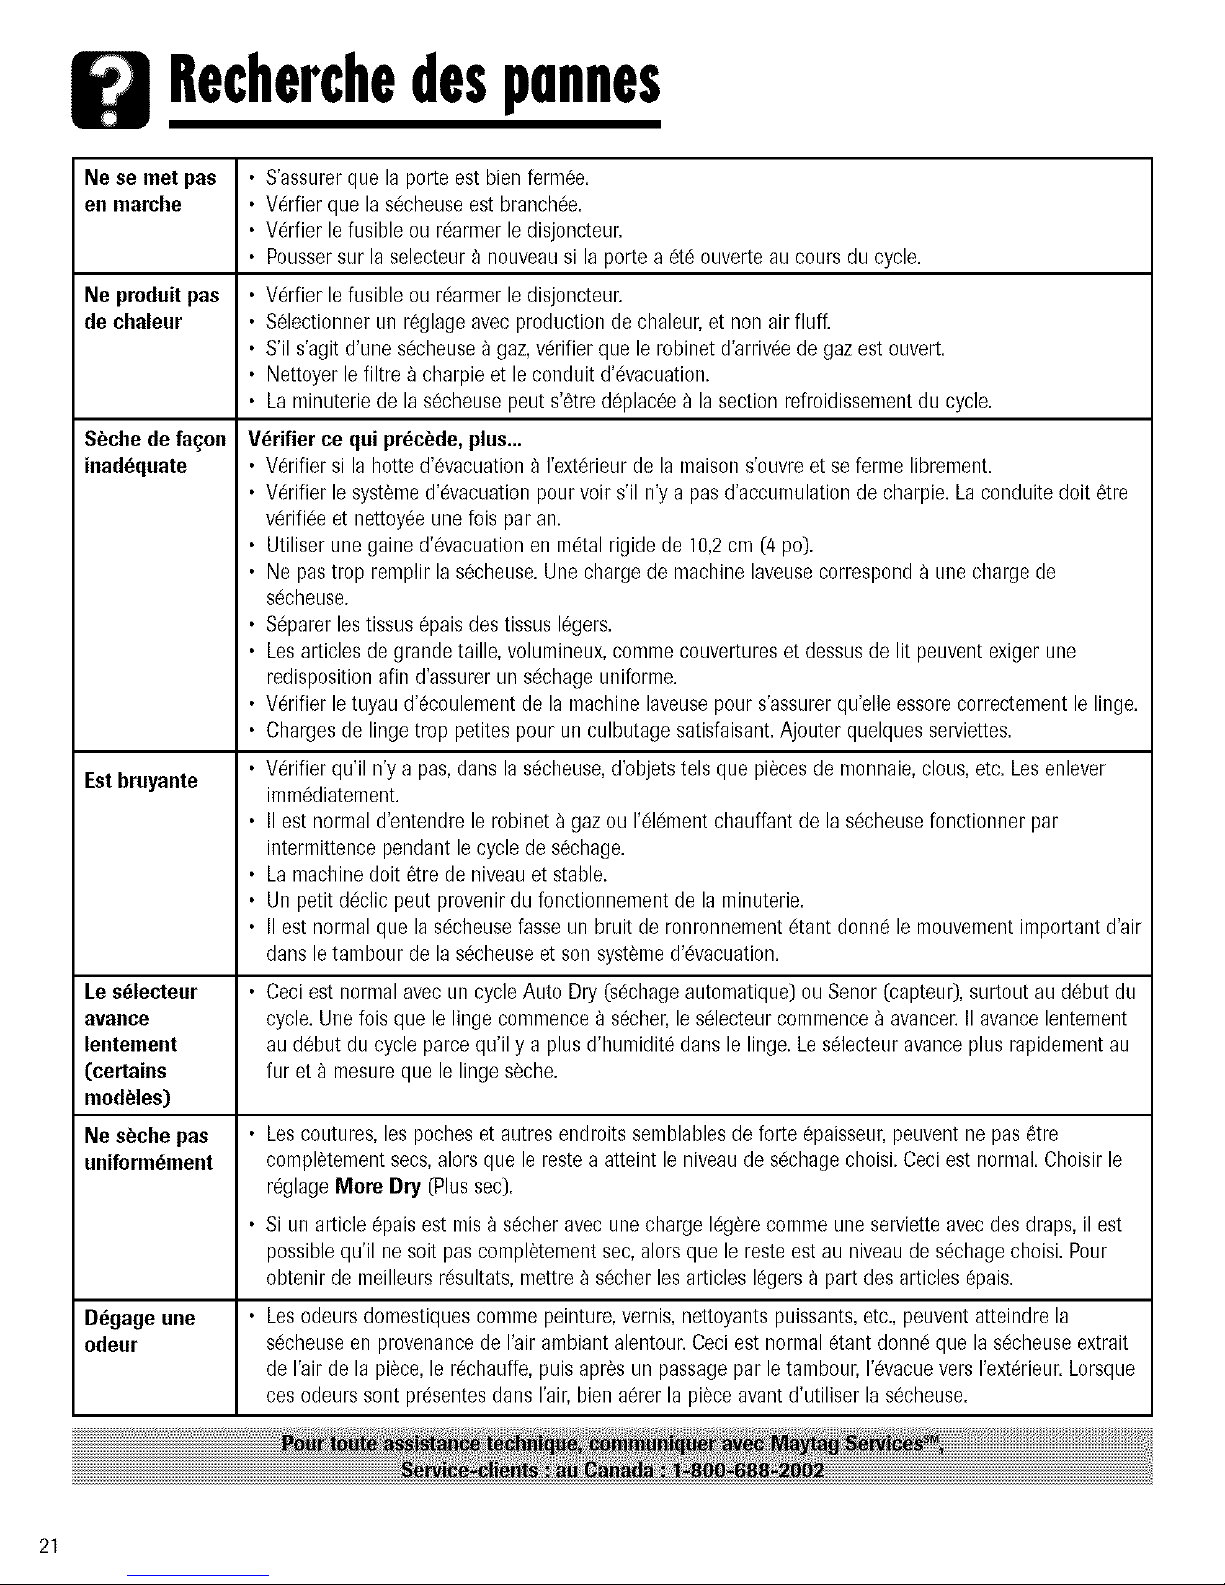
Recherchedespannes
Ne se met pas
eg marche
Ne produit pas
de chaleur
S_che de_on
inadequate
• S'assurer que la porte est bien fermee.
• V_rfier que la s6cheuse est branch6e.
• V_rfier lefusible ou r_armer le disjoncteur.
• Pousser sur la selecteur _ nouveau si la porte a 6t_ ouverte au cours du cycle.
• Wrfier le fusible ou r_armer le disjoncteur.
• Selectionner un reglage avec production de chaleur, et non air fluff.
• S'il s'agit d'une s_cheuse _ gaz, v_rifier que le robinet d'arriv_e de gaz est ouvert.
• Nettoyer le filtre _ charpie et le conduit d'_vacuation.
• La minuterie de la s6cheuse peut s'_tre d@lac6e a la section refroidissement du cycle.
V_rifier ce qui precede, plus...
• Vdrifier si la hotte d'6vacuation 9 I'exterieur de la maison s'ouvre et se ferme librement.
• Wrifier le systeme d'_vacuation pour voir s'il n'y a pas d'accumulation de charpie. La conduite doit 6tre
vdrifi6e et nettoyde une fois par an.
• Utiliser une gaine d'_vacuation en m_tal rigide de 10,2cm (4 po).
• Ne pas trop remplir la secheuse. Une charge de machine laveuse correspond a Line charge de
s6cheuse.
• S@arer les tissus @ais des tissus I_gers.
• Les articles de grande taille, volumineux, comme couvertures et dessus de lit peuvent exiger une
redisposition afin d'assurer un s6chage uniforme.
• Wrifier le tuyau d'ecoulement de la machine laveuse pour s'assurer qu'elle essore correctement le linge.
• Charges de linge trop petites pour un culbutage satisfaisant. Ajouter quelques serviettes.
Est bruyante
Le s_lecteur
avance
lentement
(certains
modbles)
Ne sbche pas
uniform_ment
D_gage une
odeur
• Wrifier qu'il n'y a pas, dans la s_cheuse, d'objets tels que pi_ces de monnaie, clous, etc. Les enlever
imm_diatement.
• II est normal d'entendre le robinet 9 gaz ou 1'616mentcbauffant de la s6cheuse fonctionner par
intermittence pendant le cycle de s6chage.
• La machine doit _tre de niveau et stable.
• Un petit d6clic peut provenir du fonctionnement de la minuterie.
• II est normal que la s_cheuse fasse un bruit de ronronnement 6tant donn_ le mouvement important d'air
dans le tambour de la s6cheuse et son syst_me d'_vacuation.
• Ceci est normal avec un cycle Auto Dry (sdchage automatique) ou Senor (capteur), surtout au d6but du
cycle. Une lois que le linge commence 9 secher, le s_lecteur commence aavancen II avance lentement
au d_but du cycle parce qu'il y a plus d'humidit_ dans le linge. Le s_lecteur avance plus rapidement au
fur et 9 mesure que le linge seche.
• Les coutures, les poches et autres endroits semblables de forte @aisseur, peuvent ne pas _tre
compl_tement secs,alors que le reste a atteint le niveau de s_chage choisi. Ceci est normal. Choisir le
reglage More Dry (Plus sec).
• Si ue article @ais est mis _ s_cher avec une charge I_ig_recomme une serviette avec des draps, il est
possible qu'il ne soit pas cornpletement sec, alors que le reste est au niveau de s_chage choisi. Pour
obtenir de meilleurs r_sultats, mettre _ s_cber les articles I_gers 9 part des articles @ais.
• Les odeurs domestiques comme peinture, vernis, nettoyants puissants, etc., peuvent atteindre la
s_cheuse en provenance de I'air ambiant alentour. Ceci est normal _tant donn_ que la s_cheuse extrait
de Fair de la piece, le r_chauffe, puis apres un passage par le tambour, I'_vacue vers I'ext_rieur. Lorsque
ces odeurs sont presentes dans I'air, bien aerer la piece avant d'utiliser la s_cheuse.
21
Page 23

Remarques
22
Page 24

Gurundeetserviceupres-vente
LESEULETUNIQUERECOURSDUCLIENTEN
VERTUDE CETTEGARANTIELIMITEEESTLA
Rt'--PARATIONDU PRODUITCOMMEDt_CRITE
PRt_Ct_DEMMENT.LESGARANTIES
IMPLICITES,Y COMPRISLESGARANTIESDE
QUALITEMARCHANDEOU D'ADAPTATIONA
UN USAGEPARTICULIER,SONTLIMITt_ESA
UN AN OUA LA PI_RIODELA PLUSCOURTE
PERMISEPARLA LOLMAYTAGCORPORATION
NESERAPASTENUERESPONSABLEDES
DOMMAGESDIRECTSOU INDIRECTS.
CERTAINSETATSETCERTAINESPROVINCES
INTERDISENTEEXCLUSIONEl-LA LIMITATION
DESDOMMAGESDIRECTSOU INDIRECTS
AINSI QUELESLIMITATIONSSURLA DUREE
DESGARANTIESIMPLICITESDEQUALm:-
MARCHANDEOU D'ADAPTATIONA UN
USAGEPARTICULIER.IL ESTDONCPOSSIBLE
QUECESLIMITATIONSNES'APPLIQUENTPAS
A,VOUS.CETTEGARANTIEVOUSCONFERE
DESDROITSJURIDIQUESSPECIFIQUESETIL
SEPEUTQUEVOUSAYIEZD'AUTRESDROITS,
QUIVARIENTD'UN ETAT_,L:AUTREOUD'UNE
PROVINCEA IJAUTRE.
Ne sent pas couverts par ces garanties
1, Les probl6mes et don_magesr6sultant des situations suivantes :
a. Mise en service, livraison ou entretien effectu6s incorrectement.
b.ToLiter@aration, modification, alteration et tout reglage non autorises par le
fabricant ou par un prestataire de service apres-vente agree.
c. Mauvais emploi, emploi abusif, accidents, usage non raisonnable, ou
catastrophe naturelle.
d.Courant electrique, tension, alimentation electrique ou en gaz incorrects.
e. Reglage incorrect d'une commande.
2. Les garanties ne peuvent etre honorees si les numeros de serie d'origine ont
ete enleves, modifies oune sont pas facilement lisibles.
3. Ampoules, filtres _ eau et filtres b ain
4. Les produits achetds _ des fins commerciales ou industrielles.
5. Les frais de d@annage ou de visite pour :
a.Correction d'erreurs de mise en service.Pour les produits necessitant une
ventilation, un conduit metallique rigide doit etre utilis&
b. Initiation de rutilisateur _ remploi de rappareil.
c. Transport de rappareil chez le r@arateur et retour de rappareil chez
rutilisateur.
6. Tout aliment perdu en raison de pannes du rdrigerateur ou du congelateur.
Z D@enses de d@lacement et de transport pour la reparation du produit dans
des endroits eloignes.
8. Cette garantie n'est pas valide _ rexterieur des Etats-Unis et du Canada.
Communiquez avec votre detaillant pour savoir si une autre garantie
s'applique.
9. Dommages indirects ou accessoires subis par toute personne b la suite d'une
quelconque violation des garanties. Certains Etatsou provinces ne permettent
pas rexclusion ou la limitation de responsabilite en ce qui
concerne les dommages directs ou indirects. L'exclusion ci-dessus peut en
consequence ne pas s'appliquer _ votre cas.
Si vous avez besoin d'aide
Consultez d'abord la section sur le d@annage dans le manuel d'utilisation et
d'entretien, puis appelez le detaillaet de qui vous avez achete votre appareil ou le
service _ la clientele de Maytag Services, LLC au 1-800-688-9900 aux Etats-Unis
et all 1-800-688-2002 au Canada pour savoir oQtrouver un r@arateur autoris&
• Veillez _ conserver la facture d'achat pour justifier de la validite de la
garantie. Pour d'autres renseignements concernant les responsabilites du
proprietaire _ I'egard du service sous garantie, voir le texte de la GARANTIE.
• Si le detaillaet ou I'agence de service apr6s-vente ne peut r6soudre le
probl_me, ecrivez b Maytag Services, LLC _ I'adresse suivante : CAIR"
Center, RO. Box 2370, Cleveland, TN 37320-2370 Etats-Unis, ou appelez au
1-800-688-9900 aux I_tats-Unis ou au 1-800-688-2002 au Canada.
• Les guides d'utilisation, les manuels de service et les renseignements sur
les pi6ces sont disponibles aupr6s du service b la client61ede Maytag
Services, LLC.
Remarques : Veillez a feumir I'iefom]ation suivante Iorsque vous communiquez
avec nous au sujet d'un probleme :
a. Vos nom, adresse et nun]ere de telephone;
b. aumelO de modele et numero de serie de rappareil;
c, Nero et adresse du detaillant avec la date rappareil achete;
d. Description detaillee du probleme observe;
e. Preuve d'achat (facture de vente),
23
Page 25

Ropa
Secadora
•,_i_S_i_i_!_,__I_I_I_
_ii_ ¸¸¸¸¸¸¸¸¸ ii_ i _ _
i i,iiii_il_i_iiii,i_iil'
_i_i_i,__ iii_i_
CD-3
Instrucciones importantes
de seguridad ............ 25-26
Use do los controles ..... 27-28
Sugerencias para
la operaci6n ............... 29
Accesorios ................ 29
Cuidado y limpieza ......... 30
Inversi6n de la puerta ....... 31
Sugerencias para el escape.. 32
Localizaci6n y soluci6n
do averias ................. 33
servicio .......... ultima pagina
Garantia y
Page 26

Instruccionesimportuntesdeseguridud
P,hora debe conocer las
instrucciones de seguridad
Lasadvertencias y las instrucciones importantes de
seguridad que aparecen en este gufa no tienen el prop6sito
de cubrir todas las condiciones y situaciones posibles que
podrian ocurrir. Se debe usar el sentido comOn, precauci6n y
cuidado cuando se instale, se efectt_e mantenimiemto o se
opere el electrodomestico.
Siempre comunfquese con el fabricante para los asuntos
relacionados con problemas o condiciones que no entienda.
Reconozca los simbolos de seguridad,
advertencias, etiquetas
25
Page 27

InstruccionesImportuntesdeSeguridud
1. Leatodas las instrucciones antes de usar el aparato.
2. Para evitar la posibilidad de incendio o de explosi6n:
a. Ne seque articulos que han sido previamente
lavados o sumergidos en gasolina, o limpiados o
desmanchados con gasolina, solventes de lavado en
seco, u otras sustancias inflamables o explosivas y
que despiden vapores que podrian encenderse o
explotar. ]-{)domaterial en el que ha usado un
solvente de limpieza, o que se ha saturado con
Ifquidos o s01idosinflamables, no debe colocarse en
la secadora hasta que todo rastro de estos Ifquidos o
s61idosinflamables y sus vapores se hayan quitado.
Hay muchos artfculos altamente inflamables que se
usan en los hogares, tales como: acetona, alcohol
desnaturalizado, gasolina, keroseno, algunos
limpiadores domesticos liquidos, algunos
quitamanchas, aguarr_s, ceras y quitaceras.
b. Los artfculos que contengan espuma de goma
(puede estar marcado come espuma de I_tex) o
materiales parecidos a la goma de similar textura no
deben secarse en un ajuste de calor. Los materiales
de espuma de goma, cuando se calientan, pueden
producir fuego per combusti6n espont_nea bajo
ciertas circunstancias.
3. Ne permita que los niiios jueguen sobre dentro ni
delante del aparato. Esnecesario supervisar de cerca a
los ni_os y animales dom_sticos se use el aparato cerca
de ellos.
4. Antes de poner fuera de servicio el electrodom_stico o
de deshacerse de 61,retire la puerta de la secadera.
5. Ne introduzca las manos dentro del aparato si el cilindro
se est_ moviendo.
6. No instale ni guarde este aparato donde va a estar
expuesto a la intemperie.
7. No altere los controles.
8. No repare ni reemplace ninguna pieza del aparato ni
intente efectuar ningt3nservicio a menos que haya sido
recomendado especificamente en las instrucciones de
reparaci6n por el usuario y que usted las comprenda y
tenga habilidad para efectuarlas.
9. No use suavizantede telas ni otros productos para
eliminar la electricidad est_tica a menos que el fabricante
del suavizanteo del producto Iorecomiende para usarse
en secadoras.
10. Limpie el filtro de pelusa antes o despu6s de cada carga.
11. Mantenga el _rea alrededor de la abertura del escape y
las _reas circundantes libres de acumulaciones de
pelusa, polvo y suciedad.
12. El interiorde la secadora y del conducto de escape debeser
limpiado peri6dicamente por personalcalificado de servicio.
13. Este aparato debe estar apropiadamente conectado a
tierra. Nunca conecte este aparato a una fuente de
electricidad que no est6 apropiadamente conectada a
tierra y de acuerdo alas regulaciones locales y
nacionales vea las instrucciones de instalaci6n para la
conexiOn a tierra de este aparato.
14. Ne se siente ni se pare en la parte superior de la
secadora de ropa.
Aviso y advertencia de
seguridad importantes
La Ley sobre Sustancias TOxicasy Agua Potable Segura de
California, de 1986 (ProposiciOn 65), estipula que el
gobernador de California debe publicar una lista de
sustancias que el Estado de California sabe que pueden
causar c_ncer o daiios en el sistema reproductor, y requiere
que las empresas adviertan a sus consumidores sobre las
exposiciones potenciales a tales sustancias.
Los usuarios de este dispositivo quedan advertidos per
medic de este documento que la combusti6n de gas puede
dar como resultado una exposici6n a bajo nivel de algunas
de las sustancias listadas, entre elias benceno, fermaldehido
y negro de humo OloIlfll), debido principalmente a la
combustion incompleta del gas natural o petr01eoliquido
(LP). Los conductos de escape deben mantenerse libres de
obstrucciones, y una secadora con un sistema de escape
adecuadamente instalado minimizar_ la exposici6n a estas
sustancias.
Nota: Debido a la mejora continua de sus productos,
Maytag se reserva el derecho de cambiar las
especificaciones sin previo aviso. Si desea ver los detalles
completos, consulte las instrucciones de instalaci6n que
vienen con su producto antes de seleccienar el ripe de
gabinete, cortar las aberturas o comenzar la instalaci6n.
CONSERVE ESTAS INSTRUCCIONES
26
Page 28

Usodeloscontroles
ICROSLEYI FWFF
;iiiii;ilim!ui¸ ii%:!ili;;.;;b_di:!i?il;:_i!_ii;
iiiiii!:;!i;e_i¸ !!iiiei_iie!!_
Selecci6n de la temperatura
Para seleccionar la temperatura correct& coloque el control
de temperatura en una de las siguientes tres opciones:
Regular, Medium (mediana, modelos selectos), Low (bajo) o
Air Fluff (aire solamente).
LOW MEDIUM LOW HIGH
OFF
REGULAR
:!ii!?¸¸
END OF CYCLE
Selecci6n del ciclo
Para seleccionar un ciclo, gire el disco de control hasta el
ajuste deseado. Cuando use un ciclo de _,uto Dry/Sensor
Dry' (sensor de secado), el disco de control debe apuntar
entre 'More Dry' (m_s seco) y 'Less Dry' (menos seco) para
la mayorfa de las cargas.
Regular Telasde algod6n resistentes o ropa con
etiqueta de secdo a mSquina.
Medium Parr telas sintdticas inarrugables o de
Mediana planchado permanente, y telas de
(modelos algod6n ligeras con etiquetade secado a
selectos) mdquina a temperatura mediana.
Low Paratelas sensibles al calor con etiqueta
Baja con etiqueta de secado a maquina a
temperatura baja o mediana.
Air Fluff Ropa que necesita refrescarse. La carga
Aire Solamente se agita con aire a temperatura
ambiente. Use el ciclo de secado
programado.
Seleccione serial
Serial de fin de ciclo
Una vez que ha terminado el ciclo, se escuchar_ un avisador
varias veces. El volumen del avisader de fin de ciclo es
ajustable. Para ajustar el volumen, seleccione cualquier
27 ajuste entre 'OFF' (apagado) y 'HIGH' (alto).
Es posible que las cargas de mayor tamale o m_s
voluminosas requieran el ajuste 'More Dry' para secar
completamente la carga. El ajuste 'Less Dry' es meier para las
telas ligeras o para dejar humedad en la ropa al final del ciclo.
'Regular Fabrics' (regular)
El cJclo regular con sensor rue dJsefiado para secar la
mayoria de la ropa de algodOn y de eama. AI final del ciclo,
la ropa se enffia para redueir las arrugas.
'Wrinkle-Free Fabrics' (telas sin
arrugas)
El ciclo ' Wrinkle-Free Fabrics' (telas inarrugables) ha side
disef_ado para secar autom_ticamente algodones
inarrugables, telas sint6ticas, tejidos dobles y telas de
planchado permanente.
Page 29

ON OFF
SENSOR DRY
MORE
DRY ,OFF
LESS
DRY
MORE DRY OFF
DRY WRINKLE
OFF
LESS
SENSOR DRY
WRINKLE-FREE
OUT
FABRICS
TOUCH UP
WRINKLE OUT
La opci6n de 'Wrinkle Out' (reducci6n de arrugas) se
ofrece para minimizar las arrugas en el ciclo de telas
inarrugables. Esta caracterfstica permite el secado adicional
sin calor durante 60 minutos adicionales al final del ciclo. La
ropa se puede sacar en cualquier momento durante esta
porci6n del ciclo. Los 60 nfinutos adicionales se pueden
cancelar girando la perilla a la posici6n 'OFF' (apagado).
DAMP DRY
'Timed Dry' (tiempo de secado)
Este ciclo se puede usar para regular el tiempo de secado.
Uselo con los ajustes de temperatura Air Fluff (aire
solamente), Low (bajo), Medium (mediana) o Regular. Para
el secado por un tiempo determinado, gire hacia la derecha
el disco de control hasta que el indicador apunte al ajuste
de tiempo adecuado en el ciclo de tiempo de secado.
Nota: Cuando se LISael ajuste de temperatura de aire
solamente el tiempo de secado ser_ mayor.
Opciones especiales (modelos selectos)
La opci6n 'Damp Dry' (secado h0medo) se encuentra en la
secciOn de Time Dry del disco de control. Esta opci6n est_
disefiada para secar parcialmente la ropa, y se puede usar
con cualquier selecci6n de temperatura. La opci6n 'Damp
Dry' proporcionar_ 20 minutos de secado, seguidos por 10
minutos de enfriamiento.
50
'Touch Up' (retoca0 eliminar_ las arrugas de los articulos
que est_n limpios y secos pero levemente arrugados a causa
de haber estado en una maleta o armario con mucha ropa o
de haber sido dejados en la secadora demasiado tiempo
despu6s del fin del ciclo. 'Touch Up' proporciona 10minutos
de agitacidn seguidos de 10 minutos de agitacidn para
enfriamiento y puede ser usado con cualquier selecci6n de
temperatura.
Presione el disco de control
para empezar
Presione el disco de control para iniciar el funcionamiento
de la secadora. La puerta de la secadora debe estar cerrada
para que la secadora flmcione.
Nota: Puede girarse el disco en cualquiera de las dos
direcciones para seleccionar un ciclo. Una vez iniciado,
el disco no avanzar_ a una velocidad especffica durante
los ciclos de 'Auto Dry/Sensor Dry' (secado
autom_tice/sensor de secado}. AI principio el disco puede
no avanza del todo. Hacia el final del ciclo (cuando la
carga comienza a secarse) el disco avanzar_ a una
velocidad m_s regular y macho m_s r@idamente. Este
operaci6n es normal.
28
Page 30

Sugerenciasparalaoperaci6n
Limpie el filtro para pelusa
• DespuOsde cada carga.
• Para reducir el tiempo de secado.
• Para que la secadora funcione con un consumo m_s
eficiente de energia.
I Nota: No use la secadora sin el filtro para pelusa,
Cargue adecuadamente la
secadora
Coloque en la secadora una carga a la vez.
Las cargas mezcladas de ropa pesada y ropa ligera
se secar4n de manera diferente. La ropa ligera se
secar4, mientras que la ropa pesada puede quedar
ht'mleda.
Cuando necesite secar solo una o dos prendas,
aiiada uno o m4s artfculos similares. De esta manera
aumentar4 el movimiento de la ropa y la eficiencia
de secado.
Las cargas excesivas restringen el movimiento de la
ropa dando como resultado un secado irregular y el
arrugado excesivo de algunas telas.
Cuando seque arUculos grandes y voluminosos tal
corr]o una frazada o cobertor, puede que sea
necesario redistribuir la ropa durante el ciclo para
asegurar un secado uniforme.
Accesorios
Rejilla de secado opcional
Algunos modelos selectos de secadora est4n equipados con
una rejilla de secado. La rejilla de secado es titil para secar
articulos que, tales como zapatillas de tenis, suOteres,
juguetes de peluche u otros articulos delicados.
Nota: La rejilla de secado con n_mero de pieza 50/4105
est_ disponible si no rue incluida con su secadora.
POngaseen contacto con su distribuidor o Ilame al
1-877-232-6771 para pedirla.
29
iio
Page 31

CuidadoVlimpieza
Panel de control
Limpie el panel con ue paso suave y ht]medo. No use
sustancias abrasivas.
Tambor
Quite cualquier mancha tal como de crayon, lapiceros de
tinta o tintura detelas de los articulos nuevos (tales como
toallas o vaqueros) con un limpiador para todo propOsito.
Luego seque toallas viejas o trapos para retirar cualquier
residuo que haya quedado de la mancha o de los
limpiadores. Una vez que ha finalizado esto, las manchas
todavfa pueden quedar visibles, pero no se transferir_n alas
otras eargas de ropa que vayan a set secadas.
Gabinete
Borre las marcas coil jabOn y agua. Si Io desea, utilice cera
para electrodomOsticos una vez al aiio.
Sistema de escape de la
secadora
Inspeccione y limpie una vez al afio el sistema de escape
para mantener un rendimiento 6ptimo. La campana exterior
de escape debe limpiarse con m_s frecuencia para asegurar
el funcionamiento adecuado. (Si desea mas informaciOn
consulte las instrucciones de instalaciOn.)
Consejos especiales
Sirvase seguir las instrucciones de la etiqueta de cuidado odel fabricante para secar artfculos especiales. Si no hay una
etiqueta de instrucciones disponible, use la siguiente informaciOn como gala.
iiiiiiiiiiiiiiiiiiiiiii_ _;;;__[!!! _ !_iiiiiiiiiiiiiiiiiiiiiiiiiiiiiiiiiiiiiiiiiiiiiiiiiiiiiiiiiiiiiiiiiiiiiiiiiiiiiiiiiiiiiiiiiiiiiiiiiiiiiiiiiiiiiiiiiiiiiiiiiiiiiiiiiiiiiiiiiiiiiiiiiii!
Sobrecamas y • Siga las instrucciones de la etiqueta de cuidado o s_quelos en el ciclo Regular.
cebertores • CerciOresede que el artfculo est_ completamente seco antes de usarlo o guardarlo.
• Puede que sea necesario redistribuir la ropa para asegurar un secado uniforme.
Frazadas • Seque sOlouna frazadas a la vez para Iograr una mejor acciOn de volteo.
• CerciOresede que el articulo est_ completamente seco antes de usarlo o guardarlo.
Cortinas y • Use el ciclo Wrinkle-Free Fabrics (secado autorn_tico de telas sin arrugas) para minimizar las arrugas.
recubrimientos • Seque en pequefias cargas para Iograr mejores resultados y s_quelas tan pronto como sea posible.
Pa_ales de tela • Use el ciclo Regular para hacer que los pafiales queden suaves y encrespados.
Articulos rellenos • Use el ciclo Regular y un ajuste de temperatura Delicate (ropa delicada).
de plumas • Coloque un par de zapatos deportivos limpios en la secadora con el articulo
(chaquetas, bolsas para encrespar los cobertores, etc. El afiadir un par de toallas secas acorta el tiempo de secado y
de dormir, etc.) absorbe humedad.
Espuma de gema • No intente usar un ajuste con calor. Use el ciclo Time Dry (Secado por tiempo) (sin calor).
(reversosde • _,ADVERTENCIA - El secar un articulo de goma con calor puede daiiar Io o crear un
tapetes,juguetes de peligro de incendio.
peluene, ciertas
hembreras, etc.)
Almehadas • Qu_ no hacer seque almohadas de capoc ni de espuma en la secadora.
• Use el ciclo Regular.
• Afiada un par de toallas secas y un par de zapatos deportivos y limpios para ayudar a la
acciOn de volteo y para encrespar el artfculo.
Pl_sticos (cortinas • Use el ciclo Time Dry (Secado por tiempo) en una temperatura low (para prendas baja) o Air Fluff
de bail& cubiertas (aire solamente), dependiendo de las instrucciones de la etiqueta de cuidado.
de muebles
exteriores, etc.)
30
Page 32
RevocuciGndelupuem
InversiOn de la puerta
Siga estos pasos para invertir la puerta:
1. Retire los cuatro tornillos que sujetan las bisagras.
2. Retire los nueve tornillos de la puerta y de las bisagras.
3. Saque la parte inferior del forro de la puerta (A), luego
tire de 61hacia abajo _) para retirar el forro de la puerta
del panel de la puerta.
4. Gire el panel de la puerta 180° como se muestra.
5. Retire la chapa de la cerradura del forro de la puerta e
instSlela en el lado opuesto.
6. Inserte el forro debajo de la brida en la parte inferior de
la puerta (A), luego oprima la parte superior del forro de
la puerta hacia su lugar (B].
7. Instale nuevamente los nueve tornillos que se sacaron
en el Paso2.
8. Usando un destornillador, retire los dos tapones de la
puerta e inst_lelos en el lado opuesto de la abertura de
la puerta.
9. Vuelva instalar los cuatro tornillos que sujetan las
bisagras que fueron quitados en el Paso 1.
31
Page 33

$ugerenciasparaelescape
QUE HACER
Si lea las instrucciones de instalaci6n y la gufa del
usario.
_UE HACER
Permita que el aire de
escape salga f_cilmente
de la secadora.
4*
OUl _ HACER
Utilice un c,ondu
rfgido de 4 (10,
C°l°q ue cinta a_az _stJ,lun_s'
incluyende en la secadora. Nunca utilice
tornillos que atrapan pelusa.
_UE NO HACER
aumente el tiempo de secado.
QUE NO HACER
No limite el
rendimiento de su
secadora con NR
sistema de escape
inadecuado.
QUI _ NO
HACER
No use conductos flexibles
de pl_stico, aluminio o no
metdlicos.
_ili_!!i¸iliill¸!¸!¸!¸!¸!¸!¸!¸!¸!¸!¸!¸!¸!!Iiiiiiiiiii!i!iill¸il¸il¸iiiiiliiiiiii¸i¸
UI_ HACER _--_
Mantenga los conductos I I_
tendidos de manera tan I It I
recta como sea posible.
_UI_ HACER
Limpie todos los conductos
viejos antes de instalar su
secadora nueva. AsegOrese de que
la aleta de ventilaci6n abra y cierre
libremente. Inspeccione y limpie el
sistema de escape anualmente,
QUIt NO HACER
No use tramos de conductos
m_s largos de Io necesario
ni con demasiados codes.
QUI _ NO HACER
No permita que los
conductos y la abertura
de ventilaci6n est_n
aplastados ni obstruidos.
32
Page 34
localizodonysolutiondeoverias
No funciona
No calienta
No seca
adecuadamente
Produce mucho
ruido
La perilla de
control avanza
con lentitud
No seca en
forma pareja
Tiena olor
• Asegt3rese de que la secadora tenga la puerta cerrada.
• 8Est_ enchufado el cable el_ctrico?
• _,Hayun fusible fundido o un disyuntor disparado?
• Si la puerta se abre durante el ciclo, presiene el disco de control para reanudar el ciclo.
• _,Hayun fusible fundido o un disyuntor disparado?
• Seleccione un ajuste de calor, no el ajuste de aire solamente.
• Verifique que el suministro de gas sea adecuado para secadoras alimentadas con gas.
• Limpie el filtro para pelusa y el conducto de escape.
• Eltemporizador de la secadora puede haber pasado a la porci6n de enfriamiento del ciclo.
Revise todo Io anterior, y adem_s,.,
• Revise la campana de escape en el exterior de la casa, 6abre y cierra libremente?
• Verifique si se ha acumulado pelusa en el sistema de escape. Los conductos deben ser
inspeccionados y limpiados todos los afios.
• Utilice un conducto de escape metalico r[gido de 4" (10,2 cm).
• No sobrecargue la secadora. 1 carga de lavado = 1 carga de secado.
• Separe las prendas pesadas de las ligeras.
• Durante el ciclo puede ser necesario redistribuir los art[culos grandes y voluminosos tales como
frazadas o cobertores redistribuir la ropa durante el ciclo para asegurar un secado uniforme.
• Reviseque la lavadora est_ drenando adecaadamente para extraer el agua de la carga.
• La carga de ropa es muy peqaefia y no hay an movimiento adecuado. Afiada unas cuantas toallas.
• Revisequeen la carga no haya objetos tales como monedas, clavos, etc. Si los hay s_quelos
inmediatamente de la secadora.
• Esnormal ofr que la v_lvula de gas de la secadora o el elemento calefactor se enciende y se apaga
durante el ciclo de secado.
• La secadora debe estar nivelada e instalada sobre un piso s61ido.
• Un ruido de chasquidos puede ser el temporizador avanzando.
• Esnormal que la secadora emita un ruido sordo causado por la alta velocidad del aire que se mueve
a trav6s del tambor de la secadora y del sistema de escape.
• Este funcionamiento es normal para un ciclo de secado autom_tico o con sensor, especialmente al
principio del ciclo. Una vez que la carga comienza a secarse, la perilla de control comenzar_ a
avanzaF,
La velocidad de avance ser_ baja al principio del ciclo porque hay m_s humedad en la carga.
AI secarse m_s la carga, la perilla de control avanzar_ m_s r_pidamente.
• Las costuras, bolsillos y otras _reas gruesas similares pueden no estar completamente secas cuando
el resto de la ropa haya alcanzado el grado de secado deseado. Esto es normal. Seleccione el ajuste
More Dry (m_s seco) si Io desea.
• Si se seca un articulo pesado con una carga de ropa liviana, tal como una toalla con s_banas, es
posible que el artfculo pesado no est_ completamente seco cuando el resto de la ropa haya
alcanzado el grado de secado deseado. Separe los art[culos pesados de los mas livianos para obtener
los mejores resultados del secado.
• Losolores domesticos, tales como olores de pintura, barnices, limpiadores fuertes, etc., pueden
penetrar a la secadora con el aire ambiente. Esto es normal plies la secadora extrae el aire de la
habitaciOn, Io calienta, Io circula en el tambor y Io hace circular al exterior. Cuando estos olores se
encuentren presentes en el aire, ventile completamente la habitaci6n antes de usar la secadora.
33
Page 35

Ilotas
34
Page 36

GarantiaVservicio
LA UNICAY EXCLUSIVASOLUCIONPARAEL
CLIENTEBAJOESTAGARANTiALIMITADAES
LA REPARACIONDELPRODUCTOSEGONSE
INDICAAQU[ LASGARANTiASIMPLfCITAS,
INCLUYENDOLASGARANTfASDE
COMERCIALIZACION0 DEAPTITUDPARAUN
PROPOSITOENPARTICULARESTAN
LIMITADASA UNAINO0 AL PERJODODE
TIEMPOMINIMO PERMITIDOPORLA LEY.
MAYTAGCORPORATIONNOSERA
RESPONSABLEDE DAINOSINCIDENTALES0
CONSECUENTES.ALGUNOSESTADOSY
PROVlNCIASNOPERMITENLAEXCLUSION0
LIMITACIONDEDAINOSINClDENTALES0
CONSECUENTES0 LALIMITACIONDELA
DURACIONDE LASGARANTIASIMPLJCITAS
DECOMERCIALIZACION0 APTITUD,PORLO
QUEESTASEXCLUSIONES0 LIMITACIONES
PUEDENNOAPLICARSEENSUCASO.ESTA
GARANTIALEOTORGADERECHOSLEGALES
ESPECJFICOS.USTEDTAMBIENPUEDETENER
OTROSDERECHOSQUEVARJANDE UN
ESTADOA OTRO0 DEUNA PROVINCIAA
OTRA.
Lo que no cubren estas garantias
1.Situaciones y daiios resultantes de cualquiera de las siguientes
situaciones:
a. InstalaciOn, entrega o mantenimiento inapropiados.
b. Cualquier reparaci6n, modificacidn, alteraci6n o ajuste no autorizados por
el fabricante o taller de servicio autorizado.
c. Mal uso, abuso, accidentes, uso no razonable o hechos fortuitos.
d. Corriente, voltaje, suministro elOctrico o suministro de gas incorrectos.
e. Ajuste inadecuado de cualquier
2. Las garantfas quedan nulas si los n0meros de serie originales han sido
retirados, alterados o no se pueden determinar f_cilmente.
3. Bombillas, filtros de agua y filtros de aire.
4. Los productos comprados para uso comercial o industrial.
5. Elcosto del servicio o Ilamada de servicio para:
a. Corregir errores de instalaci6n. Para los productos que requieran
ventilaci6n, se deben usar conductos de metal rfgido.
b. Instruir al usuario en el uso adecuado del producto.
c. Transporte del electrodomestico al establecimiento de servicio y de regreso.
6. Cualquier perdida de alimentos debido a fallas del refrigerador o
congelador.
7.Costos de viaje y transporte de servicio en _reas remotas.
8. Esta garantia no se aplica fuera de los Estados Unidos y Canad& P6ngase en
contacto con su distribuidor para determinar si se aplica cualquier otra
garantfa.
9. Los da_os consecuentes o incidentales sufridos por cualquier persona como
resultado del incumplimiento de esta garantia. En algunos
estados no se permite la exclusi6n o limitaci6n de daiios consecuentes o
incidentales, por Io tanto la limitaciOn o exclusion anterior puede no aplicarse
en su caso.
Si necesita servicio
Primero revise la seccidn de Iocalizaci6n y soluci6n de averias en su gufa de uso
y cuidado o Ilame al distribuidor donde adquiri6 el electrodom_stico. Tambien
puede Ilamar a Maytag Services, LLC, Atenci6n al cliente, al 1-800-688-9900 en
EEUU. y al 1-800-688-2002 en Canada para ubicar a un agente de servicio
calificado.
• Asegt3rese de conservar el comprobante de compra para verificar el estado de
la garantia. Consulte la secciOn sobre la GARANTIA para mayor informaci6n
sobre las responsabilidades del propietario para obtener servicio bajo la
garant_a.
• Si el distribuidor o la compafiia de servicio no pueden resolver el problema,
escriba a Maytag Services, LLC, Attn: CAIR Center, RO. Box 2370, Cleveland,
TN 37320-2370 o Ilame al 1-800-688-9900 en EE.UU. y al
1-8OO-688-2002 en Canadzi.
• Lasgufas del propietario, manuales deservicio e informaci6n sobre las piezas
pueden solicitarse a Maytag Services,LLC,AtenciOn alcliente.
Notas: Cuando Ilame o escriba acerca de LInproblema de servicio, por
favor incluya la siguiente informaciOn:
a. Su nombre, direcciOn y ntimero de teldfono;
b. NLimero de modelo y ntimero de serie;
c. Nombre y direccidn de su distribuidor o tOcnico de servicio;
d. Una descripci6n clara del problema que est_ experimentando;
e. Comprobante de compra (recibo de compra).
Form No. ¥81907 A Part No. 2206675 Litho U.S.A. _2006 Maytag Appliances Sales Co.
 Loading...