


CONTENTS
Diagrams...........................................................................................4
Safety Information............................................................................5
FCC Statement..................................................................................6
Getting Started................................................................................7
Installing the Cutting Blade Assembly.....................................7
Installing the HP
Calibration..............................................................................10
Positioning Your Cricut Imagine™ Machine.............................10
What Your Cricut Imagine™ Machine Can Cut..........................11
Basic Operations.............................................................................12
Setup......................................................................................12
Preparing the Cutting Mat......................................................13
Place Paper on Cutting Mat....................................................13
Print & Cut..............................................................................14
Cutting on Lightweight or Heavyweight Materials.......................18
Adjusting Blade Depth...........................................................18
Adjusting Cut Speed..............................................................19
Adjusting Cut Pressure...........................................................19
Multi-Cut................................................................................19
Basic Care.......................................................................................20
Blade Life.................................................................................20
Replacing the Cutting Blade..................................................20
Caring for the Cutting Mat.....................................................21
Maintaining the Print Cartridges.............................................21
Replacing a Print Cartridge.....................................................21
Cleaning Your Cricut Imagine™ Machine................................22
Additional Basic Care Tips.....................................................22
Advanced Cricut Imagine™ Use....................................................23
Viewing Cartridge Content....................................................23
Image Queue...........................................................................23
Image Editor............................................................................24
Layered Images.......................................................................24
Colors and User Palette..........................................................25
Editor Controls........................................................................26
Project Preview........................................................................27
Set Up Job...............................................................................27
Project Quantity.......................................................................27
Art Quantity.............................................................................28
Fit to Page................................................................................28
Auto-Fill..................................................................................28
Load Last.................................................................................28
Cut Settings.............................................................................29
Flip Horizontal..........................................................................29
®
Inkjet Print Cartridge...................................8

CONTENTS (CONTINUED)
Paper Size.................................................................................29
Settings...........................................................................................30
Print & Cut................................................................................30
Print Quality.............................................................................30
Paper Type................................................................................30
HP Ink.......................................................................................30
Clean Print Heads....................................................................30
Border Preferences..................................................................31
Size..........................................................................................31
Calibration..............................................................................31
Screen.....................................................................................31
Print.........................................................................................32
Blade.......................................................................................32
Restore Defaults......................................................................33
Troubleshooting.............................................................................34
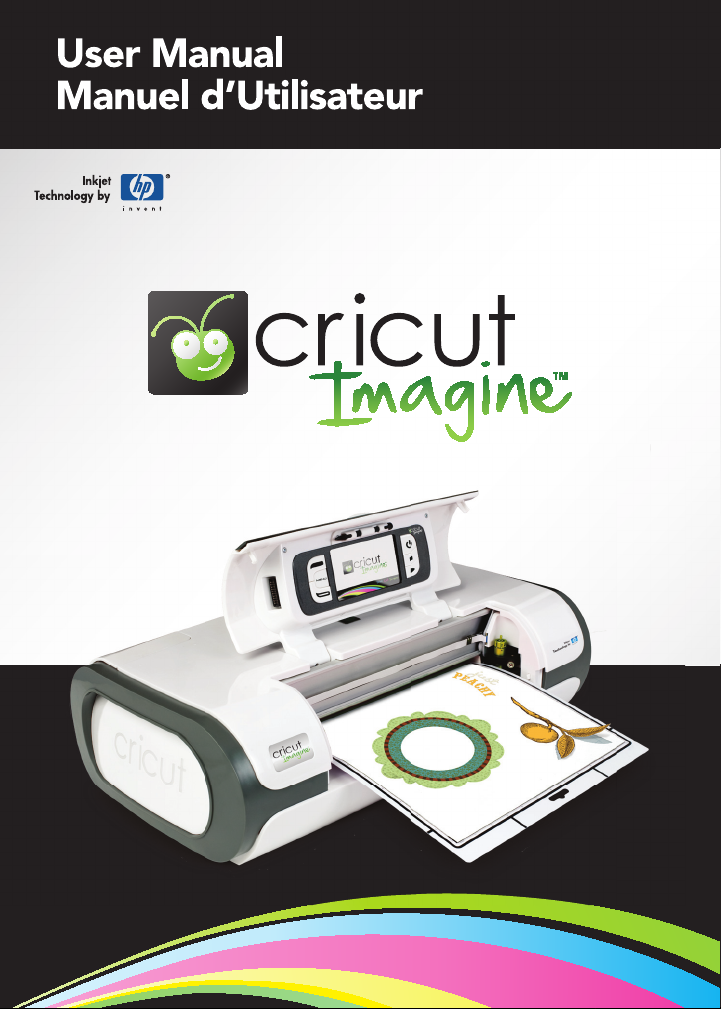
FRONT DIAGRAM
BACK DIAGRAM
4
DIAGRAMS

SAFETY INFORMATION
Disconnect electrical power before servicing or cleaning.
Do not place your fingers or other objects in the Cricut Imagine™ while it is
connected to electrical power, powered on, or during cutting operations. Rapid
movements of the cutting carriage during operation may cause bodily injury and/
or damage to the Cricut Imagine™.
Always follow basic safety precautions when using this product to reduce risk of
injury from fire or electric shock. Read and understand all instructions in the documentation that comes with the Cricut Imagine™.
Use only a grounded electrical outlet when connecting this product to a power
source. If you do not know whether the outlet is grounded, check with a
qualified electrician.
Observe all warnings and instructions marked on the product.
Do not install or use this product near water, or when you are wet.
Install the product securely on a stable surface.
Install the product in a protected location where no one can step on or trip over
the power cord and the power cord cannot be damaged.
If the product does not operate normally, see Troubleshooting.
There are no user-serviceable parts inside. Refer servicing to qualified
service personnel.
The power cord cannot be repaired. If it is defective, it should be discarded or
returned to the supplier.
Ozone-depleting chemicals, such as chlorofluorocarbons (CFCs), have been eliminated from the Provo Craft manufacturing processes.
This product contains lead in the solder that might require special handling at
end-of-life.
SAFETY INFORMATION
5

FCC STATEMENT
The U.S. Federal Communications Commission (in 47 cfr 15.105) has specified that
the following notices be brought to the attention of users of this product.
This device complies with part 15 of the FCC rules. Operation is subject to the following two conditions: (1) This device may not cause harmful interference, and (2)
this device must accept any interference received, including interference that may
cause undesired operation.
Shielded Cables
Use of a shielded data cable is required to comply with the Class B limits of Part
15 of the FCC Rules.
Pursuant to Part 15.21 of the FCC Rules, any changes or modifications to this
equipment not expressly approved by the Provo Craft, may cause harmful
interference and void the FCC authorization to operate this equipment.
NOTE: This equipment has been tested and found to comply with the limits for
a Class B digital device, pursuant to Part 15 of the FCC Rules. These limits are
designed to provide reasonable protection against harmful interference in a
residential installation. This equipment generates, uses and can radiate radio frequency energy and, if not installed and used in accordance with the instructions,
may cause harmful interference to radio communications. However, there is no
guarantee that interference will not occur in a particular installation. If this equipment does cause harmful interference to radio or television reception, which can
be determined by turning the equipment off and on, the user is encouraged to try
to correct the interference by one or more of the following measures:
• Reorient or relocate the receiving antenna.
• Increase the separation between the equipment and receiver.
• Connect the equipment into an outlet on a circuit different from that to which
the receiver is connected.
• Consult the dealer or an experienced radio/TV technician for help.
FCC STATEMENT
6
GETTING STARTED
Installing the Cutting Blade Assembly
Please note that the Cricut Imagine
tom of your box, separate from the machine. Before you turn the machine on, you
will need to insert the blade assembly. To do this:
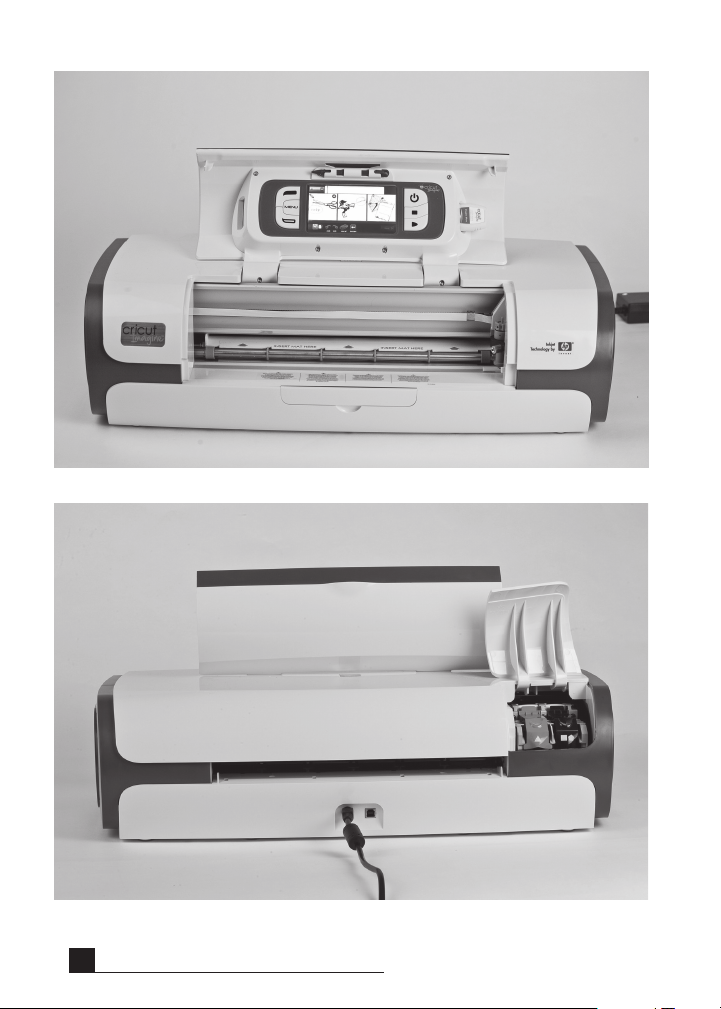
1. Remove the cardboard inserts from both
sides of the carriage. Open the front door
on the Cricut Imagine
™
machine. Manually
move the blade carriage assembly to the
left by grasping the black cradle arm and
pulling the assembly toward the center of
the opening.
2. Remove the cutting blade assembly from
its bag. The blade assembly fits into the
black cradle on the left side of the carriage.
Rotate the adjustment knob on the top of
the blade assembly so that the black arrow
on the blade assembly points to the number
3 on the adjustment knob.
3. Locate the silver nut and turn it counterclockwise until it loosens enough that you
can swing the screw to the right. Be careful
not to loosen the screw too much or it will
fall out.
™
cutting blade assembly is located in the bot-
4. Open the left arm of the black cradle and
position the cutting blade assembly inside
as shown with the black arrow facing you.
Ensure that the cutting blade has been
inserted into the assembly with the sharp
blade end pointing down. Close the cradle,
swing the nut back to the left, and tighten it
by turning it clockwise.
GETTING STARTED
7
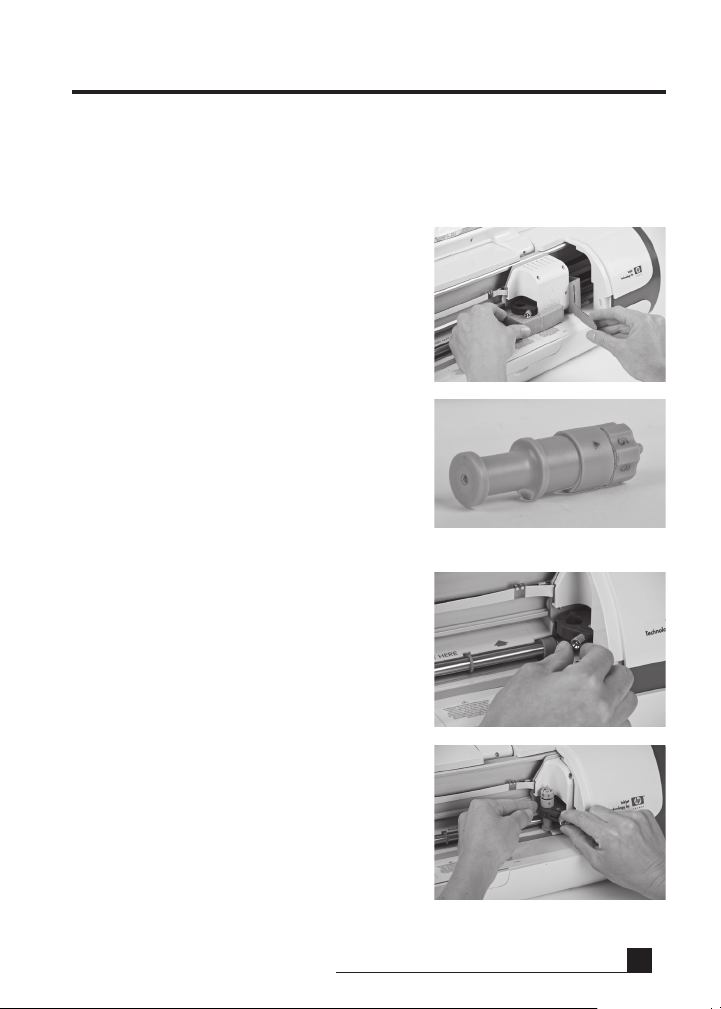
5. Return the cutter head assembly to its storage position by gently pushing the assembly
to the right until it stops.
6. Plug the machine in and press the Power
button to place the blade assembly in cutting position.
Installing the HP® Inkjet Print Cartridge
Two print cartridges are available for use with the Cricut Imagine™ machine: black
and tri-color. To install a print cartridge for the first time:
1. Turn the machine on by pressing the
Power button.
GETTING STARTED
8
2. After the initial loading screen, open the ink
access door located at the back left corner
of the machine and lift the green and black
print cartridge latches.
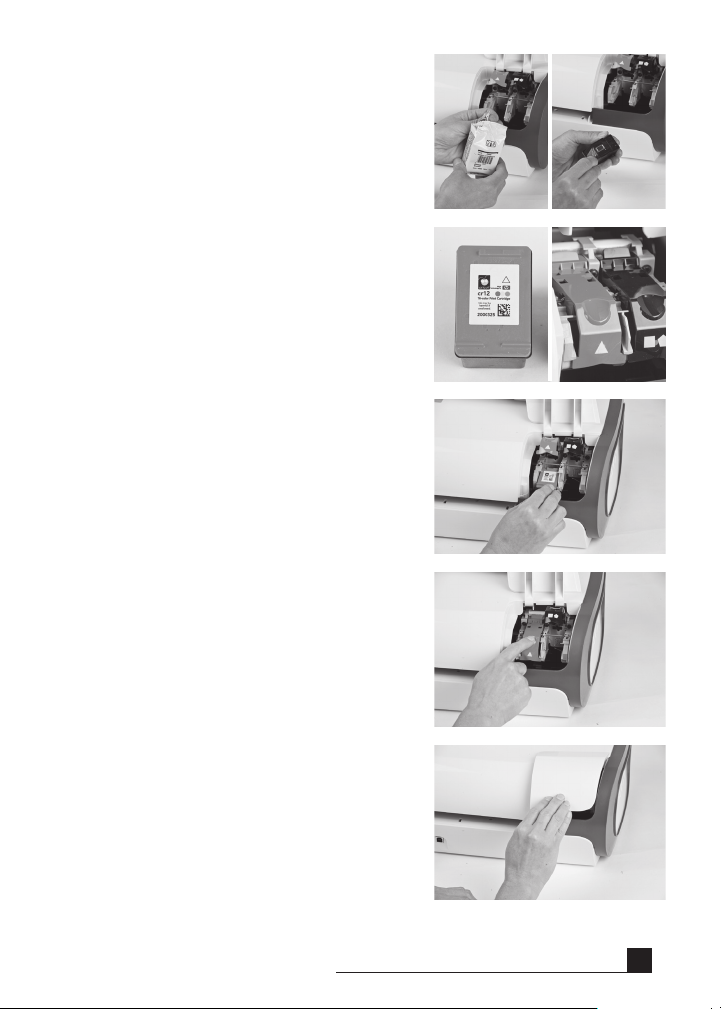
3. Remove the print cartridge from its package, and then remove the clear nozzle protective tape by pulling on the pink pull-tab.
CAUTION: To prevent clogs, ink failure,
and bad electrical connections, do not
touch the print cartridge ink nozzles or
copper contacts, and do not remove the
copper contacts.
4. Find the identification symbol on the print
cartridge and locate the print cartridge
latch which has the same symbol.
5. Hold the print cartridge with the copper
contacts facing the printer, and then slide
the print cartridge fully into the cradle.
NOTE: If you have trouble inserting the
print cartridge after lifting the cartridge
latch, verify that the printer is on and wait a
few seconds for the carriage to disengage
before inserting the print cartridge.
6. Push down on the print cartridge latch until
it snaps closed. Make sure the latch does
not spring back open.
NOTE: If the latch springs back open,
remove the print cartridge and repeat steps
4 and 5.
7. Close the ink access door.
GETTING STARTED
9

Calibration
Prior to your first use of your Cricut Imagine™, t he machine will run three calibration routines. There are instructions on the screen which will direct you through
each calibration process.
The first calibration is a screen calibration and will not require any printing or cutting. The next two calibrations will require you to put a 12" x 12" white piece of
paper on the mat and insert the mat into the machine. For assistance in mounting paper on the mat for the first time, please see instructions on page 13. After
inserting the second piece of 12" x 12" white paper and the cut and print are
complete, the Cricut Imagine™ will ask you to select a number and letter for which
the printed lines are cut most accurately. Click Test Cut and the machine will begin
cutting. Examine the cut in the center of the page to determine if the cut stayed
inside the printed line. If the cut was successful in staying inside the printed line,
click the Accept button. If the cut was outside of the printed lines, select Repeat
to run the test again. For more information on the Print & Cut calibrations, see the
instructions on page 32.
Positioning Your Cricut Imagine™ Machine
Place your Cricut Imagine™ machine at least 12" (30.48 cm) from the edge of your
table to prevent it from tipping and causing possible injury. Allow 12" (30.48 cm) in
the back of the Cricut Imagine™ machine for mat movement.
When positioning your Cricut Imagine™ machine, choose a location that:
• cannot be accessed by children. The Cricut Imagine™ machine is not a toy
and contains components, including a sharp blade, that could be hazardous
to children.
• is a hard, stable, and flat surface within 6 feet (1.83 meters) of a grounded
electrical outlet, and that has a minimum clearance of 12" (30.48 cm) behind the
Cricut Imagine™ machine for paper movement.
• is indoors or in a dry location where the Cricut® cartridges are not directly
exposed to the effects of the weather.
• is away from direct exposure to sunlight or extreme temperatures such as in
parked cars, storage sheds, sunrooms, etc.
WARNING! Your Cricut Imagine™ machine should never be left or stored outside,
in locations without heat or air conditioning, or in environments where the machine or cartridges can come in contact with water. It is recommended your
Cricut Imagine™ be maintained in an area with temperatures between 60 and 90 °F
(15.5 and 32.2 °C).
GETTING STARTED
10

™
What Your Cricut Imagine
Machine Can Cut
The Cricut Imagine™ machine can cut a wide range of materials, from vellum and
cardstock to poster board and vinyl. Since any material which passes through the
Cricut Imagine™ needs to flex slightly to make it successfully through the rollers,
it is not recommended that rigid materials such as thick chipboard be used in the
machine. The Cricut Imagine™ machine can, however, cut thin chipboard with the
use of the Multi-Cut function. More details about Multi-Cut can be found on
page 19.
The Cricut Imagine™ is designed to provide a print-to-cut alignment of +/-1 mm for
images up to 5.5" (140 mm) in size. Images larger than 5.5" (140 mm) may have up
to a +/-0.7% margin in the print-to-cut alignment.
TIP: The repeated cutting of heavy materials may reduce the life of your Cricut
Imagine™ machine’s cutting blade and mat. Replacement mats and blades can be
purchased anywhere that Cricut® products are sold.
GETTING STARTED
11
BASIC OPERATIONS
Setup
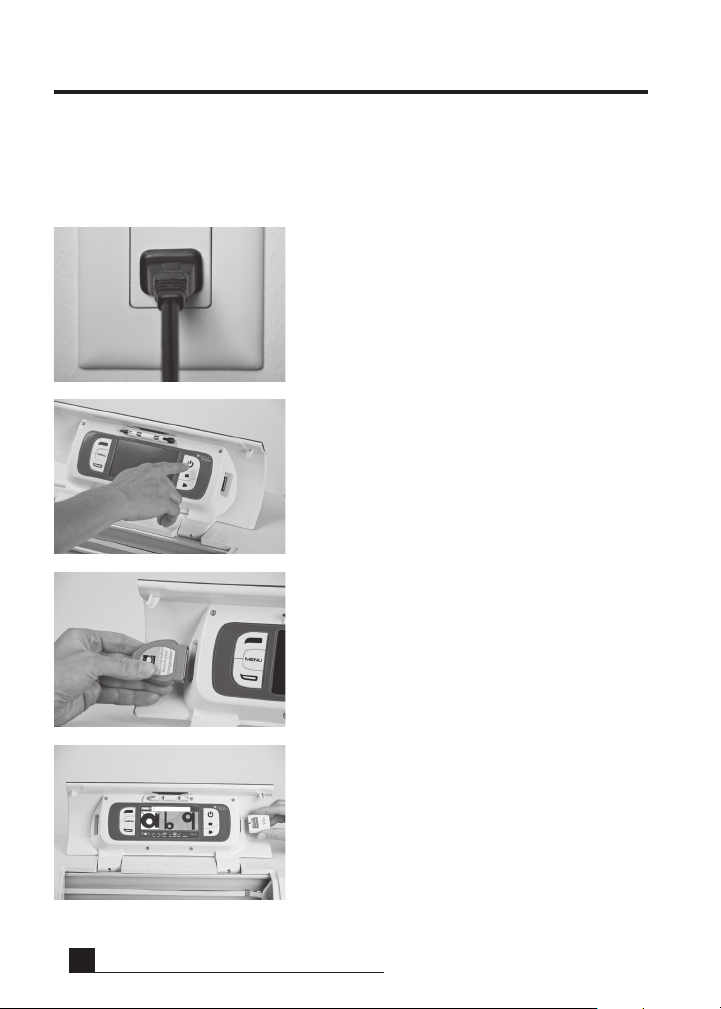
1. Plug your Cricut Imagine™ into a grounded
electrical outlet.
2. Turn it on by pressing the Power button to
the right side of the display.
®
3. Insert any original Cricut
cartridge you
wish to use into the slot on the left side of
the display.
BASIC OPERATIONS
12
™
4. Insert the Cricut Imagine
Art Cartridge in
the slot on the right side of the display.
5. If you do not wish to use a cartridge, selecting any of the welcome screen options will
allow you to continue.
Preparing the Cutting Mat
™
The Cricut Imagine
can cut materials as large as 12" x 12" (30.48 cm x 30.48 cm).
The machine performance cannot be assured for materials smaller than 3" x 3"
(7.62 cm x 7.62 cm). Seventy-five pound cardstock is recommended for
best results.
Place Paper on Cutting Mat
A 12" x 12" (30.48 cm x 30.48 cm) paper size is
recommended for the first try.
1. Remove clear protective cover from
cutting mat.
2. Align a corner of the paper with the
triangular icon in the top left corner of the
cutting mat.
3. Press and smooth from the center of the
paper to the edges of the cutting mat to
adhere it well. Your paper is ready to be cut.
TIP: The surface of the cutting mat has been
treated to make it slightly tacky to hold the
paper in place during cutting. Remove paper
slowly when using lightweight materials such
as vellum. If small or delicate pieces are difficult to remove, use Cricut Tools
are not included with your Cricut Imagine
but are available wherever Cricut
™
. Cricut Tools™
®
™
products
,
are sold.
BASIC OPERATIONS
13
Print & Cut
To begin working with an image, click the
Print & Cut button on the left of the Cricut
Imagine™ menu screen. You can always return
to the menu screen by pressing the Menu button to the left of the screen.
Choose an image source. This is done by
clicking on one of three content source icons
located at the lower left corner of the display.
®
The left icon is for original Cricut
ter icon is for art which comes with your Cricut
™
Imagine
Imagine
, and the right icon is for Cricut
™
cartridge art.
art, the cen-
You can scroll through the images in the
default Gallery View by clicking the screen
and dragging slowly to the left or right. Click
any image you would like to print and cut to
select it. The image that is selected will be
highlighted in white.
BASIC OPERATIONS
14
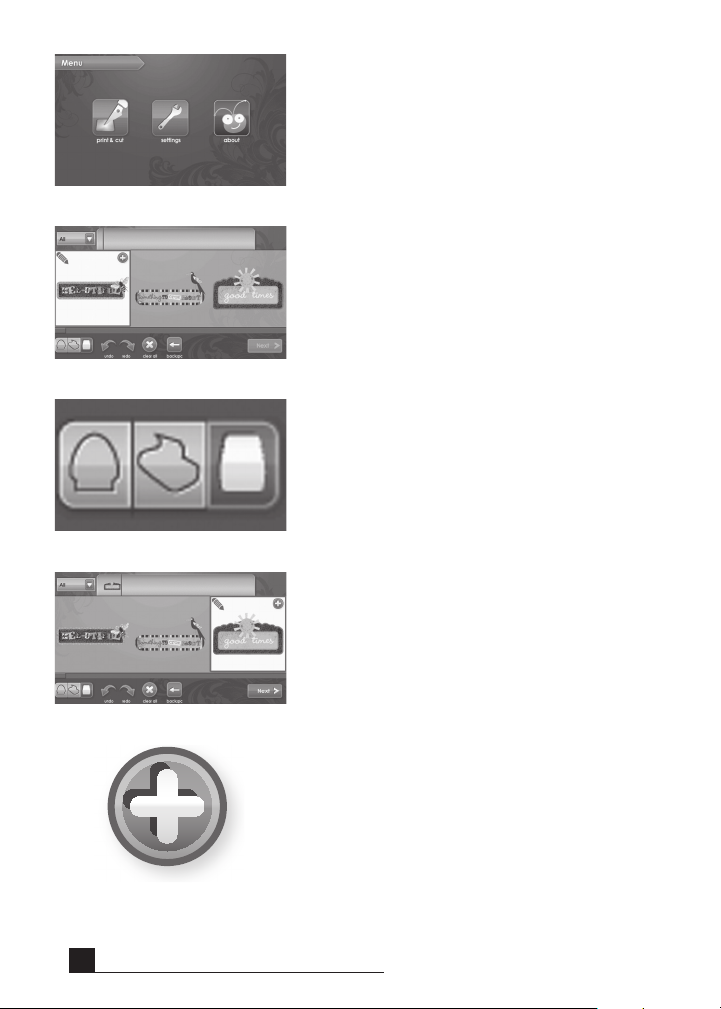
Click the green plus sign to add the image to
the Image Queue.
Another view featuring a Keypad layout is
available by clicking the drop down list in the
top left corner of the screen. To return to the
Gallery view, use the same drop down list and
select an option other than Keypad. For more
details on the two views, see page 23.
Note: Selecting All will display all images in
the gallery. Selecting Icons will only show
images with a single layer. Selecting Images
will only show the images that have more than
one layer. Selecting Bonus will show the bonus
content included with this cartridge.
Original Cricut
®
art will only be visible in
Keypad layout.
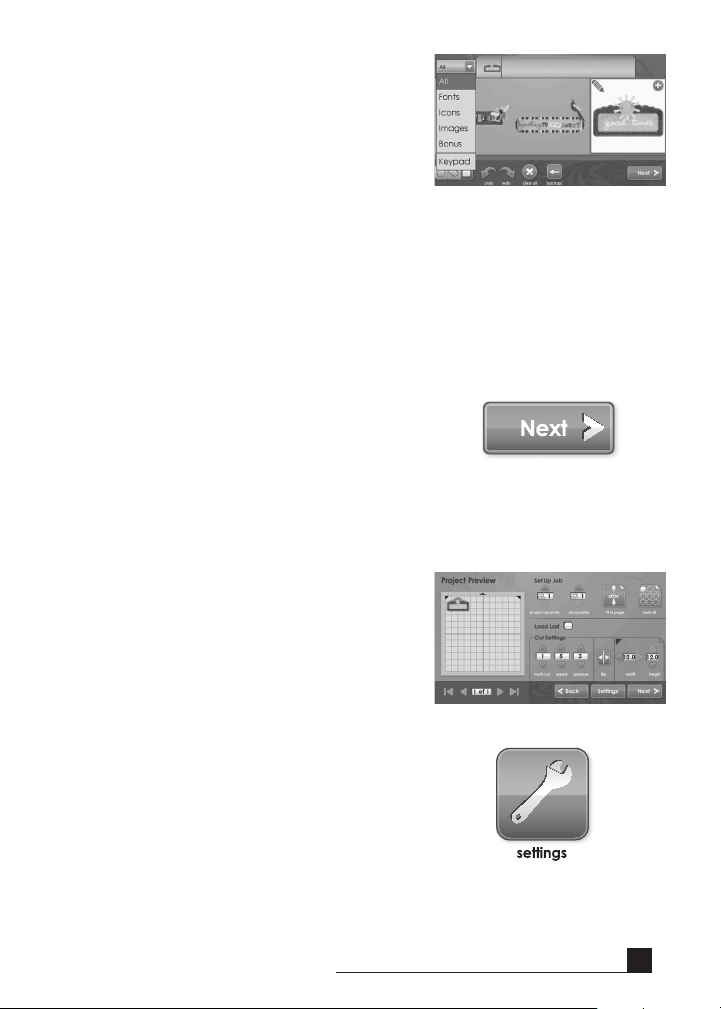
Click the Next button at the bottom right of
the Image Gallery.
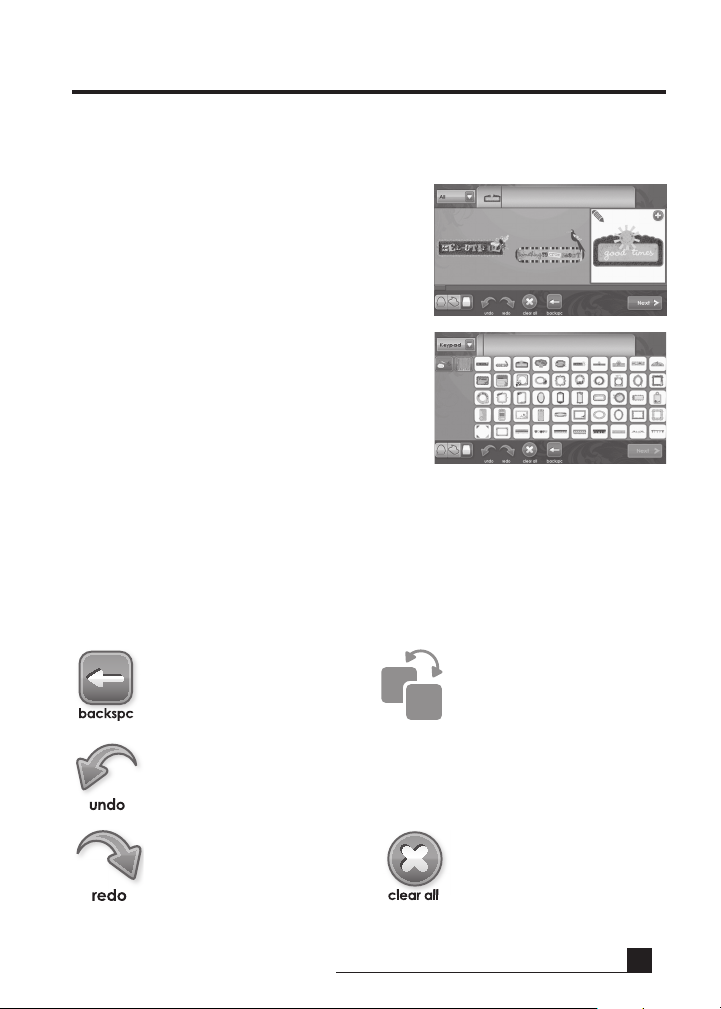
This will show you a preview of your project.
The preview shows you where the images will
be located on the paper.
To the side of the preview, several job options
can be controlled. Additional information on
the controls in the Set Up Job area can be
found on page 27.
The Settings area, also accessible on the Menu
screen, contains controls for print quality,
paper type, border preferences, machine
calibrations, as well as system defaults and
information about ink levels. For information
about the Settings area, see page 30.
BASIC OPERATIONS
15

Having edited and applied the changes to your
image, click Next in the bottom right corner
to continue.
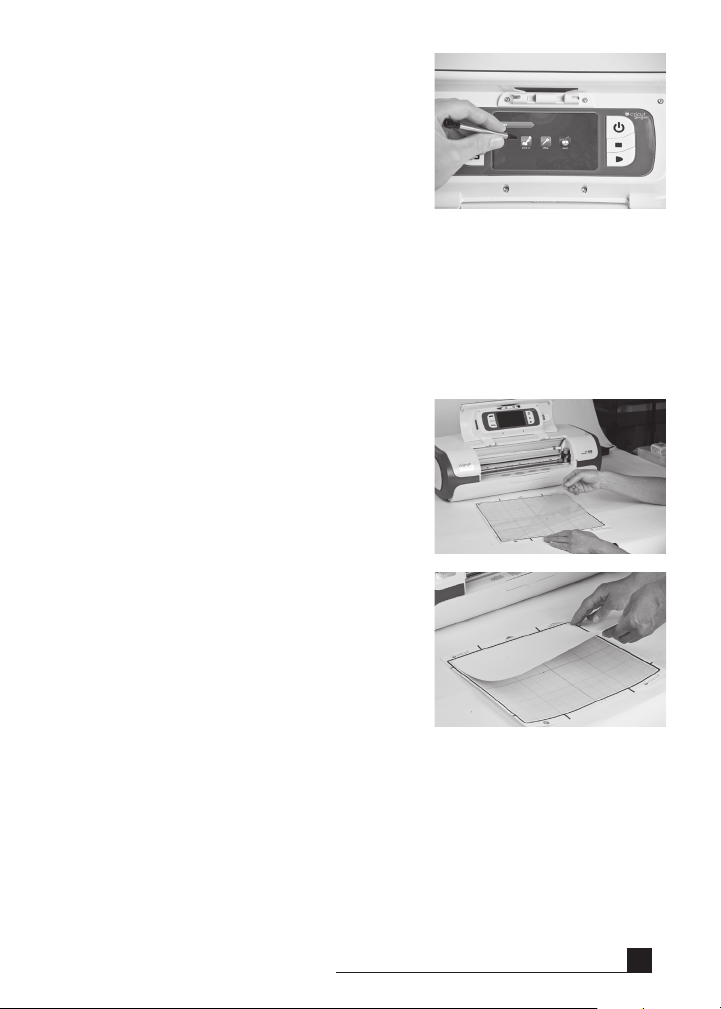
You are now prompted to load the cutting mat
with the paper. Be sure the paper is mounted
correctly according to the previous instructions. Insert the mat into the Cricut Imagine
™
with the arrow pointing toward the machine.
Insert the mat above the exposed rollers at the
label INSERT MAT HERE. Gently insert the mat
until you feel it hit the back of the print rollers.
TIP: For best results, center the mat in the
mat guide.
Hold the mat near the machine at the center,
applying gentle pressure to the mat. Click
the Go! button on the screen of the Cricut
™
Imagine
, continuing to apply pressure until
the mat is completely loaded.
BASIC OPERATIONS
16
Your project will begin printing and cutting.
You’re on the way to your fi rst of many exciting
Cricut Imagine
™
creations!
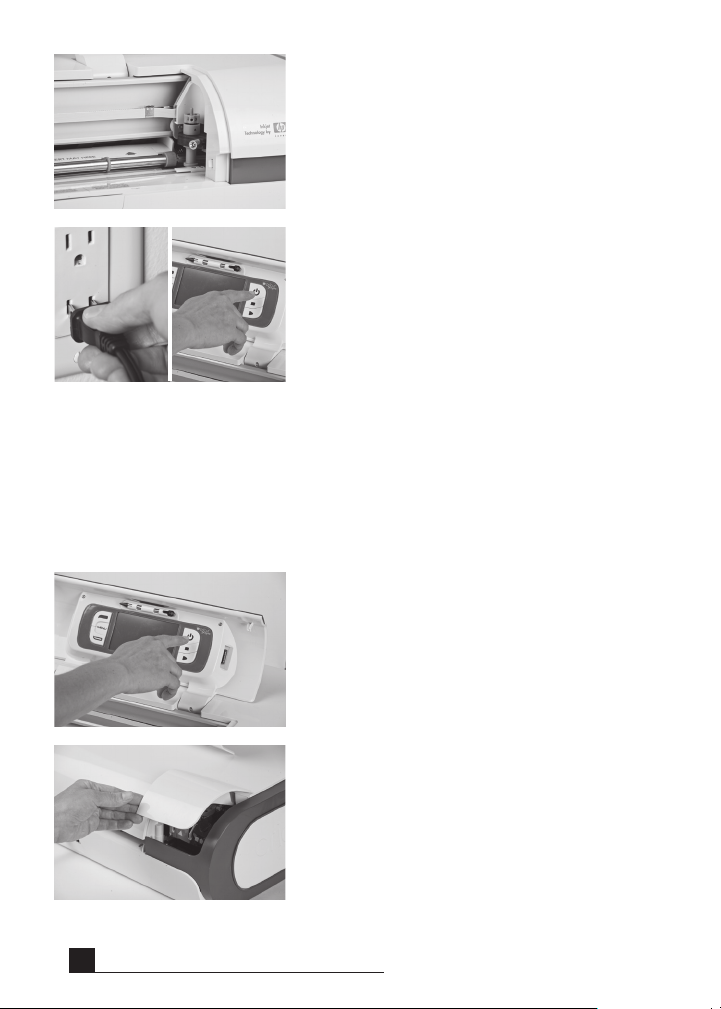
When the operation is complete, the Cricut
Imagine™ machine will eject the mat out the
front of the machine.

WARNING! Do not touch the mat during printing and cutting even if the mat
stops moving. There are many steps to printing and cutting, one of which is drying. During drying and other steps the machine may appear to be doing nothing.
Do not touch the mat until the Cricut Imagine
™
ejects it from the machine.
Gently remove images from the cutting mat. If it is difficult to remove the characters, use a craft knife or Cricut Tools
™
(sold separately) to carefully remove the images. Once all images are removed, clean off any small scraps of paper remaining
on the cutting mat. This will improve cutting mat performance in the future.
TIP: To extend the life of your cutting mat, always cover it with the protective
cover and never leave paper on it for an extended period of time.
BASIC OPERATIONS
17
CUTTING ON LIGHTWEIGHT OR HEAVYWEIGHT
MATERIALS
Your Cricut Imagine™ can cut a variety of materials. For an optimal cut on lightweight materials such as vellum or heavyweight materials such as thin cardstock,
you may need to adjust the blade depth, speed of the cut, or cut pressure.
Adjusting Blade Depth
Remove the cutting blade assembly from the Cricut Imagine™ machine to change
the setting on the adjustment knob. However, if the arrow is facing forward, you
can leave the cutting blade assembly attached and simply spin the top of the
adjustment knob to change the setting.
WARNING! Always unplug your Cricut Imagine™ machine before removing the
cutting blade assembly!
To remove the cutting blade assembly (Figure 1), first turn the Cricut Imagine™ off.
Then slide the cutting carriage aside to expose the blade clamp screw. Locate the
screw and turn it counterclockwise until it loosens enough that you can swing the
screw to the right (Figure 2). Be careful not to loosen the screw too much, or it will
fall out. Remove the cutting blade assembly from the machine. Next, locate the
adjustment knob (Figure 3) on the top of the cutting blade assembly, and turn it to
your desired setting.
Figure 3Figure 2Figure 1
The smaller the number on the adjustment knob, the shorter the blade depth will
be. Shorter blade depths are recommended for light weight materials, and longer
blade lengths for heavier materials. Reinstall the cutting blade assembly into the
Cricut Imagine
assembly. Test the setting on a scrap piece of paper and make adjustments
as necessary.
TIP: Cutting on cardstock and other heavy materials will reduce the life of your
blade, but it will produce the best cuts.
18
™
machine by reversing the procedure to remove the cutting blade
CUTTING ON LIGHTWEIGHT OR HEAVYWEIGHT MATERIALS

™
TIP: If the Cricut Imagine
produces poor cutting results, always insert a new
blade first before trying other options.
Adjusting Cut Speed
The Cut Speed setting allows you to control the cutting speed for an optimal cut
on a variety of papers. If you regularly cut on heavyweight materials, you may want
to adjust this setting up to increase the cutting speed. For lightweight materials or
for smaller, more detailed cuts, you may want to turn the setting down to decrease
the cutting speed. After each adjustment, you should test the setting with a scrap
piece of paper, readjusting as necessary until you achieve the desired results.
Controls of the Cut Speed can be found in the Project Preview screen in the Cut
Settings section. Press the up arrow to increase the speed and the down arrow
to decrease it. As a general rule, decrease the speed if your cuts are being torn.
If this doesn’t work, you may need to change the cut pressure, adjust the blade
depth, or replace the blade.
Adjusting Cut Pressure
The Cut Pressure setting allows you to control how hard the cutting mechanism
presses against the paper. For heavyweight materials, you may want to move the
setting up to increase the cut pressure. For lightweight materials, you may want
to change the setting down to decrease the pressure. After each adjustment, you
should test the setting with a scrap piece of paper, readjusting as necessary until
you achieve the desired results.
Controls for the Cut Pressure can be found in the Project Preview screen in the
Cut Settings section. Press the up arrow to increase the speed and the down arrow to decrease it. As a general rule, increase the pressure if your selections are
not being cut completely through the paper. If this doesn’t work, the cut speed or
blade depth may need to be adjusted.
Multi-Cut
The Multi-Cut function allows you to cut a selected image multiple times on top
of the original cut lines. This allows the machine to cut thicker materials, such as
thin chipboard.
Controls for Multi-Cut can be found in the Project Preview screen in the Cut Set-
tings section. You can select how many times the lines of the image should be cut
by pressing the up and down keys.
CUTTING ON LIGHTWEIGHT OR HEAVYWEIGHT MATERIALS
19

BASIC CARE
Blade Life
You can expect anywhere from 500 to 1500 single cuts from your cutting blade
before it requires replacement. Your actual cutting blade life will vary, depending on the settings you use and the materials you cut. When the quality of your
cuts decreases, it is probably time to replace your cutting blade. For best results,
use only genuine Cricut® Replacement Cutting Blades, available at participating
Cricut® retailers (part #290002).
Replacing the Cutting Blade
WARNING! Always unplug your Cricut Imagine™ before replacing the
cutting blade.
To change the cutting blade, you must first remove the cutting blade assembly. To
remove the cutting blade assembly (Figure 1), locate the screw and turn it counterclockwise until it loosens enough that you can swing the screw to the right (Figure
2). Be careful not to loosen the screw too much, or it will fall out.
Remove the cutting blade assembly from the machine. After removing the cutting
blade assembly, locate the blade release at the top of the cutting blade assembly
and push it in (Figure 3). The blade will emerge from the cutting blade assembly.
You will need to gently pull the blade away from the magnet holding it in place
(Figure 4).
To install the new blade, first remove the protective cover from the new blade.
Carefully insert the shaft of the blade into the hole in the bottom of the cutting blade assembly. The blade should be sucked up inside the shaft if properly
installed (Figure 5). The replacement cutting blade is now installed. Place the
protective cover over the old blade and dispose of it. Reinstall the cutting blade
assembly into the Cricut Imagine™ reversing the procedure to remove the cutting
blade assembly.
Figure 1 Figure 2 Figure 3 Figure 4 Figure 5
BASIC CARE
20

WARNING! Cutting blades are extremely sharp and should be handled with the
utmost care. They are also potential choking hazards; they should be kept away
from children.
Caring for the Cutting Mat
You can expect anywhere from 25 to 40 full mat cuts (expect even more when a
cut is smaller than the full mat) from your Cricut Imagine
™
cutting mat before it
requires replacement. Your actual cutting mat life will vary, depending on the settings you use and the papers you cut. It is time to replace your mat when:
• your paper no longer sticks to the cutting mat.
• the mat becomes curled on the edges, which will affect the accuracy of the
print-to-cut alignment.
Use only genuine Cricut Imagine™ replacement cutting mats, available at retailers
everywhere (part #2000784).
Maintaining the Print Cartridges
™
The following tips will help maintain the Cricut Imagine
print cartridges and
ensure consistent print quality:
• Keep all print cartridges in their sealed packages until they are needed.
Print cartridges should be stored at room temperatures between 59 and 95 °F
(15 and 35 °C).
• Do not remove the plastic tape covering the ink nozzles until you are ready to
install the print cartridge in the printer. If the plastic tape has been removed
from the print cartridge, do not attempt to reattach it. Reattaching the tape
damages the print cartridge.
WARNING! Do not drop the print cartridge. Dropping the print cartridge may
damage it.
Replacing a Print Cartridge
1. Turn on the Cricut Imagine
™
, open the print cartridge access door located
on the back of the machine and lift the print latch for the cartridge you will
be replacing.
2. Grasp the installed print cartridge and slide it out of its cradle.
CAUTION: To prevent clogs, ink failure, and bad electrical connections, do not
touch the print cartridge ink nozzles or copper contacts, and do not remove the
copper contacts.
BASIC CARE
21

3. Find the identification symbol on the print cartridge and locate the print cartridge latch which has the same symbol.
4. Hold the new print cartridge with the copper contacts facing the printer, and
then slide the print cartridge into the cradle.
NOTE: If you have trouble inserting the print cartridge after lifting the cartridge
latch, verify that the printer is on and wait a few seconds for the carriage to disengage before inserting the print cartridge.
5. Push down on the print cartridge latch until it snaps closed. Make sure the latch
does not spring back open.
6. Close the print head cover.
Cleaning Your Cricut Imagine™ Machine
WARNING! Always unplug your Cricut Imagine™ before cleaning!
To clean the Cricut Imagine™ machine, gently wipe exterior panels with a damp
cloth. Immediately dry any excess moisture with a chamois or other soft cloth.
Do not use chemicals or alcohol-based cleaners (including, but not limited to,
acetone, benzene, and carbon tetrachloride) on the machine. Abrasive cleansers
and cleaning tools should also be avoided. Do not immerse the machine or any
component of it in water.
Additional Basic Care Tips
• Keep away from food and liquids.
• Keep in dry, dust-free location.
• Avoid excessive heat or cold.
• Do not leave in car, where excessive heat may melt or damage
plastic components.
• Do not expose to direct sunlight for any extended period of time.
22
BASIC CARE
ADVANCED CRICUT IMAGINE™ USE
Viewing Cartridge Content
There are two ways to browse images in the Cricut Imagine™:
Gallery View—This view displays a long, horizontal strip of images you can scroll through.
Gallery View is the default view for browsing
images on your Cricut Imagine™ Art Cartridge.
This view is not available for original
Cricut® cartridges.
Keypad—This view allows you to view up to
50 images at once, similar to the view used on
other Cricut
Image Queue
When viewing cartridge content, several icons are available at the bottom of the
screen to allow you to control the Image Queue. Selecting an image in the queue
by clicking it and then clicking the green plus icon in the top right corner of the
image will add the image to the Image Queue. Clicking the Edit icon in the top
left of the image will allow you to make changes to the image using the Image
Editor. You can also make changes to an image in the gallery by selecting it and
clicking the Edit icon. Other controls include:
®
machines.
Backspace—removes the
last image added to the
Image Queue
Undo—reverses the last
change to the Image Queue
Redo—reverses the effect
of the Undo function,
making the change to the
Image Queue again
Duplicate—duplicates
the selected image in the
queue, available only after
clicking an image in the
Image Queue
Clear All—removes all images from the Image Queue
ADVANCED CRICUT IMAGINE™ USE
23
Image Editor
The Image Editor allows you to make changes to individual images such as altering
the color, orientation, size, and composition. Changes made in the Image Editor
will affect only the particular image, whereas changes made in the Project Preview
section will affect all of the images in the project.
To access the Image Editor click the in the gallery view.
Layered Images
Some images which come on the Cricut Imagine
™
Art Cartridge are separated into
individual elements called layers. This gives you an additional level of control over
the color and size of each layer of the image in your project. Not only can each
of these layers be individually changed to suit your needs, but they can also be
printed and cut separately.
Images on original Cricut® cartridges can be colored and sized, but are not separated into layers and thus will be changed as a single image. This means that you
cannot recolor or resize only a portion of an image which comes from an
original cartridge.
™
You can control whether an image from a Cricut Imagine
Art Cartridge is printed
as a single image or in layers using the Combine and Layers buttons at the top left
of the Image Editor. Selecting Combine will cause the edited image to be printed
and cut as a single image (Figure 1). Selecting Layers will print and cut each layer
of the image separately (Figure 2).
ADVANCED CRICUT IMAGINE™ USE
24

Figure 1 Figure 2
Colors and User Palette
Images on Cricut Imagine™ Art Cartridge come with a pre-selected palette of colors and patterns you can use to customize entire layered images or the individual
layers inside of the images. To do this, navigate to the Image Queue or Gallery
view and:
• click to select the image you would like to customize.
• click the Edit icon to open the Image Editor.
If you wish to change only a single layer of an image, click the layer to select it.
NOTE: The image at the far left of the image editor shows all the layers assembled. The images to the right of this image represent all of the individual layers. If
there are no images to the left, then you are working with an image that only has
one layer.
• Choose the new color for the layer from the strip of colors just below the image.
• Click the color to select it.
• Click Apply.
NOTE: If you don’t see the color you want to change the layer or image to, you
can use the scroll bar to see other choices or follow the instructions below for
creating a custom color.
Images from original Cricut® cartridges can also be customized with a new color.
However, because they don’t have a particular palette associated with them like
ADVANCED CRICUT IMAGINE™ USE
25
™
the images on the Cricut Imagine
Art Cartridges, you will need to use the colors
available on the Cricut Imagine™ Art Cartridge or create a custom color on the
User Palette. Follow these instruction to create a custom color.
• Click the multi-colored button at the bottom left of the screen.
• Click a blank square in the Custom Colors area to select it.
• Drag the indicator around the circle until you fi nd the color you want.
• Use the arrows at the top and bottom of the control to the right of the color
wheel to adjust the luminosity of the color. You can also enter exact RGB values
if you know them using the Red, Green, and Blue controls below the Custom
Colors section.
• Click Apply.
The custom color is automatically applied to the selected image and will
appear across the bottom of the image editing strip to the left of the
multi-colored button.
™
NOTE: You can use patterns and colors from any Cricut Imagine
your original Cricut
®
images.
cartridge with
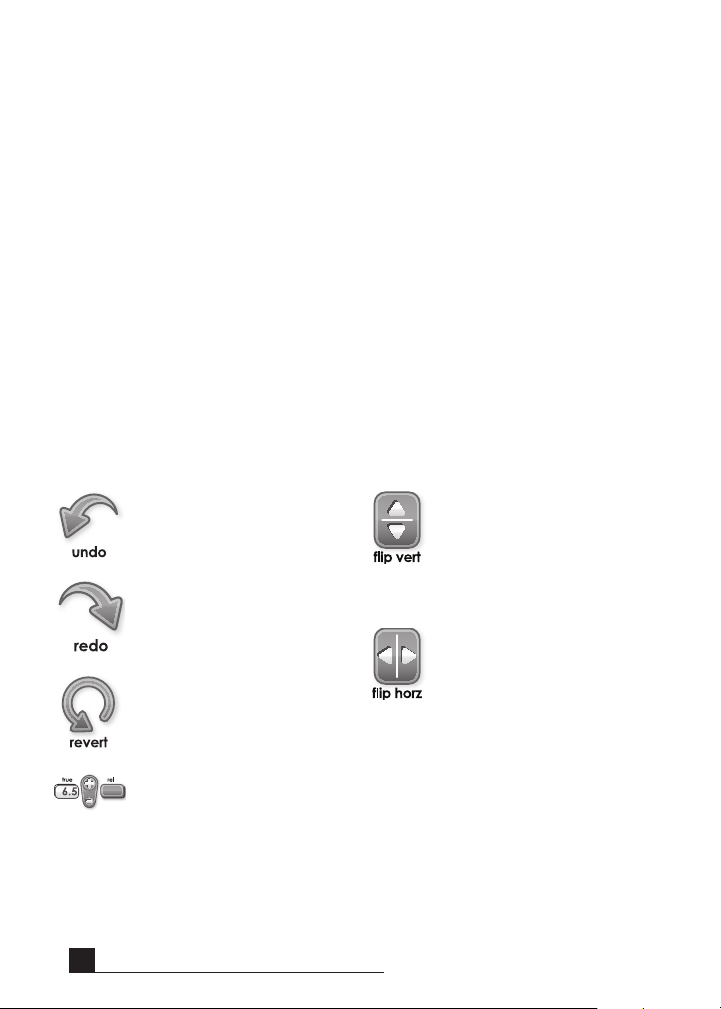
Editor Controls
Undo—reverses the last
change to the image
Flip Vertical—fl ips the orientation of the entire image vertically or a selected
portion of the image if it
Redo—reverses the effect
of the Undo function,
making the change to the
image again
Revert—erases all changes
made to the image
has been separated
into layers
Flip Horizontal — fl ips the
orientation of the entire
image horizontally or a
selected portion of the
image if it has been separated into layers
True/Relative Size—toggles between allowing you to resize images
in Relative mode, which sizes images with relation to the key height
character in your text, and Tru e mode, which sizes images independent of any other image
ADVANCED CRICUT IMAGINE™ USE
26
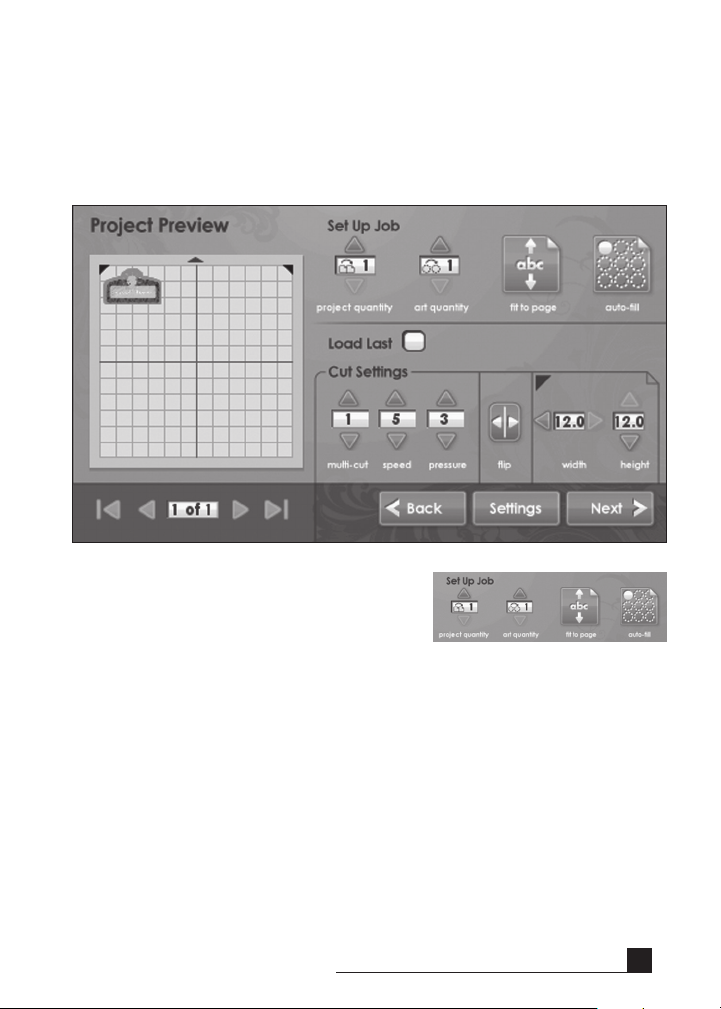
Project Preview
This screen provides options to set up the project including making changes to the
paper size, allowing you to print and cut on the unused portions of the previous
project, and altering the orientation of the images in the project. Where changes
made in the Image Editor will affect only the particular image being changed, all
changes made in this section will affect the entire print job.
Set Up Job
The Set Up Job section of the Project Preview
allows you to configure various details of the
project such as repeating the images or project to fill a page.
Project Quantity
This control can be used to repeat the entire
project. This is often useful when you need to
cut your project several times. You can change
the number of times the project is repeated by
clicking the up and down arrow.
ADVANCED CRICUT IMAGINE™ USE
27
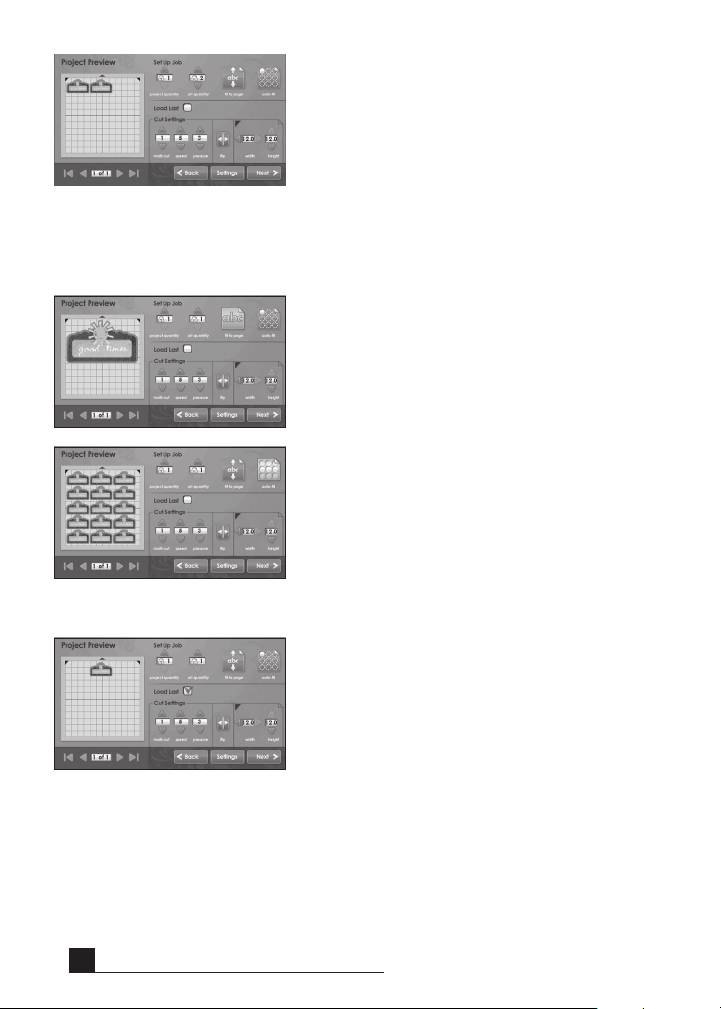
Art Quantity
This control can be used to repeat all the images in your queue and minimize the amount
of paper used for the project. This is often useful when you need several of each part of your
project or wish to fill up the empty space on
a page. You can change the number of times
the project is repeated by clicking the up and
down arrow. The additional, repeated images
will be added to the Project Preview section
to the left.
Fit to Page
This control will change the size of the images
in the project to fit the entire page. The Project Preview to the left provides a visual indication of the size of each image in the project.
Auto-Fill
This control is similar to the Project Quantity control. However, instead of choosing a
specific number of times to repeat the entire
project, using Auto-Fill repeats the project
until the page is full. The additional, repeated
projects are reflected in the Project Preview
section to the left.
ADVANCED CRICUT IMAGINE™ USE
28
Load Last
Checking the Load Last option on the Project
Preview indicates that you would like to use
the paper used for the last project for the
current project. The Cricut Imagine
™
keeps
track of what parts of the paper were used for
the last project. When the Load Last option is
selected, the new project will be automatically
repositioned to use the remaining space on
the paper.
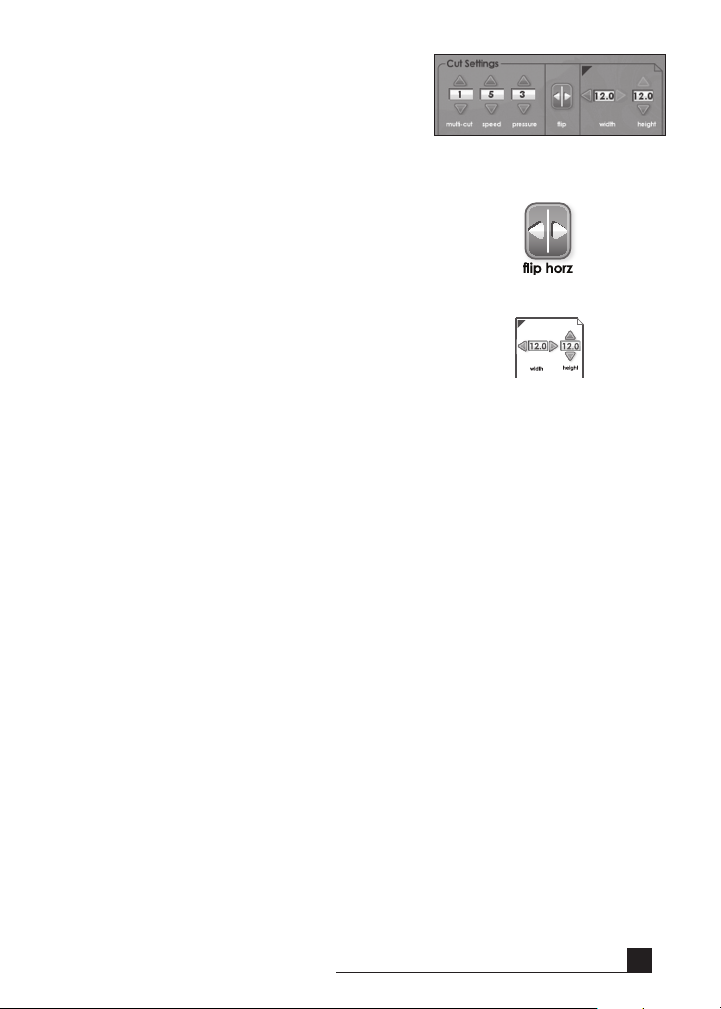
Cut Settings
The Cut Settings section of the Project
Preview allows you to change the multi-cut,
speed, and pressure values.
Flip Horizontal—Clicking this button fl ips the
horizontal orientation of the images in
the project.
Paper Size—The paper size area allows you
to change the size of the paper being printed
on. This size can be changed in increments of
one-half inch.
ADVANCED CRICUT IMAGINE™ USE
29
SETTINGS
The settings screen provides control over general settings for your
Cricut Imagine™.
Print & Cut
Choosing Print & Cut will print the project on the paper, and then cut the images
out. Print Only will print the project on the paper without cutting the images out.
Cut Only will cut the images out without printing them.
Print Quality
This option provides control over the quality of the printing done on the project.
Best Quality uses the most ink, but provides the most rich and accurate color
recreation. This option also takes the most time to print. Draft Quality uses less
ink and prints faster, but the image colors resulting from using this setting will not
be as vivid as they would be when using Best Quality.
Paper Type
This option allows you to specify the type of paper being printed on and cut,
which effects not only the amount of ink being used in the print process, but also
the amount of dry time between printing and cutting. Select Glossy when using
photo paper or other papers which have a glossy fi nish. Select Matte for regular
paper with a matte fi nish. Select Vinyl when printing on Cricut Imagine™
Printable Vinyl.
HP Ink
30
This section has an indicator for the black and color ink cartridges
for the Cricut Imagine
™
. If the ink level for either cartridge gets low,
a LOW indicator will show up for the cartridge. If ink levels are suffi cient, the indicator will read OK.
Clean Print Heads
This control will clean the print heads. It should be noted that, unlike
other printers, a page will not be printed when you clean the print
heads. You will, however, see and hear the print cartridge moving
during the cleaning process. As the cleaning process uses some ink, it
should only be used when necessary.
SETTINGS

Border Preferences
.10
This control allows you to defi ne your own image border
color. Selecting Default will cause the Cricut Imagine
™
to
select and print the border color using the original color defi ned by the artist who
created the image. To select a different color, follow these instructions.
• Select Custom in the top drop-down box.
• Click the Defi ne Color button.
• Click one of the pre-defi ned colors in the Basic Colors section.
• Click Apply.
If you wish to use a color which isn’t already in the Basic Colors section:
• Select Custom in the top drop-down box.
• Click the Defi ne Color button.
• Click a blank square in the Custom Colors area to select it.
• Drag the indicator around the circle until you fi nd the color you want.
• Use the arrows at the top and bottom of the control to the right of the color
wheel to adjust the luminosity of the color. You can also enter exact RGB values
if you know them using the Red, Green, and Blue controls below the Custom
Colors section.
• Click Apply.
Size
This control allows you to change the thickness of the image border.
By clicking the plus and minus keys above and below the control, you
can increase or decrease the size by increments of .01 of an inch.
Calibration
This section gives you the ability to change the calibration of the touch screen,
print alignment, and blade placement.
Screen
This control allows you to recalibrate the touch screen of your Cricut
™
Imagine
. It is intended primarily for use if you fi nd that touching
the screen with the stylus gives you inaccurate results, or that your
touches seem to react with an unintended area of the screen. Using
this function will present you with fi ve crosses, displayed one at a
time in the four corners and the middle of the screen. Touch the cross
with the stylus in its center, and the next cross will appear. After the
fi nal cross, your Cricut Imagine™ will restart.
SETTINGS
31

If you fi nd that your Cricut Imagine™ screen stops responding to any
touch input, it may require a forced recalibration. Follow these steps
to force a recalibration.
• Hold down the top and bottom buttons on the left of the Cricut
Imagine
™
screen.
• Press the Power button to power on the machine.
• Release the top and bottom buttons when you see the colored bars
appear on the screen.
• When the blue screen appears, click each of the white crosshairs to
fi nish the screen recalibration.
Print
This control allows you to calibrate the alignment of the Cricut Imag-
™
ine
print heads. It will repeat the print head alignment conducted
when you fi rst turned the machine on. If you fi nd that color reproduction for items printed with the Cricut Imagine
™
are lacking in fi delity,
using this recalibration may solve the issue. Print calibration should
also be done any time the print cartridge is removed or replaced.
Print calibration requires a clean 12" x 12" sheet of white paper
mounted on the cutting mat. Click the Print button and follow the
instructions on the screen.
Blade
This control allows you to calibrate the alignment of the cutting blade
of the Cricut Imagine
™
with respect to the printed image. It will repeat
the blade alignment conducted when you fi rst turned the machine on.
If you fi nd that the blade is not cutting out images within their default
borders, using this recalibration may solve the issue.
Blade calibration requires a clean 12" x 12" sheet of white paper
mounted on the cutting mat. Click the Blade and follow the instructions on the screen.
32
NOTE: Do not remove the mat after the calibration marks have been
cut next to the short vertical and horizontal lines labeled with numbers and letters, as the calibration process is still taking place.
After the cut and print are complete, the Cricut Imagine™ will ask you
to select a number and letter for which the printed lines are cut most
accurately. It will then make a test cut and ask you to determine if the
cut stayed inside the printed lines.
SETTINGS

If the cut was successful in staying inside the printed lines, click the
Select button. If the cut was outside of the printed lines, select Repeat to run the test again.
If the cut does not fall within the calibration test image line after running the blade calibration 3 times, you can try to tune the calibration
manually using the Advanced calibration screen.
NOTE: It is strongly recommended that, prior to using the advanced
calibration controls, you contact Customer Care for assistance. They
will be able to give you instructions about each of the controls in this
area, and direct you how to use them.
To reach the Advanced screen follow these instructions:
• Click the Blade button in the Calibration section of the
Settings screen.
• Hold the top button on the left side of the screen.
• Click Start Calibration.
Restore Defaults
™
This control will set your Cricut Imagine
back to its factory settings,
removing any calibration changes you have made previously.
SETTINGS
33

TROUBLESHOOTING
TIP: For our complete list of frequently asked questions, plus the latest up-
dates to the User Manual, visit www.cricut.com.
Problem: The cutting mat won’t load when I click Go! and try to feed it into
the machine.
+ Solution 1: Try pushing the cutting mat slightly into the roller bar as you
click Go!
+ Solution 2: Apply constant, gentle pressure to the mat as you click Go!
+ Solution 3: Reset the printer by raising the ink access door and then
lowering it back into place.
+ Solution 4: Turn the Cricut Imagine
attempt to load the machine.
Problem: The cutting mat didn’t load when I clicked the Go! ke y.
+ Solution 1: Your Cricut Imagine
didn’t pull it in. Follow the on-screen instructions to retry to load the mat.
+ Solution 2: Apply slightly higher pressure and try to reload the mat by
pressing Go! or the Play button.
Problem: The blade is not cutting all the way through the paper.
+ Solution 1: Use the Multi-Cut function in the Project Preview screen to
allow for multiple cuts along the same cutting lines.
™
off, and then turn it back on and
™
thought that it loaded the mat, even if it
+ Solution 2: Increase the cut pressure in the Project Preview screen.
+ Solution 3: The blade depth may need to be adjusted, particularly if you
are trying to cut through thicker materials.
+ Solution 4: The cutting blade may have become dull and needs to be
replaced. Refer to the Replacing the Cutting Blade section on page 20.
Problem: The paper lifts off the mat as the Cricut Imagine
™
machine is cutting.
+ Solution 1: Make sure you press the paper firmly onto the cutting mat
when setting up the cut.
+ Solution 2: Rinse the mat with water while gently rubbing off the paper lint
on the mat. Let the mat thoroughly dry before attempting to re-use the mat.
TROUBLESHOOTING
34

+ Solution 3: Try using a new mat. Each mat will last anywhere from 25 to
40 full page cuts, depending on the size of cuts and the kind of material
you are cutting.
Problem: The cutting mat is too sticky. It’s ripping my paper when I try to
remove it.
+ Solution: Use a craft knife or the Cricut Tools
cessfully lift the material from the cutting mat. The Cricut Tools
™
(sold separately) to suc-
™
are
custom designed for lifting, pulling, or cleaning up cut characters.
Problem: The print quality is poor.
+ Solution 1: Use the print head alignment and cleaning procedure found
on pages 30 and 32.
+ Solution 2: The print cartridges may be running out of ink. Check the Ink
Level indicators found on the Settings screen. If replacement is necessary, install only Cricut Imagine
™
ink cartridges.
Problem: When I insert the mat and click the Go! button, the Cricut Imagine
machine pushes the mat back out or pulls it completely through the machine
and out the back.
+ Solution: When inserting the mat, stop pushing when you feel resistance
from the back of the print rollers. If you push the mat in too far, it will
push the mat out.
Problem: The image printing and cutting are mismatched.
+ Solution 1: Recalibrate the print-to-cut alignment using instructions on
page 32.
™
+ Solution 2: Replace the cutting mat.
Problem: The printed image is longer on one side than the other.
+ Solution: This is usually caused by the mat being fed into the rollers
crooked. Be sure to feed the mat in straight with both of the corners
touching the print rollers at the same time.
TROUBLESHOOTING
35

TABLE DES MATIÈRES
Diagrammes ...................................................................................38
Information pour votre Sécurité ..................................................39
Déclaration de la FCC ...................................................................40
Les Premiers Pas ............................................................................41
Installation de l’Assemblage de la Lame de Coupe ...............41
Installation de la Cartouche d'Impression à Jet d'Encre HP® .... 42
Calibrage ................................................................................44
Emplacement de votre Machine Cricut Imagine™ .................44
Les Matériaux que votre Machine Cricut Imagine™ Peut Couper 45
Opérations de Base ......................................................................46
Installation .............................................................................. 46
Préparation du Tapis de Découpe .......................................... 47
Comment Placer le Papier dans le Tapis de Découpe ...........47
Print & Cut (Imprimer & Découper) .......................................48
La Découpe de Matériaux Légers ou Lourds .............................52
Ajustement de la Profondeur de la Lame .............................. 52
Ajustement de la Vitesse de Découpe ...................................53
Ajustement de la Pression de Découpe .................................53
Multi-Cut (Multi-Coupe) ......................................................... 53
Soins de Base ................................................................................54
Vie Utile de la Lame ...............................................................54
Remplacement de la Lame de Coupe ....................................54
Soins du Tapis de Découpe ....................................................55
Entretien des Cartouches d'Impression ................................. 55
Remplacement des Cartouches d’Impression ........................55
Nettoyage de votre Machine Cricut Imagine™ ......................56
Conseils Pratiques Additionnels pour les Soins De Base .......56
Usage Avancée de la Machine Cricut Imagine™ .......................... 57
Visualisation du Contenu des Cartouches .............................57
Image Queue (File d'Attente d’Images) .................................57
Image Editor (Editeur d'Images) ............................................58
Images en Couches ................................................................ 58
Palette de Couleurs et Palette de l’Utilisateur ....................... 59
Editor Controls (Commandes d'Édition) ................................ 60
Project Preview (Prévisualisation du Projet) ...........................61
Set Up Job (Tâches de Réglage) ............................................61
Project Quantity (Répétition du Projet) .................................61
Art Quantity (Répétition des Créations Artistiques) ............. 62
Fit to Page (Ajustement à la Page) ......................................... 62
Auto-Fill (Remplissage Automatique).....................................62
Load Last (Dernière Charge) ..................................................62
Cut Settings (Réglages de Découpe) .....................................63
Flip Horizontal (Renversement Horizontal) .............................63
36

TABLE DES MATIÈRES (CONTINUATION)
Paper Size (Taille du Papier) ....................................................63
Settings (Réglages) ...................................................................64
Print & Cut (Imprimer & Découper) .......................................64
Print Quality (Qualité de l'Impression) ...................................64
Paper Type (Type du Papier) ................................................... 64
HP Ink (Cartouche d’Encre HP) .............................................. 64
Clean Print Heads (Nettoyage des Têtes d'Impression) ........64
Border Preferences (Préférences des Bordures) .....................65
Size (Taille) ..............................................................................65
Calibrage ................................................................................65
Screen (Écran) .........................................................................65
Print (Impression) ....................................................................66
Blade (Lame) ...........................................................................66
Restore Defaults (Restauration des Valeurs Par Défaut) ......... 67
Détection et Solution de Problèmes ...........................................68
37

DIAGRAMME FRONTAL
DIAGRAMME POSTERIEUR
38
DIAGRAMMES

INFORMATION POUR VOTRE SÉCURITÉ
Débranchez le fil de la prise de courant avant d’entretenir ou de nettoyer cette machine.
Ne pas introduire les doigts ou d'autres objets dans la machine Cricut Imagine™
tant que celle-ci est reliée à l'électricité, en fonctionnement, ou pendant des
opérations de coupe. Les mouvements rapides du chariot de coupe pendant le
fonctionnement pourraient causer des lésions corporelles et/ou des dommages à
la machine Cricut Imagine™.
Suivez toujours des mesures de sécurité élémentaires lorsque vous utilisez ce
produit pour éviter tout risque de blessures causées par un incendie ou par un
choc électrique. Lisez et comprenez toutes les instructions de la documentation
fournie avec la machine Cricut Imagine™.
Utilisez uniquement une prise de courant reliée à la terre lors du branchement de
ce produit à une source d'énergie. Si vous ne savez pas si la prise est reliée à la
terre, vérifiez avec un électricien qualifié.
Respectez tous les avertissements et les instructions indiquées sur le produit.
N'installez et n'utilisez pas cet appareil à proximité de l'eau, ou si vous êtes mouillé(e).
Installez le produit en toute sécurité sur une surface stable.
Installez le produit dans un endroit protégé de telle manière que personne ne
puisse marcher ou trébucher dessus le cordon d'alimentation et où le cordon
d'alimentation ne puisse pas être endommagé.
Si le produit ne fonctionne pas normalement, veuillez vous référer à la section
Détection et Solution de Problèmes.
Il n'y a aucune pièce réparable par l'utilisateur. Confiez l'entretien de votre appareil à du personnel qualifié.
Le cordon d'alimentation ne doit pas être réparé. S'il est défectueux, il doit être
jeté ou retourné au fournisseur.
Les produits chimiques destructeurs de la couche d'ozone, telles que les chlorofluorocarbures (CFC), ont été éliminés du processus de fabrication de Provo Craft.
Ce produit contient du plomb dans les soudures, et par conséquent un traitement
spécial pourrait être nécessaire à son arrivé en fin de vie.
INFORMATION POUR VOTRE SÉCURITÉ
39

DÉCLARATION DE LA FCC
La Commission Fédérale Américaine des Communications (dans le titre 47 du
code des règlements fédéraux - cfr – section 15.105) a précisé que les avis suivants devront être portés à l'attention des utilisateurs de ce produit.
Cet appareil est conforme à la section 15 des règlements de la FCC. Son opération est soumise aux deux conditions suivantes: (1) Cet appareil n'entraînera pas
d'interférences nuisibles, et (2) cet appareil doit accepter toutes les interférences,
y compris les interférences risquant de provoquer un fonctionnement non désiré.
Câbles Blindés
L'utilisation d'un câble de données blindé est obligatoire pour se conformer aux
limites de Classe B de la Section 15 des règlements de la FCC.
Conformément à la Section 15.21 des règlements de la FCC, toute modification apportée à cet équipement sans l’autorisation expresse de Provo Craft
pourrait causer des interférences nuisibles et annuler l'autorisation de la FCC
d'utiliser cet équipement.
NOTE: Cet équipement a été testé et prouvé conforme aux limites imposées
aux appareils numériques de Classe B en vertu de la Section 15 des règlements
de la FCC. Ces limites ont été conçues pour fournir une protection raisonnable
contre les interférences nuisibles dans le cadre d’une installation à usage domestique. Cet équipement génère, utilise et peut radier de l'énergie aux fréquences
radioélectriques, et s’il n'est pas installé et utilisé conformément aux instructions,
il pourrait causer des interférences nuisibles aux communications radio. Il n’existe
cependant aucune garantie que de telles interférences ne se produiront pas dans
une installation particulière. Si cet équipement produit des interférences nuisibles
à la réception des émissions radio ou de télévision, ce que l’on peut déterminer en
éteignant et puis en rallumant l’équipement, nous recommandons à l’utilisateur de
tenter d’y remédier en prenant l’une ou l’autre des mesures suivantes:
• Orientez l’antenne réceptrice différemment ou déplacez-la.
• Augmentez la distance séparant l’équipement du récepteur.
• Branchez l’équipement sur une prise de courant appartenant à un circuit dif-
férent de celui sur lequel le récepteur est branché.
• Consultez votre revendeur ou un technicien radio/TV expérimenté.
DÉCLARATION DE LA FCC
40

LES PREMIERS PAS
Installation de l’Assemblage de la Lame de Coupe
Veuillez noter que l’assemblage de la lame de coupe de votre machine Cricut
Imagine™ reste au fond de votre boîte, séparé de la machine. Avant d’allumer la
machine, vous devrez introduire l’assemblage de la lame. Pour ce faire:
1. Retirez les insertions en carton de deux
côtés du chariot. Ouvrez la porte de la
partie avant de la machine Cricut Imagine
Déplacez manuellement l’assemblage du
chariot de la lame vers la gauche en le saisissant par le bras du support noir et en tirant
l’assemblage vers le centre de l'ouverture.
2. Enlevez l’assemblage de la lame de coupe
de son emballage. L’assemblage de la
lame doit s’insérer dans le support noir à
gauche du chariot. Tournez le pommeau
d’ajustement sur la partie supérieure de
l’assemblage de la lame de sorte que la
flèche noire reste orientée vers le numéro 3
du pommeau d’ajustement.
3. Localisez l’écrou argenté et tournez-le dans
le sens inverse des aiguilles d'une montre
jusqu'à ce qu’il reste suffisamment libre que
vous pouvez tourner la vis vers la droite.
Prenez soin de ne pas desserrer trop la vis
pour qu'elle ne tombe pas.
™
.
4. Ouvrez le bras gauche du support noir et
insérez l’assemblage de la lame de coupe dedans, tel qu’il est montré, avec la flèche noire
orientée vers vous. Assurez-vous que la lame
de coupe ait été insérée dans l’assemblage
avec l'extrémité coupante vers le bas. Fermez
le support, faites tourner de retour l’écrou vers
la gauche, et resserrez-le en le tournant dans
le sens des aiguilles d'une montre.
LES PREMIERS PAS
41

5. Retournez l’assemblage de la lame à sa
position de rangement en poussant doucement l'assemblage vers la droite jusqu'à ce
qu'il s'arrête.
6. Branchez la machine et pressez le bouton
Power (Marche) pour placer l’assemblage
de la lame dans la position de coupe.
Installation de la Cartouche d'Impression à Jet d'Encre HP®
Il y a deux cartouches d'impression disponibles pour être utilisées avec la machine Cricut
Imagine™: noir et tricolore. Pour installer une cartouche d'impression pour la première fois:
1. Allumez la machine en pressant le bouton
Power (Marche).
LES PREMIERS PAS
42
2. Une fois l'écran de chargement initial
s'est affiché, ouvrez la porte d'accès des
cartouches d'encre située sur le côté arrière gauche de la machine et enlevez les
dispositifs de verrouillage des cartouches
d'impression noir et vert.

3. Retirez la cartouche d'impression de son
emballage, et puis retirez le ruban adhésif de
protection transparent de l’injecteur en tirant sur
la languette rose.
PRECAUTION: Pour éviter des obturations, des
pannes d'encre, et des mauvais branchements
électriques, ne touchez pas les injecteurs d'encre
de la cartouche d'impression ou les contacts en
cuivre, et ne retirez pas les contacts en cuivre.
4. Trouvez le symbole d'identification sur
la cartouche d'impression et localisez le
dispositif de verrouillage de la cartouche
d'impression qui a le même symbole.
5. Tenez la cartouche d’impression avec les
contacts en cuivre vers l'imprimante, et puis
faites-la glisser à fond dans le support.
NOTE: Si vous avez des problèmes à insérer la cartouche d'impression après avoir
enlevé le dispositif de verrouillage, vérifiez
que l'imprimante soit allumée et attendez
quelques secondes jusqu’à ce que le chariot
se dégage avant d'insérer la cartouche.
6. Appuyez sur le dispositif de verrouillage de
la cartouche d'impression jusqu'à ce qu'il se
ferme d’un coup sec. Assurez-vous que le dispositif de verrouillage ne revient pas ouvert.
NOTE: Si le dispositif de verrouillage revient
ouvert, retirez la cartouche d’impression et
répétez les étapes 4 et 5.
7. Fermez la porte d’accès des cartouches d’encre.
LES PREMIERS PAS
43

Calibrage
Avant de votre première utilisation de votre Cricut Imagine™, la machine va
exécuter trois routines de calibrage. Des instructions s’afficheront sur l'écran qui
vont vous guider à travers chaque processus de calibrage.
Le premier s’agit d’un calibrage de l'écran et il n’y aura pas besoin d'aucune
impression ou découpe. Les deux calibrages suivants vous demanderont de
mettre une pièce de papier blanc de 12" x 12" (30.48 cm x 30.48 cm) sur le tapis,
et d'insérer le tapis dans la machine. Pour obtenir de l'aide au sujet de comment
placer le papier dans le tapis pour la première fois, veuillez voir les instructions à
la page 47. Une fois vous avez inséré la deuxième pièce de papier blanc de 12" x 12"
(30.48 cm x 30.48 cm), et lorsque l’impression et découpe est finie, la machine
Cricut Imagine™ va vous demander de sélectionner un numéro et une lettre dont
les lignes imprimées sont coupées de la façon la plus précise. Cliquez sur Test
Cut (Coupe d'Essai) et la machine va commencer à couper. Examinez la coupe
au centre de la page afin de déterminer si la coupe est restée à l'intérieur de la
ligne imprimée. Si la coupe est restée à l'intérieur de la ligne imprimée, cliquez
sur le bouton Accept (Accepter). Si la coupe a été à l'extérieur des lignes imprimées, sélectionnez Repeat (Répéter) pour exécuter l’essai à nouveau. Pour plus
d'information sur les calibrages de Print & Cut (Imprimer & Couper), veuillez voir
les instructions à la page 66.
Emplacement de votre Machine Cricut Imagine™
Mettez votre machine Cricut Imagine™ au moins 12" (30.48 cm.) du bord de
votre table pour éviter qu’elle se renverse, ce qui pourrait causer des possibles
blessures. Laissez 12" (30.48 cm) dans la partie postérieure de la machine Cricut
™
Imagine
Lorsque vous êtes en train de situer votre machine Cricut Imagine
pour permettre le mouvement du tapis.
™
, choisissez un
lieu qui:
• ne puisse pas être accédé par les enfants. La machine Cricut Imagine™ n'est pas
un jouet et elle contient des éléments, y compris une lame aiguisée, qui pourraient être dangereux pour les enfants.
• ait une surface dure, stable et plane située à 6 pieds (1.83 mètres) d'une prise
reliée à la terre, et avec un écart minimum de 2 pieds (30.48 cm) derrière la
machine Cricut Imagine™ pour permettre le mouvement du papier.
• soit situé à l’intérieur d'un immeuble ou dans une chambre sèche où les cartouches Cricut
®
ne soient pas exposées directement aux effets du climat.
• soit éloigné de l'exposition à la lumière directe du soleil ou à des températures
élevées, tels que dans le cas de voitures stationnées, entrepôts de stockage,
terrasses intérieures, etc.
LES PREMIERS PAS
44

™
AVERTISSEMENT! Votre machine Cricut Imagine
ne doit jamais être laissée ou
gardée en dehors, dans des lieux non chauffés ou non climatisés, ou dans des
environnements où la machine ou les cartouches pourraient entrer en contact avec
de l'eau. Il est conseillé de maintenir votre Cricut Imagine
™
dans un endroit à des
températures entre 60 et 90 ° F (15.5 et 32.2 ° C).
Les Matériaux que votre Machine Cricut Imagine
™
Peut Couper
La machine Cricut Imagine™ peut couper une large gamme de matériaux, de
papier vélin et de papier cardstock à carton pour affiches et vinyle. Puisque tout
matériel qui passe à travers la machine Cricut Imagine
™
doit fléchir légèrement
pour pouvoir passer à travers les rouleaux, il n'est pas recommandé d’utiliser des
matériaux rigides tels que le carton gris épais dans la machine. Cependant, la machine Cricut Imagine
™
peut couper même du carton gris mince lorsqu’on emploie
la fonction Multi-Cut (Multi Coupe). Vous pouvez trouver plus de détails sur la
fonction Multi-Cut à la page 53.
™
La machine Cricut Imagine
a été conçue pour fournir un alignement impressiondécoupe de +/-1 mm pour des images d’une taille jusqu'à 5.5"(140 mm). Les images de plus de 5.5" (140 mm) pourraient avoir une marge d'alignement impression-découpe de jusqu'à +/-0,7%.
CONSEIL PRATIQUE: La découpe répétée des matériaux de grande épaisseur
pourrait réduire la vie utile de la lame et du tapis de découpe de votre machine
Cricut Imagine
™
. On peut acheter des tapis et des lames de rechange chez tout
magasin où les produits Cricut® sont vendus.
LES PREMIERS PAS
45

OPÉRATIONS DE BASE
Installation
1. Branchez votre machine Cricut Imagine™ sur
une prise reliée à la terre.
2. Allumez-la en appuyant sur le bouton Power
(Marche) situé sur le côté droit de l'écran.
®
3. Insérez la cartouche originale Cricut
que
vous voulez utiliser dans le logement situé
sur le côté gauche de l'écran.
OPÉRATIONS DE BASE
46
4. Insérez la cartouche Cricut Imagine
(Créations Artistiques) dans le logement
situé sur le côté droit de l’écran.
™
Art

5. Si vous ne voulez pas utiliser une cartouche,
sélectionnez une des options d'écran de
bienvenue pour pouvoir continuer.
Préparation du Tapis de Découpe
™
La machine Cricut Imagine
peut couper des matériaux de tailles aussi grandes
que 12" x 12" (30.48 cm x 30.48 cm). La performance de la machine ne peut pas
être assurée pour des matériaux de tailles inférieures à 3" x 3" (7.62 cm x 7.62 cm).
Pour de meilleurs résultats, il est recommandé d'utiliser du papier cardstock de
soixante-quinze livres.
Comment Placer le Papier dans le Tapis de Découpe
Pour la première tentative on recommande
d'utiliser une taille de papier de 12" x 12"
(30.48 cm x 30.48 cm).
1. Enlevez le film protecteur transparent du
tapis de découpe.
2. Alignez un coin du papier avec l'icône trian-
gulaire sur le coin supérieur gauche du tapis
de découpe.
3. Pressez et lissez du centre du papier aux
bords du tapis de découpe pour qu'il colle
bien. Votre papier est prêt pour commencer
à couper.
CONSEIL PRATIQUE: La surface du tapis de
découpe a été traitée pour qu’elle soit légèrement collante pour y permettre l'attachement
du papier sur le tapis pendant la découpe.
Si vous utilisez des matériaux légers tel que
du papier vélin il faut que vous l'enlevez
lentement. Si les pièces petites ou délicates
s'avèrent difficiles à enlever, utilisez les outils
Cricut Tools™. Les outils Cricut Tools™ ne sont
pas inclus avec votre machine Cricut Imagine™,
mais ils sont disponibles partout où les produits Cricut
®
sont vendus.
OPÉRATIONS DE BASE
47

Print & Cut (Imprimer & Couper)
Pour commencer à travailler avec une image,
cliquez sur le bouton Print & Cut à gauche de
l'écran de menu de la machine Cricut Imagine™. Vous pouvez toujours revenir à l'écran
de menu en appuyant sur le bouton Menu à
gauche de l'écran.
Choisissez une source d’images. Cela se fait en
cliquant sur l'une des trois icônes de source de
contenu situés au coin inférieur gauche de l'écran.
OPÉRATIONS DE BASE
48
L'icône à gauche est pour les créations artistiques originales Cricut
®
, l'icône au centre est
pour les créations artistiques qui viennent avec
votre machine Cricut Imagine™, et l'icône à
droite est pour les créations de la cartouche
Cricut Imagine™ Art (Créations Artistiques).
Vous pouvez faire défi ler les images dans la
Gallery View (Vue Galerie) par défaut en cliquant sur l'écran et en faisant glisser lentement
vers la gauche ou la droite. Cliquez sur l’image
que vous voulez imprimer et couper pour la
sélectionner. L'image que vous venez de sélectionner sera mise en surbrillance en blanc.
Cliquez sur le signe plus vert pour ajouter l'image
à l’Image Queue (File d'Attente d’Images).

Une autre vue contenant un schéma du Keypad
(Clavier) est disponible en cliquant sur la liste
déroulante au coin supérieur gauche de l'écran.
Pour revenir à la Gallery View (Vue Galerie), utilisez
la même liste déroulante et sélectionnez une
option autre que le Keypad (Clavier). Pour plus de
détails sur les deux vues, veuillez voir la page 57.
Note: Si vous sélectionnez All (Toutes), toutes
les images de la galerie s’affi cheront. Si vous
sélectionnez Icons (Icônes) uniquement les images
avec une seule couche s’affi cheront. Si vous
sélectionnez Images, uniquement les images
contenant plus d'une couche s’affi cheront. Si vous
sélectionnez Bonus (Cadeau Bonus) le contenu
cadeau bonus inclus dans cette cartouche s’affi chera.
Les créations artistiques originales Cricut
®
ne seront
visibles que dans le schéma Keypad (Clavier).
Cliquez sur le bouton Next (Suivant) dans la
partie inférieure droite de l’Image Gallery
(Galerie d'Images).
Cela vous montrera une prévisualisation de votre
projet. La prévisualisation vous montre où les images seront situés sur le papier.
A côté de la prévisualisation, plusieurs options
de tâches peuvent être contrôlées. Vous pouvez
trouver des informations supplémentaires dans les
commandes du secteur Set Up Job (Tâches de
Réglage) à la page 61.
Le secteur de Settings (Réglages), également
accessible sur l'écran Menu, contient des commandes pour la qualité d'impression, le type de
papier, les préférences de bordures, les calibrages
de la machine, ainsi que des valeurs par défaut du
système et des informations sur les niveaux d'encre.
Pour plus d’information au sujet du secteur Settings
(Réglages), veuillez voir la page 64.
OPÉRATIONS DE BASE
49

Une fois vous avez édité et appliqué les
modifi cations à votre image, cliquez sur Next
(Suivant) au coin inférieur droit pour continuer.
Vous serez maintenant invité à charger le
tapis de découpe avec le papier. Assurez-vous
d'avoir chargé le papier correctement en accord avec les instructions précédentes. Insérez
le tapis dans la machine Cricut Imagine
™
avec
la fl èche dirigée vers la machine.
Insérez le tapis au-dessus des rouleaux exposés où l’on peut lire l'étiquette INSERT MAT
HERE (INSEREZ LE TAPIS ICI). Insérez doucement le tapis jusqu'à ce que vous sentiez qu'il
a frappé l'arrière des rouleaux d'impression.
CONSEIL PRATIQUE: Pour de meilleurs résultats, centrez le tapis sur le guide du tapis.
Maintenez le tapis près du centre de la
machine, en appliquant une légère pression
sur le tapis. Cliquez sur le bouton Go! (Allez!)
de l'écran de la machine Cricut Imagine
™
, en
continuant à appliquer de la pression jusqu'à
ce que le tapis soit complètement chargé.
OPÉRATIONS DE BASE
50
Votre projet va commencer à imprimer et
à couper. Vous êtes sur le chemin de votre
première de plusieurs passionnantes créations
Cricut Imagine
™
!
Lorsque l'opération est terminée, la machine
Cricut Imagine™ va éjecter le tapis par la partie
avant de la machine.

AVERTISSEMENT! Faites attention à ne pas toucher le tapis pendant l'impression
et la découpe, même si le tapis s'arrête. Il y a plusieurs étapes appartenant à
l'impression et à la découpe; l'une d’entre elles est le séchage. Pendant le séchage
et les autres étapes, la machine peut sembler ne rien faire. Ne touchez pas le tapis
jusqu'à ce que la machine Cricut Imagine
™
ait éjecté le tapis hors de la machine.
Retirez soigneusement les images du tapis de découpe. Si vous avez des difficultés
à enlever les caractères, utilisez un couteau de travaux manuels ou les outils Cricut
™
Tools
(vendus séparément) pour enlever soigneusement les images. Une fois que
vous avez enlevé toutes les images, retirez tous les morceaux du papier qui restent
sur le tapis de découpe. Ceci permettra d'améliorer la performance du tapis de
découpe dans l'avenir.
CONSEIL PRATIQUE: Pour prolonger la vie utile de votre tapis de découpe,
couvrez-le toujours avec la couverture protectrice et ne laissez jamais du papier
là-dessus pendant une période de temps prolongée.
OPÉRATIONS DE BASE
51

LA DÉCOUPE DE MATÉRIAUX LÉGERS OU LOURDS
Votre machine Cricut Imagine™ peut couper une variété de matériaux. Pour une
découpe optimale des matériaux légers tel que le papier vélin, ou des matériaux
lourds tel que le papier cardstock épais, vous pourriez avoir besoin d’ajuster la
profondeur de la lame, la vitesse de la coupe, ou la pression de la coupe.
Ajustement de la Profondeur de la Lame
Retirez l’assemblage de la lame de coupe de la machine Cricut Imagine™ pour
changer le réglage dans le pommeau d'ajustement. Cependant, si la flèche signale
vers l'avant vous pouvez laisser l’assemblage de la lame de coupe relié, et tourner
simplement la partie supérieure du pommeau d'ajustement pour changer le réglage.
AVERTISSEMENT! Débranchez toujours votre machine Cricut Imagine™ avant de
retirer l’assemblage de la lame de coupe!
Pour retirer l’assemblage de la lame de coupe (Figure 1), éteignez d’abord la machine
Cricut Imagine™. Puis, glissez le chariot de coupe pour exposer la vis du bras de
préhension de la lame. Localisez la vis et tournez-la dans le sens inverse des aiguilles
d'une montre jusqu'à ce qu’elle reste suffisamment libre que vous pouvez tourner la
vis vers la droite (Figure 2). Prenez soin de ne pas desserrer trop la vis pour qu'elle ne
tombe pas. Démontez l'assemblage de la lame de coupe de la machine. Subséquemment, localisez le pommeau d'ajustement (Figure 3) dans la partie supérieure de
l'assemblage de la lame de coupe, et tournez-le vers le réglage souhaité.
Figure 3Figure 2Figure 1
Le plus petit est le numéro sur le pommeau d'ajustement, la plus petite sera la profondeur de la lame. On recommande des profondeurs plus petites de la lame pour des
matériaux légers, et de plus grandes profondeurs de la lame pour des matériaux plus
lourds. Réinstallez l'assemblage de la lame de coupe dans la machine Cricut Imagine
™
,
en renversant la procédure pour enlever l'assemblage de la lame de coupe. Vérifiez le
réglage dans un morceau de papier et faites les ajustements qui soient nécessaires.
CONSEIL PRATIQUE: Le fait d'effectuer des coupes en papier cardstock et d'autres matériaux lourds réduira la vie utile de votre lame de coupe, mais produira les meilleures coupes.
CONSEIL PRATIQUE: Si la machine Cricut Imagine™ produit des coupes irrégulières,
insérez toujours une lame nouvelle avant d'essayer d'autres alternatives.
LA DÉCOUPE DE MATÉRIAUX LÉGERS OU LOURDS
52

Ajustement de la Vitesse de Découpe
Le réglage Cut Speed (Vitesse de la Coupe) vous permet de contrôler la vitesse de
la coupe pour un processus de coupe optimale dans une variété de papiers. Si vous
coupez régulièrement sur des matériaux lourds, vous pouvez modifier et agrandir ce
réglage pour augmenter la vitesse de la coupe. Pour des matériaux légers ou pour
des coupes plus petites et plus élaborées, vous pouvez vouloir abaisser le réglage
pour diminuer la vitesse de la coupe. Après chaque ajustement, vous devrez vérifier le
réglage dans un morceau de papier, en faisant les ajustements qui soient nécessaires
jusqu'à ce que vous obteniez les résultats souhaités.
Vous pouvez trouver les commandes Cut Speed (Vitesse de la Coupe) dans l'écran
Project Preview (Prévisualisation du Projet) sur la section Cut Settings (Réglages de la
Coupe). Appuyez sur la flèche vers le haut pour augmenter la vitesse et sur la flèche
vers le bas pour la diminuer. Comme règle générale, diminuez la vitesse si vos découpes sont endommagées. Si cela ne fonctionne pas, vous devrez peut-être modifier
la pression de coupe, ajuster la profondeur de la lame, ou remplacer la lame.
Ajustement de la Pression de Découpe
Le réglage Cut Pressure (Pression de la Coupe) vous permet de contrôler la force avec
laquelle le mécanisme de coupe exerce pression sur le papier. Pour des matériaux
lourds, vous pouvez agrandir le réglage pour augmenter la pression de la coupe. Pour
des matériaux légers, vous pouvez abaisser le réglage pour diminuer la pression.
Après chaque ajustement, vous devrez vérifier le réglage dans un morceau de papier,
en faisant les ajustements qui soient nécessaires jusqu'à ce que vous obteniez les
résultats souhaités.
Vous pouvez trouver les commandes Cut Pressure (Pression de la Coupe) dans l'écran
Project Preview (Prévisualisation du Projet) sur la section Cut Settings (Réglages de la
Coupe). Appuyez sur la flèche vers le haut pour augmenter la vitesse et sur la flèche
vers le bas pour la diminuer. Comme règle générale, augmentez la pression si vos
sélections ne sont pas complètement découpées dans le papier. Si cela ne fonctionne
pas, il se peut que vous ayez besoin d’ajuster la vitesse de la coupe ou la profondeur
de la lame.
Multi-Cut (Multi Coupe)
La fonction Multi-Cut vous permet de couper une image sélectionnée plusieurs fois
sur les lignes de coupe originales. Ceci permet à la machine de couper des matériaux
plus épais, tels que le carton gris mince.
Vous pouvez trouver les commandes Multi-Cut dans l'écran Project Preview (Prévisualisation du Projet) dans la section Cut Settings (Réglages de la Coupe). Vous pouvez
sélectionner combien de fois les lignes de l'image doivent être coupées en appuyant
sur les touches de direction vers le haut et vers le bas.
LA DÉCOUPE DE MATÉRIAUX LÉGERS OU LOURDS
53

SOINS DE BASE
Vie Utile de la Lame
Vous pouvez attendre entre environ 500 à 1500 coupes individuelles de votre
lame de coupe avant qu'elle requière d'être remplacée. La vie utile réelle de votre
lame de coupe variera selon le réglage utilisé et les matériaux que vous découpez.
Quand la qualité de vos découpes amoindrit, sera probablement le moment de
remplacer votre lame de coupe. Pour des meilleurs résultats, utilisez seulement
les Lames de Découpe de Rechange originales Cricut®, disponibles dans des
établissements commerciaux participants Cricut® (pièce # 290002).
Remplacement de la Lame de Coupe
AVERTISSEMENT! Débranchez toujours votre machine Cricut Imagine™ avant de
remplacer la lame de coupe.
Pour changer la lame de coupe, vous devez d'abord enlever l'assemblage de
la lame de coupe. Pour démonter l'assemblage de la lame de coupe (Figure 1),
localisez la vis et tournez-la au sens contraire des aiguilles d’une montre jusqu’à ce
qu'elle soit suffisamment libre pour que vous puissiez tourner la vis vers la droite
(Figure 2). Prenez soin de ne pas desserrer trop la vis pour qu'elle ne tombe pas.
Démontez l'assemblage de la lame de coupe de la machine. Apres avoir enlevé
l'assemblage de la lame de coupe, localisez le mécanisme de libération de la
lame placé dans la partie supérieure de l'assemblage et poussez-le (Figure 3). La
lame se dégagera de l'assemblage de la lame de coupe. Vous devrez la détacher
soigneusement de l'aimant qui la maintient en place (Figure 4).
Pour installer la nouvelle lame, retirez d’abord le film protecteur de la nouvelle
lame. Insérez soigneusement l'axe de la lame dans le trou situé dans la partie
inférieure de l'assemblage. Si la lame a été installée correctement, elle devrait être
sucée par l'axe (Figure 5). La lame de coupe de rechange est maintenant installée.
Remettez le film protecteur sur la lame usagée et jetez-la. Réinstallez l'assemblage
de la lame de coupe dans la machine Cricut Imagine™, en renversant la procédure
pour enlever l'assemblage de la lame de coupe.
Figure 1 Figure 2 Figure 3 Figure 4 Figure 5
SOINS DE BASE
54

AVERTISSEMENT! Les lames de coupe sont extraordinairement aiguisées et doivent être manipulées avec les plus grands soins. Elles représentent aussi un danger
potentiel d'asphyxie donc elles doivent être maintenues éloignées des enfants.
Soins du Tapis de Découpe
Vous pouvez attendre aux environs de 25 à 40 coupes de tapis complètes (et vous
pouvez attendre une plus grande quantité quand les coupes sont plus petites que
le tapis complet) dans votre tapis de découpe Cricut Imagine
™
avant qu'il requière
d'être remplacé. La vie utile réelle de votre tapis de découpe variera selon les
réglages utilisés et les papiers que vous découpez. Il est temps de remplacer votre
tapis lorsque:
• votre papier ne colle plus sur le tapis.
• le tapis devient enroulé sur les bords, ce qui affectera la précision de
l'alignement impression-découpe.
Utilisez uniquement les tapis de découpe de rechange originaux Cricut Imagine™, disponibles dans des établissements commerciaux partout dans le monde (pièce #2000784).
Entretien des Cartouches d’Impression
Les conseils pratiques suivants vous aideront à maintenir les cartouches
d'impression Cricut Imagine™ et à assurer une qualité d'impression uniforme:
• Conservez toutes les cartouches d'impression dans leurs emballages scellés
jusqu'à ce qu'elles soient nécessaires. Les cartouches d'impression doivent être
conservées à température ambiante entre 59 et 95 ° F (15 et 35 ° C).
• Ne retirez pas le ruban en plastique recouvrant les injecteurs d'encre jusqu'à ce
que vous soyez prêt(e) à installer la cartouche dans l'imprimante. Si le ruban en
plastique a été retiré de la cartouche d'impression, ne tentez pas de le fixer à
nouveau. Ceci pourrait endommager la cartouche d'impression.
AVERTISSEMENT! Ne laissez pas tomber la cartouche d'impression. Ceci pourrait l’endommager.
Remplacement des Cartouches d'Impression
1. Allumez la machine Cricut Imagine
™
, ouvrez la porte d'accès des cartouches
d'impression située à l'arrière de la machine et levez le dispositif de verrouillage
de la cartouche que vous allez changer.
2. Saisissez la cartouche d'impression installée et glissez-la hors de son support.
PRECAUTION: Pour éviter des obturations, des pannes d'encre, et des mauvais
branchements électriques, ne touchez pas les injecteurs d'encre de la cartouche
d'impression ou les contacts en cuivre, et ne retirez pas les contacts en cuivre.
SOINS DE BASE
55

3. Trouvez le symbole d'identification sur la cartouche d'impression et localisez le
dispositif de verrouillage de la cartouche d'impression qui a le même symbole.
4. Tenez la cartouche d’impression avec les contacts en cuivre vers l'imprimante, et
puis faites-la glisser à fond dans le support.
NOTE: Si vous avez des problèmes à insérer la cartouche d'impression après avoir
enlevé le dispositif de verrouillage, vérifiez que l'imprimante soit allumée et attendez
quelques secondes jusqu’à ce que le chariot se dégage avant d'insérer la cartouche.
5. Appuyez sur le dispositif de verrouillage de la cartouche d'impression jusqu'à
ce qu'il se ferme d’un coup sec. Assurez-vous que le dispositif de verrouillage
ne revient pas ouvert.
6. Fermez le couvercle de la tête d'impression.
Nettoyage de votre Machine Cricut Imagine™
AVERTISSEMENT! Débranchez toujours votre machine Cricut Imagine™ avant de
la nettoyer!
™
Pour nettoyer la machine Cricut Imagine
, passez doucement un chiffon humide
sur les panneaux extérieurs. Immédiatement, séchez tout reste d'humidité avec un
chiffon de chamois ou d'un autre tissu mou. N’utilisez pas des produits nettoyants
chimiques ou à base d’alcool dans la machine (en incluant mais sans s'y limiter,
l'acétone, le benzène, et le tétrachlorure de carbone). Vous devez de même éviter
d'utiliser des produits nettoyants et des éléments de nettoyage abrasifs. Ne submergez pas la machine ou tout composant d'elle dans l'eau.
Conseils Pratiques Additionnels pour les Soins de Base
• Maintenez-la éloigné des aliments et des liquides.
• Maintenez-la dans un endroit sec et libre de poussière.
• Évitez la chaleur ou le froid excessif.
• Ne la laissez pas dans une voiture, où la chaleur excessive pourrait fondre ou
endommager les composantes plastiques.
• Ne l’exposez pas à la lumière directe du soleil pour aucune période de
temps prolongée.
SOINS DE BASE
56

USAGE AVANCÉE DE LA MACHINE CRICUT IMAGINE
Visualisation du Contenu des Cartouches
Dans la machine Cricut Imagine™, il y a deux façons d’examiner les images:
Gallery View (Vue Galerie)—Cette vue affiche
une longue bande horizontale d’images que vous
pouvez faire défiler. La Galerie View est la vue par
défaut pour examiner les images de votre cartouche Cricut Imagine™ Art (Créations Artistiques).
Cette vue n'est pas disponible pour les cartouches
originales Cricut
Keypad (Clavier)—Cette vue vous permet
de visualiser jusqu'à 50 images à la fois; elle
est semblable à la vue utilisée sur d'autres
machines Cricut®.
®
.
™
Image Queue
(File d'Attente d’Images)
Lorsque vous êtes en train de visualiser le contenu d'une cartouche, plusieurs icônes sont disponibles en bas de l'écran pour vous permettre de contrôler l'Image Queue (File d'Attente
d’Images). Si vous cliquez sur une image dans la fi le d'attente pour la sélectionner, et ensuite
vous cliquez sur l'icône du signe plus vert situé en haut à droite de l'image, l'image sera ajoutée à l’Image Queue (File d'Attente d’Images). Si vous cliquez sur l'icône Edit (Editer) situé en
haut à gauche de l'image, vous pourrez faire des modifi cations à l'image à l’aide de l’Image
Editor (Editeur d'Images). Vous pouvez aussi faire des modifi cations à une image dans la
galerie en la sélectionnant et en cliquant sur l'icône Edit. D'autres commandes incluent:
Backspace (Touche
d'Effacement Arrière)—élimine la dernière image qui a
été ajoutée à l’Image Queue
Undo (Défaire)—renverse
la dernière modification à
Duplicate (Reproduire)—
reproduit l'image sélectionnée dans la file d'attente;
disponible uniquement
après avoir cliqué sur une
image dans l’Image Queue
l’Image Queue
Redo (Rétablir)—renverse
l'effet de la fonction Undo
(Défaire), ce qui change
Clear All (Effacer Tout)—
élimine toutes les images
de l’Image Queue
l'Image Queue à nouveau
USAGE AVANCÉE DE LA MACHINE CRICUT IMAGINE
™
57

Image Editor (Editeur d’Images)
L'Image Editor vous permet de faire des modifications aux images individuelles
comme par exemple changer la couleur, l'orientation, la taille et la composition.
Les modifications faites dans l'Image Editor vont affecter seulement l'image en
particulier, tandis que les changements effectués dans la section Project Preview
(Prévisualisation du Project) affecteront toutes les images du projet.
Pour accéder à l'Image Editor cliquez sur dans la Gallery View (Vue Galerie).
Images en Couches
Certaines des images qui viennent dans la cartouche Cricut Imagine™ Art (Créations Artistiques) sont séparées en éléments individuels, appelés layers (couches). Cela vous donne un
niveau supplémentaire de contrôle sur la couleur et la taille de chaque couche des images
de votre projet. Ces couches peuvent non seulement être changées chacune individuellement selon vos besoins, mais elles peuvent aussi être imprimées et découpées séparément.
Les images des cartouches originales Cricut® peuvent être coloriées et dimensionnées, mais
elles ne sont pas séparées en couches et en conséquence elles peuvent changer seulement
comme une seule image. Ceci signifie que vous ne pouvez pas recolorer ou redimensionner
une partie seulement d'une image qui provient d'une cartouche originale.
Vous pouvez contrôler si l’une des images d'une cartouche Cricut Imagine™ Art (Créations
Artistiques) est imprimée comme une seule image ou en couches, en utilisant les boutons
Combine (Combiner) et Layers (Couches) en haut à gauche de l'Image Editor (Éditeur
d'Images). Si vous sélectionnez Combine, l’image éditée sera imprimée et coupée comme
une image individuelle (Figure 1). Si vous sélectionnez Layers chaque couche de l’image
sera imprimée et coupée séparément (Figure 2).
USAGE AVANCÉE DE LA MACHINE CRICUT IMAGINE
58
™

Figure 1 Figure 2
Palette de Couleurs et Palette de l’Utilisateur
Les images de la Cartouche Cricut Imagine™ Art (Créations Artistiques) viennent avec une
palette de couleurs et de motifs présélectionnée que vous pouvez utiliser pour personnaliser
l'ensemble des images en couches ou les couches individuelles contenues par les images.
Pour ce faire, accédez à l’Image Queue (File d'Attente d’Images) ou à la Gallery View (Vue
Galerie) et:
• faites un clic pour sélectionner l’image que vous voulez personnaliser.
• cliquez sur l’icône Edit (Editer) pour ouvrir l’Image Editor (Editeur d’Images).
Si vous voulez changer seulement une couche individuelle d’une image, cliquez sur la couche
pour la sélectionner.
NOTE: L'image à l'extrême gauche de l'éditeur d'images affiche toutes les couches assemblées. Les images à droite de cette image représentent toutes les couches individuelles. S'il
n'y a pas d'images à gauche, alors vous êtes en train de travailler avec une image qui a une
seule couche.
• Choisissez la nouvelle couleur pour la couche à partir de la bande de couleurs juste en
dessous de l'image.
• Cliquez sur la couleur pour la sélectionner.
• Cliquez sur Apply (Appliquer).
NOTE: Si vous ne voyez pas la couleur que vous voulez pour la couche ou l'image, vous
pouvez utiliser la barre de défilement pour voir d'autres choix, ou suivre les instructions cidessous pour créer une couleur à votre goût.
Les images des cartouches originales Cricut® peuvent aussi être personnalisées avec une
nouvelle couleur. Cependant, puisqu’elles n'ont pas une palette particulière associée,
USAGE AVANCÉE DE LA MACHINE CRICUT IMAGINE
™
59

tel que les images des cartouches Cricut Imagine™ Art (Créations Artistiques), vous aurez
besoin d'utiliser les couleurs disponibles dans la cartouche Cricut Imagine™ Art ou créer
une couleur personnalisée avec l’User Palette (Palette de l’Utilisateur). Suivez ces instructions pour créer une couleur à votre goût.
• Cliquez sur le bouton multicolore en bas gauche de l'écran.
• Cliquez sur un carré en blanc dans le secteur Custom Colors (Couleurs Personnalisées)
pour le sélectionner.
• Faites glisser l'indicateur autour du cercle jusqu'à ce que vous trouvez la couleur que
vous voulez.
• Utilisez les fl èches en haut et en bas de la commande à droite de la roue chromatique
pour ajuster la luminosité de la couleur. Vous pouvez aussi introduire les valeurs RVB
exactes si vous les connaissez, en utilisant les commandes Rouge, Vert, Bleu en bas de
la section Custom Colors (Couleurs Personnalisées).
• Cliquez sur Apply (Appliquer).
La couleur personnalisée sera appliquée automatiquement à l'image sélectionnée et elle
apparaîtra à travers le bas de la bande d’édition d'images à gauche du bouton multicolore.
NOTE: Vous pouvez utiliser les motifs et les couleurs de toute cartouche Cricut Imagine™
avec vos images originales Cricut
®
.
Editor Controls (Commandes d’Edition)
Undo (Défaire)—renverse
la dernière modification
à l’image
Flip Vertical (Renversement Vertical)—fait pivoter
verticalement l'orientation
de l'image complète ou
Redo (Rétablir)—renverse
l'effet de la fonction Undo
(Défaire), ce qui change
l'image à nouveau
Revert (Retourner)—efface
toutes les modifications
faites à l'image
une partie sélectionnée de
l'image si elle a été séparée
en couches
Flip Horizontal (Renversement Horizontal)—fait
pivoter horizontalement
l'orientation de l'image
complète ou une partie sélectionnée de l'image si elle
a été séparée en couches
True/Relative Size (Taille Réelle/Taille Relative)—alterne entre vous
permettant de redimensionner les images en mode Relative, dont les
tailles des images sont par rapport au caractère de hauteur majeur de
votre texte, et le mode Tru e (Réelle), dont les tailles des images sont
indépendantes de toute autre image
USAGE AVANCÉE DE LA MACHINE CRICUT IMAGINE
60
™

Project Preview (Prévisualisation du Projet)
Cet écran vous offre des options pour configurer le projet, y compris changer la taille
du papier, ce qui vous permet d'imprimer et de découper la partie inutilisée du projet
précédent, et modifier l'orientation des images du projet. Tant que les modifications
faites dans l'Image Editor (Editeur d'Images) n’affecteront que l'image particulière que
vous êtes en train de modifier, toutes les modifications faites dans cette section affecteront le travail d'impression complet.
Set Up Job (Tâches de Réglage)
La section Set Up Job du Project Preview
(Prévisualisation du Projet) vous permet de
configurer différents détails du projet, tels que
répéter les images ou le projet pour remplir
une page.
Project Quantity (Répétition du Projet)
Cette commande peut être utilisée pour répéter le projet complet. Il est utile lorsque vous
avez besoin de couper votre projet plusieurs
fois. Vous pouvez changer le nombre de fois
que le projet se reproduit en cliquant sur les
flèches de direction haut-bas.
USAGE AVANCÉE DE LA MACHINE CRICUT IMAGINE
™
61

Art Quantity (Répétition des Créations Artistiques)
Cette commande peut être utilisée pour répéter
toutes les images dans votre file d'attente et
réduire la quantité de papier utilisé pour le projet.
Il est utile lorsque vous avez besoin de couper
plusieurs fois chaque partie de votre projet ou
lorsque vous voulez remplir l'espace vide sur une
page. Vous pouvez changer le nombre de fois que
le projet se reproduit en cliquant sur les flèches de
direction haut-bas. Les images supplémentaires
répétées seront ajoutés à la section Project Preview (Prévisualisation du Projet) à gauche.
Fit to Page (Ajustement à la Page)
Cette commande va changer la taille des images du projet pour s'adapter à la page complète. Le Project Preview (Prévisualisation du
Projet) à gauche, donne une indication visuelle
de la taille de chaque image du projet.
Auto-Fill (Remplissage Automatique)
Cette commande est similaire à la commande
Project Quantity (Répétition du Projet). Cependant, au lieu de choisir un certain nombre de fois
à répéter le projet complet, si vous utilisez AutoFill le projet va se reproduire jusqu'à ce que la
page soit complète. Les projets supplémentaires
répétés vont se refléter dans la section Project
Preview (Prévisualisation du Projet) à gauche.
Load Last (Dernière Charge)
Si vous marquez l’option Load Last dans l’écran
Project Preview (Prévisualisation du Projet) vous
indiquez que vous voudriez utiliser le papier
utilisé dans le dernier projet pour le projet actuel.
La machine Cricut Imagine
portions du papier qui ont été utilisées pour le
projet précédent. Lorsque l'option Load Last est
sélectionnée, le nouveau projet sera automatiquement repositionné pour utiliser l'espace
restant sur le papier.
USAGE AVANCÉE DE LA MACHINE CRICUT IMAGINE
62
™
garde une trace des
™

Cut Settings (Réglages de Découpe)
La section Cut Settings du Project Preview
(Prévisualisation du Projet) vous permet de
changer les valeurs de multi-cut (multi coupe),
vitesse et pression
Flip Horizontal (Renversement Horizontal)—
lorsque vous cliquez sur ce bouton,
l’orientation des images du projet pivote
horizontalement.
Paper Size (Taille du Papier)—Le secteur de
la taille du papier vous permet de changer la
taille du papier à imprimer. Cette taille peut
être changée par incréments d’un demi-pouce.
USAGE AVANCÉE DE LA MACHINE CRICUT IMAGINE
™
63

SETTINGS (RÉGLAGES)
L’écran des réglages vous permet de contrôler les réglages généraux de votre
machine Cricut Imagine™.
Print & Cut (Imprimer & Couper)
Sélectionner Print & Cut vous permet d'imprimer le projet sur le papier, et ensuite de
couper les images. Print Only (Imprimer Seulement) vous permet d'imprimer le projet
sans découper les images. Cut Only (Couper Seulement) vous permet de couper les
images sans les imprimer.
Print Quality (Qualité de l’Impression)
Cette option vous permet de contrôler la qualité de l'impression de votre projet.
Best Quality (Qualité Supérieure) consomme plus d'encre, mais fournit aussi la
reproduction la plus riche et précis des couleurs. Cette option prend également
plus du temps pour imprimer. Draft Quality (Qualité Standard) utilise moins
d'encre et imprime plus rapidement, mais les couleurs de l'image résultant de
l'utilisation de ce réglage ne seront pas si vives que celles de l’impression Best
Quality (Qualité Supérieure).
Paper Type (Type du Papier)
Cette option vous permet de spécifi er le type de papier pour imprimer et couper,
ce qui affecte non seulement la quantité d'encre utilisée dans le processus
d'impression, mais aussi la quantité de temps de séchage entre l'impression et la
découpe. Sélectionnez Glossy (Papier Gloss) lorsque vous êtes en train d’utiliser
du papier photo ou d'autres papiers à fi nition brillante. Sélectionnez Matte (Mate)
pour du papier ordinaire à fi nition mate. Sélectionnez Vinyl (Vinyle) lorsque vous
êtes en train d'imprimer sur le Vinyle Imprimable Cricut Imagine™.
HP Ink (Encre HP)
Cette section comprend un indicateur pour les cartouches d'encre noire et
couleur de la machine Cricut Imagine
des cartouches devient faible, un indicateur LOW (FAIBLE) apparaîtra pour la
cartouche. Si les niveaux d'encre sont suffi sants, l'indicateur affi chera OK.
Clean Print Heads (Nettoyage des Têtes d'Impression)
Cette commande va nettoyer les têtes d'impression. Il faut noter que, contrairement à d'autres imprimantes, une page ne sera pas imprimée lorsque
vous nettoyez les têtes d'impression. Cependant, vous allez voir et entendre le
mouvement de la cartouche d'impression pendant le processus de nettoyage. Puisque le processus de nettoyage utilise de l'encre, il devrait être utilisé
uniquement lorsque cela est nécessaire.
SETTINGS (RÉGLAGES)
64
™
. Si le niveau d'encre de quelqu’une

Border Preferences (Préférences de Bordures)
.10
Cette commande vous permet de défi nir la couleur de la bordure
de votre image. Si vous sélectionnez Default (Par Défaut) la machine
Cricut Imagine™ va sélectionner et imprimer la couleur de la bordure en utilisant la couleur
originale défi nie par l'artiste qui a créé l'image. Pour sélectionner une couleur différente, suivez
ces instructions.
• Sélectionnez Custom (Personnalisable) dans la boîte de dialogue avec liste déroulante
en haut.
• Cliquez sur le bouton Defi ne Color (Défi nir Couleur).
• Cliquez sur l'une des couleurs prédéfi nies dans la section Basic Colors (Couleurs de Base).
• Cliquez sur Apply (Appliquer).
Si vous voulez utiliser une couleur qui n'existe pas dans la section Basic Colors (Couleurs
de Base):
• Sélectionnez Custom (Personnalisable) dans la boîte de dialogue avec liste déroulante
en haut.
• Cliquez sur le bouton Defi ne Color (Défi nir Couleur).
• Cliquez sur un carré en blanc dans le secteur Custom Colors (Couleurs Personnalisées) pour
le sélectionner.
• Faites glisser l'indicateur autour du cercle jusqu'à ce que vous trouviez la couleur que
vous voulez.
• Utilisez les fl èches en haut et en bas de la commande à droite de la roue chromatique pour
ajuster la luminosité de la couleur. Vous pouvez aussi introduire les valeurs RVB exactes si
vous les connaissez, en utilisant les commandes Rouge, Vert, Bleu en bas de la section
Custom Colors (Couleurs Personnalisées).
• Cliquez sur Apply (Appliquer).
Size (Taille)
Cette commande vous permet de changer l’épaisseur de la bordure de l’image.
Si vous cliquez sur les touches plus et moins en haut et en bas de la commande,
vous pouvez augmenter ou diminuer la taille par incréments de .01 d’un pouce.
Calibrage
Cette section vous donne la possibilité de changer le calibrage de l'écran tactile, de
l'alignement d'impression, et du placement de la lame.
Screen (Écran)
Cette commande vous permet de calibrer à nouveau l'écran tactile de votre machine Cricut Imagine™. Il est principalement destiné à être utilisée si vous trouvez
que lorsque vous touchez l'écran avec le stylet les résultats sont inexacts, ou que
SETTINGS (RÉGLAGES)
65

vos touches semblent réagir dans une zone non voulue de l'écran. Si vous utilisez
cette fonction vous serez présenté avec cinq croix, affi chée l’une à la fois,
dans
les quatre coins et le centre de l'écran. Appuyez sur le centre de la croix
avec le stylet, et la croix suivante apparaîtra. Après la dernière croix, votre
machine Cricut Imagine
Si vous trouvez que l’écran de votre Cricut Imagine
™
va redémarrer.
™
ne répond plus à
tout signal tactile, il est peut être nécessaire d'effectuer un recalibrage forcé. Suivez ces étapes pour forcer un recalibrage.
• Maintenez appuyés les boutons en haut et en bas à gauche de
l'écran Cricut Imagine
™
.
• Pressez le bouton Power (Marche) pour allumer la machine.
• Lorsque vous voyez apparaître les barres de couleur sur l’écran,
relâchez les boutons en haut et en bas.
• Lorsque l'écran bleu apparaît, cliquez sur chacune des croix
blanches pour fi nir le recalibrage de l’écran.
Print (Impression)
Cette commande vous permet de calibrer l'alignement des têtes
d'impression de la machine Cricut Imagine
™
. Elle va répéter
l'alignement des têtes d'impression réalisé lors de la première fois
que vous avez allumé la machine. Si vous trouvez que la reproduction
des couleurs des pièces imprimées avec la Cricut Imagine™ n’est pas
trop fi dele, l'utilisation de ce recalibrage poudrait résoudre le problème. Le calibrage de l'impression devrait aussi être fait chaque fois
que la cartouche d'impression soit retirée ou remplacée.
Le calibrage de l'impression requiert une feuille propre de papier
blanc de 12" x 12" (30.48 cm x 30.48 cm) montée sur le tapis de découpe. Cliquez sur le bouton Print (Impression) et suivez les instructions sur l’écran.
Blade (Lame)
Cette commande vous permet de calibrer l'alignement de la lame de
coupe de la Cricut Imagine™ par rapport à l'image imprimée. Elle va
répéter l'alignement de la lame réalisé lors de la première fois que
vous avez allumé la machine. Si vous trouvez que la lame ne coupe
pas les images dans les limites de ses bordures prédéterminées,
l'utilisation de ce recalibrage pourrait résoudre le problème.
SETTINGS (RÉGLAGES)
66

Le calibrage de la lame requiert une feuille propre de papier blanc
de 12" x 12" (30.48 cm x 30.48 cm) montée sur le tapis de découpe.
Cliquez sur Blade et suivez les instructions sur l’écran.
NOTE: Ne retirez pas le tapis après les marques de calibrage ont
été coupées à côté des lignes courtes verticales et horizontales
étiquetées avec des numéros et des lettres, puisque le processus de
calibrage est encore en cours.
Une fois le processus de découpe et d’impression est fi ni, la machine
Cricut Imagine
™
va vous demander de sélectionner un numéro et une
lettre dont les lignes imprimées sont coupées de la façon la plus précise. Ensuite, elle va faire une coupe d'essai et va vous demander de
déterminer si la coupe est restée à l'intérieur des lignes imprimées.
Si la coupe a resté à l'intérieur des lignes imprimées, cliquez sur le
bouton Select (Sélectionner). Si la coupe a été à l'extérieur des lignes imprimées, sélectionnez Repeat (Répéter) pour exécuter l’essai
à nouveau.
Si la coupe ne reste pas à l’intérieur de la ligne de l'image de l’essai de
calibrage après l'exécution du calibrage de la lame pour la troisième
fois, vous pouvez essayer de régler le calibrage manuellement à l'aide
de l'Advanced Calibration Screen (Écran de Calibrage Avancé).
NOTE: Il est fortement recommandé qu’avant d'utiliser les commandes de calibrage avancées, vous contactez le Service à la Clientèle afi n d’obtenir de l’aide. Ils seront capables de vous donner des
instructions au sujet de chacune des commandes dans ce secteur, et
de vous conseiller sur comment les utiliser.
Pour accéder à l’écran Advanced (Avancé), veuillez suivre ces instructions:
• Cliquez sur le bouton Blade (Lame) dans la section Calibration
(Calibrage) de l’écran Settings (Réglages).
• Maintenez appuyé le bouton en haut à côté gauche de l'écran.
• Cliquez sur Start Calibration (Démarrer le Calibrage).
Restore Defaults (Restauration des Valeurs Par Défaut)
Cette commande va rétablir les réglages d’usine de votre machine Cricut
Imagine™, en supprimant toutes les modifi cations de calibrage que vous
avez fait précédemment.
SETTINGS (RÉGLAGES)
67

DÉTECTION ET SOLUTION DE PROBLÈMES
CONSEIL PRATIQUE: Pour notre liste complète des questions fréquentes, en plus des
mises à jour les plus récentes au Manuel de l'Utilisateur, visitez www.cricut.com.
Problème: Le tapis de découpe ne se charge pas lorsque je fais un clic sur Go! (Allez!)
et essaye de le charger dans la machine.
+ Solution 1: Essayez de pousser légèrement le tapis de découpe dans la barre du
rouleau pendant que vous cliquez sur Go! (Allez!)
+ Solution 2: Appliquez une pression constante, douce, sur le tapis au même temps
que vous cliquez sur Go! (Allez!)
+ Solution 3: Réinitialisez l'imprimante en soulevant la porte d'accès des cartouches
d’encre, et puis en la remettant en place.
+ Solution 4: Éteignez la machine Cricut Imagine™, et ensuite rallumez-la et essayez
de charger la le tapis dans la machine
Problème: Le tapis de découpe n’a pas chargé quand j’ai pressé la touche Go! (Allez!)
+ Solution 1: Votre machine Cricut Imagine™ a pensé qu'elle avait chargé le tapis,
même si celui-ci n'est pas entré. Suivez les instructions à l'écran pour réessayer de
charger le tapis.
+ Solution 2: Appliquez une pression légèrement supérieure et tentez de recharger
le tapis en appuyant sur Go! (Allez!) ou sur le bouton Play (Marche).
Problème: La lame ne coupe pas égal tout le papier.
+ Solution 1: Utilisez la fonction Multi-Cut (Multi Coupe) dans l’écran Project Pre-
view (Prévisualisation du Projet) pour produire multi coupes en suivant les mêmes
lignes de coupe.
+ Solution 2: Augmentez la pression de la coupe dans l'écran Project Preview
(Prévisualisation du Projet).
+ Solution 3: Il se peut que la profondeur de la lame ait besoin d'être ajustée, spé-
cialement si vous étés en train de couper des matériaux plus lourds.
+ Solution 4: Il se peut que la lame ait perdu son affilage et requiert d’être rem-
placée. Veuillez vous référer à la section Replacement de la Lame de Coupe à la
page 54.
Problème: Le papier se détache du tapis au fur et à mesure que ma machine Cricut
Imagine™ coupe.
+ Solution 1: Assurez-vous d'avoir fermement pressé le papier sur le tapis de dé-
coupe quand vous définissiez la coupe.
DÉTECTION ET SOLUTION DE PROBLÈMES
68

+ Solution 2: Rincez le tapis avec de l'eau tout en frottant doucement et en retirant
les peluches du papier du tapis. Laissez le tapis sécher complètement avant de
tenter de le réutiliser.
+ Solution 3: Essayez d'utiliser un tapis nouveau. Chaque tapis va durer aux envi-
rons de 25 à 40 coupes de page complet, selon la taille des coupes et le type de
matériau que vous coupez.
Problème: Le tapis de découpe est trop gluant. Il déchire mon papier quand j'essaie
de l'enlever du tapis de découpe.
+ Solution: Utilisez un couteau pour des travaux manuels ou les outils Cricut Tools
(vendus séparément) pour pouvoir enlever le matériau du tapis de découpe. Les
outils Cricut Tools™ ont été spécialement conçus pour enlever, tirer, ou nettoyer
les caractères découpés.
Problème: La qualité d'impression est médiocre.
+ Solution 1: Utilisez la procédure d'alignement de tête d'impression et de nettoy-
age, aux pages 64 et 66.
+ Solution 2: Les cartouches d'impression peuvent être à court d'encre. Vérifiez les
indicateurs Ink Level (Niveau d'Encre) disponibles sur l'écran Settings (Réglages).
Si le remplacement est nécessaire, utilisez uniquement les cartouches d'encre
Cricut Imagine™.
Problème: Lorsque j'insère le tapis et fais un clic sur le bouton Go! (Allez!), la machine
Cricut Imagine
™
repousse les tapis en arrière ou pousse le tapis complètement à
l’intérieur de la machine et puis de retour.
+ Solution: Lorsque vous insérez le tapis, cessez de pousser lorsque vous sentez
une résistance à l'arrière des rouleaux d'impression. Si vous poussez sur le tapis
trop au fond, la machine va repousser le tapis en arrière.
Problème: L'impression de l'image et la découpe sont mal accordées.
+ Solution 1: Calibrez à nouveau l'alignement impression-découpe en suivant les
instructions à la page 66.
+ Solution 2: Changez le tapis de découpe.
Problème: L'image imprimée est plus longue d’un côté que de l'autre.
+ Solution: Ceci est habituellement causé parce que le tapis a été inséré tordu dans
les rouleaux. Assurez-vous de charger le tapis en ligne droite avec les deux coins
touchant les rouleaux d'impression en même temps.
™
DÉTECTION ET SOLUTION DE PROBLÈMES
69

INDICE
Diagramas ......................................................................................72
Información para su Seguridad ....................................................73
Declaración de la Federal Communications Commission – FCC
(Comité Federal de Comunicaciones)
Primeros Pasos ..........................................................................75
Instalación del Ensamblaje de la Cuchilla de Corte ............... 75
Instalación del Cartucho de Impresión de Inyección de Tinta HP® ..76
Calibración .............................................................................78
Ubicación de su Máquina Cricut Imagine™ ............................ 78
Lo que su Máquina Cricut Imagine™ puede cortar ................ 79
Operaciones Básicas ..................................................................... 80
Instalación .............................................................................. 80
Preparación de la Almohadilla de Corte ................................81
Instalación del Papel en la Almohadilla de Corte ..................81
Print & Cut (Impresión & Corte) .............................................82
Corte de Materiales de Bajo o Alto Gramaje..............................86
Ajuste de la Profundidad de la Cuchilla ................................. 86
Ajuste de la Velocidad de Corte ............................................ 87
Ajuste de la Presión de Corte ................................................ 87
Multi-Cut (Corte Múltiple)......................................................87
Cuidados Básicos...........................................................................88
Vida Util de la Cuchilla ........................................................... 88
Cambio de la Cuchilla de Corte .............................................88
Cuidados de la Almohadilla de Corte .................................... 89
Mantención de los Cartuchos de Impresión .......................... 89
Cambio del Cartucho de Impresión .......................................89
Limpieza de su Máquina Cricut Imagine™ .............................. 90
Datos Prácticos Adicionales para el Cuidado Básico .............90
Uso Avanzado de la Máquina Cricut Imagine™ ...........................91
Visualización del Contenido de los Cartuchos ....................... 91
Image Queue (Cola de Imágenes) .........................................91
Image Editor (Editor de Imágenes) ........................................ 92
Imágenes en Capas ................................................................92
Paleta de Colores y Paleta del Usuario .................................. 93
Editor Controls (Controles de Edición) ..................................94
Project Preview (Vista Previa de Proyecto) .............................95
Set Up Job (Tareas de Configuración) .................................... 95
Project Quantity (Repetición de Proyecto) ............................95
Art Quantity (Repetición de Creaciones Artísticas) ............... 96
Fit to Page (Ajuste a la Página) ..............................................96
Auto-Fill (Relleno Automático) ............................................... 96
.......................................... 74
70

INDICE (CONTINUACIÓN)
Load Last (Ultima Carga) .........................................................96
Cut Settings (Configuraciones de Corte) ................................ 97
Flip Horizontal (Giro Horizontal). .............................................97
Paper Size (Tamaño del Papel) .................................................97
Settings (Configuraciones) .............................................................98
Print & Cut (Impresión & Corte) ..............................................98
Print Quality (Calidad de la Impresión) ...................................98
Paper Type (Tipo de Papel)......................................................98
HP Ink (Tinta HP) ..................................................................... 98
Clean Print Heads (Limpieza de los Cabezales de Impresión) ......98
Border Preferences (Preferencias de Bordes) ..........................99
Size (Tamaño) ...........................................................................99
Calibration (Calibración) ..........................................................99
Screen (Pantalla) ......................................................................99
Print (Impresión) ....................................................................100
Blade (Cuchilla)......................................................................100
Restore Defaults (Restablecimiento de Valores Predeterminados
Detección y Solución de Problemas............................................102
...101
71

DIAGRAMA DE FRENTE
DIAGRAMA DE LA PARTE POSTERIOR
72
DIAGRAMAS

INFORMACIÓN PARA SU SEGURIDAD
Desconectar de la electricidad antes de reparar o limpiar.
No introducir sus dedos u otros objetos en la máquina Cricut Imagine™ mientras
la máquina esté conectada a la electricidad, encendida, o durante operaciones
de corte. Los rápidos movimientos del carro de corte durante el funcionamiento
podrían causar lesiones corporales y/o daños a la máquina Cricut Imagine™.
Siga siempre las precauciones básicas de seguridad al utilizar este producto para
reducir el riesgo de lesiones por incendio o descargas eléctricas. Asegúrese de
leer y comprender todas las instrucciones de la documentación que acompaña a la
máquina Cricut Imagine™.
Utilice sólo enchufes con conexión a tierra al conectar este producto a una fuente
de energía. Si no sabe si el enchufe tiene conexión a tierra, consulte con un electricista calificado.
Obedezca todas las advertencias e instrucciones marcadas en el producto.
No instale o utilice este producto cerca de agua, o cuando tenga las manos o el
cuerpo húmedos.
Instale el producto firmemente en una superficie estable.
Instale el producto en un lugar protegido donde nadie pueda pisar o tropezar con
el cable de alimentación y donde el cable de alimentación no pueda ser dañado.
Si el producto no funciona normalmente, consulte la sección Detección y Solución
de Problemas.
No contiene piezas que puedan ser reparadas por el usuario. Solicite las reparaciones al personal de servicio calificado.
El cable de alimentación no puede ser reparado. Si presenta defectos, deberá ser
desechado o devuelto al proveedor.
Los productos químicos que dañan la capa de ozono, tales como los clorofluorocarbonos (CFCs), han sido eliminados de los procesos de fabricación de Provo Craft.
Este producto contiene plomo en las soldaduras, por lo que podría requerir un
manejo especial al final de su vida útil.
INFORMACIÓN PARA SU SEGURIDAD
73

DECLARACIÓN DE LA FCC
La Comisión Federal de Comunicaciones de los Estados Unidos (en el código
de reglamentos federales 47, artículo 15.105) ha especificado que los siguientes
anuncios deberán ser señalados a los usuarios de este producto.
Este dispositivo cumple con la sección 15 de las Normas de la FCC. La operación
del dispositivo está sujeta a las siguientes dos condiciones: (1) Este dispositivo no
deberá causar interferencias perjudiciales, y (2) este dispositivo deberá aceptar
recibir cualquier interferencia, incluyendo interferencias que podrían provocar un
funcionamiento no deseado.
Cables Blindados contra Interferencias
El uso de cables de datos blindados contra interferencias es indispensable para
cumplir con los límites Clase B de la Sección 15 de las Normas de la FCC.
De conformidad con las Normas de la FCC, en su Sección 15.21, cualquier cambio o modificación experimentada por este equipo que no haya sido expresamente aprobada por Provo Craft podría causar interferencias perjudiciales e
invalidar la autorización de la FCC para hacer funcionar este equipo.
NOTA: Este equipo ha sido probado y se ha verificado que cumple con los límites
para un dispositivo digital Clase B, de conformidad con las Normas de la FCC en
su Sección 15. Estos límites se han diseñado para proporcionar una protección
razonable contra interferencias perjudiciales en un inmueble residencial. Este equipo
genera, utiliza y puede irradiar energía de radiofrecuencia y, si no se instala y utiliza
de acuerdo con las instrucciones, podría causar interferencias perjudiciales a las
comunicaciones de radio. Sin embargo, no hay ninguna garantía de que no se produzcan interferencias en una instalación determinada. Si este equipo efectivamente
causara interferencias perjudiciales a la recepción de radio o televisión, cosa que se
puede determinar encendiendo y apagando el equipo, se recomienda al usuario
intentar corregir la interferencia tomando una o más de las siguientes medidas:
• Reorientar o reubicar la antena receptora.
• Aumentar la separación entre el equipo y el aparato receptor.
• Conectar el equipo a un tomacorriente en un circuito diferente de aquel al que
está conectado el aparato receptor.
• Consultar al distribuidor o a un técnico experimentado de radio/televisión para
obtener ayuda.
DECLARACIÓN DE LA FCC
74

PRIMEROS PASOS
Instalación del Ensamblaje de la Cuchilla de Corte
Le rogamos advertir que el ensamblaje de la cuchilla de corte de la máquina Cricut Imagine™ se encuentra en la parte inferior de su caja, separado de la máquina. Antes de poner
en marcha la máquina, necesitará insertar el ensamblaje de la cuchilla. Para hacerlo:
1. Retire las inserciones de cartón de ambos
lados del carro. Abra la puerta delantera de
la máquina Cricut Imagine
mente el ensamblaje del carro de la cuchilla
hacia la izquierda sujetando el brazo del
soporte negro y empujando el ensamblaje
hacia el centro de la apertura.
2. Saque el ensamblaje de la cuchilla de corte
de su bolsa. El ensamblaje de la cuchilla
debe quedar ajustado en el soporte negro
en el lado izquierdo del carro de corte. Haga
girar la perilla de ajuste de la parte superior
del ensamblaje de la cuchilla hasta que la
flecha negra en el ensamblaje de la cuchilla
apunte al número 3 en la perilla de ajuste.
1. Localice la tuerca plateada y hágala girar
en el sentido contrario a las agujas del reloj
hasta que quede lo suficientemente suelta
como para poder hacer girar el tornillo hacia
la derecha. Tenga cuidado de no soltar demasiado el tornillo para que no caiga.
™
. Mueva manual-
2. Abra el brazo izquierdo del soporte negro e
inserte el ensamblaje de la cuchilla de corte tal
como se muestra, con la flecha negra orientada
hacia usted. Asegúrese de que la cuchilla de
corte haya sido insertada en el ensamblaje
con el extremo afilado hacia abajo. Cierre el
soporte, haga girar de vuelta la tuerca hacia la
izquierda, y apriétela firmemente haciéndola
girar en el sentido de las agujas del reloj.
PRIMEROS PASOS
75

3. Devuelva el ensamblaje del cabezal de corte
a su posición de almacenamiento empujando suavemente el ensamblaje hacia la
derecha hasta que se detenga.
4. Enchufe la máquina y presione el botón
Power (Encendido) para poner el ensamblaje de la cuchilla en la posición de corte.
Instalación del Cartucho de Impresión de Inyección de Tinta HP
®
Se proporcionan dos cartuchos de impresión para utilizar con la máquina Cricut
Imagine™: negro y tricolor. Para instalar por primera vez un cartucho de impresión:
1. Encienda la máquina presionando el botón
Power (Encendido).
2. Una vez que haya aparecido la pantalla de
carga inicial, abra la puerta de acceso a los
cartuchos de tinta ubicada en la esquina
posterior izquierda de la máquina y levante
las perillas color verde y negro de los cartuchos de impresión.
PRIMEROS PASOS
76

3. Saque el cartucho de impresión de su embalaje
y luego retire la cinta protectora transparente
del inyector tirando de la lengüeta color rosado.
PRECAUCION: Para evitar obstrucciones, fallos
de la tinta, y malas conexiones eléctricas, no
toque los inyectores de tinta o los contactos de
cobre de los cartuchos, y no saque los contactos de cobre.
4. Encuentre el símbolo de identificación en
el cartucho de impresión y localice la perilla
del cartucho de impresión que tiene el
mismo símbolo.
5. Sostenga el cartucho de impresión con los contactos de cobre orientados hacia la impresora,
y luego deslice completamente el cartucho de
impresión dentro del soporte.
NOTA: Si experimenta problemas para insertar
el cartucho de impresión luego de levantar
la perilla del cartucho, compruebe que la
máquina esté encendida y espere unos pocos
segundos para que el carro se desenganche,
antes de insertar el cartucho de impresión.
6. Presione hacia abajo la perilla del cartucho
de impresión hasta que se cierre emitiendo
un sonido. Asegúrese de que la perilla no se
vuelva a abrir.
NOTA: Si la perilla se abre, retire el cartucho
de impresión y repita los pasos 4 y 5.
7. Cierre la puerta de acceso a los cartuchos
de tinta.
PRIMEROS PASOS
77

Calibración
Previo a su primer uso de su Cricut Imagine™, la máquina ejecutará tres rutinas
de calibración. Aparecerán instrucciones en la pantalla que le guiarán a través de
cada proceso de calibración.
El primer proceso de calibración es la calibración de la pantalla y no requerirá
ninguna impresión o corte. Las siguientes dos calibraciones requerirán que
usted ponga un trozo de papel blanco de 12" x 12" (30.48 cm x 30.48 cm) en la
almohadilla de corte y que introduzca la almohadilla en la máquina. Para obtener
ayuda sobre cómo poner el papel en la almohadilla por primera vez, le rogamos
consultar las instrucciones en la página 81. Una vez que haya insertado el segundo
trozo de papel blanco de 12" x 12" (30.48 cm x 30.48 cm) y que se haya completado el corte y la impresión, la Cricut Imagine™ le pedirá seleccionar un número y
una letra en que las líneas de impresión se corten de la manera más precisa. Haga
un clic en Test Cut (Corte de Prueba) y la máquina comenzará a cortar. Examine
el corte en el centro de la página para determinar si el corte se mantuvo dentro
de la línea de impresión. Si el corte se hizo correctamente manteniéndose dentro
de la línea de impresión, haga un clic en el botón Accept (Aceptar). Si el corte se
produjo fuera de las líneas de impresión, seleccione Repeat (Repetir) para ejecutar
la prueba nuevamente. Para mayor información sobre las calibraciones de Impresión & Corte, consultar las instrucciones en la página 100.
Ubicación de su Máquina Cricut Imagine™
Disponga su máquina Cricut Imagine™ a al menos 12" (30.48 cm.) del borde de su
mesa para así evitar un eventual volcamiento que podría causar posibles lesiones.
Deje 12" (30.48 cm) libres en la parte posterior de la máquina Cricut Imagine
™
para permitir el movimiento de la almohadilla.
Al ubicar su máquina Cricut Imagine
™
, escoja un lugar:
• al que no puedan acceder niños. La máquina Cricut Imagine™ no es un juguete
y contiene elementos, entre los que se incluye una cuchilla afilada, que podrían
ser peligrosos para los niños.
• que tenga una superficie dura, estable y plana que esté ubicada a no más de 6
pies (1.83 metros) de un enchufe con conexión a tierra, y que presente un área
despejada de 12" (30.48 cm) como mínimo detrás de la máquina Cricut Imagine™ para permitir el movimiento del papel.
• que esté ubicado en el interior de la casa o en una habitación seca donde los
cartuchos Cricut
®
no queden expuestos directamente a los efectos del clima.
• que se encuentre alejado de la exposición directa a la luz del sol o a temperaturas extremas, como en el caso de autos estacionados, cobertizos de almacenamiento, terrazas interiores, etc.
PRIMEROS PASOS
78

™
¡ADVERTENCIA! Su máquina Cricut Imagine
no deberá ser dejada o guardada
nunca en exteriores, en lugares sin calefacción o sin aire acondicionado, o en ambientes donde la máquina o los cartuchos pudieran entrar en contacto con agua.
Se recomienda mantener su máquina Cricut Imagine
™
en un área con temperatu-
ras entre los 60 y 90 °F (15.5 y 32.2 °C).
Lo que su Máquina Cricut Imagine
™
puede cortar
La máquina Cricut Imagine™ puede cortar una amplia variedad de materiales,
desde papel vitela y papel cardstock hasta cartulina y vinilo. Puesto que cualquier
material que pase a través de la máquina Cricut Imagine
™
requiere un cierto
nivel de flexibilidad para lograr pasar a través de los rodillos, no se recomienda
utilizar en la máquina materiales rígidos, como por ejemplo cartón gris grueso. La
máquina Cricut Imagine
™
puede, sin embargo, cortar cartón gris fino utilizando la
función Multi-Cut (Corte Múltiple). Mayores detalles sobre la función Multi-Cut se
pueden encontrar en la página 87.
™
La máquina Cricut Imagine
ha sido diseñada para proporcionar una alineación de
impresión y corte de +/-1 mm para imágenes de hasta 5.5"(140 mm) de tamaño.
Las imágenes de un tamaño superior a 5.5" (140 mm) podrían tener un margen de
+/-0.7% en la alineación de impresión y corte.
DATO PRACTICO: El corte repetido de materiales de alto gramaje podría
reducir la vida útil de la cuchilla y de la almohadilla de corte de su máquina
Cricut Imagine
™
. Las almohadillas y cuchillas de repuesto se pueden comprar en
cualquier lugar donde se vendan productos Cricut®.
PRIMEROS PASOS
79

OPERACIONES BÁSICAS
Instalación
1. Conecte su máquina Cricut Imagine™ a un
2. Enciéndala presionando el botón Power
3. Inserte cualquier cartucho original Cricut
enchufe con conexión a tierra.
(Encendido) ubicado al lado derecho de
la pantalla.
®
que desee utilizar, en el compartimiento
para cartuchos ubicado al lado izquierdo de
la pantalla.
OPERACIONES BÁSICAS
80
™
4. Inserte el Cartucho Cricut Imagine
Art
(Creaciones Artísticas) en el compartimiento
para cartuchos al lado derecho de la pantalla.

5. Si no desea utilizar un cartucho, la selección
de cualquiera de las opciones de pantalla
de bienvenida le permitirá continuar.
Preparación de la Almohadilla de Corte
™
La máquina Cricut Imagine
puede cortar materiales de dimensiones de hasta
12" x 12" (30.48 cm x 30.48 cm). El desempeño de la máquina no puede garantizarse para materiales de dimensiones inferiores a 3" x 3" (7.62 cm x 7.62 cm).
Para obtener los mejores resultados se recomienda el uso de papel cardstock de
setenta y cinco libras.
Instalación del Papel en la Almohadilla de Corte
Para el primer intento se recomienda un tamaño
de papel de 12" x 12" (30.48 cm x 30.48 cm).
1. Retire la película protectora transparente de
la almohadilla de corte.
2. Coloque una esquina del papel en línea con
el icono triangular de la esquina superior
izquierda de la almohadilla de corte.
3. Presione y alise el papel desde el centro
hacia los bordes de la almohadilla de corte
para que se adhiera bien. Su papel está listo
para el corte.
DATO PRACTICO: La superficie de la almohadilla de corte ha sido tratada para hacerla
ligeramente adhesiva para mantener el papel
en posición durante el corte. Retire lentamente
el papel cuando utilice materiales de bajo
gramaje tal como el papel vitela. Si las piezas
pequeñas o delicadas son difíciles de sacar,
utilice las herramientas Cricut Tools
ramientas Cricut Tools
su máquina Cricut Imagine
™
no están incluidas con
™
™
. Las her-
, pero están disponibles en cualquier lugar donde se vendan
productos Cricut®.
OPERACIONES BÁSICAS
81

Print & Cut (Impresión & Corte)
Para comenzar a trabajar con una imagen,
haga un clic en el botón Print & Cut ubicado
en el lado izquierdo de la pantalla de menú de
la máquina Cricut Imagine™. Siempre podrá
volver a la pantalla de menú presionando el
botón Menu a la izquierda de la pantalla.
Escoja una fuente de imágenes. Esto se hace
mediante un clic en uno de los tres iconos de
fuente de contenidos ubicados en la esquina
inferior izquierda de la pantalla.
OPERACIONES BÁSICAS
82
El icono en el extremo izquierdo es para creaciones artísticas originales Cricut
®
; el icono del
centro es para creaciones artísticas que vienen
con su máquina Cricut Imagine™, y el icono
en el extremo derecho es para las creaciones
del cartucho Cricut Imagine™ Art (Creaciones
Artísticas) de la máquina.
Puede desplazarse por las imágenes en la Gal-
lery View (Vista de Galería) predeterminada
haciendo un clic en la pantalla y arrastrando
lentamente hacia la izquierda o la derecha.
Haga un clic en cualquier imagen que le gustaría imprimir y cortar para seleccionarla. La
imagen que se ha seleccionado se resaltará en
color blanco.
Haga un clic en el signo más de color verde
para añadir la imagen a la Image Queue (Cola
de Imágenes).

Se puede acceder a otra vista, que muestra un
diseño de Keypad (Teclado), haciendo un clic
en la lista desplegable de la esquina superior
izquierda de la pantalla. Para volver a la Gallery
View (Vista de Galería), utilice la misma lista
desplegable y seleccione una opción que no sea
Keypad (Teclado). Para mayores detalles sobre
las dos vistas, consultar la página 91.
Nota: Si selecciona All (Todas), se mostrarán
todas las imágenes de la galería. Si selecciona
Icons (Iconos) se mostrarán sólo las imágenes
que tienen una sola capa. Si selecciona Images
(Imágenes) se mostrarán sólo las imágenes que
tienen más de una capa. Si selecciona Bonus
(Regalo), se mostrará el contenido de regalo
incluido en este cartucho. Las creaciones artísticas originales Cricut
®
sólo serán visibles bajo el
diseño Keypad (Teclado)
Haga un clic en el botón Next (Siguiente) en
la parte inferior derecha de la Image Gallery
(Galería de Imágenes).
Esto hará que aparezca una vista previa de su
proyecto. La vista previa le muestra dónde se
ubicarán las imágenes en el papel.
Al lado de la vista previa, se pueden controlar varias
opciones de tareas. Se puede encontrar información
adicional sobre los controles del área Set Up Job
(Tareas de Confi guración) en la página 95.
El área de Settings (Confi guraciones), a la que
también se puede acceder desde la pantalla
Menu, contiene controles para la calidad de la
impresión, el tipo de papel, las preferencias de
bordes, las calibraciones de la máquina, así como
también para los valores predeterminados del
sistema e información sobre los niveles de tinta.
Para información sobre el área de Settings (Confi guraciones), consultar la página 98.
OPERACIONES BÁSICAS
83

Una vez que haya editado y aplicado los cambios a su imagen, haga un clic en Next (Siguiente)
en la esquina inferior derecha para continuar.
Entonces se le pedirá cargar la almohadilla de
corte con el papel. Asegúrese de que el papel
esté colocado correctamente de acuerdo con
las instrucciones anteriores. Inserte la almohadilla en la máquina Cricut Imagine
™
con la
fl echa apuntando hacia la máquina.
Inserte la almohadilla por encima de los rodillos expuestos donde se lee la etiqueta INSERT
MAT HERE (insertar aqui la almohadilla). Introduzca suavemente la almohadilla hasta que
sienta que tocó la parte trasera de los rodillos
de impresión.
DATO PRACTICO: Para obtener los mejores
resultados, centre la almohadilla en la guía de
la almohadilla.
Sostenga la almohadilla cerca del centro de
la máquina, aplicando una suave presión en
la almohadilla. Haga un clic en el botón Go!
(Partida) de la pantalla de la máquina Cricut
™
Imagine
, continuando con la aplicación de
presión hasta que la almohadilla esté completamente cargada.
OPERACIONES BÁSICAS
84
Su proyecto comenzará a imprimirse y a
cortarse. ¡Usted está en camino de obtener la
primera de muchas emocionantes creaciones
Cricut Imagine
™
!
Cuando la operación se haya completado, la
máquina Cricut Imagine™ expulsará la almohadilla por la parte delantera de la máquina.

¡ADVERTENCIA! No toque la almohadilla durante la impresión y corte incluso
si la almohadilla ha dejado de moverse. Existen varios pasos entre la impresión y
el corte; uno de ellos es el secado. Durante la etapa de secado y otros pasos, la
máquina podría parecer inactiva. No toque la almohadilla hasta que la máquina
Cricut Imagine
™
la expulse hacia fuera de la máquina.
Retire cuidadosamente las imágenes de la almohadilla de corte. Si le resulta difícil
retirar los caracteres, utilice un cuchillo de manualidades o las herramientas Cricut
™
Tools
(que se venden en forma separada) para despegar cuidadosamente las figuras. Una vez que haya retirado todas las imágenes, retire cualquier trozo pequeño
de papel que haya quedado en la almohadilla de corte. Esto mejorará el desempeño de la almohadilla de corte a futuro.
DATO PRACTICO: Para aumentar la vida útil de su almohadilla de corte, cúbrala
siempre con la cubierta protectora y nunca deje papel sobre ella por un período
largo de tiempo.
OPERACIONES BÁSICAS
85

CORTE DE MATERIALES DE BAJO O ALTO GRAMAJE
Su máquina Cricut Imagine™ puede cortar una variedad de materiales. Para un
corte óptimo en materiales de bajo gramaje como el papel vitela, o de alto gramaje tal como el papel cardstock fino, podría ser necesario ajustar la profundidad
de la cuchilla, la velocidad de corte, o la presión de corte.
Ajuste de la Profundidad de la Cuchilla
Retire el ensamblaje de la cuchilla de corte de la máquina Cricut Imagine™ para cambiar la configuración en la perilla de ajuste. Sin embargo, si la flecha está apuntando
hacia delante puede dejar el ensamblaje de la cuchilla de corte conectado, y simplemente girar la parte superior de la perilla de ajuste para cambiar la configuración.
¡ADVERTENCIA! ¡Desconecte siempre su máquina Cricut Imagine™ antes de reti-
rar el ensamblaje de la cuchilla de corte!
Para sacar el ensamblaje de la cuchilla de corte (Figura 1), primero apague la máquina Cricut Imagine™. Luego deslice el carro de corte hacia un lado para exponer
el tornillo de la abrazadera de la cuchilla. Localice el tornillo y hágalo girar en el sentido contrario a las agujas del reloj hasta que quede lo suficientemente suelto como
para poder hacer girar el tornillo hacia la derecha (Figura 2). Tenga cuidado de no
soltar demasiado el tornillo para que no caiga. Retire el ensamblaje de la cuchilla de
corte de la máquina. Luego, localice la perilla de ajuste (Figura 3) en la parte superior del ensamblaje de la cuchilla de corte, y gírela hacia la configuración deseada.
Figura 3Figura 2Figura 1
Mientras más pequeño sea el número seleccionado en la perilla de ajuste, menor será la
profundidad de la cuchilla. Se recomiendan profundidades menores de la cuchilla para
materiales ligeros, y mayores profundidades de la cuchilla para materiales más gruesos.
Reinstale el ensamblaje de la cuchilla de corte en la máquina Cricut Imagine
™
, revirtiendo el procedimiento realizado para retirar el ensamblaje de la cuchilla de corte. Verifique
la configuración en un trozo de papel y realice los ajustes que sean necesarios.
DATO PRACTICO: El realizar cortes en papel cardstock y en otros materiales gruesos
reducirá la vida útil de su cuchilla de corte, pero producirá los mejores cortes.
CORTE DE MATERIALES DE BAJO O ALTO GRAMAJE
86

DATO PRACTICO: Si la máquina Cricut Imagine™ genera cortes irregulares, inserte siem-
pre una cuchilla nueva antes de intentar otras alternativas.
Ajuste de la Velocidad de Corte
La configuración Cut Speed (Velocidad de Corte) le permite controlar la velocidad de
corte para un proceso de corte óptimo en una variedad de papeles. Si corta materiales de
alto gramaje en forma habitual, sería mejor que aumentara esta configuración para así aumentar la velocidad de corte. Para materiales de bajo gramaje o para cortes más pequeños y más elaborados, sería mejor que disminuyera esta configuración para disminuir la
velocidad de corte. Después de cada ajuste, deberá verificar la configuración en un trozo
de papel, realizando los ajustes necesarios hasta lograr los resultados deseados.
Los controles de la configuración Cut Speed (Velocidad de Corte) se pueden encontrar en
la pantalla Project Preview (Vista Previa de Proyecto) en la sección Cut Settings (Configuraciones de Corte). Presione la flecha ascendente para aumentar la velocidad y la flecha
descendente para disminuirla. Como regla general, disminuya la velocidad de corte si sus
cortes salen dañados. Si con esto no logra resultados, podría ser necesario cambiar la
presión de corte, ajustar la profundidad de la cuchilla, o cambiar la cuchilla.
Ajuste de la Presión de Corte
La configuración Cut Pressure (Presión de Corte) le permite controlar la fuerza con que el
mecanismo de corte ejerce presión contra el papel. Para materiales de mayor gramaje,
deberá aumentar la configuración para así aumentar la presión de corte. Para materiales de menor gramaje, deberá disminuir la configuración para así disminuir la presión.
Después de cada ajuste, deberá verificar la configuración en un trozo de papel, realizando
los ajustes necesarios hasta lograr los resultados deseados.
Los controles de la configuración Cut Pressure (Presión de Corte) se pueden encontrar
en la pantalla Project Preview (Vista Previa de Proyecto) en la sección Cut Settings
(Configuraciones de Corte). Presione la flecha ascendente para aumentar la velocidad
y la flecha descendente para disminuirla. Como regla general, aumente la presión si
sus selecciones no se recortan completamente en el papel. Si esto no funciona, podría
ser necesario ajustar la velocidad de corte o la profundidad de la cuchilla.
Multi-Cut (Corte Múltiple)
La función Multi-Cut le permite cortar una imagen seleccionada en múltiples ocasiones pasando por las líneas originales de corte. Esto permite a la máquina cortar
materiales más gruesos, tal como cartón gris fino.
Los controles de la configuración Multi-Cut se pueden encontrar en la pantalla
Project Preview (Vista Previa de Proyecto) en la sección Cut Settings (Configura-
ciones de Corte). Podrá seleccionar cuántas veces deberán ser cortadas las líneas
de la imagen presionando las teclas ascendente y descendente.
CORTE DE MATERIALES DE BAJO O ALTO GRAMAJE
87

CUIDADOS BÁSICOS
Vida Util de la Cuchilla
Puede esperar hasta alrededor de 500 a 1500 cortes individuales de su cuchilla
de corte antes de que requiera ser reemplazada. La vida útil final de su cuchilla de
corte variará dependiendo de las configuraciones que utilice y de los materiales
que corte. Cuando disminuya la calidad de sus cortes, probablemente será el momento de reemplazar su cuchilla de corte. Para mejores resultados, use solamente
las Cuchillas de Corte de Repuesto genuinas Cricut®, disponibles en tiendas comerciales participantes Cricut® (pieza #290002).
Cambio de la Cuchilla de Corte
¡ADVERTENCIA! ¡Desconecte siempre su máquina Cricut Imagine™ antes de
reemplazar la cuchilla de corte!
Para cambiar la cuchilla de corte, primero deberá sacar el ensamblaje de la cuchilla de corte. Para retirar el ensamblaje de la cuchilla de corte (Figura 1), localice el
tornillo y hágalo girar en el sentido contrario a las agujas del reloj hasta que esté
lo suficientemente suelto como para que usted pueda girar el tornillo a la derecha
(Figura 2). Tenga cuidado de no soltar demasiado el tornillo para que no caiga.
Retire el ensamblaje de la cuchilla de corte de la máquina. Después de haber
retirado el ensamblaje de la cuchilla de corte, localice el mecanismo de liberación
de la cuchilla ubicado en la parte superior del ensamblaje de la cuchilla de corte
y presiónelo (Figura 3). La cuchilla saldrá del ensamblaje de la cuchilla de corte.
Deberá soltarla cuidadosamente del imán que la mantiene sujeta (Figura 4).
Para instalar la nueva cuchilla, deberá primero retirar la cubierta protectora de
la nueva cuchilla. Inserte cuidadosamente el eje de la cuchilla en el orificio en la
parte inferior del ensamblaje de la cuchilla de corte. Si se ha instalado correctamente, la cuchilla debiera ser succionada hacia el interior del eje (Figura 5). Ahora
el repuesto de la cuchilla de corte está instalado. Ponga la cubierta protectora en
la cuchilla usada y deséchela. Reinstale el ensamblaje de la cuchilla de corte en
la máquina Cricut Imagine™, revirtiendo el procedimiento realizado para retirar el
ensamblaje de la cuchilla de corte.
Figura 1 Figura 2 Figura 3 Figura 4 Figura 5
CUIDADOS BÁSICOS
88

¡ADVERTENCIA! Las cuchillas de corte son extraordinariamente afiladas y
deberán manipularse con el mayor cuidado. También representan un potencial
peligro de asfixia por lo que deben mantenerse alejadas de los niños.
Cuidados de la Almohadilla de Corte
Puede esperar alrededor de 25 a 40 páginas completas de cortes en su almohadilla de corte Cricut Imagine
™
(incluso más si los cortes son de menor tamaño que
la almohadilla completa), antes de que requiera ser reemplazada. La vida útil final
de su almohadilla de corte variará dependiendo de las configuraciones que utilice
y de los papeles que corte. Deberá cambiar su almohadilla de corte cuando:
• el papel ya no se adhiera a la almohadilla de corte.
• las puntas de la almohadilla se doblen hacia adentro, lo que afectará la pre-
cisión de la alineación impresión y corte.
Utilice solamente las almohadillas de corte de repuesto genuinas Cricut Imagine™,
disponibles en tiendas comerciales en todas partes (pieza #2000784).
Mantención de los Cartuchos de Impresión
Los siguientes consejos prácticos le ayudarán a conservar los cartuchos de impresión Cricut Imagine™ y asegurar una calidad de impresión estable:
• Mantenga todos los cartuchos de impresión en sus embalajes sellados hasta
que los necesite. Los cartuchos de impresión deben mantenerse a una temperatura ambiente entre 59 y 95 °F (15 y 35 °C).
• No retire la cinta plástica que cubre los inyectores de tinta hasta que esté
preparada(o) para instalar el cartucho de impresión en la máquina. Si la cinta
plástica se ha soltado del cartucho de impresión, no intente reponerla. Reponer
la cinta dañará el cartucho de impresión.
¡ADVERTENCIA! Evite caídas del cartucho de impresión. La caída del cartucho de
impresión podría dañarlo.
Cambio del Cartucho de Impresión
1. Encienda la máquina Cricut Imagine™, abra la puerta de acceso a los cartuchos
de impresión ubicada en la parte posterior de la máquina y levante la perilla
correspondiente al cartucho que cambiará.
2. Tome el cartucho de impresión instalado y deslícelo fuera de su soporte.
PRECAUCION: Para evitar obstrucciones, fallos de la tinta, y malas conexiones
eléctricas, no toque los inyectores de tinta o los contactos de cobre de los cartuchos, y no saque los contactos de cobre.
CUIDADOS BÁSICOS
89

3. Encuentre el símbolo de identificación en el cartucho de impresión y localice la
perilla del cartucho de impresión que tiene el mismo símbolo.
4. Sostenga el nuevo cartucho de impresión con los contactos de cobre orientados hacia la impresora, y luego deslice el cartucho de impresión en el soporte.
NOTA: Si experimenta problemas para insertar el cartucho de impresión luego
de levantar la perilla del cartucho, compruebe que la máquina esté encendida y
espere unos pocos segundos para que el carro se desenganche, antes de insertar
el cartucho de impresión.
5. Presione hacia abajo la perilla del cartucho de impresión hasta que se cierre
emitiendo un sonido. Asegúrese de que la perilla no se vuelva a abrir.
6. Cierre la tapa del cabezal de impresión.
Limpieza de su Máquina Cricut Imagine™
¡ADVERTENCIA! ¡Desconecte siempre su máquina Cricut Imagine™ antes de limpiarla!
™
Para limpiar la máquina Cricut Imagine
, pase un paño húmedo suavemente por los
paneles exteriores. Inmediatamente después, seque cualquier resto de humedad
con un paño de gamuza o de otra tela suave. No utilice limpiadores químicos o
con base en alcohol en la máquina (incluyendo, entre otros, acetona, benceno, y
tetracloruro de carbono). También deberá evitar usar limpiadores y elementos de
limpieza abrasivos. No sumerja la máquina o cualquier componente de ella en agua.
Datos Prácticos Adicionales para el Cuidado Básico
• Mantener la máquina alejada de alimentos y líquidos.
• Mantener la máquina en una ubicación seca y libre de polvo.
• Evitar el calor o frío excesivo.
• No dejar la máquina en un auto, donde el excesivo calor podría derretir o dañar
los componentes plásticos.
• No exponer a la luz directa del sol por un período largo de tiempo.
CUIDADOS BÁSICOS
90

USO AVANZADO DE LA MÁQUINA CRICUT IMAGINE
™
Visualización del Contenido de los Cartuchos
En su máquina Cricut Imagine™ existen dos formas de examinar las imágenes:
Gallery View (Vista de Galería)—Esta vista muestra una banda larga, horizontal, de las imágenes
por las que se puede desplazar. La Vista de
Galería es la vista predeterminada para examinar
imágenes de su cartucho Cricut Imagine™ Art
(Creaciones Artísticas). Esta vista no está disponible para los cartuchos originales Cricut
®
.
Keypad (Teclado)—Esta vista le permite examinar hasta 50 imágenes al mismo tiempo; es similar a la vista utilizada en otra máquinas Cricut
®
.
Image Queue (Cola de Imágenes)
Al examinar el contenido de un cartucho, hay varios iconos en la parte inferior de la
pantalla que le permiten controlar la Cola de Imágenes. Al seleccionar una imagen de la
cola de imágenes haciendo un clic sobre ella, y luego haciendo un clic en el signo más
color verde ubicado en la esquina superior derecha de la imagen, la imagen se agregará a
la Cola de Imágenes. Al hacer un clic en el icono Edit (Editar) ubicado en la parte superior
izquierda de la imagen, podrá realizar cambios a la imagen utilizando el Image Editor (Edi-
tor de Imágenes). También podrá realizar cambios a una imagen en la galería de imágenes
seleccionándola y haciendo un clic en el icono Edit. Algunos otros controles incluyen:
Backspace (Tecla de Retroceso)—elimina la última
imagen agregada a la Cola
de Imágenes
Undo (Deshacer)—deshace
el último cambio realizado
a la Cola de Imágenes
Redo
(Rehacer)—r
evierte el
efecto de la función Undo (Deshacer), volviendo a realizar el
cambio a la Cola de Imágenes
USO AVANZADO DE LA MÁQUINA CRICUT IMAGINE
Duplicate (Duplicar)—duplica la imagen seleccionada en la cola de imágenes;
disponible solamente
después de haber hecho
un clic en una imagen de la
Cola de Imágenes
Clear All (Eliminar Todo)—
elimina todas las imágenes
de la Cola de Imágenes
™
91

Image Editor (Editor de Imágenes)
El Editor de Imágenes le permite realizar cambios a imágenes individuales, como
por ejemplo, cambiar el color, la orientación, el tamaño, y la composición. Los
cambios realizados con el Editor de Imágenes afectarán solamente la imagen
específica, en tanto que los cambios realizados en la sección Project Preview (Vista
Previa de Proyecto) afectarán todas las imágenes del proyecto.
Para acceder al Image Editor haga un clic en en la Gallery View (Vista de Galería).
Imágenes en Capas
Algunas imágenes que vienen en el cartucho Cricut Imagine™ Art (Creaciones Artísticas)
están separadas en elementos individuales llamados layers (capas). Esto le proporciona
un nivel de control adicional sobre el color y tamaño de cada capa de la imagen de su
proyecto. Estas capas no sólo pueden ser cambiadas individualmente para satisfacer sus
necesidades, sino que también se pueden imprimir y cortar en forma separada.
Las imágenes de los cartuchos originales Cricut® se pueden colorear y cambiar de
tamaño, pero no están separadas en capas y en consecuencia cambiarán como una sola
imagen. Esto significa que no podrá cambiar el color o el tamaño de sólo una parte de
una imagen que venga en un cartucho original.
Usted podrá controlar si una imagen que viene en un cartucho Cricut Imagine™ Art (Creaciones Artísticas) se imprime como una sola imagen o en capas, utilizando los botones
Combine (Combinar) y Layers (Capas) ubicados en la parte superior izquierda del Image
Editor (Editor de Imágenes). Si selecciona Combine, la imagen editada se imprimirá y
cortará como una sola imagen (Figura 1). Si selecciona Layers, cada capa de la imagen
se imprimirá y cortará en forma separada (Figura 2).
USO AVANZADO DE LA MÁQUINA CRICUT IMAGINE
92
™

Figura 1 Figura 2
Paleta de Colores y Paleta del Usuario
Las imágenes en el cartucho Cricut Imagine™ Art (Creaciones Artísticas) vienen
con una paleta de colores y de motivos preseleccionada que usted podrá utilizar
para personalizar las imágenes en capas completas o las capas individuales
contenidas en las imágenes. Para hacer esto, navegue hacia la vista Image Queue
(Cola de Imágenes) o Gallery View (Vista de Galería) y:
• haga un clic para seleccionar la imagen que le gustaría personalizar.
• haga un clic en el icono Edit (Editar) para abrir el Image Editor (Editor de Imágenes).
Si desea cambiar sólo una capa individual de una imagen, haga un clic en la capa
para seleccionarla.
NOTA: La imagen ubicada en el extremo izquierdo del editor de imágenes muestra todas las capas reunidas. Las imágenes ubicadas a la derecha de esta imagen
representan todas las capas individuales. Si no hay imágenes a la izquierda, entonces usted está trabajando con una imagen que tiene sólo una capa.
• Escoja el nuevo color para la capa desde la banda de colores justo debajo de la imagen.
• Haga un clic en el color para seleccionarlo.
• Haga un clic en Apply (Aplicar).
NOTA: Si no encuentra el color que desea para cambiar el color de la capa o imagen, puede utilizar la barra de desplazamiento para ver otras alternativas o seguir
las instrucciones que se presentan a continuación para crear un color a su gusto.
USO AVANZADO DE LA MÁQUINA CRICUT IMAGINE
™
93

®
Las imágenes de los cartuchos originales Cricut
también se pueden personalizar
con un nuevo color. Sin embargo, debido a que no tienen una paleta de colores
determinada asociada como en el caso de los cartuchos Cricut Imagine™ Art
(Creaciones Artísticas), deberá utilizar los colores disponibles para el cartucho Cricut Imagine™ Art o crear un color a su gusto en la User Palette (Paleta del Usuario).
Siga estas instrucciones para crear un color a su gusto.
• Haga un clic en el botón multicolor en la parte inferior izquierda de la pantalla.
• Haga un clic en un cuadrado en blanco en el área de Custom Colors (Colores
Personalizados) para seleccionarlo.
• Arrastre el indicador alrededor del círculo hasta que encuentre el color que desea.
• Utilice las fl echas en la parte superior e inferior del control ubicado a la derecha de
la rueda de colores para ajustar la luminosidad del color. También podrá ingresar
valores RGB exactos si los conoce, utilizando los controles Red-Green-Blue (RojoVerde-Azul) ubicados bajo la sección Custom Colors (Colores Personalizados).
• Haga un clic en Apply (Aplicar).
El color personalizado se aplica automáticamente a la imagen seleccionada y
aparecerá en la parte inferior de la banda de edición de la imagen, ubicada a la
izquierda del botón multicolor.
NOTA: Podrá utilizar motivos y colores de cualquier cartucho Cricut Imagine™ con
sus imágenes de los cartuchos originales Cricut®.
Editor Controls (Controles de Edición)
Undo (Deshacer)—de-
shace el último cambio
realizado a la imagen
Flip Vertical (Giro Vertical)
—gira la orientación de la
imagen completa en forma
vertical, o una parte selec-
Redo (Rehacer)—revierte
el efecto de la función
Undo (Deshacer), volviendo a realizar el cambio a
la imagen
Revert (Restituir)—borra
todos los cambios realizados a la imagen
cionada de la imagen si ha
sido separada en capas
Flip Horizontal (Giro Horizontal)—gira la orientación
de la imagen completa en
forma horizontal, o una
parte seleccionada de la
imagen si ha sido separada
en capas
True/Relative Size (Tamaño Real/Relativo)—alterna entre permitirle
cambiar el tamaño de las imágenes en modo Relative (Relativo), que
establece el tamaño de las imágenes con relación al carácter de mayor
altura de su texto, y en el modo Tru e (Real), que establece el tamaño
de las imágenes independientemente de cualquier otra imagen
USO AVANZADO DE LA MÁQUINA CRICUT IMAGINE
94
™

Project Preview (Vista Previa de Proyecto)
Esta pantalla le proporciona opciones para configurar el proyecto, incluyendo
realizar cambios en el tamaño del papel, lo que le permite imprimir y cortar en
las partes no utilizadas de los proyectos anteriores, y modificar la orientación de
las imágenes en el proyecto. A diferencia de los cambios realizados con el Image
Editor (Editor de Imágenes), que sólo afectarán a la imagen específica a la que le
está realizando cambios, todos los cambios realizados en esta sección afectarán el
trabajo de impresión completo.
Set Up Job (Tareas de Configuración)
La sección Set Up Job de Project Preview
(Vista Previa de Proyecto) le permite configurar diversos detalles del proyecto, como por
ejemplo repetir las imágenes o el proyecto
hasta llenar una página.
Project Quantity (Repetición de Proyecto)
Este control se puede utilizar para repetir el
proyecto completo. Resulta útil para cuando
necesite cortar su proyecto varias veces. Puede cambiar el número de veces que necesita
repetir el proyecto haciendo un clic en la
flecha ascendente y descendente.
USO AVANZADO DE LA MÁQUINA CRICUT IMAGINE
™
95

Art Quantity (Repetición de Creaciones Artísticas)
Este control se puede utilizar para repetir todas
las imágenes que se encuentran en la cola de imágenes y minimizar la cantidad de papel utilizado
para el proyecto. Resulta útil para cuando necesite
cortar varias partes de su proyecto o cuando desee
ocupar el espacio vacío de una página. Puede
cambiar el número de veces que necesita repetir el
proyecto haciendo un clic en la flecha ascendente y
descendente. Las imágenes adicionales, repetidas,
se agregarán en la sección Project Preview (Vista
Previa del Proyecto) a la izquierda.
Fit to Page (Ajuste a la Página)
Este control cambiará el tamaño de las imágenes del proyecto para ajustarse a la página
completa. La Project Preview (Vista Previa
de Proyecto) a la izquierda proporciona una
indicación visual del tamaño de cada imagen
en el proyecto.
Auto-Fill (Relleno Automático)
Este control es similar al control Project Quantity
(Repetición de Proyecto). Sin embargo, en lugar
de escoger un número específico de veces para
repetir el proyecto completo, al utilizar el control
Auto-Fill, el proyecto se repite hasta que la
página esté completa. Los proyectos adicionales,
repetidos, se reflejan en la sección Project Preview
(Vista Previa del Proyecto) a la izquierda.
Load Last (Ultima Carga)
Al activar la opción Load Last en la sección Project
Preview (Vista Previa de Proyecto), el papel que
usted utilizó para su último proyecto se utilizará
para el proyecto actual. La máquina Cricut
Imagine
partes del papel que se utilizaron para el último
proyecto. Cuando se selecciona la opción Load
Last, el nuevo proyecto se reposicionará automáticamente para utilizar el espacio restante de papel.
USO AVANZADO DE LA MÁQUINA CRICUT IMAGINE
96
™
mantiene en memoria un registro de las
™

Cut Settings (Confi guraciones de Corte)
La sección Cut Settings de la Project Preview
(Vista Previa de Proyecto) le permite cambiar
los valores de multi-cut (corte múltiple), velocidad y presión.
Flip Horizontal (Giro Horizontal)—Al hacer
un clic en este botón cambia la orientación
horizontal de las imágenes del proyecto.
Paper Size (Tamaño del Papel)—La configuración de tamaño del papel le permite cambiar
el tamaño del papel que se está imprimiendo.
Este tamaño se puede cambiar en incrementos
de media pulgada.
USO AVANZADO DE LA MÁQUINA CRICUT IMAGINE
™
97

SETTINGS (CONFIGURACIONES)
La pantalla de confi guraciones le permite controlar las confi guraciones generales
de su máquina Cricut Imagine™.
Print & Cut (Impresión & Corte)
Al seleccionar Print & Cut, el proyecto se imprimirá en el papel y luego se cortarán
las imágenes. Print Only (Sólo Imprimir) imprimirá el proyecto en el papel sin cortar
las imágenes. Cut Only (Sólo Cortar) cortará las imágenes sin imprimirlas.
Print Quality (Calidad de Impresión)
Esta opción le permite controlar la calidad de la impresión del proyecto. Best Quality
(Mejor Calidad) utiliza más tinta, pero proporciona una recreación más rica y precisa del
color. Además, esta opción demora más tiempo en imprimir. Draft Quality (Calidad
Borrador) utiliza menos tinta e imprime más rápido, pero los colores de la imagen que
resultará al utilizar esta confi guración no serán tan vívidos como cuando utiliza la confi guración Best Quality (Mejor Calidad).
Paper Type (Tipo de Papel)
Esta opción le permite especifi car el tipo de papel en que se imprimirá y cortará, lo
que afectará no sólo la cantidad de tinta utilizada en el proceso de impresión, sino
también el tiempo de secado entre la impresión y el corte. Seleccione Glossy (Papel
Satinado Glossy) cuando utilice papel fotográfi co u otros papeles que tienen un
acabado brillante. Seleccione Matte (Mate) para papel normal con un acabado mate.
Seleccione Vinyl (Vinilo) cuando imprima en Vinilo Imprimible Cricut Imagine™.
HP Ink (Tinta HP)
Esta sección tiene un indicador para los cartuchos de tinta blanca y negra
de la máquina Cricut Imagine
™
. Si el nivel de tinta de alguno de los dos
cartuchos está bajo, aparecerá un indicador LOW (BAJO) para el cartucho.
Si los niveles de tinta son sufi cientes, el indicador mostrará OK.
Clean Print Heads (Limpieza de Cabezales de Impresión)
Este control limpiará los cabezales de impresión. Cabe destacar que,
a diferencia de otras impresoras, en ésta no se imprimirá una página
al limpiar los cabezales. Sin embargo, podrá ver y oír el cartucho moviéndose durante el proceso de limpieza. Debido a que el proceso de
limpieza utiliza cierta cantidad de tinta, deberá realizarse sólo cuando
sea necesario.
SETTINGS (CONFIGURACIONES)
98

Border Preferences (Preferencias de Bordes)
.10
Este control le permite defi nir el color del borde de su imagen.
Si selecciona Default (Predeterminado), la máquina Cricut Imagine™ seleccionará e imprimirá el color del borde utilizando el color original defi nido por el
artista que creó la imagen. Para seleccionar un color diferente, siga estas instrucciones.
• Seleccione Custom (Personalizar) en la casilla superior del menú desplegable.
• Haga un clic en el botón Defi ne Color (Defi nir Color).
• Haga un clic en uno de los colores predefi nidos de la sección Basic Colors
(Colores Básicos).
• Haga un clic en Apply (Aplicar).
Si desea utilizar un color que no esté incluido en la sección Basic Colors (Colores Básicos):
• Seleccione Custom (Personalizar) en la casilla superior del menú desplegable.
• Haga un clic en el botón Defi ne Color (Defi nir Color).
• Haga un clic en un cuadrado en blanco en el área de Custom Colors (Colores
Personalizados) para seleccionarlo.
• Arrastre el indicador alrededor del círculo hasta que encuentre el color que desea.
• Utilice las fl echas en la parte superior e inferior del control ubicado a la derecha de
la rueda de colores para ajustar la luminosidad del color. También podrá ingresar
valores RGB exactos si los conoce, utilizando los controles Red-Green-Blue (RojoVerde-Azul) ubicados bajo la sección Custom Colors (Colores Personalizados).
• Haga un clic en Apply (Aplicar).
Size (Tamaño)
Este control le permite cambiar el grosor del borde de la imagen.
Haciendo un clic en las teclas de los signos más y menos sobre y bajo el
control, podrá aumentar o disminuir el tamaño en incrementos de .01
de una pulgada.
Calibration (Calibración)
Esta sección le brinda la posibilidad de cambiar la calibración de la pantalla táctil,
la alineación de impresión y la colocación de la cuchilla.
Screen (Pantalla)
Este control le permite recalibrar la pantalla táctil de su máquina Cricut
Imagine™. Está pensado principalmente para usarlo si usted encuentra
que al tocar la pantalla con el lápiz óptico stylus obtiene resultados inexactos, o que al tocarla reacciona una zona no deseada de la pantalla.
Al utilizar esta función se le presentarán cinco cruces, mostradas una a la
vez en las cuatro esquinas y en el centro de la pantalla. Toque el centro
SETTINGS (CONFIGURACIONES)
99

de la cruz con el lápiz stylus, y aparecerá la siguiente cruz. Después de
la cruz fi nal, su máquina Cricut Imagine™ se reiniciará.
™
Si observa que la pantalla de su Cricut Imagine
deja de responder
a cualquier señal de tacto, podría ser necesario realizar una recalibración forzada. Siga estos pasos para forzar una recalibración.
• Mantenga presionados los botones superiores e inferiores a la
izquierda de la pantalla de su máquina Cricut Imagine
™
.
• Presione el botón Power (Encendido) para encender la máquina.
• Suelte los botones superiores e inferiores cuando vea que aparecen
unas barras de color en la pantalla.
• Cuando aparezca la pantalla azul, haga un clic en cada uno de los
símbolos blancos en forma de cruz para fi nalizar la recalibración.
Print (Impresión)
Este control le permite calibrar la alineación de los cabezales de
impresión de la máquina Cricut Imagine™. Repetirá la alineación de
cabezales de impresión realizada cuando encendió por primera vez la
máquina. Si encuentra que la reproducción de colores de elementos
impresos con la máquina Cricut Imagine
™
ha perdido fi delidad, la
recalibración de los cabezales de impresión podría solucionar el problema. La calibración de la impresión también deberá realizarse cada
vez que se saque o cambie el cartucho de impresión.
La calibración de la impresión requiere una hoja de papel blanca sin uso
de 12" x 12" (30.48 cm x 30.48 cm) en la almohadilla de corte. Haga un
clic en el botón Print (Imprimir) y siga las instrucciones de la pantalla.
Blade (Cuchilla)
Este control le permite calibrar la alineación de la cuchilla de corte
de la máquina Cricut Imagine
™
con respecto a la imagen impresa.
Repetirá la alineación de la cuchilla realizada cuando encendió por
primera vez la máquina. Si observa que la cuchilla no está cortando
las imágenes dentro de sus bordes predeterminados, el uso de esta
recalibración podría solucionar el problema.
La calibración de la cuchilla requiere una hoja de papel blanca sin uso
de 12" x 12" (30.48 cm x 30.48 cm) en la almohadilla de corte. Haga un
clic en el botón Blade (Cuchilla) y siga las instrucciones de la pantalla.
SETTINGS (CONFIGURACIONES)
100
 Loading...