Cricut Expression 2 User Manual
USER MANUAL AND WARRANTY MANUEL DE L'UTILISATEUR ET GARANTIE MANUAL DEL USUARIO Y GARANTÍA BENUTZERHANDBUCH UND GARANTIE

Contents |
|
Welcome to the Cricut Expression® 2 Machine................................................................. |
1 |
Diagrams.......................................................................................................................... |
2 |
Button and Icon Legend.................................................................................................... |
3 |
Safety Information........................................................................................................... |
4 |
FCC Statement ................................................................................................................. |
5 |
Getting Started................................................................................................................. |
6 |
Installing the Cutting Blade Assembly............................................................................ |
6 |
Positioning Your Cricut Expression 2 Machine............................................................... |
7 |
Power............................................................................................................................. |
7 |
Screen Calibration ......................................................................................................... |
7 |
First Project.................................................................................................................... |
8 |
What Your Cricut Expression 2 Machine Can Cut........................................................... |
9 |
Basic Operations.............................................................................................................. |
10 |
Buttons and Machine Controls....................................................................................... |
10 |
Home Screen.................................................................................................................. |
10 |
Mat Preview................................................................................................................... |
11 |
Mat Navigation Keys....................................................................................................... |
11 |
Navigation Buttons......................................................................................................... |
12 |
Image Screen................................................................................................................... |
13 |
Compatible Cartridges................................................................................................... |
13 |
Selecting Cartridges....................................................................................................... |
13 |
Selecting Images............................................................................................................ |
13 |
Keypad Mode................................................................................................................. |
14 |
Gallery Mode................................................................................................................. |
14 |
Image Queue ................................................................................................................. |
14 |
Delete Image in Queue.................................................................................................. |
14 |
Copying Image in Queue................................................................................................ |
14 |
Edit Image in Queue....................................................................................................... |
15 |
Zoom Image in Queue.................................................................................................... |
15 |
Image Editor................................................................................................................... |
15 |
Layered and Composite Images..................................................................................... |
16 |
Flip Vertical, Flip Horizontal, and Rotate........................................................................ |
16 |
Settings Screen................................................................................................................. |
17 |
Art Quantity................................................................................................................... |
17 |
Project Quantity............................................................................................................. |
18 |
Fit to Page...................................................................................................................... |
18 |
Auto Fill.......................................................................................................................... |
18 |
Mat Size ......................................................................................................................... |
18 |
Paper Size ...................................................................................................................... |
19 |
Start Position.................................................................................................................. |
19 |
Center Point................................................................................................................... |
20 |
Fit to Length................................................................................................................... |
20 |
Load Last........................................................................................................................ |
20 |
Apply All ........................................................................................................................ |
21 |
Paper Saver.................................................................................................................... |
21 |
Kerning........................................................................................................................... |
21 |
ii Contents

Tools............................................................................................................................... |
22 |
Materials........................................................................................................................ |
22 |
Machine Settings............................................................................................................ |
23 |
Screen Calibration.......................................................................................................... |
24 |
About............................................................................................................................. |
24 |
Cut Settings Screen........................................................................................................... |
25 |
Material Selection.......................................................................................................... |
25 |
Tool Selection................................................................................................................. |
25 |
Cutting Heavyweight or Lightweight Materials.............................................................. |
26 |
Adjusting Blade Depth.................................................................................................... |
26 |
Adjusting Cut Speed....................................................................................................... |
27 |
Adjusting Cut Pressure................................................................................................... |
27 |
Multi-Cut........................................................................................................................ |
28 |
Load/Unload Mat .......................................................................................................... |
28 |
Basic Care........................................................................................................................ |
29 |
Blade Life........................................................................................................................ |
29 |
Replacing the Cutting Blade........................................................................................... |
29 |
Caring for the Cutting Mat............................................................................................. |
30 |
Cleaning Your Cricut Expression 2 Machine................................................................... |
30 |
Additional Basic Care Tips.............................................................................................. |
30 |
Optional Adapter Installation........................................................................................... |
31 |
Troubleshooting............................................................................................................... |
32 |
Cricut Expression® 2 Machine Statement of Limited Warranty ......................................... |
34 |
contents iii

Welcome to the Cricut Expression®2Machine!
To celebrate the 5th Anniversary of Cricut®, we’re introducing something very special
— the Cricut Expression® 2 machine. It’s an all-new version of the Cricut Expression® Personal Electronic Cutter. On the outside, we’ve given it an all-new look, including an full-color LCD touch screen that’s bigger and faster. On the inside, we’ve kept all of the great features of the Cricut Expression machine, and added many great new features.
Your Cricut Expression 2 machine will do everything Cricut Expression machine will do and has:
•a mat preview which allows you to see shapes you’re cutting and where they fit on the mat before you cut.
•all new materials settings, allowing you to choose a default setting for materials you like to cut like cardstock or chipboard, or customize a material setting to be just how you want it.
•a cutting-area light to let you see where you’re cutting on the mat.
•independent image sizing allowing you to size each image on a mat on its own. Make one image 3" and another image 5 ½" — all on the same mat.
•multiple mat cutting so you can cut as many images as you want, even if the images won’t all fit on one mat. Your Cricut Expression 2 projects can contain up to six mats.
CRICUT®, CRICUT EXPRESSION®, CRICUT DESIGNSTUDIO®, CRICUT IMAGINE®, CRICUT CAKE®, GYPSY®, CRICUT CIRCLE™, CUTTLEBUG®, CUTTLEKIDS™, YUDU®, YOURSTORY®, and KNIFTY KNITTER® are registered or applied for trademarks of Provo Craft & Novelty, Inc. South Jordan, UT 84095.
Welcome 1
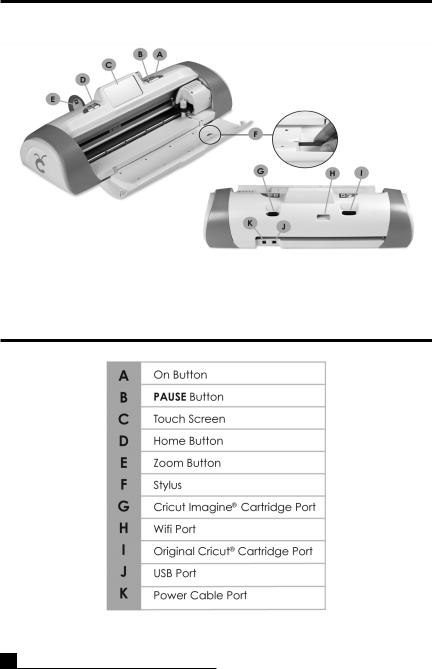
Diagrams
2diagrams

BuTTOn AnD ICOn LEGEnD
Cut
 Settings
 Image
Image
 Art Quanti ty
8
8 |
Project Quanti ty |
|
Fit to Page
Auto Fill
 Mat Size
 Paper Size
 Start Positi on
 Center Point
Fit to Length
 Load Last
 Load/Unload
 tools
tools
 Materials
 Apply All
 Machine Settings
 Calibrate
 About
About
 Composite
 Layered
 Size
Size
 Flip Horizontal
 Flip Verti cal
 Rotate
Cut Speed
Cut Pressure
Multi -Cut
4
 Clear All
 Backspace
 Redo
Redo
 Undo
Undo
 Space
Space
 Return
 New Material
 New tool
 Relati ve Size
 true Size
 Paper Saver
 Edit
Edit

 Copy
Copy
 Add Image
 Delete Image
Save
Cartridge
Home
Load/Unload
BUttoN AND ICoN LEGEND |
3 |

Safety Information
Disconnect electrical power before servicing or cleaning.
WARNING! Do not place your fingers or other objects in the Cricut Expression 2 machine while it is connected to electrical power, powered on, or during cutting operations. Rapid movements of the cutting carriage during operation may cause bodily injury and/or damage to the Cricut Expression 2 machine.
Always follow basic safety precautions when using this product to reduce risk of injury from fire or electric shock. Read and understand all instructions in the documentation that comes with the Cricut Expression 2 machine.
Observe all warnings and instructions marked on the product.
Do not install or use this product near water or when you are wet.
Install the product securely on a stable surface.
Install the product in a protected location where no one can step on or trip over the power cord and the power cord cannot be damaged.
If the product does not operate normally, see Troubleshooting.
There are no user-serviceable parts inside. Refer servicing to qualified service personnel.
The power cord cannot be repaired. If it is defective, it should be discarded or returned to the supplier.
Ozone-depleting chemicals, such as chlorofluorocarbons (CFCs), have been eliminated from the Provo Craft manufacturing processes.
This product contains lead in the solder that might require special handling at end-of-life.
4 |
Safety Information |

FCC Statement
The U.S. Federal Communications Commission (in 47 cfr 15.105) has specified that the following notices be brought to the attention of users of this product.
This device complies with part 15 of the FCC rules. Operation is subject to the following two conditions: (1) This device may not cause harmful interference, and (2) this device must accept any interference received, including interference that may cause undesired operation.
Shielded Cables
Use of a shielded data cable is required to comply with the Class B limits of Part 15 of the FCC Rules.
Pursuant to Part 15.21 of the FCC Rules, any changes or modifications to this equipment not expressly approved by Provo Craft may cause harmful interference and void the FCC authorization to operate this equipment.
NOTE: This equipment has been tested and found to comply with the limits for a Class B digital device, pursuant to Part 15 of the FCC Rules. These limits are designed to provide reasonable protection against harmful interference in a residential installation. This equipment generates, uses, and can radiate radio frequency energy and, if not installed and used in accordance with the instructions, may cause harmful interference to radio communications. However, there is no guarantee that interference will not occur in a particular installation. If this equipment does cause harmful interference to radio or television reception, which can be determined by turning the equipment off and on, the user is encouraged to try to correct the interference by one or more of the following measures:
•Reorient or relocate the receiving antenna.
•Increase the separation between the equipment and receiver.
•Connect the equipment into an outlet on a circuit different from that to which the receiver is connected.
•Consult the dealer or an experienced radio/TV technician for help.
FCC Statement |
5 |
Getting Started
Installing the Cutting Blade Assembly
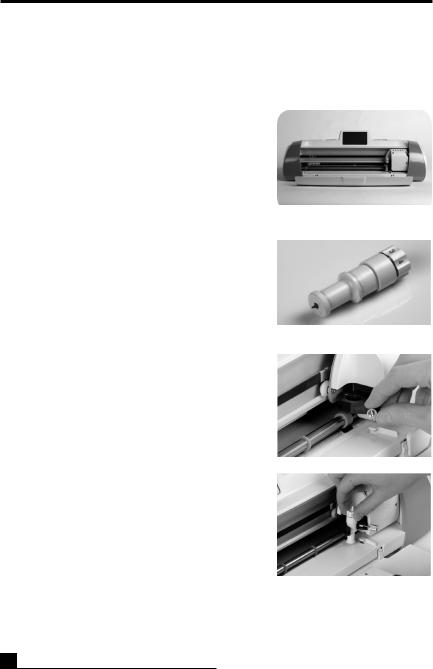
The Cricut Expression 2 cutting blade assembly is located in the bottom of your box, separate from the machine. Before you turn the machine on, you will need to insert the blade assembly. To do this:
1.Open the front door on the Cricut Expression 2 machine. Remove the cardboard inserts from both sides of the carriage.
2.Remove the cutting blade assembly from its bag. The blade assembly fits into the black cradle on the left side of the carriage. Rotate the adjustment knob on the top of the blade assembly so that the
black arrow on the blade assembly points to the number 3 on the adjustment knob.
3.Locate the silver nut and turn it counterclockwise until it loosens enough that you can swing the screw to the right. Be careful not to loosen the screw too much or it will fall out.
4.Open the left arm of the black cradle and position the cutting blade assembly inside as shown with the black arrow facing you. Ensure that the cutting blade has been inserted into the assembly with the sharp blade end pointing down. Close the cradle, swing the nut back to the left, and tighten it by turning it clockwise.
6 Getting started
Positioning Your Cricut Expression 2 Machine
Place your Cricut Expression 2 machine at least 12" (30.48 cm) from the edge of your table to prevent it from tipping and causing possible injury. Allow 24" (60.96 cm) in the back of the Cricut Expression 2 machine for mat movement.
When positioning your Cricut Expression 2 machine, choose a location that:
•cannot be accessed by children. The Cricut Expression 2 machine is not a toy and contains components, including a sharp blade, that could be hazardous
to children.
•is a hard, stable, and flat surface within 6 feet (1.83 meters) of a grounded electrical outlet, and that has a minimum clearance of 24" (60.96 cm) behind the Cricut Expression 2 machine for paper movement.
•is indoors or in a dry location where the Cricut® cartridges are not directly exposed to the effects of the weather.
•is away from direct exposure to sunlight or extreme temperatures such as in parked cars, storage sheds, sunrooms, etc.
WARNING! Your Cricut Expression 2 machine should never be left or stored outside, in locations without heat or air conditioning, or in environments where the machine or cartridges can come in contact with water. It is recommended that your Cricut
Expression 2 machine be maintained in an area with temperatures between 60 and 90 °F (15.5 and 32.2 °C).
Power
Plug the power cord into a grounded electrical outlet. Turn the machine on by pressing the Power button located to the right of the screen.
Screen Calibration
Prior to your first use of your Cricut Expression 2 machine, it will run a screen calibration. Instructions on the screen will walk you through each step of the calibration. You will only have to complete the calibration process successfully once. If, for some reason, you wish to recalibrate the machine, please see page 24.
getting started |
7 |

Aft er you complete the screen calibrati on, agree to the end user license agreement, and review the warranty informati on, you will be ready to begin your fi rst project!
first project
1. on the home screen, press the Image butt on directly to the right of the preview mat.
2.Select one of the images by pressing the corresponding butt on.
3.the image you selected will be added to the Image Queue.
4.Press the home butt on located at the bott om right of the screen.
5. Press the Cut butt on located to the right of the preview mat.
6.Remove the clear plasti c protecti ve sheet from the cutting mat and mount a 12" x 12" (30.48 cm x 30.48 cm) piece of paper on the mat.
8 |
GEttING StARtED |
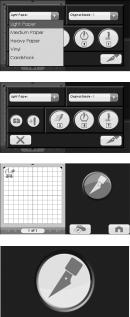
7.Select the material from the dropdown menu that most closely matches the paper you mounted on the mat.
8.Verify that the correct cutting tool has been inserted into the machine and has been set to the proper depth and press the Cut button.
9.Hold the mat up to the rollers and press the Load button at the bottom of the screen.
10.Press the Cut button.
11.When the cutting operation ends, press the Unload Mat button to eject the mat from the machine and peel the image from the mat.
What Your Cricut Expression 2 Machine Can Cut
The Cricut Expression 2 machine can cut a wide range of materials, from vellum and cardstock to poster board and vinyl. The Cricut Expression 2 machine can even cut thin chipboard with the use of the Multi-Cut function. More details about Multi-Cut can be found on page 28.
TIP: The repeated cutting of heavy materials may reduce the life of your Cricut Expression 2 machine’s cutting blade and mat. Replacement mats and blades can be purchased anywhere that Cricut products are sold.
getting started |
9 |
BASIC OpErATIOnS
Butt ons and Machine Controls
power — turns the machine on and off .
pause — stops the machine while in the middle of a cut. Pressing the Pause butt on again will start the cutting operati on where it was paused.
home — opens the Home screen.
Zoom — Press and hold the Zoom butt on on the machine console and then touch the image. to return to the normal view, release the Zoom butt on and tap the screen.
Cartridge Slots — the two cartridge slots provide you the ability to use all of your original Cricut cartridges as well as Cricut Imagine® cartridges. All original cartridges fi t in the left slot, while Imagine cartridges fi t in the right slot. Please note that Cricut Imagine Colors & Patt erns cartridges contain only color printi ng informati on and no image informati on that can be cut, and thus will not work with the Cricut Expression 2 machine.
uSB — this port allow you to connect the Cricut Expression 2 machine to a Gypsy® Handheld Design Studio for Cricut® or other design device and cut directly from that device.
1 of 1
home Screen
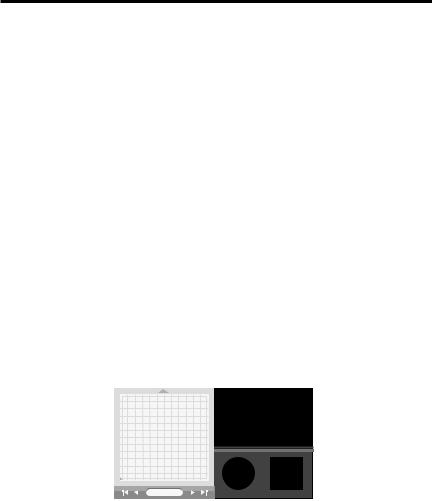
the home Screen is your starti ng point for every Cricut Expression 2 project. on this screen you will be able to see a preview of the current project as well as have access to image selecti on and the ability to makes changes to cut and other settings.
10 |
BASIC oPERAtIoNS |

Mat preview
the Mat preview area provides an overall view of your current project. Each image that has been added to the project will appear on the mat. Pressing an image will allow you to make changes to the image directly. Pressing the Edit icon will allow you to make changes to the image itself. For more details on editi ng an image, see page 15. Pressing the Delete icon will remove the image from the project. Pressing the Copy icon will duplicate the image, placing a second copy of it to the immediate right of the image.
If your project contains more than one mat, you can navigate among them using the navigati on keys below the mat preview area.
Mat navigati on Keys
Jump First — moves you to the fi rst mat in the project. If you are currently viewing the fi rst mat in the project, this butt on will be grayed out and unavailable for selecti on.
previous — moves you to the mat directly before to the one you are currently viewing. If you are currently viewing the fi rst mat in the project, this butt on will be grayed out and unavailable for selecti on.
page — contains an indicati on of which mat in the project is currently being displayed above, as well as a count of the number of mats contained in the project
next — moves you to the mat directly aft er the one that you are currently viewing. If you are currently viewing the last mat in the project, this butt on will be grayed out and unavailable for selecti on.
BASIC oPERAtIoNS |
11 |

Jump Last — moves you to the last mat in the project. If you are currently viewing the last mat in the project, this butt on will be grayed out and unavailable for selecti on.
navigati on Butt ons
to the right of the Mat Preview area, there are four navigati on butt ons which provide access to the other functi ons of the Cricut Expression 2 machine.
Image Butt on — opens the Image Screen, where you can select pictures, text, icons, and other elements to include in your project. For more informati on on the Image Screen, please see page 13.
Settings Butt on — opens the Settings Screen, where you can control a wide variety of settings for your project such as fit to page and Auto fill. For more informati on about the Settings Screen, please see page 17.
Cut Butt on — opens the Cut Screen, where you can control Cricut Expression 2 settings such as the pressure and speed of the cutting blade, enter multi - cut opti ons, as well as save and reuse cutting profi les for materials you work with oft en. Push this butt on when you are ready to cut your project. For more informati on about the Cut Screen, please see page 25.
Load/unload Butt on — loads and unloads the mat in preparation for cutting your project. For more information about this area, please see page 28.
12 |
BASIC oPERAtIoNS |
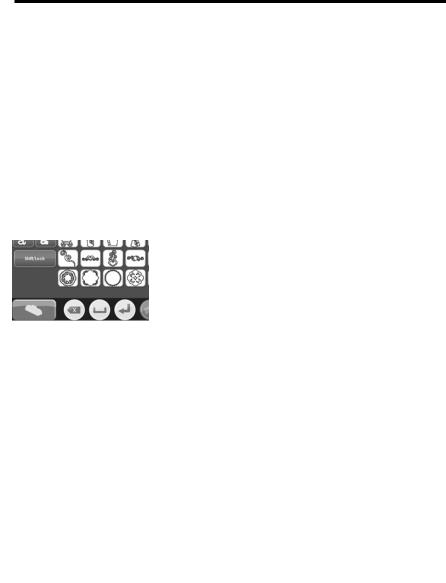
IMAGE SCrEEn
the Image Screen is the central locati on for selecti ng and editi ng images you want to include in your project.
Compati ble Cartridges
Your Cricut Expression 2 machine comes with preloaded internal cartridges. You can also use any original Cricut cartridges and Cricut Imagine Art cartridges for Cricut Expression 2 projects. Cricut Imagine Colors & Patt erns cartridges, however, contain only printi ng informati on and thus cannot be used with the Cricut Expression 2 machine.
Selecti ng Cartridges
If you insert an original cartridge into the Cricut Expression 2 machine, it will automati cally be displayed in Keypad Mode in the Image Screen. Inserti ng a Cricut Imagine cartridge by itself or along with an original cartridge will result in the Cricut Imagine images being automati cally displayed in Gallery Mode. to change the cartridge images which are currently being displayed, press the Cartridge butt on at the bott om left of the Image Screen and then select the cartridge you would like to be displayed.
original |
Internal |
Imagine |
Cartridge |
Cartridge |
Cartridge |
Selecti ng Images
there are two ways to view the images on your Cricut cartridges: Keypad Mode and Gallery Mode.
IMAGE SCREEN |
13 |

Keypad Mode
Keypad Mode features a grid of image keys familiar to Expression owners. to select an image to be included in your project while in Keypad Mode, simply press its butt on and it will be added to the Image Queue located at the top of the Image Screen.
You can use Keypad for all original and internal cartridges.
Gallery Mode
Gallery Mode features a strip of images from your Cricut Imagine cartridge which you can browse by touching an image and dragging it to the left or right. to select an image to be included in your project while in Gallery Mode, simply touch the image, press the green plus icon, and it will be added to the Image Queue. You can use Gallery Mode when viewing and working with images from Cricut Imagine cartridges.
Image Queue
the Image Queue contains the images which make up your current project. they are displayed in the order they will be cut on the paper when you begin the cutting process. You can navigate through the Image Queue either by touching and dragging
the images left and right or by using the arrow butt ons to the left and right of the Image Queue window.
Delete Image in Queue
to delete an image which is currently in the queue, press the image and then press the Delete icon on the large version of the image.
Copying Image in Queue
to duplicate an image which is currently in the queue, press the image and then press the Copy icon on the large version of the image. this will add a second copy of the image directly to the right of the fi rst copy in the queue.
14 |
IMAGE SCREEN |

 Edit Image in Queue
to edit an image which is currently in the queue, press the image and then press the Edit icon on the popup window. this will bring up the image in the Image Editor for you to make the desired changes.
Zoom Image in Queue
to zoom in on an image in the Image Queue to see a larger, more detailed view, press and hold the Zoom butt on on the machine console and then touch the image. to return to the normal view, release the Zoom butt on and tap the screen.
 Image Editor
You can adjust the size of your image in the Image Editor. to do so, press the Size butt on at the bott om of the screen.
If you want to adjust the size:
true Size
Relati ve Size
1.Select either True Size or relati ve Size for the image by pressing the corresponding butt on on the bott om row. True Size images are a fi xed height from the top of the image to the bott om. relati ve Size images adjust the height of the shape proporti onally based on the height
of other characters that are from the same cartridge.
2.Adjust the height of the image using the Decrease Value and Increase Value butt ons on the top row. You can see the
current size in the Size Value box between the two butt ons.
once you have made the desired changes to the image size, press the save butt on to conti nue to the Image Editor. You can cancel changes you have made to the image size by pressing the Cancel butt on. In the Image Editor you can make additi onal changes to the image size by pressing the Size butt on. Pressing the home butt on will return you to the Home screen.
IMAGE SCREEN |
15 |

Layered and Composite Images
Some images that come on the Cricut Imagine Art cartridges are separated into individual elements called layers. this separati on gives you an additi onal level of control over the size of each layer of the image in your project. Not only can each of these layers be individually changed to suit your needs, but they can also cut separately.
You can control whether an image from a Cricut Imagine Art cartridge is cut as a single image or in layers using the Composite and Layered butt ons at the bott om left of the Image Editor. Selecti ng Composite will cause the edited image to be cut as a single image. Selecti ng Layered will cut each layer of the image separately.
note: Selecti ng to cut a composite image will cause layers that are fully contained inside another layer to not be cut.
flip Verti cal, flip horizontal, and rotate
these three butt ons allow you to change the orientati on of the selected image.
flip Verti cal — fl ips the orientati on of the enti re image verti cally or fl ips a selected porti on of the image if it has been separated into layers.
flip horizontal — fl ips the orientati on of the enti re image horizontally or fl ips a selected porti on of the image if it has been separated into layers.
rotate — spins the enti re image 90 degrees clockwise or spins a selected porti on of the image if it has been separated into layers.
16 |
IMAGE SCREEN |

SETTInGS SCrEEn
|
|
|
|
|
|
|
|
|
|
|
8 |
|
8 |
|
|
|
|
|
|
|
|
|
|
|
|
||
|
|
|
|
|
|
|
|
|
|
|
|
||
|
|
|
|
|
|
|
|
|
|
|
|
||
|
|
|
|
|
|
|
|
|
|
||||
|
|
|
|
|
|
|
|
|
|
|
|
|
|
|
|
|
|
|
|
|
|
|
|
|
|
|
|
|
|
|
|
|
|
|
|
|
|
|
|
|
|
|
|
|
|
|
|
|
|
|
|
|
|
|
|
|
|
|
|
|
|
|
|
|
|
|
|
|
|
|
|
|
|
|
|
|
|
|
|
|
|
|
|
|
|
|
|
|
|
|
|
|
|
|
|
|
|
1 of 1
the Settings screen contains access to a variety of project settings, allowing you to manipulate the images in the project, the size of the paper and mat, as well as other settings which aff ect the functi ons of the enti re Cricut Expression 2 machine.
Similar to the Home page, you can see a preview of your current project in the Mat Preview secti on. If the project contains more than one page, you can move among the diff erent mats using the navigati on butt ons below the Mat Preview. For more informati on about navigati ng multi ple mats in the Mat Preview, please see page 11.
You can also tell which of the Settings are currently acti vated by looking at the various butt ons in the Settings screen.
8 |
Art Quanti ty |
|
this feature can be used to repeat all the images in your queue and minimize the amount of paper used for the project. this is oft en useful when you need several of each part of your project or wish to fi ll up the empty space on a page. When you press the Art Quanti ty butt on, you will see a popup window containing the Art Quanti ty controls.
You can change the number of ti mes the images are repeated by pressing the Decrease Value and Increase Value butt ons, then pressing the save butt on at the bott om right corner of the screen. You can cancel any changes you have made by pressing the Cancel butt on at the bott om left of the screen. the additi onal, repeated images will be added to the Mat Preview immediately following the selected images.
SEttINGS SCREEN |
17 |

8
project Quanti ty
this feature can be used to repeat the enti re project. this is oft en useful when you need to cut your project several ti mes. When you press the project Quanti ty butt on, you will see a popup window containing the Project Quanti ty controls.
You can change the number of ti mes the project is repeated by pressing the Decrease Value and Increase Value butt ons, then pressing the save butt on at the bott om left corner of the screen. You can cancel any changes you have made by pressing the Cancel butt on at the bott om right of the screen. When you cut a project repeatedly using this feature, you will be prompted aft er each project before conti nuing with the next. the maximum number of ti mes a project can be cut is nine.
fit to page
the fit to page butt on changes the size of the images in the project to fi t the enti re page. the Mat Preview provides a visual indicati on of the size of each image in the project. to return the images to their normal sizes, press the fit to page butt on again.
Auto fill
the functi on of the Auto fill butt on is similar to the Art Quanti ty feature. However, instead of choosing a specifi c number of ti mes to repeat all the project art, using Auto Fill repeats the project unti l the page is full. the additi onal, repeated images are refl ected in the Mat Preview. to go back to the original, non-repeated images, press the Auto fill butt on again.
Mat Size
the Mat Size butt on displays the current mat size being used in your project. If you want to change the mat size, press the Mat Size butt on and select the desired mat size. the two possible sizes are 12" x 12" (30.48 cm x 30.48 cm) and 12" x 24" (30.48 cm x 60.96 cm). the third butt on allows you to use the longer 12" x 24" mat in landscape
18 |
SEttINGS SCREEN |

orientati on rather than portrait. to save your selecti on, press the save butt on at the bott om right corner of the screen. You can cancel any changes you have made by pressing the Cancel butt on at the bott om left of the screen.
paper Size
the paper Size butt on allows you to choose a custom paper size for your project. When you press the paper Size butt on, you will see a popup window containing the Paper Size controls.
the current width and height are displayed in the boxes in the middle. to use paper which is either wider or longer, press the corresponding Increase butt on unti l you reach the desired value and then press the save butt on to save the changes. to use a more narrow or shorter page, press the corresponding Decrease butt on unti l you reach the desired value and then pressing the save butt on to save the changes. You can cancel the changes by pressing the Cancel butt on at the bott om left of the screen. Aft er altering the paper size, you will see the new paper size refl ected on the Mat Preview in the Settings area and on the Home page.
Start positi on
the Start positi on butt on allows you to change the locati on where the cutting blade begins your project on the page. the cutt er begins in the top left corner of the paper by default. When you press the Start positi on butt on you will see a popup window containing the Start Positi on controls.
to change the starti ng point, press the Increase and Decrease butt ons to choose a new starti ng point, then press the save butt on at the bott om right corner of the screen. You can cancel any changes you have made by pressing the Cancel butt on at the bott om left of the screen. Aft er altering the start positi on, the new start point will be refl ected on the Mat Preview and the images in the project will be moved to refl ect the new start point.
note: You can change the measurements units used to adjust the start point to be tenthsofinches,quartersofinches,millimetersandcenti metersinthemachinesettings
SEttINGS SCREEN |
19 |

secti on.thiscanhelpyoumoreaccuratelyadjustthestarti ngpointforthecuttingblade.For moreinformati onaboutchangingthestartpositi oninmachinesettings,pleaseseepage23.
Center point
the Center point butt on uses the center of the image to locate the shape in your project rather than the lower left corner of the image. For instance, if you were planning to cut a 8" x 10" photograph into an oval, using the Center Point functi on you could use the Start Positi on functi on to move the cutt er to the center of the photograph and select an oval shape. You could then use the Center Point functi on to line the center of the oval up with the center of the photograph.
If there are multi ple images on the mat, they will all be combined using each image's center point, creati ng a single monolithic image to be cut. this opti on is not available for projects which contain more than a single page. to return the images to the regular locati on, press the Center point butt on again.
fit to Length
the fit to Length butt on allows you to select a horizontal size you would like your
fi nished project to be. When you press the fit to Length butt on you will see a popup window containing the Fit to Length controls. the current length of the project is listed in the center box. to change the length, press the Increase and Decrease butt ons. When you have entered the desired length, press the save butt on at the bott om right corner of the screen. You can cancel any changes you have made by pressing the Cancel butt on at the bott om left of the screen.
Load Last
PressingtheLoadLastbutt onindicatesthatyouwouldliketousetheleft overpaperfrom thelastprojectforthecurrentproject.theCricutExpression2machinekeepstrackofwhat partsofthepaperwereusedforthelastproject.WhentheLoadLastbutt onisselected,the newprojectwillbeautomati callyrepositi onedtousetheremainingspaceonthepaper.the CricutExpression2machinewillautomati callyselecttheLoadLastsettingaft ereachcut.
20 |
SEttINGS SCREEN |

Apply All
the Apply All page is an easy way to apply multi ple settings to the images in a project at the same ti me.
Using the controls in this area, you can select settings for each image in your current project such as choosing:
true or Relati ve Size Flip Verti cal
Flip Horizontal Rotate
Size Paper Saver Kerning
 paper Saver
paper Saver automati cally arranges the images in your project so that it uses the least amount of paper possible.
 Kerning
this feature allows you to change the spacing between images. A negati ve value will decrease the spacing between images, and a positi ve value will increase the spacing.
Aft er selecti ng each of the areas you wish to alter, press the Save butt on at the bott om right corner of the screen to make the changes. You can cancel any changes you have made by pressing the Cancel butt on at the bott om left of the screen. Changes made using Apply All will override any previous changes made to images in the project.
If you want to undo changes that have previously been made using the Apply All page, press the undo Apply All butt on.
SEttINGS SCREEN |
21 |

tools
the tools butt on allows you to defi ne and save profi les for tools you work with oft en. Each profi le contains a label for the tool and a number which specifi es the depth that should be set for the tool on the blade assembly prior to cutting. to save a new Material profi le:
1. Press the new Tool butt on.
2.Enter a name for the tool.
3.Press the save butt on.
If you decide against saving the new profi le, you can cancel the profi le creati on by pressing the Cancel butt on instead of save. You can delete a tool by selecti ng it in the dropdown menu and pressing the Delete butt on. You can edit the name of a previously created custom tool by pressing the Edit butt on, making the desired changes, and then pressing the save butt on.
Materials
the Materials butt on allows you to defi ne and save profi les for materials you work with oft en. Each profi le contains informati on about the speed, pressure, multi -cut, and cutting tool used while working with the material. to save a new Material profi le:
1.Press the new Material butt on. 
2.Enter a name for the material profi le.
3.Press the save butt on.
4.Select the desired tool.
5.Enter the desired pressure value.
6.Enter the desired Speed value.
7.Enter the desired Multi -Cut value.
8.Press the save butt on.
22 |
SEttINGS SCREEN |

If you decide against saving the new profi le, you can cancel the profi le creati on by pressing the Cancel butt on instead of save. You can delete a profi le by selecti ng it in the dropdown menu and pressing the Delete butt on.
Machine Settings
the Machine Settings butt on opens a screen which contains four settings which control the overall behavior of your Cricut Expression 2 machine.
the Increments butt ons allow you to select the measurement increments. You can select from:
• 1/4"
•1/10"
• centi meters
• millimeters
the reset Machine Settings butt on allows you to return all of the settings on your Cricut Expression 2 machine to the factory defaults. these defaults are:
project Quanti ty: 1
Image Quanti ty: |
1 |
fit to page: |
off |
Auto fill: |
off |
Mat Size: |
12" x 12" |
paper Size: |
12" x 12" |
Start Locati on: |
0,0 |
Center point: |
off |
fit to Length: |
off |
Measure: |
Inches |
Increments: |
1/4" |
Light: |
During Cutting |
Material: |
Medium Paper |
SEttINGS SCREEN |
23 |

the Cutting Light dropdown allows you to choose from the following opti ons:
•Always on
•Always off
•During Cutting
the Language Selecti on dropdown allows you to select whether the labels, instructi ons, and other informati on displayed in the Cricut Expression 2 machine in a language other than English. Additi onal languages will be available at a later date.
Aft er making any change to the Machine Settings, pressing the save butt on will put the changes into eff ect. You can cancel any changes you have made by pressing the Cancel butt on at the bott om left of the screen.
 Screen Calibrati on
the Screen Calibrati on butt on allows you to recalibrate the touchscreen. Aft er pressing the Screen Calibrati on butt on, press each of the fi ve crosshairs on the screen as they appear and the screen will be recalibrated.
 About
About
the About secti on allows you to review important informati on such as the end-user license agreement, warranty informati on, and the soft ware version of the Cricut Expression 2 machine.
24 |
SEttINGS SCREEN |

CuT SETTInGS SCrEEn
the Cut Settings Screen contains settings which allow you to control the cutting of your project.
Material Selecti on
If you have any previously defi ned materials set up for your Cricut Expression 2 machine, you can use this dropdown menu to select this material and proceed by loading your mat and pressing the Cut butt on. You can also select one of the pre-defi ned materials in the dropdown menu. If you do not wish to select a material, you can also edit the pressure, speed, and multi -cut values directly by selecti ng the corresponding butt on.
You can also defi ne a new material by pressing the new Material butt on. Additi onal informati on about the process of defi ning a new material can be found on page 22.
Tool Selecti on
If you have any previously defi ned tools set up for your Cricut Expression 2 machine, you can use this dropdown menu to select this tool and proceed by loading your mat and pressing the Cut butt on. You can also select one of the pre-defi ned tools in the dropdown menu. the number aft er the name of each of the pre-defi ned tools specifi es the depth that should be set for that tool on the blade assembly prior to cutting.
You can also defi ne a new tool by pressing the new Tool
butt on. Additi onal informati on about the process of defi ning a new material can be found on page 22.
CUt SEttINGS SCREEN |
25 |

Cutting Heavyweight or Lightweight Materials
Your Cricut Expression 2 machine can cut a variety of materials. For an optimal cut on lightweight materials such as vellum or heavyweight materials such as thin cardstock, you may need to adjust the blade depth, speed of the cut, or cut pressure. When you find settings that work well for you, be sure to save them so that you can use them again in the future. For details on how to define a new material, please see the Material Settings section on page 22.
Adjusting Blade Depth
Remove the cutting blade assembly from the Cricut Expression 2 machine to change the setting on the adjustment knob. However, if the arrow is facing forward, you can leave the cutting blade assembly attached and simply spin the top of the adjustment knob to change the setting.
WARNING! Always unplug your Cricut Expression 2 machine before removing the cutting blade assembly!
To remove the cutting blade assembly (Figure 1), first turn the Cricut Expression 2 machine off. Locate the screw and turn it counterclockwise until it loosens enough that you can swing the screw to the right (Figure 2). Be careful not to loosen the screw too much, or it will fall out. Remove the cutting blade assembly from the machine. Next, locate the adjustment knob (Figure 3) on the top of the cutting blade assembly and turn it to your desired setting.
Figure 1 |
Figure 2 |
Figure 3 |
The smaller the number on the adjustment knob, the shorter the blade depth will be. Shorter blade depths are recommended for lightweight materials and longer blade depths for heavier materials. Reinstall the cutting blade assembly into the Cricut Expression 2 machine by reversing the procedure to remove the cutting blade assembly. Test the setting on a scrap piece of paper and make adjustments as necessary.
26 |
cut Settings Screen |
 Loading...