

Page 1

Page 2

COPYRIGHT NOTICE
Copyright 2007 Imerge Ltd. All rights reserved.
The AudioServer XiVA™ software and this
documentation are copyright materials. No part of
the AudioServer software or this documentation may
be reproduced, transmitted, transcribed, stored in
a retrieval system, or translated into any language,
or computer language, in any form or by any means
without prior written permission of Imerge.
XiVA™ is a registered trademark of Imerge Ltd.
Adagio™ is a trademark of Crestron Electronics, Inc.
All other product names are trademarks or registered
trademarks of their respective owners.
Crestron touchpanel interfaces are copyright Crestron
Electronics, Inc.
Cover art illustration from the XiVA™ on-line service
©2004 Muze Inc.
Music recognition technology and related data are
provided by Gracenote and the Gracenote CDDB®
Music Recognition ServiceSM. Gracenote is the industry
standard in music recognition technology and related
content delivery. For more information go to www.
gracenote.com
CD and music-related data from Gracenote, Inc.,
copyright © 2000-2005 Gracenote. Gracenote CDDB®
Client Software, copyright 2000-2005 Gracenote.
This product and service may practice one or more of
the following U.S. Patents: #5,987,525; #6,061,680;
#6,154,773, #6,161,132, #6,230,192, #6,230,207,
#6,240,459, #6,330,593, and other patents issued or
pending. Services supplied and/or device manufactured
under license for following Open Globe, Inc. United
States Patent 6,304,523.
Gracenote and CDDB are registered trademarks of
Gracenote. The Gracenote logo and logotype, and
the “Powered by Gracenote” logo are trademarks of
Gracenote.
MPEG Layer-3 audio coding technology licensed from
Fraunhofer IIS and THOMSON multimedia.
The information in this guide is believed to be correct as
of the date of publication. However our policy is one of
continuous development and so the information in this
guide is subject to change without notice, and does not
represent a commitment on the part of Imerge.
This guide was designed and produced by Imerge Ltd.
XIVA™ NEW MEDIA BROUGHT TO LIFE
XiVA™ is a highly portable software framework that
powers next-generation media appliances. XiVA™ blends
hard disk technology, advanced software design, and
embedded Internet technology to provide amazing
features; audio, video, text, graphics, and all forms of
streaming new media are all brought to life through a
wealth of interactive user interface options. The next
generation media appliance is powered by XiVA™.
Page 3

CONTENTS
Safety Instructions.................................................................................................................................................................................1
•
General Precautions......................................................................................................................................................................1
•
Important Safety Instructions.......................................................................................................................................................2
Important Safety Notices..............................................................................................................................................................3
•
Quick Start Guide..................................................................................................................................................................................4
English............................................................................................................................................................................................4
•
•
French.............................................................................................................................................................................................6
•
German..........................................................................................................................................................................................8
•
Spanish.........................................................................................................................................................................................10
•
Italian...........................................................................................................................................................................................12
Introduction.........................................................................................................................................................................................14
Specications...............................................................................................................................................................................14
•
Controls and Connections - Front View.....................................................................................................................................15
•
•
Controls and Connections - Rear View......................................................................................................................................16
•
Controls and Connections - Remote Control............................................................................................................................17
•
Switching On and Off.................................................................................................................................................................18
•
The Function Menu.....................................................................................................................................................................18
Recording Music..................................................................................................................................................................................19
Playing Music.......................................................................................................................................................................................20
The Audio Library........................................................................................................................................................................21
•
Audio Library Overview..............................................................................................................................................................22
•
•
Audio Library Navigation............................................................................................................................................................23
•
The Search Function....................................................................................................................................................................26
•
The Mark Function......................................................................................................................................................................26
•
Playback Information..................................................................................................................................................................27
•
Switching Audio Outputs............................................................................................................................................................28
•
Controlling Playback...................................................................................................................................................................28
•
Now Playing Screen Options.......................................................................................................................................................28
The Play Queue............................................................................................................................................................................29
•
Organising Your Music Collection......................................................................................................................................................29
Playlists.........................................................................................................................................................................................29
•
Editing the Audio Library............................................................................................................................................................30
•
System Set Up......................................................................................................................................................................................32
The Front Panel Interface...................................................................................................................................................................35
Using Your Audio Server with a Home Computer.............................................................................................................................37
•
The Remote User Interface.........................................................................................................................................................37
•
Media Transfer.............................................................................................................................................................................38
•
Remote Back Up and Restore.....................................................................................................................................................40
The Crestron Touchpanel Interface...................................................................................................................................................41
Music Browser..............................................................................................................................................................................42
•
•
Selection Mode............................................................................................................................................................................43
Now Playing.................................................................................................................................................................................44
•
Terms and Conditions..........................................................................................................................................................................45
Return and Warranty Policies.....................................................................................................................................................49
•
Page 4

Page 5

PRECAUTIONS
GENERAL PRECAUTIONS
When installing the equipment ensure that:
the ventilation holes are not covered.
•
air is allowed to circulate freely around the
•
equipment.
it is placed on a vibration free surface.
•
it will not be exposed to excessive heat, cold,
•
moisture or dust.
it will not be exposed to direct sunlight.
•
it will not be exposed to electrostatic discharges.
•
it is not installed vertically or tilted.
•
In addition, never place heavy objects on the equipment.
If a foreign object or water does enter the equipment,
contact your nearest dealer or service center.
It is advisable when leaving the house, or during a
thunderstorm, to disconnect the equipment from the
mains supply.
WARNINGS
TO REDUCE THE RISK OF FIRE OR ELECTRIC SHOCK, DO
NOT EXPOSE THIS APPLIANCE TO RAIN OR MOISTURE.
Do not remove the cover from the equipment. There
are no user serviceable parts inside, and opening the
case will invalidate your warranty.
Do not pull out the plug by pulling on the mains lead;
grasp the plug.
Do not insert anything into the equipment through
the ventilation holes.
Do not cover the ventilation holes with any items such
as tablecloths, newspapers, curtains, etc. To avoid
overheating do not position the SoundServer near
heat sources, and ensure that the ventilation holes are
not blocked.
Do not place naked ame sources, such as lighted
candles, on the equipment.
Do not handle the mains lead with wet hands.
Allow adequate ventilation. Leave a gap of 0.1m on
all sides of the unit.
Do not splash or spill water on the unit. Do not place
objects lled with liquid (such as vases) on the unit.
CAUTION: This product contains a lithium battery.
Danger of explosion if battery is incorrectly replaced.
Replace only with the same or equivalent type
recommended by Imerge. Dispose of batteries according
to the manufacturer’s instructions.
CD HANDLING PRECAUTIONS
Handle discs carefully so as not to damage or scratch
•
the front side. Always keep the disc surface clean.
To protect the disc avoid placing it in the following
•
locations:
In direct sunlight or near a source of heat like a
heater.
In a place which is damp or dirty.
In a place which could be exposed to rain, such
as near a window.
Do not use a disc with a special shape
•
For best performance when recording from a CD
•
try to maintain a temperature of 35°C or less in the
room where the SoundServer is located.
DTS Encoded Discs
CAUTION - when playing DTS encoded CDs excessive
noise will be heard on the analog outputs jacks of the
SoundServer. To avoid possible damage to the audio system
you should ensure that the correct connections are made to
your amplication system for replaying this type of disc.
MAINS PRECAUTIONS
Your Audio Server complies with the household power
and safety requirements in your area.
IMPORTANT: (for UK version only)
This apparatus is tted with an approved moulded 13
amp plug. To change a fuse in this type of plug proceed
as follows:
Remove fuse cover and fuse.
1.
Fix new fuse which should be a BS1362 5A, A.S.T.A
2.
or BSI approved type.
Ret the fuse cover.
3.
If the tted plug is not suitable for your socket outlets, it
should be cut off and an appropriate plug tted in its place.
If the mains plug contains a fuse, this should have a
value of 5A. If a plug without a fuse is used, the fuse at
the distribution board should not be greater than 5A.
Note: The severed plug must be destroyed to avoid a
possible shock hazard should it be inserted into a 13A
socket elsewhere.
How to connect a plug
The wires in the mains lead are colored in accordance
with the following code:
The BLUE wire must be connected to the terminal
1.
which is marked with the letter “N” or colored
BLACK.
The BROWN wire must be connected to the terminal
2.
which is marked with the letter “L” or colored RED.
The GREEN/YELLOW-GREEN wire must be connected
3.
to the terminal which is marked by the letter “E” or
by the safety earth symbol or colored green or
green-and-yellow.
Before replacing the plug cover, make certain that the
cord grip is clamped over the sheath of the lead - not
simply over the three wires.
COPYRIGHT NOTICE
This equipment must not be used for unauthorized
duplication of CDs or any other works protected by
copyright. No license to infringe copyright is granted
by the sale of this equipment.
Recording and playback of some material may require
permission. For further information refer to the
following:
Copyright Act 1956
•
Dramatic and Musical Performers Act 1958
•
Performers Protection Acts 1963, and 1972
•
Any subsequent statutory enactments and orders.
•
CAUTION
When disposing of used batteries, please comply
with governmental regulations or environmental
regulations or environmental public instructions that
apply in your country or area.
STANDBY BUTTON
When this button is pressed once, the power turns On
and information will appear on the display. When
pressed again, press the Off action key or the ; key
on the remote control to switch to Off mode.
When the unit is in Off mode the “Standby” indicator
is lit; the apparatus is not disconnected from the AC
mains supply in this mode.
1
Page 6
IMPORTANT SAFETY INSTRUCTIONS
READ INSTRUCTIONS - All the safety and
operating instructions should be read before
the product is operated.
KEEP INSTRUCTIONS - The safety and operating
instructions should be kept for future
reference.
HEED WARNINGS - All warnings on the product
and in the operating instructions should be
followed.
FOLLOW INSTRUCTIONS - All operating and use
instructions should be followed.
CLEANING - Unplug this product from the wall
outlet before cleaning. The product should
be cleaned only with a soft dry cloth. Never
clean with furniture wax, benzine, insecticides
or other volatile liquids since they may
corrode the cabinet.
ATTACHMENTS - Do not use attachments not
recommended by the product manufacturer
as they may cause hazards.
WATER AND MOISTURE - Do not use this product
near water - for example near a bathtub,
wash bowl, kitchen sink, or laundry tub; in a
wet basement; or near a swimming pool; and
the like.
ACCESSORIES - Do not place this product on
an unstable cart, stand, tripod, bracket, or
table. The product may fall, causing serious
injury to a child or adult, and serious damage
to the product. Use only with a cart, stand,
tripod, bracket or table recommended by the
manufacturer, or sold with the product. Any
mounting of the product should follow the
manufacturer’s instructions and should use
a mounting accessory recommended by the
manufacturer.
CART - A product and cart combination should be
moved with care. Quick stops, excessive force
and uneven surfaces may cause the product
and cart combination to overturn:
VENTILATION - Slots and openings in the cabinet
are provided for ventilation and to ensure
reliable operation of the product and to
protect it from overheating. Do not block
any ventilation openings. The openings
should never be blocked by placing the
product on a bed, sofa, rug or other similar
surface. This product should not be placed
in a built-in installation such as a bookcase
or rack unless proper ventilation is provided.
Install in accordance with the manufacturer’s
instructions.
POWER SOURCES - This product should be
operated only from the type of power source
indicated on the marketing label. If you are
not sure of the type of power supply to your
home, consult your product dealer or local
power company.
LOCATION - The appliance should be installed in
a stable location.
NONUSE PERIODS - The power cord of the
appliance should be unplugged from the
outlet when left unused for a long period
of time.
GROUNDING OR POLARIZATION - If this product
is equipped with a polarized alternating
current line plug (a plug having one blade
wider than the other), it will t into the outlet
only one way. This is a safety feature. If you
are unable to insert the plug fully into the
outlet, try reversing the plug. If the plug does
not t into the outlet, contact your electrician
to replace your obsolete outlet. Do not
defeat the safety purpose of the polarized
plug. If this product is equipped with a threewire grounding type plug, a plug having a
third (grounding) pin, it will only work in a
grounding type power outlet. This is a safety
feature. If you are unable to insert the plug
into the outlet, contact your electrician to
replace your obsolete outlet. Do not defeat
the safety purpose of the grounding type
plug.
POWER CORD PROTECTION - Power-supply cords
should be protected from being walked on
or pinched particularly at plugs, convenience
receptacles, and the point where they exit
from the product.
OUTDOOR ANTENNA GROUNDING - If an outside
antenna or cable system is connected to the
product be sure the antenna or cable system
is grounded so as to provide some protection
against voltage surges and built-up static
charges. Article 810 of the National Electric
Code. ANSI/NFPA70 provides information
with regard to proper grounding of the mast
and supporting structure, grounding of the
lead-in wire to an antenna discharge unit,
connection to grounding electrodes, and
requirements for the grounding electrode.
See Figure A.
LIGHTNING - For added protection for this
product during a lightning storm, or when it is
left unattended and unused for long periods
of time, unplug it from the wall outlet and
disconnect the antenna or cable system. This
will prevent damage to the product due to
lightning and power-line surges.
POWER LINES - An outside antenna system
should not be located in the vicinity of
overhead power lines or other electric light or
power circuits, or where it can fall into such
power lines or circuits. When installing an
outside antenna system, extreme care should
be taken to keep from touching such power
lines or circuits as contact with them might
be fatal.
OVERLOADING - Do not overload wall outlets,
extension cords or integral convenience
receptacles as this can result in a risk of re or
electric shock.
OBJECT AND LIQUID ENTRY - Never push
objects of any kind into this product through
openings as they may touch dangerous
voltage points or short-out parts that could
result in a re or electric shock. Never spill
liquid of any kind on the product.
SERVICING - Do not attempt to service this
product yourself as opening or removing
covers may expose you to dangerous voltage
or other hazards. Refer all servicing to
qualied service personnel.
DAMAGE REQUIRING SERVICE - Refer all servicing
to qualied service personnel. Servicing
is required when the apparatus has been
damaged in any way, such as power-supply
cord or plug is damaged, liquid has been
spilled or objects have fallen into the
apparatus, the apparatus has been exposed to
rain or moisture, does not operate normally,
or has been dropped.
REPLACEMENT PARTS - When replacement parts
are required, be sure the service technician
has used replacement parts specied by the
manufacturer or have the same characteristics
as the original part. Unauthorized
substitutions may result in re, electric shock,
or other hazards.
SAFETY CHECK - Upon completion of any
service or repairs to this product, ask the
service technician to perform safety checks
to determine that the product is in proper
operating condition.
WALL OR CEILING MOUNTING - The product
should not be mounted to a wall or ceiling.
HEAT - Do not install near any heat source such
as radiators, heat registers, stores, or other
apparatus (including ampliers) that produce
heat.
The lightning ash with arrowhead symbol, within an
equilateral triangle, is intended to alert the user to the
presence of uninsulated “dangerous voltage” within the
product’s enclosure that may be of sufcient magnitude to
constitute a risk of electric shock to persons.
The exclamation point within an equilateral triangle is
intended to alert the user to the presence of important
operating and maintenance (servicing) instructions in the
literature accompanying the appliance.
2
Page 7

IMPORTANT SAFETY
NOTICES
The serial number for this equipment is located on the
rear panel. Please write this serial number on your
enclosed product registration form and keep it in a
secure area. This is for your security.
U.S. MODEL
CAUTION: This product satises FCC regulations when
shielded cables and connectors are used to connect the
unit to other equipment. To prevent electromagnetic
interference with electric appliances such as radios
and televisions, use shielded cables and connectors for
connections.
Note: This equipment has been tested and found to
comply with the limits for a Class B digital device,
pursuant to Subpart J, Part 15 of the FCC rules. These
limits are designed to provide reasonable protection
against harmful interference in a residential
installation. This equipment generates, uses, and can
radiate radio frequency energy and, if not installed
and used in accordance with the instructions, may
cause harmful interference to radio communications.
However, there is no guarantee that interference will
not occur in a particular installation. If this equipment
does cause harmful interference to radio or television
reception, which can be determined by turning the
equipment off and on, the user is encouraged to try
to correct the interference by one or more of the
following measures:
Reorient or relocate the receiving antenna.
•
Increase the separation between the equipment
•
and receiver.
Connect the equipment into an outlet on a
•
circuit different from that to which the receiver is
connected.
Consult the dealer or an experienced radio/TV
•
technician for help.
Changes or modications may cause this unit to fail to
comply with Part 15 of the FCC Rules and may void the
user’s authority to operate the equipment.
EUROPEAN MODEL
Note: This product has been designed and type-tested
to comply with the limits set out in EN55013, EN55020,
EN60950, EN55022: 1998 CLASS B4, EN55024: 1998, FCC
RULES PART 15 SUBPART B CLASS B. AS/NZS 3548:1995
CLASS B
CAUTION:
LASER SAFETY: This unit employs a LASER. Only a
qualied person should remove the cover or attempt to
service the device, due to possible eye injury.
“CAUTION-USE OF CONTROLS OR ADJUSTMENTS OR
PERFORMANCE OF PROCEDURE OTHER THAN THOSE
SPECIFIED HEREIN MAY RESULT IN HAZARDOUS
RADIATION EXPOSURE.”
Use the correct power cord for your country:
CAUTION
Use of controls or adjustments or performance of
•
procedures other than those specied herein may
result in hazardous radiation exposure.
The use of optical instruments with this product
•
will increase eye hazard.
Information to User
Alteration or modications carried out without
appropriate authorization may invalidate the user’s
right to operate the equipment.
CANADIAN MODEL
Note: This Class B digital apparatus complies with
Canadian ICES-003.
Cet appareil numérique de la Classe B est conforme à
la norme NMB-003 du Canada.
CAUTION: TO PREVENT ELECTRIC SHOCK, MATCH WIDE
BLADE OF PLUG TO WIDE SLOT, FULLY INSERT.
ATTENTION: POUR ÉVITER LES CHOCS ÉLECTRIQUES,
INTRODUIRE LA LAME LA PLUS LARGE DE LA FICHE DANS
LA BORNE CORRESPON-DANTE DE LA PRISE ET POUSSER
JUSQU’AU FOND.
Waste electrical products must not be disposed of with
household waste. This equipment should be taken to
your local recycling center for safe treatment.
Les produits électriques usagés ne doivent en aucun
cas être jetés avec les ordures ménagères. Cet appareil
doit être apporté à la déchetterie pour subir un
traitement adapté.
Elektrische Geräte dürfen nicht mit dem Hausmüll
entsorgt werden. Wenden Sie sich für eine
umweltgerechte Entsorgung dieser Geräte an Ihren
örtlichen Entsorgungsbetrieb.
I dispositivi elettrici non devono essere gettati insieme
ai riuti domestici. Tali apparecchiature devono essere
consegnate al centro di riciclaggio locale per il corretto
smaltimento.
Los dispositivos electrónicos no deben desecharse
junto con los residuos domésticos. Este tipo de
aparatos debe llevarse al centro de reciclaje más
cercano para su adecuado tratamiento.
3
Page 8

QUICK START GUIDE
1
2
3 4
1
3
2
0
5
6
9
4
7
8
+
_
+
_
Now
Playing
2
1
3
4
5
FRONT PANEL
The following controls are available on the
front panel of your Audio Server.
MENU button: Press this button to display
1.
the main front panel functions screen on
the LCD display of your Audio Server.
Front panel action buttons: These four
2.
buttons have assignable functions as
indicated by the labels at the bottom
of the LCD display. For example, in the
display opposite, the Setup action button
will display the Set Up options.
Navigation buttons: Move up, down, left
3.
and right through the front panel menu
system. The button in the center is used
to select items.
Transport buttons: Control the playback of music on
4.
the currently selected audio output.
REMOTE CONTROL
Your Audio Server remote control is used to control the
television user interface.
Menu key: Displays the Function Menu on the
1.
television user interface.
Alphanumeric keypad: Use these keys to enter text
2.
and numbers where appropriate.
Navigation keys: Move up, down, left and right
3.
through the television user interface. The OSelect
button in the center is used to select items.
Transport keys: Control the playback of music on
4.
the currently selected audio output. The NOutput
key is used to change the currently selected audio
output.
Browse key: Displays the main Audio Library screen
5.
on the television user interface.
Fig. A - Front Panel Display
RECORDING FROM A CD
Press the OPEN/CLOSE button on the front panel to
•
open the CD tray.
Place a CD in the tray.
•
Press the OPEN/CLOSE button again to close the CD
•
tray.
If possible, your Audio Server will automatically use
the Gracenote Music Recognition Service to obtain
information about the CD.
Using the television user interface:
•
•
•
From the list that appears use the U and V keys to
choose a recording quality and press the OStart key.
Note: You can listen to music in your Audio Library while
a CD is being recorded.
Note: It is also possible to record a CD using the front
panel interface, refer to page 35 for details.
Press the JMenu key on your Audio Server remote
control to display the Function Menu.
Use the U and V keys to highlight the CD Drive
option and press the OSelect key.
Press the M Record key to begin the recording
process.
Fig. B - Remote Control
Fig. C - TV User Interface
4
Page 9
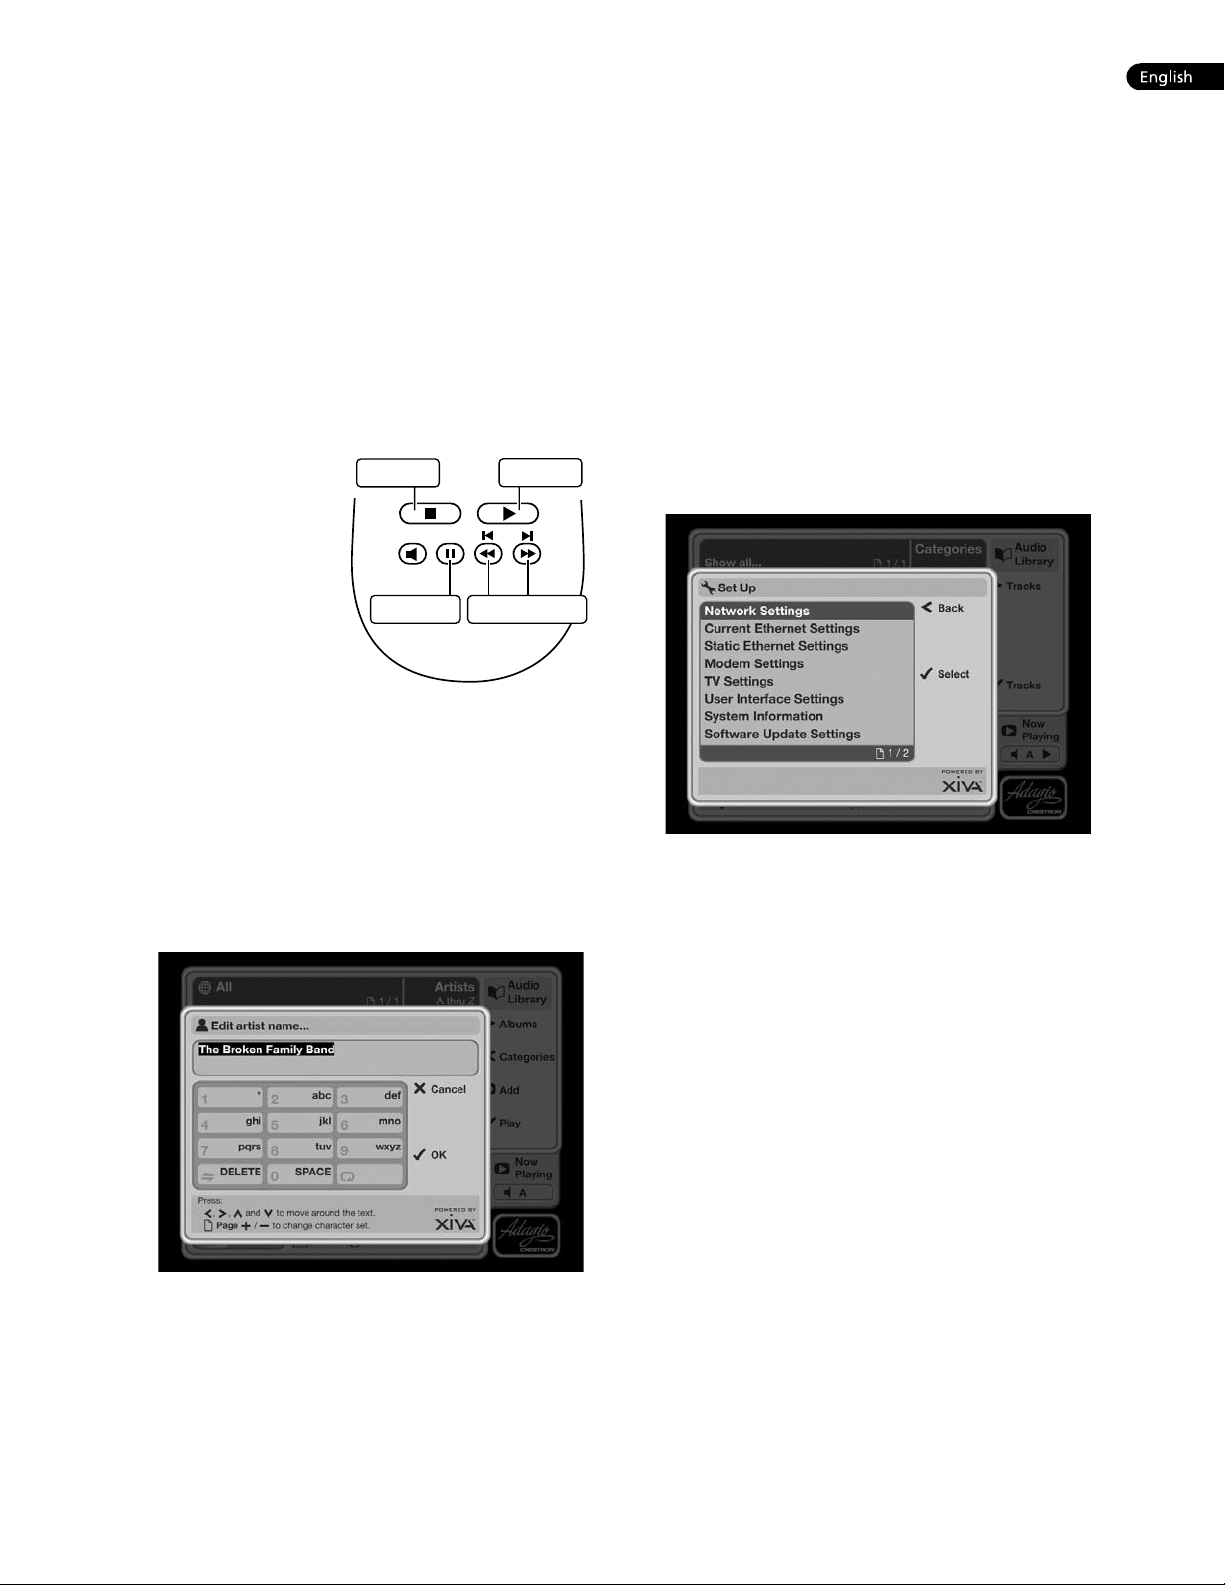
PLAYING MUSIC
Play key
Stop key
Pause key Skip/Seek keys
Display the Audio Library by pressing the àBrowse
•
key on the remote control.
The Audio Library menu allows you to choose how you
want to browse your music collection. You can browse
by track, album, artist, genre, year, era or playlist.
Press the U and V keys to step between categories.
•
For example, if you select Albums you will see an
alphabetical list of your album titles.
To play music
Use the U and V keys to highlight the item you
•
would like to play.
Press the T key to view the contents of the selected
•
item.
Press the OPlay key to begin playback.
•
To stop play
Press the g key on
•
the front panel or
the Audio Server
remote control.
To pause play
Press the h key on
•
the front panel or
your Audio Server
remote control.
To skip to the next or
previous track
Press the f or e key on the front panel or your
•
Audio Server remote control.
To seek within a track
Hold down the d or c key on the front panel or
•
your Audio Server remote control.
Play resumes from the new position when you release
the key.
ENTERING TEXT
When text is editable using the Audio Server remote
control, the text entry screen will be displayed:
To enter text using the alphanumeric keypad
Use the S and T keys to move the cursor to the
•
required position.
Use the keys on the alphanumeric keypad to enter
•
a letter.
For example, to enter S press the 7 key four times,
because S is the fourth letter on the 7 key.
Press the DELETE key on your Audio Server remote
•
control to delete characters.
Press the G Page +/- key to toggle the character
•
set and switch between upper-case and lower-case
letters.
CONNECTING TO THE INTERNET AND
CRESTRON NETWORK
Press the JMenu key on your Audio Server remote
•
control.
Use the U and V keys to highlight the Set Up
•
option and press the OSelect key.
The Set Up menu is displayed:
Press the OSelect key to open the Network Settings
•
screen and select between Ethernet and Modem as
your connection type.
Connecting via Ethernet
Use the U and V keys to highlight the Network
•
Settings option and press the OSelect key.
If you are using a broadband router or connecting via a
home network with DHCP enabled, select DHCP as the
mode. Otherwise select Static and enter your Ethernet
details manually in the IP Address, Subnet Mask,
Gateway and DNS elds in Static Ethernet Settings.
Note: When making changes to the Static Ethernet
Settings it may be necessary to switch your Audio Server
off and then on again in order for the changes to take
effect.
Connecting via modem
Use the U and V keys to highlight the Modem
•
Settings option and press the OSelect key.
Enter your ISP details in the Username, Password and
Telephone No. elds.
5
Page 10
1
2
3 4
1
3
2
0
5
6
9
4
7
8
+
_
+
_
Now
Playing
2
1
3
4
5
GUIDE DE DÉMARRAGE RAPIDE
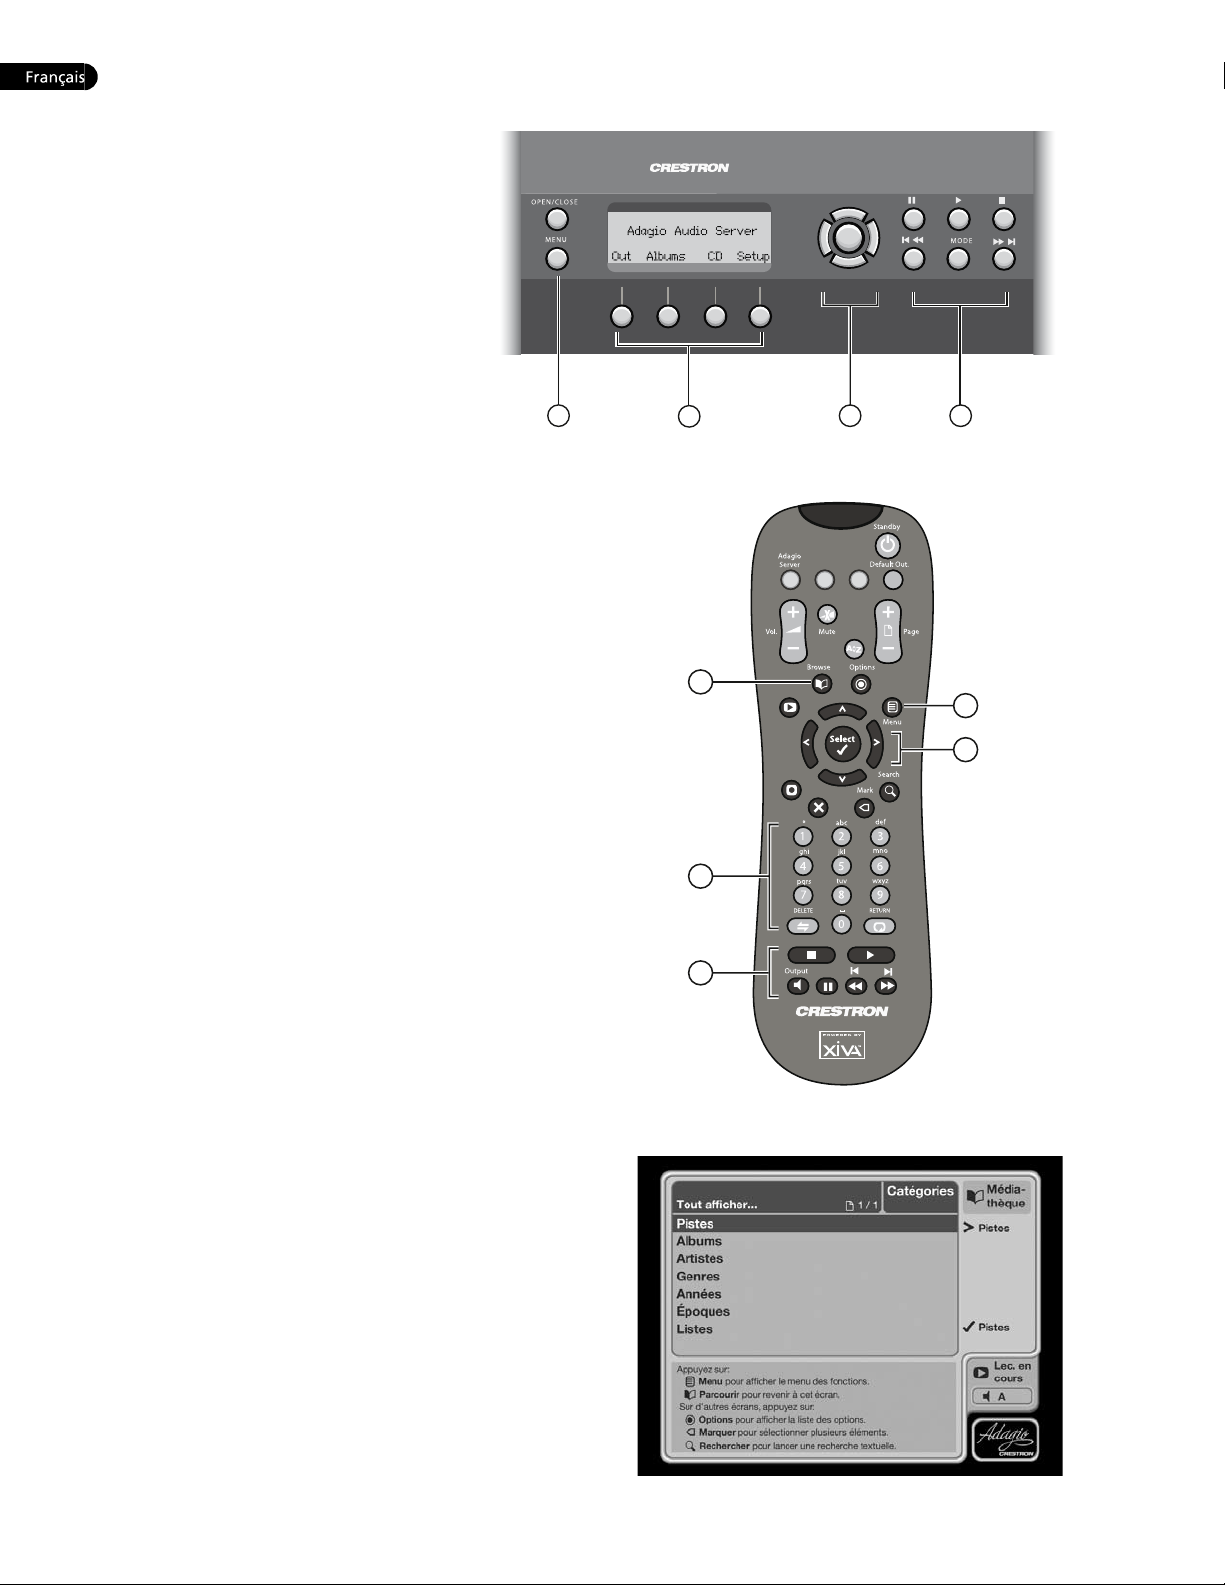
PANNEAU AVANT
Une sélection de contrôles est disponible sur le
panneau avant du serveur audio.
1.
Bouton MENU: appuyez sur ce bouton
pour afcher les principales fonctions de
l’écran du panneau avant sur l’afchage
LCD de votre serveur audio.
2.
Touches d’action du panneau avant:
ces quatre touches ont des fonctions
assignables, comme indiqué par les
inscriptions au bas de l’afchage LCD.
Par exemple, dans l’illustration ci-contre,
la touche d’action Congurer afche les
options Conguration.
3.
Touches de navigation: elles permettent de
naviguer vers le haut, le bas, la gauche et
la droite dans le menu système du panneau avant.
Le bouton au centre permet de sélectionner les
éléments.
4.
Touches de transport: elles permettent de contrôler la
lecture de la musique sur la sortie audio sélectionnée.
TÉLÉCOMMANDE
La télécommande du serveur audio permet de contrôler
l’interface utilisateur TV.
1.
Touche Menu: cette touche permet d’afcher le
Menu des Fonctions de l’interface utilisateur TV.
2.
Pavé alphanumérique: ces touches permettent de
saisir du texte et des chiffres.
3.
Touches de navigation: elles permettent de
naviguer vers le haut, le bas, la gauche et la droite
dans l’interface utilisateur TV. Le bouton OSélect.
au centre permet de sélectionner les éléments.
4.
Touches de transport: elles permettent de
contrôler la lecture de la musique sur la sortie
audio sélectionnée. La touche NOutput permet de
changer la sortie audio sélectionnée.
5.
Touche de délement: cette touche permet
d’afcher l’écran principal de la médiathèque de
l’interface utilisateur TV.
ENREGISTREMENT À PARTIR D’UN CD
•
Appuyez sur la touche OPEN/CLOSE, située sur le
panneau avant, pour faire sortir le plateau CD.
•
Posez un CD sur le plateau.
•
Appuyez de nouveau sur la touche OPEN/CLOSE
pour faire rentrer le plateau.
Le cas échéant, le serveur audio utilise automatiquement
le service de reconnaissance musicale Gracenote pour
obtenir des informations sur le CD.
Utilisation de l’interface utilisateur TV:
•
•
•
Dans la liste qui s’afche, utilisez les touches U et V
pour choisir la qualité d’enregistrement et appuyez sur la
touche ODémarrer.
Pendant l’enregistrement d’un CD, vous pouvez écouter de
la musique à partir de votre médiathèque.
Remarque: vous pouvez aussi enregistrer un CD à
l’aide de l’interface du panneau avant. Pour plus
d’informations, reportez-vous à la page 35.
Appuyez sur la touche JMenu de la télécommande
du serveur audio pour afcher le Menu des
Fonctions.
Utilisez les touches U et V pour sélectionner l’option
Lecteur de CD et appuyez sur la touche OSélect.
Appuyez sur la touche MEnregistrer pour
commencer l’enregistrement.
Fig. A - Ecran du panneau frontal
Fig. B - La Télécommande d’Audio Server
Fig. C - Interface utilisateur TV
6
Page 11
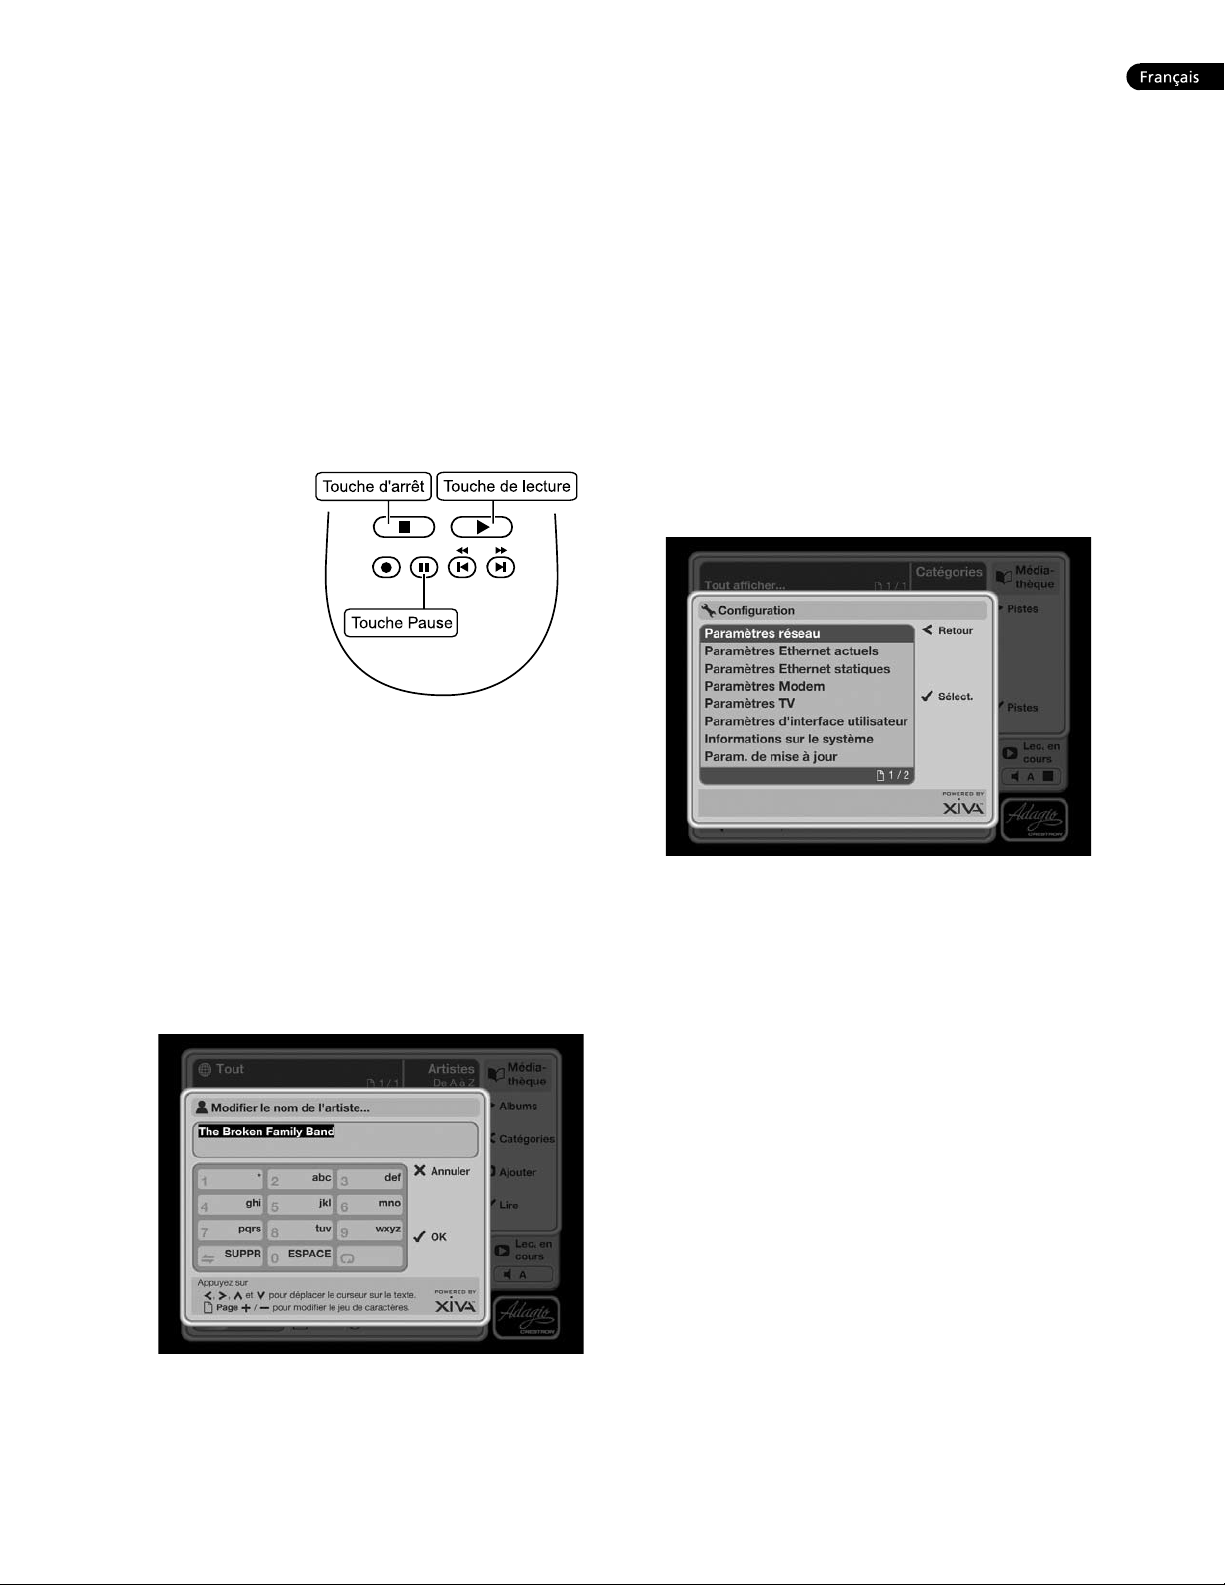
LECTURE DE MUSIQUE
Afchez la médiathèque en appuyant sur la touche
•
de àdélement de la télécommande.
Le menu de la médiathèque vous permet de parcourir
votre collection musicale en utilisant différents critères.
Vous pouvez la parcourir par titre, album, artiste, genre,
année, époque ou liste.
Appuyez sur les touches U et V pour faire déler
•
les catégories.
Par exemple, si vous sélectionnez Albums, une liste
alphabétique des titres de vos albums s’afche.
Lecture d’un titre
Utilisez les touches U et V pour sélectionner le
•
titre que vous souhaitez écouter.
Appuyez sur la touche T pour voir le contenu du
•
titre sélectionné.
Appuyez sur la touche OLire pour lancer la lecture.
•
Arrêt de la lecture
Appuyez sur
•
la touche g
du panneau
avant ou de la
télécommande
du serveur
audio.
Interruption
momentanée de la
lecture
Appuyez sur la touche h du panneau avant ou de
•
la télécommande du serveur audio.
Lecture de la piste suivante ou précédente
Appuyez sur la touche f ou e du panneau avant
•
ou de la télécommande du serveur audio.
Recherche d’une partie de piste précise
Appuyez sur la touche d ou c du panneau avant
•
ou de la télécommande du serveur audio.
La lecture reprend à l’emplacement atteint dès que vous
relâchez la touche.
SAISIE DE TEXTE
Si vous saisissez du texte à l’aide de la télécommande,
l’écran de saisie se présente comme suit:
Siasie de texte à l’aide du pavé alphanumérique
•
Utilisez les touches S et T pour placer le curseur à
l’endroit voulu.
Utilisez les touches du pavé alphanumérique pour
•
saisir une lettre.
Pour taper S, par exemple, appuyez sur la touche 7
quatre fois, S étant la quatrième lettre de la touche 7.
•
Appuyez sur la touche DELETE de la télécommande
du serveur audio pour supprimer des caractères.
Appuyez sur la touche GPage +/- pour afcher le
•
jeu de caractères et alterner entre les majuscules et
les minuscules.
CONNEXION À INTERNET ET AU RÉSEAU
CRESTRON
Appuyez sur la touche JMenu de la télécommande
•
du serveur audio.
Utilisez les touches U et V pour sélectionner
•
l’option Conguration et appuyez sur la touche
O
Sélect.
Le menu Congurer s’afche :
Appuyez sur la touche OSélect pour ouvrir l’écran
•
de Paramètres réseau et sélectionnez une connexion
via Ethernet ou un modem.
Connexion via Ethernet
Utilisez les touches U et V pour sélectionner
•
l’option Paramètres réseau et appuyez sur la touche
O
Sélect.
Si vous utilisez un routeur haut débit ou une connexion
via un réseau domestique, le serveur DHCP étant
activé, sélectionnez ce dernier comme mode. Sinon,
sélectionnez Statique et saisissez manuellement vos
coordonnées Ethernet dans les champs Adresse IP,
Masque de sous-réseau, Passerelle et DNS.
Remarque: quand vous modiez les Paramètres Ethernet
Statiques, il peut être nécessaire de désactiver le serveur
audio, puis de le réactiver an que les modications
deviennent effectives.
Connexion via un modem
Utilisez les touches U et V pour sélectionner
•
l’option Paramètres Modem et appuyez sur la
touche OSélect.
Saisissez vos coordonnées FAI dans les champs Nom
d’utilisateur, Mot de passe et Numéro de téléphone.
7
Page 12

SCHNELLSTARTHANDBUCH
1
2
3 4
1
3
2
0
5
6
9
4
7
8
+
_
+
_
Now
Playing
2
1
3
4
5
GERÄTEVORDERSEITE
Auf der Gerätevorderseite des Audio-Servers
sind eine Reihe von Bedienelementen
vorhanden.
1.
MENU -Taste: Drücken Sie diese Taste, um
die LCD-Hauptfunktionsanzeige auf der
Vorderseite des Audio-Servers anzuzeigen.
2.
Aktionstasten auf der Gerätevorderseite:
Diesen vier Tasten können Funktionen
zugewiesen werden, die im unteren
Bereich der LCD-Anzeige angegeben
sind. Beispielsweise werden durch die
Aktionstaste Auswahl am äußersten Rand
der Anzeige die Einrichtungsoptionen
anzeigt.
3.
Pfeiltasten: Mit diesen Tasten bewegen
Sie sich im Menüsystem der Gerätevorderseite nach
oben, unten, links und rechts. Mit der Taste in der
Mitte können Sie die derzeit markierte Option
auswählen.
4.
Navigationstasten: Mit diesen Tasten steuern Sie
die Musikwiedergabe am derzeit ausgewählten
Audioausgang.
FERNBEDIENUNG
Mit der Fernbedienung des Audio-Servers steuern Sie die
Benutzeroberäche des Fernsehgeräts.
1.
Menu -Taste: Zeigt das Funktionsmenü auf der
Benutzeroberäche des Fernsehgeräts an.
2.
Alphanumerische Tastatur: Mit diesen Tasten geben
Sie bei Bedarf Text und Zahlen ein.
3.
Pfeiltasten: Mit diesen Tasten bewegen Sie sich
auf der Benutzeroberäche des Fernsehgeräts
nach oben, unten, links und rechts. Mit der Taste
O
Select in der Mitte können Sie die derzeit
markierte Option auswählen.
4.
Navigationstasten: Mit diesen Tasten steuern Sie
die Musikwiedergabe am derzeit ausgewählten
Audioausgang. Mit der Taste NOutput ändern Sie
den derzeit ausgewählten Audioausgang.
5.
Browse-Taste: Zeigt die Hauptanzeige der Audio-
Bibliothek auf der Benutzeroberäche des
Fernsehgeräts an.
AUFNEHMEN VON EINER CD
•
Drücken Sie die Taste OPEN/CLOSE auf der
Gerätevorderseite, um das CD-Fach zu öffnen.
•
•
Gegebenenfalls verwendet der Audio-Server
automatisch den Musikerkennungsdienst Gracenote, um
Informationen zur CD zu erhalten.
Verwendung der Benutzeroberäche des Fernsehgeräts:
•
•
•
•
Sie können während einer CD-Aufnahme Musik in der
Audio-Bibliothek abspielen.
Legen Sie eine CD ein.
Drücken Sie erneut die Taste OPEN/CLOSE, um das
CD-Fach zu schließen.
Drücken Sie die Taste JMenü auf der
Fernbedienung des Audio-Servers, um das
Funktionsmenü anzuzeigen.
Markieren Sie mit den Tasten U und V die Option
CD-Laufwerk und drücken Sie die Taste OAuswahl.
Mit der Taste MAufnahme starten Sie die Aufnahme.
Wählen Sie im angezeigten Menü mit den Tasten U
und V eine Aufnahmequalität aus und drücken Sie
die Taste OStart.
Abb. A - Anzeige auf der Vorderseite
Abb. B - Der Fernbedienung
Abb. C - TV-Benutzeroberäche
8
Page 13

Hinweis: Außerdem können Sie über die Gerätevorderseite
auch eine CD aufnehmen (siehe Seite 35).
WIEDERGEBEN VON MUSIK
Drücken Sie die Taste àBrowse à auf der
•
Fernbedienung, um die Audio-Bibliothek aufzurufen.
Im Menü der Audio-Bibliothek können Sie angeben, wie
die Musiksammlung durchsucht werden soll. Sie können
nach Titel, Album, Künstler, Genre, Jahr, Ära oder
Playliste durchsuchen.
•
Mit den Tasten U und V können Sie zwischen den
Kategorien wechseln.
Wenn Sie beispielsweise Alben auswählen, sehen Sie eine
alphabetische Liste der Albentitel.
So spielen Sie Musik ab
Markieren Sie mit den Tasten U und V den
•
wiederzugebenden Eintrag.
Drücken Sie die
•
Taste T, um
den Inhalt des
ausgewählten
Titels, Albums
usw. anzuzeigen.
Drücken Sie
•
die Taste
O
Wiedergabe,
um die
Wiedergabe zu
starten.
So stoppen Sie die
Wiedergabe
Drücken Sie die Taste g auf der Gerätevorderseite
•
oder auf der Fernbedienung des Audio-Servers.
So halten Sie die Wiedergabe an
Drücken Sie die Taste h auf der Gerätevorderseite
•
oder auf der Fernbedienung des Audio-Servers.
So springen Sie zum nächsten oder vorherigen Titel
Drücken Sie die Taste f oder e auf der
•
Gerätevorderseite oder auf der Fernbedienung des
Audio-Servers.
So durchsuchen Sie einen Titel
Halten Sie die Taste d oder c auf der
•
Gerätevorderseite oder Fernbedienung des AudioServers gedrückt.
Die Wiedergabe wird von der Stelle aus fortgesetzt, an
der Sie die Taste loslassen.
EINGEBEN VON TEXT
Wenn Sie den Text mit der Fernbedienung des AudioServers bearbeiten können, wird die Texteingabeanzeige
angezeigt:
So geben Sie Text über die alphanumerische Tastatur ein
•
Bewegen Sie mit den Tasten S und T den Cursor
an die entsprechende Position.
Geben Sie die Buchstaben über die alphanumerische
•
Tastatur ein.
Um beispielsweise ein S einzugeben, drücken Sie viermal
die Taste 7, da S der vierte Buchstabe auf der Taste 7 ist.
•
Drücken Sie auf der Fernbedienung des AudioServers die Taste DELETE, um Zeichen zu löschen.
Drücken Sie die Taste GPage +/-, um den
•
Zeichensatz zwischen Groß- und Kleinbuchstaben zu
wechseln.
VERBINDEN MIT DEM INTERNET UND DEM
CRESTRON-NETZWERK
Drücken Sie auf der Fernbedienung des Audio-
•
Servers die Taste JMenu.
Markieren Sie mit den Tasten U und V die Option
•
Einrichtung und drücken Sie die Taste OAuswahl.
Das Menü Einrichtung wird angezeigt:
Drücken Sie die Taste OAuswahl, um die Anzeige
•
Netzwerkeinstellungen aufzurufen und wählen Sie
den Verbindungstyp Ethernet oder Modem.
Verbindung über Ethernet
Markieren Sie mit den Tasten U und V die Option
•
Netzwerkeinstellungen und drücken Sie die Taste
O
Auswahl.
Wenn Sie einen Breitband-Router oder eine Verbindung
über ein heimisches Netzwerk mit aktiviertem DHCP
verwenden, wählen Sie DHCP als modus aus. Andernfalls
wählen Sie den Statisch Modus aus und geben die
Ethernet-Informationen in die Felder IP-Adresse,
Subnetzmaske, Gateway und DNS ein.
Hinweis: Wenn Sie Änderungen an den Statische
Ethernet-Einstellung vornehmen, müssen Sie
möglicherweise den Audio-Server aus- und anschließend
wieder einschalten, damit die Änderungen übernommen
werden.
Verbindung über Modem
Markieren Sie mit den Tasten U und V die Option
•
Modemeinst. und drücken Sie die Taste OAuswahl.
Geben Sie die ISP-Informationen in die Felder
Benutzername, Kennwort und Telefon-Nr. ein.
9
Page 14
GUÍA DE INICIO RÁPIDO
1
2
3 4
1
3
2
0
5
6
9
4
7
8
+
_
+
_
Now
Playing
2
1
3
4
5
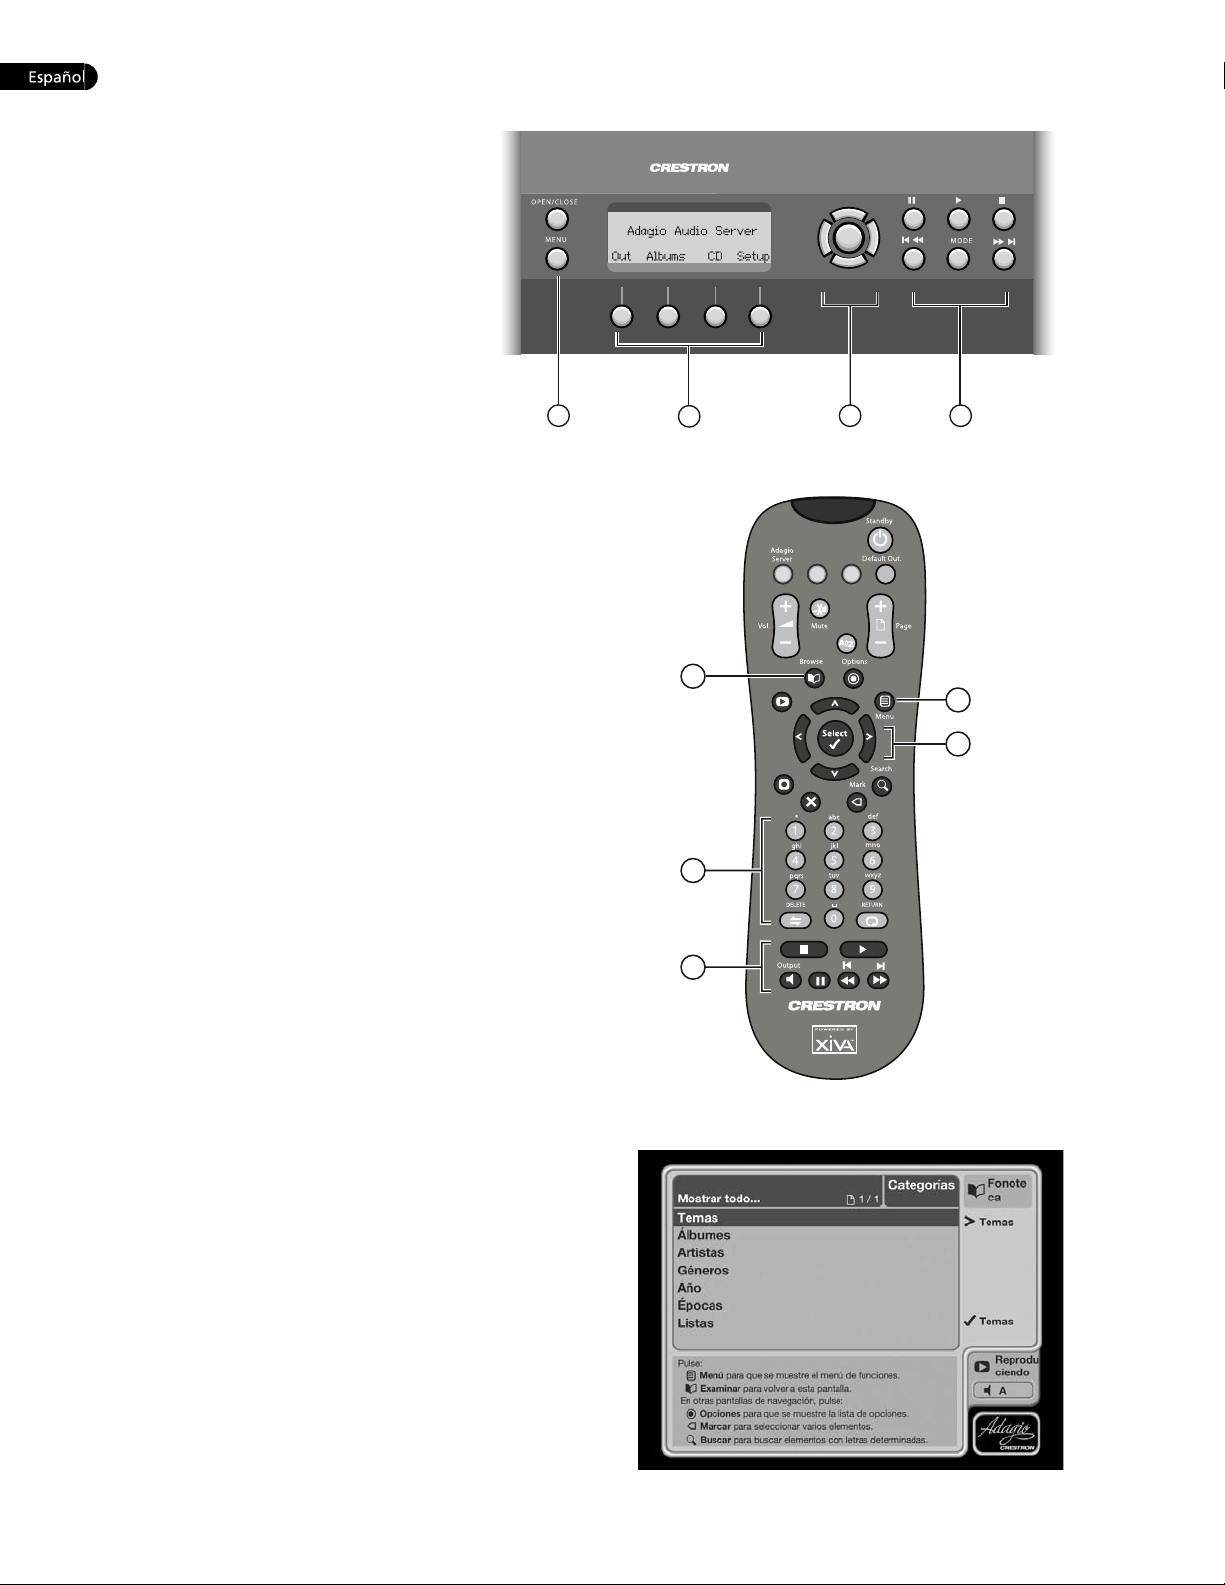
PANEL FRONTAL
El panel frontal de Audio Server incluye una
serie de controles.
1.
Botón MENU: Pulse este botón para
mostrar la pantalla de funciones principal
del panel frontal en la pantalla LCD de
Audio Server.
2.
Teclas de acción del panel frontal: Estas
cuatro teclas tienen funciones asignables,
como indican las etiquetas de la parte
inferior de la pantalla LCD. Por ejemplo,
la tecla de acción Setup mostrará las
opciones de conguración en la pantalla.
3.
Teclas de navegación: Permiten
desplazarse arriba, abajo, a la izquierda
y a la derecha en el sistema de menús del
panel frontal. El botón del centro se utiliza para
seleccionar elementos.
4.
Teclas de reproducción: Controlan la reproducción
de la música en la salida de audio seleccionada.
CONTROL REMOTO
El control remoto de Audio Server permite controlar la
interfaz de usuario del televisor.
1.
Tecla Menu: Muestra el Menú de Funciones en la
interfaz de usuario del televisor.
2.
Teclado alfanumérico: Utilice estas teclas para
introducir texto y números cuando lo necesite.
3.
Teclas de navegación: Permiten desplazarse arriba,
abajo, a la izquierda y a la derecha en la interfaz de
usuario del televisor. El botón OSelect del centro
se utiliza para seleccionar elementos.
4.
Teclas de reproducción: Controlan la reproducción
de la música en la salida de audio seleccionada. La
tecla NOutput permite cambiar la salida de audio
seleccionada.
5.
Tecla Browse: Muestra la pantalla Biblioteca de
audio en la interfaz de usuario del televisor.
Fig. A - Display del pannello anteriore
GRABAR DESDE UN CD
•
Pulse la tecla OPEN/CLOSE del panel frontal para
abrir la bandeja de CD.
•
Coloque un CD en la bandeja.
•
Vuelva a pulsar OPEN/CLOSE para cerrar la bandeja.
Si es posible, Audio Server utilizará automáticamente
el servicio de reconocimiento de música Gracenote para
obtener información sobre el CD.
En la interfaz de usuario del televisor:
•
•
•
Utilice las teclas U y V para desplazarse por la lista que
aparece y seleccionar una calidad de grabación. Pulse la
tecla OStart.
Mientras se graba un CD es posible escuchar música de la
Biblioteca de audio.
Nota: También puede grabarse un CD desde la interfaz
del panel frontal. Para más información, consulte la
página 35.”
Pulse la tecla JMenu del control remoto de Audio
Server para ver el Menú de Funciones.
Utilice las teclas U y V para resaltar la opción de la
unidad de CD y pulse la tecla OSelect.
Pulse la tecla MRecord para iniciar el proceso de
grabación.
Fig. B - Telecomando del Audio Server
Fig. C - Interfaccia utente TV
10
Page 15

REPRODUCIR MÚSICA
Abra la Biblioteca de audio pulsando la tecla
•
à
Browse del control remoto.
El menú Biblioteca de audio permite elegir el modo
de navegar por la colección de música. Puede navegar
por pista, álbum, artista, género, año, época o lista de
reproducción.
Pulse las teclas U y V para pasar de una categoría
•
a otra.
Por ejemplo, si elige Álbumes, aparecerá una lista
alfabética de los títulos de los álbumes.
Para reproducir música
Utilice las teclas U y V para resaltar el elemento
•
que desee reproducir.
Pulse la tecla T para ver el contenido del elemento
•
seleccionado.
Pulse OPlay
•
para iniciar la
reproducción.
Para detener la
reproducción
Pulse la tecla
•
g
del panel
frontal o el
control remoto
de Audio Server.
Para poner en pausa la reproducción
Pulse la tecla h del panel frontal o el control
•
remoto de Audio Server.
Para pasar a la pista anterior o siguiente
Pulse las teclas f o e en el panel frontal o el
•
control remoto de Audio Server.
Para avanzar o retroceder en una pista
Mantenga pulsadas las teclas d o c en el panel
•
frontal o el control remoto de Audio Server.
La reproducción se sitúa en la nueva posición al soltar la
tecla.
INTRODUCIR TEXTO
Cuando el texto se puede editar mediante el control
remoto de Audio Server, se abre la pantalla de entrada
de texto:
Para Introducir Texto Con El Teclado Alfanumérico
•
Utilice las teclas S y T para mover el cursor a la
posición deseada.
Introduzca una letra con las teclas del teclado
•
alfanumérico.
Por ejemplo, para escribir S pulse la tecla 7 cuatro veces,
porque la S es la cuarta letra de la tecla 7.
•
Puede borrar los caracteres con la tecla DELETE del
control remoto de Audio Server.
Pulse GPage+/- para alternar el conjunto de
•
caracteres y pasar de mayúsculas a minúsculas, y
viceversa.
CONEXIÓN A INTERNET Y LA RED
CRESTRON
Pulse la tecla JMenu del control remoto de Audio
•
Server.
Utilice las teclas U y V para resaltar la opción
•
Congurar y pulse OElegir.
Se abre el menú Congurar:
Pulse la tecla OElegir para abrir la pantalla
•
Conguración de red y seleccione Ethernet o
Modem como tipo de conexión.
Conexión a través de Ethernet
Utilice las teclas U y V para resaltar la opción
•
Conguración de red y pulse la tecla OElegir.
Si está utilizando un enrutador de banda ancha o se
conecta mediante la red de su casa con DHCP activado,
seleccione DHCP como modo. Si no, seleccione Estática y
especique manualmente la información sobre Ethernet
en los campos Dirección IP, Máscara de subred, Puerta de
enlace y DNS.
Nota: Al realizar cambios en Conguración de Ethernet
Estática , puede que sea necesario apagar Audio Server y
volver a encenderlo para que los cambios surtan efecto.
Conexión a través de módem
Utilice las teclas U y V para resaltar la opción
•
Conguración Modem y pulse OElegir.
Especique los detalles sobre ISP en los campos Nombre
de usuario, Contraseña y Nº de teléfono.
11
Page 16

GUIDA RAPIDA
1
2
3 4
1
3
2
0
5
6
9
4
7
8
+
_
+
_
Now
Playing
2
1
3
4
5
PANNELLO FRONTALE
Nel pannello frontale sono disponibili i
controlli di comando di Audio Server.
1.
Tasto MENU: premere questo tasto per
visualizzare la schermata principale delle
funzioni del pannello frontale all’interno
del display LCD di Audio Server.
2.
Tasti del pannello frontale: a questi quattro
tasti sono assegnate le funzioni indicate
nelle corrispondenti etichette riportate
nella parte inferiore del display LCD. Ad
esempio, come illustrato nell’immagine in
questa pagina, il tasto Setup consentirà di
visualizzare le opzioni di impostazione.
3.
Tasti di spostamento: consentono di
spostarsi verso l’alto, verso il basso, verso
sinistra e verso destra all’interno dei menu nel
pannello frontale. Il tasto al centro serve invece per
selezionare gli elementi.
4.
Tasti di riproduzione: consentono di controllare
la riproduzione della musica per l’output audio
selezionato.
TELECOMANDO
Il telecomando di Audio Server consente di controllare
l’interfaccia utente TV.
1.
Tasto Menu: visualizza il Menu delle Funzioni
nell’interfaccia utente TV.
2.
Tastierino alfanumerico: utilizzare questo tastierino
per immettere testo o numeri dove necessario.
3.
Tasti di spostamento: consentono di spostarsi verso
l’alto, verso il basso, verso sinistra e verso destra
all’interno dell’interfaccia utente TV. Il tasto OSelect
al centro serve invece per selezionare gli elementi.
4.
Tasti di riproduzione: consentono di controllare
la riproduzione musicale per l’output audio
selezionato. Il tasto NOutput consente di cambiare
l’output audio selezionato.
5.
Tasto sfoglia: visualizza la schermata principale della
Libreria audio nell’interfaccia utente TV.
REGISTRAZIONE DA CD
•
Premere il tasto OPEN/CLOSE nel pannello frontale
per aprire l’unità CD.
•
Inserire il CD.
•
Premere di nuovo il tasto OPEN/CLOSE per chiudere
l’unità.
Se possibile, verrà utilizzato automaticamente il servizio
di riconoscimento di musica Gracenote per ottenere
informazioni sul CD.
Nell’interfaccia utente TV:
•
•
•
Dall’elenco visualizzato selezionare la qualità di
registrazione desiderata con i tasti U e V e premere il
tasto di Oavvio.
È possibile ascoltare la musica contenuta nella Libreria
audio durante la registrazione del CD.
Nota: in alternativa è possibile registrare un CD
utilizzando l’interfaccia del pannello frontale. Per
ulteriori informazioni, vedere pagina 35.
Premere il tasto JMenu nel telecomando di Audio
Server per visualizzare il Menu delle Funzioni.
Mediante i tasti U e V evidenziare l’opzione Unità
CD e premere il tasto OScegli.
Premere il tasto MRegistra per iniziare la
registrazione.
Fig. A - Display del pannello anteriore
Fig. B - Telecomando del Audio Server
Fig. C - Interfaccia utente TV
12
Page 17

RIPRODUZIONE DI MUSICA
�
Premere il tasto àBrowse à del telecomando per
•
visualizzare la Libreria audio.
Nel menu della Libreria audio è possibile specicare
come sfogliare il repertorio di musica: per brano, per
album, per artista, per genere, per anno, per periodo o
per sequenza di brani.
Premere i tasti U e V per passare da una categoria
•
all’altra.
Ad esempio, se si seleziona Album viene visualizzato un
elenco alfabetico dei titoli dell’album.
Per riprodurre musica
Utilizzare i tasti U e U per evidenziare l’elemento
•
che si desidera riprodurre.
Premere il tasto T per visualizzare il contenuto
•
dell’elemento selezionato.
Premere il tasto OPlay per iniziare la riproduzione.
•
Per interrompere
la riproduzione
Premere il
•
tasto g nel
pannello
frontale o nel
telecomando
di Audio
Server.
Per mettere
in pausa la
riproduzione
Premere il tasto h nel pannello frontale o nel
•
telecomando di Audio Server.
Per passare al brano successivo o precedente
Premere il tasto f o e nel pannello frontale o nel
•
telecomando di Audio Server.
Per cercare all’interno di un brano
Premere il tasto d o c nel pannello frontale o
•
nel telecomando di Audio Server.
La riproduzione riprende dalla nuova posizione quando
si rilascia il tasto.
IMMISSIONE DI TESTO
Quando il testo è modicabile mediante il telecomando
di Audio Server, viene visualizzata una casella per
l’immissione del testo:
Per immettere testo con il tastierino alfanumerico
•
Premere i tasti S e T per spostare il cursore nella
posizione desiderata.
Utilizzare il tastierino alfanumerico per immettere
•
una lettera.
Ad esempio, per immettere S premere il tasto 7 quattro
volte, poiché la S è la quarta lettera indicata sul tasto 7.
•
Per cancellare, premere il tasto DELETE del
telecomando di Audio Server.
Premere il tasto GPage +/- per passare da un set
•
di caratteri all’altro o da maiuscolo a minuscolo e
viceversa.
CONNESSIONE A INTERNET E A RETE
CRESTRON IN CORSO
Premere il tasto JMenu nel telecomando di Audio
•
Server.
Con i tasti U e V evidenziare l’opzione Imposta e
•
quindi premere il tasto OScegli.
Viene visualizzato il menu Imposta:
Premere il tasto OScegli per aprire la nestra
•
Impostazioni di Rete e selezionare l’opzione
Ethernet o Modem in base al tipo di connessione di
cui si dispone.
Connessione tramite Ethernet
Con i tasti U e V evidenziare l’opzione
•
Impostazioni di rete e quindi premere il tasto
O
Scegli.
Se si utilizza un router a banda larga o ci si connette
attraverso una rete con DHCP abilitato, selezionare
DHCP come modaliti. Altrimenti selezionare Statico e
immettere manualmente i dettagli Ethernet nei campi
Indirizzo IP, Subnet Mask, Gateway e DNS.
Nota: quando si cambiano le Impostazioni Ethernet
Statico, può essere necessario spegnere Audio Server e
riaccenderlo per rendere effettive le modiche.
Connessione tramite modem
Con i tasti U e V evidenziare l’opzione
•
Impostazioni Modem e quindi premere il tasto
O
Scegli.
Immettere i dettagli ISP nei campi Nome utente,
Password e N. di telefono.
13
Page 18

INTRODUCTION
Congratulations on purchasing your Audio Server from
Crestron. The Audio Server is a revolutionary way of
lling your home with music.
Your Audio Server stores and catalogs your music
collection, allowing you to select any album or track
at the press of a key. You can browse through your
albums and tracks using convenient on-screen menus
displayed on your television, showing full album, track,
and artist names downloaded from the Gracenote Music
Recognition Service as well as album cover art illustration
from the XiVA on-line service. Your Audio Server also lets
you organize your music collection and create selections
for different occasions to suit your mood.
Incredible capacity
Your Audio Server is a hard disk based audio system
which can store thousands of hours of music, all with the
convenience of instant access, at the touch of a key.
Convenient TV screen
Play music, record CDs, or organize your library using
convenient on-screen menus which show the full album,
artist, and track names, allowing you to select the one
you want with a few simple selections.
Internet access for track listings
Your Audio Server records the CDs from your music
collection at high speed. It then automatically connects
to the Gracenote Music Recognition Service via the
built-in modem or Ethernet connection. This database
provides album and track details for a wide range of
CDs. This information can be downloaded and stored
with each CD you record, allowing you to select any item
in your music collection by album name, artist name,
track name, or genre, giving you total exibility in the
way you access and control your music collection.
Create your own playlists
Your Audio Server allows you to compile personal
playlists and then automatically play tracks from the
playlist you have selected. Playlists let you customize
your Audio Server for each member of the family, or for
matching the music to the occasion or mood.
Instant access, irrespective of your music collection
Whether you select a track by title, album, artist, or
genre, your Audio Server locates it instantly and plays
it at the press of a key. All this is achieved with an
extremely simple and intuitive user interface, operated
using a few keys on the front panel or remote control.
SPECIFICATIONS
General
•
System................................. hard disk Audio Server
•
Power Requirements...... AC 100-240V ~50Hz/60Hz
•
Power Consumption................................. 60W Max
•
Weight..................................................... 8.5Kg Max
•
Dimensions... 101mm(H) x 437mm(W) x 367mm(D)
•
Operating temperature............................... 10-40°C
•
Operating humidity... 10-90% RH (non-condensing)
Video Ouputs
S-Video Output
•
Output level........................................... 1Vp-p/75W
•
Connector............................................ S-VIDEO jack
Composite video output
•
Output level........................................... 1Vp-p/75W
Connector................................................... RCA jack
•
VGA output
•
Output level...................................... 0.75Vp-p/75W
•
Connector........................................ 15 pin D-type F
Output resolution....................................... 800x600
•
Audio Ouputs
Analog outputs (Up to 4 pairs of outputs)
Output level................................................. 2V RMS
•
Output impedance.......................................... 600W
•
Connector................................................... RCA jack
•
Digital outputs
Optical output connector............................. Toslink
•
Coaxial output level....................... 500mVp-p/75W
•
Coaxial output connector.......................... RCA jack
•
Audio Inputs
Analog inputs
Maximum input level.................................. 2V RMS
•
Input impedance............................................. 10kW
•
Connector................................................... RCA Jack
•
Digital inputs
SRC supported freqency..... 32kHz, 44.1kHz, 48kHz
•
Maximum input level..................... 500mVp-p/75W
•
Coaxial input connector............................ RCA Jack
•
Optical input connector................................ Toslink
•
Analog Audio Characteristics (typical)
Frequency response............ 20Hz to 20kHz ± 0.5dB
•
S/N ratio (@1KHz)........................ 100dB (A weight)
•
Dynamic range............................. better than 96dB
•
Total harmonic distortion (@1kHz)............. 0.003%
•
Channel separation (@1KHz)......................... 110dB
•
Communications
Modem
Connector.......................................... RJ11 (56kbit/s)
•
Ethernet
Connector..................... RJ45 (10 Base T/100 Base T)
•
Controller
Connector......................................... 9 pin D-type M
•
IR Input
Maximum input level........................................... 5V
•
Connector............................................... 3.5mm jack
•
USB (2 connectors)
Connector................................... Type A USB socket
•
Accessories
Stereo RCA cable............................................ ........ 1
•
Video cable............................................................. 2
•
Ethernet cable.......................................................... 1
•
Power cord.............................................................. 4
•
Remote control unit............................................... 1
•
AAA (R03P) dry cell batteries................................. 2
•
Operating instructions........................................... 1
•
Note: the specications and design of this product is
subject to change without notice.
14
Page 19

CONTROLS AND CONNECTIONS
6
15
10
7
2
1 43
5
9
8
11 12 13
14
16
FRONT VIEW
This section provides information about the controls and
connections available on your Audio Server.
DISC TRAY
Discs should be inserted with the label side up.
OPEN/CLOSE button
Pressing the OPEN/CLOSE button opens the disc tray.
Place a compact disc on the tray with the label side
facing up. Press the button again to close the tray.
MENU button
Press the MENU button to display the main options
screen for the front panel user interface.
ACTION buttons
Action buttons allow you to perform specic operations
dependent on the current menu screen. For more
information on using the action buttons, refer to The
Front Panel chapter on page 35.
DISPLAY
The display shows information about the music
available on the unit, the status of the Audio Server (for
instance if the unit is currently playing), and the current
conguration of the unit.
SELECT button
Selects the option currently visible on the display.
c
When the button is pressed briey during playback, play
restarts at the beginning of the next track. When the
button is held for a longer period of time the music will
fast forward at high speed.
Press the pause button to interrupt playback temporarily.
Press the play button to resume playback if the music has
been stopped or paused.
Press the stop button to halt playback on the current
audio output.
/ e button
h
PAUSE button
a
PLAY button
g
STOP button
STANDBY
Press the standby button to turn your Audio Server off,
press again to switch your Audio Server back on.
REMOTE SENSOR
This window receives signals transmitted from the
remote control unit.
ONLINE
The online indicator is illuminated when the modem is
active.
NAVIGATION buttons
The navigation buttons allow you to move up, down, left
or right through the menus shown on the display.
f
When the button is pressed briey during playback, play
restarts at the beginning of the current track. A second
brief press moves to the beginning of the previous track.
When the button is held for a longer period of time the
music will rewind at high speed.
/ d button
MODE button
This button is for future expansion and currently has no
function.
15
Page 20

REAR VIEW
6
12
13
14 1510987543
1
2
11
IR IN
The IR IN connection allows remote control information
to be carried from other devices directly into the Audio
Server.
COMPUTER
The Computer port provides serial communication with
supported devices.
USB
Allows the Audio Server to communicate with supported
USB devices.
LAN
The LAN port is used to connect the Audio Server to a
Crestron network. It can also be used to connect the
Audio Server to a high speed Internet connection.
RGBHV
The RGBHV connector may be used to connect a VGA
monitor or a suitable Plasma screen for displaying the TV
user interface.
MODEM
The Modem port can be used to connect the Audio
Server to a standard analog telephone line for Internet
access.
VIDEO OUT
Connect the composite Video Out of the Audio Server
to the composite input of a suitable PAL/NTSC TV
(depending on the supplied conguration) to display
the TV User Interface. You may also need to switch the
TV to the relevant AUX input to display the picture.
S-VIDEO OUT
Connect the S-VIDEO output of the Audio Server to the
S-VIDEO input of a suitable PAL/NTSC TV (depending
on the supplied conguration) to display the TV User
Interface. You may also need to switch the TV to the
relevant AUX input to display the picture.
DIGITAL OPTICAL OUT
The digital optical output can be used to transmit high
quality audio to a device with a digital optical input (D/A
converter, A/V amplier etc.) using an optical ber cable.
The advantage of using the optical output is that it has
low signal loss due to cables and is completely isolated
from the ground loop. The audio output of the Digital
Optical Out connector is the same as the audio output of
the Analog Audio Out 1 connector. This output may not
be used for making a digital copy of your media.
DIGITAL IN - COAXIAL
High quality recordings can be made onto the hard
disk of the Audio Server using a coaxial connection
from a suitable device (such as Minidisc or DAT). (To be
supported in future software releases).
DIGITAL OUT - COAXIAL
By connecting this jack to a digital audio component
(D/A converter, A/V amplier etc.), digital signals from
the Audio Server can be transmitted directly from the
system without rst being converted to analog. The
audio output of the Digital Coaxial Out connector is the
same as the audio output of the Analog Audio Out 1
connector. This output may not be used for making a
digital copy of your media.
ANALOG IN
Analog sources (such as cassette or vinyl LP) may be
recorded onto the hard disk of the Audio Server using
this connection. (To be supported in future software
releases).
ANALOG OUT A,B,C,D
The Audio Server is a multiroom device allowing you to
listen to different music in up to four different rooms
all at the same time (depending on the conguration
purchased). Each analog output should be connected to
the input jacks of a pre-amplier.
MAINS
Connect the supplied mains lead to this connector to
provide power to the unit.
DIGITAL OPTICAL IN
High quality recordings can be made onto the hard
disk of the Audio Server using an optical connection
from a suitable device (such as Minidisc or DAT). (To be
supported in future software releases).
16
Page 21

REMOTE CONTROL
1
3
2
0
5
jkl
6
mno
9
wxyz
4
ghi
7
pqrs
8
tuv
RETURN
+
_
+
_
Mute
Select
Menu
Mark
Search
Default Out.
Adagio
Server
Standby
Page
*
abc
def
1
4
5
6
9
11
12
15
17
19
20
21
24
26
27
28
25
23
22
18
16
14
13
10
8
7
3
2
Options
Browse
DELETE
Output
Now
Playing
Vol.
The following diagram explains the function of the keys
on your Audio Server remote control:
s MUTE key
This key currently has no function.
r VOLUME keys
These keys currently have no function
[ ALPHABETIC SCROLL key
Press this key to access the Intial Letter screen. This
screen is only available if the list currently displayed is in
alphabetical order.
à BROWSE key
The Browse key is used to display the Audio Library
screen to browse your music collection.
ä
Press this key on any library screen to view a list of
available options. If pressing this key has no effect, then
there are no options available on the current screen.
Press this key to display the Function Menu.
The Now Playing key is used to view the Now Playing
screen for the currently selected audio output.
OPTIONS key
J
MENU key
â
NOW PLAYING key
NAVIGATION S,T,U,V keys
The navigation keys are used to move up, down, left or
right through the menu pages.
O
Puts the television user interface of the Audio Server in
to and out of Standby mode.
Press this key to select the Audio Server as the device to
be controlled. This key illuminates each time a key on
the remote control is pressed.
This key has no function.
This key currently has no function.
This key has no function.
;
ADAGIO SERVER key
BLANK key
DEFAULT OUTPUT key
BLANK key
STANDBY key
G
These keys are used to scroll through menus by page.
When editing text, these keys are used to change the
character set.
PAGE SCROLL keys
Select is used to activate the currently highlighted
option. When browsing the Audio Library this key will
start playback of the selected item.
The Action key performs different tasks depending on
the screen you are currently viewing. For example,
on the Albums screen, this key is used to add the
highlighted selection to a playlist.
The Search key can be used to search for music in your
Audio Library. If pressing this key has no effect, then the
search function cannot be used on the current screen.
The Cancel key is used to cancel an operation which you
no longer wish to continue.
p MARK key
This key is used in the Audio Library to select multiple
items and then perform an action on them collectively.
For more information about using the mark function
refer to page 26.
NUMERIC (0 to 9) keys
The numeric keys can be used as follows:
•
•
SELECT key
M
ACTION key
9
SEARCH key
P
CANCEL key
In the music library you may jump to an item in the
list that begins with one of the letters specied at
the top of each key.
In text entry mode these keys can be used as an
alphanumeric key pad (similar to a mobile phone).
17
Page 22

R
The Repeat key has the following functions:
•
•
The Shufe key has the following functions:
•
•
During playback the Stop key halts playback on the
currently selected output of the Audio Server.
The Play key can be used to resume playback on the
currently selected output of the Audio Server.
Press this key to change the currently selected audio
output.
When this key is pressed briey during playback, play
restarts at the beginning of the next track. When the
key is held for a longer period of time the music will fast
forward at high speed.
When this key is pressed briey during playback, play
restarts at the beginning of the current track. A second
brief press moves to the beginning of the previous track.
When the key is held for a longer period of time the
music will rewind at high speed.
Press the pause key to interrupt playback temporarily.
REPEAT (RETURN) key
During playback this key toggles the repeat play
setting on the Audio Server.
In text entry mode this key can be used to perform
a carriage return.
Q
SHUFFLE (DELETE) key
During playback this key toggles the random play
setting on the AudioServer.
In text entry mode this key can be used to delete
characters.
g
STOP key
a
PLAY key
N
OUTPUT key
c e
key
d f
key
h
PAUSE key
SWITCHING ON AND OFF
Your Audio Server is designed to remain switched on
continuously. However, if you are not planning to use
your Audio Server for an extended period of time, you
may want to switch it off.
To switch off, press the STANDBY button on the
•
front panel of your Audio Server. Next, press the
action button labelled Yes below the LCD display.
After a brief period, the unit will switch off and the
Standby LED will glow red.
To switch back on, press the STANDBY button on
•
the front panel of your Audio Server again. After
a brief period, the unit will switch on, the Standby
LED will glow green and the TV will display the
Audio Library screen.
If you are not using your Audio Server for a brief period,
you may want to switch it to Standby mode.
Press the ;Standby key on your Audio Server
•
remote control. The TV screen will display the
Standby screen.
Press the ;Standby key again to leave Standby
•
mode and return to normal operation.
THE FUNCTION MENU
The main functions of your Audio Server are accessible
via the Function Menu.
To Display the Function Menu
From any screen in the television user interface,
•
press the JMenu key on your Audio Server remote
control.
The Function Menu is displayed:
Use the U and V keys on your Audio Server remote
•
control to select a function.
Press the OSelect key to choose a function.
•
The functions available from this menu are as follows:
Audio Library
Select this function to display the Audio Library screen.
The Audio Library stores all of the music you record on
to the hard disk of your Audio Server.
CD Drive
Select this function to display the CD Drive screen. The
CD Drive function is used to record or play CDs from the
CD tray.
Look Up Album Details
Select this function to display the Look Up Album Details
screen. If you have an Internet connection, use this
function to retrieve album details from the Internet.
Remote Back Up and Restore
Select this function to display the Remote Back Up and
Restore screen. This function allows you to back up all of
the music in your Audio Library to a selected location.
Set Up
Select this function to display the Set Up screen. From
here you can view and amend important settings used
by your Audio Server. For more information refer to the
chapter titled System Set Up on page 32.
18
Page 23

RECORDING MUSIC
Your Audio Server can make new recordings onto the
hard disk by recording music directly from an audio CD
placed in the CD tray.
Your Audio Server can access the Internet, using either
a broadband connection (via the Ethernet port) or
using the built-in modem, to automatically retrieve
information about the CD. This information includes the
album name, artist name, track names and music genre
from the Gracenote Music Recognition Service and an
album cover illustration from the XiVA on-line service.
Recording from a CD
Press the OPEN/CLOSE button on the front panel to
•
open the CD tray.
Place a CD in the tray.
•
Press the OPEN/CLOSE button on the front panel
•
again to close the CD tray.
Your Audio Server will now automatically attempt to
retrieve information about the CD from the Gracenote
Music Recognition Service.
If you do not have an Internet connection, or the CD is
not listed in the database, it will be given names such as
Album 35, Artist 21, and Track 1, Track 2 etc. and it will
be classied in genre Unclassied.
Press the JMenu key on your Audio Server remote
•
control to display the Function Menu.
Use the U or V keys to select the CD Drive option.
•
O
Press the
•
The CD Drive screen will display the contents of the CD:
Press the M Record key.
•
The Recording Quality options are displayed.
Use the U or V keys to choose either
•
Uncompressed WAV, or one of the MP3 or WMA
compression options.
Note: The higher quality options use more space on
your Audio Server hard disk, so you will not be able to
record as many CDs. The amount of recording time left
is displayed at the bottom of the screen as you scroll the
compression options when recording a CD.
The following table shows the number of hours available
at each recording quality depending on the size of the
hard disk in your Audio Server:
80GB 117 858 1287 1287 1716
160GB 240 1762 2643 2643 3524
250GB 378 2779 4169 4169 5559
Select key.
WAV HIGH
MP3
STD
MP3
HIGH
WMA
STD
WMA
O
Press the
•
The CD Recording screen, with progress indicator will be
displayed:
Once recording is complete the new album will appear in
the Audio Library.
Press the OPEN/CLOSE button to remove the disc.
•
If you have selected a recording quality using one of
the MP3 or WMA compression settings, the compression
process will begin immediately.
If there is no Internet connection present at the time of
recording a CD, you can use Look Up Album Details from
the Function Menu to retrieve any missing album details
from the Internet.
Press the JMenu key to display the Function Menu.
•
Use the U or V keys to select the Look Up Album
•
Details option.
Press the MStart key to begin.
•
Select key to begin recording.
Listening to music while recording a CD
You can play music from your Audio Library while you
are recording a CD.
If you are already playing music from the library
•
press the âNow Playing key to return to displaying
information about the track you are playing.
If you are not already playing music from the library
•
or wish to change the music you are listening to,
press the à Browse key on the Audio Server remote
control and select music as normal.
At any time you can return to see the progress of your
recording by selecting CD Drive from the Function Menu.
Playing a CD
Your Audio Server can play a CD directly from the CD
tray without rst recording it to the hard disk.
Press the OPEN/CLOSE button on the front panel to
•
open the CD tray.
Place a CD in the tray.
•
Press the OPEN/CLOSE button on the front panel
•
again to close the CD tray.
Press the JMenu key on your Audio Server remote
•
control to display the Function Menu.
Use the U or V keys to select the CD Drive option.
•
O
Press the
•
Press the
•
Note: You cannot record a CD while playing from the CD
tray.
Select key.
O
Play key.
19
Page 24

PLAYING MUSIC
OUTPUT
This chapter explains how to play music on your Audio Server. It also explains how to search for a track in a number of
alternative ways.
PLAYING MUSIC FROM THE AUDIO LIBRARY
Press the à Browse key on your Audio Server remote control from any screen and the Audio Library screen will be displayed.
This screen lets you choose how you want to browse your music collection:
20
Page 25

THE AUDIO LIBRARY
The television user interface has been designed to allow easy navigation through the Audio Library and therefore give quick
and easy access to your complete music collection in a number of different ways. Each screen in the Audio Library is carefully
constructed to provide the most important information about the items you are viewing.
The illustration below shows how the Audio Library screens are structured and describes each part of the screen, the
information displayed and the functions available. The example shows the Albums screen, however all navigation screens in
the Audio Library are similar in construction.
21
Page 26

High street
High street
Electric Avenue
Electric Avenue
High street
LIBRARY NAVIGATION OVERVIEW
Navigate to the Audio Library screen described on the previous page. You can use your remote control to select a track
directly, or follow the instructions below and navigate through the library interface to select a track.
22
Page 27

AUDIO LIBRARY NAVIGATION
The following sections contains a detailed explanation
about selecting items in the Audio Library for playback.
To browse the Audio Library by track
Use the U or V keys to highlight the Tracks option
•
in the Audio Library Menu.
Press the T key to display the Tracks screen.
•
The TV screen will display the tracks in your Audio Library:
Press the U or V keys to step between tracks, or
•
press the appropriate letter on your Audio Server
remote control to jump directly to that position in
the list.
Alternatively, press the 9 Search button to list just
•
those tracks that contain a particular word or group
of letters.
To play a particular track:
Press the OPlay key to begin playback immediately,
•
or press the M Add button to add this track to a
playlist.
Press the S key to return to the Audio Library.
•
To browse the Audio Library by album
Use the U or V keys to highlight the Albums
•
option in the Audio Library Menu.
Press the T key to display the Albums screen.
•
The TV screen will display the albums in your Audio
Library:
Press the U or V keys to step between albums, or
•
press the appropriate letter on your Audio Server
remote control to jump directly to that position in
the list.
Alternatively, press the 9 Search button to list just
•
those albums that contain a particular word or
group of letters.
To play the entire album:
•
Press the OPlay key on your Audio Server remote
control to begin playback immediately, or press the
M
Add button to add this album to the play queue.
To select a particular track from this album:
•
Press the T key to open the album and display the
tracks it contains.
•
Use the U or V keys to step between tracks.
•
Press the OPlay key to begin playback immediately,
or press the M Add button to add this track to a
playlist.
Press the S key to return to browsing by album.
•
To browse the Audio Library by artist
Use the U or V keys to highlight the Artists option
•
in the Audio Library Menu.
Press the T key to display the Artists screen.
•
The TV screen will display the artists in your Audio
Library:
Press the U or V keys to step between artists, or
•
press the appropriate letter on your Audio Server
remote control to jump directly to that position in
the list.
Alternatively, press the 9 Search button to list just
•
those artists that contain a particular word or group
of letters.
To play all albums by the selected artist:
Press the OPlay key on your Audio Server remote
•
control to begin playback immediately, or press the
M
Add button to add all albums by the selected
artist to a playlist.
To select a particular album by the selected artist:
Press the T key to display all available albums by
•
the selected artist.
Use the U or V keys to step between albums.
•
Either:
Press the OPlay key to begin playback immediately,
•
or press the M Add button to add this album to a
playlist.
Or:
Press the T key again to select a track from within
•
the album.
Or:
Press the S key to return to browsing by artists.
•
23
Page 28

To browse the Audio Library by genre
Use the U or V keys to highlight the Genres option
•
in the Audio Library Menu.
Press the T key to display the Genres screen.
•
The TV screen will display the genres in your Audio Library:
Use the U or V keys to step between genres.
•
Alternatively, press the 9 Search button to list
•
just those genres that contain a particular word or
group of letters.
To play all albums in the selected genre:
Press the OPlay key on your Audio Server remote
•
control to begin playback immediately, or press
the M Add button to add all albums in the selected
genre to a playlist.
To select a particular album in the selected genre:
Press the T key to display all artists within the
•
selected genre.
Use the U or V keys to step between artists.
•
Press the T key again to display all albums by a
•
particular artist.
Use the U or V keys to step between albums.
•
Either:
Press the OPlay key to begin playback immediately,
•
or press the M Add button to add this album to a
playlist.
Or:
Press the S key to return to browsing by genres.
•
To browse the Audio Library by Year
Use the U or V keys to highlight the Years option
•
in the Audio Library Menu.
Press the T key to display the Years screen.
•
The TV screen will display the years available in your
Audio Library:
•
Use the U or V keys to step between years, or press
the appropriate key on the alphanumeric keypad to
jump directly to that position in the list.
To play all albums in the selected year:
•
Press the OPlay key on your Audio Server remote
control to begin playback immediately, or press the
M
Add button to add all albums in the selected year
to a playlist.
To select a particular album in the selected year:
•
Press the T key to display all albums within the
selected year.
•
Use the U or V keys to step between albums.
Either:
Press the OPlay key to begin playback immediately,
•
or press the M Add button to add this album to a
playlist.
Or:
Press the S key to return to browsing by years.
•
To browse the Audio Library by Era
Use the U or V keys to highlight the Eras option in
•
the Audio Library Menu.
Press the T key to display the Eras screen.
•
The TV screen will display the eras in your Audio Library:
Use the U or V keys to step between eras, or press
•
the appropriate key on the alphanumeric keypad to
jump directly to that position in the list.
To play all albums in the selected era:
Press the OPlay key on your Audio Server remote
•
control to begin playback immediately, or press the
M
Add button to add all albums in the selected era
to a playlist.
To select a particular album in the selected era:
Press the T key to display all albums within the
•
selected era.
Use the U or V keys to step between albums.
•
Either:
Press the OPlay key to begin playback immediately,
•
or press the M Add button to add this album to a
playlist.
Or:
Press the S key to return to browsing by eras.
•
24
Page 29

To browse Playlists in the Audio Library
Playlists allow you to create your own selections of tracks
and save them with a name of your choice such as Party
Music. For more information about creating a playlist
refer to Creating a new Playlist on page 29.
Use the U or V keys to highlight the Playlists
•
option in the Audio Library Menu.
Press the T key to display the Playlists screen.
•
The TV screen will display the playlists in your Audio
Library:
Note: If you have not yet created any playlists the list will
be empty.
Press the U or V keys to step between playlists, or
•
press the appropriate letter on your Audio Server
remote control to jump directly to the item in the
list beginning with that letter.
Alternatively, press the 9 Search button to list just
•
those playlists that contain a particular word or
group of letters.
Press the OPlay key on your Audio Server remote
•
control to begin playback immediately, or press
the M Add button to add all tracks in the selected
playlist to another playlist.
Selecting items directly using your Audio
Server remote control.
You can select an item from your library directly by the
rst letter of its title using the alphanumeric keypad on
your Audio Server remote control.
To select a library item by name:
Display the appropriate library menu for the item
•
you want to nd (e.g. Artists).
Press the alphanumeric keypad key corresponding
•
to the rst letter of the item you want to select.
For example to nd the artist Santessa navigate to the
Artists screen, then press the 7 key four times because
S is the fourth letter on the 7 key. The TV screen shows
the rst artist beginning with the letter S.
If there are several artists beginning with the letter S
press the V key to step through until you nd the artist
for which you are looking.
Press the 1 key to return to the top of the list.
•
Alternatively, you can use the [ function to select a
library item by initial letter:
Display the appropriate library menu for the item
•
you want to nd (e.g. Artists).
Press the [ key on your Audio Server remote
•
control.
The TV screen displays a list of letters which correspond
to the starting letter of the items available in the chosen
list:
Use the U or V keys to step between the letters in
•
the list and highlight the starting letter of the item
you are trying to locate.
Press the OSelect key.
•
The TV screen will display the rst artist beginning with
the letter S.
If there are several artists beginning with the letter S
press the V key to step through until you nd the artist
for which you are looking.
Press the 1 key to return to the top of the list.
•
25
Page 30

THE SEARCH FUNCTION
The search function can be used from any Audio Library screen to reduce the items in the current list to only those that contain
a particular word or collection of characters.
To use the search function, navigate to the list in the library you wish to search and press the 9Search key on your Audio
Server remote control. The below screen is displayed. Use the alphanumeric keypad to enter text and press the OOK key. A
list of items containing your search criteria will then be displayed.
THE MARK FUNCTION
The mark function can be used to select multiple items
within a list in the Audio Library. You can then perform
a single action on all the marked items rather than going
through them one by one.
For example:
To delete multiple albums from the Audio Library
Press the à Browse key on your Audio Server
•
remote control to display the Audio Library.
Press the U or V keys to highlight Albums and
•
press the O Select key to display the Albums list.
Use the U or V keys again to highlight an album
•
you wish to delete.
Press the pMark key.
•
The mark symbol will appear next to the marked album:
Place a mark symbol next to the other albums you wish
to delete.
Press the äOptions key and highlight Delete
•
marked albums.
Press the O Select key.
•
If there are less than one hundred items in a list, you also
have the option to mark all of the items in a list, without
having to go through them individually.
For example:
To delete all the albums by a particular artist
Press the à Browse key on your Audio Server
•
remote control to display the Audio Library.
Press the U or V keys to highlight Artists and press
•
the O Select key to display the Artists list.
Use the U or V keys again to highlight an artist
•
and press the T key.
A list of all the albums by the chosen artist is displayed.
Press the äOptions key and choose Mark all.
•
Press the O Select key.
•
Press the äOptions key again and choose Delete
•
marked albums.
Press the O Select key.
•
Note: If pressing the pMark key has no effect, then the
mark function is not available on the current screen.
26
Page 31

PLAYBACK INFORMATION
The illustration below shows the Now Playing screen. Whenever you select an item in the Audio Library for playback,
this screen is displayed. You can also choose to display this screen at any time by pressing the âNow Playing key on your
Audio Server remote control. When you make this selection, your Audio Server will display the Now Playing screen for
the currently selected audio output. If your Audio Server has multiple audio outputs, you will also have multiple Now
Playing screens which are selectable using the NOutput key on your Audio Server remote control (refer to page 28 for more
information).
27
Page 32

SWITCHING AUDIO OUTPUTS
Your Audio Server is capable of playing different music in
several rooms simultaneously. If you wish to play music
in a particular room, you must rst choose the correct
audio output.
To select an Audio Output
Press the NOutput key on your Audio Server remote
•
control.
The following screen is displayed:
Use the U or V keys to select an audio output.
•
O
Press the
•
You are now in control of the audio output you have
selected and items you select for playback in the Audio
Library will play on this audio output.
You can view the playback status of the currently
selected output at any time by pressing the âNow
Playing key on your Audio Server remote control.
Note: The AAS-1 is a single output device and therefore
cannot switch between audio outputs.
Select key.
Shufe and repeat playback
Your Audio Server lets you play selections from the
Audio Library in a shufed order to add variety to your
music. You can also play selections repeatedly.
To shufe the playback order
•
Press the Q key on your Audio Server remote
control to randomize the order of the selections in
the play queue.
•
Press the Q key a second time to shufe all of the
tracks in the play queue. This will also turn on
repeat mode for continuous playback of all tracks.
Press the Q key a third time to disable shufe.
•
To repeat the current selection
Press the R key on your Audio Server remote
•
control to repeat the currently playing track.
Press the R key a second time to repeat the entire
•
play queue.
Press the R key a third time to disable repeat.
•
The front panel and TV screen both indicate that shufe
and repeat are enabled.
NOW PLAYING SCREEN OPTIONS
There are a number of options available from the Now
Playing screen.
Press the âNow Playing key on your Audio Server
•
remote control to display the Now Playing screen.
Press the äOptions key.
•
The following screen is displayed:
CONTROLLING PLAYBACK
Whether you are playing music from the Audio Library
or directly from the CD you can pause, stop and resume
playback as well as seek and skip tracks at any time.
To pause play
Press the h key on the front panel or your Audio
•
Server remote control.
To stop play
Press the g key on the front panel or your Audio
•
Server remote control.
To resume play
Press the a key on the front panel or your Audio
•
Server remote control.
To skip to the next or previous track
Press the
•
your Audio Server remote control.
The front panel display shows the number of each track
as you skip between them.
To seek within a track
Hold down the
•
panel or your Audio Server remote control.
Play resumes from the new position when you release
the key.
d f
e c
or
d f
key on the front panel or
e c
or
key on the front
Jump to album
Use the U or V keys to select Jump to album.
•
O
Press the
•
The currently playing album will be displayed.
Jump to artist
Use the U or V keys to select Jump to artist.
•
Press the
•
All albums by the currently playing artist will be
displayed.
Jump to genre
Use the U or V keys to select Jump to genre.
•
Press the
•
All artists in the same genre as the currently playing
track will be displayed.
From this options screen, you also have the choice to edit
album or track details. For instructions regarding the use
of these options, refer to the Editing the Audio Library
chapter on page 30.
Select key.
O
Select key.
O
Select key.
28
Page 33

THE PLAY QUEUE
Any item in your Audio Library can be selected for
playback in one of two ways:
Press the OPlay key to begin playback immediately,
•
ending playback of any current music selection.
Press the MAdd key and select the [Play Queue]
•
option to add the selected item to the end of the
play queue. For example, if you are currently
playing an album, the item you have selected will
not begin playing until the album has nished.
Any item in the Audio Library can be added to the play
queue, from an individual track to an entire genre.
To display the play queue:
Display the Now Playing screen by pressing the
•
â
Now Playing key on your Audio Server remote
control.
Press the T key to display the play queue:
•
ORGANIZING YOUR
MUSIC COLLECTION
This chapter describes the features built into your Audio
Server to help you organize the music in your music
library, including information about creating playlists of
your favorite tracks, deleting albums or tracks you no
longer want to store, and naming albums, tracks, and
artists.
PLAYLISTS
Your Audio Server allows you to create your own
selections, called playlists, and identify them with a
name of your choice. For example, you could select your
favorite party tracks from a number of different albums
and include them in a playlist called Party Music. You
can then play your selection simply by choosing the
appropriate playlist from the Playlist screen.
Creating a new playlist
Display the Audio Library by pressing the à Browse
•
key on your Audio Server remote control.
Press the U or V keys to highlight the Playlists
•
option and press the O Select key.
The following screen will be displayed, listing your
existing playlists:
To remove a selection from the play queue
Use the U or V keys to highlight the selection you
•
would like to remove from the queue.
Press the äOptions key and chose Delete Selection
•
from the list.
To clear the play queue
Press the äOptions key and choose Mark all.
•
Press the äOptions key again and choose Delete
•
marked selections.
To move a selection in the play queue
Use the pMark key to mark the selection(s) you
•
wish to move.
Use the U or V keys to highlight the selection after
•
which you wish to place the marked selections.
Press the äOptions key and choose Move marked
•
selections.
To save a play queue as a playlist
You can save a play queue as a playlist so that you can
listen to the same collection of music at a later time.
From the Play Queue screen press the MSave key on
•
your audio server remote control.
In the screen that appears, enter a name for the
•
play list using the alphanumeric keypad.
Press the OSave key.
•
Your current play queue will now be available as a
playlist in the Audio Library.
Press the äOptions key.
•
Select New Playlist and press the O Select key.
•
Use the alphanumeric keypad to enter a name for
•
the new playlist and press the O Select key.
Your new playlist will now appear in the list.
Adding music to a playlist
You can add music from your Audio Library to a playlist
from any library screen, by using the MAdd key on your
Audio Server remote control.
For example, to add an album to a playlist:
Press the à Browse key on your Audio Server
•
remote control to display the Audio Library.
Press the U or V keys to highlight Albums and
•
press the O Select key to display the albums list.
Use the U or V keys to highlight the album you
•
wish to add to a playlist.
Press the M Add key.
•
29
Page 34

The following screen is displayed:
Use the U or V keys to select the playlist to which
•
you would like to add your chosen album.
Alternatively, use the MNew key to create a new playlist
as described in the previous section.
Press the O Select key to add the album to the
•
playlist.
You can also use the pMark key to mark multiple items
in the Audio Library and then add them to a playlist
using the above method.
Editing Playlists
To edit a playlist name
From the Playlists screen, use the U or V keys to
•
highlight the playlist you wish to edit.
Press the äOptions key and choose Edit Playlist
•
Name.
Use the alphanumeric keypad to edit the playlist
•
name and then press the MSave key.
To remove an item from a playlist
Use the U or V keys to highlight the item you
•
would like to remove from the playlist.
Press the äOptions key and choose Delete
•
Selection from the list.
To delete multiple items from a playlist use the pMark
key to mark the items you wish to remove and then
follow the process described above.
To move an item in a playlist
Use the pMark key to mark the item(s) you wish to
•
move.
Use the U or V keys to highlight the item after
•
which you wish to place the marked items.
Press the äOptions key and choose Move marked
•
selections.
To delete a playlist
From the Playlists screen, use the U or V keys to
•
highlight the playlist you wish to delete.
Press the äOptions key and choose Remove
•
selected playlist.
To delete multiple playlists use the pMark key to mark
the playlists you wish to remove and then follow the
process described above.
EDITING THE AUDIO LIBRARY
Your Audio Server labels the albums, artists and tracks
in your Audio Library with names which identify the
track you are listening to, and these help you locate
items when you are browsing through the Audio
Library.
If you have an Internet connection, your Audio Server
reads the CD information automatically from the
Gracenote Music Recognition Service. You can edit
these names at any stage to suit your own preferences.
Editing Album Information
Press the à Browse key on your Audio Server
•
remote control to display the Audio Library.
Press the U or V keys to select Albums and press
•
the T key.
Use the U or V keys again to highlight the album
•
you wish to edit.
Press the äOptions key and choose Edit Album
•
Details.
The following screen is displayed:
Use the U or V keys to highlight either Name,
•
Artists, Genres, Year or Era.
Press the OEdit key.
•
Use the alphanumeric keypad to edit the text and
•
press the OOK key.
When you have nished making changes to an album’s
details make sure you press the MSave key.
If, for example, multiple genres are applicable to an
album these can be entered by pressing the RETURN key
on the remote control between entries, while editing the
genre eld.
Editing Track Information
Press the à Browse key on your Audio Server
•
remote control to display the Audio Library.
Press the U or V keys to select Tracks and press the
•
T
key.
Use the U or V keys again to highlight the track
•
you wish to edit.
Press the äOptions key and choose Edit Track
•
Details.
30
Page 35

The following screen is displayed:
Use the U or V keys to highlight either Name,
•
Artists, Genres, Year, Era or Artwork.
Press the OEdit key.
•
Use the alphanumeric keypad to edit the title and
•
press the OOK key.
When you have nished making changes to a track’s
details make sure you press the MSave key.
Editing Genre, Year and Era names
Press the à Browse key on your Audio Server
•
remote control to display the Audio Library.
Press the U or V keys to select either Genres, Years
•
or Eras and press the T key.
Use the U or V keys again to highlight the genre,
•
year or era you wish to edit.
Press the äOptions key and choose the Edit name
•
option.
Use the alphanumeric keypad to enter a new name
•
for the genre, year or era.
Selecting Album Artwork
Your Audio Server stores a number of generic cover art
images that can be applied to albums in your Audio
Library. You can also choose to apply cover art that has
been downloaded from the XiVA Online Service to any
album in your library.
Highlight the album in your Audio Library to which
•
you would like to apply a cover art image.
Press the äOptions key.
•
Use the U and V keys to select Edit Album Details
•
and press the OSelect key.
Choose the Artwork option and press the M Edit
•
key.
The following screen, listing all of the cover art images
stored on your Audio Server, is displayed:
Use the U or V keys to scroll through the cover art
•
images.
Press the OSelect key to associate a piece of
•
artwork with your chosen album.
It is also possible to upload images from your PC to your
Audio Server and apply these to albums in your Audio
Library. For more information, refer to the section titled
Importing Files To Your Audio Server on page 39.
Deleting albums and tracks
Press the à Browse key on your Audio Server
•
remote control to display the Audio Library.
Press the U,V and T keys to navigate to the album
•
or track you would like to delete.
Press the äOptions key and choose Delete track or
•
Delete album where appropriate.
A conrmation screen will appear:
Press the OYes key to conrm you wish to delete
•
the album or track.
Note: Any items you choose to delete will be
permanently erased from your Audio Server’s hard
disk. Anything you delete by accident will need to be
re-recorded.
31
Page 36

SYSTEM SET UP
This chapter describes the advanced settings that you can
access from your Audio Server’s Set Up menu.
To access the Set Up menu:
Press the JMenu key on your remote control to
•
display the Function Menu.
Use the U and V keys to highlight the Set Up
•
option.
Press the O Select key.
•
The following screen is displayed:
Current Ethernet Settings
Allows you to view the current Ethernet settings being
used by your Audio Server.
This menu is not editable and is used for reference only.
See below for instructions about changing these settings.
Static Ethernet Settings
This section allows you to congure the Audio Server’s
Ethernet settings.
The following sections describe each of the options
available from the Set Up menu.
Network Settings
This section allows you to specify how your Audio Server
connects to the Internet.
Choose between Ethernet, Modem or None as the
connection type and press the MSave key to commit any
changes you make.
Specify DHCP as the Ethernet Mode if your Audio
Server is connected to a network with a DHCP server
present, and the Ethernet settings should be assigned
automatically. Otherwise, choose Static and enter your
own Ethernet details in the Static Ethernet Settings
section.
Use this section to enter your own Ethernet details in
the IP Address, Subnet Mask, Gateway and DNS elds.
Again, be sure to press the MSave key to commit any
changes you make.
Modem Settings
If you select Modem as your Internet Connection type
you must then input your Internet Service Provider’s
details on this screen.
32
Page 37

TV Settings
This section is used to specify if your Audio Server is
congured for PAL or NTSC use.
You may need to edit this setting if the television user
interface is either not displayed on your televsion screen,
or is displayed incorrectly.
User Interface Settings
The options on this menu allow you to change the
language of the television user interface and also to
switch the mode between Active and Passive.
System Information
The System Information screen displays the serial number
of your Audio Server and also the software version
currently running.
You may need to quote this information if you contact
your dealer or installer for technical support.
On this screen there is a also a Reset System option
available by pressing the M key on the remote control.
Select this option and press the OReset Defaults key to
return your Audio Server to its default factory settings.
You can also choose the MClear Content option to
remove all the music from your Audio Library.
If you choose to clear all the content from your Audio
Library you will be asked to enter a password to conrm
your action. The password is ResetMyMusic.
Note: If you perform either of the above two actions,
you will not be able to reverse their effects.
Software Update Settings
In the unlikely event that a software update attempt
fails, you may need to amend these settings. If this
scenario arises, contact your dealer or installer for more
information.
Choose between English (the default), French, Spanish,
German and Italian as the language used in the televsion
user interface.
Note: The language of the front panel user interface
cannot be changed.
By default, your Audio Server wil be in Passive mode;
changing to Active will add icons to the interface
depicting the available options on each screen.
33
Page 38

Remote back Up Settings
This screen allows you to specify Username, Password
and Location for performing a Back Up operation.
Media Transfer Settings
Here you can enable or disable the media transfer
function.
For more information about the use of these settings,
refer to the section titled Remote Back Up And Restore,
on page 40.
CD Record Settings
In this screen you have the option to change the speed
at which the CD drive records and also to select the
default record quality setting.
Selecting Maximum as the Drive Speed will record your
CDs at high speed. If you nd this setting makes your
Audio Server too noisy, select Standard for quieter but
slower operation.
Choose between Uncompressed WAV, High Quality MP3
(192k VBR), Standard Quality MP3 (128k VBR), High
Quality WMA (128k CBR) and Standard Quality WMA
(96k CBR) as the default recording quality used by both
the TV and front panel user interfaces when recording
a CD.
Crestron Network Settings
Use this section to display settings used by your Crestron
controller.
34
Page 39

THE FRONT PANEL
INTERFACE
In addition to the user interface displayed on your
television screen, the Audio Server also has a user
interface accessible via the LCD display and buttons on
the front panel of the unit. This is an abridged version
of the television user interface and provides access to a
limited number of controls and functions.
Press the button labelled MENU on the front of the unit
to display the following screen on the front panel LCD
display:
The labels at the bottom of the screen (Out, Albums, CD
and Setup) correspond to the four action buttons below
the LCD display on the front panel. The function of
these buttons can change dependent on which screen is
displayed on the front panel.
Note: The MENU button can be used at any time to
return to the above screen.
To display playback information
The front panel user interface has the ability to display
basic information about the status of your Audio Server’s
output(s).
•
Press the left hand action button on the font panel
corresponding to the Out label on the LCD display.
The following screen is displayed:
The following screen is displayed:
To Select an Album for Playback
Use the U and V buttons on the front panel
•
to move through the albums list alphabetically
until the name of the album you wish to play is
displayed. The artist name is also displayed below
each album title.
Press the Out action button to select the audio
•
output.
Finally, press the Play action button.
•
Recording or playing a CD
The front panel user interface can be used to control
the recording of a CD onto the hard disk of your Audio
Server. It can also be used to play a CD directly from the
CD tray.
To begin recording a CD
Press the button labelled OPEN/CLOSE on the front
•
panel, insert a CD into the CD tray and press the
OPEN/CLOSE button a second time to close the tray.
Press the front panel action button corresponding
•
to the CD label on the LCD display.
The following screen is displays the album details:
1.
Indicates the current playback status.
2.
Title of the track currently playing.
3.
Name of the audio output currently selected.
4.
The name of the artist associated with the track
currently playing.
5.
Press this button to change the audio output
currently selected.
6.
Press this button to toggle the Repeat function.
7.
Press this button to toggle the Shufe function.
To Browse Albums in the Library
The font panel user interface is also capable of displaying
a list of albums present in the library of the Audio Server.
•
Press the front panel action button corresponding
to the Albums label on the LCD display.
Press the Rec action button.
•
The recording quality is determined by the CD Record
Settings in the Set Up menu.
Press the Rec action button to begin recording.
•
The LCD display will show the progress of the recording
and indicate when the recording process is complete.
To play a CD directly from the CD Tray
Press the button labelled OPEN/CLOSE on the front
•
panel, insert a CD into the CD tray and press the
OPEN/CLOSE button a second time to close the tray.
Press the front panel action button corresponding
•
to the CD label on the LCD display.
Press the Play action button.
•
To congure setup options
The settings available in the Set Up menu of the
television user interface are also available via the front
panel user interface.
Press the front panel action button corresponding
•
to the Setup label on the LCD display.
The following screen is displayed:
35
Page 40

Use the U and V buttons on the front panel to scroll
through the following Set Up options:
Network Settings
•
Current Ethernet Settings
•
•
Static Ethernet Settings
•
Modem Settings
TV Settings
•
User Interface Settings
•
System Information
•
•
Software Update Settings
•
Remote Back Up Settings
CD Record Settings
•
Media Transfer Settings
•
Crestron Network Settings
•
Online Update
•
Press the Select action button on the front panel to
enter any of the above sections and congure settings as
you would on the television user interface.
Where you are required to enter text, a screen will
appear containing letters, numbers and symbols:
Use the U,
•
to scroll down the list selecting characters to enter.
Use the Select action key on the front panel to
•
select a character.
As you select characters they will appear at the top of
the LCD display.
Press the Ok action key when you have nished
•
entering text.
Online Updates
The software used in the Audio Server is always being
improved by Crestron and therefore, periodically,
updates become available for download. The process
is handled automatically and only a few button presses
are required to check for and install the latest available
updates.
Use the U and V buttons on the front panel to
•
select the Online Update option.
Ensuring your Internet connection is present, press
•
the Select action button.
Follow the prompts to check for and install online
updates. When the process is complete, your audio
server will automatically restart with the new software
installed.
V, S
T
and
buttons on the front panel
36
Page 41

USING YOUR AUDIO
SERVER WITH A HOME
COMPUTER
Your Audio Server has a number of advanced features
which can be accessed via a computer attached to your
home network.
THE REMOTE USER INTERFACE
Your Audio Server’s television user interface is accessible
via a PC running on your home network. This gives you
complete control of your Audio Server using a keyboard
and mouse as opposed to a remote control. This can
help make editing your Audio Library easier and quicker
and also allows you to control your Audio Server from
any computer running on your home network.
Accessing the Remote User Interface
Connect your Audio Server to your home network
•
and power it on. If no DHCP address is available,
your Audio Server will automatically assign itself an
IP address and become accessible on the network.
Navigate to the Assigned Ethernet Settings screen
•
in the front panel Set Up menu on the Audio Server
and note the IP address. If you are using DHCP
this address will be in the same range as the other
computers on your network; if not, this address will
be in the range 169.254.0.1 - 169.254.255.254.
Next, using a computer on the network, type the IP
•
address or host name of your Audio Server into the
address bar of a web browser (eg. http://192.168.0.1
or http://<hostname>). If you are not using DHCP
you may need to recongure your computer’s
network settings before you can access the Remote
User Interface.
Supported Software
Currently, the operating systems and web browsers
supported are as follows:
On the Apple Macintosh:
Mac OS X 10.4.2
•
Safari 2.0.1
•
On the PC:
Microsoft Windows XP (Service Pack 2)
•
Microsoft Internet Explorer 6.0.2
•
Note: Other operating systems and web browsers,
or earlier versions of the above, may not display the
Remote User Interface correctly.
Navigating the Remote User Interface
You will notice that the Remote User Interface is
very similar to the television user interface, but for
the addition of some buttons. These buttons have
been added to allow you to perform actions normally
performed with the Audio Server remote control, but
using a standard computer mouse.
When you rst connect to the Remote User Interface,
you will recognize the Audio Library screen:
The screens of the Remote User interface are identical
to those of the television user interface but for the
following differences:
The U and V buttons now appear wherever there
•
is a list that can scrolled. You can use your mouse
to press these buttons when you would usually use
the U and V buttons on the Audio Server remote
control.
The functions of the main action keys on your Audio
•
Server remote control, such as JMenu, äOptions,
à
Browse and âNow Playing have been replaced
by buttons on the screen.
When required to edit or enter text, the Remote
•
User Interface will display the text entry screen
just as the television user interface does. However,
instead of using the alphanumeric keypad on your
Audio Server remote control, you can use your
computer keyboard to enter text.
You will also notice that playback transport controls
are available on the right hand side of the Now Playing
screen:
You can initiate and control playback from the Remote
User Interface using these controls.
37
Page 42

MEDIA TRANSFER
IR IN
RGB HV O UT
Com puter Mod em
LAN
USB
In addition to recording directly from the CD tray, it is
also possible to transfer music and cover art images to
and from your Audio Server, using a computer on your
home network. This feature allows you to transfer music
les from your Audio Server to a portable device (for
example, an Apple® iPod®) to allow you to listen to
your music collection while you are away from home.
Note: In some countries the copying of material
protected by copyright law may require permission of
the copyright owners.
Accessing Media Transfer
The illustration below shows a typical home network set
up. Connect your Audio Server to your home network as
described in the section entitled Accessing the Remote
User Interface on the previous page.
Enabling Media Transfer
Press the JMenu key on your Audio Server remote
•
control to display the Function Menu.
Use the U and V keys to highlight Set Up and press
•
the OSelect key.
Use the U and V keys again to highlight Media
•
Transfer Settings and press the OSelect key.
The following screen is displayed:
This setting should be set to Enabled by default.
However, if necessary, press the OEdit key and select
Enabled to activate media transfer. Use the MSave key
to save this setting.
Provided that your Audio Server is connected correctly it
should now be accessible by browsing the network from
your computer. Alternatively, open Windows Explorer
and type the IP address of your Audio Server into the
Address bar (e.g. \\<IP ADDRESS>). When you attempt to
access your Audio Server on your home network, you will
be asked to enter a username and password. These are
as follows:
Username - adagio
•
Password - crestron
•
Note: The above username and password are case
sensitive.
If you are using a Macintosh computer you can create a
new network connection as follows:
Select Go from the Finder menu and click Connect
•
to Server.
Click on the Browse button in the Connect to Server
•
window.
Navigate to your Audio Server on the network and
•
double-click the appropriate icon.
If your Audio Server does not appear in the browse
•
window return to the Connect to Server window
and enter: smb://<WORKGROUP><AUDIOSERVER_
NAME> (e.g. smb://MSHOME;ADAGIOSERVER) into
the Server Address box, then click the Connect
button.
Note: Both the Workgroup and Audio Server Name
should be in uppercase.
In the SMB Mount window click the OK button.
•
In the SMB/CIFS Filesystem Authentication window
•
enter the username adagio and the password
crestron and then click the OK button.
A window showing the contents of the Audio Server
hard disk will be displayed.
At the top level of the media transfer directory structure
are two folders entitled MusicShare and Import.
38
Page 43

Importing Files to your Audio Server
•
Double click on the folder entitled Import. An
empty folder window will be displayed.
To Import Music Files
•
Navigate to the location of the music les on your
computer.
•
Use your mouse to select the les you wish to
import and drag them into the Import window.
The les will appear briey in the Import window but
after a few seconds will disappear. These les should
now be accessible in the Audio Library of your Audio
Server.
Note: The currently supported audio le types for import
are WMA and MP3 (WMA Lossless and DRM protected
les are not supported). Any les of an unsupported
type that are dropped into the Import folder will not be
imported.
To Import Cover Art Files
Navigate to the location of the cover art les on
•
your computer.
Use your mouse to select the les you wish to
•
import and drag them into the Import window.
The les will appear briey in the Import window but
after a few seconds will disappear. These les should
now be available when selecting cover art for an album
in the Audio Library.
Note: The currently supported image le types are BMP
and JPEG. Files will be resized automatically. Any les of
an unsupported type that are dropped into the Import
folder will not be imported.
Exporting Files from your Audio Server
Double click on the folder entitled MusicShare. A
•
folder window will be displayed containing a folder
for each artist present in the Audio Library of your
Audio Server.
Double click on the folder for an artist. A folder
•
window will be displayed containing a folder for
each album by the chosen artist present in the
Audio Library.
Double click on the folder for an album. A folder
•
window will be displayed containing all the tracks
within the album and JPEG le containing the cover
art for the album.
You now have read only access to these les and can
drag and drop them to a location on your PC. You are
now also able to copy music from your Audio Server
directly to your portable player.
Transferring Music to your Portable Player
using iTunes
The iTunes Media Player application is specically
designed to simplify the process of synchronizing your
music collection with an iPod portable player. Support
for other devices is limited; you should check that
your portable player is compatible before using this
application. iTunes version 4.6 or later is required.
The Library source in iTunes shows all media les stored
on the local hard disk as well as media which has been
added from other network drives. You can add the
music collection from your Audio Server to the Library as
follows:
Select the Preferences option. This can be found
•
under the Edit menu on the Windows edition of
iTunes and under the iTunes menu on the Macintosh
version.
Select the Advanced tab.
•
Ensure that the option labelled Copy les to iTunes
•
Music folder when adding to library is unchecked.
Click the OK button to conrm any changes.
•
Making sure you have Library displayed in iTunes,
•
navigate to your Audio Server on the network.
Select the music you wish to transfer; you can
•
transfer entire albums, or all the music by a
particular artist, by dragging the relevant folder
into the iTunes Library and releasing the mouse
button. To transfer the entire contents of your
Audio Library, drag the folder entitled Albums By
Artist into the iTunes Library.
Note: the import process may take some time depending
on the number of albums and the speed of your
computer.
Once the iTunes Library source has been updated with
the music from your Audio Server you can you can
update your iPod as follows:
Connect your iPod in the normal way.
•
Click the Browse button in the top right-hand
•
corner of the iTunes window.
Drag any item from the Genre, Artist, Album lists
•
onto the iPod icon in the Source area.
The transfer process will begin shortly afterwards.
Updating the iTunes Library
If you have removed music from your Audio Server or
edited the names of any items in the library you will
need to update the iTunes Library to remove any broken
links. To do this, you should rst delete all the Audio
Server albums from the iTunes Library as follows:
Select the View Options item from the Edit menu.
•
Check the Grouping option, then click the OK
•
button to conrm your changes.
In the iTunes Library click the new Grouping column
•
heading. The tracks located on your Audio Server
hard disk will be grouped together using the label
<-AUDIOSERVER_NAME (e.g. <-Crestron-1234).
Click on the rst track in the list with this grouping
•
label then, holding down the Shift key, click the last
track.
Press the Delete key to remove these tracks from
•
the iTunes Library.
Click Yes to conrm your choice.
•
Repeat the import process described above to add back
the Audio Server information.
Transferring Music to your Portable Player
using Windows Media Player
It is also possible to use Windows Media Player to
transfer music from your Audio Server to your portable
device.
Firstly, make sure you can navigate to your Audio
•
Server and view the music in your MusicShare
folder.
Display the File drop down menu and select Add
•
to Library, followed by Add Folder. In the Explorer
window that appears navigate to your Audio Server
on the network and select the music you wish to
transfer; you can transfer entire albums, or all the
music by a particular artist by selecting the relevant
folder and clicking OK. To transfer the entire
contents of your Audio Library, select the folder
entitled MusicShare.
Note: the import process may take some time depending
on the number of albums and the speed of your
computer.
39
Page 44

Once your Media Library has been updated with the
music from your Audio Server you can update your
portable player as follows:
Click the Copy to CD or Device option from the
•
Media Player toolbar.
Select the Album, Artist, Genre or Playlist you wish
•
to copy from the Items to Copy list.
Under Items on Device select your portable player.
•
Click the Copy button.
•
The transfer process will begin shortly afterwards.
REMOTE BACK UP AND RESTORE
In the unlikely even that your Audio Server develops
a fault or, for example, should you one day choose to
upgrade to a larger hard disk, you have the option to
back up the contents of your Audio Server’s hard disk
to a selected location on your home network and then
restore this information at a later date.
In order to use Remote Back Up and Restore, it is rst
necessary to congure the appropriate settings on your
Audio Server.
Press the JMenu key on your Audio Server remote
•
control to display the Function Menu.
Use the U and V keys to highlight Set Up and press
•
the OSelect key.
Use the U and V again keys to highlight Remote
•
Back Up Settings and press the OSelect key.
In the Location eld, enter the location on the network
to which you wish to back up your Audio Library (e.g.
\\192.168.0.1\Media Transfer Share). Enter Username,
Password and Domain where appropriate to access your
home network.
Remote Back Up
Press the JMenu key on your Audio Server remote
•
control to display the Function Menu.
Use the U and V keys to highlight Remote Back Up
•
and Restore and press the OSelect key.
The following screen is displayed:
Note: When performing a back up, always ensure there
is enough space available at the destination for the
quantity of media being transferred. In the event that
there is not enough hard disk space, the back up will not
complete successfully and the backed up les should not
be used.
Press the OBack Up key.
•
Remote Restore
Press the JMenu key on your Audio Server remote
•
control to display the Function Menu.
Use the U and V keys to highlight Remote Back Up
•
and Restore and press the OSelect key.
Press the MRestore key.
•
Conrm that you wish to delete all of the exisiting
•
music in your Audio Library by pressing the OYes
key and entering the password ResetMyMusic.
40
Page 45

THE CRESTRON TOUCHPANEL INTERFACE
A friendly onscreen menu can be displayed on any Crestron touchpanel within your home. The screens discussed in this
section are a typical example of an interface provided by Crestron to its dealers. Since your dealer may have customized
screens for you, your screens may differ with respect to presentation, but the general topics covered should apply
nonetheless.
What appears on the screen depends on the size of the touchpanel. Larger panels have a larger touch screen area thus a
designer can display more information. Therefore, two versions of sample screens are shown below. Those on the left are for
large touchpanels (10 inches or more). The screens to the right are for touchpanels less than 10 inches.
The Music Library page, such as the one shown below, provides the convenience of easy browsing and instant access to all
the music stored within the Audio Library available on your Audio Server. The Music Library is the rst level of browsing; it
provides a list of categories (Genres, Artists, Albums, Eras, Years, Playlists, and Tracks).
The following items appear on every level of browsing (except where noted):
Music browser (categories shown on Music Library page; other pages show browse-level appropriate lists)
•
Navigate the browse-level appropriate list with the following buttons:
•
BUTTON DESCRIPTION
Jump to beginning of list
Scroll up list
Scroll down list
Jump to end of list
Open another page by selecting a ‘jump to’ button (buttons on the Music Library page include Options, Library, and
•
Now Playing). The Playlist Manager button only appears on the large touchpanels (10 inches or more).
Select one of the four audio outputs (Zones A through D; depends on the audio server model). For touchpanels less than
•
10 inches, this item appears by selecting the Options button.
Summary of current selection (Now Playing; press this area to open a new window with more details and control). The
•
summary only appears on the large touchpanels (10 inches or more).
41
Page 46

MUSIC BROWSER
There are a number of ways to browse and access the music of your choice. Touching an item on the music browser allows
you to view another level and displays another page on the touchpanel. The process of making a series of selections from
the music browser creates a browse path. As the browse path lengthens, the items listed within the music browser should
match the music of your choice. For example, from the music browser on the Music Library page, you can view all the tracks
on a particular artist’s album by selecting Artist (i.e., The B-52’s) and Album (i.e., Time Capsule), as shown below.
All the options from the Music Library page are also available from any browsed page. New features on this page include:
Browse level (for this example, the target is all the tracks on the Time Capsule album by the B-52’s)
•
Play / Add toggle – selection (on the large touchpanels, 10 inches or more) provides alternating Add to Queue and Play
•
buttons for the items listed within the music browser.
BUTTON DESCRIPTION
Allows selection to be added to end of the
play queue.
Provides immediate playback of a particular
selection for instant access to your music.
For touchpanels less than 10 inches, the Add to Queue button appears by default. To switch to the Play button, select
the Options button rst.
Back button – selection jumps back to the previously displayed page.
•
NOTE: The Search button (or A-Z button for touchpanels less than 10 inches) only appears as a ‘jump to’ button at the Album
and Track browse level assuming that albums are sorted by the artist’s name and tracks are sorted by song title (or name).
The Search button does not perform a ‘global’ search at other browse levels.
42
Page 47

NOW PLAYING
Want more information about what is currently playing? Simply select the Now Playing summary located at the bottom of
the Music Library page (or select the Now Playing ‘jump to’ button) to open the Now Playing page, shown below.
Options include:
Current song details – lists the song title, album title, and artist of the song now playing (genre is also shown on large
•
touchpanels, 10 inches or more).
Check the queue (select the Queue ‘jump to’ button).
•
Interactive slider – allows you to jump to a particular point within the song now playing (only on large touchpanels, 10
•
inches or more).
Transport buttons – enables you to search back, pause, play, stop, and search forward through the song now playing.
•
Next up details – lists the song title, album title, and artist of the next song in the queue
•
Shufe – select Shufe to randomly reorganize the selections (i.e., albums) or tracks in the play queue. Select Off to
•
disable the shufe. For touchpanels less than 10 inches, Shufe appears by selecting the Options button rst.
Repeat – select Repeat to replay the current track or the entire play queue. Select Off to disable the repeat. For
•
touchpanels less than 10 inches, Repeat appears by selecting the Options button rst.
THE QUEUE
Want to check something in the queue? Simply select the Queue ‘jump to’ button on the Now Playing page to open the Play
Queue page, shown below.
This page lists the entire queue order; you have the option to:
Save the queue as a playlist - select Save as List (only on large touchpanels, 10 inches or more).
•
Remove all items from the queue - select Remove All.
•
Remove selected items from the queue (select Remove to eliminate a specic item)
•
Recall that selections can be added to the end of the play queue while navigating with the music browser. Simply use the
Add to Queue button.
43
Page 48

PLAYLIST MANAGER
NOTE: The Playlist Manager is only available from large touchpanels, 10 inches or more.
Want to create, edit and remove playlists? Simply select the Playlist Manager ‘jump to’ button on the Music Library page to
open the Playlist Manager page, shown below.
Notice that the music browser is identical to the Music Library page. To make an addition to a playlist, simply use the music
browser to nd a particular selection (i.e., track, album, or artist). Whatever browse path you chose, two buttons appear
within the music browser: Audition and Add to List.
BUTTON DESCRIPTION
Interrupts the song currently playing and plays
the selection.
Jump to Playlist Manager - Add to Playlist
page so that you can add your selection to the
end of a playlist shown in the music browser.
To make an original playlist, select the Create New Playlist ‘jump to’ button. Use the keyboard to enter a name for the
playlist. Select Playlists from the Playlist Manager - Music Library page. Notice that the playlist now appears in the music
browser, but is empty. Use the procedure in the previous paragraph to add selections to the playlist. If the playlist is
not empty, but needs adjustments, select the playlist from the music browser. Notice that all the tracks of the selected
playlist appears in the music browser. Select Edit beneath the Options ‘jump to’ button. Three buttons appear to enable
adjustments.
BUTTON DESCRIPTION
Move the selection down one in the playlist
order.
Move the selection up one in the playlist
order.
Remove the selection from the playlist.
44
Page 49

SELECTION MODE
Compilation albums offer an interesting ‘twist’ when browsing through your library of music, because the artists can vary
from track to track on a given album. So once again you can create a browse path by selecting an artist (i.e., Nat King Cole)
and compilation album (i.e., Pottery Barn Dinner at Eight), as shown below.
Select the Options ‘jump to’ button and notice that there are two ‘Selection Mode’ options available: Track and Album. Since
Album is the default, the resultant page (shown above) shows every track on the selected album even though some of the
artists do not match the browse path constraints of ‘Artist: Nat King Cole’. If you wish to narrow your selection so that it
truly ts the browse path, select the Track button under ‘Selection Mode’. The result, shown below, is a music browser list
that truly ts the browse path.
The ‘Sort Tracks By’ option organizes the items in the music browser by Number, Name, Album, or Artist (button availability
depends on whether you are browsing albums or tracks). The tracks listed in the example of the music browser shown above
are sorted by number.
45
Page 50

TERMS & CONDITIONS
XiVA™ SOFTWARE CUSTOMER SERVICE AGREEMENT
Your next-generation XiVA™ home media appliance (your Audio
Server) is powered by XiVA™ Software brought to you by Imerge
Limited (“Imerge”). This agreement explains the terms and
conditions that will apply to your use of XiVA™ Software.
Denitions in this Agreement
“Imerge” or “we” means Imerge Limited (company registration
number 03360764) whose registered ofce is at Bar Hill Business
Park, Saxon Way, Bar Hill, Cambridge CB3 8SL England, United
Kingdom;
“Software” means the XiVA™ Software on your Audio Server
and related XiVA™ accessory software.
“Service” means the use of XiVA™ Software related services
provided to you by Imerge, for example the registration service
via the Internet.
“You”, “your” and “yourself” means you, the person entering
into this agreement with Imerge;
“Registration Data” means your name, address, postcode and
telephone number (optional) or email address (optional).
Service Charges
You will be responsible for the interoperability between your
XiVA™ home media appliance (your Audio Server), your TV set
and the public telephone service and all related charges.
XiVA Software Privacy Policy
Imerge respects the privacy of your information and will
handle any personal information you might supply to us when
you register your Audio Server in accordance with the XiVA™
Software Privacy Policy. A copy of this Privacy Policy is included
as a part of this document and forms part of these terms and
conditions. Please read it carefully.
Conditions of Use
You agree not to use the Software and/or Service in a way that
may reasonably be expected to interrupt, disturb or impair the
working of the XiVA™ Software Service. You will not insert or
knowingly or recklessly transmit, distribute, upload or otherwise
make available emails, software, data or les that contain a virus
or corrupt data; seek unauthorized entry into back ofce; hack
into any aspect of the Software or Service; knowingly corrupt
data; circumvent, or attempt to seek to circumvent, any of the
security safeguards of Imerge or any of its suppliers; make any
business use of the Service; or assist any third party to do any
of these things. By registering, you agree to these terms and
conditions.
Title to Software and Intellectual Property
Imerge retains title to and ownership of all the XiVA™ Software
and intellectual property rights in Imerge authorised products
and XiVA™ home media appliances and the Service. Imerge
also retains ownership of all Imerge copyrights and trademarks.
Except as expressly authorised by Imerge, you agree not to
copy, modify, reverse engineer, rent, lease, loan, sell, distribute,
sublicense, or create derivative works based on the XiVA™
Software, in whole or in part.
You agree not to access the XiVA™ Software Service by any
means other than through the interface provided by Imerge or
an Imerge Business Partner for use in accessing the Service.
Indemnity
Neither Imerge nor any of its directors, employees or other
representatives will be liable for damages arising out of or in
connection with the use of the Software. Save in respect of
liability for death or personal injury arising out of negligence,
Imerge hereby disclaim and exclude to the fullest extent
permitted by law all liability for any loss or damage whatsoever
and howsoever incurred including any consequential, special,
secondary or indirect loss or damage or any damage to goodwill
or prots or any loss of anticipated savings incurred by you,
whether arising in tort, contract or otherwise, and arising out
of or in relation to or in connection with your access to or use
of or inability to use the Service or any software or content
supplied to you in connection with the Service, or in connection
with any failure of performance, error, omission, interruption,
defect, delay in operation or transmission, computer virus or line
or system failure even if Imerge or its employees or agents are
advised of the possibility of such damages, losses or expenses.
Limitations of Imerge’s Liability
In no event will Imerge or its suppliers be liable to you or
any third party for any loss of prots, loss of data, loss of
revenue, loss of or loss of use of software, loss of or loss of
use of equipment, to which the Audio Server is connected,
business interruption, or other indirect, consequential, special,
or incidental damages of any nature arising from or relating
to your use of the Software, even if Imerge has been advised
of the possibility of such damages. You understand that these
limitations of Imerge’s and Imerge’s suppliers’ liability are a
fundamental term of this agreement.
Changes to the XiVA™ Software Service
Imerge reserves the right in its absolute discretion at any time
and without notice to users of the Software to add, remove,
amend or vary features of the Software or Service, temporarily
or permanently, or on notice to all users to discontinue the
Service altogether at any time in its discretion. You agree that
Imerge shall not be liable to you or to any third party for any
modication, suspension or discontinuance of the Service.
Imerge also reserves the right to change the terms and
conditions of this agreement. Such changes shall be effective
upon notication by Imerge. You are responsible for viewing
any new terms and continued use after notication will conrm
acceptance of such changes.
Invalidity
If any part of these terms and conditions are unenforceable
(including any provision in which we exclude our liability to
you) the enforceability of any other part of these terms and
conditions will not be affected.
Governing Law
These terms and conditions shall be governed by and interpreted
in accordance with the laws of England and Wales whose courts
shall have jurisdiction to resolve any disputes between us. The
ofcial text of this agreement shall be in English. In the event
any dispute concerning the construction or meaning of this
agreement, reference shall be made only to this agreement
as written in English and not to any translation into another
language. If any provision of these terms and conditions is
held by a court of competent jurisdiction to be contrary to the
law then such provisions shall be construed as far as possible to
reect the intention of the parties and the other provisions shall
remain in full force and effect.
Entire Agreement
These terms and conditions set out the whole of the agreement
relating to our supply of the Software and Service and shall
supersede any prior agreements or representations in respect
thereof. These terms and conditions cannot be varied except in
writing, which can be delivered by electronic mail by Imerge.
In particular nothing said by any sales person on behalf of
Imerge or an Imerge Business Partner should be understood
as a variation of these terms and conditions or an authorised
representation about the Service or the nature and quality of
items displayed thereon. Imerge shall have no liability for any
such representation being untrue or misleading.
No person other than the parties to this agreement shall have
the right to enforce any of its terms under the Contracts (Rights
of Third Parties) Act, 1999.
These terms do not relate to your purchase of the XiVA™ home
media appliance itself, which is governed by a separate warranty
agreement provided by Imerge’s Business Partner or their agent.
Assignment
You shall not assign any of your rights or obligations under these
terms and conditions without Imerge’s prior written consent.
Imerge shall have the right to assign or otherwise delegate all or
any of its rights or obligations under these terms and conditions
on notication to you.
Waiver
Imerge’s failure to exercise or enforce any of its rights under
these terms and conditions shall not constitute a waiver of any
such right.
46
Page 51

Notices
Any and all notices to be given by either Imerge or you to
the other under these terms and conditions shall be deemed
sufciently given when sent by email or facsimile transmission
in each case addressed to you at the email address or facsimile
number you have given us or to Imerge at the email address or
facsimile number displayed at www.xiva.com
BY USING THE SERVICE, I CONFIRM THAT I HAVE READ AND
UNDERSTOOD THIS ENTIRE AGREEMENT AND I AGREE TO ALL
THE TERMS OF THIS AGREEMENT AS STATED ABOVE.
XiVA™ Software Service Privacy Policy
Please read the following to learn more about our XiVA™
Software Service privacy policy and data-protection practices.
Imerge values the privacy of its registered users. We are strongly
committed to protecting the privacy of users of our interactive
products and services as well as to respecting the Data Protection
Act 1998. Imerge will only collect and use personal information
about you as specied below in accordance with this Policy.
The XiVA™ Software Service Privacy Policy discloses our privacy
practices and contains detailed information about exactly how
your personal information will be treated:
Who are we?
•
What information of yours do we collect?
•
What do we do with the information we collect?
•
Will Imerge share any of your personal information?
•
How you can learn what personal information we have?
•
What is the opt-out policy?
•
What types of security procedures are in place to protect
•
your information?
Will Imerge change its policy?
•
Who are we?
Imerge Limited (Imerge) welcomes you as a XiVA™ Software
user. We developed your home media appliance (your Audio
Server) and it is ‘powered’ by our XiVA™ Software. Our company
headquarters are located in Cambridge, United Kingdom and full
details of how you can contact us can be found at the end of this
document. The provision of goods, services and information to
you may also involve our business partners and other carefully
selected third party companies.
What information of yours do we collect?
When you register with Imerge, we need certain information
– such as your name, address, postcode, and telephone number
or email address - in order to provide service to you. Once you
register with Imerge you are not anonymous to us. By submitting
your information you agree to the use of that information as set
out in this Policy.
We may also use that information to let you know of additional
products and services about which you might be interested.
What do we do with the information we collect?
We may use personal information collected about you to let
you know about new goods, services or offers that you might
nd interesting; or functionality changes and enhancements to
the Service, i.e. feature upgrades; or changes to our terms and
conditions of use.
Will Imerge share any of your personal information?
Personal data will be collected, processed by Imerge and
forwarded to the relevant Imerge Business Partner for the
purpose of providing related services, as described earlier.
However, Imerge will not trade, sell or rent your personal
information (such as name, address, phone number, or email
address) to third parties world-wide for targeted services
or marketing purposes without your consent. And, we also
protect your privacy by limiting employee access to the use of
customer data. We may provide aggregate statistics about our
sales, customers, music tastes, usage patterns and other site
information to reputable third parties, but these statistics will
not include any information that could personally identify you
unless we have your consent.
Imerge reserves the right to access and disclose individually
identiable information to comply with applicable laws and
lawful government requests, to operate its systems properly, or
to protect itself or its users.
How you can learn what personal information we have?
You may send us email at: support@xiva.com or write to us at
our headquarters address given at the end of this document. A
nominal fee may apply to this request.
What is the opt-out policy?
You will be given an opportunity to select a level of privacy
associated with your use of the Service during the registration
process, to determine whether and under what conditions
information entered during the registration process or collected
subsequently may be shared with third parties. You can modify
your selection at a later date by revisiting the relevant page,
accessed via the menu screen – your changes will normally take
effect within 60 days of your re-registration – alternatively you
may send your request in writing to us at the address given at
the end of this document.
What types of security procedures are in place to protect your
information?
Imerge is committed to protecting the privacy of its customers
and we have taken extensive measures to ensure that the
information we gather from you will be secure and condential.
While we recognize that the Internet is not a completely
secure medium of communication, Imerge has taken steps to
safeguard the security of any information we collect from your
XiVA™ home media appliance by using Pretty Good Privacy
(PGP) technology which encrypts the information you input on
your system before it is transmitted to us. In addition, we have
strict security procedures covering the storage and disclosure of
your information in order to prevent unauthorized access and
to comply with the Data Protection Act 1998. This means that
sometimes we may ask you for proof of identity before disclosing
any personal information to you.
Will Imerge change its policy?
When you supply your registration data you consent to the
collection and use of your information by Imerge as described in
this policy. If we alter our Privacy Policy in any way we will notify
you and will post those changes on our website: www.xiva-net.
com so you can be aware of anything that may affect you in the
way we collect, use or share information with others. If you do
not agree to the changes in the Policy, in such event you should
contact us promptly, in the absence of which the changes will be
deemed accepted by you. You will be responsible for viewing any
alterations to our Privacy Policy - a written copy can be requested
from any of our Imerge ofces.
Contacting us
If you have any questions or concerns about this Privacy Policy
or the operation of the Service, you can contact us by email
at: support@xiva.com, or by writing to the: XiVA™ Software
Administrator, Imerge Limited, Unit 6, Bar Hill Business Park,
Saxon Way, Bar Hill, Cambridge CB3 8SL, England, United
Kingdom.
47
Page 52

MICROSOFT END-USER LICENSE AGREEMENT
You have acquired a device (“DEVICE”) that includes
•
software licensed by Imerge Ltd. from an afliate of
Microsoft Corporation (“MS”). Those installed software
products of MS origin, as well as associated media, printed
materials, and “online” or electronic documentation
(“SOFTWARE”) are protected by international intellectual
property laws and treaties. Manufacturer, MS and its
suppliers (including Microsoft Corporation) own the title,
copyright, and other intellectual property rights in the
SOFTWARE. The SOFTWARE is licensed, not sold. All rights
reserved.
This End User License Agreement (“EULA”) is valid and
•
grants the end-user rights ONLY if the SOFTWARE is genuine
and a genuine Certicate of Authenticity for the SOFTWARE
is included. For more information on identifying whether
your software is genuine, please see http://www.microsoft.
com/piracy/howtotell.
IF YOU DO NOT AGREE TO THIS EULA, DO NOT USE THE
•
DEVICE OR COPY THE SOFTWARE. INSTEAD, PROMPTLY
CONTACT YOUR DEALER. FOR INSTRUCTIONS ON RETURN
OF THE UNUSED DEVICE(S) FOR A REFUND. ANY USE OF THE
SOFTWARE, INCLUDING BUT NOT LIMITED TO USE ON THE
DEVICE, WILL CONSTITUTE YOUR AGREEMENT TO THIS EULA
(OR RATIFICATION OF ANY PREVIOUS CONSENT).
GRANT OF SOFTWARE LICENSE. This EULA grants you the
•
following license:
You may use the SOFTWARE only on the DEVICE.
•
Restricted Functionality. You are licensed to use the
•
SOFTWARE to provide only the limited functionality
(specic tasks or processes) for which the DEVICE has
been designed and marketed by Imerge Ltd.. This license
specically prohibits any other use of the software
programs or functions, or inclusion of additional software
programs or functions that do not directly support the
limited functionality on the DEVICE. Notwithstanding the
foregoing, you may install or enable on a DEVICE, systems
utilities, resource management or similar software solely for
the purpose of administration, performance enhancement
and/or preventive maintenance of the DEVICE.
If you use the DEVICE to access or utilize the services or
•
functionality of Microsoft Windows Server products (such
as Microsoft Windows Server 2003), or use the DEVICE
to permit workstation or computing devices to access or
utilize the services or functionality of Microsoft Windows
Server products, you may be required to obtain a Client
Access License for the DEVICE and/or each such workstation
or computing device. Please refer to the end user license
agreement for your Microsoft Windows Server product for
additional information.
NOT FAULT TOLERANT. THE SOFTWARE IS NOT FAULT
•
TOLERANT. Imerge Ltd. HAS INDEPENDENTLY DETERMINED
HOW TO USE THE SOFTWARE IN THE DEVICE, AND MS HAS
RELIED UPON Imerge Ltd. TO CONDUCT SUFFICIENT TESTING TO
DETERMINE THAT THE SOFTWARE IS SUITABLE FOR SUCH USE.
NO WARRANTIES FOR THE SOFTWARE. THE SOFTWARE is
•
provided “AS IS” and with all faults. THE ENTIRE RISK AS TO
SATISFACTORY QUALITY, PERFORMANCE, ACCURACY, AND
EFFORT (INCLUDING LACK OF NEGLIGENCE) IS WITH YOU.
ALSO, THERE IS NO WARRANTY AGAINST INTERFERENCE
WITH YOUR ENJOYMENT OF THE SOFTWARE OR AGAINST
INFRINGEMENT. IF YOU HAVE RECEIVED ANY WARRANTIES
REGARDING THE DEVICE OR THE SOFTWARE, THOSE
WARRANTIES DO NOT ORIGINATE FROM, AND ARE NOT
BINDING ON, MS.
No Liability for Certain Damages. EXCEPT AS PROHIBITED
•
BY LAW, MS SHALL HAVE NO LIABILITY FOR ANY INDIRECT,
SPECIAL, CONSEQUENTIAL OR INCIDENTAL DAMAGES
ARISING FROM OR IN CONNECTION WITH THE USE OR
PERFORMANCE OF THE SOFTWARE. THIS LIMITATION
SHALL APPLY EVEN IF ANY REMEDY FAILS OF ITS ESSENTIAL
PURPOSE. IN NO EVENT SHALL MS BE LIABLE FOR ANY
AMOUNT IN EXCESS OF U.S. TWO HUNDRED FIFTY DOLLARS
(U.S.$250.00).
Restricted Uses. The SOFTWARE is not designed or intended
•
for use or resale in hazardous environments requiring
fail-safe performance, such as in the operation of nuclear
facilities, aircraft navigation or communication systems,
air trafc control, or other devices or systems in which a
malfunction of the SOFTWARE would result in foreseeable
risk of injury or death to the operator of the device or
system, or to others.
48
•
Limitations on Reverse Engineering, Decompilation, and
Disassembly. You may not reverse engineer, decompile, or
disassemble the SOFTWARE, except and only to the extent
that such activity is expressly permitted by applicable law
notwithstanding this limitation.
SOFTWARE as a Component of the DEVICE - Transfer.
•
This license may not be shared, transferred to or used
concurrently on different computers. The SOFTWARE is
licensed with the DEVICE as a single integrated product and
may only be used with the DEVICE. If the SOFTWARE is not
accompanied by a DEVICE, you may not use the SOFTWARE.
You may permanently transfer all of your rights under this
EULA only as part of a permanent sale or transfer of the
DEVICE, provided you retain no copies of the SOFTWARE. If
the SOFTWARE is an upgrade, any transfer must also include
all prior versions of the SOFTWARE. This transfer must also
include the Certicate of Authenticity label. The transfer
may not be an indirect transfer, such as a consignment. Prior
to the transfer, the end user receiving the SOFTWARE must
agree to all the EULA terms.
Consent to Use of Data. You agree that MS, Microsoft
•
Corporation and their afliates may collect and use technical
information gathered in any manner as part of product
support services related to the SOFTWARE. MS, Microsoft
Corporation and their afliates may use this information
solely to improve their products or to provide customized
services or technologies to you. MS, Microsoft Corporation
and their afliates may disclose this information to others,
but not in a form that personally identies you.
Internet-Based Services Components. The SOFTWARE may
•
contain components that enable and facilitate the use
of certain Internet-based services. You acknowledge and
agree that MS, Microsoft Corporation or their afliates may
automatically check the version of the SOFTWARE and/or its
components that you are utilizing and may provide upgrades
or supplements to the SOFTWARE that may be automatically
downloaded to your DEVICE. Microsoft Corporation or their
afliates do not use these features to collect any information
that will be used to identify you or contact you. For more
information about these features, please see the privacy
statement at http://go.microsoft.com/fwlink/?LinkId=25243.
Links to Third Party Sites. You may link to third party sites
•
through the use of the SOFTWARE. The third party sites are
not under the control of MS or Microsoft Corporation, and
MS or Microsoft are not responsible for the contents of any
third party sites, any links contained in third party sites, or
any changes or updates to third party sites. MS or Microsoft
Corporation is not responsible for webcasting or any other
form of transmission received from any third party sites. MS
or Microsoft Corporation are providing these links to third
party sites to you only as a convenience, and the inclusion of
any link does not imply an endorsement by MS or Microsoft
Corporation of the third party site.
Notice Regarding Security. To help protect against breaches
•
of security and malicious software, periodically back up your
data and system information, use security features such as
rewalls, and install and use security updates.
No Rental/Commercial Hosting. You may not rent, lease, lend
•
or provide commercial hosting services with the SOFTWARE
to others.
Separation of Components. The SOFTWARE is licensed as a
•
single product. Its component parts may not be separated
for use on more than one computer.
Additional Software/Services. This EULA applies to updates,
•
supplements, add-on components, product support services,
or Internet-based services components (“Supplemental
Components”), of the SOFTWARE that you may obtain
from Imerge Ltd., MS, Microsoft Corporation or their
subsidiaries after the date you obtain your initial copy of
the SOFTWARE, unless you accept updated terms or another
agreement governs. If other terms are not provided along
with such Supplemental Components and the Supplemental
Components are provided to you by MS, Microsoft
Corporation or their subsidiaries then you will be licensed
by such entity under the same terms and conditions of this
EULA, except that (i) MS, Microsoft Corporation or their
subsidiaries providing the Supplemental Components will be
the licensor with respect to such Supplemental Components
in lieu of “Imerge Ltd.” for the purposes of the EULA, and
(ii) TO THE MAXIMUM EXTENT PERMITTED BY APPLICABLE
LAW, THE SUPPLEMENTAL COMPONENTS AND ANY (IF
ANY) SUPPORT SERVICES RELATED TO THE SUPPLEMENTAL
COMPONENTS ARE PROVIDED AS IS AND WITH ALL FAULTS.
ALL OTHER DISCLAIMERS, LIMITATION OF DAMAGES,
Page 53

AND SPECIAL PROVISIONS PROVIDED BELOW AND/OR
OTHERWISE WITH THE SOFTWARE SHALL APPLY TO SUCH
SUPPLEMENTAL COMPONENTS. MS, Microsoft Corporation
or their subsidiaries reserve the right to discontinue any
Internet-based services provided to you or made available to
you through the use of the SOFTWARE.
•
End User Proof of License. If you acquired the SOFTWARE on
a DEVICE, or on a compact disc or other media, a genuine
Microsoft “Proof of License”/Certicate of Authenticity
label with a genuine copy of the SOFTWARE identies a
licensed copy of the SOFTWARE. To be valid, the label must
be afxed to the DEVICE, or appear on Imerge Ltd’s software
packaging. If you receive the label separately other than
from Imerge Ltd., it is invalid. You should keep the label on
the DEVICE or packaging to prove that you are licensed to
use the SOFTWARE.
Product Support. Product support for the SOFTWARE is not
•
provided by MS, Microsoft Corporation, or their afliates
or subsidiaries. For product support, please refer to Imerge
Ltd. support number provided in the documentation for
the DEVICE. Should you have any questions concerning
this EULA, or if you desire to contact Imerge Ltd. for any
other reason, please refer to the address provided in the
documentation for the DEVICE.
Termination. Without prejudice to any other rights, Imerge
•
Ltd. may terminate this EULA if you fail to comply with the
terms and conditions of this EULA. In such event, you must
destroy all copies of the SOFTWARE and all of its component
parts.
EXPORT RESTRICTIONS. You acknowledge that SOFTWARE
•
is subject to U.S. and European Union export jurisdiction.
You agree to comply with all applicable international and
national laws that apply to the SOFTWARE, including the
U.S. Export Administration Regulations, as well as end-user,
end-use and destination restrictions issued by U.S. and other
governments. For additional information see http://www.
microsoft.com/exporting/.
MACROMEDIA FLASH RUN-TIME
DISTRIBUTION LICENSE
Publisher’s end-user license agreement shall contain, at a
minimum, the following limitations:
(1) no title to, or ownership rights in the Publisher
Product or any portion of the Publisher Product are
transferred;
(2) the end-user shall not reverse compile or disassemble
the Publisher Product.
GRACENOTE END-USER LICENSE
AGREEMENT
USE OF THIS PRODUCT IMPLIES ACCEPTANCE OF THE
TERMS BELOW.
This product contains technology and data from
Gracenote of Emeryville, California (“Gracenote”). The
technology from Gracenote (the “Gracenote Embedded
Software”) enables this product to do disc identication
and obtain music-related information, including name,
artist, track, and title information (“Gracenote Data”),
which is included on the Gracenote Database (the
“Gracenote Database”).
You agree that you will use Gracenote Data, the
Gracenote Database, and Embedded Software for your
own personal non-commercial use only. You agree that
you will access Gracenote Data only by means of the
standard end user functions and features of this product.
You agree not to assign, copy, transfer or transmit the
Embedded Software or any Gracenote Data to any third
party. YOU AGREE NOT TO USE OR EXPLOIT GRACENOTE
DATA, THE GRACENOTE DATABASE, OR GRACENOTE
COMPONENT, EXCEPT AS EXPRESSLY PERMITTED HEREIN.
You agree that your non-exclusive license to use the
Gracenote Data, the Gracenote Database, and Embedded
Software will terminate if you violate these restrictions.
If yourlicense terminates, you agree to cease any and all
use of the Gracenote Data, the Gracenote Database, and
racenote Embedded Software. Gracenote reserves all
rights in the Gracenote Data, Gracenote Database, and
Gracenote Embedded Software, including all ownership
rights. You agree that Gracenote may enforce its rights
under this Agreement against you directly in its own
name.
The Embedded Software and each item of Gracenote
Data are licensed to you “AS IS.” Gracenote makes
no representations or warranties, express or implied,
regarding the accuracy of any Gracenote Data.
Gracenote reserves the right to delete data or to
change data categories in any Data updates and for
any cause that Gracenote deems sufcient. No warranty
is made that the Embedded Software is error-free or
that functioning of the Embedded Software will be
uninterrupted. Gracenote is not obligated to provide
you with any new enhanced or additional data types or
categories that Gracenote may choose to provide in the
future.
GRACENOTE DISCLAIMS ALL WARRANTIES EXPRESS OR IMPLIED,
INCLUDING, BUT NOT LIMITED TO, IMPLIED WARRANTIES OF
MERCHANTABILITY, FITNESS FOR A PARTICULAR PURPOSE, TITLE,
AND NON-INFRINGEMENT. GRACENOTE DOES NOT WARRANT
THE RESULTS THAT WILL BE OBTAINED BY YOUR USE OF THE
GRACENOTE COMPONENT OR ANY GRACENOTE SERVER. IN NO
CASE WILL GRACENOTE BE LIABLE FOR ANY CONSEQUENTIAL
OR INCIDENTAL DAMAGES OR FOR ANY LOST PROFITS OR LOST
REVENUES.
Rev 2.1
49
Page 54

RETURN AND WARRANTY POLICIES
Merchandise Returns / Repair Service
For returns or repairs, please contact your CRESTRON
dealer.
CRESTRON Limited Warranty
CRESTRON ELECTRONICS, INC. warrants its products to
be free from manufacturing defects in materials and
workmanship under normal use for a period of (3) three
years from the date of purchase from CRESTRON, with
the following exceptions: disk drives and any other
moving or rotating mechanical parts, pan/tilt heads and
power supplies are covered for a period of (1) one year;
touchscreen display and overlay components are covered
for 90 days; batteries and incandescent lamps are not
covered.
This warranty extends to products purchased directly
from CRESTRON or an authorized CRESTRON dealer.
Purchasers should inquire of the dealer regarding the
nature and extent of the dealer’s warranty, if any.
CRESTRON shall not be liable to honor the terms of
this warranty if the product has been used in any
application other than that for which it was intended,
or if it has been subjected to misuse, accidental damage,
modication, or improper installation procedures.
Furthermore, this warranty does not cover any product
that has had the serial number altered, defaced, or
removed.
This warranty shall be the sole and exclusive remedy to
the original purchaser. In no event shall CRESTRON be
liable for incidental or consequential damages of any
kind (property or economic damages inclusive) arising
from the sale or use of this equipment. CRESTRON is not
liable for any claim made by a third party or made by the
purchaser for a third party.
CRESTRON shall, at its option, repair or replace any
product found defective, without charge for parts
or labor. Repaired or replaced equipment and parts
supplied under this warranty shall be covered only by the
unexpired portion of the warranty.
Except as expressly set forth in this warranty, CRESTRON
makes no other warranties, expressed or implied,
nor authorizes any other party to offer any warranty,
including any implied warranties of merchantability or
tness for a particular purpose. Any implied warranties
that may be imposed by law are limited to the terms
of this limited warranty. This warranty statement
supercedes all previous warranties.
Trademark Information
All brand names, product names, and trademarks are
the sole property of their respective owners. Windows
is a registered trademark of Microsoft Corporation.
Windows95/98/Me/XP and WindowsNT/2000 are
trademarks of Microsoft Corporation.
Adagio is a trademark of Crestron Electronics Inc. iTunes
is a trademark of Apple Computer, Inc. Windows Media
Player is a trademark of Microsoft Corporation.
Support Statement
If you cannot locate specic information or have
questions after reviewing this guide, contact your dealer.
50
Page 55

Page 56

Crestron Electronics, Inc.
15 Volvo Drive, Rockleigh, NJ 07647
Tel: 888.CRESTRON
Fax: 201.767.7576
www.crestron.com
©Copyright 2007 Imerge Ltd.
Part No. PK00330-02
(2014056)
Specications subject to
change without notice.
 Loading...