

Page 1
Page 2

Crestron TPS-IMC Interface Module
Contents
Interface Module: TPS-IMC 1
Description...............................................................................................................1
Functional Description ................................................................................. 1
Physical Description....................................................................................1
I/O Ports ...................................................................................................... 1
Leading Specifications ............................................................................................. 4
Setup........................................................................................................................4
Network Wiring........................................................................................... 4
Hardware Hookup........................................................................................5
Problem Solving.......................................................................................................7
Troubleshooting...........................................................................................7
Further Inquiries..........................................................................................7
Return and Warranty Policies...................................................................................8
Merchandise Returns / Repair Service .......................................................... 8
CRESTRON Limited Warranty ...................................................................8
Operations Guide - DOC. 5856 Contents •• i
Page 3

Crestron TPS-IMC Interface Module
Interface Module: TPS-IMC
Description
Functional Description
The TPS-IMC is designed specifically to serve as an interface module for the Crestron TPS5000 and TPS-6000 tilt touchpanels. The sleek design of the touchpanel base left little room
for all the connectors that define the touchpanel's versatility. Furthermore, since the panel is
not a stationary user interface, it is impractical to have an excessive amount of cable
connections directly to the touchpanel. As a result, it was necessary to connect the touchpanel
to an interface module that could offer additional space for interconnections.
Physical Description
The TPS-IMC, shown on the next page, is supplied with every TPS- tilt touchpanel. The
module is housed in a black enclosure with silk-screened top panel. A network connector and
video input connectors are located on one side of the unit. The opposite side offers audio
input, microphone output, and audio/network/video connections to the touchpanel. At the
shorter sides of the TPS-IMC, the enclosure extends to form feet at a right angle to the side.
There are three holes per foot for inserting screws to further stabilize the unit to a mounting
surface.
I/O Ports
There are eight I/O ports available on the TPS-IMC. Refer to the diagram on the next page
and the following bulleted items for descriptions of each port.
• NTSC/PAL VIDEO – These three ports are made active with the purchase and
installation of the TPS-VID, composite and S-video input for TV video card.
Consult the latest revision of the TPS-VID Operations & Installation Guide (Doc.
5869) for details. Use either the two BNC connectors or the six-pin connector
when connecting to a video source.
NOTE: Except for differential input (balanced) video signal, the six-pin video
connector with jumpers should be installed at all times.
Operations Guide - DOC. 5856 Interface Module: TPS-IMC •• 1
Page 4
Interface Module Crestron TPS-IMC
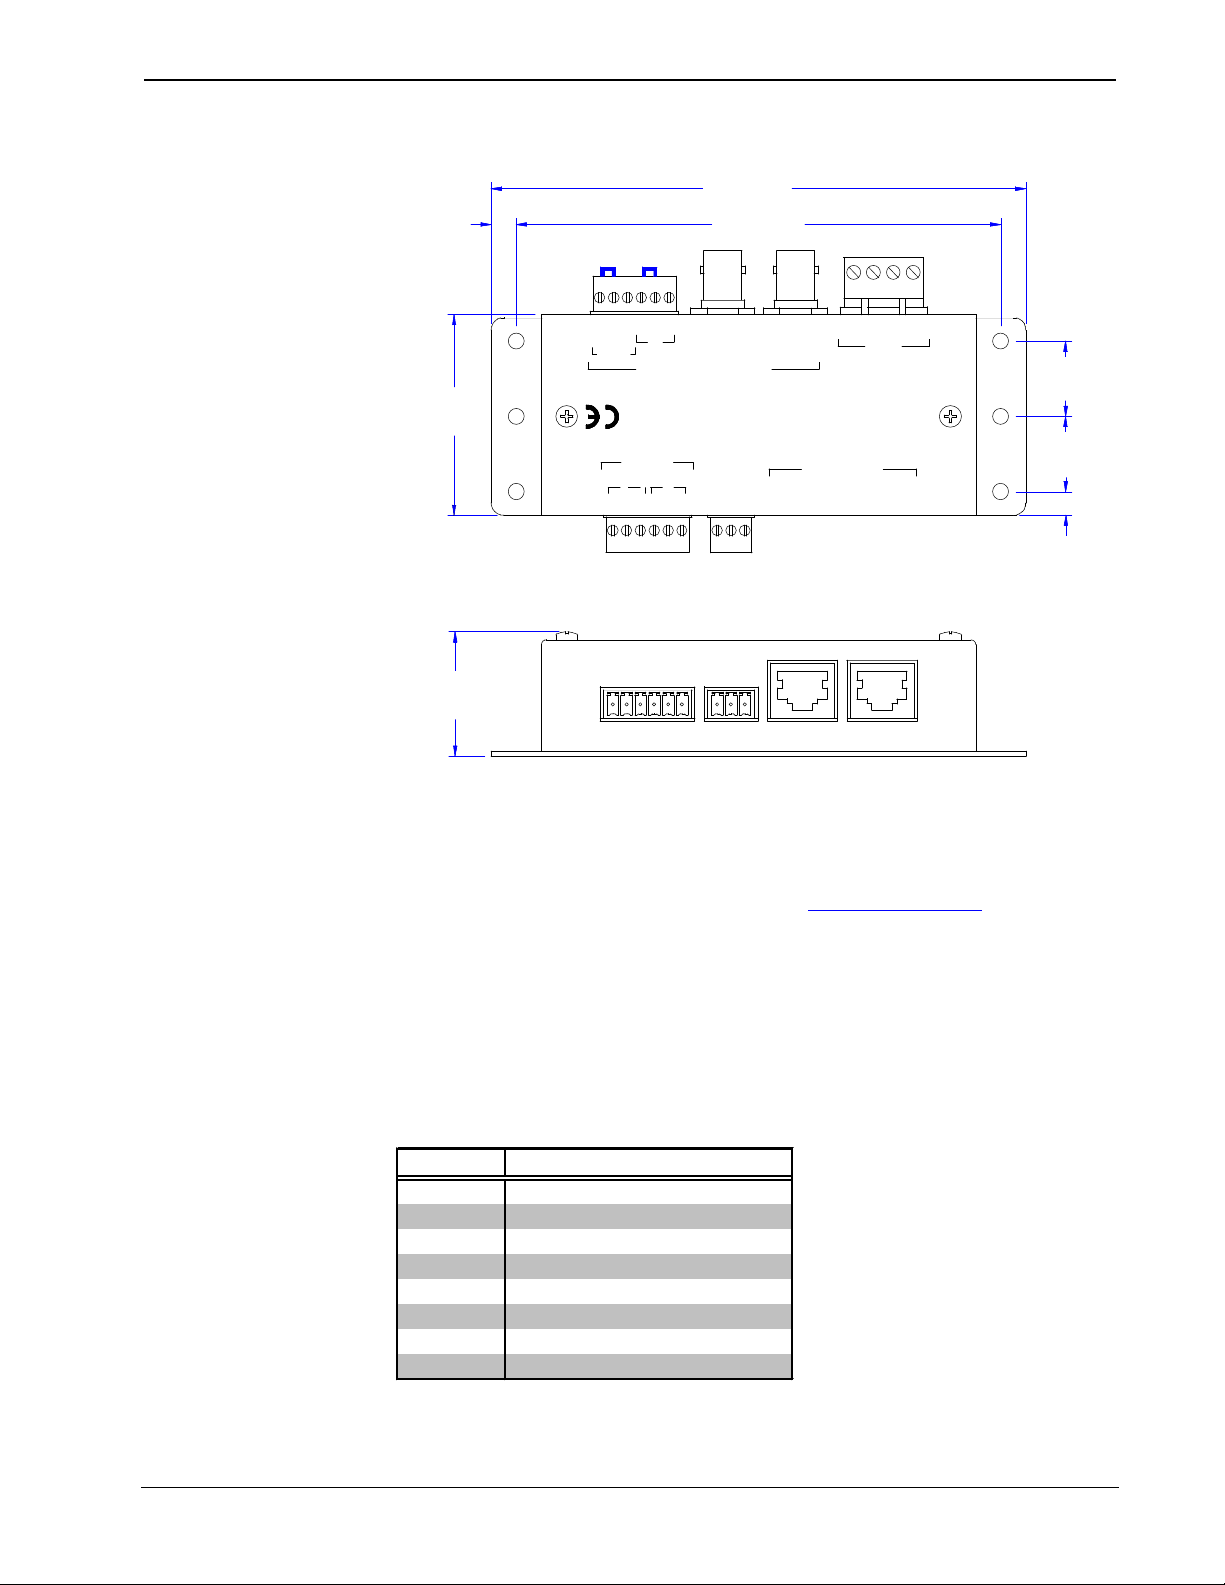
Physical Views of the TPS-IMC
5.325 in
(13.526 cm)
NOTE:
The positions of the
NET/VIDEO and AUDIO
ports on early production
models were reversed
(compared to the
illustration at right).
Observe the exact
screening on the
TPS-IMC before making
any connections.
0.250 in
(0.635 cm)
2.000 in
(5.080 cm)
S
_
Y
S
+
S
COMP
AUDIO
INPUT
R
_ _
+
+
_
C
SL+
4.820 in
(12.243 cm)
C
NTSC/PAL VIDEO
MIC
OUT
_
S
+
Y
NET/
VIDEO
COMP
TO
G
PANEL
Z
AUDIO
Y
NET
TPS - IMC
24
CRESTRON
0.750 in
(1.905 cm)
0.750 in
(1.905 cm)
0.235 in
(0.597 cm)
1.240 in
(3.150 cm)
• NET – This four-pin connector is used to connect to other four-wire devices in
the Cresnet system. If making network connections to Cresnet peripherals, refer
to the latest revision of the Cresnet Network Interconnect Drawing (Doc. 5411).
This document can be obtained from the Downloads page (CABLES and
MANUAL Libraries) of the Crestron website (www.crestron.com). Search for
CRESNET.PDF.
• AUDIO – This 8-position RJ45 mates with the TPS-5000 or TPS-6000
touchpanel. The 8-position audio cable assembly is supplied. Even though it may
fit, do not use the 10-position net/video cable.
This port provides audio input to the touchpanel and mic out from the touchpanel
to audio amplifiers. Description of the pinouts is shown in the table after this
paragraph.
AUDIO Pinouts
PIN # DESCRIPTION
1 Audio Shield
2 Audio Left +
3 Audio Left 4 Audio Right +
5 Audio Right 6 Mic Out Shield
7 Mic Out +
8 Mic Out -
2 •• Interface Module: TPS-IMC Operations Guide - DOC. 5856
Page 5

Crestron TPS-IMC Interface Module
• NET/VIDEO – This 10-position RJ45 mates with the TPS-5000 or TPS-6000
touchpanel and has a dual purpose. Refer to the descriptions and pinout table that
follow this paragraph. The 10-position net/video cable assembly is supplied.
Even though it may fit, do not use the 8-position audio cable.
1. This port provides network connection to the touchpanel.
2. This port also makes available composite and S-video input for TV video card
(with the purchase and installation of the TPS-VID). Consult the latest revision
of the TPS-VID Operations & Installation Guide (Doc. 5869) for details.
NET/VIDEO Pinouts
PIN # DESIGNATION DESCRIPTION
1
2
3
4
5
6
7
8
9
10
+24V Power (Network)
GND Ground (Network)
C+ Chrominance (Positive)
C- Chrominance (Negative)
Y Data (Network)
Z Data (Network)
Y+ Luminance (Positive)/Composite
Y- Luminance (Negative)/Composite
GND Ground (Network)
+24V Power (Network)
• MIC OUT – The port mates with a three-pin connector, supplied, and produces
line level differential output. Description of the pinouts is shown in the table after
this paragraph.
MICROPHONE Pinouts
PIN DESCRIPTION
M+ Positive
M- Negative
S Shield
• AUDIO INPUT – The port mates with a six-pin connector, supplied, and
provides differential/single ended audio input and output. Description of the
pinouts is shown in the table after this paragraph.
AUDIO INPUT Pinouts
PIN DESCRIPTION
S Shield
R+ Right Positive
R- Right Negative
L+ Left Positive
L- Left Negative
S Shield
Operations Guide - DOC. 5856 Interface Module: TPS-IMC •• 3
Page 6

Interface Module Crestron TPS-IMC
Leading Specifications
The table after this paragraph provides a summary of leading specifications for the TPS-IMC.
Dimensions and weight are rounded to the nearest hundredth unit.
Leading Specifications for the TPS-IMC
SPECIFICATION DETAILS
Dimensions
Weight 0.59 lb (0.27 kg)
Height: 2.00 in (5.08 cm)
Width: 5.33 in (13.53 cm)
Depth: 1.24 in (3.15 cm)
As of the date of manufacture, the TPS-IMC has been tested and found to comply with
specifications for CE marking.
Setup
Network Wiring
NOTE: When making wire connections, refer to the latest revision of the Cresnet Network
Interconnect Drawing (Doc. 5411). The document can be obtained from the Downloads page
(CABLES and MANUAL Libraries) of the Crestron website (www. crestron.com). Search
for the CRESNET.PDF files.
When calculating the wire gauge for a particular network run, the length of the run and the
power factor of each network unit to be connected must be taken into consideration. If
network units are to be daisy-chained on the run, the load factor of each network unit to be
daisy-chained must be added together to determine the load factor of the entire chain. The
length of the run in feet and the load factor of the run should be used in the following
resistance equation to calculate the value on the right side of the equation.
Resistance Equation
Where:
R <
40,000
L x LF
The required wire gauge should be chosen such that the resistance value is less than the value
calculated in the resistance equation. Refer to the table after this paragraph.
Wire Gauge Values
RESISTANCE (R) WIRE GAUGE
4
6
10
15
13
R = Resistance (refer to table below).
L = Length of run (or chain) in feet.
LF = Load factor of entire run (or chain).
16
18
20
22
24 (Doubled-CAT 5)
4 •• Interface Module: TPS-IMC Operations Guide - DOC. 5856
Page 7

Crestron TPS-IMC Interface Module
NOTE: All network wiring must consist of two twisted-pairs. One twisted pair is the +24V
conductor and the GND conductor and the other twisted pair is the Y conductor and the Z
conductor.
NOTE: When daisy chaining network units, always twist the ends of the incoming wire and
outgoing wire which share a pin on the network connector. After twisting the ends, tin the
twisted connection with solder. Apply solder only to the ends of the twisted wires. Avoid
tinning too far up or the tinned end becomes brittle and breaks. After tinning the twisted ends,
insert the tinned connection into the network connector and tighten the retaining screw.
Repeat the procedure for the other three network conductors.
Hardware Hookup
The TPS-IMC serves as an interface between the touchpanel and the Cresnet system. Refer to
the illustration after this paragraph (which continues on next page) for proper connections;
apply power last. When making network connections to the CNX Generation control system
or Cresnet peripherals, refer to the latest revision of the Cresnet Network Interconnect
Drawing (Doc. 5411). This document can be obtained from the Downloads page (CABLES
and MANUAL Libraries) of the Crestron website (www.crestron.com). Search for
CRESNET.PDF. It is not necessary to make connections to a video source unless the
TPS-VID has been installed into the touchpanel and a video window object resides on a page
within the uploaded VisionTools™ Pro-e project.
NOTE: The positions of the NET/VIDEO and AUDIO ports on early production models
were reversed (compared to the illustration below). Observe the exact screening on the TPSIMC before making any connections.
Hardware Hookup for the TPS-IMC
S
_
Y
COMP
+
S
_
C
+
C
NTSC/PAL VIDEO
Y
COMP
G
Z
NET
Y
24
* CONNECT
TO VIDEO
SOURCE
CONNECT
TO CNX
GENERATION
CONTROL
SYSTEM
OR CRESNET
PERIPHERALS
CONNECT
TO AUDIO
SOURCE
CONNECT
TO DEVICE,
AUDIO INPUT
CONNECT
TO TPS-5000
OR TPS-6000
NOTE:
DO NOT CONFUSE
8-POSITION AUDIO
CABLE WITH
10-POSITION
NET/VIDEO CABLE
S
R
+
_
+
L
_
S
+
OUT
_
S
VIDEO
NET/
AUDIO
AUDIO
INPUT
MIC
TO
PANEL
TPS - IMC
CRESTRON
Operations Guide - DOC. 5856 Interface Module: TPS-IMC •• 5
Page 8

Interface Module Crestron TPS-IMC
* Connect to a video source only if the TPS-VID expansion card is installed in the touchpanel. The
BNC connector and screw terminal mini Phoenix connector is connected in parallel. Possible options
are no connection, balance video using twisted pair cable, unbalance video using twisted pair cable, or
unbalanced video using coax cable. Depending on the option, the two jumpers on the NTSC/PAL
VIDEO six-pin connector remain attached or are removed.
If there is no video, do not make a connection to this port, but leave connector and jumpers attached to
the NTSC/PAL VIDEO six-pin connector on the TPS-IMC.
Video balance is determined by external connections. Refer to the three diagrams below.
Balanced Using Twisted Pair Cable Unbalanced Using Twisted Pair Cable
NTSC/PAL VIDEO
COMP
Y C +Y+_SS
COMP
C
_
NTSC/PAL VIDEO
COMP
Y
COMP
C
Y
C
_
+
+_SS
JUMPERS
REMOVED.
Unbalanced Using Coax Cable
NTSC/PAL VIDEO
COMP
Y
C
C
_
+
JUMPERS
REMAIN IN
PLACE.
COMP
Y
+_SS
JUMPERS
REMAIN IN
PLACE.
6 •• Interface Module: TPS-IMC Operations Guide - DOC. 5856
Page 9

Crestron TPS-IMC Interface Module
Touchpanel is not
communicating to
Touchpanel is not
Confirm that power is supplied to the network.
"Network Poll Error"
Problem Solving
Troubleshooting
The table below provides corrective action for possible trouble situations. If further assistance
is required, please contact a Crestron technical support representative.
TPS-IMC Troubleshooting
TROUBLE
Touchpanel does
not function.
Touchpanel is not
responding and
screen displays
POSSIBLE
CAUSE(S)
the network.
receiving network
power.
Incorrect network
wiring.
CORRECTIVE ACTION
Use Performance Viewport (via SIMPL
Windows or VT Pro-e) to poll the network.
Verify network connection to the touchpanel.
Touch screen to remove message and verify
correct wiring to all connectors.
message.
No power to the
touchpanel.
The 8-position
RJ45 audio cable
is mistakenly
connected to the
NET/VIDEO port.
Replace 8-position audio cable with 10position net/video cable.
Further Inquiries
If after reviewing this Operations Guide for the TPS-IMC, you cannot locate specific
information or have questions, please take advantage of Crestron's award winning technical
support team by calling:
• In the US and Canada, call Crestron’s corporate headquarters at
1-888-CRESTRON [1-888-273-7876] or 1-201-767-3400.
• In Europe, call Crestron International at +32-15-50-99-50.
• In Asia, call Crestron Asia at +852-2341-2016.
• In Latin America, call Crestron Latin America at +525-574-15-90.
For local support from exclusive Crestron factory-trained personnel call:
• In Australia, call Soundcorp at +613-9488-1555.
• In New Zealand, call Amber Technologies at +649-410-8382.
Operations Guide - DOC. 5856 Interface Module: TPS-IMC •• 7
Page 10

Interface Module Crestron TPS-IMC
Return and Warranty Policies
Merchandise Returns / Repair Service
1. No merchandise may be returned for credit, exchange, or service without prior
authorization from CRESTRON. To obtain warranty service for CRESTRON
products, contact the factory and request an RMA (Return Merchandise
Authorization) number. Enclose a note specifying the nature of the problem,
name and phone number of contact person, RMA number, and return address.
2. Products may be returned for credit, exchange, or service with a CRESTRON
Return Merchandise Authorization (RMA) number. Authorized returns must be
shipped freight prepaid to CRESTRON, Cresskill, N.J., or its authorized
subsidiaries, with RMA number clearly marked on the outside of all cartons.
Shipments arriving freight collect or without an RMA number shall be subject to
refusal. CRESTRON reserves the right in its sole and absolute discretion to
charge a 15% restocking fee, plus shipping costs, on any products returned with
an RMA.
3. Return freight charges following repair of items under warranty shall be paid by
CRESTRON, shipping by standard ground carrier. In the event repairs are found
to be non-warranty, return freight costs shall be paid by the purchaser.
CRESTRON Limited Warranty
CRESTRON ELECTRONICS, Inc. warrants its Cresnet products, denoted by a "CN" prefix
model number, to be free from manufacturing defects in materials and workmanship for a
period of three (3) years from the date of shipment to purchaser. Disk drives and any other
moving or rotating mechanical parts are covered for a period of one (1) year. CRESTRON
warrants all its other products for a period of one year from the defects mentioned above,
excluding touchscreen display components which are covered for 90 days. Incandescent
lamps are completely excluded from Crestron's Limited Warranty. CRESTRON shall, at its
option, repair or replace any product found defective without charge for parts or labor.
Repaired or replaced equipment and parts supplied under this warranty shall be covered only
by the unexpired portion of the warranty.
CRESTRON shall not be liable to honor warranty terms if the product has been used in any
application other than that for which it was intended, or if it has been subjected to misuse,
accidental damage, modification, or improper installation procedures. Furthermore, this
warranty does not cover any product that has had the serial number altered, defaced, or
removed.
This warranty shall be the sole and exclusive remedy to the purchaser. In no event shall
CRESTRON be liable for incidental or consequential damages of any kind (property or
economic damages inclusive) arising from the sale or use of this equipment. CRESTRON
makes no other warranties nor authorizes any other party to offer any warranty, expressed or
implied, including warranties of merchantability for this product. This warranty statement
supersedes all previous warranties.
Trademark Information
All brand names, product names, and trademarks are the sole property of their respective owners. Windows is a registered
trademark of Microsoft Corporation. Windows95, Windows98 and WindowsNT are trademarks of Microsoft Corporation.
8 •• Interface Module: TPS-IMC Operations Guide - DOC. 5856
Page 11

Page 12

 Loading...