

Page 1
NME-100
The Crestron® NME-100 offers a low-cost, scalable digital signage
solution for enterprise-wide content distribution. Its compact design
saves space without sacrificing video quality, allowing for easy
deployment in lobbies, conference rooms, or wherever else signage is
needed. With 16 GB of internal storage and the option to upgrade via the
integrated microSD™ card slot, the NME-100 can store and play hours of
audio-visual content at 1080p60 resolution, all provisioned by the
Crestron XiO Cloud™ service.
In the Box
1 NME-100, Enterprise Media Player
Additional items
1 Remote Control (2054602)
1 Power Pack (2054603)
4 Screws, Surface Mount, #8-15 x 19 mm (2054601)
4 Anchors, Threaded for #8 screws (2053825)
Quick Start
Install the Device
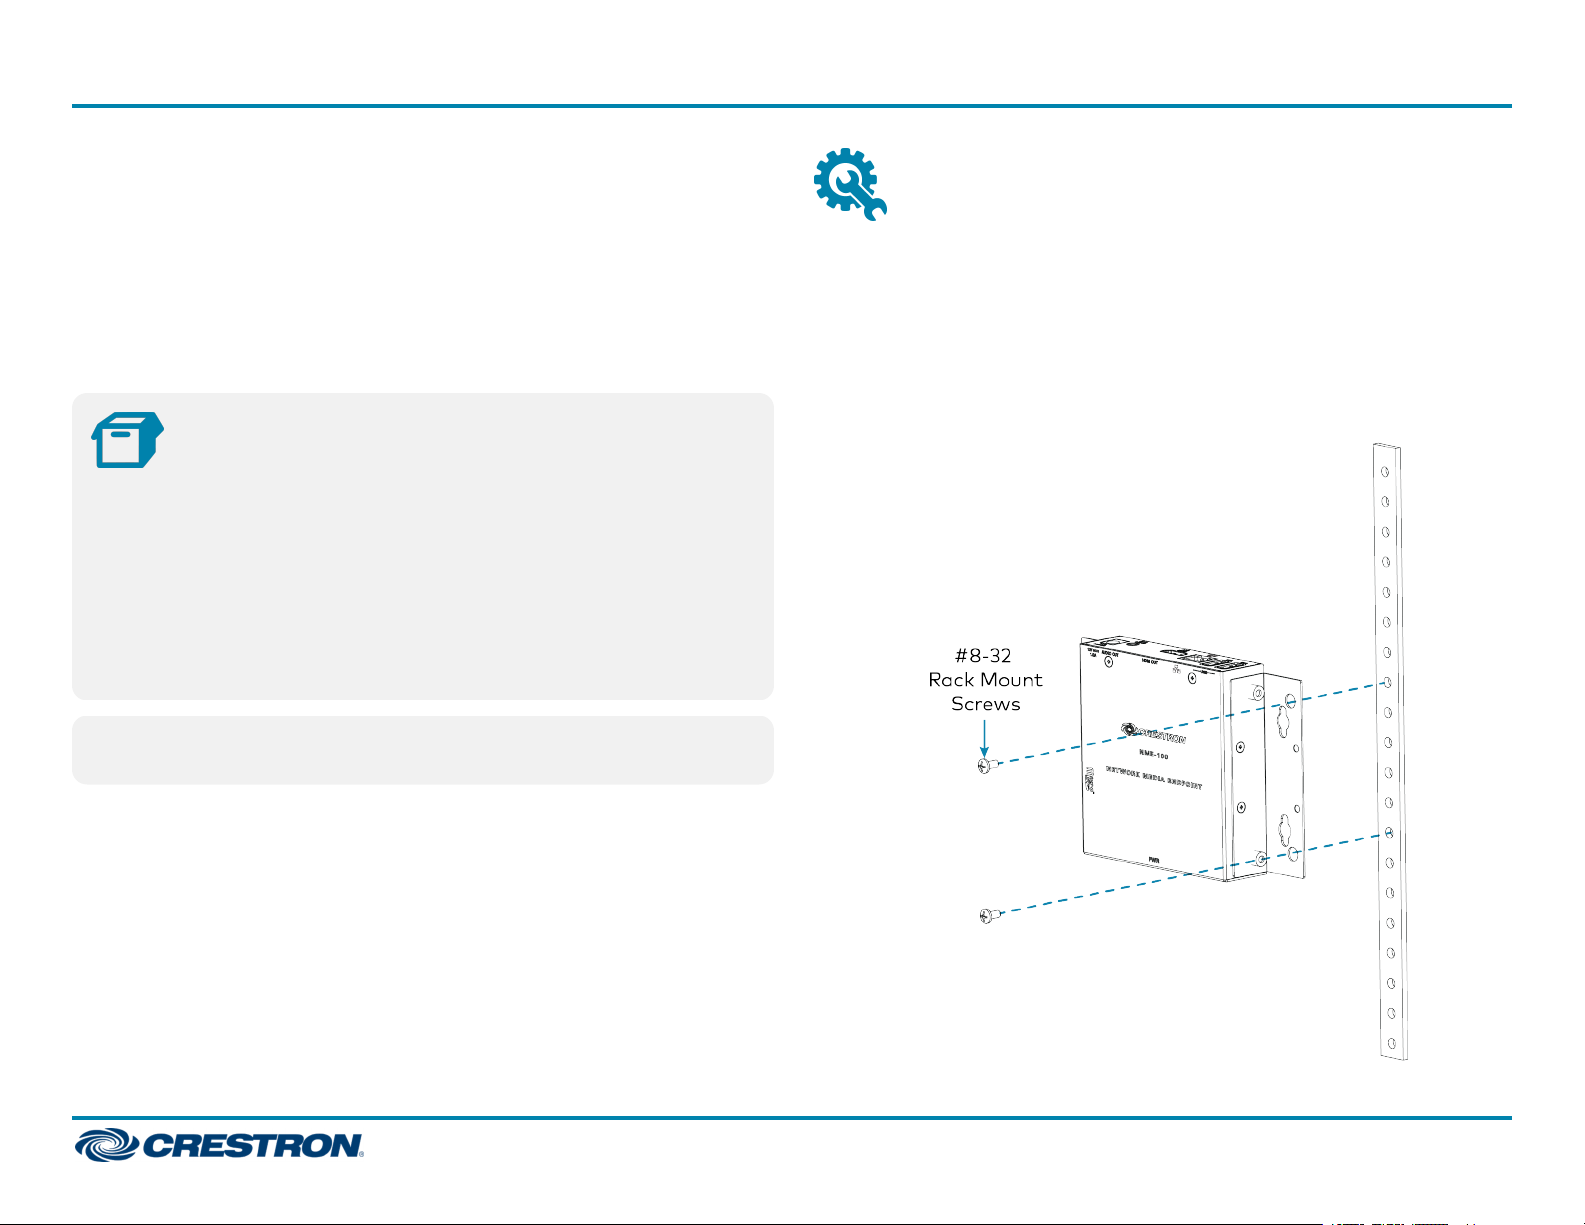
The NME-100 is shipped with its rack ears in position to install the device
on a rack rail or surface.
To install the device on a rack rail:
1. Position the device on a front or rear rack rail.
2. Use a #2 Phillips screwdriver to attach the device to the rack rail with
two #8-32 rack mount screws (not included).
WARNING: This equipment is not suitable for use in locations where
children are likely to be present.
1
Page 2

NME-100
Quick Start
To install the device on a surface:
1. Position the device on the surface.
2. Use a #2 Phillips screwdriver to attach the device to the surface with
the four included #8-15 surface mount screws.
The rack ears can be removed to access the microSD card slot. Once
removed, the rack ears can be reversed to prepare the NME-100 for
installation on a rack shelf. To reverse the rack ears:
1. Use a #2 Phillips screwdriver to remove the screws holding the rack
ears to the device.
2. Reverse the rack ears so they face inwards, then reattach them to the
device using the screws from the previous step.
2
Page 3

NME-100
Connect the Device
Make the necessary connections as called out in the following illustrations.
Connect power last.
CAUTION: Use only the included power pack. Using other power
supplies from Crestron or other manufacturers could damage the
product.
Front Panel
Quick Start
Side Panel
Rear Panel
3
Page 4

NME-100
Register the Device
Once the power pack is attached to the device, the device will power up
automatically. Registering the NME-100 requires a computer and an
active Appspace® account. To register the device:
1. Check the connected display for an Appspace registration code
onscreen.
2. Use a web browser to open the Appspace interface at
https://cloud.appspace.com, and enter your appspace account login
information.
3. Click the Devices tab at the top of the screen.
4. Click +ADD.
Quick Start
5. Enter the registration code found on the display, as well as a name for
the device, and then choose a channel selection mode.
6. Click Register. The NME-100 begins displaying content.
4
Page 5

NME-100
Remote Control
Button functions on the included remote control depend on the button
assignments made in the project file being used.
Quick Start
WARNING: Note the following precautions regarding the remote
control's battery:
l Replacing the battery with an incompatible type may result in a
risk of explosion.
l If the remote control will not be used for an extended period of
time, remove the battery.
l If the remote control gets wet, wipe it dry immediately.
l Do not short, heat, take apart, or throw the battery into a fire.
l Avoid excess heat and humidity.
l Ensure the battery's is correctly installed in the remote's
battery compartment.
l Dispose of the battery according to your local regulations.
To replace the remote control's battery:
1. Slide the battery cover off the back of the remote control.
2. Remove the old battery and replace it with a new battery (CR2032).
3. Replace the battery cover.
5
Page 6

NME-100
Quick Start
Connect to Crestron XiO Cloud
The Crestron XiO Cloud™ service allows supported Crestron devices
across an enterprise to be managed and configured from one central and
secure location in the cloud. Supported devices are preconfigured to
connect to the service. Use of the service requires a registered Crestron
XiO Cloud account.
To connect the device to the Crestrion XiO Cloud service:
1. Record the MAC address and serial number from the shipping box or
rear panel of the device. The MAC address and serial number are
required in order to add the device to the Crestrion XiO Cloud
environment.
2. Do either of the following:
l If you have a Crestron XiO Cloud account, go to
https://portal.crestron.io to access the Crestron XiO Cloud service.
l If you do not have a Crestron XiO Cloud account, go to
www.crestron.com/xiocloud to register for an account.
For detailed information about using the Crestron XiO Cloud service,
refer to the Crestron XiO Cloud Service User Guide (Doc. 8214) at
www.crestron.com/manuals.
NOTE: The Crestron XiO Cloud serivce is required to configure the
device's settings. No local web UI is provided.
Additional Information
Original Instructions
The U.S. English version of this document is the original instructions.
All other languages are a translation of the original instructions.
Crestron product development software is licensed to Crestron dealers and Crestron
Service Providers (CSPs) under a limited nonexclusive, nontransferable Software
Development Tools License Agreement. Crestron product operating system software is
licensed to Crestron dealers, CSPs, and end-users under a separate End-User License
Agreement. Both of these Agreements can be found on the Crestron website at
www.crestron.com/legal/software_license_agreement.
The product warranty can be found at www.crestron.com/warranty.
The specific patents that cover Crestron products are listed at
www.crestron.com/legal/patents.
Certain Crestron products contain open source software. For specific information, visit
www.crestron.com/opensource.
Crestron, the Crestron logo, and Crestron XiO Cloud are either trademarks or
registered trademarks of Crestron Electronics, Inc. in the United States and/or other
countries. Appspace is either a trademark or registered trademark of Appspace Inc. in
the United States and/or other countries. microSD is either a trademark or registered
trademark of SD-3C, LLC in the United States and/or other countries. UL and the UL
logo are either trademarks or registered trademarks of Underwriters Laboratories, Inc.
in the United States and/or other countries. Other trademarks, registered trademarks,
and trade names may be used in this document to refer to either the entities claiming
the marks and names or their products. Crestron disclaims any proprietary interest in
the marks and names of others. Crestron is not responsible for errors in typography or
photography.
©2019 Crestron Electronics, Inc.
Doc ID 8480A
(2054059)
10/16/19
6
 Loading...