

Page 1

Crestron
Professional Surround Sound Tuning Kit
Operations Guide
Page 2

This document was prepared and written by the Technical Documentation department at:
Crestron Electronics, Inc.
15 Volvo Drive
Rockleigh, NJ 07647
1-888-CRESTRON
Audyssey MultEQ® is a trademark of Audyssey Laboratories™.
All brand names, product names and trademarks are the property of their respective owners.
©2007 Crestron Electronics, Inc.
Page 3

Crestron Professional Surround Sound Tuning Kit
Contents
Professional Surround Sound Tuning Kit: Quickstart iii
Introduction ..............................................................................................................................iii
1. Hardware Hookup ..................................................................................................iii
2. Room EQ Setup......................................................................................................iv
3. Measurement .......................................................................................................... iv
4. Target Sound Options..............................................................................................v
5. Save Results ............................................................................................................v
Conclusion................................................................................................................................vi
Professional Surround Sound Tuning Kit 1
Introduction ...............................................................................................................................1
Setup .......................................................................................................................................... 2
Supplied Hardware...................................................................................................... 2
Installation................................................................................................................... 2
Hardware Hookup .......................................................................................................2
Operation ...................................................................................................................................4
Initial Configuration .................................................................................................... 4
Room EQ setup ...........................................................................................................5
Measurement ............................................................................................................... 6
Detection Results......................................................................................................... 9
Target Sound Options................................................................................................ 11
Save Results ..............................................................................................................12
Problem Solving ......................................................................................................................17
Troubleshooting......................................................................................................... 17
Reference Documents................................................................................................17
Further Inquiries........................................................................................................18
Future Updates ..........................................................................................................18
Software License Agreement................................................................................................... 19
Return and Warranty Policies..................................................................................................21
Merchandise Returns / Repair Service ......................................................................21
CRESTRON Limited Warranty.................................................................................21
Operations Guide – DOC. 6565B Contents • i
Page 4

Page 5

Crestron Professional Surround Sound Tuning Kit
Professional Surround Sound Tuning Kit: Quickstart
Introduction
The following steps are designed to guide you through the basic hookup and use of
your Professional Surround Sound Tuning Kit.
Follow this checklist to tune your system.
1. Hardware Hookup
All components in the system should be powered off while making
connections.
Remove the plastic cover from the front of the AMS.
NOTE: Crestron’s Professional Surround Sound Tuning Kit may be used with
either an AMS or an AMS-AIP. For simplicity within this guide, both models will
hereinafter collectively be referred to as AMS.
Place the microphone stand upright.
Attach the microphone holder to the stand.
Insert the microphone in a vertical position in the holder.
NOTE: You must place the microphone in a vertical position with the capsule
facing the ceiling for all measurements.
Connect the mini female XLR end of the female mini XLR to male XLR
cable to the microphone.
NOTE: Use care when attaching the mini XLR cable so as not to strain the
connector.
Connect the male XLR end of the cable to the XLR end of the XLR to
stereo 3.5 mm cable.
Connect the stereo 3.5 mm plug to the microphone input on the AMS.
Operations Guide – DOC. 6565B Quickstart • iii
Page 6

Professional Surround Sound Tuning Kit Crestron
NOTE: Use care when attaching the microphone cable so as not to strain the
connector.
Using the included USB cable, connect your PC to the USB port on the
front of the AMS.
2. Room EQ Setup
NOTE: When Pro Sound Tools is run for the first time, a setup wizard will take
your through the process. Thereafter, the Configure button can be used to initiate the
process.
Insert the CD that came with the kit and click Add/Change Mic Setup File.
Select the file for the microphone that came with your kit.
When a center speaker or subwoofer is not used, un-check the Front Center
Speaker and/or Subwoofer checkboxes.
Any subwoofer low-pass filter should be defeated or set to its maximum
frequency. Any subwoofer gain settings should be set to their nominal or 12
o’clock position. Also, any sort of “Auto Standby” or sleep mode for the
subwoofer should be disabled.
Click Room Equalization Setup… to begin the process. The “Job
Information” screen is used to record the name of the customer or job and
the name of the technician performing the job.
Click the forward arrow to proceed to the “Options” screen. The “Options”
screen is where you select the microphone file to match the microphone you
are using.
Select your microphone and click the forward arrow to proceed to the
“Measurement” screen.
3. Measurement
Quiet the room as much as possible.
Turn off phones, TVs, radios, air conditioners, etc. and close any open
windows.
Refrain from talking and do not sit or stand directly between any of the
speakers and the microphone.
NOTE: Do not touch the microphone stand or cable during the measurement
process.
A. Position 1 Measurement
Place the microphone at the primary listening location, at the ear height of a
listener seated at this location.
NOTE: It is important to have the microphone in the primary listening position for
the first measurement.
iv • Quickstart Operations Guide – DOC. 6565B
Page 7

Crestron Professional Surround Sound Tuning Kit
Press the Measure button. The Audyssey™ test signal will play a series of
10 “chirps” through each channel.
B. Additional Position Measurements
Move the microphone to another listening position and press the Measure
button again. Repeat the process for all listening positions in the room.
You will need to measure a minimum of three positions before you can
continue. The recommendation is to measure a minimum of eight positions
for typical rooms.
Click the forward arrow to finish the measurement process and continue to
the “Detection Results” screen, which displays the results of the
measurements.
Click the forward arrow to proceed to the “Target Sound Options” screen.
4. Target Sound Options
Choose which of the Audyssey™ target curves you want to use by selecting
the radio button next to the curve:
For small to medium rooms (up to 2500 cu. ft.), choose the High
Frequency Roll Off 1 curve.
For medium to large rooms (up to 5000 cu. ft.), choose the High
Frequency Roll Off 2 curve.
For rooms larger than 5000 cu. ft., choose the SMPTE 202M
curve.
The Midrange Compensation option (selected by default) is used to adjust
the balance between on-axis and reflected sound in the crossover region. It
is recommended that you leave this box checked. You can return to this
screen later and change your setting if you prefer.
Click the forward arrow to calculate your correction curves and proceed to
the “Save Results” screen.
5. Save Results
A. Transfer the MultEQ® XT Filters
Click Transfer to Crestron to temporarily store the filters so you can listen
to them. This process may take several minutes.
B. MultEQ® Pro On/Off Demo
You can now use the Turn MultEQ On and Turn MultEQ Off buttons to
demo the MultEQ
®
XT filters.
C. Save the MultEQ® XT Filters
Click the Save Permanently to Crestron button to save the correction
curves. This process may take several minutes. After saving is complete,
click Close in the lower right corner of the window to exit the application.
Operations Guide – DOC. 6565B Quickstart • v
Page 8

Professional Surround Sound Tuning Kit Crestron
NOTE: It is important to use the Save Permanently to Crestron function before
leaving the program. Otherwise, all measurements will be lost and you will have to
start the process over from the beginning.
Optional Adjustments
Sometimes users want to change the level of the center channel (for example, to
boost dialog) or subwoofer. This is optional and is not required most of the time but
if it is desired, adjustments to these or any other channels can be made by going into
Pro Sound Tools and clicking on Speaker Adjustments. This allows each speaker’s
level to be adjusted individually.
Conclusion
This concludes the Quickstart section of the Professional Surround Sound Tuning Kit
Operations Guide. Continue reading for more information on installing and operating
the Professional Surround Sound Tuning Kit.
vi • Quickstart Operations Guide – DOC. 6565B
Page 9
Crestron Professional Surround Sound Tuning Kit
Professional Surround Sound Tuning Kit
Introduction
Creston’s Professional Surround Sound Tuning Kit for the Adagio® Media System
allows custom installers use the Audyssey MultEQ
Audyssey MultEQ® XT sound equalization technology to high quality listening
rooms. Audyssey MultEQ® XT creates an optimum listening experience for every seat
in your theater using an ingenious equalization solution that automatically corrects
the time, level and frequency response for each speaker within the space.
Every listening room or home theater room will add colorations to the direct sound
coming from the loudspeakers. These colorations occur at both bass and treble
frequencies. In the bass, they are caused by the natural resonances (also called
modes) every room has. In the treble, they come from wall, floor and ceiling
reflections of the sound from the loudspeakers. MultEQ
information throughout the listening area. Based on these measurements, MultEQ®
Pro calculates an equalization solution that effectively removes sonic colorations
caused by the interaction of sound from the speakers with the room, allowing the
speakers to attain their best possible performance.
Professional Surround Sound Tuning Kit
®
Pro PC application to bring
®
Pro measures the sound
Operations Guide – DOC. 6565B Professional Surround Sound Tuning Kit • 1
Page 10

Professional Surround Sound Tuning Kit Crestron
Setup
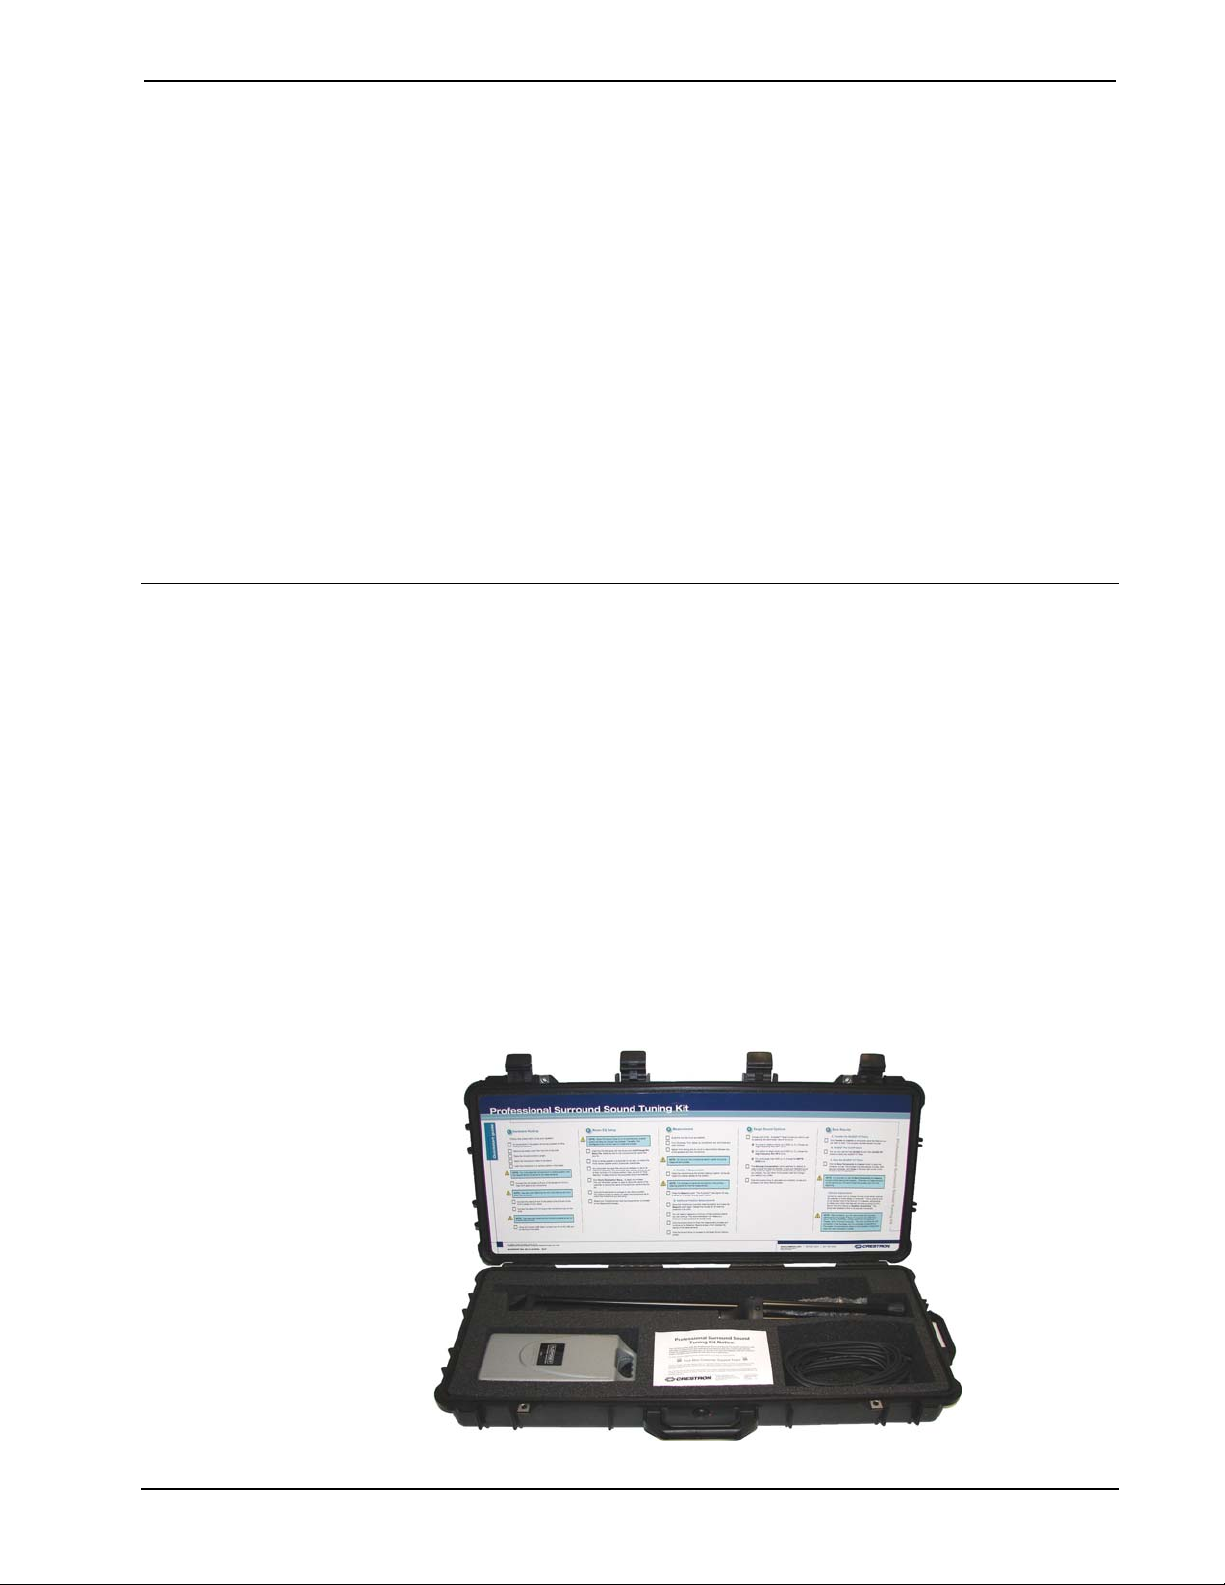
Supplied Hardware
The hardware supplied with the Professional Surround Sound Tuning Kit is listed in
the following table.
Supplied Hardware for the Professional Surround Sound Tuning Kit
DESCRIPTION PART NUMBER QUANTITY
APM1 Microphone & CD with Calibration
File
Cable Assembly, XLR to Stereo 3.5 mm, 5” 2017722 1
Cable Assembly, USB 2.0, Series “A” to “B”
Plugs, 6’
Cable Assembly, Female Mini XLR to Male
XLR, 6’
OEM Cable, XLR, 18’ 2017745 3
OEM Boom Stand, Ultra Light 2017744 1
4504520 1
2014966 1
2018284 1
Installation
NOTE: The CD that comes with the Professional Surround Sound Tuning Kit
contains a file specially configured for the individual microphone that also comes
with the kit. Crestron suggests you keep the CD and the microphone together and
also that you make a backup copy of the CD and store it in a safe place.
The Professional Surround Sound Tuning Kit requires that you have at least one of
the following software applications installed on your PC:
• Pro Sound Tools™ (version 1.00.19 or later)
• Crestron Toolbox (version 1.06.10 or later)
Hardware Hookup
While making connections, all components in the system should be powered off.
Place the microphone stand upright. Attach the microphone holder to the stand.
Insert the microphone in a vertical position in the holder.
NOTE: You must place the microphone in a vertical position with the capsule
facing the ceiling for all measurements. Refer to illustration on the following page.
2 • Professional Surround Sound Tuning Kit Operations Guide – DOC. 6565B
Page 11

Crestron Professional Surround Sound Tuning Kit
Microphone Stand and Microphone in Measuring Position
Connect the mini female XLR end of the female mini XLR to male XLR cable to the
microphone.
Connect the male XLR end of the cable to the XLR end of the XLR to stereo 3.5 mm
cable.
Connect the stereo 3.5 mm plug to the microphone input on the AMS. For details,
refer to the latest version of the Adagio Media System Operations Guide (Doc. 6509)
which is available from the Crestron website (http://www.crestron.com/manuals
NOTE: Crestron’s Professional Surround Sound Tuning Kit may be used with
either an AMS or an AMS-AIP. For simplicity within this guide, both models will
hereinafter collectively be referred to as AMS.
NOTE: The Professional Surround Sound Tuning Kit provides 3 18’ XLR cables. If
more cable length is required to reach the AMS, you can add these as needed in
between the male XLR end of the microphone cable and the XLR end of the XLR to
stereo 3.5 mm cable. You can chain multiple cables for a longer length if required. If
additional XLR cables are needed, you may supply your own.
Using the USB cable included with the Professional Surround Sound Tuning Kit,
connect your PC to the USB port on the front of the AMS.
NOTE: The USB connection is required for Audyssey MultEQ® Pro to function.
).
Operations Guide – DOC. 6565B Professional Surround Sound Tuning Kit • 3
Page 12

Professional Surround Sound Tuning Kit Crestron
Operation
Initial Configuration
The Audyssey MultEQ® Pro application can be accessed directly through Pro Sound
Tools or through Pro Sound Tools via Crestron Toolbox.
NOTE: When Pro Sound Tools is run for the first time, a setup wizard will run to
take you through the necessary steps for your system. Thereafter, the Configure
button can be used to initiate the process.
“Pro Sound Tools” Window
Click Configure at the top of the window to open the “System Configuration”
window.
“System Configuration” Window
If you have not already installed the special file for the microphone that came with
your Professional Surround Sound Tuning Kit, insert the CD that came with your kit
and click Add/Change Mic Setup File. The application will present a standard
“Browse” window where you can navigate to your CD drive and select the special
file for the microphone that came with your Professional Surround Sound Tuning
Kit. This should be “Audyssey Mic #####.apm” (where ##### represents the
microphone serial number).
4 • Professional Surround Sound Tuning Kit Operations Guide – DOC. 6565B
Page 13

Crestron Professional Surround Sound Tuning Kit
Room EQ setup
When the Pro Sound Tools application is launched it will provide a window for
selecting the current system configuration (for example, 5.1, 6.1, 7.1 plus additional
rooms, etc.). When a center speaker or subwoofer is not used, un-check the Front
Center Speaker and/or Subwoofer checkboxes as appropriate, in order to enable
“phantom” center and “phantom” subwoofer. The phantom setting will route center
and/or subwoofer information to the main speakers.
Any subwoofer low-pass filter should be defeated or set to the THX setting
(sometimes called “LFE input”). If the subwoofer low-pass filter cannot be defeated,
set it to its maximum frequency. Any subwoofer gain settings should be set to their
nominal position or at 12 o’clock on a conventional level control. Also, if the
subwoofer has any sort of “Auto Standby” or sleep mode that turns the power to the
subwoofer off after it does not receive any signal for some period of time, please
disable this mode. This will ensure that the subwoofer is always on, which is
important when taking measurements. The subwoofer may be set back to Auto after
measuring is complete.
Click Room Equalization Setup… to begin the process.
NOTE: If you have not already done so, the application will prompt you to install
the special file for the microphone that came with your Professional Surround Sound
Tuning Kit.
NOTE: The Volume control will function until the process gets to the “Job
Information” screen, at which point the use of the volume control is disabled until
the filters are transferred (refer to “Save Results” which starts on page 12).
“Job Information” Screen
The “Job Information” screen is used to record the name of the customer or job and
the name of the technician performing the job.
Click the forward arrow to proceed to the “Options” screen.
Operations Guide – DOC. 6565B Professional Surround Sound Tuning Kit • 5
Page 14

Professional Surround Sound Tuning Kit Crestron
“Options” Screen
The “Options” screen is where you select the microphone file to match the
microphone you are using. If you have more than one Professional Surround Sound
Tuning Kit and therefore more than one microphone, it is important that you choose
the correct serial number for the microphone you are using during the installation.
The serial number on the microphone setup file should match the one printed on the
microphone.
Click the forward arrow to proceed to the “Measurement” screen.
Measurement
“Measurement” Screen
6 • Professional Surround Sound Tuning Kit Operations Guide – DOC. 6565B
Page 15

Crestron Professional Surround Sound Tuning Kit
The microphone should be positioned as far out from the stand as possible to
minimize the effect of stand reflections.
NOTE: You must place the microphone in a vertical position with the capsule
facing the ceiling for all measurements. Refer to illustration on page 3.
Quiet the room as much as possible. Background noise can disrupt the room
measurements. Turn off cell phones, televisions, radios, air conditioners, fluorescent
lights and other devices or home appliances. Close any open windows.
Refrain from talking and do not sit or stand directly between any of the speakers and
the microphone during the room measurements. Each speaker will emit a series of
test signals during the measurements and your body and background noise can
disrupt the microphone’s ability to properly record the room response to the test
signal.
Position 1 Measurement
For the Position 1 measurement, place the microphone at the primary or most central
listening location. The height should be the ear height of a listener seated at this
position.
NOTE: It is important to have the microphone in the primary listening position for
the first measurement. Every position measurement will record the room’s frequency
and time response but Position 1 also detects the absolute polarity of each speaker,
calculates the exact distance (within a half inch) for setting delays and determines
levels (within half a dB) for each speaker. The speaker type, distance, level, filter
characteristics and crossover frequency from the Position 1 measurement are
displayed later on the “Detection Results” screen (refer to “Detection Results” which
starts on page 9).
Press the Measure button. The Audyssey test signal will play a series of 10 “chirps”
through each channel. The name of the speaker being measured will be indicated
under the status bar while the test signal plays.
“Measurement” Screen (Showing Position 1 Progress)
Operations Guide – DOC. 6565B Professional Surround Sound Tuning Kit • 7
Page 16

Professional Surround Sound Tuning Kit Crestron
After the application is finished playing the 10 chirps through each channel, the
application will transfer each channel’s measurement (this takes several seconds).
Click Undo Last if you want to erase your previous measurement.
Click Clear All at any time to erase all your position measurements and go back to
Position 1.
The Load Measurements and Save Measurements buttons allow you to start the
measurement procedure and return to it at a later time to continue, without losing any
measurements already taken. Press Save Measurements to save the current
measurements. Press Load Measurements to retrieve measurements already taken.
NOTE: When loading previously taken measurements, ensure the configuration
matches the current one. For example, loading a 5.1 channel measurement file into a
7.1 channel setup will result in two of the channels being undetected. Loading a 7.1
channel measurement into a 5.1 setup will result in the last two channels being
ignored.
Additional Position Measurements
Move the microphone to another listening position and press the Measure button
again. Repeat the process for all listening positions in the room. You will need to
measure a minimum of three positions before you can continue. The
recommendation is to measure a minimum of eight positions for typical rooms.
Stagger the height of the microphone by a few inches from location to location to
account for different listener heights.
NOTE: A minimum of three measurements is required. You will not be able to
continue to the next screen in the application until the third measurement is
complete.
The larger the room, the more positions you should measure (the maximum is 32
positions). Make sure you measure only in positions where people will be located
while listening to the system (i.e. measuring in a far off corner where nobody would
ever listen will not be beneficial and may detract from the overall benefit within the
main listening area).
Audyssey MultEQ
loudspeaker. If any of your speakers are wired out of polarity (i.e. + and – reversed),
the application will show you an error window that explains which loudspeaker(s) to
check. You may then check the polarity problem before continuing with the
application. It is recommended that you check for polarity problems by examining
the wire connections at the amplifier, speakers and any splices in the speaker cables.
NOTE: In some situations, such as when the rear speakers are dipolar radiators, the
program may show a polarity error even if the speakers are correctly wired. Correct
wiring should be verified by checking the connections at the amplifier, speakers and
any splices in the speaker cables.
Polarity Error Window
®
Pro measures the absolute polarity of each individual
8 • Professional Surround Sound Tuning Kit Operations Guide – DOC. 6565B
Page 17

Crestron Professional Surround Sound Tuning Kit
NOTE: After measurements are complete, Crestron recommends saving these (by
pressing the Save Measurements button) before proceeding to the “Detection
Results” screen. The program will show a standard window asking you to select a
location to save the new .amd file.
Click the forward arrow to finish the measurement process and continue to the
“Detection Results” screen.
NOTE: You can always return to the “Measurement” screen and measure more
positions by clicking the back arrow (the application will remember the last
measured position).
Detection Results
“Detection Results” Screen
The “Detection Results” screen displays the Speaker Type, Distance, Trim,
Cutoff/slope and Crossover results derived from your Position 1 measurement (refer
to “Position 1 Measurement” on page 7) and the recommended Crossover derived
from all of your position measurements.
• Speaker Type detects if the speaker connected to that channel is a satellite or
a subwoofer.
• Dist (feet) will automatically set the distance (delay) in the AMS.
NOTE: Clicking on the heading for this column will change the display to
Dist (m) showing the distance in meters. Clicking the heading again will
change the display to show Delay (ms) showing the delay in milliseconds. A
third click will return the display to Dist (feet). (Refer to illustrations on the
following page.)
Operations Guide – DOC. 6565B Professional Surround Sound Tuning Kit • 9
Page 18

Professional Surround Sound Tuning Kit Crestron
“Detection Results” Screen (Showing Distance in Meters)
“Detection Results” Screen (Showing Delay in Milliseconds)
• Trim is displayed in dB. This number is not a dB SPL (absolute loudness)
number. It is an absolute trim and must be used as shown. When applied,
absolute trim gives reference level at the primary seat for volume set to
0dB. The Trim information will be automatically set in the AMS.
• Cutoff/slope displays the filter characteristics applied to each speaker.
• Crossover is displayed in Hz. The Crossover information will be
automatically set in the AMS. You can use the drop-down menus to
override the crossover settings that will be sent to the AMS.
10 • Professional Surround Sound Tuning Kit Operations Guide – DOC. 6565B
Page 19

Crestron Professional Surround Sound Tuning Kit
The Audyssey filter calculation is optimized based on your selected crossover
frequency setting in the Crossover drop-down menus. Crossover choices are listed in
descending order of preference to optimize satellite-subwoofer blending.
Only rarely should you ever choose the Large setting for the crossover. This setting
means the bass for that channel will not be sent to the subwoofer. Only in the
following situations, should you consider choosing the Large setting:
1. Your system does not have a subwoofer.
2. Your satellite speakers extend as low or lower in frequency than your
subwoofer. Even in this case, however, you may not want to use Large
because your subwoofer probably has better power handling for the bass.
NOTE: Even if the Distance shown for the subwoofer is longer than the physical
distance, it is probably correct since subwoofers often have digital amps that delay
the signal.
Click the forward arrow to proceed to the “Target Sound Options” screen.
Target Sound Options
“Target Sound Options” Screen
On the “Target Sound Options” screen, choose which of the Audyssey target curves
you want to use by selecting the radio button next to the curve.
NOTE: To cover a wide range of room types, MultEQ
selection of three target curves.
1. The High Frequency Roll Off 1 curve introduces a slight roll off at high
frequencies that accounts for the balance between direct and reflected sound
for a small to medium size rooms (room volume less than 2500 cu. ft.).
Operations Guide – DOC. 6565B Professional Surround Sound Tuning Kit • 11
®
Pro currently provides a
Page 20

Professional Surround Sound Tuning Kit Crestron
2. The High Frequency Roll Off2 curve introduces a slightly greater roll off at
high frequencies that restores the balance between direct and reflected
sound for medium to large size rooms (room volume between 2500 and
5000 cu. ft.).
3. The SMPTE 202M curve is an international standard for the high frequency
roll off applied in a typical 500-seat movie theater. It is appropriate for
professional mixing spaces and dubbing stages that must be calibrated for
film sound post-production. It can also be used in extremely large playback
spaces (room volume greater than 5000 cu. ft.).
The Midrange Compensation option (selected by default) is used to properly adjust
the balance between on-axis and reflected sound in the crossover region of the
woofer and the tweeter. You can return to this screen later and change your setting
for this option if you prefer.
Click the forward arrow to calculate your correction curves and proceed to the “Save
Results” screen.
Save Results
“Save Results” Screen
Transfer the MultEQ® XT Filters
Transfer the correction filters you have calculated by clicking the Transfer to
Crestron button. This process temporarily stores the filters so you can listen to them
before deciding to permanently save them. Previously saved filters will not be erased
until you click the Save Permanently to Crestron button.
The Transfer to Crestron process may take several minutes. The download status
bar will indicate the progress of the transfer.
12 • Professional Surround Sound Tuning Kit Operations Guide – DOC. 6565B
Page 21

Crestron Professional Surround Sound Tuning Kit
NOTE: If the MultEQ® Pro application is turned off before the transfer is
completed, the MultEQ® XT filters will be erased. The application will show a
warning window asking you to confirm whether you wish to quit without saving.
NOTE: If the USB cable is disconnected between the processor and the PC during
this process or before the process is complete, all measurements will be lost. If this
happens, you must close the application, reopen it and start from the beginning of the
application.
MultEQ® Pro On/Off Demo
After the results are transferred, the Turn MultEQ On and Turn MultEQ Off
buttons will become unlocked and usable. You can use these buttons to demo the
MultEQ® XT filters before deciding to save them permanently.
Insert program material into your source component. Play a track from the disc. Use
the Turn MultEQ On and Turn MultEQ Off buttons to demo the MultEQ
®
XT
filters.
NOTE: If the customer is present during the MultEQ
®
Pro On/Off demo, have them
sit or stand within the room area you measured earlier. If they are not positioned
inside this area, it is less likely they will hear the full effect of the MultEQ® XT
filters.
Change the MultEQ® XT Filters
There are two options for changing the MultEQ® XT filters:
1. Add more measurement positions or redo your measurements. Click the
back arrow until you get back to the “Measurement” screen (refer to
“Measurement” which starts on page 6).
®
2. Calculate the MultEQ
XT filters with a different target curve. Click the
back arrow to go back to the “Target Sound Options” screen (refer to
“Target Sound Options” which starts on page 11).
View MultEQ® Pro On/Off Frequency Response Curves
Click the View Results button to view a graphical display of the frequency response
correction for each channel. For each channel, the graphs on the left are without the
MultEQ® Pro correction applied, while the graphs on the right are with the MultEQ®
Pro correction applied (refer to illustration on the following page).
Operations Guide – DOC. 6565B Professional Surround Sound Tuning Kit • 13
Page 22

Professional Surround Sound Tuning Kit Crestron
“Sound Correction Results” Window
NOTE: Before the changes have been permanently saved, the “Sound Correction
Results” window will show the word “DRAFT” in large letters. In the illustration
above, the window is shown as it will appear after the changes have been
permanently saved.
NOTE: Depending on the browser you are using and its security settings, you may
see a message when you click View Results. For example, with Internet Explorer
®
you may see a message that says “To help protect your security, Internet Explorer
has restricted this file from showing active content that could access your computer.
Click here for options…” (refer to illustration that follows this note). When you
enable, you will see the full graphic. This will occur for the “DRAFT” view, not
after the results have been saved permanently.
Warning Message in Internet Explorer®
Save the MultEQ® XT Filters
If you are satisfied with the MultEQ® XT filters, click the Save Permanently to
Crestron button. This action may take several minutes. The status bar will indicate
the progress of this action (refer to illustration on the following page).
14 • Professional Surround Sound Tuning Kit Operations Guide – DOC. 6565B
Page 23

Crestron Professional Surround Sound Tuning Kit
“Save Results” Screen (Shown in Progress)
After saving the MultEQ
®
XT filters, you will see an “Audyssey MultEQ Pro
Calibration Completed” message and can leave the application by clicking Close in
the lower right corner of the window.
“Audyssey MultEQ Pro Calibration Completed” Screen
MultEQ® Pro Settings in Pro Sound Tools
The Gain, Delay and Crossover settings determined by MultEQ® Pro can now be
viewed in Pro Sound Tools (refer to illustration on the following page). Pro Sound
Tools also allows you to change any of these settings to suit your individual tastes or
requirements.
Operations Guide – DOC. 6565B Professional Surround Sound Tuning Kit • 15
Page 24

Professional Surround Sound Tuning Kit Crestron
“Pro Sound Tools” Window (Showing Audyssey Settings)
NOTE: Even if the Distance shown for the subwoofer (refer to “Detection Results”
which starts on page 9) is longer than the physical distance, it is probably correct
since subwoofers often have digital amps that delay the signal.
16 • Professional Surround Sound Tuning Kit Operations Guide – DOC. 6565B
Page 25

Crestron Professional Surround Sound Tuning Kit
Problem Solving
Troubleshooting
The following table provides corrective action for possible trouble situations. If
further assistance is required, please contact a Crestron customer service
representative.
Professional Surround Sound Tuning Kit Troubleshooting
TROUBLE POSSIBLE CAUSE(S) CORRECTIVE ACTION
“Crestron
processor was
not detected…”
message.
“Input signal is
too low”
message.
Bad microphone cable. Change microphone cable.
“Ambient noise”
message
“Communication
with the device
failed” message.
Inverted polarity
message.
USB cable not
connected.
Program does not detect
a strong enough input
signal for measurement.
Room is too noisy.
Program does not detect
any signal at all.
One or more speakers
may be wired in reverse
polarity (i.e. + and –
wires reversed).
Make sure USB cable is
securely connected between
PC and AMS.
Check that microphone is
properly connected (refer to
“Hardware Hookup” which
starts on page 2).
Refrain from talking. Turn off
cell phones, televisions,
radios, air conditioners,
fluorescent lights and other
devices or home appliances.
Close any open windows.
Check that microphone and
cables are properly
connected (refer to
“Hardware Hookup” which
starts on page 2).
Check wire connections at
the amplifier, speakers and
any spices in the speaker
cables. Make sure + on
amplifier goes to + on
speaker and that – on
amplifier goes to – on
speaker.
Reference Documents
The latest version of all documents mentioned within the guide can be obtained from
the Crestron website (http://www.crestron.com/manuals). This link will provide a list
of product manuals arranged in alphabetical order by model number.
List of Related Reference Documents
DOCUMENT TITLE
Adagio Media System Operations Guide
Operations Guide – DOC. 6565B Professional Surround Sound Tuning Kit • 17
Page 26

Professional Surround Sound Tuning Kit Crestron
Further Inquiries
If you cannot locate specific information or have questions after reviewing this
guide, please take advantage of Crestron's award winning customer service team by
calling the Crestron corporate headquarters at 1-888-CRESTRON [1-888-273-7876].
For assistance in your local time zone, refer to the Crestron website
(http://www.crestron.com/offices
You can also log onto the online help section of the Crestron website
(http://www.crestron.com/onlinehelp
First-time users will need to establish a user account to fully benefit from all
available features.
) for a listing of Crestron worldwide offices.
) to ask questions about Crestron products.
Future Updates
As Crestron improves functions, adds new features and extends the capabilities of
the Professional Surround Sound Tuning Kit, additional information may be made
available as manual updates. These updates are solely electronic and serve as
intermediary supplements prior to the release of a complete technical documentation
revision.
Check the Crestron website periodically for manual update availability and its
relevance. Updates are identified as an “Addendum” in the Download column.
18 • Professional Surround Sound Tuning Kit Operations Guide – DOC. 6565B
Page 27

Crestron Professional Surround Sound Tuning Kit
Software License Agreement
This License Agreement (“Agreement”) is a legal contract between you (either an individual or a single business entity) and
Crestron Electronics, Inc. (“Crestron”) for software referenced in this guide, which includes computer software and as applicable,
associated media, printed materials and “online” or electronic documentation (the “Software”).
BY INSTALLING, COPYING OR OTHERWISE USING THE SOFTWARE, YOU REPRESENT THAT YOU ARE AN
AUTHORIZED DEALER OF CRESTRON PRODUCTS OR A CRESTRON AUTHORIZED INDEPENDENT PROGRAMMER
AND YOU AGREE TO BE BOUND BY THE TERMS OF THIS AGREEMENT. IF YOU DO NOT AGREE TO THE TERMS OF
THIS AGREEMENT, DO NOT INSTALL OR USE THE SOFTWARE.
IF YOU HAVE PAID A FEE FOR THIS LICENSE AND DO NOT ACCEPT THE TERMS OF THIS AGREEMENT,
CRESTRON WILL REFUND THE FEE TO YOU PROVIDED YOU (1) CLICK THE DO NOT ACCEPT BUTTON, (2) DO NOT
INSTALL THE SOFTWARE AND (3) RETURN ALL SOFTWARE, MEDIA AND OTHER DOCUMENTATION AND
MATERIALS PROVIDED WITH THE SOFTWARE TO CRESTRON AT: CRESTRON ELECTRONICS, INC., 15 VOLVO
DRIVE, ROCKLEIGH, NEW JERSEY 07647, WITHIN 30 DAYS OF PAYMENT.
LICENSE TERMS
Crestron hereby grants You and You accept a nonexclusive, nontransferable license to use the Software (a) in machine
readable object code together with the related explanatory written materials provided by Crestron (b) on a central processing unit
(“CPU”) owned or leased or otherwise controlled exclusively by You and (c) only as authorized in this Agreement and the related
explanatory files and written materials provided by Crestron.
If this software requires payment for a license, you may make one backup copy of the Software, provided Your backup copy
is not installed or used on any CPU. You may not transfer the rights of this Agreement to a backup copy unless the installed copy of
the Software is destroyed or otherwise inoperable and You transfer all rights in the Software.
You may not transfer the license granted pursuant to this Agreement or assign this Agreement without the express written
consent of Crestron.
If this software requires payment for a license, the total number of CPU’s on which all versions of the Software are installed
may not exceed one per license fee (1) and no concurrent, server or network use of the Software (including any permitted back-up
copies) is permitted, including but not limited to using the Software (a) either directly or through commands, data or instructions from
or to another computer (b) for local, campus or wide area network, internet or web hosting services or (c) pursuant to any rental,
sharing or “service bureau” arrangement.
The Software is designed as a software development and customization tool. As such Crestron cannot and does not
guarantee any results of use of the Software or that the Software will operate error free and You acknowledge that any development
that You perform using the Software or Host Application is done entirely at Your own risk.
The Software is licensed and not sold. Crestron retains ownership of the Software and all copies of the Software and
reserves all rights not expressly granted in writing.
OTHER LIMITATIONS
You must be an Authorized Dealer of Crestron products or a Crestron Authorized Independent Programmer to install or use
the Software. If Your status as a Crestron Authorized Dealer or Crestron Authorized Independent Programmer is terminated, Your
license is also terminated.
You may not rent, lease, lend, sublicense, distribute or otherwise transfer or assign any interest in or to the Software.
You may not reverse engineer, decompile or disassemble the Software.
You agree that the Software will not be shipped, transferred or exported into any country or used in any manner prohibited
by the United States Export Administration Act or any other export laws, restrictions or regulations (“Export Laws”). By downloading
or installing the Software You (a) are certifying that You are not a national of Cuba, Iran, Iraq, Libya, North Korea, Sudan, Syria or
any country to which the United States embargoes goods (b) are certifying that You are not otherwise prohibited from receiving the
Software and (c) You agree to comply with the Export Laws.
If any part of this Agreement is found void and unenforceable, it will not affect the validity of the balance of the Agreement,
which shall remain valid and enforceable according to its terms. This Agreement may only be modified by a writing signed by an
authorized officer of Crestron. Updates may be licensed to You by Crestron with additional or different terms. This is the entire
agreement between Crestron and You relating to the Software and it supersedes any prior representations, discussions, undertakings,
communications or advertising relating to the Software. The failure of either party to enforce any right or take any action in the event
of a breach hereunder shall constitute a waiver unless expressly acknowledged and set forth in writing by the party alleged to have
provided such waiver.
Operations Guide – DOC. 6565B Professional Surround Sound Tuning Kit • 19
Page 28

Professional Surround Sound Tuning Kit Crestron
If You are a business or organization, You agree that upon request from Crestron or its authorized agent, You will within
thirty (30) days fully document and certify that use of any and all Software at the time of the request is in conformity with Your valid
licenses from Crestron of its authorized agent.
Without prejudice to any other rights, Crestron may terminate this Agreement immediately upon notice if you fail to comply
with the terms and conditions of this Agreement. In such event, you must destroy all copies of the Software and all of its component
parts.
PROPRIETARY RIGHTS
Copyright. All title and copyrights in and to the Software (including, without limitation, any images, photographs,
animations, video, audio, music, text and “applets” incorporated into the Software), the accompanying media and printed materials
and any copies of the Software are owned by Crestron or its suppliers. The Software is protected by copyright laws and international
treaty provisions. Therefore, you must treat the Software like any other copyrighted material, subject to the provisions of this
Agreement.
Submissions. Should you decide to transmit to Crestron’s website by any means or by any media any materials or other
information (including, without limitation, ideas, concepts or techniques for new or improved services and products), whether as
information, feedback, data, questions, comments, suggestions or the like, you agree such submissions are unrestricted and shall be
deemed non-confidential and you automatically grant Crestron and its assigns a non-exclusive, royalty-free, worldwide, perpetual,
irrevocable license, with the right to sublicense, to use, copy, transmit, distribute, create derivative works of, display and perform the
same.
Trademarks. CRESTRON and the Swirl Logo are registered trademarks of Crestron Electronics, Inc. You shall not remove
or conceal any trademark or proprietary notice of Crestron from the Software including any back-up copy.
GOVERNING LAW
This Agreement shall be governed by the laws of the State of New Jersey, without regard to conflicts of laws principles.
Any disputes between the parties to the Agreement shall be brought in the state courts in Bergen County, New Jersey or the federal
courts located in the District of New Jersey. The United Nations Convention on Contracts for the International Sale of Goods shall not
apply to this Agreement.
CRESTRON LIMITED WARRANTY
CRESTRON warrants that: (a) the Software will perform substantially in accordance with the published specifications for a
period of ninety (90) days from the date of receipt and (b) that any hardware accompanying the Software will be subject to its own
limited warranty as stated in its accompanying written material. Crestron shall, at its option, repair or replace or refund the license fee
for any Software found defective by Crestron if notified by you within the warranty period. The foregoing remedy shall be your
exclusive remedy for any claim or loss arising from the Software.
CRESTRON shall not be liable to honor warranty terms if the product has been used in any application other than that for
which it was intended or if it as been subjected to misuse, accidental damage, modification or improper installation procedures.
Furthermore, this warranty does not cover any product that has had the serial number or license code altered, defaced, improperly
obtained or removed.
Notwithstanding any agreement to maintain or correct errors or defects, Crestron shall have no obligation to service or
correct any error or defect that is not reproducible by Crestron or is deemed in Crestron’s reasonable discretion to have resulted from
(1) accident; unusual stress; neglect; misuse; failure of electric power, operation of the Software with other media not meeting or not
maintained in accordance with the manufacturer’s specifications or causes other than ordinary use; (2) improper installation by anyone
other than Crestron or its authorized agents of the Software that deviates from any operating procedures established by Crestron in the
material and files provided to You by Crestron or its authorized agent; (3) use of the Software on unauthorized hardware or (4)
modification of, alteration of or additions to the Software undertaken by persons other than Crestron or Crestron’s authorized agents.
ANY LIABILITY OF CRESTRON FOR A DEFECTIVE COPY OF THE SOFTWARE WILL BE LIMITED
EXCLUSIVELY TO REPAIR OR REPLACEMENT OF YOUR COPY OF THE SOFTWARE WITH ANOTHER COPY OR
REFUND OF THE INITIAL LICENSE FEE CRESTRON RECEIVED FROM YOU FOR THE DEFECTIVE COPY OF THE
PRODUCT. THIS WARRANTY SHALL BE THE SOLE AND EXCLUSIVE REMEDY TO YOU. IN NO EVENT SHALL
CRESTRON BE LIABLE FOR INCIDENTAL, CONSEQUENTIAL, SPECIAL OR PUNITIVE DAMAGES OF ANY KIND
(PROPERTY OR ECONOMIC DAMAGES INCLUSIVE), EVEN IF A CRESTRON REPRESENTATIVE HAS BEEN ADVISED
OF THE POSSIBILITY OF SUCH DAMAGES OR OF ANY CLAIM BY ANY THIRD PARTY. CRESTRON MAKES NO
WARRANTIES, EXPRESS OR IMPLIED, AS TO TITLE OR INFRINGEMENT OF THIRD-PARTY RIGHTS,
MERCHANTABILITY OR FITNESS FOR ANY PARTICULAR PURPOSE, OR ANY OTHER WARRANTIES, NOR
AUTHORIZES ANY OTHER PARTY TO OFFER ANY WARRANTIES, INCLUDING WARRANTIES OF
MERCHANTABILITY FOR THIS PRODUCT. THIS WARRANTY STATEMENT SUPERSEDES ALL PREVIOUS
WARRANTIES.
20 • Professional Surround Sound Tuning Kit Operations Guide – DOC. 6565B
Page 29

Crestron Professional Surround Sound Tuning Kit
Return and Warranty Policies
Merchandise Returns / Repair Service
1. No merchandise may be returned for credit, exchange or service without prior authorization
from CRESTRON. To obtain warranty service for CRESTRON products, contact an
authorized CRESTRON dealer. Only authorized CRESTRON dealers may contact the factory
and request an RMA (Return Merchandise Authorization) number. Enclose a note specifying
the nature of the problem, name and phone number of contact person, RMA number and
return address.
2. Products may be returned for credit, exchange or service with a CRESTRON Return
Merchandise Authorization (RMA) number. Authorized returns must be shipped freight
prepaid to CRESTRON, 6 Volvo Drive, Rockleigh, N.J. or its authorized subsidiaries, with
RMA number clearly marked on the outside of all cartons. Shipments arriving freight collect
or without an RMA number shall be subject to refusal. CRESTRON reserves the right in its
sole and absolute discretion to charge a 15% restocking fee plus shipping costs on any
products returned with an RMA.
3. Return freight charges following repair of items under warranty shall be paid by CRESTRON,
shipping by standard ground carrier. In the event repairs are found to be non-warranty, return
freight costs shall be paid by the purchaser.
CRESTRON Limited Warranty
CRESTRON ELECTRONICS, Inc. warrants its products to be free from manufacturing defects in materials
and workmanship under normal use for a period of three (3) years from the date of purchase from
CRESTRON, with the following exceptions: disk drives and any other moving or rotating mechanical
parts, pan/tilt heads and power supplies are covered for a period of one (1) year; touchscreen display and
overlay components are covered for 90 days; batteries and incandescent lamps are not covered.
This warranty extends to products purchased directly from CRESTRON or an authorized CRESTRON
dealer. Purchasers should inquire of the dealer regarding the nature and extent of the dealer's warranty, if
any.
CRESTRON shall not be liable to honor the terms of this warranty if the product has been used in any
application other than that for which it was intended or if it has been subjected to misuse, accidental
damage, modification or improper installation procedures. Furthermore, this warranty does not cover any
product that has had the serial number altered, defaced or removed.
This warranty shall be the sole and exclusive remedy to the original purchaser. In no event shall
CRESTRON be liable for incidental or consequential damages of any kind (property or economic damages
inclusive) arising from the sale or use of this equipment. CRESTRON is not liable for any claim made by a
third party or made by the purchaser for a third party.
CRESTRON shall, at its option, repair or replace any product found defective, without charge for parts or
labor. Repaired or replaced equipment and parts supplied under this warranty shall be covered only by the
unexpired portion of the warranty.
Except as expressly set forth in this warranty, CRESTRON makes no other warranties, expressed or
implied, nor authorizes any other party to offer any warranty, including any implied warranties of
merchantability or fitness for a particular purpose. Any implied warranties that may be imposed by law are
limited to the terms of this limited warranty. This warranty statement supersedes all previous warranties.
Trademark Information
All brand names, product names and trademarks are the sole property of their respective owners. Windows is a registered trademark
of Microsoft Corporation. Windows95/98/Me/XP/Vista and WindowsNT/2000 are trademarks of Microsoft Corporation.
Operations Guide – DOC. 6565B Professional Surround Sound Tuning Kit • 21
Page 30

Professional Surround Sound Tuning Kit Crestron
This page is intentionally left blank.
22 • Professional Surround Sound Tuning Kit Operations Guide – DOC. 6565B
Page 31

Crestron Professional Surround Sound Tuning Kit
This page is intentionally left blank.
Operations Guide – DOC. 6565B Professional Surround Sound Tuning Kit • 23
Page 32

Crestron Electronics, Inc. Operations Guide – DOC. 6565B
15 Volvo Drive Rockleigh, NJ 07647 (2018352)
Tel: 888.CRESTRON 12.07
Fax: 201.767.7576 Specifications subject to
www.crestron.com change without notice.
 Loading...