

Page 1
Page 2

This document was prepared and written by the Technical Documentation department at:
Crestron Electronics, Inc.
15 Volvo Drive
Rockleigh, NJ 07647
1-888-CRESTRON
Page 3

Crestron CNXENET+ CNX Enhanced Ethernet Expansion Card
Contents
CNX Enhanced Ethernet Expansion Card: CNXENET+ 1
Description 1
Functional Description 1
Physical Description 1
Leading Specifications 2
Installation 3
Installation into CNMSX-AV/PRO 3
Installation onto CNRACKX Processor Card (CNXCPU) 5
Ethernet Wiring 8
Programming with SIMPL Windows 9
Configure CNXENET+ Program 9
TCP/IP Server and TCP/IP Client Symbols 10
Control System Ethernet Setup 11
Initial IP Setup 12
IP Table Setup 14
Communicating With the Control System via Ethernet 16
Setting a Control System Password via Ethernet 17
Troubleshooting Communications via Ethernet 18
Web Pages 19
Transferring Web Pages to the CNXENET+ 19
Using a Browser to View or Access Web Pages 21
Problem Solving 23
Troubleshooting 23
Further Inquiries 24
Future Updates 24
Return and Warranty Policies 25
Merchandise Returns / Repair Service 25
CRESTRON Limited Warranty 25
Glossary of Terms 26
Operations & Installation Guide – DOC. 8153A Contents • i
Page 4

Page 5

Crestron CNXENET+ CNX Enhanced Ethernet Expansion Card
CNX Enhanced Ethernet Expansion Card: CNXENET+
Description
Functional Description
The CNX Enhanced Ethernet Expansion Card, CNXENET+, is an optional feature
designed specifically for Crestron’s CNMSX and CNRACKX control systems. This
field-upgradable expansion card connects directly to Crestron’s exclusive Direct
Processor Access (DPA) slot providing high-speed access directly to the system
processor. The CNXENET+ provides communication via Ethernet/local area
network (LAN) and wide area network (WAN) to any Crestron Internet protocol (IP)
control device. This allows remote diagnostics and upgrades, access to Crestron’s
network analyzer, and the ability to activate any device connected to the system.
As part of Crestron e-Control™, the CNXENET+ allows Internet connections to the
control system. The CNXENET+ contains a 2Mbyte file system that can be used as a
web server. Browser pages generated in VisionTools™ Pro-e (VT Pro-e) are stored
onboard and up to five users can simultaneously connect directly to the control
system. Systems can be accessed through the World Wide Web using industry
browsers such as Microsoft® Internet Explorer™ or Netscape® Navigator. For a
Crestron e-Control demonstration, go to www.crestron-econtrol.com
Further information and additional Crestron e-Control software can be obtained from
the What’s New page (e-Control section) or Downloads page (ECONTROL Library)
of Crestron’s website (www.crestron.com)
order to obtain access to the FTP site.
. New users are required to register in
.
Physical Description
The CNXENET+, shown on the next page, is an expansion card that occupies the
DPA slot and connects directly to the control system’s processor. There are two
connectors located on the CNXENET+. An 8-wire RJ45 port for LAN connection is
available externally through the control system rear-panel or the CNX Control
Processor Card (CNXCPU) faceplate of the CNRACKX. Internally, one 26-pin
connector mates with the control system processor board or the CNXCPU board.
Two mounting brackets keep the card in place.
Operations & Installation Guide – DOC. 8153A CNX Enhanced Ethernet Expansion Card: CNXENET+ • 1
Page 6
CNX Enhanced Ethernet Expansion Card Crestron CNXENET+
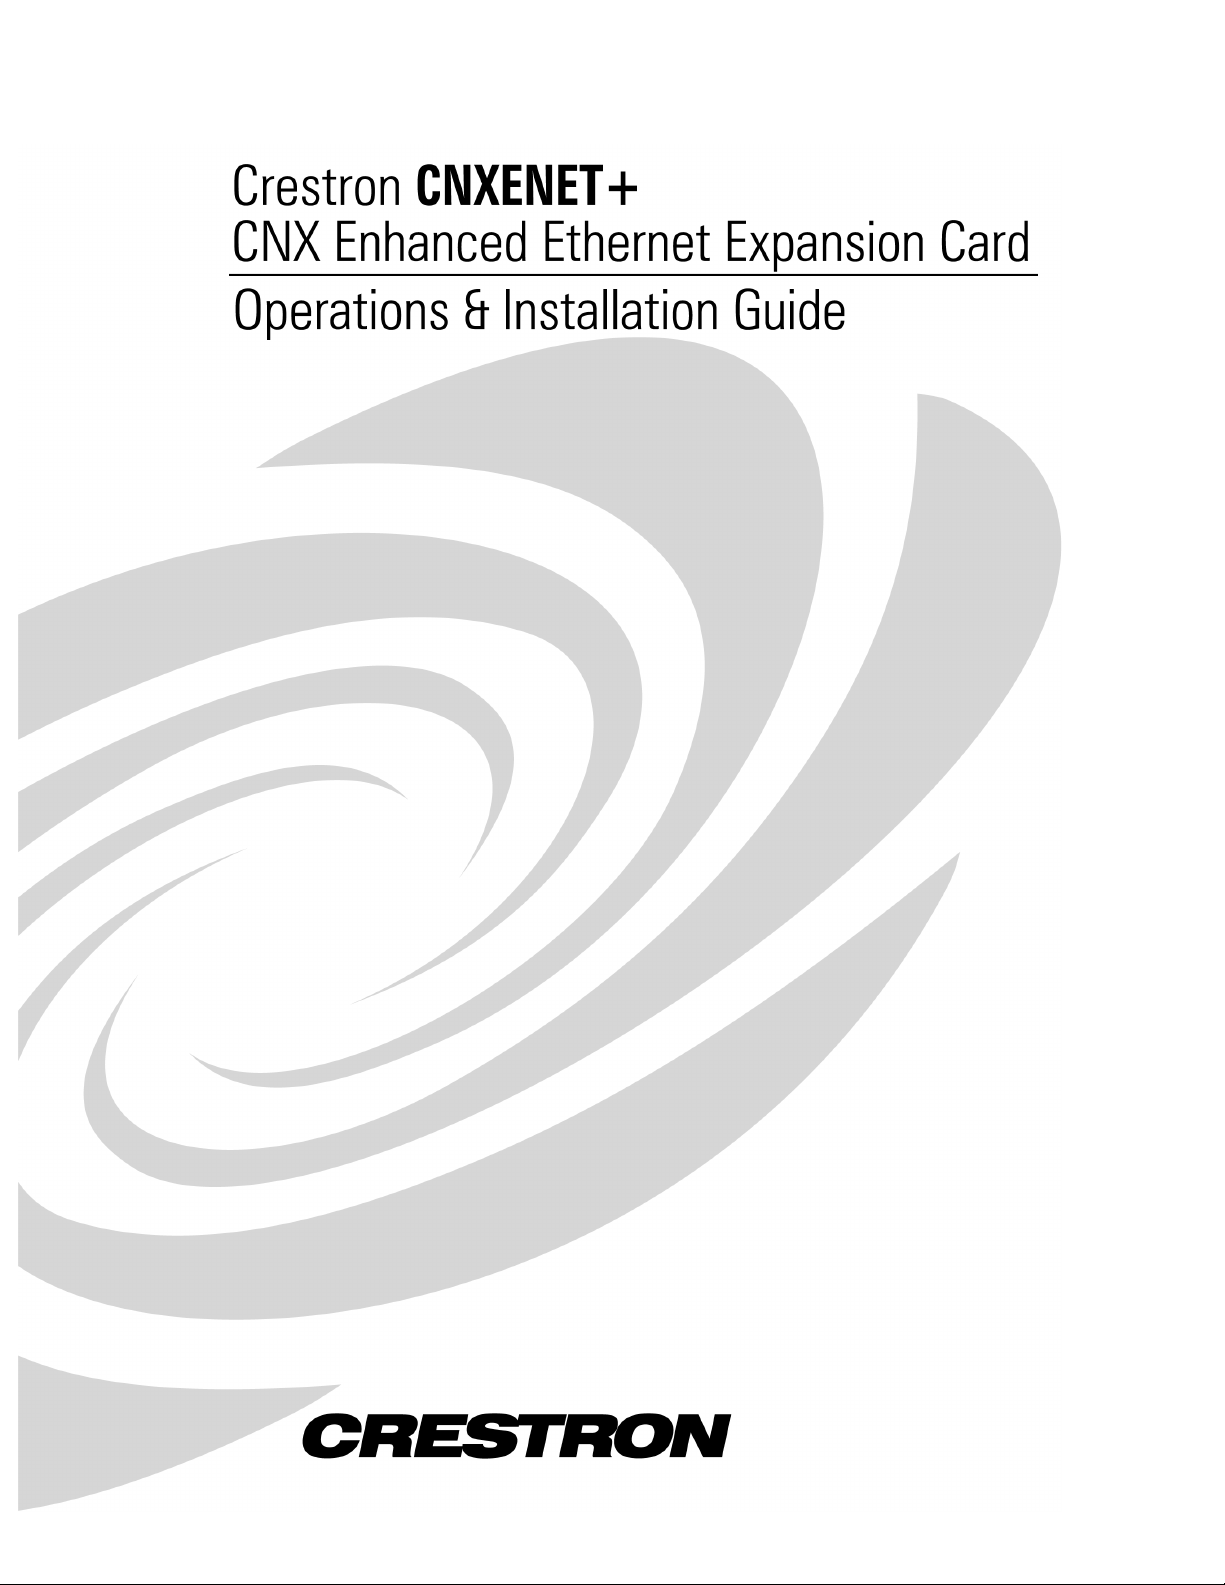
CNXENET+ Physical Views
2.95 in
(7.49 cm)
Top View
26-PIN DPA
CONNECTOR
MOUNTING
BRACKET
Front View
LAN/DPA
PORT
4.55 in
(11.56 cm)
1.13 in
(2.87 cm)
Side View
Leading Specifications
The table below provides a summary of leading specifications for the CNXENET+.
Dimensions and weight are rounded to the nearest hundredth unit.
Leading Specifications of the CNXENET+
SPECIFICATION DETAILS
Power Requirements 4 Watts (0.167 amps @ 24 VDC)
Network Type 10BaseT
Protocols TCP/IP, UDP/IP, ICMP (Ping), & HTTP
SIMPL™ Windows®
CNMSX-AV/Pro Update File
CNRACKX/-DP Update File
Internet Explorer Version 4.0 or later
Netscape Navigator Version 4.5 or later
Dimensions & Weight Height: 1.13 in (2.86 cm)
1 The latest software versions can be obtained from the What’s New page (SIMPL
Windows and VisionTools Pro-e sections) or Downloads page (SIMPLWIN and
TOUCHPNL Libraries) of Crestron’s website (www.crestron.com)
required to register in order to obtain access to the FTP site.
2 Filenames for update files have a UPZ extension and can be obtained from the What’s
New page (Control Systems Update Files section) or Downloads page (OPSYS Library)
of Crestron’s website.
Version 1.50.06 or later
Version 51165X.UPZ or later
Version 51165W.UPZ or later
Width: 2.95 in (7.49 cm)
Depth: 4.55 in (11.56 cm)
Weight: 2.10 oz (0.06 kg)
1
2
2
. New users are
As of the date of manufacture, this unit has been tested and found to comply with
specifications for CE marking.
NOTE: This device complies with part 15 of the FCC rules. Operation is subject to
the following two conditions: (1) this device may not cause harmful interference, and
(2) this device must accept any interference received, including interference that may
cause undesired operation.
2 • CNX Enhanced Ethernet Expansion Card: CNXENET+ Operations & Installation Guide – DOC. 8153A
Page 7

Crestron CNXENET+ CNX Enhanced Ethernet Expansion Card
Installation
Installation into CNMSX-AV/PRO
Items 1 through 9 listed below for the installation of the CNXENET+ are either
attached to the card or already reside on the control system. The tools required are a
grounding strap, a #1 Phillips tip screwdriver, and a #2 Phillips tip screwdriver.
Follow the assembly procedure after this paragraph.
Referenced Items for CNMSX Installation
ITEM DESCRIPTION PART NUMBER QUANTITY
Screw, 6-32 x 1/4"L, steel,
1
flat, phillip s, unde rcut, black
Screw, 6-32 x 3/8"L, steel,
2
flat, phillip s, unde rcut, black
3 Control System Top Cover MTCV02376-1 1
Screw, 6-32 x 1/4"L, zinc,
4
pan, p hillips, bla ck
5 I/O Printed Circuit Board PA05632-1 1
Screw, 4-40 x 3/8"L, steel,
6
pan, p hillips, bla ck
Washer, lock, steel, internal
7
tooth, #4, zinc
8 Plate, blank, metal, LAN/DPA MTPL02390-1 1
9 CNXENET+ ZA11281 1
SR06-32-0R2500-8
SR06-32-0R3750-9
SR06-32-0R2500-2
SR04-40-0R3750-3
WA04LO-1
4
12
6
2
2
CAUTION: The CNXENET+ and the control system contain electro-static
discharge (ESD) sensitive devices. Perform the following procedure while wearing a
grounding strap that is properly grounded or on a grounded work station to avoid
damaging the card and/or the control system.
CAUTION: Refer to the latest revision of the CNMSX Operations Guide (Doc.
8118) for proper turn-off and, if applicable, removal procedures. The latest software
version can be obtained from the Products page (PRODUCT MANUALS, Hardware
section) or Downloads page (MANUAL Library) of Crestron’s website
(www.crestron.com). New users are required to register in order to obtain access to
the FTP site.
NOTE: The unit shown in this procedure is a CNMSX-AV. The procedure is
identical for the CNMSX-PRO.
NOTE: It is assumed that the control system rack ear brackets are not attached
during this installation procedure.
1. As shown on the next page, place the control system right-side-up on a
flat surface and using a #2 Phillips tip screwdriver, remove four screws
from the top of the unit.
Operations & Installation Guide – DOC. 8153A CNX Enhanced Ethernet Expansion Card: CNXENET+ • 3
Page 8
CNX Enhanced Ethernet Expansion Card Crestron CNXENET+
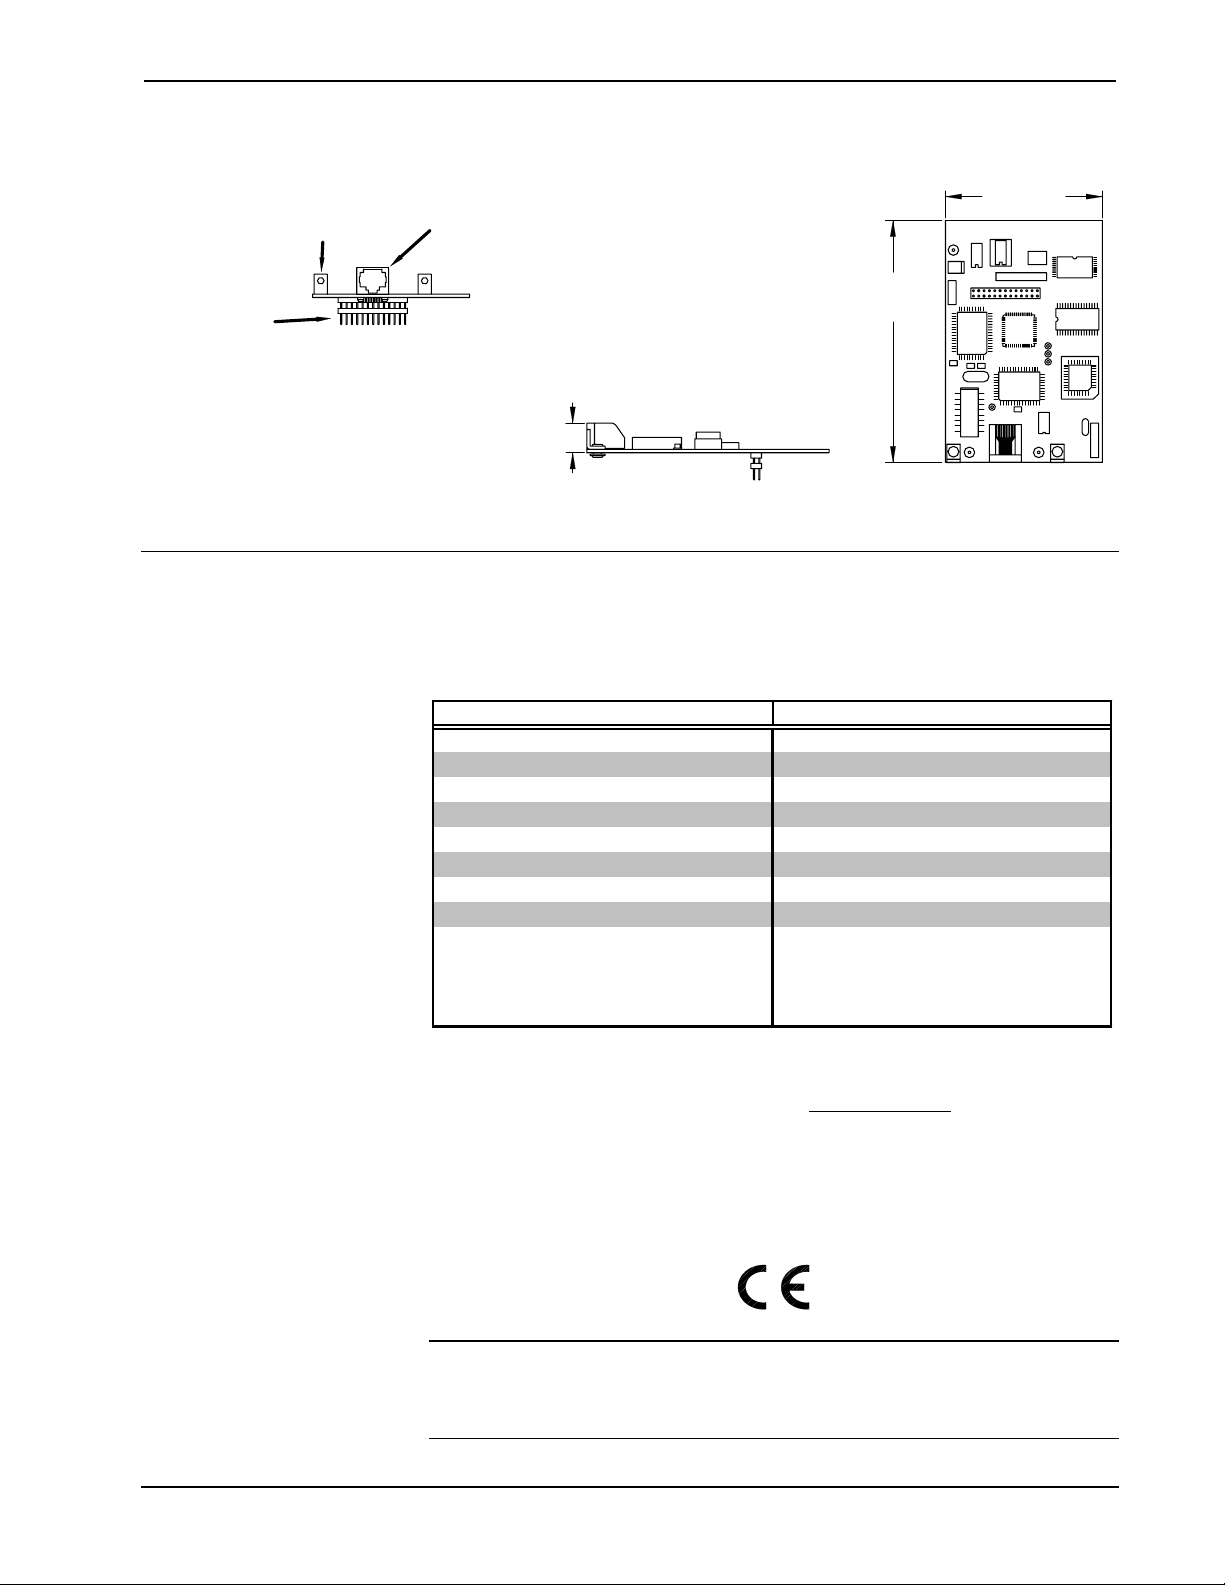
CNMSX Installation (1 of 3)
1
3
2
2. Remove six
3. Lift and remove control system top cover
4. As shown below, remove six
board
CNMSX Installation (2 of 3)
to the control system.
6
REAR PANEL
(REFERENCE ONLY)
5
4
REAR PANEL
(REFERENCE ONLY)
screws from each side of the control system.
.
screws that secure I/O printed circuit
7
8
5. Slide the I/O printed circuit board
control system so that the rear connectors are clear of the rear panel
slots and reposition the I/O printed circuit board
LAN/DPA cover plate
6. Using a #1 Phillips tip screwdriver, remove two
lock washers
system rear panel.
7. From inside the control system, remove the LAN/DPA cover plate
8. For older model control systems, carefully push the computer interface
ribbon cable aside to make room for the CNXENET+. For newer
systems, make sure that cable does not interfere with CNXENET+
placement.
4 • CNX Enhanced Ethernet Expansion Card: CNXENET+ Operations & Installation Guide – DOC. 8153A
that secure the LAN/DPA cover plate to the control
.
toward the front panel of the
to gain access to the
screws and two
.
Page 9
Crestron CNXENET+ CNX Enhanced Ethernet Expansion Card
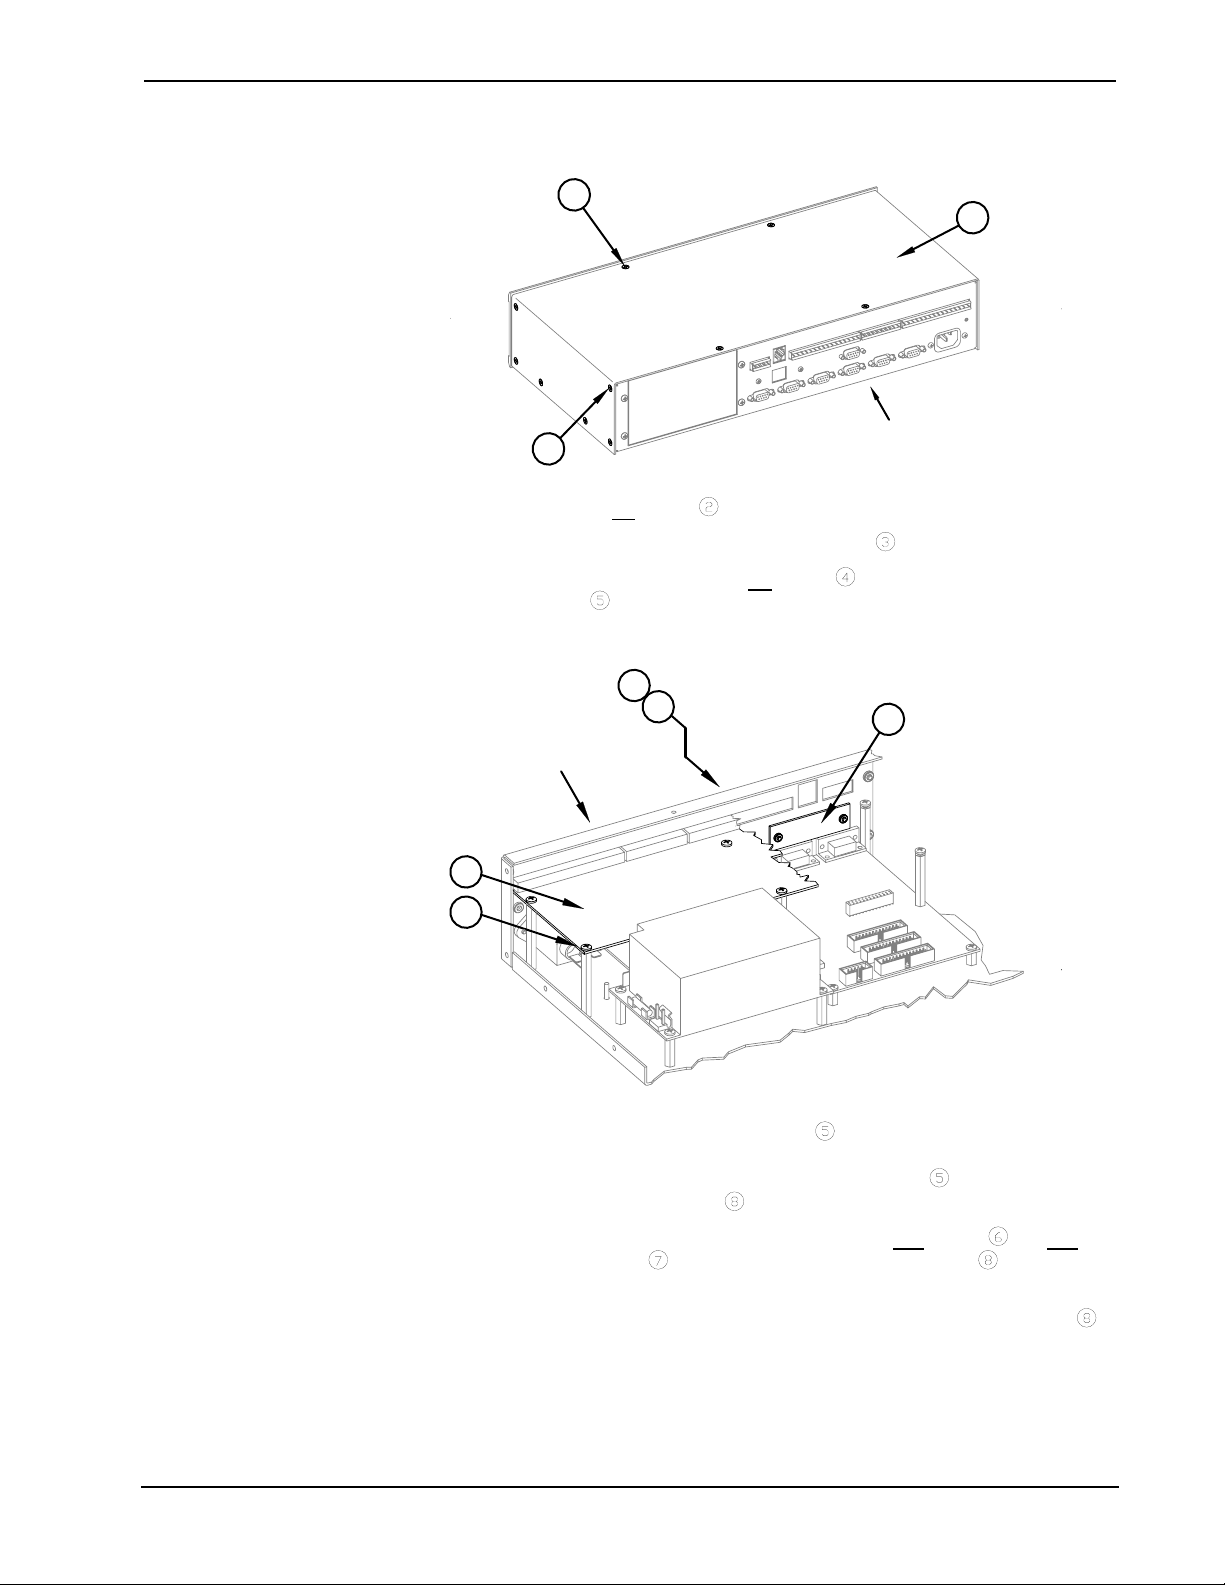
9. As shown below, align the pins on the 26-pin DPA connector of the
CNXENET+ with the ETHERNET connector on control system
processor board.
CNMSX Installation (3 of 3)
MOUNTING
BRACKETS
REAR PANEL
(REFERENCE ONLY)
9
26-PIN DPA
CONNECTOR
NOTE: The DPA pins are more easily inserted by gently “rocking” the
CNXENET+ side-to-side while pressing onto DPA connector.
10. DO NOT force pins into connector and press CNXENET+ until pins
are fully seated. Make sure that the mounting brackets on CNXENET+
align with mounting holes of the control system. Make sure that the
LAN/DPA connector aligns with cut out.
11. From the control system rear panel, reinstall the two screws and
lock washers
finger-tight then, using a #1 Phillips tip screwdriver, tighten the screws
an additional 1/8-turn
12. Reposition the I/O printed circuit board
panel slots and reinstall six
board
tip screwdriver tighten the screws an additional 1/8-turn
13. Reinstall the control system top cover
side and four
tighten the screws an additional 1/8-turn.
to secure CNXENET+ . Tighten the screws to
.
connectors into the rear
screws to secure I/O printed circuit
. Tighten the screws to finger-tight then, using a #2 Phillips
.
with six screws on each
screws on top. Tighten the screws to finger-tight then,
Installation onto CNRACKX Processor Card (CNXCPU)
The CNRACKX contains the CNXCPU Processor Card (the CNRACKX-DP
contains two CNXCPU’s) that features Crestron’s exclusive DPA (Direct Processor
Access) slot for Ethernet/LAN expansion of the control system. The CNXCPU
contains card mounting points, a LAN/DPA port opening, and a 26-pin female DPA
connector. The CNXENET+ is mounted to the faceplate of the CNXCPU and a
Operations & Installation Guide – DOC. 8153A CNX Enhanced Ethernet Expansion Card: CNXENET+ • 5
Page 10
CNX Enhanced Ethernet Expansion Card Crestron CNXENET+
26-pin male connector attaches to the DPA connector. Items 1 through 3 listed below
for installation onto the CNXCPU. The only tools required are a grounding strap and
a #1 Phillips tip screwdriver.
Referenced Items for CNXCPU Installation
ITEM DESCRIPTION PART NUMBER QUANTITY
Screw, 4-40 x 1/4"L, steel,
1
pan, phillips, black
2 Plate, blank, metal, LAN/DPA MTPL02390-1 1
3 CNXENET+ ZA11281 1
CAUTION: The CNXENET+ and the CNXCPU contain ESD sensitive devices.
Perform the following procedure while wearing a grounding strap that is properly
grounded or on a grounded work station to avoid damaging the card and/or the
CNXCPU.
1. Disconnect power from the control system.
2. At the CNXCPU, note the position of any attached cables and
disconnect each cable.
3. Loosen the CNXCPU thumb screws and pull outward to remove card.
SR04-40-0R2500-11
2
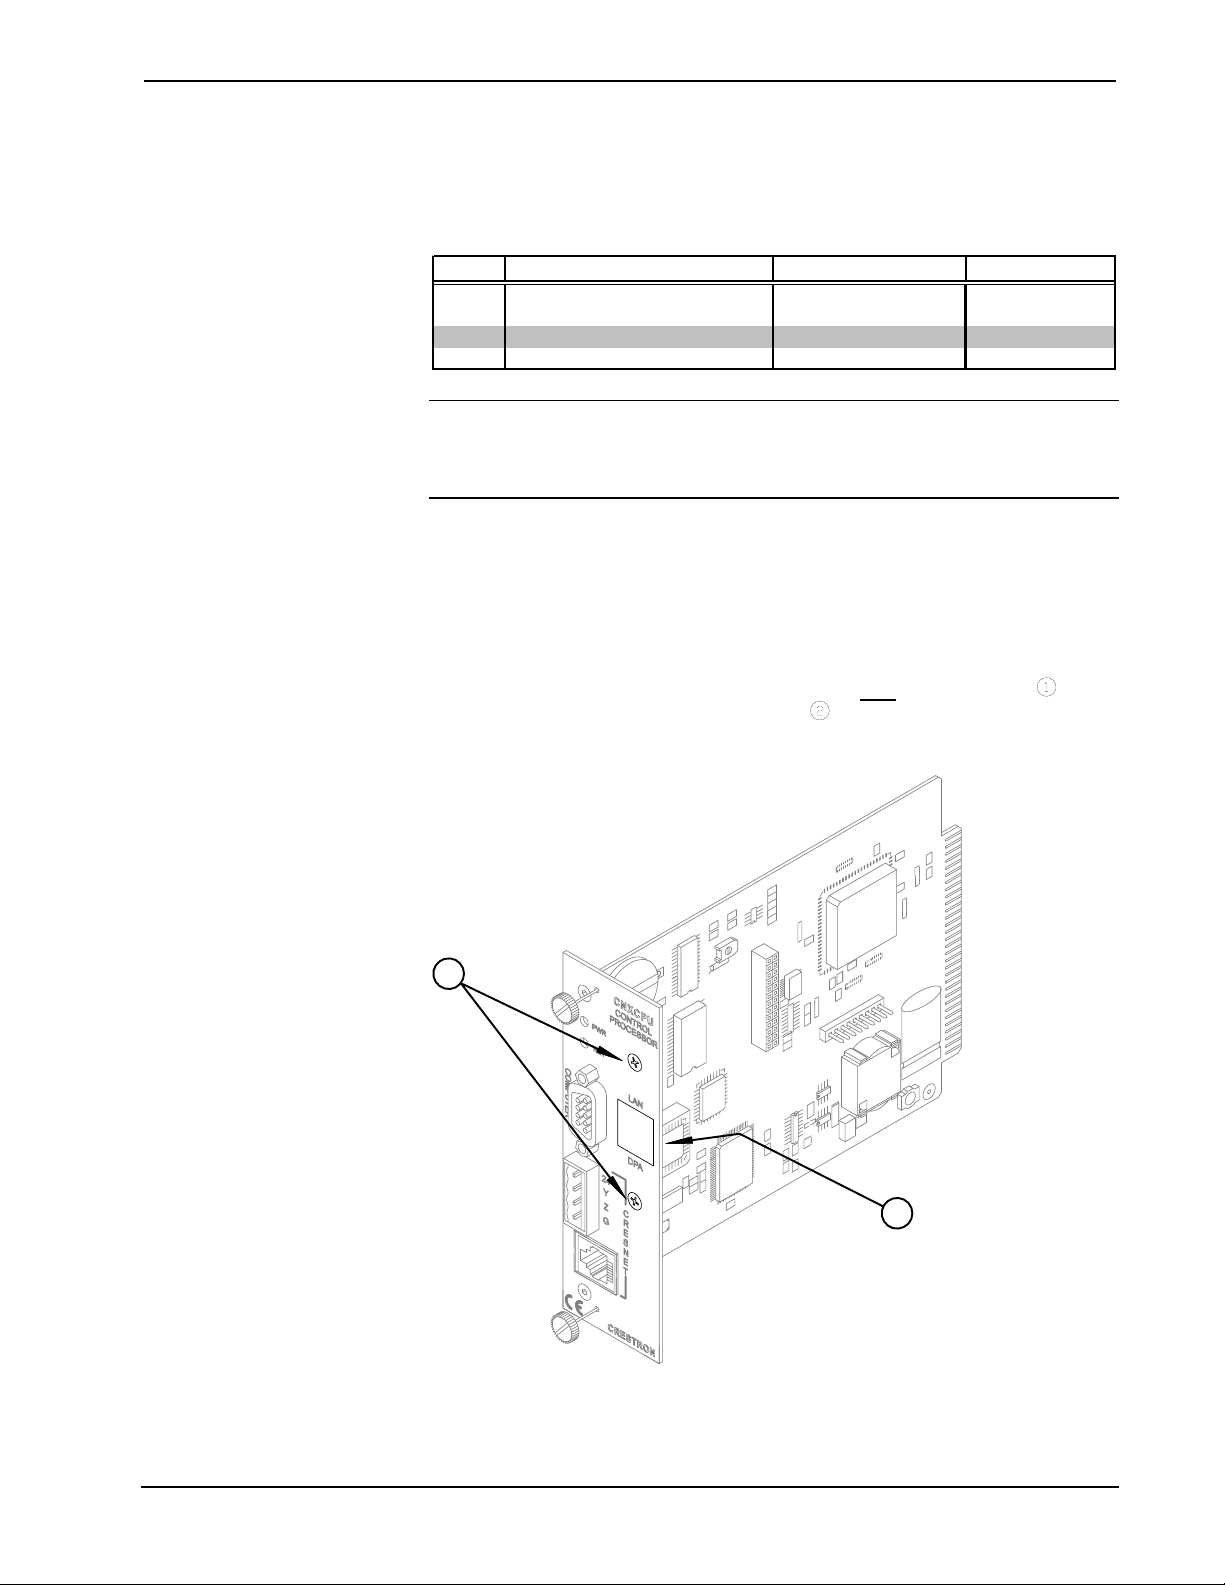
4. Refer to the diagram below. From the CNXCPU faceplate, use a #1
Phillips tip screwdriver and remove the two
secure the LAN/DPA cover plate
CNXCPU Installation (1 of 3) – Remove Screws and Cover Plate
and remove the plate.
mounting screws that
1
2
6 • CNX Enhanced Ethernet Expansion Card: CNXENET+ Operations & Installation Guide – DOC. 8153A
Page 11

Crestron CNXENET+ CNX Enhanced Ethernet Expansion Card
5. As shown below, carefully align the pins on the 26-pin DPA connector
of the CNXENET+
CNXCPU Installation (2 of 3) – Install CNXENET+
26-PIN DPA
CONNECTOR
with the DPA connector of the CNXCPU.
MOUNTING
BRACKETS
NOTE: The DPA pins are more easily inserted by gently “rocking” the
CNXENET+ side-to-side while pressing onto DPA connector.
6. DO NOT force pins into connector and press CNXENET+ until pins
are fully seated. Make sure that the mounting brackets on CNXENET+
align with mounting holes of the CNXCPU. Make sure that the
LAN/DPA connector aligns with cut out.
7. Refer to the diagram on the next page. From the CNXCPU faceplate,
reinstall the two
the screws to finger-tight
tighten the screws an additional 1/8-turn.
mounting screws to secure CNXENET+. Tighten
then, using a #1 Phillips tip screwdriver
3
Operations & Installation Guide – DOC. 8153A CNX Enhanced Ethernet Expansion Card: CNXENET+ • 7
Page 12

CNX Enhanced Ethernet Expansion Card Crestron CNXENET+
CNXCPU Installation (3 of 3) – Install Mounting Screws
1
CAUTION: Modular control systems contain CNX expansion card slots and
double-sized slot(s) for the CNXCPU(s). Do not attempt to install the CNXCPU into
any slot other than the slot labeled for the CPU.
8. Align the CNXCPU with the card guides of the CPU slot and slide the
card into position.
9. Make sure that the thumb screws are extended outward. Firmly press
both ends of the CNXCPU faceplate to seat the card into the control
system connector.
10. Tighten the thumb screws finger-tight
control system.
11. Reapply power to the control system.
to secure the CNXCPU to the
Ethernet Wiring
Wiring to LAN
If the control system is connected to a larger network via a hub, make sure that a
straight (non-crossover type) Ethernet cable is used and that the cable is NOT
connected to the UPLINK port of an Ethernet hub.
Wiring to PC
If the system is connected directly to a personal computer (PC) Ethernet card for test
purposes, make sure that the cable between the CNXENET+ is a crossover type (not
straight-through).
8 • CNX Enhanced Ethernet Expansion Card: CNXENET+ Operations & Installation Guide – DOC. 8153A
Page 13

Crestron CNXENET+ CNX Enhanced Ethernet Expansion Card
Programming with SIMPL Windows
SIMPL (Symbol Intensive Master Programming Language) is an easy-to-use
programming language that is completely integrated and compatible with all
Crestron system hardware. The objects that are used in SIMPL are called symbols.
SIMPL Windows offers drag and drop functionality in a familiar Windows®
environment.
SIMPL Windows is Crestron's software for programming Crestron control systems.
It provides a well-designed graphical environment with a number of workspaces
(i.e., windows) in which a programmer can select, configure, program, test, and
monitor a Crestron control system.
The next two sections describe a CNXENET+ within a SIMPL Windows program.
The first section provides initial configuration information and the second section
details the TCP/IP Server and TCP/IP Client symbols in SIMPL Windows. There is
no symbol required for the CNXENET+.
NOTE: The following descriptions assume that the reader has knowledge of SIMPL
Windows. If not, refer to the extensive help information provided with the software.
NOTE: VisionTools™ Pro-e (VT Pro-e) is a Windows compatible software
package for creating Crestron touchpanel screen designs. Version 2.1.8 or later of
VT Pro-e is required to produce the CNXENET+ example touchpanel pages. The
latest version of VT Pro-e can be obtained from the What’s New page (VisionTools
Pro-e section) or Downloads page (TOUCHPNL Library) of Crestron’s website
(www.crestron.com).
NOTE: An example SIMPL Windows program is available from the Downloads
page (EXAMPLES Library) of Crestron’s website (www.crestron.com). Search for
CNXENET.ZIP. It contains SIMPL Windows file(s), touchpanel pages (if
applicable) and any associated macros required for the example. As Crestron
improves functions, adds new features, and extends the capabilities of the
CNXENET+, additional example programs may be posted to the library. Future
example files shall carry the same filenames plus a numeric (i.e., CNXENET1.ZIP).
Check for any future updates.
Configure CNXENET+ Program
To create a program with a CNXENET+, in the Configuration Manager of SIMPL
Windows, refer to the table on the next page for initial configuration information.
In the Configuration Manager in SIMPL Windows, the CNXENET+ can use all
symbols that are available for the standard CNXENET including virtual
communications port, e-Control PC interface, and active CNX interface. The
CNXENET+ also uses TCP/IP Server and the TCP/IP Client symbols (not available
on the standard CNXENET card). The TCP/IP Server and the TCP/IP Client symbols
are dropped onto the CNXENET+ card as devices. They each have an IP ID and an
associated entry in the IP Table.
Operations & Installation Guide – DOC. 8153A CNX Enhanced Ethernet Expansion Card: CNXENET+ • 9
Page 14

CNX Enhanced Ethernet Expansion Card Crestron CNXENET+
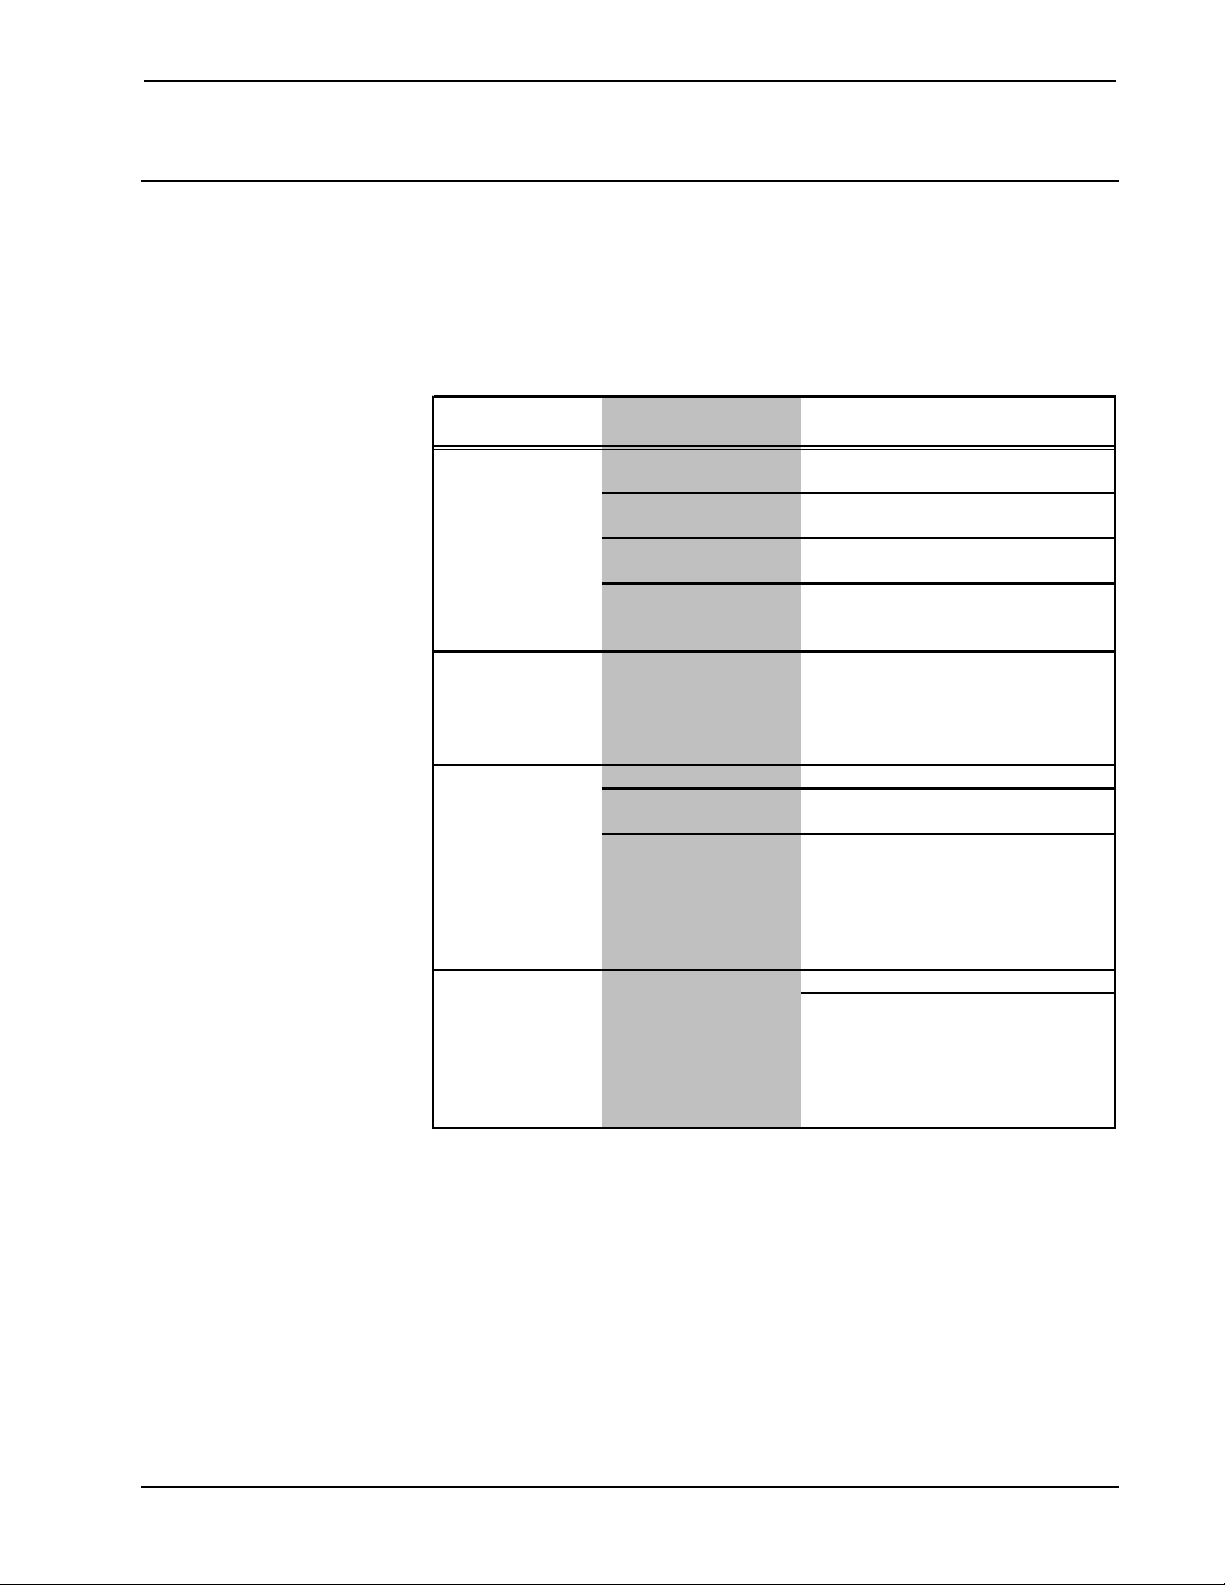
Configure CNXENET+ Program
DEVICE SYMBOL DROP ADDITIONAL
LIBRARY REQUIRED WHERE SETUP
Control
Systems
Plug-in DPA
Modules
(CNX Series)
Ethernet
Control
Modules
Desired control
system (CNMSXAV/Pro or
CNRACKX/-DP)
CNXENET+ Control system
TCP/IP Server or
TCP/IP Client
The server symbol “listens” for a connection on a particular socket, and a client
symbol is capable of connecting or disconnecting a socket. A socket is comprised of
an IP Address and a Port Number. The IP Address is specified in the IP Table on the
IP ID that the symbol is on. The Port number is specified in the symbol. For
example, if the server symbol is dropped on IP ID 15, and the IP Table entry for IP
ID 15 is 192.168.1.1, the server will listen for a connection on a 192.168.1.1 on the
port number specified in the symbol.
System Views Refer to the documentation
supplied with the specific
control system for additional
setup information.
None required. Refer to
DPA Card Slot
CNXENET+ in
control system
or Ethernet
Units in system
views
"Control System Ethernet
Setup" on page 12 of this guide
for further information.
CHANGE IP ID (OPTIONAL) Double-click on TCP/IP Server
or TCP/IP Client (or single-click
then right mouse-click). Select
Configure. Select IP ID then
select desired hexidecimal ID.
In typical TCP/IP Terminology, a client connects to a server. In this case, the server
symbol can handle only one connection to it. Since the sockets are generic TCP/IP,
the client can connect to any server (Crestron's TCP/IP Server symbol or any nonCrestron server) and the server can accept a connection from any client (Crestron's
TCP/IP Client symbol or any non-Crestron client).
TCP/IP Server and TCP/IP Client Symbols
The diagrams below and on the next page show the TCP/IP Server and the TCP/IP
Client symbols in SIMPL Windows. The table that follows each diagram lists the
inputs, outputs, and parameters, respectively, and their functional descriptions.
NOTE: TCP/IP Server and the TCP/IP Client symbols are available for the
CNXENT+ card only and cannot be used with the standard CNXENET card.
NOTE: All digital signals listed in the following tables can be high (logic level of
1), low (logic level of 0), and also have rising edge (when it goes from low to high)
and falling edge (from high to low) transitions. Depending upon how the symbol was
created, symbol inputs may work at the logic levels, some may work on transitions.
Detail View of the TCP/IP Server Symbol in SIMPL Windows’ Programming Manager
10 • CNX Enhanced Ethernet Expansion Card: CNXENET+ Operations & Installation Guide – DOC. 8153A
Page 15

Crestron CNXENET+ CNX Enhanced Ethernet Expansion Card
TCP/IP Server Symbol Signal Descriptions
SIGNAL(S) DESCRIPTION(S)
INPUT
OUTPUTS
PARAMETERS
Detail View of the TCP/IP Client Symbol in SIMPL Windows’ Programming Manager
TX$ (Digital):
symbol connected to this server symbol.
Connect-F (Digital):
connected and low when the socket is disconnected.
This signal is data that is coming from a client symbol to
RX$:
this server symbol.
A 16-bit number that specifies which port the connection
Port:
is taking place on. In combination with the IP ID Address, this
specifies a socket.
This signal is data that is going to a client
This signal is high while the socket is
TCP/IP Client Symbol Signal Descriptions
SIGNAL(S) DESCRIPTION(S)
INPUTS
OUTPUTS
PARAMETERS
Connect (Digital):
the client attempts to connect the socket. If the connection
cannot be made, the client will retry automatically. When the
signal is low, the client disconnects the socket (if it was
connected) and stops trying to connect.
TX$ (Serial):
symbol connected to this client symbol.
Connect-F (Digital):
connected and low when the socket is disconnected.
RX$ (Serial):
that is connected to this client symbol.
A 16-bit number that specifies which port the connection
Port:
is taking place on. In combination with the IP ID Address, this
specifies a socket.
Control System Ethernet Setup
This section explains how to configure a control system to communicate over
Ethernet using standard IP. These procedures assume that the CNXENET+ has been
physically installed, added to the control system through SIMPL Windows, and the
control system has been powered up.
A level-sensitive digital signal. When high,
This signal is data that is going to a server
This signal is high while the socket is
This signal is data that is coming from a server
Operations & Installation Guide – DOC. 8153A CNX Enhanced Ethernet Expansion Card: CNXENET+ • 11
Page 16

CNX Enhanced Ethernet Expansion Card Crestron CNXENET+
Initial IP Setup
NOTE: This initial IP setup MUST be done via the RS-232 COMPUTER port.
Before performing this procedure, obtain a straight-through RS-232 cable that has a
DB9 male connector on one end and a DB9 female connector on the other. Straightthrough means that pin-1 on the male end is connected to pin-1 on the female end,
etc. The male end plugs into the control system port labeled COMPUTER. The
female end plugs into the serial port of a PC. If the PC has a DB25 male connector,
obtain a DB9 to DB25 adapter (the adapter has a DB9 male end and a DB25 female
end). Thereafter, communications may be achieved by using the Crestron Viewport
to directly connect to the IP address assigned to the control system.
NOTE: It is assumed that the user has communications with the control system and
the appropriate Upgrade file has been loaded. See the CNMSX-AV/PRO or
CNRACKX/-DP Operations Guide sections “Obtaining Communications” and
“Using a Control System Upgrade file” for further details.
1. From the Crestron Viewport, select Functions | Set Control System
IP Information, as shown below:
Set IP Information via Viewport
12 • CNX Enhanced Ethernet Expansion Card: CNXENET+ Operations & Installation Guide – DOC. 8153A
Page 17

Crestron CNXENET+ CNX Enhanced Ethernet Expansion Card
2. Observe a dialog box similar to as shown below. As shown, the control
system does not have an IP address assigned to it.
Set IP Address Dialog Box
3. Refer to the two tables below and on the next page and set the network
IP values.
NOTE: If an invalid IP address is entered, the subnet mask may be CHANGED
AUTOMATICALLY BY THE EQUIPMENT to an appropriate subnet mask.
NOTE: To TURN OFF the TCP/IP stack, an IP address of 0.0.0.0
can be entered,
no IP Mask or Default Router would be required.
NOTE: When hosting web pages on the CNXENET+, add an IP Table entry of
127.0.0.1
.
SETTINGS FOR NETWORK WITH
CRESTRON ONLY EQUIPMENT
If the control system is being placed on a corporate LAN or a LAN with other
equipment besides Crestron equipment, the IP Address, IP Mask, and Default Router
(also known as Gateway) will be provided from an MIS Department or other network
administrator.
Other Crestron IP control/CEN devices on this network would require that their IP
Address, IP Mask, and Default router also be obtained by the MIS department or
other network administrator.
Reference Guidelines
First Octet of Zero and 127 are reserved.
Class A: First octet ranges from 1 to 126
Default Subnet Mask: 255.0.0.0
Class B: First two octets range from 128.1 to 191.254
Default Subnet Mask: 255.255.0.0
Class C: First three octets range from 192.0.1 to 223.255.254
Default Subnet Mask: 255.255.255.0
Class D: 224.0.0.0 to 239.255.255.254
(Not available for general use, reserved for multicast systems.)
Class E: 240.0.0.0 to 255.255.255.254
(Not available for general use, reserved for IAB use.)
Operations & Installation Guide – DOC. 8153A CNX Enhanced Ethernet Expansion Card: CNXENET+ • 13
Page 18

CNX Enhanced Ethernet Expansion Card Crestron CNXENET+
g
SETTINGS FOR NETWORK WITH
NON-CRESTRON EQUIPMENT
Recommended Settin
IP Address 172.16.X.Y
IP Mask 255.255.0.0
Default Router 0.0.0.0
Class Ranges:
Class A: 10.X.Y.Z
Class B: 172.16.X.Y to 172.31.X.Y
Class C: 192.168.0.X to 192.168.255.X
Other Crestron IP control/CEN devices on this LAN would conform to similar
parameters.
s
(X, Y and Z range from 0 to 255)
4. Click OK
to enter the values and the reboot dialog box as shown below
opens.
Reboot Dialog Box
5. Click Yes
to reboot the control system and continue.
6. You will receive a confirmation message that the control system IP
information has been setup. After the system reboots, select Function
Cold Boot
, to view the IP Information.
NOTE: If an error that the Viewport could not setup the IP information opens, first
verify that the CNXENET+ card is installed and seated properly. Second, verify that
the control system has been updated to the minimum operating system (refer to
“Leading Specifications” on page 2) required for Ethernet functionality. If the
control system still cannot set the IP information, contact Crestron customer service.
|
IP Table Setup
NOTE: To add Ethernet capability to a SIMPL Windows program using a CNMSXAV/PRO or CNRACKX/-DP, select a CNXENET+ card from the "Plug-In DPA
Modules" category and drop it onto the DPA card slot.
Ethernet devices that are addressed by the control system may have their IP IDs set
either in the SIMPL Windows program or through the Viewport using a PC. Just as
each Cresnet device is assigned a Cresnet identification (NET ID), e.g. 03 through
FE, to be used when programming, an Ethernet device is assigned an IP ID which
also may range from 03 through FE. Ultimately, each IP ID is converted into an
actual IP address through an IP table that exists inside the control system.
14 • CNX Enhanced Ethernet Expansion Card: CNXENET+ Operations & Installation Guide – DOC. 8153A
Page 19

Crestron CNXENET+ CNX Enhanced Ethernet Expansion Card
Adding Devices and IP Table Setup in SIMPL Windows
To add Ethernet devices to your program, in the SIMPL Windows' Configuration
Manager, drag an Ethernet-connected device, e.g. a CEN-IO or a Virtual Touchpanel
symbol, into the program. Drop it onto the CNXENET+ card or the "Ethernet Units"
arrow underneath the "Cresnet Units" arrow. (If the "Cresnet Units" arrow is not
visible in the System View window, pull the window divider down further.)
1. Double click on the icon and set an IP ID and a corresponding IP
address in the tabbed configuration dialog titled "IP Net Address".
2. For example, drop a CEN-IO and set it IP ID: 03 at IP address
192.168.2.7 OR in the SIMPL Windows Program Manager, connect
signals to the "Virtual Touchpanel" symbol, exactly as you would to a
regular wired Touchpanel symbol.
NOTE: For more detailed information, refer to the SIMPL Windows help file by
selecting Help | Help Topics. Select the Index tab, type in IP Table, then select
Adding Ethernet Devices to a SIMPL Windows Program.
When the SIMPL Windows program is compiled, the compiler creates an IP table
consisting of the IP IDs and the IP addresses that were entered for the various
Ethernet devices added to the program. During upload, choose whether to load this
IP table or whether to use the table that already exists in the control system.
Changing the IP Table via Crestron Viewport
You can modify the corresponding IP address for any IP ID without changing or
reloading the program by changing the IP table directly. From the Crestron Viewport
select Functions | Setup IP Table then click the Retrieve Current IP Table from
Control System button. This will extract the IP table from the control system and
list it in the dialog box. Modify or delete existing entries or add new ones and save
the new table to disk and/or load it back into the control system. Do not overwrite the
IP table in the control system the next time the program is uploaded, unless the
addresses in the program supercede those in the current IP table.
NOTE: For more detailed information, refer to the SIMPL Windows help file by
selecting Help | Help Topics. Select the Index tab, type in IP table, then select
Changing IP Addresses without Changing the Program.
Crestron e-Control IP Table Information
It is extremely important that the IP ID in the SIMPL Windows program match the
IP ID (sometimes called the Cres ID) encoded in the Crestron e-Control SDK object
by the developer of the Web page or Visual Basic® program.
If more than one PC uses the same IP ID for a connection (e.g. each loads the same
Web page), the CNX Gateway will duplicate all packets that are received from the
control system to each of the identical IP IDs. This is known as touchpanel tracking.
The IP address that is typed into the virtual touchpanel devices in the SIMPL
Windows program is the IP address of the CNX Gateway, not of the individual PCs
(running a web browser or Active CNX application). This is because individual
computers may change, but the CNX Gateway does not.
Operations & Installation Guide – DOC. 8153A CNX Enhanced Ethernet Expansion Card: CNXENET+ • 15
Page 20

CNX Enhanced Ethernet Expansion Card Crestron CNXENET+
Communicating With the Control System via Ethernet
The Crestron Viewport may be used to communicate with the control system via
Ethernet. To connect the Viewport to the control system, perform the procedure
below.
1. In the Viewport, select Remote
Viewport Connect TCP/IP
2. As shown below, enter the IP address of the configured control system
and select the Connect
from 0 to 255. In the example shown below, X is 135 and Y is 246.)
| TCP/IP | Connect as shown below.
button. (Within the address, X and Y may range
Connect TCP/IP Address Dialog Box
3. If a password has been set for the control system, an access password is
required to connect. As shown on the next page, enter the required
password. (The correct password must be entered within three attempts
or the password dialog box displays a password invalid message.)
16 • CNX Enhanced Ethernet Expansion Card: CNXENET+ Operations & Installation Guide – DOC. 8153A
Page 21

Crestron CNXENET+ CNX Enhanced Ethernet Expansion Card
Password Dialog Boxes
4. Perform any of the diagnostics and features that the Viewport provides.
Setting a Control System Password via Ethernet
After establishing communication with a control system via Ethernet, the Crestron
Viewport may be used to set (or change) a password to limit access to the control
system. To set a password via Ethernet, perform the following procedure.
1. In the Viewport, select Functions
TCP/IP as shown below.
Viewport Set Control System Password Function
| Set Control System Password for
Operations & Installation Guide – DOC. 8153A CNX Enhanced Ethernet Expansion Card: CNXENET+ • 17
Page 22

CNX Enhanced Ethernet Expansion Card Crestron CNXENET+
2. Enter a password, verify the password then click OK as shown below.
Enter New Password Dialog box
Troubleshooting Communications via Ethernet
You can PING the control system from a MS-DOS® prompt (Windows
95/98/Me™) or a Command Prompt (Windows NT/2000™). In the example below,
the control system is at address 172.16.135.246. When pinged, the unit should reply
and there should be no packet loss, as shown below.
MS-DOS or Command Screen
NOTE: The round trip times for a control system plugged into a LAN versus going
out over the Internet will vary greatly. If there is a ping reply, communications
should work properly via a SIMPL program and via the Viewport. If there is no
reply, verify that the IP Settings you have given the control system are correct, and
that the PC used to ping the control system can ping other devices that are on the
control system's subnet.
18 • CNX Enhanced Ethernet Expansion Card: CNXENET+ Operations & Installation Guide – DOC. 8153A
Page 23

Crestron CNXENET+ CNX Enhanced Ethernet Expansion Card
Web Pages
To work with CNXENET+ web pages, communication must be established with the
control system. To establish communication through the control system
COMPUTER port, obtain a straight-through RS-232 cable that has a DB9 male
connector on one end and a DB9 female connector on the other. Straight-through
means that pin-1 on the male end is connected to pin-1 on the female end, etc. The
male end plugs into the control system COMPUTER port. The female end plugs into
the serial port of a PC. If the PC has a DB25 male connector, obtain a DB9 to DB25
adapter (the adapter has a DB9 male and a DB25 female end). Thereafter,
communications may be achieved by using the Crestron Viewport to directly connect
to the IP address assigned to the control system. To establish Ethernet
communication, refer to “Communicating With the Control System via Ethernet” on
page 16.
Transferring Web Pages to the CNXENET+
After establishing communication with the control system and verifying
communication parameters, use the Viewport (from either SIMPL Windows or VT
Pro-e) to transfer web pages designed with VT Pro-e or the e-Control SDK.
1. From Viewport, select File Transfer
Viewport Send Web Pages
NOTE: When the CNXENET+ card receives web page files, it first initializes itself
which deletes all of the files on the card. The Crestron Viewport provides 30 seconds
before file transfer begins and transferring large web files may exceed this time.
When transferring large web files, the card may produce an error of “Can Not
Delete Files” or “Transfer Error” in the Viewport. If so, transfer large web files
one at a time.
| Send Web Pages.
Operations & Installation Guide – DOC. 8153A CNX Enhanced Ethernet Expansion Card: CNXENET+ • 19
Page 24

CNX Enhanced Ethernet Expansion Card Crestron CNXENET+
2. The "Transfer Web Pages" dialog box appears. Three transfer options
are available. The Transfer Entire Project option transfers the
selected web page and all files and subdirectories in the same folder as
the selected web page. The Only Transfer Files that have Changed
option transfers those files in the selected file directory and all subdirectories that have different dates from the last time the web page was
transferred. The Transfer Single File
page only. Choose an appropriate option and click OK
"Transfer Web Pages" Dialog Box
3. The "Select Web Pages" dialog box appears to prompt the user that a
web page needs to be selected. It further informs the user that the
selected page will be the resultant default page for the URL. The last
statement in the dialog box confirms the transfer option chosen in the
previous paragraph. Click OK
transfer.
option transfers the selected web
as shown below.
as shown below to continue with the
"Select Web Pages" Dialog Box
4. The "Open" dialog box appears so that a web page can be selected.
Browse to the desired directory, select the appropriate web page, and
click OK
appears as shown on the next page to reveal the status of the transfer.
The user has the option to cancel the transfer at any time. Otherwise the
transfer of web pages to the control system should conclude
successfully.
to initiate transfer. The "Transfer In Progress…" dialog box
20 • CNX Enhanced Ethernet Expansion Card: CNXENET+ Operations & Installation Guide – DOC. 8153A
Page 25

Crestron CNXENET+ CNX Enhanced Ethernet Expansion Card
"Transfer In Progress…" Dialog Box
Using a Browser to View or Access Web Pages
Cresnet control systems equipped with a CNXENET+ can be accessed through the
Internet using industry browsers such as Microsoft Internet Explorer or Netscape
Navigator. The example diagrams in this section are shown using the Internet
Explorer, Netscape Navigator is similar.
Viewing Control System Web Pages
To access a control system and view the web pages, perform the following
procedure.
1. As shown below, open the browser.
Internet Explorer
2. At the browser address bar, enter the IP address of the control system to
be accessed.
3. Observe the default web page of the control system.
Operations & Installation Guide – DOC. 8153A CNX Enhanced Ethernet Expansion Card: CNXENET+ • 21
Page 26

CNX Enhanced Ethernet Expansion Card Crestron CNXENET+
Accessing Control System Web Page Files
To access control system web page files, perform the following procedure.
1. Open the browser.
2. As shown below, enter the IP address of the control system to be
accessed followed by “_sys_command/dir” at the browser address bar.
Browser Address Bar
NOTE: To display the current CNXENET+ version, enter “_sys_command/ver”
after the IP address at the browser address bar.
3. As shown below, select the web page to access from the control system
file directory.
Example Control System File Directory
4. Observe the selected web page. An example control system page shown
below is a VT Pro-e touchpanel web page.
NOTE: Depending upon the files of the accessed control system, various files may
be downloaded. Follow the screen prompts for downloading.
Example Control System Web Page
22 • CNX Enhanced Ethernet Expansion Card: CNXENET+ Operations & Installation Guide – DOC. 8153A
Page 27
Crestron CNXENET+ CNX Enhanced Ethernet Expansion Card
p
)
Problem Solving
Troubleshooting
The table below provides corrective action for possible trouble situations. If further
assistance is required, please contact a Crestron customer service representative.
CNXENET+ Troubleshooting
TROUBLE
Communications via
the DPA port is not
functioning.
Crestron e-control
message "CNX
Gateway closed
communications."
dialog box opens.
Unable to load Web
pages via Ethernet
or via local RS-232
port.
Viewport receives
“Can Not Delete
Files” or “Transfer
Error” message
while transferring
web pages.
POSSIBLE
CAUSE(S)
CNXENET+ improperly
installed.
Improper Ethernet
connection.
Damaged connector
pins.
Incorrect
firmware/software.
PC with browser not
setup for e-control
communications.
Web file(s) too large. Transfer large Web files one at a time.
Control system requires
reset.
Control system update
(UPZ) file outdated.
Web file(s) too large. Transfer large Web files one at a time.
CORRECTIVE ACTION
Follow installation procedures in this
guide.
Verify proper connection at Ethernet
port.
Follow installation procedures in this
guide and inspect connector pins.
Upgrade firmware/software versions
as per those listed in the Leading
Specifications section.
Contact Crestron customer service.
Cycle power to reset to control
system.
Update control system with latest
version listed in the "Leading
Specifications" section of this guide.
Refer to "Updating the Control
System" in the control system
Operations Guide.
In Viewport, use the INITIALIZE
command to erase the flash file
system. Press the
then ' (apostrophe), type
then press the
information without s
ENTER
key, then x,
ESC
INITIALIZE
key. (Input the
aces.
,
Operations & Installation Guide – DOC. 8153A CNX Enhanced Ethernet Expansion Card: CNXENET+ • 23
Page 28

CNX Enhanced Ethernet Expansion Card Crestron CNXENET+
Further Inquiries
If after reviewing this Operations & Installations Guide, you cannot locate specific
information or have questions, please take advantage of Crestron's award winning
customer service team by calling:
• In the US and Canada, call Crestron’s corporate headquarters at
1-888-CRESTRON [1-888-273-7876].
• In Europe, call Crestron International at +32-15-50-99-50.
• In Asia, call Crestron Asia at +852-2341-2016.
• In Latin America, call Crestron Latin America at +5255-5093-2160.
• In Australia and New Zealand, call Crestron Pacific at
+613-9480-2999.
Future Updates
As Crestron improves functions, adds new features, and extends the capabilities of
the CNXENET+, additional information and programming examples may be made
available as manual updates. These updates are solely electronic and serve as
intermediary supplements prior to the release of a complete technical documentation
revision.
The Downloads page of the Crestron website (www.crestron.com
to the location and description of each update. Check the site periodically for update
availability and its subjective value. New users are required to register in order to
obtain access to the FTP site.
) directs the reader
24 • CNX Enhanced Ethernet Expansion Card: CNXENET+ Operations & Installation Guide – DOC. 8153A
Page 29

Crestron CNXENET+ CNX Enhanced Ethernet Expansion Card
Return and Warranty Policies
Merchandise Returns / Repair Service
1. No merchandise may be returned for credit, exchange, or service without prior
authorization from CRESTRON. To obtain warranty service for CRESTRON
products, contact the factory and request an RMA (Return Merchandise
Authorization) number. Enclose a note specifying the nature of the problem, name
and phone number of contact person, RMA number, and return address.
2. Products may be returned for credit, exchange, or service with a CRESTRON Return
Merchandise Authorization (RMA) number. Authorized returns must be shipped
freight prepaid to CRESTRON, Cresskill, N.J., or its authorized subsidiaries, with
RMA number clearly marked on the outside of all cartons. Shipments arriving freight
collect or without an RMA number shall be subject to refusal. CRESTRON reserves
the right in its sole and absolute discretion to charge a 15% restocking fee, plus
shipping costs, on any products returned with an RMA.
3. Return freight charges following repair of items under warranty shall be paid by
CRESTRON, shipping by standard ground carrier. In the event repairs are found to
be non-warranty, return freight costs shall be paid by the purchaser.
CRESTRON Limited Warranty
CRESTRON ELECTRONICS, Inc. warrants its products to be free from manufacturing defects in
materials and workmanship under normal use for a period of three (3) years from the date of
purchase from CRESTRON, with the following exceptions: disk drives and any other moving or
rotating mechanical parts, pan/tilt heads and power supplies are covered for a period of one (1)
year; touchscreen display and overlay components are covered for 90 days; batteries and
incandescent lamps are not covered.
This warranty extends to products purchased directly from CRESTRON or an authorized
CRESTRON dealer. Purchasers should inquire of the dealer regarding the nature and extent of the
dealer's warranty, if any.
CRESTRON shall not be liable to honor the terms of this warranty if the product has been used in
any application other than that for which it was intended, or if it has been subjected to misuse,
accidental damage, modification, or improper installation procedures. Furthermore, this warranty
does not cover any product that has had the serial number altered, defaced, or removed.
This warranty shall be the sole and exclusive remedy to the original purchaser. In no event shall
CRESTRON be liable for incidental or consequential damages of any kind (property or economic
damages inclusive) arising from the sale or use of this equipment. CRESTRON is not liable for
any claim made by a third party or made by the purchaser for a third party.
CRESTRON shall, at its option, repair or replace any product found defective, without charge for
parts or labor. Repaired or replaced equipment and parts supplied under this warranty shall be
covered only by the unexpired portion of the warranty.
Except as expressly set forth in this warranty, CRESTRON makes no other warranties, expressed
or implied, nor authorizes any other party to offer any warranty, including any implied warranties
of merchantability or fitness for a particular purpose. Any implied warranties that may be imposed
by law are limited to the terms of this limited warranty. This warranty statement supercedes all
previous warranties.
Trademark Information
All brand names, product names, and trademarks are the sole property of their respective owners. Windows is a registered
trademark of Microsoft Corporation. Windows95/98/Me/XP and WindowsNT/2000 are trademarks of Microsoft
Corporation.
Operations & Installation Guide – DOC. 8153A CNX Enhanced Ethernet Expansion Card: CNXENET+ • 25
Page 30

CNX Enhanced Ethernet Expansion Card Crestron CNXENET+
Glossary of Terms
CNX CONTROL SYSTEM
A CNX control system is any Crestron control processor in the CNX product line.
Currently, these include the integrated control systems CNMSX-AV and the
CNMSX-PRO and modular control systems CNRACKX and the CNRACKX-DP.
CRESNET ID
Cresnet ID, a unique identity code ranging from 03 to FE (in hexadecimal), is given
to all devices that communicate using the Cresnet network protocol.
DEFAULT ROUTER
A default router is a router that sends packets within the local network to destinations
outside of the local network, or receives them from outside and propagates them onto
the local network. It is also referred to as a Gateway.
ETHERNET HUB
Inexpensive four to 16 port devices that provide a way to physically tap into an
existing Ethernet connection and expand the plugs available, but do not perform any
packet routing.
GATEWAY
See Default Router above.
IP ADDRESS
Internet protocol address is a unique number that is used to represent every single
computer in a network. All the computers on the Internet have a unique IP address.
The format of the IP address is four numbers separated by dots (e.g., 198.123.456.7).
IP ID
The IP ID is a two-digit hexadecimal number that is used to differentiate a given
device from a group of Ethernet devices in a control system with the same IP
address. Just as the Net ID is used to distinguish between identical devices within a
SIMPL Windows program, the IP address for a specific IP ID in the control system’s
IP table must be set to the IP address of the given device. Furthermore, the IP ID in
the given device’s static master table must be set to the IP address of the control
system.
26 • Glossary of Terms Operations & Installation Guide – DOC. 8153A
Page 31

Crestron CNXENET+ CNX Enhanced Ethernet Expansion Card
IP MASK
An IP mask is a pattern of bits in IP address format (e.g. 255.255.255.0) which, when
"and"ed with your IP address, produces a network address. If an outgoing packet's
network address has the same network address as the source of the packet, it is sent
on the local network wire, to be received by a device on that local network.
Otherwise, it is sent to the gateway to be routed to a device existing on another
network. The IP mask for any device should be assigned by whoever manages the
local network. An IP mask is also referred to as a Subnet Mask.
IP TABLE
An IP table lists IP IDs and their corresponding IP addresses. This table is
maintained inside each CNX control system, though it may be generated by a SIMPL
Windows program, or edited manually using the Viewport utility.
NETWORK ADDRESS
A network address is a pattern of bits in IP address format that is shared by all
network devices on a given local network. For example, network address
192.168.2.0 describes the local network where all devices have an IP address of
192.168.2.x, where x is any value from 1 to 254.
ROUTER
Router is a communications device which routes data between networks.
SUBNET MASK
See IP Mask above.
TCP/IP
TCP/IP stands for Transmission Control Protocol/Internet Protocol. It is quite simply
a standard set of protocols that govern the basic workings of the Internet that was
implemented in 1982.
The TCP part is all about ensuring that data is transmitted correctly between two
computers. If any errors occur these are detected and the data is retransmitted. The
data transmitted is split up into small portions called data packets. The IP part of
TCP/IP is how these data packets are moved from one point to another. Each
computer on the Internet has a unique IP address and the data packets are moved
from the source to the destination through many different computers which is
controlled via TCP/IP. This protocol is used on the Internet and also by computers
which are part of a LAN.
Operations & Installation Guide – DOC. 8153A Glossary of Terms • 27
Page 32

Crestron Electronics, Inc. Operations Guide – DOC. 8153A
15 Volvo Drive Rockleigh, NJ 07647 05.01
Tel: 888.CRESTRON
Fax: 201.767.7576 Specifications subject to
www.crestron.com change without notice.
 Loading...