

Page 1

Crestron CHV-TSTATRF
infiNET™ Thermostat
Operations & Installation Guide
Page 2

This document was prepared and written by the Technical Documentation department at:
Crestron Electronics, Inc.
15 Volvo Drive
Rockleigh, NJ 07647
1-888-CRESTRON
All brand names, product names and trademarks are the property of their respective owners.
©2008 Crestron Electronics, Inc.
Page 3

Crestron CHV-TSTATRF infiNET™ Thermostat
Contents
infiNET™ Thermostat: CHV-TSTATRF 1
Introduction ...............................................................................................................................1
Features and Functions................................................................................................ 1
Specifications ..............................................................................................................3
Physical Description.................................................................................................... 4
Industry Compliance ...................................................................................................7
Installation ................................................................................................................................. 8
Mounting the CVH-TSTATRF to the Wall................................................................. 8
Wiring the CHV-TSTATRF to the HVAC System................................................... 10
Basic Setup ..............................................................................................................................15
Basic Thermostat Setup.............................................................................................15
Basic infiNET™ Setup.............................................................................................. 16
Advanced Setup....................................................................................................................... 19
Setup Mode................................................................................................................19
Setup Mode Parameters/Functions ............................................................................ 20
Operation .................................................................................................................................24
System Mode.............................................................................................................24
Fan.............................................................................................................................26
Setpoints .................................................................................................................... 26
Hold...........................................................................................................................26
Remote Operation......................................................................................................27
LCD Display..............................................................................................................28
Programming Software............................................................................................................30
Earliest Version Software Requirements for the PC .................................................30
Programming with Crestron D3 Pro or SystemBuilder............................................. 30
Programming with SIMPL Windows........................................................................ 30
Example Program...................................................................................................... 32
Uploading and Upgrading........................................................................................................ 33
Establishing Communication.....................................................................................33
Programs and Firmware ............................................................................................33
Program Checks ........................................................................................................34
Problem Solving ......................................................................................................................35
Troubleshooting......................................................................................................... 35
Bootloader ................................................................................................................. 36
Reference Documents................................................................................................37
Further Inquiries........................................................................................................37
Future Updates ..........................................................................................................37
Appendix: About Heat Pumps................................................................................................ 38
Glossary................................................................................................................................... 39
Return and Warranty Policies.................................................................................................. 41
Merchandise Returns / Repair Service ......................................................................41
CRESTRON Limited Warranty.................................................................................41
Operations & Installation Guide – DOC. 6490A Contents • i
Page 4

Page 5

Crestron CHV-TSTATRF infiNET™ Thermostat
infiNET™ Thermostat:
CHV-TSTATRF
Introduction
The CHV-TSTATRF is a wireless networked thermostat featuring infiNET™
wireless technology. The CHV-TSTATRF is designed to be installed easily in place
of a conventional thermostat without requiring additional control wiring. Although it
can be used as a standalone thermostat, the CHV-TSTATRF delivers enhanced
functionality as part of a complete Crestron Home® automation system
communicating via the infiNET wireless control network.
The thermostat is available in three colors: the CHV-TSTATRFA in almond, the
CHV-TSTATRFB in black and the CHV-TSTATRFW in white. For simplicity
within this guide, these thermostats are referred to as CHV-TSTATRF. The features
and specifications for all three thermostats are identical.
Features and Functions
• Wall-mounted heat/cool thermostat
• For baseboard, forced air and heat pump (with auxiliary heat) HVAC
systems
• User selectable Auto mode with single or dual setpoint operation*
• Crestron
⇒
⇒
⇒
⇒
• Easy to read, backlit LCD display
• Available in white, black or almond
®
system integration via infiNET wireless network
2.4 GHz infiNET mesh network technology
Range up to 150 feet indoors or 250 feet outdoors
(subject to site-specific conditions)
Range may be increased with the use of additional infiNET devices
or C2N-MNETRPT repeaters
“Wi-Fi” friendly operating frequencies to avoid interference
* Auto mode support requires firmware version 1.005.0005 or later.
Operations & Installation Guide – DOC. 6490A infiNET™ Thermostat: CHV-TSTATRF • 1
Page 6

infiNET™ Thermostat Crestron CHV-TSTATRF
Heat/Cool Thermostat
The CHV-TSTATRF is designed for heating and cooling control of baseboard,
forced air, heat pump and dual-fuel heat pump HVAC systems. The large backlit
LCD display provides a clear view of current temperature, setpoint, system mode,
fan mode, system status and setup functions. Climate-control features include
separate heat and cool setpoints and adjustable anticipators to prevent overshooting
the desired temperature. Continuous fan operation can be selected when needed for
increased circulation.
infiNET™
Creston’s groundbreaking infiNET wireless technology affords reliable two-way
communications throughout a home or office structure without the need for physical
control wiring. Numerous infiNET thermostats and other devices can be linked to a
control system via a single RF gateway. Employing a 2.4 GHz mesh network
topology, every infiNET device functions as an RF repeater, increasing effective
range and reinforcing the complete network by providing multiple redundant signal
paths within the mesh network. In addition, a dedicated repeater (C2N-MNETRPT,
sold separately) can be added to increase the system range.
NOTE: The CHV-TSTATRF must be powered by 24 Volt AC source and have its
power setting on “24” to allow it to function as a repeater.
Automation System Integration
Its wireless connection to the control system allows the functions of the
CHV-TSTATRF to be controlled from touchpanels, keypads, wireless remotes and
computers to support unlimited flexibility for remote control, scheduling and
integration with other devices and systems. However, in the event that
communication with the control system is disrupted for any reason, the
CHV-TSTATRF will remain operable to control the HVAC system.
Easy Installation
System design, installation and upgrade using infiNET thermostats along with
lighting dimmers and other devices could not be easier. Since there is no control
wiring required, the CHV-TSTATRF can be installed just like any conventional
thermostat.
Setting up a complete network of infiNET devices is simple, utilizing dynamic
discovery (self-install) to locate and acquire each RF device automatically. Setting
the RF ID of each device employs the same convention as Crestron’s familiar TSID
method. The RF ID can also be set manually from the local display. Each device is
programmable using Crestron SIMPL™ Windows
software just like any wired Cresnet® device. Even firmware updates are performed
over the wireless network.
No further action is required to configure the infiNET network. Each device assigned
to a common gateway automatically behaves as a repeater for any other device
within range (approximately 150 feet indoors) and additional repeaters may be added
if necessary. At all times, the infiNET gateway monitors each device on the network,
ignoring any other 2.4 GHz signals and reconfiguring the entire network
automatically in response to new sources of interference and other changes in RF
conditions.
®
, SystemBuilder™ or D3 Pro™
2 • infiNET™ Thermostat: CHV-TSTATRF Operations & Installation Guide – DOC. 6490A
Page 7
Crestron CHV-TSTATRF infiNET™ Thermostat
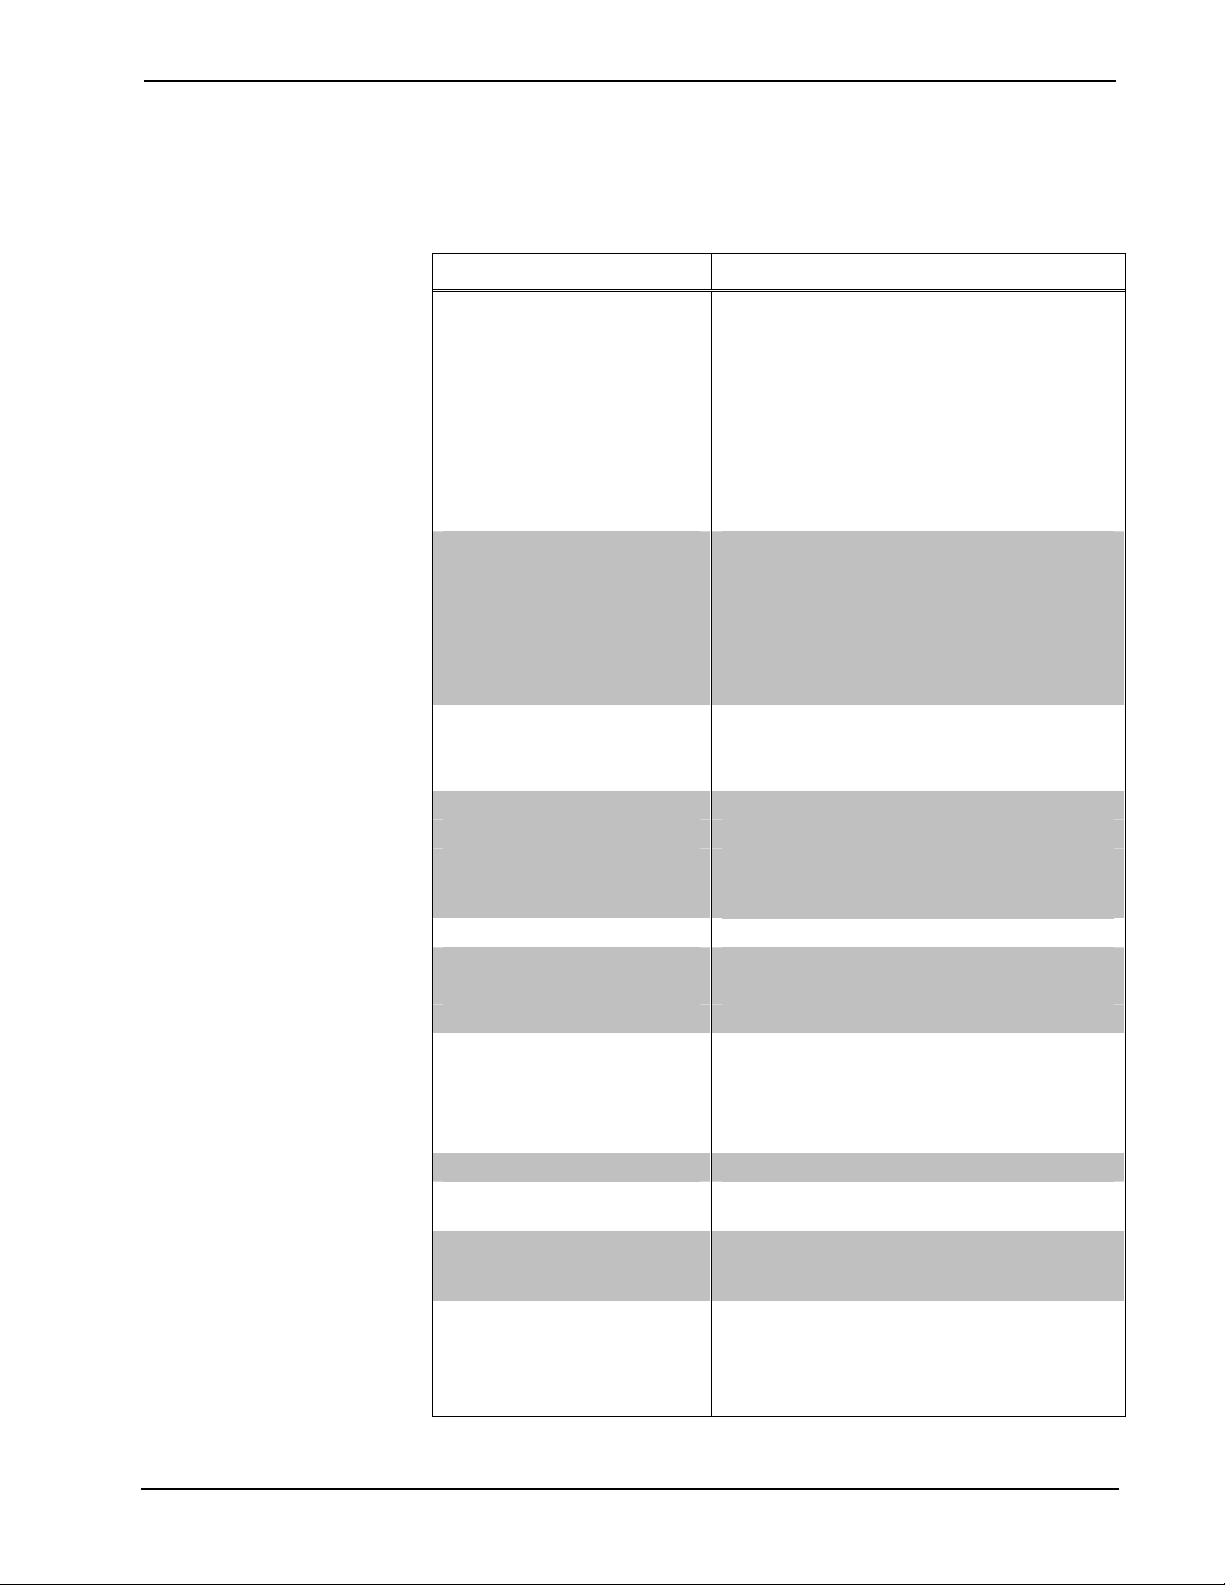
Specifications
Specifications for the CHV-TSTATRF are listed in the following table.
CHV-TSTATRF Specifications
SPECIFICATION DETAILS
Wireless
RF Transceiver
RF Output Power 10 mW
Range (typical)
Display
Measurement Range
Ambient Temperature -10º to 110ºF (-23º to 43ºC)
Display Limits -9º to 99ºF (-9º to 43ºC)
Setpoint Range
Heat only setpoint 38º to 89ºF (3º to 32ºC)
Cool only setpoint
Relay Rating 1 Amp @ 40 Volts DC or 24 Volts AC (nominal)
Environmental
Temperature -10º to 110ºF (-23º to 43ºC)
Humidity 10% to 90% RH (non-condensing)
Power Requirements
Battery
Default MNET ID 01
Minimum 2-Series Control
System Update File
Housing
Dimensions
Height 4.50 in (11.43 cm)
Width 5.53 in (14.05 cm)
Depth 1.03 in (2.60 cm)
1, 2
C2N-MNETGW gateway/transceiver required
(sold separately)
Two-way RF, 2.4 GHz ISM Channels 11-26
(2400 to 2483.6 MHz),
IEEE 802.15.4 compliant
150 feet indoor, 250 feet outdoor, subject to
site-specific conditions; range is increased by
adding additional devices or
C2N-MNETRPT repeater
Backlit LCD with two large seven-segment
digits, two small seven-segment digits, 14
dedicated symbols;
Displays ambient temperature, setpoint,
system mode, fan setting, call activity, low
battery, RF or control system communication
errors, firmware download progress, setup
parameter/function and value
59º to 99ºF (15º to 37ºC) or
38º to 99ºF (3º to 37ºC) extended cool mode
enabled
0.24 Watts (10 mA @ 24 Volts AC) supplied by
heating or cooling system
Two AA batteries, estimated one year normal
operation (with power parameter set to “Steal
Power” setting)
Version 3.154 or later
Injection molded plastic, surface-mountable to
the front of a horizontally oriented single-gang
electrical box.
(Continued on following page)
Operations & Installation Guide – DOC. 6490A infiNET™ Thermostat: CHV-TSTATRF • 3
Page 8
infiNET™ Thermostat Crestron CHV-TSTATRF
CHV-TSTATRF Specifications (Continued)
SPECIFICATION DETAILS
Weight 6.7 oz (189.9 g)
Available Models
CHV-TSTATRFA infiNET Thermostat, Almond
CHV-TSTATRFB infiNET Thermostat, Black
CHV-TSTATRFW infiNET Thermostat, White
Available Accessories
C2N-MNETGW infiNET Gateway/Transceiver
C2N-MNETRPT infiNET Repeater
1. The latest software versions can be obtained from the Crestron website. Refer to the NOTE following
these footnotes.
2. Crestron 2-Series control systems include the AV2 and PRO2. Consult the latest Crestron Product
Catalog for a complete list of 2-Series control systems.
NOTE: Crestron software and any files on the website are for authorized Crestron
dealers and Crestron Authorized Independent Programmers (CAIP) only. New users
may be required to register to obtain access to certain areas of the site (including the
FTP site).
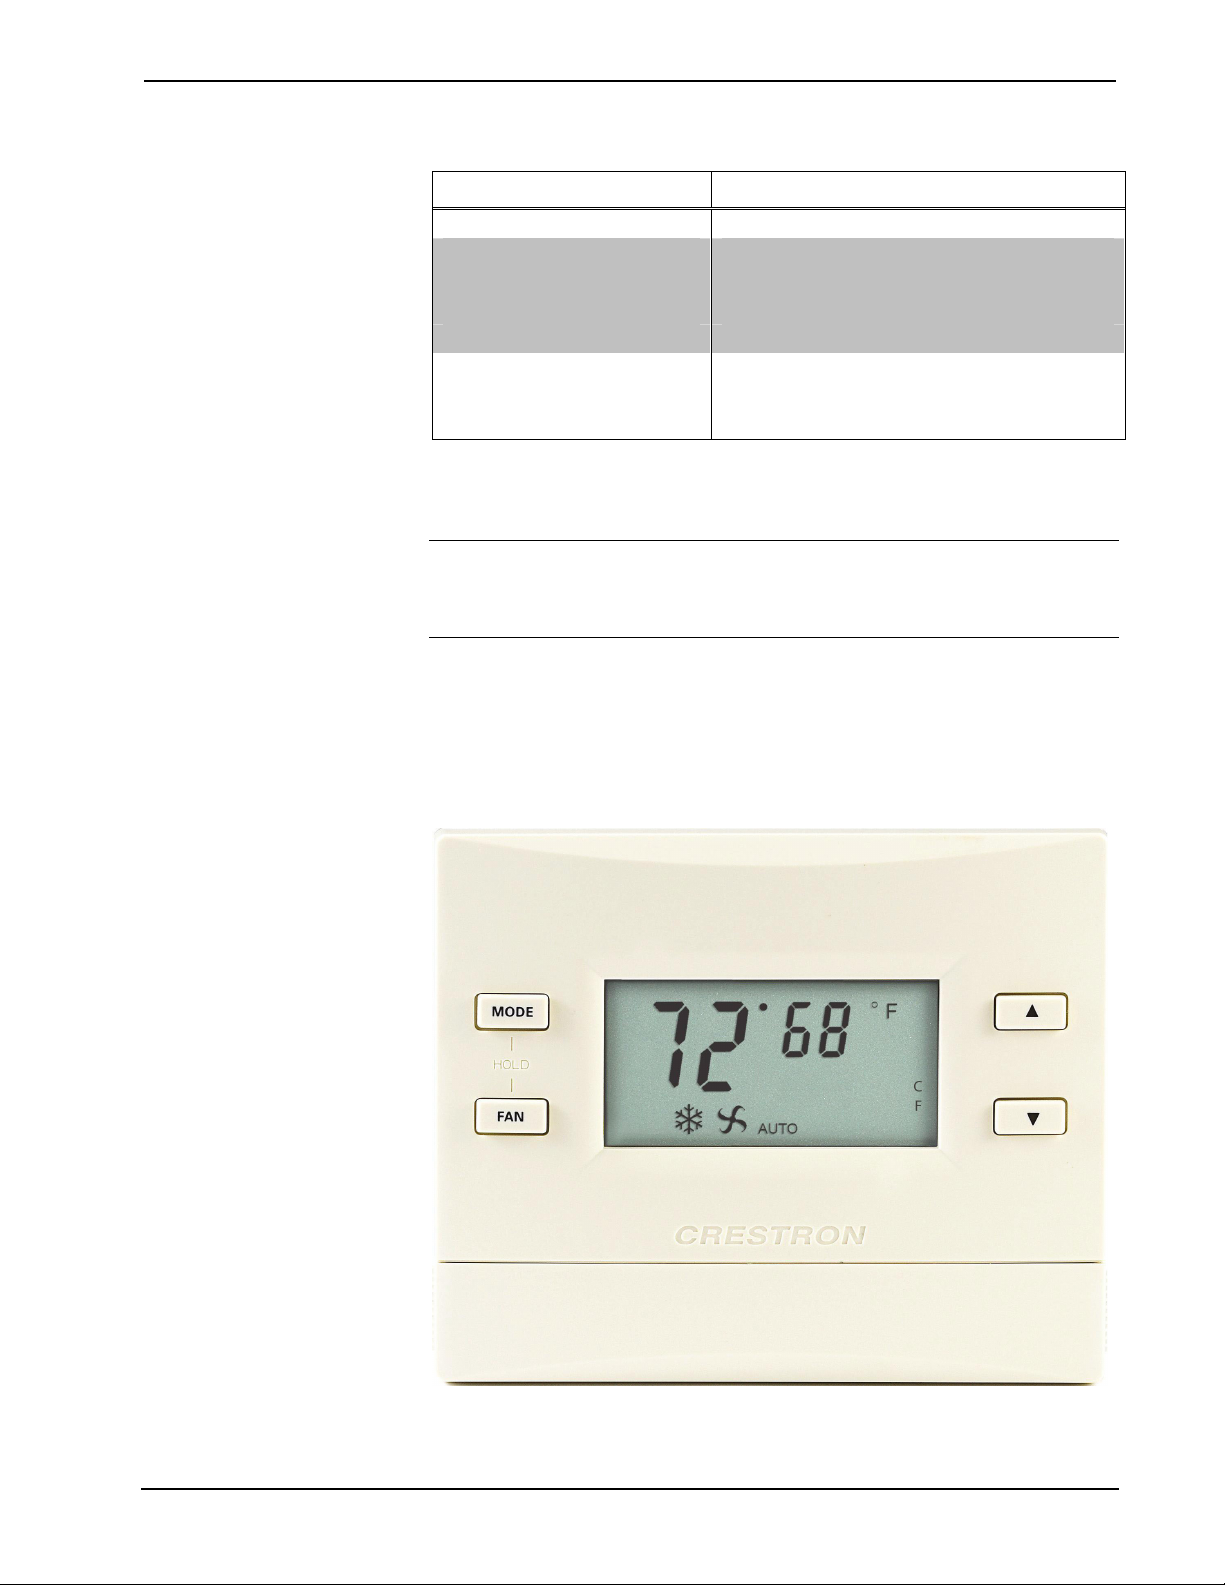
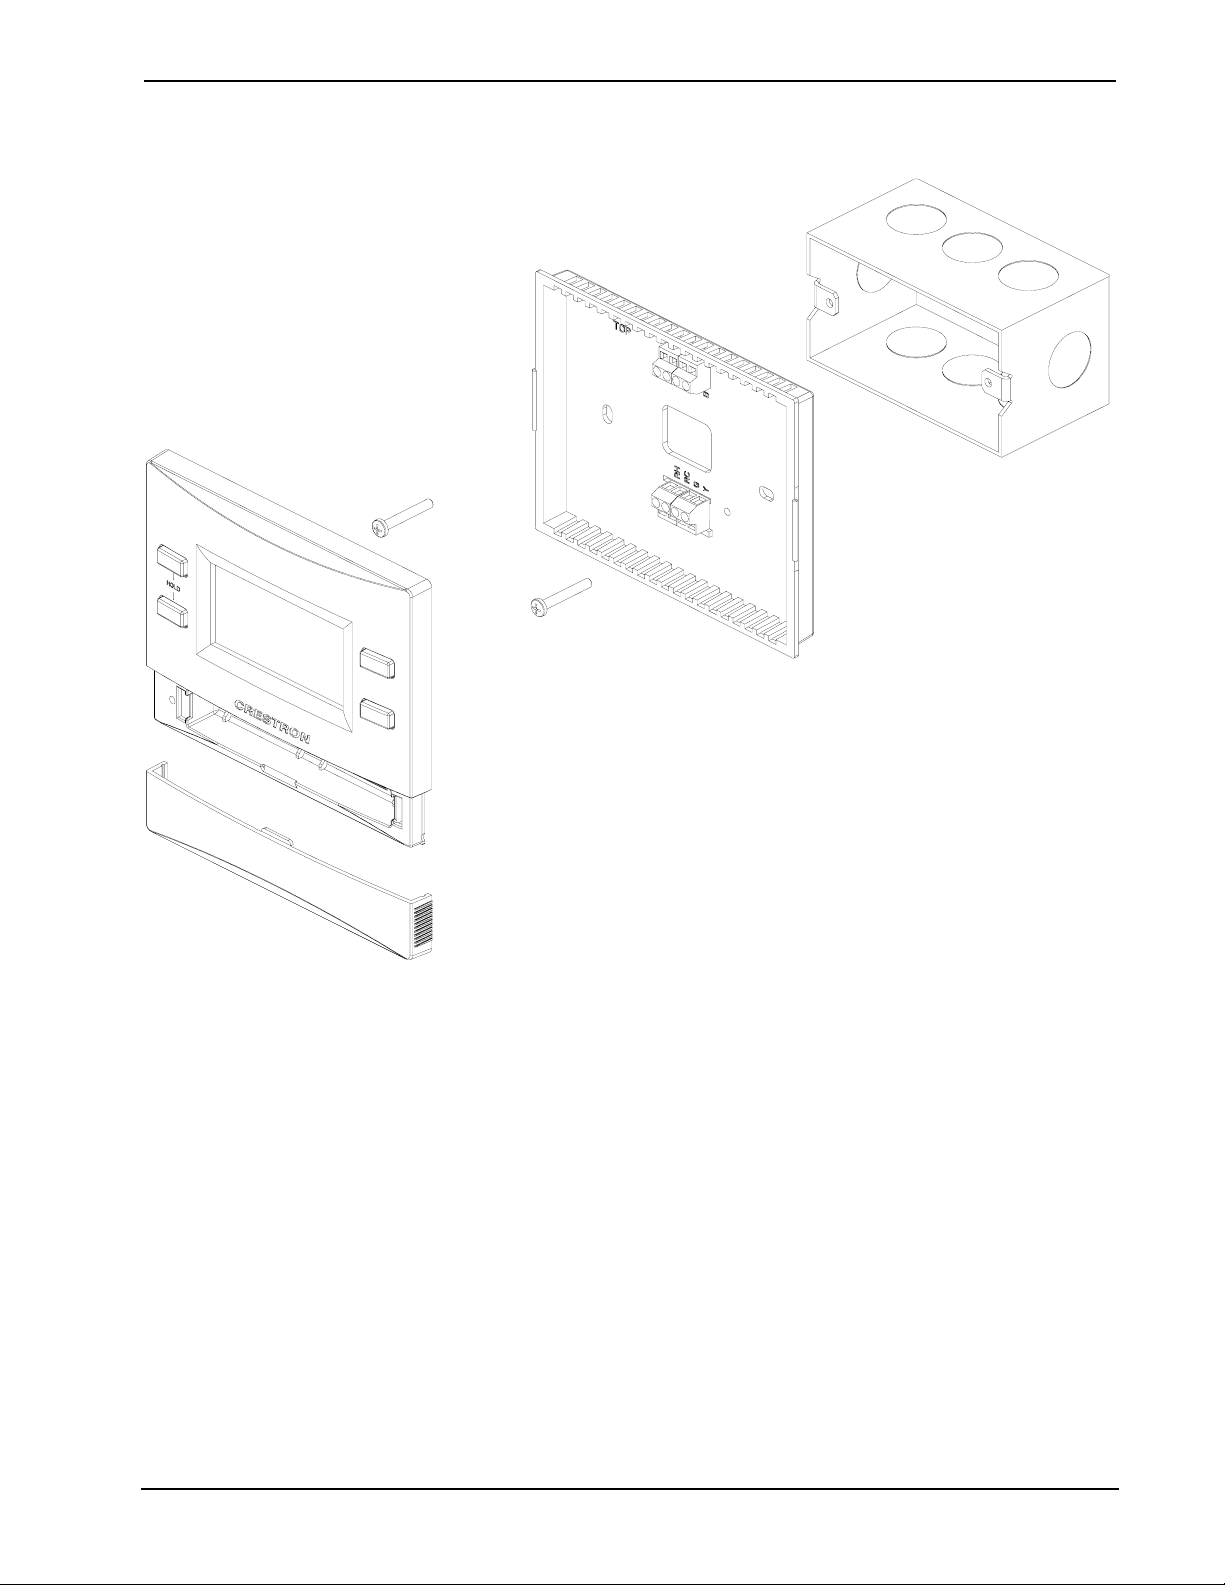
Physical Description
This section provides information on the connections, controls and indicators
available on your CHV-TSTATRF.
CHV-TSTATRF Physical View
4 • infiNET™ Thermostat: CHV-TSTATRF Operations & Installation Guide – DOC. 6490A
Page 9
Crestron CHV-TSTATRF infiNET™ Thermostat
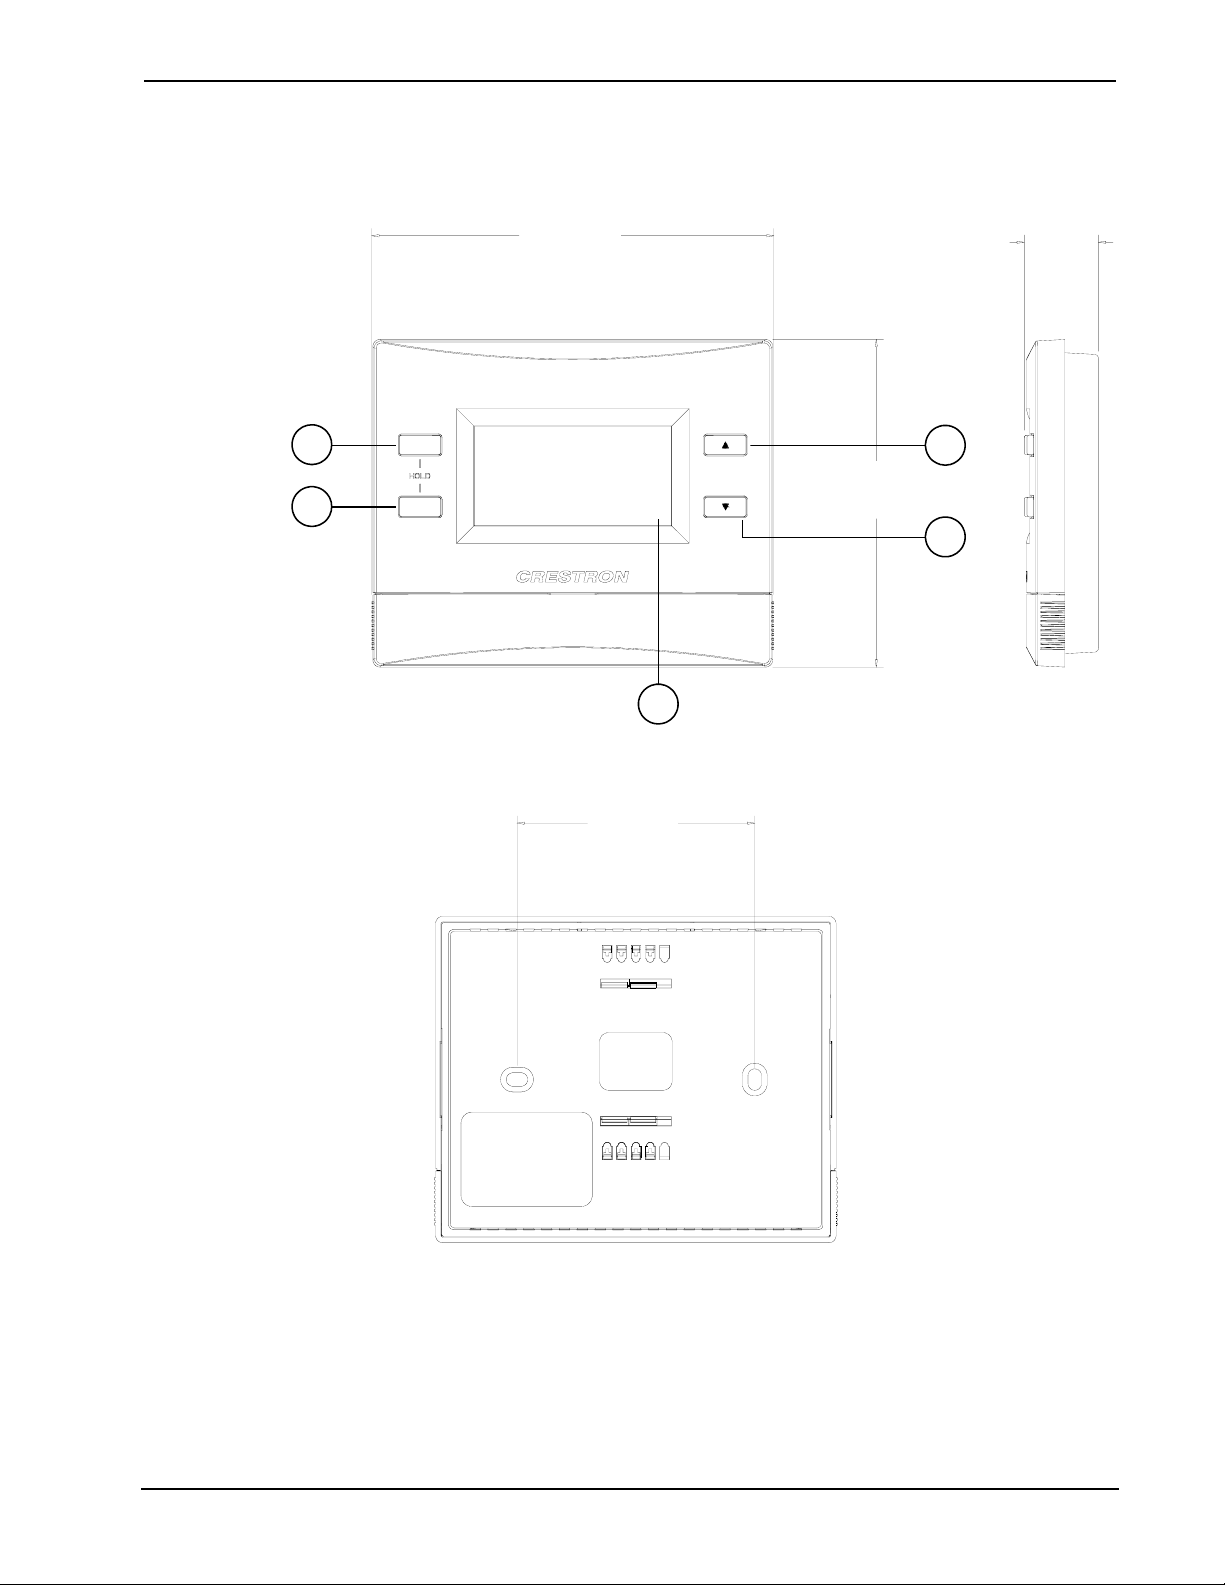
CHV-TSTATRF Overall Dimensions (Front and Side Views)
1.03 in
5.53 in
(14.05 cm)
(2.60 cm)
1
2
MODE
FAN
3
4.50 in
(11.43 cm)
4
5
CHV-TSTATRF Overall Dimensions (Rear View)
3.27 in
(8.30 cm)
Operations & Installation Guide – DOC. 6490A infiNET™ Thermostat: CHV-TSTATRF • 5
Page 10
infiNET™ Thermostat Crestron CHV-TSTATRF
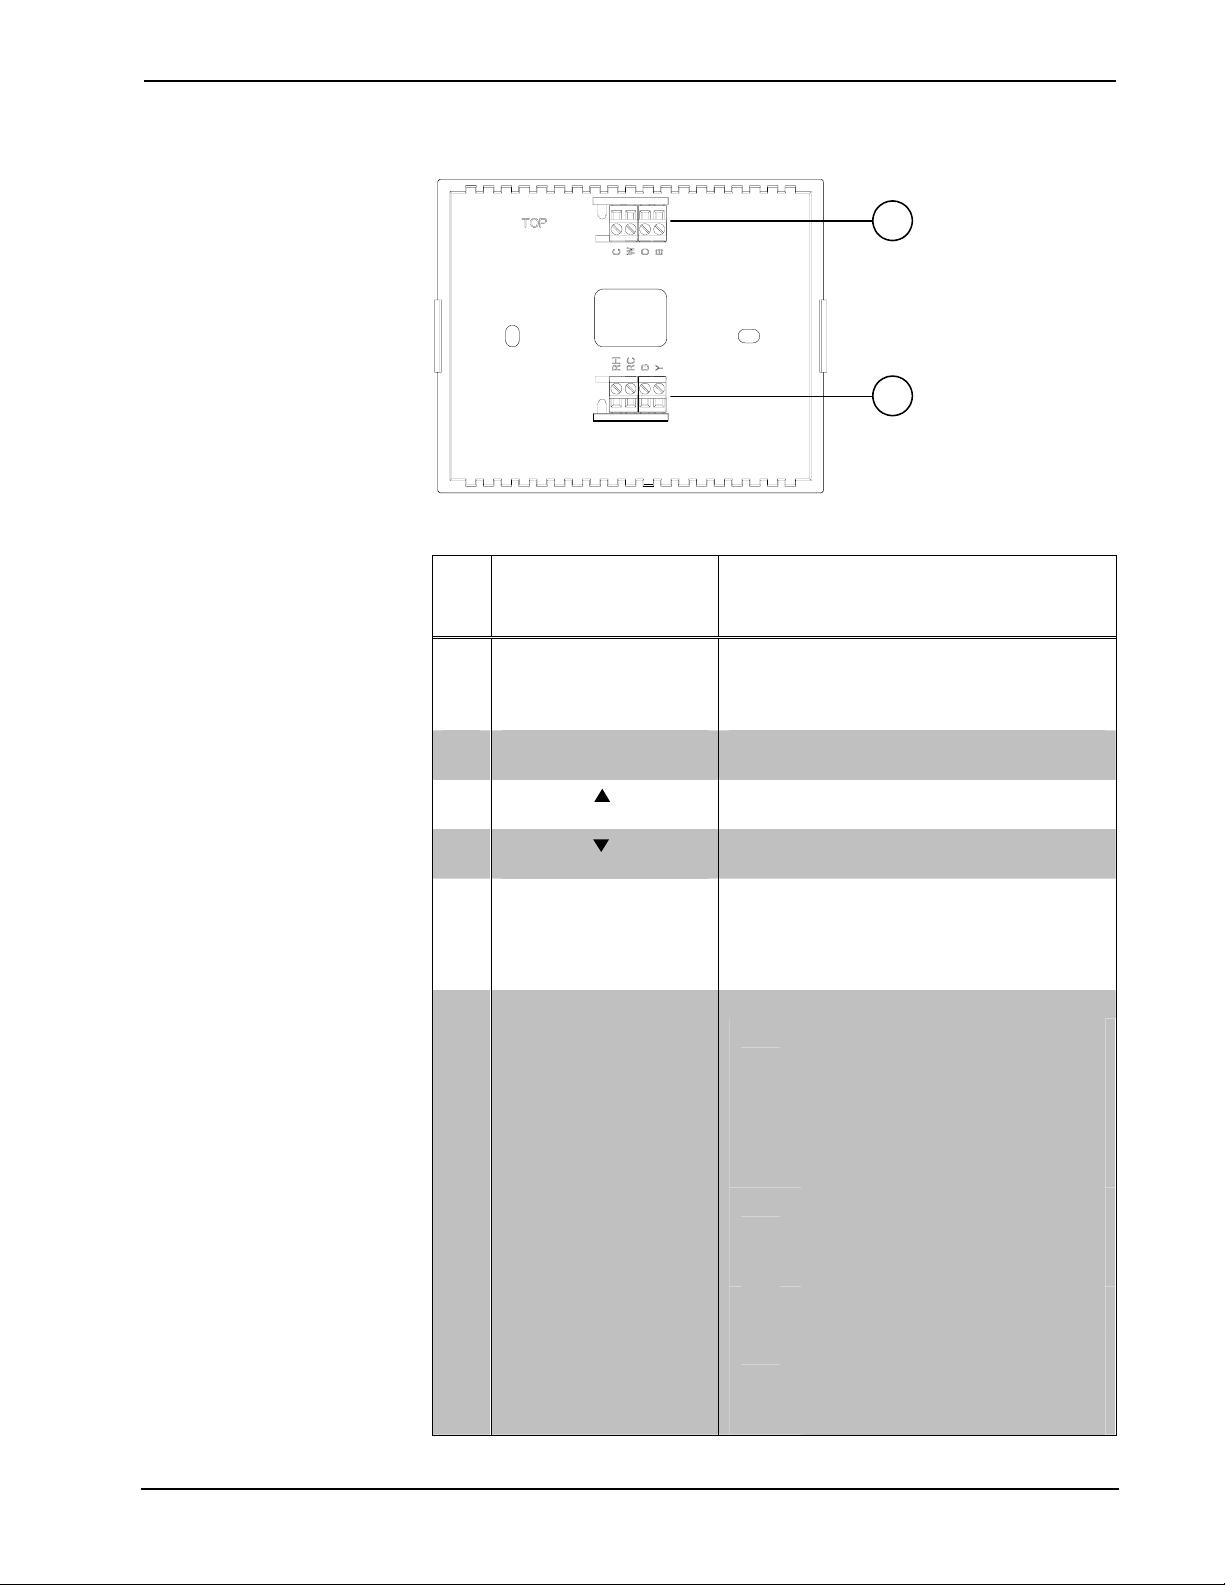
CHV-TSTATRF (Connection View, front with cover removed)
6
6
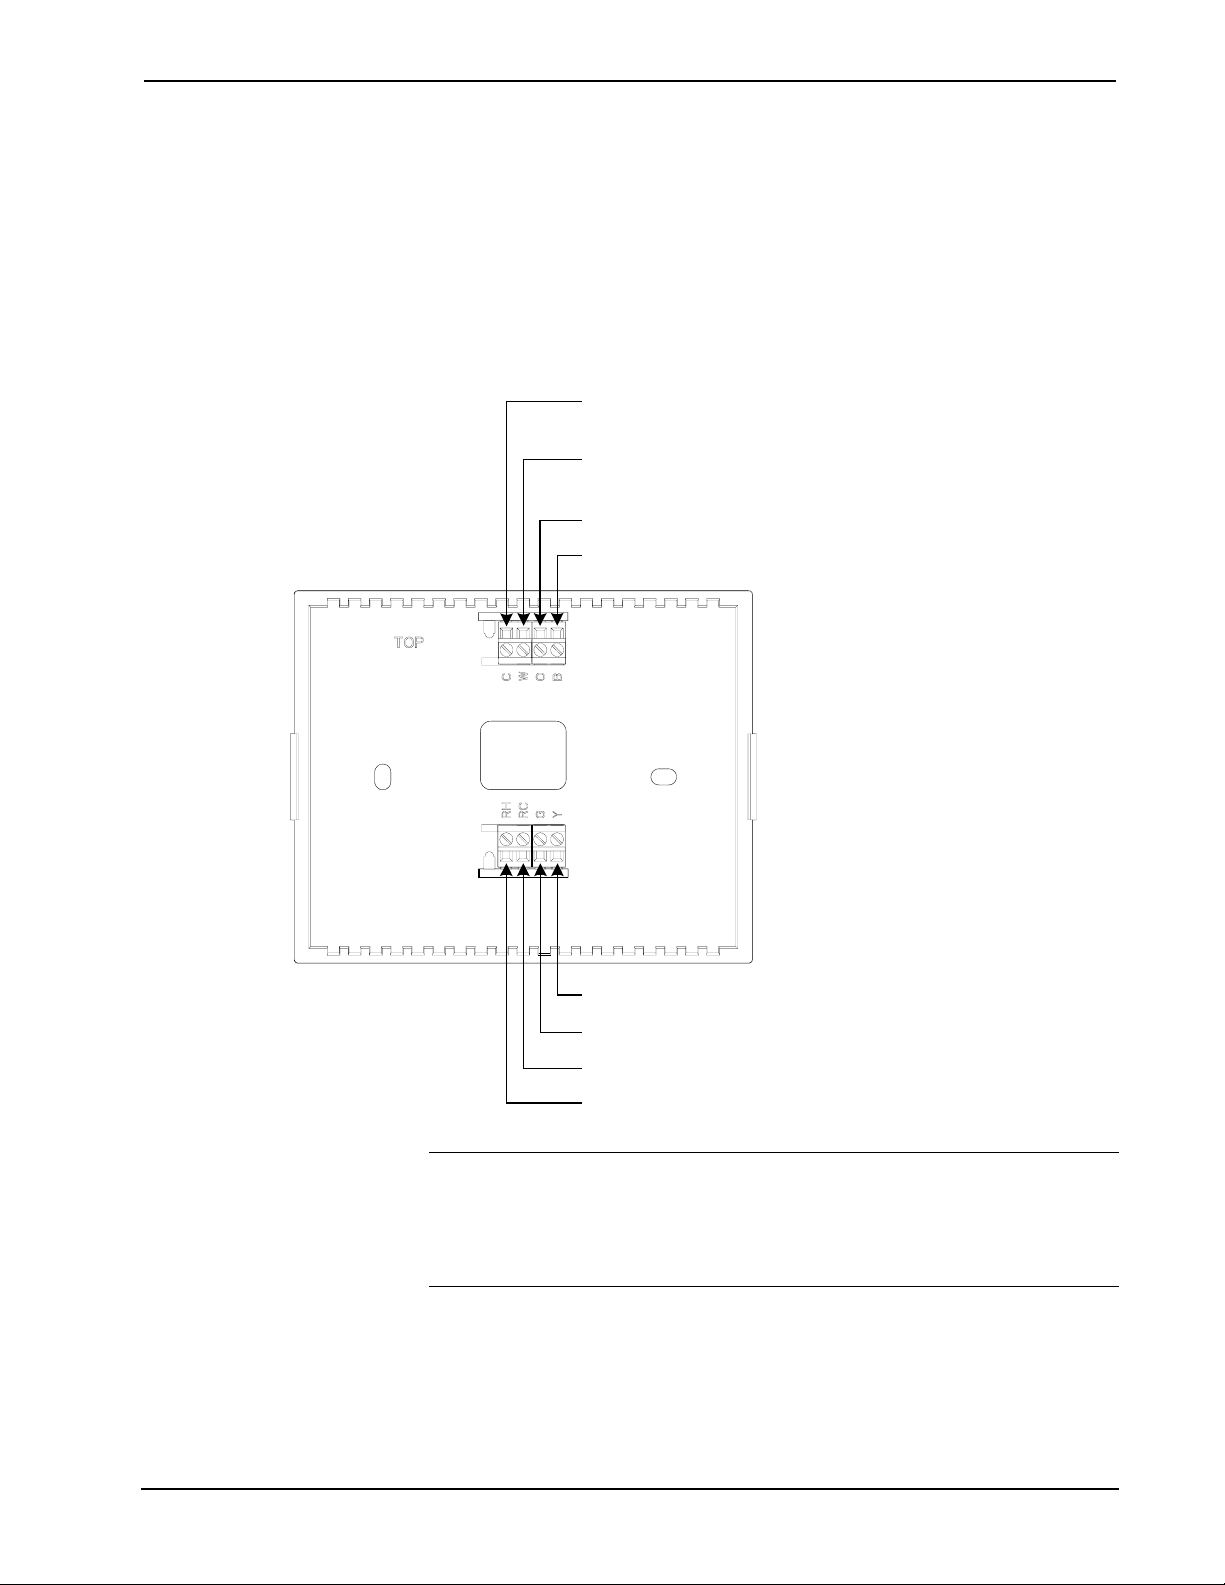
Connectors, Controls & Indicators
# CONNECTORS,
DESCRIPTION
CONTROLS &
INDICATORS
1 MODE BUTTON
2 FAN BUTTON
3
(RAISE BUTTON)
4
(LOWER BUTTON)
5 LCD DISPLAY
6 HVAC (4) Two-position terminal blocks.
Cycles through available System Modes:
OFF, HEAT, EMERGENCY HEAT (for heat
pump or dual-fuel systems only), COOL and
AUTO.
Toggles fan setting between FAN AUTO and
FAN ON.
Raises the setpoint.
Lowers the setpoint.
Displays ambient temperature, setpoint,
system mode, fan setting, call activity, low
battery, RF or control system communication
errors, firmware download progress, setup
parameter/function and value.
C 24 VAC common terminal supplies
remote power to thermostat
W Heat – Switched to RH during a call
for heat in heat/cool systems or aux
heat in heat pump systems
O Changeover control – Switched to
RC during cooling modes
B Switched to RC during heating
modes
RH Reference Heat – Used for calls to
heating system
RC Reference Cool – Used for calls to
cooling system
G Fan – Switched to RC during call
for fan
Y Compressor: - Switched to RC
when compressor is run
6 • infiNET™ Thermostat: CHV-TSTATRF Operations & Installation Guide – DOC. 6490A
Page 11

Crestron CHV-TSTATRF infiNET™ Thermostat
Industry Compliance
As of the date of manufacture the CHV-TSTATRF has been tested and found to
comply with specifications for CE marking and standards per EMC and
Radiocommunications Compliance Labelling.
FCC ID: EROCWD1013
Compliance Statement (Part 15.19)
This device complies with Part 15 of the FCC Rules. Operation is subject to the
following two conditions:
1. This device may not cause harmful interference and
2. This device must accept any interference received, including interference
that may cause undesired operation.
Warning (Part 15.21)
Changes or modifications not expressly approved by the party responsible for
compliance could void the user’s authority to operate the equipment.
FCC Interference Statement
This equipment has been tested and found to comply with the limits for a Class B
digital device pursuant to Part 15 of the FCC Rules. These limits are designed to
provide reasonable protection against harmful interference in a residential
installation. This equipment generates, uses and can radiate radio frequency energy
and, if not installed and used in accordance with the instructions, may cause harmful
interference to radio communications. However, there is no guarantee that
interference will not occur in a particular installation. If this equipment does cause
harmful interference to radio or television reception, which can be determined by
turning the equipment off and on, the user is encouraged to try to correct the
interference by one of the following measures:
1. Reorient or relocate the receiving antenna.
2. Increase the separation between the equipment and receiver.
3. Connect the equipment into an outlet on a circuit different from that to
which the receiver is connected.
4. Consult the dealer or an experienced radio/TV technician for help.
FCC Statement
To comply with FCC’s RF exposure limits for general population / uncontrolled
exposure, the antenna(s) used for this transmitter must be installed to provide a
separation distance of at least 20 cm from all persons and must not be co-located or
operating in conjunction with any other antenna or transmitter.
Industry Canada Statement
The term “IC” before the certification/registration number only signifies that the
Industry Canada technical specifications were met
IC: 5683A-CWD1013
Section 7.1.5 of RSS-GEN
Operation is subject to the following two conditions:
1. This device may not cause harmful interference, and
2. This device must accept any interference received, including interference
that may cause undesired operation.
Operations & Installation Guide – DOC. 6490A infiNET™ Thermostat: CHV-TSTATRF • 7
Page 12

infiNET™ Thermostat Crestron CHV-TSTATRF
Installation
NOTE: Installers should have a strong working knowledge of HVAC systems.
Mounting the CVH-TSTATRF to the Wall
The location of the thermostat can affect its performance and efficiency. Install the
thermostat away from direct sunlight, drafts, doorways, skylights and windows. Also
make sure the thermostat is conveniently located for control access and setup and do
not mount on an exterior wall.
Thermostats should be mounted 60 inches (152.4 cm) above the finished floor
(HVAC industry standard).
The following tools/hardware are required for installation.
• Standard single-gang electrical box, mounted horizontally (not supplied)
• Phillips screwdriver (not supplied)
• Two 1-inch pan head Phillips screws (supplied)
• Two AA batteries (supplied)
Use the following procedure to install the CHV-TSTATRF in a standard, single-gang
electrical box (refer to illustration on the following page):
1. Separate thermostat front plate from back plate (you may need to exert force
when removing the front plate).
2. Turn HVAC system power OFF.
3. Feed HVAC wiring from the electrical box through the hole in the center of
the back plate so it can be connected to the proper terminals on the
CHV-TSTATRF after the thermostat is mounted.
4. Make sure unit is correctly oriented and place it in the electrical box.
CAUTION: Excess wire that is pinched between the CHV-TSTATRF and electrical
box could short out. Make sure that all excess wire is completely inside the electrical
box and not between the box and the CHV-TSTATRF.
NOTE: To ensure accurate temperature readings, avoid drafts in the back of the unit
by plugging the wire hole with insulation.
5. Attach the CHV-TSTATRF back plate to the electrical box using the
supplied two 1-in. pan head screws.
6. Attach faceplate.
7. Insert batteries and attach battery compartment cover.
8. Turn HVAC system power ON.
NOTE: Crestron has provided small slots on either side of the battery cover,
designed to allow a flathead screwdriver to be inserted to assist in removal.
8 • infiNET™ Thermostat: CHV-TSTATRF Operations & Installation Guide – DOC. 6490A
Page 13
Crestron CHV-TSTATRF infiNET™ Thermostat
Installation view
Operations & Installation Guide – DOC. 6490A infiNET™ Thermostat: CHV-TSTATRF • 9
Page 14
infiNET™ Thermostat Crestron CHV-TSTATRF
Wiring the CHV-TSTATRF to the HVAC System
Make the necessary connections as called out in the illustrations that follow. A flat
head screwdriver (not supplied) is required to attach the control wires from the
HVAC system. Apply power after all connections have been made.
The illustrations on the following pages show examples for connection to various
types of HVAC systems. If your system does not match any of the systems described
below, contact Crestron Technical Support for assistance.
Connections for the CHV-TSTATRF
C: 24 VAC common terminal supplies remote power to thermostat
(optional)
W: Heat - Switched to RH during a call for heat in heat/cool
systems or aux heat in heat pump systems
O: Changeover control - Switched to RC during cooling modes
B: Switched to RC during heating modes
Y: Compressor - Switched to RC when compressor is run
G: Fan - Switched to RC during call for fan
RC: Reference Cool - Used for calls to the cooling system
RH: Reference Heat - Used for calls to the heating system
NOTE: 24 Volt power is returned through the RH connector. Refer to wiring
diagrams on the following pages.
NOTE: Most heat pump systems use O for changeover. B is provided for the
systems that do not.
10 • infiNET™ Thermostat: CHV-TSTATRF Operations & Installation Guide – DOC. 6490A
Page 15
Crestron CHV-TSTATRF infiNET™ Thermostat
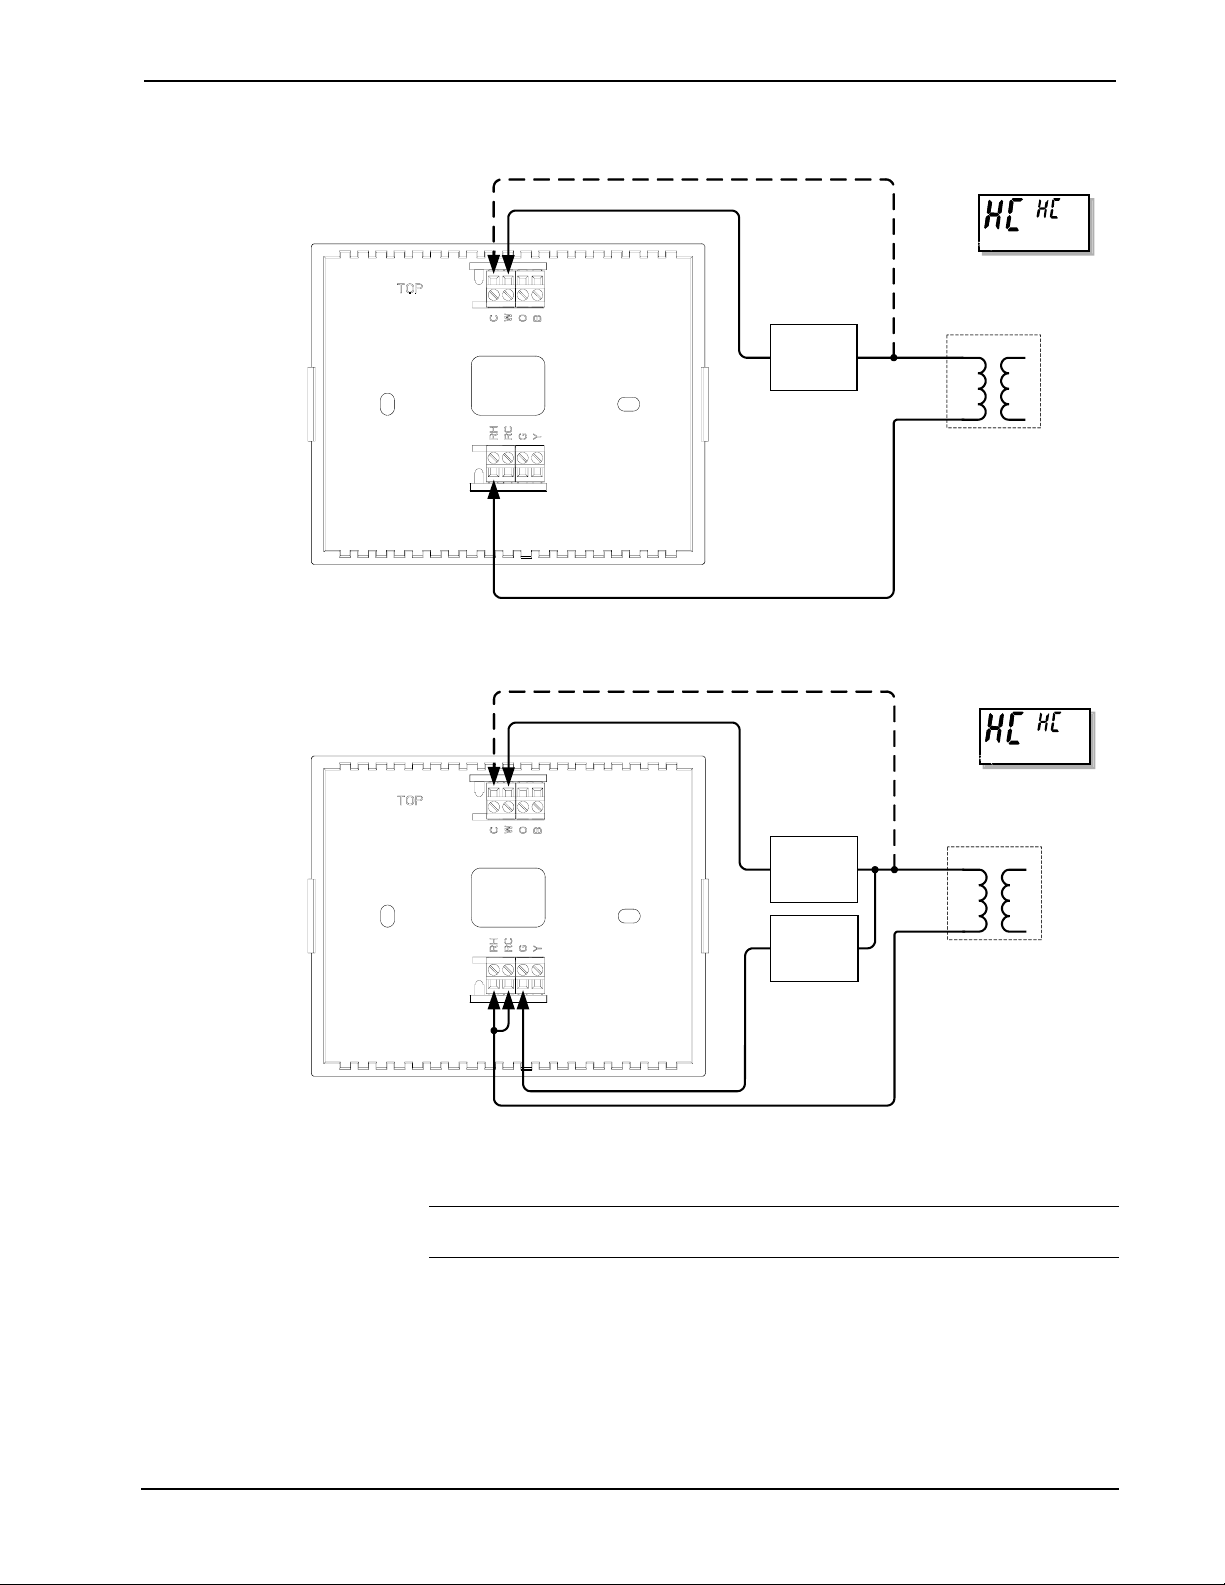
CHV-TSTATRF in Heat Only Application
Optional, for power
(Refer to “Basic Thermostat
Setup” on page 15)
System
Heat
Relay
Transformer
C
R
120 VAC
CHV-TSTATRF in Heat Only with Fan Application
RH-RC jumper required
since supply power is
returned through RH
NOTE: To run fan during heat calls, be sure to enable the HF parameter by setting
it to “Y”. Refer to “Advanced Setup” which starts on page 19 for details.
Optional, for power
Heat
Relay
Fan
Relay
(Refer to “Basic Thermostat
Setup” on page 15)
System
Transformer
C
120 VAC
R
Operations & Installation Guide – DOC. 6490A infiNET™ Thermostat: CHV-TSTATRF • 11
Page 16

infiNET™ Thermostat Crestron CHV-TSTATRF
CHV-TSTATRF in Cool Only Application
Optional, for power
RH-RC jumper required
since supply power is
returned through RH
CHV-TSTATRF in Heat-Cool Application with Separate Systems
C
Y
Compressor
(Refer to “Basic Thermostat
Setup” on page 15)
Transformer
C
Relay
G
Fan
R
Relay
R
Optional, for power
(Refer to “Basic Thermostat
Setup” on page 15)
C
W
Heat
Transformer
C
Cooling
Relay
R
Y
Compressor
R
Relay
G
Fan
Transformer
C
Heating
Relay
R
R
12 • infiNET™ Thermostat: CHV-TSTATRF Operations & Installation Guide – DOC. 6490A
Page 17

Crestron CHV-TSTATRF infiNET™ Thermostat
CHV-TSTATRF in Heat-Cool Application with Integrated Control Unit
Optional, for power
C
W
Y
G
R
RH and RC jumpered
since control unit has
them on a single terminal
CHV-TSTATRF in Heat Pump System Application with Integrated Controller
Heat
Relay
Cool
Relay
Fan
Relay
(Refer to “Basic Thermostat
Setup” on page 15)
Transformer
C
R
RH and RC jumpered
since control unit has
them on a single terminal
Optional, for power
C
E - U - W
Aux Heat
(Refer to “Basic Thermostat
Setup” on page 15)
Transformer
C
Relay
O
Changeover
R
Valve
Y
Compressor
Relay
G
Fan
Relay
R
NOTE: Heat pump and dual-fuel heat pump systems require an outdoor temperature
sensor (e.g. Crestron’s C2N-RTHS, sold separately) to function properly. In SIMPL
Windows, connect the “Temp” output of the sensor to the “OutdoorTemp” input of
the CHV-TSTATRF. For details, refer to the SIMPL Windows help file. If using D3
Pro or SystemBuilder refer to “Programming with Crestron D3 Pro or
SystemBuilder” on page 30
Operations & Installation Guide – DOC. 6490A infiNET™ Thermostat: CHV-TSTATRF • 13
Page 18

infiNET™ Thermostat Crestron CHV-TSTATRF
CHV-TSTATRF in Dual-Fuel Heat Pump Application
Optional, for power
C
(Refer to “Basic Thermostat
Setup” on page 15)
O
Changeover
Valve
Transformer
C
Y
Compressor
R
Relay
G
Fan
Relay
R
Transformer
Fossil Heat
C
System
R
NOTE: The diagram above applies where furnace control is not integrated into the
heat pump system.
14 • infiNET™ Thermostat: CHV-TSTATRF Operations & Installation Guide – DOC. 6490A
Page 19

Crestron CHV-TSTATRF infiNET™ Thermostat
Basic Setup
Basic Thermostat Setup
The following documents the most common CHV-TSTATRF setup requirements.
For full details on all setup options, refer to “Advanced Setup” which starts on page
19.
Install two AA batteries (supplied) in the battery compartment.
NOTE: When first setting up the CHV-TSTATRF, batteries are required, even if
you plan to power it from a constant 24 VAC supply.
Place the CHV-TSTATRF in the Setup mode by doing the following:
1. Press and hold the FAN button.
2. While the FAN button is being held, press and hold the
simultaneously.
3. Hold all three buttons for five seconds, after which the unit will enter Setup
mode. The display shows the Temperature Scale function (FC).
Use or to choose the temperature units: F (Fahrenheit), C1 (setpoint in whole
degrees Celsius) or C2 (setpoint in half degrees Celsius). Then press MODE twice
until the Heat/Cool function is displayed (HC).
and to choose between Heat/Cool (HC), Heat pump (HP) and Dual-fuel
Use
Heat Pump (dF) functions. Then press MODE repeatedly until the Power Source
function is displayed (Po).
and to choose between 24V always available (24) and steal power (SP).
Use
By default, the CHV-TSTATRF is configured to be powered by two AA alkaline
batteries. In addition, in order to extend battery life, the device is able to steal power
from the HVAC system by drawing a small amount of current through the heat or
cool terminals. It will not draw enough current to cause the external heat or cool
relays to close.
More specifically, when the unit is not making a call for heat, it will draw power
through the RH and W terminals. When the unit is making a call for heat, it will
draw power through the RC and Y terminals. (This will not work if the thermostat
has been wired for a cool only application.)
NOTE: The CHV-TSTATRF must be wired for heat control in order to take
advantage of the steal power setting.
and buttons
NOTE: The power stealing ability is designed to extend battery life, not to eliminate
the need for batteries. Two AA batteries are still required.
NOTE: When the Power Source (Po) function is set to steal power (SP), even when
an auxiliary power source is available, the unit will continue to enter a
communications sleep state, waking every 30 seconds or one minute (based on the
infiNET Sleep Time setting) to exchange data with the control system. Refer to
“Remote Operation” on page 27 for details.
Operations & Installation Guide – DOC. 6490A infiNET™ Thermostat: CHV-TSTATRF • 15
Page 20

infiNET™ Thermostat Crestron CHV-TSTATRF
NOTE: The power stealing function may cause problems with some types of
HVAC systems. While rare, the symptom would be a heat or cool call occurring
when the thermostat itself does not indicate a heat or cool call. If this occurs, you
should change the power setting to “24” and ensure that you have two AA batteries
installed. Be aware that this situation will shorten the expected battery life.
If you have wired the thermostat so that 24 Volts AC will always be present on the
“C” terminal (refer to “Wiring the CHV-TSTATRF to the HVAC System” which
starts on page 10), you can set the unit to run from this power supply, thus
eliminating the need for batteries (except during initial setup). The thermostat will
run on battery power if 24 VAC is not present. In addition, when the unit detects 24
VAC is present, it will no longer “sleep”, meaning that it will offer real-time
communication with the control system.
When shipped from the factory, the CHV-TSTATRF will have a steal power setting.
If you plan to power the device from a constant 24 VAC supply, you must still install
batteries in order to access Setup mode and change the power setting to “24”.
NOTE: When the unit is powered from a constant 24 VAC supply, there may be a
slight discrepancy between the ambient temperature displayed on the thermostat and
the actual room temperature. This discrepancy will also be seen when switching from
“SP” to “24”. This is normal and the discrepancy will disappear within
approximately 10 minutes.
Basic infiNET™ Setup
The MNET ID of the CHV-TSTATRF has been factory set to 01. After an infiNET
device is added to an infiNET network, its MNET ID must be changed to a value that
can be addressed by the control system program (03 to 20). The MNET IDs of
multiple CHV-TSTATRF devices on the same gateway must be unique. MNET IDs
are changed locally using the setup parameter ability of the CHV-TSTATRF (refer to
“Setup Mode Parameters/Functions” which starts on page 20). They can also be
changed from a personal computer (PC) via the Crestron Toolbox™.
When setting the MNET ID, consider the following:
• The MNET ID of each unit must match an ID code specified in the SIMPL
Windows or D3 Pro/SystemBuilder program.
• Each network device on the same gateway must have a unique MNET ID.
In Setup mode, press MODE until the infiNET ID (MNET ID) function is displayed
(id).
Use or to choose the infiNET ID (must be in the range from 03 to 20).
Press MODE to select the infiNET RF Channel (CH).
Each infiNET device communicates with its gateway on one of 16 infiNET
channels. The gateway can be set to operate in an auto channel state, in which case it
will operate on a single channel but may switch to a new channel if it detects
excessive interference. It can also be set to operate in a fixed channel state, in which
it will stay on a specified channel indefinitely.
The RF channel on the thermostat must be set to correspond with the gateway with
which it will be communicating. For example, if the desired gateway is running in
auto channel, the thermostat must be set to auto as well. If the gateway has been set
to run on a fixed channel, the thermostat should be set to that specific channel.
16 • infiNET™ Thermostat: CHV-TSTATRF Operations & Installation Guide – DOC. 6490A
Page 21

Crestron CHV-TSTATRF infiNET™ Thermostat
Use and to choose 11 – 26 for fixed-channel operation, (Au) for auto channel
or (0) to disable the radio. Disabling the radio is useful for extending battery life if,
for example, you have installed the thermostat prior to installing the gateway and/or
control system. Press MODE until the Start infiNET Acquire function is displayed
(AC).
Before an infiNET device can be used on an infiNET network, it must first be
acquired by a C2N-MNETGW gateway that is connected to a Cresnet network.
NOTE: An infiNET device can be acquired by only one gateway.
To acquire the CHV-TSTATRF, perform the following procedure:
1. Ensure the unit is in Setup mode (refer to “Basic Thermostat Setup” on page
15 or “Setup Mode” which starts on page 19) and that Acquire mode (AC)
is selected.
2. Put the C2N-MNETGW in the Acquire mode, from the unit itself by
pressing ACQUIRE or from Toolbox, as described in the latest revision of
the C2N-MNETGW guide (Doc. 6317), which is available for download
from the Crestron website (http://www.crestron.com/manuals
ACQUIRE LED lights.
). The gateway
NOTE: In environments where multiple gateways are installed, only one
gateway should be in Acquire mode at a time.
3. Press and simultaneously on the CHV-TSTATRF to start the acquire
process: display shows flashing “—” (in progress). When finished, display
shows “00” (finished, found gateway) or “E#” (finished, could not find
gateway), where # represents an error code.
NOTE: The acquire process can take up to five minutes, depending on the RF
channel. Please allow enough time for process to complete.
NOTE: “E0” indicates that search time has expired and no gateway was found.
“E1” indicates the RF channel is set to “0” (disabled). To enable the RF channel,
refer to “infiNET RF Channel” in “Setup Mode Parameters/Functions” which starts
on page 20.
NOTE: To cancel an acquire process before it has completed, press the
buttons simultaneously.
After the process is complete, take the C2N-MNETGW out of the Acquire mode by
pressing ACQUIRE on the gateway. Refer to the latest revision of the
C2N-MNETGW guide (Doc. 6317).
To exit from Setup mode, press the FAN button on the CHV-TSTATRF.
and
The Fan icon will indicate the status of infiNET communication:
• Solid (non-blinking): Communication with control processor established
via gateway.
• Two brief blinks every eight seconds: Communication with gateway
established but control system is not addressing this MNET ID. It is
possible the MNET ID of the device (or the gateway ID) is not set to match
the MNET ID of the D3 Pro, SystemBuilder or SIMPL Windows program.
Use the Network Device Tree in Crestron Toolbox to poll the infiNET
Operations & Installation Guide – DOC. 6490A infiNET™ Thermostat: CHV-TSTATRF • 17
Page 22

infiNET™ Thermostat Crestron CHV-TSTATRF
network. Verify that the MNET ID for the infiNET device is set to match
the MNET ID specified in the program. Check the D3 Pro, SystemBuilder
or SIMPL Windows program to ensure that a CHV-TSTATRF has been
added at the proper MNET-ID. Refer to “Programming with Crestron D3
Pro or SystemBuilder” on page 30 or “Programming with SIMPL
Windows” which starts on page 30.
• Four brief blinks every eight seconds: No communication with gateway
established. Refer to “Troubleshooting” which starts on page 35 for details.
18 • infiNET™ Thermostat: CHV-TSTATRF Operations & Installation Guide – DOC. 6490A
Page 23

Crestron CHV-TSTATRF infiNET™ Thermostat
Advanced Setup
Setup Mode
After the CHV-TSTATRF is installed, it is necessary to set it up for a particular
heating/cooling system. Please note that some of the setup parameters listed below
will not always be available. Refer to “Setup Mode Parameters/Functions”, which
starts on page 20 for details.
Place the CHV-TSTATRF in the Setup mode by doing the following:
1. Press and hold the FAN button.
2. While the FAN button is being held, press and hold the
simultaneously.
3. Hold all three buttons for five seconds, after which the unit will enter Setup
mode.
Once in Setup mode, the display will indicate the currently selected setup
parameter/function. Press and release the MODE button quickly (must be released
within one second) to change to the next parameter/function in the list.
NOTE: Holding the MODE button for more than one second will reset the
currently selected parameter/function to its default value.
When setting parameters (such as when choosing between Fahrenheit or Celsius
display), pressing the or button will increment or decrement the value. Value
change occurs when button is released.
When a function is selected (such as when starting an infiNET acquire), pressing
either
or will execute the function.
To exit from Setup mode, press the FAN button on the CHV-TSTATRF.
CHV-TSTATRF LCD Display (Setup Mode)
Indicates current Setup
Parameter/Function
Skips to next Setup
Parameter/Function
and buttons
Indicates current value for
selected Setup Parameter
MODE
Adjust Current Setup
Exits Setup Mode
Parameter/Function value
FAN
NOTE: When the CHV-TSTATRF is in Setup mode the large seven-segment
displays will show the current setup parameter/function. The small seven-segment
displays will show the current value for the selected setup parameter, if applicable, or
Operations & Installation Guide – DOC. 6490A infiNET™ Thermostat: CHV-TSTATRF • 19
Page 24

infiNET™ Thermostat Crestron CHV-TSTATRF
it will display “—” when a function is selected. All other display elements will be
hidden (refer to “LCD Display” which starts on page 28).
NOTE: While in Setup mode, a period of one minute with no button activity will
cause the CHV-TSTATRF to revert to standard operation, unless a function (such as
an infiNET acquire) is executing.
Setup Mode Parameters/Functions
The following table shows the available setup parameters/functions.
Setup Mode Parameters/Functions
PARAMETER/
FUNCTION
Temperature Scale FC F, C1 or C2 F
Backlight Timeout bL
Heat/Cool Type HC
Auto mode AU
Auto Dead Band
(will only appear when
Auto mode is enabled)
Temperature Offset to
Wide-range Cool Mode
(Extended Cool)
CODE VALID VALUES
1 – 4 seconds or
disabled (--)
Heat/Cool (HC), Heat
pump (HP), Dual-Fuel
Heat pump (dF)
Disabled (--),
Dual setpoint (d) or
Single setpoint (S)
db
EC
2 – 4 (for Fahrenheit)
or
1 – 3 (for Celsius)
-9 to +9 (for
Fahrenheit) or
-5 to +5 (for Celsius)
Enabled (Y) or
Disabled (no)
DEFAULT
--
HC
--
2
0
no
VALUE
NOTES
Sets units to use for temperature
display (Fahrenheit or Celsius).
When using Celsius temperature
scale, C2 allows the setpoint to
be adjusted in 0.5ºC steps.
Sets the number of seconds the
backlight will remain lit after a
button press.
Sets the system type being used.
Heat pump type will allow aux
heat to stage with the heat pump.
A dual-fuel heat pump type will
not allow both systems to run at
the same time.
Used to enable Auto mode with
single or dual setpoint operation.
Used to set minimum separation
between heat and cool setpoints
(with dual setpoints) or maximum
drift before system latches
alternate mode (with single
setpoint).
Permits recalibration of room
temperature sensor. This is the
number of degrees added to or
subtracted from the actual
temperature. This adjustment
changes the actual regulation
temperature, not just the display.
Useful for wine chiller
applications; extends the cool
setpoint range down to the
minimum used for Heat mode
(38ºF/3ºC).
(Continued on following page)
20 • infiNET™ Thermostat: CHV-TSTATRF Operations & Installation Guide – DOC. 6490A
Page 25

Crestron CHV-TSTATRF infiNET™ Thermostat
Setup Mode Parameters/Functions (Continued)
PARAMETER/
FUNCTION
Heat Anticipator HA 1 – 6 3
Cool Anticipator CA 1 – 6 3
Heat pump Balance
Point
(will only appear for
Heat pump and DualFuel Heat pump
systems)
Aux-Heat Balance
Point
(will only appear for
Heat pump type
systems)
Interstage Differential
(will only appear for
Heat pump systems)
Run Fan During Heat
Calls
Changeover Outputs
(will only appear for
Heat-Cool systems)
CODE VALID VALUES
Hb
Ab
dF
HF
Co
16 to 90 (for
Fahrenheit) or
-9 to 32 (for Celsius) or
Disabled (--)
16 to 90 (for
Fahrenheit) or
-9 to 32 (for Celsius) or
Disabled (--)
05 to 80 (tenths of a
degree Fahrenheit),
adjustable in 5 tenths
degree increments or
05 to 45 (tenths of a
degree Celsius),
adjustable in 5 tenths
degree increments
Enabled (Y) or
Disabled (no)
Enabled (Y) or
Disabled (no)
DEFAULT
VALUE
--
--
20 (F) or
10 (C)
no
no
NOTES
Lower setting results in more
frequent cycles and faster
response (tighter regulation).
Higher setting results in less
frequent cycles and slower
response (looser regulation). The
default value should suffice in
nearly all installations.
Lower setting results in more
frequent cycles and faster
response (tighter regulation).
Higher setting results in less
frequent cycles and slower
response (looser regulation). The
default value should suffice in
nearly all installations.
Heat pump systems have
performance restrictions based
on outdoor temperature. This
setting is the minimum outdoor
temperature at which the heat
pump (or dual-fuel heat pump)
system will run.
Aux heat operation is locked out
when outdoor temperature
exceeds the Aux Heat Balance
Point. Dual-fuel systems do not
allow both the heat pump and the
aux to run at the same time.
Heat pump systems can allow
both the heat pump and aux to
run at the same time. This sets
the ambient temperature
threshold to trigger aux heat in
addition to the heat pump.
Most heat systems handle the fan
call if required. If the system
requires the thermostat to control
the fan during heat calls, set this
parameter to “Y”.
Indicates the mode in which the
thermostat is operating. Will
automatically be engaged for
heat pump or dual-fuel heat
pump systems. If not required, it
should be disabled to extend
battery life.
(Continued on following page)
Operations & Installation Guide – DOC. 6490A infiNET™ Thermostat: CHV-TSTATRF • 21
Page 26

infiNET™ Thermostat Crestron CHV-TSTATRF
Setup Mode Parameters/Functions (Continued)
PARAMETER/
FUNCTION
Power Source Po
Check Firmware
Version
infiNET ID (MNET ID) id 01 and 03 – FE 01
infiNET RF Channel CH
infiNET Sleep Time SL Short (S) or Long (L) L
Start infiNET Acquire AC
Unacquire Gateway UA
CODE VALID VALUES
24V always available
(24) or steal power
(SP)
rE
Firmware version is
displayed in xx.yy.zz
format. “—“ can also
be displayed
11-26 for fixed-channel
operation, “Au” for auto
or “0” for disabled
(battery saver)
Not started (--)
In progress (flashing -)
Finished, found GW
(00)
Finished, could not find
GW (E#, where #
represents an error
code)
Not started (--)
In progress (flashing -)
Finished, success (00)
Finished, failed (E#,
where # represents an
error code)
DEFAULT
VALUE
24
--
26
N/A
N/A
NOTES
Selects source of input power for
thermostat. 24VAC assumes
constant power is available
between the C and RH
connectors. The steal-power
function allows recovery of some
power from the HVAC system
when constant power is not
available. Steal power may not
work with some zone controllers.
In this case, set value to “24” and
ensure that you have two AA
batteries installed.
When firmware version is not yet
shown, display will be “—“. Each
press of the or button will
cycle to the next portion of the
version number.
Sets the infiNET ID. SIMPL
Windows restricts infiNET
devices to an ID range of 03 –
20.
Selects the RF channel. A fixed
channel allows faster setup and
reconnect when the gateway
channel is fixed. Auto channel
allows more flexibility but may
consume slightly more power if
network communications are
interrupted. A setting of “0”
disables the radio.
Indicates thermostat update rate.
Setting for fewer updates (“L”) will
conserve battery power.
Used to acquire the device to a
gateway.
”E0” indicates that search time
has expired and no gateway was
found.
”E1” indicates the infiNET RF
Channel is set to “0” (disabled).
Used to remove gateway
information from the device, so it
will no longer communicate with
the current gateway.
”E0” indicates that there is no
previous gateway information (i.e.
the gateway may already have
been unacquired).
(Continued on following page)
22 • infiNET™ Thermostat: CHV-TSTATRF Operations & Installation Guide – DOC. 6490A
Page 27

Crestron CHV-TSTATRF infiNET™ Thermostat
Setup Mode Parameters/Functions (Continued)
PARAMETER/
FUNCTION
Check Battery Life bA
Restore Factory
Defaults
Perform Heat Call Test
(Toggle)
Perform Cool Call Test
(Toggle)
Perform Aux Heat Call
Test (Toggle)
(will appear only on
Heat pump and DualFuel Heat pump
systems)
Perform Fan Call Test
(Toggle)
Perform Self Test St
CODE VALID VALUES
Fd
H
C
A
F
Not started (--)
Estimated remaining
battery life (0 – 99)
Not started (--)
In progress (blank or
flashing --)
Finished (00)
Button not held long
enough (Er)
Not started/Heat call off
(--)
Heat call on (on) (also,
“H” icon will turn on)
Not started/Cool call off
(--)
Cool call on (on) (also,
“C” icon will turn on)
Not started/Aux call off
(--)
Aux call on (on) (also,
“A” icon will turn on)
Not started/Fan call off
(--)
Fan call on (on) (also,
“F” icon will turn on)
Not started (--)
In progress (flashing --)
Finished, self test ok
(00)
Finished, self test failed
(E#, where # represents
an error code)
DEFAUL
T VALUE
N/A
N/A
N/A
N/A
N/A
N/A
N/A
NOTES
Gives estimated remaining
battery life in percent.
Restores all setup parameters to
their default settings. To prevent
accidentally performing this
action, you must press and hold
either the or button for
three seconds for this function to
execute.
Will test the heat call output.
Bypasses short-cycle timers.
Useful for technician system
testing. Note that calling the heat
may activate other relays in the
thermostat as required, such as
the fan output for heat pump or
dual-fuel types.
Will test the cool call output.
Bypasses short-cycle timers.
Useful for technician system
testing. Note that calling the
cooling may activate other relays
in the thermostat as required,
such as the fan output.
Same as above, for testing aux
heat output.
Same as above, for fan. Note that
only the fan relay can be
activated for a fan call test.
Performs a self-test of the
thermostat.
”E0” indicates low battery voltage
(replace batteries).
”E1” indicates low HVAC system
voltage (check supply voltage –
must be at least 24 VAC or 30
VDC).
”E5” indicates no gateway
information (acquire the device to
a C2N-MNETGW).
”E2”, “E3”, “E4”, “E6”, “E7”
reserved (serious errors, contact
tech support).
Operations & Installation Guide – DOC. 6490A infiNET™ Thermostat: CHV-TSTATRF • 23
Page 28

infiNET™ Thermostat Crestron CHV-TSTATRF
Operation
System Mode
The MODE button on the CHV-TSTATRF will cycle the unit through all available
system modes in the following order: Off, Heat, Emergency Heat (for heat pump and
dual-fuel systems), Cool and Auto (if enabled in Setup).
The system mode will change upon release of the MODE button and the selected
mode will become operational three seconds after the mode has been entered.
Off Mode
In Off mode, all HVAC systems are disabled.
Heat Mode
In Heat mode, the thermostat uses the heating system to maintain the setpoint
temperature.
Emergency Heat Mode
In Emergency Heat mode, the thermostat uses only the auxiliary heat output on heat
pump or dual-fuel systems to maintain the setpoint temperature.
NOTE: Emergency Heat mode can only be accessed when heat/cool type has been
set to “Heat pump” or “Dual-Fuel Heat pump”. This setting can be useful when the
heat pump is being serviced or when there is an unexpected problem with it. The
display will flash the “flame” icon when the system is in Emergency Heat mode.
Cool Mode
In Cool mode, the thermostat uses the cooling system to maintain the setpoint
temperature.
Auto Mode
NOTE: Auto mode support requires firmware version 1.005.0005 or later.
In Auto mode, the thermostat allows the system to switch between Heat and Cool
automatically as needed to maintain the setpoint temperature. By default, the
CHV-TSTATRF has been configured with Auto mode disabled, meaning it is not
available from the thermostat itself or via another interface such as a touchpanel.
In order to enable Auto mode, you must enter Setup mode and change the “AU”
setting from “--” to either “d” (dual setpoint) or “S” (single setpoint). Refer to “Setup
Mode” which starts on page 19 for details.
Once Auto mode has been enabled, you can access it from the CHV-TSTATRF
controls as follows:
1. Press the MODE button until both the flame
appear in the display. This indicates Auto mode is now active.
24 • infiNET™ Thermostat: CHV-TSTATRF Operations & Installation Guide – DOC. 6490A
and snowflake icons
Page 29

Crestron CHV-TSTATRF infiNET™ Thermostat
2. Use the and buttons to adjust the setpoint. Actual operation will
depend on whether you are using single or dual setpoints.
a. In dual setpoint Auto mode, the first press of the
second press if the first press simply turned on the backlight) will cause
either the flame
indicates which setpoint will be adjusted by subsequent presses of the
or buttons. To adjust or view the alternate setpoint, press the
MODE button while the icon is flashing. This will cause the alternate
icon to flash and now the and buttons will adjust that setpoint.
The flashing icon will time out after five seconds of no button activity.
b. In single setpoint Auto mode, use the buttons to adjust the setpoint as
usual.
or snowflake icon to flash rapidly. This
or buttons (or
Dual Setpoint Auto Mode (“AU” = “d” in Setup Mode)
In dual setpoint Auto mode, separate heat and cool setpoints are used. When the
ambient temperature drops below the heat setpoint, the unit will call for heat to
maintain the heat setpoint. When the ambient temperature rises above the heat
setpoint, the unit will not call for cooling until the temperature exceeds the cool
setpoint. When the ambient temperature drops below the cool setpoint, the unit will
not call for heating until the temperature is below the heat setpoint.
When dual setpoint Auto mode has been enabled, the Auto Dead Band is used to
maintain a minimum separation between the heat and cool setpoints. If this
separation is violated by a setpoint adjustment, the other setpoint will be
automatically adjusted.
For example, if the heat setpoint is at 68 degrees, the cool setpoint is at 72 degrees
and the Auto Dead Band is set to 4 degrees, if you lower the cool setpoint to 71
degrees, the heat setpoint will automatically be adjusted to 67 degrees to maintain
the 4 degree Auto Dead Band separation.
In dual setpoint Auto mode, the CHV-TSTATRF display will indicate whichever
setpoint is closer to the ambient temperature. Both the heat and cool setpoints can be
viewed simultaneously using a touchpanel.
Single Setpoint Auto Mode (“AU” = “S” in Setup Mode)
In single setpoint Auto mode, a single setpoint is used for regulation at all times,
regardless of whether the system is heating or cooling. The Auto Dead Band (“db”)
setup parameter is used to determine when to switch between heating and cooling.
For example, if the setpoint is at 70 degrees and the Auto Dead Band is set to 2
degrees, if the system is cooling, it will not start heating until the ambient
temperature drops below 68 degrees (setpoint – Auto Dead Band). Once the unit has
switched to heating, it will not resume cooling until the ambient temperature rises
above 72 degrees (setpoint + Auto Dead Band).
A larger value for the Auto Dead Band setting will result in less cycling between
heating and cooling but can result in large temperature swings during the course of
the day. Smaller values for the Auto Dead Band setting will result in tighter
temperature regulation but more frequent cycling between heating and cooling.
NOTE: When using a single setpoint, the CHV-TSTATRF has a 20-minute change
limiter to prevent system toggling.
Operations & Installation Guide – DOC. 6490A infiNET™ Thermostat: CHV-TSTATRF • 25
Page 30

infiNET™ Thermostat Crestron CHV-TSTATRF
Fan
The FAN button toggles the fan setting between fan AUTO and fan ON. When set to
AUTO, a fan call will be made whenever the system makes a cool call or when the
system makes a heat call or auxiliary heat call (if the HF setup parameter is set to
“Y”). When set to ON the fan will always run.
Setpoints
The setpoint is the user selectable temperature you want the system to maintain.
and buttons will change the current setpoint by one degree F or C (if
The
Temperature Scale is set to “F” or “C1”) or by one half degree C (if Temperature
Scale is set to “C2”).
NOTE: While the setpoint is being adjusted, if it is set to a half-degree increment,
the integer portion of the number will be displayed and will alternate with “_5” every
quarter second for a period of four seconds after the last adjustment. After four
seconds, only the integer portion of the number will be displayed.
If the or buttons is held down for two seconds, the unit will enter an autorepeat state and the setpoint will adjust rapidly until the button is released or until the
upper (or lower) limit is reached.
Some users will want to have setpoints change automatically based on the day of the
week and the time of day. For example, in the winter they may want to lower the
heat setpoint while they sleep to lower heating costs. To accommodate this, the
CHV-TSTATRF provides a “Scheduled Heat Setpoint” and a “Scheduled Cool
Setpoint” which can be specified by the control system program. This is handled
automatically by the “Crestron CHV-TSTATRF w/5-2 Scheduler” module provided
with the Crestron Database. Refer to “Programming with SIMPL Windows” which
starts on page 30 for more details about how to add this module to your program.
For dual setpoint operation, refer to “Auto Mode” which starts on page 24.
Hold
Hold allows the user to adjust the setpoint and will maintain that setpoint until the
unit is taken out of Hold. This means that any change to the scheduled heat or cool
setpoint that occurs while in Hold will be ignored until the unit is taken out of Hold.
Pressing the MODE and FAN buttons simultaneously will cause the unit to enter
Hold if Hold is not yet active and the system mode is Heat, Emergency Heat or Cool.
Pressing the MODE and FAN buttons simultaneously when Hold is active will
cause the unit to exit from Hold and recall either the scheduled heat setpoint or
scheduled cool setpoint as appropriate to the system mode.
If the system is in single setpoint Auto mode, exiting from Hold will recall the
scheduled auto setpoint. If the system is in dual setpoint Auto mode, upon exiting
from Hold, the auto cool setpoint becomes the scheduled cool setpoint and the auto
heat setpoint becomes the scheduled heat setpoint.
Pressing the MODE and FAN buttons simultaneously when the system mode is Off
will have no effect.
When Hold is active, the unit will continue to adjust the current setpoint when the
buttons are pressed. The unit will also continue to adjust the current setpoint
or
when the setpoint signal from the control system changes.
26 • infiNET™ Thermostat: CHV-TSTATRF Operations & Installation Guide – DOC. 6490A
Page 31

Crestron CHV-TSTATRF infiNET™ Thermostat
When the system mode changes to Heat or Emergency Heat, the current setpoint will
be set to the scheduled heat setpoint.
When the system mode changes to Cool, the current setpoint will be set to the
scheduled cool setpoint.
Remote Operation
As an infiNET device, the CHV-TSTATRF can be controlled remotely via a
Crestron control system. Most often, control of the thermostat will be achieved via a
touchpanel or web-based graphical interface. In order to extend battery life, the
thermostat will only communicate with the control system once every 30 seconds or
one minute, based on the infiNET Sleep Time setting. Because of this, there will be a
noticeable delay between the time a button is pressed on a touchpanel and when the
thermostat reacts to the command. To account for this, the CHV-TSTATRF modules
written by Crestron and provided in the Crestron Database will mimic the feedback
from the thermostat so that the user will see an immediate response on the
touchpanel.
Likewise, pressing a local button on the thermostat (for example, setpoint raise or
lower) will not cause an immediate change to the corresponding display on a
touchpanel. Instead, the thermostat will wake up approximately 10 seconds after the
last button press to send its updated status to the control system.
NOTE: When the CHV-TSTATRF is powered via a constant 24 VAC supply, it
will not go to sleep.
Operations & Installation Guide – DOC. 6490A infiNET™ Thermostat: CHV-TSTATRF • 27
Page 32

infiNET™ Thermostat Crestron CHV-TSTATRF
LCD Display
CHV-TSTATRF LCD Display
1 2
F
C
H
OFF
HOLDAUTO
C
F
A
3 4
LCD Display Elements
# LCD DISPLAY
ELEMENT
1
2
3 Flame icon
4 Snowflake icon
Large seven-segment
Small seven-segment
5
digits
digits
7
6
Indicates current ambient temperature
Setup mode, indicates current setup
parameter/function.
Display range is limited to –9º to 99ºF (-9º to
43ºC). If the ambient temperature is above
99º, the display will indicate 99º. If the
ambient temperature is below –9º, the
display will indicate –9º.
Indicates current setpoint (in F or C) in whole
degrees.
While the setpoint is being adjusted, if it is
set to a half-degree increment, the integer
portion of the number will be displayed and
will alternate with “_5” every quarter second
for a period of four seconds after the last
adjustment. After four seconds, only the
integer portion of the number will be
displayed.
In Setup mode, indicates current value for
selected Setup Parameter.
Displayed when the system mode is Heat.
Flashes (on two seconds, off one half
second) when the system mode is
Emergency Heat.
Displayed with snowflake icon when system
is in Auto mode.
Displayed when the system mode is Cool.
Displayed with flame icon when system is in
Auto mode.
8 9
DESCRIPTION
1, 2
. In
(Continued on following page)
28 • infiNET™ Thermostat: CHV-TSTATRF Operations & Installation Guide – DOC. 6490A
Page 33

Crestron CHV-TSTATRF infiNET™ Thermostat
LCD Display Elements (Continued)
# LCD DISPLAY
DESCRIPTION
ELEMENT
5 Fan icon
6 AUTO indicator
7 OFF indicator Displayed when the system mode is Off.
8 HOLD indicator Displayed when the HOLD setting is active.
9 H, C, F & A indicators
1. For heat pump and dual-fuel systems, when you select Emergency Heat mode (by pressing and
releasing the MODE button when System mode is Heat) the display will show “EH” in place of the
ambient temperature for two seconds.
2. When the CHV-TSTATRF detects a low battery condition (approximately one month of battery life
remaining), the display will alternate “Lo” in place of the ambient temperature once per second.
Displayed at all times. Flashes if a
communication error occurs.
Displayed when FAN setting is AUTO.
If this is not displayed, FAN is always ON.
H – Displayed whenever a Heat Call is being
made.
C – Displayed whenever a Cool Call is being
made.
F – Displayed whenever a Fan Call is being
made.
A – Displayed whenever an Aux Heat Call is
being made.
Operations & Installation Guide – DOC. 6490A infiNET™ Thermostat: CHV-TSTATRF • 29
Page 34

infiNET™ Thermostat Crestron CHV-TSTATRF
Programming Software
Have a question or comment about Crestron software?
Answers to frequently asked questions (FAQs) can be viewed in the Online Help
section of the Crestron website. To post a question or view questions you have
submitted to Crestron’s True Blue Support, log in at http://support.crestron.com.
First-time users will need to establish a user account.
Earliest Version Software Requirements for the PC
NOTE: Crestron recommends that you use the latest software to take advantage of
the most recently released features. The latest software is available from the Crestron
website.
Crestron has developed an assortment of Windows-based software tools to develop
an infiNET system. For the minimum recommended software versions, visit the
Version Tracker page of the Crestron website (www.crestron.com/versiontracker
).
Configuration Manager
Programming with Crestron D3 Pro or SystemBuilder
Crestron D3 Pro or SystemBuilder is the easiest method of programming but does
not offer as much flexibility as SIMPL Windows. For additional details, download
D3 Pro or SystemBuilder from the Crestron website and examine the extensive help
files.
NOTE: Heat pump and dual-fuel heat pump systems require an outdoor temperature
sensor (e.g. Crestron’s C2N-RTHS, sold separately) to function properly. Use a
“Connect” step to attach the sensor’s “Temp” output to the “OutdoorTemp” input of
the CHV-TSTATRF.
Programming with SIMPL Windows
NOTE: While SIMPL Windows can be used to program the CHV-TSTATRF, it is
recommended to use SystemBuilder or D3 Pro for configuring a system.
SIMPL Windows is Crestron’s premier software for programming Crestron control
systems. It is organized into two separate but equally important “Managers”.
Configuration Manager is the view where programmers “build” a Crestron control
system by selecting hardware from the Device Library.
• To incorporate the CHV-TSTATRF into the system, first drag the
C2N-MNETGW (MNET Gateway) from the Wireless Receivers | Wireless
Receivers (RF) folder of the Device Library and drop it in the System
Views. Then drag the module from the infiNET Control Modules | infiNET
Sensing Modules folder of the Device Library and drop it on the
C2N-MNETGW.
30 • infiNET™ Thermostat: CHV-TSTATRF Operations & Installation Guide – DOC. 6490A
Page 35

Crestron CHV-TSTATRF infiNET™ Thermostat
NOTE: It is not recommended to add the CHV-TSTATRF directly.
Instead, add one of the available “modules” listed underneath it as shown
below.
Locating the C2N-MNETGW in the Device Library
Locating the CHV-TSTATRF in the Device Library
• The system tree of the control system displays the device in the appropriate
slot with a default MNET ID as shown in the following illustration.
C2Net Device, Slot 9
• Additional CHV-TSTATRF devices are assigned different MNET ID
numbers as they are added.
• If necessary, double click a device to open the “Device Settings” window
and change the MNET ID, as shown in the following figure.
Operations & Installation Guide – DOC. 6490A infiNET™ Thermostat: CHV-TSTATRF • 31
Page 36

infiNET™ Thermostat Crestron CHV-TSTATRF
“CHV-TSTATRF Device Settings” Window
• The ID code specified in the SIMPL Windows program must match the
MNET ID of each unit.
Program Manager
Program Manager is the view where programmers “program” a Crestron control
system by assigning signals to symbols. The symbol can be viewed by double
clicking on the icon or dragging it into Detail View. Each signal in the symbol is
described in the SIMPL Windows help file (F1).
Example Program
An example program for the CHV-TSTATRF is available from the Crestron website
(http://www.crestron.com/exampleprograms).
32 • infiNET™ Thermostat: CHV-TSTATRF Operations & Installation Guide – DOC. 6490A
Page 37

Crestron CHV-TSTATRF infiNET™ Thermostat
Uploading and Upgrading
Crestron recommends using the latest programming software and that each device
contains the latest firmware to take advantage of the most recently released features.
However, before attempting to upload or upgrade it is necessary to establish
communication. Once communication has been established, files (for example,
programs or firmware) can be transferred to the control system (and/or device).
Finally, program checks can be performed (such as changing the device ID) to
ensure proper functioning.
Establishing Communication
Use Crestron Toolbox for communicating with the CHV-TSTATRF; refer to the
Crestron Toolbox help file for details. There is a single method of communication:
indirect serial communication.
Indirect Serial Communication
infiNET
CRESNET
SERIAL,
CONTROL SYSTEM
• CHV-TSTATRF connects to the C2N-MNETGW (Gateway), which
connects to the control system via Cresnet.
• Establish communications between the PC and the control system as
described in the latest version of the 2-Series Control Systems Reference
Guide (Doc. 6256).
ETHERNET
OR USB
CHV-TSTATRFC2N-MNETGW
PC RUNNING
CRESTRON TOOLBOX
Programs and Firmware
Program or firmware files may be distributed from programmers to installers or from
Crestron to dealers. Firmware upgrades are available from the Crestron website as
new features are developed after product releases. One has the option to upload
programs via the programming software or to upload and upgrade via the Crestron
Toolbox. For details on uploading and upgrading, refer to the SIMPL Windows help
file or the Crestron Toolbox help file.
SIMPL Windows
Operations & Installation Guide – DOC. 6490A infiNET™ Thermostat: CHV-TSTATRF • 33
If a SIMPL Windows program is provided, it can be uploaded to the control system
using SIMPL Windows or Crestron Toolbox.
Page 38

infiNET™ Thermostat Crestron CHV-TSTATRF
Firmware
Check the Crestron website to find the latest firmware. (New users may be required
to register to obtain access to certain areas of the site, including the FTP site.)
Upgrade CHV-TSTATRF firmware via Crestron Toolbox.
• Establish communications with the CHV-TSTATRF and display the
“System Info” window.
• Select Functions | Firmware… to upgrade the CHV-TSTATRF firmware.
Since the CHV-TSTATRF might be “asleep”, there may be a delay of one minute or
less before the update starts.
Program Checks
Using Crestron Toolbox, display the network device tree (Tools | Network Device
Tree) to show all network devices connected to the control system and all infiNET
devices that have been acquired by the CHV-TSTATRF (C2N-MNETGW). Rightclick on the CHV-TSTATRF (C2N-MNETGW) to display actions that can be
performed on the CHV-TSTATRF (C2N-MNETGW).
34 • infiNET™ Thermostat: CHV-TSTATRF Operations & Installation Guide – DOC. 6490A
Page 39

Crestron CHV-TSTATRF infiNET™ Thermostat
Problem Solving
Troubleshooting
The following table provides corrective action for possible trouble situations. If
further assistance is required, please contact a Crestron customer service
representative.
CHV-TSTATRF Troubleshooting
TROUBLE POSSIBLE
CAUSE(S)
No display
Device does
not follow
control system
commands.
Heating/Cooling
system is not
operating.
No power from
system.
Incorrect mounting
to back plate.
Device is not
communicating
with the
C2N-MNETGW.
MNET ID of
device (or the
gateway ID) is not
set to match the
MNET ID of the
SIMPL Windows
program.
Device has
entered a state of
“hibernation”.
No power to
thermostat.
CORRECTIVE ACTION
Check for +24V on C connector.
Check circuit breaker powering
furnace or boiler.
Check thermostat wiring.
Check batteries (if running on battery
power).
Check thermostat mounting.
Open Crestron Toolbox and select the
Network Device Tree. Expand the
tree until the gateway to be managed
is selected.
Right-click the NET ID of the selected
gateway to open the
sub-menu and select Functions |
MNET Gateway… If device is not
listed, acquire the device to the
infiNET network (refer to ”Basic
Thermostat Setup” which starts on
page 15).
Use the Network Device Tree infiNET
network in Crestron Toolbox to poll
the infiNET network. Verify that the
MNET ID for the infiNET device is set
to match the MNET ID specified in the
SIMPL Windows program.
If the thermostat is unable to locate its
gateway for a period of one hour, in
order to prevent excess battery usage,
it will hibernate. In this state, it will
only look for the gateway once every
20 minutes. To remedy this, press any
button on the thermostat. It should
look for the gateway within 10
seconds.
Check circuit breaker.
Check for +24V on C connector.
Check circuit breaker powering
furnace or boiler.
Recheck wiring connections.
Check batteries, replace if necessary.
(Continued on following page)
Operations & Installation Guide – DOC. 6490A infiNET™ Thermostat: CHV-TSTATRF • 35
Page 40

infiNET™ Thermostat Crestron CHV-TSTATRF
CHV-TSTATRF Troubleshooting (Continued)
TROUBLE POSSIBLE
CAUSE(S)
Cannot change
setpoint setting.
System cycles
too quickly.
Room has high
temperature
variance.
Wide
temperature
variance in
single setpoint
Auto mode.
Heating/Cooling
not operating in
single setpoint
Auto mode.
Wrong
temperature is
displayed.
Heat or cool
call occurs but
device does not
indicate a heat
or cool call.
Can not enter
Auto mode.
The upper or lower
temperature limits
were reached.
Anticipator setting
is too low.
Anticipator setting
is too high.
Auto dead band
setting is too high.
20-minute system
toggling lockout.
Wrong
temperature scale.
A Temperature
Offset has been
applied.
Bad location.
Steal power
function may be
causing problems
with HVAC
system.
Improper wiring
connections.
Auto mode is
disabled in setup.
CORRECTIVE ACTION
Heat setpoint range is
38º to 89ºF (3º to 32ºC).
Cool setpoint range is 59º
to 99ºF (15º to 37ºC)
or 38º to 99ºF (3º to 37ºC) if extended
cool mode enabled.
Reprogram anticipator setting (refer to
“Setup Mode Parameters/Functions”
which starts on page 20).
Reprogram anticipator setting (refer to
“Setup Mode Parameters/Functions”
which starts on page 20).
Reprogram auto dead band (db)
setting (refer to “Setup Mode
Parameters/Functions” which starts
on page 20).
Reprogram auto dead band (db) and
anticipator settings for smoother
operation (refer to “Setup Mode
Parameters/Functions” which starts
on page 20).
Select F or C as necessary.
Reset Temperature Offset (refer to
“Setup Mode Parameters/Functions”
which starts on page 20).
Ensure the thermostat is located away
from direct sunlight, drafts, doorways,
skylights and windows or exterior
walls.
Change power setting (Po) to “24” and
ensure you have two AA batteries
installed.
Recheck wiring connections.
Reprogram Auto mode setting (AU) to
“S” (for single setpoint operation) or
“d” (for dual setpoint operation) (refer
to “Setup Mode
Parameters/Functions” which starts
on page 20).
Bootloader
The bootloader is a low-level version of the CHV-TSTATRF’s firmware that will
become active in the event an upload of the standard firmware fails. This lets you
perform some basic functions with the goal of getting the CHV-TSTATRF back to
normal operation.
36 • infiNET™ Thermostat: CHV-TSTATRF Operations & Installation Guide – DOC. 6490A
Page 41

Crestron CHV-TSTATRF infiNET™ Thermostat
If the CHV-TSTATRF goes into bootloader, the large seven-segment display will
show “Ld”, except when in Setup mode. All other LCD segments will be off. All
button presses will be ignored, except for the sequence which enters Setup mode
(refer to “Setup Mode” which starts on page 19).
From the bootloader, Setup mode will support only the following functions:
• Check Firmware Version (rE)
• infiNET ID (id)
• infiNET RF Channel (CH)
• Start infiNET Acquire (AC)
• Unacquire Gateway (UA)
To restore functionality, try cycling power to the CHV-TSTATRF. If unit remains in
bootloader, you should resend the latest firmware using Crestron Toolbox.
NOTE: To manually enter bootloader, press and hold the MODE button for 10
seconds during unit power up.
Reference Documents
The latest version of all documents mentioned within the guide can be obtained from
the Crestron website (http://www.crestron.com/manuals). This link will provide a list
of product manuals arranged in alphabetical order by model number.
List of Related Reference Documents
DOCUMENT TITLE
2-Series Control Systems Reference Guide
C2N-MNETGW infiNET Gateway/Transceiver
Further Inquiries
If you cannot locate specific information or have questions after reviewing this
guide, please take advantage of Crestron's award winning customer service team by
calling Crestron at 1-888-CRESTRON [1-888-273-7876].
You can also log onto the online help section of the Crestron website
(www.crestron.com/onlinehelp
users will need to establish a user account to fully benefit from all available features.
) to ask questions about Crestron products. First-time
Future Updates
As Crestron improves functions, adds new features and extends the capabilities of
the CHV-TSTATRF, additional information may be made available as manual
updates. These updates are solely electronic and serve as intermediary supplements
prior to the release of a complete technical documentation revision.
Check the Crestron website periodically for manual update availability and its
relevance. Updates are identified as an “Addendum” in the Download column.
Operations & Installation Guide – DOC. 6490A infiNET™ Thermostat: CHV-TSTATRF • 37
Page 42

infiNET™ Thermostat Crestron CHV-TSTATRF
Appendix: About Heat Pumps
A heat pump extracts available heat from one area and transfers it to another. Even
cold air contains some heat and heat pumps can extract heat from the outside air on a
cold day and transfer it indoors to maintain a comfortable temperature. A heat pump
also works in reverse during the summer, extracting heat from indoors and
transferring it outdoors.
In the heating mode, the efficiency of a heat pump decreases as the outdoor air
temperature decreases.
Heat Pump Operation
Heat flows naturally from a warm area to a cooler area and the heat pump takes
advantage of this principle. The heat pump essentially consists of a compressor, an
inside coil and fan and an outside coil and fan. A refrigerant flows inside the coils,
under pressure applied by the compressor.
The refrigerant boils at a very low temperature (as low as -15° F) and becomes a
vapor, just as water becomes a vapor (steam) when boiled. This vapor is sucked into
the compressor where it becomes a high pressure, high temperature vapor.
When heating, the refrigerant is then forced through a coil within part of the heat
pump located indoors. A fan blows cool air over the coil, the vapor cools, turns back
to a liquid, releasing heat that is blown through a duct system to heat the house.
The cycle begins again as the cooled liquid refrigerant is pumped back outside after
releasing it’s heat. On the way, it passes through an expansion valve, lowering the
refrigerant's pressure and temperature again so it can boil more easily in the outdoor
coil.
In its cooling mode the heat pump system works in reverse, extracting available heat
from indoors and transferring it outside.
Heat pumps are most economical when they can be used year-round for both winter
heating and summer cooling.
The efficiency of a heat pump varies significantly with the outdoor temperature.
While a heat pump may be twice as efficient as a conventional heating system at
50°F. When the outdoor temperature drops to less than 30°F, the heat pump must be
supplemented with an auxiliary heating system such as electric resistance. At
temperatures of 15°F or less the heat pump may shut off and the backup heating
system takes over. This is the heat pump balance point.
In a dual-fuel system, the heat pump is supplemented with a standard furnace, which
takes over when it becomes more efficient than the heat pump at very low
temperatures. The heat pump type setting (HP) of the Heat/Cool Type (HC) setup
parameter will allow aux heat to stage with the heat pump. A dual-fuel type setting
(dF) will not allow both systems to run at the same time.
38 • infiNET™ Thermostat: CHV-TSTATRF Operations & Installation Guide – DOC. 6490A
Page 43

Crestron CHV-TSTATRF infiNET™ Thermostat
Glossary
Anticipators
Used to anticipate the drop or rise in temperature and energize the
appropriate system before reaching the set point. Anticipators affect how
tightly the setpoint temperature is maintained.
Auto Dead Band
Sets the minimum separation in auto mode between heat and cool setpoints
(with dual setpoints) or maximum drift before system latches alternate
mode (with single setpoint).
Balance Point
At low outdoor temperatures, the refrigeration cycle of a heat pump will not
be able to supply the heating requirements without the aid of a
supplementary heat source. At higher outdoor temperatures, it is inefficient
to use supplementary heat.
The heat pump balance point sets the minimum outdoor temperature
required to allow operation of the heat pump. Additionally, for conventional
heat pump system types (Heat/Cool Type setup parameter = HP), the AuxHeat Balance Point sets the maximum outdoor temperature to allow
operation of the auxiliary heat.
Since dual fuel system types only allow operation of one system at a time,
only one balance point is available.
Blower (Fan)
An air-handling device for moving air in a distribution system.
Call
A call is the action taken by the thermostat when it sends a signal to turn on
the heating or cooling system.
Dual Fuel
A heat pump used in conjunction with an existing fossil fueled furnace.
Emergency Heat (Supplementary Electric Heat)
The auxiliary (AUX) or emergency heat provided at temperatures below a
heat pump's balance point. It is usually electrical resistance heat.
Extended Cool
Extends the cool setpoint range to the full auto range of 38 to 99°F.
Forced Air
A type of heating system that uses a blower motor to move air through the
furnace and into the ductwork.
Furnace
Equipment used to convert heating energy, such as fuel, oil, gas or
electricity, to usable heat. It usually contains a heat exchanger, a blower and
the controls to operate the system.
Heat Pump
A unit that both cools and heats. A heat pump system can be either a split
system or a packaged system. A heat pump can be used in conjunction with
a gas/oil/LP furnace (using the furnace instead of electric resistance heat
when temperatures fall below about 35º F).
Operations & Installation Guide – DOC. 6490A infiNET™ Thermostat: CHV-TSTATRF • 39
Page 44

infiNET™ Thermostat Crestron CHV-TSTATRF
Humidity
The total amount of moisture in air. Relative humidity (RH) is the amount
of moisture in air, relative to its total capability based upon its temperature
(dew point). Moisture will condense on surfaces that are below this dew
point.
HVAC
Heating, ventilation and air conditioning.
Interstage Differential
The proportional temperature error (0.5 to 3.0º) to trigger the second stage
(2-stage only), such as the aux heat for a heat pump type system.
Run Fan in Heat Calls
A device setting that activates the fan output during heat (W) calls. (For
heat pump or dual fuel system types, this setting activates the fan during
calls for auxiliary heat.
Setpoint
The user selectable temperature you want the system to maintain.
Time Delay (Timer Guards)
Refers to a safety device or circuit that will not allow restart for three
minutes.
40 • infiNET™ Thermostat: CHV-TSTATRF Operations & Installation Guide – DOC. 6490A
Page 45

Crestron CHV-TSTATRF infiNET™ Thermostat
Return and Warranty Policies
Merchandise Returns / Repair Service
1. No merchandise may be returned for credit, exchange or service without prior authorization
from CRESTRON. To obtain warranty service for CRESTRON products, contact an
authorized CRESTRON dealer. Only authorized CRESTRON dealers may contact the factory
and request an RMA (Return Merchandise Authorization) number. Enclose a note specifying
the nature of the problem, name and phone number of contact person, RMA number and
return address.
2. Products may be returned for credit, exchange or service with a CRESTRON Return
Merchandise Authorization (RMA) number. Authorized returns must be shipped freight
prepaid to CRESTRON, 6 Volvo Drive, Rockleigh, N.J. or its authorized subsidiaries, with
RMA number clearly marked on the outside of all cartons. Shipments arriving freight collect
or without an RMA number shall be subject to refusal. CRESTRON reserves the right in its
sole and absolute discretion to charge a 15% restocking fee plus shipping costs on any
products returned with an RMA.
3. Return freight charges following repair of items under warranty shall be paid by CRESTRON,
shipping by standard ground carrier. In the event repairs are found to be non-warranty, return
freight costs shall be paid by the purchaser.
CRESTRON Limited Warranty
CRESTRON ELECTRONICS, Inc. warrants its products to be free from manufacturing defects in materials
and workmanship under normal use for a period of three (3) years from the date of purchase from
CRESTRON, with the following exceptions: disk drives and any other moving or rotating mechanical
parts, pan/tilt heads and power supplies are covered for a period of one (1) year; touchscreen display and
overlay components are covered for 90 days; batteries and incandescent lamps are not covered.
This warranty extends to products purchased directly from CRESTRON or an authorized CRESTRON
dealer. Purchasers should inquire of the dealer regarding the nature and extent of the dealer's warranty, if
any.
CRESTRON shall not be liable to honor the terms of this warranty if the product has been used in any
application other than that for which it was intended or if it has been subjected to misuse, accidental
damage, modification or improper installation procedures. Furthermore, this warranty does not cover any
product that has had the serial number altered, defaced or removed.
This warranty shall be the sole and exclusive remedy to the original purchaser. In no event shall
CRESTRON be liable for incidental or consequential damages of any kind (property or economic damages
inclusive) arising from the sale or use of this equipment. CRESTRON is not liable for any claim made by a
third party or made by the purchaser for a third party.
CRESTRON shall, at its option, repair or replace any product found defective, without charge for parts or
labor. Repaired or replaced equipment and parts supplied under this warranty shall be covered only by the
unexpired portion of the warranty.
Except as expressly set forth in this warranty, CRESTRON makes no other warranties, expressed or
implied, nor authorizes any other party to offer any warranty, including any implied warranties of
merchantability or fitness for a particular purpose. Any implied warranties that may be imposed by law are
limited to the terms of this limited warranty. This warranty statement supersedes all previous warranties.
Trademark Information
All brand names, product names and trademarks are the sole property of their respective owners. Windows is a registered trademark
of Microsoft Corporation. Windows95/98/Me/XP/Vista and WindowsNT/2000 are trademarks of Microsoft Corporation.
Operations & Installation Guide – DOC. 6490A infiNET™ Thermostat: CHV-TSTATRF • 41
Page 46

infiNET™ Thermostat Crestron CHV-TSTATRF
This page is intentionally left blank.
42 • infiNET™ Thermostat: CHV-TSTATRF Operations & Installation Guide – DOC. 6490A
Page 47

Crestron CHV-TSTATRF infiNET™ Thermostat
This page is intentionally left blank.
Operations & Installation Guide – DOC. 6490A infiNET™ Thermostat: CHV-TSTATRF • 43
Page 48

Crestron Electronics, Inc. Operations & Installation Guide – DOC. 6490A
15 Volvo Drive Rockleigh, NJ 07647 (2015101)
Tel: 888.CRESTRON 11.08
Fax: 201.767.7576 Specifications subject to
www.crestron.com change without notice.
 Loading...