

Creek Audio Destiny User Manual

DESTINY
RDS FM/AM TUNER
DESIGNED AND ENGINEERED
IN THE UNITED KINGDOM
Thank you for purchasing the Creek Destiny tuner. You are now in possession of a State of the Art RDS
AM/FM tuner. The Destiny is the matching tuner for the Destiny Integrated Amplifier and CD Player,
although it will also work very well with any other manufacturers’ amplifiers.
The functions and operation of the Destiny tuner are deceptively simple for the many features that it offers,
all of which can be remotely controlled.
SAFETY REQUIREMENTS
Read all the instructions before connecting or operating the unit. Keep this manual so you can refer to these
safety instructions.
WATER & MOISTURE
To reduce the risk of fire or electric shock, do not expose the unit to moisture or water. If the unit is exposed
to moisture, immediately disconnect the power cord from the wall. Take the unit to an authorised service
centre for inspection. Do not touch the unit, power cord, or plug with wet hands.
OPERATING INSTRUCTIONS
VENTILATION
You must allow 5 cm (2 inches) of unobstructed clearance around the unit. Do not place the unit on a bed,
sofa, rug, or similar surface that could block ventilation from the bottom.
HEAT
Keep the unit away from naked flames, radiators, stoves, or any other heat-producing appliances (including
amplifiers).
RACK & STANDS
Place the unit on a fixed, level surface strong enough to support its weight, such as the Creek Audio Rack. Do
not place it on a moveable device that could tip over.
CLEANING
Unplug the unit from the mains supply before cleaning. The case should normally require only a wipe with a
soft lint-free cloth.
POWER SOURCES
Only connect the unit to a power supply of the type and voltage described in the operating instructions or
specified on the rear panel of the unit.
POWER CORD PROTECTION
Connect the unit to the power outlet only with the cord supplied. Do not modify the supplied cable in any
way. Do not attempt to defeat grounding and/or polarisation provisions. Do not use extension cords. Do
not route the power cord where it will be crushed, pinched, bent at severe angles, exposed to heat, or
damaged in any way.
NON-USE PERIODS
If the unit is to be left unused for a long period of time, the power cord should be unplugged from the wall
outlet.
DESTINY RDS FM/AM TUNER OPERATING INSTRUCTIONS
SAFETY INSTRUCTIONS CONT’D
DAMAGE REQUIRING SERVICE
Stop using the unit immediately and have it inspected by an authorised service centre whenever:
1. The power supply cord or plug has been damaged.
2. Liquid has been spilled into the unit.
3. The unit has been exposed to rain.
4. The unit does not operate properly.
5. The unit has been dropped or damaged.
6. Smoke or any unusual smell is detected from the unit.
CAUTION: To reduce the risk of electric shock, do not remove cover. No serviceable parts inside.
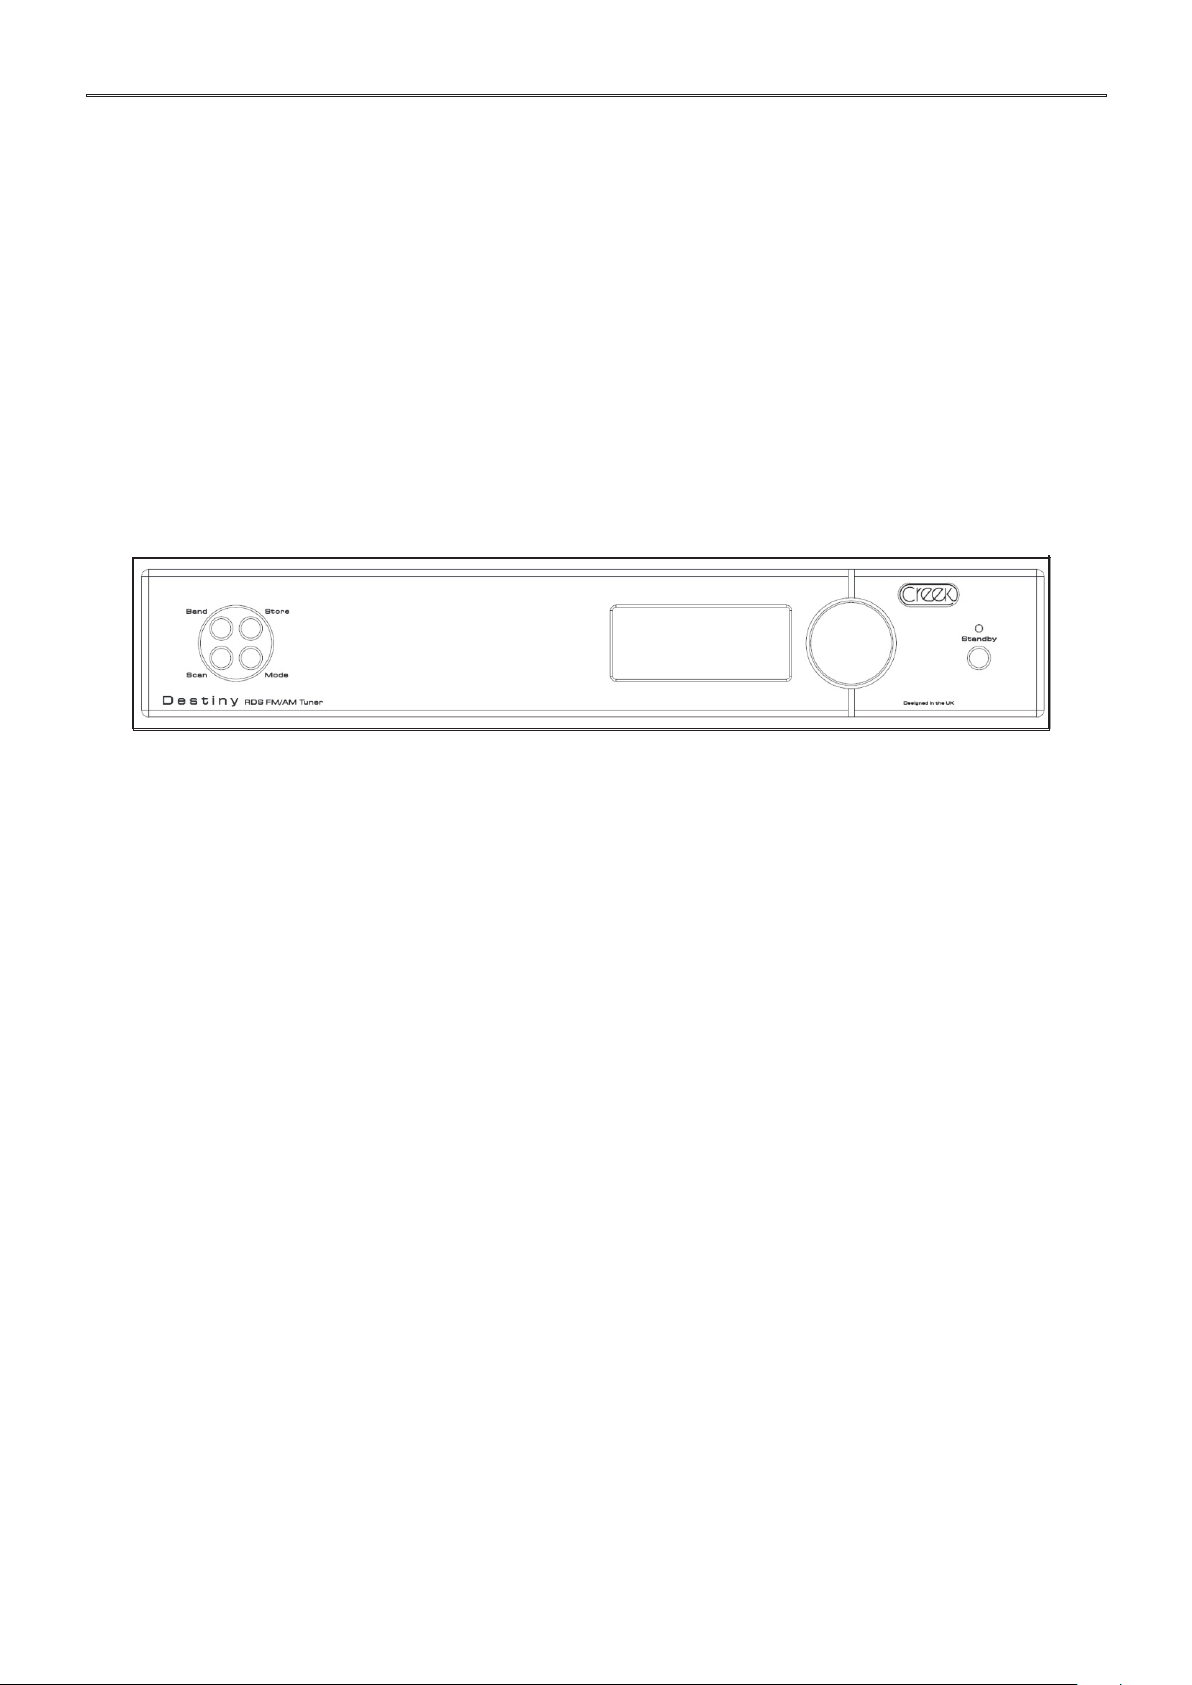
FRONT PANEL
FRONT PANEL CONTROLS & OPERATION
STANDBY
Press this button to turn the tuner on and off. In standby, this product draws less than 1 Watt of power. However,
if you are leaving the unit switched off for a long period, it is advisable to switch it off permanently by using the
POWER SWITCH on the rear panel.
TUNING
Turn the knob left or right to manually fine tune stations after switching Mode to tuning. When tuned to the maximum
frequency, it is possible to go to the minimum frequency quickly by continuing to turn the knob clockwise. The
frequency will flip to the bottom 87.5Mhz on FM.
PRE-SET
Steps up or down through pre-set stations by turning the knob on the right after switching Mode to Pre-set. When
using Pre-set mode, after reaching the last stored station in FM, the tuner will flip to any stored stations in AM, then
back to FM if the knob is turned back or forward through all of the stored AM stations.
MODE
Press this button to select manual tuning or pre-set mode, when using the knob on the right of the panel. The
button toggles between the 2 functions and the display will either show the pre-set station number, say 12F, for the
station pre-set 12, or it will show 00F at the beginning to indicate free tuning and not pre-set.
SCAN
Pressing the Scan button will automatically search for the next tuned (strong) station. If you want to keep it, follow the
"Store" procedure described below.
STORE
Use to set a station pre-set. Tune to the station you wish to save as a pre-set. Press the STORE button then press the
MODE button (to select the PRE-SET mode). The band (FM or AM) and a pre-set number will be displayed and begin to
flash. Turn the tuning/preset knob on the front panel until the desired number is displayed then press the STORE
button. Any number from 1- 80 can be used for AM or FM pre-sets. Pre-sets can be set faster by using the remote
control.
Page Two
 Loading...