

Cree XSP Series Installation Instructions Manual
XSP Series
LED Street Light
Includes: XSPR™ Luminaires
When using electrical equipment, basic safety precautions should always be followed
including the following:
READ AND FOLLOW ALL SAFETY INSTRUCTIONS
IMPORTANT SAFEGUARDS
1. DANGER- Risk of shock- Disconnect power before installation.
DANGER – Risque de choc – Couper l’alimentation avant l’installation.
2. This luminaire must be installed in accordance with the NEC or your local electrical
code. If you are not familiar with these codes and requirements, consult a qualied
electrician.
Ce produit doit être installé conformément à NEC ou votre code électrique local.
Si vous n’êtes pas familier avec ces codes et ces exigences, veuillez contacter un
électricien qualié.
3. If NEMA photo control is installed refer to NEMA Receptacle section for instructions.
4. If mounting bolts are completely removed in the eld they should be hand threaded
(prior to use of power tools) to ensure proper engagement of the thread when reinstalling. Failure to pre-start threads may result in cross-threading or stripping of the
bolts during reinstallation.
SAVE THESE INSTRUCTIONS FOR FUTURE REFERENCE
TO INSTALL:
1 2
Cover Tabs
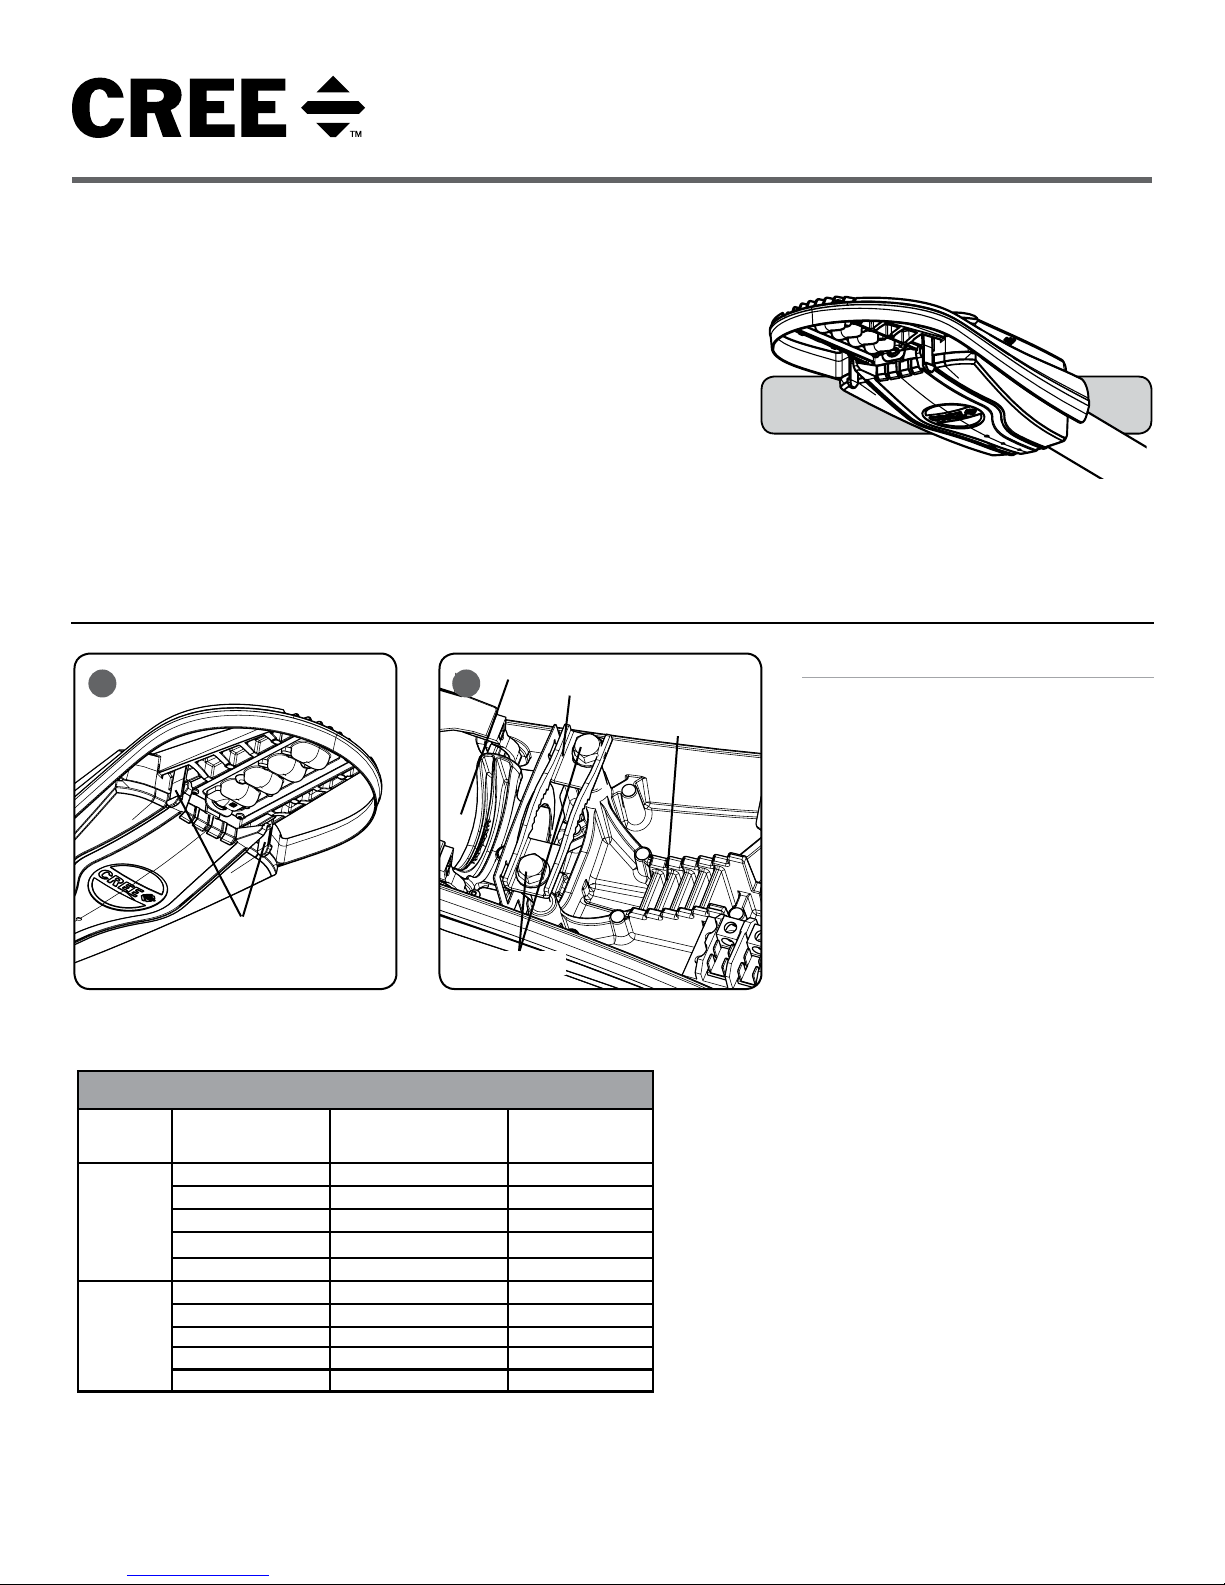
TORQUE VALUES
Pipe
Size
1.66 in O.D.
2.38 in O.D.
1 of 2
Pipe Position
+5.0 degrees tilt 275 31
+2.5 degrees tilt 275 31
0 degrees (no tilt) 275 31
-2.5 degrees tilt 275 31
-5.0 degrees tilt 275 31
+5.0 degrees tilt 225 25
+2.5 degrees tilt 225 25
0 degrees (no tilt) 225 25
-2.5 degrees tilt 225 25
-5.0 degrees tilt 225 25
Bolt Torque
Required (in-lbs)
Pole
Mounting
Bracket
Mounting Bracket
Bolts
Bolt Torque
Required (N-m)
Adjustment
Steps
INSTALLATION INSTRUCTIONS
LUMINAIRE INSTALLATION
STEP 1:
DO NOT remove splashguard from fixture. If
mounting fixture to 1.25 IP pipe (1.66 O.D.), there
is no need to modify the splashguard. If mounting
fixture onto 2.0 IP pipe (2.38 O.D.), remove
the knockout of the splashguard thru the rear
opening of the fixture while the fixture is closed.
STEP 2:
To open cover, press tabs in on both sides of the
cover and carefully let the cover swing down.
Splashguard may dislodge from fixture, but
should be repositioned once ready to mount. See
Figure 1.
STEP 3:
Slide fixture on to pole through opening on the
rear of housing and through splashguard. See
Figure 2.
STEP 4:
Adjust leveling of fixture from side to side. To
level from front to back, slide pole to different
Adjustment Steps in upper housing. Each step
changes the angle in 2.5° degree increments.
STEP 5:
Once desired position is achieved, tighten
mounting bolts to the appropriate torque values
specified in TORQUE VALUES table on the back
of the sheet. See Figure 2 (use 9/16" socket
wrench).
STEP 6:
IMPORTANT - DO NOT exceed these
torque levels on the mount bolts. Exceeding
recommended torque value resulting in excessive
deformation of mounting bracket will cause
stripping of mount hardware which could lead to
an unsafe mounting condition.
STEP 7:
Reference Electrical Connections section for
completing electrical connections.
CI379X20R3
LINE
OR HOT 1
GREEN
LINE-BLACK
GROUND-GREEN
NEUTRAL-WHITE
DIM (-) GREY
DIM (+) VIOLET
NEUTRAL
OR HOT 2
VIOLET
GREY
SUPPLY WIRING
(DIMMING OPTIONAL)
LUMINAIRE
OPTIONAL NEMA CONTENT
TERMINAL
BLOCK
DRV
A
B
C
D
E
F
G
H
I
DRV CRTL
1 2 3 4 5
3 4
DRV
A
B
C
D
E
F
G
H
I
DRV CRTL
1 2 3 4 5
NEMA® RECEPTACLE (OPTIONAL)
STEP 1:
Rotational adjustment of the photo control is
tool-less.
STEP 2:
Engage/install photo control into NEMA®
receptacle on top of the fixture.
STEP 3:
Firmly rotate photo-control with its photoeye approximately in the ‘N’ north direction.
Some photo-controls operate best somewhere
between NW and NE.
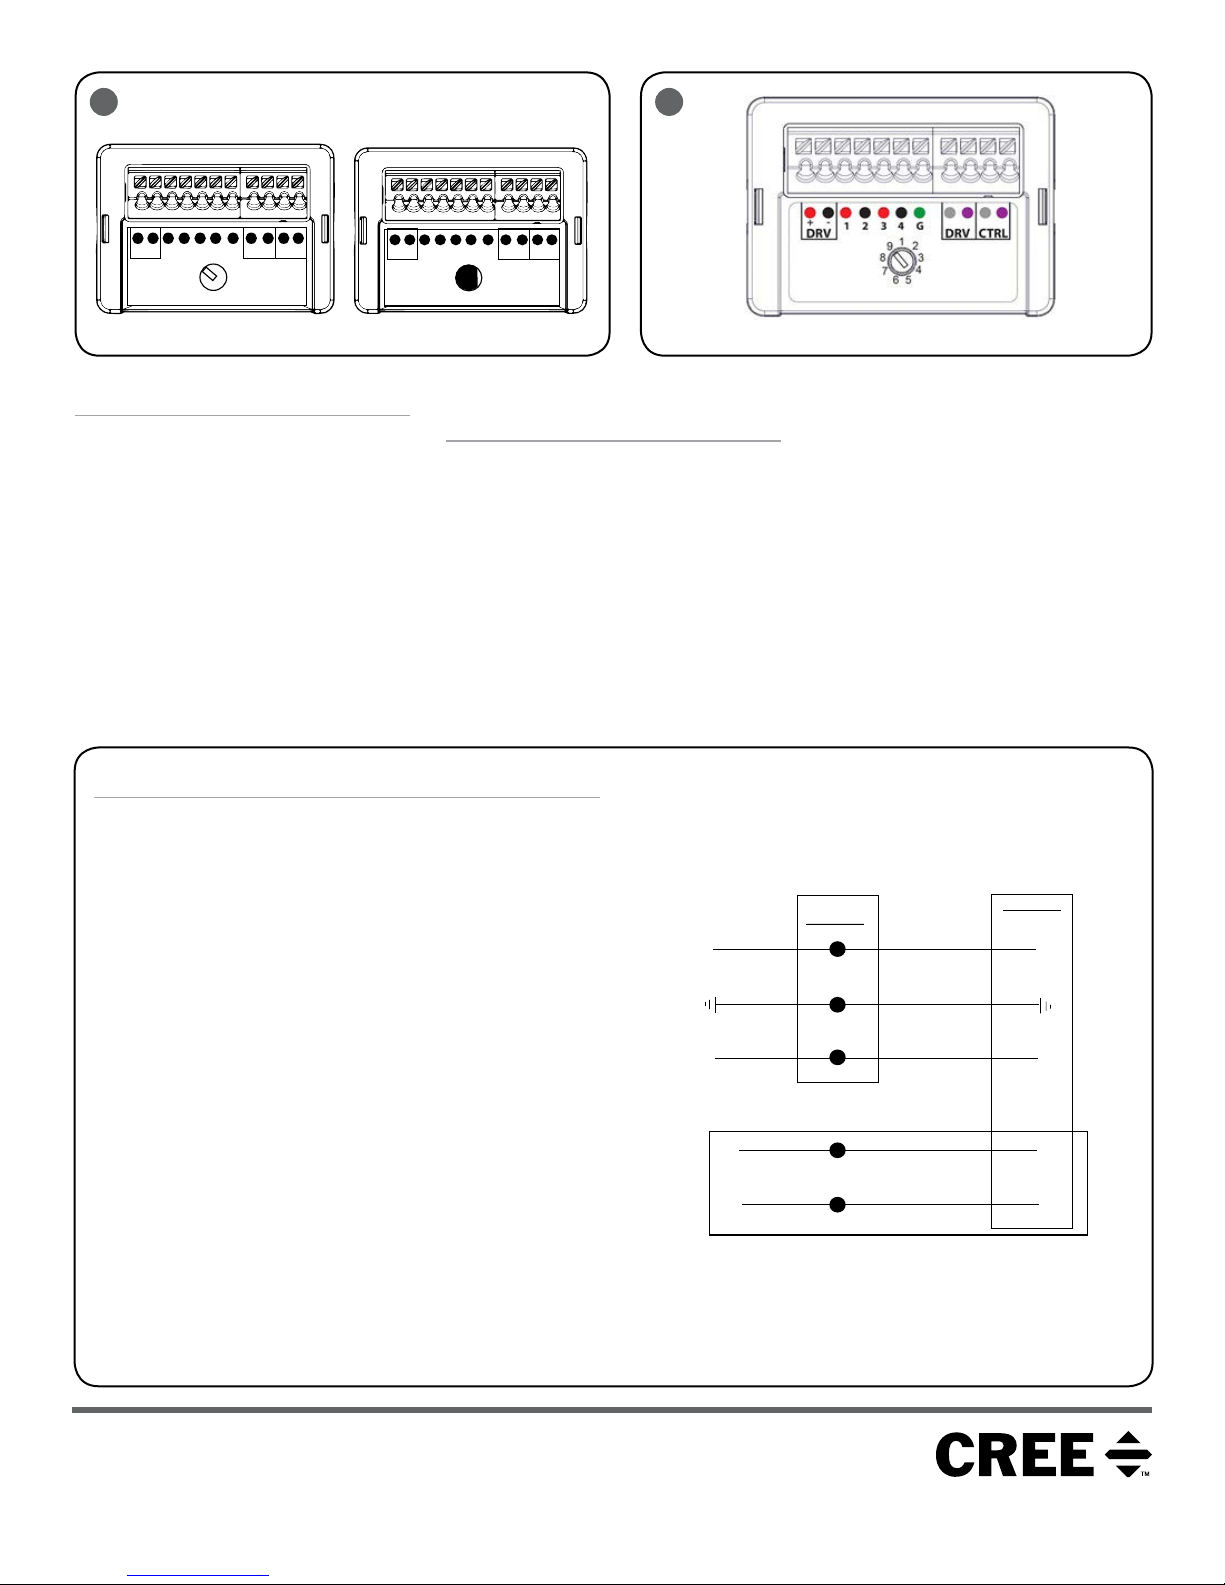
FIELD ADJUSTABLE DIMMING
(OPTIONAL)
NOTE: This luminaire may be provided with
field adjustable dimming. Luminaires leave
the factory adjusted to the maximum setting
specified when ordered. Verify which dimming
module, either Figure 3 or 4 is in the luminaire
and visit the product specification sheet for
lumen and power multipliers for each field
adjustable output dim setting.
STEP 1:
The Dimming module is located inside the
luminaire.
ELECTRICAL CONNECTIONS
STEP 1:
Make the following Electrical Connections to the terminal block:
a. For 120/277V connect the black fixture lead to the voltage supply
position of the terminal block (Hot 1 for 208/240V wiring).
b. For 120/277V connect the white fixture lead to the neutral supply
position of the terminal block or (Hot 2 for 208/240V wiring).
c. Connect the green or green/yellow ground lead to the green wire
position of the terminal block.
Dimming capabilities may be accessible through optional Nema
receptacle.
NOTE: Brown and orange leads on optional NEMA Receptacle are not
used and are capped off. No electrical connection is necessary.
d. If Dimming is an option; connect the violet dimming positive lead
to the supply dimming positive lead. If dimming is not being used
ensure to cap off the violet lead.
e. If Dimming is an option; connect the grey dimming
to the supply dimming negative lead. If dimming is not being
used ensure to cap off the grey lead.
f. If dimming through Nema is an option, install photo control with
dimming capabilities.
STEP 2:
Push excess supply wires into pole.
STEP 3:
Close cover, making sure that no wires are pinched and latches are
fully engaged.
STEP 2:
Establish the desired input power multiplier by
referring to the product dimming spec sheet
and turn the switch to the correlating position.
For the half moon shaped dial (Figure 3) the
center of the flat side should be turned to the
desired setting.
STEP 3:
Adjust the Dimming Module, see Figure 3 or
4, to the selected position and close the cover
ensuring no wires are pinched.
NOTE: The Utility Option will be limited to the
highest setting ordered.
negative lead
© 2018 Cree, Inc. All rights reserved. For informational purposes only. Content is subject to change. See
http://lighting.cree.com/warranty for warranty and specifications. Cree® is a registered trademark, and the
Cree logo and XSPR™ are trademarks of Cree, Inc.
2 of 2
www.cree.com/lighting
CI379X20R3
 Loading...