

Page 1

Instructions for Installation and Use
Dishwasher
Model IDV60
T o the Installer:
Before installation please make a note of the product details specified on the back cover
of this book.
The information can be found on the rating plate.
T o the User:
Y ou must read the instructions prior to installing and using the appliance
and then retain them for future reference.
Page 2

ISHWASHER
D
Contents
Electrical Connection
For Your Safety
Installation
Getting to know your Dishwasher
The Controls
How to use your Dishwasher
Programme Chart
Before Using your Dishwasher
Loading your Dishwasher
Care and Cleaning
Troubleshooting
Information for Test Labs
Key Contacts
3
4
5
6
6
7
8
9-10
11
12
13
14
Back Cover
Retention of this Instruction Book
This Instruction Book must be kept handy for reference as it contains important details on the safe and proper use of
the appliance.
If you sell or pass the appliance to someone else, or move house and leave it behind, make sure this Book is also
provided so the new owner can become familiar with the appliance and safety warnings.
If the Book is lost or damaged a copy may be obtained from:
GDA LTD., Morley Way, Peterborough, PE2 9JB
2
Page 3

Electrical Connection
WARNING: This appliance must be earthed.
ISHWASHER
D
Fuses
Y our appliance comes fitted with a plug and a 13A fuse. If you need to replace
the fuse, only those rated at 13A and ASTA approved to BS1362 should be
used. If you lose the fuse cover, a replacement may be obtained from your
local authorised Service Centre or Electrical company. Correct replacement is
identified by colour coding or the marking on base of plug.
WARNING: DO NOT use the plug unless the fuse cover is fitted.
Safety Information
At the time of delivery...
All functions of your dishwasher have been thoroughly tested at the factory . A
small number of water marks may have been left as a result, they will
disappear when the appliance is used for the first time.
WARNING: The dishwasher must not be connected to the electricity
supply while installation is being carried out.
- This appliance should only be connected to a 230/240V AC source,
Changing the Plug
Cut off and dispose of the supplied plug if it does not fit your socket.
WARNING: T o avoid a shock hazard DO NOT insert the discarded plug
into a socket anywhere else.
IMPORTANT : WIRES IN THE MAINS LEAD ARE COLOURED IN
ACCORDANCE WITH THE FOLLOWING CODE:
Green/Yellow - Earth
Blue - Neutral
Brown - Live
If you change the plug, the colour of the wires in the mains lead may not
correspond with the terminal markings in the plug, which if not coloured, could
be:
E AR T H ‘E’ or
NEUTRAL ‘N’
LIVE ‘L’
- Use the dishwasher solely in a domestic environment.
- DO NOT stand or place heavy objects on the door when it is
If your family includes children...
- DO NOT allow children to play with the appliance or tamper
- Keep detergents and rinse aids away from children. Keep
via a properly installed earthed socket.
open, this could damage the door or cause the appliance to tip
forward.
with its controls.
children away from the open door of a dishwasher, there could
still be some detergent left inside.
Changing the Mains Lead
A lead can be ordered from Creda Service
UK: 08709 066 066 or
Republic of Ireland: 1850 302 220
If you have damaged the existing lead or require a longer one a charge will be
made. It is strongly advised that this work is carried out by a qualified
electrician.
If the domestic wiring includes a residual current-operated circuit breaker,
ensure that it conforms to the latest regulations.
CAUTION:
The dishwasher meets the requirements set out by the regulations in force
concerning safety and electrical equipment.
Any technical checks should be conducted exclusively by a trained and
authorised technician: Repairs carried out by unaithorised persons will
invalidate the guarantee, as well as posing a potential hazard to the user.
The manufacturer declines all responsibility for damage to persons or property
resulting from failure to observe the above precautions, from tampering with
even a single component or from the use of non-original spare parts.
3
Page 4

ISHWASHER
D
For your Safety
This manual forms an integral part of the appliance. It must always be kept handy for reference. Read through all the instructions contained in this manual before using this
dishwasher.
Installation must be performed by a qualified technician, in compliance with the
regulations in force, including the prevention and elimination of radio frequency
interference.
The dishwasher is designed for washing and drying dishes, any other
use shall be considered improper. The manufacturer declines all
responsibility for uses other than those described above.
1 . Seperate the various packaging
materials and dispose of safely DO NOT leave discarded
packaging material around the
home.
2 . After removing the packaging,
check to make sure your appliance
is intact. If in doubt, contact a
qualified professional.
3. DO NOT use extension leads and
multiple plugs. If the electricity
supply wire is not long enough,
then have it replaced with one of
the correct length and remember
that it should be free of bends or
dangerous kinks.
4 . In the event of any damage to the
power cord have it replaced by a
qualified technician.
5 . The mains plug must be easily
accessible after installation.
6 . If the appliance is not operating
properly or if maintenance
operations are necessary,
disconnect the dishwasher from
the mains power supply (unplug
it!).
7. DO NOT install outdoors, not even
if the area is covered by a roof: it is
extremely dangerous to leave it
exposed to rain and
thunderstorms.
8. If installed on a carpeted or
covered floor, ensure that the
openings on the underside are not
obstructed.
9. Do not touch the heating element
during or straight after a wash
cycle.
10 . If the appliance malfunctions,
turn off the water inlet tap and
disconnect the plug from the wall
socket. Then read the section
entitled "Troubleshooting". If you
cannot resolve the problem, then
call Creda Service (see KEY
CONTACTS, back page).
The rating plate, featuring the
technical data, serial number and
markings, is visibly positioned
on the inner edge of the door.
DO NOT remove the rating plate.
The dishwasher is intended for use by adults. DO NOT allow children to come
near or play with the controls.
Keep children away from detergents and clear of the dishwasher door when
open.
Keep all packaging material away from children.
1 . DO NOT use solvents, such as alcohol or turpentine which may cause an
explosion.
2. DO NOT load dishes to wash that are soiled with ash, wax or paints.
3 . DO NOT lean, sit or stand on any part of the dishwasher - this could cause
injury and/or damage the appliance.
4. DO NOT drink any water residues from inside the dishwasher.
4
Page 5
Installation
ISHWASHER
D
Choose where you want to install your
dishwasher, you can place it so that its
sides or back panel are side by side with
furniture or up against the wall. The
dishwasher is provided with water supply
and drain hoses, which can be directed
towards the left or right to facilitate
appropriate installation.
Levelling.
Once the appliance is positioned, adjust
the feet by screwing them in or out
depending on how high you want it and
to level it so that it is horizontal. Make
sure that it is not inclined more than 2
degrees. If the appliance is level, it will
help ensure its correct operation.
Height Adjustment
Insert the appliance into the cutout and
then adjust the height using the screws
located on the front bottom part of the
machine. Use a screwdriver to turn the
screws in the clockwise or anti-clockwise
direction to increase or decrease the
height respectively.
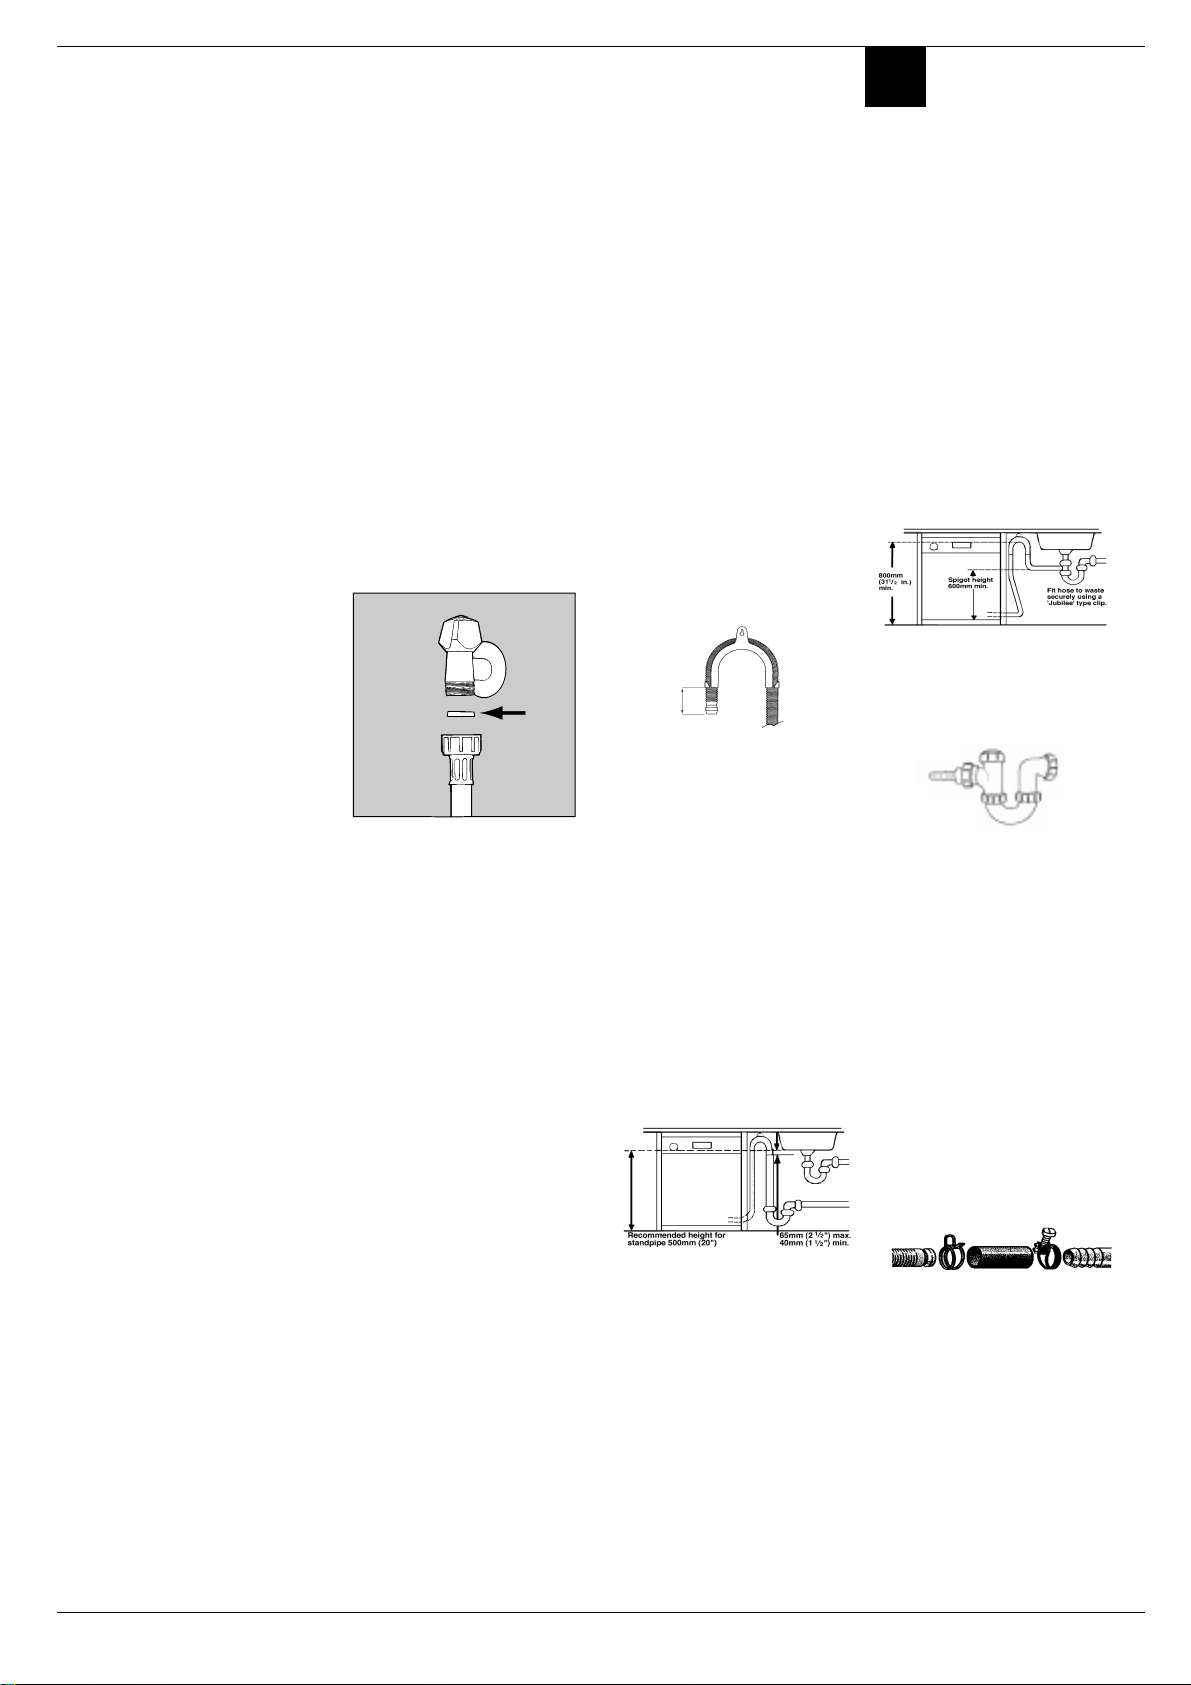
Cold water connection.
Connect the cold water supply hose,
inserting the small filter supplied with the
dishwasher and making sure that it is
fastened tightly in place (see figure 2). If
the water hoses are new or have been
out of use for an extended period of time,
let the water run to make sure it is clear
and free of impurities before making the
connection. If this precaution is not taken,
the water inlet could get blocked, causing
damage to your dishwasher.
A
Fig.2
Drain hose connection.
WARNING: Connect your dishwasher
drain hose to pipes which connect to the
foul drain system and not to surface
water drains.
IMPORT ANT: For the correct operation
of your dishwasher, it is essential to
comply with the following information:-
Standpipe:
Ensure that the hose is not pushed too
far down the standpipe.
If the end of your drain hose is fitted with
‘retaining flaps’, ensure they are inserted
fully into the standpipe. This will prevent
the pipe from jumping out during
installation and use.
DO NOT position the standpipe near an
electrical outlet.
ENSURE that the drain hose is not
kinked and it is routed as shown in the
diagram.
The standpipe should have a bore of at
least 38mm (11/2”). It should be installed
as shown, have a trap fitted and must
discharge into the same drain system
as your household sink.
It MUST NOT be connected to a surface
water drain.
Sink Waste System:
For under sink drainage:
Before connecting the drain hose,
remove any internal restrictions - This
will prevent a build up of debris which
could cause a blockage.
Remove any restrictions from the waste
spigot and ensure that the sealing bung
is removed. The hose should be routed,
such that it is raised to a minimum height
of 800mm (31/2”).
NOTE: Ensure the sink outlet pipe
has a minimum diamtere of 32mm.
1. Untie the end of the GREY
drainage hose from the rear of the
appliance.
2. Reposition the ‘Hooked End
Support’ as required along the GREY
drainage hose.
3. If fitting an under sink waste
disposal unit, cut out the membrane,
bung or blanking plug.
4. Attach the GREY drainage hose to
the under sink waste disposal unit
securely , using the clip and rubber
tube supplied.
Ensure the drain hose is
securely attached, to prevent it
coming away while the machine
is in use and causing a flood.
5
Page 6

ISHWASHER
D
Getting to know your Dishwasher
E
E . Upper basket
F . Top spray arm
G . Basket height adjuster
H . Lower basket
The Controls
A. ON-OFF Button
Press this button to switch the appliance
on.
B . ON-OFF Indicator light
This light informs you that the
dishwasher is on.
C . Door opening handle
Use this handle to open the dishwasher
door.
D. Wash Programme Selector
Use this knob to select the cycle.
E. Cycle phase indicator light
(pre-wash, wash, rinses, drying)
I. Bottom spray arm
J. Salt container cap
K . Washing filter
L . Detergent and rinse aid dispenser
E
F
G
J
I
H
K
L
B
C
D
A
Technical Characteristics
Technical characteristics
Width cm. 59,5
Depth cm. 57
Height cm. 82
Capacity 12 standard place settings
Mains water pressure 20 KPa÷ 1MPa (0,2 ÷10 bar)
Power voltage See data plate
Total absorber power See data plate
Fuse See data plate
6
This dishwasher conforms to the
following European Community
Directives:
• 73/23/EEC of 19/02/73 (Low
Voltage) and subsequent
modifications;
• 89/336/EEC of 03/05/89
(Electromagnetic Compatibility)
and subsequent modifications
• 97/17/CE
(Labelling)
Page 7

How to use your Dishwasher
ISHWASHER
D
First of all.
- Turn on the water supply tap
completely.
- Add the correct amount of
detergent.
- Load the baskets correctly.
- Check that the spray arms rotate
freely.
- Close the door securely.
-
Press the ON-OFF button "A": indicator light "B" comes on. Y our appliance is
now on and ready to be programmed.
Select the wash cycle.
T o select the wash cycle, turn knob "D"
clockwise until the indicator on the knob
lines up with the number or symbol for
the wash cycle most suitable for the type
of dishes to wash (see ‘Programme
Chart’).
After a few seconds, you will hear a short
beep: the wash cycle has started, it is
not advisable to make any changes from
this point.
Indicator lights
Y our dishwasher is fitted with indicator lights (E) that come on to show you
at which point the wash cycle is at.
Here are the symbols corresponding
to each cycle phase:
Starting from the indicator light on the
left moving towards the one on the
right: pre-wash, wash, rinses, drying.
Modifying a wash cycle in
progress.
If you have chosen the wrong cycle - Y ou
can modify the wash cycle in progress,
if it has only just started. Turn knob "D"
anti-clockwise and set it to Reset, after
a few seconds you will hear 3 short
beeps and
Indicator light "E" will go out to show all
the settings will have been cancelled. You
are now free to re-set the correct wash
cycle.
You've left out a dish?
Interrupt the wash cycle by pressing the
ON-OFF button, insert the dish you had
forgotten and press the ON-OFF button
again.
The cycle will start up from where you
interrupted it.
Cycle end
The end of the wash cycle is indicated
by 2 short beeps and a flashing drying
phase indicator light .
Set the knob to the reset position to clear
all settings.
Turn the appliance off by pressing button “A”, cutting off the electricity supply .
Turn off the water tap.
Wait a few minutes before unloading the
dishes: they are very hot! If you wait a
little while, they dry better due to the
steam.
Empty the lower basket first.
At all times, your dishwasher tells you
where it is at.
There's been a power failure or
you opened the dishwasher
door
The wash cycle stops and then restarts
when the electricity comes back on or
when you close the door.
7
Page 8

ISHWASHER
D
Programme Chart
Select the most suitable programme for the type of dishes and how dirty they are. T o select the wash programme see the chart below:
3URJUDPPH :KHQ3URJUDPPH
VKRXOG EHXVHG
9HU\GLU W\GL VKHVDQGSDQV
QRW WREHXVHGI RUGHOL FDW H
LWHPV
+HDY\'XW\
1RUPDOO \GL UW\ SDQVDQG
GLVKH V6W DQGDUGGDLO \
F\FOH
'DLO\F\FOH
(FRQRP\DQGIDV WF\ FOH WR
EHXVHGIRUVOLJKWO \GLUW\
R
5DSLG
GLVKHV
5XQF\FOHLPPHGLDWHO\
DIW HUXVH 1RGU\LQJ
3URJUDPPH'HVFULSWLRQ $PRXQWRI
GHWHUJHQWIRU
SUHZDVK
3UHZ DVKZ LW KFROGZ DWHU
3UHZ DVKZ LW KKRWZ DWHU DW&
([WHQGHGZ DVKDW &
5LQVHZLWKFROGZDWHU
5LQVHZLWKKRWZDWHUDW&
'U\LQJ
SUHZ DVKHVZ LW KFRO GZDW HU
([WHQGHGZ DVKDW &
5LQVHZLWKKRWZDWHUDW&
'U\LQJ
6KRUWZ DVKDW &
&ROGULQVH
JU
JU
5LQVH
$LG
ZDVK
JU
3UHOLPLQDU\ZDVKF\FOHIRU
GLVKH VDQGSDQVDZDL WL QJ
FRPSOHWLRQRIWKHORDGZLWK
WKHGLVKHVIURPWKHQH[W
6RDN
T o optimise wash performance and save on energy, try to use the dishwasher with a full wash load. If it takes some time to fill your dishwasher, use
the soak cycle to avoid caked on food and build up of bad odours.
8
PHDO
6KRUWFRO GZDVKW RSUHYH QWI RRG
IU RP GU \L Q JRQ W RW KH GL V KH V
Page 9

ISHWASHER
D
Before Using your Dishwasher
Adjusting the water softener.
Your dishwasher can adjust its salt consumption according to the hardness of
the water in your home. This way , you
can optimise and customise your dishwasher's salt consumption.
T o adjust salt consumption, do as
follows:
1. Unscrew the salt container cap
2. There is an arrow on the neck of the
container (see figure): if necessary,
turn the arrow anti-clockwise from
the "-" setting to the "+" setting.
Select the arrow position depending on
the water hardness, referring to the table.
Clarke
degrees
0 - 14 0 - 17 0 -1,7 / 0 /
14 - 36 18 - 44 1,8 - 4,4 "-" 20 60
36 - 71 45 - 89 4,5 - 8,9 MED 40 40
>71 >89 > 8,9 "+" 60 25
Water Hardness
°fH mmol/l
To prevent rust from
forming, load the salt
just before beginning a
wash cycle.
Salt
Selector
position
You don't know how hard
the water in your home
is? Ask the company that
supplies water in your
consumption
(grams/cycle)
area.
Autonomy
(cycles\2kg)
Salt
Filling the salt container.
Always use salt which is intended for
dishwasher use.
The salt container is situated underneath
the lower basket, fill it up as follows:
1.Pull out the lower basket completely ,
unscrew and remove the container
cap
2. If it is the first time you add the salt,
first fill the container up with water
(you won't have to do this again next
time)
3. Put the dishwasher funnel on the hole
and pour in approximately two kilos
of salt. It is normal that some water
comes out of the container.
4. Screw the cap back in place carefully.
Low Salt indicator
This green device is located at the centre of the cap for the decalcification cartridge and it indicates whether the container is full.
When the indicator is not visible it means
that you need to add salt.
9
Page 10

ISHWASHER
D
Before Using your Dishwasher
B
25 gr
D
.
C
5 gr.
A
The detergent
Adding detergent
T o open lid A, press button B.
The detergent should be put into the two
containers C and D.
If using a tablet, put it in container "D".
Now you can close the lid: press it down
until you hear it click.
If it won't close
Check whether there is any detergent
residue on the edges of the dispenser.
Remove the excess.
We recommend Glist 3 in 1 for use in all Creda dishwashers...
Brilliant cleaning is guaranteed with Glist 3 in 1.
Creda only recommends Glist 3 in 1 Dishwasher tablets to give outstanding cleaning and care.
It is important to use detergent specially designed for domestic dishwashers. (Always follow the manufacturers
instructions.)
Glist 3 in 1 advanced dishwasher tablets with active enzymes are the ideal way to protect and care for your dishwasher,
while getting your dishes and glasses sparking clean.
• Use the right amount of detergent (see
programme chart).
• Store your detergent and rinse aid in a
cool, dry place, safely away from
children.
Softer Water:
Built in salt action softens water, helping to prevent the build up of limescale in the dishwasher and improve the
cleaning result*.
Cleaner Dishes:
With unique active enzymes in the cleaning phase Glist 3 in 1 breaks down even the hard to shift foodstuffs and
grease, leaving the dishes spotless and the dishwasher clean too.
Sparkling Results:
The built-in Glist rinse agent ensures the dishes and glasses are free from water marks and smears.
If you have any questions regarding Glist 3 in 1, please contact the hotline on 0800 216 730.
Rinse aid.
Rinse aid makes dishes sparkle more
as it improves their drying. The rinse aid
container is situated on the inside of the
appliance door, you should refill it when
light “D” indicates that it is empty.
(If your dishwasher is fitted with a “low
rinse aid” indicator light, fill the container
up when the indicator light flashes or
lights up).
Adding rinse aid.
T o open the dispenser , turn cap C
anticlockwise. T ake care when you pour
in the rinse aid to avoid it overflowing.
You can regulate the amount of rinse aid
used by the dishwasher, move the
adjuster F which you will find under lid
C .
D
You can choose from six dif ferent positions.
It is normally set to 4.
F
C
*If you live in an area particularly prone
to very hard water ( 35
Glist and Creda recommend that you
continue to keep your dishwasher salt
topped up.
- The amount of rinse aid needs
to be increased if the dishes
appear dull or you can see
circular stains.
- The amount of rinse aid needs
to be reduced if the dishes are
sticky or you can see white
streaks.
°
f)
10
Page 11

Loading your Dishwasher
ISHWASHER
D
First of all.
Before placing dishes in the baskets,
remove all course food remains. This
avoids blocking the filter, which would
reduce the efficiency of the wash.
If saucepans and frying pans are very
dirty, allow them to soak before being
washed.
T o make it easier to load your dishes,
pull the baskets out.
What goes into the lower
basket?
We recommend you place the most
difficult dishes to wash into the lower
basket: saucepans, lids, soup dishes and
plates (a load example is shown in the
photo).
• Serving dishes and large lids:
place them on the sides of the
basket.
• Saucepans, salad bowls: must
always be placed upside down
• Very deep dishes: place them
obliquely, thus allowing water to run
down them and cleaning them better
Place the cutlery with the handles at the
bottom; if the basket is the one with side
inserts, then insert the tea spoons one
by one into the slots.
It is best if you place longer utensils
horizontally at the front of the upper
basket.
After loading the dishes, remember to
check that the spray arms can turn freely
without hitting against any dishes.
What goes into the upper
basket?
Place delicate and lightweight dishes in
the upper basket: glasses, tea cups and
coffee cups, saucers and plates - shallow
salad bowls, slightly dirty frying pans and
shallow pans.
Position lightweight dishes in such as
way as to avoid their being moved by
the spray of water.
How to adjust the upper basket.
The upper basket can be set in high or
low position to enable you to organise
your dishes effortlessly.
1
3
Fig.F
Open the rail stop flaps and pull the
basket out completely. Now place it
in high or low position, then slide it
along the guide rails until the front
wheels also go in. Now close the rail
stop flaps. Follow the sequence of
actions illustrated in figure "F".
2
4
upper basket
lower basket
Load examples
upper basket
lower basket
What can I Wash
• Cutlery and tableware made from wood or part wood - They may become faded and unsightly in appearance.
• Avoid washing horn handled and bronze cutlery in the machine.
• Delicate/decorative glassware and vases, special antique or irreplaceable china - the decorative patterns printed on these
items will not be dishwasher proof.
• Plastic objects that are not resistant to hot water.
• Copper and Pewter utensils. Aluminium and Sliver objects.
• Some types of glass can become opaque in appearance after they have been washed too many times in a dishwasher.
• Highly absorbent materials such as sponges and towels should never be placed in a dishwasher .
• If in any doubt, check with the manufacturer on items suitability for dishwasher’s.
WARNING: Dishes or cutlery soiled with tobacco ash, wax, lubricating grease or paint should not be put in the
dishwasher.
Our recommendation: In future, only purchase table or kitchenware that has been confirmed - dishwasher proof.
Items not suitable for the dishwasher:
11
Page 12

ISHWASHER
D
Care and Cleaning
Unplug the appliance.
Before carrying out any cleaning or
maintenance on the dishwasher,
always remove the plug from the
electricity socket.
After every wash.
When the wash cycle has ended,
always remember to turn off the water
supply tap and to leave the appliance
door ajar. This way, moisture and bad
odours will not be trapped inside.
The filter assembly
• If you want consistent good results
from your dishwasher, you need to
clean the filter assembly.
•
Remove the larger food particles
trapped inside the cup “C” and the
semi-circular filter A after each wash;
pull the cup handle upwards to remove
them. Just rinse them under running
water.
• The entire filter assembly should be
cleaned thoroughly once a month: cup
C + semi-circular filter A + cylindrical
filter B. Rotate filter “B” anticlockwise
to remove it.
For cleaning, use a non metallic brush.
Reassemble the filter parts (as shown
1
B
in the figure) and reinsert the whole
assembly into the dishwasher. Position
it into its housing and press
downwards.
The dishwasher is not to be used
without filters. Improper replacement
of the filters may reduce the efficiency
of the wash and even damage your
dishwasher.
2
C
A
Cleaning the spray arms.
Food residue may become encrusted
onto the spray arms and block the
holes where water comes out. Check
the spray arms regularly and clean
them once in a while.
Cleaning the Water Inlet Filter
Periodically clean the water inlet filter
(see figure 2 under "Installation")
located on the outlet of the water
supply tap. After turning of f the water
tap, unscrew the end of the water
supply hose, remove the filter and
clean it carefully under running water.
Then, return the filter to its place and
tighten the water supply hose back into
position.
The seals.
One of the factors that cause
unpleasant odours to form inside the
dishwasher is food that remains
trapped in the seals. Periodic cleaning
using a damp sponge will prevent this
from occurring.
DO NOT use solvents or abrasives to
clean the exterior and rubber parts of
your appliance, do not use solvents or
abrasive cleaning products. Use a
cloth dampened with lukewarm soapy
water only.
If there are any stains on the surface
of the appliance interior, use a cloth
dampened with water and a little white
vinegar, or a cleaning product
specifically made for dishwashers.
Going away
If the dishwasher is not going to be
used for some time, carry out the
following:
• run a cycle with the dishwasher
empty.
• switch off at the electrical socket and
unplug.
• turn off the water supply tap,
disconnect the inlet hose and allow
to drain.
• fill the rinse aid dispenser.
• leave the door ajar, to prevent the
build up of unpleasant odours
inside the dishwasher.
Before using the dishwasher after a
long break, plug in and switch on at
the electrical socket. Reconnect the
inlet hose and turn on the water supply
tap. Check there are no deposits of
rust inside the water pipe, if there are
allow water to run from the supply tap
for a few minutes.
Disconnecting the dishwasher.
When disconnecting the dishwasher
it is important that tasks are carried
out in the correct sequence.
• switch off at the mains and remove
the plug from the socket.
• turn off the water supply .
• disconnect drain and water inlet
hose.
• pull out the dishwasher, carefully ,
withdrawing hoses at the same
time.
Moving the appliance.
Drain water from the dishwasher.
Secure all loose parts. Only transport
in an upright position.
• If not kept upright during transport,
any water remaining inside may
seep into the control module and
cause subsequent errors with
programme functions.
12
Page 13

ISHWASHER
D
Troubleshooting
Caution
- Do not forget that repairs should only be carried out by a qualified specialist. Improper repairs can lead to considerable equipment damage, as well as
danger to the user.
- The dishwasher must first be disconnected from the electricity supply before any repairs or other work can be carried out. Sw itch off at the mains socket
and water supply and remove the plug.
Resolving minor problems yourself.
Experience has shown that you can resolve most problems that arise during normal daily usage yourself, without having to call out a service
engineer. Not only does this save costs but it also means the appliance is available for use again that much sooner . The following list of common
occurences and their remedies should help you identify the causes of most problems.
If the dishwasher won't start,
check...
■ Is the dishwasher plugged in at the
electricity socket and switched on?
■ Is there a power failure, check other
appliances.
■ Check the fuse.
■ Is the water supply tap turned on?
■ Is the water inlet hose connected
properly?
■ Is the pressure of the water supply
sufficient?
■ Is the inlet hose kinked?
■ Is the filter on the water supply
hose blocked?
■ Is the dishwasher door not closed
properly?
If water remains inside the
dishwasher, check...
■ the drain hose is not kinked.
■ the drain syphon is not obstructed.
■ the dishwasher filters are not
clogged.
If the dishes are not being
cleaned properly, check...
■ the correct amount of detergent
has been added.
■ there is regenerating salt in the salt
container.
■ the dishes have been loaded
correctly.
■ the selected programme is suitable
for the type of dishes and the
degree of soiling.
■ all filters are clean and positioned
correctly.
■ the spray arm nozzles are not
obstructed.
■ there is nothing obstructing the
rotation of the spray arms.
If the dishes fail to dry or
remain dirty, check...
■ there is rinse aid inside the rinse
aid container.
■ the rinse aid dispenser setting is
correct.
■ the detergent being used is of good
quality and has not lost its
effectiveness (for example, through
incorrect storage, with the box left
open).
If the dishes show signs of
streaking, staining etc. check...
■ the rinse aid dispenser setting is
not set too high.
If there are visible traces of rust
inside the tank, check...
■ the cap off the salt container is
securely closed and that the water
softner setting is correct.
■ the correct amount of detergent is
being used. Certain detergents can
be more corrosive than others.
■ the tank is made of steel and
therefore any rust marks are due
to external elements (fragments of
rust from the tank pipes, pots,
cutlery etc.) Special products are
commercially available to remove
such marks.
Error messages
Y our dishwasher is equipped with a
safety system which is able to detect
operating faults.
These faults are reported by one or
two wash cycle indicator lights "E"
flashing rapidly . T ake note of which
lights are flashing, turn the appliance
off and call Creda Service for technical assistance.
Tap off alarm
If you have forgotten to turn the water
tap on, your appliance will remind you
of this by sounding a few short beeps
for a few minutes. Turn the tap on and
your appliance will start up again after
a few minutes. Were you to be absent
when these beeps are sounded, the
appliance will be blocked automatically
and wash cycle 2 and 3 indicator lights
(wash and rinse) will flash rapidly. Turn
the appliance off at the ON-OFF button, turn on the water tap and wait approximately 20 seconds before turning the appliance back on.
Re-select the wash cycle and the appliance will start up again.
If after all the checks, the appliance still
does not operate or the problem persists, call Creda Service (see KEY
CONT ACTS, back page) and inform
them of:
- the type of problem
- the abbreviation of the model name
(Mod.) and the relative numbers (S/N)
written on the rating plate
located on the inner edge of
the door.
Switch off at the mains
socket and remove the plug.
Turn off the water supply.
13
Page 14

ISHWASHER
D
Load for 12 Standard Settings tests (upper rack at top position)
INFORMATION FOR TEST LABS
Detergent
Detergent specifically intended for use with dishwashers
must be used. The dispenser must be refilled before the
start of each wash cycle following the instructions provided
in the "Programme Chart". The detergent dispenser is
located on the inside panel of the door.
Loading the detergent
To open lid "A", press button "B". The cleaning detergent
should be introduced into the three containers "1", “2”and
“3”. "(see table at the end of the page)
After pouring in the detergent, replace the lid, pressing down
until it clicks.
B
Comp1
Comp2
Comp3
The rinse aid
This product makes dishes sparkle more as it improves
their drying. The rinse aid container is situated on the inside
of the door, you should refill it when light “D” indicates that
it is empty.
(If your dishwasher is fitted with a “low rinse aid” indicator
light, fill the container up when the indicator light flashes or
lights up).
Loading the Rinse Aid
To open the dispenser, turn the "C" cap in the anti-clockwise
direction and then pour in the rinse aid, making sure not to
overfill. The amount of rinse aid used for each cycle can
be regulated by turning the dose adjuster ‘F’ which you will
find under lid ‘C’.
There are 6 different settings; the normal dosage is setting
5.
D
F
C
A
Comp.1 Comp.2 Comp.3
25 5
10
20
EN 50242
IEC/ DIN
Cycle
See booklet
See booklet
Total detergent
30 gr.
30 gr.
To use the Normal or daily wash cycles (See Programm Chart in the instruction booklet)
14
Page 15

Notes
ISHWASHER
D
15
Page 16

Key Contacts
After Sales Service
Over 1200 trained specialists, directly employed by us, ensure that you can have complete confidence in
both the appliances and services we offer.
Repair Service and Information Desk
UK: 08709 066 066
(Open 8 to 8 Mon - Fri, 8 to 6 Sat, 10 to 4 Sun & Bank Holidays)
www.theservicecentre.co.uk
Republic of Ireland: 1850 302 200
Note: Our operators will require the following information:
Model number:
Serial number:
Extended Warranties
UK: 08709 088 088
(Open 8 to 8 Mon - Sun)
www.theservicecentre.co.uk
Republic of Ireland: 1850 502 200
Genuine Parts and Accessories
UK: 08709 077 077
(Open 8-30 to 5-30 Mon - Fri & 9 to 12 Sat)
www.theservicecentre.co.uk
Republic of Ireland: (01) 842 6836
195.036.729.00
General Domestic Appliances Limited, Morley Way, Peterborough, PE2 9JB.
January 2003 Part no. FP188 - 01
 Loading...