

Page 1

Handheld Wireless Programmable Touch Screen
User 's Manual
V3.0 version
Guangzhou Creator electronic Ltd. Co
Page 2
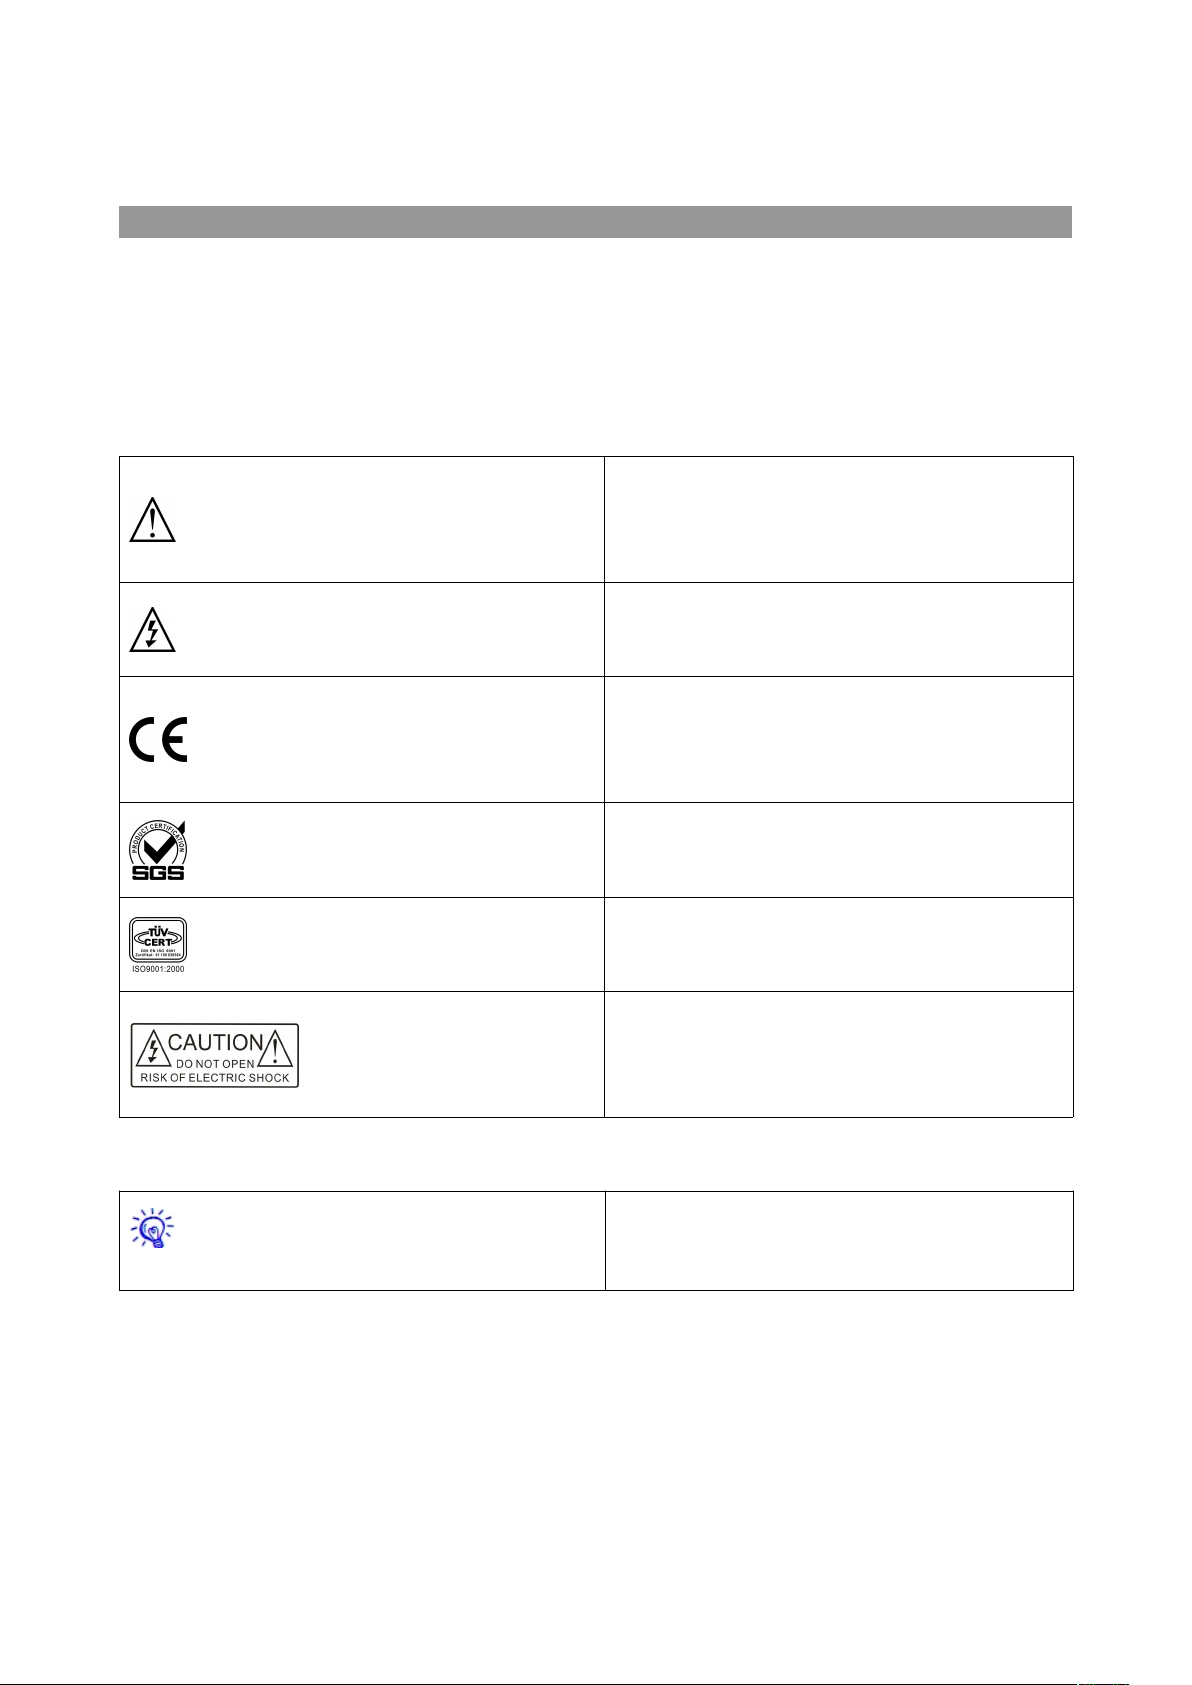
The meaning of symbols
This is A level product, which may cause radio
interference in the living environment. In this
case, users may need to take the feasible
measures to get around the interference.
CE certification means that the product has
reached the directive safety requirements
defined by the European Union. Users can be
assured about the use of it
Warning: in order to avoid electrical shock, do
not open the machine cover, nor is the useless
part allowed to be placed in the box. Please
contact the qualified service personnel.
■ Safety instructions
For your safe and correct use of equipments, we use a lot of symbols on the equipments and in the
manuals, demonstrating the risk of body hurt or possible damage to property for the user or others.
Indications and their meanings are as follow. Please make sure to correctly understand these
instructions before reading the manual.
Remind users that the dangerous voltage
without insulation occurring within the
equipment may cause people suffer from shock
■ General information instructions
SGS certification means that the product has
reached the quality inspection standards
proposed by the world's largest SGS.
This product passed the ISO9001 international
quality certification (certification body: TUV
Rheinland, Germany).
It lists the factors leading to the unsuccessful
operation or set and the relevant information to
pay attention to
Page 3

Important note
Warning
In order to ensure the reliable performance of the
equipment and the safety of the user, please
observe the following matters during the process
of installation, use and maintenance:
The matters needing attention of installation
◆Please do not use this product in the following
places: the place of dust, soot and electric
conductivity dust, corrosive gas, combustible gas;
the place exposed to high temperature,
condensation, wind and rain; the occasion of
vibration and impact . Electric shock, fire, wrong
operation can lead to damage and deterioration
to the product, either;
◆in processing the screw holes and wiring,
make sure that metal scraps and wire head will
not fall into the shaft of controller, as it could
cause a fire, fault, or incorrect operation;
◆when the installation work is over, it should be
assured there is nothing on the ventilated face,
including packaging items like dust paper.
Otherwise this may cause a fire, fault, incorrect
operation for the cooling is not free;
◆Should avoid wiring and inserting cable plug in
charged state, otherwise it is easy to cause the
shock, or electrical damage;
◆The installation and wiring should be strong
and reliable, contact undesirable may lead to
false action;
◆For a serious interference in applications,
should choose shield cable as the high frequency
signal input or output cable, so as to improve the
anti-jamming ability of the system.
Attention in the wiring
◆ Only after cutting down all external power
source, can install, wiring operation begin, or it
may cause electric shock or equipment damage;
◆This product grounds by the grounding
wires .To avoid electric shocks, grounding wires
and the earth must be linked together. before the
connection of input or output terminal, please
make sure this product is correctly grounded;
◆Immediately remove all other things after the
wiring installation. Please cover the terminals of
the products cover before electrification so as to
avoid cause electric shock;
Matters needing attention during operation
and maintenance
◆ Please do not touch terminals in a current
state, or it may cause a shock, incorrect
operation;
◆ Please do cleaning and terminal tighten
work after turning off the power supply. These
operations can lead to electric shock in a current
state;
◆ Please do the connection or dismantle work
of the communication signal cable , the
expansion module cable or control unit cable
after turning off the power supply, or it may cause
damage to the equipment, incorrect operation;
◆ Please do not dismantle the equipment,
avoid damaging the internal electrical
component;
Page 4

◆ Should be sure to read the manual, fully
confirm the safety, only after that can do program
changes, commissioning, start and stop
operation;
Matters needing attention in discarding
product
◆ electrolytic explosion: the burning of
electrolytic capacitor on circuit boards may lead
to explosion;;
◆ please collect and process according to the
classification, do not put into life garbage;
◆please process it as industrial waste, or
according to the local environmental protection
regulations.
Page 5

Preface
Handheld Wireless Programmable Touch Screen User 's Manual mainly introduces the operation
methods of CR-Wireless G7C,CR-Wireless G7pip,CR-Wireless G8C,CR-Wireless G8pip,Their main
performance parameters and common fault solutions.
This manual is only used as user instruction, not for a repair service usage. The functions or
related parameters may be changed since the date of issue, please inquire the supplemental
information from CREATOR Electronics or local distributors.
The copyright of this manual belongs to CREATOR Electronics. Without permission, no unit or
individual shall adopt part or all of its content for commercial use.
The manual is protected by of the Copyright Law of the Peoples Republic of China and other
regulations about intellectual property rights. Without written permission shall not be copied or
distributed.
Page 6

Index
Chapter 1 summary................................................................................................................................................... 1
1.1Features............................................................................................................................................................1
1.2 Equipment....................................................................................................................................................... 2
1.3 Conventional methods of operation................................................................................................................2
1.4 Dimensions Figures........................................................................................................................................ 2
1.5 touch screen driver install...............................................................................................................................2
1.5.1 Windows XP system, the touch screen driver installation........................................................ 2
1.5.2 Other Windows system touch screen driver installation........................................................... 4
Chapter 2 Touch Screen........................................................................................................................................... 5
2.1 panel description..........................................................................................................................................5
2.2 System Settings...............................................................................................................................................5
2.2.1 Login Page..................................................................................................................................... 6
2.2.2 Main Page...................................................................................................................................... 6
2.2.3 RF.................................................................................................................................................... 7
2.2.4 Volume&Power.............................................................................................................................. 8
2.2.5 Others..............................................................................................................................................9
2.2.6 Ver.Info............................................................................................................................................9
2.3 Download (update) data...............................................................................................................................9
2.4 System Connection Diagram..................................................................................................................... 11
Chapter 3 Technical parameters.........................................................................................................................13
Chapter 4 FAQS and Exclusion.............................................................................................................................14
Chapter 5 Maintenance Requirements................................................................................................................ 16
Page 7

1
Handheld Wireless Programmable Touch Screen User's Manual
Chapter 1 summary
The handheld wireless programmable touch
screen is a desktop wireless full-color touch
screen, which is compatible to new generations of
PGM Ⅱ, PGM Ⅲ programmable host. It has the
merits like easy to use, durable, fast response,
etc., wireless transmission distance up to 100M
(open). It has the following advantages as well:
◆ adopt high-class Touch Lens touch
technology
Touch Lens have realized the perfect
combination of Lens and Touch Panel, the touch
screen and the casing surface is completely flat;
has a long service life, high recognition accuracy,
advanced structure and other aesthetic features,
at the same time, the high transmittance have
decided to have a good visual effect on the
screen.
◆ exquisite appearance
The stylish and compact design, the perfect
combination of high-gloss and matte texture of
the material, sbq brushed aluminum alloy makes
water chestnut more hierarchically clear.
◆ Low-power, high-capacity lithium battery
The CPU Clocked at 667MHz, Smart pbw power
management means, built-in oversized lithium
battery, normal work up to 5 hours or more
(related to power management settings and
brightness settings.)
◆ intelligent core
Single-core CPU clocked at 667mhz.
◆ wince system
the dual-control function of Feiyang, simply slide
your finger on the screen at your will, everything
is so simple.
◆ USB 2.0 download mode
Hi-Speed USB download, can easily
download the compiled multi-language control
screen and the information screen.
Handheld The wireless programmable touch
screen is suitable for a variety of large and
medium-sized command and control centers,
multimedia conference room, multi-media
classrooms, villas, hotels and other places, help
you to achieve a screen in hand, all easy to
control.
1.1Features
1, support wireless transmission distance of up
to 100M in the open area;
2, support for true color TFT LCD, clear
high-resolution color display:
CR-Wireless G7C, CR-Wireless G7pip support
800X480 resolution, clear 16:9 widescreen color
display;
CR-Wireless G8C, CR-Wireless G8pip clear
support for 1024 x 600 resolution, 17:10
widescreen color display.
3,Operator interface is up to user’s self-definition,
PNG, JPG and other common image formats,
graphical interface supports text, 3D buttons,
multi-state buttons, effects of irregular button,
user interface is vivid and beautiful;
4, can control freely by just touch screen;
5, support for handheld mobile use;
6, using high-end Touch Lens touch technology
with stylish, beautiful exterior design.
CREATOR CHINA 2012-11 WWW. CREATOR1997.COM
Page 8
2
Handheld Wireless Programmable Touch Screen User's Manual
1.2 Equipment
◆ CR-Wireless G7C 8.0 inch wireless
programmable touch screen
◆ CR-Wireless G7pip 8.0 inch wireless
programmable touch screen
◆ CR-Wireless G8C 10.1 inch wireless
programmable touch screen
◆ CR-Wireless G8pip 10.1 inch wireless
programmable touch screen
1.3 Conventional methods of
operation
◆ boot
Click on the touch screen touch area to
achieve boot function.
◆ Standby
By setting the touch screen attributes page
setup when enter standby mode.
◆ Shutdown
Shut down by the switch button.
◆ wireless touch-screen charging
Connect DC12V power adapter and
power interface of the touch screen to charge.
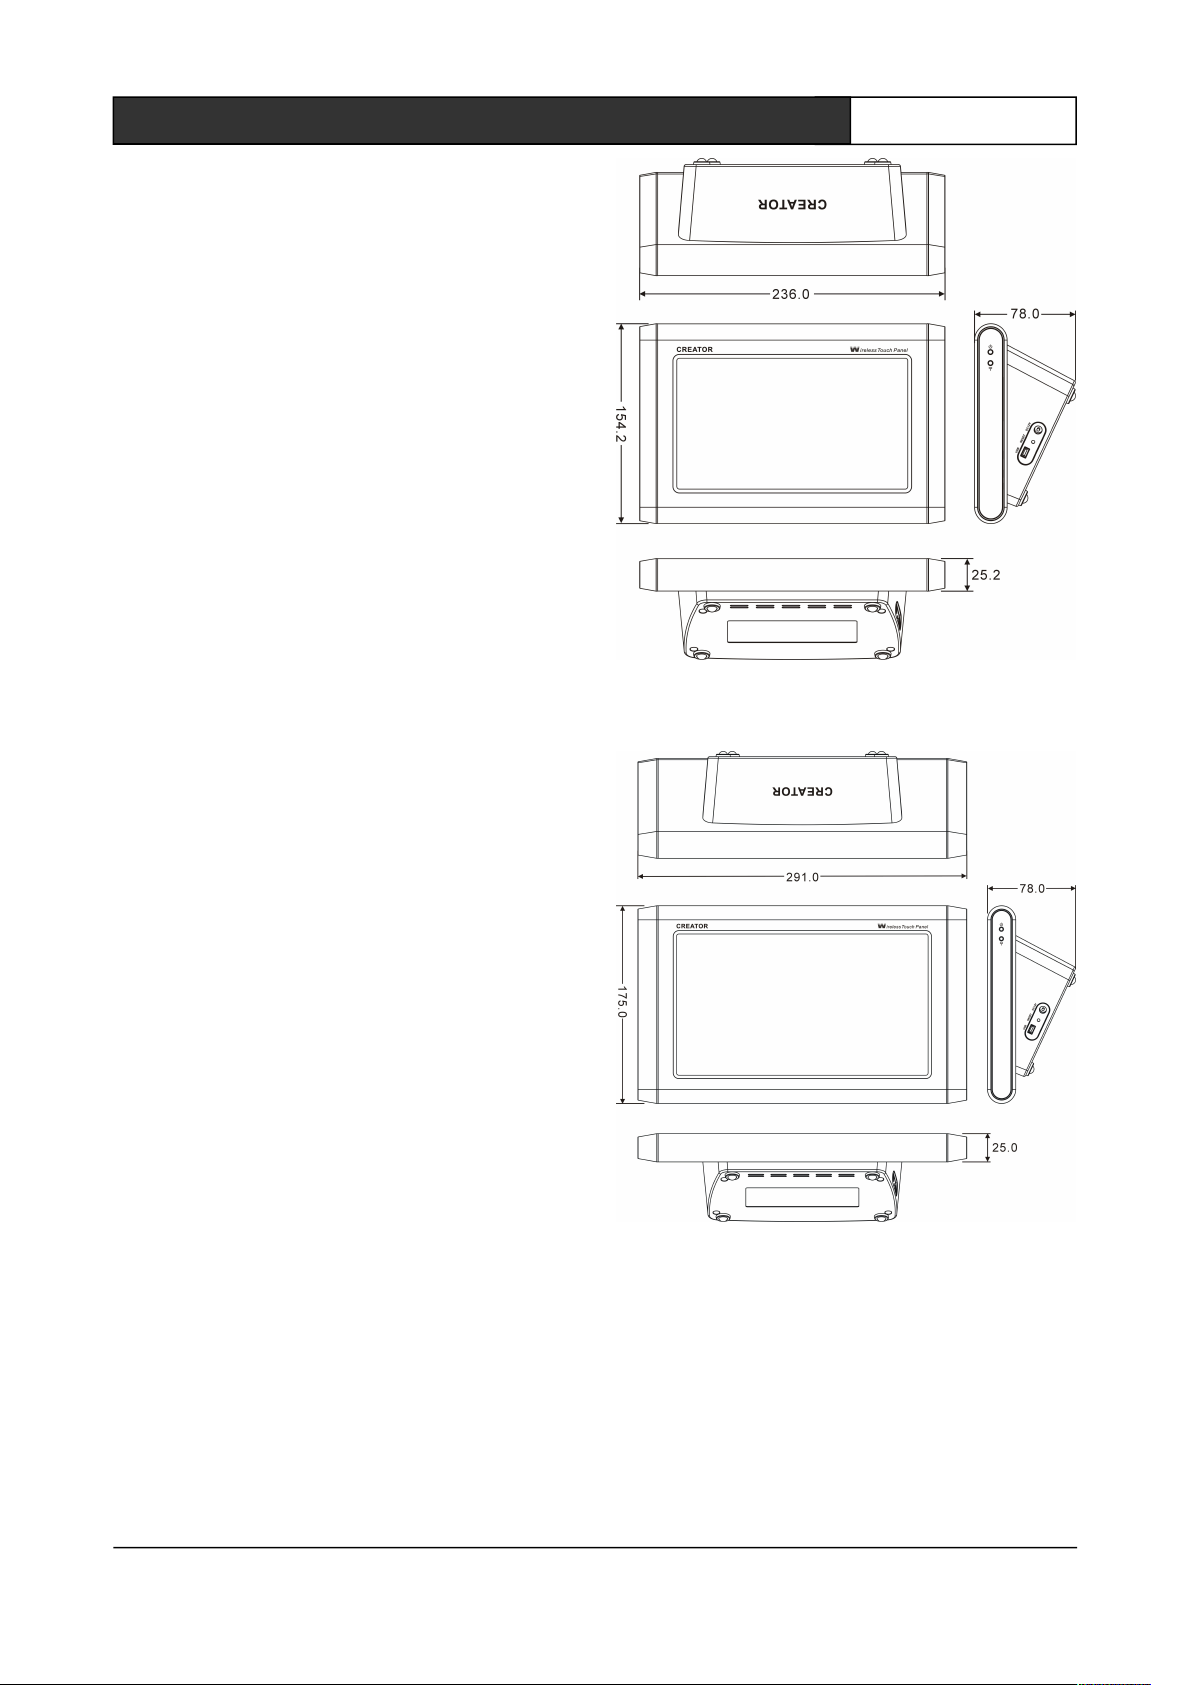
1.4 Dimensions Figures
Unit (mm)
◆ CR-Wireless G7C,CR-Wireless G7pip
◆ CR-Wireless G8C,CR-Wireless G8pip
1.5 touch screen driver install
1.5.1 Windows XP system, the touch
screen driver installation
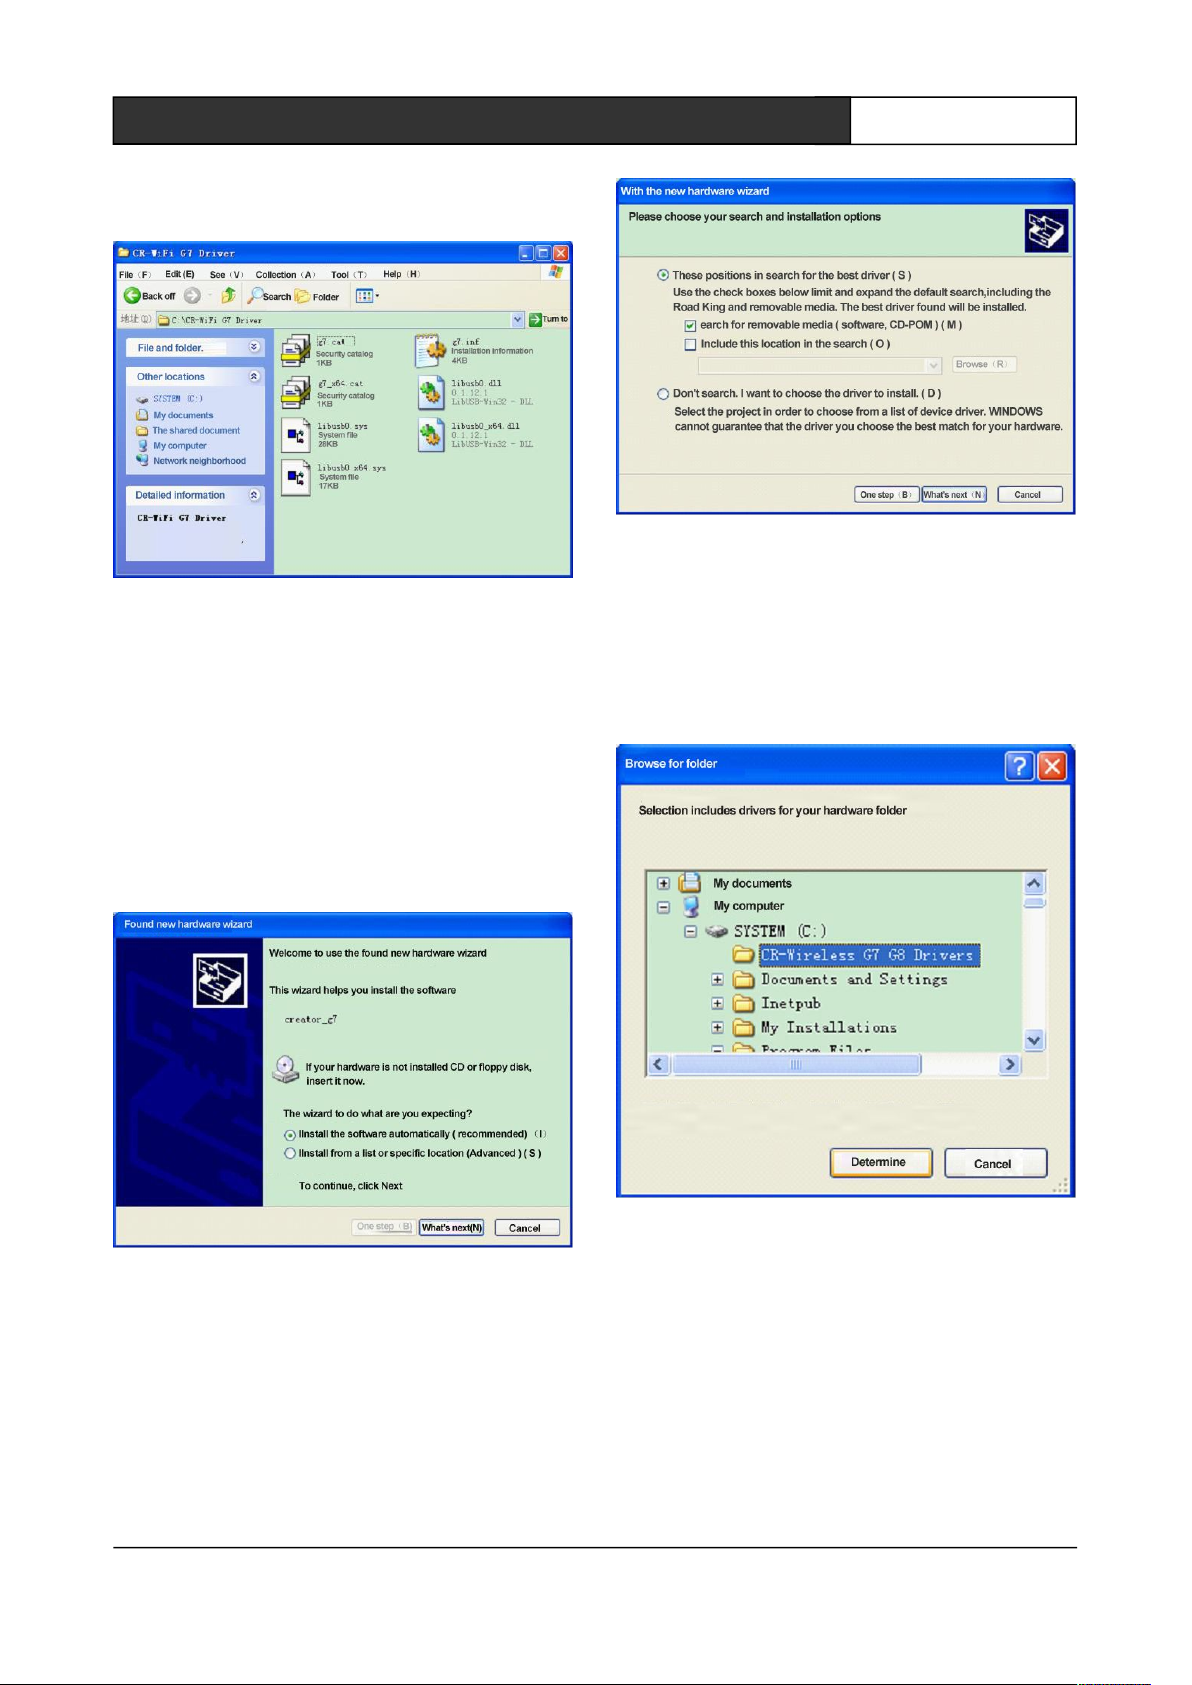
1, prepare the following items: a touch screen
[complete touch screen, correctly installed battery
(non-essential)], 12V power supply, USB data
cable. Touch screen driver software (driver file is
CREATOR CHINA 2012-11 WWW. CREATOR1997.COM
Page 9
3
Handheld Wireless Programmable Touch Screen User's Manual
stored in the CR-Wireless G7C G8C Driver folder),
as shown in Figure 1-1:
Figure 1-1
2, stored the folder in PC machine installed PC
software ThinkDraw, C: \ CR-Wireless G7C G8C
Driver.
3,Start touch screen, plug USB data cable in a PC,
then prompt "Found New Hardware" and pop-up
"Found New Hardware Wizard" dialog box,
shown in Figure 1-2:
Figure 1-2
4, select "install from a list or specific location
(Advanced) (s)", click "Next", "Hardware Update
Wizard” dialog box pops up,
Shown in Figure 1-3:
Figure 1-3
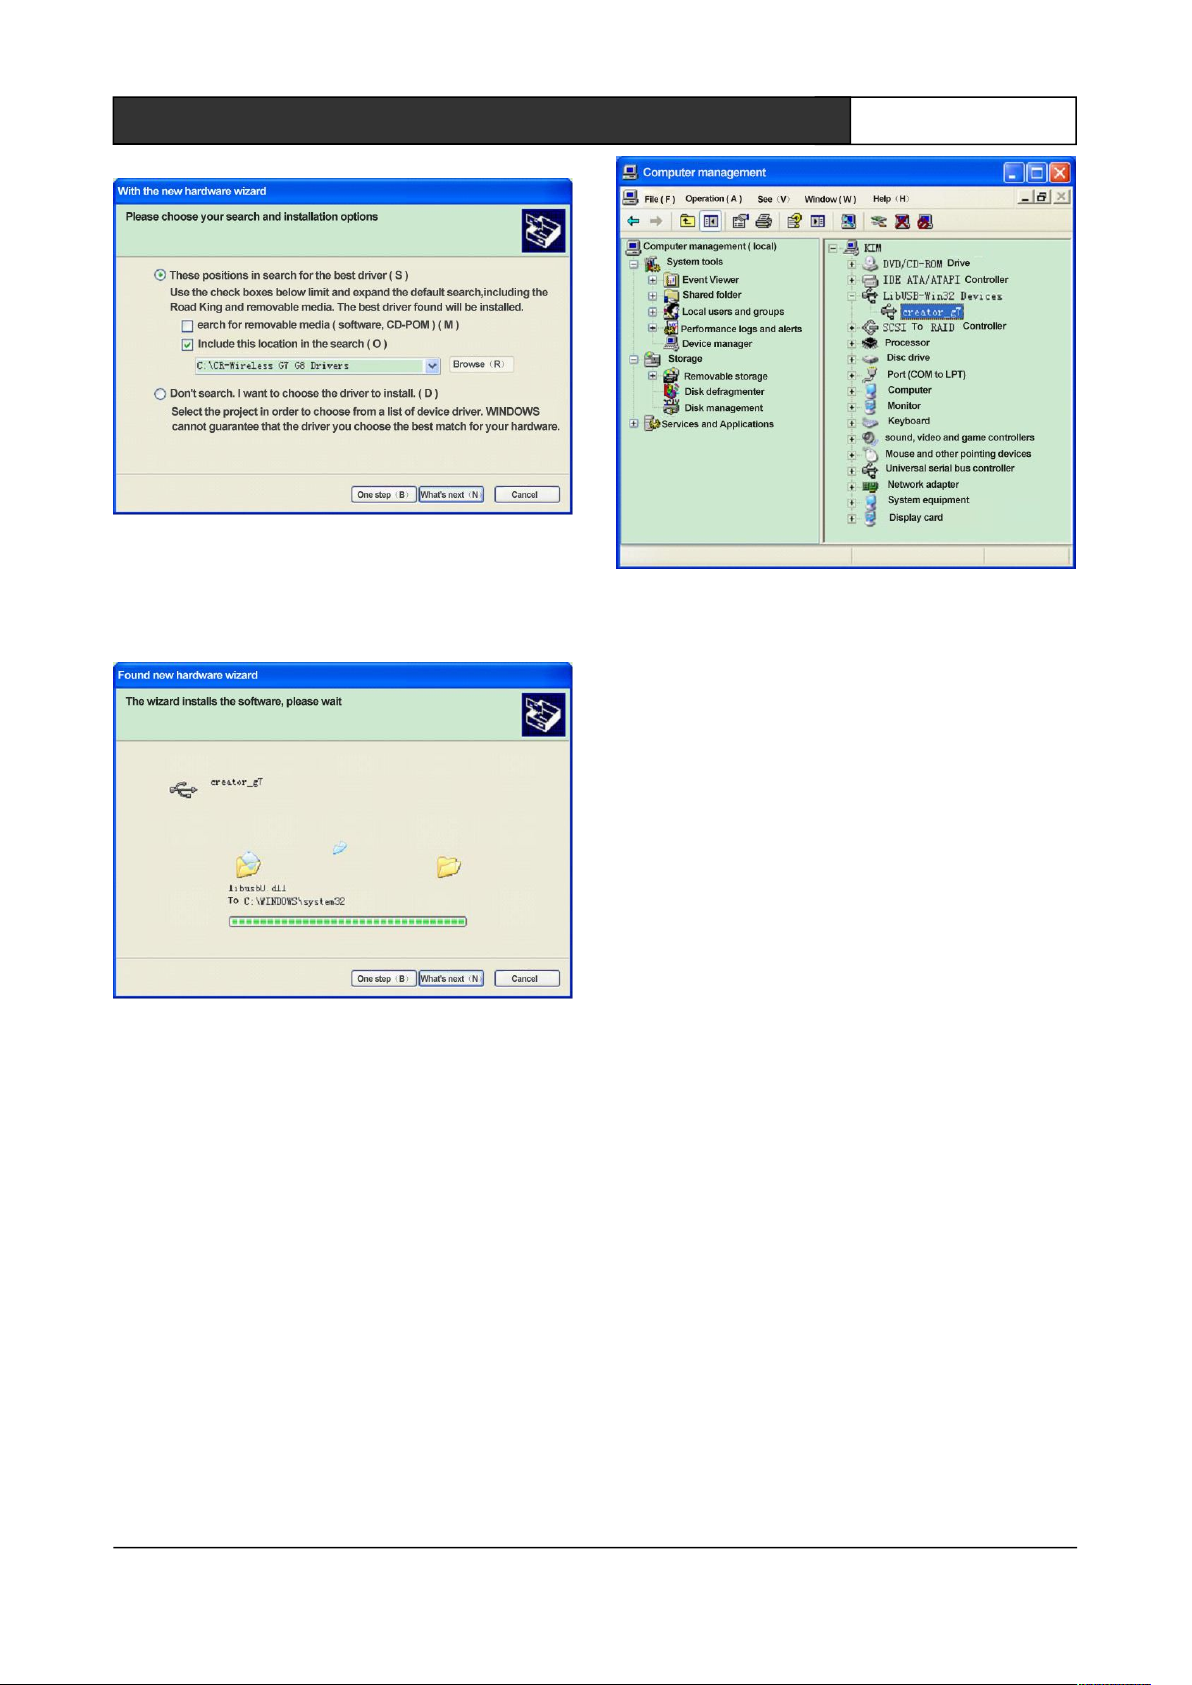
Remove the hook before the "Search
removable media (floppy, CD_ROM)", and then
check the "Include this location in the search (0)",
click "Browse" and select the drive storage path,
click OK, as Figure 1-4, as shown in Figure 1-5:
Figure 1-4
CREATOR CHINA 2012-11 WWW. CREATOR1997.COM
Page 10
4
Handheld Wireless Programmable Touch Screen User's Manual
Figure 1-5
5, click on the "Next", the system begins to install
the driver, as shown in Figure 1-6:
Figure 1-6
6 Click "Finish" to complete the installation of the
touch screen driver, then the logo of Creator_g7
devices will appear in Device Manager, as shown
in Figure 1-7:
Figure 1-7
7, open PC editing software ThinkDraw,
customized your unique user interface and
update to the touch screen to experience.
1.5.2 Other Windows system touch
screen driver installation
Other touch screen driver installations in
Windows system are basically the same with
Windows XP installation, and are not repeated
here.
CREATOR CHINA 2012-11 WWW. CREATOR1997.COM
Page 11
5
Handheld Wireless Programmable Touch Screen User's Manual
Chapter 2 Touch Screen
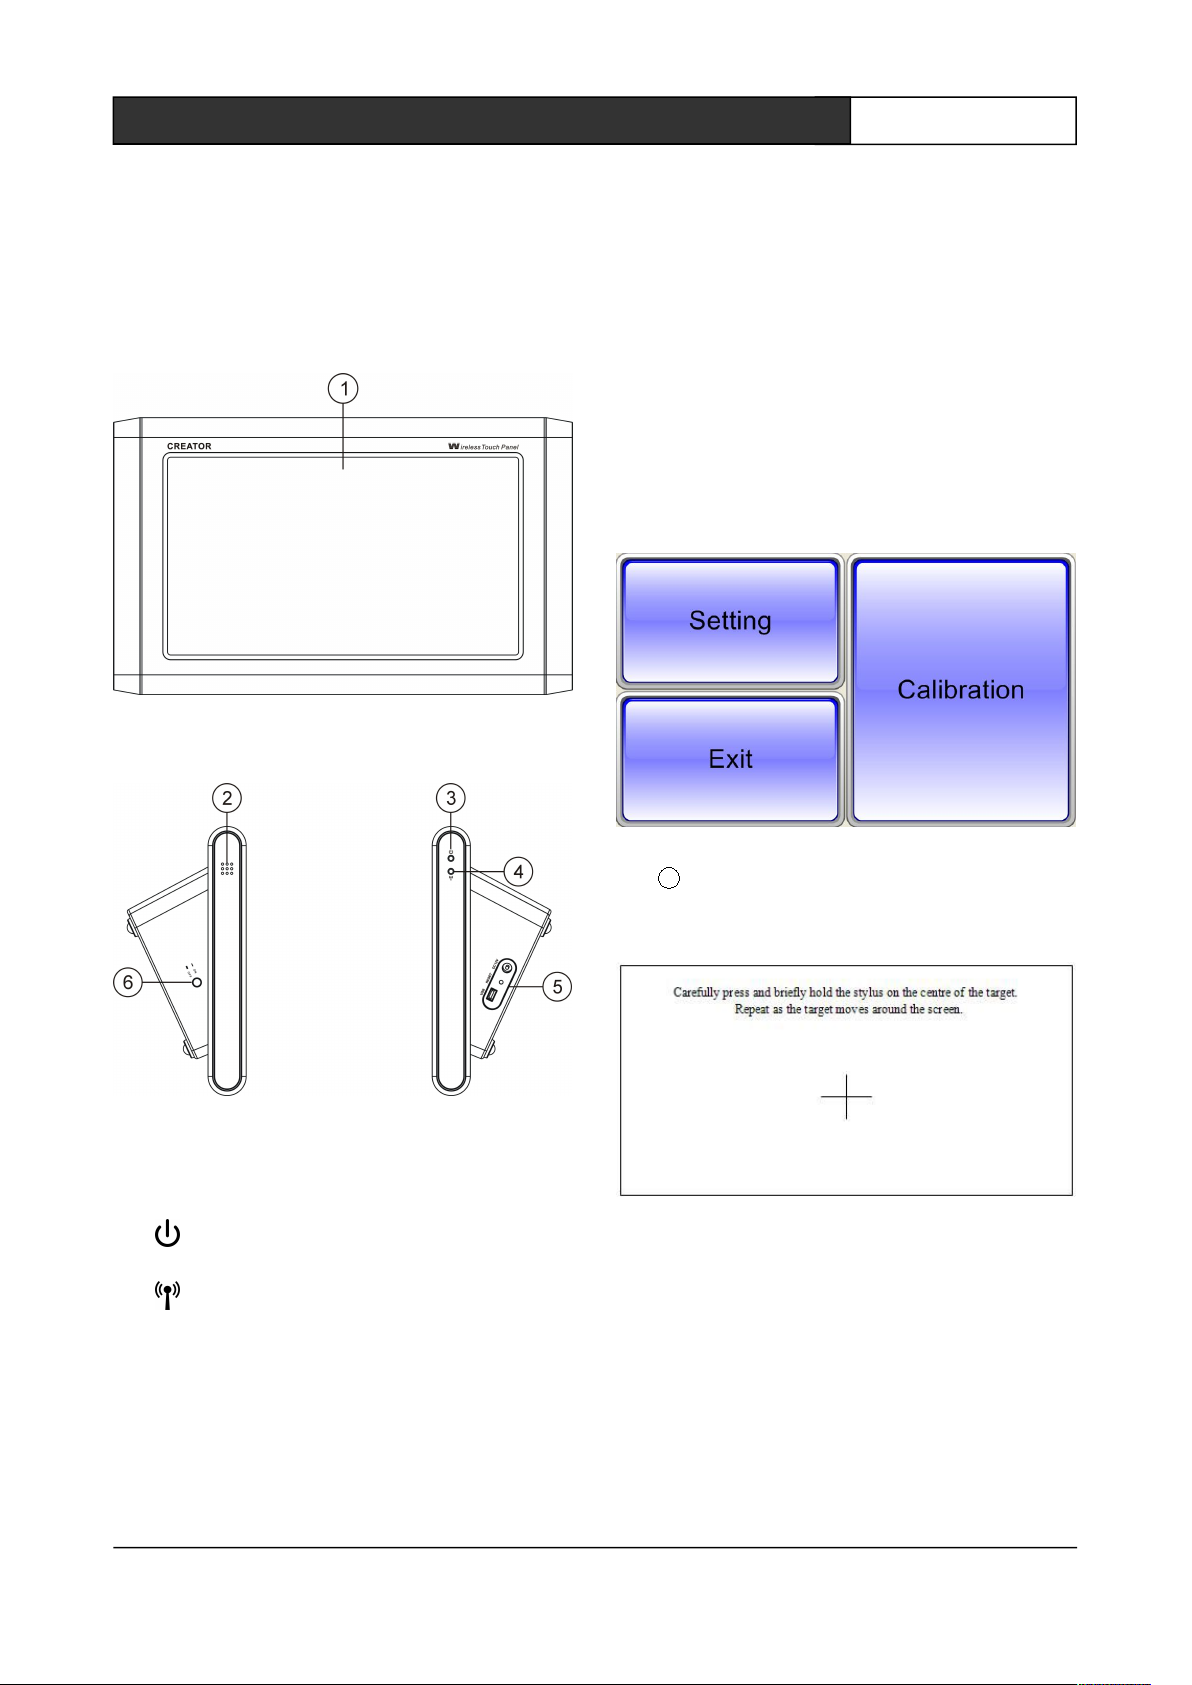
2.1 panel description
Front view:
Side view:
① touch screen
② amplifier
③ ——power indicator
④ ——signal indicator
⑤ DC 12V——the input port of a power supply,
support DC 12Vinput
USB——USB port
RESET——system reset
⑥ power switch. Use as a switching power supply
in the case of no external buttons. Press to
normal use, bounce to shut down and can not
touch screen to boot. This button is invalid in the
case of an external power supply.
2.2 System Settings
Long press any blank space of the system
(refer to no control button, bar strips) 3-4 seconds,
the pop-up interface shown in Figure 2-1,
Figure 2-1
1 If there is an error touchscreen tap,
select "Calibration", then enter the
interface shown in Figure 2-2,
Figure 2-2
Align the crosshairs Centre and press (about
2 seconds) until the cross cursor moves, repeat
the above action until the cross cursor disappears,
pop-up interface shown in Figure 2-3,
CREATOR CHINA 2012-11 WWW. CREATOR1997.COM
Page 12
6
Handheld Wireless Programmable Touch Screen User's Manual
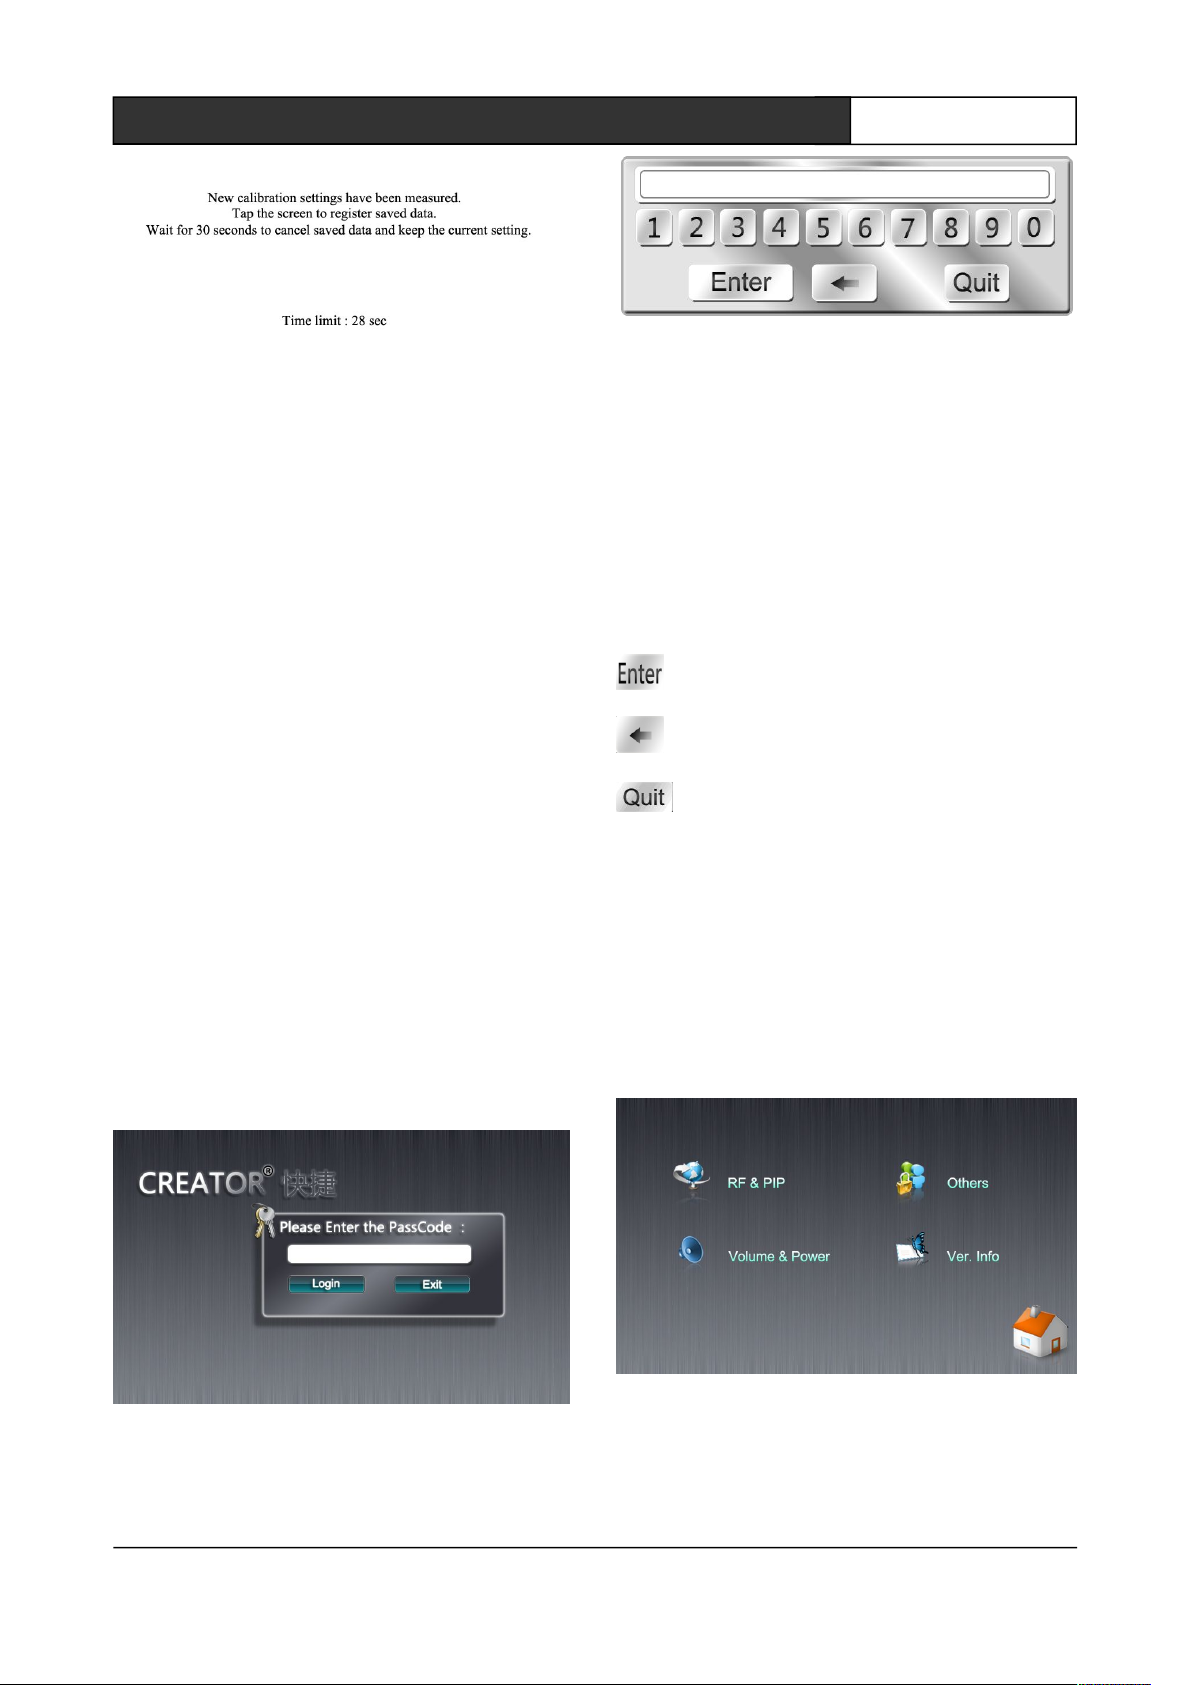
Figure 2-3
If you want to save the new calibration data, tap
the screen to save data to complete the screen
calibration, return to the interface in Figure 2-1
Do not want to save the new calibration data, wait
30 seconds, the system automatically exit
calibration interface to return to the Figure 2-1
Interface and maintain the original screen
calibration data unchanged.
② For setting the system properties, select
"Setting", enter the property setting of system,
please refer to the the 2.2.1-2.2.6 section for
details.
③ no need to do other things, select "Exit" to
return to the main control interface.
2.2.1 Login Page
1, enter the setup program, when the system has
a password, will enter the login screen, shown in
Figure 2-4:
Figure 2-4
2, click on the password input box, pop-up
keyboard, as shown in Figure 2-5:
Figure 2-5
The Keyboard is composed of input field,
character area, and function bar. Select the
desired value in character area, the input field will
display a corresponding number, the maximum
number of input characters is 16 characters.
When the input is complete, press OK to exit the
Password "*" is displayed in the login screen
dialog box;
confirm key;
backspace key
exit button
3 finish typing, press the "Login" button, if the
password is correct, direct access to setup home
page, or will be asked to re-enter the password.
4, "Exit" key is used to exit the system setup
program.
2.2.2 Main Page
Figure 2-6
1, as shown in Figure 2-6, the main page
containing RF & PIP Volume & Power, Others,
Ver.Info and Exit option, touch the option to enter
CREATOR CHINA 2012-11 WWW. CREATOR1997.COM
Page 13
7
Handheld Wireless Programmable Touch Screen User's Manual
the corresponding settings interface.
2,Finger across the appropriate option when
touching the touch screen, to get the focus. away
loses focus (and did not leave the touch screen),
leave touch-screen and enter the option of the
focus, if the focus is not in any option then will not
do any operation.
3, press the icon button at the right lower corner
to leave the setup program and return to the
Control Center.
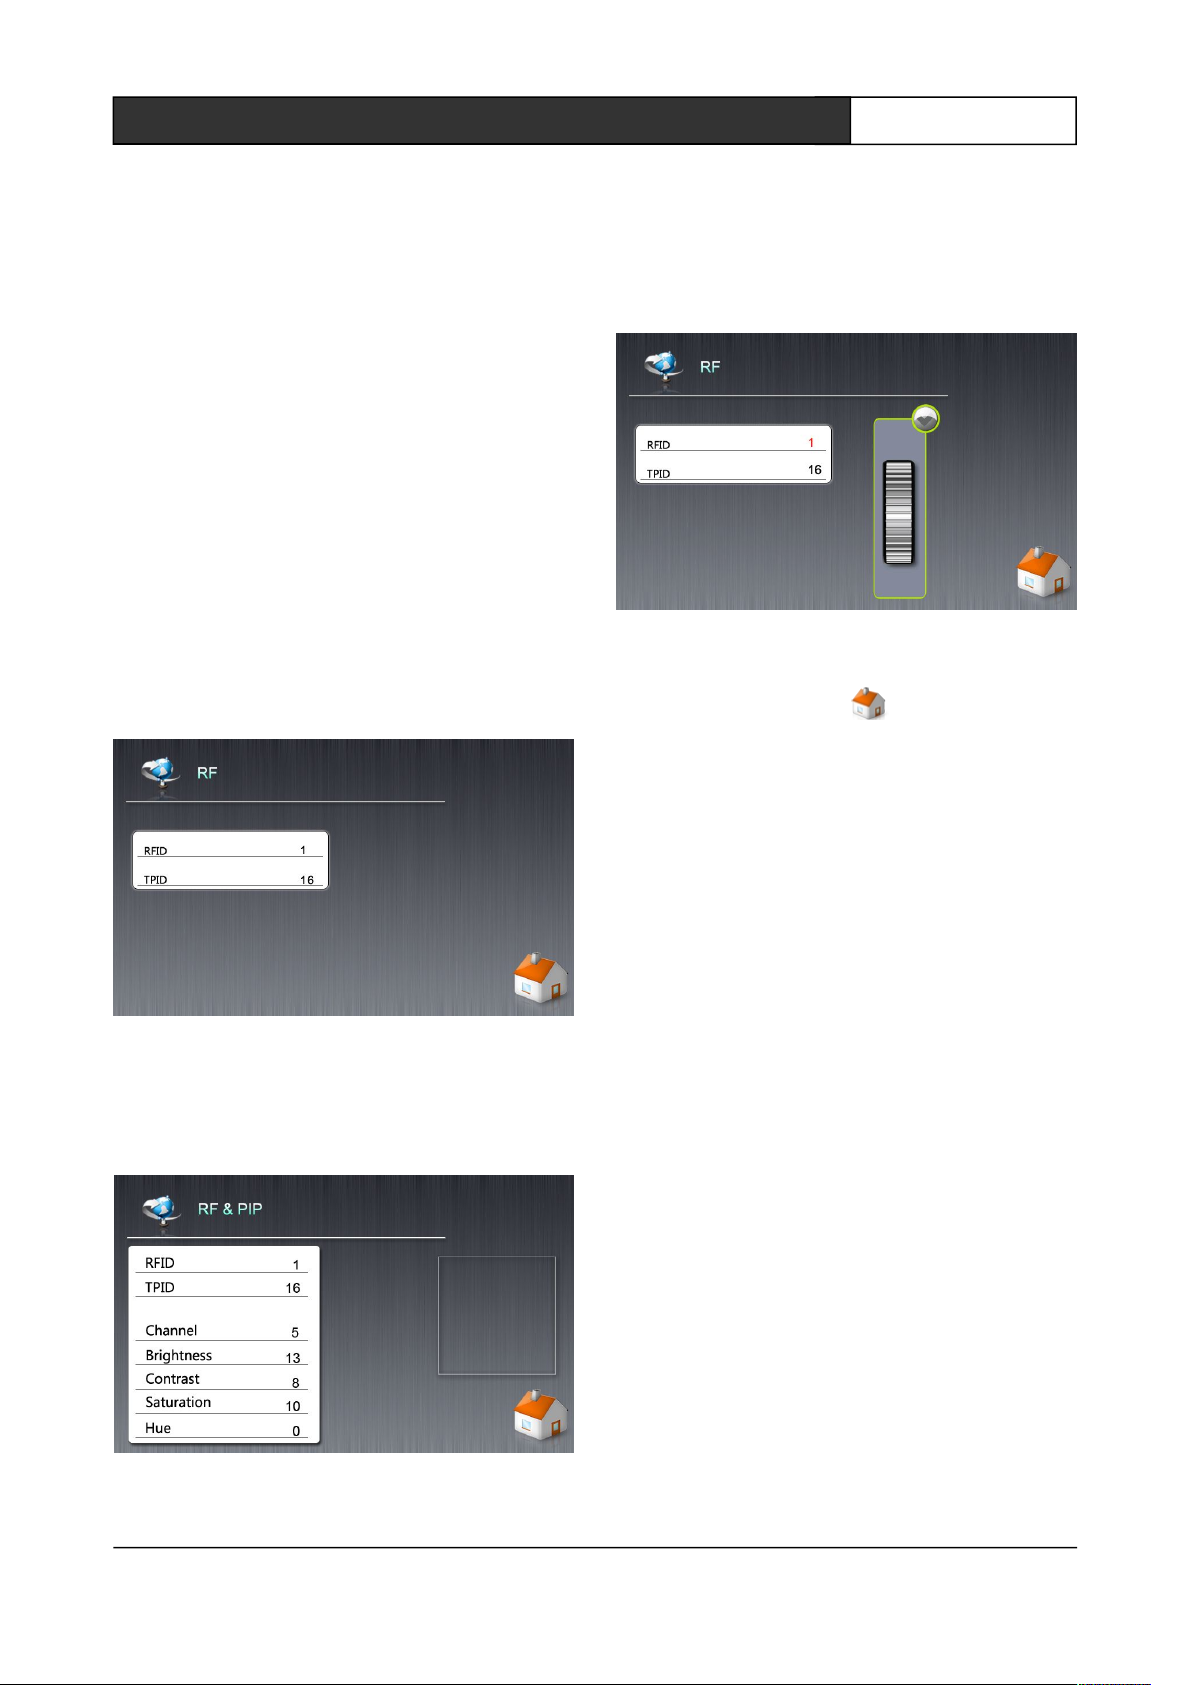
2.2.3 RF
Click RF icon on the main page of the touch
screen to enter the RF setup interface. This page
is for wireless transmission settings.
RF settings interface of CR-Wireless G7C
CR-Wireless G8C touch screen, such as 2-7:
Figure 2-7
RF settings interface of CR-Wireless G7pip \
CR-Wireless G8pip touch screen, such as 2-8
below:
Figure 2-8
2, RFID refers to receiver ID which ranges from 1
to 16, the TPID is touch screen’s own ID,
corresponding with PGMII, PGMIII host
engineering, its range is 1-50. Click the option to
modify the pop-up pulley (shown in Figure 2-9).
Figure 2-9
3,click the icon button at the right lower
corner to return to the main page.
4, on the RF interface of the CR-Wireless G7pip,
CR-Wireless G8pip touch screen, click on the
option will pop up pulley for corresponding
settings, as shown in Figure 2-10. Where:
Channel is used to set the transmitter
(CR-DS61, CRRFA-Ⅱ) video transmission
channels, currently only supports 7 different
channels (1-7);
Brightness option to adjust the video
brightness;
contrast option is used to adjust the video
contrast;
Saturation option is used to adjust the color
saturation;
The Hue option is used to adjust the colors
scheduling, and their values are 0-32.
CREATOR CHINA 2012-11 WWW. CREATOR1997.COM
Page 14
8
Handheld Wireless Programmable Touch Screen User's Manual
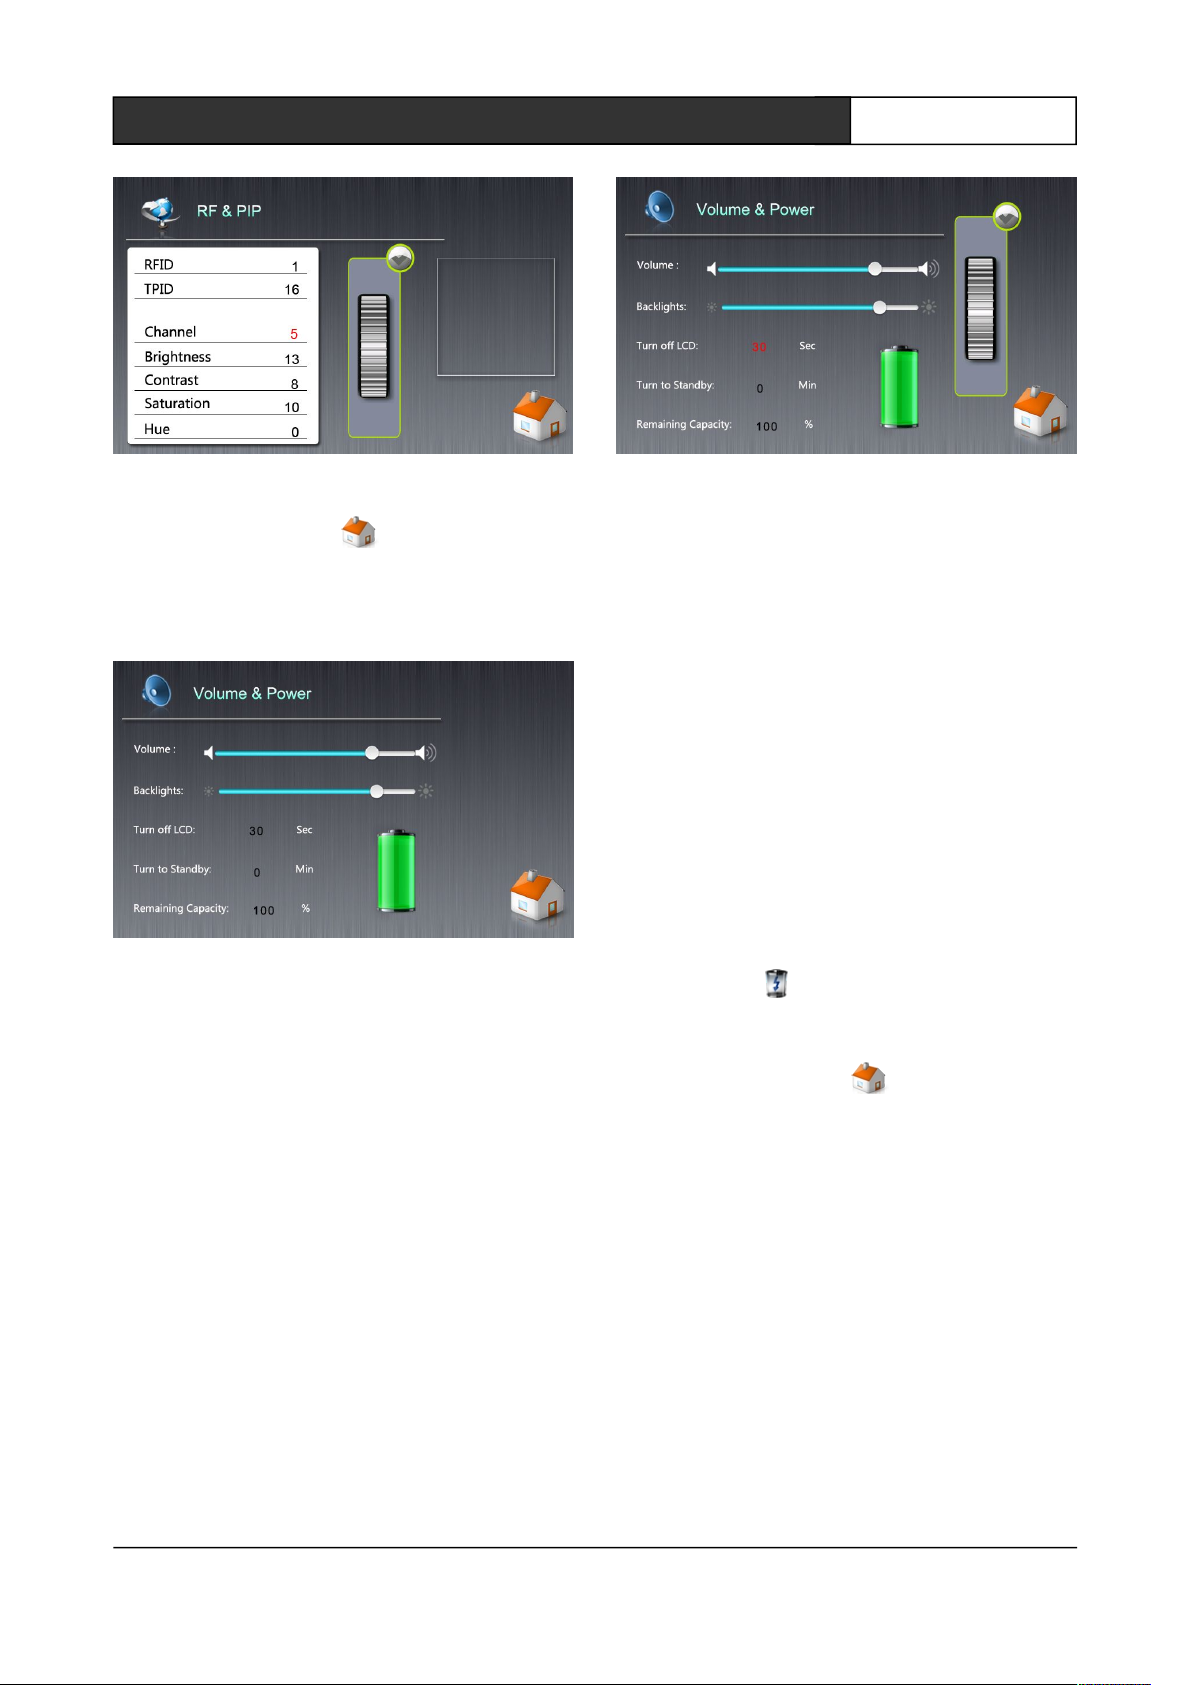
Figure 2-10
5,tap the icon button at the right lower
corner to return to the main page.
2.2.4 Volume&Power
Figure 2-11
As shown in Figure 2-11, this is power
management page for the adjustment of touch
screen’s sound , backlight, turn off the backlight
time to enter standby time , display battery level
and whether a battery is installed, whether it is
charging with external power supply.
1,Drag bars in Volume option can adjust the
sound.
2,Drag backlit scroll bar in Backlights option to
adjust the brightness of the backlight.
3,Click Turn off LCD to turn off the digital area of
the backlight time, the pop-up adjustment pulley
is used to adjust the time to turn off the backlight
(0,5-60 seconds), 0 means do not turn off the
backlight, the minimum can only be set to five
seconds, stands for Closing LCD in five seconds,
the effect was shown in Figure 2-12,
Figure 2-12
4,click on the TurnTo Standby, digital area of
standby time, pop-up adjustment pulley is used to
adjust the standby time (0-60 minutes),
The initial value is 8 minutes, i.e.8 minutes later,
the touch screen will go to sleep.
The setting of 0 indicates no standby.
5, when the percentage of power displays as 0%,
suggests that there is no battery connection
currently. Other values stand for the current
percentage of battery power.
6, as the green battery shown in the right side,
when the battery is static, representing the
corresponding battery power. Dynamic, it
indicates that external power is currently being
used, the icon is displayed at the same time
in the "Remaining Capacity" column.
7,click the icon button in the right lower
corner to return to the main page.
CREATOR CHINA 2012-11 WWW. CREATOR1997.COM
Page 15
9
Handheld Wireless Programmable Touch Screen User's Manual
2.2.5 Others
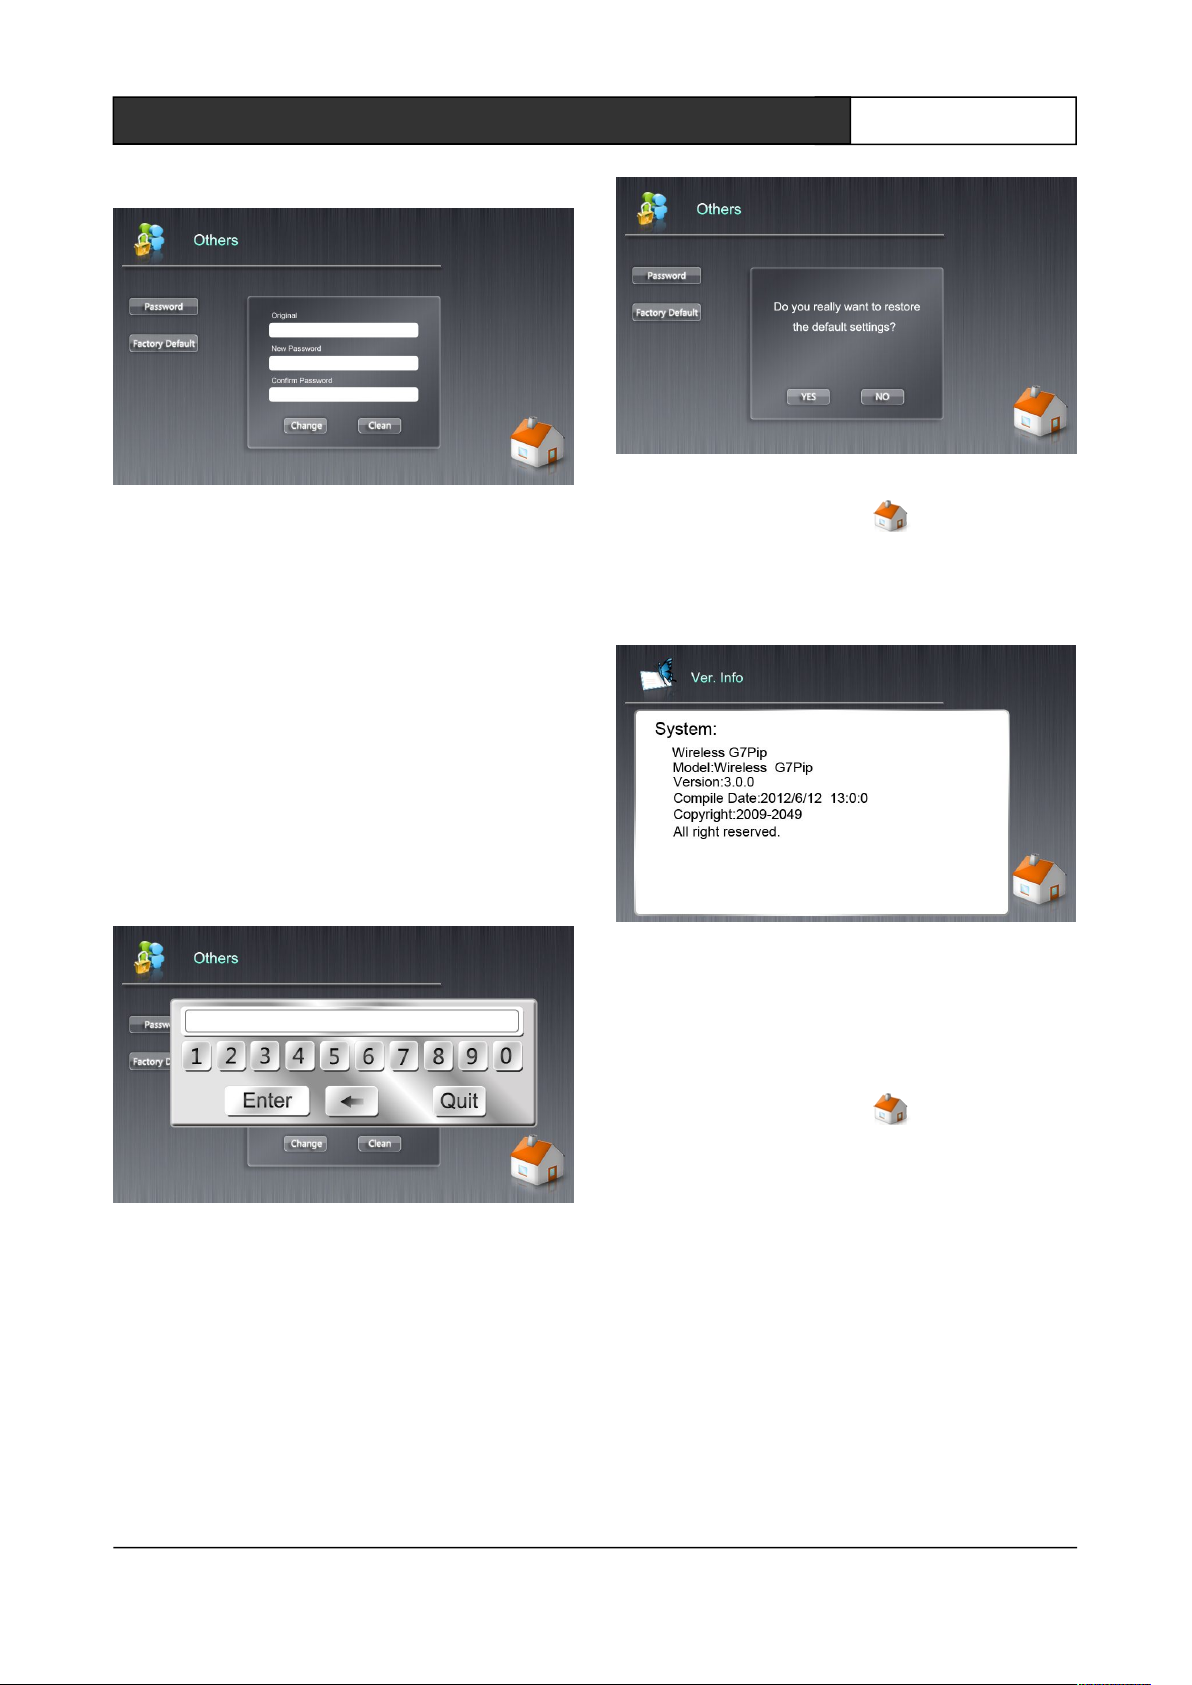
Figure 2-13
Shown in Figure 2-13, this page is password
settings and related appearance settings used to
set the password and restore the RF parameters,
sound, and power to the system factory state.
"Password" setting, click Set Password area
Original, pop-up keyboard (as shown in Figure
2-14), enter the login password. If it is empty, you
can not enter. Click the New Password and
Confirm Password to enter the new password,
press the change button to complete the setup,
press the clean button to empty all password
input.
Figure 2-14
"Factory Default" setting, press factory settings
button to pop up the interface shown in Figure
2-15, click "YES" to complete the factory settings.
If the operation is successful, it will be prompted
to succeed and return to the main interface.
Select "NO" to return to the main interface
directly.
Figure 2-15
Press the icon button in the right lower
corner to return to the main page.
2.2.6 Ver.Info
Figure 2-16
Shown in Figure 2-16, this page describes the
date of manufacture of the touch screen and the
system version information.
Press the icon button in the right lower
corner to return to the main page.
2.3 Download (update) data
Prepare the following items: touch screen
[complete touch screen, correctly installed battery
(non-essential)], 12V power supply, USB data
cable. PC
The editing software ThinkDraw (updated user
interface module integrated in the ThinkDraw
editing software), shown in Figure 2-17:
CREATOR CHINA 2012-11 WWW. CREATOR1997.COM
Page 16
10
Handheld Wireless Programmable Touch Screen User's Manual
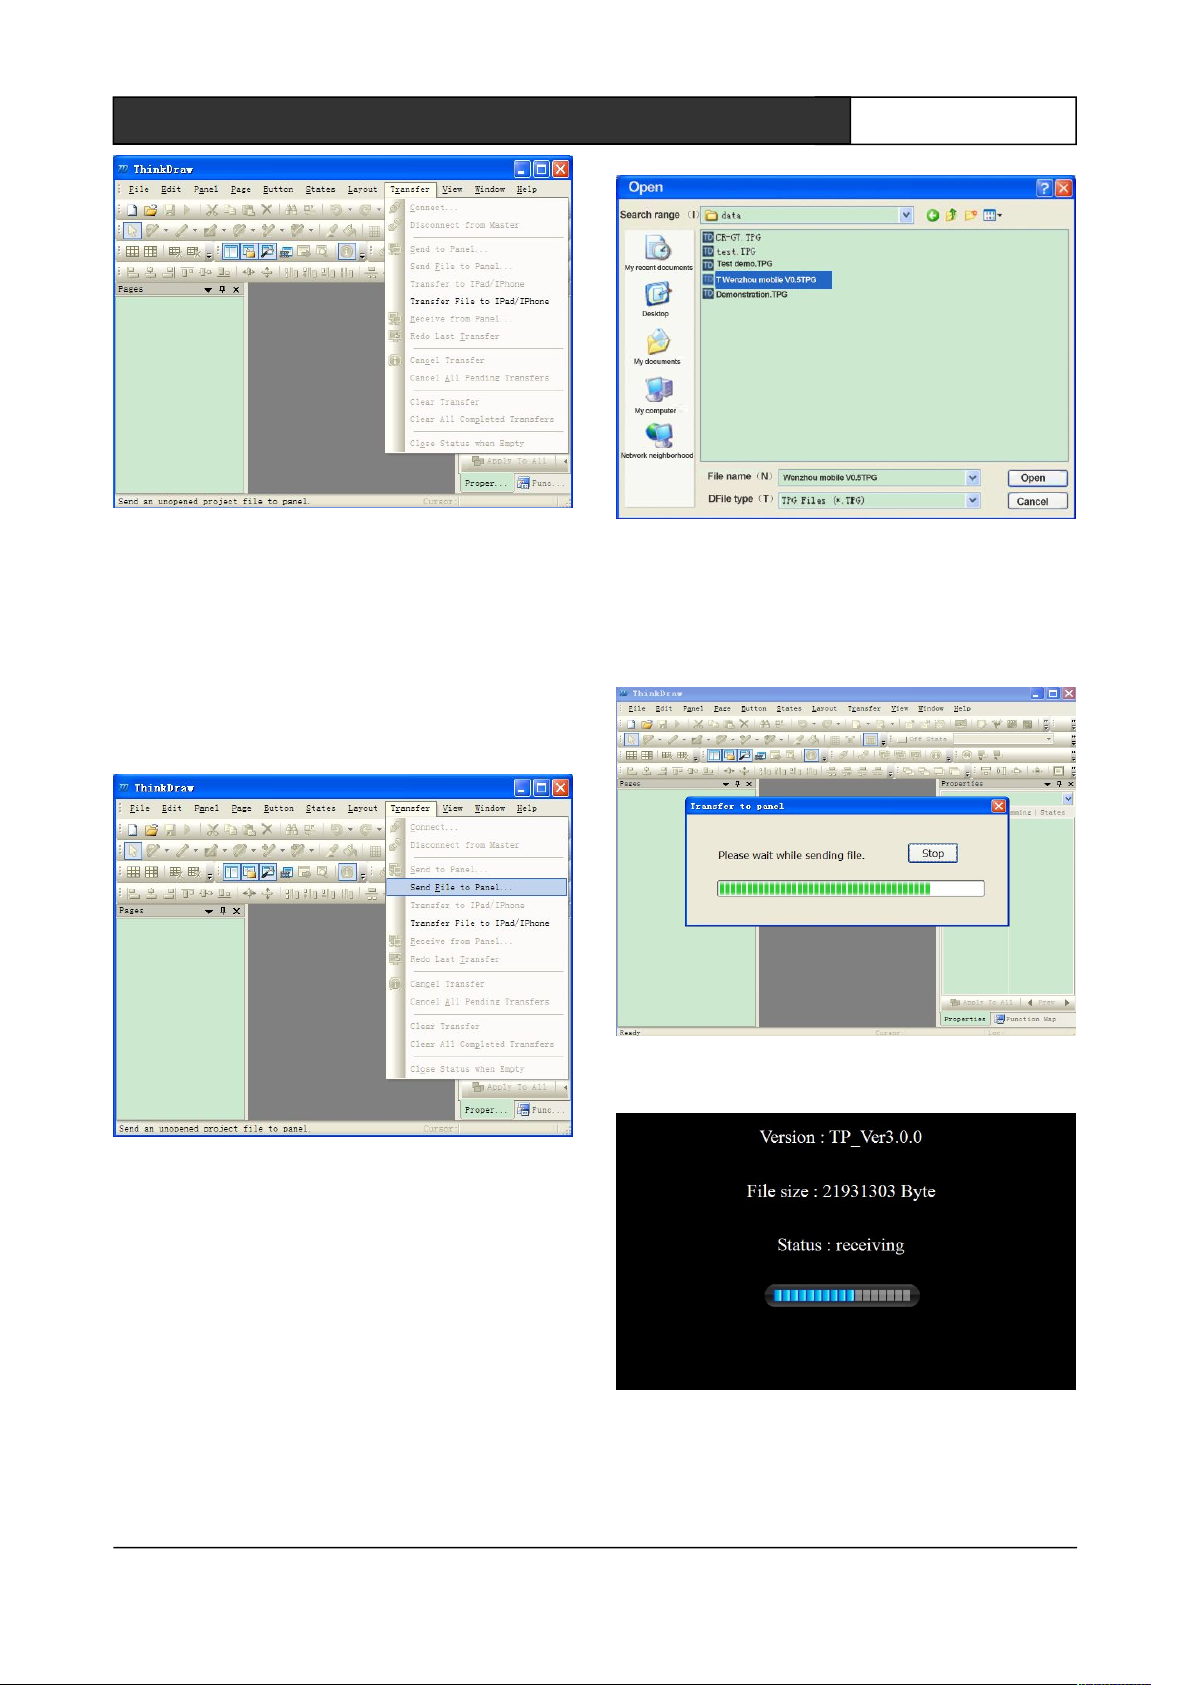
Figure 2-17 ThinkDraw editing software
interface
1,Properly connect power supply, USB data cable,
and run the system, then found " Thansfer--》Send
File to Panel "become available, as shown in
Figure 2-18:
Figure 2-18
2, select " Thansfer-- 》 Send File to Panel ",
pop-up" Open "dialog box, select updating file,
and then click" Open "button, as shown in Figure
2-19 below:
Figure 2-19
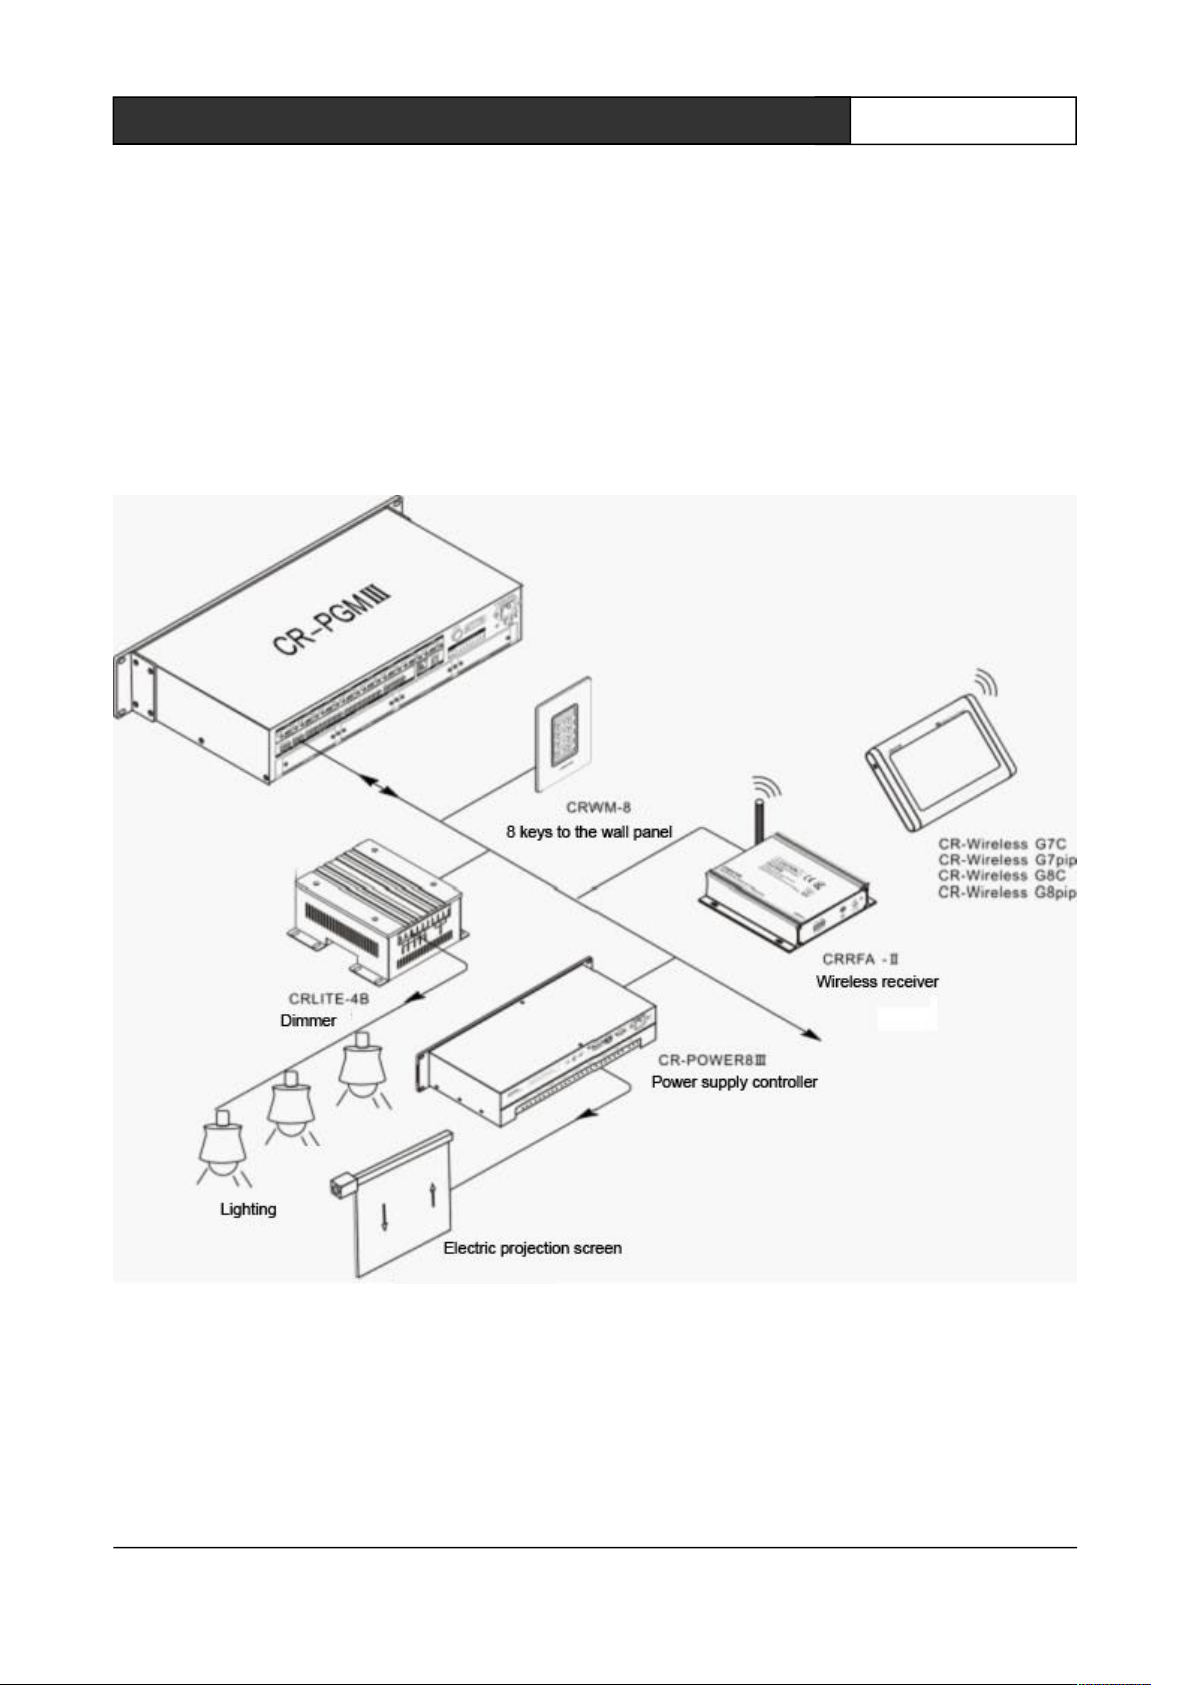
3, PC editing software ThinkDraw will display the
progress of the data transfer, as shown in Figure
2-20, Figure 2-21:
Figure 2-20
Figure 2-21
Version stands for system version, FileSize
stands for the size of the update data in reality.
Status for the real state, and progress bar for the
CREATOR CHINA 2012-11 WWW. CREATOR1997.COM
Page 17
11
Handheld Wireless Programmable Touch Screen User's Manual
realistic current progress percentage.
4,When the update is complete, the program
automatically jumps to the control interface.
For other operations of programmable
touch-screen software ThinkDraw, please refer to
"TouchPanel G Series User's Manual”.
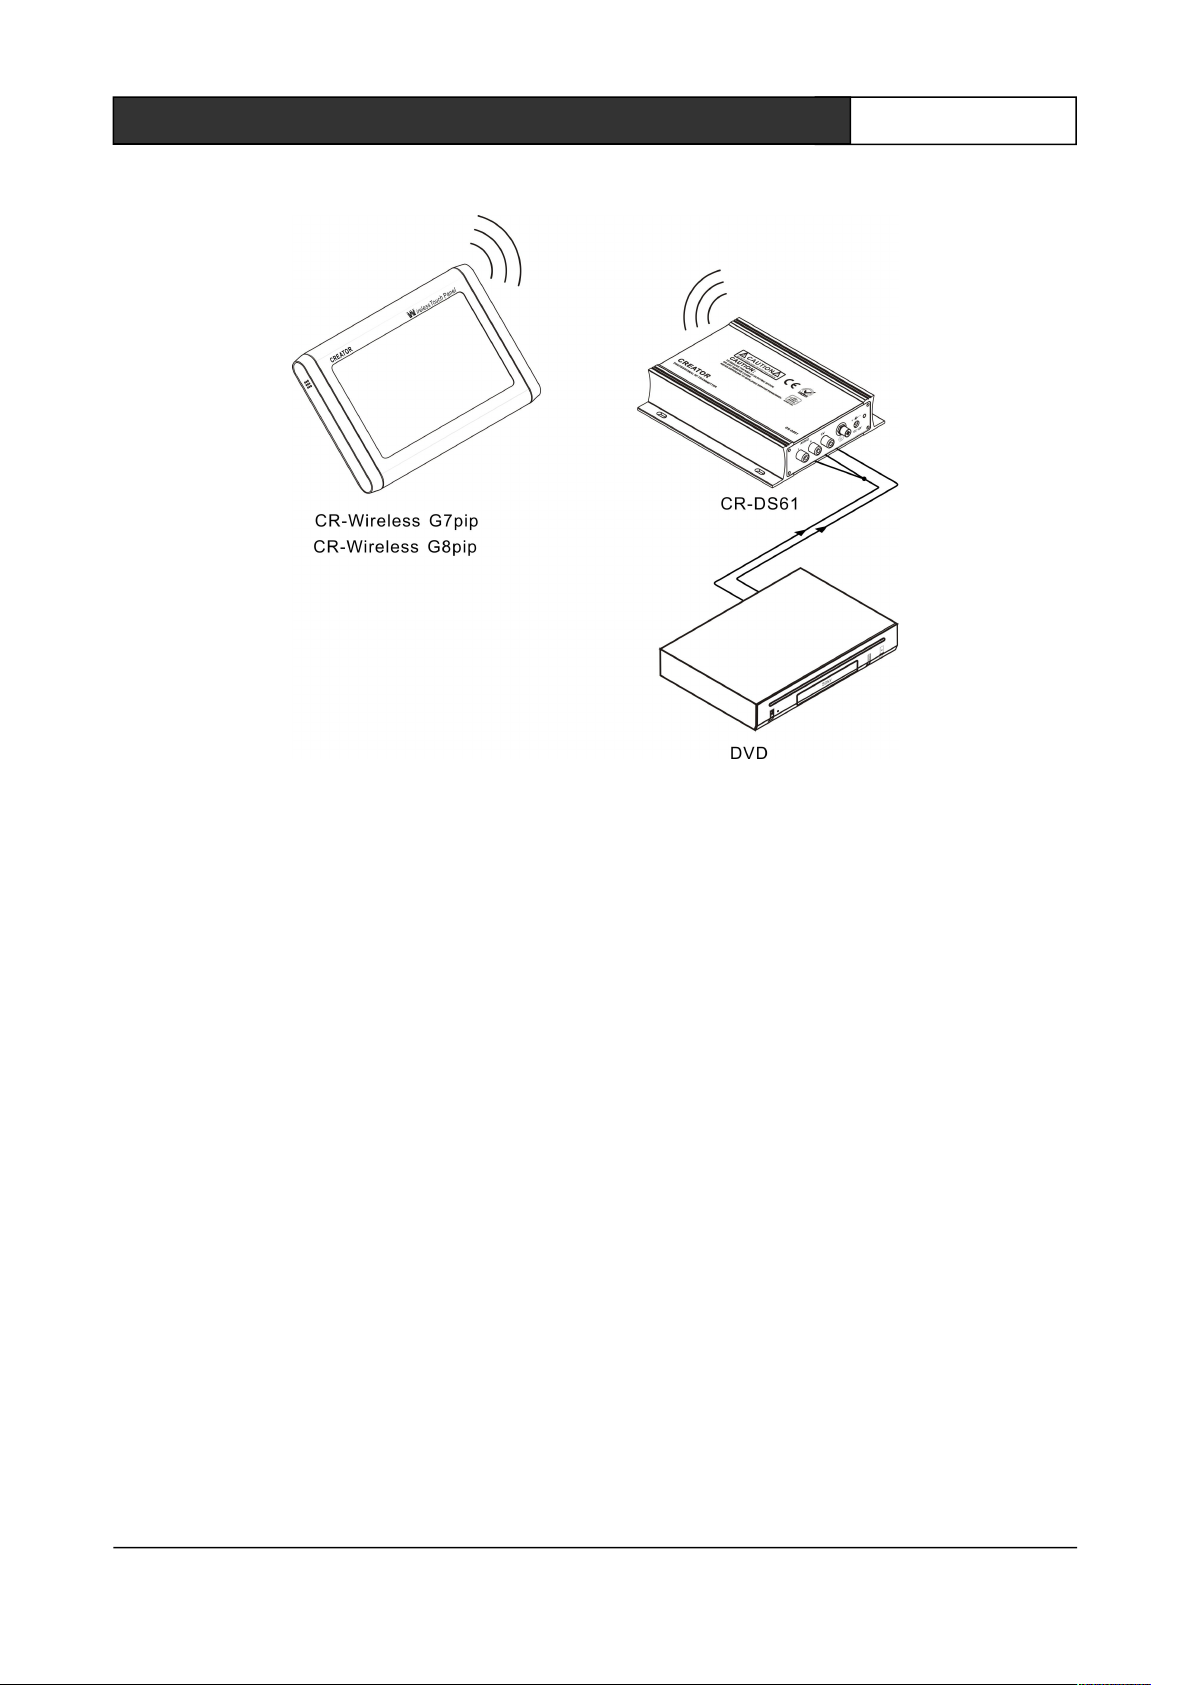
2.4 System Connection Diagram
Mode 1:
CREATOR CHINA 2012-11 WWW. CREATOR1997.COM
Page 18
12
Handheld Wireless Programmable Touch Screen User's Manual
Mode 2:
CREATOR CHINA 2012-11 WWW. CREATOR1997.COM
Page 19
13
Handheld Wireless Programmable Touch Screen User's Manual
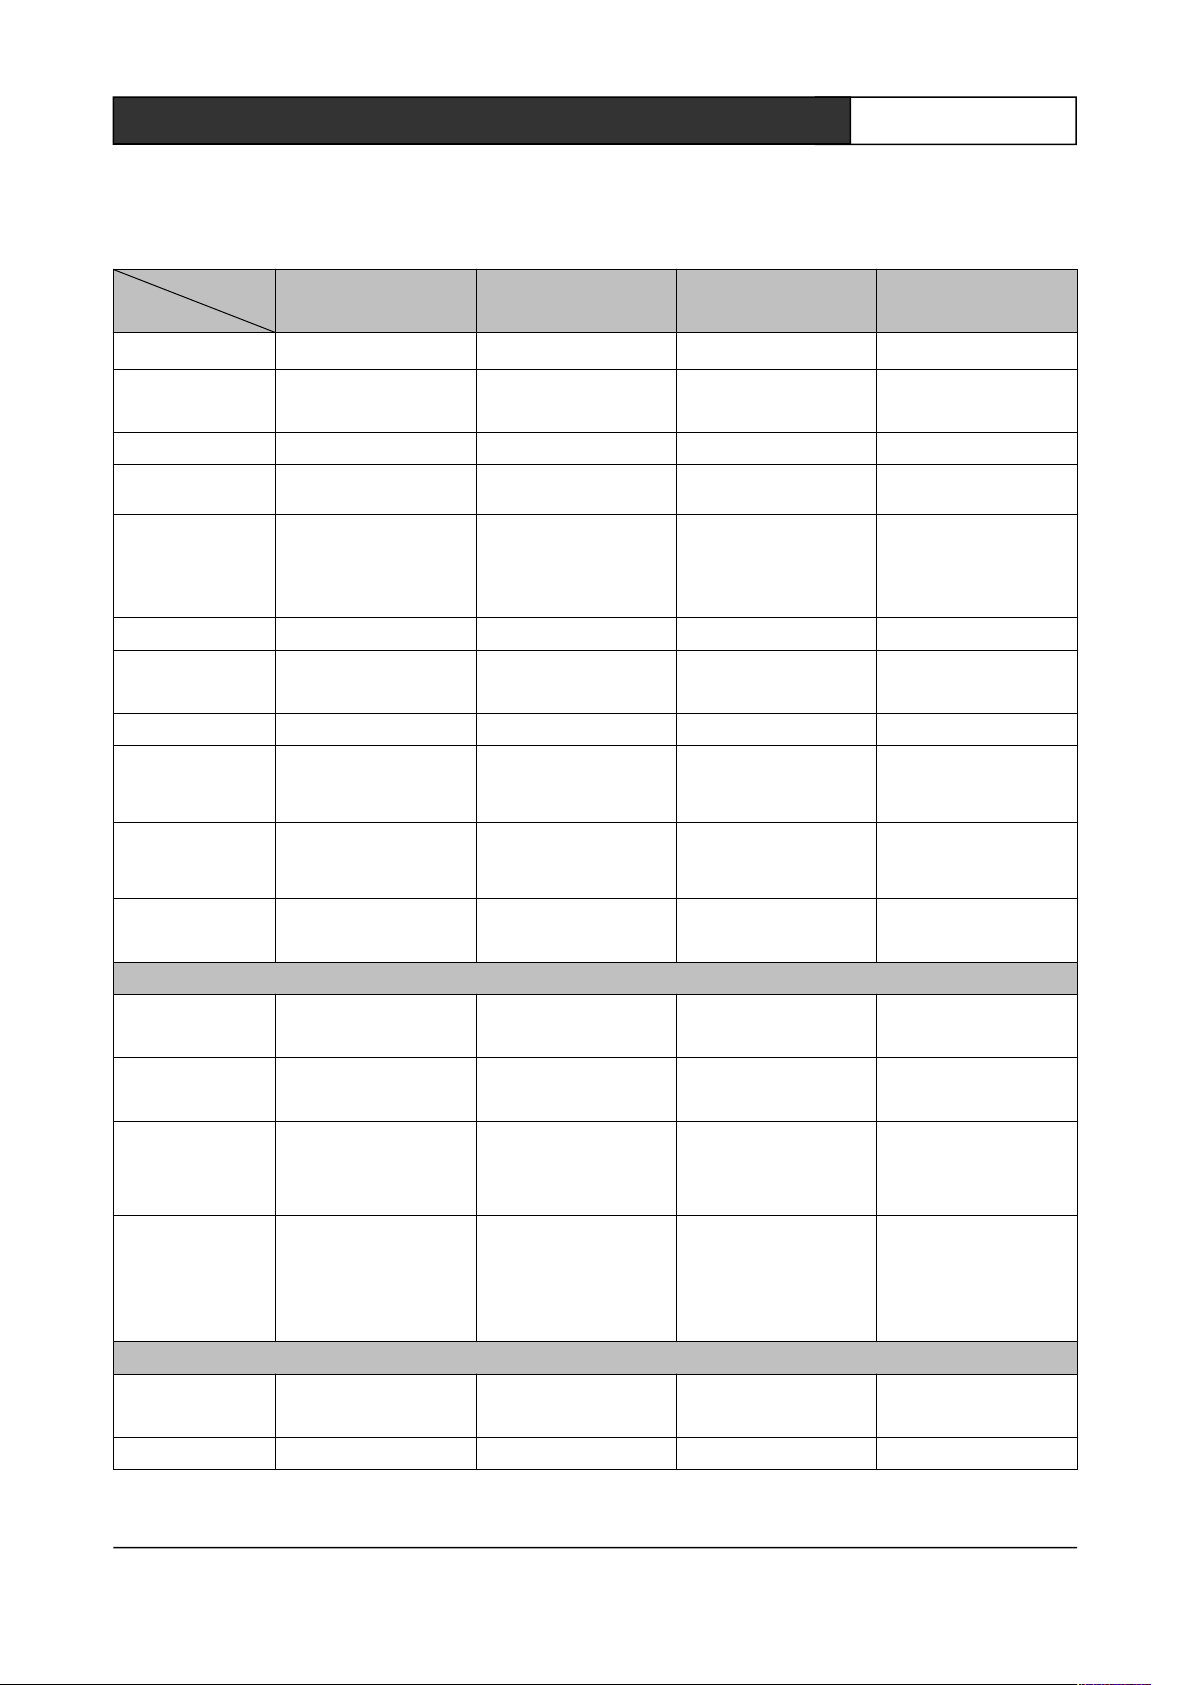
Chapter 3 Technical parameters
Touch screen
size
Lithium-ion
rechargeable
battery 7.4V
Lithium-ion
rechargeable
battery 7.4V
Lithium-ion
rechargeable
battery 7.4V
Lithium-ion
rechargeable
battery 7.4V
Other specifications
236LX154.2WX78
H
236LX154.2WX78
H
About 1KG
type
parameters
Display TFT LCD full color TFT LCD full color TFT LCD full color TFT LCD full color
Touch screen
resolution
Control mode Wireless Wireless Wireless Wireless
Scope
PIP switch no yes no yes
Communicatio
n Interface
Memory 1G 1G 1G 1G
Wireless
transmitter
frequency
Remote
control
distance
External power
supply
Battery
Battery
capacity
Charge
saturation time
Charge the
battery
temperature
CR-Wireless
CR-Wireless
800X480 800X480 1024X600 1024X600
8inch 8inch 10.1inch 10.1inch
Can access
CR-PGM Ⅱ,
CR-PGM Ⅲ
control system
USB interface USB interface USB interface USB interface
433MHz 433MHz/5.8GHz 433MHz 433MHz/5.8GHz
100m (barrier-free)
DC 12V/3.3A DC 12V/3.3A DC 12V/3.3A DC 12V/3.3A
7.4V/4400mAh 7.4V/4400mAh 7.4V/4400mAh 7.4V/4400mAh
5h 5h 5h 5h
0°C ~50°C 0°C ~50°C 0°C ~50°C 0°C ~50°C
G7C
G7C
CR-Wireless
CR-Wireless
G7pip
G7pip
Can access
CR-PGM Ⅱ,
CR-PGM Ⅲ
control system
100m/ <
100m(barrier-free)
CR-Wireless
CR-Wireless
Can access
CR-PGM Ⅱ,
CR-PGM Ⅲ
control system
100m
G8C
G8C
CR-Wireless
CR-Wireless
G8pip
G8pip
Can access
CR-PGM Ⅱ,
CR-PGM Ⅲ
control system
100m/ <
100m(barrier-free)
Battery
Specifications
Dimensions
(mm)
Weight
CREATOR CHINA 2012-11 WWW. CREATOR1997.COM
About 1KG About 1.2KG About 1.2KG
291LX175WX78H 291LX175WX78H
Page 20
14
Handheld Wireless Programmable Touch Screen User's Manual
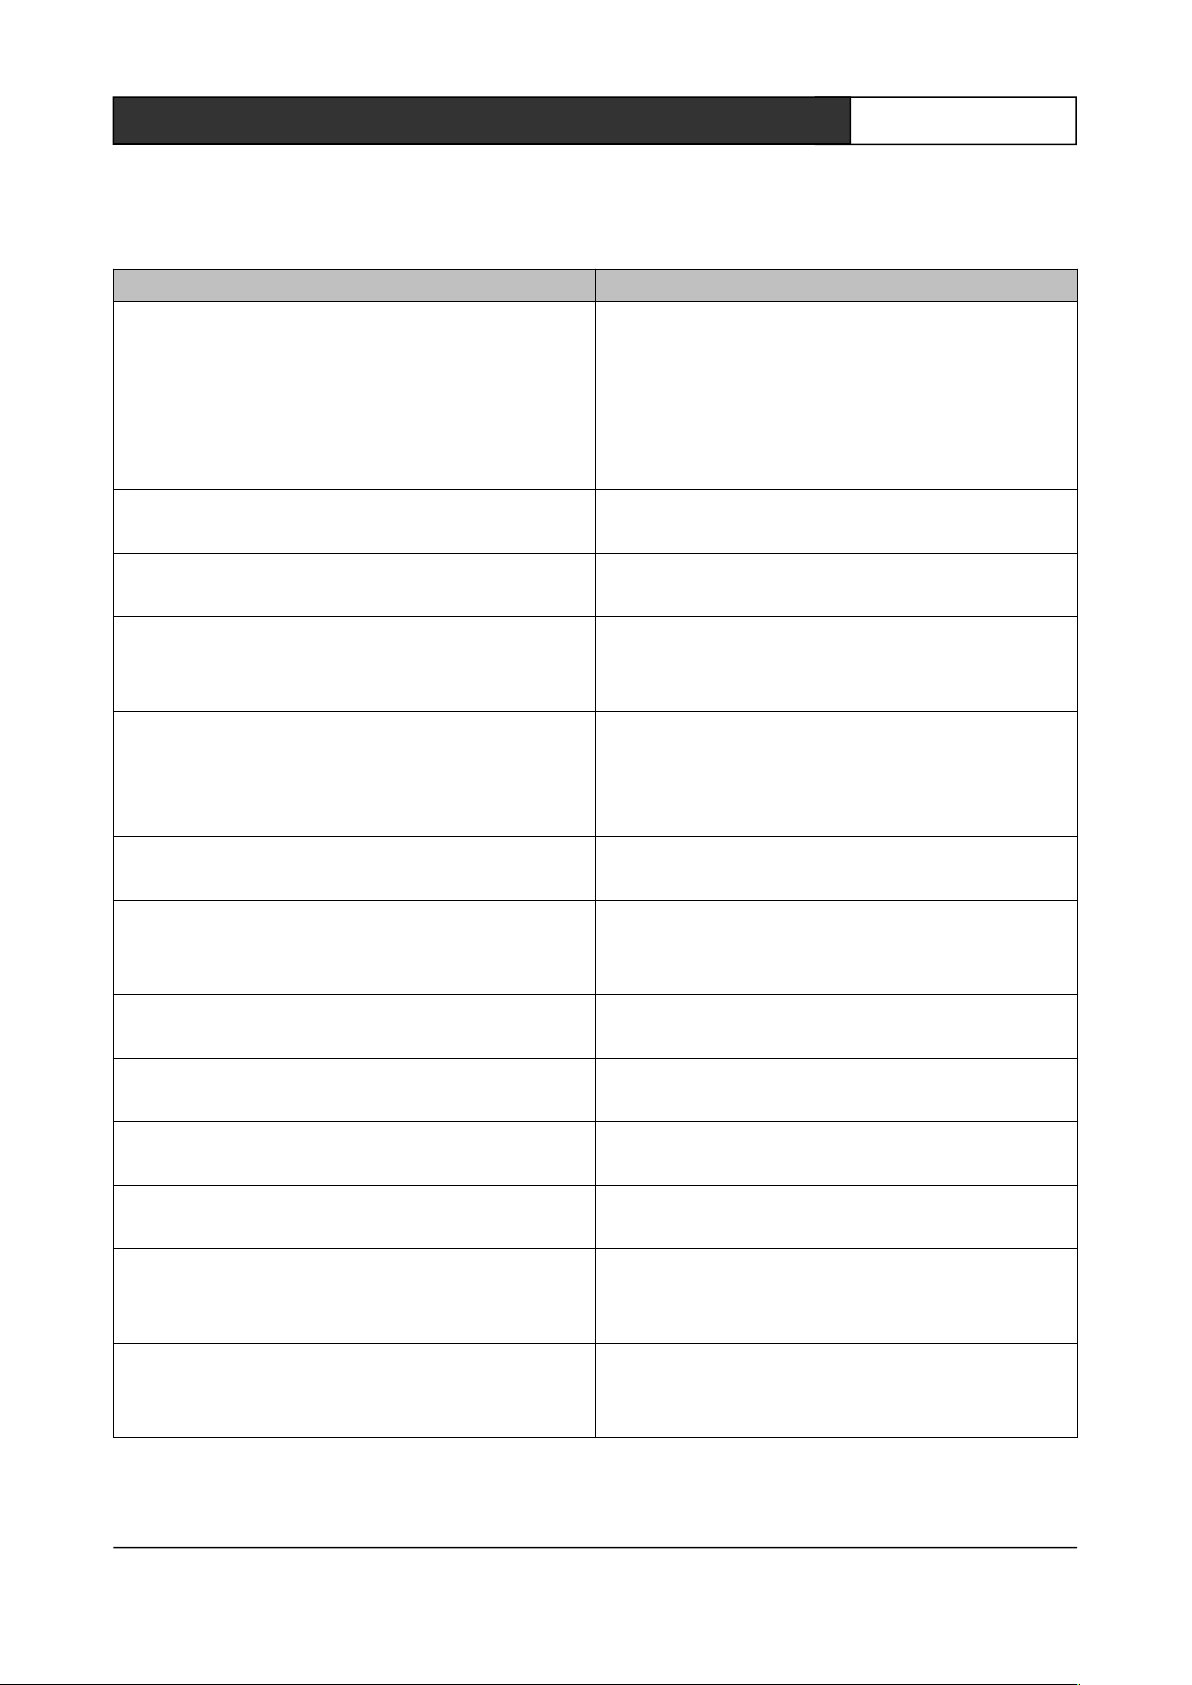
Chapter 4 FAQS and Exclusion
● Check whether the close control of touch
screen and the receiver can control, can not
control, possibly one of two devices is in question,
please send professionals for overhaul.
● make sure the USB data cable is connected
properly;
● Check the touch screen driver is successfully
installed, in this case can re-install the driver to
resolve;
● Check whether the computer USB port can
work normally;
● Make sure the power adapter is already
correctly connected to the touch screen when
charging;
FAQS Exclusion
Touch screen can not control the host
● Check whether the Join No. Values of touch
The computer can not download for the touch
screen
screen button are the same as the
of host program;
● Check whether the touch screen ID are the
same as the host program touch screen ID;
● check the connection between the receiver
and control host is correct;
● Check whether the receiver is mounted with
antenna, touch screen and the receiver are
working in the distance range;
JOIN NO.
● Check whether the touch-screen user
program is the same with touch-screen model;
● Check whether the touch screen has power
and light the touch screen.
no display on touch screen ● battery power of touch screen may be run out,
please charge timely;
● Check whether the touch-screen battery is in
poor installation, remove the battery and reinstall
can be resolved.
CREATOR CHINA 2012-11 WWW. CREATOR1997.COM
Page 21

15
Handheld Wireless Programmable Touch Screen User's Manual
14
No responds by touching touch screen buttons
● may drift appears on touch screen, go to the
settings page recalibration coordinate to solve the
problem;
● check whether the button in the touch-screen
user program picture wrong into text, reset button
can be resolved;
● Check the touch screen whether the charge is
low, please charge timely.
CREATOR CHINA 2012-11 WWW. CREATOR1997.COM
Page 22

16
Handheld Wireless Programmable Touch Screen User's Manual
1
Chapter 5 Maintenance Requirements
1, The dust on the touch screen can be wiped by
a soft, dry cloth;
2, Please avoid storing touch screen in the place
to bask in the sun, make sure to store in dry
place;
3,Maintain good ventilation environment for the
work place of touch screen, avoid using it under
direct sunlight or in wet places;
4, Avoid the use of sharp, rough, hard object, click
on the touch screen surface, recommend hand or
a dedicated touch pen;
5, Click on the touch screen with the appropriate
intensity, not too large force Click to avoid
crushing touch screen;
6,Touch screen battery is touch screen-specific,
and can not be used for other purposes, to avoid
damage to the battery;
7, The battery has a certain life, repeated
charging and discharging will shorten its time;
8, If the touch screen is not used for a long time, it
is recommended that users remove the touch
screen battery, sealing pack with plastic bags and
store in the cool, dry place;
9, Do not casually throw the old battery and
general waste together, to avoid the danger.
CREATOR CHINA 2012-11 WWW. CREATOR1997.COM
Page 23

CREATOR CORPORATION(CHINA)
Copyright by CREATOR
Last Revision:11/2012
 Loading...