

Page 1

User Manual
Creative Sound Blaster PCI
Information in this document is subject to change without notice and does not represent a commitment on the part of Creative Technology Ltd. No part of this manual may be
reproduced or transmitted in any form or by any means, electronic or mechanical, including photocopying and recording, for any purpose without the written permission of
Creative Technology Ltd. The software described in this document is furnished under a license agreement and may be used or copied only in accordance with the terms of the
license agreement. It is against the law to copy the software on any other medium except as specifically allowed in the license agreement. The licensee may make one copy of
the software for backup purposes.
Copyright © 1998-2002 Creative Technology Ltd. All rights reserved.
Version 1.0
November 2002
Sound Blaster and Blaster are registered trademarks, and the Sound Blaster PCI logo, EAX, Creative Multi Speaker Surround, and Oozic are trademarks of Creative Technology
Ltd. in the United States and/or other countries.
SoundWorks is a registered trademark, and MicroWorks, PCWorks and FourPointSurround are trademarks of Cambridge SoundWorks, Inc..
Microsoft, MS-DOS, and Windows are registered trademarks of Microsoft Corporation.
Pentium is a registered trademark of Intel Corporation.
All other products are trademarks or registered trademarks of their respective holders.
This product is covered by one or more of the following U.S. patents:
4,506,579; 4,699,038; 4,987,600; 5,013,105; 5,072,645; 5,111,727; 5,144,676; 5,170,369; 5,248,845; 5,298,671; 5,303,309; 5,317,104; 5,342,990; 5,430,244; 5,524,074;
5,698,803; 5,698,807; 5,748,747; 5,763,800; 5,790,837.
Page 2
Creative Sound Blaster PCI
User Manual
Contents
Depending on your
geographical region, your
audio card’s product name
may be one of the following:
• Creative Ensoniq
AudioPCI
• Creative Sound Blaster 16
PCI
• Creative Sound Blaster
AudioPCI 128
• VIBRA 128
• Creative Sound Blaster
PCI Compact
• Creative Sound Blaster
PCI 128
• Sound Blaster 4.1 Digital
• Creative Sound Blaster 16
4.1 Digital
Introduction............................................................................................................................. 2
Minimum System Requirements ............................................................................................ 2
Using This Manual..................................................................................................................3
About Your Audio Card..........................................................................................................5
Installing Hardware.................................................................................................................7
Installing Software................................................................................................................10
Uninstalling Your Audio Card ..............................................................................................10
Testing The Installation.........................................................................................................11
Troubleshooting ....................................................................................................................11
General Specifications ..........................................................................................................15
Creative Sound Blaster PCI User Manual 1
Page 3

Introduction
The four-speaker environment
is only available on 4-channel
audio cards.
Congratulations on your purchase of a Creative Sound Blaster™ PCI audio card. With its high
quality performance and low CPU utilization, Sound Blaster PCI is the ideal choice for your
computer.
Featuring 128-voice wave-table synthesis with very high sample rate converters, Sound Blaster
PCI ensures high level audio quality and performance. In addition, Sound Blaster PCI supports
localized three-dimensional sound immersion in headphone and four-speaker environments.
Sound Blaster PCI also supports multiple algorithm levels of reverb and chorus effects on the
wave-table sounds as well as spatial sound enhancement on MIDI and Wave sounds in two
speakers. Full duplex operation also allows simultaneous audio recording and playback.
Its use of the PCI bus and Plug and Play (PnP) technology helps make the Sound Blaster PCI
one of the easiest audio cards to install. We believe this Sound Blaster PCI card will give you
years of enjoyment of high-quality sound on your PC.
Minimum System Requirements
❑ Genuine Intel® Pentium® 133 MHz or faster for Windows 95, Windows 98 and Windows 98
Second Edition (SE)
Genuine Intel Pentium 166 MHz or faster for Windows Millennium Edition (Me)
Genuine Intel Pentium 200 MHz or faster for Windows NT 4.0 and Windows 2000
Genuine Intel Pentium 233 MHz or faster for Windows XP
❑ 16 MB RAM for Windows 95/98/98 SE (32 RAM recommended)
32 MB RAM for Windows NT 4.0/Me
64 MB RAM for Windows 2000
128 MB RAM for Windows XP
❑ One free PCI slot
❑ Windows 95, Windows 98, Windows 98 SE, Windows Me, Windows NT 4.0, Windows 2000
or Windows XP
❑ Headphones or amplified speakers (FourPointSurround series speakers recommended for
Sound Blaster PCI 4-channel audio cards)
Creative Sound Blaster PCI User Manual 2
Page 4

Using This Manual
This manual explains the various hardware components on your audio card, and also shows
you how to install the card into your computer.
Getting More Information
Refer to Creative Sound Blaster PCI’s online Help for more information and instructions on
how to use the various applications found in your package.
To to Creative Sound Blaster PCI’s online Help, do the following:
Click Start -> Programs -> Creative -> Sound Blaster PCI -> User’s Guide
Online Registration Enjoy a host of benefits by registering your product during installation, or at
www.creative.com/register. Benefits include:
❑ Service and product support from Creative
❑ Exclusive updates on promotions and events
Technical Support and Warranty
For Technical Support information, go to Start -> Programs -> Creative -> Technical Support.
This information can also be found in the Installation CD. Go to
D:\Support\<Language>\Support.pdf.
For Warranty information, go to D:\Warranty\<Region>\<Language>\Warranty.pdf (where D:
represents your CD-ROM drive, <Region> represents the region you are in and <Language>
represents the language the document is in).
Please keep your Proof of Purchase for the duration of the Warranty period.
Creative Sound Blaster PCI User Manual 3
Page 5
Document Conventions
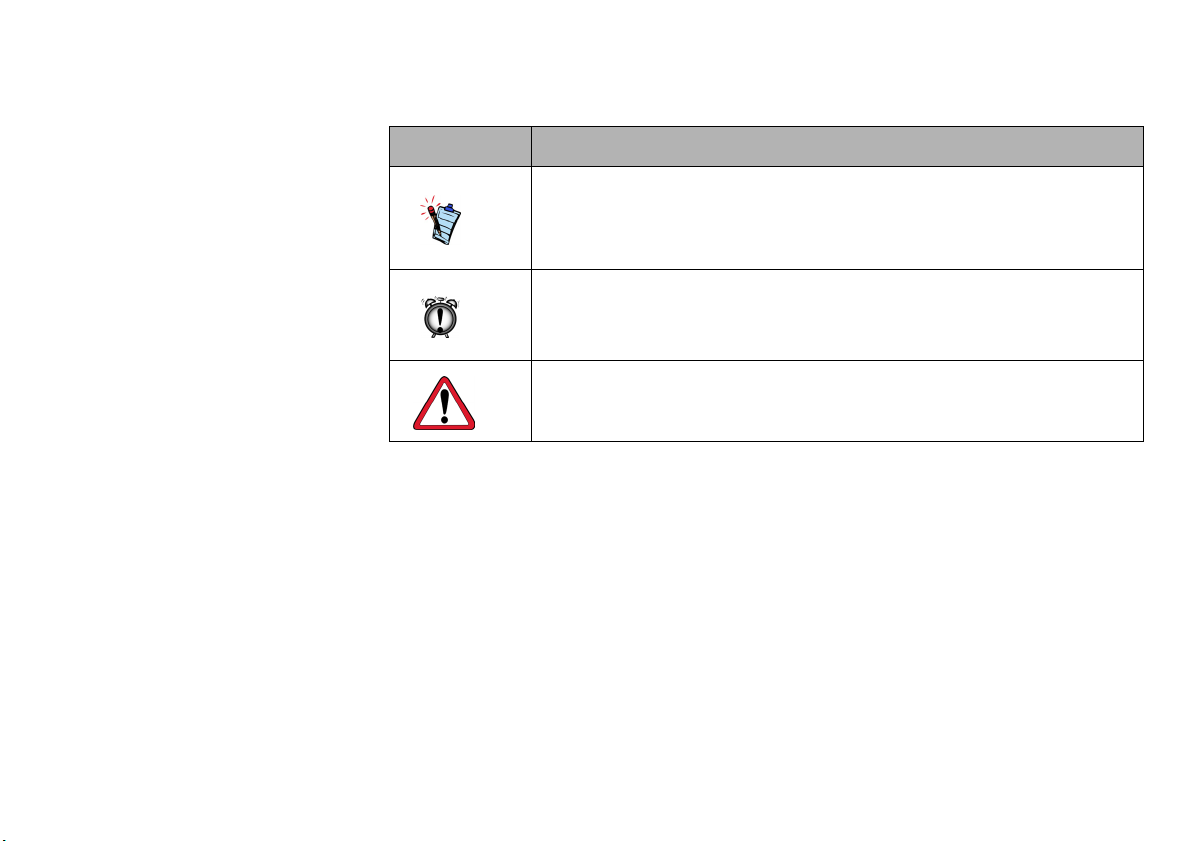
The following conventions are used throughout this document:
Table i: Document conventions
This Represents
This notepad icon indicates information that is of particular importance
and should be considered before continuing.
This alarm clock icon indicates that failure to adhere to directions may
result in loss of data or damage to your system.
The warning sign indicates that failure to adhere to directions may result
in bodily harm or life-threatening situations.
Creative Sound Blaster PCI User Manual 4
Page 6
About Your Audio Card
• The Rear Out connector is
only available on 4-channel
audio cards.
• SPDIF Out is only available
on certain audio cards. If
available, refer to the online
Help for SPDIF Out mode
selection. The jumper JP1 is
not available on audio cards
supporting SPDIF Out.
• The Line Out jack supports
Speaker Out mode only if
your audio card has the
jumper JP1.
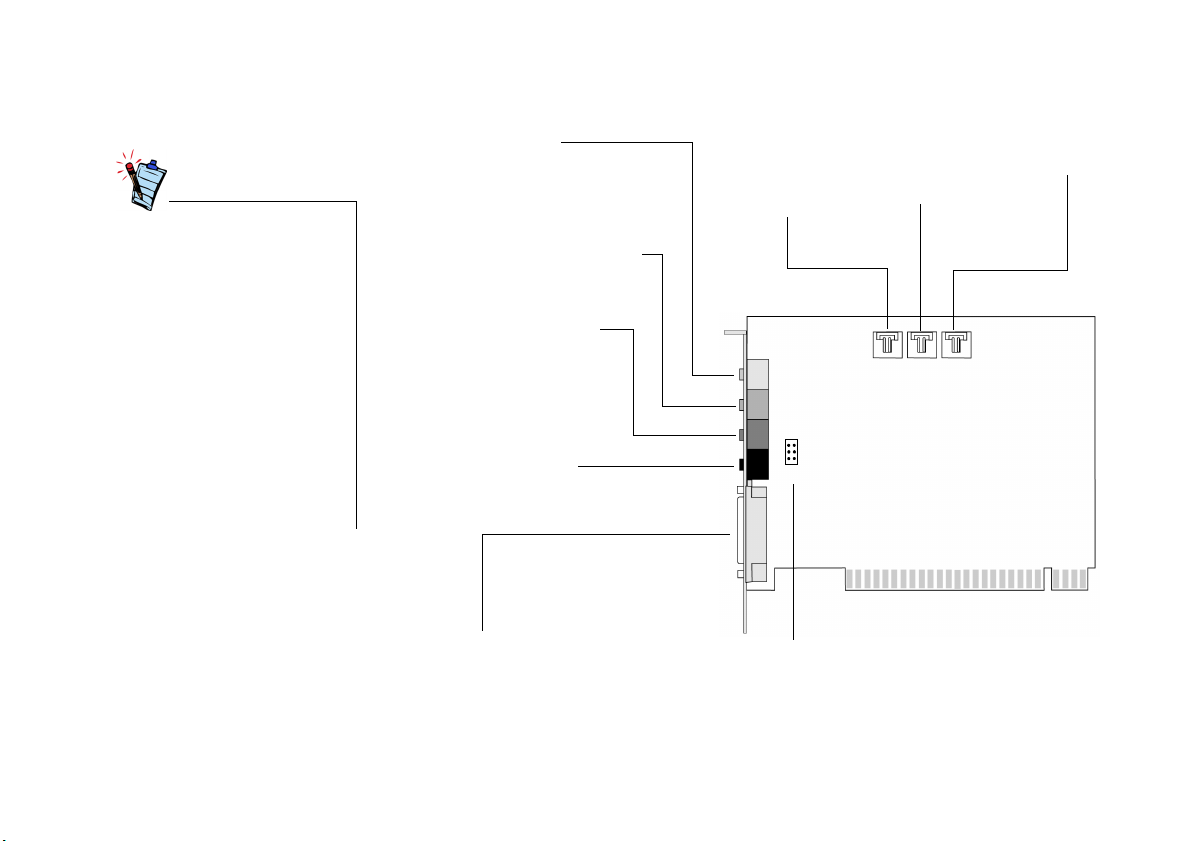
The figure below shows the connectors of a full-height audio card. These connectors allow you
to attach a variety of devices to your audio card.
Line In connector (Blue)
Connects to external devices
such as cassette, DAT, or
MiniDisc player for playback
and recording.
Microphone In connector (Red/Pink)
Connects to an external microphone for
voice input.
Line Out/SPDIF Out connector
(Green/Lime)
Connects to headphones,
powered/FourPoint Surround
speakers and an external amplifier.
SPDIF output can be obtained
from a mono 3.5mm minijack
(available separately).
Rear Out connector (Black)
Connects to powered speakers for
audio output.
Telephone Answering
Device/Modem
connector
Connects to a voice
modem to transmit and
receive audio signals.
SPK
JP1
LINE
CD Audio
connector
Connects to a CDROM drive using an
MPC-3 CD audio
cable.
TAD CD AUX
AUX connector
Connects to a TV card
or second CD-ROM
drive.
Joystick/MIDI connector
Connects to a joystick or a MIDI device. You can buy
an optional MIDI kit that allows you to plug in the
joystick and the MIDI device simultaneously.
Figure 1: Connectors on your audio card.
Front Line Out/Speaker Out jumper (JP1)
Selects between Line Out (default) or Speaker Out
mode for the Green jack. Your card may not support
Speaker Out, and thus, may not have this jumper.
Creative Sound Blaster PCI User Manual 5
Page 7
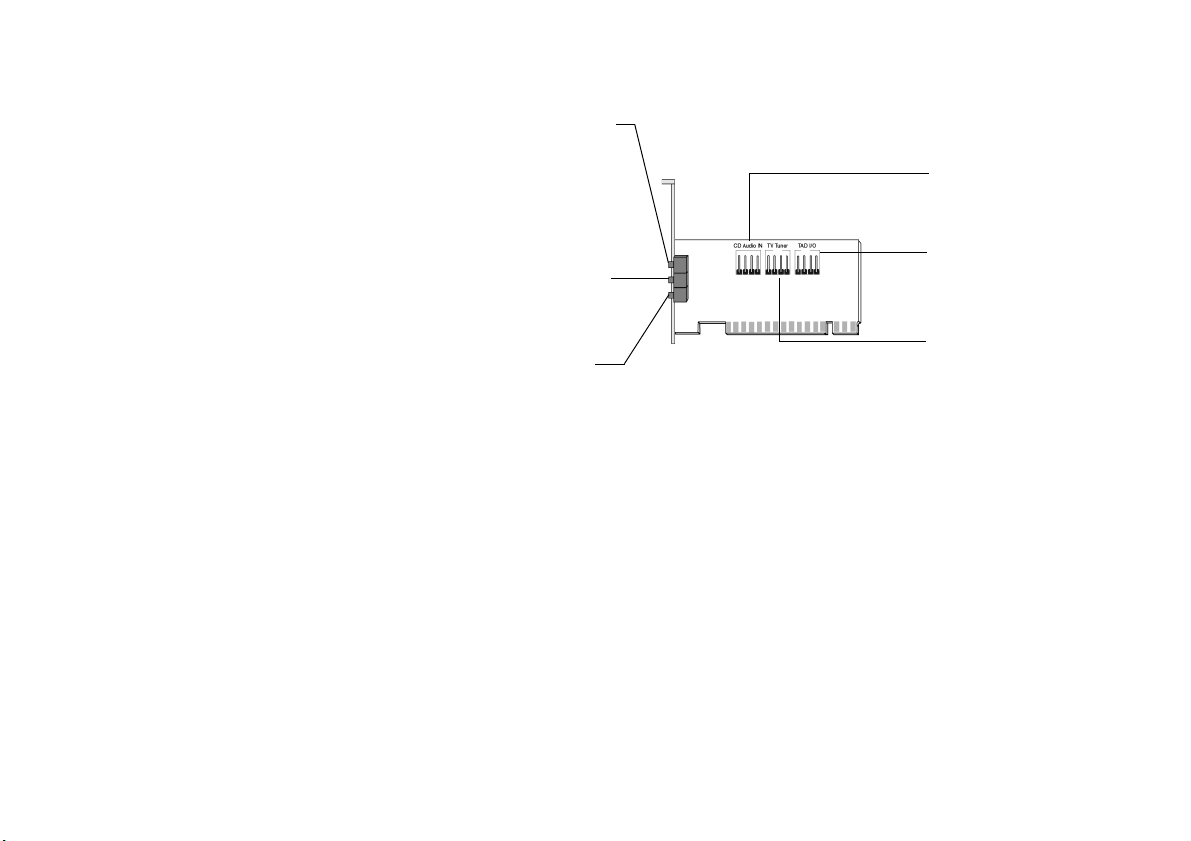
You may have purchased a half-height audio card as shown in the figure below. The connectors
of this type of audio card are shown in the figure below.
Line Out or SPDIF Out connector
(Green/Lime)
Connects to powered speakers or
digital devices. Refer to Creative Sound
Blaster PCI Compact’s online Help for
the SPDIF Out mode selection.
Line In connector (Black/Blue)
Connects to external devices such
as cassette, DAT or Minidisc
players for playback and recording.
Microphone In connector
(Red/Pink)
Connects to an external
microphone for voice input.
Figure 2: Connectors on your audio card.
CD Audio In connector
Connects to a CD-ROM drive
using an MPC-3 CD audio cable.
Telephone Answering Device/
Modem connector
Connects to a voice modem to
transmit and receive audio
signals.
TV Tuner connector
Connects to a TV card or second
CD-ROM drive.
Creative Sound Blaster PCI User Manual 6
Page 8
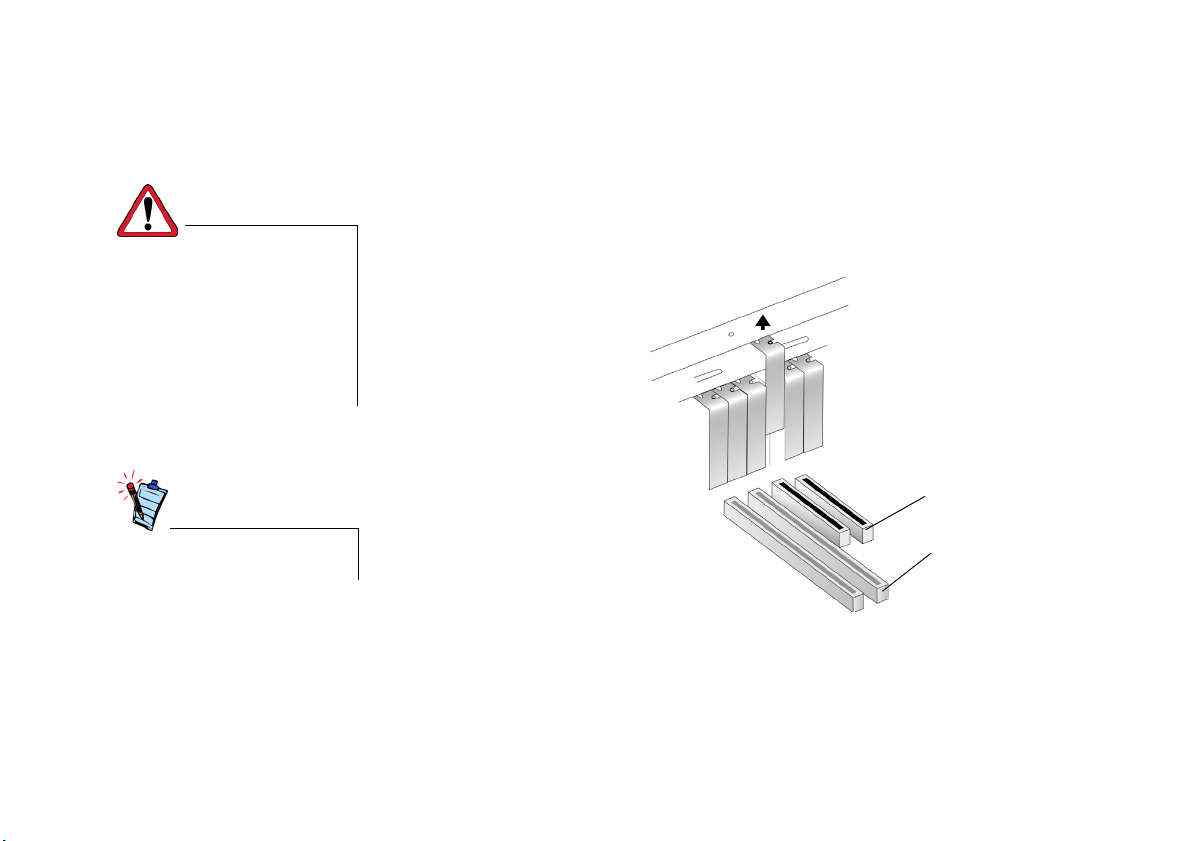
Installing Hardware
Step 1: Prepare your computer
Turn off the main power supply
and disconnect your computer’s
power cord. Systems using an
ATX power supply unit with soft
power off may still be powering
the PCI slot. This can damage
your audio card when it is
inserted into the slot.
Remove any existing audio card
or disable the onboard audio.
1. Turn off your computer and all peripheral devices.
2. Touch a metal plate on your computer to ground yourself and to discharge any static
electricity, and then unplug the power cord from the wall outlet.
3. Remove the computer cover.
4. Remove the metal bracket from an unused PCI slot as shown in Figure 3. Put the screw aside
for use later.
PCI slot
ISA slot
Figure 3: Removing a metal plate.
Creative Sound Blaster PCI User Manual 7
Page 9
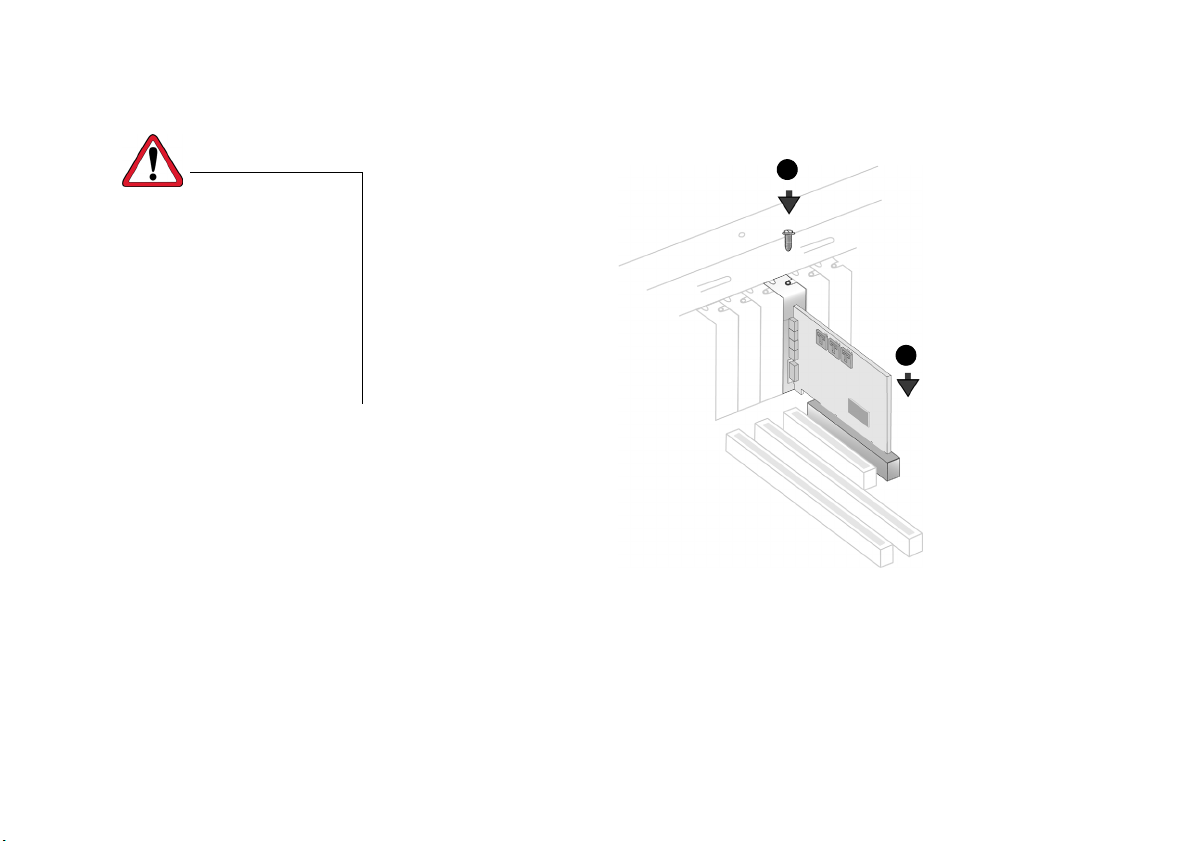
Step 2: Install the audio card
Do not force the audio card into
the slot. Make sure that the gold
finger PCI connector on the
Creative audio card is aligned
with the PCI bus connector on
the motherboard before you
insert the card into the PCI
expansion slot.
If it does not fit properly, gently
remove it and try again
.
1. Align the Creative audio card with the PCI slot and press the card gently but firmly into the
slot as shown in Figure 4.
2. Secure the Creative audio card with the screw you had placed aside earlier.
2
1
Figure 4: Aligning and securing the card against the slot.
Creative Sound Blaster PCI User Manual 8
Page 10
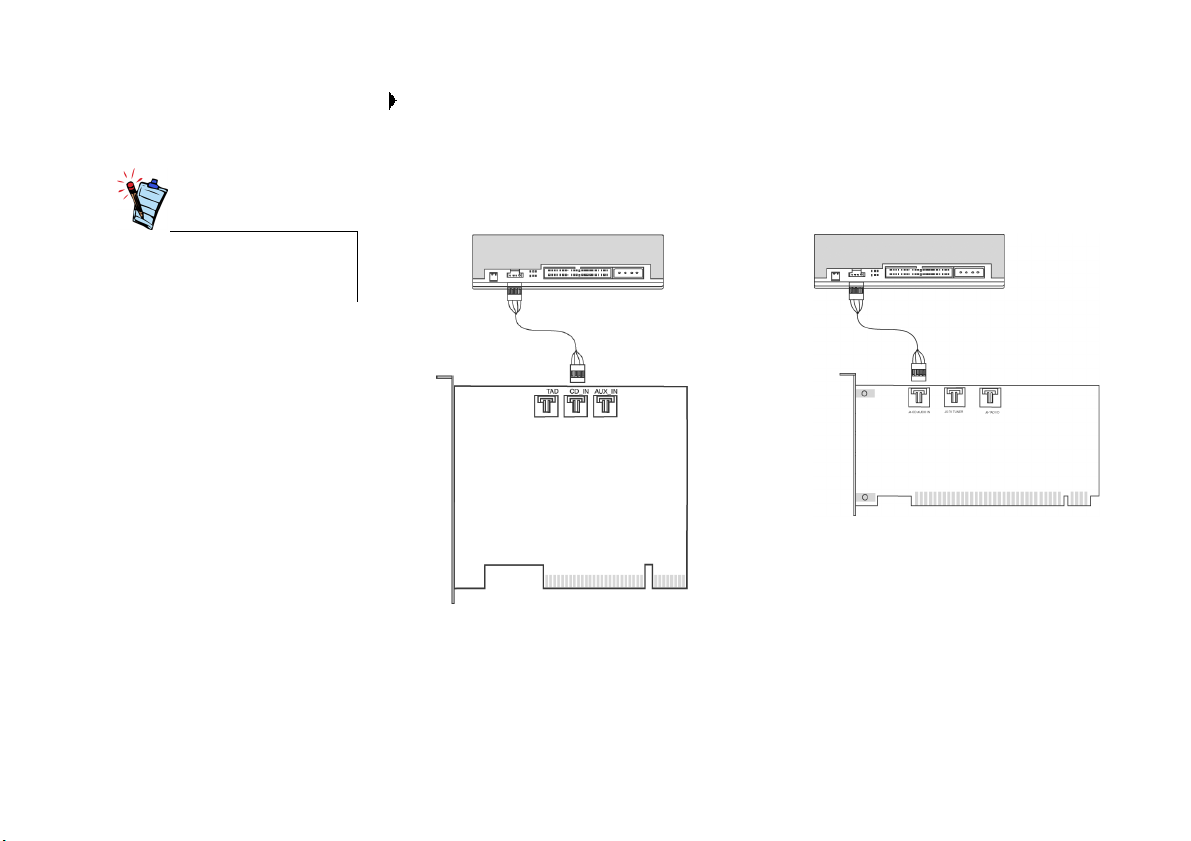
Step 3: Connect to the CD-ROM/DVD-ROM drive
For analog CD audio output:
Connect the Analog CD audio cable from the Analog Audio connector on your CD-ROM/
DVD-ROM drive to the CD Audio connector on the Creative audio card as shown in Figure
5.
The Analog CD audio cable is
not bundled with your audio
card.
CD-ROM/DVD-ROM drive
Full-height Creative audio card
Figure 5: Connecting to a CD-ROM/DVD-ROM drive.
OR
CD-ROM/DVD-ROM drive
Half-height Creative audio card
Creative Sound Blaster PCI User Manual 9
Page 11

Installing Software
You need to install device drivers and applications to use Sound Blaster PCI. To install these
drivers and the bundled applications, use the following instructions. The instructions are
applicable to all supported Windows operating systems.
1. After you have installed the Creative audio card, turn on your computer. Windows
automatically detects the audio card and device drivers.
2. When prompted for the audio drivers, click the Cancel button.
3. Insert the Sound Blaster PCI installation CD into your CD-ROM drive. The disc supports
Windows AutoPlay mode and starts running automatically. If not, either enable your CDROM drive’s auto-insert notification feature, or click Start -> Run and then type
D:\CTRUN\CTRUN.EXE in the Open box (where D: represents your CD-ROM drive).
4. Follow the instructions on the screen to complete the installation.
5. When prompted, restart your computer.
Uninstalling Your Audio Card
You may at times need to uninstall and then reinstall the Creative audio card to correct
problems or change configurations. The following instructions tell you how to uninstall the
Creative audio card in all Windows operating systems.
1. Click Start -> Settings -> Control Panel.
2. Double-click the Add/Remove Programs icon.
3. Click the Install/Uninstall tab. The Add/Remove Programs dialog box appears.
4. Click Sound Blaster PCI and then click the Add/Remove button in Windows 95/98/98 SE/
ME/NT 4.0 or the Change/Remove button in Windows 2000/XP.
5. When the Confirm File Deletion dialog box appears, click the Ye s button.
Creative Sound Blaster PCI User Manual 10
Page 12

Testing The Installation
After the drivers are installed, you can use Creative PlayCenter to test whether your audio card
is working properly.
1. Click Start -> Programs -> Creative -> Creative PlayerCenter.
2. Click the File button and then click Open.
3. Click the Browse button. The Open dialog box appears.
4. Locate and double-click a .WAV file.
5. Click the OK button. You should hear the selected sound being played. If you encounter any
problems, refer to the “Troubleshooting” section in Creative Sound Blaster PCI’s online
Help.
Troubleshooting
Configuring Speakers The default speaker setup for Sound Blaster PCI may be Stereo Speakers for Windows 95/98/
98 SE and Desktop Stereo Speakers for Windows 2000/Me/XP, which are 2-speaker setups.
Depending on which Windows operating system you are using, follow one of the series of
steps to change your speaker setting.
Windows 95/98/98 SE 1. Click Start -> Settings -> Control Panel.
2. Double-click the System icon. A dialog box appears.
3. Click the Device Manager tab.
4. Double-click the Sound, Video and Game Controllers option from the hardware tree.
5. Click the Sound Blaster PCI option.
6. Click the Properties button.
The Creative Sound Blaster PCI Properties dialog box appears.
7. Click the 3D Audio tab and select the speaker setting that you want.
8. Click the OK button.
Creative Sound Blaster PCI User Manual 11
Page 13

Windows Me/2000/XP 1. Click Start -> Settings -> Control Panel.
2. Double-click the Sounds and Multimedia icon. A dialog box appears.
3. Click the Audio tab and then click the Advanced button.
4. On the Speakers tabbed page, select the speaker setting that you want.
5. Click the OK button.
Updating Windows 2000 (Service Pack 2)
No audio output when playing audio CDs
• CD volume is controlled by
the Wave/MP3 slider in the
Audio Mixer application.
Windows 2000 now provides better support for AC-3 SPDIF output (non-PCM through
waveOut) for software DVD viewing. Click the website address below to go to Microsoft’s
Windows 2000 web site to download the Windows 2000 Service Pack 2 to enjoy this support
and to fix other issues in the Windows 2000 OS.
http://microsoft.com/windows2000/downloads/servicepacks/sp2/default.asp
Sound Blaster PCI does not support analog CD audio playback. To listen to audio CDs, digital
CD playback must be enabled. Do the following to enable digital CD playback:
For Windows 98 SE
1. Click Start -> Settings -> Control Panel.
2. In the Control Panel dialog box, double-click the Multimedia icon.
3. In the Multimedia Properties dialog box, click the CD Music tab.
4. Click the Enable digital CD audio for this CD-ROM device check box to select it.
5. Click the OK button.
For Windows Me
1. Click Start -> Settings -> Control Panel.
2. In the Control Panel dialog box, double-click the System icon.
3. In the System Properties dialog box, click the Device Manager tab.
4. Double-click the DVD/CD-ROM drives icon.
Your computer drives will appear.
Creative Sound Blaster PCI User Manual 12
Page 14

5. Right-click the disk drive icon.
A menu will appear.
6. Click Properties.
7. In the Digital CD Playback box of the next dialog box, click the Enable digital CD audio
for this CD-ROM device check box to select it.
8. Click the OK button.
For Windows 2000 and Windows XP
1. Click Start -> Settings -> Control Panel.
2. In the Control Panel dialog box, double-click the System icon.
3. In the System Properties dialog box, click the Hardware tab.
4. Click the Device Manager button.
5. Double-click the DVD/CD-ROM drives icon.
Your computer drives will appear.
6. Right-click the disk drive icon.
A menu will appear.
7. Click Properties.
8. In the Digital CD Playback box of the next dialog box, click the Enable digital CD audio
for this CD-ROM device check box to select it.
You can also enable Direct Memory Access to your storage devices. Follow the steps below:
For Windows 98 SE and Windows Me
1. Click Start -> Settings -> Control Panel.
2. In the Control Panel dialog box, double-click the System icon.
3. In the System Properties dialog box, click the Device Manager tab.
4. Double-click the Disk drives icon.
Your computer drives will appear.
5. Double-click the hard disk drive icon.
Creative Sound Blaster PCI User Manual 13
Page 15

6. In the box that appears, click the Settings tab.
7. Click the DMA (Direct Memory Access) check box to select it.
An alert message box appears.
8. Click the OK button.
9. Click the OK button in the next box.
10. Click the Close button on the System Properties dialog box.
11. When prompted to restart your computer, click the Ye s button.
12. Repeat steps 4-11 if you have other drives, for example, other hard disk drives, CD-ROM,
CD-RW, and DVD-ROM drives. In step 4, double-click the respective drive icon.
For Windows 2000 and Windows XP
1. Click Start -> Settings -> Control Panel.
2. In the Control Panel dialog box, double-click the System icon.
3. In the System Properties dialog box, click the Hardware tab.
4. Click the Device Manager button.
5. Double-click the ATA/ATAPI IDE Controllers icon.
Your IDE channels will appear.
6. Right-click the Primary IDE Channel icon.
7. Click Properties.
8. In the Properties dialog box, click the Advanced Settings tab.
9. Click the DMA if available check box, to select it.
10. Click the OK button.
No audio output when using speakers that support digital audio
Digital output is only available on audio cards that support SPDIF Out. To check if your audio
card supports SPDIF Out, follow the steps below.
1. Click Start -> Settings -> Control Panel.
2. Double-click the System icon.
3. In the dialog box that appears, click the Device Manager tab.
Creative Sound Blaster PCI User Manual 14
Page 16

4. Double-click the Sound, Video and Game Controllers, and click the Sound Blaster PCI
option.
5. Click the Properties button.
6. In the Creative Sound Blaster PCI Properties dialog box, click the Settings tab.
7. Under Output Mode, click the Digital check box to select it.
8. Click the OK button.
9. If you still do not hear any audio output from your speakers, this means that your audio card
does not support SPDIF Out.
General Specifications
Wave- Table Synthesis ❑ Creative synthesis engine
❑ Digital effects engine for reverb and chorus
❑ 128-voice polyphony and multi-timbral capability
❑ 16 MIDI channels, 128 GM and GS compatible instruments and 10 drum kits
❑ MT-32 compatible instrument set
❑ 2MB,4MB and 8MB sample sets included
3D Audio Technology ❑ Support for Microsoft DirectSound and DirectSound3D and Creative Environmental Audio
Extensions (EAX) audio technologies in two-speaker mode
❑ Localized 3D Sound technology expands the spaciousness of sounds in the traditional two
speaker system
❑ Multi-Algorithm reverb and chorus
Memory Subsystem ❑ Utilizes system RAM for wave-table samples
❑ User configurable for 2 MB, 4 MB or 8 MB
Creative Sound Blaster PCI User Manual 15
Page 17

CD-Quality, 16-Bit Stereo
Digital Audio
❑ 8-bit and 16-bit mono and stereo recording and playback
❑ User-selectable sample rates from 5 kHz to 48 kHz
❑ Full-duplex support enables simultaneous record and playback for Internet communications
software
MIDI Interface/Joystick
Connector
(on selected models)
❑ Built-in 15-pin MIDI interface (cable available separately)
❑ Compatible with Sound Blaster and MPU-401 UART modes
❑ IBM-compatible 15-pin joystick connector with analog support
Onboard Connectors ❑ Line In
❑ Microphone In
❑ Line Out/SPDIF Out (on selected models)
❑ Joystick/MIDI connector (on selected models)
❑ Telephone Answering Device In/Out
❑ MPC-3 CD Audio In
❑ Auxiliary In/TV Tuner
Works with the following
standards
❑ Windows 95/98/98 SE/Me/NT 4.0/2000/XP
❑ General MIDI
❑ MPC-3
❑ Plug and Play
❑ Sound Blaster PCI
❑ Microsoft DirectSound, DirectSound3D
❑ EAX
Creative Sound Blaster PCI User Manual 16
 Loading...