

Page 1

Creative ZEN Vision W User's Guide
Introduction
Applications
Accessories
Getting Started
Playing and Managing Media
Using Windows Media Player 10
Managing Data Files
Managing Organizer Data
Using a Memory Card
Customizing Your Player
Frequently Asked Questions
Safety Information
General Specifications
License and Copyright
Page 1
Page 2

How to use this manual
This document has been designed to provide you with complete product knowledge. You can resize the
document window, print this document, access linked web sites and get information from specially
prepared graphics.
To jump to a linked topic or a web site, click the underlined blue text, or the hand symbol
whenever it appears.
To show a short description (tooltip) of an object, move your mouse cursor over it. A tooltip
appears after a few seconds.
You can choose to print portions of this document:
On the Contents tabbed page to your left, click a topic heading.
1.
On the menu, click the Print button.
2.
In the dialog box that appears, click the option to print one topic only, or all topics under a
3.
heading.
Page 2
Page 3

Introduction
Creative ZEN
Vision W is a portable media player with a brilliant 4.3-inch widescreen TFT Liquid Crystal Display
(LCD) for video and picture display. Your player also plays back audio files.
Read on for a tour of your player and its features.
®
Page 3
Page 4

Your Player at a Glance
This section introduces you to the various components of your player.
Front view
Side views
Top and bottom views
Navigation buttons
Page 4
Page 5
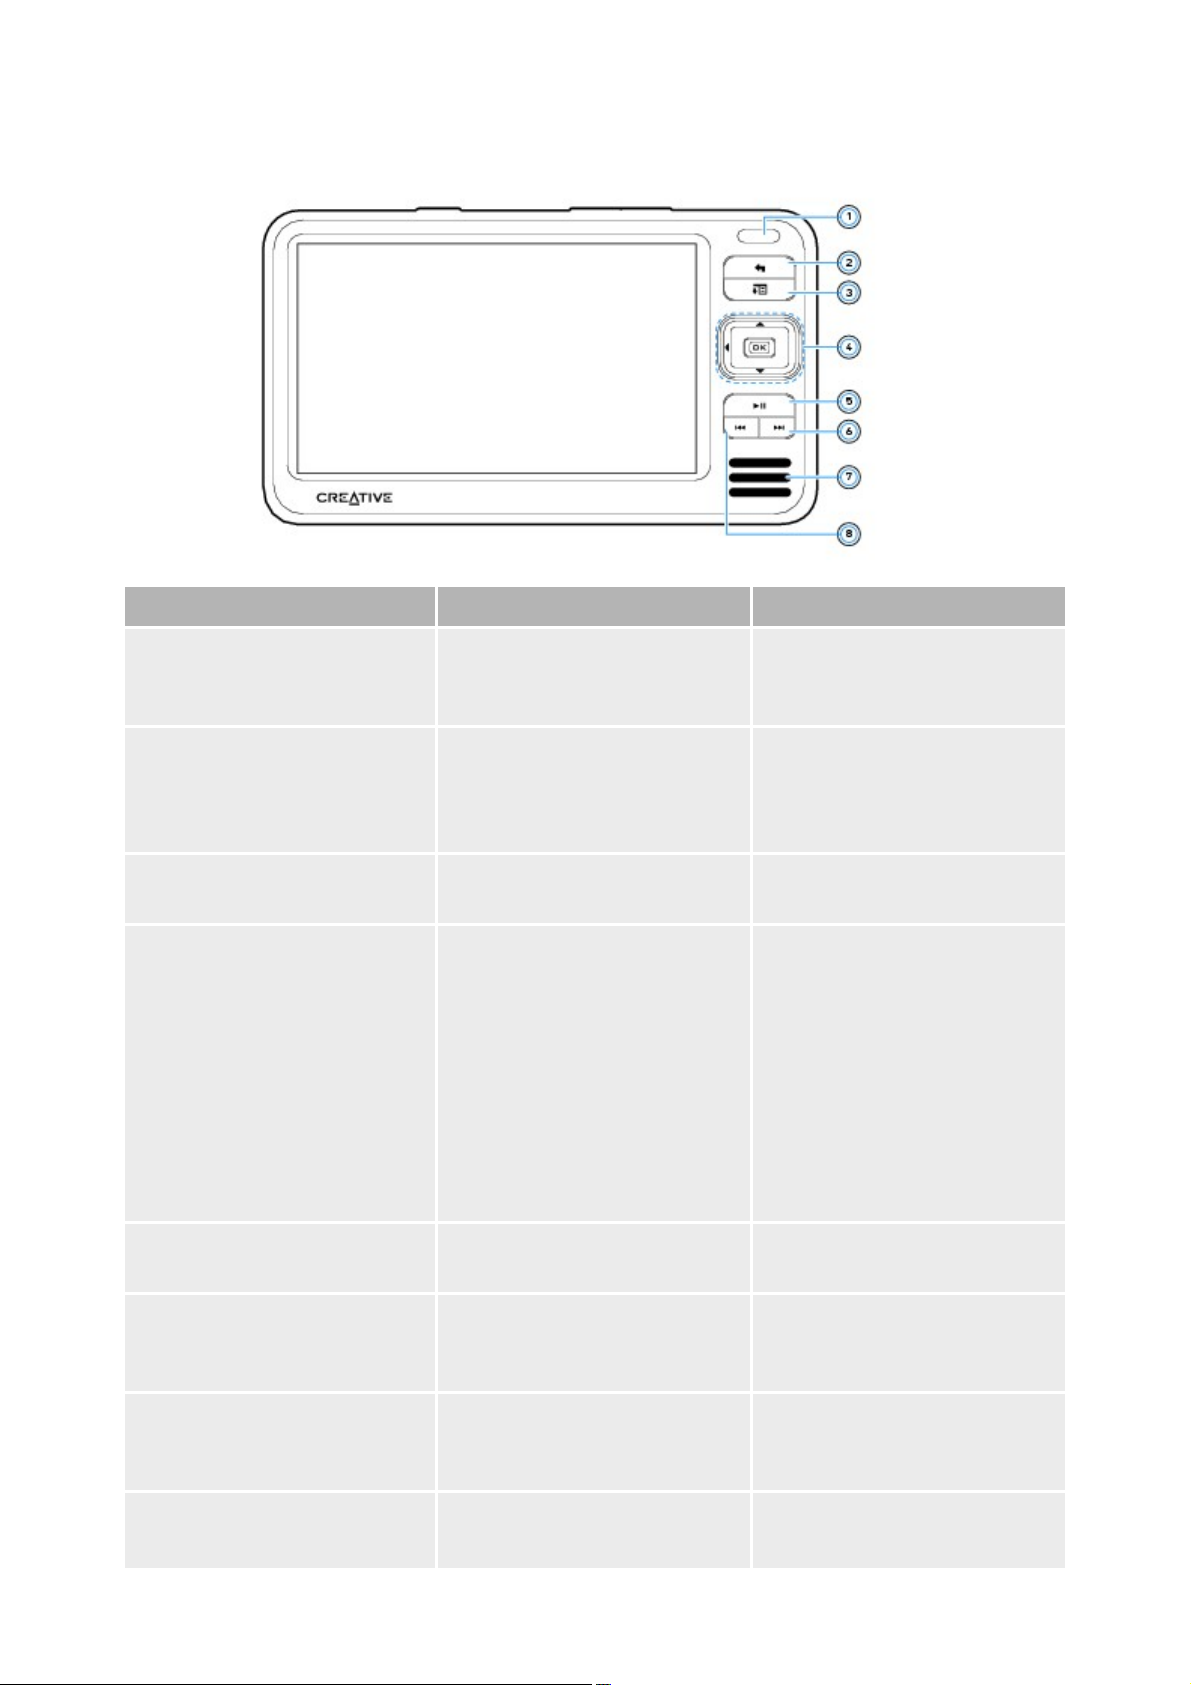
Front view
Component
What It Does
1.
Infrared (IR) receiver
Enables control of your player
using the IR remote control
(available separately).
2.
Menu/Back button
Press and hold to display the
main menu.
Press to return to the previous
menu.
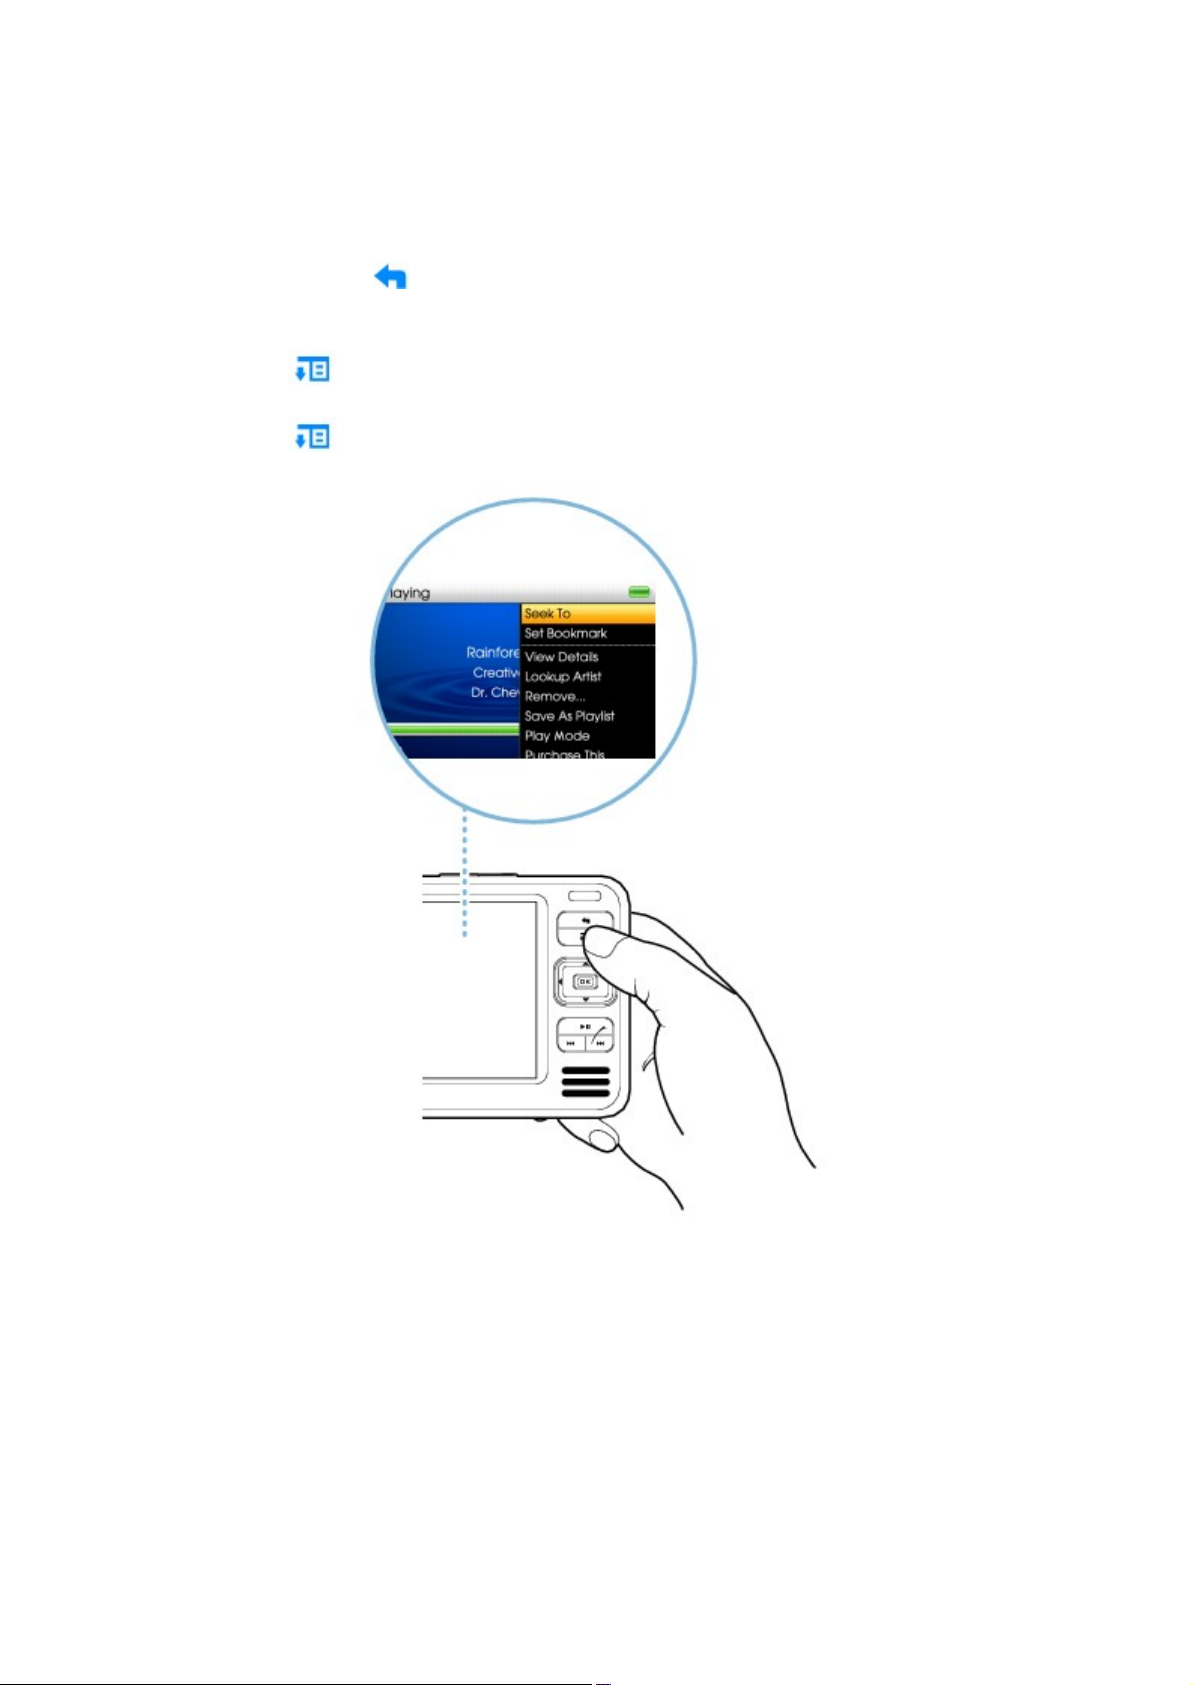
3.
Options button
Press this button to display the
options available.
4.
Navigation buttons
Press the Up or Down button to
scroll to a menu item.
Press the OK button to select a
menu item.
Press and hold the Right or Left
button to move forward or
backward within a track.
Press the Up, Down, Left or
Right buttons to scroll through
thumbnails in a picture folder.
5.
Play/Pause button
Starts, pauses and resumes
playback.
6.
Next/Fast-Forward button
Press to go to the next track.
Press and hold to move forward
within a track.
7.
Integrated speaker
Enables you to listen to audio
without headphones or an
external speaker connection.
8.
Previous/Rewind button
Press to go to the previous
track.
Page 5
Page 6

Press and hold to move back
within a track.
Notes
In the process of Liquid Crystal Display (LCD) manufacturing, instances of one or more pixels
appearing in a dark or fixed color, or in an unchanging state, may occur. These appear on the
screen as spots and may be fixed on a particular colour, such as, white or red.
In line with industry standards and based on Creative's screen manufacturer's technical
specifications, there may be occurrences of fixed spots and these occurrences are considered
acceptable if they do not impair display quality.
If, however, you notice fixed spots on your display interfering with your use, contact Customer
Support Services. You can find Customer Support Services information in the Installation and
Applications CD. Go to d:\support\<region>\<language>\support.chm.
(replace d with the drive letter of your CD-ROM/DVD-ROM drive, <region> with the region
that you are in, and <language> with the language that your document is in)
Page 6
Page 7
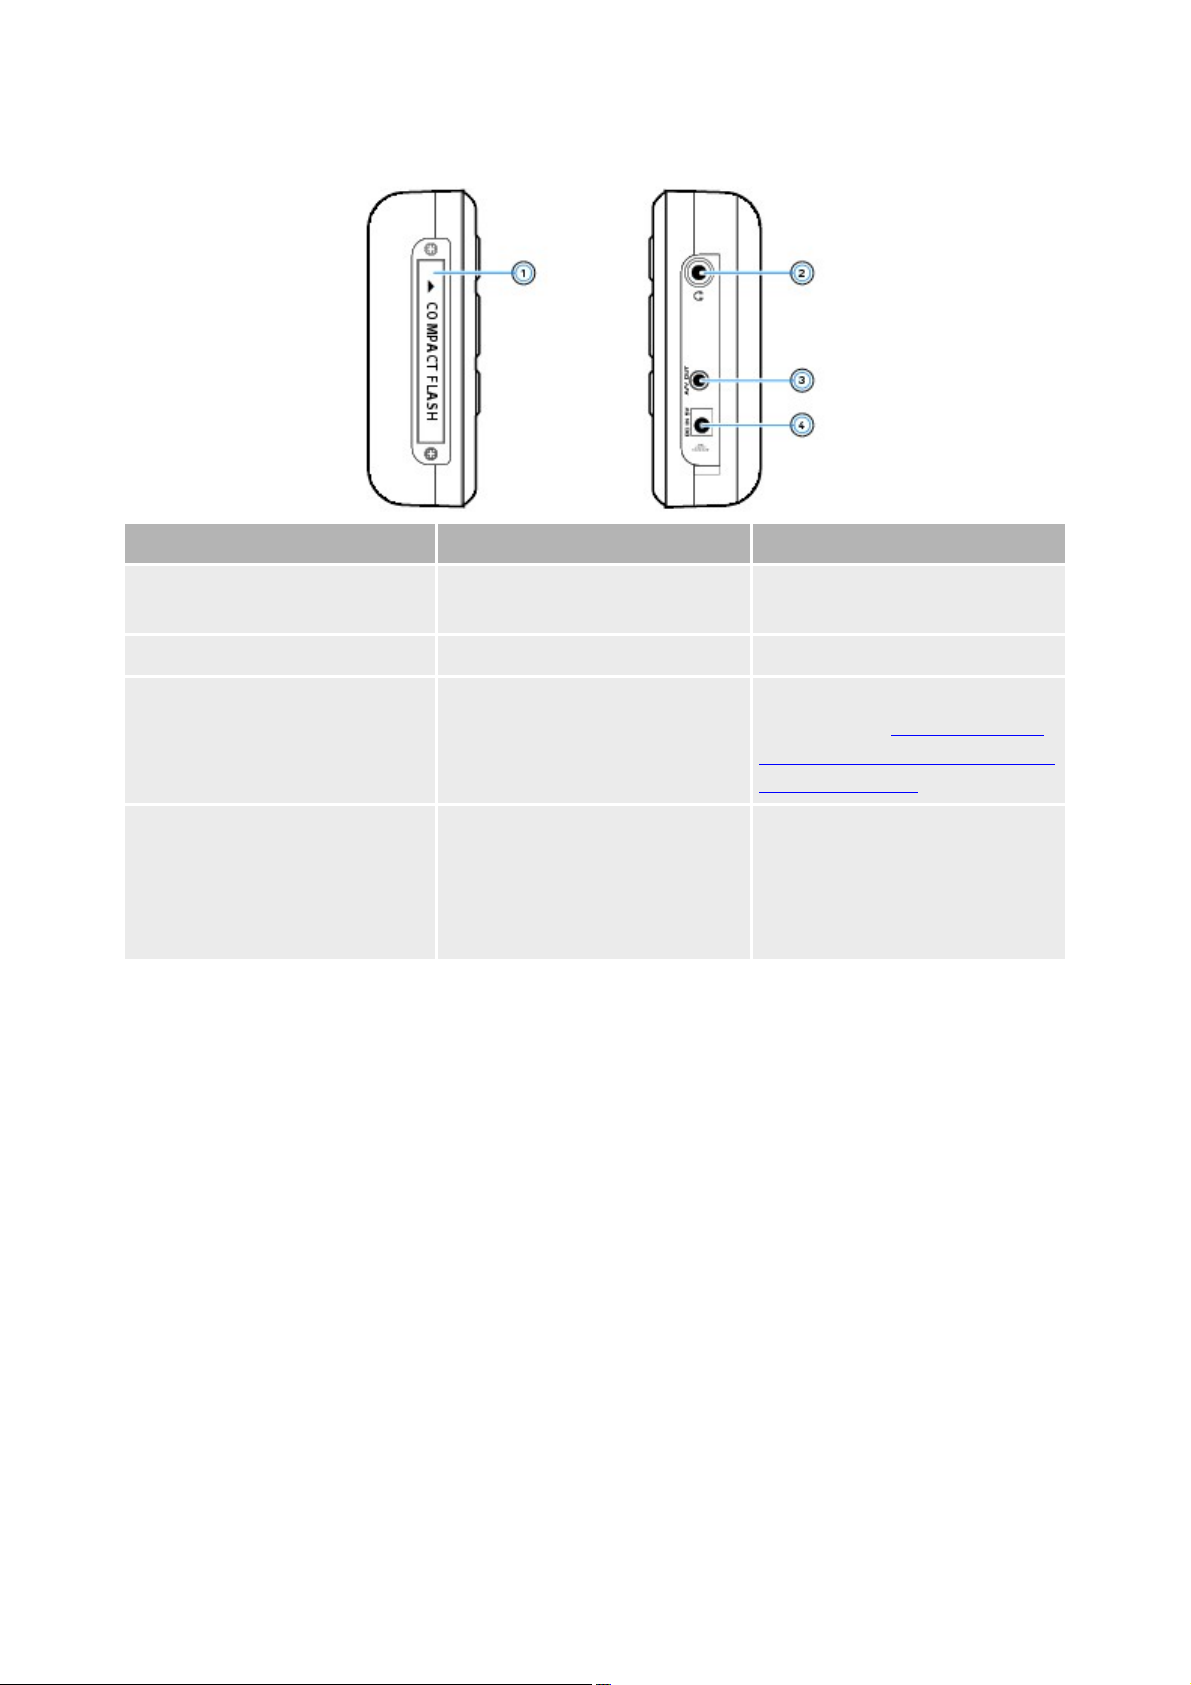
Side views
Component
What It Does
1.
Compact Flash (CF) memory
card slot
Insert a memory card into this
slot.
2.
Headphone jack
Connect earphones to this jack.
3.
A/V Out jack
To view photos or videos on a
bigger screen, connect your TV
set to this jack using the supplied
audio video cable.
4.
DC IN 5V jack
To charge your player's battery,
connect one end of the power
adapter to this jack, and the
other end to a power outlet. Turn
on the power outlet if necessary.
Page 7
Page 8
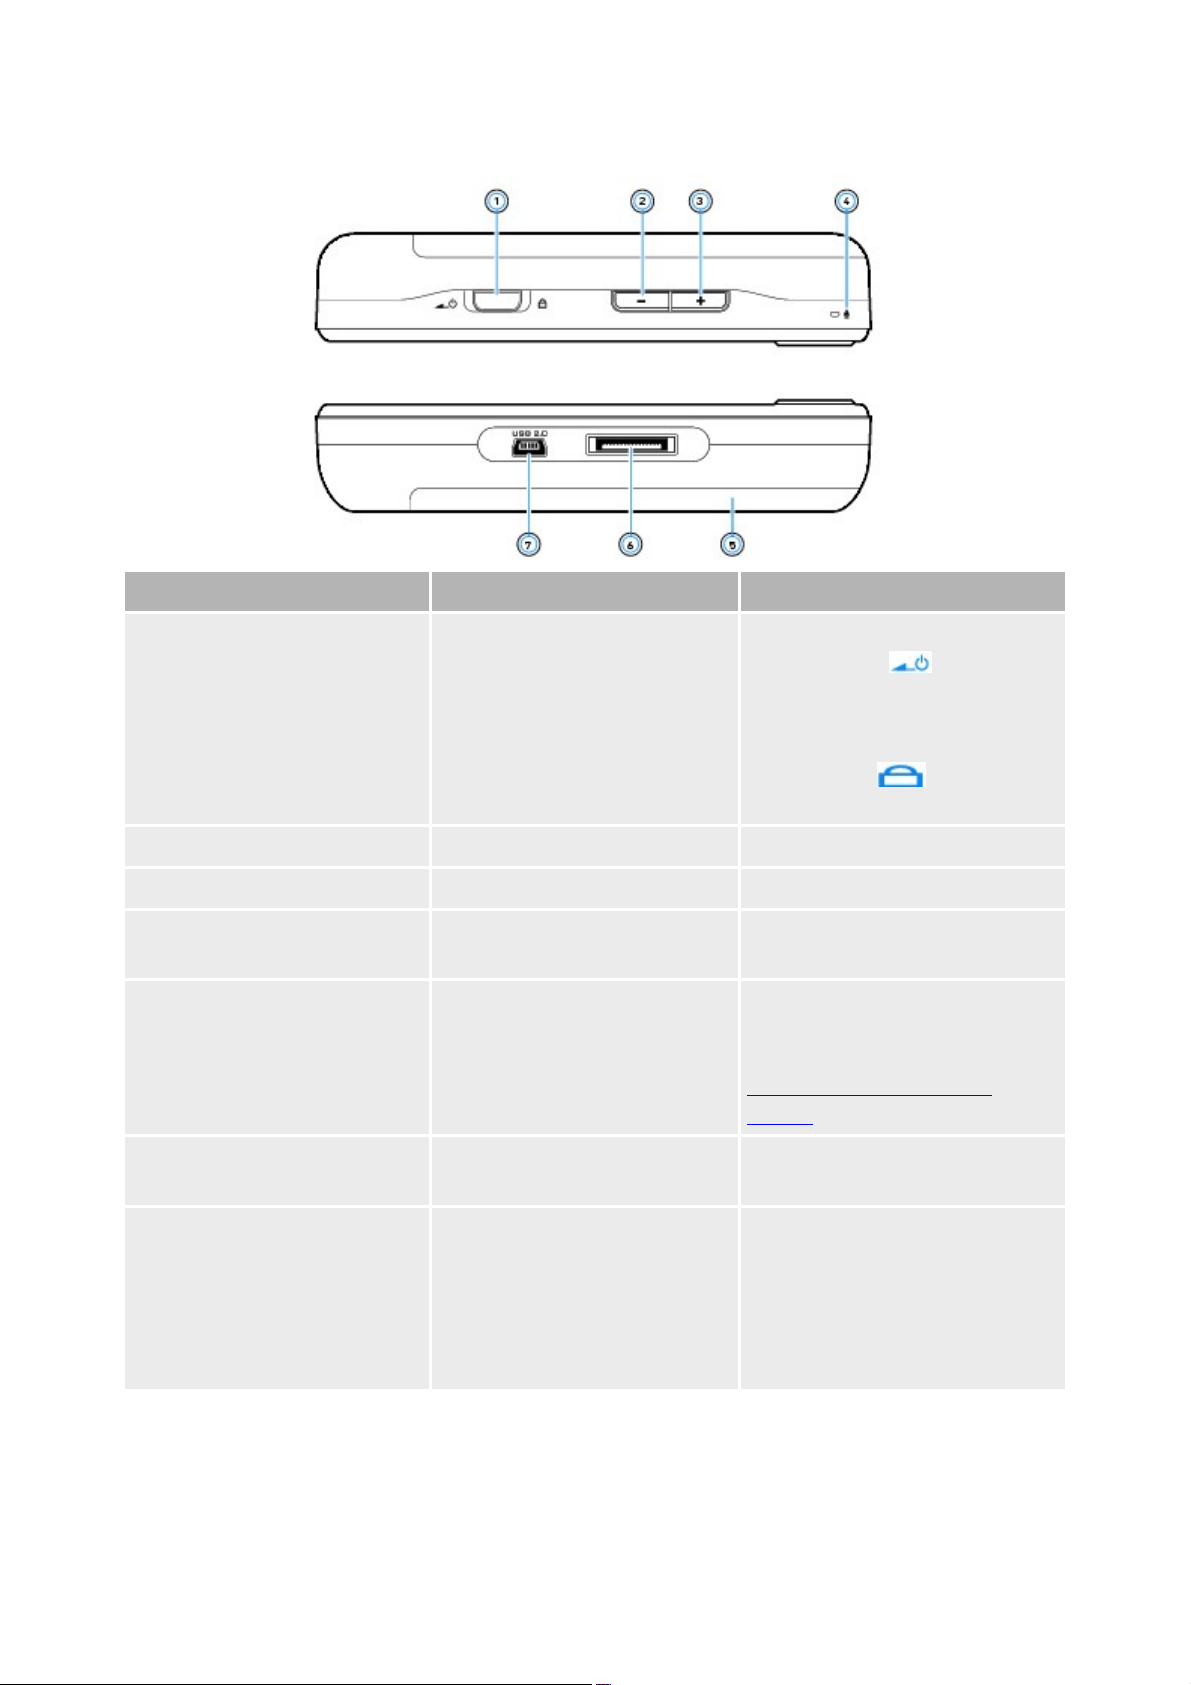
Top and bottom views
Component
What It Does
1.
Power switch
Slide the Power switch towards
the Power icon and hold it
there to turn your player on and
off.
Slide the Power switch towards
the Lock icon to disable your
player's controls.
2.
Volume Decrease button
Press to decrease the volume.
3.
Volume Increase button
Press to increase the volume.
4.
Microphone
Make voice recordings with this
built-in microphone.
5.
Removeable Lithium-Ion
battery
Remove and reinsert the battery to
reset your player.
To remove the battery, see
Removing and Inserting the
Battery.
6.
Dock connector
Connects to a docking station
(available separately).
7.
USB 2.0 port
To charge your player's battery or
transfer files, connect one end of
the supplied USB cable to this
port, and the other end of the
USB cable to your computer's
USB port.
Page 8
Page 9
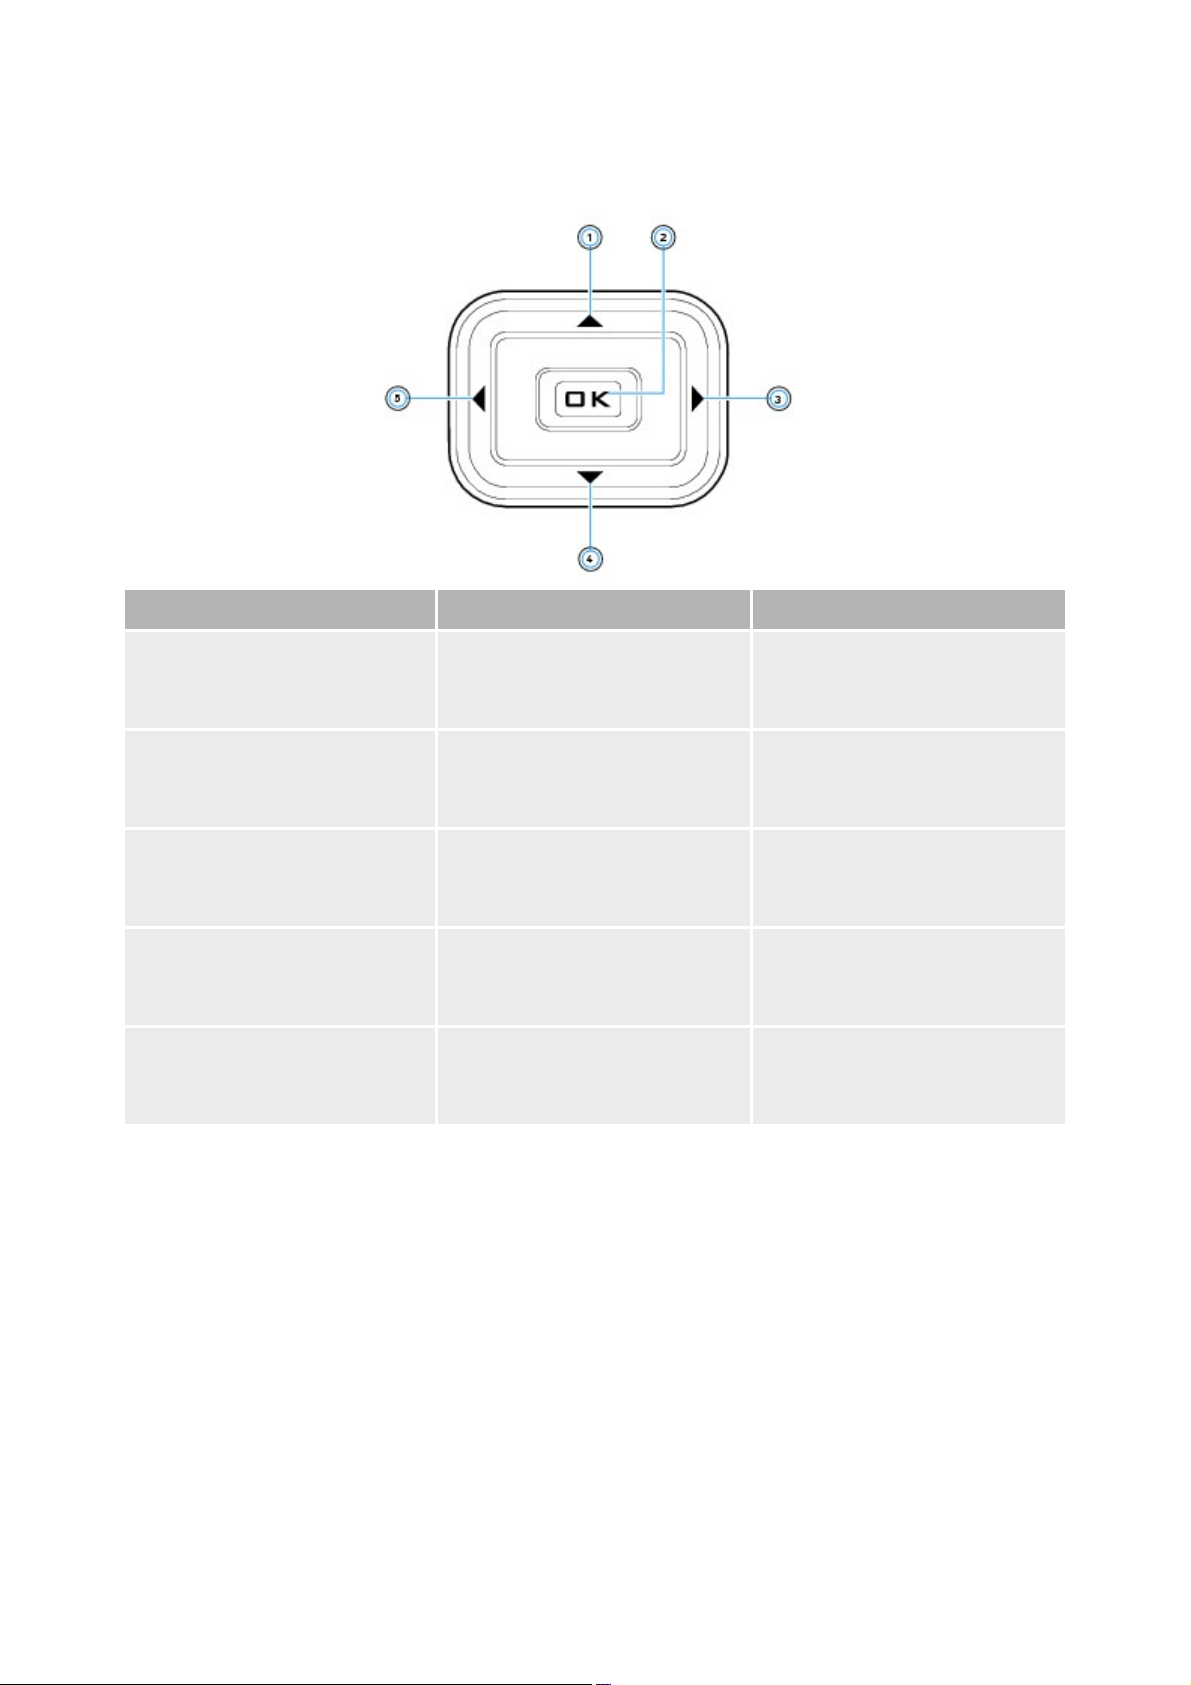
Navigation buttons
Button
What It Does
1.
Up button
Press to go to the menu option
or selection above the current
selection.
2.
OK button
Press to select the highlighted
menu option or selection on the
screen.
3.
Right button
Press to go to the menu option
or selection to the right of the
current selection.
4.
Down button
Press to go to the menu option
or selection below the current
selection.
5.
Left button
Press to go to the menu option
or selection to the left of the
current selection.
Use your player's Navigation buttons to select menu items and access your player's functions.
Page 9
Page 10
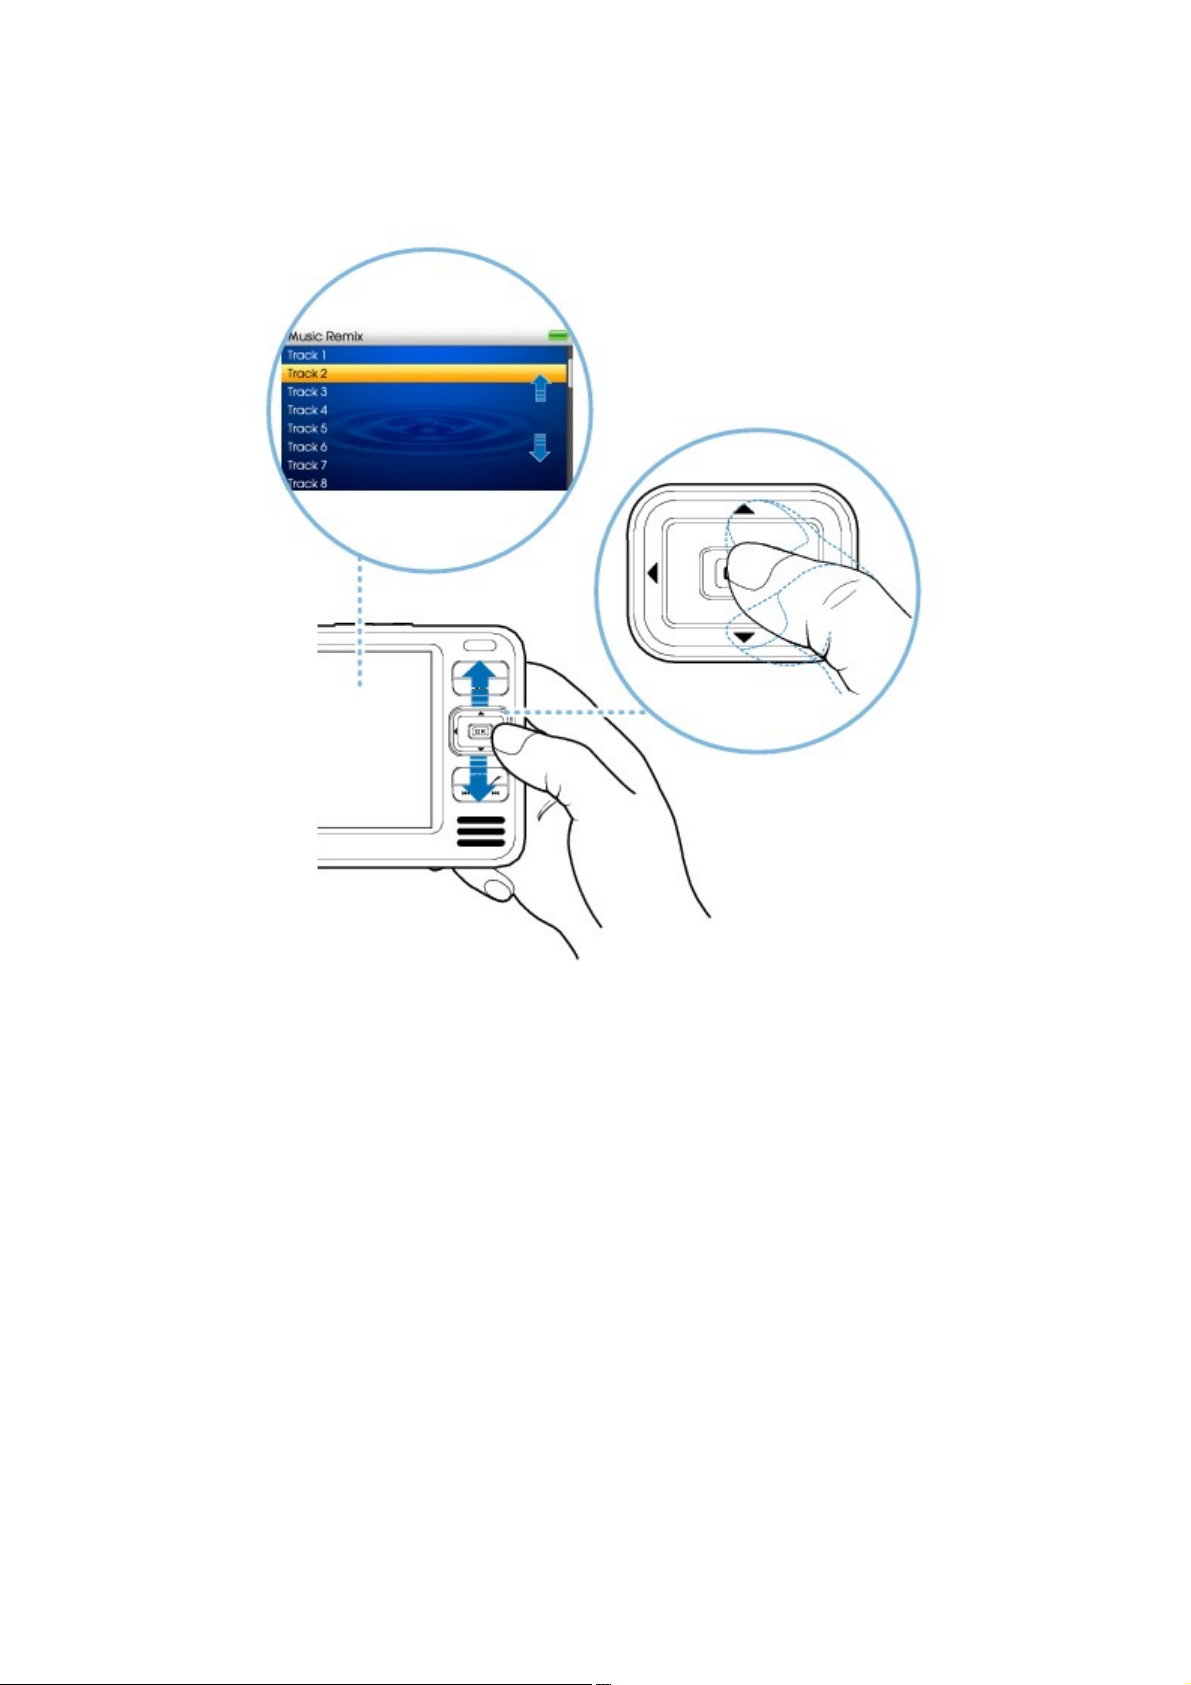
Selecting options
In the following sections of this document, we use the term `Select' to indicate that you should use the
Up, Down, Left or Right buttons to highlight menu options, then press the OK button to select the option.
Page 10
Page 11
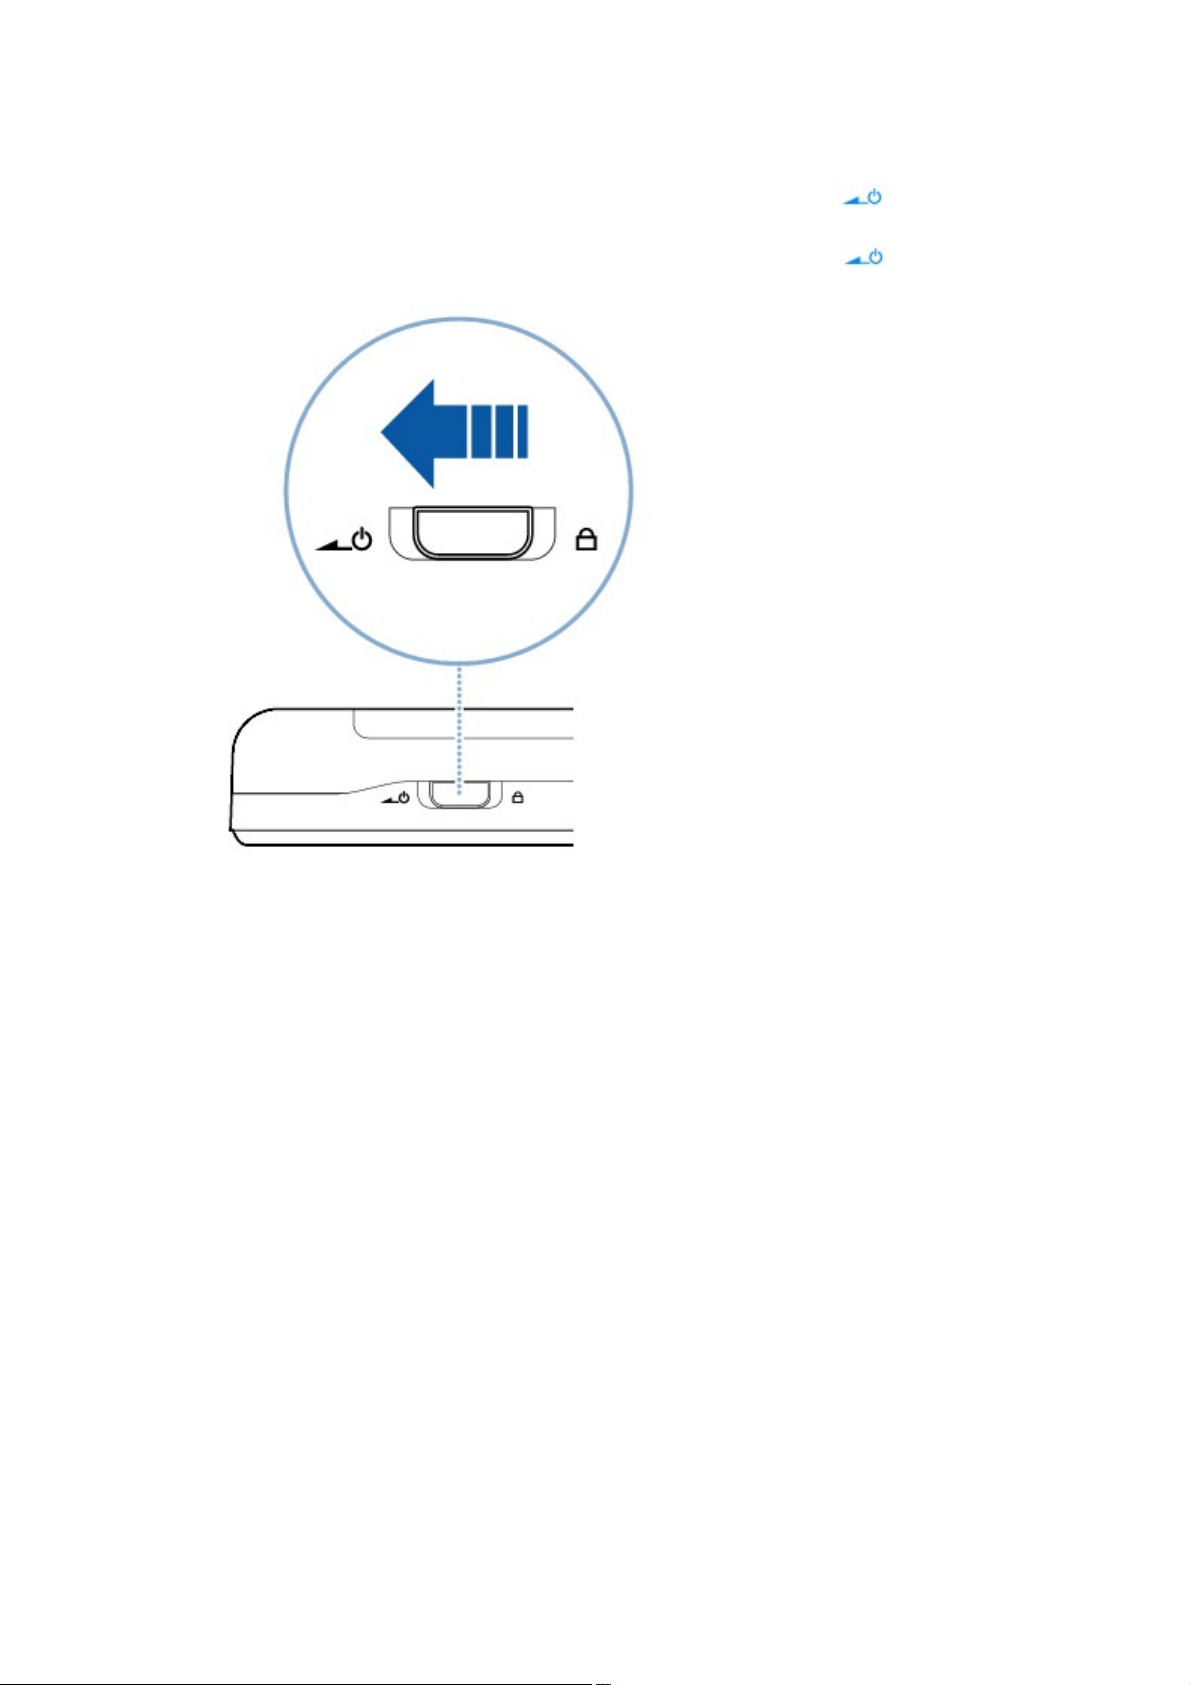
Turning Your Player On and Off
To turn on your player, slide the Power switch towards the Power icon and hold it there
1.
until the display lights up.
To turn off your player, slide the Power switch towards the Power icon and hold it there
2.
until the Shutting down message appears.
2.
Page 11
Page 12

Removing and Inserting the Battery
Component
a.
Battery Release latch
Your player comes with a removable Lithium-Ion battery.
To remove the battery
Press the Battery Release latch and slide the battery away from the player.
1.
Remove the battery gently from the battery connectors.
2.
2.
To insert the battery
Align the battery with the battery connectors.
1.
Slide the battery towards the Battery Release latch.
2.
2.
Notes
Removing and reinserting the battery resets your player.
Page 12
Page 13

Reactivating the Player's Screen
When the screen turns off, press any button on your player to reactivate the screen. For more information
about setting the display timer, see Setting the backlight duration
.
Page 13
Page 14
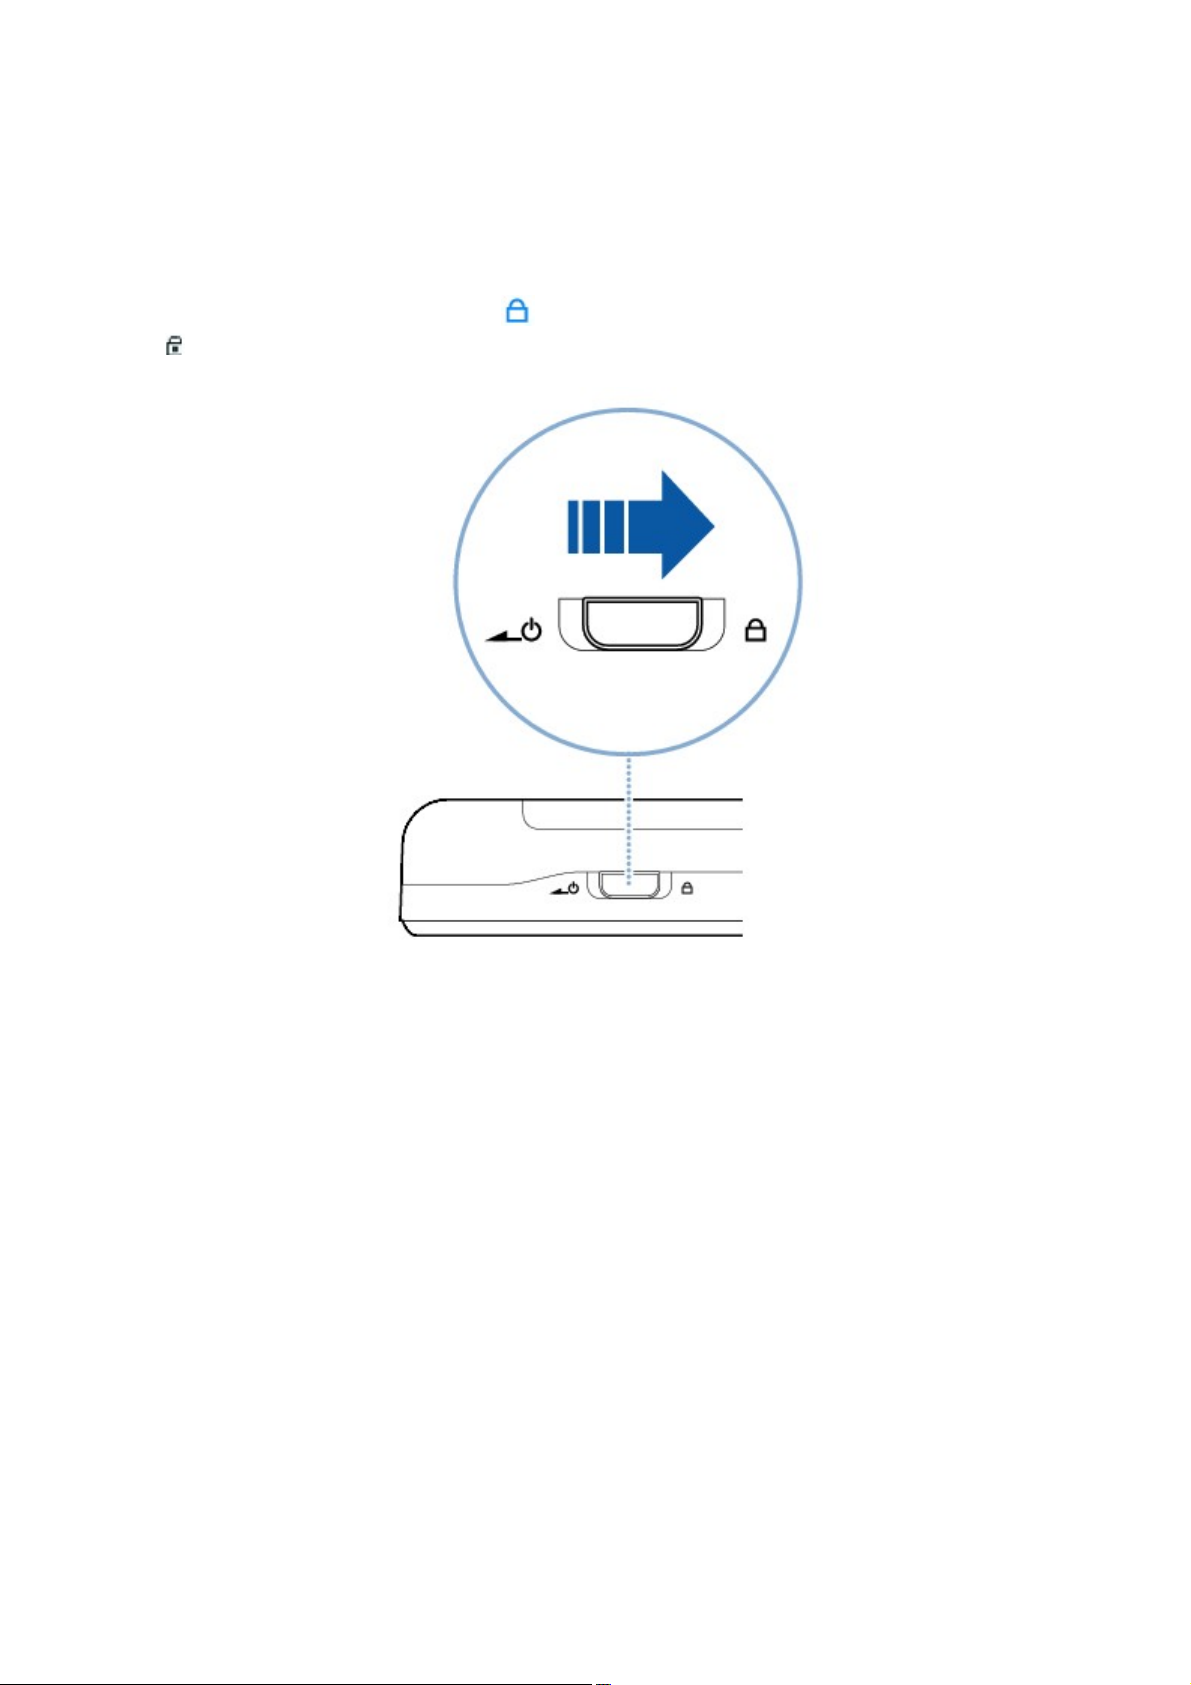
Locking Your Player
Locking your player disables the functions of all buttons on your player. Locking your player is useful
when you do not want to accidentally activate functions on your player, such as when your player is in
your pocket or bag.
To lock your player
Slide the Power switch towards the Lock icon. When you lock your player, you will see the Locked
icon
on the top right of the display.
Page 14
Page 15

Connecting Your Player to a TV
Component
1.
A/V Out jack
2.
Video In jack
3.
Audio In (Left) jack
4.
Audio In (Right) jack
5.
Audio Video cable
To view your player's content on a larger screen, connect your player to a TV using the supplied audio
video cable.
Slide the Power switch on your player towards the Power icon and hold it there until the
1.
display lights up.
If you are not in the main menu, press and hold the Menu/Back button.
2.
Select Settings Photo/Video Settings Video Out.
3.
Select Auto (NTSC) or Auto (PAL). Refer to the User's Guide for your TV if you are not sure
4.
about your TV's display format.
Connect your player to a TV with the audio video cable.
5.
5.
Page 15
Page 16

Your Player's Onscreen Interface
You can access your player's various features and operations from your player's onscreen interface.
Accessing the main menu and Options menus
Now Playing screen
Viewing player information
Page 16
Page 17
Accessing the main menu and Options menus
Access the main functions of your player from the main menu. Access selections unique to each function
of your player from Options menus.
To access the main menu
Press and hold Menu/Back
button.
To access Options menus
Press the Options
button.
Press the Options
button again to clear the Options menu.
Page 17
Page 18
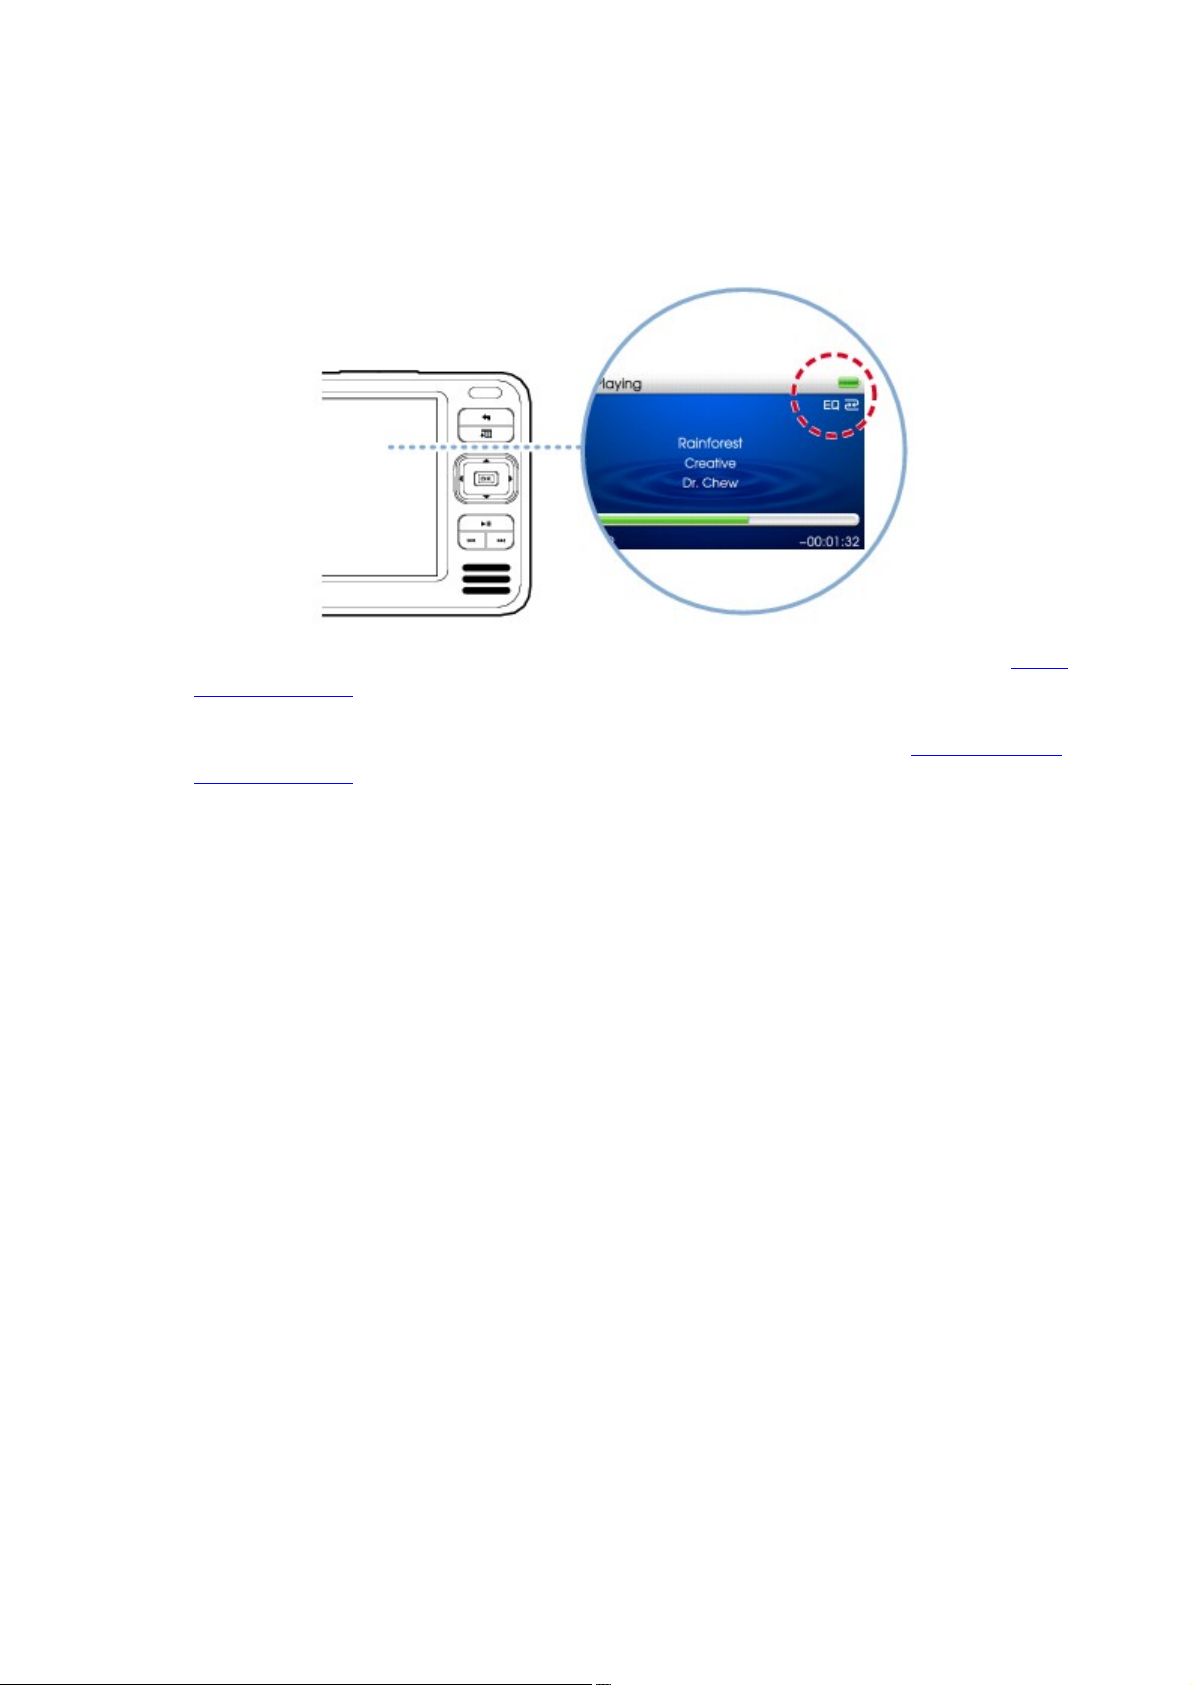
Now Playing screen
The Now Playing screen appears when you select
Now Playing from the main menu. In this screen, you can:
view your player's settings and battery status icons.
access the Track Rating screen when you press the OK button. For more information, see Rating
your music tracks.
access the Selected Music screen when you press the OK button twice. The Selected Music
screen displays your preselected list of music tracks. For more information, see Managing the list
of selected tracks.
Page 18
Page 19

Viewing player information
You can view player information, such as disk space and the total number of tracks, in the
Information screen.
Press and hold the Menu/Back button to access the main menu.
1.
Select System Information.
2.
Page 19
Page 20

Applications
Creative ZENcast Organizer, Creative Media Explorer and Creative MediaSource Player/Organizer
are included in your Installation CD.
Page 20
Page 21

Creative ZENcast Organizer
With Creative ZENcast Organizer, you can subscribe to your favorite ZENcast channels, and download
and transfer ZENcast media files to your player.
Creative ZENcast Organizer is your center for playing, managing, and subscribing to your favorite
ZENcast channels. With ZENcast Organizer, you can:
quickly access ZENcast channels of your favorite topics from ZENcast Directory and
ZENcast.com
subscribe to your favorite ZENcast channels
schedule regular updates of your ZENcast channel subscriptions
transfer downloaded ZENcast media files to your player
synchronize ZENcast content with your player.
For more information, see www.zencast.com
.
Page 21
Page 22

Creative Media Explorer
Use Creative Media Explorer if:
you are new to to digital music and videos, and want to transfer them from your CDs or
computer to your player
you want to convert, synchronize, and organize media files
you prefer to manage your player in the familiar "Windows Explorer" environment.
To start Creative Media Explorer, double-click the ZEN Vision W Media Explorer icon under
My Computer or on the desktop. For more information about using Creative Media Explorer, refer to its
online Help.
Page 22
Page 23
Creative MediaSource Player/Organizer
Use the full-featured Creative MediaSource
Player/Organizer if:
you require additional features such as recording, automatic playlist generation, and audio format
conversion
you want to manage a music library on your computer.
To start Creative MediaSource Player/Organizer, double-click the Creative MediaSource
Player/Organizer
icon on your desktop.
Creative MediaSource Player/Organizer has a Home page from which you can access common tasks.
For more information about using Creative MediaSource Player/Organizer, refer to its online Help.
TM
Page 23
Page 24

Accessories
Your player comes with some of the accessories described in this section. Accessories that are not
included with your player are available from your Creative dealer or at www.creative.com/shop
.
Power Adapter
Earphones
Pouch
Page 24
Page 25
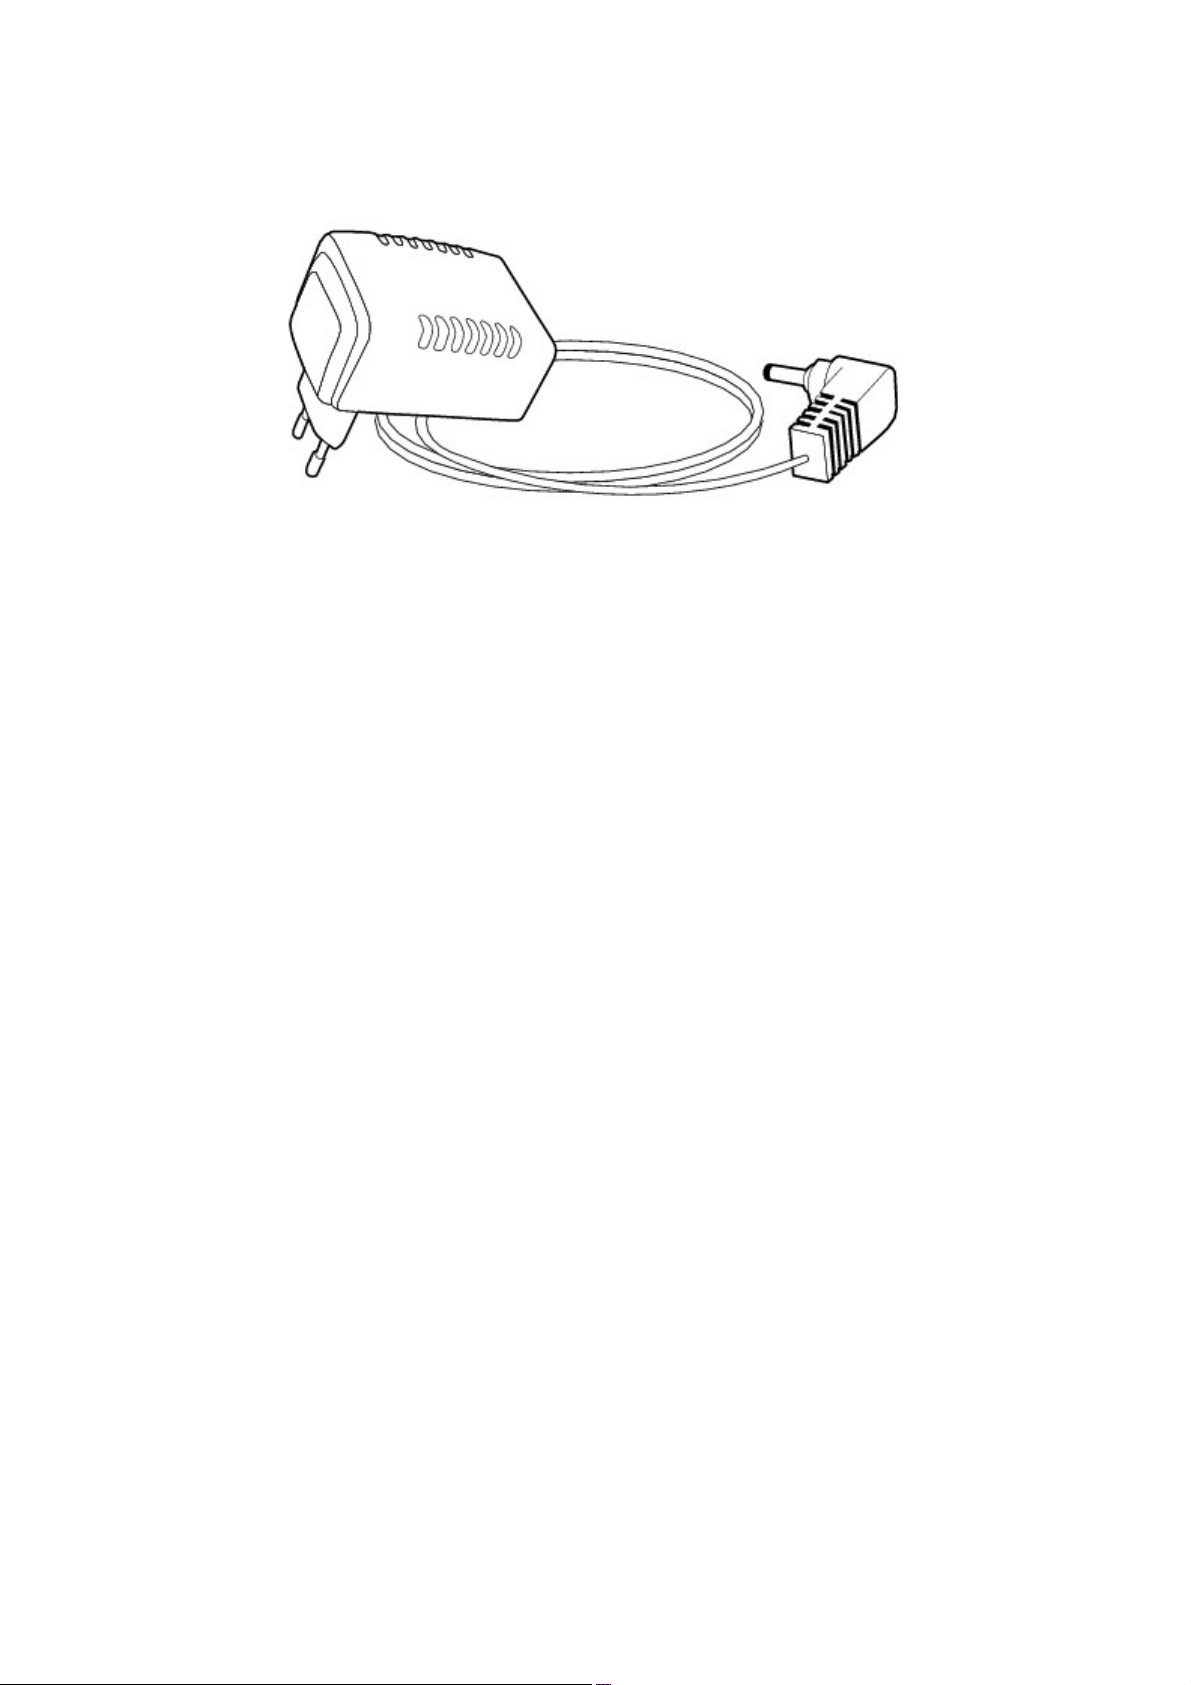
Power Adapter
Your player's power adapter enables express charging of your player's battery.
Notes
Depending on your region of purchase, your power adapter may differ from the one shown here.
Page 25
Page 26

Earphones
Your player's earphones feature dynamic bass response and enhanced audio clarity.
Warning!
For your safety and the safety of others, do not use your earphones while driving, cycling or
during any other activity that requires your full attention.
Page 26
Page 27
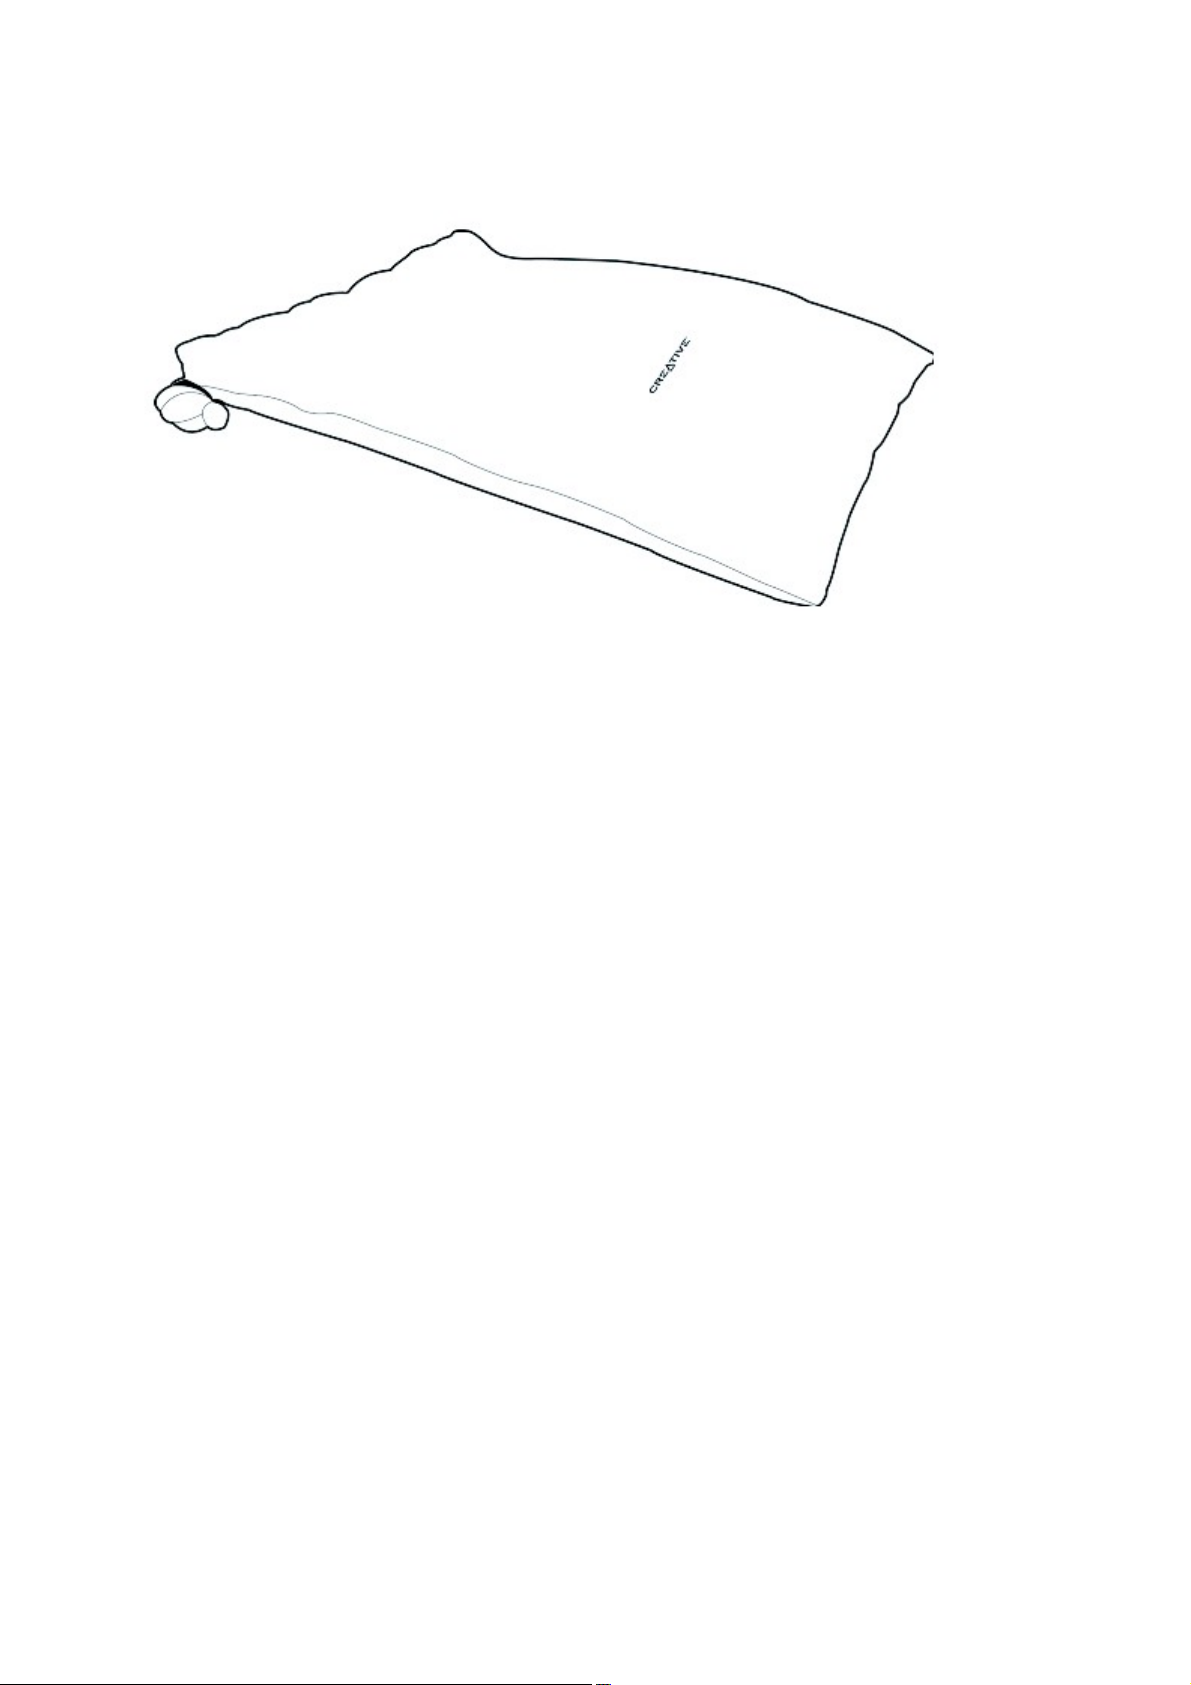
Pouch
Your player's protective pouch keeps your player snug and safe.
Page 27
Page 28

Getting Started
Step 1: Charge Your Player
Step 2: Set Up the Software
Step 3: Connect Your Player to Your Computer
Step 4: Transfer Content
Step 5: Disconnect Your Player
Step 6: Select Your Menu Language
Step 7: Watch Videos, View Pictures and Play Music
Page 28
Page 29
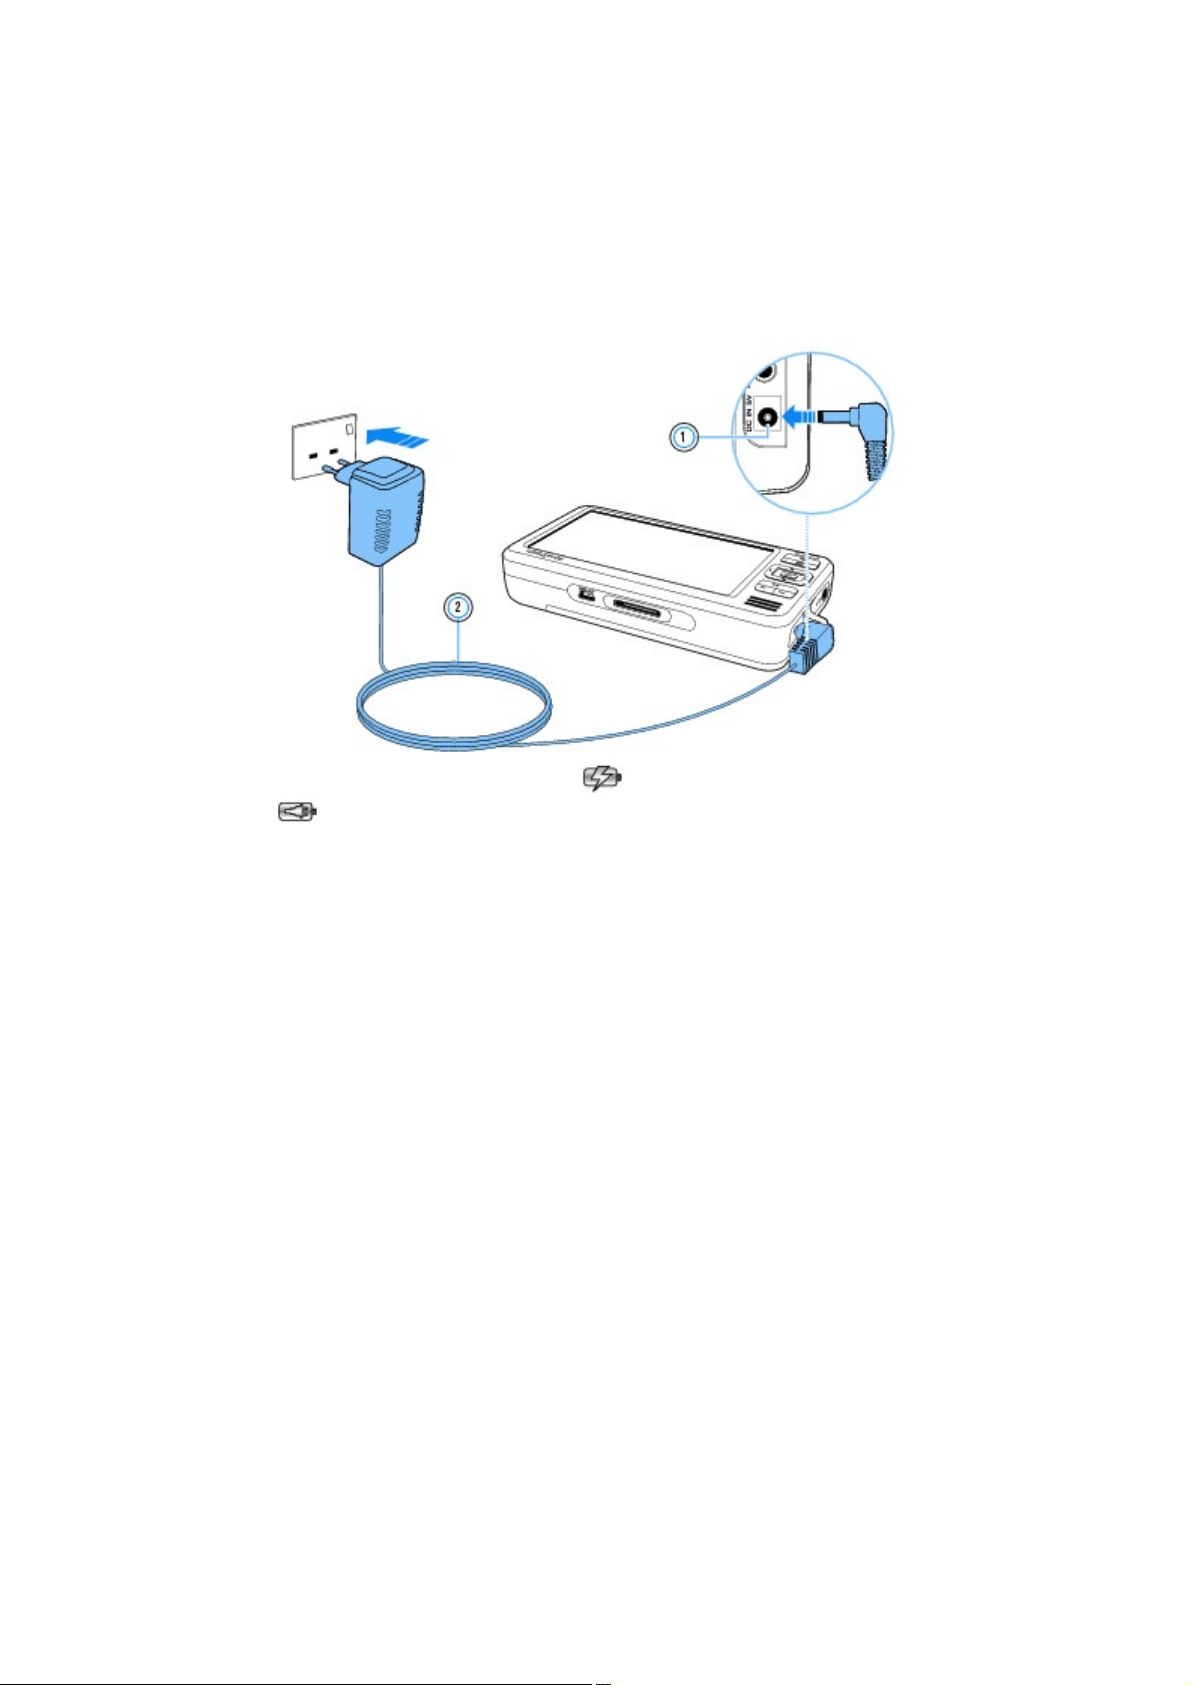
Step 1: Charge Your Player
The high performance lithium-ion battery supplied with your player needs to be fully charged before you
use your player. The battery is fully charged in approximately three hours. To charge your player's
battery, connect the power adapter cable to your player and a power outlet as shown in the diagram
below.
When the battery is charging, the Battery Charging icon appears on the display. When you see the
Battery Charged
icon on your player's display, disconnect your player from the power adapter.
Notes
Depending on your region of purchase, your power adapter may differ from the one shown here.
Your player will continue to charge even after it turns off, as long as it is connected to a power
outlet or a computer.
Page 29
Page 30

Step 2: Set Up the Software
DO NOT connect your player to your computer before setting up the software.
Turn on your computer.
1.
You must log in as an administrator in Microsoft® Windows® before you can set up the software.
1.
For more information, refer to your operating system's online Help.
Insert the Installation and Applications CD into your CD-ROM/DVD-ROM drive. Your CD
2.
should start automatically. If it does not, follow the steps below:
Double-click the My Computer icon.
i.
Alternatively, click Start My Computer.
i.
Right-click the CD-ROM/DVD-ROM drive icon, and then click Autoplay.
ii.
Follow the instructions on the screen and when prompted, restart your computer.
3.
If you want to register your product when your computer restarts, follow the instructions on the
4.
screen to do so.
Notes
You need an Internet connection to register your product.
Page 30
Page 31

Step 3: Connect Your Player to Your Computer
If you have not done so, connect your player to your computer's USB port using the supplied USB
cable.
Notes
Your player's battery charges automatically when you connect your player to your computer's
USB port. It takes approximately six hours to charge your player's battery using your computer's
USB port.
For continuous battery charging using the USB port, make sure your computer is not in power
conservation mode. For more information on power conservation modes, refer to your operating
system's Help.
If your fully charged player remains connected to your computer or a power outlet for a
prolonged period, the display turns off automatically to conserve power.
Connect your player directly to a USB port on your computer or a self-powered USB hub; do
not connect your player to a bus-powered USB hub.
Page 31
Page 32
Step 4: Transfer Content
Use Creative Media Explorer
to transfer music and other files from your CD collection or computer.
To start Creative Media Explorer
Make sure your player is connected to your computer.
1.
Double-click the ZEN Vision W Media Explorer icon on the desktop.
2.
To transfer or `rip' music from your CD collection
In Creative Media Explorer, click the Rip Audio CDs button .
1.
Follow the instructions on the screen.
2.
If you are connected to the Internet and have registered with a music information provider, album
2.
information will automatically be retrieved.
To transfer music, videos or pictures from your computer
In Creative Media Explorer, click the Browse Media button .
1.
Locate your media files, and using the drag-and-drop method, copy them to the following folders
2.
in your player:
Media Library\Music folder for audio files
o
Media Library\Videos folder for video files
o
Media Library\Pictures folder for pictures
o
To transfer data files from your computer
In Creative Media Explorer, click the Browse Documents button.
1.
Locate your data files, and using the drag-and-drop method, transfer them to the Data folder in
2.
your player.
To transfer ZENcast content
Double-click the ZENcast Organizer icon on the desktop.
1.
Click the Transfer button .
2.
Follow the instructions on the screen.
3.
Click the Done button.
4.
Notes
For more information on ZENcast Organizer, see Creative ZENcast Organizer.
Page 32
Page 33

Step 5: Disconnect Your Player
When you have finished transferring files, disconnect your player. DO NOT disconnect your player if you
see the File Transfer Active icon on the display. Track or data file transfer is in progress and
disconnecting your player may damage the content being transferred. When you see the File Transfer
Inactive icon
on the display, disconnect your player.
Page 33
Page 34

Step 6: Select Your Menu Language
If your player is not turned on, slide the Power switch towards the Power icon and hold it
1.
there until the display lights up.
When you turn on your player for the first time, the menu is in English. To change the language:
2.
Press and hold the Menu/Back button. The main menu appears.
i.
Select System Language, and then select the language that you want.
ii.
Page 34
Page 35

Step 7: Watch Videos, View Pictures and Play Music
You are now ready to play or view files, including Audible
and ZENcast media files.
Notes
Press and hold the Menu/Back button to access the main menu.
Files in your player are sorted alphabetically to enable faster searches.
To watch videos
In the main menu, select Videos, and select the video you want.
1.
Video playback starts automatically.
1.
To adjust the viewing window size, press the Options button and select the viewing window size
2.
that you want.
To view pictures
In the main menu, select Photos, and select the picture you want.
1.
Select Zoom In, and use the Navigation buttons to pan across the picture horizontally or
2.
vertically.
To play music and Audible files
Connect your earphones to the Headphone jack.
1.
In the main menu, select Music Library, and select the category you want.
2.
Select a track and select Play.
3.
Press the Volume Increase and Volume Decrease buttons to adjust the volume.
4.
Notes
To manage Audible files, you need to install AudibleManager®.
Audible files are currently available to selected regions only.
If your audio file is accompanied by album art, the artwork is displayed on your player.
To play ZENcast media files
In the main menu, select Videos, and select ZENcast.
1.
Select the ZENcast channel folder you want, and select the ZENcast media file you want.
2.
ZENcast playback starts automatically.
2.
®
Page 35
Page 36

Playing and Managing Media
Your player plays back many different types of media, including videos, TV recordings, audio tracks and
still photos. To learn how to transfer content to your player, see Step 4: Transfer Content
.
You can acquire content from many legal sources. Here are some suggestions:
Audio tracks - ripped from personal audio CDs and home studio recordings, or purchased
o
from online music stores.
Pictures - encoded from digital cameras, webcams or scanned from printed photos.
o
ZENcast content - downloaded from the Internet using ZENcast Organizer.
o
Videos - purchased from online movie stores or captured from your digital camera.
o
TV recordings - recorded using Microsoft® Windows® XP Media Center Edition.
o
This section shows you how to play and manage media with your player.
Synchronizing Media with Your Computer
Playing and Managing Videos
Viewing and Managing Pictures
Playing and Managing Music Tracks
Playing ZENcast Content
Playing Audible Files
Listening to the Radio
Recording with the Built-in Microphone
Page 36
Page 37

Synchronizing Media with Your Computer
You can use Sync Manager to automatically update and synchronize content between your player and
your computer.
Connect your player to your computer.
1.
You can start Sync Manager in either Creative Media Explorer or Creative MediaSource
2.
Player/Organizer.
Start Sync Manager.
3.
You can start Sync Manager by clicking the Sync Manager icon on your computer's system
3.
tray, and then clicking Start Synchronize.
Follow the instructions on the screen.
4.
Notes
To configure the synchronization settings, Sync Manager icon on your computer' s system
tray, and then click Player Settings Creative Zen Vision W.
Tips
You can transfer content from your computer to your player using Creative Media Explorer. For
more information, see Step 4: Transfer Content.
Page 37
Page 38

Playing and Managing Videos
To play videos, you must first convert them to a video format your player supports and transfer them to
your player. Transferred videos are categorized by name and duration in your player's
Video Library.
Converting a video
Playing a video
Going forward or backward in a video
Changing the viewing size of a video
Deleting a video
Displaying the last viewed video
Hiding video or picture folders
Setting a password to display or hide protected video or picture folders
Page 38
Page 39

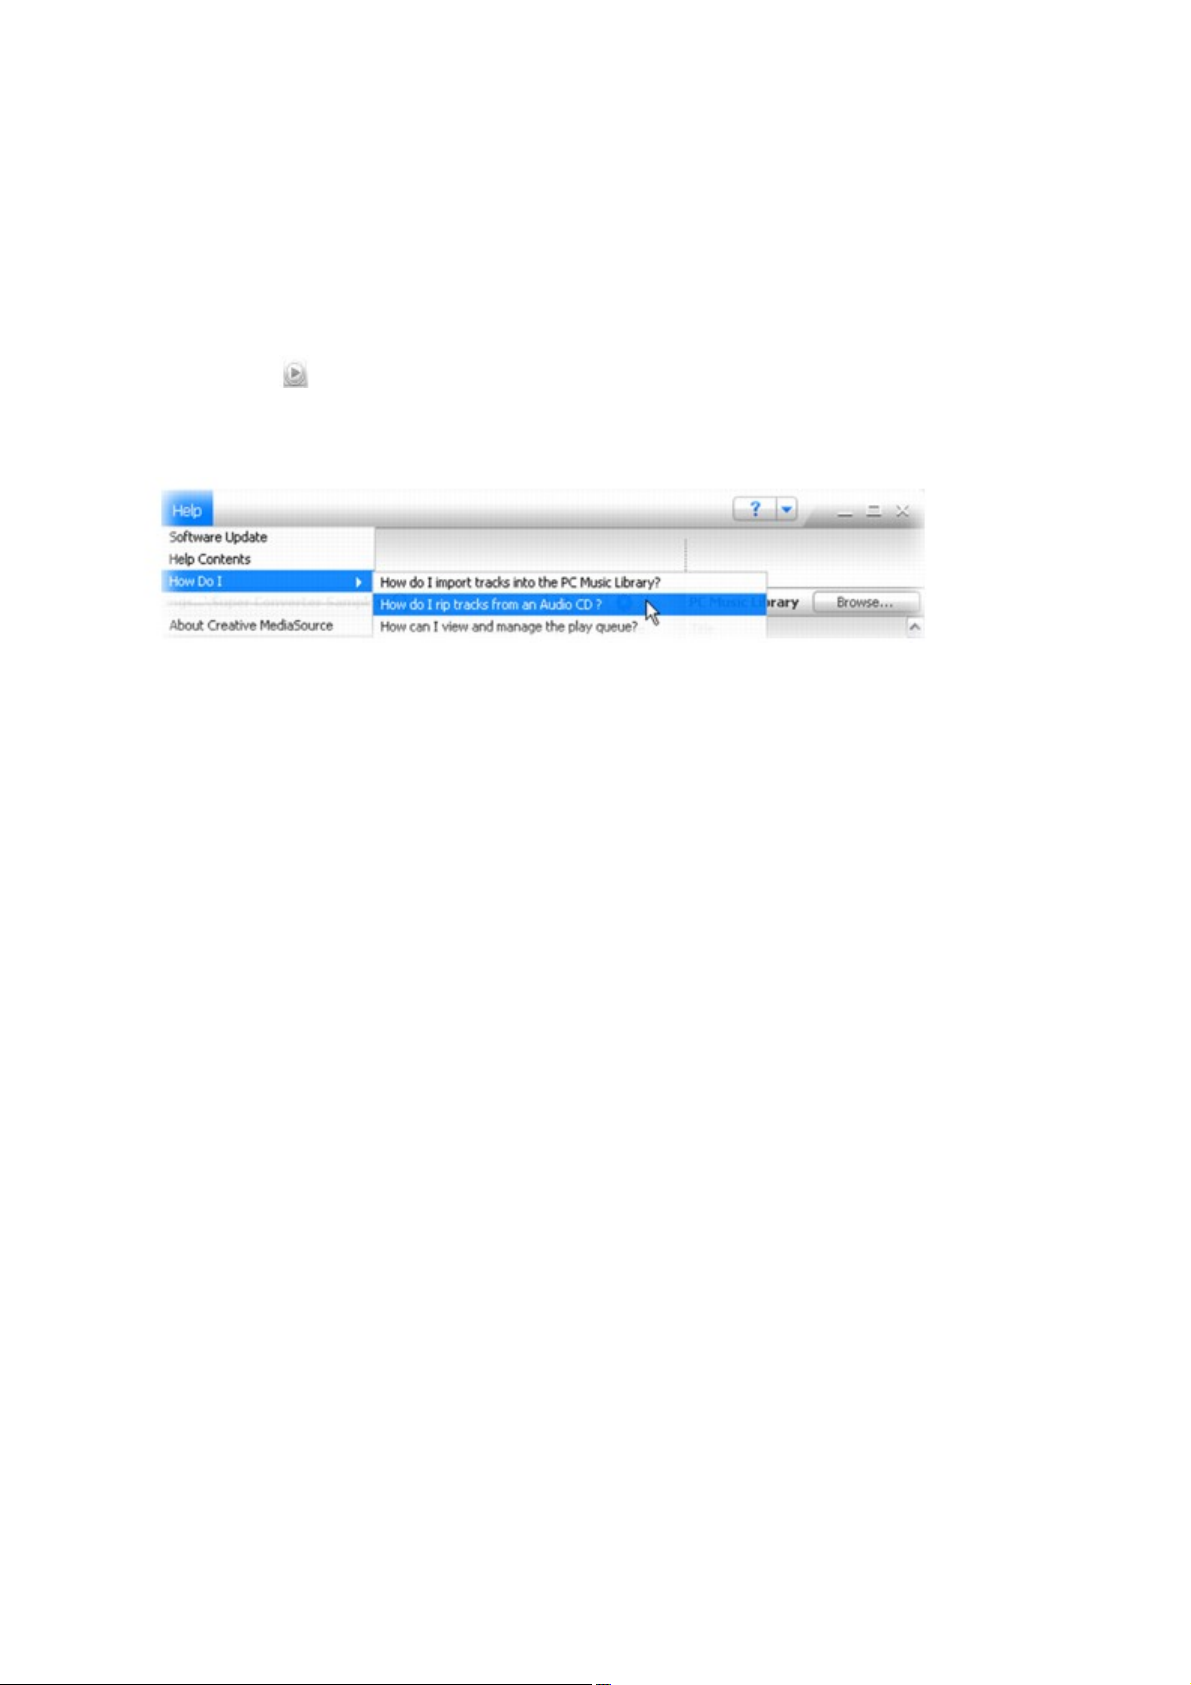
Converting a video
To convert your videos to a format supported by your player
Launch Creative Media Explorer and click the Convert Video
icon to launch Creative Video Converter.
For step-by-step instructions on how to convert your videos, refer to Creative Video Converter's online
Help.
To access Creative Video Converter's online Help
Click the Convert Video icon on the top right corner of the Creative Video Converter window and
select the
Help Contents option.
Page 39
Page 40

Playing a video
Press and hold the Menu/Back button to access the main menu.
1.
Select Videos Video.
2.
Select the video you want.
3.
To play the video, press the Play/Pause button.
4.
To pause the video, press the Play/Pause button again.
5.
Page 40
Page 41

Going forward or backward in a video
Press and hold the Next/Fast-Forward button or the Previous/Rewind
button to move forward or backward within a track.
Page 41
Page 42

Changing the viewing size of a video
During video playback, press the Options button.
1.
Select one of the following items to change the viewing size of your video:
2.
Fit to Screen
o
Resizes your video to best fit your player's screen.
o
Your player's default video display setting is Fit to Screen.
o
Stretch to Full
o
Resizes your video's width to fill your player's screen.
o
Zoom to Full
o
Resizes your video to fill your player's screen.
o
Original Size
o
Resizes your video to its original resolution.
o
Page 42
Page 43

Deleting a video
Press and hold the Menu/Back button to access the main menu.
1.
Select Videos Video.
2.
Select the video you want.
3.
Press the Options button.
4.
Select Delete Video.
5.
Page 43
Page 44

Displaying the last viewed video
Press and hold the Menu/Back button to access the main menu.
1.
Select Videos Recently browsed videos.
2.
Page 44
Page 45

Hiding video or picture folders
You can hide video and picture folders containing content that you do not want your player to display.
Press and hold the Menu/Back button to access the main menu.
1.
Select Videos Video video folder that you want
2.
OR
2.
select Photos Pictures picture folder that you want.
2.
Press the Options button and select Protect.
3.
Press and hold the Menu/Back button to access the main menu.
4.
Select System Player Settings Protected Content: Show or Hide to select whether to show
5.
or hide the protected folders.
Notes
You cannot hide individual videos or pictures.
The Protect or Unprotect option will appear in the Options menu only if the Protected
Content setting is set to Show.
When the Protected Content setting is set to Show, hidden folders that are now shown are
indicated by the Protected Content icon.
Page 45
Page 46

Setting a password to display or hide protected video or picture folders
You can password protect your
Protected Content setting.
Press and hold the Menu/Back button to access the main menu.
1.
Select System Player Settings Protected Content Password.
2.
Use the Navigation buttons to create a password.
3.
Select the Checkmark to confirm the password.
4.
You will be prompted for this password when you select System Player Settings Protected
4.
Content: Show or Hide to select whether to show or hide the protected folders.
To disable the password feature or change your password, select System Player Settings
5.
Protected Content Password.
Use the Navigation buttons to enter your current password.
6.
To disable the password, use the Navigation buttons to enter 0000.
7.
To change the password, use the Navigation buttons to create a new password.
7.
Select the Checkmark to confirm your settings.
8.
Notes
If you have forgotten your password, see To clean up your player's hard disk drive.
Page 46
Page 47

Viewing and Managing Pictures
With your player's high-capacity storage, you can store thousands of pictures in your player, and even set
up a slideshow, so that you can share memories with friends and family. Your player displays pictures
that are in the JPEG (JPG) format only.
Viewing pictures
Viewing pictures in a slideshow
Deleting a picture or folder
Setting a picture as wallpaper
Page 47
Page 48

Viewing pictures
Press and hold the Menu/Back button to access the main menu.
1.
Select Photos, and select the picture you want to view. If you have organized your pictures into
2.
folders, select the folder containing the picture you want to view, and then select the picture.
Press the Down or Up buttons to rotate the picture 90° clockwise or anticlockwise.
3.
Press Options button to select other display options. From the Options menu you can select:
4.
Zoom In to zoom in on a picture. Use the Up , Down , Left or Right buttons to
o
move the picture up, down, left or right.
Rate Picture to give the picture a rating. Use the Up or Down buttons to increase or
o
decrease the picture's rating. Press the OK button to confirm the rating.
Set as Wallpaper to use the picture as your player's wallpaper.
o
View as Slideshow to start a slideshow of all the pictures in the folder, beginning with the
o
current picture you are viewing. For more information on slideshows, see Viewing pictures in
a slideshow.
Tips
You can hide picture folders containing content that you do not want your player to display. For
more information, see Hiding video or picture folders and Setting a password to display or hide
protected video or picture folders.
Page 48
Page 49

Viewing pictures in a slideshow
Press and hold the Menu/Back button to access the main menu.
1.
Select Photos and highlight the picture or folder that you want.
2.
Press the Play/Pause button to start a slideshow.
3.
To stop the slideshow, press the Menu/Back button.
4.
To change the slideshow interval duration, press and hold the Menu/Back button to access
5.
the main menu, and select System Photo/Video Settings Set Slide Interval.
Tips
You can create your own slideshows using Creative Media Explorer. To access your slideshows,
press and hold the Menu/Back button to access the main menu, and select Photos My
Slideshows. For more information, refer to the application's online Help.
Page 49
Page 50

Deleting a picture or folder
Press and hold the Menu/Back button to access the main menu.
1.
Select Photos, and select the picture or folder that you want to delete.
2.
Press and hold the Menu/Back button.
3.
Select Delete Picture or Delete Folder.
4.
Select Yes.
5.
Page 50
Page 51

Setting a picture as wallpaper
Press and hold the Menu/Back button to access the main menu.
1.
Select Photos, and select the picture that you want.
2.
Press the Options button.
3.
Select Set as wallpaper.
4.
Use the Left and Right buttons to adjust the brightness, and use the Up and Down
5.
buttons to select a color.
Page 51
Page 52

Playing and Managing Music Tracks
You can search for music tracks by album, artist, genre or title. If you have created playlists (tracks you
have organized into lists) on your player, or transferred playlists from Creative MediaSource
Player/Organizer, you can search for music tracks in playlists as well. You can also use the steps below
to locate and play Audible files and ZENcast content that you have transferred.
Press and hold the Menu/Back button to access the main menu.
1.
Select Music Library and select a music category, such as Albums or Genres. Select All Tracks
2.
if you want to search by track title.
To perform a quick alphabetical search, press the Right button to highlight the alphabet panel
3.
on the right of the screen and select the letter that you want.
Continue searching with the Up or Down buttons until you find what you want.
4.
Select the item you want to play, and press the Play/Pause button.
5.
The currently playing track appears on the Now Playing screen. See Now Playing screen.
5.
Notes
To manage Audible files, you need to install AudibleManager®.
Audible files are currently available to selected regions only.
You can also get your player's DJ to select and play songs according to criteria set by you. See
Selecting tracks with your player's DJ.
Page 52
Page 53

Adding a track to the list of selected tracks
Press and hold the Menu/Back button to access the main menu.
1.
Select Music Library and select a music category, such as Albums or Genres. Select All Tracks
2.
if you want to search by track title.
Select an album, artist, genre or track.
3.
Press the Options button.
4.
Select Add to Selected.
5.
Notes
For more information about creating playlists on your player, see Managing the list of selected
tracks.
Page 53
Page 54

Searching for tracks by the same artist
If you like the artist of the song you are playing now, you can do a quick search for other titles by the
same artist.
During playback, press and hold the Menu/Back button to access the main menu.
1.
Select Now Playing.
2.
Press the Options button.
3.
Select Lookup Artist to display albums or tracks from the same artist.
4.
Notes
The Lookup Artist option is also available in the Options menu in the Selected Music screen. To
access the Selected Music screen, see Now Playing screen.
Page 54
Page 55

Rating your music tracks
You can give each of your music tracks a rating, from one to five stars. Giving your music tracks a rating
allows your player's DJ to automatically play your favorite music tracks.
If you are not already in the Now Playing screen, press and hold the Menu/Back button to
1.
access the main menu, and select Music Library Now Playing.
Press the OK button.
2.
In the Track Rating screen, press the Left button to decrease the rating and the Right button
3.
to increase the rating.
Press the OK button to confirm the rating.
4.
Page 55
Page 56

Selecting tracks with your player's DJ
Instead of selecting tracks yourself, you can let your player's DJ pick out tracks for you.
Press and hold the Menu/Back button to access the main menu.
1.
Select Music Library DJ and select one of the following options from the menu:
2.
Album of the Day
o
Let your player's DJ play an album of music tracks.
o
Random Play All
o
Let your player's DJ randomly play all tracks, including your recorded tracks.
o
Most Popular
o
Let your player's DJ play frequently played tracks.
o
Rarely Heard
o
Let your player's DJ play rarely played tracks.
o
Highly Rated
o
Let your player's DJ play that you have rated highly.
o
Yet to be Rated
o
Let your player's DJ play tracks you have yet to rate.
o
Page 56
Page 57

Managing the list of selected tracks
Tracks you have selected for playback can be viewed and managed from the
Selected Music screen.
Press and hold the Menu/Back button to access the main menu.
1.
Select Now Playing.
2.
Press the Options button.
3.
Select one of the following playlist management options from the menu:
4.
Remove... Remove Track
o
Removes the current track from the list.
o
Remove... Remove All
o
Clears the list.
o
Save As Playlist
o
Saves the list as a playlist. Name the playlist using the characters in the list box that appears,
o
and then select Ok.
Tips
These playlist management options are also available in the Options menu in the Selected Music
screen. To access the Selected Music screen, see Now Playing screen.
Page 57
Page 58

Shuffling and repeating the list of selected tracks
You can shuffle or repeat your list of selected tracks by selecting a different play mode.
Press and hold the Menu/Back button to access the main menu.
1.
Select Play Mode.
2.
Select one of the following items in the Play Mode screen:
3.
Normal
o
Plays your selected tracks in sequential order.
o
Repeat Track
o
Repeats the current track.
o
Repeat All
o
Repeats all selected tracks.
o
Shuffle
o
Plays all selected tracks in random order, once only.
o
Shuffle Repeat
o
Plays and repeats all selected tracks, in random order.
o
Track Once
o
Stops playing after the current track ends.
o
Tips
To change the play mode in the Now Playing or Selected Music screen during playback, press
the Options button and select Play Mode.
Page 58
Page 59

Searching within a track
You can search for a particular point within a track and start playback from there. For example, if you
want to start playback one minute into a music track, you can pinpoint or
seek to the one minute position and then begin playback from there.
In the Now Playing screen, press the Options button and select Seek To.
1.
Press the Left and Right buttons to move backwards or forwards to any point within the current
2.
track.
Press the OK button to start playback from the selected position.
3.
Page 59
Page 60

Creating and transferring playlists
With Creative MediaSource Player/Organizer, organizing music tracks into playlists (tracks you have
organized into lists) has never been easier. You can create as many playlists as you like and transfer these
to your player.
You can compile playlists using the drag-and-drop method, or automatically generate playlists based on
your preferences using the Smart Playlist feature.
Tips
For more information about using Creative MediaSource Player/Organizer, refer to its online
Help.
You can also directly create playlists on your player. For more information, see Managing the list
of selected tracks.
Page 60
Page 61

Using bookmarks
You can insert bookmarks during playback. A bookmark helps you mark a point within a track, so you
can return to it at a later time.
For example, if you are listening to a long voice recording, insert a bookmark if you need to stop at any
point. To resume from where you left off, select this bookmark.
You can use up to 10 bookmarks at any one time.
To insert a bookmark
In the Now Playing screen, press the Options button and select Set Bookmark. Playback
1.
pauses and the Set Bookmark screen appears.
Select a bookmark number.
2.
Your bookmark is assigned to the selected bookmark number. If all 10 bookmark numbers have
2.
been assigned, you can replace an existing bookmark with the new bookmark.
To go to a bookmark
Press and hold the Menu/Back button to access the main menu.
1.
Select Music Library Bookmarks.
2.
Select the bookmark that you want.
3.
Page 61
Page 62

Viewing track information
To view detailed information about a track, such as its duration, scroll to the track, press the Options
button, and select
View Details.
Page 62
Page 63

Deleting tracks
Press and hold the Menu/Back button to access the main menu.
1.
Select Music Library and select a music category, such as Albums or Genres. Select All Tracks
2.
if you want to search by track title.
Continue searching with the Up or Down buttons until you find the track or category of
3.
tracks that you want to delete.
Press the Options button and select Delete Playlist, Delete Album, Delete Artist, Delete
4.
Genre or Delete Track.
For more song management tasks, connect your player to your computer and use Creative
4.
MediaSource Player/Organizer.
Page 63
Page 64

Playing ZENcast Content
Use ZENcast Organizer to subscribe to your favorite ZENcast channels, and download and transfer
ZENcast media files to your Creative portable media player. For more information, refer to the Creative
ZENcast Organizer online Help.
To play ZENcast media files
Press and hold the Menu/Back button to access the main menu.
1.
Select Videos ZENcast the ZENcast channel folder you want the ZENcast episode you
2.
want.
To search for ZENcast channel folders or ZENcast episodes alphabetically
ZENcast channel folders and ZENcast episodes are sorted alphabetically to enable quicker searches.
In the ZENcast screen or ZENcast channel folder screen, press the Right button to highlight the
1.
alphabet panel.
Press the Up and Down buttons to scroll through the characters.
2.
Press the OK button to select a character.
3.
A list of ZENcast channel folders or ZENcast channel episodes with titles beginning with the
3.
selected character is displayed.
Page 64
Page 65

Playing Audible Files
After downloading Audible audio to your player, search for Audible files by album, artist, genre or title.
For more information, see Playing and Managing Music Tracks
.
You can skip one or more sections in your Audible file, instead of moving forward or backward within a
track.
To skip sections within a track
In the Now Playing screen, press the OK button.
1.
Press the Left or Right buttons to skip sections within the track.
2.
To go back to the Now Playing screen, press the OK button twice.
3.
Notes
Audible files are currently available to selected regions only.
You can insert bookmarks and search within a section in Audible files. For more information,
see Using bookmarks.
Page 65
Page 66

Listening to the Radio
You can tune in to FM radio stations with your player.
Performing an autoscan and autosave
Performing a manual scan
Naming or renaming a radio preset
Deleting radio presets
The FM frequency range on your player is set to "International" by default. Most regions in the world
receive FM broadcasts in this range.
Tips
If you are using your player's wired remote control (sold separately), you can press the MODE
button to switch between the Now Playing and FM Radio screens.
If you are using your player in Japan, make sure you have selected "Japanese" as your player's
default language before selecting your FM region.
In the main menu, select FM Radio.
i.
Press the Options button, and select Set Region.
ii.
Select the FM Region that you want.
iii.
Page 66
Page 67

Performing an autoscan and autosave
Connect your earphones to the Headphone jack. Your earphones act as an antenna and must be
1.
connected to your player for radio reception.
Press and hold the Menu/Back button to access the main menu.
2.
Select FM Radio.
3.
To automatically scan and save radio stations, press the Options button and select Autoscan.
4.
At the end of the autoscan, your player saves all stations as preset channels and tunes in to the
first preset.
Page 67
Page 68
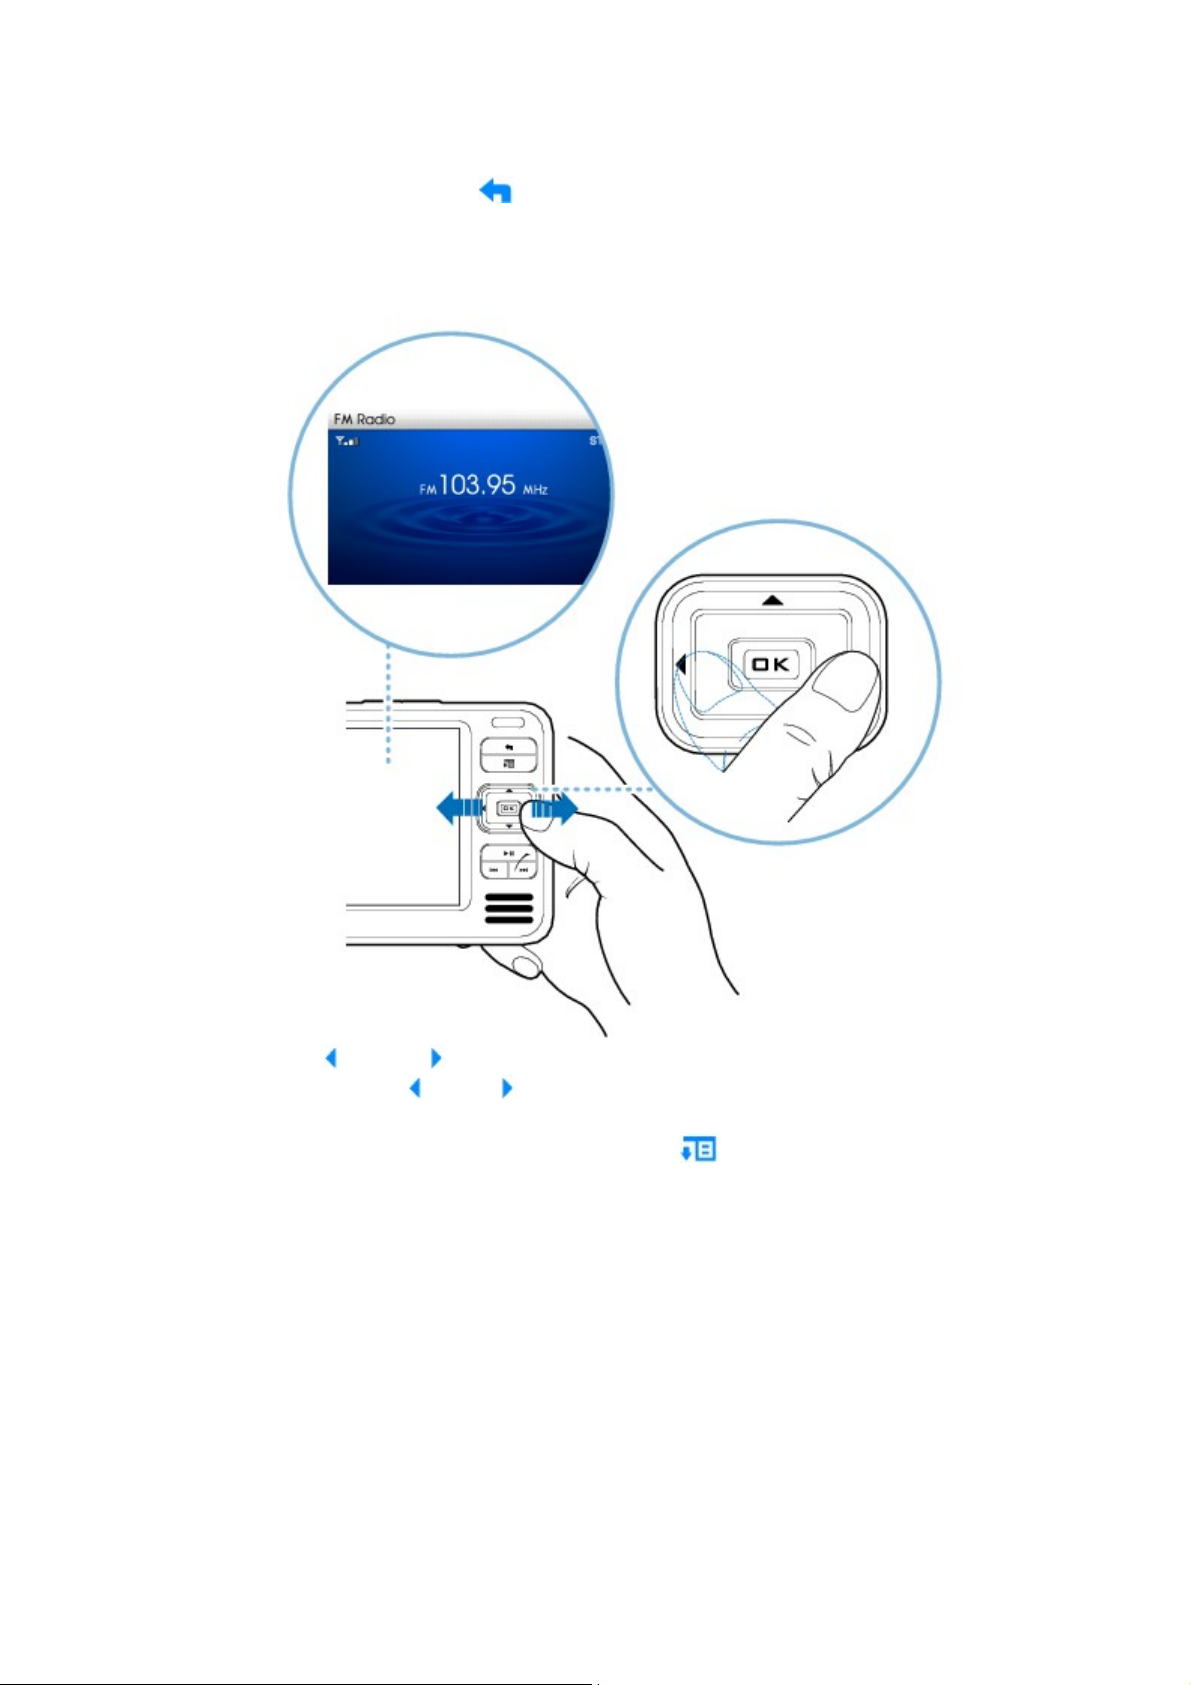
Performing a manual scan
Press and hold the Menu/Back button to access the main menu.
1.
Select FM Radio.
2.
To fine tune or manually scan for a radio station, press the Play/Pause button to switch to the
3.
manual tuning view.
3.
Press the Left and Right buttons to fine tune the radio frequency.
4.
Press and hold the Left or Right buttons for one second to scan for the next available radio
5.
station.
To save a radio station as a preset, press the Options button, select Save As Preset, and
6.
then select a preset number.
Page 68
Page 69

Naming or renaming a radio preset
Press and hold the Menu/Back button to access the main menu.
1.
Select FM Radio.
2.
Select a preset.
3.
Press the Options button.
4.
Select Name preset.
5.
Use the Navigation buttons to type a name for your preset.
6.
Select OK.
7.
Page 69
Page 70

Deleting radio presets
Press and hold the Menu/Back button to access the main menu.
1.
Select FM Radio.
2.
Press the Left and Right buttons to select the preset you want to delete.
3.
Press the Options button and select Delete Preset.
4.
Page 70
Page 71

Recording with the Built-in Microphone
Press and hold the Menu/Back button to access the main menu.
1.
Select Microphone.
2.
Press and hold the Play/Pause button to start the recording.
3.
While recording, you can press the Options button and select one of the following options:
4.
Pause
o
Pauses the recording. You can also pause the recording by pressing the Play/Pause
o
button.
Stop
o
Stops and saves the recording.
o
Split
o
Ends and saves current recording session, and begins a new one.
o
The recorded track is named MIC followed by the date and time of the recording (MIC
o
YYYY-MM-DD HH:MM:SS). For example, if you record a track on March 15, 2004 at
2:57 pm, the track is named
MIC 2004-03-15 14:57:00.
o
To preview your new recording, press the Play/Pause button. To delete it, select Delete
5.
Recording.
Tips
For a better quality recording, make sure you place your player as close as possible to the
source.
Page 71
Page 72

Using Windows Media Player 10
Windows Media
Player 10 (WMP 10) is included with your player. Basic instructions on managing your library and
transferring audio tracks are included in this chapter. For more information on WMP10, refer to the
WMP 10 online Help.
Notes
To get the most from your player, visit www.creative.com/support for additional tutorials,
step-by-step how-to instructions, and other useful information.
®
Page 72
Page 73
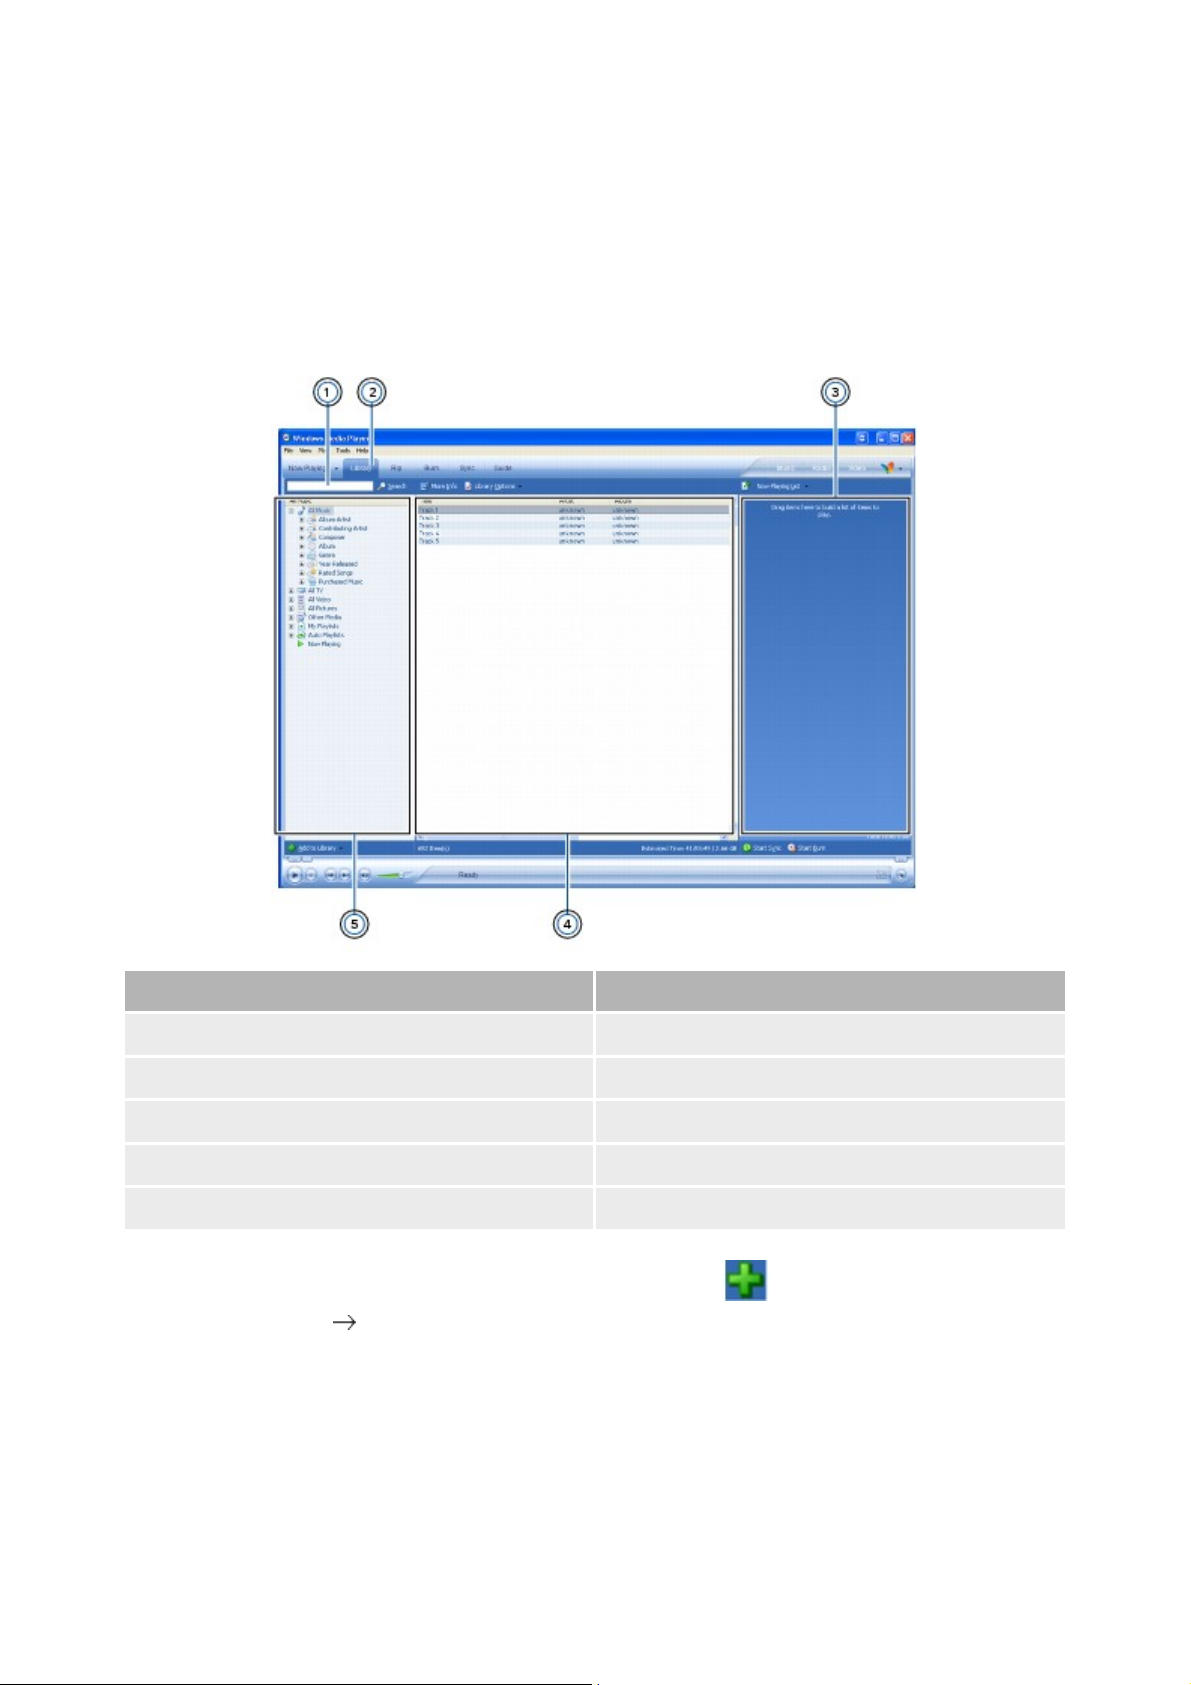
Managing Your Library
Display Element
1.
Search box
2.
Library tab
3.
List pane
4.
Details pane
5.
Contents pane
Before burning CDs or transferring tracks, you need to add media content to WMP 10's library. Media
content in your WMP 10 library is organized in the All Music, All TV and All Video folders, located in
the
Contents pane.
To view your library, in WMP 10, click the
Library tab.
To add items to your library
On the bottom left corner of the window, click the Add to Library button.
Alternatively, click File
Add to Library.
To sort the items in your library
Notes
In the Contents pane, click the folder containing the items that you want to sort.
1.
To sort items in ascending alphabetic order, in the Details pane, click the heading of the column
2.
(for example, Title, Genre or Length) that you want the items sorted by.
To sort the items in descending order, in the Details pane, click the heading of the column again.
3.
The items in your library are played back in the order that they are displayed.
Page 73
Page 74

To find an item in your library
Click the Search box and type a keyword.
1.
Click the Search button. The search results are displayed in the Details pane.
2.
To delete items from your library
In WMP 10, click the Library tab.
1.
In the Details pane, right-click the file to delete.
2.
Click Delete.
3.
In the Windows Media Player dialog box, click the Delete from library only option.
4.
Click the OK button.
5.
Notes
In step 4, selecting Delete from library and my computer will delete the item from WMP 10's
media library and your computer's hard disk.
Page 74
Page 75

Transferring Audio Tracks To Your Player
You can transfer audio tracks from WMP 10 to your player.
In WMP 10, click the Sync tab.
1.
Click the Sync List box and select a genre, album or artist.
2.
Select the checkboxes next to the tracks that you want to transfer.
3.
On the right pane, click the Device box and select your player's entry.
4.
Click the Start Sync button.
5.
Notes
If the Sync tab is not visible in WMP 10, click View Menu Bar Options Hide Taskbar.
Page 75
Page 76

Managing Data Files
You can use your player to store music, pictures and data files, or to transfer files from one computer to
another.
You can use Creative Media Explorer to transfer files between your player and your computer. For more
information, see Step 4: Transfer Content
.
Use your player's Removable Disk mode if you need to transfer data from your player to computers that
do not support media transfer protocol (MTP) or that do not have Creative Media Explorer.
Page 76
Page 77

Using Your Player as a Removable Disk
Press the Menu/Back button to access the main menu.
1.
Select Extras Removable Disk.
2.
If you are selecting this menu item for the first time, you must select the amount of disk space you
3.
want to use for the Removable Disk mode. To do so, press the Options button, and select
the capacity that you want.
When you see Removable Disk on the player's display, you are ready to transfer data files.
4.
Connect your player to your computer using the supplied USB cable.
5.
5.
5.
5.
6.
7.
Notes
Your player appears as a Removable Disk under My Computer in Windows Explorer.
Use the drag-and-drop method in Windows Explorer to copy files to and from your player.
When you have finished copying files, safely disconnect your player using the Safely Remove
Hardware icon on the Taskbar. To safely disconnect your player, see Stopping Your Player
Properly.
Data files saved in the Removable Disk mode disk space cannot be viewed or managed with
Creative Media Explorer.
Similarly, data files transferred to your player using Creative Media Explorer cannot be viewed
or managed in Removable Disk mode.
Page 77
Page 78

Changing the Amount of Disk Space in Removable Disk Mode
You can change the amount of disk space in Removable Disk mode at any time.
Press the Menu/Back button to access the main menu.
1.
Select Extras Removable Disk.
2.
Press the Options button, select Set Capacity, and select the capacity that you want.
3.
Before you can decrease the amount of disk space, the existing data files stored in Removable
3.
Disk mode must be able to fit into the decreased space.
Alternatively, connect your player to your computer and use Creative Removable Disk Manager
4.
to increase or decrease the amount of disk space in Removable Disk mode.
Notes
To delete all the data files in the Removable Disk disk space, press the Options button and
select Format.
Use Windows Explorer if you want to delete individual data files stored in Removable Disk
mode.
Tips
Creative Removable Disk Manager is included with your player and is automatically installed
when you set up your player's software on your computer.
To start Creative Removable Disk Manager, click Start Programs or All Programs Creative
Creative Removable Disk Manager Creative Removable Disk Manager.
Page 78
Page 79

Stopping Your Player Properly
If your player is in Removable Disk mode, make sure that:
you have stopped your player properly in Windows before unplugging it from the USB port on
your computer (refer to the steps for your respective operating system).
you do not disconnect your player from the USB port on your computer when transferring files to
or from the device, or when files stored in your player are in use.
Caution!
Only disconnect your player after the Do not Disconnect message disappears from the display. If
not, your player may not be able to function normally.
To stop your player properly, click the Safely Remove Hardware icon on the Taskbar, click
Safely remove USB Mass Storage Device, and disconnect your player when you are prompted to do so.
Page 79
Page 80

Managing Organizer Data
Your player can store your contacts, calendar events and tasks from Microsoft Outlook. If you do not
have Microsoft Outlook installed, you can use the Personal Information Manager (PIM) in Creative
Media Explorer to edit and manage calendar, tasks and contact information on your player.
Page 80
Page 81

Synchronizing Your Player with Microsoft Outlook
Connect your player to your computer.
1.
You can start Sync Manager from Creative Media Explorer or Creative MediaSource
2.
Player/Organizer.
Select My Computer and your player as the device you want to synchronize, and then click the
3.
Next button.
Select the information you want to import from Microsoft Outlook, and then click the Sync Now
4.
button.
Follow the instructions on the screen.
5.
Click the Finish button.
6.
Tips
You can also use Sync Manager to synchronize media between your player and your computer.
Page 81
Page 82

Using Personal Information Manager
Double-click the ZEN Vision W Media Explorer icon on the desktop.
1.
Click the Manage Organizer Data icon.
2.
In the Personal Information Manager (PIM) window, click the Calendar, Tasks or Contacts tab
3.
to add to or edit your player's organizer information.
When you are done, close the PIM window.
4.
You will prompted with a message asking you if you want to save your edits to your player.
5.
Click the Yes button to do so.
For more information, refer to Personal Information Manager's online Help.
Page 82
Page 83

Viewing the Calendar
Press and hold the Menu/Back button to access the main menu.
1.
Select Extras Organizer Calendar.
2.
Press the Left and Right buttons to scroll through the various months, and Up and Down
3.
buttons to scroll through the days in a month.
Press the OK button to view the events and task list in a day.
4.
Page 83
Page 84

Viewing Today's Tasks
Press and hold the Menu/Back button to access the main menu.
1.
Select Extras Organizer Tasks.
2.
Press the Up and Down buttons to scroll through your task list.
3.
Press the OK button to select a task.
4.
Page 84
Page 85

Viewing Contacts
Press and hold the Menu/Back button to access the main menu.
1.
Select Extras Organizer Contacts.
2.
Select a name in your contact list to view details about the contact.
3.
Page 85
Page 86

Using a Memory Card
You can transfer or view files from a CF memory card by inserting the card into your player's CF
memory slot.
Page 86
Page 87
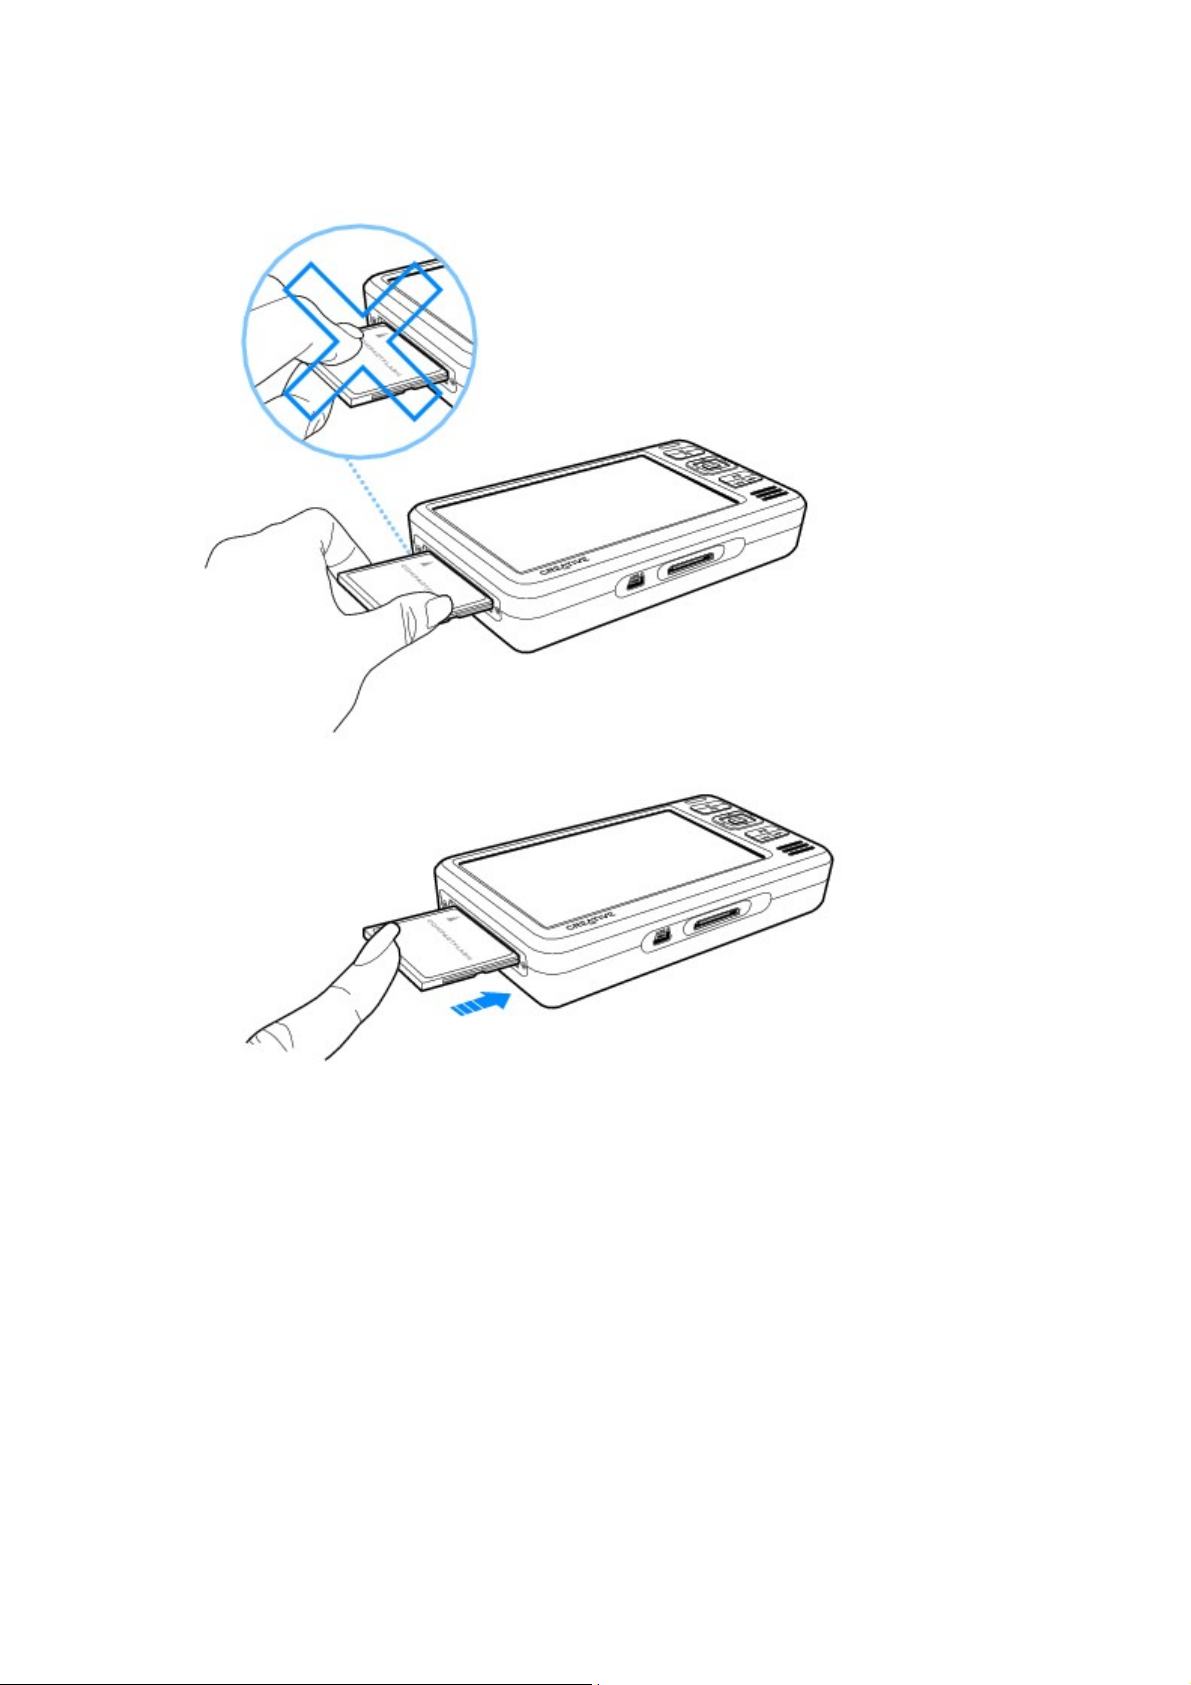
Inserting a Memory Card
Align the memory card with the CF memory card slot.
1.
1.
Gently push the memory card into the CF memory card slot.
2.
2.
To remove the memory card, pull out the memory card as shown below.
3.
Page 87
Page 88

3.
Warning!
To avoid damage to your CF memory card:
o
o
o
Do not force the memory card into the CF memory card slot. If it does not fit properly,
gently remove it and try again.
DO NOT shake the memory card when removing it.
Remove the memory card only when your player displays the main menu or when your
player is turned off.
Page 88
Page 89

Transferring Content From Your Memory Card
All content in your memory card is transferred to your player. After transferring the files, you can view
.JPG pictures and .AVI videos on your player. To view files that are in other formats, use your
computer.
Insert your memory card into your player's CF card slot. For more information, see Inserting a
1.
Memory Card.
In the main menu, Select Compact Flash Card.
2.
Select Copy from Compact Flash.
3.
Select a copy option.
4.
When a message appears, telling you that the transfer is complete, press any button on your
5.
player to close the message.
To view transferred photos (JPEG) or videos (AVI) using your player, Select Photos/Videos
6.
Imported Files <CF YYYY-MM-DD HHHMMMSSS>. For example, if you transfer content
on July 18, 2006 at 3:15 am, the folder name is CF 2006-07-18 03H15M00S.
To locate all transferred content, connect your player to your computer using the supplied USB
7.
cable, then click your player's icon under My Computer, and click Data Imported Files
<CF YYYY-MM-DD HHHMMMSSS>.
To transfer new content from a previously transferred folder in the same memory card, select
8.
Append from Compact Flash.
Notes
You cannot transfer content from your player to your memory card.
Your player only supports memory cards formatted with FAT16 or FAT32 file systems. To
ensure that your memory card is of the correct format, use a 128 MB or higher capacity memory
card.
You can also view transferred photos or videos by selecting Compact Flash Card Browse
Imported Pictures or Browse Imported Video.
For accurate folder names, make sure that you set the correct date and time in your player. To
change the date or time, see Changing Clock Settings.
Page 89
Page 90

Customizing Your Player
Your player can be configured in various ways to suit your needs and preferences.
Configuring Your Player's Menus
Changing Audio Settings
Changing Display Settings
Changing Player Settings
Changing Clock Settings
Resetting Your Player
Page 90
Page 91

Configuring Your Player's Menus
You can personalize the main menu by adding and removing menu items. For example, if you usually
search for songs by album, you can add Albums to the main menu so you can access the
Albums screen more conveniently.
Page 91
Page 92

Adding and removing main menu items
To access the main menu from any screen
Press and hold the Menu/Back
button.
To add/remove menu items
In the main menu, press the Options button and select Configure Menu.
1.
To add menu items, select the check boxes next to the menu items you want.
2.
To remove menu items, clear the check boxes.
2.
To change the order of the menu items
In the main menu, press the Options button and select Change Order.
1.
Use the Navigation buttons to change the position of the highlighted menu item.
2.
To revert to the default menu settings
Press the Options button and select
Default Menu.
Page 92
Page 93

Setting the menu language
Press and hold the Menu/Back button to access the main menu.
1.
Select System Language, and select the language that you want.
2.
Page 93
Page 94

Changing Audio Settings
You can configure audio settings on your player in the following ways:
Using equalizer (EQ)
Enabling volume restriction
Enabling Smart Volume
Enabling Bass Boost
Turning off the speaker
Page 94
Page 95

Using equalizer (EQ)
EQ is the player's collection of equalizer settings, which you can use to enhance your audio tracks. You
can select an equalizer preset or customize your own settings to suit the genre or style of your music.
To select an equalizer preset
Press and hold the Menu/Back button to access the main menu.
1.
Select System Audio Settings EQ.
2.
Select one of the EQ menu items.
3.
When an EQ setting is selected, appears on the Now Playing screen.
3.
To customize equalizer settings
In the EQ screen, select Custom EQ.
1.
Each slider on the Custom EQ screen represents successively higher frequencies that can be
1.
adjusted.
80 controls bass frequency
o
250 adjusts the low mid-range frequency
o
1k adjusts the mid-range frequency
o
4k adjusts the upper mid-range frequency
o
13k adjusts the treble frequency.
o
Select a slider, and press the Up and Down buttons to move the control knob up or down
2.
to vary the amount of boost or reduction in the selected frequency range.
Press the Left and Right buttons to select the remaining sliders, and repeat step 2.
3.
Select the check mark to save and enable the Custom EQ settings.
4.
Page 95
Page 96

Enabling volume restriction
Listening to audio at high levels for prolonged periods may damage your hearing. To protect your
hearing, you can control your player's maximum playback volume.
To enable volume restriction
Press and hold the Menu/Back button to access the main menu.
1.
Select System Audio Settings Restrict Volume. The volume bar appears.
2.
Press the Up and Down buttons to adjust the maximum volume that you want.
3.
Press the OK button. You will be prompted to set a password.
4.
Use the Navigation buttons to set a password.
5.
To disable password protection for this feature, enter 0000.
5.
Press the OK button to save your password and enable volume restriction.
6.
To disable volume restriction
Press and hold the Menu/Back button to access the main menu.
1.
Select System Audio Settings Restrict Volume. You will be prompted for your password.
2.
Use the Navigation buttons to enter your password. The volume bar appears.
3.
Press the Up button to set the volume to the player's maximum of 25.
4.
Press the OK button. The Restrict Volume setting turns off.
5.
Warning!
Stop audio playback on your player before disabling this feature. Your player will play back
audio at maximum levels when you increase the volume to the maximum of 25. Listening to audio
at high levels may damage your hearing.
Notes
If you forget your password, see To clean up your player's hard disk drive.
Page 96
Page 97

Enabling Smart Volume
You can limit the volume range of playback with Smart Volume. When enabled, Smart Volume sets
playback at a constant volume, so you do not have to continually adjust the volume when you play back
different tracks.
Press and hold the Menu/Back button to access the main menu.
1.
Select System Audio Settings Smart Volume.
2.
Page 97
Page 98

Enabling Bass Boost
Enabling the bass boost feature enhances the bass of audio during playback.
Press and hold the Menu/Back button to access the main menu.
1.
Select System Audio Settings Bass Boost.
2.
Page 98
Page 99

Turning off the speaker
By default, if your earphones are not connected to the Headphones jack, audio is played back through
your player's speaker. You can turn off your player's speaker.
Press and hold the Menu/Back button to access the main menu.
1.
Select System Audio Settings Speaker.
2.
Page 99
Page 100

Changing Display Settings
You can configure display settings of your player in the following ways:
Changing the theme
Setting the backlight duration
Setting the display contrast
Page 100
 Loading...