

Page 1
Page 2
Page 3
monet wa qsb 2.fm Page 1 Tuesday, July 18, 2006 4:41 PM
Congratulations! Thank you for purchasing Creative’s
multiformat player, Creative ZEN™ Vision W. Read on to learn how to get
started with your new player!
To get the most out of your player, also read the comprehensive User’s
Guide on your Installation and Applications CD.
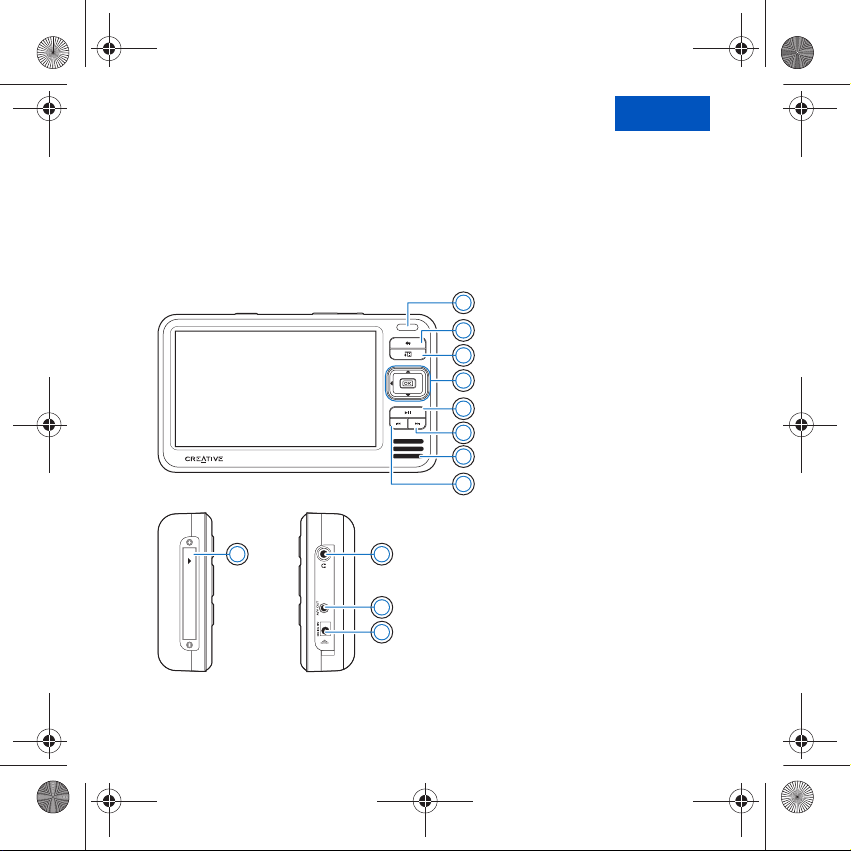
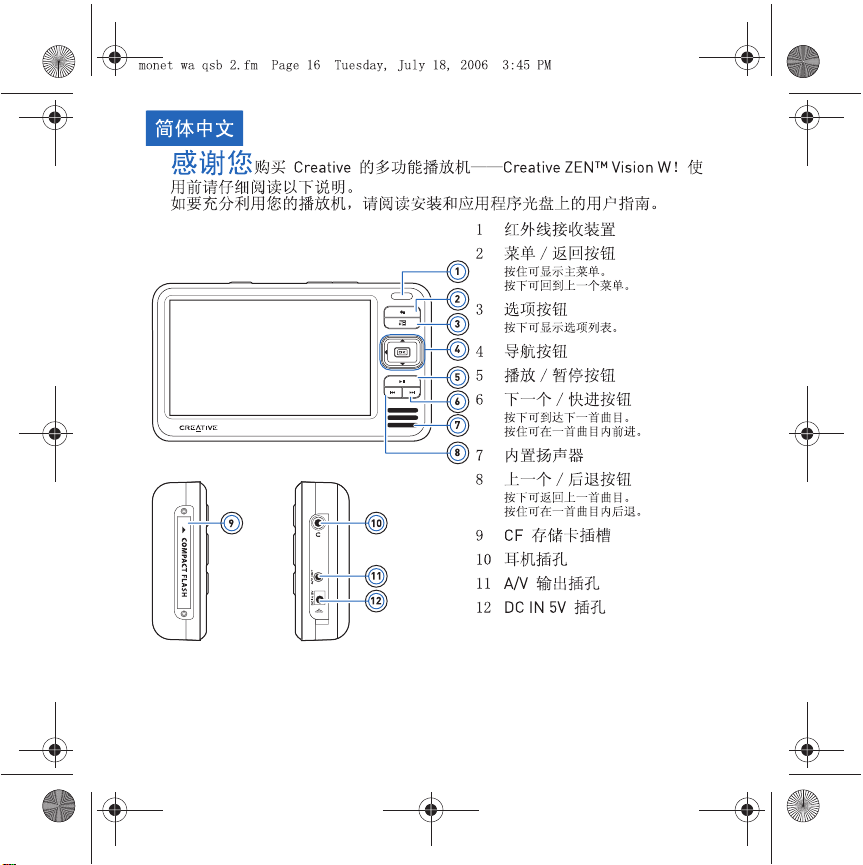
1 Infrared receiver
2 Menu/Back button
Press and hold to display the main
1
menu.
Press to return to the previous menu.
2
3 Options button
3
Press to display a list of options.
4
4 Navigation buttons
5
5Play/Pause button
6
6 Next/Fast-Forward button
7
Press to go to the next track.
Press and hold to move forward
8
within a track.
7 Integrated speaker
COMPACT FLASH
109
11
12
8 Previous/Rewind button
Press to go to the previous track.
Press and hold to move forward
within a track.
9 Compact Flash memory
card slot
10 Headphone jack
11 A/V Out jack
12 DC IN 5V jack
English
Page 4
monet wa qsb 2.fm Page 2 Tuesday, July 18, 2006 4:41 PM
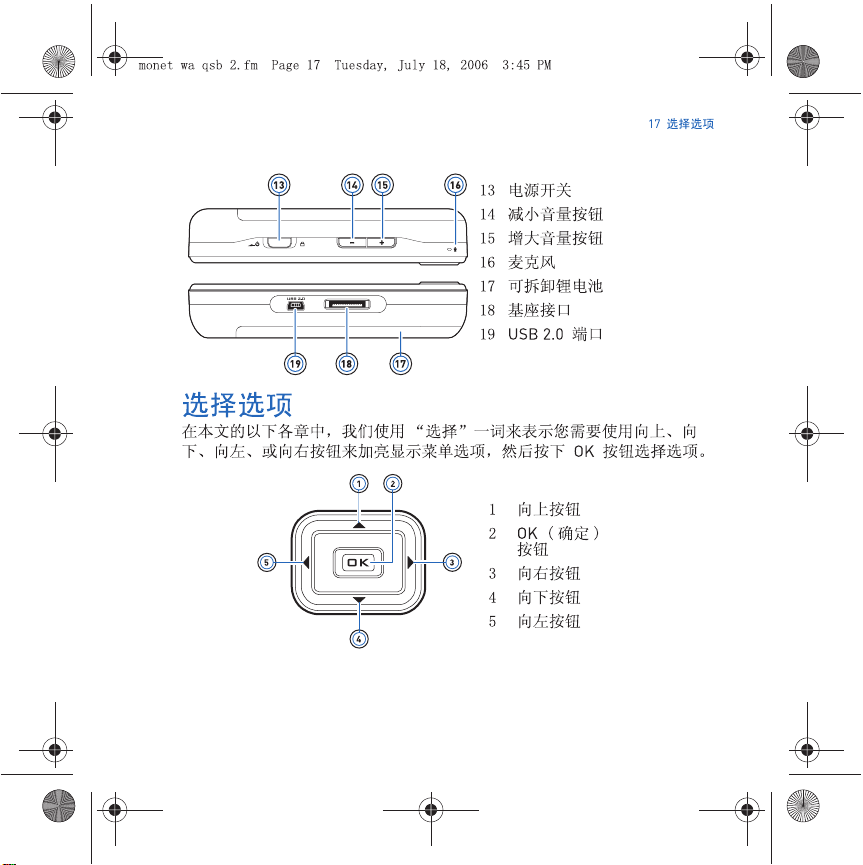
2 Selecting Options
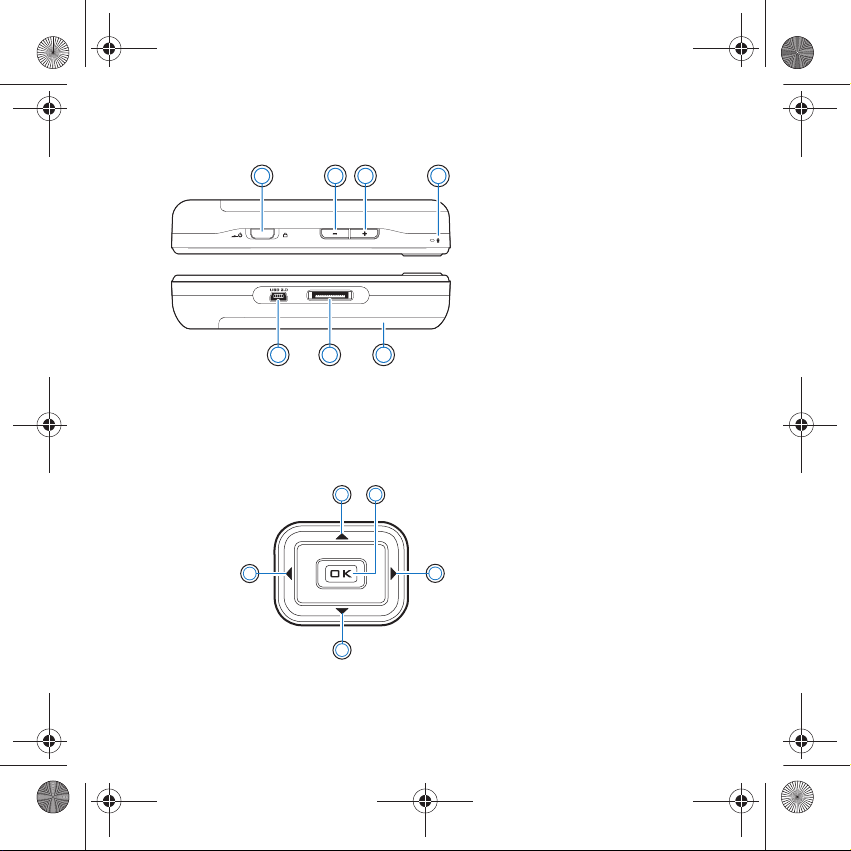
13 14
15 16
13 Power switch
14 Volume Decrease button
15 Volume Increase button
16 Microphone
17 Removeable Lithium-Ion
battery
18 Dock connector
19 18 17
19 USB 2.0 port
Selecting Options
In the following sections of this document, we use the term ‘Select’ to
indicate that you should use the Up, Down, Left or Right buttons to highlight
menu options, then press the OK button to select the option.
1
2
1 Up button
2 OK button
3 Right button
5
4
3
4Down button
5 Left button
Page 5
monet wa qsb 2.fm Page 3 Tuesday, July 18, 2006 4:41 PM
Getting Started
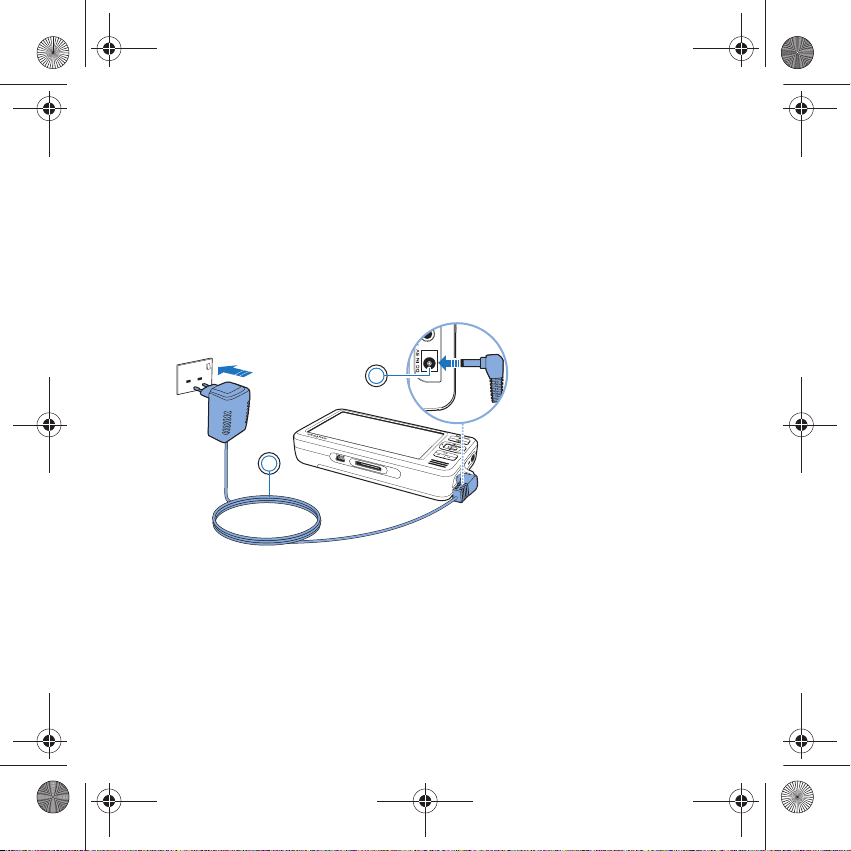
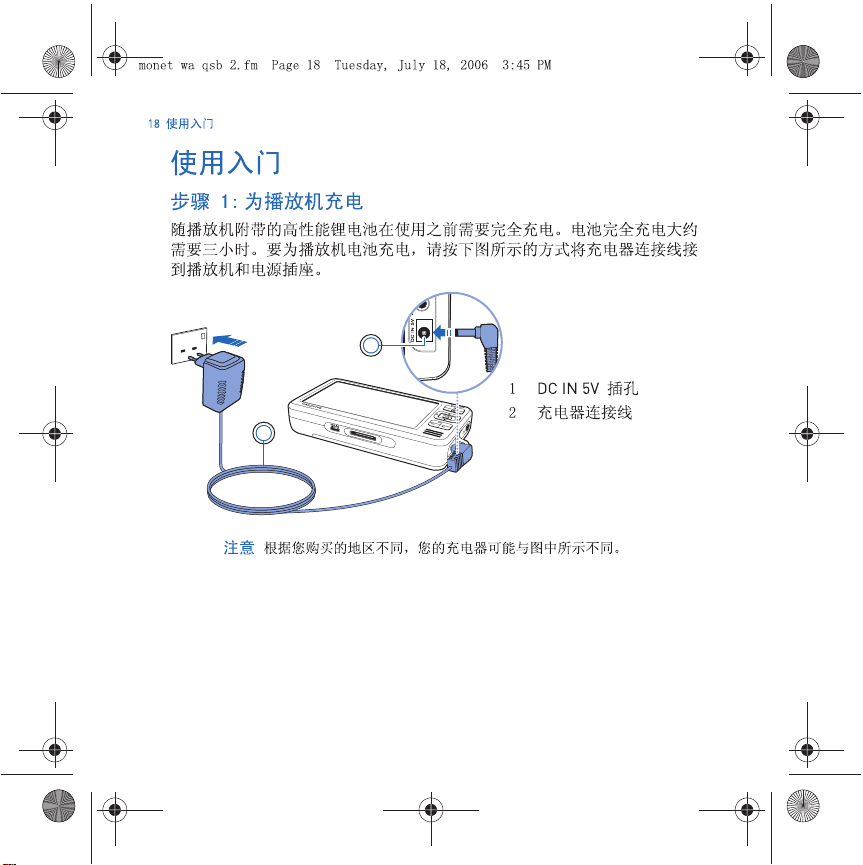
Step 1: Charge Your Player
The high performance lithium-ion battery supplied with your player needs
to be fully charged before you use your player. The battery is fully charged in
approximately three hours. To charge your player's battery, connect the
power adapter cable to your player and a power outlet as shown in the
diagram below.
1
1DC IN 5V jack
2 Power adapter cable
2
NOTES
Depending on your region of purchase, your power adapter may
differ from the one shown here.
3 Getting Started
Page 6
monet wa qsb 2.fm Page 4 Tuesday, July 18, 2006 4:41 PM
4 Set Up the Software
When the battery is charging, the Battery Charging icon appears on the
display. When you see the Battery Charged icon on your player’s
display, disconnect your player from the power adapter.
NOTES
Your player will continue to charge even after it turns off, as long
as it is connected to a power outlet or a computer.
Step 2: Set Up the Software
WARN ING
DO NOT connect your player to your computer before setting up
the software.
1 Turn on your computer.
You must log in as an administrator in Microsoft
®
Windows® before you can
set up the software. For more information, refer to your operating system’s
online Help.
2 Insert the Installation and Applications CD into your CD-ROM/DVD-ROM
drive.
Your CD should start automatically. If it does not, follow the steps below:
i. Double-click the My Computer icon.
Alternatively, click Start My Computer.
ii. Right-click the CD-ROM/DVD-ROM drive icon, and then click Autoplay.
3 Follow the instructions on the screen and when prompted, restart your
computer.
4 If you want to register your product when your computer restarts, follow the
instructions on the screen to do so.
NOTES
You need an Internet connection to register your product.
Page 7
monet wa qsb 2.fm Page 5 Tuesday, July 18, 2006 4:41 PM
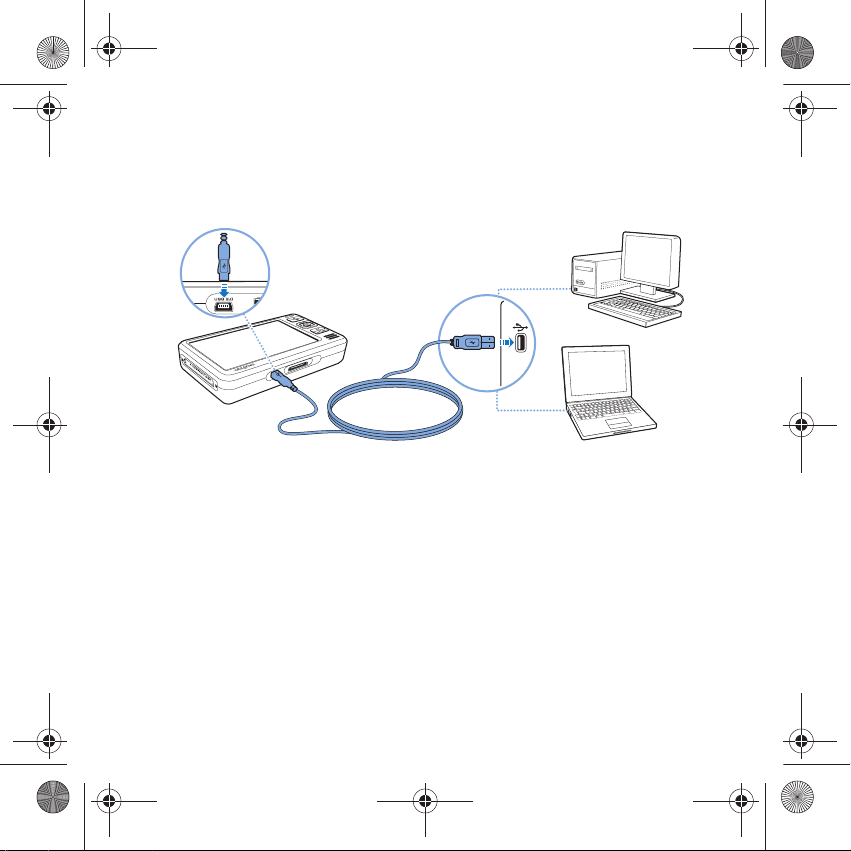
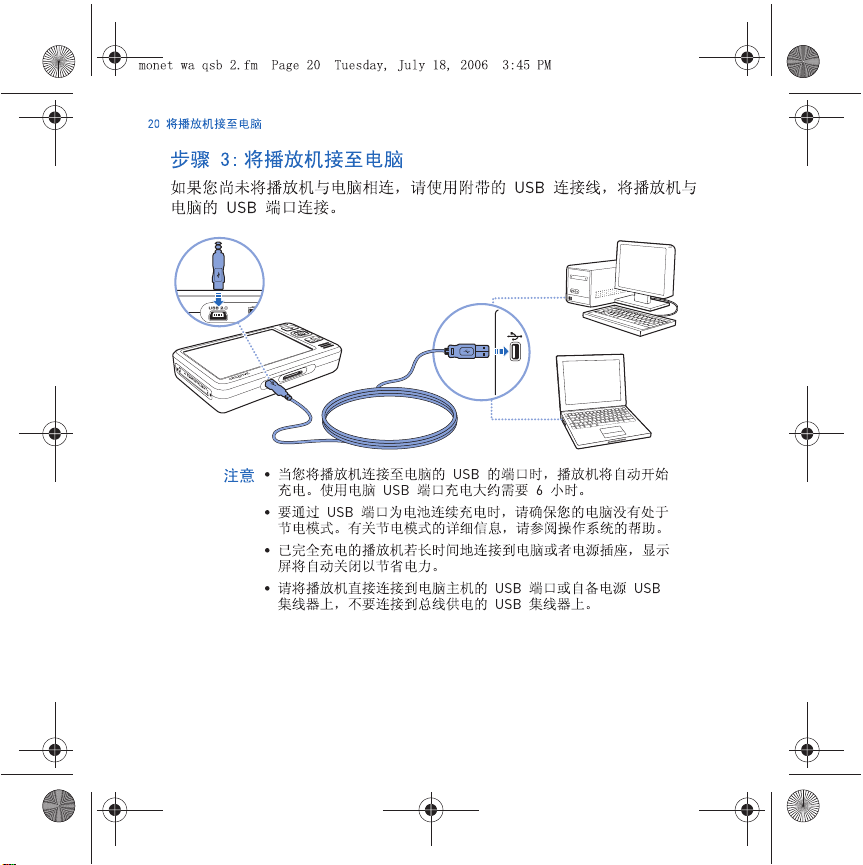
5 Connect Your Player to Your Computer
Step 3: Connect Your Player to Your Computer
If you have not done so, connect your player to your computer’s USB port
using the supplied USB cable.
NOTES
• Your player’s battery charges automatically when you connect
your player to your computer’s USB port. It takes approximately
six hours to charge your player’s battery using your computer’s
USB port.
• For continuous battery charging using the USB port, make sure
your computer is not in power conservation mode. For more
information on power conservation modes, refer to your
operating system's Help.
• If your fully charged player remains connected to your computer
or a power outlet for a prolonged period, the display turns off
automatically to conserve power.
• Connect your player directly to a USB port on your computer or
a self-powered USB hub; do not connect your player to a buspowered USB hub.
Page 8
monet wa qsb 2.fm Page 6 Tuesday, July 18, 2006 4:41 PM
6 Transfer Content
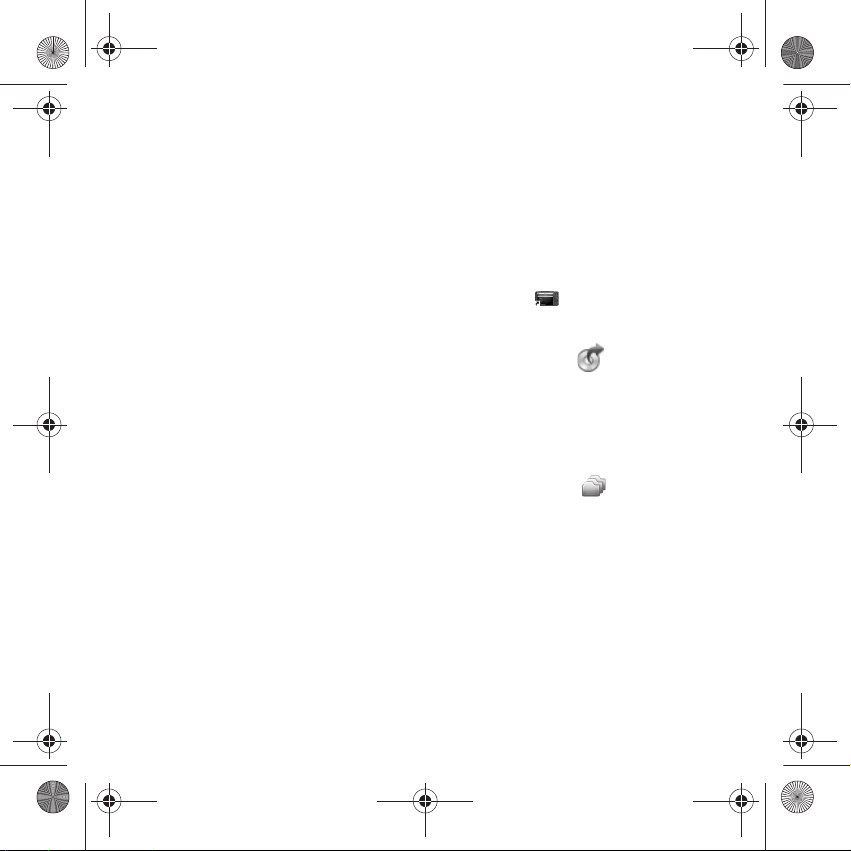
Step 4: Transfer Content
Use Creative Media Explorer to transfer music and other files from your CD
collection or computer. For more details, see “Managing Media and Data”
on page 10.
To start Creative Media Explorer
1 Make sure your player is connected to your computer as shown on page 5.
2 Double-click the ZEN Vision W Media Explorer icon on the desktop.
To transfer or ‘rip’ music from your CD collection
1 In Creative Media Explorer, click the Rip Audio CDs button .
2 Follow the instructions on the screen.
If you are connected to the Internet and have registered with a music
information provider, album information will automatically be retrieved.
To transfer music, videos or pictures from your computer
1 In Creative Media Explorer, click the Browse Media button .
2 Locate your media files, and using the drag-and-drop method, copy them to
the following folders in your player:
• Media Library\Music folder for audio files
• Media Library\Video folder for video files
• Media Library\Pictures folder for pictures
Page 9
monet wa qsb 2.fm Page 7 Tuesday, July 18, 2006 4:41 PM
7 Disconnect Your Player
To transfer data files from your computer
1 In Creative Media Explorer, click the Browse Documents button .
2 Locate your data files, and using the drag-and-drop method, transfer them
to the Data folder in your player.
NOTES
You can also transfer audio files and pictures using the Browse
Documents button. They will, however, be treated as data files and
cannot be played back or viewed on your player.
To transfer ZENcast content
1 Double-click the ZENcast Organizer icon on the desktop.
2 Click the Transfer button .
3 Follow the instructions on the screen.
4 Click the Done button.
NOTES
With ZENcast Organizer, you can subscribe to your favorite
ZENcast channels, and download and transfer ZENcast media files
to your player. For more information, visit www.zencast.com.
Step 5: Disconnect Your Player
Disconnect your player when you see the File Transfer Inactive icon
on the display. DO NOT disconnect your player if you see the File Transfer
Active icon on the display. File transfer is in progress and disconnecting
your player may damage the content being transferred.
Page 10
monet wa qsb 2.fm Page 8 Tuesday, July 18, 2006 4:41 PM
8 Select Your Menu Language
Step 6: Select Your Menu Language
1 If your player is not turned on, slide the Power switch towards the Power
2 When you turn on your player for the first time, the menu is in English. To
icon and hold it there until the display lights up.
change the language:
i. Press and hold the Menu/Back button. The main menu appears.
ii. Select System Language, and then select the language that you want.
Step 7: Watch Videos, View Pictures and Play Music
You are now ready to play or view files, including Audible® and ZENcast
media files.
NOTES
• Press and hold the Menu/Back button to access the main
menu.
• Files in your player are sorted alphabetically to enable faster
searches.
To watch videos
1 In the main menu, select Videos, and select the video you want.
Video playback starts automatically.
2 To adjust the viewing window size, press the Options button and select
the viewing window size that you want.
To view pictures
1 In the main menu, select Photos, and select the picture you want.
2 Select Zoom In, and use the Navigation buttons to pan the picture
horizontally or vertically.
Page 11
monet wa qsb 2.fm Page 9 Tuesday, July 18, 2006 4:41 PM
9 Watch Videos, View Pictures and Play Music
To play music and Audible files
1 Connect your earphones to the Headphone jack.
2 In the main menu, select Music Library, and select the category you want.
3 Select a track and select Play.
4 Press the Volume Increase and Volume Decrease buttons to
adjust the volume.
NOTES
• To manage Audible® files, you need to install AudibleManager®.
• Audible files are currently available to selected regions only.
• If your audio file is accompanied by album art, the artwork is
displayed on your player.
To play ZENcast media files
1 In the main menu, select Videos, and select ZENcast.
2 Select the ZENcast channel folder you want, and select the ZENcast media
file you want.
ZENcast playback starts automatically.
Page 12
monet wa qsb 2.fm Page 10 Tuesday, July 18, 2006 4:41 PM
10 Managing Media and Data
Managing Media and Data
Creative Media Explorer and Creative MediaSource™ Player/Organizer are
included with your player.
Creative Media Explorer
Use Creative Media Explorer if you:
• are new to digital music, and want to transfer them from your CDs or computer
to your player
• want to convert, synchronize, and organize media files
• prefer to manage your player in the familiar “Windows Explorer” environment.
To start Creative Media Explorer, double-click the ZEN Vision W Media
Explorer icon in My Computer or on the desktop. For more information
about using Creative Media Explorer, refer to its online Help.
Creative MediaSource Player/Organizer
Use the full-featured Creative MediaSource Player/Organizer if you:
• require additional features such as recording, automatic playlist generation,
and audio format conversion
• want to manage a music library on your computer.
To start Creative MediaSource Player/Organizer, double-click the Creative
MediaSource Player/Organizer icon on your desktop.
Creative MediaSource Player/Organizer has a Home page from which you
can access common tasks. For more information about using Creative
MediaSource Player/Organizer, refer to its online Help.
NOTES
Windows Media® Player (WMP) 10 is also included with your
player. For more information on WMP10, refer to the User’s Guide
on your Installation & Applications CD or visit Creative's 24-hour
self-help Knowledge Base (see “More Information” on page 13).
Page 13
monet wa qsb 2.fm Page 11 Tuesday, July 18, 2006 4:41 PM
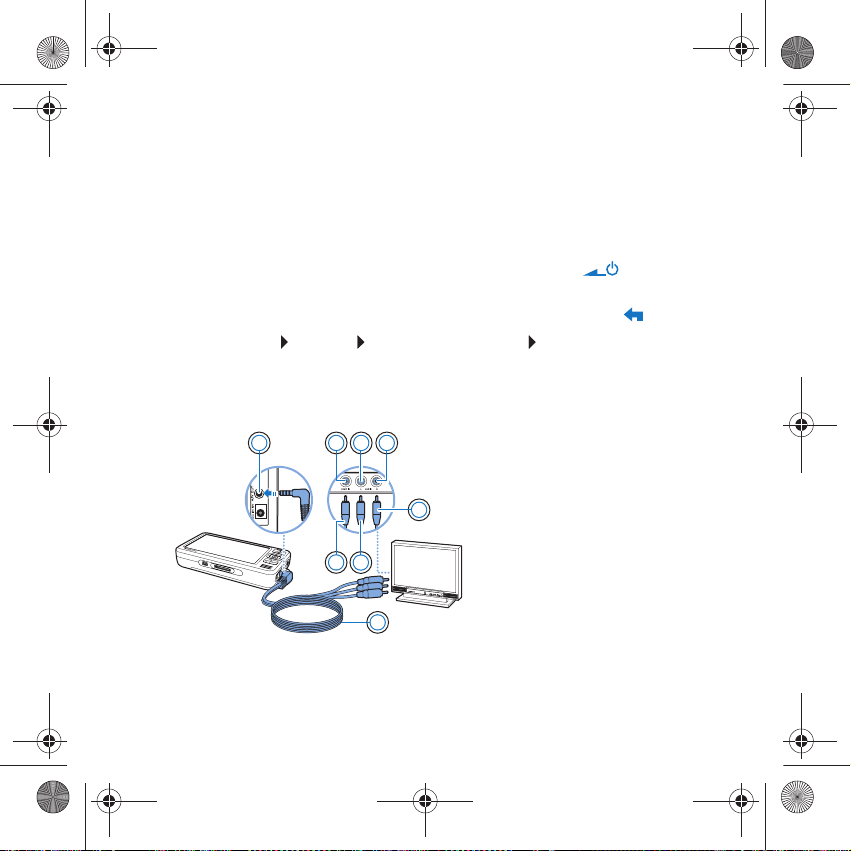
11 Connecting Your Player to a TV
Connecting Your Player to a TV
To view your player’s content on a larger screen, connect your player to a TV
using the supplied audio video cable
WARN ING
1 Slide the Power switch on your player towards the Power icon and
hold it there until the display lights up.
2 If you are not in the main menu, press and hold the Menu/Back
3 Select System
4 Select Auto (NTSC) or Auto (PAL). Refer to the User’s Guide for your TV if
you are not sure about your TV’s display format.
5 Connect your player to a TV with the supplied audio video cable.
DO NOT use a standard audio video cable.
Settings Photo/Video Settings Video Out.
1
273 4
6
8
1A/V Out jack
2 Video In jack - Yellow
5
3 Audio In (Left) jack - White
4 Audio In (Right) jack - Red
5Red connector
6 White connector
7 Yellow connector
8 Audio Video cable
button.
Page 14
monet wa qsb 2.fm Page 12 Tuesday, July 18, 2006 4:41 PM
12 Creating Playlists
Creating Playlists
You can select any combination of tracks you want from your player’s Music
Library to create playlists for convenient playback.
To create a playlist from your player’s Music Library
1 Select Music Library track or category of tracks that you want.
2 Press and hold the Options button, and select Add to Selected.
3 Repeat steps 1 and 2 to add another track or category of tracks.
4 Press and hold the Menu/Back button to access the main menu and
select Now Playing.
5 Press the Options button, and select Save As Playlist.
6 Use the Navigation buttons to create a name for your playlist and select the
Checkmark ✔ button to confirm the name.
7 To play a playlist, select Music Library Playlists playlist that you want.
Page 15
monet wa qsb 2.fm Page 13 Tuesday, July 18, 2006 4:41 PM
13 More Information
More Information
User’s Guide
Read the User’s Guide found on your Installation and Applications CD to learn about
your player’s many features. Go to d:\manual\<language>\manual.chm
(replace d with the drive letter of your CD-ROM/DVD-ROM drive, and
a language that your User’s Guide is available in)
Creative Knowledge Base
Resolve and troubleshoot technical queries at Creative's 24-hour self-help Knowledge
Base. Go to www.creative.com, select your region and then select Support.
Product Registration
Registering your product ensures you receive the most appropriate service and product
support available. You can register your product during installation or at
www.creative.com/register.
Please note that your warranty rights are not dependent on product registration.
Customer Support Services and Warranty
You can find Customer Support Services, Warranty and other information in the CD.
Customer Support Services d:\support\<region>\<language>\support.chm
Warranty
(replace d with the drive letter of your CD-ROM/DVD-ROM drive,
region that you are in, and
Keep this document for future reference.
d:\warranty\<region>\<language>\warranty.chm
Please keep your Proof of Purchase for the duration of the warranty
period.
<language>
with the language that your document is in)
<language>
<region>
with
with the
Page 16

monet wa qsb 2.fm Page 14 Tuesday, July 18, 2006 4:41 PM
14 Safety Information
Safety Information
Refer to the following information to use your product safely, and to reduce
the chance of electric shock, short-circuiting, damage, fire, hearing
impairment or other hazards.
NOTES
Improper handling may void the warranty for your product. For
more information, read the Warranty available with your product.
• Do not dismantle or attempt to repair your product, battery or power adapter.
Refer all servicing to Creative or authorized repair agents.
• Do not expose your player or battery to temperatures outside the range of 0°C
to 45°C (32°F to 113°F).
• Do not pierce, crush or set fire to your product or battery.
• Keep your product or battery away from strongly magnetic objects.
• Do not subject your product to excessive force or impact.
• Do not expose your product or battery to water or moisture.
• If your product is moisture-resistant (see product packaging for details), take
care not to immerse your player in water or expose it to rain.
• Do not listen to audio at high volume for prolonged periods of time.
• The battery must be recycled or disposed of properly. Contact local agencies for
recycling and disposal information.
• Do not allow metal objects to touch the terminals of your battery.
If there is leakage, an offensive odor, discoloration or deformation during
charging or use, remove the battery and do not use it again. Clean your hands
well before touching food or sensitive areas, for example, your eyes.
When a conductive apparatus, such as earphones, is used in close proximity
•
with a CRT television or CRT monitor, the latter may emit an electrostatic
discharge. The electrostatic discharge can be felt as a static shock. While this
static shock is usually harmless, it is good practice to avoid close contact with
CRT devices when using earphones.
Page 17
monet wa qsb 2.fm Page 15 Tuesday, July 18, 2006 4:41 PM
15 Safety Information
WARNING
As with any digital media-based storage device, data should be
backed up regularly. We strongly recommend that you observe the
usage precautions laid out in this booklet, and also back up the
data in your player regularly. In no event will Creative be liable for
any indirect, incidental, special or consequential damages to any
persons caused by Creative's negligence, or for any lost profits,
lost savings, loss of use, lost revenues or lost data arising from or
relating to this device, even if Creative has been advised of the
possibility of such damages. In no event will Creative’s liability or
damages to you or any other person ever exceed the amount paid
by you for the device, regardless of the form of the claim. Some
countries/states do not allow the limitation or exclusion of liability
for incidental or consequential damages, so the above limitation
or exclusion may not apply to you.
Copyright © 2006 Creative Technology Ltd. All rights reserved. The Creative logo, Creative MediaSource
and ZEN are trademarks or registered trademarks of Creative Technology Ltd. in the United States and/
or other countries. Audible and AudibleManager are registered trademarks of Audible, Inc. Microsoft,
Windows, Windows Media and the Windows logo are registered trademarks of Microsoft Corporation.
Page 18
Page 19
Page 20
1
2
Page 21

Page 22
Page 23
Page 24
Page 25

Page 26

Page 27

Page 28

1
273 4
5
6
8
Page 29

Page 30

Page 31

Page 32

Page 33

Page 34

Page 35

1
2
Page 36

Page 37

Page 38

Page 39

Page 40

Page 41

Page 42

Page 43

1
273 4
5
6
8
Page 44

Page 45

Page 46

Page 47

Page 48

Page 49

Page 50

Page 51

Page 52

Page 53

Page 54

Page 55

Page 56

Page 57

Page 58

Page 59

Page 60

Page 61

Page 62

Page 63

Page 64

monet wa qsb_TR.fm Page 62 Wednesday, July 19, 2006 7:34 AM
E
Türkçe
Tebrikler! Creative’in birden çok dosya biçimini destekleyen cihazı
Creative ZEN™ Vision W’yi satın aldığınız için teşekkür ederiz. Yeni
cihazının nasıl kullanılacağını öğrenmek için okumaya devam edin!
1 Kızılötesi alıcı
2 Menü/Geri düğmesi
Ana menüyü görüntülemek için basılı
1
tutun.
Önceki menüye dönmek için basın.
2
3 Seçenekler düğmesi
3
Seçeneklerin listesini görüntülemek
4
için basın.
5
4 Gezinme düğmeleri
6
5 Çal/Duraklat düğmesi
7
6 Sonraki/Hızlı İleri Sarma
düğmesi
8
Bir sonraki parçaya gitmek için basın.
Bir parçayı ileri sarmak için basın ve
basılı tutun.
COMPACT FLASH
109
11
12
7Yerleşik hoparlör
8 Önceki/Geriye Sarma
düğmesi
Bir önceki parçaya gitmek için basın.
Bir parçayı ileri sarmak için basın ve
basılı tutun.
9 Compact Flash bellek kartı
yuvası
10 Kulaklık jakı
11 A/V Çıkış jakı
12 DC Girişi 5V jakı
Page 65

monet wa qsb_TR.fm Page 63 Wednesday, July 19, 2006 7:34 AM
63 Seçenekleri Seçm
13 14
15 16
13 Güç düğmesi
14 Ses Kapama düğmesi
15 Ses Açma düğmesi
16 Mikrofon
17 Çıkarılabilir Lithium-Ion pil
18 Bağlayıcı
19 USB 2.0 bağlantı noktası
19 18 17
Seçenekleri Seçm
Bu belgenin aşağıdaki bölümlerinde, menü seçeneklerini vurgulamak
amacıyla Yukarı, Aşağı, Sol veya Sağ düğmelerini kullanmak ve sonra
seçeneği seçmek için OK (Tamam) düğmesine basmak zorunda
olduğunuzu belirtmek için “Seç” ifadesini kullanıyoruz.
1
2
1 Yukarı düğmesi
2 OK (Tamam) düğmesi
3Sağ düğmesi
5
4
3
4Aşağı düğmesi
5Sol düğmesi
Page 66

monet wa qsb_TR.fm Page 64 Wednesday, July 19, 2006 7:34 AM
64 Başlangıç
Başlangıç
Adım 1:Cihazınızı Şarj Etme
Cihazla birlikte verilen yüksek performanslı lithium-ion pilin, cihaz
kullanılmadan önce tam olarak şarj edilmesi gereklidir. Pil yaklaşık üç saat
içinde tam şarj olur. Cihazın pilini şarj etmek için güç adaptörünü cihaza ve
duvar prizine aşağıdaki şekilde gösterildiği gibi takın.
1
1DC Girişi 5V jak
2 Güç adaptörü
2
kablosu
NOTLAR
Cihazı satın aldığınız bölgeye bağlı olarak güç adaptörünüz
burada gösterilenden farklı olabilir.
Page 67

monet wa qsb_TR.fm Page 65 Wednesday, July 19, 2006 7:34 AM
65 Yazılımı Kurma
Pil şarj olurken, ekranda Pil Şarj Oluyor simgesi yanıp söner. Cihazın
ekranında Pil Şarj Oldu simgesini gördüğünüzde güç adaptörünü
cihazdan çıkartın.
NOTLAR
Cihazınız kapatıldıktan sonra bile, bir bilgisayara ya da güç prizine
bağlı olduğu sürece şarj olmaya devam eder.
Adım 2:Yazılımı Kurma
UYARI
Yazılımı kurmadan cihazı bilgisayarınıza BAĞLAMAYIN.
1 Bilgisayarınızı açın.
Yazılımı kurmadan önce Microsoft
açmanız gerekir. Daha fazla bilgi için işletim sisteminizde çevrimiçi Yardım’a
başvurun.
2 Yükleme ve Uygulamalar CD’sini, CDROM/DVD-ROM sürücüsüne
yerleştirin.
CD'niz otomatik olarak başlar. CD otomatik olarak başlamazsa, aşağıdaki
adımları izleyin:
i. Bilgisayarım simgesini çift tıklatın.
Buna alternatif olarak, Başlat Bilgisayarım öğelerini tıklatın.
ii. CD-ROM/DVD-ROM sürücü simgesini sağ tıklatıp, Otomatik Çal
seçeneğini tıklatın.
3 Ekrandaki yönergeleri izleyin ve istendiğinde bilgisayarınızı yeniden
başlatın.
4 Bilgisayarınız yeniden başlatılınca cihazınızı kaydetmek isterseniz ekranda
bununla ilgili verilen yönergeleri izleyin.
NOTLAR
Ürününüzü kaydettirmek için Internet bağlantısına ihtiyacınız
olacaktır.
®
Windows®’da yönetici olarak oturum
Page 68

monet wa qsb_TR.fm Page 66 Wednesday, July 19, 2006 7:34 AM
66 Cihazınızı Bilgisayarınıza Takın.
Adım 3:Cihazınızı Bilgisayarınıza Takın.
Yapmadıysanız, birlikte gelen USB kablosunu kullanarak cihazı
bilgisayarınızın USB bağlantı noktasına bağlayın.
NOTLAR
• Cihazı bilgisayarınızın USB bağlantı noktasına bağlandığınızda
pilleri otomatik olarak şarj olmaya başlar. Bilgisayarınızın USB
bağlantı noktasını kullanarak cihazın pillerini şarj etmek yaklaşık
altı saat sürer.
• USB bağlantı noktasını kullanarak pili kesintisiz şarj edebilmek
için, bilgisayarınızın güç tasarruf modunda olmadığından emin
olun. Güç tasarruf modları hakkında daha fazla bilgi için, işletim
sisteminizin Yardım dosyalarına bakın.
•Cihazı dolu şarj ile bilgisayara ya da elektrik prizine uzun süre
bağlı bırakırsanız, ekran güç tasarrufu sağlamak için otomatik
olarak kapanır.
• Bilgisayarınızdaki USB bağlantı noktasına veya bağımsız USB
hub’ına cihazınızı doğrudan bağlayın; cihazınızı gücünü veri
yolundan alan bir USB hub’ına bağlamayın.
Page 69

monet wa qsb_TR.fm Page 67 Wednesday, July 19, 2006 7:34 AM
67 İçerik Aktarma
Adım 4:İçerik Aktarma
Creative Media Explorer kullanarak müzik ve diğer dosyaları CD
koleksiyonunuzdan veya bilgisayardan aktarabilirsiniz. Daha ayrıntılı bilgi
için, 71. sayfadaki “Ortam ve Veri Yönetimi bölümüne bakın.
Creative Media Explorer’ı başlatmak için
1 Cihazınızın 66. sayfada gösterildiği gibi bilgisayara bağlı olduğundan emin
olun.
2 Masaüstündeki ZEN Vision W Media Explorer simgesini çift tıklatın.
CD koleksiyonunuzdan müzik aktarmak veya 'kopyalamak' için
1 Creative Media Explorer’da Rip Audio CDs(Ses CD’si Çöz) düğmesini
tıklatın.
2 Ekrandaki yönergeleri izleyin.
Internet'e bağlıysanız ve bir müzik bilgisi sağlayıcısına kayıt yaptırmışsanız
albüm bilgileri otomatik olarak alınır.
Bilgisayarınızdan müzik, video veya resim aktarmak için
1 Creative Media Explorer’da Browse Media (Ortama Gözat) düğmesini
tıklatın.
2 Ortam dosyalarını bulun ve sürükle bırak yöntemini kullanarak cihazınızda
bulunan aşağıdaki klasörlere kopyalayın:
• Ses dosyaları için Media Library\Music (Ortam Kitaplığı\Müzik)
klasörü
• Video dosyaları için Media Library\Video (Ortam Kitaplığı\Videolar)
klasörü
• Resimler için Media Library\Pictures (Ortam Kitaplığı\Resimler)
klasörü
Page 70

monet wa qsb_TR.fm Page 68 Wednesday, July 19, 2006 7:34 AM
68 Cihazınızın Bağlantısını Kesme
Bilgisayarınızdan veri dosyalarının kopyalanması
1 Creative Media Explorer’da Browse Documents (Belgelere Gözat)
düğmesini tıklatın.
2 Veri dosyalarını bulun ve sürükle bırak yöntemini kullanarak cihazınızdaki
Data (veri) klasörüne aktarın.
ZENcast içeriğini aktarmak için
1 Masaüstünde ZENcast Organizer simgesini çift tıklatın.
2 Transfer (Aktar) düğmesini tıklatın.
3 Ekrandaki yönergeleri izleyin.
4 Done (Tamam) düğmesini tıklatın.
NOTLAR
ZENcast Organizer ile, sevdiğiniz ZENcast kanallarına abone
olabilir ve cihazınıza ZENcast ortam dosyalarını indirip
aktarabilirsiniz. Daha fazla bilgi için www.zencast.com adresini
ziyaret edin.
Adım 5:Cihazınızın Bağlantısını Kesme
Ekranda File Transfer Inactive (Dosya Aktarma Devre Dışı) simgesini
gördüğünüzde cihazınızın bağlantısını kesin. Ekranda File Transfer Active
(Dosya Aktarma Etkin) simgesini gördüğünüzde cihazınızın bağlantısını
KESMEYİN. Dosya aktarımı sürmektedir ve cihazınızın bağlantısını
kesmek, aktarılan içeriğe zarar verebilir.
Page 71

monet wa qsb_TR.fm Page 69 Wednesday, July 19, 2006 7:34 AM
69 Menü Dilini Seçme
Adım 6:Menü Dilini Seçme
1 Cihazınız açık değilse, Güç düğmesini Güç simgesine doğru kaydırın
ve ekran ışığı yanana kadar basılı tutun.
2 Cihazınızı ilk açtığınızda menü İngilizce’dir. Dili değiştirmek için:
i. Menü/Geri düğmesini basılı tutun. Ana menü görüntülenir.
ii. System Language (Sistem Dili) öğesini, ardından da istediğiniz dili
seçin.
Adım 7:Video İzleme, Resimlere Bakma ve Müzik Çalma
Audible® ve ZENcast ortam dosyaları dahil, dosyaları çalmaya ya da
görüntülemeye hazırsınız.
NOTLAR
Video seyretmek için
1 Ana menüde Videos öğesini ve istediğiniz videoyu seçin.
Video oynatma otomatik olarak başlatılır.
2 Görüntüleme penceresinin boyutunu ayarlamak için Seçenekler
düğmesine basın ve istediğiniz görüntüleme penceresi boyutunu seçin.
Resim görüntülemek için
1 Ana menüde Photos öğesini ve istediğiniz resmi seçin.
2 Zoom In öğesini seçin ve resmi yatay ya da dikey olarak hareket ettirmek
için Gezinme düğmelerini kullanın.
• Ana menüye erişmek için Menü/Geri düğmesini basılı tutun.
• Cihazınızdaki dosyalar daha hızlı aramalar için alfabetik olarak
sıralanmıştır.
Page 72

monet wa qsb_TR.fm Page 70 Wednesday, July 19, 2006 7:34 AM
70 Video İzleme, Resimlere Bakma ve Müzik Çalma
Müzik ve Audible dosyaları çalmak için
1 Kulaklıklarınızı Kulaklık jakına takın.
2 Ana menüde Music Library ve istediğiniz kategoriyi seçin.
3 Parça seçin ve Play (Oynat) seçeneğini belirleyin.
4 Sesi ayarlamak için Ses Artırma ve Ses Azaltma düğmelerine
basın.
NOTLAR
• Audible dosyaları yönetmek için, AudibleManager® kurulu
olmalıdır.
• Sesli dosyalar şu anda yalnızca belirli bölgeler için kullanılabilir.
• Ses dosyanızın yanında albüm çalışması da varsa çalışma
cihazınızın ekranında görüntülenir.
ZENcast ortam dosyalarını çalmak için
1 Ana menüde Videos ve ZENcast öğesini seçin.
2 İstediğiniz ZENcast kanal klasörünü ve ZENcast ortam dosyasını seçin.
ZENcast oynatma otomatik olarak başlatılır.
Page 73

monet wa qsb_TR.fm Page 71 Wednesday, July 19, 2006 7:34 AM
71 Ortam ve Veri Yönetimi
Ortam ve Veri Yönetimi
Creative Media Explorer ve Creative MediaSource™ Player/Organizer
cihaz ile birlikte gelir.
Creative Media Explorer
Aşağıdaki durumlarda Creative Media Explorer kullanın:
• Dijital müzik konusunda çok bilgili değilseniz ve CD’den ya da bilgisayardan
cihazınıza müzik aktarmak istiyorsanız
• ortam dosyalarını dönüştürmek, eşleştirmek ve düzenlemek istiyorsanız
• cihazınızı daha bilinen “Windows Gezgini” ortamında yönetmek istiyorsanız.
Creative Media Explorer’ı başlatmak için, Bilgisayarım ya da masaüstü
altında ZEN Vision W Media Explorer simgesini tıklatın. Creative Media
Explorer’ı kullanma hakkında daha fazla bilgi için, çevrimiçi Yardım’dan
yararlanın.
Creative MediaSource Player/Organizer
Aşağıdaki durumlarda bütün özelliklere sahip Creative MediaSource Player/
Organizer kullanın:
• Kayıt, otomatik çalma listesi hazırlama ve ses formatı dönüştürme gibi ek
özelliklere gereksinim duyduğunuzda
• Bilgisayarınızda bir müzik kitaplığı yönetmek istediğinizde.
Creative MediaSource Player/Organizer’ı başlatmak için, masaüstündeki
Creative MediaSource Player/Organizer simgesini çift tıklatın.
Page 74

monet wa qsb_TR.fm Page 72 Wednesday, July 19, 2006 7:34 AM
72 Ortam ve Veri Yönetimi
Creative MediaSource Player/Organizer’ın bazı görevlere ulaşabileceğiniz
bir Ana Sayfası vardır. Creative MediaSource Player/Organizer’ı kullanma
hakkında daha fazla bilgi için, çevrimiçi Yardım’dan yararlanın.
NOTLAR
Windows Media® Player (WMP) 10 cihazınızla birlikte
sunulmuştur. WMP10 hakkında daha fazla bilgi için, Kurulum ve
Uygulamalar CD’sindeki Kullanıcı Kılavuzu’na başvurun veya
Creative’in 24 saat hizmet veren otomatik yardımlı Bilgi
Tabanı’nda çözün (sayfa 75’te “Daha Fazla Bilgi” bölümüne
bakın).
Page 75

monet wa qsb_TR.fm Page 73 Wednesday, July 19, 2006 7:34 AM
73 Cihazı Televizyona Bağlama
Cihazı Televizyona Bağlama
Cihazın içeriğini daha geniş bir ekranda görüntülemek için, cihazla birlikte
verilen ses video kablosuyla bir televizyona bağlayın.
UYARI
Standart bir ses video kablosu KULLANMAYIN.
1 Cihazın Güç düğmesini Güç simgesine doğru kaydırın ve ekran ışığı
yanana kadar basılı tutun.
2 Ana menüde değilseniz Menü/Geri
3 System
Settings Photo/Video Settings Video Out (Sistem Ayarları
Fotoğraf/Video Ayarları Video Çıkışı) öğesini seçin.
4 Auto (NTSC) veya Auto (PAL)’ı seçin. Televizyonunuzun ekran biçimi
hakkında emin değilseniz, televizyonunuzun Kullanıcı Kılavuzuna bakın.
5 Cihazınızı ürünle birlikte verilen ses video kablosunu kullanarak televizyona
bağlayın.
1
273 4
6
8
düğmesini basılı tutun.
1 A/V Çıkış jakı
2 Video Girişi jakı - Sarı
3Ses Girişi (Sol) jakı -
5
Beyaz
4Ses Girişi (Sağ) jakı -
Kırmızı
5 Kırmızı bağlayıcı
6 Beyaz bağlayıcı
7 Sarı bağlayıcı
8 Ses Görüntü kablosu
Page 76

monet wa qsb_TR.fm Page 74 Wednesday, July 19, 2006 7:34 AM
74 Çalma Listeleri Oluşturma
Çalma Listeleri Oluşturma
Çalma listesi oluşturmak amacıyla cihazınızdaki Music Library’den parçaları
istediğiniz kombinasyonda seçebilirsiniz.
Cihazınızın Müzik Kitaplığından çalma listesi oluşturma
1 Music Library istediğiniz parça veya parça kategorisini seçin.
2 Seçenekler düğmesini basılı tutun ve Add to Selected (Seçilene Ekle)
öğesini seçin.
3 Parça veya parça kategorisi eklemek için 1 ve 2. adımları tekrarlayın.
4 Ana menüye erişmek için Menü/Geri düğmesini basılı tutun ve Now
Playing (Çalan Parça) öğesini seçin.
5 Seçenekler düğmesine basın ve Save As Playlist (Çalma Listesi
Olarak Kaydet) öğesini seçin.
6 Çalma listesine ad vermek için Gezinme düğmelerini kullanın ve adı
onaylamak için Checkmark (Onay İşareti) ✔ düğmesini seçin.
7 Çalma listesinden çalmak için Music Library Playlists istediğiniz çalma
listesini seçin.
Page 77

monet wa qsb_TR.fm Page 75 Wednesday, July 19, 2006 7:34 AM
Diğer Bilgiler
Creative Bilgi Tabanı
Teknik sorunlarınızı Creative’in 24 saat hizmet veren otomatik yardımlı Bilgi Tabanı’nda
çözün. Web’de www.creative.com adresine gidin, bölgenizi ve ardından Support’u
(Destek) seçin.
Ürün Kaydı
Ürününüzü kaydettirerek en uygun hizmetlerden ve ürün desteğinden
yararlanabilirsiniz. Ürünü yükleme sırasında ya da www.creative.com/register
adresinden kaydettirebilirsiniz.
Lütfen garantiden doğan haklarınızın ürün kaydına bağlı olmadığını unutmayın.
Müşteri Destek Hizmetleri ve Garanti
CD’de Müşteri Destek Hizmetleri, Garanti ve diğer konularla ilgili bilgiler bulabilirsiniz.
Müsteri Destek Hizmetleri d:\support\<region>\<language>\support.chm
Garanti
(d harfini CD-ROM/DVD-ROM sürücünüzün harfiyle, <region> seçeneğini
bulunduğunuz bölgeyle ve <language> seçeneğini belgenizin diliyle değiştirin)
Bu belgeyi daha sonra başvuru amacıyla saklayın.
d:\warranty\<region>\<language>\warranty.chm
Garanti süresi boyunca lütfen Satış Belgenizi saklayın.
Bu ürünün Türkiye`deki garanti süresi 2 yıldır.
75 Diğer Bilgiler
Page 78

monet wa qsb_TR.fm Page 76 Wednesday, July 19, 2006 7:34 AM
76 Güvenlik Bilgileri
Güvenlik Bilgileri
Ürününüzü güvenle kullanmak, elektrik şoku, kısa devre, zarar, yangın,
işitme kaybı veya diğer tehlikelerden korunmak için aşağıdaki bilgileri
okuyun.
NOTLAR
• Cihazınızı, pilinizi ya da güç adaptörünüzü sökmeyin veya onarmaya
• Cihazınızı ya da pilinizi 0°C - 45°C (32°F - 113°F) dışında sıcaklıkta
• Cihazınızı ya da pilinizi delmeyin, ezmeyin veya ateşte bırakmayın.
• Cihazınızı ya da pilinizi güçlü manyetik nesnelerden uzak tutun.
• Ürününüze aşırı güç veya basınç uygulamayın.
• Cihazınızı ya da pilinizi su ve nemden uzak tutun.
• Ürününüz neme karşı dayanıklıysa (ayrıntılı bilgi için ürününüzün paketine
• Parçaları uzun süre yüksek seste dinlemeyin.
•Yerleşik pili çıkarmaya çalışmayın. Ürün yerel yasalara uyarınca elden
• Pillerin kutuplarına metal nesnelerin temas etmesine izin vermeyin.
•
Ürünün yanlış kullanılması ürününüzün garantisini geçersiz
kılabilir. Daha fazla bilgi için, ürününüzle birlikte verilen Garanti
belgesini okuyun.
çalışmayın.
Tüm servis işlemleri için Creative’e veya yetkili servislere başvurun.
bırakmayın.
bakın), suya batırmamaya veya yağmurda bırakmamaya dikkat edin.
çıkarılmalıdır. Pili değiştirmek için cihazınızı bölgenizdeki servise götürün. Ürün
servis bilgisi için www.creative.com adresini ziyaret edin.
Akıntı, kötü koku, renk solması ya da biçim bozulması olursa, pili çıkarın ve bir
daha kullanmayın. Yiyecek tutmadan ya da gözleriniz gibi hassas bölgelere
dokunmadan önce ellerinizi temizleyin.
CRT televizyon veya CRT monitör yakınında kulaklık gibi iletken bir cihaz
kullanıldığında, elektrostatik boşalma meydana gelebilir. Bu elektrostatik
boşalma, statik şok olarak hissedilebilir. Bu statik şok genellikle zararsız olsa
da, kulaklık kullanırken CRT cihazlara dokunmamak gerekir.
Page 79

monet wa qsb_TR.fm Page 77 Wednesday, July 19, 2006 7:34 AM
UYARI
Tüm dijital ortam tabanlı saklama aygıtlarında olduğu gibi, veriler
düzenli aralıklarla yedeklenmelidir. Bu kitapçıktaki kullanım
önlemlerini incelemenizi ve cihazınızdaki verileri düzenli aralıklarla
yedeklemenizi öneririz. Creative hiçbir durumda kişilerde
Creative’in ihmaline bağlı olarak dolaylı, kaza sonucu, özel veya
risk sebebiyle oluşan hasarlardan veya bu aygıtla ilgili veya bu
aygıttan kaynaklanacak kar kaybı, para kaybı, kullanım kaybı, gelir
kaybı veya veri kaybından, bu gibi hasarların oluşma olasılığı
konusunda uyarılmış olsa dahi sorumlu tutulamaz. Creative’nin siz
veya zarar gören diğer kişilere karşı sorumluluğu, talebin biçimi ne
olursa olsun, tarafınızdan aygıt için ödenen tutarı aşmaz. Bazı
ülkeler ve eyaletlerde kaza veya risk nedeniyle oluşan hasarlarda
yükümlülüklerin sınırlandırılması ve hariç tutulmasına izin
verilmez; bu nedenle yukarıdaki sınırlama ve hariç tutulan
yükümlülükler sizin için geçerli olmayabilir.
WEEE Simgesinin kullanımı, bu ürüne ev atığı olarak işlem
yapılabileceğini gösterir. Bu ürünün doğru şekilde atılmasını
sağlayarak, çevre korumasına katkıda bulunmuş olursunuz. Bu
ürünün geri dönüşüme tabi tutulması konusunda ayrıntılı bilgi için
lütfen ilgili kurumlara ya da ürünü satın olduğunuz mağazaya
başvurun.
77 Güvenlik Bilgileri
Telif Hakkı © 2006 Creative Technology Ltd. Tüm hakları saklıdır. Creative logosu, Creative
MediaSource ve ZEN, Creative Technology Ltd.’in Amerika Birleşik Devletleri ve/veya diğer ülkelerdeki
ticari ya da kayıtlı ticari markalarıdır. Audible ve AudibleManager, Audible, Inc.’in kayıtlı ticari
markalarıdır. Microsoft, Windows, Windows Media ve Windows logosu Microsoft Corporation’ın kayıtlı
ticari markalarıdır.
Page 80

notes.fm Page 78 Wednesday, July 19, 2006 7:50 AM
78 NOTES
NOTES
 Loading...