

Page 1
Zen Vision W (Monet WA) CLE_QS.book Page i Wednesday, September 27, 2006 10:06 AM
English . . . . . . . . . . . . . . . . . . . . . . . . . . . . . . . 1
Français . . . . . . . . . . . . . . . . . . . . . . . . . . . . . 16
Deutsch . . . . . . . . . . . . . . . . . . . . . . . . . . . . . 33
Italiano . . . . . . . . . . . . . . . . . . . . . . . . . . . . . . 51
Español . . . . . . . . . . . . . . . . . . . . . . . . . . . . . 67
Nederlands . . . . . . . . . . . . . . . . . . . . . . . . . . 83
Português . . . . . . . . . . . . . . . . . . . . . . . . . . . 99
Svenska . . . . . . . . . . . . . . . . . . . . . . . . . . . . 115
Norsk . . . . . . . . . . . . . . . . . . . . . . . . . . . . . 131
Dansk. . . . . . . . . . . . . . . . . . . . . . . . . . . . . . 147
Suomi. . . . . . . . . . . . . . . . . . . . . . . . . . . . . . 163
Česky. . . . . . . . . . . . . . . . . . . . . . . . . . . . . . 179
i
Polski . . . . . . . . . . . . . . . . . . . . . . . . . . . . . . 195
Page 2
Zen Vision W (Monet WA) CLE_QS.book Page ii Wednesday, September 27, 2006 10:06 AM
ii
Русский . . . . . . . . . . . . . . . . . . . . . . . . . . . 211
Ellinika . . . . . . . . . . . . . . . . . . . . . . . . . . . . . 231
Magyar . . . . . . . . . . . . . . . . . . . . . . . . . . . . . 251
Lietuvis . . . . . . . . . . . . . . . . . . . . . . . . . . . . 267
Slovensky. . . . . . . . . . . . . . . . . . . . . . . . . . . 285
Page 3

Zen Vision W (Monet WA) CLE_QS.book Page 1 Wednesday, September 27, 2006 10:06 AM
English
Congratulations! Thank you for purchasing Creative’s
multiformat player, Creative ZEN™ Vision W. Read on to learn how to get
started with your new player!
To get the most out of your player, also read the comprehensive User’s
Guide on your Installation and Applications CD.
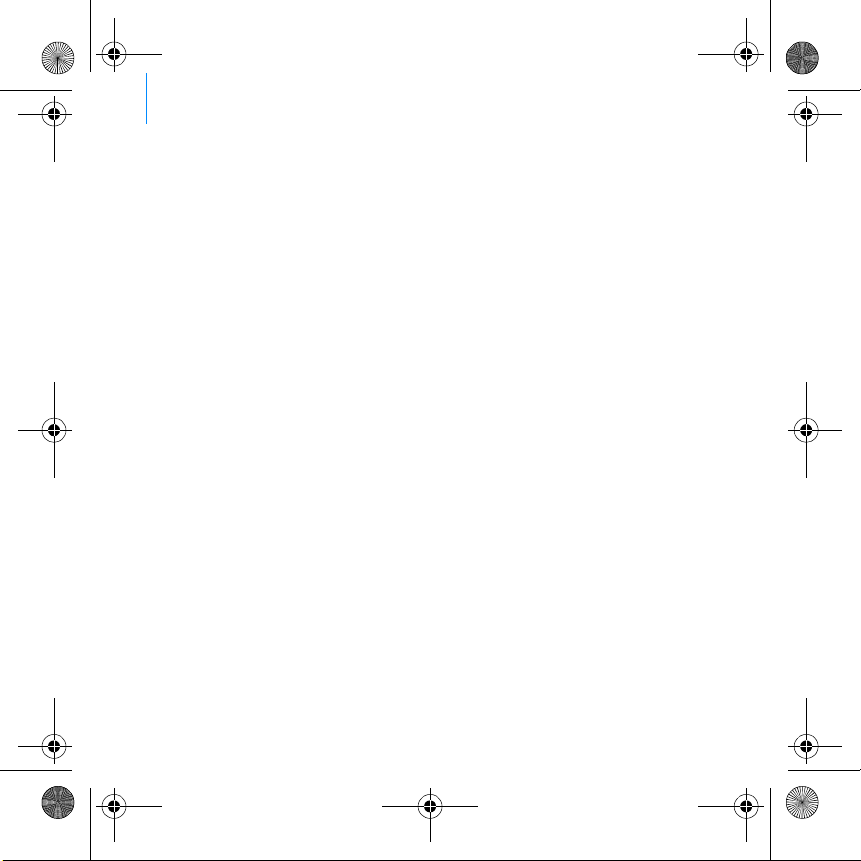
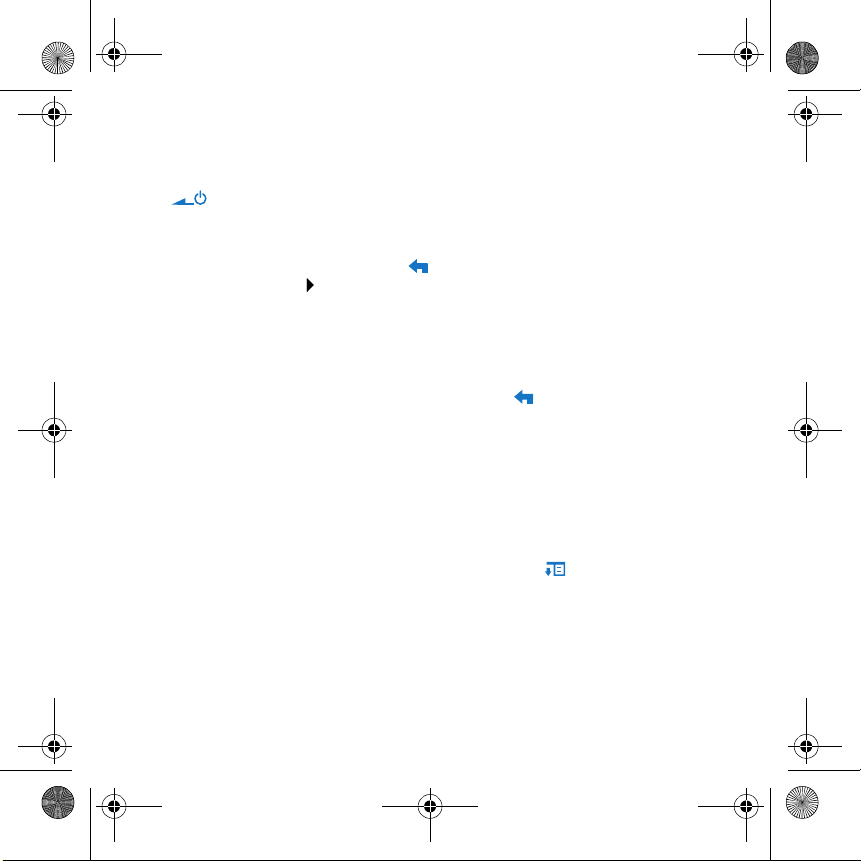
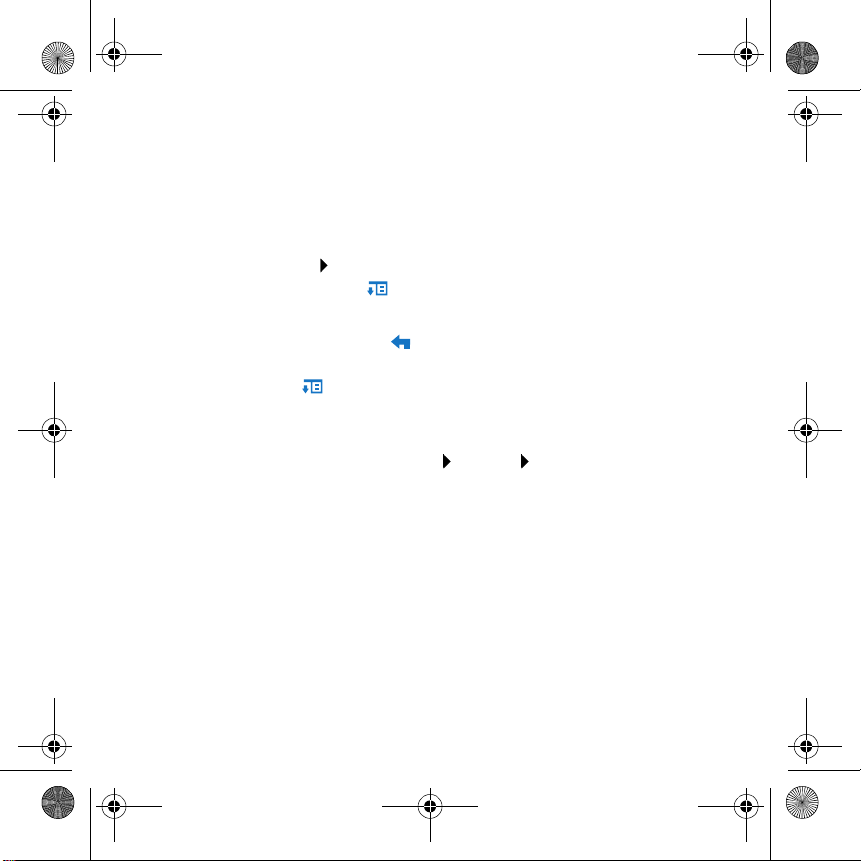
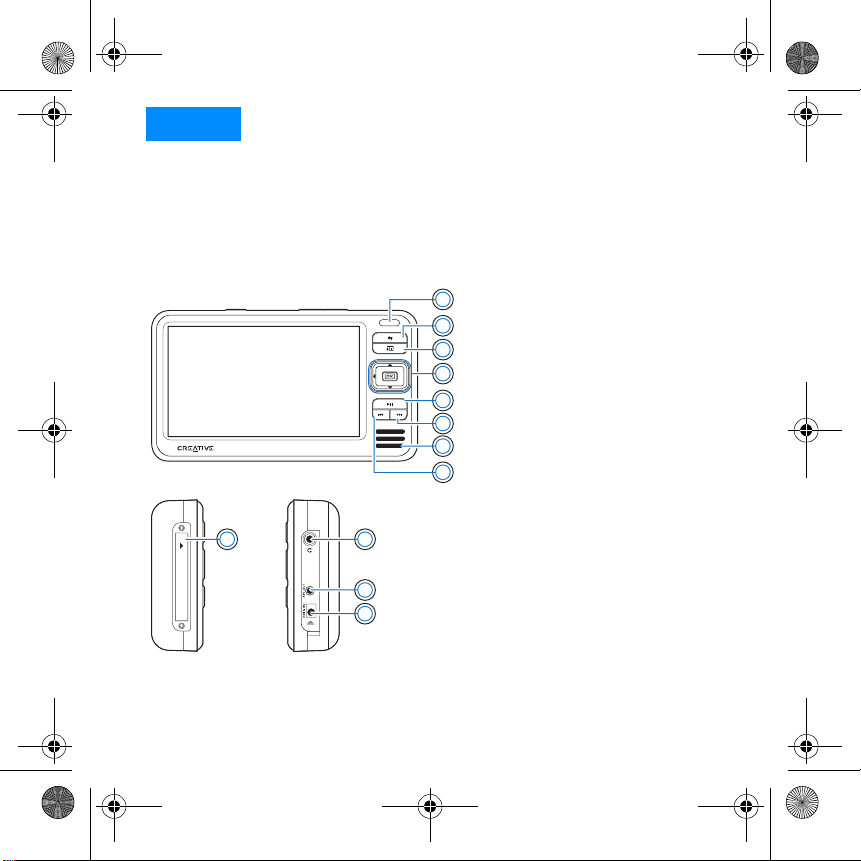
1 Infrared receiver
2 Menu/Back button
Press and hold to display the main
1
menu.
Press to return to the previous menu.
2
3 Options button
3
Press to display a list of options.
4
4 Navigation buttons
5
5 Play/Pause button
6
6 Next/Fast-Forward button
7
Press to go to t he next track.
Press and hold to move forward
8
within a track.
7 Integrated speaker
COMPACT FLA SH
109
11
12
8 Previous/Rewind button
Press to go to the previous track.
Press and hold to move forward
within a track.
9Compact Flash memory
card slot
10 Headphone jack
11 A/V Out jack
12 DC IN 5V jack
Page 4
Zen Vision W (Monet WA) CLE_QS.book Page 2 Wednesday, September 27, 2006 10:06 AM
2 Selecting Options
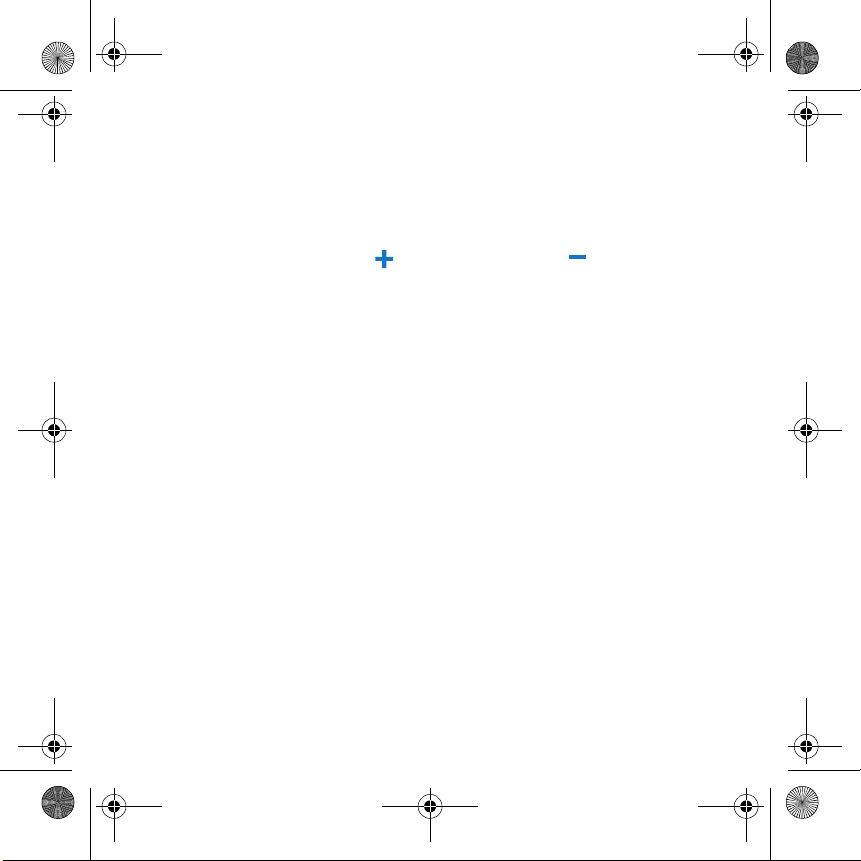
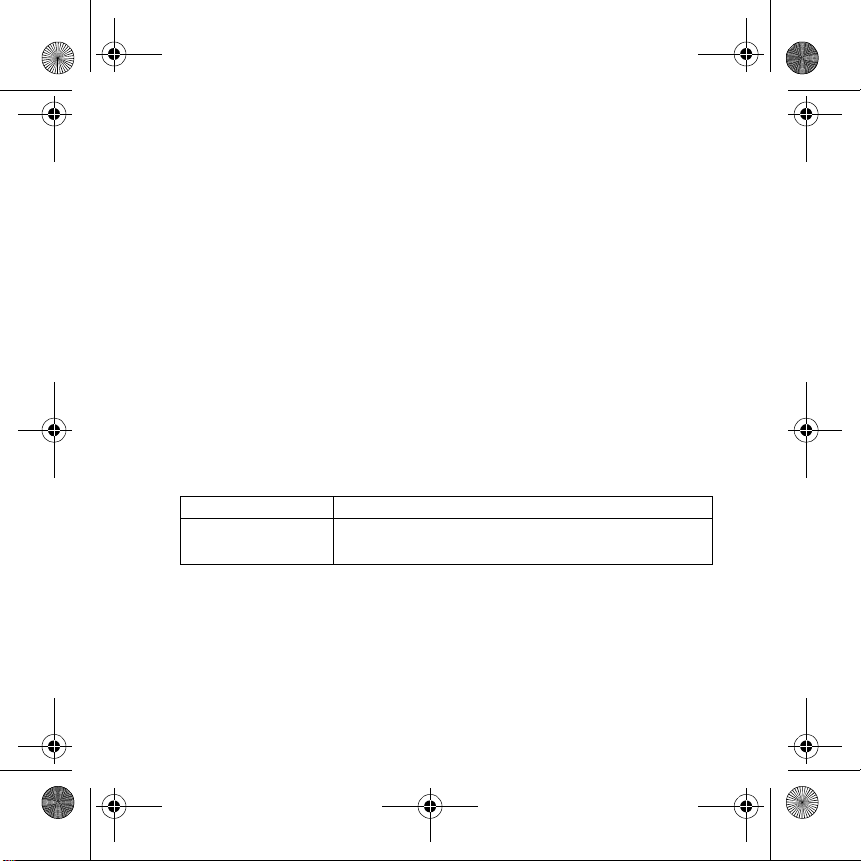
13 14
15 16
13 Power switch
14 Volume Decrease button
15 Volume Increase button
16 Microphone
17 Removeable Lithium-Ion
battery
18 Dock connector
19 18 17
19 USB 2.0 port
Selecting Options
In the following sections of this document, we use the term ‘Select’ to
indicate that you should use the Up, Down, Left or Right buttons to highlight
menu options, then press the OK button to select the option.
1
2
1 Up button
2 OK button
3 Right button
5
4
3
4 Down button
5 Left button
Page 5
Zen Vision W (Monet WA) CLE_QS.book Page 3 Wednesday, September 27, 2006 10:06 AM
Getting Started 3
Getting Started
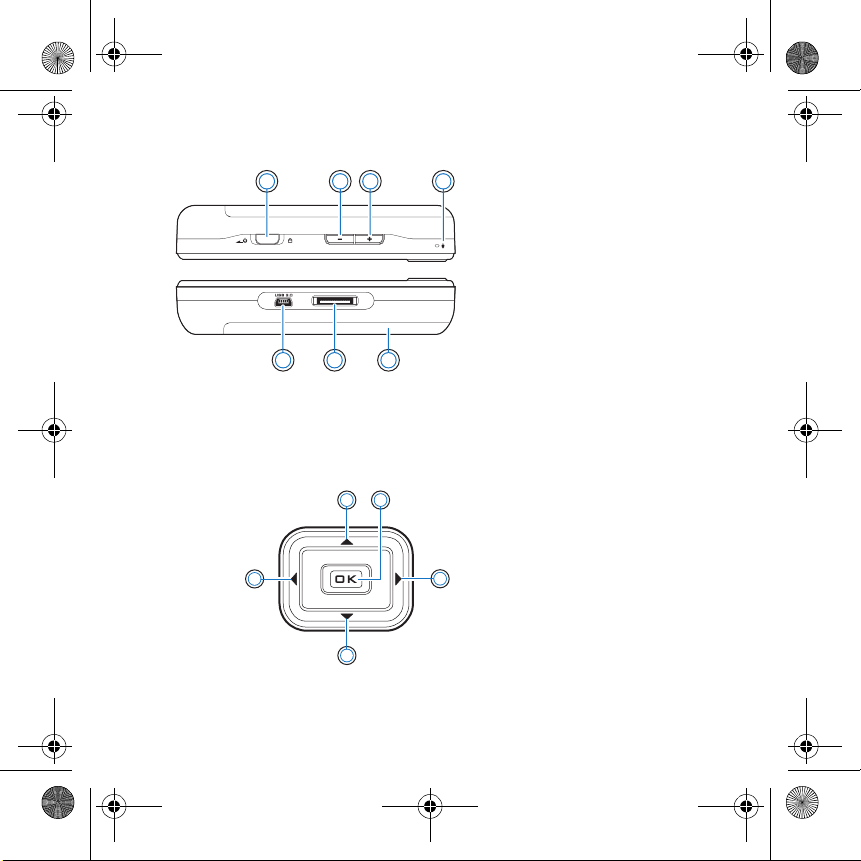
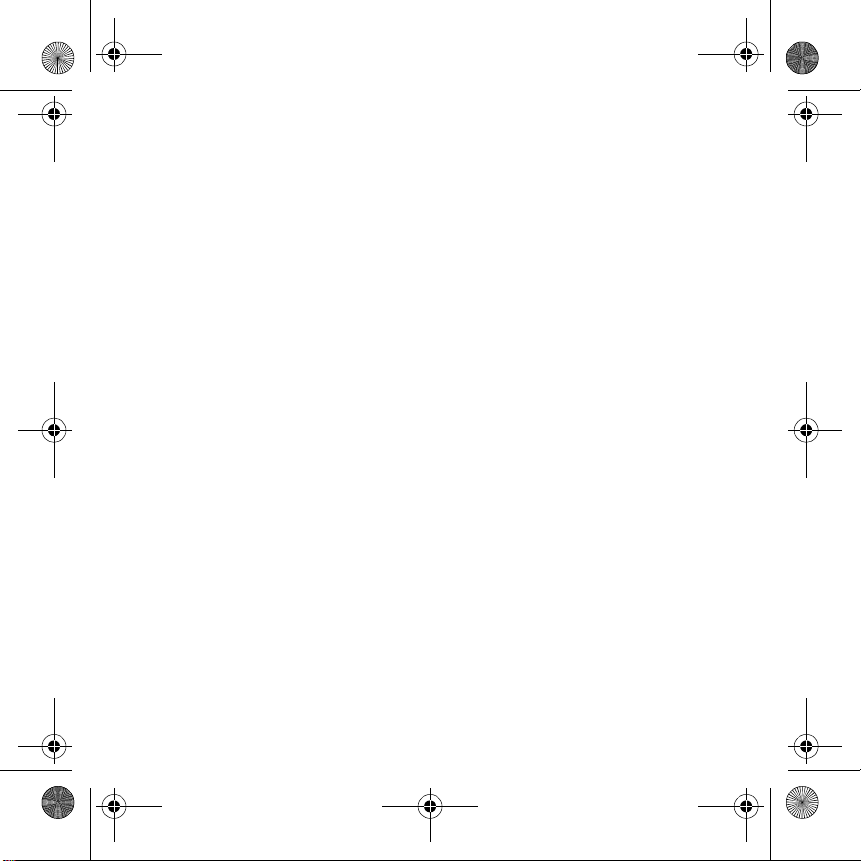
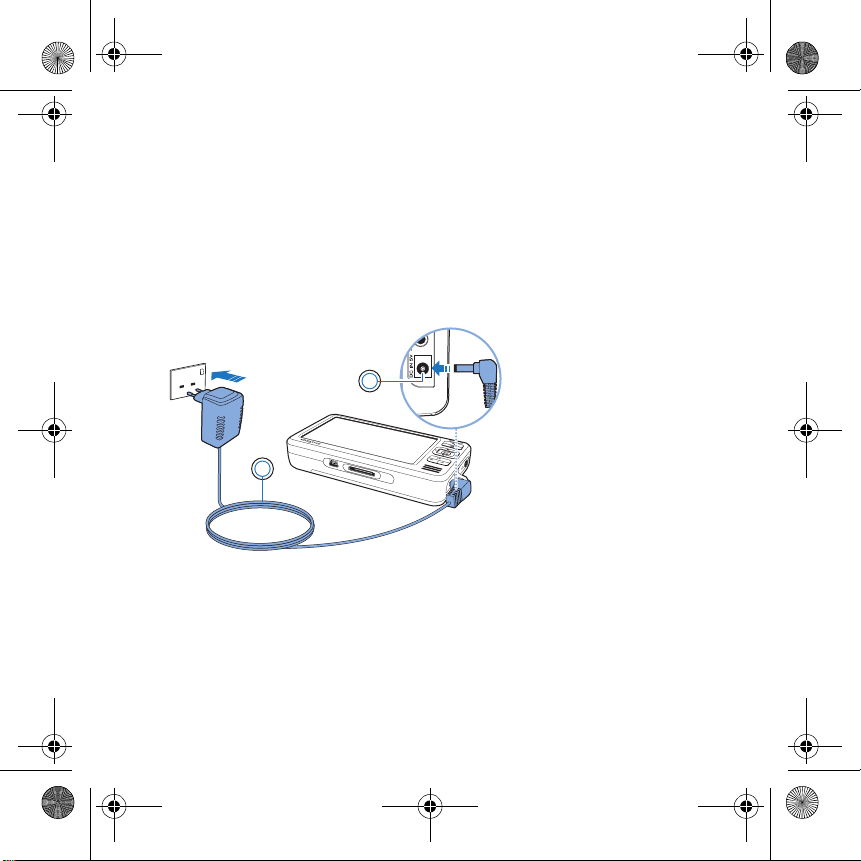
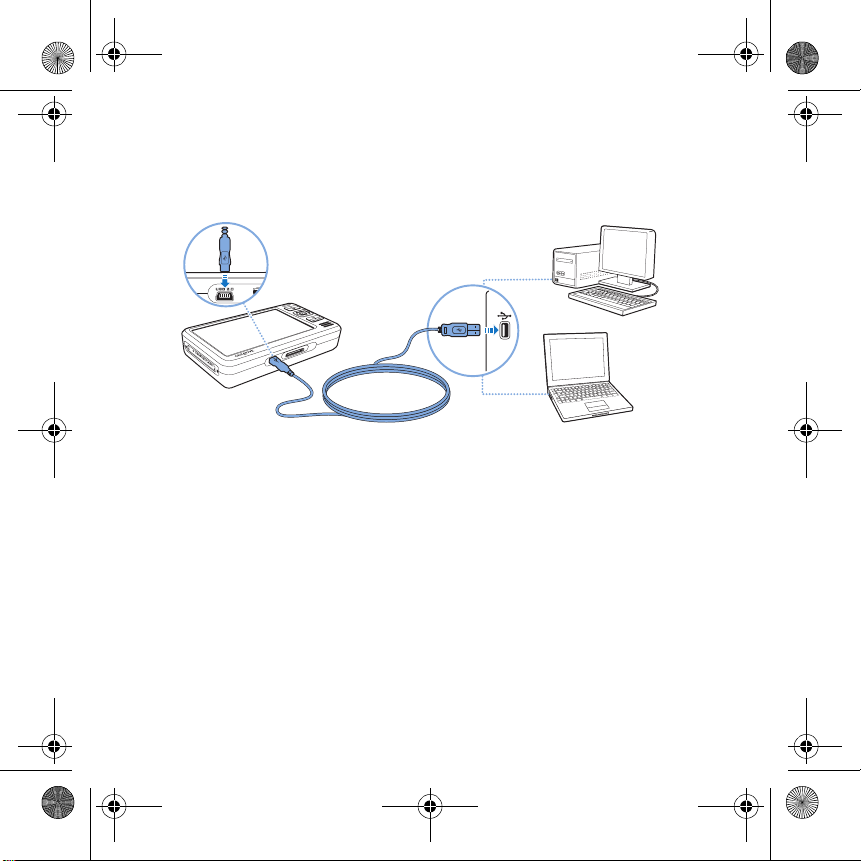
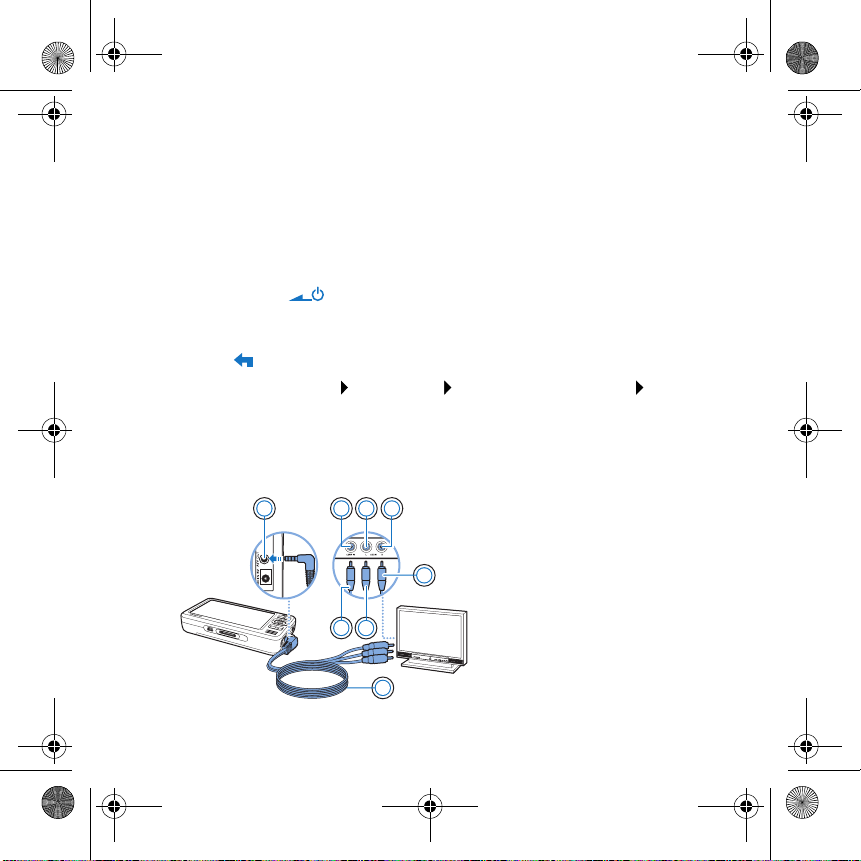
Step 1: Charge Your Player
The high performance lithium-ion battery supplied with your player needs
to be fully charged before you use your player. The battery is fully charged in
approximately three hours. To charge your player's battery, connect the
power adapter cable to your player and a power outlet as shown in the
diagram below.
1
1DC IN 5V jack
2 Power adapter cable
2
Depending on your region of purchase, your power adapter may
NOTES
differ from the one shown here.
Page 6
Zen Vision W (Monet WA) CLE_QS.book Page 4 Wednesday, September 27, 2006 10:06 AM
4 Set Up the Software
When the battery is charging, the Battery Charging icon appears on the
display. When you see the Battery Charged icon on your player’s
display, disconnect your player from the power adapter.
NOTES
Your player will continue to charge even after it turns off, as long
as it is connected to a power outlet or a computer.
Step 2: Set Up the Software
WARNING
DO NOT connect your player to your computer before setting up
the software.
1 Turn on your computer.
You must log in as an administrator in Microsoft
®
Windows® before you can
set up the software. For more information, refer to your operating system’s
online Help.
2 Insert the Installation and Applications CD into your CD-ROM/DVD-ROM
drive.
Your CD should start automatically. If it does not, follow the steps below:
i. Double-click the My Computer icon.
Alternatively, click Start My Computer.
ii. Right-click the CD-ROM/DVD-ROM drive icon, and then click Autoplay.
3 Follow the instructions on the screen and when prompted, restart your
computer.
4 If you want to register your product when your computer restarts, follow the
instructions on the screen to do so.
NOTES You need an Internet connection to register your product.
Page 7
Zen Vision W (Monet WA) CLE_QS.book Page 5 Wednesday, September 27, 2006 10:06 AM
Connect Your Player to Your Computer 5
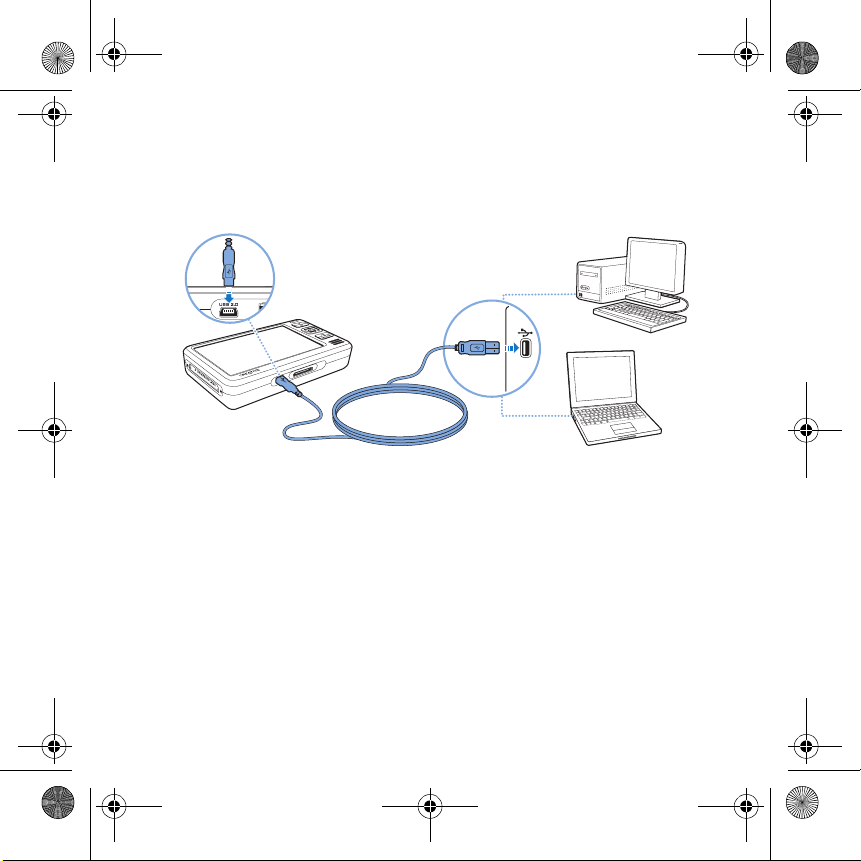
Step 3: Connect Your Player to Your Computer
If you have not done so, connect your player to your computer’s USB port
using the supplied USB cable.
NOTES
• Your player’s battery charges automatically when you connect
your player to your computer’s USB port. It takes approximately
six hours to charge your player’s battery using your computer’s
USB port.
• For continuous battery charging using the USB port, make sure
your computer is not in power conservation mode. For more
information on power conservation modes, refer to your
operating system's Help.
• If your fully charged player remains connected to your computer
or a power outlet for a prolonged period, the display turns off
automatically to conserve power.
• Connect your player directly to a USB port on your computer or
a self-powered USB hub; do not connect your player to a buspowered USB hub.
Page 8
Zen Vision W (Monet WA) CLE_QS.book Page 6 Wednesday, September 27, 2006 10:06 AM
6 Transfer Content
Step 4: Transfer Content
Use Creative Media Explorer to transfer music and other files from your CD
collection or computer. For more details, see “Managing Media and Data”
on page 10.
To start Creative Media Explorer
1 Make sure your player is connected to your computer as shown on page 5.
2 Double-click the ZEN Vision W Media Explorer icon on the desktop.
To transfer or ‘rip’ music from your CD collection
1 In Creative Media Explorer, click the Rip Audio CDs button .
2 Follow the instructions on the screen.
If you are connected to the Internet and have registered with a music
information provider, album information will automatically be retrieved.
To transfer music, videos or pictures from your computer
1 In Creative Media Explorer, click the Browse Media button .
2 Locate your media files, and using the drag-and-drop method, copy them to
the following folders in your player:
• Media Library\Music folder for audio files
• Media Library\Videos folder for video files
• Media Library\Pictures folder for pictures
Page 9
Zen Vision W (Monet WA) CLE_QS.book Page 7 Wednesday, September 27, 2006 10:06 AM
Disconnect Your Player 7
To transfer data files from your computer
1 In Creative Media Explorer, click the Browse Documents button .
2 Locate your data files, and using the drag-and-drop method, transfer them
to the Data folder in your player.
You can also transfer audio files and pictures using the Browse
NOTES
Documents button. They will, however, be treated as data files and
cannot be played back or viewed on your player.
To transfer ZENcast content
1 Double-click the ZENcast Organizer icon on the desktop.
2 Click the Transfer button .
3 Follow the instructions on the screen.
4 Click the Done button.
NOTES With ZENcast Organizer, you can subscribe to your favorite
ZENcast channels, and download and transfer ZENcast media files
to your player. For more information, visit www.zencast.com.
Step 5: Disconnect Your Player
Disconnect your player when you see the File Transfer Inactive icon on
the display. DO NOT disconnect your player if you see the File Transfer
Active icon on the display. File transfer is in progress and disconnecting
your player may damage the content being transferred.
Page 10
Zen Vision W (Monet WA) CLE_QS.book Page 8 Wednesday, September 27, 2006 10:06 AM
8 Select Your Menu Language
Step 6: Select Your Menu Language
1 If your player is not turned on, slide the Power switch towards the Power
2 When you turn on your player for the first time, the menu is in English. To
icon and hold it there until the display lights up.
change the language:
i. Press and hold the Menu/Back button. The main menu appears.
ii. Select System Language, and then select the language that you want.
Step 7: Watch Videos, View Pictures and Play Music
You are now ready to play or view files, including Audible® and ZENcast
media files.
NOTES
• Press and hold the Menu/Back button to access the main
menu.
• Files in your player are sorted alphabetically to enable faster
searches.
To watch videos
1 In the main menu, select Videos, and select the video you want.
Video playback starts automatically.
2 To adjust the viewing window size, press the Options button and select
the viewing window size that you want.
To view pictures
1 In the main menu, select Photos, and select the picture you want.
2 Select Zoom In, and use the Navigation buttons to pan the picture
horizontally or vertically.
Page 11
Zen Vision W (Monet WA) CLE_QS.book Page 9 Wednesday, September 27, 2006 10:06 AM
Watch Videos, View Pictures and Play Music 9
To play music and Audible files
1 Connect your earphones to the Headphone jack.
2 In the main menu, select Music Library, and select the category you want.
3 Select a track and select Play.
4 Press the Volume Increase and Volume Decrease buttons to
adjust the volume.
•To manage Audible® files, you need to install AudibleManager®.
NOTES
• Audible files are currently available to selected regions only.
• If your audio file is accompanied by album art, the artwork is
displayed on your player.
To play ZENcast media files
1 In the main menu, select Videos, and select ZENcast.
2 Select the ZENcast channel folder you want, and select the ZENcast media
file you want.
ZENcast playback starts automatically.
Page 12
Zen Vision W (Monet WA) CLE_QS.book Page 10 Wednesday, September 27, 2006 10:06 AM
10 Managing Media and Data
Managing Media and Data
Creative Media Explorer and Creative MediaSource™ Player/Organizer are
included with your player.
Creative Media Explorer
Use Creative Media Explorer if you:
• are new to digital music, and want to transfer them from your CDs or computer
to your player
• want to convert, synchronize, and organize media files
• prefer to manage your player in the familiar “Windows Explorer” environment.
To start Creative Media Explorer, double-click the ZEN Vision W Media
Explorer icon in My Computer or on the desktop. For more information
about using Creative Media Explorer, refer to its online Help.
Creative MediaSource Player/Organizer
Use the full-featured Creative MediaSource Player/Organizer if you:
• require additional features such as recording, automatic playlist generation,
and audio format conversion
• want to manage a music library on your computer.
To start Creative MediaSource Player/Organizer, double-click the
Creative MediaSource Player/Organizer icon on your desktop.
Creative MediaSource Player/Organizer has a Home page from which you
can access common tasks. For more information about using Creative
MediaSource Player/Organizer, refer to its online Help.
Windows Media® Player (WMP) 10 is also included with your
NOTES
player. For more information on WMP10, refer to the User’s Guide
on your Installation & Applications CD or visit Creative's 24-hour
self-help Knowledge Base (see “More Information” on page 13).
Page 13
Zen Vision W (Monet WA) CLE_QS.book Page 11 Wednesday, September 27, 2006 10:06 AM
Connecting Your Player to a TV 11
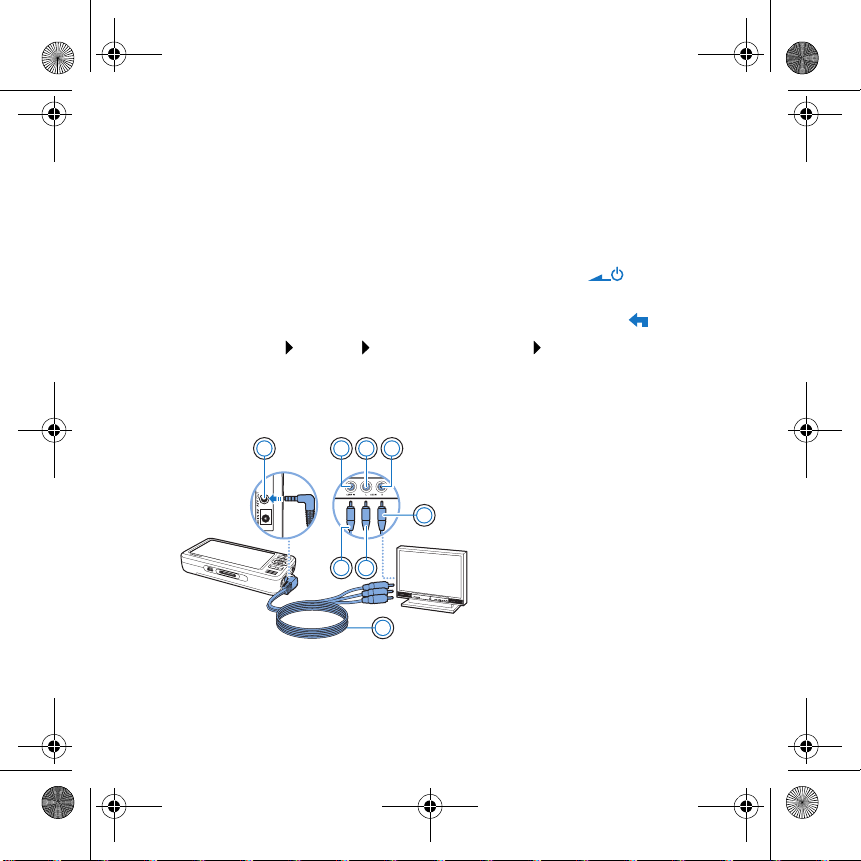
Connecting Your Player to a TV
To view your player’s content on a larger screen, connect your player to a TV
using the supplied audio video cable
WARNING
1 Slide the Power switch on your player towards the Power icon and
hold it there until the display lights up.
2 If you are not in the main menu, press and hold the Menu/Back
3 Select System
4 Select Auto (NTSC) or Auto (PAL). Refer to the User’s Guide for your TV if
you are not sure about your TV’s display format.
5 Connect your player to a TV with the supplied audio video cable.
DO NOT use a standard audio video cable.
Settings Photo/Video Settings Video Out.
1
273 4
6
8
1 A/V Out jack
2 Video In jack - Yellow
5
3 Audio In (Left) jack - White
4 Audio In (Right) jack - Red
5 Red connector
6 White connector
7 Yellow connector
8Audio Video cable
button.
Page 14
Zen Vision W (Monet WA) CLE_QS.book Page 12 Wednesday, September 27, 2006 10:06 AM
12 Creating Playlists
Creating Playlists
You can select any combination of tracks you want from your player’s Music
Library to create playlists for convenient playback.
To create a playlist from your player’s Music Library
1 Select Music Library track or category of tracks that you want.
2 Press and hold the Options button, and select Add to Selected.
3 Repeat steps 1 and 2 to add another track or category of tracks.
4 Press and hold the Menu/Back button to access the main menu and
select Now Playing.
5 Press the Options button, and select Save As Playlist.
6 Use the Navigation buttons to create a name for your playlist and select the
Checkmark ✔ button to confirm the name.
7 To play a playlist, select Music Library Playlists playlist that you want.
Page 15
Zen Vision W (Monet WA) CLE_QS.book Page 13 Wednesday, September 27, 2006 10:06 AM
More Information 13
More Information
User’s Guide
Read the User’s Guide found on your Installation and Applications CD to learn about
your player’s many features. Go to d:\manual\<language>\manual.chm
(replace d with the drive letter of your CD-ROM/DVD-ROM drive, and
a language that your User’s Guide is available in)
Creative Knowledge Base
Resolve and troubleshoot technical queries at Creative's 24-hour self-help Knowledge
Base. Go to www.creative.com, select your region and then select Support.
Product Registration
Registering your product ensures you receive the most appropriate service and product
support available. You can register your product during installation or at
www.creative.com/register.
Please note that your warranty rights are not dependent on product registration.
Customer Support Services and Warranty
You can find Customer Support Services, Warranty and other information in the CD.
Customer Support Services d:\support\<region>\<language>\support.chm
Warranty
(replace d with the drive letter of your CD-ROM/DVD-ROM drive,
region that you are in, and
Keep this document for future reference.
d:\warranty\<region>\<language>\warranty.chm
Please keep your Proof of Purchase for the duration of the warranty
period.
<language>
with the language that your document is in)
<language>
<region>
with the
with
Page 16
Zen Vision W (Monet WA) CLE_QS.book Page 14 Wednesday, September 27, 2006 10:06 AM
14 Safety Information
Safety Information
Refer to the following information to use your product safely, and to reduce
the chance of electric shock, short-circuiting, damage, fire, hearing
impairment or other hazards.
NOTES Improper handling may void the warranty for your product. For
more information, read the Warranty available with your product.
• Do not dismantle or attempt to repair your product, battery or power adapter.
Refer all servicing to Creative or authorized repair agents.
• Do not expose your player or battery to temperatures outside the range of 0°C
to 45°C (32°F to 113°F).
• Do not pierce, crush or set fire to your product or battery.
• Keep your product or battery away from strongly magnetic objects.
• Do not subject your product to excessive force or impact.
• Do not expose your product or battery to water or moisture.
• If your product is moisture-resistant (see product packaging for details), take
care not to immerse your player in water or expose it to rain.
• Do not listen to audio at high volume for prolonged periods of time.
• The battery must be recycled or disposed of properly. Contact local agencies for
recycling and disposal information.
• Do not allow metal objects to touch the terminals of your battery.
If there is leakage, an offensive odor, discoloration or deformation during
charging or use, remove the battery and do not use it again. Clean your hands
well before touching food or sensitive areas, for example, your eyes.
When a conductive apparatus, such as earphones, is used in close proximity
•
with a CRT television or CRT monitor, the latter may emit an electrostatic
discharge. The electrostatic discharge can be felt as a static shock. While this
static shock is usually harmless, it is good practice to avoid close contact with
CRT devices when using earphones.
Page 17
Zen Vision W (Monet WA) CLE_QS.book Page 15 Wednesday, September 27, 2006 10:06 AM
Safety Information 15
WARNING
As with any digital media-based storage device, data should be
backed up regularly. We strongly recommend that you observe the
usage precautions laid out in this booklet, and also back up the
data in your player regularly. In no event will Creative be liable for
any indirect, incidental, special or consequential damages to any
persons caused by Creative's negligence, or for any lost profits,
lost savings, loss of use, lost revenues or lost data arising from or
relating to this device, even if Creative has been advised of the
possibility of such damages. In no event will Creative’s liability or
damages to you or any other person ever exceed the amount paid
by you for the device, regardless of the form of the claim. Some
countries/states do not allow the limitation or exclusion of liability
for incidental or consequential damages, so the above limitation
or exclusion may not apply to you.
The use of the WEEE Symbol indicates that this product may not be
treated as household waste. By ensuring this product is disposed of
correctly, you will help protect the environment. For more detailed
information about the recycling of this product, please contact your
local authority, your household waste disposal service provider or
the shop where you purchased the product.
Copyright © 2006 Creative Technology Ltd. All rights reserved. The Creative logo, Creative MediaSource
and ZEN are trademarks or registered trademarks of Creative Technology Ltd. in the United States and/
or other countries. Audible and AudibleMan ager are registered trademarks of Audible, Inc. Microsoft,
Windows, Windows Media and the Windows logo are registered trademarks of Microsoft Corporation.
Page 18
Zen Vision W (Monet WA) CLE_QS.book Page 16 Wednesday, September 27, 2006 10:06 AM
E
Français
Félicitations ! Nous vous remercions d’avoir acheté le lecteur
multiformat de Creative, Creative ZEN™ Vision W. Lisez la suite pour savoir
comment utiliser votre nouveau lecteur !
Pour tirer le meilleur parti de votre lecteur, lisez également le Guide de
l’utilisateur situé sur le CD d’installation et des applications.
1 Récepteur infrarouge
2 Bouton Menu/Retour
Appuyez sur ce bouton et maintenez-le
1
enfoncé pour afficher le menu principal.
Appuyez sur ce bouton pour revenir au
2
menu précédent.
3
3 Bouton Options
Appuyez sur ce bouton pour afficher une
4
liste d'options.
4 Boutons de navigation
5
5 Bouton Lecture/Pause
6
6 Bouton Suivant/Avance rapide
7
Appuyez sur ce bouton pour passer à la
piste suivante.
8
Appuyez sur ce bouton et maintenez-le
enfoncé pour avancer dans une piste.
7Haut-parleur intégré
COMPACT FLA SH
109
11
12
8 Bouton Précédent/Retour
rapide
Appuyez sur ce bouton pour revenir à la
piste précédente.
Appuyez sur ce bouton et maintenez-le
enfoncé pour avancer dans une piste.
9 Emplacement carte mémoire
Compact Flash
10 Prise casque
11 Prise de sortie A/V
12 Prise d’alimentation courant
continu 5 V
Page 19
Zen Vision W (Monet WA) CLE_QS.book Page 17 Wednesday, September 27, 2006 10:06 AM
Sélection d’options 17
13 14
15 16
13 Interrupteur
d’alimentation
14 Bouton de diminution du
volume
15 Bouton d'augmentation du
volume
16 Microphone
17 Batterie au lithium-ion
amovible
18 Connecteur de la station
19 18 17
d’accueil
19 Port USB 2.0
Sélection d’options
Dans les sections suivantes de ce document, nous utilisons le terme
« Sélectionner » pour indiquer que vous devez utiliser les boutons Haut,
Bas, Gauche ou Droite pour choisir une option de menu, puis appuyer sur le
bouton OK pour valider votre sélection.
1
2
1Bouton Haut
2Bouton OK
3 Bouton Droite
5
4
3
4Bouton Bas
5Bouton
Gauche
Page 20
Zen Vision W (Monet WA) CLE_QS.book Page 18 Wednesday, September 27, 2006 10:06 AM
18 Démarrage
Démarrage
Etape 1 : Chargement du lecteur
La batterie lithium-ion hautes performances fournie avec le lecteur doit
être totalement chargée avant toute utilisation de votre lecteur. Le temps de
charge est d’environ trois heures. Pour recharger la batterie du lecteur,
branchez le câble de l’adaptateur secteur au lecteur et à la prise de courant,
comme indiqué dans le schéma ci-dessous.
1
1 Prise d’alimentation
courant continu 5 V
2
2 Câble de l’adaptateur
secteur
REMARQUE
En fonction de votre lieu d'achat, il est possible que votre
adaptateur secteur diffère du modèle présenté ici.
Page 21
Zen Vision W (Monet WA) CLE_QS.book Page 19 Wednesday, September 27, 2006 10:06 AM
Configuration du logiciel 19
Lorsque la batterie est en cours de chargement, l’icône Chargement de la
batterie s’affiche à l’écran. Lorsque l’icône Batterie chargée
apparaît à l’écran, débranchez votre lecteur de l’adaptateur secteur.
REMARQUE
Le lecteur continue à se charger, même éteint, aussi longtemps
qu’il reste connecté à un ordinateur ou à une prise de courant.
Etape 2 : Configuration du logiciel
ATTENTION
1 Allumez l’ordinateur.
Pour installer le logiciel, vous devez être connecté en tant
qu’administrateur sous Microsoft
consultez l'aide en ligne de votre système d'exploitation.
2 Insérez le CD d’installation et des applications dans le lecteur de CD-ROM/
DVD-ROM.
La lecture du CD doit démarrer automatiquement. Dans le cas contraire,
procédez comme suit :
i. Double-cliquez sur l’icône Poste de travail.
Ou cliquez sur Démarrer Poste de travail.
ii. A l’aide du bouton droit de la souris, cliquez sur l’icône du lecteur de
CD-ROM/DVD-ROM, puis cliquez sur Lecture automatique.
3 Suivez les instructions qui s'affichent à l'écran et, à l'invite, redémarrez
l'ordinateur.
4 Si vous désirez enregistrer votre produit lors du redémarrage de
l'ordinateur, suivez les instructions s’affichant à l'écran.
REMARQUE
NE CONNECTEZ PAS le lecteur à l’ordinateur avant d’avoir
installé le logiciel.
®
Windows®. Pour plus d'informations,
Vous devez être connecté à Internet pour enregistrer votre lecteur.
Page 22
Zen Vision W (Monet WA) CLE_QS.book Page 20 Wednesday, September 27, 2006 10:06 AM
20 Connexion du lecteur à un ordinateur
Etape 3 : Connexion du lecteur à un ordinateur
Si ce n’est pas encore fait, connectez le lecteur au port USB de l'ordinateur
à l’aide du câble USB fourni.
REMARQUES
• La batterie du lecteur se charge automatiquement lorsque
vous connectez ce dernier au port USB de l'ordinateur. Le
temps de charge de la batterie est d'environ six heures via le
port USB de l'ordinateur.
• Pour un chargement en continu de la batterie à l’aide du port
USB, assurez-vous que l’ordinateur ne se trouve pas en mode
d’économie d’énergie. Pour obtenir de plus amples
informations sur les modes d’économie d’énergie, consultez
l’aide de votre système d’exploitation.
• Si le lecteur, une fois chargé, reste connecté à un ordinateur
ou à une prise de courant pendant une période prolongée,
l’écran s’éteint automatiquement pour économiser de
l’énergie.
• Connectez directement le lecteur à un port USB de
l'ordinateur ou à un hub USB auto-alimenté ; ne le connectez
pas à un hub USB alimenté par un bus.
Page 23
Zen Vision W (Monet WA) CLE_QS.book Page 21 Wednesday, September 27, 2006 10:06 AM
Transfert de contenu 21
Etape 4 : Transfert de contenu
Utilisez Creative Media Explorer pour transférer de la musique ou d'autres
fichiers à partir de votre collection de CD ou de votre ordinateur. Pour plus
de détails, reportez-vous à la section
« Gestion des supports et des données » à la page 25.
Démarrer Creative Media Explorer
1 Assurez-vous que le lecteur est raccordé à l'ordinateur, comme illustré
page 20.
2 Double-cliquez sur l’icône ZEN Vision W Media Explorer sur le bureau.
Transférer ou extraire de la musique de votre collection de CD
1 Dans Creative Media Explorer, cliquez sur le bouton Extraire les CD
audio .
2 Suivez les instructions qui s'affichent à l'écran.
Si vous êtes connecté à Internet et êtes inscrit auprès d'un fournisseur
d'informations musicales, les informations sur l'album sont
automatiquement extraites.
Transférer de la musique, des images ou des vidéos à partir de
votre ordinateur
1 Dans Creative Media Explorer, cliquez sur le bouton Parcourir fichier(s)
média .
2 Repérez l’emplacement de vos fichiers multimédia et, à l’aide de la
méthode « glisser-déplacer », copiez-les dans les dossiers suivants de
votre lecteur :
• Dossier Bibliothèque multimédia\Musique pour les fichiers audio
• Dossier Bibliothèque multimédia\Vidéos pour les fichiers vidéos
• Dossier Bibliothèque multimédia\Images pour les images
Page 24
Zen Vision W (Monet WA) CLE_QS.book Page 22 Wednesday, September 27, 2006 10:06 AM
22 Déconnexion de votre lecteur
Transférer des fichiers de données à partir de votre ordinateur
1 Dans Creative Media Explorer, cliquez sur le bouton Parcourir des
documents .
2 Repérez l’emplacement de vos fichiers de données et, à l’aide de la
méthode « glisser-déplacer », copiez-les dans le dossier Données du
lecteur.
REMARQUE
Vous pouvez également transférer des fichiers audio et des
images en utilisant le bouton Parcourir des documents. Ils
seront toutefois traités en tant que fichiers de données et ne
pourront pas être lus ou affichés sur votre lecteur.
Transférer du contenu ZENcast
1 Double-cliquez sur l’icône ZENcast Organizer sur le bureau.
2 Cliquez sur le bouton Transférer .
3 Suivez les instructions qui s'affichent à l'écran.
4 Cliquez sur le bouton Terminé.
REMARQUE Avec ZENcast Organizer, vous pouvez vous abonner à vos canaux
ZENcast préférés, télécharger et transférer des fichiers
multimédia ZENcast vers votre lecteur. Pour plus
d’informations, consultez le site www.zencast.com.
Etape 5 : Déconnexion de votre lecteur
Déconnectez votre lecteur lorsque l'icône Transfert de fichier inactif
s’affiche à l’écran. NE DECONNECTEZ PAS votre lecteur si l’icône Transfert
de fichier en cours est affichée à l’écran. Un transfert de fichier est en
cours et la déconnexion du lecteur peut endommager les éléments
transférés.
Page 25
Zen Vision W (Monet WA) CLE_QS.book Page 23 Wednesday, September 27, 2006 10:06 AM
Sélection de la langue des menus 23
Etape 6 : Sélection de la langue des menus
1 Si votre lecteur n’est pas allumé, faites glisser l’interrupteur d’alimentation
vers l'icône d’alimentation et maintenez-le dans cette position
jusqu’à ce que l’écran s’allume.
2 Lorsque vous mettez le lecteur sous tension pour la première fois, le menu
s’affiche en anglais. Pour changer de langue :
i. Appuyez sur le bouton Menu/Retour et maintenez-le enfoncé . Le
menu principal s'affiche.
ii. Sélectionnez System Language, puis sélectionnez la langue
souhaitée.
Etape 7 : Visionnage de vidéos, affichage d'images et
lecture de musique
Vous pouvez à présent lire ou afficher des fichiers, y compris des fichiers
®
Audible
Regarder des vidéos
1 Dans le menu principal, sélectionnez Vidéos puis choisissez la vidéo
souhaitée.
La lecture de la vidéo débute automatiquement.
2 Pour ajuster la taille de la fenêtre de visualisation, appuyez sur le bouton
Options et sélectionnez la taille souhaitée.
et des fichiers multimédia ZENcast.
REMARQUES
• Appuyez sur le bouton Menu/Retour et maintenez-le
enfoncé pour accéder au menu principal.
• Les fichiers stockés sur le lecteur sont triés par ordre
alphabétique pour faciliter les recherches.
Page 26
Zen Vision W (Monet WA) CLE_QS.book Page 24 Wednesday, September 27, 2006 10:06 AM
24 Visionnage de vidéos, affichage d'images et lecture de musique
Afficher des images
1 Dans le menu principal, sélectionnez Photos puis sélectionnez l’image
souhaitée.
2 Sélectionnez Zoom avant et utilisez les boutons de navigation pour élargir
l’image horizontalement ou verticalement.
Lire de la musique et des fichiers Audible
1 Raccordez vos écouteurs à la prise casque.
2 Dans le menu principal, sélectionnez Bibl. de musique puis sélectionnez la
catégorie souhaitée.
3 Sélectionnez une piste, puis l’option Lire.
4 Réglez le volume en appuyant sur les boutons d'augmentation ou de
diminution du volume.
REMARQUES
• Pour gérer des fichiers Audible®, vous devez installer
AudibleManager
• Actuellement, les fichiers Audible sont disponibles
uniquement pour certaines régions.
• Lorsque le fichier audio s’accompagne de la pochette de
l’album, celle-ci s'affiche sur votre lecteur.
®
.
Lire des fichiers multimédia ZENcast
1 Dans le menu principal, sélectionnez Vidéos puis choisissez ZENcast.
2 Sélectionnez le dossier de canal ZENcast désiré puis le fichier multimédia
ZENcast qui vous intéresse.
La lecture du fichier ZENcast démarre automatiquement.
Page 27
Zen Vision W (Monet WA) CLE_QS.book Page 25 Wednesday, September 27, 2006 10:06 AM
Gestion des supports et des données 25
Gestion des supports et des données
Creative Media Explorer et Creative MediaSource™ Player/Organizer sont
fournis avec le lecteur.
Creative Media Explorer
Utilisez Creative Media Explorer si :
• vous découvrez la musique numérique et souhaitez en transférer de vos CD ou
de votre ordinateur vers le lecteur ;
• vous souhaitez convertir, synchroniser et organiser des fichiers multimédia ;
• vous préférez gérer votre lecteur dans l’environnement familier de
l’Explorateur Windows.
Pour démarrer Creative Media Explorer, double-cliquez sur l’icône
ZEN Vision W Media Explorer dans le Poste de travail ou sur le
bureau. Pour obtenir plus d’informations sur l’utilisation de Creative Media
Explorer, consultez l’aide en ligne.
Creative MediaSource Player/Organizer
Utilisez l'application complète Creative MediaSource Player/Organizer si :
• vous avez besoin de fonctionnalités supplémentaires comme l’enregistrement,
la création d’une compilation automatique et la conversion du format audio ;
• vous souhaitez gérer une bibliothèque musicale sur votre ordinateur.
Pour démarrer Creative MediaSource Player/Organizer, double-cliquez sur
l’icône Creative MediaSource Player/Organizer du bureau.
Page 28

Zen Vision W (Monet WA) CLE_QS.book Page 26 Wednesday, September 27, 2006 10:06 AM
26 Gestion des supports et des données
Vous pouvez accéder aux tâches habituelles à partir de la page d’accueil de
Creative MediaSource Player/Organizer. Pour obtenir plus d'informations
sur l'utilisation de Creative MediaSource Player/Organizer, consultez l'aide
en ligne.
REMARQUE
Windows Media® Player (WMP) 10 est aussi fourni avec le
lecteur. Pour plus d’informations sur WMP10, consultez le Guide
de l'utilisateur sur le CD d’installation et des applications ou
consultez la Base de connaissances Creative disponible 24
heures sur 24 (consultez la rubrique « Informations
supplémentaires » à la page 29).
Page 29
Zen Vision W (Monet WA) CLE_QS.book Page 27 Wednesday, September 27, 2006 10:06 AM
Connexion du lecteur à un téléviseur 27
Connexion du lecteur à un téléviseur
Pour afficher le contenu du lecteur sur un plus grand écran, connectez le
lecteur à un téléviseur en utilisant le câble audio vidéo fourni.
ATTENTION
1 Faites glisser l’interrupteur d’alimentation du lecteur vers l’icône
d’alimentation et maintenez-le dans cette position jusqu’à ce que
l’écran s’allume .
2 Si vous n'êtes pas dans le menu principal, appuyez sur le bouton Menu/
Retour et maintenez-le enfoncé.
3 Sélectionnez Système
vidéo.
4 Sélectionnez Auto (NTSC) ou Auto (PAL). Si vous n’êtes par sûr du format
d’affichage de votre télévision, consultez son mode d’emploi.
5 Connectez le lecteur à un téléviseur à l’aide du câble audio vidéo fourni.
N’UTILISEZ PAS un câble audio vidéo standard.
Paramètres Paramètres photo/vidéo Sortie
1
273 4
5
6
8
1 Prise de sortie A/V
2 Prise d’entrée vidéo -
3 Prise d’entrée audio
4 Prise d’entrée audio
5 Connecteur rouge
6 Connecteur blanc
7 Connecteur jaune
8 Câble audio vidéo
Jaune
(gauche) - Blanche
(droite) - Rouge
Page 30
Zen Vision W (Monet WA) CLE_QS.book Page 28 Wednesday, September 27, 2006 10:06 AM
28 Création de compilations
Création de compilations
Pour une lecture conviviale, vous pouvez sélectionner n’importe quel
ensemble de pistes dans la Bibliothèque musicale du lecteur et créer des
compilations.
Créer une compilation à partir de la Bibliothèque musicale de
votre lecteur
1 Sélectionnez la piste ou catégorie de pistes souhaitée dans Bibl. de
musique .
2 Appuyez sur le bouton Options et maintenez-le enfoncé, puis
sélectionnez Ajouter à sél..
3 Répétez les étapes 1 et 2 pour ajouter une autre piste ou catégorie de
pistes.
4 Appuyez sur le bouton Menu/Retour et maintenez-le enfoncé pour
accéder au menu principal puis sélectionnez Lecture en cours.
5 Appuyez sur le bouton Options et sélectionnez Enr comme compil.
6 Utilisez les boutons de navigation pour attribuer un nom à la compilation et
sélectionnez le bouton Coche ✔ pour le valider.
7 Pour lire une compilation, sélectionnez Bibl.de musique Liste de
compilations puis la compilation souhaitée.
Page 31

Zen Vision W (Monet WA) CLE_QS.book Page 29 Wednesday, September 27, 2006 10:06 AM
Informations supplémentaires 29
Informations supplémentaires
Guide de l'utilisateur
Les nombreuses fonctions du lecteur sont décrites dans le Guide de l’utilisateur fourni
sur le CD d’installation et des applications. Il se trouve dans le répertoire
d:\manual\<langue>\manual.chm
(remplacez d par la lettre de votre lecteur de CD-ROM/DVD-ROM et
langue de rédaction du Guide de l’utilisateur)
Base de connaissances Creative
Résolvez des problèmes techniques grâce à la Base de connaissances Creative,
disponible 24 heures sur 24. Visitez le site www.creative.com et sélectionnez votre
région puis Support.
Enregistrement du produit
Enregistrez votre lecteur pour bénéficier du service le plus approprié et du meilleur
support disponible. Vous pouvez enregistrer le lecteur pendant son installation ou sur
la page Web www.creative.com/register.
Veuillez noter que vos droits relatifs à la garantie ne dépendent pas de
l’enregistrement du produit.
Service d’assistance clients et garantie
Vous trouverez des informations sur le Service d’assistance clients, la garantie et
d’autres précisions sur le CD.
Services d’assistance clients d:\support\<région>\<langue>\support.chm
Garantie
(remplacez d par la lettre de votre lecteur de CD-ROM/DVD-ROM,
région où vous vous trouvez et
Conservez ce document pour référence ultérieure.
d:\warranty\<région>\<langue>\warranty.chm
Veuillez conserver votre preuve d’achat pendant la durée de la
période de garantie.
<langue>
par la langue du document)
<langue>
<région>
par la
par la
Page 32

Zen Vision W (Monet WA) CLE_QS.book Page 30 Wednesday, September 27, 2006 10:06 AM
30 Informations sur la sécurité
Informations sur la sécurité
Consultez les informations suivantes pour utiliser votre lecteur en toute
sécurité et réduire les risques de choc électrique, de court-circuit, de
dommages, d’incendie, de lésion auditive ou autres.
REMARQUE Une manipulation incorrecte peut annuler la garantie de votre
• Ne démontez pas et ne tentez pas de réparer le lecteur, la batterie ou
l’adaptateur secteur.
Pour toute réparation, adressez-vous à Creative ou à ses techniciens agréés.
• N’exposez pas le lecteur ou la batterie à des températures inférieures à 0 °C et
supérieures à 45 °C.
• Ne percez pas, n’écrasez pas et ne mettez pas feu au lecteur ou à la batterie.
• Protégez le lecteur et la batterie des objets fortement magnétiques.
• Ne soumettez pas le lecteur à une force ou un impact excessif.
• N’exposez pas le lecteur ou la batterie à l’eau ni à l’humidité.
• Si le lecteur est résistant à l’humidité (voir emballage du produit pour plus de
détails), veillez à ne pas l’immerger dans l’eau ni à l’exposer à la pluie.
• N’écoutez pas de musique à volume élevé pendant de longues périodes.
• La batterie doit être recyclée ou éliminée correctement. Contactez les agences
locales pour obtenir des informations sur le recyclage et la mise au rebut.
• Ne mettez pas d’objets métalliques en contact avec les bornes de la batterie.
En cas de fuite, d’odeur nauséabonde, de décoloration ou de déformation
pendant la recharge ou l’utilisation, retirez la batterie et ne l’utilisez plus.
Lavez-vous soigneusement les mains avant de toucher de la nourriture ou des
zones sensibles, par exemple, les yeux.
L’utilisation d’un appareil conducteur, tel que des écouteurs, à proximité d’un
•
téléviseur ou d’un écran à tube cathodique peut engendrer l’accumulation
d’électricité statique. Cette accumulation peut alors occasionner des
décharges électrostatiques à l’utilisateur de l’appareil. Bien que ces décharges
soient généralement sans danger, il est recommandé de ne pas utiliser
d’écouteurs à proximité d’appareils munis d’écrans cathodiques.
lecteur. Pour plus d’informations, lisez la garantie fournie avec
le produit.
Page 33

Zen Vision W (Monet WA) CLE_QS.book Page 31 Wednesday, September 27, 2006 10:06 AM
Informations sur la sécurité 31
AVERTISSEMENT Comme pour tout périphérique de stockage
numérique, il est recommandé de sauvegarder les
données régulièrement. Nous vous conseillons de
respecter les précautions d’utilisation indiquées dans
ce guide et de sauvegarder régulièrement les données
stockées sur le lecteur. En aucune circonstance,
Creative ne peut être tenu responsable des dommages
indirects, accessoires, particuliers ou immatériels
subis par quiconque suite à la négligence de Creative,
ou de toute perte de profit, d’économie, de chiffre
d’affaires ou de données liée à l’utilisation de ce
périphérique, même si Creative a été informé de la
possibilité de tels dommages. En aucun cas la
responsabilité de Creative ou les dommages causés à
des tiers ou à vous-même ne sauraient excéder le
montant que vous avez payé pour cet appareil, quelle
que soit la nature de la réclamation. Certains pays/
états n’autorisent pas la limitation ou l’exclusion de la
responsabilité vis-à-vis des dommages accessoires ou
immatériels. En l’occurrence, la limitation ou
l’exclusion mentionnée précédemment peut ne pas
s’appliquer à votre cas.
L'utilisation du symbole WEEE indique que ce produit ne peut pas être
traité comme déchet domestique. Assurez-vous de vous débarrasser
de ce produit selon les lois en vigueur. Vous aiderez ainsi à protéger
l'environnement. Pour plus d'informations détaillées sur le recyclage
de ce produit, veuillez contacter les autorités locales, le fournisseur
de service de mise au rebut de déchets domestiques ou le magasin où
vous avez acheté le produit.
Page 34

Zen Vision W (Monet WA) CLE_QS.book Page 32 Wednesday, September 27, 2006 10:06 AM
32 Informations sur la sécurité
IMPORTANT — A LIRE AVEC ATTENTION
Ecouter de manière prolongée, à un très haut volume sonore de la musique (au dessus
de 80 decibels), au moyen d'un casque ou d'écouteurs, peut entraîner une
détérioration irreversible et définitive de vos facultés auditives. L’usage répété et
habituel d’un casque ou d’écouteurs à un niveau de volume sonore trop élevé peut
donner l'impression à l'utilisateur que le volume sonore émis par l’appareil n'est pas
suffisant. L’utilisateur sera tenté d’augmenter, petit à petit, son réglage habituel,
risquant ainsi d'atteindre un niveau dangereux pour ses oreilles. Afin de protéger votre
santé, et vos oreilles, veillez à maintenir le volume de la sortie casque de votre appareil
à un niveau adapté et à interrompre son utilisation régulièrement et particulièrement
si des symptômes, comme des troubles de l'ouïe, se manifestent.
N'utilisez pas le casque ou les écouteurs pendant la conduite d'une voiture, d'une
bicyclette ou de tout autre véhicule motorisé, afin d'éviter tout accident de le
circulation. En outre, il est interdit dans certains pays d'utiliser un casque ou des
écouteurs en conduisant. Il peut être également dangereux d'écouter à volume élevé
tout en marchant, spécialement aux passages piétons. Soyez toujours extrêment
prudent et cessez d'utiliser cet appareil dans les situations présentant des risques
d'accident.
Evitez d'utiliser le casque ou les écouteurs à volume élevé. Les médecins spécialistes
de l'audition déconseillent une écoute continue à volume trop élevé. Si vous percevez
un sifflement dans les oreilles, réduisez le volume ou cessez l'écoute.
Maintenez un volume d'écoute modéré. Vous pourrez ainsi entendre les sons
extérieurs et être attentif aux gens qui vous entourent.
Votre produit Creative accompagné des écouteurs fournis, est conforme à la
règlementation française concernant les baladeurs musicaux (Arrêté du 24 Juillet
1998). Les caractéristiques techniques de ces écouteurs se trouvent dans le manuel en
ligne et/ou sur le site internet de Creative. Si vous choisissez d'utiliser un autre casque
ou d'autres écouteurs, veuillez vous assurer au préalable que leurs caractéristiques
techniques soient les mêmes.
Copyright © 2006 Creative Technology Ltd. Tous droits réservés. Le logo Creative, Creative MediaSource
et ZEN sont des marques commerciales ou déposées de Creative Technology Ltd. aux Etats-Unis et/ou
dans d’autres pays. Audible et AudibleManager sont des marques déposées d'Audible, Inc. Microsoft,
Windows, Windows Media et le logo Windows sont des marques déposées de Microsoft Corporation.
Page 35

Zen Vision W (Monet WA) CLE_QS.book Page 33 Wednesday, September 27, 2006 10:06 AM
Deutsch
Herzlichen Glückwunsch! Vielen Dank, dass Sie sich
für den viele Formate unterstützenden Player Creative ZEN™ Vision W von
Creative entschieden haben. In dieser Kurzanleitung finden Sie
Informationen, die Ihnen bei der erstmaligen Inbetriebnahme des Players
helfen.
Wenn Sie ausführlichere Informationen zu den Funktionen des Players
benötigen, lesen Sie das Benutzerhandbuch auf der Installations- und
Anwendungs-CD.
COMPACT FLA SH
109
11
12
1Infrarotempfänger
2Menü/Zurück
1
Halten Sie diese Taste gedrückt, um
das Hauptmenü anzuzeigen.
2
Wechselt zum vorherigen Menü.
3
3Optionen
Ruft eine Liste weiterer Optionen auf.
4
4 Navigationstasten
5
5Wiedergabe/Pause
6
6 Weiter/Vorlauf
Wechselt zum nächsten Titel.
7
Halten Sie diese Taste gedrückt, um
innerhalb eines Titels vorzuspulen.
8
7 Eingebauter Lautsprecher
8 Zurück/Rücklauf
Wechselt zum vorherigen Titel.
Halten Sie diese Taste gedrückt, um
innerhalb eines Titels vorzuspulen.
9 Steckplatz für Compact
Flash-Speicherkarte
10 Kopfhörerbuchse
11 A/V-Ausgangsbuchse
12 GS-Eingangsbuchse (5 V)
Page 36

Zen Vision W (Monet WA) CLE_QS.book Page 34 Wednesday, September 27, 2006 10:06 AM
34 Auswählen von Optionen
13 14
15 16
13 Ein/Aus-Schalter
14 Leiser
15 Lauter
16 Mikrofon
17 Austauschbarer
Lithiumionenakku
18 Docking-Anschluss
19 USB 2.0-Anschluss
19 18 17
Auswählen von Optionen
Wenn in den folgenden Kapiteln die Begriffe „Auswahl“ und „Auswählen“
verwendet werden, bedeutet das, dass Sie mithilfe der Navigationstasten
(Auf, Ab, Rechts oder Links) zu der gewünschten Menüoption navigieren
und anschließend „OK“ drücken müssen, um die Option auszuwählen.
1
2
1Auf
2OK
3Rechts
5
4
3
4Ab
5Links
Page 37

Zen Vision W (Monet WA) CLE_QS.book Page 35 Wednesday, September 27, 2006 10:06 AM
Erste Schritte 35
Erste Schritte
Schritt 1: Aufladen des Akkus
Der im Lieferumfang des Players enthaltene leistungsstarke
Lithiumionenakku muss vor Verwendung des Players vollständig geladen
werden. Der Ladevorgang nimmt etwa drei Stunden in Anspruch. Wenn Sie
den Akku laden möchten, schließen Sie das Netzteilkabel an Ihren Player
und an eine Netzsteckdose an (siehe nachstehende Abbildung).
1
1GS-Eingangsbuchse
(5 V)
2
2 Netzteilkabel
HINWEISE Je nachdem, wo Sie das Gerät gekauft haben, weicht das
Aussehen Ihres Netzteils möglicherweise von der Abbildung ab.
Während der Akku aufgeladen wird, wird das
Display angezeigt. Wenn Sie das Symbol
Ladesymbol
auf dem LCD-
Ladevorgang abgeschlossen
auf dem Display sehen, können Sie den Player wieder vom Netzteil trennen.
HINWEISE Solange der Player an einen Computer bzw. eine Netzsteckdose
angeschlossen bleibt, wird er auch nach dem Abschalten weiter
geladen.
Page 38

Zen Vision W (Monet WA) CLE_QS.book Page 36 Wednesday, September 27, 2006 10:06 AM
36 Konfigurieren der Software
Schritt 2: Konfigurieren der Software
ACHTUNG
Schließen Sie den Player erst NACH dem Installieren der Software
an den Computer an.
1 Schalten Sie den Computer ein.
Sie müssen sich unter Microsoft
®
Windows® als Administrator anmelden,
um die Software zu installieren. Weitere Informationen finden Sie in der
Onlinehilfe zu Ihrem Betriebssystem.
2 Legen Sie die Installations- und Anwendungs-CD in das CD-ROM/DVD-
ROM-Laufwerk ein.
Die CD wird in der Regel automatisch gestartet. Ist das nicht der Fall,
führen Sie die nachstehenden Schritte aus:
i. Doppelklicken Sie auf das Symbol Arbeitsplatz.
Als Alternative können Sie auf Start Arbeitsplatz klicken.
ii. Klicken Sie mit der rechten Maustaste auf das Symbol des CD-ROM/
DVD-ROM-Laufwerks, und wählen Sie AutoPlay aus.
3 Folgen Sie den Anweisungen auf dem Bildschirm, und starten Sie den
Computer bei Aufforderung neu.
4 Wenn Sie das Produkt nach dem Neustart des Computers registrieren
möchten, folgen Sie den entsprechenden Anweisungen auf dem Bildschirm.
HINWEISE
Sie benötigen einen Internetanschluss, um das Produkt zu
registrieren.
Page 39

Zen Vision W (Monet WA) CLE_QS.book Page 37 Wednesday, September 27, 2006 10:06 AM
Verbinden des Players mit dem Computer 37
Schritt 3: Verbinden des Players mit dem Computer
Verbinden Sie den Player über das beiliegende USB-Kabel mit dem USBAnschluss Ihres Computers.
HINWEISE
• Wenn Sie den Player mit dem USB-Anschluss Ihres Computers
verbinden, wird der Playerakku automatisch geladen. Der
Ladevorgang über den USB-Anschluss des Computers nimmt
ca. sechs Stunden in Anspruch.
• Wenn Sie den Akku über den USB-Anschluss laden möchten,
achten Sie darauf, dass sich Ihr Computer nicht im
Energiesparmodus befindet. Weitere Informationen zum
Energiesparmodus finden Sie in der Onlinehilfe zu Ihrem
Betriebssystem.
• Wenn Sie den vollständig geladenen Player für längere Zeit am
Computer oder einer Netzsteckdose angeschlossen lassen,
erlischt das Display aus Energiespargründen automatisch.
• Verbinden Sie den Player direkt mit dem USB-Anschluss eines
Computers oder eines USB-Hubs mit separater
Stromversorgung. Verwenden Sie keinen USB-Hub, der über den
USB-Anschluss mit Strom versorgt wird.
Page 40

Zen Vision W (Monet WA) CLE_QS.book Page 38 Wednesday, September 27, 2006 10:06 AM
38 Übertragen von Inhalten
Schritt 4: Übertragen von Inhalten
Mithilfe von Creative Media Explorer können Sie Musik- und andere
Dateien aus Ihrer CD-Sammlung bzw. von Ihrem Computer auf das Gerät
übertragen. Weitere Informationen finden Sie unter „Verwalten von Medien
und Daten“ auf Seite 43.
So starten Sie Creative Media Explorer
1 Stellen Sie sicher, dass der Player wie auf Seite 37 gezeigt an den
Computer angeschlossen ist.
2 Doppelklicken Sie auf dem Desktop auf das Symbol ZEN Vision WMedia
Explorer .
So übertragen oder „rippen“ Sie Musik von Ihrer CD-Sammlung
1 Klicken Sie in Creative Media Explorer auf die Schaltfläche Audio-CDs
rippen .
2 Folgen Sie den Anweisungen auf dem Bildschirm.
Wenn Ihr Computer mit dem Internet verbunden ist und Sie sich bei einem
Music Information Provider angemeldet haben, werden entsprechende
Albuminformationen automatisch abgerufen.
Page 41

Zen Vision W (Monet WA) CLE_QS.book Page 39 Wednesday, September 27, 2006 10:06 AM
Übertragen von Inhalten 39
So übertragen Sie Musik-, Video- oder Bilddaten von Ihrem
Computer
1 Klicken Sie in Creative Media Explorer auf die Schaltfläche Medien
durchsuchen .
2 Suchen Sie Ihre Mediendateien, und kopieren Sie diese per Drag & Drop in
folgende Ordner auf dem Player:
• Medienbibliothek\Musik für Audiodateien
• Medienbibliothek\Videos für Videodateien
• Medienbibliothek\Bilder für Bilder
So übertragen Sie Datendateien vom Computer
1 Klicken Sie in Creative Media Explorer auf die Schaltfläche Dokumente
durchsuchen .
2 Suchen Sie nach den gewünschten Datendateien, und übertragen Sie sie
per Drag&Drop in den Ordner Daten auf Ihrem Player.
HINWEISE
Mithilfe der Schaltfläche Dokumente durchsuchen können Sie
auch Audiodateien und Bilder auf das Gerät übertragen. Beachten
Sie jedoch, dass die Dateien in diesem Fall als Datendateien
behandelt werden und auf dem Player weder wiedergegeben noch
angezeigt werden können.
So übertragen Sie ZENcast-Inhalte
1 Doppelklicken Sie auf dem Desktop auf das Symbol ZENcast Organizer
.
2 Klicken Sie auf die Schaltfläche Übertragen .
3 Folgen Sie den Anweisungen auf dem Bildschirm.
Page 42

Zen Vision W (Monet WA) CLE_QS.book Page 40 Wednesday, September 27, 2006 10:06 AM
40 Trennen des Players vom Computer
4 Klicken Sie auf die Schaltfläche Fertig.
HINWEISE
Mit ZENcast Organizer können Sie Ihre bevorzugten ZENcastKanäle abonnieren sowie ZENcast-Mediendateien herunterladen
und auf Ihren Player übertragen. Weitere Informationen finden Sie
unter www.zencast.com.
Schritt 5: Trennen des Players vom Computer
Wenn Sie das Symbol Dateiübertragung inaktiv auf dem Display sehen,
können Sie den Player vom Computer trennen. Wenn auf dem Display
dagegen das Symbol Dateiübertagung aktiv angezeigt, wird, dürfen Sie
die Verbindung NICHT trennen. Die Dateiübertragung ist in diesem Fall
noch nicht abgeschlossen, und ein vorzeitiges Trennen kann die
übertragenen Inhalte beschädigen.
Page 43

Zen Vision W (Monet WA) CLE_QS.book Page 41 Wednesday, September 27, 2006 10:06 AM
Auswählen der Menüsprache 41
Schritt 6: Auswählen der Menüsprache
1 Um den Player einzuschalten, schieben Sie den Ein/Aus-Schalter in
Richtung Ein/Aus-Symbol , und halten Sie ihn in dieser Position, bis
das Display aufleuchtet.
2 Bei der erstmaligen Inbetriebnahme des Players wird das Menü zunächst in
englischer Sprache angezeigt. So ändern Sie die Sprache
i. Drücken Sie die Taste Menü/Zurück , und halten Sie sie gedrückt.
Daraufhin wird das Hauptmenü angezeigt.
ii. Wählen Sie System Language, und wählen Sie die gewünschte
Sprache aus.
Schritt 7: Wiedergeben von Videos, Bildern und Musik
Nach diesen Vorbereitungen sind Sie jetzt bereit, Ihre Mediendateien
(einschließlich Audible
anzuzeigen.
HINWEISE
• Drücken Sie die Taste Menü/Zurück , und halten Sie sie
• Die Dateien sind auf dem Player alphabetisch sortiert, um die
So geben Sie Videos wieder
1 Wählen Sie im Hauptmenü die Option Videos aus, und wählen Sie das
gewünschte Video aus.
Die Wiedergabe des Videos wird automatisch gestartet.
2 Um die Größe des Videofensters anzupassen, drücken Sie die Optionstaste
, und wählen Sie die gewünschte Fenstergröße aus.
®
- und ZENcast-Mediendateien) wiederzugeben bzw.
gedrückt, um das Hauptmenü anzuzeigen.
Suche zu erleichtern.
Page 44

Zen Vision W (Monet WA) CLE_QS.book Page 42 Wednesday, September 27, 2006 10:06 AM
42 Wiedergeben von Videos, Bildern und Musik
So zeigen Sie Bilder an
1 Wählen Sie im Hauptmenü die Option Fotos aus, und wählen Sie das
gewünschte Bild aus.
2 Wählen Sie Vergrößern aus, und verschieben Sie das Bild ggf. mithilfe der
Navigationstasten in horizontaler bzw. vertikaler Richtung.
So geben Sie Musik- und Audible-Dateien wieder
1 Verbinden Sie den Kopfhörer mit der dafür vorgesehenen Buchse.
2 Wählen Sie im Hauptmenü die Option Musikbibliothek aus, und wählen Sie
die gewünschte Kategorie aus.
3 Wählen Sie einen Titel aus, und drücken Sie Wiedergabe.
4 Zum Regeln der Lautstärke drücken Sie die Taste Lauter oder Leiser
.
HINWEISE
• Zum Verwalten von Audible®-Dateien müssen Sie
AudibleManager
• Audible-Dateien sind momentan nur in ausgewählten Regionen
verfügbar.
• Wenn für eine Audiodatei auch eine visuelle Darstellung des
Plattencovers (auch als „Album Art“ bekannt) verfügbar ist,
wird diese auf dem Player angezeigt.
®
installieren.
So geben Sie ZENcast-Mediendateien wieder
1 Wählen Sie im Hauptmenü die Option Videos und anschließend ZENcast aus.
2 Wechseln Sie in den gewünschten ZENcast-Kanalordner, und wählen Sie
die gewünschte ZENcast-Mediendatei aus.
Die ZENcast-Wiedergabe wird automatisch gestartet.
Page 45

Zen Vision W (Monet WA) CLE_QS.book Page 43 Wednesday, September 27, 2006 10:06 AM
Verwalten von Medien und Daten 43
Verwalten von Medien und Daten
Creative Media Explorer und Creative MediaSource™ Player/Organizer sind
im Lieferumfang des Players enthalten.
Creative Media Explorer
Die Verwendung von Creative Media Explorer empfiehlt sich in folgenden
Situationen:
• Sie sind mit digitaler Musik noch nicht vertraut und wollen Musik von Ihren CDs
oder Ihrem Computer auf den Player übertragen.
• Sie möchten Mediendateien konvertieren, synchronisieren und organisieren.
• Sie möchten Ihren Player in der vertrauten Windows Explorer-Umgebung
verwalten.
Um Creative Media Explorer zu starten, doppelklicken Sie unter
Arbeitsplatz auf das Symbol ZEN Vision W Media Explorer
dazu auch auf das entsprechende Symbol auf dem Desktop klicken. Weitere
Informationen zum Verwenden von Creative Media Explorer finden Sie in
der dazugehörigen Onlinehilfe.
Creative MediaSource Player/Organizer
Die Verwendung der umfassend ausgestatteten Creative MediaSource
Player/Organizer-Software empfiehlt sich in folgenden Situationen:
• Sie benötigen weitere Funktionen, wie Aufnahme, automatische Erstellung von
Playlisten und Audioformatkonvertierung.
• Sie möchten eine Musikbibliothek auf Ihrem Computer verwalten.
Zum Starten des Programms doppelklicken Sie auf Ihrem Desktop auf das
Creative MediaSource Player/Organizer-Symbol .
. Sie können
Page 46

Zen Vision W (Monet WA) CLE_QS.book Page 44 Wednesday, September 27, 2006 10:06 AM
44 Verwalten von Medien und Daten
Für den Zugriff auf häufig verwendete Funktionen steht in Creative
MediaSource Player/Organizer eine Startseite zur Verfügung. Weitere
Informationen zur Arbeit mit Creative MediaSource Player/Organizer finden
Sie in der dazugehörigen Onlinehilfe.
HINWEISE
Im Lieferumfang Ihres Players ist auch Windows Media® Player
(WMP) 10 enthalten. Weitere Informationen zu WMP10 finden Sie
im Benutzerhandbuch auf der Installations- und Anwendungs-CD
oder in der rund um die Uhr verfügbaren Creative Knowledge
Base zur Selbsthilfe (siehe „Weitere Informationen“ auf Seite 48).
Page 47

Zen Vision W (Monet WA) CLE_QS.book Page 45 Wednesday, September 27, 2006 10:06 AM
Anschließen des Players an ein TV-Gerät 45
Anschließen des Players an ein TV-Gerät
Wenn Sie den Inhalt des Players auf einem größeren Bildschirm anzeigen
möchten, schließen Sie den Player an ein TV-Gerät an.
ACHTUNG
1 Schieben Sie den Ein/Aus-Schalter in Richtung Ein/Aus-Symbol , und
halten Sie ihn in dieser Position, bis das Display aufleuchtet.
2 Sofern Sie sich nicht im Hauptmenü befinden, halten Sie die Taste
Menü/Zurück gedrückt.
3 Wählen Sie die Option System
Einstellungen
4 Wählen Sie Auto (NTSC) oder Auto (PAL) aus. Wenn Sie Informationen zum
Anzeigeformat des TV-Geräts benötigen, schlagen Sie im
Benutzerhandbuch für das Gerät nach.
Verwenden Sie KEIN standardmäßiges Videokabel.
Einstellungen Foto-/Video-
Videoausgang aus.
Page 48

Zen Vision W (Monet WA) CLE_QS.book Page 46 Wednesday, September 27, 2006 10:06 AM
46 Anschließen des Players an ein TV-Gerät
5 Schließen Sie den Player mithilfe des mitgelieferten A/V-Kabels an das TV-
Gerät an.
1
273 4
1 A/V-Ausgangsbuchse
2 Videoeingang – gelb
5
6
3 Audioeingang (links) –
weiß
4 Audioeingang (rechts) –
rot
5 Roter Stecker
6 Weißer Stecker
8
7 Gelber Stecker
8 Audio-/Videokabel
Page 49

Zen Vision W (Monet WA) CLE_QS.book Page 47 Wednesday, September 27, 2006 10:06 AM
Erstellen von Wiedergabelisten 47
Erstellen von Wiedergabelisten
Sie können eine beliebige Kombination von Titeln aus der Musikbibliothek
Ihres Players auswählen und diese auf bequeme Weise wiedergeben.
So erstellen Sie eine Wiedergabeliste aus der Musikbibliothek
des Players
1 Wählen Sie Musikbibliothek und den gewünschten Titel oder die
gewünschte Kategorie von Titeln.
2 Halten Sie die Optionstaste gedrückt, und wählen Sie Zu Auswahl hinzu
aus.
3 Wiederholen Sie die Schritte 1 und 2, um einen weiteren Titel oder eine
Kategorie von Titeln hinzuzufügen.
4 Halten Sie die Taste Menü/Zurück gedrückt, um das Hauptmenü
anzuzeigen, und wählen Sie die Option Aktueller Titel aus.
5 Drücken Sie die Optionstaste , und wählen Sie Als PL speichern aus.
6 Erstellen Sie mithilfe der Navigationstasten einen Namen für Ihre
Wiedergabeliste, und wählen Sie das Häkchen ✔ aus, um den Namen zu
bestätigen.
7 Zum Abspielen einer Wiedergabeliste wählen Sie Musikbibliothek
Playlisten und die gewünschte Wiedergabeliste aus.
Page 50

Zen Vision W (Monet WA) CLE_QS.book Page 48 Wednesday, September 27, 2006 10:06 AM
48 Weitere Informationen
Weitere Informationen
Benutzerhandbuch
Lesen Sie das Benutzerhandbuch auf Ihrer Installations- und Anwendungs-CD, um
mehr über die zahlreichen Funktionen Ihres Players zu erfahren. Wechseln Sie zu
d:\manual\<Sprache>\manual.chm.
(Ersetzen Sie d durch den Laufwerksbuchstaben des CD-ROM/DVD-ROM-Laufwerks
<Sprache>
und
Creative Knowledge Base
Mit der rund um die Uhr verfügbaren Knowledge Base von Creative lassen sich
zahlreiche technische Fragen und Probleme in Selbsthilfe klären. Besuchen Sie
unsere Website unter www.creative.com, wählen Sie Ihre Region und dann
Kundendienst aus.
Produktregistrierung
Durch Registrierung Ihres Produkts stellen Sie sicher, dass Sie stets den besten
Kundendienst und Produktsupport erhalten. Sie können Ihr Produkt bereits während
der Installation oder nachträglich unter www.creative.com/register registrieren
lassen.
Die Garantierechte sind nicht von einer Produktregistrierung abhängig.
Kundendienst und Garantie
Informationen zu Kundendienst, Garantieleistungen und anderen Themen finden Sie
auf der CD.
Kundensupport d:\support\<Region>\<Sprache>\support.chm
Garantie
(Ersetzen Sie
Laufwerks,
die gewünschte Dokumentsprache.)
Bewahren Sie das vorliegende Dokument zu Referenzzwecken auf.
durch die Sprache des Dokuments.)
d:\warranty\<Region>\<Sprache>\warranty.chm
Bewahren Sie Ihren Kaufbeleg für die Dauer der Garantiezeit gut auf.
d:\
durch den Laufwerksbuchstaben Ihres CD-ROM/DVD-ROM-
<Region>
durch die Region, in der Sie sich befinden, und
<Sprache>
durch
Page 51

Zen Vision W (Monet WA) CLE_QS.book Page 49 Wednesday, September 27, 2006 10:06 AM
Sicherheitsinformationen 49
Sicherheitsinformationen
Beachten Sie die folgenden Hinweise, um Ihr Produkt vor Beschädigungen
zu schützen und die Gefahr von elektrischen Schlägen, Kurzschlüssen,
Feuer und Hörschäden zu mindern sowie weitere Risiken zu vermeiden.
HINWEISE Eine unsachgemäße Bedienung kann zum Verlust Ihrer
• Öffnen Sie den Player nicht und versuchen Sie nicht, den Player, den Akku oder
• Setzen Sie den Player bzw. den Akku keinen Temperaturen unter 0 °C oder
• Wirken Sie nicht mit spitzen oder stumpfen Gegenständen auf den Player bzw.
• Halten Sie den Player bzw. Akku von starken Magnetfeldern fern.
• Setzen Sie den Player keinen starken Stößen oder Erschütterungen aus.
• Vermeiden Sie, dass der Player bzw. der Akku mit Wasser oder Feuchtigkeit in
• Achten Sie darauf, dass Sie den Player nicht in Wasser eintauchen bzw. Regen
• Hören Sie nicht längere Zeit mit großer Lautstärke Musik.
• Der Akku muss ordnungsgemäß recycelt bzw. entsorgt werden. Informationen
• Bringen Sie die Akkuanschlüsse nicht mit metallischen Objekten in Berührung.
Garantieansprüche führen. Weitere Informationen enthält die zum
Lieferumfang des Produkts gehörende Garantieerklärung.
das Netzteil zu reparieren.
Wenden Sie sich mit allen Reparaturanfragen an Creative oder einen
autorisierten Reparaturdienst.
über 45 °C aus.
Akku ein, und halten Sie das Gerät von offenen Flammen fern.
Kontakt kommen.
aussetzen, auch wenn dieser feuchtigkeitsbeständig ist (Details finden Sie auf
der Verpackung).
zum Recycling sowie zur Entsorgung erhalten Sie von den zuständigen lokalen
Stellen.
Wenn der Akku bei Gebrauch ausläuft, Geruch, Verfärbungen oder
Verformungen auftreten, sollte er entfernt und entsorgt werden. Reinigen Sie
Ihre Hände gründlich, bevor Sie Lebensmittel oder empfindliche
Körperbereiche (z. B. Ihre Augen) berühren.
Page 52

Zen Vision W (Monet WA) CLE_QS.book Page 50 Wednesday, September 27, 2006 10:06 AM
50 Sicherheitsinformationen
Wenn Sie ein elektrisches Gerät wie z. B. Kopfhörer in der Nähe eines Röhren-
•
TV-Geräts oder Röhrenmonitors verwenden, können von letzteren
elektrostatische Entladungen ausgesendet werden. Diese Entladungen können
als elektrischer Schlag wahrgenommen werden. Obwohl diese statischen
Schocks normalerweise harmlos sind, sollten Sie die Nähe von Geräten mit
Kathodenstrahlröhren bei der Verwendung von Kopfhörern meiden.
ACHTUNG Wie bei allen Speichermedien auf der Basis digitaler Medien müssen
Copyright © 2006, Creative Technology Ltd. Alle Rechte vorbehalten. Das Creative-Logo, Creative
MediaSource und ZEN sind Marken oder eingetragene Marken von Creative Technology Ltd. in den USA
und/oder anderen Ländern. Audible und AudibleManager sind eingetragene Marken von Audible, Inc.
Microsoft, Windows, Windows Media und das Windows-Logo sind eingetragene Marken der Microsoft
Corporation.
die Daten regelmäßig gesichert werden. Es wird dringend
empfohlen, die in der vorliegenden Dokumentation beschriebenen
Vorsichtsmaßnahmen zu beachten und darüber hinaus die im Player
gespeicherten Daten regelmäßig zu sichern. Creative übernimmt in
keinem Fall die Haftung für indirekte, zufällig entstandene, spezielle
Schäden oder Folgeschäden, die einer Person durch Fahrlässigkeit
seitens Creative entstanden sind. Des Weiteren haftet Creative nicht
für Gewinnverlust, entgangene Gewinne und Einnahmen oder
Datenverlust, die durch dieses Gerät entstanden oder mit ihm
verbunden sind, und zwar auch dann nicht, wenn Creative von der
Möglichkeit solcher Schäden in Kenntnis gesetzt wurde. In keinem
Fall übersteigt die Haftung von Creative für Schäden die von Ihnen
für das Gerät entrichtete Kaufsumme, und zwar unabhängig von der
Art des Anspruchs. In einigen Ländern/Staaten ist die
Einschränkung oder der Haftungsausschluss für zufällig
entstandene Schäden oder Folgeschäden nicht zulässig, daher
treffen diese möglicherweise nicht auf Sie zu.
Durch Verwendung des WEEE-Symbols weisen wir darauf hin, dass dieses
Produkt nicht als normaler Haushaltsmüll behandelt werden darf. Sie
tragen zum Schutze der Umwelt bei, indem Sie dieses Produkt korrekt
entsorgen. Genauere Informationen zum Recycling dieses Produkts
erhalten Sie von Ihrer Stadtverwaltung, von Ihrem Müllabfuhrunternehmen
oder im Laden, in dem Sie das Produkt erworben haben.
Page 53

Zen Vision W (Monet WA) CLE_QS.book Page 51 Wednesday, September 27, 2006 10:06 AM
Italiano
Complimenti! Grazie per aver acquistato il lettore multiformato
Creative, Creative ZEN™ Vision W. In questa sezione è riportata
un'introduzione al nuovo lettore.
Per sfruttare al massimo il lettore, leggere anche il manuale dell'utente
completo disponibile sul CD di installazione e delle applicazioni.
COMPACT FLA SH
109
11
12
1 Ricevitore a infrarossi
2 Pulsante Menu/Indietro
Tenere premuto per visualizzare il
menu principale.
1
Premere per tornare al menu
precedente.
2
3 Pulsante Opzioni
Premere per visualizzare un elenco
3
di opzioni.
4
4 Pulsanti di navigazione
5 Pulsante Riproduci/Pausa
5
6 Pulsante Successivo/In avanti
6
veloce
Premere questo pulsante per
7
spostarsi al brano successivo.
Tenere premuto questo pulsante per
8
passare a un punto successivo
all'interno di un brano.
7 Altoparlante integrato
8 Pulsante Precedente/
Riavvolgi
Premere questo pulsante per
passare al brano precedente.
Tenere premuto questo pulsante per
passare a un punto successivo
all'interno di un brano.
9 Slot per scheda di memoria
Compact Flash
10 Jack cuffie
11 Jack Uscita A/V
12 Jack ingresso CC 5V
Page 54

Zen Vision W (Monet WA) CLE_QS.book Page 52 Wednesday, September 27, 2006 10:06 AM
52 Selezione delle opzioni
13 14
15 16
13 Interruttore di
alimentazione
14 Pulsante Riduzione
volume
15 Pulsante Aumento
volume
16 Microfono
17 Batteria agli ioni di litio
removibile
18 Connettore
19 18 17
alloggiamento di
espansione
19 Porta USB 2.0
Selezione delle opzioni
Nelle sezioni seguenti di questo documento, il termine 'Selezionare' indica
che i pulsanti di spostamento Su, Giù, Sinistra o Destra devono essere
utilizzati per evidenziare opzioni di menu e il pulsante OK per scegliere
l'opzione.
1
2
1Pulsante Su
2Pulsante OK
3Pulsante
5
4
3
Destra
4Pulsante Giù
5Pulsante
Sinistra
Page 55

Zen Vision W (Monet WA) CLE_QS.book Page 53 Wednesday, September 27, 2006 10:06 AM
Guida introduttiva 53
Guida introduttiva
Passo 1: Caricamento del lettore
La batteria agli ioni di litio a elevate prestazioni fornita con il lettore deve
essere caricata completamente prima dell'uso del lettore. La batteria si
ricarica completamente in circa tre ore. Per caricare la batteria del lettore,
collegare l'alimentatore al lettore e alla presa di corrente come indicato
nell'immagine di seguito.
1
1Jack ingresso CC 5V
2Cavo
2
A seconda del paese in cui è stato acquistato il prodotto,
NOTE
l'alimentatore di corrente potrebbe essere diverso da quello
raffigurato qui.
dell'alimentatore di
corrente
Page 56

Zen Vision W (Monet WA) CLE_QS.book Page 54 Wednesday, September 27, 2006 10:06 AM
54 Installazione del software
Durante il caricamento, appare sullo schermo l'icona di caricamento della
batteria . Quando sullo schermo del lettore viene visualizzata l'icona
batteria ricaricata , scollegare il lettore dall'alimentatore.
NOTE
Il lettore continuerà a caricarsi anche da spento, purché rimanga
collegato a un computer o a una presa di corrente.
Passo 2: Installazione del software
AVVISO
1 Accendere il computer.
Prima di installare il software, è necessario accedere a Microsoft
Windows
Guida in linea del sistema operativo.
2 Inserire il CD di installazione e delle applicazioni nell'unità CD-ROM/DVD-
ROM.
Il CD dovrebbe avviarsi automaticamente. In caso contrario, seguire la
procedura riportata sotto:
i. Fare doppio clic sull'icona Risorse del computer.
ii. Fare clic con il pulsante destro del mouse sull'icona dell'unità CD-ROM/
3 Seguire le istruzioni visualizzate sullo schermo e, se richiesto, riavviare il
computer.
4 Se si desidera registrare il prodotto dopo che il computer è stato riavviato,
seguire le istruzioni visualizzate sullo schermo.
NON collegare il lettore al computer prima di aver installato il
software.
®
come amministratore. Per ulteriori informazioni, consultare la
In alternativa, fare clic su Start Risorse del computer.
DVD-ROM, quindi fare clic su AutoPlay.
NOTE Per registrare il prodotto, è necessario disporre di una
connessione a Internet.
®
Page 57

Zen Vision W (Monet WA) CLE_QS.book Page 55 Wednesday, September 27, 2006 10:06 AM
Collegamento tra il lettore e il computer 55
Passo 3: Collegamento tra il lettore e il computer
Se non ancora collegato, collegare il lettore alla porta USB del computer
mediante il cavo USB in dotazione..
NOTE
• La batteria del lettore si ricarica automaticamente quando si
collega il lettore alla porta USB del computer. La ricarica della
batteria mediante la porta USB del computer richiede circa sei
ore.
• Per caricare in modo continuo la batteria tramite la porta USB,
assicurarsi che il computer non sia in modalità di risparmio
energia. Per ulteriori informazioni sulle modalità di risparmio
energia, consultare la Guida in linea del sistema operativo.
• Se il lettore completamente carico rimane collegato al
computer o alla presa di corrente per un periodo di tempo
prolungato, lo schermo si spegne automaticamente per
risparmiare energia.
• Collegare il lettore direttamente alla porta USB del computer
oppure a un hub USB autoalimentato, non a un hub USB
alimentato dal bus.
Page 58

Zen Vision W (Monet WA) CLE_QS.book Page 56 Wednesday, September 27, 2006 10:06 AM
56 Trasferimento di contenuti
Passo 4: Trasferimento di contenuti
Utilizzare Creative Media Explorer per trasferire la musica e altri file dalla
propria raccolta CD o dal computer. Per ulteriori dettagli, consultare la
sezione “Gestione di contenuto multimediale e dati” a pagina 60.
Per avviare Creative Media Explorer
1 Assicurarsi che il lettore sia collegato al computer come mostrato a
pagina 55.
2 Fare doppio clic sull'icona ZEN Vision W Media Explorer presente sul
desktop.
Per trasferire o estrarre brani musicali da una raccolta di CD
1 In Creative Media Explorer, fare clic sul pulsante Estrai CD audio .
2 Seguire le istruzioni visualizzate.
Se si è collegati a Internet e se si è registrati a un provider di informazioni
musicali, le informazioni sull'album vengono recuperate automaticamente.
Per trasferire musica, video o immagini dal computer
1 In Creative Media Explorer, fare clic sul pulsante Sfoglia multimediali .
2 Individuare i file multimediali e copiarli nelle seguenti cartelle del lettore
tramite il metodo di trascinamento della selezione:
• cartella Libreria multimediali\Musica per i file audio
• cartella Libreria multimediali\Video per i file video
• cartella Libreria multimediali\Immagini per i file di immagine
Page 59

Zen Vision W (Monet WA) CLE_QS.book Page 57 Wednesday, September 27, 2006 10:06 AM
Scollegamento del lettore 57
Per trasferire i file di dati dal computer
1 In Creative Media Explorer, fare clic sul pulsante Sfoglia documenti .
2 Individuare i file di dati e trasferirli nella cartella Dati del lettore utilizzando
la funzione di trascinamento.
È inoltre possibile trasferire file audio e immagini utilizzando il
NOTE
pulsante Sfoglia documenti. In questo modo, però, i file verranno
considerati come file di dati e non saranno pertanto riproducibili o
visualizzabili sul lettore.
Per trasferire il contenuto ZENcast
1 Fare doppio clic sull'icona ZENcast Organizer presente sul desktop.
2 Fare clic sul pulsante Trasferimento .
3 Seguire le istruzioni visualizzate.
4 Fare clic sul pulsante Terminato.
NOTE
Con ZENcast Organizer, è possibile abbonarsi ai propri canali
ZENcast preferiti, nonché scaricare e trasferire i file multimediali
ZENcast sul lettore. Per ulteriori informazioni, visitare il sito
www.zencast.com.
Passo 5: Scollegamento del lettore
Scollegare il lettore quando sullo schermo appare l'icona Trasferimento
file inattivo . NON scollegarlo se sullo schermo appare l'icona
Trasferimento file attivo Questa icona indica che è in corso il
trasferimento dei file e se si dovesse scollegare il lettore si potrebbe
danneggiare il contenuto che si sta trasferendo.
Page 60

Zen Vision W (Monet WA) CLE_QS.book Page 58 Wednesday, September 27, 2006 10:06 AM
58 Selezione della lingua del menu
Passo 6: Selezione della lingua del menu
1 Se il lettore non è acceso, spostare l'interruttore di alimentazione verso
l'icona corrispondente e mantenerlo in questa posizione finché lo
schermo non si illumina.
2 Quando si accende per la prima volta il lettore, viene visualizzato il menu in
inglese. Per modificare la lingua:
i. Tenere premuto il pulsante Menu/Indietro . Viene visualizzato il
menu principale.
ii. Selezionare System Language, quindi scegliere la lingua desiderata.
Passo 7: Visione di video e immagini e riproduzione di
musica
A questo punto è possibile riprodurre o visualizzare i file, tra cui i file audio
®
Audible
Visione di video
1 Nel menu principale, selezionare Video, quindi selezionare il video
desiderato.
La riproduzione dei video viene avviata automaticamente.
2 Per regolare le dimensioni della finestra di visualizzazione, premere il
pulsante Opzioni e selezionare le dimensioni della finestra di
visualizzazione desiderate.
e i file multimediali ZENcast.
• Tenere premuto il pulsante Menu/Indietro per accedere al
NOTE
menu principale.
• Per accelerare la ricerca, i file nel lettore vengono ordinati in
ordine alfabetico.
Page 61

Zen Vision W (Monet WA) CLE_QS.book Page 59 Wednesday, September 27, 2006 10:06 AM
Visione di video e immagini e riproduzione di musica 59
Visualizzazione di immagini
1 Nel menu principale, selezionare Foto, quindi selezionare l'immagine
desiderata.
2 Selezionare Zoom avanti, quindi utilizzare i pulsanti di navigazione per
muovere l'immagine in orizzontale o verticale.
Riproduzione di musica e di file Audible
1 Collegare gli auricolari al jack cuffie.
2 Nel menu principale, selezionare Libreria musica quindi selezionare la
categoria desiderata.
3 Selezionare un brano, quindi premere Riproduci.
4 Premere i pulsanti Aumento volume e Riduzione volume per
regolare il volume.
• Per gestire i file Audible®, è necessario avere installato
NOTE
AudibleManager
• I file Audible sono disponibili attualmente solo in determinate
regioni.
• Se il file audio presenta un album di immagini, anche questo
viene visualizzato sul lettore.
®
.
Riproduzione di file multimediali ZENcast
1 Nel menu principale, selezionare Video, quindi selezionare ZENcast.
2 Selezionare la cartella dei canali ZENcast desiderata, quindi selezionare il
file multimediale ZENcast che si vuole riprodurre.
La riproduzione ZENcast viene avviata automaticamente.
Page 62

Zen Vision W (Monet WA) CLE_QS.book Page 60 Wednesday, September 27, 2006 10:06 AM
60 Gestione di contenuto multimediale e dati
Gestione di contenuto multimediale e dati
Sul lettore sono disponibili Creative Media Explorer e Lettore/Organizer
Creative MediaSource™.
Creative Media Explorer
Utilizzare Creative Media Explorer se:
• non si è ancora esperti di musica digitale e si desidera trasferire musica dai
propri CD o dal computer al lettore;
• si desidera convertire, sincronizzare e organizzare i file multimediali;
• si preferisce utilizzare il lettore nell'ambiente "Windows Explorer" con cui si ha
maggiore familiarità.
Per avviare Creative Media Explorer, fare doppio clic sull'icona ZEN Vision
W Media Explorer presente in Risorse del computer oppure sul
desktop. Per ulteriori informazioni sull'uso di Creative Media Explorer,
consultare la relativa Guida in linea.
Page 63

Zen Vision W (Monet WA) CLE_QS.book Page 61 Wednesday, September 27, 2006 10:06 AM
Gestione di contenuto multimediale e dati 61
Lettore/Organizer Creative MediaSource
Utilizzare le ampie funzionalità di Lettore/Organizer Creative MediaSource
se:
• si necessitano funzioni aggiuntive quali la registrazione, la generazione
automatica di playlist e la conversione dei formati audio;
• si desidera gestire una libreria musica sul computer.
Per avviare questa applicazione, fare doppio clic sull'icona
Lettore/Organizer Creative MediaSource presente sul desktop.
Lettore/Organizer Creative MediaSource dispone di una pagina principale
da cui è possibile accedere ad attività tradizionali. Per ulteriori informazioni
sull'uso di Lettore/Organizer Creative MediaSource, consultare la relativa
Guida in linea.
NOTE
Nel lettore è inoltre incluso Windows Media® Player (WMP) 10.
Per ulteriori informazioni su WMP10, consultare il Manuale
dell'utente sul CD di installazione e delle applicazioni oppure
visitare il Database Informativo di Creative disponibile ventiquattro
ore su ventiquattro (vedere “Ulteriori informazioni” a pagina64).
Page 64

Zen Vision W (Monet WA) CLE_QS.book Page 62 Wednesday, September 27, 2006 10:06 AM
62 Collegamento del lettore a un televisore
Collegamento del lettore a un televisore
Per visualizzare il contenuto del lettore su uno schermo più grande,
collegare il lettore a un televisore tramite il cavo audio e video in dotazione.
AVVISO
1 Spostare l'interruttore di alimentazione del lettore verso l'icona e
tenerlo in questa posizione finché lo schermo non si illumina.
2 Se non ci si trova nel menu principale, premere e tenere premuto il pulsante
Menu/Indietro
3 Selezionare Sistema
Video.
4 Selezionare Auto (NTSC) o Auto (PAL). Se non si conosce il formato di
visualizzazione del proprio televisore, consultare il relativo Manuale
dell'utente.
5 Collegare il lettore al televisore mediante il cavo audio e video in dotazione.
NON utilizzare un cavo audio e video standard.
.
Impostazioni Impostazioni foto/video Uscita
1
273 4
5
6
8
1Jack Uscita A/V
2 Jack ingresso video -
Giallo
3 Jack ingresso audio
(canale sinistro) - Bianco
4 Jack ingresso audio
(canale destro) - Rosso
5 Connettore rosso
6 Connettore bianco
7 Connettore giallo
8 Cavo audio e video
Page 65

Zen Vision W (Monet WA) CLE_QS.book Page 63 Wednesday, September 27, 2006 10:06 AM
Creazione di playlist 63
Creazione di playlist
È possibile selezionare una qualsiasi combinazione di brani dalla Libreria
musica del lettore per creare playlist per una riproduzione più comoda.
Per creare una playlist dalla Libreria musica del lettore
1 Selezionare Libreria musica brano o categoria di brani desiderati.
2 Premere e tenere premuto il pulsante Opzioni , quindi selezionare Agg.
a selezione.
3 Ripetere i passi 1 e 2 per aggiungere un altro brano o categoria di brani.
4 Tenere premuto il pulsante Menu/Indietro per accedere al menu
principale e selezionare Ascolto in corso.
5 Premere il pulsante Opzioni , quindi selezionare Salva playlist.
6 Utilizzare i comandi di navigazione per creare un nome per la playlist,
quindi selezionare il pulsante Segno di spunta ✔ per confermare il nome.
7 Per riprodurre una playlist, selezionare Libreria musica Playlist playlist
desiderata.
Page 66

Zen Vision W (Monet WA) CLE_QS.book Page 64 Wednesday, September 27, 2006 10:06 AM
64 Ulteriori informazioni
Ulteriori informazioni
Manuale dell'utente
Leggere il Manuale dell'utente disponibile sul CD di installazione e delle applicazioni
per ulteriori informazioni sulle molteplici funzionalità del lettore. Passare a
d:\manual\<lingua>\manual.chm
(sostituire d con la lettera dell'unità CD-ROM/DVD-ROM e
è disponibile il Manuale dell'utente)
Database Informativo Creative
Per rispondere a domande e risolvere problemi tecnici, è disponibile il Database
Informativo Creative, consultabile 24 ore su 24. Visitare il sito www.creative.com,
selezionare la regione di provenienza e scegliere Assistenza.
Registrazione del prodotto
La registrazione del prodotto consente di ricevere il servizio e l'assistenza sul prodotto
più adatti disponibili. È possibile registrare il prodotto durante l'installazione o
all'indirizzo www.creative.com/register.
Si noti che la garanzia non dipende dalla registrazione del prodotto.
Servizi di assistenza clienti e garanzia
Il CD contiene informazioni sull'assistenza ai clienti, sulla garanzia e su altri
argomenti.
Servizio di assistenza
clienti
Garanzia
(sostituire d con la lettera dell'unità CD-ROM/DVD-ROM,
si risiede e
Conservare questo documento per riferimento futuro.
<lingua>
d:\support\<regione>\<lingua>\support.chm
d:\warranty\<regione>\<lingua>\warranty.chm
Si consiglia di conservare la prova d'acquisto per tutta la durata del
periodo di garanzia.
con la lingua in cui è scritto il documento).
<lingua>
<regione>
con la lingua in cui
con il paese in cui
Page 67

Zen Vision W (Monet WA) CLE_QS.book Page 65 Wednesday, September 27, 2006 10:06 AM
Informazioni di sicurezza 65
Informazioni di sicurezza
Per l'utilizzo sicuro del prodotto e per evitare scosse elettriche, corti
circuiti, danni vari, incendi, danni all'udito e altri pericoli, fare riferimento
alle informazioni seguenti.
NOTE Un uso non corretto potrebbe invalidare la garanzia del prodotto.
Per ulteriori informazioni, leggere la garanzia disponibile con il
prodotto.
• Non smontare o tentare di riparare da soli il prodotto, la batteria o
l'alimentatore.
Per tutti gli interventi di assistenza, rivolgersi a Creative o a tecnici
autorizzati.
• Non esporre il lettore o la batteria a temperature inferiori a 0 °C o superiori a
45 °C.
• Non perforare, rompere o incendiare il prodotto o la batteria.
• Tenere il prodotto o la batteria lontano da oggetti altamente magnetici.
• Non sottoporre il prodotto a forti pressioni o urti violenti.
• Non bagnare il prodotto o la batteria e non esporli all'umidità.
• Se il prodotto è resistente all'umidità (vedere la confezione per i dettagli),
prestare attenzione a non immergerlo nell'acqua o a esporlo alla pioggia.
• Non ascoltare musica ad alto volume per periodi di tempo prolungati.
• La batteria deve essere riciclata o smaltita in modo adeguato. Per informazioni
su riciclaggio e smaltimento, contattare le autorità locali.
• Evitare che i poli della batteria vengano a contatto con oggetti metallici.
Se durante l'uso o il caricamento della batteria si verificassero perdite, cattivo
odore, decolorazione o deformazioni, rimuovere la batteria e non riutilizzarla.
Lavarsi accuratamente le mani prima di toccare cibi o parti delicate del corpo,
ad esempio gli occhi.
Se un dispositivo conduttore, ad esempio le cuffie, viene utilizzato in prossimità
•
di un televisore o di un monitor a tubo catodico, quest'ultimo potrebbe emettere
una scarica elettrostatica, avvertita come una scossa elettrostatica. Sebbene
questa scossa elettrostatica sia generalmente innocua, durante l'utilizzo degli
auricolari, è buona norma evitare il contatto ravvicinato con i dispositivi a tubo
catodico.
Page 68

Zen Vision W (Monet WA) CLE_QS.book Page 66 Wednesday, September 27, 2006 10:06 AM
66 Informazioni di sicurezza
AVVISO
Come per tutti i dispositivi di memorizzazione basati su supporto
digitale, si consiglia di eseguire regolarmente il backup dei dati. Si
raccomanda di attenersi scrupolosamente alle precauzioni d'uso
riportate in questo documento e di eseguire regolarmente il
backup dei dati memorizzati sul lettore. In nessun caso Creative
potrà essere ritenuta responsabile per danni a persone, indiretti,
incidentali, speciali o consequenziali causati dalla negligenza di
Creative stessa o per perdite di profitto, di denaro, di introiti o di
dati conseguenti all'uso del presente dispositivo, anche se
Creative è stata messa a conoscenza di tale possibilità. In nessun
caso, la responsabilità di Creative o i danni arrecati all'utente o a
qualsiasi altra persona potranno superare l'importo pagato per
l'acquisto del prodotto, a prescindere dalla forma della richiesta di
risarcimento. Alcuni paesi non consentono limitazioni o esclusioni
di responsabilità per danni incidentali o consequenziali, di
conseguenza, è possibile che le limitazioni di cui sopra non siano
applicabili.
Il simbolo RAEE utilizzato per questo prodotto indica che quest'ultimo
non può essere trattato come rifiuto domestico. Lo smaltimento
corretto di questo prodotto contribuirà a proteggere l'ambiente. Per
maggiori informazioni sul riciclaggio di questo prodotto, rivolgersi
all'ufficio competente del proprio ente locale, alla società addetta allo
smaltimento dei rifiuti domestici o al negozio dove è stato acquistato
il prodotto.
Copyright © 2006 Creative Technology Ltd. Tutti i diritti riservati. Il logo Creative, Creative MediaSource
e ZEN sono marchi o marchi registrati di Creative Technology Ltd. negli Stati Uniti e/o in altri paesi.
Audible e AudibleManage r sono marchi registrati di Audible, Inc. Mi crosoft, Windows , Windows Media e
il logo di Windows sono marchi registrati di Microsoft Corporation.
Page 69

Zen Vision W (Monet WA) CLE_QS.book Page 67 Wednesday, September 27, 2006 10:06 AM
Español
¡Enhorabuena! Gracias por adquirir el reproductor
multiformato de Creative, Creative ZEN™ Vision W. Siga leyendo para saber
cómo empezar a utilizar el reproductor.
Para sacar el máximo partido del reproductor, lea también la completa Guía
del usuario que encontrará en el CD de instalación y aplicaciones.
1 Receptor de infrarrojos
2 Botón Menú/Atrás
Manténgalo pulsado para mostrar el
1
menú principal.
Púlselo para volver al menú anterior.
2
3 Botón Opciones
3
Púlselo para mostrar una lista de
opciones.
4
4 Botones de desplazamiento
5
5 Botón Reproducir/Pausa
6
6 Botón Siguiente/Avance
7
rápido
Púlselo para ir a la pista siguiente
8
Manténgalo pulsado para avanzar
dentro de una pista.
7Altavoz integrado
COMPACT FLA SH
109
11
12
8 Botón Anterior/Rebobinar
Púlselo para ir a la pista anterior.
Manténgalo pulsado para avanzar en
la misma pista.
9 Ranura de tarjeta de
memoria Compact Flash
10 Toma de auriculares
11 Conector de salida A/V
12 Conector de entrada DC 5V
Page 70

Zen Vision W (Monet WA) CLE_QS.book Page 68 Wednesday, September 27, 2006 10:06 AM
68 Selección de opciones
13 14
15 16
13 Interruptor de encendido
14 Botón Bajar volumen
15 Botón Subir volumen
16 Micrófono
17 Batería de litio-ión
extraíble
18 Conector de
acoplamiento
19 18 17
19 Puerto USB 2.0
Selección de opciones
En las secciones siguientes de este documento se utiliza el término
"seleccionar" para indicar que debe utilizar los botones Arriba, Abajo,
Izquierda o Derecha para resaltar las opciones de menú y pulsar el botón
Aceptar para seleccionar la opción.
1
2
1 Botón Arriba
2 Botón Aceptar
3Botón Derecha
5
4
3
4Botón Abajo
5Botón Izquierda
Page 71

Zen Vision W (Monet WA) CLE_QS.book Page 69 Wednesday, September 27, 2006 10:06 AM
Primeros pasos 69
Primeros pasos
Paso 1: Carga del reproductor
Es necesario cargar completamente la batería de iones de litio de alto
rendimiento que se proporciona con el reproductor antes de utilizarlo. La
batería tardará unas tres horas en cargarse por completo. Para cargar la
batería del reproductor, conecte el cable del adaptador de alimentación al
reproductor y a la toma de corriente, tal y como se muestra en el siguiente
diagrama.
1
1 Conector de entrada
DC 5V
2
2 Cable del adaptador
de alimentación
NOTAS
Dependiendo de la región en la que haya realizado su compra, el
adaptador de alimentación puede ser distinto del que se muestra
aquí.
Page 72

Zen Vision W (Monet WA) CLE_QS.book Page 70 Wednesday, September 27, 2006 10:06 AM
70 Configuración del software
Cuando la batería se está cargando, el icono de carga de la batería se
muestra en la pantalla. Cuando vea el icono de batería cargada en la
pantalla del reproductor, desconéctelo del adaptador de alimentación.
NOTAS
El reproductor seguirá cargándose incluso si se apaga siempre
que esté conectado a una toma de corriente o a un ordenador.
Paso 2: Configuración del software
ADVERTENCIA NO conecte el reproductor al PC antes de configurar el
software.
1 Encienda el ordenador.
Debe iniciar sesión como administrador en Microsoft
®
Windows® para
poder instalar el software. Para obtener más información, consulte la
ayuda en línea del sistema operativo.
2 Inserte el CD de instalación y aplicaciones en la unidad de CD-ROM/DVD-
ROM.
El CD se iniciará automáticamente. En caso contrario, siga los pasos que se
indican a continuación:
i. Haga doble clic en el icono Mi PC.
También puede hacer clic en Inicio Mi PC.
ii. Haga clic con el botón derecho del ratón en el icono de la unidad de CD-
ROM/DVD-ROM y, a continuación, haga clic en Reproducción
automática.
3 Siga las instrucciones de la pantalla y, cuando el sistema lo solicite, reinicie
el PC.
4 Si quiere registrar el producto cuando se reinicie el ordenador, siga las
instrucciones que aparecerán en pantalla.
NOTAS Necesita una conexión a Internet para registrar el producto.
Page 73

Zen Vision W (Monet WA) CLE_QS.book Page 71 Wednesday, September 27, 2006 10:06 AM
Conexión del reproductor al ordenador 71
Paso 3: Conexión del reproductor al ordenador
Si aún no lo ha hecho, conecte el reproductor al puerto USB del ordenador
mediante el cable USB suministrado.
NOTAS
• La batería del reproductor se carga automáticamente cuando
conecta el reproductor al puerto USB del ordenador. Cuando se
usa el puerto USB del ordenador, la batería del reproductor
tarda unas seis horas en cargarse.
• Para cargar la batería de forma continuada a través del puerto
USB, asegúrese de que el ordenador no esté en el modo de
ahorro de energía. Para obtener más información sobre los
modos de ahorro de energía, consulte la ayuda del sistema
operativo.
• Si el reproductor está totalmente cargado y permanece
conectado al ordenador o a la toma de corriente durante un
periodo de tiempo prolongado, la pantalla se apagará
automáticamente para ahorrar energía.
• Conecte directamente el reproductor al puerto USB de un
ordenador o a un hub USB de alimentación automática. No lo
conecte a un hub USB alimentado a través de un bus.
Page 74

Zen Vision W (Monet WA) CLE_QS.book Page 72 Wednesday, September 27, 2006 10:06 AM
72 Transferencia de contenido
Paso 4: Transferencia de contenido
Utilice Creative Media Explorer para transferir música y demás archivos
desde su colección de CD o desde su ordenador. Para obtener más
información, consulte “Administración de datos y archivos multimedia” en
la página 76.
Para iniciar Creative Media Explorer
1 Asegúrese de que el reproductor está conectado al ordenador tal y como se
muestra en la página 71.
2 Haga doble clic en el icono ZEN Vision W Media Explorer situado en el
escritorio.
Para transferir o extraer música de su colección de CD
1 En Creative Media Explorer, haga clic en el botón Extraer CD de audio .
2 Siga las instrucciones que aparecen en pantalla.
Si está conectado a Internet y se ha registrado con un proveedor de
información musical, se recuperará automáticamente la información sobre
el álbum.
Para transferir música, vídeos o imágenes desde el ordenador
1 En Creative Media Explorer, haga clic en el botón Buscar archivos
multimedia .
2 Busque los archivos multimedia y utilice el método de arrastrar y colocar
para copiarlos en las siguientes carpetas del reproductor:
•Carpeta Biblioteca de medios\Música para archivos de sonido
•Carpeta Biblioteca de medios\Vídeos para archivos de vídeo
•Carpeta Biblioteca de medios\Imágenes para imágenes
Page 75

Zen Vision W (Monet WA) CLE_QS.book Page 73 Wednesday, September 27, 2006 10:06 AM
Desconexión del reproductor 73
Para transferir archivos de datos del ordenador
1 En Creative Media Explorer, haga clic en el botón Examinar
documentos .
2 Busque los archivos de datos y use el método de arrastrar y soltar para
transferirlos a la carpeta Datos del reproductor.
NOTAS
También puede transferir los archivos de sonido e imágenes con el
botón Examinar documentos. No obstante, se tratan como
archivos de datos y no se pueden reproducir o visualizar en el
repr oductor.
Para transferir contenido de ZENcast
1 Haga doble clic en el icono ZENcast Organizer situado en el
escritorio.
2 Haga clic en el botón Transferir .
3 Siga las instrucciones que aparecen en pantalla.
4 Haga clic en el botón Terminado.
NOTAS
Con ZENcast Organizer, puede suscribirse a sus canales ZENcast
favoritos, y descargar y transferir archivos multimedia ZENcast al
reproductor. Para obtener más información, visite
www.zencast.com.
Paso 5: Desconexión del reproductor
Desconecte el reproductor cuando vea el icono Transmisión de archivos
inactiva en la pantalla. NO desconecte el reproductor si se muestra el
icono Transmisión de archivos activa en la pantalla. Indica que se
están transfiriendo archivos y si desconecta el reproductor, puede dañar su
contenido.
Page 76

Zen Vision W (Monet WA) CLE_QS.book Page 74 Wednesday, September 27, 2006 10:06 AM
74 Selección de idioma del menú
Paso 6: Selección de idioma del menú
1 Si el reproductor no está encendido, deslice el interruptor de encendido
hasta el icono de encendido y manténgalo en esa posición hasta que
se encienda la pantalla.
2 Cuando encienda el reproductor por primera vez, el menú aparecerá en
inglés. Para cambiar el idioma:
i. Pulse y mantenga pulsado el botón Menú/Atrás . Aparecerá el menú
principal.
ii. Seleccione System Language y elija el idioma deseado.
Paso 7: Visualización de vídeos e imágenes, y reproducción
de música
Ya puede reproducir o visualizar los archivos, incluidos los archivos
multimedia Audible
NOTAS
Para ver vídeos
1 En el menú principal seleccione Vídeos, y elija el vídeo que desee ver.
La reproducción del vídeo se iniciará automáticamente.
2 Para ajustar el tamaño de la ventana de visualización, pulse el botón
Opciones y seleccione el tamaño de ventana que desee.
®
y ZENcast.
• Mantenga pulsado el botón Menú/Atrás para acceder al
menú principal.
• Los archivos del reproductor están ordenados alfabéticamente
para que las búsquedas puedan ser más rápidas.
Page 77

Zen Vision W (Monet WA) CLE_QS.book Page 75 Wednesday, September 27, 2006 10:06 AM
Visualización de vídeos e imágenes, y reproducción de música 75
Para ver imágenes
1 En el menú principal, seleccione Fotos y, a continuación, la fotografía que
desee ver.
2 Seleccione Acercar, y utilice los botones de navegación para obtener una
panorámica de la imagen horizontal o vertical.
Para reproducir música y archivos Audible
1 Conecte los auriculares al conector correspondiente.
2 En el menú principal, seleccione Biblioteca de música y seleccione la
categoría que desee.
3 Seleccione una pista y, a continuación, Reproducir.
4 Pulse los botones Subir volumen y Bajar volumen para ajustar el
volumen deseado.
NOTAS
• Para administrar archivos Audible®, debe instalar
AudibleManager
• En estos momentos, los archivos Audible sólo están disponibles
para regiones seleccionadas.
• Si el archivo de audio viene con una carátula, ésta se mostrará
en el reproductor.
®
.
Para reproducir archivos de medios ZENcast
1 En el menú principal, seleccione Vídeos y luego ZENcast.
2 Seleccione la carpeta del canal ZENcast que quiera y elija el archivo
multimedia ZENcast deseado.
La reproducción de ZENcast se iniciará automáticamente.
Page 78

Zen Vision W (Monet WA) CLE_QS.book Page 76 Wednesday, September 27, 2006 10:06 AM
76 Administración de datos y archivos multimedia
Administración de datos y archivos
multimedia
Tanto Creative Media Explorer como Creative MediaSource™ Player/
Organizer se suministran con el reproductor.
Creative Media Explorer
Utilice Creative Media Explorer si:
• no está familiarizado con la música digital y desea transferir música desde los
CD o el ordenador al reproductor.
• desea convertir, sincronizar y organizar archivos multimedia.
• prefiere administrar el reproductor con el entorno de “Windows Explorer” que
ya le es familiar.
Para iniciar Creative Media Explorer, haga doble clic en el icono ZEN Vision
W Media Explorer que se encuentra en Mi PC o en el escritorio. Si
desea obtener más información sobre el uso de Creative Media Explorer,
consulte la ayuda en línea.
Creative MediaSource Player/Organizer
Utilice Creative MediaSource, un reproductor y organizador de archivos
multimedia con numerosas prestaciones, si:
• necesita funciones adicionales como la grabación, la generación automática de
listas de reproducción y la conversión de formatos de audio.
• desea administrar una biblioteca de música en su equipo.
Para iniciar Creative MediaSource Player/Organizer, haga doble clic en el
icono Creative MediaSource Player/Organizer situado en el
escritorio.
Page 79

Zen Vision W (Monet WA) CLE_QS.book Page 77 Wednesday, September 27, 2006 10:06 AM
Administración de datos y archivos multimedia 77
Creative MediaSource Player/Organizer tiene una página de inicio desde la
que puede acceder a las tareas comunes. Si desea obtener más
información sobre el uso de Creative MediaSource Player/Organizer,
consulte la ayuda en línea.
NOTAS
Windows Media® Player (WMP) 10 también se incluye con el
reproductor. Para obtener más información sobre WMP10,
consulte la Guía del usuario del CD de instalación y aplicaciones o
visite la Base de conocimiento de autoayuda de Creative las 24
horas del día (consulte “Información adicional” en la página 80).
Page 80

Zen Vision W (Monet WA) CLE_QS.book Page 78 Wednesday, September 27, 2006 10:06 AM
78 Conexión del reproductor a un televisor
Conexión del reproductor a un televisor
Para ver el contenido del reproductor en una pantalla más grande, conecte
el reproductor a un televisor mediante el cable de vídeo y audio
suministrado.
ADVERTENCIA
1 Deslice el interruptor de encendido del reproductor hasta el icono de
encendido y manténgalo en esa posición hasta que se encienda la pantalla.
2 Si no está en el menú principal, mantenga pulsado el botón
3 Seleccione Sistema
de vídeo.
4 Seleccione Automático (NTSC) o Automático (PAL). Consulte la Guía del
usuario del televisor si no está seguro del formato de visualización del
televisor.
5 Conecte el reproductor a un televisor mediante el cable de audio y vídeo
suministrado.
NO utilice un cable de vídeo y audio estándar.
Configuración Configuración de foto/vídeo Salida
1
273 4
5
6
8
Menú/Atrás.
1 Conector de salida A/V
2 Conector de entrada de
vídeo - Amarillo
3 Conector (izquierdo) de
entrada de audio - Blanco
4 Conector (derecho) de
entrada de audio - Rojo
5 Conector rojo
6 Conector blanco
7 Conector amarillo
8 Cable de audio y vídeo
Page 81

Zen Vision W (Monet WA) CLE_QS.book Page 79 Wednesday, September 27, 2006 10:06 AM
Creación de listas de reproducción 79
Creación de listas de reproducción
Seleccione la combinación de pistas que desee en la Biblioteca de música
del reproductor para crear listas de reproducción que desee escuchar con
tranquilidad.
Para crear una lista de reproducción desde la biblioteca de
música del reproductor
1 Seleccione la pista o la categoría de pistas que desee en la Biblioteca de
música .
2 Mantenga pulsado el botón Opciones y seleccione Agregar a
seleccionadas.
3 Repita los pasos 1 y 2 para agregar otra pista o categoría de pistas.
4 Mantenga pulsado el botón Menú/Atrás para acceder al menú principal
para acceder al menú principal y seleccione Repr. ahora.
5 Pulse el botón Opciones y seleccione Guardar como lista.
6 Utilice los botones de navegación para crear el nombre de la lista de
reproducción y seleccione el botón Marca de comprobación ✔ para
confirmar el nombre.
7 Para reproducir una lista, seleccione Biblioteca de música Listas de
reproducción lista de reproducción deseada.
Page 82

Zen Vision W (Monet WA) CLE_QS.book Page 80 Wednesday, September 27, 2006 10:06 AM
80 Información adicional
Información adicional
Guía del usuario
Lea la Guía del usuario del CD de instalación y aplicaciones para obtener información
sobre las funciones del reproductor. Vaya a d:\manual\<idioma>\manual.chm
(sustituya d por la letra de la unidad que corresponda a la unidad de CD-ROM/DVD-
<idioma>
ROM e
por un idioma en el que esté disponible la Guía del usuario)
Base de conocimientos de Creative
Busque y resuelva sus dudas técnicas en la Base de conocimientos de autoayuda de
Creative las 24 horas del día. Vaya a www.creative.com, seleccione la región
correspondiente y, a continuación, seleccione Soporte.
Registro del producto
Si registra el producto, recibirá el servicio de asistencia al cliente más adecuado.
Puede registrar el producto durante la instalación o en la página www.creative.com/
register.
Tenga en cuenta que, para disfrutar de la garantía, no es necesario que registre el
producto.
Garantía y servicios de asistencia al cliente
El CD incluye información de garantía, de servicios de asistencia al cliente y otros
datos.
Servicios de asistencia al
cliente
Garantía
(sustituya d por la letra de la unidad de CD-ROM/DVD-ROM,
que se encuentra e
Conserve este documento para futuras consultas.
d:\support\<región>\<idioma>\support.chm
d:\warranty\<región>\<idioma>\warranty.chm
Conserve la prueba de compra durante el período de garantía.
<idioma>
por el idioma en que está el documento).
<región>
.
por el área en la
Page 83

Zen Vision W (Monet WA) CLE_QS.book Page 81 Wednesday, September 27, 2006 10:06 AM
Información de seguridad 81
Información de seguridad
Consulte la siguiente información para usar el producto de forma segura y
reducir las posibilidades de que se produzcan descargas eléctricas,
cortocircuitos, daños, incendios, lesiones auditivas o de correr otros
riesgos.
NOTAS El uso inadecuado del producto puede anular la garantía del
• No desmonte ni intente reparar el producto, la batería o el adaptador de
• No exponga el reproductor ni la pila a temperaturas que no estén entre los 0 °C
• No agujeree, aplaste ni prenda fuego al producto o a la pila.
• Mantenga el producto y la batería lejos de objetos magnéticos potentes.
• No someta el producto a una presión excesiva y evite que reciba golpes.
• No moje ni exponga a la humedad el producto o la batería.
• Si el producto es resistente a la humedad (consulte la caja del producto para
• No escuche el sonido a un volumen alto durante largos períodos de tiempo.
• La batería debe reciclarse o desecharse correctamente. Póngase en contacto
• No permita que los terminales de la batería entren en contacto con objetos
•
mismo. Para obtener más información, consulte la Garantía que
acompaña al producto.
corriente.
Solicite todas las reparaciones a Creative o a un técnico de reparación
autorizado.
y los 45 °C (32º F a 113º F).
obtener información), evite sumergirlo en agua o exponerlo a la lluvia.
con los organismos locales para obtener información sobre reciclaje y
eliminación de residuos.
metálicos.
Si durante el uso o la carga observa una pérdida de líquido, malos olores,
decoloraciones o deformaciones, extraiga la batería y no vuelva a usarla.
Lávese bien las manos antes de tocar alimentos o áreas sensibles del cuerpo,
como los ojos.
Si utiliza un aparato conductor, como un par de auriculares, muy cerca de un
televisor CRT o de un monitor CRT, estos últimos pueden emitir una descarga
electroestática. La descarga puede dar la sensación de un choque estático. Si
bien esta descarga electroestática no suele ser peligrosa, es recomendable
evitar el contacto directo con dispositivos CRT cuando se utilizan auriculares.
Page 84

Zen Vision W (Monet WA) CLE_QS.book Page 82 Wednesday, September 27, 2006 10:06 AM
82 Información de seguridad
ADVERTENCIA
Al igual que ocurre con cualquier otro dispositivo de
almacenamiento basado en soportes digitales, deben
realizarse copias de seguridad de los datos con regularidad.
Creative recomienda que se respeten las precauciones de uso
indicadas en este folleto y que se realicen copias de seguridad
de los datos almacenados en el reproductor con frecuencia.
Creative no se hará responsable en ningún caso de ningún
daño de carácter indirecto, incidental, especial o consecuente
sufrido por cualquier persona a causa de la negligencia de
Creative, ni de la pérdida de beneficios, ahorros,
funcionalidad, ingresos o datos relacionada con este
dispositivo o derivada de su utilización, aunque se haya
advertido a Creative de la posibilidad de tales daños. La
responsabilidad legal de Creative o su compensación
económica por los daños causados al cliente o a cualquier
otra persona no superarán en ningún caso el importe
abonado por el dispositivo, independientemente del tipo de
reclamación. En algunos países o Estados no se permite la
limitación o exclusión de responsabilidades relacionadas con
daños incidentales o consecuentes, por lo que tal limitación o
exclusión puede que no sea aplicable en su caso.
El símbolo RAEE en un producto indica que éste no se puede eliminar
como cualquier otra basura. Si garantiza la eliminación correcta del
producto, ayudará a proteger el medio ambiente. Para obtener más
informaciones sobre el reciclaje del mismo, póngase en contacto con
las autoridades locales pertinentes, con el proveedor de servicios de
recogida de basura o con el establecimiento donde adquirió el
producto.
Copyright © 2006 Creative Technology Ltd. Reservados todos los derechos. El logotipo de Creative,
Creative MediaSource y ZEN son marcas comerciales o marcas comerciales registradas de Creative
Technology Ltd. en los Estados Unidos u otros países. Audible y AudibleManager son marcas
comerciales registradas de Audible Inc. Microsoft, Windows, Windows Media y el logotipo de Windows
son marcas comerciales registradas de Microsoft Corporation.
Page 85

n
e
Zen Vision W (Monet WA) CLE_QS.book Page 83 Wednesday, September 27, 2006 10:06 AM
Nederlands
Gefeliciteerd! Wij danken u van harte voor uw aankoop van de
Creative ZEN™ Vision W, de speler van Creative voor meerdere indelingen.
In dit document vindt u de nodige informatie om met uw nieuwe speler aan
de slag te gaan!
Voor een optimaal gebruik van de speler is het raadzaam ook de uitgebreide
Gebruikershandleiding op de installatie- en toepassingen-cd goed door te
nemen.
COMPACT FLA SH
109
11
12
1 Infraroodontvanger
2 Knop Menu/Vorige
Houd deze knop ingedrukt om het
1
hoofdmenu weer te geven.
Druk hierop om terug te keren naar
2
het vorige menu.
3Knop Opties
3
Druk hierop om een lijst van opties
weer te geven.
4
4 Navigatieknoppen
5
5 Knop Afspelen/Onderbreken
6
6 Knop Volgende/Vooruitspoele
Druk hierop om naar de volgende
7
track te gaan.
Houd deze knop ingedrukt om in een
8
track vooruit te spoelen.
7 Ingebouwde luidspreker
8 Knop Vorige/Achteruitspoelen
Druk hierop om naar de vorige track t
gaan.
Houd deze knop ingedrukt om in een
track vooruit te spoelen.
9CompactFlash-
geheugenkaarthouder
10 Hoofdtelefoonaansluiting
11 Audio/video Uit-aansluiting
12 DC IN 5V-aansluiting
Page 86

Zen Vision W (Monet WA) CLE_QS.book Page 84 Wednesday, September 27, 2006 10:06 AM
84 Opties selecteren
13 14
15 16
13 Aan/uit-knop
14 Knop Volume verlagen
15 Knop Volume verhogen
16 Microfoon
17 Verwijderbare lithium-
ionbatterij
18 Verbindingsconnector
19 USB 2.0-poort
19 18 17
Opties selecteren
In de volgende onderdelen van deze handleiding verstaan we onder de term
‘Selecteren’ dat u met de navigatieknoppen (Omhoog, Omlaag, Links en
Rechts) menuonderdelen markeert en vervolgens op de knop OK drukt om
de optie te selecteren.
1
2
1Knop
Omhoog
2Knop OK
5
4
3
3Knop Rechts
4 Knop Omlaag
5Knop Links
Page 87

Zen Vision W (Monet WA) CLE_QS.book Page 85 Wednesday, September 27, 2006 10:06 AM
Aan de slag 85
Aan de slag
Stap 1: De speler opladen
De lithium-ionbatterij die bij uw speler wordt geleverd, moet volledig
worden opgeladen voordat u de speler in gebruik neemt. De batterij is na
ongeveer drie uur volledig opgeladen. Om de batterij van de speler op te
laden, sluit u de stroomadapterkabel van de speler aan op de speler en op
een stopcontact zoals in onderstaande afbeelding wordt getoond.
1
1DC IN 5V-aansluiting
2 Stroomadapterkabel
2
OPMERKINGEN
Afhankelijk van de regio waarin u uw apparaat hebt gekocht,
verschilt uw stroomadapter mogelijk van het model dat hier is
afgebeeld.
Page 88

Zen Vision W (Monet WA) CLE_QS.book Page 86 Wednesday, September 27, 2006 10:06 AM
86 De software installeren
Wanneer de batterij wordt geladen, knippert het pictogram Batterij wordt
geladen op het scherm. Wanneer op het scherm van de speler het
pictogram Batterij geladen zichtbaar is, koppelt u de speler los van de
stroomadapter.
OPMERKINGEN
De speler zal blijven opladen, zelfs nadat hij is
uitgeschakeld, zolang hij op een computer of stopcontact
aangesloten blijft.
Stap 2: De software installeren
WAARSC HUWING
1 Schakel de computer in.
U moet zich als beheerder aanmelden bij Microsoft
de software kunt installeren. Raadpleeg de on line Help van het
besturingssysteem voor meer informatie.
2 Plaats de installatie- en toepassingen-cd in het cd-rom-/dvd-rom-station.
Normaal wordt de cd automatisch gestart. Anders volgt u de onderstaande
stappen:
i. Dubbelklik op het pictogram Deze computer.
U kunt ook gewoon klikken op Start Deze computer.
ii. Klik met de rechtermuisknop op het pictogram van het cd-rom-/dvd-
rom-station en klik vervolgens op Automatisch afspelen.
3 Volg de instructies op het scherm en start de computer opnieuw als u
daarom wordt gevraagd.
4 Als u uw product wilt registreren nadat de computer opnieuw is opgestart,
volgt u de overeenkomstige instructies op het scherm.
OPMERKINGEN Voor de registratie van het product hebt u een
Installeer EERST de software voordat u de speler op de
computer aansluit.
®
Windows® voordat u
internetverbinding nodig.
Page 89

Zen Vision W (Monet WA) CLE_QS.book Page 87 Wednesday, September 27, 2006 10:06 AM
De speler aansluiten op de computer 87
Stap 3: De speler aansluiten op de computer
Sluit de speler met behulp van de meegeleverde USB-kabel aan op de USBpoort van de computer als dat nog niet is gebeurd.
OPMERKINGEN
• De batterij van de speler wordt automatisch opgeladen wanneer
u de speler op de USB-poort van de computer aansluit. Bij
gebruik van de USB-poort van de computer duurt het ongeveer
zes uur om de batterij van de speler op te laden.
• Als u de batterijen continu wilt opladen via de USB-poort, mag
de computer niet in de energiespaarstand staan. Raadpleeg de
Help van uw besturingssysteem voor meer informatie over
energiespaarstanden.
• Als uw volledig geladen speler gedurende lange tijd
aangesloten blijft op de computer of een stopcontact, wordt het
scherm automatisch uitgeschakeld om energie te besparen.
• Sluit de speler rechtstreeks aan op een USB-computerpoort of
een USB-hub met eigen voeding, maar niet op een USB-hub
met busvoeding.
Page 90

Zen Vision W (Monet WA) CLE_QS.book Page 88 Wednesday, September 27, 2006 10:06 AM
88 Inhoud overbrengen
Stap 4: Inhoud overbrengen
Gebruik Creative Media Explorer om muziek en andere bestanden van uw
cd-verzameling of computer over te brengen. Zie “Media en gegevens
beheren” op pagina 92 voor meer informatie.
Creative Media Explorer starten
1 Zorg ervoor dat de speler op de computer is aangesloten, zoals is afgebeeld
op pagina 87.
2 Dubbelklik op het bureaublad op het pictogram ZEN Vision W Media
Explorer .
Muziek van uw cd-verzameling overbrengen of ‘rippen’
1 Klik in Creative Media Explorer op de knop Audio-cd’s rippen .
2 Volg de instructies op het scherm.
Albuminformatie wordt automatisch opgehaald als u verbonden bent met
internet en zich bij een provider van muziekinformatie hebt geregistreerd.
Muziek, video's of afbeeldingen van de computer overbrengen
1 Klik in Creative Media Explorer op de knop Bladeren in media .
2 Zoek uw mediabestanden en kopieer ze met slepen-en-neerzetten naar de
volgende mappen in uw speler:
•De map Mediabibliotheek\Muziek voor audiobestanden
•De map Mediabibliotheek\Video's voor videobestanden
•De map Mediabibliotheek\Afbeeldingen voor afbeeldingen
Page 91

Zen Vision W (Monet WA) CLE_QS.book Page 89 Wednesday, September 27, 2006 10:06 AM
De speler loskoppelen 89
Gegevensbestanden van de computer overbrengen
1 Klik in Creative Media Explorer op de knop Bladeren in documenten .
2 Zoek de gegevensbestanden en kopieer ze door middel van slepen-en-
neerzetten naar de map Gegevens in de speler.
OPMERKINGEN
U kunt ook audiobestanden en foto's overbrengen met de
knop Bladeren in documenten. Die bestanden worden dan
echter als gegevensbestanden beschouwd en kunnen niet
worden afgespeeld of weergegeven op de speler.
ZENcast-inhoud overbrengen
1 Dubbelklik op het bureaublad op het pictogram ZENcast Organizer .
2 Klik op de knop Overbrengen .
3 Volg de instructies op het scherm.
4 Klik op de knop Gereed.
OPMERKINGEN
Met ZENcast Organizer kunt u zich abonneren op uw
favoriete ZENcast-kanalen en ZENcast-mediabestanden
downloaden en overbrengen naar uw speler. Bezoek
www.zencast.com voor meer informatie.
Stap 5: De speler loskoppelen
Koppel de speler los wanneer het pictogram Bestandsoverdracht inactief
op het scherm is weergegeven. Koppel de speler NIET los als op het
display het pictogram Bestandsoverdracht actief is weergegeven. De
bestandsoverdracht is dan nog niet voltooid. Als u de speler nu loskoppelt,
kan de inhoud die u overbrengt, beschadigd raken.
Page 92

Zen Vision W (Monet WA) CLE_QS.book Page 90 Wednesday, September 27, 2006 10:06 AM
90 De gewenste menutaal selecteren
Stap 6: De gewenste menutaal selecteren
1 Als de speler niet is ingeschakeld, schuift u de Aan/uit-knop naar het
stroompictogram en houdt u de knop in die stand tot het scherm
verlicht is.
2 Wanneer u de speler voor het eerst inschakelt, krijgt u een Engelstalig
menu te zien. U kunt als volgt de taal wijzigen:
i. Druk op de knop Menu/Vorige en houd deze ingedrukt. Het
hoofdmenu verschijnt.
ii. Selecteer System Language en selecteer de gewenste taal.
Stap 7: Video's of afbeeldingen bekijken en muziek
afspelen
U bent nu klaar om bestanden af te spelen of te bekijken, waaronder
®
Audible
Video's bekijken
1 Selecteer in het hoofdmenu Video's en selecteer de gewenste video.
Het afspelen van de video wordt automatisch gestart.
2 Als u de grootte van het weergavevenster wilt aanpassen, drukt u op de
knop Opties en selecteert u het gewenste formaat.
- en ZENcast-mediabestanden.
OPMERKINGEN
• Druk op de knop Menu/Vorige om het hoofdmenu
weer te geven.
• Voor snellere zoekresultaten worden de bestanden op de
speler alfabetisch gesorteerd.
Page 93

Zen Vision W (Monet WA) CLE_QS.book Page 91 Wednesday, September 27, 2006 10:06 AM
Video's of afbeeldingen bekijken en muziek a fspelen 91
Foto's bekijken
1 Selecteer in het hoofdmenu Foto's en selecteer de gewenste foto.
2 Selecteer Inzoomen en gebruik de navigatieknoppen om de foto horizontaal
of verticaal te pannen.
Muziek en andere Audible-bestanden afspelen
1 Sluit de oortelefoon aan op de hoofdtelefoonaansluiting.
2 Selecteer in het hoofdmenu via Muziekbiblioth. de gewenste categorie.
3 Selecteer eerst een nummer en vervolgens Afspelen.
4 Druk op de knoppen Volume verhogen en Volume verlagen om
het volume aan te passen.
OPMERKINGEN
• Voor het beheer van Audible®-bestanden dient u
AudibleManager
• Audible-bestanden zijn momenteel alleen beschikbaar voor
bepaalde regio's.
• Als in uw audiobestand de albumhoes beschikbaar is, wordt
deze op de speler weergegeven.
®
te installeren.
ZENcast-mediabestanden afspelen
1 Selecteer in het hoofdmenu Video’s en daarna ZENcast.
2 Selecteer de gewenste ZENcast-kanaalmap en daarna het gewenste
ZENcast-mediabestand.
Het afspelen van de ZENcast-video wordt automatisch gestart.
Page 94

Zen Vision W (Monet WA) CLE_QS.book Page 92 Wednesday, September 27, 2006 10:06 AM
92 Media en gegevens beheren
Media en gegevens beheren
De toepassingen Creative Media Explorer en Creative MediaSource™
Player/Organizer worden met de speler meegeleverd.
Creative Media Explorer
Gebruik Creative Media Explorer als u:
• nog niet bekend bent met digitale muziek en deze wilt overbrengen van uw cd’s
of computer naar de speler
• audiobestanden wilt converteren, synchroniseren en organiseren
• liever de speler beheert vanuit de vertrouwde “Windows Verkenner”-omgeving.
Voor het starten van Creative Media Explorer dubbelklikt u op het pictogram
ZEN Vision W Media Explorer in Deze computer of op het bureaublad.
Raadpleeg de on line Help van Creative Media Explorer voor meer
informatie over het gebruik van dit programma.
Page 95

Zen Vision W (Monet WA) CLE_QS.book Page 93 Wednesday, September 27, 2006 10:06 AM
Media en gegevens beheren 93
Creative MediaSource Player/Organizer
Gebruik Creative MediaSource Player/Organizer, een volwaardig
programma voor het ordenen/afspelen van media, als u:
• extra voorzieningen nodig hebt, zoals het samenstellen van automatische
afspeellijsten en de conversie van audio-indelingen
• een muziekbibliotheek op uw computer wilt beheren.
Als u Creative MediaSource Player/Organizer wilt starten, dubbelklikt u op
het bureaublad op het pictogram Creative MediaSource Player/Organizer
.
Creative MediaSource Player/Organizer heeft een startpagina waarop uw
toegang kunt krijgen tot algemene taken. Raadpleeg de on line Help van
Creative MediaSource Player/Organizer voor meer informatie over het
gebruik van dit programma.
OPMERKINGEN
Windows Media® Player (WMP) 10 wordt eveneens bij de
speler meegeleverd. Voor meer informatie over WMP10,
raadpleegt u de Gebruikershandleiding op de installatie- en
toepassingen-cd of bezoekt u de Knowledge Base voor
zelfhulp van Creative waar u 24 uur per dag terecht kunt (zie
“Aanvullende informatie” op pagina 96).
Page 96

Zen Vision W (Monet WA) CLE_QS.book Page 94 Wednesday, September 27, 2006 10:06 AM
94 De speler aansluiten op een tv
De speler aansluiten op een tv
Als u de inhoud van de speler op een groter scherm wilt weergeven, sluit u
de speler op een tv aan met de meegeleverde audio/video-kabel.
WAARSC HUWING
1 Schuif de aan/uit-knop op de speler naar het stroompictogram toe en
houd de knop in die positie tot het scherm verlicht is.
2 Als u zich niet in het hoofdmenu bevindt, houdt u de knop Menu/Vorige
ingedrukt.
3 Selecteer Systeem
4 Selecteer (Auto) NTSC of (Auto) PAL. Raadpleeg de gebruikershandleiding
bij uw tv als u niet precies weet welke weergavestandaard voor uw tv wordt
gebruikt.
5 Sluit de speler op een tv aan met behulp van de meegeleverde audio/video-
kabel (die apart wordt verkocht).
1
Gebruik NOOIT een standaard audio/video-kabel.
Instellingen Foto/video-instellingen Video Uit.
273 4
5
6
8
1 Audio/video Uit-
aansluiting
2 Video In-plug - geel
3 Audio In-plug (links) - wit
4 Audio In-plug (rechts) -
rood
5 Rode connector
6 Witte connector
7 Gele connector
Page 97

Zen Vision W (Monet WA) CLE_QS.book Page 95 Wednesday, September 27, 2006 10:06 AM
Afspeellijsten maken 95
Afspeellijsten maken
Voor het samenstellen van afspeellijsten voor gemakkelijker afspelen kunt
u elke gewenste combinatie van tracks uit uw Muziekbibliotheek
gebruiken.
Een afspeellijst maken vanuit de muziekbibliotheek van de speler
1 Selecteer via Muziekbiblioth. de gewenste track of categorie van tracks.
2 Houd de knop Opties ingedrukt en selecteer Toevoegen aan selectie.
3 Herhaal stap 1 en 2 om nog een track of categorie van tracks toe te voegen.
4 Druk op de knop Menu/Vorige om het hoofdmenu weer te geven en
selecteer Wordt nu afgespeeld.
5 Druk op de knop Opties en selecteer Opslaan als afspeellijst.
6 Gebruik de navigatieknoppen om een naam voor uw afspeellijst te maken
en selecteer het vinkje ✔ om de naam te bevestigen.
7 Als u een afspeellijst wilt afspelen, selecteert u via Muziekbiblioth.
Afspeellijsten de gewenste afspeellijst.
Page 98

Zen Vision W (Monet WA) CLE_QS.book Page 96 Wednesday, September 27, 2006 10:06 AM
96 Aanvullende informatie
Aanvullende informatie
Gebruikershandleiding
Lees de Gebruikershandleiding op uw installatie- en toepassingen-cd voor meer
informatie over de vele functies van uw speler. Ga naar d:\manual\<taal>\manual.chm
(vervang
d:\
door een van de talen waarin de Gebruikershandleiding beschikbaar is.)
door de stationsaanduiding van uw cd-rom/dvd-rom-station en
Creative Knowledge Base
Voor vragen over en oplossingen voor technische problemen kunt u 24 uur per dag
terecht op de Knowledge Base voor zelfhulp van Creative. Ga naar www.creative.com,
selecteer uw regio en selecteer daarna Ondersteuning.
Productregistratie
Door uw product te registreren, bent u zeker dat u de meest geschikte service en
productondersteuning ontvangt die beschikbaar is. U kunt uw product registreren
tijdens de installatie of later op www.creative.com/register.
Uw garantierechten zijn niet afhankelijk van de productregistratie.
Customer Support Services en garantie
U vindt informatie over onder meer Customer Support Services en garantie op de
installatie-cd.
Customer Support Services d:\support\<regio>\<t aal>\support.chm
Garantie
(Vervang
d:\
door de regio waarin u zich bevindt, en
door de stationsaanduiding van uw cd-rom-/dvd-rom-station,
opgesteld)
Bewaar dit document voor later gebruik.
d:\warranty\<regio>\<taal>\warranty.chm
Bewaar uw aankoopbewijs gedurende de hele garantieperiode.
<taal>
door de taal waarin het document is
<taal>
<regio>
Page 99

Zen Vision W (Monet WA) CLE_QS.book Page 97 Wednesday, September 27, 2006 10:06 AM
Veiligheidsinformatie 97
Veiligheidsinformatie
Raadpleeg de volgende informatie als u uw product op een veilige manier
wilt gebruiken en het risico op elektrische schokken, kortsluiting,
beschadiging, brand, gehoorstoornissen of overige gevaren wilt beperken.
OPMERKINGEN Foutief gebruik van het product kan de garantie ongeldig
• Demonteer het product, de batterij of de stroomadapter niet en probeer ze ook
niet zelf te repareren.
Neem voor alle onderhoudswerk contact op met Creative of bevoegde
reparatiediensten.
• Stel de speler of batterij niet bloot aan temperaturen lager dan 0°C of hoger
dan 45°C.
• Maak geen openingen in het product of de batterij, onderwerp ze niet aan
overmatige druk en steek ze niet in brand.
• Houd het product of de batterij weg van sterk magnetische objecten.
• Stel het product niet bloot aan overmatige druk of stoten.
• Bescherm het product of de batterij tegen water of vocht.
• Als het product niet vochtbestendig is (zie de productverpakking voor
gedetailleerde informatie), dient u ervoor te zorgen dat het product niet wordt
ondergedompeld in water of wordt blootgesteld aan regen.
• Stel geen hoog volumeniveau in wanneer u gedurende lange tijd audio beluistert.
• U moet de batterij op geschikte wijze recyclen of wegwerpen. Neem contact op
met de lokale instanties voor informatie over het recyclen en wegwerpen van
gebruikte batterijen.
• Vermijd dat metalen objecten in contact komen met de batterijpolen.
In geval van lekkage, stank, verkleuring of vervorming tijdens het opladen of
gebruik, verwijdert u de batterij en gebruikt u deze niet opnieuw. Was daarna
uw handen goed voordat u in aanraking komt met etenswaren of gevoelige
plaatsen op uw lichaam, zoals uw ogen.
Wanneer een geleidend apparaat, zoals een oortelefoon, wordt gebruikt in de
•
nabijheid van een CRT-televisie of CRT-monitor, kan die televisie of monitor
een elektrostatische ontlading uitzenden. De elektrostatische ontlading kan
aanvoelen als een statische schok. Hoewel deze statische schok gewoonlijk
niet schadelijk is, wordt u aanbevolen afstand te bewaren tussen u en CRTapparaten wanneer u een oortelefoon gebruikt.
maken. Lees de garantiebepalingen bij het product voor meer
informatie.
Page 100

Zen Vision W (Monet WA) CLE_QS.book Page 98 Wednesday, September 27, 2006 10:06 AM
98 Veiligheidsinformatie
WAARSCHUWING
Zoals bij alle opslagapparaten die op digitale media zijn
gebaseerd, dient u regelmatig een back-up van uw gegevens
te maken. Wij bevelen u ten zeerste aan de
voorzorgsmaatregelen voor het gebruik die in deze
handleiding zijn vermeld, in acht te nemen, en regelmatig
een back-up van de gegevens in de speler te maken.
Creative zal in geen enkel geval aansprakelijk zijn voor enige
indirecte, incidentele, bijzondere of gevolgschade aan enige
personen, die veroorzaakt is door de nalatigheid van
Creative, noch voor enig verlies van winsten, besparingen,
gebruiksverlies, inkomsten of gegevens dat voorvloeit uit of
gerelateerd is aan dit apparaat, zelfs als Creative op de
hoogte was van de mogelijkheid tot dergelijke schade. In
geen enkel geval zal de aansprakelijkheid of
schadevergoeding van Creative jegens u meer bedragen dan
het bedrag dat u voor het apparaat betaald hebt, ongeacht
de vorm van uw claim. In bepaalde landen/staten is de
uitsluiting of beperking van aansprakelijkheid voor
incidentele of gevolgschade niet toegestaan. In dat geval is
het mogelijk dat de hierboven vermelde beperking of
uitsluiting niet op u van toepassing is.
Het gebruik van het symbool voor Afgedankte elektrische en
elektronische apparatuur (WEEE) geeft aan dat dit product niet mag
worden behandeld als huishoudelijk afval. Door ervoor te zorgen dat
dit product op de juiste wijze wordt afgedankt, draagt u bij aan de
bescherming van het milieu. Raadpleeg voor meer gedetailleerde
informatie over hergebruik van dit product uw plaatselijke overheid,
de dienst voor huishoudelijk afval of de winkel waar u dit product hebt
aangeschaft.
Copyright © 2006 Creative Technology Ltd. Alle rechten voorbehouden. Het Creative-logo, Creative
MediaSource en ZEN zijn handelsmerken of geregistreerde handelsmerken van Creative Technology Ltd.
in de Verenigde Staten en/of andere landen. Audible en AudibleManager zijn geregistreerde
handelsmerken van Audible, Inc. Microsoft, Windows, Windows Media en het Windows-logo zijn
geregistreerde handelsmerken van Microsoft Corporation.
 Loading...