

Page 1

Page 2
1
( )
2
15
14
13
12
11
10
( )
3
( )
( )
4
5
6
7
8
9
Page 3

1
Congratulations
ZEN Vision:M™ is the new digital player from Creative. Read on to learn how to
get started with your new player!
Contents
About Your Player ................................................................................... 2
Using the Navigation Controls ............................................................... 3
Getting Started ....................................................................................... 4
Managing Music and Data .................................................................... 10
Understanding Your Player .................................................................. 11
Managing Your Player .......................................................................... 12
Personalizing Your Player .................................................................... 21
Connecting Your Player to a TV ............................................................ 24
FAQ ....................................................................................................... 25
Information Diagrams .......................................................................... 26
General Specifications ........................................................................ 28
Copyright and License .......................................................................... 30
Page 4

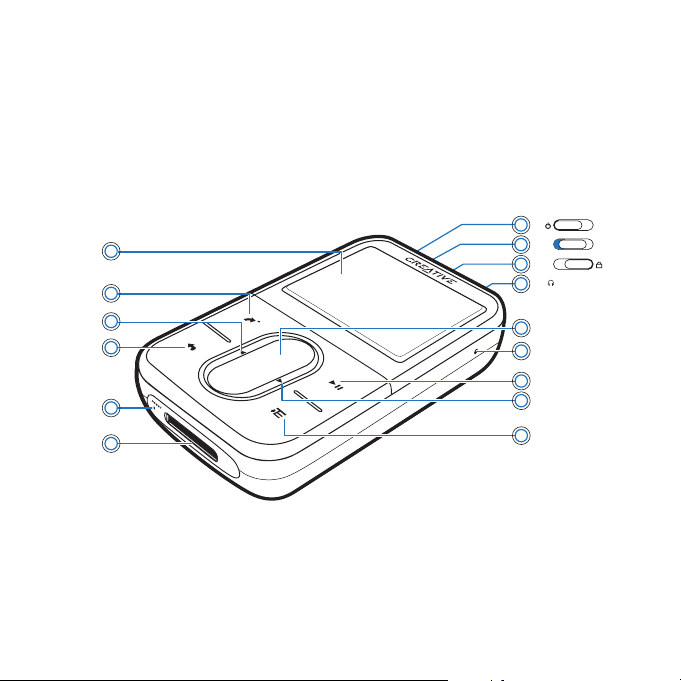
2 About Your Player
About Your Player
Unfold the last page of this booklet, and reference the image there against the
names and descriptions below.
1Power switch
2Power LED
3Lock
Push toward the Lock icon to
lock the player and prevent
functions from being accidentally
activated.
4Headphone jack
5Vertical Touch Pad
See “Using the Navigation
Controls” on page 3.
6Microphone
7 Play/Pause button
8 Next/Fast Forward button
Press to go to the next track or
menu option.
Press and hold to move forward
within a track.
9 Options button
Press to display more options.
10 Dock connector
Connect the USB synchronization
adapter to this connector.
11 Reset hole
See “How do I reset ZEN
Vision:M?” on page 25.
12 Menu/Back button
Press to return to the previous
screen or menu.
Press and hold to return to the
main menu.
13 Previous/Rewind button
Press to go to the previous track
or menu option.
Press and hold to move back
within a track.
14 My Shortcut button
See “To assign a menu shortcut
to My Shortcut button” on
page 21.
15 Liquid Crystal Display (LCD)
Page 5
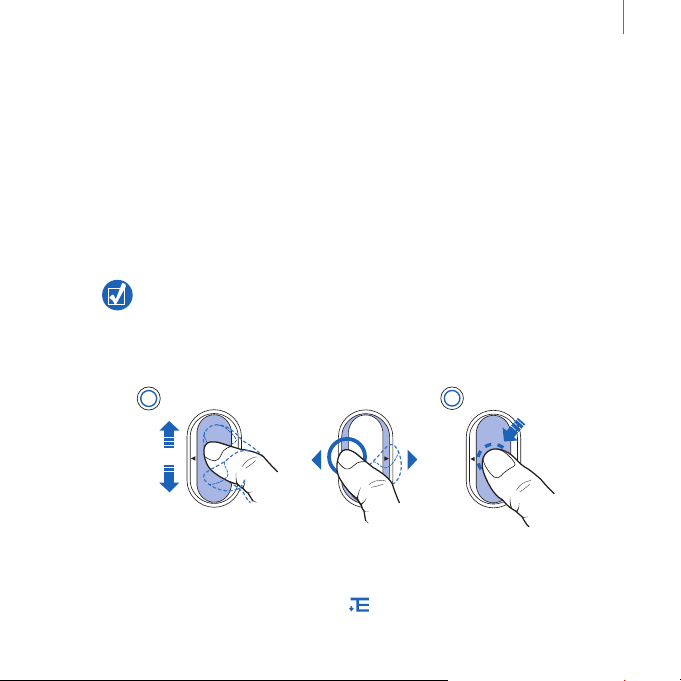
Using the Navigation Controls 3
Using the Navigation Controls
We use the term “Navigation controls” to mean the following:
Vertical Touch Pad
Previous/Rewind button
Next/Fast Forward button.
We use the term “Select” to mean the following actions:
1 Move your thumb up and down the Vertical Touch Pad to move vertically in a
menu OR press the Previous/Rewind or Next/Fast Forward button to move
horizontally in a menu.
Firmly tap the top or bottom edge of the Vertical Touch Pad to move up or down
one menu option.
Press and hold the top or bottom edge of the Vertical Touch Pad to rapidly scroll
through menu options.
2 Firmly tap the Vertical Touch Pad to select the highlighted option.
1
OR
To adjust volume with the Vertical Touch Pad
Depending on the menu you are in, move your thumb up and down the Vertical
Touch Pad OR press the Options button and select Volume.
2
Page 6

4 Getting Started
Getting Started
Step 1: Set Up Software
DO NOT connect your player to your computer before setting up the software.
1 Turn on your computer. You must log in as an administrator in Windows®
before you can set up the software. For more information, refer to your
operating system’s online Help.
2 Insert the Installation CD into your CD-ROM/DVD-ROM drive. Your CD
should start automatically. If it does not, follow the steps below:
i. Double-click the My Computer icon.
Alternatively, click Start → My Computer.
ii. Right-click the CD-ROM/DVD-ROM drive icon, and then click Autoplay.
3 Follow the instructions on the screen and when prompted, restart your
computer.
4 When your computer restarts, follow the product registration instructions
on the screen.
You will require an Internet connection to register your product.
Page 7
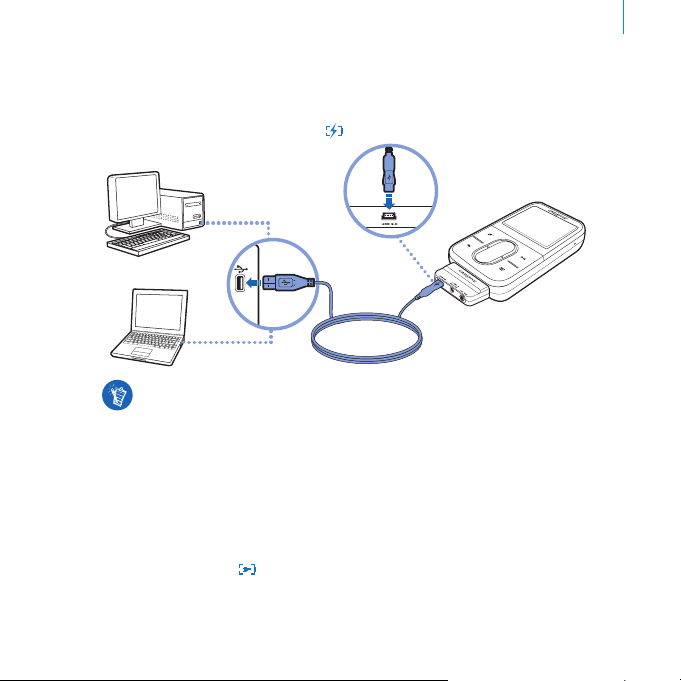
Getting Started 5
Step 2: Charge Your Player
1 If you have not done so, connect your player to your computer’s USB port
with the supplied USB cable.
blinks or the battery charging icon flashes on your player’s LCD.
For continuous battery charging using the USB port, minimize computer usage
and make sure your computer is not in power conservation mode. For more
information on power conservation modes, refer to your operating system's
Help.
Connect to a computer USB port or a self-powered USB hub; do not connect to a
bus powered USB hub.
For express battery charging without using your computer, purchase the ZEN
Vision:M Power Adapter. For more information on this and other ZEN Vision:M
accessories, visit www.creative.com.
2 Disconnect your player from your computer when the battery is fully
charged and you see on your player’s LCD. The battery is fully charged in
approximately five hours.
When the battery is charging, the Power LED
Page 8
6 Getting Started
Step 3: Turn On Your Player
1 Slide the Power switch towards the Power icon and hold it there until the
LCD lights up.
2 When you turn on your player for the first time, the menu is in English. To
change the language:
i. Press and hold the Menu/Back button . The main menu appears.
ii. Select System
→ Language → language that you want.
3 After you have finished using your player, slide the Power switch towards
the Power icon until the Shutting down message appears.
Step 4: Transfer Content
Transfer music and other files from your CD collection or computer. For more
details, see “Managing Music and Data” on page 10.
You can acquire content from many legal sources. Here are some suggestions:
Audio tracks - ripped from personal audio CDs, home studio recordings or
purchased from online music stores.
Videos - purchased from online movie stores or digitized home video
footage.
Photos - encoded from your personal digital camera or scanned from
printed photos.
To transfer or ‘rip’ music from your CD collection
1 Make sure your player is connected to your computer as shown on page 5.
2 Double-click the ZEN Vision:M Media Explorer icon on the desktop.
3 Click the Rip Audio CDs button .
Page 9
Getting Started 7
4 Follow the instructions on the screen.
Creative Media Explorer uses MusicIDSM from Gracenote® to get artist, title,
track, credits, and other information about the CDs you play. This service is
FREE and automatic. You must be connected to the Internet when using this
service. For more information, refer to the Creative Audio CD Ripper online
Help.
To transfer audio files, videos or pictures from your computer
1 Repeat steps 1 and 2 in "To transfer or ‘rip’ music from your CD collection".
2 Click the Browse Media button .
3 Locate your media files and copy them to your player using the
drag-and-drop method.
To transfer data files
1 Repeat steps 1 and 2 in "To transfer or ‘rip’ music from your CD collection".
2 Click the Browse Documents button .
3 Locate your data files and transfer them to your player using the
drag-and-drop method. You can also transfer audio files and photos using
the Browse Documents button .
Make sure files are transferred to the correct folder, for example pictures are
transferred to Media → Pictures and music to Media → Music.
Page 10
8 Getting Started
Step 5: Disconnect Your Player
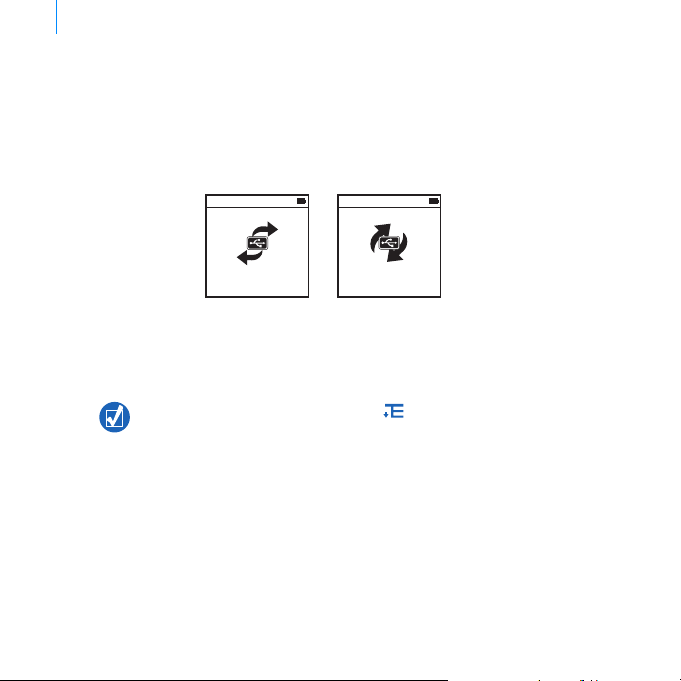
When you have finished transferring files, disconnect ZEN Vision:M.
DO NOT disconnect your player if you see the left picture below on the display.
Track or data file transfer is in progress and disconnecting your player may
damage the content being transferred. Wait until you see the right picture
below on the display before disconnecting your player.
Docked
Docked
Step 6: Play Music or View Files
You are now ready to play music that you have ripped, and view files you have
transferred!
At any time, press the Options button for more options.
Files in your player are sorted alphabetically for quicker searches.
To play music
1 Connect your earphones to the Headphone jack.
2 In the main menu, select Music Library → category that you want.
3 Select a track and select Play.
4 Move your thumb up and down the Vertical Touch Pad to adjust the volume.
Page 11

Getting Started 9
To play videos
In the main menu, select Videos → Video → video that you want.
To view pictures
1 In the main menu, select Photos → Pictures → picture that you want.
2 Press the Options button
If you select the zoom option, use the Navigation controls to pan horizontally
and vertically in four different directions.
to select rotate and zoom options.
Caring For Your Player
Portable players are subject to normal wear and tear, which could include
scratches to the screen. To prevent this, take extra care when handling your
product and in particular when placing your player in pockets or bags. If you
want to maintain your player's original finish, you may wish to invest in an
optional case or screen protector, both available for separate purchase at
www.creative.com/shop.
Page 12

10 Managing Music and Data
Managing Music and Data
Creative Media Explorer and Creative MediaSource™ Player/Organizer are
included with your player. Try out these applications to decide which one is
more suitable for your needs.
Creative Media Explorer
Use Creative Media Explorer if:
you are new to digital music and want to transfer music from your CDs to your
player
you want to convert, synchronize, and organize audio files
you prefer to manage your player in the familiar “Windows Explorer” environment.
To start Creative Media Explorer, double-click the ZEN Vision:M Media
Explorer icon under My Computer or on the desktop. For more information
about using Creative Media Explorer, refer to its online Help.
Creative MediaSource Player/Organizer
Use the full-featured Creative MediaSource Player/Organizer if:
you require additional features such as recording, automatic playlist generation, and
audio format conversion
you want to manage a music library on your computer.
To start Creative MediaSource Player/Organizer, double-click the Creative
MediaSource Player/Organizer icon
on your desktop. Creative
MediaSource Player/Organizer has a Home page from which you can access
common tasks. For more information about using Creative MediaSource
Player/Organizer, refer to its online Help.
Page 13

Understanding Your Player 11
Understanding Your Player
Navigate through the different menus to find out what your player can do!
These are the main menu options on your player:
Music Library
Photos
Videos
FM Radio
Microphone
Extras
System
Your player’s menu interface, features and operations are controlled by your
player’s firmware. Sometimes, improvements are made to your player’s
firmware and these firmware upgrades are placed on Creative’s web site for
you. To check for upgrades, go to www.creative.com/support/ and click
Downloads.
select to play music and recordings, or to use the DJ function
select to view pictures
select to play videos
select to scan for and listen to FM radio stations
select to make instant recordings
select to use additional features including Organizer and
Removable Disk
select to view and customize your player’s settings
Page 14

12 Managing Your Player
Managing Your Player
You are now equipped to use your player’s more advanced features! Read on to
get the most out of your player.
“Managing Audio” on page 12
“Managing Videos” on page 15
“Managing Pictures” on page 16
“Managing Recordings” on page 17
“Managing Data” on page 18
“Managing Organizer Features” on page 19.
Managing Audio
To create playlists
You can select any combination of tracks you want from your player’s Music
Library to create playlists for convenient playback.
1 To add a track or category of tracks to the Now Playing folder:
i. Select Music Library → track or category of tracks that you want.
ii. Press the Options button , and select Add to Selected.
iii. Repeat steps i) and ii) to add another track or category of tracks.
iv. Select Music Library → Now Playing.
2 Press the Options button , and select Save As Playlist.
3 Use the Navigation controls to create a name for your playlist and select the
check mark to confirm the name.
4 To play a playlist, select Music Library → Playlists → playlist that you want.
Page 15

Managing Your Player 13
To select tracks with ZEN Vision:M’s DJ
In the main menu, select Music Library → DJ → option that you want:
Album of the Day: plays a randomly selected album
Random Play All: plays all tracks randomly
Most Popular: plays the most played tracks
Rarely Heard: plays rarely played tracks.
To enhance your audio experience
In the main menu, select System → Audio Settings → option/s that you want:
Play Mode: shuffles, repeats or plays your audio tracks in sequential order
Bass Boost: enhances the bass in your track during playback
Smart Volume: sets playback at a constant volume. You no longer need to adjust the
volume when you play different tracks.
EQ: enhances your music depending on its genre or style. You can also customize
your own EQ setting. See “To create a customized equalizer setting” on page 23.
To set up FM Radio
1 In the main menu, select FM Radio.
2 To automatically scan and save radio stations, press the Options button
and select Autoscan.
At the end of the autoscan, ZEN Vision:M automatically saves all stations as
preset channels and tunes in to the first preset.
,
Page 16

14 Managing Your Player
3 To select a different preset, firmly tap the Vertical Touch Pad to display the
list of presets, and then move your thumb up and down the Vertical Touch
Pad to select the preset that you want.
Hold down the Next/Fast Forward button or Previous/Rewind button for
one second to scan for the next available radio station.
Page 17

Managing Your Player 15
Managing Videos
To convert your videos to a format supported by your player, launch Creative
Media Explorer and click Convert Video. For information about Creative Media
Explorer, see “Managing Music and Data” on page 10.
To go forward or backward in a video
1 In the main menu, select Videos → Video → video that you want.
2 Press the Options button , and select Seek To.
3 Use the Navigation controls to go forward or backward in a video.
To delete a video
1 In the main menu, select Videos → Video, and highlight the video that you
want.
2 Press the Options button , and select Delete Video.
To display the last viewed video
In the main menu, select Videos → Recently browsed videos.
To display or hide video folders
See “To display or hide video or picture folders” on page 22.
To set a password when displaying or hiding video folders
See “To set a password when displaying or hiding video or picture folders” on
page 22.
Page 18

16 Managing Your Player
Managing Pictures
To view your pictures in a slideshow
1 In the main menu, select Photos → Pictures.
2 Press the Options button , and select Start Slideshow.
3 To customize your own slideshows, launch Creative Media Explorer.
4 To change the slideshow interval duration, select System → Photo/Video
Settings.
To rate and view your favorite pictures
1 In the main menu, select Photos → Pictures → picture that you want.
2 Press the Options button to select rating and viewing options.
To display or hide picture folders
See “To display or hide video or picture folders” on page 22.
To set a password when displaying or hiding picture folders
See “To set a password when displaying or hiding video or picture folders” on
page 22.
Page 19

Managing Your Player 17
Managing Recordings
To record audio
1 In the main menu, select Microphone.
2 Press the Options button , and select Start Recording.
3 While recording, you can press the Options button
following:
Pause: pauses the recording
Resume: resumes the paused recording
Stop: stops and saves the recording
Split: starts a new recording.
To record radio broadcasts
1 In the main menu, select FM Radio.
2 While listening to a radio broadcast, press the Options button , and
select Record Radio to start recording.
To listen to recorded audio
In the main menu, select Music Library → Recordings → recording that you
want.
to do one of the
Page 20

18 Managing Your Player
Managing Data
You can use ZEN Vision:M to store backup copies of your computer’s data files,
or use it to transfer files from one computer to another.
To use ZEN Vision:M as a Removable Disk
1 In the main menu, select Extras → Removable Disk.
2 Press the Options button
Alternatively, connect ZEN Vision:M to your computer and use Creative
Removable Disk Manager to increase or decrease the amount of hard disk
space in Removable Disk mode.
To start Creative Removable Disk Manager, click Start → Programs or All
Programs → Creative → Creative Removable Disk Manager → Creative
Removable Disk Manager.
3 When you see Removable Disk on ZEN Vision:M’s LCD, you are ready to
transfer data files to and from any computer.
4 Connect ZEN Vision:M to your computer. ZEN Vision:M appears as a
Removable Disk under My Computer.
5 Use the drag-and-drop method to copy files to and from ZEN Vision:M.
6 When you have finished copying files, click the Safely Remove Hardware
icon on the Taskbar, click Safely remove USB Mass Storage Device, and
disconnect your player when you are prompted to do so.
To delete all the data files in the Removable Disk hard disk space, press the
Options button , and select Form at. Go to My Computer if you want to
delete individual data files stored in Removable Disk mode.
, and select the capacity that you want.
Page 21

Managing Your Player 19
Managing Organizer Features
You can use ZEN Vision:M to store and display contacts, calendar events and
tasks from Microsoft® Outlook®.
If you do not have Microsoft Outlook installed, you can use Creative Media
Explorer to edit your calendar, "to do" tasks and contact information using
the Personal Information Manager editor. In Creative Media Explorer, click
Manage Organizer Data.
To synchronize with Microsoft Outlook
1 Make sure your player is connected to your computer as shown on page 5.
2 Start Sync Manager. You can start Sync Manager from Creative Media
Explorer or Creative MediaSource Player/Organizer. See “Managing Music
and Data” on page 10.
3 Select My Computer and ZEN Vision:M as the devices you want to
synchronize.
4 Select the Organizer data check box, and then click the Next button.
5 Select the information you want to import from Microsoft Outlook, and then
click the Next button.
6 Follow the instructions on the screen.
7 Click the Finish button.
You can also use Sync Manager to synchronize music, pictures and videos
between ZEN Vision:M and your computer.
Page 22

20 Managing Your Player
To view the calendar
1 In the main menu, select Extras → Organizer → Calendar.
2 To go to a specific month, press the Options button , and select the
month that you want.
3 Firmly tap the Vertical Touch Pad to view the events and tasks of the
selected day.
To view today’s tasks
In the main menu, select Extras → Organizer → Tas ks.
To view contacts
In the main menu, select Extras → Organizer → Contacts.
Page 23

Personalizing Your Player 21
Personalizing Your Player
To assign a menu shortcut to My Shortcut button
In the main menu, select System → Player Settings → My Shortcut Button →
menu shortcut that you want.
To assign a user name
1 In the main menu, select System → Player Settings → Owner.
2 Use the Navigation controls to create a user name.
To select a picture as wallpaper
1 In the main menu, select Photos → Pictures.
2 Select the picture that you want.
3 Press the Options button , and select Set as Wallpaper.
To configure screen and display settings
In the main menu, select System → Display Settings → setting that you want:
Theme: specifies your player’s display design
Backlight Time: specifies the backlight duration
Brightness: adjusts screen brightness
Configure Menu: adds or removes main menu options.
To configure the Vertical Touch Pad
In the main menu, select System → Player Settings → Touc hP ad to select
sensitivity and clicker options.
Page 24

22 Personalizing Your Player
To configure power conservation settings
In the main menu, select System → Player Settings → setting that you want:
Idle Shutdown: specifies how long ZEN Vision:M remains inactive before it
automatically shuts down
Sleep Timer: specifies a fixed period of time before ZEN Vision:M automatically
turns off.
To configure date and time settings
1 In the main menu, select Extras → Date & Time.
2 Press the Options button to select date, time and alarm options.
3 To display the clock in the menu bar, select System → Clock Settings →
Clock in Title.
To display or hide video or picture folders
1 In the main menu, select Videos → Video → video folder that you want OR
select Photos → Pictures → picture folder that you want.
2 Press the Options button , and select the protect option. You can only
protect folders and not individual files.
3 In the main menu, select System → Player Settings and select whether to
show or hide the protected folder.
To set a password when displaying or hiding video or picture folders
1 In the main menu, select System → Player Settings and select the
password option.
2 Use the Navigation controls to create a password.
Page 25

Personalizing Your Player 23
3 Firmly tap the Vertical Touch Pad and select the check mark to confirm
the password. You will be prompted for this password when you select
System → Player Settings and select whether to show or hide the protected
folder.
4 To disable the password feature or change your password, select System →
Player Settings and select the password option.
5 If you forget your password, see “Step 1: Clean Up Your Player’s Firmware”
on page 27.
To create a customized equalizer setting
1 In the main menu, select System → Audio Settings → EQ.
Each slider on the Custom EQ screen represents successively higher
frequencies that can be adjusted.
80: controls bass frequency
250: adjusts the low mid-range frequency
1k: adjusts the mid-range frequency
4k: adjusts the upper mid-range frequency
13k: adjusts the treble frequency.
2 Select a slider, and move your thumb up and down the Vertical Touch Pad to
boost or reduce the selected frequency range.
3 Select the check mark to save and enable the Custom EQ settings.
To reset ZEN Vision:M to its original firmware settings
In the main menu, select System → Reset Settings → Ye s.
When you reset your player’s firmware settings, all your player’s personalized
settings will be replaced with default settings.
Page 26

24 Connecting Your Player to a TV
Connecting Your Player to a TV
The ZEN Vision:M Audio Video Cable required for TV connection is available
for separate purchase. For information about ZEN Vision:M accessories, visit
www.creative.com/shop.
DO NOT use a standard video cable. The USB synchronization adapter works
only with the proprietary Creative ZEN Vision:M Audio Video Cable (sold
separately).
1 In your player’s main menu, select System → Photo/Video Settings →
Video Out.
2 Select Auto (NTSC) or Auto (PAL). See the User’s Guide for your TV if you
are not sure about your TV’s display format.
3 Connect your player to a TV with the ZEN Vision:M Audio Video Cable (sold
separately).
1
2 3 4
8
67
5
1 Video In jack -
Yel lo w
2 Audio In (Left) jack -
White
3 Audio In (Right) jack -
Red
4 A/V Out jack
5 ZEN Vision:M Audio
Video Cable (sold
separately)
6 Red connector
7 White connector
8 Yellow connector
Page 27

FAQ 25
FAQ
This section covers questions you might have while using your player. For
further assistance, you may wish to consult our self-help tool "Knowledge
Base". Go to www.creative.com, select your region and then select Support.
Can I transfer Digital Rights Management (DRM) protected WMA files to my
player?
Yes. To transfer DRM protected WMA files to ZEN Vision:M, you can use
Creative Media Explorer, Creative MediaSource Player/Organizer or Windows
Media Player 10.
ZEN Vision:M does not turn on or stops responding. What do I do?
Do one or more of the following:
Make sure the Power switch is not in the Lock position.
If you are using the ZEN Vision:M wired remote control (sold separately), make sure
the wired remote control’s Lock switch is not is the Lock position.
Your battery may need to be recharged. See “Step 2: Charge Your Player” on page 5.
How do I reset ZEN Vision:M?
If your player stops responding, reset the player. This should not cause you to
lose any data or audio tracks, unless you were in the middle of transferring an
audio track.
Insert and remove a thin object (for example, a straightened paperclip) from
the Reset hole.
Page 28

26 Information Diagrams
Information Diagrams
Use your player only after this library rebuilding is completed.
Re-building Library
See “Step 1: Clean Up Your Player’s Firmware” on page 27.
Hardware Problem
See “Step 1: Clean Up Your Player’s Firmware” on page 27.
Harddisk Problem
Your player will be automatically reset for the firmware to take
effect. In the rare event that your player does not reset itself, see
“How do I reset ZEN Vision:M?” on page 25.
Please reset player
Page 29

Firmware Problem
Information Diagrams 27
Refer to the following information before contacting Customer
Support Services. For more information about Customer
Support Services, see your Product Information Guide.
Step 1: Clean Up Your Player’s Firmware
1. Do the following to enter Recovery mode:
i. Slide the Power switch toward the Power icon
the switch in the Power On position.
ii. Insert and remove a thin object (for example, a straightened
paperclip) from the Reset hole.
iii. Release the Power switch when the Creative logo appears.
The Recovery Mode screen appears.
2. Select Clean Up → Reboot.
3.
If this does not work, proceed to "Step 2: Update Your
and hold
Player’s Firmware".
Step 2: Update Your Player’s Firmware
1. Download from the Creative website any firmware update that is
available for your player.
2. Enter Recovery mode (see step 1 in "Step 1: Clean Up Your
Player’s Firmware").
3. Select Reload Firmware and reinstall your player’s firmware.
If this does not work, proceed to "Step 3: Format Your
4.
Player".
Step 3: Format Your Player
WARNING: This step deletes all your player’s content. If
possible, back up all your player’s content on your computer
before proceeding.
1. Enter Recovery mode (see step 1 in "Step 1: Clean Up Your
Player’s Firmware").
2.
Select Format All → Reboot.
Page 30

28 General Specifications
General Specifications
Power Source
Playback Formats
MP3 Playback
Performance
Recording
Formats
Connectors
Battery: 1 x Rechargeable Lithium Ion battery
DC IN 5V when connected to a power outlet (ZEN Vision:M
power adapter sold separately)
USB bus powered when connected to a powered USB port on
a computer
Audio playback formats: MP3: Up to 320 kbps, WMA: Up to 320
kbps, WMA with PlaysForSure Digital Rights Management
(DRM) 10 or later, WAV
Video playback formats: MPEG-1, MPEG-2, MPEG-4-SP,
Windows Media™ Video (WMV) 9, MJPEG
Picture format: JPEG Baseline: Up to 16 MegaPixels, JPEG
Progressive: Up to 4 MegaPixels
Signal-to-Noise Ratio: Up to 97 dB
Channel Separation: Up to -70 dB (Line Out)
Frequency Response: 20 Hz ~ 20 kHz
Harmonic Distortion Output: <0.1%
Voice (via built-in microphone): IMA ADPCM (16 kHz, Mono)
FM Radio: IMA ADPCM (22 kHz, Stereo)
Headphone jack: 3.5 mm (1/8") stereo minijack, 25 mW per
channel
Docking connector
USB 2.0 (High speed)
USB 1.1 (Full speed)
Page 31

General Specifications 29
Firmware Support
FM Radio
FM region support
Earphone
Specifications
LCD
Upgradable via USB
Stereo and Mono
Up to 32 preset stations
International: 87.5 MHz ~ 108.0 MHz, 100 kHz intervals
Frequency Range: 20 Hz ~ 20 KHz
Sensitivity: 113 dB ± 5 dB (I/P Level:1 mW)
Impedance: 32
Plug: 3.5 mm (1/8") stereo minijack
Large 63.50 mm or 2.5" 320 x 240 pixel resolution backlit
display (262144 colors)
In the process of LCD manufacturing, instances of one or
more pixels appearing in a dark or fixed color, or in an
unchanging state, may occur.
In line with industry standards and based on Creative's screen
manufacturer's technical specifications, occurrences of fixed
spots may appear and are considered acceptable if they do not
impair display quality.
If, however, you notice fixed spots on your player’s LCD display
interfering with your use, contact Customer Support Services.
Ω ± 15%
Page 32

30 Copyright and License
Copyright and License
Information in this document is subject to change without notice and does not
represent a commitment on the part of Creative Technology Ltd. No part of this
manual may be reproduced or transmitted in any form or by any means,
electronic or mechanical, including photocopying and recording, for any
purpose without the written permission of Creative Technology Ltd.
Copyright © 2006 Creative Technology Ltd. All rights reserved. The Creative
logo, ZEN Vision:M and Creative MediaSource are trademarks or registered
trademarks of Creative Technology Ltd. in the United States and/or other
countries. Microsoft, Windows, Windows Media, Outlook and the Windows logo
are registered trademarks of Microsoft Corporation. Intel and Pentium are
registered trademarks of Intel Corporation.
The Software License Agreement can be found on the Installation CD.
Version 1.1
May 2006
Page 33

 Loading...