

Page 1
Congratulations 1
English
Congratulations
Thank you for purchasing Creative ZEN™ V / ZEN V Plus! Read on to learn
how to get started with your new player!
To get the most out of your player, also read the comprehensive User’s
Guide on your Installation and Applications CD.
NOTE Product specifications may vary, depending on model purchased.
( )
1
13
2
3
4
12
5
6
7
8
9
10
11
( )
( )
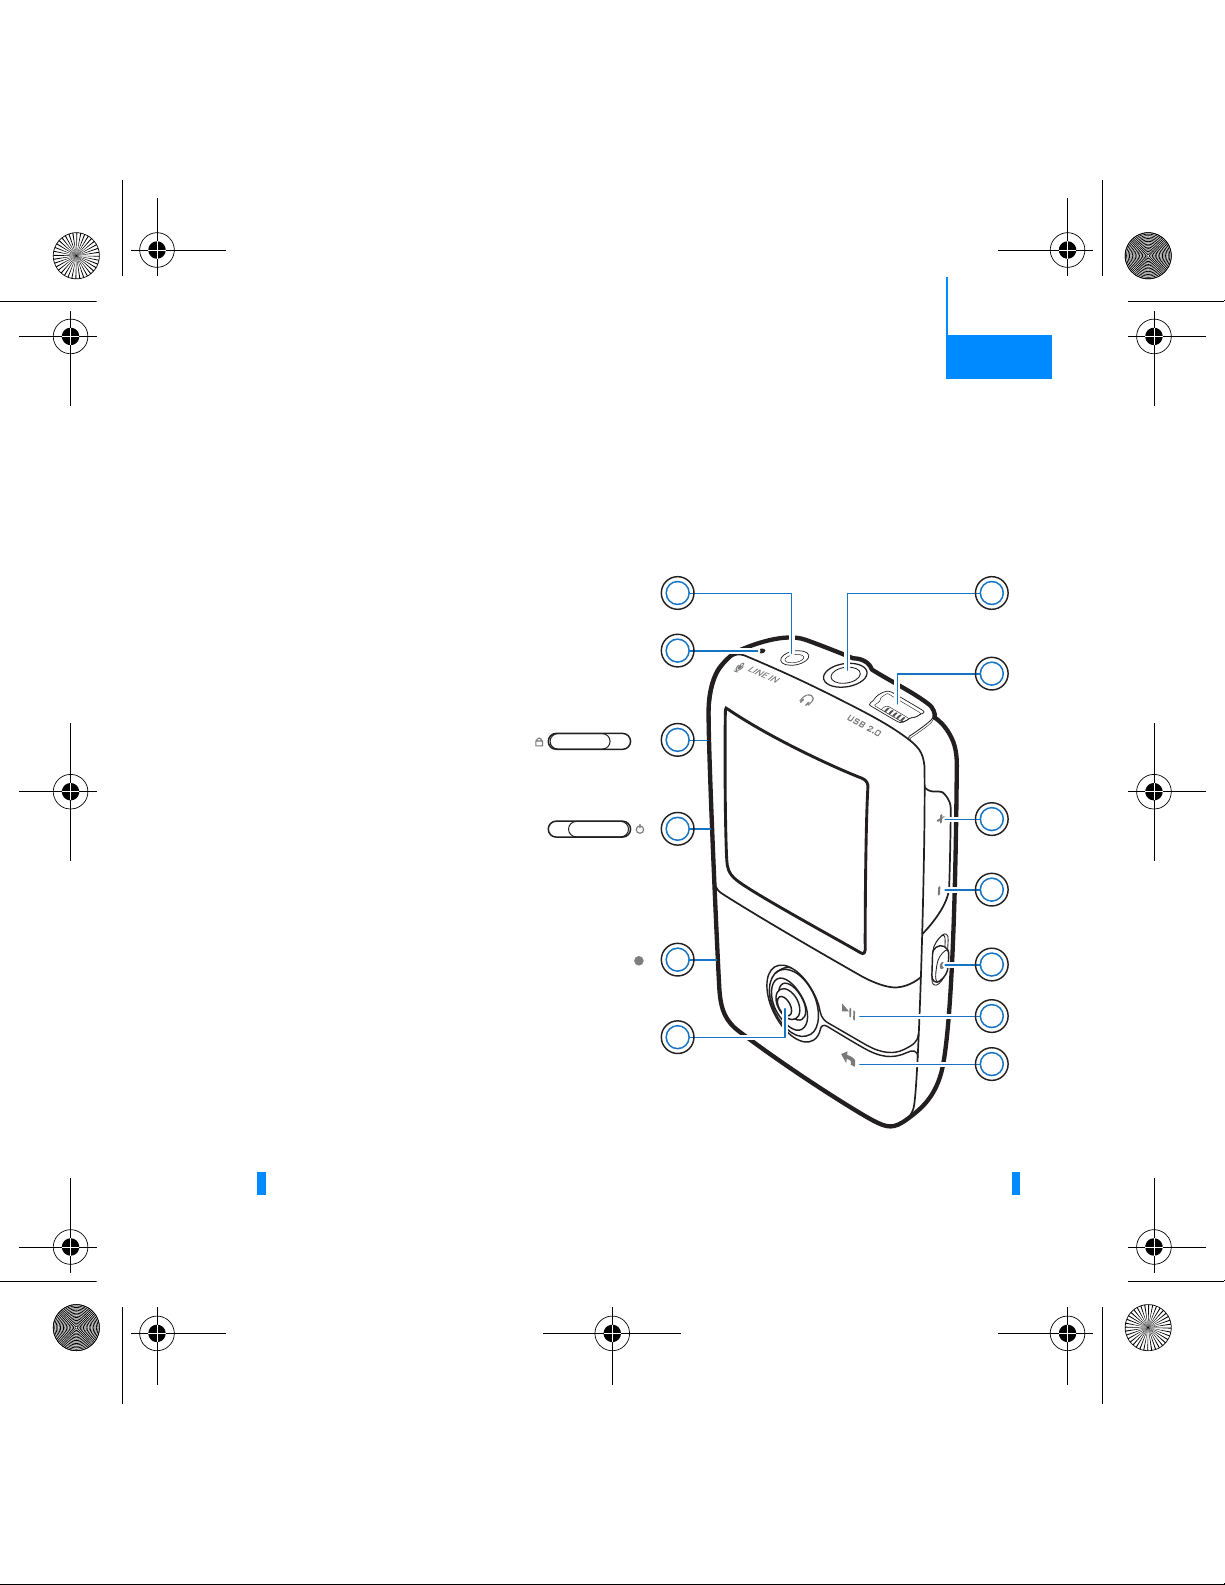
1. Power switch
2. Lock
3. Microphone
4. LINE IN jack
5. Headphone jack
6. USB 2.0 port
7. Volume Increase
button
8. Volume Decrease
button
9. Record button
10. Play/Pause button
11. Back/Options
button
12. 5-way Navigation
Joystick
13. Reset button
Zen V_CLI.fm Page 1 Thursday, May 25, 2006 3:52 PM
Page 2
2 Using the 5-Way Navigation Joystick
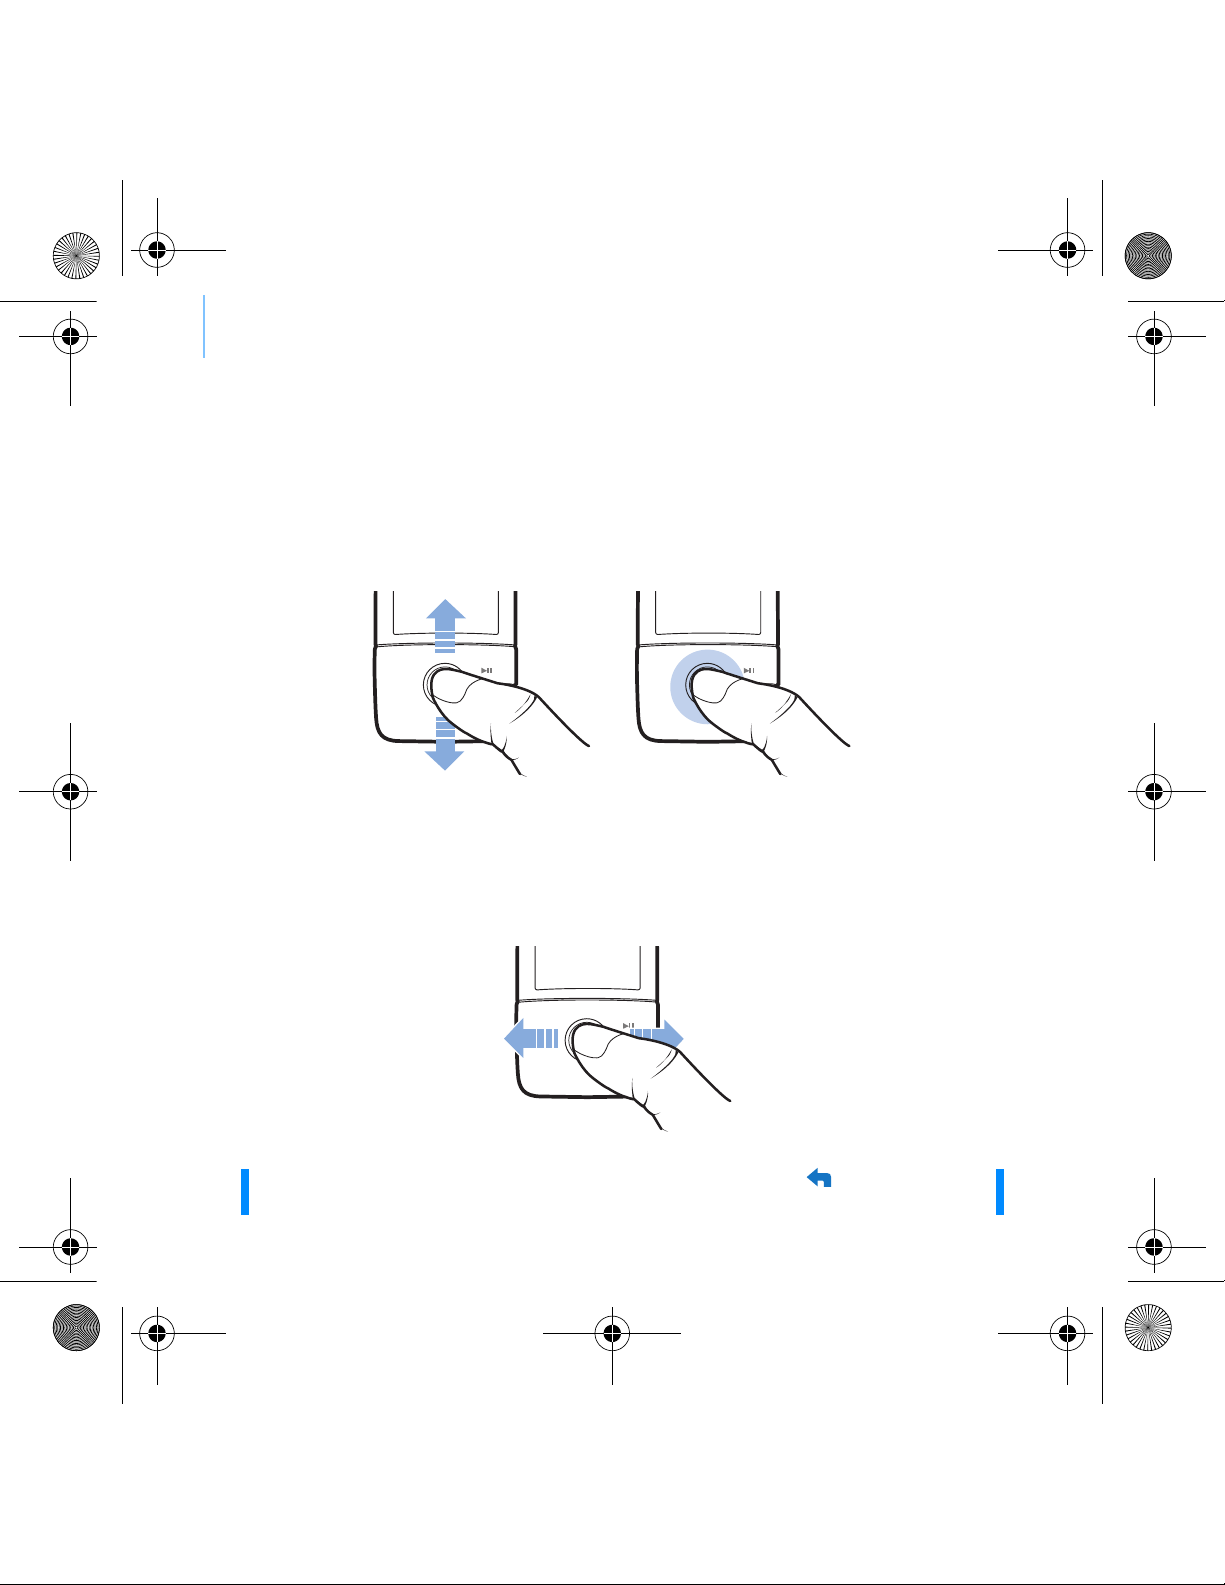
Using the 5-Way Navigation Joystick
The 5-way Navigation Joystick is one of the most important features of your
player. In this document, we will use the term "Select" to mean that you
should push the 5-way Navigation Joystick up or down to browse through
options, and then select the option by pressing down the 5-way Navigation
Joystick.
When playing music, you can do the following:
■ push the joystick left or right to go to the previous or next track.
■ push and hold the joystick right or left to move forward or
backward within a track.
NOTE At any time, press and hold the Back/Options
button for more
options.
Zen V_CLI.fm Page 2 Thursday, May 25, 2006 3:52 PM
Page 3
Getting Started 3
Getting Started
Step 1: Set up the software
1 Turn on your computer.
You must log in as an administrator before you can set up the software. For
more information, refer to your operating system’s online Help.
2 Insert the Installation and Applications CD into your CD-ROM/DVD-ROM
drive.
Your CD should start automatically. If it does not, follow the steps below:
i. Double-click the My Computer icon.
Alternatively, click Start
→ My Computer.
ii. Right-click the CD-ROM/DVD-ROM drive icon, and then click
Autoplay.
3 Follow the instructions on the screen and when prompted, restart your
computer.
4 When your computer restarts, follow the product registration instructions
on the screen.
WARNING DO NOT connect your player to your computer before setting up the
software.
NOTE You will require an Internet connection to register your product.
Zen V_CLI.fm Page 3 Thursday, May 25, 2006 3:52 PM
Page 4
4 Charge Your Player
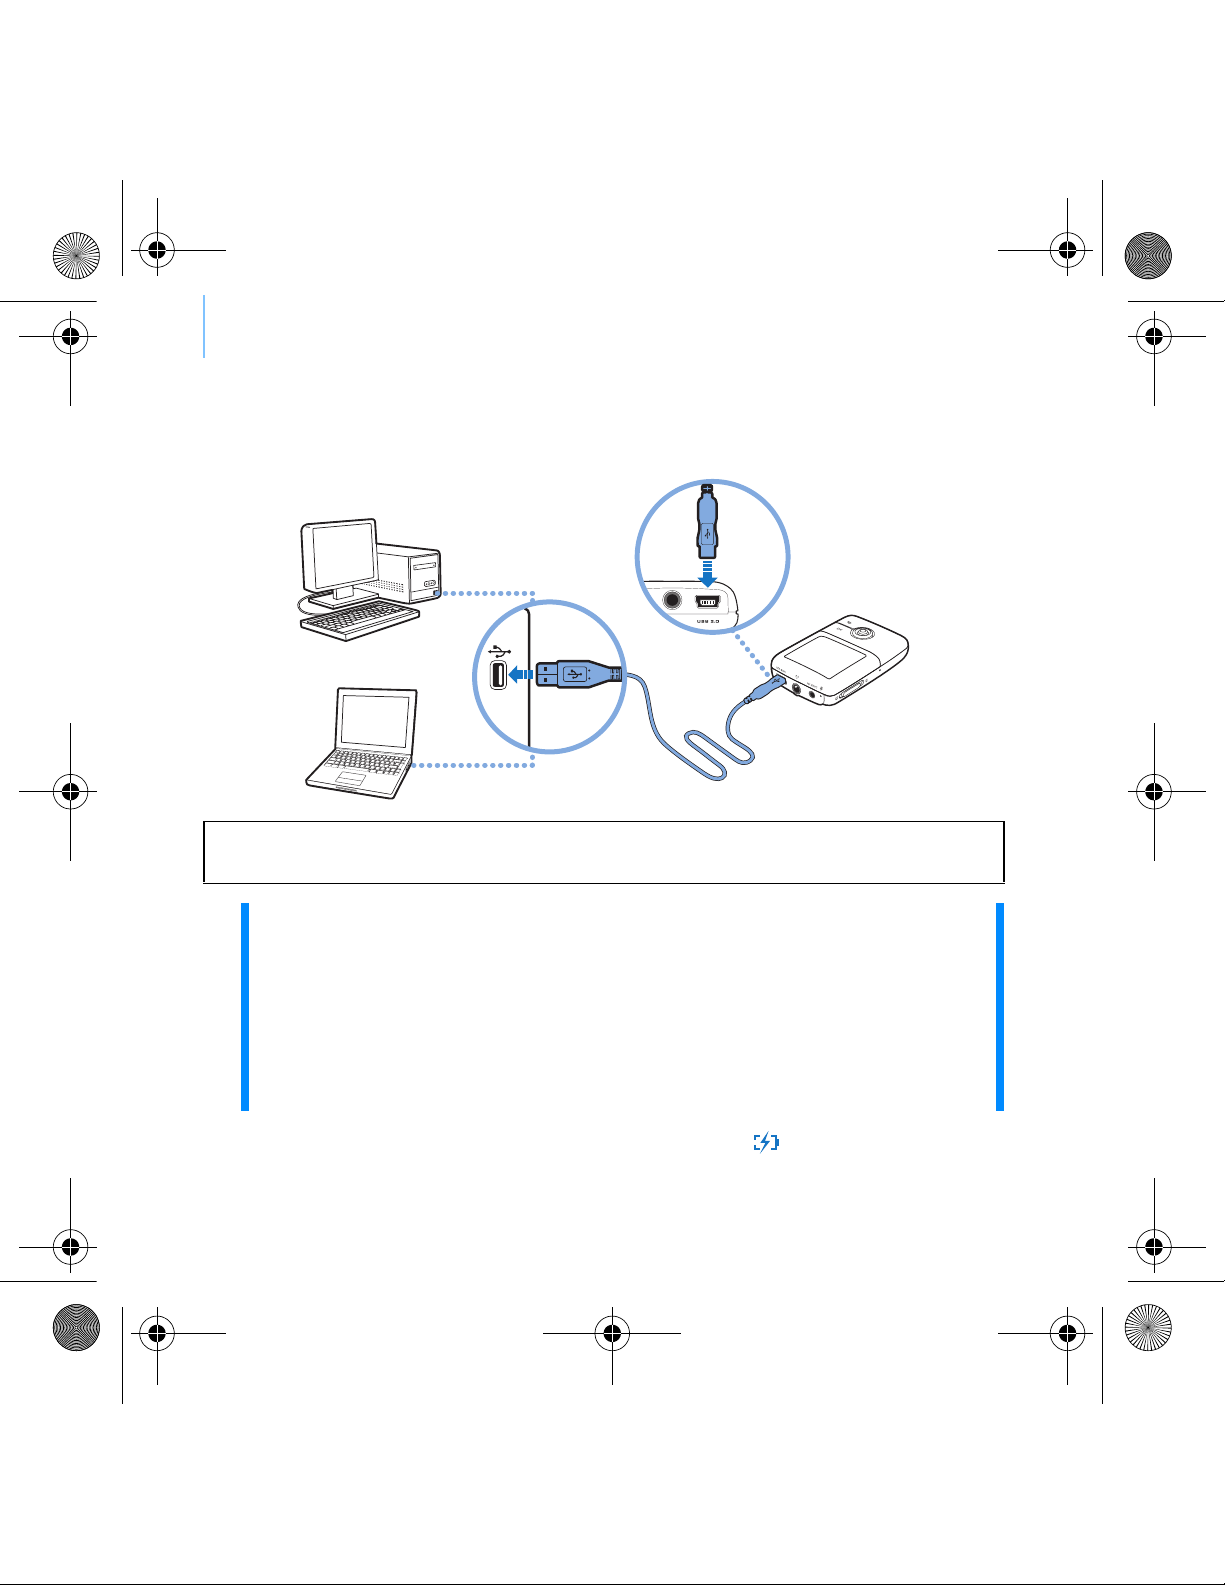
Step 2: Charge Your Player
1 If you have not done so, connect your player to your computer’s USB port
with the supplied USB cable.
When the battery is charging, the battery charging icon flashes on the
Organic Light Emitting Diode (OLED) display.
WARN I N G : The cord(s) included with this product may contain chemicals known to the State of
California to cause cancer and birth defects or other reproductive harm. Wash hands after handling.
NOTE ■ For continuous battery charging using the USB port, make sure
your computer is not in power conservation mode. For more
information on power conservation modes, refer to your
operating system's Help.
■ Connect to a computer USB port only; avoid connecting to a USB
hub.
■ For express battery charging without using your computer,
purchase the ZEN Power Adapter. For more information on this
and other ZEN V Series accessories, visit www.creative.com.
Zen V_CLI.fm Page 4 Thursday, May 25, 2006 3:52 PM
Page 5

Select Your Menu Language 5
2 Disconnect your player from your computer when the battery is fully
charged and you see on your player’s OLED display. The battery is fully
charged in approximately six hours. If your fully charged player remains
connected to your computer for a prolonged period, the OLED display
blanks out automatically to save battery power.
Step 3: Select Your Menu Language
1 If your player is not turned on, slide the Power switch towards the Power
icon and hold it there until the OLED display lights up.
2 When you turn on your player for the first time, the menu is in English. To
change the language:
i. Press the Back/Options button. The main menu appears.
ii. Select System
→ Language, and then select the language that
you want.
3 After you have finished using your player, slide the Power switch towards
the Power icon until the Shutting down message appears.
Step 4: Transfer Content
Transfer music and other files from your CD collection or computer. For
more details, see “Managing Music, Videos and Data” on page 10.
NOTE Your player will continue charging even after it turns off, as long as it
is connected to a computer or power outlet.
Zen V_CLI.fm Page 5 Thursday, May 25, 2006 3:52 PM
Page 6

6 Transfer Content
To transfer or ‘rip’ music from your CD collection
1 Make sure your player is connected to your computer as shown on page 4.
2 Double-click the ZEN V Series Media Explorer
icon on the desktop.
3 Click the Rip Audio CDs button.
4 Follow the instructions on the screen.
If you are connected to the Internet, album information is automatically
retrieved.
To transfer music, pictures or videos from your computer
1 Repeat steps 1 and 2 in "To transfer or ‘rip’ music from your CD collection"
above.
2 Click the Browse Media button.
3 Locate your media files, and using the drag-and-drop method, copy them to
the following folders in your player:
■ Media Library\Music folder for audio files
■ Media Library\Videos folder for videos
■ Media Library\Pictures folder for pictures.
NOTE
■ Use Creative Media Explorer, Creative MediaSource Player/
Organizer or Windows Media Player 10 (and above) to transfer
files protected by Digital Rights Management (DRM) technology.
■ The video function is available on ZEN V Plus players only.
■ All video formats require conversion before they can be played on
your ZEN V Plus. Use Creative Media Explorer or Creative
MediaSource Player/Organizer only to convert your videos. Note
that if you choose to skip a video file, it will not be transferred to
your player.
Zen V_CLI.fm Page 6 Thursday, May 25, 2006 3:52 PM
Page 7

Disconnect Your Player 7
To transfer data files
1 Repeat steps 1 and 2 in “To transfer or ‘rip’ music from your CD collection”
on page 6.
2 Click the Browse Documents button.
3 Locate your data files, and using the drag-and-drop method, transfer them
to the Data folder in your player.
Step 5: Disconnect Your Player
When you have finished transferring files, disconnect your player.
DO NOT disconnect your player if you see the left picture below on the
display. Track or data file transfer is in progress and disconnecting your
player may damage the content being transferred. When you see the right
picture below on the display, disconnect your player.
NOTE ■ You can also transfer audio files, pictures and videos using the
Browse Documents button. They will, however, be treated as
data files and cannot be played back or viewed on your player.
■ Use your player's Removable Disk mode if you need to transfer
and manage data between your player and computers that do not
have Creative Media Explorer. For more information, see the
User’s Guide on your Installation and Applications CD.
Docked
Docked
Zen V_CLI.fm Page 7 Thursday, May 25, 2006 3:52 PM
Page 8

8 Play Media Files or View Pictures
Step 6: Play Media Files or View Pictures
You are now ready to play or view files, including Audible® and ZENcast
audio files.
To play music and Audible files
1 Connect your earphones to the Headphone jack.
2 In the main menu, select Music Library → category that you want.
3 Select a track and select Play.
4 Press the Volume Increase and Volume Decrease buttons to adjust
the volume.
NOTE ■ The video function is available on ZEN V Plus players only.
■ At any time, press and hold the Back/Options button for more
options.
■ Files in your player are sorted alphabetically for quicker
searches.
NOTE
■ To manage Audible files, you need to install AudibleManager
®
.
■ Audible files are currently available to selected regions only.
■ If available with a music track, album art will be displayed on
your player.
Zen V_CLI.fm Page 8 Thursday, May 25, 2006 3:52 PM
Page 9

Play Media Files or View Pictures 9
To play ZENcast audio files
With Creative ZENcast Organizer, you can subscribe to your favorite
ZENcast channels, and download and transfer ZENcast audio files to your
ZEN V / ZEN V Plus. For more information, visit www.zencast.com.
To view pictures
1 In the main menu, select Photos, and select the picture you want.
2 Press and hold the Back/Options button
3 Select Zoom In, and use the 5-way Navigation Joystick to pan the picture
horizontally or vertically.
To play videos
In the main menu, select Videos → Video → video that you want.
NOTE ■ The video function is available on ZEN V Plus players only.
■ ZENcast video files are not supported by your player.
Zen V_CLI.fm Page 9 Thursday, May 25, 2006 3:52 PM
Page 10

10 Managing Music, Videos and Data
Managing Music, Videos and Data
Creative Media Explorer and Creative MediaSource Player/Organizer are
included with your player. Try out these applications to decide which one is
more suitable for your needs.
Creative Media Explorer
Use Creative Media Explorer if:
■ you are new to digital music and videos, and want to transfer them
from your CDs or computer to your player
■ you want to convert, synchronize, and organize audio and video
files
■ you prefer to manage your player in the familiar “Windows
Explorer” environment.
To start Creative Media Explorer, double-click the ZEN V Series Media
Explorer icon under My Computer or on the desktop. For more
information about using Creative Media Explorer, refer to its online Help.
Creative MediaSource Player/Organizer
Use the full-featured Creative MediaSource Player/Organizer if:
■ you require additional features such as recording, automatic
playlist generation, and audio format conversion
■ you want to manage a music library on your computer.
To start Creative MediaSource Player/Organizer, double-click the Creative
MediaSource Player/Organizer icon on your desktop.
Creative MediaSource Player/Organizer has a Home page from which you
can access common tasks. For more information about using Creative
MediaSource Player/Organizer, refer to its online Help.
NOTE The video function is available on ZEN V Plus players only.
Zen V_CLI.fm Page 10 Thursday, May 25, 2006 3:52 PM
Page 11

Managing Your Player 11
Managing Your Player
Creating playlists
You can select any combination of tracks you want from your player’s Music
Library to create playlists for convenient playback.
1 To add a track or category of tracks to the Now Playing folder:
i. Select Music Library → track or category of tracks that you want.
ii. Press and hold the Back/Options
button, and select Add to
Selected.
iii. Repeat steps i) and ii) to add another track or category of tracks.
iv. Press the Back/Options
button.
You may need to do this more than once until the main menu
appears
v. In the main menu, select Now Playing.
2 Press and hold the Back/Options button, and select Save As Playlist.
3 Use the 5-way Navigation Joystick to create a name for your playlist and
select Ok to confirm the name.
4 To play a playlist, select Music Library → Playlists → playlist that you want.
Listening to FM Radio
1 In the main menu, select FM Radio.
2 To automatically scan and save radio stations, press and hold the Back/
Options button, and select Autoscan. At the end of the autoscan, your
player saves all stations as preset channels and tunes in to the first preset.
3 To select a different preset, push the 5-way Navigation Joystick right or left.
NOTE ■ The FM radio function is available on ZEN V Plus players only.
■ To fine tune or manually scan for a radio station, see the User’s
Guide on your Installation and Applications CD.
Zen V_CLI.fm Page 11 Thursday, May 25, 2006 3:52 PM
Page 12

12 Safety Information
Safety Information
Refer to the following information to use your player safely, and to reduce
the chance of electric shock, short-circuiting, damage, fire, hearing
impairment or other hazards.
■ Do not dismantle or attempt to repair your player, battery or power adapter.
Refer all servicing to Creative or authorized repair agents.
■ Do not expose your player or battery to temperatures outside the range of 0°C to
45°C (32°F to 113°F).
■ Do not pierce, crush or set fire to your player or battery.
■ Keep your player or battery away from strongly magnetic objects.
■ Do not subject your player to excessive force or impact.
■ Do not expose your player or battery to water or moisture.
If your player is moisture-resistant (see product packaging for details), take care not
to immerse your player in water or expose it to rain.
■ Do not listen to audio at high volume for prolonged periods of time.
■ Do not attempt to remove the embedded battery. The player must be disposed of
according to local environmental regulations. To replace the battery, return your
player to your regional support office. For product service information, go to
www.creative.com.
■ When a conductive apparatus such as earphones, is used in close proximity with a
CRT television or CRT monitor, the latter may emit an electrostatic discharge. This
electrostatic discharge can be felt as a static shock. While this static shock is usually
harmless, it is good practice to avoid close contact with CRT devices when using
earphones.
NOTE
Improper handling may void the warranty for your player. For more information, read the
Warranty available with your product.
WARNING
As with any digital media-based storage device, data should be backed up regularly. We
strongly recommend that you observe the usage precautions laid out in this booklet, and
also back up the data in your player regularly. In no event will Creative be liable for any
indirect, incidental, special or consequential damages to any persons caused by
Creative's negligence, or for any lost profits, lost savings, loss of use, lost revenues or
lost data arising from or relating to this device, even if Creative has been advised of the
possibility of such damages. In no event will Creative’s liability or damages to you or any
other person ever exceed the amount paid by you for the device, regardless of the form of
the claim. Some countries/states do not allow the limitation or exclusion of liability for
incidental or consequential damages, so the above limitation or exclusion may not apply
to you.
Zen V_CLI.fm Page 12 Thursday, May 25, 2006 3:52 PM
Page 13

More Information 13
More Information
User’s Guide
Read the User’s Guide found on your Installation and Applications CD to learn about
your player’s many features. Go to d:\manual\<language>\manual.chm
(replace d:\ with the drive letter of your CD-ROM/DVD-ROM drive, and <language> with
a language that your User’s Guide is available in)
Creative Knowledge Base
Resolve and troubleshoot technical queries at Creative's 24-hour self-help Knowledge
Base. Go to www.creative.com, select your region and then select Support.
Product Registration
Registering your product ensures you receive the most appropriate service and product
support available. You can register your product during installation or at
www.creative.com/register.
Please note that your warranty rights are not dependent on product registration.
Customer Support Services and Warranty
You can find Customer Support Services, Warranty and other information in the CD.
(replace d:\ with the drive letter of your CD-ROM/DVD-ROM drive, <region> with the
region that you are in, and <language> with the language that your document is in)
Keep this document for future reference.
Customer Support Services d:\support\<region>\<language>\support.chm
Warranty
d:\warranty\<region>\<language>\warranty.chm
Please keep your Proof of Purchase for the duration of the
warranty period.
Regulatory d:\fcc\<model>\doc.chm
Copyright © 2006 Creative Technology Ltd. All rights reserved. The Creative logo, Creative MediaSource
and ZEN are trademarks or registered trademarks of Creative Technology Ltd. in the United States and/
or other countries. Microsoft, Windows and the Windows logo are registered trademarks of Microsoft
Corporation. Audible and AudibleManager are registered trademarks of Audible, Inc. in the U.S. and/or
other countries.
Zen V_CLI.fm Page 13 Thursday, May 25, 2006 3:52 PM
 Loading...