

Page 1

How to use this manual
This document has been designed to provide you with complete product knowledge. You can resize the
document window, print this document, access linked web sites and get information from specially
prepared graphics.
To jump to a linked topic or a web site, click the underlined blue text, or the hand symbol
whenever it appears.
To show a short description (tooltip) of an object, move your mouse cursor over it. A tooltip
appears after a few seconds.
You can choose to print portions of this document:
On the Contents tabbed page to your left, click a topic heading.
1.
On the menu, click the Print button.
2.
In the dialog box that appears, click the option to print one topic only, or all topics under a
3.
heading.
Page 1
Page 2
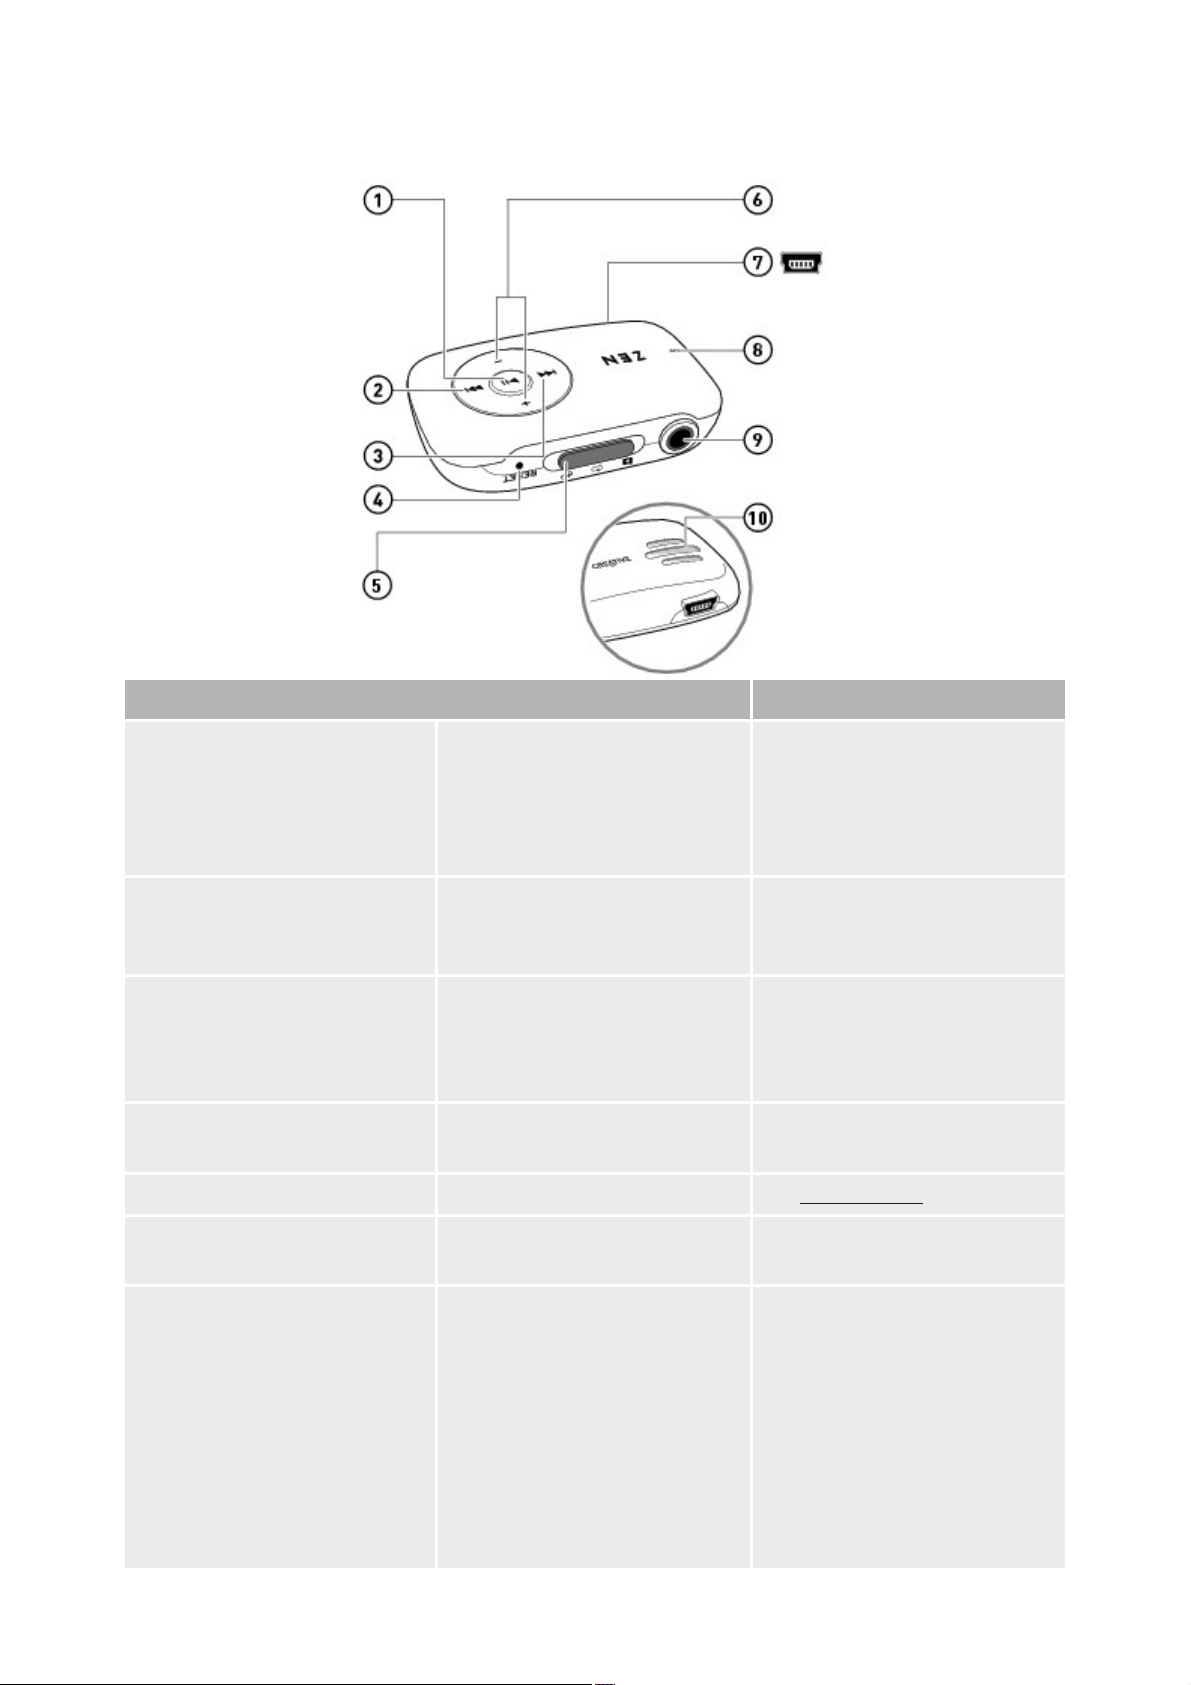
A Tour of Your Player
Button/Connector
What It Does
1.
Power/Play/Pause
Turns player on or off. Press and
hold until LED lights up or turns
off.
Playback starts automatically
when your player is turned on.
2.
Next/Fast-Forward
Press to move to the next track.
Press and hold to move forward
within a track.
3.
Previous/Rewind
Press to move to the previous
track.
Press and hold to move
backward within a track.
4.
Reset Hole
To reset player, insert a
straightened paperclip.
5.
Mode switch
See Mode Switch.
6.
Volume +/-
Press to increase or decrease the
volume.
7.
USB port
To charge your player or transfer
files, connect one end of the
supplied USB cable to this port,
and the other end to your
computer's USB port.
To charge your player without
using the computer, purchase the
ZEN™ USB power adapter.
For more information about this
Page 2
Page 3

and other accessories, visit
www.creative.com/zenstone.
8.
LED
See LED.
9.
Headphone jack
Connect your player's earphones
to this jack.
10.
Speaker
(For selected player models
only.)
To play through speaker,
disconnect your earphones.
Page 3
Page 4
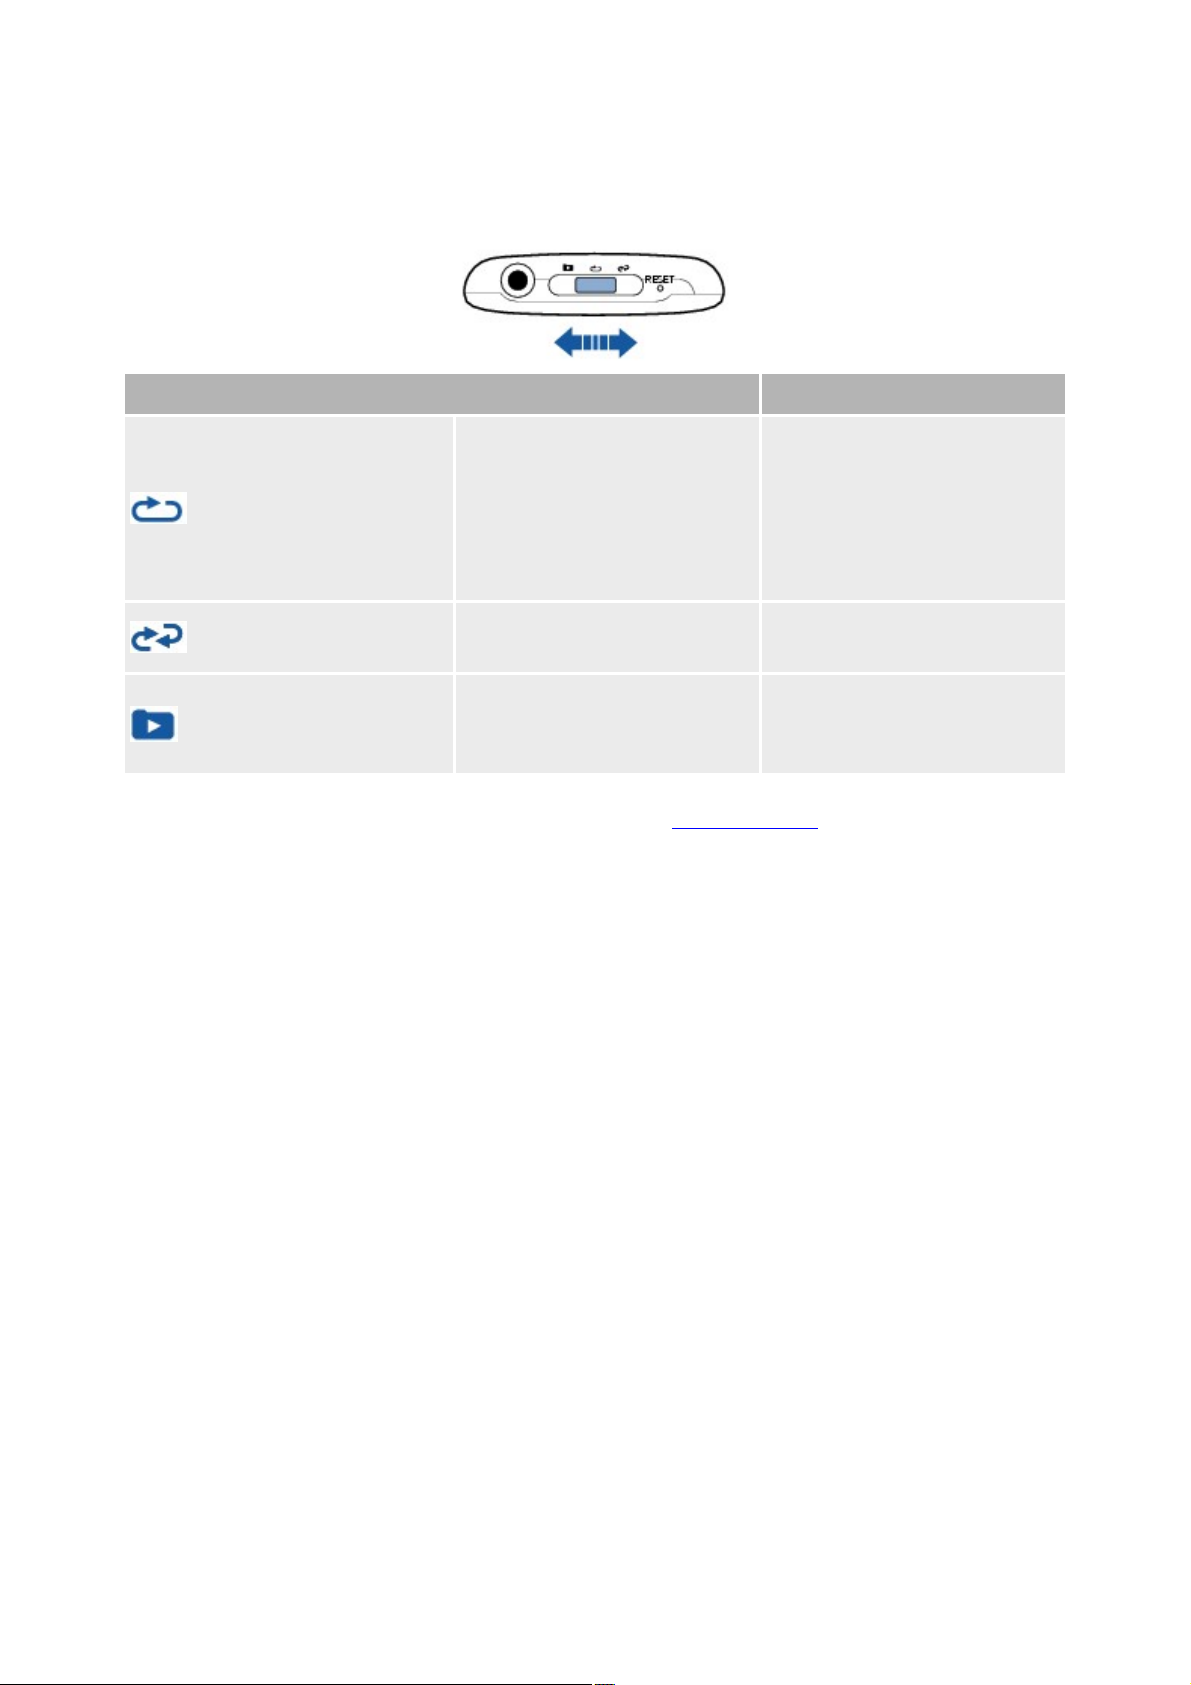
Mode Switch
Play Mode
What It Does
Repeat All
Plays and repeats all music
folders, in alphanumeric order.
If your music is not organized
into folders, all tracks are
played back in alphanumeric
order.
Shuffle
Plays and repeats all music, in
random order.
Skip Folder
Skips to the next folder, in
alphanumeric order.
To select, push and release.
Use the Mode Switch to change your player's play modes. In addition to shuffling music, you can also
locate your favorite music tracks by skipping folders.
Note
To understand your player's playback sequence, see Playback Order.
Page 4
Page 5
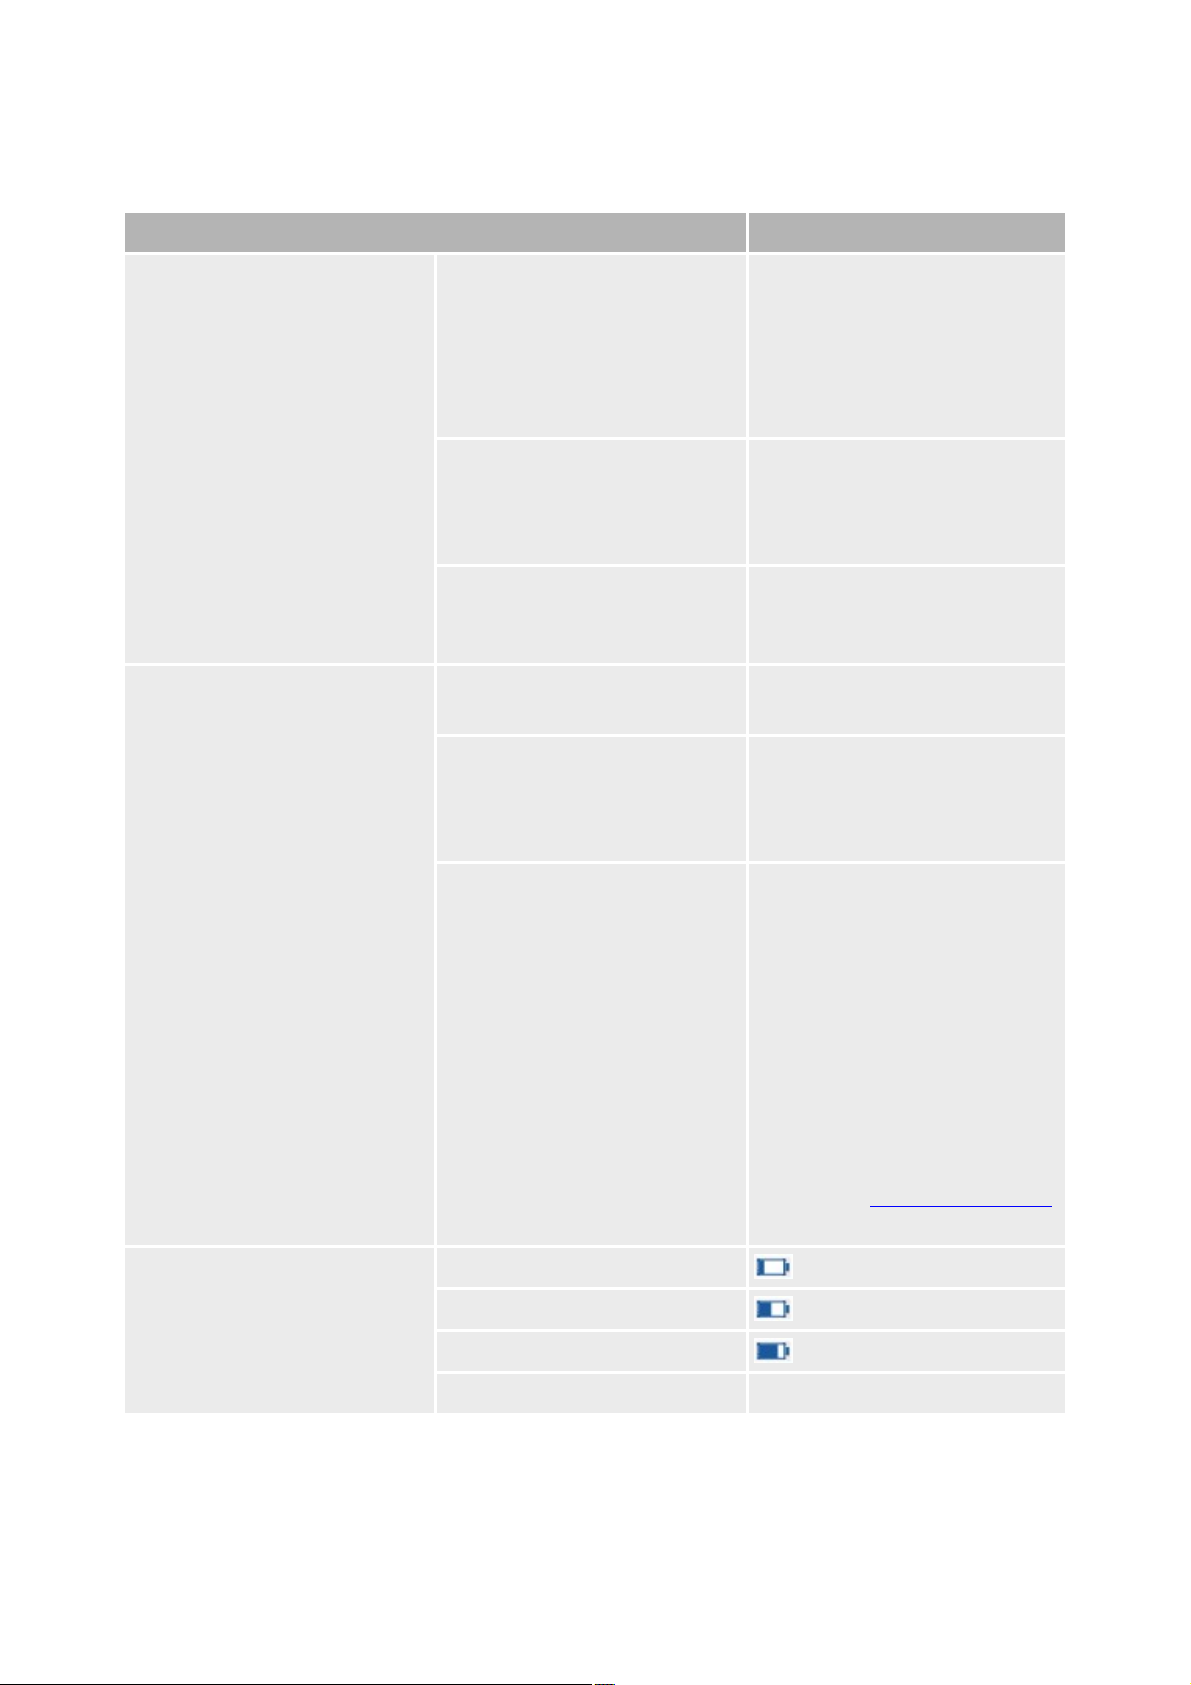
LED
LED
Meaning/Action
Green
Blinking
Connected to computer
File transfer in progress. Do not
disconnect.
Disconnected from computer
Playback in progress, good
battery level.
Random blinking
Turning on your player after
transferring files
Player scanning new files. This
may take up to a few minutes.
Steady
Playback paused. Player turns off
after a few minutes.
Good battery level.
Red
Blinking
Low battery level, charge as soon
as possible.
Steady
Playback paused. Player turns off
after a few minutes.
Low battery level, charge as soon
as possible.
3 blinks
After turning on your player
Battery depleted, charge
immediately. OR
No music files detected.
During playback
Unsupported format detected, file
will be skipped.
Adjusting volume
Maximum or restricted volume
level reached.
To adjust the volume restriction
level, launch Creative Media Lite
.
Orange
1 blink
below 25%
2 blinks
25 ~ 75%
3 blinks
76 ~ 99%
Steady
Fully charged.
The LED changes color or blinks, to indicate your player's battery and playback status.
Page 5
Page 6
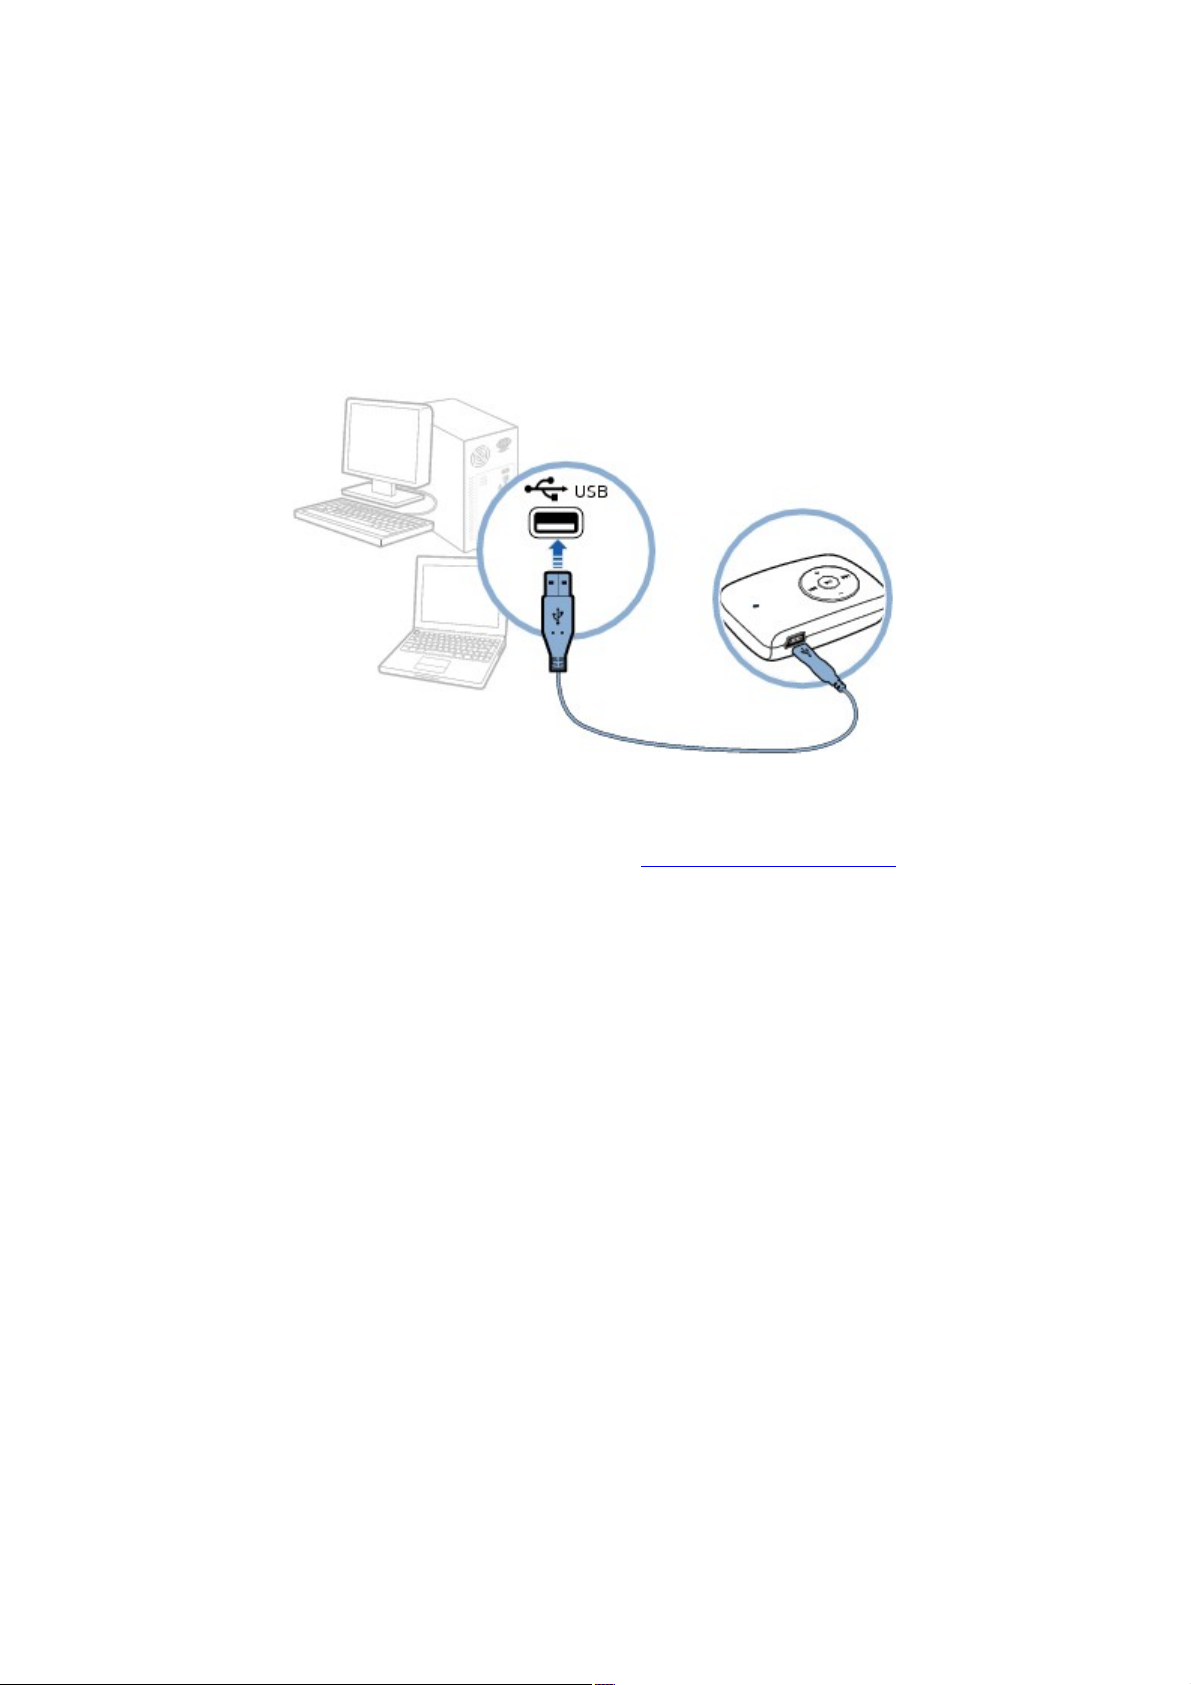
Charging Your Player
Connect your player to your computer with the supplied USB cable. When your player starts charging,
the LED blinks orange. When charging is complete in approximately two to three hours, the LED
changes to steady orange.
Important: Make sure your computer is turned on, and not in power conservation mode while the player
is charging.
See your operating system's documentation on turning off power conservation mode.
Note
Avoid using a USB hub.
Your player can also be charged with a ZEN USB power adapter (sold separately). For more
information about this and other accessories, visit www.creative.com/zenstone.
Page 6
Page 7

Creative Media Lite
Creative Media Lite is specially designed to rip CDs and transfer files to your player.
Your player is recognized as a removable disk on your computer and you can also use other software to
transfer content. However, Creative Media Lite supports the transfer of Windows Media® Digital Rights
Management (WMDRM) 9 or copy-protected music. Other software may not.
To launch Creative Media Lite, click the Creative Media Lite icon on your desktop.
Alternatively, click Start Creative
Creative Media Lite.
Note
Before installing Creative Media Lite, make sure you log on to your computer in Administrator
mode. For details about Administrator mode, see your operating system's documentation.
For details about using Creative Media Lite, click the Access How-To Online button in the
application.
Page 7
Page 8

Getting Content
Your player plays back audio tracks in MP3 or WMA formats. You can acquire audio tracks from
online music stores, or by ripping personal audio CDs.
Page 8
Page 9
Ripping CDs
To rip music from your CD collection
Launch Creative Media Lite.
1.
Click the Rip Audio CD button .
2.
Follow the instructions on the screen, and select the My Computer and/or Music Player
3.
checkbox to indicate where your tracks will be ripped to. You can also select to retrieve album
information (subject to availability) from the Internet.
Note
Creative Media Lite uses MusicIDSM from Gracenote® to get artist and title information about the
CDs you play. You must be connected to the Internet when using this service.
If you selected to transfer files to your player, do not disconnect your player while transferring
files. The LED blinks green during file transfer. After transferring files, see Disconnecting Your
Player Safely.
Page 9
Page 10

Transferring Music
To transfer music from your computer
Connect your player to your computer as shown.
1.
1.
Launch Creative Media Lite and click the My Computer drop-down box.
2.
Locate and select the music files you want.
3.
Click the Transfer to Player button .
4.
Alternatively, use the drag-and-drop method to transfer the files to your player.
4.
Note
Do not disconnect your player when transferring files to or from your player. The LED blinks
green during file transfer. After transferring files, see Disconnecting Your Player Safely.
Page 10
Page 11

Transferring Data
You can use your player as a removable disk to transfer data.
In Creative Media Lite, click the Views button and select View All
Files.
Note
Do not disconnect your player when transferring files to or from your player. The LED blinks
green during file transfer. After transferring files, see Disconnecting Your Player Safely.
Page 11
Page 12

Disconnecting Your Player Safely
To stop your player properly, select one the following options:
In Creative Media Lite, click the Disconnect Player button .
From the Taskbar, click the Safely Remove Hardware icon and then select Safely remove USB
Mass Storage Device.
Page 12
Page 13

Playing Music
Your player automatically starts playing music when it is turned on.
To navigate your player's controls, see A Tour of Your Player
.
To change play mode or skip folders, see Mode Switch
.
To organize music and customize playback order, see Playback Order
.
Page 13
Page 14

Volume Restriction
Protect your hearing using the Volume Restriction feature on your player. You can set your player's
maximum volume to a comfortable level.
This feature is especially useful for parents who want to protect their children's hearing while they enjoy
listening to music. You can also select to set a password to lock the volume restriction level setting.
To adjust the volume restriction level, launch Creative Media Lite and click the Set Volume Restriction
Limit button . For details, click the Access How-To Online button
in the application.
Page 14
Page 15

Playback Order
You can customize your music playback experience by naming and organizing your music according to
the following guidelines:
Your player plays back music in alphanumeric order.
For example, Autumn.mp3, 02 Summer.mp3 and 01 Spring.mp3 will be played back in the
following order:
01 Spring.mp3, 02 Summer.mp3, Autumn.mp3.
If there are tracks and folders in the same location, tracks will be played back first.
Your player supports up to three levels of folders from the root. For details, see Folder Structure
.
Page 16

Folder Structure
Your player supports up to three levels of folders from the root. Any tracks placed outside this structure,
for example in a fourth level folder from the root, will not be played back.
Page 16
Page 17

Deleting Files and Folders
To delete files and folders in your player
Launch Creative Media Lite.
1.
Select the file or folder you want.
2.
Click the Delete button in the same window as the selected file or folder.
3.
Page 17
Page 18

Troubleshooting
My player is not responding, what do I do?
If your player stops responding, reset the player. This should not cause you to lose any data or audio
tracks, unless you were in the middle of transferring files.
Insert and remove a straightened paperclip from the Reset Hole.
1.
If this does not work, proceed to Formatting Your Player.
2.
Formatting Your Player
WARNING: This step deletes all your player's content. If possible, back up all your player's content on
your computer before proceeding.
Make sure your player is connected to your computer and you are logged on in Administrator
1.
mode. For details about Administrator mode, see your operating system's documentation.
In Windows Explorer, right-click your player and select Format.
2.
Why does formatting my player in Windows Vista take a long time?
Windows Vista formats devices differently from earlier versions of Windows. As such, your player may
take a significantly longer time to perform a full format. Rest assured that once formatted, your player will
perform as expected. To format your player in considerably less time, use the Quick Format option
instead.
Page 18
Page 19

Regulatory Information
The following sections contain notices for various countries:
CAUTION: This product is intended for use with FCC/CE certified computer equipment. Please check
the equipment operating/installation manual and/or with the equipment manufacturer to verify/confirm if
your equipment is suitable prior to the installation or use of the product.
Page 19
Page 20

Federal Communication Commission (FCC) Interference Statement
FCC Part 15: This equipment has been tested and found to comply with the limits for a Class B digital
device, pursuant to Part 15 of the FCC Rules. These limits are designed to provide reasonable protection
against harmful interference in a residential installation. This equipment generates, uses and can radiate
radio frequency energy and, if not installed and used in accordance with the instructions, may cause
harmful interference to radio communications. However, there is no guarantee that interference will not
occur in a particular installation. If this equipment does cause harmful interference to radio or television
reception, which can be determined by turning the equipment off and on, the user is encouraged to try to
correct the interference by one or more of the following measures:
Reorient or relocate the receiving antenna.
Increase the separation between the equipment and receiver.
Connect the equipment into an outlet on a circuit different from that to which the receiver is
connected.
Consult the dealer or an experienced radio/TV technician for help.
This device complies with part 15 of the FCC Rules. Operation is subject to the following two
conditions:
This device may not cause harmful interference, and
1.
This device must accept any interference received, including interference that may cause
2.
undesired operation.
CAUTION: To comply with the limits of the Class B digital device, pursuant to Part 15 of the FCC
Rules, this device must be installed with computer equipment certified to comply with Class B limits.
All cables used to connect to the computer and peripherals must be shielded and grounded. Operation
with non-certified computers or non-shielded cables may results in interference to radio or television
reception.
MODIFICATION: Any changes or modifications not expressly approved by the grantee of this device
could void the user's authority to operate the device.
Page 20
Page 21

California Proposition 65 Statement
WARNING: Handling this product may expose you to chemicals known to the State of California to
cause cancer and birth defects or other reproductive harm.
Wash hands after handling.
Explanatory Note: California Safe Drinking Water and Toxic Enforcement Act of 1986 (Proposition 65)
requires special product labeling for products containing certain chemicals known to the State of
California to cause cancer, birth defects or other reproductive harm. Creative has chosen to provide a
warning based on its knowledge about the presence of one or more listed chemicals without attempting
to evaluate the level of exposure. With Creative's products, the exposure may be below the Proposition
65 level of concern, or could even be zero. However, out of an abundance of caution, Creative has
elected to place the Proposition 65 warning on its products.
Déclaration de la Proposition 65 de la Californie
AVERTISSEMENT: La manipulation de ce produit peut vous exposer à des produits chimiques qui sont
reconnus par l'État de la Californie comme pouvant provoquer le cancer, des anomalies congénitales ou
d'autres effets nuisibles à la reproduction.
Veuillez vous laver les mains après l'avoir manipuler.
Note explicative: La Proposition 65 (California Safe Drinking Water and Toxic Enforcement Act of
1986) de la Californie sur les matières dangereuses et l'eau potable exige un étiquetage spécial pour les
produits contenant certains produits chimiques qui sont reconnus par l'État de la Californie comme
pouvant provoquer le cancer, des anomalies congénitales ou d'autres effets nuisibles à la reproduction.
Creative a choisi d'inclure une mise en garde s'appuyant sur sa connaissance de la présence d'un ou de
plusieurs de ces produits chimiques sans essayer d'en évaluer le niveau d'exposition. Pour les produits de
Creative, le niveau d'exposition peut être inférieur au niveau critique établi par la Proposition 65 ou même
être nul. Néanmoins, par souci extrême de prudence, Creative a choisi de placer l'avertissement de la
Proposition 65 sur ses produits.
Page 21
Page 22

Declaration of Conformity
According to the FCC96 208 and ET95-19,
Manufacturer/Importer's Name:
Creative Labs, Inc.
Manufacturer/Importer's Address:
1901 McCarthy Boulevard
Milpitas, CA. 95035
United States
Tel: (408) 428-6600
declares under its sole responsibility that the product
Trade Name:
Creative Labs
Model Numbers:
DAP-FL0042
DAP-FL0050
has been tested according to the FCC / CISPR22/97 requirement for Class B devices and found
compliant with the following standards:
EMI/EMC:
ANSI C63.4 2003, FCC Part 15 Subpart B
Complies with Canadian ICES-003 Class B
This device complies with part 15 of the FCC Rules.
Operation is subject to the following two conditions:
This device may not cause harmful interference, and
This device must accept any interference received, including interference that may cause
undesirable operation.
Ce matériel est conforme à la section 15 des régles FCC.
Son Fonctionnement est soumis aux deux conditions suivantes:
Le matériel ne peut étre source D'interférences et
Doit accepter toutes les interférences reques, Y compris celles pouvant provoquer un
fonctionnement indésirable.
Compliance Manager
Creative Labs, Inc.
December 11, 2007
Page 22
Page 23

Notice for Canada
This Class B digital apparatus complies with Canadian ICES-003.
Cet appareil numérique de la classe B est conforme à la norme NMB-003 du Canada.
CANADIAN CLASS B STATEMENT: This digital device does not exceed the Class B limits for radio
noise emissions from digital apparatus as set out in the interference-causing equipment standard entitled
"Digital Apparatus," ICES-003 of the Department of Communications.
Cet appareil numerique respecte les limites de bruits radioelectriques applicables aux appareils
numeriques de Classe B prescrites dans la norme sur le materiel brouilleur: "Appareils Numeriques,"
NMB-003 edictee par le ministre des Communications.
MODIFICATION: Any changes or modifications not expressly approved by the grantee of this device
could void the user's authority to operate the device.
Toute modification non approuvée explicitement par le fournisseur de licence de l'appareil peut entraîner
l'annulation du droit de l'utilisateur à utiliser l'appareil.
Page 23
Page 24

European Compliance
This product conforms to the following:
EMC Directive 2004/108/EEC
Mains operated products for the European market comply with Low Voltage Directive 2006/95/EC.
Communication / RF wireless products for the European market comply with R&TTE Directive
1999/5/EC.
CAUTION: To comply with the Europe CE requirement, this device must be installed with CE certified
computer equipment which meet with Class B limits.
All cables used to connect this device must be shielded, grounded and no longer than 3m in length.
Operation with non-certified computers or incorrect cables may result in interference to other devices or
undesired effects to the product.
MODIFICATION: Any changes or modifications not expressly approved by Creative Technology
Limited or one of its affiliated companies could void the user's warranty and guarantee rights.
Page 24
Page 25

Notice for Japan
Recycling Rechargeable Battery
Lithium rechargeable battery is a resource that can be recycled.
For recycling of embedded lithium rechargeable batteries inside Creative products, please do not
attempt to remove the battery from the device. For recycling information and instruction, please
go to Creative Media K K customer support at http://jp.creative.com/support/contact/ (in
Japanese)
For recycling of replaceable (removable) lithium rechargeable batteries:
It is recommended to remove the rechargeable batteries when they are fully discharged.
o
Precaution needs to be taken on metal parts of the battery by covering them with isolation
o
materials such as scotch tape.
Refer to the homepage of JBRC for information on recycling and recovery of rechargeable
o
batteries and supporting shops.
(URL: http://www.jbrc.com/)
o
Page 25
Page 26

Safety Information
Refer to the following information to use your product safely, and to reduce the chance of electric shock,
short-circuiting, damage, fire, hearing impairment or other hazards.
Improper handling may void the warranty for your product. For more information, read the warranty
available with your product.
Do not dismantle or attempt to repair your product.
Refer all servicing to authorized repair agents.
Do not expose your product to temperatures outside the range of 0°C to 45°C (32°F to 113°F).
Do not pierce, crush or set fire to your product.
Keep your product away from strong magnetic objects.
Do not subject your product to excessive force or impact.
Do not expose your product to water or moisture.
If your product is moisture-resistant, take care not to immerse your product in water or expose it
to rain.
Earphones
When a conductive apparatus such as earphones, is used in close proximity with a CRT
television or CRT monitor, the latter may emit an electrostatic discharge. This electrostatic
discharge can be felt as a static shock. While this static shock is usually harmless, it is good
practice to avoid close contact with CRT devices when using earphones.
Do not listen to audio on your earbuds or headphones at high volume for prolonged periods of
time as hearing loss may result. For users in the United States, go to www.hei.org for more
information.
Do not listen to your audio device at high volume when driving, cycling or crossing the road,
especially in heavy traffic, or in any other traffic condition where such use will hinder safe travel
on the roads. We recommend that consumers be extremely cautious when using this device on
the road.
Embedded Battery
Do not attempt to remove the embedded battery.
The product must be disposed of according to local environmental regulations. To replace the
battery, return your product to your regional support office. For product service information, go
to www.creative.com.
Removable Battery
The battery must be recycled or disposed of properly. Contact local agencies for recycling and
disposal information.
Do not allow metal objects to touch the terminals of your battery.
If there is leakage, an offensive odor, discoloration or deformation during charging or use,
remove the battery and do not use it again. Clean your hands well before touching food or
sensitive areas, for example, your eyes.
Bluetooth Product
Do not turn on or use your product in an airplane.
Page 26
Page 27

General Specifications
Size (WxHxD)
53.7 mm (2 1/10") x 35.3 mm (1 2/5") x 12.8 mm (1/2")
53.7 mm (2 1/10") x 35.6 mm (1 3/8") x 16 mm (5/8") for player models with built-in speaker
Weight (approximate)
18.5 g (1/2 ounce)
24 g (4/5 ounce) for player models with built-in speaker
Power Source
Battery: 1 x Rechargeable Lithium Ion battery
USB bus powered when connected to a power outlet or powered USB port on a computer
Audio Playback Formats
Audible Format 2 and 3
Audible Format 4 (For selected player models only)
MP3 (Up to 320 kbps)
WMA (Up to 320 kbps)
WMA with Windows Media Digital Rights Management (WMDRM) 9
MP3 Playback Performance
Signal-to-Noise Ratio: Up to 90 dB
Channel Separation: Up to 65 dB
Frequency Response: 20 Hz ~ 20 kHz
Harmonic Distortion Output: <0.1%
Connectors
Headphone jack: 3.5 mm (1/8") stereo minijack, 5 ~ 7 mW per channel
USB port: Standard USB mini-B receptacle
Firmware Support
Upgradable via USB (firmware upgrades are available from www.creative.com/support).
Earphone Specifications
Frequency Range: 20 Hz ~ 20 KHz
Sensitivity: 111 dB ±3 dB SPL at 1 KHz
Impedance: 32 W ±15%
Plug: 3.5 mm (1/8") stereo minijack
Page 27
Page 28

License and Copyright
Information in this document is subject to change without notice and does not represent a commitment on
the part of Creative Technology Ltd. No part of this manual may be reproduced or transmitted in any
form or by any means, electronic or mechanical, including photocopying and recording, for any purpose
without the written permission of Creative Technology Ltd. The software described in this document is
furnished under a license agreement and may be used or copied only in accordance with the terms of the
license agreement. It is against the law to copy the software on any other medium except as specifically
allowed in the license agreement. The licensee may make one copy of the software for backup purposes
only.
This product is not intended for the unauthorized recording or distribution of copyrighted material.
ZEN and the Creative logo are trademarks or registered trademarks of Creative Technology Ltd. in the
United States and/or other countries. Microsoft, Windows, Windows Media, Windows Vista and
PlaysForSure are trademarks or registered trademarks of Microsoft Corporation. All rights reserved.
Intel and Pentium are trademarks of Intel Corporation in the U.S. and other countries.
Audible and AudibleManager are registered trademarks of Audible, Inc. in the U.S. and/or other
countries.
Gracenote is CDDB, Inc. d/b/a ""Gracenote."" CD and music-related data from Gracenote CDDB®
Music Recognition Service
© 2000, 2001, 2002 Gracenote. Gracenote CDDB Client Software © 2000, 2001, 2002 Gracenote.
U.S. Patents Number #5,987,525; #6,061,680; #6,154,773, and other patents issued or pending.
CDDB is a registered trademark of Gracenote. The Gracenote logo and logotype, the Gracenote CDDB
logo and logotype, and the "Powered by Gratenote CDDB" logo are trademarks of Gracenote. Music
Recognition Service and MRS are service marks of Gracenote.
RealPlayer is a trademark or a registered trademark of RealNetworks, Inc.
Winamp is a trademark or registered trademark of Nullsoft, Inc. in the United States and/or other
countries.
All other products are trademarks or registered trademarks of their respective owners.
Copyright © 2008 by Creative Technology Ltd. All rights reserved.
Version 1.10.03
May 2008
SM
Page 28
 Loading...