

Page 1
CLE_WCam Live Pro QS.book Page 1 Thursday, July 29, 2004 10:48 AM
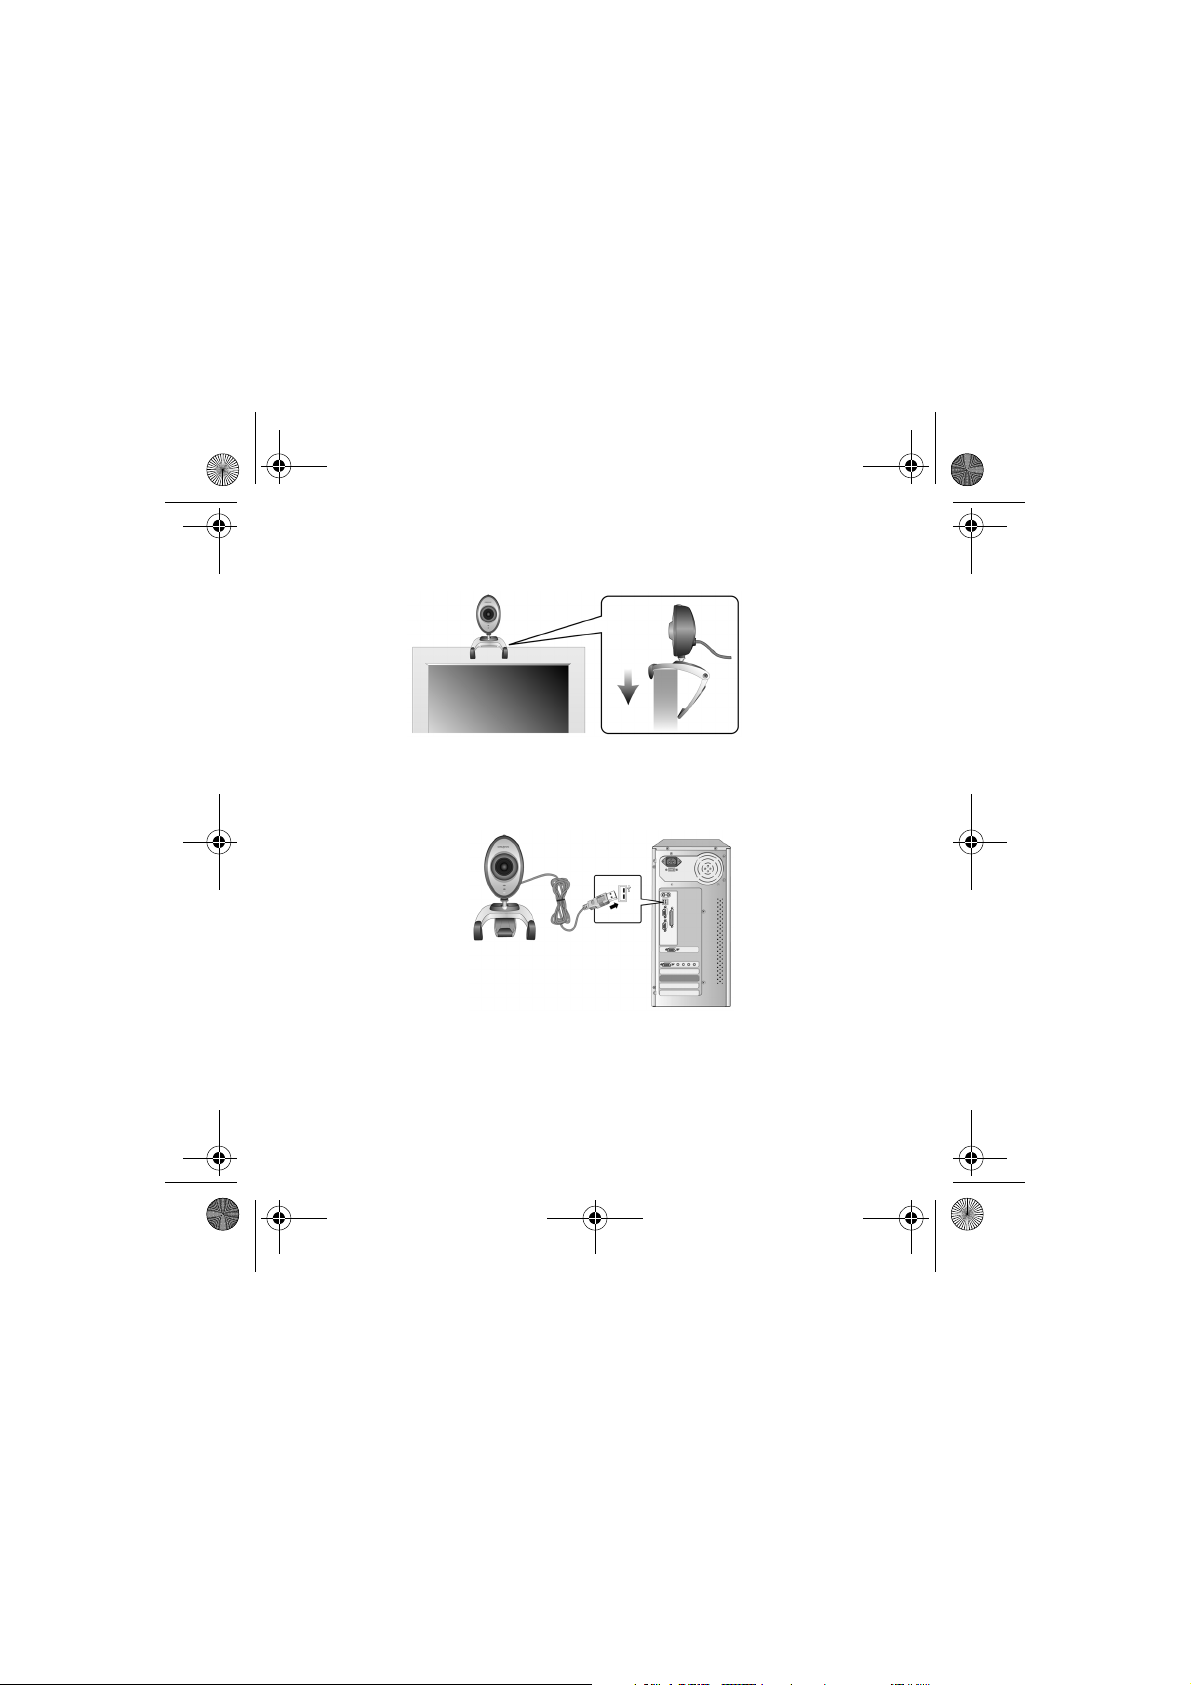
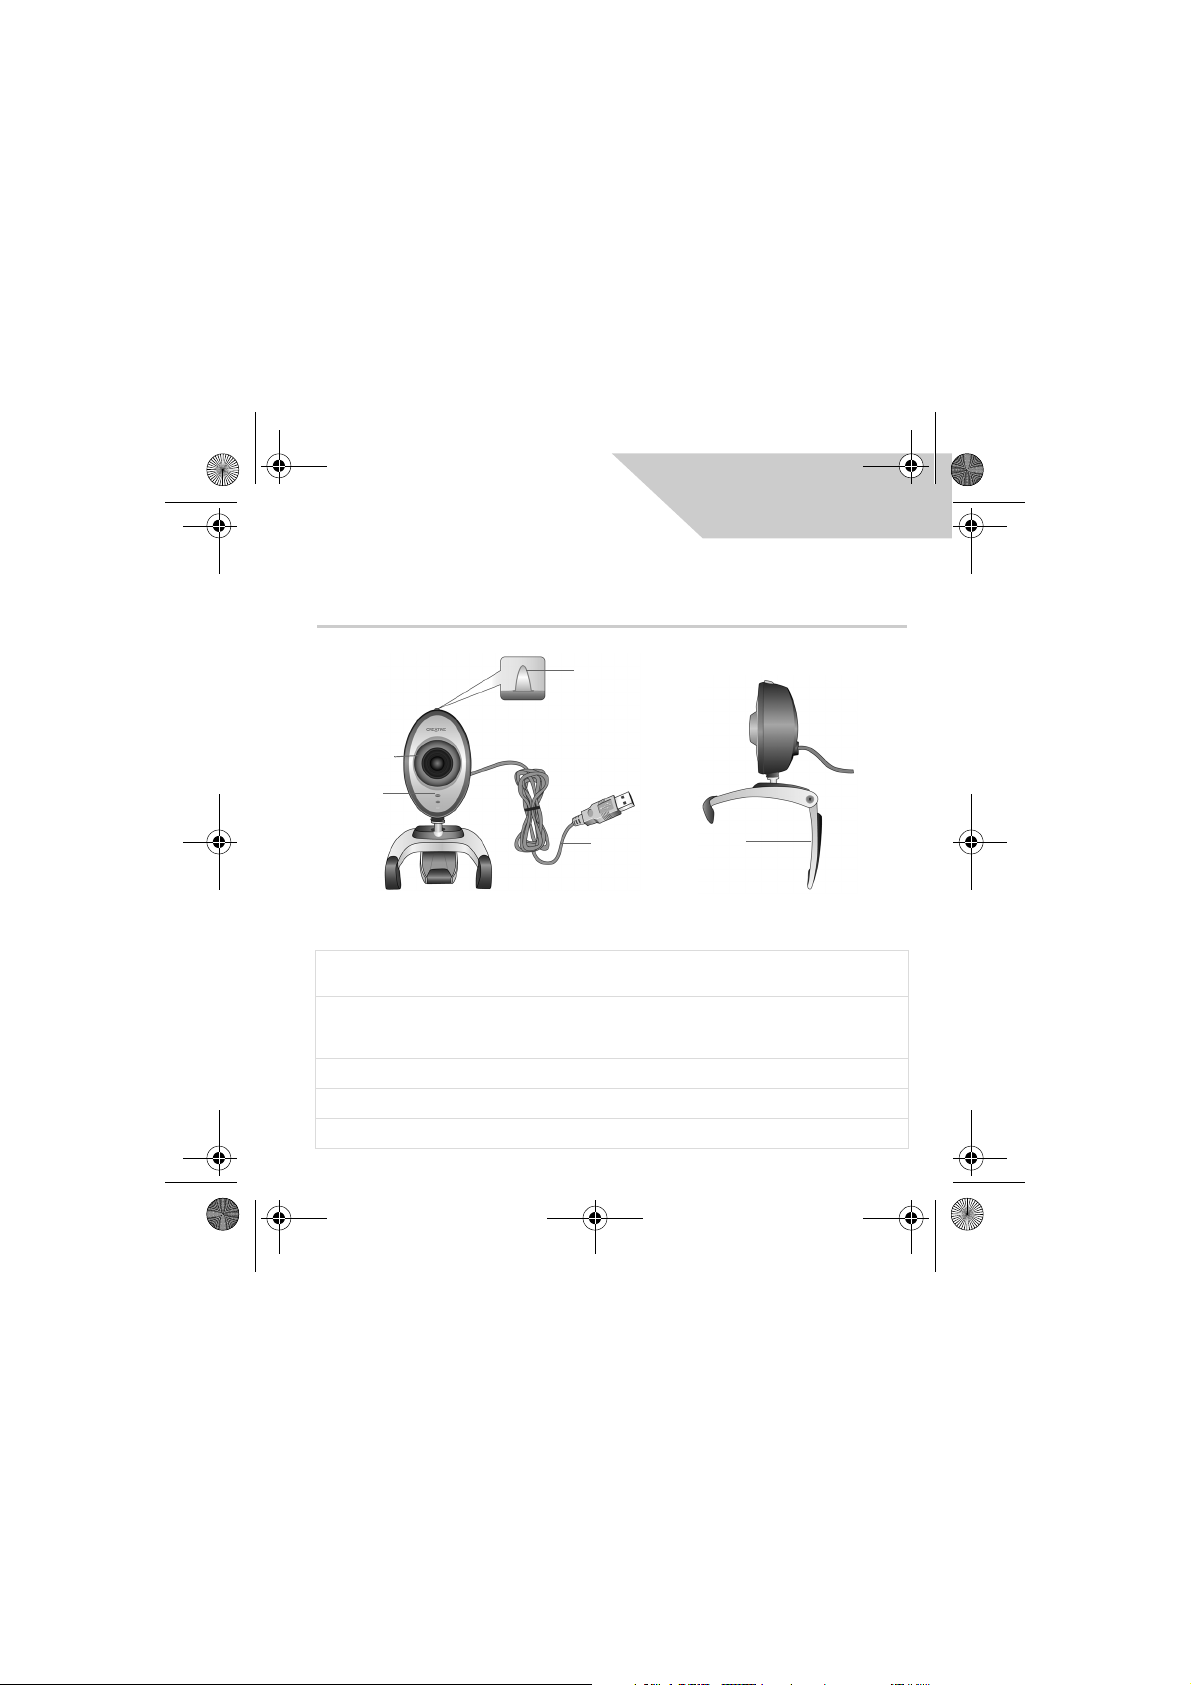
About Your Creative WebCam
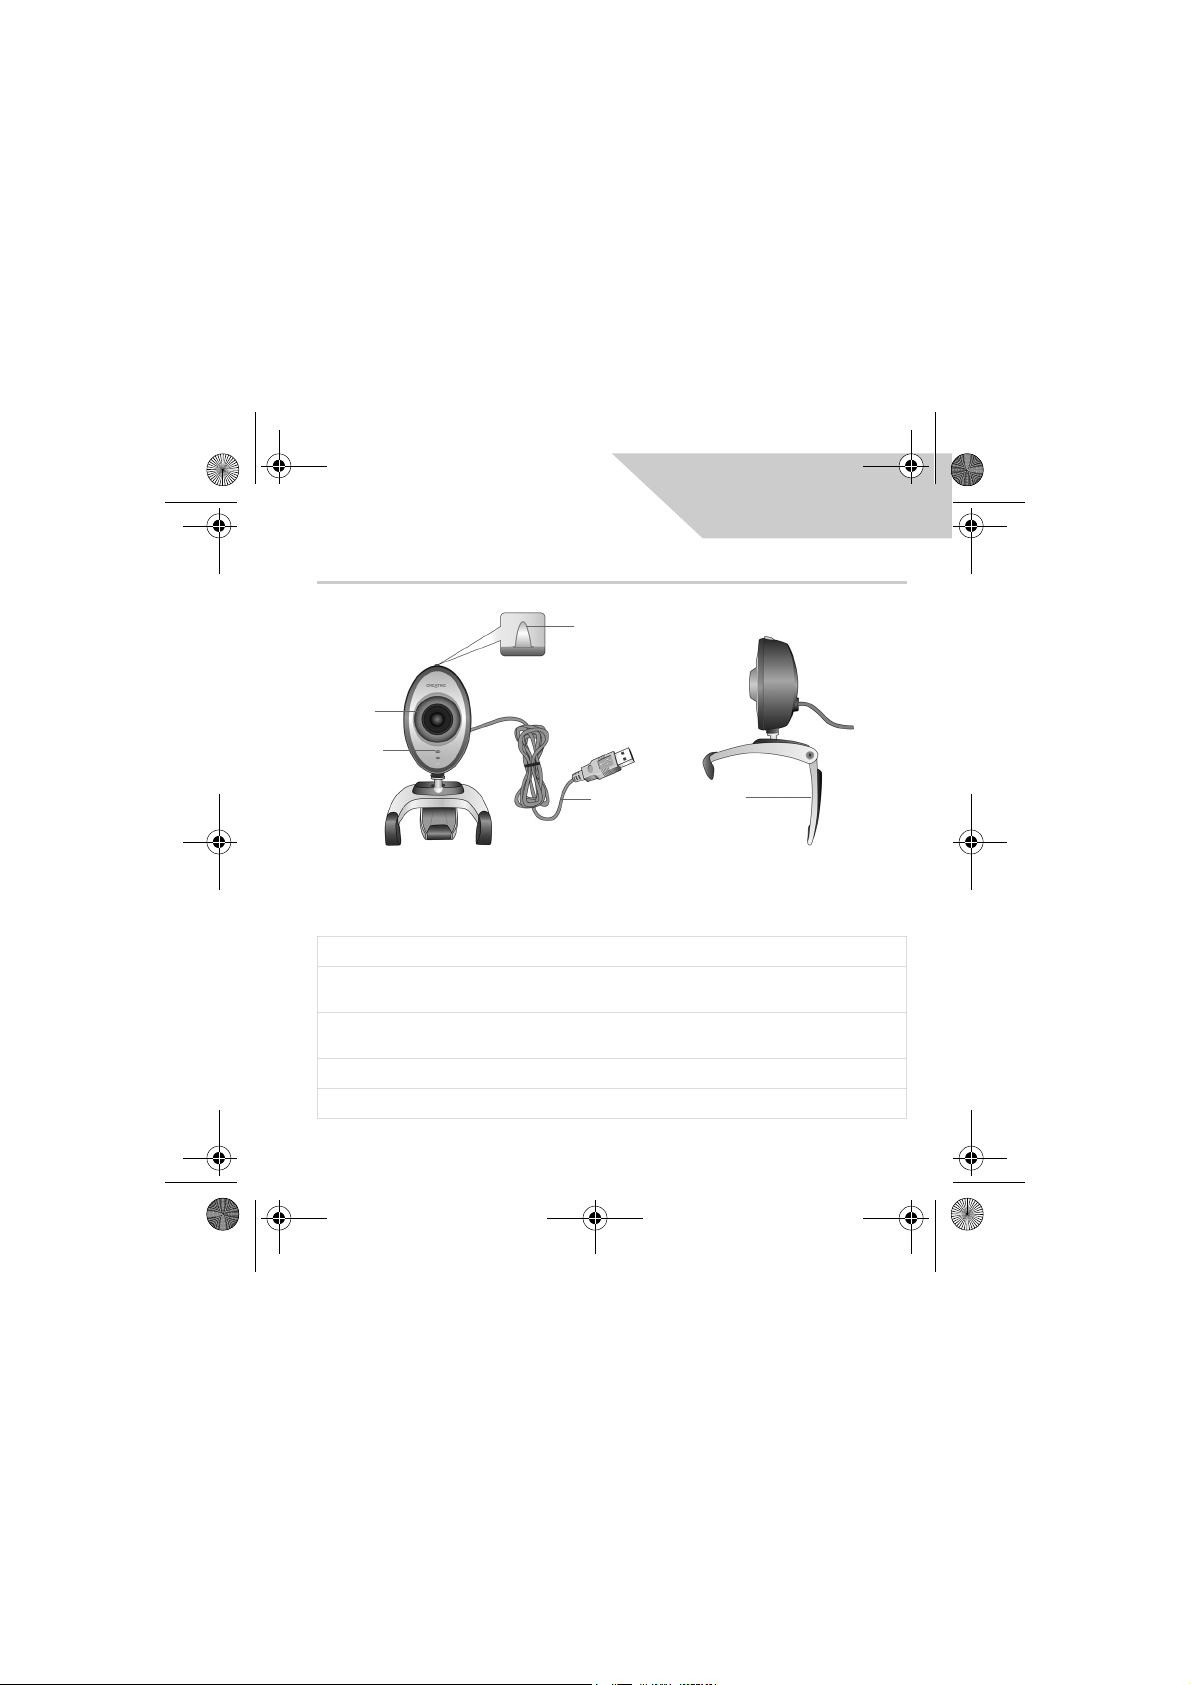
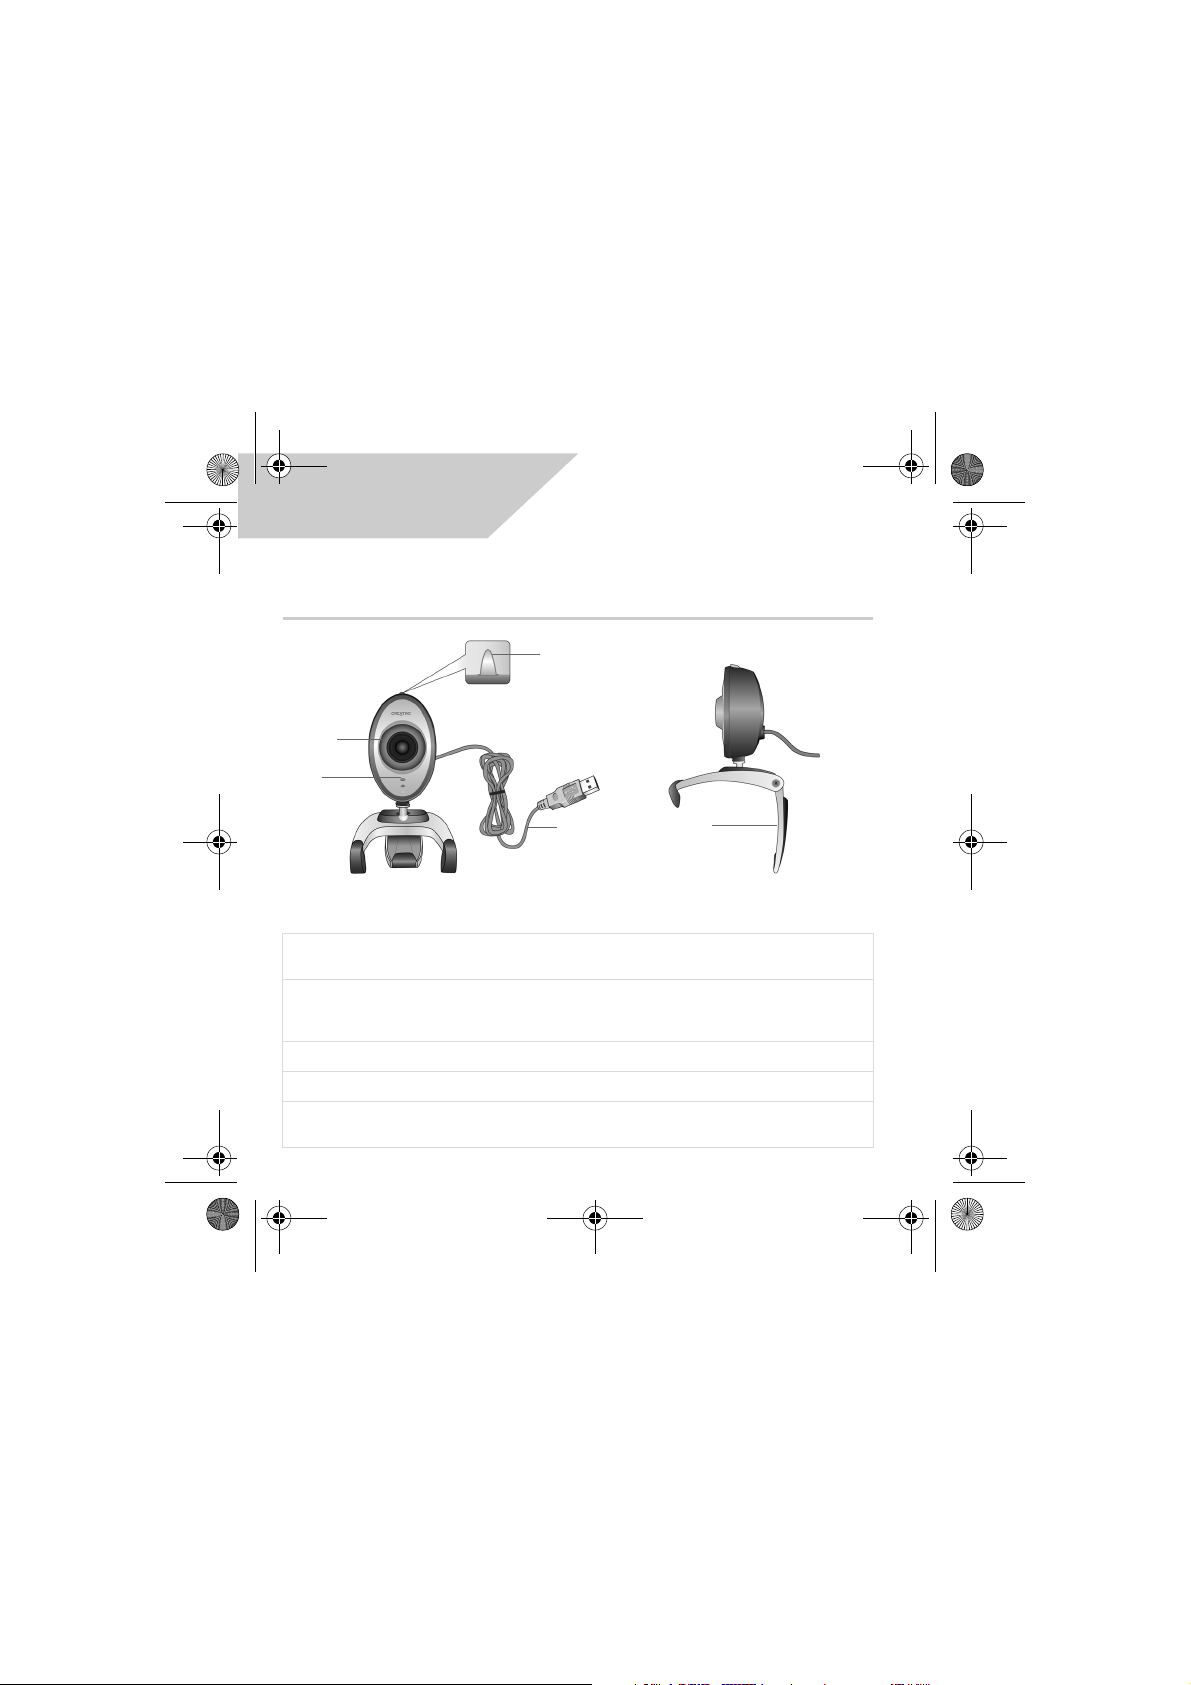
Snapshot
button
Focus ring
Power L ED
English
USB cable
Hinged
lever
Front View Side View
Figure 1
Power LED Lights up when your Creative WebCam is connected to your computer's USB port.
Focus ring
Snapshot
button
USB cable Connect it to your computer's USB port.
Hinged lever Use this to mount your Creative WebCam on an LCD display panel.
Adjusts the view focus. Point the lens toward your subject and then rotate this ring in
a clockwise or counterclockwise motion until the image is in focus.
Press it to launch WebCam Center and capture images.
1
Page 2

CLE_WCam Live Pro QS.book Page 2 Thursday, July 29, 2004 10:48 AM
Getting Started
Installing Your Creative WebCam
1
1
1. Do not connect your Creative WebCam to your computer before installing the
drivers. If you accidentally begin installation with your Creative WebCam connected
and the Add New Hardware Wizard or Found New Hardware Wizard dialog
box appears, click the Cancel button.
2. Insert the Creative WebCam Live! Pro Installation CD into your CD-ROM drive. If it
does not run automatically, click Start → Run and type d:\setup.exe (replace d:\
with the drive letter of your CD-ROM drive).
3. Select the region you are in and then click the Next button.
4. Select a language and then click the Next button.
5. Click the options for installing drivers and applications, and then click the Install
button.
For users with USB 2.0-equipped computers only:
Creative Installation automatically checks that the software components required for optimal
USB 2.0 performance are installed on your computer, and alerts you if these components are
missing. If you receive such a message, do either of the following to ensure that your Creative
WebCam always performs to its fullest potential over a USB 2.0 connection:
• install the driver provided by the vendor of your USB 2.0 Enhanced Host Controller; or
• download and install the latest Service Pack (SP) for your respective Windows
System.
Should you choose to install Windows XP SP1, you must install Windows XP
Hotfix KB822603 as well.
The latest Windows Service Packs (including Windows XP SP1) and Windows
Hotfix KB822603 can be obtained from the Microsoft Help and Support website
or via Windows Update.
2
®
Operating
Page 3
CLE_WCam Live Pro QS.book Page 3 Thursday, July 29, 2004 10:48 AM
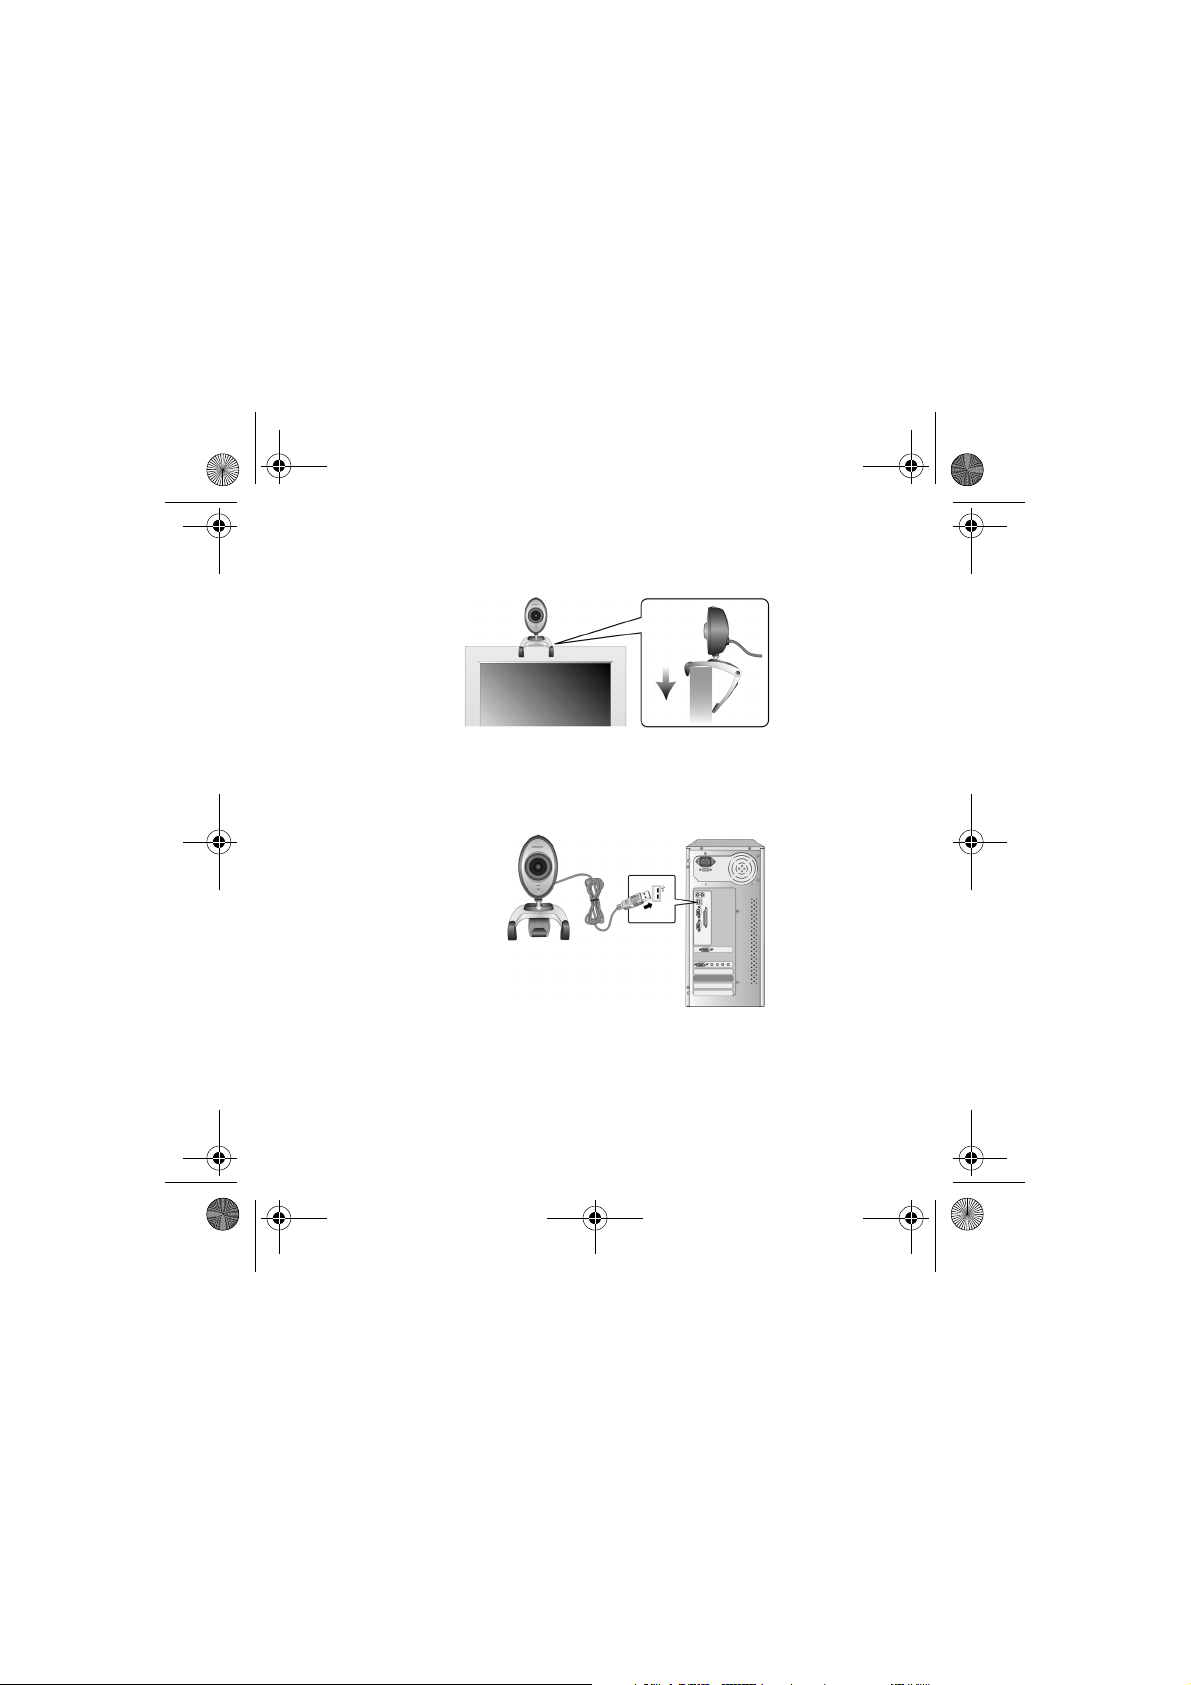
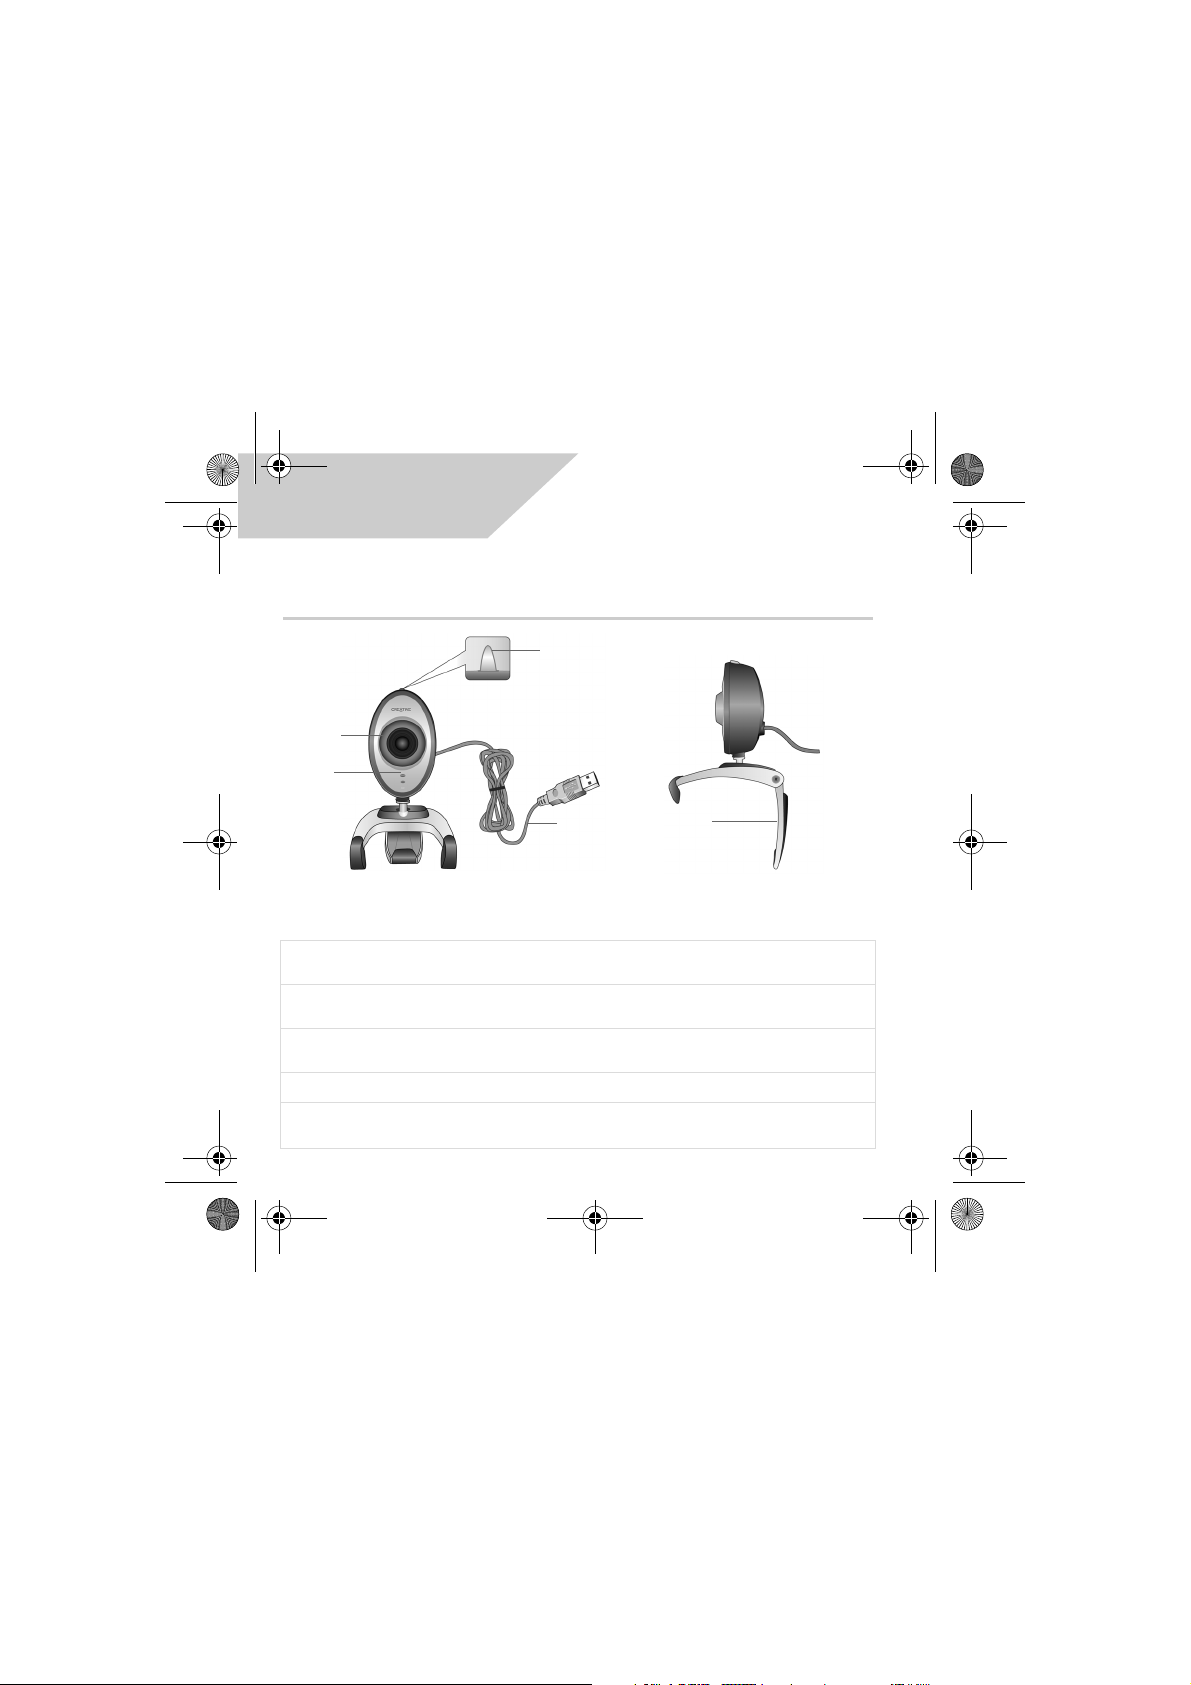
6. Place your Creative WebCam on top of your computer monitor or other flat surface.
For LCD flat panel monitors or notebook computers, use the integrated hinged lever
to balance the Creative WebCam (see Figure 2).
Figure 2
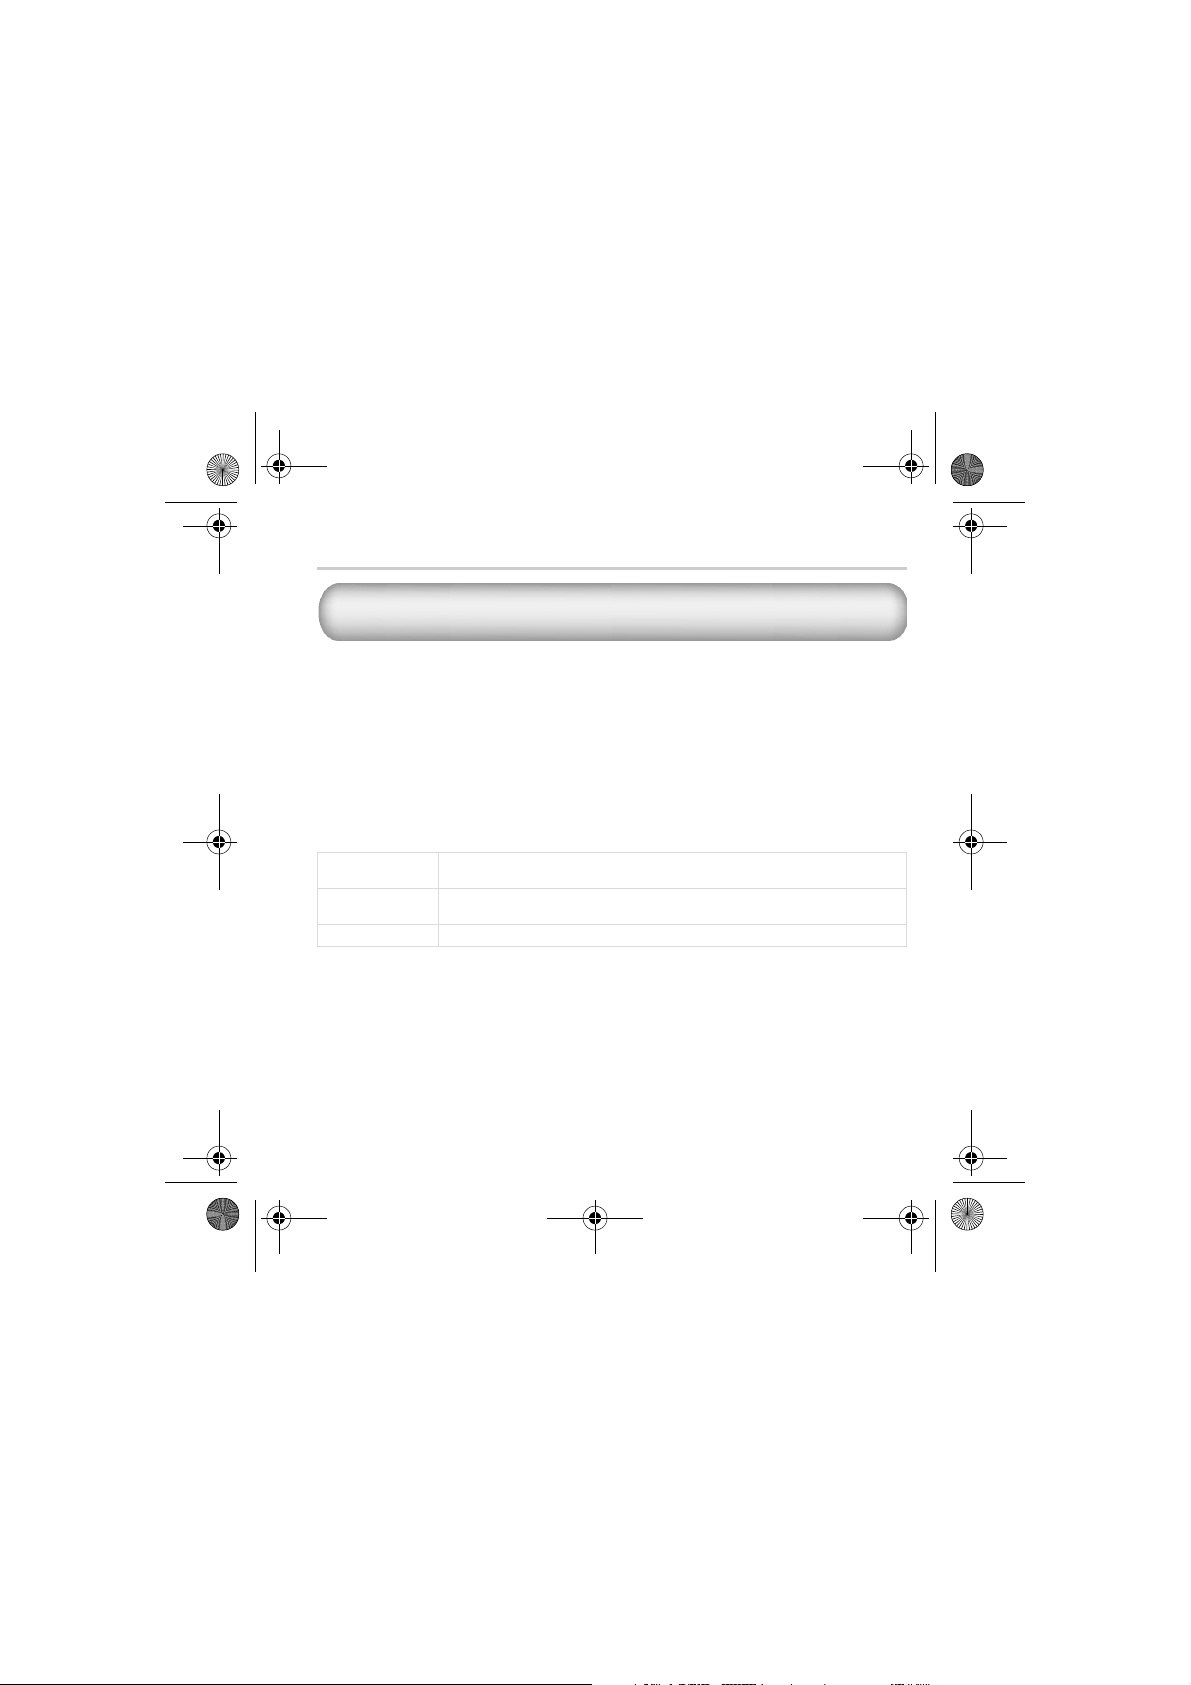
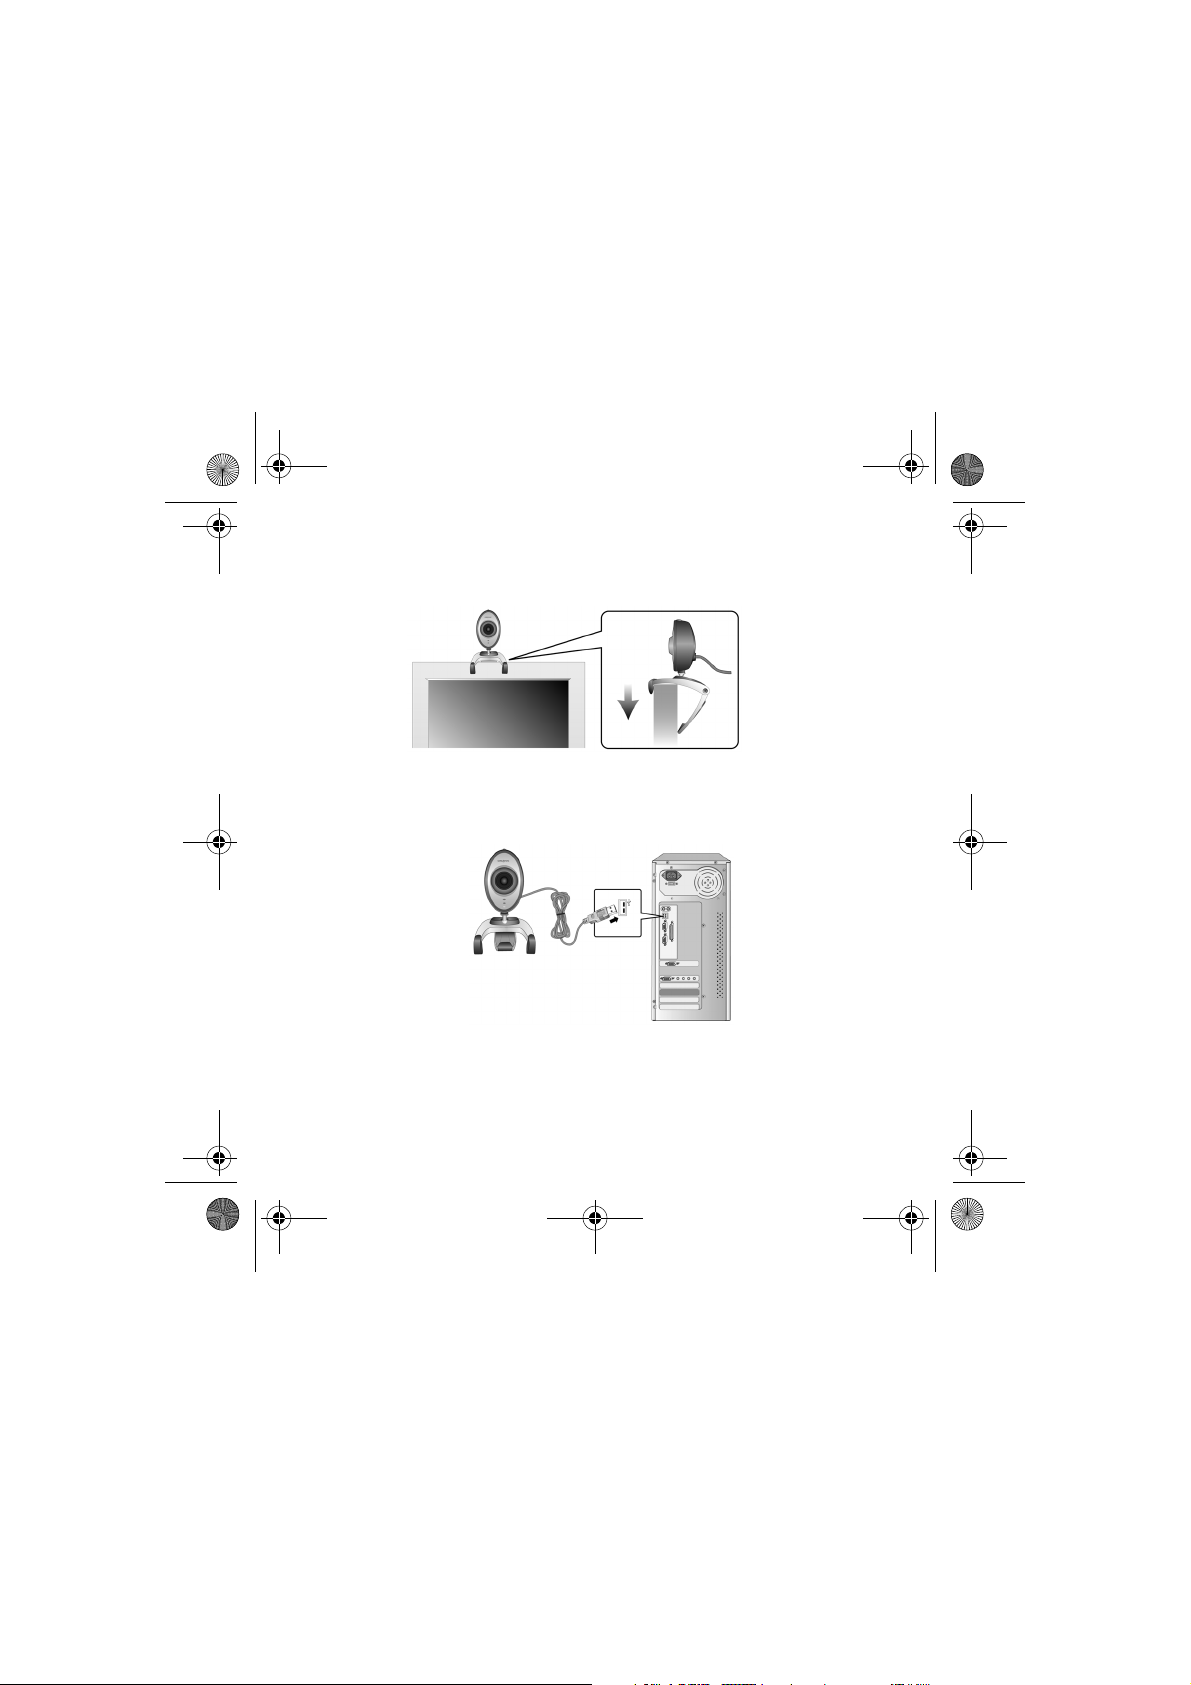
7. When prompted, connect your Creative WebCam's USB cable to an available USB
port on your computer (see Figure 3). Windows automatically detects the device.
Figure 3
In Windows XP only:
i. When the Found New Hardware Wizard dialog box appears, select Install the software
automatically (Recommended), and then click the Next button.
ii. When a Hardware Installation dialog box appears, click the Continue Anyway button.
3
Page 4

CLE_WCam Live Pro QS.book Page 4 Thursday, July 29, 2004 10:48 AM
In Windows 2000 only:
When a Digital Signature Not Found dialog box appears, telling you that Creative WebCam
Live! Pro has been detected, click the Ye s button.
In Windows Me and Windows 98 SE only:
i. If you are prompted to insert the Windows 98 SE or Windows Me CD, replace the Creative
WebCam Live! Pro Installation CD with the appropriate CD.
ii. In the Insert Disk dialog box, click the OK button.
8. Follow the instructions on screen to complete the installation. You may be asked, after
the drivers have been successfully installed, if you want to restart your computer.
Select No until all the applications are installed.
9. Restart your computer after all the applications have been installed.
Verifying the Installation
2
2
1. Right-click the My Computer icon on your desktop or in the Windows Start menu.
2. On the menu that appears, click Properties.
In Windows XP and Windows 2000 only:
In the System Properties dialog box, click the Hardware tab. Click the Device Manager
button.
In Windows Me and Windows 98 SE:
In the System Properties dialog box, click the Device Manager tab.
3. Click the plus (+) sign next to the Imaging Device icon. The entry "Creative
WebCam Live! Pro" appears.
4
Page 5

CLE_WCam Live Pro QS.book Page 5 Thursday, July 29, 2004 10:48 AM
Using Your Creative WebCam
3
3
Taking a Photo
1. Click Start → Programs → Creative → Creative WebCam → Creative
WebCam Center.
2. In the Creative WebCam Center window, click the Capture tab.
3. Click the Photo Resolution box and select the resolution that you want.
4. Click the Snap photo button to capture an image. Images are saved as files in the
default media folder.
To view the photos in the image viewer, double-click the image files in the Thumbnails/
Details pane.
Recording a Video
1. Click Start → Programs → Creative → Creative WebCam → Creative
WebCam Center.
2. In the Creative WebCam Center window, click the Capture tab.
3. Click the Video Resolution box and select the resolution that you want.
4. Click the Record button to start and stop video recording. Videos are saved as files in
the default media folder when you stop recording.
To view the videos in the video viewer, double-click the video files in the Thumbnails/
Details panel.
5
Page 6

CLE_WCam Live Pro QS.book Page 6 Thursday, July 29, 2004 10:48 AM
Enabling Face Tracking
With Face Tracking, your camera automatically zooms in on your face during video instant
messaging sessions, or when recording video.
You can enable Face Tracking in the Face Tracking Utility. You can launch the Face Tracking
Utility in the following ways:
• In WebCam Center, click Tools → Face Tracking Utility.
• Right-click the Creative Cam Detector icon in the System Tray and click the Face
Tracking Utility option.
• Click Start → Programs or All Programs → Creative → Creative WebCam
Center → Face Tracking Utility.
For more information, read the User’s Guide on the Installation CD.
Go to d:\manual\<language>\manual.chm (replace d:\ with the drive letter of your CD-ROM/
DVD-ROM drive, and <language> for the language the document is in)
6
Page 7
CLE_WCam Live Pro QS.book Page 7 Thursday, July 29, 2004 10:48 AM
More Information
Resolve and troubleshoot technical queries at Creative's 24-hour self-help
Knowledge Base. Go to www.creative.com and select your region.
Creative Knowledge Base
Register your product!
Enjoy a host of benefits by registering your product during installation, or at
www.creative.com/register. Benefits include:
• Service and product support from Creative
• Exclusive updates on promotions and events.
Customer Support Services and Warranty
You can find Customer Support Services, Warranty and other information in the
Installation CD.
Customer Support
Services
Warrant y d:\warranty\<region>\<language>\warranty.chm
User’s Guide d:\manual\<language>\manual.chm
(replace d:\ with the drive letter of your CD-ROM/DVD-ROM drive, <region> with the
region that you are in, and <language> with the language that your document is in)
Copyright © 2004 Creative Technology Ltd. All rights reserved. The Creative logo is a registered trademark of Creative
Technology Ltd. in the United States and/or other countries. Microsoft and Windows are registered trademarks of Microsoft
Corporation. All other products are trademarks or registered trademarks of their respective owners and are hereby
recognized as such. All specifications are subject to change without prior notice. Actual contents may differ slightly from
those pictured.
d:\support\<language>\support.chm
Please keep your Proof of Purchase for the duration of the warranty period.
7
Page 8
CLE_WCam Live Pro QS.book Page 8 Thursday, July 29, 2004 10:48 AM
Français
A propos de votre Creative
WebCam
Bouton
Vue
Bague de mise
au point
Ecran
d'alimentation
Câble
USB
Levier à
charnière
Vue de face Vue latérale
Ecran
d'alimentation
Bague de mise
au point
Bouton Vue Permet de lancer WebCam Center et de capturer des images.
Câble USB Permet de connecter la WebCam au port USB de l'ordinateur.
Levier à
charnière
S'allume lorsque votre Creative WebCam est connectée au port USB de votre
ordinateur.
Permet de régler la mise au point. Dirigez l'objectif vers votre sujet puis faites
tourner la bague vers la gauche ou vers la droite jusqu'à ce que l'image soit nette
(mise au point).
Utilisez-le pour monter votre Creative WebCam sur un écran d'affichage LCD.
Figure 1
8
Page 9

CLE_WCam Live Pro QS.book Page 9 Thursday, July 29, 2004 10:48 AM
Mise en route
Installation de votre Creative WebCam
1
1
1. Ne connectez pas votre Creative WebCam à votre ordinateur avant d'installer les
pilotes. Si, par erreur, vous avez commencé l'installation avec votre Creative WebCam
connectée et que la boîte de dialogue Assistant Ajout de nouveau matériel ou
Assistant Ajout de nouveau matériel détecté apparaît, cliquez sur le bouton
Annuler.
2. Insérez le CD-ROM d’installation de Creative WebCam Live! Pro dans votre lecteur de
CD-ROM. S'il ne s'exécute pas automatiquement, cliquez sur Démarrer →
Exécuter et tapez d:\setup.exe (remplacez d:\ par la lettre de votre lecteur de
CD-ROM).
3. Sélectionnez la région où vous résidez puis cliquez sur le bouton Suivant.
4. Sélectionnez une langue puis cliquez sur le bouton Suivant.
5. Cliquez sur les options pour installer les pilotes et les applications, puis cliquez sur le
bouton Installer.
Pour les utilisateurs d'ordinateurs avec USB 2.0 :
Le programme d'installation de Creative vérifie automatiquement que les composants logiciels
requis pour une performance optimale d'USB 2.0 sont installés sur votre ordinateur et vous
prévient si des composants manquent. Si vous recevez un tel message, effectuez l'une des
deux opérations suivantes pour vous assurer que votre Creative WebCam fonctionne toujours
à son potentiel maximum avec une connexion USB 2.0.
• installez le pilote fourni par le revendeur de votre contrôleur hôte amélioré USB 2.0 ; ou
• téléchargez et installez le dernier Service Pack (SP) approprié à votre système
d'exploitation Windows
Si vous choisissez d'installer Windows XP SP1, vous devez également installer le
correctif KB822603 Windows XP.
Vous pouvez obtenir les Services Packs Windows (y compris Windows XP SP1)
et le correctif KB822603 Windows depuis le site Web d'aide Microsoft.
®
.
9
Page 10
CLE_WCam Live Pro QS.book Page 10 Thursday, July 29, 2004 10:48 AM
6. Placez la Creative WebCam sur le haut de votre moniteur ou sur toute autre surface
plane. Pour les moniteurs à écran plat LCD ou les ordinateurs portables, utilisez le
levier à charnière intégré pour équilibrer la Creative WebCam (voir Figure 2).
Figure 2
7. A l'invite, connectez le câble USB de votre Creative WebCam à un port USB disponible
sur votre ordinateur (voir Figure 3). Windows la détecte automatiquement.
Figure 3
Sous Windows XP uniquement :
i. Lorsque la boîte de dialogue Assistant Ajout de nouveau matériel détecté s'affiche,
sélectionnez Installer le logiciel automatiquement (recommandé), puis cliquez sur le
bouton Suivant.
ii. Lorsque la boîte de dialogue Installation matérielle apparaît, cliquez sur le bouton
Continuer.
10
Page 11

CLE_WCam Live Pro QS.book Page 11 Thursday, July 29, 2004 10:48 AM
Sous Windows 2000 uniquement :
Lorsqu'une boîte de dialogue Signature numérique introuvable s'affiche pour indiquer que la
Creative WebCam Live! Pro a été détectée, cliquez sur le bouton Oui.
Sous Windows Me et Windows 98 Deuxième Edition uniquement :
i. Si vous êtes invité à insérer le CD de Windows 98 Deuxième Edition ou Windows Me,
remplacez le CD d'installation Creative WebCam Live! Pro par le CD approprié.
ii. Dans la boîte de dialogue Insérer un disque, cliquez sur le bouton OK.
8. Suivez les instructions à l'écran pour terminer l'installation. Vous serez peut-être invité
à redémarrer l'ordinateur après l'installation réussie des pilotes. Sélectionnez Non tant
que toutes les applications ne sont pas installées.
9. Redémarrez votre ordinateur lorsque toutes les applications ont été installées.
Vérification de l'installation
2
2
1. Cliquez avec le bouton droit de votre souris sur l'icône Poste de travail sur votre
Bureau ou dans le menu Démarrer de Windows.
2. Dans le menu qui s'affiche, cliquez sur Propriétés.
Sous Windows XP et Windows 2000 uniquement :
Dans la boîte de dialogue Propriétés système, cliquez sur l’onglet Matériel. Cliquez sur le
bouton Gestionnaire de périphériques
Sous Windows Me et Windows 98 Deuxième Edition :
Dans la boîte de dialogue Propriétés système, cliquez sur l'onglet Gestionnaire de
périphériques.
3. Cliquez sur le signe plus (+) situé en regard de l'icône Périphérique d'acquisition
d'images. L'entrée « Creative WebCam Live! Pro » apparaît.
11
Page 12

CLE_WCam Live Pro QS.book Page 12 Thursday, July 29, 2004 10:48 AM
Utilisation de votre Creative WebCam
3
3
Prise d'une photo
1. Cliquez sur Démarrer → Programmes → Creative → Creative WebCam →
Creative WebCam Center.
2. Dans la fenêtre Creative WebCam Center, cliquez sur l'onglet Capturer.
3. Cliquez sur la zone de résolution Photo et sélectionnez la résolution souhaitée.
4. Cliquez sur le bouton Prendre une photo pour capturer une image. Les images sont
enregistrées en tant que fichiers dans le dossier de média par défaut.
Pour visualiser les photos dans l'afficheur d'images, double-cliquez sur les fichiers image
dans le volet Miniatures/Détails.
Enregistrement d'une vidéo
1. Cliquez sur Démarrer → Programmes → Creative → Creative WebCam →
Creative WebCam Center.
2. Dans la fenêtre Creative WebCam Center, cliquez sur l'onglet Capturer.
3. Cliquez sur la zone de résolution Vidéo et sélectionnez la résolution souhaitée.
4. Cliquez sur le bouton Enregistrer pour commencer et arrêter l'enregistrement d'une
vidéo. Les vidéos sont sauvegardées en tant que fichiers dans le dossier de média par
défaut lorsque vous arrêtez l'enregistrement.
Pour visualiser les vidéos dans l'afficheur de vidéos, double-cliquez sur les fichiers vidéo
dans le volet Miniatures/Détails.
12
Page 13

CLE_WCam Live Pro QS.book Page 13 Thursday, July 29, 2004 10:48 AM
Activation du suivi de visage
Avec la fonction Suivi du visage, votre caméra effectue un zoom automatiquement sur votre
visage lors de sessions de messagerie instantanée ou lors d'enregistrement de vidéos.
Vous pouvez activer le suivi de visage dans l'utilitaire Suivi du visage. Vous pouvez démarrer
l'utilitaire Suivi du visage de différentes façons :
• Dans WebCam Center, cliquez sur Outils → Utilitaire Suivi du visage.
• Cliquez avec le bouton droit de la souris sur l'icône Creative Cam Detector dans la
barre d'état système et cliquez sur l'option Utilitaire Suivi du visage.
• Cliquez sur Démarrer → Programmes ou Tous les programmes → Creative →
Creative WebCam Center → Utilitaire Suivi du visage.
Pour de plus amples informations, consultez le Guide de l'utilisateur sur le CD d'installation.
Accédez à d:\manual\<langue>\manual.chm (remplacez d:\ par la lettre correspondant à votre
lecteur de CD-ROM/DVD-ROM, et <langue> par la langue du document)
13
Page 14

CLE_WCam Live Pro QS.book Page 14 Thursday, July 29, 2004 10:48 AM
Informations complémentaires
Vous pouvez accéder, 24 heures sur 24, à la base de connaissances d'auto-consultation de
Base de connaissances de Creative
Creative pour obtenir un dépannage ou des solutions à vos requêtes techniques. Accédez
au site www.creative.com et sélectionnez votre région.
Enregistrez votre produit !
Bénéficiez de nombreux avantages en enregistrant votre produit durant l'installation ou
depuis notre site www.creative.com/register, entre autres :
• Service et support technique de Creative
• Mises à jour exclusives concernant les promotions et les événements.
Services de support client et garantie
Le CD d'installation contient des informations relatives au support client, à la garantie...
Services de support
client
Garantie d:\warranty\<région>\<langue>\warranty.chm
Guide de
l'utilisateur (User's
Guide)
(remplacez d:\ par la lettre correspondant à votre lecteur de CD-ROM/DVD-ROM,
<région> par la région dans laquelle vous résidez, et <langue> par la langue de votre
documentation)
Copyright © 2004 Creative Technology Ltd. Tous droits réservés. Le logo Creative est une marque déposée de Creative
Technology Ltd. aux Etats-Unis et/ou dans d'autres pays. Microsoft et Windows sont des marques déposées de
Microsoft Corporation. Tous les autres produits sont des marques commerciales ou des marques déposées de leurs
propriétaires respectifs et sont reconnus par la présente en tant que tels. Toutes les spécifications peuvent faire l'objet de
modifications sans préavis. Le contenu réel peut être légèrement différent de celui illustré dans ce document.
14
d:\support\<langue>\support.chm
Veuillez conserver votre preuve d'achat durant toute la période de garantie.
d:\manual\<langue>\manual.chm
Page 15
CLE_WCam Live Pro QS.book Page 15 Thursday, July 29, 2004 10:48 AM
Einführung in Ihre Creative
WebCam
Auslöser
Fokussierring
Betriebs
-LED
Deutsch
USB-Kabel
Vorderansicht Seitenansicht
Betriebs-LED
Fokussierring
Auslöser Drücken Sie diese Taste, um WebCam Center zu starten und Bilder aufzunehmen.
USB-Kabel Schließen Sie das Kabel direkt an den USB-Anschluss Ihres Computers an.
Gelenkarm Mit diesem Arm bringen Sie Ihre Creative WebCam an einem LCD-Bildschirm an.
Leuchtet auf, wenn Ihre Creative WebCam an den USB-Anschluss Ihres Computers
angeschlossen ist.
Passt die Fokussierung an. Richten Sie das Objektiv auf das gewünschte Motiv.
Drehen Sie anschließend diesen Ring im und/oder entgegen dem Uhrzeigersinn, bis
das Bild scharf eingestellt ist.
Abbildung 1
Gelenkarm
15
Page 16

CLE_WCam Live Pro QS.book Page 16 Thursday, July 29, 2004 10:48 AM
Erste Schritte
Installieren der Creative WebCam
1
1
1. Schließen Sie die Creative WebCam erst an den Computer an, nachdem Sie die Treiber
installiert haben. Wenn Sie versehentlich mit der Installation beginnen, während die
Creative WebCam angeschlossen ist, und der Hardware-Assistent oder das
Dialogfeld Neue Hardware gefunden angezeigt wird, klicken Sie auf die Schaltfläche
Abbrechen.
2. Legen Sie die Installations-CD für die Creative WebCam Live! Pro in Ihr
CD-ROM-Laufwerk ein. Wenn die CD nicht automatisch gestartet wird, klicken Sie auf
Start → Ausführen, und geben Sie d:\setup.exe ein (ersetzen Sie dabei d:\ durch
den Laufwerksbuchstaben Ihres CD-ROM-Laufwerks).
3. Wählen Sie die Region, in der Sie sich befinden, und klicken Sie dann auf die
Schaltfläche Wei te r.
4. Wählen Sie eine Sprache, und klicken Sie dann auf die Schaltfläche Weiter.
5. Klicken Sie auf die Optionen zum Installieren von Treibern und Anwendungen, und
klicken Sie dann auf die Schaltfläche Installieren.
Nur für Benutzer, deren Computer mit USB 2.0 ausgestattet sind:
Die Creative-Installation überprüft automatisch, ob die für eine optimale USB 2.0-Leistung
erforderlichen Softwarekomponenten auf dem Computer installiert sind, und zeigt eine
Meldung an, wenn diese Komponenten fehlen. Wenn Sie eine derartige Meldung erhalten,
führen Sie einen der folgenden Schritte aus, um sicherzustellen, dass die Creative WebCam
über die USB 2.0-Verbindung stets optimal funktioniert:
• Installieren Sie die Treiber, die der Hersteller Ihres erweiterten USB 2.0-Hostcontrollers
zur Verfügung stellt; oder
• Rufen Sie das neueste Service Pack (SP) für Ihr Windows
installieren Sie es.
Wenn Sie Windows XP SP1 installieren, müssen Sie auch Windows XP Hotfix
KB822603 installieren.
Die neuesten Windows Service Packs (einschließlich Windows XP SP1) und
Windows Hotfix KB822603 erhalten Sie über die Support-Website von Microsoft
oder über Windows Update.
16
®
-Betriebssystem ab, und
Page 17

CLE_WCam Live Pro QS.book Page 17 Thursday, July 29, 2004 10:48 AM
6. Stellen Sie die Creative WebCam auf den Monitor oder eine andere ebene Fläche. Zur
Montage auf LCD-Flachbildschirmen oder Notebook-Computern können Sie die
Creative WebCam auf dem integrierten Gelenkarm anbringen (siehe Abbildung 2).
Abbildung 2
7. Schließen Sie, wenn Sie dazu aufgefordert werden, das USB-Kabel der Creative
WebCam an einen freien USB-Anschluss an Ihrem Computer an (siehe Abbildung 3).
Das Gerät wird durch Windows automatisch erkannt.
Abbildung 3
Nur Windows XP:
i. Wählen Sie im angezeigten Dialogfeld Hardware-Assistent die Option Software
automatisch installieren (empfohlen), und klicken Sie anschließend auf die Schaltfläche
We ite r.
ii. Wenn ein Dialogfeld zur Hardwareinstallation angezeigt wird, klicken Sie auf die
Schaltfläche Dennoch fortsetzen.
17
Page 18

CLE_WCam Live Pro QS.book Page 18 Thursday, July 29, 2004 10:48 AM
Nur Windows 2000:
Wenn Ihnen über das Dialogfeld Digitale Signatur nicht gefunden mitgeteilt wird, dass die
Creative WebCam Live! Pro gefunden wurde, ignorieren Sie diese Meldung, und klicken Sie auf Ja.
Nur Windows Me und Windows 98 SE:
i. Wenn Sie aufgefordert werden, die Windows 98 SE- oder Windows Me-CD einzulegen,
nehmen Sie die Installations-CD der Creative WebCam Live! Pro aus dem Laufwerk, und legen
Sie die entsprechende CD ein.
ii. Klicken Sie im Dialogfeld Datenträger einlegen auf die Schaltfläche OK.
8. Folgen Sie den Anweisungen auf dem Bildschirm, um die Installation abzuschließen.
Nach der erfolgreichen Installation der Treiber werden Sie möglicherweise
aufgefordert, Ihren Computer neu zu starten. Wählen Sie Nein, bis alle Anwendungen
installiert sind.
9. Starten Sie Ihren Computer neu, nachdem alle Anwendungen installiert wurden.
Überprüfen der Installation
2
2
1. Klicken Sie auf dem Desktop oder im Windows-Start-Menü mit der rechten Maustaste
auf das Symbol Arbeitsplatz.
2. Klicken Sie in dem Kontextmenü, das daraufhin angezeigt wird, auf die Option
Eigenschaften.
Nur Windows XP und Windows 2000:
Klicken Sie im Dialogfeld Systemeigenschaften auf die Registerkarte Hardware. Klicken Sie auf
die Schaltfläche Geräte-Manager.
Nur Windows Me und Windows 98 SE:
Klicken Sie im Dialogfeld Eigenschaften von System auf die Registerkarte Geräte-Manager.
3. Klicken Sie auf das Pluszeichen (+) neben dem Symbol Bildverarbeitungsgerät. Der
Eintrag „Creative WebCam Live! Pro“ wird angezeigt.
18
Page 19

CLE_WCam Live Pro QS.book Page 19 Thursday, July 29, 2004 10:48 AM
Verwenden Ihrer Creative WebCam
3
3
Aufnehmen eines Fotos
1. Klicken Sie auf Start → Programme → Creative → Creative WebCam →
Creative WebCam Center.
2. Klicken Sie im Fenster Creative WebCam Center auf die Registerkarte Erfassung.
3. Klicken Sie auf das Fotoauflösungsfeld, und wählen Sie die gewünschte Auflösung.
4. Klicken Sie auf die Schaltfläche Foto aufnehmen, um ein Bild aufzunehmen. Bilder
werden als Dateien im Standardmedienordner gespeichert.
Wenn Sie die Fotos in einer Bildanzeige sehen möchten, doppelklicken Sie im Teilfenster
Miniaturen/Details auf die Bilddateien.
Aufnehmen eines Videos
1. Klicken Sie auf Start → Programme → Creative → Creative WebCam →
Creative WebCam Center.
2. Klicken Sie im Fenster Creative WebCam Center auf die Registerkarte Erfassung.
3. Klicken Sie auf das Videoauflösungsfeld, und wählen Sie die gewünschte Auflösung.
4. Klicken Sie auf die Schaltfläche Aufnahme, um die Videoaufzeichnung zu beginnen und
zu beenden. Videos werden nach Abschluss der Aufnahme als Dateien im
Standardmedienordner gespeichert.
Wenn Sie die Videos in einer Videoanzeige sehen möchten, doppelklicken Sie im Teilfenster
Miniaturen/Details auf die Videodateien.
19
Page 20

CLE_WCam Live Pro QS.book Page 20 Thursday, July 29, 2004 10:48 AM
Aktivieren der Gesichtsverfolgung
Mit der Gesichtsverfolgung vergrößert die Kamera Ihr Gesicht automatisch, wenn Sie eine
Video-Instant-Messaging-Sitzung abhalten oder ein Video aufnehmen.
Sie können die Gesichtsverfolgung im gleichnamigen Dienstprogramm aktivieren. Das
Dienstprogramm Gesichtsverfolgung starten Sie folgendermaßen:
• Klicken Sie in WebCam Center auf We rk zeug e → Face-Tracking-Programm.
• Klicken Sie mit der rechten Maustaste auf das Symbol Creative Cam Detector in der
Systemablage, und klicken Sie auf die Option Face-Tracking-Programm.
• Klicken Sie auf Start → Programme oder Alle Programme → Creative →
Creative WebCam Center → Face-Tracking-Programm.
Weitere Informationen finden Sie im Benutzerhandbuch auf der Installations-CD.
Wechseln Sie zu d:\manual\<Sprache>\manual.chm (ersetzen Sie d:\ durch den
Laufwerksbuchstaben Ihres CD-ROM-/DVD-ROM-Laufwerks und <Sprache> durch die gewünschte
Dokumentsprache.)
20
Page 21

CLE_WCam Live Pro QS.book Page 21 Thursday, July 29, 2004 10:48 AM
Weitere Informationen
Zur Fehlerbehebung und Lösung technischer Fragen steht rund um die Uhr das
Selbsthilfetool Creative Knowledge Base zur Verfügung. Wechseln Sie zu
www.creative.com, und wählen Sie Ihre Region aus.
Creative Knowledge Base
Lassen Sie Ihr Produkt registrieren!
Sie können eine Fülle von Vorteilen in Anspruch nehmen, wenn Sie Ihr Produkt während
der Installation oder unter www.creative.com/register registrieren lassen. Zu den
Vorteilen zählen:
• Service- und Produktunterstützung durch Creative
• Exklusive Benachrichtigungen zu Promotionen und Events.
Kundenunterstützungsservices und Garantie
Kundenunterstützungsservices, Garantie und andere Informationen finden Sie auf der
Installation-CD.
Kundenunterstützungsservices d:\support\<Sprache>\support.chm
Garantie d:\warranty\<Region>\<Sprache>\warranty.chm
Benutzerhandbuch d:\manual\<Sprache>\manual.chm
(ersetzen Sie d:\ durch den Laufwerksbuchstaben Ihres CD-ROM/DVD-ROM-Laufwerks,
<Region> durch die Region, in der Sie sich befinden, und <Sprache> durch die
gewünschte Dokumentsprache.)
Copyright © 2004 Creative Technology Ltd. Alle Rechte vorbehalten. Das Creative-Logo ist eine eingetragene Marke von
Creative Technology Ltd. in den USA und/oder anderen Ländern. Microsoft und Windows sind eingetragene Marken der
Microsoft Corporation. Alle anderen Produkte sind Marken oder eingetragene Marken ihrer jeweiligen Eigentümer und
werden hiermit als solche anerkannt. Alle technischen Daten können jederzeit ohne vorherige Ankündigung geändert werden.
Der eigentliche Inhalt kann geringfügig von den Abbildungen abweichen.
Bewahren Sie Ihren Kaufbeleg während der gesamten
Garantielaufzeit gut auf.
21
Page 22
CLE_WCam Live Pro QS.book Page 22 Thursday, July 29, 2004 10:48 AM
Italiano
Presentazione di Creative
WebCam
Pulsante
Istantanea
Regolatore
di messa a
fuoco
LED di
alimentazione
Cavo USB
Vista anteriore Vista laterale
Figura 1
Leva
incernierata
LED di
alimentazione
Regolatore di
messa a fuoco
Pulsante
Istantanea
Cavo USB Collegarlo alla porta USB del computer.
Leva
incernierata
Si accende quando Creative WebCam è collegata a una porta USB del computer.
Regola la messa a fuoco. Puntare l'obiettivo sul soggetto, quindi ruotare la ghiera in
senso orario o antiorario fino a mettere a fuoco l'immagine.
Premere questo pulsante per avviare WebCam Center e acquisire le immagini.
Utilizzarla per montare Creative WebCam su uno schermo LCD.
22
Page 23

CLE_WCam Live Pro QS.book Page 23 Thursday, July 29, 2004 10:48 AM
Preparazione
Installazione di Creative WebCam
1
1
1. Non collegare Creative WebCam al computer prima di aver installato i driver. Se
involontariamente si avvia l'installazione con Creative WebCam collegata e vengono
visualizzate le finestre di dialogo Installazione guidata Nuovo hardware o
Trovato nuovo hardware, fare clic sul pulsante Annulla.
2. Inserire il CD d'installazioneCreative WebCam Live! Pro nell'unità CD-ROM. Se non
viene eseguito automaticamente, fare clic su Start → Esegui e digitare d:\setup.exe,
dove d:\ rappresenta l'unità CD ROM.
3. Selezionare la propria area geografica, quindi scegliere il pulsante Avanti.
4. Selezionare la lingua, quindi scegliere il pulsante Avanti.
5. Fare clic sulle opzioni per l'installazione dei driver e delle applicazioni, quindi scegliere il
pulsante Installa.
Solo per utenti con computer dotati di porte USB 2.0:
Il programma di installazione Creative verifica automaticamente se i componenti software
richiesti per un funzionamento ottimale con porte USB 2.0 sono installati sul computer e in
caso contrario visualizza un apposito messaggio. Se si riceve un tale messaggio, eseguire una
delle seguenti operazioni per assicurare che Creative WebCam funzioni in modo ottimale con
porte di connessione USB 2.0.
• Installare il driver fornito dalla casa produttrice del controller host avanzato USB 2.0,
oppure
• Scaricare e installare l'ultima versione del Service Pack (SP) per il sistema operativo
®
Windows
utilizzato.
Se si decide di installare Windows XP SP1, è necessario installare anche
Windows XP Hotfix KB822603.
Le ultime versioni dei Service Pack di Windows (compreso Windows XP SP1) e
Windows Hotfix KB822603 sono disponibili sul sito Web del servizio di
supporto tecnico Microsoft o sono accessibili utilizzando Windows Update.
23
Page 24
CLE_WCam Live Pro QS.book Page 24 Thursday, July 29, 2004 10:48 AM
6. Posizionare Creative WebCam sulla parte superiore del monitor del computer o su
un'altra superficie piana. Nel caso di monitor a schermo piatto LCD o di computer
portatili, utilizzare la leva incernierata e integrata per posizionare la videocamera in
equilibrio (vedere la Figura 2).
Figura 2
7. Quando viene richiesto, collegare il cavo USB di Creative WebCam alla porta USB
libera del computer (vedere la Figura 3). Windows rileva automaticamente la
periferica.
Figura 3
Solo in Windows XP:
i. Quando viene visualizzata la finestra di dialogo Installazione guidata nuovo hardware,
selezionare Installazione software automatica (consigliata), quindi scegliere il pulsante
Avanti.
ii. Quando viene visualizzata la finestra di dialogo Installazione hardware, fare clic sul pulsante
Continuare.
24
Page 25

CLE_WCam Live Pro QS.book Page 25 Thursday, July 29, 2004 10:48 AM
Solo in Windows 2000:
Quando viene visualizzata la finestra di dialogo Firma digitale non trovata che informa
dell'avvenuto rilevamento di Creative WebCam Live! Pro, fare clic sul pulsante Sì
Solo in Windows Me e Windows 98 SE:
i. Se viene richiesto di inserire il CD di Windows 98 SE o Windows Me, sostituire il CD di
installazione di Creative WebCam Live! Procon il CD appropriato.
ii. Nella finestra di dialogo Inserisci disco, fare clic sul pulsante OK.
8. Seguire le istruzioni visualizzate sullo schermo per portare a termine l'installazione.
Una volta completata l'installazione dei driver, potrebbe essere richiesto il riavvio del
computer. Selezionare No fino a quando tutte le applicazioni non sono state installate.
9. Una volta installate tutte le applicazioni, riavviare il computer.
Verifica dell'installazione
2
2
1. Fare clic con il pulsante destro del mouse sull'icona Risorse del computer
visualizzata sul desktop o sul menu Start di Windows.
2. Dal menu a discesa visualizzato, fare clic su Proprietà.
Solo in Windows XP e Windows 2000:
Nella finestra di dialogo Proprietà del sistema, fare clic sulla scheda Hardware. Fare clic sul
pulsante Gestione periferiche.
In Windows Me e Windows 98 SE:
Nella finestra di dialogo Proprietà Sistema, fare clic sulla scheda Gestione periferiche.
3. Fare clic sul segno più (+) accanto all'icona Periferiche di imaging. Viene visualizzata
la voce “Creative WebCam Live! Pro”.
25
Page 26

CLE_WCam Live Pro QS.book Page 26 Thursday, July 29, 2004 10:48 AM
Utilizzo di Creative WebCam
3
3
Cattura di una foto
1. Fare clic su Start → Programmi → Creative → Creative WebCam → Creative
Web C a m Cent e r.
2. Nella finestra Creative WebCam Center, fare clic sulla scheda Cattura.
3. Fare clic sulla casella di selezione del tipo di risoluzione Foto e selezionare la
risoluzione desiderata.
4. Fare clic sul pulsante Cattura foto per catturare l'immagine. Le immagini vengono
salvate come file nella cartella multimediale predefinita.
Per visualizzare le foto nel visualizzatore di immagini, fare doppio clic sui file delle immagini
visualizzati nel riquadro Miniatura/Dettagli.
Registrazione di un video
1. Fare clic su Start → Programmi → Creative → Creative WebCam → Creative
Web C a m Cent e r.
2. Nella finestra Creative WebCam Center, fare clic sulla scheda Cattura.
3. Fare clic sulla casella di selezione del tipo di risoluzione Video e selezionare la
risoluzione desiderata.
4. Fare clic sul pulsante Registra per avviare o arrestare la registrazione del video.
Quando si arresta la registrazione, le immagini vengono salvate come file nella cartella
multimediale predefinita.
Per visualizzare i video nel visualizzatore di video, fare doppio clic sui file dei video
visualizzati nel riquadro Miniatura/Dettagli.
26
Page 27

CLE_WCam Live Pro QS.book Page 27 Thursday, July 29, 2004 10:48 AM
Abilitazione della funzione di rilevamento facciale
La funzione di rilevamento facciale consente di eseguire una zoomata automatica sul
proprio volto durante sessioni di messaggeria istantanea video o durante la registrazione di
video.
La funzione di rilevamento facciale può essere abilitata utilizzando l'utilità di rilevamento
facciale. Per avviare l'utilità di rilevamento facciale, procedere come segue:
• In WebCam Center, scegliere Strumenti → Utilità di rilevamento facciale.
• Fare clic con il pulsante destro del mouse sull'icona Creative Cam Detector situata
sulla barra delle applicazioni e scegliere Utilità di rilevamento facciale.
•Scegliere Start → Programmi o Tutti programmi → Creative → Creative
Web C am Cent e r → Utilità di rilevamento facciale.
Per ulteriori informazioni, leggere il manuale dell'utente contenuto nel CD di installazione.
Spostarsi su d:\manual\<lingua>\manual.chm (dove d:\ rappresenta la lettera dell'unità CD-ROM/
DVD-ROM e <lingua> è la lingua del documento)
27
Page 28

CLE_WCam Live Pro QS.book Page 28 Thursday, July 29, 2004 10:48 AM
Altre fonti di informazione
Strumento di guida automatica, utile per l'individuazione e la risoluzione in linea dei
problemi tecnici, attivo 24 ore su 24 . Visitare www.creative.com e selezionare il
Database Informativo
proprio paese (o regione).
Registra il prodotto
È possibile beneficiare di innumerevoli vantaggi registrando il prodotto nel corso
dell'installazione o collegandosi alla pagina di registrazione all'indirizzo
www.creative.com/register. I vantaggi includono:
• Assistenza e supporto al prodotto Creative.
• Aggiornamenti esclusivi su promozioni ed eventi.
Assistenza clienti e informazioni sulla garanzia
Il CD di installazione contiene informazioni sull'assistenza ai clienti, sulla garanzia e su altri
argomenti.
Assistenza clienti d:\support\<lingua>\support.chm
Garanzia d:\warranty\<regione>\<lingua>\warranty.chm
Manuale dell'utente d:\manual\<lingua>\manual.chm
(dove d:\ rappresenta la lettera dell'unità CD-ROM/DVD-ROM, <regione> l'area
geografica e <lingua> la lingua del documento).
Copyright © 2004 Creative Technology Ltd. Tutti i diritti riservati. Il logo Creative è un marchio registrato di Creative
Technology Ltd. negli Stati Uniti e/o in altri paesi. Microsoft e Windows sono marchi registrati di Microsoft Corporation.
Tutti gli altri prodotti sono marchi o marchi registrati dei rispettivi proprietari e come tali riconosciuti. Tutte le specifiche
sono soggette a modifiche senza preavviso. Il contenuto della confezione potrebbe risultare leggermente diverso da quanto
raffigurato.
28
Si consiglia di conservare la prova d’acquisto per tutta la durata del periodo di
garanzia.
Page 29

CLE_WCam Live Pro QS.book Page 29 Thursday, July 29, 2004 10:48 AM
Acerca de Creative WebCam
Botón
Instantánea
Aro de
enfoque
Indicador de
alimentación
Español
Cable
USB
Soporte
articulado
Vista frontal Vista lateral
Figura 1
Indicador de
alimentación
Aro de
enfoque
Botón
Instantánea
Cable USB Conecte la cámara directamente al puerto USB del ordenador.
Soporte
articulado
Se ilumina cuando Creative WebCam está conectada al puerto USB del ordenador.
Ajusta el enfoque. Mire por la lente al sujeto que va a fotografiar y gire este aro hacia
la derecha y hacia la izquierda hasta que la imagen esté enfocada.
Púlselo para iniciar WebCam Center y capturar imágenes.
Utilícelo para colocar Creative WebCam sobre una pantalla de LCD.
29
Page 30

CLE_WCam Live Pro QS.book Page 30 Thursday, July 29, 2004 10:48 AM
Introducción
Instalación de Creative WebCam
1
1
1. No conecte Creative WebCam a su ordenador antes de instalar los controladores. En
caso de que comience la instalación con Creative WebCam conectada al ordenador y
se abra el cuadro de diálogo Asistente para agregar nuevo hardware o
Asistente para hardware nuevo encontrado, haga clic en el botón Cancelar.
2. Inserte el CD de instalación de Creative WebCam Live! Pro en la unidad de CD-ROM.
Si no se ejecuta automáticamente, haga clic en Inicio → Ejecutar y escriba
d:\setup.exe (reemplace d:\ por la letra de la unidad de CD-ROM).
3. Seleccione el área donde se encuentre y haga clic en el botón Siguiente.
4. Seleccione el idioma y haga clic en el botón Siguiente.
5. Haga clic en las opciones para instalar los controladores y las aplicaciones y, a
continuación, haga clic en el botón Instalar.
Sólo para los usuarios de ordenadores provistos de USB 2.0:
La instalación de Creative verifica de manera automática que los componentes necesarios
para obtener un rendimiento óptimo del USB 2.0 están instalados en el ordenador y le avisa si
falta alguno de estos componentes. Si recibe este mensaje, realice uno de los pasos siguientes
para asegurarse de que Creative WebCam funciona a su máximo potencial en una conexión
USB 2.0:
• instale el controlador proporcionado por el distribuidor de su controlador de host
mejorado de USB 2.0 o
• descargue e instale la última versión del Service Pack del sistema operativo Windows
que posea.
En el caso de instalar Windows XP SP1, deberá instalar asimismo Windows XP
Hotfix KB822603.
Los Service Packs más recientes de Windows (incluido Windows XP SP1) y
Windows Hotfix KB822603 pueden obtenerse en el sitio Web de ayuda y
soporte técnico de Microsoft o a través de Windows Update.
®
30
Page 31

CLE_WCam Live Pro QS.book Page 31 Thursday, July 29, 2004 10:48 AM
6. Coloque Creative WebCam sobre el monitor del ordenador o cualquier otra
superficie plana. Para ordenadores portátiles o monitores planos LCD, use el soporte
articulado para equilibrar Creative WebCam (consulte la Figura 2).
Figura 2
7. Cuando se le pida, conecte el cable USB de Creative WebCam a un puerto USB libre
del ordenador (consulte la Figura 3). Windows detectará el dispositivo de manera
automática.
Figura 3
En Windows XP solamente:
i. Cuando aparece el cuadro de diálogo Asistente para hardware nuevo encontrado
seleccione Instalar el software automáticamente (Recomendado) y haga clic en el
botón Siguiente.
ii. Cuando se abra el cuadro de diálogo Instalación de hardware, haga clic en el botón
Continuar.
31
Page 32

CLE_WCam Live Pro QS.book Page 32 Thursday, July 29, 2004 10:48 AM
En Windows 2000 solamente:
Si aparece el cuadro de diálogo Firma digital no encontrada, diciéndole que se ha detectado
Creative WebCam Live! Pro, haga clic en el botón Sí.
En Windows Me y Windows 98 SE solamente:
i. Si se le pide que introduzca el CD de Windows 98 SE o Windows Me, reemplace el CD de
instalación de Creative WebCam Live! Pro por el CD adecuado.
ii. En el cuadro de diálogo Insertar disco, haga clic en el botón Aceptar.
8. Siga las instrucciones que aparecen en pantalla para realizar la instalación. Es posible
que una vez instalados los controladores con éxito, se le pida que reinicie el ordenador.
Seleccione No hasta que haya instalado todas las aplicaciones.
9. Una vez instaladas todas las aplicaciones, reinicie el ordenador.
Verificación de la instalación
2
2
1. Haga clic con el botón derecho del ratón en el icono Mi PC del escritorio o en el
menú Inicio de Windows.
2. En el menú que aparece, haga clic en Propiedades.
En Windows XP y Windows 2000 solamente:
En el cuadro de diálogo Propiedades del sistema, haga clic en la ficha Hardware. Haga clic en el
botón Administrador de dispositivos.
En Windows Me y Windows 98 SE:
En el cuadro de diálogo Propiedades de sistema, haga clic en la ficha Administrador de
dispositivos.
3. Haga clic en el signo más (+) situado junto al icono Dispositivo de imágenes.
Aparece la entrada "Creative WebCam Live! Pro".
32
Page 33

CLE_WCam Live Pro QS.book Page 33 Thursday, July 29, 2004 10:48 AM
Utilización de Creative WebCam
3
3
Cómo hacer una fotografía
1. Haga clic en Inicio → Programas → Creative → Creative WebCam →
Creative WebCam Center.
2. En la ventana Creative WebCam Center, haga clic en la ficha Capturar.
3. Haga clic en la casilla Foto para seleccionar la resolución deseada.
4. Haga clic en el botón Capturar foto para capturar una imagen. Las imágenes se
guardan como archivos en la carpeta predeterminada del dispositivo.
Para ver las fotos en el visor de imágenes, haga doble clic en los archivos de imagen en el
panel Lista de miniaturas/Detalles.
Cómo grabar un vídeo
1. Haga clic en Inicio → Programas → Creative → Creative WebCam →
Creative WebCam Center.
2. En la ventana Creative WebCam Center, haga clic en la ficha Capturar.
3. Haga clic en la casilla Vídeo para seleccionar la resolución deseada.
4. Haga clic en el botón Grabar para iniciar y detener la grabación. Los vídeos se
guardan como archivos en la carpeta predeterminada del dispositivo al detener la
grabación.
Para ver los vídeos en el visor de vídeo, haga doble clic en los archivos de vídeo en el panel
Lista de miniaturas/Detalles.
33
Page 34

CLE_WCam Live Pro QS.book Page 34 Thursday, July 29, 2004 10:48 AM
Activar seguimiento de cara
Con seguimiento de cara, la cámara enfoca de manera automática a la cara durante las
sesiones de mensajería instantánea de vídeo o durante la grabación de un vídeo.
Seguimiento de cara se puede activar en Utilidad de Seguimento Cara. Existen varias
maneras de iniciar la prestación Utilidad de Seguimiento Cara:
• En WebCam Center, haga clic en Herramientas → Utilidad de Seguimento Cara.
• Haga clic con el botón derecho en el icono Creative Cam Detector situado en la
barra de tareas y luego haga clic en la opción Utilidad de Seguimento Cara.
• Haga clic en Inicio → Programas o Todos los programas → Creative →
Creative WebCam Center → Utilidad de Seguimento Cara.
Para obtener más información, véase la Guía del usuario incluida en el CD de instalación.
Vaya a d:\manual\<idioma>\manual.chm (reemplace d:\ por la letra de la unidad de CD-ROM/
DVD-ROM e <idioma> por el idioma en que está el documento)
34
Page 35

CLE_WCam Live Pro QS.book Page 35 Thursday, July 29, 2004 10:48 AM
Información adicional
Puede encontrar información y solucionar problemas técnicos en la Base de
conocimientos de búsqueda personal de Creative, disponible las 24 horas del día. Vaya a
Base de conocimientos de Creative
www.creative.com y seleccione su área.
Registre el producto.
Si registra el producto durante la instalación o a través de la página Web
www.creative.com/register, podrá disfrutar de múltiples ventajas. Éstas incluyen:
• Asistencia técnica de productos y servicios de Creative
• Actualizaciones exclusivas sobre promociones y celebraciones.
Servicios de asistencia al cliente y garantía
En el CD de instalación, se incluye información acerca de los servicios de asistencia al
cliente, la garantía e información de otro tipo.
Servicios de
asistencia técnica
Garantía d:\warranty\<área>\<idioma>\garantía.chm
Guía del usuario d:\manual\<idioma>\manual.chm
(reemplace d:\ por la letra de la unidad de CD-ROM/DVD-ROM, <área> por la zona
donde se encuentre e <idioma> por el idioma en que está el documento).
Copyright © 2004 Creative Technology Ltd. Reser vados todos los derechos. El logotipo de Creative es una marca comercial
registrada de Creative Technology Ltd. en los EE. UU. y en otros países. Microsoft y Windows son marcas comerciales
registradas de Microsoft Corporation. Todos los otros productos s on marcas c omerciale s o marcas comercial es regist radas
de sus propietarios respectivos y se reconocen como tal. Todas las especificaciones podrán ser objeto de modificaciones
sin previo aviso. El contenido real puede variar ligeramente del que aparece en las ilustraciones.
d:\support\<idioma>\asistencia.chm
Conserve el certificado de compra durante el período de garantía.
35
Page 36

CLE_WCam Live Pro QS.book Page 36 Thursday, July 29, 2004 10:48 AM
Nederlands
Info over uw Creative WebCam
De knop
Snapshot
Scherpstelring
Voedingslampje
USB-kabel
Montagebeugel
Vooraanzicht Zijaanzicht
Afbeelding 1
Voedingslampje
Scherpstelring
De knop
Snapshot
USB-kabel Sluit deze aan op de USB-poort van de computer.
Montagebeugel Hiermee bevestigt u uw Creative WebCam op een LCD-scherm.
Gaat branden wanneer uw Creative WebCam is aangesloten op een USB-poort van
uw computer.
Hiermee stelt u het beeld scherp in. Richt de lens op het onderwerp en draai deze
ring vervolgens met de klok mee of tegen de klok in tot het beeld scherp is.
Druk hierop om WebCam Center te starten en beelden op te nemen.
36
Page 37

CLE_WCam Live Pro QS.book Page 37 Thursday, July 29, 2004 10:48 AM
Aan de slag
Installatie van uw Creative WebCam
1
1
1. Sluit uw Creative WebCam niet op de computer aan voordat u de stuurprogramma’s
hebt geïnstalleerd. Als u per abuis toch met de installatie begint terwijl de Creative
WebCam is aangesloten, en het dialoogvenster Wizard Hardware toevoegen of
Wizard Nieuwe hardware gevonden verschijnt, klikt u op de knop Annuleren.
2. Plaats de Creative WebCam Live! Pro-installatie-cd in het cd-rom-station. Als deze niet
automatisch start, klikt u op Start → Uitvoeren en typt u d:\setup.exe (waarbij u
d:\ vervangt door de stationsaanduiding van uw cd-rom-station).
3. Selecteer de regio waarin u zich bevindt, en klik daarna op de knop Volgende.
4. Selecteer een taal en klik daarna op de knop Vo lg en de .
5. Klik op de opties voor de installatie van stuurprogramma’s en toepassingen, en klik
daarna op de knop Installeren.
Alleen voor gebruikers van computers met USB 2.0:
Het installatieprogramma van Creative controleert automatisch of de softwareonderdelen voor
optimale USB 2.0-prestaties en op computer zijn geïnstalleerd, en geeft een waarschuwing
wanneer deze onderdelen ontbreken. Als een dergelijk bericht verschijnt, gebruikt u een van
de volgende twee mogelijkheden om ervoor te zorgen dat uw Creative WebCam altijd zo goed
mogelijk presteert via een USB 2.0-aansluiting:
• installeer het stuurprogramma dat werd geleverd door de leverancier van uw USB 2.0
Enhanced Host Controller, of
• download en installeer het meest recente Service Pack (SP) voor uw
®
Windows
-besturingssysteem.
Als u besluit om Windows XP SP1 te installeren, dient u ook de Hotfix
KB822603 voor Windows XP te installeren.
De meest recente Service Packs voor Windows (inclusief Windows XP SP1) en
de Hotfix KB822603 voor Windows kunt u downloaden vanaf de
Microsoft-website voor Help en ondersteuning of via Windows Update.
37
Page 38

CLE_WCam Live Pro QS.book Page 38 Thursday, July 29, 2004 10:48 AM
6. Plaats de Creative WebCam boven op de monitor van uw computer of op een andere
vlakke ondergrond. Bij platte LCD-schermen of notebookcomputers monteert u de
Creative WebCam op het scherm met behulp van de meegeleverde montagebeugel
(zie Afbeelding 2).
Afbeelding 2
7. Wanneer u daartoe de instructie krijgt, sluit u de USB-kabel van uw Creative WebCam
aan op de beschikbare USB-poort op uw computer (zie Afbeelding 3). Windows
detecteert het apparaat automatisch.
Afbeelding 3
Alleen in Windows XP:
i. Wanneer het dialoogvenster Wizard Nieuwe hardware gevonden verschijnt, selecteert u
De software automatisch installeren (aanbevolen) en klikt u op de knop Vo lg en de .
ii. Wanneer het dialoogvenster Hardware-installatie verschijnt, klikt u op de knop Toch
doorgaan.
38
Page 39

CLE_WCam Live Pro QS.book Page 39 Thursday, July 29, 2004 10:48 AM
Alleen in Windows 2000:
Als er een dialoogvenster Kan digitale handtekening niet vinden wordt geopend, waarin
wordt vermeld dat de Creative WebCam Live! Pro is aangetroffen, klikt u op de knop Ja.
Alleen in Windows ME en Windows 98 SE:
i. Als u wordt gevraagd om de cd van Windows 98 of Windows ME in het cd-rom-station te
plaatsen, verwijdert u de Creative WebCam Live! Pro-installatie-cd van de Creative WebCam
uit het cd-rom-station en plaatst u de juiste cd in het cd-rom-station.
ii. In het dialoogvenster Schijf plaatsen klikt u op OK.
8. Volg de instructies op het scherm om de installatie uit te voeren. Nadat u de
stuurprogramma’s met succes hebt geïnstalleerd, wordt u mogelijk gevraagd of u de
computer opnieuw wilt opstarten. Selecteer Nee zolang u niet alle stuurprogramma’s
en toepassingen hebt geïnstalleerd.
9. Start uw computer opnieuw nadat u alle toepassingen hebt geïnstalleerd.
De installatie controleren
2
2
1. Klik met de rechtermuisknop op het pictogram Deze computer op het bureaublad
of in het menu Start van Windows.
2. Klik in het menu dat verschijnt, op Eigenschappen.
Alleen in Windows XP en Windows 2000:
Klik in het dialoogvenster Systeemeigenschappen op het tabblad Hardware. Klik op de knop
Apparaatbeheer.
In Windows ME en Windows 98 SE:
Klik in het dialoogvenster Eigenschappen van Systeem op het tabblad Apparaatbeheer.
3. Klik op het plusteken (+) naast het pictogram Imaging-apparaat Het onderdeel
“Creative WebCam Live! Pro” verschijnt.
39
Page 40

CLE_WCam Live Pro QS.book Page 40 Thursday, July 29, 2004 10:48 AM
Gebruik van uw Creative WebCam
3
3
Een foto maken
1. Klik op Start → Programma’s → Creative → Creative WebCam →
Creative WebCam Center.
2. Klik in het dialoogvenster Creative WebCam Center op het tabblad Vastleggen.
3. Klik op het vak voor de resolutie Foto en selecteer de gewenste resolutie.
4. Klik op de knop Foto maken om het beeld vast te leggen. Beelden worden als
bestanden opgeslagen in de standaard mediamap.
Als u de foto’s wilt bekijken in een beeldviewer, dubbelklikt u op de beeldbestanden in het
deelvenster Voorbeelden/details.
Een video opnemen
1. Klik op Start → Programma’s → Creative → Creative WebCam →
Creative WebCam Center.
2. Klik in het dialoogvenster Creative WebCam Center op het tabblad Vastleggen.
3. Klik op het vak voor de resolutie Video en selecteer de gewenste resolutie.
4. Klik op de knop Opnemen om het opnemen van video te starten en te stoppen.
Video-opnamen worden als bestanden opgeslagen in de standaard mediamap wanneer
u stopt met opnemen.
Als u de video-opnamen wilt bekijken in een videoviewer, dubbelklikt u op de
videobestanden in het deelvenster Voorbeelden/details.
40
Page 41

CLE_WCam Live Pro QS.book Page 41 Thursday, July 29, 2004 10:48 AM
Gezichtsdetectie inschakelen
Via de functie Gezichtsdetectie zoomt uw camera automatisch in op uw gezicht tijdens
sessies voor video instant messaging of tijdens het maken van een video-opname.
U kunt gezichtsdetectie inschakelen via de functie Gezichtsdetectie. Gezichtsdetectie kunt
u op een van de volgende manieren starten:
• In het WebCam Center klikt u op Extra → Gezichtsdetectie.
• Klik met de rechtermuisknop op het pictogram Creative Cam Detector op de
taakbalk en klik op de optie Gezichtsdetectie.
• Klik op Start → Programma’s of Alle programma’s → Creative → Creative
Web C am Cent e r → Gezichtsdetectie.
Lees de gebruikershandleiding op de installatie-cd voor meer informatie.
Ga naar d:\manual\<taal>\manual.chm (waarbij u d:\ vervangt door de stationsaanduiding van uw
cd-rom-/dvd-rom-station, en <taal> door de taal waarin het document is opgesteld)
41
Page 42

CLE_WCam Live Pro QS.book Page 42 Thursday, July 29, 2004 10:48 AM
Aanvullende informatie
Los technische vragen en problemen op door middel van de Knowledge Base van
Creative; deze vraagbaak is 24 uur per dag beschikbaar. Ga naar www.creative.com en
Creative Knowledge Base
kies uw regio.
Registreer uw product!
Registreer uw product tijdens de installatie of op de webpagina www.creative.com/
register en geniet van tal van voordelen. Voornaamste voordelen:
• Service- en productondersteuning van Creative
• Exclusieve aankondigingen van aanbiedingen en evenementen
Customer Support Services en garantie
U vindt informatie over onder meer Customer Support Services en garantie op de
installatie-cd.
Customer Support
Services
Garantie d:\warranty\<regio>\<taal>\warranty.chm
Handboek d:\manual\<taal>\manual.chm
(vervang hierbij d:\ door de stationsaanduiding van uw cd-rom-/dvd-rom-station, <regio>
door de regio waarin u zich bevindt, en <taal> door de taal waarin uw document is
opgesteld)
Copyright © 2004 Creative Technology Ltd. Alle rechten voorbehouden. Het Creative-logo is een gedeponeerd handelsmerk
van Creative Technology Ltd. in de Verenigde Staten en/of andere landen. Microsoft en Windows zijn gedeponeerde
handelsmerken van Microsoft Corporation. Alle overige producten zijn handelsmerken of gedeponeerde handelsmerken
van de respectieve eigenaars en worden hierbij als zodanig erkend. Alle specificaties kunnen zonder enige voorafgaande
waarschuwing worden gewijzigd. De werkelijke inhoud kan enigszins afwijken van de afgebeelde inhoud.
42
d:\support\<taal>\support.chm
Bewaar uw aankoopbewijs gedurende de hele garantieperiode.
Page 43

CLE_WCam Live Pro QS.book Page 43 Thursday, July 29, 2004 10:48 AM
Acerca da sua WebCam da
Creative
Botão
Instantâneo
Anel de
focagem
Indicador
luminoso de
alimentação
Cabo USB
Alavanca
de fixação
Português
Perspectiva frontal Perspectiva lateral
Indicador
luminoso de
alimentação
Anel de
focagem
Botão
Instantâneo
Cabo USB Ligue-o à porta USB do seu computador.
Alavanca de
fixação
Acende-se quando a WebCam da Creative está ligada à porta USB do computador.
Ajusta o foco visual. Direccione a lente para o objecto e rode este anel no sentido dos
ponteiros do relógio ou no sentido contrário ao dos ponteiros do relógio até a imagem
estar focada.
Carregue para iniciar o Centro de Controlo da WebCam e capturar imagens.
Utilize-a para montar a sua WebCam da Creative num painel LCD.
Figura 1
43
Page 44

CLE_WCam Live Pro QS.book Page 44 Thursday, July 29, 2004 10:48 AM
Iniciação
Instalar a sua WebCam da Creative
1
1
1. Não ligue a WebCam da Creative ao computador antes de instalar os controladores.
Se iniciar acidentalmente a instalação com a WebCam da Creative ligada e se aparecer
a caixa de diálogo Assistente para adicionar novo hardware ou Assistente de
novo hardware encontrado, clique no botão Cancelar.
2. Introduza o CD de instalação Creative WebCam Live! Pro na unidade de CD-ROM. Se
não for executado automaticamente, clique em Iniciar → Executar e escreva
d:\setup.exe (substitua d:\ pela letra da sua unidade de CD-ROM).
3. Seleccione a sua região e clique no botão Seguinte.
4. Seleccione um idioma e clique no botão Seguinte.
5. Clique nas opções de instalação de controladores e aplicações e, em seguida, clique no
botão Instalar.
Apenas para utilizadores que disponham de computadores equipados com USB
2.0:
O programa de instalação da Creative verifica automaticamente se os componentes de
software necessários para o máximo desempenho do USB 2.0 estão instalados no
computador e avisa-o caso esses componentes não estejam instalados. Se vir esta mensagem,
utilize um dos seguintes procedimentos para assegurar que a sua WebCam da Creative terá
sempre o máximo desempenho ao utilizar a ligação USB 2.0:
• instale o controlador fornecido pelo fabricante do seu controlador avançado USB 2.0; ou
• descarregue e instale o pacote de actualização (service pack - SP) disponível para o seu
sistema operativo Windows
Caso opte por instalar o Windows XP SP1, terá de instalar igualmente o
Windows XP Hotfix KB822603.
Os pacotes de actualização mais recentes do Windows (incluindo o Windows
XP SP1) e o Windows Hotfix KB822603 podem ser obtidos através do website
Microsoft Help and Support ou do Windows Update.
44
®
.
Page 45

CLE_WCam Live Pro QS.book Page 45 Thursday, July 29, 2004 10:48 AM
6. Coloque a WebCam da Creative em cima do monitor do computador ou noutra
superfície plana. Para monitores LCD de ecrã plano ou computadores portáteis, utilize
a alavanca de fixação integrada para que a câmara fique numa posição estável (consulte
Figura 2).
Figura 2
7. Quando solicitado, ligue o cabo USB da WebCam da Creative a uma porta USB
disponível no seu computador (consulte Figura 3). O Windows detecta
automaticamente o dispositivo.
Figura 3
Só no Windows XP:
i. Quando aparecer a caixa de diálogo Assistente de novo hardware encontrado,
seleccione a opção Instalar o software automaticamente (Recomendado) e clique no
botão Seguinte.
ii. Se aparecer uma caixa de diálogo Instalação de hardware, clique no botão Continuar
mesmo assim.
45
Page 46

CLE_WCam Live Pro QS.book Page 46 Thursday, July 29, 2004 10:48 AM
Apenas para o Windows 2000:
Se aparecer a caixa de diálogo Assinatura digital não encontrada a indicar que a Creative
WebCam Live! Pro foi detectada, clique no botão Sim.
Apenas para o Windows Me e Windows 98 SE:
i. Se lhe for pedido que introduza o CD do Windows 98 SE ou do Windows Me, substitua o CD
de instalação da Creative WebCam Live! Pro pelo CD adequado.
ii. Na caixa de diálogo Inserir disco, clique no botão OK.
8. Siga as instruções que aparecem no ecrã para concluir a instalação. É possível que lhe
seja pedido para, após a correcta instalação dos controladores, confirmar se pretende
reiniciar o computador. Seleccione Não até estarem instaladas todas as aplicações.
9. Reinicie o computador quando todas as aplicações estiverem instaladas.
Verificar a instalação
2
2
1. Clique com o botão direito do rato no ícone O Meu Computador do ambiente de
trabalho ou no menu Iniciar do Windows.
2. No menu que aparece, clique em Propriedades.
Apenas para o Windows XP e Windows 2000:
Na caixa de diálogo Propriedades do sistema, clique no separador Hardware. Clique no botão
Gestor de dispositivos.
Para o Windows Me e Windows 98 SE:
Na caixa de diálogo Propriedades do sistema, clique no separador Gestor de dispositivos.
3. Clique no sinal de adição (+) que se encontra junto ao ícone Dispositivo de
processamento de imagens. Aparece a opção "Creative WebCam Live! Pro".
46
Page 47

CLE_WCam Live Pro QS.book Page 47 Thursday, July 29, 2004 10:48 AM
Utilizar a sua WebCam da Creative
3
3
Tirar uma fotografia
1. Clique em Iniciar → Programas → Creative → Creative WebCam →
Creative WebCam Center.
2. Na janela Creative WebCam Center, clique no separador Capturar.
3. Clique na caixa Resolução da fotografia e seleccione a resolução que pretende.
4. Clique no botão Fotografar para capturar uma imagem. As imagens são guardadas
como ficheiros na pasta predefinida de multimédia.
Para ver as fotografias no visualizador de imagens, faça duplo clique nos ficheiros de imagem
no painel Instantâneos/Detalhes.
Gravar um vídeo
1. Clique em Iniciar → Programas → Creative → Creative WebCam →
Creative WebCam Center.
2. Na janela Creative WebCam Center, clique no separador Capturar.
3. Clique na caixa Resolução do vídeo e seleccione a resolução que pretende.
4. Clique no botão Gravar para iniciar e parar uma gravação de vídeo. Os vídeos são
guardados como ficheiros na pasta predefinida de multimédia quando parar a gravação.
Para ver os vídeos no visualizador de vídeos, faça duplo clique nos ficheiros de vídeo no
painel Instantâneos/Detalhes.
47
Page 48

CLE_WCam Live Pro QS.book Page 48 Thursday, July 29, 2004 10:48 AM
Activar a focagem facial
Quando a função Face Tracking (focagem facial) está activa, a câmara amplia
automaticamente a sua face durante as sessões de mensagens instantâneas de vídeo ou
durante as gravações de vídeo.
Pode activar a função de focagem facial utilizando o utilitário de focagem facial. Para iniciar
o utilitário de focagem facial utilize um dos seguintes procedimentos:
• No Centro de controlo da WebCam, clique em Tools → Face Tracking Utility.
• Clique com o botão direito do rato no ícone Creative Cam Detector na bandeja do
sistema e clique em Face Tracking Utility.
• Clique em Iniciar → Programas ou Todos os programas → Creative →
Creative WebCam Center → Face Tracking Utility.
Para obter mais informações, leia o Guia do Utilizador no CD de instalação.
Vá para d:\manual\<idioma>\manual.chm (substitua d:\ pela letra da unidade de CD-ROM/
DVD-ROM do seu computador e <idioma> para o idioma em que está escrito o documento).
48
Page 49

CLE_WCam Live Pro QS.book Page 49 Thursday, July 29, 2004 10:48 AM
Mais informações
Resolva e detecte questões técnicas na Knowledge Base da Creative 24 horas por dia. Vá
para www.creative.com e seleccione a sua região.
Creative Knowledge Base
Registe o produto!
Tire partido de inúmeras vantagens registando os seus produtos durante a instalação ou em
www.creative.com/register. As vantagens incluem:
• Assistência e suporte de produtos da Creative
• Actualizações exclusivas sobre promoções e eventos.
Serviços de apoio ao cliente e Garantia
Pode encontrar os Serviços de apoio ao cliente, a Garantia e outras informações no CD de
instalação.
Serviços de apoio
ao cliente
Garantia d:\garantia\<região>\<idioma>\warranty.chm
Manual do
utilizador
(substitua d:\ pela letra da sua unidade de CD-ROM/DVD-ROM, <região> pela região em
que se encontra e <idioma> pelo idioma em que está o seu documento)
Copyright © 2004 Creative Technology Ltd. Todos os direitos reservados. O logótipo da Creative é uma marca registada
da Creative Technology Ltd. Nos Estados Unidos e/ou noutros países. Microsoft e Windows são marcas registadas da Microsoft
Corporation. Todos os restantes produtos são marcas comerciais ou marcas registadas dos seus respectivos proprietários
e são reconhecidos como tal neste documento. Todas as especificações estão sujeitas a alteração sem aviso prévio. O conteúdo
actual pode diferir ligeiramente do da imagem.
d:\suporte\<idioma>\support.chm
Guarde o recibo durante o período de validade da garantia.
d:\manual\<idioma>\manual.chm
49
Page 50

CLE_WCam Live Pro QS.book Page 50 Thursday, July 29, 2004 10:48 AM
Svenska
Så här fungerar din Creative
WebCam
Avtryckar
knapp
Fokusring
Indikator
för ström
USB-kabel
Framsida Från sidan
Bild 1
Hopfällbart
stöd
Indikator för
ström
Fokusring
Avtryckarknapp Tryck ner knappen för att starta WebCam Center och ta bilder.
USB-kabel Anslut den till datorns USB-port.
Hopfällbart
stöd
Tänds när Creative WebCam ansluts till datorns USB-port.
Justerar fokus. Rikta linsen mot motivet och vrid sedan ringen med- eller motsols tills
motivet blir skarpt.
Använd stödet för att montera din Creative WebCam på en LCD-display.
50
Page 51

CLE_WCam Live Pro QS.book Page 51 Thursday, July 29, 2004 10:48 AM
Komma igång
Installera din Creative WebCam
1
1
1. Anslut inte Creative WebCam till datorn innan du har installerat drivrutinerna. Om du
av misstag påbörjat installationen med Creative WebCam ansluten och dialogrutan
Lägg till ny maskinvara eller Ny maskinvara har hittats visas, klickar du på
knappen Avbryt.
2. Sätt i installations-cd:n för Creative WebCam Live! Pro i cd-rom-enheten. Om den inte
startar automatiskt klickar du på Start → Kör och skriver sedan in d:\setup.exe
(ersätt d:\ med korrekt enhetsbokstav för din cd-rom-enhet).
3. Välj den region där du befinner dig och klicka på knappen Nästa.
4. Välj ett språk och klicka på knappen Nästa.
5. Klicka på alternativen för installation av drivrutiner och program och klicka sedan på
knappen Installera.
Endast för användare vilkas datorer har USB 2.0:
Creative-installationsprogrammet kontrollerar automatiskt att de programvarukomponenter
som krävs för optimala USB 2.0-prestanda finns installerade på datorn och varnar ifall de
saknas. Om du får en sådan varning kan du se till att din Creative WebCam fungerar med
optimala prestanda över en USB 2.0-anslutning genom att göra något av följande:
• Installera den drivrutin som tillhandahålls av försäljaren av din USB 2.0 Enhanced Host
Controller eller
• Hämta och installera det senaste Service Pack (SP) som finns för ditt
®
Windows
-operativsystem.
Om du väljer att installera Windows XP SP1 måste du även installera Windows
XP Hotfix KB822603.
De senaste Windows Service Pack som finns (inklusive Windows XP SP1) och
Windows Hotfix KB822603 kan erhållas på Microsofts hjälp- och
supportwebbplats eller via Windows Update.
51
Page 52

CLE_WCam Live Pro QS.book Page 52 Thursday, July 29, 2004 10:48 AM
6. Placera din Creative WebCam ovanpå bildskärmen eller på en annan plan yta. Om du
har en platt LCD-bildskärm eller en bärbar dator använder du det hopfällbara stödet
för att balansera kameran (se Bild 2).
Bild 2
7. Anslut Creative WebCam-enhetens USB-kabel till en tillgänglig USB-port på datorn när
du ombeds göra det (se Bild 3). Windows hittar enheten automatiskt.
Bild 3
Endast i Windows XP:
i. Om dialogrutan Guiden Ny maskinvara visas väljer du Installera programmet
automatiskt (rekommenderas) och klickar sedan på knappen Nästa.
ii. Om det visas en dialogruta med texten Maskinvaruinstallation klickar du på knappen
Fortsätt ändå.
52
Page 53

CLE_WCam Live Pro QS.book Page 53 Thursday, July 29, 2004 10:48 AM
Endast i Windows 2000:
När dialogrutan Ingen digital signatur hittades visas, vilket innebär att Creative WebCam Live!
Pro har identifierats, klickar du på knappen Ja.
Endast för Windows Me och Windows 98 SE:
i. Om du ombeds mata in cd:n med Windows 98 SE eller Windows Me byter du ut
installations-cd:n för Creative WebCam Live! Pro mot rätt cd.
ii. Klicka på OK i dialogrutan Sätt i disketten.
8. Slutför installationen genom att följa anvisningarna på skärmen. När installationen av
drivrutinerna har genomförts kan du få frågan om du vill starta om datorn. Välj Nej
varje gång tills alla program har installerats.
9. Starta om datorn när alla program har installerats.
Verifiera installationen
2
2
1. Högerklicka på ikonen Den här datorn på skrivbordet eller på Start-menyn i
Windows.
2. Klicka på Egenskaper på menyn som visas.
Endast i Windows 2000 och XP:
Klicka på fliken Maskinvara i dialogrutan Systemegenskaper. Klicka på Enhetshanteraren.
Endast för Windows Me och Windows 98 SE:
Klicka på fliken Enhetshanteraren i dialogrutan Egenskaper för System.
3. Klicka på plustecknet (+) bredvid ikonen Imaging-enhet. "Creative WebCam Live!
Pro" visas.
53
Page 54

CLE_WCam Live Pro QS.book Page 54 Thursday, July 29, 2004 10:48 AM
Så här använder du din Creative
3
3
WebCam
Ta ko r t
1. Klicka på Start → Program → Creative → Creative WebCam → Creative
Web C a m Cent e r.
2. I fönstret Creative WebCam Center, klicka på fliken Capture.
3. Klicka på rutan Photo Resolution och välj den upplösning du vill ha.
4. Klicka på knappen Snap photo för att ta en bild. Bilderna sparas som filer i
standardmappen för media.
För att se bilderna i bildfönstret, dubbelklicka på bildfilerna i fönstret Thumbnails/
Details.
Spela in video
1. Klicka på Start → Program → Creative → Creative WebCam → Creative
Web C a m Cent e r.
2. I fönstret Creative WebCam Center, klicka på fliken Capture.
3. Klicka på rutan Video Resolution och välj den upplösning du vill ha.
4. Klicka på knappen Record för att börja eller avsluta inspelningen Videoklipp sparas
som filer i standardmappen för media när du är klar med en inspelning.
För att se bilderna i videofönstret, dubbelklicka på videofilerna i fönstret Thumbnails/
Details.
54
Page 55

CLE_WCam Live Pro QS.book Page 55 Thursday, July 29, 2004 10:48 AM
Aktivera Face Tracking
Med Face Tracking zoomar kameran automatiskt in ditt ansikte under videosessioner för
snabbmeddelanden eller när du spelar in video.
Du kan aktivera Face Tracking i Face Tracking Utility. Du kan starta Face Tracking Utility på
något av följande sätt:
• Öppna WebCam Center och klicka på To o l s → Face Tracking Utility.
• Högerklicka på ikonen Creative Cam Detector i systemfältet och klicka på
alternativet Face Tracking Utility.
• Klicka på Start → Program eller Alla program → Creative → Creative
Web C am Cent e r → Face Tracking Utility.
För ytterligare information, läs användarhandboken på installations-cd:n.
Gå till d:\manual\<språk>\manual.chm (byt ut d:\ mot bokstaven för din cd-rom/dvd-rom-enhet
och <språk> mot det språk som ditt dokument är skrivet på).
55
Page 56

CLE_WCam Live Pro QS.book Page 56 Thursday, July 29, 2004 10:48 AM
Mer information
Lokalisera och hitta lösningen på tekniska frågor i Creatives självhjälpsverktyg Knowledge
Base dygnet runt. Gå till www.creative.com och välj en region.
Creatives Knowledge Base
Registrera produkten!
Ta del av en massa fördelaktiga erbjudanden genom att registrera dina produkter under
installationen eller på www.creative.com/register. Förmånerna omfattar:
• Service och produktsupport från Creative
• Exklusiv information om kampanjer och evenemang
Teknisk support och garanti
Du hittar även teknisk support- och garantiinformation och övrig information på
installations-cd:n.
Teknisk support d:\support\<språk>\support.chm
Garanti d:\warranty\<region>\<språk>\warranty.chm
Användarhandbok d:\manual\<språk>\manual.chm
(ersätt d:\ med enhetsbeteckningen för din cd/dvd-rom-enhet, <region> med den region
där du befinner dig och <språk> med det språk som ditt dokument är på)
Copyright © 2004 Creative Technology Ltd. Med ensamrätt. Creatives logotyp är ett registrerat varumärke som tillhör Creative
Technology Ltd i Förenta staterna och/eller andra länder. Microsoft och Windows är registrerade varumärken som tillhör
Microsoft Corporation. Alla andra produkter är varumärken eller registrerade varumärken som tillhör sina respektive ägare
och erkänns som sådana. Alla specifikationer kan ändras utan föregående meddelande. Det faktiska innehållet kan skilja sig
från det avbildade.
56
Behåll ditt inköpsbevis under hela garantiperioden.
Page 57

CLE_WCam Live Pro QS.book Page 57 Thursday, July 29, 2004 10:48 AM
Om ditt Creative WebCam
Stillbildeknapp
Fokuseringsring
Strøm-LED
Norsk
USB-kabel
Hengslet
hendel
Sett forfra Sett fra siden
Figur 1
Strøm-LED Tennes når Creative WebCam kobles til datamaskinens USB-port.
Fokuseringsring
Stillbildeknapp Trykk på denne for å starte WebCam Center og ta bilder.
USB-kabel Koble denne til datamaskinens USB-port.
Hengslet hendel Bruk denne til å feste ditt Creative WebCam på en LCD-skjerm.
Justerer visningsfokus. Vend linsen mot motivet, og roter denne ringen med eller
mot klokken til bildet er i fokus.
57
Page 58

CLE_WCam Live Pro QS.book Page 58 Thursday, July 29, 2004 10:48 AM
Komme i gang
Installere Creative WebCam
1
1
1. Ikke koble Creative WebCam til datamaskinen før du har installert driverne. Hvis du
ved et uhell starter installeringen mens Creative WebCam er koblet til og dialogboksen
Veiviser for ny maskinvare eller Ny maskinvare funnet vises, klikker du på
Avbryt-knappen.
2. Sett inn installerings-CDen for Creative WebCam Live! Pro i CD-ROM-stasjonen. Hvis
CDen ikke kjører automatisk, klikker du på Start → Kjør og skriver d:\setup.exe
(erstatt d:\ med stasjonsbokstaven til CD-ROM-stasjonen).
3. Velg regionen du er i, og klikk på Neste.
4. Velg et språk, og klikk på Neste.
5. Klikk på alternativene for installering av drivere og programmer, og klikk deretter på
Installer.
Bare for brukere av utstyr med USB 2.0:
Creative-installeringen kontrollerer automatisk at programvarekomponentene som er
nødvendig for optimal USB 2.0-ytelse, er installert på datamaskinen, og varsler deg hvis disse
komponentene mangler. Hvis du mottar en slik melding, gjør du ett av følgende for å sikre at
ditt Creative WebCam alltid gir full ytelse over en USB 2.0-forbindelse:
• installer driveren du fikk av leverandøren av din USB 2.0 Enhanced Host Controller, eller
• last ned og installer siste Service Pack (SP) for ditt Windows
Hvis du velger å installere Windows XP SP1, må du også installere Windows XP
Hotfix KB822603.
De siste Windows Service Packs (inkludert Windows XP SP1) og Windows
Hotfix KB822603 kan lastes ned via Microsofts nettsted for hjelp og støtte, eller
via Windows-oppdatering.
®
-operativsystem.
58
Page 59

CLE_WCam Live Pro QS.book Page 59 Thursday, July 29, 2004 10:48 AM
6. Plasser Creative WebCam oppå datamaskinskjermen eller et annet plant underlag. For
LCD-flatskjermer eller bærbare datamaskiner kan du bruke den integrerte, hengslede
hendelen til å balansere Creative WebCam (se Figur 2).
Figur 2
7. Når du blir bedt om det, kobler du Creative WebCams USB-kabel til en ledig USB-port
på datamaskinen (se Figur 3). Windows vil oppdage enheten automatisk.
Figur 3
Bare Windows XP:
i. Når dialogboksen Ny maskinvare funnet vises, velger du Installer programvaren
automatisk (anbefales) og klikker på Neste-knappen.
ii. Hvis en dialogboks av typen Maskinvareinstallasjon vises, klikker du på Fortsett likevel.
59
Page 60

CLE_WCam Live Pro QS.book Page 60 Thursday, July 29, 2004 10:48 AM
Bare Windows 2000:
Når dialogboksen Fant ikke digital signatur vises, som angir at Creative WebCam Live! Pro er
oppdaget, klikker du på Ja-knappen.
Bare Windows Me og Windows 98 SE:
i. Hvis du blir bedt om å sette inn CDen for Windows 98 SE eller Windows Me, bytter du ut
CDen for Creative WebCam Live! Pro med riktig CD.
ii. Klikk på OK i dialogboksen Sett inn diskett.
8. Følg instruksjonene på skjermen for å fullføre installeringen. Etter at driverne er
installert, kan du bli spurt om du ønsker å starte datamaskien på nytt. Velg Nei til alle
programmene er installert.
9. Start datamaskinen på nytt når alle programmene er installert.
Verifisere installeringen
2
2
1. Høyreklikk på Min datamaskin-ikonet på skrivebordet eller på Start-menyen i
Windows.
2. Velg Egenskaper fra menyen som vises.
Bare Windows XP og Windows 2000:
Klikk på kategorien Maskinvare i dialogboksen Egenskaper for System. Klikk på knappen
Enhetsbehandling.
Windows Me og Windows 98 SE:
Klikk på kategorien Enhetsbehandling i dialogboksen Egenskaper for System.
3. Klikk på plusstegnet (+) ved siden av Bildeenhet-ikonet. Oppføringen "Creative
WebCam Live! Pro" vises.
60
Page 61

CLE_WCam Live Pro QS.book Page 61 Thursday, July 29, 2004 10:48 AM
Bruke Creative WebCam
3
3
Ta et fotografi
1. Klikk på Start → Programmer → Creative → Creative WebCam →
Creative WebCam Center.
2. I vinduet Creative WebCam Center klikker du på kategorien Capture (Opptak).
3. Klikk i boksen Photo Resolution (Fotooppløsning) og velg oppløsningen du ønsker.
4. Klikk på Snap photo (Stillbilde) for å ta et bilde. Bilder lagres som filer i standard
mediemappe.
Hvis du vil vise bilder i bildevisningsprogrammet, dobbeltklikker du på bildefilene i ruten
Thumbnails/Details (Miniatyrbilder/detaljer).
Gjøre et videoopptak
1. Klikk på Start → Programmer → Creative → Creative WebCam →
Creative WebCam Center.
2. I vinduet Creative WebCam Center klikker du på kategorien Capture (Opptak).
3. Klikk i boksen Video Resolution (Videooppløsning) og velg oppløsningen du ønsker.
4. Klikk på Record (Ta opp) for å starte og stoppe opptaket. Videoopptak lagres som
filer i standard mediemappe når du stopper opptaket.
Hvis du vil vise videoopptak i visningsprogrammet, dobbeltklikker du på videofilene i ruten
Thumbnails/Details (Miniatyrbilder/detaljer).
61
Page 62

CLE_WCam Live Pro QS.book Page 62 Thursday, July 29, 2004 10:48 AM
Aktivere Face Tracking
Med Face Tracking (ansiktssporing) vil kameraet automatisk zoome inn på ansiktet ditt
under videomeldingssesjoner eller når du tar opp video.
Du kan aktivere Face Tracking i Face Tracking Utility. Face Tracking Utility kan startes på
følgende måter:
• I WebCam Center klikker du på Tools → Face Tracking Utility.
• Høyreklikk på Creative Cam Detector-ikonet i systemstatusfeltet og klikk på Face
Tracking Utility-alternativet.
•Klikk på Start → Programmer eller Alle programmer → Creative → Creative
WebCam Center → Face Tracking Utility.
Du finner mer informasjon i brukerhåndboken på installerings-CDen.
Gå til d:\manual\<språk>\manual.chm (erstatt d:\ med stasjonsbokstaven for din CD-ROM/
DVD-ROM-stasjon, og <språk> med språket dokumentet er skrevet på).
62
Page 63

CLE_WCam Live Pro QS.book Page 63 Thursday, July 29, 2004 10:48 AM
Mer informasjon
Løs og finn ut av tekniske problemer i Creatives 24-timers Knowledge Base for selvhjelp.
Creatives Knowledge Base
Gå til www.creative.com og velg din region.
Registrer produktet!
Dra nytte av en mengde fordeler ved å registrere produktene under installeringen, eller på
www.creative.com/register. Fordelene inkluderer følgende:
• Service og produktstøtte fra Creative
• Eksklusive oppdateringer om kampanjer og arrangementer
Kundestøttetjenester og garanti
Du finner informasjon om kundestøttetjenester, garanti og annet på installerings-CDen.
Kundestøttetjenester d:\support\<språk>\support.chm
Garanti d:\warranty\<region>\<språk>\warranty.chm
Brukerhåndbok d:\manual\<språk>\manual.chm
(bytt ut d:\ med stasjonsbokstaven til din CD-ROM/DVD-ROM-stasjon, <region> med
regionen du befinner deg i, og <språk> med språket som dokumentet er skrevet på)
Copyright © 2004 Creative Technology Ltd. Med enerett. Creative-logoen er et registrert varemerke for Creative Technology
Ltd. i USA og/eller andre land. Microsoft og Windows er registrerte varemerker for Microsoft Corporation. Alle andre
produktnavn er varemerker eller registrerte varemerker for sine respektive innehavere, og anerkjennes med dette som slike.
Alle spesifikasjoner kan endres uten forhåndsvarsel. Faktisk innhold kan være litt forskjellig fra det som er illustrert.
Ta vare på kjøpsbeviset så lenge garantiperioden varer.
63
Page 64

CLE_WCam Live Pro QS.book Page 64 Thursday, July 29, 2004 10:48 AM
Dansk
Om dit Creative WebCam
Udløserknap
Fokusring
LED-indikator
for strøm
USB-kabel
Set forfra Set fra siden
Figur 1
Hængselarm
LED-indikator
for strøm
Fokusring
Udløserknap Tryk på knappen for at starte WebCam Center og tage billeder.
USB-kabel Tilslut det til computerens USB-port.
Hængselarm Brug denne arm til at montere dit Creative WebCam på et LCD-panel.
Lyser, når dit Creative WebCam er tilsluttet computerens USB-port.
Justerer visningsfokus. Peg på emnet med linsen, og drej derefter denne ring med
eller mod uret, indtil billedet er i fokus.
64
Page 65

CLE_WCam Live Pro QS.book Page 65 Thursday, July 29, 2004 10:48 AM
Introduktion
Installation af dit Creative WebCam
1
1
1. Slut ikke dit Creative WebCam til computeren, før du har installeret driverne. Hvis du
ved et tilfælde begynder installationen med Creative WebCam tilsluttet, og
dialogboksen Guiden Tilføj hardware eller Guiden Ny hardware fundet vises,
skal du klikke på knappen Annuller.
2. Indsæt installations-cd'en med Creative WebCam Live! Pro i cd-rom-drevet. Hvis
installationen ikke begynder automatisk, skal du klikke på Start → Kør og skrive
d:\setup.exe (erstat d:\ med drevbogstavet for dit cd-rom-drev).
3. Vælg den region, du befinder dig i, og klik på knappen Næste.
4. Vælg et sprog, og klik på knappen Næste.
5. Klik på indstillingerne for installation af drivere og programmer, og klik på knappen
Installer.
Kun brugere med computere, der er udstyret med USB 2.0:
Creative Installation kontrollerer automatisk, at de krævede softwarekomponenter til optimal
USB 2.0-ydelse er installeret på computeren, og giver dig besked, hvis komponenterne
mangler. Hvis du modtager en sådan besked, skal du gøre et af følgende for at sikre, at
Creative WebCam altid opnår den fulde ydeevne via en USB 2.0-forbindelse:
• installer den driver, du fik fra leverandøren til tin USB 2.0 Enhanced Host Controller; eller
• hent og installer den nyeste Service Pack (SP) til dit Windows
Hvis du vælger at installere Windows XP SP1, skal du også installere Windows
XP Hotfix KB822603.
De nyeste Windows Service Packs (inklusive Windows XP SP1) og Windows
Hotfix KB822603 kan hentes fra webstedet Microsoft Help and Support eller via
Windows Update.
®
-operativsystem.
65
Page 66

CLE_WCam Live Pro QS.book Page 66 Thursday, July 29, 2004 10:48 AM
6. Anbring dit Creative WebCam oven på computerskærmen eller på en anden plan
overflade. I forbindelse med LCD-fladskærme eller bærbare computere skal du bruge
den integrerede hængselarm til at afbalancere dit Creative WebCam (se Figur 2).
Figur 2
7. Når du bliver bedt om det, skal du tilslutte USB-kablet til din Creative WebCam til en
ledig USB-port på computeren (se Figur 3). Windows registrerer automatisk enheden.
Figur 3
Kun Windows XP:
i. Når dialogboksen Guiden Ny hardware fundet vises, skal du vælge indstillingen Installere
softwaren automatisk (anbefales) og klikke på knappen Næste.
ii. Hvis dialogboksen Installation af hardware vises, skal du klikke på knappen Fortsæt
alligevel.
66
Page 67

CLE_WCam Live Pro QS.book Page 67 Thursday, July 29, 2004 10:48 AM
Kun Windows 2000:
Når dialogboksen Digital signatur blev ikke fundet vises med besked om, at Creative WebCam
Live! Pro er registreret, skal du klikke på knappen Ja.
Kun Windows Me og Windows 98 SE
i. Hvis du bliver bedt om at indsætte cd'en med Windows 98 SE eller Windows Me, skal du
udskifte installations-cd'en med Creative WebCam Live! Pro med den korrekte cd.
ii. Klik på knappen OKi dialogboksen Indsæt disk.
8. Følg vejledningen på skærmen for at fuldføre installationen. Når driverne er installeret,
kan du blive spurgt, om du vil genstarte computeren. Vælg Nej, indtil alle
programmerne er installeret.
9. Genstart computeren, når alle programmerne er installeret.
Kontrol af installationen
2
2
1. Højreklik på ikonet Denne computer på skrivebordet eller i menuen Start i
Windows.
2. Klik på Egenskaber i den menu, der vises.
Kun Windows XP og Windows 2000:
Klik på fanen Hardware i dialogboksen Egenskaber for system. Klik på knappen
Enhedshåndtering.
Windows Me og Windows 98 SE:
Klik på fanen Enhedshåndtering i dialogboksen Egenskaber for system.
3. Klik på plustegnet (+) ved siden af ikonet for Billedenhed. Posten "Creative WebCam
Live! Pro" vises.
67
Page 68

CLE_WCam Live Pro QS.book Page 68 Thursday, July 29, 2004 10:48 AM
Brug af dit Creative WebCam
3
3
Sådan tager du et billede
1. Klik på Start → Programmer → Creative → Creative WebCam → Creative
Web C a m Cent e r.
2. Klik på fanen Capture i vinduet Creative WebCam Center.
3. Klik på feltet Billedopløsning, og marker den ønskede opløsning.
4. Klik på knappen Snap photo for at tage et billede. Billederne gemmes som filer i
standardmappen med medier.
Hvis du vil se billederne i billedfremviseren, skal du dobbeltklikke på billedfilerne i ruden
Thumbnails/Details.
Sådan optager du en video
1. Klik på Start → Programmer → Creative → Creative WebCam → Creative
Web C a m Cent e r.
2. Klik på fanen Capture i vinduet Creative WebCam Center.
3. Klik på feltet Video Resolution, og marker den ønskede opløsning.
4. Klik på knappen Record for at starte og stoppe optagelsen. Videoerne gemmes som
filer i standardmappen med medier, når du stopper optagelsen.
Hvis du vil se videoerne i videofremviseren, skal du dobbeltklikke på videofilerne i ruden
Thumbnails/Details.
68
Page 69

CLE_WCam Live Pro QS.book Page 69 Thursday, July 29, 2004 10:48 AM
Aktivering af ansigtssporing
Med ansigtssporing zoomer kameraet automatisk ind på dit ansigt under online
videosessioner, eller når der optages video.
Du kan aktivere ansigtssporing i Face Tracking Utility. Du kan starte Face Tracking Utility på
følgende måder:
• Klik på To o l s → Face Tracking Utility i WebCam Center.
• Højreklik på ikonet Creative Cam Detector på proceslinjen, og klik på indstillingen
Face Tracking Utility.
• Klik på Start → Programmer eller Alle programmer → Creative → Creative
Web C am Cent e r → Face Tracking Utility.
Hvis du ønsker yderligere oplysninger, kan du læse brugervejledningen på installations-cd'en.
Gå til d:\manual\<sprog>\manual.chm (erstat d:\ med drevbogstavet for dit cd-rom/dvd-rom-drev
og <sprog> med det sprog, dokumentet er skrevet på)
69
Page 70

CLE_WCam Live Pro QS.book Page 70 Thursday, July 29, 2004 10:48 AM
Yderligere oplysninger
Find selv hjælp til løsning og fejlfinding af tekniske problemer i Creatives Knowledge Base,
der er åben døgnet rundt. Gå til www.creative.com, og vælg dit land/område.
Creative Knowledge Base
Registrer produktet!
Få en række fordele ved at registrere produkterne under installationen eller på
www.creative.com/register. Fordelene omfatter:
• Service- og produktsupport fra Creative
• De seneste oplysninger vedrørende salgsfremstød og begivenheder.
Kundesupportservice og garanti
Du finder oplysninger om bl.a. kundesupportservice og garanti på installations-cd'en.
Kundesupportservice d:\support\<sprog>\support.chm
Garanti d:\warranty\<region>\<sprog>\warranty.chm
Brugervejledning d:\manual\<sprog>\manual.chm
(erstat d:\ med drevbogstavet for dit cd-rom/dvd-rom-drev, <region> med det land/
område, du befinder dig i, og <sprog> med det sprog, dokumentet er skrevet på)
Copyright © 2004 Creative Technology Ltd. Alle rettigheder forbeholdes. Creative-logoet er et registreret varemærke
tilhørende Creative Technology Ltd. i USA og/eller andre lande. Microsoft og Windows er registrerede varemærker tilhørende
Microsoft Corporation. Alle andre produkter er varemærker eller registrerede varemærker tilhørende deres respektive
ejere og anerkendes hermed. Alle specifikationer kan ændres uden forudgående varsel. Det faktiske indhold kan være forskelligt
fra dét, der er afbildet.
70
Opbevar venligst dit købsbevis i hele garantiperioden.
Page 71

CLE_WCam Live Pro QS.book Page 71 Thursday, July 29, 2004 10:48 AM
Tietoja Creative WebCam
-kamerasta
Laukaisin
Tarkennussäädin
Virran merkkivalo
Suomi
USB-kaapeli
Kamera edestä Sivunäkymä
Kuva 1
Virran merkkivalo Syttyy, kun Creative WebCam liitetään tietokoneen USB-porttiin.
Tarkennussäädin
Laukaisin Painamalla laukaisinta voit laukaista WebCam Center -kameran ja ottaa kuvia.
USB-kaapeli Kytke USB-kaapeli tietokoneen USB-porttiin.
Säädettävä jalusta Kiinnitä Creative WebCam jalustan avulla nestekidenäyttöön.
Säätää kuvan tarkennusta. Suuntaa linssi kuvauskohteeseen ja käännä sitten
rengasta myötä- tai vastapäivään, kunnes kuva on terävä.
Säädettävä
jalusta
71
Page 72

CLE_WCam Live Pro QS.book Page 72 Thursday, July 29, 2004 10:48 AM
Näin pääset alkuun
Creative WebCam -kameran
1
1
asentaminen
1. Asenna ensin ohjaimet ja kytke vasta sitten Creative WebCam -kamera
tietokoneeseen. Jos aloitat vahingossa asentamisen niin, että Creative WebCam
-kamera on kytketty tietokoneeseen, näyttöön tulee Ohjattu uuden laitteen
asentaminen- tai Ohjattu uuden laitteiston asennus -valintaikkuna. Valitse tällöin
Per uut a.
2. Aseta Creative WebCam Live! Pro -asennuslevy tietokoneen CD-asemaan. Jos ohjelma
ei käynnisty automaattisesti, valitse Käynnistä → Suorita ja kirjoita d:\setup.exe.
(d:\-tunnus tarkoittaa CD-aseman tunnusta. Valitse oman CD-asemasi tunnus.)
3. Valitse oma alueesi ja napsauta Seuraava-painiketta.
4. Valitse kieli ja napsauta Seuraava-painiketta.
5. Napsauta ohjainten ja sovellusten asetuksia ja Asenna-painiketta.
Ainoastaan käyttäjät, joiden tietokoneessa on USB 2.0 -liitäntä:
Creative-asennus tarkistaa automaattisesti, että tietokoneellesi on asennettu ihanteellisen USB
2.0 -käytön vaatimat ohjelmistokomponentit, ja antaa ilmoituksen, jos jokin komponenteista
puuttuu. Jos saat tällaisen ilmoituksen, tee jokin seuraavista toimenpiteistä, niin voit varmistaa,
että Creative WebCam toimii aina parhaalla mahdollisella tavalla USB 2.0 -yhteyttä
käytettäessä:
• asenna USB 2.0 Enhanced Host Controllerin toimittama ohjain tai
• lataa ja asenna Windows
Jos sinun on asennettava Windows XP SP1, muista asentaa myös Windows XP
Hotfix KB822603.
Saat uusimmat Windowsin päivityspakkaukset (Windows XP SP1 mukaan lukien)
ja Windows Hotfix KB822603:n Microsoftin ohje- ja tukisivustolta tai Windows
Updatesta.
®
-käyttöjärjestelmäsi uusin päivityspakkaus (SP, Service Pack).
72
Page 73

CLE_WCam Live Pro QS.book Page 73 Thursday, July 29, 2004 10:48 AM
6. Aseta Creative WebCam -kamera tietokoneen päälle tai muulle tasaiselle alustalle. Jos
asetat kameran litteän nestekidenäytön tai kannettavan tietokoneen päälle, käytä apuna
säädettävää jalustaa (katso Kuva 2).
Kuva 2
7. Kytke Creative WebCam -kameran USB-kaapeli pyydettäessä tietokoneen vapaaseen
USB-porttiin (katso Kuva 3). Windows tunnistaa laitteen automaattisesti.
Kuva 3
Vain Wind ows XP :
i. Jos Ohjattu uuden laitteiston asennus -valintaikkuna tulee näyttöön, valitse Asenna
ohjelmistot automaattisesti (suositus) -asetus ja napsauta Seuraava-painiketta.
ii. Kun näyttöön tulee Laitteen asentaminen -valintaikkuna, napsauta Jatka asentamista
-painiketta.
73
Page 74

CLE_WCam Live Pro QS.book Page 74 Thursday, July 29, 2004 10:48 AM
Vain Windows 2000:
Kun näyttöön tulee Digitaalista allekirjoitusta ei löytynyt -valintaikkuna, jossa on ilmoitus siitä,
että järjestelmä on havainnut Creative WebCam Live! Pro -kameran, valitse Kyllä.
Vain Windows Me ja Windows 98 SE:
i. Jos näytössä kehotetaan asettamaan Windows 98 SE- tai Windows Me -levy CD-asemaan,
vaihda pyydetty CD-levy Creative WebCam Live! Pro -asennuslevyn tilalle.
ii. Napsauta Aseta levyke -valintaikkunan OK-painiketta.
8. Suorita asennus noudattamalla näyttöön tulevia ohjeita. Kun ohjaimet on asennettu,
järjestelmä saattaa kysyä, haluatko käynnistää tietokoneen uudelleen. Valitse Ei, kunnes
kaikki sovellukset on asennettu.
9. Käynnistä tietokone uudelleen, kun kaikki sovellukset on asennettu.
Asennuksen vahvistaminen
2
2
1. Napsauta hiiren kakkospainikkeella Oma tietokone -kuvaketta, joka näkyy
työpöydällä tai Windowsin Käynnistä-valikossa.
2. Napsauta näyttöön tulevassa valikossa olevaa Ominaisuudet-painiketta.
Vain Windows XP ja Windows 2000:
Valits e Ominaisuudet: Järjestelmä -valintaikkunan Laitteisto-välilehti. Napsauta
Laitehallinta-painiketta.
Windows Me ja Windows 98 SE:
Valits e Ominaisuudet: Järjestelmä -valintaikkunan Laitehallinta-välilehti.
3. Napsauta Kuvankäsittelylaite-kuvakkeen vieressä olevaa plus (+) -merkkiä. Creative
WebCam Live! Pro tulee näkyviin.
74
Page 75

CLE_WCam Live Pro QS.book Page 75 Thursday, July 29, 2004 10:48 AM
Creative WebCam -kameran
3
3
käyttäminen
Kuvan ottaminen
1. Valitse Käynnistä → Ohjelmat → Creative → Creative WebCam →
Creative WebCam Center.
2. Napsauta Creative WebCam Center -ikkunassa Capture-välilehteä.
3. Napsauta Photo Resolution -valintaruutua ja valitse haluamasi tarkkuus.
4. Ota kuva napsauttamalla Snap photo -painiketta. Kuvat tallennetaan tiedostoina
oletuskansioon.
Jos haluat katsella valokuvia kuvankatseluohjelmassa, kaksoisnapsauta kuvatiedostoja
Thumbnails/Details-kentässä.
Videokuvan tallentaminen
1. Valitse Käynnistä → Ohjelmat → Creative → Creative WebCam →
Creative WebCam Center.
2. Napsauta Creative WebCam Center -ikkunassa Capture-välilehteä.
3. Napsauta Video Resolution -valintaruutua ja valitse haluamasi tarkkuus.
4. Aloita ja lopeta kuvan tallentaminen napsauttamalla Record-painiketta. Videokuva
tallennetaan tiedostoina oletuskansioon, kun lopetat tallennuksen.
Jos haluat katsella videokuvatiedostoja kuvankatseluohjelmassa, kaksoisnapsauta
videokuvatiedostoja Thumbnails/Details-kentässä.
75
Page 76

CLE_WCam Live Pro QS.book Page 76 Thursday, July 29, 2004 10:48 AM
Face Tracking -toiminnon käyttäminen
Face Tracking -toiminnossa kamera zoomaa automaattisesti kasvoihisi Video Instant
Messaging -istunnon aikana tai tallentaessasi videokuvaa.
Voit ottaa Face Tracking -toiminnon käyttöön Face Tracking Utility -apuohjelmassa. Voit
käynnistää Face Tracking Utility -apuohjelman jollakin seuraavista tavoista:
• Napsauta WebCam Centerissä Tools → Face Tracking Utility.
• Napsauta hiiren kakkospainikkeella tehtäväpalkissa näkyvää Creative Cam Detector
-kuvaketta ja napsauta Face Tracking Utility -kohtaa.
•Napsauta Käynnistä → Ohjelmat tai Kaikki ohjelmat → Creative → Creative
WebCam Center → Face Tracking Utility.
Lisätietoja on asennuslevyllä olevassa käyttöoppassa.
Avaa tiedosto d:\manual\<kieli>\manual.chm (jossa d:\ vastaa CD-/DVD-aseman kirjainta ja
<kieli> asiakirjan kieltä).
76
Page 77

CLE_WCam Live Pro QS.book Page 77 Thursday, July 29, 2004 10:48 AM
Lisätietoja
Voit määrittää ja ratkaista teknisiä ongelmia Creativen aina avoinna olevassa
itsepalvelutietokannassa. Siirry osoitteeseen www.creative.com ja valitse alue.
Creative Knowledge Base -tietokanta
Tuotteen rekisteröiminen
Voit nauttia monista eduista rekisteröimällä tuotteen asennuksen aikana tai myöhemmin
osoitteessa www.creative.com/register. Etuihin sisältyvät:
• Creativen palvelu- ja tuotetuki
• ajantasaiset tiedot myynninedistämiskampanjoista ja tapahtumista.
Asiakastuen palvelut ja takuu
Asennuslevyllä on tietoja asiakastuen tarjoamista palveluista ja takuusta sekä muita
lisätietoja.
Asiakastuen
palvelut
Ta ku u d:\warranty\<alue>\<kieli>\warranty.chm
Käyttöopas d:\manual\<kieli>\manual.chm
(Käytä d:\-kirjaimen paikalla CD-/DVD-asemasi kirjainta, <alue> paikalla omaa aluettasi ja
<kieli> paikalla haluamaasi kieltä.)
Copyright © 2004 Creative Technology Ltd. Kaikki oikeudet pidätetään. Creative-logo on Creative Technology Ltd.:n
Yhdysvalloissa ja/tai muissa maissa rekisteröity tavaramerkki. Microsoft ja Windows ovat Microsoft Corporationin
rekisteröityjä tavaramerkkejä. Kaikki muut tuotteet ovat omistajiensa tavaramerkkejä tai rekisteröityjä tavaramerkkejä. Tämän
asiakirjan tiedot voivat muuttua ilman erillistä ilmoitusta. Pakkauksen todellinen sisältö voi poiketa hieman kuvan ilmoittamasta
sisällöstä.
d:\support\<kieli>\support.pdf
Säilytä ostotodistus takuun voimassaoloajan.
77
Page 78

CLE_WCam Live Pro QS.book Page 78 Thursday, July 29, 2004 10:48 AM
Česky
O kameře Creative WebCam
Spouš
t’
Kroužek
ostření
Dioda
LED
napájení
Pohled zepředu Boční pohled
Kabel
USB
obr. 1
Úchyt
Dioda LED
napájení
Kroužek
ostření
Spoušt’ Slouží ke spuštění aplikace WebCam Center a pořízení snímků.
Kabel USB Připojte jej k portu USB na počítači.
Úchyt Slouží k uchycení kamery Creative WebCam na displej LCD.
Dioda se rozsvítí, jakmile kameru Creative WebCam připojíte k portu USB na
počítači.
Zaostří obraz. Namiřte objektiv na požadovaný objekt a otočte tímto kroužkem
doprava či doleva až do plného zaostření.
78
Page 79

CLE_WCam Live Pro QS.book Page 79 Thursday, July 29, 2004 10:48 AM
Začínáme
Instalace kamery Creative WebCam
1
1
1. Nepřipojujte kameru Creative WebCam k počítači před instalací ovladačů.
Pokud náhodou zahájíte instalaci s připojenou kamerou Creative WebCam,
zobrazí se dialogové okno Průvodce přidáním nového hardwaru nebo
Průvodce nově rozpoznaným hardwarem. V takovém případě klepněte na
tlačítko Storno.
2. Vložte do mechaniky CD-ROM instalační disk CD Creative WebCam Live! Pro.
Pokud se disk nespustí automaticky, vyberte příkaz Start → Spustit a zadejte
d:\setup.exe (písmeno d:\ nahraďte písmenem jednotky CD-ROM).
3. Vyberte zemi, ve které se nacházíte, a klepněte na tlačítko Další.
4. Vyberte jazyk a klepněte na tlačítko Další.
5. Klepněte na možnosti instalace ovladačů a aplikací a poté na tlačítko
Nainstalovat.
Informace pro uživatele počítačů pouze s portem USB 2.0:
Instalace Creative automaticky zkontroluje, zda jsou komponenty softwaru,
které jsou zapotřebí pro optimální provoz portu USB 2.0, na počítači
nainstalovány, a v případě, že tyto komponenty chybí, vás upozorní. Pokud
obdržíte hlášení o chybě, proveďte jeden z následujících dvou kroků. Zajistíte
tak, aby kamera Creative WebCam byla při připojení přes port USB 2.0 vždy
maximálně využita:
• nainstalujte ovladač dodaný prodejcem řadiče USB 2.0 Enhanced Host
Controller;
• stáhněte a nainstalujte poslední aktualizaci Service Pack (SP), která
odpovídá vašemu operačnímu systému Windows
Pokud se rozhodnete pro instalaci aktualizace Windows XP SP1, musíte
nainstalovat také Windows XP Hotfix KB822603.
Poslední aktualizace Windows Service Pack (včetně Windows XP SP1) a
Windows Hotfix KB822603 získáte na webových stránkách nápovědy a
podpory společnosti Microsoft nebo prostřednictvím nástroje Windows
®
.
79
Page 80

CLE_WCam Live Pro QS.book Page 80 Thursday, July 29, 2004 10:48 AM
6. Umístěte kameru Creative WebCam na monitor počítače nebo na jiný rovný
povrch. U displejů LCD nebo přenosných počítačů použijte k zajištění kamery
Creative WebCam integrovaný úchyt (viz Obr. 2).
obr. 2
7. Po vyzvání zapojte kabel USB kamery WebCam Creative do volného portu USB
na počítači (viz Obr. 3). Systém Windows zařízení automaticky rozpozná.
obr. 3
Pouze v systému Windows XP:
i. Jakmile se zobrazí dialogové okno Průvodce nově rozpoznaným hardwarem,
vyberte volbu Instalovat software automaticky (doporučeno) a poté klepněte na
tlačítko Další.
ii. Když se zobrazí dialogové okno Instalace hardwaru, klepněte na tlačítko Pokračovat.
80
Page 81

CLE_WCam Live Pro QS.book Page 81 Thursday, July 29, 2004 10:48 AM
Pouze v systému Windows 2000:
Když se zobrazí dialogové okno Nebyl nalezen digitální podpis s informací, že kamera
Creative WebCam Live! Pro byla rozpoznána, klepněte na tlačítko Ano.
Pouze pro systém Windows Me a Windows 98 SE:
i. Pokud se zobrazí výzva k vložení disku CD systému Windows 98 SE nebo Windows
Me, nahraďte instalační disk kamery Creative WebCam Live! Pro požadovaným
diskem CD.
ii. V dialogovém okně Vložit disketu klepněte na tlačítko OK.
8. Postupujte podle pokynů na obrazovce až do dokončení instalace. Po
úspěšném dokončení instalace ovladačů se může zobrazit dotaz, zda má být
počítač restartován. Klepněte vždy na tlačítko Ne, dokud nenainstalujete
všechny aplikace.
9. Po dokončení instalace všech aplikací počítač restartujte.
Ověření instalace
2
2
1. Pravým tlačítkem myši klepněte na pracovní ploše nebo v nabídce Start
systému Windows na ikonu Tento počítač.
2. V nabídce, která se zobrazí, klepněte na položku Vlastnosti.
Pouze systémy Windows XP a Windows 2000:
V dialogovém okně Vlastnosti systému klepněte na kartu Hardware. Klepněte na tlačítko
Správce zařízení.
Systémy Windows Me a Windows 98 SE:
V dialogovém okně Vlastnosti systému klepněte na kartu Správce zařízení.
3. Klepněte na znaménko plus (+) u ikony Imaging Device (Zobrazovací zařízení).
Zobrazí se položka “Creative WebCam Live! Pro”.
81
Page 82

CLE_WCam Live Pro QS.book Page 82 Thursday, July 29, 2004 10:48 AM
Použití kamery Creative WebCam
3
3
Pořízení snímku
1. Klepněte na Start → Programy → Creative → Creative WebCam →
Creative WebCam Center.
2. V okně Creative WebCam Center klepněte na kartu Capture (Pořízení
snímku).
3. Klepněte na pole Photo Resolution (Rozlišení fotografie) a vyberte požadované
rozlišení.
4. Klepnutím na tlačítko Snap photo (Pořídit foto) pořiďte snímek. Snímky se uloží
jako soubory ve výchozí složce pro média.
Chcete-li si snímky prohlédnout, poklepejte na soubory snímků v okně Thumbnails/
Details (Miniatury a podrobnosti).
Záznam videa
1. Klepněte na Start → Programy → Creative → Creative WebCam →
Creative WebCam Center.
2. V okně Creative WebCam Center klepněte na kartu Capture (Pořízení
snímku).
3. Klepněte na pole Video Resolution (Rozlišení videa) a vyberte požadované
rozlišení.
4. Klepnutím na tlačítko Record (Zaznamenat) spustíte a zastavíte nahrávání.
Video se po skončení nahrávání uloží jako soubor ve výchozí složce pro média.
Chcete-li si video prohlédnout, poklepejte na soubory videa v okně Thumbnails/
Details (Miniatury a podrobnosti).
82
Page 83

CLE_WCam Live Pro QS.book Page 83 Thursday, July 29, 2004 10:48 AM
Povolení funkce zaměření obličeje
Je-li funkce zaměření obličeje aktivní, kamera během rychlého zasílání zpráv s
obrazem nebo nahrávání videa automaticky přiblíží váš obličej.
Funkci zaměření obličeje lze aktivovat v nástroji zaměření obličeje (Face Tracking
Utility). Nástroj zaměření obličeje (Face Tracking Utility) lze spustit následujícími
způsoby:
• V okně WebCam Center klepněte na položku Nástroje → Face Tracking Utility.
• Pravým tlačítkem myši klepněte na ikonu Creative Cam Detector na hlavním
panelu systému a poté klepněte na možnost Face Tracking Utility.
• Klepněte na Start → Programy nebo Všechny programy → Creative →
Creative WebCam Center → Face Tracking Utility.
Další informace naleznete v souboru User’s Guide (Příručka uživatele) na instalačním disku
CD.
Vyhledejte d:\manual\<jazyk>\manual.chm (nahraďte písmeno d:\ za písmeno jednotky
CD-ROM\DVD-ROM na svém počítači a pojem <jazyk> za jazykovou verzi dokumentu).
83
Page 84

CLE_WCam Live Pro QS.book Page 84 Thursday, July 29, 2004 10:48 AM
Další informace
Při řešení technických dotazů a problémů použijte databázi Knowledge Base
společnosti Creative, která je k dispozici 24 hodin denně. Přejděte na adresu
Creative Knowledge Base – databáze informací
www.creative.com a vyberte příslušnou zemi.
Zaregistrujte si produkt!
Po registraci produktu během instalace můžete využít celou řadu výhod.
Zaregistrovat se lze i na adrese www.creative.com/register. Poskytované výhody:
• servis a podpora produktů společnosti Creative,
• exkluzivní informace o propagačních akcích či jiných událostech.
Služby podpory zákazníků a záruka
Informace o službách podpory zákazníků, záruce a další informace naleznete na
instalačním disku CD.
Služby podpory
zákazníků
Záruka d:\warranty\<oblast>\<jazyk>\warranty.chm
Příručka uživatele d:\manual\<jazyk>\manual.chm
(písmeno d:\ nahraďte písmenem označujícím jednotku CD-ROM/DVD-ROM, pojem
oblast> nahraďte zemí, v níž se nacházíte, a pojem <jazyk> nahraďte jazykem
<
dokumentu).
Copyright © 2004 Creative Technology Ltd. Všechna práva vyhrazena. Logo Creative je registrovanou ochrannou
známkou společnosti Creative Technology Ltd. v USA a/nebo jiných zemích. Microsof t a Windows jsou registrované
ochranné známky společnosti Microsoft Corporation. Všechny ostatní produkty jsou ochrannými známkami nebo
registrovanými ochrannými známkami příslušných vlastníků. Veškeré technické údaje se mohou změnit bez
předchozího upozornění. Skutečný obsah se může mírně lišit od vyobrazení uvedených v této příručce.
84
d:\support\<jazyk>\support.chm
Po dobu trvání záruky si uschovejte doklad o koupi produktu.
Page 85

CLE_WCam Live Pro QS.book Page 85 Thursday, July 29, 2004 10:48 AM
Informacje dotyczące kamery
internetowej Creative WebCam
Przycisk
migawki
Pierścień
ustawiania
ostrości
Dioda LED
zasilania
Kabel USB
Widok z przodu Widok z boku
Rysunek 1
Ruchoma
podpórka
Polski
Dioda LED
zasilania
Pierścień
ustawiania
ostrości
Przycisk
migawki
Kabel USB Podłącz go do złącza USB komputera.
Ruchoma
podpórka
Zostaje zapalona po podłączeniu internetowej kamery Creative WebCam do
portu USB komputera.
Umożliwia ustawianie ostrości obrazu. Skieruj obiektyw w stronę wybranego
przedmiotu, a następnie obracaj pierścień w kierunku zgodnym lub przeciwnym
do ruchu wskazówek zegara, aż uzyskasz ostry obraz.
Wciśnij go w celu uruchomienia aplikacji WebCam Center i przechwycenia
obrazów.
Użyj jej w celu przymocowania kamery Creative WebCam do ekranu monitora
ciekłokrystalicznego.
85
Page 86

CLE_WCam Live Pro QS.book Page 86 Thursday, July 29, 2004 10:48 AM
Wprowadzenie
Instalacja kamery WebCam firmy
1
1
Creative
1. Nie podłączać kamery WebCam firmy Creative do komputera przed
zainstalowaniem sterowników. W razie przypadkowego rozpoczęcia instalacji,
kiedy kamera internetowa Creative WebCam była podłączona, zostanie
wyświetlone okno dialogowe Kreator dodawania nowego sprzętu lub Kreator
znajdowania nowego sprzętu, w których należy kliknąć przycisk Anuluj.
2. Włożyć płytę Creative WebCam Live! ProInstallation CD do napędu CD-ROM.
Jeśli płyta nie zostanie uruchomiona automatycznie, kliknąć przycisk Start →
Uruchom i wpisz d:\setup.exe (literę d:\ należy zastąpić literą napędu
CD-ROM).
3. Wybrać obszar zamieszkania i kliknąć przycisk Dalej.
4. Wybrać język i kliknąć przycisk Dalej.
5. Kliknąć opcje instalowania sterowników i aplikacji, a następnie kliknąć przycisk
Instaluj.
Dotyczy wyłącznie komputerów posiadających złącze USB 2.0:
Program instalacyjny Creative Installation automatycznie sprawdza elementy
oprogramowania wymagane do optymalnego działania złącza USB 2.0 zostały
zainstalowane na danym komputerze oraz informuje o ich ewentualnym braku.
W razie wyświetlenia takiego komunikatu należy wykonać jedną z poniższych
czynności, aby zakupiona internetowa kamera Creative WebCam zawsze w
pełni wykorzystywała swój potencjał przy pracy na złączu typu USB 2.0:
• zainstalować sterownik dostarczony przez producenta złącza USB 2.0; lub
• pobrać z internetu a następnie zainstalować najnowszy pakiet Service Pack
(SP) dla zainstalowanego systemu operacyjnego Windows
W razie instalacji pakietu SP1 dla systemu Windows XP, należy również
zainstalować poprawkę Windows XP Hotfix KB822603.
Najnowszą wersję pakietu Windows Service Pack (w tym SP1 dla
systemu Windows XP) oraz poprawkę Windows Hotfix KB822603 można
pobryć ze strony internetowej pomocy technicznej firmy Microsoft
86
®
.
Page 87

CLE_WCam Live Pro QS.book Page 87 Thursday, July 29, 2004 10:48 AM
6. Umieścić kamerę Creative WebCam na monitorze komputera lub innej płaskiej
powierzchni. W przypadku płaskich monitorów krystalicznych lub ekranów
komputerów przenośnych, ustaw równo kamerę przy pomocy zintegrowanej
ruchomej podpórki (Patrz: Rysunek 2).
Rysunek 2
7. Po wyświetleniu monitu podłączyć kabel USB kamery Creative WebCam do
dostępnego złącza USB komputera (Patrz: Rysunek 3). System Windows
automatycznie wykryje urządzenie.
Rysunek 3
Tylko w systemie Windows XP:
i. Kiedy zostanie wyświetlone okno dialogowe Kreator znajdowania nowego sprzętu,
wybierz opcję opcję Zainstaluj oprogramowanie automatycznie (zalecane) i kliknij
przycisk Dalej.
ii. Kiedy zostanie wyświetlone okno dialogowe Instalacja sprzętu, kliknij przycisk Mimo
to kontynuuj.
87
Page 88

CLE_WCam Live Pro QS.book Page 88 Thursday, July 29, 2004 10:48 AM
Tylko w systemie Windows 2000:
Po wyświetleniu okna dialogowego Nie znaleziono podpisu cyfrowego z informacją o
wykryciu Creative WebCam Live! Pro kliknij przycisk Tak .
Tylko w systemach Windows Me i Windows 98 SE:
i. Po wyświetleniu monitu o włożenie płyty CD systemu Windows 98 SE lub Windows
Me, zastąp płytę Installation Creative WebCam Live! Pro odpowiednią płytą CD.
ii. W oknie dialogowym Włóż dysk, kliknij przycisk OK.
8. Postępuj zgodnie z instrukcjami wyświetlanymi na ekranie, aby ukończyć
instalację. Instalator może zaproponować ponowne uruchomienie komputera po
pomyślnym zainstalowaniu sterowników. Wybieraj przycisk Nie, aż do chwili,
kiedy zostaną zainstalowane wszystkie aplikacje.
9. Ponownie uruchomić komputer po zainstalowaniu wszystkich aplikacji.
Sprawdzanie poprawności instalacji
2
2
1. Kliknąć prawym przyciskiem myszy ikonę Mój komputer na pulpicie lub w
menu Start systemu Windows.
2. W wyświetlonym menu kliknij polecenie Właściwości.
Tylko w systemach Windows 2000 i Windows XP:
W oknie dialogowym Właściwości systemu kliknij zakładkę Sprzęt. Kliknij przycisk
Menedżer urządzeń.
W systemach Windows Me i Windows 98 SE:
W oknie dialogowym Właściwości systemu kliknij zakładkę Menedżer urządzeń.
3. Kliknij znak (+) obok ikony Urządzenie przetwarzania obrazu. Zostanie
wyświetlona pozycja kamera internetowa "Creative WebCam Live! Pro".
88
Page 89

CLE_WCam Live Pro QS.book Page 89 Thursday, July 29, 2004 10:48 AM
Używanie kamery WebCam firmy
3
3
Creative
Robienie zdjęć
1. Kliknij kolejno Menu Start → Programy → Creative → Creative WebCam →
Creative WebCam Center.
2. W oknie Creative WebCam Center, kliknij zakładkę Capture.
3. Kliknij okienko Photo Resolution (Rozdzielczość obrazu) i wybierz żądaną
rozdzielczość.
4. Kliknij przycisk Snap photo (Zrób zdjęcie), aby zrobić zdjęcie. Obrazy zostają
zapisane jako pliki w domyślnym folderze multimediów.
W celu obejrzenie zdjęć w przeglądarce obrazów, dwukrotnie kliknij plik obrazów w
okienku Thumbnails/Details (Miniatury / Informacje szczegółowe).
Nagrywanie filmów wideo
1. Kliknij kolejno Menu Start → Programy → Creative → Creative WebCam →
Creative WebCam Center.
2. W oknie Creative WebCam Center, kliknij zakładkę Capture.
3. Kliknij okienko Video Resolution (Rozdzielczość filmu) i wybierz żądaną
rozdzielczość.
4. Aby rozpocząć lub zakończyć nagrywanie, kliknij przycisk Record (Nagrywaj).
Filmy zostają zapisane jako pliki w domyślnym folderze multimediów, po
zatrzymaniu nagrywania
W celu obejrzenie filmów w odtwarzaczu filmów, dwukrotnie kliknij plik filmu w
okienku Thumbnails/Details (Miniatury / Informacje szczegółowe).
89
Page 90

CLE_WCam Live Pro QS.book Page 90 Thursday, July 29, 2004 10:48 AM
Aktywacja funkcji Face Tracking (Śledzenia twarzy)
Przy pomocy funkcji Śledzenia twarzy, kamera automatycznie powiększa twarz
użytkownika w trakcie sesji pracy z aplikacjami typu komunikatory lub w trakcie
nagrywania filmów.
Funkcję Śledzenie twarzy mozna aktywować poprzez narzędzie Face Tracking
Utility. Narzędzie Face Tracking Utility można uruchomić w jeden z następujących
sposobów:
• W centrum WebCam Center, kliknąć Narzędzia (Tools)→ Face Tracking Utility.
• Kliknąć prawym przyciskiem myszy ikonę -click the Creative Cam Detector w
schowku systemowych a następnie klinąć opcję Face Tracking Utility.
• Kliknij kolejno Menu Start → Programy lub Wszystkie programy → Creative
→ Creative WebCam Center → Face Tracking Utility.
Dalsze informacje zostały zawarte w dokumencie User’s Guide (Informator użytkownika) na
płycie instalacyjnej.
Przejdź do folderu d:\manual\<język>\manual.chm (należy zastąpić d:\ literą napędu CD—
ROM/DVD—ROM, a <język> językiem dokumentu).
90
Page 91

CLE_WCam Live Pro QS.book Page 91 Thursday, July 29, 2004 10:48 AM
Więcej informacji
W dostępnej całą dobę bazie wiedzy firmy Creative można rozwiązać problemy
techniczne i uzyskać odpowiedzi na pytania. Przejdź na stronę www.creative.com
Baza wiedzy Creative Knowledge Base
i wybierz swój obszar zamieszkania.
Zarejestruj swój produkt!
Można korzystać z wielu udogodnień po zarejestrowaniu swojego produktu podczas
instalacji lub pod adresem www.creative.com/register. Korzyści obejmują:
• Pomoc techniczną oraz pomoc dla produktów świadczoną przez firmę Creative
• Aktualne informacje dotyczące promocji i imprez.
Pomoc techniczna oraz gwarancja
Na płycie instalacyjnej znajduje się pomoc techniczna, gwarancja i wiele innych
informacji.
Pomoc techniczna d:\support\<język>\support.chm
Gwarancja d:\warranty\<region>\<język>\warranty.chm
Instrukcja obsługi d:\manual\<język>\manual.chm
(należy zastąpić d:\ literą napędu CD-ROM/DVD-ROM, <region> obszarem, gdzie
przebywa użytkownik, a <język> językiem dokumentu)
Copyright © 2004 Creative Technology Ltd. Wszelkie prawa zastrzeżone. Logo Creative jest zarejestrowanym
znakiem towarowym firmy Creative Technology Ltd. w Stanów Zjednoczonych i / lub innych krajach. Microsoft i
Windows są zastrzeżonymi znakami towarowymi firmy Microsoft Corporation. Wszystkie inne produkty są znakami
towarowymi lub zastrzeżonymi znakami towarowymi ich odpowiednich właścicieli i za takie są uważane. Wszelkie
wymienione parametry techniczne mogą ulec zmianie bez powiadomienia. Rzeczywista zawartość może
Dowód zakupu należy przechowywać przez cały czas trwania gwarancji.
91
Page 92

CLE_WCam Live Pro QS.book Page 92 Thursday, July 29, 2004 10:48 AM
Русский
Камера Creative WebCam
Кнопка
съемки
Фокусировочное
кольцо
Индикатор
питания
Кабель
USB
Вид спереди Вид сбоку
Рис. 1
Шарнирн
ый
рычажок
Индикатор
питания
Фокусировочное
кольцо
Кнопка съемки
Кабель USB Кабель подключается к порту USB на вашем компьютере.
Шарнирный
рычажок
Загорается при подключении камеры Creative WebCam к порту USB
компьютера.
Предназначено для наводки на резкость. Направьте объектив на
предмет съемки, а затем вращайте это кольцо по часовой или против
часовой стрелки до получения максимальной резкости изображения.
Нажмите эту кнопку, чтобы запустить WebCam Center и записать
изображение.
Рычажок предназначен для установки камеры Creative WebCam на
ЖК-монитор.
92
Page 93

CLE_WCam Live Pro QS.book Page 93 Thursday, July 29, 2004 10:48 AM
Подготовка к работе
Установка камеры Creative WebCam
1
1
1. Не подключайте камеру Creative WebCam к компьютеру до установки
драйверов. Если вы случайно начали установку с подключенной камерой
Creative WebCam, и на экране появилось окно Установка нового
оборудования или окно Обнаружено новое устройство, нажмите кнопку
Отмена.
2. Вставьте установочный компакт-диск в дисковод для компакт-дисков. Если
компакт-диск не запускается автоматически, выберите пункт меню Пуск →
Выполнить и введитеd:\setup.exe (замените d:\ на букву, используемую
для обозначения дисковода для компакт-дисков).
3. Выберите свой регион, затем щелкните Далее.
4. Выберите соответствующий язык и щелкните Далее.
5. Выберите пункты установки драйверов и приложений и нажмите
Установить.
Только для пользователей компьютеров, оборудованных портом USB 2.0:
Программа установки Creative Installation автоматически проверяет
наличие программных компонентов, необходимых для оптимальной
работы USB 2.0, и предупреждает, если такие компоненты не установлены.
При получении предупреждения выполните одно из следующих действий,
чтобы обеспечить максимальную эффективность работы камеры Creative
WebCam с портом USB 2.0:
• Установите драйвер, предлагаемый производителем контроллера USB
2.0; или
• Загрузите и установите последний пакет обновления (Service Pack),
соответствующий вашей операционной системе Windows
При установке пакета обновления Windows XP SP1 также необходимо
установить обновление Windows XP Hotfix KB822603.
Последние пакеты обновления (включая Windows XP SP1) и Windows
Hotfix KB822603 можно загрузить с веб-узла технической поддержки
Microsoft или установить с помощью Windows Update.
®
.
93
Page 94

CLE_WCam Live Pro QS.book Page 94 Thursday, July 29, 2004 10:48 AM
6. Установите камеру Creative WebCam на монитор вашего компьютера или
другую плоскую поверхность. При установке на плоскопанельный
ЖК-монитор или переносной компьютер для крепления камеры Creative
WebCam используйте встроенный шарнирный рычажок (см. Рис. 2).
Рис. 2
7. При появлении окна с соответствующим предложением подключите
USB-кабель камеры WebCam к свободному USB-порту компьютера (см.
Рис. 3). Система Windows автоматически обнаружит устройство.
Рис. 3
Только дл я Windows XP:
i. При появлении диалогового окна Обнаружено новое устройство выберите
Автоматическая установка (рекомендуется) и нажмите кнопку Далее.
ii. После появления диалогового окна Установка оборудования нажмите кнопку
Все равно продолжить.
94
Page 95

CLE_WCam Live Pro QS.book Page 95 Thursday, July 29, 2004 10:48 AM
Только для Windows 2000:
Когда появится диалоговое окно Цифровая подпись не найдена с сообщением, что
обнаружена камера Creative WebCam Live! Pro, нажмите кнопку Да.
Только для Windows Me и Windows 98 SE:
i. При появлении запроса на установку компакт-диска Windows 98 SE или Windows
Me замените установочный компакт-диск Creative WebCam Live! Pro на
соответствующий компакт-диск.
ii. В диалоговом окне Вставка диска нажмите кнопку ОК.
8. Следуйте инструкциям на экране для завершения установки. После
установки драйверов система может предложить вам перезагрузить
компьютер. Выберите Нет, если еще не все драйверы и приложения были
установлены.
9. Выполните перезагрузку компьютера после установки всех приложений.
Проверка установки
2
2
1. Щелкните правой кнопкой мыши значок Мой компьютер, расположенный
на рабочем столе или в меню “Пуск”.
2. Выберите из появившегося меню команду Свойства.
Только для Windows XP и 2000:
В диалоговом окне Свойства системы выберите вкладку Оборудование. Щелкните
кнопку Диспетчер устройств.
Для Windows Me и Windows 98 SE:
В диалоговом окне Свойства системы выберите вкладку Диспетчер устройств.
3. Щелкните значок (+) рядом со значком Устройства обработки
изображений. Появится запись “Creative WebCam Live! Pro”.
95
Page 96

CLE_WCam Live Pro QS.book Page 96 Thursday, July 29, 2004 10:48 AM
Работа с камерой Creative WebCam
3
3
Фотосъемка
1. Выберите пункт меню Пуск → Программы → Creative → Creative
WebCam → Creative WebCam Center.
2. В окне Creative WebCam Center перейдите на вкладку Capture (Захват
изображения).
3. Щелкните поле Photo Resolution (Разрешение фотоснимка) и выберите
нужное разрешение.
4. Нажмите кнопку Snap photo (Фотосъемка), чтобы сделать фотоснимок.
Снимки сохраняются в файлах в установленной по умолчанию
мультимедийной папке.
Чтобы просмотреть фотографии в программе просмотра, двойным щелчком
откройте файл в области Thumbnails/Details (Миниатюры/Подробно).
Запись видео
1. Выберите пункт меню Пуск → Программы → Creative → Creative
WebCam → Creative WebCam Center.
2. В окне Creative WebCam Center перейдите на вкладку Capture (Захват
изображения).
3. Щелкните поле Video Resolution (Разрешение видео) и выберите нужное
разрешение.
4. Для начала или остановки записи видео нажмите кнопку Record video
(Запись видео). Видеоролики сохраняются в виде файлов в
мультимедийной папке после остановки записи.
Чтобы просмотреть видеоролики в программе просмотра видео, двойным
щелчком откройте файл в области Thumbnails/Details (Миниатюры/Подробно).
96
Page 97

CLE_WCam Live Pro QS.book Page 97 Thursday, July 29, 2004 10:48 AM
Функция Face Tracking
С функцией Face Tracking камера автоматически дает лицо крупным планом
во время обмена мгновенными видеосообщениями или записи видео.
Функцию Face Tracking можно включить в приложении Face Tracking. Запустить
приложение можно следующим образом:
• В окне WebCam Center нажмите Tools → Face Tracking Utility.
• Правой кнопкой мыши нажмите значок Creative Cam Detector в Панели
задач и выберите Face Tracking Utility.
• Выберите пункт меню Пуск → Программы или Все программы → Creative
→ Creative WebCam Center → Face Tracking Utility.
Более подробные сведения приведены в Руководстве пользователя, находящемся на
установочном компакт-диске.
Выберите d:\manual\<language>\manual.chm (замените d:\ на букву, используемую для
обозначения дисковода для компакт- или DVD-дисков, и <language> - на язык, на
котором документ написан)
97
Page 98

CLE_WCam Live Pro QS.book Page 98 Thursday, July 29, 2004 10:48 AM
Дополнительная информация
Для самостоятельного решения технических вопросов и проблем можно
Creative Knowledge Base
обратиться в доступную круглосуточно Базу знаний Creative. Перейдите на
узел http://www.creative.com и выберите свой регион.
Зарегистрируйте свое устройство!
Воспользуйтесь преимуществами, которые появятся у вас при регистрации
продукта во время установки или на веб-странице по адресу:
www.creative.com/register. Преимущества:
• Обслуживание и поддержка устройства компанией Creative
• Последняя информация о новейших продуктах и событиях компании.
Техническая поддержка клиентов и гарантийные
обязательства
Сведения по обслуживанию клиентов, гарантийным обязательствам и другая
информация содержатся на установочном компакт-диске.
Технич еск ая
поддержка клиентов
Гарантийные
обязательства
Руководство
пользователя
(замените d:\ на букву, используемую на вашем компьютере для обозначения
дисковода компакт- или DVD-дисков, <region> - на регион, в котором вы нахо
находитесь и <language> - на язык, на котором документ написан)
© Creative Technology Ltd., 2004. Все права защищены. Логотип Creative является зарегистрированным
товарным знаком Creative Technology Ltd. в США и/или других странах. Microsoft и Windows являются
зарегистрированными товарными знаками корпорации Майкрософт. Все другие продукты являются
товарными знаками или зарегистрированными товарными знаками их владельцев и в данном документе
рассматриваются в качестве таковых. Все технические характеристики могут быть изменены без
предварительного уведомления. Фактический внешний вид поставки может незначительно отличаться от
того, что изображено на рисунках.
98
d:\support\<language>\support.chm
d:\warranty\<region>\<language>\warranty.chm
Сохраняйте документ, подтверждающий факт покупки, в
течение всего гарантийного периода.
d:\manual\<language>\manual.pdf
 Loading...