

Page 1

LCD Monitor.book Page 0 Tuesday, June 22, 2004 11:15 AM
Contents
Congratulations! ...................................................................................................... 1
Package Contents .................................................................................................... 1
Getting Started ........................................................................................................ 2
Insert Batteries .................................................................................................. 2
Connect Devices ............................................................................................... 2
Connect Power Adapter Cable ..................................................................... 2
Turn On LCD Display ...................................................................................... 3
Select Input Source ........................................................................................... 3
Overview ................................................................................................................... 4
LCD Display ....................................................................................................... 4
Remote control ................................................................................................. 6
Computer Monitor Connections ........................................................................ 8
DVI ........................................................................................................................ 8
VGA ...................................................................................................................... 8
Video Connections ................................................................................................. 9
Video .................................................................................................................... 9
S-Video ................................................................................................................ 9
YCbCr (Component) ..................................................................................... 10
YPbPr (HDTV) ................................................................................................. 10
Optional Audio Out Connections .................................................................... 11
Speakers or Amplifiers ................................................................................... 11
Using the On Screen Display (OSD) Menu .................................................... 12
Selecting OSD menu options ....................................................................... 12
Overview of OSD menu options ................................................................ 12
Frequently Asked Questions .............................................................................. 14
General Specifications .......................................................................................... 15
Important Safety Instructions ............................................................................. 16
Creative Limited Warranty ................................................................................ 17
Creative Customer Support Services .............................................................. 19
Support Services .............................................................................................. 19
Product Registration and Returns ............................................................... 19
Customer Support Services Centers ......................................................... 21
Page 2
LCD Monitor.book Page i Tuesday, June 22, 2004 11:15 AM
Information in this document is subject to change without notice and does not represent a commitment on the part of
Creative Technology Ltd. Use of this product is subject to limited hardware warranty. Actual contents may differ slightly
from those pictured. No part of this manual may be reproduced or transmitted in any form or by any means, electronic
or mechanical, including photocopying and recording, for any purpose without the written permission of Creative Technology
Ltd.
Copyright © 2004 by Creative Technology Ltd. All rights reserved.
Version 1.0
June 2004
The Creative logo is a registered trademark of Creative Technology in the United States and/or other countries. All other
brand and product names are trademarks or registered trademarks of their respective holders and are hereby recognized
as such. All specifications are subject to change without prior notice. Actual contents may differ slightly from those pictured.
Notice for the USA
FCC Part 15: This equipment has been tested and found to comply with the limits for a Class B digital device, pursuant
to Part 15 of the FCC Rules. These limits are designed to provide reasonable protection against harmful interference in
a residential installation. This equipment generates, uses, and can radiate radio frequency energy and, if not installed and
used in accordance with the instructions, may cause harmful interference to radio communications. However, this notice
is not a guarantee that interference will not occur in a particular installation. If this equipment does cause harmful
interference to radio or television reception, which can be determined by turning the equipment off and on, the user is
encouraged to try one or more of the following measures:
• Reorient or relocate the receiving antenna.
• Increase the distance between the equipment and receiver.
• Connect the equipment to an outlet on a circuit different from that to which the receiver is connected.
• Consult the dealer or an experienced radio/TV technician.
CAUTION: To comply with the limits for the Class B digital device, pursuant to Part 15 of the FCC Rules, this device
must be installed in computer equipment certified to comply with the Class B limits.
All cables used to connect the computer and peripherals must be shielded and grounded. Operation with non-certified
computers or non-shielded cables may result in interference to radio or television reception.
Modifications
Any changes or modifications not expressly approved by the manufacturer of this device could void the user’s authority
to operate the device.
Notice for Canada
This apparatus complies with the Class “B” limits for radio interference as specified in the Canadian Department of
Communications Radio Interference Regulations.
Cet appareil est conforme aux normes de CLASSE “B” d’interférence radio tel que spécifié par le Ministère Canadien
des Communications dans les règlements d’interférence radio.
Compliance
This product conforms to the following Council Directive:
Directive 89/336/EEC, 92/31/EEC (EMC), 73/23/EEC (LVD), as amended by directive 93/68/EEC.
Notice for Europe
Communication products for the European market comply with Directive R&TTE 1999/5/EC.
WARN ING: Handling the cord(s) on this product may expose you to lead, a chemical
known to the State of California to cause cancer and birth defects or other reproductive
harm. Wash hands after handling.
Page 3
LCD Monitor.book Page 1 Tuesday, June 22, 2004 11:15 AM
Congratulations!
We are confident that your new Creative Tru-VIEW LCD2200 LCD Display will bring you
many hours of fun and entertainment.
To learn how to take advantage of your LCD Display’s many features, we encourage you to
review this User’s Guide. If you have additional questions that are not answered in this User’s
Guide, you can contact your dealer, as he or she is your best source of local information. You
may also contact us directly. For our contact details, see “Creative Customer Support
Services” on page 19.
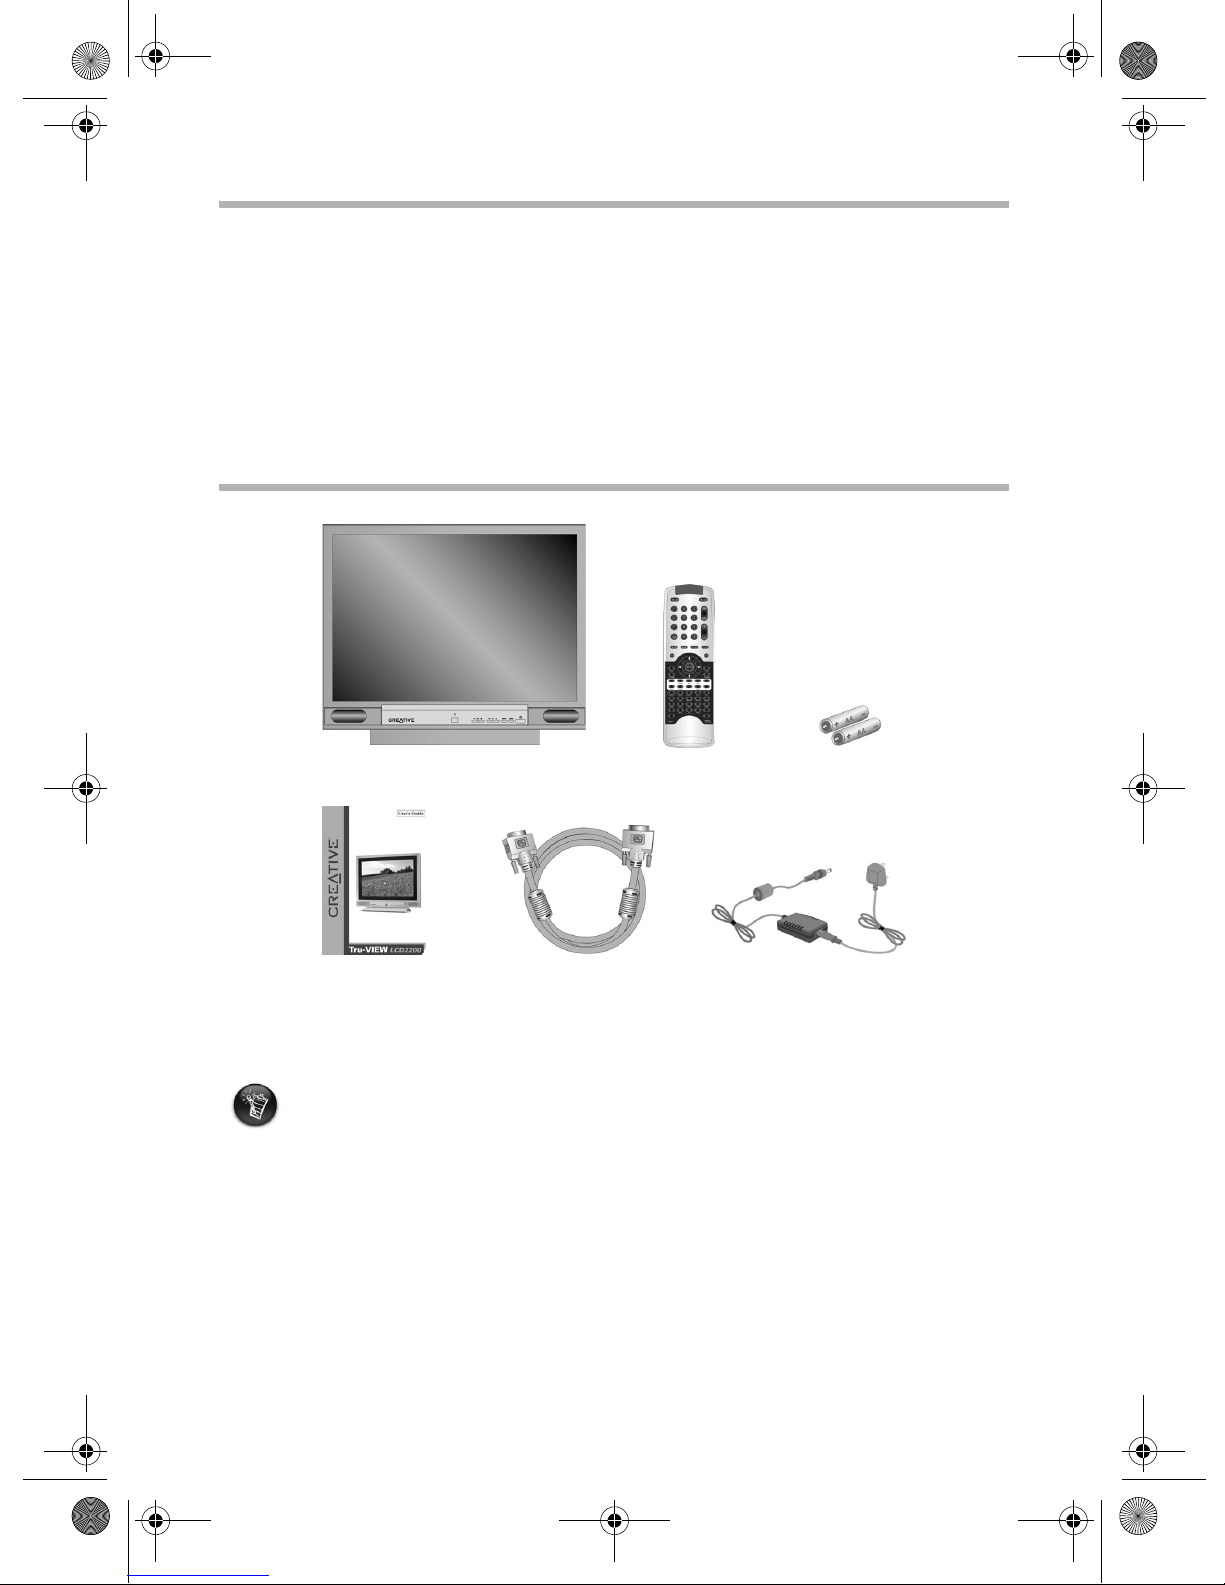
Package Contents
LCD Display
User’s Guide Power Adapter cableDVI cable
• The appearance of contents, like the Powe r A dapter cable, may vary depending on the region
of purchase.
• An optional TV Tuner module is available separately.
Remote control
AA batteries
1
Page 4
LCD Monitor.book Page 2 Tuesday, June 22, 2004 11:15 AM
Getting Started
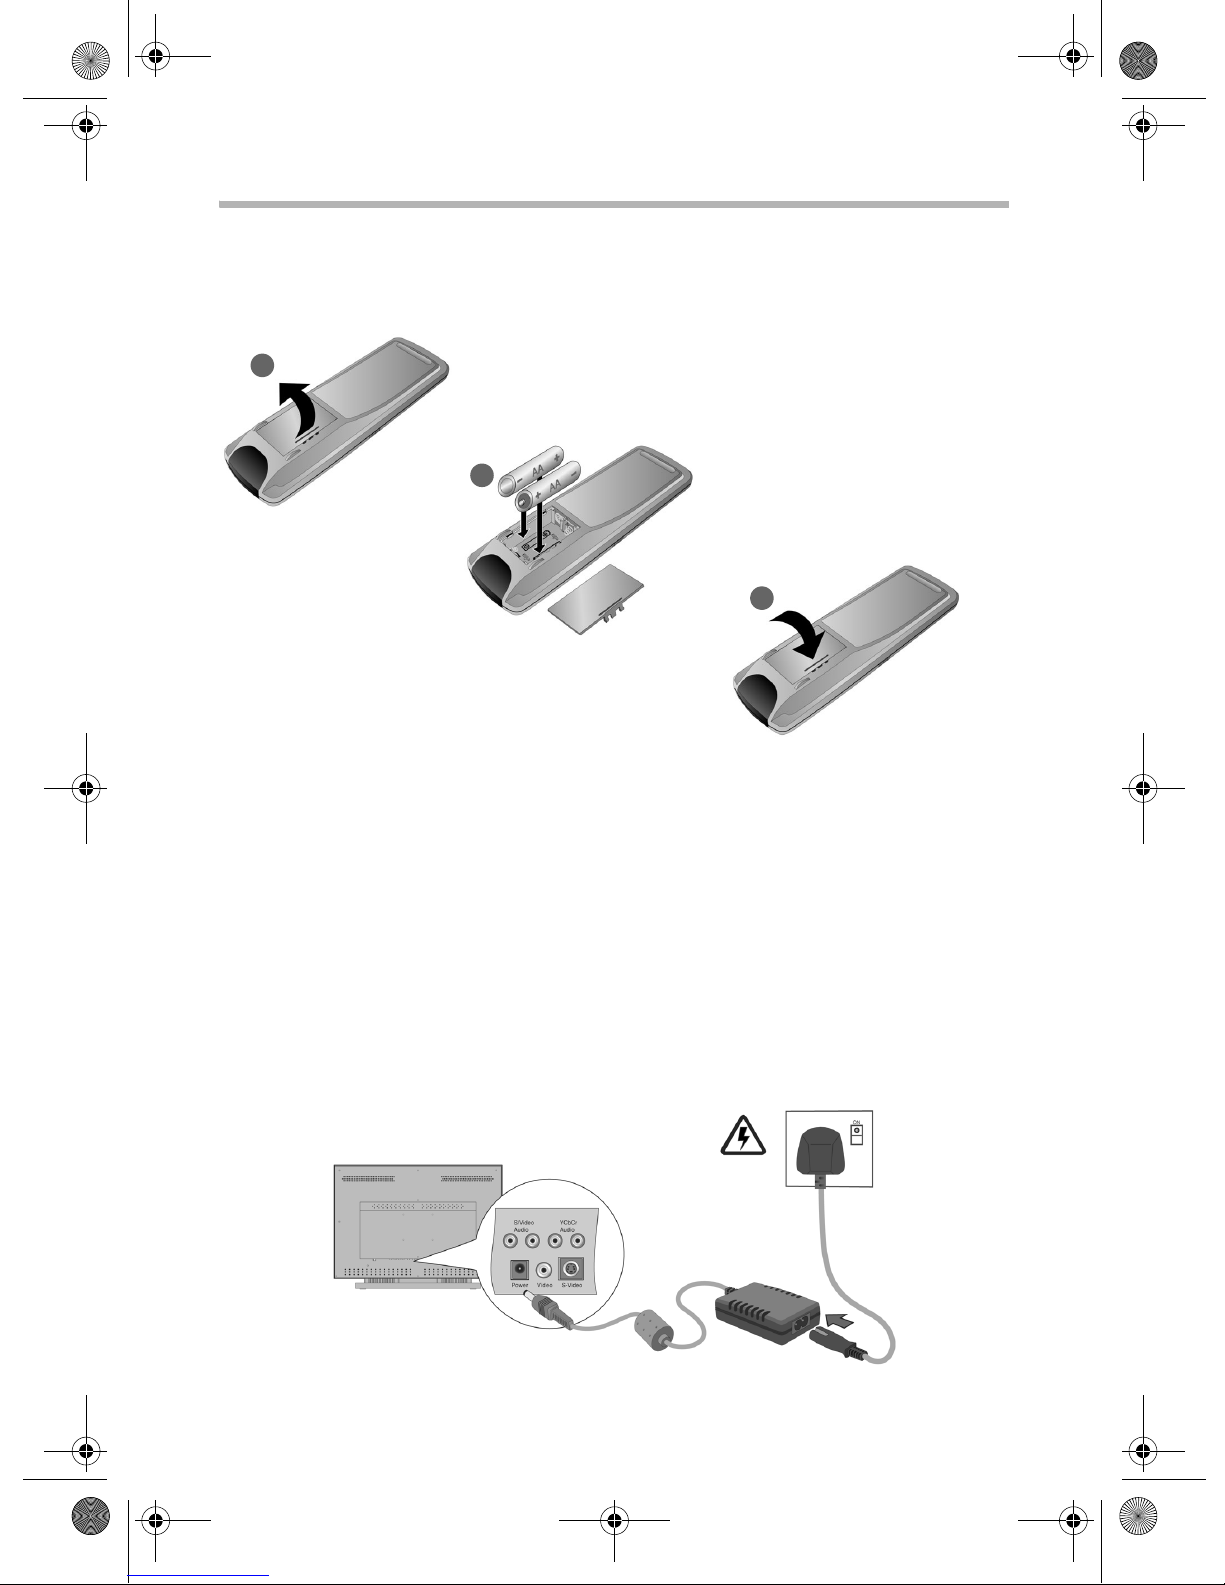
Insert Batteries
1
1
Insert the supplied AA batteries into the remote control.
A
B
C
Connect Devices
2
2
You can use your LCD Display as a computer monitor as well as a TV set. For information on
connecting devices, see “Computer Monitor Connections” on page 8, “Video Connections”
on page 9 and “Optional Audio Out Connections” on page 11.
Connect Power Adapter Cable
3
3
Connect one end of the supplied Power Adapter cable to the Power connector on the
rear panel of your LCD Display, and the other end to a power outlet.
2
Page 5

LCD Monitor.book Page 3 Tuesday, June 22, 2004 11:15 AM
Turn On LCD Display
4
4
1. Make sure the power outlet is turned on (if necessary).
The Power LED (see on page page 4) lights up when your LCD Display is connected
to a power outlet.
2. On your LCD Display or remote control, press the Power button.
The Power LED turns off when you turn on your LCD Display.
3. On your LCD Display or remote control, press the Volum e buttons to increase or
decrease the volume.
2
Select Input Source
5
5
On your LCD Display, repeatedly press the INPUT button to select the input source that
you want. For example, if you have connected your LCD Display to your computer using a
VGA connection, repeatedly press the INPUT button until the VGA input is selected.
Or
On the remote control, press one of the Input buttons. Alternatively, repeatedly press the
GS button or VS button to switch between graphic input sources (HDTV, VGA and DVI) or
video input sources (TV, Video, S-Video and YCbCr).
To configure your LCD Display’s settings, see “Using the On Screen Display (OSD) Menu” on
page 12.
3
Page 6
LCD Monitor.book Page 4 Tuesday, June 22, 2004 11:15 AM
Overview
LCD Display
1
2
3
5 6 74
10 12 13 14 15 16119 17
8
4
2223 20 19 1821
Page 7

LCD Monitor.book Page 5 Tuesday, June 22, 2004 11:15 AM
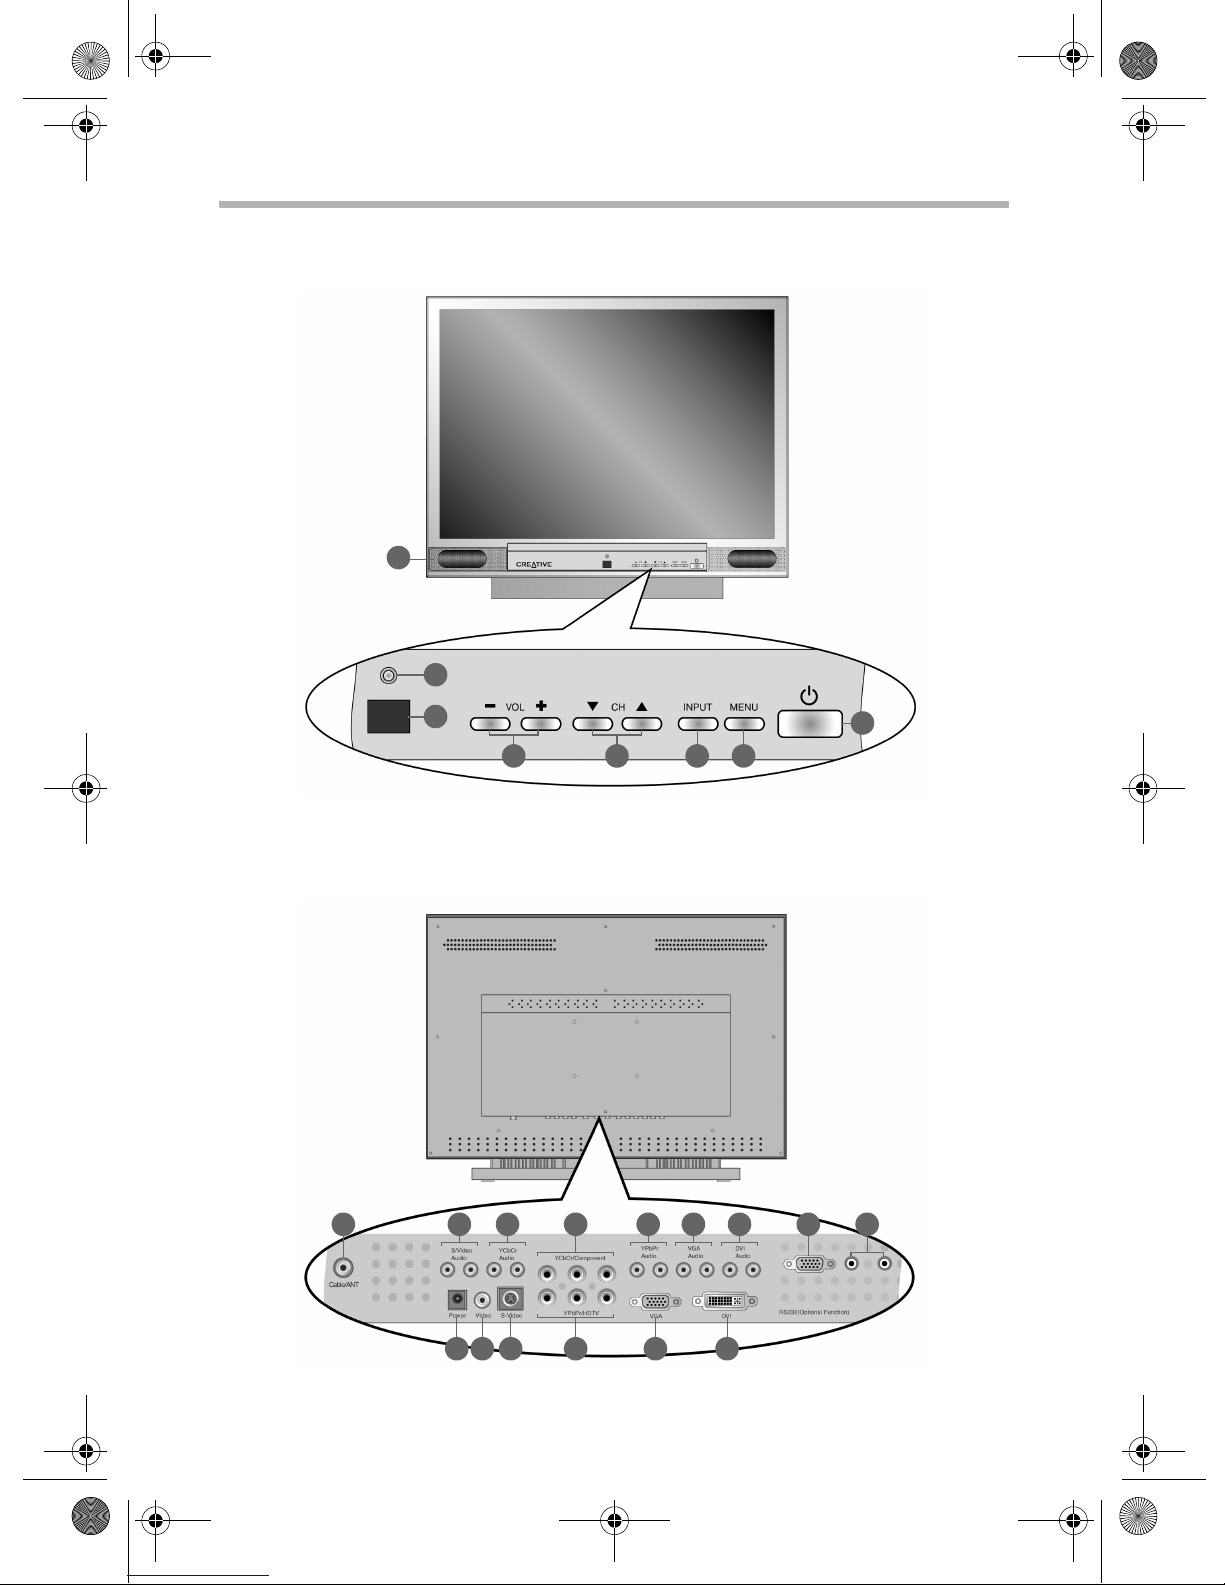
1. Built-in speakers
2. Power LED
Indicates the power status of your LCD
Display. The LED lights up after you connect
your LCD Display to a power outlet, and
turns off when you turn on your LCD
Display.
3. Infrared receiver
4. Volume buttons
Adjusts the volume.
When the On Screen Display (OSD) menu is
displayed, press these buttons to increase or
decrease adjustable values of menu options.
For more information, see “Using the On
Screen Display (OSD) Menu” on page 12.
5. Channel buttons
Select TV channels.
*
When the OSD menu is displayed, press
these buttons to scroll up and down the OSD
menu. For more information, see “Using the
On Screen Display (OSD) Menu” on page 12.
6. INPUT button
Selects an input source.
When the OSD menu is displayed, press this
button to select highlighted menu options.
For more information, see “Using the On
Screen Display (OSD) Menu” on page 12.
7. MENU button
Displays the OSD menu. Press this button
again to exit the menu.
8. Power button
Turns your LCD Display on and off.
9. Cable/ANT connector
If your LCD Display is installed with the TV
Tuner module (available separately), connect
this connector to a Cable TV module or a TV
antenna wall outlet.
10. S/Video Audio jacks
Connect these jacks to the Audio Out jacks
on your VCR or DVD player.
11. YCbCr Audio jacks
Connect these jacks to the Audio Out jacks
on your VCR or DVD player.
12. YCbCr/Component jacks
Connect these jacks to the YCbCr jacks on
your VCR or DVD player.
13. YPbPr Audio jacks
Connect these jacks to the Audio Out jacks
on your VCR or DVD player.
14. VGA Audio jacks
Connect these jacks to the Audio Out jacks
on your VCR or DVD player.
15. DVI Audio jacks
Connect these jacks to the Audio Out jacks
on your VCR or DVD player.
16. RS232 (Optional Function) port
Do not connect devices to this port. This
port should only to be used by qualified
service personnel when they are servicing
your LCD Display.
17. Audio Out jacks
Connect these jacks to the Audio In jacks of
speakers or an amplifier.
18. DVI port
Connect this port to the DVI port on your
computer.
19. VGA port
Connect this port to the VGA port on your
computer.
20. YPbPr/HDTV jacks
Connect these jacks to the YPbPr (HDTV)
jacks on your VCR or DVD player.
21. S-Video connector
Connect this connector to the S-Video Out
connector on your VCR or DVD player.
22. Video connector
Connect this connector to the Video Out
connector on your VCR or DVD player.
23. Power connector
Connect the supplied Power Adapter cable
to this connector.
* For TV inputs only.
5
Page 8

LCD Monitor.book Page 6 Tuesday, June 22, 2004 11:15 AM
Remote control
24
25
26
27
28
29
30
31
32
33
34
35
47
46
45
44
43
42
41
40
39
38
37
24. Mute button
Mutes the volume.
25. Number pad
Selects TV channels.
* For TV input only.
6
36
Make sure that you operate the remote control
within 7 meters (23 feet) of your LCD Display.
26. Jp (Jump) button
Switches to the previous TV channel.
*
27. SRS (Surround Sound) button
Enables or disables surround sound.
*
Page 9

LCD Monitor.book Page 7 Tuesday, June 22, 2004 11:15 AM
28. SAP (Separate Audio Program) button
Switches to the alternative sound track of a
TV program. For example, some TV
programs are broadcast in dual languages,
and this button lets you switch to the
alternative language.
*
29. M (Mode) button
Switches between the different
Picture-In-Picture (PIP) modes.
30. Navigation buttons
When the OSD menu is displayed, press
these buttons to scroll through and select
menu options. For more information, see
“Using the On Screen Display (OSD) Menu”
on page 12.
31. Menu button
Displays the OSD menu. Press this button
again to exit the menu.
32. G-Freeze button
Captures the current graphic input image on
the screen.
33. Input buttons
Switch between input sources.
34. F-OFF (Function Off) button
Exits the function settings.
35. Zoom + and Zoom - buttons
Magnify or shrink the main image on the
display.
36. Aspect Ratio buttons
Change the aspect ratio. You can also change
the aspect ratio with the R (Ratio) button
41
.
37. Function buttons
<PC> Selects the preset color setting for
computer monitor display.
<TV> Selects the preset color setting for TV
programmes.
<Movies> Selects the preset color setting
for movies.
<User1> and <User2> Select user defined
color settings. To change a user defined color
setting, press the <User1> or <User2>
button and adjust the color settings in the
OSD menu. For more information about the
OSD menu, see “Using the On Screen
Display (OSD) Menu” on page 12.
<GFS> Only displays the graphic input image
on the screen.
<VFS> Only displays the video input image
on the screen.
<GOV> Selects a Picture-In-Picture (PIP)
mode where the graphic input image appears
as an inset over the video input image.
<VOG> Selects a Picture-In-Picture (PIP)
mode where the video input image appears
as an inset over the graphic input image.
<PBP> Selects the Picture-By-Picture mode
where the images of graphic and video inputs
are displayed side by side on the screen.
38. Win + and Win - buttons
Magnify or shrink the Picture-In-Picture (PIP)
inset.
39. V-Freeze button
Captures the current video input image on
the screen.
40. Cable button
Switches between American free air cable
(NTSC) and Japanese cable systems.
41. R (Ratio) button
Changes the aspect ratio. You can also
change the aspect ratio with the Aspect
Ratio buttons .
36
42. VS (Video Source) button
Switches between video input sources (TV,
Video, S-Video and YCbCr).
43. GS (Graphic Source) button
Switches between graphic input sources
(HDTV, VGA and DVI).
44. X (Cancel) button
Cancels the keyed in TV channel.
*
45. + / - (Volume) buttons
Adjust the volume.
46. UP/DOWN (Channel) buttons
Selects TV channels.
*
47. Power button
Turns your LCD Display on and off.
*
* For TV input only.
7
Page 10

LCD Monitor.book Page 8 Tuesday, June 22, 2004 11:15 AM
Computer Monitor Connections
You can use a DVI or VGA connection to connect your computer to your LCD Display. Make
sure you turn off your computer and LCD Display before connecting them. Note that you
may need to install a graphics card and audio card on your computer for computer
connections.
DVI
Audio cable
(available separately)
VGA
To DVI Audio jacks
Rear panel of
LCD Display
To DVI port
To VGA Audio jacks
Rear panel of
LCD Display
To Audio
Out jack
To DVI port
DVI cable
Audio cable
(available separately)
To Audio
Out jack
8
To VG A portTo VG A port
VGA cable (available separately)
Page 11

LCD Monitor.book Page 9 Tuesday, June 22, 2004 11:15 AM
Video Connections
The diagrams below show you the different ways you can connect your VCR or DVD player
to your LCD Display. Make sure you turn off your VCR, DVD player and LCD Display before
connecting them.
Video
To S/Video Audio jacks
S-Video
Audio/Video cable
(available separately)
Rear panel of
LCD Display
To Video jack
VCR or DVD Player
To S/Video Audio jacks
(available separately)
Audio cable
Rear panel of
LCD Display
To S-Video jack
S-Video cable
(available separately)
VCR or DVD Player
9
Page 12

LCD Monitor.book Page 10 Tuesday, June 22, 2004 11:15 AM
YCbCr (Component)
To YCbCr Audio jacks
(available separately)
YPbPr (HDTV)
Audio cable
Rear panel of
LCD Display
VCR or DVD Player
To YCbCr/Component jacks
Component Video cable
(available separately)
10
To YPbPr Audio jacks
Rear panel of
LCD Display
To YPbPr/HDTV jacks
Component Video cable
(available separately)
Audio cable
(available separately)
VCR or DVD Player
Page 13

LCD Monitor.book Page 11 Tuesday, June 22, 2004 11:15 AM
Optional Audio Out Connections
Speakers or Amplifiers
Rear panel of
LCD Display
To Audio Out jacks
Audio cable
(available separately)
OR
Stereo
Speakers
You will continue to hear audio from the built-in speakers even after connecting speakers or an
amplifier to the Audio Out jack.
If you only want to hear audio from devices connected to the Audio Out jack, do the following:
1. In the OSD menu, select the General tab.
2. Scroll to Audio Output and select Line Out Only.
Audio cable
(available separately)
Amplifier
Rear panel of
LCD Display
To Audio Out jacks
For more information about the OSD menu, see “Using the On Screen Display (OSD) Menu” on
page 12.
11
Page 14

LCD Monitor.book Page 12 Tuesday, June 22, 2004 11:15 AM
Using the On Screen Display (OSD) Menu
Selecting OSD menu options
You can select OSD menu options using buttons on your LCD Display or on the remote
control.
Using the LCD Display’s front panel buttons
1. Press the MENU button to display the OSD menu.
2. Press the Channel buttons to scroll up and down the OSD menu.
3. Press the INPUT button to select a menu option.
4. Press the Volum e buttons to increase or decrease adjustable values of menu options.
5. To exit the OSD menu, press the MENU button.
Using the remote control
1. Press the Menu button to display the OSD menu.
2. Press the arrow Navigation buttons to scroll up and down the OSD menu. These
buttons also increase or decrease adjustable values in the OSD.
Press the Enter button to select a highlighted menu option.
3. To exit the OSD menu, press the Menu button.
Overview of OSD menu options
Video IMAGE and Graphic IMAGE
• Brightness: Adjusts the brightness.
• Intensity: Adjusts the overall color illumination.
• Contrast: Adjusts the contrast ratio of black and white.
• Saturation: Adds or removes color.
• Hue: Adjusts the appearance of color.
• Sharp: Highlights the edge between brighter and darker areas.
• ICC: Adjusts individual color components (red, green, blue and yellow).
SCREEN
• Video Screen: Adjusts the aspect ratio of video input.
• Graphic Screen: Adjusts the aspect ratio of graphic input.
Graphic ADJUST
• Phase: Adjusts the pixel sampling phase.
• Total Pixel: Adjusts the total number of pixels per line.
• Hor. Adjust: Adjusts the horizontal position.
• Ver. Adjust: Adjusts the vertical position.
• Auto Adjust: Automatically adjusts the Phase, Total Pixel, Hor. Adjust and Ver. Adjust
settings.
12
Page 15

LCD Monitor.book Page 13 Tuesday, June 22, 2004 11:15 AM
General
• Deinterlacer: Adjusts the image interlacing setting. Still and motion image displays require
different image interlacing settings to be displayed correctly. Select Adaptive for
automatic adjustments, select Spatial for motion image displays, or select Temporal PF
or Temporal NF for still image displays.
• Audio Input: Lets you choose between the audio from the main image or the inset. If you
have selected the Picture-By-Picture mode, note that the main image is on the right.
• Audio Output: Lets you choose between two audio output settings. Select Both for audio
output from the built-in speakers and the Audio Out jacks, or select Line Out Only for
audio output from the Audio Out jacks only.
• SRS Surround: Enables or disables surround sound.
• Tuner: Adjusts the tuner parameters according to the your broadcast system. Note that
the optional TV Tuner module is available separately.
• PBP Mode: Selects the Picture-By-Picture (PBP) mode, where the graphic and video inputs
are displayed side by side on the screen.
• Default Reset: Restores all default factory settings.
13
Page 16

LCD Monitor.book Page 14 Tuesday, June 22, 2004 11:15 AM
Frequently Asked Questions
The LCD Display does not turn on.
Check the following:
• The Power Adapter cable is properly connected to your LCD Display and a power
outlet.
• The power outlet is turned on, if necessary.
There are flashing dots or stripes on the screen.
Make sure that there are no interfering sources such as high-voltage wires or neon lights near
your LCD Display.
The remote control is not working properly.
Do one or more of the following:
• Make sure that you operate the remote control within 7 meters (23 feet) of your LCD
Display.
• Make sure that the remote control is facing the infrared receiver on your LCD Display, and
the remote control’s line of sight to the infrared receiver is not obstructed.
• Change the batteries in the remote control.
The image on the screen has poor color and quality.
Make sure that the image configuration settings, such as the brightness, contrast or color,
have been adjusted correctly. For instructions on how to adjust the image configuration
settings, see “Using the On Screen Display (OSD) Menu” on page 12.
The image on the screen is in the wrong position and size.
Make sure that the image position and size have been adjusted correctly by doing one or
more of the following:
•Press the Zoom + and Zoom - buttons on the remote control.
•Press the R button or Aspect Ratio buttons on the remote control.
•Press the Menu button to display the OSD menu, and adjust the Graphic ADJUST
settings. For more information about the OSD menu, see “Using the On Screen Display
(OSD) Menu” on page 12.
The image on the screen is the wrong color.
Do one or more of the following:
• Check that the VGA or DVI cable is properly connected to your LCD Display and
computer.
• Turn your LCD Display off and then on again.
•Press the Menu button to display the OSD menu, and adjust the Video IMAGE or
Graphic IMAGE settings. For more information about the OSD menu, see “Using the On
Screen Display (OSD) Menu” on page 12.
There is no sound from the LCD Display.
Do one or more of the following:
•Press the Mute button on the remote control to make sure that your LCD Display’s
volume is not in muted.
• Check that all audio cables are properly connected.
14
Page 17

LCD Monitor.book Page 15 Tuesday, June 22, 2004 11:15 AM
General Specifications
Panel type
22-inch TFT LCD (16:10)
Maximum resolution
1600 x 1024 pixels (Wide SXGA)
Contrast ratio
300:1
Brightness
250 cd/m²
Viewing angle
160° (Horizontal) / 160° (Vertical)
Pixel pitch
0.294 x 0.294 mm
Response time
Rising: 25 ms; Falling: 35 ms
PC Interface
DB-15 VGA, DVI
Composite
Composite (A/V) Input x 1
S-Video
S-Video Input x 1
Antenna Input
No
Component
YCbCr / YPbPr
Audio/In
RCA x 5
Audio/Out
RCA x 1
Speakers
4W x 2 Integrated Stereo
TV-Tuner
Optional
HDTV
Ye s
Cable/Satellite TV
Ye s
Special Features
Picture-In-Picture (PIP); Picture-By-Picture (PBP)
15
Page 18

LCD Monitor.book Page 16 Tuesday, June 22, 2004 11:15 AM
Important Safety Instructions
Read Instructions
Read all safety and operating instructions before operating the product. Keep all safety and operating instructions for
future reference. Take note of all warnings on the product and in the operating instructions. Follow all operating and
usage instructions.
Cleaning
Unplug this product from the power source before cleaning. Do not use liquid or aerosol cleaners. Use a damp cloth for
cleaning.
Attachments
Do not use attachments or accessories not recommended by Creative as they may cause hazards.
Water and Moisture
Do not use this product near any water source or water hazard.
Placement
Place the product on a stable surface. Otherwise, the product may fall and get damaged, and cause injury to a person.
Ventilation
To ensure reliable operation and to prevent overheating, do not block or cover ventilation openings and slots with
fabrics or impermeable material. Do not place the product in a built-in casing such as a bookcase or rack unless there is
proper ventilation or Creative’s instructions have been adhered to.
Heat
Do not place this product near heat sources such as radiators, stoves, and other products (including amplifiers) that
produce heat.
Power Sources
This product is specifically designed for operation within the electrical range(s) specified on the product and use outside
of this range shall be at your own risk. Please contact your local electric utility company if you have any questions about
the electrical voltage at your intended location of use.
Power-cord Protection
Arrange the power-cords to minimize the risk of damage from traffic or other hazards. Pay particular attention to the
area near the plug head, the power source outlet and the connection from the product.
Lightning
Unplug the product from the power source during lightning storms or if the product is unused for long periods of time.
This will prevent lightning and power-line surge damage to the product.
Overloading
Do not overload wall outlets, extension cords, or integral power circuits as this can result in a risk of fire or electric
shock.
Object and Liquid Entry
Never push any object through the product’s openings, as this can result in a fire, electric shock or damage. Do not spill
liquids on the product.
Servicing
Do not attempt to service the product yourself. Refer all servicing to qualified service personnel.
Damage Requiring Service
Unplug the product from the power source. Call for servicing when:
• the power-supply cord or plug is damaged
• objects have fallen through or liquids have been spilled into the product’s openings
• the product has been exposed to rain or water
• the product does not operate normally when following the operating instructions
• the product behaves differently
• the product has been dropped or damaged in any way
Replacement Parts
When replacing parts, check that the service technician has used replacement parts specified by Creative or have the
same characteristics as the original parts. Unauthorized substitutions may result in fire, electric shock, or other hazards.
Safety Check
After servicing or repairing the product, get the service technician to perform safety checks to be sure that the product
is working properly.
16
Page 19

LCD Monitor.book Page 17 Tuesday, June 22, 2004 11:15 AM
Creative Limited Warranty
Creative Technology Ltd. ("Creative") warrants that the retail hardware product herein ("Product") is free of material
defects in materials and workmanship that result in Product failure during normal usage, according to the following
terms and conditions:
1. The limited warranty extends only to the original end-user purchaser and holder of this warranty ("You" or "Your")
and is not transferable or assignable to any subsequent purchaser.
2. You must provide proof of purchase of the Product by a dated itemized receipt to be eligible for this limited
warranty.
3. The limited warranty is ONLY applicable in the country or territory where the product was purchased from an
authorized Creative retailer and excludes any product that has not been purchased as new or is obtained as a result
of the purchase of a non-Creative product.
4. During the Warranty Period (as provided below), Creative will repair, or replace, at Creative's sole option, any
defective parts or any parts that will not properly operate for their intended purpose with new or refurbished parts
if such repair or replacement is needed.
a. The limited warranty for the Product extends for ONE (1) year from the date of your purchase ("Warranty
Period"). The warranty period will be extended by each whole day that the Product is out of Your possession for
repair under this warranty.
b.Creative will pay for the labor charges incurred by Creative in repairing or replacing the defective parts during
the Warranty Period from the date of your purchase.
c. You will not have to pay for any such replacement parts.
d.Creative also warrants that the repaired or replaced parts will be free from defects in material and workmanship
for a period of NINETY (90) days from the date of repair or replacement, or for the remainder of the Warranty
Period, whichever is greater.
5. Creative does not warrant uninterrupted or error-free operation of the Product. Creative is not under any
obligation to support the Product for all operating environments, including but not limited to, interoperability with
all current and/or future versions of software or hardware.
6. For Products that are capable of storing data: Creative is not responsible or liable for any data stored on the
Product that is lost, deleted, or is otherwise inaccessible. All data will be deleted from the Product during repairs.
You should remove or make a backup copy of any data stored on the Product prior to shipping the Product to
Creative.
7. If a problem develops during the Warranty Period, please refer to the Product Returns section of the Creative
Customer Support Services documentation accompanying the Product. This document will provide you with
contact information for a local Creative office and step-by-step procedures for returning the Product for warranty
service.
a. You must provide proof of purchase of the Product by a dated itemized receipt.
b.You will bear the cost of shipping the Product to Creative. Creative will bear the cost of shipping the Product
back to You after completing the warranty service.
c. You must be issued a Return Merchandise Authorization (RMA) number. Write the RMA number on the outside
of the package. Creative will not accept a return that does not have a RMA number on the outer packaging.
d.Only return the defective item(s). Creative is not responsible for other products or accessories returned with
the defective item.
8. The limited warranty does not apply to:
a. Damage caused by normal wear and tear, abnormal use or conditions, misuse, neglect, abuse, accident, improper
handling or storage, exposure to moisture, unauthorized modifications, alterations, or repairs, improper
installation, improper use of any electrical source, undue physical or electrical stress, operator error,
non-compliance with instructions or other acts which are not the fault of Creative, including damage or loss
during shipment.
b.Damage from external causes such as floods, storms, fires, sand, dirt, earthquakes, an Act of God, exposure to
sunlight, weather, moisture, heat, or corrosive environments, electrical surges, battery leakage, theft, or damage
caused by the connection to other products not recommended for interconnection by Creative.
c. Damage or loss of data due to (i) interoperability with current and/or future versions of operating systems or
other current and/or future software and hardware, (ii) a computer virus, worm, Trojan horse or memory
content corruption, or (iii) malfunction or defect of the Product.
d.Counterfeit products or any accompanying products not bearing a Creative serial number provided with the
Product, or in the case of communications products, the use of the Product outside the borders of the country
intended for use (as indicated by local telecommunication approval stickers).
e.Any Product that has had its serial number altered, defaced or removed.
f. Any defect occurring after the expiration of the Warranty Period or where Creative was not advised in writing of
an alleged defect or malfunction within seven (7) days after the expiration of the Warranty Period.
9. Creative's limit of liability under the limited warranty is the actual cash value of the Product at the time You return
the Product for repair (e.g., the purchase price of the Product less a reasonable amount for usage). Creative will
not be liable for any other losses or damages. These remedies are Your exclusive remedies for breach of warranty.
Any action or lawsuit for breach of warranty must be commenced within eighteen (18) months following the
purchase of the Product.
17
Page 20

LCD Monitor.book Page 18 Tuesday, June 22, 2004 11:15 AM
10. THE FOREGOING LIMITED WARRANTY IS YOUR SOLE AND EXCLUSIVE REMEMDY AND IS IN LIEU OF ALL
OTHER WARRANTIES, EXPRESS OR IMPLIED. TO THE EXTENT PERMITTED BY APPLICABLE LAW, CREATIVE
HEREBY DISCLAIMS THE APPLICABILITY OF ANY IMPLIED WARRANTY OF MERCHANTABILITY, FITNESS
FOR A PARTICULAR PURPOSE OR USE FOR THE PRODUCT. IF SUCH A DISCLAIMER IS PROHIBITED BY
APPLICABLE LAW, THE IMPLIED WARRANTY IS LIMITED TO THE DURATION OF THE FOREGOING
LIMITED WRITTEN WARRANTY.
11. CREATIVE WILL NOT BE LIABLE FOR ANY INDIRECT, INCIDENTAL, SPECIAL, PUNITIVE OR
CONSEQUENTIAL DAMAGES, OR DAMAGES, INCLUDING BUT NOT LIMITED TO ANY LOST PROFITS.
SAVINGS, DATA, OR LOSS OF USE, ANY THIRD PARTY CLAIMS, AND ANY INJURY TO PROPERTY OR
BODILY INJURY (INCLUDING DEATH) TO ANY PERSON, ARISING FROM OR RELATING TO THE USE OF
THIS PRODUCT OR ARISING FROM BREACH OF THE WARRANTY, BREACH OF CONTRACT,
NEGLIGENCE, TORT, OR STRICT LIABILITY, EVEN IF CREATIVE HAS BEEN ADVISED OF THE POSSIBILITY OF
SUCH DAMAGES.
12. This warranty gives You specific legal rights. You may also have other rights, which vary from state to state and
country to country. Some states and countries do not allow limitations on how long an implied warranty lasts, or
the exclusion or limitation of incidental or consequential damages, so the above limitations or exclusions may not
apply to You.
13. This is the entire warranty between You and Creative and supercedes all prior and contemporaneous agreements
or understandings, oral or written, relating to the Product, and no representation, promise or condition not
contained herein will modify these terms.
Version 2.0 June 2004
18
Page 21

LCD Monitor.book Page 19 Tuesday, June 22, 2004 11:15 AM
Creative Customer Support Services
At Creative, in addition to giving you the best products, we are
committed to providing you with a comprehensive range of support
services. These support services are designed to assist you with the
setup and use of your Creative product. In order to provide you with an
accurate and timely response, please have the following information
available beforehand:
• Name, model and serial number of your Creative product
• Computer make, model and operating system, for example, Microsoft
• Details of your question, such as any message boxes that appear
• Place and date of purchase
To access our support services, go to www.creative.com/support.
Support Services
Knowledge Base
www.creative.com/support/
Creative's Knowledge Base empowers you to quickly find solutions to your questions. Using
natural language support and stepping you through targeted questions, the Knowledge Base
will help you pinpoint the best solution to your particular question. The Knowledge Base also
provides access to Frequently Asked Questions (FAQs) and Technical Specifications on
Creative products.
®
Windows® XP
Email
Should a solution be unavailable on the Creative Knowledge Base, you can contact our
support staff through email by completing our web-based form (see the Customer Support
Services Centers section for information on regional email addresses).
Product Documentation
In addition, the Creative web site contains an extensive library of product installation and user
guides for your Creative product.
Te l e p h o n e
Where web access is unavailable, you may contact our service support team via telephone.
Telephone numbers can be found in the Customer Support Services Centers section.
Product Registration and Returns
Registering your Product
In order to provide you with better support services, we ask that you register your product.
You can do this when installing your product or, alternatively, you can go to
www.creative.com/register and register online. Please note that your warranty rights are
not dependent on product registration.
There are a host of benefits to registering your product, such as:
• Email notifications of attractive promotions and events.
• News and tips on upcoming products.
19
Page 22

LCD Monitor.book Page 20 Tuesday, June 22, 2004 11:15 AM
All information you provide us will not be shared with others unless we have your permission
to do so. You always have the choice to receive or not to receive future mails. Your
information is safeguarded under the terms of our Privacy Policy. For more information about
our Privacy Policy, visit www.creative.com/legal/privacy.asp.
Returning your Product for Warranty Service
You must provide proof of purchase (an itemized dated receipt) to be eligible for warranty
service. You should retain your proof of purchase for the duration of the Warranty Period.
Warranty service is only applicable if the product was purchased by you from an authorized
Creative retailer, and will not be provided for any product that has not been purchased as new
or was obtained as a result of the purchase of a non-Creative product. You should also retain
all product contents and packaging in case you need to return your product for warranty or
factory service.
A copy of the warranty is available on the product installation CD, or together with your
product. You can also visit www.creative.com and select your region, then Support, then
Warra nty.
If a problem develops during the Warranty Period, follow the step-by-step procedures below
for returning your product for warranty service:
1. Contact your local Creative Customer Support Services Center.
2. Have your proof of purchase available to validate your Warranty.
3. After the product has been determined to require warranty service, you will be issued a
Return Merchandise Authorization (RMA) number. All products returned to Creative for
warranty service must have a RMA number.
4. Write the RMA number on the outside of the package. Creative will not accept a return
that does not have an RMA number on the outer packaging.
5. Return only the defective item(s). Creative is not responsible for other products or
accessories returned with the defective item.
6. If applicable, you should remove or make a backup copy of any data stored on the product
prior to shipping the product to Creative. All data will be deleted from the product during
repairs. Creative is not responsible or liable for any data stored on the product that is
lost, deleted, or is otherwise inaccessible.
Shipping Charges and Tariffs
Shipment to Creative is at your expense and at your own risk (including any loss or damage to
the product during shipment). We recommend using proper packing materials (including using
the original product package), shipping the package through a carrier that provides proof of
delivery and insuring the shipment at full product value.
To avoid any applicable tariffs when shipping a product to Creative from outside the United
States, the European Union, or from zones with special tax status, you must complete the
relevant customs documentation before shipping the product. If the relevant customs
documentation has not been completed, in order to ensure return delivery to you, Creative
will include charges for any applicable tariffs applied to the shipment (whether to or from
Creative).
20
Page 23

LCD Monitor.book Page 21 Tuesday, June 22, 2004 11:15 AM
Customer Support Services Centers
SINGAPORE
• Address
Creative Technology Ltd
Customer Support Services,
31 International Business Park,
Creative Resource,
Singapore 609921,
Republic of Singapore
• Web
www.singapore.creative.com
• Email
www.singapore.creative.com/support/contact/
• Fax
(65) 6895 4550
• Operating Hours
11:00 a.m - 7:00 p.m, Monday - Sunday
(Closed on Public Holidays)
• Te l e p h o n e
(65) 6895 4100
21
 Loading...