

Page 1
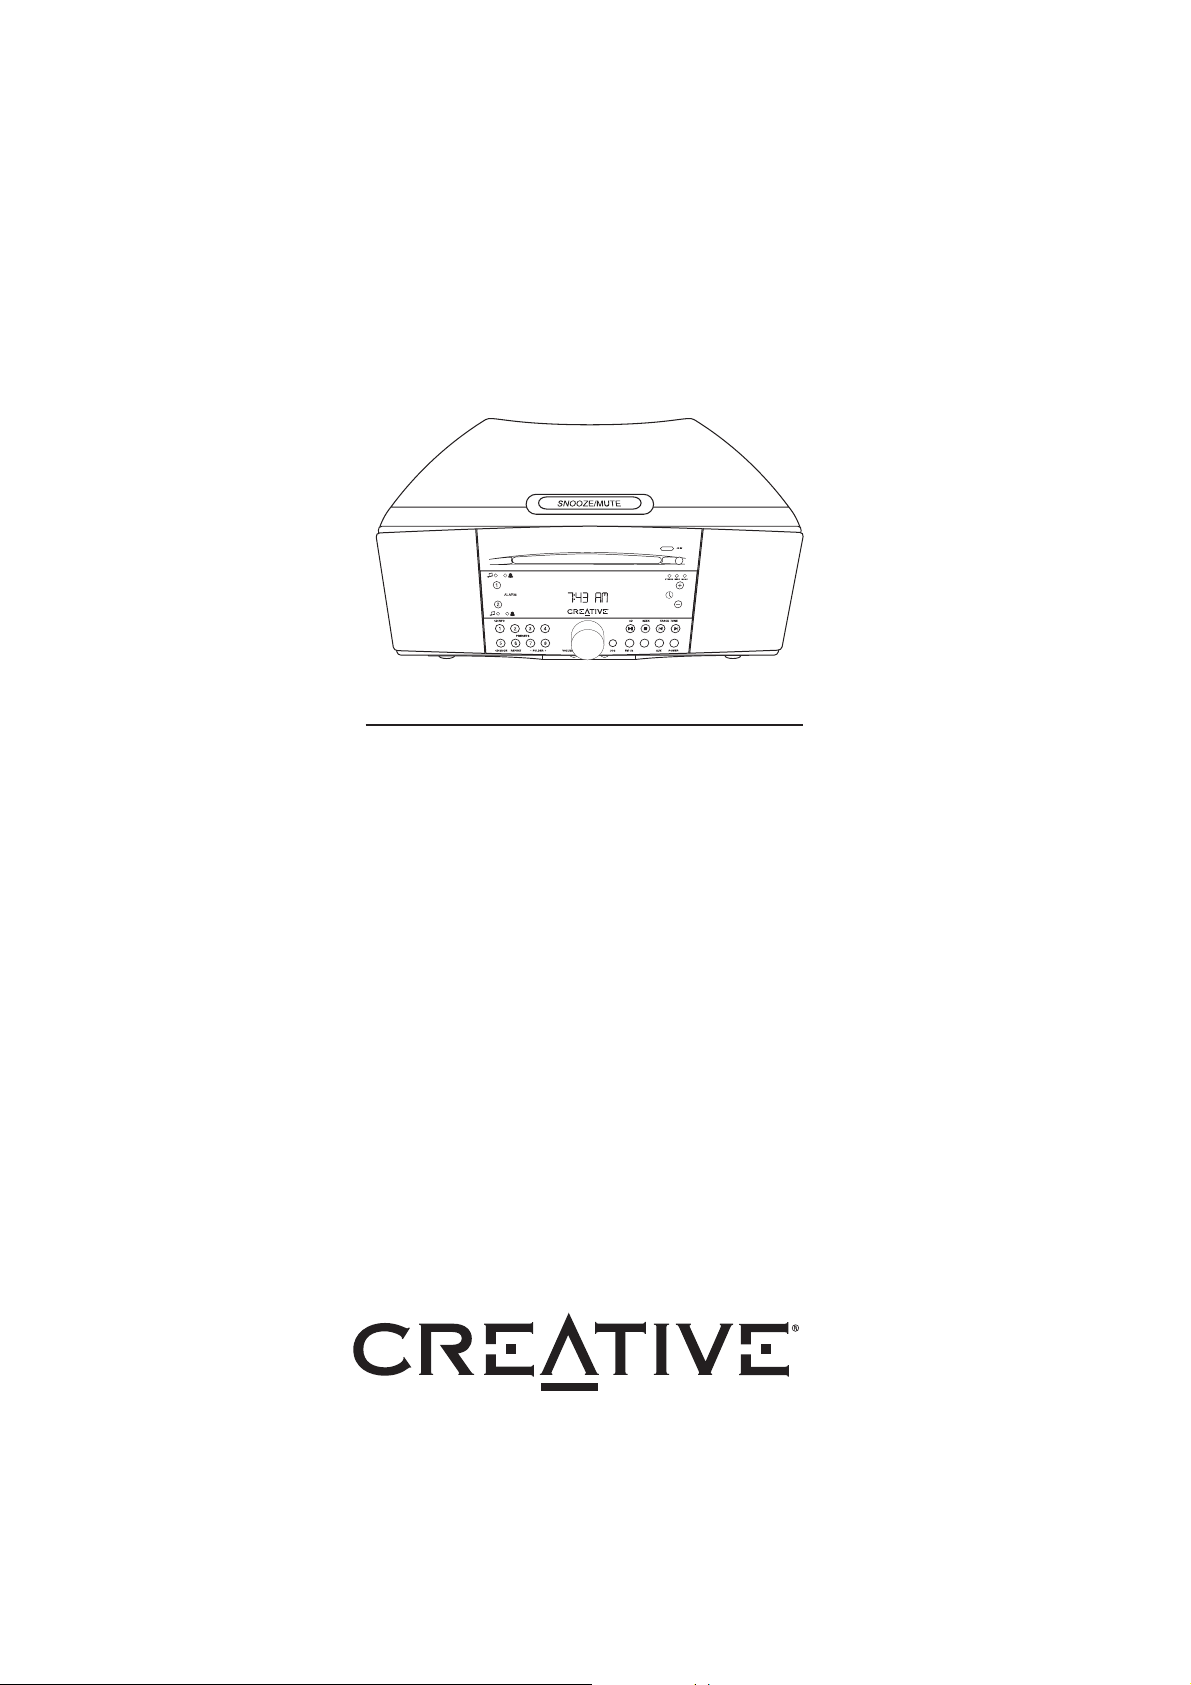
SoundWorks Radio CD 740
User Manual
MW
Page 2

Page 3

1
English ......................................................................................................................................................................................................2
Français ............................................................................................................................................................................................ 27
Deutsch.............................................................................................................................................................................................. 53
Italiano.................................................................................................................................................................................................. 79
Español .......................................................................................................................................................................................... 105
Nederlands ................................................................................................................................................................................ 131
Page 4

2
The lightning flash with arrowhead,
within an equilateral triangle, is intended
to alert the user to the presence of
uninsulated “dangerous voltage” within
the product’s enclosure that may be of
sufficient magnitude to constitute risk
of electric shock to persons.
The exclamation point within an equilateral triangle is intended to alert the user
to the presence of important operating
and maintenance (servicing) instructions
in the literature accompanying this
product
WARNING
DO NOT OPEN
TO PREVENT THE RISK OF ELECTRIC
SHOCK, DO NOT REMOVE
SPEAKER’S COVER. NO USER-
SERVICEABLE PARTS INSIDE.
REFER SERVICING TO QUALIFIED
SERVICE PERSONNEL.
AVERTISSEMENT
POUR EVITER TOUT RISQUE DE CHOC
ELECTRIQUE, NE PAS DEMONTER LE
COUVERCLE DU HAUT PARLEUR. AUCUN
ENTRETIEN DES PIECES INTERIEURES
N’EST REQUIS.TOUT SERVICE D’ENTRETIEN NE DOIT ETRE EFFECTUE QUE PAR
DU PERSONNEL D’ENTRETIEN QUALIFIE.
READ AND HEED IMPORTANT SAFTEY
WARNINGS ON THE ENCLOSURE
CAUTION:
TO PREVENT ELECTRIC SHOCK, MATCH WIDE
BLADE OF PLUG TO WIDE SLOT, INSERT FULLY.
ATTENTION:
POUR EVITER LES CHOCS ELECTRIQUES, INTRODUIRE LA LAME LA PLUS LARGE DE LA FICHE
DANS LA BORNE CORRESPONDANTE DE LA PRISE
ET POUSSER JUSQU’AU FOND.
IMPORTANT NOTICE:
THE SERIAL NUMBER FOR THE SPEAKER IS
LOCATED ON THE SPEAKER’S CONTROL PANEL.
PLEASE WRITE THIS NUMBER DOWN AND KEEP IT
IN A SECURE AREA. THIS IS FOR YOUR SECURITY.
Page 5

3
ADDENDA:
The following entries supplement or correct information in the User Manual, or describe features added after the
User Manual was completed.
DISC PLAY FEATURES
During Audio CD Play
Press STOP Disc Position
1 time ....................... Resume from Same Location
2 times ............................ Start at beginning of Disc
During CD-ROM Play
Press STOP Disc Position
1 time ....................... Resume from Same Location
2 times ......................... Start at beginning of Folder
3 times ............................ Start at beginning of Disc
CD Play and the POWER button: Pressing the POWER button during disc play causes the Radio CD to enter
STANDBY track resume mode. Pressing the POWER button again resumes play at exactly the same location on the
disc (audio CD or CD-ROM).
Preset 5 "FOLDER" feature: The SoundWorks Radio CD 740 recognises folders at the Top Level of a
CD-ROM. Pressing Preset 5 "FOLDER" during CDROM play will show the first 16 letters of the name of the folder
containing the active MP3 track. TOP LEVEL is displayed if the file is not inside a folder.
CD-ROM PREPARATION
Maximum number of individual MP3 files supported on a CD-ROM
295 files.
If the total number of MP3 files on the CD-ROM exceeds 295, the folder name display, folder play sequence and
MP3 file play sequence will be unpredictable.
Maximum folders supported on a CD-ROM:
29 folders.
Sequence of MP3 file play on a CD-ROM
The SoundWorks Radio CD 740 recognises the first 8 characters of an MP3 filename to determine play sequence.
Be sure to number your MP3 filenames from the beginning of the filename. Most CD-ROM burning programs support automatic numbering at the start of filenames when burning CD-ROMs.
Multi-session CD-ROM:
The SoundWorks Radio CD 740 will recognise just the first session of a CD-ROM. Burn complete CD-ROMs for use
with the SoundWorks Radio CD 740.
RADIO PRESET FEATURES
When an FM frequency is stored on a PRESET, the current Stereo/Wide/Mono and RDS Text setting is also stored.
When the PRESET is tapped, the stored settings will override the JOG menu setting. Storing a weak FM stereo
station in MONO will insure cleaner reproduction under varying reception conditions. You can also elect to store FM
stations with RDS text you do not wish to see in STATIC or NO TEXT mode.
Page 6

4
ALARM ADJUSTMENT FEATURES
To wake to a specific audio CD track: Insert an audio CD into the radio and press Alarm 1 or
Alarm 2 for two seconds to enter an Alarm Adjustment session. During the Alarm Adjustment
session, first press the CD Play/Pause button to select Wake to CD. Then use the Track/Tune
buttons on the Radio CD faceplate to select which track you would like to play. During alarm
activation, the radio will start CD play from your selected track and continue playing the CD tracks
in sequence.
To wake to a specific MP3 file on a CD-ROM: The SoundWorks Radio CD 740 also lets you
select an MP3 file (or track) on a CD-ROM for wakeup using the Track/Tune button. During an
Alarm Activation session, a specific MP3 file for wakeup is selected from the faceplate Track/Tune
buttons. A simplified scheme for track selection on CD-ROM is supported. All MP3 files on a disc
are represented by a number that corresponds to the play sequence of the disc’s MP3 files in Play
All mode. Tracks at the top level of the disc are numbered first followed by the tracks in the first
folder, then the second folder and so on.
Page 7

5
IMPORTANT SAFETY INSTRUCTIONS
Read Instructions
Read all safety and operating instructions before operating the product.
Retain Instructions
Keep all safety and operating instructions for future reference.
Heed Warnings
Take note of all warnings on the product and in the operating instructions.
Follow Instructions
Follow all operating and usage instructions.
Cleaning
Unplug this product from the power source before cleaning. Do not use liquid or aerosol cleaners. Use a damp
cloth for cleaning.
Attachments
Do not use attachments or accessories not recommended by Creative as they may cause hazards.
Water and Moisture
Do not use this product near any water source or water hazard.
Placement
Place the product on a stable surface or recommended stand, or sold with the product. Otherwise, the product
may fall and cause injury to a person, and damage to the product. Follow the manufacturer’s instructions for
mounting the product.
Ventilation
To ensure reliable operation and to prevent overheating, do not block or cover ventilation openings and slots
with fabrics or impermeable material. Do not place in a built-in installation such as a bookcase or rack unless
there is proper ventilation or Creative’s instructions have been adhered to.
Heat
Do not place this product anywhere near heat sources such as radiators, stoves, and other products (including
amplifiers) that produce heat.
Power Sources
This speaker system is specifically designed for operation within the electrical range(s) specified on the
provided power adapter and use outside of this range shall be at your own risk. Please contact your local
electric utility company if you have any questions about the electrical voltage at your intended location of use.
Page 8

6
IMPORTANT SAFETY INSTRUCTIONS
Polarisation
The product may be equipped with a polarised alternating-current line plug, a safety feature. As one blade is
wider than the other, this plug can only fit into the power outlet in one way. If you cannot insert the plug fully into
the outlet, reverse the plug. If the plug still fails to fit, contact your electrician to replace your obsolete outlet. Do
not force the plug into the outlet.
Power-cord Protection
Arrange the power-cords to minimise the risk of damage from traffic or other hazards. Pay particular attention to
the area near the plug head, the power source outlet and the connection from the product.
Lightning
Unplug the product from the power source during lightning storms or if unused for long periods of time. This will
prevent lightning and power-line surge damage to the product.
Overloading
Do not overload wall outlets, extension cords, or integral power circuits as this can result in a risk of fire or
electric shock.
Object and Liquid Entry
Never push any object through the product’s openings, as this can result in a fire, electric shock or damage. Do
not spill liquids on the product.
Servicing
Do not attempt to service the product yourself. Refer all servicing to qualified service personnel.
Damage Requiring Service
Unplug the product from the power source. Call for servicing when:
a) the power-supply cord or plug is damaged.
b) objects have fallen through or liquids have been spilled into the product’s openings.
c) the product has been exposed to rain or water.
d) the product does not operate normally when following the operating instructions
e) the product behaves differently.
f) the product has been dropped or damaged in any way.
Replacement Parts
When replacing parts, check that the service technician has used replacement parts specified by Creative or
have the same characteristics as the original parts. Unauthorised substitutions may result in fire, electric shock,
or other hazards.
Safety Check
After servicing or repairing the product, get the service technician to perform safety checks to be sure that the
product is working properly.
Page 9

7
INTRODUCTION
The people at Cambridge SoundWorks hope you enjoy
your new high-performance SoundWorks Radio CD
740. Your new radio has great FM stereo sound and
plays useful MW band stations. It stores 16 FM station
presets along with 8 MW station presets. An integral,
slot-load disc player plays audio CDs and MP3 files on
CD-ROM. The large 32-character display and fullfunction remote makes radio operation easy from
across the room.
The SoundWorks Radio CD 740 displays three types of
supplementary text:
• Radio Data Service (RDS) FM station text
• CD-text
• “ID3” text stored in most MP3 files.
An automatic dimmer function reduces display
brightness in dark rooms while maintaining good
legibility in bright light. An internal long-life power cell
maintains the current time accurately for many years.
By inserting a 9V battery (not supplied), a user
ensures that an activated wakeup function will work
even during a power outage.
Front and rear inputs allow easy connection of audio
program sources (like portable MP3 and cassette
players). A Record Output lets you send the current
audio program signal to other devices.
A convenient JOG button lets you select from a variety
of secondary adjustments (Bass and Treble, Snooze
time and Text display modes, among others).
Page 10
8
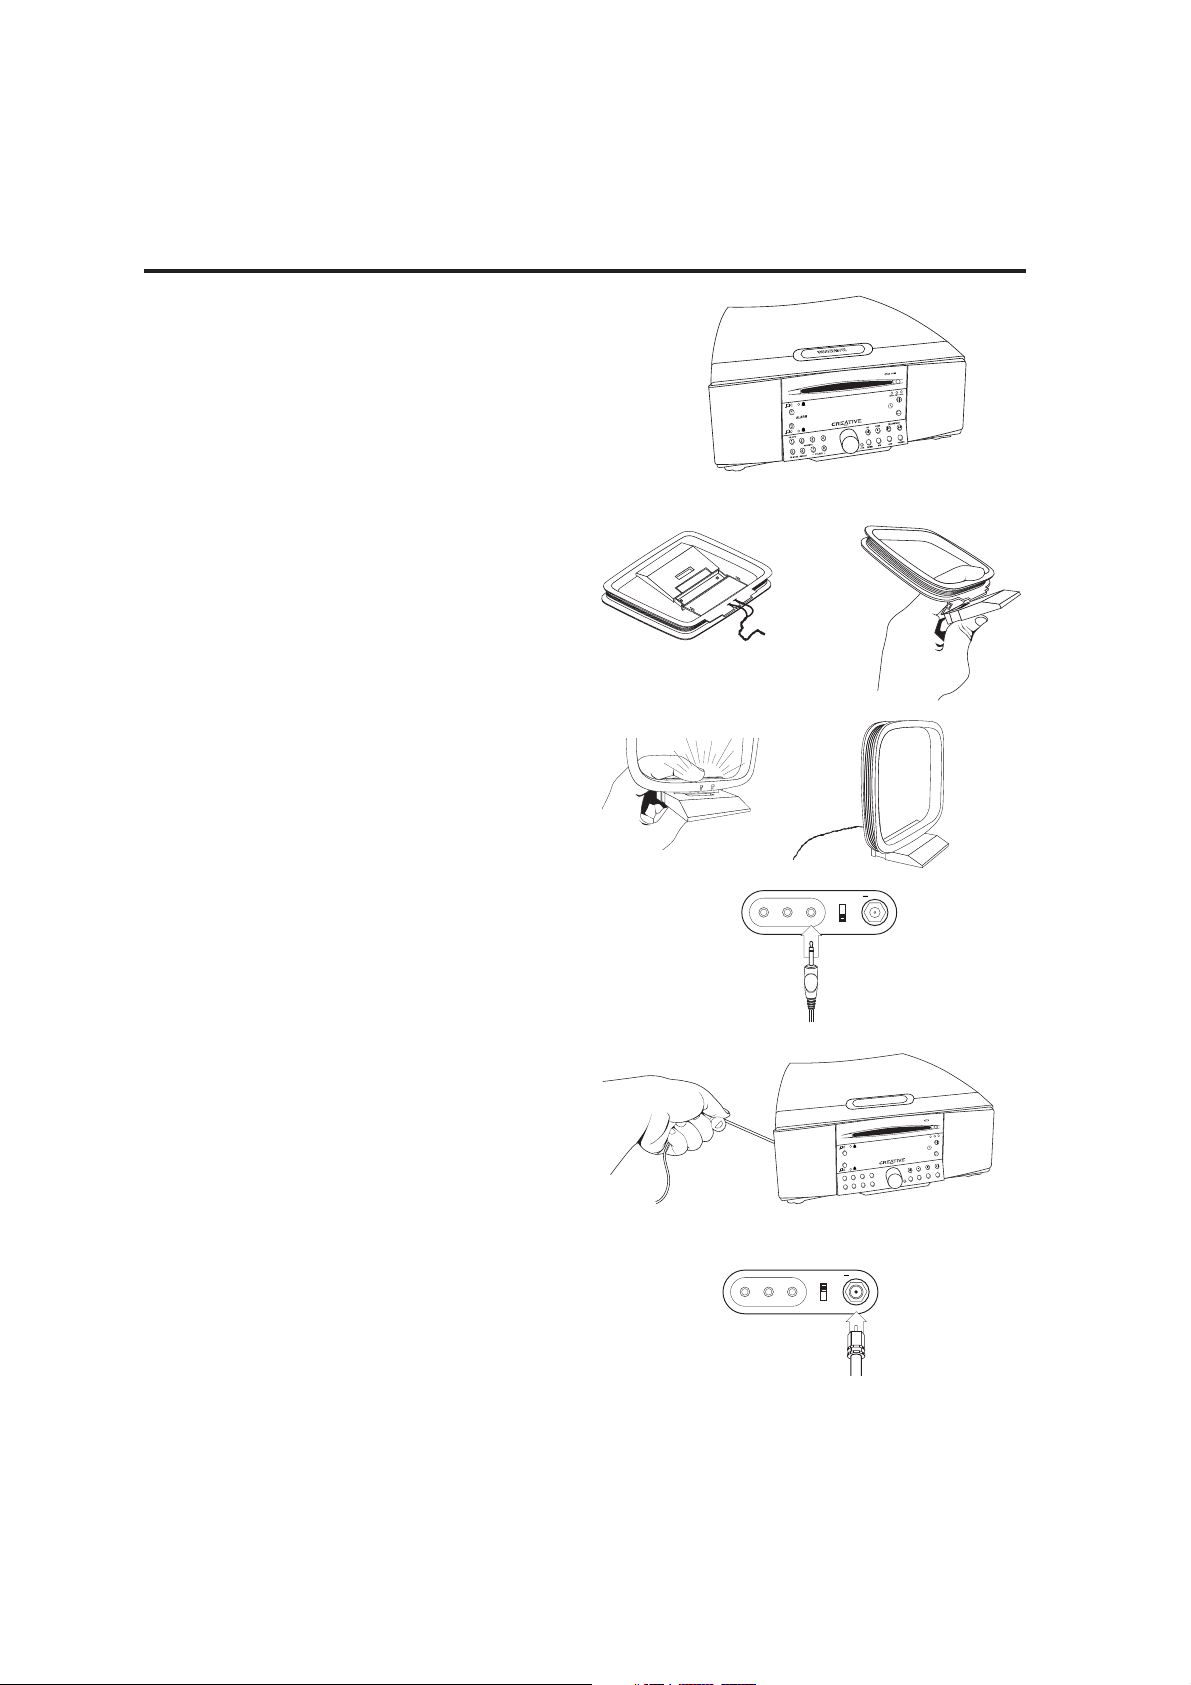
Remove the SoundWorks Radio CD (See A) from its
protective polybag and place it in your preferred
location. The Radio CD’s Tone alarm sound and bass
output will be reduced if the Radio is placed on a
compliant, soft surface.
Connect the MW antenna (See B): To prepare the
antenna (1), fold the base (2) and snap it into place (3).
Position the MW antenna (4) in any out-of-the way
site, preferably at least 8 inches apart from the Radio
CD. Insert the MW Antenna’s miniplug into the Radio
CD’s rear panel minijack marked
MW ANTENNA (5).
Rotate the MW antenna to achieve the best signal for
MW stations.
Connect the power cord by inserting
the SoundWorks Radio CD’s AC plug
into a convenient outlet.
The AC cord is also the Radio CD’s primary FM
antenna. It will function better if at least 50% or more
of it’s length follows a straight line (See C). Check to
make sure the FM antenna switch on the rear panel of
the Radio enclosure is in the INT (internal) position
(factory default).
If desired, the external FM antenna can be connected
and used instead of the internal antenna (See D).
Connect the external antenna to the “F”-type
connector of the rear panel. Set the FM antenna
switch to EXT (external) .
GETTING STARTED
MIXING
INPUT
RECORD
OUTPUT
INPUT INPUT
MW
ANTENNA
FM ANTENNA
EXT
INT
INPUT
75 OHMS
AUX
MIXING
INPUT
RECORD
OUTPUT
INPUT INPUT
MW
ANTENNA
FM ANTENNA
EXT
INT
INPUT
75 OHMS
AUX
A
L
A
R
M
P
R
E
S
E
T
S
S
T
E
R
E
O
C
D
IN
C
D
I
N
F
O
C
D
M
O
D
E
JOG
FM
1/2
CD
SEEK
TR
ACK/TU
NE
M
W
AUX
PO
W
ER
R
E
P
E
A
T
–
F
O
L
D
E
R
+
W
ID
E
M
O
N
O
1
1
2
2
3
4
5
6
7
8
SNOOZE/MUTE
B.
1.
2.
3.
4.
5.
C.
D.
A.
Page 11
9
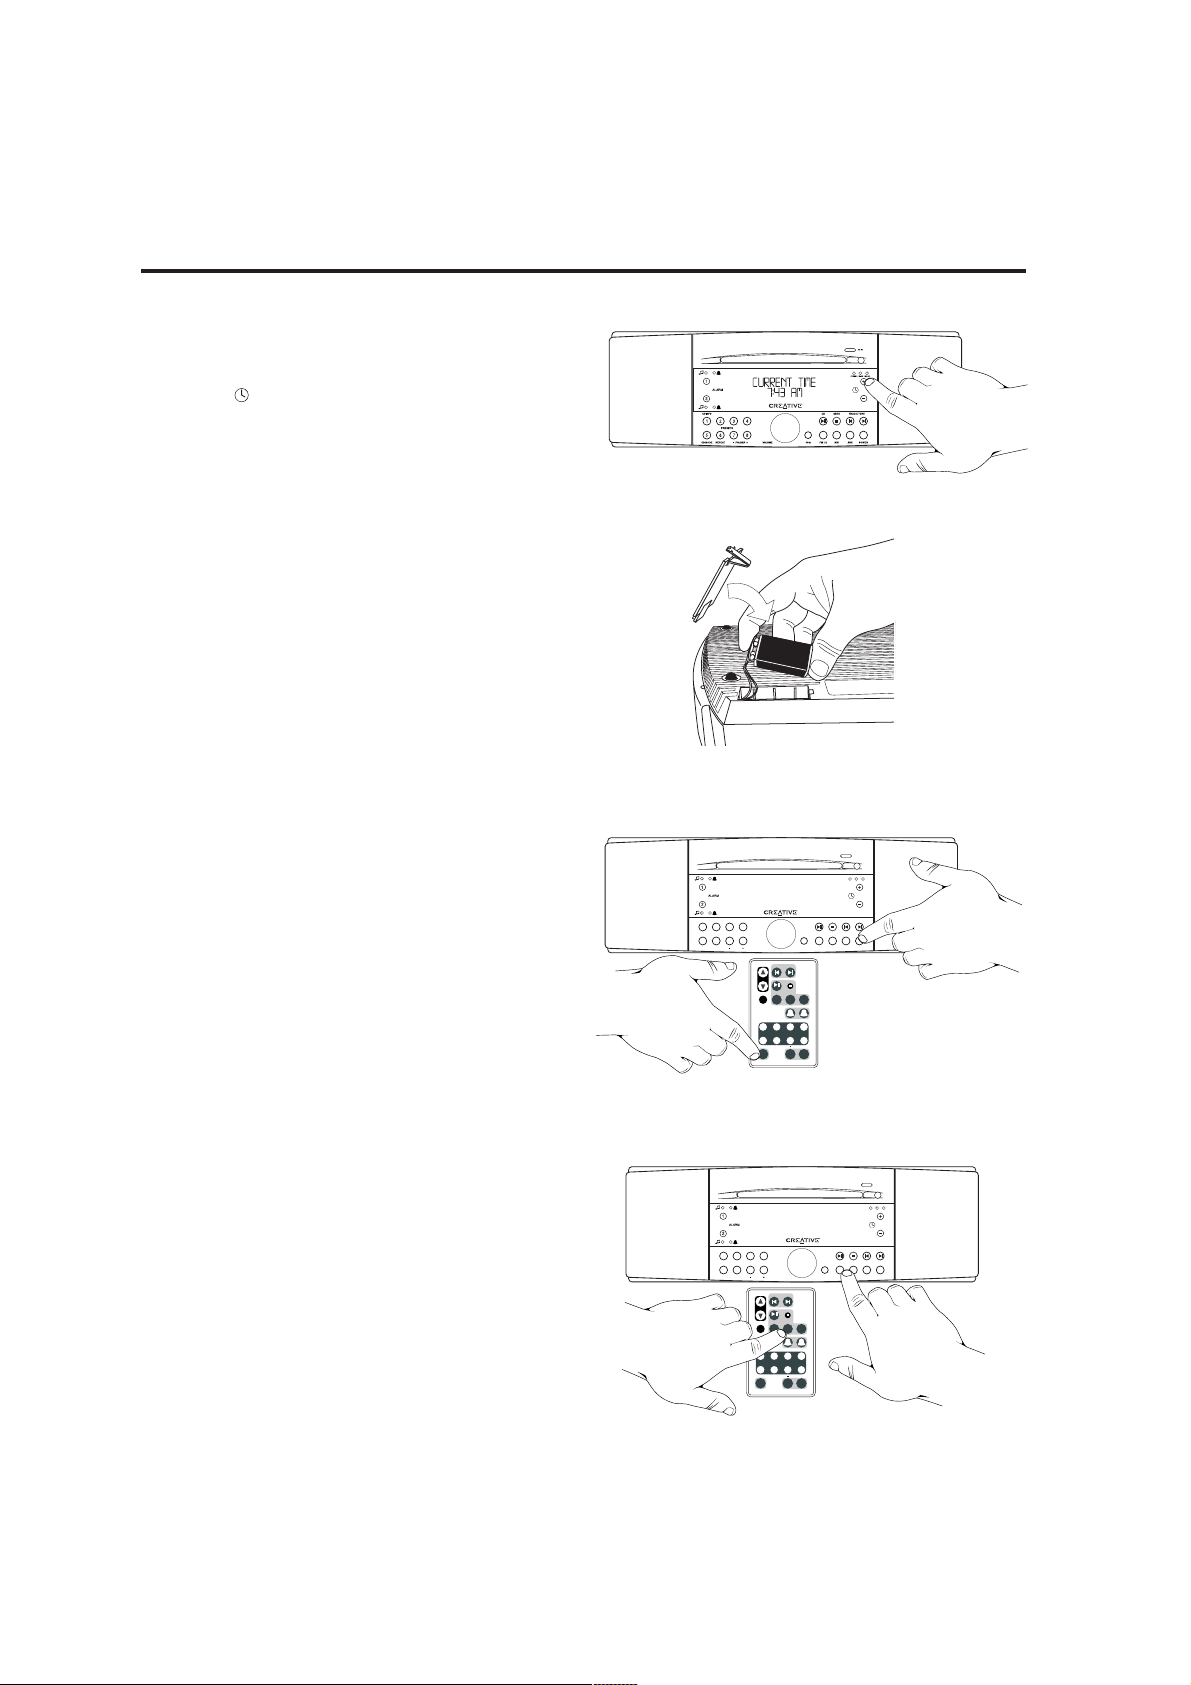
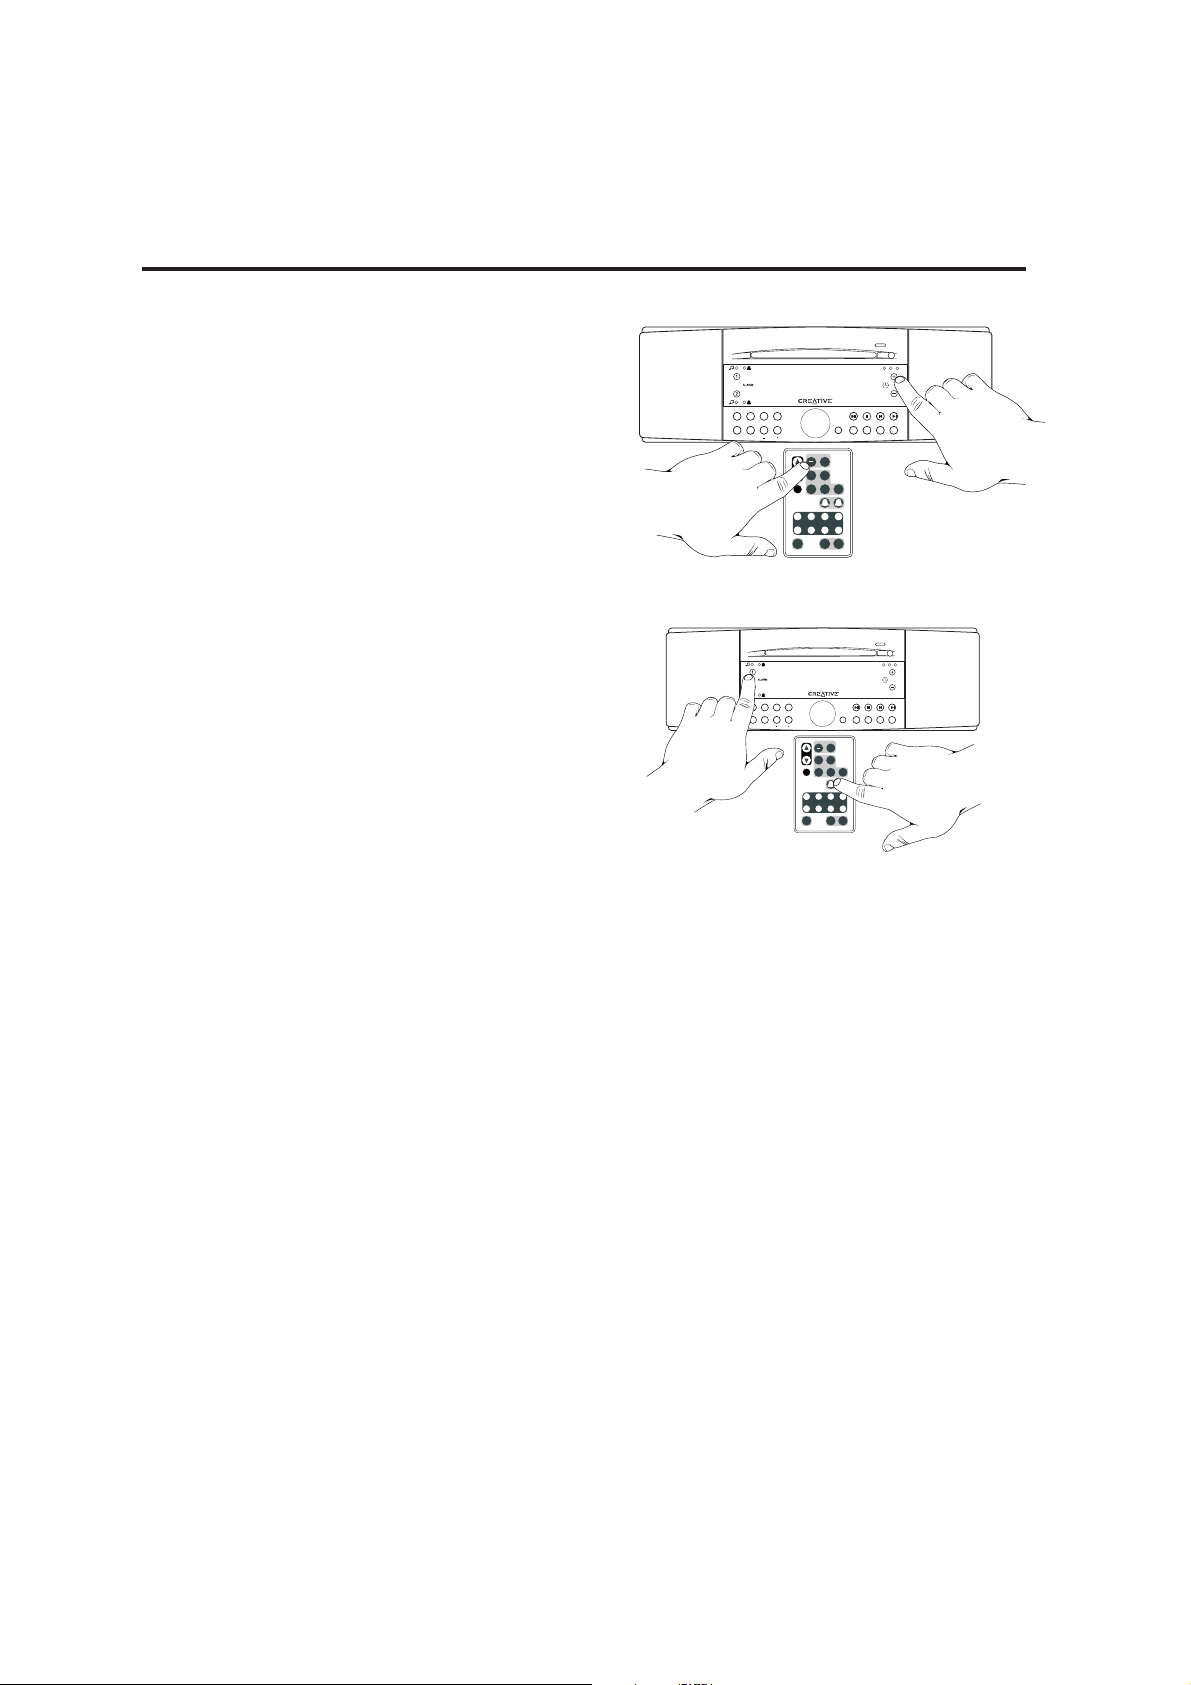
Setting the Clock
You can adjust the current time whether the radio is
in Standby or On. Just press the time adjust buttons
(next to the symbol) on the right hand side of the
display (See E).
Note: The current time can only be adjusted from the
Radio CD faceplate. The Remote Control can adjust
the wake up time setting, but not the current time.
Tone Alarm Backup Battery
For 48 hours of alarm function backup during an AC
power failure, obtain and install a 9 volt battery in the
radio compartment. Release the battery cover, attach
the battery and restore the cover.
If either alarm is set to activate (music or tone wakeup) and the power fails, the battery sounds the tone
alarm at the appropriate time. Press Power on the
radio to silence the alarm. Remove the battery if the
unit is unplugged for more than 24 hours. Replace the
battery after 30 minutes of emergency tone alarm
operation (See F).
Standby and On
Pushing the POWER button chooses Standby or On
operation (See G)
The faceplate Power button can also be used to
engage SLEEP delay operation (See page 13).
Selecting The Radio Bands
1) Pressing the FM 1/2 button selects the FM radio
band and one of two banks of FM station presets.
You can store eight FM stations in the PRESET
bank FM1 and eight different FM stations in
PRESET bank FM2 (See H).
2) If you switch from another mode to FM, the Radio
will return to the last PRESET bank used (from
Standby, MW, CD or from an AUX input). Pressing
the FM 1/2 button during FM operation selects the
other preset bank.
3) Pressing the MW button selects the MW radio
band. The MW band has one PRESET bank.
GETTING STARTED
G.
H.
PRESETS
ALARMS
TAP TO SET
PRESS & HOLD TO ADJUST
FOLDER
REPEAT
+
1
2
SOUNDWORKS RADIO CD
SEEK
STOP
TRACK / TUNE
WAKEUP
TIME
ADJUST
CD
FM 1/2
MW AUX
JOG
VOLUME
SLEEP
SNOOZE
MUTE
1
2
3
4
5
6
7
8
CD MODE
CD TIME
POWER
FM 1/2
CD INFO
CD MODE REPEAT
PRESETS
FOLDER
VOLUME
JOG
MW AUX
POWER
TRACK
SEEK
CD
/TUNE
WIDE
STEREO
CD IN
MONO
1234
5678
9 : 43AM
PRESETS
ALARMS
TAP TO SET
PRESS & HOLD TO ADJUST
FOLDER
REPEAT
+
1
2
SOUNDWORKS RADIO CD
SEEK
STOP
TRACK / TUNE
WAKEUP
TIME
ADJUST
CD
FM 1/2
MW
AUX
JOG
VOLUME
SLEEP
SNOOZE
MUTE
1
2
3
4
5
6
7
8
CD MODE
CD TIME
POWER
FM 1/2
CD INFO
CD MODE REPEAT
PRESETS
FOLDER
VOLUME
JOG
AM AUX
POWER
TRACK
SEEK
CD
/TUNE
WIDE
STEREO
CD IN
MONO
1234
5678
FM2 P1
88 . 1
9 : 43AM
E.
F.
Page 12
10
PRESETS
ALARMS
TAP TO SET
PRESS & HOLD TO ADJUST
FOLDER
REPEAT
+
1
2
SOUNDWORKS RADIO CD
SEEK
STOP
TRACK / TUNE
WAKEUP
TIME
ADJUST
CD
FM 1/2
MW AUX
JOG
VOLUME
SLEEP
SNOOZE
MUTE
1
2
3
4
5
6
7
8
CD MODE
CD TIME
POWER
FM 1/2
CD INFO
CD MODE REPEAT
PRESETS
FOLDER
VOLUME
JOG
MW AUX
POWER
TRACK
SEEK
CD
/TUNE
WIDE
STEREO
CD IN
MONO
1234
5678
FM2 P1
88 . 1
9 : 43AM
PRESETS
ALARMS
TAP TO SET
PRESS & HOLD TO ADJUST
FOLDER
REPEAT
+
1
2
SOUNDWORKS RADIO CD
SEEK
STOP
TRACK / TUNE
WAKEUP
TIME
ADJUST
CD
FM 1/2
MW AUX
JOG
VOLUME
SLEEP
SNOOZE
MUTE
1
2
3
4
5
6
7
8
CD MODE
CD TIME
POWER
FM 1/2
CD INFO
CD MODE REPEAT
PRESETS
FOLDER
VOLUME
JOG
MW AUX
POWER
TRACK
SEEK
CD
/TUNE
WIDE
STEREO
CD IN
MONO
1234
5678
FM2 P1
88 . 1
9 : 43AM
J.
K.
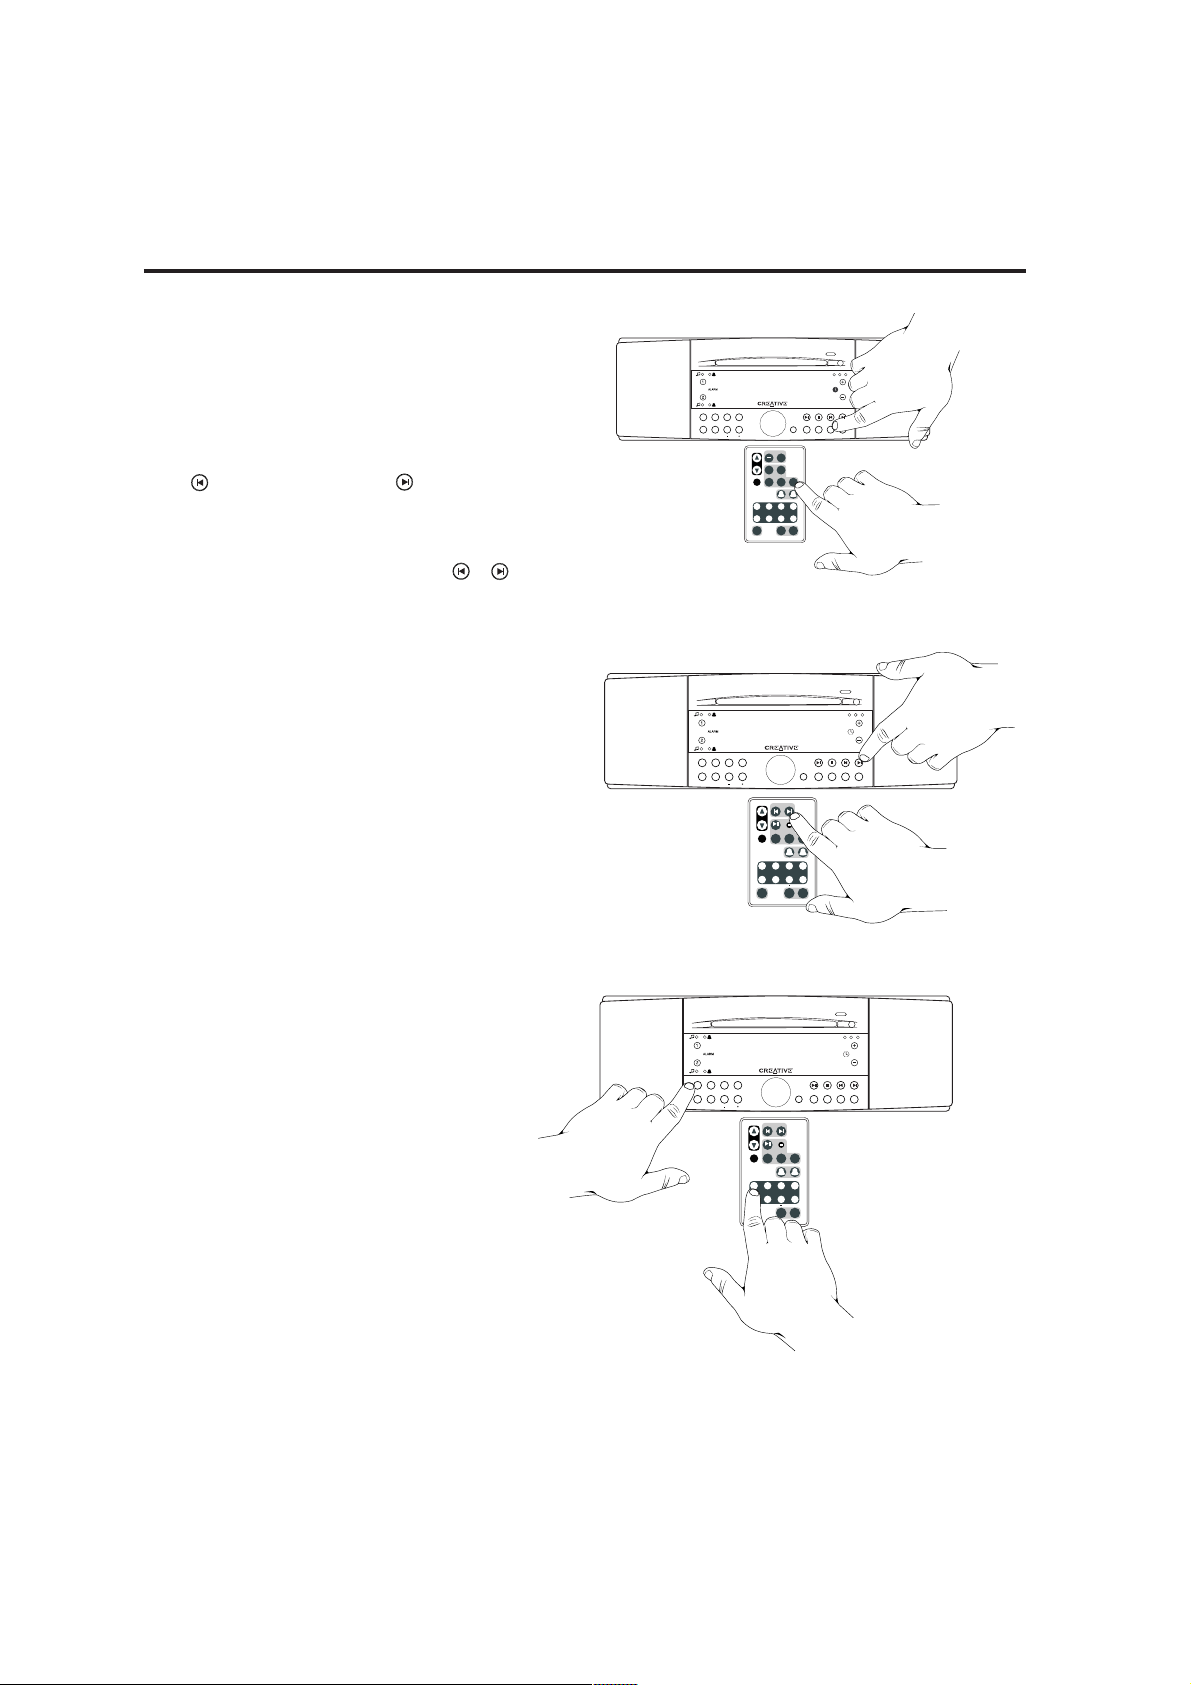
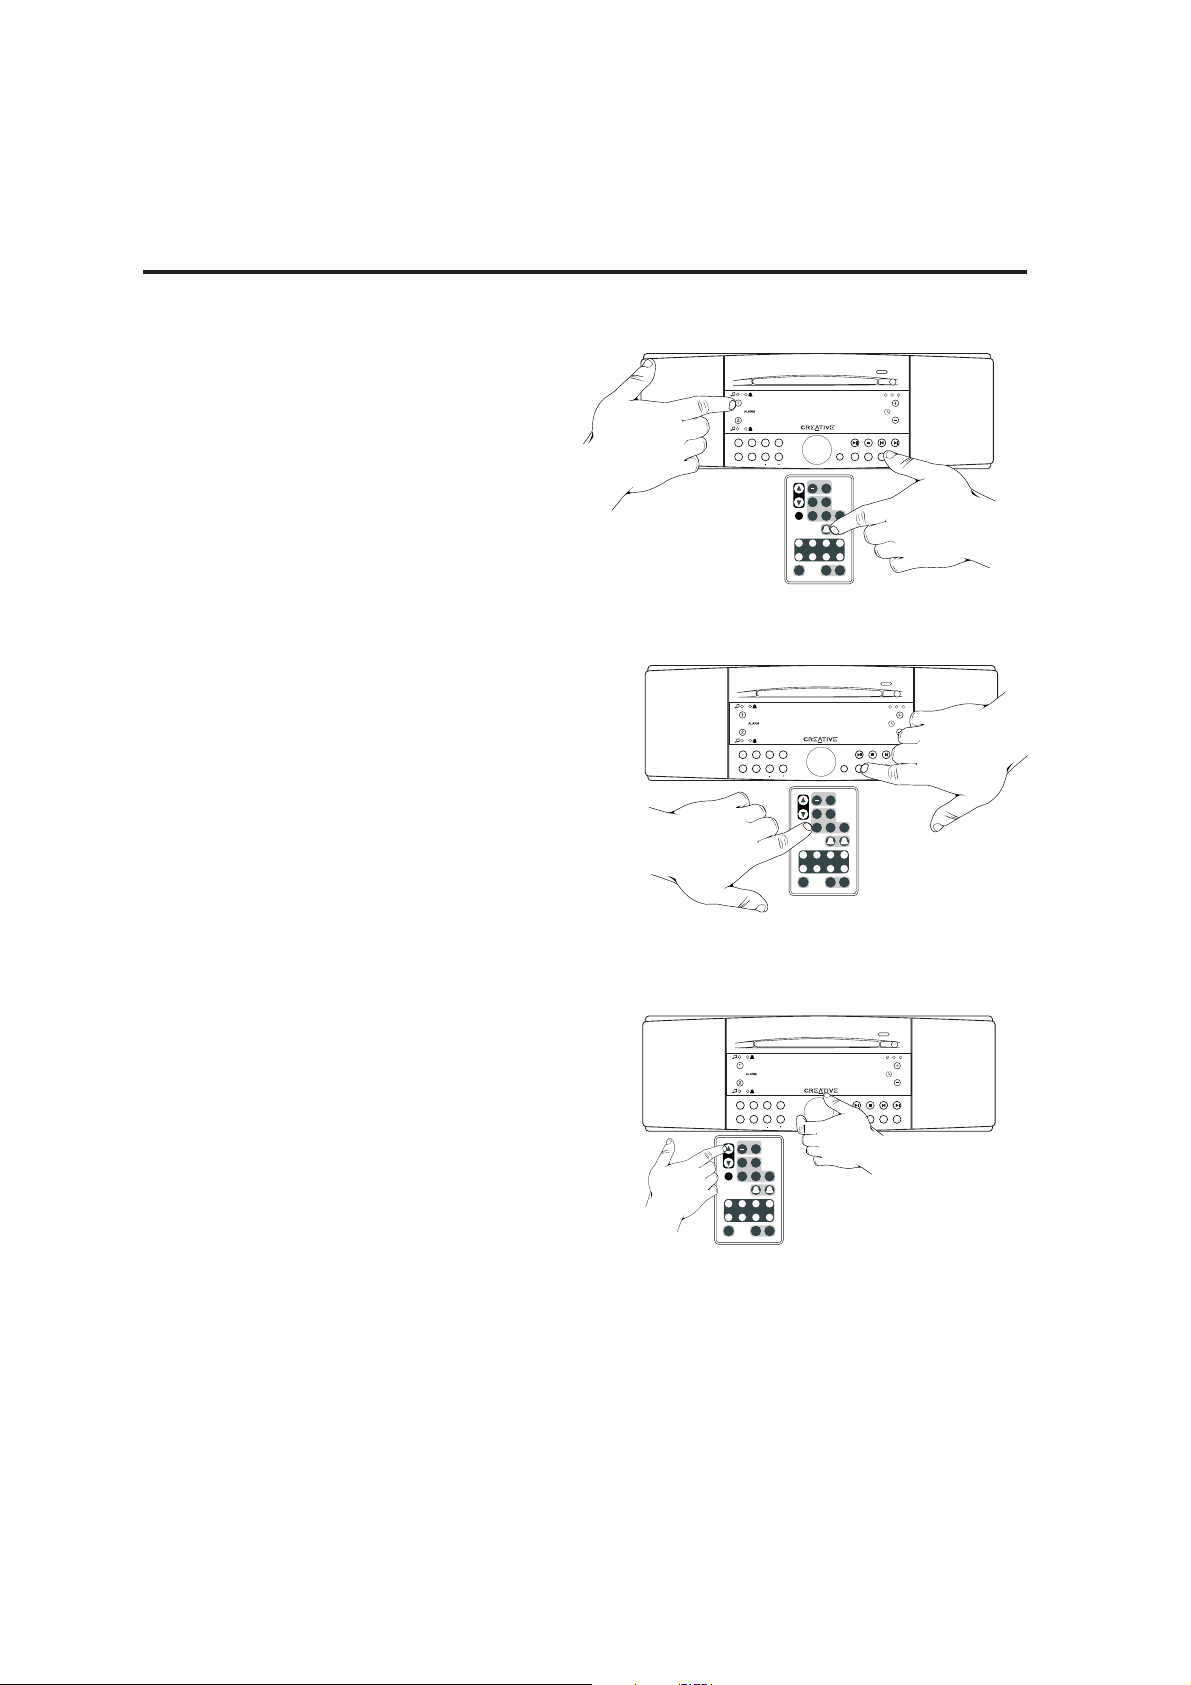
Tuning Stations (FM or MW)
• Autotune Method 1: Press the SEEK button
(remote or radio face) to automatically find the next
station of higher frequency (See I).
• Autotune Method 2: Press and hold either
TRACK/TUNE button to seek the next station
(the button seeks down, the button seeks up).
(See J)
• Manual Tune: To find a specific frequency, tap
the appropriate TRACK/TUNE button ( or ).
Storing Stations in PRESET banks
Press the FM 1/2 button to choose the desired PRESET bank (FM1 or FM2) or choose the MW radio
band. Tune to the desired station. Press and hold the
desired PRESET button until a short tone is heard. The
station is stored (See K).
GETTING STARTED
PRESETS
ALARMS
TAP TO SET
PRESS & HOLD TO ADJUST
1
2
SOUNDWORKS RADIO
TUNE
WAKEUP
TIME
ADJUST
FM 1/2
MW
SEEK
AUX
AUX
F
JOG
VOLUME
SLEEP
SNOOZE
MUTE
1
2
3
4
5
6
7
8
POWER
+
FM 1/2
CD INFO
CD MODE REPEAT
PRESETS
FOLDER
VOLUME
JOG
MW AUX
POWER
TRACK
SEEK
CD
/TUNE
WIDE
STEREO
CD IN
MONO
FM2 P1
88 . 1
1234
5678
9 : 43AM
I.
Page 13
11
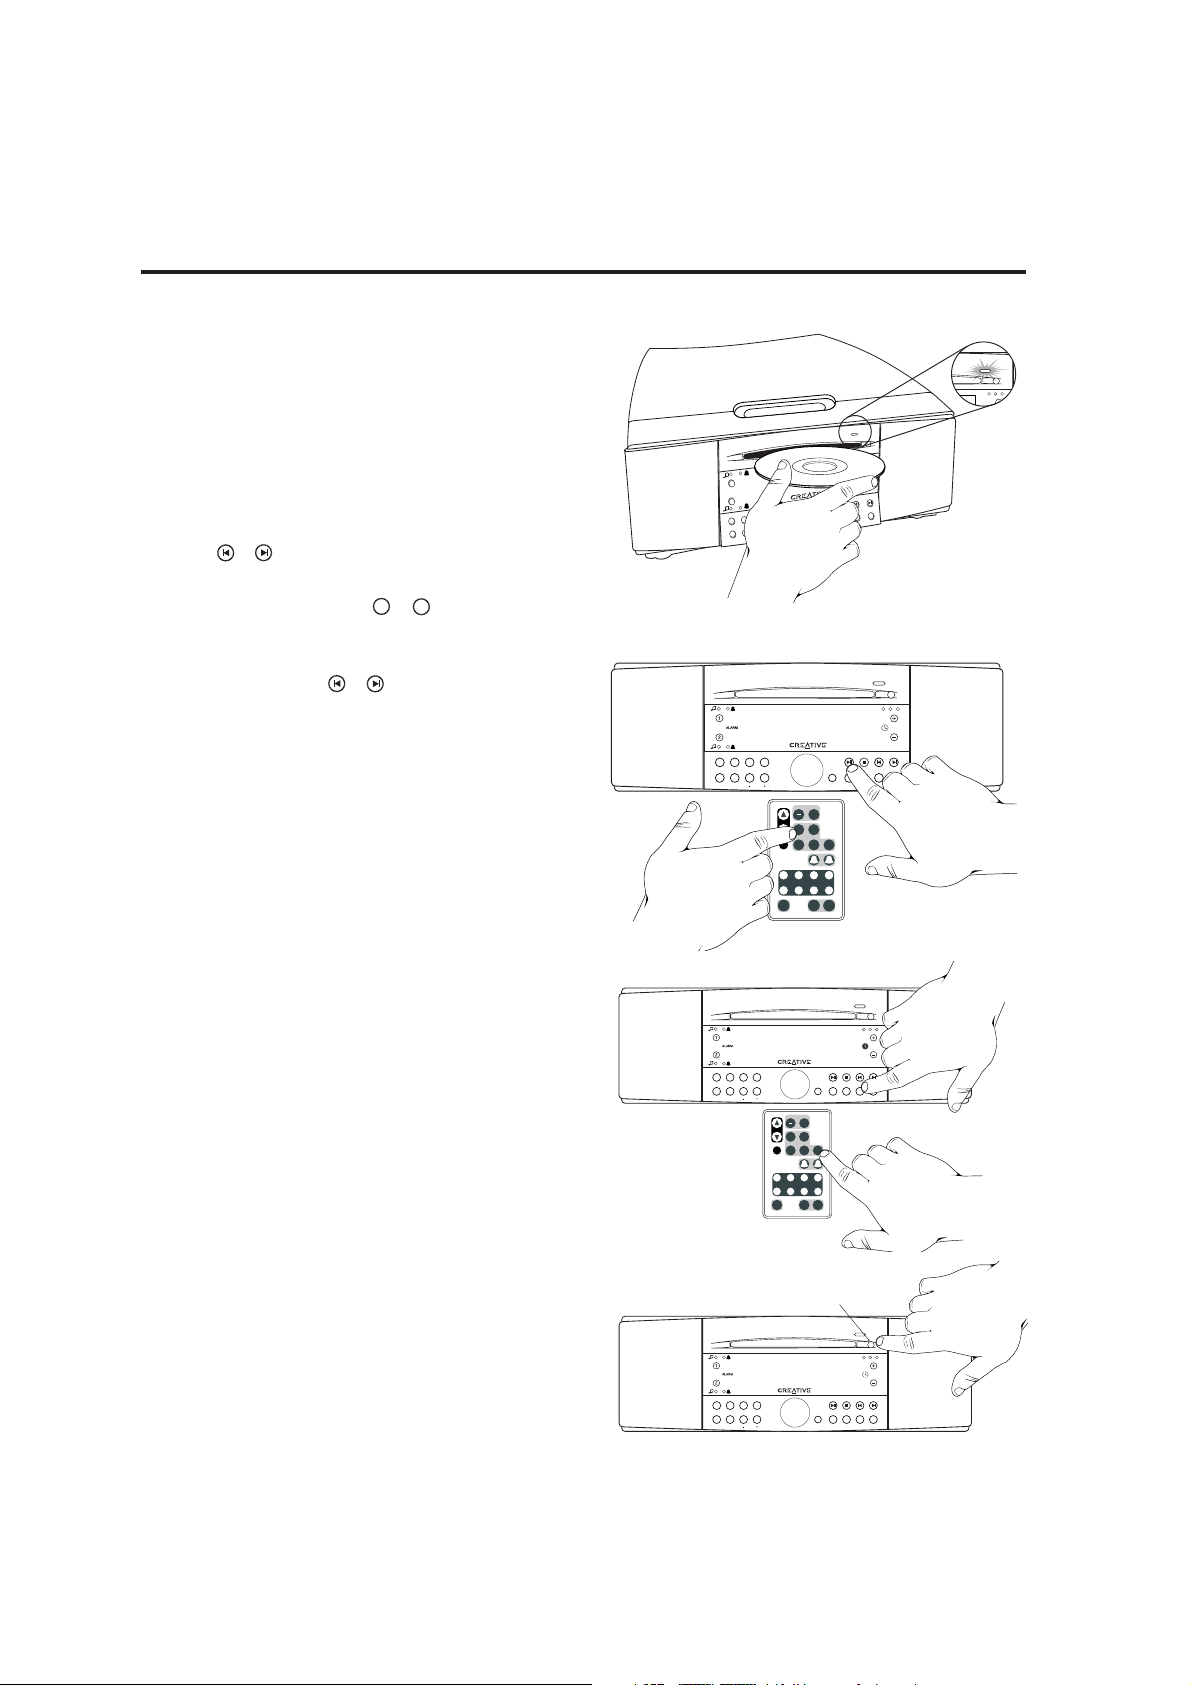
Important: Use only standard 12cm (4 3/4") compact discs.
Smaller discs will not work in the slot load mechanism.
1) Insert a CD disc into the slot to automatically select
CD play. The CD IN light indicates if there is a disc
inside the Radio CD (See L).
2) If there is a CD disc inside the Radio CD, tapping
the CD button will start disc play (See M).
Choosing Selections
• Track selection: Tap the appropriate TRACK/TUNE
button ( or ) (See N).
• CD-ROM folder selection: To move from the current
folder (directory), tap either or . See page 23-25
for an explanation of folder (directory) navigation.
• Forward scan and reverse scan: Press and hold a
TRACK/TUNE button ( or ).
Disc Stop
Press the Stop button once (inline image of stop button
only) to stop disc play with "resume from same
location” feature. Press the stop button twice to stop
disc play and return to the start of the disc.
Disc Eject
Press the disc eject button (See O).
CD INFO
The CD INFO button (preset 1) displays disc playing
time readouts, as follows:
Audio CD – Track time elapsed • Track time remaining •
CD time elapsed • CD time remaining
CD-ROM – File time elapsed
CD MODE
The CD MODE button (preset 5) selects the following
other disc play modes:
Audio CD – Random Play • Play 1 track
CD-ROM – Random Play • Play Folder • Random Play
Folder • Play 1 file
REPEAT
The REPEAT button (preset 6) will repeat the current
play mode until the disc is ejected or the POWER
button is pressed. The Repeat mode is maintained until
the disc is ejected or the POWER button is pressed.
SELECTING CD PLAY
ALARM
P
R
E
S
E
T
S
S
T
E
R
E
O
CD IN
C
D
I
N
F
O
C
D
M
O
D
E
J
O
G
F
M
1
/2
C
D
S
E
E
K
T
R
A
C
K
/T
U
N
E
A
M
A
U
X
P
O
W
E
R
R
E
P
E
A
T
– FOL
DER
+
WIDE
M
O
N
O
1
1
2
2
3
4
5
6
7
8
SNOOZE/MUTE
WIDE
STEREO
MONO
CD IN
PRESETS
ALARMS
TAP TO SET
PRESS & HOLD TO ADJUST
1
2
SOUNDWORKS RADIO
TUNE
WAKEUP
TIME
ADJUST
FM 1/2
MW
SEEK
AUX
AUX
F
JOG
VOLUME
SLEEP
SNOOZE
MUTE
1
2
3
4
5
6
7
8
POWER
+
FM 1/2
CD INFO
CD MODE REPEAT
PRESETS
FOLDER
VOLUME
JOG
MW AUX
POWER
TRACK
SEEK
CD
/TUNE
WIDE
STEREO
CD IN
MONO
FM2 P1
88 . 1
1234
5678
9 : 43AM
FM 1/2
CD INFO
CD MODE REPEAT
PRESETS
FOLDER
VOLUME
JOG
MW AUX
POWER
TRACK
SEEK
CD
/TUNE
WIDE
STEREO
CD IN
MONO
1234
5678
FM2 P1
88 . 1
9 : 43AM
TRACK/TUNE
PRESETS
ALARMS
TAP TO SET
PRESS & HOLD TO ADJUST
1
2
SOUNDWORKS RADIO
TUNE
WAKEUP
TIME
ADJUST
FM 1/2
MW
SEEK
AUX
AUX
F
JOG
VOLUME
SLEEP
SNOOZE
MUTE
1
2
3
4
5
6
7
8
POWER
+
FM 1/2
CD INFO
CD MODE REPEAT
PRESETS
FOLDER
VOLUME
JOG
AM AUX
POWER
TRACK
SEEK
CD
/TUNE
WIDE
STEREO
CD IN
MONO
1234
5678
FM2 P1
88 . 1
9 : 43AM
CD Play/Pause
CD Insertion
CD IN
Light
Disk Eject
L.
M.
N.
O.
7
8
Page 14

121212121212
Listening To External Sound sources
If you have an external audio source you always want
to keep connected to the SoundWorks Radio CD, like
a desktop cassette player, connect it to the AUX input
on the rear panel (See P). Press the AUX button on the
front panel or remote control to select this input
(See Q).
If you have an external audio program source you
occasionally want to connect to the Radio CD, like a
portable MP3 player, connect it to the AUX-F input on
the front panel (See Q). This input overrides the rear
AUX input. The AUX button on the front panel or
remote control selects this input (See R).
Mixing Input/Record Output
You may want to mix the sound from an audio program
source (computer audio output, for instance) with the
other Radio CD audio sources (FM, MW, Disc, Aux).
Connect the audio source to the MIXING INPUT on the
rear panel (See S). The program source will be mixed
with the currently selected Radio CD program source.
The audio source connected to the Mixing Input must
have a level control if you wish to adjust the balance
between the Radio CD program source and the Mixing
Input audio source.
CONNECTING AN EXTERNAL AUDIO SOURCE
FM 1/2
CD INFO
CD MODE REPEAT
PRESETS
FOLDER
VOLUME
JOG
MW AUX
POWER
TRACK
SEEK
CD
/TUNE
WIDE
STEREO
MONO
1234
5678
AUX-F
HEADPHONES
FM2 P1
88 . 1
9 : 43AM
PRESETS
ALARMS
TAP TO SET
PRESS & HOLD TO ADJUST
1
2
SOUNDWORKS RADIO
TUNE
WAKEUP
TIME
ADJUST
FM 1/2
MW
SEEK
AUX
AUX
F
JOG
VOLUME
SLEEP
SNOOZE
MUTE
1
2
3
4
5
6
7
8
POWER
+
FM 1/2
CD INFO
CD MODE REPEAT
PRESETS
FOLDER
VOLUME
JOG
MW AUX
POWER
TRACK
SEEK
CD
/TUNE
WIDE
STEREO
CD IN
MONO
FM2 P1
88 . 1
1234
5678
9 : 43AM
MIXING
INPUT
RECORD
OUTPUT
INPUT INPUT
MW
ANTENNA
FM ANTENNA
EXT
INT
INPUT
75 OHMS
AUX
MIXING
INPUT
RECORD
OUTPUT
INPUT INPUT
MW
ANTENNA
FM ANTENNA
EXT
INT
INPUT
75 OHMS
AUX
P.
Q.
R.
S.
Page 15
13131313131313
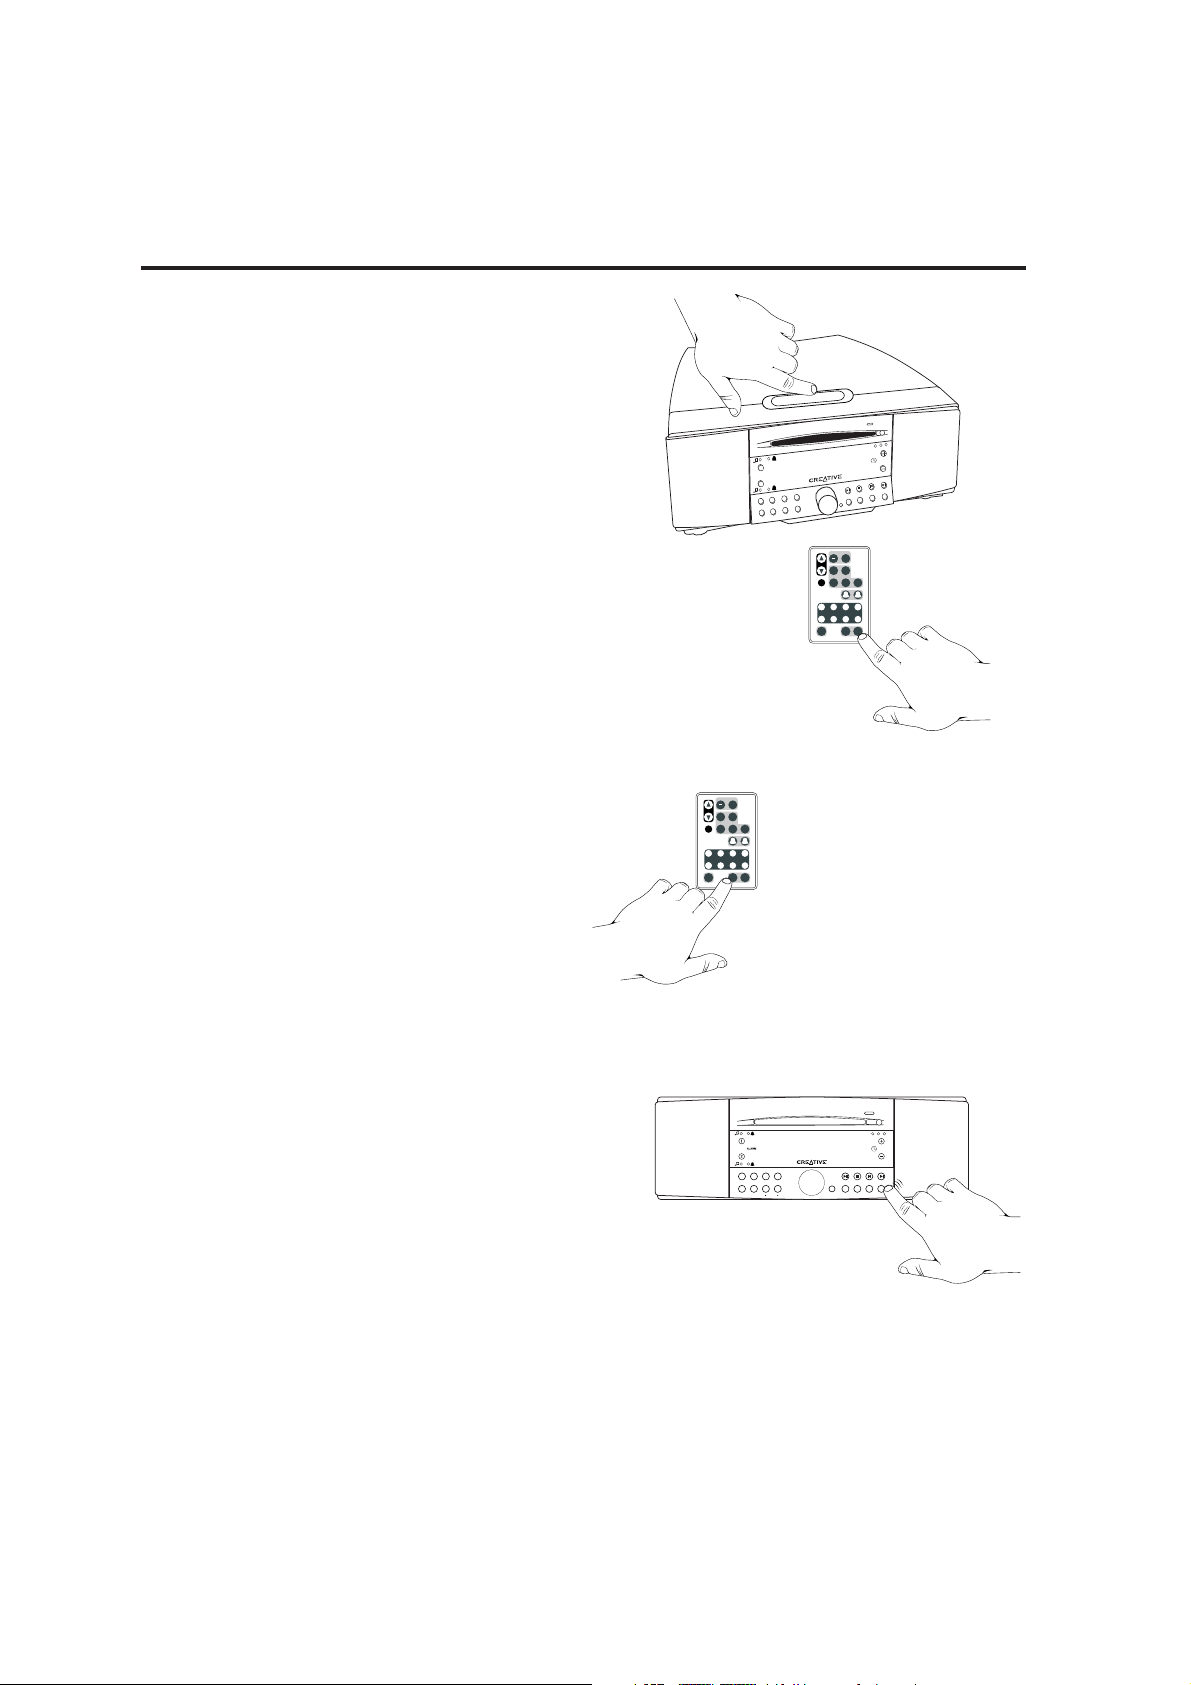
CONVENIENCE FEATURES
Mute
To mute the SoundWorks Radio CD: Press the
SNOOZE/MUTE bar or the SNOOZE/MUTE button on
the Remote Control (See T). Mute is cancelled if
the POWER button is pressed, if a disc is inserted or
the Volume is adjusted.
Sleep Delay
To make the Radio CD automatically turn off after a
specific period of time:
• Press the SLEEP button on the Remote Control until
the desired amount of play time is reached (See U).
OR
• With the Radio CD in Standby, rapidly tap the POWER
button until the desired amount of play time is
reached (See V).
Sleep delay is available for 15, 30, 45, 60, 90 and
120 minute lengths. Sleep delay is cancelled if the
POWER button is pressed or if a disc is inserted.
Insert a disc before choosing the Sleep function if
you wish to use the Sleep function during disc play.
PRESETS
ALARMS
TAP TO SET
PRESS & HOLD TO ADJUST
1
2
SOUNDWORKS RADIO
TUNE
WAKEUP
TIME
ADJUST
FM 1/2
MW
SEEK
AUX
AUX
F
JOG
VOLUME
SLEEP
SNOOZE
MUTE
1
2
3
4
5
6
7
8
POWER
+
PRESETS
ALARMS
TAP TO SET
PRESS & HOLD TO ADJUST
1
2
SOUNDWORKS RADIO
TUNE
WAKEUP
TIME
ADJUST
FM 1/2
MW
SEEK
AUX
AUX
F
JOG
VOLUME
SLEEP
SNOOZE
MUTE
1
2
3
4
5
6
7
8
POWER
+
PRESETS
ALARMS
TAP TO SET
PRESS & HOLD TO ADJUST
1
2
TUNE
WAKEUP
TIME
ADJUST
FM 1/2
MW
SEEK
AUX
AUX
F
JOG
VOLUME
1
2
3
4
5
6
7
8
+
FM 1/2
CD INFO
CD MODE REPEAT
PRESETS
FOLDER
VOLUME
JOG
MW AUX
POWER
TRACK
SEEK
CD
/TUNE
WIDE
STEREO
CD IN
MONO
1234
5678
SLEEP DELAY
45 M I N
T.
U.
V.
ALARM
PRE
SETS
S
T
E
R
E
O
C
D
I
N
C
D
I
N
F
O
C
D
M
O
D
E
J
O
G
FM
1
/2
CD
SE
EK
TR
AC
K
/TU
NE
MW
A
U
X
PO
W
E
R
R
E
P
E
A
T
– F
O
LD
E
R
+
W
I
D
E
M
O
N
O
1
1
2
2
3
4
5
6
7
8
SN
O
O
Z
E/M
U
TE
Page 16
14
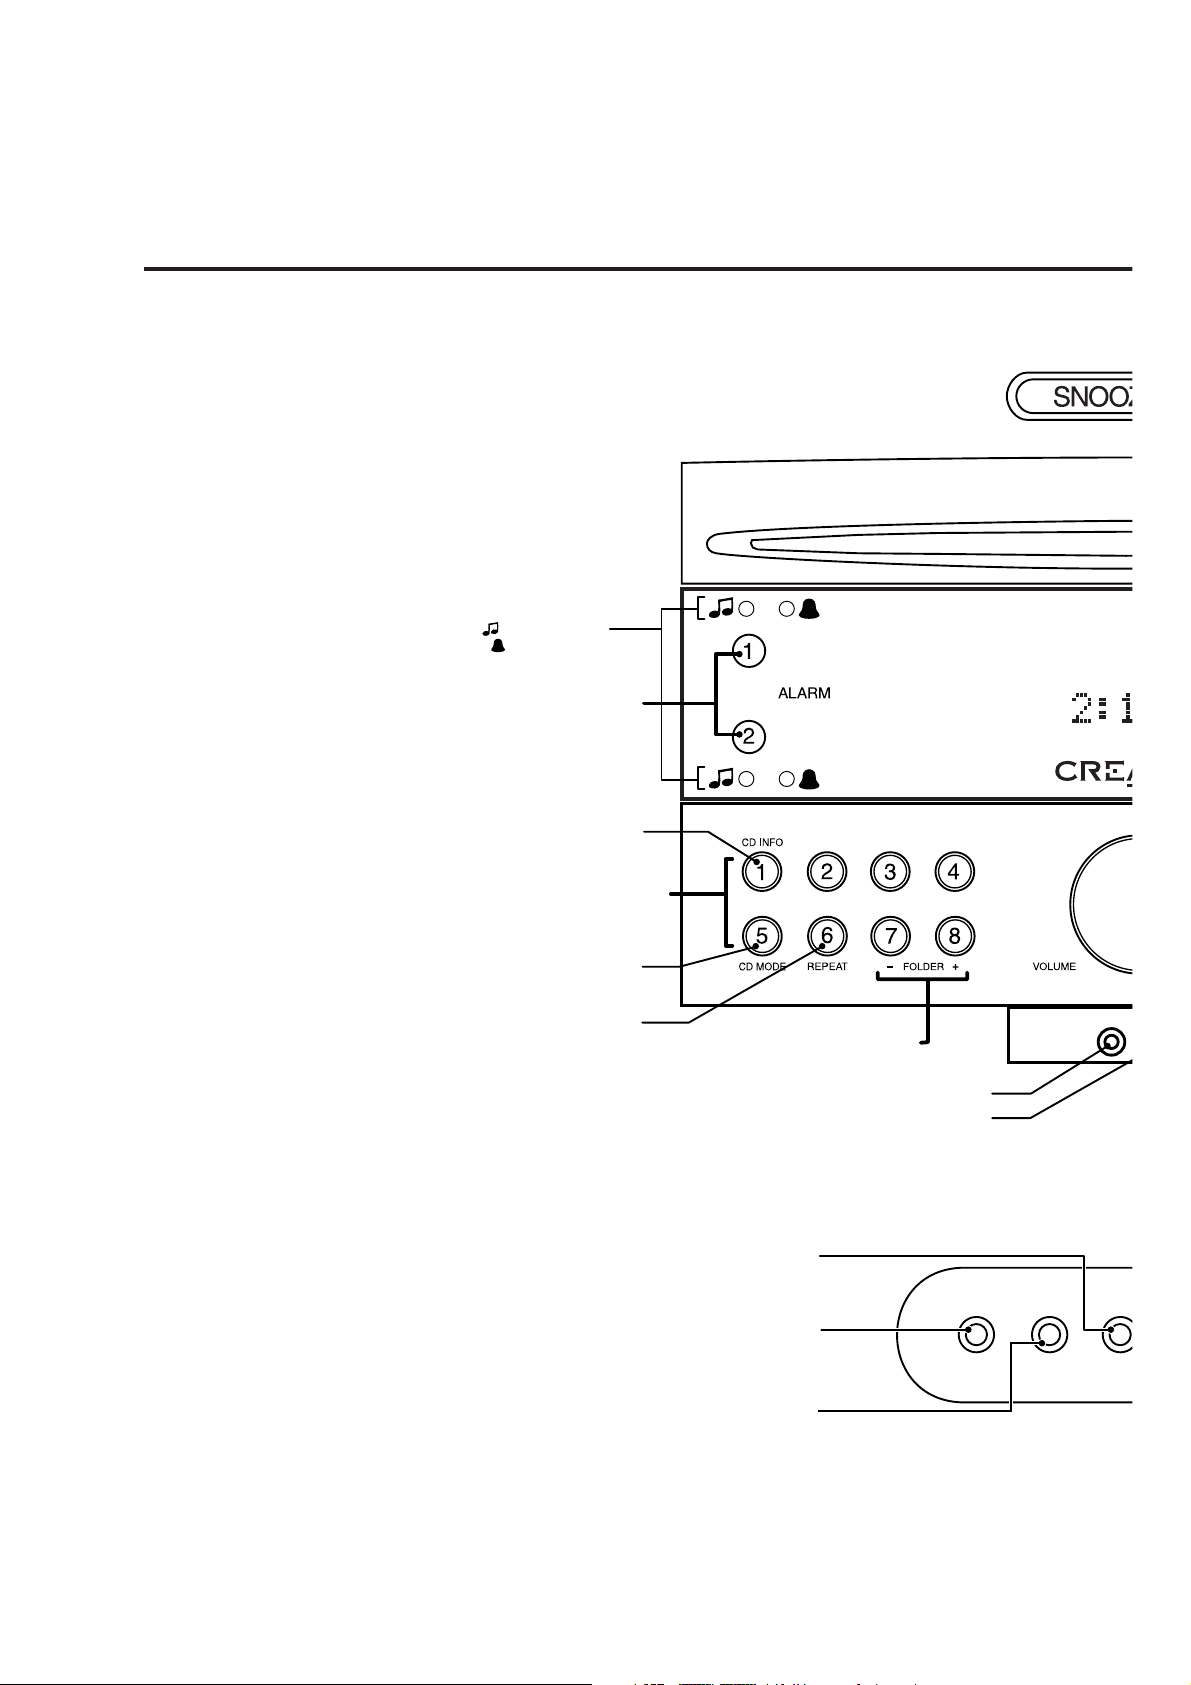
HEADPHONES
TAP TO ACTIVATE ALARM
PRESS AND HOLD TO ADJUST ALARM
DURING DISC PLAY, TAP THIS BUTTON FOR:
AUDIO CD:
TRACK TIME ELAPSED, TRACK TIME REMAINING
TOTAL TIME ELAPSED, TOTAL TIME REMAINING
CD-ROM:
TRACK TIME ELAPSED
DURING DISC PLAY, TAP THIS BUTTON FOR:
AUDIO CD:
RANDOM PLAY, PLAY ONE TRACK
CD-ROM:
RANDOM PLAY OF DISC, PLAY ONE FOLDER
RANDOM PLAY OF ONE FOLDER , PLAY ONE TRACK
RADIO STATION PRESET BUTTONS:
PRESS AND HOLD TO STORE CURRENT STATION
INDICATES ALARM STATUS
= MUSIC WAKEUP
= TONE WAKEUP
INSERT HEADPHONES WITH 3.5mm STEREO MINIPLUG HERE FOR PRIVATE LISTENING
INSERT AUDIO PLAYER WITH 3.5mm STEREO MINIPLUG HERE. PRESS AUX TO HEAR IT:
THIS INPUT OVERIDES AUX-R IN BACK.
ADJUSTS VOLUME DURING NORMAL OPERATION: ADJUSTS SETTINGS IN JOG BUTTON
DURING DISC PLAY, TAP THIS BUTTON FOR
REPEAT PLAY OF CURRENT CD MODE
TAP THESE BUTTONS TO MOVE BETWEEN
DIFFERENT DIRECTORIES ON A CD-ROM DISC
NORMAL OPERATION: PRESS
DURING WAKEUP: PRESS TO
MW
ANTEN
INPU
MIXING
INPUT
RECORD
OUTPUT
AUX
REAR 3.5mm STEREO
MINIJACK AUXILIARY INPUT
MW ANTENNA
INPUT MINIJACK
3.5mm STEREO MINIJACK FIXED LEVEL AUDIO
OUTPUT ALSO FUNCTIONS AS A MIXING INPUT
SOUNDWORKS RADIO CD
FRONT AND TOP PANEL
FUNCTIONS
QUICK REFERENCE GUIDE - SOUNDWORKS RADIO CD FACEPLATE
Page 17
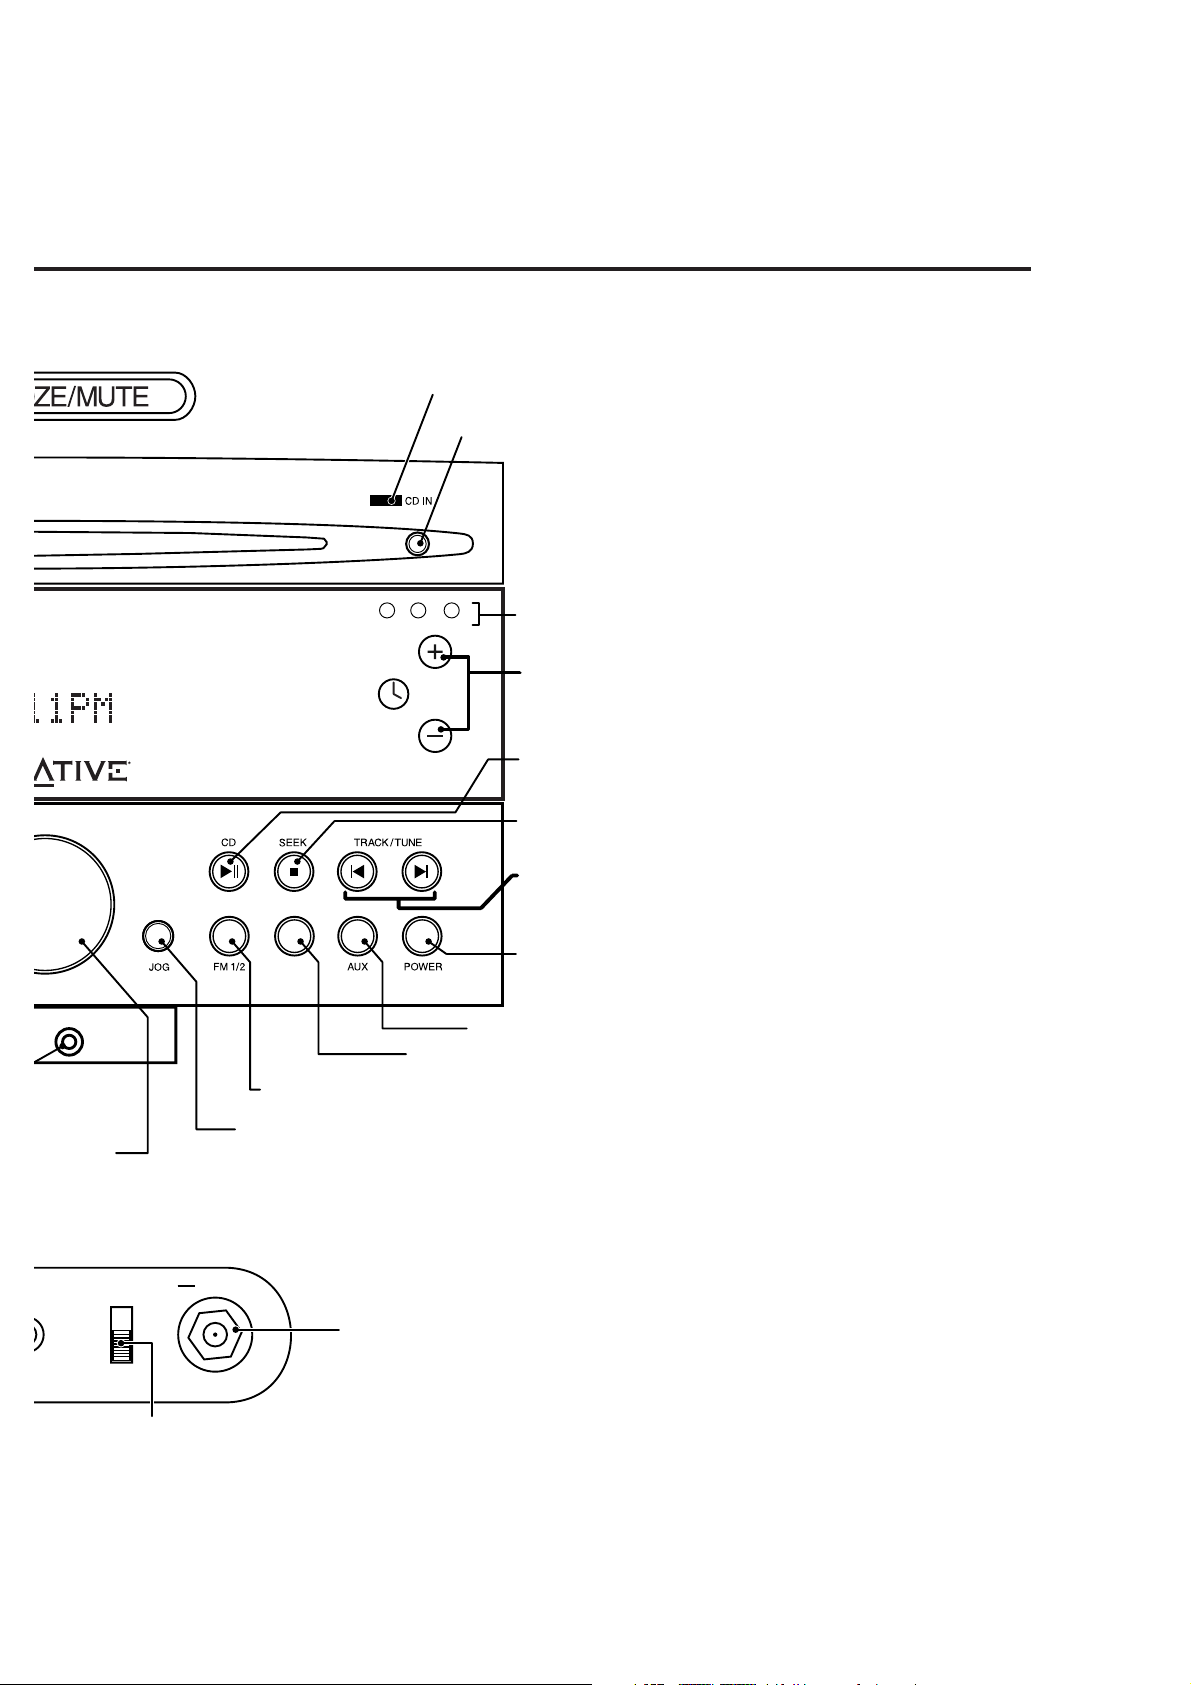
15
WIDE
STEREO
MONO
AUX-F
INDICATES DISC INSIDE
EJECTS DISC
SELECTS FM BAND
PRESS AGAIN TO SWITCH BETWEEN PRESET BANK 1 OR 2
PRESS REPEATEDLY TO VIEW MANY RADIO SETTINGS.
USE VOLUME TO ADJUST SETTINGS.
BASS_ +4 TO -4 SNOOZE TIME- 5 MIN TO 22 MIN
TREBLE_ +4 TO -4 RDS TEXT- SCROLLING, FIXED, OFF
STEREO, WIDE, MONO DISC TEXT- SCROLLING, FIXED, OFF
LOUDNESS- ON, OFF TIME DISPLAY- 12 hr AM/PM OR 24 hr
DISPLAY LANGUAGE- ENGLISH, SPANISH, FRENCH,
ITALIAN, GERMAN OR DUTCH.
SELECTS MW BAND
(ONE PRESET BANK)
SELECTS AUX INPUT
SELECTS RADIO "ON" OR "OFF"
(ALARMS ACTIVE IN "OFF" MODE)
PRESS REPEATEDLY FOR SLEEP DELAY
FUNCTION (15 MIN TO 120 MIN)
RADIO: TAP TO MANUAL TUNE, PRESS AND HOLD
TO SEEK NEXT STATION.
DISC: TAP TO ADVANCE OR GO BACK ONE AUDIO
SELECTION, PRESS AND HOLD TO SCAN
FORWARD OR BACKWARD THROUGH AN AUDIO.
RADIO: TAP TO AUTOMATICALLY SEEK
THE NEXT STATION UP THE BAND.
DISC: TAP TO STOP PLAY.
TAP TO START DISC PLAY, TAP
AGAIN TO PAUSE DISC PLAYBACK.
SETS CURRENT TIME
IN NORMAL OPERATION
SETS WAKEUP TIME IN ALARM
ADJUSTMENT MODE
INDICATES AUDIO MODE
FM ANTENNAW
INPUT
EXT
INT
75 OHMS
EXTERNAL FM ANTENNA
"F" TYPE INPUT
INTERNAL / EXTERNAL
FM ANTENNA SELECTOR
MW
Page 18
1616161616
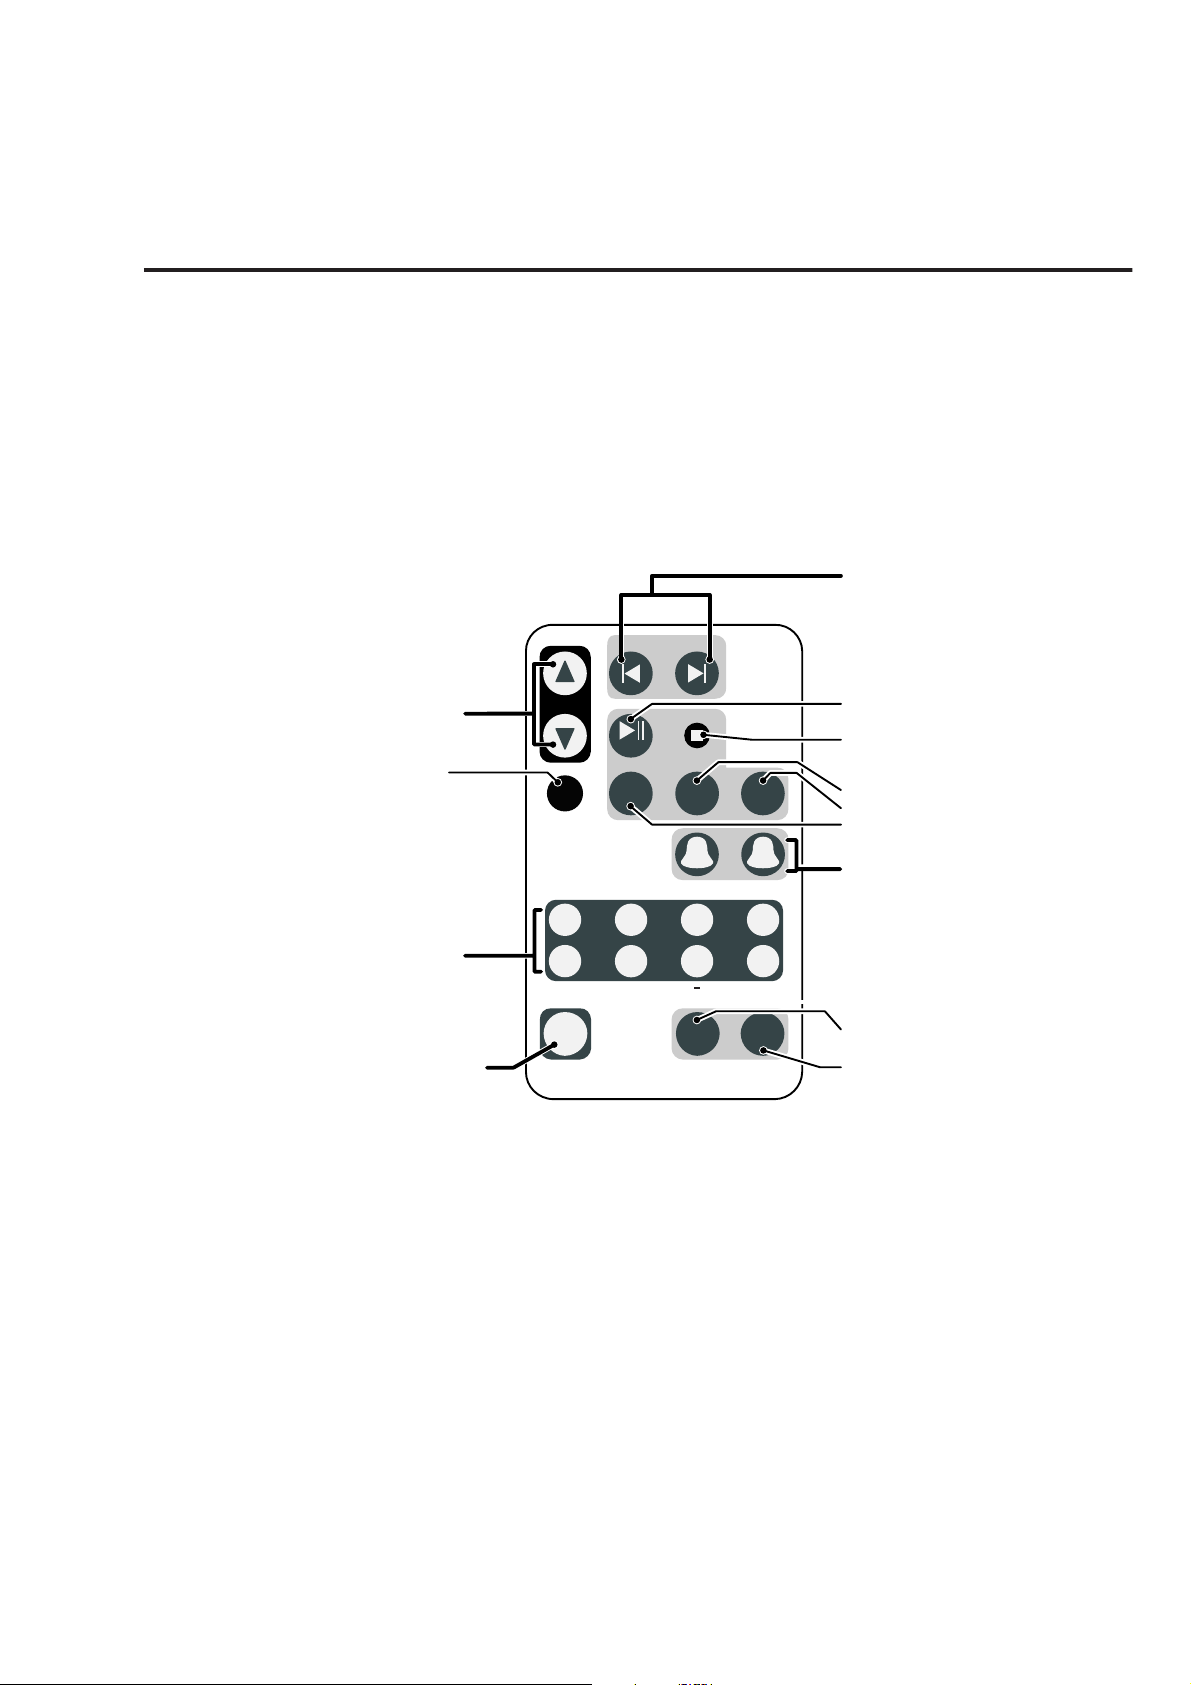
QUICK REFERENCE GUIDE - REMOTE CONTROL
SOUNDWORKS RADIO CD 740
REMOTE CONTROL
RADIO AND ALARM FUNCTIONS
TRACK / TUNE
ADJUSTS VOLUME DURING NORMAL OPERATION
ADJUSTS SETTINGS IN JOG BUTTON OPERATION
PRESS REPEATEDLY TO VIEW MANY RADIO SETTINGS.
DISPLAY LANGUAGE_ ENGLISH, SPANISH, FRENCH.
USE VOLUME TO ADJUST SETTINGS.
RDS TEXT DISPLAY_ SCROLLING, FIXED, OFF
DISC TEXT DISPLAY_ SCROLLING, FIXED, OFF
SNOOZE TIME_ 5 MIN. TO 25 MIN.
TIME DISPLAY_ 12 hr AM/PM OR 24 hr
GERMAN, DUTCH, ITALIAN
RADIO STATION PRESET BUTTONS:
TAP TO PLAY STORED STATION
BASS_ +4 TO -4
TREBLE_ +4 TO -4
STEREO, WIDE, MONO
LOUDNESS– ON, OFF
PRESS AND HOLD TO STORE
CURRENT STATION
VOLUME
CD
JOG
CD TIME
FM 1/2
ALARMS
TAP TO SET
PRESS & HOLD TO ADJUST
SEEK
STOP
MW AUX
12
1234
PRESETS
5678
REPEATCD MODE
FOLDER
WAKEUP
TIME
ADJUST
FOLDER
FM: TAP TO MANUAL TUNE, PRESS
AND HOLD TO SEEK NEXT STATION.
ALARM SET: ADJUST WAKEUP TIME.
TAP TO START DISC PLAY
TAP TO AUTOMATICALLY SEEK THE
NEXT STATION UP THE BAND.
SELECTS MW BAND (ONE PRESET BANK)
SELECTS AUX INPUT
SELECTS FM BAND
PRESS AGAIN TO SWITCH BETWEEN
PRESET BANK 1 OR 2
TAP TO ACTIVATE ALARM
PRESS AND HOLD TO ADJUST ALARM
+
SELECTS RADIO "ON" OR "OFF"
ALARMS OPERATE IN "OFF" MODE
POWER
SLEEP
SNOOZE
SOUNDWORKS RADIO CD
MUTE
PRESS REPEATEDLY TO CHOOSE
SLEEP TIME (15 MIN TO 120 MIN)
NORMAL OPERATION: PRESS TO
MUTE SOUND.
DURING WAKEUP: PRESS TO TO
ACTIVATE SNOOZE FEATURE.
Page 19
171717171717
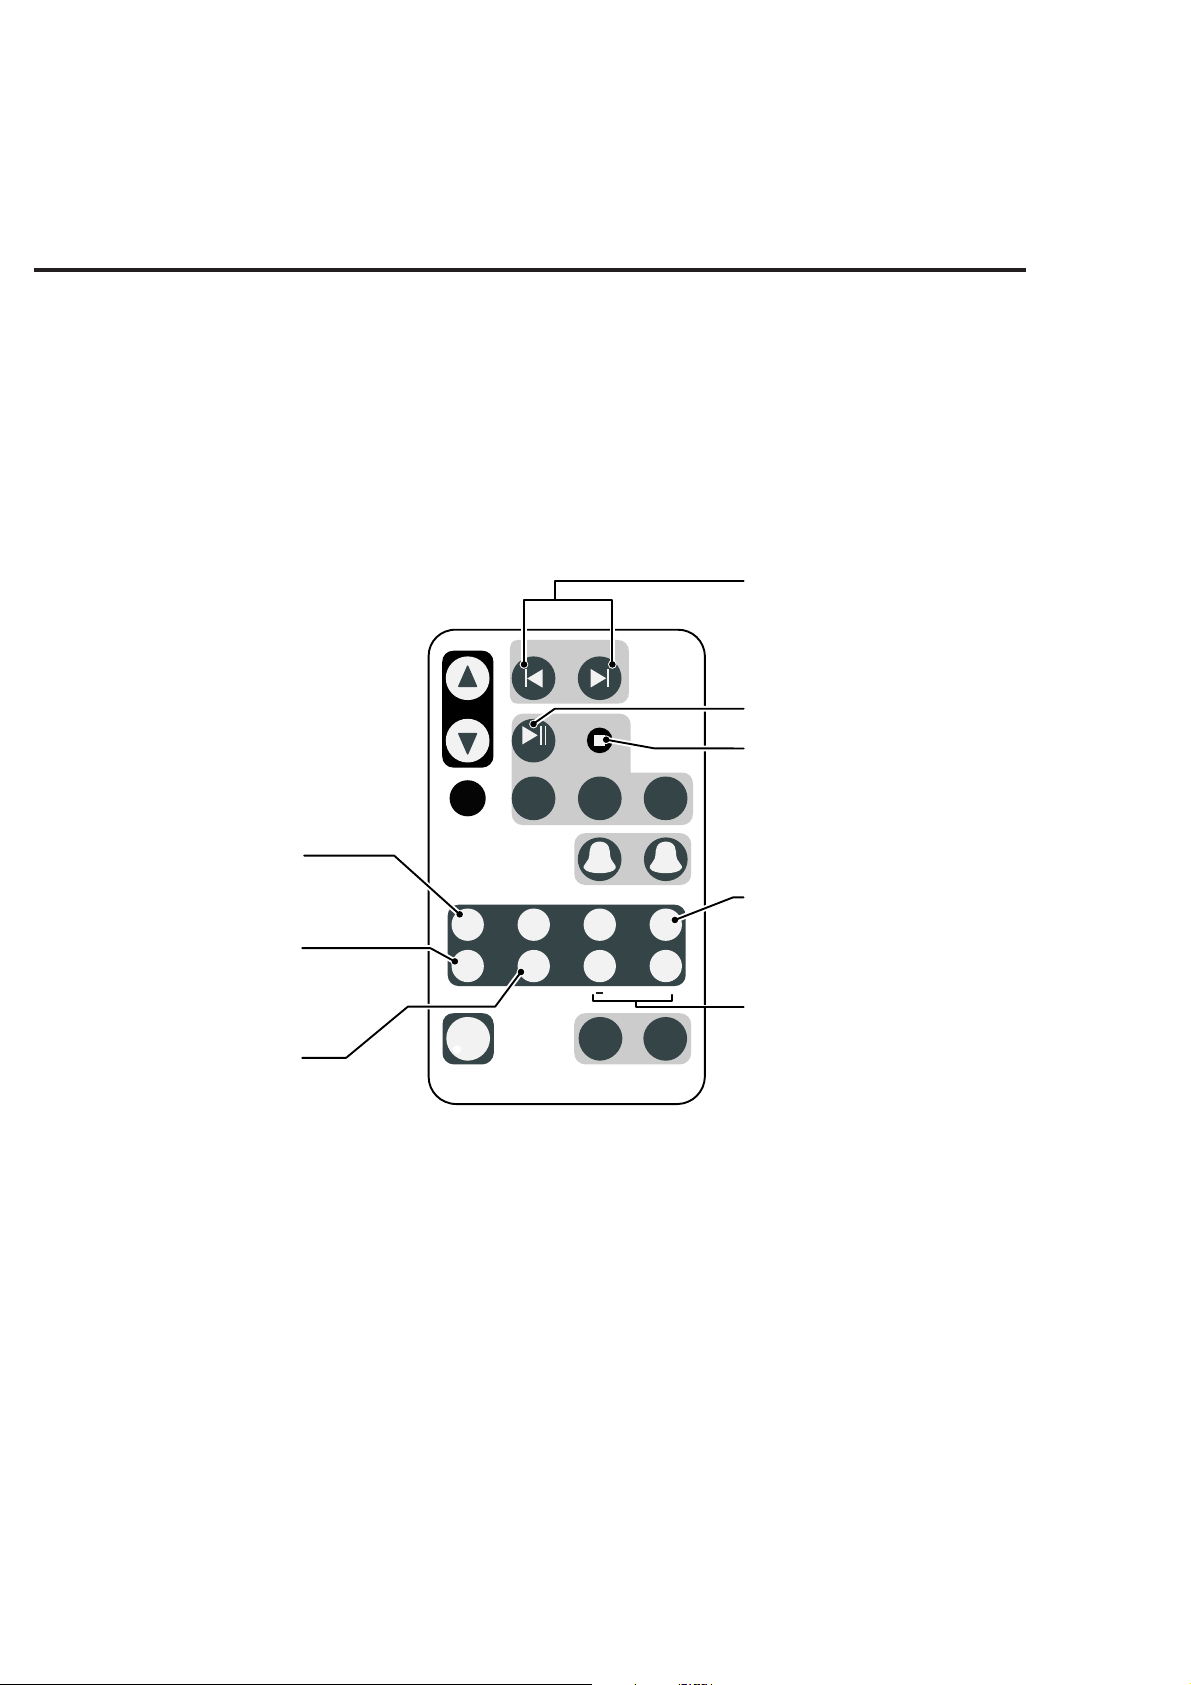
SOUNDWORKS RADIO CD 740
REMOTE CONTROL
DISC PLAY FUNCTIONS
VOLUME
JOG
TRACK / TUNE
CD
FM 1/2
WAKEUP
TIME
ADJUST
SEEK
STOP
MW AUX
TAP TO ADVANCE OR GO BACK ONE
AUDIO SELECTION
PRESS AND HOLD TO SCAN FORWARD OR
BACKWARD THROUGH AN AUDIO SELECTION
TAP TO START DISC PLAY
TAP AGAIN TO PAUSE DISC PLAY
DURING DISC PLAY:
TAP TO STOP PLAY WITH RESUME FEATURE
TAP TWICE TO CLEAR RESUME FEATURE
TAP THIS BUTTON FOR:
AUDIO CD:
TRACK TIME ELAPSED
TRACK TIME REMAINING
TOTAL TIME ELAPSED
TOTAL TIME REMAINING
CD-ROM:
TRACK TIME ELAPSED
TAP THIS BUTTON FOR:
AUDIO CD:
RANDOM PLAY
CD-ROM:
RANDOM PLAY OF ONE FOLDER
TAP THIS BUTTON FOR REPEATED
PLAY OF CURRENT DISC MODE
PLAY ONE TRACK
RANDOM PLAY OF DISC
PLAY ONE FOLDER
PLAY ONE TRACK
ALARMS
TAP TO SET
PRESS & HOLD TO ADJUST
CD TIME
12
FOLDER
1234
PRESETS
5678
+
FOLDERREPEATCD MODE
POWER
SLEEP
SOUNDWORKS RADIO CD
SNOOZE
MUTE
TAP THIS BUTTON TO VIEW FOLDER NAME
TAP THESE BUTTONS TO MOVE BETWEEN
DIFFERENT FOLDERS ON A CD-ROM
Page 20
1818181818
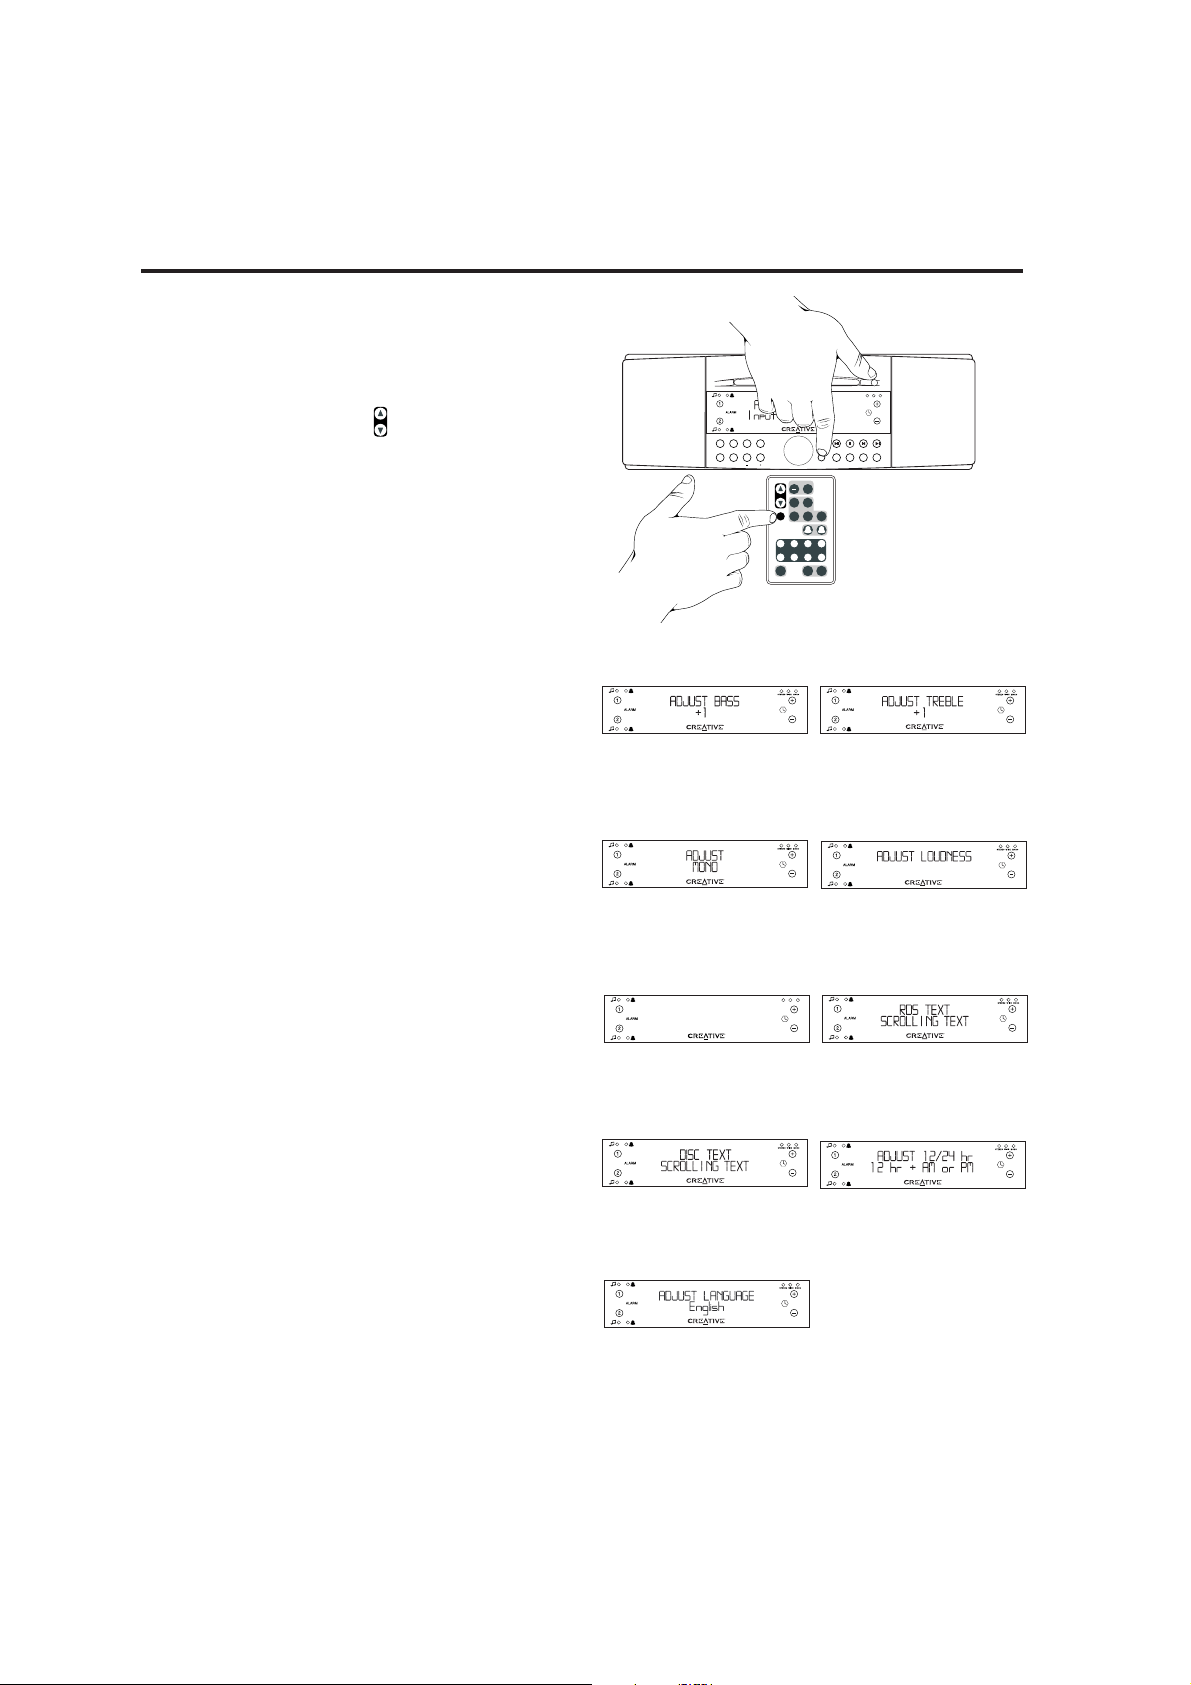
JOG FUNCTIONS
JOG button operation:
Press the JOG button on the radio or on the remote
control to select the first JOG (See W). Press the JOG
button again to select additional JOG functions.
Use the VOLUME knob or the buttons on the remote
control to adjust settings of JOG functions. JOG
operation is cancelled five seconds after the last JOG
or VOLUME adjustment. Pressing any other Radio CD
function also cancels JOG operation.
JOG functions
Bass: Bass output can be adjusted in four steps up
or down.
Treble: Treble output can be adjusted in four steps up
or down.
Stereo/Wide/Mono: Adjustment cycles through
STEREO, WIDE and MONO modes. MONO operation
is cancelled when standby is entered.
Loudness: With LOUDNESS engaged, the Radio CD
will boost the bass output at low VOLUME settings.
Snooze Time: Adjustable from 5 minutes to
22 minutes
RDS Text Display: For FM station RDS text, choose
between “scrolling text” display, “static text” display
and no text display.
Disc Text Display: For audio CDs that have CD text or
MP3 files, choose between “scrolling text” display,
“static text” display and no text display.
Time Display Mode: Choose 12 hour AM/PM time (US
standard) or 24 hour time (International standard)
Display Language: Choose English, Spanish, French,
Italian or German or Dutch.
PRESETS
ALARMS
TAP TO SET
PRESS & HOLD TO ADJUST
1
2
SOUNDWORKS RADIO
TUNE
WAKEUP
TIME
ADJUST
FM 1/2
AM
SEEK
AUX
AUX
F
JOG
VOLUME
SLEEP
SNOOZE
MUTE
1
2
3
4
5
6
7
8
POWER
+
FM 1/2
CD INFO
CD MODE REPEAT
PRESETS
FOLDER
VOLUME
JOG
MW AUX
POWER
TRACK
SEEK
CD
/TUNE
WIDE
STEREO
CD IN
MONO
1234
5678
9 : 43AM
BASS Adjustment display
TREBLE Adjustment display
LOUDNESS
Adjustment display
WIDE
STEREO
MONO
ADJUST SNOOZE
9 M I N
SNOOZE Adjustment display
RDS TEXT
Adjustment display
Time Adjustment display
Language Adjustment display
STEREO/WIDE/MONO
Adjustment display
VOLUME
DISC TEXT
Adjustment display
Page 21
19191919191919
Adjusting The Wakeup Settings
During Wakeup Settings adjustment, you select Wakeup
time and the Music Wakeup Source and Volume. The
choice of Tone or Music Wakeup is selected later as the
Alarm is activated.
Note: Store any radio station you wish to use as a
Wakeup station in a PRESET location.
1) Press and hold either the Alarm 1 or the Alarm 2
button until a short tone is heard (about 1.5
seconds). The Radio CD enters Wakeup Adjustment
mode. Wakeup Adjustment persists for about 15
seconds if no button is pressed. You always have
five seconds between adjustments.
2) At any point during the Wakeup Adjustment session,
you can choose your preferred Music Wakeup by
selecting FM1, FM2, MW or CD. After choosing a
radio preset bank (FM1, FM2, or MW), choose the
desired station by pressing its PRESET button on the
remote control of the radio faceplate.
You can only choose CD wakeup if there is a CD
stored in the Radio CD. If the CD is removed after
CD wakeup is selected, the Wakeup Setting will
default to Tone Wakeup.
The AUX inputs are not available for Wakeup.
3) At any time during the Wakeup Adjustment session,
you can determine the Music Wakeup volume by
adjusting the VOLUME on either the remote control
or the radio faceplate.
WAKEUP FUNCTIONS
PRESETS
ALARMS
TAP TO SET
PRESS & HOLD TO ADJUST
1
2
SOUNDWORKS RADIO
TUNE
WAKEUP
TIME
ADJUST
FM 1/2
MW
SEEK
AUX
AUX
F
JOG
VOLUME
SLEEP
SNOOZE
MUTE
1
2
3
4
5
6
7
8
POWER
+
FM 1/2
CD INFO
CD MODE REPEAT
PRESETS
FOLDER
VOLUME
JOG
MW AUX
POWER
TRACK
SEEK
CD
/TUNE
WIDE
STEREO
CD IN
MONO
1234
5678
WAKEUP T I ME
7 : 57 AM
PRESETS
ALARMS
TAP TO SET
PRESS & HOLD TO ADJUST
1
2
SOUNDWORKS RADIO
TUNE
WAKEUP
TIME
ADJUST
FM 1/2
MW
SEEK
AUX
AUX
F
JOG
VOLUME
SLEEP
SNOOZE
MUTE
1
2
3
4
5
6
7
8
POWER
+
FM 1/2
CD INFO
CD MODE REPEAT
PRESETS
FOLDER
VOLUME
JOG
AM AUX
POWER
TRACK
SEEK
CD
/TUNE
WIDE
STEREO
CD IN
MONO
1234
5678
FM WAKEUP
7 : 57 AM
2. MUSIC WAKEUP Adjustment, First screen
1. Entering WAKEUP Adjustment
PRESETS
ALARMS
TAP TO SET
PRESS & HOLD TO ADJUST
1
2
SOUNDWORKS RADIO
TUNE
WAKEUP
TIME
ADJUST
FM 1/2
MW
SEEK
AUX
AUX
F
JOG
VOLUME
SLEEP
SNOOZE
MUTE
1
2
3
4
5
6
7
8
POWER
+
FM 1/2
CD INFO
CD MODE REPEAT
PRESETS
FOLDER
VOLUME
JOG
AM AUX
POWER
TRACK
SEEK
CD
/TUNE
WIDE
STEREO
CD IN
MONO
1234
5678
ALARM VOLUME
20
3. WAKEUP Volume adjustment
Page 22
20202020202020
WAKEUP FUNCTIONS
PRESETS
ALARMS
TAP TO SET
PRESS & HOLD TO ADJUST
1
2
SOUNDWORKS RADIO
TUNE
WAKEUP
TIME
ADJUST
FM 1/2
MW
SEEK
AUX
AUX
F
JOG
VOLUME
SLEEP
SNOOZE
MUTE
1
2
3
4
5
6
7
8
POWER
+
FM 1/2
CD INFO
CD MODE REPEAT
PRESETS
FOLDER
VOLUME
JOG
MW AUX
POWER
TRACK
SEEK
CD
/TUNE
WIDE
STEREO
CD IN
MONO
1234
5678
FM WAKEUP
7 : 57 AM
4. WAKEUP Time adjustment
PRESETS
ALARMS
TAP TO SET
PRESS & HOLD TO ADJUST
1
2
SOUNDWORKS RADIO
TUNE
WAKEUP
TIME
ADJUST
FM 1/2
MW
SEEK
AUX
AUX
F
JOG
VOLUME
SLEEP
SNOOZE
MUTE
1
2
3
4
5
6
7
8
POWER
+
FM 1/2
CD INFO
CD MODE REPEAT
PRESETS
FOLDER
VOLUME
JOG
MW AUX
POWER
TRACK
SEEK
CD
/TUNE
WIDE
STEREO
CD IN
MONO
1234
5678
ALARM 1
SETT I NGS STORED
5. WAKEUP Setting Stored display
Adjusting The Wakeup Settings
4) At any point in the Wakeup Adjustment session, you
can determine the wakeup time by using the Time
adjustment on the front panel or the TRACK/TUNE
adjustment on the remote control.
5) End the Wakeup Adjustment session by pressing
the same Alarm button again, or just wait about ten
seconds. The Wakeup Adjustment session will
automatically end. Either way, the Radio CD will
store your new settings.
Page 23
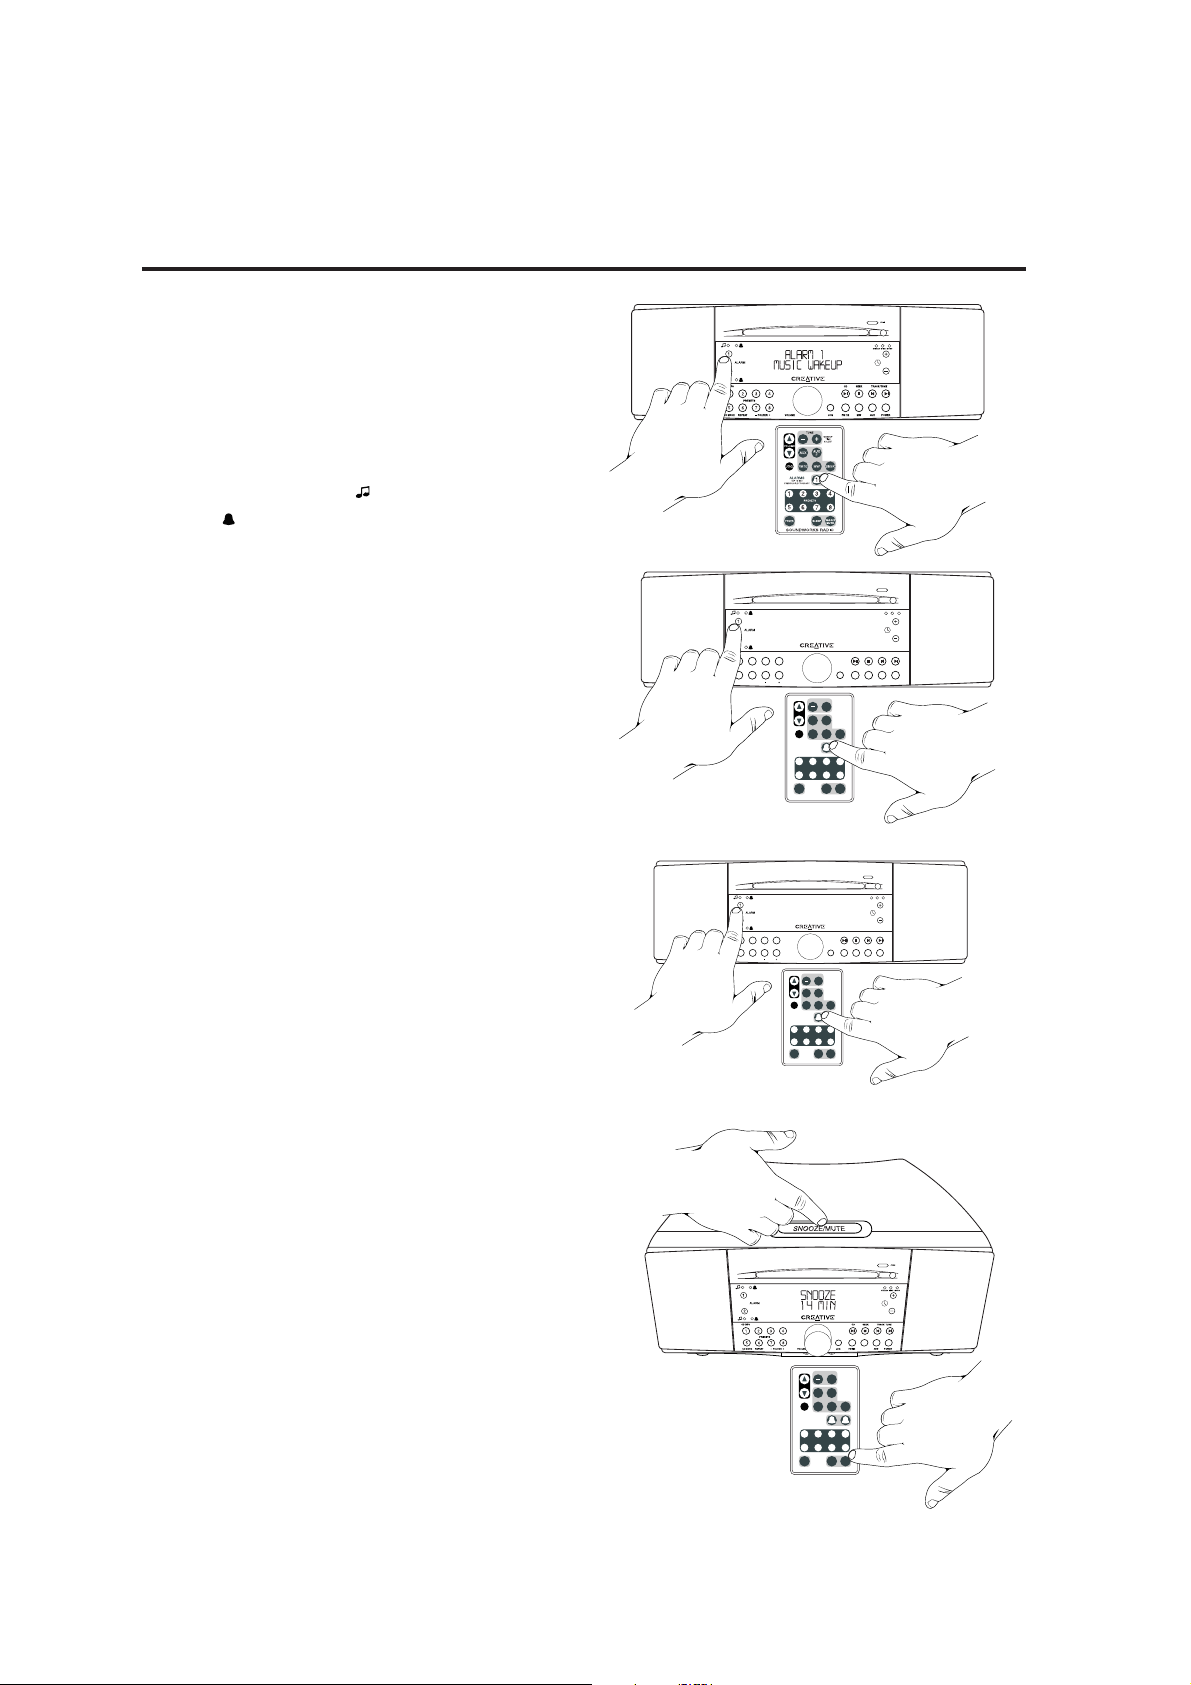
212121212121
Activating Wakeup
While in Standby or normal operation, tap either Alarm
button to cycle between
Music Wakeup
Tone Wakeup
No Wakeup
A Music Wakeup indicator ( ) or a Tone Wakeup
indicator ( ) lights to show activation.
Music Wakeup only functions if the Radio remains in
Standby mode.
Tone Wakeup operates whenever it is activated. You can
use Tone Wakeup as a reminder function during the day
while using the Radio normally.
Silencing a Wakeup
To cancel an operating Wakeup alarm for the day, but
keep it activated, tap the Power button on the front
panel or the remote control. The Wakeup settings will
remain active and operate the next day.
To silence an alarm and deactivate it (cancel it from
functioning the next day), press the appropriate Alarm
button on the radio face or the remote control.
Snooze Function
Tapping the SNOOZE/MUTE bar on the radio, or the
SNOOZE MUTE button (2) on the remote will silence
a Wakeup alarm for a pre-determined period of time
(5 to 22 minutes).
Adjust the SNOOZE delay period by using the JOG
function.
WAKEUP FUNCTIONS
PRESETS
ALARMS
TAP TO SET
PRESS & HOLD TO ADJUST
1
2
SOUNDWORKS RADIO
TUNE
WAKEUP
TIME
ADJUST
FM 1/2
MW
SEEK
AUX
AUX
F
JOG
VOLUME
SLEEP
SNOOZE
MUTE
1
2
3
4
5
6
7
8
POWER
+
FM 1/2
CD INFO
CD MODE REPEAT
PRESETS
FOLDER
VOLUME
JOG
MW AUX
POWER
TRACK
SEEK
CD
/TUNE
WIDE
STEREO
CD IN
MONO
1234
5678
ALARM 1
TONE WAKEUP
PRESETS
ALARMS
TAP TO SET
PRESS & HOLD TO ADJUST
1
2
SOUNDWORKS RADIO
TUNE
WAKEUP
TIME
ADJUST
FM 1/2
MW
SEEK
AUX
AUX
F
JOG
VOLUME
SLEEP
SNOOZE
MUTE
1
2
3
4
5
6
7
8
POWER
+
FM 1/2
CD INFO
CD MODE REPEAT
PRESETS
FOLDER
VOLUME
JOG
MW AUX
POWER
TRACK
SEEK
CD
/TUNE
WIDE
STEREO
CD IN
MONO
1234
5678
ALARM 1
OFF
PRESETS
ALARMS
TAP TO SET
PRESS & HOLD TO ADJUST
1
2
SOUNDWORKS RADIO
TUNE
WAKEUP
TIME
ADJUST
FM 1/2
MW
SEEK
AUX
AUX
F
JOG
VOLUME
SLEEP
SNOOZE
MUTE
1
2
3
4
5
6
7
8
POWER
+
MW
1a .
1b .
1c .
Snooze Function
2.
Page 24
2222222222
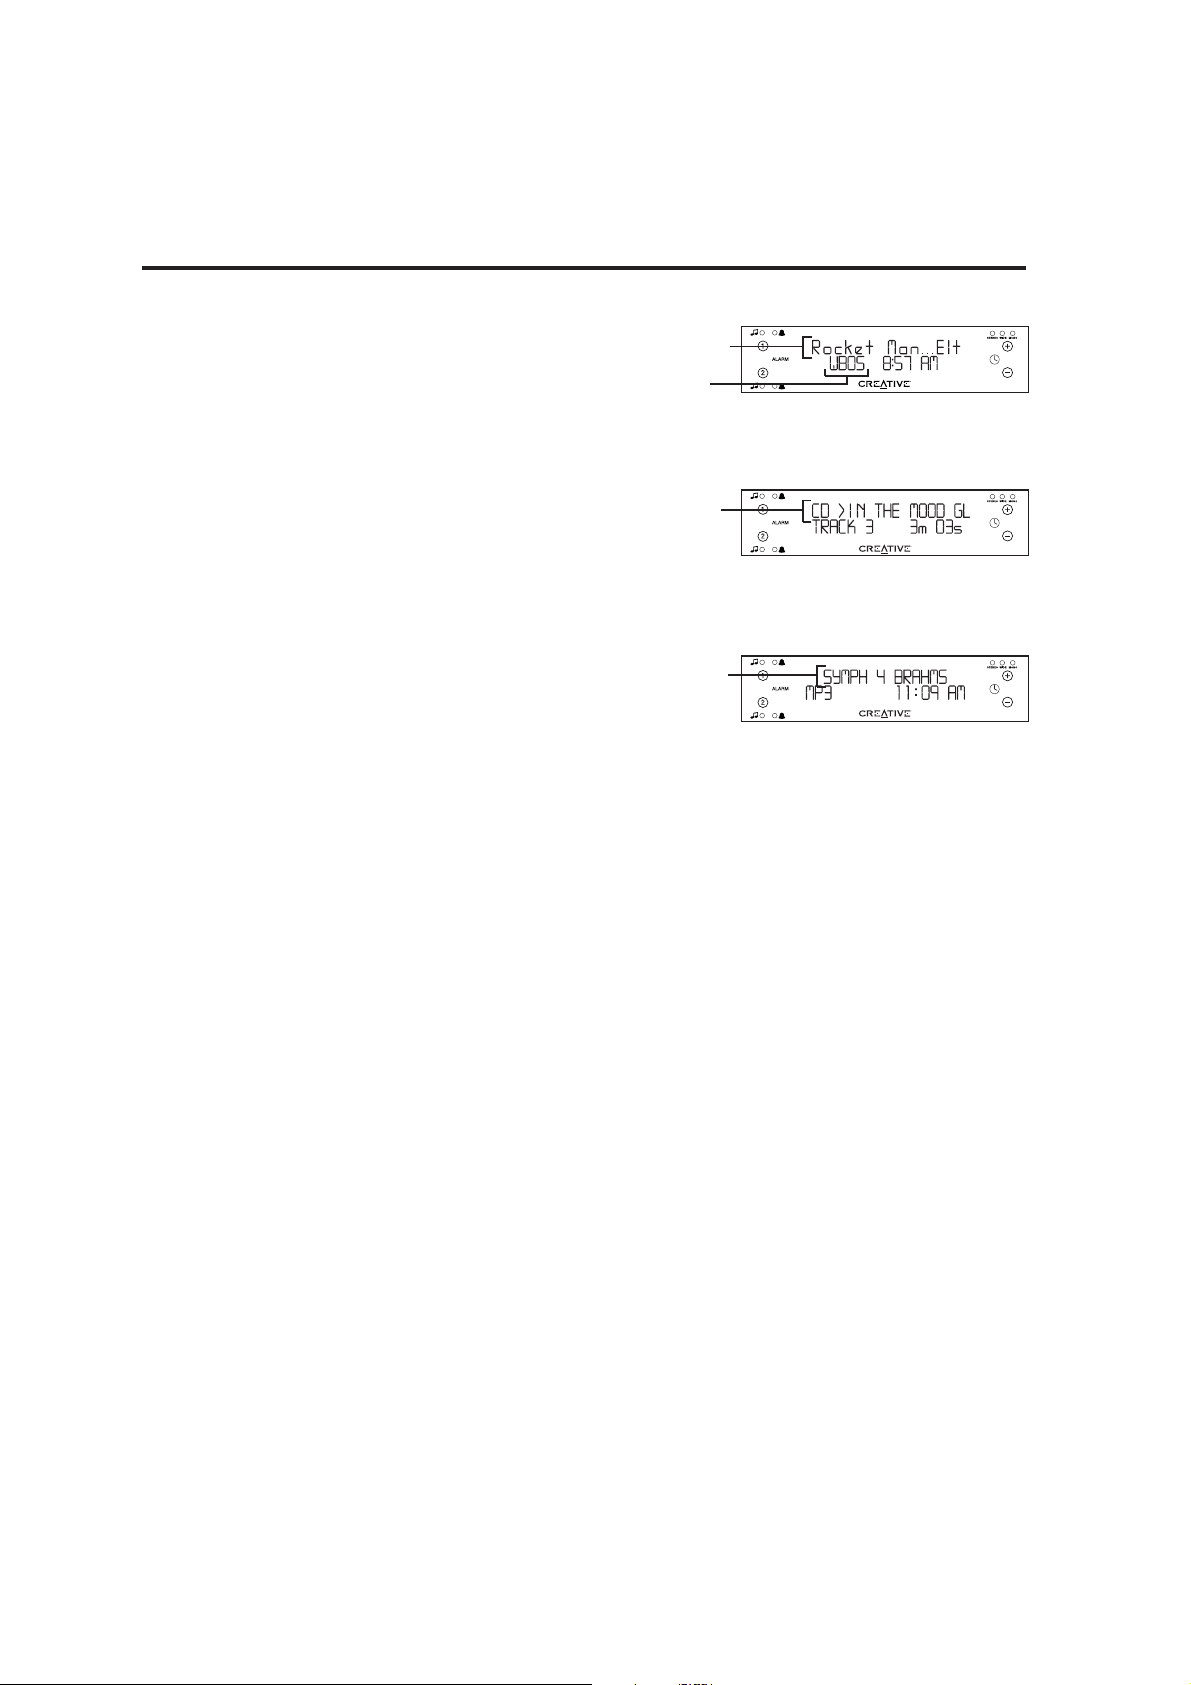
RADIO DATA SERVICE (RDS)
Some FM radio stations broadcast Radio Data Service
(RDS) text along with their programs. Station
Identification Text is displayed in the first 8 characters
of the lower line. This text generally does not change.
Descriptive Text is displayed on the top line. This text
may describe the station’s format or it may show the
song title and artist.
CD-Text
Audio CDs now include descriptive text stored along
with their audio programs. The Radio CD will decode
and display this text.
MP3 File ID3 Text Information
MP3 files downloaded from the Internet may contain
ID3 text information. ID3 text information can be added
to MP3 files as the file is created from an
uncompressed audio source. The Radio CD will
display this text when present in MP3 files. If there is
no ID3 text information, the Radio CD will display the
file name.
Choosing Text Displays
The JOG menu has separate RDS text and DISC text
headings that let you choose between scrolling text
display, static text display or no text display.
RADIO AND DISC TEXT DISPLAYS
RADIO DATA SERVICE display
CD-Text display
MP3 ID3 Text display
RDS descriptive text
RDS station
identification text
CD descriptive text
MP3 file ID3 text
Page 25
232323232323
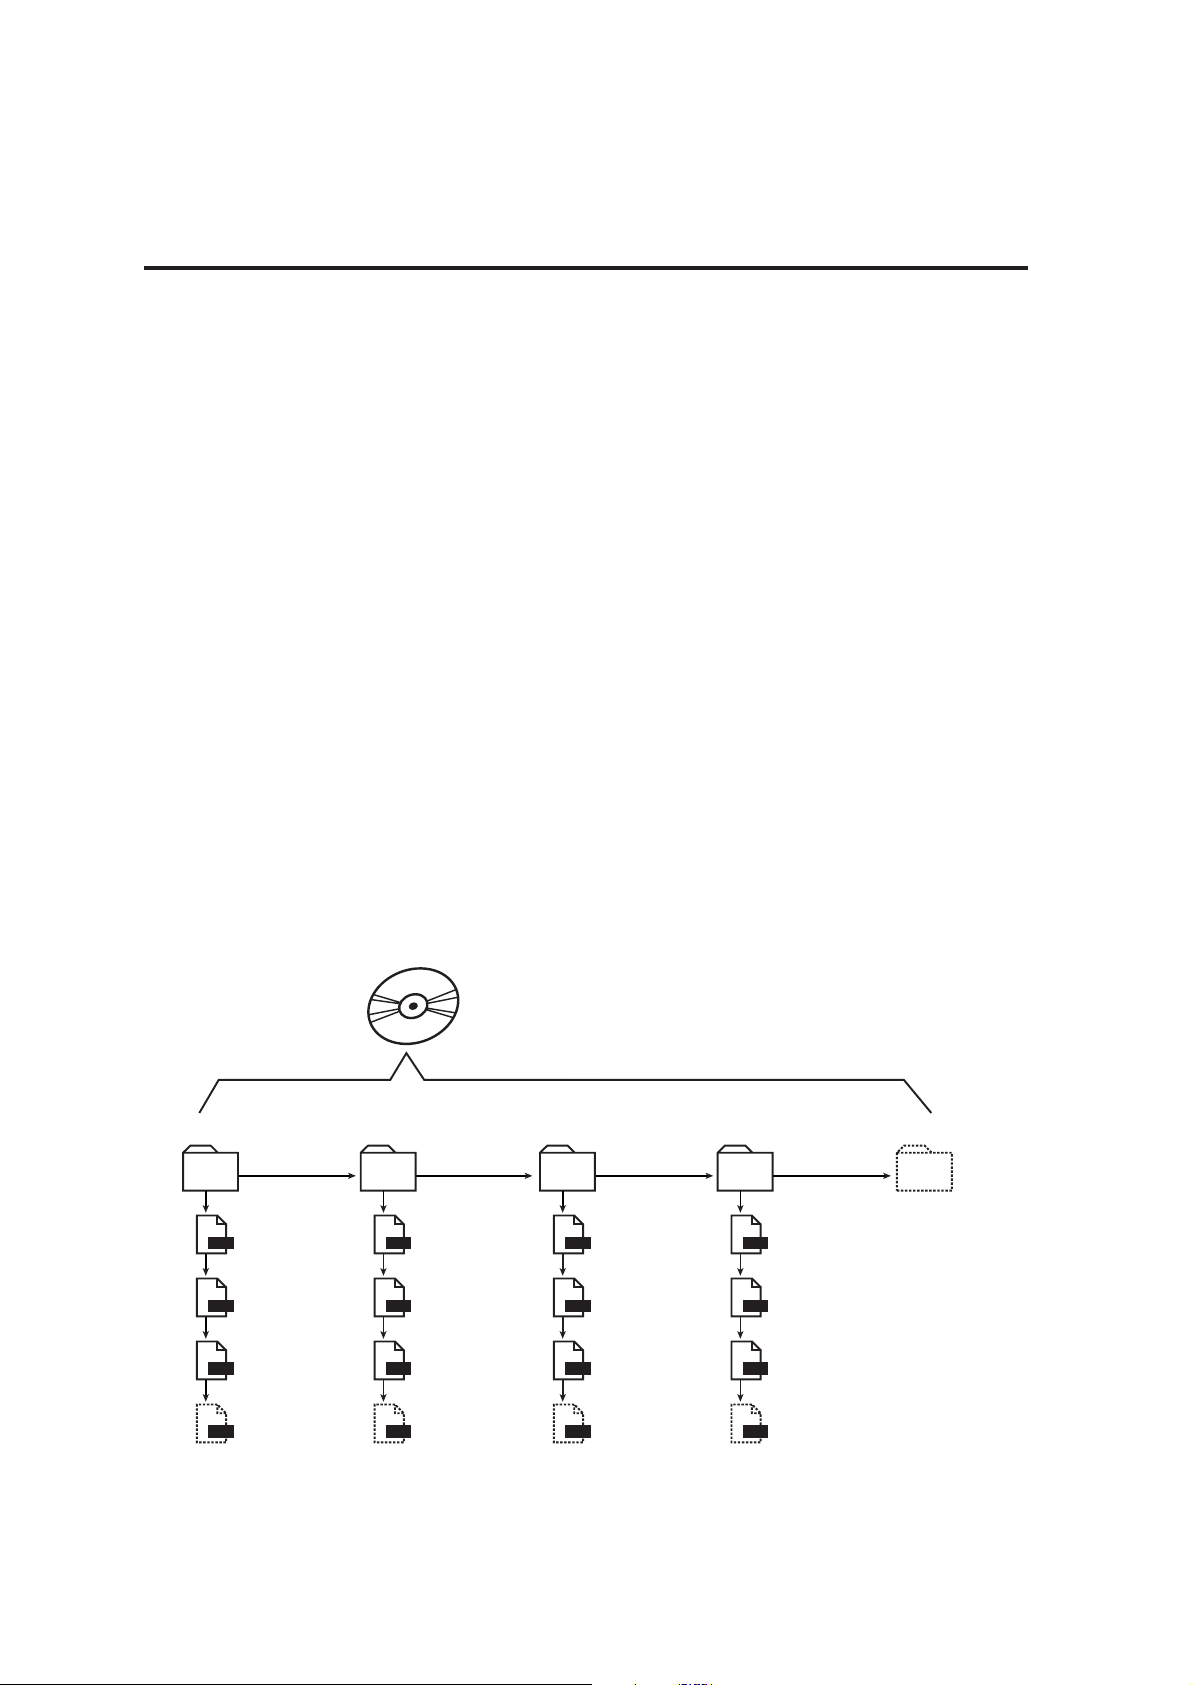
The Radio CD recognises MP3 compressed audio files
stored on a CD-ROM disc. You can create (or “burn”)
your own CD-ROM compilation discs containing much
more music than would fit on an audio CD. The Radio
CD will also recognise folders at the top level of a CDROM and display their folder names. Use folders on a
CD-ROM as a convenient way to select between
different groups of music.
The Radio CD recognises a maximum of 99 tracks in
any folder, or at the top level of a disc. The Radio CD
will not recognise subfolders. The Radio CD will treat
MP3 files inside subfolders as being inside the top
level folder.
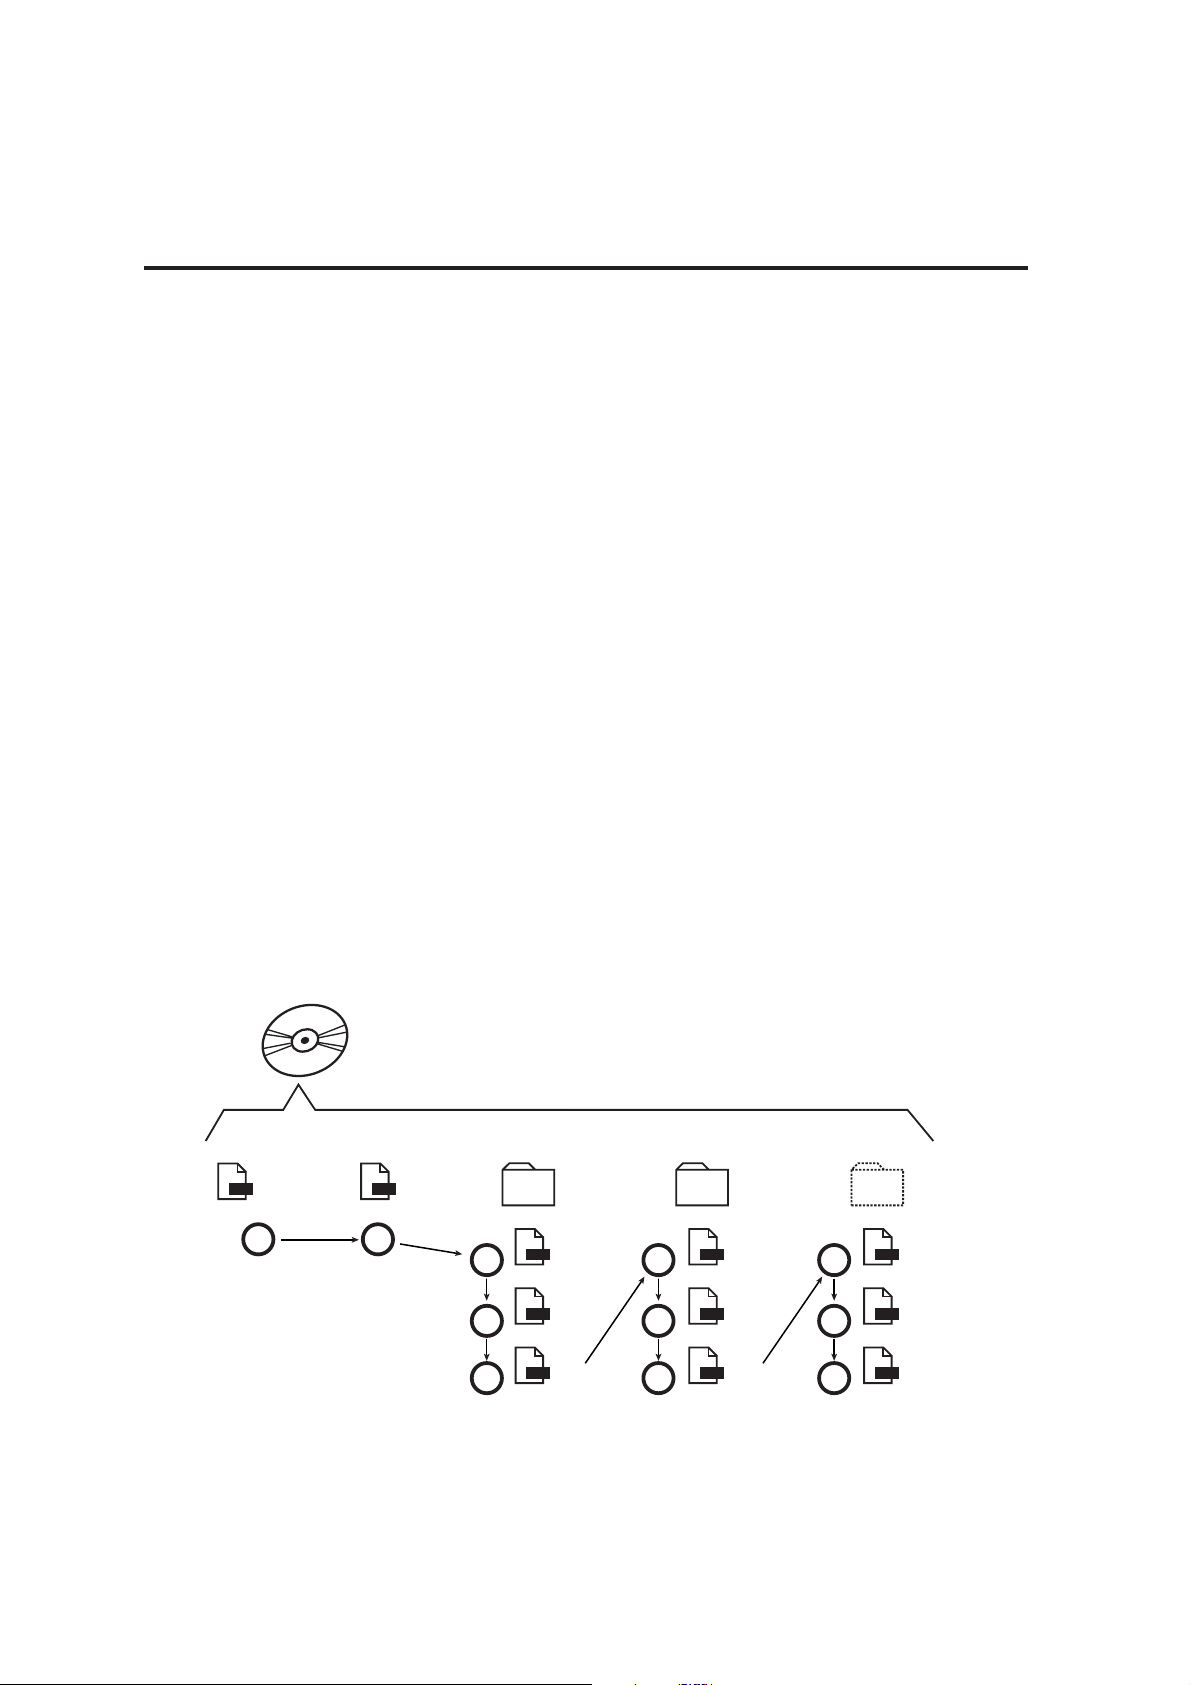
Sequence of Play on a CD-ROM
a) The Radio CD will first recognise any MP3 files
stored on the top level of the CD-ROM. It will play
those files "file name" sequence. The Radio CD will
ignore any files that do not end in “.mp3”.
b) After the Radio CD has played all MP3 files on the
top level of the CD-ROM, it will then play the
contents of any folders present on the CD-ROM in
“file name” sequence.
CD-ROM PLAY
mp3
Title b
mp3
Title a
Top Level of the CD-ROM
PLAY SEQUENCE
Tracks and Folders played
in alphabetical order.
Folder a Folder b
CD-ROM
More Folders
mp3
mp3
mp3
mp3
mp3
mp3
Title a
Title b
Title c
Title a
Title b
Title c
mp3
mp3
mp3
Title a
Title b
Title c
1
2
3
4
5
6
7
8
9
10
11
Page 26

2424242424
c) If there are no “.mp3” audio files in the top level of the
CD-ROM, the Radio CD will automatically play the
contents of the first folder on the CD-ROM (according
to the “folder name” sequence).
Press Preset 4 during MP3 file play to briefly display
the name of the active folder.
d) Once all the contents of the first folder are played, the
Radio CD will play the contents of any remaining
folders at the top level of the disc.
e) The FOLDER + and FOLDER - buttons skip to the
next or previous directory in sequence according to
the folder names.
f) The diagram on page 19 is an example of the
automatic play sequence the Radio CD follows when
playing the contents of a CD-ROM.
Tips For Preparing An MP3 CD-ROM
1) Start the title of each track or folder with a number to
designate its sequence. Many CD-ROM recording
programs support the automatic addition of sequence
numbers to the start of each MP3 file name.
2) The Radio CD treats numbers as text when
determining track and folder sequence. Use a
leading zero on single digit numbers (01, 02, 03, ...)
if the total of your tracks or folders is ten or greater.
3) The Radio CD supports a maximum of 99 tracks at
the top level of a CD or within any folder at the top
level of the CD-ROM.
CD-ROM PLAY
Page 27
25252525252525
Arranging MP3 Files and Folders on a CD-ROM
a) Place only folders at the top level of your CD-ROM (no
MP3 files). This lets you cycle through the folders using
the FOLDER + and FOLDER - buttons in a similar manner
to choosing discs in a multiple CD player.
b) RIP (compress) your favorite tracks from an audio CD
into a folder on your computer hard drive. Make sure the
track titles start with numbers according to your desired
track sequence.
c) Repeat the procedure for other groups of compressed
audio files you wish to store on the same CD-ROM,
saving the files in separate folders on your hard drive.
d) Use folder titles with a number at the start, in a sequence
of your choice.
e) “Burn” all the folders onto a CD-ROM at once.
Once completed, you could have a CD-ROM with much
more music than a conventional Audio CD. You can navigate
through each folder simply by pressing the FOLDER + and
FOLDER - buttons.
CD-ROM PLAY
mp3
mp3
mp3
mp3
mp3
mp3
mp3
mp3
mp3
mp3
mp3
mp3
mp3
mp3
mp3
mp3
01 Folder Name
01 Title
02 Title
03 Title
Up to 99 files
02 Folder Name
Top Level of the CD-ROM
03 Folder Name 04 Folder Name
CD-ROM
More Folders
01 Title
02 Title
03 Title
Up to 99 files
01 Title
02 Title
03 Title
Up to 99 files
01 Title
02 Title
03 Title
Up to 99 files
Page 28

2626262626
SPECIFICATIONS
Internal audio sources:
FM stereo tuner with display of Radio Data Service text
from supporting FM stations.
MW tuner.
CD Transport With:
INPUT VOLTAGE: 230VAC 50HZ 0.5A
Audio CD play supporting display of CD-text
Decode and playback of MP3 files from CD-ROM disc.
MP3 data rates supported: 30-300 kbps and variable
data rates
Inputs:
INPUT VOLTAGE: 230VAC 50HZ 0.5A
One rear panel AUX IN 3.5 mm stereo minijack
One rear panel MIXING INPUT (combined with REC
OUT) 3.5 mm stereo minijack
One rear panel MW Antenna 3.5 mm stereo minijack
Antenna stereo mini plug wiring configuration
sleeve – no connection, tip and ring-wire loop antenna
One rear panel FM Antenna “F”-type jack, 75 ohms
One front panel AUX-F 3.5 mm stereo minijack
Outputs:
One rear panel REC OUT stereo minijack
One front panel Headphone 3.5 mm stereo minijack
Rear Panel Controls:
FM antenna INT/EXT switch
Dimensions:
English Metric
Height: 4
15
/16inches 125 mm
Width: 14 inches 356 mm
Depth: 9
7
/8inches 248 mm
Depth (with knob and AC cord):
10
3
/8inches 258 mm
Weight: 12 lbs 5.5 kg
Page 29
SoundWorks Radio CD 740
Manuel de l’utilisateur
MW
Page 30

28
Le symbole de l’éclair dans un triangle
équilatéral est destiné à prévenir
l’utilisateur de la présence à l’intérieur
de l’appareil de « voltage dangereux »
non isolé d’une importance suffisante
pour constituer un risque d’électrocution.
Le point d’exclamation dans un triangle
équilatéral est destiné à prévenir l’utilisateur
de la présence d’importantes instructions
concernant le fonctionnement et la
maintenance (entretien) dans la
documentation accompagnant ce produit.
WARNING
DO NOT OPEN
TO PREVENT THE RISK OF ELECTRIC
SHOCK, DO NOT REMOVE
SPEAKER’S COVER. NO USER-
SERVICEABLE PARTS INSIDE.
REFER SERVICING TO QUALIFIED
SERVICE PERSONNEL.
ADVERTISSEMENT
POUR EVITER TOUT RISQUE DE CHOC
ELECTRIQUE, NE PAS DEMONTER LE
COUVERCLE DU HAUT PARLEUR. AUCUN
ENTRETIEN DES PIECES INTERIEURES N’EST
REQUIS.TOUT SERVICE D’ENTRETIEN NE DOIT
ETRE EFFECTUE QUE PAR DU PERSONNEL
D’ENTRETIEN QUALIFIE.
IMPORTANTES CONSIGNES DE
SECURITE AFFICHEES SUR LE
CAISSON A LIRE ET A RESPECTER
CAUTION:
TO PREVENT ELECTRIC SHOCK, MATCH WIDE
BLADE OF PLUG TO WIDE SLOT, INSERT FULLY.
ATTENTION :
POUR EVITER LES CHOCS ELECTRIQUES,
INTRODUIRE LA LAME LA PLUS LARGE DE LA
FICHE DANS LA BORNE CORRESPONDANTE
DE LA PRISE ET POUSSER JUSQU’AU FOND.
REMARQUE IMPORTANTE :
LE NUMERO DE SERIE DU HAUT-PARLEUR EST
SITUE SUR LE PANNEAU DE COMMANDE. NOTEZ
CE NUMERO ET CONSERVEZ-LE DANS UN ENDROIT
SUR. CECI CONCERNE VOTRE SECURITE.
Page 31

29
ADDENDA:
Les entrées suivantes complètent ou corrigent les informations du manuel de l’utilisateur, ou décrivent des
fonctionnalités venues s’ajouter après la rédaction du manuel.
FONCTIONNALITES DE LA LECTURE DE DISQUE
Au cours de la lecture d’un CD audio
Appuyez sur STOP Position du disque
1 fois ....................... Reprendre à partir du même emplacement
2 fois ............................ Démarrer au début du disque
Au cours de la lecture d’un CD-ROM
Appuyez sur STOP Position du disque
1 fois ....................... Reprendre à partir du même emplacement
2 fois ......................... Démarrer au début du répertoire
3 fois ............................ Démarrer au début du disque
Lecture CD et bouton ALIMENTATION : Appuyez sur le bouton ALIMENTATION au cours de la lecture d’un disque
pour entrer dans le mode reprise de piste VEILLE. Appuyez de nouveau sur le bouton ALIMENTATION pour
reprendre la lecture exactement au même emplacement sur le disque (CD audio ou CD-ROM).
Fonctionnalité de Présélection 5 « REPERTOIRE » : Le radio CD 740 SoundWorks reconnaît les répertoires du
niveau supérieur d’un CD-ROM. Appuyez sur Présélection 5 « REPERTOIRE » au cours de la lecture d’un CD-ROM
pour afficher les 16 premières lettres du nom du répertoire contenant la piste MP3 active. HAUT NIVEAU apparaît si
le fichier ne se trouve pas dans un répertoire.
PREPARATION DU CD-ROM :
Nombre maximal de fichiers MP3 individuels pris en charge sur un CD-ROM :
295 fichiers.
Si le nombre total de fichiers MP3 sur un CD-ROM dépasse 295, l’affichage du nom du répertoire, la séquence de
lecture du répertoire et du fichier MP3 ne seront pas connus.
Nombre maximal de répertoires pris en charge sur un CD-ROM :
29 répertoires.
Séquence de lecture de fichier MP3 sur un CD-ROM :
Le radio CD 740 SoundWorks reconnaît les huit premiers caractères du nom d’un fichier MP3 afin de déterminer
la séquence de lecture. Assurez-vous de numéroter vos noms de fichiers MP3 dès le début du nom de fichier.
La plupart des logiciels de gravure de CD-ROM prennent en charge la numérotation automatique au début des
noms de fichiers lors de la gravure de CD-ROM.
CD-ROM multi-session :
Le radio CD 740 SoundWorks ne reconnaît que la première session d’un CD-ROM. Gravez des CD-ROM complets
pour les utiliser avec le radio CD 740 SoundWorks.
FONCTIONNALITES DE PRESELECTION RADIO :
Quand une fréquence FM est stockée dans une PRESELECTION, le paramètre Stéréo/Large/Mono et Texte RDS en
cours est également stocké. Si vous appuyez sur PRESELECTION, les paramètres stockés écrasent le paramètre
de menu EQUAL. Le stockage d’une station stéréo FM faible en mode MONO garantira une reproduction plus nette
dans des conditions de réception diverses. Vous pouvez également choisir de stocker des stations FM avec du
texte RDS que vous ne voulez pas voir en mode STATIQUE ou AUCUN TEXTE.
Page 32

30
FONTIONNALITES DE REGLAGE DE L’ALARME
Pour un réveil accompagné d’une piste de CD audio spécifique : IInsérez un CD audio dans la
radio et appuyez sur Alarme 1 ou Alarme 2 pendant deux secondes pour entrer dans une session
Réglage de l’alarme. Au cours de la session Réglage de l’alarme, appuyez d’abord sur le bouton
Lecture/Pause CD pour sélectionner Réveil CD. Puis utilisez les boutons Piste/Réglage sur le
panneau avant du lecteur radio CD pour sélectionner la piste à écouter. Lors de l’activation de
l’alarme, la radio lancera la lecture du CD à partir de la piste sélectionnée et continuera à lire les
pistes CD de manière séquentielle.
Pour un réveil accompagné d’un fichier MP3 de CD-ROM spécifique : Le radio CD 740
SoundWorks vous permet également de sélectionner un fichier MP3 (ou piste) sur un CD-ROM
pour vous réveiller à l’aide du bouton Piste/Réglage. Lors d’une session d’activation d’alarme,
un fichier MP3 de réveil est sélectionné à partir des boutons Piste/Réglage du panneau avant.
Un schéma simplifié de sélection des pistes d’un CD-ROM est pris en charge. Tous les fichiers
MP3 d’un disque sont représentés par un numéro correspondant à la séquence de lecture des
fichiers MP3 présents sur le disque en mode Lecture tout. Les pistes du niveau supérieur du
disque sont d’abord numérotées, suivies des pistes du premier répertoire, du deuxième répertoire
et ainsi de suite.
Page 33

31
INSTRUCTIONS IMPORTANTES CONCERNANT LA SECURITE
Lire les instructions
Lisez l’ensemble des instructions relatives à la sécurité et à l’utilisation avant de faire fonctionner le produit.
Conserver les instructions
Conservez précieusement les instructions relatives à la sécurité et à l’utilisation pour pouvoir vous y référer à
tout moment.
Avertissements
Tenez compte des avertissements présents sur le produit et les instructions d’utilisation.
Instructions
Suivez toutes les instructions concernant le fonctionnement et l’utilisation.
Nettoyage
Mettez le produit hors tension avant tout nettoyage. N’utilisez pas de nettoyants liquides ou aérosols. Utilisez un
chiffon humide.
Fixations
Pour plus de sûreté, utilisez uniquement des fixations ou accessoires recommandés par Creative.
Eau et humidité
N’utilisez pas ce produit à proximité d’une source d’eau.
Positionnement
Placez le produit sur une surface stable ou un support recommandé ou vendu avec le produit. Dans le cas
contraire, le produit risque de tomber et de s’endommager, voire de causer des blessures physiques. Suivez les
instructions du fabricant relatives au montage du produit..
Ventilation
Afin d’assurer un fonctionnement correct et de prévenir tout risque de surchauffe, veillez à ne pas obstruer ni
couvrir les ouvertures et fentes de ventilation avec des tissus ou matériaux imperméables. Evitez également
d’installer le produit sur une étagère ou un casier encastré dans un mur, à moins qu’une ouverture pour la
ventilation soit aménagée ou que les instructions de Creative aient été respectées.
Chaleur
N’installez pas le produit à proximité d’une source de chaleur telle qu’un radiateur, un four et tout autre produit
(y compris un amplificateur) générant de la chaleur.
Alimentation électrique
Ce système de haut-parleurs est spécialement conçu pour une utilisation avec la plage électrique spécifiée
sur l’adaptateur secteur fourni ; toute utilisation en dehors de cette plage est à votre propre risque. Veuillez
contacter votre compagnie électrique locale pour toute question relative à la tension électrique du lieu
d’utilisation du produit.
Page 34

32
INSTRUCTIONS IMPORTANTES CONCERNANT LA SECURITE
Polarisation
Le produit peut comprendre une prise de courant alternatif polarisée, par mesure de sécurité. L’une des
broches étant plus large que l’autre, vous pouvez insérer cette prise dans la prise murale d’une seule façon.
Si vous ne parvenez pas à insérer complètement la prise, enfoncez-la dans l’autre sens. Si vous n’arrivez
toujours pas à enfoncer la prise, demandez à votre électricien de remplacer votre prise murale. Ne forcez
pas la prise dans la prise murale.
Protection du câble électrique
Les câbles électriques doivent être disposés de manière à minimiser les risques d’endommagement par
piétinement ou écrasement etc. Faites particulièrement attention à la prise, la prise murale et au câble reliant
le produit.
Foudre
Mettez le produit hors tension lors d’un orage ou si vous ne l’utilisez pas pendant un certain temps. Cela permet
d’éviter tout risque d’endommagement causé par la foudre ou la surtension de la ligne électrique.
Surchage
Ne surchargez pas les prises, les rallonges électriques ou les prises multiples afin d’éviter tout risque
d’incendie ou de courtcircuit.
Objets et liquide dans l’appareil
N’insérez jamais d’objets dans le produit au travers des ouvertures afin d’éviter tout risque d’incendie,
d’électrocution ou d’endommagement. Ne renversez aucun liquide sur le produit.
Réparation
N’essayez pas de réparer le produit vous-même. La réparation de l’appareil doit être effectuée par un
personnel qualifié.
Dépannage
Mettez le produit hors tension. Faites appel à un dépanneur lorsque :
a) le câble d’alimentation ou la prise de l’appareil est endommagé.
b) vous avez laissé tomber un objet ou renversé du liquide dans les ouvertures du produit.
c) le produit a été exposé à la pluie ou l’eau.
d) le produit ne fonctionne pas correctement même après avoir suivi les instructions relatives au
fonctionnement.
e) le comportement du produit est inattendu.
f) le produit est tombé ou a été endommagé.
Remplacement des composants de l’appareil
Lors du remplacement de composants, vérifiez que le technicien utilise des composants spécifiés par Creative
ou ayant les mêmes spécifications que les composants d’origine. L’utilisation de composants non recommandés
peut entraîner un risque d’incendie, de choc électrique ou d’autres dangers.
Vérification de sécurité
Une fois le produit révisé ou réparé, demandez au technicien de vérifier que l’état de marche du produit est
satisfaisant.
Page 35

33
INTRODUCTION
Cambridge SoundWorks vous souhaite de profiter
pleinement des hautes performances de votre
nouveau lecteur radio CD 740 SoundWorks. Votre
nouvelle radio offre un son FM stéréo de haute qualité
et une lecture de stations utiles de la bande MW.
Elle peut stocker 16 présélections de stations FM et
8 présélections de stations MW. Un lecteur de disque
intégral, à chargement par fente, lit les CD audio et
les fichiers MP3 sur CD-ROM. Le large affichage de
32 caractères et la commande à distance intégrale
facilite l’utilisation de la radio dans toute la pièce.
Le radio CD 740 SoundWorks affiche trois types de
texte supplémentaire :
• Texte station FM Radio Data Service (RDS)
• Texte CD
• Texte « ID3 » stocké dans la plupart des
fichiers MP3.
Une fonction de gradation automatique réduit la
luminosité de l’affichage dans les pièces sombres tout
en conservant une bonne lisibilité à la lumière vive.
Une cellule d’alimentation interne longue durée permet
d’afficher l’heure actuelle de manière précise pendant
des années. L’insertion d’une pile 9 V (non fournie)
garantit à l’utilisateur le déclenchement d’une fonction
de réveil activée même lors d’une coupure de courant.
Les entrées avant et arrière permettent une connexion
facile des sources de programmes audio (telles que
des lecteurs de cassettes et de MP3 portables).
Une sortie Enregistrement vous permet d’envoyer le
signal du programme audio courant vers d’autres
périphériques.
Un bouton EQUAL pratique vous permet de
sélectionner une variété de réglages secondaires
(Aigus et Graves, modes Temps de rappel et Affichage
du texte, entre autres).
Page 36

34
Retirez le radio CD SoundWorks (voir A) de son
enveloppe en polyéthylène et placez-le à l’endroit de
votre choix. La sortie des basses et la tonalité de
l’alarme du radio CD seront réduites si la radio est
placée sur une surface plane appropriée.
Connectez l’antenne MW (voir B) : Pour préparer
l’antenne (1), pliez la base (2) et enclenchez l’antenne
sur la base (3). Placez l’antenne MW (4) aussi loin que
possible, de préférence à 20 cm (8 pouces) au moins
du lecteur radio CD. Insérez la mini-prise de l’antenne
MW sur le panneau arrière du radio CD, dans la
mini-prise marquée ANTENNE MW (5).
Faites pivoter l’antenne MW pour rechercher le
meilleur signal de réception des stations MW
individuelles.
Connectez le cordon d’alimentation en
insérant la prise du radio CD SoundWorks
dans une prise facile d’accès.
Le cordon CA fait également office d’antenne FM
principale du radio CD. Améliorez le fonctionnement
du cordon en le tirant sur au moins 50 % de sa
longueur pour former une ligne droite (voir C). Vérifiez
que le commutateur de l’antenne FM situé sur le
panneau arrière de la radio est sur la position (interne)
INT (réglage usine par défaut).
Si vous le souhaitez, vous pouvez connecter l’antenne
FM externe et l’utiliser à la place de l’antenne interne
(voir D). Branchez l’antenne externe au connecteur
de type « F » situé sur le panneau arrière. Réglez le
commutateur de l’antenne FM sur EXT (externe).
MISE EN ROUTE
MIXING
INPUT
RECORD
OUTPUT
INPUT INPUT
MW
ANTENNA
FM ANTENNA
EXT
INT
INPUT
75 OHMS
AUX
MIXING
INPUT
RECORD
OUTPUT
INPUT INPUT
MW
ANTENNA
FM ANTENNA
EXT
INT
INPUT
75 OHMS
AUX
A
L
A
R
M
P
R
E
S
E
T
S
S
T
E
R
E
O
C
D
IN
C
D
I
N
F
O
C
D
M
O
D
E
JOG
FM
1/2
CD
SEEK
TR
ACK/TU
NE
M
W
AUX
PO
W
ER
R
E
P
E
A
T
–
F
O
L
D
E
R
+
W
ID
E
M
O
N
O
1
1
2
2
3
4
5
6
7
8
SNOOZE/MUTE
B.
1.
2.
3.
4.
5.
C.
D.
A.
Page 37

35
Réglage de l’horloge
Vous pouvez régler l’heure courante que la radio soit
activée ou en mode veille. Il vous suffit d’appuyer sur
les boutons de réglage de l’heure (en regard du
symbole) situés à droite de l’affichage (voir E).
Remarque : L’heure courante ne peut être réglée
qu’à partir du panneau avant du radio CD. Vous
pouvez régler l’heure de réveil à l’aide de la
télécommande, mais pas l’heure courante.
Pile de sauvegarde de l’alarme par tonalité
Pour sauvegarder la fonction d’alarme pendant
48 heures lors d’une coupure de courant, procurezvous une pile de 9 volts et installez-la dans le compartiment de la radio. Retirez le couvercle du compartiment à piles, insérez la pile et replacez le couvercle.
Si l’alarme est activée (réveil en musique ou par
tonalité) et qu’une panne de courant survient, la pile
déclenche l’alarme par tonalité à l’heure correcte.
Appuyez sur Alimentation sur la radio pour arrêter
l’alarme. Retirez la pile si l’appareil est débranché
pendant plus de 24 heures. Remplacez la pile si
l’alarme par tonalité s’est déclenchée en urgence
pendant 30 minutes (voir F).
Mode veille et mode actif
Appuyez sur le bouton ALIMENTATION pour
sélectionner le mode veille ou actif (voir G)
Vous pouvez aussi utiliser le bouton Alimentation
du panneau avant pour déclencher la MINUTERIE
(voir page 39).
Sélection des bandes radio
1) Appuyez sur le bouton FM 1/2 pour sélectionner
la bande radio FM et l’une des deux banques
de présélections de station FM. Vous pouvez
stocker huit stations FM dans la banque de
PRESELECTIONS FM1 et huit stations FM
différentes dans la banque de PRESELECTIONS
FM2 (voir H).
2) Si vous basculez d’un autre mode au mode FM,
la radio retournera à la dernière banque de
PRESELECTIONS utilisée (à partir du mode veille,
MW, CD ou à partir d’une entrée AUX). Appuyez
sur le bouton FM 1/2 en mode FM pour
sélectionner l’autre banque de présélections.
3) Appuyez sur le bouton MW pour sélectionner la
bande radio MW. La bande MW dispose d’une
banque de PRESELECTIONS.
MISE EN ROUTE
G.
H.
PRESETS
ALARMS
TAP TO SET
PRESS & HOLD TO ADJUST
FOLDER
REPEAT
+
1
2
SOUNDWORKS RADIO CD
SEEK
STOP
TRACK / TUNE
WAKEUP
TIME
ADJUST
CD
FM 1/2
MW AUX
JOG
VOLUME
SLEEP
SNOOZE
MUTE
1
2
3
4
5
6
7
8
CD MODE
CD TIME
POWER
FM 1/2
CD INFO
CD MODE REPEAT
PRESETS
FOLDER
VOLUME
JOG
MW AUX
POWER
TRACK
SEEK
CD
/TUNE
WIDE
STEREO
CD IN
MONO
1234
5678
9 : 43AM
PRESETS
ALARMS
TAP TO SET
PRESS & HOLD TO ADJUST
FOLDER
REPEAT
+
1
2
SOUNDWORKS RADIO CD
SEEK
STOP
TRACK / TUNE
WAKEUP
TIME
ADJUST
CD
FM 1/2
MW
AUX
JOG
VOLUME
SLEEP
SNOOZE
MUTE
1
2
3
4
5
6
7
8
CD MODE
CD TIME
POWER
FM 1/2
CD INFO
CD MODE REPEAT
PRESETS
FOLDER
VOLUME
JOG
AM AUX
POWER
TRACK
SEEK
CD
/TUNE
WIDE
STEREO
CD IN
MONO
1234
5678
FM2 P1
88 . 1
9 : 43AM
E.
F.
Page 38

36
PRESETS
ALARMS
TAP TO SET
PRESS & HOLD TO ADJUST
FOLDER
REPEAT
+
1
2
SOUNDWORKS RADIO CD
SEEK
STOP
TRACK / TUNE
WAKEUP
TIME
ADJUST
CD
FM 1/2
MW AUX
JOG
VOLUME
SLEEP
SNOOZE
MUTE
1
2
3
4
5
6
7
8
CD MODE
CD TIME
POWER
FM 1/2
CD INFO
CD MODE REPEAT
PRESETS
FOLDER
VOLUME
JOG
MW AUX
POWER
TRACK
SEEK
CD
/TUNE
WIDE
STEREO
CD IN
MONO
1234
5678
FM2 P1
88 . 1
9 : 43AM
PRESETS
ALARMS
TAP TO SET
PRESS & HOLD TO ADJUST
FOLDER
REPEAT
+
1
2
SOUNDWORKS RADIO CD
SEEK
STOP
TRACK / TUNE
WAKEUP
TIME
ADJUST
CD
FM 1/2
MW AUX
JOG
VOLUME
SLEEP
SNOOZE
MUTE
1
2
3
4
5
6
7
8
CD MODE
CD TIME
POWER
FM 1/2
CD INFO
CD MODE REPEAT
PRESETS
FOLDER
VOLUME
JOG
MW AUX
POWER
TRACK
SEEK
CD
/TUNE
WIDE
STEREO
CD IN
MONO
1234
5678
FM2 P1
88 . 1
9 : 43AM
J.
K.
Réglage des stations (FM ou MW)
• Méthode Autotune 1
(réglage automatique) : Appuyez sur le bouton
RECHERCHE (télécommande ou panneau avant de
la radio) pour rechercher automatiquement la
prochaine station de la fréquence la plus élevée
(voir I).
• Méthode Autotune 2
(réglage automatique) : Maintenez enfoncé
l’un des boutons PISTE/REGLAGE pour rechercher
la prochaine station (le bouton recherche de
manière descendante, le bouton de manière
ascendante). (Voir J)
• Réglage manuel : Pour rechercher une
fréquence spécifique, appuyez sur le bouton
PISTE/REGLAGE approprié ( ou ).
Stockage des stations dans des banques de
PRESELECTIONS
Appuyez sur le bouton FM 1/2 pour sélectionner la
banque de PRESELECTIONS souhaitée (FM1 ou FM2)
or sélectionnez la bande radio MW. Choisissez la
station souhaitée. Maintenez enfoncé le bouton
approprié jusqu’à ce qu’une courte tonalité se fasse
entendre. La station est stockée (voir K).
MISE EN ROUTE
PRESETS
ALARMS
TAP TO SET
PRESS & HOLD TO ADJUST
1
2
SOUNDWORKS RADIO
TUNE
WAKEUP
TIME
ADJUST
FM 1/2
MW
SEEK
AUX
AUX
F
JOG
VOLUME
SLEEP
SNOOZE
MUTE
1
2
3
4
5
6
7
8
POWER
+
FM 1/2
CD INFO
CD MODE REPEAT
PRESETS
FOLDER
VOLUME
JOG
MW AUX
POWER
TRACK
SEEK
CD
/TUNE
WIDE
STEREO
CD IN
MONO
FM2 P1
88 . 1
1234
5678
9 : 43AM
I.
Page 39

37
Important : N’utilisez que des disques compacts standard
de 12 cm (4
3
/4pouces). Les disques plus petits ne fonctionneront pas dans le mécanisme de chargement
par fente.
1) Insérez un CD dans l’emplacement pour sélection-
ner automatiquement la lecture CD. Le voyant CD
DANS allumé indique qu’un disque se trouve dans
le radio CD (voir L).
2) Si un CD se trouve dans le radio CD, appuyez sur le
bouton CD pour lancer la lecture du disque (voir M).
Choix des sélections
• Sélection d’une piste : Appuyez sur le bouton
PISTE/REGLAGE approprié ( ou ) (Voir N).
• Sélection d’un répertoire du CD-ROM : Pour sortir du
répertoire actuel (dossier), appuyez sur ou .
Voir page 49-51 pour consulter les explications sur
la navigation dans les répertoires (dossiers).
• Recherches avant et arrière : Maintenez enfoncé un
bouton PISTE/REGLAGE ( ou ).
Arrêt du disque
Appuyez une fois sur le bouton Stop (image incluse
du bouton stop uniquement) pour arrêter la lecture
du disque grâce à la fonctionnalité « reprise à partir
du même emplacement ». Appuyez deux fois sur le
bouton pour arrêter la lecture du disque et retourner
au début du disque.
Ejection du disque
Appuyez sur le bouton d’éjection du disque (voir O).
INFO CD
Le bouton INFO CD (présélection 1) permet d’afficher
les temps de lecture de disque, comme suit :
CD audio – Temps de piste écoulé • Temps de piste
restant • Temps CD écoulé • Temps CD restant
CD-ROM – Temps de fichier écoulé
MODE CD
Le bouton MODE CD (présélection 5) permet de sélectionner les autres modes de lecture de disque suivants :
CD audio – Lecture aléatoire • Lecture de la piste 1
CD-ROM – Lecture aléatoire • Lecture du répertoire •
Lecture aléatoire du répertoire • Lecture du fichier 1
REPETER
Le bouton REPETER (présélection 6) répète le mode
de lecture courant jusqu’à ce que le disque soit éjecté
ou que jusqu’à ce que vous appuyiez sur le bouton
ALIMENTATION. Le mode Répéter est activé tant que
le disque n’est pas éjecté ou jusqu’à ce que vous
appuyiez sur le bouton ALIMENTATION.
SELECTION DU LECTEUR CD
ALARM
P
R
E
S
E
T
S
S
T
E
R
E
O
CD IN
C
D
I
N
F
O
C
D
M
O
D
E
J
O
G
F
M
1
/2
C
D
S
E
E
K
T
R
A
C
K
/T
U
N
E
A
M
A
U
X
P
O
W
E
R
R
E
P
E
A
T
– FOL
DER
+
WIDE
M
O
N
O
1
1
2
2
3
4
5
6
7
8
SNOOZE/MUTE
WIDE
STEREO
MONO
CD IN
PRESETS
ALARMS
TAP TO SET
PRESS & HOLD TO ADJUST
1
2
SOUNDWORKS RADIO
TUNE
WAKEUP
TIME
ADJUST
FM 1/2
MW
SEEK
AUX
AUX
F
JOG
VOLUME
SLEEP
SNOOZE
MUTE
1
2
3
4
5
6
7
8
POWER
+
FM 1/2
CD INFO
CD MODE REPEAT
PRESETS
FOLDER
VOLUME
JOG
MW AUX
POWER
TRACK
SEEK
CD
/TUNE
WIDE
STEREO
CD IN
MONO
FM2 P1
88 . 1
1234
5678
9 : 43AM
FM 1/2
CD INFO
CD MODE REPEAT
PRESETS
FOLDER
VOLUME
JOG
MW AUX
POWER
TRACK
SEEK
CD
/TUNE
WIDE
STEREO
CD IN
MONO
1234
5678
FM2 P1
88 . 1
9 : 43AM
PISTE/REGLAGE
PRESETS
ALARMS
TAP TO SET
PRESS & HOLD TO ADJUST
1
2
SOUNDWORKS RADIO
TUNE
WAKEUP
TIME
ADJUST
FM 1/2
MW
SEEK
AUX
AUX
F
JOG
VOLUME
SLEEP
SNOOZE
MUTE
1
2
3
4
5
6
7
8
POWER
+
FM 1/2
CD INFO
CD MODE REPEAT
PRESETS
FOLDER
VOLUME
JOG
AM AUX
POWER
TRACK
SEEK
CD
/TUNE
WIDE
STEREO
CD IN
MONO
1234
5678
FM2 P1
88 . 1
9 : 43AM
Lecture/Pause CD
Insertion du CD
CD DANS
allumé
Ejection du disque
L.
M.
N.
O.
7
8
Page 40

38
Ecoute de sources sonores externes
Si vous souhaitez connecter en permanence une
source audio externe au radio CD SoundWorks, telle
qu’un lecteur cassette de bureau, connectez-la à
l’entrée AUX sur le panneau arrière (voir P). Appuyez
sur le bouton AUX sur le panneau avant ou sur la
télécommande pour sélectionner cette entrée (voir Q).
Si vous souhaitez connecter occasionnellement une
source de programme audio externe au radio CD, telle
qu’un lecteur MP3 portable, connectez-la à l’entrée
AUX-F sur le panneau avant (voir Q). Cette entrée
désactive l’entrée AUX arrière. Appuyez sur le bouton
AUX sur le panneau avant ou sur la télécommande
pour sélectionner cette entrée (voir R).
Entrée mixage/Sortie enregistrement
Vous pouvez mixer le son d’une source de programme
audio (sortie audio d’ordinateur par exemple) avec
d’autres sources audio du radio CD (FM, MW,
disque, Aux).
Connectez la source à l’ENTREE MIXAGE située sur
le panneau arrière (voir S). La source de programme
sera mixée avec la source de programme du radio CD
sélectionnée.
La source audio connectée à l’entrée mixage doit
avoir un contrôle de niveau si vous souhaitez régler la
balance entre la source de programme du radio CD et
la source audio de l’entrée mixage.
CONNEXION D’UNE SOURCE AUDIO EXTERNE
FM 1/2
CD INFO
CD MODE REPEAT
PRESETS
FOLDER
VOLUME
JOG
MW AUX
POWER
TRACK
SEEK
CD
/TUNE
WIDE
STEREO
MONO
1234
5678
AUX-F
HEADPHONES
FM2 P1
88 . 1
9 : 43AM
PRESETS
ALARMS
TAP TO SET
PRESS & HOLD TO ADJUST
1
2
SOUNDWORKS RADIO
TUNE
WAKEUP
TIME
ADJUST
FM 1/2
MW
SEEK
AUX
AUX
F
JOG
VOLUME
SLEEP
SNOOZE
MUTE
1
2
3
4
5
6
7
8
POWER
+
FM 1/2
CD INFO
CD MODE REPEAT
PRESETS
FOLDER
VOLUME
JOG
MW AUX
POWER
TRACK
SEEK
CD
/TUNE
WIDE
STEREO
CD IN
MONO
FM2 P1
88 . 1
1234
5678
9 : 43AM
MIXING
INPUT
RECORD
OUTPUT
INPUT INPUT
MW
ANTENNA
FM ANTENNA
EXT
INT
INPUT
75 OHMS
AUX
MIXING
INPUT
RECORD
OUTPUT
INPUT INPUT
MW
ANTENNA
FM ANTENNA
EXT
INT
INPUT
75 OHMS
AUX
P.
Q.
R.
S.
Page 41

39
FONCTIONNALITES PRATIQUES
Sourdine
Pour mettre le radio CD SoundWorks en sourdine :
Appuyez sur la barre ARRET MOMENTANE/SOURDINE
ou sur le bouton ARRET MOMENTANE/SOURDINE de
la télécommande (voir T). La mise en sourdine est
annulée si le bouton ALIMENTATION est activé,
si un disque est inséré ou que le volume est réglé.
Minuterie
Pour éteindre le radio CD automatiquement au bout
d’un certain temps :
• Appuyez sur le bouton MINUTERIE de la
télécommande jusqu’à ce que la durée de
lecture souhaitée soit atteinte (voir U).
OU
• Le radio CD en mode veille, appuyez rapidement sur
le bouton ALIMENTATION jusqu’à ce que la durée de
lecture souhaitée soit atteinte (voir V).
Le délai de minuterie est disponible pour une durée
de 15, 30, 45, 60, 90 ou 120 minutes. Le délai de
minuterie est annulé si le bouton ALIMENTATION est
activé ou si un disque est inséré. Insérez un disque
avant de sélectionner la fonction de minuterie si vous
souhaitez utiliser cette fonction en cours de lecture
d’un disque.
PRESETS
ALARMS
TAP TO SET
PRESS & HOLD TO ADJUST
1
2
SOUNDWORKS RADIO
TUNE
WAKEUP
TIME
ADJUST
FM 1/2
MW
SEEK
AUX
AUX
F
JOG
VOLUME
SLEEP
SNOOZE
MUTE
1
2
3
4
5
6
7
8
POWER
+
PRESETS
ALARMS
TAP TO SET
PRESS & HOLD TO ADJUST
1
2
SOUNDWORKS RADIO
TUNE
WAKEUP
TIME
ADJUST
FM 1/2
MW
SEEK
AUX
AUX
F
JOG
VOLUME
SLEEP
SNOOZE
MUTE
1
2
3
4
5
6
7
8
POWER
+
PRESETS
ALARMS
TAP TO SET
PRESS & HOLD TO ADJUST
1
2
TUNE
WAKEUP
TIME
ADJUST
FM 1/2
MW
SEEK
AUX
AUX
F
JOG
VOLUME
1
2
3
4
5
6
7
8
+
FM 1/2
CD INFO
CD MODE REPEAT
PRESETS
FOLDER
VOLUME
JOG
MW AUX
POWER
TRACK
SEEK
CD
/TUNE
WIDE
STEREO
CD IN
MONO
1234
5678
SLEEP DELAY
45 M I N
T.
U.
V.
ALA
R
M
PRESETS
S
T
E
R
E
O
C
D
IN
C
D
IN
F
O
C
D
M
O
D
E
J
OG
FM
1/2
CD
S
EEK
TRA
CK
/T
UN
E
M
W
AU
X
PO
W
ER
R
E
P
E
A
T
–
FO
L
D
E
R
+
W
ID
E
M
O
N
O
1
1
2
2
3
4
5
6
7
8
SN
O
O
ZE/M
UT
E
Page 42

40
HEADPHONES
APPUYEZ POUR ACTIVER L’ALARME
APPUYEZ SUR LE BOUTON ET MAINTENEZ-LE
ENFONCE POUR REGLER L’ALARME
LORS DE LA LECTURE D’UN DISQUE,
APPUYEZ SUR CE BOUTON POUR :
CD AUDIO :
TEMPS DE PISTE ECOULE, TEMPS DE PISTE RESTANT
TEMPS TOTAL ECOULE, TEMPS TOTAL RESTANT
CD-ROM :
TEMPS DE PISTE ECOULE
LORS DE LA LECTURE D’UN DISQUE, APPUYEZ SUR CE
BOUTON POUR :
CD AUDIO : LECTURE ALEATOIRE, LECTURE D’UNE PISTE
CD-ROM : LECTURE ALEATOIRE DE DISQUE, LECTURE D’UN DOSSIER
LECTURE ALEATOIRE D’UN DOSSIER, LECTURE D’UNE PISTE
BOUTONS DE PRESELECTION DES STATIONS RADIO :
APPUYEZ SUR UN BOUTON ET MAINTENEZ-LE ENFONCE
POUR STOCKER LA STATION EN COURS
INDIQUE LE STATUT DE L’ALARME
= REVEIL EN MUSIQUE
= REVEIL PAR TONALITE
INSEREZ LA MINI-PRISE CASQUE STEREO DE 3,5 mm ICI POUR UNE ECOUTE EN PRIVE
INSEREZ LA MINI-PRISE STEREO 3,5 mm DU LECTEUR AUDIO ICI. APPUYEZ SUR AUX POUR L’ECOUTER :
CETTE ENTREE ECRASE L’ENTREE AUX-R SITUEE A L’ARRIERE.
REGLE LE VOLUME EN FONCTIONNEMENT NORMAL : REGLE LES PARAMETRES LORS DE L’UTILISATION DU BOU
LORS DE LA LECTURE D’UN DISQUE, APPUYEZ SUR CE BOUTON
POUR REPETER LA LECTURE DU MODE CD EN COURS
APPUYEZ SUR CES BOUTONS POUR VOUS
DEPLACER ENTRE LES DIFFERENTS
REPERTOIRES D’UN CD-ROM
OPERATION NORMALE : APPUYEZ PO
PENDANT LE REVEIL : APPUYEZ POU
MW
ANTEN
INPUT
MIXING
INPUT
RECORD
OUTPUT
AUX
ENTREE AUXILIAIRE DE LA MINI-PRISE
STEREO 3,5 mm ARRIERE
MINI-PRISE D’ENTREE
DE L’ANTENNE MW
LA SORTIE AUDIO DE NIVEAU FIXE DE LA MINI-PRISE
STEREO 3,5 mm EST EGALEMENT UNE ENTREE MIXAGE
FONCTIONS DES PANNEAUX AVANT
ET SUPERIEUR DU RADIO CD
SOUNDWORKS
GUIDE DE REFERENCE RAPIDE –
PANNEAU AVANT DU RADIO CD SOUNDWORKS
Page 43

41
WIDE
STEREO
MONO
AUX-F
INDIQUE LA PRESENCE D’UN DISQUE DANS LE LECTEUR
EJECTE LE DISQUE
SELECTIONNE LA BANDE FM
RAPPUYEZ POUR PASSER DE LA BANQUE DE PRESELECTIONS 1 A 2
APPUYEZ PLUSIEURS FOIS POUR AFFICHER PLUSIEURS PARAMETRES RADIO.
UTILISEZ LE VOLUME POUR REGLER LES PARAMETRES.
BASSES_ +4 A -4 TEMPS DE RAPPEL- 5 A 22 MINUTES
AIGUS_ +4 A -4 TEXTE RDS- DEFILANT, FIXE, DESACTIVE
STEREO, LARGE, MONO DISC TEXTE- DEFILANT, FIXE, DESACTIVE
LOUDNESS- ACTIVE, DESACTIVE AFFICHAGE HEURE- 12 h AM/PM OU 24 h
LANGUE D’AFFICHAGE- ANGLAIS, ESPAGNOL, FRANÇAIS,
ITALIEN, ALLEMAND OU NEERLANDAIS
SELECTIONNE LA BANDE MW
(UNE BANQUE DE PRESELECTIONS)
SELECTIONNE L’ENTREE AUX
ALLUME OU ETEINT LA RADIO
(ALARME ACTIVE EN MODE « DESACTIVE »)
APPUYEZ PLUSIEURS FOIS POUR LA FONCTION
MINUTERIE (DE 15 A 120 MINUTES)
RADIO : APPUYEZ LEGEREMENT POUR EFFECTUER LE REGLAGE MANUEL,
APPUYEZ ET MAINTENEZ ENFONCE POUR CHERCHER LA STATION SUIVANTE.
DISQUE : APPUYEZ LEGEREMENT POUR AVANCER OU RECULER D’UNE
SELECTION AUDIO, APPUYEZ ET MAINTENEZ ENFONCE POUR EFFECTUER
DES RECHERCHES VERS L’AVANT OU L’ARRIERE DANS L’AUDIO.
RADIO : APPUYEZ POUR CHERCHER AUTOMATIQUEMENT
LA STATION SUIVANTE SUR LA BANDE.
DISQUE : APPUYEZ POUR ARRETER LA LECTURE.
TAPPUYEZ POUR LANCER LA LECTURE
DU DISQUE, RAPPUYEZ POUR METTRE
LA LECTURE EN PAUSE.
REGLE L’HEURE EN COURS
EN FONCTIONNEMENT NORMAL
REGLE L’HEURE DE REVEIL EN
MODE D’AJUSTEMENT DE L’ALARME
INDIQUE LE MODE AUDIO
FM ANTENNAW
INPUT
EXT
INT
75 OHMS
ANTENNE FM EXTERNE
ENTREE DE TYPE « F »
INTERNE/EXTERNE
SELECTEUR D’ANTENNE FM
MW
Page 44

42
GUIDE DE REFERENCE RAPIDE - TELECOMMANDE
RADIO CD 740 SOUNDWORKS
TELECOMMANDE
FONCTIONS RADIO ET ALARME
REGLE LE VOLUME EN FONCTIONNEMENT NORMAL
REGLE LES PARAMETRES LORS DE L’UTILISATION DU
APPUYEZ PLUSIEURS FOIS POUR AFFICHER
UTILISEZ LE VOLUME POUR REGLER LES PARAMETRES.
AFFICHAGE TEXTE RDS _ DEFILANT, FIXE, DESACTIVE
AFFICHAGE DISC TEXTE _ DEFILANT, FIXE, DESACTIVE
LANGUE D’AFFICHAGE _ ANGLAIS, ESPAGNOL,
FRANÇAIS, ITALIEN, ALLEMAND OU NEERLANDAIS
BOUTONS DE PRESELECTION DES STATIONS RADIO :
ENFONCE POUR STOCKER LA STATION EN COURS
PLUSIEURS PARAMETRES RADIO.
STEREO, LARGE, MONO
LOUDNESS– ACTIVE, DESACTIVE
TEMPS DE RAPPEL _ 5 A 25 MINUTES.
AFFICHAGE HEURE _ 12 h AM/PM OU 24 h
APPUYEZ SUR UN BOUTON ET MAINTENEZ-LE
BOUTON EQUAL
BASSES _ +4 A -4
TREBLE_ +4 A -4
TRACK / TUNE
VOLUME
CD
JOG
CD TIME
FM 1/2
ALARMS
TAP TO SET
PRESS & HOLD TO ADJUST
1234
PRESETS
5678
REPEATCD MODE
WAKEUP
TIME
ADJUST
SEEK
STOP
MW AUX
12
FOLDER
FOLDER
FM : APPUYEZ LEGEREMENT POUR
EFFECTUER LE REGLAGE MANUEL,
APPUYEZ ET MAINTENEZ ENFONCE
POUR CHERCHER LA STATION SUIVANTE.
REGLAGE ALARME : REGLE L’HEURE
DE REVEIL.
APPUYEZ POUR LANCER LA LECTURE
DU DISQUE
APPUYEZ POUR CHERCHER
AUTOMATIQUEMENT LA STATION
SUIVANTE SUR LA BANDE
SELECTIONNE UNE BANDE MW
(UNE BANQUE DE PRESELECTIONS)
SELECTIONNE L’ENTREE AUX
SELECTIONNE LA BANDE FM
RAPPUYEZ POUR PASSER DE LA BANQUE DE
PRESELECTIONS 1 A 2
APPUYEZ POUR ACTIVER L’ALARME
APPUYEZ SUR LE BOUTON ET MAINTENEZ-LE
ENFONCE POUR REGLER L’ALARME
+
L’ALARME FONCTIONNE EN MODE « DESACTIVE »
ALLUME OU ETEINT LA RADIO
POWER
SLEEP
SNOOZE
SOUNDWORKS RADIO CD
MUTE
APPUYEZ PLUSIEURS FOIS POUR CHOISIR
L’HEURE DE MINUTERIE (DE 15 A 120 MINUTES)
FONCTIONNEMENT NORMAL : APPUYEZ
POUR METTRE LE SON EN SOURDINE.
PENDANT LE REVEIL : APPUYEZ POUR
ACTIVER LA FONCTIONNALITE DE RAPPEL.
Page 45

43
RADIO CD 740 SOUNDWORKS
TELECOMMANDE
FONCTIONS DE LECTURE
DE DISQUE
VOLUME
JOG
TRACK / TUNE
CD
FM 1/2
WAKEUP
TIME
ADJUST
SEEK
STOP
MW AUX
APPUYEZ POUR AVANCER OU RECULER D’UNE
SELECTION AUDIO
APPUYEZ SUR LE BOUTON ET MAINTENEZ-LE
ENFONCE POUR EFFECTUER DES
RECHERCHES VERS L’AVANT OU L’ARRIERE
DANS UNE SELECTION AUDIO
APPUYEZ POUR LANCER LA
LECTURE DU DISQUE
LORS DE LA LECTURE :
APPUYEZ POUR ARRETER LA LECTURE
AVEC LA FONCTIONNALITE REPRENDRE
APPUYEZ SUR CE BOUTON POUR :
CD AUDIO
: TEMPS DE PISTE ECOULE
TEMPS DE PISTE RESTANT
TEMPS TOTAL ECOULE
TEMPS TOTAL RESTANT
CD-ROM
: TEMPS DE PISTE ECOULE
APPUYEZ SUR CE BOUTON POUR :
CD AUDIO
: LECTURE ALEATOIRE
CD-ROM
LECTURE ALEATOIRE D’UN REPERTOIRE
APPUYEZ SUR CE BOUTON POUR
LIRE PLUSIEURS FOIS LE MODE
LECTURE D’UNE PISTE
: LECTURE ALEATOIRE DU DISQUE
LECTURE D’UN REPERTOIRE
LECTURE D’UNE PISTE
DISQUE EN COURS
ALARMS
TAP TO SET
PRESS & HOLD TO ADJUST
CD TIME
12
FOLDER
1234
PRESETS
5678
+
FOLDERREPEATCD MODE
POWER
SLEEP
SOUNDWORKS RADIO CD
SNOOZE
MUTE
APPUYEZ SUR CE BOUTON POUR
VOIR LE NOM DU REPERTOIRE
APPUYEZ SUR CES BOUTONS POUR
VOUS DEPLACER ENTRE LES
REPERTOIRES D’UN CD-ROM
Page 46

44
FONCTIONS EQUAL
Fonctionnement du bouton EQUAL :
Appuyez sur le bouton EQUAL sur la radio ou la
télécommande pour sélectionner le premier EQUAL
(voir W). Appuyez de nouveau sur le bouton EQUAL
pour sélectionner d’autres fonctions EQUAL.
Utilisez le bouton VOLUME ou les boutons sur
la télécommande pour régler les paramètres des
fonctions EQUAL. Le fonctionnement de EQUAL
est annulé cinq secondes après le dernier réglage
VOLUME ou EQUAL. Le fonctionnement de EQUAL
est aussi annulé si vous appuyez sur toute autre
fonction radio CD.
Fonctions EQUAL
Basses : Quatre paliers, croissants ou décroissants,
permettent de régler la sortie des basses.
Aigus : Quatre paliers, croissants ou décroissants,
permettent de régler la sortie des aigus.
Stéréo/Large/Mono : L’ajustement défile entre les
modes STEREO, LARGE et MONO. Le fonctionnement
MONO est annulé lors du passage en veille.
Loudness : Lorsque LOUDNESS est activé, le radio
CD va régler la sortie des basses sur un VOLUME
faible.
Temps de rappel : réglable, de 5 à 22 minutes
Affichage Texte RDS : Pour le texte RDS des stations
FM, choisissez entre l’affichage « texte défilant »,
« texte fixe » et pas d’affichage de texte.
Affichage Disc Texte : Pour les CD audio disposant
de texte CD ou de fichiers MP3, choisissez entre
l’affichage « texte défilant », « texte fixe » et pas
d’affichage de texte.
Mode Affichage heure : Choisissez entre l’heure
indiquée sur 12 heures AM/PM (norme américaine)
ou l’heure sur 24 heures (norme internationale).
Langue d’affichage : Choisissez entre anglais,
espagnol, français, italien, allemand ou néerlandais.
PRESETS
ALARMS
TAP TO SET
PRESS & HOLD TO ADJUST
1
2
SOUNDWORKS RADIO
TUNE
WAKEUP
TIME
ADJUST
FM 1/2
AM
SEEK
AUX
AUX
F
JOG
VOLUME
SLEEP
SNOOZE
MUTE
1
2
3
4
5
6
7
8
POWER
+
FM 1/2
CD INFO
CD MODE REPEAT
PRESETS
FOLDER
VOLUME
JOG
MW AUX
POWER
TRACK
SEEK
CD
/TUNE
WIDE
STEREO
CD IN
MONO
1234
5678
9 : 43AM
Affichage Réglage
des BASSES
Affichage Réglage
des AIGUS
Affichage Réglage`
LOUDNESS
WIDE
STEREO
MONO
ADJUST SNOOZE
9 M I N
Affichage Réglage
du RAPPEL
Affichage Réglage
du TEXTE RDS
Affichage Réglage de l’heure
Affichage Réglage de
la langue
Affichage Réglage
STEREO/LARGE/MONO
VOLUME
Affichage Réglage
du DISC TEXTE
Page 47

45
Réglage des paramètres de réveil
Lors du réglage des paramètres de réveil, vous
sélectionnez une heure de réveil ainsi qu’une source
et un volume de réveil. Le choix de la tonalité ou de la
musique de réveil est sélectionné ultérieurement lorsque
l’alarme est activée.
Remaeque : Stockez dans une PRESELECTION la
station radio que vous voulez utiliser comme station
de réveil.
1) Appuyez sur le bouton Alarme 1 ou Alarme 2 et
maintenez-le enfoncé jusqu’à ce qu’une brève
tonalité (1,5 seconde environ) se fasse entendre.
Le radio CD passe en mode Réglage du réveil.
Le Réglage du réveil persiste pendant 15 secondes
environ si aucun bouton n’est pressé. Vous disposez
toujours de cinq secondes entre les réglages.
2) A tout moment de la session de Réglage du réveil,
vous pouvez choisir votre musique de réveil favorite
en sélectionnant FM1, FM2, MW ou CD. Après avoir
sélectionné une banque de présélections de radio
(FM1, FM2 ou MW), choisissez la station radio
voulue en appuyant sur le bouton PRESELECTION
correspondant sur la télécommande du panneau
avant de la radio. Vous ne pouvez sélectionner le
réveil CD que si un CD se trouve dans le radio CD.
Si le CD est retiré après que le réveil CD est
sélectionné, le paramètre de réveil par défaut sera
Réveil par tonalité.
Les entrées AUX ne sont pas disponibles pour la
fonction de réveil.
3) A tout moment de la session de Réglage du réveil,
vous pouvez définir le volume du réveil en musique
en réglant le VOLUME soit sur la télécommande, soit
sur le panneau avant de la radio.
FONCTIONS DE REVEIL
PRESETS
ALARMS
TAP TO SET
PRESS & HOLD TO ADJUST
1
2
SOUNDWORKS RADIO
TUNE
WAKEUP
TIME
ADJUST
FM 1/2
MW
SEEK
AUX
AUX
F
JOG
VOLUME
SLEEP
SNOOZE
MUTE
1
2
3
4
5
6
7
8
POWER
+
FM 1/2
CD INFO
CD MODE REPEAT
PRESETS
FOLDER
VOLUME
JOG
MW AUX
POWER
TRACK
SEEK
CD
/TUNE
WIDE
STEREO
CD IN
MONO
1234
5678
WAKEUP T I ME
7 : 57 AM
PRESETS
ALARMS
TAP TO SET
PRESS & HOLD TO ADJUST
1
2
SOUNDWORKS RADIO
TUNE
WAKEUP
TIME
ADJUST
FM 1/2
MW
SEEK
AUX
AUX
F
JOG
VOLUME
SLEEP
SNOOZE
MUTE
1
2
3
4
5
6
7
8
POWER
+
FM 1/2
CD INFO
CD MODE REPEAT
PRESETS
FOLDER
VOLUME
JOG
AM AUX
POWER
TRACK
SEEK
CD
/TUNE
WIDE
STEREO
CD IN
MONO
1234
5678
FM WAKEUP
7 : 57 AM
2. Réglage REVEIL EN MUSIQUE, premier écran
1. Saisie du réglage REVEIL
PRESETS
ALARMS
TAP TO SET
PRESS & HOLD TO ADJUST
1
2
SOUNDWORKS RADIO
TUNE
WAKEUP
TIME
ADJUST
FM 1/2
MW
SEEK
AUX
AUX
F
JOG
VOLUME
SLEEP
SNOOZE
MUTE
1
2
3
4
5
6
7
8
POWER
+
FM 1/2
CD INFO
CD MODE REPEAT
PRESETS
FOLDER
VOLUME
JOG
AM AUX
POWER
TRACK
SEEK
CD
/TUNE
WIDE
STEREO
CD IN
MONO
1234
5678
ALARM VOLUME
20
3. Réglage du volume REVEIL
Page 48

46
FONCTIONS DE REVEIL
PRESETS
ALARMS
TAP TO SET
PRESS & HOLD TO ADJUST
1
2
SOUNDWORKS RADIO
TUNE
WAKEUP
TIME
ADJUST
FM 1/2
MW
SEEK
AUX
AUX
F
JOG
VOLUME
SLEEP
SNOOZE
MUTE
1
2
3
4
5
6
7
8
POWER
+
FM 1/2
CD INFO
CD MODE REPEAT
PRESETS
FOLDER
VOLUME
JOG
MW AUX
POWER
TRACK
SEEK
CD
/TUNE
WIDE
STEREO
CD IN
MONO
1234
5678
FM WAKEUP
7 : 57 AM
4. Réglage de l’heure de REVEIL
PRESETS
ALARMS
TAP TO SET
PRESS & HOLD TO ADJUST
1
2
SOUNDWORKS RADIO
TUNE
WAKEUP
TIME
ADJUST
FM 1/2
MW
SEEK
AUX
AUX
F
JOG
VOLUME
SLEEP
SNOOZE
MUTE
1
2
3
4
5
6
7
8
POWER
+
FM 1/2
CD INFO
CD MODE REPEAT
PRESETS
FOLDER
VOLUME
JOG
MW AUX
POWER
TRACK
SEEK
CD
/TUNE
WIDE
STEREO
CD IN
MONO
1234
5678
ALARM 1
SETT I NGS STORED
5. Affichage « Paramètres de REVEIL stockés »
Réglage des paramètres de réveil
4) A tout moment de la session de réglage du réveil,
vous pouvez choisir l’heure de réveil en utilisant
le réglage de l’heure sur le panneau avant ou en
utilisant le réglage PISTE/REGLAGE sur la
télécommande.
5) Clôturez la session de réglage du réveil en appuyant
de nouveau sur le même bouton Alarme ou en
attendant simplement une dizaine de secondes.
La session de réglage du réveil va se terminer
automatiquement. Quelle que soit la méthode
choisie, le radio CD stockera les nouveaux
paramètres.
Page 49

47
Activation du réveil
En fonctionnement normal ou en veille, appuyez sur
un des boutons Alarme pour vous déplacer entre :
Réveil en musique
Réveil par tonalité
Pas de réveil
Un indicateur de réveil en musique ( ) ou un indicateur
de réveil par tonalité ( ) s’allume pour indiquer
l’activation de l’alarme.
Le réveil en musique fonctionne uniquement si la radio
reste en mode veille.
Le réveil par tonalité fonctionne chaque fois qu’il est
activé. Vous pouvez utiliser le réveil par tonalité comme
fonction de rappel pendant la journée tout en utilisant la
radio normalement.
Arrêt d’un réveil
Pour annuler une alarme de réveil enclenchée pour la
journée tout en la conservant activée, appuyez sur le
bouton Alimentation sur le panneau avant ou sur la
télécommande. Les paramètres de réveil resteront
actifs et fonctionneront le lendemain.
Pour arrêter une alarme et la désactiver (l’empêcher
de fonctionner le lendemain), appuyez sur le bouton
d’alarme approprié sur le panneau avant de la radio
ou appuyez sur la télécommande.
Fonction Rappel
En appuyant sur la barre RAPPEL/MUET sur la radio ou
sur le bouton RAPPEL MUET (2) de la télécommande,
l’alarme de réveil sera arrêtée pendant un laps de
temps déterminé (de 5 à 22 minutes).
Réglez le délai RAPPEL à l’aide de la fonction EQUAL.
FONCTION RAPPEL
PRESETS
ALARMS
TAP TO SET
PRESS & HOLD TO ADJUST
1
2
SOUNDWORKS RADIO
TUNE
WAKEUP
TIME
ADJUST
FM 1/2
MW
SEEK
AUX
AUX
F
JOG
VOLUME
SLEEP
SNOOZE
MUTE
1
2
3
4
5
6
7
8
POWER
+
FM 1/2
CD INFO
CD MODE REPEAT
PRESETS
FOLDER
VOLUME
JOG
MW AUX
POWER
TRACK
SEEK
CD
/TUNE
WIDE
STEREO
CD IN
MONO
1234
5678
ALARM 1
TONE WAKEUP
PRESETS
ALARMS
TAP TO SET
PRESS & HOLD TO ADJUST
1
2
SOUNDWORKS RADIO
TUNE
WAKEUP
TIME
ADJUST
FM 1/2
MW
SEEK
AUX
AUX
F
JOG
VOLUME
SLEEP
SNOOZE
MUTE
1
2
3
4
5
6
7
8
POWER
+
FM 1/2
CD INFO
CD MODE REPEAT
PRESETS
FOLDER
VOLUME
JOG
MW AUX
POWER
TRACK
SEEK
CD
/TUNE
WIDE
STEREO
CD IN
MONO
1234
5678
ALARM 1
OFF
PRESETS
ALARMS
TAP TO SET
PRESS & HOLD TO ADJUST
1
2
SOUNDWORKS RADIO
TUNE
WAKEUP
TIME
ADJUST
FM 1/2
MW
SEEK
AUX
AUX
F
JOG
VOLUME
SLEEP
SNOOZE
MUTE
1
2
3
4
5
6
7
8
POWER
+
MW
1a .
1b .
1c .
Fonction Rappel
2.
Page 50

48
RADIO DATA SERVICE (RDS)
Certaines stations de radio FM diffusent du texte
Radio Data Service (RDS) avec leurs programmes.
Le texte d’identification de station est affiché dans les
huit premiers caractères de la ligne inférieure. Ce texte
ne change généralement pas. Le texte descriptif
s’affiche sur la ligne supérieure. Ce texte peut décrire
le format de la station radio ou afficher le titre de la
chanson et le nom de l’artiste.
Texte CD
Les CD audio contiennent maintenant du texte
descriptif stocké avec les programmes audio. Le radio
CD est capable de décoder et d’afficher un tel texte.
Informations texte ID3 pour fichiers MP3
Les fichiers MP3 téléchargés depuis Internet peuvent
contenir des informations texte ID3. Les informations
texte ID3 peuvent être ajoutées aux fichiers MP3
lorsque le fichier est créé à partir d’une source audio
non compressée. Le radio CD affichera un texte de
cette nature s’il se trouve dans les fichiers MP3. S’il n’y
a pas d’informations texte ID3, le radio CD affichera le
nom du fichier.
Choix des affichages de texte
Le menu EQUAL dispose d’en-têtes séparés pour le
texte RDS et le texte DISC qui vous permettent de
choisir entre l’affichage texte défilant, l’affichage texte
fixe ou l’absence d’affichage texte.
AFFICHAGES RADIO ET DISC TEXTE
Affichage RADIO DATA SERVICE
Affichage texte CD
Affichage texte ID3 MP3
Texte descriptif RDS
Texte d’identification
de station RDS
Texte descriptif CD
Texte ID3 pour
fichiers MP3
Page 51

49
Le radio CD reconnaît les fichiers audio compressés
MP3 stockés sur un CD-ROM. Vous pouvez créer
(ou graver) vos propres compilations sur CD-ROM
contenant bien plus de musique qu’un CD audio.
Le radio CD reconnaît également les répertoires du
niveau supérieur d’un CD-ROM et affiche leur nom.
Utilisez les répertoires d’un CD-ROM pour pouvoir
distinguer facilement différents groupes de musique.
Le radio CD reconnaît un maximum de 99 pistes dans
tout répertoire ou au niveau supérieur d’un disque.
Le radio CD ne reconnaît pas les sous-répertoires.
Le radio CD considère les fichiers MP3 situés dans
des sous-répertoires comme appartenant au répertoire
du niveau supérieur.
Séquence de lecture sur un CD-ROM
a) Tout d’abord, le radio CD reconnaît les fichiers
MP3 stockés au niveau supérieur du CD-ROM.
La lecture séquentielle par « nom de fichier »
de ces fichiers s’effectue. Le radio CD ignore
tout fichier disposant d’une extension autre
que « .mp3 ».
b) Une fois que le radio CD a lu tous les fichiers
MP3 situés au niveau supérieur du CD-ROM,
il procédera à la lecture du contenu de tous les
répertoires présents sur le CD-ROM et ce, selon
le « nom de fichier ».
LECTURE DU CD-ROM
mp3
Titre b
mp3
Titre a
Niveau supérieur du CD-ROM
SEQUENCE DE LECTURE
Pistes et répertoires lus par
ordre alphabétique.
Répertoire a Répertoire b
CD-ROM
Plus de
répertoires
mp3
mp3
mp3
mp3
mp3
mp3
Titre a
Titre b
Titre c
Titre a
Titre b
Titre c
mp3
mp3
mp3
Titre a
Titre b
Titre c
1
2
3
4
5
6
7
8
9
10
11
Page 52

50
c) S’il n’existe aucun fichier audio « .mp3 » au niveau
supérieur du CD-ROM, le radio CD procède automatiquement à la lecture du contenu du premier répertoire
du CD-ROM (selon la séquence « nom de répertoire »).
Appuyez sur Présélection 4 lors de la lecture du
fichier MP3 pour afficher brièvement le nom du
répertoire actif.
d) Une fois que l’ensemble du contenu du premier
répertoire a été lu, le radio CD lit le contenu des
autres répertoires situés au niveau supérieur du disque.
e) Les boutons REPERTOIRE + et REPERTOIRE -
permettent de passer au dossier suivant ou précédent
de manière séquentielle et selon le nom du répertoire.
f) Le diagramme page 19 constitue un exemple de la
séquence de lecture automatique effectuée par le
radio CD lors de la lecture du contenu d’un CD-ROM.
Conseils pour la préparation d’un CD-ROM MP3
1) Le titre de chaque piste ou répertoire doit commencer
par un numéro pour en désigner la séquence.
De nombreux programmes d’enregistrement de
CD-ROM prennent en charge l’ajout automatique de
numéros de séquence au début du nom de fichier MP3.
2) Le radio CD considère les numéros comme du texte
lorsqu’il détermine la séquence des pistes et
répertoires. Placez un zéro en tête des numéros à un
seul chiffre (01, 02, 03…) si le total de vos pistes ou
répertoires est égal ou supérieur à dix.
3) Le radio CD prend en charge un maximum de 99 pistes
au niveau supérieur d’un CD ou dans tout répertoire
situé au niveau supérieur du CD-ROM.
LECTURE DU CD-ROM
Page 53

51
Organisation des fichiers et répertoires MP3 sur un
CD-ROM
a) Placez uniquement des répertoires au niveau supérieur
du CD-ROM (aucun fichier MP3). Ceci vous permet de
naviguer entre les répertoires à l’aide des boutons
REPERTOIRE + et REPERTOIRE - tout comme vous
pouvez sélectionner des disques sur un lecteur de
CD multiples.
b) Extrayez (compressez) vos pistes favorites depuis un
CD audio dans un répertoire situé sur le disque dur de
votre ordinateur. Assurez-vous que les titres des pistes
commencent par des chiffres en fonction de la séquence
de pistes requise.
c) Répétez cette procédure pour les autres groupes de
fichiers audio compressés à stocker sur le même
CD-ROM, tout en enregistrant les fichiers dans des
répertoires différents sur votre disque dur.
d) Utilisez des titres de répertoires commençant par un
chiffre, selon la séquence de votre choix.
e) Gravez tous les répertoires en même temps sur
le CD-ROM.
Une fois tout ceci terminé, vous pourriez disposer d’un
CD-ROM contenant plus de musique qu’un CD audio
conventionnel. Vous pouvez naviguer dans chaque
répertoire tout simplement en appuyant sur les boutons
REPERTOIRE + et REPERTOIRE -.
LECTURE DU CD-ROM
mp3
mp3
mp3
mp3
mp3
mp3
mp3
mp3
mp3
mp3
mp3
mp3
mp3
mp3
mp3
mp3
01 Nom de répertoire
01 Titre
02 Titre
03 Titre
Jusqu’à 99 fichiers
02 Nom de répertoire
Niveau supérieur du CD-ROM
03 Nom de répertoire 04 Nom de répertoire
CD-ROM
Plus de répertoires
01 Titre
02 Titre
03 Titre
Jusqu’à 99 fichiers
01 Titre
02 Titre
03 Titre
Jusqu’à 99 fichiers
01 Titre
02 Titre
03 Titre
Jusqu’à 99 fichiers
Page 54

52
5252525252
CARACTERISTIQUES
Sources audio internes :
Tuner stéréo FM avec affichage de texte Radio Data
Service provenant des stations FM prenant en charge
cette fonctionnalité.
Tuner MW.
Transport CD avec :
VOLTAGE EN ENTREE: 230VAC 50HZ 0.5A
Lecture de CD audio prenant en charge l’affichage du
décodage de texte CD et la lecture de fichiers MP3 à
partir d’un CD-ROM.
Débits de données MP3 pris en charge : 30-300 kbps
et débits variables
Entrées :
VOLTAGE EN ENTREE: 230VAC 50HZ 0.5A
Une mini-prise stéréo ENTREE AUX de 3,5 mm sur le
panneau arrière
Une mini-prise stéréo ENTREE MIXAGE (combinée avec
SORTIE ENR.) de 3,5 mm sur le panneau arrière.
Une mini-prise stéréo ANTENNE MW de 3,5 mm sur le
panneau arrière
Jaquette de configuration du câblage de la mini-prise antenne
stéréo - pas de connexion, bec ni antenne cadre avec fil de nuque
Une prise de type « F » ANTENNE FM de 75 ohms sur
le panneau arrière
Une mini-prise stéréo AUX-F de 3,5 mm sur le
panneau avant
Sorties :
Une mini-prise stéréo SORTIE ENR. sur le
panneau arrière
Une mini-prise stéréo Casque de 3,5 mm sur le
panneau avant
Commandes du panneau arrière :
Commutateur INT/EXT antenne FM
Dimensions :
Français Mesures
Hauteur : 4
15
/
16
pouces 125 mm
Largeur : 14 pouces 356 mm
Profondeur : 9
7
/8pouces 248 mm
Profondeur (avec bouton et cordon CA) :
10
3
/8pouces 258 mm
Poids : 12 livres 5.5 kg
Page 55

SoundWorks Radio CD 740
Bedienungsanleitung
MW
Page 56

54
Durch das Blitzsymbol in einem
gleichseitigen Dreieck soll der Benutzer
auf das Vorhandensein einer nicht
isolierten „gefährlichen Spannung“
innerhalb des Gerätegehäuses
aufmerksam gemacht werden, die
die Gefahr eines elektrischen Schlages
mit sich bringt.
Das Ausrufezeichen in einem
gleichseitigen Dreieck weist den
Benutzer auf wichtige Bedienungsund Wartungs-(Reparatur-)Hinweise
in der Begleitdokumentation für das
Produkt hin.
WARNUNG
NICHT ÖFFNEN
UM DIE GEFAHR EINES
ELEKTRISCHEN SCHLAGES
ZU VERMEIDEN, DARF DIE
LAUTSPRECHERABDECKUNG NICHT
GEÖFFNET WERDEN. UNTER DER
ABDECKUNG BEFINDEN SICH KEINE
DURCH DEN BENUTZER ZU
WARTENDEN TEILE.
REPARATURARBEITEN DÜRFEN
AUSSCHLIESSLICH VON
QUALIFIZIERTEM WARTUNGSPERSONAL
AUSGEFÜHRT WERDEN.
DIE SICHERHEITSHINWEISE AUF DEM
GEHÄUSE MÜSSEN GELESEN UND
BEFOLGT WERDEN
VORSICHT:
UM DIE GEFAHR EINES ELEKTRISCHEN SCHLAGES
ZU VERMEIDEN, BRINGEN SIE DEN BREITEN STIFT
DES STECKERS MIT DEM BREITEN SCHLITZ IN DER
STECKDOSE IN ÜBEREINSTIMMUNG, UND FÜHREN
SIE DEN STECKER BIS ZUM ANSCHLAG EIN.
WICHTIGER HINWEIS:
DIE SERIENNUMMER DES LAUTSPRECHERS
BEFINDET SICH AUF DEM DAZUGEHÖRIGEN
BEDIENFELD. NOTIEREN SIE SICH DIESE NUMMER,
UND BEWAHREN SIE DIESE ZU IHRER EIGENEN
SICHERHEIT AN EINEM SICHEREN ORT AUF.
Page 57

55
ANHANG:
Die folgenden Angaben enthalten ergänzende oder korrigierende Informationen zu den Angaben in der
Bedienungsanleitung oder beschreiben Features, die erst nach Fertigstellung der Bedienungsanleitung
hinzugefügt wurden.
CD-WIEDERGABEFUNKTIONEN
Während der Wiedergabe von Audio-CDs
STOPP drücken CD-Position
1 Mal ....................... Fortsetzen an selber Position
2 Mal ............................ Zurück zum Anfang der CD
Während der Wiedergabe von CD-ROMs
STOPP drücken CD-Position
1 Ma ....................... Fortsetzen an selber Position
2 Ma ......................... Zurück zum Anfang des Verzeichnisses
3 Ma ............................ Zurück zum Anfang der CD
CD-Wiedergabe und POWER-Taste: Wenn Sie bei der CD-Wiedergabe die POWER-Taste drücken, wechselt
das Radio CD-Gerät in den STANDBY-Modus (Titel fortsetzen). Bei erneuter Betätigung der POWER-Taste wird
die Wiedergabe an genau derselben Position auf der CD (Audio-CD oder CD-ROM) fortgesetzt.
Preset 5-Funktion „FOLDER“: Das SoundWorks Radio CD 740 erkennt Verzeichnisse im Quellverzeichnis einer
CD-ROM. Wenn Sie während der CD-ROM-Wiedergabe die Preset-Taste 5 (FOLDER) betätigen, werden die ersten
16 Buchstaben des Verzeichnisnamens mit dem aktiven MP3-Titel angezeigt. Wenn sich die Datei nicht innerhalb
eines Verzeichnisses befindet, wird QUELLVERZEICHNIS angezeigt.
CD-ROM-VORBEREITUNG
Maximale Anzahl einzelner MP3-Dateien, die auf einer CD-ROM unterstützt werden
295 Dateien.
Wenn die Gesamtzahl von MP3-Dateien auf einer CD-ROM 295 übersteigt, treten hinsichtlich der Anzeige der
Verzeichnisnamen sowie bezüglich der Wiedergabereihenfolge der Verzeichnisse und MP3-Dateien möglicherweise
unvorhersehbare Ergebnisse auf.
Maximale Anzahl von Verzeichnissen auf einer CD-ROM
29 Verzeichnisse.
Wiedergabereihenfolge für MP3-Dateien auf einer CD-ROM
Zum Festlegen der Wiedergabereihenfolge analysiert das SoundWorks Radio CD 740 die ersten 8 Zeichen eines
MP3-Dateinamens. Sorgen Sie daher dafür, dass die entsprechende Nummerierung jeweils am Anfang der MP3Dateinamen steht. Die meisten Brennprogramme für CD-ROMs ermöglichen beim Brennvorgang eine automatische
Nummerierung am Anfang der Dateinamen.
Multisession-CD-ROMs:
Bei in mehreren Sitzungen gebrannten CD-ROMs erkennt das SoundWorks Radio CD 740 lediglich das Material der
ersten Sitzung. CD-ROMs, die für die Verwendung mit dem SoundWorks Radio CD 740 vorgesehen sind, sollten
daher in einem Durchgang beschrieben werden.
SENDERSPEICHERFUNKTIONEN
Wenn Sie die Frequenz eines FM-Senders speichern, werden auch die aktuellen Stereo/Wide/Mono- und RDSTexteinstellungen mit gespeichert. Bei Auswahl des entsprechenden Senderspeichers werden die Einstellungen
des JOG-Menüs durch die gespeicherten Einstellungen überschrieben. Um bei einem signalschwachen FMStereosender auch unter schwankenden Empfangsbedingungen eine saubere Wiedergabe zu gewährleisten,
sollten Sie diesen in MONO speichern. FM-Sender, die Sie nicht im Modus STATISCHER TEXT oder KEIN TEXT
sehen möchten, können Sie ebenfalls mit RDS-Text speichern.
Page 58

56
WECKFUNKTIONEN
So wachen Sie zu einem bestimmten Titel auf einer Audio-CD auf: Legen Sie eine Audio-CD
ein, und drücken Sie die Alarm 1- bzw. Alarm 2-Taste für zwei Sekunden, um eine
Weckeinstellungssitzung zu starten. Drücken Sie während der Weckeinstellungssitzung die
CD-Wiedergabe-/-Pausentaste, um den CD-Weckmodus auszuwählen. Wählen Sie dann mithilfe
der Titelauswahltasten (Track/Tune) auf der Frontblende des Geräts den gewünschten Titel aus.
Zur eingestellten Weckzeit startet das Gerät die Wiedergabe der CD beim ausgewählten Titel und
spielt die restlichen CD-Titel in normaler Reihenfolge ab.
So wachen Sie zu einer bestimmten MP3-Datei auf einer CD-ROM auf: Als Alternative ist es
mit dem SoundWorks Radio CD 740 auch möglich, mithilfe der Titelauswahltasten (Track/Tune)
eine bestimmte MP3-Datei (Titel) auf einer CD-ROM als Wecktitel auszuwählen. Wählen Sie dazu
während einer Weckeinstellungssitzung mithilfe der Titelauswahltasten auf der Frontblende des
Geräts eine bestimmte MP3-Datei aus. Für die Auswahl eines Titels von der CD-ROM wird ein
vereinfachtes Titelauswahlschema unterstützt. Dabei werden alle MP3-Dateien auf der CD durch
eine Nummer dargestellt, die der Wiedergabeposition des Titels im Modus ALLE ABSPIELEN
entspricht. Die Titel im Quellverzeichnis der CD stehen an erster Stelle, gefolgt von den Titeln im
ersten Verzeichnis, dann denen im zweiten Verzeichnis u.s.w.
Page 59

57
WICHTIGE SICHERHEITSHINWEISE
Anleitungen durchlesen
Lesen Sie alle Sicherheits- und Betriebsanleitungen durch, bevor Sie das Produkt in Betrieb nehmen.
Anleitungen aufbewahren
Bewahren Sie sämtliche Sicherheits- und Betriebsanleitungen zur zukünftigen Bezugnahme auf.
Warnungen beachten
Beachten Sie alle Warnungen auf dem Produkt selbst und in den Betriebsanleitungen.
Anleitungen befolgen
Befolgen Sie alle Betriebs- und Bedienungsanleitungen.
Reinigung
Trennen Sie das Produkt vor einer Reinigung von der Stromversorgung. Verwenden Sie keine Flüssig- oder
Aerosol- Reiniger. Verwenden Sie zum Reinigen ein feuchtes Tuch.
Zusatzgeräte
Verwenden Sie keine Zusatzgeräte oder Zubehörteile, ausgenommen der von Creative empfohlenen, da diese
zu Schäden führen können.
Wasser und Feuchtigkeit
Verwenden Sie dieses Produkt nicht in der Nähe einer Wasserquelle oder an einem Ort, wo es Wasser
ausgesetzt werden kann.
Standort
Stellen Sie das Produkt auf einer stabilen Oberfläche oder einem mit dem Produkt gelieferten oder empfohlenen
Stand auf. Andernfalls könnte des Produkt herunterfallen und jemanden verletzen oder das Produkt
beschädigen. Befolgen Sie die Anleitungen des Herstellers zur korrekten Aufstellung des Produkts.
Ventilation
Um den zuverlässigen Betrieb zu gewährleisten und einer eventuellen Überhitzung vorzubeugen, dürfen Sie die
Ventilatoröffnungen und -schlitze nicht blockieren oder mit Stoff oder einem undurchlässigen Material abdecken.
Stellen Sie es nicht in irgendwelche Einbauschränke, wie Bücherregale oder Einschubgestelle, sofern nicht für
ordnungsgemäße Ventilation gesorgt wurde bzw. die Anleitungen von Creative befolgt wurden.
Hitze
Stellen Sie das Produkt nicht in der Nähe von Wärmequellen, wie Heizkörpern, Öfen oder anderen Produkten,
die Wärme produzieren (einschließlich Verstärker), auf.
Stromquellen
Dieses Lautsprechersystem wurde speziell für den Betrieb in dem auf dem Stromadapter angegebenen
Leistungsbereich konzipiert, und der Betrieb außerhalb dieses Bereichs erfolgt auf eigenes Risiko. Wenden
Sie sich an Ihr Elektrizitätswerk, falls Sie Fragen bezüglich der Spannung am geplanten Aufstellungsort haben.
Page 60

58
WICHTIGE SICHERHEITSHINWEISE
Polarisierung
Das Produkt ist möglicherweise mit einem polarisierten ACStecker als Sicherheitsvorrichtung ausgestattet.
Da ein Stift breiter als der andere ist, passt dieser Stecker nur in einer Richtung in die Stromsteckdose. Wenn
Sie den Stecker nicht vollständig in die Steckdose einschieben können, drehen Sie ihn um. Wenn der Stecker
immer noch nicht passt, sollten Sie sich zum Auswechseln der Steckdose an einen Elektriker wenden. Stecken
Sie den Stecker nicht mit Gewalt in die Steckdose.
Schutz des Stromkabels
Verlegen Sie die Stromkabel so, dass das Risiko einer Beschädigung durch Verkehr oder andere Gefahren
möglichst gering gehalten wird. Seien Sie besonders vorsichtig in dem Bereich um den Stecker, die Steckdose
und die Anschlussstellen des Produkts.
Blitz
Trennen Sie das Produkt von der Stromquelle bei Gewittern, oder wenn es für längere Zeit nicht verwendet wird.
Dadurch wird eine eventuelle Beschädigung durch Blitzeinschlag oder Stromstoß verhindert.
Überlastung
Überlasten Sie Wandsteckdosen, Verlängerungskabel und eingebaute Steckdosen nicht, da dies zu
Brandgefahr oder einem Stromschlag führen kann.
Eintritt eines Fremdkörpers oder von Flüssigkeity
Stecken Sie unter keinen Umständen ein Objekt durch die Öffnungen des Produkts, da dies einen Brand,
einen elektrischen Schlag oder eine Beschädigung verursachen kann. Verschütten Sie keine Flüssigkeit auf
dem Produkt.
Wartung
Versuchen Sie nicht, das Produkt selbst zu warten. Wartungsarbeiten dürfen nur durch qualifiziertes
Servicepersonal ausgeführt werden.
Wartung aufgrund von Beschädigung
Trennen Sie das Produkt von der Stromversorgung. Wenden Sie sich in den folgenden Fällen an den
Kundendienst zwecks Wartungsarbeiten:
a) Das Stromkabel oder der Stecker ist beschädigt.
b) Objekte sind durch die Öffnungen des Produkts gefallen, oder es wurde Flüssigkeit darauf verschüttet.
c) Das Produkt war Regen oder Wasser ausgesetzt.
d) Das Produkt funktioniert trotz Einhaltung der Betriebsanleitungen nicht normal.
e) Das Produkt verhält sich anders als sonst.
f) Das Produkt ist heruntergefallen oder wurde beschädigt.
Ersatzteile
Beim Auswechseln von Teilen, ist darauf zu achten, dass der Wartungstechniker von Creative empfohlene
Ersatzteile oder Ersatzteile, die die gleichen Merkmale wie die Originalteile aufweisen, verwendet. Der Einbau
von nicht erlaubten Teilen kann zu Feuer, Stromschlag oder anderen Schäden führen.
Sicherheitsprüfung
Nach einer Wartung oder Reparatur des Produkts sollten Sie den Wartungstechniker bitten, alle
Sicherheitsprüfungen durchzuführen, um sich zu vergewissern, dass das Produkt ordnungsgemäß funktioniert.
Page 61

59
EINFÜHRUNG
Die Mitarbeiter von Cambridge SoundWorks hoffen,
dass Sie an Ihrem neuen Hochleistungsmodell
SoundWorks Radio CD 740 viel Freude haben werden.
Ihr neues Radio zeichnet sich durch hervorragenden
FM-Stereosound aus, und empfängt darüber hinaus
auch nützliche MW-Sender. Neben 16 FM-Sendern
können auch 8 MW-Sender als so genannte „Presets“
gespeichert werden. Über einen integrierten CD-Player
mit Ladeeinschub können Audio-CDs sowie auf
CD-ROM gespeicherte MP3-Dateien wiedergegeben
werden. Dank dem großzügig dimensionierten
Display mit 32 Zeichen und der mit allen Funktionen
ausgestatteten Fernbedienung kann das Gerät auch
aus einiger Entfernung problemlos bedient werden.
Auf dem Display des SoundWorks Radio CD 740
können drei Typen von ergänzendem Text
angezeigt werden:
• RDS-Text (Radio Data Service) für FM-Sender
• CD-Text
• „ID3“-Text, wie er in den meisten MP3-Dateien
gespeichert wird.
Durch eine automatische Dimmerfunktion wird die
Helligkeit des Displays in dunklen Räumen verringert,
ohne dass die Lesbarkeit unter hellen
Umgebungsbedingungen beeinträchtigt wird. Eine
besonders langlebige, interne Stromversorgungszelle
sorgt für eine hohe Ganggenauigkeit über viele Jahre
hinweg. Durch Einlegen einer 9-V-Batterie (separat
erhältlich) kann der Benutzer gewährleisten, dass
die Weckfunktion auch bei einem Stromausfall
ordnungsgemäß funktioniert.
Über diverse Eingänge an der Gerätevorder- und
-rückseite können problemlos verschiedene
Programmquellen (z. B. tragbare MP3-Player und
Kassettenrecorder) angeschlossen werden. Darüber
hinaus kann das aktuelle Audioprogrammsignal über
einen separaten Aufnahmeausgang an andere Geräte
ausgegeben werden.
Zur Auswahl verschiedener sekundärer Einstellungen
(z. B. Bass und Höhen, Schlummereinstellungen und
Textanzeigemodi) steht eine leicht zu bedienende
JOG-Taste zur Verfügung.
Page 62

60
Entnehmen Sie das SoundWorks Radio CD (siehe
Abb. A) aus der Schutzverpackung, und stellen Sie es
am gewünschten Aufstellungsort ab. Wenn Sie das
Gerät auf einer weichen Unterlage abstellen, werden
das Wecksignal und die Bassausgabe entsprechend
gedämpft wiedergegeben.
Schließen Sie die MW-Antenne an (siehe Abb. B):
Zur Vorbereitung der Antenne (1) müssen Sie die
Basis (2) ausklappen, bis sie hörbar einrastet (3).
Positionieren Sie die MW-Antenne (4) an einer
beliebigen Stelle, nach Möglichkeit mindestens 20 cm
vom Radio CD-Gerät entfernt. Verbinden Sie den
Ministecker der MW-Antenne mit der durch die
Aufschrift MW ANTENNA gekennzeichneten
Minibuchse auf der Rückseite des Radio CD-Geräts (5).
Drehen Sie die MW-Antenne so, dass Sie für die
gewünschten MW-Sender den optimalen Empfang
erzielen.
Stecken Sie das Netzkabel des SoundWorks
Radio CD in eine geeignete Steckdose.
Da das Netzkabel auch als primäre FM-Antenne dient,
sollte es nach Möglichkeit zu mindestens 50 %
entlang einer geraden Linie verlegt werden
(siehe Abb. C). Vergewissern Sie sich, dass sich der
Schalter für die FM-Antenne an der Rückseite des
Gerätegehäuses in der Position INT (intern) befindet
(Werkseinstellung).
Falls gewünscht, kann anstelle der internen Antenne
auch die externe FM-Antenne angeschlossen und
verwendet werden (siehe Abb. D). Verbinden Sie
die externe Antenne mit der F-Buchse auf der
Geräterückseite. Außerdem müssen Sie den Schalter
für die FM-Antenne auf die Position EXT (extern)
umstellen.
ERSTE SCHRITTE
MIXING
INPUT
RECORD
OUTPUT
INPUT INPUT
MW
ANTENNA
FM ANTENNA
EXT
INT
INPUT
75 OHMS
AUX
MIXING
INPUT
RECORD
OUTPUT
INPUT INPUT
MW
ANTENNA
FM ANTENNA
EXT
INT
INPUT
75 OHMS
AUX
A
L
A
R
M
P
R
E
S
E
T
S
S
T
E
R
E
O
C
D
IN
C
D
I
N
F
O
C
D
M
O
D
E
JOG
FM
1/2
CD
SEEK
TR
ACK/TU
NE
M
W
AUX
PO
W
ER
R
E
P
E
A
T
–
F
O
L
D
E
R
+
W
ID
E
M
O
N
O
1
1
2
2
3
4
5
6
7
8
SNOOZE/MUTE
B.
1.
2.
3.
4.
5.
C.
D.
A.
Page 63

61
Stellen der Uhr
Die Uhrzeit kann unabhängig davon eingestellt werden,
ob das Gerät eingeschaltet ist oder sich im Standbymodus befindet. Betätigen Sie dazu einfach die
Zeiteinstellungstasten (neben dem Symbol), die sich
rechts neben dem Display befinden (siehe Abb. E).
Hinweis: Die aktuelle Uhrzeit kann nur an der
Frontblende des Radio CD-Geräts eingestellt werden.
Über die Fernbedienung lässt sich ausschließlich die
Weckzeit, nicht aber die aktuelle Zeit festlegen.
Pufferbatterie für Wecksignal
Um zu gewährleisten, dass für einen Zeitraum von
48 Stunden auch bei einem Stromausfall noch ein
Wecksignal ausgegeben wird, können Sie eine
9-V-Batterie in das Batteriefach des Geräts einlegen.
Nehmen Sie dazu die Abdeckung des Batteriefachs ab,
legen Sie die Batterie ein, und setzen Sie die Abdeckung
wieder ein.
Wenn eine der beiden Alarmoptionen (Musik oder Ton)
aktiviert ist, wird bei einem Stromausfall zur festgelegten
Zeit gegebenenfalls der Weckton ausgegeben. Drücken
Sie in diesem Fall die POWER-Taste am Gerät, um den
Wecker auszuschalten. Wenn das Gerät für mehr als
24 Stunden ohne externe Stromversorgung arbeitet,
muss die Batterie ausgetauscht werden.
Im Notfallalarmbetrieb muss die Batterie bereits nach
30 Minuten ausgetauscht werden (siehe Abb. F).
Standby und Ein
Bei Betätigung der POWER-Taste wechseln Sie zwischen
Standby- und eingeschaltetem Modus (siehe Abb. G).
Darüber hinaus können Sie mit der POWER-Taste auf der
Frontblende den SCHLAFVERZ.-Modus aktivieren (siehe
Seite 65).
Auswahl der Frequenzbereiche
1) Bei Betätigung der FM 1/2-Taste werden der FMBereich und eine der beiden Senderspeichergruppen
für FM-Sender ausgewählt. In jeder der beiden
Gruppen FM1 und FM2 können jeweils acht FMSender gespeichert werden (siehe Abb. H).
2) Wenn Sie von einem anderen Modus (Standby, MW,
CD oder einem AUX-Eingang) in den FM-Modus
wechseln, kehrt das Gerät zu der zuletzt verwendeten
Senderspeichergruppe zurück. Bei Betätigung der FM
1/2-Taste im laufenden FM-Betrieb wird die jeweils
andere Senderspeichergruppe ausgewählt.
3) Wenn Sie die MW-Taste drücken, wird der
MW-Bereich ausgewählt. Für den MW-Bereich steht
nur eine Senderspeichergruppe zur Verfügung.
ERSTE SCHRITTE
G.
H.
PRESETS
ALARMS
TAP TO SET
PRESS & HOLD TO ADJUST
FOLDER
REPEAT
+
1
2
SOUNDWORKS RADIO CD
SEEK
STOP
TRACK / TUNE
WAKEUP
TIME
ADJUST
CD
FM 1/2
MW AUX
JOG
VOLUME
SLEEP
SNOOZE
MUTE
1
2
3
4
5
6
7
8
CD MODE
CD TIME
POWER
FM 1/2
CD INFO
CD MODE REPEAT
PRESETS
FOLDER
VOLUME
JOG
MW AUX
POWER
TRACK
SEEK
CD
/TUNE
WIDE
STEREO
CD IN
MONO
1234
5678
9 : 43AM
PRESETS
ALARMS
TAP TO SET
PRESS & HOLD TO ADJUST
FOLDER
REPEAT
+
1
2
SOUNDWORKS RADIO CD
SEEK
STOP
TRACK / TUNE
WAKEUP
TIME
ADJUST
CD
FM 1/2
MW
AUX
JOG
VOLUME
SLEEP
SNOOZE
MUTE
1
2
3
4
5
6
7
8
CD MODE
CD TIME
POWER
FM 1/2
CD INFO
CD MODE REPEAT
PRESETS
FOLDER
VOLUME
JOG
AM AUX
POWER
TRACK
SEEK
CD
/TUNE
WIDE
STEREO
CD IN
MONO
1234
5678
FM2 P1
88 . 1
9 : 43AM
E.
F.
Page 64

62
PRESETS
ALARMS
TAP TO SET
PRESS & HOLD TO ADJUST
FOLDER
REPEAT
+
1
2
SOUNDWORKS RADIO CD
SEEK
STOP
TRACK / TUNE
WAKEUP
TIME
ADJUST
CD
FM 1/2
MW AUX
JOG
VOLUME
SLEEP
SNOOZE
MUTE
1
2
3
4
5
6
7
8
CD MODE
CD TIME
POWER
FM 1/2
CD INFO
CD MODE REPEAT
PRESETS
FOLDER
VOLUME
JOG
MW AUX
POWER
TRACK
SEEK
CD
/TUNE
WIDE
STEREO
CD IN
MONO
1234
5678
FM2 P1
88 . 1
9 : 43AM
PRESETS
ALARMS
TAP TO SET
PRESS & HOLD TO ADJUST
FOLDER
REPEAT
+
1
2
SOUNDWORKS RADIO CD
SEEK
STOP
TRACK / TUNE
WAKEUP
TIME
ADJUST
CD
FM 1/2
MW AUX
JOG
VOLUME
SLEEP
SNOOZE
MUTE
1
2
3
4
5
6
7
8
CD MODE
CD TIME
POWER
FM 1/2
CD INFO
CD MODE REPEAT
PRESETS
FOLDER
VOLUME
JOG
MW AUX
POWER
TRACK
SEEK
CD
/TUNE
WIDE
STEREO
CD IN
MONO
1234
5678
FM2 P1
88 . 1
9 : 43AM
J.
K.
Sendersuche (FM oder MW)
• Automatische Sendersuche – Methode 1:
Drücken Sie die SEEK-Taste (Fernbedienung oder
Frontblende), um automatisch nach dem Sender
mit der nächsthöheren Frequenz zu suchen
(siehe Abb. I).
• Automatische Sendersuche – Methode 2:
Halten Sie eine der beiden TRACK/TUNE-Tasten
gedrückt, um nach dem jeweils nächsten Sender
zu suchen. (Mit der -Taste suchen Sie aufwärts
und mit der -Taste suchen Sie abwärts.)
(Siehe Abb. J).
• Manuelle Sendersuche: Um nach einer
bestimmten Frequenz zu suchen, drücken Sie
einmal kurz die entsprechende TRACK/TUNE-Taste
( oder ).
Speichern von Sendern in
Senderspeichergruppen (PRESETs)
Drücken Sie die FM 1/2-Taste, um die gewünschte
Senderspeichergruppe (FM1 oder FM2) bzw. den
MW-Bereich auszuwählen. Stellen Sie den
gewünschten Sender ein. Halten Sie die Taste für
den gewünschten Speicherplatz gedrückt, bis Sie
ein kurzes akustisches Signal hören. Der Sender ist
gespeichert (siehe Abb. K).
ERSTE SCHRITTE
PRESETS
ALARMS
TAP TO SET
PRESS & HOLD TO ADJUST
1
2
SOUNDWORKS RADIO
TUNE
WAKEUP
TIME
ADJUST
FM 1/2
MW
SEEK
AUX
AUX
F
JOG
VOLUME
SLEEP
SNOOZE
MUTE
1
2
3
4
5
6
7
8
POWER
+
FM 1/2
CD INFO
CD MODE REPEAT
PRESETS
FOLDER
VOLUME
JOG
MW AUX
POWER
TRACK
SEEK
CD
/TUNE
WIDE
STEREO
CD IN
MONO
FM2 P1
88 . 1
1234
5678
9 : 43AM
I.
Page 65

63
Wichtig: Es können nur CDs im Standardformat (12 cm)
verwendet werden. Kleinere CDs lassen sich nicht laden.
1) Wenn Sie eine CD in den Ladeeinschub einlegen,
wechselt das Gerät automatisch in den
Wiedergabemodus. Durch die CD IN-Anzeige wird
angegeben, ob sich eine CD im Radio CD-Gerät
befindet (siehe Abb. L).
2) Sofern eine CD eingelegt ist, können Sie durch
kurzen Druck auf die CD-Taste die Wiedergabe
dieser CD starten (siehe Abb. M).
Auswahloptionen
• Titelauswahl: Drücken Sie einmal kurz die
entsprechende TRACK/TUNE-Taste ( oder ).
(Siehe Abb. N).
• CD-ROM-Verzeichnisauswahl: Um das aktuelle
Verzeichnis (Ordner) zu verlassen, drücken Sie die
Nummerntaste 7 oder . Nähere Informationen zur
Verzeichnis-(Ordner-) Navigation finden Sie auf den
Seiten 75 bis 77.
• Vorwärts- und Rückwärtssuche: Halten Sie eine der
beiden TRACK/TUNE-Tasten ( oder ) gedrückt.
CD-Stopp
Drücken Sie die Stopp-Taste einmal, um die CDWiedergabe so anzuhalten, dass sie gegebenenfalls an
derselben Position wieder aufgenommen werden kann.
Eine zweimalige Betätigung der Stopp-Taste beendet
die Wiedergabe und kehrt zum Anfang der CD zurück.
CD-Auswurf
Drücken Sie die Auswurftaste (siehe Abb. O).
CD INFO
Bei Betätigung der CD INFO-Taste (Preset 1) werden
Informationen zur Wiedergabezeit wie folgt
ausgegeben:
Audio CD – Verstrichene Zeit für Titel •
Verbleibende Zeit für Titel • Verstrichene Zeit für CD •
Verbleibende Zeit für CD
CD-ROM – Verstrichene Zeit für Datei
CD MODE
Mit der CD MODE-Taste (Preset 5) können die
folgenden CD-Wiedergabemodi ausgewählt werden:
Audio CD – Zufällig • 1 Titel spielen
CD-ROM – Zufällig • Verz. spielen • Verz. zufällig •
1 Titel spielen
REPEAT
Bei Betätigung der REPEAT-Taste (Preset 6) wird der
aktuelle Wiedergabemodus so lange wiederholt, bis die
POWER-Taste gedrückt oder die CD ausgeworfen wird.
AUSWÄHLEN DER CD-WIEDERGABE
ALARM
P
R
E
S
E
T
S
S
T
E
R
E
O
CD IN
C
D
I
N
F
O
C
D
M
O
D
E
J
O
G
F
M
1
/2
C
D
S
E
E
K
T
R
A
C
K
/T
U
N
E
A
M
A
U
X
P
O
W
E
R
R
E
P
E
A
T
– FOL
DER
+
WIDE
M
O
N
O
1
1
2
2
3
4
5
6
7
8
SNOOZE/MUTE
WIDE
STEREO
MONO
CD IN
PRESETS
ALARMS
TAP TO SET
PRESS & HOLD TO ADJUST
1
2
SOUNDWORKS RADIO
TUNE
WAKEUP
TIME
ADJUST
FM 1/2
MW
SEEK
AUX
AUX
F
JOG
VOLUME
SLEEP
SNOOZE
MUTE
1
2
3
4
5
6
7
8
POWER
+
FM 1/2
CD INFO
CD MODE REPEAT
PRESETS
FOLDER
VOLUME
JOG
MW AUX
POWER
TRACK
SEEK
CD
/TUNE
WIDE
STEREO
CD IN
MONO
FM2 P1
88 . 1
1234
5678
9 : 43AM
FM 1/2
CD INFO
CD MODE REPEAT
PRESETS
FOLDER
VOLUME
JOG
MW AUX
POWER
TRACK
SEEK
CD
/TUNE
WIDE
STEREO
CD IN
MONO
1234
5678
FM2 P1
88 . 1
9 : 43AM
TRACK/TUNE
PRESETS
ALARMS
TAP TO SET
PRESS & HOLD TO ADJUST
1
2
SOUNDWORKS RADIO
TUNE
WAKEUP
TIME
ADJUST
FM 1/2
MW
SEEK
AUX
AUX
F
JOG
VOLUME
SLEEP
SNOOZE
MUTE
1
2
3
4
5
6
7
8
POWER
+
FM 1/2
CD INFO
CD MODE REPEAT
PRESETS
FOLDER
VOLUME
JOG
AM AUX
POWER
TRACK
SEEK
CD
/TUNE
WIDE
STEREO
CD IN
MONO
1234
5678
FM2 P1
88 . 1
9 : 43AM
CD Weidergabe-/-Pausen
CD einlegen
CD IN
Anzeige
CD-Auswurf
L.
M.
N.
O.
7
8
Page 66

64
Wiedergeben externer Audioquellen
Wenn Sie eine bestimmte externe Audioquelle
(z. B. einen Kassettenrecorder) permanent an das
SoundWorks Radio CD-Gerät anschließen möchten,
verbinden Sie sie mit dem AUX-Eingang auf der
Geräterückseite (siehe Abb. P). Zum Aktivieren dieses
Eingangs brauchen Sie dann lediglich die AUX-Taste
auf der Frontblende bzw. der Fernbedienung zu
drücken (siehe Abb. Q).
Externe Audioprogrammquellen (z. B. tragbare MP3-
Player), die nur gelegentlich mit dem Radio CD-Gerät
verbunden werden sollen, können Sie an den AUX-FEingang auf der Frontblende anschließen (siehe
Abb. Q). Dieser Eingang setzt den AUX-Eingang auf
der Rückseite außer Kraft. Die Auswahl des Eingangs
erfolgt ebenfalls mithilfe der AUX-Taste auf der
Frontblende bzw. der Fernbedienung (siehe Abb. R).
Mischeingang/Aufnahmeausgang
In bestimmten Situationen kann es wünschenswert
sein, das Signal einer bestimmten
Audioprogrammquelle (z. B. Audioausgabe eines
Computers) mit anderen Radio CD-Audioquellen
(FM, MW, Disc, Aux) zu mischen.
Verbinden Sie die Quelle mit dem MIXING INPUTEingang auf der Geräterückseite (siehe Abb. S).
Daraufhin wird die entsprechende Programmquelle mit
der aktuell ausgewählten Radio CD-Programmquelle
gemischt.
Wenn Sie die Balance zwischen der Radio CDProgrammquelle und der MIXING INPUT-Audioquelle
regeln möchten, muss die an den MIXING INPUTEingang angeschlossene Audioquelle über einen
Pegelregler verfügen.
ANSCHLIESSEN EINER EXTERNEN AUDIOQUELLE
FM 1/2
CD INFO
CD MODE REPEAT
PRESETS
FOLDER
VOLUME
JOG
MW AUX
POWER
TRACK
SEEK
CD
/TUNE
WIDE
STEREO
MONO
1234
5678
AUX-F
HEADPHONES
FM2 P1
88 . 1
9 : 43AM
PRESETS
ALARMS
TAP TO SET
PRESS & HOLD TO ADJUST
1
2
SOUNDWORKS RADIO
TUNE
WAKEUP
TIME
ADJUST
FM 1/2
MW
SEEK
AUX
AUX
F
JOG
VOLUME
SLEEP
SNOOZE
MUTE
1
2
3
4
5
6
7
8
POWER
+
FM 1/2
CD INFO
CD MODE REPEAT
PRESETS
FOLDER
VOLUME
JOG
MW AUX
POWER
TRACK
SEEK
CD
/TUNE
WIDE
STEREO
CD IN
MONO
FM2 P1
88 . 1
1234
5678
9 : 43AM
MIXING
INPUT
RECORD
OUTPUT
INPUT INPUT
MW
ANTENNA
FM ANTENNA
EXT
INT
INPUT
75 OHMS
AUX
MIXING
INPUT
RECORD
OUTPUT
INPUT INPUT
MW
ANTENNA
FM ANTENNA
EXT
INT
INPUT
75 OHMS
AUX
P.
Q.
R.
S.
Page 67

65
ZUSATZFUNKTIONEN
Stummschalten
So können Sie die Ausgabe des SoundWorks Radio
CD-Geräts stummschalten: Drücken Sie die
SNOOZE/MUTE-Taste am Gerät bzw. auf der
Fernbedienung (siehe Abb. T). Wenn Sie die
POWER-Taste drücken, eine CD einlegen oder den
Lautstärkeregler betätigen, wird die MUTE-Funktion
wieder aufgehoben.
Schlafverzögerung
So können Sie festlegen, dass sich das Radio CD-Gerät
nach Ablauf eines bestimmten Zeitraums automatisch
ausschaltet:
• Drücken Sie die SLEEP-Taste auf der Fernbedienung,
bis die gewünschte Spieldauer angezeigt wird (siehe
Abb. U).
ORER
• Wenn sich das Radio CD-Gerät im Standbymodus
befindet, drücken Sie wiederholt die POWER-Taste,
bis die gewünschte Spieldauer angezeigt wird
(siehe Abb. V).
Als gültige Einstellungen für die Schlafverzögerung
stehen die Werte 15, 30, 45, 60, 90 und 120 Minuten
zur Auswahl. Wenn Sie die POWER-Taste drücken
oder eine CD einlegen, wird die
Schlafverzögerungseinstellung aufgehoben. Wenn
Sie die Schlafverzögerung bei der Wiedergabe einer
CD nutzen möchten, müssen Sie die CD daher bereits vor dem Einstellen der Verzögerungszeit einlegen.
PRESETS
ALARMS
TAP TO SET
PRESS & HOLD TO ADJUST
1
2
SOUNDWORKS RADIO
TUNE
WAKEUP
TIME
ADJUST
FM 1/2
MW
SEEK
AUX
AUX
F
JOG
VOLUME
SLEEP
SNOOZE
MUTE
1
2
3
4
5
6
7
8
POWER
+
PRESETS
ALARMS
TAP TO SET
PRESS & HOLD TO ADJUST
1
2
SOUNDWORKS RADIO
TUNE
WAKEUP
TIME
ADJUST
FM 1/2
MW
SEEK
AUX
AUX
F
JOG
VOLUME
SLEEP
SNOOZE
MUTE
1
2
3
4
5
6
7
8
POWER
+
PRESETS
ALARMS
TAP TO SET
PRESS & HOLD TO ADJUST
1
2
TUNE
WAKEUP
TIME
ADJUST
FM 1/2
MW
SEEK
AUX
AUX
F
JOG
VOLUME
1
2
3
4
5
6
7
8
+
FM 1/2
CD INFO
CD MODE REPEAT
PRESETS
FOLDER
VOLUME
JOG
MW AUX
POWER
TRACK
SEEK
CD
/TUNE
WIDE
STEREO
CD IN
MONO
1234
5678
SLEEP DELAY
45 M I N
T.
U.
V.
ALA
R
M
PRESETS
S
T
E
R
E
O
C
D
IN
C
D
IN
F
O
C
D
M
O
D
E
J
OG
FM
1/2
CD
S
EEK
TRA
CK
/T
UN
E
M
W
AU
X
PO
W
ER
R
E
P
E
A
T
–
FO
L
D
E
R
+
W
ID
E
M
O
N
O
1
1
2
2
3
4
5
6
7
8
SN
O
O
ZE/M
UT
E
Page 68

66
HEADPHONES
TIPPEN ZUM AKTIVIEREN DES WECKERS
DRÜCKEN UND HALTEN ZUM ÄNDERN
DER WECKEINSTELLUNG
DRÜCKEN UND HALTEN ZUM ÄNDERN DER
WECKEINSTELLUNG:
AUDIO-CD:
VERSTRICHENE ZEIT FÜR TITEL,
VERBLEIBENDE ZEIT FÜR TITEL
VERSTRICHENE GESAMTZEIT, VERBLEIBENDE GESAMTZEIT
CD-ROM:
VERSTRICHENE ZEIT FÜR TITEL
BEI CD-WIEDERGABE TIPPEN FÜR
FOLGENDE FUNKTIONEN:
AUDIO-CD:
ZUFÄLLIG, 1 TITEL SPIELEN
CD-ROM:
ALLE ZUFÄLLIG, 1 VERZ. SPIELEN
VERZ. ZUFÄLLIG, 1 TITEL SPIELEN
SENDERSPEICHERTASTEN:
DRÜCKEN UND HALTEN ZUM SPEICHERN DES
AKTUELLEN SENDERS
WECKSTATUSANZEIGE
= WECKEN MIT MUSIK
= WECKEN MIT TON
KOPFHÖRERANSCHLUSS FÜR 3,5-mm-MINISTECKER (STEREO) FÜR PRIVATEN HÖRGENUSS
ANSCHLUSS FÜR AUDIOPLAYER MIT 3,5-mm-MINISTECKER (STEREO) AKTIVIEREN ÜBER AUX-TASTE:
DIESER EINGANG SETZT DEN AUX-R-EINGANG AUF DER RÜCKSEITE AUSSER KRAFT.
LAUTSTÄRKEREGELUNG IM NORMALBETRIEB: EINSTELLUNGSANPASSUNG IN JOG-TAST
BEI CD-WIEDERGABE TIPPEN
FÜR FOLGENDE FUNKTIONEN:
WIEDERG. WIEDERH. FÜR
AKTUELLEN CD-MODUS
DURCH TIPPEN DIESER TASTEN KÖNNEN SIE
ZWISCHEN VERSCHIEDENEN VERZEICHNISSEN AUF
EINER CD-ROM WECHSELN
NORMALBETRIEB: DRÜCKEN ZUM S
IM WECKMODUS: DRÜCKEN ZUM AK
MW
ANTEN
INPUT
MIXING
INPUT
RECORD
OUTPUT
AUX
HINTERER 3,5-mm-AUX-
EINGANG (STEREOBUCHSE)
MW-ANTENNE
MINIBUCHSE
3,5-mm-STEREO-MINIBUCHSE (FESTER PEGEL)
FUNKTIONIERT AUCH ALS MISCHEINGANG
FUNKTIONEN AUF DER
SOUNDWORKS RADIO
CD-VORDER- UND
-OBERSEITE
KURZREFERENZ - SOUNDWORKS RADIO CD-FRONTBLENDE
Page 69

67
WIDE
STEREO
MONO
AUX-F
ZEIGT AN, DASS EINE
CD EINGELEGT IST
WIRFT CD AUS
TENBETRIEB.
AUSWÄHLEN DES FW-BEREICHS
ERNEUT DRÜCKEN ZUM WECHSELN ZWISCHEN SENDERSPEICHERGRUPPE 1 UND 2
WIEDERHOLT DRÜCKEN ZUM ANZEIGEN VERSCHIEDENER RADIOEINSTELLUNGEN
ÄNDERN DER EINSTELLUNGEN MIT DEN LAUTSTÄRKETASTEN.
BASS_ +4 BIS -4 SCHLUMMERZEIT - 5 BIS 22 MIN
TREBLE_ +4 BIS -4 RDS-TEXT - BILDLAUFTEXT, FEST, AUS
STEREO, WIDE, MONO CD-TEXT - BILDLAUFTEXT, FEST, AUS
LOUDNESS- EIN, AUS ZEITANZEIGE - 12 Stunden AM/PM ODER 24 Stunden
DISPLAYSPRACHE - ENGLISCH, SPANISCH, FRANZÖSISCH,
ITALIENISCH, DEUTSCH ODER NIEDERLÄNDISCH.
AUSWÄHLEN DES MW-BEREICHS
(EINE SENDERSPEICHERGRUPPE)
AUSWÄHLEN DES AUX-EINGANGS
RADIO „EIN“ ODER „AUS“
(WECKER AUCH IM „AUS“-MODUS AKTIV)
WIEDERHOLT DRÜCKEN FÜR
SCHLAFVERZÖGERUNGSFUNKTION
(15 BIS 120 MIN)
RADIO: TIPPEN ZUR MANUELLEN SENDERSUCHE;
DRÜCKEN UND HALTEN, UM NACH DEM NÄCHSTEN
SENDER ZU SUCHEN.
DISC: TIPPEN UM ZUM NÄCHSTEN BZW.
VORHERIGEN TITEL ZU WECHSELN; DRÜCKEN UND
HALTEN UM BEI DER AUDIOWIEDERGABE VORBZW. ZURÜCKZUSPULEN
RADIO: TIPPEN, UM AUTOMATISCH NACH
DEM SENDER MIT DER NÄCHSTHÖHEREN
FREQUENZ ZU SUCHEN.
CD: TIPPEN ZUM BEENDEN DER
WIEDERGABE.
TIPPEN ZUM STARTEN DER
CD-WIEDERGABE, ERNEUT
TIPPEN ZUM ANHALTEN DER
WIEDERGABE.
LEGT IM NORMALBETRIEB
DIE AKTUELLE UHRZEIT FEST
IM WECKEINSTELLUNGSMODUS
WIRD DIE WECKZEIT FESTGELEGT
GIBT DEN AUDIOMODUS
FM ANTENNAW
INPUT
EXT
INT
75 OHMS
EXTERNE FM-ANTENNE
„F“-EINGANG
INTERN / EXTERN
FM-ANTENNENAUSWAHLSCHALTER
MW
Page 70

68
KURZREFERENZ - FERNBEDIENUNG
SLEEP
SNOOZE
MUTE
1234
5678
PRESETS
ALARMS
TAP TO SET
PRESS & HOLD TO ADJUST
FOLDER
FOLDER
REPEATCD MODE
CD TIME
+
12
SOUNDWORKS RADIO CD
POWER
SEEK
STOP
TRACK / TUNE
WAKEUP
TIME
ADJUST
CD
FM 1/2
MW AUX
JOG
VOLUME
TIPPEN ZUM AKTIVIEREN DES WECKERS
DRÜCKEN UND HALTEN ZUM ÄNDERN DER
WECKEINSTELLUNG
SENDERSPEICHERTASTEN:
DRÜCKEN UND HALTEN ZUM
SPEICHERN DES AKTUELLEN
SENDERS
LAUTSTÄRKEREGELUNG IM NORMALBETRIEB
EINSTELLUNGSANPASSUNG IN JOG-TASTENBETRIEB
AUSWÄHLEN DES FW-BEREICHS
ERNEUT DRÜCKEN ZUM WECHSELN ZWISCHEN
SENDERSPEICHERGRUPPE 1 UND 2
WIEDERHOLT DRÜCKEN ZUM ANZEIGEN VERSCHIEDENER
RADIOEINSTELLUNGEN
ÄNDERN DER EINSTELLUNGEN MIT DEN LAUTSTÄRKETASTEN.
BASS _ +4 BIS -4
TREBLE _ +4 BIS -4
STEREO, WIDE, MONO
LOUDNESS - EIN, AUS
SCHLUMMERZEIT _ 5 BIS 25 MIN
RDS-TEXT _ BILDLAUFTEXT, FEST, AUS
CD-TEXT _ BILDLAUFTEXT, FEST, AUS
ZEITANZEIGE _ 12 Stunden AM/PM ODER 24 Stunden
DISPLAYSPRACHE _ ENGLISCH, SPANISCH, FRANZÖSISCH,
ITALIENISCH, DEUTSCH ODER NIEDERLÄNDISCH
AUSWÄHLEN DES MW-BEREICHS
(EINE SENDERSPEICHERGRUPPE)
AUSWÄHLEN DES AUX-EINGANGS
WIEDERHOLT DRÜCKEN
ZUM EINSTELLEN DER
SCHLAFVERZÖGERUNG
(15 BIS 120 MIN)
NORMALBETRIEB: DRÜCKEN
ZUM STUMMSCHALTEN.
IM WECKMODUS: DRÜCKEN
ZUM AKTIVIEREN DER
SCHLUMMERFUNKTION.
RADIO "EIN" ODER "AUS"
WECKER AUCH IM "AUS"-MODUS AKTIV
FM: TIPPEN ZUR MANUELLEN SENDERSUCHE;
DRÜCKEN UND HALTEN, UM NACH DEM
NÄCHSTEN SENDER ZU SUCHEN.
WECKER: WECKZEIT EINSTELLEN.
TIPPEN, UM AUTOMATISCH NACH DEM
SENDER MIT DER NÄCHSTHÖHEREN
FREQUENZ ZU SUCHEN
TIPPEN ZUM STARTEN DER
CD-WIEDERGABE
SOUNDWORKS RADIO CD 740
FERNBEDIENUNG
RADIO- UND WECKFUNKTIONEN
Page 71

69
SOUNDWORKS RADIO CD 740
FERNBEDIENUNG
DISC PLAY FUNCTIONS
VOLUME
JOG
TRACK / TUNE
CD
FM 1/2
WAKEUP
TIME
ADJUST
SEEK
STOP
MW AUX
TIPPEN FÜR WECHSEL ZUR NÄCHSTEN ODER
VORHERIGEN AUDIOAUSWAHL
DRÜCKEN UND HALTEN ZUM VOR- ODER
ZURÜCKSPULEN DURCH EINE AUDIOAUSWAHL
TIPPEN ZUM STARTEN DER CD-WIEDERGABE
TIPPEN ZUM ANHALTEN DER CD-WIEDERGABE
BEI CD-WIEDERGABE:
TIPPEN ZUM BEENDEN DER WIEDERGABE
MIT WIEDERAUFNAHMEFUNKTION
TIPPEN FÜR FOLGENDE FUNKTIONEN:
AUDIO-CD:
VERSTRICHENE ZEIT FÜR TITEL
VERBLEIBENDE ZEIT FÜR TITEL
VERSTRICHENE GESAMTZEIT
VERBLEIBENDE GESAMTZEIT
CD-ROM:
VERSTRICHENE ZEIT FÜR TITEL
TIPPEN FÜR FOLGENDE FUNKTIONEN:
TIPPEN FÜR WIEDERHOLTE WIEDERGABE
AUDIO-CD:
ALLE ZUFÄLLIG
1 TITEL SPIELEN
CD-ROM:
ALLE ZUFÄLLIG
1 VERZ. SPIELEN
VERZ. ZUFÄLLIG
1 TITEL SPIELEN
DES AKTUELLEN CD-MODUS
ALARMS
TAP TO SET
PRESS & HOLD TO ADJUST
CD TIME
12
FOLDER
1234
PRESETS
5678
+
FOLDERREPEATCD MODE
POWER
SLEEP
SOUNDWORKS RADIO CD
SNOOZE
MUTE
TIPPEN ZUM ANZEIGEN DES VERZEICHNISNAMENS
DURCH TIPPEN DIESER TASTEN KÖNNEN
SIE ZWISCHEN VERSCHIEDENEN
VERZEICHNISSEN AUF EINER CD-ROM
Page 72

70
JOG-FUNKTIONEN
JOG-Tastenbetrieb:
Drücken Sie die JOG-Taste am Gerät oder auf
der Fernbedienung, um die erste JOG-Funktion
auszuwählen (siehe Abb. W). Durch erneuten
Druck auf die JOG-Taste können Sie zusätzliche
JOG-Funktionen auswählen.
Mithilfe des Lautstärkereglers (VOLUME) am Gerät
bzw. der -Tasten auf der Fernbedienung können
Sie die Einstellungen für die JOG-Funktionen ändern.
Fünf Sekunden nach der letzten JOG- bzw.
Lautstärkeanpassung wird der JOG-Betrieb automatisch beendet. Darüber hinaus führt auch die
Auswahl einer beliebigen anderen Radio CD-Funktion
zum Abbruch des JOG-Betriebs.
JOG-Funktionen
Bass: Die Bassausgabe kann in vier Stufen nach oben
oder unten korrigiert werden.
Treble: Die Höhenausgabe kann in vier Stufen nach
oben oder unten korrigiert werden.
Stereo/Wide/Mono: Es werden nacheinander die Modi
STEREO, WIDE und MONO aktiviert. Beim Wechsel in
den Standbymodus wird der MONO-Betrieb
automatisch beendet.
Loudness: Wenn die LOUDNESS-Funktion aktiviert
ist, wird die Bassausgabe bei geringer Lautstärke
verstärkt.
Schlummerzeit: Eingestellt werden können Werte
zwischen 5 und 22 Minuten
RDS-Textanzeige: Für die RDS-Textausgabe von
FM-Sendern können Sie zwischen BILDLAUFTEXT,
STATISCHER TEXT und KEIN TEXT wählen.
CD-Textanzeige: Für Audio-CDs mit CD-Text oder
MP3-Dateien können Sie zwischen BILDLAUFTEXT,
STATISCHER TEXT und KEIN TEXT wählen.
Uhrzeitanzeigemodus: Wählen Sie zwischen
12-Stunden-Anzeige (AM/PM, US-Standard) und
24-Stunden-Anzeige (Internationaler Standard)
Displaysprache: Zur Auswahl stehen Englisch,
Spanisch, Französisch, Italienisch, Deutsch und
Niederländisch.
PRESETS
ALARMS
TAP TO SET
PRESS & HOLD TO ADJUST
1
2
SOUNDWORKS RADIO
TUNE
WAKEUP
TIME
ADJUST
FM 1/2
AM
SEEK
AUX
AUX
F
JOG
VOLUME
SLEEP
SNOOZE
MUTE
1
2
3
4
5
6
7
8
POWER
+
FM 1/2
CD INFO
CD MODE REPEAT
PRESETS
FOLDER
VOLUME
JOG
MW AUX
POWER
TRACK
SEEK
CD
/TUNE
WIDE
STEREO
CD IN
MONO
1234
5678
9 : 43AM
Display für Bassanpassung
Display für Höhenanpassung
Display für
Loudnessmodus
WIDE
STEREO
MONO
ADJUST SNOOZE
9 M I N
Display für
Schlummerzeiteinstellung
Display für
RDS-Textmodus
Display für
Uhrzeitanzeigemodus
Display für Sprachauswahl
Display für
STEREO/WIDE/MONO-Modus
VOLUME
Display für
CD-Textmodus
Page 73

71
Anpassen der Weckeinstellungen
Beim Festlegen der Weckeinstellungen wählen
Sie neben der Weckzeit auch die Musikquelle und
-lautstärke. Ob Sie mit Musik oder per Alarmton
geweckt werden möchten, geben Sie zu einem
späteren Zeitpunkt beim Aktivieren des Weckers an.
Hinweis: Wenn Sie mit einem bestimmten
Radiosender geweckt werden möchten, müssen
Sie diesen als PRESET auf einem der verfügbaren
Senderspeicherplätze speichern.
1) Drücken und halten Sie die Alarm 1- bzw.
Alarm 2-Taste, bis ein kurzer Ton hörbar wird
(ca. 1,5 Sekunden). Das Radio CD-Gerät wechselt
in den Weckeinstellungsmodus. Wenn 15 Sekunden
lang keine Taste gedrückt wird, wird der Modus
automatisch beendet. Zwischen den einzelnen
Einstellungen bleiben Ihnen jeweils fünf Sekunden.
2) Zu jedem beliebigen Zeitpunkt während der
Weckeinstellungssitzung können Sie durch Auswahl
von FM1, FM2, MW oder CD Ihren bevorzugten
Musikweckmodus angeben. Aktivieren Sie eine
Senderspeichergruppe (FM1, FM2 oder MW), und
wählen Sie über die entsprechende PRESET-Taste
auf der Frontblende bzw. Fernbedienung den
gewünschten Sender aus.
Die Auswahl der CD-Weckfunktion ist nur möglich,
wenn eine CD eingelegt ist. Wenn Sie die CD nach
Aktivierung der CD-Weckfunktion wieder entnehmen,
wechselt das Gerät in den Wecktonmodus. Über
die AUX-Eingänge angeschlossene externe
Geräte können für die Weckfunktion nicht
ausgewählt werden.
3) Zu jedem beliebigen Zeitpunkt während der
Weckeinstellungssitzung können Sie die Lautstärke
für den Musikweckmodus festlegen. Betätigen Sie
dazu den Lautstärkeregler (VOLUME) an der
Frontblende bzw. die beiden Lautstärketasten
auf der Fernbedienung.
WECKFUNKTIONEN
PRESETS
ALARMS
TAP TO SET
PRESS & HOLD TO ADJUST
1
2
SOUNDWORKS RADIO
TUNE
WAKEUP
TIME
ADJUST
FM 1/2
MW
SEEK
AUX
AUX
F
JOG
VOLUME
SLEEP
SNOOZE
MUTE
1
2
3
4
5
6
7
8
POWER
+
FM 1/2
CD INFO
CD MODE REPEAT
PRESETS
FOLDER
VOLUME
JOG
MW AUX
POWER
TRACK
SEEK
CD
/TUNE
WIDE
STEREO
CD IN
MONO
1234
5678
WAKEUP T I ME
7 : 57 AM
PRESETS
ALARMS
TAP TO SET
PRESS & HOLD TO ADJUST
1
2
SOUNDWORKS RADIO
TUNE
WAKEUP
TIME
ADJUST
FM 1/2
MW
SEEK
AUX
AUX
F
JOG
VOLUME
SLEEP
SNOOZE
MUTE
1
2
3
4
5
6
7
8
POWER
+
FM 1/2
CD INFO
CD MODE REPEAT
PRESETS
FOLDER
VOLUME
JOG
AM AUX
POWER
TRACK
SEEK
CD
/TUNE
WIDE
STEREO
CD IN
MONO
1234
5678
FM WAKEUP
7 : 57 AM
2. Musikweckeinstellung, erster Bildschirm
1. Starten der Weckeinstellungssitzung
PRESETS
ALARMS
TAP TO SET
PRESS & HOLD TO ADJUST
1
2
SOUNDWORKS RADIO
TUNE
WAKEUP
TIME
ADJUST
FM 1/2
MW
SEEK
AUX
AUX
F
JOG
VOLUME
SLEEP
SNOOZE
MUTE
1
2
3
4
5
6
7
8
POWER
+
FM 1/2
CD INFO
CD MODE REPEAT
PRESETS
FOLDER
VOLUME
JOG
AM AUX
POWER
TRACK
SEEK
CD
/TUNE
WIDE
STEREO
CD IN
MONO
1234
5678
ALARM VOLUME
20
3. Wecklautstärkeeinstellung
Page 74

72
WECKFUNKTIONEN
PRESETS
ALARMS
TAP TO SET
PRESS & HOLD TO ADJUST
1
2
SOUNDWORKS RADIO
TUNE
WAKEUP
TIME
ADJUST
FM 1/2
MW
SEEK
AUX
AUX
F
JOG
VOLUME
SLEEP
SNOOZE
MUTE
1
2
3
4
5
6
7
8
POWER
+
FM 1/2
CD INFO
CD MODE REPEAT
PRESETS
FOLDER
VOLUME
JOG
MW AUX
POWER
TRACK
SEEK
CD
/TUNE
WIDE
STEREO
CD IN
MONO
1234
5678
FM WAKEUP
7 : 57 AM
4. Weckzeiteinstellung
PRESETS
ALARMS
TAP TO SET
PRESS & HOLD TO ADJUST
1
2
SOUNDWORKS RADIO
TUNE
WAKEUP
TIME
ADJUST
FM 1/2
MW
SEEK
AUX
AUX
F
JOG
VOLUME
SLEEP
SNOOZE
MUTE
1
2
3
4
5
6
7
8
POWER
+
FM 1/2
CD INFO
CD MODE REPEAT
PRESETS
FOLDER
VOLUME
JOG
MW AUX
POWER
TRACK
SEEK
CD
/TUNE
WIDE
STEREO
CD IN
MONO
1234
5678
ALARM 1
SETT I NGS STORED
5. Anzeige der gespeicherten Weckeinstellungen
Anpassen der Weckeinstellungen
4) Zu jedem beliebigen Zeitpunkt während der
Weckeinstellungssitzung können Sie die Weckzeit
festlegen. Betätigen Sie dazu die entsprechenden
Tasten an der Frontblende bzw. die TRACK/TUNETasten auf der Fernbedienung.
5) Zum Beenden der Weckeinstellungssitzung
können Sie dieselbe Alarmtaste noch einmal
drücken oder einfach zehn Sekunden warten.
Die Weckeinstellungssitzung wird automatisch
beendet. Die neuen Einstellungen werden in
jedem Fall gespeichert.
Page 75

73
Aktivieren der Weckeinstellungen
Tippen Sie im Standbymodus oder Normalbetrieb auf
eine der beiden Alarmtasten, um zwischen folgenden
Modi zu wechseln
Wecken mit Musik
Wecken mit Ton
Kein Wecken
Je nach aktiviertem Modus wird das Musik- ( ) bzw.
Tonwecksymbol ( ) angezeigt.
Wecken mit Musik ist nur möglich, wenn das Gerät im
Standbymodus verbleibt.
Der Weckton funktioniert dagegen in jedem Modus.
Dadurch ist es möglich, den Weckton während des
Tages als Erinnerungsfunktion zu nutzen, während
das Radio ganz normal läuft.
Stummschalten des Weckers
Wenn Sie den Wecker für den aktuellen Tag abschalten
aber sonst grundsätzlich aktiviert lassen möchten,
tippen Sie auf die POWER-Taste an der Frontblende
oder auf der Fernbedienung. Dadurch bleiben die
Weckeinstellungen aktiv und werden am nächsten
Tag ganz normal wirksam.
Wenn Sie den Wecker stummschalten und deaktivieren
möchten (sodass er auch am nächsten Tag nicht
ausgelöst wird), drücken Sie die entsprechende
Alarmtaste an der Frontblende oder auf der
Fernbedienung.
Schlummerfunktion
Bei Betätigung der SNOOZE/MUTE-Taste am Gerät
bzw. auf der Fernbedienung (2) wird der Wecker für
einen voreingestellten Zeitraum (5 bis 22 Minuten)
stummgeschaltet.
Der Schlummerzeitraum kann mithilfe der JOG-Funktion
angepasst werden.
SCHLUMMERFUNKTION
PRESETS
ALARMS
TAP TO SET
PRESS & HOLD TO ADJUST
1
2
SOUNDWORKS RADIO
TUNE
WAKEUP
TIME
ADJUST
FM 1/2
MW
SEEK
AUX
AUX
F
JOG
VOLUME
SLEEP
SNOOZE
MUTE
1
2
3
4
5
6
7
8
POWER
+
FM 1/2
CD INFO
CD MODE REPEAT
PRESETS
FOLDER
VOLUME
JOG
MW AUX
POWER
TRACK
SEEK
CD
/TUNE
WIDE
STEREO
CD IN
MONO
1234
5678
ALARM 1
TONE WAKEUP
PRESETS
ALARMS
TAP TO SET
PRESS & HOLD TO ADJUST
1
2
SOUNDWORKS RADIO
TUNE
WAKEUP
TIME
ADJUST
FM 1/2
MW
SEEK
AUX
AUX
F
JOG
VOLUME
SLEEP
SNOOZE
MUTE
1
2
3
4
5
6
7
8
POWER
+
FM 1/2
CD INFO
CD MODE REPEAT
PRESETS
FOLDER
VOLUME
JOG
MW AUX
POWER
TRACK
SEEK
CD
/TUNE
WIDE
STEREO
CD IN
MONO
1234
5678
ALARM 1
OFF
PRESETS
ALARMS
TAP TO SET
PRESS & HOLD TO ADJUST
1
2
SOUNDWORKS RADIO
TUNE
WAKEUP
TIME
ADJUST
FM 1/2
MW
SEEK
AUX
AUX
F
JOG
VOLUME
SLEEP
SNOOZE
MUTE
1
2
3
4
5
6
7
8
POWER
+
MW
1a .
1b .
1c .
Schlummerfunktion
2.
Page 76

74
RADIO DATA SERVICE (RDS)
Einige FM-Radiosender strahlen neben dem
eigentlichen Programmsignal auch so genannte
RDS-Textmeldungen (Radio Data Service) aus.
Die Sender-ID wird in den ersten acht Zeichen der
unteren Zeile angezeigt. Dieser Text ändert sich in
der Regel nicht. In der oberen Zeile wird dagegen
beschreibender Text angezeigt. Hierbei kann es sich
beispielsweise um das Senderformat oder um den
Titel bzw. Interpreten handeln.
CD-Text
Auf neueren Audio-CDs sind neben dem eigentlichen
Audiomaterial auch beschreibende Texte gespeichert.
Dieser Text wird vom Radio CD-Gerät decodiert und
angezeigt.
ID3-Textinformationen in MP3-Dateien
Aus dem Internet heruntergeladene MP3-Dateien
enthalten unter Umständen ID3-Textinformationen.
Solche Informationen können beim Erstellen von
MP3-Dateien aus unkomprimierten Audioquellen mit
in die Dateien eingebettet werden. Wenn MP3-Dateien
ID3-Textinformationen enthalten, werden diese vom
Radio CD-Gerät angezeigt. Andernfalls wird der
jeweilige Dateiname ausgegeben.
Auswählen des Textanzeigemodus
Das JOG-Menü verfügt über separate RDS- und
CD-Textoptionen, mit denen Sie festlegen können,
ob der jeweilige Text als Bildlauftext, statischer Text
oder überhaupt nicht angezeigt werden soll.
RADIO- UND CD-TEXTANZEIGEN
Anzeige von RADIO DATA SERVICE-Text
Anzeige von CD-Text
Anzeige von ID3-Text in MP3-Dateien
Beschreibender
RDS-Text
RDS-Sender-ID
Beschreibender
CD-Text
ID3-Text in
MP3-Datei
Page 77

75
Das Radio CD-Gerät erkennt auf einer CD-ROM
gespeicherte MP3-komprimierte Audiodateien. Somit
können Sie eigene CD-ROM-Musiksammlungen erstellen
(„brennen“), die weit mehr Titel enthalten, als auf einer
normalen Audio-CD Platz finden. Darüber hinaus ist Ihr
Radio CD-Gerät in der Lage, Verzeichnisse auf der
obersten Ebene einer CD-ROM zu erkennen und die
entsprechenden Verzeichnisnamen anzuzeigen.
Mithilfe von Verzeichnissen können auf einer CD-ROM
verschiedene Titelgruppen auf bequeme Weise getrennt
verwaltet werden.
Im Quellverzeichnis und jedem darin befindlichen
Verzeichnis werden maximal 99 Titel erkannt. Beachten
Sie jedoch, dass Unterverzeichnisse vom Radio
CD-Gerät nicht erkannt werden können. MP3-Dateien,
die sich in untergeordneten Verzeichnissen befinden,
werden als Dateien des Quellverzeichnisses interpretiert.
Wiedergabereihenfolge der Dateien auf einer
CD-ROM
a) Zuerst werden alle MP3-Dateien erkannt, die sich
im Quellverzeichnis der CD-ROM befinden. Diese
Dateien werden entsprechend den Dateinamen in
alphanumerischer Reihenfolge wiedergegeben.
Dateien, deren Erweiterung nicht „.mp3“ lautet,
werden bei der Wiedergabe ignoriert.
CD-ROM-WIEDERGABE
mp3
Titel b
mp3
Titel a
Quellverzeichnis der CD-ROM
WIEDERGABEREIHENFOLGE
Titel und Verzeichnisse werden
alphanumerisch geordnet
wiedergegeben.
Verzeichnis a Verzeichnis b
CD-ROM
Weitere
Verzeichnisse
mp3
mp3
mp3
mp3
mp3
mp3
Titel a
Titel b
Titel c
Titel a
Titel b
Titel c
mp3
mp3
mp3
Titel a
Titel b
Titel c
1
2
3
4
5
6
7
8
9
10
11
Page 78

76
b) Sobald alle MP3-Dateien im Quellverzeichnis
der CD-ROM wiedergegeben wurden, werden die
Dateien der anderen Verzeichnisse entsprechend
ihren Verzeichnis- und Dateinamen in alphanumerischer Reihenfolge abgespielt.
c) Wenn sich im Quellverzeichnis der CD-ROM keine
MP3-Dateien befinden, werden automatisch die
Dateien im ersten Verzeichnis (entsprechend der
„Verzeichnisnamenreihenfolge“) wiedergegeben.
Durch Betätigen der PRESET-Taste 4 können Sie
bei der MP3-Dateiwiedergabe kurzzeitig den
Namen des aktiven Verzeichnisses anzeigen.
d) Nachdem alle Dateien des ersten Verzeichnisses
abgespielt wurden, werden die Inhalte aller
anderen Verzeichnisse wiedergegeben, die sich
im Quellverzeichnis der CD befinden.
e) Mit den Tasten FOLDER + und FOLDER - können zum
jeweils nächsten bzw. vorhergehenden Verzeichnis
wechseln.
f) Im Diagramm auf Seite 19 ist die Wiedergabereihenfolge
für den Inhalt einer CD-ROM in einem Beispiel
dargestellt.
Tipps zur Vorbereitung einer CD-ROM
mit MP3-Dateien
1) Beginnen Sie den Namen jedes Titels bzw.
Verzeichnisses mit einer Nummer, um die gewünschte
Reihenfolge festzulegen. Viele Brennprogramme für
CD-ROMs unterstützen das automatische Hinzufügen
einer fortlaufenden Nummerierung zu Beginn der
MP3-Dateinamen.
2) Beim Ermitteln der Titel- und Verzeichnisreihenfolge
werden Nummern vom Radio CD-Gerät als Text
behandelt. Wenn die Gesamtanzahl der Titel
oder Verzeichnisse den Wert neun übersteigt,
sollten einstellige Nummern mit einer führenden
Null (01, 02, 03..,) versehen werden.
3) Im Quellverzeichnis der CD-ROM sowie allen darin
enthaltenen Verzeichnissen werden jeweils maximal
99 Titel unterstützt.
CD-ROM-WIEDERGABE
Page 79

77
Organisieren von MP3-Dateien und Verzeichnissen
auf einer CD-ROM
a) Legen Sie im Quellverzeichnis der CD-ROM nur
Verzeichnisse (keine MP3-Dateien) ab. Dadurch können Sie
mithilfe der Tasten FOLDER + und FOLDER - durch
die einzelnen Verzeichnisse blättern. Dieser Vorgang ist mit
der Auswahl einer bestimmten CD in einem Mehrfach-CDPlayer vergleichbar.
b) Lesen Sie Ihre Lieblingstitel von einer Audio-CD aus,
und speichern Sie diese in einem Verzeichnis auf der
Festplatte Ihres Computers. Vergewissern Sie sich, dass
die Titel mit einer fortlaufenden Nummerierung beginnen,
die der gewünschten Wiedergabereihenfolge entspricht.
c) Wiederholen Sie diesen Vorgang für andere Gruppen
komprimierter Audiodateien, die Sie auf derselben CD-ROM
speichern möchten. Legen Sie die Dateien gruppenweise
in separaten Verzeichnissen auf Ihrer Festplatte ab.
d) Versehen Sie auch die Verzeichnisnamen mit einer
vorangestellten Nummerierung entsprechend der
gewünschten Reihenfolge.
e) „Brennen“ Sie alle Verzeichnisse in einer Sitzung auf
eine CD-ROM.
Im Ergebnis dieses Vorgangs erhalten Sie eine CD-ROM,
die wesentlich mehr Musik enthält als eine herkömmliche
Audio-CD. Mithilfe der Tasten FOLDER + und FOLDER können Sie problemlos durch die verschiedenen
Verzeichnisse navigieren.
CD-ROM-WIEDERGABE
mp3
mp3
mp3
mp3
mp3
mp3
mp3
mp3
mp3
mp3
mp3
mp3
mp3
mp3
mp3
mp3
01 Verzeichnisname
01 Titel
02 Titel
03 Titel
Max. 99 Dateien
02 Verzeichnisname
Quellverzeichnis der CD-ROM
03 Verzeichnisname 04 Verzeichnisname
CD-ROM
Weitere
Verzeichnisse
01 Titel
02 Titel
03 Titel
Max. 99 Dateien
01 Titel
02 Titel
03 Titel
Max. 99 Dateien
01 Titel
02 Titel
03 Titel
Max. 99 Dateien
Page 80

78
TECHNISCHE DATEN
Interne Audioquellen:
FM-Stereotuner mit Anzeige von RDS-Text (Radio Data
Service) bei entsprechenden FM-Sendern.
MW-Tuner.
CD-Transport mit:
EINGANGS SPANNUNG: 230VAC 50HZ 0.5A
Audio-CD-Wiedergabe mit Anzeige von decodiertem
CD-Text sowie Wiedergabe von MP3-Dateien auf einer
CD-ROM.
Unterstützte MP3-Datenraten: 30-300 kbps sowie
variable Datenraten
Eingänge:0
EINGANGS SPANNUNG: 230VAC 50HZ 0.5A
Rückseite: 1 AUX IN (3,5-mm-Stereominibuchse)
Rückseite: 1 MIXING INPUT-Anschluss (kombiniert mit
REC OUT), 3,5-mm-Stereominibuchse
Rückseite: 1 Anschluss für MW-Antenne (3,5-mmStereominibuchse)
Minibuchsenkonfiguration für Antenne: Sleeve (Masse) –
keine Verbindung, Tip (heiß) und Ring (kalt) – Schleifenantenne
Rückseite: 1 F-Buchse für FM-Antenne, 75 Ohm
Frontblende: 1 AUX-F-Anschluss (3,5-mmStereominibuchse)
Ausgänge:
Rückseite: 1 REC OUT-Anschluss (Stereominibuchse
Frontblende: 1 Kopfhöreranschluss
(3,5-mm-Stereominibuchse
Bedienelemente auf Rückseite:
INT/EXT-Schalter für FM-Antenne
Abmessungen:
Englisch Metrisch
Höhe: 4
15
/16Zoll 125 mm
Breite: 14 Zoll 356 mm
Tiefe: 9
7
/8Zoll 248 mm
Tiefe (mit Griff und Netzkabel):
10
3
/8Zoll 258 mm
Gewicht: 12 Pfund 5,5 kg
Page 81

SoundWorks Radio CD 740
Manuale dell'utente
MW
Page 82

80
Il simbolo del fulmine con la punta a
freccia all'interno di un triangolo è un
simbolo di avvertenza che indica la
presenza di "tensioni pericolose" non
isolate all'interno del prodotto, tali da
poter comportare rischi di scosse
elettriche alle persone.
Il simbolo del punto esclamativo
all'interno di un triangolo è un simbolo
di avvertenza che indica la presenza
di importanti istruzioni di funzionamento
e manutenzione nella documentazione
allegata al prodotto
AVVERTENZA
NON APRIRE
AL FINE DI PREVENIRE IL POSSIBILE
RISCHIO DI SCOSSE ELETTRICHE,
NON RIMUOVERE IL COPERCHIO
DELL'ALTOPARLANTE. ALL'INTERNO
NON SONO PRESENTI PARTI
RIPARABILI DALL'UTENTE.
PER L'ASSISTENZA RIVOLGERSI A
PERSONALE TECNICO QUALIFICATO.
LEGGERE E CONFORMARSI ALLE IMPORTANTI
AVVERTENZE DI SICUREZZA RIPORTATE
SULL'APPARECCHIO
ATTENZIONE:
AL FINE DI PREVENIRE SCOSSE ELETTRICHE,
INSERIRE COMPLETAMENTE IL CONTATTO DI
MESSA A TERRA DEL CONNETTORE NELLA
CORRISPONDENTE PRESA A MURO.
AVVISO IMPORTANTE:
IL NUMERO DI SERIE DELL'ALTOPARLANTE È SITUATO
SUL PANNELLO DI CONTROLLO DELL'ALTOPARLANTE.
PER LA PROPRIA SICUREZZA, ANNOTARE IL NUMERO
E CONSERVARLO IN UN LUOGO PROTETTO.
Page 83

81
ADDENDUM:
Quanto segue completa o corregge le informazioni contenute nel manuale dell'utente o descrive funzioni aggiunte
successivamente al completamento di tale manuale.
FUNZIONI DI RIPRODUZIONE DISCO
Durante la riproduzione di un CD audio
Press STOP Disc Position
1 volta ....................... Ripresa dallo stesso punto
2 volte ............................ Inizio del disco
Durante la riproduzione di un CD-ROM
Premere STOP Posizione nel disco
1 volta ....................... Ripresa dallo stesso punto
2 volte ....................... Inizio della cartella
3 volte ....................... Inizio del disco
Riproduzione CD e pulsante POWER (Alimentazione): se si preme il pulsante POWER (Alimentazione) durante
la riproduzione di un disco, il Radio CD entra in modalità STANDBY con ripresa traccia. Se si preme nuovamente
il pulsante POWER, la riproduzione riprende esattamente nello stesso punto del disco (CD audio o CD-ROM).
Preset 5 "FOLDER" feature: il SoundWorks Radio CD 740 riconosce le cartelle al livello principale di un CD-ROM.
Se si preme il preset 5 "FOLDER" (Cartella) durante la riproduzione di un CD-ROM, verranno visualizzate le prime
16 lettere del nome della cartella contenente la traccia MP3 attiva. Se il file non si trova all'interno di una cartella,
viene visualizzato PRINCIPALE.
PREPARAZIONE DI UN CD-ROM
Numero massimo di singoli file MP3 supportati su un CD-ROM
295 file.
Se il totale dei file MP3 sul CD-ROM supera 295, la visualizzazione del nome della cartella e la sequenza
di riproduzione delle cartelle e dei file MP3 saranno imprevedibili.
Numero massimo di cartelle supportate su un CD-ROM:
29 cartelle.
Sequenza di riproduzione di file MP3 su un CD-ROM
Il SoundWorks Radio CD 740 riconosce i primi 8 caratteri del nome di un file MP3 per determinare la sequenza
di riproduzione. Accertarsi di numerare i file MP3 nella parte iniziale del nome. La maggior parte dei programmi
di masterizzazione dei CD-ROM supporta la numerazione automatica apposta all'inizio dei nomi dei file.
CD-ROM multisessione:
il SoundWorks Radio CD 740 riconosce solo la prima sessione di un CD-ROM. Per l'utilizzo nel SoundWorks
Radio CD 740, masterizzare CD-ROM completi.
FUNZIONI PRESET DELLA RADIO
Quando una frequenza FM viene memorizzata su un PRESET, vengono memorizzate anche l'impostazione corrente
di Stereo/Wide/Mono e del testo RDS. Quando si tocca il PRESET, le informazioni memorizzate sostituiscono
l'impostazione del menu JOG (Impostazione rapida). Se si memorizza una stazione stereo FM debole in MONO,
si otterrà una riproduzione più nitida in condizioni di ricezione variabili. È anche possibile scegliere di memorizzare
le stazioni FM con il testo RDS che non si desidera visualizzare in modalità TESTO STATICO o NO TESTO.
Page 84

82
FUNZIONI DI REGOLAZIONE DELLA SVEGLIA
Per impostare la sveglia su una traccia specifica di un CD audio: inserire un CD audio
nell'apparecchio radio e premere Alarm 1 (Sveglia 1) o Alarm 2 (Sveglia 2) per due secondi per
avviare una sessione di regolazione della sveglia. Durante la sessione di regolazione della sveglia,
premere prima il pulsante CD Play/Pause (Riproduzione/Pausa CD) per selezionare Risveglio con
CD. Utilizzare quindi i pulsanti Track/Tune (Traccia/Sintonia) sul pannello frontale del Radio CD per
selezionare la traccia da riprodurre. Durante l'attivazione della sveglia, la radio inizierà la
riproduzione del CD dalla traccia selezionata e continuerà con le altre tracce in sequenza.
Per impostare la sveglia su un file MP3 specifico su un CD-ROM: il SoundWorks Radio CD 740
consente anche di selezionare un file MP3 (o traccia) su un CD-ROM per la sveglia utilizzando i
pulsanti Track/Tune (Traccia/Sintonia). Durante una sessione di attivazione della sveglia, un file
MP3 specifico per il risveglio viene selezionato mediante i pulsanti Track/Tune (Traccia/Sintonia)
del pannello frontale. È supportato uno schema semplificato per la selezione delle tracce da un
CD-ROM. Tutti i file MP3 contenuti in un disco sono rappresentati da un numero corrispondente
alla sequenza di riproduzione dei file MP3 del disco nella modalità Esegui tutto. Le tracce al livello
principale del disco vengono numerate per prime, seguite dalle tracce nella prima cartella, quindi
da quelle nella seconda cartella e così via.
Page 85

83
ISTRUZIONI IMPORTANTI SULLA SICUREZZA
Lettura delle istruzioni
Leggere attentamente le istruzioni sulla sicurezza e sul funzionamento prima di utilizzare il prodotto.
Conservazione delle istruzioni
Conservare le istruzioni sulla sicurezza e sul funzionamento per un eventuale utilizzo futuro.
Avvisi
Tenere conto di tutti gli avvisi riportati sul prodotto e nelle istruzioni sul funzionamento.
Istruzioni
Seguire attentamente tutte le istruzioni sul funzionamento e sull’utilizzo.
Pulizia
Scollegare il prodotto dalla presa di corrente prima di procedere alla pulizia. Non utilizzare detergenti liquidi
o spray. Utilizzare un panno inumidito.
Accessori
Non utilizzare accessori non consigliati da Creative in quanto potrebbero causare danni.
Luoghi eccessivamente umidi
Non utilizzare il prodotto in prossimità di luoghi eccessivamente umidi.
Installazione
Collocare il prodotto su una superficie piana o sul supporto consigliato o venduto con il prodotto. In caso
contrario, il prodotto potrebbe cadere e danneggiarsi, oppure ferire l’utente. Seguire attentamente le istruzioni
del produttore per montare il prodotto.
Ventilazione
Per assicurare un funzionamento corretto del sistema e prevenirne il surriscaldamento, non bloccare o ostruire
in alcun modo le fessure di ventilazione con tessuti o materiale impermeabile. Non collocare il sistema in un
luogo chiuso quale una libreria o uno scaffale, a meno che non ci sia una ventilazione adeguata o siano state
seguite attentamente le istruzioni di Creative.
Calore
Non collocare il prodotto in prossimità di fonti di calore quali termosifoni e altri elementi (inclusi gli amplificatori)
che emanano calore.
Alimentazione
Questo sistema di altoparlanti è stato appositamente progettato per l’uso entro i limiti di potenza specificati sul
trasformatore fornito. L’utilizzo al di fuori di questi limiti è pertanto a rischio e pericolo dell’utente. Contattare
l’azienda elettrica locale per ulteriori informazioni sul voltaggio dell’area in cui si intende utilizzare il prodotto.
Page 86

84
ISTRUZIONI IMPORTANTI SULLA SICUREZZA
Polarizzazione
Per ragioni di sicurezza, il prodotto può essere provvisto di spina ca polarizzata. Poiché uno spinotto è più largo
dell’altro, la spina può essere inserita nella presa in un solo modo. Se non si riesce a inserire completamente la
spina nella presa, provare a capovolgerla. Se il problema persiste, contattare l’elettricista di fiducia per sostituire
la presa obsoleta. Non forzare la spina nella presa.
Protezione del cavo di alimentazione
Installare i cavi di alimentazione in modo tale da ridurre il rischio di danni. Prestare particolare attenzione
all’area in prossimità della spina, della presa di corrente e della connessione al prodotto.
Temporali
Scollegare il prodotto dalla presa di corrente durante temporali o in caso di inutilizzo per periodi di tempo
prolungati. In questo modo, si prevengono i danni causati da scariche elettriche e sovracorrente momentanea.
Sovraccarico
Non sovraccaricare le prese a muro, i cavi di estensione o le prese integrali poiché ciò potrebbe provocare
incendi o scosse elettriche.
Penetrazione di oggetti e sostanze liquide
Non inserire alcun oggetto nelle aperture del prodotto poiché ciò potrebbe provocare incendi, scosse elettriche
o danni. Non rovesciare sostanze liquide sul prodotto.
Manutenzione
Evitare di riparare il prodotto personalmente. Per qualsiasi tipo di intervento di manutenzione, rivolgersi a
personale qualificato.
Danni che richiedono assistenza
Scollegare il prodotto dalla presa di corrente. Chiamare personale qualificato quando:
a) il cavo di alimentazione o la spina risultano danneggiati;
b) oggetti o sostanze liquidi sono penetrate attraverso le aperture del prodotto;
c) il prodotto è stato esposto a pioggia o umidità eccessiva;
d) il prodotto non funziona normalmente pur attenendosi alle istruzione per l’uso;
e) il prodotto funziona in modo strano;
f) il prodotto è caduto o è stato danneggiato in qualsiasi altro modo.
Parti di ricambio
Quando si sostituiscono parti del prodotto, assicurarsi che il tecnico utilizzi le parti di ricambio indicate da
Creative o parti con le stesse caratteristiche di quelle originali. L’utilizzo di parti non autorizzate può provocare
incendi, scosse elettriche e altri tipi di danni.
Verifica di sicurezza
Dopo interventi di manutenzione o riparazione, chiedere al tecnico di eseguire una verifica di sicurezza per
accertarsi che il prodotto funzioni correttamente.
Page 87

85
INTRODUZIONE
Cambridge SoundWorks presenta il nuovo
SoundWorks Radio CD 740 ad alte prestazioni, dotato
di radio con sistema audio stereo FM di eccezionale
qualità e capacità di riprodurre utili stazioni della
banda MW. La radio è in grado di memorizzare
16 preset di stazioni FM e 8 preset di stazioni MW.
Un lettore disco integrato a fessura riproduce CD
audio e file MP3 su CD-ROM. L'ampio display a
32 caratteri e il telecomando che include tutte le
funzioni consentono di utilizzare la radio con estrema
facilità da qualsiasi angolo della stanza.
Il SoundWorks Radio CD 740 mostra tre tipi di testo
supplementare:
• testo RDS (Radio Data Service) delle stazioni FM
• testo CD
• testo "ID3" memorizzato nella maggior parte dei
file MP3.
Una funzione automatica riduce la luminosità del
display in ambienti scuri e assicura ottima leggibilità
in presenza di luci forti. Una pila a lunga durata
incorporata mantiene con precisione l'ora corrente per
molti anni. Inserendo una batteria a 9 V (non inclusa),
è possibile assicurare che la funzione risveglio, una
volta attivata, funzioni anche in assenza di
alimentazione di rete.
Ingressi anteriori e posteriori consentono di collegare
facilmente sorgenti di programmi audio (come lettori
MP3 e di cassette portatili). Un'uscita di registrazione
consente di inviare il segnale del programma audio
corrente ad altre periferiche.
Un comodo pulsante JOG (Impostazione rapida)
facilita la selezione di una serie di regolazioni
secondarie, come bassi e treble, la durata del ritardo
e le modalità di visualizzazione del testo.
Page 88

86
Rimuovere il SoundWorks Radio CD (vedere la figura
A) dall'involucro protettivo e collocarlo nella posizione
desiderata. Il suono dell'opzione Tono della sveglia
e l'uscita dei bassi del Radio CD risulteranno ridotti
se la radio viene collocata su una superficie morbida
e regolare.
Collegare l'antenna MW (vedere la figura B): per
preparare l'antenna (1), piegarne la base (2) e
collocarla in posizione con uno scatto (3). Collocare
l'antenna MW (4) in modo che non possa subire urti
o danni, possibilmente a una distanza minima di circa
20 cm da Radio CD. Inserire il miniconnettore
dell'antenna MW nel minijack contrassegnato MW
ANTENNA (5) sul pannello posteriore dell'apparecchio
Radio CD
Ruotare l'antenna MW in modo da ottenere il miglior
segnale dalle singole stazioni MW.
Collegare il cavo di alimentazione inserendo
la spina CA del SoundWorks Radio CD in una
presa opportunamente posizionata.
Il cavo CA è anche l'antenna FM principale
dell'apparecchio. Funzionerà meglio se almeno il 50%
della sua lunghezza viene collocato in linea retta
(vedere la figura C). Verificare che l'interruttore
dell'antenna FM posto sul pannello posteriore della
radio sia nella posizione INT (interna) (impostazione
predefinita del produttore).
Se lo si desidera, è possibile collegare e utilizzare
l'antenna FM esterna invece di quella interna (vedere
la figura D). Collegare l'antenna esterna al connettore
di tipo "F" sul pannello posteriore. Impostare
l'interruttore dell'antenna FM su EXT (esterna).
PREPARAZIONE
MIXING
INPUT
RECORD
OUTPUT
INPUT INPUT
MW
ANTENNA
FM ANTENNA
EXT
INT
INPUT
75 OHMS
AUX
MIXING
INPUT
RECORD
OUTPUT
INPUT INPUT
MW
ANTENNA
FM ANTENNA
EXT
INT
INPUT
75 OHMS
AUX
A
L
A
R
M
P
R
E
S
E
T
S
S
T
E
R
E
O
C
D
IN
C
D
I
N
F
O
C
D
M
O
D
E
JOG
FM
1/2
CD
SEEK
TR
ACK/TU
NE
M
W
AUX
PO
W
ER
R
E
P
E
A
T
–
F
O
L
D
E
R
+
W
ID
E
M
O
N
O
1
1
2
2
3
4
5
6
7
8
SNOOZE/MUTE
B.
1.
2.
3.
4.
5.
C.
D.
A.
Page 89

87
Impostazione dell'orologio
È possibile regolare l'ora corrente sia quando la radio è
in standby sia quando è accesa. È sufficiente premere
i pulsanti di regolazione dell'ora (accanto al simbolo)
sul lato destro del display (vedere la figura E).
Nota: l'ora corrente può essere regolata solo dal
pannello frontale del Radio CD. Con il telecomando
è possibile regolare l'impostazione dell'ora di risveglio
ma non l'ora corrente.
Batteria di backup per la sveglia con Tono
Per ottenere 48 ore di backup nella funzione di sveglia
in caso di interruzione dell'alimentazione di rete,
installare una batteria da 9 volt nello scomparto della
radio. Rilasciare il coperchio della batteria, collegare la
batteria e richiudere il coperchio.
Se la sveglia è attivata (opzione Musica o Tono) e
l'alimentazione di rete viene a mancare, la batteria
assicura l'attivazione del Tono all'ora corretta. Premere
Power (Alimentazione) sulla radio per interrompere la
sveglia. Rimuovere la batteria se l'unità resta scollegata
dall'alimentazione di rete per più di 24 ore.
Riposizionare la batteria dopo 30 minuti di
funzionamento del Tono della sveglia in emergenza
(vedere la figura F).
Standby e On
L'utilizzo del pulsante POWER (Alimentazione) consente
di scegliere la modalità di funzionamento Standby o On
(vedere la figura G)
Il pulsante Power (Alimentazione) del pannello frontale
può essere utilizzato anche per inserire la modalità
Autospegnimento (vedere a pagina 91).
Selezione delle bande radio
1) È possibile memorizzare otto stazioni FM nel banco
di PRESET FM1 e altre otto stazioni FM nel banco di
PRESET FM2 (vedere la figura H).
2) Se si passa da un'altra modalità alla FM, la radio
tornerà al banco di PRESET utilizzato per ultimo
(da Standby, MW, CD o da un ingresso AUX). Se si
preme il pulsante FM 1/2 durante il funzionamento
FM, viene selezionato l'altro banco di preset.
3) Se si preme il pulsante MW, viene selezionata la
banda radio MW. Tale banda dispone di un solo
banco di PRESET.
PREPARAZIONE
G.
H.
PRESETS
ALARMS
TAP TO SET
PRESS & HOLD TO ADJUST
FOLDER
REPEAT
+
1
2
SOUNDWORKS RADIO CD
SEEK
STOP
TRACK / TUNE
WAKEUP
TIME
ADJUST
CD
FM 1/2
MW AUX
JOG
VOLUME
SLEEP
SNOOZE
MUTE
1
2
3
4
5
6
7
8
CD MODE
CD TIME
POWER
FM 1/2
CD INFO
CD MODE REPEAT
PRESETS
FOLDER
VOLUME
JOG
MW AUX
POWER
TRACK
SEEK
CD
/TUNE
WIDE
STEREO
CD IN
MONO
1234
5678
9 : 43AM
PRESETS
ALARMS
TAP TO SET
PRESS & HOLD TO ADJUST
FOLDER
REPEAT
+
1
2
SOUNDWORKS RADIO CD
SEEK
STOP
TRACK / TUNE
WAKEUP
TIME
ADJUST
CD
FM 1/2
MW
AUX
JOG
VOLUME
SLEEP
SNOOZE
MUTE
1
2
3
4
5
6
7
8
CD MODE
CD TIME
POWER
FM 1/2
CD INFO
CD MODE REPEAT
PRESETS
FOLDER
VOLUME
JOG
AM AUX
POWER
TRACK
SEEK
CD
/TUNE
WIDE
STEREO
CD IN
MONO
1234
5678
FM2 P1
88 . 1
9 : 43AM
E.
F.
Page 90

88
PRESETS
ALARMS
TAP TO SET
PRESS & HOLD TO ADJUST
FOLDER
REPEAT
+
1
2
SOUNDWORKS RADIO CD
SEEK
STOP
TRACK / TUNE
WAKEUP
TIME
ADJUST
CD
FM 1/2
MW AUX
JOG
VOLUME
SLEEP
SNOOZE
MUTE
1
2
3
4
5
6
7
8
CD MODE
CD TIME
POWER
FM 1/2
CD INFO
CD MODE REPEAT
PRESETS
FOLDER
VOLUME
JOG
MW AUX
POWER
TRACK
SEEK
CD
/TUNE
WIDE
STEREO
CD IN
MONO
1234
5678
FM2 P1
88 . 1
9 : 43AM
PRESETS
ALARMS
TAP TO SET
PRESS & HOLD TO ADJUST
FOLDER
REPEAT
+
1
2
SOUNDWORKS RADIO CD
SEEK
STOP
TRACK / TUNE
WAKEUP
TIME
ADJUST
CD
FM 1/2
MW AUX
JOG
VOLUME
SLEEP
SNOOZE
MUTE
1
2
3
4
5
6
7
8
CD MODE
CD TIME
POWER
FM 1/2
CD INFO
CD MODE REPEAT
PRESETS
FOLDER
VOLUME
JOG
MW AUX
POWER
TRACK
SEEK
CD
/TUNE
WIDE
STEREO
CD IN
MONO
1234
5678
FM2 P1
88 . 1
9 : 43AM
J.
K.
Sintonizzazione delle stazioni (FM o MW)
• Metodo di sintonizzazione automatica 1:
premere il pulsante SEEK (Ricerca) sul telecomando
o sul pannello frontale della radio per la ricerca
automatica della successiva stazione di frequenza
più elevata (vedere la figura I).
• Metodo di sintonizzazione automatica 2:
tenere premuto uno dei due pulsanti TRACK/TUNE
(Traccia/Sintonia) per cercare la stazione
successiva. Il pulsante esegue la ricerca alle
frequenze inferiori, il pulsante alle frequenze
superiori (vedere la figura J).
• Sintonizzazione manuale: per trovare una
frequenza specifica, toccare il pulsante
TRACK/TUNE (Traccia/Sintonia) appropriato
( o ).
Memorizzazione delle stazioni nei banchi
di PRESET
Premere il pulsante FM 1/2 per scegliere il banco di
PRESET desiderato (FM1 o FM2) oppure scegliere la
banda radio MW. Eseguire la sintonizzazione sulla
stazione desiderata. Tenere premuto il pulsante
desiderato fino a sentire un breve segnale acustico.
La stazione è memorizzata (vedere la figura K).
PREPARAZIONE RESET
PRESETS
ALARMS
TAP TO SET
PRESS & HOLD TO ADJUST
1
2
SOUNDWORKS RADIO
TUNE
WAKEUP
TIME
ADJUST
FM 1/2
MW
SEEK
AUX
AUX
F
JOG
VOLUME
SLEEP
SNOOZE
MUTE
1
2
3
4
5
6
7
8
POWER
+
FM 1/2
CD INFO
CD MODE REPEAT
PRESETS
FOLDER
VOLUME
JOG
MW AUX
POWER
TRACK
SEEK
CD
/TUNE
WIDE
STEREO
CD IN
MONO
FM2 P1
88 . 1
1234
5678
9 : 43AM
I.
Page 91

89
Importante: utilizzare esclusivamente compact disc
standard da 12 cm (4
3
/4"). Dischi di dimensioni inferiori
non funzioneranno nel meccanismo a fessura.
1) Per selezionare automaticamente la riproduzione
disco, inserire un CD nello slot. La spia CD IN
indica che un disco è inserito nel Radio CD (vedere
la figura L).
2) Se c'è un CD nel Radio CD, se si tocca il pulsante
CD viene avviata la riproduzione del disco (vedere
la figura M).
Scelta delle selezioni
• Selezione di tracce: toccare il pulsante TRACK/TUNE
(Traccia/Sintonia) appropriato ( o ) (vedere
la figura N).
• Selezione di cartelle su CD-ROM: per spostarsi dalla
cartella (directory) corrente, toccare o .
Vedere a pagina 101-103 per una spiegazione della
navigazione tra cartelle (directory).
• Ricerca avanti e ricerca indietro: tenere premuto un
pulsante TRACK/TUNE (Traccia/Sintonia) ( o ).
Interruzione del disco
Premere il pulsante Stop (Interrompi) una volta (solo
l'immagine inline del pulsante stop) per interrompere
la riproduzione del disco con la funzione "ripresa dallo
stesso punto". Premere il pulsante Stop (Interrompi)
due volte per interrompere la riproduzione e tornare
all'inizio del disco.
Espulsione del disco
Premere il pulsante di espulsione del disco (vedere
la figura O).
INFORMAZIONI SUL CD
Il pulsante CD INFO (Informazioni CD) (preset 1)
visualizza i dati sui tempi di riproduzione, come
riportato di seguito.
CD audio: Tempo della traccia trascorso • Tempo della
traccia rimanente • Tempo del CD trascorso • Tempo
del CD rimanente
CD-ROM: Tempo del file trascorso
MODALITÀ CD
Il pulsante CD MODE (Modalità CD) (preset 5)
seleziona le altre modalità di riproduzione disco
riportate di seguito.
CD audio: Riproduzione casuale • Riproduzione
di 1 traccia
CD-ROM: Riproduzione casuale • Riproduzione cartella •
Riproduzione casuale cartella • Riproduzione di 1 file
SELEZIONE DELLA RIPRODUZIONE DISCO
ALARM
P
R
E
S
E
T
S
S
T
E
R
E
O
CD IN
C
D
I
N
F
O
C
D
M
O
D
E
J
O
G
F
M
1
/2
C
D
S
E
E
K
T
R
A
C
K
/T
U
N
E
A
M
A
U
X
P
O
W
E
R
R
E
P
E
A
T
– FOLD
ER +
W
IDE
M
O
N
O
1
1
2
2
3
4
5
6
7
8
SNOOZE/MUTE
WIDE
STEREO
MONO
CD IN
PRESETS
ALARMS
TAP TO SET
PRESS & HOLD TO ADJUST
1
2
SOUNDWORKS RADIO
TUNE
WAKEUP
TIME
ADJUST
FM 1/2
MW
SEEK
AUX
AUX
F
JOG
VOLUME
SLEEP
SNOOZE
MUTE
1
2
3
4
5
6
7
8
POWER
+
FM 1/2
CD INFO
CD MODE REPEAT
PRESETS
FOLDER
VOLUME
JOG
MW AUX
POWER
TRACK
SEEK
CD
/TUNE
WIDE
STEREO
CD IN
MONO
FM2 P1
88 . 1
1234
5678
9 : 43AM
FM 1/2
CD INFO
CD MODE REPEAT
PRESETS
FOLDER
VOLUME
JOG
MW AUX
POWER
TRACK
SEEK
CD
/TUNE
WIDE
STEREO
CD IN
MONO
1234
5678
FM2 P1
88 . 1
9 : 43AM
TRACK/TUNE (TRACCIA/SINTONIA)
PRESETS
ALARMS
TAP TO SET
PRESS & HOLD TO ADJUST
1
2
SOUNDWORKS RADIO
TUNE
WAKEUP
TIME
ADJUST
FM 1/2
MW
SEEK
AUX
AUX
F
JOG
VOLUME
SLEEP
SNOOZE
MUTE
1
2
3
4
5
6
7
8
POWER
+
FM 1/2
CD INFO
CD MODE REPEAT
PRESETS
FOLDER
VOLUME
JOG
AM AUX
POWER
TRACK
SEEK
CD
/TUNE
WIDE
STEREO
CD IN
MONO
1234
5678
FM2 P1
88 . 1
9 : 43AM
CD Play/Pause (Riproduzione/Pausa CD)
Inserimento CD
CD IN
indica
Espulsione del disco
L.
M.
N.
O.
7
8
Page 92

90
RIPETIZIONE
Il pulsante REPEAT (Ripetizione) (preset 6) consente la
ripetizione della modalità di riproduzione corrente fino
all'espulsione del disco o alla pressione del pulsante
POWER (Alimentazione). La modalità di ripetizione
viene mantenuta finché il disco non viene espulso o il
pulsante POWER (Alimentazione) non viene premuto.
Ascolto di sorgenti audio esterne
Se si dispone di una sorgente audio esterna che si
desidera tenere sempre collegata al SoundWorks Radio
CD, come un lettore di cassette, collegarla all'ingresso
AUX sul pannello posteriore (vedere la figura P).
Premere il pulsante AUX (Ausiliario) sul pannello
anteriore o sul telecomando per selezionare questo
ingresso (vedere la figura Q).
Se si dispone di una sorgente di programmi audio
esterna che si desidera collegare occasionalmente
al Radio CD, come un lettore MP3 portatile, collegarla
all'ingresso AUX-F sul pannello anteriore (vedere la
figura Q). Questo ingresso è prioritario rispetto
all'ingresso AUX posteriore. Il pulsante AUX (Ausiliario)
sul pannello anteriore o sul telecomando seleziona
questo ingresso (vedere la figura R).
Ingresso di mixaggio/Uscita di registrazione
È possibile mixare il suono di una sorgente di
programmi audio (ad esempio, l'uscita audio di un
computer) con le altre sorgenti audio del Radio CD
(FM, MW, disco, Aux).
Collegare la sorgente al MIXING INPUT (Ingresso di
mixaggio) sul pannello posteriore (vedere la figura S).
La sorgente di programmi verrà mixata con la sorgente
di programmi del Radio CD attualmente selezionata.
La sorgente audio collegata all'ingresso di mixaggio
deve disporre di un controllo dei livelli se si desidera
regolare il bilanciamento tra la sorgente del Radio CD
e la sorgente audio dell'ingresso di mixaggio.
COLLEGAMENTO A UNA SORGENTE AUDIO ESTERNA
FM 1/2
CD INFO
CD MODE REPEAT
PRESETS
FOLDER
VOLUME
JOG
MW AUX
POWER
TRACK
SEEK
CD
/TUNE
WIDE
STEREO
MONO
1234
5678
AUX-F
HEADPHONES
FM2 P1
88 . 1
9 : 43AM
PRESETS
ALARMS
TAP TO SET
PRESS & HOLD TO ADJUST
1
2
SOUNDWORKS RADIO
TUNE
WAKEUP
TIME
ADJUST
FM 1/2
MW
SEEK
AUX
AUX
F
JOG
VOLUME
SLEEP
SNOOZE
MUTE
1
2
3
4
5
6
7
8
POWER
+
FM 1/2
CD INFO
CD MODE REPEAT
PRESETS
FOLDER
VOLUME
JOG
MW AUX
POWER
TRACK
SEEK
CD
/TUNE
WIDE
STEREO
CD IN
MONO
FM2 P1
88 . 1
1234
5678
9 : 43AM
MIXING
INPUT
RECORD
OUTPUT
INPUT INPUT
MW
ANTENNA
FM ANTENNA
EXT
INT
INPUT
75 OHMS
AUX
MIXING
INPUT
RECORD
OUTPUT
INPUT INPUT
MW
ANTENNA
FM ANTENNA
EXT
INT
INPUT
75 OHMS
AUX
P.
Q.
R.
S.
Page 93

91
FUNZIONI COMFORT
Disattivazione del suono
Per disattivare il suono sul SoundWorks Radio CD,
premere la barra SNOOZE/MUTE (Ritardo/Disattivazione
suono) o il pulsante SNOOZE/MUTE sul telecomando
(vedere la figura T). La disattivazione del suono viene
annullata se viene premuto il pulsante POWER
(Alimentazione), se viene inserito un disco o se viene
regolato il volume.
Autospegnimento
Per impostare il Radio CD in modo che si spenga
automaticamente dopo un determinato periodo
di tempo:
• Premere il pulsante SLEEP (Spegnimento automatico)
sul telecomando fino al raggiungimento della durata
di riproduzione desiderata (vedere la figura U).
OPPURE
• Con il Radio CD in standby, toccare in rapida
successione il pulsante POWER (Alimentazione)
fino al raggiungimento della durata di riproduzione
desiderata (vedere la figura V).
L'autospegnimento è disponibile per le durate di 15,
30, 45, 60, 90 e 120 minuti. L'autospegnimento viene
annullato quando si preme il pulsante POWER
(Alimentazione) o quando viene inserito un disco.
Se si desidera utilizzare la funzione di
autospegnimento durante la riproduzione di un disco,
inserire il disco prima di scegliere la funzione.
PRESETS
ALARMS
TAP TO SET
PRESS & HOLD TO ADJUST
1
2
SOUNDWORKS RADIO
TUNE
WAKEUP
TIME
ADJUST
FM 1/2
MW
SEEK
AUX
AUX
F
JOG
VOLUME
SLEEP
SNOOZE
MUTE
1
2
3
4
5
6
7
8
POWER
+
PRESETS
ALARMS
TAP TO SET
PRESS & HOLD TO ADJUST
1
2
SOUNDWORKS RADIO
TUNE
WAKEUP
TIME
ADJUST
FM 1/2
MW
SEEK
AUX
AUX
F
JOG
VOLUME
SLEEP
SNOOZE
MUTE
1
2
3
4
5
6
7
8
POWER
+
PRESETS
ALARMS
TAP TO SET
PRESS & HOLD TO ADJUST
1
2
TUNE
WAKEUP
TIME
ADJUST
FM 1/2
MW
SEEK
AUX
AUX
F
JOG
VOLUME
1
2
3
4
5
6
7
8
+
FM 1/2
CD INFO
CD MODE REPEAT
PRESETS
FOLDER
VOLUME
JOG
MW AUX
POWER
TRACK
SEEK
CD
/TUNE
WIDE
STEREO
CD IN
MONO
1234
5678
SLEEP DELAY
45 M I N
T.
U.
V.
ALA
R
M
PRESETS
S
T
E
R
E
O
C
D
IN
C
D
IN
F
O
C
D
M
O
D
E
J
OG
FM
1/2
CD
S
EEK
TRA
CK
/T
UN
E
M
W
AU
X
PO
W
ER
R
E
P
E
A
T
–
FO
L
D
E
R
+
W
ID
E
M
O
N
O
1
1
2
2
3
4
5
6
7
8
SN
O
O
ZE/M
UT
E
Page 94

92
HEADPHONES
TOCCARE PER ATTIVARE LA SVEGLIA
TENERE PREMUTI PER REGOLARE LA SVEGLIA
DURANTE LA RIPRODUZIONE DI UN DISCO,
TOCCARE QUESTO PULSANTE PER:
CD AUDIO:
TEMPO DELLA TRACCIA TRASCORSO,
TEMPO DELLA TRACCIA RIMANENTE
TEMPO TOTALE TRASCORSO, TEMPO TOTALE RIMANENTE
CD-ROM:
TEMPO DELLA TRACCIA TRASCORSO
DURANTE LA RIPRODUZIONE DI UN DISCO,
TOCCARE QUESTO PULSANTE PER:
CD AUDIO:
RIPRODUZIONE CASUALE,
RIPRODUZIONE DI UNA TRACCIA
CD-ROM:
RIPRODUZIONE CASUALE DEL DISCO,
RIPRODUZIONE DI UNA CARTELLA
RIPRODUZIONE CASUALE DI UNA CARTELLA,
RIPRODUZIONE DI UNA TRACCIA
PULSANTI PRESET DELLE STAZIONI RADIO:
TENERE PREMUTI PER MEMORIZZARE LA
STAZIONE CORRENTE
INDICA LO STATO DELLA SVEGLIA
= RISVEGLIO CON MUSICA
= RISVEGLIO CON TONO
INSERIRE QUI CUFFIE CON MINICONNETTORE STEREO DA 3,5 mm PER L'ASCOLTO PRIVATO
INSERIRE QUI UN LETTORE AUDIO CON MINICONNETTORE STEREO DA 3,5 mm.
PREMERE AUX PER L'ASCOLTO: QUESTO INGRESSO È PRIORITARIO SU AUX-R SUL RETRO.
REGOLA IL VOLUME DURANTE IL FUNZIONAMENTO NORMALE: REGOLA LE IMPOST
DURANTE IL FUNZIONAMENTO DEL PULSANTE JOG (IMPOSTAZIONE R
DURANTE LA RIPRODUZIONE DI UN DISCO,
TOCCARE QUESTO PULSANTE PER
RIPETERE LA RIPRODUZIONE DELLA
MODALITÀ CD CORRENTE
TOCCARE QUESTI PULSANTI PER SPOSTARSI TRA
DIVERSE DIRECTORY SU UN DISCO CD-ROM
FUNZIONAMENTO NORMALE: PREMERE PER D
DURANTE LA FUNZIONE RISVEGLIO: PREMER
MW
ANTENNA
INPUT
MIXING
INPUT
RECORD
OUTPUT
AUX
INGRESSO AUSILIARIO CON MINIJACK
STEREO DA 3,5 mm POSTERIORE
MINIJACK DI INGRESSO
ANTENNA MW
L'USCITA AUDIO A LIVELLO FISSO CON MINIJACK STEREO DA 3,5 mm
FUNZIONA ANCHE DA INGRESSO DI MIXAGGIO
FUNZIONI DEI PANNELLI
ANTERIORE E SUPERIORE
DEL SOUNDWORKS RADIO CD
MANUALE DI RIFERIMENTO RAPIDO PANNELLO FRONTALE DEL SOUNDWORKS RADIO CD
Page 95

93
WIDE
STEREO
MONO
AUX-F
INDICA CHE È INSERITO UN DISCO
ESPELLE IL DISCO
SELEZIONA LA BANDA FM
PREMERE ANCORA PER PASSARE DAL BANCO DI PRESET 1 AL 2 E VICEVERSA
PREMERE RIPETUTAMENTE PER VISUALIZZARE NUMEROSE IMPOSTAZIONI RADIO.
UTILIZZARE IL VOLUME PER REGOLARE LE IMPOSTAZIONI.
BASSI _ DA +4 A -4 RITARDO- DA 5 A 22 MINUTI
TREBLE _ DA +4 A -4 TESTO RDS- MOBILE, STATICO, NO TESTO
STEREO, WIDE, MONO TESTO DISCO- MOBILE, STATICO, NO TESTO
BOOST- SPENTO, ACCESO VISUALIZZAZIONE ORA- 12 OREe AM/PM OPPURE 24 ORE
LINGUA DI VISUALIZZAZIONE- INGLESE, SPAGNOLO,
FRANCESE, ITALIANO, TEDESCO O OLANDESE.
SELEZIONA LA BANDA MW
(UN BANCO DI PRESET)
SELEZIONA L'INGRESSO AUX
SELEZIONA L'ACCENSIONE O LO SPEGNIMENTO
DELLA RADIO
(SVEGLIA E ALLARMI ATTIVI A RADIO SPENTA)
PREMERE RIPETUTAMENTE PER LA FUNZIONE
DI AUTOSPEGNIMENTO (DA 15 A 120 MINUTI)
RADIO: TOCCARE PER LA SINTONIZZAZIONE
MANUALE, TENERE PREMUTO PER CERCARE
LA STAZIONE SUCCESSIVA.
DISCO: TOCCARE PER ANDARE AVANTI
O INDIETRO DI UNA SELEZIONE AUDIO,
TENERE PREMUTO PER CERCARE IN AVANTI
O INDIETRO IN UNA SELEZIONE AUDIO.
RADIO: TOCCARE PER CERCARE
AUTOMATICAMENTE LA SUCCESSIVA
STAZIONE IN ALTO NELLA BANDA.
DISCO: TOCCARE PER INTERROMPERE
LA RIPRODUZIONE.
TOCCARE PER INIZIARE LA
RIPRODUZIONE DEL DISCO,
TOCCARE ANCORA PER METTERE
IN PAUSA.
IMPOSTA L'ORA CORRENTE
DURANTE IL FUNZIONAMENTO NORMALE
IMPOSTA L'ORA DI RISVEGLIO
IN MODALITÀ DI REGOLAZIONE DELLA
SVEGLIA
INDICA LA MODALITÀ AUDIO
DISATTIVARE IL SUONO.
FM ANTENNA INPUT
EXT
INT
75 OHMS
INGRESSO DI TIPO "F" PER
L'ANTENNA FM ESTERNA
SELETTORE ANTENNA
FM INTERNA/ESTERNA
MW
Page 96

94
MANUALE DI RIFERIMENTO RAPIDO - TELECOMANDO
SLEEP
SNOOZE
MUTE
1234
5678
PRESETS
ALARMS
TAP TO SET
PRESS & HOLD TO ADJUST
FOLDER
FOLDER
REPEATCD MODE
CD TIME
+
12
SOUNDWORKS RADIO CD
POWER
SEEK
STOP
TRACK / TUNE
WAKEUP
TIME
ADJUST
CD
FM 1/2
MW AUX
JOG
VOLUME
TOCCARE PER ATTIVARE LA SVEGLIA
TENERE PREMUTO PER REGOLARE LA SVEGLIA
PULSANTI PRESET DELLE STAZIONI RADIO:
TENERE PREMUTI PER MEMORIZZARE LA
STAZIONE CORRENTE
REGOLA IL VOLUME DURANTE IL FUNZIONAMENTO NORMALE
REGOLA LE IMPOSTAZIONI DURANTE IL FUNZIONAMENTO DEL
PULSANTE JOG (IMPOSTAZIONE RAPIDA
SELEZIONA LA BANDA FM
PREMERE ANCORA PER PASSARE DAL BANCO
DI PRESET 1 AL 2 E VICEVERSA
PREMERE RIPETUTAMENTE PER VISUALIZZARE
NUMEROSE IMPOSTAZIONI RADIO.
UTILIZZARE IL VOLUME PER REGOLARE LE IMPOSTAZIONI.
BASSI _ DA +4 A -4
TREBLE_ +4 TO -4
STEREO, WIDE, MONO
BOOST- SPENTO, ACCESO
RITARDO- DA 5 A 25 MINUTI
VISUALIZZAZIONE TESTO RDS- MOBILE, STATICO, NO TESTO
VISUALIZZAZIONE TESTO DISCO- MOBILE, STATICO, NO TESTO
VISUALIZZAZIONE ORA - 12 hr AM/PM OPPURE 24 hr
LINGUA DI VISUALIZZAZIONE - INGLESE, SPAGNOLO,
FRANCESE, ITALIANO, TEDESCO O OLANDESE
SELEZIONA LA BANDA MW (UN BANCO DI PRESET)
SELEZIONA L'INGRESSO AUX
PREMERE RIPETUTAMENTE PER
SCEGLIERE LA FUNZIONE DI
AUTOSPEGNIMENTO (DA 15 A 120 MINUTI)
FUNZIONAMENTO NORMALE: PREMERE
PER DISATTIVARE IL SUONO.
DURANTE LA FUNZIONE RISVEGLIO:
PREMERE PER ATTIVARE LA
FUNZIONE RITARDO.
SELEZIONA L'ACCENSIONE O LO
SPEGNIMENTO DELLA RADIO
SVEGLIA E ALLARMI FUNZIONANTI A
RADIO SPENTA
FM: TOCCARE PER LA SINTONIZZAZIONE
MANUALE, TENERE PREMUTO PER
CERCARE LA STAZIONE SUCCESSIVA.
IMPOSTAZIONE SVEGLIA: REGOLARE L'ORA
DI RISVEGLIO.
TOCCARE PER CERCARE
AUTOMATICAMENTE LA SUCCESSIVA
STAZIONE IN ALTO NELLA BANDA.
TOCCARE PER INIZIARE LA
RIPRODUZIONE DEL DISCO
SOUNDWORKS RADIO CD 740
TELECOMANDO
FUNZIONI RADIO E SVEGLIA
Page 97

95
SOUNDWORKS RADIO CD 740
TELECOMANDO
FUNZIONI DI
RIPRODUZIONE DISCO
VOLUME
JOG
TRACK / TUNE
CD
FM 1/2
WAKEUP
TIME
ADJUST
SEEK
STOP
MW AUX
TOCCARE PER ANDARE AVANTI O INDIETRO DI UNA
SELEZIONE AUDIO
TENERE PREMUTO PER RICERCARE IN AVANTI
O INDIETRO IN UNA SELEZIONE AUDIO
TOCCARE PER INIZIARE LA RIPRODUZIONE
DEL DISCO
TOCCARE ANCORA PER METTERE IN PAUSA
DURANTE LA RIPRODUZIONE DEL DISCO:
TOCCARE PER INTERROMPERE LA
RIPRODUZIONE CON LA FUNZIONE
DI RIPRESA
TOCCARE QUESTO PULSANTE PER:
CD AUDIO:
TEMPO DELLA TRACCIA TRASCORSO
TEMPO DELLA TRACCIA RIMANENTE
TEMPO TOTALE TRASCORSO
CD-ROM:
TOCCARE QUESTO PULSANTE PER:
CD-ROM:
RIPRODUZIONE CASUALE DI UNA CARTELLA
TOCCARE QUESTO PULSANTE PER
LA RIPRODUZIONE RIPETUTA DELLA
TEMPO TOTALE RIMANENTE
TEMPO DELLA TRACCIA TRASCORSO
CD AUDIO:
RIPRODUZIONE CASUALE
RIPRODUZIONE DI UNA TRACCIA
RIPRODUZIONE CASUALE DEL DISCO
RIPRODUZIONE DI UNA CARTELLA
RIPRODUZIONE DI UNA TRACCIA
MODALITÀ DISCO CORRENTE
ALARMS
TAP TO SET
PRESS & HOLD TO ADJUST
CD TIME
12
FOLDER
1234
PRESETS
5678
+
FOLDERREPEATCD MODE
POWER
SLEEP
SOUNDWORKS RADIO CD
SNOOZE
MUTE
TOCCARE QUESTO PULSANTE PER
VISUALIZZARE IL NOME DELLA CARTELLA
TOCCARE QUESTI PULSANTI PER SPOSTARSI
TRA DIVERSE CARTELLE SU UN CD-ROM
Page 98

96
Funzionamento del pulsante JOG:
Premere il pulsante JOG sulla radio o sul telecomando
per selezionare la prima funzione JOG (vedere la
figura W). Premere nuovamente il pulsante JOG per
selezionare ulteriori funzioni JOG.
Utilizzare la manopola del volume o i pulsanti sul
telecomando per regolare le impostazioni delle
funzioni JOG. Il funzionamento in modalità JOG viene
annullato cinque secondi dopo l'ultima regolazione
JOG o VOLUME. Anche l'utilizzo di qualsiasi altra
funzione del Radio CD annulla il funzionamento in tale
modalità.
Funzioni JOG
Bassi: l'uscita dei bassi può essere regolata in quattro
passi in alto o in basso.
Treble: l'uscita dei treble può essere regolata in
quattro passi in alto o in basso.
Stereo/Wide/Mono: la regolazione alterna in
modo ciclico le modalità STEREO, WIDE e MONO.
Il funzionamento in modalità MONO viene annullato
quando l'apparecchio entra in standby.
Boost: con BOOST attivato, il Radio CD amplificherà
l'uscita dei bassi a impostazioni VOLUME ridotte.
Durata ritardo: regolabile da 5 a 22 minuti
Visualizzazione testo RDS: per il testo RDS delle
stazioni FM, scegliere tra le opzioni "Testo mobile",
"Testo statico" e "No testo".
Visualizzazione testo disco: per i CD audio che
dispongono di testo CD o di file MP3, scegliere tra
le opzioni "Testo mobile", "Testo fisso" e "No testo".
Modalità di visualizzazione dell'ora: scegliere il
formato a 12 ore AM/PM (standard USA) o a 24 ore
(standard internazionale).
Lingua di visualizzazione: scegliere tra le lingue
inglese, spagnolo, francese, italiano, tedesco o
olandese.
PRESETS
ALARMS
TAP TO SET
PRESS & HOLD TO ADJUST
1
2
SOUNDWORKS RADIO
TUNE
WAKEUP
TIME
ADJUST
FM 1/2
AM
SEEK
AUX
AUX
F
JOG
VOLUME
SLEEP
SNOOZE
MUTE
1
2
3
4
5
6
7
8
POWER
+
FM 1/2
CD INFO
CD MODE REPEAT
PRESETS
FOLDER
VOLUME
JOG
MW AUX
POWER
TRACK
SEEK
CD
/TUNE
WIDE
STEREO
CD IN
MONO
1234
5678
9 : 43AM
Visualizzazione della
regolazione BASSI
Visualizzazione della
regolazione TREBLE
Visualizzazione della
regolazione BOOST
WIDE
STEREO
MONO
ADJUST SNOOZE
9 M I N
Visualizzazione della
regolazione RITARDO
Visualizzazione della
regolazione TESTO RDS
Visualizzazione della
regolazione dell'ora
Visualizzazione della
regolazione della lingua
Visualizzazione della rego-
lazione STEREO/WIDE/MONO
VOLUME
Visualizzazione della
regolazione TESTO DISCO
FUNZIONI JOG (IMPOSTAZIONE RAPIDA)
Page 99

97
Regolazione delle impostazioni Risveglio
Durante la regolazione delle impostazioni Risveglio,
vengono selezionati l'ora di risveglio e la sorgente
e il volume della musica. La scelta tra Tono e Musica
viene effettuata successivamente quando la sveglia
viene attivata.
Nota: memorizzare le stazioni radio che si desidera
utilizzare come stazione di risveglio in una posizione
PRESET.
1) Tenere premuto il pulsante Alarm 1 (Sveglia 1) o
Alarm 2 (Sveglia 2) fino a sentire un breve segnale
acustico (circa 1,5 secondi). Il Radio CD entra in
modalità di regolazione della sveglia. Tale modalità
dura per circa 15 secondi se non viene premuto
alcun pulsante. Tra una regolazione e l'altra
possono passare cinque secondi.
2) In qualsiasi momento durante la sessione di
regolazione del risveglio è possibile scegliere la
musica preferita selezionando FM1, FM2, MW o
CD. Dopo avere selezionato un banco di preset
sulla radio (FM1, FM2 o MW), scegliere la stazione
desiderata premendo il pulsante PRESET sul
telecomando del pannello frontale della radio.
È possibile scegliere il risveglio con CD solo se un
CD è inserito nel Radio CD. Se il CD viene rimosso
dopo la selezione del risveglio con CD,
l'impostazione Risveglio assumerà il valore
predefinito di Tono.
Gli ingressi AUX non sono disponibili per la
funzione Risveglio.
3) In qualsiasi momento durante la sessione di
regolazione del risveglio è possibile determinare
il volume del risveglio con musica regolando il
VOLUME sul telecomando o sul pannello frontale
della radio.
FUNZIONI RISVEGLIO
PRESETS
ALARMS
TAP TO SET
PRESS & HOLD TO ADJUST
1
2
SOUNDWORKS RADIO
TUNE
WAKEUP
TIME
ADJUST
FM 1/2
MW
SEEK
AUX
AUX
F
JOG
VOLUME
SLEEP
SNOOZE
MUTE
1
2
3
4
5
6
7
8
POWER
+
FM 1/2
CD INFO
CD MODE REPEAT
PRESETS
FOLDER
VOLUME
JOG
MW AUX
POWER
TRACK
SEEK
CD
/TUNE
WIDE
STEREO
CD IN
MONO
1234
5678
WAKEUP T I ME
7 : 57 AM
PRESETS
ALARMS
TAP TO SET
PRESS & HOLD TO ADJUST
1
2
SOUNDWORKS RADIO
TUNE
WAKEUP
TIME
ADJUST
FM 1/2
MW
SEEK
AUX
AUX
F
JOG
VOLUME
SLEEP
SNOOZE
MUTE
1
2
3
4
5
6
7
8
POWER
+
FM 1/2
CD INFO
CD MODE REPEAT
PRESETS
FOLDER
VOLUME
JOG
AM AUX
POWER
TRACK
SEEK
CD
/TUNE
WIDE
STEREO
CD IN
MONO
1234
5678
FM WAKEUP
7 : 57 AM
2. Regolazione RISVEGLIO CON MUSICA, prima schermata
1. Ingresso nella regolazione RISVEGLIO
PRESETS
ALARMS
TAP TO SET
PRESS & HOLD TO ADJUST
1
2
SOUNDWORKS RADIO
TUNE
WAKEUP
TIME
ADJUST
FM 1/2
MW
SEEK
AUX
AUX
F
JOG
VOLUME
SLEEP
SNOOZE
MUTE
1
2
3
4
5
6
7
8
POWER
+
FM 1/2
CD INFO
CD MODE REPEAT
PRESETS
FOLDER
VOLUME
JOG
AM AUX
POWER
TRACK
SEEK
CD
/TUNE
WIDE
STEREO
CD IN
MONO
1234
5678
ALARM VOLUME
20
3. Regolazione del volume RISVEGLIO
Page 100

98
FUNZIONI RISVEGLIO
PRESETS
ALARMS
TAP TO SET
PRESS & HOLD TO ADJUST
1
2
SOUNDWORKS RADIO
TUNE
WAKEUP
TIME
ADJUST
FM 1/2
MW
SEEK
AUX
AUX
F
JOG
VOLUME
SLEEP
SNOOZE
MUTE
1
2
3
4
5
6
7
8
POWER
+
FM 1/2
CD INFO
CD MODE REPEAT
PRESETS
FOLDER
VOLUME
JOG
MW AUX
POWER
TRACK
SEEK
CD
/TUNE
WIDE
STEREO
CD IN
MONO
1234
5678
FM WAKEUP
7 : 57 AM
4. Regolazione dell'ora di RISVEGLIO
PRESETS
ALARMS
TAP TO SET
PRESS & HOLD TO ADJUST
1
2
SOUNDWORKS RADIO
TUNE
WAKEUP
TIME
ADJUST
FM 1/2
MW
SEEK
AUX
AUX
F
JOG
VOLUME
SLEEP
SNOOZE
MUTE
1
2
3
4
5
6
7
8
POWER
+
FM 1/2
CD INFO
CD MODE REPEAT
PRESETS
FOLDER
VOLUME
JOG
MW AUX
POWER
TRACK
SEEK
CD
/TUNE
WIDE
STEREO
CD IN
MONO
1234
5678
ALARM 1
SETT I NGS STORED
5. Visualizzazione di impostazione RISVEGLIO memorizzata
Regolazione delle impostazioni Risveglio
4) ) In qualunque momento durante la sessione di
regolazione del risveglio è possibile determinare
l'ora di risveglio utilizzando la regolazione dell'ora
sul pannello anteriore o la regolazione
TRACK/TUNE (Traccia/Sintonia) sul telecomando.
5) Terminare la sessione di regolazione del risveglio
premendo nuovamente lo stesso pulsante Alarm
(Sveglia) o semplicemente attendendo circa dieci
secondi. La sessione terminerà automaticamente.
In entrambi i casi, le nuove impostazioni saranno
memorizzate nel Radio CD.
 Loading...