

Page 1
Page 2
User’s Guide
Creative Sound Blaster Wireless Music
Information in this document is subject to change without notice and does not represent a commitment on the part of Creative
Technology Ltd. No part of this manual may be reproduced or transmitted in any form or by any means, electronic or mechanical,
including photocopying and recording, for any purpose without the written permission of Creative Technology Ltd. The software
described in this document is furnished under a license agreement and may be used or copied only in accordance with the terms of
the license agreement. It is against the law to copy the software on any other medium except as specifically allowed in the license
agreement. The licensee may make one copy of the software for backup purposes only.
The Software License Agreement can be found on the Installation CD.
Copyright © 2003 by Creative Technology Ltd. All rights reserved.
Version 1.1
December 2003
The Creative logo, the Sound Blaster logo, Blaster, I-trigue and Creative MediaSource are trademarks or registered trademarks of
Creative Technology Ltd. in the United States and/or other countries. Microsoft, MS-DOS, Windows and the Windows logo are
registered trademarks of Microsoft Corporation. Intel and Pentium are registered trademarks of Intel Corporation. All other products
are trademarks or registered trademarks of their respective owners. All specifications are subject to change without prior notice.
Actual contents may differ slightly from those pictured.
Page 3
Contents
Page 4

Contents
1 Introduction
Before You Begin....................................................................................................................................... 1-1
Package Contents ............................................................................................................................ 1-1
Minimum System Requirements ................................................................................................. 1-2
Model Number, Serial Number and MAC Address............................................................. 1-2
More Help.......................................................................................................................................... 1-2
Product Registration....................................................................................................................... 1-2
Regulatory Information.................................................................................................................. 1-2
Technical Support and Warranty ............................................................................................... 1-3
Document Conventions................................................................................................................ 1-3
2Overview
Receiver........................................................................................................................................................ 2-1
RF Remote................................................................................................................................................... 2-3
Software Applications............................................................................................................................... 2-6
Wireless Music Media Server ...................................................................................................... 2-6
Wireless Music Console................................................................................................................ 2-6
Wireless Music Network Setup.................................................................................................. 2-7
Creative MediaSource.............................................................................................................................. 2-7
3 Getting Started
Step 1: Install Software............................................................................................................................. 3-1
Step 2: Configure Hardware.................................................................................................................. 3-3
Step 3: Add Tracks to PC Music Library............................................................................................ 3-8
i
Page 5

Step 4: Set up Receiver.......................................................................................................................... 3-10
Step 5: Play Music .................................................................................................................................... 3-14
4 Using Your RF Remote
Selecting Menu Options........................................................................................................................... 4-1
Using Multiple Receivers ......................................................................................................................... 4-1
Playing Music ............................................................................................................................................... 4-2
Playing tracks from an artist ......................................................................................................... 4-2
Playing tracks from an album........................................................................................................ 4-2
Playing tracks from a genre........................................................................................................... 4-3
Playing a track by searching for it by name.............................................................................. 4-3
Playing a smart playlist.................................................................................................................... 4-3
Playing a favorite playlist ................................................................................................................ 4-4
Playing a playlist created in Creative MediaSource ............................................................... 4-4
Playing tracks in the Now Playing List....................................................................................... 4-5
Viewing the Now Playing List ................................................................................................................ 4-5
Setting Play Modes..................................................................................................................................... 4-5
Viewing Information.................................................................................................................................. 4-5
Changing Menu Language........................................................................................................................ 4-6
Selecting Font Type................................................................................................................................... 4-6
Restarting Your Receiver........................................................................................................................ 4-6
Operating Range ........................................................................................................................................ 4-7
Switching radio frequencies.......................................................................................................... 4-7
Checking Battery Status........................................................................................................................... 4-8
ii
Page 6

5 Configuring Settings
Configuring Your Receiver..................................................................................................................... 5-2
Creating Smart Playlists ........................................................................................................................... 5-3
Assigning Favorite Playlists...................................................................................................................... 5-4
Appendixes
A About Music Files
Downloading from the Internet........................................................................................................... A-1
'Ripping' Audio CDs................................................................................................................................. A-1
B Frequently Asked Questions
Installation and Configuration................................................................................................................ B-1
Operation..................................................................................................................................................... B-4
Speakers........................................................................................................................................................ B-9
Updates......................................................................................................................................................... B-9
C Maintenance and Safety Advice
Receiver and RF Remote........................................................................................................................ C-1
Batteries....................................................................................................................................................... C-1
iii
Page 7

D Glossary
E Technical Specifications
Receiver........................................................................................................................................................ E-1
Standards .................................................................................................................................. E-1
Interface .................................................................................................................................... E-1
Antenna..................................................................................................................................... E-1
Frequency Band...................................................................................................................... E-1
Data Rate.................................................................................................................................. E-1
Channels ................................................................................................................................... E-1
Security...................................................................................................................................... E-2
Range.......................................................................................................................................... E-2
Playback Formats ................................................................................................................... E-2
Power Adapter....................................................................................................................... E-2
RF Remote................................................................................................................................................... E-2
LCD............................................................................................................................................ E-2
Antenna..................................................................................................................................... E-2
Frequency Band...................................................................................................................... E-2
Range.......................................................................................................................................... E-2
Power Requirements............................................................................................................ E-2
iv
Page 8
Introduction
Page 9
Introduction
Before You Begin
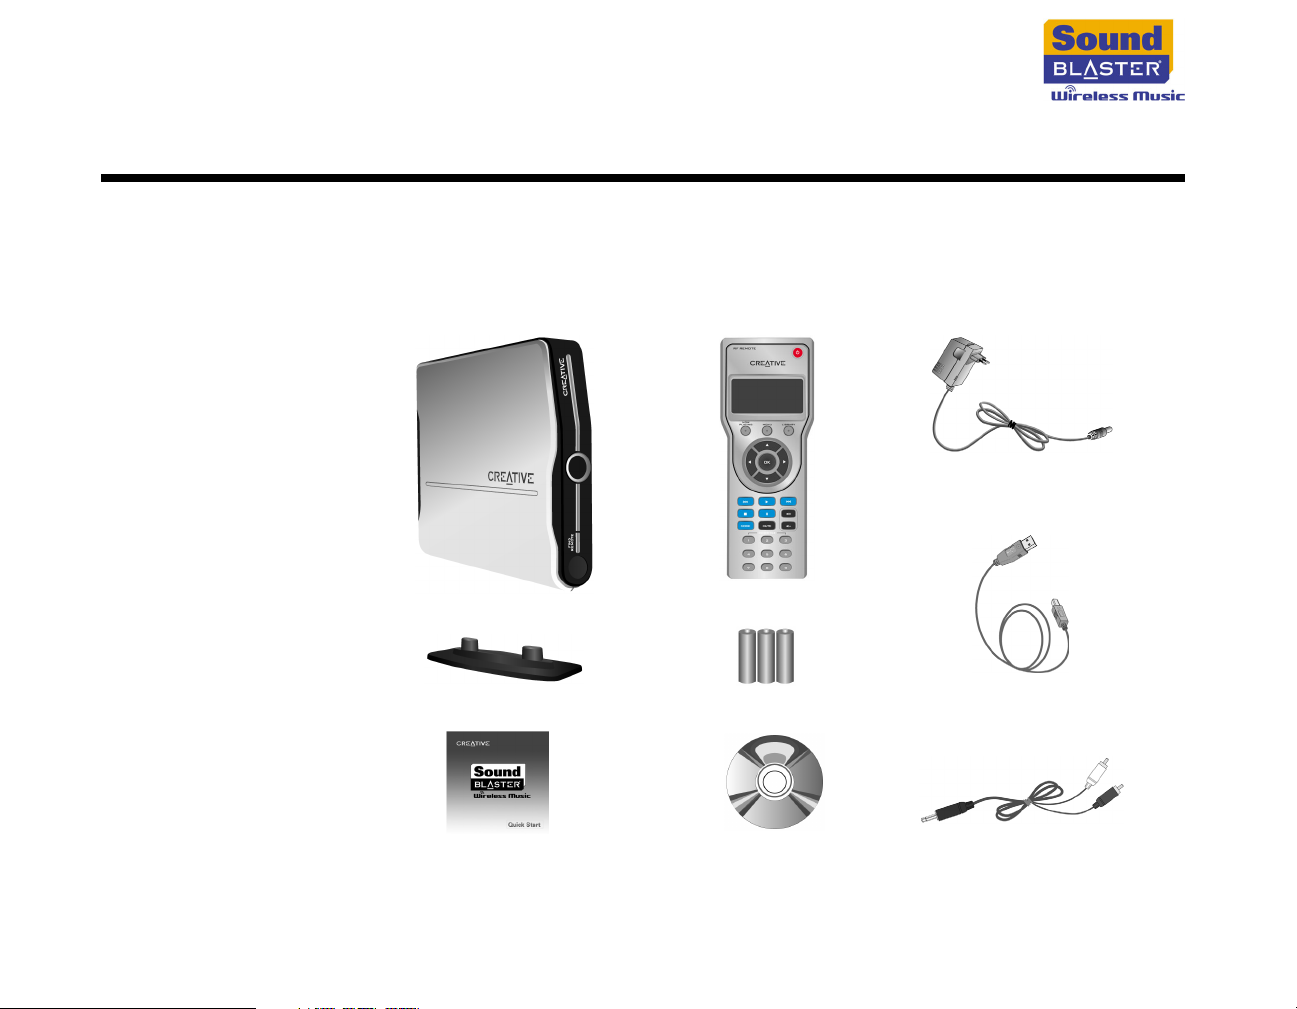
Package Contents
Power adapter
Receiver
Receiver stand
Quick Start
RF Remote
AA batteries
Installation CD
USB cable
RCA-to-miniplug cable
Introduction 1-1
Page 10

Minimum System
Requirements
• Microsoft® Windows® XP, Windows Millennium Edition (Me), Windows 2000 or
Windows 98 Second Edition (SE)
®
•Intel
• 128 MB RAM
• 100 MB of free hard disk space (more space is required for storing music files)
• CD-ROM/DVD-ROM drive for software installation
• Available USB port for installation and configuration
• Network interface to an IEEE 802.11b or 802.11g compatible wireless network
with a wireless router or access point. Network interface can be a built-in, PCI,
USB or PCMCIA interface that supports 10/100 BaseT (Cat-5), 802.11b or
802.11g networks.
Pentium® III 500 MHz or equivalent
Model Number,
Serial Number and
MAC Address
You will find a model number, a serial number and a MAC address on your Receiver.
You will need to provide model and serial numbers when contacting Technical
Support, and you will need the MAC address if you have enabled the MAC address
security feature on your wireless network. Refer to the User’s Guide of your
wireless router or access point to learn how to use the MAC address security
feature.
More Help For information on making purchases, technical help, and the latest driver and
firmware updates, go to www.creative.com and select your region.
Product
Registration
Regulatory
Information
Enjoy a host of benefits by registering your product during installation, or at
www.creative.com/register. Benefits include:
• Service and product support from Creative
• Exclusive updates on promotions and events
Regulatory information can be found on the Installation CD.
Go to d:\fcc\<language>\doc.pdf
(replace d:\ with the drive letter of your CD-ROM/DVD-ROM drive and
<language> with the language that the document is in)
Introduction 1-2
Page 11
Technical Support
and Warranty
Technical Support information can be found on the Installation CD.
Go to d:\support\<language>\support.pdf
Warranty information can be found on the Installation CD as well.
Go to d:\warranty\<region>\<language>\warranty.pdf
(replace d:\ with the drive letter of your CD-ROM/DVD-ROM drive, <region> with
the geographical region you are in, and <language> with the language that the
document is in)
Please keep your Proof of Purchase for the duration of the Warranty
period.
Document
Conventions
We use icons to highlight useful or urgent information for you:
Tip. This tells you about short cuts or hints relating to a feature.
Note. This highlights additional or important information about a
feature.
Caution! This highlights proper usage of your product. Use this
information to avoid risky situations.
Warning! This warns you of possible hazards to yourself or your
product, that may result in injury or damage.
Introduction 1-3
Page 12
Overview
Page 13
Overview
Receiver
1
2
3
4
5
6
Overview 2-1
Page 14
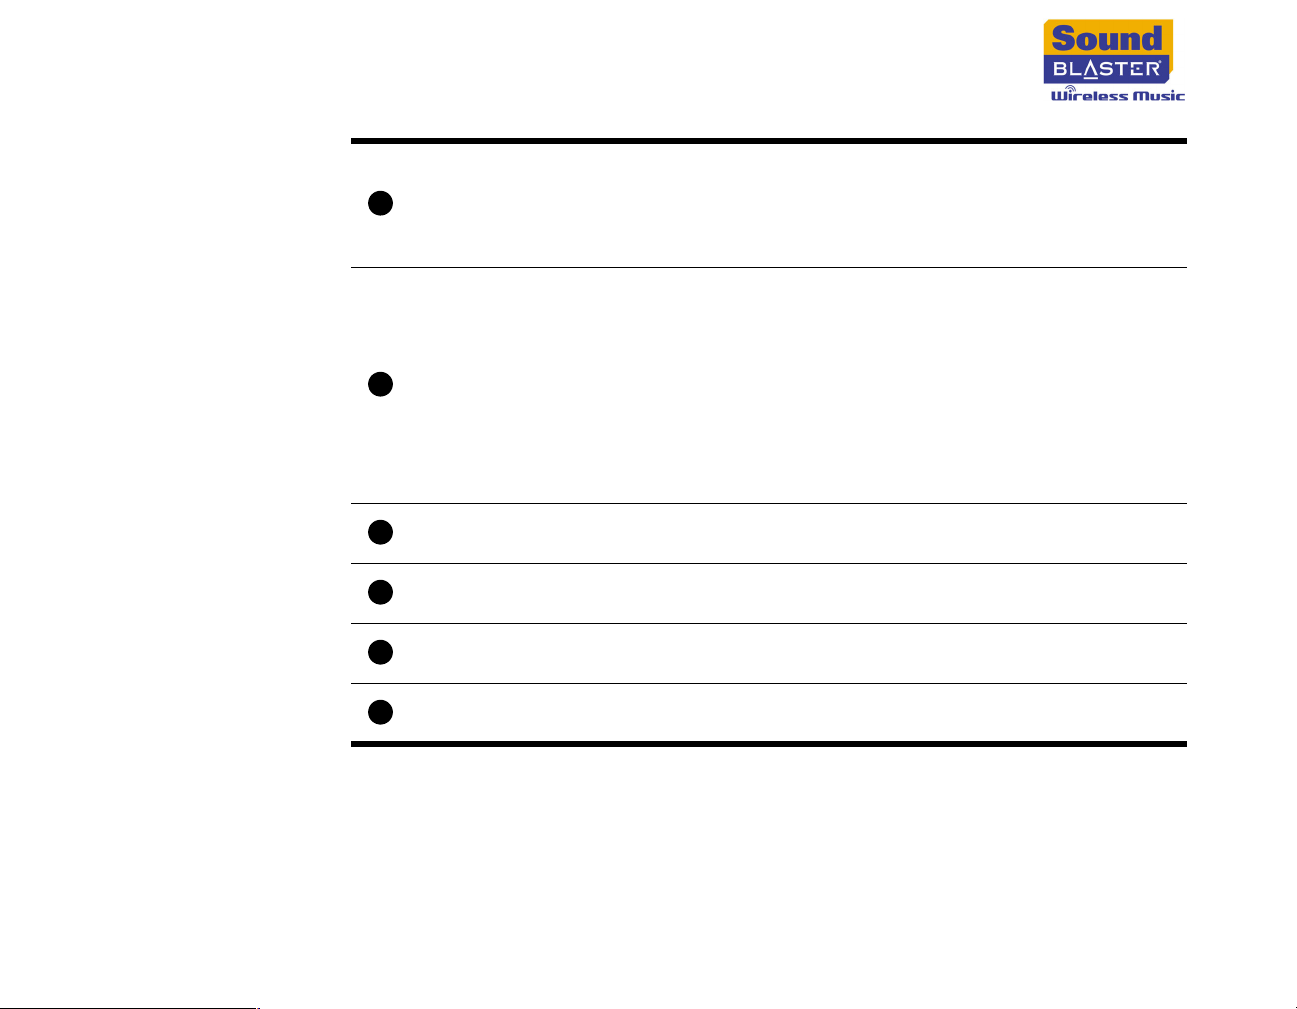
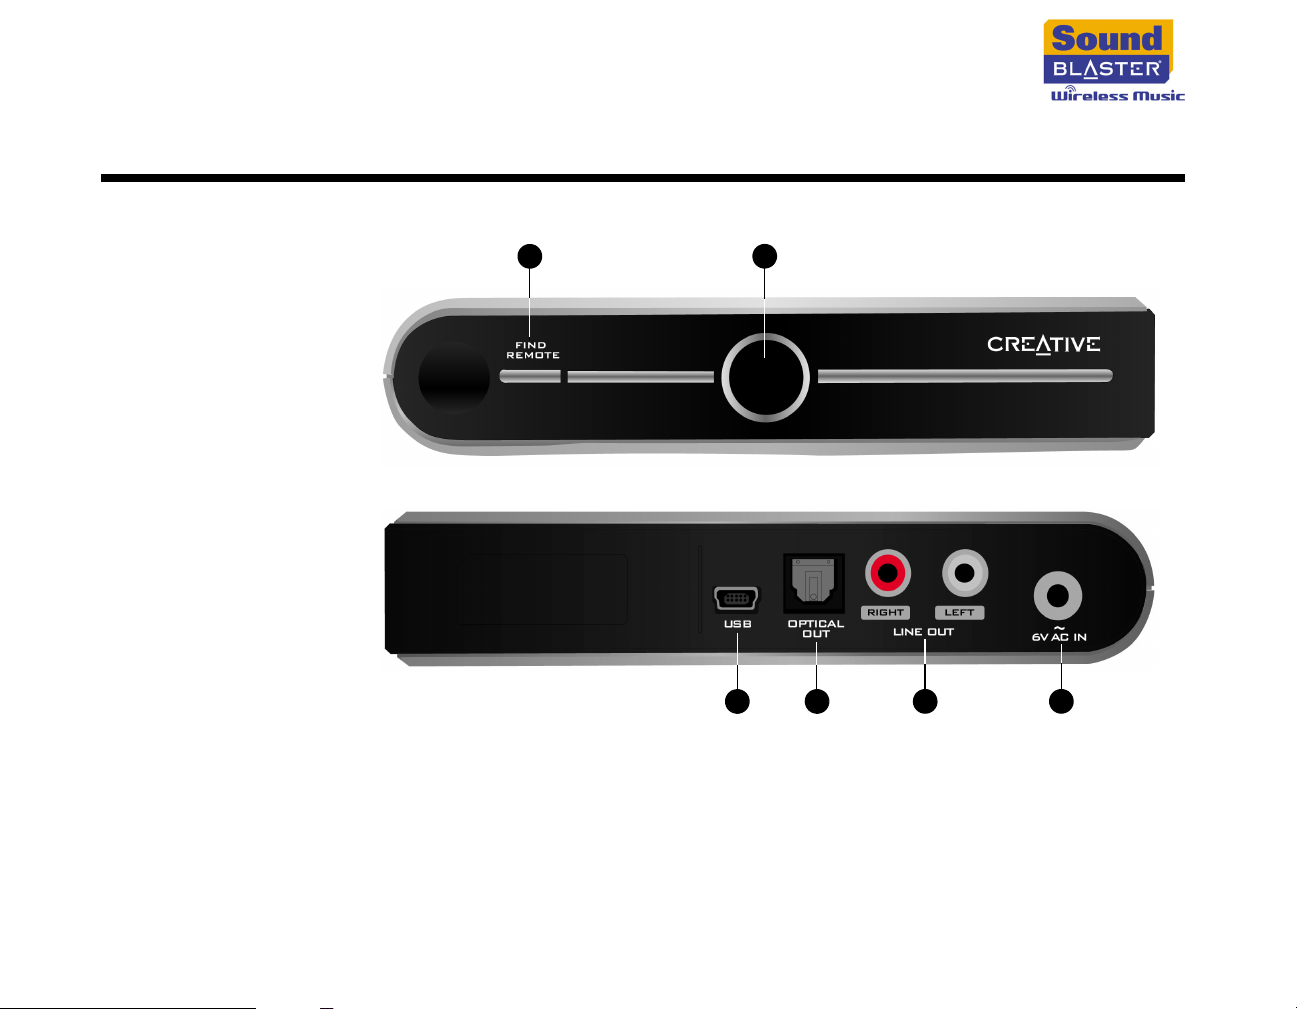
FIND REMOTE
1
button
Light Emitting
2
Diodes (LEDs)
❍ Activates a beeping sound from the RF Remote. Press
this button if you need to locate your RF Remote.
❍ Assigns an RF Remote to a Receiver. This lets you use
one RF Remote with different Receivers. For more
information, see "Using Multiple Receivers" on page 4-1.
❍ Left (or bottom) LED
Green: Receiver is turned on
Red: Receiver is on standby
❍ Right (or top) LED
Green: Receiver is connected to Wireless Music Media
Server
Flashing green: Receiver is connecting to Wireless Music
Media Server
Flashing amber: Receiver is connecting to a network
Flashing red: Receiver is resetting
USB port
3
OPTICAL OUT
4
connector
LINE OUT jacks
5
6V AC IN
6
connector
❍ Connects to your computer’s USB port using the supplied
USB cable
❍ Connects to the optical input of speakers or a home
stereo system (both available separately)
❍ Connects to the input jacks of speakers or a home stereo
system (both available separately)
❍ Connects to a power outlet using the supplied power
adapter
Overview 2-2
Page 15
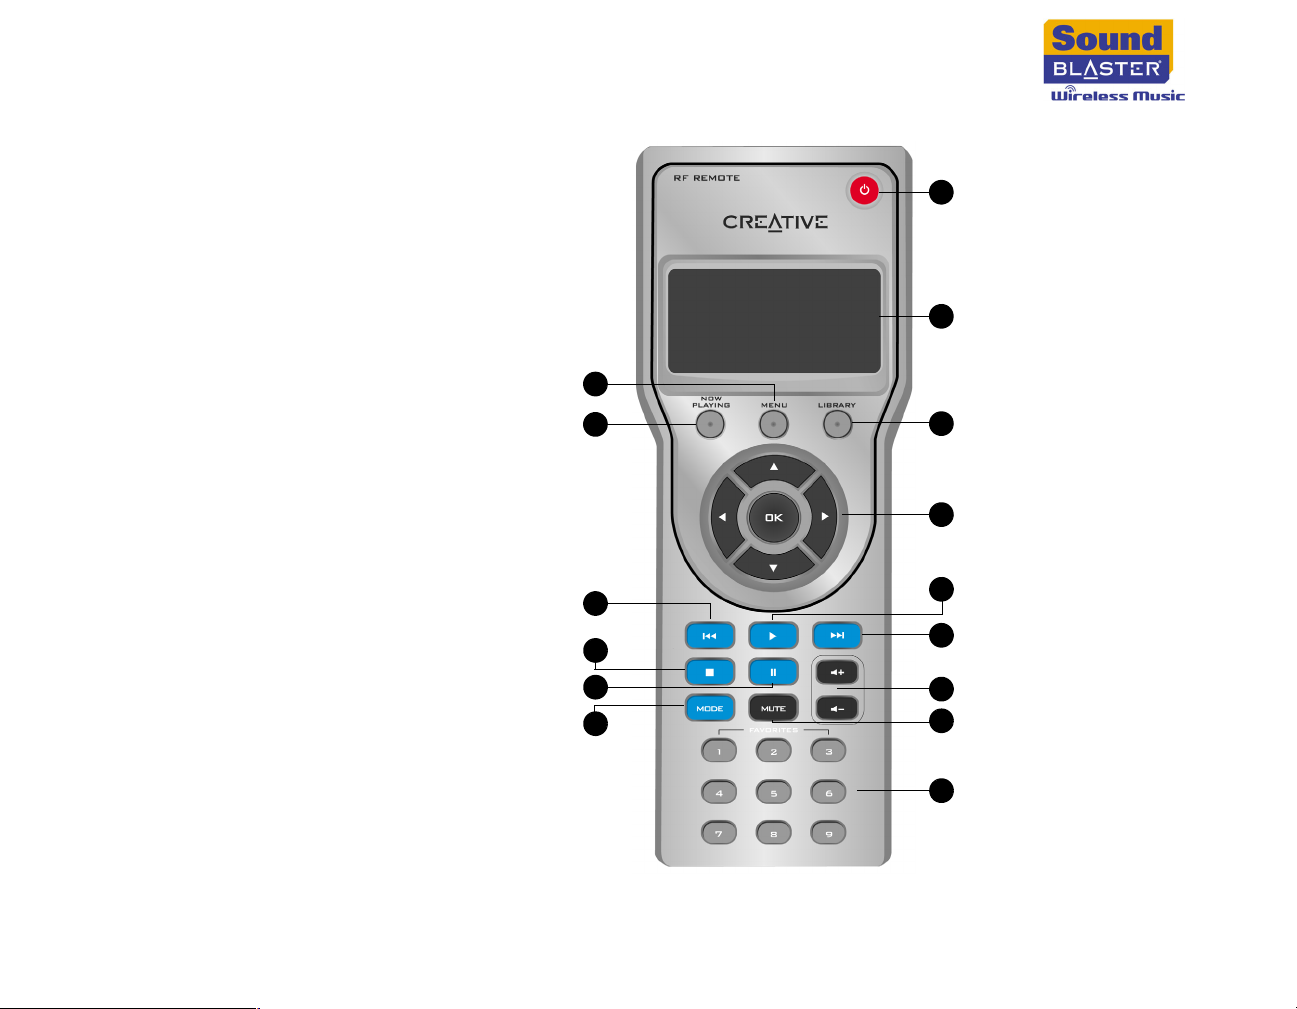
RF Remote
7
8
1
2
3
4
5
6
9
0
1
1
1
2
1
3
1
4
1
5
1
Overview 2-3
Page 16
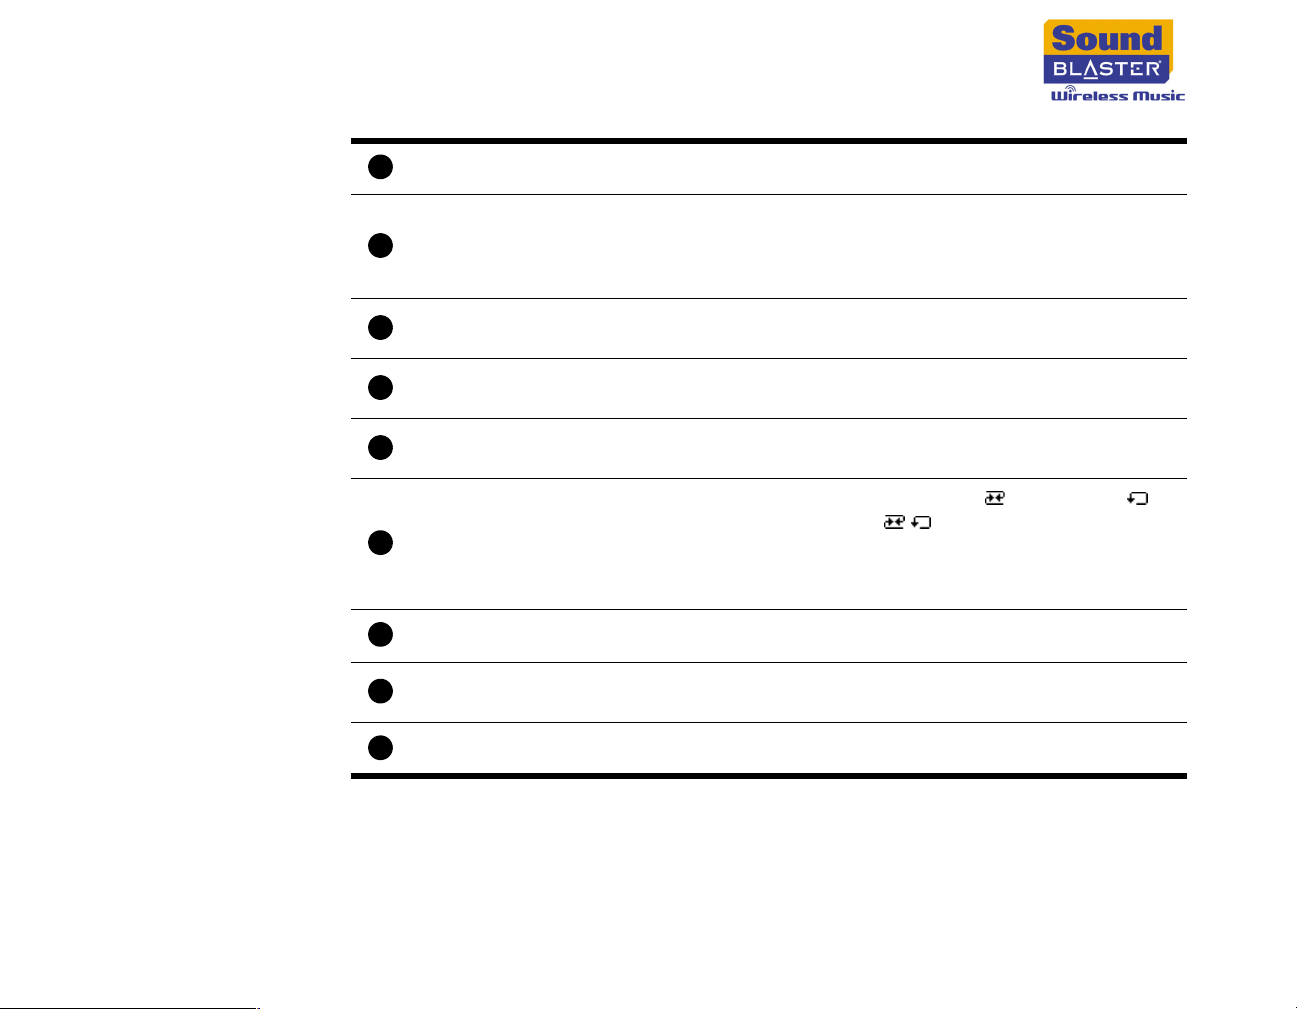
MENU button ❍ Displays the main menu on the LCD
1
❍ Displays the track details of the track currently being
NOW PLAYING
2
button
played. If nothing is playing, or the NOW PLAYING
button is pressed a second time, the Now Playing List is
displayed.
Previous button
3
Stop button
4
Pause button
5
❍ Press to go to the previous track
❍ Press and hold to move back within a track
❍ Press to stop playback
❍ Press and hold to delete all tracks in the Now Playing List
❍ Press once to pause playback, press again to resume
playback
❍ Switches between Normal, Shuffle , Repeat All
and Shuffle/Repeat All play modes
MODE button
6
❍ Assigns an RF Remote to a Receiver. This lets you use
one RF Remote with different Receivers. For more
information, see "Using Multiple Receivers" on page 4-1.
Power button ❍ Turns on your Receiver or sets it to standby
7
Liquid Crystal
8
Display (LCD)
LIBRARY button ❍ Displays the PC Music Library menu on the LCD
9
❍ Lets you view the tracks in PC Music Library
Overview 2-4
Page 17
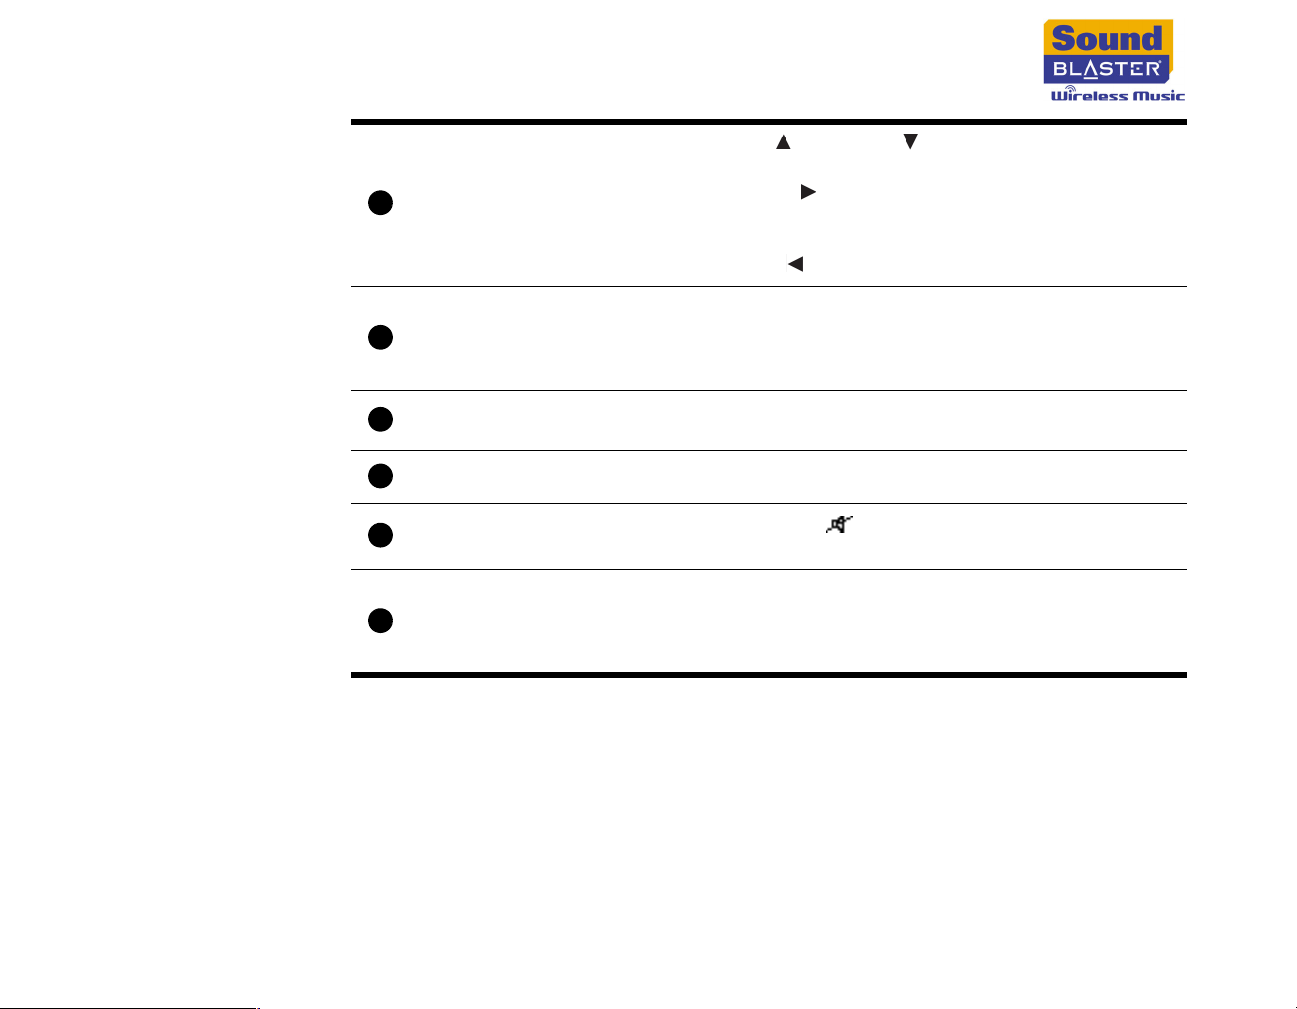
10
1
1
Navigation
buttons
Play button
❍ Press the Up and Down buttons to scroll through
menu options
❍ Press the Right button or OK button to select a
highlighted menu option, or show a list of additional
options for the highlighted menu option
❍ Press the Left button to return to the previous menu
❍ Press to start playback. This clears the Now Playing List
and plays the highlighted menu option.
❍ Press and hold to add a highlighted track or playlist to
the Now Playing List
Next button
12
Volume buttons ❍ Increases or decreases playback volume
13
MUTE button
14
❍ Press to go to the next track
❍ Press and hold to move forward within a track
❍ Mutes the volume. appears on the LCD when the
volume is muted.
❍ Play back favorite playlists that you have assigned to
FAVORITES
15
buttons
these buttons. You can use Wireless Music Console to
assign favorite playlists. For more information, see
"Assigning Favorite Playlists" on page 5-4.
Overview 2-5
Page 18
Software Applications
Wireless Music
Media Server
Wireless Music
Console
Wireless Music Media Server lets your computer communicate with your Receiver,
and makes it possible for Sound Blaster Wireless Music to access your computer’s
digital music collection. By default, Wireless Music Media Server is automatically
launched whenever you turn on your computer. You will see the Wireless Music
Media Server icon on your computer’s Taskbar when Wireless Music Media
Server is running.
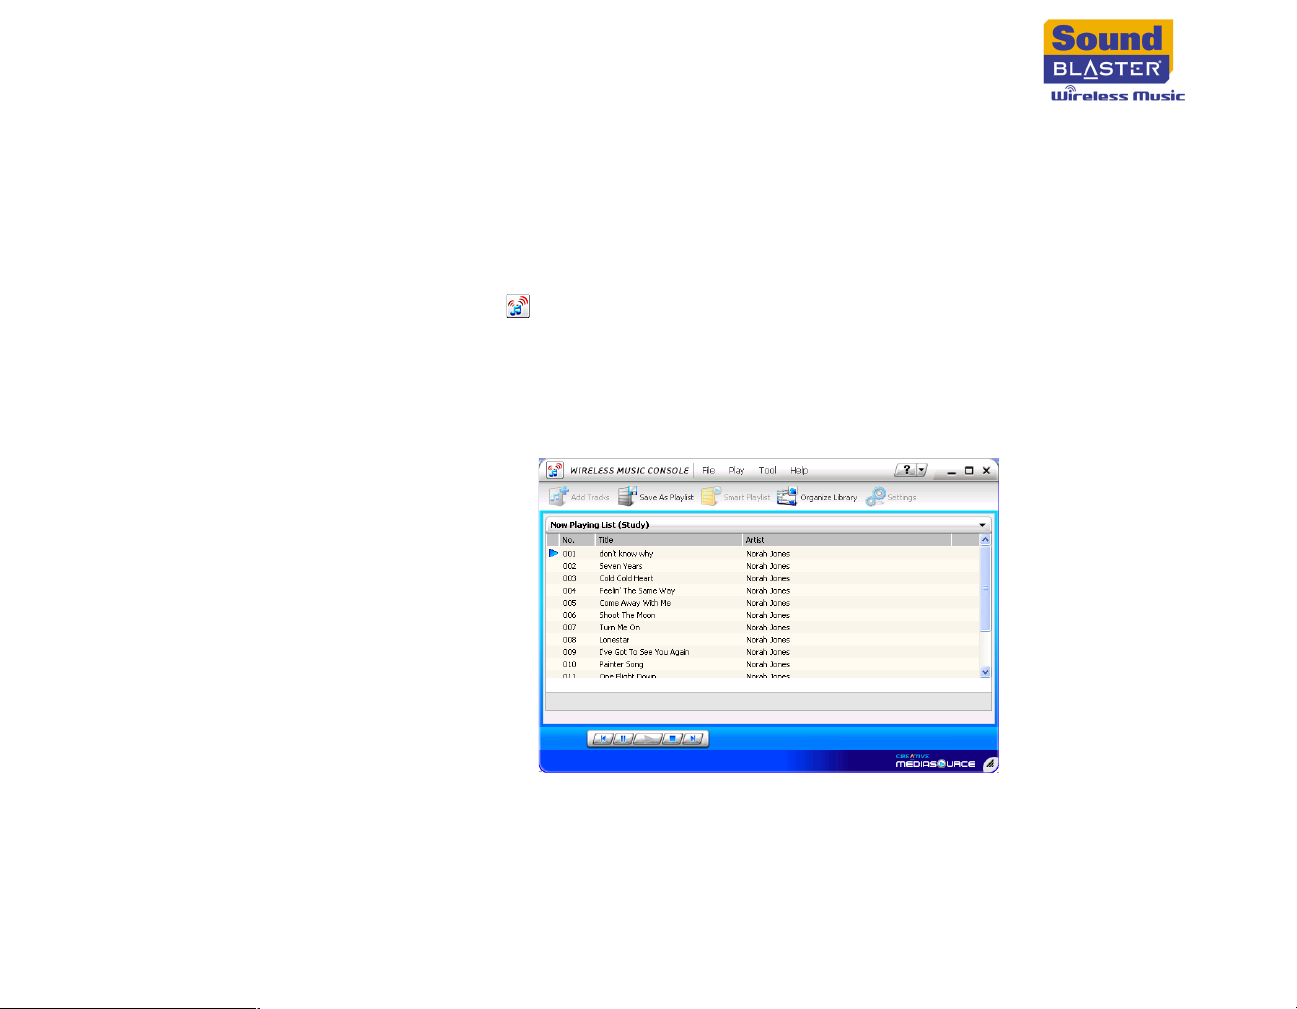
Wireless Music Console lets you configure the settings of your Receiver. For
example, launch Wireless Music Console when you want to create smart playlists
or assign favorite playlists.
Overview 2-6
Page 19
Wireless Music
Network Setup
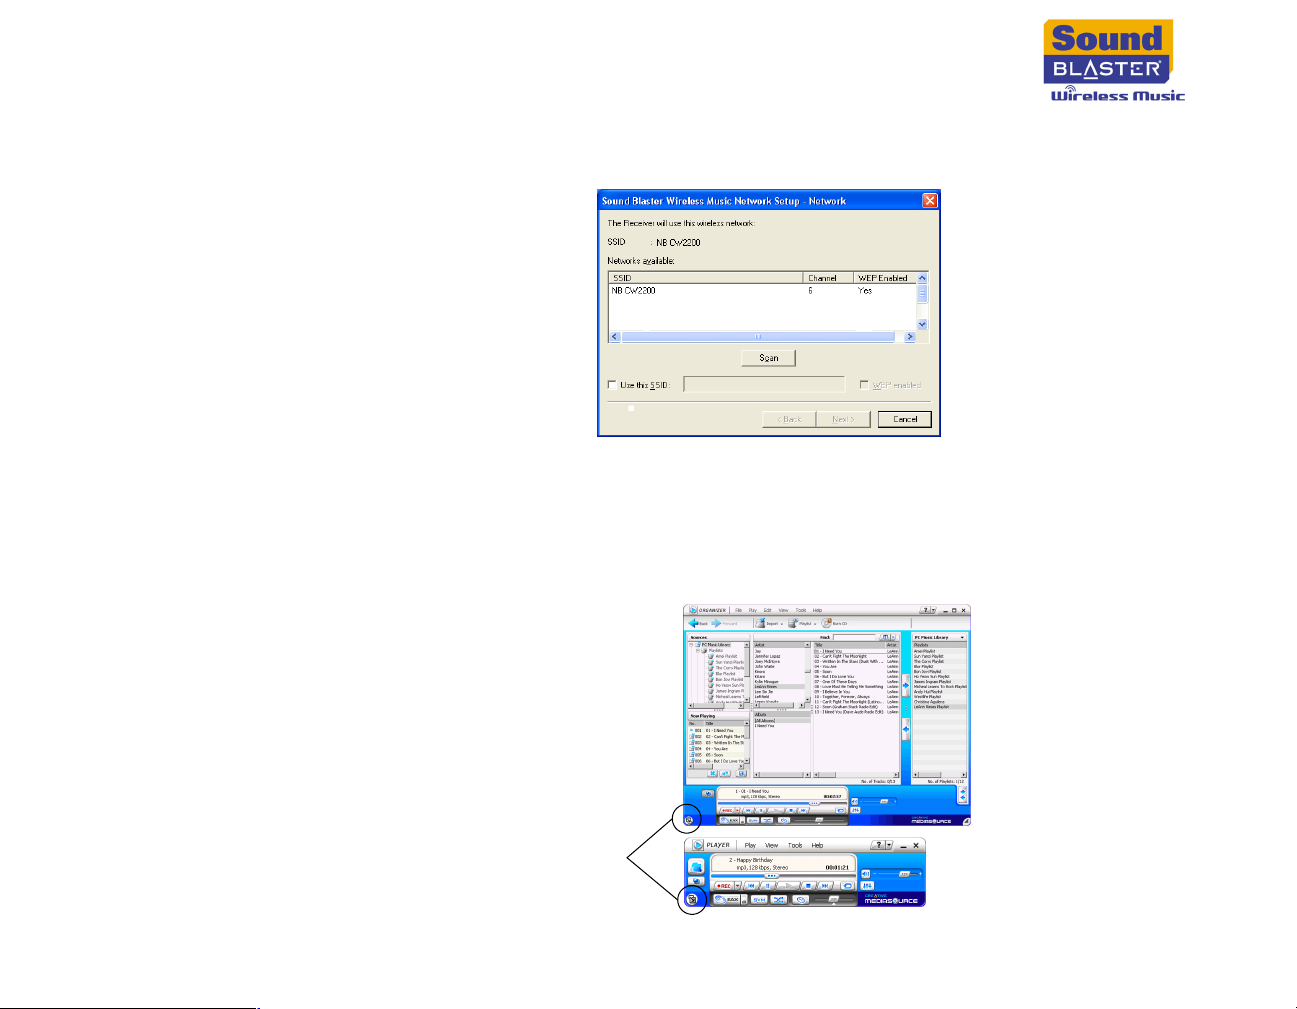
Wireless Music Network Setup lets you set up the network connection between
your Receiver and your wireless network.
Creative MediaSource
Creative MediaSource is your digital music center for playing, creating, organizing
and transferring digital music. Creative MediaSource has Player and Organizer
views. You can switch between these views by clicking the Player/Organizer
View button.
Organizer
view
Player/Organizer
View button
Player
view
Overview 2-7
Page 20
Getting Started
Page 21
Getting Started
DO NOT connect your Receiver to your computer until you have installed the
software.
Step 1: Install Software
• Disable all firewall
software on your
wireless network
before installing the
software. For more
information, refer to
your firewall
software's
documentation.
• If your wireless
router or access
point can be
configured as a
DHCP server, enable
this feature. This
makes it easier to
add other devices to
your wireless
network.
•If you are setting up
multiple Receivers,
make sure you set
them up one at a
time.
1. Turn on your computer and make sure your wireless router or access point is
set up and working properly.
2. Insert the Installation CD into your CD-ROM/DVD-ROM drive.
The disc supports Windows Autoplay mode and starts running automatically. If
not, you need to enable the Windows auto-insert notification feature for your
CD-ROM/DVD-ROM drive. For more information, see "What do I do when the
installation does not start automatically after the Installation CD is inserted?"
on page B-1.
3. For Windows XP only: If the Hardware Installation error message appears,
click the Continue Anyway button. For more information about this
message, see "Why does a Hardware Installation error message appear on a
Windows XP operating system during installation?" on page B-2.
Getting Started 3-1
Page 22
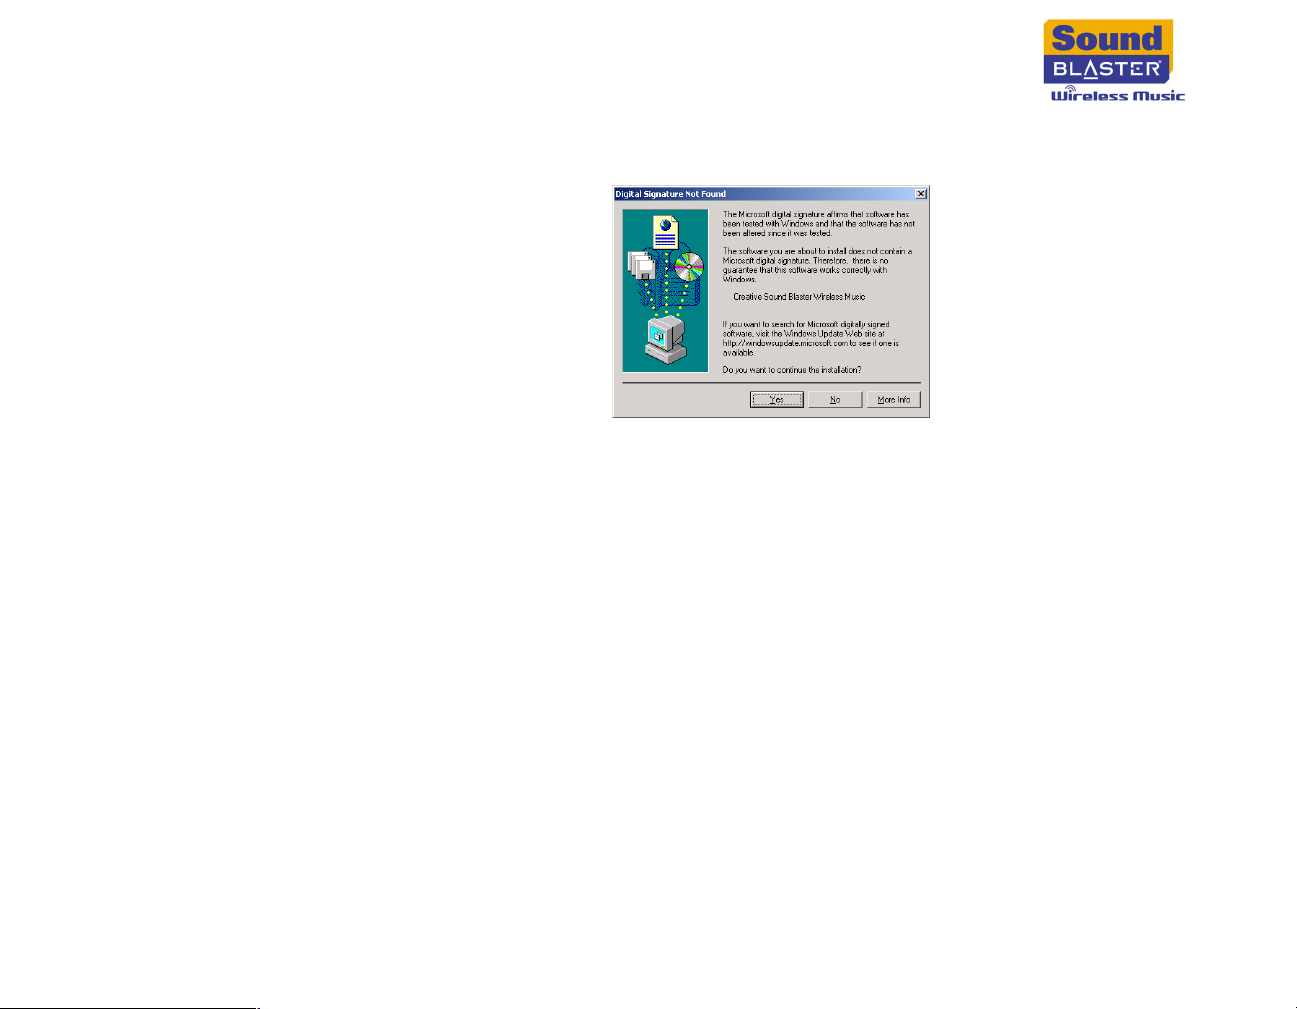
4. For Windows 2000 only: If the Digital Signature Not Found window
appears, click the Yes button.
5. Follow the instructions on the screen to complete the installation, and restart
your computer when you are prompted to do so.
Getting Started 3-2
Page 23
Step 2: Configure Hardware
If there are multiple wireless networks operating in the vicinity, or your wireless
network is WEP encrypted, you will need to configure your hardware.
If not, you can skip the following instructions and proceed to "Step 3: Add Tracks
to PC Music Library" on page 3-8.
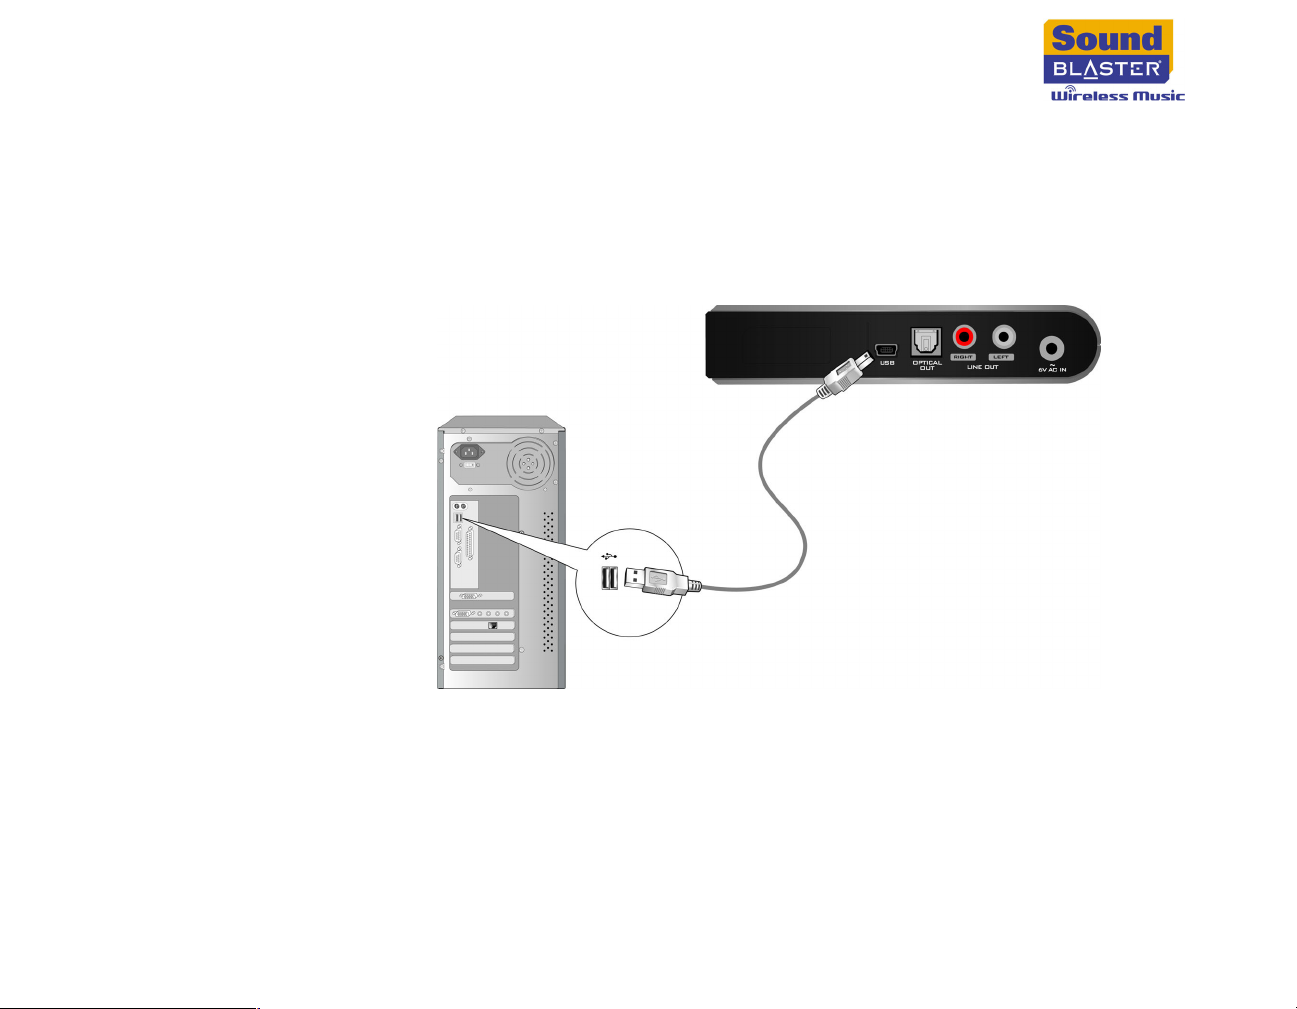
1. When your computer restarts, connect your Receiver to your computer’s USB
port using the supplied USB cable.
Getting Started 3-3
Page 24
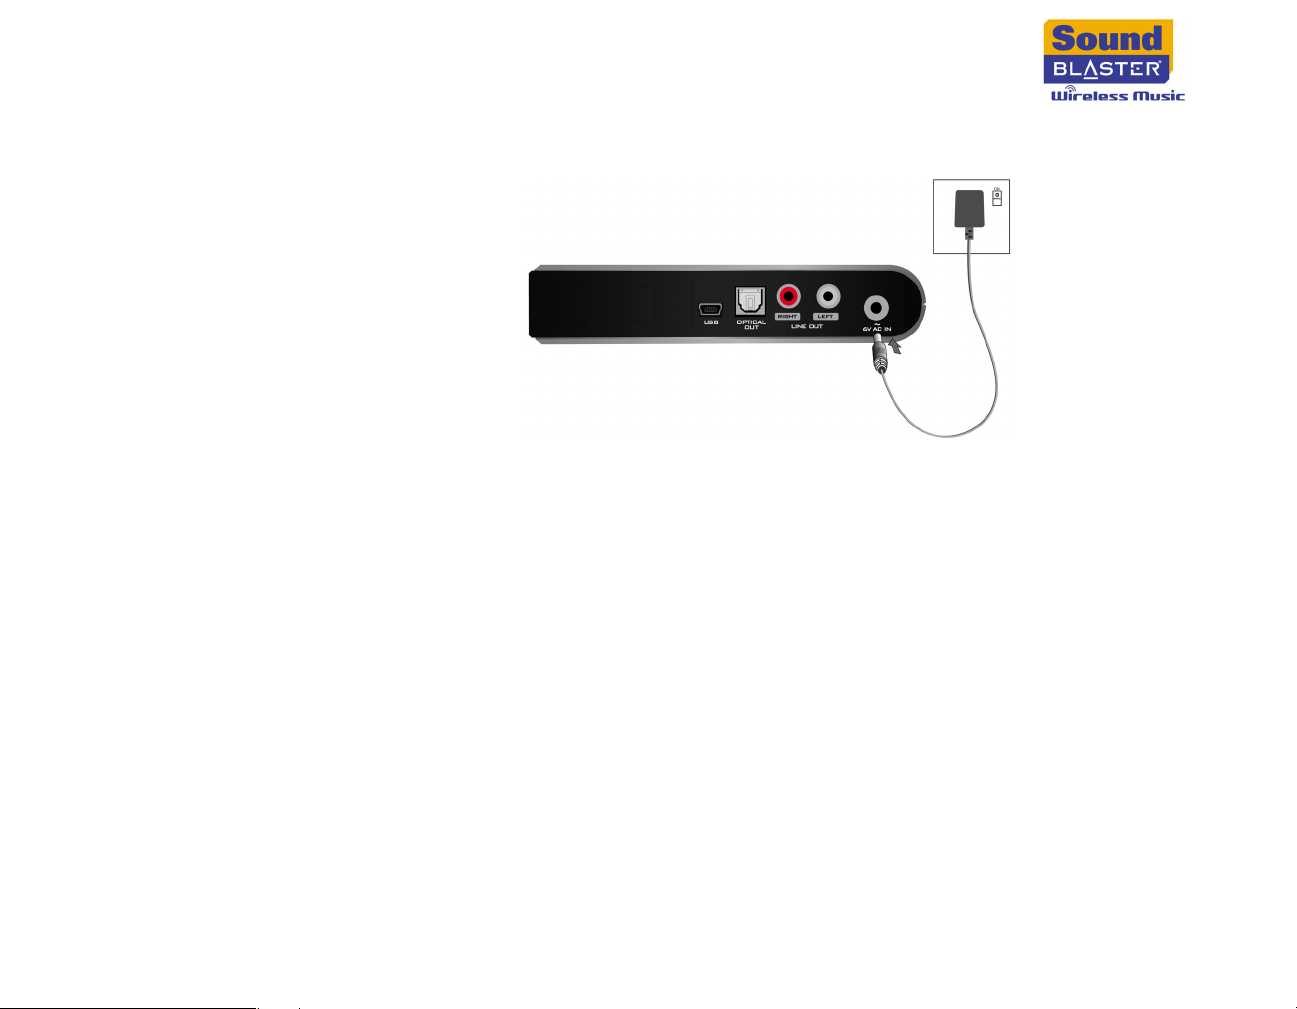
2. Connect your Receiver to a power outlet using the supplied power adapter, and
turn on the power outlet if necessary.
3. Click Start
Blaster Wireless Music
→ Programs or All Programs → Creative → Sound
→ Network Setup.
Getting Started 3-4
Page 25
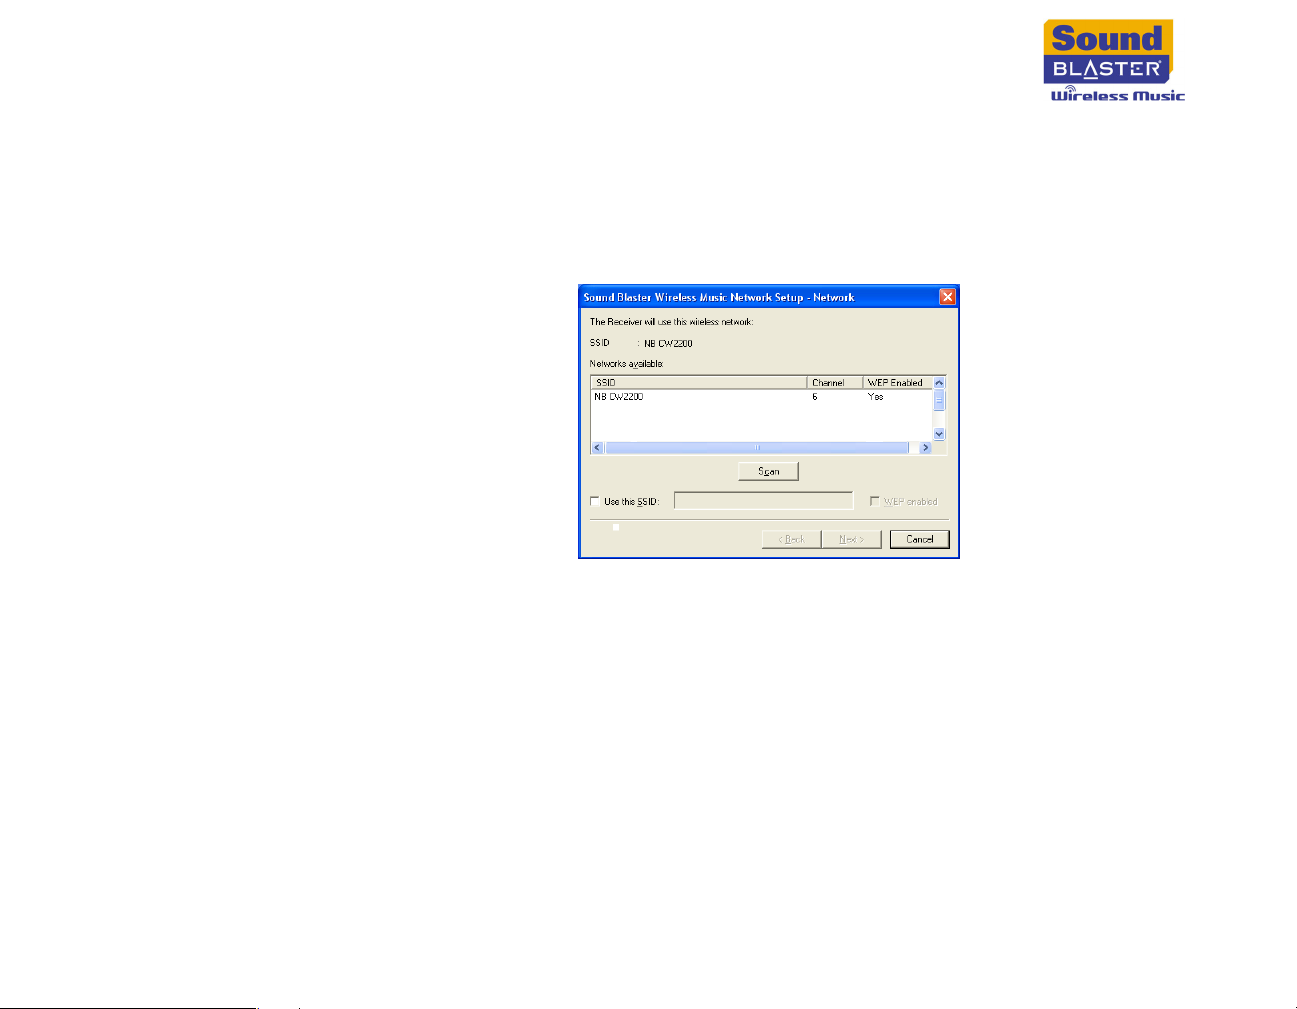
4. In the Sound Blaster Wireless Music Network Setup — Network dialog
box, click a network from the list of available networks, and click the Next
button.
If your network is not listed, click the Scan button to refresh the list of
available networks, or click the Use this SSID check box to select it and type
in the SSID of the network to which you want to connect.
Getting Started 3-5
Page 26
If your network is WEP
enabled, make sure it
is in Open mode.
Share Key mode is n o t
supported by Sound
Blaster Wireless Music.
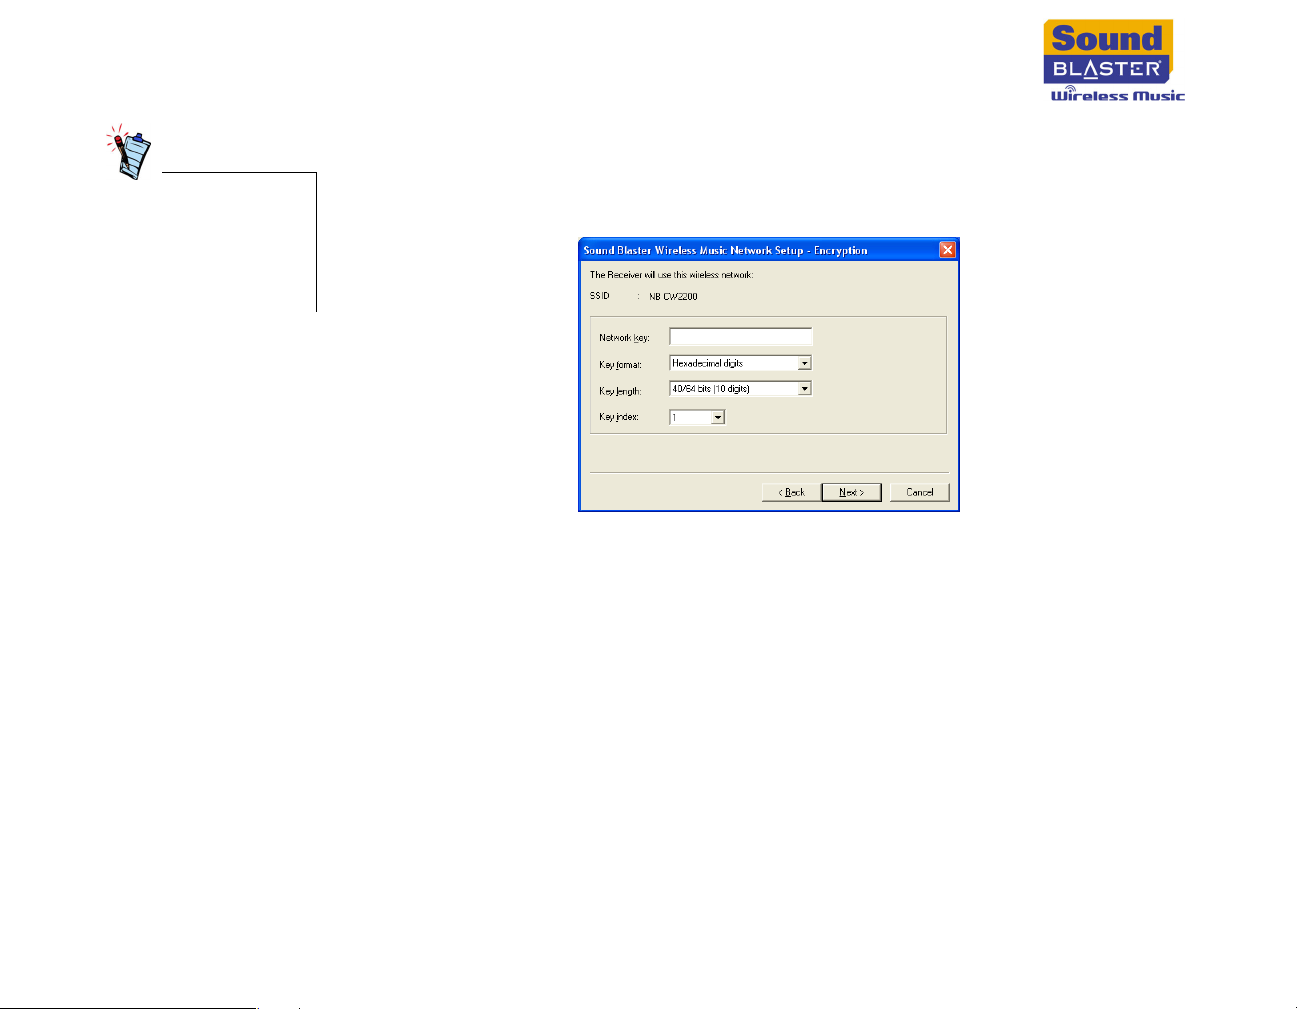
5. If your network is WEP encrypted, type in the encryption information in the
Sound Blaster Wireless Music Network Setup — Encryption dialog box,
and click the Next button. Refer to the User’s Guide of your wireless router or
access point to learn how to check your network’s encryption information.
Getting Started 3-6
Page 27
For more information
on using a static IP
address for your
Receiver, see "How do I
use a static IP for my
Receiver?" on page
B-4.
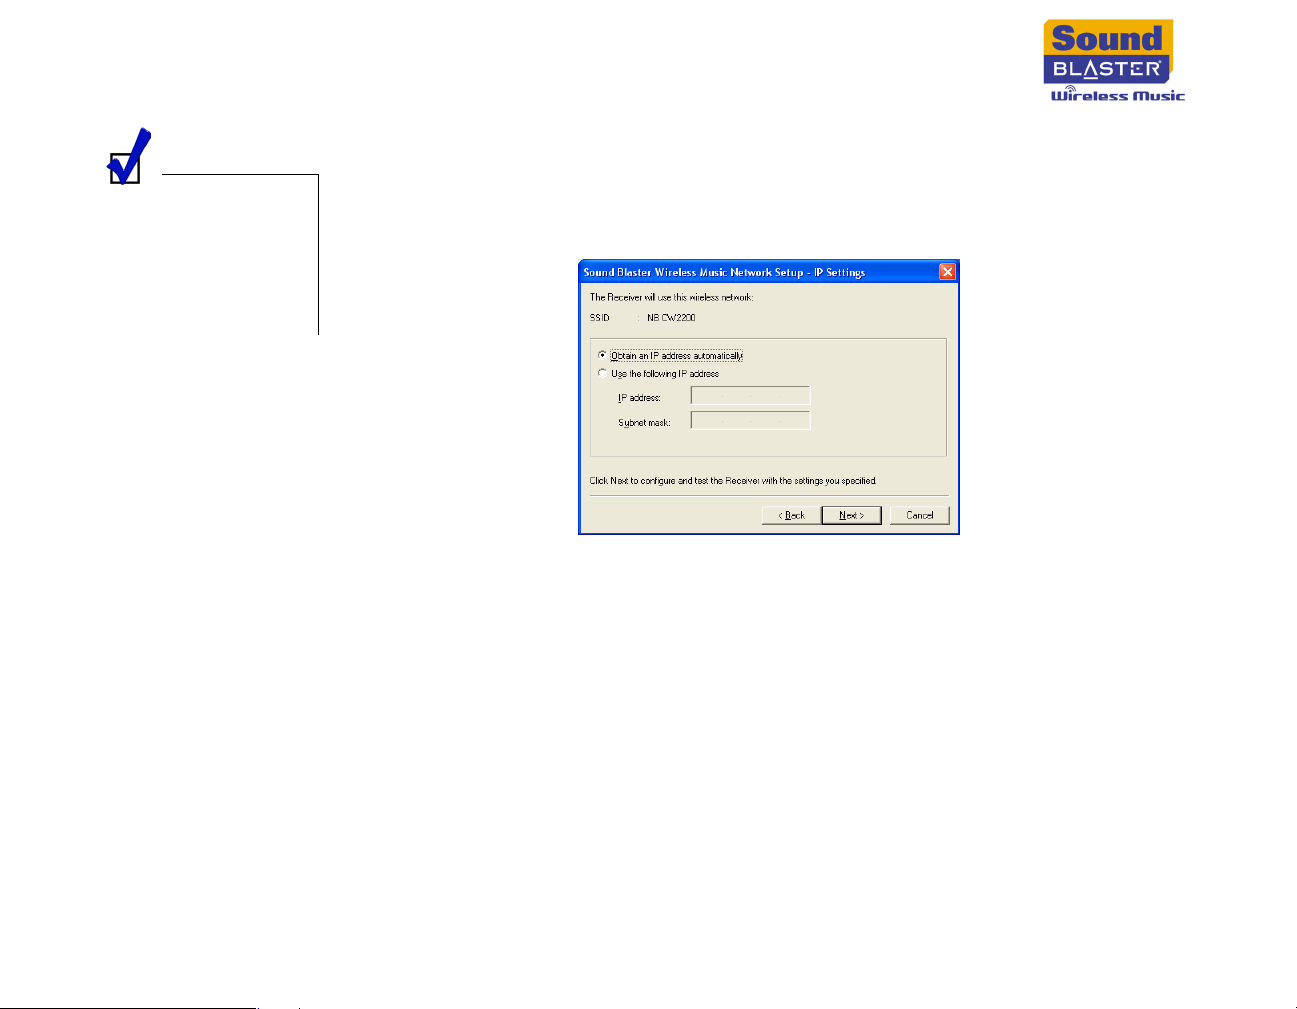
6. In the Sound Blaster Wireless Music Network Setup — IP Settings
dialog box, click the Obtain an IP address automatically option. If you
prefer to use a static IP address for your Receiver, click the Use the
following IP address option and type in values that match those of your
wireless network.
7. Click the Next button.
8. Click the OK button. If your settings are incompatible with those of your
network, Wireless Music Network Setup will return to the first setup page so
that you can select the correct settings.
9. Follow the instructions on the screen, and disconnect your Receiver when you
are prompted to do so.
Getting Started 3-7
Page 28
Step 3: Add Tracks to PC Music Library
For information on
'ripping' and
downloading music
files, see "About Music
Files" on page A-1.
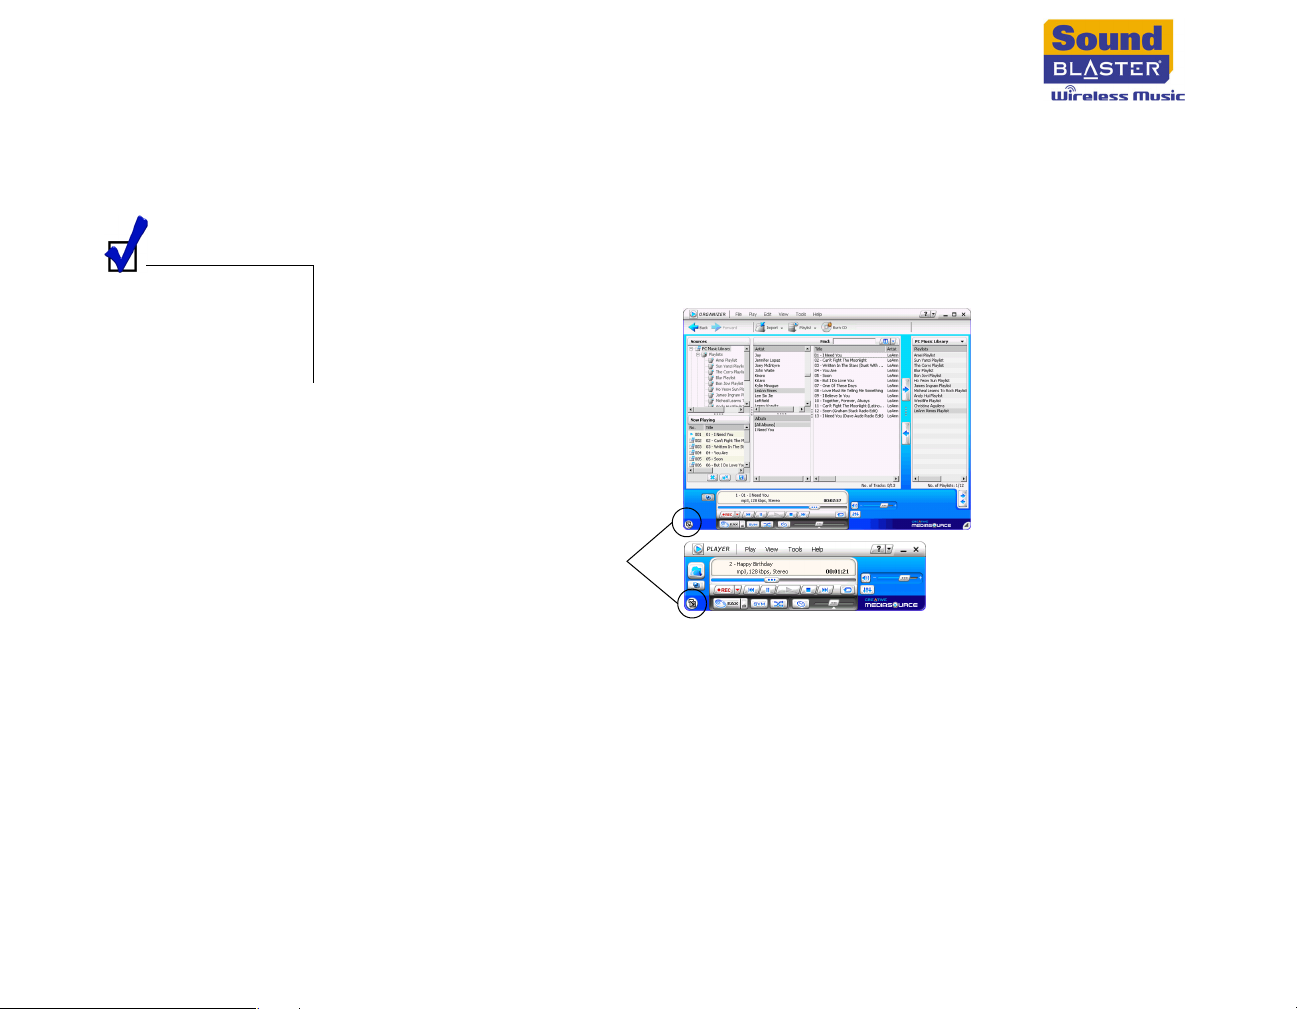
1. Creative MediaSource should automatically launch when your computer
restarts after installation. To manually launch Creative MediaSource in
Organizer view, click Start
→ Programs or All Programs → Creative →
Creative MediaSource Organizer.
2. If Creative MediaSource is already open in Player view, click the Player/
Organizer View button to switch to Organizer view.
Organizer
view
Player/Organizer
View button
Player
view
3. On the Task bar, click the Import button, and select Import Tracks.
The Import Wizard dialog box appears.
4. In the My Computer: panel, locate the 'ripped' or downloaded music files that
you want to add to PC Music Library.
5. Click a folder to display the tracks in it. The list of tracks is displayed in the
panel beneath the My Computer: panel.
6. To add a track, select it from the panel beneath the My Computer: panel and
click the Add File
→ button.
Getting Started 3-8
Page 29

7. To add a folder, select it from the My Computer: panel and click the Add
Folder
A list of tracks is displayed in the Files to be imported panel.
8. Click the Continue button.
9. Follow the instructions on the screen to finish adding tracks to PC Music
Library.
→ button.
Getting Started 3-9
Page 30
Step 4: Set up Receiver
1. Decide where you would like to place your Receiver. For optimum
performance, make sure your Receiver is placed on a flat surface that is at
least 50 cm (20 inches) from the floor, and where there is minimum
obstruction between your Receiver and your wireless router or access point.
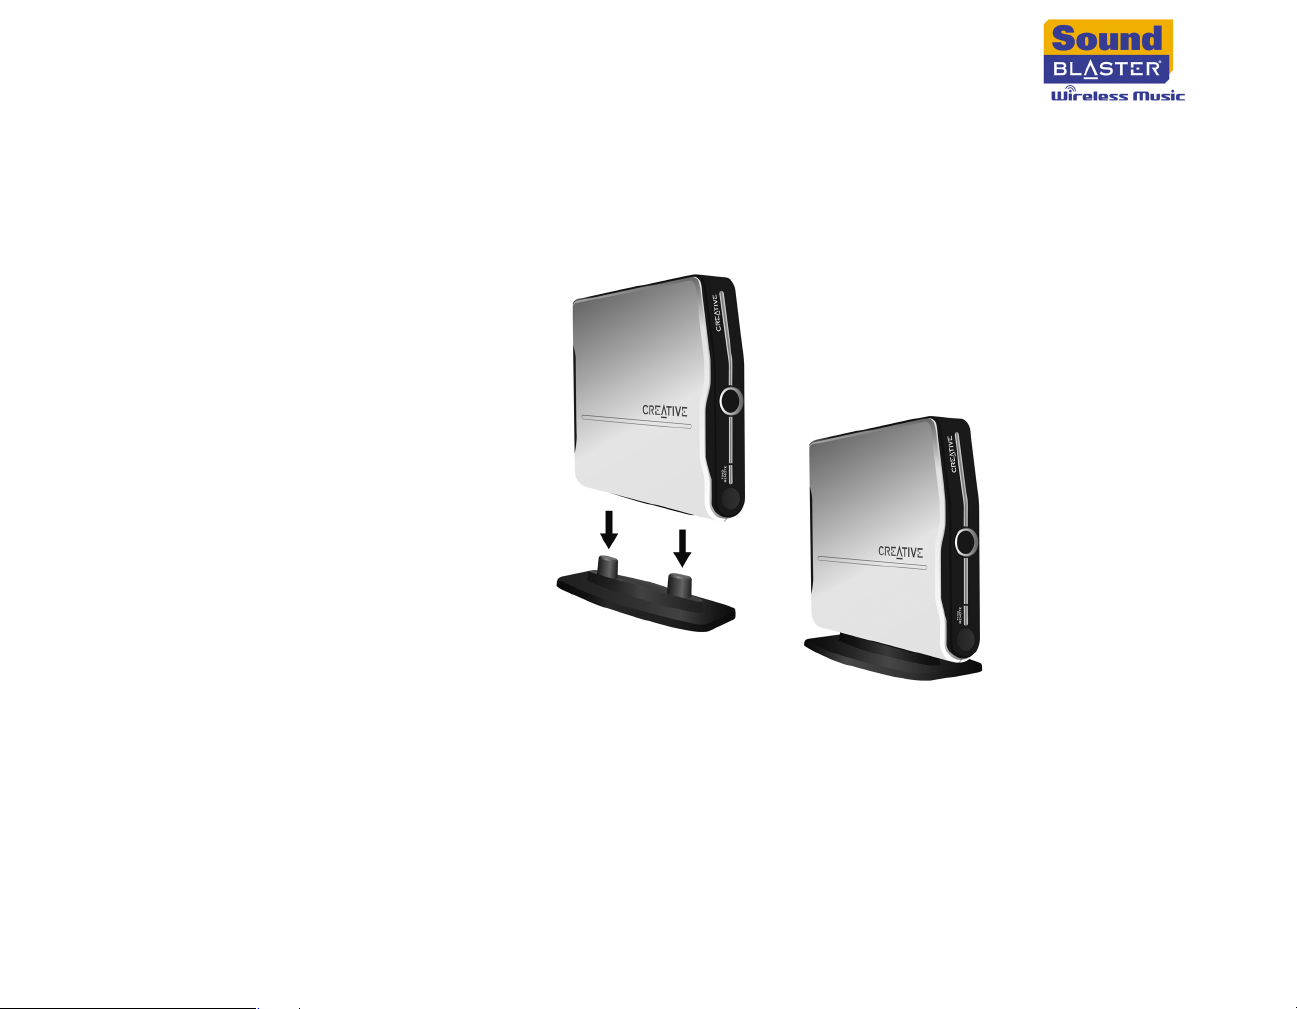
2. Attach the receiver stand to the Receiver (optional).
3. Connect your Receiver to speakers or a home stereo system (both available
separately) as shown in the following diagrams.
Getting Started 3-10
Page 31
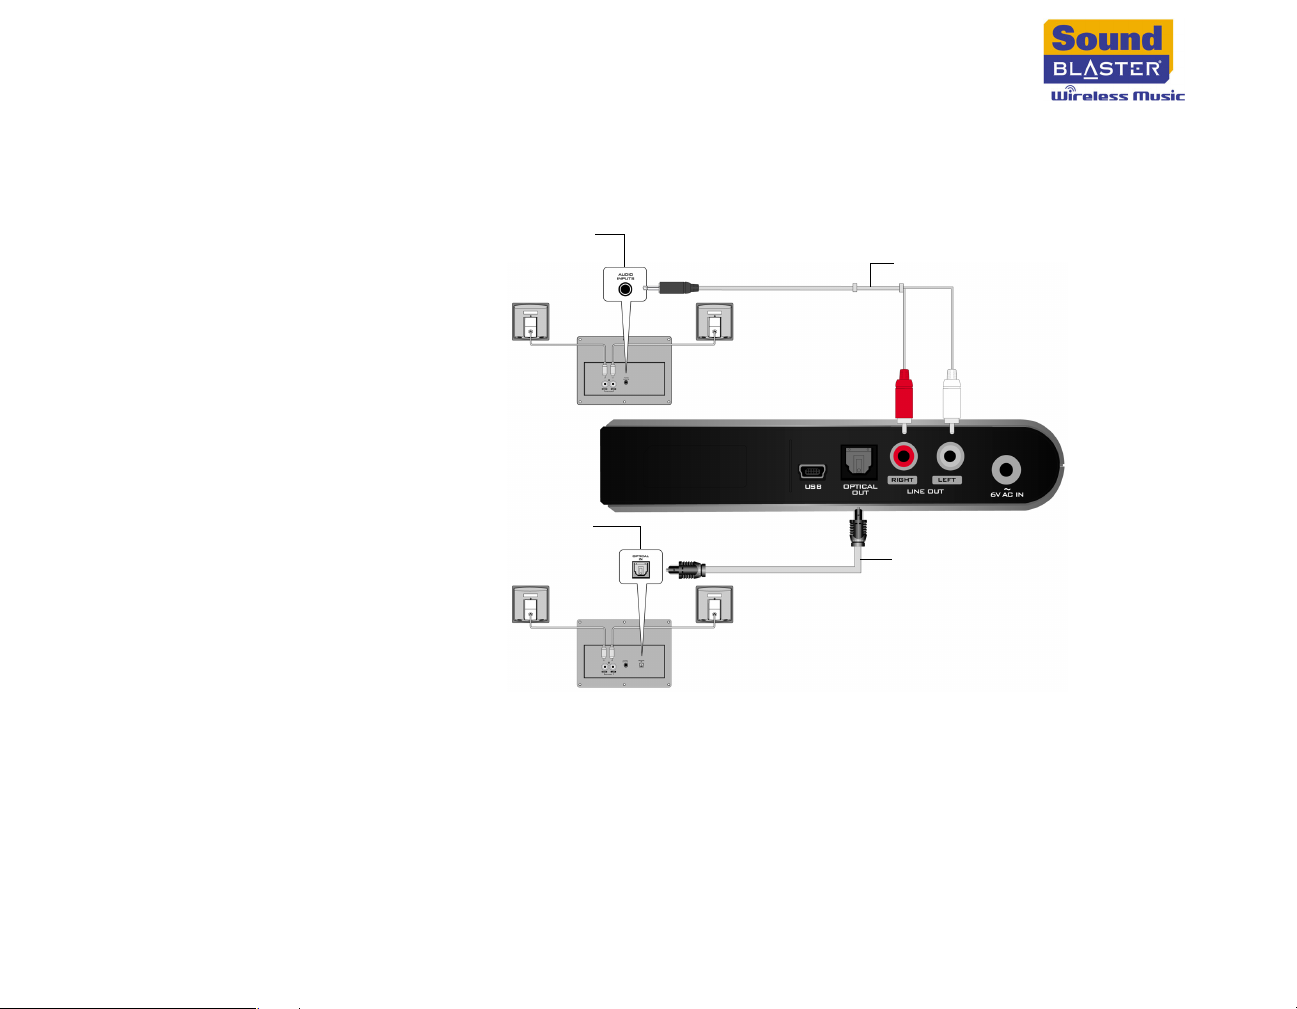
Connecting to speakers
You can connect speakers to either the LINE OUT jacks or the OPTICAL OUT
connector of your Receiver.
Audio input jack
RCA-to-miniplug cable
Optical input
connector
Optical cable
(available separately)
Getting Started 3-11
Page 32
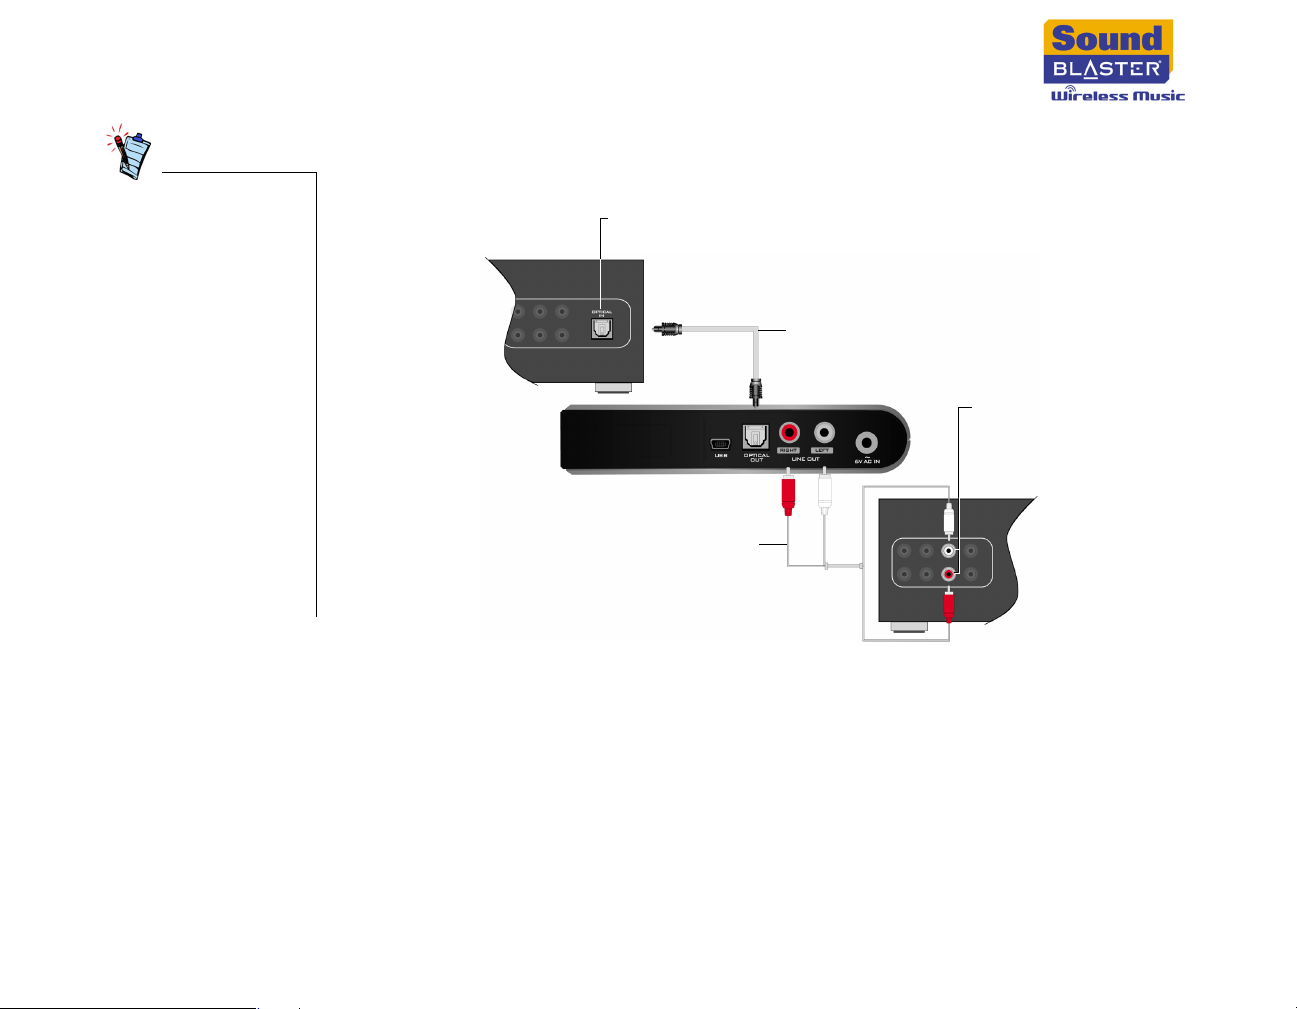
• On your home stereo
system, connect the
RCA cable to either
the CD inputs or the
auxiliary inputs.
Connect to other
inputs only if these
are unavailable.
• When you turn on
your home stereo
system, make sure
the correct input
mode is selected.
For example, select
auxiliary mode on
your home stereo
system if your
Receiver is
connected to the
auxiliary inputs.
Connecting to a home stereo system
You can connect a home stereo system to either the LINE OUT jacks or the
OPTICAL OUT connector of your Receiver.
Optical input connector on a
stereo receiver or AV Amplifier
Optical cable
(available separately)
RCA input
jacks on a
stereo receiver
or AV Amplifier
RCA cable (available separately)
Getting Started 3-12
Page 33
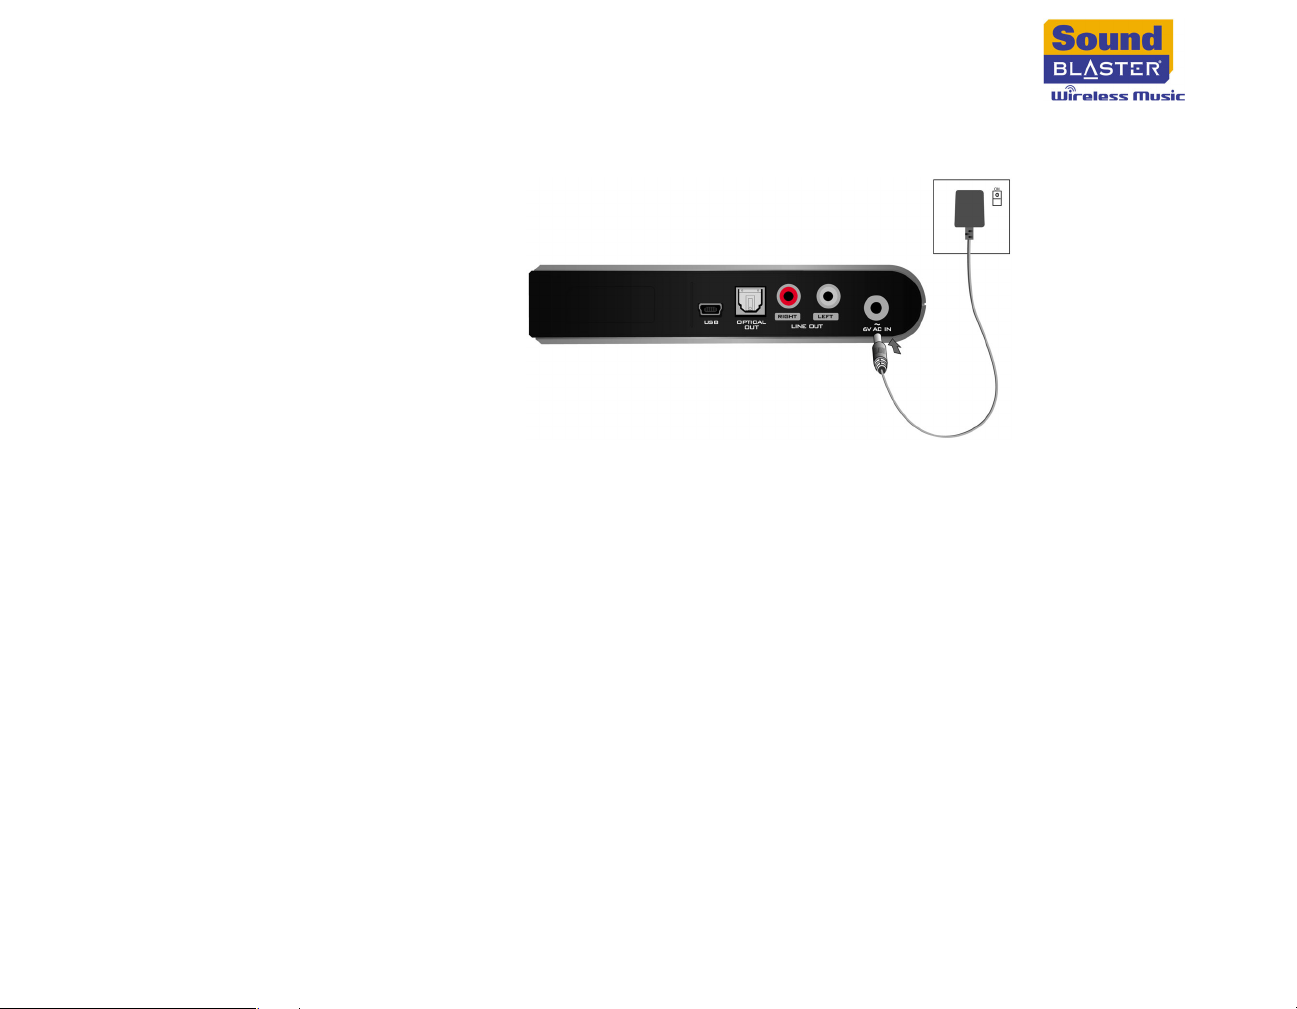
4. Connect your Receiver to a power outlet using the supplied power adapter, and
turn on the power outlet if necessary.
Getting Started 3-13
Page 34
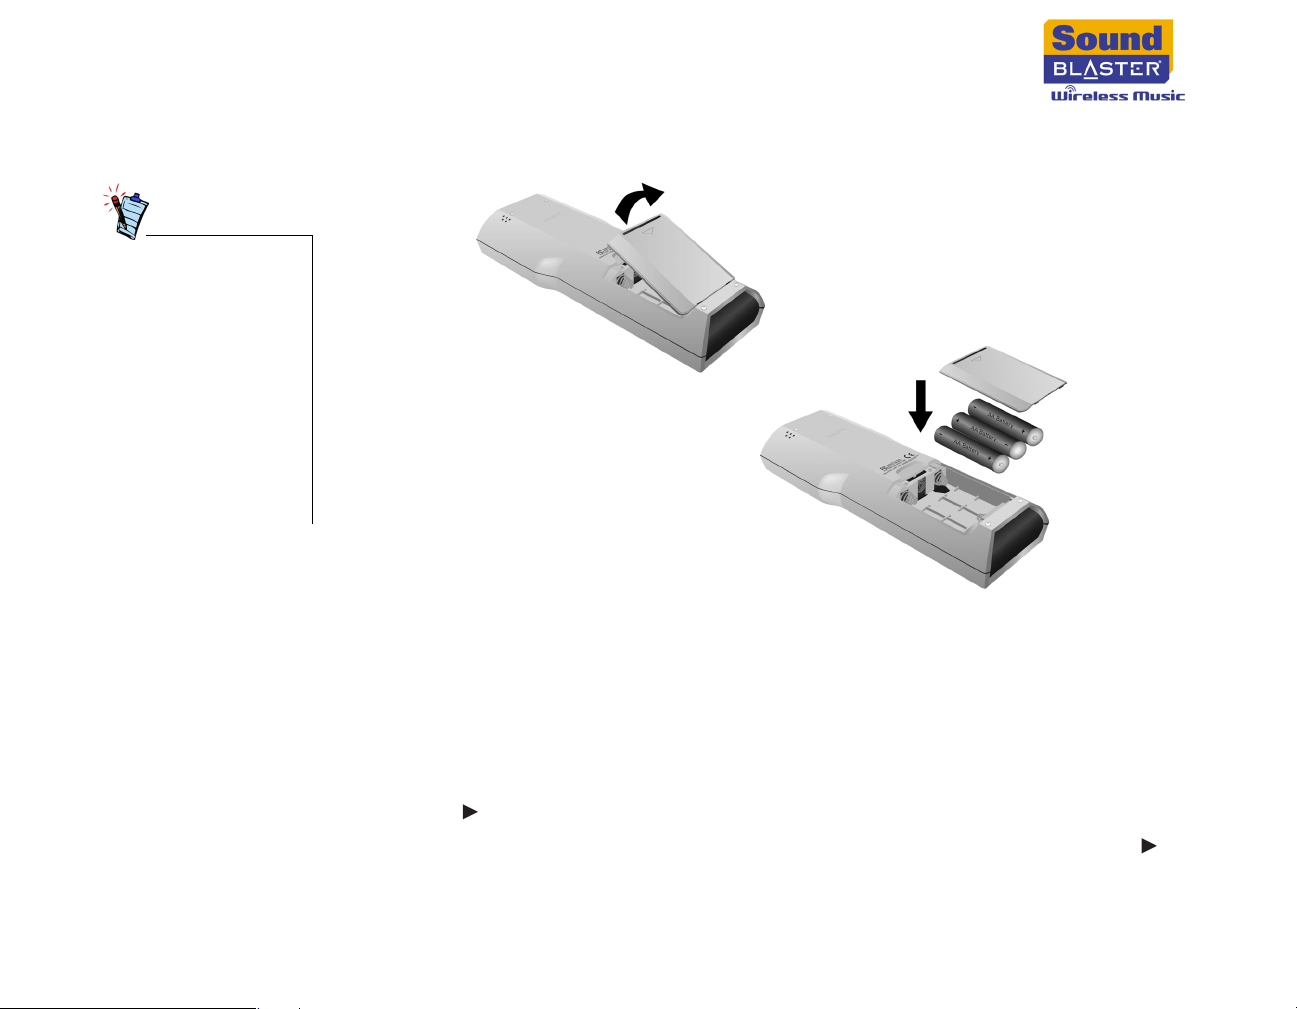
Step 5: Play Music
• Make sure your RF
Remote is no more
than 10 meters (33
feet) from your
Receiver when you
set up and use your
RF Remote.
• For more
information about
using the RF
Remote, see "Using
Your RF Remote" on
page 4-1.
1. Insert three AA batteries into the RF Remote.
2. Press the Power button to turn on your RF Remote.
3. Your RF Remote is automatically assigned to your Receiver if you have only
one Receiver installed on your wireless network. If not, you will need to
manually assign the RF Remote to the Receiver that you are installing. For
more information, see "Using Multiple Receivers" on page 4-1.
4. When the main menu appears on the LCD, press the LIBRARY button.
5. Use the Navigation buttons to scroll to the All Tracks option and press the
Right button or OK button.
6. Scroll to the first letter of the track you want to play and press the Right
button or OK button.
7. Scroll to a track and press the Play button to start playback.
Getting Started 3-14
Page 35
Using Your RF Remote
Page 36
Using Your RF Remote
Selecting Menu Options
Using Multiple Receivers
Make sure you are
near your Receiver
when you are
assigning the RF
Remote, as you will
need to press the
FIND REMOTE button
on the Receiver.
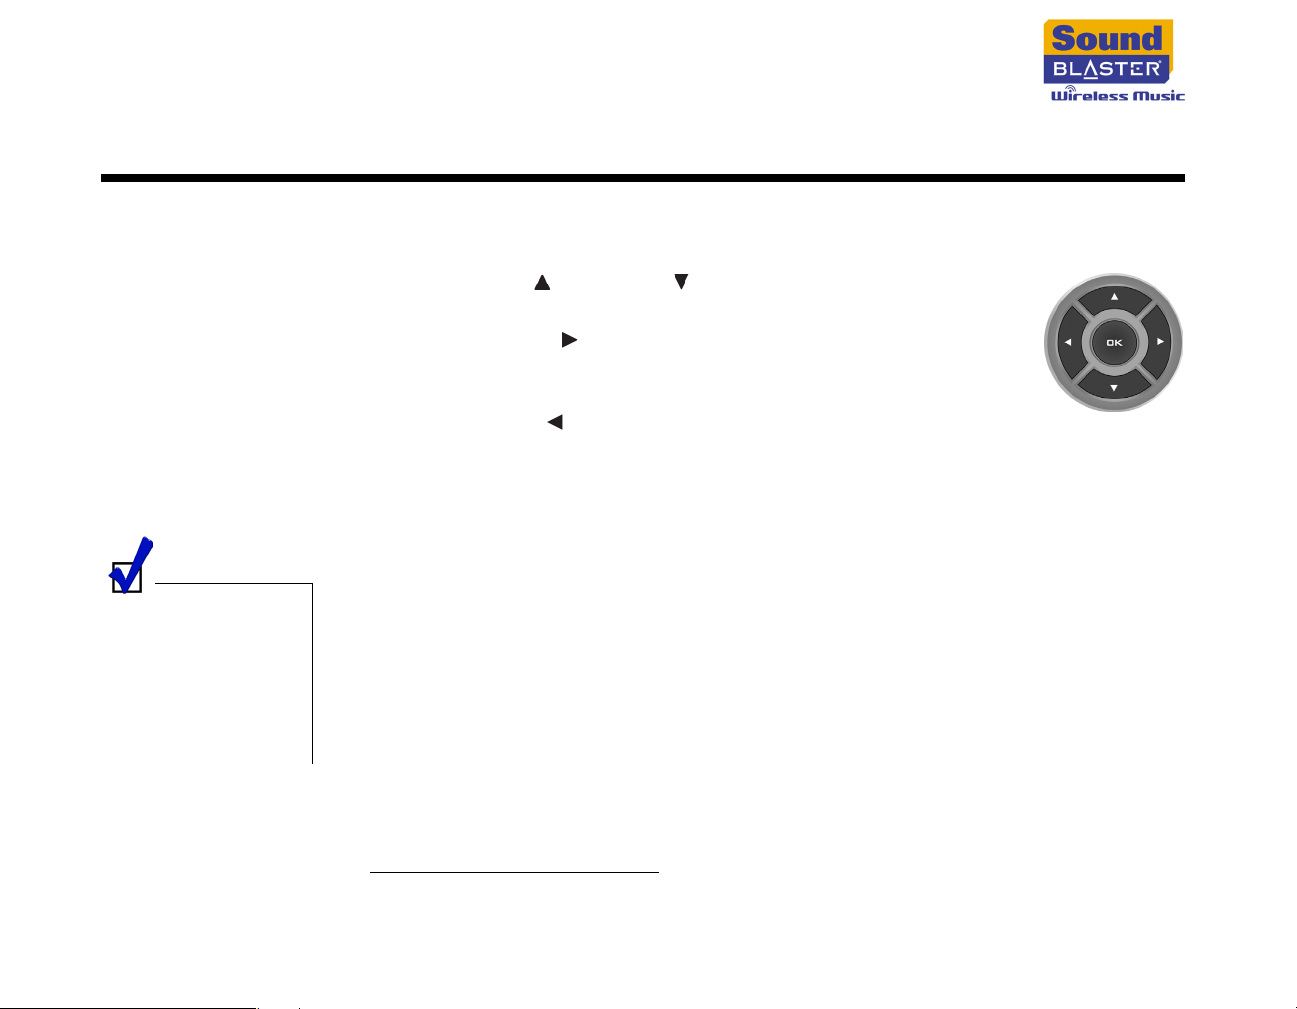
You can use the Navigation buttons to scroll and select menu options. For example,
if you are in the Now Playing List menu:
1. Press the Up and Down buttons to scroll up and down
the menu.
2. Press the Right button or OK button to select a highlighted
menu option, or show a list of additional options for the
highlighted menu option.
3. Press the Left button to return to the previous menu.
If you have multiple Receivers*, you can control all of them with one RF Remote.
Your RF Remote, however, can only control one Receiver at a time. To select the
Receiver that your RF Remote controls, you need to manually assign the RF
Remote to the Receiver that you want to control.
To manually assign an RF Remote to a Receiver
1. Press and hold the MODE button on the RF Remote until the LED on the
Receiver starts flashing. This may take about 5 seconds.
2. While the LED on the Receiver is flashing, press the FIND REMOTE button on
the Receiver.
The LCD of your RF Remote displays the name of the Receiver it is assigned to.
After you have manually assigned a Receiver, your RF Remote will save its name as
a preset. You can instantly assign your RF Remote to this Receiver by selecting this
preset option on your RF Remote.
To instantly assign a preset Receiver
1. Press and hold the MENU button.
* You can use up to four Receivers on a wireless network.
Using Your RF Remote 4-1
Page 37
Playing Music
2. Scroll to the icon and press the Right button or OK button.
3. Scroll to the Receiver that you want to control and press the Right button or
OK button.
Playing tracks from
an artist
Playing tracks from
an album
1. Press the LIBRARY button.
2. Scroll to the Artist option and press the Right button or OK button.
3. Scroll to the first letter of the artist name you want and press the Right
button or OK button. If the artist name starts with a number or punctuation
mark, scroll to 0-9 and press the Right button or OK button.
4. Scroll to an artist and press the Play button to start playback, or press and
hold the Play button to add all tracks from the selected artist to the Now
Playing List.
To view the albums listed under the highlighted artist, press the Right
button or OK button.
1. Press the LIBRARY button.
2. Scroll to the Album option and press the Right button or OK button.
3. Scroll to the first letter of the album name you want and press the Right
button or OK button. If the album name starts with a number or punctuation
mark, scroll to 0-9 and press the Right button or OK button.
4. Scroll to an album and press the Play button to start playback, or press and
hold the Play button to add the tracks from the selected album to the Now
Playing List.
To view the tracks listed under the highlighted album, press the Right
button or OK button.
Using Your RF Remote 4-2
Page 38
Playing tracks from
a genre
1. Press the LIBRARY button.
2. Scroll to the Genre option and press the Right button or OK button.
3. Scroll to a genre and press the Play button to start playback, or press and
hold the Play button to add the tracks from the selected genre to the Now
Playing List.
To view the artists listed under the highlighted genre, press the Right
button or OK button.
Playing a track by
searching for it by
name
Playing a smart
playlist
For information on
creating smart
playlists, see "Creating
Smart Playlists" on
page 5-3.
1. Press the LIBRARY button.
2. Scroll to the All Tracks option and press the Right button or OK button.
3. Scroll to the first letter of the track you want to play and press the Right
button or OK button. If the track starts with a number or punctuation mark,
scroll to 0-9 and press the Right button or OK button.
4. Scroll to a track and press the Play button to start playback, or press and hold
the Play button to add the selected track to the Now Playing List.
A smart playlist automatically generates playlists from PC Music Library based on
your preferences. A different playlist is generated each time you play a smart
playlist. Several smart playlists are pre-installed for you to use immediately.
1. Press the LIBRARY button.
2. Scroll to the Smart Playlist option and press the Right button or OK
button.
3. Scroll to a smart playlist and press the Play button to start playback, or press
and hold the Play button to add the tracks in the selected smart playlist to the
Now Playing List.
To view the tracks listed under the highlighted smart playlist, press the Right
button or OK button.
Using Your RF Remote 4-3
Page 39
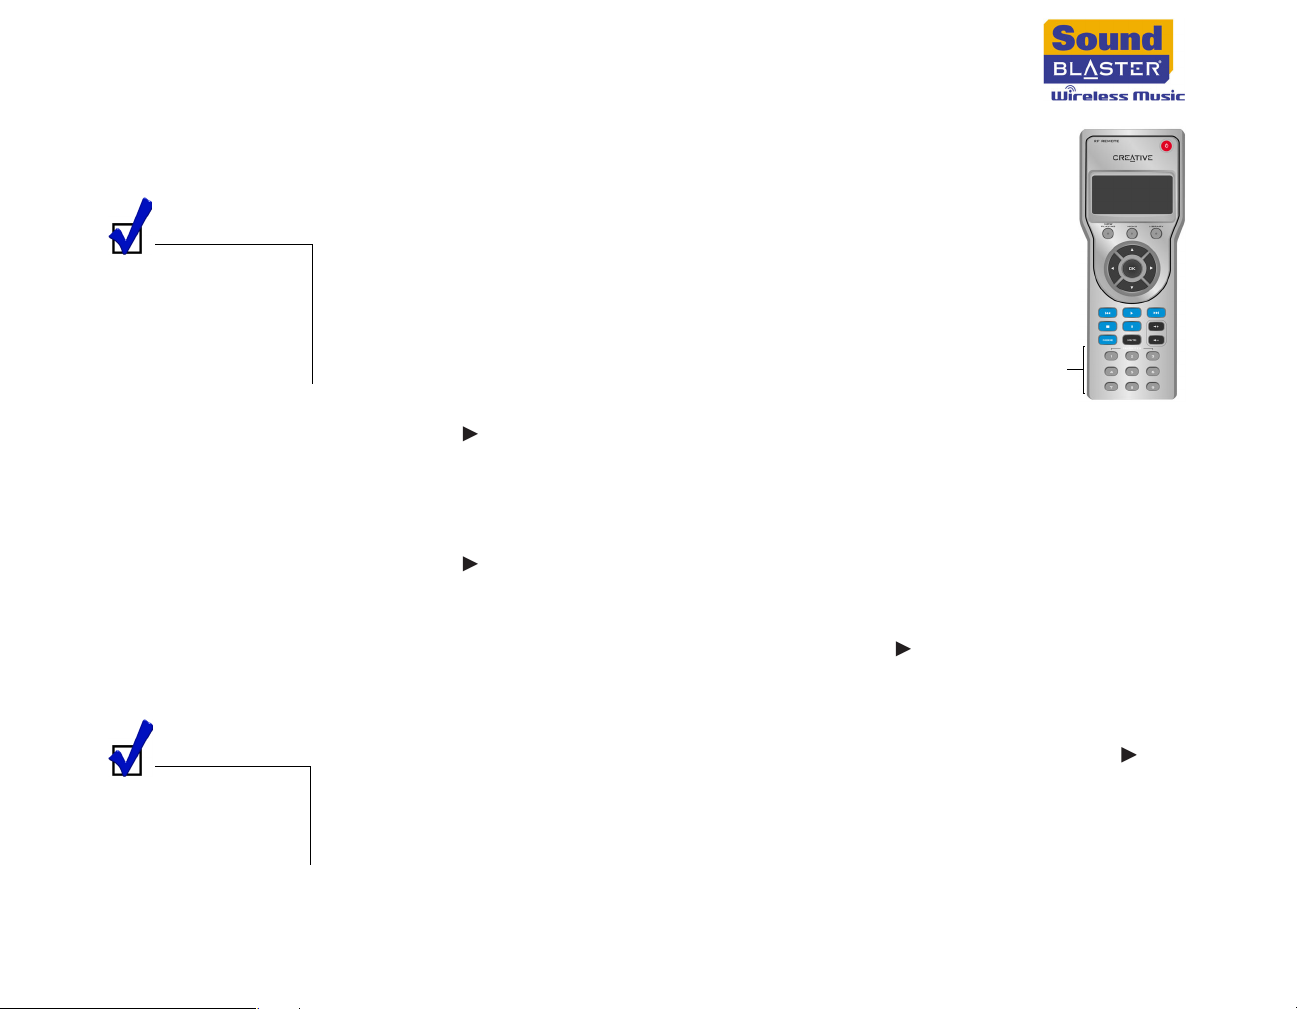
Playing a favorite
playlist
For information on
assigning playlists to
the FAVORITES
buttons, see
"Assigning Favorite
Playlists" on page 5-4
Favorite playlists are playlists that are assigned to the
FAVORITES buttons on your RF Remote.
Press a FAVORITES button to play back the assigned
playlist. The first three FAVORITES buttons are preset with
smart playlists for your convenience.
You can also select favorite playlists from the Favorite
Playlists menu.
To play a favorite playlist from the Favorite
Playlists menu
1. Press the MENU button.
FAVORITES
buttons
2. Scroll to the Favorite Playlists option and press the
Right button or OK button.
3. Scroll to a favorite playlist and press the Play button to start playback, or
press and hold the Play button to add the tracks in the selected favorite
playlist to the Now Playing List.
To view the tracks listed under the highlighted favorite playlist, press the
Right button or OK button.
Playing a playlist
created in Creative
MediaSource
For information on
creating playlists in
Creative MediaSource,
refer to its online help.
1. Press the LIBRARY button.
2. Scroll to the Playlist option and press the Right button or OK button.
3. Scroll to a playlist and press the Play button to start playback, or press and
hold the Play button to add the tracks in the selected playlist to the Now
Playing List.
To view the tracks listed under the highlighted playlist, press the Right
button or OK button.
Using Your RF Remote 4-4
Page 40
Playing tracks in
the Now Playing
List
1. Press the NOW PLAYING button.
2. Press the Play button.
3. If the Now Playing List is empty, the favorite playlist assigned to the first
FAVORITES button plays by default.
Viewing the Now Playing List
Setting Play Modes
Viewing Information
Press the NOW PLAYING button to view the Now Playing List. You can view the
Now Playing List at anytime. If a track is being played back, the following
information is displayed:
• artist and album name
• title of the track
•elapsed time
• order number of current track and total number of tracks in the Now Playing List
Press the MODE button to switch between the following play modes:
• Normal
Resumes playing tracks in sequence.
• Shuffle
Plays all tracks in the Now Playing List in random order.
• Repeat All
Repeats all tracks in the Now Playing List.
• Shuffle/Repeat All
Plays and repeats all tracks in the Now Playing List, in random order.
You can view the following on your RF Remote:
Receiver name
❑
❑ Receiver MAC address
❑ Receiver IP address
❑ Receiver firmware version
❑ RF Remote firmware version
❑ RF Remote radio frequency channel
❑ number of tracks in PC Music Library
Using Your RF Remote 4-5
Page 41
To view information
1. Press the MENU button.
2. Scroll to the System option and press the Right button or OK button.
3. Scroll to the Information option and press the Right button or OK button.
Restarting Your Receiver
Operating Range
Switching radio
frequencies
For normal operation, you only need to set your Receiver to standby when you are
not using it. Press the Power button on your RF Remote to turn on your Receiver
or set it to standby.
However, if you need to restart your Receiver, you can do so from the System
menu.
To restart your Receiver from the System menu
1. Press the MENU button.
2. Scroll to the System option and press the Right button or OK button.
3. Scroll to the Restart option and press the OK button.
You can also restart your Receiver by disconnecting your Receiver from the power
outlet and waiting for a few seconds before reconnecting it.
Your RF Remote communicates with your Receiver via radio frequency. This means
you can use your RF Remote even when you are not in the same room as your
Receiver.
The signal strength between your RF Remote and Receiver is indicated by an icon
on the top left corner of your RF Remote’s LCD. indicates that the RF Remote and
Receiver are within range, and indicates that the RF Remote is out of range from
your Receiver.
At times, interference from external sources may affect the operating range of
your RF Remote. To solve this problem, you can switch radio frequency channels.
To switch radio frequencies
1. Press and hold the MENU button.
Using Your RF Remote 4-6
Page 42
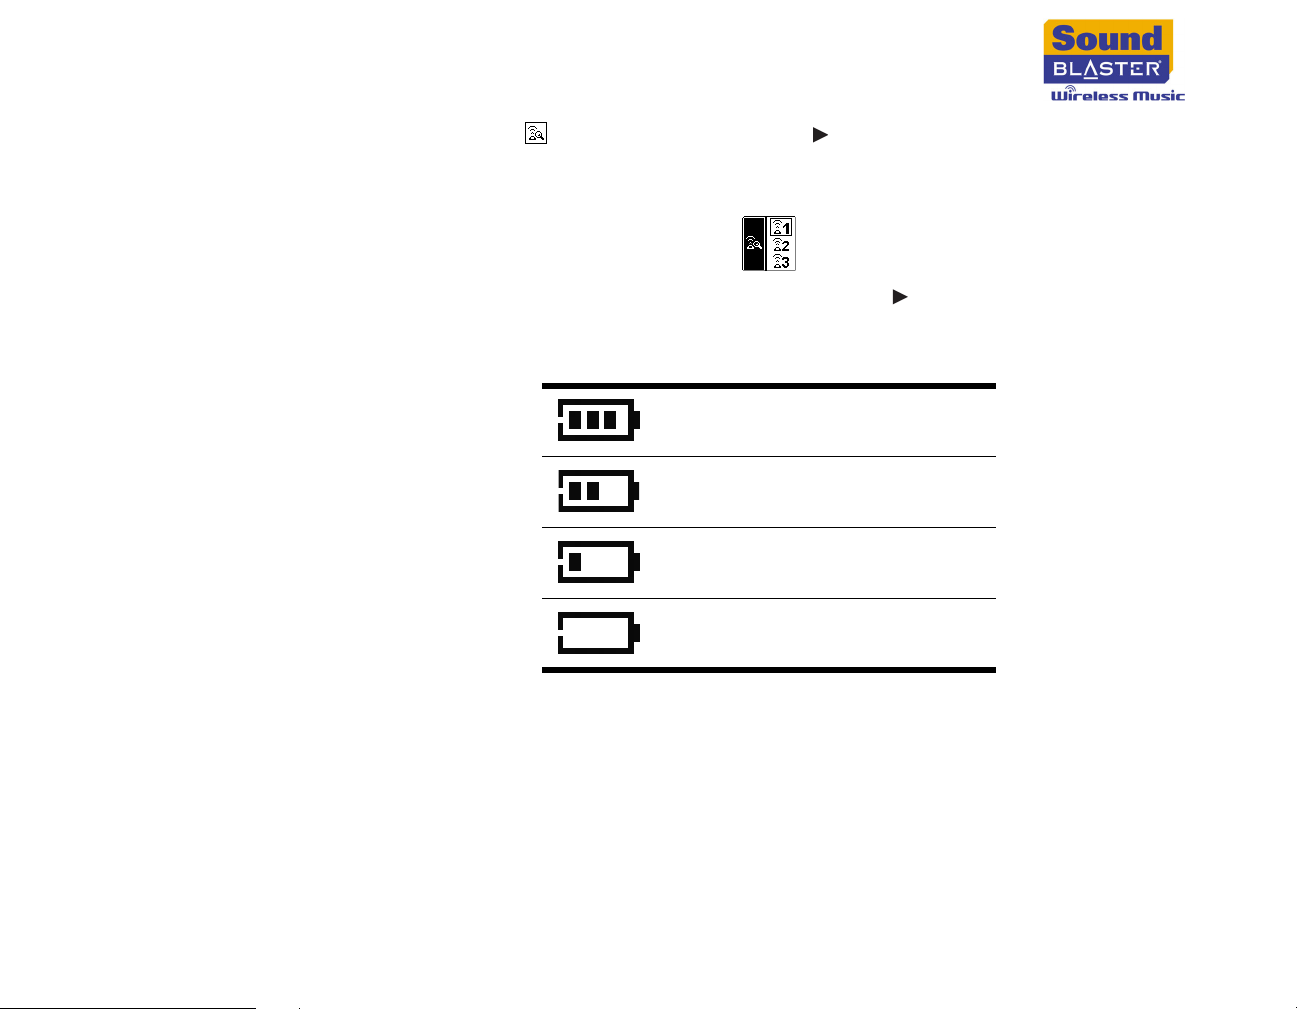
2. Scroll to the icon and press the Right button or OK button.
Three radio frequency channels appear. Your current radio frequency channel
is the highlighted channel.
3. Scroll to a different channel and press the Right button or OK button.
Checking Battery Status
The LCD may display one of the following icons to indicate the battery status:
❍ Batteries are full
❍ Batteries are 60% full
❍ Batteries are 30% full
❍ Replace your batteries as soon
as you can
Using Your RF Remote 4-7
Page 43
Configuring Settings
Page 44
Configuring Settings
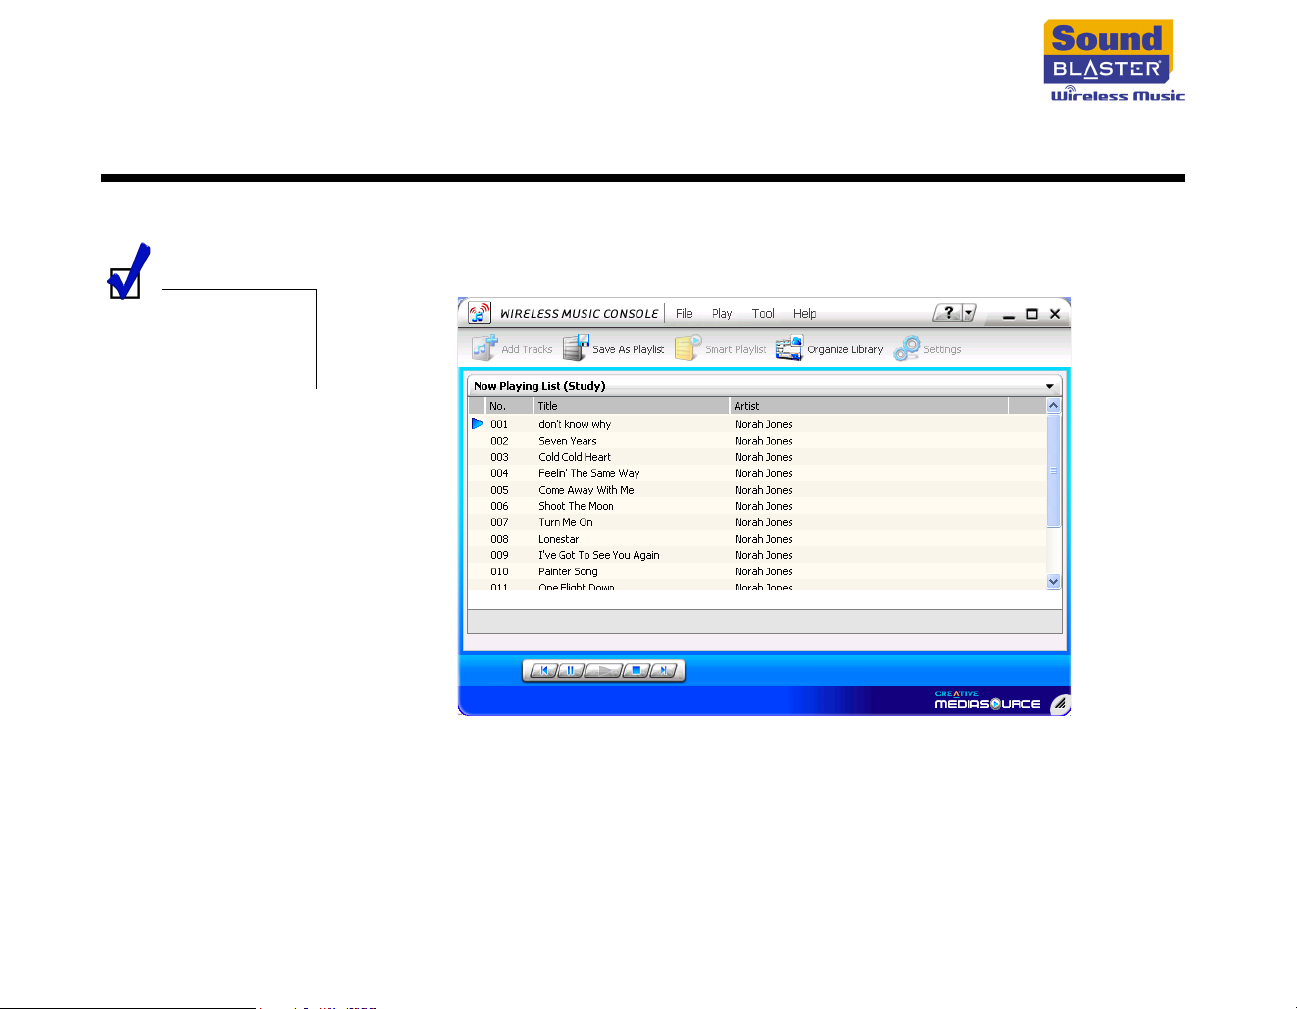
You can configure settings using Wireless Music Console.
To launch Wireless Music Console: Click Start
→ Creative → Sound Blaster Wireless Music → Console.
For more information
about using Wireless
Music Console, refer to
its online help.
→ Programs or All Programs
Configuring Settings 5-1
Page 45
Configuring Your Receiver
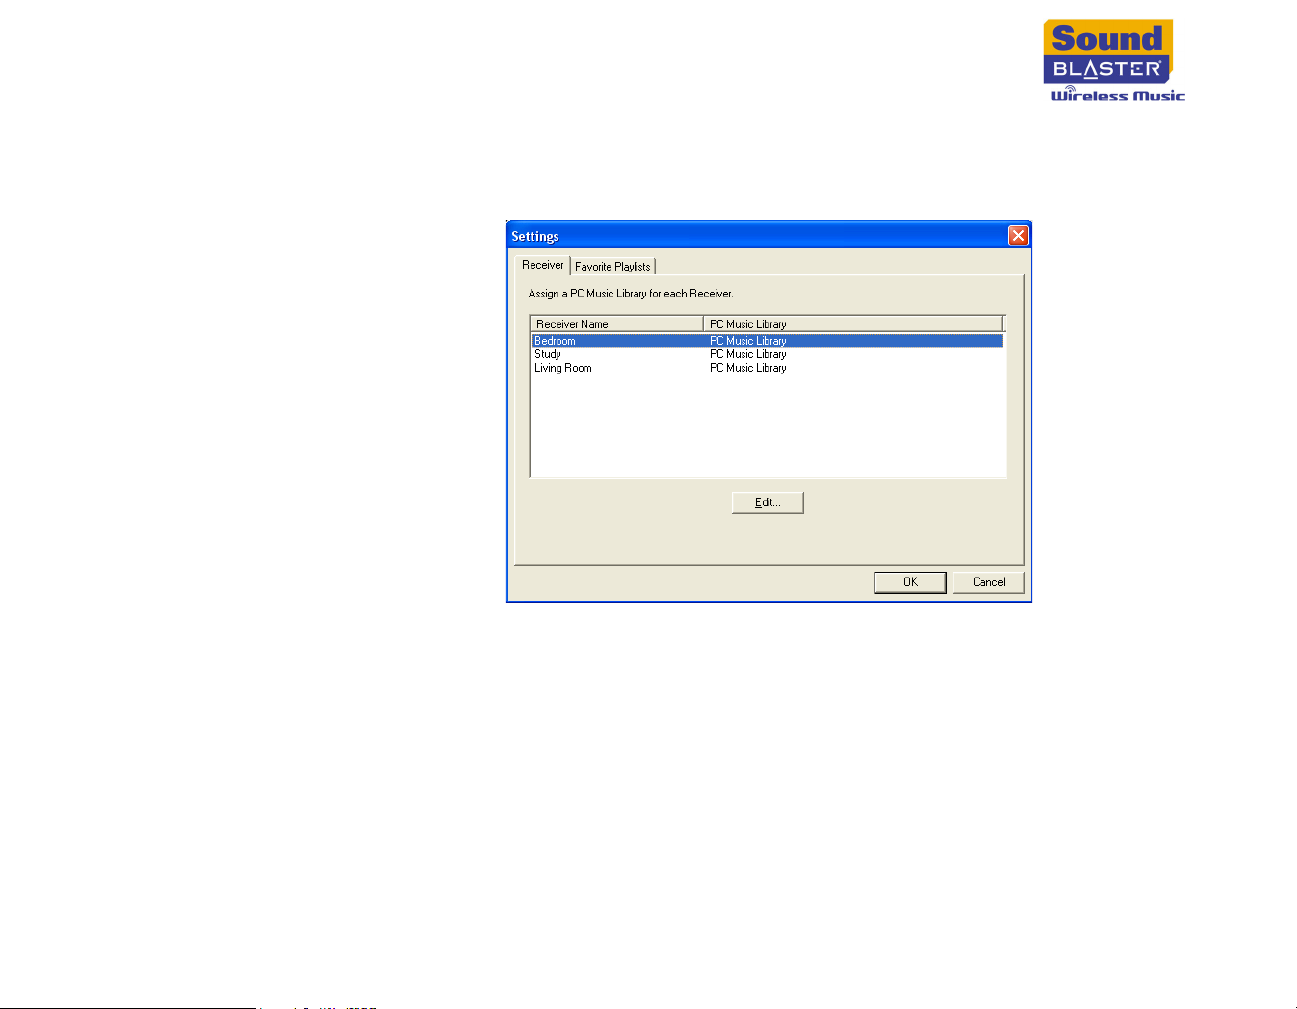
1. In Wireless Music Console, click the Settings button.
2. Click the Receiver tab.
3. Select a Receiver and click the Edit button.
4. Change the settings of your Receiver and click the OK button.
Configuring Settings 5-2
Page 46
Creating Smart Playlists
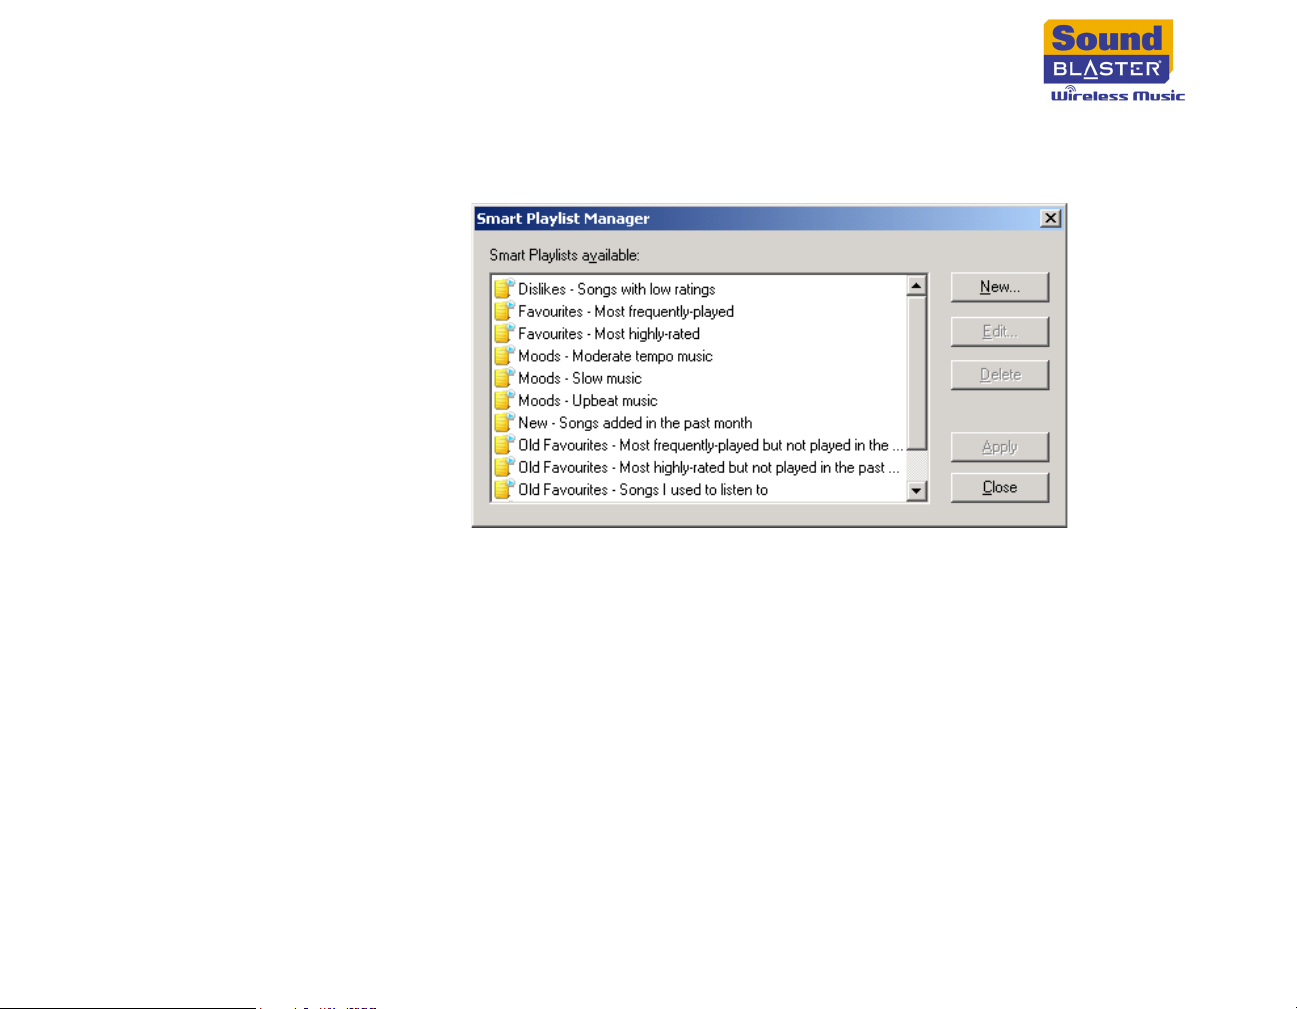
1. In Wireless Music Console, click the Smart Playlist button.
2. In the Smart Playlist Manager dialog box, click the New button.
3. In the Smart Playlist Name box, type in a name for your smart playlist.
4. Select your preferences and click the OK button.
5. To change the settings of an existing smart playlist, select a smart playlist in
the Smart Playlist Manager dialog box, and click the Edit button.
Configuring Settings 5-3
Page 47
Assigning Favorite Playlists
The first three
FAVORITES buttons
are preset with smart
playlists for your
convenience.
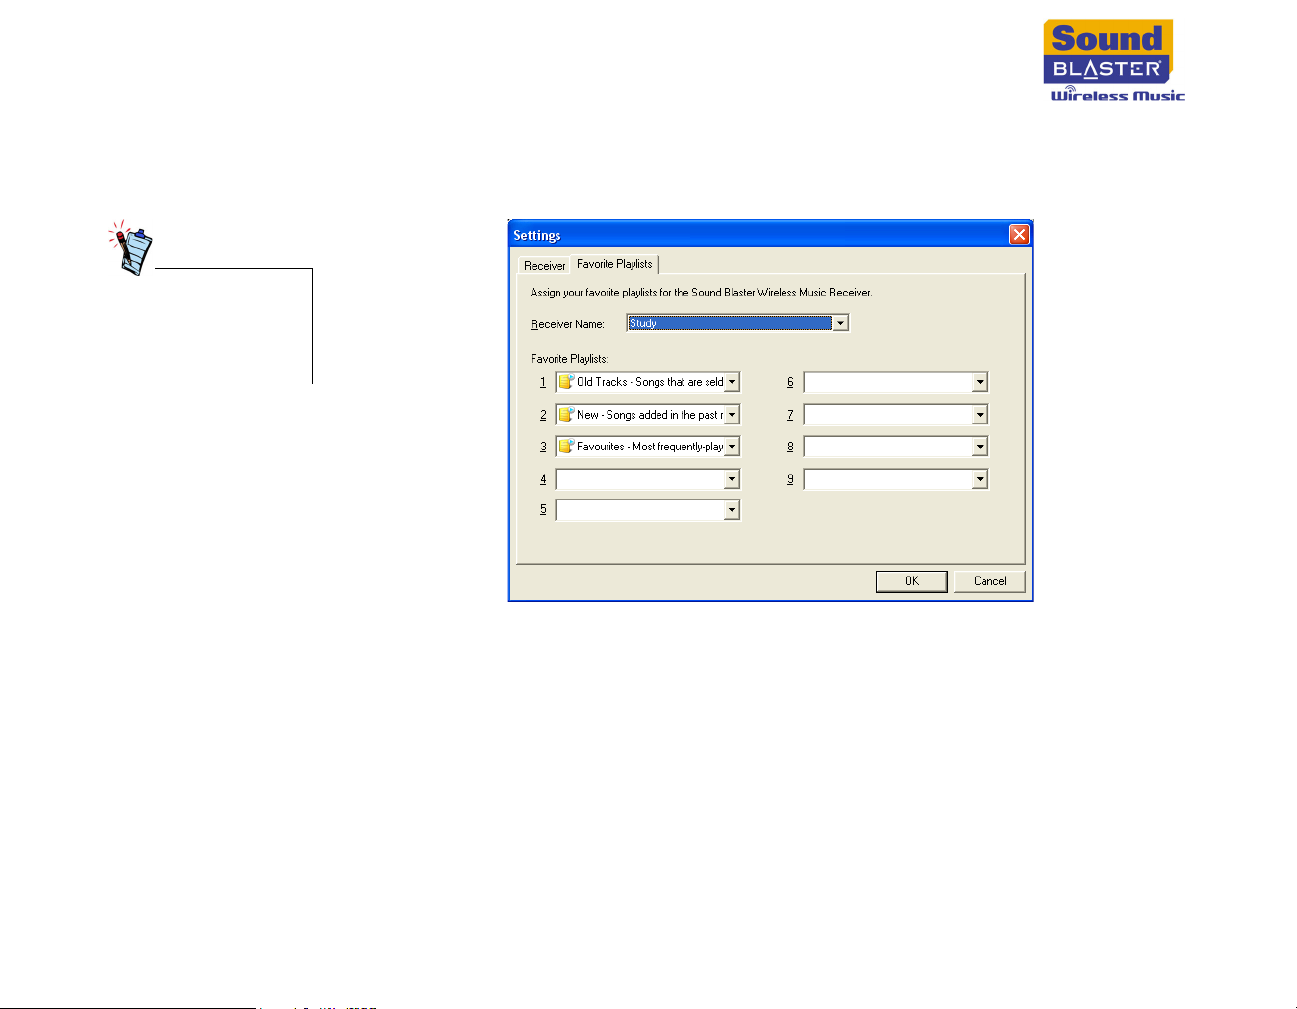
1. In Wireless Music Console, click the Settings button.
2. Click the Favorites Playlist tab.
3. In each Favorite Playlists box, click the list box to select a playlist.
4. Click the OK button.
Configuring Settings 5-4
Page 48
About Music Files
Page 49
About Music Files
You can download music files from Internet music sites, or 'rip' music files from
audio CDs to your computer. However, you can only play back MP3 and WMA files
with Sound Blaster Wireless Music.
MP3 and WMA files are music files that have lossy compression encoding, which
means that some data is lost during compression. Using standard sampling rates
and bitrates will ensure that these music files retain much of their audio quality.
The standard bitrate of most MP3 files is 128 Kbps, although some are set higher,
at 160 or 192 Kbps. The standard bitrate for most WMA files is 64 Kbps. Higher
bitrates will result in better audio quality, but this means that file sizes will be
larger.
Downloading from the Internet
'Ripping' Audio CDs
To get MP3 files from the Internet, use a search engine to locate sites with MP3
content. You can also try out these sites (web sites listed here are correct at the
time of this document’s release):
• NOMADWorld (www.NOMADworld.com)
• SoundClick.com (www.soundclick.com)
• Soundbuzz.com (www.soundbuzz.com)
Follow the instructions on the sites to download the music files to your computer.
The first phase of 'ripping' is extracting audio data (usually WAV files) from an
audio CD. Encoding is the second phase, where the audio data is converted into
MP3 or WMA files. To 'rip' audio CDs, you will need a CD-ROM/DVD-ROM drive that
can extract digital audio data, and a program such as Creative MediaSource that
can extract and encode this data. With Creative MediaSource, you can 'rip' most
audio CDs, as well as organize and transfer these 'ripped' files.
The time needed for a successful audio extraction depends on:
• CD-ROM/DVD-ROM drive speed
• defects, like scratches on the audio CD
• error-checking features on the CD-ROM/DVD-ROM drive
About Music Files A-1
Page 50
For more information
about using Creative
MediaSource, refer to
its online Help.
To rip an audio CD using Creative MediaSource
1. Insert an audio CD into your CD-ROM/DVD-ROM drive.
2. Click Start
→ Programs or All Programs → Creative → Creative
MediaSource Organizer to launch Creative MediaSource in Organizer view.
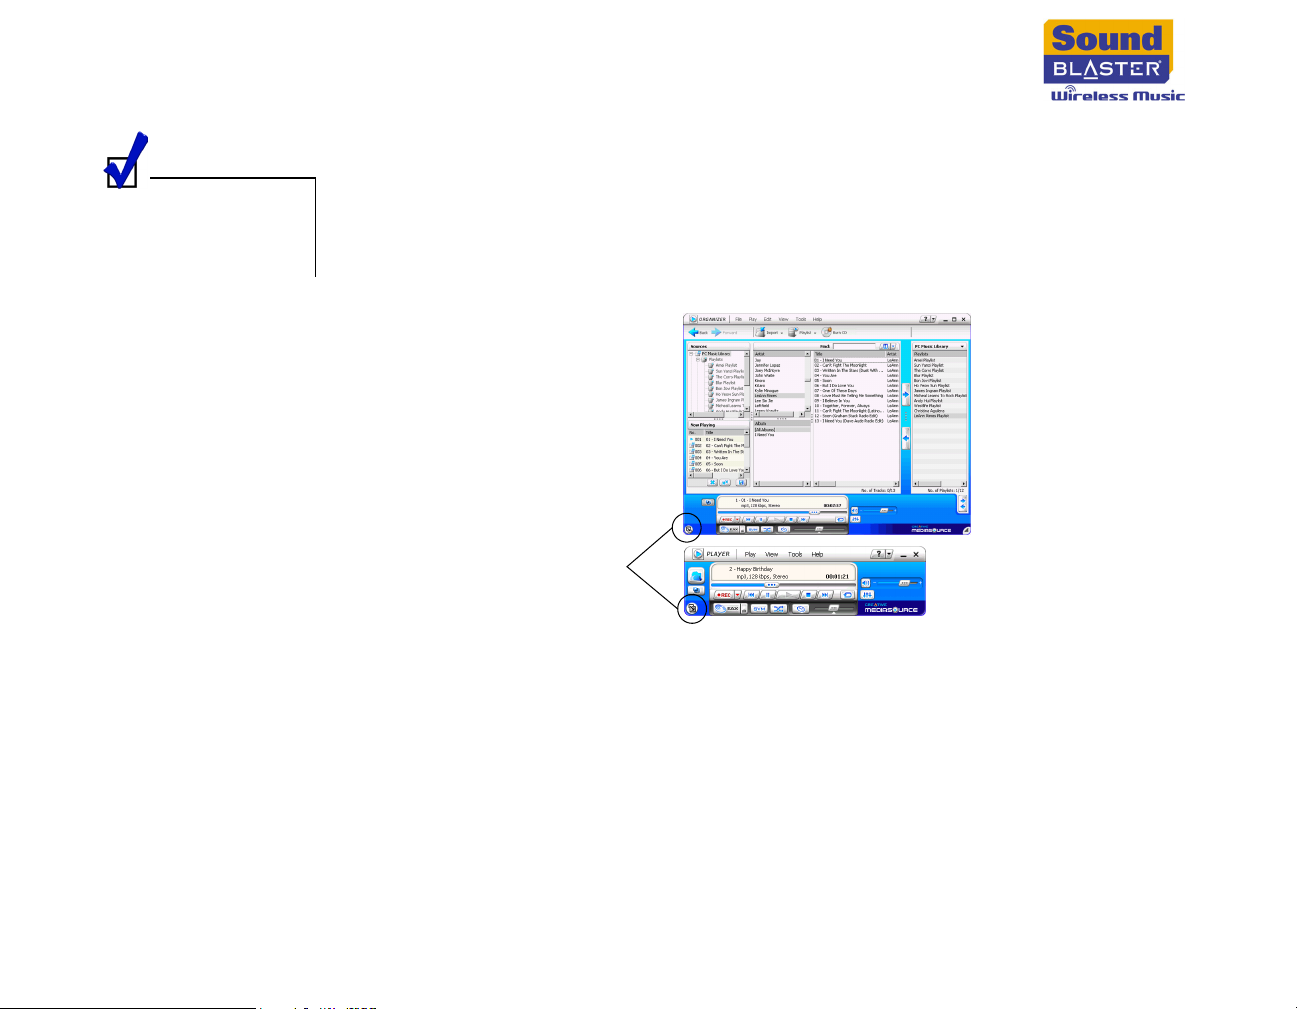
3. If Creative MediaSource is already open in Player view, click the Player/
Organizer View button to switch to Organizer view.
Organizer
view
Player/Organizer
View button
Player
view
4. In the Sources window, under My Computer, select [D:] Audio CD (replace
D: with the drive letter of your CD-ROM/DVD-ROM drive).
5. In the Task bar, click the Rip Now button.
About Music Files A-2
Page 51
Frequently Asked Questions
Page 52
Frequently Asked Questions
This section covers common problems you might encounter or questions you might
have while using this product. If you have a technical problem with this product,
you may wish to consult our self-help tool “Knowledgebase” for online
troubleshooting and solutions. Go to www.creative.com and select your region.
Installation and Configuration
What do I do when the installation does not start automatically after the
Installation CD is inserted?
The AutoPlay feature in your Windows system may not be enabled.
To start the installation program through the My Computer shortcut menu
1. On your Windows desktop, double-click the My Computer icon.
2. Right-click the CD-ROM/DVD-ROM drive icon, and then click AutoPlay.
3. Follow the instructions on the screen.
To enable AutoPlay through Auto Insert Notification
1. Click Start → Settings → Control Panel.
2. Double-click the System icon. The System Properties dialog box appears.
3. Click the Device Manager tab and select your CD-ROM drive.
4. Click the Properties button.
5. Click the Settings tab, and then select Auto Insert Notification.
6. Click the OK button.
To start the installation program through Windows Explorer
1. In Windows Explorer, search and locate the d:\ctrun folder (replace d:\ with
the drive letter of your CD-ROM/DVD-ROM drive).
2. Double-click the ctrun.exe file.
Frequently Asked Questions B-1
Page 53
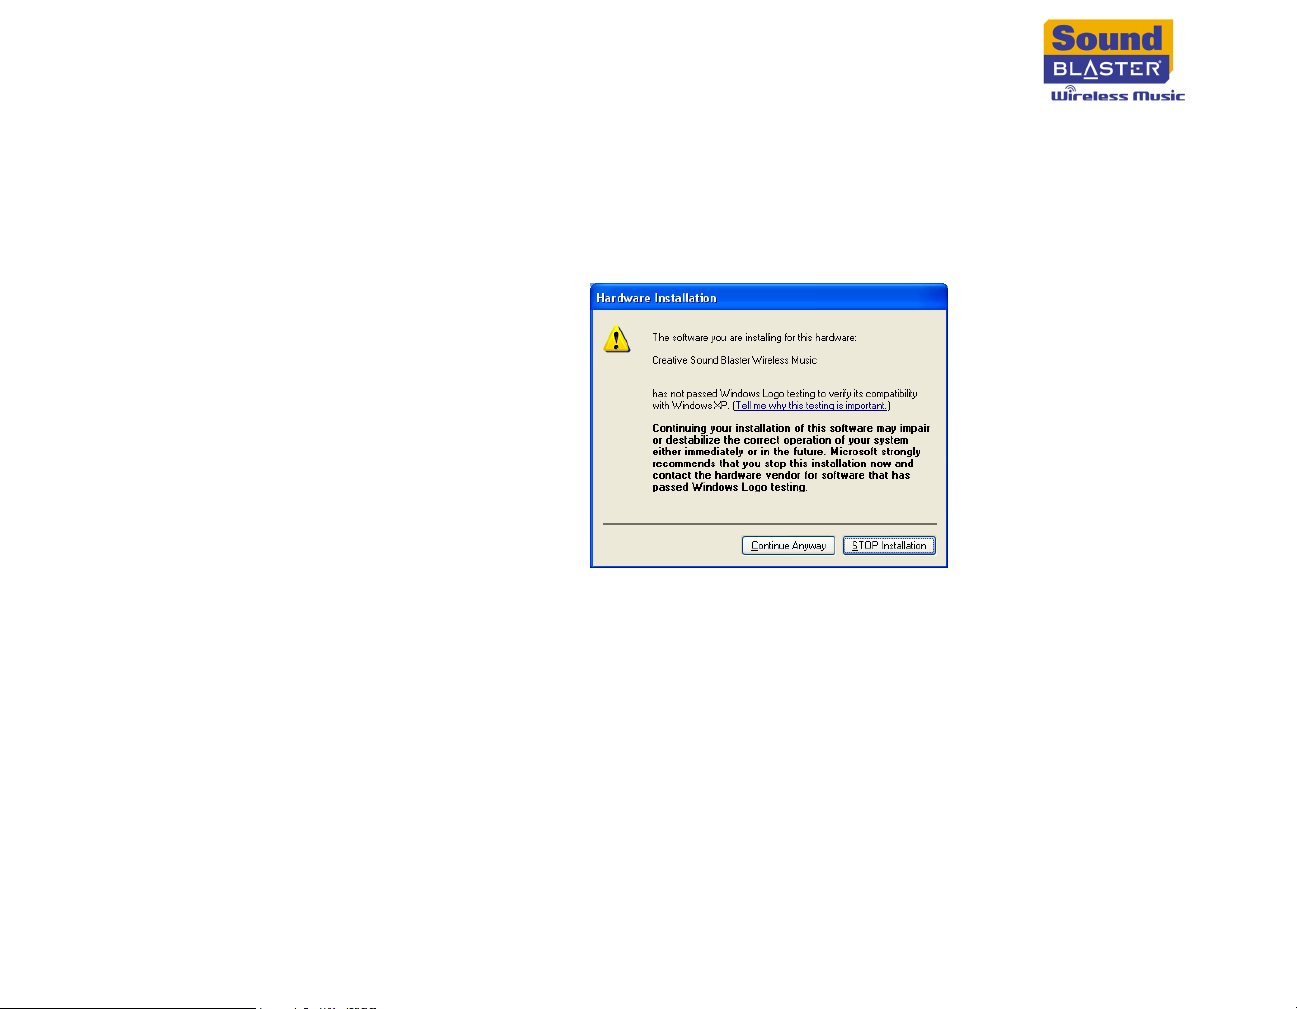
Why does a Hardware Installation error message appear on a Windows XP
operating system during installation?
At the time of this product's release, Microsoft strongly encouraged companies to
submit their hardware solutions for certification. If a hardware device driver is not
submitted, or does not qualify, for Microsoft certification, a warning message
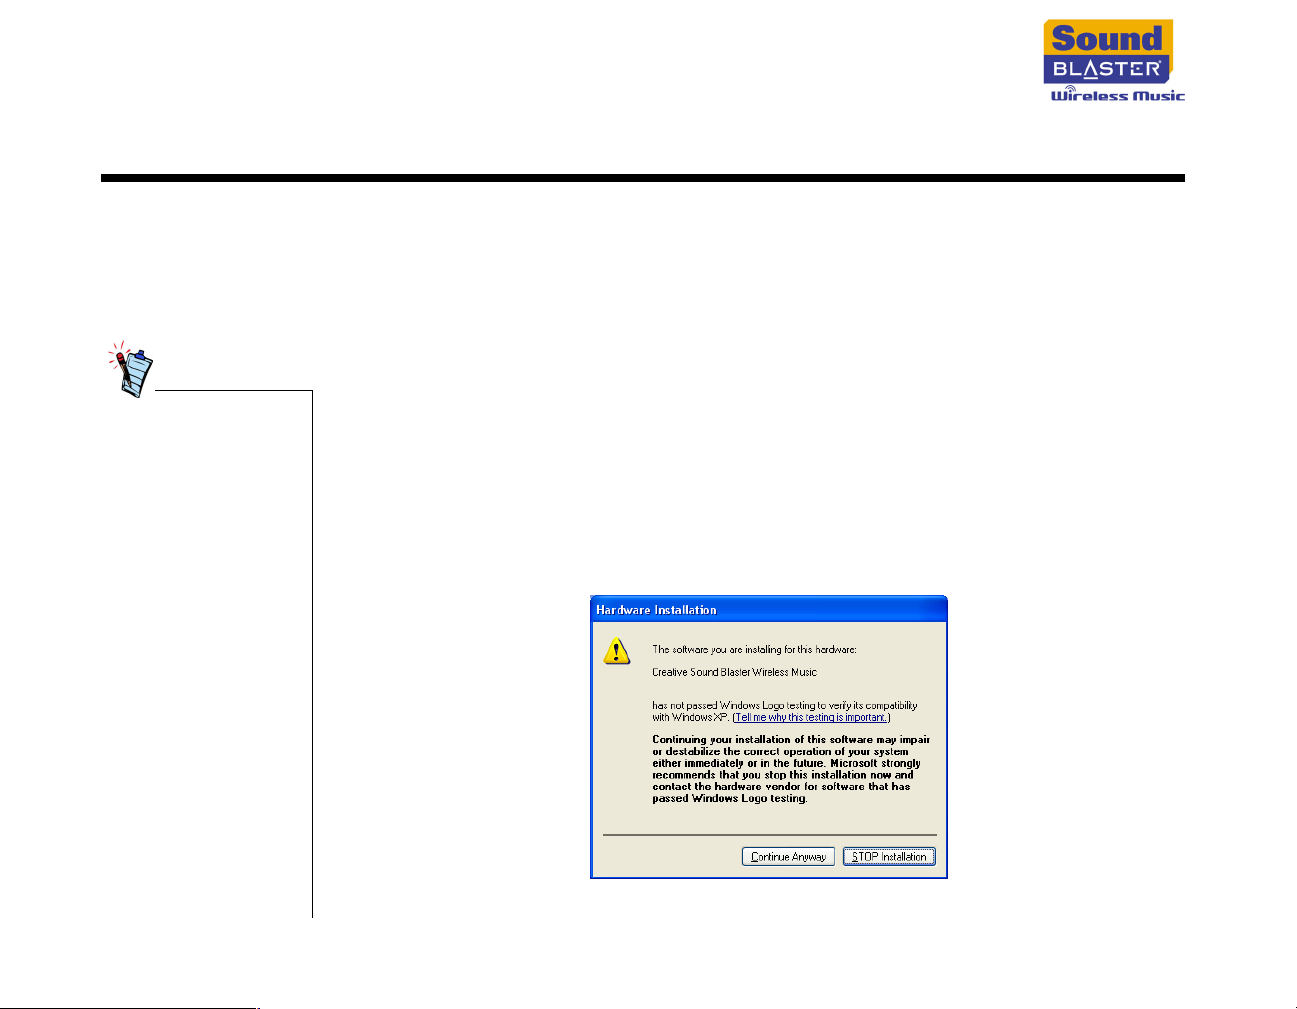
similar to the one shown here, appears.
You may see the message when installing this driver. If you do, you may choose to
click the Continue Anyway button. Creative has tested this driver on Windows
XP, and it does not impair or destabilize your computer.
Why do I have to specify configuration settings during installation?
Although Sound Blaster Wireless Music is designed to be easy to install,
configuration-free installation is only possible when:
• yours is the only wireless network operating in the vicinity
• your wireless router or access point is operating in default mode, where WEP
encryption is disabled and beacon message is enabled
Frequently Asked Questions B-2
Page 54
Why do I have problems connecting to my wireless network when I use
an 802.11g router?
Your 802.11g router may be running on an older firmware version. Download and
install the latest version of your router’s firmware that provides full 802.11g
compatibility. Contact your router’s manufacturer for more information.
How do I know if my Receiver is connected to my wireless network?
The Information menu on your RF Remote displays the IP address of your Receiver.
When connected to the same wireless network, the only difference between this IP
address and the IP address of the computer that Wireless Music Media Server is
running on, is the last number. For example, the IP address of your Receiver can
be 192.168.1.100, whilst the IP address of the computer that Wireless Music
Media Server is running on is 192.168.1.101.
To view the Information menu
1. Press the MENU button.
2. Scroll to the System option and press the Right button or OK button.
3. Scroll to the Information option and press the Right button or OK button.
What do I do if my Receiver is not connected to my wireless network?
• Try moving your Receiver closer to your wireless router or access point, or vice
versa
• Make sure your wireless router or access point is active and transmitting data
• Connect your Receiver to your computer and reconfigure your Receiver’s
connection settings using Wireless Music Network Setup. For more information,
see "Step 2: Configure Hardware" on page 3-3.
How do I check the IP address of the computer that Wireless Music Media
Server is running on?
Move the mouse over the Wireless Music Media Server icon on your
computer’s Taskbar. A dialog box will appear showing the IP address of the
computer. The Taskbar is usually located at the bottom right corner of your
desktop.
Frequently Asked Questions B-3
Page 55

How do I use a static IP for my Receiver?
1. Click Start
Blaster Wireless Music
2. In the Sound Blaster Wireless Music Network Setup — IP Settings
dialog box, click the Use the following IP address option.
3. In the IP address box, type in a value that matches the IP address of the
computer that Wireless Music Media Server is running on except for the last
number. For example, the IP address of your Receiver can be 192.168.1.100,
whilst the IP address of the computer that Wireless Music Media Server is
running on is 192.168.1.101.
4. In the Subnet box, type in a value that is identical to that of your wireless
network.
→ Programs or All Programs → Creative → Sound
→ Network Setup.
Operation
My computer does not have an audio card. Will Sound Blaster Wireless
Music work?
Yes, Sound Blaster Wireless Music does not require an audio card to work.
However, you will not be able to preview tracks with Wireless Music Console on
your computer.
Can I play back Internet streaming audio?
This feature is currently not supported.
Can I play back songs from audio CDs?
No, but you can rip songs from audio CDs into MP3 or WMA formats with Creative
MediaSource™. Creative MediaSource is installed on your computer when you
install the software. For more information about ripping songs from audio CDs, see
"'Ripping' Audio CDs" on page A-1.
Frequently Asked Questions B-4
Page 56

I cannot play back some of my MP3 and WMA files. Why is this?
Make sure that your MP3 and WMA files have not been moved since they were
imported into Creative MediaSource.
Also, if your music files are encoded using Digital Rights Management (DRM), they
cannot be played back on your Sound Blaster Wireless Music.
After pressing the Play button on my RF Remote, the Play icon is displayed
on the LCD but I do not hear anything. What do I do?
• Make sure your Receiver is connected to your speakers or home stereo system.
• Make sure your speakers or home stereo system is turned on.
• Increase the volume using your RF Remote.
• Increase the volume of your speakers or home stereo system.
What is PC Music Library?
PC Music Library is your collection of digital audio tracks in Creative MediaSource.
In Creative MediaSource, you can have more than one PC Music Library. When
sharing the same computer, multiple users can each have their own music library,
each with its own settings. However, only one music library can be active at one
time.
Can PC Music Library be automatically updated?
Yes. You can use Creative MediaSource’s Media Sniffer tool to monitor or 'watch'
folders in your computer. With Media Sniffer enabled, PC Music Library is updated
when tracks in monitored folders are added, deleted or moved. This helps to
prevent broken links in PC Music Library. For more information about using
Creative MediaSource, refer to its online help.
What do I do if my Receiver does not detect my music files?
On your RF Remote, go to the Information menu and check that:
• your Receiver is connected to Wireless Music Media Server.
• music files have been imported using Creative MediaSource.
Frequently Asked Questions B-5
Page 57

To view the Information menu
1. Press the MENU button.
2. Scroll to the System option and press the Right button or OK button.
3. Scroll to the Information option and press the Right button or OK button.
What is the maximum number of tracks I can have in a playlist?
Based on the minimum system requirements and network bandwidth, 1000 tracks
is the recommended maximum number of tracks that you should have in any
playlist. If you have more than 1000 tracks in a playlist, the retrieval of these
tracks may time out, depending on the performance and setup of your computer
and wireless network.
How many Receivers can I use on a wireless network?
A wireless network can support up to four Receivers playing at the same time.
Additional Receivers may be installed provided that not more than four are playing
at the same time. For more information, see "Using Multiple Receivers" on page
4-1.
How do I restart my Receiver?
See "Restarting Your Receiver" on page 4-6.
Can I search for tracks using my RF Remote?
Yes, you can search for tracks by artist, album and genre using your RF Remote.
For more information, see "Playing Music" on page 4-2.
What do I do if my RF Remote does not display anything?
•Press the Power button on your RF Remote.
• Make sure the batteries are not flat, and are properly inserted in your RF
Remote.
• Make sure you are using your RF Remote within 10 meters (33 feet) of your
Receiver.
• Make sure your Receiver is connected to a power outlet, and the power outlet is
turned on if necessary.
Frequently Asked Questions B-6
Page 58
What do I do when the System menu on my RF Remote displays the <No
Server> message?
• Make sure Wireless Music Media Server is running on your computer. To launch
Wireless Music Media Server, click Start
Creative Wireless Music
Media Server icon on your computer’s Taskbar when Wireless Music Media
Server is running. The Taskbar is usually located at the bottom of your desktop.
• Make sure your computer and your Receiver are within transmission range of
your wireless router or access point.
• Make sure your Receiver is running on the same wireless network as Wireless
Music Media Server. For more information, see "How do I know if my Receiver is
connected to my wireless network?" on page B-3.
• If you are using a static IP address, make sure that there is no IP address
conflict with another computer or device.
If the <No Server> message still appears after you have gone through the above
checks, you can:
• Close and then launch Wireless Music Media Server on your computer.
•Press the Power button on your RF Remote to set your Receiver to standby and
then press it again to turn on your Receiver.
• Restart your Receiver. For more information, see "Restarting Your Receiver" on
page 4-6.
How do I reset my RF Remote?
Remove your RF Remote’s batteries, and then re-insert them.
→ Media Server. You will see the Wireless Music
→ Programs or All Programs →
Why does the LCD of my RF Remote go blank after a few seconds?
This is a power saving feature of your RF Remote. Pushing any button on the RF
Remote will display the menu options on the LCD again. Note that pushing any of
the blue buttons on the RF Remote will immediately activate the Receiver. For
example, if you press the Play button, playback will start.
Frequently Asked Questions B-7
Page 59

Why does nothing happen when I press a FAVORITES button on my RF
Remote?
Check to see if the FAVORITES button you pressed is associated with a smart
playlist that has conditions that are not met by any tracks. For example, no playlist
will be played back if the smart playlist has a "Tracks added in last 30 days"
condition and no tracks have been added during that period.
The first three FAVORITES buttons are preset with smart playlists for your
convenience. You can manually reset all FAVORITES buttons using Wireless Music
Console. For more information, see "Assigning Favorite Playlists" on page 5-4.
Why does music play when I press the Play button without selecting
anything?
This feature is for your convenience. When nothing is selected and the Play button
is pressed, the playlist assigned to the first FAVORITES button will be played
back.
Why is there no beeping sound from my RF Remote when I press the FIND
REMOTE button on my Receiver?
• Your RF Remote may be out of range.
• Your RF Remote’s batteries may be flat.
What is the operating range of my RF Remote?
The operating range of your RF Remote can be up to 10 meters (33 feet). However,
radio waves can pass through walls and glass but not metal. If the signal on the
other side of a wall is weak, it may be that the wall has reinforcing metal in its
structure. In addition, floors usually have metal girders and metal reinforcing
struts that weaken radio frequency waves. For more information, see "Operating
Range" on page 4-6.
Frequently Asked Questions B-8
Page 60

Speakers
What type of speakers should I use?
You can connect any amplified digital or analog speaker system. For high-quality
sound, we recommend the following Creative I-Trigue™ range of speakers:
• Creative I-Trigue 2.1 L3300
• Creative I-Trigue L3500
• Creative I-Trigue L3450
For more details, go to www.creative.com/speakers or consult your local
Creative office/distributor. Note that the availability of Creative speakers varies
from country to country.
Can I listen to music in surround sound?
Sound Blaster Wireless Music only supports stereo output. However, some Creative
speaker systems feature Creative Multi-Speaker Surround™ (CMSS) that upmixes
stereo input to 5.1 channels or above.
Updates
Where can I get more information on all Sound Blaster products?
Visit www.soundblaster.com for updates and downloads relating to all Sound
Blaster products.
Frequently Asked Questions B-9
Page 61
Maintenance and Safety Advice
Page 62
Maintenance and Safety Advice
Receiver and RF Remote
Batteries
• Store away from direct sunlight.
• Do not expose to heat or fire.
• Avoid using or storing in environments that exceed 45°C (113°F).
• Keep away from excessive moisture.
• Do not subject to excessive force or impact.
• Do not modify or disassemble.
• Do not use outdoors.
• Only clean the product with a soft dry cloth. Do not use liquid cleaners.
• Only qualified personnel should repair or service the product.
• Remember to set the volume at a moderate level. Listening to music at high
volumes can impair your hearing and damage your speakers.
• Store away from direct sunlight.
• Do not expose to heat or fire.
• Avoid using or storing in environments that exceed 45ºC (113ºF).
• Keep away from excessive moisture.
• Do not subject to excessive force or impact.
• Do not modify or disassemble.
• Avoid contact with metal objects.
• Do not pierce or crush.
• If there is leakage, stench, discoloration or deformation during use, remove the
batteries and do not use it again. Clean your hands well before handling food or
touching sensitive areas of your body, for example, your eyes.
Maintenance and Safety Advice C-1
Page 63
Glossary
Page 64
Glossary
Ad-hoc mode
A small peer-to-peer network mode, in which wireless clients are connected to
each other directly without using an access point. Some of the wireless clients are
part of the network for a limited duration. They are also in close proximity with the
rest of the network. According to the IEEE 802.11b specification, Ad-hoc mode is
referred to as an independent basic service set.
Antenna
A device that intercepts radio frequency (RF) waves from the atmosphere and
converts them to corresponding signal voltages.
Access Point (AP)
A networking device that transparently bridges wireless computers to a wired local
network.
Bandwidth
A measure of the maximum rate of data transfer. A higher bandwidth allows more
data transmission in a given period of time. For digital services, the bandwidth is
usually expressed in bits or bytes per second.
BSS (Basic Service Set)
A group of wireless clients and an access point using the same ID (SSID).
DHCP (Dynamic Host Configuration Protocol)
A method of assigning a temporary IP address to a host, such as a computer,
connected on a specific network. With dynamic addressing, a particular host may
have a different IP address each time it connects to the network.
Dynamic IP address
See DHCP (Dynamic Host Configuration Protocol).
Glossary D-1
Page 65

Encryption
A procedure to convert a file from its original form to one that can be read only by
the intended recipient.
Firewall
A hardware or software security system that prevents unauthorized users from
accessing files on a network.
IEEE 802.11
A family of wireless network standards, which includes 802.11a, 802.11b,
802.11e, and 802.11g. The original 802.11 standard was first approved in 1997
but was not very successful because it was relatively slow at 2 Mbps.
IEEE 802.11b
A high-bit wireless network standard that works on the 2.4 GHz band, utilizes
DSSS (direct sequence spread spectrum) technology and specifies WEP encryption
for security. It offers data bit rates of up to 11 Mbps and the range is from 200 to
300 feet for maximum speed.
IEEE 802.11g
A new 802.11 standard for wireless networking hardware. The 802.11g standard
specifies a maximum data transfer rate of 54 Mbps, an operating frequency of 2.4
GHz, backward compatibility with 802.11b devices and WEP encryption for
security.
Infrastructure mode
A LAN or other small network mode in which wireless clients are part of the
network and use one or more access points to connect to a wired network. Each
access point is connected to the Ethernet network using a standard Ethernet cable.
In IEEE 802.11b specification, the infrastructure mode is referred to as the Basic
Service Set.
Glossary D-2
Page 66

IP (Internet Protocol)
The standard protocol within TCP/IP that defines the basic unit of information by
breaking down data messages into packets, routing and transporting the packets
over networks, then reassembling the packets at their destination. IP corresponds
to the Network layer (layer 3) in the ISP/OSI model.
IP address
The address for a computer on a TCP/IP network. The IP address identifies a
particular machine on a network. The format of an IP address is a 32-bit numeric
address written as four numbers separated by periods. Each number can be 0 to
255, for example, 11.160.10.240 is an IP address. Any machine connected to the
Internet is assigned an IP address.
LAN (Local Area Network)
A computer network that spans a relatively small area. Most LANs are confined to
an office, single building, or group of buildings.
MAC (Media Access Control) address
A unique number that is assigned by manufacturers to each Ethernet network
device. A MAC address lets a network identify Ethernet network devices at the
hardware level.
Router
A hardware device that connects two separately functional networks using the
same or different protocols. Routers look at the destination addresses on the
packets passing through them and then decide which route to send them on.
SSID (Service Set Identity)
A group name shared by all members of an IEEE 802.11 standard wireless
network. Only wireless devices with the same SSID are allowed to establish
connections.
Glossary D-3
Page 67

Static IP address
A permanent IP address assigned to a computer (host) connected on a specific
network.
TCP/IP (Transmission Control Protocol/Internet Protocol)
A suite of communication protocols that are used by computers or networking
devices on the Internet so that they can communicate with each other. TCP/IP
uses several protocols, the two main being TCP and IP.
USB (Universal Serial Bus)
A plug-and-play interface that allows the user to attach a device without having to
add an adapter card and turning off the computer.
WEP (Wired Equivalent Privacy)
A wired security policy defined by the IEEE 802.11 working group. WEP uses the
RC-4 40-bit encryption algorithm to scramble all data before it is transmitted.
Vendors add proprietary encryption features to their software, taking the
encryption level up to 128 bits.
Wi-Fi
Wi-Fi is promoted by the Wireless Ethernet Compatibility Alliance (WECA). It
places a stamp of certification on wireless products that are interoperable with
other 802.11b compliant products.
Glossary D-4
Page 68
Technical Specifications
Page 69
Technical Specifications
Receiver
Standards ❑ IEEE 802.11b
Interface ❑ USB 1.1 port for Receiver installation and configuration
❑ Two RCA jacks for analog output
❑ Optical connector for optical SPDIF output
Antenna ❑ Built-in antenna (2.4 GHz)
❑ Built-in antenna (433 MHz — 924 MHz)
Frequency Band 802.11
❑ 2.412 GHz — 2.472 GHz
RF Remote
❑ US (FCC): 906 MHz, 910 MHz, 917 MHz, 924 MHz
❑ Europe (CE): 433.3 MHz, 433.7 MHz, 434.1 MHz, 434.5 MHz
Data Rate ❑ 11/5.5/2/1 Mbps
Channels ❑ US and Canada: 11 channels
❑ Europe: 13 channels
* In mainland France, 13 channels may be used for indoor operation, and only channels 1 through
7 may be used for outdoor operation. In Guadeloupe, Martinique, St. Pierre and Mayotte, 13
channels may be used for indoor and outdoor operation. In Réunion and Guyane, 13 channels
may be used for indoor operation, and only channels 5 through 13 may be used for outdoor
operation.
*
Technical Specifications E-1
Page 70

Security ❑ 64 or 128-bit WEP encryption
Range ❑ Indoors: Up to 50 meters (164 feet) at 11 Mbps, subject to the signal strength of your
wireless network
❑ Outdoors: Up to 150 meters (492 feet) at 11 Mbps, subject to the signal strength of your
wireless network
Playback Formats ❑ MPEG Audio Layer 3 (MP3) and Windows Media Audio (WMA)
Power Adapter ❑ 6VAC 1.5A adaptor
RF Remote
LCD ❑ 132 x 64 pixel backlit display
Antenna ❑ Built-in antenna (433 MHz — 924 MHz)
Frequency Band ❑ US (FCC): 906 MHz, 910 MHz, 917 MHz, 924 MHz
❑ Europe (CE): 433.3 MHz, 433.7 MHz, 434.1 MHz, 434.5 MHz
Range ❑ Up to 10 meters (33 feet) based on open space usage between RF Remote and Receiver
Power Requirements
❑ 3 AA batteries
Technical Specifications E-2
 Loading...