

Page 1
User’s Guide
Model No.: SB1560
Page 2

Introduction
Congratulations on your purchase of Sound Blaster® Omni Surround 5.1! Featuring SBX® Pro Studio™
technology, this USB audio solution will give you an unparalleled audio experience and provide you with
years of entertainment.
Package Checklist
Your Sound Blaster Omni Surround 5.1 package comes with the following components.
l The Sound Blaster Omni Surround 5.1 USBdevice
l 1.5m MicroUSB 2.0 cable
l Stereo RCA to 3.5mm (1/8-inch) plug
l Remote Control (available for selected countries only)
Minimum System Requirements
For Windows®OS
l Intel Core™2 Duo processor 2.2 GHz, AMD Athlon 64x2 Dual Core or equivalent processor
l Microsoft® Windows 8 32-bit or 64-bit, Windows 7 32-bit or 64-bit, Windows Vista® 32-bit or 64-bit
l CD-ROM or DVD-ROM drive for software installation
l 1 GB RAM
l 600 MB of free hard disk space
l Available USB 2.0 port
For Mac OS
l Intel Core 2 Duo processor 2.8 GHz
l Mac OSX10.6 and above
l 1 GB RAM
l 600 MB of free hard disk space
l Available USB 2.0 port
Registering Your Product
Registering your product ensures you receive the most appropriate service and product support
available. You can register your product during installation or at www.creative.com/register. Please
note that your warranty rights are not dependent on registration.
More Help
For the latest news and products for the Sound Blaster, please visit www.soundblaster.com. The site
also includes information on making purchases, technical help and the latest software updates.
Using Creative Software AutoUpdate
Locating, downloading and installing updates for your Creative products is now simpler and faster with
the web-based Creative Software AutoUpdate system.
Page 3

When you connect to Creative Software AutoUpdate via the Internet, the website will analyze your
computer system to determine your operating system, language and which Creative products are
connected to your system.
When this analysis is completed, you will then be given a list of only the most relevant software updates
for your connected products. The files can then be retrieved and installed.
To learn more about the Creative Software AutoUpdate, please visit www.soundblaster.com/support.
Note:
First-time users of Creative Software AutoUpdate may be prompted to authorize the download of a
browser component required for system analysis. Check to ensure that this content is signed by
Creative Labs, Inc., then click the Yes button.
Please ensure that all your Creative products are connected and installed on the same computer
running Creative Software AutoUpdate.
Page 4
About Your Hardware
Refer to the Quick Start leaflet for instructions on setting up your audio device. To learn more about
your product, refer to the relevant section below:
l Your Audio Device
l Your Remote Control
Your Audio Device
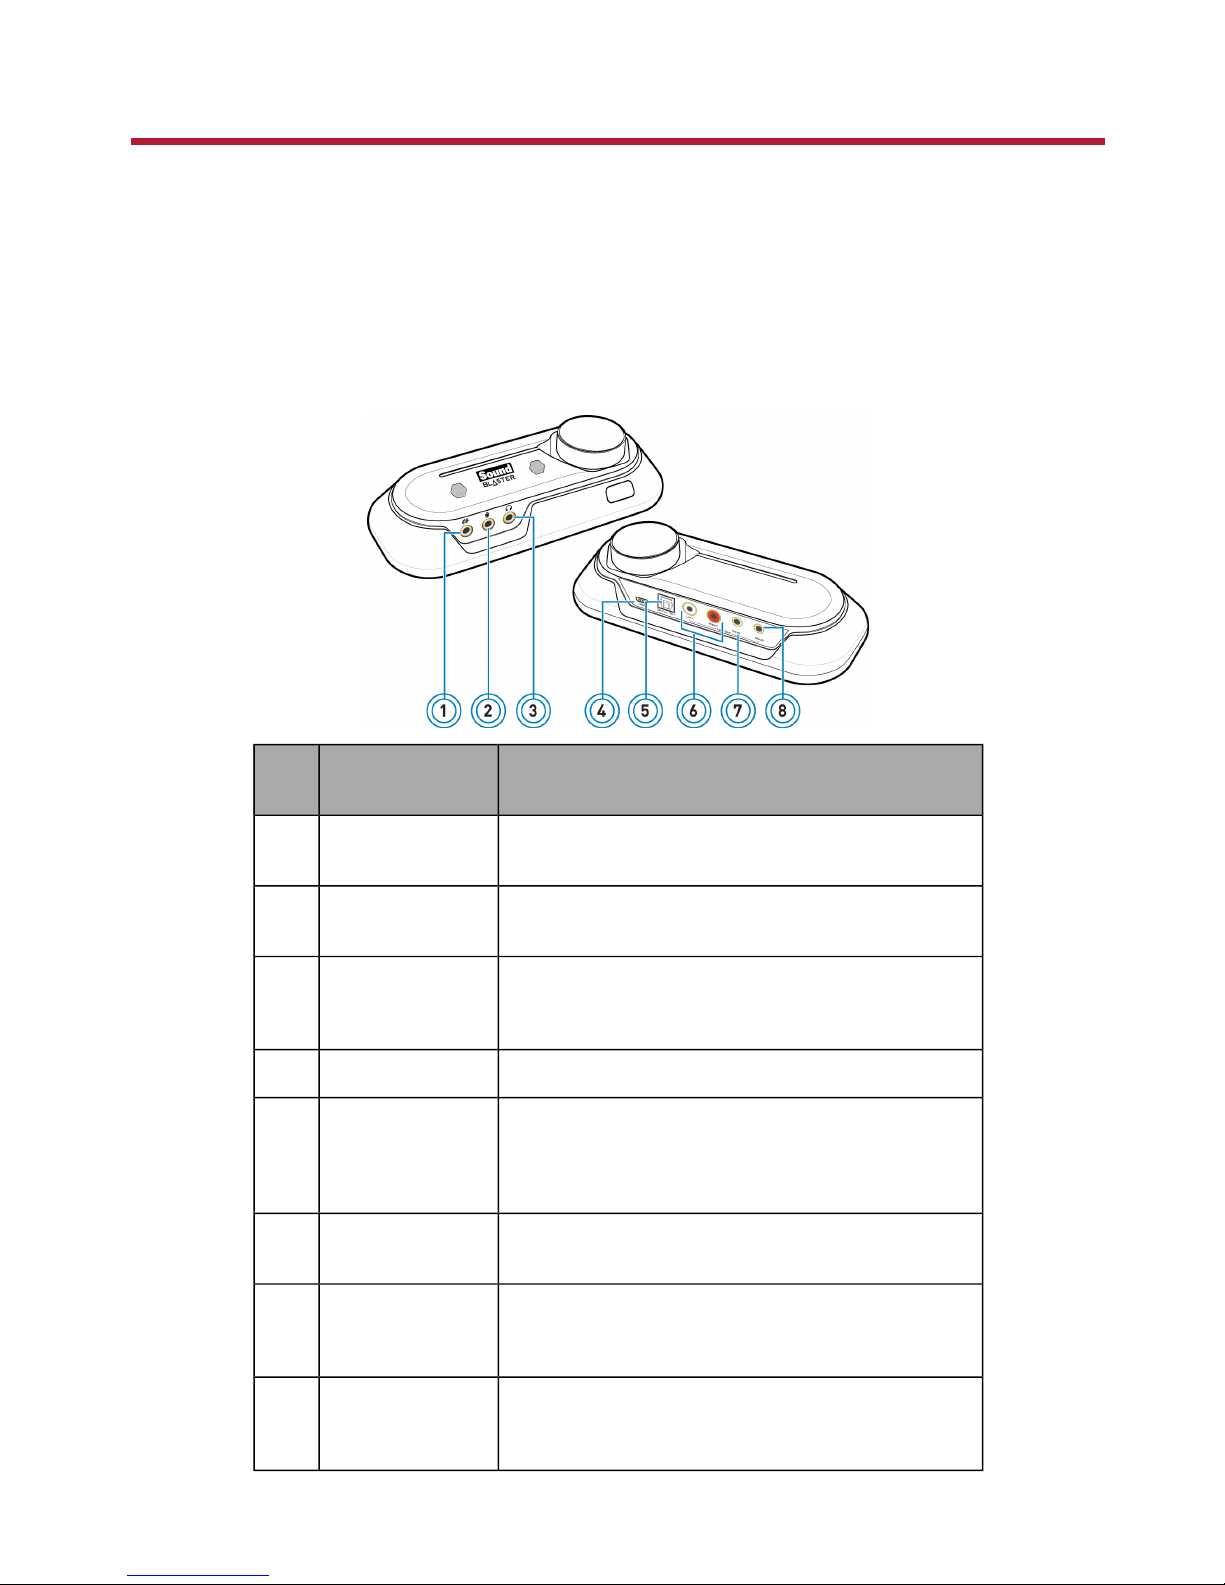
Your USB audio device has these jacks and connectors to enable the attachment of a wide variety of
devices:
Jack or
Connector
Description
1 Line-In jack Connects to the line output of external stereo sources
(such as an MP3 player or CD player).
2 Mic-In jack Connects to a microphone using a 3.50 mm (1/8-inch)
mono jack.
3 Headphone jack Connects to stereo headphones using a 3.50 mm (1/8-
inch) stereo jack. Speaker output is muted when the
jack is detected.
4 USB port Connects to the computer with the USB cable.
5 Optical S/PDIF
Out Connector
Connects to the Optical In connector of recording/playback devices with optical connectors (for example, MiniDisc recorders, Digital Audio Tape recorders or
external amplifiers).
6 RCA Front Out
jacks
Connect to amplified stereo or multi-channel speaker
systems, or to an external amplifier.
7 Rear Out jack Connects to rear or surround channel inputs of an
amplified multi-channel speaker system or to the
multi-channel inputs of a home theater receiver.
8 Center/Subwoofer
Out jack
Connects to center/subwoofer channel inputs on an
amplified 5.1 speaker system or to the multi-channel
inputs of a home theater receiver.
Page 5
Note:
External microphone will override the built-in microphones when it is plugged in.
Using display indicators and control dials
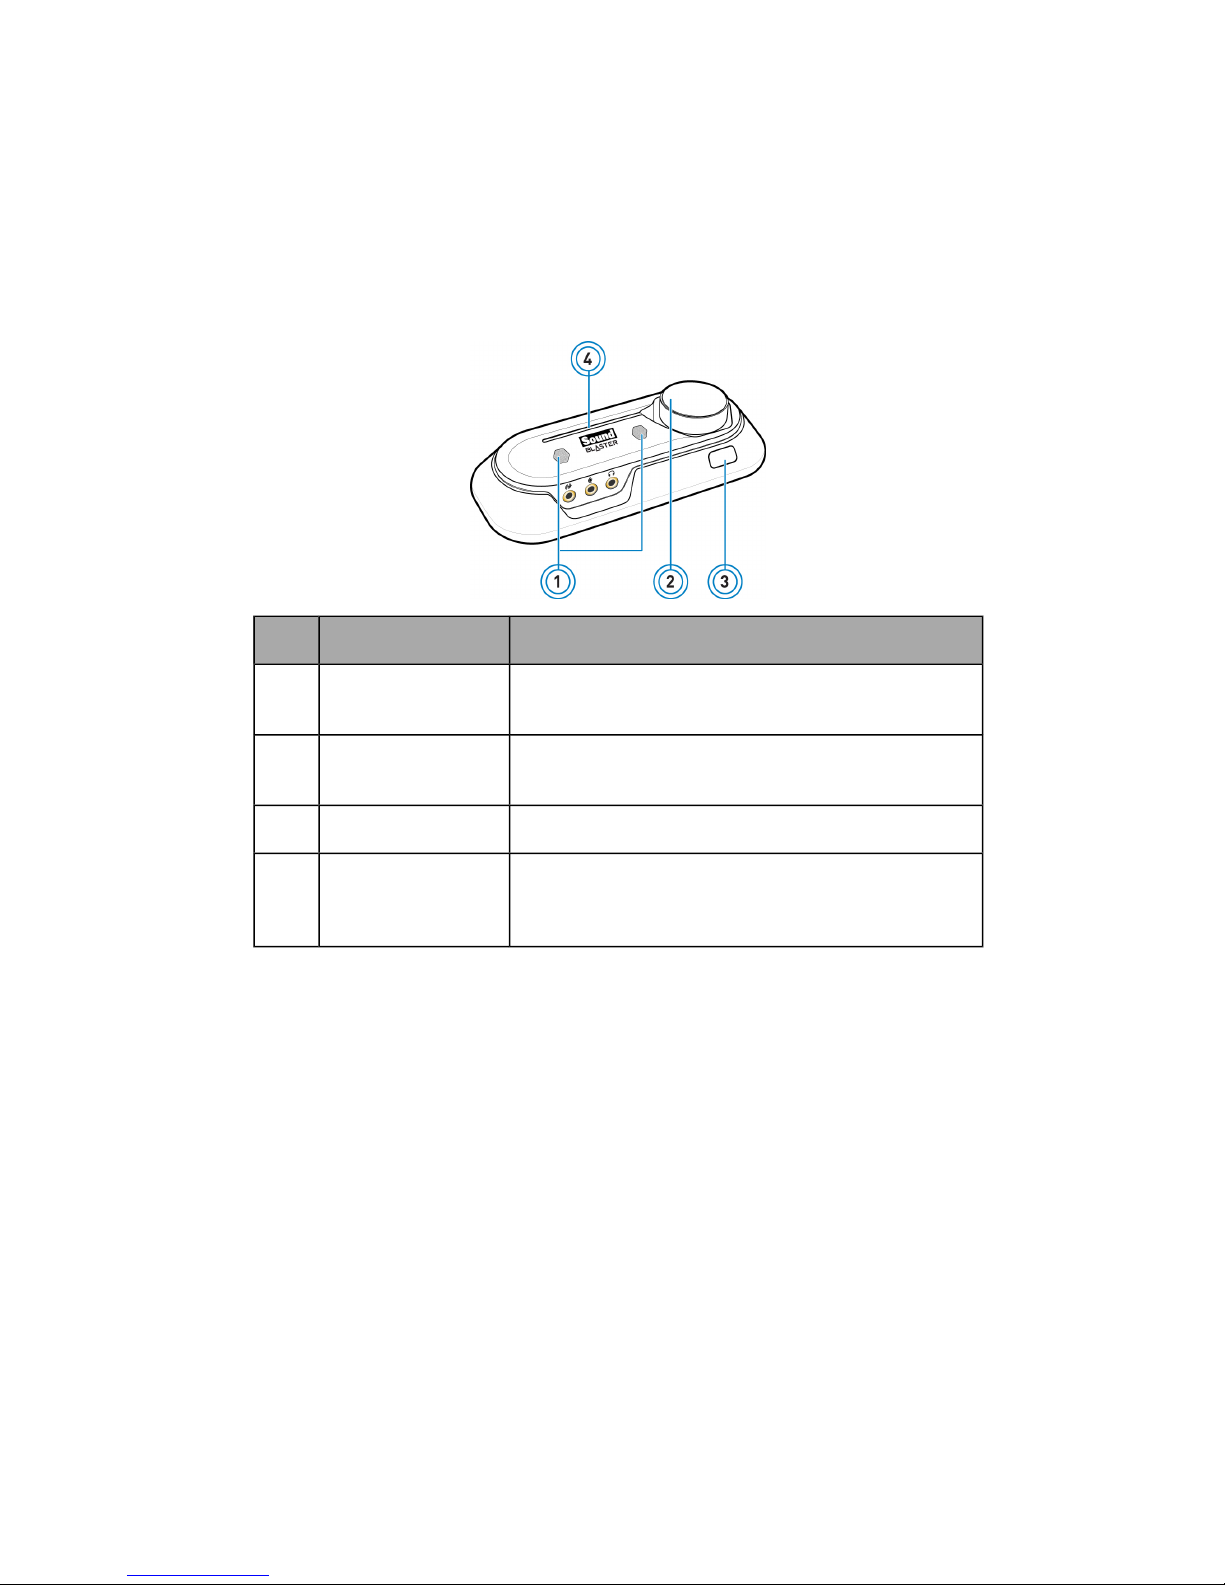
Your USB audio device has the following indicators and control dials to adjust and monitor operational
status.
Button / Slider Description
1 Internal
Microphone Array
Built-in dual microphone with CrystalVoice technology.
2 Volume control dial Turn clockwise or counterclockwise to increase or
decrease the volume. Press down to mute.
3 Infrared receiver Receives infrared commands from the remote control.
4 Power LED Lights up in red when USB power is detected. Blinks
intermittently when there is infrared activity. Blinks
continuously when audio is muted.
Adjusting volume
Besides using the Volume control dial, you can also adjust or mute volume using:
l Your remote control
l Sound Blaster Omni Control Panel
Note:
If you mute the volume in the software applications, you will not hear any sound output even if the
Volume control dial is set to the maximum.
Page 6
Your Remote Control
Your USB audio device has an infrared receiver for your Creative remote control. Your remote control
lets you operate your computer from the comfort of your sofa or bed, at a distance of three meters (9.8
feet).
Note:
The Creative remote control is available for selected countries only.
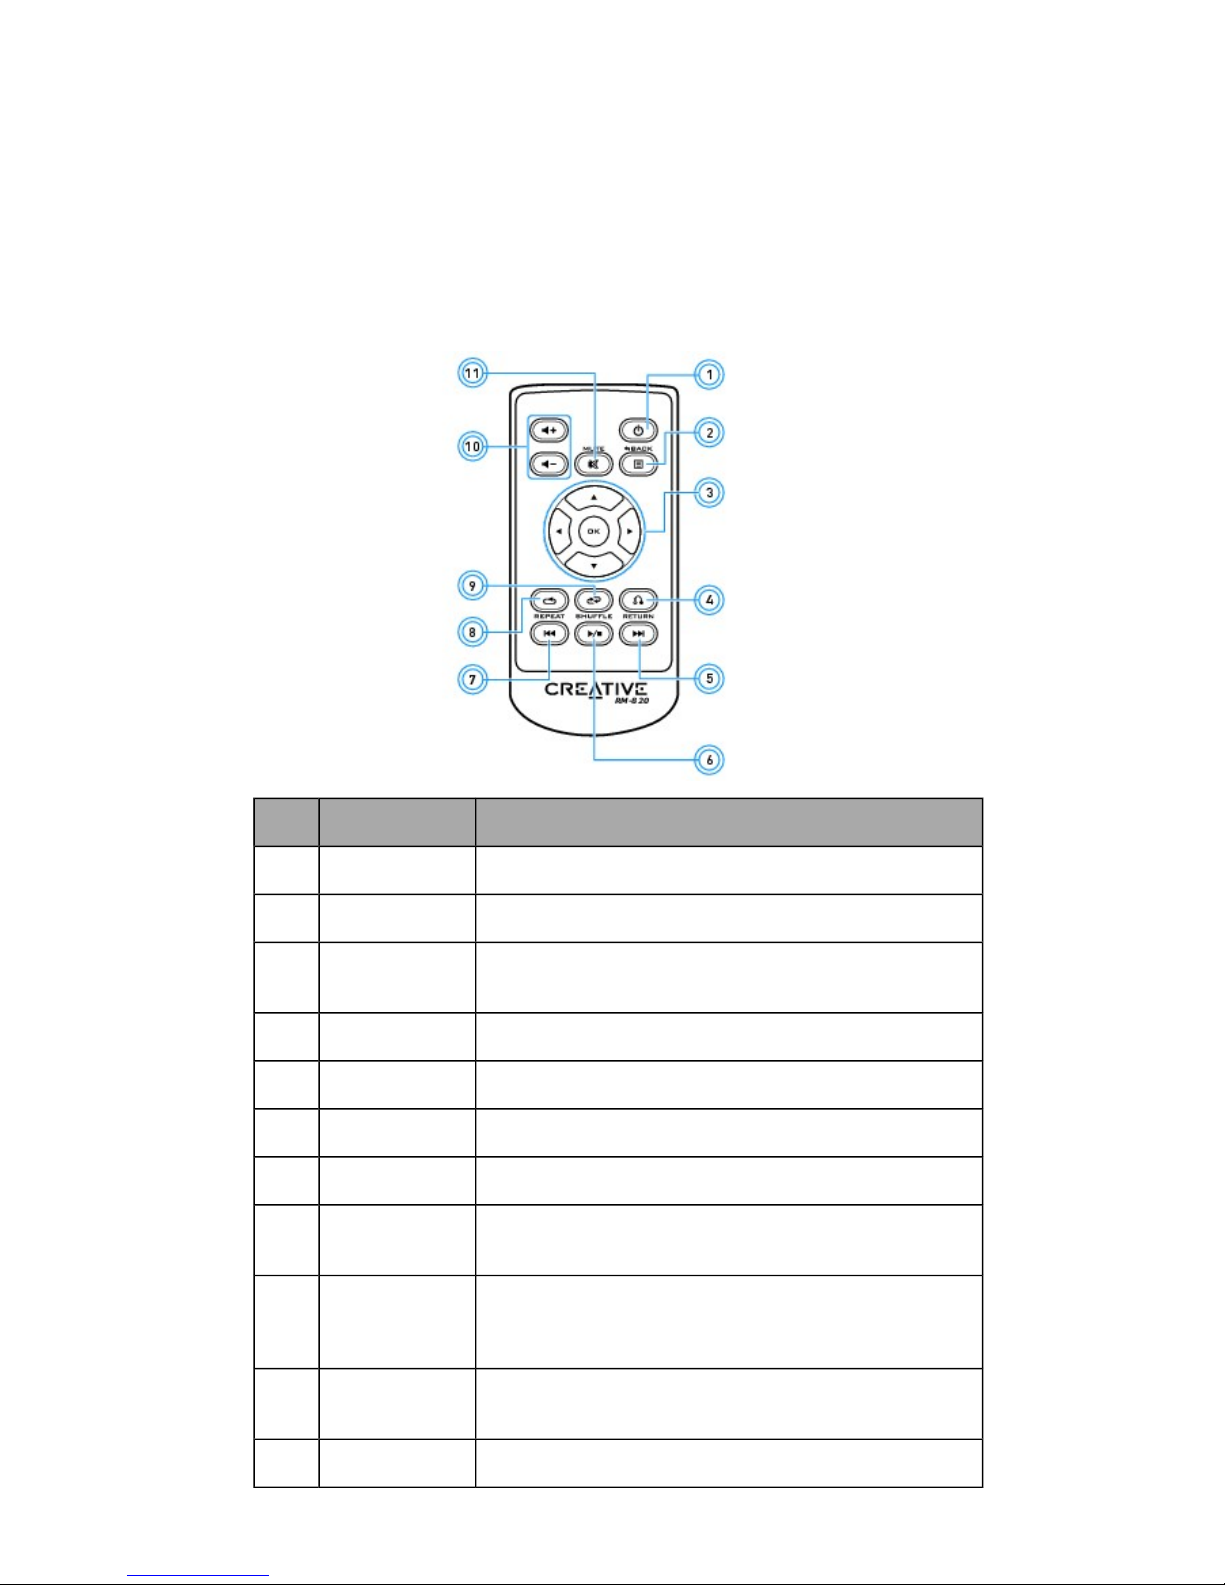
Using your remote control
Button Description
1 Power Not applicable.
2 Menu Not applicable.
3 Menu Navi-
gation
Scrolls up or down in a menu. Press OK to execute
selected menu option.
4 Return Returns to a previous submenu or function.
5 Next Plays the next track.
6 Play/Pause Starts, pauses or resumes current playback.
7 Previous Plays the previous track.
8 Repeat Repeats the current track or playlist.
Only applicable for Windows Media Player on PC.
9 Shuffle Plays the tracks of the current playlist in random order.
Press to toggle shuffle ON or OFF.
Only applicable for Windows Media Player on PC.
10 Volume
Up/Down
Volume Up (+) and Volume Down (-) control the master
volume of your audio output.
11 Mute On/Off Mutes or unmutes audio.
Page 7
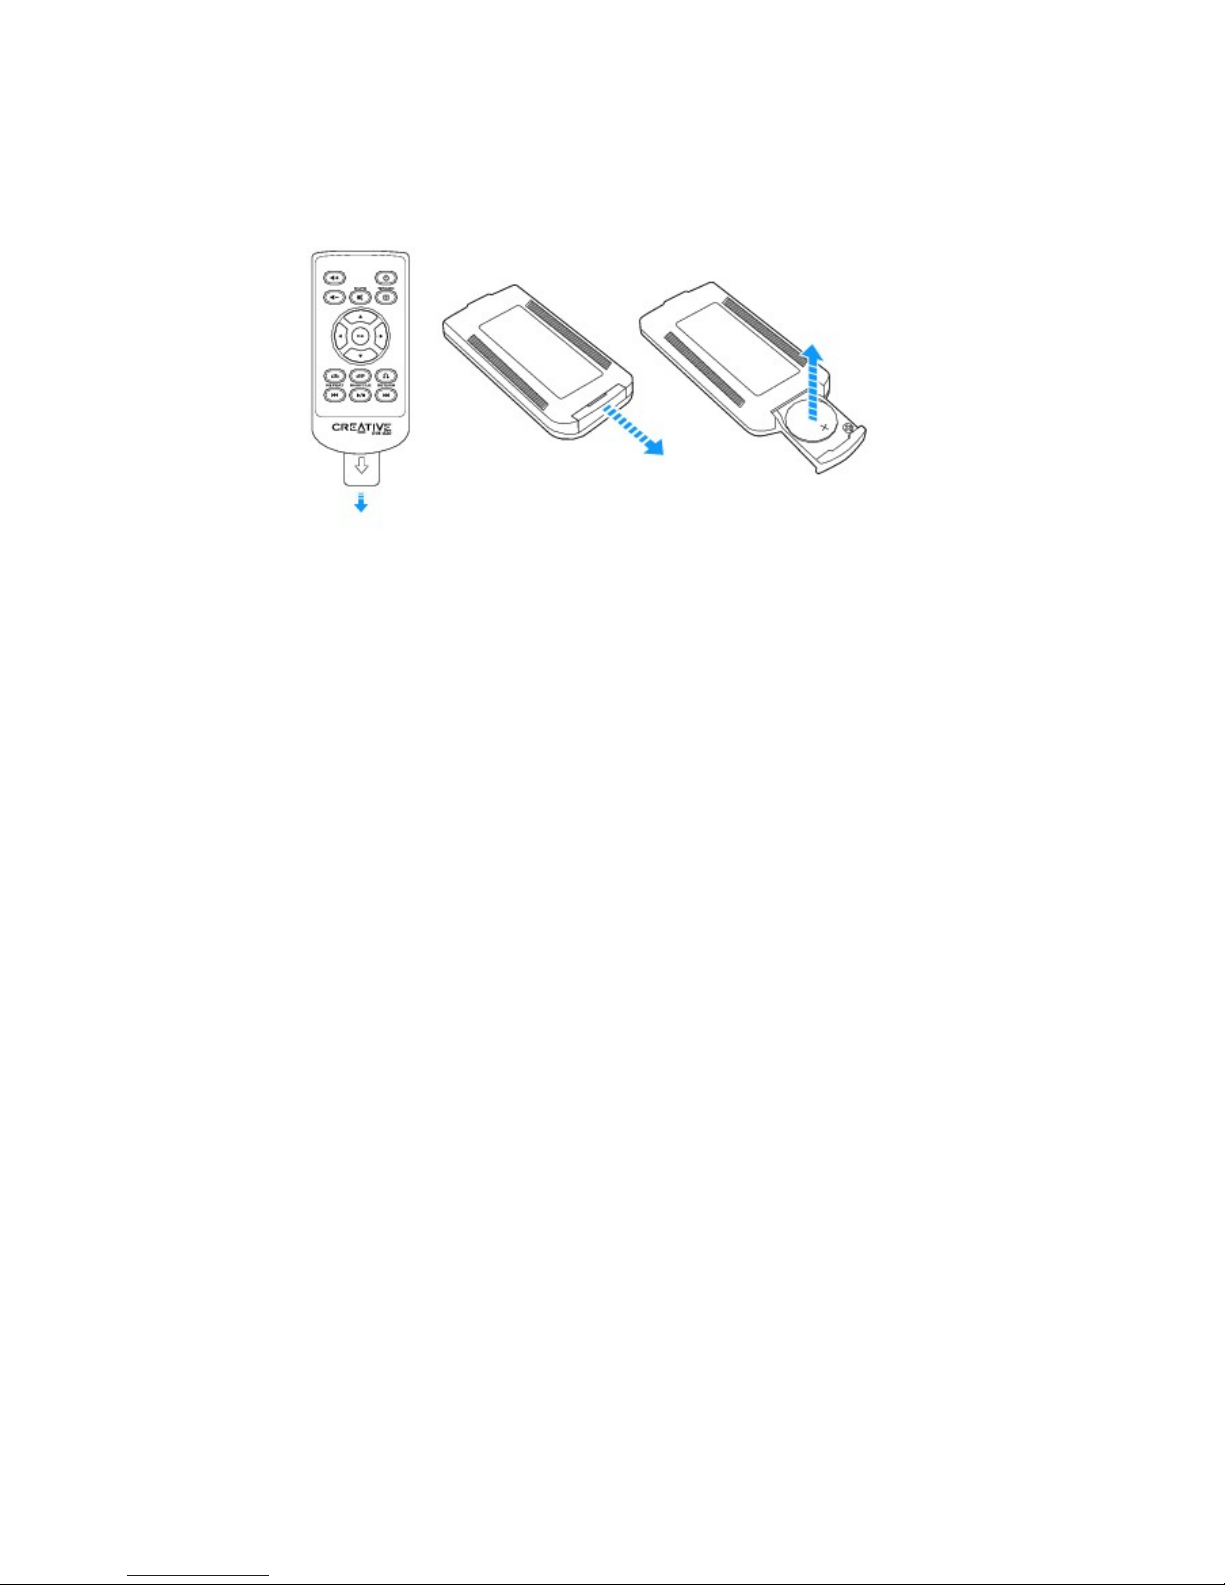
Replacing the battery
Remove the plastic strip before using the remote control. To replace the battery, refer to the diagram
below.
Page 8

Installing and Uninstalling Software
To take full advantage of your Sound Blaster Omni Surround 5.1 audio device, you need to install device
drivers and applications. At times, you may also need to uninstall some or all of the device drivers and
applications to correct problems, change configurations, or upgrade outdated drivers or applications. To
learn how to do so in all supported Windows and Mac operating systems, consult the following sections:
l Installing Drivers and Applications
l Uninstalling Drivers and Applications
Installing Drivers and Applications
Ensure that your audio device is connected before proceeding. For instructions on
installing your audio device, consult your Quick Start leaflet.
After you have connected your audio device, turn on your computer. Windows automatically detects
your audio device and searches for device drivers.
For Windows Vista / Windows 7
1. Insert the Installation CD into your CDor DVD drive.
Your CDshould start automatically. If it does not, follow the steps below:
i. Click Start >Computer.
ii. Right-click the CD or DVD drive icon, and then click Open AutoPlay.
2. To complete the installation, follow the instructions on the screen.
3. When prompted, restart your computer.
For Windows 8
1. Insert the Installation CD into your CD or DVD drive.
2. In a short while, a drive icon will be displayed. Click on the icon, and then choose Run setup.exe.
If you do not see the drive icon, follow the steps below:
i. Right-click on the background of the Windows start screen, and then click All apps.
ii. Click Computer.
iii. Right-click the CD or DVD drive icon, and then click Open AutoPlay.
3. To complete the installation, follow the instructions on the screen.
4. When prompted, restart your computer.
For Mac OS
1. Using your web browser, visit www.creative.com/support and locate the software package for the
Mac OS.
2. Download this package into your local hard disk.
3. Double-click the downloaded file to uncompress it.
4. Double-click the uncompressed DMG file.
5. Double-click the Install icon and follow the subsequent on-screen instructions to complete the
installation.
Page 9

Uninstalling Drivers and Applications
In the event that an uninstallation is required (such as for upgrades), please follow the following
procedure.
Before you begin, close all running audio applications. Applications that are still running
during uninstallation will not be removed.
For Windows OS
1. From the Control Panel, click Uninstall a program.
2. Select your audio device's entry.
3. Click the Uninstall button or option.
If the User Account Control dialog box appears, click the Continue button.
4. Click the Yes button.
5. When prompted, restart your computer.
For Mac OS
1. Click Applications > Creative > Creative Uninstaller
2. Select the Creative product to be uninstalled.
3. Click the Uninstall button.
4. Follow the on-screen instructions.
Page 10
Using Your Audio Device
Your audio device works seamlessly with many external devices. To connect these peripherals, refer to
their relevant sections below:
l Playing Music
l Recording Music
l Creating Music
l Watching DVDs
Playing Music
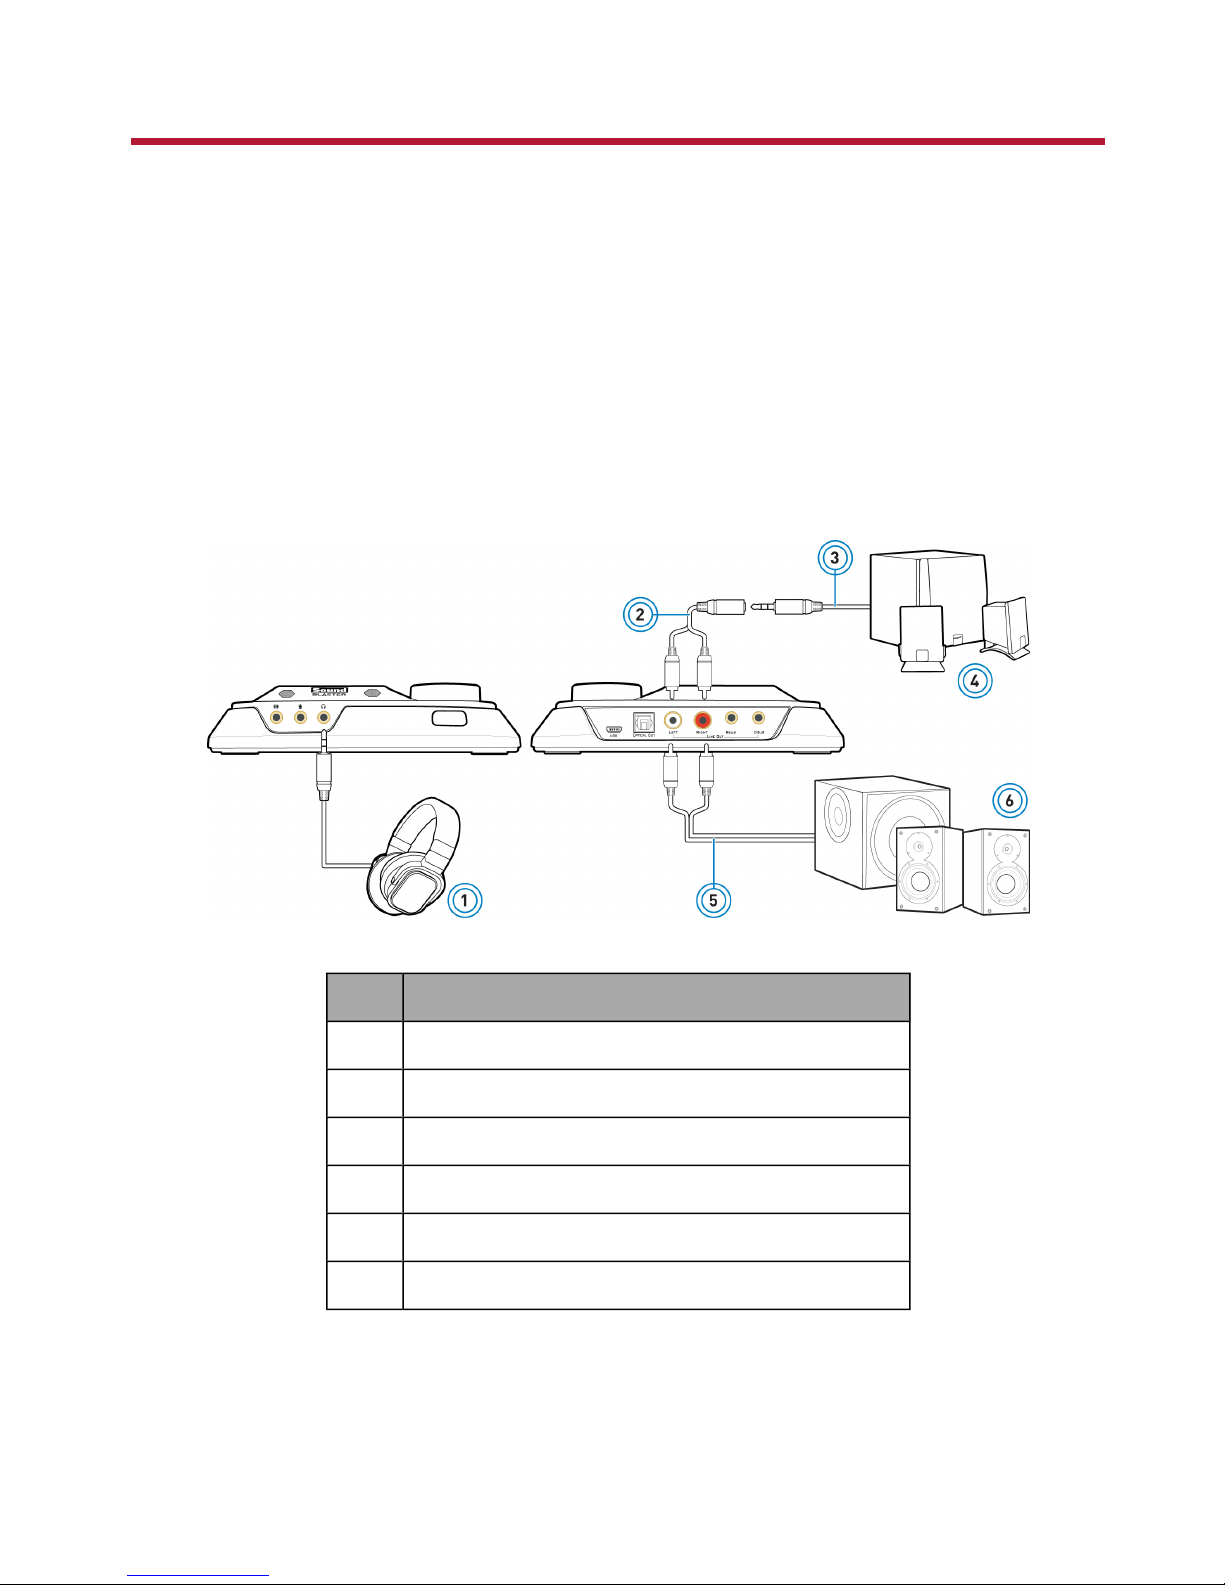
You can connect stereo headphones to the Headphone jack of your audio device. The following diagram
also shows the connection for analog stereo or 2.1 channel speakers. For connection to analog 5.1
channel speakers, see Connecting Speakers.
Component
1 Headphones
2 Y-Splitter cable
3 Analog speaker cable (available separately)
4 Analog stereo speakers
5 RCA-to-RCA stereo cable (available separately)
6 Analog stereo speakers with RCA audio input jacks
Page 11
Recording Music
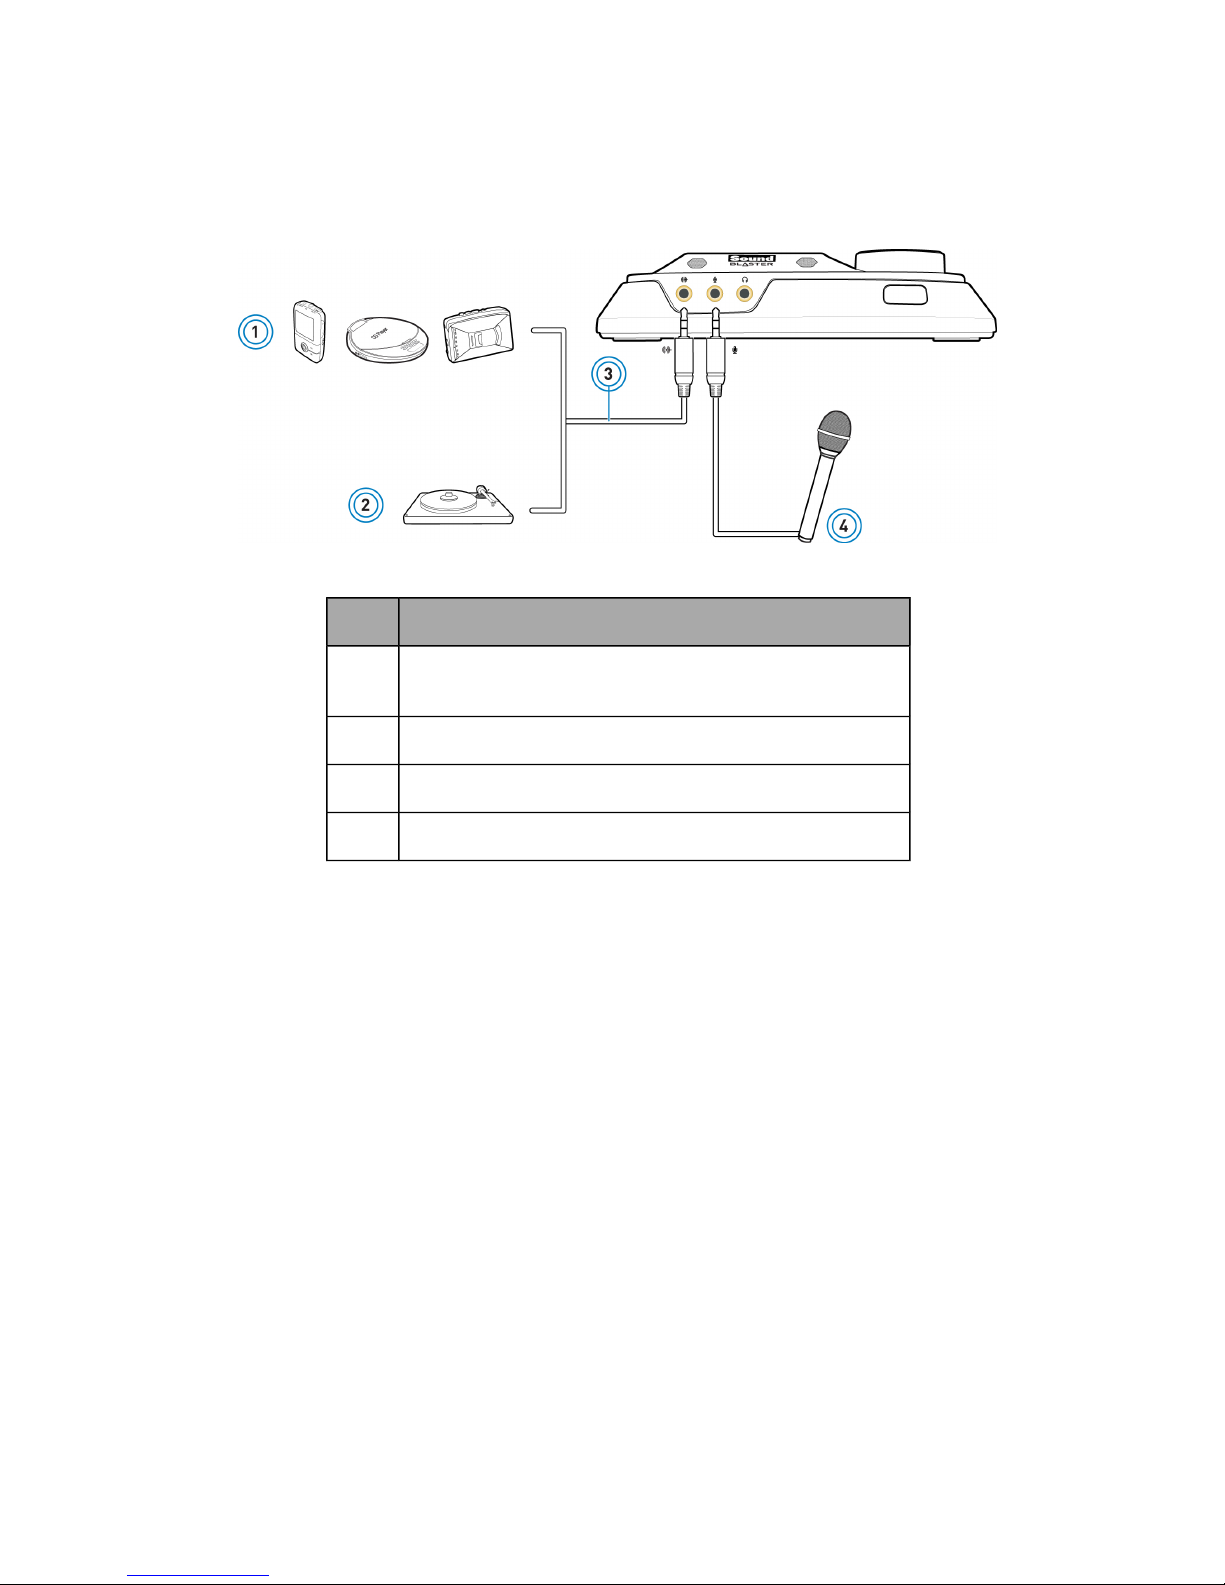
To record audio from external sources like MP3 or CD players, connect the source to the Line-In jack of
your audio device. Connect a microphone to the Mic-In jack.
Component
1 External audio sources (MP3 players, CD players, cassette
players, etc.)
2 Turntable (at line level)
3 Analog audio cable (available separately)
4 Microphone
Note:
To listen to the audio from the source connected to the Line-In or Mic-In jack, or the Internal
Microphone Array, refer to Using the Creative Software Suite - Mixer Settings.
Page 12
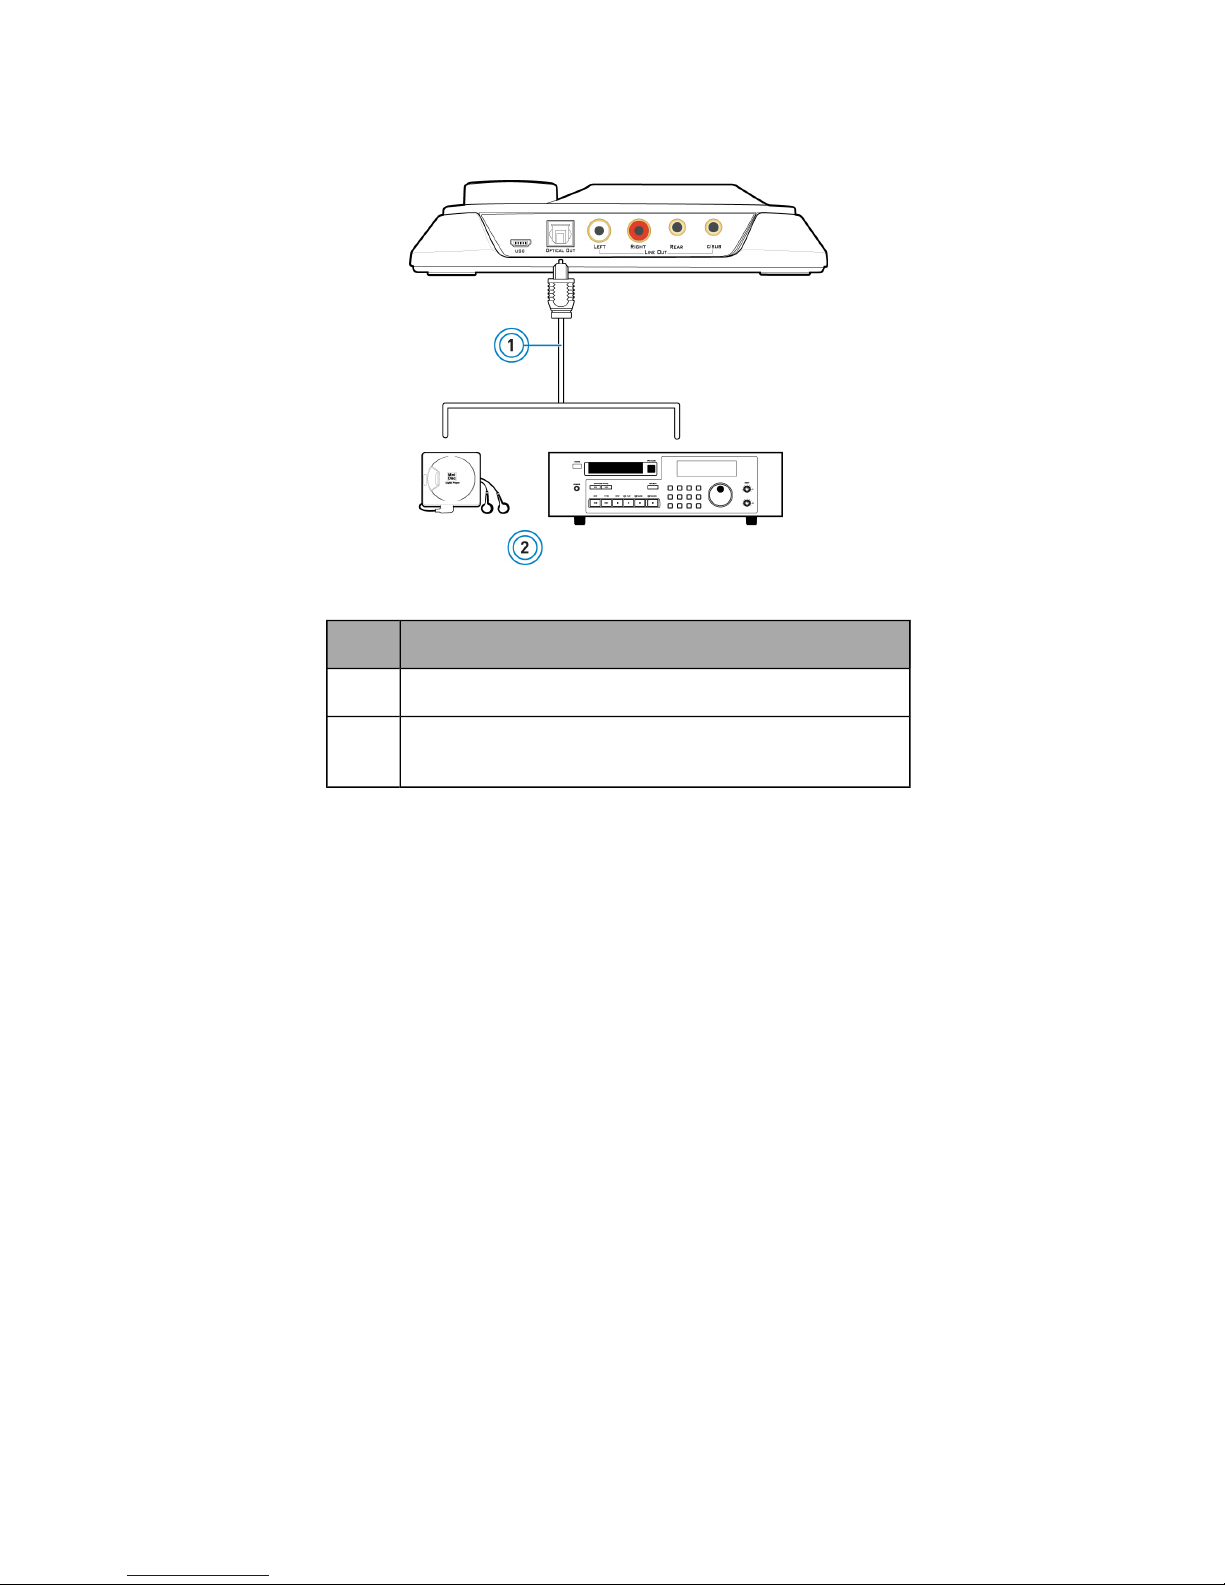
To record audio to external devices like MD(MiniDisc) or DAT(Digital Audio Tape) recorders, connect the
recording device to the Optical SPDIF Out connector.
Component
1 Optical cable (available separately)
2 External recording devices (MD recorders, DAT recorders,
etc.)
Page 13
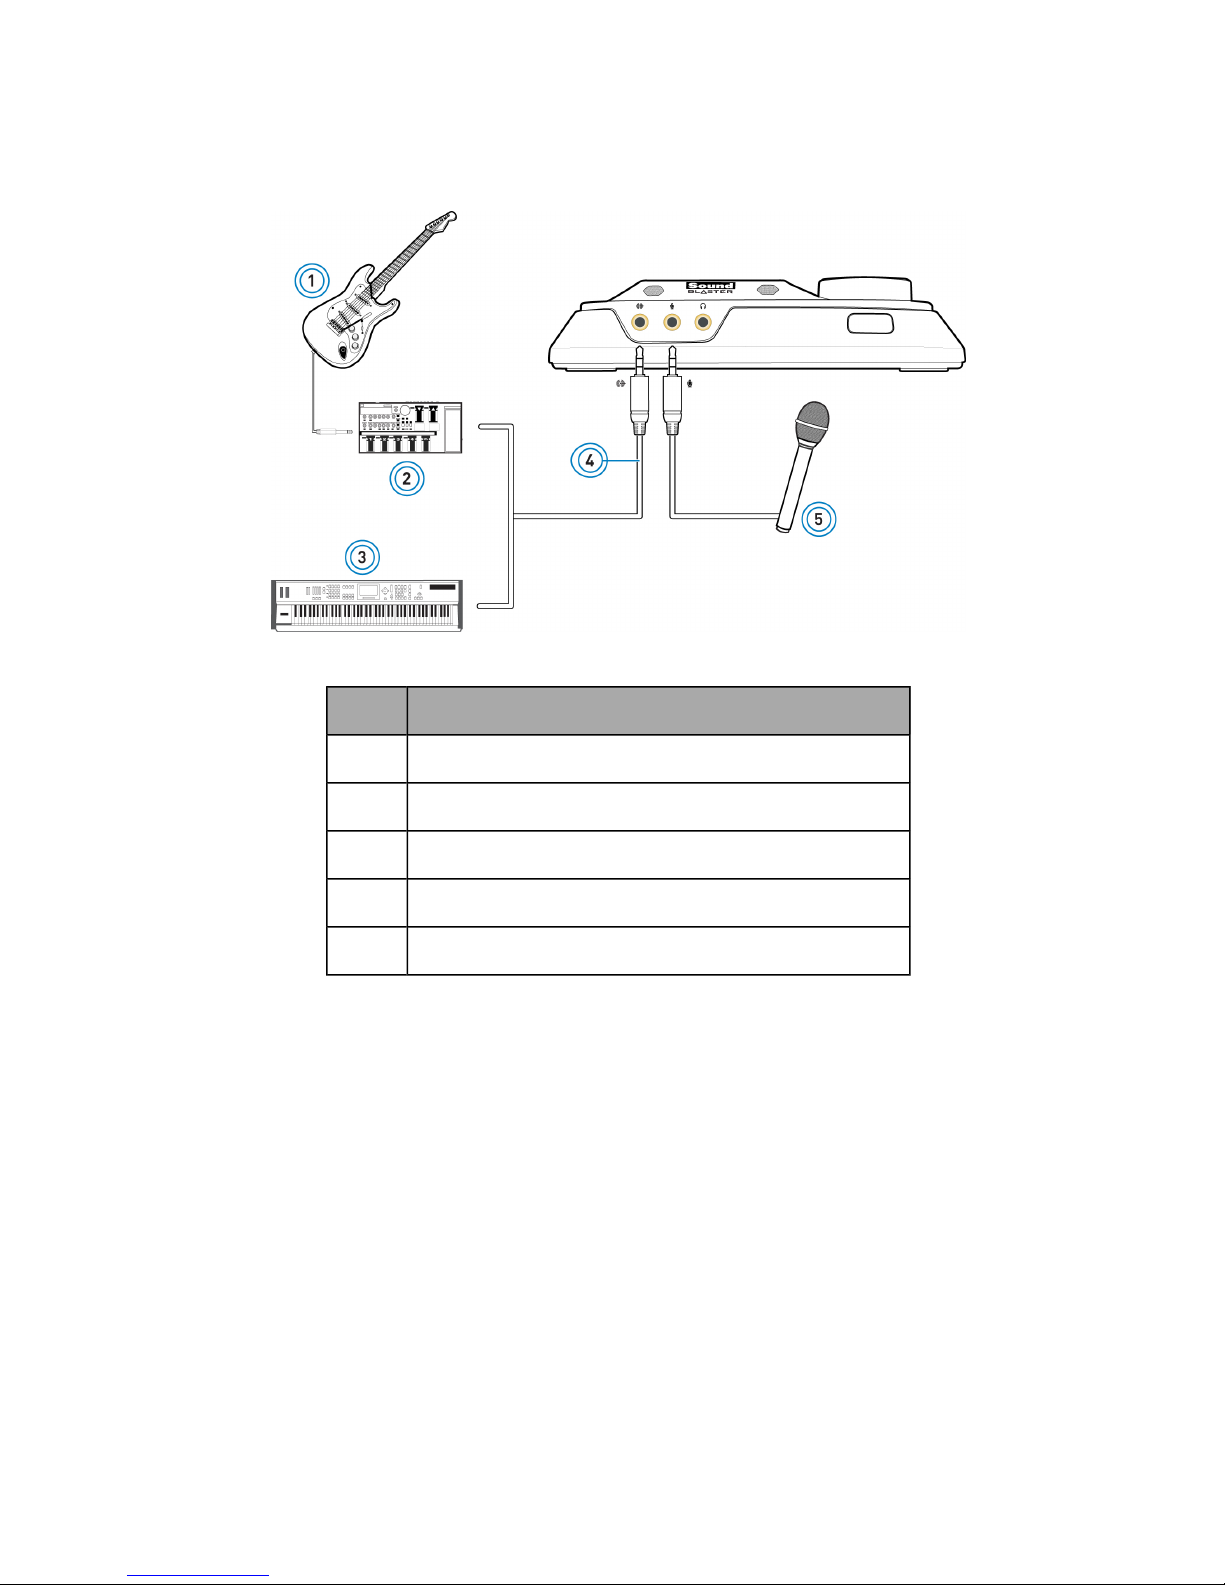
Creating Music
Put together your own compositions consisting of audio inputs from an electric guitar, a synthesizer or a
microphone. You can also connect a Pre-amp FX Box for your electric guitar to the Line-In jack.
Component
1 Electric guitar
2 Pre-amp FX Box
3 Synthesizer
4 Analog audio cable (available separately)
5 Microphone
Note:
To listen to the audio from the source connected to the Line-In or Mic-In jack, or the Internal
Microphone Array, refer to Using the Creative Software Suite - Mixer Settings.
Page 14
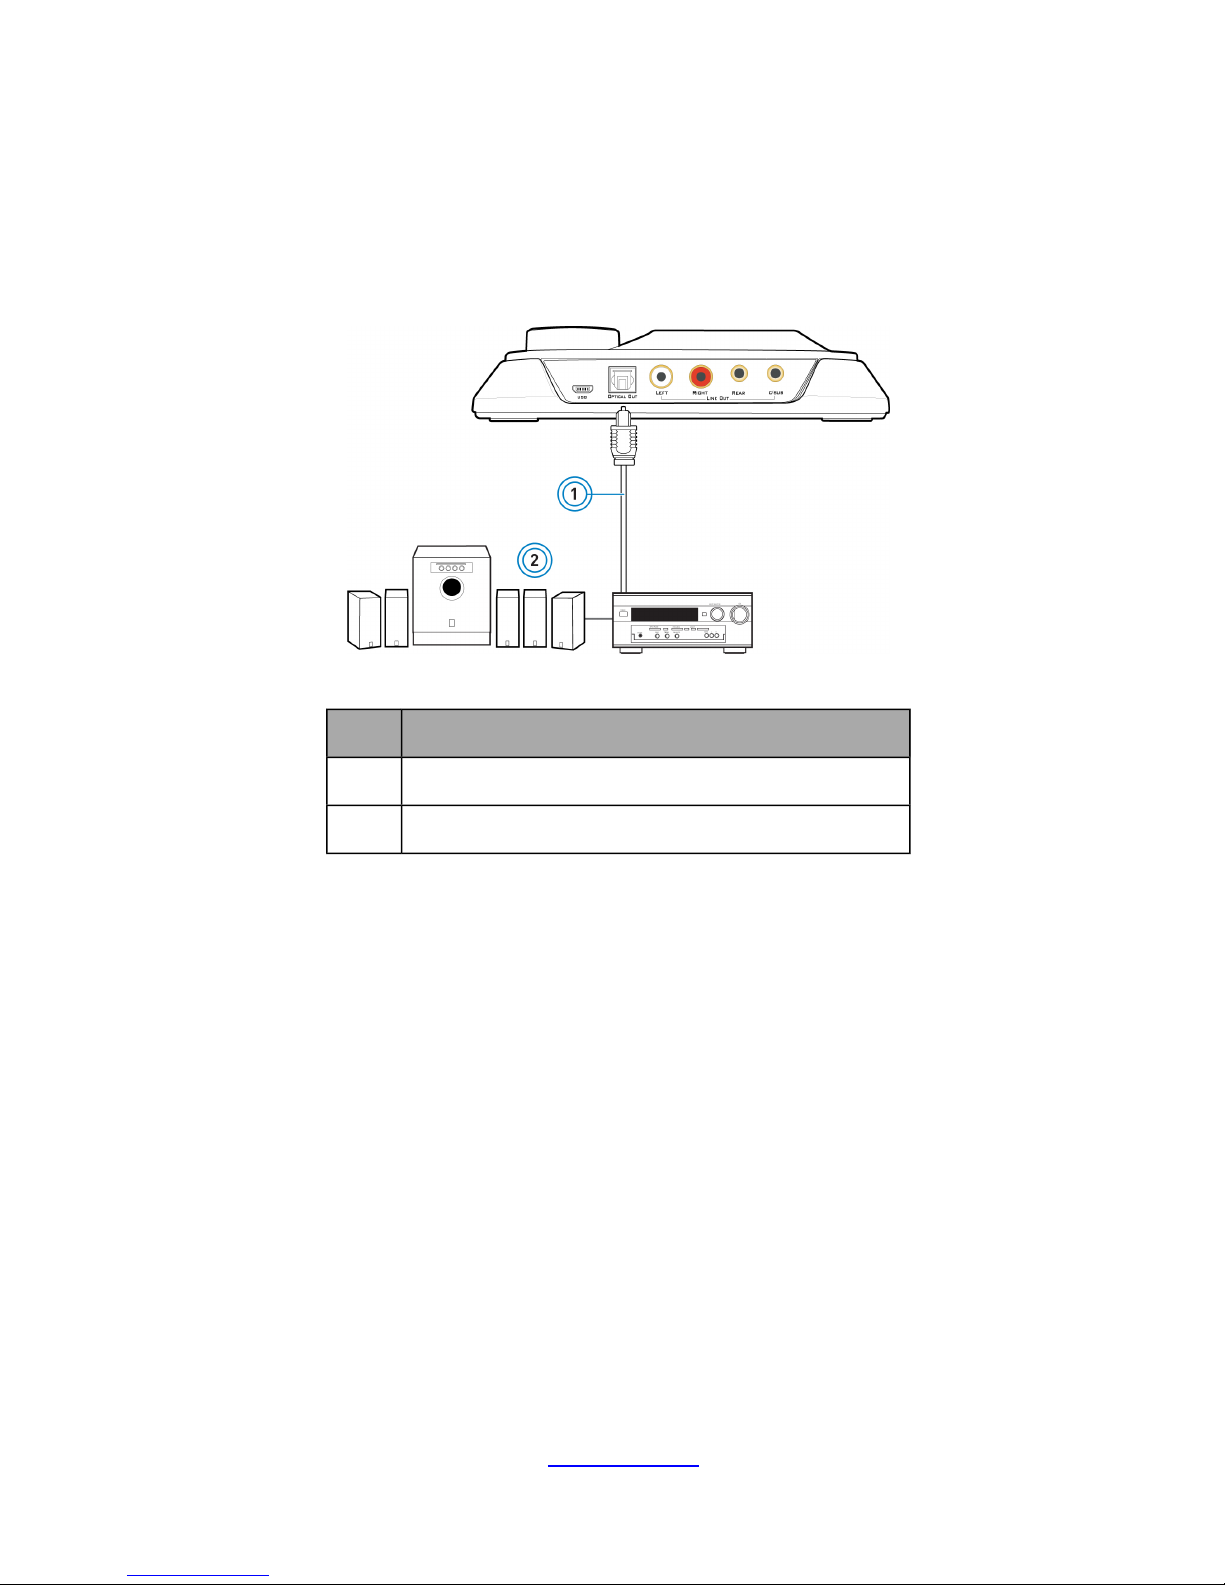
Watching DVD
You can set up a PC home entertainment system using your audio device. Watch DVDs on your PC and
decode Dolby Digital and DTS® signals from your audio device through a Dolby Digital external decoder
or an AV Amplifier.
Connect the digital input of your external decoder or AV Amplifier to the Optical SPDIF Out connector of
your audio device. For more information on external decoder or AV Amplifier speaker connection
settings, consult the User's Guide of your external decoder or AV Amplifier.
Component
1 Optical cable (available separately)
2 External decoder, AV Amplifier or home theatre receiver
Decoding with a software DVD player
You can use a software DVD player to decode Dolby Digital or DTS encoded signals from your DVDs, and
output multichannel audio through your audio device to your speakers. To do so, you need to install a
software DVD player such as Cyberlink® PowerDVD®.
Dolby Digital Live
Dolby Digital® Live is a real-time encoding technology from Dolby Laboratories that converts any audio
signal into a Dolby Digital bitstream for transport and playback through your home theater or digital
speaker system.
Transform your gameplay into an exciting and realistic experience using Dolby Digital Live. Audio cues
and effects that follow the onscreen action are reproduced, immersing you in 5.1 channel surround
sound that puts you at the center of the action.
With Dolby Digital Live, a single digital cable is all that is needed to connect your computer to your
home theater system, simplifying setup and eliminating the confusion of multiple cables.
To learn how to connect your A/V receiver or digital speaker system to your audio device, consult the
following sections:
l Connecting Digital Speaker Systems
l Connecting Home Theater Systems
To learn more about Dolby Digital Live, visit www.dolby.com.
Page 15
Connecting Speakers
The connectors and associated components shown here may be different from that of your speaker
system. Consult the User's Guide of your speaker system to identify similar input connectors. The
cables shown here are available separately.
To learn how to connect different types of speaker systems to your audio device, consult the following
sections:
l Connecting Analog Speaker Systems
l Connecting Digital Speaker Systems
l Connecting Home Theater Systems
For a list of supported Creative speaker systems or interactive help on speaker connectivity, visit
www.creative.com.
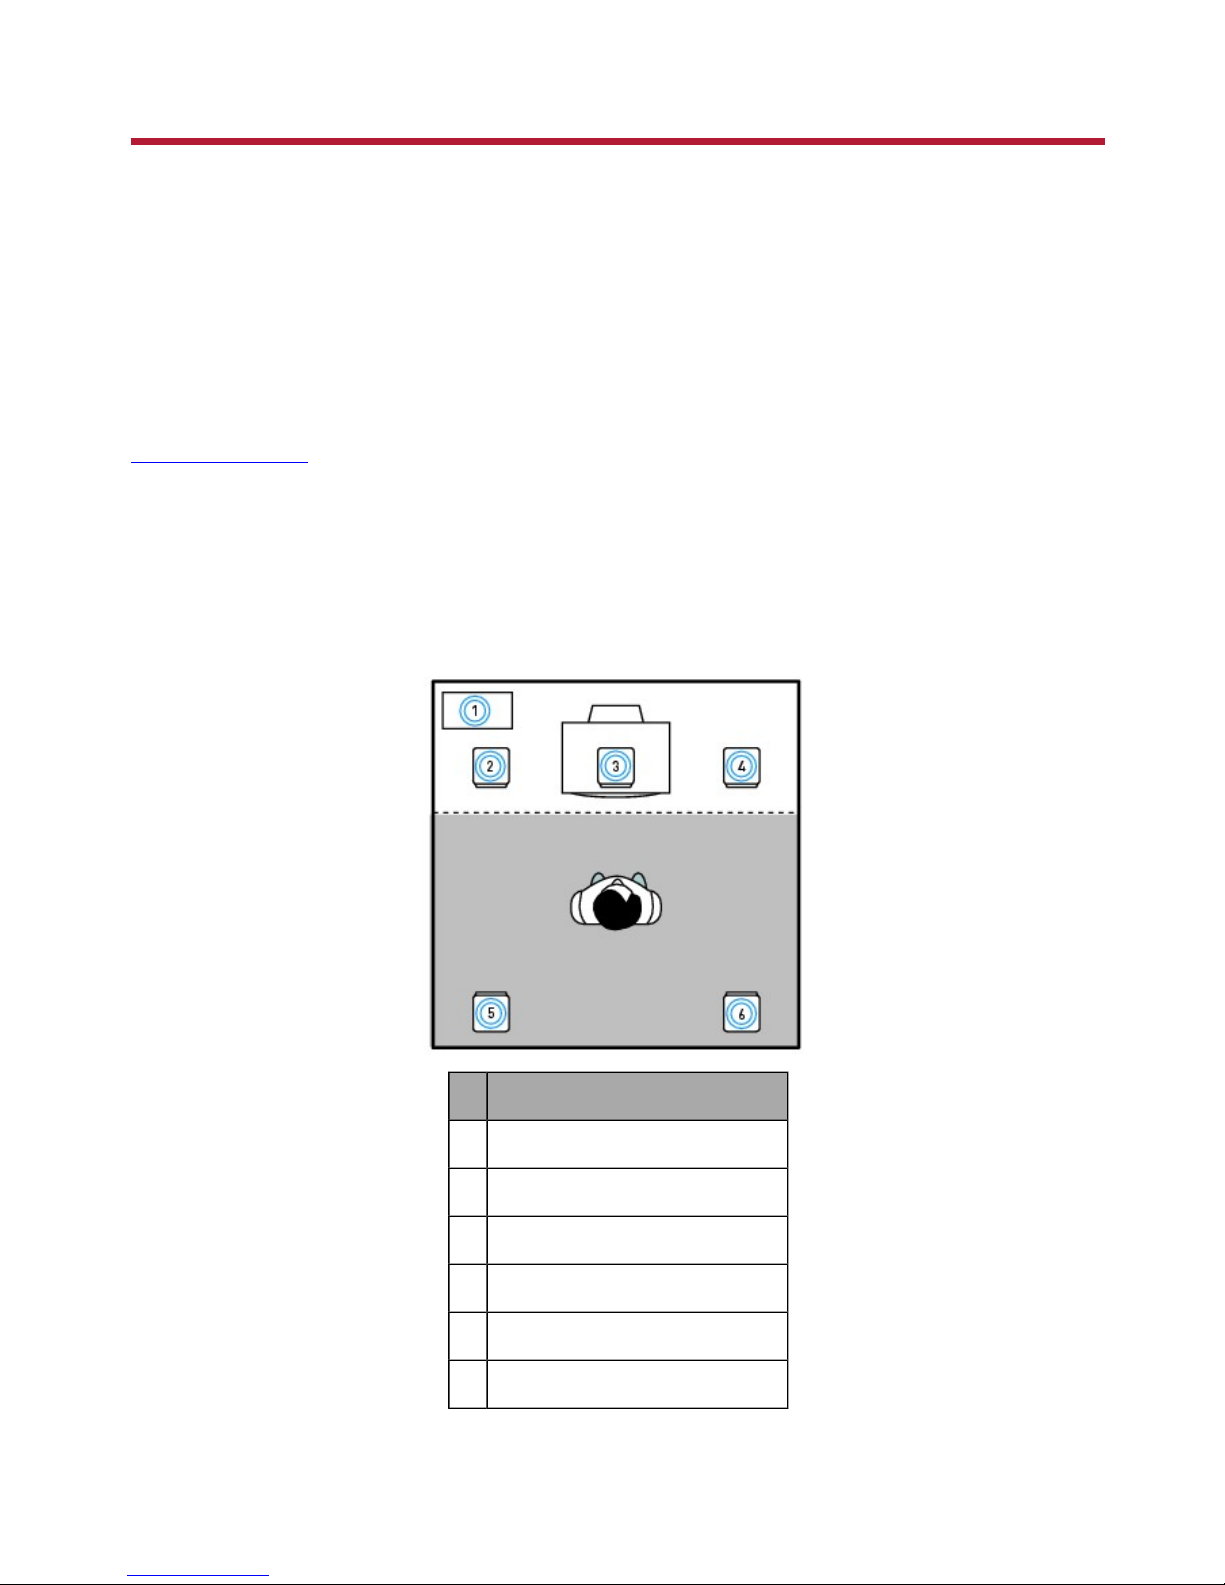
Positioning your speakers
Good speaker placement can enhance your listening experience, while careless placement can make
good audio systems sound bad. For detailed speaker placement tips, refer to the User's Guide of your
speaker system.
For 5.1 channel speakers:
Speaker Component
1 Subwoofer
2 Front Left
3 Front Center
4 Front Right
5 Rear Left
6 Rear Right
Page 16
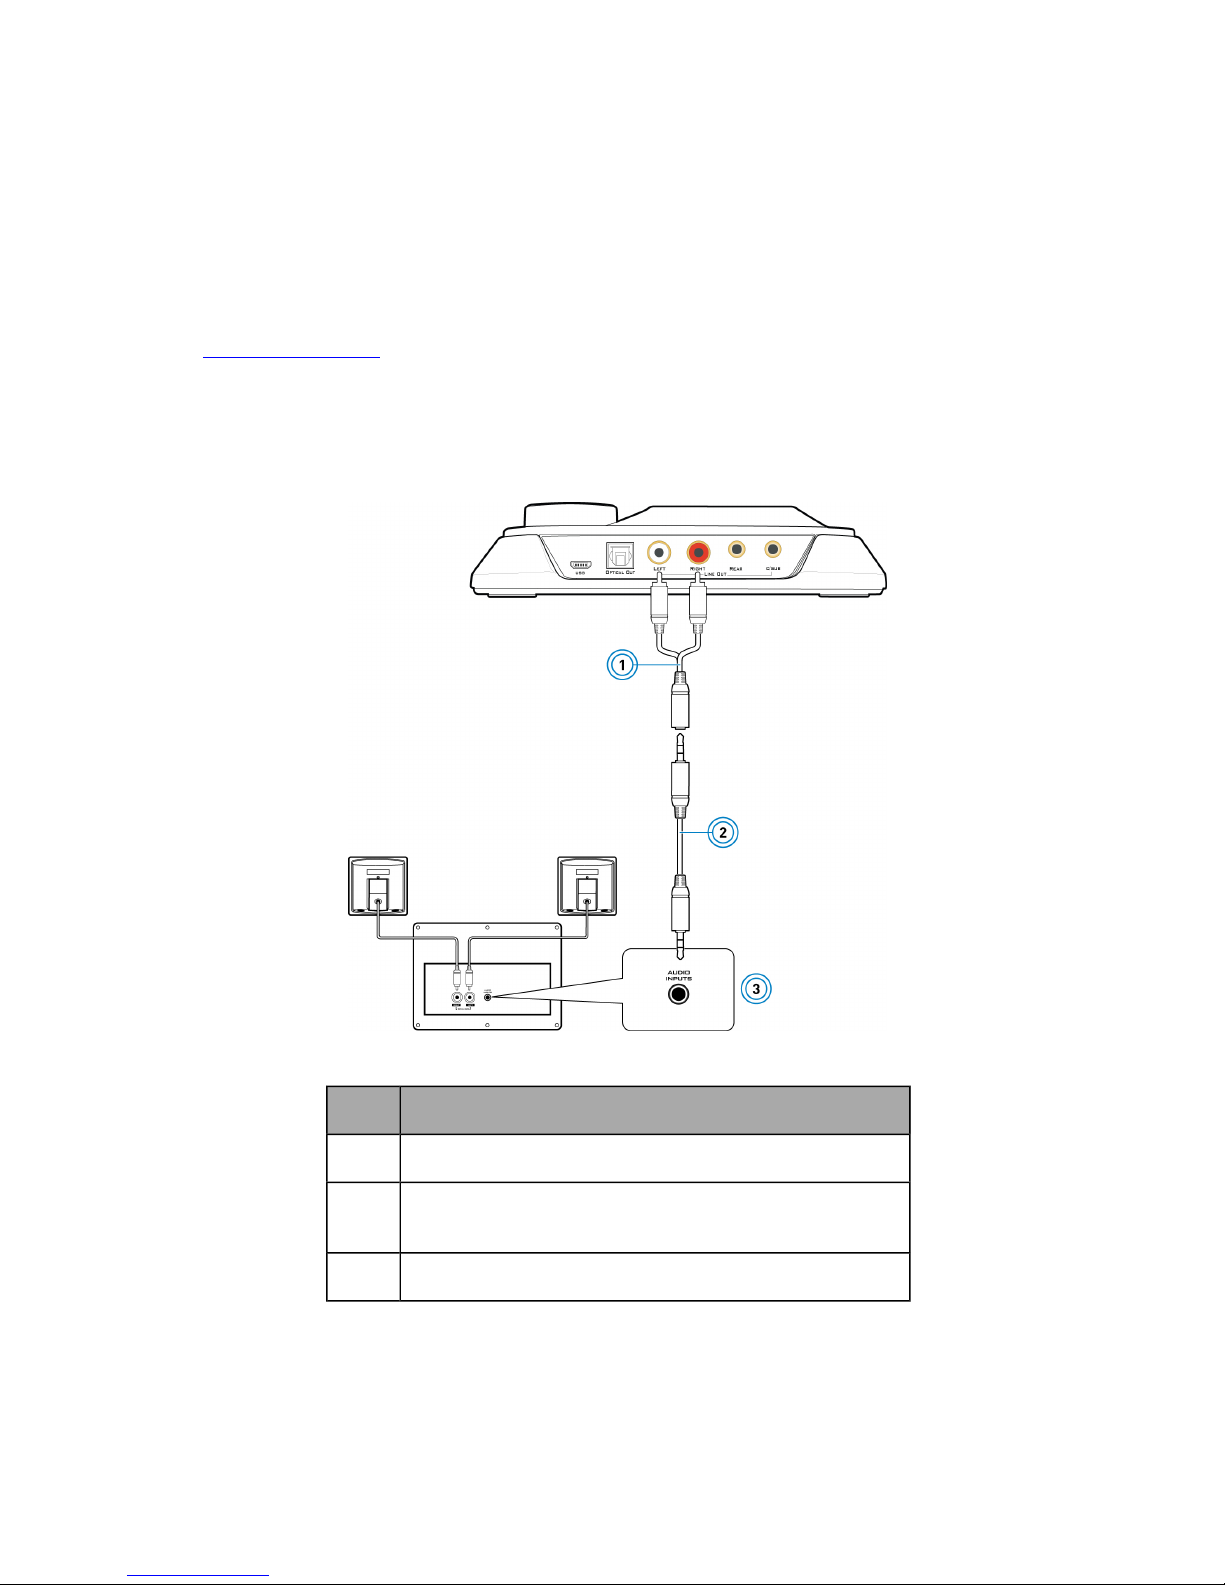
Connecting Analog Speaker Systems
You can connect analog speaker systems for up to 5.1 channels. For more information on the
appropriate jacks and cables to use for your speaker system, refer to the following speaker
configurations:
l 2.1 channel analog speakers
l 5.1 channel analog speakers
Note:
Visit www.creative.com for a list of supported Creative speaker systems.
2.1 channel analog speakers
Jack, Connector or Cable
1 Y-Splitter cable
2 Analog speaker cable (available separately, see Notes
below)
3 Audio input jack of analog stereo speakers
Note:
You may use the speaker cables that were bundled with your speakers.
Page 17
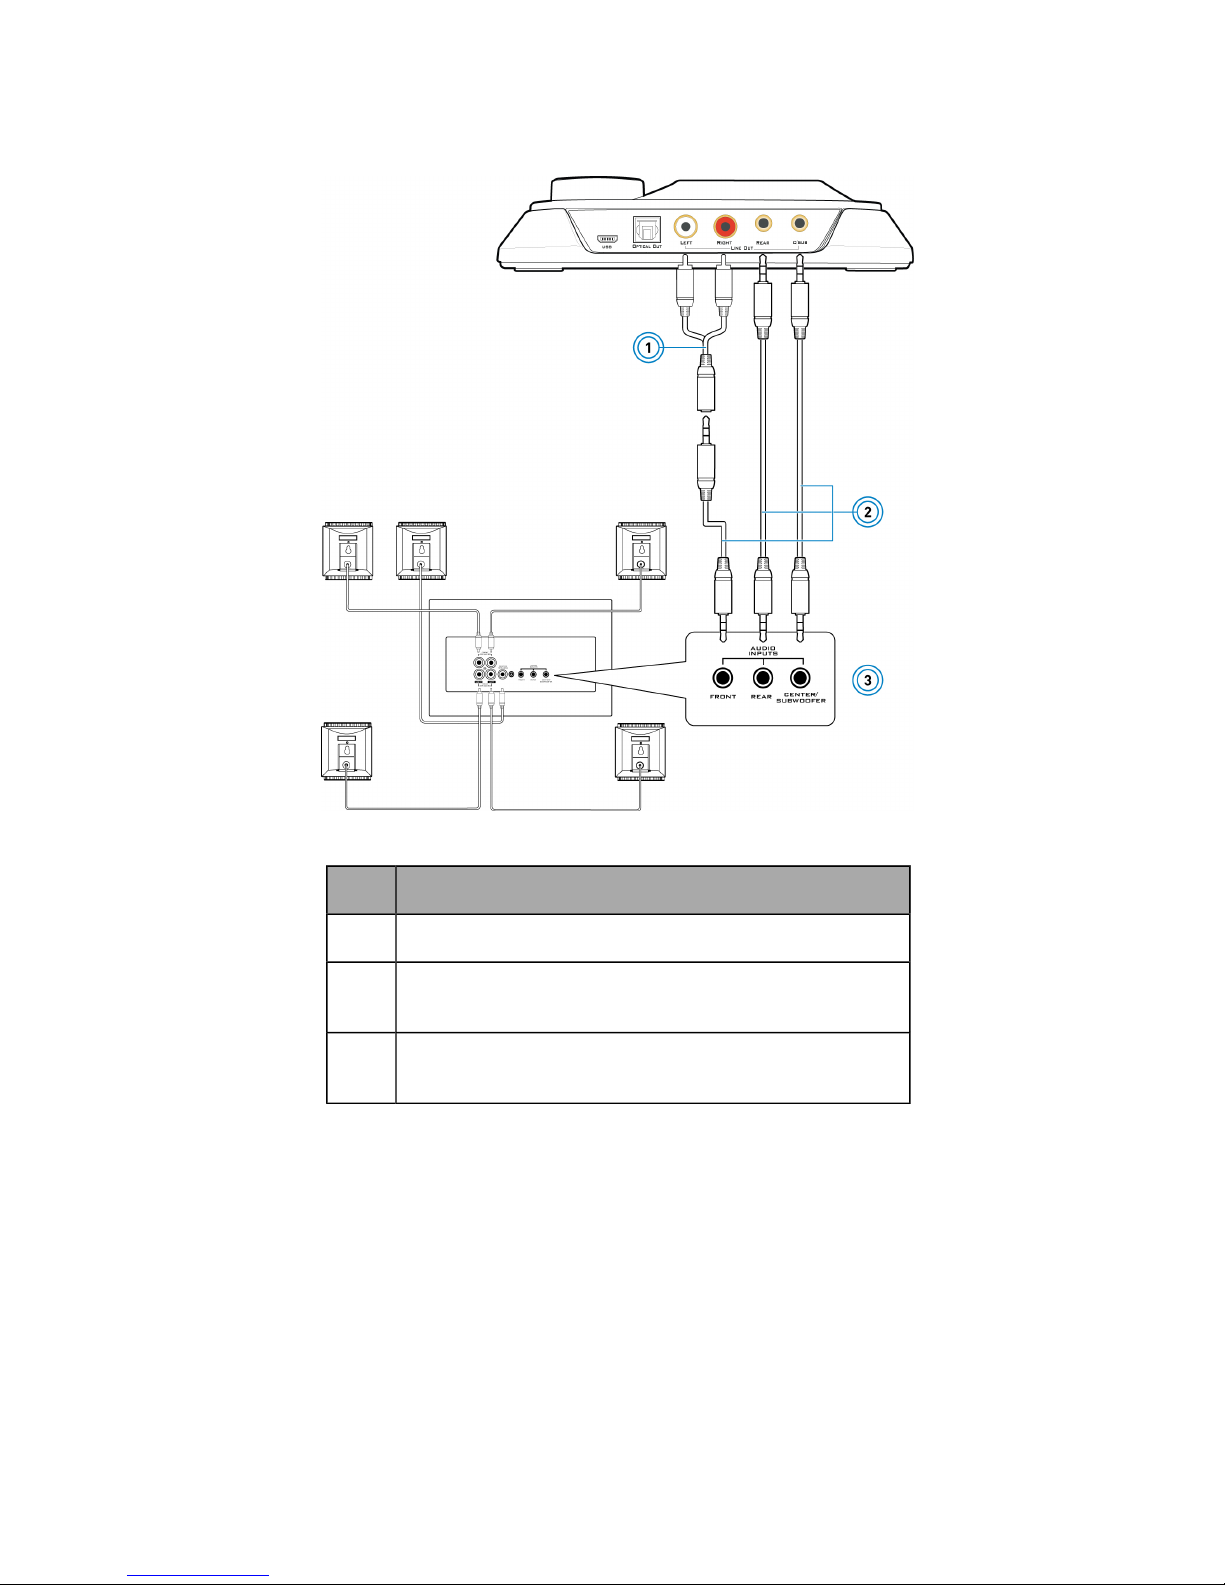
5.1 channel analog speakers
Jack, Connector or Cable
1 Y-Splitter cable
2 Analog speaker cables (available separately, see Notes
below)
3 Front, Rear and Center/Subwoofer audio input jacks of
analog 5.1 channel speakers
Note:
You may use the speaker cables that were bundled with your speakers.
Page 18
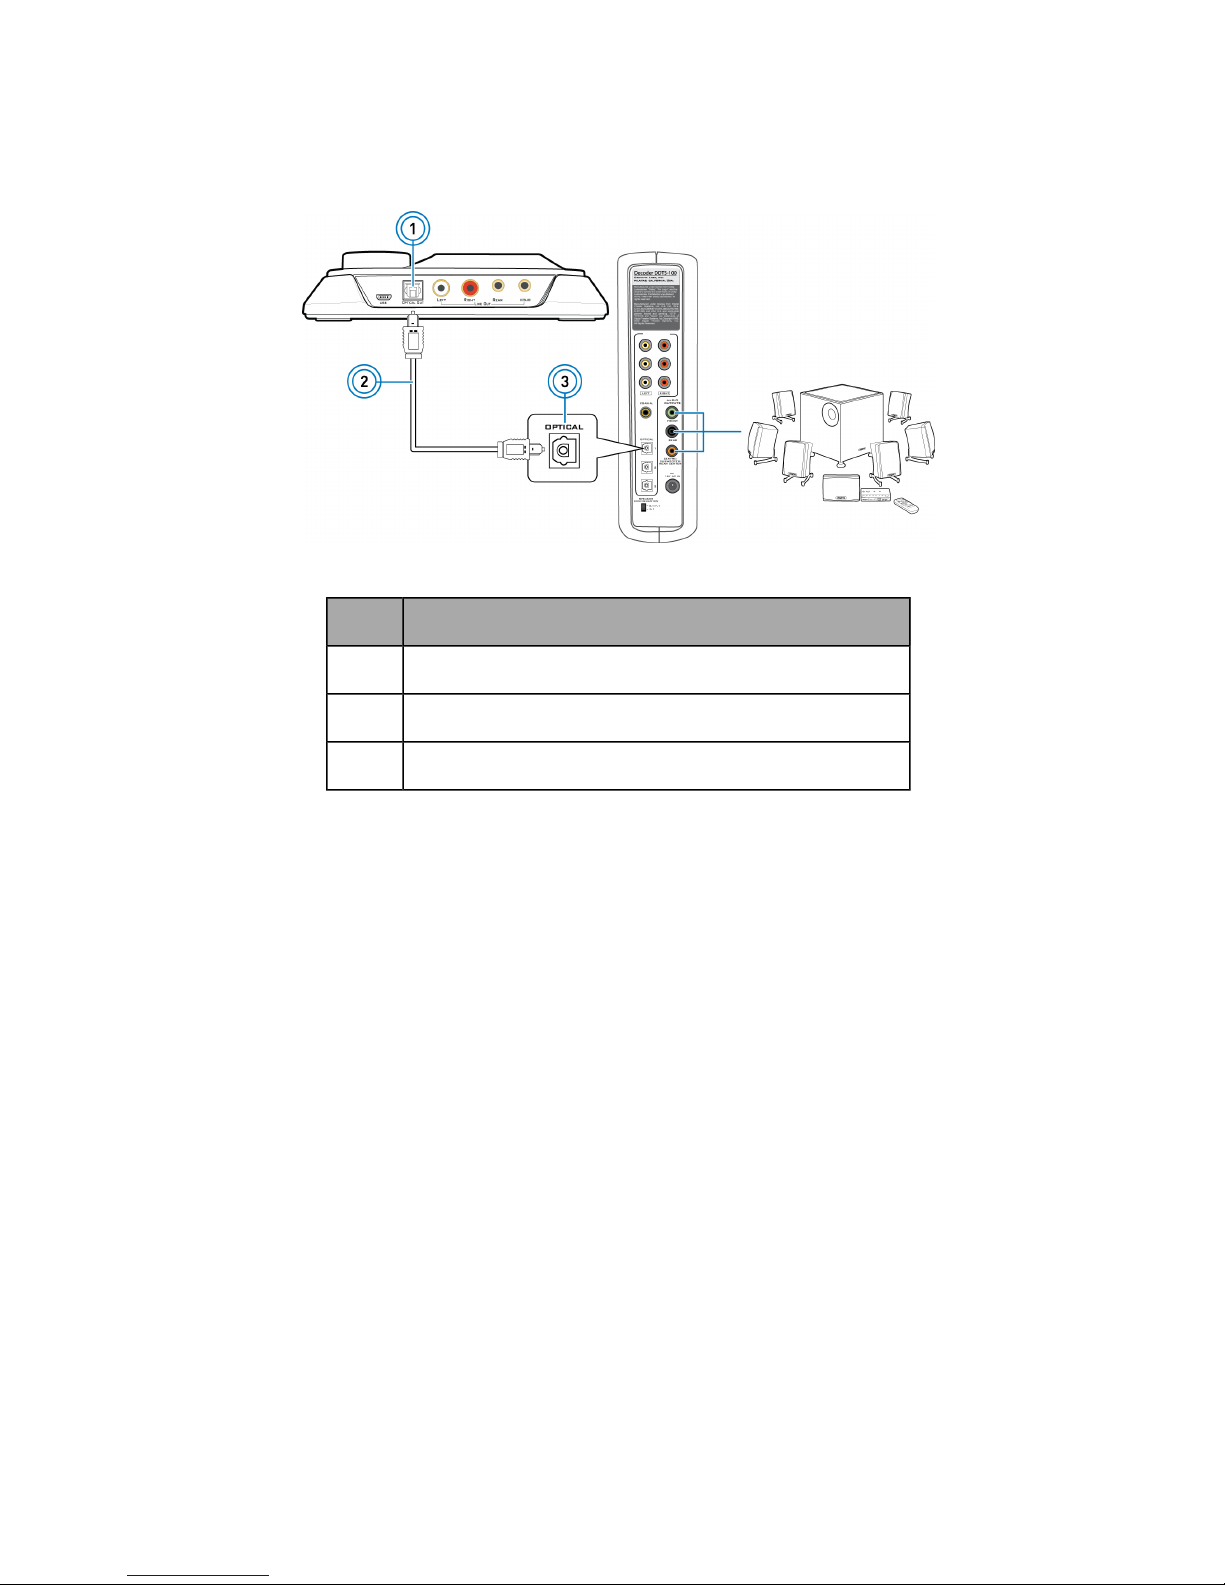
Connecting Digital Speaker Systems
Your audio device comes with an Optical S/PDIF Out connector which allows you to connect your digital
speaker system. For more information on your digital speaker connections, consult its documentation.
Jack, Connector or Cable
1 Optical S/PDIF Out connector
2 Optical cable (available separately)
3 Optical S/PDIF In connector of digital speaker sytem
Page 19
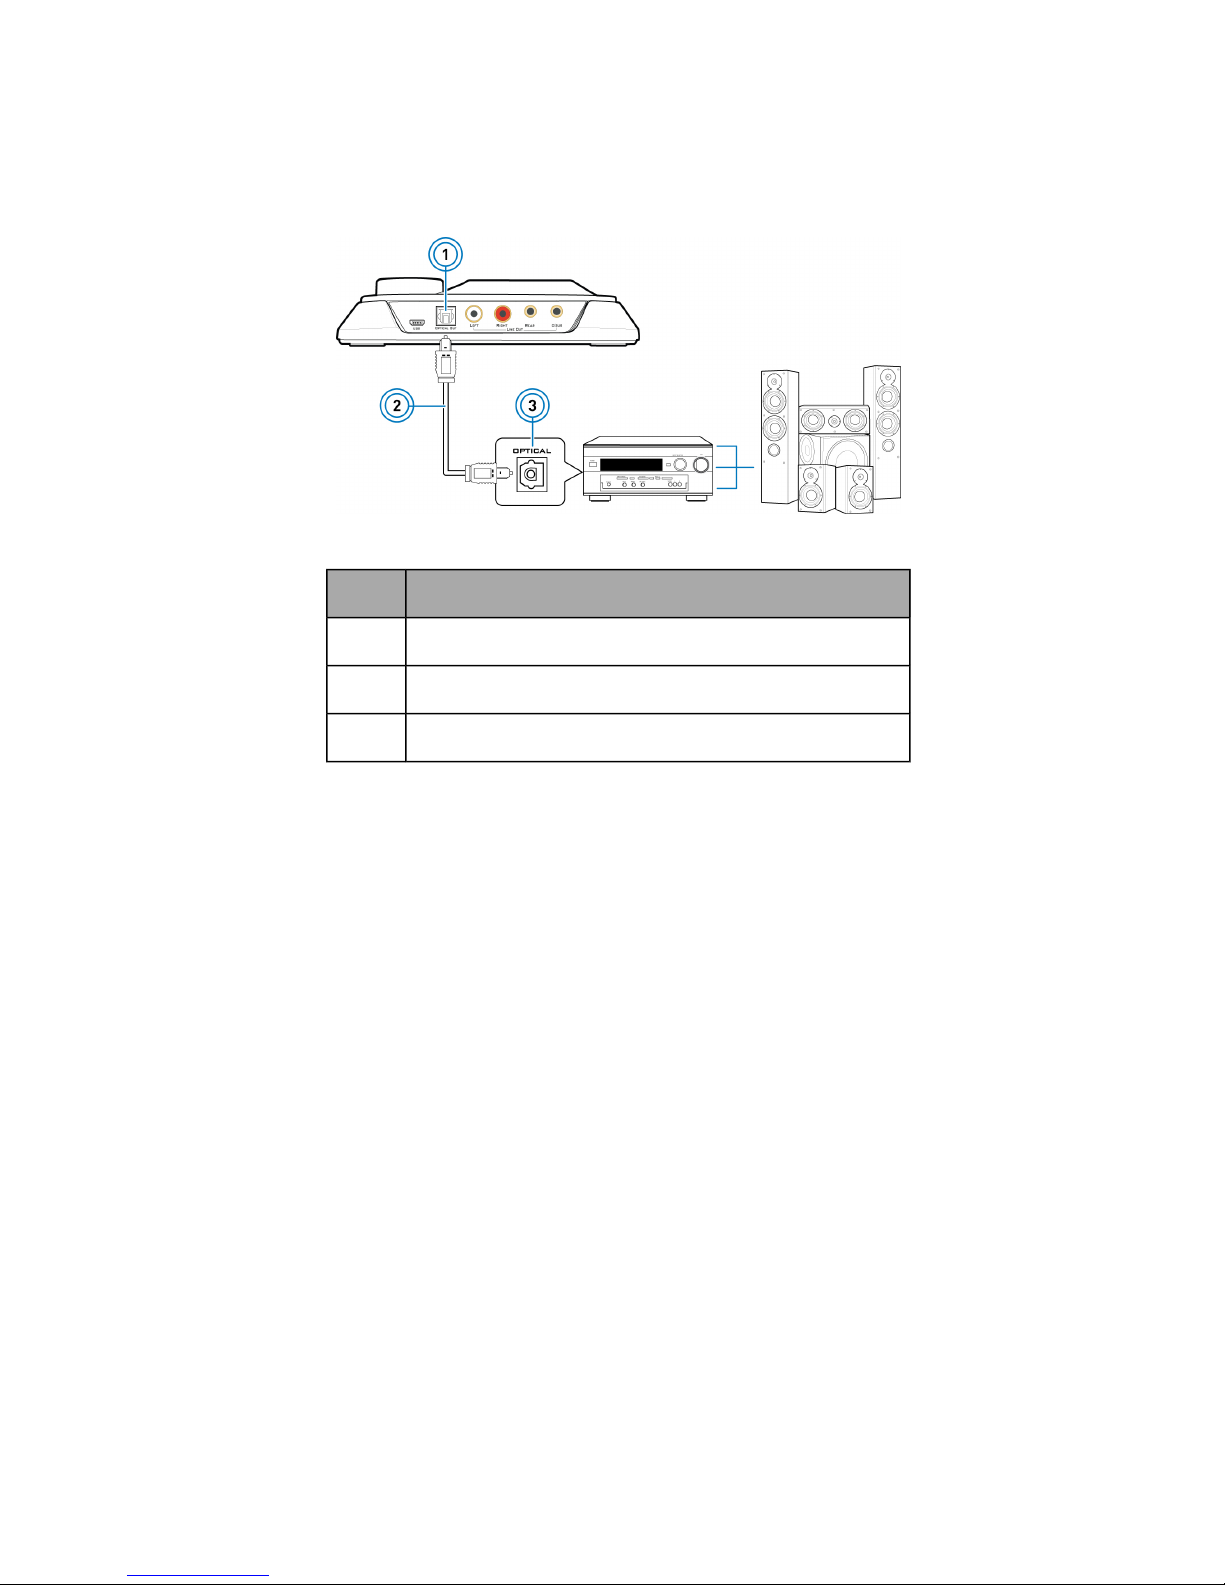
Connecting Home Theater Systems
Your audio device comes with an Optical S/PDIF Out connector which allows you to connect your home
theater system. For more information on your A/V receiver's speaker connections, consult its
documentation.
Jack, Connector or Cable
1 Optical S/PDIF Out connector
2 Optical cable (available separately)
3 Optical S/PDIF In connector of A/V receiver
Page 20
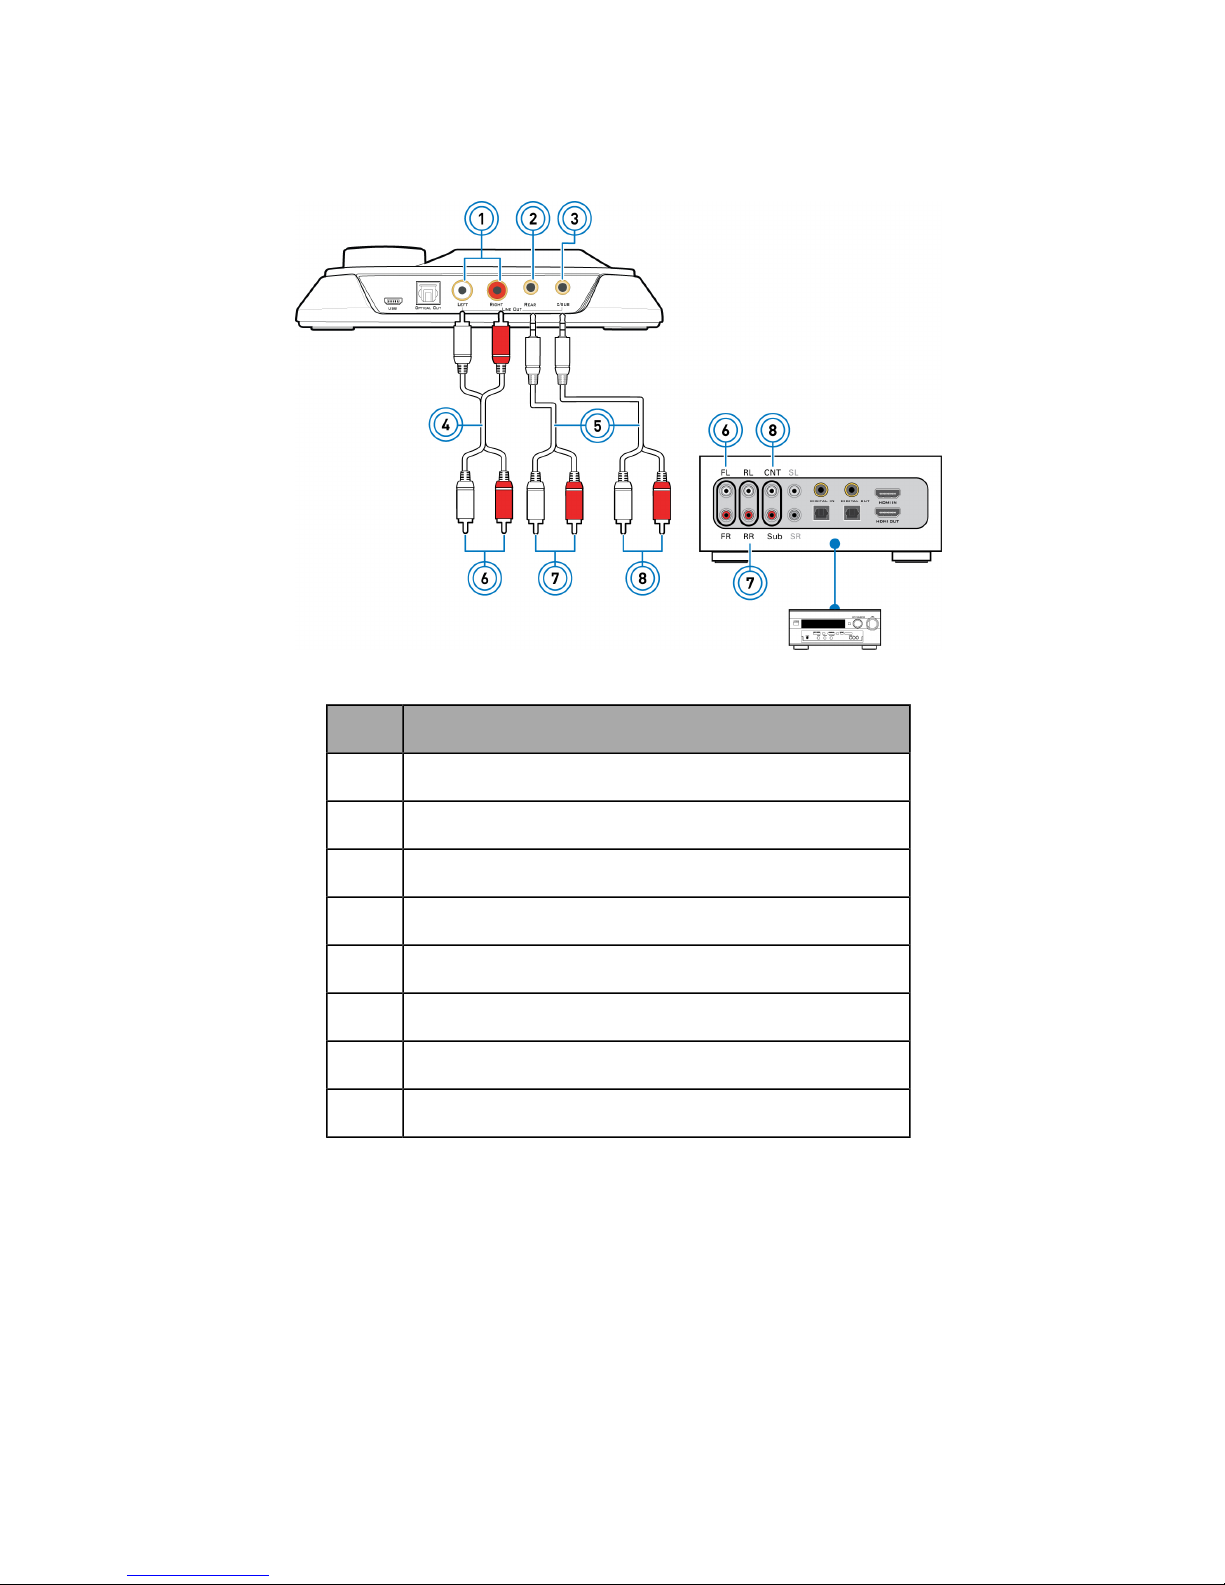
Connecting your A/V Receiver using Line level inputs
If your A/V receiver supports multichannel line-level inputs, you can connect them directly to your audio
device's Line Out jacks instead of the Optical S/PDIF Out connector as shown below.
Jack, Connector or Cable
1 RCA Front Out jacks
2 Rear Out jack
3 Center/Subwoofer Out jack
4 RCA-to-RCA stereo cable (available separately)
5 Stereo-to-RCA cable (available separately)
6 Front Left and Right input jacks of A/V receiver
7 Rear Left and Right input jacks of A/V receiver
8 Center and Subwoofer input jacks of A/V receiver
Page 21

Using the Creative Software Suite
The following software is designed for you to access the basic as well as the advanced features of your
audio device. We recommended that you familiarize yourself with their functions in order to make full
use of the rich features of your audio device.
Software Applications
For Windows,
l Sound Blaster Omni Control Panel
l Creative System Information
For Mac OS,
l Sound Blaster Omni Control Panel
Bonus Pack (for Windows only)
Various other bonus Creative applications are also compatible for your audio device. Visit
www.creative.com/support and navigate to the relevant product page to view and download these
applications:
l Creative WaveStudio
l Creative Media ToolBox Trial
Page 22
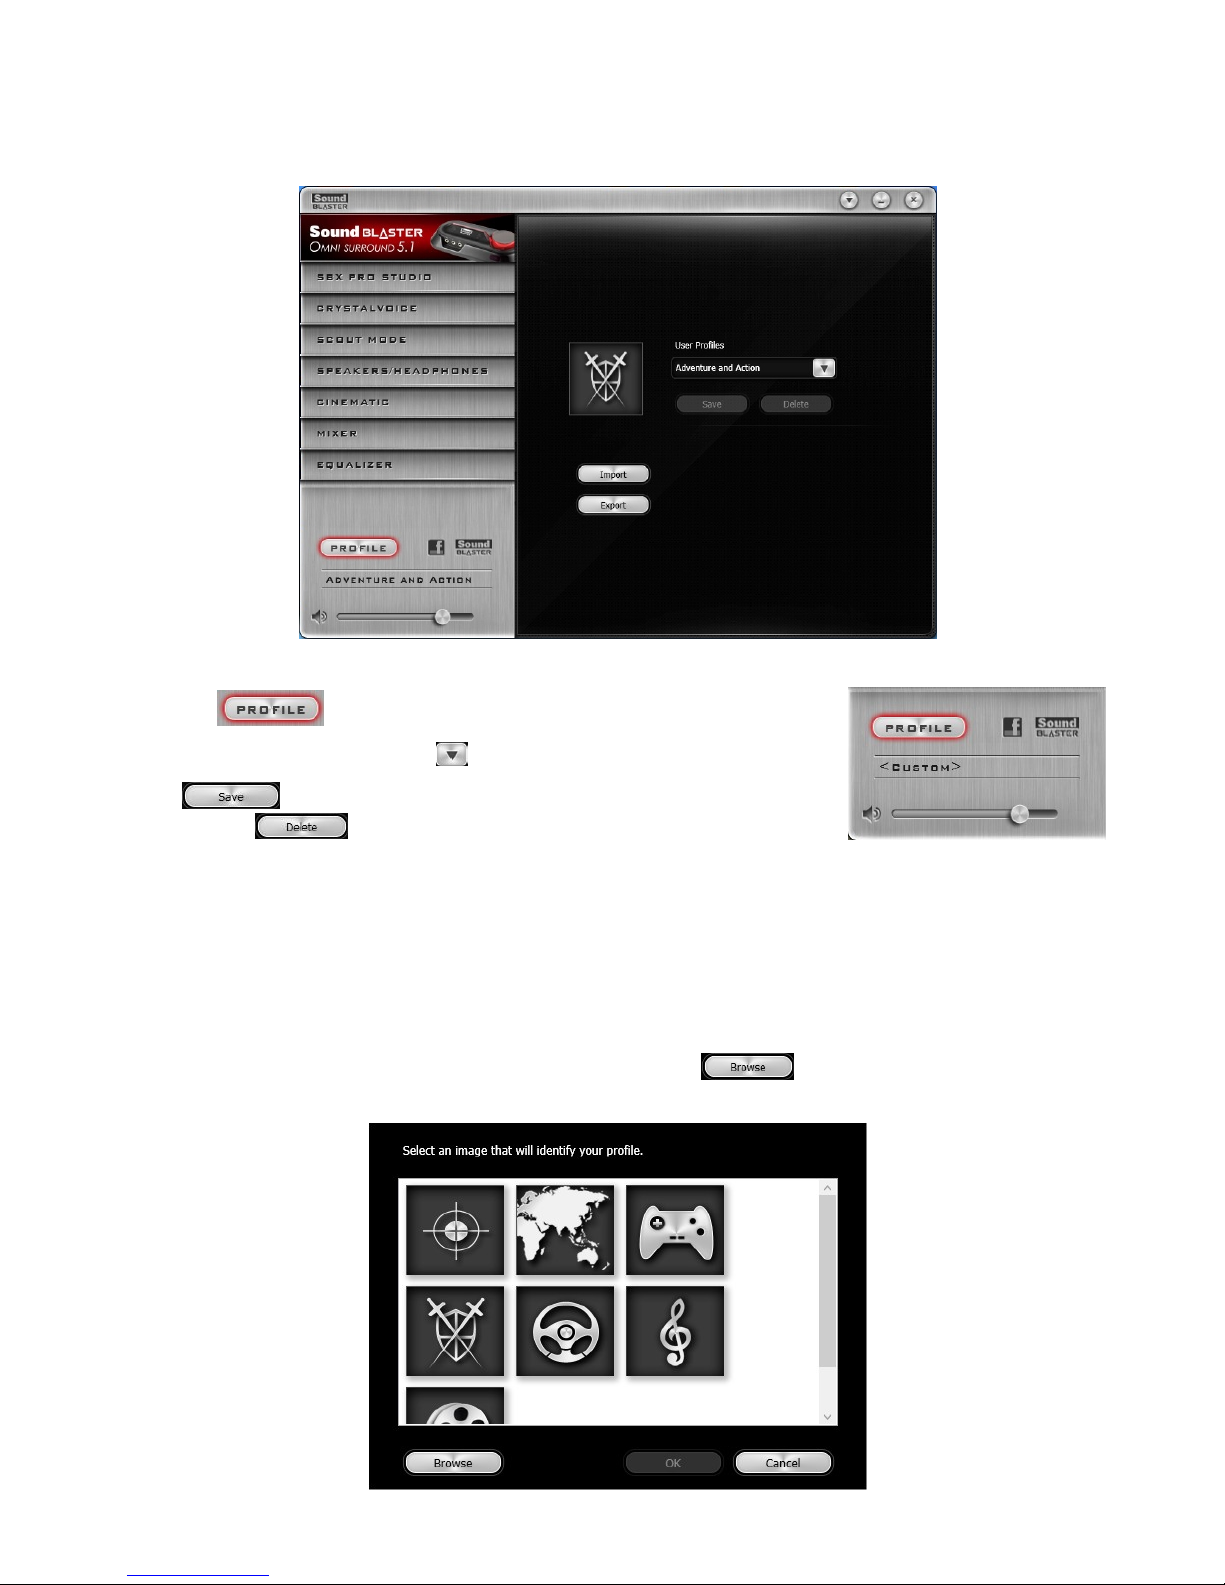
Sound Blaster Omni Control Panel
Managing Your Profiles
Click the button to display the Profiles pane.
Activate a profile by clicking the and selecting it from the list.
Click to save all settings to the current profile or create a new
profile. Click to delete the active profile.
Sharing Profiles
You can export your custom settings and share them with others, or import other gamers' custom
settings.
Customizing Your Avatar
You can customize the avatar for each profile. Double-click the current avatar to open the selection
window. You can either select an avatar from the list or click to select your own image file to
be used as the avatar.
Page 23
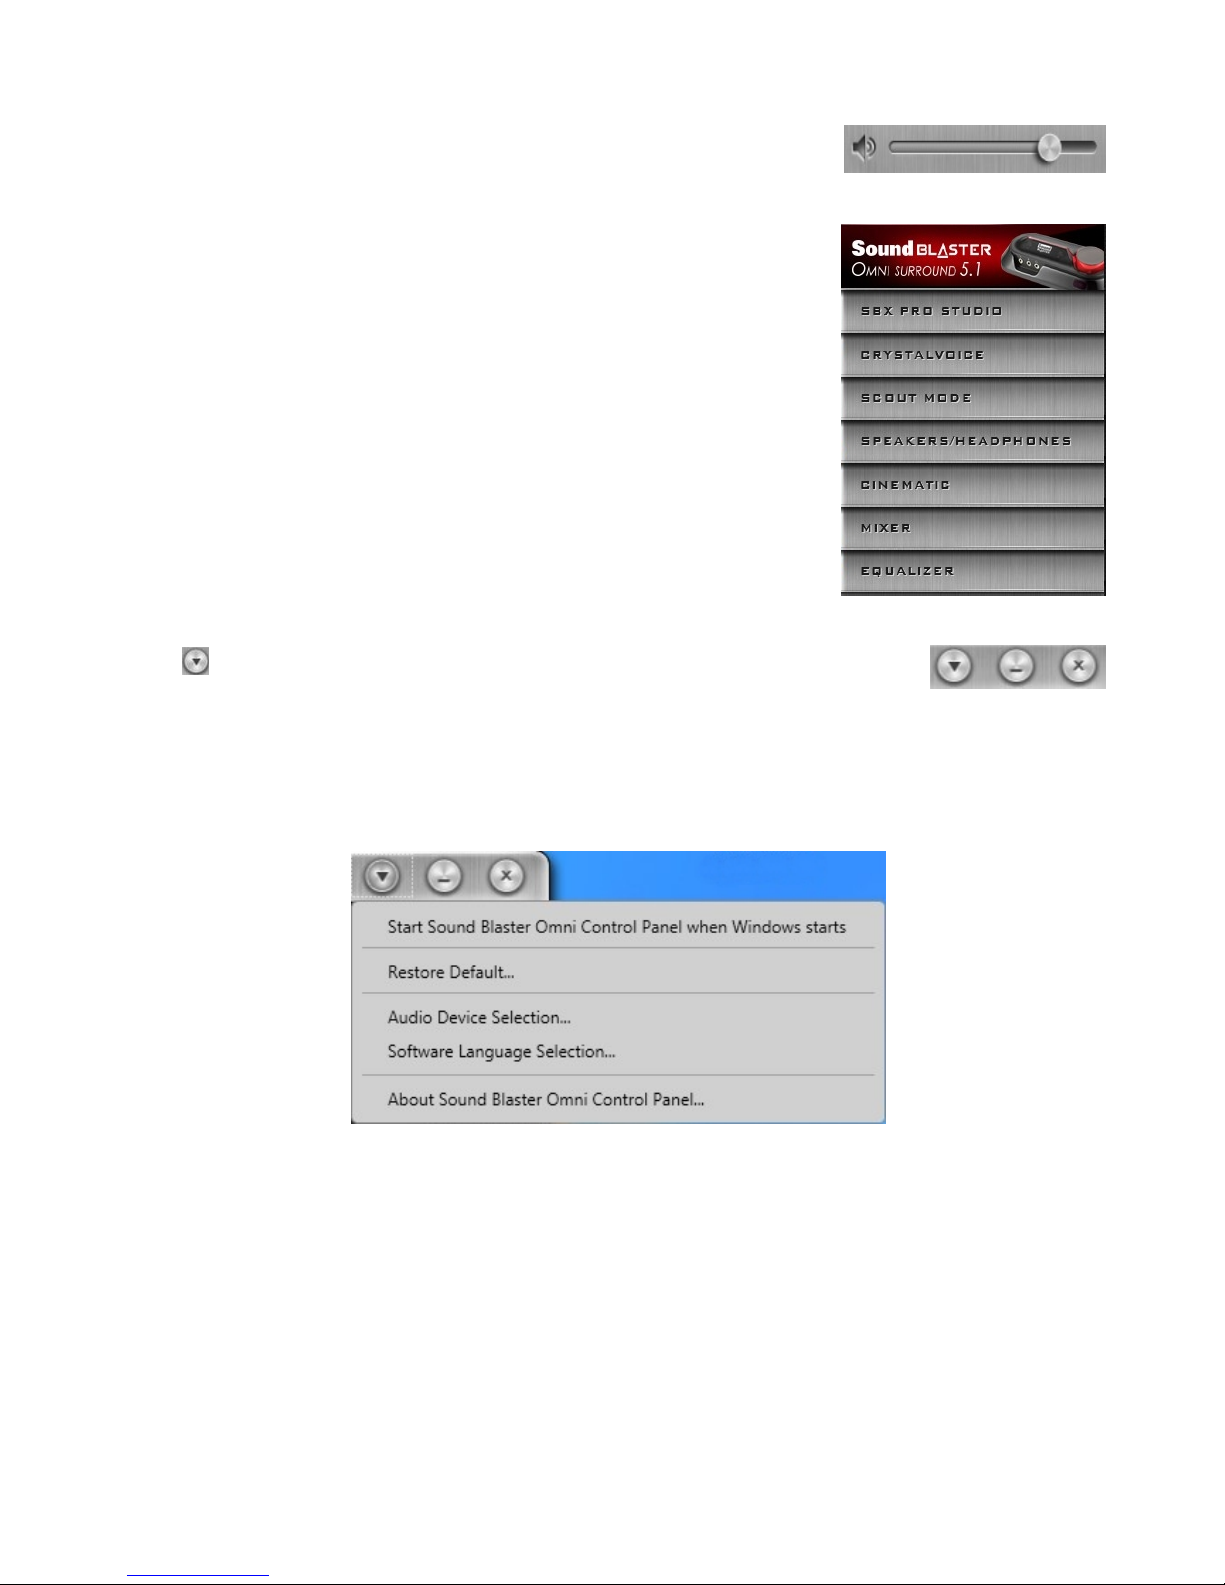
Adjusting Your Master Volume Settings
Drag the master volume slider to adjust the volume level. You can mute /
unmute the volume by clicking the speaker icon.
Configuring Your Software Settings
Click each feature to access its settings page. More information on each
feature can be found in their respective sections in this manual.
Configuring Your General Settings
Click and configure various options from the list that displays including:
l Select whether the Sound Blaster Omni Control Panel is activated when Windows starts.
l Restore default settings.
l Select the audio playback device.
l Select the supported software languages available for your system.
l General information regarding your Sound Blaster Omni Control Panel software.
Page 24
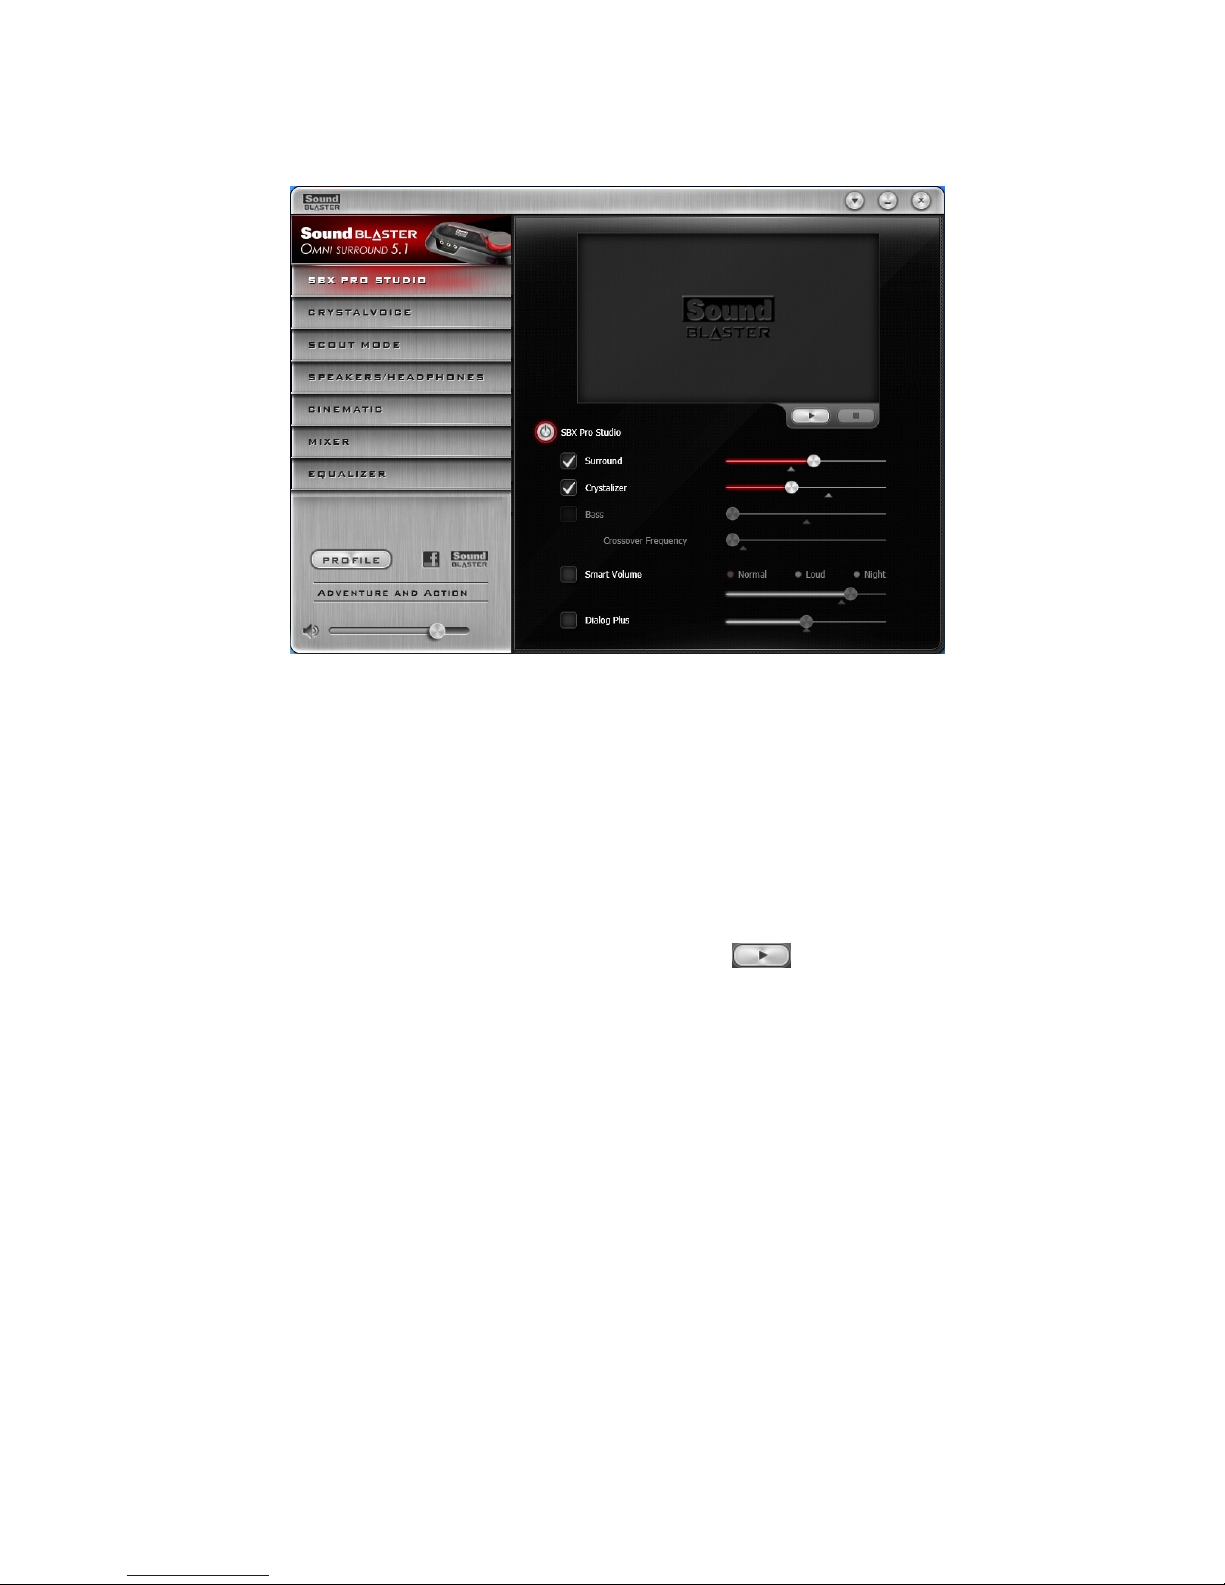
SBX Pro Studio Settings
1. SBXPro Studio enhancements
Select to turn on or turn off each enhancement. You can hover your mouse cursor over each
enhancement to display a brief explanation.
2. Enhancement Level sliders
Adjust the amount of enhancement to apply.
3. Audio test controls
Play/Pause or Stop the demo video.
Enhancing Your Listening Experience
You can adjust the amount to apply for each enhancement by dragging its slider left to decrease or right
to increase. To test the effects of the audio enhancements, click and listen to the demo video.
l SBXPro Studio Surround provides immersion control of sounds not just around you, but also
above and below for a full 3D audio experience. Hear the natural sense of audio depth, spaciousness
and stunning 3D surround effects from your audio content. Enjoy an unbelievably true-to-life audio
experience, whether it's over stereo speakers or headphones.
l SBXPro Studio Crystalizer restores the dynamic range that is lost when iTunes and MP3 music
gets compressed. This makes the music sound as good as the artist originally intended, and adds an
enhanced level of realism for movies and games.
l SBX Pro Studio Bass fills in the low frequency tones and gives the extra impact for a better
entertainment experience. It dramatically improves the sound experience without a subwoofer.
l SBXPro Studio Smart Volume addresses the problem of abrupt volume level changes during
playback and between songs by automatically and continously measuring volume, and intelligently
applying gain and attenuation to compensate for those changes.
l SBXPro Studio Dialog Plus enhances the voices in movies for clearer dialog, allowing the
listener to hear the dialog over the rest of the soundtrack and over ambient noise in the listening
environment.
Page 25
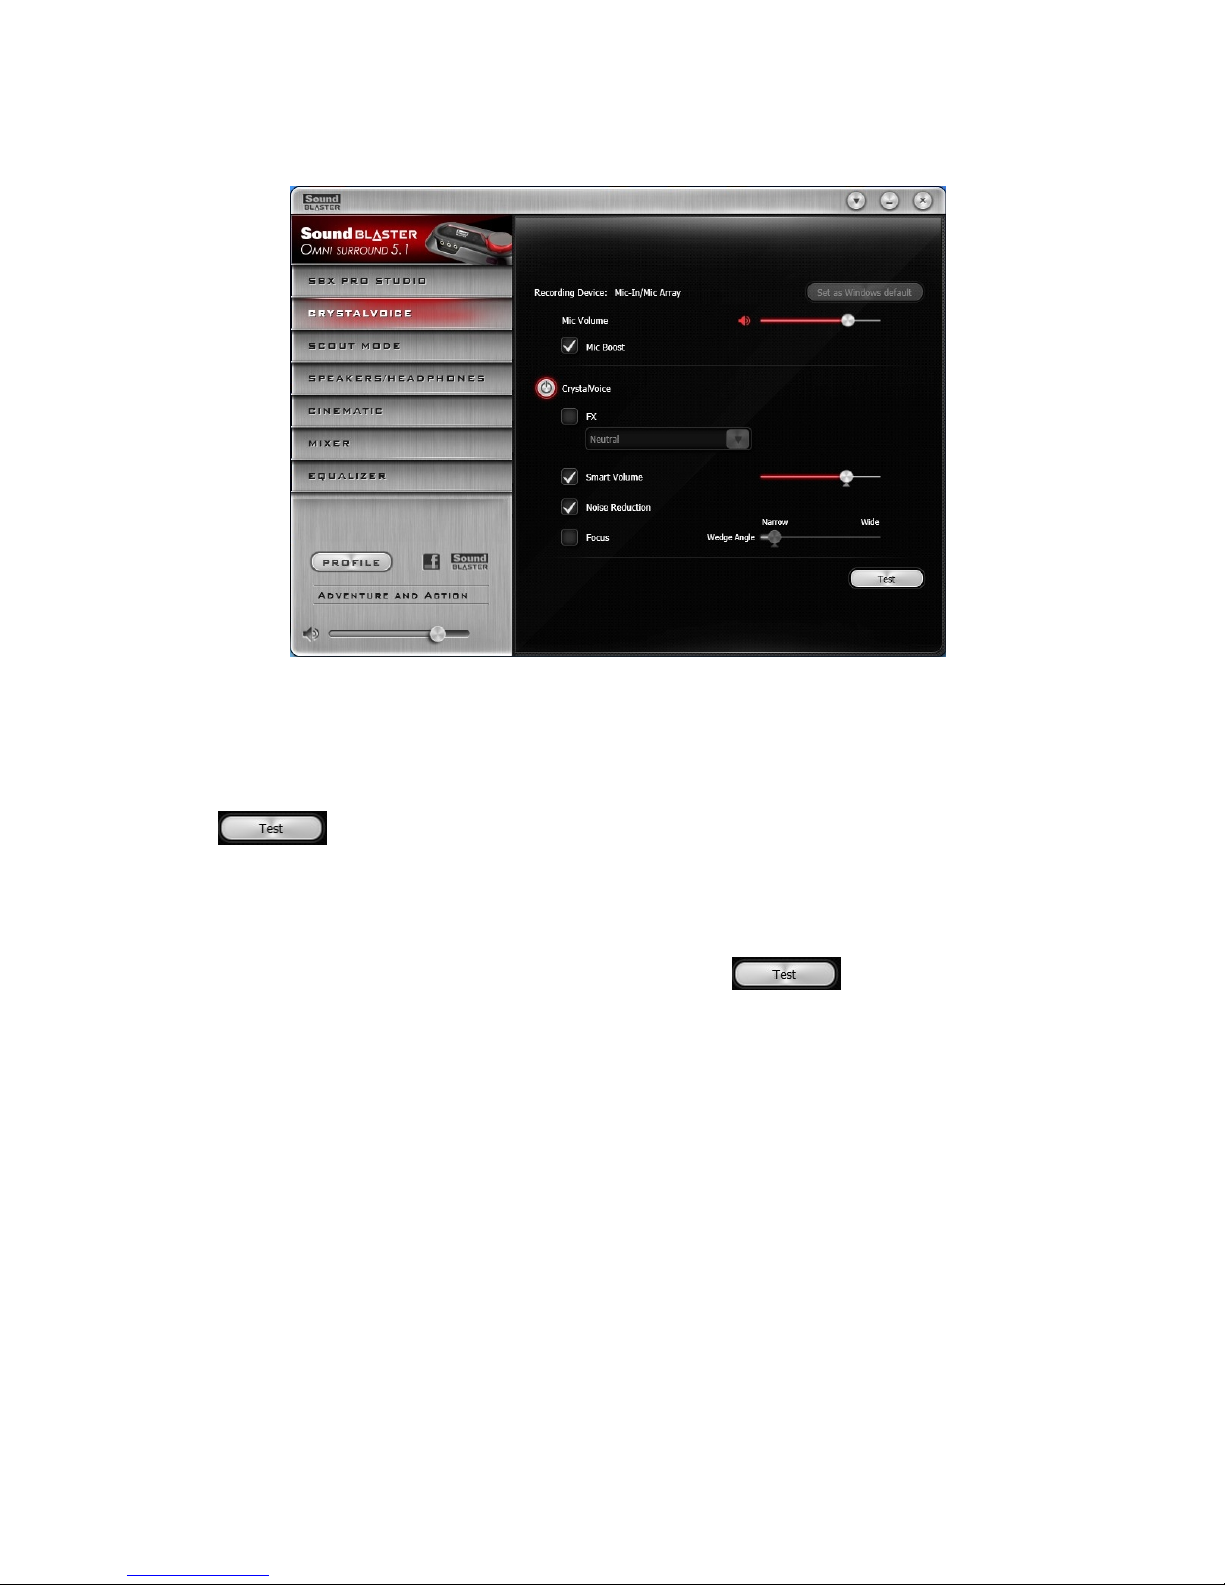
CrystalVoice Settings
1. CrystalVoice enhancements
Select to turn on or turn off each of the available enhancements.
2. Enhancement Level sliders
Adjust the amount of enhancement to apply.
3. Audio test button
Click and speak into your microphone to hear how your voice sounds with CrystalVoice
applied.
Having Fun with CrystalVoice
You can adjust the amount to apply for each enhancement by dragging its slider left to decrease or right
to increase. To test the effects of the audio enhancements, click and speak into your
microphone.
l CrystalVoice FX enables the speaker's voice to be altered with a variety of effects, which can be
used to enhance the tone of the speaker's voice, create interesting accents or to sound like a completely different person.
l CrystalVoice Smart Volume automatically adjusts the loudness of the speaker's voice to main-
tain a consistent volume level. This makes it convenient for the speaker to converse normally,
regardless of whether the speaker is close to or far away from the microphone.
l CrystalVoice Noise Reduction enables the speaker to be heard clearly over background noise by
constantly monitoring the environment and eliminate the unwanted noise that interferes with the
conversation.
l CrystalVoice Focus creates a zone and suppresses noise outside it to enable the speaker within to
be heard with amazing clarity. Multiple microphones are used to focus, enhance the speaker's voice,
and eliminate sounds outside the zone.
Page 26
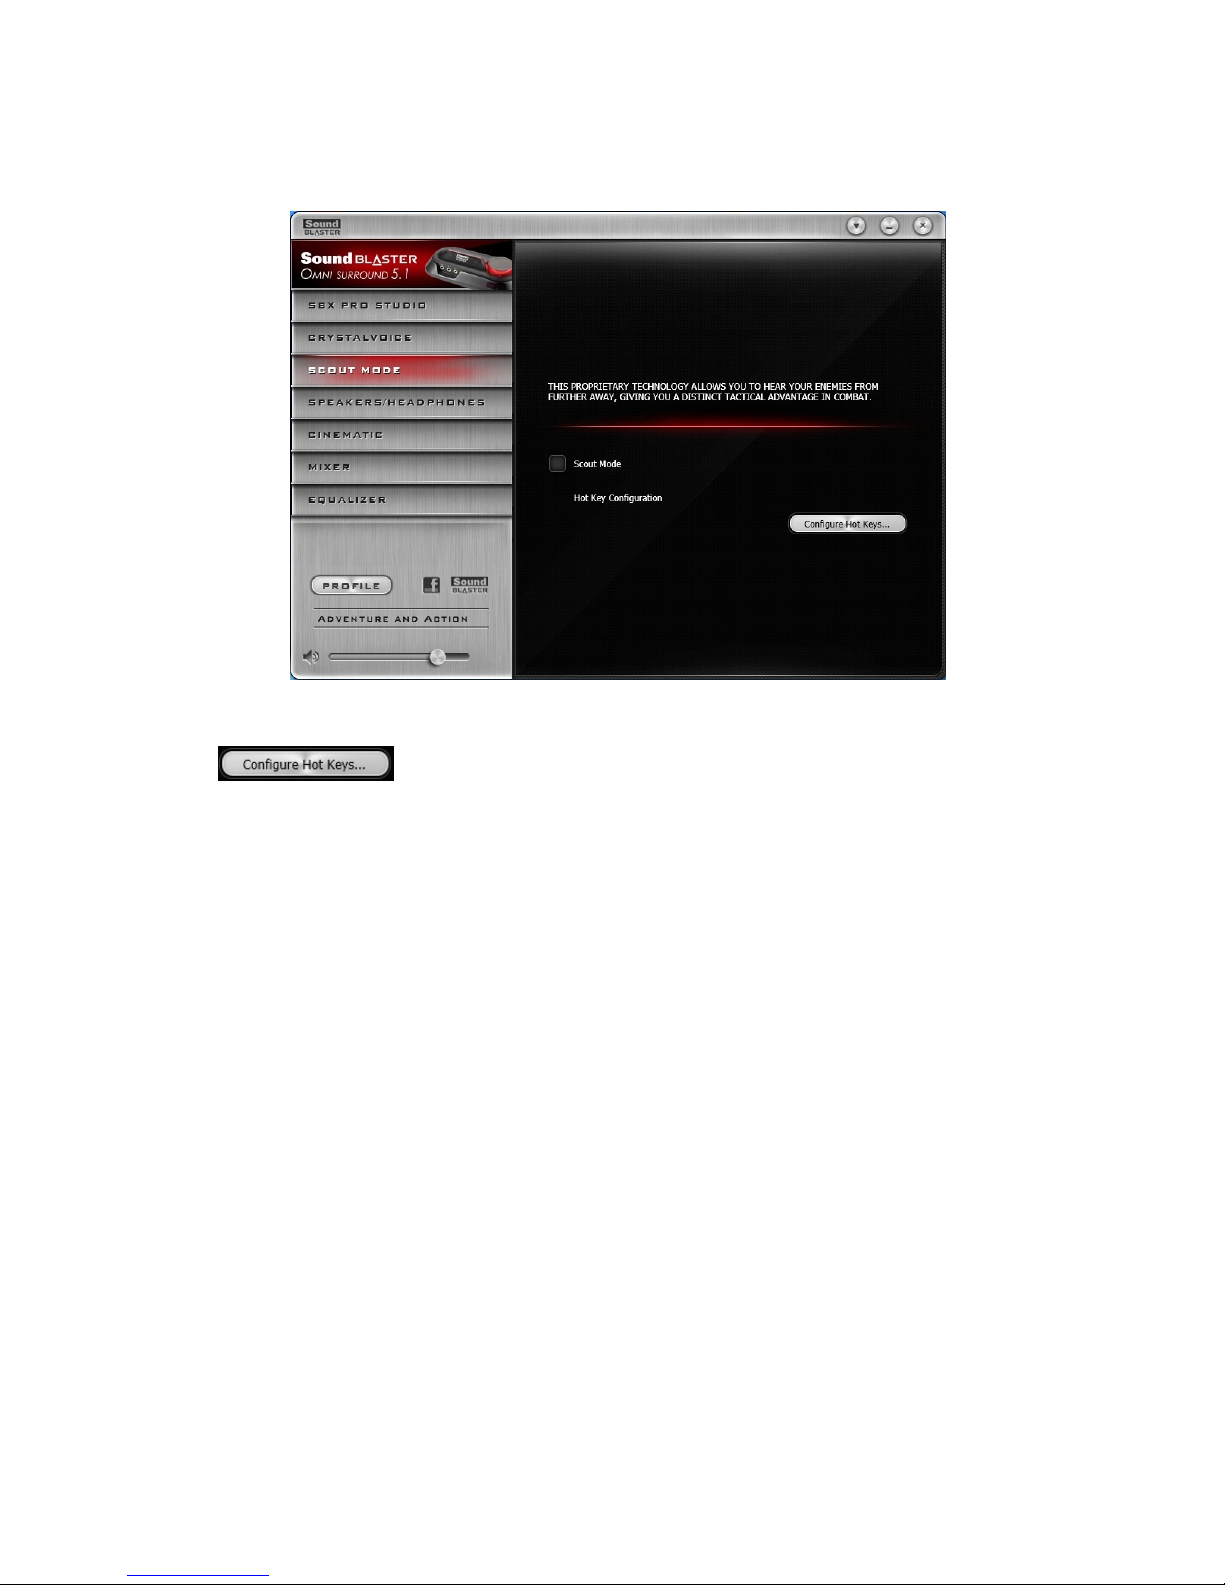
Scout Mode
Scout mode transforms your hearing and enables you to hear your opponents from further away, giving
you a distinct tactical advantage in combat.
1. Scout Mode
Select to turn on or off Scout Mode.
Click to configure hotkeys for turning on and turning off Scout Mode.
Page 27
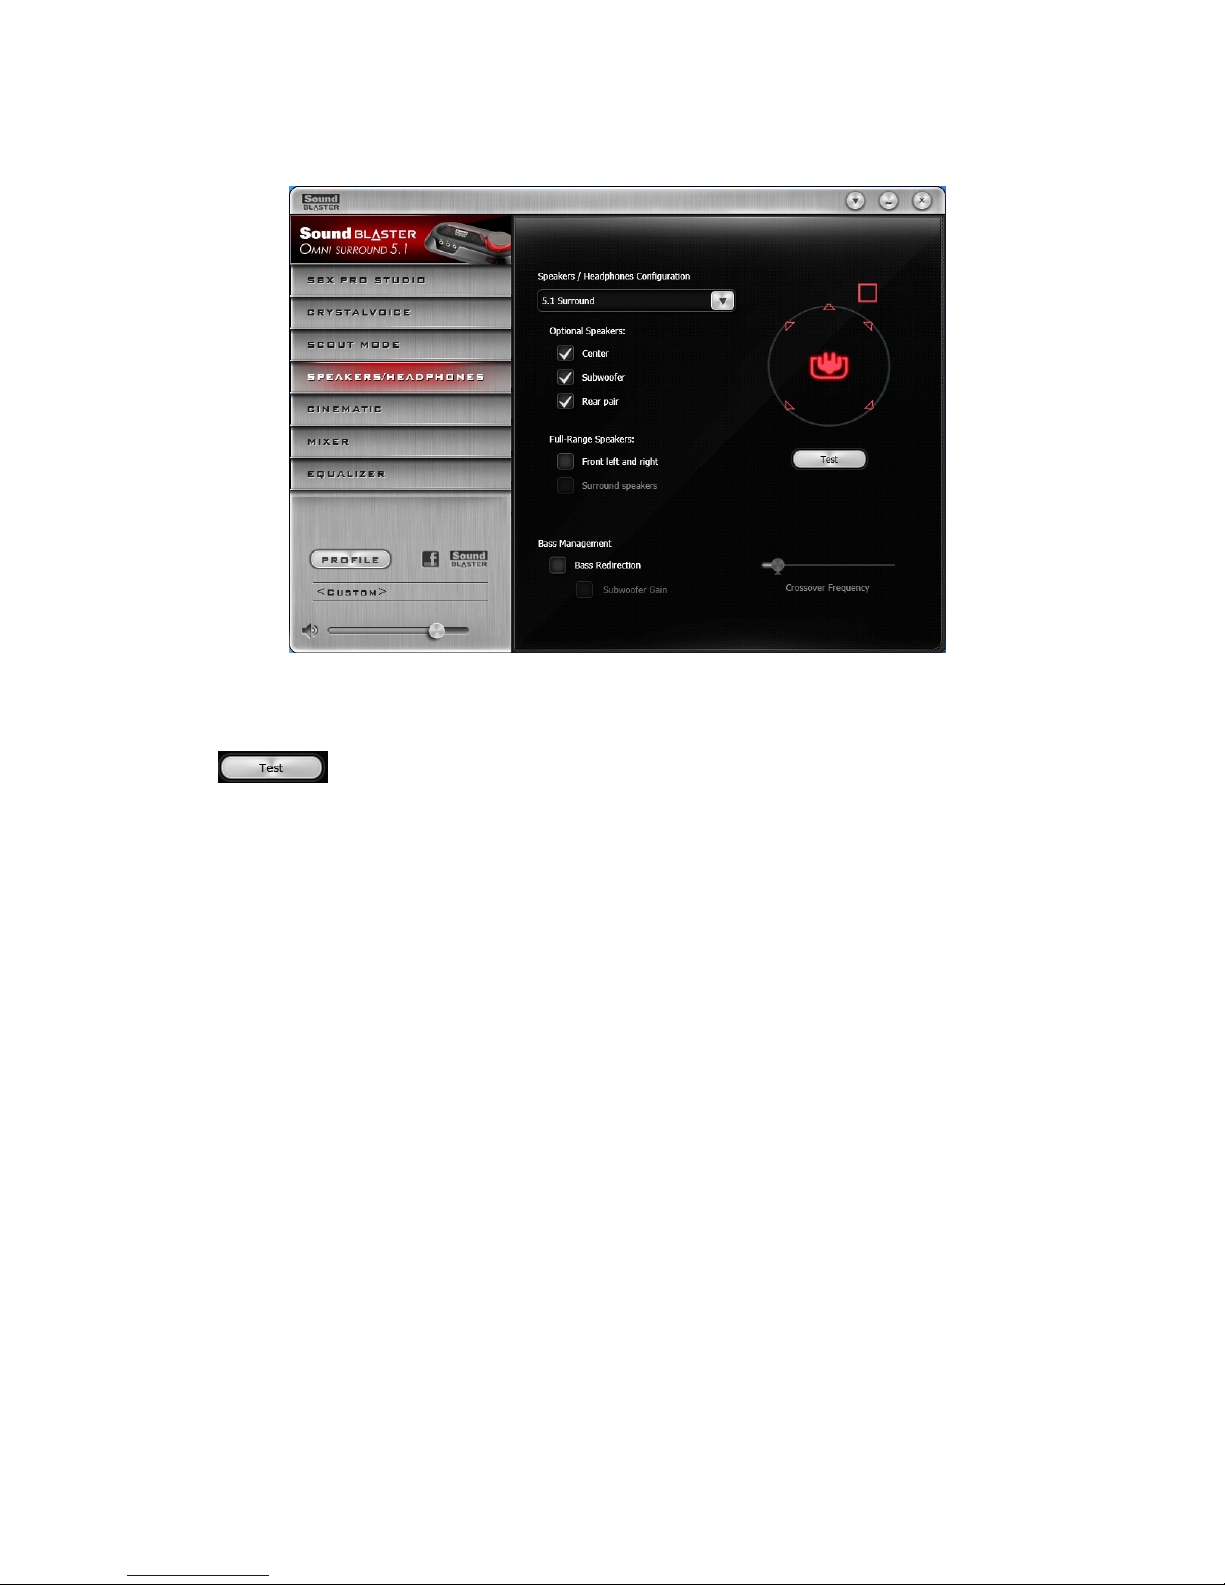
Speakers/Headphones Settings
1. Speakers / Headphones Configuration
Select your current physical speakers or headphones configuration.
2. Testing your audio playback
Click to hear a sample audio clip being played back through your setup.
Page 28
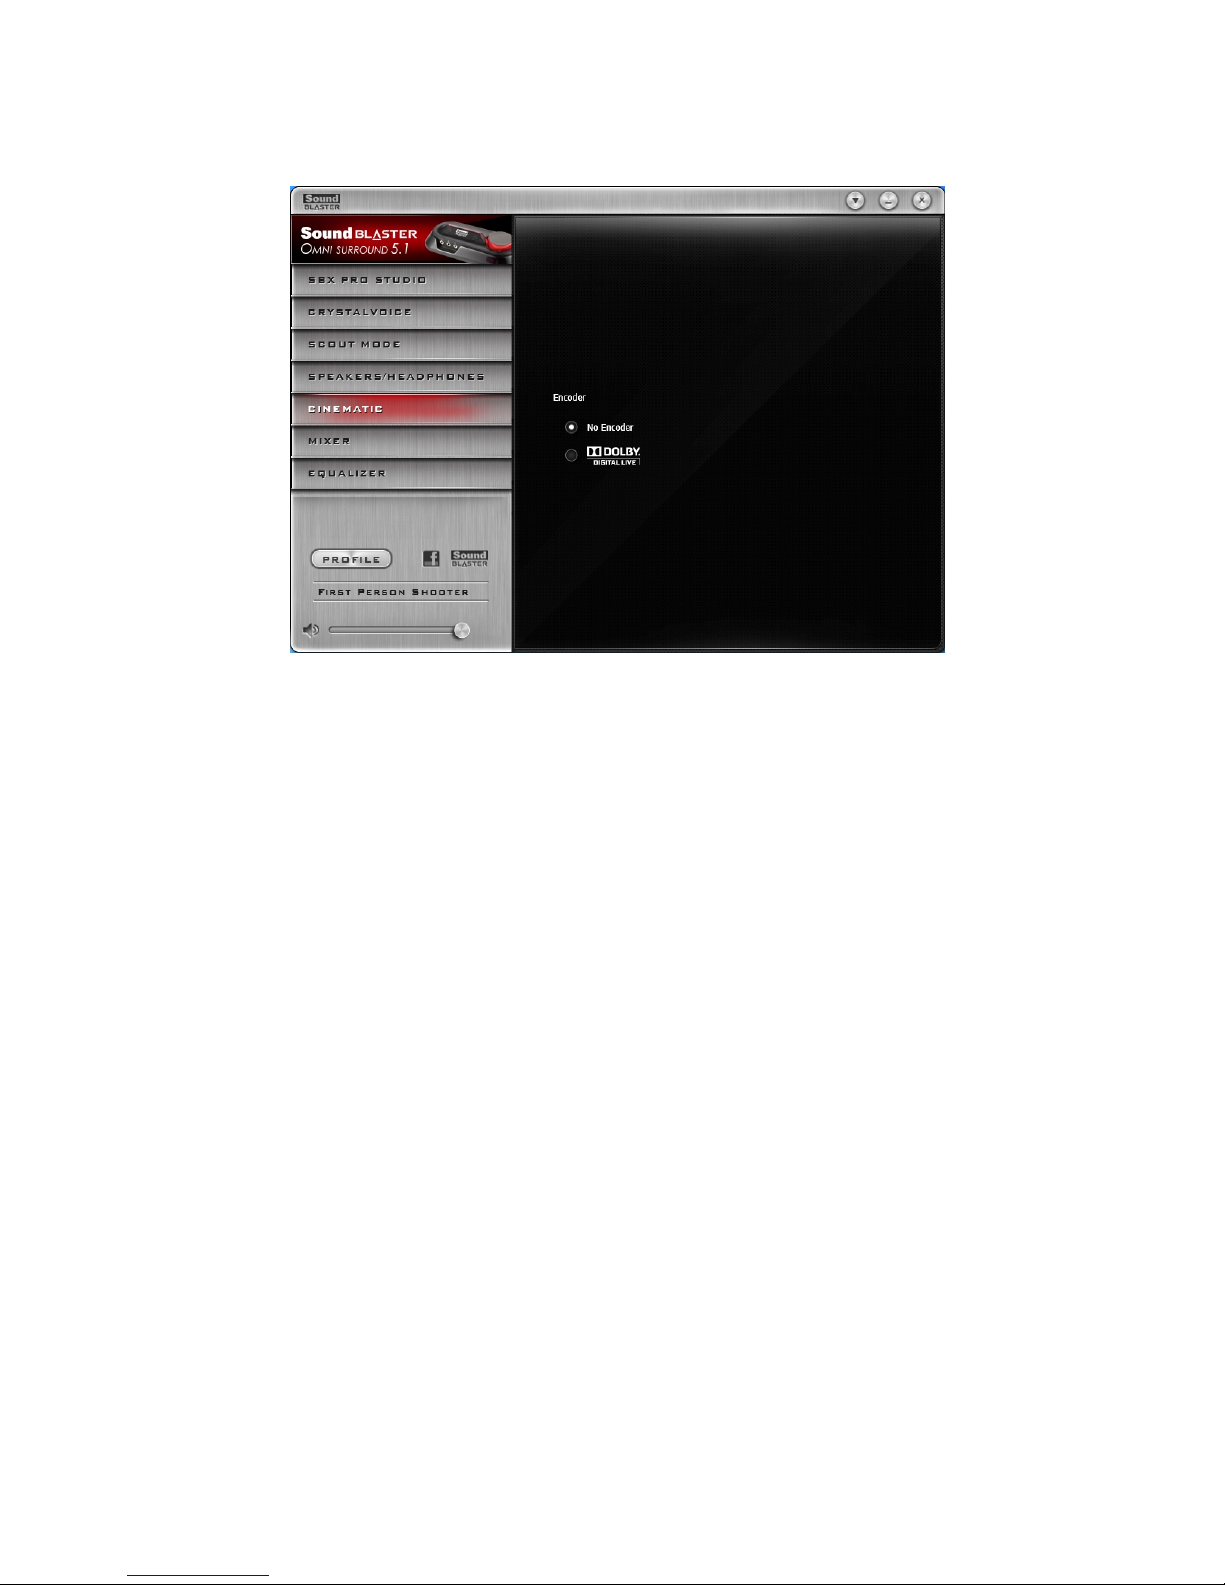
Cinematic Settings
1. Turn off encoder
Select No Encoder if you wish to turn off encoding.
2. Other Encoder settings
Select Dolby Digital Live to turn on the encoder.
Page 29
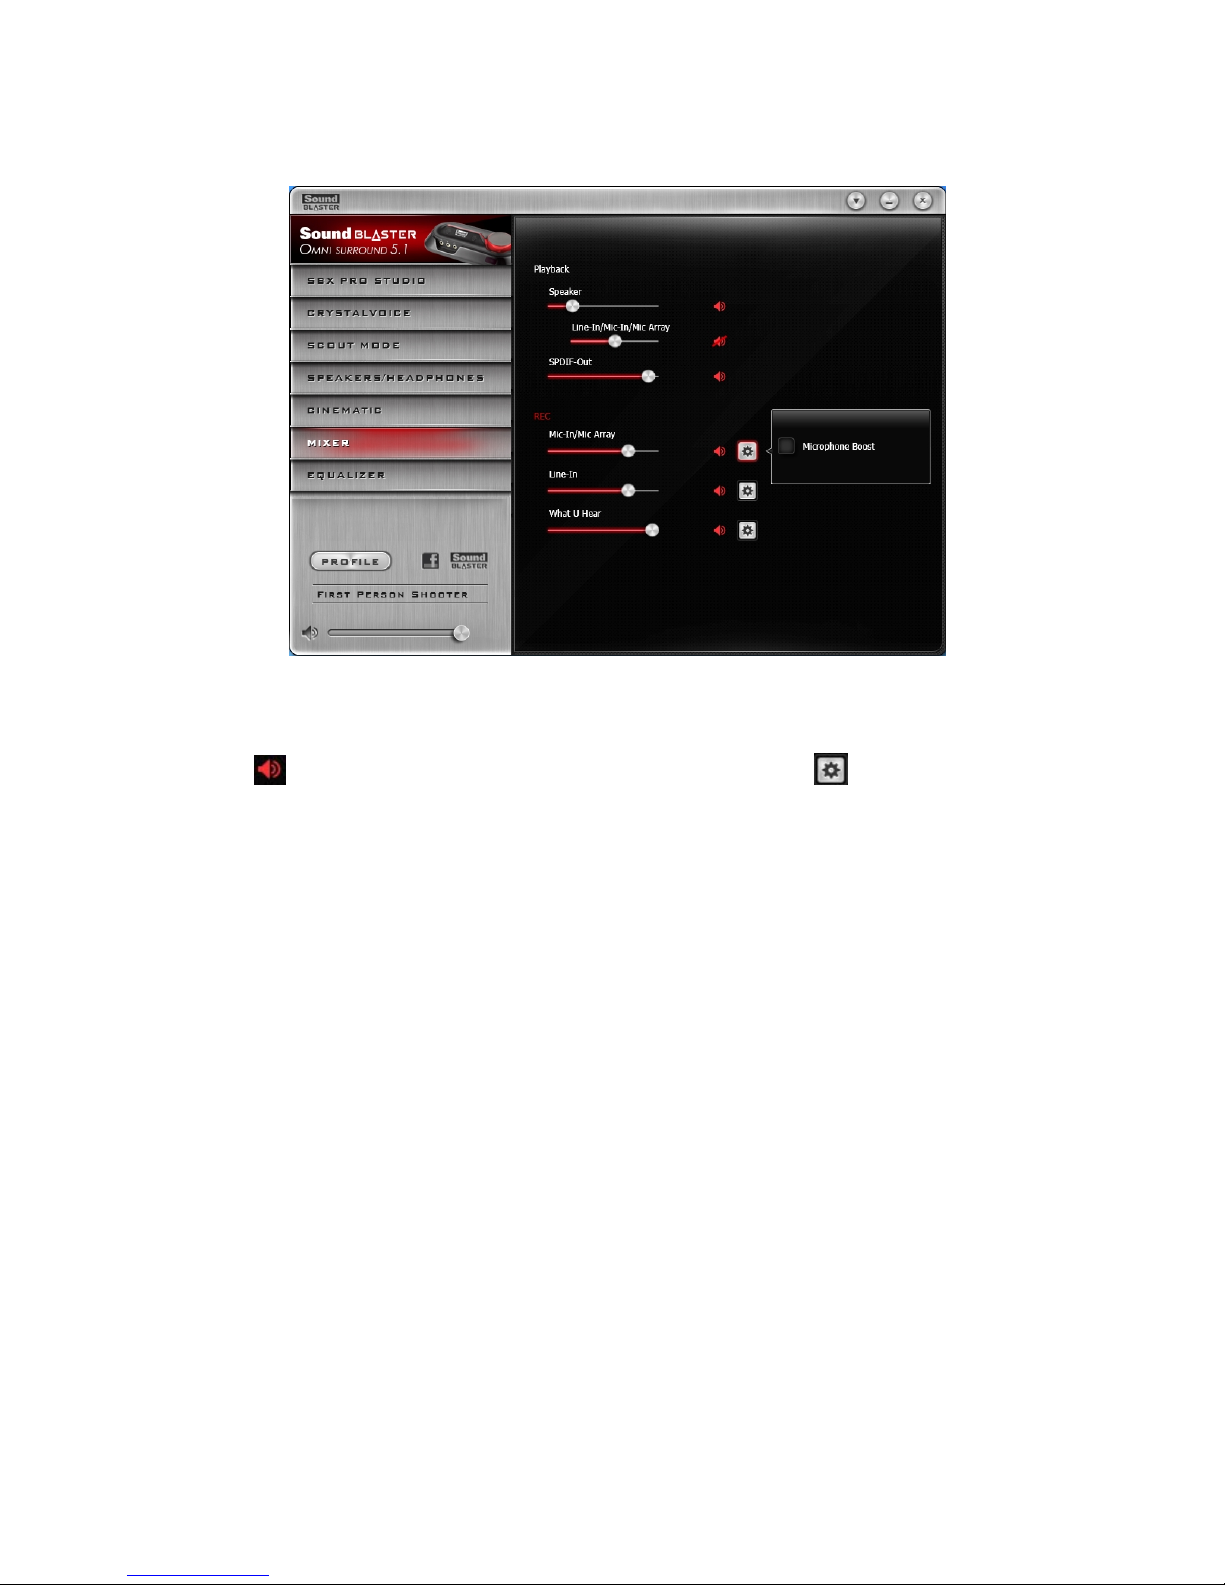
Mixer Settings
1. Volume sliders
Adjust the playback and recording volume for your various inputs and outputs.
2. Mixer Settings
Click the icon to mute/unmute the input/output. You can click the icon to adjust the settings
for your input/output.
3. To listen to the audio from the source connected to the Line-In or Mic-In jack, or the Internal
Microphone Array:
For Windows systems,
Go to the Mixer page of the Sound Blaster Omni Control Panel and unmute the Line-In/Micin/Mic Array from Playback option.
Note: For Internal Mic Array, ensure that there's no external microphone connected.
For Macsystems,
1)Go to System Preferences and click Sound.
2)Click the Input tab and select Line-In or Mic-in/Mic Array as the default recording device.
3) Go to the Mixer page of the Sound Blaster Omni Control Panel and unmute the Line-In or Mic-
in/Mic Array from both REC and Playback options.
Note:
- For the audio source playback, ensure that your Sound Blaster Omni Control Panel is running.
- For Internal Mic Array, ensure that there's no external microphone connected.
Page 30
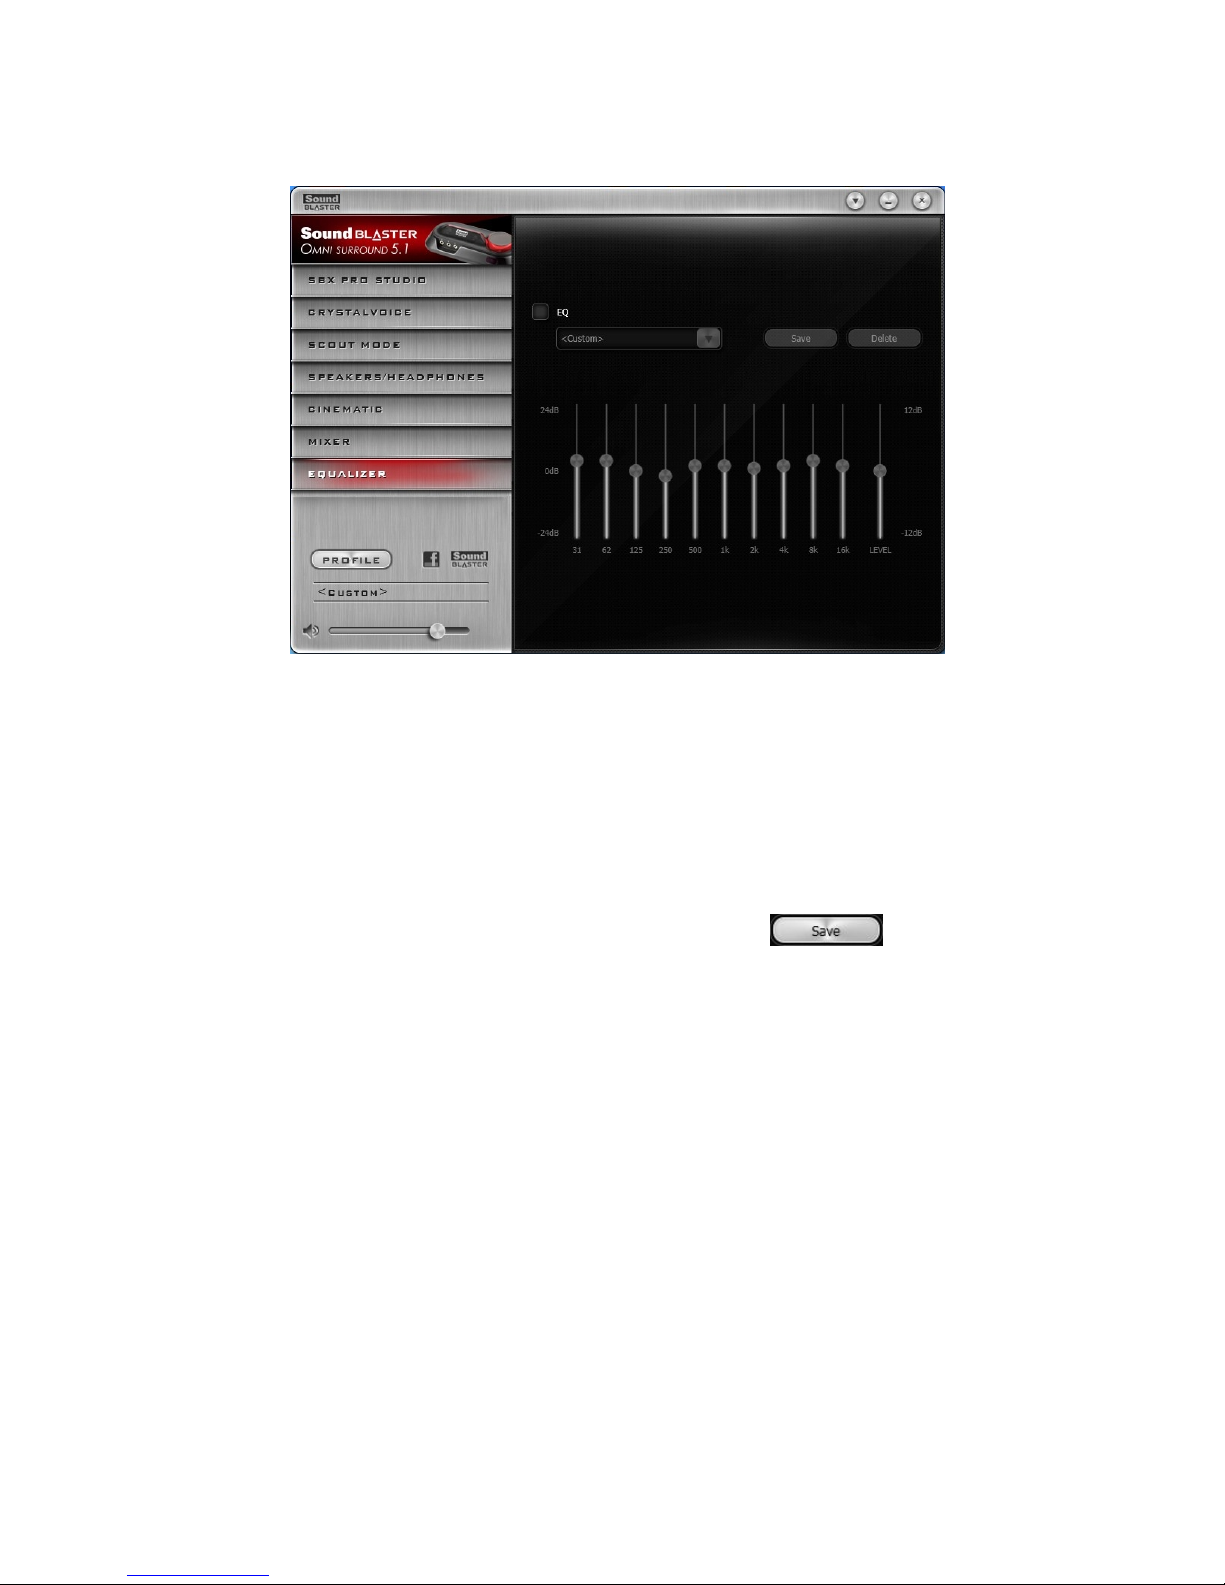
Equalizer Settings
1. EQ presets
Select an equalizer preset to apply to your audio.
2. EQ sliders
Adjust the equalizer settings.
Customizing Your EQSettings
Select the EQ checkbox to enable this feature, then click the EQ drop-down arrow and select a preset
from the list.
Selecting a preset will move the EQ sliders to the appropriate values. You can then adjust the equalizer
setting by dragging the sliders up or down to the desired level. Click to save the new
configuration as a new preset.
Note:
The list of default EQ presets cannot be deleted or overwritten.
Page 31

General Specifications
High Definition Audio Quality (for Windows)
l High Signal-to-Noise Ratio (SNR) exceeding 100 dB using high linearity, low distortion 24-bit con-
verters with resolutions of up to 96 kHz.
l 24-bit Digital-to-Analog conversion of digital sources during playback in 24-bit with sampling rate of
up to 96 kHz in 5.1 mode without audio monitoring.
l 24-bit Analog-to-Digital conversion of analog sources during recording in 24-bit with sampling rates
up to 96 kHz without audio monitoring.
Connectivity
Inputs
l One 3.5 mm (1/8") jack for mono analog Microphone input
l One 3.5 mm (1/8") jack for stereo line-level analog input
Outputs
l One 3.5 mm (1/8") jack for stereo analog Headphones
l Optical jack for optical SPDIF output
l Pair of RCA jacks for stereo line-level analog output
l One 3.5 mm (1/8") jack for Rear output
l One 3.5 mm (1/8") jack for Center/Subwoofer output
Interfaces
l One micro USB port
l One infrared receiver for use with the remote control (available for selected countries only)
Others
l One Volume Control knob
l One red LED to indicate USB link
Page 32

Troubleshooting and Support
This section provides solutions to problems you may encounter during installation or normal use. This
includes:
l Problems with Sound
l Problems with Simultaneous Playback/Recording
Problems with Sound
No sound from the headphones.
Check the following:
l The headphones are connected to the Headphone jack.
l In the speakers and headphone selection of Sound Blaster Omni Control Panel, the Headphones
option is selected.
No audio output when playing digital files such as WAV, MIDI files or AVI clips.
Check the following:
l The speakers' volume control knob, if any, is set at mid-range. Adjust the volume mixer settings in
Sound Blaster Omni Control Panel, if necessary.
l The powered speakers or external amplifier are connected to the Line Out jacks.
l The speakers and headphone selection in Sound Blaster Omni Control Panel corresponds to your
speaker or headphone configuration.
No audio can be heard from the source connected to Line-In or Mic-In jack, or the
Internal Microphone Array.
Do the following:
l In the Mixer selection of Sound Blaster Omni Control Panel, unmute the Line-In or Mic-In/Mic
Array from Playback option.
No audio can be recorded from the source connected to Line-In or Mic-In jack, or
the Internal Microphone Array.
Do the following:
i. Navigate to Windows Control Panel > Sound > Recording tab.
ii. Select Line-In or Mic-In/Mic Array as the default recording device.
iii. In the Mixer selection of Sound Blaster Omni Control Panel, unmute the Line-In or Mic-In/Mic
Array from REC option.
Problems with Simultaneous Playback/Recording
An error message appears when recording and playing back simultaneously.
This may occur due to data transfer limitations if your computer is using a USB 1.1 connection. It may
not be possible to play back, or simultaneously record and play back, content at the highest bit rate
and/or frequency supported (24-bit, 96 kHz). Select lower bit depth and sampling rates for reduced CPU
consumption and lower USB bandwidth requirements. Select lower settings if you encounter
performance problems or if you run out of USB bandwidth. Lower sampling and bit depth rates,
however, usually result in lower audio quality.
This should not be a problem if you are using a USB 2.0 connection.
Page 33

Additional Support
If you encounter any other issues or have any other enquiries about your Sound Blaster Omni Surround
5.1 or any other Creative products, please visit our comprehensive knowledge base at
support.creative.com or www.soundblaster.com for additional information.
Page 34

License and Copyright
Information in this document is subject to change without notice and does not represent a commitment
on the part of Creative Technology Ltd. No part of this manual may be reproduced or transmitted in any
form or by any means, electronic or mechanical, including photocopying and recording, for any purpose
without the written permission of Creative Technology Ltd.
The Software License Agreement is found in a separate folder on the Installation CD.
Copyright © 2013 Creative Technology Ltd. All rights reserved. Creative, the Creative logo, Sound
Blaster, the Sound Blaster logo, SBX Pro Studio, the SBX logo and CrystalVoice are trademarks or
registered trademarks of Creative Technology Ltd. in the United States and/or other countries. Intel and
Pentium are registered trademarks of Intel Corporation. AMD and AMD Athlon are trademarks of
Advanced Micro Devices, Inc. Microsoft, Windows Vista, Windows and the Windows logo are trademarks
or registered trademarks of Microsoft Corporation. Dolby and the double-D symbol are registered
trademarks of Dolby Laboratories, Inc. DTS and DTS-ES Extended Surround are trademarks of Digital
Theater Systems, Inc. CyberLink and PowerDVD are registered trademarks or trademarks of CyberLink
Corp. Other trademarks and trade names are those of their respective owners. All specifications are
subject to change without prior notice. Use of this product is subject to a limited hardware warranty.
Actual contents may differ slightly from those pictured. The software included in this packaging may not
be used separately from the hardware. Before using the software, you must agree to be bound by the
terms and conditions of the end user license agreement.
Version 1.0
June 2013
 Loading...