

Page 1
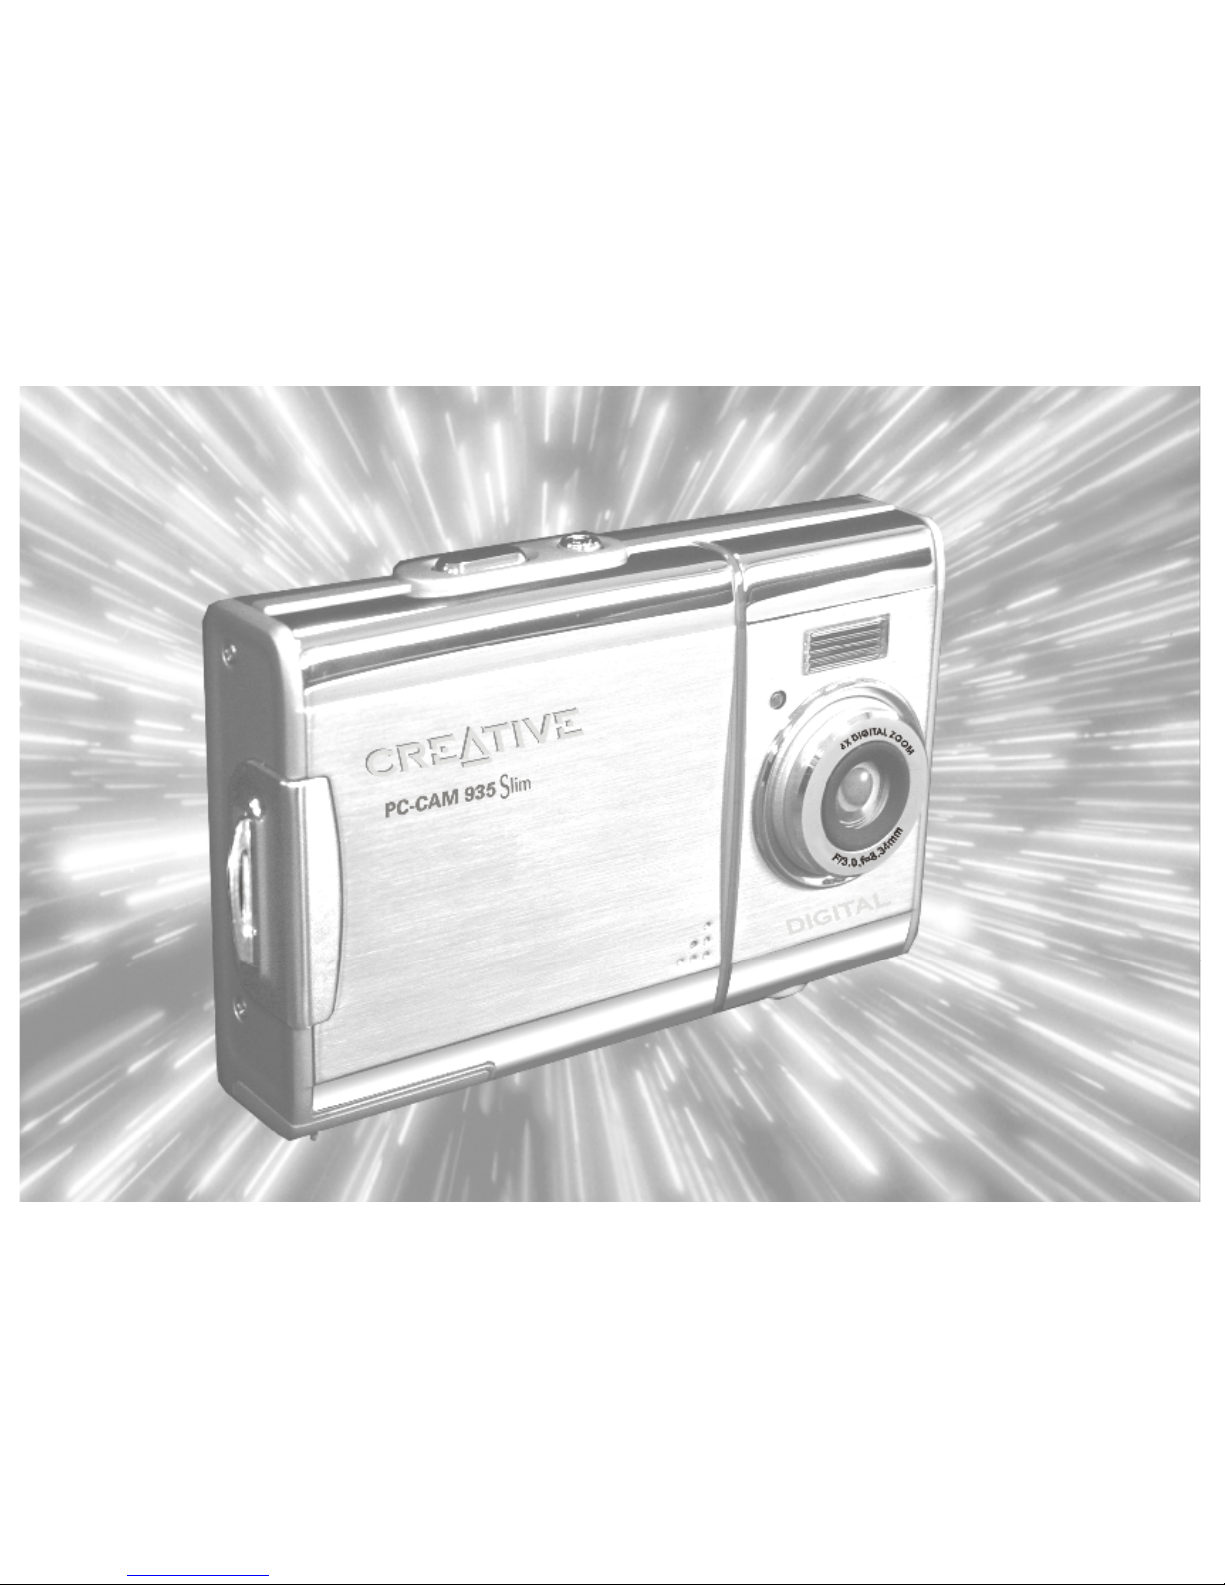
User’s Manual
Page 2

1
Chapter 1 Attention
1-1 Safety Precautions……….....................…....…..…...2
1-2 Before Using Your Camera……..............……..........2
1-3 Operation Caution………......................……...........2
1-4 Package Contents………........................………..…...3
Chapter 2 Getting to Know Your Camera
2-1 Names of Parts……….....................…………...…......4
2-2 Specifications.................................……….....…...6
2-3 System Requirements……………………………………………6
Chapter 3 Controls, Operation, and
Display
3-1 LED Indicators………....................…..........………...7
3-2 LCD Monitor Display………..................…..............7
3-3 Power Supply.…………………………………..………….........8
3-4 Shutter Button……….............................………......8
3-5 Mode Button.......……….….......…...………...............9
3-6 Function Key…..………..……………………….….…………..…9
3-7 Set Button…..…………………….……………….….……….…...9
3-8 Image/Movie Play Button…………………….…….…..…….9
3-9 Macro Button…………………………………………….………….10
Chapter 4 Navigating Modes and Menus
4-1 Record Mode……….. ...............…………................11
4-2 Playback Mode.………….............….……………..........12
4-3 Movie Mode……….. .................…….….................13
4-4 Setup Mode………...............................…...........14
4-5 PC Mode………......................………….........….…....16
.
Chapter 5 Preparing Your Camera
5-1 Attaching the Strap….............…......……………......17
5-2 Loading Batteries.....………...................…….........17
5-3 Loading and Removing the Memory Card....….....18
5-4 Setting Up the OSD Language………...........……....19
5-5 Setting Up the Date/Time …………….…………………....19
Chapter 6 Getting Started
6-1 Setup Mode………......…....……………………………........20
6-2 Record Mode………......… .....……………………………......20
6-3 Play Mode.….........….…………… ............................21
6-4 Movie Mode……….. .........................…...............21
6-5 PC Mode…………………………………………………………………22
Chapter 7 Driver Installation
7-1 Installing the Camera Driver for PC.......…………...24
7-2 Installing the Application for PC………………….…….…26
Content
Page 3

2
Please read through this manual carefully before using
the camera and follow the instructions to avoid damages
caused by improper operation.
1-1 Safety Precautions
●The software CD-ROM packaged with the camera is
designed for PC only. Using a stereo or CD player may
damage the CD-ROM.
●This camera is a precision electronic device. Do not
attempt to service this camera yourself, as opening or
removing covers may expose you to dangerous voltage
points or other risks.
●Do not expose this camera under direct sunlight to
avoid causing a fire.
1-2 Before Using Your Camera
●Take some test shots before you perform the formal
recording.
Before taking pictures with this camera in any
important occasion (such as a wedding ceremony or an
overseas trip), do test the camera beforehand to
ensure that it functions well. Any additional loss
caused by the malfunction of this product (such as
costs of photography or any loss of benefit generated
by the photography) is not the responsibility of our
company and no compensation will be given for it.
●Copyright information
Unless agreed by the right owner, all the pictures taken
with this digital camera cannot be used in violation of
copyright law. Moreover, when "No Photography"
restriction is placed on site, one cannot record any live
performance, improvisation or exhibits even for
personal purpose. Any transfer of pictures or memory
card with data must be conducted under the
constraints of copyright law.
●Notes on the LCD (Liquid Crystal Display) monitor
Please be extra careful with the liquid if the LCD
monitor is damaged; also please abide the stated
procedures, if the followings occur:
1. If the liquid makes contacts with the skin:
Please wipe the skin dry with a cloth and wash
thoroughly with water.
2. If the liquid gets in the eye:
Please rinse with water immediately for at least 15
minutes and then consult a physician to receive
treatment as soon as possible.
3. If the liquid is accidentally swallowed:
Please rinse the mouth with water, drink large
amount of water and induce vomiting. And then
consult a physician to receive treatment as soon as
possible.
1-3 Operation Caution
This product consists of intricate electrical parts. To
ensure the performance normality, do not drop or hit the
camera when taking pictures.
●Avoid using or placing the camera in the following
locations:
1. Damp and dusty places.
1. Attention
Page 4
3
2. Sealed vehicles, direct sunlight exposure areas, or
places with extreme high temperatures or heat.
3. Violent turbulent environment.
4. Locations full of smoke, oil fumes or steams.
5. Locations subject to strong magnetic field.
6. Rainy or snowy environment.
●Do not open the battery cover when the power is on.
●If water has gotten into the camera, turn the power
OFF and remove the batteries immediately.
●How to maintain your camera:
1. If the lens, LCD monitor is dirty, please use lens
brush or soft cloth to wipe clean instead of touching
the lens with you fingers.
2. To avoid scratching the lens, LCD monitor or
viewfinder surface, do not use any solid object to hit
the camera.
3. Do not use any detergent or volatile solution, which
will subject the camera case and the paint to solving
or distortion. Use soft cloth only.
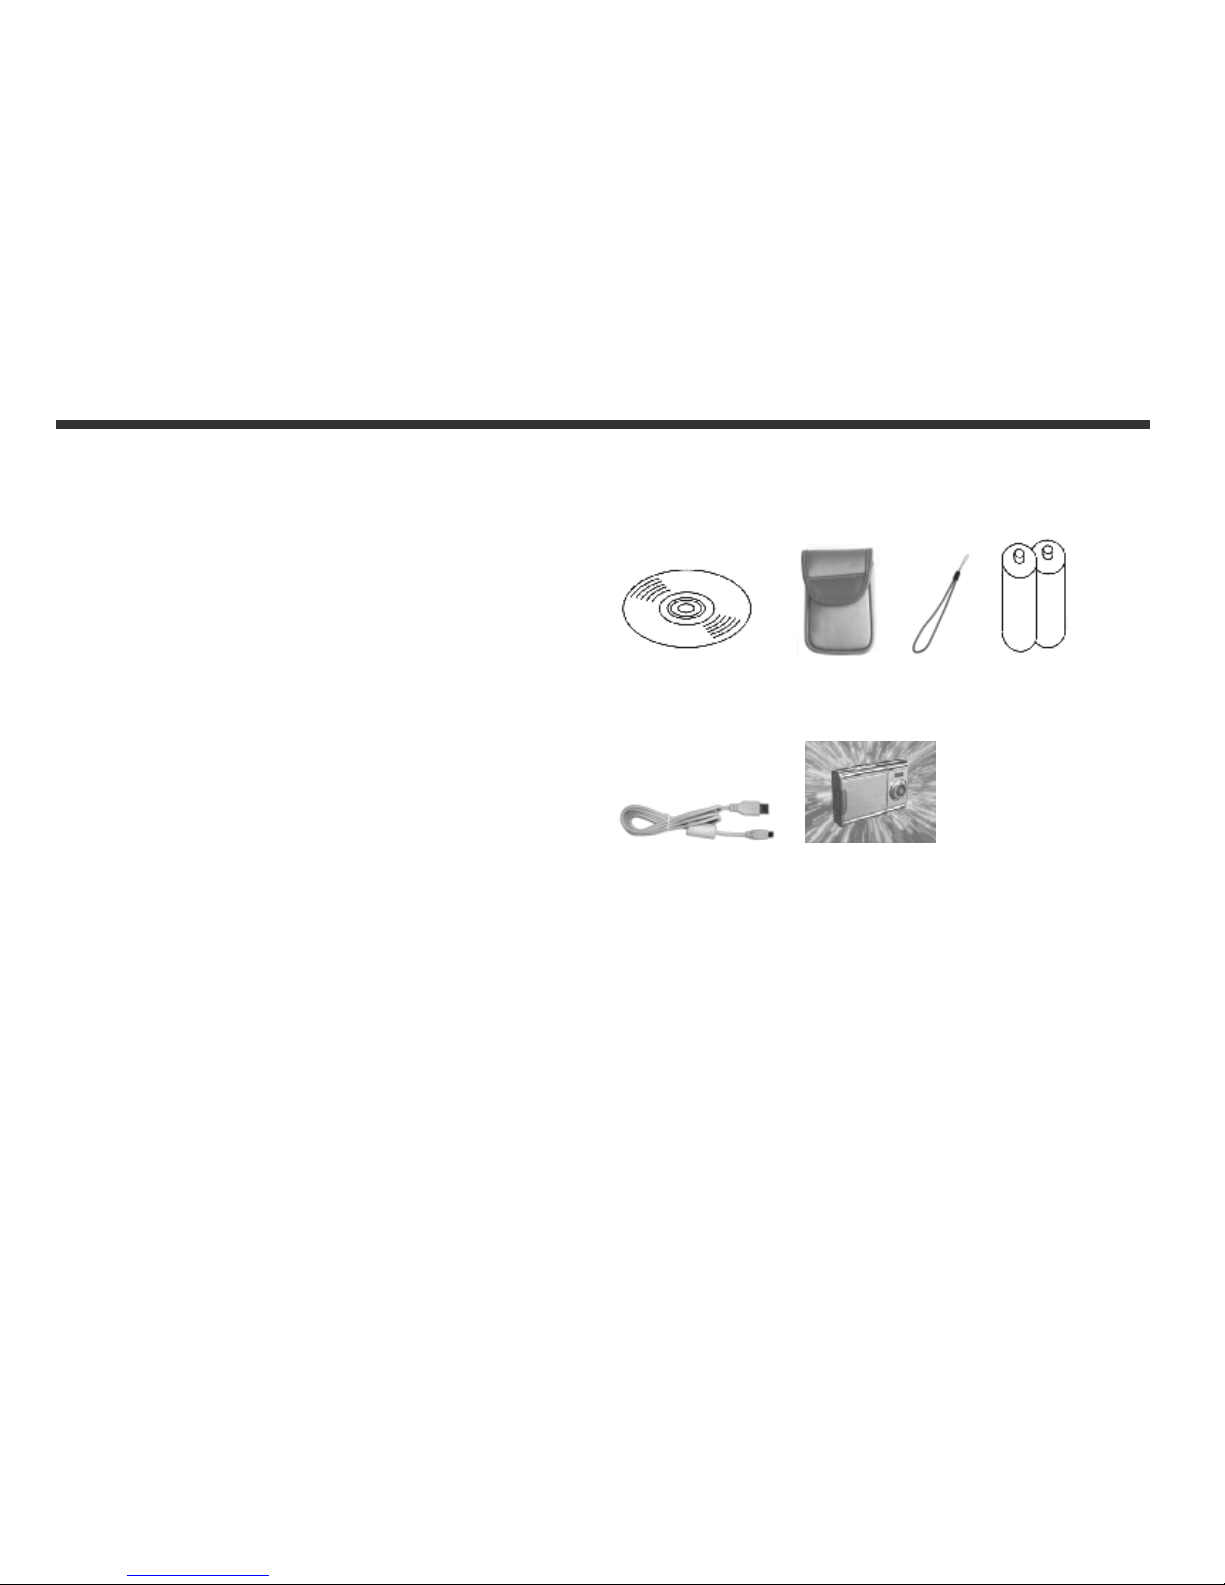
1-4 Package Contents
Please check if the following items are in the package
when purchasing this product.
CD-ROM
(incl. Camera Driver), Pouch, Wrist Strap, Batteries
USB CABLE This User's Manual
●CD-ROM (incl. Camera Driver)
●Pouch
●Wrist Strap
●2 x AAA Alkaline Batteries
●USB Cable
●This User's Manual
Page 5
4
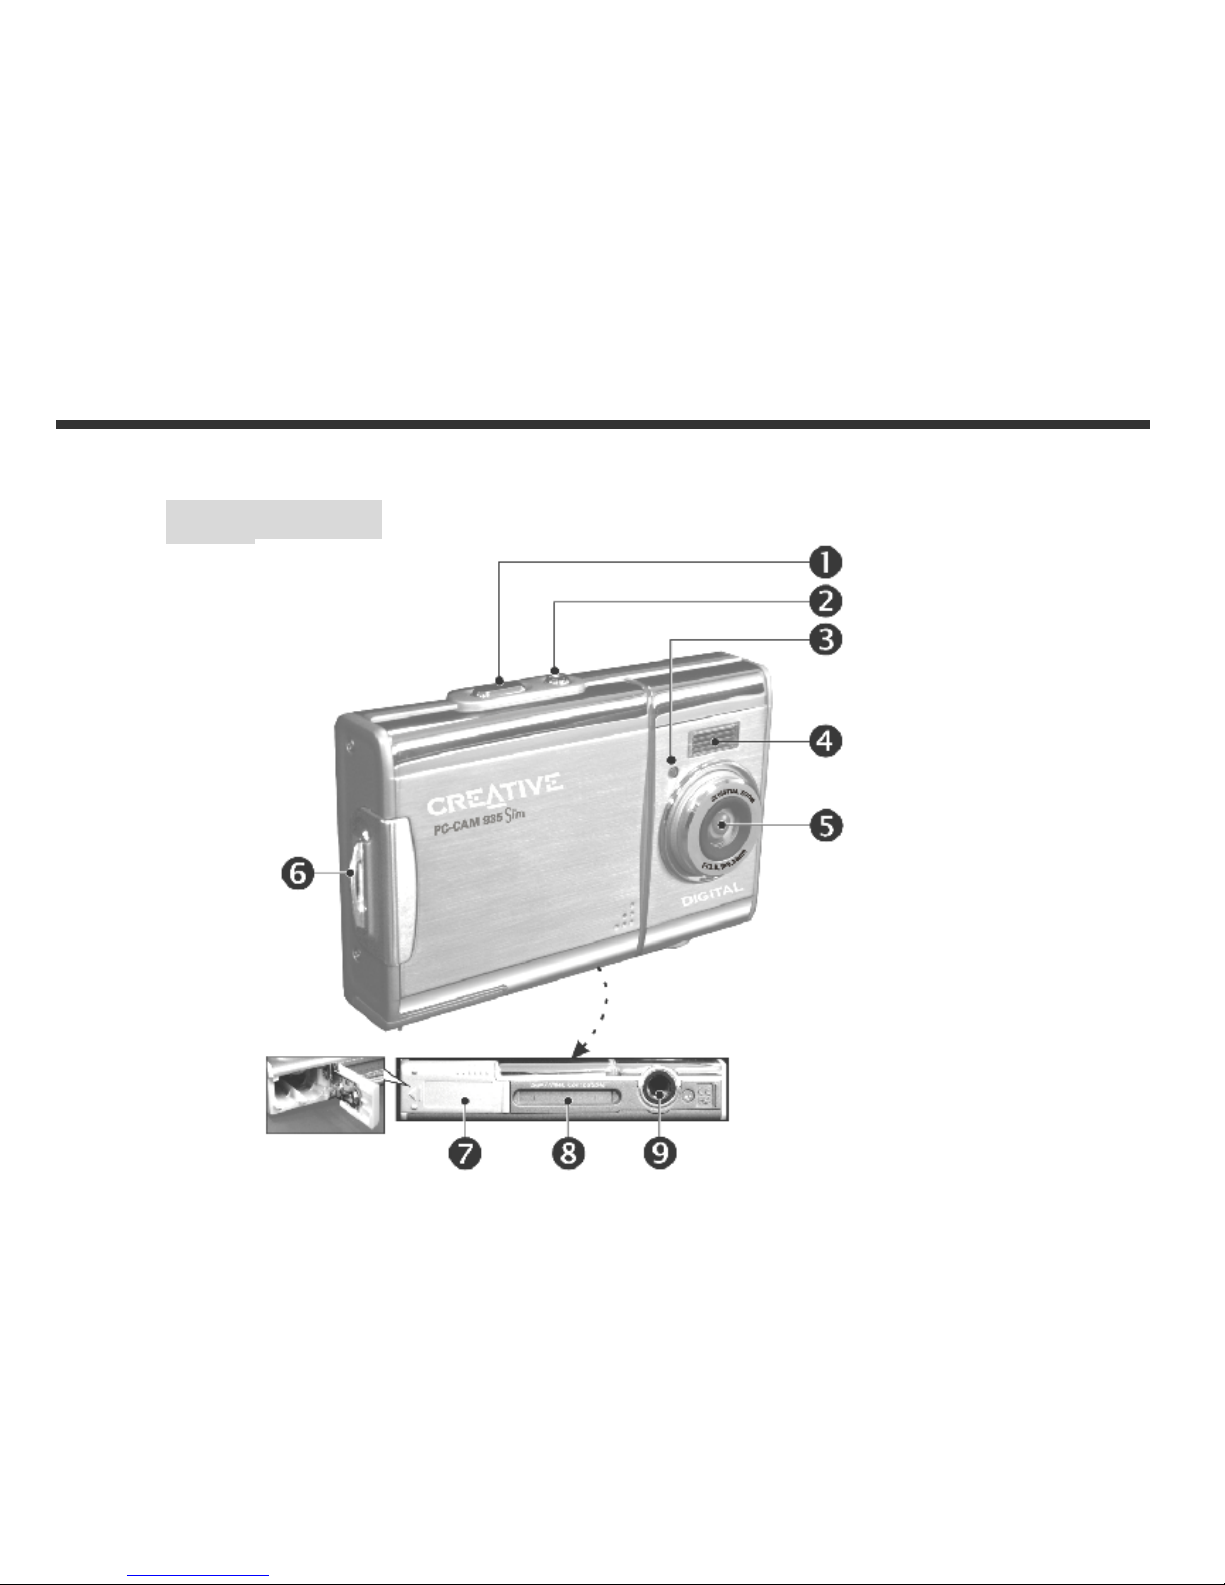
2-1 Names of Parts
Front View
2. Getting to Know Your Camera
(1) Shutter
(2) Power Switch
(3) Self-timer LED
(4) Flash Light
(5) Lens
(6) Strap Holder
(7) Battery Cover
(8) Memory Card Slot
(9) Tripod Socket
Page 6
5
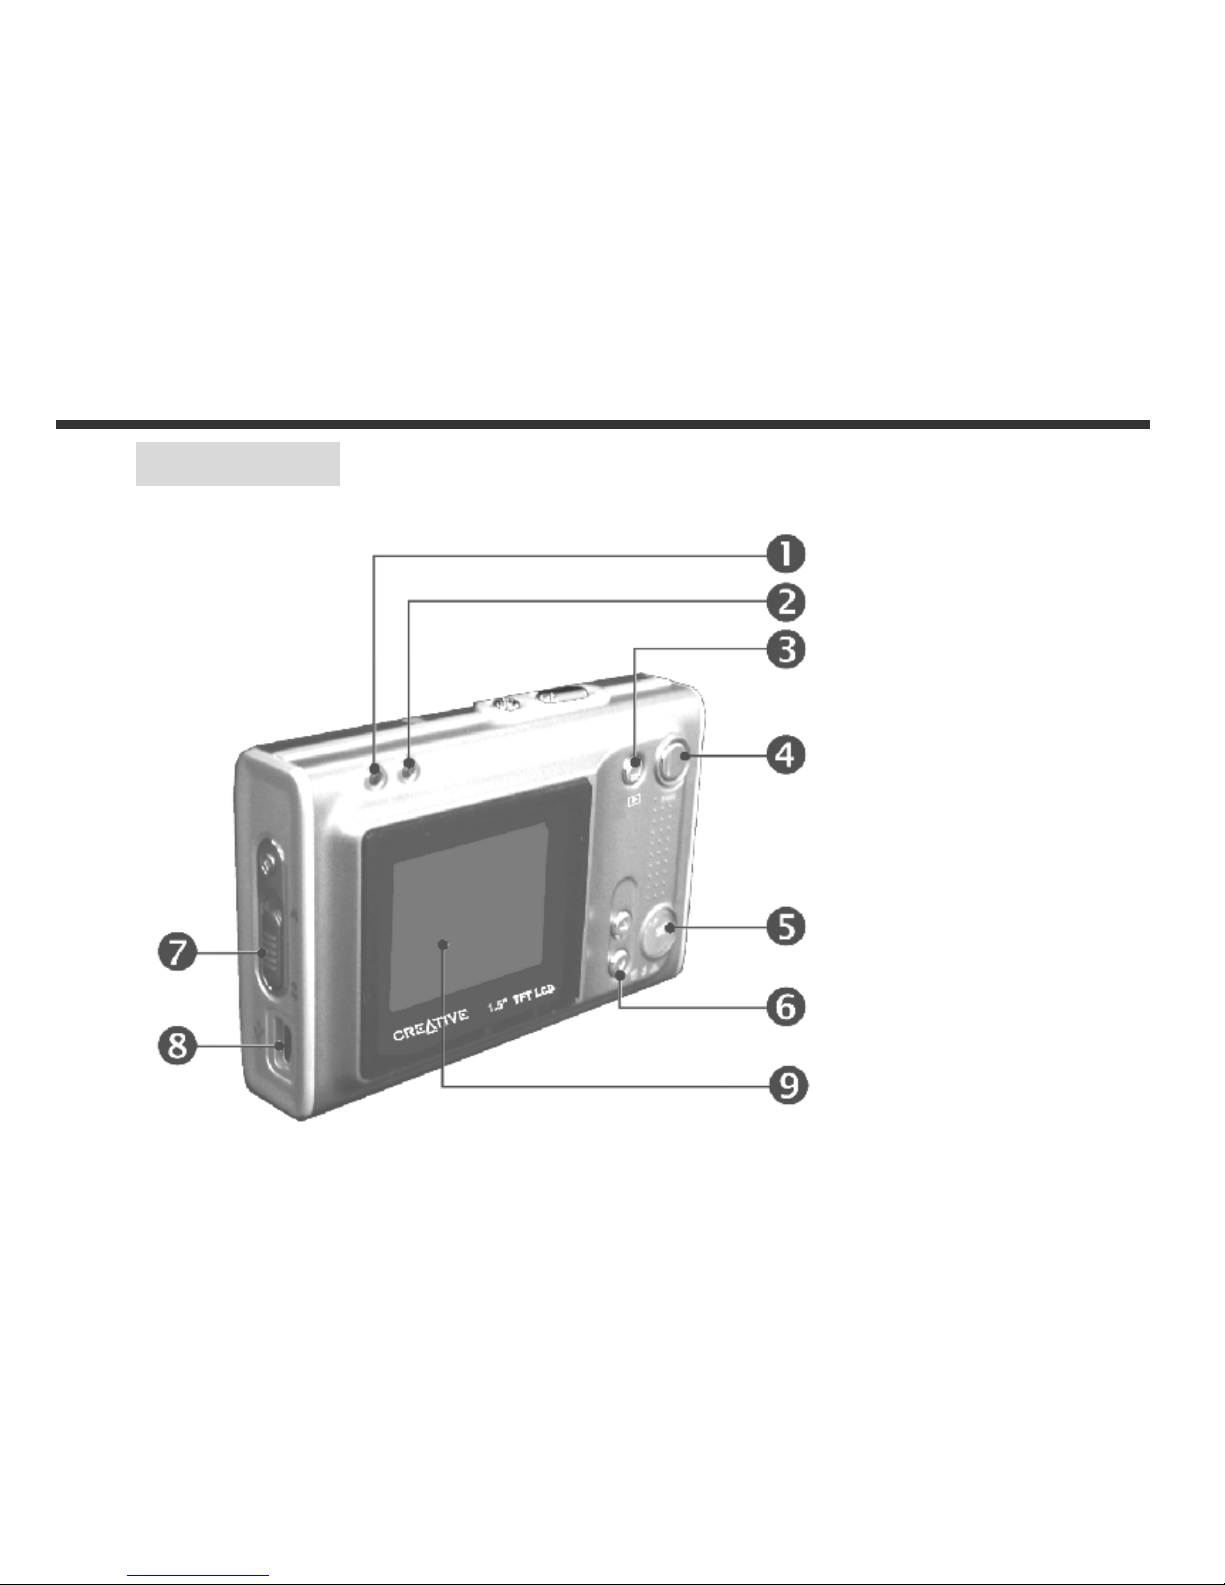
Rear View
(1) Macro LED
(2) Status LED
(3) Image/Movie Play Button
(4) Mode Button
(5) Set Button
(6) Function Key
(7) Macro Button
(8) USB Port
(9) LCD Monitor
Page 7
6
2-2 Specifications
●Lens: f=8.34mm
● Image Sensor: 1/2" CMOS with 3.0 mega pixels
●Focus: F / 3.0
●Sensitivity: ISO 100
●White Balance: White Balance: Auto, Sunny, Tungsten,
Fluorescent.
●Shutter: Electrical
●Shutter Speed: 1/4 sec. ~ 1/2000 sec.
●Storage Medium: 16MB Internal Flash Memory
SD Card Slot (support 32MB~512MB)
● Image File Format: JPEG (Still Image)
AVI (Motion Image)
● Image Resolution: Fine: 2976 x 2232 (Software
Interpolation
2048 x 1536
1600 x 1200
1280 x 960
● Digital Zoom: 10-Step 4X Digital Zoom
● Focal Range – Standard: 1.2m ~ Infinity
● Focal Range – Macro: 15 ~ 20cm
● Self-timer: 10 sec. delay
●PC-CAM Mode: QVGA (320 x 240) Up to 20fps
VGA (640 x 480) Up to 10fps
●Flash Mode: Auto, Off
●PC Interface: USB (Ver. 1.1)
●Movie File: Recording movie files for 60 seconds
continuously with (512 x 384) format
(16MB internal memory)
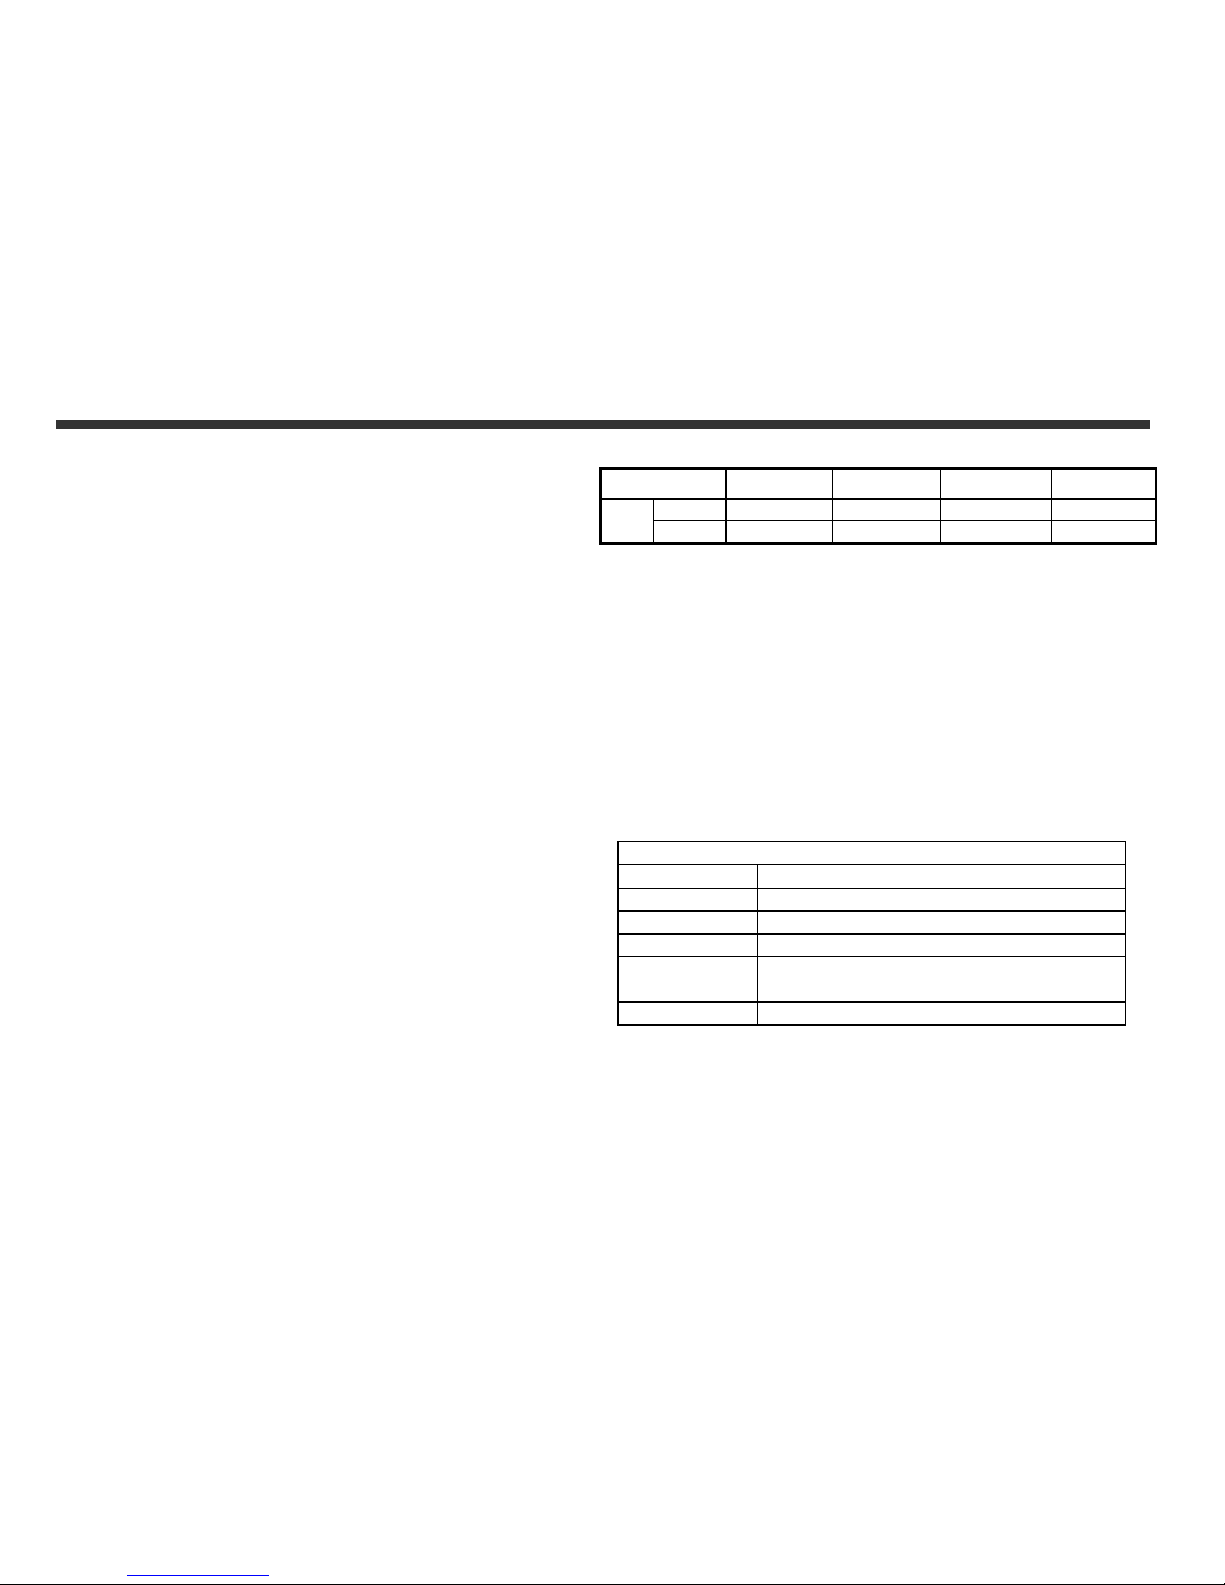
●Recordable Image Numbers (16MB):
1280x960 1600x1200 2048x1536 2976x2232
Fine 41 27 16 8
16MB
Normal
103 68 43 21
●Power Supply: 2 x AAA Alkaline Batteries or supports
USB 5V (PC-CAM Mode)
●Dimensions: 89 x 58 x 27 mm
● Weight: About 90g (batteries excluded)
2-3 System Requirements
When operating the digital camera, we strongly
recommend you to use a better computer system for
optimal performance. The minimal system requirement
for digital camera is as follows:
System Requirement
OS Microsoft Windows 98SE/Me/2000/XP
CPU Intel Pentium 166MHz or higher
Memory 64 MB memory or above
CD-ROM 4X or above
HDD
Minimum 100MB free disk space on the
hard drive
Others One standard USB 1.1 or USB 2.0 port
Page 8
7
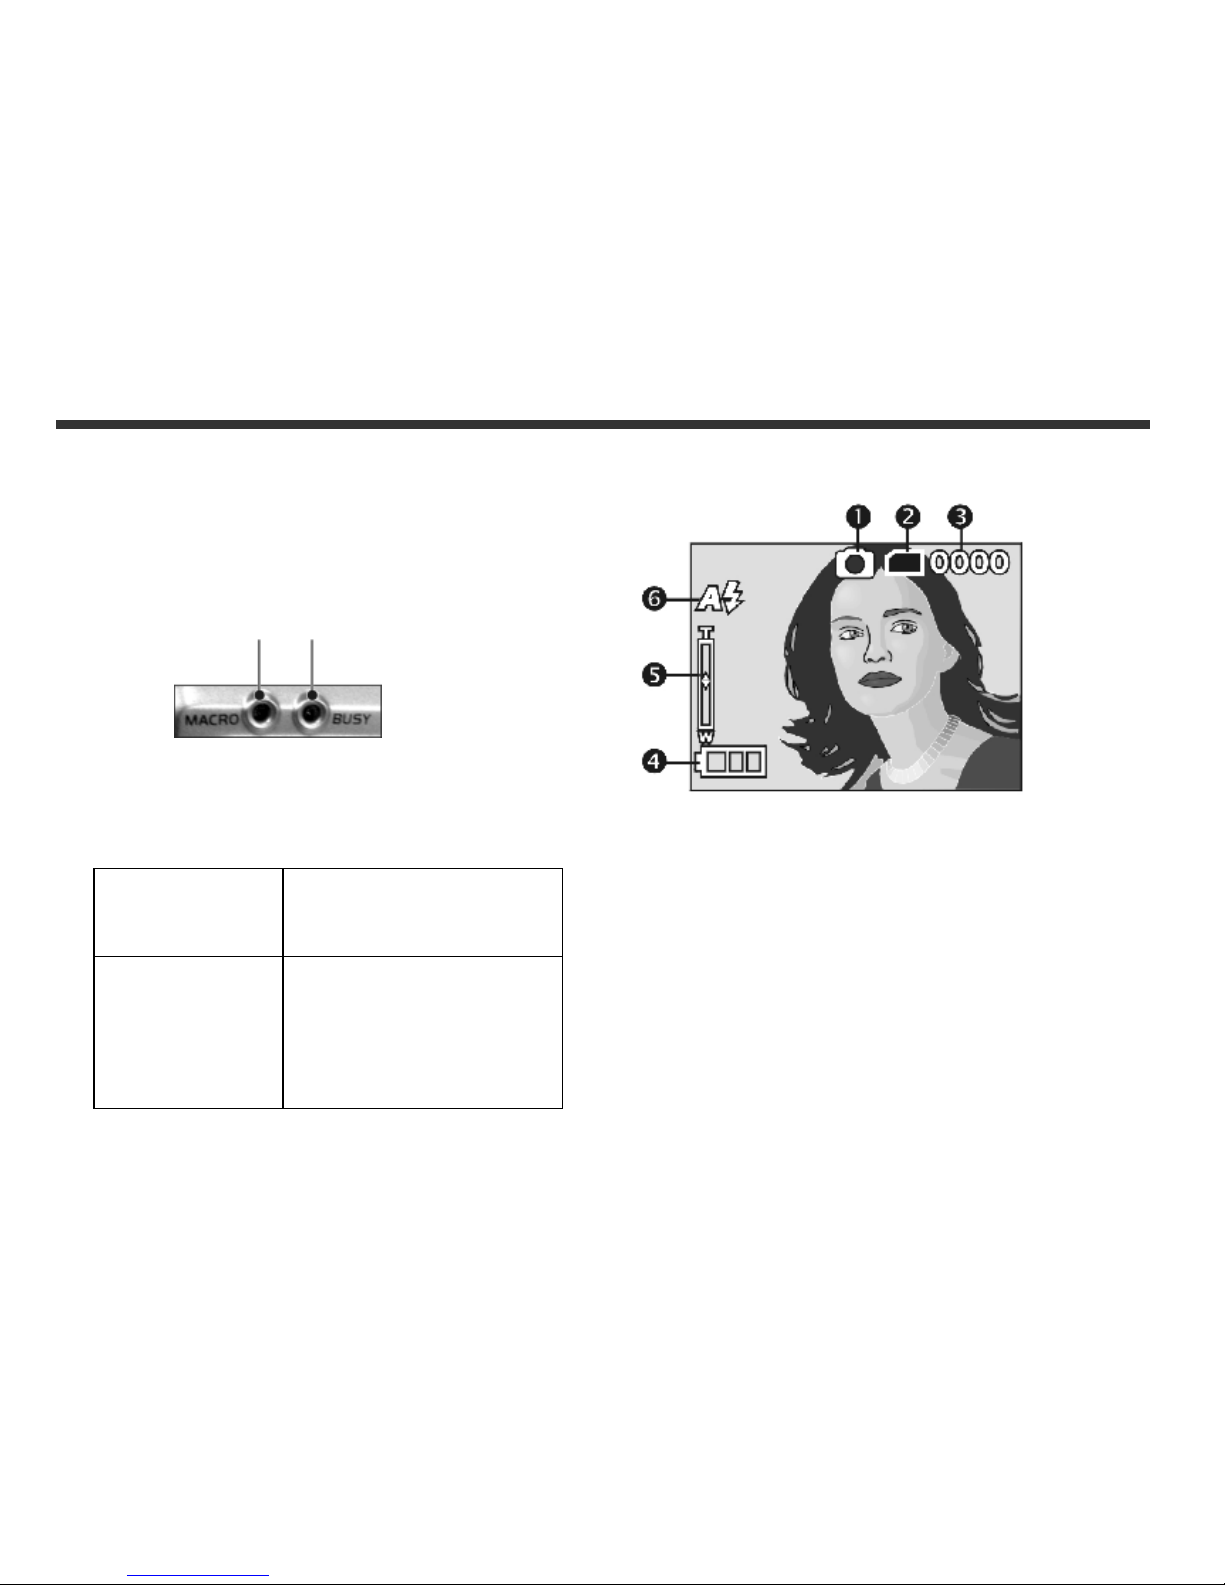
3-1 LED Indicators
The meanings of the LED indicators located on the top of
the LCD monitor are:
Macro LED Standby/Busy
(Green LED) (Red LED)
Macro (Left
Green LED)
The green LED will be on when
the Macro key on the left hand
side of the camera is switched
to Macro mode.
Busy (Right
Red LED)
The red LED will be on when
the camera is recording or
when the batteries for the
flash lights are charging.
The LED would blink every 10
seconds under normal standby
mode.
3-2 LCD Monitor Display
(1) Current working mode
(2) Memory Status
(3) Possible number of shots
(4) Remaining battery power
(5) Zoom lever
(6) Flash light status
3. Contro
ls, Operation, and Display
Page 9
8
3-3 Power Supply
●To turn on the camera, press and hold the power
button until you hear a long beep.
●To turn off the camera, press and hold the power
button until you hear a long beep.
●Press the power button on the top to turn on/off the
camera. When the power is on, the red indicator will be
blinking and the LCD monitor turns on.
※This camera has power saving design. If no operation
on camera for 60 seconds, the power is turned off to
prevent battery wear. Please power on camera again.
※The following features will automatically save the
configuration before the camera is turned off unless
the "Reset Default" has been selected to restore its
factory anticipated settings.
1.Resolution 2. Image Quality 3.Language
4.White balance 5.EV value 6.Frequency
7.PC MODE
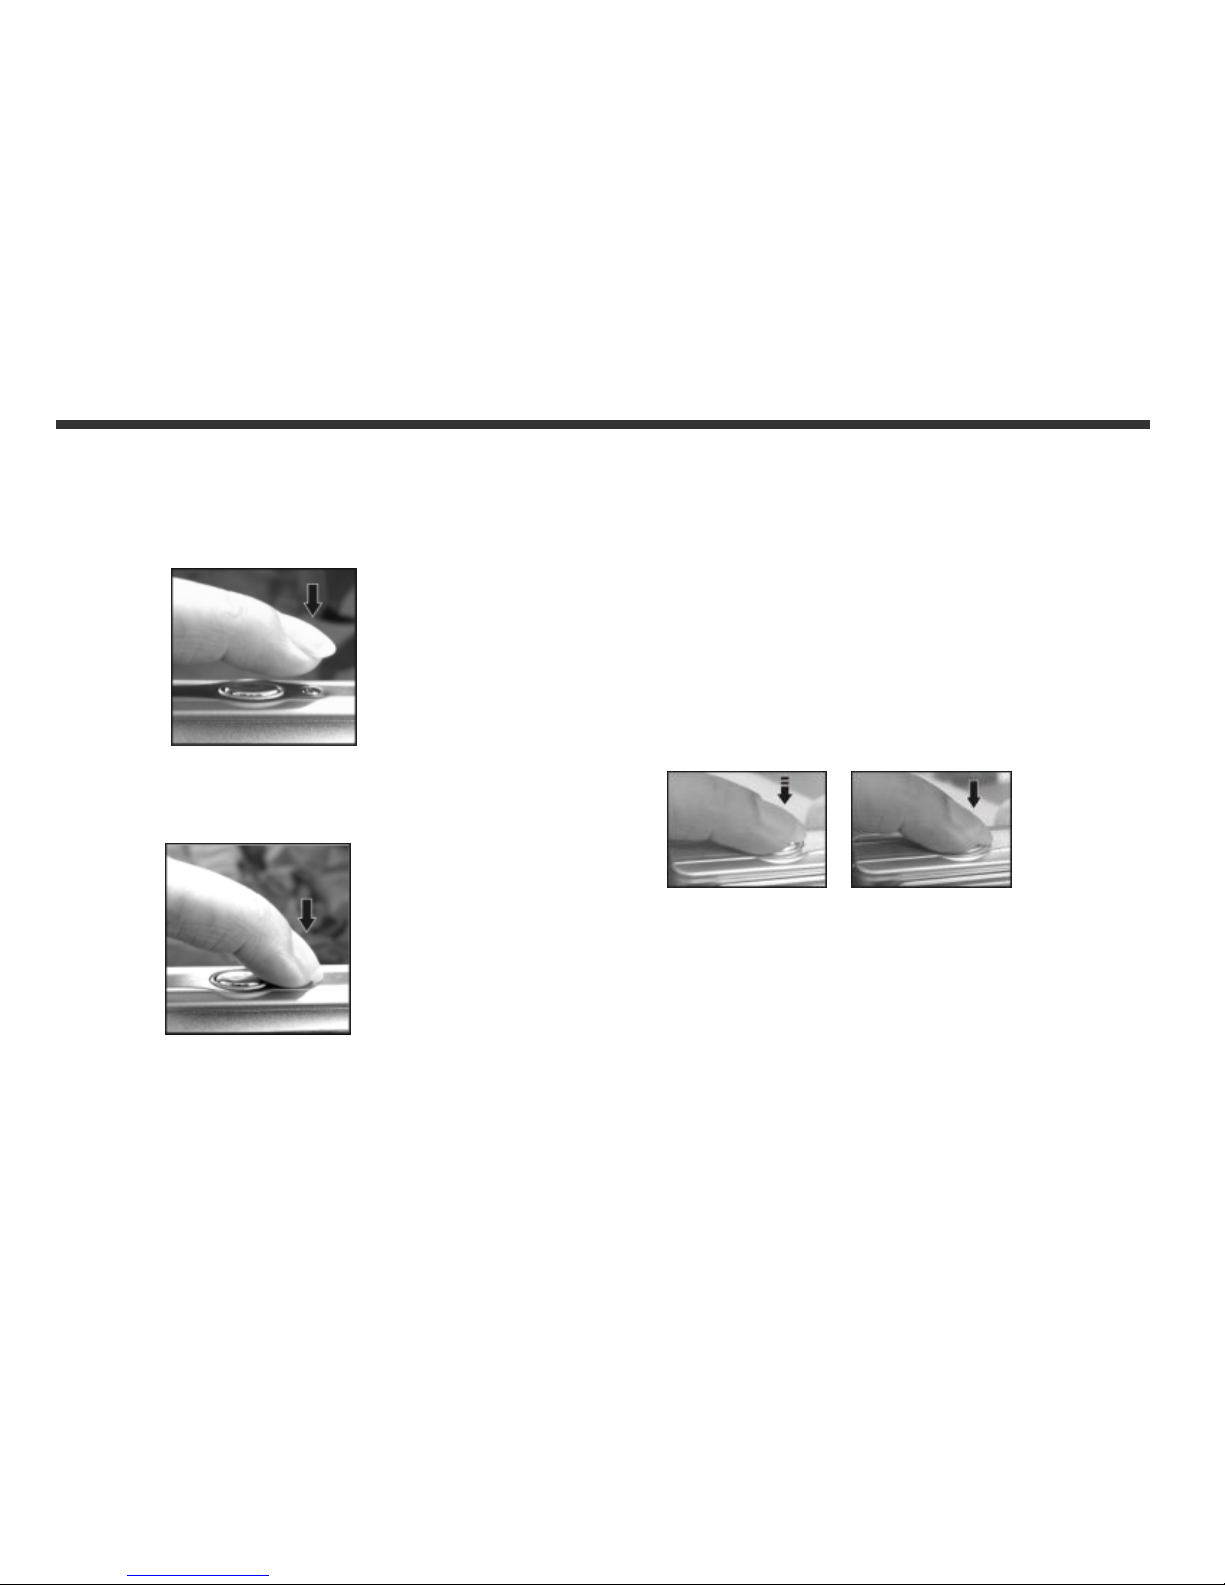
3-4 Shutter Button
This camera is designed for 2-step shutter function. A
"[ ]" mark will appear in the center of the LCD monitor
when the Shutter button is pressed and held half way
down. The camera will beep after the Shutter button is
pressed down fully; then release the Shutter button to
take a picture.
Page 10
9
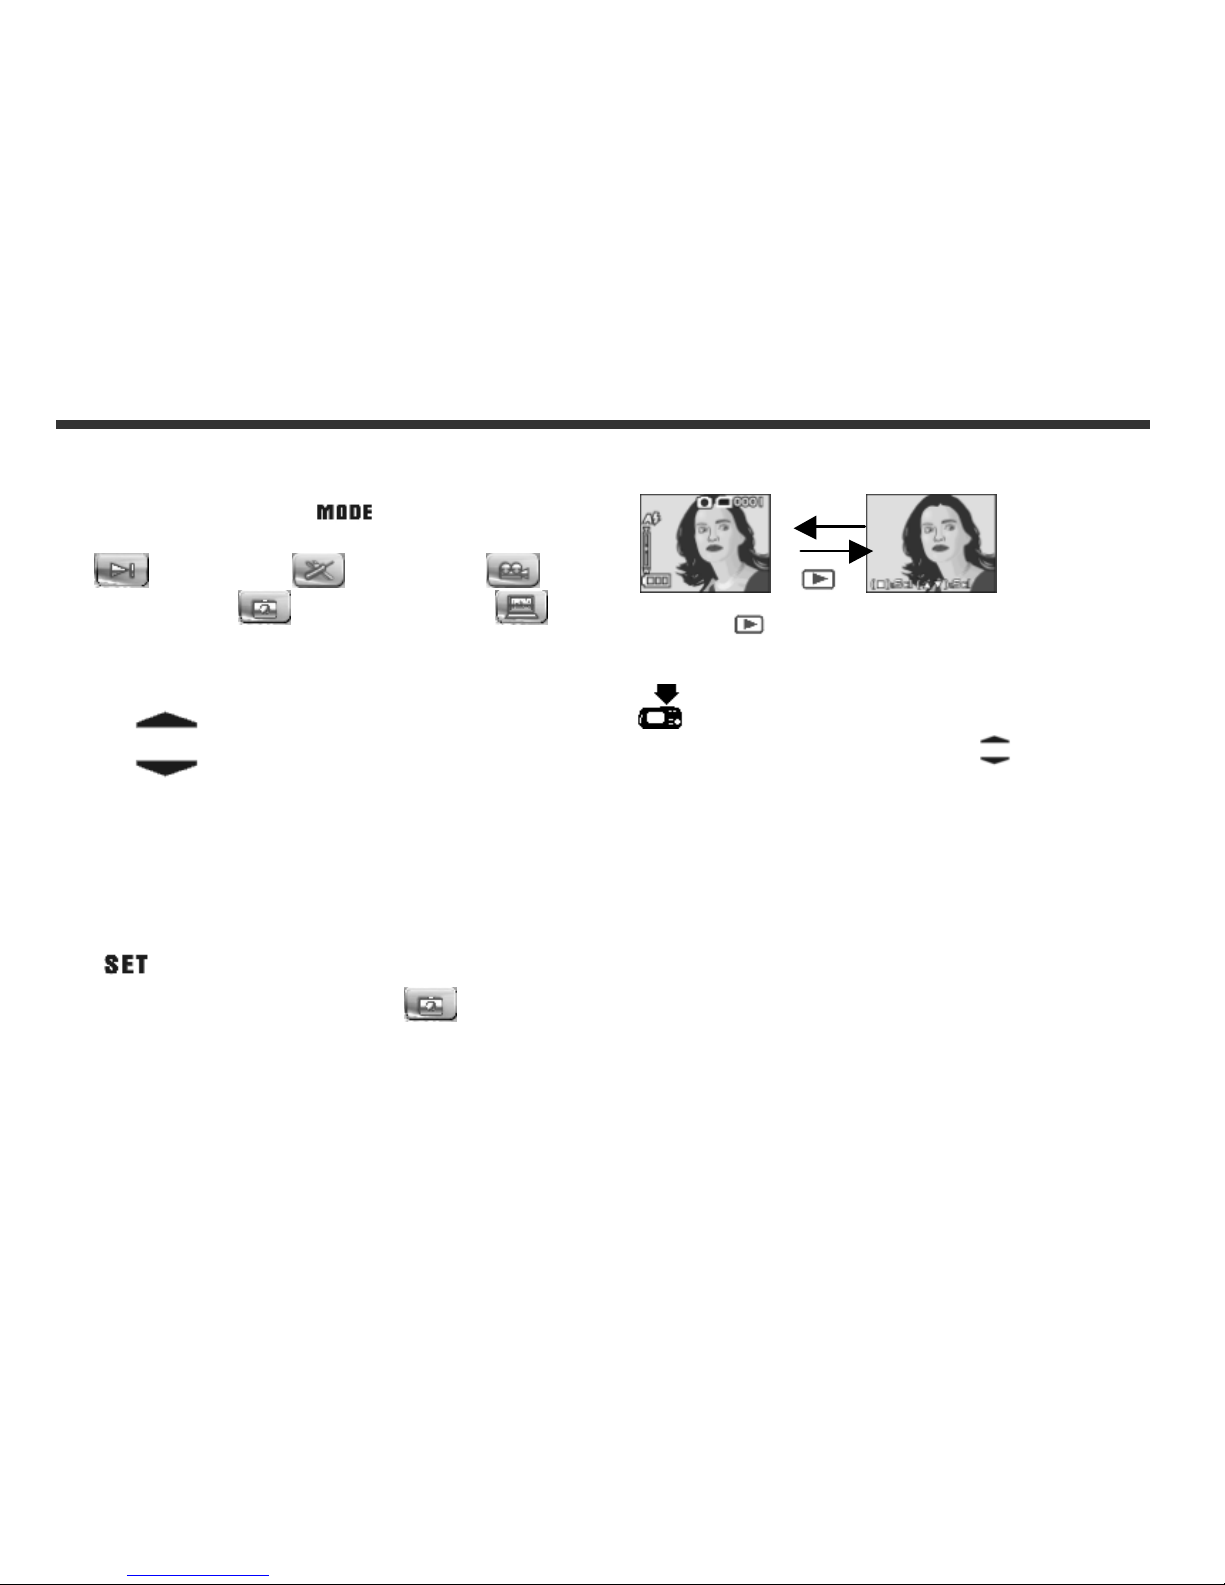
3-5 Mode Selection
●Please press and hold ” ” button for 2 seconds
to enter mode selection menu including “Play Mode”
“Setup Mode” “Movie Mode”
“Record Mode" "Function Selection” .
3-6 Function Key
●You can perform different operations in the
different mode by using the Function Key, e.g.
select, go up/down and move.
3-7 ”SET” Button
● This key is used for SELECTION/SET UP
under selection menu This key
is also flash
button under record mode.
3-8 Image/Movie Play Button
1.Press this
button you can change to the Playback
Mode (quick view).
Record Mode → Playback Mode → Record Mode
2.
Press Shutter Key to play the video and Press
again to pause the video play or Press
Key to Stop
the video play.
Page 11
10
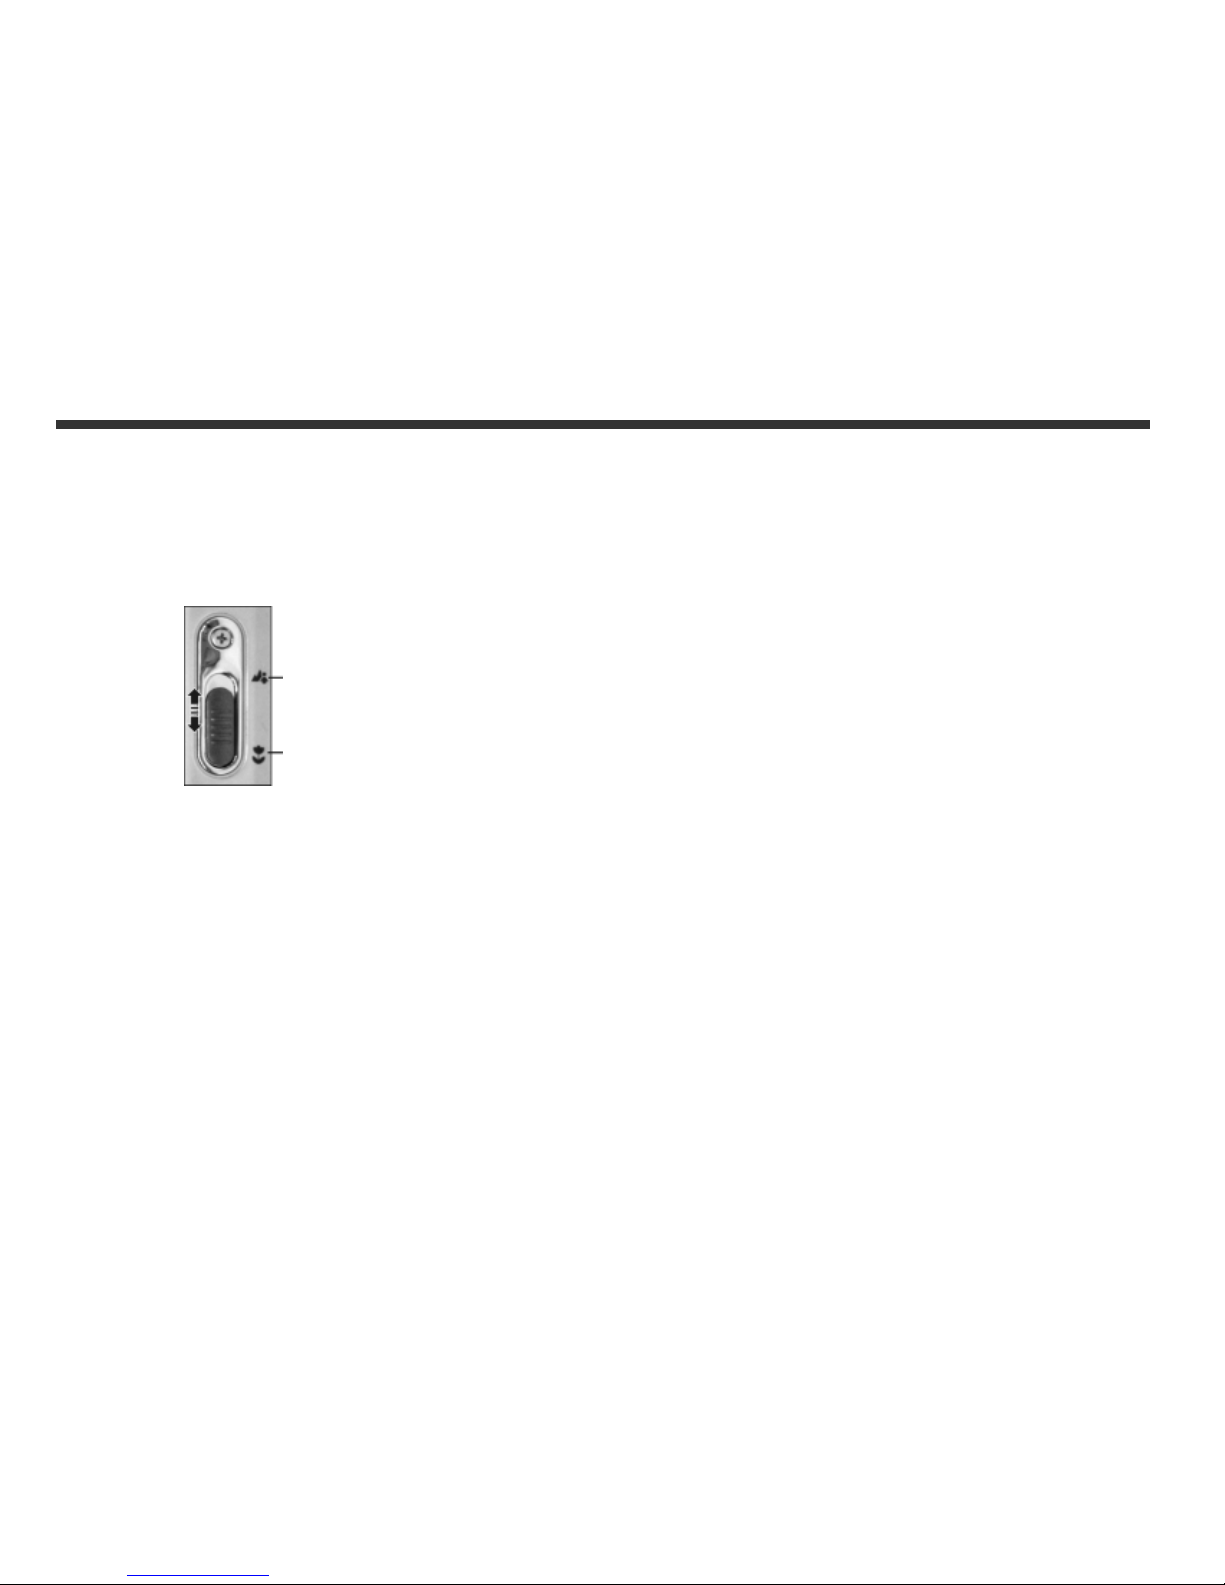
3-9 Macro Button
You can select between Basic and Macro mode under
Record mode and Movie mode by the switch on left
side of the camera. When you have selected the Macro
mode, the green LED will be on at the back of the
camera.
※If you have selected the Macro Mode when using the
camera, the flash off function will be enabled
automatically.
Standard Mode
Macro Mode
Page 12
11
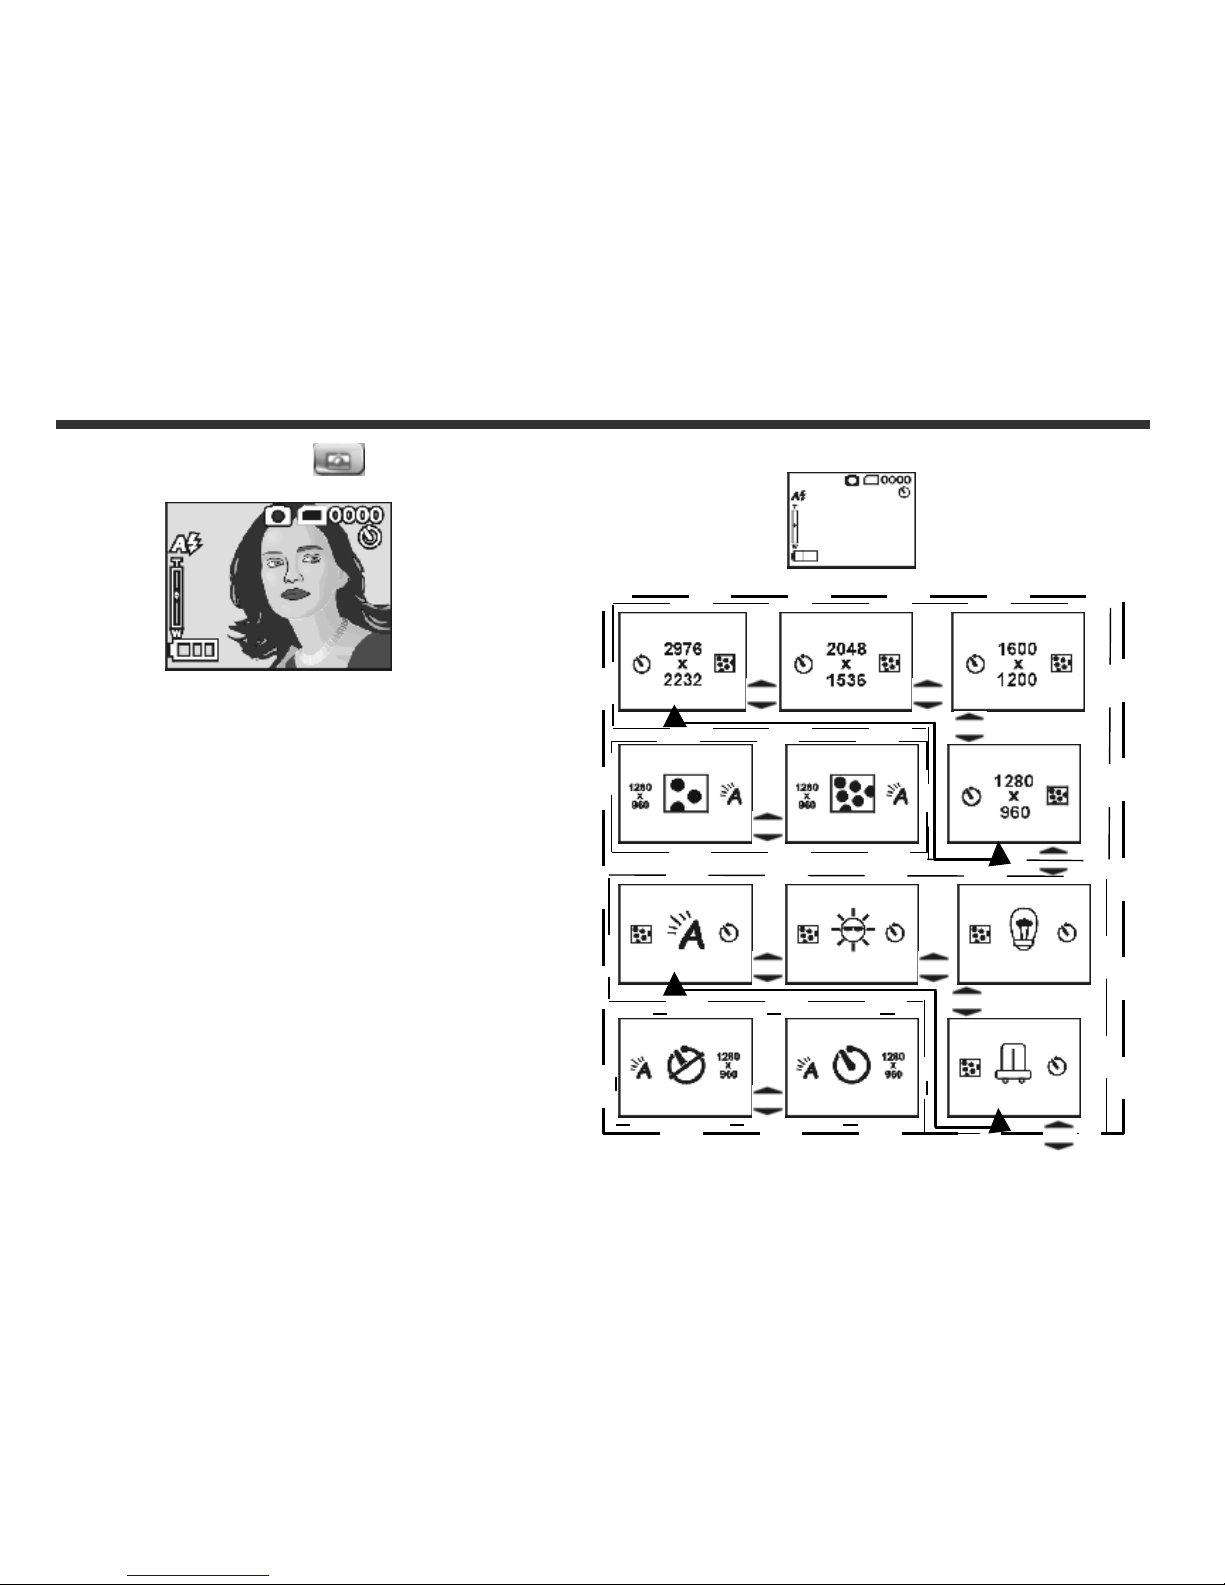
4-1 Record Mode
↑ For more information, please refer to the "3-2 LCD
Monitor Display" section on page 8.
Index for Quick Menu:
4. Navigation Modes and Menus
Press MODE to enter
Press Mode again to Exit
Page 13
12
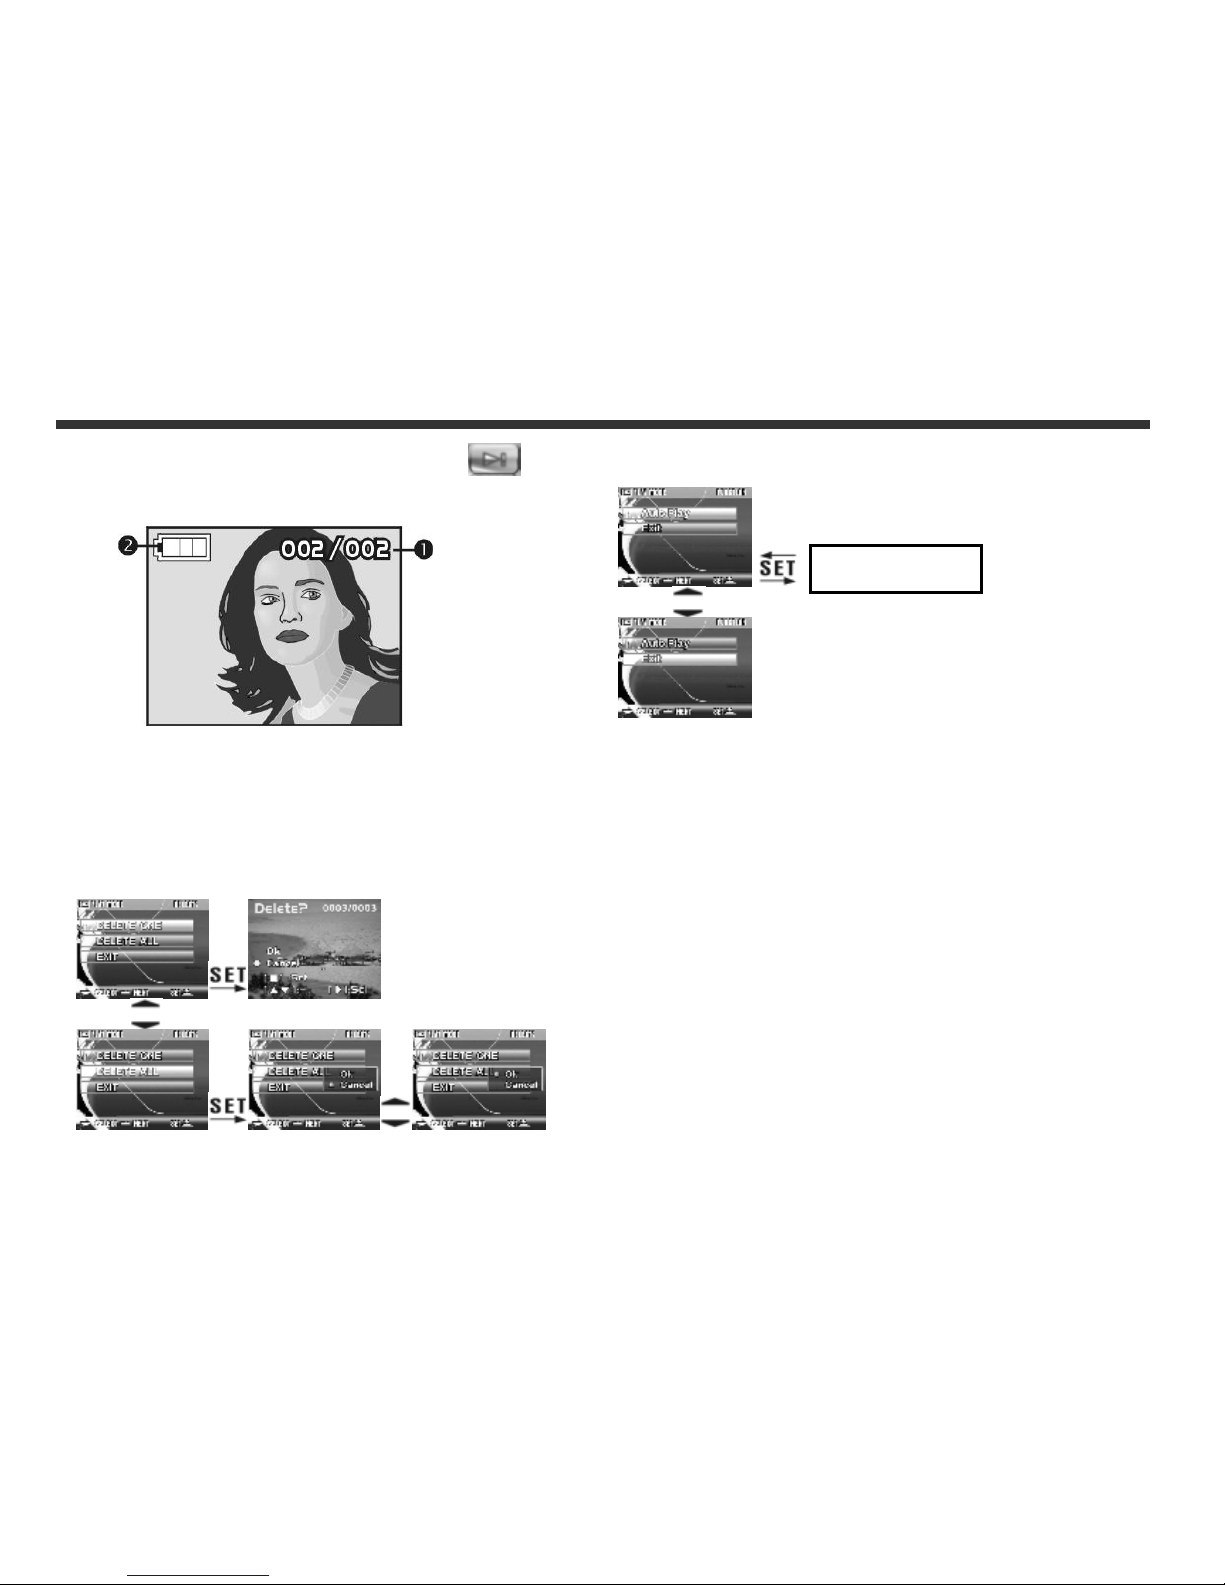
4-2 Image/Movie Play Mode
(1) Possible Number of Shots
(2) Remaining Battery Power
Index for Quick Menu:
1. Delete Pictures
2. Slideshow
3. DPOF (Digital Print Order Format) Settings
● There are three options when printing images with
DPOF: Printing one image, printing all images and the
option of printing the recorded date or not.
● DPOF function can only be operated when the printer
settings of the memory card is inserted, and not active
with the internal memory of the camera.
※If the memory card is not inserted, the DPOF function
is disabled even if there are images stored in the
internal memory.
Start Auto Play
Page 14
13
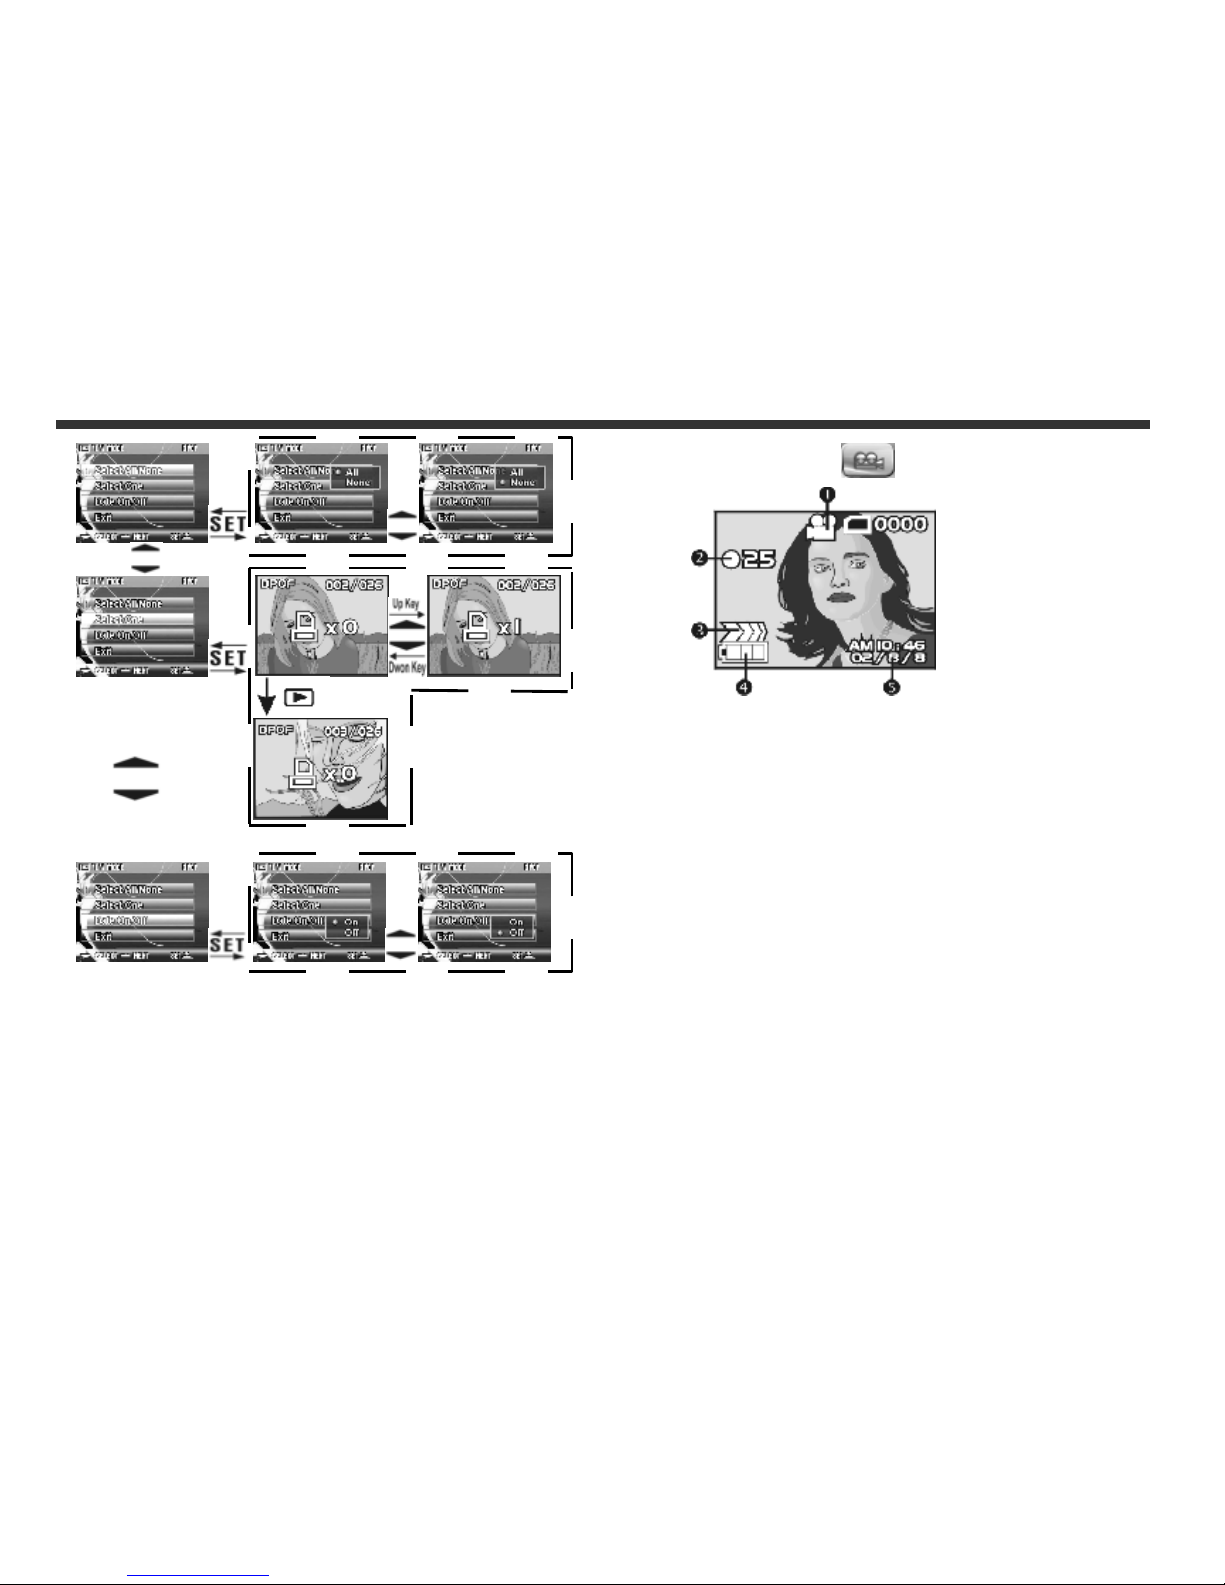
4-3 Movie Mode
(1) Movie Mode
(2) Recorded Movie Time (seconds)
(3) Recording
(4) Remaining Battery Power
(5) Time/Date
Page 15
14
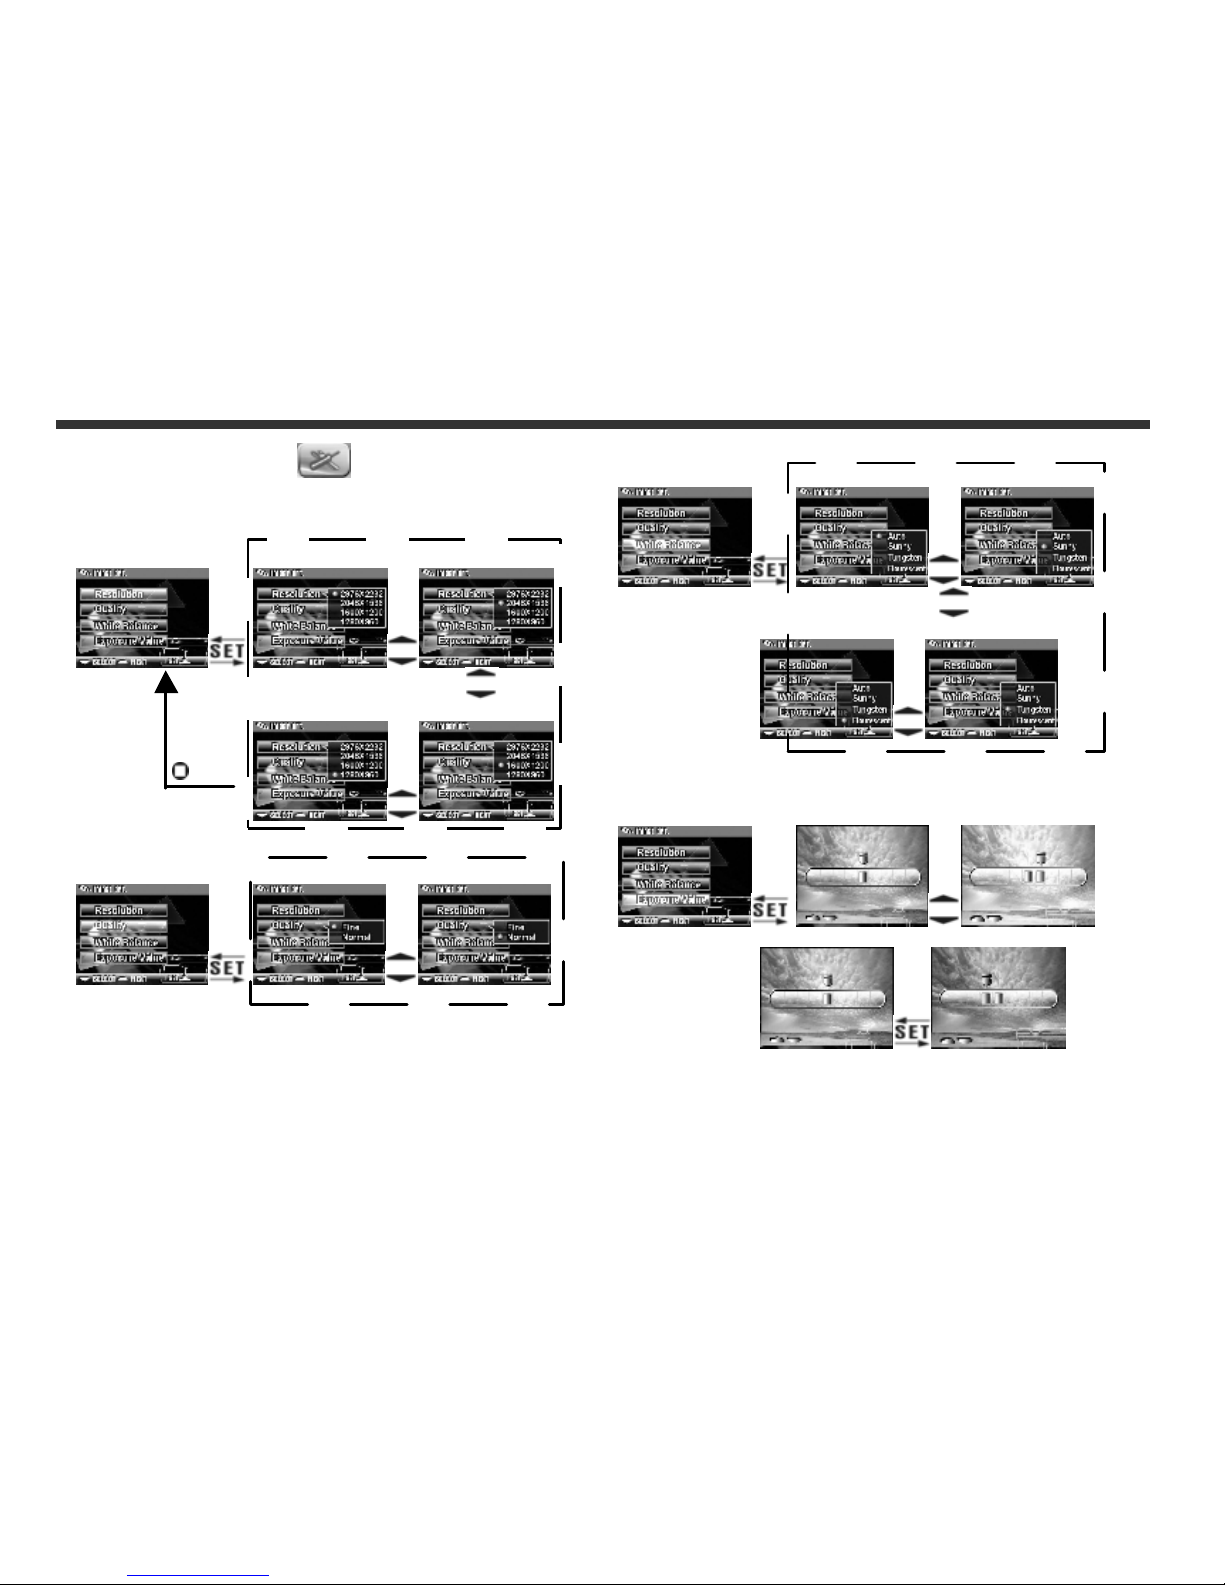
4-4 Setup Mode
1. Image Resolution
2976x2232 2048x1536
1280x960 1600x1200
2. Image Quality
(Fine Quality) (Basic Quality)
3. White Balance
(Auto) (Sun)
(Fluorescent) (Bult)
4. EV Compensation
Page 16
15
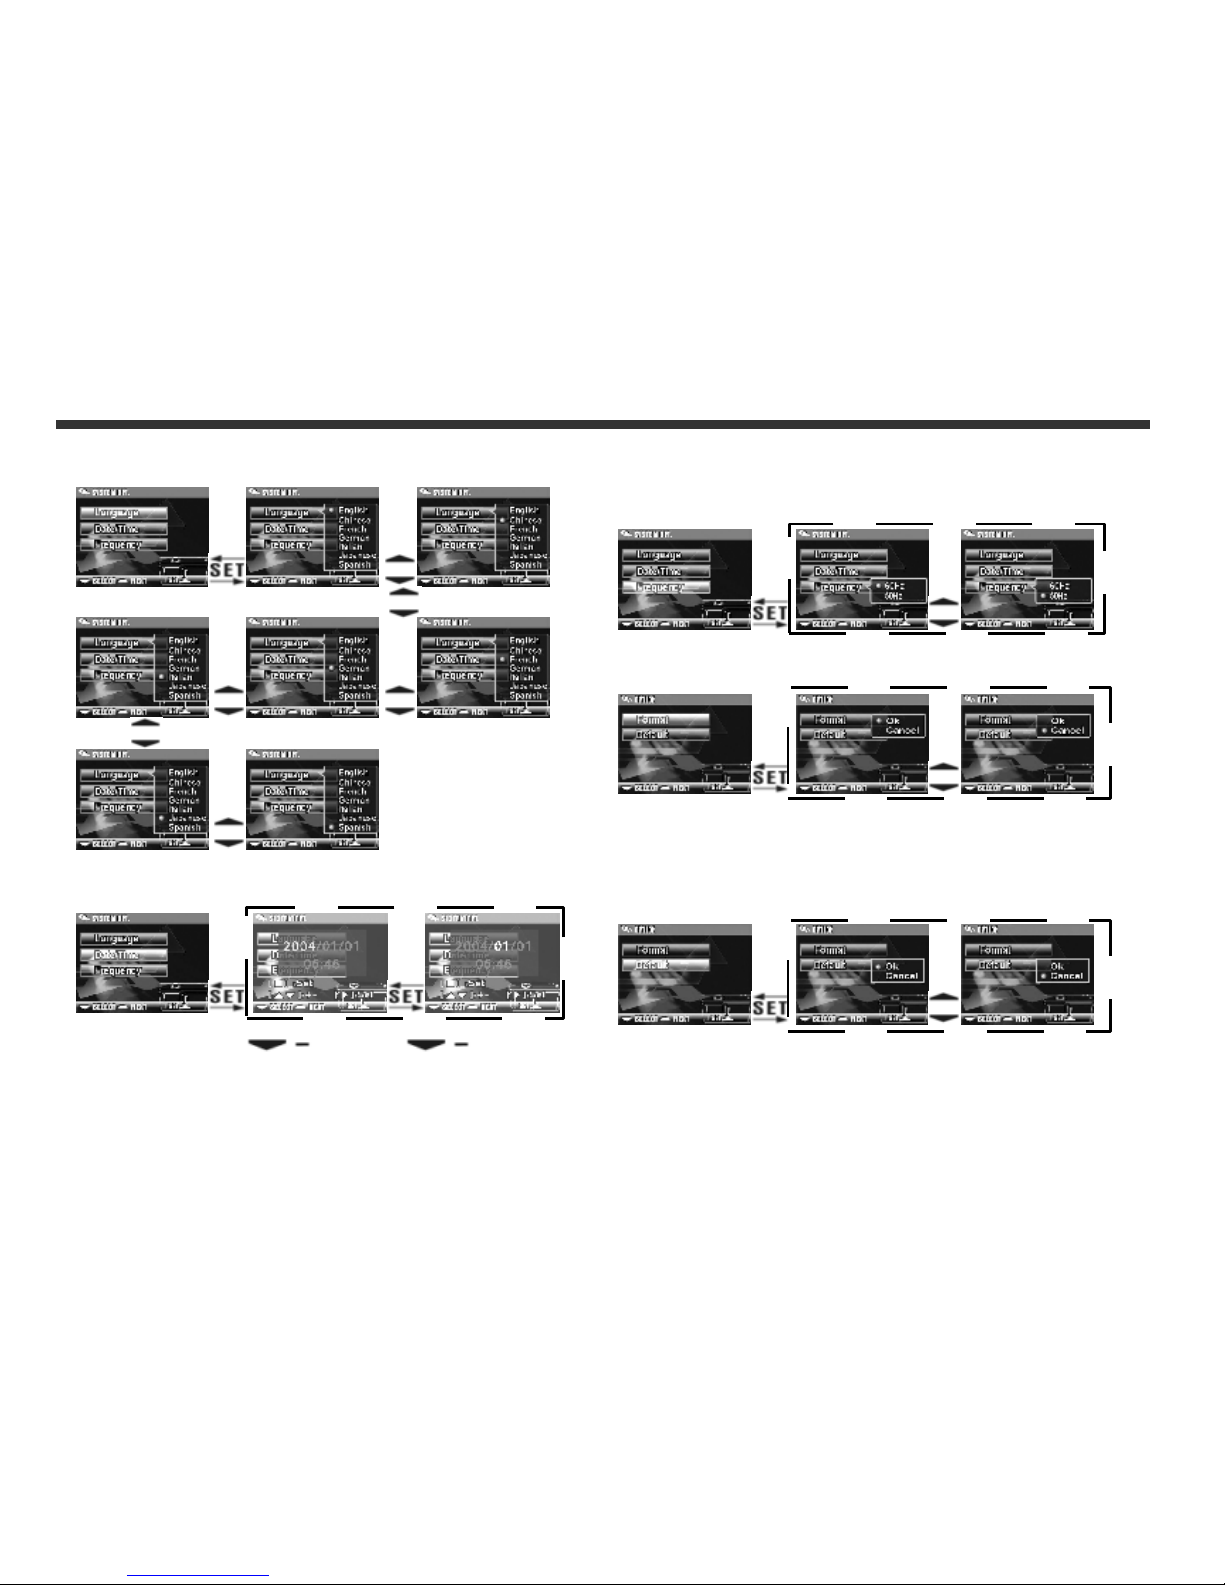
5. OSD Language
6. Date/Time
7. Light Frequency
Select the correct frequency type (50Hz or 60Hz)
according to your region.
8. Format Media
※If the memory card has been inserted, it would only
format the memory card, and not the internal memory.
9. Reset to Default Factory Anticipated Settings
Page 17
16
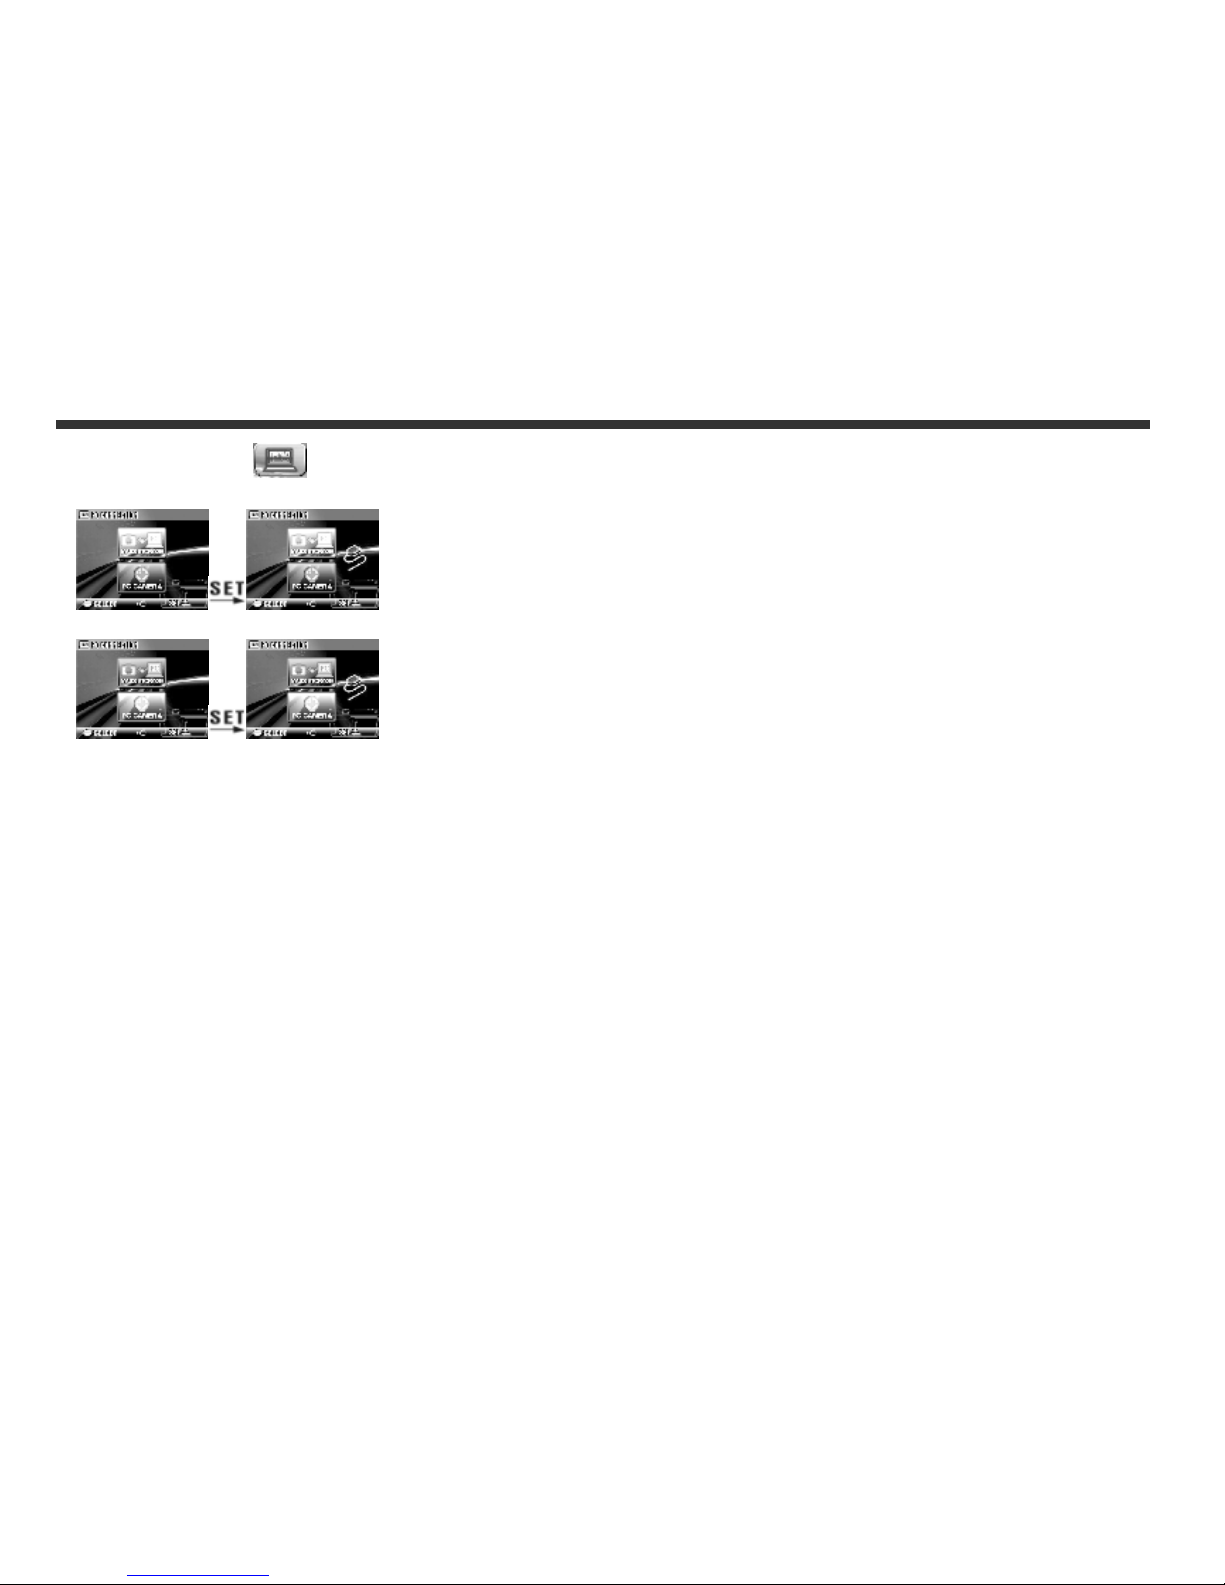
4-5 PC Mode
Page 18
17
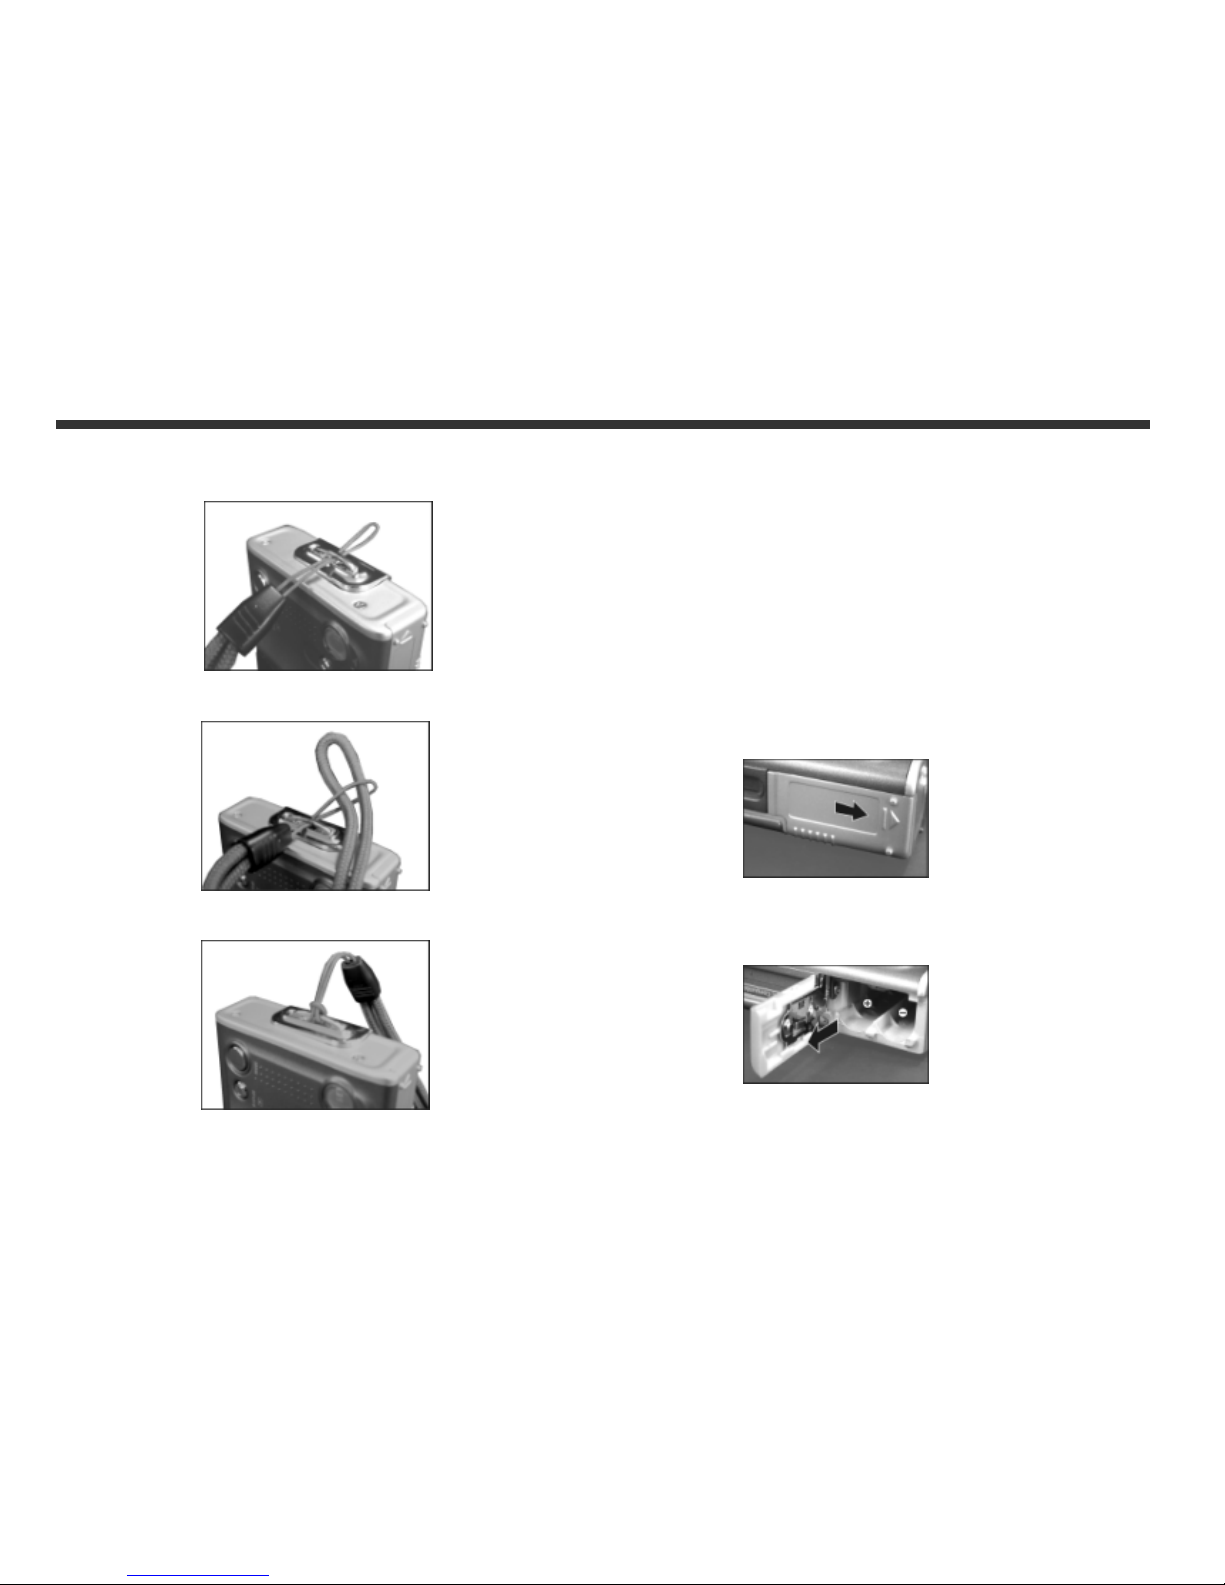
5-1 Attaching the Strap
●Insert the thin end of the strap into the strap holder.
.
●Pass the other end of the strap through the loop.
●Pull the strap tightly.
5-2 Loading Batteries
●Turn the camera off first.
●Insert 2 x AAA alkaline batteries or rechargeable
batteries. Please make sure the batteries are fully
charged. If the batteries are low power, please change
the batteries as soon as possible to maintain operation
normality.
※ If the battery power indicator only shows one black
block, the flash light would be disabled: If lower than
1.8V (when the battery power indicator turns red) the
camera would automatically turn off.
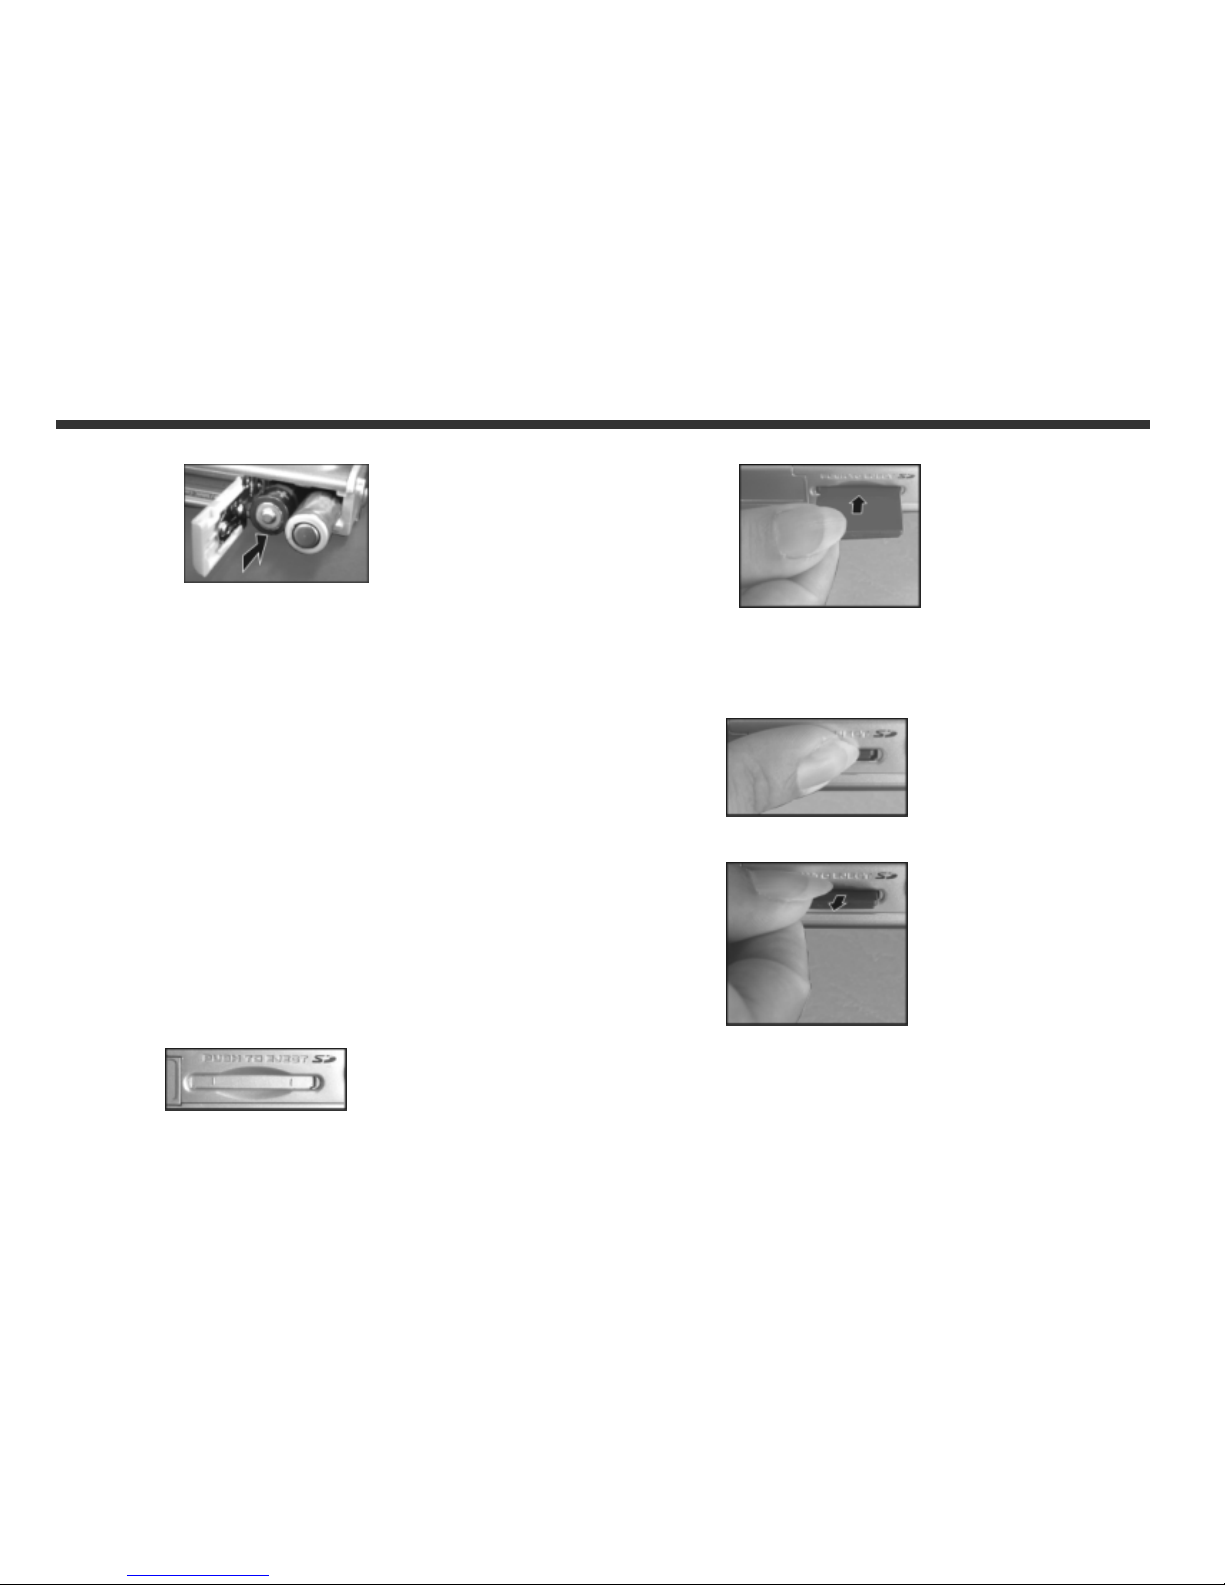
●Slide the battery cover open in the direction indicated
by the arrow.
●Insert the batteries according to the indication on the
inner side of the cover.
5. Preparing Your Camera
Page 19
18
● Close and lock the battery cover.
NOTE: Do not open the cover roughly to avoid damaging
the battery compartment cover.
※ If the battery power indicator only shows one black
block, the flash light would be disabled.
※ When the battery indicator turns red, recording of still
pictures and movies would be disabled.
※ The Date/Time would be stored for approximately 3
minutes during battery change. However,
double-check the correct Date/Time after the new
batteries have been inserted.
5-3 Loading and Removing the
Memory Card
●Turn off the power of the camera first.
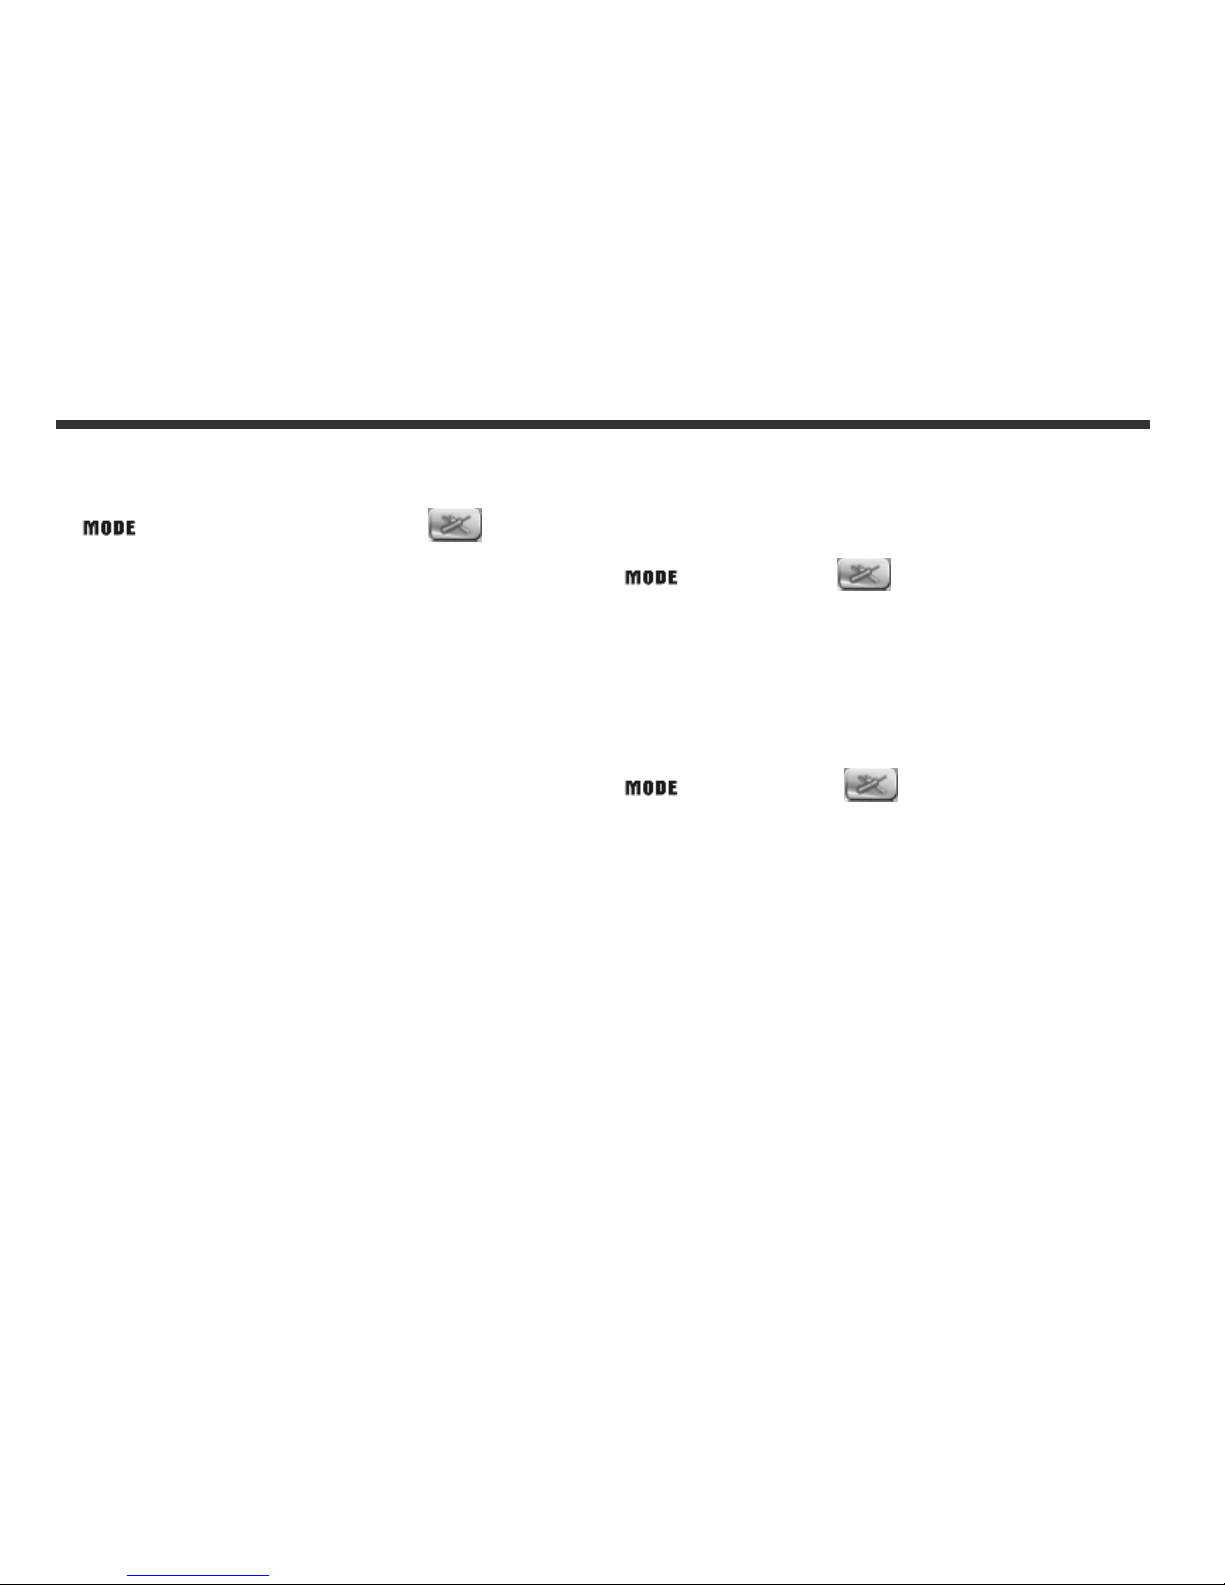
1. Loading the Memory Card
●Memory card insertion diagram.
●Insert the memory card according to the indicated
arrow.
2. Removing the Memory Card
● Press the memory card down gently first.
● The memory card would pop up automatically.
Remove the memory card according to the indicated
arrow.
Attention:
Page 20
19
Before using the camera, please remember to insert the
memory card into the slot. If the memory card is full or
contains other images, you can press the Mode Button
to Format of the Setup Mode to format
the memory card.
● There is 16MB internal memory built-in in the digital
camera for Image Storage. If the memory card is
inserted, it will be the top priority for saving data.
※ The specification of memory card applicable for this
camera is SD or MMC (4MB~512MB).
※ Please turn off the camera first when
inserting/removing the SD memory card.
●Please don’t take out SD card while shooting or
playback images to avoid damage risk on SD card or
camera.
● If the memory card is inserted from the wrong
direction, it would not be fitted in. Do not force the
insertion to avoid memory card damage.
● If the camera does not detect the memory card,
please gently wipe the metal interface of the card with
a soft cloth and reload the card again.
5-4 Setting Up the OSD Language
Before using the camera, please select "Language" to
set the OSD language by pressing the Mode Button
to Setup Mode . There are 7 options for
your selection: English, Chinese, French, German,
Italian, Japanese, Spanish.
5-5 Date/Time
Before using the camera, please select "Date/Time" to
set the date and time by pressing the Mode Button
to Setup Mode .
Page 21
20
6-1 Setup Mode
By using the Setup Mode, you can adjust the basic
camera settings, including: Image Size, Image Quality,
White balance, and EV Compensation. General setting
format and factory default setting. Setup for language,
date/time and light frequency is as follows:
1. Press the power button on the top to turn on the
camera.
2. Press Mode Button
and use Function key
to move to .
3. Press the
Button to get into Setup Mode
screen, the LCD monitor will display the menu.
4. Use the “6” of the Function key
to move
between selections; Use “5” to toggle between
selections.
5. Use
Button to enter the menu. and confirm
function selections with “5 ” and ”6”.
6. Lastly, use the
Button to confirm selections.
6-2 Record Mode
Record Mode offers you a quick and easy way to take
your ideal pictures.
1. Press the power button on the top to turn on the
camera. You can also enter into Record Mode through
Mode Button
and use the Function key
to move to , and select .
Upon entering, images will appear on the LCD monitor.
2. Press and hold the Shutter button down half way to
select the photography location, and a yellow “[ ]" will
appear in the center of the LCD monitor. Select the AE,
and press the Shutter button down fully and release it
to complete the recording.
3. You can use
to select two flash light modes
when using the camera: Auto, and Off.
4. Using the Mode Button
to set the details
settings for recording images, e.g., Image Resolution,
Image Quality, Self-timer, and Light Frequency
settings. The menu will appear on the LCD monitor
when Mode Button
is pressed. Use “6” of
the Function key
to move between selections.
5. Using “ 5” and ” 6 ” of the Function key
to adjust
the digital zoom. The adjustment ratio of the digital
zoom will appear on the left hand side of the LCD
monitor, from 1.0 time to 4.0 times, with 0.5 times
increase at each adjustment.
6. The green LED will be on when the Macro key on the
left hand side of the camera is toggled to Macro
Mode.
※If the icon appears on the LCD Monitor for low battery
power, please change the batteries immediately to
maintain operation normality.
※ The countdown for the Self-timer is 10 seconds.
※ There are 4 types of resolutions offered by the camera:
6. Getting Started
Page 22
21
2976x2233 ,2048x1536, 1600x1200 and
1280x960
.
※ Please pay attention to the distance between the
camera and the object when using the Flash Light.
The internal built-in Flash Light of this camera is
effective within 1.5 meter.
※ If the Macro Mode is selected, the flash off function
will be enabled automatically.
※ If the "Memory Full" or “Card Full” warning
messages appear on the LCD Monitor, it means the
memory card is full. Please remove the memory card
and insert a new one in immediately.
6-3 Image/Movie Play Mode
In Play Mode, users can review the recorded still and
movie pictures. To review the pictures, perform the
following:
1. Press the power button on the top to turn on the
camera.
2. Press Mode Button
and use Function key
to move to .
3. Press the
Button to get into Setup Mode
screen, the LCD monitor will display the menu.
4. Use”5”and”6” of the Function key
to go to
“previous” and “next ” of the picture display.
5. You can select Delete Picture and Slideshow when
using the
Button to enter the function menu.
6. Use “6” of the Function key
to move between
selections; Use “5” to toggle between selections.
7. Use
Button to enter the menu.
8. Use exit to end the function menu, and return to Play
Mode menu.
※ DPOF function can only be operated when the memory
card is inserted.
※ If there is no image stored in the internal memory or
memory card, a “No picture” message will pop up on
the LCD Monitor in the Play Mode.
6-4 Movie Mode
You can use Movie Mode to record movie pictures (not
including audio). To record the movie pictures, perform
the following:
1. Press the power button on the top to turn on the
camera.
2. Press Mode Button
and use Function key
to move to .
3. Press the
Button to get into the Setup Mode
screen, the LCD monitor will then display the menu.
4. The top left hand corner will display the recorded time
in red while you are recording the movie pictures.
Page 23
22
5. The green LED will be on when the Macro key on the
left hand side of the camera is toggled to Macro
Mode.
※ When the LCD monitor displays “Memory full", the
recording will be stopped because the memory card is
full.
※ When recording the movie pictures, the maximum
recording time will depend on the free spaces of the
memory card.
※ The digital zoom function will be disenabled when
recording movie pictures.
6-5 PC Mode
● Removable Disk
The digital camera offers removable disk function such
as a card reader device. You can treat this digital camera
as an SD device; just follow the instructions mentioned
below:
1. Please follow the steps of “software installation,
camera driver” to complete the installation of the
camera driver.
2. Press the power button on the top to turn on the
camera.
3. Press Mode Button
and use Function key
to move to .
4. You will see “mass stroage” and “PC camera” upon
entering the menu screen when the
Button is
pressed.
5. Please use the Function key
to move to “mass
stroage” and press Function key to confirm
storage.
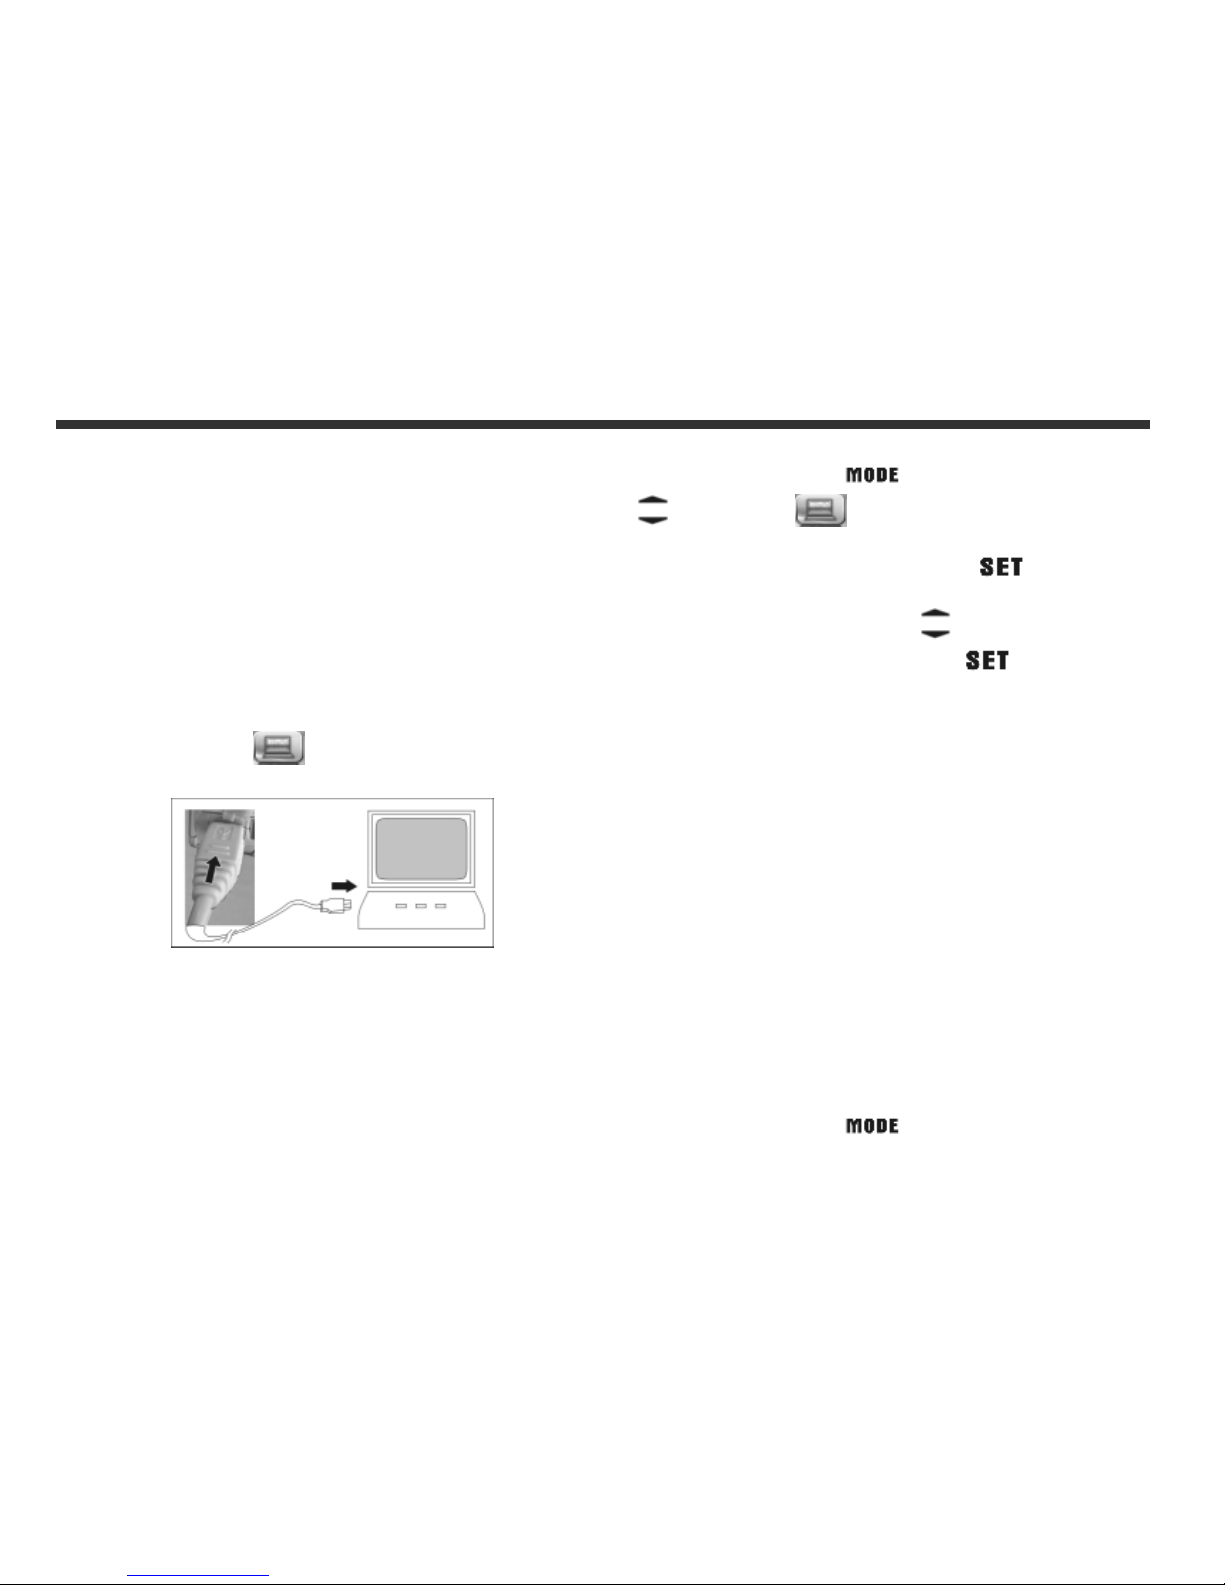
6. Please connect the USB cable to the camera and
the PC when the diagram USB Connection pops up
the screen.
7. A new item – removable disk will be added into my
computer after the system installation is completed.
8. You may start to operate with the newly added
removable disk (SD device) offered by the digital
camera.
● PC Camera
The digital camera can be treated as a PC camera or a
Web Cam. Please follow the instructions mentioned
below:
1. Please follow the steps of “software installation,
camera driver” to complete the installation of the
camera driver.
2. Press the power button on the top to turn on the
camera.
3. Press Mode Button
and use Function key
Page 24
23
to move to .
4. You will see “mass stroage” and “PC camera” upon
entering the menu screen when the Function
key
is pressed.
5. Please use the Function key
to move to“PC
camera” and press Function key
to confirm
storage.
6. Please connect the USB cable to the camera and
the PC when the diagram USB Connection pops up
the screen.
7. You may operate the PC camera through the software
that comes with the CD-ROM or other software.
Page 25
24
7-1. Installing the Camera Driver in PC
You can use the "Mass Storage" and "PC Camera"
functions of the camera in the PC. To install the proper
camera driver, perform the following:
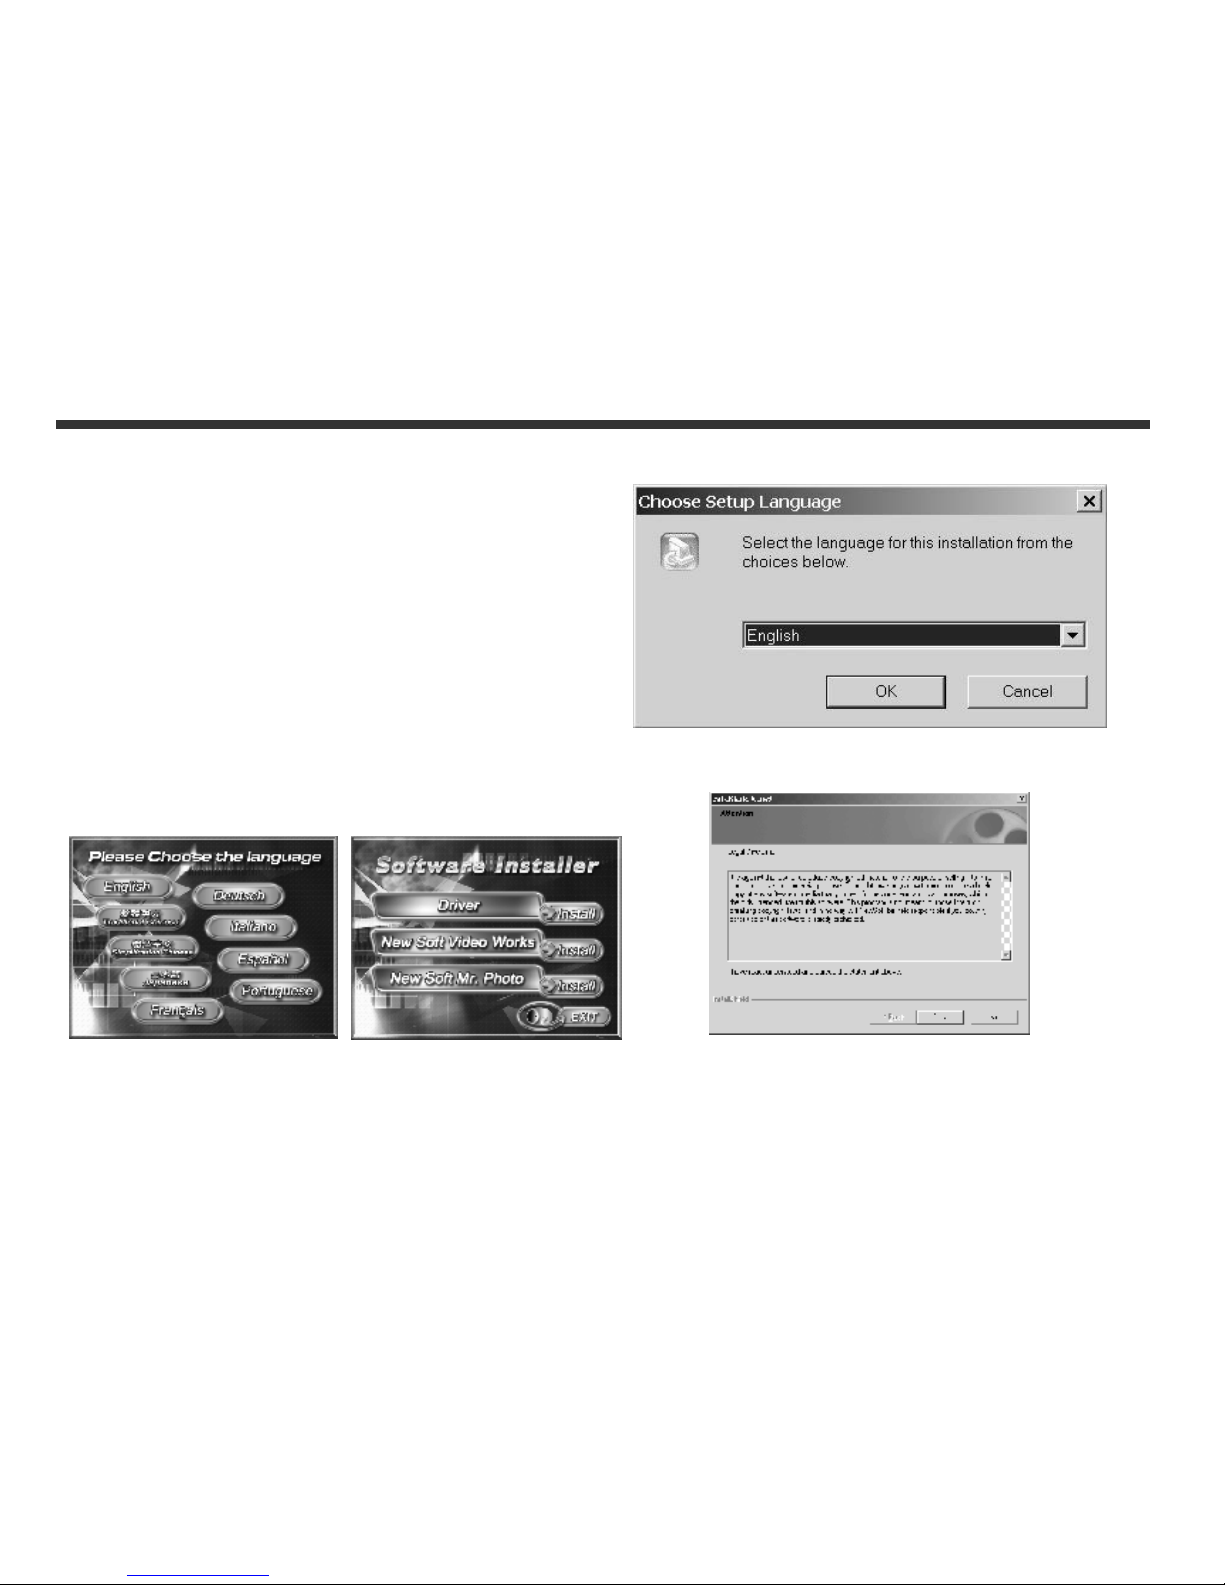
1.Insert the Software CD supplied by the package into
the CD-ROM drive.
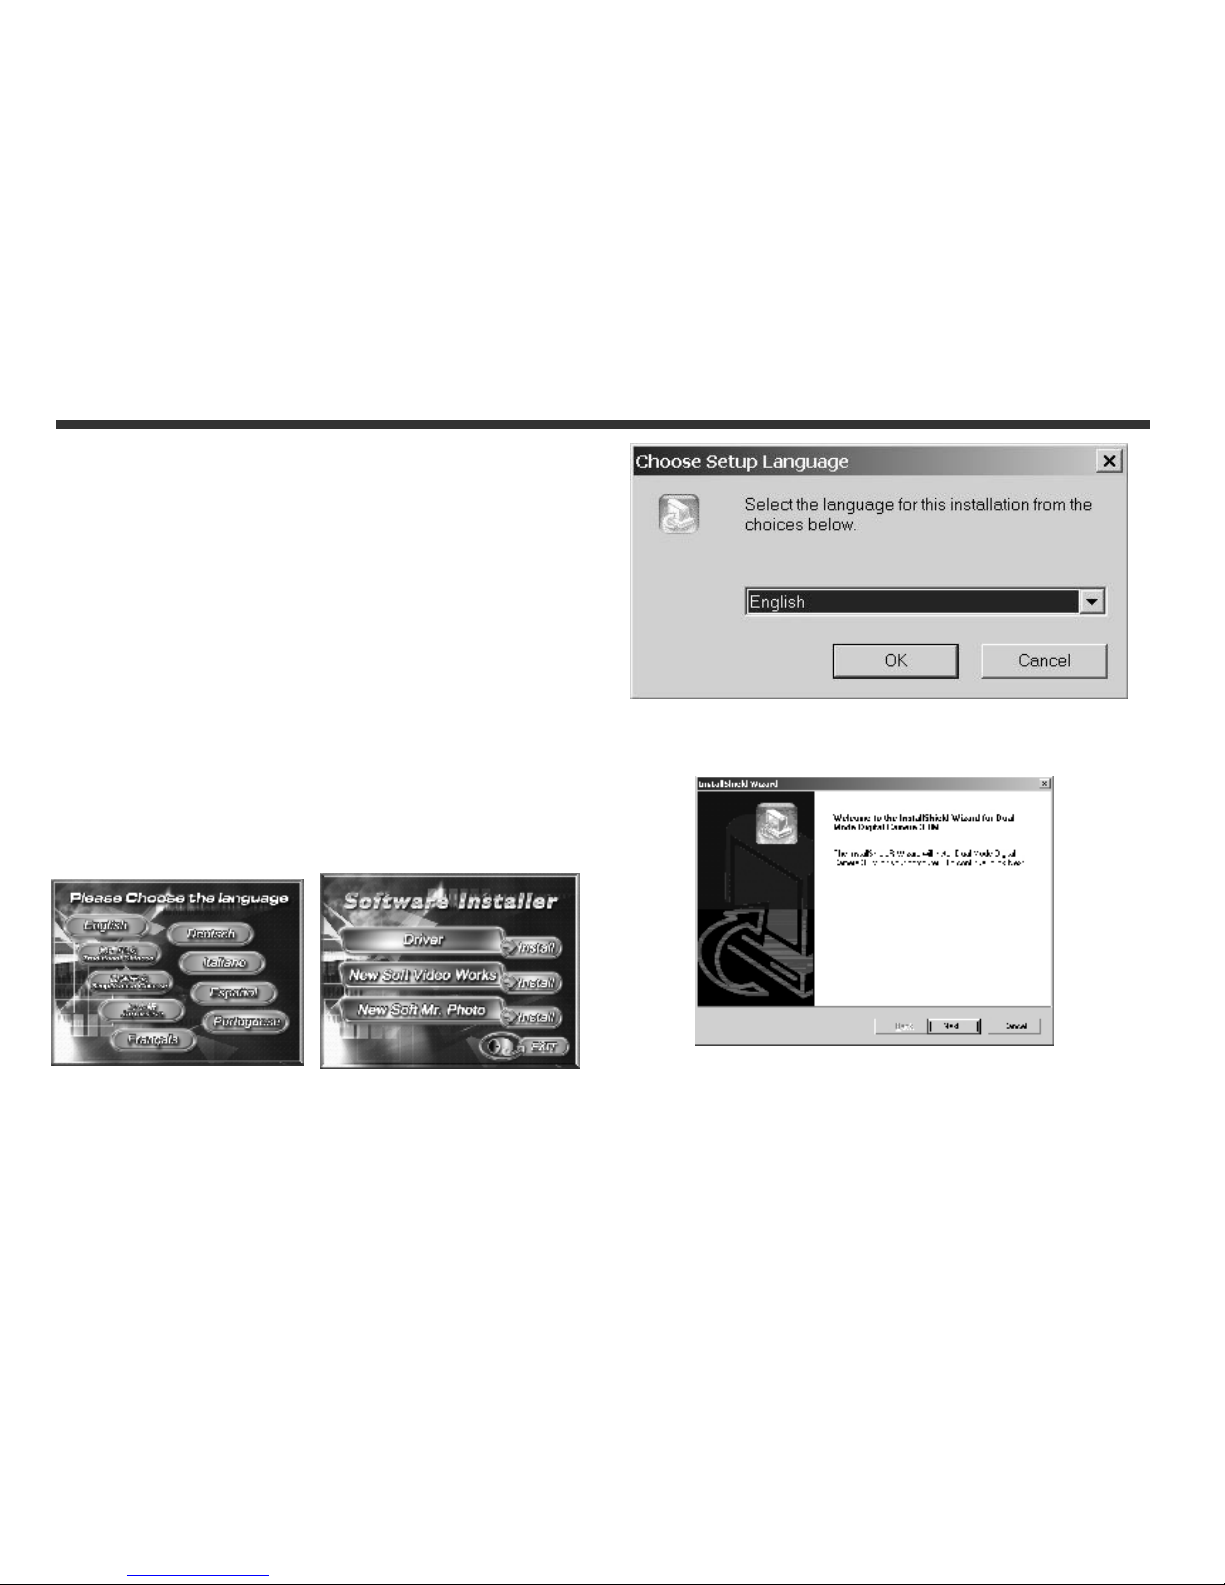
2.The Auto-run program will be executed and the
welcome screen will appear the following message: (If
your CD-ROM drive doesn't support the auto-run
function, please double click on the "My Computer"
icon on the desktop. Then double click the CD-ROM
drive icon and click the " Driversetup\Setup.exe "
file in the root directory.)
3.Please select the desired language of setup program
you want to install.
4.Please click on the "Driver > Install", the following
screen will appear:
5.Select the desired language, and then press "OK".
6. Entering the application setup screen, press "Next" to
continue.
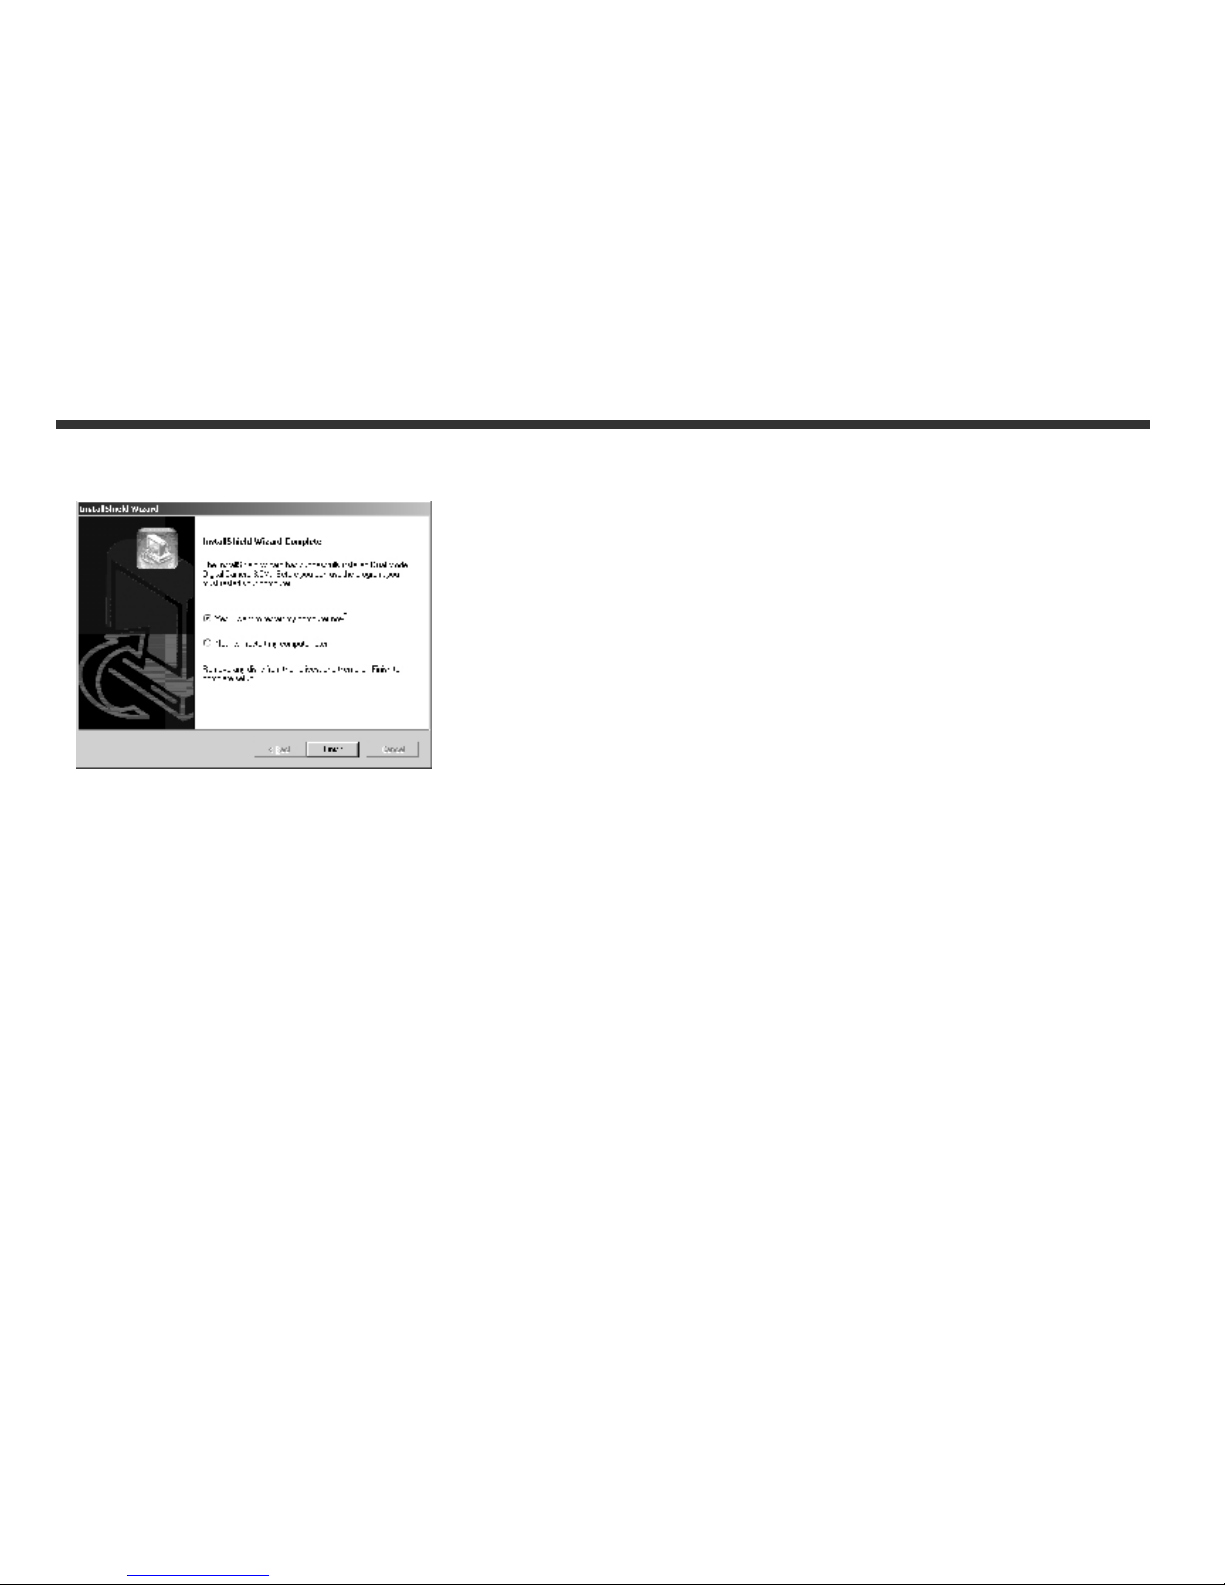
7. After the installation is complete, the following screen
will appear, press "installation is complete" to
complete application installation.
Page 26
25
Page 27
26
7-2 Installing the Application for PC
NewSoft application installation (In case of MP38)
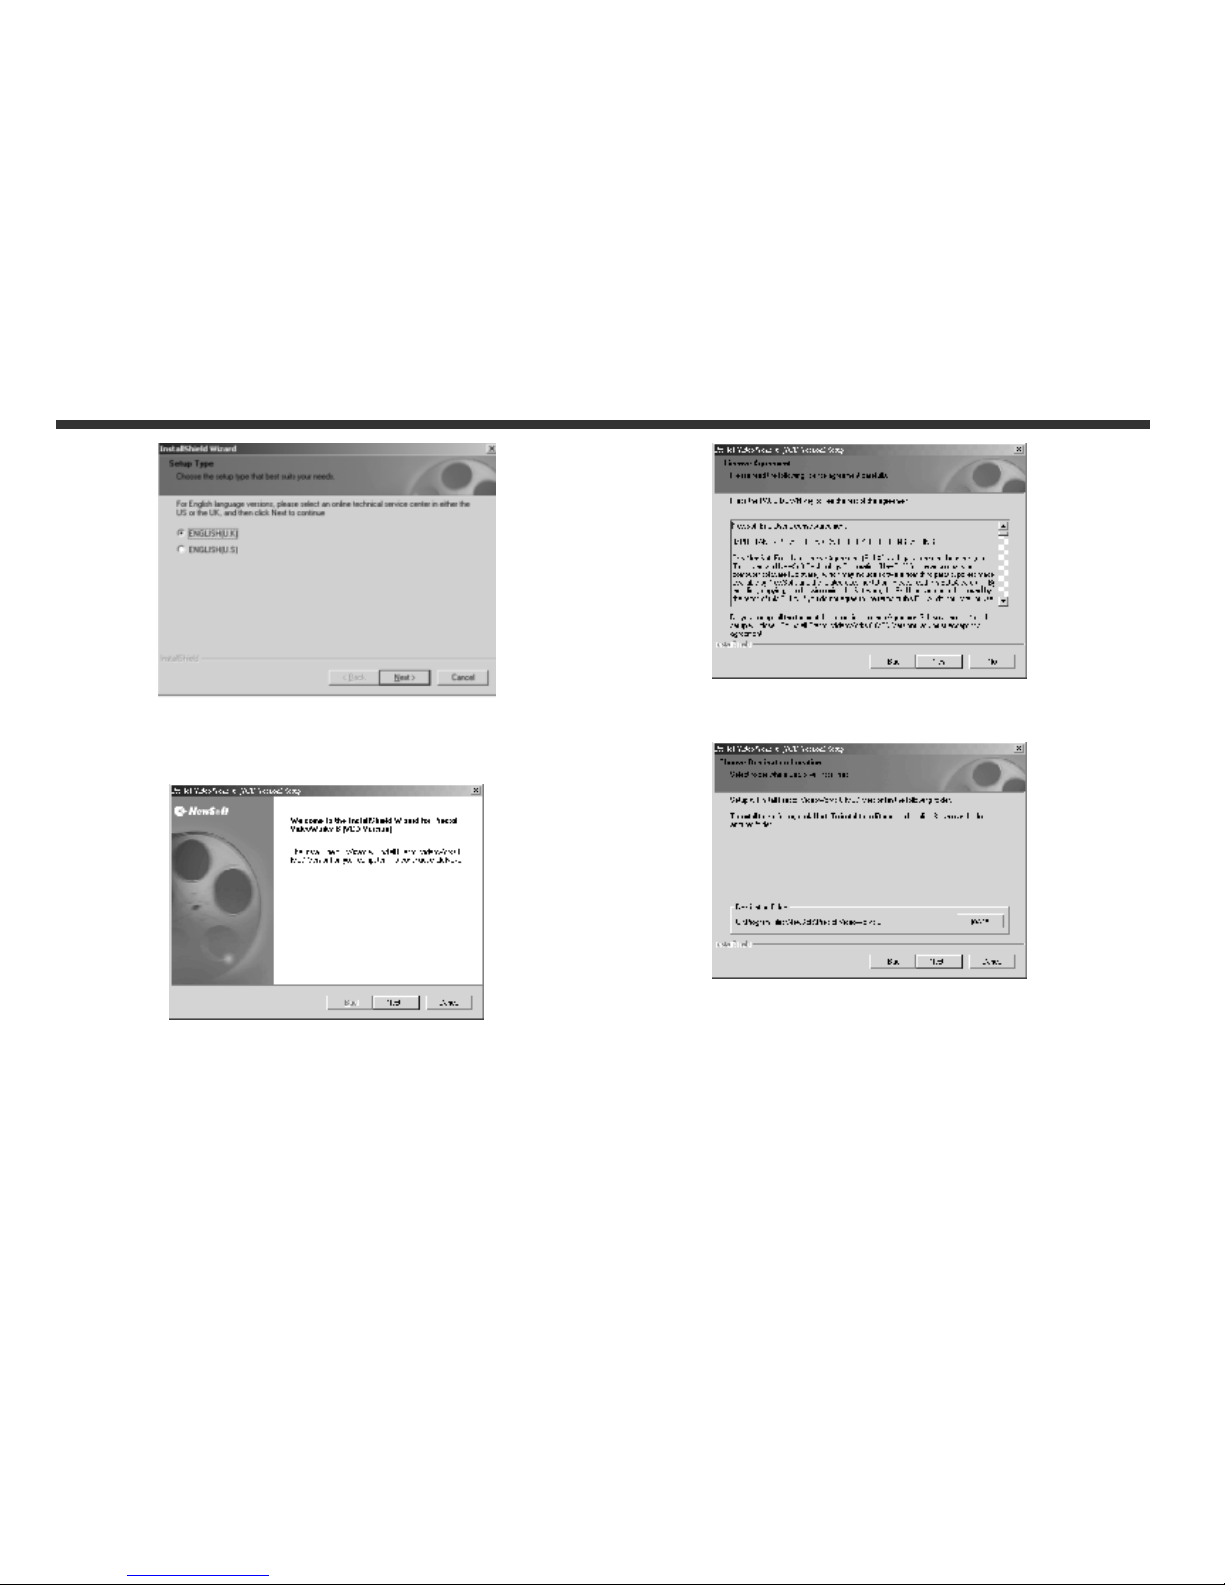
1.Insert the Software CD supplied by the package into
the CD-ROM drive.
2.The Auto-run program will be executed and the
welcome screen will appear the following message: (If
your CD-ROM drive doesn't support the auto-run
function, please double click on the "My Computer"
icon on the desktop. Then double click the "
InstallMgr.exe " CD-ROM drive icon and click the file
in the root directory.)
3.Please select the desired language of setup program
you want to install.
4.Please click on the "New Soft Video works >
Install", the following screen will appear:
5.Select the desired language, and then press "OK".
6.Press "Yes" to accept the conditions of Legal
Disclaimer and continue the installation.
7.Please select the area of language, then press "Next"
to continue.
Page 28
27
8.Entering the application setup screen, press "Next" to
continue.
9.Press "Yes" to accept the conditions of
Software License Agreement and continue the
installation.
10.Please follow the installation wizard to select the
folder location.
11.Please select the program folder name.
Page 29
28
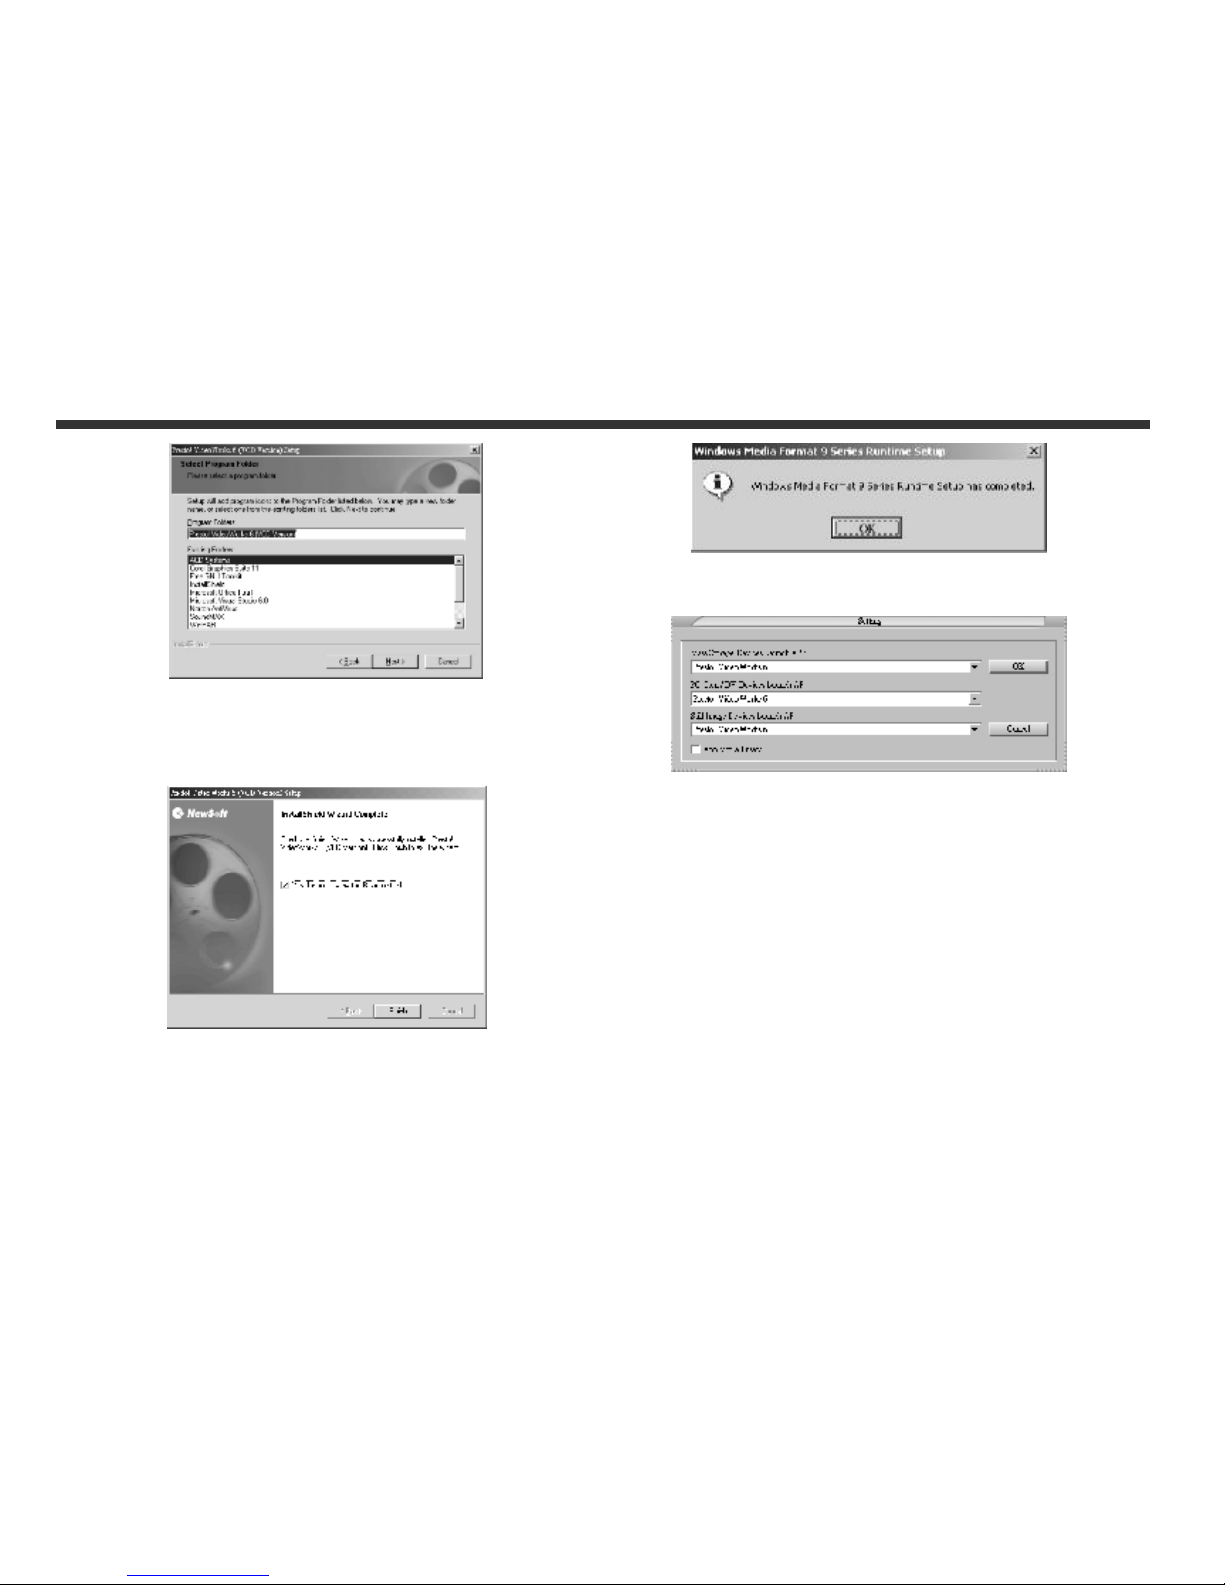
12.After the installation is completed, the following
screen will appear. Press "installation is
complete" to complete the application installation.
13. After the Multimedia Software is complete, the
following screen will appear, press "Ok" to continue.
14. Entering DirectX9 setup screen, press "Ok" after the
content is confirmed.
 Loading...