

Page 1
Getting Started
Page 2

Getting Started
&UHDWLYH3&&$0
Information in this document is subject to change without notice and does not represent a commitment on the part of Creative Technology Ltd. No part of this manual may be
reproduced or transmitted in any form or by any means, electronic or mechanical, including photocopying and recording, for any purpose without the written permission of
Creative Technology Ltd. The software described in this document is furnished under a license agreement and may be used or copied only in accordance with the terms of the
license agreement. It is against the law to copy the software on any other medium except as specifically allowed in the license agreement. The licensee may make one copy of
the software for backup purposes.
Copyright © 1998-2001 by Creative Technology Ltd. All rights reserved.
Version 1.0
November 2001
Video Blaster and Blaster are registered trademarks, the Sound Blaster PCI logo are trademarks of Creative Technology Ltd. in the United States and/or other countries.
Microsoft, MS-DOS, and Windows are registered trademarks of Microsoft Corporation. All rights reserved. All ot her prod ucts are trademarks or registered trademarks of their
respective owners.
Page 3
Contents
Page 4

Introduction ................................................................................ ix
Creative Oozic Player................................................................................................ xi
Creative W ebCam PhotoEditor................................................................................. xi
Creative PC-CAM Center......................................................................................... xi
Creative W ebCam Monitor....................................................................................... xi
Ulead Photo Express MCE....................................................................................... xii
Ulead VideoStudio Version 4.0 SE Basic................................................................ xii
PixAround PixMaker (Creative Edition)................................................................. xii
PixAround PixScreen (Creative Edition) ................................................................ xii
Microsoft NetMeeting.............................................................................................. xii
Microsoft Internet Explorer...................................................................................... xii
README File......................................................................................................... xiii
Minimum System Requirements ............................................................................ xiii
Document Conventions........................................................................................... xiv
1 Installing PC-CAM 600 ........................................................... 1
Package Contents......................................................................................................................2
About PC-CAM 600.................................................................................................................3
Buttons and LCD on PC-CAM 600.........................................................................................5
Buttons.......................................................................................................................... 5
Installing PC-CAM 600............................................................................................................9
In Windows 98/98 SE/Me........................................................................................... 9
Verifying the installation in Windows 98/98 SE/Me....................................11
In Windows 2000....................................................................................................... 12
Verifying the installation in Windows 2000..................................................13
ii
Page 5

2 Using PC-CAM 600 as a Web Camera ............................... 14
Starting PC-CAM Center........................................................................................................15
Capturing Images and Videos.................................................................................................16
Recording a Video in Preview Mode........................................................................ 17
Viewing a Photo......................................................................................................................18
Viewing a Video......................................................................................................................18
Reactivating the Camera.........................................................................................................18
Starting PC-CAM Center Help ..............................................................................................19
3 Using PC-CAM 600 as a Digital Camera ............................ 20
Turning on the Camera...........................................................................................................21
Battery Low.............................................................................................................................21
T aking Pictures........................................................................................................................22
Tips on Taking Good Pictures................................................................................................25
Recording Videos....................................................................................................................26
Downloading Images and Audio from the Camera ..............................................................27
Docked Mode............................................................................................................. 28
Undocked Mode......................................................................................................... 28
A Technical Specifications....................................................... 29
Features and Specifications....................................................................................................30
Driver and Operating System Compatibility.........................................................................31
Power.......................................................................................................................................31
Sensor.......................................................................................................................................31
Image Resolution ....................................................................................................................31
Docked mode............................................................................................................. 31
Undocked mode......................................................................................................... 32
Light Sensitivity......................................................................................................................32
Video Formats.........................................................................................................................32
iii
Page 6

Exposure Control ....................................................................................................................32
Color Balance..........................................................................................................................32
Color Matrix............................................................................................................................32
Depth-of-Field.........................................................................................................................33
Port Compatibility...................................................................................................................33
Flash.........................................................................................................................................33
B Troubleshooting ..................................................................... 34
Problem Installing Software...................................................................................................35
Problems Using PC-CAM 600...............................................................................................35
C USB Compatibility ................................................................ 38
Technical Support...................................................................... 39
iv
Page 7

Introduction
Page 8

Introduction
Creative PC-CAM 600 is an Internet video camera that allows you to capture images
in 24-bit (16.7 million) colors. It also records videos in full-color. The following are
just some of the things you can do with your PC-CAM 600:
❑ Video Conferencing. Want to chat face-to-face with someone over the Internet?
Used together with Microsoft NetMeeting, PC-CAM 600 allows you to have realtime videoconferencing with virtually anybody over the Internet!
❑ Security Camera. Worried that someone will use your computer without your
kn o wle dge ? Wh e n us ed t o ge t her wit h We b Ca m Mon ito r, PC -CA M 60 0 can fun cti o n
as a security camera, recording short videos of any movement in its field of view.
It can also be programmed to take pictures automatically at regular intervals.
❑ Portable Digital Camera. As PC-CAM 600 is detachable, you can disconnect it
from the computer and use it as a digital camera to take pictures anywhere you
like! With PC-CAM 600’s focus-free lens, you don’t need to manually focus your
camera. Downloading images from PC-CAM 600 is a breeze with PC-CAM Center.
Introduction x
Page 9

About the
Applications
Creative Oozic Player
Creative PC-CAM Center
Creative WebCam Monitor
Ulead Photo Express MCE
An advanced software developed at the prestigious Creative-EMU Technology
Center, Oozic
accompany your music files. It combines textures, images and colors to create
mesmerizing forms that dance and groove – all in a matter of seconds. Oozic videos
are relatively compact and may be sent easily through the Internet.
Oozic Player requires a 3D graphics card.
This powerful application lets you take pictures or record videos and store them in
albums. Use this application to download pictures to your computer, when using PCCAM 600 as a portable digital camera. You can also export these pictures or videos
to other programs, or send them as attachments in your e-mail message. There are
various settings for you to adjust, allowing you to optimize the quality of your
pictures and videos.
If you are thinking of putting a live snapshot of your office, garden, or even your
hamster cage on your web page, use WebCam Monitor. Just point your camera,
specify some settings, and WebCam Monitor does the rest, including automatically
uploading the snapshots to your web site. WebCam Monitor can even act as a
motion-detecting security system that automatically sends an e-mail message to
notify you whenever anybody moves within the camera’s field of view.
Ulead® Photo Express® MCE lets you download and organize photos and other
multimedia files. You can also perform quick and easy photo enhancements.
™
Player lets you create and play stunning animated 3D videos to
Introduction xi
Page 10

Ulead VideoStudio Version 4.0 SE Basic
The fastest way to create great videos, Ulead® VideoStudio™ 4.0 SE Basic takes full
advantage of the most advanced digital video technology to put digital video
excitement within the reach of anyone with a digital video camcorder and a
computer.
PixAround PixMaker (Creative Edition)
PixAround PixScreen (Creative Edition)
Microsoft NetMeeting
Microsoft Internet Explorer
PixAround™ PixMaker™ lets you create your own 360° interactive PixAround scenes,
web pages and postcards in 3 easy steps – just snap, stitch and publish! Now, you
can create interactive 360° web pages easily, without the need for expensive
professional equipment or additional plug-ins.
PixScreen™ lets you view PixAround scenes without the need for additional plug-ins.
Navigate around a 360° PixAround scene with the help of buttons built into
PixScreen's friendly user interface, or print out your PixAround scenes in normal or
panoramic view!
Microsoft® NetMeeting® is a voice communications client that includes support for
international conferencing standards and provides true multi-user application
sharing and data conferencing capabilities.
It supports one-way or two-way videoconferencing, so your friends can see you even
if they do not have a camera. Audio-only conversations and text chats are also
supported. Two or more users can collaborate on a document, doodle on a
whiteboard, or even share any Windows application in real-time over the Internet or
a corporate intranet.
Microsoft Internet Explorer is an Internet browser that features ActiveX technology,
so web pages can combine interactive ActiveX Controls, Java applets, and more to
create interactive content. ActiveMovie technology allows you to view multimedia
content on the Web, including MPEG audio and video.
Introduction xii
Page 11

Before You Begin
README File
Minimum System Requirements
❑ The README file on the PC-CAM 600 installation CD contains information not
available at the time of printing. Read the file before connecting your PC-CAM to
the computer.
❑ Genuine Intel
❑ 64 MB RAM
❑ 70 MB free hard disk space for installation of all software titles
❑ Available USB port or self-powered USB hub
❑ Microsoft
Edition (Me) or Windows 2000
❑ Display adapter that supports 16-bit color at a resolution of 800 x 600 pixels
❑ CD-ROM drive installed
❑ Sound Blaster
videoconferencing)
❑ Modem or LAN access to the Internet at 28.8 Kbps or faster (required for
videoconferencing)
For optimal performance:
❑ Display adapter that supports 24-bit color at a resolution of 1024 x 768 pixels
❑ Sound Blaster 16 or higher, or other Windows-compatible sound card with full-
duplex support for simultaneous two-way conversations
®
Pentium® 266 MHz, AMD® K6-2 300 MHz or faster processor
®
Windows® 98, Windows 98 Second Edition (SE), Windows Millennium
®
or other compatible audio card and microphone (required for
Introduction xiii
Page 12
Updating Drivers To download the latest drivers and file updates for PC-CAM 600, visit the following
Creative web sites:
❑ http://creative.com/support/files/
(for driver and software updates)
❑ http://creative.com/support/faq/
(for questions about using PC-CAM products)
❑ http://creative.com/support/tech/
(to contact regional technical support offices)
Document Conventions
The following typographical conventions are used throughout this document:
Table 0-1: Document conventions
This Represents
This notepad icon indicates information that is of particular
importance and should be considered before continuing.
This alarm clock icon indicates that failure to adhere to
directions may result in loss of data or damage to your
computer.
The warning sign indicates that failure to adhere to
directions may result in bodily harm or life-threatening
situations.
Introduction xiv
Page 13

1
Installing PC-CAM 600
Page 14

Installing PC-CAM 600
Package Contents
Your package contains the following items:
❑ One PC-CAM 600 camera
❑ One PC-CAM 600 camera stand
❑ One wrist-strap
❑ One USB cable
❑ Four alkaline AAA batteries (twin pack)
❑ One PC-CAM 600 installation CD
❑ Quick Start
Installing PC-CAM 600 2
Page 15

About PC-CAM 600
Figure 1-1 shows you the front and back views of the camera.
Snapshot button
Focus-free lens
Front view
Viewfinder
Strobe-Flash
Front LED
Lights up when
the camera is
connected to the
computer.
Camera-ready LED
Back view
Figure 1-1: Front and back views of PC-CAM 600.
Viewfinder
Installing PC-CAM 600 3
Page 16
• To view pictures that you
)
have taken while using the
camera on-the-go, you
must connect the camera
to the computer and
download the pictures
using PC-CAM Center.
• As JPEG compresses an
image according to its
details, colors and
compression ratio, the file
size varies according to the
picture taken.
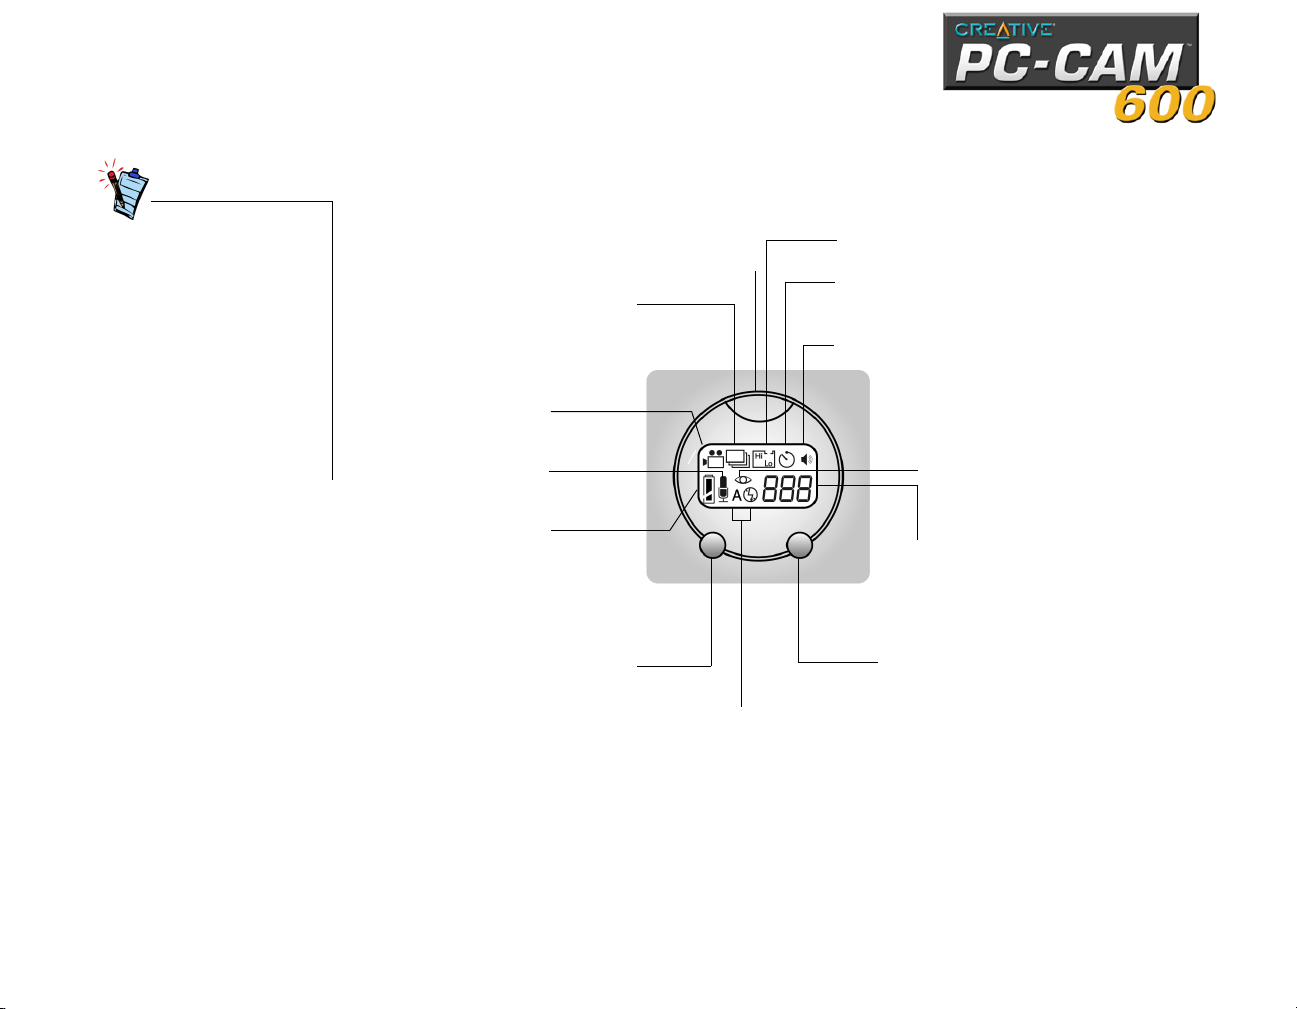
Figure 1-2 shows the buttons and LCD on the camera.
Single snapshot (high resolution),
Single snapshot (normal resolution)
and Single snapshot (low resolution)
modes icons
Self-timer single snapshot (high resolution
and Self-timer single snapshot (normal
resolution) modes icons
Audio cues enabled icon
Image counter
Multiple-snapshot (high resolution)
mode icon
Video Recording ic on
Audio Recording icon
Battery level indicator
Power button
Red eye flash mode icon
Operation Mode button
Figure 1-2: Buttons and LCD on PC-CAM 600.
Flash mode button.
Flash mode Icons
Installing PC-CAM 600 4
Page 17

Buttons and
LCD on
The following section explains the functions of the buttons and LCD on your PCCAM 600. Refer to Figure 1-1 and Figure 1-2 for the location of these buttons and
LCDs on your camera.
PC-CAM 600
Buttons The following buttons are found on your PC-CAM 600:
❑ Power button
To turn on your camera, press this button. You can only turn on your camera
when it is disconnected from the computer.
To turn off your camera, press and hold this button for two seconds.
Note: The camera will turn itself off if it is left idle for three minutes.
❑ Operation Mode button
This button will change the camera’s operation mode each time it is pressed.
There are eight modes of operation: Single snapshot (normal resolution),
Single snapshot (high resolution), Single snapshot (low resolution), Self-timer
single snapshot (normal resolution), Self-timer single snapshot (high
resolution), Multiple snap shot, Video Recording and Audio Recording. To erase
all the data from your camera, press this button together with the Snapshot
button and hold for 3 seconds.
❑ Flash Mode button
This button will change the camera’s flash mode each time it is pressed. There
are four flash modes: Auto, Always, Red Eye and Disabled. To erase the last
picture taken, press this buton together with the Snapshot button and hold for
3 seconds
❑ Snapshot button
This button is used for taking photos and videos. It is a two-stage button.
Pressing the button halfway (the first stage) will allow the camera to make the
necessary adjustments for flash and exposure. Pressing the button completely
(the second stage) allows the camera to take a picture or video.
Installing PC-CAM 600 5
Page 18

LCD
The following LCD icons and symbols are found on your PC-CAM 600:
❑ Single snapshot (high resolution)
This icon indicates that you are in Single snapshot (high resolution) mode. In
this mode, the camera captures images at 1280 x 960 pixels with
interpolation.
❑ Single snapshot (normal resolution)
This icon indicates that you are in Single snapshot (normal resolution) mode.
In this mode, the camera captures images at 1024 x 768 pixels.
❑ Single snapshot (low resolution)
This icon indicates that you are in Single snapshot (low resolution) mode. In
this mode, the camera captures images at 640 x 480 pixels.
❑ Multiple snapshot
This icon indicates that you are in the Multiple snapshot mode. In this mode,
the camera captures five successive snapshots at 640 x 480 pixels.
❑ Self-timer single snapshot (high resolution)
This icon indicates that you are in Self-timer single snapshot mode (high
resolution). In this mode, the camera takes a high resolution snapshot after a
specified length of time. Images are captured at 1280 x 960 pixel with
interpolation.
❑ Self-timer single snapshot (normal resolution)
This icon indicates that you are in Self-timer single snapshot mode. In this
mode, the camera takes a high resolution snapshot after a specified length of
time. Images are captured at 1024 x 768 pixels.
❑ Video Recording
This icon indicates that the camera is in Video Recording mode. In this mode,
the camera records videos with audio.
Installing PC-CAM 600 6
Page 19

• No batteries are required
when the camera is
connected to the
computer.
• If the camera is to be
connected to the computer
for a long period of time,
remove the batteries to
prevent battery leakage.
• Make sure that you insert
the batteries in the correct
direction. If not, they may
leak and cause damage to
the camera.
• Do not mix old batteries
with new ones or batteries
of different types together.
❑ Audio Recording
This icon indicates that the camera is in Audio Recording mode. In this mode,
the camera records voices or sounds.
❑ Auto Flash
This icon indicates that your camera is in Auto Flash mode. In this mode, the
camera automatically detects whether there is sufficient light and activates the
camera flash if needed.
❑ Always Flash
This icon indicates that your camera is in Always Flash mode. In this mode, the
camera emits one flash for every photo taken.
❑ Red eye
This icon indicates that your camera is in Red eye reduction flash mode. In this
mode, the camera emits multiple flashes for each photo taken, to reduce the
red-eye effect in captured images.
❑ No Flash
This icon indicates that your camera’s flash is disabled.
❑ Battery level indicator
This icon displays the battery level.
❑ Audio cues enabled
This icon indicates that the various audio cues built into your camera are
enabled. When these cues are enabled, various beep sounds and shutter
noises are emitted. Press the Operation Mode button for two seconds to
disable your camera’s audio cues. To enable your camera’s audio cues again,
press the Operation Mode button for two seconds.
❑ Image Counter
Depending on which mode you are in, this counter displays
the total number of photos, videos or audio samples
taken.
Installing PC-CAM 600 7
Page 20

Inserting or
Changing Batteries
For PC-CAM 600 to function as a portable digital camera when it is disconnected
from the computer, you need to insert four 1.5 V AAA alkaline batteries into its
battery compartment.
To insert or replace batteries:
1. Press the Power button for two seconds to turn off the camera.
2. Holding the camera in one hand, push the battery compartment cover catch
inwards, and then lift the cover up with your fingertip as shown in Figure 1-3.
3. Remove the old batteries (if any).
4. Insert the new batteries according to the directions shown in the battery
compartment.
5. Close the battery compartment cover
and then push the catch outward to
lock the compartment cover.
Figure 1-3: Opening the battery
compartment.
Installing PC-CAM 600 8
Page 21

Installing PCCAM 600
Refer to the instructions for your computer's operating system.
For users of Windows 98, Windows 98 SE and Windows Me, see “In Windows 98/98
SE/Me” in the section that follows.
For users of Windows 2000, see “In Windows 2000” on page 1-12.
In Windows 98/98 SE/Me
1. Do not connect PC-CAM 600 to your computer before installing the drivers.
If you accidentally begin installation with PC-CAM 600 connected, the Add New
Hardware Wizard dialog box appears.
Click the Cancel button.
2. Insert the PC-CAM 600 installation CD into your CD-ROM drive.
3. Click the names of the drivers and applications you want to install on your
computer.
4. Follow the instructions on the screen to complete the installation.
You may be asked, after an application is installed, if you want to restart your
computer. Do not restart your computer until all the drivers and applications are
installed.
Installing PC-CAM 600 9
Page 22

• The USB port(s) of certain
computers may be found
on the front panel instead
of the back panel.
• You can also attach the
camera to a self-powered
USB hub.
• You can connect the
camera while the computer
is switched on.
5. Connect PC-CAM 600’s USB cable to an available USB port on your computer (see
Figure 1-4). Windows automatically detects the device.
USB cable
Figure 1-4: Connecting PC-CAM 600 to the computer.
USB port
i. If you are prompted to insert the Windows 98 CD, replace the PC-CAM 600 Installation
CD with the appropriate CD.
Note: Windows 98 is available in various editions. Be sure to use the correct edition for
your computer.
ii. In the Insert Disk dialog box, click the OK button.
iii. Follow the instructions on the screen.
Installing PC-CAM 600 10
Page 23

6. Place PC-CAM 600 on top of your
computer monitor or another flat surface.
7. When the Light Frequency Selection
dialog box appears (see Figure 1-5),
select the option that represents your
power supply frequency, and then click
the OK button.
Figure 1-5: The Light Frequency Selection
dialog box.
Verifying the installation in Windows 98/98 SE/ Me
1. Right-click the My Computer icon on your desktop.
2. On the menu that appears, click Properties.
3. In the System Properties dialog box, click the Device Manager tab.
4. Click the plus (+) sign next to the Imaging Device icon.
The entries Creative PC-CAM 600 (Still Image) and Creative PC-CAM 600
(Video) should appear.
Click the plus (+) sign next to the Universal Serial Bus controllers icon.
The entry Creative PC-CAM 600 (Composite) should appear.
If the entries do not appear, repeat the installation procedure in “In Windows 98/
98 SE/Me” on page 1-9.
Installing PC-CAM 600 11
Page 24

In Windows 2000 1. Do not connect PC-CAM 600 to your computer before installing the drivers.
If you accidentally begin installation with PC-CAM 600 connected, the Found
New Hardware Wizard dialog box appears. Click the Cancel button.
2. Insert the PC-CAM 600 installation CD.
3. Click the names of the drivers and applications you want to install on your
computer, and then click the OK button.
4. Connect PC-CAM 600’s USB cable to an available USB port on your computer.
5. Place PC-CAM 600 on top of your computer monitor or another flat surface.
6. Two Digital Signature Not Found dialog
boxes appear, one at a time, telling you
that Creative PC-CAM 600 (Still
Image) and Creative PC-CAM 600
(Video) (Figure 1-6) have been detected.
7. Ignore the messages and click the Yes
button for each dialog box.
Figure 1-6: Digital Signature Not Found
dialog box.
Installing PC-CAM 600 12
Page 25

8. When the Light Frequency Selection
dialog box appears (see Figure 1-7), select
the option that represents your power
supply frequency, and then click the OK
button.
Figure 1-7: The Light Frequency Selection
dialog box.
Verifying the installation in Windows 2000
1. Right-click the My Computer icon on your desktop.
2. On the menu that appears, click Properties.
3. In the System Properties dialog box, click the Hardware tab.
4. Click the Device Manager button. A window appears.
5. Click the plus (+) sign next to the Imaging Device icon.
The entries Creative PC-CAM 600 (Still Image) and Creative PC-CAM 600
(Video) should appear.
Click the plus (+) sign next to the Universal Serial Bus controllers icon.
The entry Creative PC-CAM 600 (Composite) should appear.
If the entries do not appear, repeat the installation procedure in “In Windows
2000” on page 1-12.
Installing PC-CAM 600 13
Page 26

2
Using PC-CAM 600 as a Web Camera
Page 27

Using PC-CAM 600 as a Web Camera
“
Starting PCCAM Center
If PC-CAM Center does not
recognize the camera
correctly, see Appendix A,
Troubleshooting.”
PC-CAM Center is an easy-to-use application that enables you to take pictures and
record short videos with the PC-CAM 600 camera. You can also view pictures and
videos, create and manage albums, and download image files from your camera.
To start PC-CAM Center, do one of the following:
❑ Click Start -> Programs -> Creative -> Creative PC-CAM 600-> PC-CAM
Center.
❑ Press the Snapshot button on the camera.
❑ If, during installation, you clicked the option for PC-CAM Center to launch
automatically at Windows startup, you will have an icon on your taskbar. Click this
icon.
❑ You can start PC-CAM Center either in Digital Camera or Live Video mode from
the menu that appears when your PC-CAM is auto detected.
Using PC-CAM 600 as a Web Camera 15
Page 28

After PC-CAM Center is started, the PC-CAM Center screen similar to Figure 2-1
appears.The following sections describe the more commonly used operations. For
more details on how to use PC-CAM Center, see the section “Starting PC-CAM Center
Help” on page 2-19.
Figure 2-1: PC-CAM Center screen.
Capturing Images and Videos
With PC-CAM Center, you can take photos and record videos in two modes — with
and without a preview. The preview mode is active by default.
For instructions on how to take a photo or record a video without a preview, refer to
the PC-CAM Center Help file. To launch PC-CAM Center Help, see “Starting PC-CAM
Center Help” on page 2-19.
Using PC-CAM 600 as a Web Camera 16
Page 29

Taking a Photo in
Preview Mode
To take a photo in the default preview mode, do this:
1. In the PC-CAM Center window, click the Live Video button. The current camera
view is displayed in the Viewing window.
2. In the Photo Size box, select a suitable resolution.
3. In the Save Photo in box, select the destination album for your photo.
4. If the Save automatically check box is selected, click to clear it.
5. To capture the image in the viewing window, click the Snap Photo button at the
bottom of the window.
The image is captured but not saved. A preview of the photo is shown at the
bottom-left corner of the Live Video window.
6. Click the Save button.
The photo is added to the destination album.
Recording a Video in Preview Mode
To record a video in the default preview mode, do this:
1. In the PC-CAM Center window, click the Live Video button. The current camera
view is displayed in the Viewing window.
2. In the Video Size box, select a suitable resolution.
3. In the Save Video in box, select the destination album for your photo.
4. If the Save automatically check box is selected, click to clear it.
5. To start recording a video, click the Capture video button.
The button starts blinking to indicate that recording is now in progress.
6. To stop the recording, click the button again.
The button stops blinking. The video is captured as an AVI file but is not saved.
7. To preview the video, click the Play button on the bottom-left corner of the Live
Video window.
After you have previewed the video, and have decided that you want to save the
video, click the Save button.
8. The video capture is added to the destination album.
Using PC-CAM 600 as a Web Camera 17
Page 30

Viewing a Photo
To view a photo you have taken, do this:
1. Click the My Album button. PC-CAM Center is now in My Album mode.
2. In the My Album box, click the My Photo folder and then click the album that
contains the photos that you want to view.
The album’s thumbnails are displayed in the Thumbnails window.
3. Double-click the thumbnail of the image that is displayed in the Thumbnails
window.
The image is displayed in the PC-CAM Center Viewing window, in its actual size.
If you are not satisfied with the result, you can select a higher resolution, and
then capture the image again.
Viewing a Video
Reactivating the Camera
To view a video you have taken, do this:
1. Click the My Album button. PC-CAM Center is now in My Album mode.
2. In the My Album box, click the My Video folder and then click the album that
contains the video that you want to view.
The album’s thumbnails are displayed in the Thumbnails window.
3. Double-click the thumbnail of the video that is displayed in the Thumbnails
window.
The video is displayed in the PC-CAM Center Viewing window, in its actual size.
If you are not satisfied with the result, you can select a higher resolution, and
then capture the video again.
If your computer goes into standby mode, your camera will go into suspend mode.
You can reactivate the camera and computer using the following methods:
❑ Move the mouse or press any key on the keyboard.
❑ Press the camera’s Snapshot button.
Using PC-CAM 600 as a Web Camera 18
Page 31

Starting PCCAM Center
Help
This Help file contains instructions on how to use PC-CAM Center to take pictures
and record short videos. It also teaches you how to change settings so as to achieve
optimum quality for your pictures and videos.
To start the Help file:
1. Click the Creative logo at the top left corner of PC-CAM Center’s main window.
2. On the PC-CAM Center menu, click Help.
Using PC-CAM 600 as a Web Camera 19
Page 32

Using PC-CAM 600 as a Digital
3
Camera
Page 33

Using PC-CAM 600 as a Digital Camera
You can also use PC-CAM 600 as a portable digital camera when it is not connected to your
computer.
Note: Remember to insert four 1.5 V AAA alkaline batteries into the camera’s battery
compartment.
Turning on the Camera
Battery Low
To turn on the camera, do the following:
Press the Power button on the camera.
One beep indicates that your camera has been turned on.
When the battery is running low, the following occurs:
❑ The battery-low indicator (as shown on the right) is
displayed.
❑ When the Snapshot button is pressed, two warning
beeps are heard.
Using PC-CAM 600 as a Digital Camera 21
Page 34

Taking Pictures
• You can only turn on the
camera when it is
disconnected from the
computer.
• If there is insufficient
memory in the camera, the
counter will start flashing
“000” immediately.
• When the counter starts
flashing “000,” you cannot
take any more pictures
until you have cleared the
camera’s memory by
deleting existing pictures.
• The Multiple-snapshot
mode consumes more
battery power.
• The camera turns itself off
if it is left idle after three
minutes.
When the audio cues of your
camera are enabled, a
warning sound is emitted if
the lighting conditions are
inadequate for a snapshot.
1. Make sure the USB cable is unplugged from the camera.
2. Press the Power button on the camera. Two beeps will follow. When the camera
is first turned on, it is in the default state.
The following default LCD icons are displayed:
❑ The default operation mode will be displayed: Single Snapshot (normal
resolution, 1024 x 768 pixel) mode.
❑ The default flash setting will be displayed: Autoflash.
❑ The number of images you have taken so far is shown by the image counter
on the LCD.
3. To change the flash mode of the camera, press the Flash Mode button:
❑ Auto
In this mode, the camera automatically detects whether there is sufficient light
and activates the camera flash if needed.
❑ Always
In this mode, the camera emits one flash for every photo taken.
❑ Red Eye
In this mode, the camera emits multiple quick flashes, followed by a normal
flash for each photo taken. This flash mode reduces the ‘red eye’ effect caused
by insufficient pupil dilation.
❑ Disabled
In this mode, the flash is turned off.
4. To change the operation mode of the camera, press the Operation Mode button:
❑ Single snapshot (high resolution)
This is the default mode once the camera is turned on.
Select this mode if you want to take single snapshots at high resolution.
Images are captured at a resolution of 1280 x 960.
Select the flash mode that you want, then press the Snapshot button to take
Using PC-CAM 600 as a Digital Camera 22
Page 35

a snapshot. The front red LED blinks once and the camera-ready green LED
blinks when the image is stored into memory, and turns off after the image is
saved.
❑ Single snapshot (normal resolution)
Select this mode if you want to take single snapshots at normal resolution.
Images are captured at a resolution of 1024 x 768.
Select the flash mode that you want and then press the Snapshot button to
take a snapshot. The front red LED blinks once and the camera-ready green
LED blinks when the image is stored into memory, and turns off after the
image is saved.
❑ Single snapshot (low resolution)
Select this mode if you want to take single snapshots at low resolution. Images
are captured at a resolution of 640 x 480.
Select the flash mode that you want and then press the Snapshot button to
take a snapshot. The front red LED blinks once and the camera-ready green
LED blinks when the image is stored into memory, and turns off after the
image is saved.
❑ Self-timer single snapshot (high resolution)
Select this mode if you want a high resolution snapshot to be taken after a
delay of ten seconds.
You can use this feature to take pictures of yourself.
Press the Snapshot button to take a delayed snapshot. The front LED light will
blink with increasing speed and then proceed to take a snapshot in the Single
snapshot mode.
The default delay time is ten seconds.
Note: You can cancel the snapshot while the camera is counting down by
pressing the Snapshot button again.
Using PC-CAM 600 as a Digital Camera 23
Page 36

• The counter value
normally increases by one
after a picture is taken.
• Depending on the quality of
the picture, the counter
value may also inrease by
two, or not at all.
❑ Self-timer single snapshot (normal resolution)
Select this mode if you want a normal resolution snapshot to be taken after a
delay of ten seconds.
You can use this feature to take pictures of yourself.
Press the Snapshot button to take a delayed snapshot. The front LED light will
blink with increasing speed and then proceed to take a snapshot in the Single
snapshot mode.
The default delay time is ten seconds.
Note: You can cancel the snapshot while the camera is counting down by
pressing the Snapshot button again.
❑ Multiple snapshot
Select this mode if you want to take a series of five successive snapshots at
high resolution.
Press the Snapshot button once to take the snapshots. The front red LED will
light up and the camera-ready green LED blinks, indicating that the images are
being stored to memory.
The flash is automatically disabled in this mode.
The image counter displays that the total number of snapshots has increased
by five.
5. Aim the camera at the desired object, use the camera’s viewfinder to verify that
the object is in the camera’s view.
Note: The object should be at least 75 cm (30 inches) from the camera.
6. Hold the camera still and press the Snapshot button.
7. The front red LED lights up and the camera-ready green LED indicator blinks. At
this point, do not shake the camera. When the picture has been taken, the
indicator turns off.
The picture taken is stored in the camera’s memory, and the counter value
increases accordingly, depending on the resolution of the picture taken.
8. To take another picture, repeat steps 4 through 6.
9. To turn off the camera, press and hold the Power button for two seconds.
Using PC-CAM 600 as a Digital Camera 24
Page 37

Tips on Taking Good Pictures
There are a few tips to note when taking a good picture.
❑ Bright lighting
Avoid taking pictures with bright light sources all around the object. These
lights will create “hotspots,” which will affect the quality of the picture.
❑ Bad lighting
When indoors or outdoors, be sure there is enough light falling onto the object.
Avoid taking pictures of objects in shadows, especially when the light source
(for example, sun or spotlight) is directly behind the object. Select the ‘Always
Flash’ flash mode to take a photo if you still want to capture an image under
these conditions.
❑ Distance
This camera is focus free but be sure the minimum distance between camera
and object is not less than 75 cm (30 inches). Any closer, the close-up images
may appear blurry.
Fill the viewfinder with the object (unless taking a panoramic picture).
❑ Using Flash
When in a dimly lit environment, be sure that the distance between camera
and object is less or equivalent to 2 meters (7 feet). However, objects in the
background that are more than 2 meters (7 feet) away from the camera may
appear fuzzy.
❑ Moving objects
Fast-moving objects may appear blurry in your picture.
Unless a blurry or out-of-focus effect snapshot is intended, avoid taking fastmoving objects.
❑ Camera shake
Shaking the camera while taking pictures may also result in a blurry picture.
So keep your hands steady at all times for sharp, clear pictures.
To avoid shaking the camera, gently squeeze the Snapshot button.
If necessary, use both hands to hold the camera while pressing the Snapshot
button.
Using PC-CAM 600 as a Digital Camera 25
Page 38

Recording Videos
In Video Recording mode, the
camera’s flash is
automatically disabled.
To start recording a video, do the following:
1. Press the Operation Mode button to select the Video Recording mode .
2. Aim the camera at the desired object, and use the camera’s viewfinder to verify
that the object is in the camera’s view.
Note: The object should be at least 75 cm (30 inches) away from the camera.
3. Hold the camera still and press the Snapshot button.
A beep sound is heard at the start of the recording.
The Video Recording mode icon flashes to indicate that the recording has begun.
4. The front red LED lights up and the camera-ready green LED indicator blinks. At
this point, do not shake the camera. When the video is complete, the indicator
will go off.
Audio recording is enabled automatically during video recording.
5. Press the Snapshot button once more to end the recording.
A beep sound is heard at the end of the recording.
6. The recorded video taken is stored in the camera’s memory, and the counter
value increases by one.
Using PC-CAM 600 as a Digital Camera 26
Page 39

Recording Voices
or Sounds
To start recording voices or sound samples, do the following:
1. Press the Operation Mode button to select the Audio Recording mode.
2. Position the camera near the sound source and press the Snapshot button once
to start recording.
A beep sound is heard at the start of the recording.
The Audio Recording mode icon flashes to indicate that recording has begun.
The camera-ready LED indicator blinks.
3. Press the Snapshot button again to end the recording.
A beep sound is heard at the end of the recording.
4. The audio sample is stored in the camera’s memory, and the counter value
increases by one.
Downloading Images and Audio from the Camera
To download the pictures, videos or audio samples you have saved, connect the
camera to your computer and then use PC-CAM Center to download the files.
To download pictures, videos or audio samples, do the following:
1. Connect PC-CAM Center to your computer and start PC-CAM Center.
2. Click the Digital Camera button. Temporary copies of the PC-CAM files are
created automatically, and displayed as thumbnails in the thumbnails window.
3. Click the Select All button to select all the files.
4. Click the Transfer To button. The Transfer dialog box appears.
5. Click the Photo, Video or Voice tab containing the destination media album you
want. Only the tab belonging to the media of the selected files will appear.
6. Click the album you want to transfer the files to.
7. Click the OK button.
Using PC-CAM 600 as a Digital Camera 27
Page 40

Deleting Images
and Audio from
After downloading the picture, video and audio files safely into your album, delete
them from your camera to make space for new pictures, videos and audio samples
to be stored.
the Camera
Docked Mode When PC-CAM 600 is connected to your computer, do the following to delete
images and audio samples:
1. In the PC-CAM Center window, click the Digital Camera button.
A thumbnail view of the pictures stored in the camera’s memory is displayed.
2. Click the Select All button to select all the files in the camera memory.
3. Click the Delete button on the toolbar.
All the selected files are removed from the camera’s memory.
Undocked Mode When PC-CAM 600 is connected to your computer and you are using it as a portable
digital camera, do the following to delete all the files in your camera’s memory:
1. In any mode, press the Snapshot button and Operation Mode button
simultaneously for more than two seconds to delete all the files from the camera.
2. A beep sound is heard when the memory is cleared and the LCD displays zero.
To clear the last image or audio sample recorded in your camera, do the following:
1. In any mode, press the Snapshot button and Flash Mode button simultaneously
for more than two seconds to delete the last photo or audio sample from the
camera.
2. A beep sound is heard when the last file is cleared.
The value on the camera’s Image counter decreases by one.
Using PC-CAM 600 as a Digital Camera 28
Page 41

A
s
Technical Specification
Page 42

Technical Specifications
This section lists the specifications of your PC-CAM 600 camera.
Features and Specifications
❑ Color XGA (1024 x 768 pixels) CCD image sensor
❑ 16 MB of on-board non-volatile memory for image storage
❑ LCD counter display to indicate number of pictures taken and mode of stills
captured
❑ Snapshot button for taking pictures or videos when used as a stand-alone camera
❑ Smart Strobe-Flash that automatically adjusts the intensity of flash according to
the environment
❑ LEDs to indicate powered-on state and camera-readiness state
❑ High-quality, focus-free, scratch-resistant, dual-aperture glass lens
❑ Built-in optical viewfinder
❑ Operation Mode button for selection of four different modes of still capture
❑ When detached:
• Capable of capturing up to:
20 still pictures JPEG format (single snapshot high resolution)
85 still pictures JPEG format (single snapshot normal resolution)
200 still pictures JPEG format (single snapshot low resolution)
• Capable of capturing up to 75 sec of video
• Capable of capturing up to 60 min of audio
• Draws power from four AAA batteries
Note: Battery life depends on mode and battery type. Four AAA alkaline
batteries can last for up to 1000 snapshots with flash and 3000 snapshots
without flash.
• Auto shut-off after three minutes of idle time
Technical Specifications 30
Page 43

❑ When attached:
• Captures video at up to 30 frames per second at image resolutions of 320 x
240 and 160 x 120 and up to 15 frames per second at 640 x 480
• Captures still images in 24-bit color at all image resolutions up to 1280 x 960
❑ Attaches to the computer via the Universal Serial Bus (USB) port
Driver and Operating System Compatibility
Power
Sensor
Image Resolution
Docked mode
❑ USB model supports Windows 98, Windows Me and Windows 2000
❑ WDM MiniDriver for DirectShow, and Video For Windows compatibility
❑ TWAIN support
❑ Standard interface works with virtually all camera applications including Microsoft
NetMeeting
❑ Microsoft Still Image (STI) support
From USB port or self-powered USB hub (powered by an external power source).
CCD image sensor
❑ Still Mode
• 1280 x 960 (with software interpolation)
• 1024 x 768
• 800 x 600
• 640 x 480
• 320 x 240
• 160 x 120
Technical Specifications 31
Page 44

❑ Video Mode
• 640 x 480
• 352 x 288
• 320 x 240
• 176 x 144
• 160 x 120
Undocked mode
Light Sensitivity
Video Formats
Exposure Control
Color Balance
Color Matrix
❑ Still Mode
• 1280 x 960 (with interpolation)
• 1024 x 768
• 640 x 480
❑ Video Mode
• 320 x 240
10 lux
❑ 24-bit RGB
❑ 4:2:0 YUV Planar
❑ JPEG
Automatic (optional manual control with software)
Automatic (optional manual control with software)
Preset and integral to camera
Technical Specifications 32
Page 45

Field-of-View
❑ 50 degrees (diagonal)
❑ 40 degrees (horizontal)
Depth-of-Field
Port Compatibility
Flash
75 cm (30 inches) to infinity
Universal Serial Bus port
Up to 2 meters (7 feet) effectiveness
Technical Specifications 33
Page 46

B
Troubleshooting
Page 47

Troubleshooting
This appendix provides solutions to problems you may encounter during installation
or normal use.
Problem Installing Software
Problems Using PC-CAM 600
The setup program for PC-CAM 600 does not run automatically after you insert the
Installation CD into the drive.
The AutoPlay feature in your Windows system may not be enabled.
To install the software from the CD:
1. Leave the installation CD in the CD-ROM drive.
2. Click Start -> Run.
3. In the Open box, type D:\CTRUN\CTRUN.EXE (where D: represents your CDROM drive).
4. Follow the instructions on the screen to complete the installation.
There is no USB port available to connect the USB cable.
Do one of the following:
❑ Unplug the device currently connected to the USB port.
❑ Add a self-powered USB hub.
❑ Add a PCI USB card.
Troubleshooting 35
Page 48

An application reports that the video driver is already in use, or that the camera
cannot be found.
Do the following:
❑ The camera is not properly connected. To resolve this problem, ensure that the
camera’s USB connector is inserted, and that the USB host controller is enabled
in your computer’s BIOS. Refer to your computer’s documentation for information
on the BIOS.
❑ Reinstall the video capture drivers and reboot.
The image is too bright even though exposure and brightness levels have been
adjusted.
The amount of light entering the camera has exceeded the exposure control limit.
There may be a very bright object in the camera’s view.
Avoid pointing the camera at very bright objects (for example, sunlight, anticipated light
sources, or highly reflective surfaces).
Insufficient system resources reserved for the USB port, causing the computer to
be unable to function.
There are too many devices in the computer, causing IRQ conflicts with the
computer’s USB controller.
Do the following:
1. Remove some devices from the computer.
2. Restart the computer. The computer will automatically re-allocate the resources.
Troubleshooting 36
Page 49

If you select more than one
application, you will be
prompted to choose one of
them when you press the
Snapshot button.
When the camera is connected to the computer, pressing the Snapshot button does
not start an application.
The application to be activated has not been pre-selected.
Do the following:
3. Click Start -> Settings -> Control Panel.
4. Double-click the Scanners & Cameras icon. The Scanners & Cameras
Properties dialog box appears.
5. Click the Devices tab.
6. Click Creative PC-CAM 600 (Video), and then click the Properties button. The
Creative PC-CAM 600 (Video) Properties dialog box appears.
7. Click the Events tab.
8. Make sure that the Disable device events check box is not selected.
9. In the Camera events box, click Open Application.
10.In the Send to this application box, click PC-CAM Center and/or other
applications that you want to activate by pressing the Snapshot button.
11.Make sure that you have selected an application for taking pictures.
Troubleshooting 37
Page 50

C
USB Compatibility
Page 51

Note on USB Compatibility
In our testing on a wide variety of computer motherboards with integrated Universal
Serial Bus (USB) ports, we have encountered a small number of motherboards with
USB ports that do not meet the USB specification exactly. Unfortunately, PC-CAM
600 may not operate correctly with these computers.
So far, for some of the non-USB-compliant motherboards that we have tested, the
motherboard manufacturers have released new versions of motherboards or BIOS
to address the problem.
If the camera does not work on your computer and you suspect that the problem
may be related to your computer’s USB port, the following is a list of available
options:
1. Contact your computer vendor.
Your computer vendor may be able to upgrade your motherboard or its BIOS to
a newer version that addresses USB incompatibilities.
2. Use a PCI host adapter which provides USB connectors.
To look for a USB compatible
product, you can visit the
product search page at the
official USB web site: http://
www.usb.org/app/
search/products.
If you are not able to upgrade your motherboard or its BIOS, we recommend this
approach.
3. Attach PC-CAM 600 to a self-powered USB hub.
Some USB devices (such as monitors) also operate as self-powered USB hubs;
you can also buy dedicated powered USB hubs which are to be attached to your
computer’s USB port. However, in some cases, attaching a powered USB hub to
a non-USB-compliant USB motherboard connector will not solve the problem.
Note on USB Compatibility 39
Page 52

Technical Support Product Return
Visit our online help websites for help with installation, answers to frequently asked
questions, or troubleshooting tips. Our websites hold a wealth of information as well as upto-the-minute software and driver upgrades.
www.americas.creative.com/support
BEFORE YOU CONTACT US
Please fill out the following information and be seated at your computer.
• Model #: _____________Serial # _____________(both found on the back of the device)
• Error message on the screen and how it came about: _______________________________
_________________________________________________________________________
________________________________________________________________________
• Information on the adapter card that conflicts with the product (if applicable): __________
_________________________________________________________________________
________________________________________________________________________
• Hardware configuration information: __________________________________________
• I/O address: __________________ ___________________________________________
• IRQ line: _______________________________________________________________
• DMA channel used (if applicable): ___________________________________________
• Computer type and speed: __________________________________________________
• Type and version of your operating system; Windows 95/98/Me/NT/2000: ___________
_______________________________________________________________________
For comments or questions regarding our technical support, you can also contact us at the
following address: Creative Labs, Inc., Technical Support, 1523 Cimarron Plaza, Stillwater,
OK 74075.
If after consulting our online help, you still have an installation question on a Creative
product, you may contact us by the following numbers (please have your system hardware
and operating system configuration information and Creative product model and serial
numbers available for the call): (405) 742-6622 telephone, (405) 742-6633 fax.
To return a Creative product for a factory service,
contact the Creative Technical Support office. Once
the staff has verified the product is defective, you will
be given a Return Merchandise Authorization (RMA)
number.
NOTE: Retain your purchase receipt, as well as all
packaging and contents, until all product components
are functioning to your satisfaction. They are
required in the unlikely event you need to return the
product to Creative.
When returning a product for factory service:
• Shipment to Creative is at your expense and you
assume all risk. Ship the package through a carrier that
provides proof of delivery; insure the shipment at full
product value.
• Place the RMA number on the outside of the package.
• Use proper materials for packing the product for
shipment.
• For free repair or replacement, you must include a
copy of a dated proof of purchase (store receipt),
proving the product is still under Warranty
Creative may replace or repair the product with new
or reconditioned parts, and the faulty parts or product
will become the property of Creative.
Outside the United States
To avoid tariffs when shipping a product to Creative
Labs from outside the U.S., you must complete an
official customs form before shipping the product. To
ensure delivery, Creative may include charges for
return shipment.
 Loading...