

Page 1

User Manual for Wrist Oximeter
I
Instructions to User
PC-68B Wrist Oximeter is a precision measuring device,
please read the manual very carefully before using this
device. Failure to follow these instructions may cause
measur ing abnormality or damage to the oximeter.
No part of this manua l may be phot ocopied, reprodu ced or
translated into another language without the prior written
consent. Shenzhen Creative Industry Co., Ltd. reserves the
right to improve and amend it at any time without prior
notice.
Version of This Manual: Ver 1.4
Revised date: July 26, 2012
All rights reser ved.
3502-2290033
Page 2

User Manual for Wrist Oximeter
II
Notes:
The contents contained in this manual are subject to
change without prior notice.
Information furnished by Creative is believed to be
accurate and reliable. However, no responsibility is
assumed by us for its use, or any infringements of
patents or other rights of third parties that may result
from its use.
Instructions for Safe Operations
Check the device to make sure that there is no
visible damage that may affect user’s safety and
measurement performance. When there is obvious
damage, stop using the device.
Necessary servicing must be performed by
qualified service engineers ONLY. Users are not
permitted to mainta in it by themselves.
The oximeter cannot be used together with the
devi c es not s pecified in U ser M anual .
Cautions
Explosive hazard—DO NOT use the oximeter in
environment with inflammable gas such as some
ignitable anesthetic agents.
DO NOT u se th e oximeter while the testee is under
MRI or CT scanning.
Page 3

User Manual for Wrist Oximeter
III
Warnings
For individual patients, there should be a more
prudent inspecting in the placing process. The
device can not be clipped on the edema and tender
tissue.
The light (the infrared light is invisible) emitted
fr o m the se nso r is harmful to the eyes, so t he user or
even the service engineer should not stare at the
ligh t emitting comp onents.
To dispose the device, the local law should be
followed.
Attentions
Keep the oximeter away from dust, vibration,
corrosive substances, explosive materials, high
temperature and moisture.
The device should be kept out of the reach of
children.
If the oximeter gets wet, please stop operating it.
When it is carried from cold environment to warm
and humid environment, please do not use it
immediately.
DO NOT operate the button on front panel with
sharp materials.
Page 4

User Manual for Wrist Oximeter
IV
High temperature or high pressure steam
disinfection to the oximeter is not permitted. Refer
to related chapter for instructions of cleaning and
disinfection.
Declaration of Conformity:
The manufacturer hereby declares that this device complies
with the following standards:
IEC 6060 1-1
ISO 9919
and follows the provisions of the council directive
MDD93/42/EEC.
Page 5

User Manual for Wrist Oximeter
V
Table of Contents
1 OVERVIEW .................................................................. 1
1.1 Appe aran ce .............................................................. 1
1.2 N a me and Mod el ...................................................... 2
1.3 Conformation ........................................................... 3
1.4 Fe at ures .................................................................... 3
1.5 Intended Use ............................................................ 4
1.6 Key of Sy mb ols ........................................................ 5
2 BAT TERY INSTALLATION........................................ 6
3 OPERATION ................................................................. 7
3.1 M e a su r ing Operat io n .............................................. 7
3.2 M e nu O pe ratio n .................................................... 15
3.3 Upload Data ........................................................... 21
3.4 Low Battery Indication ......................................... 22
4 ADDITIONAL ADV ICE FO R OPERATION............ 23
5 TECHNICAL SPECIFICATIONS ............................. 24
6 ACCESSORIES ........................................................... 27
7 REP AIR AND MAINTENANCE ............................... 28
7.1 Maintenance ........................................................... 28
7.2 C leaning and Di si nfect ing Instruction.................. 29
8 TROUBLESH OOTING .............................................. 30
9 APPENDIX .................................................................. 32
A Common Knowle dge for SpO
2
Measurement ........ 32
B Wrist band Installatio n and D i sasse mbly ................ 36
Page 6
User Manual for Wrist O x ime ter
-1-
1 Overview
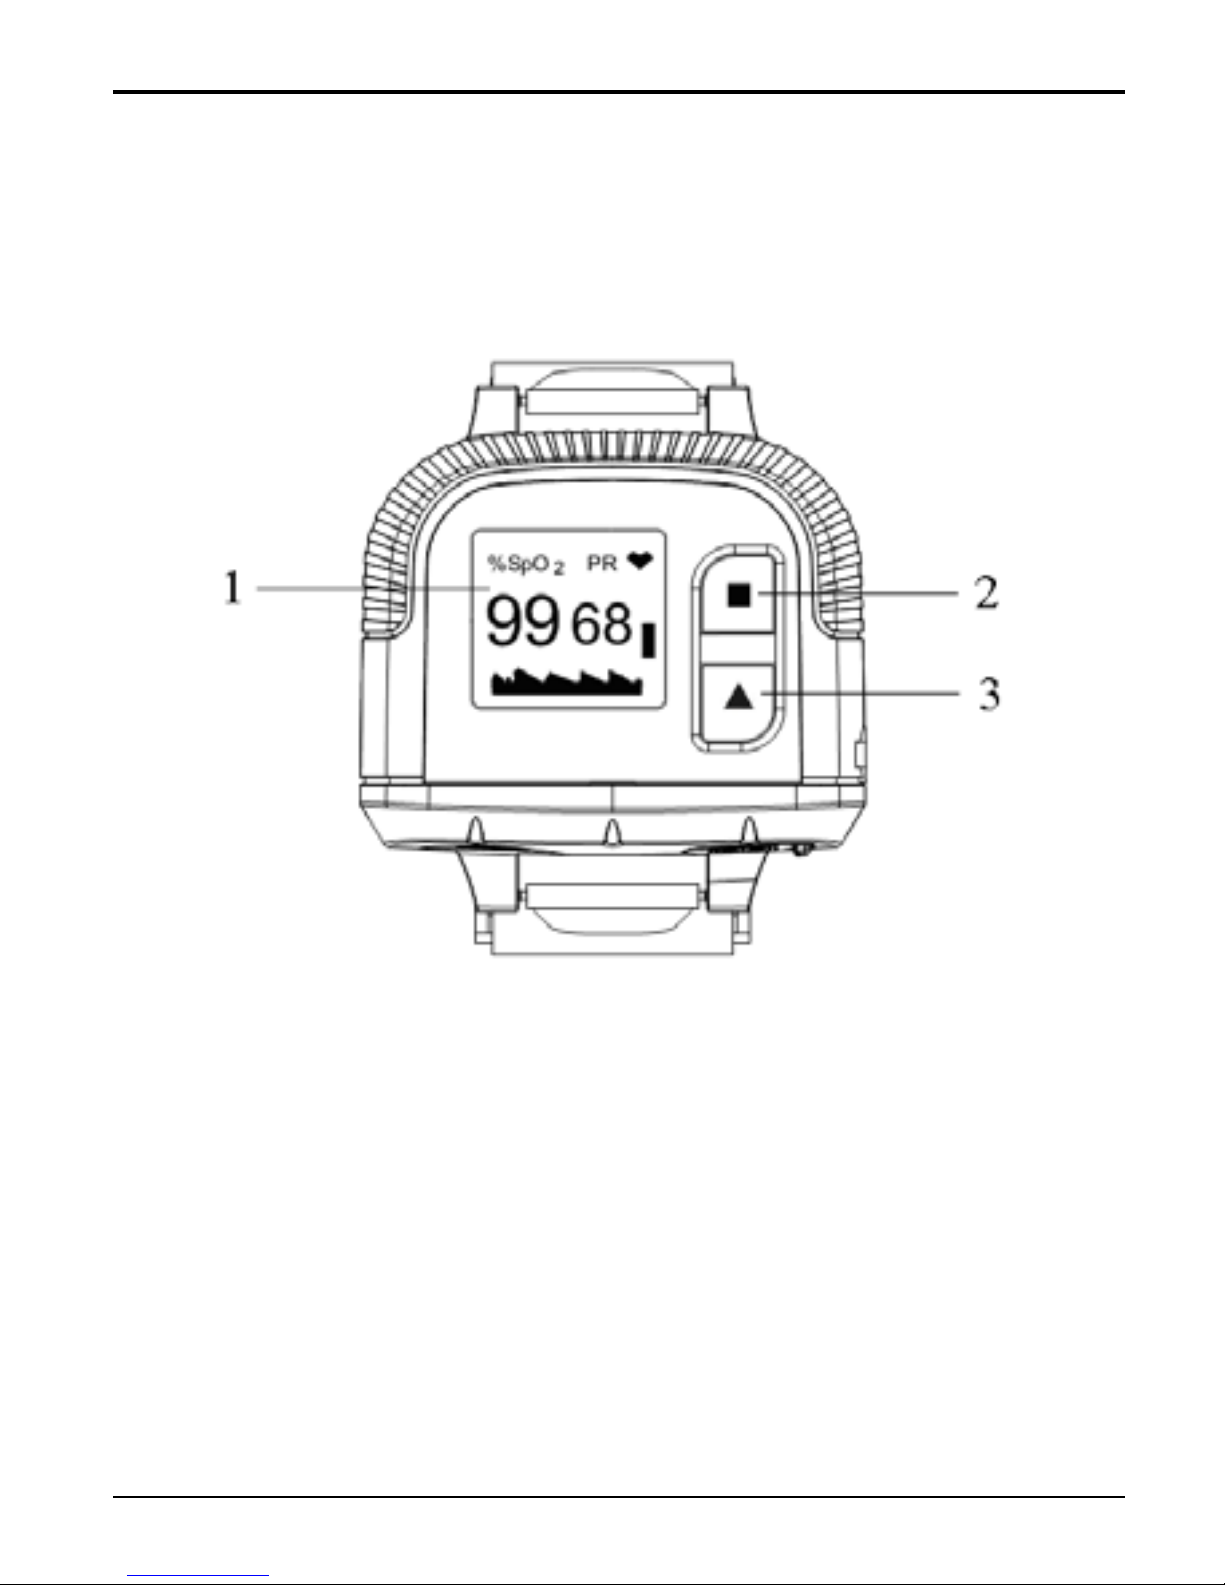
1.1 Appearance
Figure 1 Front Vie w
1. LCD sc reen
2. Set key: shift display modes, confirm the
oper a tion etc.
3. Scroll key: short press: move display cursor, modify
parameter valu es et c.
Longtime press: choose display always on or not
which will be eff ective during measuring.
Page 7
User Manual for Wrist O x ime ter
-2-
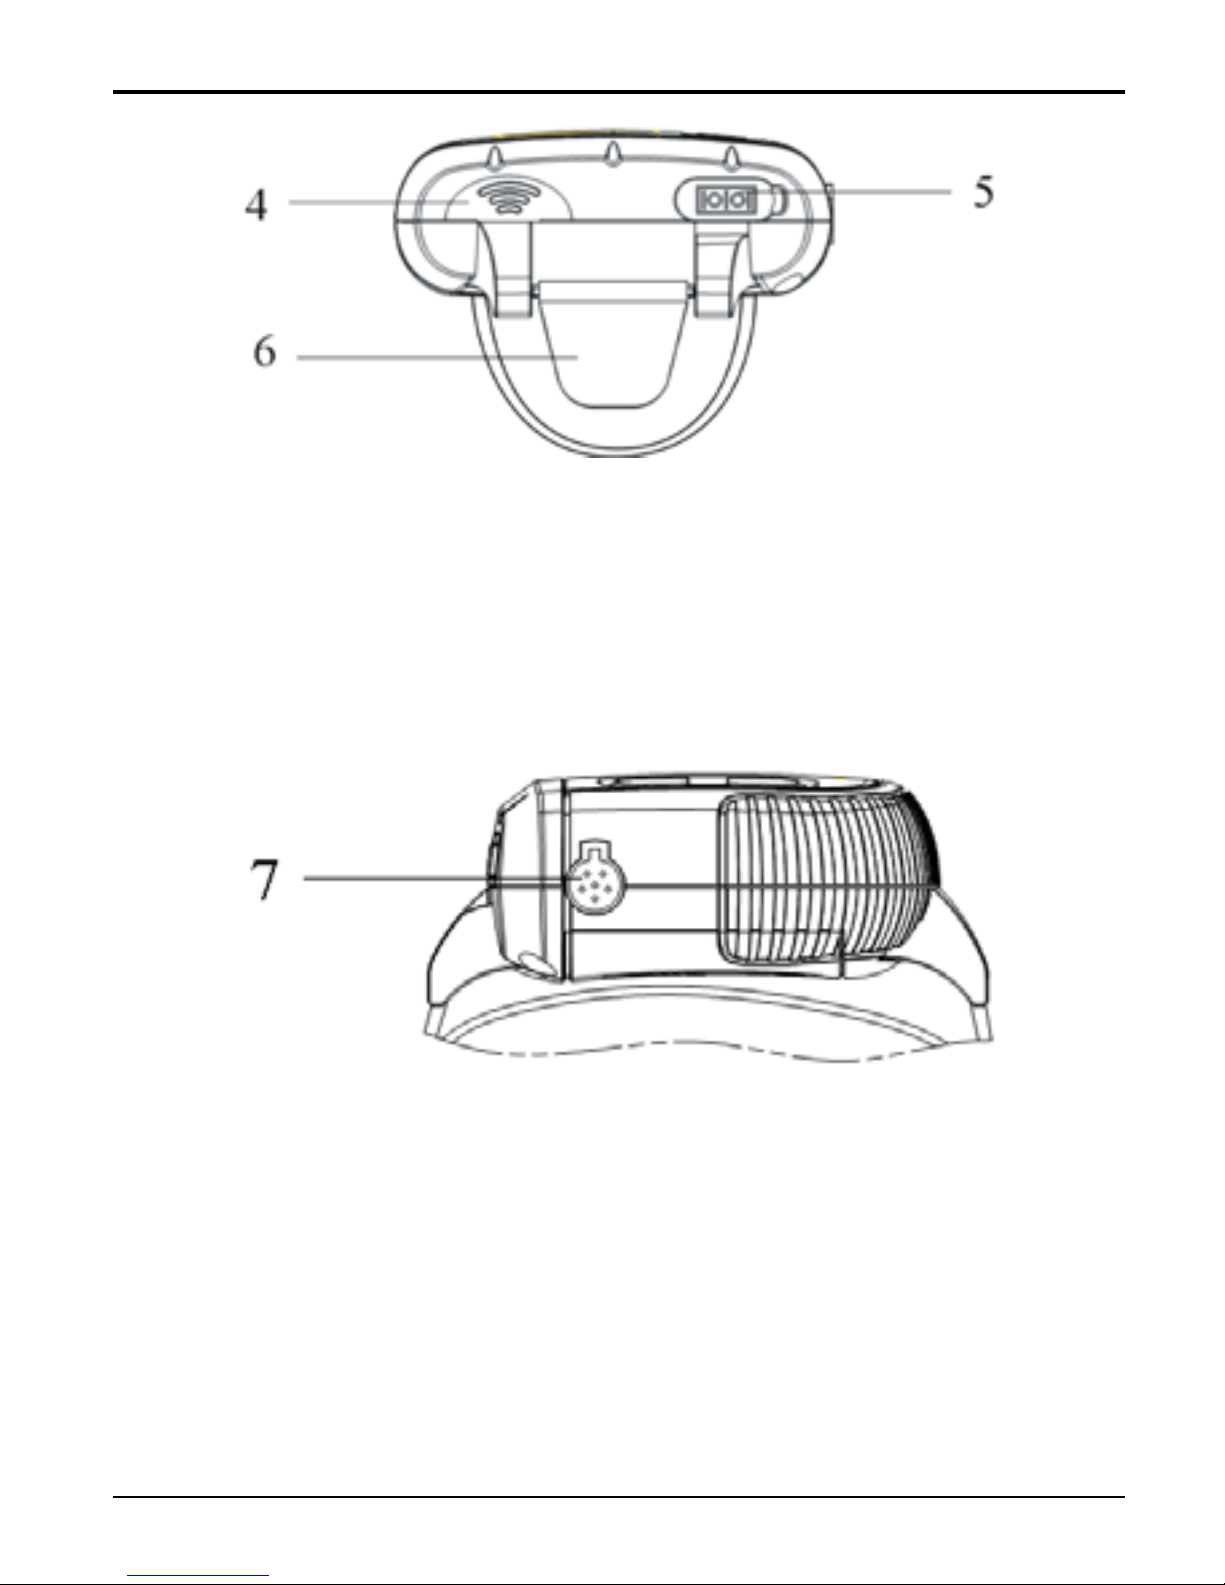
Figure 2 Frontal Side View
4. Buzzer
5. Dat a in terf ac e
6. Wristband Underlay
Figure 3 Right Side View
7. SpO2 pro be receptacl e
1.2 Name and Model
Name: Wrist Oximeter
Model: PC-68B
Page 8

User Manual for Wrist O x ime ter
-3-
1.3 Conformation
It compr ises the main unit and SpO2 probe.
1.4 Features
Wrist Oximeter can be used to monitor pulse oxygen
saturation (SpO
2
) and pulse rate accurately. Simply put
your finger into sensor, SpO
2
value and pulse rate value
will be displayed on screen and stored in the device.
It is lightweight, small in size and easy to carry;
Color OLED display;
Perfusion ind ex (PI) display is available;
Automatic starts to measure SpO
2
and Pulse
Rate(PR);
Real-time clock display and set;
Audible & visible over-limit indication, high & low
limits are adjust able;
It is convenient for you to monitor SpO
2
in long-term
while sleeping or at other daily activity.
Rec ord in t erval can b e s e lected, up t o 48 0 hours d ata
memory;
Applicable for longtime continuous monitoring;
Page 9

User Manual for Wrist O x ime ter
-4-
PR trend curve and SpO2 trend curve view;
Data storage and transmission to PC for view and
analysis(Optional);
Smart battery power management with low battery
indication;
1. 5 Inte nded Use
This Wrist Oximeter is intended for measuring the pulse
rate and functional oxygen saturation (SpO
2
). It is
appli cable for long-ter m measu rement of adult’s SpO
2
and
pulse rate in home and clinics.
Page 10
User Manual for Wrist O x ime ter
-5-
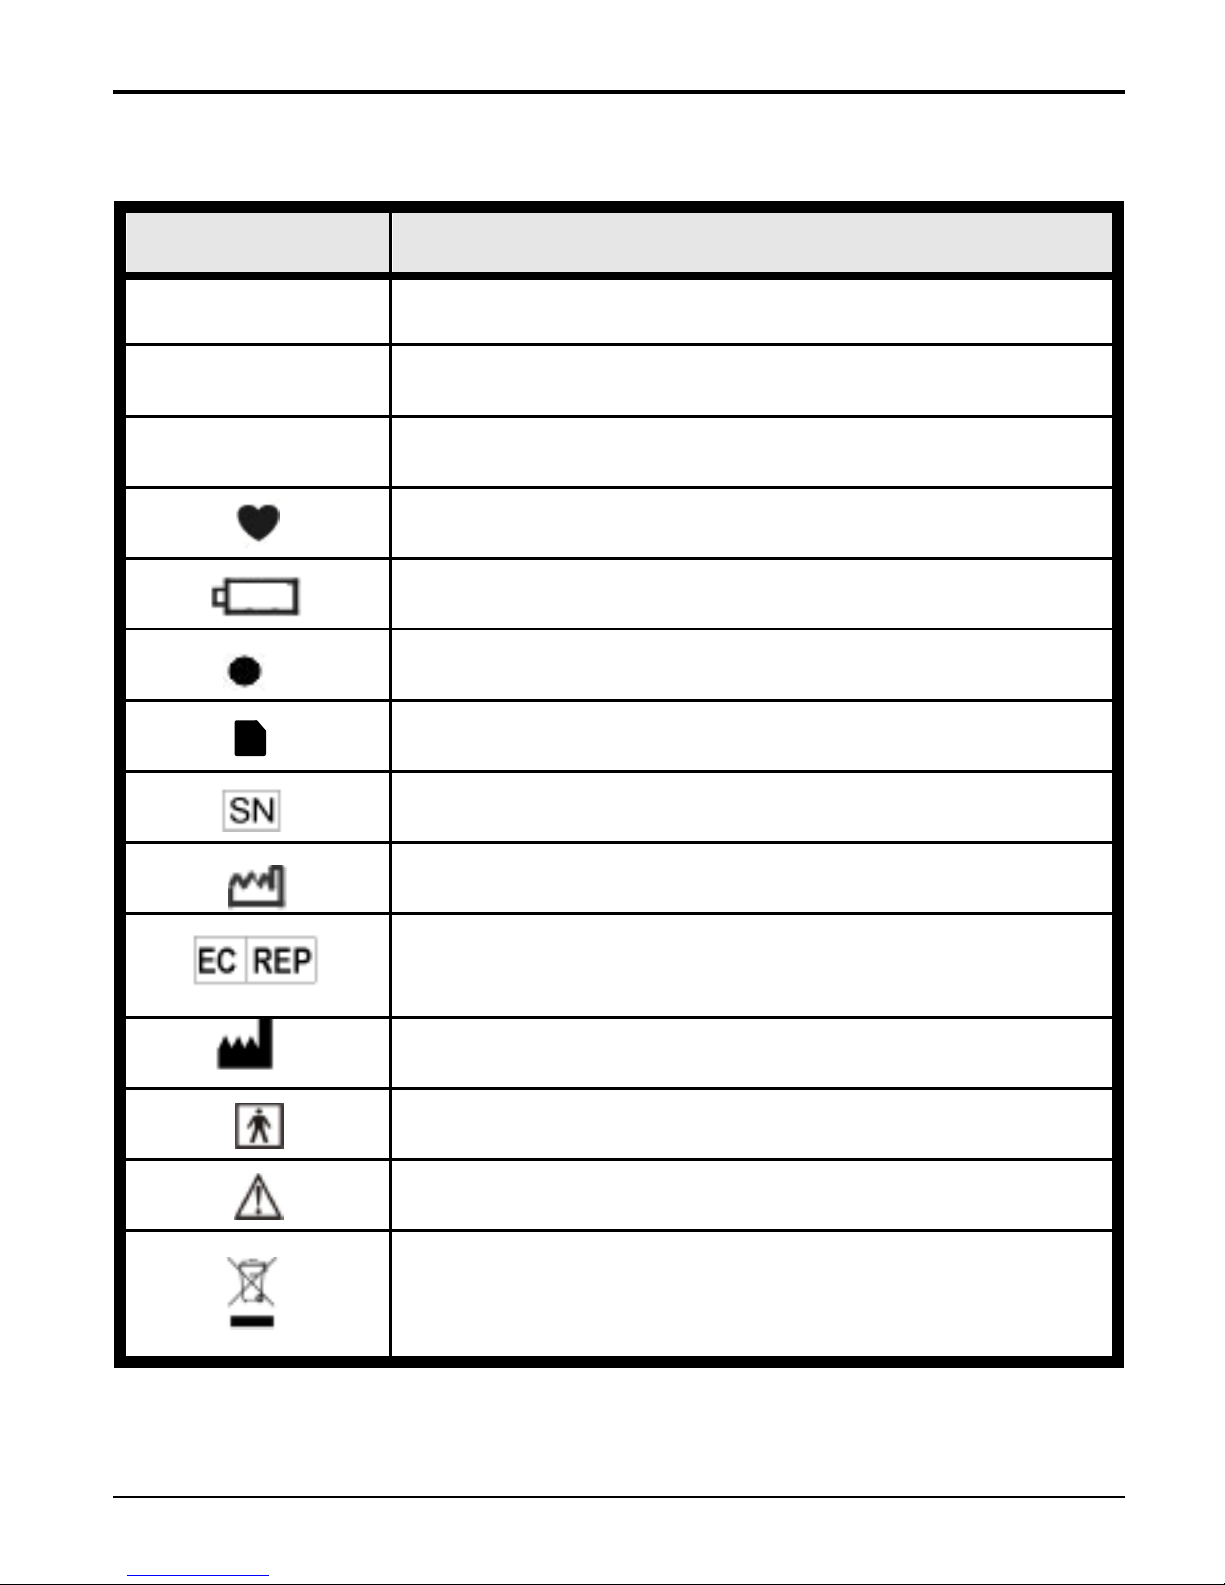
1.6 Key of Symbols
Symbol
Description
%SpO
Pulse Oxygen Saturation
PI%
Perfu sion Index
PR
Pulse Rate
Pulse rate symbol
Low battery voltage
Symbol for display always on
Memor y full.
Seria l number
Date of manufacture
Aut ho rised representat ive in t he
Europe an community
Manu facturer (including address)
Wit h Type BF applied part
Warning
─
See User Manual
Disposal of this device according to
WEEE regu lations
Page 11
User Manual for Wrist O x ime ter
-6-
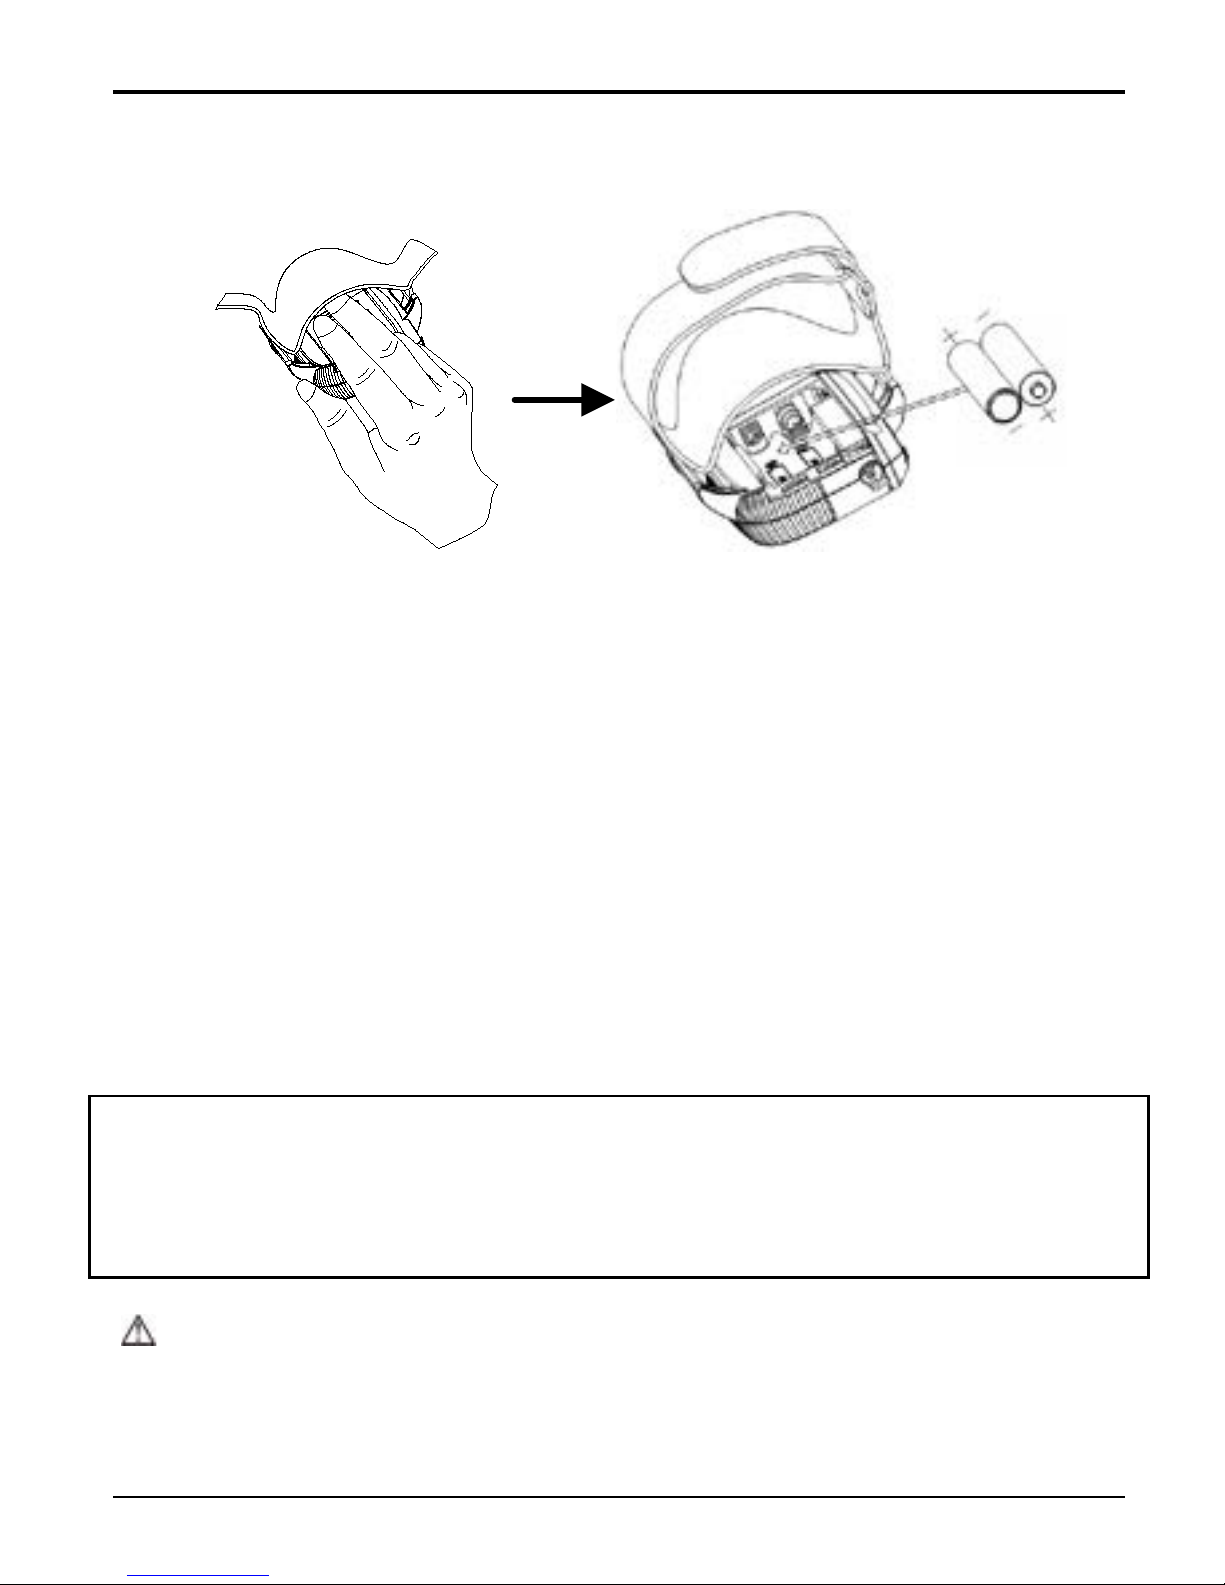
2 Battery Installation
Figu re 4 Batt ery Installation
1. Lift up the cloth covered on the battery cover. Then, use
your index finger and midd le finger t o press against the
battery cover. Meanwhile, slide it towards the side with
SpO
2
probe (as shown in Figure 4).
2. Refer to Fi gure 4, insert t wo AAA size batte ries int o the
battery compartment properly in the right direction.
3. Replace the cover.
Remark: After finishing battery installation, the oximeter
will automatically power on and display software version
number firstly.
Please take care when you insert the batteries, as the
improper insertion may make the device not work.
Page 12
User Manual for Wrist O x ime ter
-7-
3 Operation
3.1 Measuring Operat ion
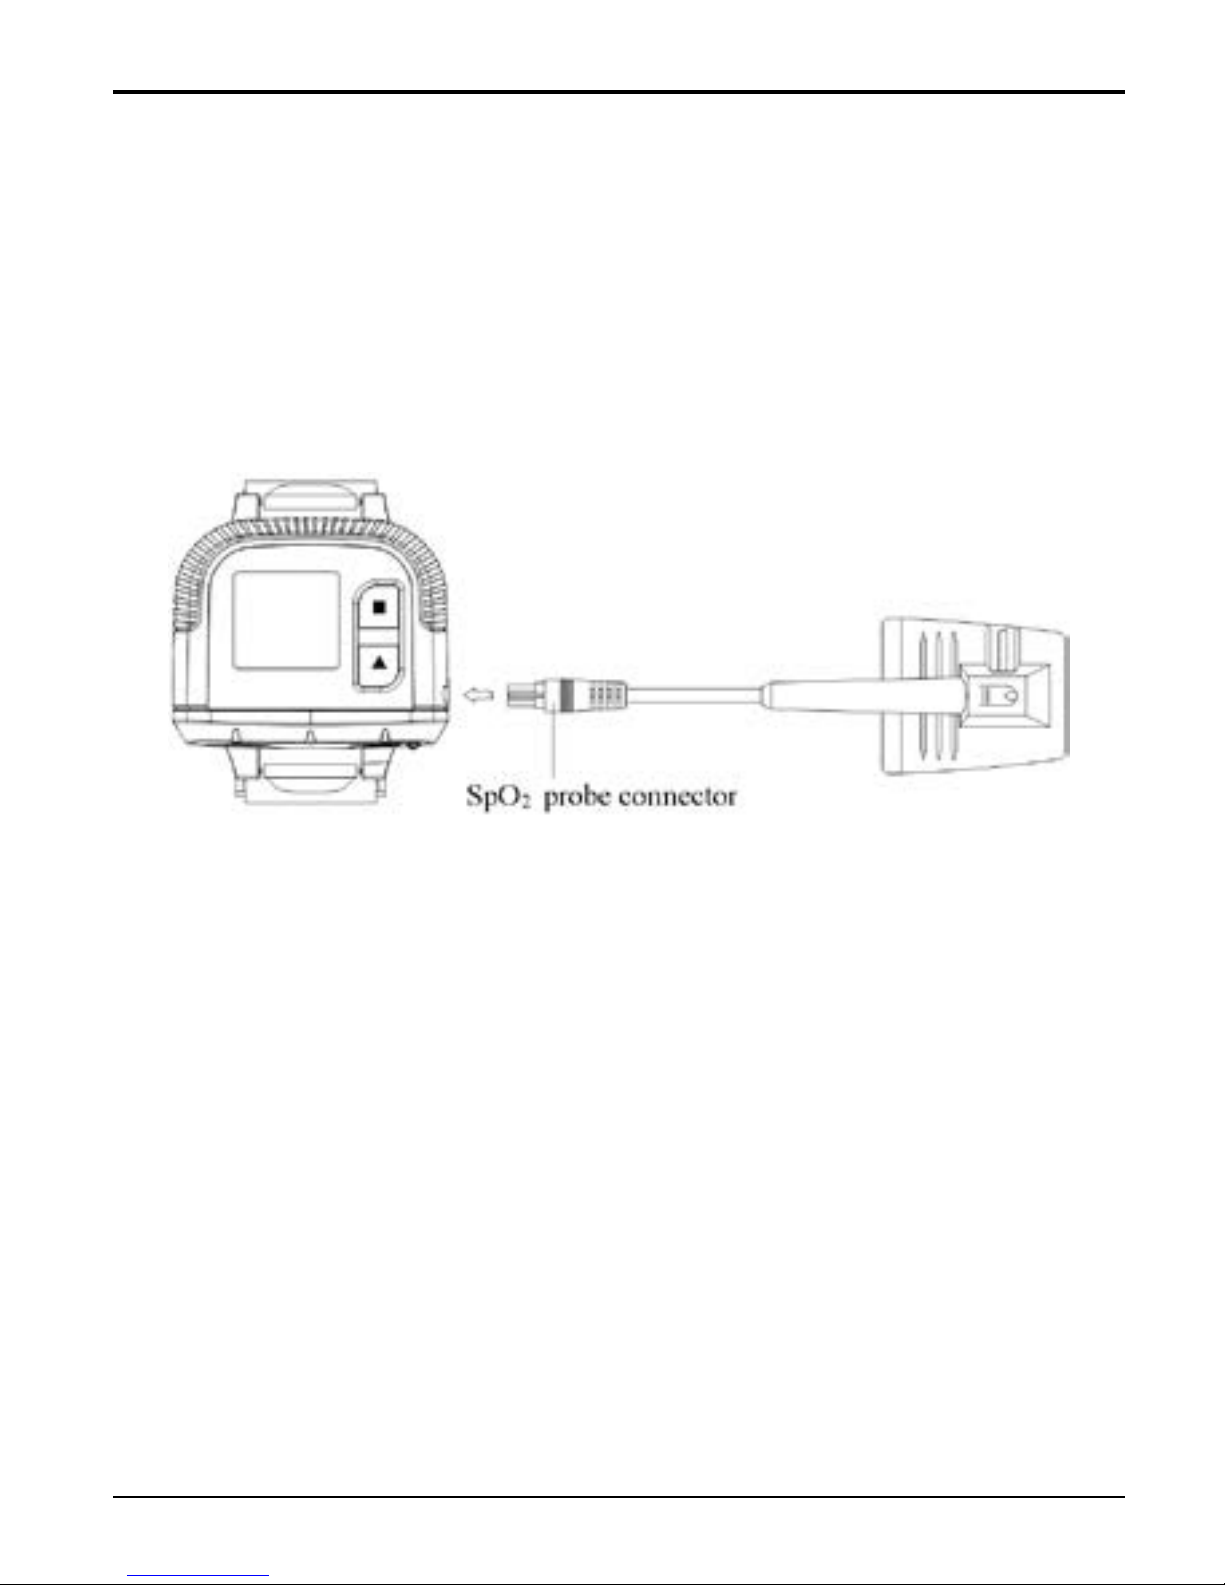
1. Insert the external SpO2 probe connector into SpO2
probe rece ptacl e properly.
Figu re 5 Sp02 Probe Connection
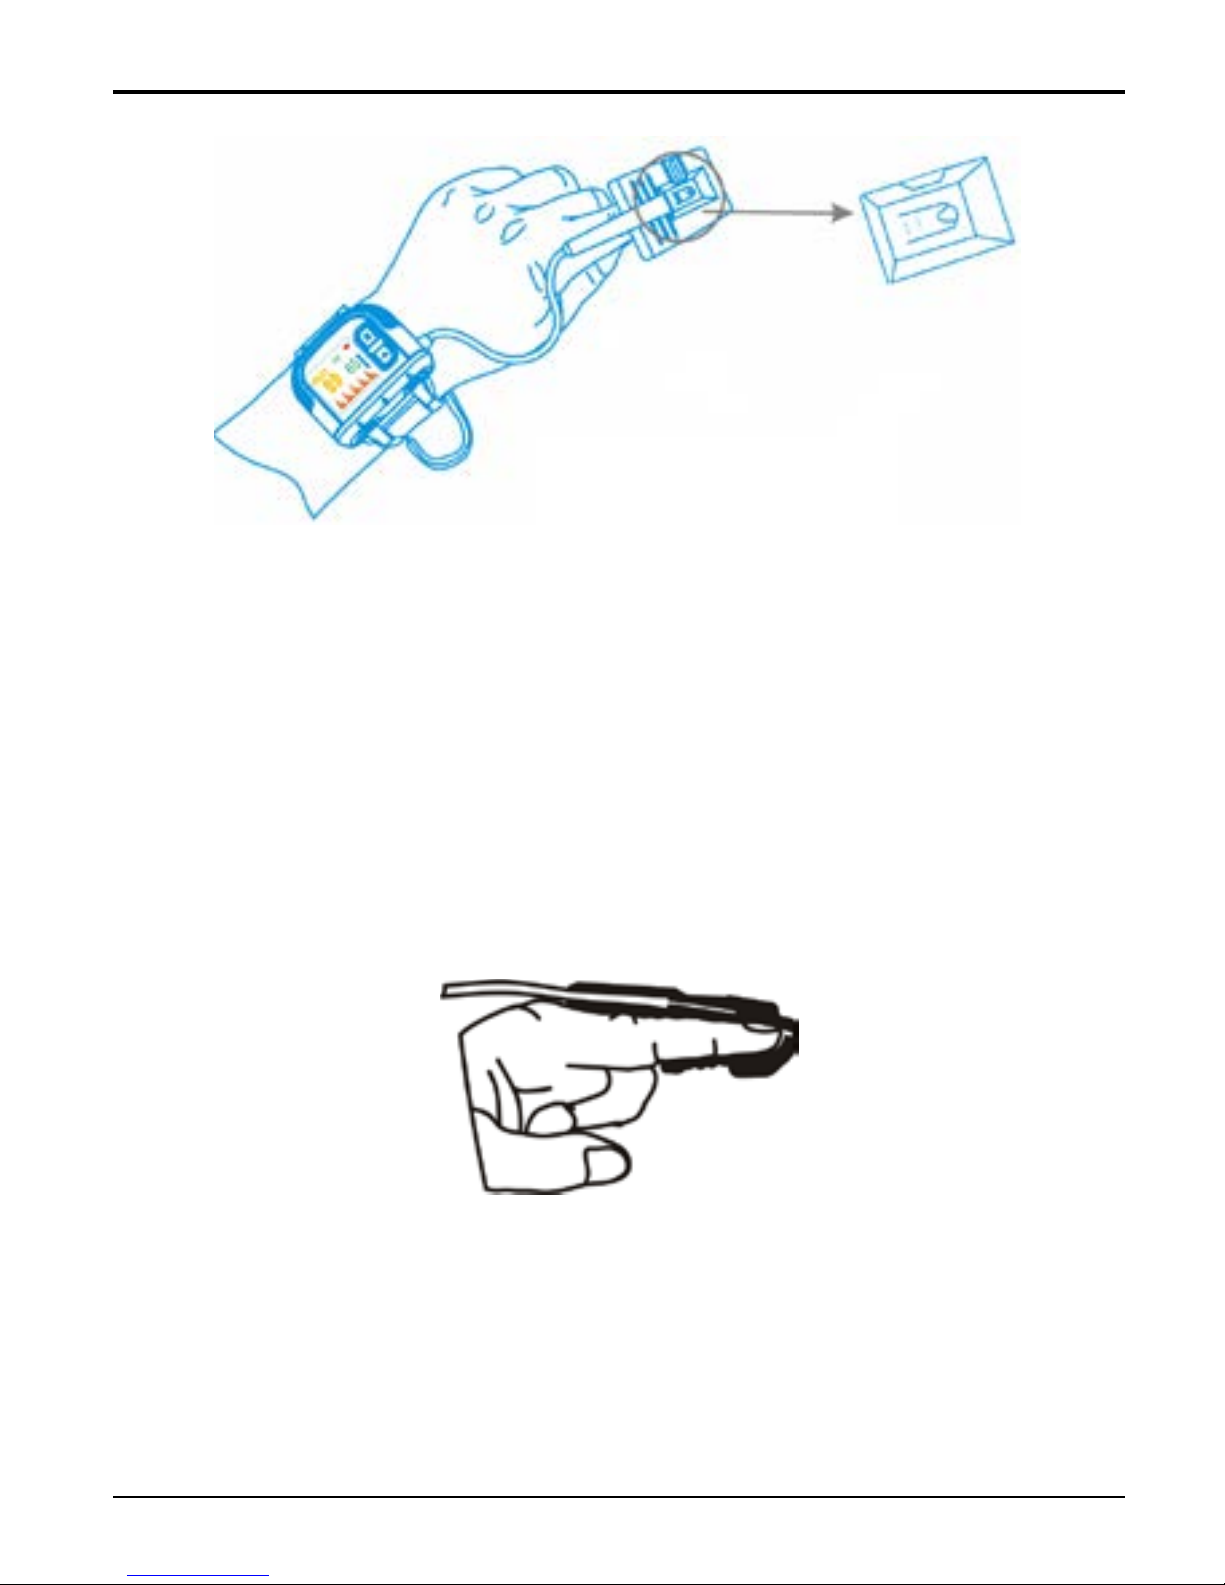
2. Fix the oximete r on your left wrist (Figure 6);
3. Then, hold the probe with its opening towards your
index finger. The probe should be oriented in such a way
that the sensor side with a finger tip sign is positioned on
the top (Figure 6).
Page 13
User Manual for Wrist O x ime ter
-8-
Figure 6 Placement Demonstration
4. Next, insert your index finger into the probe until the
fingernail tip rests against the stop at the end of the probe
(Figure 7). Adjust the finger to be placed evenly on the
middle base of the sensor (make sure the finger is in the
right position). If the index finger cannot be positioned
correctly, or is not available, other finger can be used.
Figure 7
Finger tip sign
Page 14

User Manual for Wrist O x ime ter
-9-
Wrong Placement of the Probe:
Figure 8
5. The oximeter will automatically start measurement in 2
seconds. Then the defau lt screen will be disp layed (Fi gure
9A). User can read the valu es and view the waveform from
the display screen.
Figure 9 A Defau lt Screen
“%SpO
2
”: SpO2 symbol; “99”: SpO2 value;
“PR”: Pulse rate icon; “65”: Pulse rate value;
“
”: Pulse beat sym bo l;
“
”: Batte ry indicator;
“
”: Puls e intensity bargraph.
The waveform displayed in the lower area is SpO
2
plethysmogram.
Finger out Not deep enough
Page 15

User Manual for Wrist O x ime ter
-10-
Key Operations:
Short time press “
■” key to switch display modes
circularly, dis pla y screen will be switched am ong the
screens as shown in Figure 9A, Figure 9C and Figure
9D.
Longtime press “
▲” key: choose display always on
or not which will be effective during measuring. If
you choose display always on, the symbol for
“display always on” will appear on the screen as
shown in Figur e 9B.
Short time press “
▲” key, the display screen can
shif t 180
Figure 9B
“
”: Symbol for dis play always on, it indicat es that
the LCD screen is always on during meas urin g. If the
symbol is disappeared, it indicates that the LCD
screen will be off after a period of display time
during measuring for power saving.
Page 16

User Manual for Wrist O x ime ter
-11-
Figure 9C
“PI%”: Perfusion index symbol;
Figure 9D Real Time Clock
“12:30”: the current time;
Key Operations:
Longtime press “
■ ” key, menu screen will be
disp layed, refer to section 3.2 for details;
Page 17

User Manual for Wrist O x ime ter
-12-
6. Prompt information
During monitoring, if you haven’t inserted your
finge r into th e probe, “Finger out ” will b e p romp ted
on the screen.
During monitoring, if the probe is not connected to
the oxi met er or the pr ob e is off, “No Si gn a l!” will b e
promp ted on the screen, as shown in Figur e 10.
Figure 10 No Signal
During measuring, if the memory is full or the total
number of the records is 1024 pieces, the earliest
records will be overwritten and the icon “ ” will
appear on the screen for prompt, as shown in Figure
11.
Page 18

User Manual for Wrist O x ime ter
-13-
Figure 11 Memo r y Full
Note: It is suggested that the data shall be uploaded
to compu ter for saving, or the ear liest records will b e
overwritten.
W orking Mode
The measurement will start automatically when the
finger is inserted into the soft rubber of the se nsor, so
the data recording (SpO
2
and PR values) starts
simultaneously as well. The display is as shown in
Figure 9A
During measuring, if the display mod e is n ot display
always on (the symbol for “display always on” i s n ot
shown on s creen) and no key button operation for 1
minute, the LCD display will be blank for power
saving even when the measurement and data
recording are still undergoin g, but long time pressing
Page 19

User Manual for Wrist O x ime ter
-14-
any key will activate the display for viewing the
current measuring information again.
If there is no signal to be detected (e.g. finger off) for
20 seconds, th e device wi ll be at idle state (i.e. blank
scr een and standby for measurement).
When the device is at idle state, long time pressing
any key will act ivate th e LCD display for measuring
default screen, or once the finger is inserted in the
soft rubber of the sensor, the measurement will s tart
and LCD dis play will be activated as well.
Note: During measuring, there is a green-dot
flashing on the screen for indicating the
measurement and data recording are undergoing
when the display screen is blank, and if SpO2
or/and PR values exceed the preset limit, it will
active the display and the value exceeded limit
will flas h.
Page 20

User Manual for Wrist O x ime ter
-15-
3.2 Menu Operation
On display screen, longtime press “■” key menu screen
wil l be displayed on the sc reen, as shown in Fig ure 12.
Figure 12 Menu Screen
Rec Interval: set the interval to record SpO
2
and
pul se r ate da ta;
Alarm: set SpO
2
low limit and puls e rate high/low
limit;
Time: set current time;
Trend Review: view SpO
2
and pulse rate trend
graph ;
Delete Data: delete all the records.
Operation In st r uctions:
Short time press “
▲” key: shif t cursor circ ul a r l y;
Short time press “
■” key: confirm the selection
and ent er into the corresponding screen;
Longtime press “
■ ” key: back to the default
screen;
Page 21

User Manual for Wrist O x ime ter
-16-
3.2. 1 Record Interval Setting s
On menu screen, select “Rec Interval” and press “
■” key
to enter Record Interval Setting screen, as shown in Figure
13.
Figu re 13 Record Int erv al Sett in g
Operation In st r uctions:
Short time press “
■” key: active the option;
Short time press “
▲” key: select record interval;
three options: “1s”, “4s” and “8s;
Short time press “
■” key: confirm the sele ction;
Longtime press “
■” key: back to the menu screen;
Note: The len gth of data record is limited to 30 seconds
at least, and the maximal length for one record is also
limited to 60 hours (for 1 second interval) , 240 hours
(for 4 second interval) or 480 hours (for 8 second
interval).
Page 22

User Manual for Wrist O x ime ter
-17-
3.2. 2 O v e r-li mi t indication Settings
On m enu screen, select “Alarm Limit” and p ress “
■” key
to enter Alarm Limit Settings screen, as shown in Figure
14.
Figu re 14 Over-l i mit indic ation Settings
SpO
2
Lo: set SpO2 low limit; Setting
range:85%~95%, default setting: 85%;
PR Lo: set pulse rate low limit; Setting
ran ge:25bpm~99bpm , de fault sett ing: 50bpm;
PR Hi: set pulse rate high limit; Setting range:
100bpm~250bpm, default setting: 120bpm;
Alarm: enable/disable the audible & visual limit
indication function.
If SpO
2
value or/and PR value exceeds its/their preset
limits during measuring, the oximeter will beep and the
numerical value exceeded limit will flash. Pressing “
■”
key can suspend the cur rent beep sound.
Page 23

User Manual for Wrist O x ime ter
-18-
Operation In st r uctions:
Short time press “
▲” key: shif t cursor circ ul a r l y;
Short time press “
■” key: active the option;
Short time press “
▲” key: increase numerical value
one time;
Long tim e press “
▲” key: increase numerical values
continuously;
Short time press “
■” key: confirm the sele ction;
Longtime press “
■” key: back to the menu screen;
Page 24

User Manual for Wrist O x ime ter
-19-
3.2. 3 T im e Sett in gs
On menu screen, select “Time” and press “
■” key to ente r
Time Settings screen, as shown in Figure 15.
Figu re 15 Time Settings
Date format: MM/DD/YYYY;
Time format: hh:mm:ss;
Operation In st r uctions:
Short time press “
▲” key: shif t cursor circ ul a r l y;
Short time press “
■” key: active the option;
Short time press “
▲” key: increase numerical value
one time;
Longtime press “
▲” key: increase numerical value
continuously;
Short time press “
■” key: confirm the modification;
Longtime press “
■” key: back to the menu screen;
Page 25

User Manual for Wrist O x ime ter
-20-
3.2.4 Trend Review
On menu screen, sele ct “Trend Review” and press “
■” key
to enter Trend Review screen, as shown in Figure 1 6.
Figu re 16 Trend Re view Screen
“03/06/2008”: date of th e measurement
“11:20:35”: initial time of trend graph displayed
on th i s sc reen;
“
■ ▲”: Page scroll (left/ right) symbol;
Cur v es in the mid d le area:
Green curve: indicate pulse ra t e tr end curve;
Orange curve: indicate SpO
2
trend curve;
Operation In st r uctions:
Short time press “
▲” key: Page scroll right;
Short time press “
■” key: Page scroll left;
Longtime press “
■” key: back to the menu screen;
Note: when the display screen is menu screen or its
submenu screen , the mea sur em ent will be interrupt ed.
Page 26

User Manual for Wrist O x ime ter
-21-
3.2.5 Delete Data
On menu screen, select “Delete Data” and press “■” key
to enter into Deletion Confirmation screen. Then, select
“Yes” with “▲” key(short time press), after short time
pressing “■” key, all the records will be deleted.
Figu re 17 Delete Recor ds
3.3 Upload Data
Before uploading the data to PC, p lease quit from the menu
screen if you are doing the setup or trend view operation.
When start uploading, connect the data cable between the
device and PC, do the following operation by the
instruction in “Oximeter Data Manager User Manual”,
then the data uploadi ng will be activated.
Page 27

User Manual for Wrist O x ime ter
-22-
3.4 Low Battery Indication
If “ ” occurs on the screen, it indicates ba tter y power
is not enough, please change batteries. If you keep on
using, after a while, when the batteries are exhausted,
“Low Battery!” indication will be displayed and the
oxime ter will be off in 5 seconds.
Page 28

User Manual for Wrist O x ime ter
-23-
4 Additional Advice for Operation
The finge r should be put properly and correctly.
Avoid shaking finger as possible as you can during
measuring;
Do not put wet finger directly into sensor.
Avoid placing the de vice on the same limb whic h is
wrapp ed with a cuff for blood pressure measur ement
or during venous infusion.
Do not let anything block the emitting light from
device.
Electrosurgical device interference may affect the
measuring accuracy.
Using enamel or other makeup on the nai l may affect
the measuring accuracy.
If the first reading appears with poor waveform
(irregular or n ot smooth), then the reading is unlikely
true, the more stable value is expected by waiting for
a while , or a restart is needed when necessary.
Page 29

User Manual for Wrist O x ime ter
-24-
5 Technical Specifications
A. Di splay mode :Color OLED Display
B. Power supply requirement:
2 x LR03 (AAA) alkaline batteries
or Ni-MH rechargeable batteries
Supply voltage: 3.0VDC
Continues workin g time (display is off): 70hours
C. Operating curren t: ≤40mA
D. SpO
2
Parameter Specifications
T ransducer: dual-wavelength LED
Measur ement wavelength:
Red light: 663 nm, Infrared light: 890 nm.
Maxi mal optical outpu t power: less than 1.5mW
maxi mum average
Measuring range: 35~100%
Measur ing accuracy:
Not gre ater than 3% for SpO
2
range from 70% to 100%
*NOTE: A
rms
is defined as root-mean-square value of
deviation according to ISO 9919.
E. Pu lse Rate P arameter Speci f icatio n s
Measuring range: 30bpm~240bpm
Accuracy: ±2bpm or ±2% (whiche ver is greater)
Page 30

User Manual for Wrist O x ime ter
-25-
F. Preset limit s:
SpO
2
Low limit setting: 85%
Pulse Rate limit setting range:
Upper limit: 120bpm
Lower limit: 50bpm
G. Update rate:
6 sec onds moving average for SpO
2
an d 8 beats
average for Pulse Rate readings.
H. Perfusion Index Display
Range: 0.2%~20%
I. Performanc e u n der low perfusion con dition
The accuracy of SpO
2
and PR measurement still
meets the specification described above when the
modula tion amplitu de is as low as 0.6%.
J. Resistance to interference o f su r rounding light:
The difference between the SpO
2
value measured in
the condition of indoor natural light and that of
dar kroom is less than ±1%.
K. Resistance to 5 0Hz /60Hz interference:
SpO
2
and PR are precise which have been tested by
BIO-TEK pulse oximeter simulator.
Page 31

User Manual for Wrist O x ime ter
-26-
L. Dimensions: W 59mm×D 49mm×H 22mm
Net W eight: about 60g (not includi ng batteries)
M. Classification
The type of protection against electric shock:
Internally p owered equipment.
The degree of protection against electric shock:
Type B F applied part.
The degree of protection against harmful ingress
of liquids: Ordinary equipment without protection
against ingress of water.
Electro-Magnetic Compatibility: Group I, Class B
Page 32

User Manual for Wrist O x ime ter
-27-
6 Accessories
A data cable (optional)
Oximeter Dat a Manager software (optional)
A Wristband
A SpO
2
Probe
Two batteries (AAA)
A User Manua l
Quality Certificate
Note: The accessories are subject to change. See the
Packing List for detailed items and quantity.
Page 33

User Manual for Wrist O x ime ter
-28-
7 Repair and Maintenance
7.1 Maintenance
The service life (not a warranty) of this device is 5 years.
In order to ensure its long service life, please pay attention
to th e maintenance.
Please change the batteries when the low-voltage
indicator lightens.
Please clean the surface of the device before using.
Use cloth with alcohol to wipe the device first, and
then let it dry in air or wipe it dry.
Please take out the batteries if the oximeter will not
be used for a long time.
The recommended storage environment of the
device:
ambient tem per atur e: -20ºC ~60ºC, relative humidity
10%~95%, atmospheric pressure: 50kPa~107.4kPa.
The oximeter is calibrated in the factory before sale,
there is no need to calibrate it during its life cycle.
However, if it is necessary to verify its accuracy
routinely, the user can do the verification by means
of SpO
2
simulator, or it can be done by the local third
party test house.
High-pressure sterilization cannot be used on the
device.
Do n ot immerse the device in liquid.
Page 34

User Manual for Wrist O x ime ter
-29-
7.2 Cl eaning a nd Dis infecting Instruc tio n
Surface-clean sensor with a soft gauze by wetting
with a solution such as 75% isopropyl alcohol, if
low-level disinfection is required, use a 1:10 bleach
solution. Then surface-clean with a damp cloth and
dry with a piece of cloth.
Clean the wristband with soap y water. Pleas e detach
the wristband from the oximeter firstly.(Refer to
Appendix for detailed disassembly method)
Caution: Do n ot ste rilize b y irr adiati on ste am, or ethylen e
oxide.
Do not use the sensor if it is damaged.
Page 35

User Manual for Wrist O x ime ter
-30-
8 Troubleshooting
Trouble
Possi ble Reason
Solution
The SpO
2
and Pulse
Rate
display
instable
1. The finger is
not
placed far enough
inside.
1. Place the finger
corre ctly inside
and
try again.
Can not
turn on the
device
1. T
he batteries are
drained or almost
drained.
2. T
he batteries are
not ins erted
properly.
3. The device is
malfunctioning.
1. Change batte r i e s .
2. Reinstall
batteries.
3. Please contac t the
local s ervice center.
Fragmental
trend curve
of SpO
2
and PR
1. Your finger is
out of pr oper
lo ca tion in the
probe.
2. Blood flow in
the finger blocked.
3.
Extreme
movement
1. Adjust your finger
location properly.
2. Make
sure there is
no obj ect may
occlude the blood
flow.
3. Extreme
movemen t may
caus e invalid
measur ing result.
Page 36

User Manual for Wrist O x ime ter
-31-
Trouble Possi ble Reason Solution
Always
display
“No
Signal”
1. T he probe is no t
connected to the
oximeter properly.
2. The finger is
not
placed well.
3. The probe
connector or the
prob e sensor is
broken.
1. Connect the
probe to the
oximeter properly
and tr y again.;
2. Place the finger
prope rly and try
again.
3. Please contac t
the local service
center.
Page 37

User Manual for Wrist O x ime ter
-32-
9 Appendix
A Common Kn o wledge for SpO2
Measurement
1 Meaning of SpO
2
SpO2 is the saturation percentage of oxygen in the blood,
so called O
2
concent rati on in th e blood; it is defined by the
percentage of oxyhemoglobin (HbO
2
) in the total
hemoglobin of the arterial blood. SpO
2
is an important
physiological parameter to reflect the respiration function;
it is calculated by the following method:
SpO
2
= HbO2/ (HbO2 +Hb)×100%
HbO
2
are the oxyhemoglobins (oxygenized hemoglobin),
Hb are those hemoglobins which release oxygen.
2 Principle of Measurement
Based on Lamb er-Beer law, the light absorbance of a given
substance is directly proportional with its density or
concentration. When the light with certain wavelength
emits on human tissue, the measured intensity of li gh t a ft er
absorption, reflecting and attenuation in tissue can reflect
the structure character of the tissue by which the light
Page 38

User Manual for Wrist O x ime ter
-33-
passes. Due to that oxygenated hemoglobin (HbO2) and
deoxygenated hemoglobin (Hb) have different absorption
character in the spectrum range from red to infrared light
(600nm~1000nm wavelength), by using these
characteristics, SpO
2
can be determined. SpO2 measured
by this oximeter is the functional oxygen saturation -- a
per centa ge of th e hem oglobi n that can transp ort oxygen . In
contrast, hemoxi meters report fractional oxygen saturation
– a percentage of all measured hemoglobin, including
dysfunctional hemoglobin, such as carboxyhemoglobin or
metahemoglobin.
Clinical application of pulse oximeters: SpO2 is an
important physiological parameter to reflect the r espirati on
and ventilation function, so SpO
2
monitoring used in
clinical becomes more popularly, such as monitoring the
patient with serious respiratory disease, the patient under
anesthesia during operation, premature and neonate. The
status of SpO
2
can be determined in time by measurement
and find the hypoxemia patient earlier, thereby preventing
or reduc ing accidental death caused by hypoxia effectively.
Page 39

User Manual for Wrist O x ime ter
-34-
3 Factors affecting SpO2 measuring accuracy
(interference reason)
Intravascular dyes such as indocyanine green or
met hylene blue
Exposure to excessive illumination, such as surgical
lamps, bilirubin lamps, fluorescent lights, infrared
heating lamps, or direct sunlight.
Vascular dyes or external used color-up product such
as nail enamel or color skin care
Excessive patient movement
Placement of a sensor on an extremity with a blood
press ure cuff, arte rial catheter, or intr avascular line
Exposu r e to the chamber with High pressure oxygen
There i s an ar te rial occ lusion pr o x imal to the sensor
Blood vessel contraction caused by peripheral vessel
hyperkinesias or body temperature decreasing
Page 40

User Manual for Wrist O x ime ter
-35-
4 Factors causing low SpO2 Measuring value
(pa thology reason)
Hypoxemia disease, functional lack of HbO
2
Pigmentation or abnormal oxyhemoglobin level
Abnormal oxyhemoglobin variation
Methemoglobin disease
Sulfhemoglobinemia or arteria l occlusion ex ists near
sensor
Obvious veno us pulsatio ns
Peripheral arter ial pul sa tio n beco mes weak
Peripheral blood supply is not enough
Page 41

User Manual for Wrist O x ime ter
-36-
B Wristband Installation and Disassembly
Step 1: Fi x the wristband on your left wrist(Fig.A).
Step 2: Put the oximeter on the propriate site of the
wristband. Then press the oximeter to ma ke the wristb and
underlay(Fig.B) st ick to t he wri stband firmly. Ne xt, follow
the Fi g.C to fix the oxim eter well.
St e p 3: The process of wristband disassembly is similar to
the installation method, but with reverse procedure.
Note: Please detach the wristband from the
oximeter before cleaning the wristband.
Wristband
underlay
Fig. A
Fig.C
Fig . B
Wristband
Page 42

User Manual for Wrist O x ime ter
-37-
 Loading...