

Page 1

How to use this manual
This document has been designed to provide you with complete product knowledge. You can resize the
document window, print this document, access linked web sites and get information from specially
prepared graphics.
To jump to a linked topic or a web site, click the underlined blue text, or the hand symbol
whenever it appears.
To show a short description (tooltip) of an object, move your mouse cursor over it. A tooltip
appears after a few seconds.
You can choose to print portions of this document:
On the Contents tabbed page to your left, click a topic heading.
1.
On the menu, click the Print button.
2.
In the dialog box that appears, click the option to print one topic only, or all topics under a
3.
heading.
Page 1
Page 2
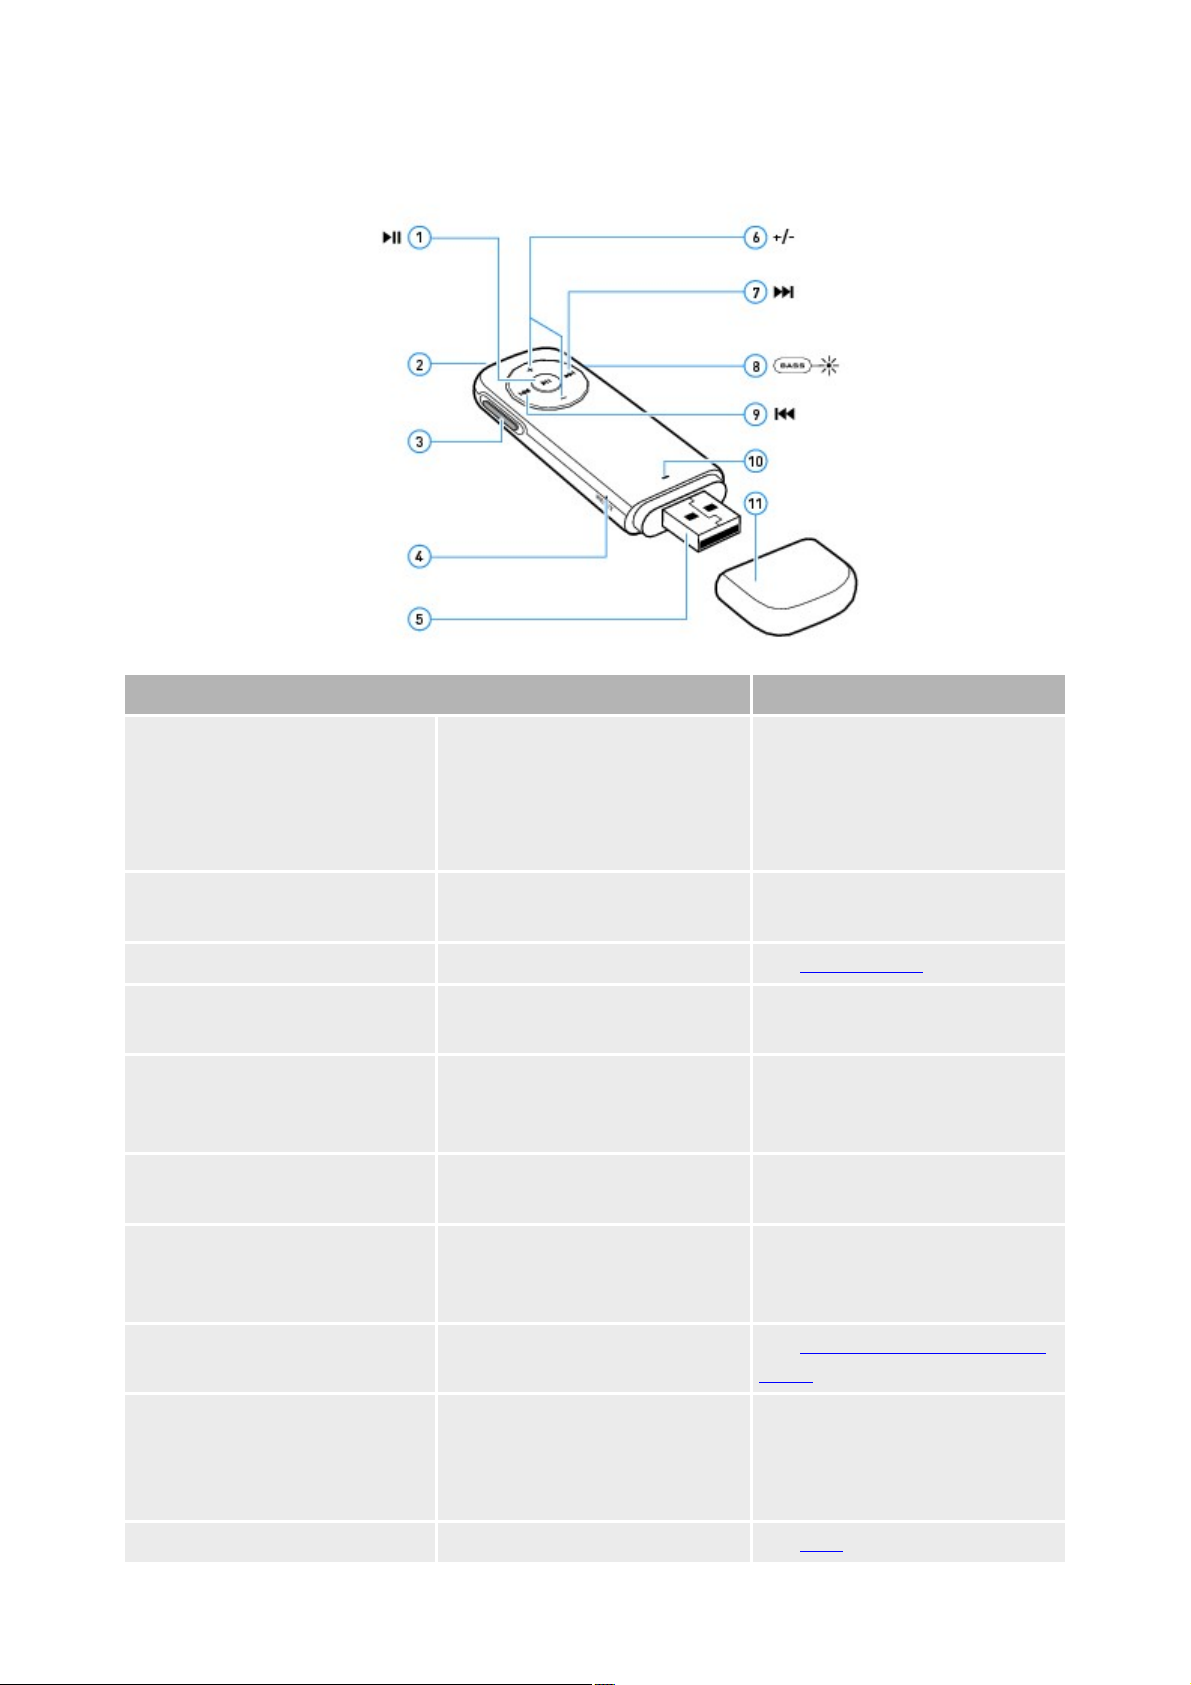
A Tour of Your Player
Button/Connector
What It Does
1.
Power/Play/Pause
Turns player on or off. Press and
hold until LED lights up or turns
off.
Playback starts automatically
when your player is turned on.
2.
Headphone jack
Connect your player's earphones
to this jack.
3.
Mode switch
See Mode Switch.
4.
Reset Hole
To reset player, insert a
straightened paperclip.
5.
USB connector
To charge your player or transfer
files, connect this end to your
computer's USB port.
6.
Volume Control
Press to increase or decrease the
volume.
7.
Next/Fast-Forward
Press to move to the next track.
Press and hold to move forward
within a track.
8.
Bass Boost
See Enhancing Audio with Bass
Boost.
9.
Previous/Rewind
Press to move to the previous
track.
Press and hold to move
backward within a track.
10.
LED
See LED.
Page 2
Page 3

11.
Cover
Use this to protect the USB
connector when it is not in use.
Page 3
Page 4

Mode Switch
Play Mode
What It Does
Shuffle
Plays and repeats all music, in
random order.
Repeat All
Plays and repeats all music
folders, in alphanumeric order.
If your music is not organized
into folders, all tracks are
played back in alphanumeric
order.
Skip Folder
Skips to the next folder, in
alphanumeric order.
To select, push and release.
Use the Mode Switch to change your player's play modes. In addition to shuffling music, you can also
locate your favorite music tracks by skipping folders.
Note
To understand your player's playback sequence, see Playback Order.
Page 4
Page 5

LED
LED
Meaning/Action
Green
Blinking
Connected to computer
File transfer in progress. Do not
disconnect.
Disconnected from computer
Playback in progress, good
battery level.
Random blinking
Turning on your player after
transferring files
Player scanning new files. This
may take up to a few minutes.
Steady
Playback paused. Player turns off
after a few minutes.
Good battery level.
Red
Blinking
Low battery level, charge as soon
as possible.
Steady
Playback paused. Player turns off
after a few minutes.
Low battery level, charge as soon
as possible.
3 blinks
After turning on your player
Battery depleted, charge
immediately. OR
No music files detected.
During playback
Unsupported format detected, file
will be skipped.
Adjusting volume
Maximum volume level reached.
Orange
1 blink
below 50%
2 blinks
50 ~ 74%
3 blinks
75 ~ 99%
Steady
Fully charged.
The LED changes color or blinks, to indicate your player's battery and playback status.
Page 5
Page 6
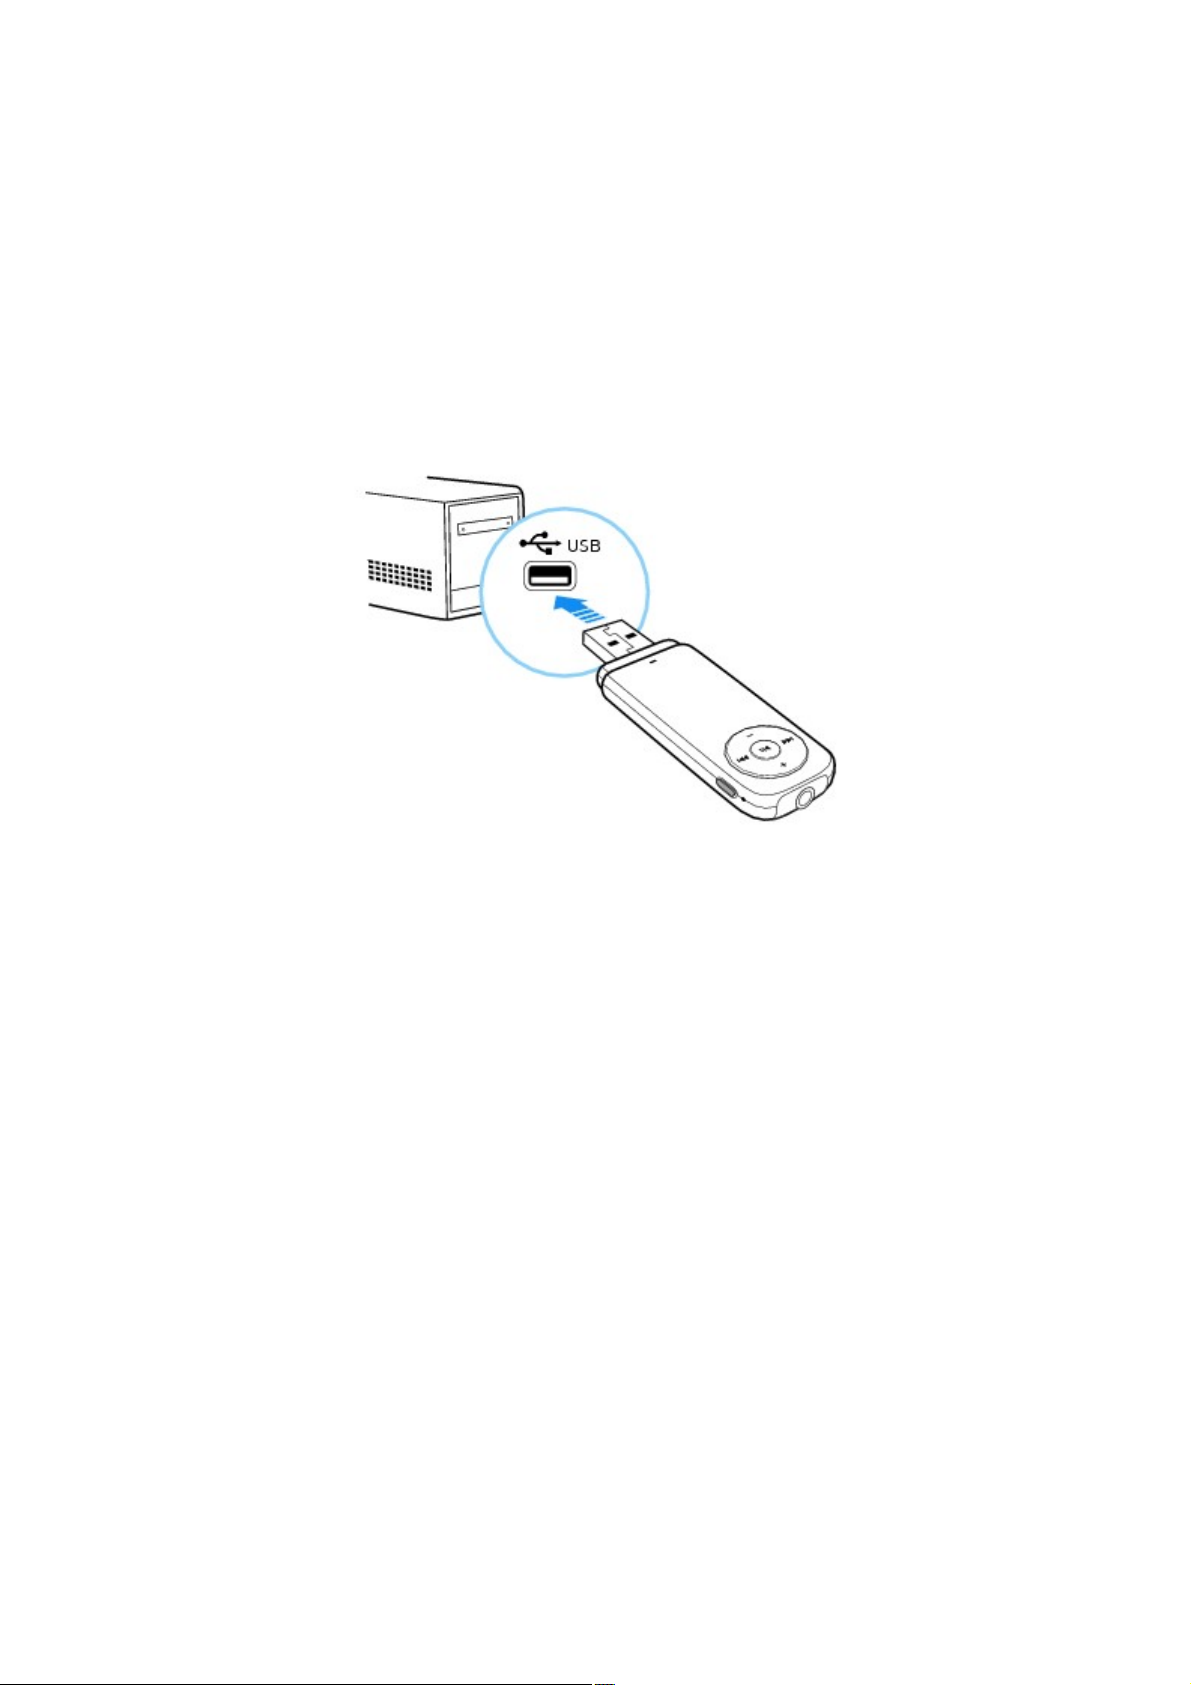
Charging Your Player
Connect your player to your computer as shown below. When your player starts charging, the LED
blinks orange. When charging is complete in approximately two to three hours, the LED changes to
steady orange.
Important: Make sure your computer is turned on, and not in power saving mode while the player is
charging.
See your operating system's documentation on turning off power saving mode.
Note
Avoid using a USB hub.
Page 6
Page 7
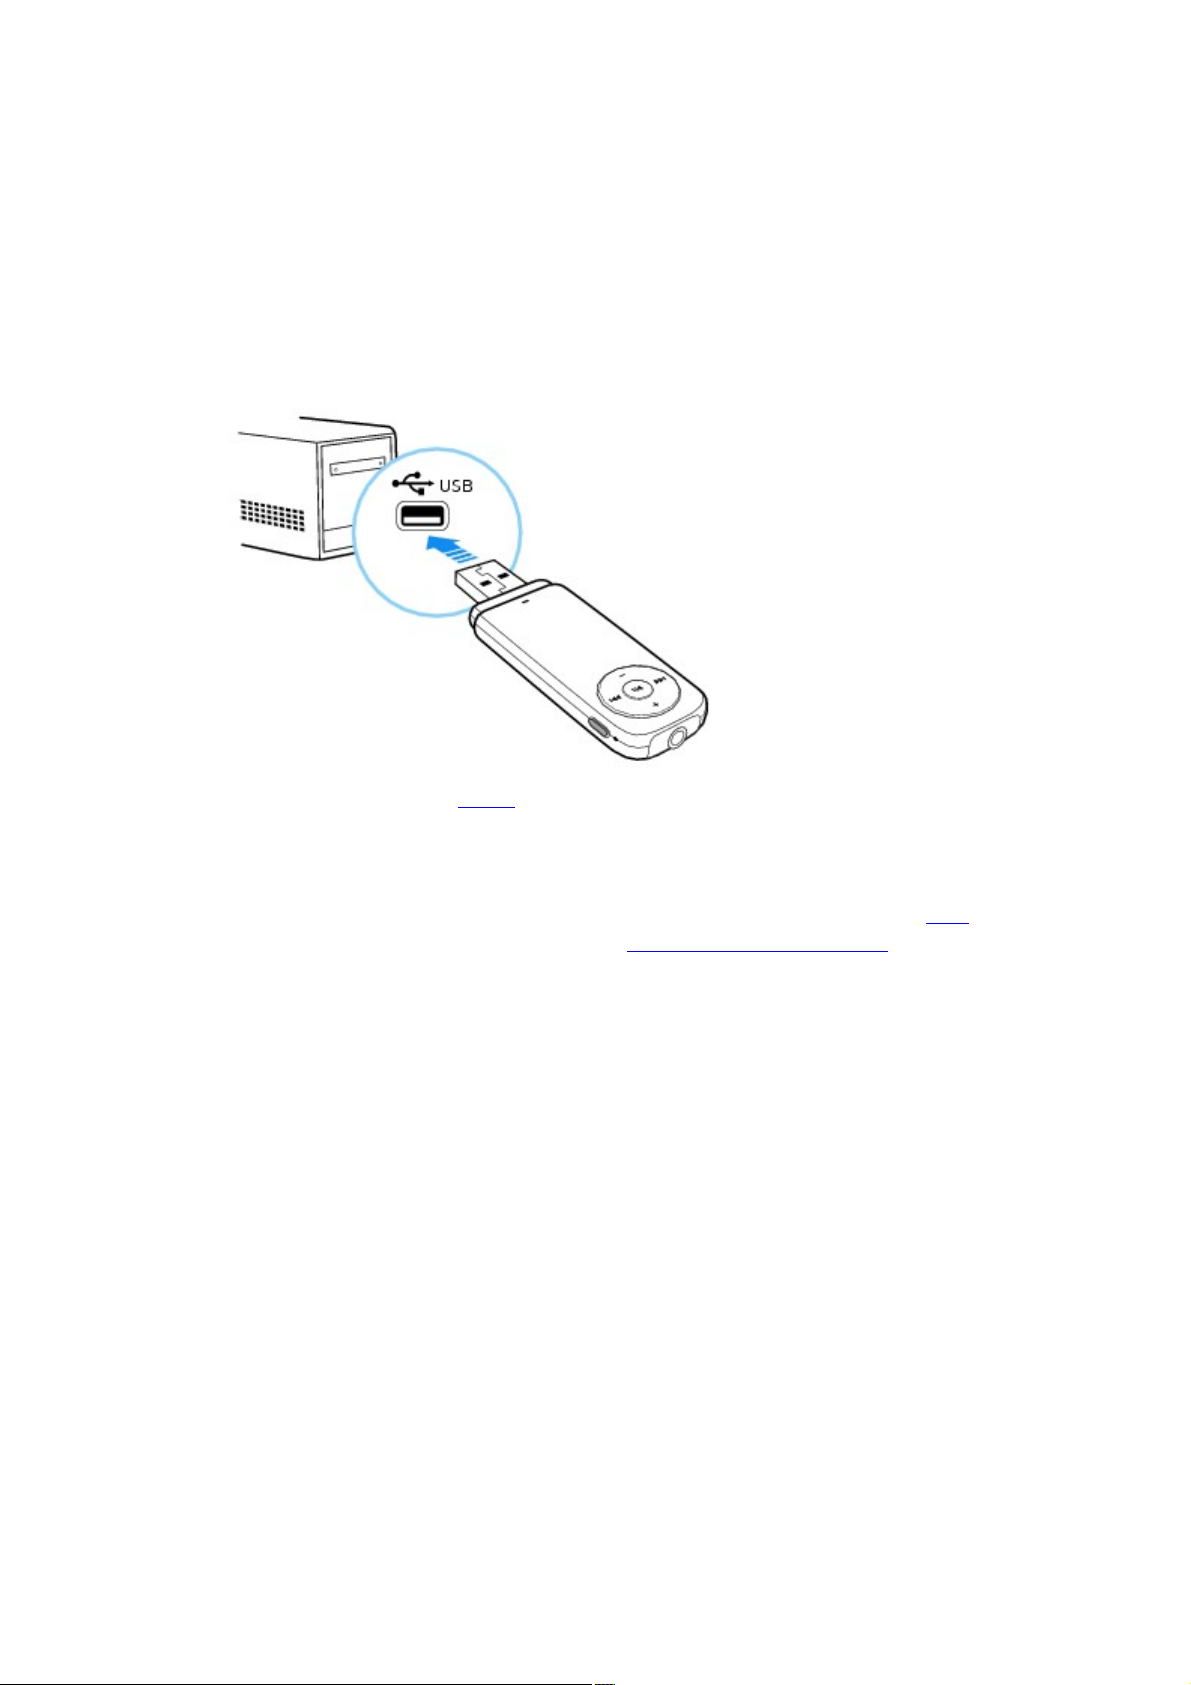
Transferring Audio and Data
Your player is recognized as a removable disk on your computer. So you can use Windows Explorer to
transfer audio tracks and data files to your player.
You can also use software such as Windows Media
Player (WMP) to rip CDs and transfer content. WMP supports the transfer of Windows Media Digital
Rights Management (WMDRM) 9 or copy-protected music. Other software may not.
To transfer audio tracks and data files from your computer
Connect your player to your computer as shown.
1.
®
1.
To transfer audio tracks, use WMP or Windows Explorer.
2.
To transfer data files, use Windows Explorer.
2.
For details, refer to the application's documentation.
2.
Warning!
Do not disconnect your player when transferring files to or from your player. The LED blinks
green during file transfer. After transferring files, disconnect your player safely.
Note
Your player plays back audio tracks in MP3, WMA and Audible formats.
You can also acquire audio tracks from online music stores.
Page 7
Page 8

Using Windows Media Player
You can use Windows Media
Player (WMP) to manage your media files. Basic instructions on using the latest version of WMP are
included in this chapter. For more information on WMP, refer to the WMP online Help.
Managing Your Library
Transferring Audio Tracks to Your Player
®
Page 8
Page 9

Managing Your Library
Display Element
1.
Library tab
2.
Search box
3.
List pane
4.
Details pane
5.
Contents pane
Media content is organized in WMP's library. To browse through WMP's library, click the Library tab,
and select the Music, Pictures, Video, Recorded TV or
Other option.
Before burning CDs or transferring tracks, you need to add media content to your library.
To add items to your library
Click the Library tab and select the Add to Library... option.
1.
Select one of the options available and click the OK button.
2.
WMP searches for items and automatically adds them to your library.
2.
To sort the items in your library
In the Contents pane, click the folder containing the items that you want to sort.
1.
To sort items in ascending alphabetic order, in the Details pane, click the heading of the column
2.
(for example, Title, Genre or Length) that you want the items sorted by.
To sort the items in descending order, in the Details pane, click the heading of the column again.
3.
Page 9
Page 10

Notes
The items in your library are played back in the order that they are displayed.
To find an item in your library
Click the Search box and type a keyword.
The search results are displayed in the
Details pane.
To delete items from your library
In the Details pane, right-click the file to delete.
1.
Click Delete.
2.
In the Windows Media Player dialog box, click the Delete from library only option.
3.
Click the OK button.
4.
Notes
In step 3, selecting Delete from library and my computer will delete the item the library and your
computer's hard disk.
Page 10
Page 11

Transferring Audio Tracks to Your Player
You can transfer audio tracks from WMP to your player.
Click the Sync tab and select your player's entry. Your player appears in the List pane.
1.
From the Contents pane, browse through your library using the various headings such as Artist,
2.
Album or Genre.
From the Details pane, use the drag-and-drop method to transfer the tracks or albums that you
3.
want to the List pane.
Click the Start Sync button.
4.
Page 11
Page 12

Disconnecting Your Player Safely
To stop your player properly, click the Safely Remove Hardware icon on the Taskbar and then
select
Safely remove USB Mass Storage Device.
Page 12
Page 13

Playing Music
Your player automatically starts playing music when it is turned on.
To navigate your player's controls, see A Tour of Your Player
.
To change play mode or skip folders, see Mode Switch
.
To organize music and customize playback order, see Playback Order
.
Page 13
Page 14

Enhancing Audio with Bass Boost
Setting
Description
Level 1
Provides a relatively high bass level.
The indicator beside the Bass Boost button is lit
dimly.
Level 2
Provides a relatively higher bass level.
The indicator beside the Bass Boost button is lit
brightly.
Off
Bass Boost is turned off.
The indicator beside the Bass Boost button is not
lit.
You can enhance your audio tracks by boosting its bass. To do so, press the Bass Boost
button repeatedly to switch between the following Bass Boost settings:
Page 14
Page 15

Playback Order
You can customize your music playback experience by naming and organizing your music according to
the following guidelines:
Your player plays back music in alphanumeric order.
For example, Autumn.mp3, 02 Summer.mp3 and 01 Spring.mp3 will be played back in the
following order:
01 Spring.mp3, 02 Summer.mp3, Autumn.mp3.
If there are tracks and folders in the same location, tracks will be played back first.
Your player supports up to three levels of folders from the root. For details, see Folder Structure
.
Page 16

Folder Structure
Your player supports up to three levels of folders from the root. Any tracks placed outside this structure,
for example in a fourth level folder from the root, will not be played back.
Note
You can add or delete files and folders in your player using Windows Explorer.
Page 16
Page 17

Frequently Asked Questions
This section covers questions you might have while using your player.
Page 17
Page 18

Battery
How will I know when my player is fully charged?
When your player's LED changes from blinking orange to steady orange, your player is fully charged.
I have to charge my player's battery quite often. Is there anything I can do to make it last longer?
The following will make your player's battery last longer.
Avoid unnecessarily moving to the previous or next track.
Avoid unnecessarily moving forward or backward within tracks.
Avoid unnecessarily turning the player on or off.
Avoid using passive speakers or high-powered headphones.
Avoid playing back tracks with high bitrates or heavy bass.
Page 18
Page 19

Transferring Music
How do I transfer music from my audio CDs to my computer or player?
You can use Windows Media Player 9 (or later) to rip music from your CDs. For details, refer to the
application's Help file.
What is DRM and what type of DRM music can I transfer to my player?
DRM stands for Digital Rights Management. It is a form of copy protection for music and subscription
content purchased from online music stores. Your player is a mass storage class (MSC) device that
supports purchased music in the Windows Media DRM (WMDRM) 9 format. Your player does not
support subscription music.
To transfer WMDRM 9 music to your player, use Windows Media Player 9 (or later).
Why do error messages appear when I transfer copy protected music to my player?
Your player supports Windows Media DRM (WMDRM) 9 content. Music files that use other forms of
copy protection cannot be transferred to or be played on your player. Some content from online music
stores may not be transferable to portable devices, or there may be a limit on the number of transfers.
For details, contact your online music store.
Why are some files corrupted when they are transferred to my player?
The file transfer process may have been interrupted. To safely disconnect your player after transferring
files, click the
Safely Remove Hardware icon on the Taskbar.
I already have music on my computer that I play with a media player such as Windows Media Player,
RealPlayer® or Winamp™. Where is my music normally located on my computer, and how can I
transfer it to my Creative player?
Most media players save your music at the following locations:
For Windows Vista™: C:\Users\<Your Name>\Music.
For Windows® XP: C:\Documents and Settings\<Your Name>\My Documents\My Music.
To transfer music to your player, you can use Windows Media Player 9 (or later), which supports the
transfer of Windows Media DRM (WMDRM) 9 copy-protected music. Other software may not.
Page 19
Page 20

Playing Music
Can I play back MP3 or WMA files in my player if they are stored in folders?
Yes, you can. Your player supports up to three folder levels from the root. Your player supports up to:
100 folders for 2 GB players
200 folders for 4 GB players
For details about folders, see Folder Structure.
How can I change my player's music playback order?
Your player's playback sequence follows the alphanumeric order of the file names. To customize
playback sequence, add a number in front of the file name (for example, 01 Track A, 02 Track B, and
so on).
Why does my player skip certain tracks?
The track may have been transferred incorrectly or is in an unsupported format. Check the following:
The track is in a format supported by your player (.mp3 or .wma).
The track is within three levels of folders from the root. For details, see Folder Structure.
If the music track is copy protected, make sure that it is transferred using Windows Media Player
9 (or later), not Windows Explorer.
Page 20
Page 21

Supported Formats
Can I play back PlaysForSure™ and subscription content on my player?
Your player is a mass storage class (MSC) device and supports Windows Media DRM (WMDRM) 9
content only. It does not support PlaysForSure and subscription content.
Page 21
Page 22

Audible
What is Audible content and is it supported by my player?
Audible content refers to spoken audio programs such as audio books that you can purchase online. To
transfer Audible content to your player, download AudibleManager at www.audible.com/creative
.
Some Audible tracks contain sections or chapters that you can skip to quickly.
To skip sections within an Audible track
Using your player's Mode Switch, push and hold at Skip Folder .
1.
Release the mode switch when the LED starts blinking faster.
1.
Press the Previous/Rewind or Next/Fast-Forward button.
2.
If no button is pressed for 15 seconds, your player returns to normal play mode.
2.
Page 22
Page 23

Transferring Data
Can I use my player as a portable data storage device?
Yes, you can. Your player is recognized as a removable disk by your computer. You can use Windows
Explorer to transfer files (including music tracks) to your player. Please note that copy protected WMA
files will not play on your player if they were transferred using Windows Explorer.
Your player is displayed as
MuVo T100 in Windows Explorer.
In Windows Vista, click the Start button
Computer.
In Windows XP, click Start
My Computer.
Page 23
Page 24

Firmware
What is firmware and can my player's firmware be updated?
Firmware refers to the software residing on your player which controls your player's features.
Sometimes, improvements are made to your player's firmware and these firmware upgrades are placed
on the Creative web site, www.creative.com/support
.
Before upgrading your player's firmware, you need to log on to your computer in Administrator mode.
For details about Administrator mode, see your operating system's documentation.
Page 24
Page 25

LED
After my player is turned on, why does it blink red three times then turn off?
The battery may be too depleted to power your player.
Charge the player for approximately two to three hours by connecting to an actively running computer
before turning on the player again. Avoid using a USB hub.
If you encounter problems after two to three hours, try the following:
Do not use a USB hub and ensure that the player is connected properly.
Connect your player to another computer.
Reset your player.
To understand what the LED colors and blinks mean, see LED
.
Page 25
Page 26

Software
Can I use Windows Media Player to transfer music to my player?
Yes, you can. For details, refer to the application's documentation.
Can I use Creative MediaSource to manage the content on my player?
Yes, you can. If you already own a Creative player that comes with the Creative MediaSource software,
you can use the application to manage content that is not copy protected. Your player is displayed as
MuVo T100 under
My Computer in Creative MediaSource by default.
Page 26
Page 27

Troubleshooting
My player is not responding, what do I do?
If your player stops responding, reset the player. This should not cause you to lose any data or audio
tracks, unless you were in the middle of transferring files.
Insert and remove a straightened paperclip from the Reset Hole.
1.
If this does not work, proceed to Formatting Your Player.
2.
Formatting Your Player
WARNING: This step deletes all your player's content. If possible, back up all your player's content on
your computer before proceeding.
Make sure your player is connected to your computer and you are logged on in Administrator
1.
mode. For details about Administrator mode, see your operating system's documentation.
In Windows Explorer, right-click your player and select Format.
2.
If this does not work, proceed to Reloading Your Player's Firmware in Recovery Mode.
3.
Reloading Your Player's Firmware in Recovery Mode
Download the latest firmware before proceeding.
1.
Disconnect your player from the computer, and then turn off your player.
2.
Press and hold the Bass Boost button. Continue to hold the button until you have
3.
performed Steps 4 and 5.
If you accidentally release the button, start the procedure again.
3.
Press and hold the Power/Play/Pause button.
4.
After 5 seconds, release both buttons.
5.
Connect your player to your computer's USB port.
6.
Your player will be recognized as a USB Mass Storage Device.
6.
Double-click the firmware file you downloaded earlier, and follow the instructions on the screen.
7.
Why does formatting my player in Windows Vista take a long time?
Windows Vista formats devices differently from earlier versions of Windows. As such, your player may
take a significantly longer time to perform a full format. Rest assured that once formatted, your player will
perform as expected. To format your player in considerably less time, use the Quick Format option
instead.
Page 27
Page 28

Regulatory Information
The following sections contain notices for various countries:
CAUTION: This product is intended for use with FCC/CE certified computer equipment. Please check
the equipment operating/installation manual and/or with the equipment manufacturer to verify/confirm if
your equipment is suitable prior to the installation or use of the product.
Page 28
Page 29

Notice for the USA
FCC Part 15: This equipment has been tested and found to comply with the limits for a Class B digital
device, pursuant to Part 15 of the FCC Rules. These limits are designed to provide reasonable protection
against harmful interference in a residential installation. This equipment generates, uses and can radiate
radio frequency energy and, if not installed and used in accordance with the instructions, may cause
harmful interference to radio communications. However, there is no guarantee that interference will not
occur in a particular installation. If this equipment does cause harmful interference to radio or television
reception, which can be determined by turning the equipment off and on, the user is encouraged to try to
correct the interference by one or more of the following measures:
Reorient or relocate the receiving antenna.
Increase the separation between the equipment and receiver.
Connect the equipment into an outlet on a circuit different from that to which the receiver is
connected.
Consult the dealer or an experienced radio/TV technician for help.
This device complies with part 15 of the FCC Rules. Operation is subject to the following two
conditions:
This device may not cause harmful interference, and
1.
This device must accept any interference received, including interference that may cause
2.
undesired operation.
CAUTION: To comply with the limits of the Class B digital device, pursuant to Part 15 of the FCC
Rules, this device must be installed with computer equipment certified to comply with Class B limits.
All cables used to connect to the computer and peripherals must be shielded and grounded. Operation
with non-certified computers or non-shielded cables may results in interference to radio or television
reception.
MODIFICATION: Any changes or modifications not expressly approved by the grantee of this device
could void the user's authority to operate the device.
Page 29
Page 30

Notice for Canada
This Class B digital apparatus complies with Canadian ICES-003.
Cet appareil numérique de la classe B est conforme à la norme NMB-003 du Canada.
CANADIAN CLASS B STATEMENT: This digital device does not exceed the Class B limits for radio
noise emissions from digital apparatus as set out in the interference-causing equipment standard entitled
"Digital Apparatus," ICES-003 of the Department of Communications.
Cet appareil numerique respecte les limites de bruits radioelectriques applicables aux appareils
numeriques de Classe B prescrites dans la norme sur le materiel brouilleur: "Appareils Numeriques,"
NMB-003 edictee par le ministre des Communications.
MODIFICATION: Any changes or modifications not expressly approved by the grantee of this device
could void the user's authority to operate the device.
Toute modification non approuvée explicitement par le fournisseur de licence de l'appareil peut entraîner
l'annulation du droit de l'utilisateur à utiliser l'appareil.
Page 30
Page 31

European Compliance
This product conforms to the following:
EMC Directive 2004/108/EC.
Mains operated products for the European market comply with Low Voltage Directive 2006/95/EC.
Communication / RF wireless products for the European market comply with R&TTE Directive
1999/5/EC.
CAUTION: To comply with the Europe CE requirement, this device must be installed with CE certified
computer equipment which meet with Class B limits.
All cables used to connect this device must be shielded, grounded and no longer than 3m in length.
Operation with non-certified computers or incorrect cables may result in interference to other devices or
undesired effects to the product.
MODIFICATION: Any changes or modifications not expressly approved by Creative Technology
Limited or one of its affiliated companies could void the user's warranty and guarantee rights.
Page 31
Page 32

Safety Information
Refer to the following information to use your product safely, and to reduce the chance of electric shock,
short-circuiting, damage, fire, hearing impairment or other hazards.
Improper handling may void the warranty for your product. For more information, read the warranty
available with your product.
Do not dismantle or attempt to repair your product.
Refer all servicing to authorized repair agents.
Do not expose your product to temperatures outside the range of 0°C to 45°C (32°F to 113°F).
Do not pierce, crush or set fire to your product.
Keep your product away from strong magnetic objects.
Do not subject your product to excessive force or impact.
Do not expose your product to water or moisture.
If your product is moisture-resistant, take care not to immerse your product in water or expose it
to rain.
When a conductive apparatus such as earphones, is used in close proximity with a CRT
television or CRT monitor, the latter may emit an electrostatic discharge. This electrostatic
discharge can be felt as a static shock. While this static shock is usually harmless, it is good
practice to avoid close contact with CRT devices when using earphones.
Do not listen to audio on your earbuds or headphones at high volume for prolonged periods of
time as hearing loss may result. For users in the United States, go to www.hei.org.
Do not attempt to remove the embedded battery.
The product must be disposed of according to local environmental regulations. To replace the
battery, return your product to your regional support office. For product service information, go
to www.creative.com.
Page 32
Page 33

General Specifications
Size (WxHxD)
24.99 mm (1") x 77.49 mm (3") x 8.9 mm (1/3")
Weight (approximate)
17.8 g (2/3 ounce)
Power Source
Battery: 1 x Rechargeable Lithium Ion battery
USB bus powered when connected to a powered USB port on a computer
Audio Playback Formats
Audible Format 2 and 3
MP3 (Up to 320 kbps)
WMA (Up to 320 kbps)
WMA with Windows Media Digital Rights Management (WMDRM) 9
MP3 Playback Performance
Signal-to-Noise Ratio: Up to 90 dB
Channel Separation: Up to 65 dB
Frequency Response: 20 Hz ~ 20 kHz
Harmonic Distortion Output: <0.1%
Connectors
Headphone jack: 3.5 mm (1/8") stereo minijack, 5 ~ 7 mW per channel
USB connector
Firmware Support
Upgradable via USB (firmware upgrades are available from www.creative.com/support).
Earphone Specifications
Frequency Range: 20 Hz ~ 20 KHz
Sensitivity: 111 dB ±3 dB SPL at 1 KHz
Impedance: 32 W ±15%
Plug: 3.5 mm (1/8") stereo minijack
Page 33
Page 34

License and Copyright
Information in this document is subject to change without notice and does not represent a commitment on
the part of Creative Technology Ltd. No part of this manual may be reproduced or transmitted in any
form or by any means, electronic or mechanical, including photocopying and recording, for any purpose
without the written permission of Creative Technology Ltd. The software described in this document is
furnished under a license agreement and may be used or copied only in accordance with the terms of the
license agreement. It is against the law to copy the software on any other medium except as specifically
allowed in the license agreement. The licensee may make one copy of the software for backup purposes
only.
This product is not intended for the unauthorized recording or distribution of copyrighted material.
MuVo and the Creative logo are trademarks or registered trademarks of Creative Technology Ltd. in the
United States and/or other countries. Microsoft, Windows, Windows Media, Windows Vista and
PlaysForSure are trademarks or registered trademarks of Microsoft Corporation. All rights reserved.
Intel and Pentium are trademarks of Intel Corporation in the U.S. and other countries.
Audible and AudibleManager are registered trademarks of Audible, Inc. in the U.S. and/or other
countries.
RealPlayer is a trademark or a registered trademark of RealNetworks, Inc.
Winamp is a trademark or registered trademark of Nullsoft, Inc. in the United States and/or other
countries.
All other products are trademarks or registered trademarks of their respective owners.
Copyright © 2007 by Creative Technology Ltd. All rights reserved.
Version 1.0
September 2007
Page 34
 Loading...