

Creative Muvo Muvo Mix 512MB, MUVO MIX, Muvo Quick Start Manual
i
English. . . . . . . . . . . . . . . . . . . . . . . . . . . . . . . . . . . . . . . . . . 1
Français. . . . . . . . . . . . . . . . . . . . . . . . . . . . . . . . . . . . . . . .11
Español . . . . . . . . . . . . . . . . . . . . . . . . . . . . . . . . . . . . . . . . 22
Português Brasileiro. . . . . . . . . . . . . . . . . . . . . . . . . . . . . . 32
English.book Page i Wednesday, March 2, 2005 1:30 PM

ii
English.book Page ii Wednesday, March 2, 2005 1:30 PM
1
English
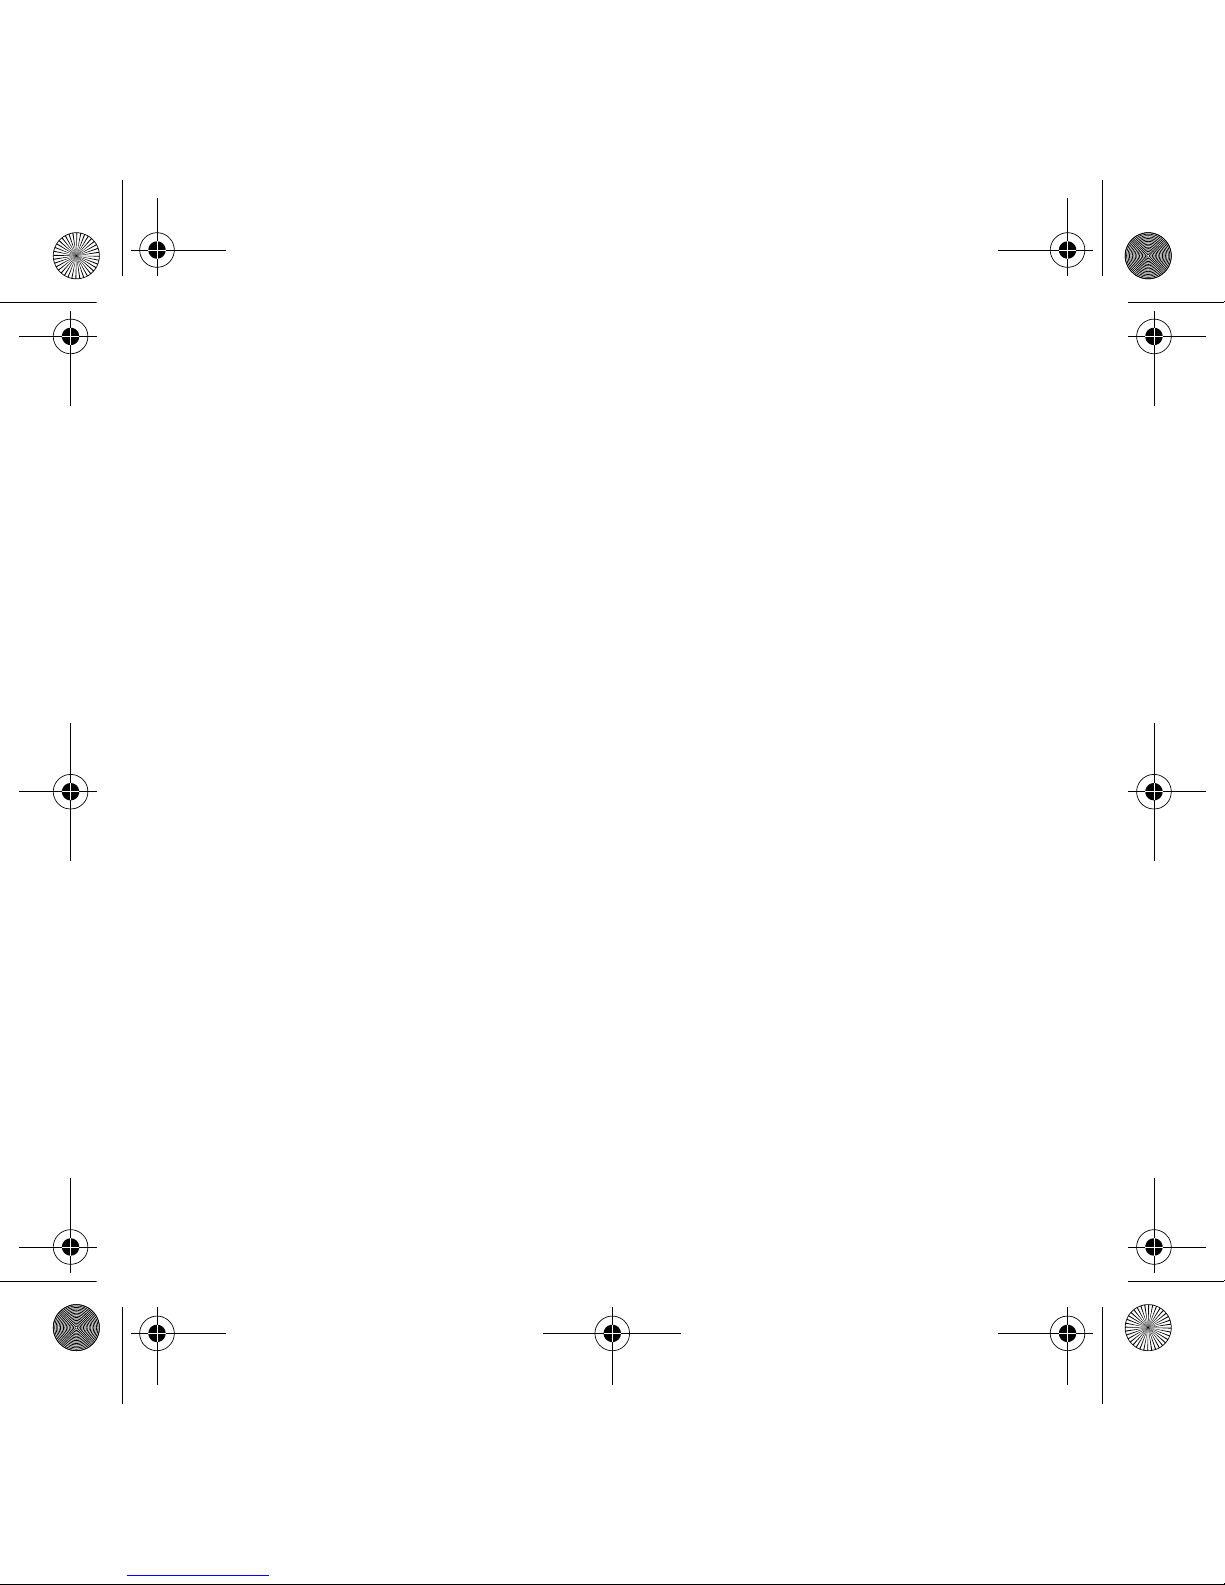
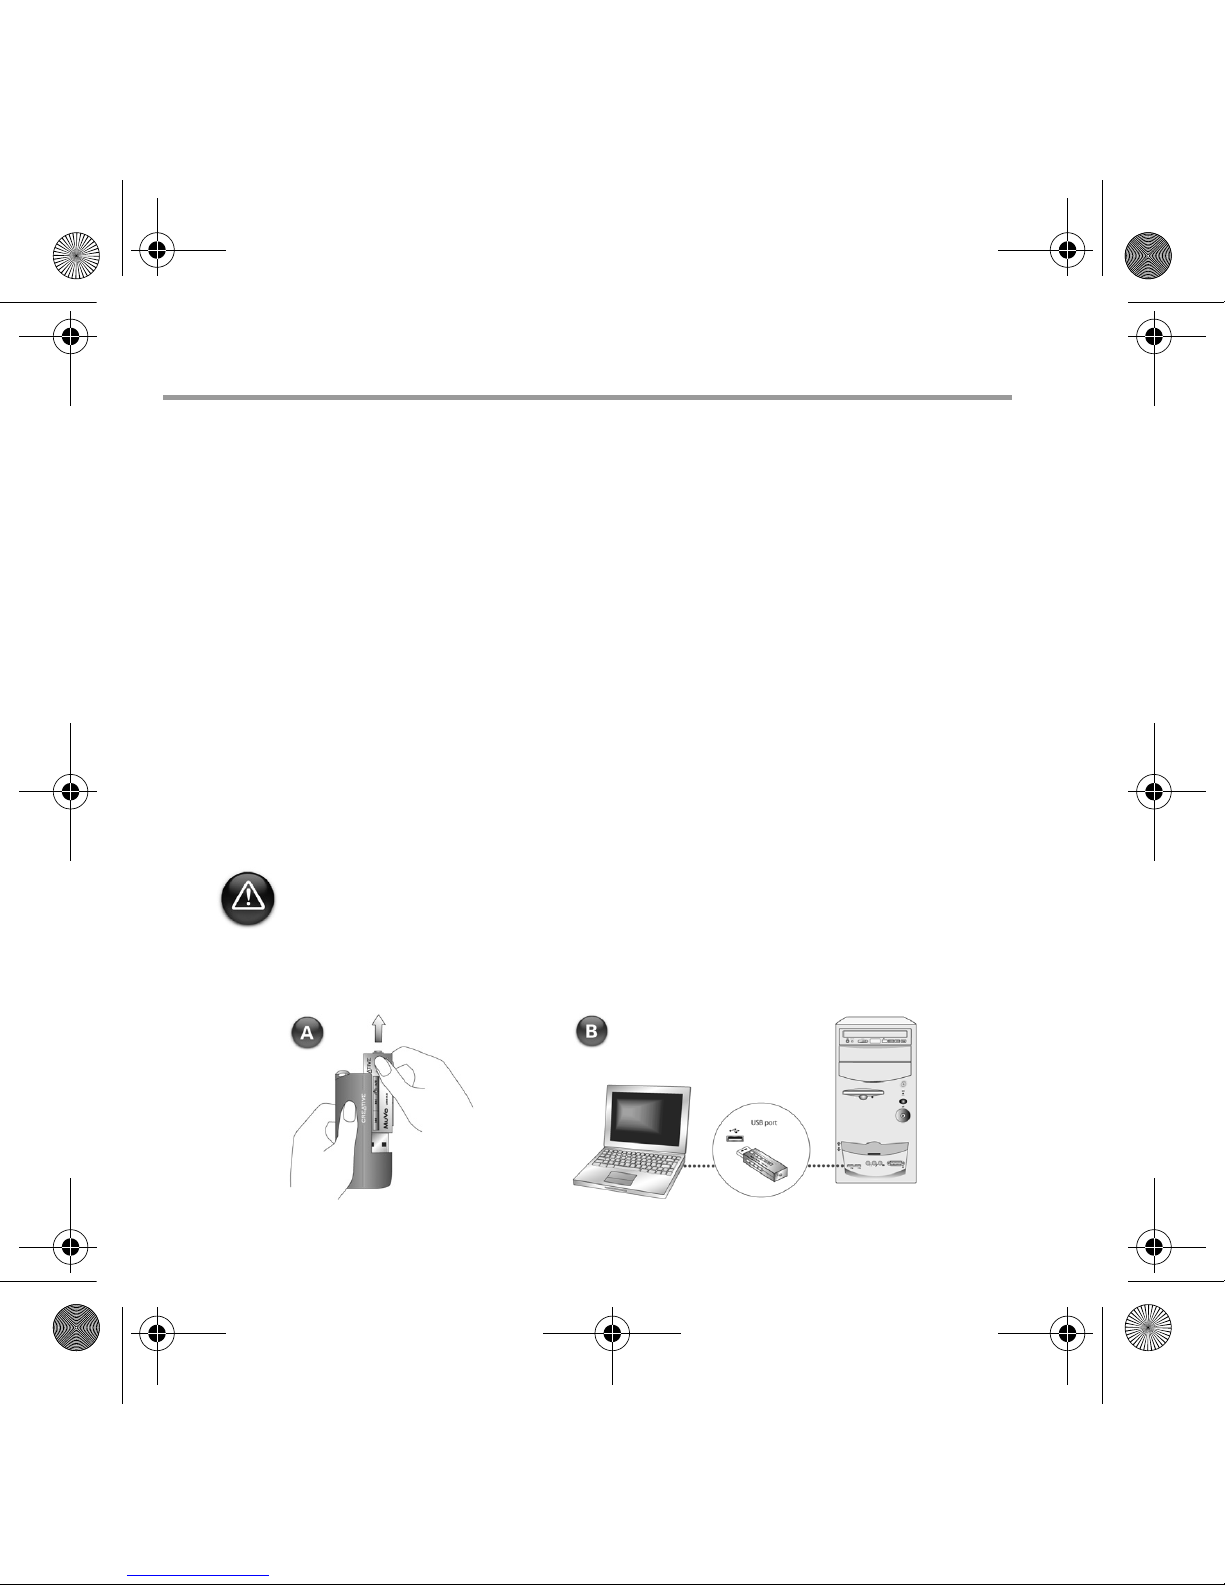
Overview
You can use stickers (included) to label your player. Place the stickers on the space
provided at the back of the USB Flash Drive.
Headphones
connector
Front View Side View
Play/Pause/Power
Dual color LED
Next Track/
Fast Forward
Previous Track/
Rewind
Repeat A-B /
Shuffle Track
Volume Increase
Volume Decrease
English.book Page 1 Wednesday, March 2, 2005 1:30 PM
2
English
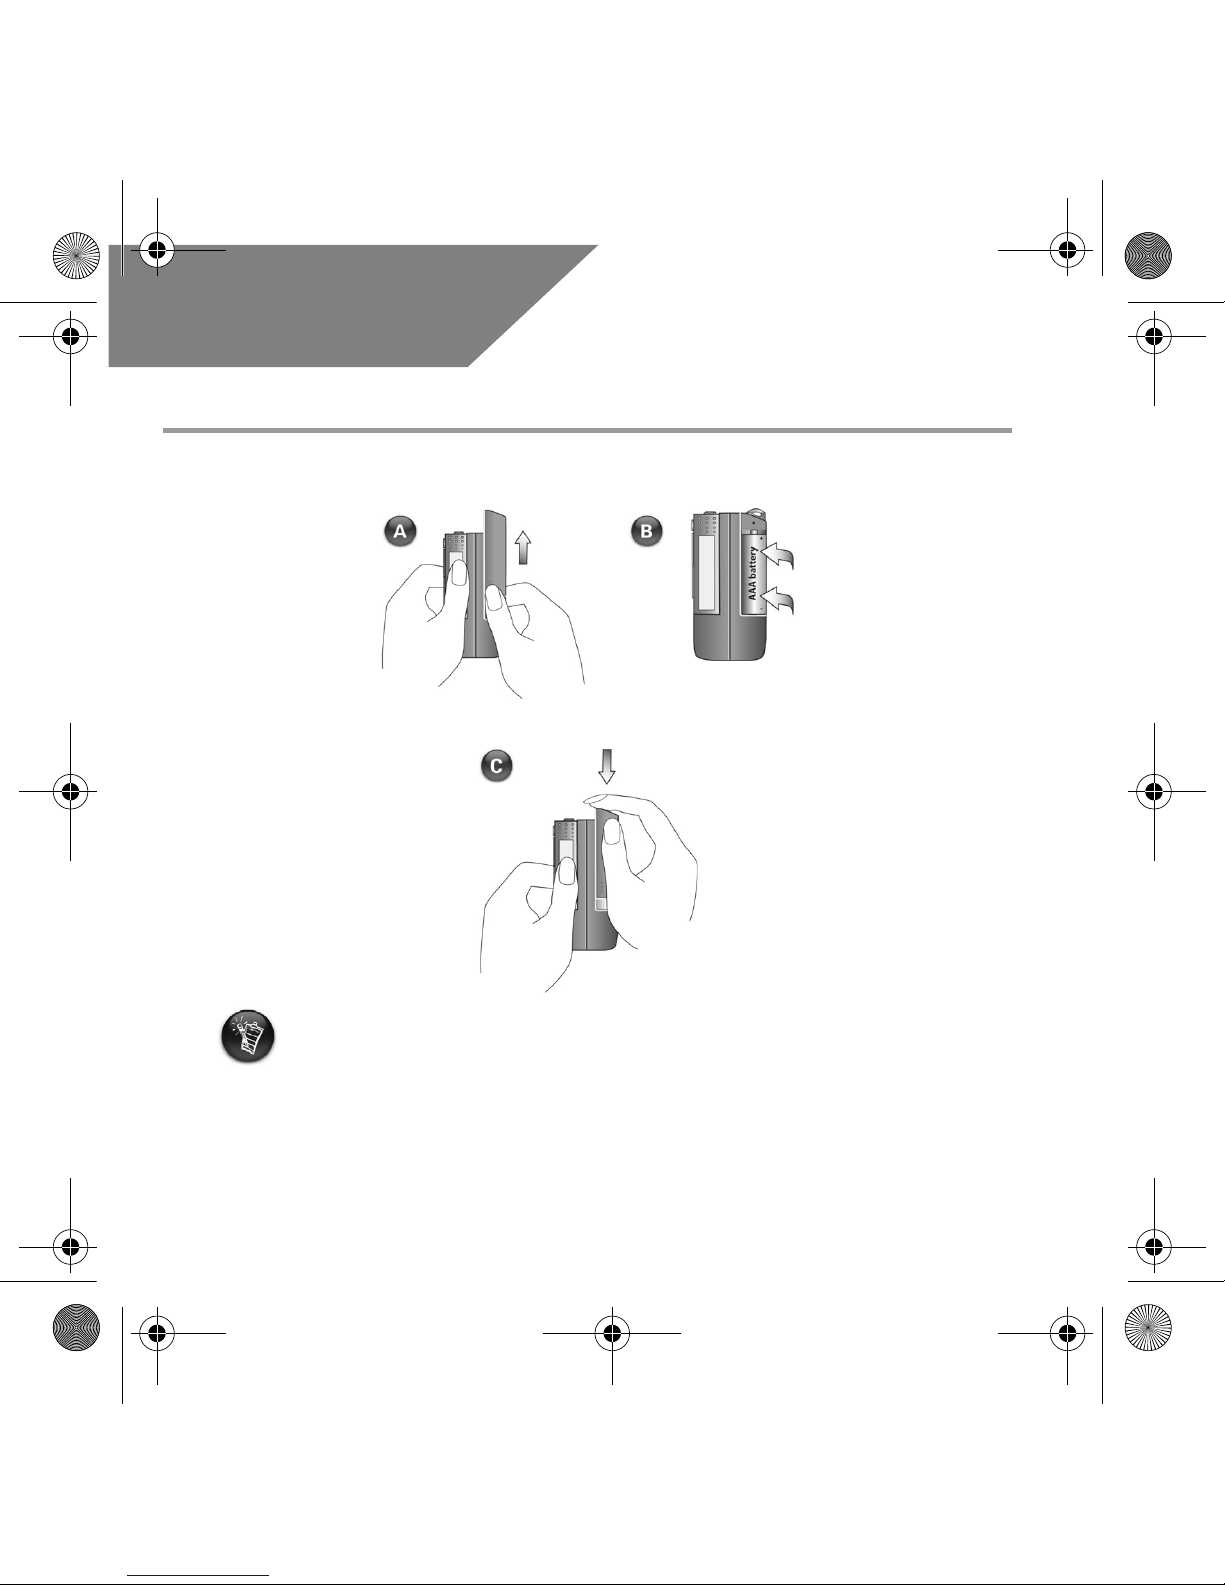
How To Use Your Player
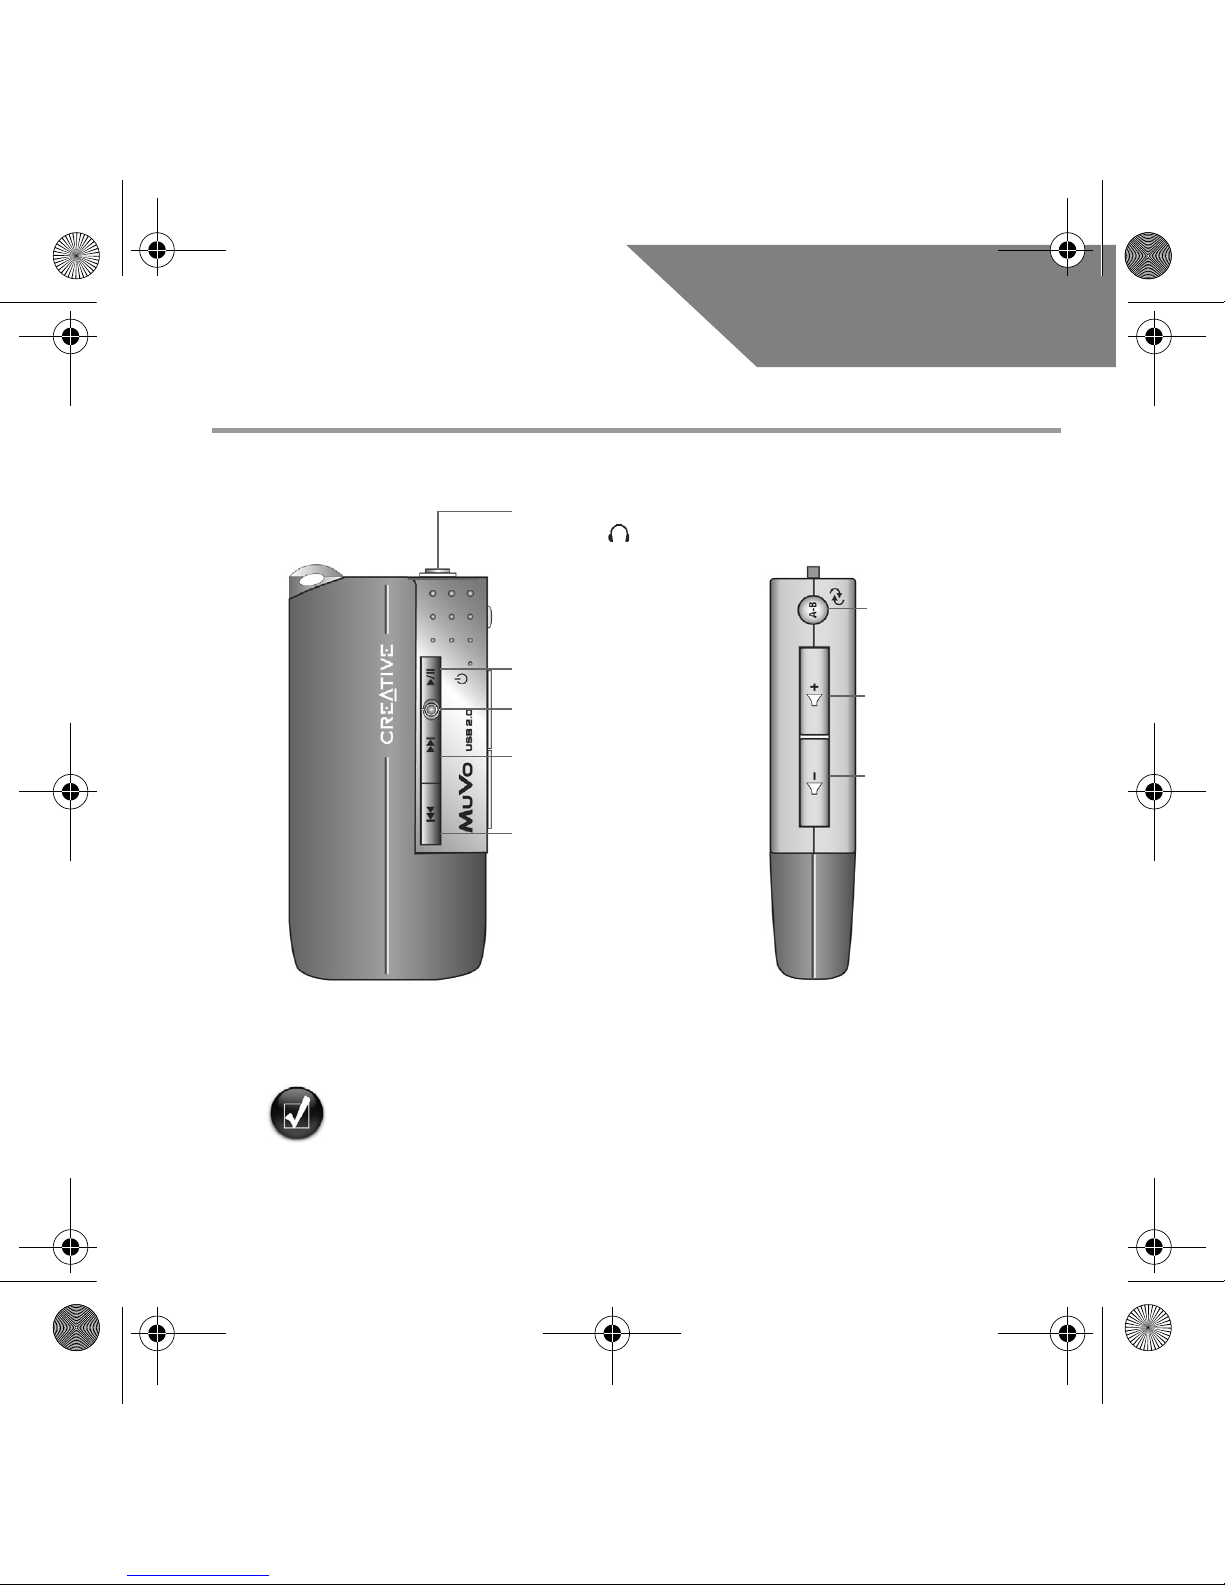
Inserting the battery
• If the LED on the player blinks red, the battery power is low. If the LED on the player
is a steady red, there are no tracks on your player.
• The battery life depends on the type of battery used. It is recommended that you use
alkaline batteries. Playing .WMA files with a high bass level may also reduce your
battery's life significantly.
• Remember to unplug the USB Flash Drive from your computer and insert it into the
battery module before turning on the player.
WARN ING: The cord(s) included with this product may contain chemicals known to the State
of California to cause cancer and birth defects or other reproductive harm. Wash hands after
handling.
English.book Page 2 Wednesday, March 2, 2005 1:30 PM
3
Turning on the player
Press and hold the Play/Pause button for a few seconds. The LED turns green and
there is music playback. If, however, there are no music tracks in your player, the LED turns
red.
Turning off the player
Press and hold the Play/Pause button for a few seconds until after the LED turns off.
Pausing a music track
Press the Play/Pause button . The LED turns red.
Shuffling your music
Press and hold the Repeat A-B /Shuffle Track button for a few seconds. The
LED blinks green. To resume normal playback, press the Repeat A-B /Shuffle Track
button again.
Repeating a portion of a music track
Press the Repeat A-B /Shuffle Track button to mark the beginning of the
portion you wish to repeat. The LED blinks green. Press the Repeat A-B /Shuffle
Tr a ck button again to mark the end of the portion. The LED blinks green at a slower
speed, and the marked portion is played back repeatedly. To resume normal playback, press
the Repeat A-B /Shuffle Track button again.
English.book Page 3 Wednesday, March 2, 2005 1:30 PM
4
Setup
1
1
Installing the driver
1. Turn on your computer and insert the installation CD into your CD-ROM drive. The
disc supports Windows AutoPlay mode and starts running automatically. If not, click
Start → Run. In the Open box, type d:\ctrun\ctrun.exe (replace d: with the drive
letter of your CD-ROM drive), and then click the OK button.
2. Follow the onscreen instructions to complete the installation.
3. When prompted, restart your system.
2
2
Connecting USB Flash Drive to your
computer
• For Windows 98 SE, you must install the driver (step 1) before transferring music
tracks/files.
• Do not press the buttons on your USB Flash Drive while connecting it to your
computer.
English.book Page 4 Wednesday, March 2, 2005 1:30 PM
5
3
3
Transferring Music Tracks
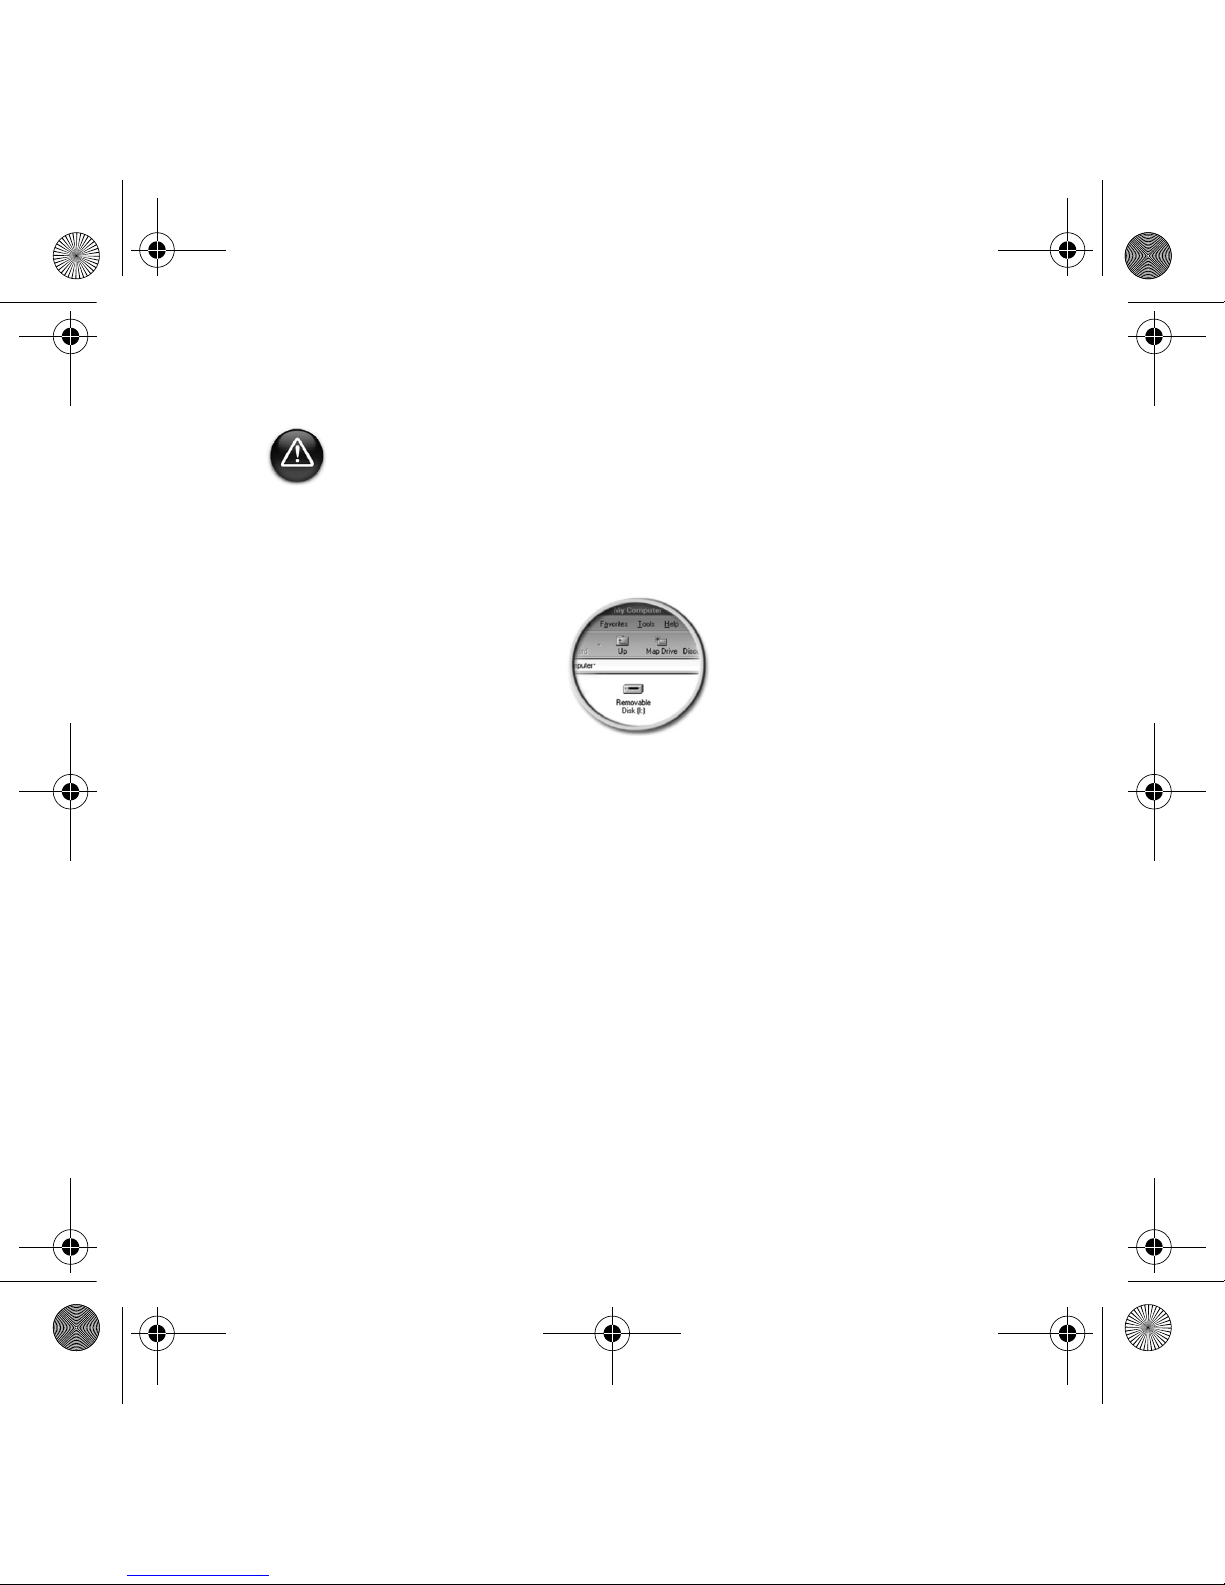
1. On your desktop, right-click the My Computer icon, and then click Explore. The
USB Flash drive appears as a removable disk icon (Figure 1).
2. Drag and drop .MP3 or .WMA files only into your player. The LED on the MuVo
Memory blinks red during data transfer.
You can use other applications such as Creative MediaSource, Windows Media player
or RealOne to manage the music tracks in your player. When prompted, restart your
computer.
4
4
Transferring Files
1. On your desktop, right-click the My Computer icon, and then click Explore.
2. Drag and drop files or folders into your player. The LED on the USB Flash Drive blinks
red during data transfer.
Before unplugging your player from your computer, use the Windows Eject or Safely
Remove Hardware function to safely disconnect your player.
Figure 1
English.book Page 5 Wednesday, March 2, 2005 1:30 PM
6
Formatting Your Player
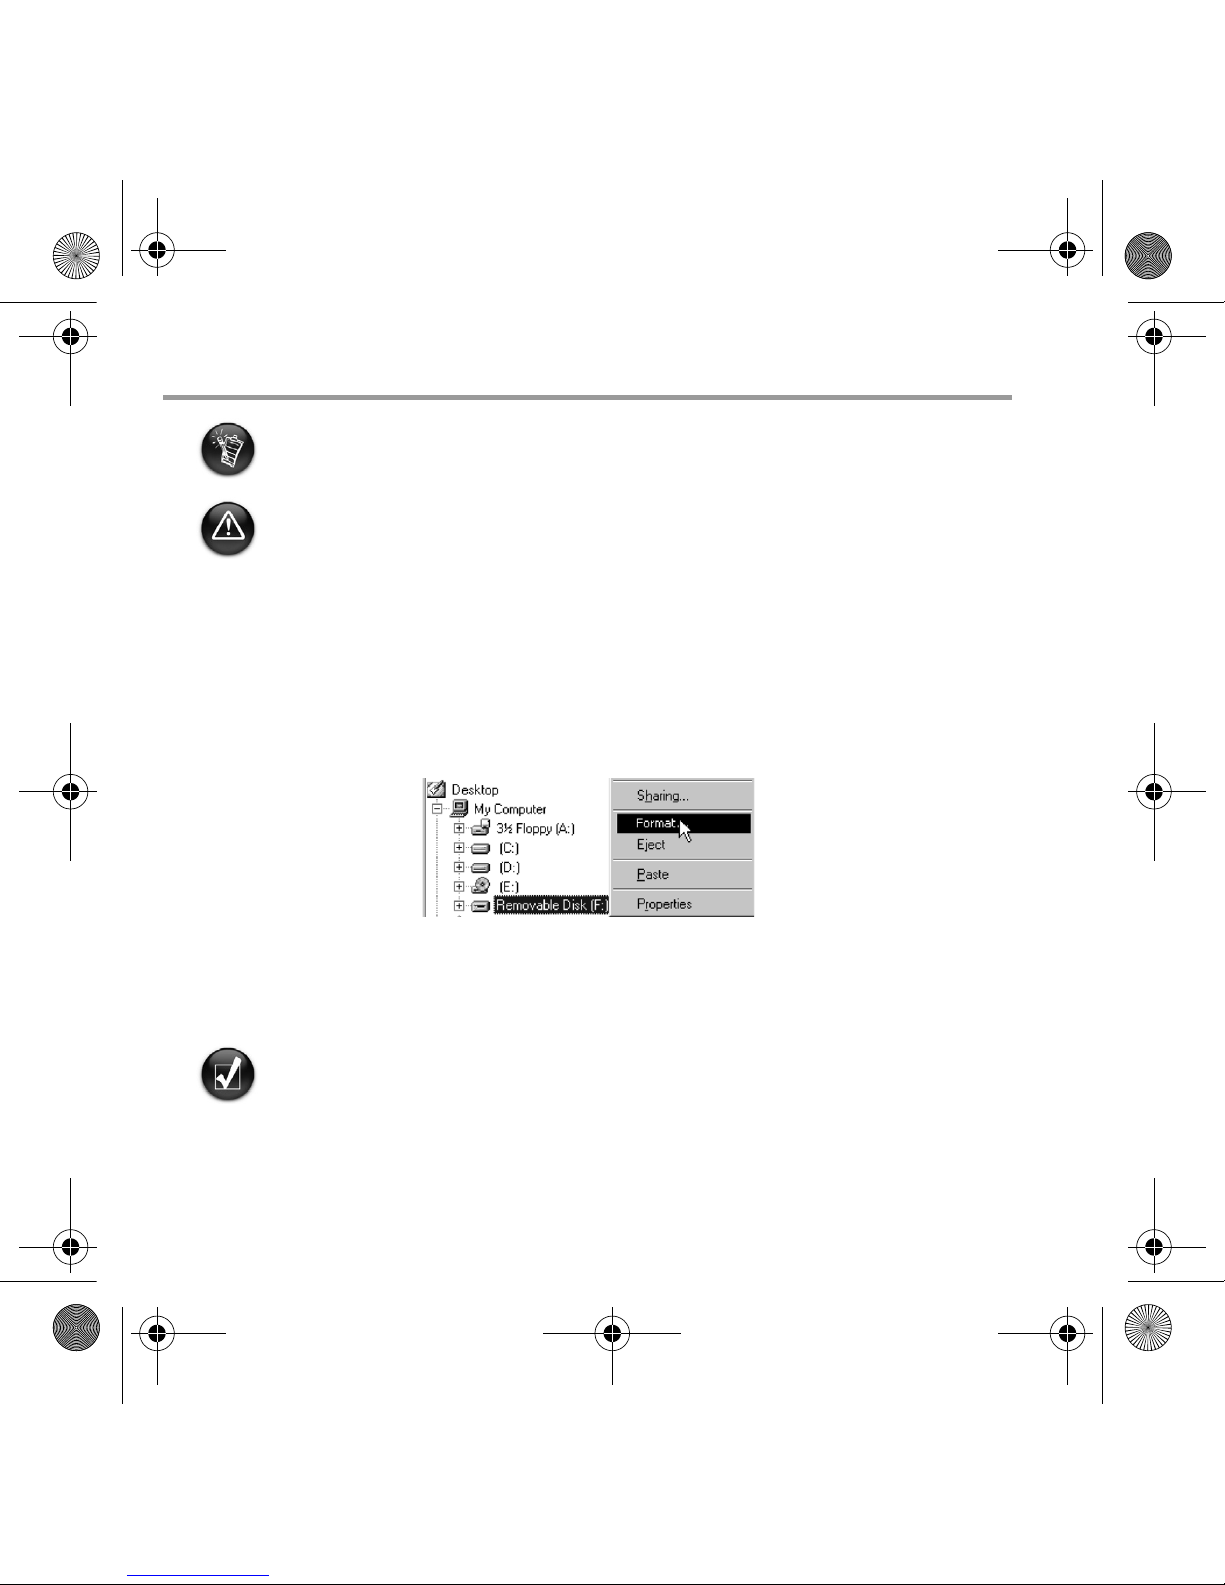
1. Connect your player to your computer's USB port.
2. Launch Windows Explorer on your computer. Your player is recognized as a
Removable Disk in Windows Explorer.
3. Right-click the Removable Disk icon and click the Format option. The Format F:\
dialog box appears (replace F:\ with the drive letter of your player).
4. Follow the instructions on the screen to format your player.
5. After the formatting is complete, make sure you stop your player before disconnecting
it from your computer.
• Your player supports the FAT16/32 (16/32-bit File Allocation Table) file system. Format
your player with the FAT file system only.
• Windows 98 SE users must install the MuVo drivers before formatting the player.
If you need to format your player, backup the files in your player first. When you format
your player, all songs and files will be deleted. By default, your player is already formatted.
For more information about using Windows Explorer, refer to its online Help.
English.book Page 6 Wednesday, March 2, 2005 1:30 PM
7
Software Included
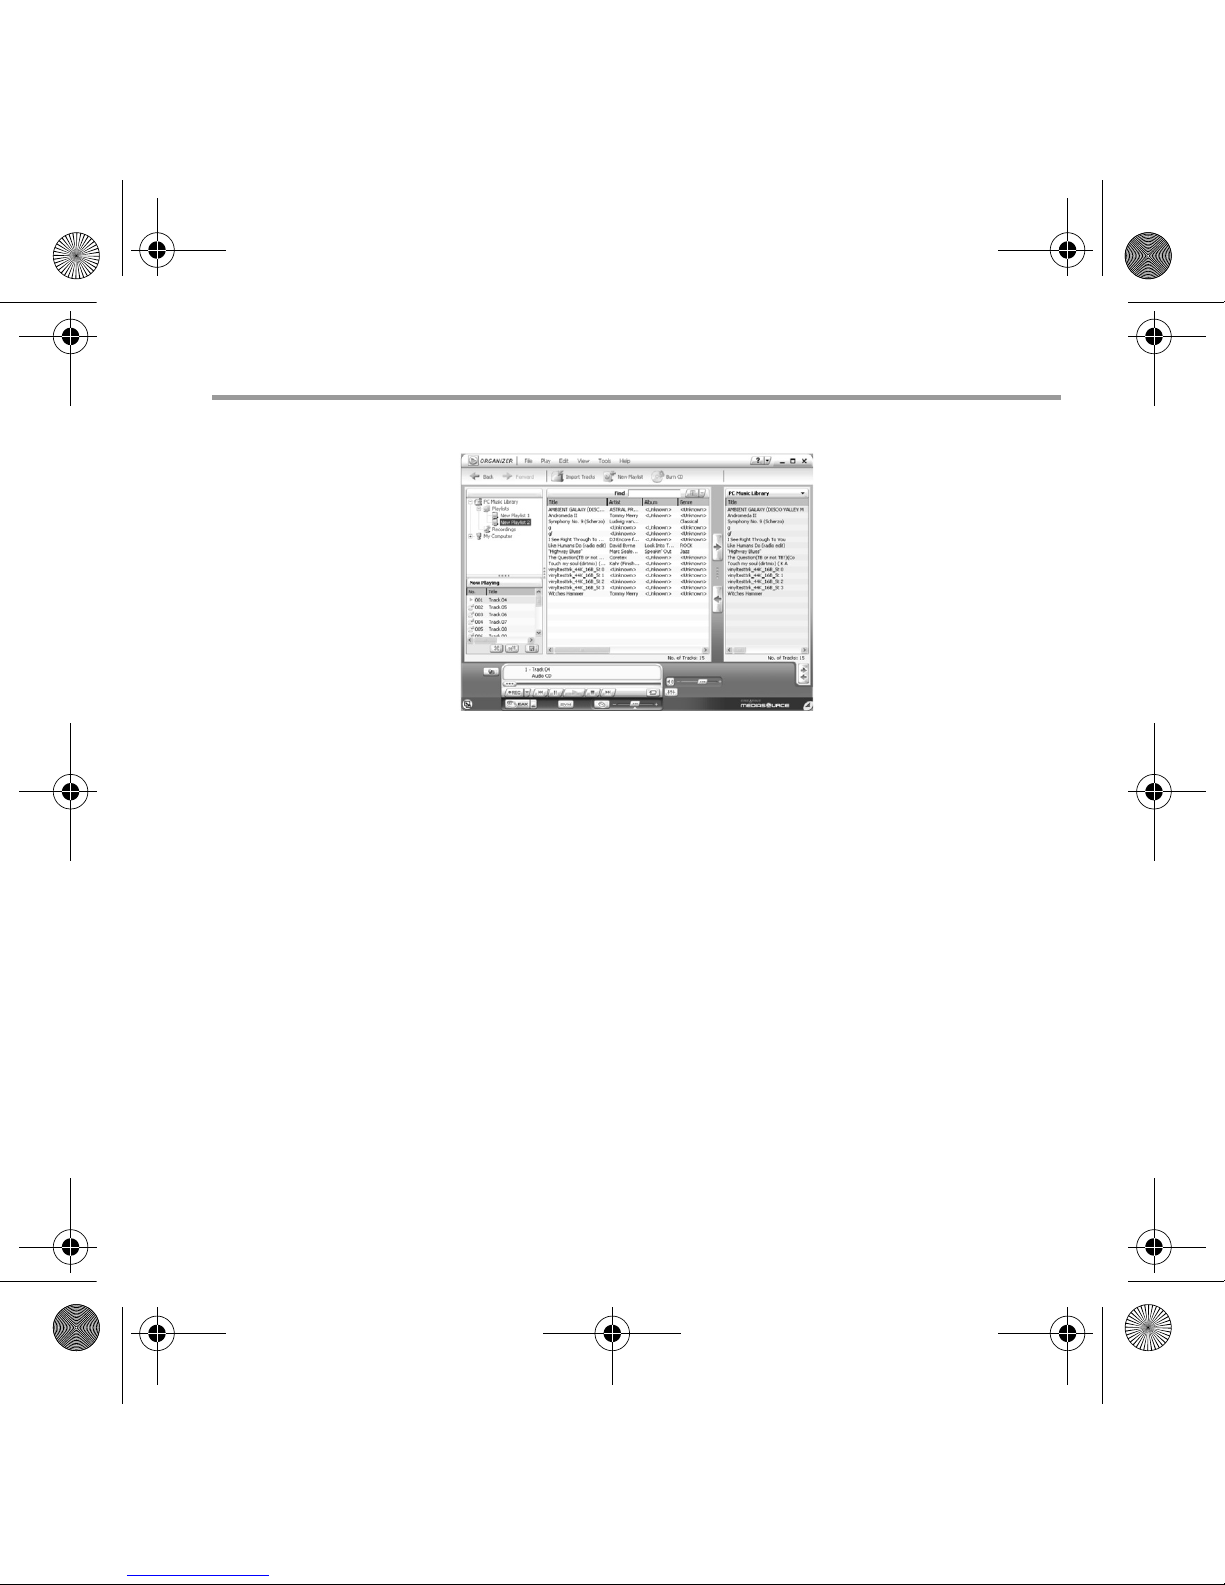
Creative MediaSource
Creative MediaSource allows you to rip CDs and create high quality digital audio files, play
and organize media files on your computer as well as transfer music tracks or files
seamlessly to and from your player. Special features such as SMARTFIT, using intelligent
track management and WMA compression, enables you to transfer a higher number of
music tracks to your player. For more information, refer to the Creative MediaSource
online Help.
Go to Start → Programs → Creative → Creative MediaSource → Creative
MediaSource Organizer.
English.book Page 7 Wednesday, March 2, 2005 1:30 PM
8
Troubleshooting
The player's LED does not light up.
Do the following:
• Insert a new battery into your player.
• Format your player as described above in "Formatting your player".
File transfers to the player are very slow (less than 100kb/sec).
Do the following:
• Format your player as described above in "Formatting your player".
After playing the first few music tracks, the player skips a music track.
Do the following:
• Format your player as described above in "Formatting your player".
The player's LED is red and there is no playback.
Do the following:
• Make sure that there are music tracks stored in your player.
Files/music tracks are corrupted when transferred to the player.
• Before unplugging your player from your computer, use the Windows Eject or Safely
Remove Hardware function to safely disconnect your player.
The player's LED turns from green to red instantly when a music track is
played.
• Using Windows Explorer, delete the SETTINGS.DAT file from your player.
The player turns off immediately after it is turned on.
• Using Windows Explorer, delete the SETTINGS.DAT file from your player.
English.book Page 8 Wednesday, March 2, 2005 1:30 PM
9
Safety Information
Refer to the following information to use your player safely, and to reduce the
chance of electric shock, short-circuiting, damage, fire, hearing impairment or
other hazards.
• Do not dismantle or attempt to repair your player, battery or power adapter.
Refer all servicing to Creative or authorized repair agents.
• Do not expose your player or battery to temperatures outside the range of 0°C to 45°C
(32°F to 113°F).
• Do not pierce, crush or set fire to your player or battery.
• Keep your player or battery away from strongly magnetic objects.
• Do not subject your player to excessive force or impact.
• Do not expose your player or battery to water or moisture.
If your player is moisture-resistant (see product packaging for details), take care not to
immerse your player in water or expose it to rain.
• Do not listen to audio at high volume for prolonged periods of time.
• The battery must be recycled or disposed of properly. Contact local agencies for
recycling and disposal information.
• Do not allow metal objects to touch the terminals of your battery.
• If there is leakage, an offensive odor, discoloration or deformation during charging or
use, remove the battery and do not use it again. Clean your hands well before touching
food or sensitive areas, for example, your eyes.
Improper handling of your player may void the warranty for your player.
For more information, read the Warranty available with your product.
English.book Page 9 Wednesday, March 2, 2005 1:30 PM

10
Other Information
Product Registration
Enjoy a host of benefits by registering your product during installation, or at
www.creative.com/register. Benefits include:
• Service and product support from Creative.
• Exclusive updates on promotions and events.
Please note that your warranty rights are not dependent on product registration.
Customer Support Services and Warranty
You can find Customer Support Services, Warranty and other information in the
Installation CD.
(replace d:\ with the drive letter of your CD-ROM/DVD-ROM drive, <region> with the region that you
are in, and <language> with the language that your document is in)
Customer Support Services d:\support\<region>\<language>\support.chm
Warranty d:\warranty\<region>\<language>\warranty.chm
Please keep your Proof of Purchase for the duration of the warranty
period.
Creative Knowledge Base
Resolve and troubleshoot technical queries at Creative's 24-hour self-help
Knowledge Base. Go to www.creative.com and select your region.
Copyright © 2005 Creative Technology Ltd. All rights reserved. The Creative logo is a registered trademark and MuVo is
a trademark of Creative Technology Ltd. NOMAD is a registered trademark of Aonix and is used by Creative Technology
Ltd. and/or its affiliates under license. Microsoft, Windows Media, and Windows are trademarks or registered trademarks
of Microsoft Corporation in the United States and/or other countries. All other brand and product names listed are trademarks
or registered trademarks of their respective holders and are hereby recognized as such. Actual contents may differ slightly
from those pictured. MPEG Layer-3 audio compression technology licensed by Fraunhofer IIS and Thomson Multimedia.
English.book Page 10 Wednesday, March 2, 2005 1:30 PM

11
Français
Présentation
Vous pouvez utiliser les auto-collants (inclus) pour étiqueter votre lecteur. Placez les
auto-collants dans l’espace fourni au dos du Flash Drive USB.
Connecteur des
écouteurs
Vue avant Vue latérale
Lecture/Pause/
Alimentation
Ecran d’alimentation à
deux couleurs
Piste suivante/
Avance rapide
Piste
précédente/
Retour rapide
Répéter A-B /
Piste aléatoire
Augmentation du
volume
Diminution du
volume
English.book Page 11 Wednesday, March 2, 2005 1:30 PM
12
Français
Utilisation de votre lecteur
Insertion de la pile
• Si l’écran d’alimentation de votre lecteur clignote en rouge, l’alimentation de la pile
est faible. Si l’écran d’alimentation sur le lecteur est rouge continu, il n’y a pas de piste
sur votre lecteur.
• La durée de vie d’une pile dépend du type de pile utilisée. Il est recommandé d’utiliser
des piles alcalines. La lecture de fichiers .WMA avec un niveau de basse élevé peut
également réduire la durée de vie des piles de façon significative.
• N'oubliez pas de déconnecter le Flash Drive USB de votre ordinateur et de l'insérer
dans le module de pile avant de mettre le lecteur sous tension.
English.book Page 12 Wednesday, March 2, 2005 1:30 PM
 Loading...