

Page 1

Users Guide
Modem Blaster
Information in this document is subject to change without notice and does not represent a
commitment on the part of Creative Technology Ltd. No part of this manual may be reproduced
or transmitted in any form or b y any means, electronic or mechanical, including pho tocopying
and record ing, for any purpose without the writ ten permiss ion of Creat ive Technology Ltd. The
software d es c r ibed in this document is furnished under a license agreement and may be used or
copied only in accordance with the ter ms of the license agreement. It is against th e law to copy
the software on any other medium e xcept as specifically allowed in the license agre ement. The
licensee may make one copy of the software for backup purposes.
Copyright © 1999 by Creative Technology Ltd. All rights reserved.
Version 2.0
Marc h 2000
Modem Blaster is a trademark of Creative Technology L td .
IBM is a registered trademark of International Business Machines Corporation.
Microsof t, MS-DOS, Wi ndows, and the Windows Logo are registered trademarks of Microsoft
Corporation.
All other pro ducts are trademarks or registered trademarks of t heir respective owners.
Page 2

Creative End -User Softwa re License A greement
Version 2.3, Janu ary 2000
PLEASE READ THIS DOCUMENT CAREFULLY BEFORE INST ALLING THE
SOFTW ARE. BY INSTALLING AND USING THE SOFTWARE, Y OU AGREE TO BE
BOUND BY THE TERMS OF THIS AGREEMENT. IF YOU DO NOT AGREE TO THE
TERMS OF THIS AGREEMENT, DO NOT INSTALL OR USE THE SOFTWARE.
PROMPTL Y RETURN, WITHIN 15 DAYS, THE SOFTWARE, ALL RELATED
DOCUMENTATION AND ACCOMPANYING ITEMS TO THE PLACE OF ACQUISITION
FOR A FULL REFUND.
This is a legal agreement between you and
and conditions upon which Creative offers to license the software sealed in the disk package together with all related documentation
and accompanying items including, but not limited to, the executable programs, drivers, libraries and data files associated with such
programs (collectively, the “Software”).
LICENSE
1.
Grant of License
The Software is licensed, not sold, to you for use only under the terms of this Agreement. You own the disk or other media on which
the Software is originally or subsequently recorded or fixed; but, as between you and Creative (and, to the extent applicable, its
licensors), Creative retains all title to and ownership of the Software and reserves all r ights not expressly granted to you.
2.
For Use on a Single Computer
The Software may be used only on a single computer by a single user at any time. You may transfer the machine-readable portion
of the Software from one computer to another computer, provided that (a) the Software (including any portion or copy thereof) is
erased from the first computer and (b) there is no possibility that the Software will be used on more than one computer at a time.
3.
Stand-Alone Basis
Y ou may use the Software only on a stand-alone basis, such that the Software and the functions it provides are accessible only to
persons who are physically present at the location of the computer on which the Software is lo aded. You may not allow the Software
or its functions to be accessed remotely, or transmit all or any portion of the Software through any network or communication line.
4.
Copyright
The Software is owned by Creative and/or its licensees and is protected by United States copyright laws and international treaty
provisions. You may not remove the copyright notice from any copy of the Software or any copy of the written materials, if an y,
accompanying the Software.
5.
One Archival Copy
You may make one (1) archival copy of the machine-readable portion of the Software for backup purposes only in support of your
use of th e So ftw are on a sin gl e com p uter, provided that yo u rep rodu c e on th e copy a ll co py ri ght and o the r pr op rie tar y r igh ts no tices
included on the originals of the Software.
6.
No Merger or Integration
Y ou may not merge any portion of the Software into, or integrate any portion of the Software with, any other program, except to the
extent expressly permitted by the laws of the jurisdiction where you are located. Any portion of the Software merged into or
integrated with another program, if any, will con tinue to be subject to the terms and conditions of this Agreement, and you must
reproduce on the merged or integrated portion all copyright and other proprietary rights notices included in the originals of t he
Software.
7.
Network Version
If you have purchased a “network” version of the Software, this Agreement applies to the installation of the Software on a single
“file server”. It may not be copied onto multiple systems. Each “node” connected to the “file server” must also have its own license
of a “node copy” of the Software, which becomes a license only for that specific “node”.
8.
Transfer of License
Y ou may transfer your license of the Software, provided that (a) you transfer all portions of the Software or copies thereof, (b) you
do not retain any portion of the Software or any copy thereof, and (c) the transferee reads and agrees to be bound by the terms and
conditions of this Agreement.
9. Limitations on U s ing, Copying, and Modifying the Software
Except to the extent expressly permitted by this Agreement or by the laws of the jurisdiction where you acquired the Software, you
may not use, copy or modify the Software. Nor may you sub-license any of your rights under this Agreement. You may use the
software for your personal use only, and not for public performance or for the creation of publicly displayed videotapes.
10.
Decompiling, Disassembling, or Reverse Engineering
Y ou acknowledge that the So ftware contains trade secrets and other proprietary information of Creative and its licensors. Except to
the extent expressly permitted by this Agreement o r by the laws of the jurisdiction where you are located, you may not decompile,
disassemble or otherwise reverse engineer the Software, or engage in an y other activities to obtain underlying information that is
not visible to the user in connection with normal use of the Software.
In particular, you agr ee not fo r any purpose to transmit t he Software or display the Softwar e's object code o n any computer screen
or to make any hardcopy memory dumps of the Software's object code. If you believe you require information related to the
interoperability of the Software with other programs, you shall not decompile or disassemble the Software to obtain such
information, and you agree to request such information from Creative at the address listed below. Upon receiving such a request,
Creative shall determine whether you require such information for a legitimate purpose a nd, if so, Creativ e will pro vid e such
information to you within a reasonable time and on reasonable conditions.
In any event, you will notify Creative of any information de ri ved from reverse engineering or such other activities, and the results
thereof will constitute the confidential information of Creative tha t may be used only in connection with the Software .
Creative Technology Ltd.
and its subsidiaries (“Creative”). This Agreement states the terms
Page 3

TERMINATION
The license granted to you is effective until terminated. You may terminate it at any time by returning the Software (including any
portions or copies th ereof) to Creative. The license will also terminate automatically without any notice from Creative if you fail to
comply with any term or condition of this Agreemen t. You agree upon such termin at ion to return the Software (including any portions
or copies thereof) to Creative. Upon termination, Creative may also enforce any rights provided by law. The provisions of this
Agreement that protect the proprietary rights of Creative will continue in force after termination.
LIMITED WARRANTY
Creative warrants, as the sole warranty, that the disks on which the Software is furnished will be free of defects, as set forth in the
Warranty Card or printed manual included with the Software. No distributor, dealer or any other entity or person is authorized to expand
or alter this warranty or any other provisions of this Agreement. Any representation, other than the warranties set forth in this
Agreement, will not bind Creative.
Creative does not warran t that the functions co ntained in the Sof tware will meet y our requirements or that the operation of the Software
will be uninterrupted, error-free or free from malicious code. For purposes of this paragraph, “malicious code” means any progr am
code designed to contaminate other computer programs or computer data, consume computer resources, modify, destroy, record, or
transmit data, or in some other fashion usurp the normal operation of the computer, computer system, or computer network, including
viruse s, Tr oja n ho rs es , dro pp ers , wor ms , lo gic bomb s, and th e li ke. EXCEP T AS STATED ABOVE IN THIS AGREEM ENT, THE
SOFTWARE IS PROVIDED AS-IS WITHOUT WARRANTY OF ANY KIND, EITHER EXPRESS OR IMPLIED,
INCLUDING, BUT NOT LIMITED TO, ANY IMPLIED WARRANTIES OF MERCHANTABILITY AND FITNESS FOR A
PART ICULAR PURPOSE. CREATIVE IS NOT OBLIGATED TO PROVIDE ANY UPDA TES, UPGRADES OR
TECHNICAL SUPPORT FOR THE SOFTWARE.
Further, Creative shall not be liable for the accuracy of any information provided by Creative or third party technical support personnel,
or any da mages caused, either directly or indir ectly, by acts t aken or omissions made by you as a res ult of such technical support.
Y ou assume full responsibili ty for the selection of the So ftware to achiev e your intended re sults, and for the installa tion, use and results
obtained from the Software. Y ou also assume the entire risk as it applies to the quality and performance of the Software. Should the
Software prove defective, you (and not Creative, or its distributors or dealers) assume the entire cost of all necessary servicing, repair
or correction.
This warranty gives you specific legal rights, and you may also have other rights which vary from country/state to country/state. Some
countries/states do not allow the exclusion of imp lied warran ties, so the above exclusion may not apply to you. Creative disclaims all
warranties of any kind if the Software was customized, repackaged or altered in any way by any third party other than Creative.
LIMITATION OF REMEDIES AND DAMAGES
THE ONLY REMEDY FOR BREACH OF WARRANTY WILL BE THAT SET FORTH IN THE WARRANTY CARD OR
PRINTED MANUAL INCLUDED WITH THE SOFTWARE. IN NO EVENT WILL CREATIVE OR ITS LICENSORS BE
LIABLE FOR ANY INDIRECT, INCIDENTAL, SPECIAL OR CONSEQUENTIAL DAMAGES OR FOR ANY LOST
PROFITS, LOST SAVINGS, LOST REVENUES OR LOST DATA ARISING FROM OR REL ATING TO THE SOFTWARE
OR THIS AGREEMENT, EVEN IF CREATIVE OR ITS LICENSORS HAVE BEEN ADVISED OF THE POSSIBILITY OF
SUCH DAMAGES. IN NO EVENT WILL CREATIVE’S LIABILITY OR DAMAGES TO YOU OR ANY OTHER PERSON
EVER EXCEED THE AMOUNT PAID BY YOU TO USE THE SOFTWARE, REGARD LESS OF THE FORM OF THE
CLAIM.
Some countries/states do not allow the limitation or exclusion of liability for incidental or consequential damages, so the above
limitation or exc lus i o n m ay no t app ly t o you .
PRODUCT RETURNS
If you must ship the software to Creative o r an authorized Creative distributor or dealer, you must prepay shipping and either insure the
software or assume all risk of loss or damage in transit.
U.S. GOVERNMENT RESTRICTED RIGHTS
All Software and related documentation are provided with restricted rights. Use, duplication or disclosure by the U.S. Government is
subject to restrictions as set forth in subdivision (b)(3)(ii) of the Rights in T e chn ical Data and Computer Software Clause at
252.227-7013. If you are sub-licensing or using the Software outside of the United States, you will comply with the applicable local
laws of your country, U.S. export control law, and the English version of this Agreement.
CONTRACTOR/MANUF ACTURER
The Contractor/Manufacturer for the Software is:
Creative Technology Ltd
31, International Business Park
Creative Resource
Singapore 6099 21
GENERAL
This Agreement is binding on you as well as your employees, employers, contractors and agents, and on any successors and assignees.
Neither the Software nor any information derived therefrom may be exported except in accordance with the laws of the U.S. or other
applicable provisions. This Agreement is governed by the laws of the State of California (except to the extent federal law governs
copyrights and federally registered trademarks). This Agreement is the entire agreement between us and supersedes any other
understandings or agreements, including, but not limited to, advertising, with respect to the Software. If any provision of this
Agreement is deemed invalid or unenforceable by any country or government agency having jurisdiction, that particular provision will
be deemed modified to the extent necessary to make the provision valid and enforceable, and the remaining provisions will remain in
full force and effect.
For questions concerning this Agreement, please contact Creative at the address stated above. For questions on product or technical
matters, contact the Creative technical support center nearest you.
Page 4

ADDENDUM TO THE MICROSOFT SOFTWARE LICENSE AGREEMENT (WINDOWS
95)
IMPORTANT: By using the Microsoft software files (the “Microsoft Software”) provided with this
Addendum, yo u are agr eeing t o be bound b y the follo wi ng ter ms. If you do no t agre e to be bou nd by
these terms, you may not use the Microsoft Software.
The Micros oft Softw are is pr ovid ed for the so le purpo se of rep lacing t he corre sponding fil es provi ded
with a prev iously licensed copy of the Mi crosoft software product identified above (“ORIGINAL
PRODUCT”). Upon installation, the Microsoft Software files become part of the ORIGINAL
PRODUCT and are subject to the same warranty and license terms and conditions as the ORIGINAL
PRODUCT . If you do not have a valid license to use the ORIGINAL PRODUCT, you may not use
the Microsoft Software. Any other use of the Microsoft Software is prohibited.
SPECIAL PROVISIONS APPLICABLE TO THE EUROPEAN UNION
IF YOU ACQUIRED THE SOFTWARE IN THE EUROPEAN UNION (EU), THE FOLLOWING PROVISIONS ALSO APPLY TO
YOU. IF THERE IS ANY INCONSISTENCY BETWEEN THE TERMS OF THE SOFTWARE LICENSE AGREEMENT SET OUT
EARLIER AND IN THE FOLLOWING PROVISIONS, THE FOLLOWING PROVISIONS SHALL TAKE PRECEDENCE.
DECOMPILATION
Y ou agree not for any purpose to transmit the Software or display the Software’s object code on any computer screen or to make any
hard copy memory dumps of the Software’s object code. If you believe you require information related to the interoperability of the
Software with other programs, you shall not decompile or disassemble the Software to obtain such information, and you agree to
request such information from Creative at the address listed earlier. Upon receiving such a request, Creative shall determine whether
you require such information for a legitimate p urpose and, if so , Creativ e will prov ide such information to y ou within a reasonable tim e
and on reasonable conditions.
LIMITED WARRANTY
EXCEPT AS STATED EARLIER IN THIS AGREEMENT, AND AS PROVIDED UNDER THE HEADING “STATUTORY
RIGHTS”, THE SOFTWARE IS PROVIDED AS-IS WITHOUT WARRANTY OF ANY KIND, EITHER EXPRESS OR
IMPLIED, INCLUDING, BUT NOT LIMITED TO, ANY IMPLIED WARRANTIES OR CONDITIONS OF
MERCHANTABILITY, QUALITY AND FITNESS FOR A PARTICULAR PURPOSE.
LIMITATION OF REMEDY AND DAMAGES
THE LIMITATIONS OF REMEDIES AND DAMAGES IN THE SOFTWARE LICENSE AGREEMENT SHALL NOT
APPLY TO PERSONAL INJURY (INCLUDING DEATH) TO ANY PERSON CAUSED BY CREATIVE’S NEGLIGENCE
AND ARE SUBJECT TO THE PROVISION SET OUT UNDER THE HEADING “ST ATUTORY RIGHTS”.
STATUTORY RIGHTS
Irish law provides that certain conditions and warranties may be implied in contracts for the sale of goods and in contracts for the supply
of services. Such conditions and warr anties are hereby e xcluded, to the e xtent such exclusion, in the co ntext of this t ransaction, is lawful
under Irish law. Conversely, such conditions and warranties, insofar as they may not be lawfully excluded, shall apply.
Accordi ngly nothing in this Agre ement shall prejudice any rights that you may enjoy by vir tue of Sections 12, 13, 14 o r 15 of the Irish
Sale of Goods Act 1893 (as amended).
GENERAL
This Agreement is governed by the laws of the Republic of Ireland. The local language version of this agreement shall apply to
Software acquired in the EU. This Agreement is the entire agreement between us, and you agree th at Creativ e will not hav e any liability
for any untrue statement or representation made by it, its agents or anyone else (whether innocently or negligently) upon whi ch you
relied upon entering this Agreement, unless such untrue statement or representation was made fraudulently.
Safety & Regulatory Information
7KHIROORZLQJVHFWLRQVFRQWDLQQRWLFHVIRUYDULRXVFRXQWULHV
CAUTION:
computers in the manufacturer’s defined operator access area. Check the equipment operating/installation manual and/or with the
equipment manufacturer to verify/confirm if your equipment is suitable for user- installed application cards.
ATTENTION:
A T , à l’intérieur de la zone définie par le fabricant. Consulte r le mode d’emploi ou le fabricant de l’appareil pour vérifi er ou c on fi rme r
si l’utilisateur peut y installer lui-même des cartes périphériques.
Compliance
This product conforms to the following Council Directive:
This device is intended to be installed by the user in a CSA/TUV/UL certified/listed IBM AT or compatible personal
Ce carte est destiné à être installé p ar l’utilisateur, dans un ordinateur co mpa tible certifié CSA/TUV/UL ou listé IBM
❑
Directive 89/336/EEC, 92/31/EEC (EMC)
Page 5

The equipment has been approved in accordance with Council Decision 98/482/EC for pan-European single
terminal connection to the public s wi tched telep h one network (PSTN). However, due to differences between
the individual PSTNs provided in different countries, the approval does not of itself give an unconditional
assurance of successful operation on every PSTN network termination point.
In the event of problems, you should contact y our equipmen t suppli er in the fi rst instanc e.
Note: The manufacturer should ensure that the vendor and user of the equipment is clearly informed of the
above information by means of packaging and/or user manuals or other forms of user instructions.
Page 6

Ta b l e o f co n t e n t s
Introduction
Before you Begin........................... ........ ....... ....... ....... ....... ....... ....... ....... .......1
Modem Blaster Flash 56 External Fe atu res.....................................1
Recording Mo d el and Serial Numbers................... ........................ ..2
System Requi rements................ ............................................... .........2
Document Conventions............................. ........................................3
Creative Modem Bl as ter DE5720 - Quick Installation Reference
Guide................................................................................................4
1 Getting To Know Your Modem
Plug and Play.................................. ........................ ........................ ............1-1
Jacks......................... ............................................... ........................ ............1-2
Tele phone Line Jack............................. ........ ....... ....... ....... ....... .....1-2
Microphone and Speaker Jacks...................... ......... .......... ......... ...1-2
RS-232 Serial Cable Jack................. ..................... ..................... ...1-2
Power Jack......... .. ..... .. ... .. ..... .. ... .. ..... .. .. ... ..... .. .. ... .... ... .. ... .... ... .. .. ...1-3
On and Off Switch...... ... .. ..... .. ... .. ..... .. .. ... ..... .. .. ... .... ... .. ... .... ... .. .. ...1-3
Indicator LEDs.......... ........................ ........................ ................................. 1-3
2 Modem Installation
Installin g th e Modem................... ................................................ ..............2-2
Connecting Telephone Line................ ... ..................... ...............................2-3
Installin g Driver s in Win d ows 95/98........................... ........................ ..... 2-5
Installin g Driver s in Win d ows NT 4.0..................... ....................... ........ 2-11
1st Method....... .. .. ..... .. ... .. ..... .. ... .. ..... .. .. ... ..... .. .. ... .... ... .. ... .... ... .. .. .2-11
2nd Method....................................................... ... ..................... ... 2-17
Testing the I nstallation in Windows 95/98............................ ................ .2-22
Uninstallin g Mo d em Blaster in Windows 95/98/N T.............................2-26
v
Page 7

A General Specifications
B Troubleshooting
Frequentl y Asked Questions............................... ........................ ..............B-1
C Technical Support
If You Have a Problem .......................................... ........................ ............C-2
Returning a product for repair............................... ....... ....... ....... ...C -3
Limited Warranty.................... ........................ ........................ ...................C-3
Creative European Help Line
vi
Page 8
Introduction
Before you Begin
This section pr ovides information you should kn ow before using thi s
manual. It is organized as follows :
• Mode m Bl aster Flas h 56 Ex ternal Features
• Recording Model and Serial Numbers
• System Req ui r ements
• Document Conventions
• Creative Modem Blaster DE5720 - Quick Installation
Reference Guide
Modem Blaster Flash 56 External Features
W elco me to Modem Blas ter! You now own a modem that allo ws you to
fax documents, transfer data, and access information online easily from
your computer. It supports the follow ing:
Plug and Play
This fea tu r e allows you to install the Mod em Blaster ea sily, as the
resources are assigned automatically by the Plug and Play
configu ration manager.
Send and Receive Faxes
Modem Blaster adds a new dime nsion to your work when you us e it
to send and r eceive fax d ocuments. It can also be confi gured to s erve
as a fax-on-demand sy st em usi ng the supplied Communication
Software
Internet Access
Modem Blaster al lows you to access computer bulletin boards and
browse the int ernet at speeds up to 56Kbps.
1
Page 9

Answering Machin e
Modem Blaster can functio n as an answering machine with multiple
mail boxes using the supplied Communicat ion Software. Remote
callers can leave message s in your mailbox, and you can play back
these messages at any time.
Speaker Phone
It can also be used as a profess ional quality speake r phone when
placing call s.
Video Conferencing
Complete with V.80 standa rd support for use with H.32x video
confere n ci n g sy s t ems.
Recording Model and Serial Numbers
Your modem has a model number and a serial number. You could
locate them either on the box or on the manual. Record the model
number and serial number to register your Modem Blaste r Fl as h 56
External online and al ways ke ep a ha rdcopy for you r future r eferenc e.
System Requirements
The minimum system requirements for the :
• 486DX or faster IBM compatible PC
• 8 MB of RAM minimum (16 MB of RAM recommended)
• 25 MB of hard disk space
• Microsoft Windows 95/98 and Windows NT4.0
• Available Seri al Port
• CD-ROM drive for modem and communicati on software
installation
• A sound card is required for MP3 play bac k
• A sound card and a microphone are required for video
conferencing and for complete full-duplex speakerphone
functionality.
Note: Internet software requires connections to the Internet through an
Internet Service Provider.
2
Page 10

Some supplied software may require a faster CPU and newer
operating systems.
Modem Blaster must be connected to an analog
telephone line , also call ed a PO TS (Plain Old Telephone
Serv ic e) line.
Chapter 2 provides detailed information
Document Conventions
This guide foll o ws c ertai n conventions to help you loc at e and ident ify
the information that you need. These con vent ions are desc ribed in the
following sections:
• Text Conventions
•Icons
Te x t C o n v e n t i o n s
The follow i ng text conve n tions are use d to help di s t i nguish elements
of the text in this guide (see
Table i
).
Table i:Text Conventions.
Text Element Use
Identify an Exact description and word of a
bold
italics
UPPERCASE ACRONYM.
selection or a key. For example: ‘selec t Specify
a Loca t i o n ’, ‘click Next to continue’, ‘find
Drivers folder, etc.
Ident ify a referen ce location and a target/obj ect
description. For example: ‘see
Software and Mode m I nst allation
‘insert
CD-ROM’
Figure 2-1
’,
3
Page 11
Icons
In this guide, icons are used to high light areas of text that requir e your
Table ii
attention (s ee
Icon Use
).
Table ii : Ico ns.
A note or tip.
A caution or warning.
Creative Modem Blaster DE5720 - Quick Installation Reference Guide
For Windows 98
1. Position your computer where the back of the computer can be
easily accessed, this may re quire you t o turn off your computer.
2. Switch off your system and all peripheral devices. Unplug the
power cord from the wall outlet.
3. Connect the power adapte r and the RS232 cable to your
Modem Blaster 56 External.
4. Connect the other end of the power adapter to an electrical
outlet, and conne ct the ot her end o f the RS232 cable to a s erial
port on the back of your computer .
5. Insert the Modem Blaster DE5720
Installation
6. An “Add New Hardware Wizard” dialog box appears, click on
Next to continue installation process.
7. The next “Add New Hardware Wiz ard” di alog box will p rompt
the question,
“
What do you want Windows to do?”
4
CD-ROM into your CD-ROM drive.
Software and Modem
.
Page 12

Make sure you select “
device (Recommended)”
Search for the best driver for your
. Click on Next to proceed.
8. The next “Add New Hardware Wiz ard” di alog box will p rompt
you for the Modem Blas ter DE57 20 drivers . Cli ck on Specify
a location and type in D:\Drivers and click on Next to install
modem driver.
NOTE: The driver letter D could be diffe rent depen ding on
the location of you r CD- ROM drive.
9. Follow the on-screen instructions to complete the installation.
5
Page 13

Getting To Know Your Modem
This chapter introduces the concept of Plug and Play, and also helps
you locate and identify the components of your Modem.
Place the modem in front of you as you go thro ugh this chapte r.
This will help you ident ify the various components on your
modem.
Plug and Play
Your Modem Blaster support s P lug and Pla y in W i ndo ws 95 /98. Thi s
feature enables the system to detect and assign system resources to
your Modem Blaster aut oma tically when installing.
1
Getting To Know Your Modem 1-1
Page 14
Jacks
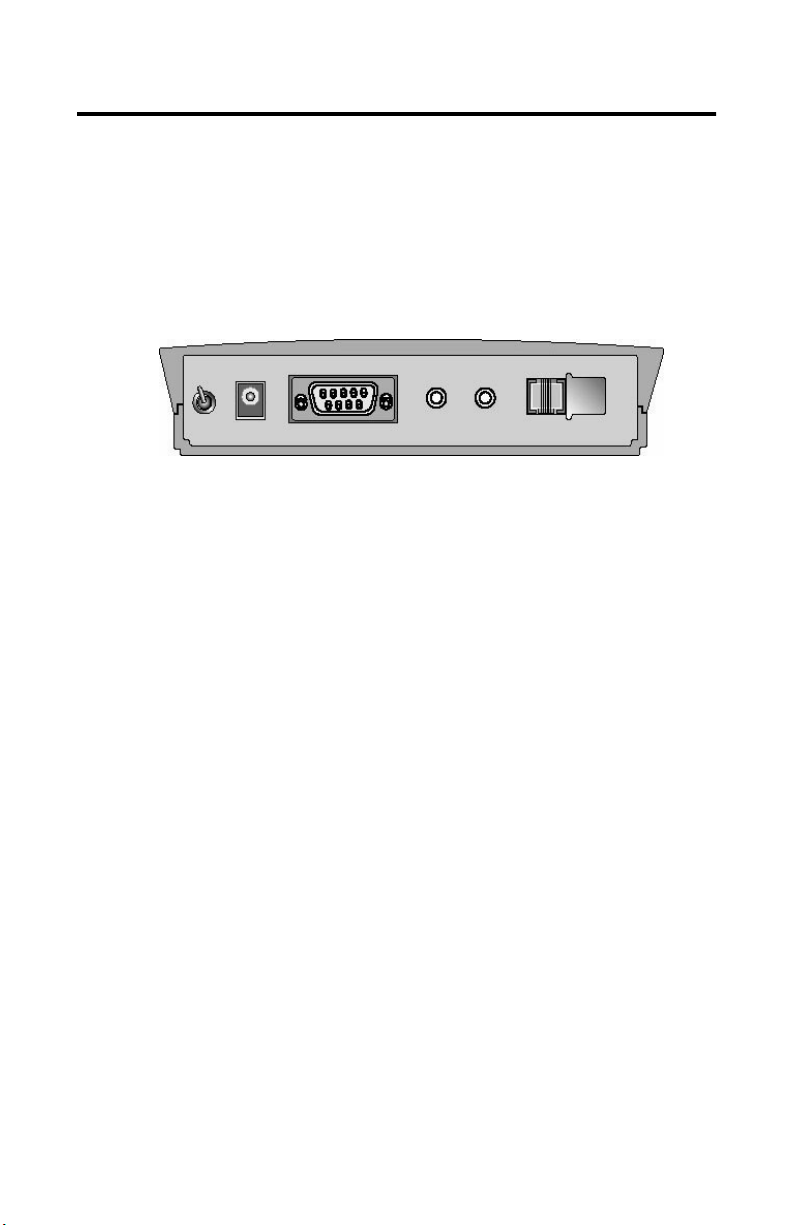
Jacks are connecti ng interfaces on your modem. The y allow you to
attach other devices to your modem. The jacks on your Mode m
Blaster Flash 56 External can be seen in
The Rear V iew of your mode m
Figure 1-1
.
POWER
on
off
Figura 1-1: The jacks on the back of your Modem Blaster.
RS-232
Telephone Line Jack
The T elephone Line jack (LINE) allows you to connect a telephone
line for data, fax, an d voice function. The PHONE jack is not
available for this model.
Microphone and Speaker Jacks
The Microphone jack (MIC) and Speaker jack (S PK) allow you to
connect an exte rnal microphone , speake r, and /or headse t for use with
voice mail and s peaker phone applications.
RS-232 Serial Cable Jack
The RS-232 jack allows you to connect the modem to a computer
serial port.
MIC SPK LINE PHONE
1-2 Getting To Know Your Modem
Page 15
Power Jack
The POWER ja ck allo ws you t o connect the supplie d power a dapter to
your Modem Blaster.
On and Off Switch
Turn the s wit ch t o the ON o r OFF pos ition to a cti v a te or ter mi nat e th e
entire function of your Modem Blaster.
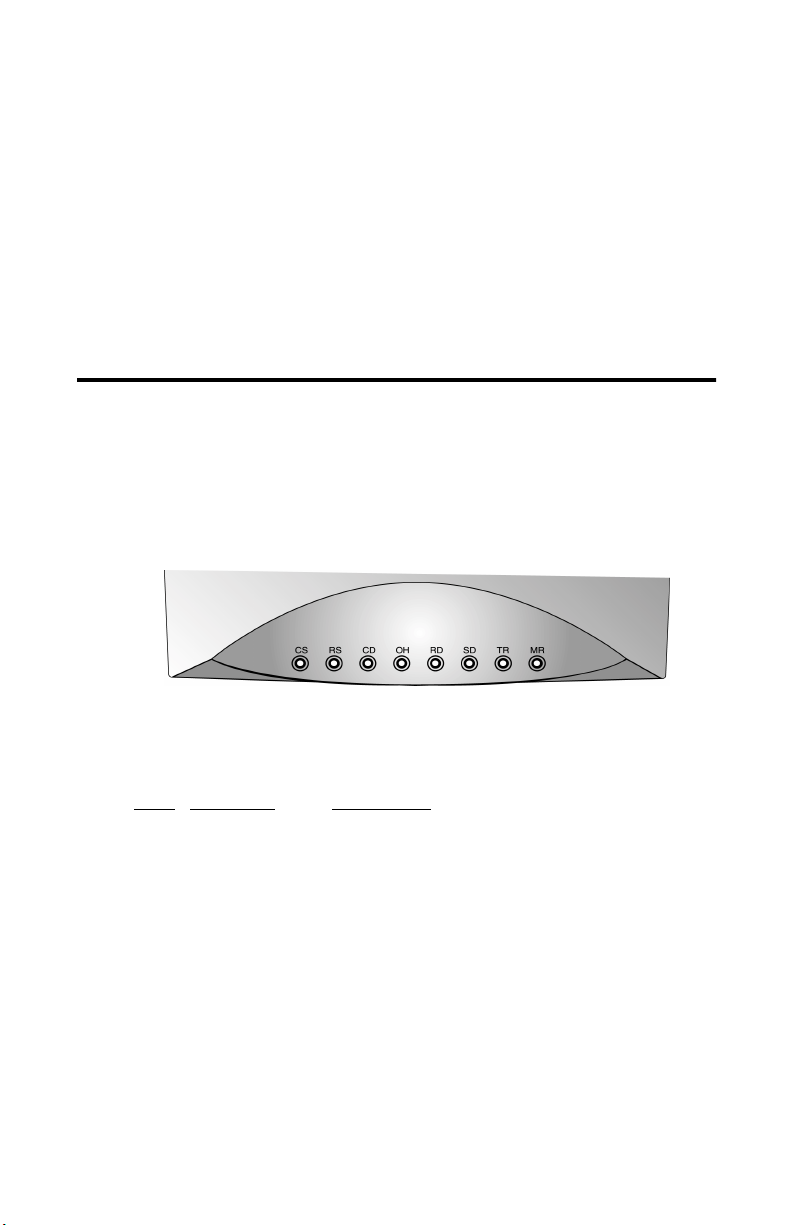
Indicator LEDs
Modem Blaster Flash 56 External f eatures indicat or LEDs on the front
panel. These LEDs report your mode m sta tus.
The Fron t View of your modem
Figura 1-2: LED indi cators on the front of your Modem Blaster
Definition Description
LED
CS
Clear to send On when CTS(clear to se nd) signals i s active
RS
Request to Send On when RTS(request to send) signal is active
CD
Carrier Dete ct On when rem ot e ca rrier has been det ec ted
OH
Off Hook On when modem i s off hook
RD
Receive Dat a On when modem is receiving data from remote
modem
SD
Send Data On when modem is transmitting data to remote
modem
TR
Terminal Ready On when DT R (data terminal ready) signal is active
MR
Modem Ready On when modem is ready to work
Getting To Know Your Modem 1-3
Page 16

Modem Installation
This chapter guides you throug h the proces s of instal ling your mode m.
It is organiz ed as follows:
• Installing the Modem
• Connecting Telephone Line
• Installing Drivers in Windows 95/98
• Installi ng Drivers in Windows NT 4.0
• Testing the Installation in Windows 95/98
• Uninstalling The Modem in Windows 95/98/NT
2
Modem Installation 2-1
Page 17
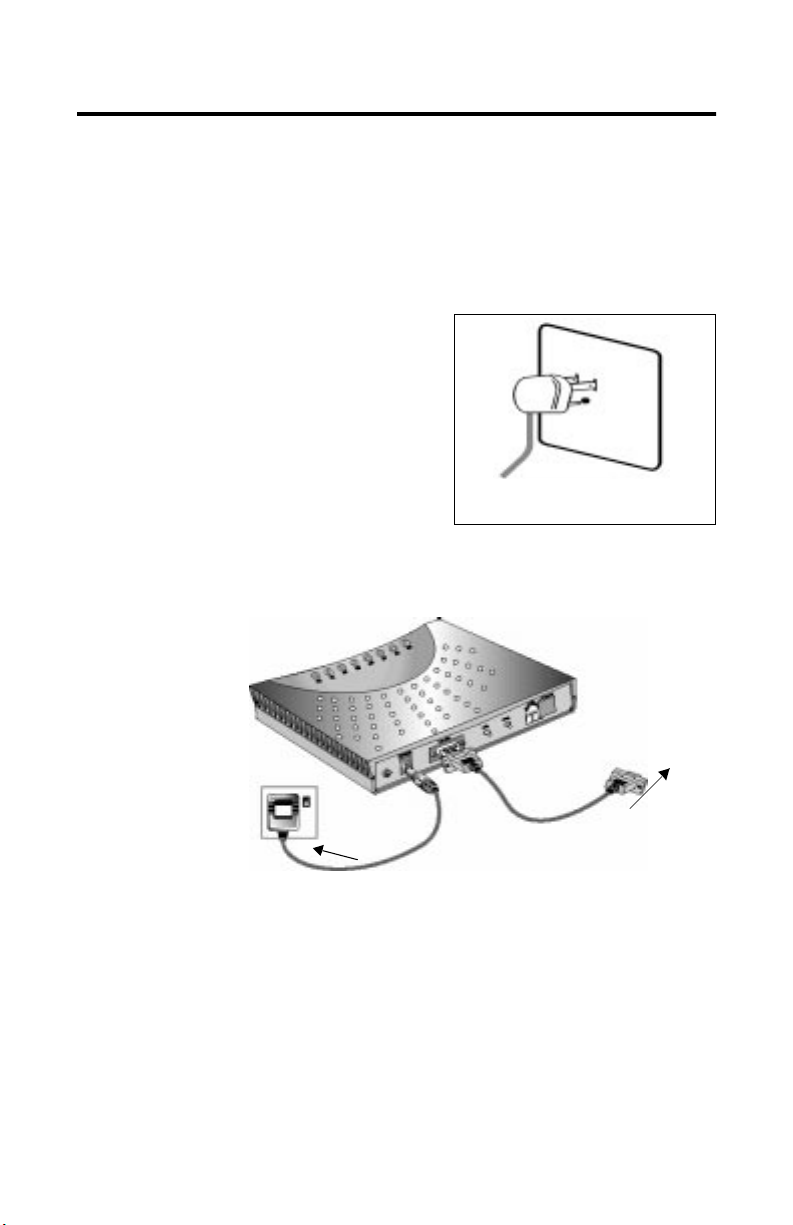
Installing the Modem
To install the modem in your system, please follow the instructions
carefully.
Note: If you are replacing the modem cur r ently in your system, you
must remove the existing modem and all existing modem drivers.
1. Shut down your sys tem and
all peripheral devices.
Unplug the power cord from
the wall outlet.
Note: The power adapt er
connector and wall outlet
shown may be dif f erent in
your country.
2. Connect the po wer adapter and the RS232 serial cable to your
Mode m Bl aster Flas h 56 Ex ternal .
Figure 2-1: Unplug the
power cord
A 25-pin connector is also avai lable on the supplie d RS232
serial cable as an option for your insta llation.
3. Connect the other end of the po wer adapter to an electr ical
outlet, and conne ct the oth er end of the RS232 se rial c able t o a
serial port on the back of your computer.
2-2 Modem Installation
RS232
Serial Cable Jack
Power
Adapter
To electrical
outlet
Figure 2-2: Connect RS232 and Power adapter
To your system
Serial port
Page 18

Connecting Telephone Line
Before using the Modem Bla ster, you need to connect your telephone
line to the modem. To ensure that the modem works properly, you
should have the following in form ation concerning your te lephone
line:
• Your modem may not be used on “party lines”, or on toll or
coin - o pera te d lines.
Contact your local telephone company for help if you are not
sure about the suitability of your telephone line.
• This modem is intende d for use on an analog telephone line ,
also called a POTS (Plain Old Telephone Service) line. You
cannot connect the modem directly to a digit al telephone line,
such as those commonly found in businesses.
If you must connect to a digit al line, obt ain an ana log con ver ter
compatible with the telephone line you are us ing.
• Certain opti onal telephone feature s, such as a “message
waiting” light or call waiting, are not compatible with this
modem and should not be present on the telephone line on
which the modem is to be used .
Modem Installation 2-3
Page 19
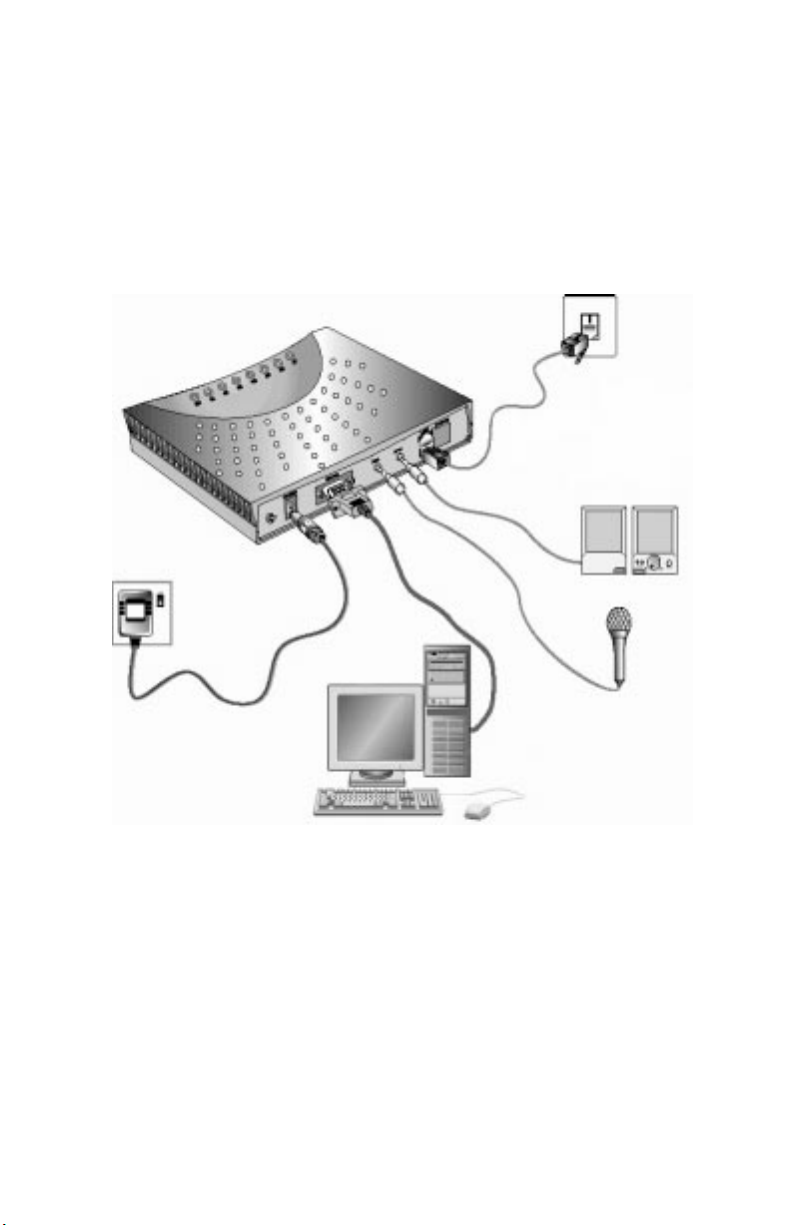
To connect the telephone line to your Modem Blaster:
1. Locate the most convenient telephone wall outlet.
2. If a phone is already conne cted to it, unpl ug the telephone ca ble
from the wall outlet.
3. Follow Figure 2-3 to connect your Modem Blaster to the
telephone line and other devices.
from
LINE jack
to outlet
SPK jack
from
to speaker
from
POWER jack
to electrical outlet
from
RS232 jack
to your system serial port
from
MIC jack
to microphone
2-4 Modem Installation
Figure 2-3: Connecting your Modem Blaster
Page 20
Installing Drivers in Windows 95/98
Before you begin, please have the
CD-ROM ready, which will be required to install the modem drivers.
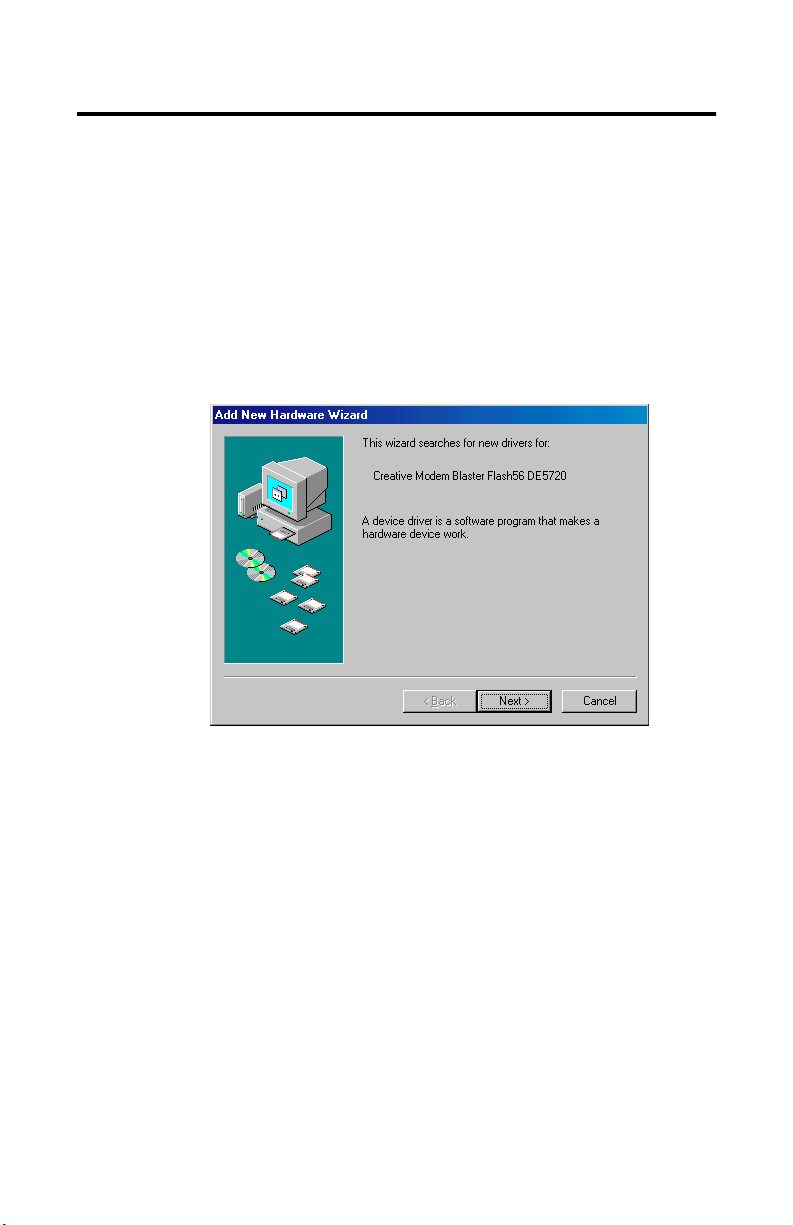
Follow the steps below to install your Modem Blaste r driver:
1. Power on your modem and then th e computer to allow the
operating system to detect the Modem Blaster.
2. Once detected, as seen in
will begin to install the modem. Please select the Next option
to continue.
Figure 2-4: The installation w izdard dialog box
Software and Modem Installatio n
Figure 2-4
, the insta llation wizard
Modem Installation 2-5
Page 21
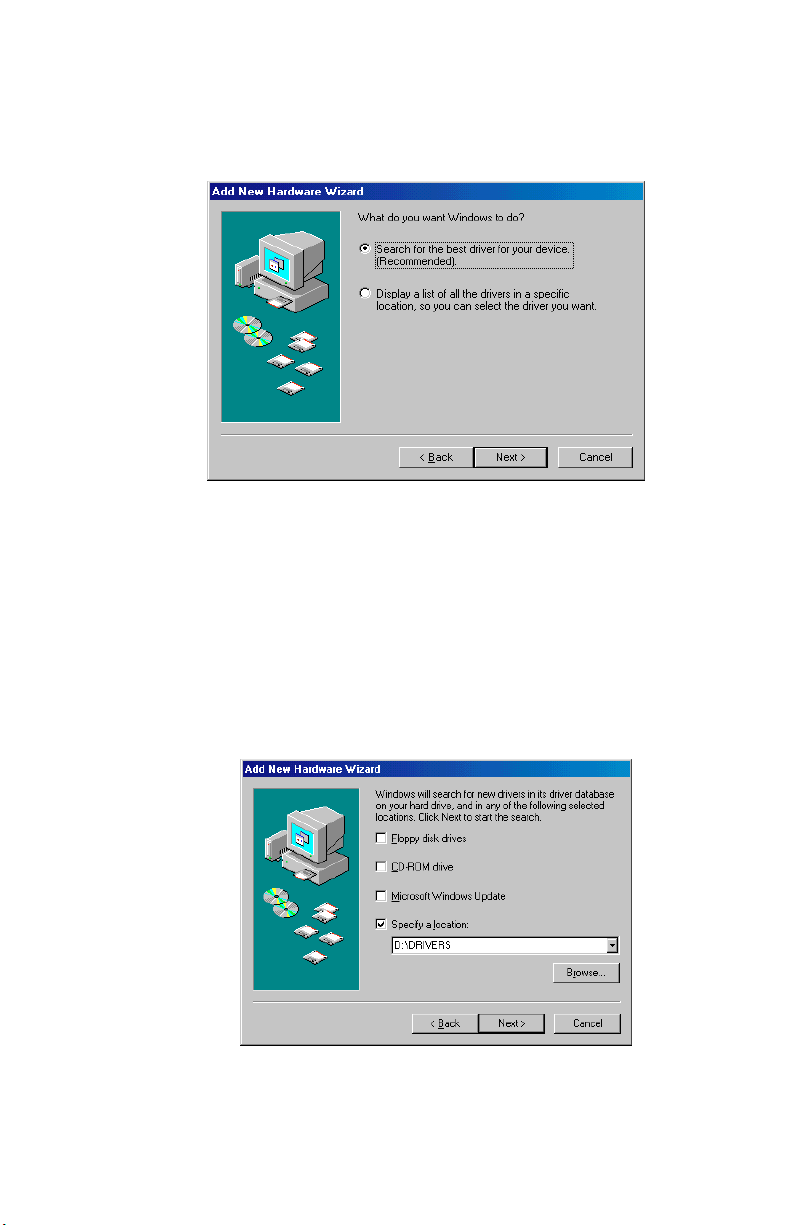
3. A figure similar to
Figure 2-5
Searc h for the best driver...
on the Next button to continue.
Figure 2-5: Select ‘Search for the best driver...’
will appear. Make sure that the
option is selected before clicking
4. When the next screen appears, similar to
suppl ied
Softwar e and Modem Installation
button t o l oca te th e Dr ivers folder of the
Installation
CD (e.g. D:\Drivers or E:\Drivers). Click the
Figu r e 2-6
CD. Cl ick th e Next
Software and M odem
, insert th e
Next button to continue once you have found this folder.
Most modern phone systems use tone dialling. If,
however, your phone system supports pulse dialling,
the appropriate drivers can be found in the
\Drivers\pulse\english directory.
Figur e 2-6: Locate your modem drivers in CD-ROM drive
2-6 Modem Installation
Page 22
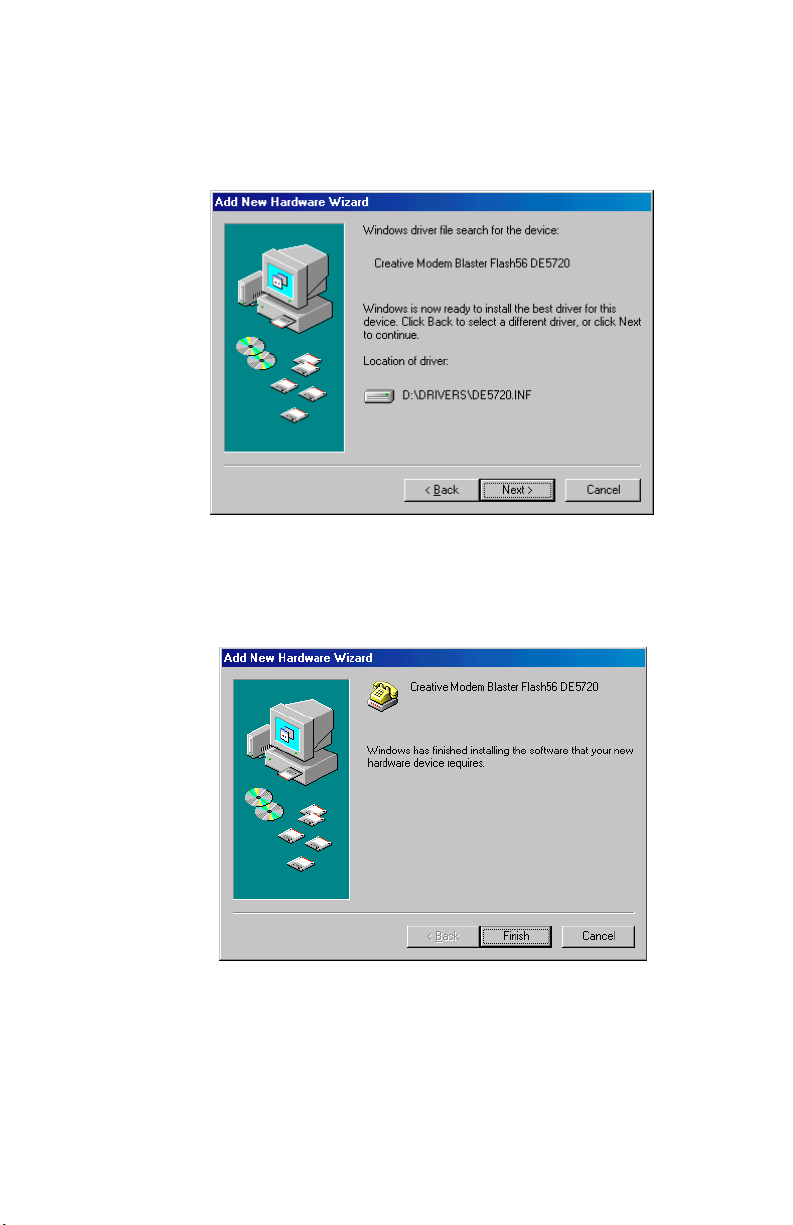
5. A dialog box similar to
Figure 2-7
will appear to in dicate the
modem’s drivers have been detected and are now ready to
install. Click on Next to continue.
Figure 2-7: Con fir m the locat i o n of dr iver
6.
Figure 2-8
appear s once the d riv er has l oaded. Cli ck the Finish
botton to complet e the modem driver installation.
Figure 2-8: New hardware driver installati on complete
Modem Installation 2-7
Page 23
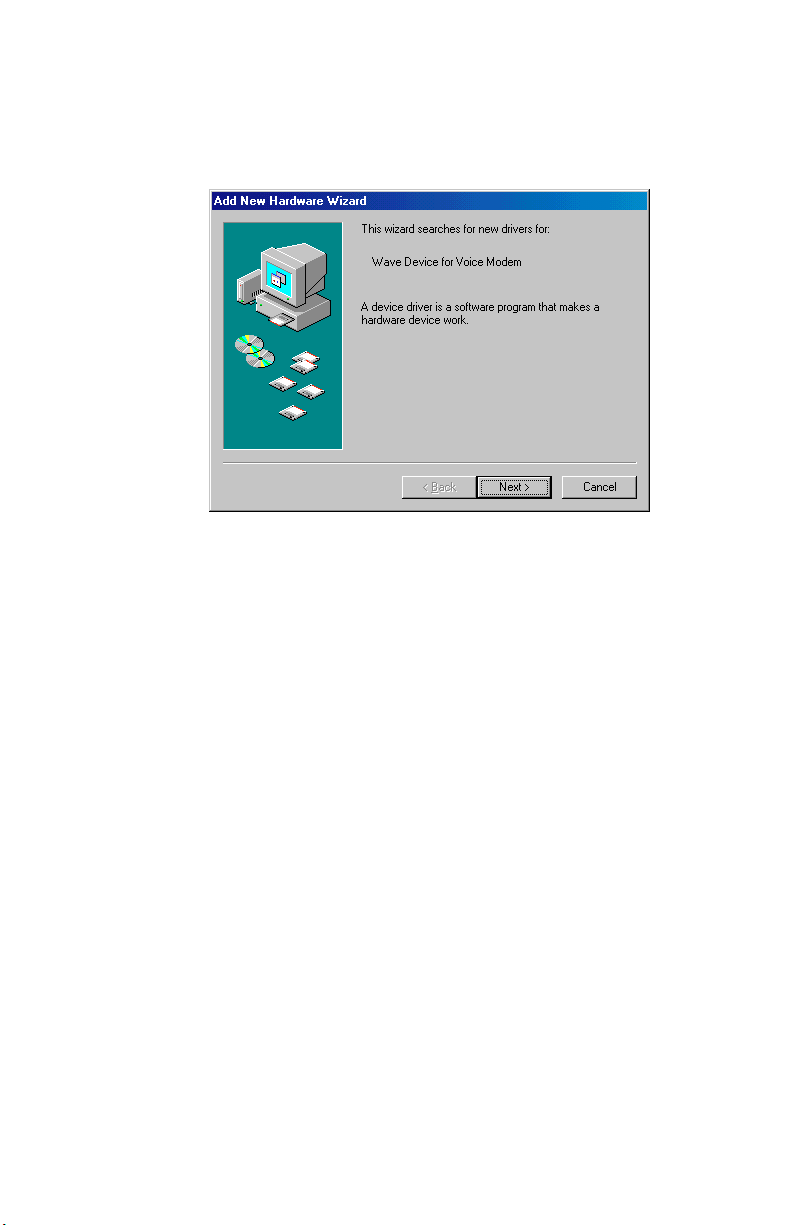
7. A new dialog box, s imilar to
Figur e 2-9
, will appea r to indi cate
the detection of the modem’s wave device driver. Click on
Next to continue.
Figure 2-9: Sea rch f or the wave devi ce dr i v e r
2-8 Modem Installation
Page 24
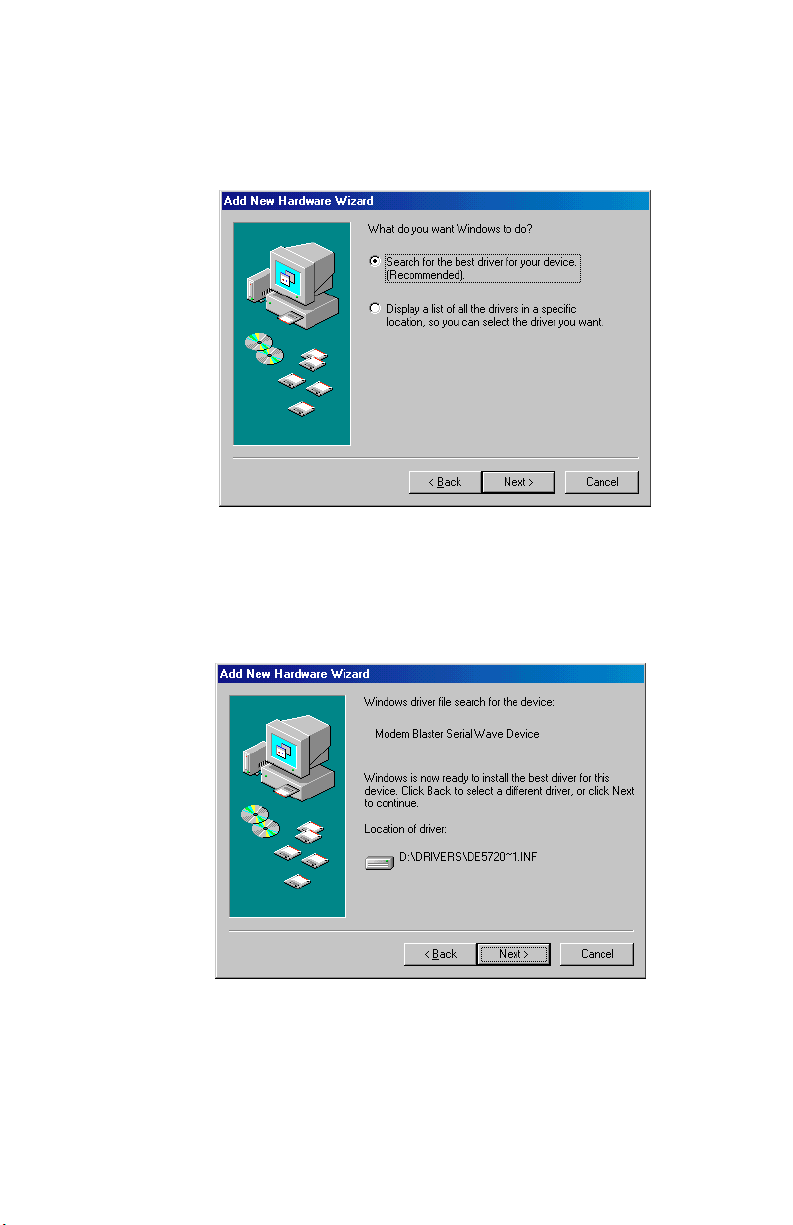
8. A figure similar to
that the
Search for the best driver...
Figure 2-10
will appear next. Make sure
option is selec ted before
clicking on Next to continue.
Figure 2-10: Request to searc h for the wave device dr iver
9. A dialog box s imilar to
Figu r e 2-11
will appear to indi cate the
modem’s drivers hv e been detected and are now ready to
install. Click on Next to continue.
Figure 2-11: Confirm the location of wave device driver
Modem Installation 2-9
Page 25
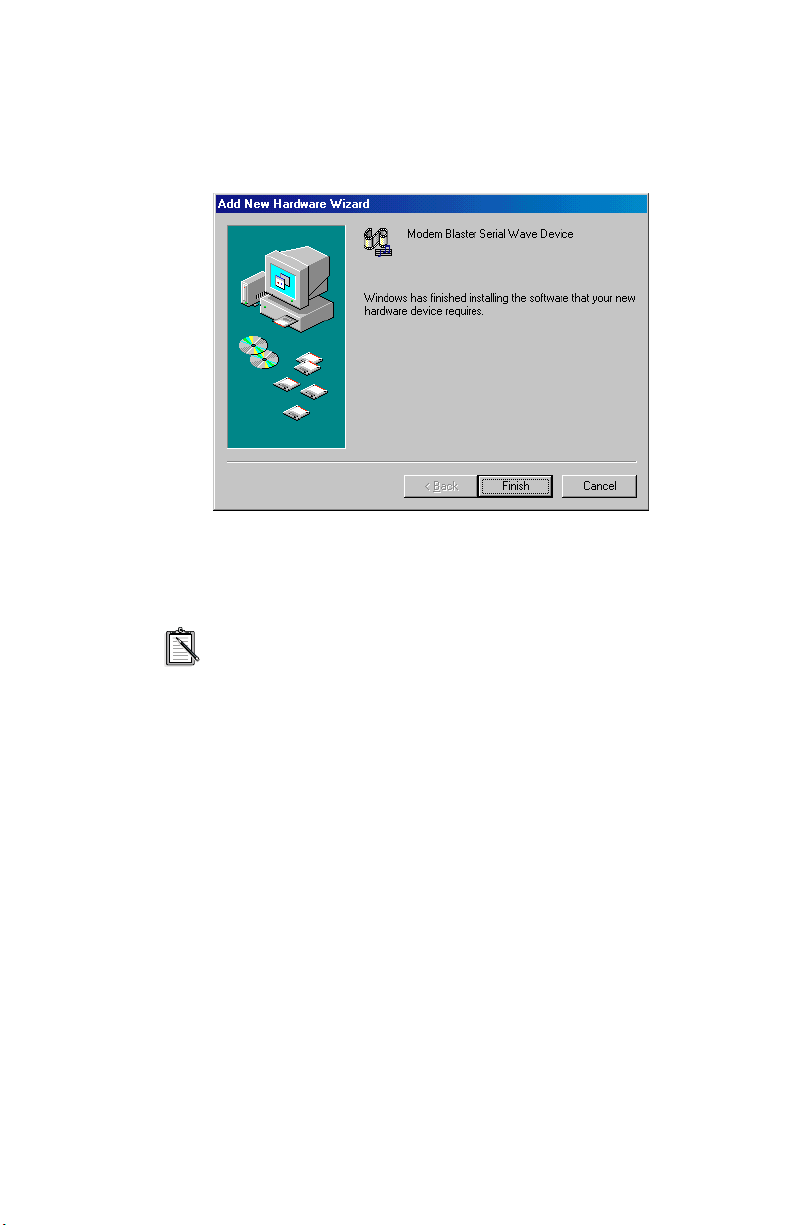
10.
Figure 2- 12
appears once the driver has loaded. Click on
Finish to com plete the Modem Blaster Serial Wave Device
installation.
Figure 2-12: Devi ce dr iver installation complete
The above instructions and images may differ somewhat
depending upon which relea se v ersio n of Microso ft W indo ws
you are using.
2-10 Modem Inst allation
Page 26
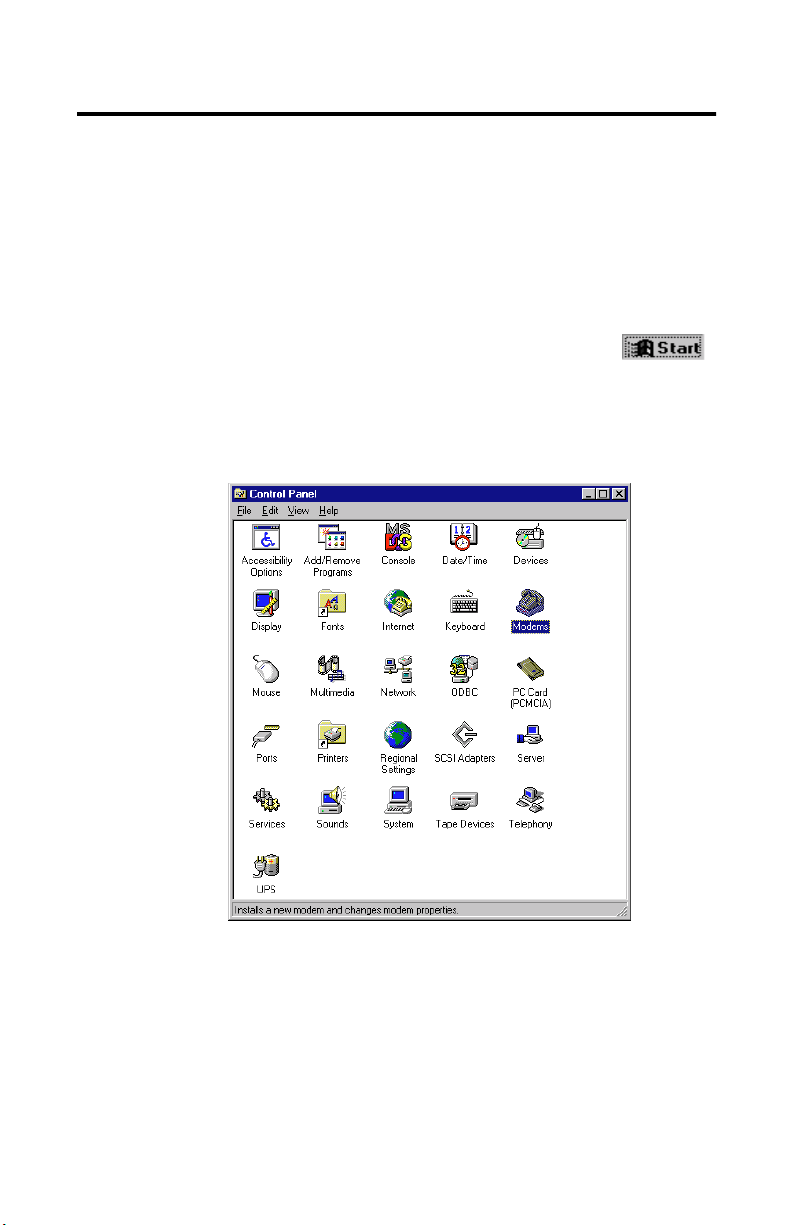
Installing Drivers in Windows NT 4.0
Before you begin, please have the
CD-ROM ready, which will be required to install the modem drivers.
1st Method
Software and Modem Installatio n
1. Power on your computer and insert the
Installation
into the Windows environment, select the
button at t he b ottom left c orner of your s cree n. Sel ect Settings,
and then select Control Panel.
2. Once Contr ol Panel is open, similar to
double-click the Modems icon to open it.
CD-ROM into the CD-ROM drive. Once you are
Software and Modem
Figure 2-13,
Figure 2-13: Windows Control Panel
Modem Installation 2-11
Page 27
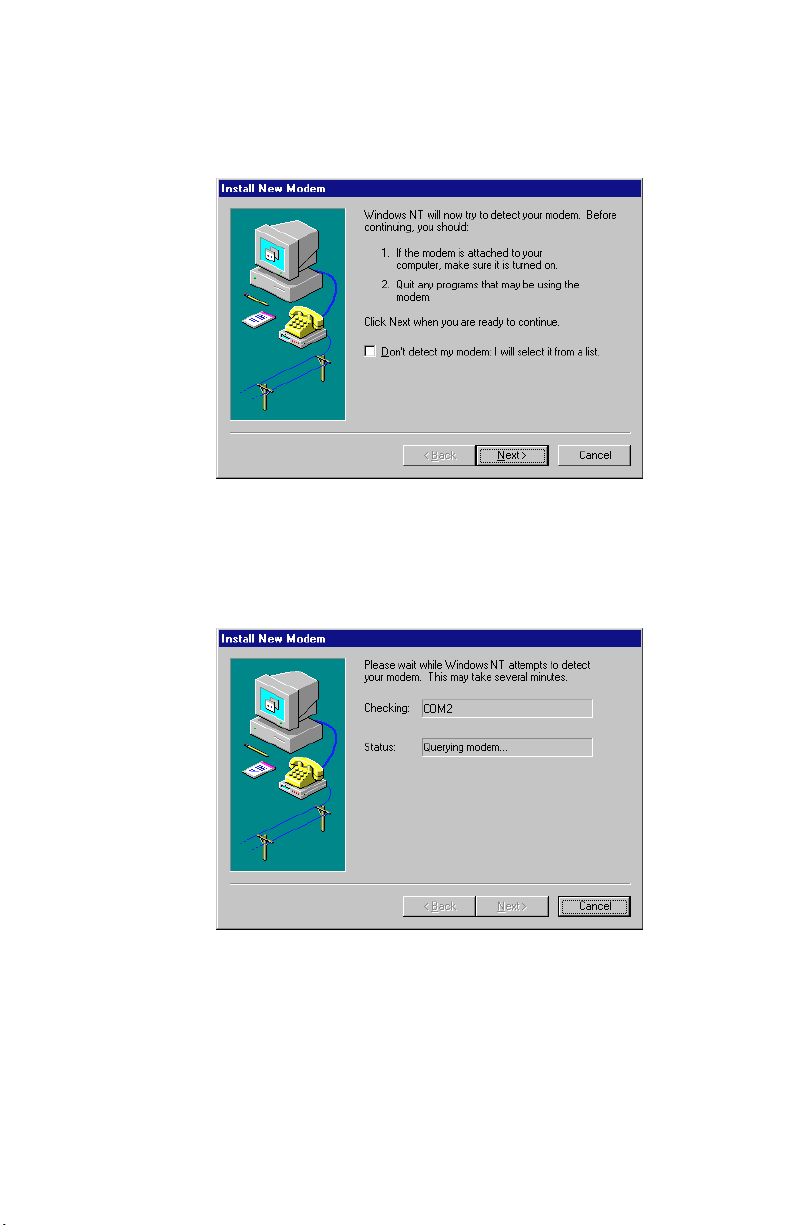
3. The
Install New Modem
dialog box, simil ar to
Figur e 2-1 4
then appear. Click Next to continue.
Figure 2-14: A pre new modem installation message dialog box
4. Once Next is clicked, Windows NT starts to automatically
dete ct th e M o dem Blaster, simi lar to
Figure 2-15
.
,will
2-12 Modem Inst allation
Figure 2-15: NT is detecting your new modem
Page 28
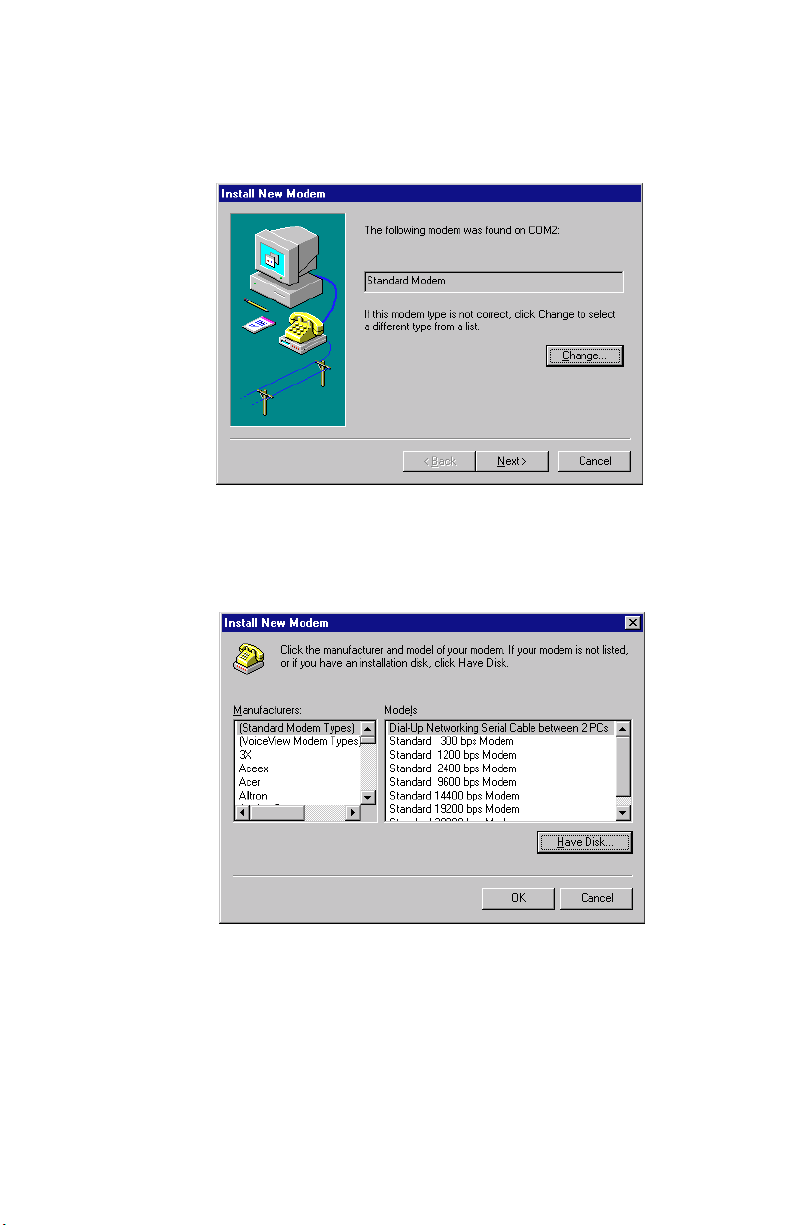
5. The operating system will initially find the Modem Blaster as
a Standard Mod em, similar to what is seen in
Figure 2-16: A new mo dem device is detected
Figure 2-16
.
6. Select the Change option to begin installing the correct
modem drive r . A dialog b ox simil ar to
Figur e 2-17
will appea r.
Figure 2-17: Select ‘Have Disk’ to continue
Modem Installation 2-13
Page 29
Most modern phone systems use tone dialling. If,
however, your phone system supports pulse dialling,
the appropriate drivers can be found in the
\Drivers\pulse \ english directory.
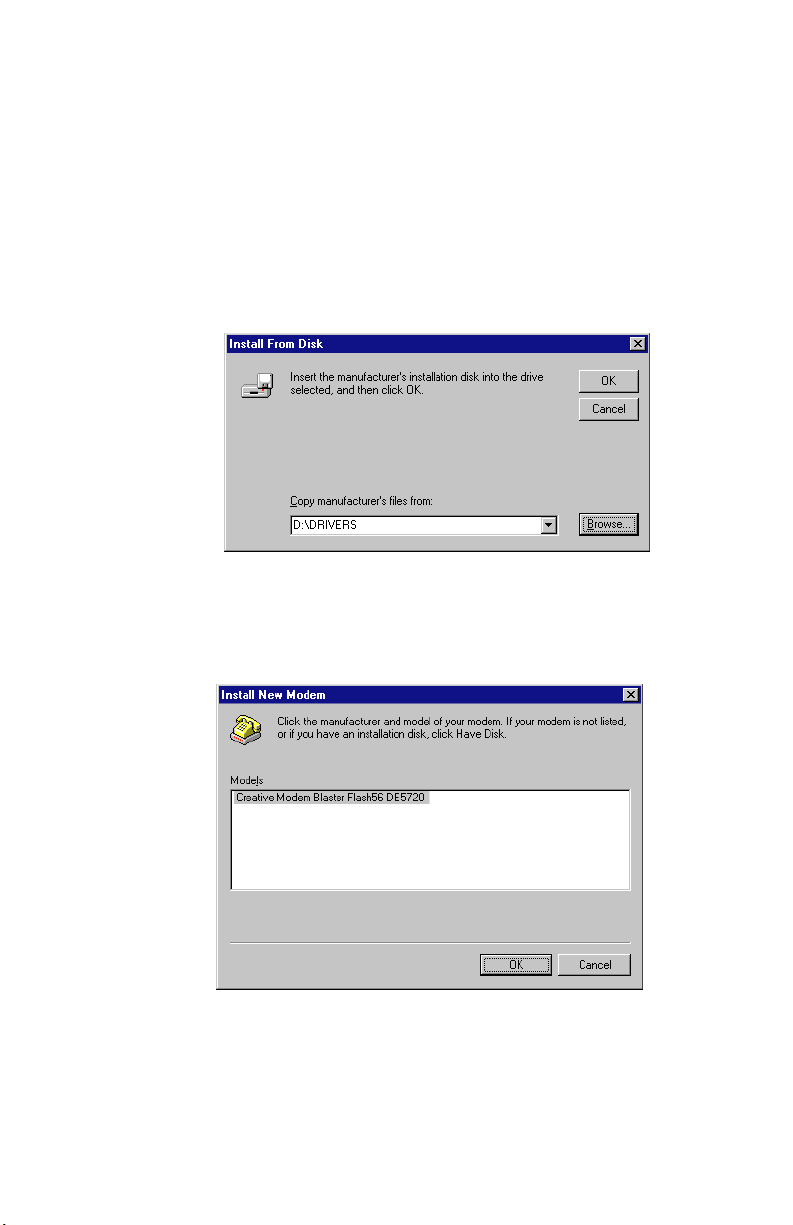
7. Select the
Figure 2- 18
Drivers
(e.g.
Have Disk
will appear; click on
folder of the
D:\Drivers
option to continue.
Figure 2-18: Browse to locate the correct modem driver on supp lie d CD-ROM
8. The next dialog box app ears will indicat e the modem drive r has
been found, as seen similar to
option. A dialog box similar to
Browse
and locate the
Software and Mode m I nst allation
or
E:\Drivers
). Once found, click on OK
Figure 2-19
.
CD
2-14 Modem Inst allation
Figure 2-19: Your new modem driver is found
Page 30
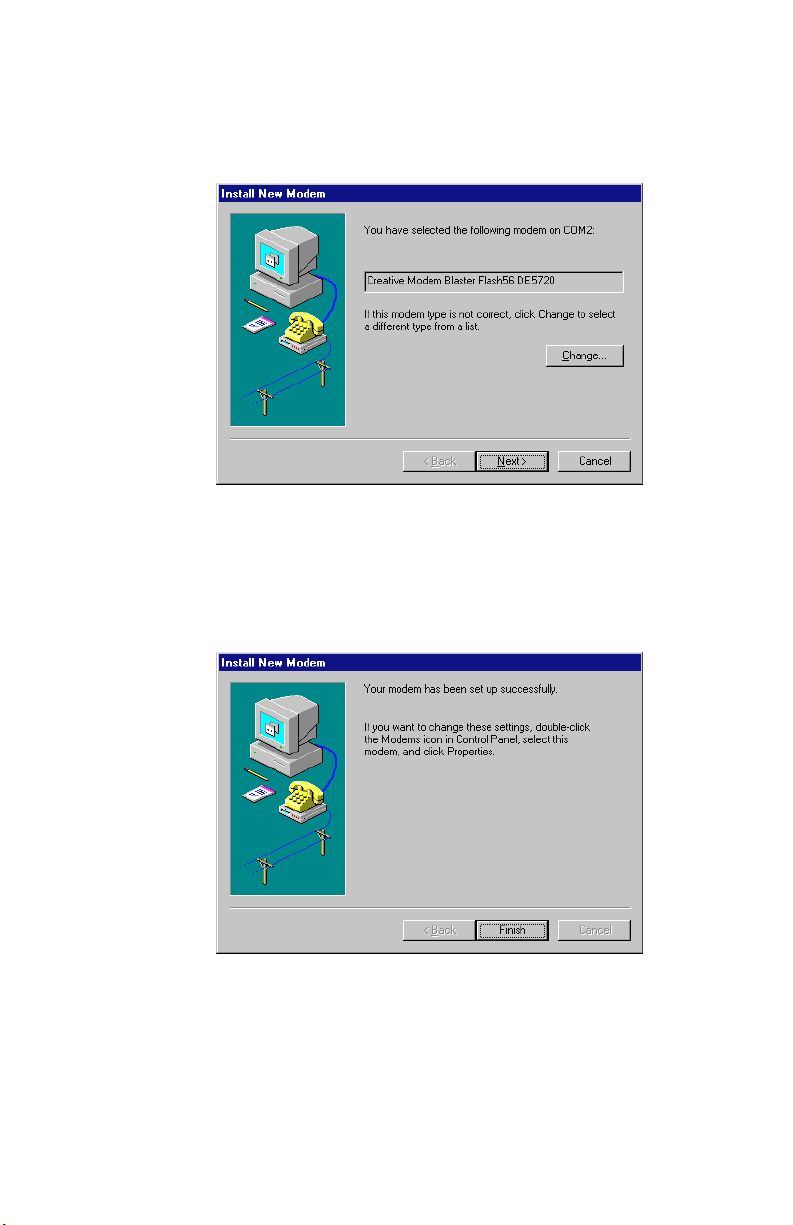
9. Click OK, and a dialog bo x similar to
Click Next to continue.
Figure 2-20: Windows NT confirms your new modem
Figur e 2-20
will appear.
10.The final .”
as seen similar to
modem installation.
Figure 2-21: Modem driver installation is complete
Install New Modem”
Figur e 2-21
. Click on Fi ni sh t o comp lete t he
dialog box will appear next,
Modem Installation 2-15
Page 31
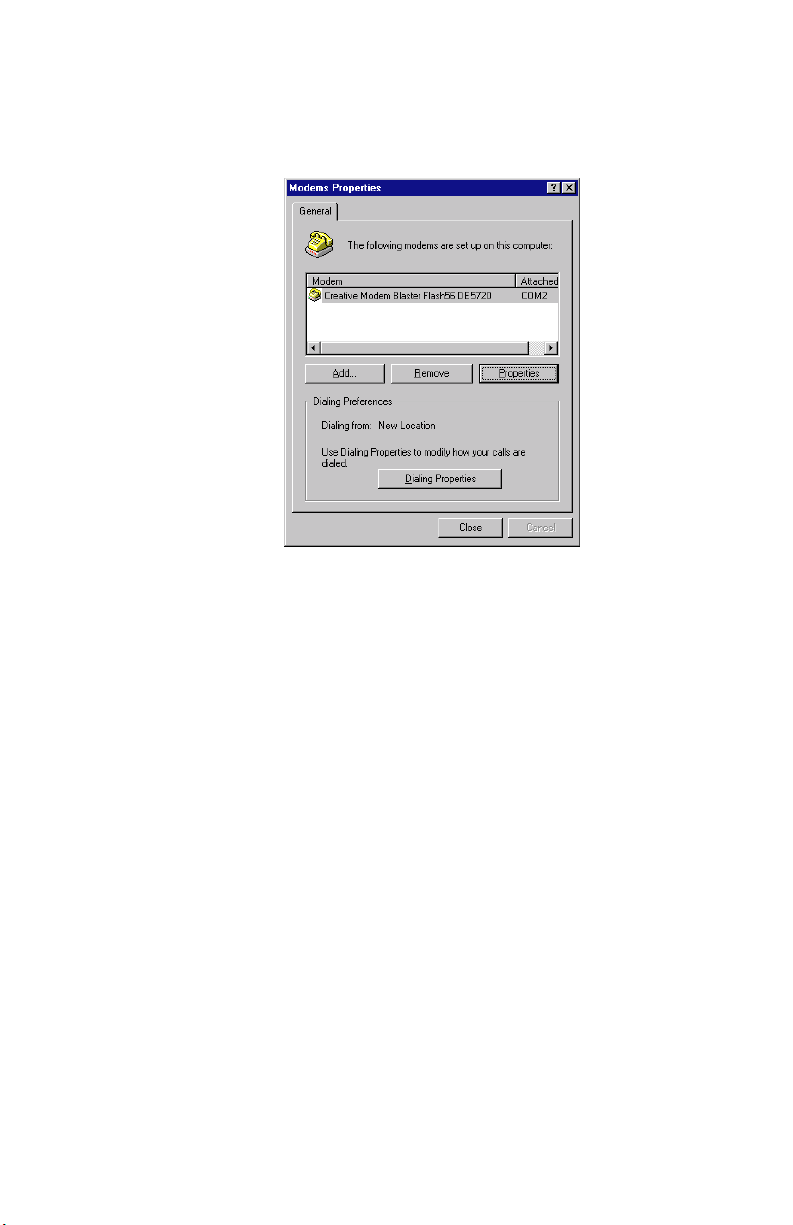
11.The
Modem Properties
dialog box, similar to
Figure 2-22
appears to indicate a successful ins tallation of the mode.
Figure 2-22: Windows NT to final confirm the successful driver installation
Congratulations! Your Modem Blaster is now installed.
,
2-16 Modem Inst allation
Page 32
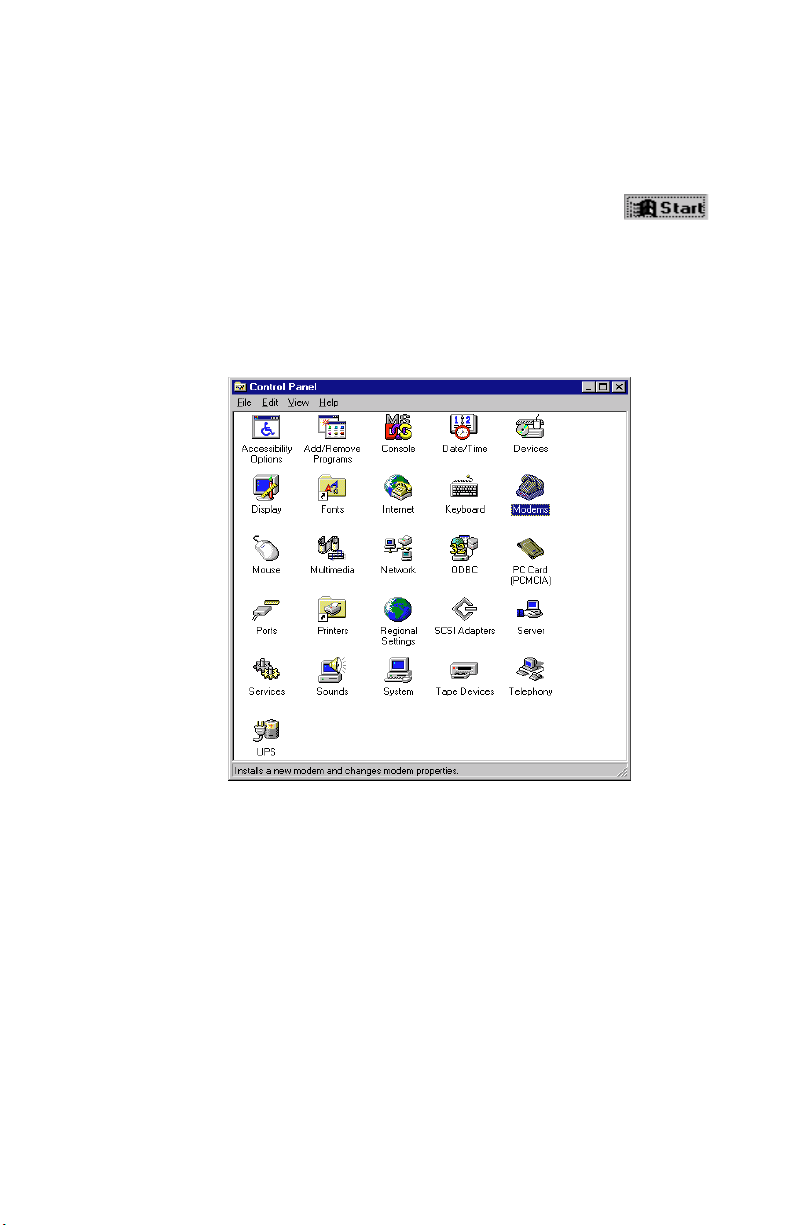
2nd Method
1. Power on your computer and insert the
Installation
CD-ROM into the CD-ROM drive. Once you are
Software and Modem
into the Windows environment, select the
button at the bottom left corner of your screen.
Select Se ttings, and then select Control Panel.
2. Once Control Panel is open, as seen in
Figure 2-23,
double-click the Modems icon to op e n it.
Figure 2-23 : Windows Control Panel
Modem Installation 2-17
Page 33
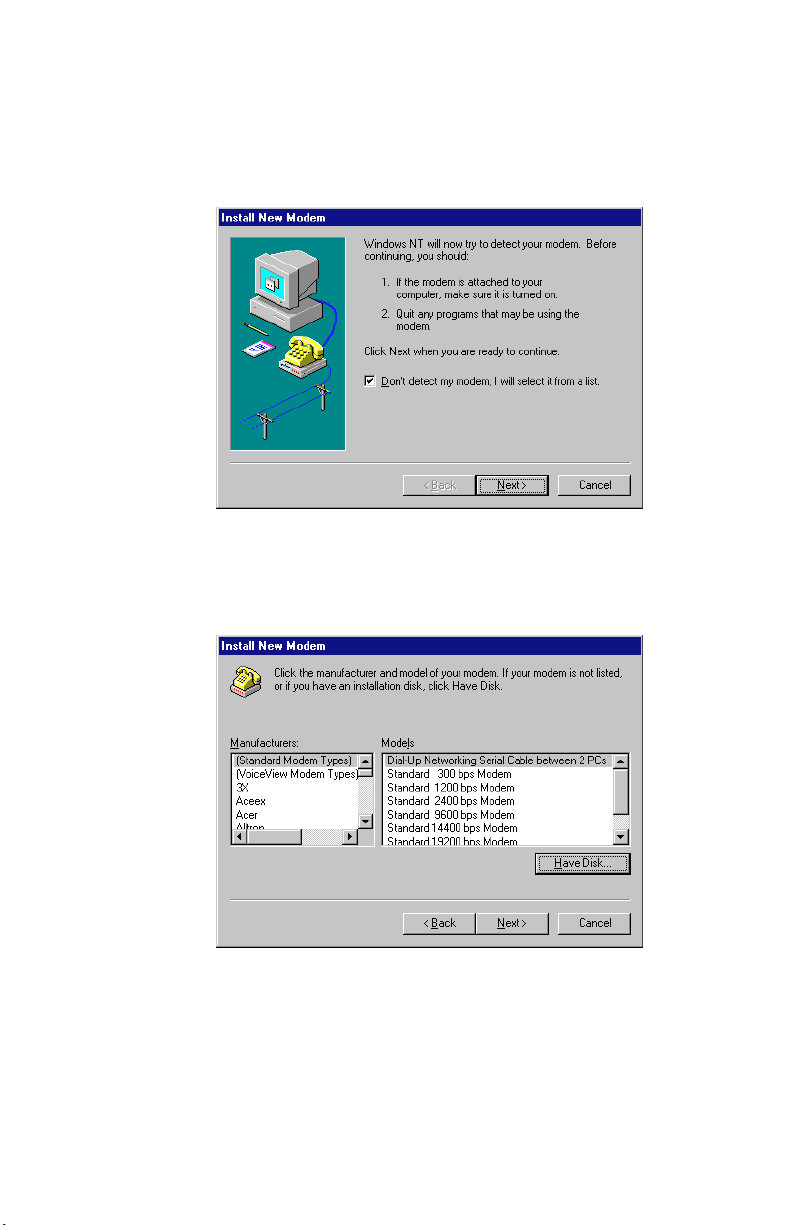
3. The
Instal l New Modem
dialog box, simi lar to
Figur e 2-24
, will
appear. Select the “Don’t detect my mo dem; I w i ll select it
from a list” option. Click on Next to continue.
Figure 2-2 4: A pre modem installation di alog box
4. Click on the Have Disk option when the dialog box similar to
Figure 2- 25
appears.
Most modern phone systems use tone dialling. If ,
however, your phone system supports p ulse dialling, the
appropriate drivers can be found in the
\Drivers\pulse\english directory.
2-18 Modem Inst allation
Figure 2-25: Select ‘Have Disk’ to continue
Page 34
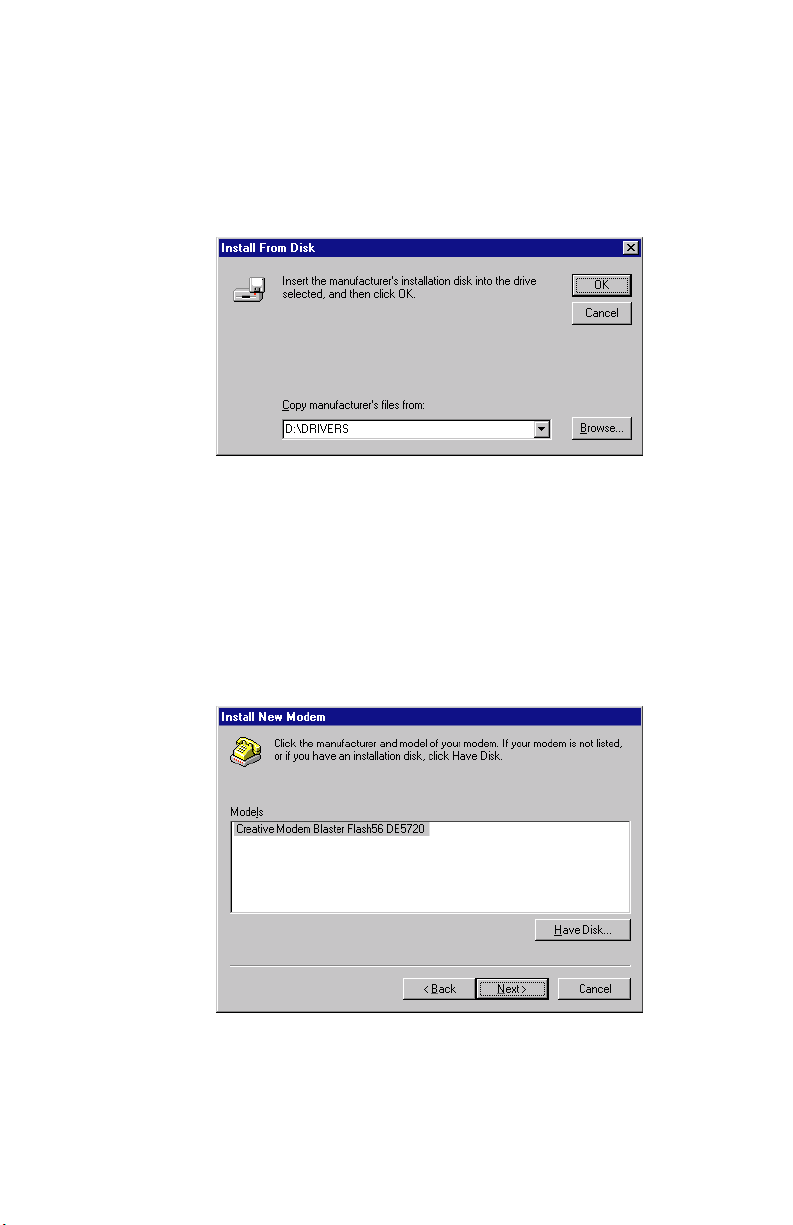
5. The next dial og box, s imil ar to
Figur e 2-26
on Br o wse to l ocate Drive rs folder of the
Installation
CD-ROM, (e.g. D:\Drivers or E:\Dri vers). Click
, will appea r . Cli ck
Softwar e and Modem
OK to continue.
Figure 2-26: Browse to locate the correct modem driver on supplied CD-ROM
6. A dialog box similar to
Figure 2-27
appears next, indicating
that the modem dri ver has been detecte d. Click on Next to
contiune.
Figure 2-27: Your new modem driver is detected
Modem Installation 2-19
Page 35
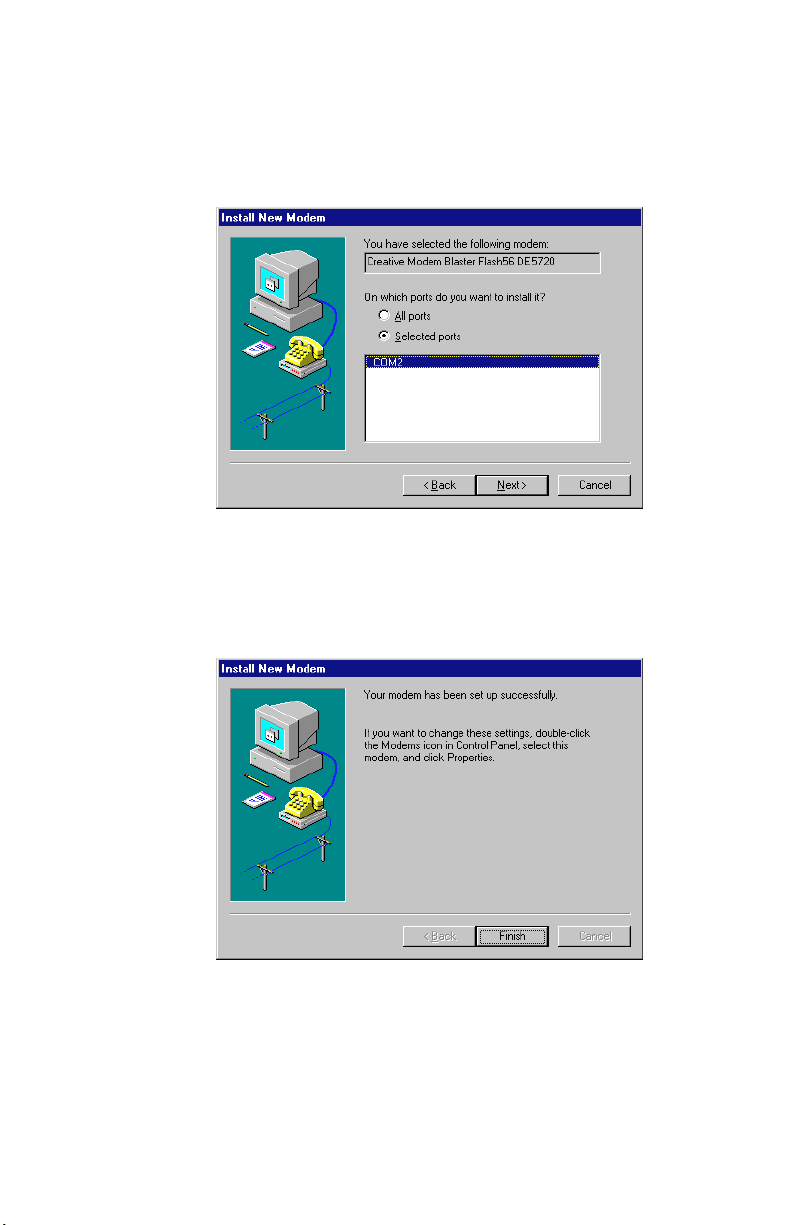
7. When
Figure 2-28
appears, s elect the Com port to which your
modem is attached, f or example COM 2. Click on Next to
continue.
Figure 2-28: Choose the COM Port of your selection
8. A dialog box simil ar to
modem has been successfully installed. Clic k on Next.
2-20 Modem Inst allation
Figur e 2- 29
Figure 2-29: Modem driver installation is complete
appears, indi catin g that the
Page 36
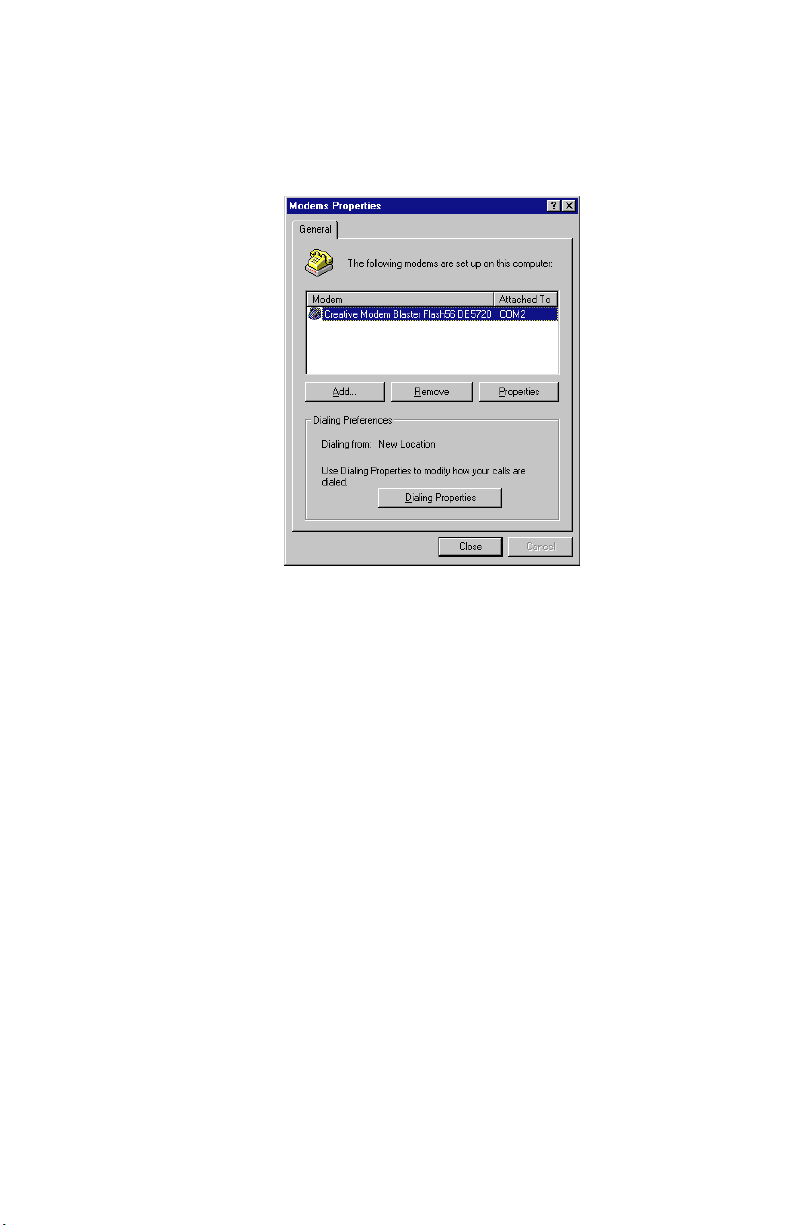
9. The
Modem Prope rties
dialog box, sim ilar to
Figur e 2 -30
appear to indicate a successful installation of the modem.
Click on Finish to compl et e th e modem insta llati o n.
Figure 2-30: Windows NT final con firms the successful driver installation
Congratulations! Your Modem Blaster is now installed.
, will
Modem Installation 2-21
Page 37
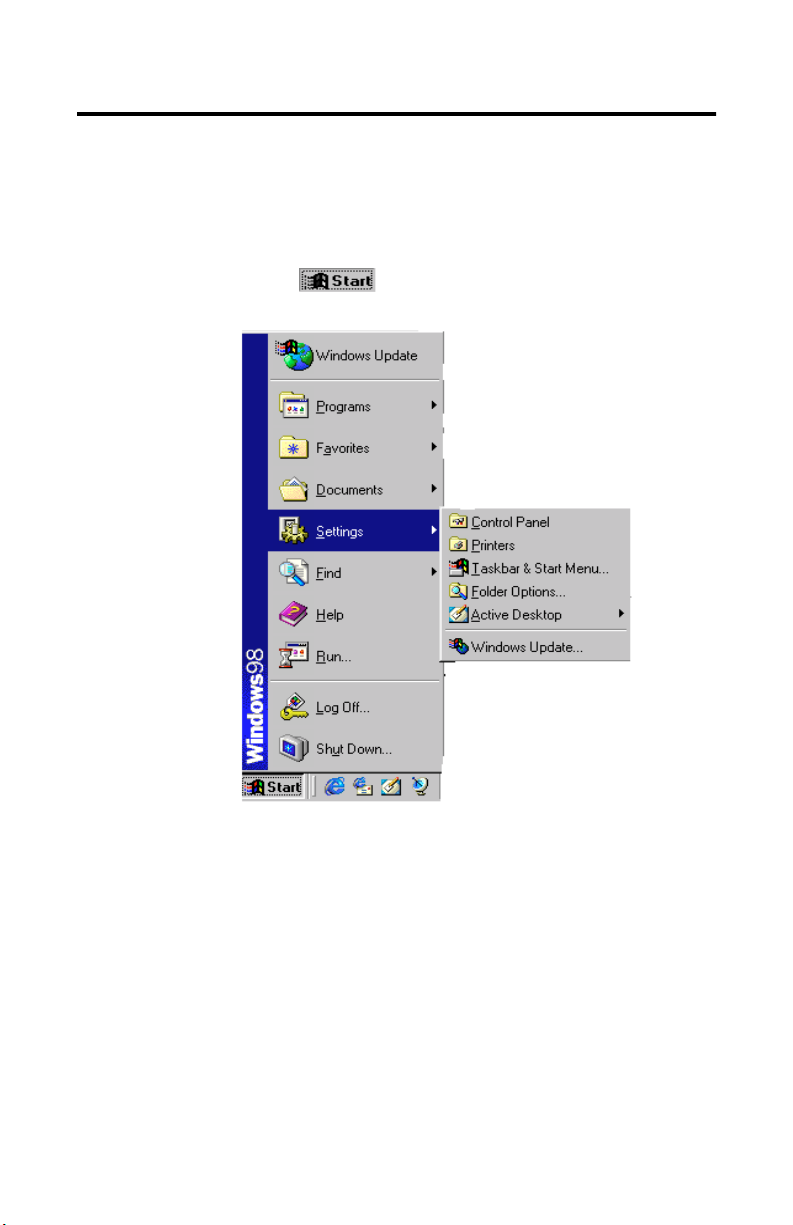
Testing the Installation in Windows 95/98
After you have set up your Modem Blaster, run the following test to
ensure that your modem has been ins talled properly.
To test your modem installation:
1. Click the button on the tas kbar.
The Start me nu s imila r to
Figure 2-31
appears.
2-22 Modem Inst allation
Figure 2-31: Windows St ar t menu
Page 38
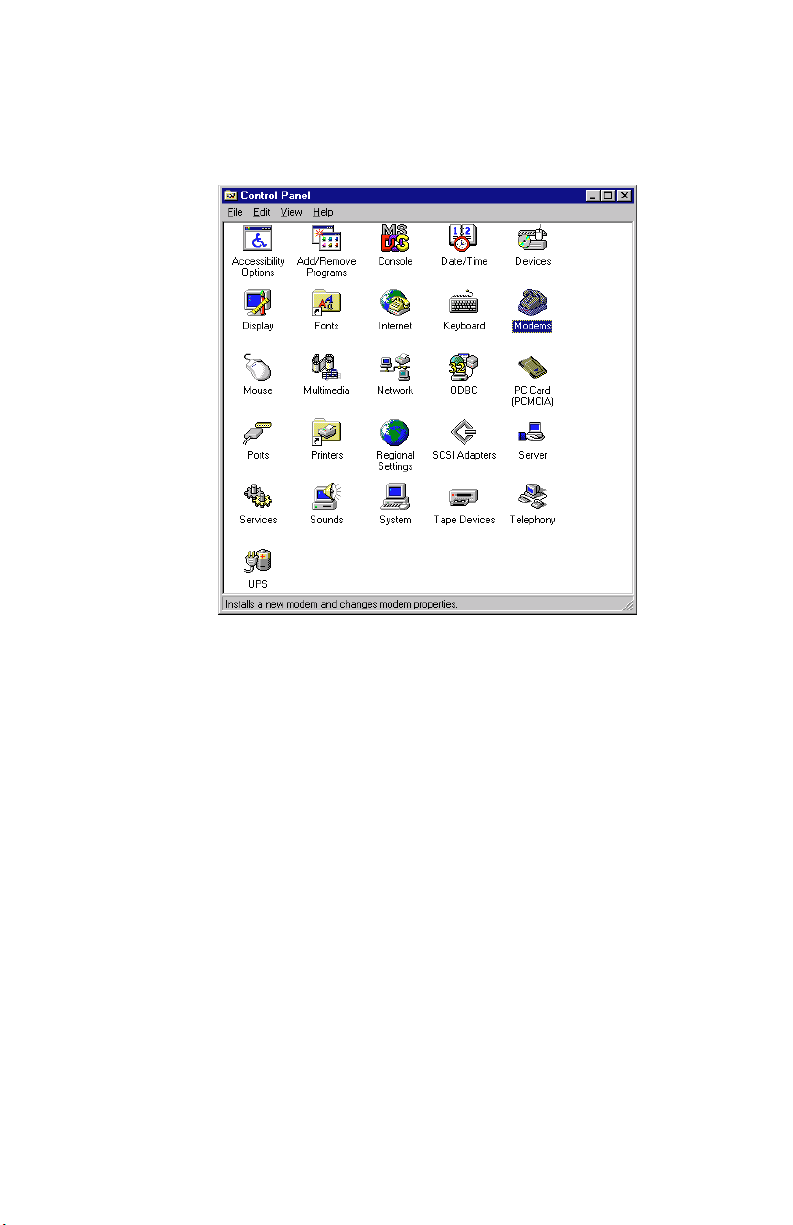
2. Select Settings, then Control Panel.
The
Control Panel
window s imilar to
appears.
Figure 2-32: Windows Co ntrol Panel
Figure 2-32
below
Modem Installation 2-23
Page 39
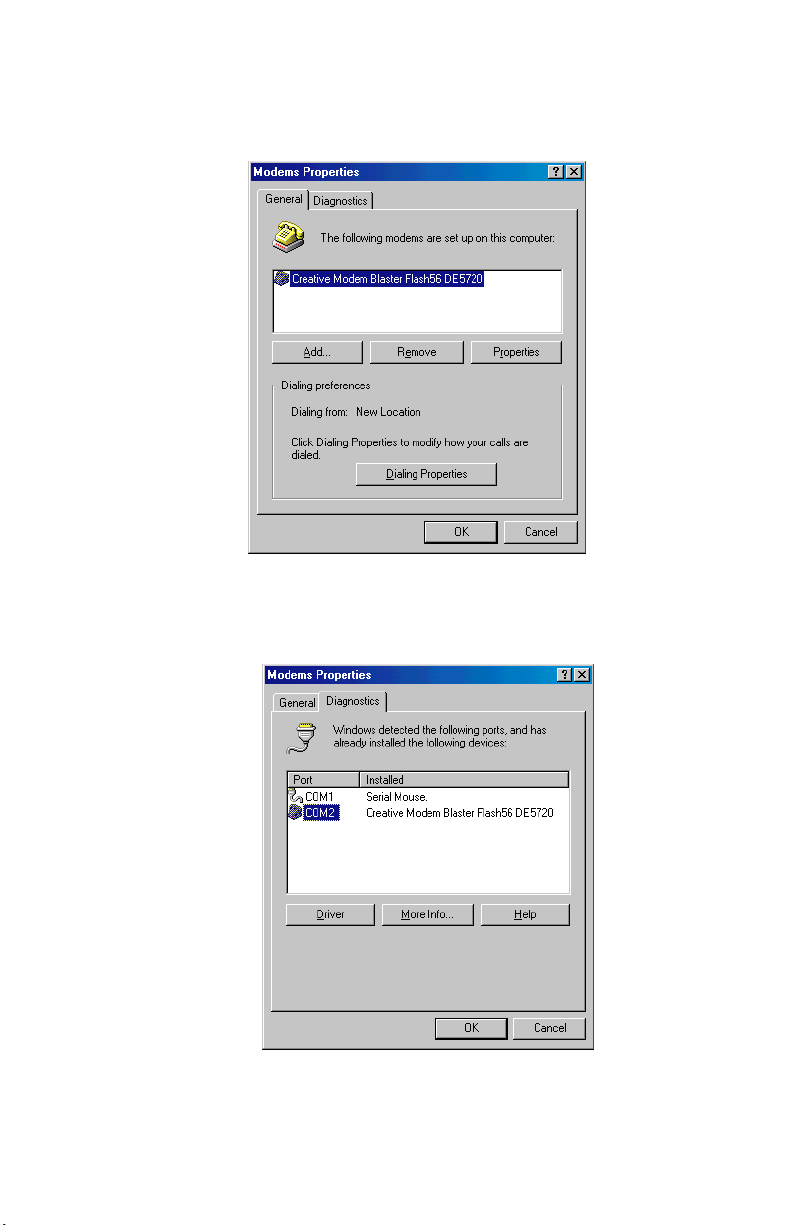
3. Double-click the Modems ico n.
The
Modems Properti es
Figure 2-33: Modem is confi r m ed installed via ‘Modem Pr oper ties’ dialog box
sheet, similar to
Figu r e 2-33
, appears.
4. Click on the Diagnos tics tab.
A dialog box similar to
Figure 2-34
will appear.
2-24 Modem Inst allation
Figure 2-34: ‘Diagnostics’ s howing modem located COM port
Page 40
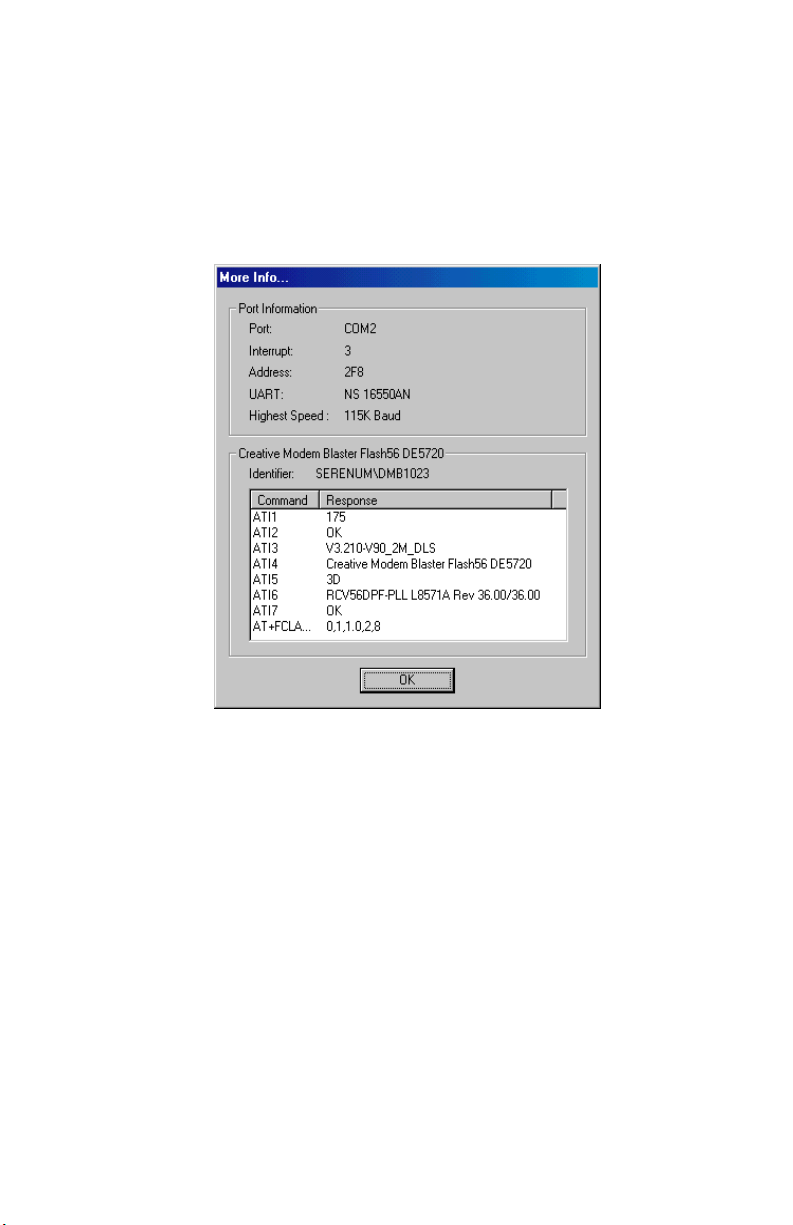
5. Select the COM port that has been assigned to the Modem
Blaster.
6. Click the More Info.. . button to have the responses from the
modem displayed, s imilar to
Figure 2-35
. The More Info...
action poll s the modem for certa in informati on and then echoes
back the results from the modem to the screen.
Figure 2-35: COM port assignment to confirm the successful modem installat ion
Modem Installation 2-25
Page 41
Uninstalling Modem Blaster in Windows 95/98/NT
This chapter provides instructions to uninstall Modem Blaster in
Windows 95/98 and NT4.0.
To uninstall your Modem Blaster:
1. Click the button on the tas kbar.
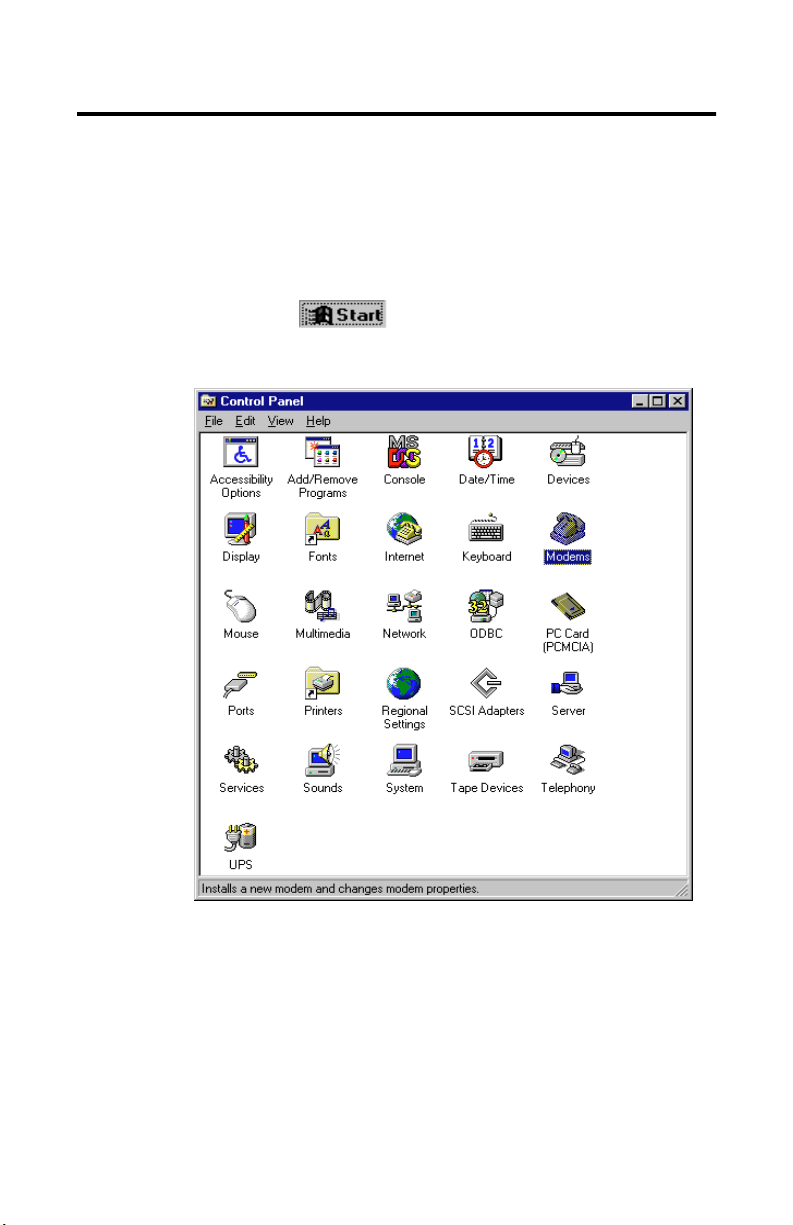
2. Select Settings, then Control Panel.
The
Control Panel
window s imilar to
Figure 2-36
appears.
2-26 Modem Inst allation
Figure 2-36: Windows Control Panel
Page 42
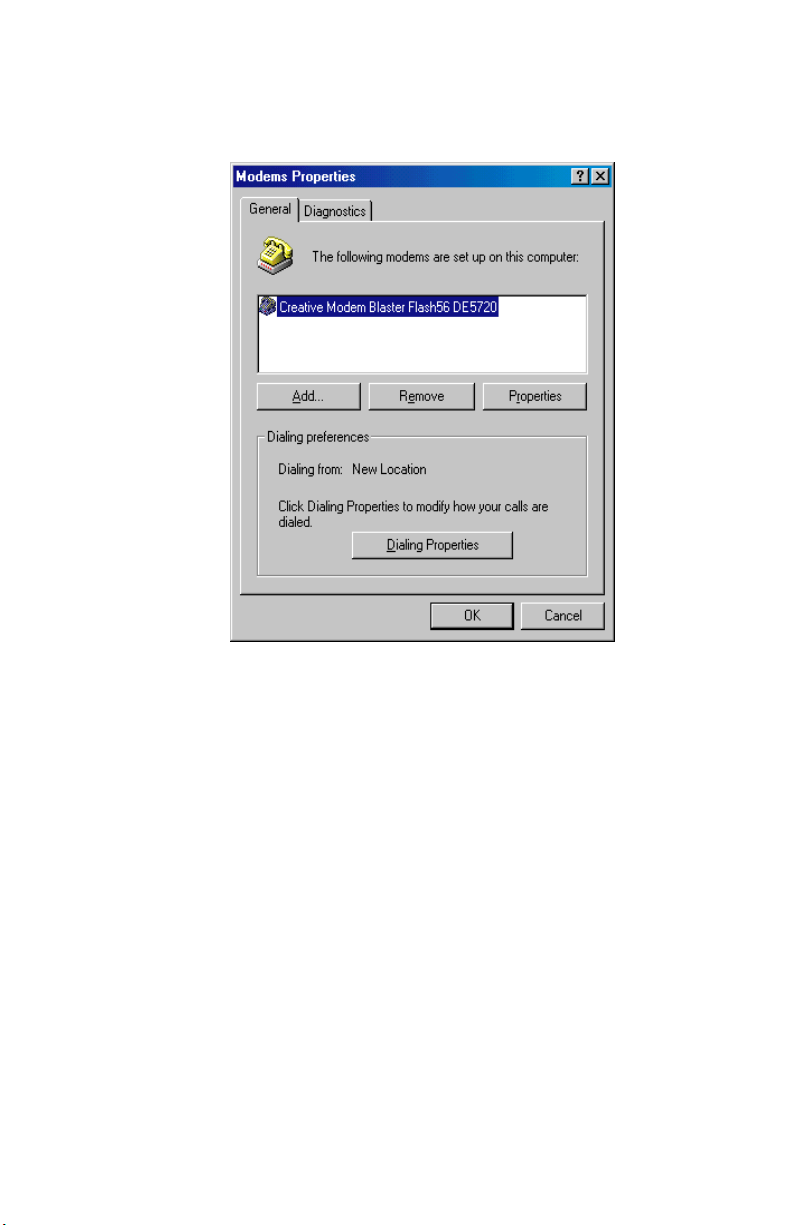
3. Double-click the Modems ic on.
The
Modems Properties
Figure 2-37: The ‘Modems Pr operties’ dialog box
sheet similar to
Figure 2-37
appears.
4. Select Creative Modem Blaster.
5. Click Remove, and then s elect Yes when you are asked if you
are sure you want to remove the device.
6. Click Close to finish the process.
7. Exit from Windows.
8. Shut down your computer and disconnect the Modem Blaster.
Modem Installation 2-27
Page 43

General Specifications
Modem Blaster comprises the data and fax features of a modem with
voice and speaker phone function. This appendix lists the general
specific ations of your Modem Blaster.
General Features
• Auto Fall back
•AT Commands
• Data/Fax/Voice/Speakerphone
• V.80 for ITU-T H.324 and H.323 specifications
• Plug & Play
• High throughput Vir tual UART, DTE rate up to 115, 200
• Signal Qual ity Monitoring and Auto Retrain
Data Features of the Modem
• Integrated data, fax, and voice mail modem.
• 56,000/54,000/52,000/50,000/48,000/46,000/
44,000/42,000/40,000/38,000/36,000/34,000
• 33600/28800/26400/24000/21600/19200/16800/14400/
12000/9600/7200 /4800/2400/1200/300 bps data speeds.
A
• Compatibility with the following data modem standards:
- V.90, K56Flex, V.34, V.32bis, V.32, V.23, V.22bis,
V.22A/B, and V.21; Bell 212A and 103.
- V.42 LAPM and MNP2-4 error correction.
- V.42bis and MNP5 data compression.
General Specifications A-1
Page 44

• Compression, line control, and error cont rol are implemented
in hardware. Therefore , no s pecial drive r s or libraries are
needed to take advantage of the higher speeds and data
reliability.
• A utomatic dial and answer capabilities.
Note: Due to line conditions and your country regulation s, your data
rate may be lower.
Fax Features of the Modem
• Support Class 1 and Cla ss 2 fax commands and Group 3 send
and rece ive fax.
• Fax speeds of up to 14400 bps for send and receive.
• Compatibility with the following fax modem transmission
standards:
- V.17 (14400 bps)
- V.21 Channel 2 (300 bps)
- V.27ter (7200 bps)
- V.29 (9600 bps)
Voice & Speaker Phone Features of the Modem
• Able to reco rd and play v oice mess ages ove r the tel ephone lin e.
• Multiple mai l boxes using included communica tions software.
• High performance Speaker Phone.
Video Conferencing Support
• Supports the ITU-T V.80 standard to allow high performance
video conferenc ing over sta ndard phone lines and the inter net.
Vid eo Conferencing standards supports ITU-T H.324 and
H.323. For video conferencing functionality, a microphone,
sound card, and digita l web cam are required.
A-2 G en e ral Spe c ifica tio n s
Page 45

Troubleshooting
This appendix provides so me tips and strateg ies for resolving some of
the problems you might enc ounter with your modem either during
installation or normal use.
Frequently Asked Questions
Probl em The modem fails to accept comma nds to dial or to
answer a call.
Cause Improper telephone line connection.
Solution The tele phone cab le must be att ached to the w all outle t.
The RS232 cable must be connected to the modem and
computer properly.
Also, check that all devices are turned on.
B
Problem Interference on the telephone line connected to the
modem.
Cause May be due to interference fr om a power source,
monitor, printer, or other computer cables.
Solution Move the telephone line away from any power source,
monitor, printer, and other computer cables.
Troubleshooting B-1
Page 46

Problem Cannot connect to Internet at 56,000bps speeds.
Cause It could be due to one or more of the following reasons:
1. May be due to telephone line conditions in your
area. Due to FCC regulations and/or line
conditions, it is not always possible to achieve the
maximum data rate.
2. Intern et Service Provider (ISP ) is not equipped to
support 56,000bps speeds.
3. ISP does not support V.90/K56Flex at the number
you are dialing.
Solution The following steps are recommended to ensure your
Modem Blaster is operating in optimum conditions.
1. Move the telephone line away from any power
source, monitor, printer, other c omputer cables and
remove other telephone equipment from the line.
2. Contact your ISP for the dial-up number at which
they support V.90/K56Flex.
Problem The modem or communicati ons softw are fail s to de tect
that the remote user has hung up.
Cause The modem and commun ications software rely on dial
B-2 Troubleshooting
tone, busy tone, or a period of silence to detect that a
remote user h as hung up. This det ection may f ail due to
one of the following reasons:
1. The local telephone system does not ge nerate the
dial or busy tone when the remote user hangs up.
2. The period of silence is not long e nough for the
modem or communications software to detect that
the remote user has hung up.
3. The modem or communications software cannot
detect a different dial or busy tone.
For example, if you are connecting to a PABX
system, the dial or busy tone generated is different
from the usual dia l or busy to n e.
Page 47

Solution Prompt the user to respond.
This may, however, result in a long delay be fore the
communicat ions software responds to the remote user
hanging up. To minimize this delay, try to modify the
following settings:
1. Voice message recording time.
2. The number of prompts.
3. The time to wait for a response after prompting.
Problem Poor sound quality when using communication
software.
Cause Some 32-bit sound and communication software
require a Unimodem V file . Win95 normal ly installs the
file. However, in some installations the file is missing
and that could affect sound quality when 32-bit
software is used.
Solution Try to inst al l th e Unim o d em V fil e as fo l low s :
1. Go to www.mode mblaster .com Download Software
Drivers section. Download Unimodem V file.
2. Use Windows Explorer and copy the file
unimodv.exe to your Windows/System directory.
3. Run unimodv.exe -- this can be done by double
clicking on the file under Windows Explorer.
4. Find the file unimodv.inf and right click your
mouse butt on on thi s fil e and choose instal l from the
pop up menu.
5. Restart your computer to activate Unimodem V.
Troubleshooting B-3
Page 48

C
Technical Support
We are committed to giving you the best product as well as the best te chnical
support.
For fast and efficient Technical Support solutions, please use the Cre ative Web
Support services in the first instanc e. If your Creative product was p r e-installed
in your computer, your primary source of technical support is the Personal
Computer supplier who provided the system.
The European support area on our web site at
continuously updated and conta ins the following:
FAQ:
Solve Your Own Problem:
Download Drivers:
Library:
Email Your Problem:
Telephone Su pport:
Access the latest infor mation on
Creative products with advice on how
to resolve commonly asked
questions
Enter keywor ds to search the
comprehensive library of product and
technical infor mation
Quick access to the latest Creative
drivers
Find the documents for a wide range of
Creative products
Complete the technical support web
form and submit for a response
European Telephone Support contact
details. See also European Helpline
section in manual for cont act details.
www.creative.com
is
T echnical Support C-1
Page 49

If You Have a Problem
Please retai n all c ontents inc luding packaging a nd proof of purchase until you are
fully satisfied with product.
If you have a proble m installing or using your Creative product, please use the
Creativ e W eb Support and/or T elephon e Support services for assist ance. Note the
following information for reference should you require technical assistance:
❑
The model and serial number of your Creative product
❑
Error information on the screen and ho w it came about
❑
Information on the adapter cards which may be causing a conflict
❑
Hardware configuration information such as the base I/O address,
IRQ line, DMA channels used
❑
Motherboard information: BIOS manufacturer/version an d chipset
manufacturer
❑
Type and version of your operating system, e.g., DOS 6.0,
Windows 3.1x, Windows 95, Windows 98 or Windows NT
If, after u sing the Crea ti ve sup port servic es, you beli ev e your Creat iv e pr oduct to
be defective, you should verify the purchase date and the tak e the appropriate
action as detailed below:
Less than 30 days since date of purchase
Should your store receipt indicate that the product is less than 30 days old, you
have the opt ion of returning the full product to the dealer/retailer for a
replacement or credit. The 30-day time period may not appl y in all instances, so
please check the seller’s replacement/credit terms.
More than 30 days since date of purchase
Contact European Technical Support to clar ify the nature of the problem and to
obtain detail s of our repair returns procedure. Cre ative Labs requ ires that all
returns for repair/replacement mus t first be issued with an authorisation number.
C-2 Technical Supp or t
Page 50

Returning a product for repair
❑
Contact Technical Support to receive your authorisation number for
repair/replacement of product.
❑
T echnical Support will communicate ho w to return the product in
question for repair/replacement.
❑
You should only return the hardware item in question and return it to
the address detailed by Technical Support. Please retain all sof tware,
accessories and the original pa ckaging.
❑
Please quote the authorisation number clearly on the outside of the
packaging in which you return the hardware ite m in question.
❑
Upon receipt of the faulty item, Creative Labs will process your
request and arrange a return or replacement.
Creativ e may repl ace or repa ir th e product with ne w or re-c onditio ned p arts, an d
the faulty parts wil l bec om e the property of Creative. The warranty period for
your repaired/replacement item is 90 days from the date of shipm ent from
Creative, or what is left on the original item’ s warranty, whichever is longer.
T o a voi d ta rif fs whe n shipp ing a produc t to Cre ati v e Labs fro m outs ide the E.U.,
you must complete the relevant customs documentation before shipping the
product (please allow 30 days).
Limited Warranty
Creative Labs (Ireland) Limited (“Creative”) wa rrants to you, the orig inal
purchaser only, that the hardware p roduc t will b e fre e of def ects in ma teria ls and
workmanship for a period of two years after the date of purchase, or such other
period as may be expressly specified by Creative or required by applica ble law
(“Warranty Period”).
Creative’s entire liability and your remedy will be, at Creat ive’s sole discretion,
the repair or replacement (with the same or similar model) of any hardware or
accompanying it em(s) not meetin g th e “Li mited Warranty” expl ained abov e that
is returned to Creative’s author ised distributor or dealer during the Warranty
Period with a copy of your receipt.
T echnical Support C-3
Page 51

What this warranty does not cover
This warranty gives you specific legal rights. You may have other rights which
vary from country to country. Certain limitations in this warranty are not
permitted b y the j urisdi ction o f some cou ntries , so so me limitat ions h ere may not
apply to you.
T o t he ma ximum e xtent pe rmitt ed b y a pplica ble l aw, Creative di scl aims all ot her
warranties and conditions, expressed or implied, including the conditions of
quality, merchantability o r f itness for a part icula r pur pose wi th respect to the us e
of this product . Crea ti v e als o dis clai ms any obli gati on to support product s for a ll
operating environments - for example, by ensuring interoperability with future
versions of software or hardware. In no event shall Creative or its licensors be
liable for any in direct, incidental, special or consequential loss or for any lost
profits, sa vings or data arising from or relating to the use of this product, e ven if
Creative or its licensors have been advised of the poss ibility of such loss.
Specifically, this warranty does not cover failure s of the product which result
from accident, abuse, misuse, alter ations (by persons other than Creative or its
authorized repair agents), moisture, corrosive environments, shipp ing, high
voltage surges, or abnormal working cond itions. This warranty does not cover
normal wear and te ar. You are specifically advised to take a backup copy of any
software provided with the Creative product for security purposes.
C-4 Technical Supp or t
Page 52

Creative European Help Line
CREA TIVE LABS (IRELAND) L TD.,
T ech nical Support Depart ment ,
Ballycoolin Busines s P ar k, Blan chards to w n,
Dublin 15, Ireland.
Fax: +353 1 8205052
United Kingdom
T el +44 1 189 344 744
Germany
Tel +069-66982900
Ireland
Tel +353 1 820 7555
France
Tel +33 1 55 46 87 77
Spain
Tel +34 (91) 66 25 116
Italy
T e l +39 02 48 28 0000
Austria
Tel +43 (01) 589 244 320
Belgium
Tel +32 (02) 7171 198
Denm ark
Tel +45 3525 9498
Finland
Tel +358 (09) 2294 3101
Norway
Tel +47 2305 0401
Sweden
Tel +46 (08) 7519 147
Holland
Tel +31 (0) 205040616
Switzerland
Tel +41 (01) 2121 868
Portugal
Tel 800 8 53066
Czech Republic
Tel 353 1 8066964
Poland
Freephone 00 800 353 1229
Hungary
Freephone 06 800 1222
Russia
Tel +353 1 8066967
Operating Hours/Heures d’ouverture/Öffnungszei ten/
Ore d’ufficio/Horario de oficina/Openingstijden/Horário de abertura
EUROPE
Mon-Fri : Business Hours Sat-Sun & Public Holidays : Closed
Lun. au vend. : Heures de bureau Sam., dim. et jours fériés : Fermé
Mo-Fr : Geschäftszeiten Sa, So & gesetzl. Feiertage : Geschlossen
Lunedì-venerdì : Orario d’ufficio Sabato, domenica e festivi : Chiuso
Lunes-Viernes : Horario de oficina Sábados, domingos y festivos : Cerrado
Maandag-Vrijdag : Kantooruren Zat.-Zon. & Nationale Feestdagen : Gesloten
Segunda a sexta-feira : Horário de expediente Sábado, domingo e feriados : Fechado
Internet To receive technical support via the Internet, please e-mail:
[email protected]
Web Site www.creative.com
T echnical Support C-5
 Loading...