

Page 1

QUICK START GUIDE
IMPORTANT:
Please read this manual carefully.
Use this manual when you need quick reference help for the printer.
LABELTAC 4 PRO
THERMAL TRANSFER PRINTER
CREATIVE SAFETY SUPPLY
(866) 777-1360
www.creativesafetysupply.com
Page 2

2
PACKING LIST
Check to ensure that you receive these items:
a) LabelTac 4 PRO Thermal Transfer Printer
b) USB Transfer Cable
c) Power Cable
d) Software/Driver Install CD
e) This Quickstart Manual
GETTING STARTED
Here are the main components of your LabelTac 4 PRO printer.
Cover support
release
Used ribbon rewind
spool/hub
Ribbon supply spool/
hub
Media holder
Platen roller
Alignment
guides
Black mark
sensor
Power switch
(on rear)
USB interface port
(on rear)
Left cover
release
Ribbon access
cover
Right cover
release
LED indicator
Feed button
Printhead
Page 3
3
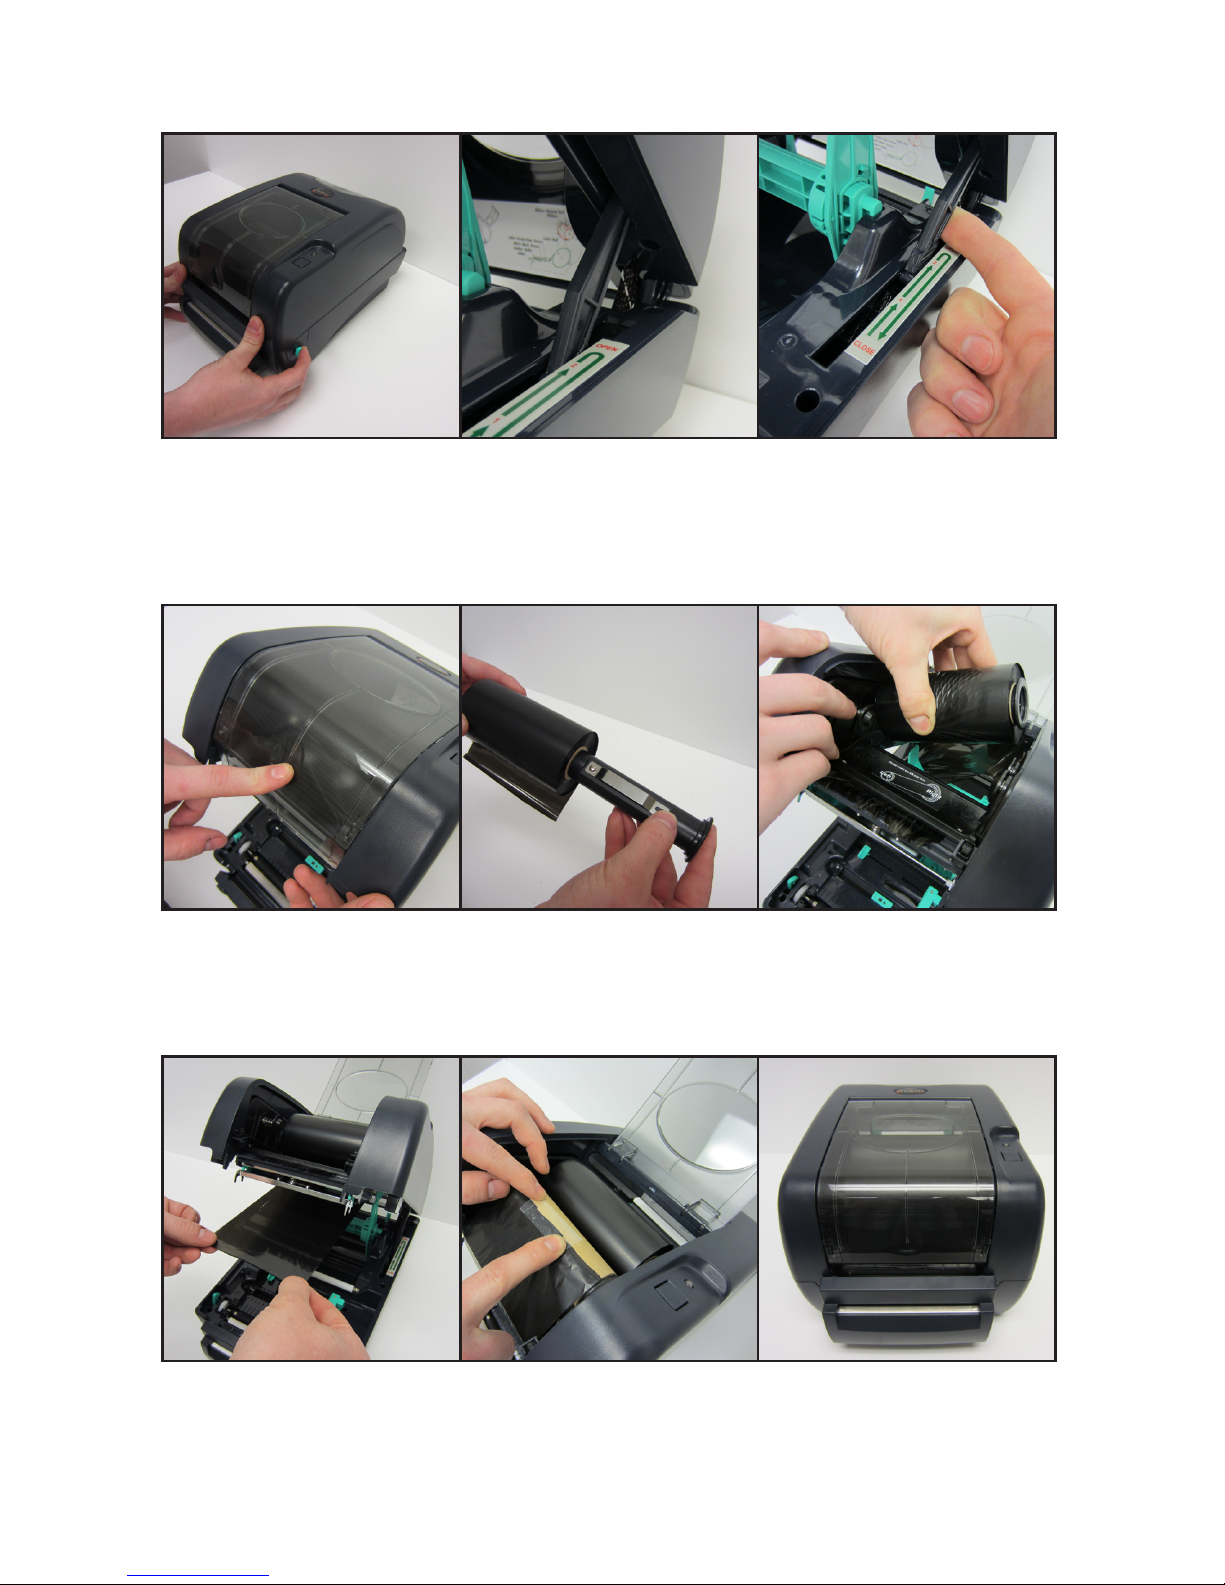
A) OPENING/CLOSING THE TOP COVER
B) LOADING PRINT RIBBON (Video available on LabelTac 4 Install Disc)
1) To open cover, pull both
blue cover release tabs
straight towards you. Lift
cover.
1) Open cover using both
blue cover release tabs.
Open ribbon access cover
by pressing on the indent.
4) Pull ribbon (dull side
down) up and over the printhead. Insert the carboard
core into the rewind spool.
2) The cover support will
engage to hold the cover
open.
2) Remove ribbon supply and rewind spools and
insert ribbon into the supply
spool.
5) Insert rewind spool into
the rewind hub (front), and
tape the ribbon to the the
cardboard core lengthwise.
3) To close cover, lift cover
support from rear, pull towards you, and close cover
gently.
3) Insert supply spool into
the supply hub (rear), left
side rst, and snap into
place.
6) Close the ribbon access
cover, disengage the cover
support and gently close the
top cover.
Page 4
4
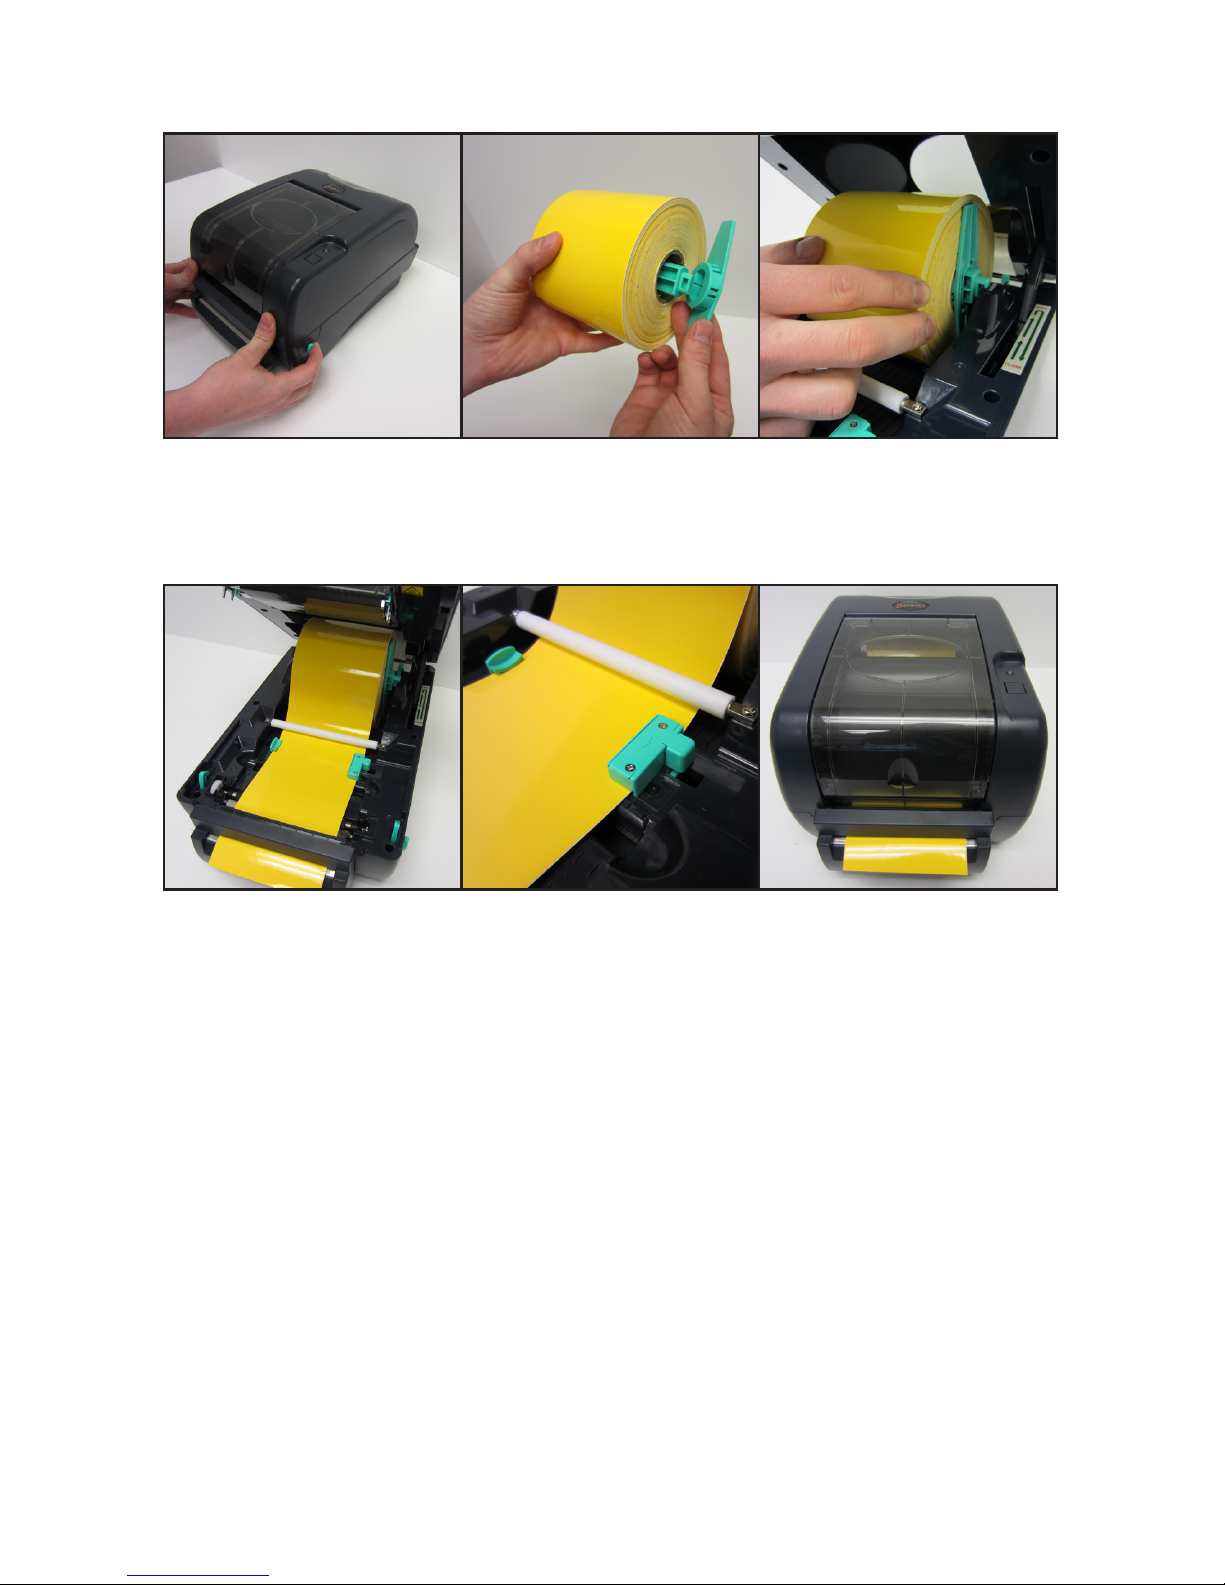
C) LOADING MEDIA SUPPLY (Video available on LabelTac 4 Install Disc)
1) Open cover using both
blue cover release tabs.
4) Feed the supply through
the alignment guides and
out through the mouth of
the printer.
2) Remove blue media
holder and place media on
holder, closing each end
with the arm cap.
5) Adjust the blue alignment
guides manually to t the
width of the media
3) Replace media holder,
ensuring the media can turn
freely.
6) Disengage the cover
support and gently close the
top cover.
Page 5
5
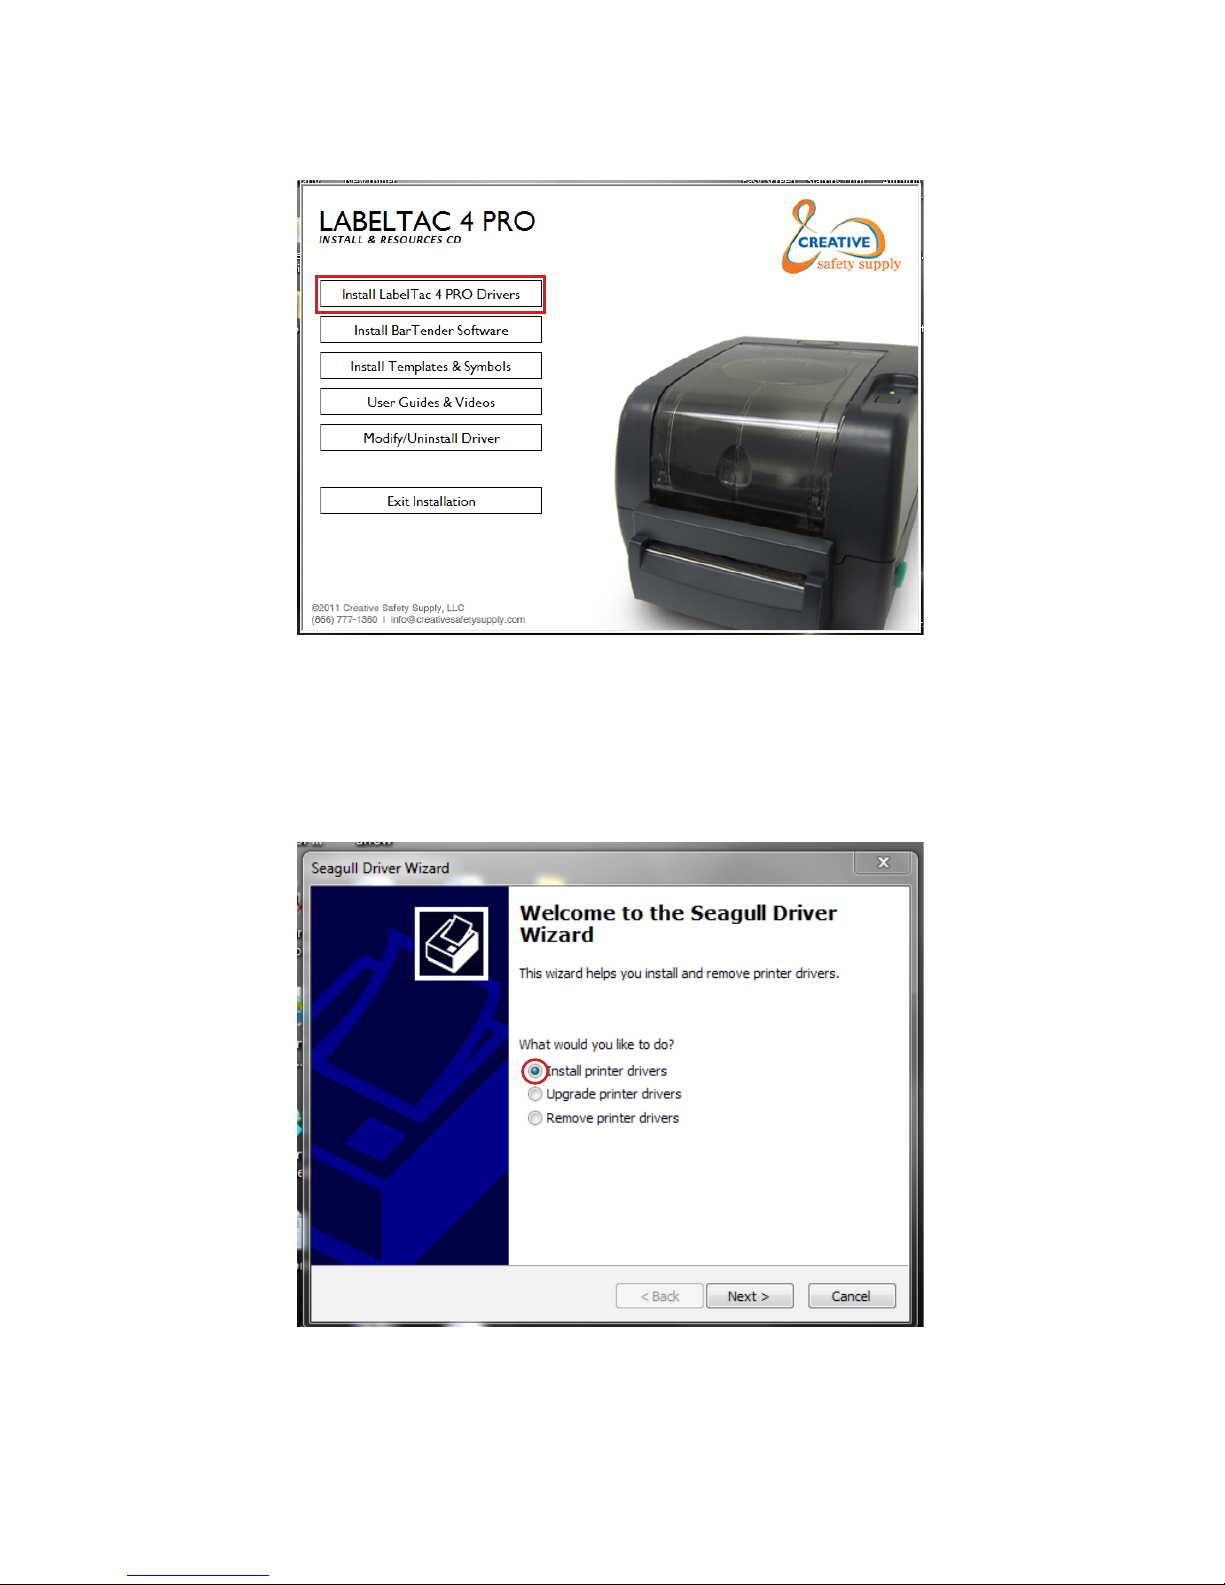
INSTALLING PRINTER DRIVERS (Windows Only)
1) Insert the LabelTac 4 PRO Install Disc. The disc will autorun and pop up the Install
Menu. Select “Install LabelTac Drivers” from the menu options. Depending on your
account settings, a popup box may appear asking if you want to allow the software to
make changes to your computer- Select “Yes” and continue.
2) Select “Install printer drivers” and click Next.
Page 6

6
INSTALLING PRINTER DRIVERS (continued)
3) By default, “Install a driver for a Plug and Play printer” is selected. The LabelTac 4
(TSC TTP-343C) should be the only printer in this list. Click the next button.
4) Rename the printer from “TSC_TTP-343C” to “LabelTac4” for easy reference. Click
Next to continue.
Page 7

7
INSTALLING PRINTER DRIVERS (continued)
5) Click Finish to complete the installation.
6) If the dialog box above pops up, select “Install this driver software anyways” to
continue.
Page 8

8
INSTALLING PRINTER DRIVERS (continued)
7) The LabelTac 4 PRO drivers will now install.
8) When the drivers are nished installing, select Close to continue.
Page 9

9
1) Select “Install Templates and Symbols” to begin the installation process.
2) Choose the folder you would like to install the templates and symbols to. The default
is the currently logged-in user’s desktop. We recommend installing the folder to the
desktop for easy access. To select a different location, click browse, and select the
destination folder. When you are done, click “Install” to begin installation.
INSTALLING TEMPLATES & SYMBOLS
Page 10

10
INSTALLING PRINTER DRIVERS (continued)
3) When installation is complete, click the Close button to nish installation.
4) The Templates and Symbols will install to a folder called “LabelTac 4 Templates” and
are broken into folders based on the width of the label stock they are to be printed on.
There is also a folder for OpenOfce templates, and another for Symbols and Images.
Page 11

11
LED AND BUTTON FUNCTIONS
LED Color Description
Green (Solid)
This illuminates that the power is on and the device is ready to
use
Green (Flash)
This illuminates that the system is downloading data from the
PC to memory, or that the printer is paused
Amber
This illuminates that the system is clearing data from the printer
Red (Solid)
This illuminates printer head open or a cutter error
Red (Flashing)
This illuminates a printing error, such as head open, paper jam,
ribbon empty, or memory error
Power-On Utility Functions
Release button during the following ashing pattern:
Amber
Red
(5 Blinks)
Amber
(5 Blinks)
Green
(5 Blinks)
Green/
Amber
(5 Blinks)
Red/
Amber
(5 Blinks)
1) Ribbon sensor calibration and
Gap/Black Mark sensor calibration
release
2) Gap/Black Mark sensor calibration + self test and enter dump
mode
release
3) Printer Initialization
release
4) Set Black Mark sensor as media
sensor and calibrate the Black Mark
sensor
release
5) Set Gap sensor as Media Sensor
and calibrate the Gap sensor
release
BUTTON FUNCTIONS:
a) While powered on & not printing: Feeds material (equal size to the last label printed)
b) While printing: Pauses the current print job. Pressing again will resume.
c) While the printer is powered off- if the button is held, and released during different
LED cycles, the printer will perform different functions as detailed in the chart below.
The LabelTac 4 PRO has one button and one 3-color LED indicator. By indicating the
LED with different color and pressing the button, the printer can perform several functions, including feed labels, pause printing, selecting and claibrating the medai sensor,
resetting the printer, and more. Please refer to the button operation and LED function
charts below.
Please call us at (866) 777-1360 with any questions regarding Black Mark, Gap Sensor, or any other Power-On utilities.
Page 12

12
TROUBLESHOOTING
• POOR PRINT QUALITY
If you are having issues with poor print quality from your LabelTac 4 PRO printer, do
not hesitate to give us a call at (866) 777-1360, and one of our support representatives
would be glad to help get your printer functioning optimally.
Typically poor print quality is resolved by adjusting the print speed and/or density (labeled as “darkness”) in the printing preferences, and/or setting the “print orientation”.
You can reach these screens by going to:
Start -> Devices and Printers -> LabelTac 4 -> Printing Preferences -> Page Setup/Options
We nd the following settings work best with the LabelTac 4 PRO Printer
a) In Page Setup, under orientation, select Landscape 180. This will just change the
direction that the printhead will print the label. This will not chage the format of your
printed label (portrait/landscape). This generally gives the best search results.
*Important*
b) & c) If you are getting speckles or inconsistent printing (g.1), try lowering the print
speed, and/or adjusting the density (darkness). We nd that a setting of 2.00 in/sec
and print density of 6 or 7 produces the best results. If you get arched heat lines in
your print (g.2), this means the print ribbon is getting too hot- in this case, try lowering
the density (darkness) and/or raising the print speed.
a)
b)
c)
(g.1) (g.2)
Page 13

13
• CONTINUOUS/DIE-CUT LABELS
TROUBLESHOOTING (continued)
When using Die-Cut labels, you must change the settings of the printer so that the
gap sensor detects the die-cut material. If you do not do this, the print will not correctly
align.
There are 2 steps involved with this.
1) Go to the “Stock” tab in the Printing Preferences screen. You can reach this at:
Start -> Devices and Printers -> LabelTac 4 -> Printing Preferences -> Stock
In this screen you will nd an area called “Media Settings”. If you have been printing on
continuous vinyl, the “Type” should be set to “Continuous”. Change this to “Labels with
Gaps”. Leave the other settings as is.
2) Turn off the LabelTac 4 PRO printer. Load the die-cut supply in the printer. Hold the
top button down, and while holding it down, turn the printer back on. The LED will blink
amber once, blink green once, and then begin ashing red rapidly 5 times. Release
the button during the red blinking. The printer will feed out some of the die-cut material
as the gaps/black marks are sensed. You should now be ready to print on the die-cut
material.
When switching back to continuous vinyl, turn the printer off, load the vinyl supply in
the LabelTac 4 PRO and hold down the top button. While holding down the button, turn
the printer back on and release when the printer begins ashing green rapidly. (This
will be after the red blink cycle and amber blink cycle). The printer will feed material,
but will not cut after this intial feed, or if you press the feed button. This is normal.
Once you send a print job to the printer it will resume its normal cutting function.
Page 14

CREATIVE SAFETY SUPPLY
(866) 777-1360
www.creativesafetysupply.com
QUESTIONS?
 Loading...