

Page 1

$ERXW<RXU9,%5$&DUG
Contents
Introduction
Introduction.............................................................................................................................1
Checki n g S y st em R eq u irements ......... .. .......... .......... .. .......... .. .......... ... ......... ... ......... ... .......... . 2
Using Th i s Gu i de ... ......... ... .......... .. .......... .. .......... .. .......... .. .......... ... ......... ... .......... .. .......... . .....2
Prelim in ary Step fo r Window s 95 u ser s........ ......... ... ......... ... .......... ......... ... .......... .. .......... .. ....3
On the Audio Card..................................................................................................................4
T o Install the Card and Related Hardware.............................................................................. 5
To Instal l V I BR A 128 in Window s 9 5/ 9 8 /M e ....... ... ......... ... .......... .. .......... .. .......... .......... .. ....6
To Instal l V I BR A 12 8 in Windows N T 4. 0 /Wind ows 200 0 ...... .. .......... .. .......... .......... .. ......... 8
T esting the Installation..........................................................................................................10
General Specifications ..........................................................................................................11
Congratulations on your purchase of Creative VIBRA™ 128 audio card. With its high PCI b us
speed and high-quali ty audio performance, VIBRA 128 is the ideal choice for you r computer.
Featuring 128-voice wave-table synthesi s with high sample rate convertors, VIBRA 128
ensures a high level of audio quality and performance.
In addition, VIBRA 128 supports localized three-dimension al s ound immersion and spatial
sound enhancement in two-speaker environments. Full duplex operation also allows
simultaneous audi o recording and playbac k.
Page 2

VIBRA 128's compatibility with Sound Blaster P CI ensures you of nea r perfect Sound Bla ster
compatibility on legacy applications. Its use of the Plug and Play (PnP) technology also helps
make VIBRA 128 one of the easiest audio cards to install.
We believe your VIBRA 128 card will give you years of enjoyment of high-quality sound on
your PC.
Checking System Requirements
Using This Guide
Getting More Information
2 About Your VIBRA™ 128 Card
Your audio card requires at least:
Pentium class 90MHz or 166MHz (recommended) computer with a free PCI slot
❑
16 MB RAM for Window s NT 4.0 and Windows 95/98/Me (32 RAM recommended)
❑
64 MB RAM for Window s 2000
❑
Windows NT 4.0, Windows 2000 or Windows 95/98/Me
❑
Passive or amplified speakers (Cambr idge SoundWorks speakers recommended)
❑
This guide expla ins the various hardware components on your a udio card, and also shows you
how to install the card into your computer.
Refer to the VIBRA 128 online Help for more information and instruc tions on how to use the
various app lications fou nd in your package.
Page 3
Document Conventions
This guide uses the following conventions to help you locate and identify the information you
need:
Text In Repres en ts
Preliminary Step for Windows 95 users
bold
italic
UPPERCASE Directory name, file name, or acronym.
< > Symbols, letters, and key names on the keyboard.
If you are using W indows 95, you need to find your Windows’ version number before you can
proceed to the section
“To Install VIBRA 128 in Windows 95/98/Me” on page 6.
To find your W indows’ version number:
1. Switch on your computer .
2. Click the Start button, point to Settings, and then click Control Panel.
T ext that must be entered exactl y as it appears.
Title of a book or a plac eholder , which represents t he inform ation you
mus t pr ovide.
The notepad icon indic ates information that is of particular
importance and should be considered before continuing.
The alarm clock designates a caution or warning that can help you
avoid situations involving risk.
About Your VIBRA™ 128 Car d 3
Page 4
3. In the
Control Panel
window, double-click the
System
Your Windows 95 version number is displayed in the
Properties
dialog box.
4. Note the version number.
The following are possible Windows 95 version numbers:
4.00.950
❑
4.00.950A
❑
4.00.950B
❑
4.00.950C
❑
icon.
General
tabbed page of the
System
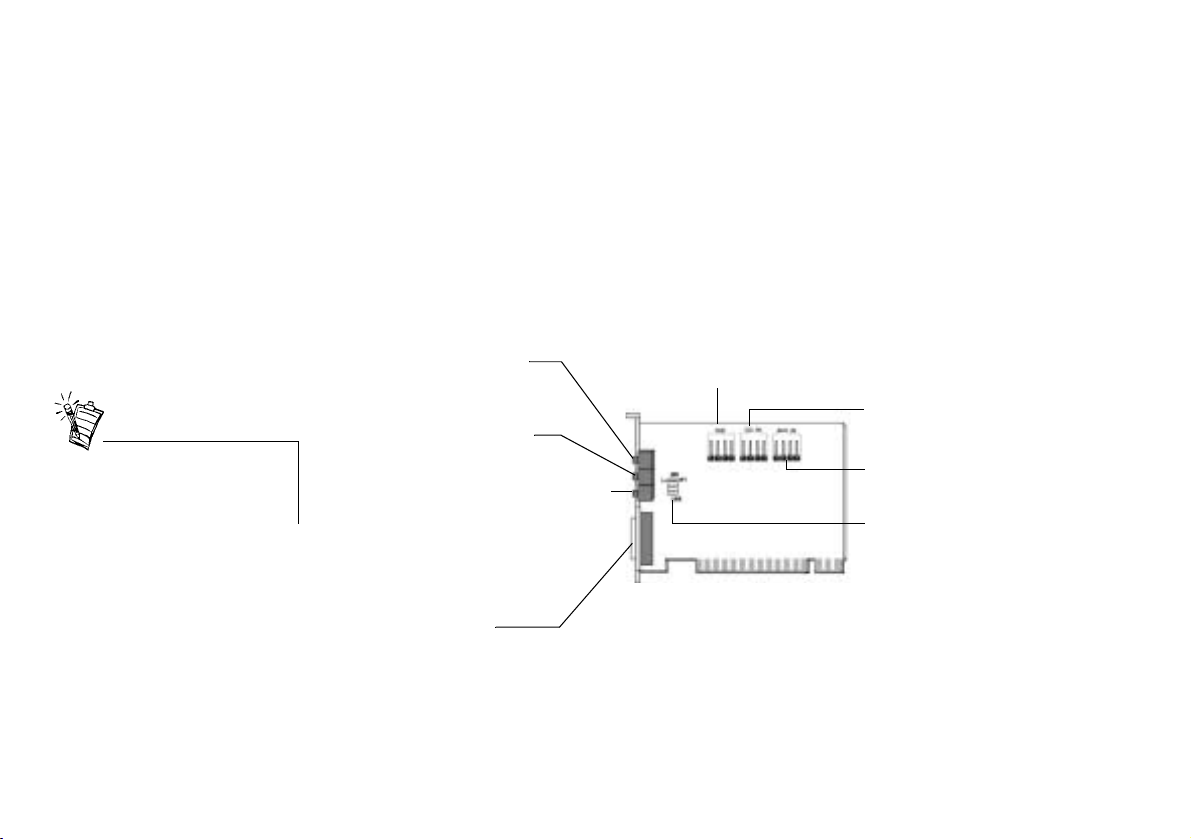
On the Audio Card
Jacks are one-hole connecting
interfaces whereas connectors are
multi-pin interfaces.
4 About Your VIBRA™ 128 Card
Your audio card has these jacks and connectors which allow you to attach other devices:
Line In jack (Blue/Light Blue)
Connects external devices such as
cassette, DAT, or Minidisc player)
for playback and recording.
Microphone In jack (Red/Pink)
Connects an external microphone
for voice input.
Line Out or Speaker Out jack (Green/Lime)
Connects powered or non-powered
speakers.
OR
Line Out or SPDIF Out jack (Green/Lime)
Connects powered speakers or digital
devices. Refer to the online Help for the
SPDIF Out mode selection.
Joystick/MIDI connector
Connects a joystick or a MIDI device.
Y ou can buy an optional MIDI kit that
allows you to plug in the joystick and
MIDI device simultaneously.
Telephone Answering Device/Modem connector
Connects a voice modem to transmit and receive audio signals.
CD Audio connector
Connects a CD-ROM drive using
an MPC-3 CD audio cable.
AUX connector
Connects a TV card or second
CD-ROM drive.
Front Line Out/Speaker Out
jumper (JP1)
Selects between Line Out (default)
or Speaker Out mode for the
Green/Lime jack. Your card may
not support Speaker Out and,
thus, may not have this jumper.
Figure 1: Jacks and c onnectors on your audio card.
Page 5

To Install the Card and Related Hardware
1. Switch off your system and all peri pheral devic es, and then touch a metal plate on your
computer to discharge any stat ic elec tricity.
2. Unplug the power cord from the wall outlet.
3. Remove the cover of your computer to expose the mothe rboard and PCI slots.
4. Find an available PCI slot. Remove the cover plate at the back of the computer to create an
opening for the audio card's jacks. Place the screw aside for later use.
5. (Only for certain models) Adjust the Line Out/Speaker Out jumper (JP1) as follows:
If you are using powered speakers for the Line Out/ S pea ker Out jack, set th e jumper as
❑
shown in Figur e 2.
If you are using non-powe red speakers for t he Line Out/Speak er Out jack, set the jumper
❑
as shown in Figure 3
.
Figure 2: Line O ut mode (default )
6. Align your card's 32-bit slot connector with the expansion slot and press the card into the
slot gently and e v enly , wi th the ex ternal jacks facing the outsi de of the co mputer . Ensure that
the bus connector has been pressed in as far as it will go and is sitting firmly inside the
expansion slot.
7. Plug the CD-ROM audio cable into the CD Audio connecto r and plug the s pea kers into t he
Line Out/Speaker Out ja ck (see Figure 1). Make any other internal con nec tions applicable
for your computer, including modem or video card connection s.
8. Replace the computer c over . Plug al l components back int o their re specti ve out lets. You may
now start the computer.
Figure 3: Speaker Out mode
About Your VIBRA™ 128 Car d 5
Page 6

To Install VIBRA 128 in Windows 95/98/ Me
To Install Audio Drivers
To Install Audio Drivers
❑
For Version (4.00.950/A)
❑
For Version (4.00.950B/C)
❑
For Windows 98/Me
❑
To Install Software
❑
To Uninstall VIBRA 128
❑
When you start your c omputer after installing the audio card, Windows 95/98/Me
Note:
automatically detects the aud io card ins talled in your comp uter.
For Version (4.00.950/A)
For Version 4.00.950B/C
6 About Your VIBRA™ 128 Card
1. In the audio card’s
Provide d By H a rdw a re M anufact urer
2. Inse r t th e in s t allatio n CD in t o th e CD-ROM drive.
3. In the
4. Follow the instruct ions on the screen to complete the audio driver installation.
1. Inse r t th e in s t allatio n CD in t o th e CD-ROM drive.
2. In the
3. Click the
4. Type the path or cli ck the Browse button to select the path of the drivers’ location (that is,
Install From Disk
(where D: represents your CD-ROM drive and
that you want to install) and click the OK button.
Update Device Driver Wizard
Othe r Loca tions
D:\AUDIO\
Language
and click the OK butto n.
represents the language of the software that you want to install)
New Hardware Found
dialog box, type
Language
\DRIVERS\WIN9XDRV,
option.
dialog box, select the
option and click the OK button.
D:\AUDIO\
Language
dialog box, click the
Language
represents the language of the software
where D: represents your CD-ROM drive and
Driver From Disk
\DRIVERS\WIN9XDRV
button.
Next
Page 7

5. Click the
If the system pr ompts you for the instal lation CD ag ain, cli ck the OK button and re peat from
Step 4.
The audio drivers are copied to your sys tem.
Finish
butto n.
For Windows 98/Me
To Install Software
To Uninstall VIBRA 128
1. Insert the VIBRA 128 installation CD and click the
2. Select the
the
3. Clear all check boxes and check only the
Browse
Windo ws 98:
Windows Me:
ROM drive and
and click the
4. Click the
5. Click the
6. Restart your system when prompted.
1. Make sure that the installation CD is in your CD-ROM drive. Double-click the
Computer
icon.
2. The VIBRA 128 installation screen appears.
Clic k th e OK button.
3. Follow the instructions on screen to com p lete the installation.
4. Restart your system when prompted.
1. Click
2. Double-click the
Search For The Best Driver For Your Device (Recommended)
button.
Next
Specify a Location
button and point to the path of the drivers’ location (that is,
D:\AUDIO\
D:\AUDIO\
Language
Next
butto n to in stall the Wind ow s 98 /Me drive r s.
Next
button when the installation is complete.
Finish
icon on your Win dows Desktop, the n double-click on your
->
Start
Settings
Add/Remove Programs
Language
Language
represents the language of the software that you want to install)
button.
->
Control Panel
\DRIVERS\WIN9XDRV
\DRIVERS\WDMDRV,
.
icon.
Next
button.
option and c lick
check box. Type or click the
where D: represents your CD-
CD-ROM drive
My
About Your VIBRA™ 128 Car d 7
Page 8

To Install VIBRA 128 in Windows NT 4.0/ Windows 2000
3. On the
4. Click the
❑
❑
❑
Install/Uninstall
Add/Remove
software.
To Install Audio Drivers and Software
To Uninstall VIBRA 128
If a Windows NT 4.0 Service Cont rol Man age r error message appears ...
tabbed page, select
button, and then click the
VIBRA 128
.
button when prompted to remove the
Yes
To Install Audio Drivers and Software
To Uninstall VIBRA 128
Windows NT 4.0
Windows 2000
8 About Your VIBRA™ 128 Card
1. Insert the installation CD into your CD-ROM drive.
The installation s cre en appears.
2. Follow the instructions on the screen to compl ete the installation.
1. Click
2. Double-click the
3. From the
Remove
4. Close the
1. Click
2. In the
3. In the
Change/Remove
4. After the uninstallation, click the
->
Start
Start
Control Panel
Add/Remove Programs
Settings
Audio Devices
. Click
Yes
Mult im edia Prop erties
->
Settings
->
Control Panel
Multimedia
tabbed page, sel ect any existing audio de vices and then clic k
when prompted to remove the driver.
->
Control Panel
window, double-click the
button.
.
icon.
window and restart your computer.
.
Add/Remove Programs
dialog box, select the VIBRA 128 entry, and then click the
butto n.
Close
icon.
Page 9

If a Windows NT 4.0 Service Control Manager error message appears ...
If error messages appear at system restart, it is because you removed an audio card from your
computer after you have successfully installed the VIBRA 128 card. The drivers of the
removed audio card ca nnot locate the card.
To solve this problem:
1. Lo g on to your computer as Administrator.
2. Click
3. Double-click the
4. In the list, under these entries
Audio Devices
❑
MIDI Devices And Instruments
❑
remov e all items except
Audio for VIBRA 128 / SB AUDIO PCI
❑
MIDI for VIBRA 128 / SB AUDIO PCI
❑
5. Click the OK button to close the dialog box.
The drivers are removed.
Start
->
Settings
->
Control Panel
Multimedia
.
icon, and then click the
Devices
tab.
About Your VIBRA™ 128 Car d 9
Page 10

Testing the Installation
After the drivers are installed, you can use Creative PlayCent er to test whether your audio card
is working properly.
1. Click
2. Start Windows Explorer, and then browse to any folder that contains a file with a .WAV
extension.
3. Drag the .WAV file from Windows Explorer to Pl ayCenter. You should hear the selected
sound being played. If you en counter any proble m s, cons ult the “Troubleshooting in
Window s 95 /98/Me” section of the VIBRA 128 online Help.
Start
->
Programs
->
Creative
->
Creative PlayCenter
.
10 About Your VIBRA™ 128 Card
Page 11

General Specifications
Wave-Table Synthesis
3D Audio Technology
Memory Subsystem
MIDI Interface/Joystick Port
On-Board Connectors
Creative synthesis eng ine
❑
Digital effe cts engine for re verb and chorus
❑
128-voice polyphony and multi-timbral capabi lity
❑
2MB, 4MB and 8MB sample sets included
❑
Support for Microsoft DirectSound and DirectSound3D audio technology in two-speaker
❑
mode
Multi-Algorithm reverb and chorus
❑
Utilizes system RAM for wave-table samples
❑
User configurable for 2MB, 4MB or 8MB
❑
Built-in 15-pin MIDI interface (cable available separately)
❑
Compatible with So und Blaster and MPU-401 UART modes
❑
IBM-compatible 15-pin joystick port with analog support
❑
Line In
❑
Microphone In
❑
Line Out/Speaker Out or Line Out/SPDIF Out
❑
MIDI/Joystick port
❑
Telephone Answering Device In/Out
❑
CD Audio In
❑
Auxiliary In
❑
About Your VIBRA™ 128 Card 11
Page 12

Works With The Following
Standards
General MIDI
❑
Plug-and-Play
❑
Sound Blaster PCI
❑
Microsoft Direc tSound, DirectSound3D, and EAX
❑
Creative Mixer
6 Channel Mixer control for access to CD, TAD, Microphone, Line, Music Synthe siz er and
❑
Digital Audio
Spatial audio (3D) control for Digital Audio and Music Sy nthesizer
❑
No part of this publication may be reproduced or transmitted in any form or by any means without the prior written consent of Creative Technolog y Lt d.
Copyright © 2000 Creati ve Techno logy Ltd. All rights reserved.
Version 1.1
October 20 00
Sound Blaster and Blaster ar e registered trademarks, and the Sound Blast er Live! logo, the Sound Blaster PCI log o, EAX, Creative Multi Speaker Surround
are trademarks of Creative Technology Ltd. in the United States and/or other countries.
Microsoft, MS-DOS, and Windows are registered trademarks of Microsoft Corporation.
All other products are trademarks or regis tered trademarks of their re s pectiv e owners.
 Loading...