

Page 1

User's Guide
®
TM
VA L U E
Sound
Page 2

User’s Guide
Creative Sound Blaster Live! Value
Creative Audio Software
Information in this document is subject to change without notice and does not represent a
commitment o n the part of C r eative Technology Ltd. N o part of thi s manual may be reproduced
or transmitted in any form or by any means, electronic or mechanical, including pho tocopying
and recording, for any purpose without the written permission of Creative Technology Ltd. The
software described in thi s document is furnished under a lic e ns e agreement and may be used or
copied only in accordance with the terms of the license agreement. It is against the law to copy
the software on any other medium except as specif ically allowed in the license agreement. The
licensee may make on e copy of the softwar e for backup purposes.
Copyright © 1998 by Creative Technology Ltd. All rights reserved.
Version 1.00
September 1998
Sound Blaster and Blaster are registered trademarks, and the Sound Blaster Live! logo, the Sound Blaster PCI
logo, EMU10K1, E-mu En vironmental Modeling, Environmental Audio, Creative Multi Speaker Surround,
and DynaRAM are trademarks of Creative Technology Ltd. in the United States and/or other countries.
E-Mu and SoundFont are registered trademarks of E-mu Systems, Inc. PCWorks and FourPointSurround are
trademarks of Cambridge SoundWorks, Inc. Microsoft, MS-DOS, and Windows are registered trademarks
of M icrosoft Co rporation. A ll other produc ts are trademarks or registered trademarks of their
respective owners.
This product is covered by one or more of the following U.S. patents:
4,506,579; 4,699,038; 4,987 ,600; 5,013,105; 5, 072,645; 5,111,727; 5,144,676 ; 5,170,36 9;
5,248,845; 5,298,671; 5,303 ,309; 5,317,104; 5, 342,990; 5,430,244; 5,524,074 ; 5,698,80 3;
5,698,807; 5,748,747; 5,763 ,800; 5,790,837.
Page 3

Safety & Regulatory Information
The following sections contain notices for various countries:
Safety Information
CAUTION: This device is intended to be installed by the user
in a CSA/TUV/UL certified/listed IBM AT or compatible
personal computers in the manufacturer’s defined operator
access area. Check the equipment operating/installation manual
and/or with the equipment manufacturer to verify/confirm if
your equipment is suitable for user-installed application cards.
ATTENTION: Ce carte est destiné à être installé par
l’utilisateur, dans un ordinateur compatible certifié
CSA/TUV/UL ou listé IBM AT, à l’intérieur de la zone définie
par le fabricant. Consulter le mod e d’emploi ou l e fabri cant de
l’appareil pour vérifier ou confirmer si l’utilisateur peut y
installer lui-même des cartes périphériques.
Notice for the USA
FCC Part 15: This equipment has been tested and found to
comply with the limits for a Class B digital device, pursuant to
Part 15 of the FCC Rules. These limits are designed to provide
reasonable protection against harmful interference in a
residential installation. This equipme nt ge nera tes, uses, and can
radiat e radio frequency energy and, if not in stalled a nd used i n
accordance with the instructions, may cause harmful
interference to radio communications. However, this notice is
not a guarantee that interference will not occur in a particular
installation. If this equipment does cau se harmful inte rference to
radio or television reception, which can be determined by
turning the equipment off and on, the user is encouraged to try
one or more of the following measures:
❑ Reorient or relocate the receiving antenna.
❑ Increase the distance between the equipment and receiver.
❑ Connect the equipment to an outlet on a circuit different
from that to which the receiver is connected.
❑ Consult the dealer or an experienced radio/TV technician.
CAUTION: To comply with the limits for the Class B digital
device , p ur sua nt to Pa rt 1 5 of th e FCC Ru le s, this device mu st be
installed in computer equipment certified to comply with the
Class B limits.
All cables used to connect the computer and peripherals must be
shielded and grounded. Operation with non-certified compu ters
or non-shielded cables may result in interference to radio or
television reception.
Modifications
Any changes or modifications not expressly approved by the
grantee of this device could void the user’s authority to operate
the device.
Notice for Canada
This apparatus complies with the Class “B” limits for radio
interference as specified in the Canadian Department of
Communications Radio Interference Regulations.
Cet appareil est conforme aux normes de CLASSE “B”
d’interference radio tel que spe’cifie’ par le Ministère Canadien
des Communications dans les règlements d’interfe’rence radio.
Declaration of Conformity
According to the FCC96 208 and ET95-19
Name: Creative Labs Inc.
Address: 1901 McCarthy Boulevard
declares under its sole responsibility that the product
Trade Name: Creative Labs
Model Number: CT4620/CT4660
has been tested according to the FCC / CISPR22/85
requirement for Class B de vices and found compliant
with the following standards:
EMI/EMC: ANSI C63.4 1992, FCC Part 15 Subpart B
This device complies with part 15 of the FCC Rules.
Operation is subject to the following two conditions:
1. This device may not cause harmful interference,
2. This device must accept any interference received,
Ce matériel est conforme à la section 15 des régles FCC.
Son Fonctionnement est soumis aux deux conditions
suivantes:
1. Le matériel ne peut étre source D’interférences et
2. Doit accepter toutes les int er f ér en ces reques, Y
Supplementary:
CT4660 is an optional add-on board for CT4620. It’s
providing SPDIF In/Out, and MIDI In/Out to any external
device.
Milpitas, CA. 95035
United S t ate s
Tel: (408) 428- 66 00
and
including interference that may cause undesirable
operation.
compris celles pouvant provoquer un
fonctionnement indésirable.
Compliance Manager
Creative Labs, Inc.
April 28, 1998
Compliance
This product conforms to the following Council Directive:
❑ Directive 89/336/EEC, 92/31/EEC (EMC)
Page 4

Contents
Introduction............... ... .. .. ..... ... .. .. ... .. .. ...................... .. ..... ................... .. ..... ....... v
Sound Blaster Live! Value Benefits.......... ........ .... ....... ....... .......... .......v
Checking Sy stem Requi re ments...... .. ... .. ..... .. ... .. ..... .. ... .. ..... .. .. ... .... ... .. ... .... ... .vi
Before You Begin..................................... ............................................. ...........vi
Getting More Inform atio n...... ...................................... .......................vi
Document Co nventions................................................... ....................vi
1 Knowing and Installing Your Cards
On the Audio Card.............................. ............................................. ..............1-1
To ins t all the ca r d s and related peripherals............................................... ....1-2
Positioning your spe ake rs................. ...................................... .......................1-4
Connecting Creative PC-DVD........ .......... ......... .......... ......... ......... .......... ....1-4
2 Installing Software in Windows 95/98
Setting Up the Audi o D river s.............................. ..........................................2-1
Installing the App licatio ns....... .. .. ..... .. ... .. ..... .. ... .. ..... .. ... .. ..... .. .. ... .... ... .. ... .... ..2-2
Using Sound Blaster Live! Value...................... ....... ....... ....... ....... ....... ....... ..2-3
Configuring Your Speak er s........................................... ................................2-3
Experiencing Sound Blaster Live! Value....... .......................... .....................2-4
Uninstallin g the Applications......... ....................... ................. .......................2-4
Reinstalling the Audio Drivers From the Installation Disc........................ ..2-4
Playing Legacy Games.............. .................................................... ................2-4
3 Installing Software in Windows NT 4.0
Installing the Sof twar e............. .. .. ..... .. ... .. ..... .. ... .. ..... .. ... .. ..... .. .. ... .... ... .. ... .... ..3-1
Setting Up Joystick Drivers in Windows NT 4. 0.... .....................................3-1
Using Sound Blaster Live! Value; Configuring Your Speakers..................3-1
Experiencing Sound Blaster Live! Value....... .......................... .....................3-2
Reinstalling the Audio Drivers From the Installation Disc........................ ..3-2
Removing Unused Sound Blaster Drivers............................... ............ .........3-2
A General Specifications
Features..........................................................................................................A-1
Connectivity..................................................................................................A-2
iii
Page 5

B SB16 Emulation in MS-DOS/Windows 95/98
Background ......... ..... ..... .. ... .... ... .. ..... .. ..... .. ..... ... .... ... .. ..... .. ..... .. ..... .. ..... .. ... ....B-1
Understanding the Insta llation Program in Windows 95/98............ ...........B-1
The AUTOE XE C.BAT File Setti n g s........................ .......................B-2
The CONFIG.SYS File Settings....... ............................................. ..B-2
Understanding the Syste m Resource Set tin g s............ ........................ .........B-2
Input/Output (I/O) Addresses.......................... ............ ....... ............ ..B-3
Interru pt Reques t (I RQ) Line............ ... .. .. ..... .. ... .. ..... .. ... .. ..... .. .. ... ....B-3
Direct Memor y Access (DMA) Channel........................................B-3
Understanding the Environment Variables................ .................................B-3
CTSYN Environme n t Variab le................................................. .......B-3
BLASTER Environment Variable........................................ ...........B-4
Determining Res ources. .. ..... .. ... .. ..... .. ... .. ..... .. ... .. ..... .. .. ... ..... .. .. ... .... ... .. .. ..... ..B-4
Selecting the Best Au d i o Options in a Game..............................................B-4
MS-DOS Mode Utilities........... .. ... .. ..... .. .. ..... ... .. ..... .. .. ..... ... .. .. ..... .. ... .... ... .. ..B-5
C Changing Audio Card Settings
Enabling/D isabling Gameport Joystick I n terface.......................... ..............C-1
Enabling/D isabling Ot h er Features.......................................................... ....C-2
D Troubleshooting
Problems Installing Sof tware.............................. ..........................................D-1
Problems with Sound........... .. ... .. ... ....................... .......................... ..............D-1
Insufficient SoundF ont Cache....................... ....... ....... ........ ....... ....... ....... ....D-3
Problems with Joystick........ ............................................. ............................D-3
Resolving I/O Conflicts................... ............................................. ................D-3
Problems in DOS.................................................. ........................................D-4
Problems in Windows NT 4 .0.... ............................................. .....................D-4
Problems with Encore DVD Player................... ..........................................D-4
E Technical Support
Inside Eu r o p e............................................. ............................................. .......E-2
Through CompuServe............ ... ...................................... ..............................E-2
By Fax.... ............................................. ............................................. ..............E-2
If You Have a Problem.......................... ............................................. ...........E-2
Returning a product for repair.......................................... ................E-3
Limited Warranty............ ..... .. ... .. ..... .. ... .. ..... .. ... .. ..... .. .. ... ..... .. .. ... .... ... .. .. ..... ..E-3
Creative Technical Services
iv
Page 6

Introduction
With the Sound Blast er Live!— the most
powerful sound card ever—taking the
industry by storm, Creative now introduces
Sound Blas te r Li v e! Value for the mai ns tr eam
market. Th e casual PC entertainment
enthusia sts and even the non-gaming music
lover s can now enjoy the wonde rs of Sound
Blaster Live!’s Environmental Audio. Sound
Blaster Live! Value offers the same quality
and perfor m ance of the highly successful
Sound Blaster Live!—without the extended
Digital I/O card. W ith featur es and
performances surpas sing professional aud io
equipment . Sound Blaster Live! Value
incorpor ates the superior surr ound - sound
rendering of Environmental Audio
sound so real it has to be Live! You'll enjoy
music productions so dyn am ic like you're
right in the middl e of an orche stra. The Sou nd
Blaster Live! Value hardware-ac c el er ated
Envir onm ental Audio Extensions
supporting new tit les, off ers an experience
that goes be yond 3D Audi o. Add the ab ility to
enhance al l your existing games and legacy
audio with true digital processing and it will
blow your home theater away!
Sound Blaster Live! Value Benefits
❑
Hollywood-Quality Audio Re-creation
With professional-quality synth esizers
and digital I/O, Sound Blaster Live! Value
prov id es au dio fidelity that rivals movie
theaters with digital sound. Excellent
overa ll audio fi delity is ach ieved with an
average Noise Floor of -120 dB, a level
unheard of in the PC industry.
❑
Powerfu l Audio Processi ng Engine
The EMU10K1
most powerful integrated music, audio
and effe cts engi ne a v ail abl e. Eve ry si gnal
is process ed at 32-bit, 192 dB, 48 kHz
using 8-point interpol ation to smoothen
™
audio processor is the
™
to crea te
™
(EAX™),
the sound, instantly i m proving any audio
source. Apply real- time effects including
Reverb, Chorus, Flanger, Echo, and Pitch
Shifter, that rival stand-alone expensive
professional effects processors.
❑
Envi ronmental Audio™ Enhances
Existing Contents
Experien ce depth and realism beyond
existi ng 3D audio. App ly preset
envi ronments such as
underwate r
existing games and applications for
incredi bly true sound. Game
envi ronmental settings al so make your
existing games come “alive”
instantaneously.
❑
Multiple Speaker Output
Produce surround-sound audio on your
PC with bui lt-in suppor t for two or four
analog speakers.
❑
256-Voice Music Synthesis
256-voice capability goes beyond the
quality and perfor mance a va ilable i n most
profess ional mus ic equ ipment . Usin g host
memory, you can choose from E-mu's 2
MB, 4 MB, or 8 MB SoundFont
profess ional-quality sample banks fo r
music repr oduction. Or use up to 32 MB
of memory f or am azi ng Soun dFont mus ic
fidelity. All these without sacrificing on
CPU utilization.
❑
Sound Blaster PCI Sta ndard
You can be assured of near -per fec t Sou nd
Blaster compatibility on the PCI bus while
enjoying all its benefits. It works with the
existi ng M S -D OS
Windows
replacing your existing ISA sound card.
❑
Environmental Audio Extensions
(EAX™)/Broad Driver Support
Envi ronment A udio Ext ension s is an o pen
standard that allows the broadest suppor t
from software developer s. Supports
Microsof t D irectSound
DirectSo und3D, and derivative
tech no lo g ie s. Advanced ar ch itecture is
that can be applied to your
®
-based titles, completely
hall, cave
®
-based an d
®
,
or
®
™
v
Page 7
ready for the coming generations of
WDM, DLS, and IEEE 1394/Firewire
devices.
❑
Sound Blast er Live! Webs ite
www.sblive.com
Exciting new applications and developer
support wil l be available on the Sound
Blaster Live! website. For instan t access
to the late st applications, en hancements,
drivers, and more, visit www.sblive.com.
Refer to online documentation (RE A DME or
HLP files) or specifications on the outer box
for details.
Before You Begin
The RE A D ME fil e on th e in stallation
CD-ROM contains information and changes
not av ailable at the time of printing. Read the
file before you continue.
Checking System Requirements
For Creative softwa re, your ca rds requir e at
least:
❑
Intel Pentium® class 133 MHz or
equiv alent processor
❑
Windows 9 5, 98 or Windows NT 4.0
❑
16 MB RAM for Windows 95/98
(32 MB RAM recommended),
32 MB RAM for Windows NT 4.0
❑
72 MB of free hard disk space
for Windows 95/98;
55 MB for Windows NT 4.0
❑
1 free PCI bu s slot
❑
Powere d speakers or external am plifier
(recommended: Cambridge SoundWorks
speakers)
Sound Blaster Live! Value gi ves you an
estimate of the har d di sk spac e re qui red w hen
you select it on the installation screen. Some
applications may require a system
configuration greater than that listed above.
Getting More Information
See the online
specifi ca ti ons a nd conn ector p in assi gnme nts ,
as well as instruct ions on using the various
applica tions in your audio package.
User’s Guide
for MIDI
Document Conventions
This guide uses the following conventions to
help you locate and identify the information
you need:
T able i: Tex t conventions.
Text In Represents
bold Text that must be entered
exact ly as it appears.
italic
UPPERCASE Directory name, file name,
< > Symbols, letter s, and key
Tit le of a book or a
placeholder, which
represents the information
you must provide.
or acronym.
names on the keyboard.
vi
Page 8
Knowing and Installing Your Cards
This chapter is organized as follows:
❑
On the Audio Card
❑
T o in st all t he c ar ds a nd re late d pe ri phe ra ls
On the Audio Card
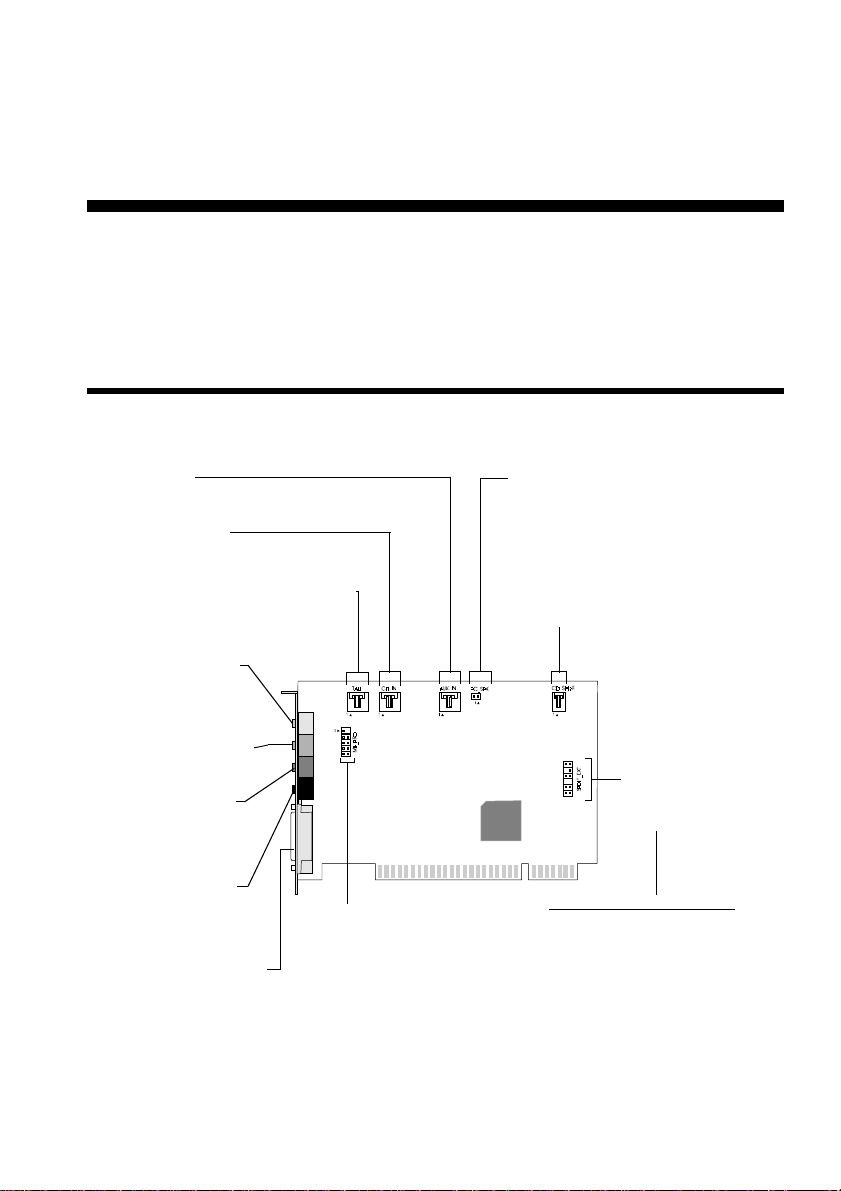
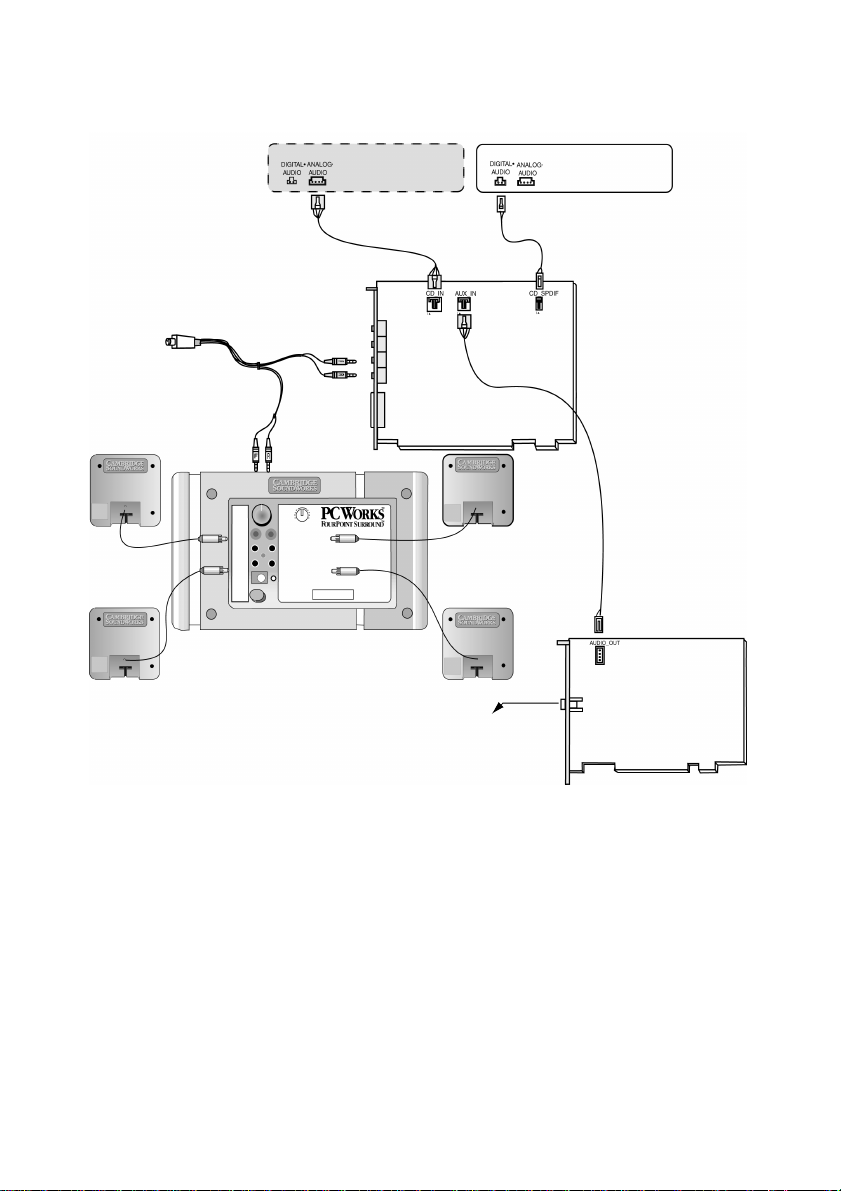
Your audio card has these jacks an d connectors w hich allow you to attach other de vices:
AUX connector
Connects to internal audio sources such as
TV Tuner, MPEG, or other similar cards
CD Audio connector
Connects to the Analog Audio output on a
CD-ROM or PC-DVD drive using a CD audio cable.
Telephone Answering Device connector
Provides a mono connection from a standard
voice modem, and transmits microphone
signals to the modem.
Line In jack (blue)
Connects to external devices
(such as cassette, DA T, or
Minidisc player) for playback
or recording.
Microph one In jack (red)
Connects to an external
microphone for voice input.
Line Out jack (green)
Connects to powered
speakers or an amplifier for
external audio output. Also
supports headphones.
Rear Out jack (black)
Connects to powered
speakers or an external
amplifier for audio output.
Joystick/MIDI connector
Connects to a joystick or a
MIDI device. You can buy an
optional MIDI kit that allows
you to plug in the joystick and
MIDI device simultaneously.
Figure 1-1: Jacks and connectors on the Sound Blaster Live! Value card
.
Modem connector
Connects to any modem card that is
specifically designed for this interface.
❑
Positioning your speakers
❑
Connecting Creativ e PC-DVD
PC Speaker connector
Connects to your motherboard’s
speaker connector (refer to “Redirecting
PC Sounds to External Speakers” in the
online
User’s Guide
CD SPDIF connector
Connects to the SPDIF (Digital Audio)
output (where available)
CD-ROM or PC-DVD drive.
SPDIF Extension
(SPDIF Digital I/O)
connector
Connects to a digital
I/O device. See pin
assignment below
12-pin SPDIF_EXT connector pin
Pin Name Description
1 SPDIFO#0 SPDIF Out signal
2 GND Ground
3 KEY
4 VCC Power
5 GND Ground
6 SPDIF_IN SPDIF In signal
7 NC Not connected
8 NC Not connected
9 SPDIFO#1 SPDIF Out signal
10 GND Ground
11 SPDIFO#2 SPDIF Out signal
12 SPDIFO#3 SPDIF Out signal
for details).
on a
1
Knowing and Installin g Your Cards 1-1
Page 9
Note: Jacks ar e one-ho le conne ctin g int erf ac es whe rea s co nnecto rs cons ist of man y pai rs of
pins. Some connectors here may not be available on your card. Refer to the online
Guide,
“Hardware Inform ation”, for detail s on connecto r pin assignm ents.
User’s
Line Out and Rear Out jacks can be used simultaneously to power 4.1 channel speaker
systems, for example, PCWorks FourPointSurround from Cam bridge SoundWorks.
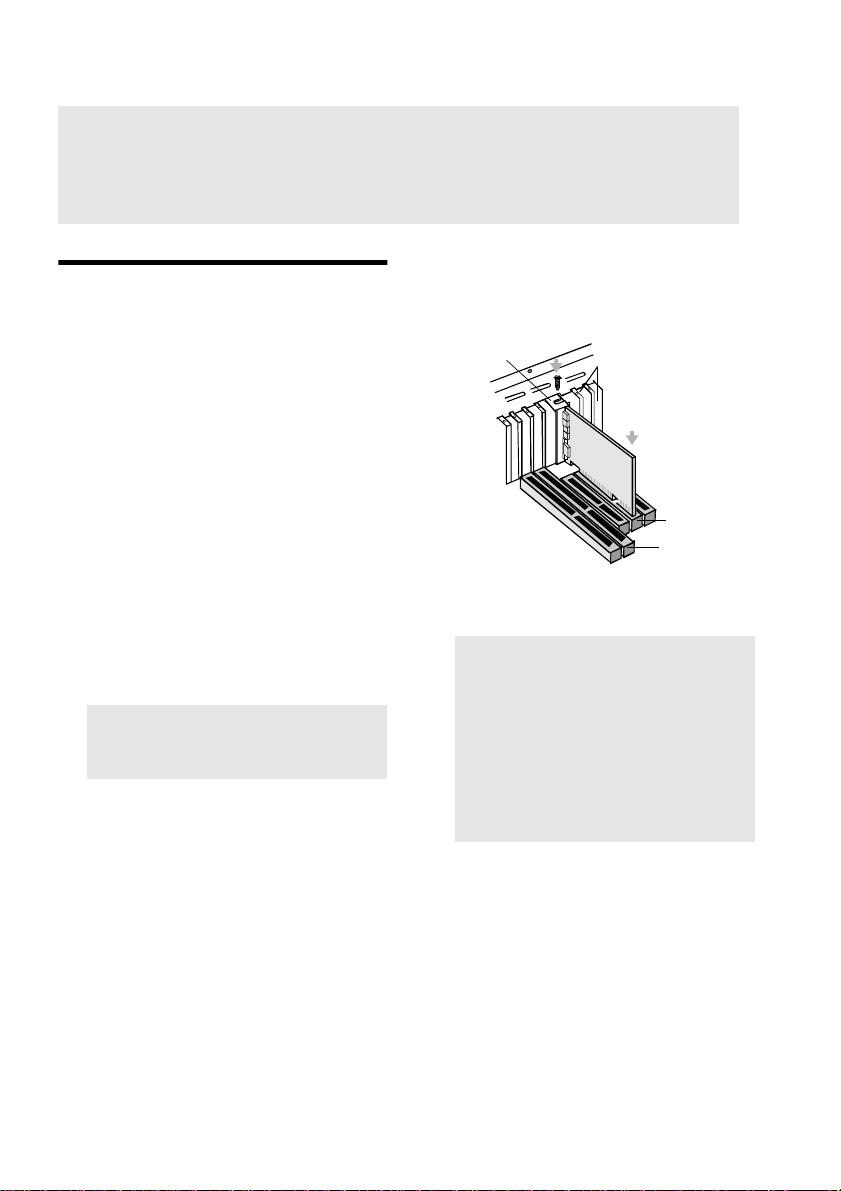
To install the cards and related peripherals
1. Switch of f your system and all peripheral
device s.
2. Touch a metal plate on your system to
ground yourself and to discharge any
static electricity, and then unplug the
power cord from the wall outlet.
3. Remove the cover from your system.
4. Remove the metal plates from an unused
PCI expans ion slot i n your syste m and put
the sc rews aside, to be us e d la ter.
5. Align the au di o ca rd w ith the vacant PC I
expansi on slot. Pres s the card gently and
evenly into the slot as shown. Ensure that
the card sits firmly inside the PCI
expansi on slot.
Warning: Do not force the audio card
into the slot. If it does not fi t properly,
gently remove it and try again.
6. Secure the card to th e e xpa nsion s lot wit h
a screw.
7. There are several w ays to configure your
speaker system for the best Environmental
Audio experience; see the
Speaker
Config uratio n Guid e
leafle t. T o learn ho w
to connect the rest of the devices, see
Figure 1-3.
ii. Fasten the card to
the slot with a
screw.
Figure 1-2: Securing the audio card to the
PCI expa ns ion slot.
Unused brackets
i. Gently press the
audio card into the
slot.
PCI slot
ISA slot
Note: The joys tick connector on your
audio card is identical to that on a
standa rd PC g ame cont r ol ada pt er or th e
game I/O connecto r. You can connect
any ana log joystic k with a 15-pin
D-shell connector or any device
compatible with the standard PC
joysti ck. T o use two joysti cks, you need
a Y-cable splitter.
8. Replace t he cove r onto your sy stem.
9. Plug the power cord back into the wall
outlet, and switc h on th e system.
1-2 Knowing and Installing Your Cards
Page 10
Notes:
If you are pla ying games in Windo w s 95/98 MS-DOS mode (that is, pure DOS mode), you
must:
• Connect the CD In connector to the Analog Audio jack of t h e PC -DVD or CD-ROM drive.
• Unmute the CD Audio device in the Play Control view of SB Live! Mixer.
If you connect to the Digital Audio and Analog Audio jacks of the same PC-DVD or CD-ROM
drive, make sure that in the Play Control view of SB Live! Mixer only the CD Audio or CD
Digital device is unmuted but not both.
If you get distorted or no audio at all, it is because your PC-DVD and CD-ROM drives do not
fully comply to SPDIF specifications. In such cases, make sure that you:
• Connect the CD In connector to the Analog Audio jack of t h e PC -DVD or CD-ROM drive.
• Unmute the CD Audio device in the Play Control view of SB Live! Mixer.
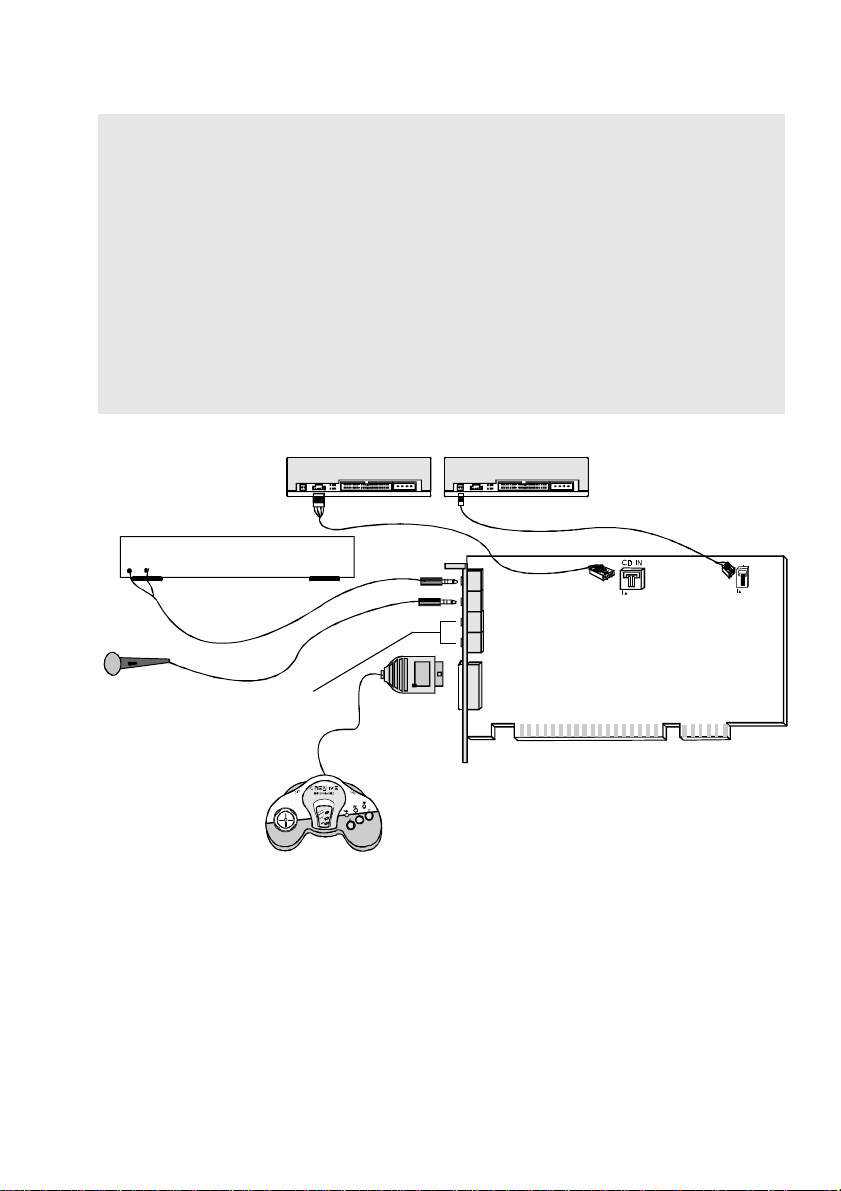
Line-out
Microphone
For details, see the
Guide
leaflet.
Cassette and CD player,
Synthesizer, etc.
Speaker Configuration
GamePad
Figure 1-3: Conn ecting other devices
CD-ROM drive
MPC-to-MPC
(4-pin) audio cable
PC-DVD drive
MPC-to-MPC (2-pin) audio cable
Line In
Mic In
Line Out
Rear Out
Joystick/MIDI
SB Live! Value card
CD Audio
connector
CD SPDIF
connector
Knowing and Installin g Your Cards 1-3
Page 11
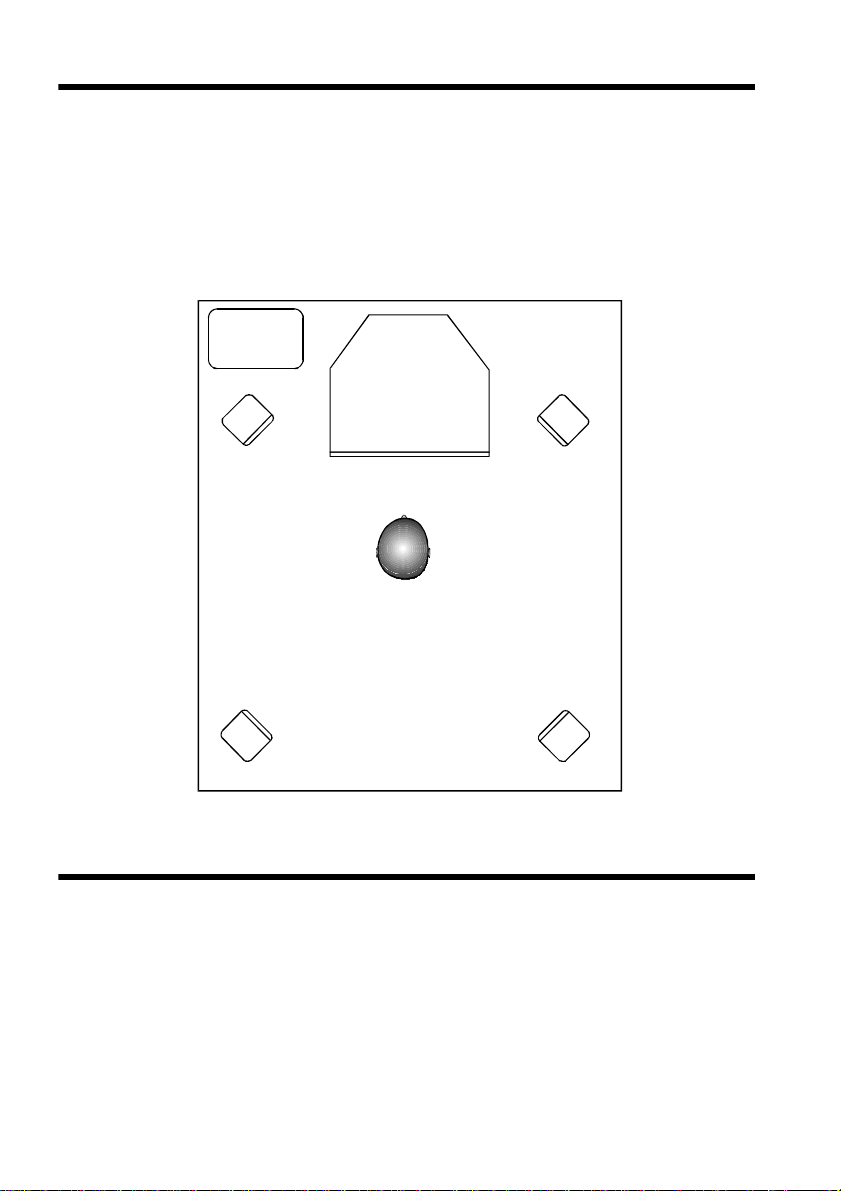
Positioning your speakers
If you are using four speakers, place them
such that they form the corners of a square
with you exactly in the centre (as in Figure
1-4) and the y are angled toward you. Make
sure the comp ute r moni to r is not bloc ki ng th e
Subwoofer
Computer monitor
Front left speaker
Rear left speaker
path of you r front speakers. You may want to
adjust t he relative positions of the speakers
until you ge t t he be st aud io e x perie nce . If yo u
have a subw oof er, place the unit in a c orn er of
the room fo r th e optimum bass respon s e.
Front right speaker
You
Rear right speaker
Figur e 1-4 : Recommended speaker positions for the 4-speaker configuration.
Connecting Creative PC-DVD
When you are playing your DVD movies or
games:
It is re commended t hat yo u connec t the Au dio
Out connect or of your Encore Dxr2 or
MPEG2 deco der c ard t o the Aux In co nnec tor
of the Sound Bl aster Live! Value card. When
you are playing your DVD movies or games,
1-4 Knowing and Installing Your Cards
make sur e t hat you se le ct (tha t i s, un mute ) the
Aux Input in the SB Live! Mixer’s Play
Control vie w.
To open the mixer, bring your pointer to the
top of th e scr een t o displ ay Cre ati ve Laun cher ,
click th e A udioHQ tab, and then click the
Mixer icon.
Page 12

❑ If your Encore Dxr2 or MPEG2 decode r
card is conn ected to an external Do lby
Digital (AC-3) decoder such as Desktop
Theater 5.1, either:
• Disconnect the So und Bl ast er L i v e! Value
card’ s Au x In c onn ect or fr om th e de cod er
card’s Audio Out connector (Highly
recommended),
OR
• Mute the Aux Input in the SB Live!
Mixer’s Pla y C on trol view.
❑ If your dec oder car d is
not
connect ed to an
external Dolby Digital (AC-3) decoder, it
is recommended that you:
1. Connect the Sound Blaster Live! Value
card’s Aux In conn ector to the decoder
card’s Audio Out connector.
2. Select (that is, unmu te) the Aux In put in
the SB L ive! M ix er’s Play Control view.
❑ If you:
• Get disto rted or no audio at all (Reason:
Your CD-ROM drives do not fully
comply to SP D IF specificat ions
),
OR
• Are playing games in Windows 95/98
MS-DOS mode (that is, pure D O S mo de),
do the foll owing:
1. Connect the CD In connec tor to the
Analog Audio jac k of the CD-ROM dri ve.
2. Unmute the CD Au dio device in the Play
Control view of SB Live! Mixer.
If you conne ct to the Digital Audio and
Analog Audio jacks of the
same
PC-DVD or
CD-R O M drive , m ake sure that in the Play
Control view of SB Live! Mixer, unmute only
one of CD Aud io or CD Dig ital de vi ce b ut no t
both.
Knowing and Installin g Your Cards 1-5
Page 13
MPC-to-MPC (4-pin) audio cable
CD-ROM drive (optional) PC-DVD drive
MPC-to-MPC (2-pin) audio cable
SB Live! Value card
To Dolby Digital (AC-3) decoder
(e.g., DeskTop Theater 5.1)
MPC-to-JST or
MPC-to-MPC
audio cable
(The position of the
jack and the connector
form may differ from
your card)
Dolby Digital (AC-3)
SPDIF Out jack
Figure 1-5: Connecting Creative PC-DVD.
MPEG2 decoder card
Page 14

2
Installing Software in Windows 95/98
This chapter shows you how to install the
audio software in Windows 95/98 after
installing your card. It consists of the
following sections:
❑
Setting Up the Audio Drivers
❑
Installing the Applications
❑
Using Sound Bla ster Liv e! Value
❑
Configuring Your Speakers
❑
Experienc ing Sound Blaster Live! Value
❑
Uninstalling the Applications
❑
Reins t a ll ing the Audi o Drive rs Fro m th e
Installation Disc
❑
Play in g Leg acy G am e s
Setting Up the Audio
Drivers
You need device drivers to control the
components on your audio card. After you
have installe d the card and sw itched on your
system, Windows 95/98 automatically detects
the co m p on e nts, and then either installs the
driv ers automatically or prompts you for the
driv ers. You may encounter the following
messages, which may not be in the sequence
shown.
❑
If a mess age s imila r to Figure 2 -1 ap pears ,
just take note of it and wait for the next
message.
Figure 2-1: Message box indicatin g the
detection of a device.
❑
If a dialog box similar to Figure 2-2
appears, click the Driver From Disk
Provid ed B y H ardware Manufactur er
option, and then click the OK button.
Figure 2-2 : Driver installat ion dialog box
where the Windows d efault driver
option is not ava il a b l e.
❑
If the Install from Disk dialog box or a
dialog box similar to Figure 2-3 appears:
1. Insert t h e installation CD into your
CD-ROM drive and select the drive .
2. If ther e is a Spec ify A Locat i on ch eck
box, make s ure it is selec te d an d cl ear
the other ch eck boxes.
3. Click the Browse button and select the
AUDIO\Language\WIN95DR V
folder
Languag e
where
software that you want to install.
is the la nguage of th e
Installing Software in Windows 95/98 2-1
Page 15

4. Click the OK button.
g
The required files are copied to you r
hard disk.
Figure 2-3: Windows 98 Add New Hardwar e
Wiz ard dialog box.
❑ If a dialog box similar to Figure 2-4
appears:
4. Click the OK button.
5. At the Copying Files dialog box, click
the Browse button and select the
AUDIO\Language\WIN95DRV
folder
Language
where
is the la nguage of th e
software that you want to install.
6. Click th e O pen button, and then click
the OK button twice.
The file is copied to your hard disk.
❑ If a dialog box similar to Figure 2-5
appears , cli ck the Nex t b u tton, an d fo llo w
the instructions on the screen to complete
the installati on of the driver.
Figure 2-5: Update Device Driver Wizard
dialog box at start of installation.
Figur e 2-4: Update Device Driver W izard dialo
box when driver cannot be found.
1. Click the Other Locations button.
2. At the Selec t O ther Locations dialog
box, click the Browse button and
select the folder
AUDIO\Language\WIN95DRV
Language
where
is the langua ge of the
software that you want to install.
3. Click the OK button, and then click
the Finish button.
Some of the requ ired files are copie d
to your hard disk. However, an error
message stating that a file
(
2GMGSMT.SF2
or otherwise) cannot be
found also appears.
2-2 Installing So f tware in Windows 95 / 98
❑ If a V e rsion Confli ct mess age box appe ars
about
VJOYD.VXD
MSJSTICK.DRV
and
, click
the Yes button to keep the files.
Installing the Applications
1. If your in stallat ion disc is already in your
CD-ROM drive, eject the disc and insert it
again.
The di sc su pports Window s Au toPlay
mode and starts running automatically. If
not, see “Problems Ins talling Sof tware”
on page D-1.
2. Follow the in structions on the screen to
compl et e th e ins ta lla tion.
Note:
It is highly recommen ded that you
install SB Live! Experience. It appears as a
check box on the Aut o Pl ay screen.
Page 16

Using Sound Blaster Live! Va l ue
Every bundled appl ication provides onl ine
help to guid e you along when yo u use it.
Figure 2-6: Creative Launcher.
For the latest upda tes and drivers, further
information, tips, tricks and plug-ins, check
the SB Live! websit e any time at
http:/ /www.sblive.com
A fast way of ge tt in g to the w ebsi te is to clic k
the right-most button (the Environmental
Audio icon) on Creative Launcher.
Creative Launcher
quickly start your applications and get to the
Creative and the SB L ive! ow ne rs ’ websites .
T o d ispl ay Lau nche r , br in g your po in te r to th e
top of the screen.
Creative PlayCenter
types of media—multimedia files (MIDI,
Wave, etc.), audio CDs, and Video
CDs—using a sing le play er! Ther e i s no need
to use dif fere nt pla yers t o play d iffer ent med ia
types. Ju st insert or select your media and
PlayC enter will d o th e re st.
Figure 2-7: Creative PlayCenter.
To run PlayC enter, bring your pointe r to the
top of th e scre en to disp lay Crea ti ve L auncher ,
click the P rograms tab , and then click the
PlayCenter icon.
is a one-sto p shortcut to
allows you to play most
Configuring Your Speakers
Note: If you ha ve a 4-speaker
conf iguration (2 in the front, 2 in the rea r),
and there is no sound comi ng from the rear
speake rs, open the Sou nd Blaster Li ve!
Speaker applet to change to the correct
speaker output setting.
1. Bring your po inte r t o t he top of t he s creen
to display Creative Launcher, then click
the Audio HQ tab, followed by the
Speaker icon.
The Speaker dialog box appears.
2. On the Configuration tabbed page, make
sure that the value in the Output box
corresp onds to the number of speakers
you are using. For example, if you are
using two pairs of speakers, select the “4
Speaker s” option; if you leave the Output
value as “2 Speakers”, there will be no
sound from your rear spea kers.
3. Using Creative PlayCenter or Windows
Media Player, open a Wave fil e in your
computer and play it. In the Speaker
dialog box, drag the Wave source icon
from the Panning Sourc e box to each
speaker in the Preview box in turn.
You should hear the select ed sound being
played. If you do not , see “Pr obl ems with
Sound” on page D-1.
Installing Software in Windows 95/98 2-3
Page 17

Experiencing Sound Blaster Live! Value
Congratulations! You have successfully
installed Sound Blaster Live! Value. To
enhance your experience, it is highl y
recommen ded that you run these programs:
❑ SB Live! Experience
Demonstrates the many wonderful
experiences Sound Blaster Live! can give
you.
To run SB Live! Experience, bring your
pointer to the top of th e screen to display
Creative Launcher, then click the
SB Live! Value tab, followed by the SB
Live! Experience icon.
❑ SB Live! Tour
Easy-to-follow Screen C a m
show you how to use Sound Blaster Live!
and get the most out of it.
To run SB Live! Tour, insert the SB Live!
Value Installation and Tour CD into your
CD-ROM driv e. At the AutoPlay screen,
click the SB Live! Tour button.
TM
movies to
Uninstalling the Applications
The Windows U ninstall feature allows you to
cleanly remove applications and to reinstall
them in order to correct problems, change
configuration s, or make v ersion upgrades.
Notes: Quit the audio card’s applications
before uninstal ling. Applications that are
still run ning during uni nstall ation will no t be
uninst alled.
Some applications may share files
with other Windows applications. If so, the
uninst allation program will pr ompt you
when it tries to delete these files. Do not
delete the files unless you are sure that you
do not need to use them.
To uninstall the applications
1. Click the Start button, point to Settings,
and then click Control Panel.
2. Double-click the Add/Remove Programs
icon.
3. In the Add/Remove Programs Properties
dialog box, select Sound Blaster Live!,
and then click the Add/Remove button.
4. Follow the in structions on the screen to
uninsta ll.
Reinstalling the Audio
Drivers From the
Installation Disc
You may want to reinstall the audio drivers if
you think they have been corrupted. To do so:
1. Insert the installation disc into your
CD-ROM drive.
2. Run the
AUDIO\
your CD-ROM drive, where
the lan guage of t he sof twar e that yo u want
to inst al l.
The updating process may take a while.
When the progress indicator box
disappea rs, the updat e is complete.
UPDDRV95.EXE
Langua ge
program from the
\WIN95DRV
folder of
Language
is
Playing Legacy Games
For more information, see Appendix B, “SB16
Emulation in MS-DOS/ Windows 95/98”.
2-4 Installing So f tware in Windows 95 / 98
Page 18

3
Installing Software in Windows NT 4.0
This chapter shows you how to install the
audio software in Windows NT 4.0 after
installing your card. It consists of the
following sections:
❑
Installing the Software
❑
Setting Up Joystick Drivers in Windows NT 4.0
❑
Using Sound Bla ster Liv e! Value;
Configuring Your Speakers
❑
Experienc ing Sound Blaster Live! Value
❑
Reins t a ll ing the Audi o Drive rs Fro m th e
Installation Disc
❑
Removing Unus ed Sound Bl aster Dri v ers
Note:
You cannot install more than one
Sound Blaster audio card of the same type
on your computer.
Installing the Software
The software installation in NT 4.0 includes
the insta llation of au dio drivers.
1. Insert th e installation disc into your
CD-ROM drive.
The AutoPlay s creen appears.
2. Follow the instructions on the screen to
complete the installation.
Setting Up Joystick
2. Click the Sta rt butto n, point to Se tt in gs,
and then click Control Panel.
3. Double-click the Multimedia icon, click
the Devices tab, and then click the Add
button.
4. In the List of D rivers box of the Add
dialog box, select Unlisted Or Updated
Driv er, and then click the OK button.
5. Insert the Windows NT 4.0 CD-ROM
which contains the
into the CD-ROM drive.
6. In the Install Driver dialog box, type
E:\DRVLIB\MULTIMED\JOYSTICK\X86
if E:\ is th e CD-R OM dr iv e le tter , an d then
click th e OK button.
7. In the Add Unlisted Or Updated Driver
dialog box, click Analog Joystick Driver,
and th en cl ick the OK button.
8. In the Microsoft Joystick Configuration
dialog box, click the OK button.
9. Restart your computer when prompted.
JOYSTICK.SYS
file
Using Sound Blaster Live!
Value; Configuring Your
Speakers
See “Experi encing Sound Blaster Live!
V alue ” on page 2-4. It also applies in Windo ws
NT 4.0.
Drivers in Windows NT 4.0
1. Log on to your compu ter as
Administrator .
Instal li ng Software in W indows NT 4.0 3-1
Page 19

Experiencing Sound Blaster Live! Value
Congratulations! You have successfully
instal led Sound Blaster Live! Value. It is
recommended that you run SB Live! Tour to
learn ho w to use and g et th e most out of So und
Blaster Live! Value.
To run SB Live! Tour
1. Insert the SB Live! Value Installation and
Tour CD into your CD-ROM drive.
2. At the Au toPla y scr een, click t he SB Liv e!
Tour button.
1. Insert the installation disc into your
CD-ROM drive.
2. Run the
3. Restart your computer when prompted.
If a Windows NT 4.0 Service Control
Manager error message appears, se e
“Problems in Windows NT 4.0” on page D-4.
UPDPCINT.EXE
AUDIO\Lang uage \NT4DRV
CD-ROM d rive, where
language of the software that you want to
instal l.
Y ou may be prompt ed to re star t more tha n
once.
program from t he
folder of your
Language
is the
Removing Unused Sound
Reinstalling the Audio
Drivers From the
Installation Disc
You may want to reinst all the audio drivers if
you think they are corrupted. To do so:
Blaster Drivers
You may want to remove unused Sound
Blas te r IS A an d PC I audio driver s after you
have removed the cards from your computer.
T o remove the dri vers, use th e procedur e in the
previous section, “Reinsta lling the Audio
Drivers From the Installation Disc”.
3-2 Installing Software in Windows NT 4.0
Page 20

General Specifications
A
This se ction lists the specifica tions of you r
audio cards.
Features
PCI Bus Master ing
❑
PCI Specification Version 2.1 compliant
❑
Bus maste ring re duces l atenc y a nd speeds
up system performance
EMU10K1
❑
Advanc ed hardware accelera te d digital
effects processing
❑
32-bit digital processing whil e
maintaining a 192 dB dynamic range
❑
Patented 8-point interpolation that
achieves the hi ghest quality of audio
reproduction
❑
64-voi ce hardware w avetable synthes izer
❑
Professional-quality digit al mixing and
equaliza tion
❑
Up to 32 MB of sound RAM mapped to
host memory
Stereo Di gitized Voice Channel
❑
True 16- bit Full Duplex operation
❑
16-bit and 8 -bit digitizing in ster eo and
mono modes
❑
Playback of 64 audi o cha nne ls, ea ch at an
arbitrary sample rate
❑
ADC recordi ng s ampl ing r at es : 8, 1 1.025,
16, 22.05, 24, 32, 44.1 and 48 kHz
❑
Dithering for 8-bit and 16-bit recording
AC ’97 Codec Mixer
❑
Mixes EMU10K1 audio sources and
analog sourc es such as CD Audi o, Line In,
Microphone, Auxiliary, TAD and PC
Speaker
❑
Selectable input sour ce or mixing of
vari ous audio sources for recording
❑
16-bit Analog-to- D igital conversion of
anal og in puts at 48 kHz sample rate
Volu m e Contro l
❑
Softwar e record and playback control of
Master, Digitized Voice, and inputs from
MIDI device, CD Audio, Li ne,
Microphone , Auxiliary, TAD, PC
Speaker, SPDIF, Wave/DirectSound
device, and CD Digital (CD SPDIF)
❑
Separate bass and treble control
❑
Front and rear balance control
❑
Muting and ba la nce contr ol fo r indi vi du al
playback sources
E-mu Environmental Modeling
❑
Real is ti c 3D experienc e that increa ses
depth and br eadth in perceived audio
❑
High ly ac curate positioni n g of audio
objects in 3D space
❑
Exceptio nal reproduction of va rious
ambient and environmental effects
DynaRAM
❑
❑
TM
Dynamic allocation of host memory for
storing and processing sound samples
Need not rely on on-board audio card
memory
TM
General Specific at ions A-1
Page 21

Creative Multi Speaker SurroundTM
TM
(CMSS
❑ Multi-speaker technology
❑ Professional-quality panning and mixing
❑ Independent multiple so und sources can
)
algorithm
be moved and placed around a listen er
Connectivity
MAIN CARD
Audio Inputs
❑ One line-level analog Line input via
stereo jack on rear bracket
❑ One mono Micro phone analog input via
stereo jack on rear bracket
❑ CD_IN line-l evel analog input via 4-pin
Molex connector on card
❑ AUX_ IN li ne -l e vel an al og inpu t v ia 4- pin
Molex connector on card
❑ T A D line-level ana log input via 4-pin
Molex connector on card
❑ CD_SPDIF digi tal input via 2-pin Molex
connecto r on card, accepting sampling
rates of 32, 44.1 and 48 kHz
Audi o Ou tputs
❑ T w o line-level an alog outputs vi a stereo
jacks on rear bracke t, Front and R ear
Line-Outs
❑ Stereo headphone (32-ohm load) support
on Front Line-O ut
Interfaces
❑ MB_PRO 2x5 pin header
❑ PC_SPK 1x2 pin header
❑ SPDIF_EXT (SPDI F Digit al I/O) 2x6 pin
header
A-2 General Specifications
Page 22

SB16 Emulation in MS-DOS/ Windows 95/98
B
This append ix is organized as foll ows:
❑
Background
❑
Understan ding the Inst allati on Pr ogram i n
Windows 95/98
❑
Understan ding the System Resource
Settings
❑
Understanding the Environment Variables
❑
Determining Resources
❑
Selecting the Best Audio Options in a
Game
❑
MS-DOS Mode U tilities
Background
Legacy g am es on the mark et have been
designed fo r only MS-DOS. SB Live!
supports MS-DOS ga mes. T here are t wo way s
to play MS-DOS games:
❑ From the MS-DOS box in Windows
95/98
This is the recommended method.
To open the box:
• Click the Sta rt button on the taskbar of
Windows 95/98, point to Programs,
and then click MS-DOS Prompt.
❑ In the Windows 95/98 MS-DOS m ode
There could be times when you do not
want to or cannot run a game from the
MS-DOS box. The gam e m ay be
incompatible with Windows 95/98, or
there ar e insufficient system resources to
play the game with Windows 95/98
loaded. In such cases , use the MS-DOS
mode, in which only the real-mode
portions of Windows 95/98 ar e loaded.
T o r estar t t he s yst em i n MS-DO S mode
when you are already in Windows
95/98:
1. Click the Start button on the taskbar,
and th en cl ick Shutdow n .
2. Click the Restart The Computer In
MS-DOS Mode option button, and
then clic k the OK button.
To start the system in MS-DOS mode at
system startup:
1. At startu p as Windows 95/98 i s
loading, hold the F8 key.
2. At the startup menu, cho ose the
Command Prompt Only option, and
then pres s <Enter>.
Understanding the
Installation Program in
Windows 95/98
The installation program modifies your
AUTOEXEC.BAT
and
CONFIG.SYS
files.
SB16 Emulation in MS-DOS/ W indows 95/98 B-1
Page 23

The AUTOEXEC.BAT File Settings
The installation program adds t he follow ing
statements to the
SET CTSYN=C:\WINDOWS
SET BLASTER=A220 I5 D1 H5 P330 T6
C:\PROGRA~1\CREATIVE\SBLIVE\DOSDRV\SB
EINIT.COM
The firs t two statements set up the
envi ronment variable s for your au dio card.
For an explanation of the variables , see
“Understanding the Environment Variables”
on page B-3.
The third statement runs the
SBEINIT.COM
driv er.
driver. It is required for the SB Live! card to
function properly under MS-DOS mode . The
syntax for the statement is as follows:
<SB Live! path>\SBEINIT.COM
SBEINIT.COM
EMM386.EXE
installation program adds the necessary
HIMEM.SYS
CONFIG.SYS
pres en t.
On the rare occasion a program does not work
with expa nded memory, simply add the
NOEMS
parameter to your memory manager.
For example:
DEVICE=C:\WINDOWS\EMM386.EXE NOEMS
C:\WINDOWS
if
Y ou may load this driver into high memory in
AUTOEX EC .BAT
the
default is not. For example:
LOADHIGH=C:\PROGRA~1\CREATIVE\SBLIVE\
DOSDRV\SBEINIT.COM
Do not remove the memory manager
altoget her. Do not attempt to load
SBEINIT.COM
NOEMS
the
SBELOAD.EXE
AUTOEXEC.BAT
file:
SBEINIT.COM
is the SB Live! MS-DOS
requires that the
HIMEM.SYS
files are loaded. If ne eded, the
EMM386.EXE
and
lines to yo ur
file, crea ti n g th e file if it is not
is your Windows directory.
file, even though the
into high mem ory when usin g
SBECFG.EXE
or
SBEINIT.COM
.
fails t o run
optio n if
and
In the rare case that a n MS- DOS game wi ll n ot
work with a mem ory man ager , you will not be
able to use the SB Live! card with the gam e.
The CONFIG.SYS File Settings
The installation program adds the follow in g
statements to the CONFIG.SYS file:
DEVICE=C:\WINDOWS\HIMEM.SYS
DEVICE=C:\WINDOWS\EMM386.EXE
Understanding the System Resource Settings
This section explains the following sof tware
SB emulation resource s—not hardware
resourc es—of your car d:
❑ Input/Output (I/ O ) A ddresses
❑ Interrupt Request (IRQ) Line
❑ Direct Memory Access (DMA) Channel.
Notes:
❑ If your card enco unt er s a confl i ct with a
peripheral device, you may need to
change i ts reso ur ce se tt ings. Fo r de tail s,
see “Reso lving I/O Confl icts” on page
D-3.
When any resource setting is ch anged,
make sure that the environment
vari ables (s ee “U nderstanding the
Env ironment Variables” on page B-3)
reflect the changes as well. You can
view your system environment by
typing SET at the DOS prompt.
❑ In the foll owing tables, the preferred
values are in bold.
B-2 SB16 Emulation in MS-DOS/ Windows 95/98
Page 24

Input/Output (I/O) Addresses
Direct Memory Access (DMA) Channel
I/O addresses are communication areas used
by your computer’s central processor to
disting uish among various peripheral devices
connected to your syst em w hen sending or
recei ving data.
T ab le B-1: Possibl e default input/output ( I/O)
addresses.
Device
SB interf ac e 220H to 22FH
MPU-401 UART MIDI
interface
Stereo music synthesizer 388H to 38BH
Default I/O
Address Range
240H to 24FH
260H to 26FH
280H to 28FH
300H to 301H
310H to 311H
320H to 321H
330H to 331H
Interrupt Request (IRQ) Line
An IRQ line is a signal lin e that a device us es
to notify your computer’s central processor
that it wa nts to send or receive data for
processi ng.
T able B-2: Possible default interrupt re quest (IRQ) line
assignment.
Device Default IRQ Line
SB inte rface 5, 7, 9, 10
A DMA channel is a data channe l that a
devic e uses to transfer data directly t o and
from the system memory.
T ab le B-3: Possib le default direct memory access
(DMA) channel assignment.
Usage
First DMA channel 0, 1, 3
Second DMA channel 5, 6, 7
Default DMA
Channel
Understanding the Environment Variables
Envi ronment variable s are used to pass
hardware configuration information to the
softwar e in your system. For MS-DOS, your
audi o ca rd in cludes the fo llowing:
❑ CTSYN Environment Variable
❑ BLASTER Enviro nment Variable
CTSYN Environment Variable
CTSYN
The
location of the
resides in the Windows directory. The syntax
for this variable is as follows:
where path is the location of the CTSYN.INI
file.
envi ronm ent v ar ia ble poi nt s to th e
CTSYN.INI
CTSYN=path
file, w hich usually
SB16 Emulation in MS-DOS/ W indows 95/98 B-3
Page 25

BLASTER Environment Variable
The BLASTER environment variable
specif ies the base I/O address, IRQ line , and
DMA channe ls of the SB inter face. Its synt ax
is:
BLASTER=A220 I5 D1 H5 P330 T6
The parameters in the command are as
follows.
This
Parameter Specifies
xxx
A
x
I
x
D
x
H
xxx
P
x
T
SB interfa c e’s bas e I/O
address.
IRQ line used by the audio
interface.
First DMA channel used by
the audio interface.
Second DMA channel us ed by
the audio interface.
MPU-401 UART interface’s
base I/ O address.
Card type. x must be 6.
Determining Resources
To find the current SB Live! SB16
Emulation resources in Windows 95/98:
1. Click the Start button, point to Sett ings,
and th e n cl ick Contro l Pa nel.
2. In the Control Panel window,
double-click the Sys tem icon.
3. In the Sys tem Proper t ies di al og box, c li ck
the Device Manager tab.
4. Double-cl ick Creative Miscellaneous
Devices, and then dou ble-click Creati ve
SB Live! SB16 Emulation.
5. Click the Resouces tab.
You can use the information in the resource
list to h elp you co nf i gur e MS-DOS gam es for
use with the SB Live! ca r d.
B-4 SB16 Emulation in MS-DOS/ Windows 95/98
The resource list may show three entries of
“Input/Output Range” and two entries of
“Direct Memory Acce ss”. They c orrespon d to
the se quence of e ntri es in Table B-1 and Table
B-3. If th e num ber of entries do not mat ch, a
good es tim a te of the iden tity of the devic e is
its I/O address or DMA channel.
To fin d the current SB L ive! SB16
Emulation resources in MS-DOS mo de:
1. Switch to your SB Live! DOS driver
directory, that is:
C:
\PROGRA~1\CREATIVE\SBLIVE\DOSDRV
2. Type SBECFG and t hen press <Ent er>.
Note: The MS-DOS dr iver
must be running for
prope rly.
Some ol der games ma y hav e di fficulty
detect ing the SB Live ! car d at cert ain re source
setti ngs. Typically, these games would expect
the card to be at a fixed set of resources and
would fail to load i f those resources are not
detect ed. If you have older MS-DO S games
that do not work pr operly, try changing the SB
Live! SB16 Emul ation configuration. Use t he
follow in g as a guide:
Problem: Sound Blaster emulation is not
recognized.
Resource: Try switching the SB Emulation
IRQ between 5 and 7, use DMA channel 1,
use SB interface port 220 .
Problem: T he MPU-401 emul ation is not
recognized.
Resource: Try using Port address 330.
SBECFG.EXE
SBEINIT.COM
to work
Selecting the Best Audio Options in a Game
Most MS-DOS–based ga me s that prov ide
sound ha ve some proce dure for audio setup.
These proc edures genera lly prese nt you with a
list of popular audio cards or audio devices
from which to choose.
Page 26

The methods used by games to present audio
options c an vary greatly. Some may present a
single cho ice that corresponds to a particular
audio device, that i s, Sound Blaste r, Sound
Blaster 16, Roland Sound Canvas, and so on.
Others wil l provide an option for music and
digital audi o s epa ra te ly ; for e xa mple , Gene ra l
MIDI music wit h So und Blast er digi ta l audio .
In such a case, there ar e often two s eparate
menus to configure.
Some games allow you to set the MIDI port
address an d IR Q for music and sound. Make
sure that these settings correspond to the
values displayed by
SBECFG.EXE
or the
Resources tabbed page of the Creati ve SB
Live! SB16 Emulation Properties dialog box.
There are gam es that off er MPU-401/Roland
(General MIDI or MT-32/LAPC -1) as an
option. Often the se games al low you to set th e
MIDI port a ddr ess. M ake su re t ha t th e y ma tc h
the MIDI address in the Resources list on
Resources tabbed page of the Creati ve SB
Live! SB16 Emulation Propertie s dialog box.
The same v alues ca n be f ound un der “
(General MIDI, Roland MT-32/LAPC-1) Emulation
displaye d by
SBECFG.EXE
in MS-DOS mode.
MPU-401
”,
Reme m b er to en able the MT-32 MIDI pa tch
with the
Roland
SBEMIXER
MT -32
or
program if you select
LAPC-1
for music .
Music Options
Most MS-D OS game s of fe r a menu choi ce f or
sound when the y start up. If you ha ve a cho ice
between General MIDI and
choose General MIDI, since it will provide
you with the bes t sound quali ty . If you need to
MT -32
use
, you must first sw itch from th e
General MI D I instrument set (the default) to
MT -32
the
instrument set using
sure to switch back to the General MIDI set
when you are finished using the MT-32
instrument set.
MT -32
SBEMIXER
, always
. Be
Digital Audio Options
SB Live! supports Sound Blaster, Sound
Blaster Pro, Sound Blast er 16, and Adlib
digita l audio emula tion. If an applicati on
provides all these as options, specify the
choices in this order:
1. Sound Blaster 16
2. Sound Blaster Pro
3. Sound Blaster
4. Adlib
MS-DOS Mode Utilities
The SB Live! ca rd include s a few M S -D O S
utilities. These utilities require the SB Live!
DOS driver
SBECFG.EXE
Use the
hardware settings and the status of the SB
Live! card.
Typing
displays the following hardware settings:
❑ PCI Hardware Settings : Port, IRQ
❑ Sound Blaster Emulation: Port, IRQ,
❑ MPU-401 Emulati on (GM, Roland
❑ Adlib Emulation: Port
The emulat io n sett i ngs appe ar onl y if t he y a re
enabled.
SBEMIXER.EXE
Use
lev els of th e MP U-4 01 inst ru ment se t us ed on
the SB Liv e! car d. You can use
from the comm a nd line —u seful for adv a nced
users who want to set up batch files with
particular volume levels—or within the
SBEMIXER
SBEMIXER.EXE
Mixer settings in Windows 95/98.
SB16 Emulation in MS-DOS/ W indows 95/98 B-5
SBEINIT.COM
SBECFG.EXE
SBECFG.EXE
to be loaded.
utility to obtain the
at the command prompt
DMA
MT-32/LAPC-1) Emulation: Port
SBEMIXER.EXE
to change the volume
SBEMIXER.EXE
screen. The settin g s fo r
are indep endent of t he Crea tiv e
Page 27

To set
SBEMIXER
values in the command
line:
At the DOS prompt, type the
SBEMIXER
command in a single line. Its syntax is:
SBEMIXER
[/S:x] [/W:x] [/C:x] [/M:x] [/?]
where
• Square brackets [ ] denote optional
parameters
This
Parameter Specifies
x
/S:
Synth v olume. x can be a
val ue from the range 0 to 127.
x
/W:
Wave volume. x can be a
val ue from the range 0 to 127.
x
/C:
CD audio v olume. x can be a
val ue from the range 0 to 127.
x
/M:
Synth MT-32/LAPC-1 mode.
For x, 0 is Off, 1 is On.
/? View a short description of
the param e ters.
An example of an
SBEMIXER
command is
SBEMIXER /S:64 /W:120 /C:50 /M:0
which corr espond s to “set t he synt h volum e to
64, the Wave volume to 120, the CD audio
volume to 50, and turn off the Synth
MT-32/LAPC-1 mode”.
To set
SBEMIXER
values within the Mixer
screen:
At the DOS prompt, type the
SBEMIXER
The interactive editor mode allows you to
change the mixer settings with the mouse,
<Tab>, <PgUp>, <PgDn>, or arrow keys.
Use the Save button to save the settings for the
next session.
SBESET.EXE
SBESET.EXE
Use
resources or disable SB Emulation. By
default, SB Emulation in DOS follows the
Windo ws se ttin gs. F or e xample, if you disabl e
SB Emulation in Windows, in the next boot to
to manually configure SB
DOS SB Emulation i n D O S disabled. Under
rare ci rcum stan ces you may nee d t o man ual ly
reconf igur e DOS SB Emu lati on, f or ex ampl e,
if th ere is c onfl ict in D OS b efo re i t c an bo ot t o
Windo ws .
SBESET.EXE
is run from the
command line.
SBESET
To set
At the DOS prom pt, type the
values in the command line:
SBESET
command in a single line. Its syntax is:
SBESET [- A
[-P
xxx
xxx
] [-Ix] [-Dx] [-Hx]
] [-dx] [-wx]
where square brackets [ ] denote optional
parameters, and:
This
Parameter Specifies
xxx
-A
SB interface’s base I/O
address.
x
-I
IRQ line used by the audio
interface.
x
-D
First DMA channel used by
the audio i nterface.
x
-H
Second DMA chan nel used by
the audio i nterface.
xxx
-P
MPU-401 UART interface’s
base I/O addr ess.
x
-d
SB Emulation mod e. For x, 1
is Off, 0 is On.
x
-w
Set x to 1 to use the
Windows-assigned resource
configuration.
Set x to 0 to use (your)
user-assigned resource
configuration.
Note: See “Understanding the System
Resourc e Settings” on page B-2 for a list of
the possible values.
An example of an SBESET command is
SBES ET -A 2 4 0 -I 5 -D 3 -w 0
which corresponds to “set the SB interface’s
base I/O a ddress
the audio interface
to 240, the
to 5, th e
IRQ line used b y
First DMA
B-6 SB16 Emulation in MS-DOS/ Windows 95/98
Page 28

channel used by the audio inter face
use the Windows-assigned resource
configuration
”.
to 3, and
SBEGO.EXE
Use this to confirm whether SB16 Emulation
is properly insta lled and wor king.
SB16 Emulation in MS-DOS/ W indows 95/98 B-7
Page 29

Changing Audio Card Settings
C
You might want to disable int erfaces that you
are not using to free up resources , for
example, w hen you do not have enough IRQ
lines.
This append ix is organized as foll ows:
❑
Enabling/D isabling Gam eport Joystick Interface
❑
Enabling/D isabling Oth er Features
Enabling/Disabling
Gameport Joystick
Interface
The Gameport Joystick interface on your
audio card can be enabled or disabled in
Windows 9 5/98.
To enable or disable the
interface in Windows 95/98
1. Click the Start button, point to Settings,
and the n click Cont ro l Pa ne l.
2. In the Control Panel wi ndow,
double-click the Sys tem icon.
3. In the Sy stem Prope rt ie s dia log box , cli ck
the Device Manager tab.
4. Double-click Sound, Video And Game
Controll ers, and then select Creative
Gameport Joystick.
5. Click the Pro p er ties button.
6. In the Properties dialog box:
If you hav e an Original Configuration
(Current) check box:
• To enable the interf ace, make sure
that the check box is selected.
To disable it, clear th e check box.
If you hav e a Disable In This Hardwa re
Profile check box:
• To enable the interface, clear the
check box.
To disable it, make sure that the check
box is selected.
7. Click OK to restart Windows and fo r the
change to take eff ect.
When the Gameport Joystick int erface is
disabled, the entry in Device Manager has a
red cross .
Changing A udio Car d Settings C-1
Page 30

Enabling/Disabling Other Features
In Windows 95/98 and Windows
NT 4.0
Use the applets under Cre ative AudioHQ to
enable or disable features such as Stereo
Enhancement Effect.
To open an AudioHQ applet
from the Sound Blaster menu
• Click the Start button on the taskbar, point
to Programs, point to Creative, point to
Sound Blast er Live!, and then cl ick
AudioHQ.
Check out the applets within the
AudioHQ window.
To open an AudioHQ applet
from Creative Launcher
• Click Creative Launcher at the top or
bottom of your c om puter sc re en, a nd t hen
click th e A udioHQ tab.
Check out th e applets indi cated b y the tabs
in the second row of Launcher.
C-2 Changing Audio Card Settings
Page 31

Troubleshooting
D
This append ix provides some tips for solving
some problems you may encounter wit h your
audio card during installation or normal use.
Problems Installing Software
In Windows 95/98, the installation
program does not run automatically
after inserting the CD-ROM into the
drive.
The AutoPlay fea ture in yo ur W i ndo ws 95 /98
syst em m a y no t be enabled.
To start the insta llation pr ogram through
the My Computer short cut menu:
1. Double-cl ick the My Computer icon on
your Windows desktop.
2. In the My Computer window, rig ht-click
the CD-ROM drive i con.
3. On the sh ort cut menu , clic k Aut oP lay a nd
follow th e instructi ons on the scr ee n.
To enable AutoPlay through Auto I nsert
Notification:
1. Click the Start button, point to Settings,
and the n click Cont ro l Pa ne l.
2. In the Control Panel wi ndow,
double-click the Sys tem icon.
3. In the Sys tem Proper t ies di al og box, c li ck
the Device Manager tab and select your
CD-ROM drive.
4. Click the Pro p er ties button.
5. In the Properties dialog box, click the
Settings tab and make sure that the Auto
Insert Notification check box is selected.
6. Click the OK button to exit from the
dialog box.
Problems with Sound
There is unexpected excessive
environmental sound or effects when
an audio file is being played.
An inappropriate environmental preset was
the last selected preset.
To switch to an ap propriate environme n t:
1. Open the Environmental Audio control
applet.
OR
Display Creative Launcher. It is found at
the top or bot tom of you r scree n (you may
have t o bring your pointer to the edge of
the scr een to di spl ay Laun che r) . And t hen
click the Environments tab.
2. In the En vironment list, sel ect “No
effe cts” or an appropriate enviro nm ent.
In a 4-speaker configuration, there is
no sound from the rear speakers.
Check the following:
❑
The rear speakers are connected to the
main card’s Rear Out jack.
Troubleshooting D-1
Page 32

❑ In Creative Mixer’s Record Control view:
• If a single source (e.g., CD Audio,
Line In, TAD, Auxiliary or
Microphone ) is playin g, the ch eck box
for the source is selected.
Note: If, instead, you decide to select the
“What U Hear” device icon in the Record
Control view, then of these five sources in
the Play Control view, you can unmute only
one at a time. Therefore, you can get sound
from the rear speakers only from the
unmuted source.
To solve the problem:
1. In Creative Mixer’s Play Control view,
make sure the check box of the source
being played is unmuted, that is, enabled.
2. In the Recor d Control vi ew , make sur e the
corresponding check box is also selected.
For example, if you ar e playing DVD games
or movies, make sure in Creative Mixer you
unmute the Auxiliary device in the Play
Control view and select the Auxiliary device
in the Record Contro l view. For more
information, see “Connecting Creative
PC-DVD” on page 1-4.
If you hav e changed environm ents, go to the
Record Control view of Creative Mixer and
make sure that th e check boxes of your active
sources ar e selected.
No sound from the headphones.
Check the following:
❑ The headphone s are connected to Line
Out jack.
❑ In the Speak er applet (click t he AudioHQ
icon on the ta skbar, and then cli ck the
Speaker applet), make sure the Output
field is set to Headphones.
No audio output when playing digital
files such as .WAV, MIDI files or AVI
clips.
Possible causes:
❑ The speaker volume knob (if any) is not
set prope rly.
❑ The ex te rn al amplifier or sp e akers are
connecte d to the wrong jack.
❑ There is a hardware conflict.
❑ The output selection in the Configur ation
tabbed pag e of the Speaker applet is
incorrectly selected.
❑ The Original Sound sli d ers in either the
Master and Source tabbed pages of the
Environmental Audio applet are set at or
near 0%.
Check the following:
❑ The speakers’ volume control knob, if
any, is set at mid-range. Use Creative
Mixer to adjust the volume, if necessary.
❑ The powered speakers or external
amplif ier ar e con nec te d to the ca rd’s Line
Out or Rear Out jack.
❑ No hardware conflict between the card
and a peripheral device. See “Resolving
I/O Confli cts” on page D-3.
❑ The output se lectio n in the Spea ker ap plet
corresp onds to your speake r or headphone
configur ation.
❑ The Original Sound sli d ers in either or
both the Mast er and Source tabbed pages
of the Speak er applet ar e set to 100%.
No audio output when playing
CD-Audio.
OR
No audio output when playing DOS
games that require a CD-ROM.
To solve this proble m :
• Make sure the CD audio cable between
the CD-ROM driv e and the audio card is
connected.
D-2 Troubleshooting
Page 33

Insufficient SoundFont Cache
There is insufficient memory to load
SoundFonts.
This may occur when you load or play a
SoundFont-compatible MIDI file.
Cause: There is insufficient memory allocated
to SoundFonts.
To allocate more SoundFont cache:
• On the Options tabbed page of the
SoundFont Control applet, move the
SoundFont Cache slider to the right.
The amount of SoundFont cache you can
allocate depends on the system RAM
available.
If there is still insufficient system RAM
available:
• On the Configure Banks tabbed page of
the SoundFont Control applet, select a
smaller SoundFont bank from the Select
Bank box.
The smallest SoundFont bank available is
2 MB (2GMGSMT.SF2).
Note:The tradeoff of a smaller SoundFont
bank is its lower sound quality.
Problems with Joystick
The joystick port is not working.
The audio card’s joystick port conflicts with
the system’s joystick port.
To solve this problem:
• Disable the audio card’s joystick port and
use the system port instead. For details,
see “Enabling/Disabling Gameport
Joystick Interface” on page C-1.
The joystick is not working properly in
some programs.
The program may use the system processor
timing to calculate the joystick position.
When the processor is fast, the program may
determine the position of the joystick
incorrectly, assuming that the position is out
of range.
To solve this problem:
• Increase your system's 8 bit I/O recovery
time of the BIOS setting, usually under
the Chipset Feature Settings section. Or, if
available, you may adjust the AT Bus
speed to a slower clock. If the problem
persists, try a different joystick.
Note:Do not attempt to make changes to
the BIOS unless you have experience with
system software.
Resolving I/O Conflicts
Conflicts between your audio card and
another peripheral device may occur if your
card and the other device are set to use the
same I/O address.
To resolve I/O conflicts, change the resource
settings of your audio card or the conflicting
peripheral device in your system using Device
Manager in Windows 95/98.
If you still do not know which card is causing
the conflict, remove all cards except the audio
card and other essential cards (for example,
disk controller and graphics cards). Add each
card back until Device Manager indicates that
a conflict has occurred.
To resolve hardware conflicts in
Windows 95/98:
1.Click the Start button, point to Settings,
and then click Control Panel.
2.In the Control Panel window,
double-click the System icon.
TroubleshootingD-3
Page 34

3. In the Sys tem Proper t ies di al og box, c li ck
the Device Manager tab.
4. Under the Sound, Video And Game
Controllers entry, select the con flicting
audio card driver—indicated by an
exclamation mark (!)—and click the
Prop e rties butto n .
5. In the Properties dialog box, clic k the
Resources tab.
6. Make sure that the Use Automatic
Settings check box is selected, and click
the OK button.
7. Restart your system to allow Windows
95/98 to reassign resources to your audio
card and/o r the conflic ting device.
Note: You can also refer to the
Troubleshooting section in the Help file of
Windows 95/98.
To solve this proble m :
1. Log on to your co mputer as
Administrator .
2. Click the Start button, point to Settings,
and then click Control Panel.
3. Double-click the Mu ltimedia icon, and
then cli ck the Devi ces tab.
4. In the list, remove from under these
entries
• Audio Devices
• MIDI Devices And Instruments
the items other than
• Audio for Creative SB Live!
• MIDI for Creative SB Live!
• MIDI for Creative S/W Synth
5. Click the OK button to close the dialog
box.
The dr iver s are removed .
Problems in DOS
The system stops responding during
voice output.
There is conflict between the audio card and
another ca rd.
To resolve the conflict:
• Same as for Windows 95/98 in the
previous section.
Problems in Windows NT
4.0
A Service Control Manager error
message appears with one or more
other error messages at system restart.
This occurs after you remove an audio card
from your computer after you have
successfully installed Sound Blaster Live!
cards. The drivers of the removed audio card
cannot find the card.
Problems with Encore DVD Player
The Encore DVD Player is not launched
when a DVD disc is inserted into the
drive.
1. To solve this proble m :
1. In the Windows system tray, right-click
the Disc Detector icon, and then click
Propert ies.
2. On the Gene ral tabbed page of the
Creative Disc Detector dialog box, make
sure that Enable Disc Detector check box
is selected.
3. Click the Pla yers tab.
4. Select the DVD Disc entry and then click
the Select Player button.
5. In the Pl ayer s Pr ope rtie s d ia log box , click
the Browse button.
D-4 Troubleshooting
Page 35

6. Browse to C:\Program Files\Creative\PCDVD Encore and double-click the entry
ctdvdply
The Name box now displays the entry
ctdvdply.
7. Click the OK button twice to close.
Now when you double-clic k the Disc De tector
icon, the Encore DVD Player is lau nched.
Troubleshooting D-5
Page 36

Technical Support
We are committed to giving you the best
product as well as the best techni cal support.
Plea se en te r th e following in fo r m ation in the
table bel ow and hav e it ready when you
contact Technical Support.
❑
The model and serial numbers of your
card and othe r devices.
❑
Error message on the screen and how it
came about.
❑
Information on the adapter card that
conflicts with your card.
❑
Hardware c onf igu ra ti on inf orma ti on such
as the bas e I/O addr ess, IRQ line, or DM A
channel use d.
❑
Type and version of your operating
system, e.g., DOS 6.0, Windows 3.1x,
Windows 95 or Windows 98.
T ab le E-1: Model and Serial Numbers of your har dware.
Hardware Model Number Serial Number
CD-ROM Drive
Audio Card*
Video Card
Fax/Modem
MIDI Device
Others:
E
Note:
Please ensure to retain your
purchase receipt plus all packaging and
contents until such time that al l components
of the product are functioning to your
satisfaction. They will all be required in the
unlikely event that your product needs to be
returned to Creative.
Before contacting ‘Creative Technical
Services’, please ensure that you have read
Appendix D, ‘Troubleshooting’.
For quick and easy ref erence, it i s advisable
that you write do wn th e fol lo wi ng numbe rs of
your card and other hardware devices, if
instal led in your system in Tabl e E-1 and
Ta ble E-2.
*See label on underside of card
Technical Support E-1
Page 37

T ab le E-2: Hardware Configuration Information.
Hardware Base I/O Addres s IRQ DMA
CD-ROM Drive
Audio Card
Video Card
Fax/Modem
MIDI Device
Others:
Inside Europe
See ‘Creat ive Technical Services’ sectio n for
contact numbers.
Through CompuServe
To serve you better, we have created a
Creative Labs Forum on CompuServe.
Through this forum:
❑ You will h ave direct access to our
company representatives who will be
there to answer your questions.
❑ You will b e part of an interactive
community of Creative’s product use rs.
Here you can share experiences and ideas
and al so se ek solution s to problem s .
❑ We will also keep you up-to-date on the
latest product information, software
updates, and fixes to common problems.
❑ We will al so welco me your
recommen dations and suggestions for
new products and for i mp roving our
products in future releases.
By Fax
For fas t and efficient Technical Support
solutions, please use our telephone service in
the first ins tan ce. I f you decide t o wri te or fa x
us then please send your correspondence
ONLY to our Ireland a ddr es s. Pl eas e all o w up
to two w eeks processing and postal time for a
response. See ‘Creativ e Technical Servi ces’
section for contact numbers.
AutoFax is a facility that allows you to obtain
product and technical information through
facsimile services. In Europe, use the
follo wing number: +353 1 8203667 .
If You Have a Problem
Please retai n all cont ents incl uding pac kaging
and proof of purchase until you are fully
satisfied wit h product.
If you find that you have a problem with your
Creativ e product and believ e that it ne eds to be
repaired or replaced, you should v erify the
purchase date and take the appropriate action
as deta il ed below:
Less than 30 days since date of
purchase
Should your store re ceipt indic a te that the
product is less than 30 days old, you ha ve the
option of calling Technical Support for
assistance or returning the ful l product to the
dealer/ reatailer for a repl acement or cr edit
(see Creative Technical Services section for
contact numbers).
E-2 Technical Support
Page 38

More than 30 days since date of
purchase
First cont act Eu ropean T echni cal Su pport (s ee
Creative Technical Services section for
contact nu mber s) t o es ta blish t he na ture o f th e
problem and details on our repair returns
procedure. Creative Labs requires that all
returns for repair/replacement must first be
issued wit h an authorisation number.
Returning a product for repair
❑ Contact T echni cal Su pport to recei v e your
authoris ation numbe r for
repair/replacement of product. The
authoris ation numbe r is only valid for 90
days, after which you mus t call Technical
Support to ob tain a new authoris ation
number .
❑ Creative Labs will dispatch a pre-paid
returns shipment package with
instructions on how to return the product
for repai r.
❑ On receipt of the packaging, you should
insert only the faulty hardware item in
question and m ail it to the Cr eative
address pr inted on the package provided.
❑ Upon receipt of the fau lty item, Creative
Labs will process your request and
arrange return.
❑ Before mailing your package please
ensure t he autho ri sa tion numbe r is clea rl y
quoted on the outside of the packaging.
Note: Creative may replace or repair the
product with new or reconditioned parts,
and the faulty parts will become the
property of Creative. The warranty period
for your repaired/replacement item is 90
days from the date of shipment from
Creative, or what is left on the original
item’s warranty, whichever is longer.
To avoi d tariffs when shipping a product to
Creative Labs from outside the E.U., you must
complete t he re levant customs do cumen ta tion
before shipping the product (please allow 30
days).
Limited Warranty
Creative Labs (Ireland) Limited (“Creativ e”)
warrant s to you, the original purchaser only,
that the hardware product will be free of
defects in materials and workmanship for a
period of tw o years af te r th e date of p urc has e,
or such other period as may be expressly
specified by Creative or required by
applicable law (“Warranty Period”).
Creative’s entire liability and your remedy
will be, at Creative’ s sole discretion, the repair
or replac em ent (wit h the same or si mi lar
model) of any hardware or accompanying
item(s) not meet in g th e “Li m ited Warranty”
explai ned above that is returned to Creative’s
authorised distributor or dealer during the
Warranty Period with a copy of your receipt.
What this warranty does not
cover
T o the maximum extent permitted by
applicable law, Creative disclaims all other
warranties and conditions, expressed or
implied, includi ng the conditions of quality,
merch an tability or fitness for a part ic ular
purpose with r espect to th e use of t his p roduct.
Creative also disclaims any ob li ga t i on to
support products for all operating
environments - for example, by ensuring
interoperability with future versions of
software or hardware. In no event shall
Creative or its licensors be liable for any
indire ct, incidental, special or consequenti al
loss or for any lost profits, savings or data
arising from or relating to the use of this
product, even if Creativ e or its licensors ha ve
been advis ed of the possibi lity of such loss.
Technical Support E-3
Page 39

Specif ically, this warranty does not cover
failures of the product which re sult from
accident, abuse, misuse, alterations (by
persons other than Creative or its authorized
repair agents), moisture, corrosive
envi ronments, shipping, hi gh voltage surges,
or abnormal working conditions. This
warrant y does not co ver normal wear and t ear .
You are specifica lly advised to take a backup
copy of an y software provided with the
Creative product for security purposes.
Note: This warranty gives you specific
legal rights. You may have other rights
which vary from country to country. Certain
limitations in this warranty are not
permitted by the jurisdiction of some
countries, so some limitations here may not
apply to you.
E-4 Technical Support
Page 40

Creative Technical Services
CREA TIVE LABS (IRELAND) LTD .,
T ech nical Support Depart me nt,
Ballycoolin Business Par k, B lanchardst o w n,
Dublin 15, Irelan d.
United Kingdom
T el :+44 1189 344 744
Germany and Eastern Europe
Tel :+49 89 957 9081
Ireland
Tel :+353 1 820 7555
BBS :+353 1 820 3818
France
Tel :+33 1 39 20 04 21
Spain
Tel :+34 (91) 66 25 116
Italy
Tel :+39 02 5750 0150
Austria
Tel :+43 (01) 589 244 320
For all correspondence by fax please use the following number: +353 1 8205052
Veuillez utiliser le numéro suivant pour toute correspondance par télé copie: +353 1 8205052
Bitte senden Sie alle Faxmitteilungen an die f olgende Nummer: +353 1 8205052
Inviare la corrispondenza via f a x al numero: +353 1 8205052
Para correspondencia mediante fax por favor use el siguiente número: +353 1 8205052
Voor alle korrespondentie via fax gebruik het volgende nummer: +353 1 8205052
O nosso número de fax é: +353 1 8205052
Belgium
Tel :+32 (02) 7171 198
Denmark
Tel :+45 3525 9498
Finland
Tel :+358 (09) 2294 3101
Norway
Tel :+47 2305 0401
Sweden
Tel :+46 (08) 7519 147
Holland
Tel : +31 152 57 82 44
Switzerland
Tel :+41 (01) 2121 868
Portugal
Tel : 0800 8 53066
Page 41

Operating Hours/Heures d’ouverture/Öffnungszeiten/
Ore d’ufficio/Horario de of icina/Openingstijde n/H orário de abertura
EUROP E
Mon-Fri : Business Hours Sat-Sun & Public Holidays : Closed
Lun. au vend. : Heures de bureau Sam., dim. et jours fériés : Fermé
Mo-Fr : Geschäftszeiten Sa, So & gesetzl. Feiertage : Geschlossen
Lunedì-venerdì : Orario d’ufficio Sabato, domenica e festivi : Chiuso
Lunes-Viernes : Horario de oficina Sábados, domingos y festivos : Cerrado
Maandag-Vrijdag : Kantooruren Zat.-Zon. & Nationale Feestdagen : Gesloten
Segunda a sexta-feira : Horário de expediente Sábado, domingo e feriados : Fechado
AutoF ax & CompuServe
AutoFax is a facility that allows you to obtain product and technical information through
UK
facsimile s ervices. In Europe, use the following number: +353 1 820 3667.
At the CompuSe rve prompt, Type
AutoFax es t un des services vous permettant d’obtenir des informatio ns r e latives aux
produits ainsi q ue de s in format ions tech nique s pa r télé cop ie. E n Eur ope le n uméro Auto Fax
F
est le suivant : +353 1 820 3667
A l'invite de CompuServe, ta pez
Mit dem AutoFax-Service erhalten Sie Infor mationen übe r P rodukte und tech nische
Information en per Fax. Ruf en Sie in Euro pa die folg end e Faxnu mmer an: +353 1 820 3667
D
Geben Sie in der CompuServe-Befehlszeile
AutoFax è un sistema che consente di ottenere informazioni tecniche e commerciali sui
prodotti mediante fax. Per l’Europa, il numero di fax è +353 1 820 3667.
I
Al prompt di Co mpuServe, digitare
Go Blaster
Go Blaster
Go Blaster
and press <Enter>.
et appuyez sur <Ent rée>.
Go Blaster
ein, und drücken Sie <Eingabe>.
e preme r e <I nvio>.
AutoFax e s un s ervicio que le permite obtene r información técnica sobre los productos de
Creative Labs. En Europa, llame al número siguiente +353 1 8203667
E
Escriba
Go Blaster
Met AutoFax kunt u product informatie en technische i nf ormatie opvragen via de fax.
Gebruik hiervoor in Europa het volgende nummer: +353 1 8203667.
N
Bij de CompuServ e pr ompt, Type
y pulse la tecla <In tro> tras el indicativo de CompuServe.
Go Blaster
Internet
To receive technical support via the Internet, please e-mail:
http://ww w.cle.creaf .c om
ftp.cle.creaf.com
en druk op <Enter>.
support@CR EATIVE-LABS.CO.UK
Web Site
 Loading...