

Page 1
Page 2

User’s Guide
Creative Broadband Blaster DSL Router 8015U
Information in this document is subject to change without notice and does not represent a commitment on the part of Creative
Technology Ltd. The software described in this document is furnished under a license agreement and may be used or copied only in
accordance with the terms of the license agreement. It is against the law to copy the software on any other medium except as
specifically allowed in the license agreement. The licensee may make one copy of the software for backup purposes. No part of this
manual may be reproduced or transmitted in any form or by any means, electronic or mechanical, including photocopying and
recording, for any purpose without the written permission of Creative Technology Ltd.
Copyright © 2004 Creative Technology Ltd. All rights reserved.
Version 1.1
September 2004
Broadband Blaster is a trademark of Creative Technology Ltd.
IBM is a registered trademark of International Business Machines Corporation.
Intel and Pentium are registered trademarks of Intel Corporation
Microsoft, MS-DOS, Windows, and the Windows logo are registered trademarks of Microsoft Corporation.
Netscape Communicator is a trademark of Netscape Communications Corporation and may be registered outside the U.S.
All other products are trademarks or registered trademarks of their respective owners.
Page 3

Contents
Page 4

vi
Contents
Introduction
DSL Router information........................................................................................................................... 1-v
Package Contents....................................................................................................................................... 1-v
System requirements................................................................................................................................ 1-vi
Using Ethernet connection ........................................................................................................... 1-vi
Using USB connection.................................................................................................................... 1-vi
Using this document................................................................................................................................ 1-vii
1 About your DSL Router
2 Setting up your DSL Router using Ethernet connection
Setting up your DSL Router................................................................................................................... 2-2
Using the Ethernet port................................................................................................................. 2-2
Configuring your Network Interface Card ...................................................................................... 2-4
In Windows XP/Windows 2000................................................................................................. 2-4
In Windows Me/Windows 98 SE ............................................................................................... 2-7
3 Setting up your DSL Router using USB connection
Installing the USB Driver......................................................................................................................... 3-1
In Windows XP................................................................................................................................ 3-1
In Windows 2000 ............................................................................................................................ 3-5
In Windows Me................................................................................................................................ 3-7
In Windows 98 SE ........................................................................................................................... 3-9
Page 5

vii
Setting up your DSL Router................................................................................................................. 3-12
Using the USB port ....................................................................................................................... 3-12
4 Configuring your DSL Router
Understanding DSL Router configurations........................................................................................ 4-1
Connecting to your DSL Router’s Home Page ............................................................................... 4-1
Configuring your DSL Router................................................................................................................ 4-3
PPPoA/PPPoE Configuration........................................................................................................ 4-3
RFC 1483 Routed IP Configuration.......................................................................................... 4-5
RFC 1483 Bridged IP Configuration .......................................................................................... 4-7
Disabling the Proxy Server ..................................................................................................................... 4-8
Using Internet Explorer................................................................................................................. 4-9
Disconnecting from the Internet........................................................................................................ 4-10
In PPPoA and PPPoE Mode ........................................................................................................ 4-10
In RFC 1483 Routed and Bridged Mode................................................................................ 4-10
Checking your DSL Router’s Status .................................................................................................. 4-10
Restoring Factory Default Settings..................................................................................................... 4-11
5 Configuring Advanced Features
LAN Settings ............................................................................................................................................... 5-1
DHCP Server Settings.............................................................................................................................. 5-1
LAN Client................................................................................................................................................... 5-2
Diagnostic Tests......................................................................................................................................... 5-3
Loopback Test .................................................................................................................................. 5-3
Ping Test ............................................................................................................................................. 5-3
DMZ Settings.............................................................................................................................................. 5-4
Port Forwarding......................................................................................................................................... 5-5
Universal Plug and Plug ............................................................................................................................ 5-5
Filtering.......................................................................................................................................................... 5-6
Page 6

viii
IP Address Filtering ......................................................................................................................... 5-6
MAC Address Filtering .................................................................................................................. 5-7
Change Password ...................................................................................................................................... 5-8
Restore Factory Default Settings.......................................................................................................... 5-8
Firmware Upgrade .................................................................................................................................... 5-9
Appendixes
A Technical Specifications
B Troubleshooting
Connection to your DSL Router’s home page................................................................................ B-1
Connection to the Internet.................................................................................................................... B-2
LED Status.................................................................................................................................................... B-3
Normal Setup Status....................................................................................................................... B-3
Difficulties In Windows XP .................................................................................................................... B-5
C Frequently Asked Questions
D Glossary
Page 7

Introduction
Page 8

Introduction v
Introduction
Thank you for purchasing Creative Broadband Blaster DSL Router 8015U.
Developed with the most advanced Digital Subscriber Line (DSL) today, the DSL
Router provides you with high-speed broadband Internet connection using an
existing phone line. Enjoy speedy file transfers, watch Internet movies, videoconference, and view videos without any long waits. You can also surf the Internet
and make a phone call at the same time!
Your DSL Router can be connected to your computer using a USB or Ethernet port.
Compliant with both ITU G.Lite and G.DMT, your DSL Router is capable of
Asymmetric Digital Subscriber Line (ADSL) full-rate operation up to 12 Mbps
downstream and 1 Mbps upstream, depending on your subscription with your
Internet Service Provider (ISP).
Your DSL Router is also capable of transmitting data at a higher rate using the
latest ADSL technology – ADSL2 and ADSL2+. ADSL2 can achieve downstream
data rate of up to 12Mbps, an d ADSL2+ ca n achieve downstream data rate of up to
20Mbps (requires ISP with complementary infrastructure to support these
standards).
DSL Router
information
Before you begin, write down your DSL Router’s model and serial numbers found
at the bottom of your DSL Router.
Package
Contents
❑ Creative Broadband Blaster DSL Router 8015U
❑ USB cable
❑ Straight Ethernet cable
❑ RJ-11 phone cable
❑ Power adapter
❑ Installation CD
❑ Quick Start Leaflet
Page 9
Introduction vi
❑ Microfilter
System
requirements
In order for your DSL Router to operate properly, be sure that your computer
meets the following minimum system requirements:
Using Ethernet
connection
❑ Installed Network Interface Card (NIC)
❑ CD-ROM drive for software installation
❑ Microsoft® Internet Explorer version 6.0
Using USB
connection
❑ Intel® Pentium® II 300 MHz or equivalent processor
❑ Microsoft Windows® XP, 2000, Me (Millennium Edition) or 98 SE (Second Edition)
❑ 20 MB of free hard disk space
❑ 32 MB RAM
❑ USB port
❑ CD-ROM drive for software installation
❑ Microsoft Internet Explorer version 6.0
You will need a hub if
you wish to connect
more than 2 computers
to your DSL Router.
Depending on your
computer’s
configurations, you can
choose to install your
router using the
Ethernet or USB port.
Page 10
Introduction vii
Using this
document
These icons highlight useful or urgent information:
❍ Tip. This tells you about shortcuts or hints relating to a feature.
❍ Note. This highlights additional or important information about a
feature.
❍ Caution! This highlights proper usage of your device. Use this
information to avoid situations involving risk.
❍ Warning! This warns you of possible hazards to yourself or your device,
which may result in injury or damage.
Page 11
About your DSL Router
Page 12
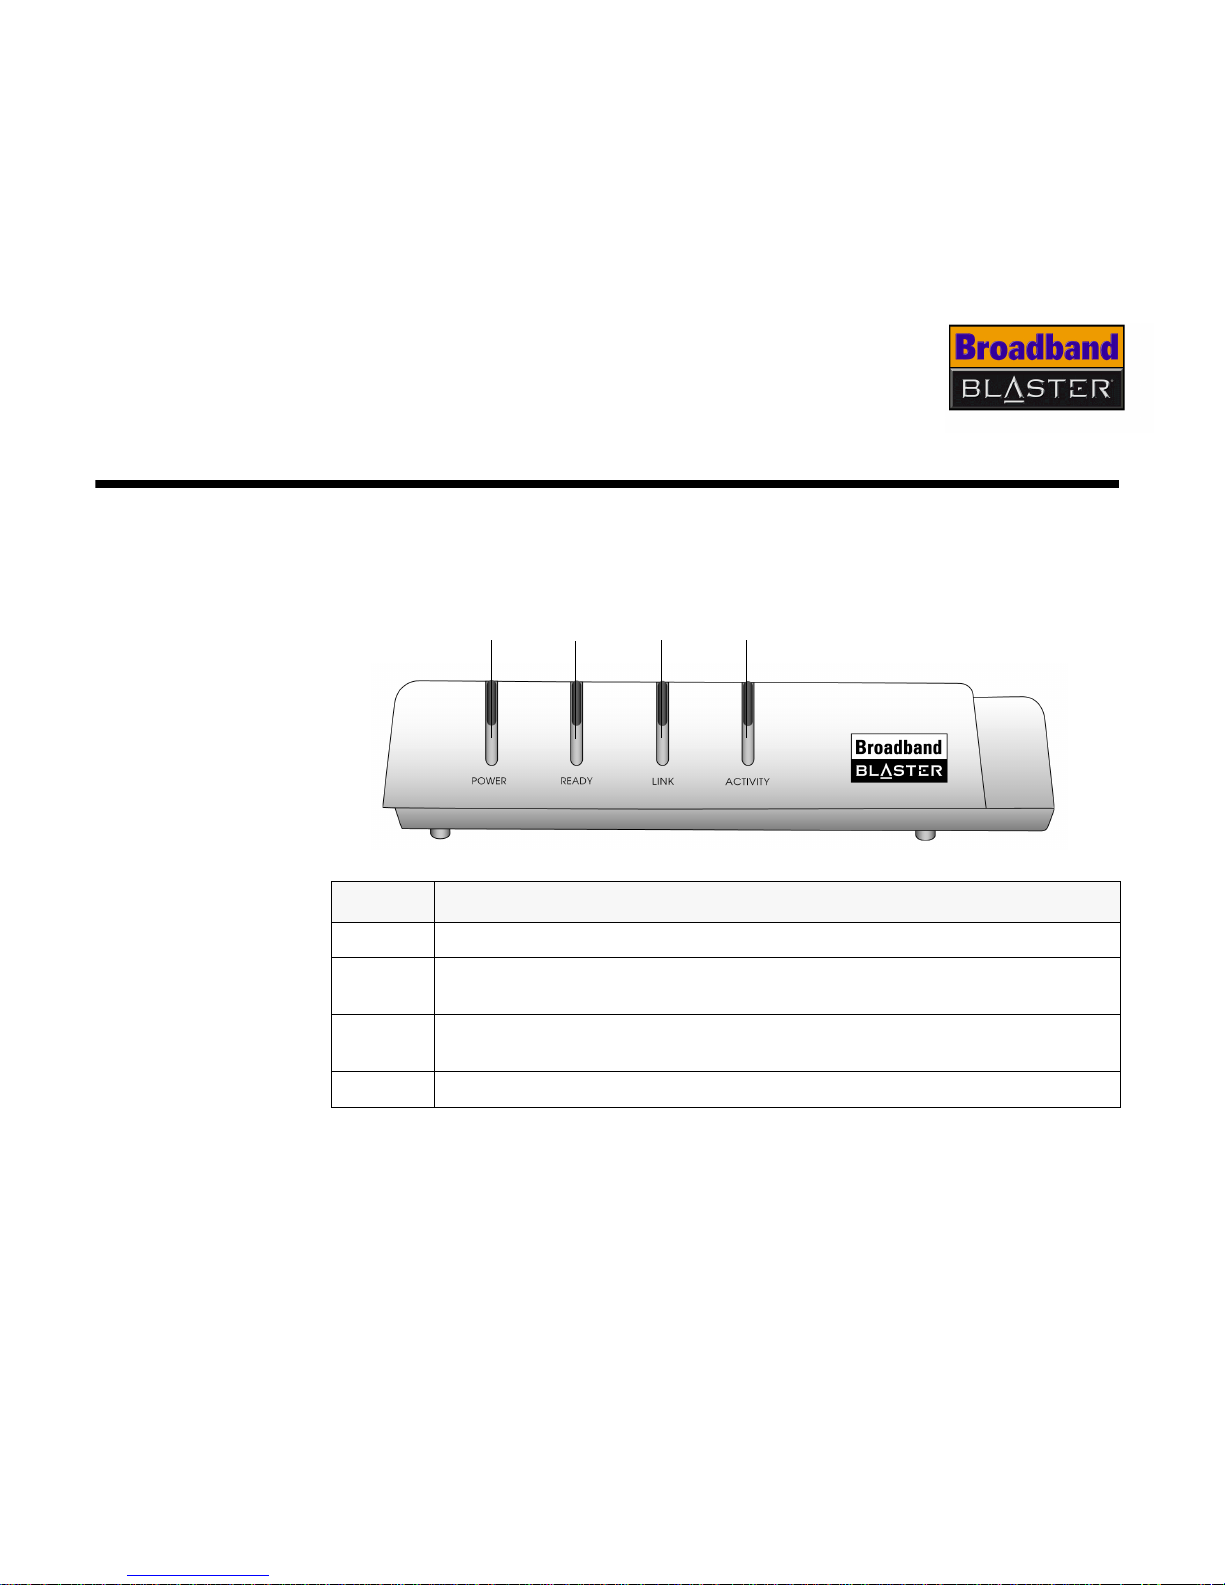
About your DSL Router 1-1
About your DSL Router
This manual will guide you through the process of setting up your DSL Router.
Place your DSL Router in front of you as you go through this section to help you to
identify the various components of your modem.
LED Indication
POWER LED lights up when your DSL Router is connected to a power source.
READY
LED flashes when your DSL Router is initializing the DSL connection. LED
lights up when DSL connection is ready.
LINK
LED lights up when the Ethernet or USB port is connected to your
computer.
ACTIVITY LED flashes when there is data transfer to or from the Internet.
Figure 1-1: Front view of your DSL Router
Ready
LED
Activity
LED
Link
LED
Power
LED
Page 13
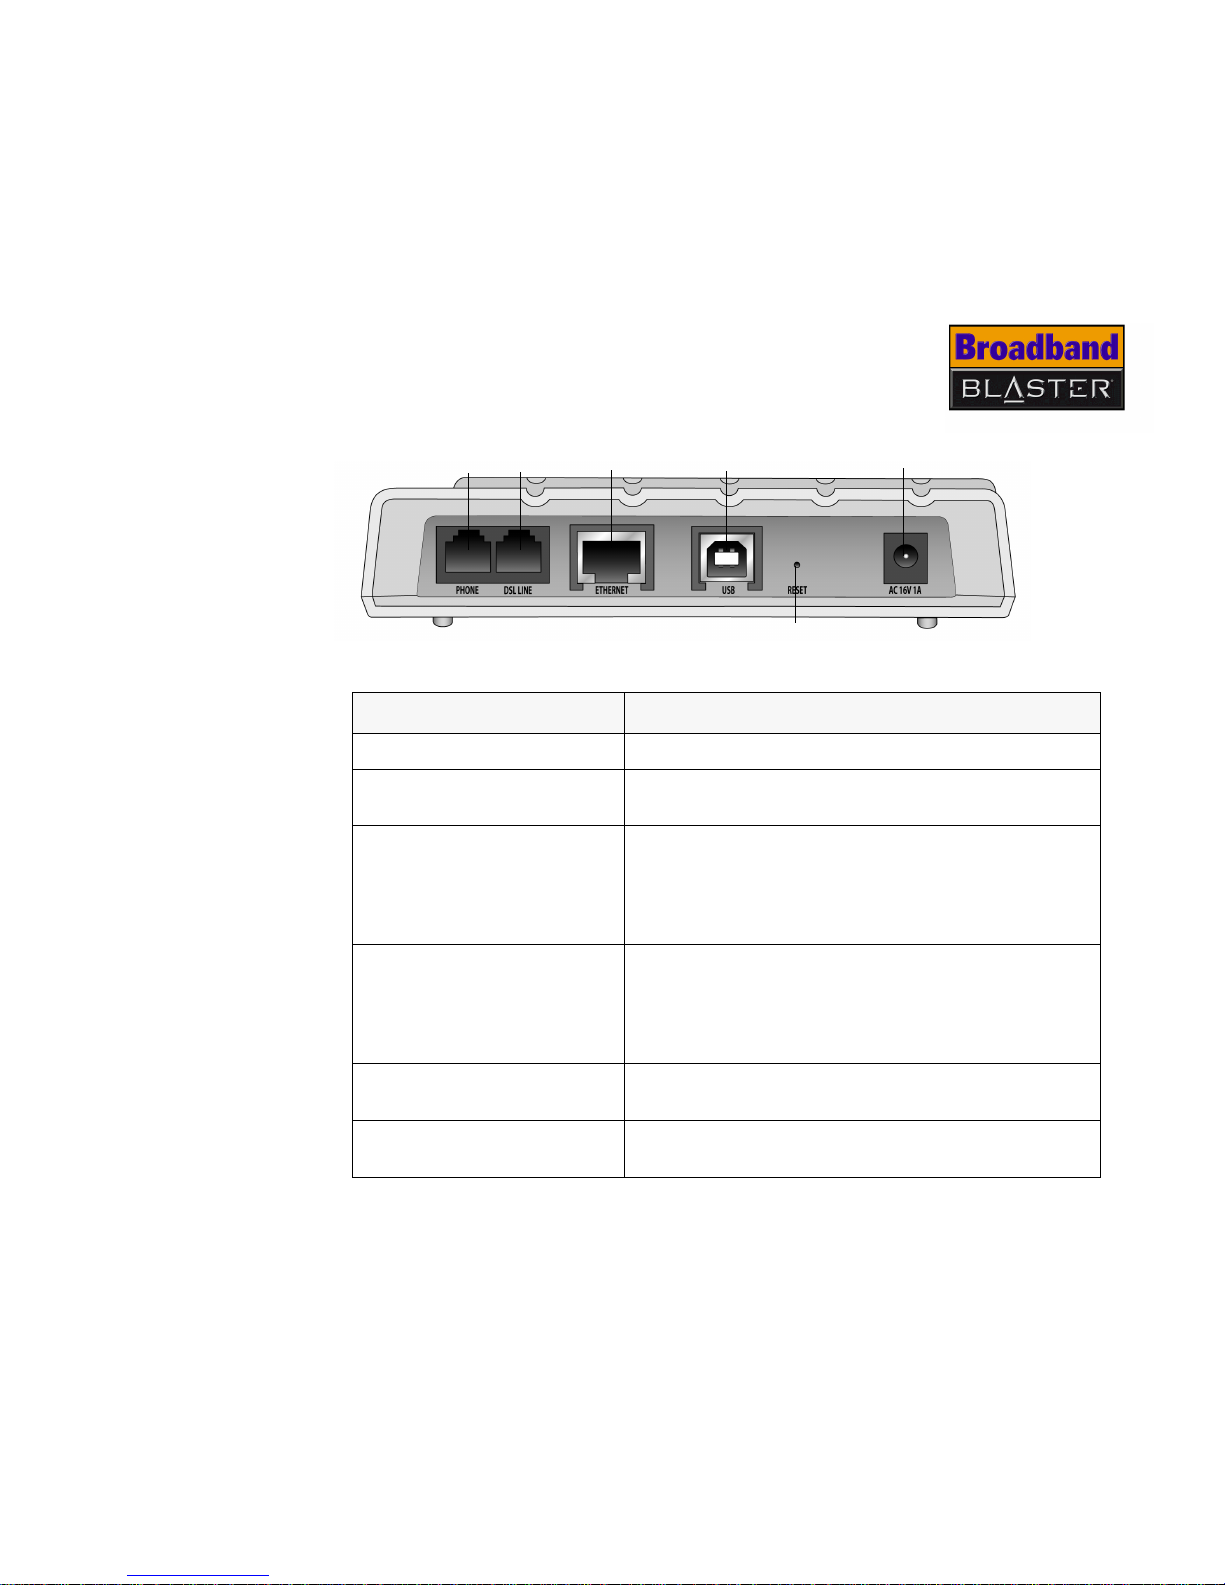
About your DSL Router 1-2
Port/Connector Indication
PHONE PORT Connects to the telephone via a microfilter.
DSL LINE PORT
Connects to the telephone wall outlet using the
provided RJ-11 phone cable.
ETHERNET PORT
Connects to the Ethernet port on your computer
using the Straight Ethernet cable.
If you are connecting your DSL Router using the
Ethernet port, do not connect the USB port on the
same computer.
USB PORT
Connects to the USB port on your computer using
the USB cable.
If you are connecting your DSL Router using the
USB port, do not connect the Ethernet port on the
same computer.
RESET BUTTON
Resets your DSL Router’s settings to the factory
default settings.
POWER CONNECTOR
Connects to the power outlet using the provided
power adapter.
Figure 1-2: Back view of your DSL Router
DSL LINE
port
Ethernet
port
Reset button
Power
connector
USB
port
Phone
port
Page 14
Setting up your DSL Router using
Ethernet connection
Page 15

Setting up your DSL Router using Ethernet connection 2-1
Setting up your DSL Router using Ethernet connection
Depending on your computer’s configurations, you can choose to install your DSL
Router using the Ethernet or USB port on the same computer. Do not install your
DSL Router using both connections on the same computer.
If you are connecting your DSL Router using the USB port, skip this chapter and go
to
"Setting up your DSL Router using USB connection" on page 3-1.
Page 16
Setting up your DSL Router using Ethernet connection 2-2
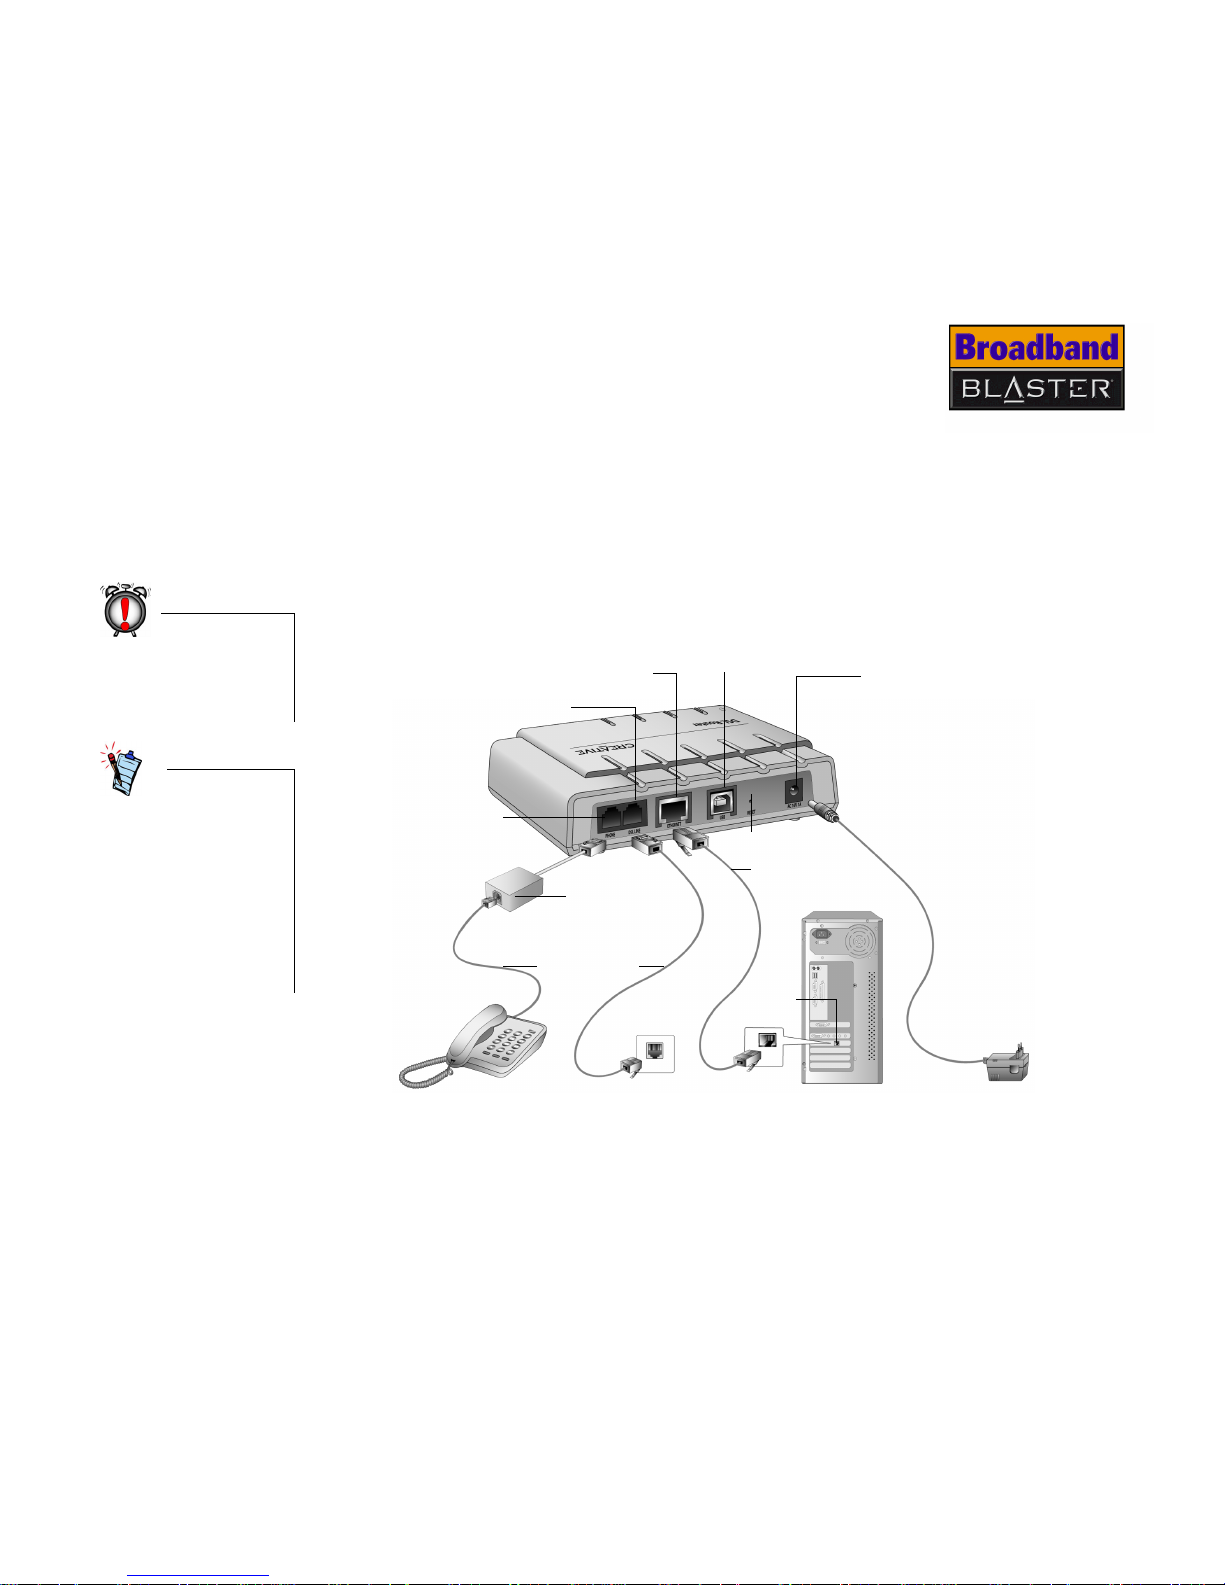
Setting up your
DSL Router
Using the Ethernet
port
Before setting up your DSL Router, be sure that the Network Interface Card in your
computer is installed and functioning properly.
Use Figure 2-1 as a reference when following these instructions to set up your DSL
Router.
1. Connect the straight Ethernet cable to the Ethernet ports on your computer
and DSL Router.
2. Locate a telephone wall outlet and unplug any telephone cable that is
connected to it.
DO NOT use the USB
port on your DSL
Router if you are using
the Ethernet port on
the same computer.
If you want more than
2 computers to have
access to your DSL
Router through a hub,
you may need to use a
crossed Ethernet cable
to connect your DSL
Router to the hub.
Consult your hub’s
manual for details.
Figure 2-1: Setting up your DSL Router using the Ethernet port
Telephone wall
outlet
RJ-11 cables
Power adapter
Ethernet
port
Ethernet port
Straight
Ethernet
cable
DSL LINE port
Power connector
Phone Port
Reset button
USB port
Microfilter
Page 17
Setting up your DSL Router using Ethernet connection 2-3
3. Connect one end of the RJ-11 phone cable provided into the telephone wall
outlet.
4. Connect the other end into the DSL LINE port of your DSL Router.
5. Connect the small round plug of the power adapter provided to the DSL
Router’s power connector and plug your power adapter into a power outlet.
6. Turn on the power supply.
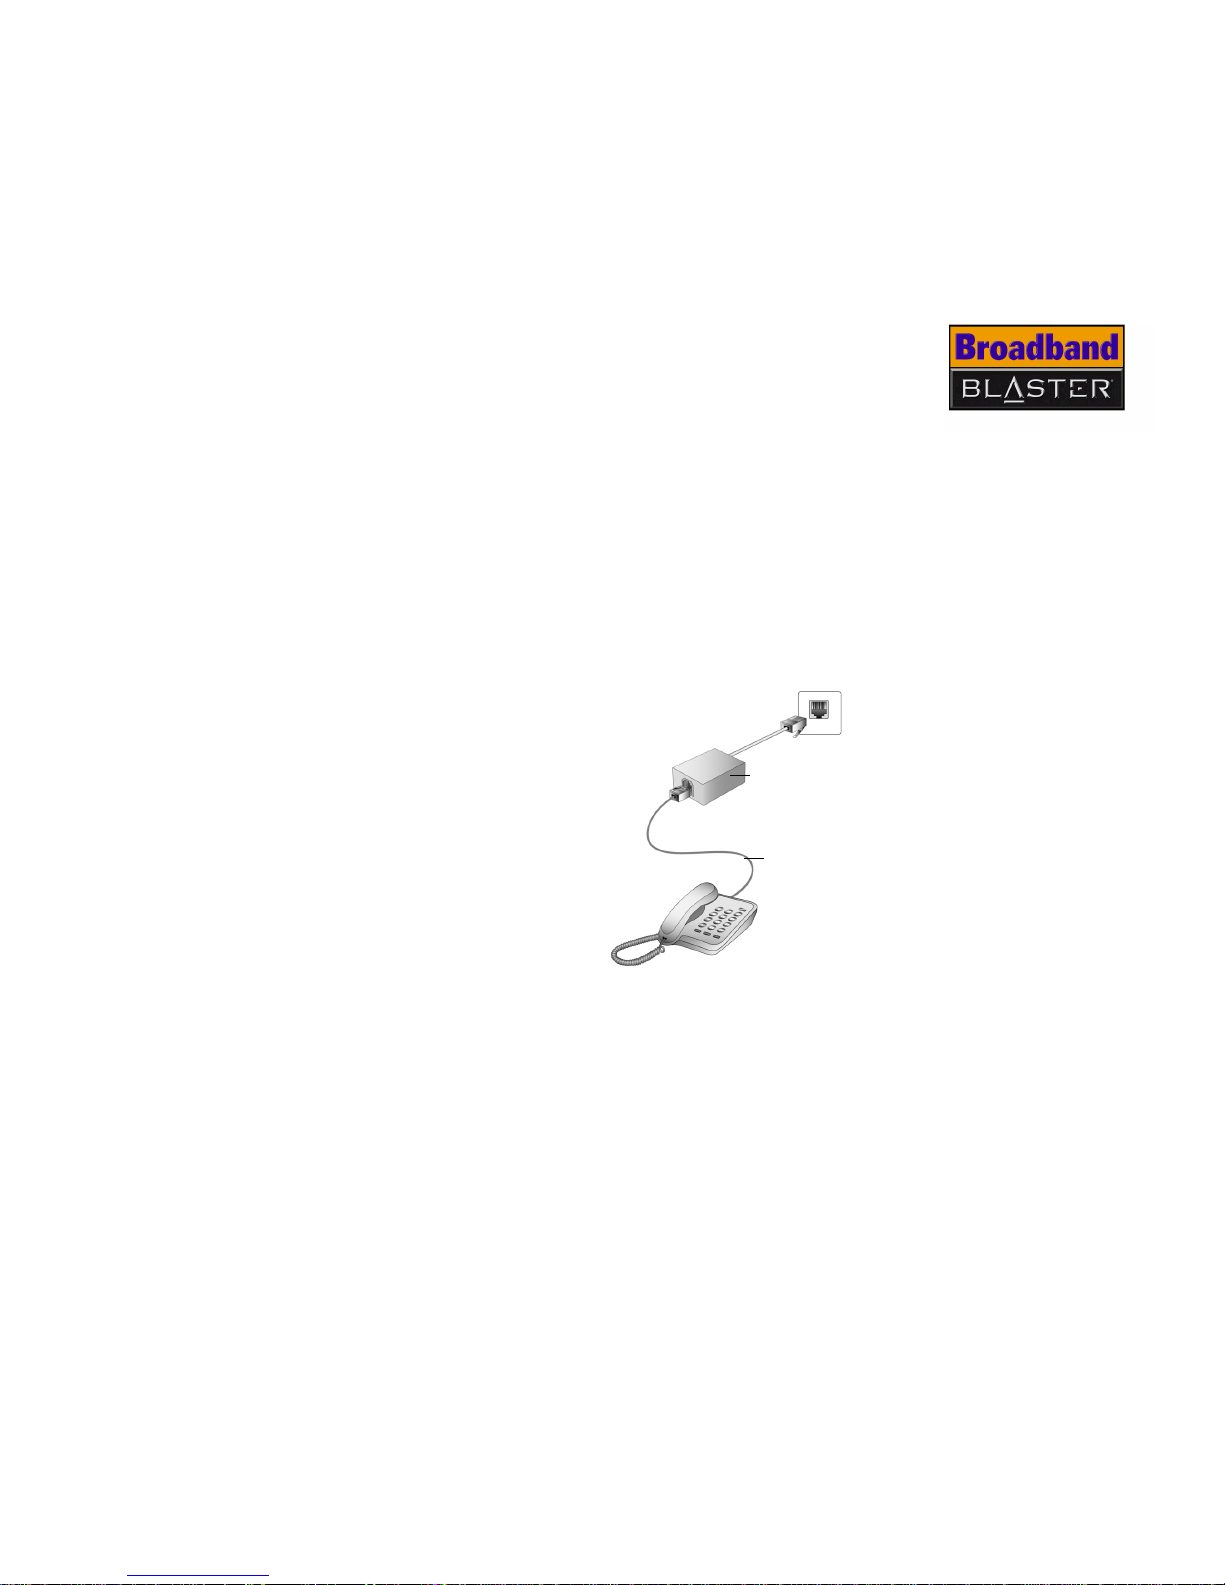
7. If you have telephones and fax machines sharing the same phone line,
connect them to the telephone wall outlet or your DSL Router phone port with
microfilters as shown below. The microfilters will help to ensure voice and data
quality.
Figure 2-2: Connecting a telephone to the telephone wall outlet
Telephone Wall
outlet
RJ-11
phone cable
Microfilter
Tele ph on e
Page 18
Setting up your DSL Router using Ethernet connection 2-4
Configuring
your Network
Interface Card
Before using your DSL Router, you need to configure your Network Interface Card.
In Windows XP/
Windows 2000
1. After setting up your DSL Router, turn on
your computer.
2. In Windows XP, click Start -> Settings ->
Control Panel and double-click the
Network Connections icon.
In Windows 2000, click Start -> Control
Panel and double click the Network and
Dial Up Connections icon.
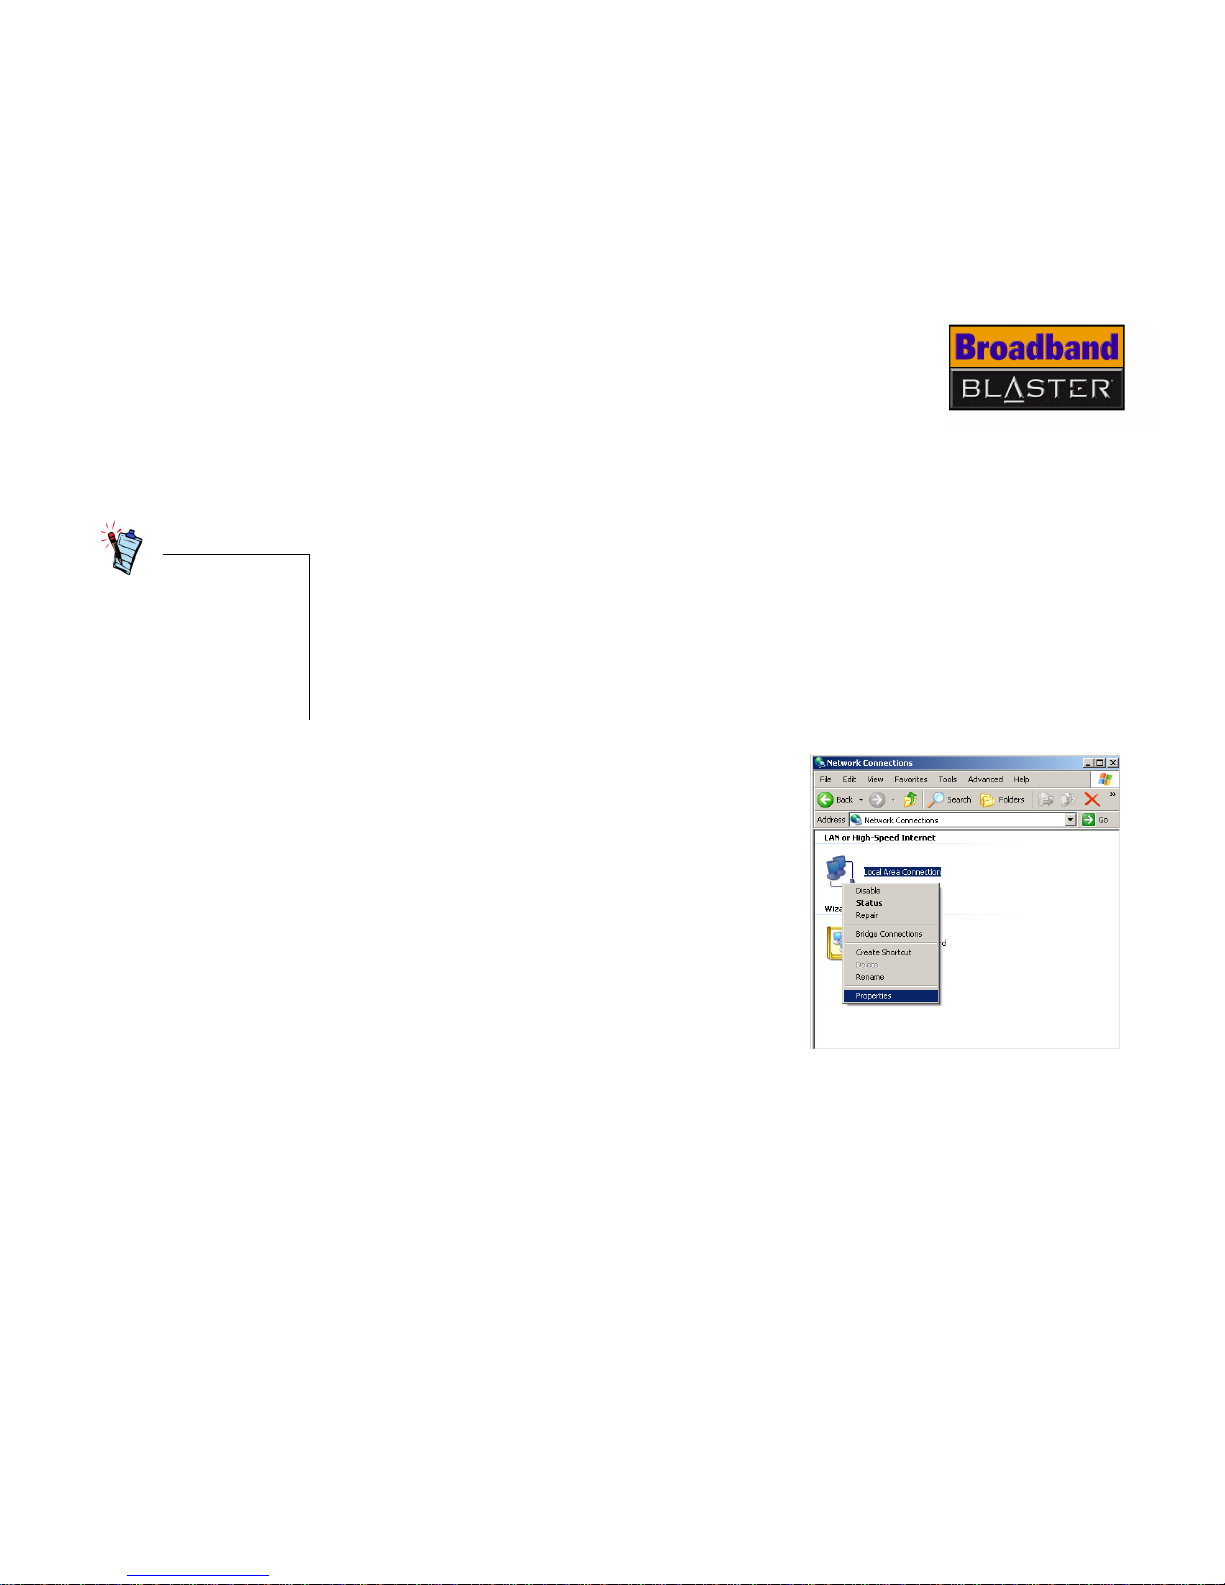
3. When the window similar to Figure 2-3
appears, right-click the Local Area
Connection icon, and then click
Properties.
If you are connecting
your DSL Router using
the USB port, skip this
chapter and go to
"Setting up your DSL
Router using USB
connection" on page 3-1.
Figure 2-3
Page 19

Setting up your DSL Router using Ethernet connection 2-5
4. When the dialog box similar to Figure 2-4
appears, be sure that the name of your
network card is displayed in the first box.
5. In the list below the box, click the
Internet Protocol (TCP/IP) check box
to select it.
6. Click the Properties button.
Figure 2-4
Page 20
Setting up your DSL Router using Ethernet connection 2-6
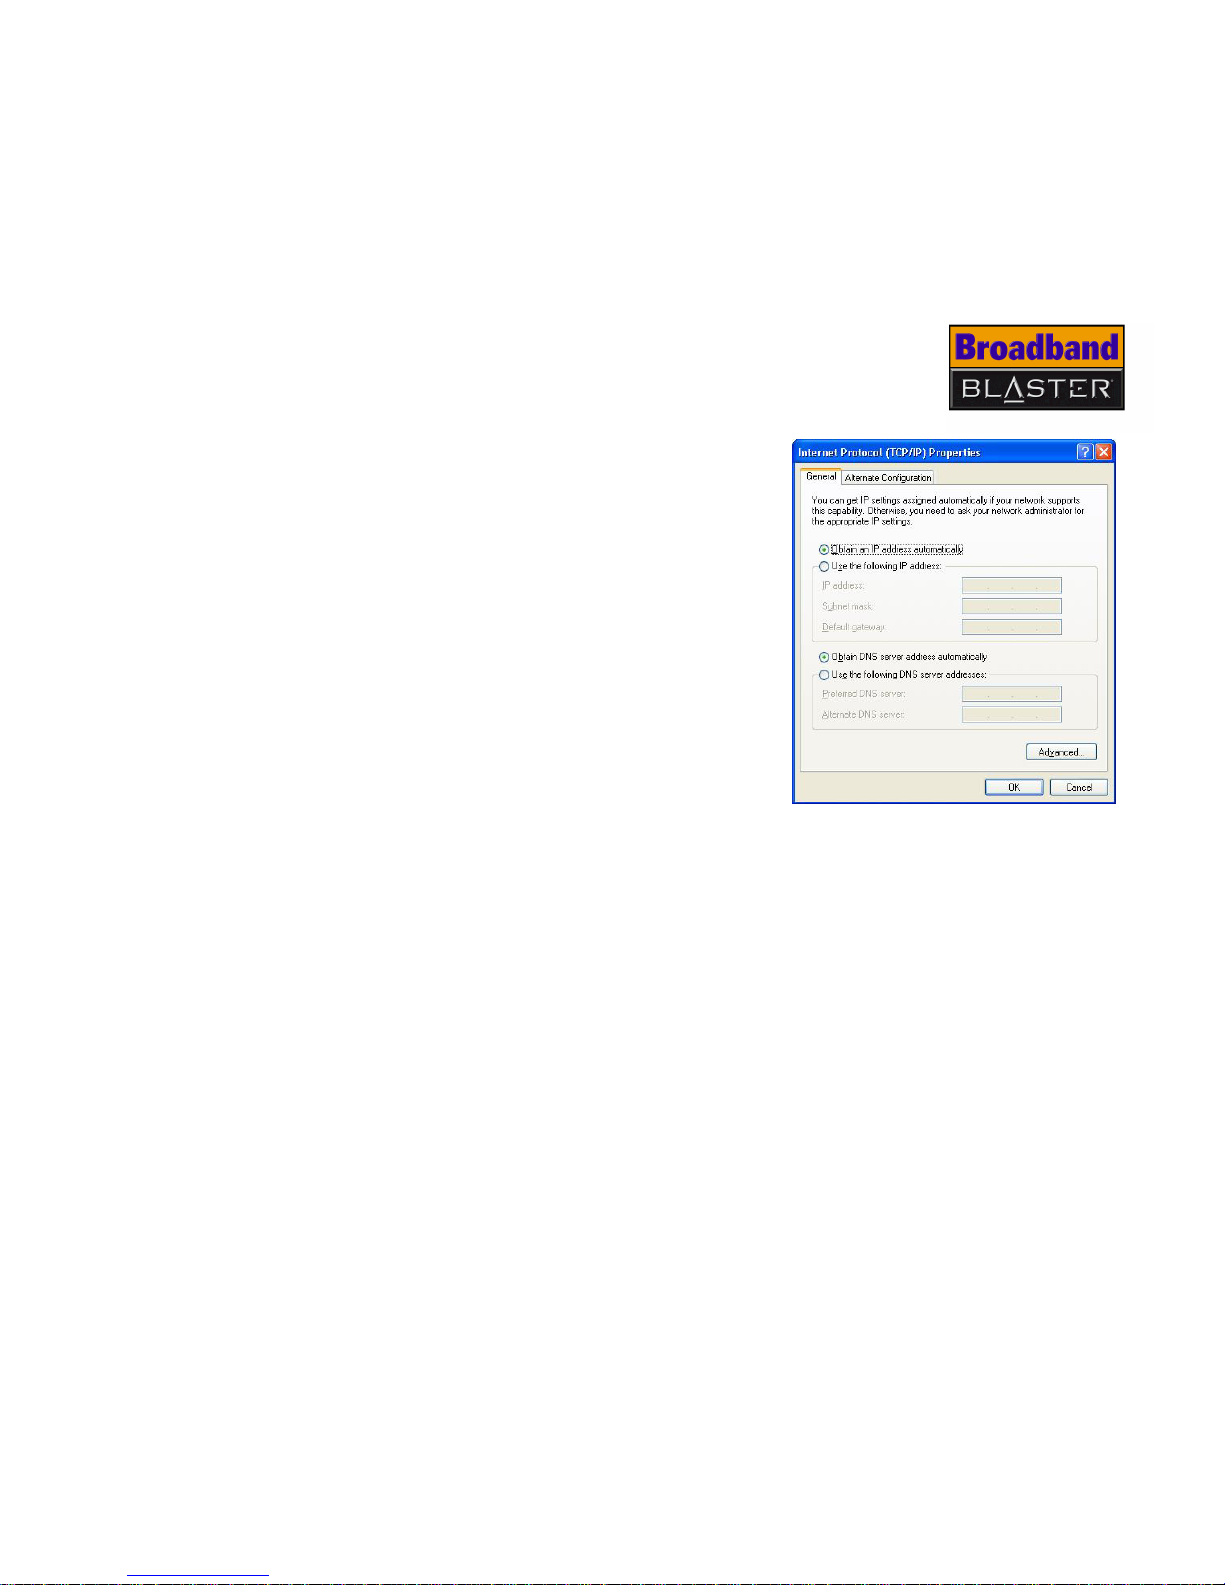
7. When the dialog box similar to
Figure 2-5 appears, click Obtain an IP
address automatically option, and
then click the OK button.
8. When the Local Area Connection
Properties dialog box appears, click
the OK button.
Before using your DSL Router, you will need
to configure your DSL Router. See
"Configuring your DSL Router" on page 4-1.
Figure 2-5
Page 21
Setting up your DSL Router using Ethernet connection 2-7
In Windows Me/
Windows 98 SE
1. After setting up your DSL Router, turn on your computer.
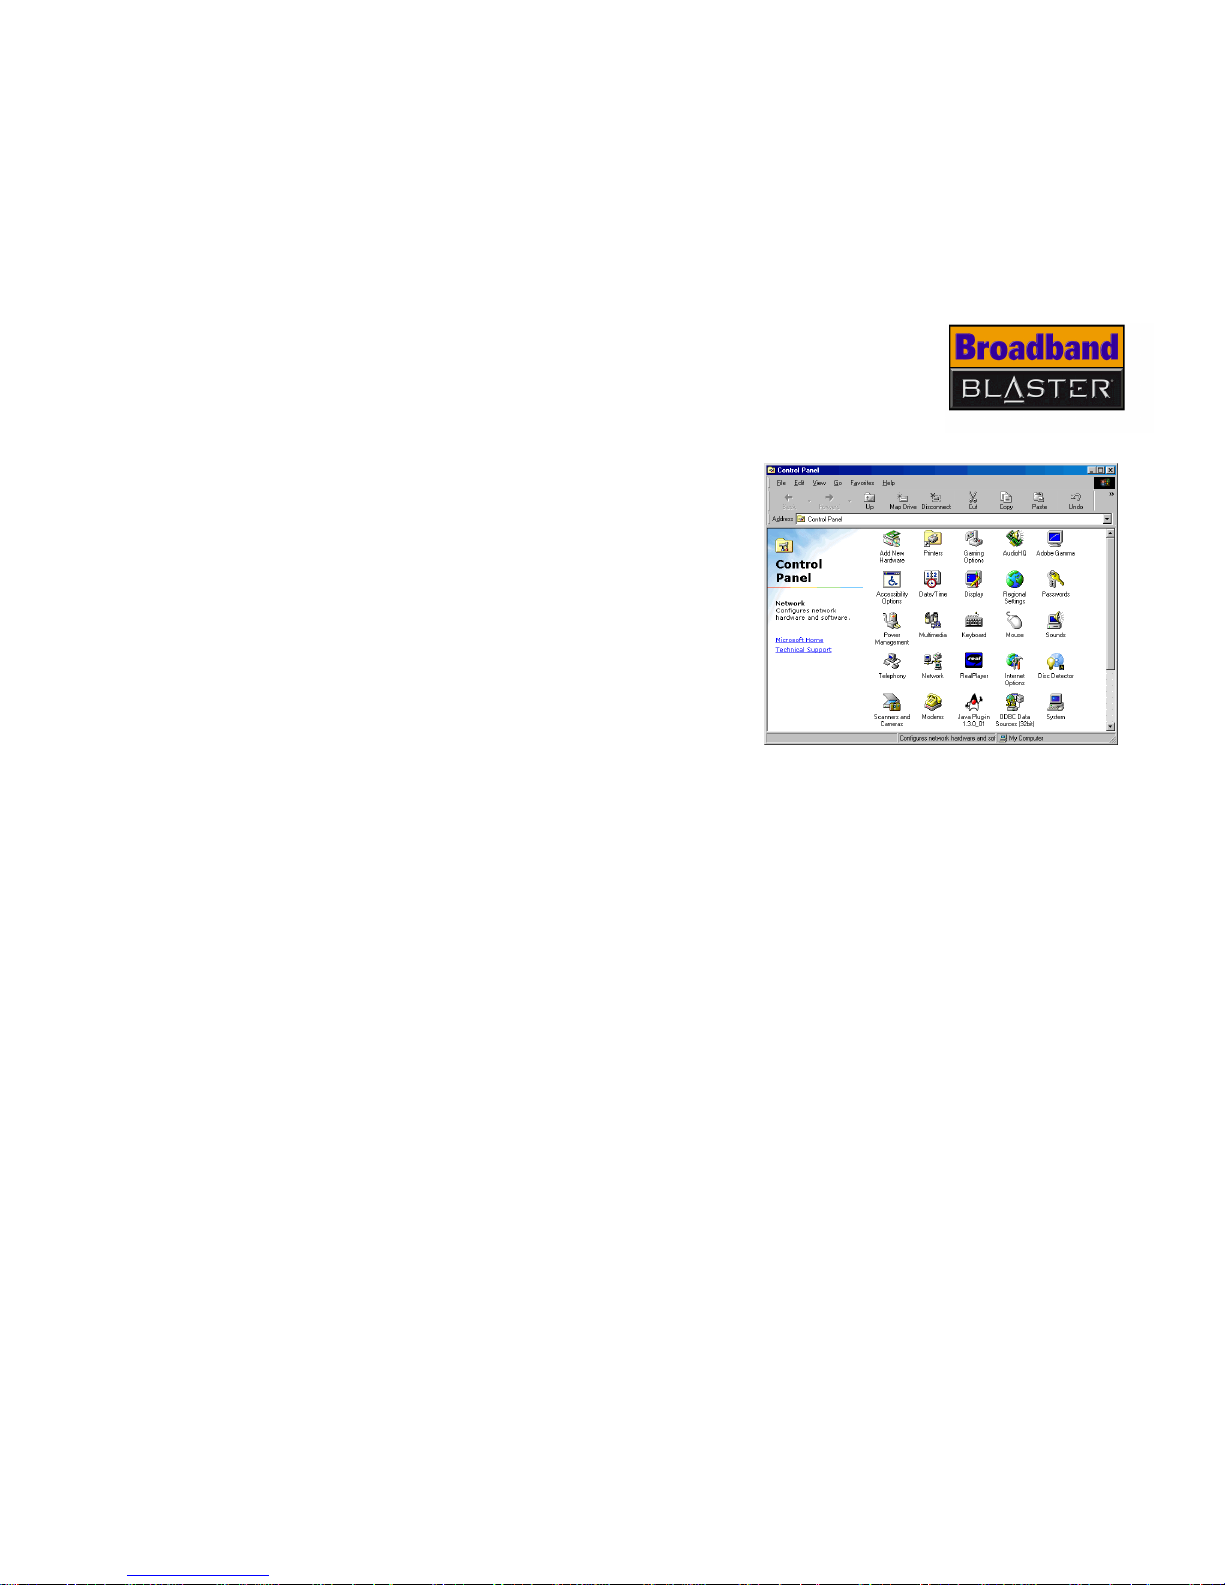
2. Click Start -> Settings -> Control
Panel.
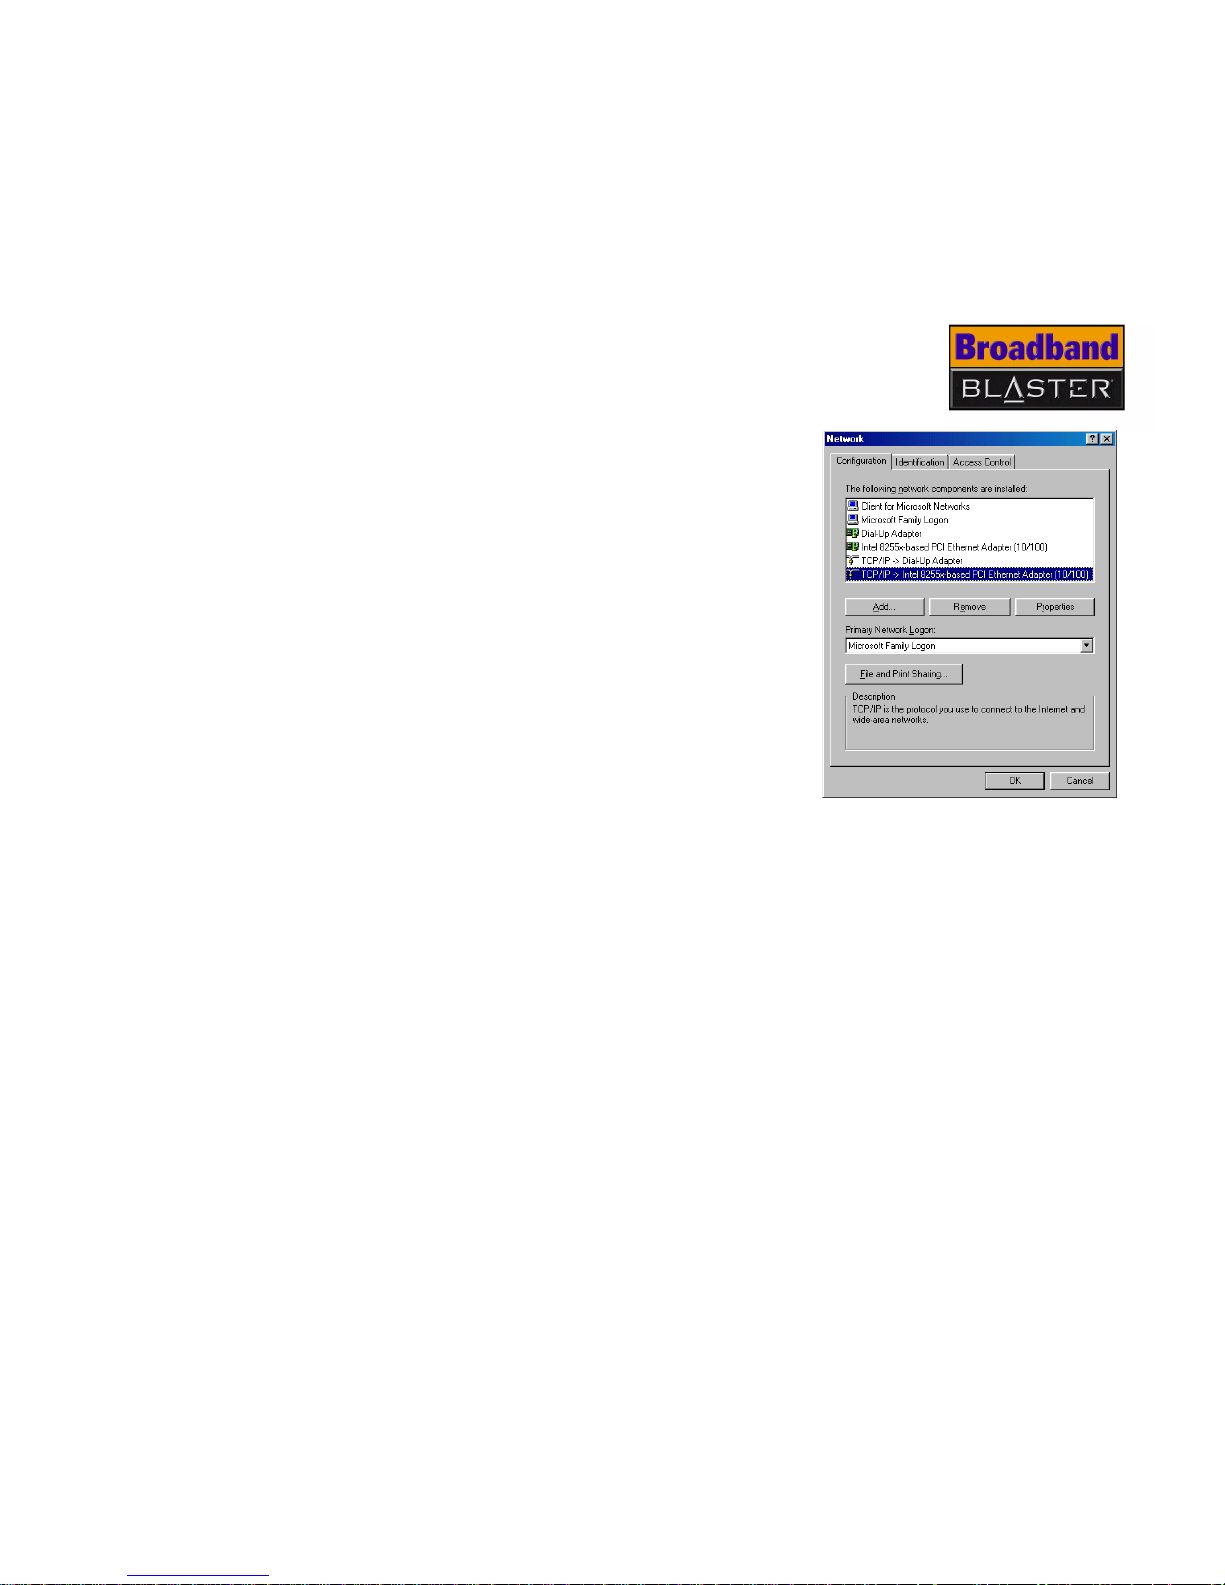
3. When the dialog box similar to Figure
2-6 appears, double-click the Network
icon.
Figure 2-6
Page 22
Setting up your DSL Router using Ethernet connection 2-8
4. When the dialog box similar to Figure 2-7
appears, click the Configuration tab.
5. Click the adapter that has the name of your
Ethernet card, for example,
TCP/IP->Intel 8255x-based PCI
Ethernet Adapter (10/100).
6. Click the Properties button.
Figure 2-7
Page 23
Setting up your DSL Router using Ethernet connection 2-9
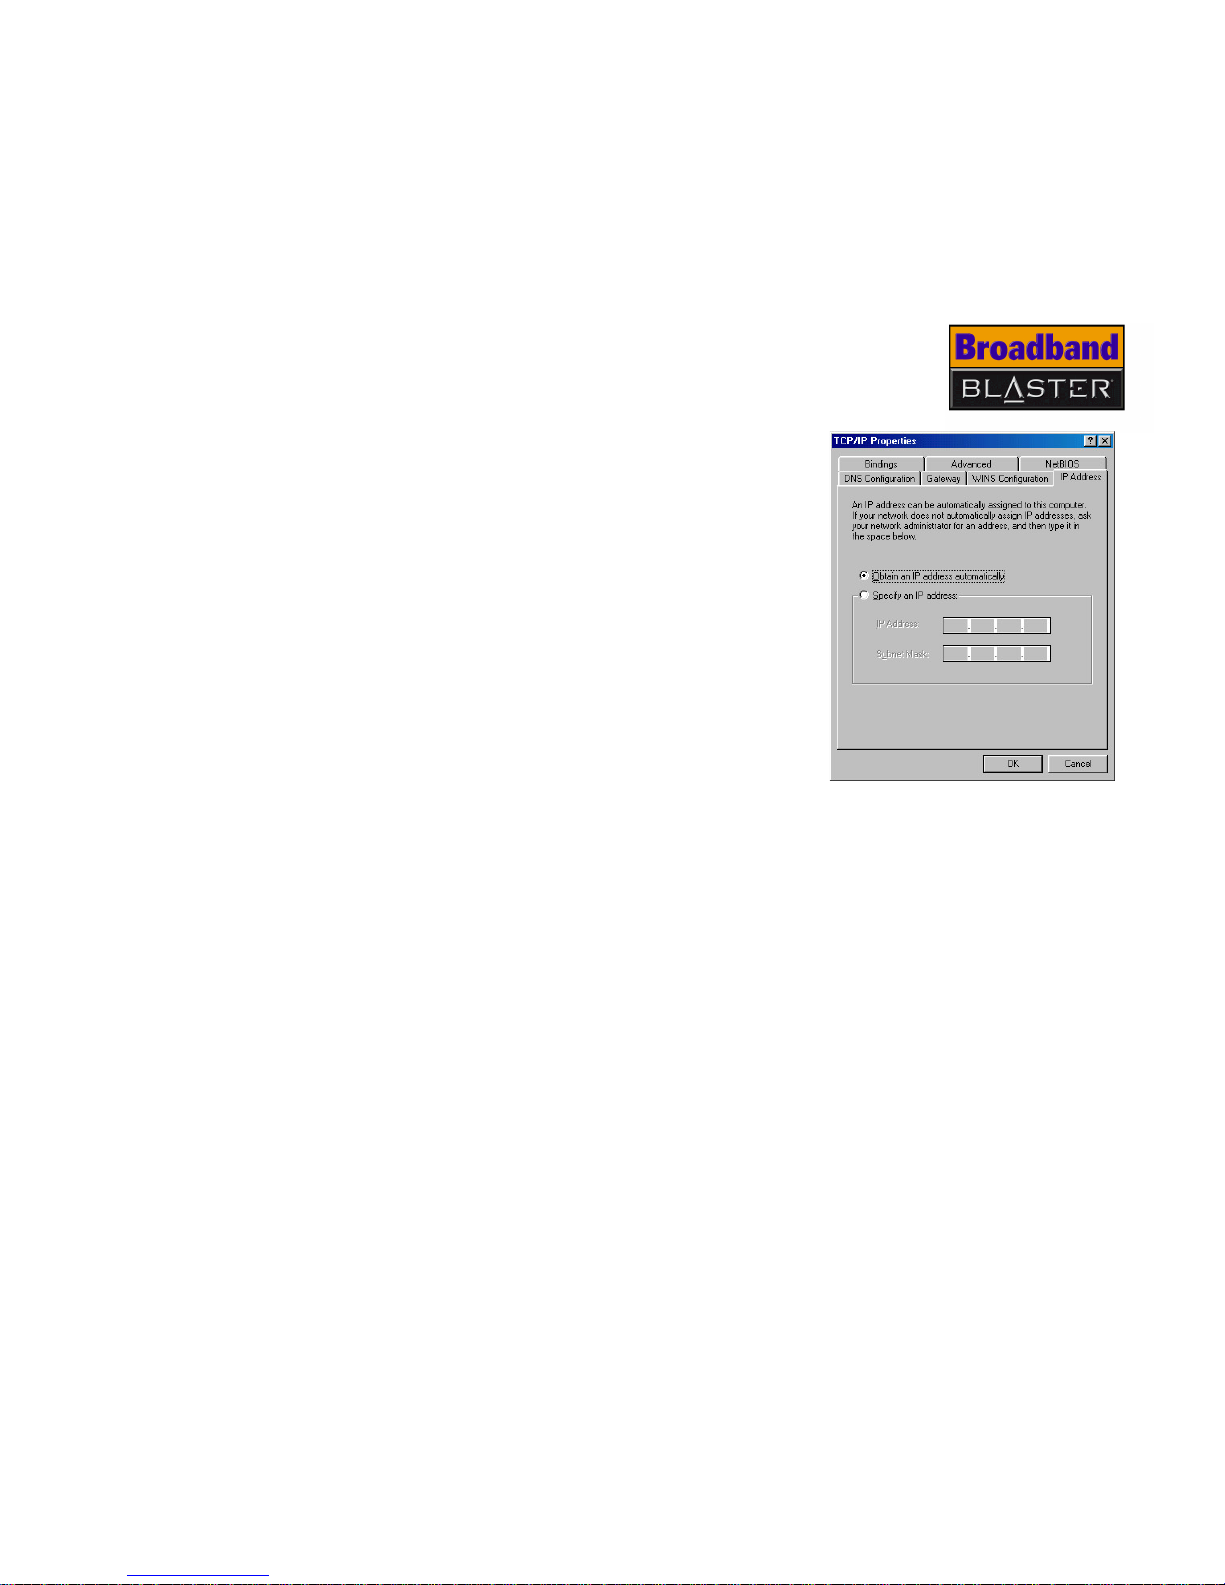
7. When the dialog box similar to Figure 2-8
appears, click the IP Address tab.
8. Click the Obtain an IP address
automatically option, and then click the OK
button.
9. In the Network window, click the OK
button.
10. Restart your computer to let the changes
take effect.
Before using your DSL Router, you will need to
configure your DSL Router. See
"Configuring your
DSL Router" on page 4-1.
Figure 2-8
Page 24

Setting up your DSL Router using
USB connection
Page 25

Setting up your DSL Router using USB connection 3-1
Setting up your DSL Router using USB connection
Depending on your computer’s configurations, you can choose to install your DSL
Router using the Ethernet or USB port on the same computer. Do not install your
DSL Router using both connections on the same computer.
Installing the
USB Driver
Before using your DSL Router, you need to install the USB driver. Do not connect
the USB cable to the USB ports on your computer and DSL Router before installing
the USB drivers.
In Windows XP 1. Insert the Installation CD into your CD-ROM drive. The disc supports Windows
Autoplay mode and starts running automatically. If the Autoplay window
appears, select the applications that you want to install, and then click the OK
button.
2. Follow the onscreen instructions.
3. When prompted, restart your computer.
If you are connecting
your DSL Router using
the Ethernet port, skip
this chapter and go to
"Setting up your DSL
Router using Ethernet
connection" on page 2-1.
If you want to install
the applications later,
from the Autoplay
window, click the Exit
button and proceed to
step 6 to install the
USB drivers.
Page 26

Setting up your DSL Router using USB connection 3-2
4. When the Installshield Wizard
dialog box (Figure 3-1) appears,
click the Next button.
5. When the dialog box similar to
Figure 3-2 appears, click the
Install button.
Figure 3-1
Figure 3-2
Page 27

Setting up your DSL Router using USB connection 3-3
6. If the dialog box similar to Figure 3-3
appears, click the Continue Anyway
button. For more information, refer to
"Difficulties In Windows XP" on page B-5.
7. Click the Finish button.
8. Connect the USB cable to the USB ports
on your computer and DSL Router. See
"Setting up your DSL Router" on page 3-
12.
9. Click the Install the software
automatically
(Recommended) option and
click the Next button (
Figure 3-
4).
Figure 3-3
Figure 3-4
Page 28

Setting up your DSL Router using USB connection 3-4
10. If the dialog box similar to Figure 3-5
appears, click the Continue Anyway
button. For more information, refer to
"Difficulties In Windows XP" on page B-5.
11. Click the Finish button (Figure 3-
6).
Before using your DSL Router, you will
need to configure your DSL Router.
See
"Configuring your DSL Router" on
page 4-1.
Figure 3-5
Figure 3-6
Page 29

Setting up your DSL Router using USB connection 3-5
In Windows 2000 1. Insert the Installation CD into your CD-ROM drive. The disc supports Windows
Autoplay mode and starts running automatically. If the Autoplay window
appears, select the applications that you want to install, and then click the OK
button.
2. Follow the onscreen instructions.
3. When prompted, restart your
computer.
4. When the Installshield Wizard
dialog box (
Figure 3-7) appears,
click the Next button.
If you want to install
the applications later,
from the Autoplay
window, click the Exit
button and proceed to
step 6 to install the
USB drivers.
Figure 3-7
Page 30

Setting up your DSL Router using USB connection 3-6
5. When the dialog box similar to
Figure 3-8 appears, click the
Install button.
6. If the Digital Signature Not
Found dialog box (
Figure 3-9)
appears, click the Yes button.
7. Click the Finish button.
8. Connect the USB cable to the USB
ports on your computer and DSL
Router. See
"Setting up your DSL
Router" on page 3-12.
Figure 3-8
Figure 3-9
Page 31

Setting up your DSL Router using USB connection 3-7
9. If the Digital Signature Not Found
dialog box (Figure 3-10) appears, click
the Yes button.
Before using your DSL Router, you will need
to configure your DSL Router. See
"Configuring your DSL Router" on page 4-1.
In Windows Me 1. Insert the Installation CD into your CD-ROM drive. The disc supports Windows
Autoplay mode and starts running automatically. If the Autoplay window
appears, select the applications that you want to install, and then click the OK
button.
2. When prompted, restart your computer.
Figure 3-10
If you want to install
the applications later,
from the Autoplay
window, click the Exit
button and proceed to
step 5 to install the
USB drivers.
Page 32

Setting up your DSL Router using USB connection 3-8
3. When the Installshield Wizard
dialog box (Figure 3-11) appears,
click the Next button.
4. When the dialog box similar to
Figure 3-12 appears, click the
Install button.
5. Click the Finish button to restart
the system if prompted.
6. Connect the USB cable to the USB
ports on your computer and DSL
Router. See
"Setting up your DSL
Router" on page 3-12.
Before using your DSL Router, you will
need to configure your DSL Router.
See
"Configuring your DSL Router" on
page 4-1.
Figure 3-11
Figure 3-12
Page 33

Setting up your DSL Router using USB connection 3-9
In Windows 98 SE 1. Insert the Installation CD into your CD-ROM drive. The disc supports Windows
Autoplay mode and starts running automatically. If the Autoplay window
appears, select the applications that you want to install, and then click the OK
button.
2. Follow the onscreen instructions.
3. When prompted, restart your computer.
4. When the Installshield Wizard
dialog box (Figure 3-13) appears,
click the Next button.
Windows 98 users
may be prompted to
insert the Windows 98
installation CD into
the CD-ROM drive
during installation.
If you want to install
the applications later,
from the Autoplay
window, click the Exit
button and proceed to
step 6 to install the
USB drivers.
Figure 3-13
Page 34

Setting up your DSL Router using USB connection 3-10
5. When the dialog box similar to
Figure 3-14 appears, click the
Next button.
6. When the dialog box similar to
Figure 3-15 appears, click the
Install button.
Figure 3-14
Figure 3-15
Page 35

Setting up your DSL Router using USB connection 3-11
7. When the dialog box similar to Figure 316 appears, click the Finish button to
restart the system.
8. Connect the USB cable to the USB ports
on your computer and DSL Router. See
"Setting up your DSL Router" on page 3-
12.
Before using your DSL Router, you will need
to configure your DSL Router. See
"Configuring your DSL Router" on page 4-1.
Figure 3-16
Page 36

Setting up your DSL Router using USB connection 3-12
Setting up your
DSL Router
Using the USB
port
Use Figure 3-17 as a reference when following these instructions to set up your
DSL Router.
1. Do not connect the USB cable to the USB ports on your computer and DSL
Router until after you have installed the USB drivers.
2. Locate a telephone wall outlet and unplug any telephone cable that is
connected to it.
DO NOT use the
Ethernet port on your
DSL Router if you are
using the USB port on
the same computer.
Figure 3-17: Setting up your DSL Router using the USB port
USB port
USB cable
Tele ph on e
Wall outlet
Power adapter
Ethernet port
DSL LINE port
Power connector
Reset button
USB port
RJ-11 cables
Phone port
Microfilter
Page 37

Setting up your DSL Router using USB connection 3-13
3. Connect one end of the RJ-11 phone cable provided into the telephone wall
outlet.
4. Connect the other end into the DSL LINE port of your DSL Router.
5. Connect the small round plug of the power adapter provided to the DSL
Router’s power connector and plug your power adapter into a power outlet.
6. Turn on the power supply.
7. If you have telephones and fax machines sharing the same phone line,
connect them to the telephone wall outlet or your DSL Router phone port with
microfilters as shown below. The microfilters will help to ensure voice and data
quality.
Figure 3-18: Connecting a telephone to the telephone wall outlet
Telephone Wall
outlet
RJ-11
phone cable
Microfilter
Tele ph on e
Page 38

Configuring your DSL Router
Page 39

Configuring your DSL Router 4-1
Configuring your DSL Router
Understanding
DSL Router
configurations
Your DSL Router can be configured in several ways. Consult your Internet Service
Provider for the configuration that best suits you.
You need to configure your DSL Router just once, unless your Internet Service
Provider changes the configuration settings.
Your DSL Router supports the following configurations:
❑ PPPoA LLC/PPPoA VC-Mux/PPPoE LLC — this requires a User ID and Password for
authentication. See "PPPoA/PPPoE Configuration" on page 4-3.
❑ RFC 1483 Routed IP — the Internet Protocol (IP) address used can be static or dynamic
depending on your ISP provider.. See "RFC 1483 Routed IP Configuration" on page 4-5.
❑ RFC 1483 Bridged IP — the Internet Protocol (IP) address used can be static or
dynamic depending on your ISP provider. See "RFC 1483 Bridged IP Configuration" on
page 4-7.
Connecting to
your DSL
Router’s Home
Page
Before proceeding, make sure that you have configured your Network Interface
Card (see "Configuring your Network Interface Card" on page 2-4) or installed the
USB device drivers successfully (see "Installing the USB Driver" on page 3-1).
You need to connect to your DSL Router’s home page to configure your DSL
Router.
Disable any proxy
server in use before
accessing the DSL
Router home page.
See "Disabling the
Proxy Server" on page
4-8.
Page 40

Configuring your DSL Router 4-2
1. If your DSL Router is connected
using the Ethernet or USB port, the
Link LED will light up.
2. Start Internet Explorer.
3. In the Address box, type http://
192.168.1.1.
4. Press the Enter key on your
keyboard.
5. In the dialog box similar to Figure 41 appears, type admin in the User
name box and admin in the
Password box.
6. Click the Submit button.
Figure 4-1
Page 41

Configuring your DSL Router 4-3
Configuring
your DSL
Router
PPPoA/PPPoE
Configuration
1. After connecting to your DSL
Router’s home page,
move your
mouse over Configuration on the
left pane and select WAN Settings.
2. When the window similar to Figure
4-2 appears, select PPPoA or
PPPoE in the encapsulation mode.
3. Type in the VPI and VCI values
provided by your Internet Service
Provider in their respective boxes.
4. Click the Next button.
Figure 4-2
If your DSL connection
is charged on the basis
of time online, turn off
your DSL Router when
it is not in use, to
avoid unnecessary
charges.
Page 42

Configuring your DSL Router 4-4
5. When the window similar to Figure
4-3 appears, type in the user name
and password provided by your DSL
service provider.
6. Click the Next button.
7. When the window similar to Figure
4-4 appears, check that all settings
are correct. Click the Finish button.
Figure 4-3
Figure 4-4
Page 43

Configuring your DSL Router 4-5
8. When the window similar to Figure
4-5 appears, click the OK button.
9. Wait for your DSL Router to connect
to the Internet.
You can now start surfing the
Internet at high speed!
RFC 1483 Routed
IP Configuration
1. After connecting to your DSL
Router’s home page, click
Configuration on the left pane and
select WAN Settings.
2. When the web page similar to Figure
4-6 appears, select RFC 1483
Routed in Encapsulation Mode.
3. Type in the VPI and VCI values
provided by your Internet Service
Provider in their respective boxes.
4. Click the Next button. The web page
similar to
Figure 4-7 appears.
Figure 4-5
Figure 4-6
Page 44

Configuring your DSL Router 4-6
5. Click the WAN DHCP Client option
if your ISP provider provides you
with a Dynamic WAN IP address.
Click the Next button and proceed
to step 7.
Do not click the WAN DHCP Client
option if your ISP provider provides
you with a Static WAN IP address.
Click the Next button.
6. When the WAN Settings web page
(
Figure 4-8) appears, type in the
WAN IP address, subnet mask,
gateway and DNS IP address values
provided by your ISP in their
respective boxes. Click the Next
button.
7. Click the Finish button.
8. Click the OK button.
9. Wait for your DSL Router to connect
to the Internet.
You can now start surfing the
Internet at high speed!
Figure 4-7
If you are using a
Static WAN IP address,
you must configure the
WAN IP address,
subnet mask, gateway
and DNS IP address.
Figure 4-8
If your DSL connection
is charged on the basis
of time online, turn off
your DSL Router when
it is not in use, to
avoid unnecessary
charges.
DO NOT turn off the
computer or DSL
Router when the DSL
Router configuration is
being saved.
Page 45

Configuring your DSL Router 4-7
RFC 1483 Bridged
IP Configuration
1. After connecting to your DSL Router’s home page, click Configuration on the
left pane and select WAN Settings.
2. When the window similar to Figure 4-9 appears, select Bridge in
Encapsulation Mode.
3. Type in th e VPI and VCI values
provided by your Internet Service
Provider in their respective boxes.
4. Click the Next button.
5. In the web page that appears
(
Figure 4-10), click the Next button.
Figure 4-9
DO NOT turn off the
computer or DSL
Router when your DSL
router is restarting.
Figure 4-10
If your DSL connection
is charged on the basis
of time online, turn off
your DSL Router when
it is not in use, to
avoid unnecessary
charges.
Page 46

Configuring your DSL Router 4-8
6. In the web page that appears
(
Figure 4-11), click the Finish
button.
7. Click the OK button.
8. Wait for your DSL Router to connect
to the Internet.
You can now start surfing the
Internet at high speed!
Disabling the
Proxy Server
You need to disable any proxy server in use before accessing the DSL Router home
page.
Figure 4-11
Page 47

Configuring your DSL Router 4-9
Using Internet
Explorer
1. Start Internet Explorer.
2. From the Tools menu, click Internet
Options.
3. When the dialog box similar to Figure 4-12
appears, click the Connections tab.
4. Click the Never dial a connection option to
select it and click the LAN Settings
button.
5. When the Local Area Network (LAN)
Settings dialog box similar to Figure 4-13
appears, make sure that the Automatically
detect settings, Use automatic
configuration script and Use a proxy
server check boxes are not selected, and
then click the OK button.
6. In the next dialog box that appears, click the
OK button.
Figure 4-12
Figure 4-13
Page 48

Configuring your DSL Router 4-10
Disconnecting
from the
Internet
When you reconnect your DSL Router to the Internet, always make sure that you
turn on your DSL Router before you turn on your computer. Wait at least 30 - 60
seconds for your DSL Router to connect to the Internet.
In PPPoA and
PPPoE Mode
If you are using PPPoA or PPPoE configurations for your DSL router, you can
disconnect from the Internet by turning off the main power supply to your DSL
Router.
Alternatively, you can disconnect from the Internet through your DSL Router’s
home page:
1. Click Status on the left pane and select Connection.
2. Click the Disconnect button on the right pane.
3. To reconnect to the Internet, click the Connect button.
In RFC 1483
Routed and
Bridged Mode
If you have chosen RFC 1483 Routed or Bridged mode for your DSL Router, you
can disconnect from the Internet by turning off the main power supply to your DSL
Router.
Checking your
DSL Router’s
Status
The DSL Router web page allows you to view your DSL Router’s status, such as
your DSL Line status, PPP Connection status and WAN status. On the left
pane, place your cursor over the Status link to select the statistic you want to
view.
The DSL Router web page also enables you to perform the following tasks:
Diagnostic Test (Loopback test and Ping test), Firmware Upgrade, Reboot
Modem and Log Out. On the left pane, click the link of the task you want to
perform.
Page 49

Configuring your DSL Router 4-11
Restoring
Factory
Default
Settings
To reset your DSL Router to the factory default settings
1. Make sure your DSL Router is turned on.
2. Push the end of a thin object (for example, a straightened paperclip) into the
Reset hole, and hold for approximately 10 seconds until all the LEDs light up.
You can also reset your
DSL Router using your
web browser. For more
information, see
"Restore Factory
Default Settings" on
page 5-8
Page 50

Configuring Advanced Features
Page 51

Configuring Advanced Features 5-1
Configuring Advanced Features
This chapter tells you how to configure your DSL Router’s advanced settings.
LAN Settings
This allows you to change your DSL Router’s IP address.
1. Connect to your DSL Router’s home
page. See
"Connecting to your DSL
Router’s Home Page" on page 4-1.
2. Click Configuration -> LAN Settings
-> LAN IP.
3. When the web page similar to Figure 51 appears, type your LAN IP Address
and Subnet Mask in the respective
boxes.
4. Click the Save button.
DHCP Server
Settings
Dynamic Host Configuration Protocol (DHCP) is a method of assigning a temporary
IP address to a host, such as a computer, connected on a specific network. With
dynamic addressing, a particular host may have a different IP address each time it
connects to the network.
Figure 5-1
Page 52

Configuring Advanced Features 5-2
1. Connect to your DSL Router’s home
page. See
"Connecting to your DSL
Router’s Home Page" on page 4-1.
2. Click Configuration -> LAN Settings
-> DHCP Server Settings.
3. When the web page similar to Figure 52 appears, select your DHCP
configuration.
4. Click the Next button.
5. Type the DHCP server start and end IP
Address, and lease time for the pool of
IP Addresses defined.
6. Click the Submit button.
7. Click the OK button.
8. Wait for your DSL Router to restart.
LAN Client
The feature allows you to add LAN clients.
1. Connect to your DSL Router’s home
page. See
"Connecting to your DSL
Router’s Home Page" on page 4-1.
2. Click Configuration -> Advanced
Settings -> LAN Client.
3. When the web page similar to Figure 53 appears, type in the LAN Client
Name and IP address.
4. Select the check box under Selected.
5. Click the Add button.
6. Click the OK button.
7. Wait for your DSL Router to restart.
Figure 5-2
Figure 5-3
Page 53

Configuring Advanced Features 5-3
Diagnostic
Te s t s
Loopback Test This feature allows you to test the physical connection between your DSL Router
and ISP.
1. Connect to your DSL Router’s home
page. See
"Connecting to your DSL
Router’s Home Page" on page 4-1.
2. Click Diagnostic Test -> Loopback
Test.
3. When the web page similar to Figure 54 appears, click the Begin button.
Ping Test This feature allows you to check if an IP Address exists.
Figure 5-4
Page 54

Configuring Advanced Features 5-4
1. Connect to your DSL Router’s home
page. See
"Connecting to your DSL
Router’s Home Page" on page 4-1.
2. Click Diagnostic Test -> Ping Test.
3. When a web page similar to Figure 5-5
appears, type your IP Address.
4. Click the Begin button.
DMZ Settings
Demilitarized Zone (DMZ) is a computer host or small network inserted as a
"neutral zone" between a company's private network and the outside public
network. It allows access from the Internet to the host computer.
1. Connect to your DSL Router’s home
page. See
"Connecting to your DSL
Router’s Home Page" on page 4-1.
2. Click Configuration -> Advanced
Settings -> DMZ.
3. When a web page similar to Figure 5-6
appears, click the Enable DMZ box.
4. In the DMZ IP Address Setting box,
type the IP Address of the local server’s
computer.
5. Click the Submit button.
6. Click the OK button.
7. Wait for your DSL Router to restart.
Figure 5-5
Enabling DMZ will
allow access from the
Internet to your LAN
and may compromise
on your security.
Figure 5-6
Page 55

Configuring Advanced Features 5-5
Port
Forwarding
Port forwarding, also known as port mapping, allows you to direct TCP/UDP ports
to computers on your LAN. This allows access from the Internet to your LAN.
1. Connect to your DSL Router’s home
page. See
"Connecting to your DSL
Router’s Home Page" on page 4-1.
2. Click Configuration -> Advanced
Settings -> Port Forwarding.
3. When a web page similar to Figure 5-7
appears, select the check box. Type the
port number that you want to forward in
the Start Port Number and End Port
Number (optional) boxes.
4. Select the type of port that you want to
forward, for example, the TCP, UDP
option.
5. In the IP Address box, type the IP Address of the local computer you want to
forward the port to, and then click the Add button.
6. Click the OK button.
7. To forward more ports, repeat steps 2 to 5.
8. Wait for your DSL Router to restart.
Universal Plug
and Plug
Universal Plug and Play (UPnP) allows your DSL Router to be automatically
detected when it is connected to a network.
Enabling port
forwarding will allow
access from the
Internet to your LAN
and may compromise
on your security.
Figure 5-7
Page 56

Configuring Advanced Features 5-6
1. Connect to your DSL Router’s home
page. See
"Connecting to your DSL
Router’s Home Page" on page 4-1.
2. Click Configuration -> Advanced
Settings -> UPnP.
3. When a web page similar to Figure 5-8
appears, select the Enable UPnP
check box.
4. Click the Submit button.
5. Click the OK button.
Filtering
IP Address
Filtering
IP Address Filter allows you to filter out specified IP addresses.
1. Connect to your DSL Router’s home
page. See
"Connecting to your DSL
Router’s Home Page" on page 4-1.
2. Click Configuration -> Advanced
Settings -> Filtering -> IP Address
Filter.
3. When a web page similar to Figure 5-9
appears, type the LAN Client Name
and IP Address that you want to filter.
4. Select the Filtered check box.
5. Click the Submit button.
6. Click the OK button.
7. Wait for your DSL Router to restart.
Figure 5-8
Figure 5-9
Page 57

Configuring Advanced Features 5-7
MAC Address
Filtering
Media Access Control (MAC) filtering is used to block data transfer on your LAN.
The MAC address of a Network Interface device is a 12 digit hexadecimal number
that is unique.
1. Connect to your DSL Router’s home
page. See
"Connecting to your DSL
Router’s Home Page" on page 4-1.
2. Click Configuration -> Advanced
Settings -> Filtering -> MAC
Address Filter.
3. When a web page similar to Figure 5-10
appears, select the Selected check
box.
4. In the Source MAC and/or
Destination MAC box, type the MAC
Address of the Network Interface card.
5. Select Protocol and Mode settings.
6. Click the Add button.
7. Click the OK button.
8. Wait for your DSL Router to restart.
Figure 5-10
Page 58

Configuring Advanced Features 5-8
Change
Password
1. Connect to your DSL Router’s home
page. See "Connecting to your DSL
Router’s Home Page" on page 4-1.
2. Click Configuration -> Advanced
Settings -> Change Password.
3. When a web page similar to Figure 5-11
appears, type in your new password,
and then click the Submit button.
4. Click the OK button.
5. Wait for your DSL Router to restart.
Restore
Factory
Default
Settings
This feature allows you to restore your DSL router’s settings to the factory default
settings.
1. Connect to your DSL Router’s home
page. See
"Connecting to your DSL
Router’s Home Page" on page 4-1.
2. Click Restore Factory.
3. When a web page similar to Figure 5-12
appears, click the OK button.
Figure 5-11
You can also reset your
DSL Router using the
Reset hole. For more
information, see
"Restoring Factory
Default Settings" on
page 4-11.
Figure 5-12
Page 59

Configuring Advanced Features 5-9
Firmware
Upgrade
To upgrade your DSL Router firmware, do the following:
1. Connect to your DSL Router’s home
page. See
"Connecting to your DSL
Router’s Home Page" on page 4-1.
2. Click the Firmware Upgrade link on
the left pane.
3. When a web page similar to Figure 5-13
appears, click the Browse button.
4. Select the firmware upgrade file.
5. Click the OK button.
Figure 5-13
Page 60

Technical Specifications
Page 61

Technical Specifications A-1
Technical Specifications
This section provides certain technical specifications for your Creative Broadband
Blaster DSL Router 8015U.
Data Encapsulation
Protocol
❑ RFC 2684/1483 Bridge/Routed, PPPoA LLC/VC MUX, PPPoE LLC
ADSL Line Interface ❑ ANSI T1.413 issue 2
❑ ITU-T G.992.1 (G.DMT)
❑ ITU-T G.992.2 (G.LITE)
❑ ITU-T G.992.3 (ADSL 2)
❑ ITU-T G.992.5 (ADSL 2+)
Electrical ❑ Power adapter with output 16 V AC, 750 mA
Interface ❑ Ethernet 10/100 Base-T (LAN). MDI-X
❑ RJ-11 (WAN)
❑ USB 2.0 Full Speed
Dimensions ❑ Length: 145 mm / Width: 125 mm / Height: 30 mm
Compliance ❑ IEC 60950
❑ CE EN55022
❑ CE EN55024
❑ CB
❑ FCC Part 15B
❑ FCC Part 68
❑ UL
Page 62

Troubleshooting
Page 63

Troubleshooting B-1
Troubleshooting
If you have a technical problem with this product, you may wish to consult our
self-help tool "Knowledge Base" for online troubleshooting and solutions. Go to
www.creative.com and select your region.
Connection to
your DSL
Router’s home
page
The Web browser does not connect to the DSL Router home page.
You are not using the correct IP address.
Try the following:
❑ Be sure that you have typed the default IP address as 192.168.1.1.
❑ Check your network device’s IP address:
In Windows XP/2000:
1. Click Start -> Programs/All Programs -> Accessories -> Command
Prompt.
2. In the window that appears, type ipconfig/release, and then press the
Enter key.
3. Type ipconfig/renew, and then press the Enter key.
4. Be sure that the IP Address is 192.168.1.x. x may be any number
between 2 and 254.
In Windows Me/98 SE:
1. Click Start -> Run.
2. In the window that appears, type winipcfg, and then click the OK button.
3. Under Ethernet Adapter Information, click your network adapter.
4. Click the Release button, and then click the Renew button.
5. Be sure that the IP Address is 192.168.1.x. x may be any number
between 2 and 254.
Page 64

Troubleshooting B-2
Connection to
the Internet
My DSL Router does not connect to the Internet.
You did not set up your DSL Router correctly.
Try the following:
❑ Be sure that if your DSL Router is connected to your computer through a hub, you are
using a crossed Ethernet cable.
Also, be sure that you have configured your DSL Router correctly. For more information,
see "Configuring your DSL Router" on page 4-1.
❑ If your computer is connected to your DSL Router using a USB cable, be sure that you
have installed the USB driver.
❑ Be sure that the power adapter is plugged in securely and the power is turned on.
❑ Be sure that the phone line from the telephone wall outlet is connected securely to the
LINE connector of your DSL Router.
❑ Be sure that you have subscribed with a Internet Service Provider.
❑ Be sure that the Ready LED is turned on.
❑ If yo u ar e re q uir ed t o sp ecif y you r WA N IP add r ess , be sur e tha t yo u hav e ty ped the val u es
for IP address, Subnet Mask, Gateway and DNS Server provided by your Internet Service
Provider correctly.
Page 65

Troubleshooting B-3
LED Status Observe the LEDs on your DSL Router to check if the device is functioning properly.
Normal Setup
Status
When your DSL Router is turned on, all the LED lights up. After several seconds, all
the LEDs will go into their correct states. See
"About your DSL Router" on page 1-
1 for more information.
The Power LED on my DSL Router does not turn on.
Your DSL Router is not properly powered by an external power source.
Try the following:
❑ Check both ends of the DC adapter cable connection to see if the connectors are firmly
plugged into both the telephone wall outlet and your
DSL Router.
❑ Be sure that you have turned on the power outlet connected to your DSL Router.
❑ Be sure that you are using the power adapter provided.
The Link LED on my DSL Router does not turn on after I connect my DSL
Router and computer with the Straight Ethernet cable.
Your DSL Router is not properly connected to your computer.
Try the following:
❑ Check both ends of the Straight Ethernet cable and be sure that they are plugged in
securely.
❑ Be sure that you have used a Straight Ethernet cable. However, if you are connecting to
more than 2 computers through a hub, you may need to use a crossed Ethernet cable to
connect your DSL Router to your hub.
❑ Be sure that you have configured your Network Interface Card correctly.
The Link LED on my DSL Router is turned on and is unable to access the
Internet.
Your DSL Router may not be properly configured. See topic "My DSL Router does
not connect to the Internet." on page B-2.
Page 66

Troubleshooting B-4
The Ready LED on the DSL Router keeps flashing.
There is no DSL service subscription.
There is too much noise on your telephone line.
Your Internet Service Provider may be experiencing problems.
Check on the following:
❑ Be sure that the telephone cable is connected correctly to your DSL Router.
❑ Try connecting again after a few minutes as external interference can cause disruptions
to your DSL line.
❑ Attach microfilters to all phone jacks connected to analog devices sharing the same line
as your DSL connection. Examples of analog devices include telephones, analog modems
and fax machines.
❑ Be sure that you have a subscription with a Internet Service Provider.
❑ Check with your Internet Service Provider.
Page 67

Troubleshooting B-5
Difficulties In
Windows XP
A Hardware Installation error message appears on a Windows XP
operating system when a driver is being installed.
At the time of this product's release, Microsoft strongly encouraged companies to
submit their hardware solutions for certification. If a hardware device driver is not
submitted, or does not qualify, for Microsoft certification, a warning message
similar to the one below appears.
You may see this message when installing this driver or update. If you do, you may
choose to click the Continue Anyway button. Creative has tested this driver on
Windows XP, and it does not impair or destablize your computer.
Page 68

Frequently Asked Questions
Page 69

Frequently Asked Questions C-1
Frequently Asked Questions
Can my DSL Router work with Operating Systems other than Windows?
Yes, if you are connecting your DSL Router using the Ethernet port. Ethernet port
connection is operating system independant. Currently, Technical Support only
provides support for Windows-based operating systems.
If you are, however, connecting your DSL Router using the USB port, your DSL
Router will only work with Windows XP, Windows 2000, Windows Me and Windows
98 SE.
How can I check whether I have either Static or DHCP IP addressing?
Consult your DSL Service Provider.
Which Ethernet card is compatible with my DSL Router?
Your DSL Router is compatible with virtually any Network Interface Card.
Which protocol does my DSL Router support?
Currently, TCP/IP is the only protocol standard for the Internet and has become
the global standard for communications.
Page 70

Glossary
Page 71

Glossary D-1
Glossary
This section offers a short explanation of some of the common networking and DSL
terminologies.
ADSL Asymmetric Digital Subscriber Line — A Digital Subscriber Line (DSL) technology
that allows digital data to be sent over existing telephone lines. Though many
different DSL technologies have been developed, ADSL is the most popular among
individuals and small businesses because it offers higher downstream (or
download) than upstream (or upload) data rates.
Bridge A hardware device that links two or more LANs and manages the transfer of data
between these LANs. The two networks being connected can be alike or dissimilar.
Broadband A transmission media that can handle the transmission of multiple messages, at
different frequencies, at one time. Broadband signals use analog carriers.
DHCP Dynamic Host Configuration Protocol — A method of assigning a temporary IP
address to a host, such as a computer, connected to a specific network. With
dynamic addressing, a particular host has a different IP address each time it
connects to the network.
DNS Domain Name System — This allows you to specify a symbolic name, a meaningful
and easy-to-remember “handle,” instead of an IP address. The DNS is the way that
Internet domain names are located and translated into Internet Protocol
addresses.
Downstream Data transferred from the telecommunication network to the customer’s premises.
Page 72

Glossary D-2
DSL Digital Subscriber Line — A technology that transforms ordinary telephone lines
into high-speed digital lines for fast Internet access. This technology uses a digital
coding technique to get large capacity out of existing phone lines without
interfering with regular services — one can use the phone and surf the Internet at
the same time. In this way, DSL provides simultaneous Internet and voice/fax
capabilities over a single telephone line without any interference.
Ethernet A local-area network (LAN) protocol that supports data transfer rates of 10 Mbps.
It is one of the most widely implemented LAN standards that operates using the
twisted pair or coaxial cable. A version of Ethernet, called 100 Base-T (or fast
Ethernet), supports data transfer rates of 100 Mbps.
G.dmt An industry standard known as G.992.1, which refers to ADSL technology that
uses DMT modulation and that does not require a splitter box to be installed at the
user’s premises. This technology supports downstream data rates of up to 8
megabits per second and upstream data rates of up to 960 kilobits per second.
G.Lite A “splitterless” ADSL technology that uses CAP or DMT modulation, and supports
downstream data rates of up to 1.5 megabits per second and upstream data rates
of up to 384 kilobits per second.
Hub A device used for connecting nodes in a star topology, that is, all the nodes are
connected to a central hub. A passive hub simply organizes the wiring, while an
active hub also regenerates and retransmits signals.
Internet The world’s largest computer network, which links computers and networks that
communicate via the standard TCP/IP protocol.
Page 73

Glossary D-3
IP Address The address for a computer on a TCP/IP network. An IP address identifies a
particular machine on a network. The format of an IP address is a 32-bit numeric
address written as four numbers separated by periods. Each number can be 0 to
255, for example, 11.160.10.240 is an IP address. Any machine connected to the
Internet is assigned an IP address.
ISP Internet Service Provider — An organization that provides Internet access to
computer users.
LAN Local Area Network — A computer network that spans a relatively small area. Most
LANs are confined to an office, single building, or group of buildings.
Mbps Megabits per second — A measure of data transfer speed.
NIC Network Interface Card — A card that is installed in a computer so that it can be
connected to a network. The NIC manages the flow of network information to and
from the computer.
Packet A unit of information, which is data of a fixed length, sent as a whole from one
device to another on a network. It contains a header with a destination address
and control information, and a payload that has the user data.
PING ’Packet Internet Groper — An Internet program used to determine whether a
specific IP address is accessible. It works by sending a packet to the specified
address and waiting for a reply. PING is used primarily to troubleshoot network
connections.
PPP Point-to-Point Protocol — A communication protocol that allows a computer to be
connected to the Internet.
Protocol A set of agreed-upon rules for transmitting data between two devices. A computer
must support the right protocols in order to communicate with other computers.
Page 74

Glossary D-4
RFC 1483 A standard method for linking different devices across networks and which assures
“interoperability”.
RJ-11 A connector/socket for two pairs (four wires) of twisted pair cables that is used
primarily to connect telephone equipment.
Router A hardware device connecting two separately functional networks that use the
same or different protocols. Routers look at the destination addresses on data
packets, and then decide which route to send them on.
Subnet Mask A 32-bit string of a TCP/IP address — one part of which is the network address and
another part of which is the host address. A Subnet Mask is usually represented in
dotted-decimal notation, for example, 255.255.255.0.
TCP/IP Transmission Control Protocol/Internet Protocol. A suite of communication
protocols that is used by computers or networking devices on the Internet so that
they can communicate with each other. TCP/IP uses several protocols, the two
main being TCP and IP.
VPI Virtual Path Identifier — A numerical value assigned by your Internet Service
Provider to your DSL device to ensure proper connection with the DSL equipment
at the telephone company’s office.
VCI Virtual Channel Identifier — A numerical value assigned by your Internet Service
Provider to your DSL device. VCI goes hand in hand with VPI to ensure connection
with your Internet Service Provider’s equipment.
WAN Wide Area Network — A computer network that spans a relatively large
geographical area. Typically, a WAN consists of two or more LANs.
Page 75

 Loading...