

Page 1

Blaster CDRW 6424
User Guide
On-line Version
Page 2

Getting Started
Creative Blaster CD-RW
Nero®-Burning ROM Software
Prassi™ abCD™ Software
Information in this document is subject to change without notice and does not represent a commitment on the part of Creative
Technology Ltd. No part of this document may be reproduced or transmitted in any fo rm or by any means, electronic or
mechanical, including photocopying and recording, for any purpose without the written permission of Creative Technology Ltd.
The software described in this document is furnished under a license agreement and may be used or copied only in accordance
with the terms of the license agreement. It is against the law to copy the software on any other medium except as specifically
allowed in the licens e agreement. The licensee m ay make one copy of the software for backup purposes.
Copyright © 1999 Creative Technology Ltd. All rights reserved.
Version 1.0 (CLI)
July 1999
Sound Blaster, Creative, and the Creative logo are registered trademarks of Creative Technology Ltd. in the United States and/
or other countries.
Microsoft, MS-DOS, Windows, and Windows NT are registered trademarks or trademarks of Microsoft Corpora ti on in the
United States and/or other countries.
Nero is a registered trademark of Ahead Software GmbH and its licensors. Prassi and abCD are trademarks of Prassi Software
USA, Inc.
All other prod ucts are trademarks or registered trademarks of their resp ective owners.
Page 3

Contents v
Contents
Introduction
Latest Information.......................................................................................................................................xi
System Requirements ............................................................................................................................... xii
Firmware V ersion Number....................................................................................................................... xii
To check the Firmware version number...................................................................................... xii
Disk Backup.............................................................................................................................................. xii
Document Conventions........................................................................................................................... xiii
1 Installing Blaster CD-RW
What Y ou Need............................................................................................................................................1
Installing the BlasterCD-RW Drive............................................................................................................2
Installing the Blaster CD-RW Software......................................................................................................4
Windows 95/98................................................................................................................................4
2 Advanced Configurations
Changing the Settings in Windows 95/98...................................................................................................7
Adding a CD-ROM Drive...........................................................................................................................8
In Windows 95/98............................................................................................................................8
3 Troubleshooting
CD-RW Drive..............................................................................................................................................9
Page 4

vi Contents
4 Using Prassi abCD
Introduction................................................................................................................................................11
Installing Prassi abCD ...............................................................................................................................11
To Install abCD in Windows 95/98..............................................................................................11
To Uninstall abCD.........................................................................................................................12
Using Prassi abCD.....................................................................................................................................12
The Taskbar Icon...........................................................................................................................12
Mounting CD.................................................................................................................................12
Ejecting a Disc..............................................................................................................................13
Formatting a Disc ..........................................................................................................................13
Notes...........................................................................................................................................................14
5 Using Ahead Software Nero - Burning Rom
Installing Nero in Windows 95/98 ...........................................................................................................15
To Uninstall Nero..........................................................................................................................15
Starting Nero..............................................................................................................................................16
To check your
CD-RW drive..............................................................................................................................16
Creating Y our First CD..............................................................................................................................17
To Create a Data CD (ISO9660)...................................................................................................17
To Create an Audio CD.................................................................................................................18
To Duplicate a CD.........................................................................................................................19
Troubleshooting.........................................................................................................................................21
More Support.................................................................................................................................24
Page 5

Creative End-User
Software License
Agreement
PLEASE READ THIS DOCUMENT CAREFULLY BEFORE USING THE SOFTWARE. BY USING THE SOFTWARE, YOU ARE AGREEING TO BECOME BOUND BY THE TERMS OF
THIS AGREEMENT. IF YOU DO NOT AGREE TO THE TERMS OF THE AGREEMENT, YOU MUST NOT USE THE SOFTWARE. PROMPTLY RETURN, WITHIN 15 DAYS, THE
SOFTWARE, ALL RELATED DOCUMENTATION AND ACCOMPANYING ITEMS TO THE PLACE OF ACQUISITION FOR A FULL REFUND.
This is a legal agreement between you and Cr eative Technology Ltd. and its subsidiaries (“Creative”). This Agreement states the terms and conditions upon which Creative offers to license the software sealed
in the disk package together with all related documentation and accompanying items including, but not lim ited to, the executable programs, drivers, libraries and data files associated with such programs
(collectivel y, the “Soft w ar e”).
License
1. Grant of License
The Software is licensed, not sol d, to you for use only under the terms of this Agreement. You own the disk or other media on which the Software is originally or subsequently recorded or fixed; but, as
between you and Creative (and, to the extent applicable, its licensors ) , Creative retains all title to and ownership of the Software and reserves all rights not expressly granted to you.
2. For Use on a Single Computer
The Software may be used by you only on a single c ompute r with a s ingle CPU. You may transfer the machine -reada ble port ion of the Softwar e from one computer to anothe r computer, provided that (a) the
Software (including any portio n or copy thereof) is erased from the first computer and (b) there is no possibility that the Software will be used on more than one computer at a time.
3. Stand-Alone Basis
You may use the Software only on a stand-alone basis, such that the Software and the functions it provides are accessible only to persons who are physically present at the location of the computer on which
the Software is loaded. You may not allow the Software or its functions to be accessed remotely, or tra nsmit all or any portion of the Software through any network or communication line.
4. One Archival Copy
You may make one (1) arc hival copy of the machine-readable portion of the Software for backup purposes only in support of your use of the Software on a single computer, provided that you reproduce on
the copy all copyright and other proprietary rights notices included on the orig inals of the Software.
5. No Merger or Integr ati o n
You may not merge any portion of the Software into, or integrate any portion of the Software with, any other program, except to the extent expressly permitted by the laws of the jurisdiction where you are
located. Any portion of the Software mer ged int o or int egrat ed with ano ther progr am, if any, will continue to be subject t o the terms and conditions of this Agreement, and you must reproduce on the merg ed
or integrated portion all copyri ght and other proprietary rights notices included in the originals of the Software.
6. Network Version
If you have purchased a “network” version of the Software, this Agreement applies to the installation of the Software on a single “file server”. It may not be copied onto multiple systems. Each “node”
connected to the “file server” must also have its own license of a “node copy” of the Software, which becomes a license only for that specific “node”.
7. Transfer of Li ce nse
You may transfer your license of the Software, provided that (a) you transfer all portions of the Software or copies thereof, (b) you do not re tain any portion of the Software or any copy thereof, and (c) the
transferee reads and agrees to be bound by the te rms and conditions of this Agreement.
8. Limitations on Using, Copying, and Modifying the Software
Except to the extent express ly permitted by this Agreement or by the laws of the jurisdiction where you acquired the Software, you may not use, copy or modify the Software. Nor may you sub-license any
of your rights under this Agreement.
9. Decompiling, Disassembling, or Reverse Engineering
You acknowledge that the Software contains trade secrets and other proprietary information of Creativ e and its licensors. Except to the extent expressly permitted by this Agreement or by the laws of the
jurisdiction where you are located, you may not decompile, disassemble or otherwise reverse engineer the Software, or engage in any other activities to obtain under lying info rmati on that is not visib le to the
user in connection with norm al use of the Software. In any event, you will notify Creative of any information derived from rever se engineering o r such other activities, and the resu lts thereof will constitute
the confidential information of Creative that may be used only in connection with the Software.
Termination
The license granted to you is effective until terminated. You may terminate it at any time by returning the Software (including any portions or copies thereof) to Creative. The license will also terminate
automatically without any notice from Creative if you fail to comply with any term or condition of this Agreement. You agree upon such termination to return the Software (including any portions or copies
thereof) to Creative. Upon termination, Creative may also enforce any rights prov ided by law. The provisions of this Agreement that protect the proprietary rights of Creative will continue in force afte r
termination.
Limited Warran ty
Creative warrants, as the sole warranty, that the disks on which the Software is furnished will be free of defects, as set forth in the Warranty Card or printed manual included with the Software. No distributor,
dealer or any other entity or p erson is authori zed to e xpand or a lter t his warran ty or any othe r provis ions of thi s Agreement . Any re present ation , other than the warr anties set fo rth in thi s Agree ment, wi ll not bi nd
Creative.
Creative does not warrant that the functions contained in the Software will meet your requirements or that the o peration of the Software will be uninterrupted or error-free. EXCEPT AS STATED ABOVE IN
THIS AGREEMENT, THE SOFTWARE IS PROVIDED AS-IS WITHOUT WARRANTY OF ANY KIND, EITHER EXPRESS OR IMPLIED, INCLUDING, BUT NOT LIMITED TO, ANY
IMPLIED WARRANTIES OF MERCHANT ABILI TY AND FITNESS FOR A PARTICULAR PURPOSE.
You assume full responsibility for the selection of the Software to achieve your intended results , and for the installation, use and results obtained from the So ft war e. You also assume the entire risk as it appli es
to the quality and performance of the Software. Should the Software prove defective, you (and not Creative, or its distributors or dealers) assume the entir e cost of all necessary servicing, repair or correc tion.
This warranty gives you specific legal rights, and you may also have other rights which vary from country/state to country/stat e. Some countries/states do not allow the exclusion of implied warranties, so the
above exclusion may not apply to you. Creative disclaims all warranties of any kind if the Software was customized, repackaged or altered in any way by any third party other than Creative.
Limitation of Remedies and
Damages
THE ONLY REMEDY FOR BREACH OF WARRANTY WILL BE THAT SET FORTH IN THE WARRANTY CARD OR PRINTED MANUAL INCLUDED WITH THE SOFTWARE. IN NO EVENT
WILL CREATIVE OR ITS LICENSORS BE LIABLE FOR ANY INDIRECT, INCIDENTAL, SPECIAL OR CONSEQUENTIAL DAMAGES OR FOR ANY LOST PROFITS, LOST SAVINGS, LOST
REVENUES OR LOST DATA ARISING FROM OR RELATING TO THE SOFTWARE OR THIS AGREEMENT, EVEN IF CREATIVE OR ITS LICENSORS HAVE BEEN ADVISED OF THE
POSSIBILITY OF SUCH DAMAGES. IN NO EVENT WILL CREATIVE’S LIABILITY OR DAMAGES TO YOU OR ANY OTHER PERSON EVER EXCEED THE AMOUNT PAID BY YOU TO USE
THE SOFTWARE, REGARDLESS OF THE FORM OF THE CLAIM. Some countries/st ates do not all ow the li mita tion or ex clus ion of liabil it y for in ciden tal or co nsequ entia l da mages, s o the abo ve li mitati on
or exclusion may not apply to you.
Product Returns
If you must ship the software to Creative or an authorized Creative distributor or dealer, you must prepay shipping and either insure the so ftware or assume all ris k of loss or damage in transit.
Page 6
Introduction xi
Introduction
Your Blaster CD-RW drive transforms your PC into an easy, fast, and economical internal personal CD
mastering system. Now you can archive your documents or multimedia content and create your own
CDs. Your CD-RW drive makes the copying, storage, and distribution of large files on CDs costeffective and reliable.
Latest Information
The README file on the disk labeled “Creative Drivers Disk” contains the latest information and
changes not available at the time this manual was printed. Please read the file before continuing.
To view the file in Windows 95/98:
1. Start Windows 95/98
2. Insert the disk into your floppy disk drive.
3. Open the My Computer window by double-clicking its icon.
4. Double-click the icon representing the driv e containing your dis k. The README file appears i n
the folder.
5. Double-click the REA DME file. The W ind ows 95 Notepad appears and display s the contents of
the README file.
To view the file in DOS:
1. Start your computer.
2. Insert the installation disk into your floppy drive.
3. Change to the drive containing the file. For example, type A: and press the ENTER key to
change to drive A.
4. Type README and press the ENTER key. The contents of the README file are displayed.
The colored insert in this manual
gives you information about your
CD-ROM drive, and co ntact
information for Creative Labs.
Page 7

xii Introduction
System
Requirements
To use the Creative CD-RW drive and software, you need:
❒ 100 MHz Pentium® or above
❒ 10 MB of available space on your hard disk drive
❒ 16 MB RAM
❒ Mi cro so ft ® Windows® 95/98
❒ Available 5.25” half-height drive bay
❒ Available Enhanced IDE connector on the motherboard. (A slower PC or an ISA/VL-bus
interface may work, however, CD-ROM access time and transfer rate may be reduced.)
❒ 3.5” floppy drive
Firmware Version
Number
You need to take note of the firmware version number of your CD-RW drive. This number will enable
Technical Support to troubleshoot any problems involving your drive should you need to call our
Technical Support staff.
To check the Firmware
version number
1. Switch on the computer after you have installed the CD-RW drive.
2. Click Start -> Settings -> Control Panel.
3. In the Control Panel window, double-click the System icon.
4. In the System Properties dialog box, click the Device Manager tab.
5. Double-click CDROM, select Creative CD-RW 6424E and click the Properties button.
6. In the Settings tabbed page of the Creative CD-RW 6424E Properties dialog box, note the
Firmware revision number shown.
Disk Backup
Before you start, make a backup copy of the original disk. Use the backup; keep the original in a safe
place.
Page 8
Introduction xiii
Document
Conventions
The following typographical conventions are used throughout this document:
Bold
Bold face type identifies words and phras es that are to be entered exactly as shown. For
example:
SET SOUND=C:\SB16
Italic Italic type identifies words and phrases that are to be replaced by you. For example:
DEVICE=C:\SBCD\DRV\SBIDE.SYS /D:MSCD001 /P:xxx,yy
In the example, you must supply a value for xxx,yy.
Italic in the text emphasizes or identifies a word or phrase that is being defined. In this
document, it is also used to identify a button or menu item that you are to select: for
example, “Select the Play button on the main menu.”
ALL CAPS A word in all capital letters identifies a key you are to press. For example, “Select Yes
and press ENTER.”
The notepad icon indicates information that is of particular importance and should be
considered before continuing.
Designates a caution or warning that can help you avoid situations involving risk.
Page 9
Installing Blaster CD-RW 1
1
Installing Blaster CD-RW
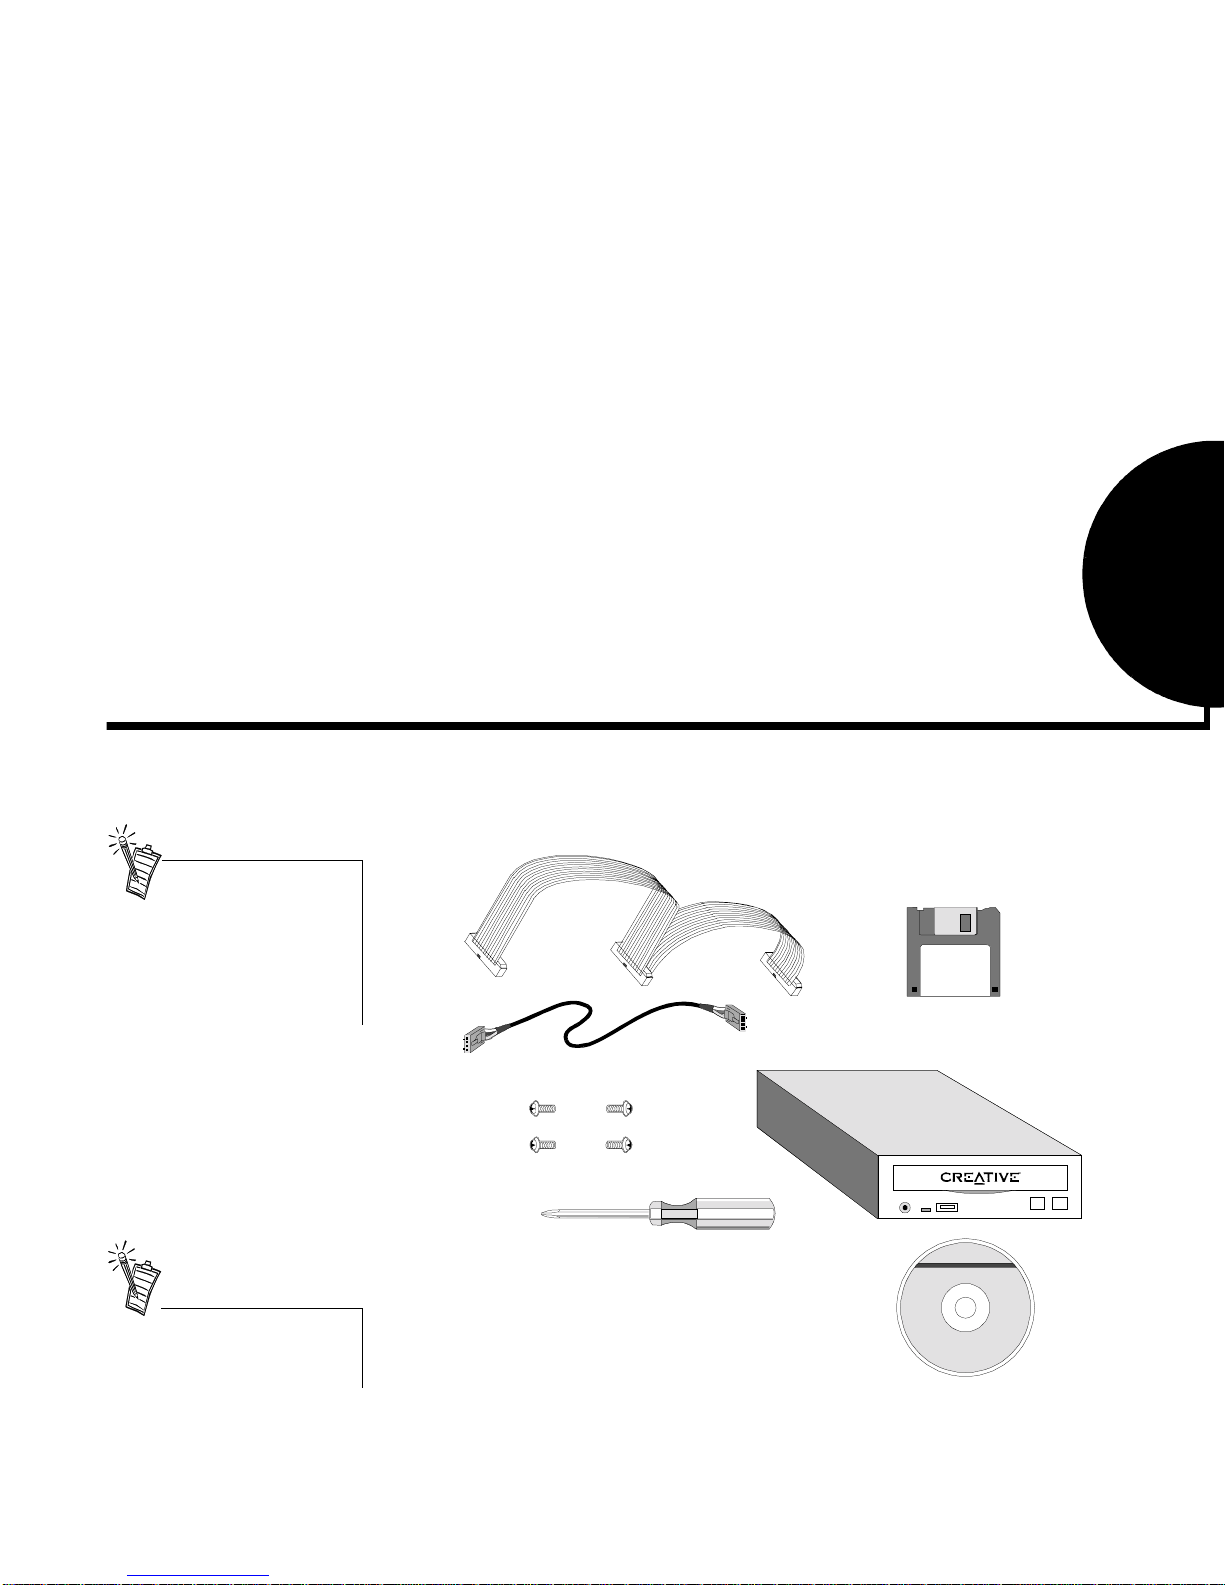
What You Need
Blaster CD-RW can be installed in our computer by attaching the drive to an enhanced IDE connector on
the motherboard. An ISA/Vl-bus interface may work, however, CD-ROM access time and transfer rate
may be reduced.
Data Cable
Screws for the
CD-RW Drive
CD Audio Cable
Phillips Screwdriver
(not included)
CD-RW
Software
CD
Creative CD-RW
Drive
Driver
Installation
Disc
Installing your Blaster CD-RW
requires y o u to perform the
following steps:
• Install the CD-RW drive
• Install the Creative CD-RW
software
Refer to the colored insert for
specific information about the
CD-RW drive.
Page 10
Installing Blaster CD-RW 2
Installing the
Creative
CD-RW Drive
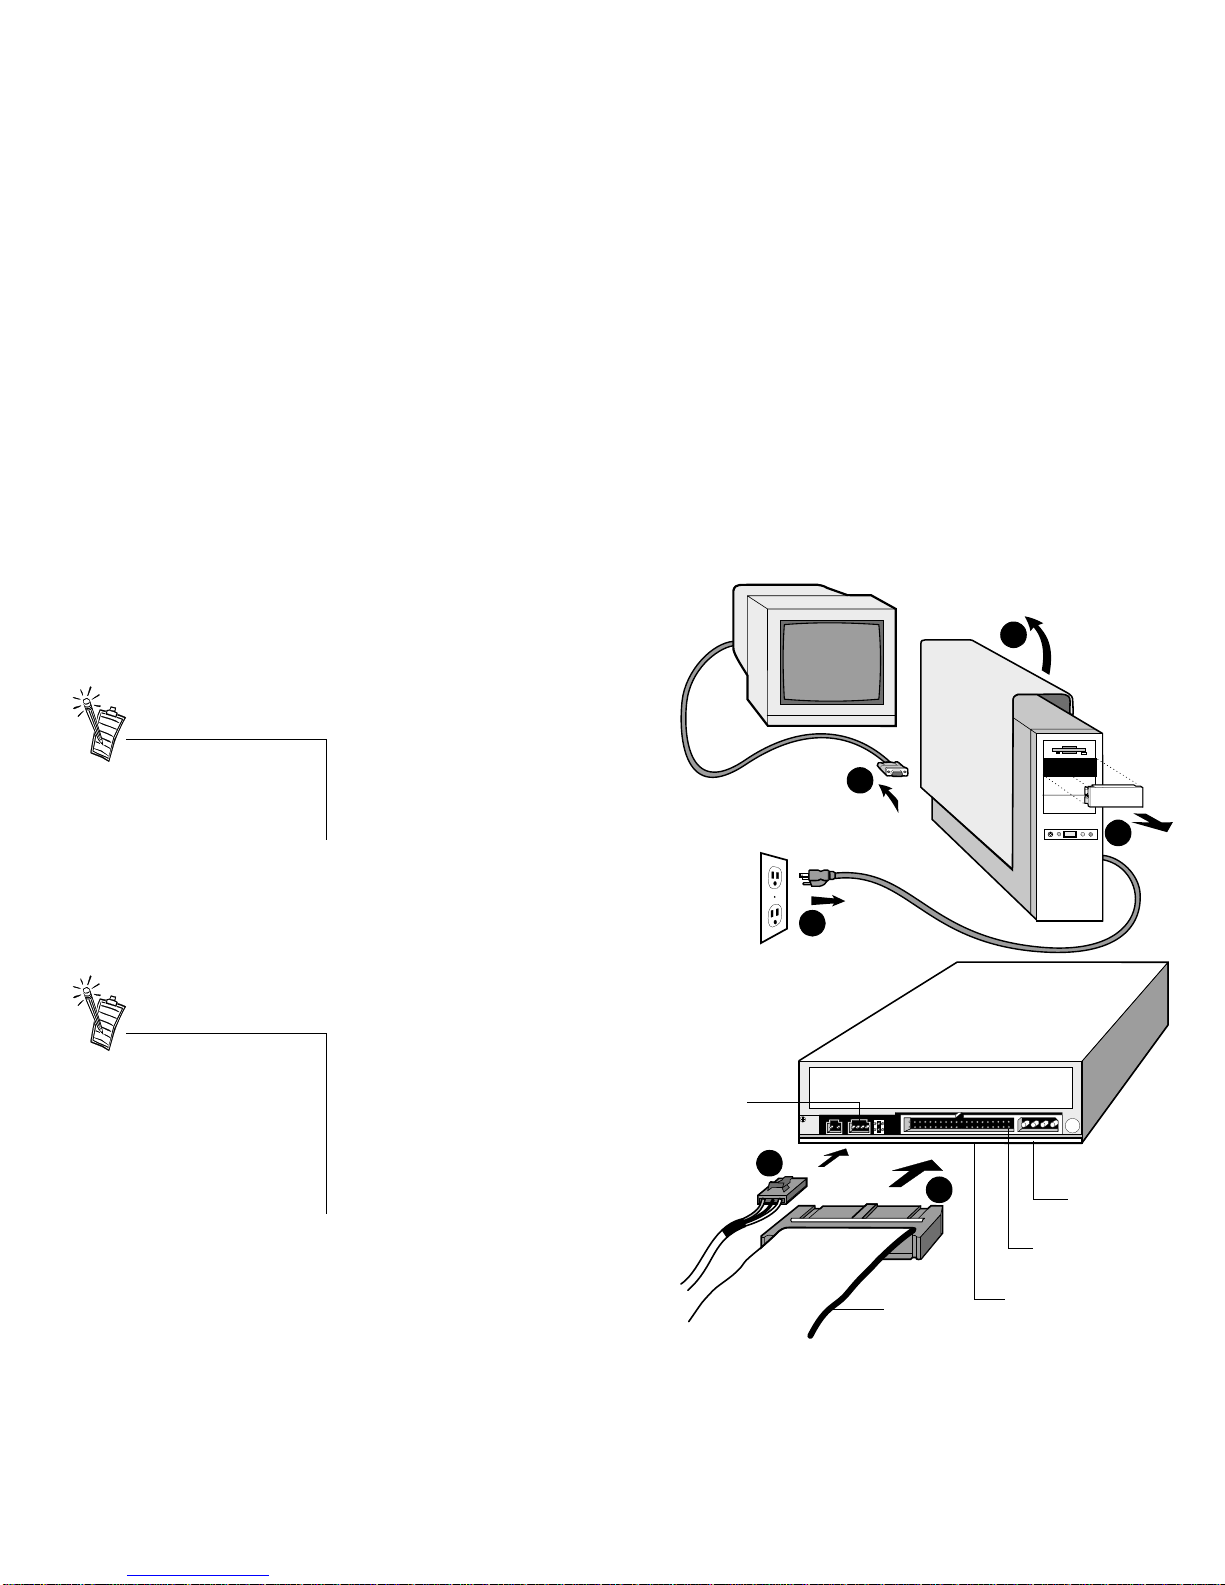
T o install the Creative CD-RW drive:
1. Turn off your computer, and
disconnect the power cable.
2. Disconnect the monitor and
other devices that are
connected to the back of the
computer.
3. Remove the computer cover.
4. Remove the cover from an
available 5¼” bay for the
Creative CD-RW drive.
5. Connect the data cable to the
rear of the Creative CD-RW
drive.
6. Optional: Connect the audio
cable to the rear of the
CD-RW drive.
1
2
3
4
5
6
Power Supply
Connector
Data Cable
Connector
CD Audio
Connector
Colored
Stripe
Pin 1
Before you remove the computer
cover , touch a grounded met al
surface to discharge static
electricity.
• When connecting the data cable,
align the cable’s colored stripe
to pin 1 on the CD-RW drive.
• See “Adding a CD-ROM Drive”
on page 8 if you connect the
CD-RW drive with an existing
hard drive or CD-ROM drive.
Page 11

Installing Blaster CD-RW 3
7. Insert the drive into the open
5¼” bay, feeding the cables
through the bay.
8. Secure the CD-RW drive to
your computer’s frame usi ng
the supplied screws.
9. Locate an available power
supply cable, and attach it to
the rear of the CD-RW drive.
10. Connect the data cable to an
available enhanced IDE
connector on your
motherboard, with the
cable’s colored stripe
connectin g to pin 1.
11. Optional: Connect the CD
audio cable from your
CD-RW drive to your audio
card’s CD_IN connector.
12. Replace the computer cover.
13. Reconnect the power cable,
monitor, and other devices.
8
7
9
10
Power Supply
EIDE
Connector
Power Supply
Cable
Data Cable
The power supply is generally
located in a rear corner of your
computer, housed in a metal box
with several cables protruding
from it. If you do not have a spare
power supply cable, a splitter can
be purchased from your local
computer retailer.
Review your comput er’s
documentation if you have
difficulty locating an enhan ced
IDE connector on your
motherboard.
Page 12

Installing Blaster CD-RW 4
Installing the
Creative CD-RW
Software
The Creative Drivers Disk contains drivers necessary to operate your Creative CD-RW drive.
Windows 95/98
The Creative CD-RW drive functions as a CD-ROM drive in Windows once it is connected correctly to
the Enhanced IDE connector on your motherboard. To use the read-write features, you must install the
Creative CD-RW software.
To install the Creative CD-RW software:
1. Turn on the power to your computer.
2. When Windows boots, choose the button on the task bar. The Start menu is displayed.
3. Choose Run... on the Start menu.
The Run dialog is displayed.
4. Insert the Drivers Disk into the
floppy drive.
5. On the Run dialog, enter
A:\SETUP (A: is your floppy
drive) and choose OK. The
installation program prepares the
InstallShield Wizard to guide you
through the application setup.
Your installation pro cedure and the
on-screen display may differ from
what is shown and described here
depending your com puter’s
operating system, its version, and
the computer ’s configuration.
Page 13

Installing Blaster CD-RW 5
6. The README.TXT file appears.
Read this file before you proceed
with the installation.
7. Choose Next. The Choose
Destination Location dialog
appears. The default path is
C:\Program Files\ S bcd\.
To change the destination
directory, choose Browse.
Page 14

Installing Blaster CD-RW 6
8. When the destination path is correct,
choose Next. The installation program
copies the files to your computer. The
Device Selection dialog appears.
9. Select the device that you have connected
to the CD-RW drive.
❒ Choose “IDE Hard Disk Cont roller
Card” if you have daisy-chained the
CD-RW drive to the primary port on
your motherboard.
❒ Choose “Onboard IDE Secondary
Port” if the CD-RW drive is
connected to an available secondary
IDE port on your motherboard.
❒ Choose “Plug and Play Card” if you attached the drive to a Plug and Play interface card.
❒ Choose “Non-Plug and Play Card” if the drive is connected to a non-Plug and Play
interface card.
10. The Setup Complete dialog
appears.
11. Choose Finish to restart your
computer.
Page 15

Advanced Configurations 7
2
Advanced Configurations
Blaster CD-RW is installed dependent on the I/O address (port) and interrupt (IRQ) setting. The
information that follows explains how to change the interface port and interrupt settings in case of a
conflict.
Changing the
Settings in W indows
95/98
To change the resource settings for the Blaster CD-RW:
1. Click th e Start button.
2. Select Se ttings and Control Panel.
3. Double-click the System icon.
4. Click the Device Manager tab.
5. Click the plus sign next to the hardware device type. For example, click on the plus sign next to
“Hard disk controllers” or “CD-ROM controllers.”
6. Double-click the hardware. For example, double-click on “IDE CD-ROM Controller.”
7. Click the Resources or Settings tab.
8. If your device does not have a Resources tab, either you cannot change its resources or it is not
using any resource settings.
9. Disable the Use automatic settings option.
10. Double-click the resource you want to change.
If you connect the CD-ROM drive
to an Enhanced IDE connector on
the motherboard, the drive settings
are based upon the controller’s
settings and cannot be changed.
For detailed information, refer to
the Windows 95/98 on-line
documentation are based upon the
controller’s settings and cannot be
changed.
Page 16

Advanced Configurations 8
Adding a
CD-ROM Drive
You can daisy-chain a CD-ROM drive to your com puter by connecting the drives with a data cable. You
can connect two IDE CD-ROM drives to an IDE port. If your second drive is not a Creative IDE CDROM drive, consult the documentation for the second drive before connecting the two drives.
You must set one of the two drives connected
to the IDE port as a master and the other as a
slave. The master/slave assignment is made by
configuring the jumper block at the back of the
CD-ROM drives—the factory default for the
Creative CD-RW drive is for a master.
In Windows 95/98
After connecting the drive, sw it ch o n y our computer to allow Windows 95 to detect the CD -R OM drive.
When prompted to select a driver for your new hardware, insert the Drivers Disk into the appropriate
drive; select “Driver from disk provided by hardware manufacturer” and choose OK. Follow the
remaining prompts to complete the installation.
Master Drive
(Default)
Slave Drive
Master
Drive
Slave
Drive
CD-ROM Data Connector
Pin 1
Power
Cable
Colored
Stripe
CD Audio Cable
Connect to IDE
Connector
Power Cable
Data
Cable
Pin 1
Page 17

Troubleshooting 9
3
Troubleshooting
This appendix provides you with the causes of and solutions for some common problems you may face.
CD-RW Drive
PROBLEM: No sound from headphones or speakers.
Causes: The audio cable may not be connected properly or the volume may not be set to an
audible level.
Solutions: ❒ If your headphones or speakers are connected to the jack on the front of the
Creative CD-RW drive, adjust the volume control on the drive.
❒ If your headphones or speakers are connected to an audio card, adjust the through
the audio card mixer or volume control.
❒ Connect headphones to the stereo phone jack on the audio card. If there is no
sound from your headphon es, check to s ee if the audio cable is properly conn ected
from the CD-RW drive to the audio card.
PROBLEM: Interface card or Creative CD-RW drive is not ready.
Causes: The problem may be caused by:
❒ Power or data cable is not properly connected
❒ I/O setting in CONFIG.SYS file is n ot correct
❒ The Secondary IDE port may be disabled in your computer’s BIOS
Solutions: The problem may be corrected by:
❒ Ensure the power and data cables are connected properly to the drive.
❒ Set the slave jumper to the master setting (see “Adding a CD-ROM Drive” on
page 8) if the drive is not connected as the slave to another CD-RW or CD-ROM
drive.
Page 18

Using Prassi abCD 11
4
Using Prassi abCD
Introduction
Prassi abCD is a "Drive Letter Packet Writing" software for CD-RW under Microsoft Windows 95/98.
Prassi abCD is the combination of an UDF Installable File System, a simple User Interface based on a
Taskbar icon, and a Device Driver. It implements a "drive letter" for almost every CD-RW drive when
using rewritable media.
After formatting a rewritable disc for Packet Writing, you can copy files and folders to that CD-RW by
dragging and dropping or saving to the drive as you normally do with a floppy.
Installing Prassi
abCD
The installation is comprised of 3 files which are copied to the Windows System folder.
abCD.exe is the application managing the taskbar icon, the menu and the disc format process.
PtUDF.vxd is the UDF Windows installable file system. It manages all the requests from the Windows
File System when an abCD disc has been mounted.
PtabCD.vxd is the CD-RW device driver that manages all the low level commands sent by both
abCD.exe (while formatting, for instance) and by the UDF Windows installable file system that answers
requests made by the Windows file system.
To Install abCD in
Windows 95/98
1. Insert the Nero/Prassi abCD CD into the Creative CD-RW drive.
2. Start Windows Explorer and browse to the abCD folder of the installation CD.
3. Double-click the file SETUP.EXE.
The installation program will guide you through subsequent steps. Simply follow the instructions
as they appear on the screen.
4. Restart your computer when the installation is complete.
The online help files is found in
abcd\manual.doc on the CD.
Page 19

Using Ahead Software Nero - Burning Rom 15
5
Using Ahead Software Nero - Burning Rom
Installing Nero in
Windows 95/98
1. Insert the Nero/Prassi abCD CD into the Creative CD-RW drive.
2. Start Windows Explorer and browse to the NERO folder of the installation CD.
3. Double-click the Setup folder. Select the desired language and double-click on Isetup.exe.
The installation program will guide you through subsequent steps. Simply follow the instructions
as they appear on the screen.
4. Enter your name and company when prompted.
5. You can select one of the Setup options listed.
6. Restart your computer when the installation is complete.
Note: Nero software will not operate if you do not have a Creative CD-RW drive installed in your
system.
To Uninstall Nero
1. Click Start -> Settings -> Control Panel.
2. Double-click the Add/Remove Programs icon.
3. Select “Nero - Burning Rom” and then click the Remove button.
Installing more than one
recording software on your
computer is not recommended,
because there may be d ri ver
conflicts between these
applications. This may cause
defective CDs to be written or
may even cause your system to
become uns table. It is a good
idea to uninstall any other CD
recording software before starting
to install Nero.
Online help can be found in
D:\Nero\Manual folder or
D:\Nero\QuickStart folder.
Page 20

Using Ahead Software Nero - Burning Rom 16
Starting Nero
To start Nero:
1. Click Start -> Programs ->
Nero-Burning Rom.
The New Compilation dialog
box also appears on top of the
Nero program.
To check your
CD-RW drive
You should see the SCSI/IDE identification string of your Creative CD-RW drive (for example,
“CREATIVE CD-RW6424”) on the lower right corner of Nero’s main window.
If the message “No recorder selected” is displayed, you
may have problems with your system configuration. Refer
to the “Troubleshooting” section at the end of this chapter.
Page 21

Using Ahead Software Nero - Burning Rom 17
Creating Your First
CD
The following sections only describe the more common CD Recording operations that you may more
likely use. They contain instructions to create data and audio CDs, and duplicate discs.
For more detailed information on other functions and settings, refer to Nero’s online Help or manual
(.pdf Acrobat document).
To Create a Data CD
(ISO9660)
1. If the New Compilation dialog box is not already open, click the New Compilation icon
on the toolbar.
2. In the New Compilation dial og box, clic k the CD-ROM (ISO) icon on the left side-bar.
The Multisession tabbed page is displayed.
3. Click the File Options tab. Select either the Mode 1 or Mode 2/XA options. If these options are
dimmed, then they cannot be modified at this time (for example, you may have created an ISO
Mode 1 CD and want to continue writing to it using Mode 2. A CD which has been recorded with
different sector formats may be unreadable).
4. Click the New button.
A blank compilation window for CD-ROM appears.
5. Drag the files in the File Browser to the compilatio n wi ndow. You can open the File Browser
using the m enu command View > New File Browser or clicking the File Browser icon
.
6. Click the Wri t e CD icon in the toolbar.
The Write CD dialog box appears showing the Burn tabbed page.
7. In the Write CD dialog box, check and change the options if necessary.
If you wish to create a CD-ROM as a single session, you must click the Finalize CD check box.
Do not click this check box for a session of a multisession CD unless it is the last session. The
CD is write-protected after this.
8. Click the Write button to confirm and start the burning process.
A status window is displayed for you to monitor its progress. When completed, a message like
“burning process was successful with 2x(300KB/s)” is displayed, and the CD will be ejected.
9. You can check the contents of your new CD by re-inserting the CD and clicking the CD Info
icon
.
Besides using the File Browser,
you can also use Windows
Explorer to drag and drop files
into the compilation window.
Page 22

Using Ahead Software Nero - Burning Rom 18
To Create an Audio CD
There are two ways to create audio CDs:
❑ Compiling .CDA audio files: Selected audio tracks are copied directly “on-the-fly” from the source
CD in the CD-ROM drive to the disc in the CD recorder.
❑ Compiling .WAV files: The audio tracks are saved as Wave files first, compiled, and then written to
the disc in the CD recorder.
Compiling .CDA
Audio Files
1. In the New Compilation dial og box, clic k the Audio-CD icon on the left side-bar.
The Audio-CD tabbed page is displayed.
2. Click the New button. A blank compilation window for CD-ROM appears.
3. If the File Browser is not already open, click the menu command View > New File Browser, or
click the File Browser icon .
4. Insert the source audio CD you wish to extract audio tracks from into the CD-ROM drive.
5. Click the drive letter of th e CD-ROM drive in the File Browser to display its contents.
6. Drag the desired files in the File Browser to the compilation wind ow.
When you compile selected audio tracks, Nero will analyze the tracks information. You will be
asked to give each source CD a name. If you get an erro r message when yo u drop the CDA files
in the Audio compilation, it could be due to one of the following:
❒ You used your recorder’s drive letter instead of your CD-ROM’s drive letter.
❒ Nero does not recognize this CD-ROM drive model yet and needs to auto-detect it first.
❒ The CD-ROM drive is unable to read digital audio at all.
7. If you wish to extract audio files from another CD source, insert the next CD now and follow
Step 6. Otherwise, proceed to the next step.
8. Once you have compiled all audio files, click the Wr ite CD icon in the toolbar.
The Write CD dialog box appears showing the Burn tabbed page.
9. In the Write CD dialog box, check and change the options if necessary.
You will not be able to select some of the features of your CD recorder (for example, CD Text,
variable pause length) as these are available only if you use the second method.
10. Click the Write button to confirm and start the burning process.
If the compiled audio tracks have been extracted from several CDs, you will be prompted to
insert the CD corresponding to the track Nero is ready to write.
The CD will be ejected when burning is complete.
11. You can check the contents of your new CD by re-inserting the CD and clicking the CD Info
icon .
If your audio CD contains
crackling noises or the so un ds
are strangely distorted, you may
have problems with the “audio
jitter” effect. These are caused
by the hardware failing to read
audio data correctly . Refer to the
Nero manual or online Help
Top ics for more information.
Page 23

Using Ahead Software Nero - Burning Rom 19
Compiling .Wav Files 1. If the audio tracks you want to write to a CD are not in Wave format yet, then create these W ave
files first by using the menu command CD-Recorder > Save track.
2. In the New Compilation dialog box, click the Audio-CD icon on the left side-bar.
The Audio-CD tabbed page is displayed.
3. Click the New button.
A blank compilation window for Audio CD appears.
4. Drag the Wave files in the File Browser to the compilation window. You can open the File
Browser using the menu command View > New File Browser or clicking the File Browser icon
.
5. Currently all tracks have a standard pause length of 2 seconds, which is added before the track.
If you do not want Nero to add 2 seconds pause, then select all desired tracks except the first one
and choose the menu command Edit > Properties and enter the pause length.
6. Click the Wri t e CD icon in the toolbar.
The Write CD dialog box appears showing the Burn tabbed page.
7. In the Write CD dialog box, check and change the options if necessary.
8. Click the Write button to confirm and start the burning process.
When completed, the CD will be ejected.
9. You can check the contents of your new CD by re-inserting the CD and clicking the CD Info
icon
.
To Duplicate a CD
There are two methods to duplicate a CD:
❑ Image copy
There are three steps in this method:
❒ The recorder reads from the original source CD.
❒ Nero creates an image file on your hard disk.
❒ Nero writes the image file onto a blank CD.
This is the best method to use to ensure safe and correct duplication. However, this method takes
longer and you need enough hard disk space to store an entire CD image file (possibly up to 800MB).
❑ Copy On the fly
Nero will read from your CD-ROM drive and write directly to your recorder without creating an image
file on your hard disk. This method is faster and does not require large hard disk space, but there is a
risk of a buffer underrun if there are read errors on the source CD.
Page 24

Using Ahead Software Nero - Burning Rom 20
Creating your CD copy 1. In the New Compilation dial og box, clic k the CD-Copy icon on the left side-bar.
The Burn tabbed page is displayed.
2. Click the Copy options tab. Do not select the On the fly check box if you want an image copy.
3. If you have selected the On the fly check box, insert the original CD into your CD-ROM drive.
If you have not selected this, insert the original CD into your CD recorder.
4. Click the Copy CD button.
The Write CD dialog box appears.
5. Click the Copy CD button to confirm and start the burning process.
A status window is displayed for you to monitor its progress. When completed, a message like
“burning process was successful with 2x(300KB/s)” is displayed, and the CD will be ejected.
6. You can check the contents of your new CD by re-inserting the CD and clicking the CD Info
icon .
Checking the Capacity of Your
Original CD
1. Insert the original CD into the CD recorder.
2. Use the menu command CD Recorder >
CD Info.
The CD Info dialog box similar to
appears.
The most important information is the Total
Capacity value. The format displayed is
M:S:F (Minutes:Seconds:Frames). One frame
equals 1/75 second. An example is shown in
the above figure (“16:38:52”).
CDRs normally have a capacity of 74 minutes
(650 MB), but CDRs with 80 minutes
(700 MB) of capacity are becoming more
widely available.
If the source CD needs more than 74 minutes of capacity, then you have to use a 80-minute CDRs to
copy the CD. However, this will only work if your CD recorder supports 80-minute CDRs. Some old
models of CD recorders will not correctly support such CDRs.
Making a Backup of PC Games Some PC game CDs may display uncommon CD layout in the CD Info dialog box. For example, it may
Page 25

Using Ahead Software Nero - Burning Rom 21
contain one data Mode 1 track, several audio tracks, followed by a data track again. Many PC games
have this track layout. Most of them also need to be written onto 80-minute CDRs. To backup such CDs,
do the following:
❑ Use the image copy method of duplication (Do not select the On the fly option.)
❑ Select the following (if available) in the Read options tabbed page:
❒Read media catalog number and ISRC
❒Ignore illegal TOC type
❒Continue copying
❒Data mode 1: Force raw reading and Write uncorrected
❒Data mode 2: Force raw reading and Write uncorrected
❒Read audio data with sub channe l
❒Ignore read errors
❑ Do not select the Use Jitter correction check box.
❑ Select a hard disk partition with at least 700MB of free space in the Image tabbed page.
Note that some games cannot be backed up at all because they have a special copy protection. It is
possible for Nero to backup these CDs without displaying errors, but the copies will not run.
Important: Unless you own the copyright or have permission to copy from the copyright owner, you
may be violating national or international copyright laws and may be subjected to payment of damages
and other remedies, if you make copies of the CDs.
Troubleshooting
The computer does not restart correctly after the Nero installation.
Cause There may be driver conflicts between Nero and other recording software.
Solution Restart your computer in safe mode and uninstall the other recording software.
If this does not help, then uninstall Nero in safe mode and write us an e-mail to our technical
support at support@ahead.de. Tell us exactly which Nero version you are using (for
example, 4.0.0.6), your serial number , the mo del of your CD-ROM drive, the mod el of your
CD recorder, the model of your SCSI controller (if any) and the operating system you are
using.
Page 26

Using Ahead Software Nero - Burning Rom 22
Nero is unable to detect the CD-RW drive.
Solutions If you cannot select your CD-RW drive by using the menu command
CD-Recorder > Choose Recorder, check if:
❑ you have installed DOS drivers for your CD-ROM drive in your AU TOEXEC.BAT and
CONFIG.SYS files. This may cause problems in Windows 95/98.
❑ you have installed more than one recordin g s oft ware on your computer. If so, uninstall
any other recording software.
❑ you can access your CD-RW drive through a drive letter . If not, then yo u probably have
a hardware problem.
❑ your Nero version supports the CD-RW drive you are using. Nero can only support CD-
RW drives which were sold at the time when this Nero version was compiled. You may
have an outdated Nero version and need an update for new CD recorder models. C heck
our website http://www.ahead.de for updates. If the update does not solve the problem,
write us an e-mail to support@ahead.de. T ell us the exact model of the CD recorder and
the exact version of Nero (for example, 4.0.0.6) you are using.
❑ you are using the latest WinAspi drivers (for Windows 95/98).
Start Windows Explorer, right-click the file WINASPI.DLL in the Windows\System
folder and click Properties. Click the Version tabbed page and check the file version.
If the version is 1.0.0.0, then you may need new WinAspi drivers. Check the websites
of the suppliers of your mainboard or SCSI card for new drivers.
Audio extraction takes a very long time.
Cause Y ou may have selected the Use Jitter Correction or Read audio with sub channel options
in the Read Optio ns tabbed page.
Solution Do not select these options and see if the problem pers ists.
Page 27

Using Ahead Software Nero - Burning Rom 23
Nero does not support my CD-ROM drive.
Solution Nero uses auto-detection to determine drive parameters of new CD-ROM drives it does not
recognize. This feature is required to get the best possibl e reading performance of your CD-
ROM drive.
To auto-detect your CD-ROM drive:
1.Click CD-Recorder on the menu bar.
If your drive is not supp orted by Ner o, then the men u command Autodetect CD-ROM
is automatically enabled (if this menu command is dimmed, then Nero supports this
drive and no auto-detection is required).
2.Click the menu command Autodetect CD-ROM drive.
3.Enter as much information as possible in the auto-detection dialog box.
4.Click the Continue button and inser t the in sta lla tion CD.
5.Wait until all the tests are done. Nero will store the parameters. You should now be able
to use your CD-ROM drive with Nero.
My Audio CD player will not accept CDRWs.
Cause This is probably a hardware problem of y our audio CD player . There are very few audio CD
players that accept CDRWs.
Solution Use CDRs to create audio CDs instead.
Nero cannot copy multisession CDs.
Cause Currently, Nero does not support copying of multisession CDs. That means it is impossible
to copy ISO multisession or CD Extra CDs. Do look out for future Nero versions.
Nero cannot create CD Extra, Video CD and Photo CD formats.
Cause Currently, Nero does not support the creation of CDs in the formats mentioned above.
However Video CDs can be copied using Nero.
Auto-detection will only work
for CD-ROM drives but NOT for
CD recorders!
Page 28

Using Ahead Software Nero - Burning Rom 24
Is Nero Year 2000 compliant?
Yes. Nero will work correctly until the year 2037. In 2037, some Microsoft Foundation
Classes (MFC) objects will cause errors, since they count the seconds since 1.1.1970. Their
32- bit counter will cause an overflow in 2037. Since Nero uses the MFC, it will also work
only until 2037.
More Support
Nero provides context-sensitive help on the interface itself. For additional information concerning an
item on one of Nero screens, click the button in the toolbar and then click the item. A corresponding
information window appears.
You can also get more help and information from the manual or the Help Topics of Nero’s online Help.
Page 29

Using Prassi abCD 12
To Uninstall abCD
1. Click Start -> Settings -> Control Panel.
2. Double-click the Add/Remove Programs icon.
3. Select “Prassi abCD” and then click the Remove button.
Using Prassi abCD
Once abCD is installed and the CD-RW disc in the CD-RW drive is formatted and moun ted, you c an use
it just like a floppy or other removable storage device.
The Taskbar Icon
All the actions and Prassi abCD statuses are based on an icon in the Windows
taskbar. Right-click on this icon to access the abCD menu.
If abCD is installed, but there are no compatible CD-RW
drives, the icon appears as "blocked" and the tip (the string
that appears when you stop the mouse on a taskbar icon)
displays as shown:
When a compatible drive is found, the icon is "normal" and the tip specifies
which drive (or drives) is managed:
Mounting CD
Prassi abCD remains in the "idle" status if there is no dis c in the driv e or if the d isc is not compatible (fo r
example, it is a standard CD-ROM, a CD-R or a CD-RW already "mastered" with data or audio.)
When you insert an abCD compatible disc (a disc formatted as Packet
Writing), it is mounted and the icon changes, becoming:
At this point the disc is under the abCD control and the drive door is locked. You can now read and write
to the disc as if it was a floppy with the standard Microsoft Windows features.
Page 30

Using Prassi abCD 13
Ejecting a Disc
When you want to eject the disc, you can use the normal function in the Shell interface, the Eject
function in the abCD menu or just press the button on the drive.
While ejecting, abCD performs an operation that can slow down the tray opening for few seconds.
During that period, a message box is displayed.
Formatting a Disc
Before using a disc for the first time, abCD must format the disc for Packet Writing. The format dialog
can be selected by the T askb ar Icon menu or it is opened automatically when a new blank disc is inserted ,
if the abCD specific option is set.
A new disc, an erased disc, or a disc containing d ata or audio m ust be completely for matted. The pro cess
takes about 35 minutes, but is not CPU intensive. A progress dialog is maintained in a screen corner:
You can quickly format a disc for abCD only if it is a rewritable disc already formatted as Packet
Writing. The quick format will take only a few seconds.
While formatting, the user can perform almost any other normal operation with the computer, without
any risk of interrupting or ruining the formatting process.
Page 31

Using Prassi abCD 14
Notes
Prassi abCD disc
compatibility
An abCD UDF Packet Writing disc can be read in Microsoft Windows 95 and Windows 98 when the
abCD reader driver is installed.
Refusing to Format a new disc
when requested
If the automatic request to format is refused by the user because, for instance, he inserted a blank RW
disc just to make a CD copy, abCD recognizes this and it will not try to mount until the disc is ejected
and inserted again.
Vol um e L ab el This default date-time volume label is in the "standard" format 981011-1847 as it is common to some
mastering software applications. Note that in the case o f abCD, a d ash "-" is used inst ead of an un derline
"_" to easily distinguish that it is an abCD disc.
Page 32

Troubleshooting 10
PROBLEM: The message “Out of environment space” is displayed.
Cause: The system environment space is insufficient.
Solution: Add the following statement to the CONFIG.SYS file:
SHELL=C:\COMMAND.COM /E:512 /P
The /E switch sets a new size for the system environment space. If the message
reappears after changing the size to 512, reset it to 1024. See your DOS manual for
information about the Shell command.
 Loading...