

Page 1
Page 2

How to use this manual
Creative Sound Blaster Audigy Platinum eX
Creative Audio Software
Information in this document is subject to change without notice and does not represent a commitment on the part of Creative
Technology Ltd. No part of this manual may be reproduced or transmitted in any form or by any means, electronic or mechanical,
including photocopying and recording, for any purpose without the written permission of Creative Technology Ltd. The software
described in this document is furnished under a license agreement and may be used or copied only in accordance with the terms of
the license agreement. It is against the law to copy the software on any other medium except as specifically allowed in the license
agreement. The licensee may make one copy of the software for backup purposes only.
The Software License Agreement is found in a separate folder on this installation CD. The copyright and disclaimer, including trademark
issues are also found in the same folder.
Important:
This PDF file has been designed to provide you with complete product knowledge. The following
are instructions on how to make use of this PDF file effectively by launching applications and help files, as well
as accessing relevant web sites, where applicable, via specially prepared links.
• To launch applications, Help files or to access relevant web sites, click the blue text, or whenever the
symbol or appears on the object or text.
• For best viewing, this PDF is by default set to "Fit Width" so that all the contents on every page is visible. If
you are unable to read the text clearly, press Ctrl + <+> to zoom in or Ctrl + <-> to zoom out. To view full
screen, press Ctrl + <L>.
Note:
Otherwise, you will receive error messages. When you click a link to launch a program, a dialog box may appear to inform
you that Adobe Acrobat is going to launch the application. Click the
message appearing again. To access linked web sites, your computer must be connected to the Internet.
To access the applications and Help files, you must first install the manual and the applications in your computer.
button to run subsequent applications without the
All
Page 3

Contents
Introduction
Welcome to high-definition digital audio entertainment ....................... ix
What is EAX ADVANCED HD? ............................................................ x
CreativeWare .................................................................................. xi
In Your Package ..............................................................................xii
System Requirements .....................................................................xiii
Sound Blaster Audigy card and external Audigy Drive .................xiii
SB1394 applications, games and DVD viewing ...........................xiii
Getting More Information................................................................ xiv
More Help ..................................................................................... xiv
Technical Support .......................................................................... xiv
Document Conventions................................................................... xiv
1 About the Sound Blaster Audigy Card and external Audigy Drive
What You Need...................................................................................... 1-1
Your Sound Blaster Audigy Card ..............................................................1-2
Your Audigy Extension Card ....................................................................1-3
Your External Audigy Drive...................................................................... 1-4
Adjusting Headphones Volume and Microphone Gain.................................. 1-5
Using the Audigy Drive control knobs .............................................. 1-5
Using Creative Surround Mixer ....................................................... 1-6
Using a Remote Control with Your Computer ............................................. 1-6
2 Installing Hardware
Installation Steps ...................................................................................2-1
Step 1: Prepare the external Audigy Drive ....................................... 2-1
Step 2: Prepare your computer ...................................................... 2-1
Step 3: Connect the Sound Blaster Audigy and Audigy Extension cards 2-2
Step 4: Install the Sound Blaster Audigy and Audigy Extension cards.. 2-3
Step 5: Install the external Audigy Drive ......................................... 2-4
ii
Page 4

Step 6: Install the CD-ROM/DVD-ROM drive .................................... 2-4
Step 7: Connect to power supply ..................................................... 2-5
Connecting Related Peripherals................................................................ 2-6
Connecting Speaker Systems ..................................................................2-8
Connecting External Consumer Devices .................................................... 2-9
Positioning Your Speakers ..................................................................... 2-10
3 Installing Software
Installing Drivers and Applications............................................................ 3-1
Installing Ulead VideoStudio Application .......................................... 3-1
Windows 98 Second Edition .................................................... 3-2
Windows Me .........................................................................3-2
Windows 2000 ......................................................................3-3
Uninstalling the Applications and Device Drivers ........................................ 3-4
Reinstalling the Device Drivers ................................................................3-4
Updating Windows 2000 (Service Pack 2) ................................................. 3-5
Updating Windows 98 SE ........................................................................ 3-5
AC-3 SPDIF output........................................................................ 3-5
1394 storage supplement .............................................................. 3-5
Installing Digital Video Update ................................................................. 3-6
4 Sound Blaster Audigy Applications
Creative Sound Blaster Audigy Applications............................................... 4-1
Third Party Sound Blaster Audigy Applications ...........................................4-2
Creative Taskbar.................................................................................... 4-2
Creative Sound Blaster Audigy Online Quick Start ...................................... 4-3
Creative Sound Blaster Audigy Experience ................................................ 4-3
EAX ADVANCED HD Gold Mine Experience ................................................4-3
Creative Diagnostics............................................................................... 4-3
Creative Surround Mixer ......................................................................... 4-4
Creative AudioHQ................................................................................... 4-4
iii
Page 5

SoundFont Control ........................................................................ 4-5
Device Controls ............................................................................ 4-5
Creative Keyboard ........................................................................ 4-5
MIDI Input............................................................................ 4-5
EAX Control...................................................................................4-6
Creative WaveStudio .............................................................................. 4-6
Creative PlayCenter................................................................................ 4-7
Creative Recorder .................................................................................. 4-7
Creative Oozic Reactor............................................................................ 4-7
Vienna SoundFont Studio........................................................................ 4-8
Creative MiniDisc Center ......................................................................... 4-8
Creative RemoteCenter........................................................................... 4-9
SoundFont Showcase .............................................................................4-9
Creative Restore Defaults........................................................................ 4-9
Steinberg’s Audio Applications ............................................................... 4-10
Cubasis VST (for Creative)........................................................... 4-10
WaveLab Lite ............................................................................. 4-10
ReCycle Lite ............................................................................... 4-10
MixMeister........................................................................................... 4-11
Ulead VideoStudio Version 4.0 SE Basic .................................................. 4-11
FireNet ............................................................................................... 4-11
5 Using Applications
Multimedia Playback............................................................................... 5-1
Watching DVDs ............................................................................ 5-1
Playing MP3 or WMA files............................................................... 5-1
Playing back Wave and CD Audio files ............................................. 5-2
Playing MIDI files.......................................................................... 5-2
Creating non-General-MIDI-compliant files ...................................... 5-2
Digital Entertainment.............................................................................. 5-2
Watching surround movies............................................................. 5-2
iv
Page 6

Compiling personal albums ............................................................ 5-2
Content Creation.................................................................................... 5-3
Organizing SoundFont banks.......................................................... 5-3
Applying voice effects.................................................................... 5-3
Recording sound and effects .......................................................... 5-3
Capturing and editing videos .......................................................... 5-3
Advanced Content Creation ..................................................................... 5-4
Recording multi-tracks with ASIO ................................................... 5-4
Creating music ............................................................................. 5-4
Recording and transcribing music ................................................... 5-4
Recording and editing musical instruments ...................................... 5-4
Recording digital audio ................................................................... 5-5
Creating multiple effects ................................................................ 5-5
Creating and playing back SoundFonts ............................................ 5-5
Internet Entertainment ...........................................................................5-5
Experiencing music with visual entertainment .................................. 5-5
Encoding CD songs to MP3 format .................................................. 5-5
Downloading and playing MP3 songs ............................................... 5-6
Playing MP3 songs with EAX........................................................... 5-6
Mixing MP3 songs ......................................................................... 5-6
Gaming Reference.................................................................................. 5-6
Enjoying EAX support.................................................................... 5-6
Enjoying DirectSound3D support .................................................... 5-6
Enjoying A3D 1.0 support .............................................................. 5-6
Enjoying DOS games..................................................................... 5-7
Enjoying audio presets in games .................................................... 5-7
Customizing environments for non-3D games .................................. 5-7
Appendixes
A General Specifications
v
Page 7

Features ...............................................................................................A-1
PCI Bus Mastering .................................................................A-1
Audigy Processor ................................................................... A-1
High Quality Audio Path.......................................................... A-1
Professional Digital Audio Processing........................................A-2
Flexible Mixer Control............................................................. A-2
Dolby Digital (AC-3) Decoding................................................. A-3
Creative Multi Speaker SurroundTM (CMSSTM) .........................A-3
SB1394TM Compatibility.........................................................A-3
Connectivity ..........................................................................................A-4
Sound Blaster Audigy card ............................................................. A-4
Audio Inputs .........................................................................A-4
Audio Outputs .......................................................................A-4
SB1394 Interfaces ................................................................. A-5
Interfaces ............................................................................. A-5
Audigy Extension card ................................................................... A-5
External Audigy Drive..................................................................... A-6
Inputs and outputs on front panel ...........................................A-6
Inputs and outputs on rear panel ............................................A-6
B SB Emulation in MS-DOS/Windows 98 Second Edition
Background...........................................................................................B-1
Installing MS-DOS Drivers....................................................................... B-1
Opening MS-DOS ................................................................................... B-1
Understanding the Installation Program .................................................... B-2
AUTOEXEC.BAT File Settings .......................................................... B-2
CONFIG.SYS File Settings .............................................................. B-3
System Resource Settings.......................................................................B-3
Input/Output (I/O) Addresses ........................................................ B-4
Interrupt Request (IRQ) Line.......................................................... B-4
Direct Memory Access (DMA) Channel............................................. B-5
vi
Page 8

Environment Variables............................................................................B-5
CTSYN Environment Variable.......................................................... B-5
BLASTER Environment Variable ...................................................... B-5
Determining Resources...........................................................................B-6
Selecting the Best Audio Options in a Game ..............................................B-7
Music Options............................................................................... B-8
Digital Audio Options..................................................................... B-8
MS-DOS Mode Utilities............................................................................B-8
SBECFG.EXE ................................................................................ B-8
SBEMIXER.EXE ............................................................................. B-9
SBESET.EXE............................................................................... B-10
SBEGO.EXE................................................................................ B-11
C Troubleshooting
Problems Installing Software ...................................................................C-1
Problems with Sound..............................................................................C-2
Insufficient SoundFont Cache ..................................................................C-5
Problems With Joystick ...........................................................................C-5
Problems with Multiple Audio Devices .......................................................C-6
Problems with Sound Blaster Live! Series or Sound Blaster PCI512 card ....... C-7
Resolving I/O Conflicts............................................................................C-8
Problems in Windows NT 4.0 ...................................................................C-9
Problems with Encore DVD Player .......................................................... C-10
Problems with Software DVD Player ....................................................... C-10
Problems with DV driver for Windows 98 SE/2000/Me .............................. C-11
Index
vii
Page 9
Introduction
Page 10
Introduction
Welcome to highdefinition digital
audio entertainment
Thank you for purchasing Sound Blaster Audigy Platinum eX, which consists of the
Sound Blaster Audigy card, Audigy Extension card, the external Audigy Drive and
the IR remote control. It is the most complete high-definition digital audio
entertainment solution that you will ever come across.
With the onboard 24-bit Analog-to-Digital Converter (ADC) and Digital-to-Analog
Converter (DAC), Sound Blaster Audigy Platinum eX delivers high-definition sound
of astounding quality with 96 kHz SPDIF support. The Sound Blaster Audigy card,
with its Audigy processor, is four times as powerful as its nearest competitor. This
enables awesome EAX ADVANCED HD
listening experience.
The external Audigy Drive is designed for your convenience. You can place it away
from the computer and nearer to your work area. On its front panel, you can plug
in your microphone and headphones, and adjust the gain/volume. The external
Audigy Drive also provides Creative SB1394, MIDI, and digital connectors for your
audio/video recording and content authoring purposes. The SB1394 port provides
easy high-speed connectivity to NOMAD portable digital audio players, external
CD-RW drives and other IEEE 1394 compatible devices like DV Camcorders,
printers, scanners and digital still cameras.
In addition, the external Audigy Drive can be used with an IR remote control. The
infrared receiver on the external Audigy Drive lets you control your computer and
perform tasks (such as playing audio CDs and video CDs) up to a distance of four
meters.
TM
technologies for your games and music
Introduction ix
Page 11

What is EAX ADVANCED HD?
Combine Sound Blaster Audigy Platinum eX with a rich software bundle and you get
endless hours of fun. Included in your Sound Blaster Audigy Installation CD are
exciting applications that allow you to create EAX-enhanced MP3 songs, and instant
interactive Oozic music videos, which you can share with your friends over the
Internet.
EAX ADVANCED HD brings a new level of performance, power and flexibility to PC
audio. Taking advantage of the increased processing capabilities of the Sound
Blaster Audigy HDA Processor, EAX ADVANCED HD delivers a host of new high
definition audio features for gaming and music enhancement.
The all-new EAX ADVANCED HD Game Audio Library takes in-game audio acoustics
to a whole new level. New Multi-Environment
simultaneous audio environments in real time. Environment Panning
spatializing and localizing environments in 3D possible. Environment Reflections
offers localization of early reflections and echoes. Environment Filtering
accurately simulates the propagation of sound in both open and closed
environments. Finally, Environment Morphing
TM
technology renders up to 4
TM
allows for seamless transition from
TM
makes
TM
TM
one environment to the next. These innovative technologies bring tremendous
realism and immersiveness to gaming.
Sonic superiority is also assured with EAX ADVANCED HD Music Technologies. Audio
Clean-Up enables the removal of unwanted noise in a digital audio file. DREAM
TM
creates an enhanced, "disco-like" surround sound for any stereo music. Time Scaling
speeds up and slows down music with no distortion. Music playback is further
enhanced with the specially developed EAX ADVANCED HD music effects.
EAX ADVANCED HD offers dramatically increased 3D audio performance and
functionality, delivering superior audio fidelity and sophisticated reverb effects for
an unsurpassed digital entertainment experience that is only available from the
Sound Blaster Audigy family of products.
Introduction x
Page 12

CreativeWare
CreativeWare is a post-purchase programme that adds new features, enhancements
and additional functionality to Creative’s upgradeable products. With CreativeWare,
you can always be sure of having the best digital entertainment experience because:
- You can easily upgrade your Sound Blaster Audigy card with the latest features,
device drivers, and applications.
- You can personalize the functions on your Sound Blaster Audigy card.
Introduction xi
Page 13
In Your Package
The items listed here may
differ for certain countries.
The following items are included in your package:
❑
Sound Blaster Audigy card
❑
Audigy Extension card
❑
External Sound Blaster Audigy Drive and IR remote control
❑
Internal SB1394 cable
❑
Audigy Extension cable
❑
AUD_EXT/Joystick cable
❑
Analog CD audio cable
❑
Digital CD audio cable
❑
Power splitter cable
❑
Mini-DIN-to-standard-DIN adapter
❑
3.5 mm minijack to ¼” jack adapter
❑
4 rubber feet
❑
2 non-alkaline AAA batteries (twin pack) for the IR remote control
❑
Sound Blaster Audigy Installation CD
❑
Application and game CDs
❑
Quick Start leaflet
❑
Warranty card
❑
Technical Support leaflet
Introduction xii
Page 14

System Requirements
Sound Blaster Audigy card and external Audigy Drive
SB1394 applications, games and DVD viewing
❑ Genuine Intel
❑ Intel, AMD or 100% compatible motherboard chipset
❑ Windows 98 Second Edition (SE), Windows Millennium Edition (Me), Windows NT
4.0 or Windows 2000
❑ 64 MB RAM
❑ 600 MB of free hard disk space
❑ Available PCI 2.1 compliant slot for the Sound Blaster Audigy card
❑ Available adjacent slot for the Audigy Extension card
❑ Headphones or amplified speakers (available separately)
❑ CD-ROM drive installed
❑ Genuine Intel Pentium II 350 MHz, MMX or AMD 450 MHz processor/3Dnow!
❑ Windows 98 SE, Windows Me or Windows 2000 (Creative PlayCenter on Windows
NT 4.0 requires Service Pack 6 with Internet Explorer 4.0)
❑ 3D graphics accelerator with at least 8 MB of texture RAM for games
❑ 128 MB RAM recommended for digital video (DV) capture and editing
❑ Ultra DMA type hard disk space with 1 GB workspace (ATA-100, 7,200 rpm type
and 6 GB recommended) for DV applications (300—500 MB of free hard disk
space for games)
❑ At least second generation DVD-ROM drive with these recommended soft-DVD
players: InterVideo’s WinDVD 2000 or CyberLink’s PowerDVD 3.0 and above
Other applications may have higher system requirements or may require a
microphone. Refer to the individual application’s online Help for details.
®
Pentium® 266 MHz, AMD® K6 300 MHz or faster processor
Introduction xiii
Page 15
Getting More Information
Refer to the Sound Blaster Audigy Online Quick Start and the various online Help
files for detailed information on Creative applications. The Sound Blaster Audigy
Experience, an online demo, gives you an interactive introduction to Sound Blaster
Audigy and demonstrates the card’s capabilities.
More Help
Technical Support
Document Conventions
View the contents of the Sound Blaster Audigy Installation CD for additional
demonstrations, libraries and other software. Visit the www.soundblaster.com site
for the latest Sound Blaster news and products. The site also includes information
on making purchases, technical help, and CreativeWare updates.
Visit http://www.soundblaster.com/support/faq/ for general help.
The following typographical conventions are used throughout this manual:
The notepad icon indicates information that is of particular
importance and should be considered before continuing.
The alarm clock designates a caution or warning that can help
you avoid situations involving risk.
The warning sign indicates that failure to adhere to directions
may result in bodily harm or life-threatening situations.
Introduction xiv
Page 16

1
About the Sound Blaster Audigy Card and external Audigy Drive
This chapter gets you ready to install the Sound Blaster Audigy
hardware.
Page 17
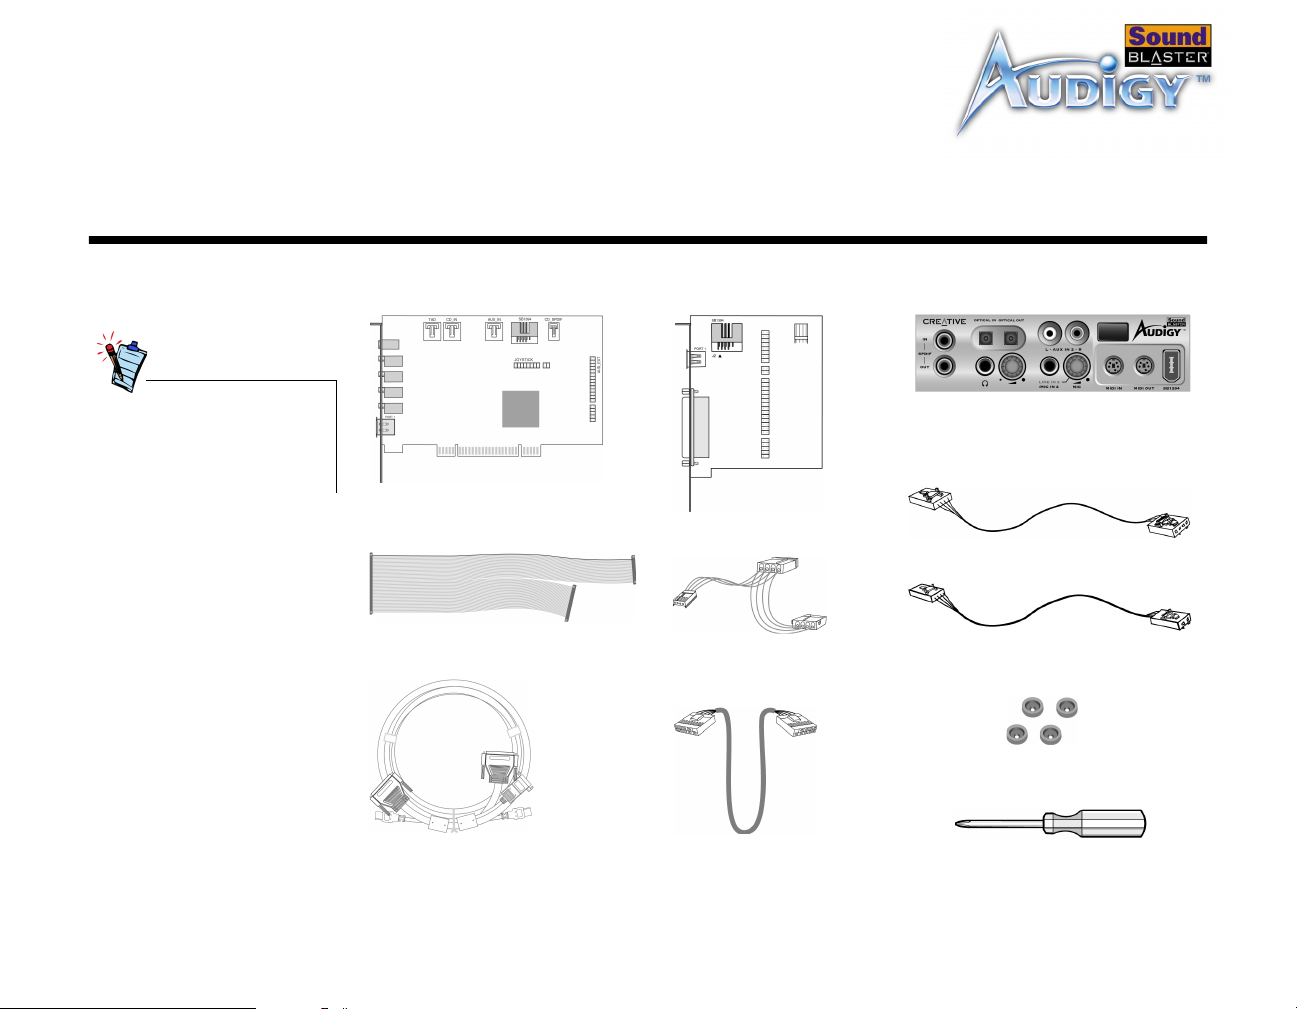
About the Sound Blaster Audigy Card and external
Sound Blaster Audigy card
External Audigy Drive
Internal SB1394 cable
AUD_EXT/Joystick cable
Rubber feet
Digital CD audio cable
Philips-head screwdriver (not included)
Audigy Extension card
Analog CD audio cable
Audigy Extension cable
Power supply splitter cable
Audigy Drive
What You Need
In addition, you will also
need an available PCI slot
and another adjacent
available slot on your
computer.
Before you begin installation, be sure that you have these:
About the Sound Blaster Audigy Card and external Audigy Drive 1-1
Page 18
Your Sound
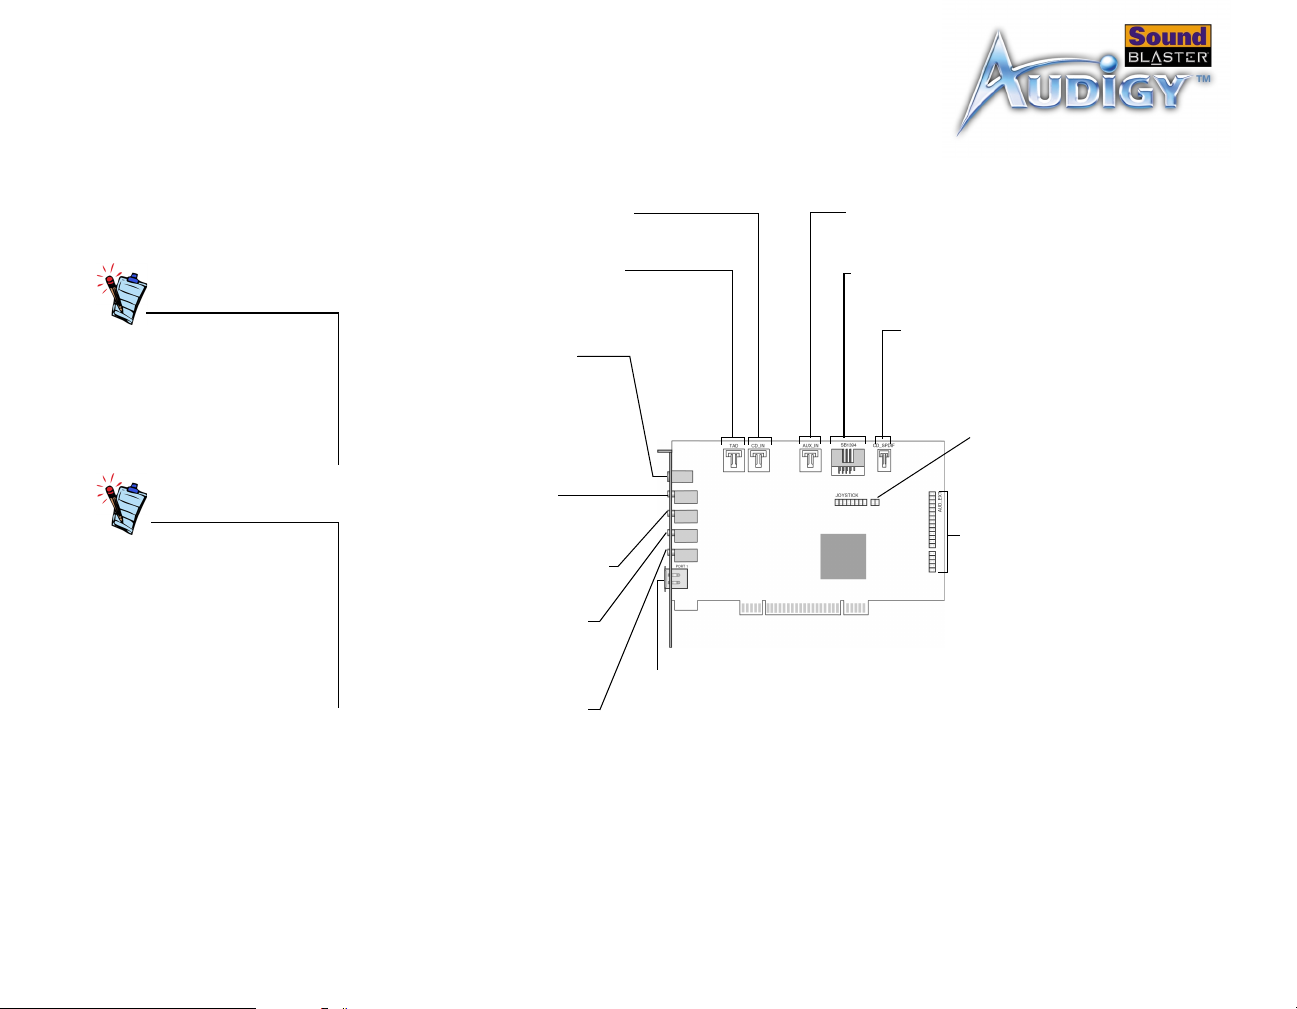
CD Audio connector (CD_IN)
Connects to the Analog Audio output on a CD-ROM
or DVD-ROM drive using a CD audio cable.
SB1394 port (SB1394)
Connects to an IEEE1394 compatible external
device (such as a digital video camcorder,
digital still camera, printer or scanner).
Line In jack (LIN_IN)
Connects to an external device
(such as a cassette, DAT or
MiniDisc player).
Microphone In jack (MIC_IN)
Connects to an external
microphone for voice input.
Figure 1-1: Jacks, connectors and ports on the Sound Blaster Audigy card.
Rear Out jack (LIN_OUT2)
Connects to powered speakers or
an external amplifier for audio
output.
Line Out jack (LIN_OUT1)
Connects to powered speakers or
an external amplifier for audio
output. Also supports
headphones.
Telephone Answering Device
connector (TAD)
Provides a mono connection from a
standard voice modem, and transmits
microphone signals to the modem.
AUX In connector (AUX_IN)
Connects to internal audio sources such as
TV Tuner, MPEG, or other similar cards.
CD SPDIF connector (CD_SPDIF)
Connects to the SPDIF (Digital Audio)
output (where available) on a CDROM or DVD-ROM drive.
Internal SB1394 port
Connects to J2 on the Audigy Extension card.
Joystick/MIDI connector
(JOYSTICK)
Connects to the AUD_EXT/
Joystick header on the Audigy
Extension card.
Analog/Digital Out jack
6-channel or compressed AC-3
SPDIF output for connection to
external digital devices or digital
speaker systems.
Also supports Center and Subwoofer
analog channels for connection to
5.1 analog speaker systems.
Audio Extension (Digital I/O)
connector (AUD_EXT)
Connects to the external Audigy
Drive or Digital I/O card.
Warning:
This is not an IDE
interface. Do not connect it to
your IDE devices.
Your audio card has these jacks and connectors that allow you to attach other
devices:
Blaster Audigy
Card
A jack is a one-hole
connector consists of many
pins. Refer to the User
Guide, “Hardware
Information”, for connector
pin assignments.
In Analog mode, Line Out
and Rear Out jacks can be
used simultaneously for 4.1
channel speaker systems.
The Analog/Digital Out jack
can be used for the Center
and Subwoofer (LFE)
channels for 5.1 speaker
systems.
connecting interface whilst a
About the Sound Blaster Audigy Card and external Audigy Drive 1-2
Page 19
Your Audigy
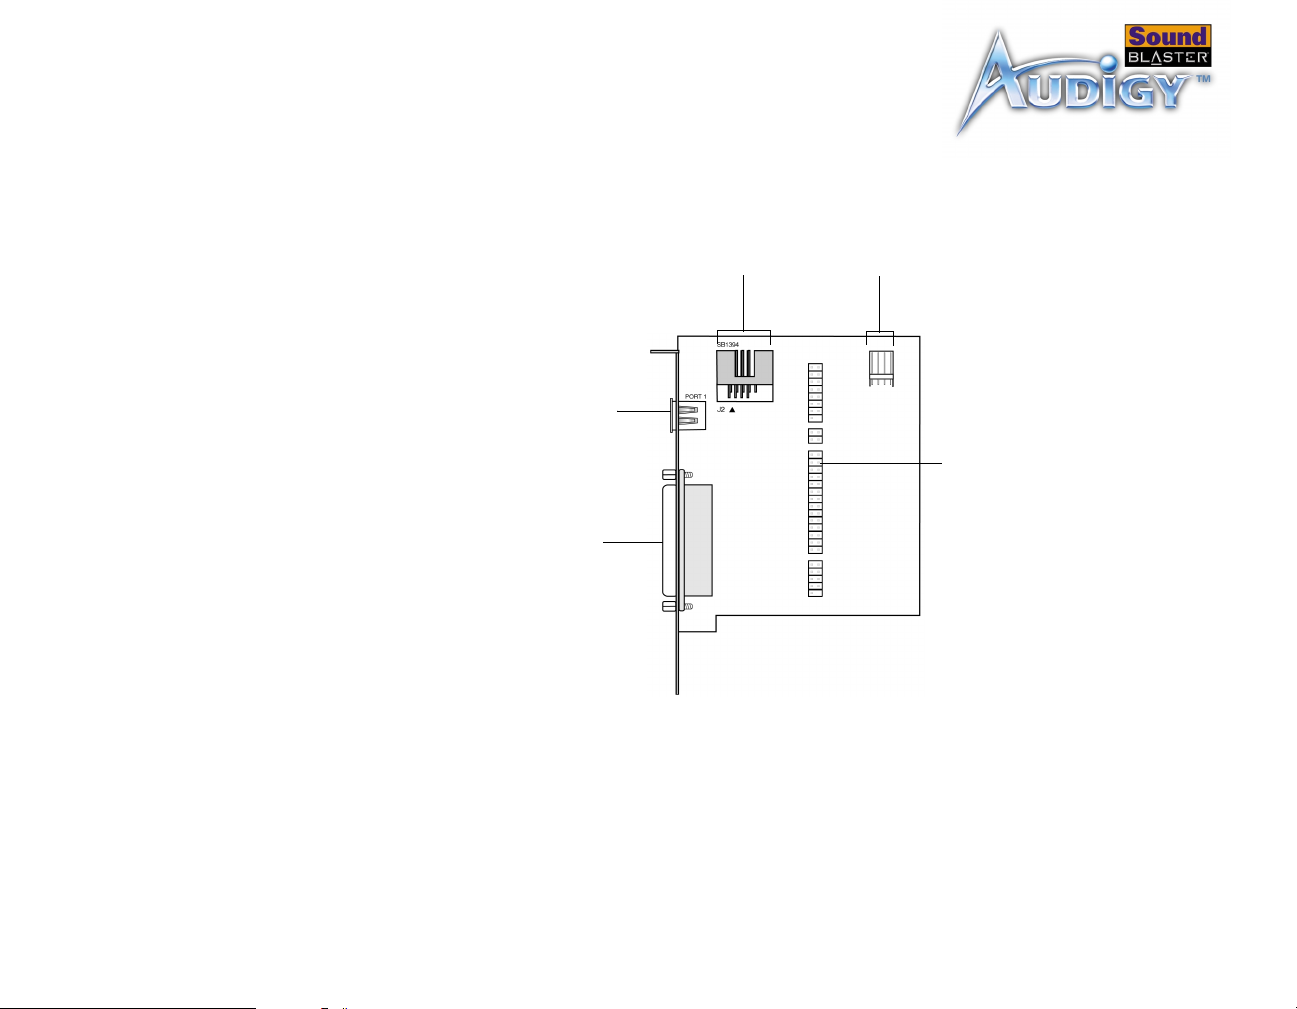
Figure 1-2: Jacks, connectors and ports on the Audigy Extension card.
Internal SB1394 port
Connects to the Internal
SB1394 connector on the Sound
Blaster Audigy card.
SB1394 Extension port
Connects to the 6-pin SB1394
connector on the Audigy Extension
cable.
Also connects to an IEEE1394
compatible external device (such as a
digital video camcorder, digital still
camera, printer or scanner).
Audigy Extension connector
Connects to the 44-pin DB
connector on the Audigy
Extension cable.
Audio Extension/Joystick
header
Connects to the AUD_EXT and
Joystick connectors on the Sound
Blaster Audigy card.
Power supply connector
Connects to the power splitter
cable for connection to the
system power supply unit.
Extension Card
Your Audigy Extension card has these jacks and connectors that allow you to attach
other devices:
About the Sound Blaster Audigy Card and external Audigy Drive 1-3
Page 20
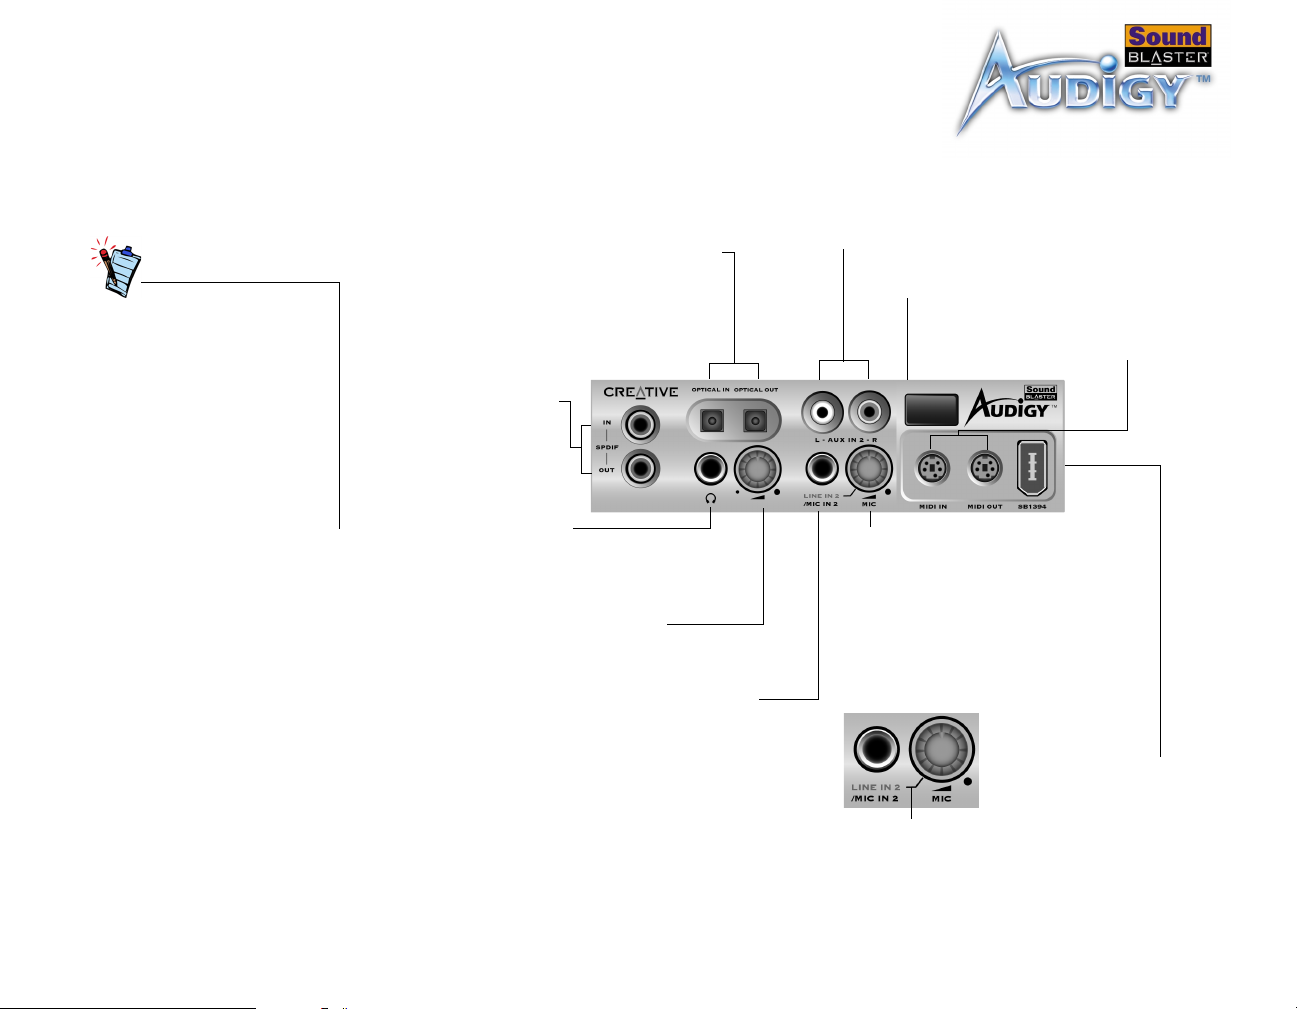
Your External
MIDI In/Out connectors
Connects to MIDI devices using
the Mini DIN-to-Standard DIN
adapter provided.
Line In 2/Mic In 2 selector
knob(Microphone Gain Control)
To switch to Line In 2, turn the knob counter
clockwise over the Line In 2/Mic In 2
separator mark until you hear a “click” sound.
To switch back to Mic In 2, turn the knob
clockwise over the separator mark until you
hear a “click” sound. To control the
microphone gain, continue to turn clockwise.
See “Adjusting Headphones Volume and
Microphone Gain” on page 1-5.
¼” Line In 2/Mic In 2 jack
Connects to high-quality dynamic
microphones or audio devices such as
electric guitars and DAT or MiniDisc
players.
RCA Auxiliary In jacks
Connects to consumer equipment such as VCRs,
TVs and CD players, via RCA Auxiliary outputs.
Optical SPDIF In/Out connectors
Connects to digital audio devices such
as DAT and MiniDisc recorders, via
optical input/output.
Headphones Volume control knob
Controls the headphones output volume.
See “Adjusting Headphones Volume and
Microphone Gain” on page 1-5.
RCA SPDIF In/Out
jacks
Connects to digital audio
devices such as DAT and
MiniDisc recorders, via
RCA input/output.
¼” Headphones jack
Connects to a pair of high-quality
headphones. Your speaker output
is muted when you connect the
headphones to the drive.
Figure 1-3: Jacks, connectors and controls on the external Audigy Drive.
Line In 2/Mic In 2
separator mark
Infrared Receiver
Lets you control your computer using
the IR remote control.
SB1394 connector
Connects to IEEE1394
compatible devices.
Audigy Drive
The front panel of your external Audigy Drive has these jacks, connectors and
controls:
• To connect your existing
computer headphones and
microphone to the
external Audigy Drive, use
a 3.5 mm minijack to ¼”
jack adapter.
• Set the gain level of the
Mic In 2 jack to the
minimum before
connecting or turning on a
microphone, especially if
you are using headphones.
About the Sound Blaster Audigy Card and external Audigy Drive 1-4
Page 21

Adjusting Headphones Volume and Microphone Gain
You can adjust the headphones volume and microphone gain in two ways.
Using the Audigy Drive control knobs
On the front panel of the external Audigy Drive, turn the respective control knob:
❑
Counterclockwise
❑
Clockwise
to
to
increase
decrease
the headphones volume or microphone gain.
About the Sound Blaster Audigy Card and external Audigy Drive 1-5
the headphones volume or microphone gain.
Page 22
Using Creative Surround Mixer
To install Surround Mixer and
other applications, see
“Installing Drivers and
Applications” on page 3-1.
• For best effects, set the
headphones volume and
microphone gain levels to
75% in Surround Mixer,
and then use the external
Audigy Drive’s control
knobs to make further
adjustments.
• If you set the headphones
volume or microphone
gain levels to 0%, or mute
them in Surround Mixer,
you hear no sound if the
external Audigy Drive’s
control knobs are set to
the maximum.
To adjust headphones volume:
1. Click Start -> Programs -> Creative -> Sound Blaster Audigy -> Surround
Mixer.
2. On the lower half of Surround Mixer, make sure that the Mute check box under
the Volume slider is clear. Otherwise, click the check box.
3. Drag the Volume slider left or right to adjust the headphones volume.
To adjust microphone gain:
1. Click Start -> Programs -> Creative -> Sound Blaster Audigy -> Surround
Mixer.
2. On the lower half of Surround Mixer, click an audio input source button with a
down arrow, and then select Line-In 2/Mic 2.
3. Make sure the check box below the Line-In 2/Mic 2 slider is cleared. If not, click
it to clear the check box. This will unmute the audio input source.
4. Drag the slider to adjust the microphone gain.
Using a Remote Control with Your Computer
The external Audigy Drive has an infrared receiver for the remote control. This
remote control lets you operate your computer from the comfort of your sofa or bed
up to a distance of 4 meters. For details, refer to the RemoteCenter online Help.
About the Sound Blaster Audigy Card and external Audigy Drive 1-6
Page 23
2
Installing Hardware
This chapter tells you how to install the Sound Blaster
Audigy Platinum eX hardware.
Page 24
Installing Hardware
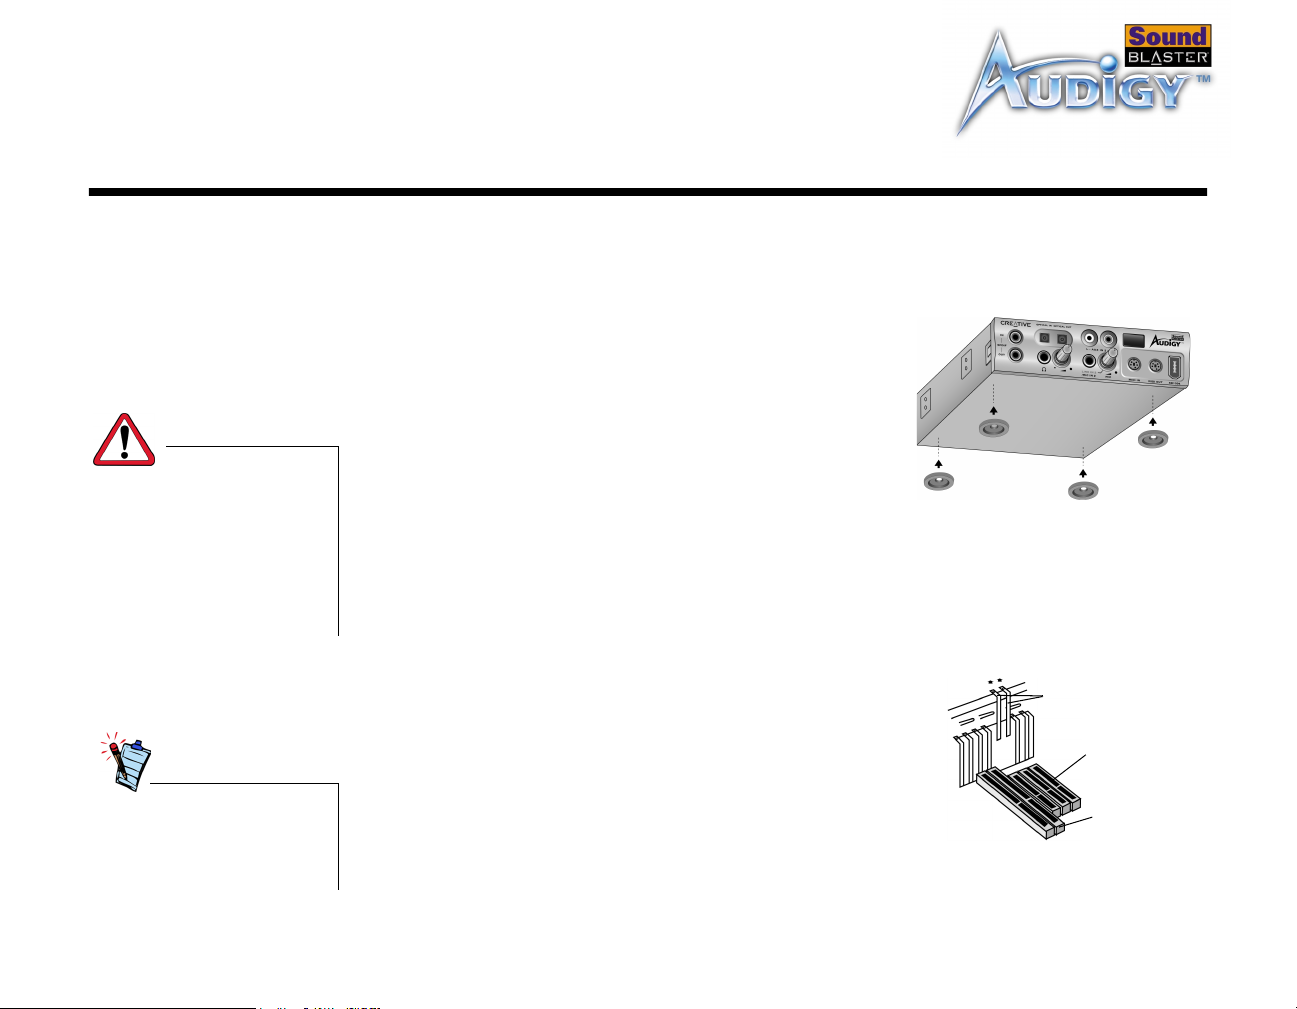
Figure 2-1: Sticking rubber feet
PCI slots
Figure 2-2: Removing metal plates
ISA slots
metal brackets
Installation Steps
Step 1: Prepare the external Audigy Drive
Turn off the main power
supply and disconnect your
computer’s power cord.
Systems using an ATX power
supply unit with soft power
off may still be powering the
PCI slot. This can damage
your audio card when it is
inserted into the slot.
Step 2: Prepare your computer
Remove any existing audio
card or disable the onboard
audio. For more information,
see “Problems with Multiple
Audio Devices” on page C-6.
1. Stick the four rubber feet to the underside in each
corner of the external Audigy Drive as shown in
Figure 2-1.
2. Place the external Audigy Drive near your
computer.
1. Turn off your computer and all peripheral devices.
2. Touch a metal plate on your computer to ground
yourself and to discharge any static electricity, and
then unplug the power cord from the wall outlet.
3. Remove the computer cover.
4. Remove the metal brackets from two adjacent
unused PCI slots as shown in Figure 2-2. Put the
screws aside for use later.
Installing Hardware 2-1
Page 25
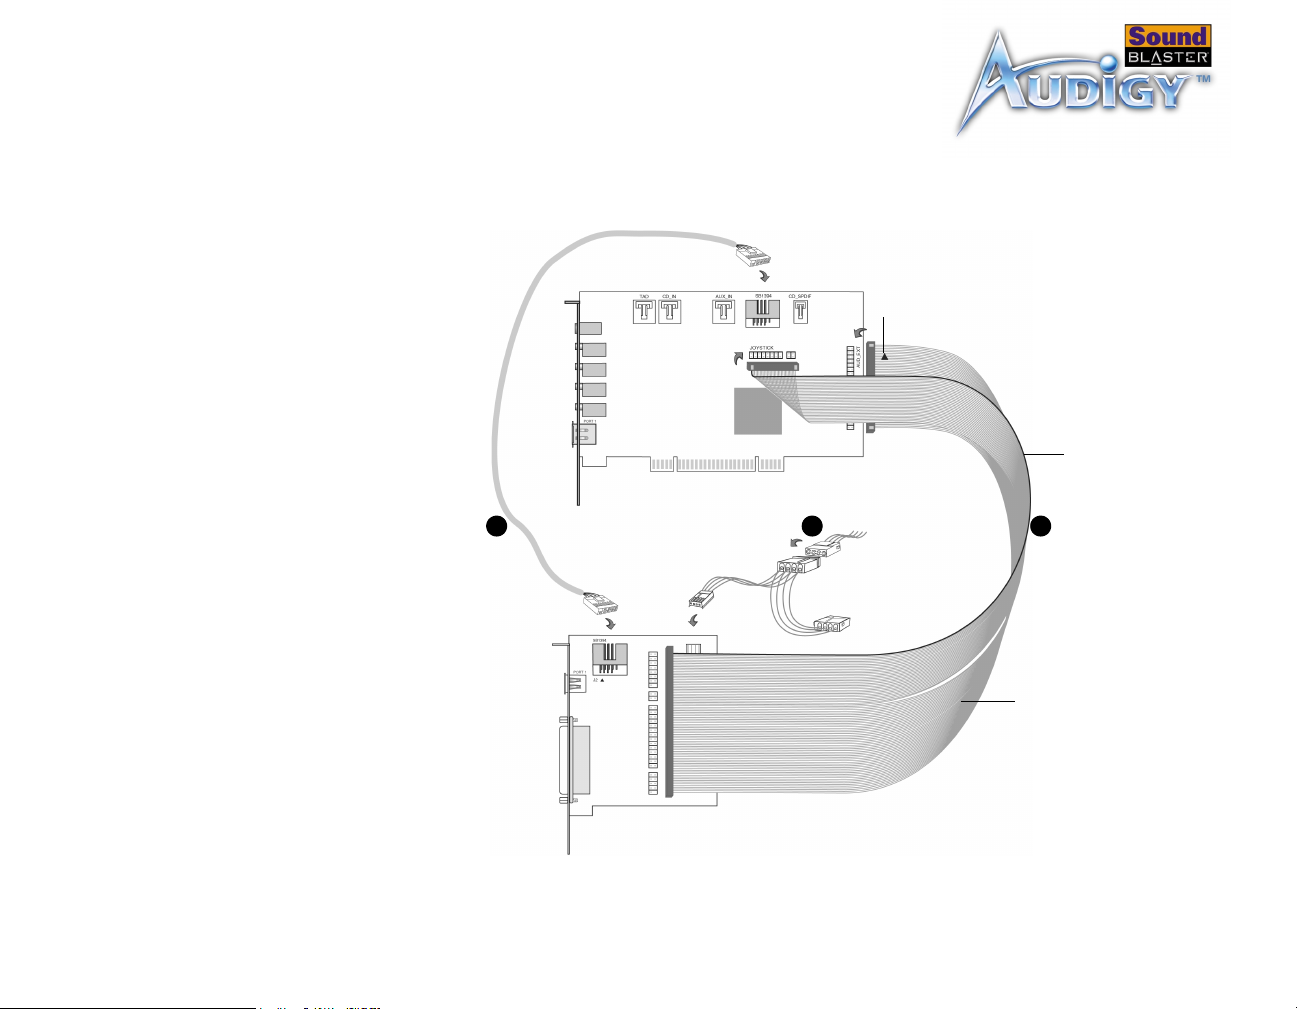
Step 3: Connect the
Figure 2-3: Connecting the Sound Blaster Audigy and Audigy Extension cards.
Power splitter cable
To sy s t e m po w e r
supply unit
Sound Blaster Audigy card
Red-colored
wire*
J2
J3
Internal SB1394
cable
J4
AUD_EXT/Joystick
cable
Audigy Extension card
Black triangle on the cable*
21 1
*Alignment markers to assist
you in installing the hardware
Sound Blaster
Audigy and Audigy
Extension cards
1. Using the AUD_EXT/Joystick cable and internal SB1394 cable, connect the cards
as shown in Figure 2-3.
2. Connect the power splitter cable to the Audigy Extension card.
Installing Hardware 2-2
Page 26
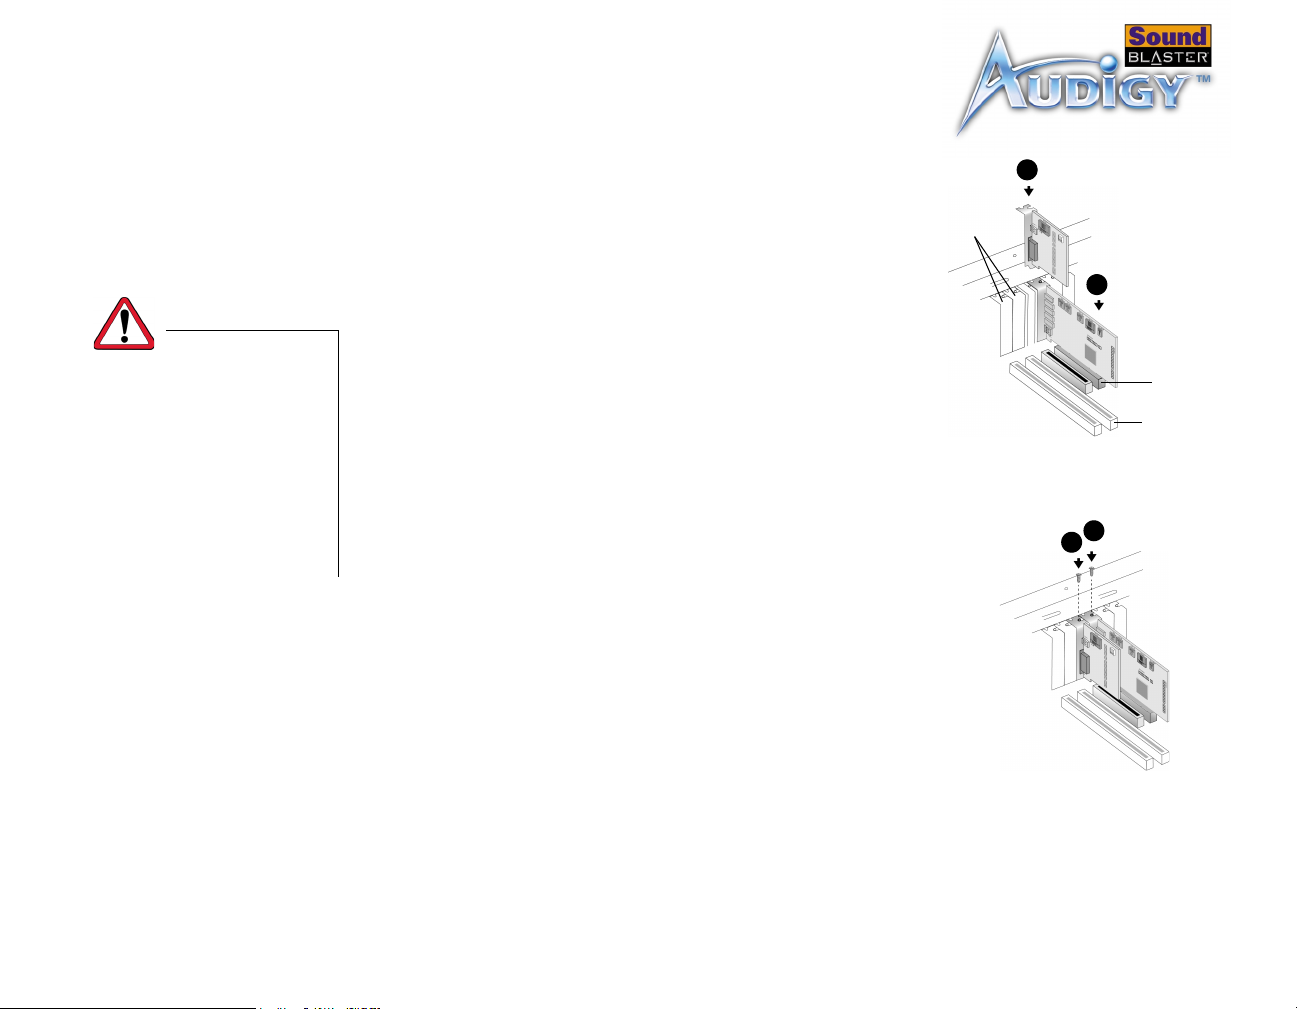
Step 4: Install the
Unused brackets
PCI
slot
ISA slot
Figure 2-4: Aligning the cards against
the slots.
2
1
Fasten the cards
and brackets with
screws.
Figure 2-5: Securing the cards to the
slots.
3
4
Sound Blaster
Audigy and Audigy
Extension cards
Do not force the audio card
into the slot. Make sure that
the gold finger PCI connector
on the Sound Blaster Audigy
card is aligned with the PCI
bus connector on the
motherboard before you
insert the card into the PCI
expansion slot.
If it does not fit properly,
gently remove it and try
again
1. Align the Sound Blaster Audigy card with the PCI
slot and press the card gently but firmly into the
slot as shown in Figure 2-4.
2. Align the Audigy Extension card with an
adjacent free slot.
3. Secure the Audigy Extension card with one of
.
the screws you had placed aside earlier as
shown in Figure 2-5.
4. Secure the Sound Blaster Audigy card with the
other screw.
5. Connect the power splitter cable from the
Audigy Extension card to the system power
supply unit.
Installing Hardware 2-3
Page 27
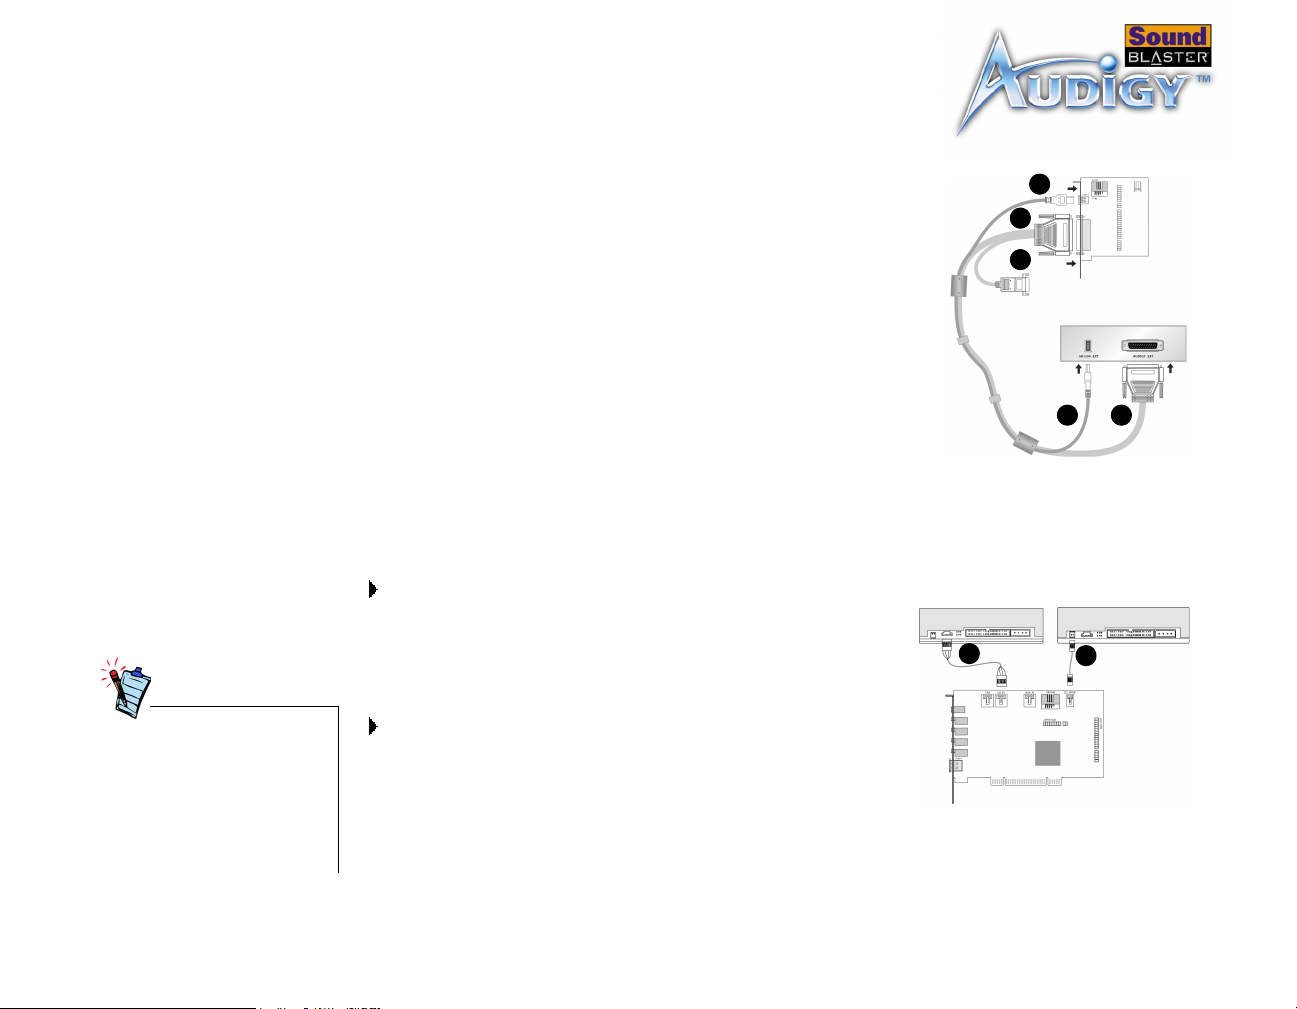
Step 5: Install the
Figure 2-6: Connecting the cables to
the external Audigy Drive
2
21
1
Audigy Extension card
Rear panel of external
Audigy Drive
3
Figure 2-7: Connecting CD-ROM/
DVD-ROM drives.
CD-ROM/DVD-ROM drive
Sound Blaster Audigy card
1
2
OR
external Audigy
Drive
1. Attach the SB1394 connector on the Audigy
Extension cable to the SB1394 Extension ports
on the Audigy Extension card and external
Audigy Drive as shown in Figure 2-6.
2. Attach the 44-pin DB connector on the Audigy
Extension cable to the Audigy Extension
connectors on the Audigy Extension card and
External Audigy Drive.
3. If you are installing a joystick or a MIDI device,
connect the Joystick/MIDI connector on the
Audigy Extension cable to the device.
Step 6: Install the
CD-ROM/DVDROM drive
If the Sound Blaster Audigy
card is connected to both the
CD SPDIF and CD Audio
connectors on a CD-ROM or
DVD-ROM drive, do not
enable the CD Audio and CD
Digital options at the same
time in Surround Mixer.
For analog CD audio output:
connect the Analog CD audio cable from the
Analog Audio connector on your CD-ROM/DVDROM drive to the CD_IN connector on the Sound
Blaster Audigy card as shown in Figure 2-7.
For digital CD audio output:
connect the Digital CD audio cable from the
Digital Audio connector on your CD-ROM/DVDROM drive to the CD_SPDIF connector on the
Sound Blaster Audigy card.
Installing Hardware 2-4
Page 28
Step 7: Connect to power supply
1. Replace the computer cover.
2. Plug the power cord back into the wall outlet, and turn on the computer.
To connect your Sound Blaster Audigy and Audigy Extension cards to other devices,
see “Connecting Related Peripherals” on page 2-6.
If the Audigy Extension cable
is too long, coil it.
To install drivers and software, refer to “Installing Drivers and Applications” on
page 3-1.
Installing Hardware 2-5
Page 29
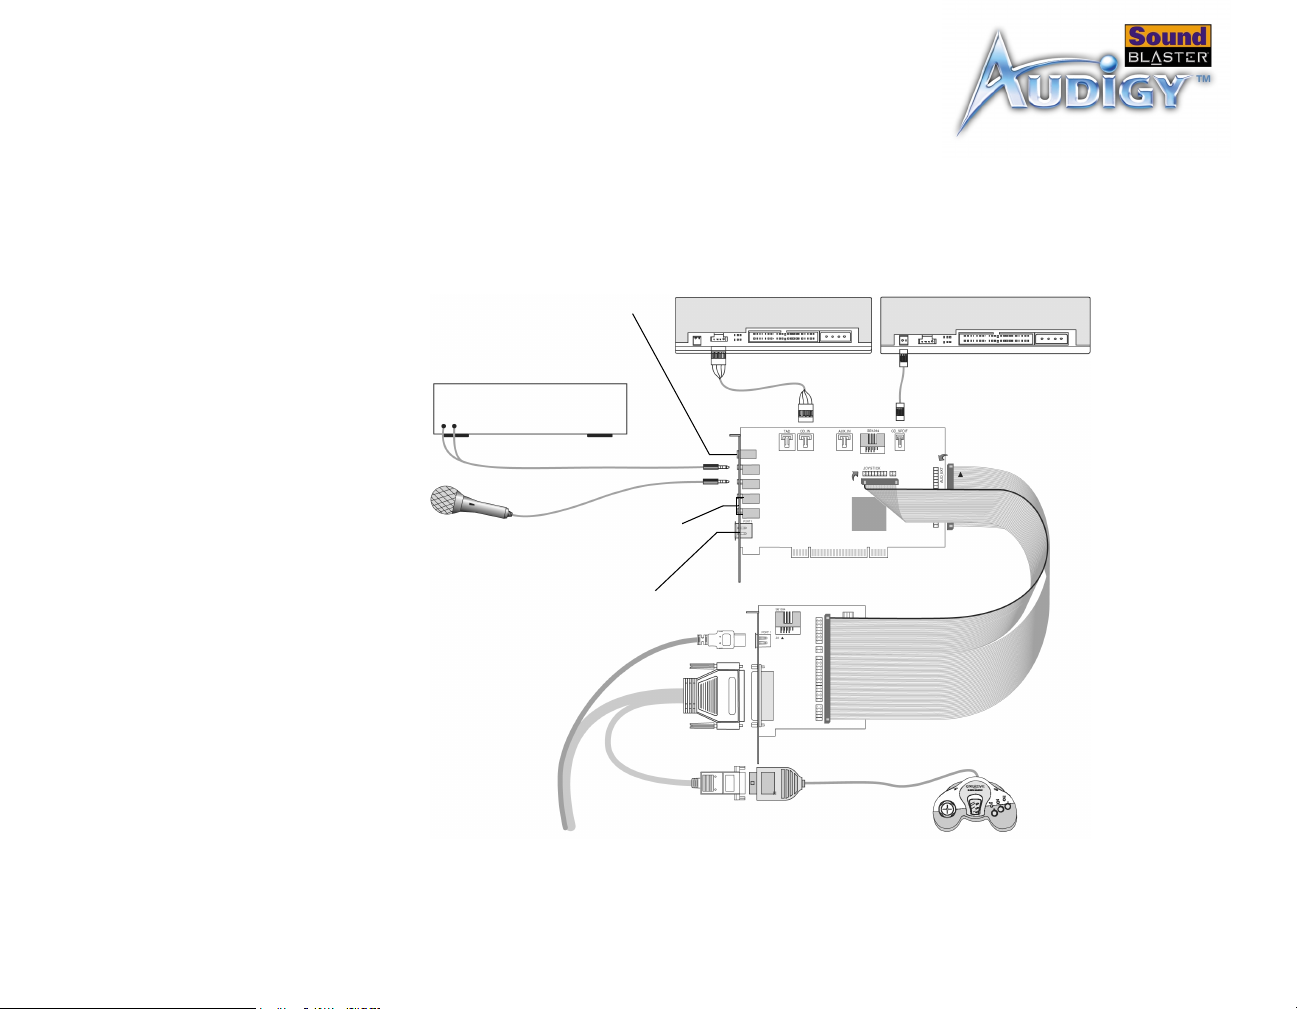
Connecting
Related
Sound Blaster Audigy Platinum eX will most undoubtedly give you endless hours of
listening pleasure. Figure 2-8 shows you how to connect related peripherals to your
Sound Blaster Audigy Platinum eX to optimize your enjoyment.
Peripherals
Analog/Digital Out jack
Analog Mode
Digital Mode
to-DIN cable.
For instructions on how to switch between digital and analog modes, refer
to topic “Digital Output Only” of the Creative Surround Mixer online Help.
(default): Connects to Center and Subwoofer channels.
: Connects to digital speakers*, MiniDisc or DAT via minijack-
Cassette or CD
player,
synthesizer, etc.
Microphone
Line-out
Connects to analog front and rear
inputs of 4-channel speakers.**
Connects to network games and
IEEE 1394 compatible devices such
as the IEEE 1394 Creative digital
audio player, DV camcorder,
WebCam and digital camera.
CD-ROM/DVD-ROM drive
Analog CD audio cable
Line In
Mic In
Line Out
Rear Out
SB1394 port
Sound Blaster Audigy card
Digital CD audio cable
Audigy Extension card
Connects to the external Audigy Drive. See “Connecting
Speaker Systems” on page 2-8 for more details.
Game pad
Figure 2-8: Connecting Sound Blaster Audigy Platinum eX to other devices.
*For example,
Creative Inspire
5.1 Digital
Speakers.
**For example, 4channel Creative
or Cambridge
SoundWorks
analog speaker
systems
TM
Installing Hardware 2-6
Page 30
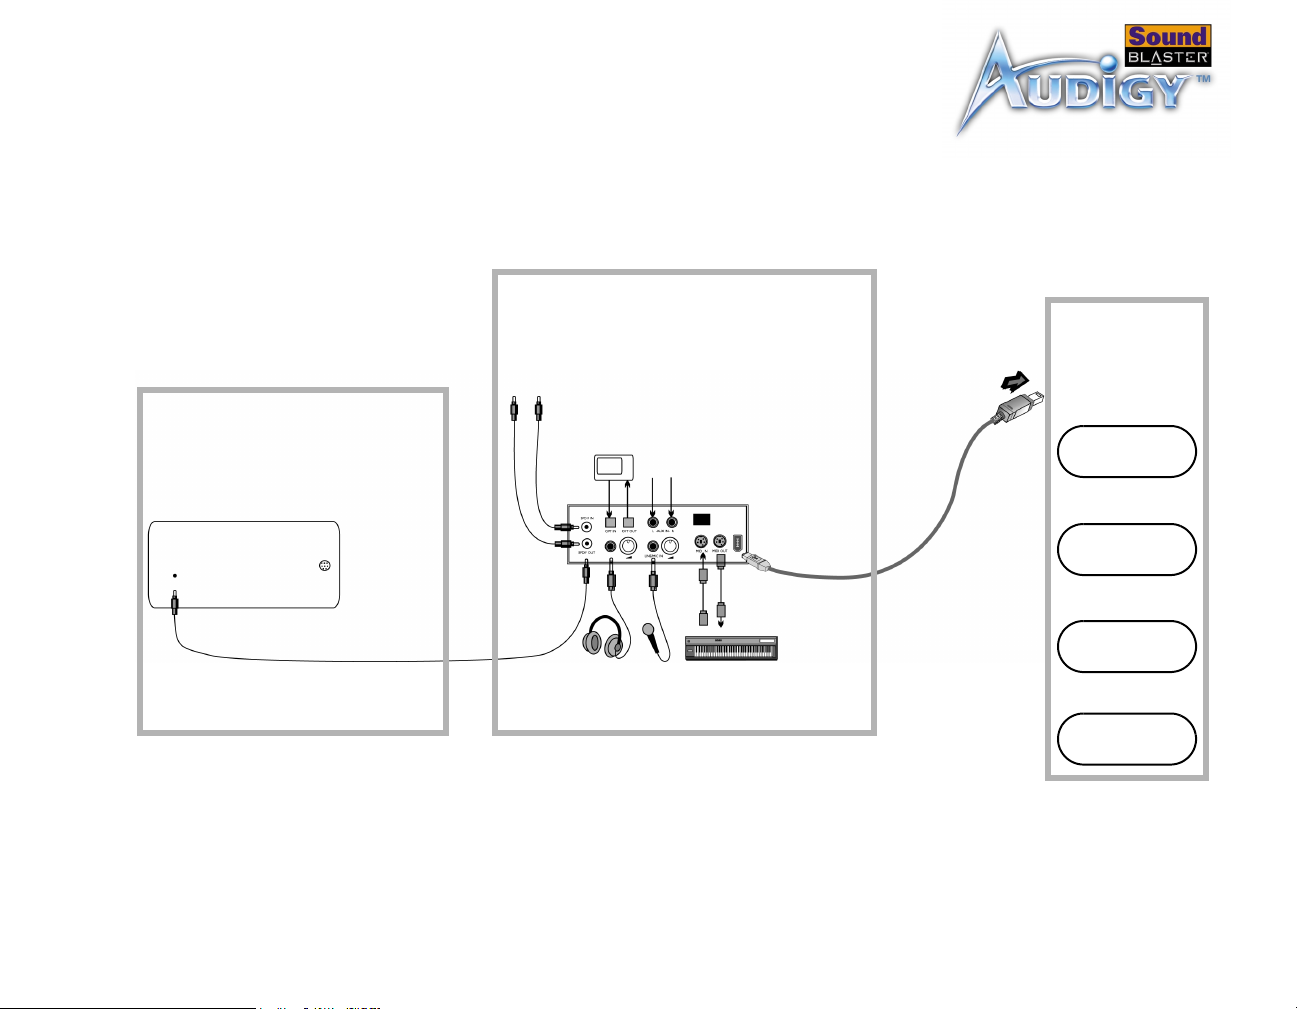
Watching DVD Movies
with Creative SoftPC-DVD and Creative
or Cambridge SoundWorks line of
speaker systems
Creative or Cambridge SoundWorks
line of speaker systems
Dolby Digital
(AC-3)
SPDIF In
Digital
DIN
Figure 2-9: Connecting peripherals to the external Audigy Drive.
Recording and Content Authoring
with external Audigy Drive
Digital devices such
as DAT recorders
MiniDisc
player
Headphones Microphone /
Analog devices such as CD
or tape players
External Audigy Drive
via Mini-DIN-tostandard-DIN
adapter
Line In
MIDI devices
such as MIDI
keyboards
Connecting IEEE
1394 compatible
devices
with SB1394
connector
Digital video
camcorder
IEEE 1394
hard disk
CD-RW drive
IEEE 1394
Nomad
Jukebox
Installing Hardware 2-7
Page 31
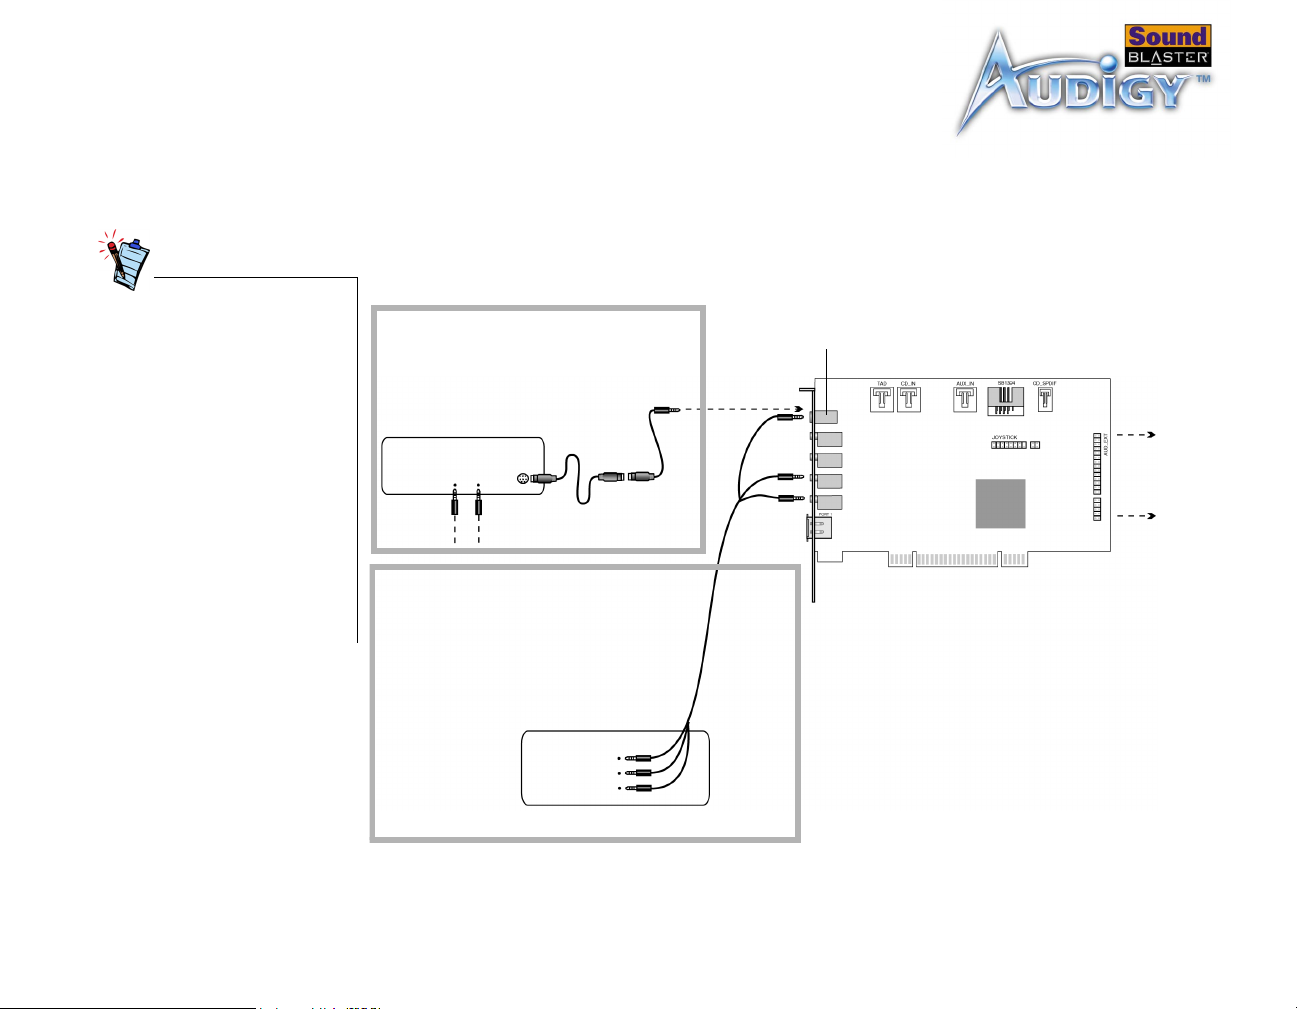
Connecting Speaker Systems
If you are playing games in
Windows 98 SE MS-DOS mode
(pure DOS mode), you must:
• Make sure the CD Audio
connector on the Sound
Blaster Audigy card and the
Analog Audio connector on
the CD-ROM or DVD-ROM
drive are connected.
• In addition, if you get
distorted sound, do not
connect the CD SPDIF
connector on the Sound
Blaster Audigy card to the
Digital Audio connector on
the CD-ROM or DVD-ROM
drive.
For instructions on how to switch between digital and analog modes, refer to topic
“Digital Output Only” of the Creative Surround Mixer online Help.
If you have a 5.1 channel speaker system, you can upmix your stereo sources
(such as CD Audio, MP3, WMA, MIDI and Wave) to 5.1 channels by using the
Creative Multi Speaker Surround (CMSS) technology. To upmix, you need to enable
CMSS feature in PlayCenter. Refer to the PlayCenter online Help.
Playing Games and Music,
and Watching Movies
with 4.1 or 5.1 Digital
Speaker System of Creative
or Cambridge SoundWorks
Analog Line
and Rear
Inputs
Playing Games and Music,
and Watching Movies
with an analog 5.1 channel
speaker system*
Digital
DIN
Minijack-toDIN cable
Analog/Digital Out jack
Line Out
Rear Out
SB1394 port
Sound Blaster Audigy card
Connects to
the Audigy
Extension
card
*For example,
Creative Inspire
5.1 Analog
Speakers
5.1 Channel Analog
Speaker System*
Analog
Front, Rear
and Center/
Sub Inputs
Triple stereo
audio cable
Figure 2-10:Connecting speaker systems to the Sound Blaster Audigy card.
Installing Hardware 2-8
Page 32
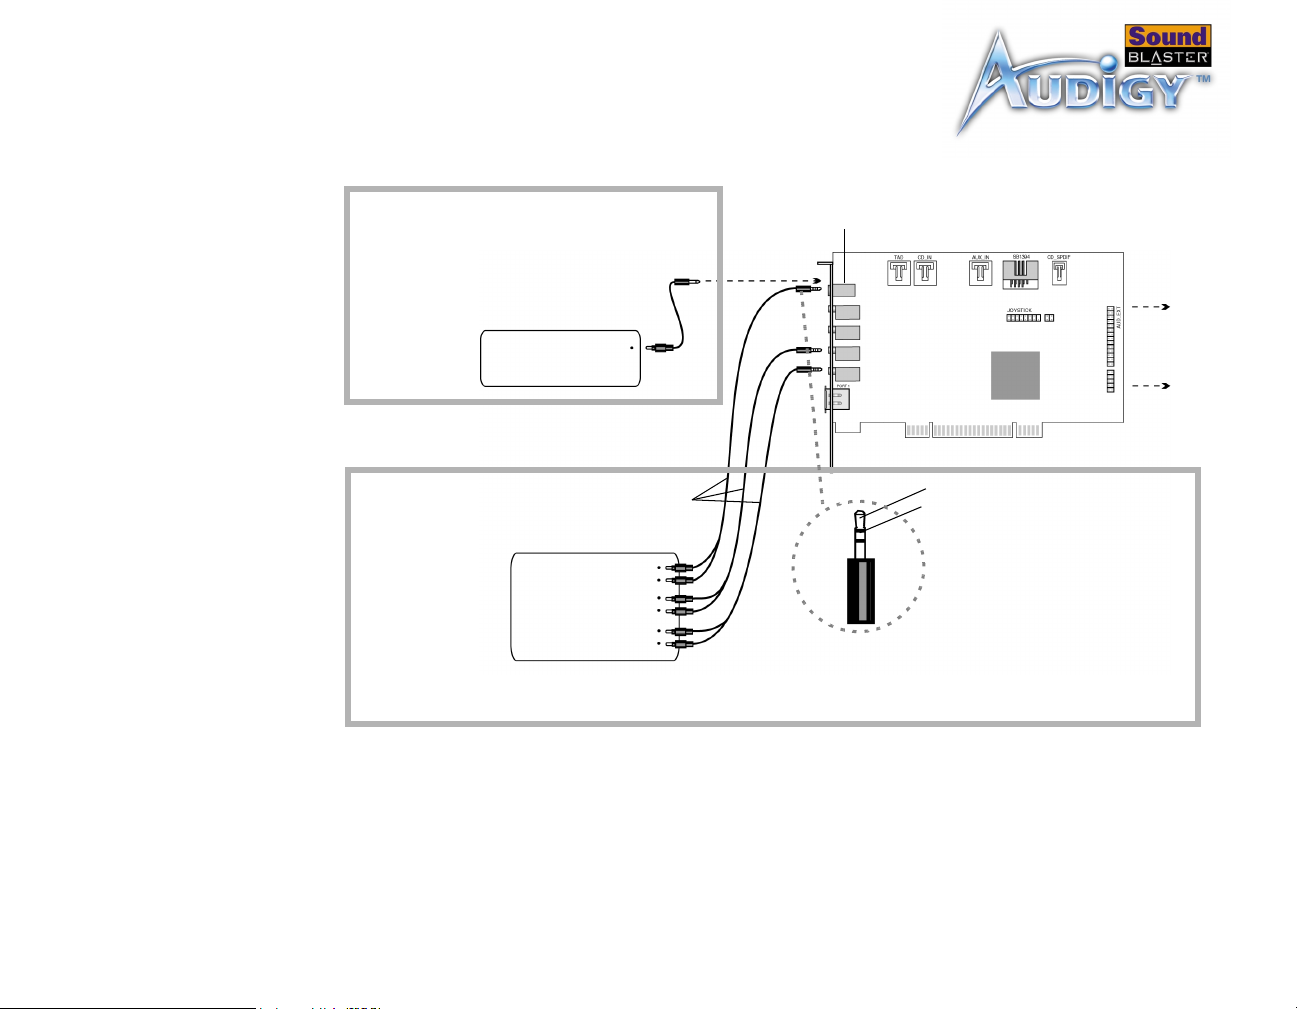
Connecting
Dolby Digital Decoder/Amplifier
Sound Blaster Audigy card
Connects to
the Audigy
Extension
card.
3.5mm(mono)to-RCA cable
Analog Front,
Rear and
Center/ Sub
Inputs
3 pairs of 3.5 mm
(stereo)-to-RCA
cable
Dolby Digital
(AC-3)
SPDIF In
Discrete 6-channel Amplifier
Additional information for advanced
users:
For connection to Center and
Subwoofer channels using a 3.5mm
(stereo)-to-RCA cable, connect the
white RCA jack to the Center input and
the red RCA jack to the Subwoofer
input of the amplifier.
Tip : Left / Center channel
Ring : Right / Subwoofer channel
Figure 2-11:Connecting external consumer electronic devices to the Sound Blaster Audigy card.
Rear Out
Line Out
Analog/Digital Out jack
External
Consumer
Devices
Installing Hardware 2-9
Page 33
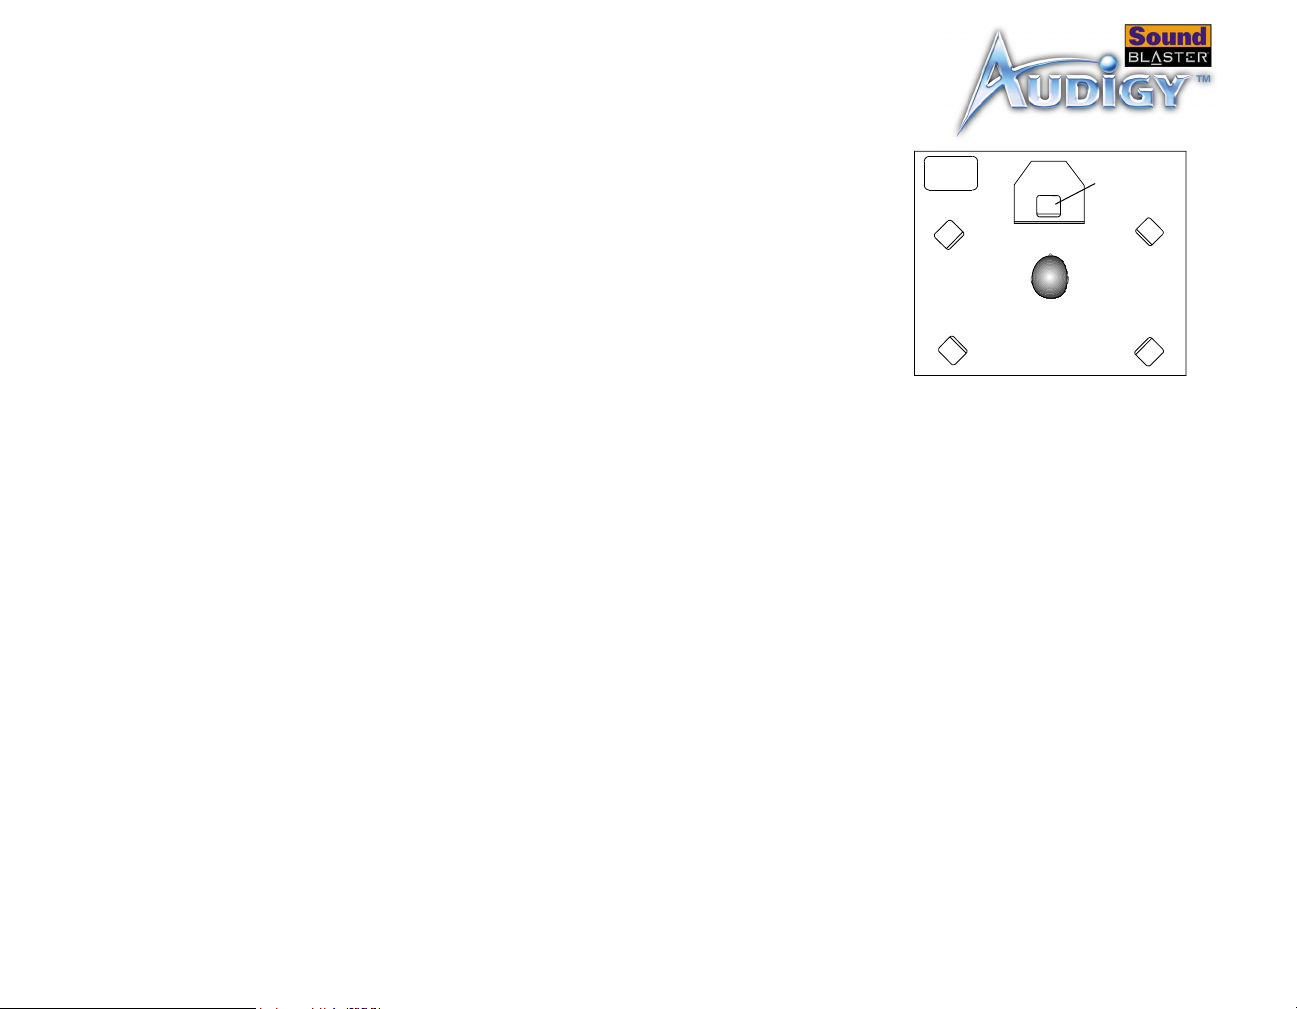
Positioning Your
Figure 2-12:Recommended speaker
positions.
Center Center
speaker
Front left
speaker
Front right
speaker
Rear left
speaker
Rear right
speaker
You
Subwoofer
Speakers
If you are using four speakers, place them so that
they form the corners of a square with you exactly
in the center (Figure 2-12) and that they are
angled toward you. Be sure that the computer
monitor is not blocking the path of your front
speakers. You may want to adjust the relative
positions of the speakers until you get the audio
experience you like best. If you have a subwoofer,
place the unit in a corner of the room for the best
bass experience.
Installing Hardware 2-10
Page 34
3
Installing Software
This chapter tells you how to install the Sound Blaster
Audigy Platinum eX software.
Page 35
Installing Software
Installing Drivers and Applications
During the installation
process, Windows 98 SE
users will be prompted to
insert the
Windows 98 SE installation
CD into the CD-ROM drive.
Insert the installation CD into
the CD-ROM drive and then
click the OK button.
Installing Ulead VideoStudio Application
You need to install device drivers and applications to use Sound Blaster Audigy
Platinum eX. To install these drivers and the bundled applications, use the following
instructions. The instructions are applicable to all supported Windows operating
systems.
1. After you have installed the Sound Blaster Audigy card, Audigy Extension card,
and external Audigy Drive, turn on your computer. Windows automatically detects
the audio card and device drivers.
2. When prompted for the audio drivers, click the Cancel button.
3. Insert the Sound Blaster Audigy installation CD into your CD-ROM drive.
The disc supports Windows AutoPlay mode and starts running automatically. If
not, you need to enable your CD-ROM drive’s auto-insert notification feature. For
more details, see “Problems Installing Software” on page C-1.
4. Follow the instructions on the screen to complete the installation.
5. When prompted, restart your system.
Refer to the section which applies to your Windows operating system.
Installing Software 3-1
Page 36
Windows 98 Second
Edition
In Windows 98 SE, Windows
Me and Windows 2000, to
verify that the driver was
installed successfully, click
Start -> Settings ->
Control Panel.
Double-click the System
icon. Click the Device
Manager tab and
double-click Sound, video
and game controllers. You
should see a list of Creative
devices.
1. Connect your digital video (DV) camcorder to the Sound Blaster Audigy card and
turn it on.
2. If prompted, insert the Windows 98 SE CD into the CD-ROM drive and click the
OK button.
3. If a Version Conflict message appears, click the Yes button to continue the
installation.
4. Insert the Ulead VideoStudio installation CD into your CD-ROM drive.
5. Follow the instructions on the screen to complete the setup.
6. If prompted, click the Yes button to let the setup program detect the MS DV
drivers.
7. If prompted to install the Windows 98/98 Second Edition Qxxxxxx Update,
click the Yes button.
8. When prompted, restart your system.
Windows Me
1. Connect your digital video (DV) camcorder to the Sound Blaster Audigy card and
turn it on.
2. If prompted, insert the Windows Me CD into the CD-ROM drive and click the OK
button.
3. Insert the Ulead VideoStudio installation CD into your CD-ROM drive.
4. Follow the instructions on the screen to complete the setup.
5. If prompted, click the Yes button to let the setup program detect the MS DV
drivers.
6. When prompted, restart your system.
Installing Software 3-2
Page 37

Windows 2000
1. Connect your digital video (DV) camcorder to the Sound Blaster Audigy card and
turn it on.
2. Insert the Ulead VideoStudio installation CD into your CD-ROM drive.
3. If prompted, click the
drivers.
4. When prompted, restart the system.
button to let the setup program detect the MS DV
Yes
Installing Software 3-3
Page 38

Uninstalling the Applications and Device Drivers
You may at times need to uninstall and then reinstall the applications to correct
problems, change configurations, or make version upgrades. The following
instructions tell you how to uninstall the applications in all Windows operating
systems.
1. Close all audio card applications. This includes Creative Taskbar. Applications that
are still running during the uninstallation will not be removed.
2. Click
3. Double-click the
4. Click the
Click the
5. When the
items you want to delete and click the
The selected applications will be uninstalled.
6. Click the OK button.
7. If prompted, restart your computer.
->
Start
Settings
Add/Remove Programs
Install/Uninstall
Add/Remove
Creative Uninstaller
->
Control Panel
tab and select
button.
dialog box appears, click the check boxes of the
.
icon.
Sound Blaster Audigy
button.
Next
.
Reinstalling the Device Drivers
You may at times need to reinstall only the device drivers because of driver
corruption.
1. Insert the Sound Blaster Audigy installation CD into the CD-ROM drive.
The disc supports Windows AutoPlay mode and starts running automatically. If
not, see “Problems Installing Software” on page C-1.
2. Follow the instructions on the screen until the
appears.
3. Click the
4. Follow the instructions on the screen to complete the installation of the device
drivers.
Drivers only
button.
Setup Options
dialog box
Installing Software 3-4
Page 39

Updating Windows 2000 (Service Pack 2)
Updating Windows 98 SE
Windows 2000 now provides better support for AC-3 SPDIF output (non-PCM
through waveOut) for software DVD viewing. Click the website address below to go
to Microsoft’s Windows 2000 web site to download the Windows 2000 Service Pack
2 to enjoy this support and to fix other issues in the Windows 2000 OS.
http://microsoft.com//windows2000/server/evaluation/news/bulletins/sp2.asp
AC-3 SPDIF output
1394 storage supplement
AC-3 SPDIF output (Non-PCM through waveOut) support is also available to
Windows 98 SE users. Click the address below to go to the Microsoft Product
Support Services, where you can request the update package (269601USA8.EXE).
http://www.microsoft.com/HWDEV/audio/Non-PCM.htm
A Safe Removal utility that allows you to safely stop a plug-and-play storage device
before disconnecting the device, and to provide an update for 1394 drivers related
to surprise removal of peripheral device is available form the web site below. If you
disconnect a 1394 storage device from your computer immediately after it is
disabled, you may do some damage to it.
With these storage device drivers, expect large performance improvements of
nearly 300%, as well as protect your investment.
www.microsoft.com/windows98/downloads/contents/WURecommended/
S_WUFeatured/1394/Default.asp
Installing Software 3-5
Page 40

Installing Digital Video Update
If you have installed DirectX 8.0 or 8.0a run time, install the latest update for this
application. This update provides 1394 Digital Video equipment users PAL support
and improved device support. This is applicable for Windows 98 SE and Windows
2000 users. This update provides minor improvement to the Windows Me OS. To do
this, go to the web site below.
www.microsoft.com/downloads/release.asp?ReleaseID=28377
Installing Software 3-6
Page 41
4
Sound Blaster Audigy Applications
This chapter tells you how to get the most out of your Sound Blaster
Audigy.
Page 42
Sound Blaster Audigy Applications
Creative Sound Blaster Audigy Applications
Sound Blaster Audigy is supported by a full range of applications to help you get
the most from your audio card. The following software is most important to the
operation of your audio card:
❑
Creative Taskbar
❑
Creative Sound Blaster Audigy Online Quick Start
❑
Creative Sound Blaster Audigy Experience
❑
EAX ADVANCED HD Gold Mine Experience
❑
Creative Diagnostics
❑
Creative Surround Mixer
❑
Creative AudioHQ
❑
Creative Wave Studio
❑
Creative PlayCenter
❑
Creative Recorder
❑
Creative Oozic Reactor
❑
Vienna SoundFont Studio
❑
Creative MiniDisc Center
❑
Creative RemoteCenter
❑
SoundFont Showcase
❑
Creative Restore Defaults
Sound Blaster Audigy Applications 4-1
Page 43
Third Party Sound Blaster Audigy Applications
The applications included with
Sound Blaster Audigy differ
from the ones described here.
Sound Blaster Audigy can best be appreciated through some of the advanced
software that makes maximum use of the audio card’s features. To assist you in
exploring the limitless potential of Sound Blaster Audigy, Creative has included an
assortment of applications and games:
❑
Steinberg’s Audio Applications — MIDI sequencer and digital audio tools
❑
MixMeister — digital music/DJ tool
❑
Ulead VideoStudio Version 4.0 SE Basic — video editing application
❑
FireNet — IEEE 1394 network connectivity application
❑
Latest EAX ADVANCED HD Games
Creative Taskbar
Creative Taskbar is an application that allows you to perform tasks with your audio
card easily and quickly. Just select a task and everything is done for you — the
necessary applications are started and your mixer and effects settings are
configured automatically.
Creative Taskbar also comes with Creative TaskGuide, which provides tips and
useful links related to the selected task.
For more information and usage details on Creative Taskbar, refer to its online
Help.
Sound Blaster Audigy Applications 4-2
Page 44

Creative Sound Blaster Audigy Online Quick Start
This is a good starting point from which you can learn about Sound Blaster Audigy.
The online Quick Start consists of several interactive and informative demos that
feature different aspects of Sound Blaster Audigy, like experiencing digital music and
digital gaming, watching movies, connecting speakers and performing tasks.
Creative Sound Blaster Audigy Experience
EAX ADVANCED HD Gold Mine Experience
Creative Diagnostics
Use the Creative Sound Blaster Audigy Experience to
awesome gaming, music listening and home studio capabilities. You will experience
the advantage of multi-environment audio processing, dynamic EAX ADVANCED HD
effects, high-quality surround output and EAX-enhanced home theater quality
audio.
Note:
Run this demonstration, which is set in a gold mine, and experience EAX
ADVANCED HD technologies such as Environment Panning, Environment Reflection
and Environment Morphing. Compare the scenes with and without EAX ADVANCED
HD, and understand why more game developers are using EAX ADVANCED HD
technologies for the best gaming experience.
Use Creative Diagnostics to quickly test your audio card’s Wave, MIDI or CD Audio
playback capability, recording function and speaker output. For more information
and usage details on Creative Diagnostics, refer to its online Help.
This application does not work in Windows NT 4.0.
feel
Sound Blaster Audigy’s
Sound Blaster Audigy Applications 4-3
Page 45
Creative Surround Mixer
Creative Surround Mixer is the main application to use for the following tasks:
❑
Tes t i ng s p eake r s
❑
Applying EAX-enabled audio effects
❑
Mixing sounds from various audio input sources
❑
Setting audio effects
To restore Surround Mixer to its
original settings, click
Programs
Sound Blaster Audigy
Creative Restore Defaults
->
Creative
Start
->
->
->
.
Creative AudioHQ
Surround Mixer has two modes. Click the
to switch between the two modes:
In basic mode, the Mixer panel is displayed. You can:
❑
mix sounds from various audio input sources when playing or recording
❑
control volume, bass, treble, balance and fade
In advanced mode, the Surround Mixer and Mixer panels are displayed. In Surround
Mixer, you can:
❑
select audio effects
❑
specify the speaker output
❑
perform a speaker test
For more information and usage details on Creative Surround Mixer, refer to its
online Help.
AudioHQ is Creative's audio software control center.
The AudioHQ interface has the standard look and feel of the Windows Control
Panel. It contains several control applets that allow you to view, audition or set up
the audio properties of one or more audio devices on your computer.
As in Control Panel, you can view AudioHQ's control applets in the main window as
large icons, small icons, list items or detailed list items. You can also select all or
invert the selection when you are in the Applet view. The number of items in the
main window, however, varies with the control applet or device selected. The By
Audio Device view shows only the control applets supported by the selected device.
Basic Mode
or
Advanced Mode
Sound Blaster Audigy Applications 4-4
button
Page 46

The Applet view shows only the audio devices that support the selected applet.
For more information and usage details on Creative AudioHQ, refer to its online Help.
SoundFont Control
Device Controls
Creative Keyboard
MIDI Input
SoundFont Control allows you to configure MIDI banks with SoundFont, DLS and
Wave files and instruments, as well as set the caching algorithm and space.
For more information and usage details on SoundFont Control, refer to its online
Help.
Device Controls lets you configure devices to allow multiple simultaneous Wave
playback. For example, you can play five Wave tracks at the same time. Device
Controls also allows you to enable the SPDIF Bypass feature for your digital inputs
and outputs, and mute your speakers when you plug your headphones into Audigy
Drive.
For more information and usage details on Device Controls, refer to its online Help.
Creative Keyboard is a virtual keyboard that allows you to audition or play musical
notes produced through MIDI devices. To edit the sound, use Vienna SoundFont
Studio or another sound editor.
You can use external MIDI input devices to audition your MIDI banks and
instruments. First, connect a MIDI input device to your audio card and then select
that device in Creative Keyboard.
Sound Blaster Audigy Applications 4-5
Page 47

EAX Control
EAX Control allows you to configure the Sound Blaster Audigy chip's effects engine.
It allows you to specify to a low level the components that make up the audio
elements that in turn make up an audio effect.
It promises to deliver sounds that are so life-like, you can almost see them! It is the
computer industry's first system to recreate and deliver real-world, interactive audio
experiences in games, music, and other audio applications. These audio effects take
your computer beyond home-theater quality, immersing you in sound so vivid your
imagination can almost "see it". The effects go beyond today's surround-sound and
3D positional audio and actually model an environment by taking into account room
size, acoustic properties, reverb, echo and many other effects that create a realworld experience.
For more information and usage details on EAX Control, refer to its online Help.
Creative WaveStudio
Creative WaveStudio allows you to perform the following sound editing functions
easily:
❑
Play, edit, and record 8-bit (tape quality) and 16-bit (CD quality) wave data
❑
Enhance wave data or create unique sounds with various special effects and
editing operations such as reverse, echo, mute, pan, cut, copy, and paste
❑
Open and edit several audio files at the same time
❑
Open Raw (.RAW) and MP3 (.MP3) data files
❑
For more information and usage details on Creative WaveStudio, refer to its
online Help.
Sound Blaster Audigy Applications 4-6
Page 48

Creative PlayCenter
Creative PlayCenter is a revolutionary audio CD and digital audio (such as MP3 or
WMA) player. Besides managing your favorite digital audio files on your computer,
it is also an integrated MP3/WMA encoder for ripping audio CD tracks into
compressed digital audio files. It can encode tracks many times faster than normal
play speed and up to 320 kbps (for MP3).
Note:
.
Help
For more information and usage details on Creative PlayCenter, refer to its
online
Creative Recorder
Creative Oozic Reactor
Recorder allows you to record sounds or music from various input sources like the
microphone or Audio CD, and save them as Wave (.WAV) files. For more
information and usage details on Creative Recorder, refer to its online Help.
Creative Oozic Reactor gives your music visual expression that enhances the
emotional depth of your music experience.
With Oozic Reactor, you can enjoy hypnotic visuals with your CD, WMA or MP3
music mixes. Just connect your computer to your TV and let the beat control the
evolution of trance-like psychedelic images. You can also trigger stunning
cinematic, lens and camera effects, and explore exciting 3D objects in full detail.
The multiple camera mode allows you to mutate and distort the music video to
create surreal visuals, zoom in or out, and randomly switch to different camera
positions.
You can restore life to your digital images or photos by using Oozic Reactor to
generate 3D slideshows that can be shared with friends via e-mail. You can also
use the photos to personalize your very own screensaver.
Explore the various animation scenarios provided by Oozic or create your own
environments and scenarios for your animation. For more information and usage
details on Creative Oozic Reactor, refer to its online Help.
Sound Blaster Audigy Applications 4-7
Page 49

Vienna SoundFont Studio
If you are new to desktop music, Vienna SoundFont Studio is just what you need to
produce your first masterpiece. This is a professional sampler that allows you to
create sounds (saved as SoundFont banks), and edit them in any way you wish! If
you are already familiar with Vienna SoundFont Studio, you will be glad to know that
this latest version (Version 2.3) makes creating SoundFont banks easier than ever.
Now, you can
❑
Double-click a sample and the assigned Wave editor will automatically be started.
❑
Assign up to four MIDI controller bars to send real time controller messages to
your MIDI synthesizer.
If you are a beginner, start by plugging a microphone into your Sound Blaster Audigy
card, and sampling your voice. Vienna SoundFont Studio will help you to create an
instrument and place the sample to allow you to pitch-shift your voice up and down
the keyboard. Next, you can try to apply an articulation effect like Filter, to change
your voice. Once you discover the power of SoundFont technology, you will be
amazed at the sound design possibilities available.
For more information and usage details on Vienna SoundFont Studio, refer to its
online Help.
Creative MiniDisc Center
Creative MiniDisc Center allows you to play back known audio format or compact
discs for recording to digital recorders such as DAT players, especially for MiniDisc
(MD) recorders.
With MiniDisc Center, you can:
❑
create an album of your favorite songs, each of which may be in a different audio
format
❑
insert a preset period of silence automatically between each track
❑
play back your personal album and record it to your MD recorder
❑
For more information and usage details on Creative MiniDisc Center, refer to its
online Help.
Sound Blaster Audigy Applications 4-8
Page 50

Creative RemoteCenter
Creative RemoteCenter converts your computer into an entertainment system,
which you can control from the comfort of your bed or sofa. With the remote
control and RemoteCenter Player, a simple but powerful multimedia player, you can
play audio and video CDs on your computer from a distance. You no longer need to
be directly in front of your computer to select or change tracks because the remote
center system comes with On-Screen Display (OSD), which makes the commands
or functions available, viewable from a distance of 4 meters. RemoteCenter also
allows you to start and control your favorite Windows applications.
For more information on Creative RemoteCenter, refer to its online Help.
SoundFont Showcase
Creative Restore Defaults
SoundFont Showcase contains a wide and comprehensive range of downloadable
SoundFont demos from companies like Sonic Implants and Voice Crystal. You can
also learn how to create and manage your own SoundFont banks in here.
For more information and usage details on SoundFont Showcase, refer to its online
Help.
Creative Restore Defaults allows you to restore all your audio settings to the
default settings.
Sound Blaster Audigy Applications 4-9
Page 51

Steinberg’s Audio Applications
Cubasis VST (for Creative)
WaveLab Lite
ReCycle Lite
Cubasis VST is an application that transforms your PC into a complete recording
studio for audio and MIDI recording. You can record from MIDI instruments or from
any audio source such as a microphone or an electric guitar. It allows you to do
multi-track recording and play back up to 16 audio channels and 64 MIDI tracks.
After recording, you can use the simple tools available to edit and mix recordings
for your own compositions. You can also apply real-time audio effects to your
recordings and print out professional quality scores complete with automatic
layout.
If you just want to do some fast and simple recording or editing, then WaveLab Lite
is the application for you. Although simple and small, WaveLab Lite packs a punch
with its features. It is capable of sample rate conversion, stereo editing through
drag-and-drop operation, mono and stereo conversion, and simple wave processing
such as phase inversion, normalization and more.
ReCycle Lite is an audio processing tool to help you get the right tempo for your
drum loops and grooves. ReCycle Lite can analyze your drum loop, slice it, create
the necessary audio elements and export it to another format such as SoundFont.
Sound Blaster Audigy Applications 4-10
Page 52

MixMeister
If you like parties and MP3s, then you will definitely love MixMeister, a
revolutionary software that creates “killer mixes” of MP3 music files. With just a
few clicks, you can easily mix your music, just like a radio DJ, and produce results
that you will be amazed with. MixMeister automatically determines when to fade
between songs and shows you how the music fits together in the mix, without you
having to worry about details. Now you can produce the ultimate DJ mix for
parties, web casts and CD-Recordables.
Ulead VideoStudio Version 4.0 SE Basic
FireNet
The fastest way to create great videos, Ulead VideoStudio 4.0 SE Basic takes full
advantage of the most advanced digital video technology to put digital video
excitement within the reach of anyone with a digital video camcorder and a
computer.
Firenet is an Ethernet emulator that supports all standard Ethernet protocols,
including IPX/SPX, NetBEUI and TCP/IP. It provides high network speed at low cost,
supports broadband and is easy to use. FireNet is able to coexist with existing
Ethernet infrastructures and is capable of transferring vast amount of data, up to 4
times the equivalent of a 100 Mbps Ethernet network.
Sound Blaster Audigy Applications 4-11
Page 53
5
Using Applications
This chapter tells you which applications to use for content
creation, gaming and entertainment purposes.
Page 54
Using Applications
Sound Blaster Audigy offers you high-quality multimedia playback, digital
entertainment, content creation capability, Internet entertainment and gaming.
The following pages tell you which applications would best suit your needs.
Multimedia Playback
Watching DVDs
Some software DVD
decoders/players cannot
decode up to 5.1 channels,
but can support SPDIF
output. In such cases,
enable the SPDIF output
function to allow Sound
Blaster Audigy to decode the
Dolby Digital signal.
Playing MP3 or WMA files
If you have an external Dolby Digital (AC-3) decoder, you can enjoy Dolby Digital
audio content from your DVD movies.
However, if you do not have an external Dolby Digital (AC-3) decoder, you must
first have a DVD-compatible drive and a set of speakers that supports up to six
channels such as Creative Inspire 5.1 Analog Speakers. Next, you must have a
software DVD player capable of sending a compressed AC-3 SPDIF signal to your
Sound Blaster Audigy card for decoding, such as InterVideo WinDVD 2000 or
Cyberlink PowerDVD 3.0.
In Creative Surround Mixer, enable the Dolby Digital (AC-3) Decode feature. For
more information, refer to the Creative Surround Mixer online Help.
In your software DVD decoder/player, enable the SPDIF output or a similar
function.
Creative PlayCenter supports and plays MP3 and WMA files.
Using Applications 5-1
Page 55

Playing back Wave and CD Audio files
Use Creative PlayCenter to play back both Wave and CD Audio files. WAV is the
format for digital audio files on the Windows operating platform. CD Audio refers to
audio compact discs that can be played on your CD-ROM drive.
Playing MIDI files
Creating nonGeneral-MIDIcompliant files
Digital Entertainment
Watching surround movies
Compiling personal albums
MIDI (*.MID) is a music format that uses an internal synthesizer for playback. Use
Creative PlayCenter or the MIDI sequencer in the Sound Blaster Audigy Installation
CD for playing MIDI files. To achieve the best quality, load the 8MB GM bank in the
SoundFont applet found in the AudioHQ group.
Many musicians have created music files that use exotic or non-regular instrument
(non General MIDI compliant) using Vienna Soundfont Studio. These instruments
are stored in SoundFont banks. Such MIDI files can be played back using Creative
PlayCenter. The Sound Blaster Audigy Installation CD contains many MIDI demos
that use high quality SoundFont banks.
If you want to enjoy high quality movie entertainment, ensure you have good
speakers. If you have a 4- or 5-speaker system connected to your Sound Blaster
Audigy, configure your speaker setup in Creative Surround Mixer. For DVD movies,
it is recommended that you purchase Creative PC-DVD Encore, a digital home
entertainment system, as well as Creative Inspire 5.1 Digital Speakers.
You can compile albums containing CD Audio, WAV or MIDI files using Creative
PlayCenter.
Using Applications 5-2
Page 56

Content Creation
Organizing SoundFont banks
Applying voice effects
Recording sound and effects
Capturing and editing videos
Sound Blaster Audigy bundles many SoundFont banks that contain instrument
sounds you can use. Use Vienna SoundFont Studio to organize and customize the
instruments.
When singing and recording you own songs, you can enhance your voice, or even
add special effects. You can do this with EAX Control, which can be accessed from
Creative Surround Mixer.
Creative Recorder is an easy way of recording any audio source without worrying
about mixer settings. You can also record any audio effects.
Ulead VideoStudio is the fastest way to create great videos. Ulead VideoStudio
allows you to capture and edit your videos, then output them to popular formats
like AVI, QT, MOV or MPEG.
Using Applications 5-3
Page 57

Advanced Content Creation
Recording multitracks with ASIO
Creating music
Recording and transcribing music
Recording and editing musical instruments
You can create a home music studio using Cubasis VST. It lets you put together
your own productions consisting of multiple music tracks from a MIDI Synthesizer
(internal or external), your guitar or external musical instrument (Line-In), a digital
device (SPDIF), or a microphone. ASIO support allows you to create all these with
amazingly low latency (solving multi-track sync up issues).
You can create desktop music on your Sound Blaster Audigy using Cubasis VST.
Hook up a MIDI controller keyboard to the MIDI/Joystick port and you instantly
have a high quality (up to 8 MB GM) synthesizer with this software. The sequencing
software provided also lets you compose your own music compositions and
arrangements.
Using Cubasis VST, you can record your own music and do musical notation
transcriptions. You can even print your own music score.
You can record any sound effects or sample loops and then use them as a MIDI
instrument — all using Vienna SoundFont Studio. You can also edit existing
SoundFont banks.
Using Applications 5-4
Page 58

Recording digital audio
You can do digital recording and editing (16-bit, 48 kHz) on your computer with
Sound Blaster Audigy using Creative Wave Studio and WaveLab Lite. Connect any
SPDIF compatible device such as a DAT deck and select CD Digital in Creative
Surround Mixer.
Creating multiple effects
Creating and playing back SoundFonts
Internet Entertainment
Experiencing music with visual entertainment
Encoding CD songs to MP3 format
Sound Blaster Audigy comes with a variety of effects that are programmable. You
can literally create thousands of reverb and other special effects in EAX Control,
which can be accessed from Creative Surround Mixer.
With Creative's SoundFont technology, you have limitless sound creation
possibilities for use with your own music. Create your own SoundFont banks in
Vienna SF Studio or use ReCycle Lite to convert drum loops to Soundfont banks,
and then use them in your bundled MIDI sequencer.
With Creative Oozic Reactor, your MP3 songs can now be associated with a
customized “music video” (called MV3) containing high quality 3D animation, giving
dynamic visual expression to your songs. Distribute the music video over the
Internet and watch the animation dance to the beat of your music!
To enjoy the Oozic experience, you will also need a 3D accelerated graphics card.
With Creative PlayCenter, you can encode and record all your favorite CD songs into
your computer’s hard drive, so that you have a database of customized song lists.
Using Applications 5-5
Page 59

Downloading and playing MP3 songs
With Creative PlayCenter, you can add current songs to your database by
downloading them from various sites on the Internet.
Playing MP3 songs with EAX
Mixing MP3 songs
Gaming Reference
Enjoying EAX support
Enjoying DirectSound3D support
Enjoying A3D 1.0 support
Use Creative PlayCenter to create MP3 renditions with multi-dimensional and multitextured realism by adding environments such as “concert hall” or “bathroom”! You
can share these enhanced MP3 songs, even with someone who does not own a
Sound Blaster Audigy card.
Download MP3 songs and then use MixMeister to create party mixes like a DJ.
MixMeister takes care of the details while you dance all night, and allows you to
fine-tune your mixes whenever you want.
Enjoy the many EAX titles designed by top game developers, which immerse you in
realistic environments. Visit http://www.eax.creative.com for a full list of
compatible titles.
DirectSound3D (DS3D) games are supported on your Sound Blaster Audigy. You
can hear sounds positioned in 3D space that enhance your game experience.
Your card translates A3D calls into DirectSound3D, meaning that you can enjoy
A3D games.
Using Applications 5-6
Page 60

Enjoying DOS games
Your card provides you with exceptional Sound Blaster compatibility so that you
can continue to play the thousands of popular DOS games already in the market.
For more information and usage details, see “SB Emulation in MS-DOS/Windows 98”
on page B-1.
Enjoying audio presets in games
Customizing environments for non-3D games
You can enjoy audio effects even if your game does not have EAX3 support. Your
card is bundled with a good selection of presets for use with games. These can be
accessed through Creative Taskbar.
You can create customized environments for your non-EAX games using the EAX
Control panel, which can be accessed from Creative Surround Mixer.
Using Applications 5-7
Page 61
A
General Specifications
This section displays the specifications of your
Sound Blaster Audigy card, Audigy Extension card and
external Audigy Drive.
Page 62
General Specifications
This section lists the specifications of your Sound Blaster Audigy card, Audigy
extension card and external Audigy Drive.
Features
❑
PCI Bus Mastering
Audigy Processor
High Quality Audio Path
PCI Specification Version 2.1 compliant
❑
Bus mastering reduces latency and speeds up system performance
❑
Advanced hardware accelerated digital effects processing
❑
32-bit digital processing, which maintains a 192 dB dynamic range
❑
Patented 8-point interpolation that reduces distortion to inaudible levels
❑
64-voice hardware wavetable synthesizer
❑
Professional quality digital mixing and equalization
❑
Unlimited size of SoundFont bank can be mapped to host memory (limited by
available system memory)
❑
Mixes analog sources such as CD Audio, Line in, Auxiliary, TAD and PC speaker,
Microphone in via AC’97 Codec with internal digital sources
❑
32-bit mixing of all digital sources within Audigy’s Digital Mixer
❑
Playback of 64 audio channels, each at an arbitrary sample rate
❑
24-bit Analog-to-Digital conversion of analog inputs at 48 kHz sample rate
❑
24-bit Digital-to-Analog conversion of digital sources at 48 kHz to analog 5.1
speaker output
❑
16-bit recording sampling rates: 8, 11.025, 16, 22.05, 24, 32, 44.1 and 48 kHz
General Specifications A-1
Page 63

Professional Digital Audio Processing
Flexible Mixer Control
❑
Supports Sony/Philips Digital Interface (SPDIF) format input signal of up to 24bit/96 kHz quality
❑
SPDIF output up to 24-bit resolution at selectable sampling rate of 44.1, 48 or 96
kHz
SPDIF output not available during playback of protected digital audio contents
Note:
authored with Microsoft DRM (Digital Rights Management) technology
❑
Selectable 6-channel SPDIF output to external amplifier/digital speaker systems
❑
Software switching of SPDIF Input-to-Output (bypass) to minimize cable
connection hassle
❑
Low latency multitrack recording with ASIO support
❑
Software playback control of CD Audio, Line In, Auxiliary, TAD, PC speaker,
Microphone In, Wave/DirectSound device, MIDI device, CD Digital (CD SPDIF),
Line In 2, Microphone In 2, Auxiliary 2 and SPDIF In
❑
Software recording control of Analog Mix (sum of CD Audio, Line In, Auxiliary,
TAD, PC speaker) Microphone In, Wave/DirectSound device, MIDI device, CD
Digital (CD SPDIF), Line In 2, Microphone In 2, Auxiliary 2 and SPDIF In
❑
Selectable input source or mixing of various audio sources for recording
❑
Adjustable master volume control
❑
Separate bass and treble control
❑
Front and rear balance control
❑
Muting and panning control for mixer sources
General Specifications A-2
Page 64

Dolby Digital (AC-3) Decoding
Creative Multi Speaker
Surround
TM
(CMSSTM)
SB1394TM Compatibility
❑
Decodes Dolby Digital (AC-3) to 5.1 channels or pass-through compressed Dolby
Digital (AC-3) PCM SPDIF stream to external decoder
❑
Bass redirection: enhances bass output to subwoofer for small satellite speaker
systems
❑
Crossover bass frequency (10-200 Hz): adjustable to standalone subwoofer units
for desired bass level
❑
Adjustable Center and LFE level control
❑
Multispeaker technology
❑
Upmixes mono or stereo sources to 5.1 channels
❑
Professional-quality panning and mixing algorithm
❑
Compliant to IEEE 1394a specification
❑
Supports data rates of 100, 200, and 400 Mbps
❑
Supports up to 63 IEEE 1394 compatible devices in a daisy-chain configuration
General Specifications A-3
Page 65

Connectivity
Sound Blaster Audigy card
Audio Inputs
Audio Outputs
❑
One line-level analog Line input via stereo jack on rear bracket
❑
One mono Microphone analog input via stereo jack on rear bracket
❑
CD_IN line-level analog input via 4-pin Molex connector on card
❑
AUX_IN line-level analog input via 4-pin Molex connector on card
❑
TAD line-level analog input via 4-pin Molex connector on card
❑
CD_SPDIF digital input via 2-pin Molex connector on card
❑
ANALOG/DIGITAL OUT via 4-pole 3.5 mm minijack on rear bracket
• ANALOG OUT: Center and Subwoofer channels
• DIGITAL OUT: Front, Rear, Center and Subwoofer SPDIF digital outputs
❑
Two line-level analog outputs via stereo jacks on rear bracket, Front and Rear
Line-Outs 1 and 2
❑
Stereo headphone (32-ohm load) support on Front Line-Out
General Specifications A-4
Page 66
SB1394 Interfaces
The 6-pin SB1394
connector/port has a 2 watt
maximum power output.
Connect only one high power
usage device such as the
IEEE 1394 hard disk and CDRW drive to this port unless
it is self-powered.
Interfaces
❑
One 2 x 5 pin Internal SB1394 connector on card for connection to the Audigy
Extension card
❑
One 6-pin SB1394 connector/port on rear bracket
❑
VOL_CTRL 1 x 4 pin header
❑
PC_SPK (PC speaker) 1 x 2 pin header
❑
AUD_EXT 2 x 20 pin header for connection to the Audigy Extension card
❑
JOYSTICK 2 x 8 pin header for connection to the Audigy Extension card
Audigy Extension card
❑
AUD_EXT/Joystick 2 x 32 pin header for connection to the Sound Blaster Audigy
card
❑
One 2 x 5 pin Internal SB1394 connector for connection to the Sound Blaster
Audigy card
❑
One 6-pin SB1394 connector/port on rear bracket for connection to the external
Audigy Drive
❑
One 44-pin DB connector for connection to the external Audigy Drive
❑
One 15-pin DB Joystick/MIDI connector attached to the Audigy Extension cable
General Specifications A-5
Page 67

External Audigy Drive
Inputs and outputs on front panel
Inputs and outputs on rear panel
❑
Two RCA jacks for coaxial SPDIF input and output
❑
One headphone output with auto detection via ¼” stereo jack with volume control
❑
One shared line-level analog Line/Microphone input (Line-In 2/Mic-In 2) via ¼”
stereo jack. Shared input selectable via knob. Gain/level control for microphone
❑
Two RCA jacks with left and right channel stereo Auxiliary input
❑
Two optical connectors for optical SPDIF input and output
❑
Two mini MIDI DIN (female) connectors for separate MIDI input and output
❑
One SB1394 connector for 1394 input and output
❑
One infrared receiver for receiving information from the remote control
(transmission range within 4 meters with 15° deviation from the center axes)
❑
One 6-pin SB1394 connector/port (SB1394_EXT) for connection to the Audigy
Extension cable
❑
One 44-pin DB connector for connection to the Audigy Extension cable
General Specifications A-6
Page 68
B
SB Emulation in MS-DOS/
Windows 98 Second Edition
This section tells you how to use your Sound Blaster Audigy
card to play MS-DOS games.
Page 69
SB Emulation in MS-DOS/Windows 98 Second Edition
Background
Installing MSDOS Drivers
Opening MSDOS
Legacy games in the market were designed for use in MS-DOS mode and they
require MS-DOS drivers in order to run. However, MS-DOS drivers are not installed
together with other Sound Blaster Audigy devices and applications. If you want to
to install these drives and play MS-DOS games, read this chapter. Sound Blaster
Audigy supports MS-DOS games.
To install MS-DOS drivers, do the following:
1. Insert the Sound Blaster Audigy installation CD into your CD-ROM drive.
2. Click
3. In the
represents your CD-ROM drive and Language represents the file’s language).
4. Follow the instructions on the screen to complete the installation.
There are two ways to play MS-DOS games:
❑ From the MS-DOS box in Windows 98 Second Edition
Click
❑ In MS-DOS mode
There may be times when you do not want to or cannot run a game from the MSDOS box. The legacy game may be incompatible with Windows 98 SE, or there
are insufficient system resources to play the game with Windows 98 SE loaded.
In such cases, use MS-DOS mode.
To restart the system in MS-DOS mode when you are already in Windows 98 SE:
->
Start
Run
Start
Run
dialog box, click
->
.
Programs
D:\DOSDRV\LANGUAGE\SETUP.EXE
->
MS-DOS Prompt
.
(where D:
1. Click
Start
->
Shut Down
.
SB Emulation in MS-DOS/Windows 98 Second Edition B-1
Page 70

2. Click the
button.
OK
To start the system in MS-DOS mode at system startup:
1. At startup, as Windows 98 SE is loading, press and hold the F8 key.
2. At the startup menu, choose the
press <Enter>.
Restart the computer in MS-DOS mode
Command Prompt Only
option, and then click the
option, and then
Understanding the Installation Program
AUTOEXEC.BAT File Settings
When you install the MS-DOS drivers, the AUTOEXEC.BAT and CONFIG.SYS files in
your system are changed.
The installation program adds the following statements to the AUTOEXEC.BAT file:
SET CTSYN=C:\WINDOWS
SET BLASTER=A220 I5 D1 H5 P330 T6
C:\PROGRA~1\CREATIVE\DOSDRV\SBEINIT.COM
The first two statements set up the environment variables for your audio card. For
an explanation of the variables, see “Environment Variables” on page B-5.
The third statement runs SBEINIT.COM, which is the Sound Blaster Audigy MS-DOS
driver. It is required for the Sound Blaster Audigy card to function properly in MSDOS mode.
SBEINIT.COM requires the HIMEM.SYS and EMM386.EXE files to be loaded. If
needed, the installation program adds the necessary HIMEM.SYS and EMM386.EXE
lines to your CONFIG.SYS file, creating the file if it is not present.
On the rare occasion a program does not work with expanded memory, simply add
the NOEMS parameter to your memory manager. For example:
SB Emulation in MS-DOS/Windows 98 Second Edition B-2
Page 71
DEVICE=C:\WINDOWS\EMM386.EXE NOEMS
You may load this driver into high memory in the AUTOEXEC.BAT file, even though
the default is not. For example:
LOADHIGH=C:\PROGRA~1\CREATIVE\DOSDRV\SBEINIT.COM
Do not remove the memory manager altogether. Do not attempt to load
SBEINIT.COM into high memory when using the NOEMS option if SBEINIT.COM fails
to run SBELOAD.EXE or SBECFG.EXE. In the rare case that an MS-DOS game will
not work with a memory manager, you will not be able to use the Sound Blaster
Audigy card with the game.
CONFIG.SYS File Settings
System Resource Settings
In the following tables, the
preferred values are in bold.
The installation program adds the following statements to the CONFIG.SYS file:
DEVICE=C:\WINDOWS\HIMEM.SYS
DEVICE=C:\WINDOWS\EMM386.EXE
This section explains the following software SB emulation resources—not hardware
resources—of your card:
❑
Input/Output (I/O) Addresses
❑
Interrupt Request (IRQ) Line
❑
Direct Memory Access (DMA) Channel
If your card encounters a conflict with a peripheral device, you may need to change
its resource settings. For details, see “Resolving I/O Conflicts” on page C-8.
When any resource setting is changed, make sure that the environment variables
(see “Environment Variables” on page B-5) reflect the changes as well. You can view
your system environment by typing
at the DOS prompt.
SET
SB Emulation in MS-DOS/Windows 98 B-3
Page 72
Input/Output (I/O) Addresses
I/O addresses are communication areas used by your computer’s central processor
to distinguish among various peripheral devices connected to your system when
sending or receiving data.
Table B-1:Possible default input/output (I/O) addresses.
Device Default I/O Address
Range
Interrupt Request (IRQ) Line
SB interface
MPU-401 UART MIDI
interface
Stereo music synthesizer 388H to 38BH
An IRQ line is a signal line that a device uses to notify your computer’s central
processor that it wants to send or receive data for processing.
Table B-2:Possible default interrupt request (IRQ) line assignment.
Device Default IRQ Line
SB interface5, 7, 9, 10
220H to 22FH
240H to 24FH
260H to 26FH
280H to 28FH
300H to 301H
310H to 311H
320H to 321H
330H to 331H
SB Emulation in MS-DOS/Windows 98 B-4
Page 73
Direct Memory Access (DMA) Channel
A DMA channel is a data channel that a device uses to transfer data directly to and
from the system memory.
Table B-3:Possible default direct memory access (DMA) channel assignment.
Usage Default DMA Channel
First DMA channel 0, 1, 3
Second DMA channel5, 6, 7
Environment Variables
CTSYN Environment Variable
BLASTER Environment Variable
Environment variables are used to pass hardware configuration information to the
software in your system. For MS-DOS, your audio card includes the following:
❑
CTSYN Environment Variable
❑
BLASTER Environment Variable
The CTSYN environment variable points to the location of the CTSYN.INI file, which
usually resides in the Windows directory. The syntax for this variable is as follows:
CTSYN=path
where “path” is the location of the CTSYN.INI file.
The BLASTER environment specifies the base I/O address, IRQ line, and DMA
channels of the SB interface. Its syntax is:
BLASTER=A220 I5 D1 H5 P330 T6
The parameters in the command are as follows:
This
Parameter Specifies
xxx
A
x
I
SB interface’s base I/O address.
IRQ line used by the audio interface.
SB Emulation in MS-DOS/Windows 98 B-5
Page 74
Dx First DMA channel used by the audio interface.
Hx Second DMA channel used by the audio interface.
Pxxx MPU-401 UART interface’s base I/O address.
Tx Card type. x must be 6.
Determining Resources
The MS-DOS driver
SBEINIT.COM must be running
for SBECFG.EXE to work
properly
.
To find the current Sound Blaster Audigy SB16 Emulation resources in Windows 98 SE:
1. Click Start -> Settings -> Control Panel.
2. In the Control Panel window, double-click the System icon.
3. In the System Properties dialog box, click the Device Manager tab.
4. Double-click Creative Miscellaneous Devices, and then double-click Creative
Sound Blaster Audigy SB16 Emulation.
5. Click the Resources tab.
You can use the information in the resource list to help you configure MS-DOS games
for use with the Sound Blaster Audigy card.
The resource list may show three entries of “Input/Output Range” and two entries
of “Direct Memory Access”. They correspond to the sequence of entries in Table B-1
and Table B-3. If the number of entries do not match, a good estimate of the identity
of the device is its I/O address or DMA channel.
To find the current Sound Blaster Audigy SB16 Emulation resources in MS-DOS mode:
1. Switch to your Sound Blaster Audigy DOS driver directory, that is:
C:\PROGRA~1\CREATIVE\DOSDRV
2. Type SBECFG and then press <Enter>.
Some older games may have difficulty detecting the Sound Blaster Audigy card at
certain resource settings. Typically, these games expect the card to be at a fixed
set of resources and would fail to load if those resources are not detected. If you
have older MS-DOS games that do not work properly, try changing the Sound
Blaster Audigy SB16 Emulation configuration. Use the following as a guide:
SB Emulation in MS-DOS/Windows 98 Second Edition B-6
Page 75

Problem:
Solution:
1, use SB interface port 220.
Problem:
Solution:
Sound Blaster emulation is not recognized.
Try switching the SB Emulation IRQ between 5 and 7, use DMA channel
The MPU-401 emulation is not recognized.
Try using Port address 330.
Selecting the Best Audio Options in a Game
Most MS-DOS–based games that provide sound have some procedure for audio
setup. These procedures generally allow you to choose from a list of popular audio
cards or audio devices.
Games may present audio options differently. Some may present a single choice that
corresponds to a particular audio device; for example, Sound Blaster 16, Roland
Sound Canvas, etc. Others provide an option for music and digital audio separately;
for example, General MIDI music with Sound Blaster digital audio. In such a case,
there are often two separate menus to configure.
Some games allow you to set the MIDI port address and IRQ for music and sound.
Make sure that these settings correspond to the values displayed by SBECFG.EXE or
the Resources tabbed page of the Creative Sound Blaster Audigy SB16 Emulation
Properties dialog box.
There are games that offer MPU-401/Roland (General MIDI or MT-32/LAPC-1) as an
option. Often these games allow you to set the MIDI port address. Make sure that
they match the MIDI address in the Resources list on Resources tabbed page of the
Creative Sound Blaster Audigy SB16 Emulation Properties dialog box. The same
values can be found under “MPU-401 (General MIDI, Roland MT-32/LAPC-1)
Emulation”, displayed by SBECFG.EXE in MS-DOS mode. Remember to enable the
MT-32 MIDI patch with the SBEMIXER program if you select Roland MT-32 or LAPC1 for music.
SB Emulation in MS-DOS/Windows 98 B-7
Page 76

Music Options
Most MS-DOS games offer a menu choice for sound when they start up. If you have
a choice between General MIDI and MT-32, always choose General MIDI, since it will
provide you with the best sound quality. If you need to use MT-32, you must first
switch from the General MIDI instrument set (the default) to the MT-32 instrument
set using SBEMIXER. Be sure to switch back to the General MIDI set when you are
finished using the MT-32 instrument set.
Digital Audio Options
MS-DOS Mode Utilities
SBECFG.EXE
Sound Blaster Audigy supports Sound Blaster, Sound Blaster Pro, Sound Blaster 16,
and Adlib digital audio emulation. If an application provides all these as options,
specify the choices in this order:
1. Sound Blaster 16
2. Sound Blaster Pro
3. Sound Blaster
4. Adlib
The Sound Blaster Audigy card includes a few MS-DOS utilities. These utilities
require the Sound Blaster Audigy DOS driver SBEINIT.COM to be loaded.
Use the SBECFG.EXE utility to obtain the hardware settings and the status of the
Sound Blaster Audigy card. Typing
the following hardware settings:
❑
PCI Hardware Settings: Port, IRQ
❑
Sound Blaster Emulation: Port, IRQ, DMA
❑
MPU-401 Emulation (GM, Roland MT-32/LAPC-1) Emulation: Port
❑
Adlib Emulation: Port
The emulation settings appear only if they are enabled.
SBECFG.EXE
at the command prompt displays
SB Emulation in MS-DOS/Windows 98 B-8
Page 77

SBEMIXER.EXE
Use SBEMIXER.EXE to change the volume levels of the MPU-401 instrument set
used on the Sound Blaster Audigy card. You can use SBEMIXER.EXE from the
command line—useful for advanced users who want to set up batch files with
particular volume levels—or within the SBEMIXER screen. The settings for
SBEMIXER.EXE are independent of the Creative Mixer settings in Windows 98 SE.
To set SBEMIXER values in the command line:
At the DOS prompt, type the SBEMIXER command in a single line. Its syntax is
SBEMIXER [/S:x] [/W:x] [/C:x] [/M:x] [/?]
where square brackets [ ] denote optional parameters, and
This
Parameter Specifies
/S:x Synth volume. x can be a value from the range 0 to 127.
/W:x Wave volume. x can be a value from the range 0 to 127.
/C:x CD audio volume. x can be a value from the range 0 to 127.
/M:x Synth MT-32/LAPC-1 mode. For x, 0 is Off, 1 is On.
/? View a short description of the parameters.
An example of an
SBEMIXER /S:64 /W:120 /C:50 /M:0
SBEMIXER
command is
which corresponds to “set the synth volume to 64, the Wave volume to 120, the CD
audio volume to 50, and turn off the Synth MT-32/LAPC-1 mode”.
To set SBEMIXER values within the Mixer screen:
At the DOS prompt, type SBEMIXER.
The interactive editor mode allows you to change the mixer settings with the mouse,
<Tab>, <PgUp>, <PgDn>, or arrow keys.
Use the Save button to save the settings for the next session.
SB Emulation in MS-DOS/Windows 98 Second Edition B-9
Page 78
SBESET.EXE
Use SBESET.EXE to manually configure SB resources or disable SB Emulation. By
default, SB Emulation in DOS follows the Windows settings. For example, if you
disable SB Emulation in Windows, in the next boot to DOS, SB Emulation in DOS
disabled. Under rare circumstances you may need to manually reconfigure DOS SB
Emulation, for example, if there is conflict in DOS before it can boot to Windows.
SBESET.EXE is run from the command line.
To set SBESET values in the command line:
See “System Resource
Settings” on page B-3 for a list
of the possible values.
At the DOS prompt, type the
SBESET [-Axxx] [-Ix] [-Dx] [-Hx] [-Pxxx] [-dx] [-wx]
command in a single line. Its syntax is
SBESET
where square brackets [ ] denote optional parameters, and
This
Parameter Specifies
xxx
-A
-I
-D
-H
-P
-d
-w
x
x
x
xxx
x
x
SB interface’s base I/O address.
IRQ line used by the audio interface.
First DMA channel used by the audio interface.
Second DMA channel used by the audio interface.
MPU-401 UART interface’s base I/O address.
SB Emulation mode. For x, 1 is Off, 0 is On.
Set x to 1 to use the Windows-assigned resource configuration.
Set x to 0 to use (your) user-assigned resource configuration.
An example of an SBESET command is
SBESET -A240 -I5 -D3 -w0
which corresponds to “set the SB interface’s base I/O address to 240, the IRQ line
used by the audio interface to 5, the First DMA channel used by the audio interface
to 3, and use the Windows-assigned resource configuration”.
SB Emulation in MS-DOS/Windows 98 B-10
Page 79

SBEGO.EXE
Use this to confirm whether SB16 Emulation is properly installed and working.
SB Emulation in MS-DOS/Windows 98 B-11
Page 80
C
Troubleshooting
This section provides solutions to problems you may
encounter during installation or normal use.
Page 81
Troubleshooting
This appendix provides solutions to problems you may encounter during installation
or normal use.
Problems Installing Software
The installation does not start automatically after the Sound Blaster Audigy
Installation CD is inserted.
The AutoPlay feature in your Windows system may not be enabled.
To start the installation program through the My Computer shortcut menu:
1. Double-click the
2. In the
3. On the shortcut menu, click
To enable AutoPlay through Auto Insert Notification:
1. Click
2. In the
3. In the
your CD-ROM drive.
4. Click the
5. In the
Notification
6. Click the OK button to exit from the dialog box.
My Computer
Start
Control Panel
System Properties
Properties
Properties
My Computer
->
Settings
.
window, right-click the CD-ROM drive icon.
->
window, double-click the
button.
dialog box, click the
icon on your Windows desktop.
AutoPlay
Control Panel
dialog box, click the
and follow the instructions on the screen.
.
System
Device Manager
Settings
tab and select
icon.
tab and select
Auto Insert
Troubleshooting C-1
Page 82

Problems with Sound
There is unexpected excessive environmental sound or effects when an audio file is
played.
The last selected preset is an inappropriate environment for the current audio file.
To switch to an appropriate environment:
1. Double-click the
2. In the
appropriate environment.
No sound from the headphones.
Check the following:
❑
The headphones are connected to the Headphones jack.
❑
In the
Headphones
❑
In the Mixer panel of Surround Mixer, the recording source selected is
Hear”
Individual analog recording sources are not displayed in Surround Mixer.
The following analog recording sources are combined in one recording control called
Analog Mix (Line/CD/TAD/Aux/PC)
panel:
❑
Line-In
❑
CD Audio
❑
Auxiliary
❑
TAD -In
❑
PC Speaker
Environment
Speakers
.
EAX Control Panel
box, click the down arrow to select
tabbed page of the Main panel of Surround Mixer, the
option is selected in the
icon in AudioHQ.
(No effects)
Speaker
, which is found in the one-column record
box.
or an
“What U
Troubleshooting C-2
Page 83

Individual analog recording sources cannot be selected in Surround Mixer.
Five analog recording sources are combined under the selection
CD/TAD/Aux/PC)
. For more information, see “Individual analog recording sources
Analog Mix (Line/
are not displayed in Surround Mixer.” on page C-2.
To record an individual analog source:
❑
In the one-column record panel of Surround Mixer, make sure the recording
source selected is
❑
In the six-column panel, mute the analog sources that you do not want to record
by clicking the
No sound from the speakers.
Check the following:
❑
You have connected your speakers to your card's output.
❑
You have selected the correct source in the Mixer panel.
❑
If both the above conditions have been met and you still do not get any sound,
click the
red plus sign
Output Only
Analog Mix (Line/CD/TAD/Aux/PC)
check box to select it.
Mute
above the
control and check whether the
VOL
check box is selected. If it is, you are in the Digital Output Only
.
Digital
mode and so must connect to digital speakers to hear the sound from your audio
card. See the section on Digital Output Only in Surround Mixer’s online Help for
more information.
No audio output when playing digital files such as .WAV, MIDI files or AVI clips.
Check the following:
❑
The speakers’ volume control knob, if any, is set at mid-range. Use Creative Mixer
to adjust the volume, if necessary.
❑
The powered speakers or external amplifier are connected to the card’s Line Out
or Rear Out jack.
❑
There is no hardware conflict between the card and a peripheral device. See
“Resolving I/O Conflicts” on page C-8.
Troubleshooting C-3
Page 84

❑
The Speaker selection in the Main panel of Surround Mixer corresponds to your
speaker or headphone configuration.
❑
The
Original Sound
pages of the
No audio output when playing audio CDs or DOS games that require a CD-ROM.
To solve this problem:
EAX Control Panel
sliders in either or both the
application are set to 100%.
Master
and
Source
tabbed
Make sure the Analog Audio connector on the CD-ROM drive and the CD In connector
on the audio card are connected.
Panning a source sometimes turns off its sound.
This occurs when you are in the Digital Output Only mode and the source’s left-right
balance in a software mixer application other than Surround Mixer (for example, the
Windows Volume Control application) is at the opposite end compared to the
position to which you have panned the source in the Main panel of Surround Mixer.
For example, the CD Audio balance in Windows Volume Control is on the left but in
Surround Mixer you have panned the CD Audio to the right.
To solve this problem:
Open that other mixer, and center the balances for all the audio input sources.
This ensures that your analog sources will not turn silent when you pan them in
Surround Mixer.
Troubleshooting C-4
Page 85
Insufficient SoundFont Cache
The trade-off of a smaller
SoundFont file is its lower
sound quality.
There is insufficient memory to load SoundFonts.
This may occur when a SoundFont-compatible MIDI file is loaded or played while
insufficient memory has been allocated to SoundFonts.
To allocate more SoundFont cache:
On the
Cache slider to the right.
The amount of SoundFont cache you can allocate depends on the system RAM
available.
If there is still insufficient system RAM available:
Do one of the following:
❑
❑
Options
On the
smaller SoundFont bank from the
Increase the system RAM on your computer.
tabbed page of the SoundFont Control applet, move the SoundFont
Configure Banks
tabbed page of the SoundFont Control applet, select a
Select Bank
box.
Problems With Joystick
The joystick port is not working.
The audio card’s joystick port may be conflicting with the system’s joystick port.
To solve this problem:
Disable the audio card’s joystick port and use the system port instead. Do the
following:
1. Click
2. In the
3. In the
4. Double-click
Audigy Gameport (Creative Game Port
5. Click the
6. In the Properties dialog box:
If you have an
->
Start
Control Panel
System Properties
Settings
window, double-click the
Sound, Video And Game Controllers
Properties
button.
Original Configuration (Current)
->
Control Panel
dialog box, click the
.
System
Device Manager
for Windows 2000).
icon.
, and then select
check box:
tab.
Creative
Troubleshooting C-5
Page 86
Do not attempt to make
changes to the BIOS unless
you have experience with
system software.
• Clear the check box to disable it.
If you have a
• Make sure that the check box is selected to disable it.
7. Click OK to restart Windows and for the change to take effect.
When the Gameport Joystick interface is disabled, the entry in Device Manager has
a red cross.
The joystick is not working properly in some programs.
The program may use the system processor timing to calculate the joystick position.
When the processor is fast, the program may determine the position of the joystick
incorrectly, assuming that the position is out of range.
To solve this problem:
Increase your system’s 8 bit I/O recovery time of the BIOS setting, usually under
the Chipset Feature Settings section. Or, if available, you may adjust the AT Bus
speed to a slower clock. If the problem persists, try a different joystick.
Disable In This Hardware Profile
check box:
Problems with Multiple Audio Devices
The other installed audio card is not working well.
You may have an existing audio device installed in your computer. The audio device
may be an audio card or an onboard audio chipset. Before you install your Sound
Blaster Audigy card, you are advised to completely uninstall and remove your
existing audio device. Operating multiple audio devices in your computer may
introduce usability issues.
Alternatively, during the installation of your Sound Blaster Audigy card, do the following:
❑
If your computer detects an installed Sound Blaster Live! Series or Sound Blaster
PCI512 audio card, a message box recommending that you completely uninstall
and remove the older audio device will appear. Click the
the instructions on the screen to complete the removal of the old audio device.
Remove the old audio card from your computer.
button and follow
Yes
Troubleshooting C-6
Page 87

❑
If your computer detects any other installed audio card, a message box
recommending that you completely uninstall and remove the older audio device
will appear. Click the
Blaster Audigy card.
After the installation of the Sound Blaster Audigy card, completely uninstall the
existing card and remove the audio card from your computer.
The onboard audio chipset is not working well.
To disable an onboard audio chipset, do the following:
1. Restart your system.
2. During the memory check, press <F2> or <Delete>, depending on your
motherboard.
The BIOS setup menu appears.
3. Select
4. Select
chipset.
5. Press <Esc> to return to the BIOS setup menu.
6. Select
7. Press <Y> and then press <Enter>
Chipset Features Setup
Onboard Legacy Audio
Save & Exit Setup
button to continue with the installation of the Sound
Yes
and press <Enter>.
and press <Enter> to disable your onboard audio
, and then press <Enter>.
Problems with Sound Blaster Live! Series or Sound Blaster PCI512 card
Sound Blaster Live! or Sound Blaster PCI512 applications are not working.
Other than normal playback and recording function, older audio devices may not
work well when Sound Blaster Audigy is installed.
To solve this problem:
Uninstall and remove the older card from the computer. Otherwise, you can choose
to disable the Sound Blaster Live! or Surround Blaster PC512 card:
1. Click
Start
->
Settings
->
Control Panel
.
Troubleshooting C-7
Page 88
2. In the Control Panel window, double-click the System icon.
3. In the System Properties dialog box, click the Device Manager tab.
4. Double-click Sound, Video And Game Controllers, and then select Creative
Sound Blaster Live! Series or Creative Sound Blaster PCI512.
5. Click the Properties button.
6. In the Properties dialog box:
If you have an Original Configuration (Current) check box:
• Clear the check box to disable it.
If you have a Disable In This Hardware Profile check box:
• Make sure that the check box is selected to disable it.
7. Click OK to restart Windows and for the change to take effect.
When the Sound Blaster Live! series is disabled, the entry in Device Manager has a
red cross.
Resolving I/O Conflicts
You can also refer to the
Troubleshooting section in the
online Help of Windows 98 SE/
Me.
Conflicts between your audio card and another peripheral device may occur if your
card and the other device are set to use the same I/O address.
To resolve I/O conflicts, change the resource settings of your audio card or the
conflicting peripheral device in your system using Device Manager in Windows 98
SE/Me.
If you still do not know which card is causing the conflict, remove all cards except
the audio card and other essential cards (for example, disk controller and graphics
cards). Add each card back until Device Manager indicates that a conflict has
occurred.
To resolve hardware conflicts in Windows 98 SE/Me:
1. Click Start -> Settings -> Control Panel.
2. In the Control Panel window, double-click the System icon.
Troubleshooting C-8
Page 89

3. In the System Properties dialog box, click the Device Manager tab.
4. Under the Sound, Video And Game Controllers entry, select the conflicting audio
card driver—indicated by an exclamation mark (!)—and click the Properties
button.
5. In the Properties dialog box, click the Resources tab.
6. Make sure that the Use automatic settings check box is selected, and click the
OK button.
7. Restart your system to allow Windows 98 SE/Me to reassign resources to your
audio card and/or the conflicting device.
Problems in
Windows NT
4.0
A Service Control Manager error message appears with one or more other error
messages at system restart.
This occurs after you remove an audio card from your computer after you have
successfully installed the Sound Blaster Audigy card. Windows is trying to match the
drivers to the removed audio card.
To solve this problem:
1. Log on to your computer as Administrator.
2. Click Start -> Settings -> Control Panel.
3. Double-click the Multimedia icon, and then click the Devices tab.
4. In the list, remove from under these entries
• Audio Devices
• MIDI Devices And Instruments
the items other than
• Audio for Creative Sound Blaster Audigy
• MIDI for Creative Sound Blaster Audigy
• MIDI for Creative S/W Synth
Troubleshooting C-9
Page 90

5. Click the OK button to close the dialog box.
The drivers are removed.
Problems with Encore DVD Player
Problems with Software DVD Player
The Encore DVD Player is not launched when a DVD disc is inserted into the drive.
To solve this problem:
1. In the Windows system tray, right-click the Disc Detector icon, and then click
Properties.
2. On the General tabbed page of the Creative Disc Detector dialog box, make
sure that Enable Disc Detector check box is selected.
3. Click the Players tab.
4. Select the DVD Disc entry and then click the Select Player button.
5. In the Players Properties dialog box, click the Browse button.
6. Browse to C:\Program Files\Creative\PC- DVD Encore
and double-click the entry ctdvdply
The Name box now displays the entry ctdvdply.
7. Click the OK button twice.
Now when you double-click the Disc Detector icon, the Encore DVD Player is
launched.
Changing audio configuration (for example, switching from 6-channel mode to
SPDIF Output mode or vice versa) while watching a DVD movie does not seem to
work, even though all settings in the software DVD player and in Surround Mixer are
correct.
To solve this problem:
Close and restart the software DVD player.
Troubleshooting C-10
Page 91

Problems with DV driver for Windows 98 SE/ 2000/Me
The DV camcorder is not working properly.
The MSDV camcorder driver may not be the latest version (v4.10.2226).
To solve this problem:
1. Visit the Microsoft web site and download the Digital Video update for DirectX 8.0
file (dx80bda.exe).
2. Install the above file into your computer.
Note:You need to install DirectX 8.0 or 8.0a run time first.
If the problem still persists, the MSDV camcorder driver may not be fully optimized
for your DV camcorder.
To solve this problem:
1. Turn on your DV camcorder.
2. Insert the Sound Blaster Audigy Installation CD into your CD-ROM drive.
Exit from the welcome screen.
3. Using Windows Explorer, locate the 1394 folder in the CD-ROM, and run the
DVConnect 240.exe file. Follow the instructions on the screen to complete the
setup.
If you are in Windows 98 SE, you may be prompted to insert the Windows 98 SE
CD-ROM first. Follow the instructions on the screen to complete this setup.
4. Click the Finish button.
5. Turn off and then turn on your DV camcorder.
Troubleshooting C-11
Page 92
Index
Page 93

A
About
Audigy Extension card
4-4
2-6
xi
4-7
1-5
4-2
1-5
4-3
4-7
CreativeWare
EAX
x
External Audigy Drive
Sound Blaster Audigy card
2
Adjusting
headphones volume
microphone gain
Advanced content creation
Aligning
Audigy Extension card
Sound Blaster Audigy card
3
Analog mode
applications
AudioHQ
Creative Diagnostics
Creative MiniDisc Center
Creative Oozic
Creative PlayCenter 2
Creative Recorder 2
Creative RemoteCenter
Creative Restore Defaults
Creative Sound Blaster
Audigy Demonstration
Creative Surround Mixer
Creative Taskbar
1-3
1-4
2-3
4-7
5-4
4-8
4-9
4-3
4-4
1-
2-
4-9
5-3
4-5
4-6
4-9
Creative Wave Studio
SoundFont Showcase
Vienna SoundFont Studio
Applying voice effects
ASIO
5-4
4-6
4-5
xiv
1-2
Audigy Experience
Audigy Extension connector
Audigy Online Quick Start
AudioHQ
Creative Keyboard
EAX control
MIDI input
AUX In connector
C
2-9
5-3
1-2
1-2
Capturing videos
CD Audio connector
CD SPDIF connector
Compiling personal albums
Connecting
Analog CD audio cable
Audigy Extension card cables
2-2
Center and Subwoofer
channels
external consumer devices
9
IEEE 1394 compatible devices
2-7
1-3
xiv
5-2
2-4
4-8
2-
2-5
1-2
1-3
5-5
2-8
1-3
2-2
2-6
1-4
Index xiii
2-
power splitter cable
2-2
1-2
1-4
1-2
1-2
1-4
5-3
5-5
power supply
power supply splitter cable
3
related peripherals
Sound Blaster Audigy card
cables
speaker devices
Connecting high power usage
1-2
files
A-5
5-4
5-2
devices
Connector
Audigy Extension
Connectors
AUX In
CD Audio
CD SPDIF
Joystick/MIDI
MIDI In/Out
Optical SPDIF In/Out
Power supply
SB1394
Telephone Answering Device
Content creation
Creating
multiple effects
music
non-General-MIDI-compliant
SoundFonts
Creative AudioHQ
Page 94

SoundFont Control
CreativeWare
Customizing environments
xi
4-5
5-7
D
Digital entertainment
B-1
B-1
2-6
Digital mode
direct memory access
DMA
B-5
Dos Driver
Downloading MP3 songs
Driver
DOS
5-2
B-5
5-6
E
EAX
x
5-3
4-6
5-7
5-6
5-6
5-4
5-7
5-6
EAX Control
Editing
musical instruments
videos
Encoding CD songs to MP3 format
5-5
Enjoying
A3D 1.0 support
audio presets in games
DirectSound3D support
DOS games
EAX support
5-5
A-2
B-7
B-8
5-6
B-5
A-1
A-3
A-1
B-8
A-2
A-3
A-5
audio inputs
audio outputs
connectivity
Inputs and outputs on front
panel
Inputs and outputs on rear
panel
interfaces
SB1394 interfaces
general specifications
H
Headphones Volume control knob
1-4
I
I/O addresses
Infrared Receiver
input/output address
Installing
Applications
Audigy Extension card
CD-ROM/DVD-ROM drive
Drivers
external Audigy Drive
joystick
MIDI device
Sound Blaster Audigy card
environment variable
B-5
B-5
BLASTER
CTSYN
Experiencing music with visual
entertainment
F
Features
G
Games
Gaming reference
General specifications
A-1
1394 Compatibility
Audigy processor
Dolby Digital (AC-3) decoding
A-3
flexible mixer control
high quality audio delivery
process
multi speaker surround
PCI bus mastering
professional digital audio
processing
audio option
digital audio option
music option
Audigy Extension card
A-1
A-6
A-6
3-1
2-4
A-5
B-4
A-4
A-4
3-1
2-4
A-4
1-4
A-5
A-1
B-4
2-3
2-4
2-4
2-
Index xiv
Page 95

3
Ulead VideoStudio
Installing hardware
Internal SB1394 port
Internet entertainment
interrupt request line
IRQ
B-4
3-1
2-1
1-2, 1-3
B-4
J
Jack
1-2
Jacks
1-2
1-2
1-2
1-4
1-2
1-4
1-4
1-4
Headphones
Line In
Line In 2/Mic In 2
Line Out
Microphone In
RCA Auxiliary In
RCA SPDIF In/Out
Rear Out
Joystick/MIDI connector
K
Knobs
Headphones Volume control
1-4
Line In 2/Mic In 2 selector
5-5
1-2
1-4
5-3
5-4
1-2
5-5
5-1
5-2
2-8
2-1
1-2
5-2
1-2
2-10
5-5
1-3
1-4
1-4
B-1
1-3
2-1
5-4
5-4
L
Line In 2/Mic In 2 selector knob
1-4
Line Out jack
1-2
M
B-1
5-6
1-2
5-1
1-4
Microphone In jack
MIDI In/Out connectors
Mixing MP3 songs
MS-DOS driver
Multimedia playback
O
Online Help
RemoteCenter
Optical SPDIF In/Out connector
1-4
Organizing SoundFont banks
1-6
5-3
P
5-2
5-1
5-2
5-6
5-6
Personal albums
Playing
MIDI files
MP3 files
MP3 songs
MP3 songs with EAX
SoundFonts
WMA files
Playing back
CD Audio files
Wave files
Playing games
Playing MS-DOS games
Ports
Internal SB1394
SB 1394
SB1394 Extension
Positioning speakers
Positioning the external Audigy
Drive
2-1
Power supply connector
Preparing
computer
external Audigy Drive
R
RCA Auxiliary In jack
RCA SPDIF In/Out jack
Rear Out jack
Recording
digital hard disk
effects
multi-tracks with ASIO
music
musical instruments
Index xv
Page 96

sound 5-3
Recording and content authoring
2-7
Removing metal brackets
2-1
S
SB Emulation B-1
AUTOEXEC.BAT file settings
B-2
background
CONFIG.SYS file settings
in Windows 98 Second Edition
B-1
in Windows Me
Legacy games
understanding installation
program
SB1394 connector
SB1394 Extenion port
SB1394 port
SBECFG.EXE
SBEGO.EXE
SBEINIT.COM
SBEMIXER.EXE
SBESET.EXE
Securing
Audigy Extension card
Sound Blaster Audigy card
3
B-1
B-2
1-2
B-8
B-11
B-2
B-9
B-10
B-1
B-1
1-4
1-3
2-3
B-3
2-
5-3
2-1
5-4
C-9
xiv
xiii
C-10
C-1
C-5
xiii
xiii
C-10
2-
1
U
Ulead Video Studio
Windows 2000
Windows 98 Second Edition
3-2
Windows Me
Ulead VideoStudio
Windows 98 Second Edition
3-2
Using
remote control
3-2
3-3
1-6
V
Videos 5-3
Visual entertainment
Voice effects
5-3
5-5
W
Watching
DVDs
5-1
surround movies
Watching DVD movies
5-2
2-7
Sound Blaster website
SoundFont banks
Sticking rubber feet
System requirements
external Audigy Drive
games
SB1394 applications
Sound Blaster Audigy card
viewing DVD titles
system resource
xiii
xiii
B-3
T
Technical support xiv
Telephone Answering Device
connector
Transcribing music
troubleshooiting
DV driver
troubleshooting
Encore DVD Player
I/O conflicts
installing software
joystick
software DVD player
sound
SoundFont Cache
Windows NT 4.0
Turning off main power supply
1-2
C-11
C-1
C-8
C-5, C-7
C-2
Index xvi
Page 97

 Loading...