

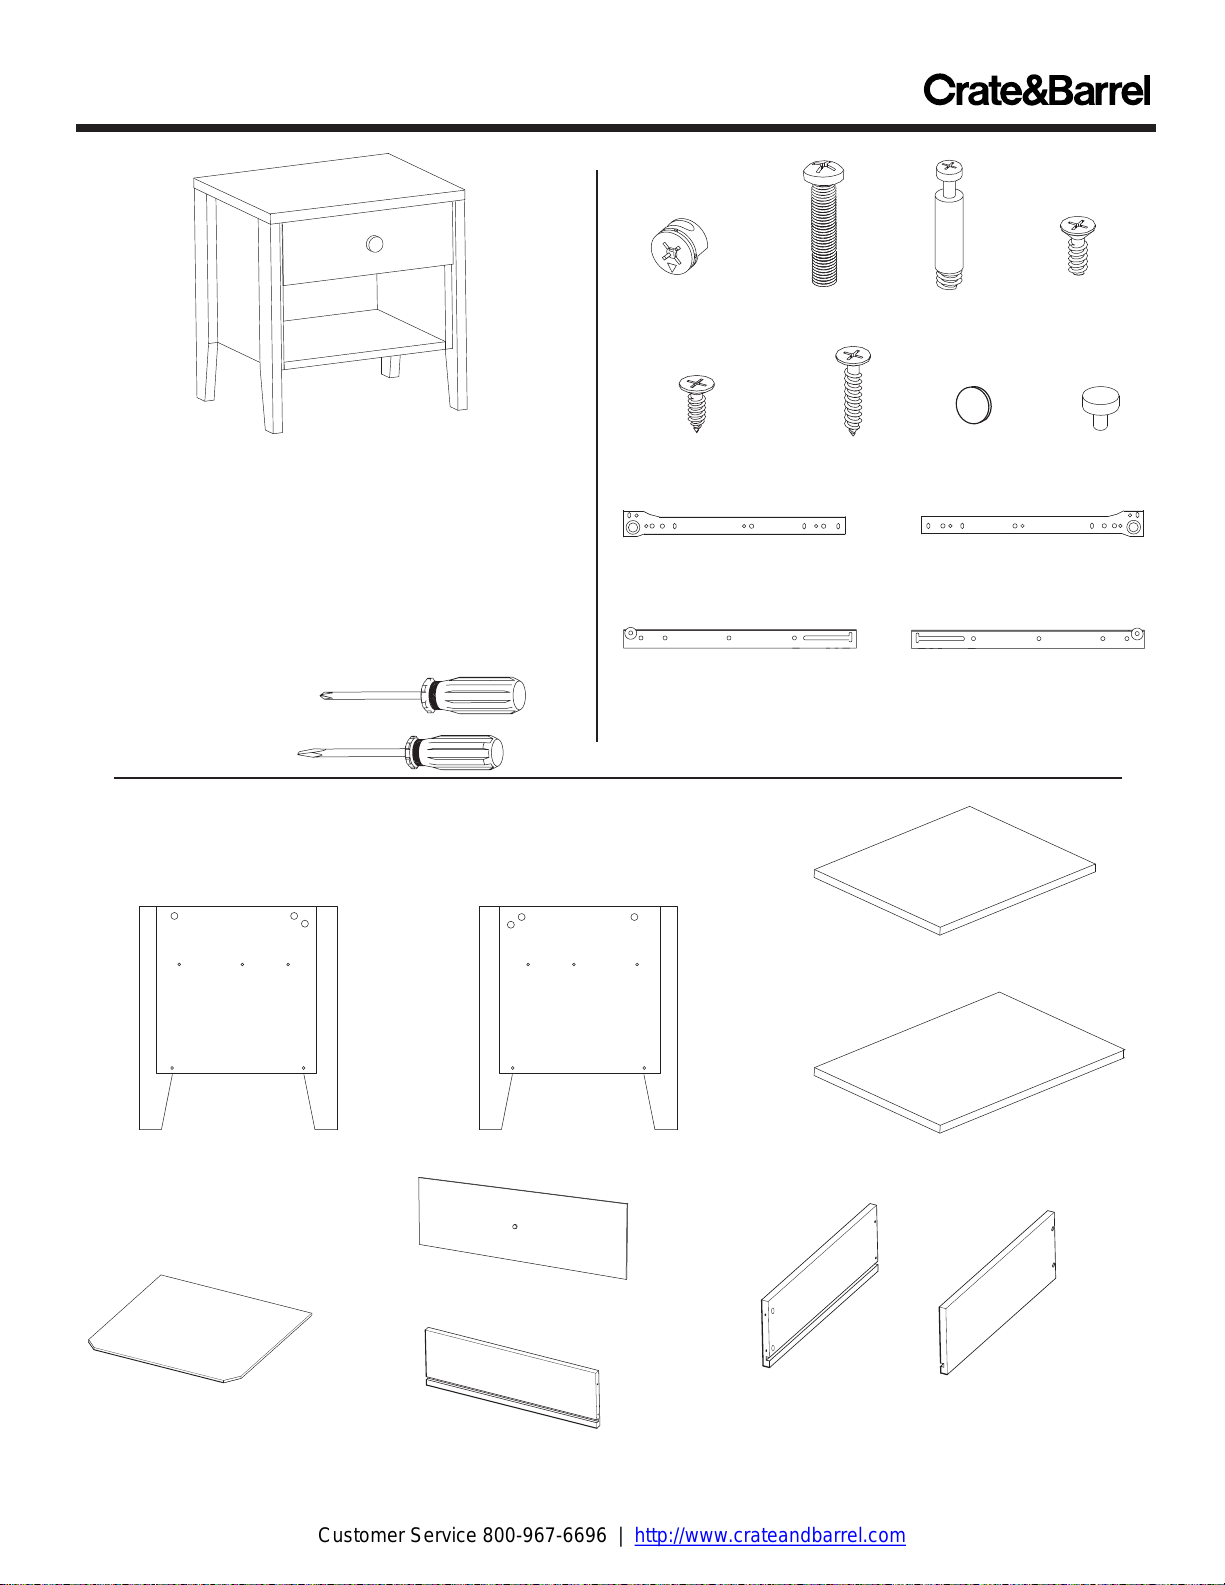
Crate & Barrel Pacific Maple Nightstand, Pacific Dark Stain Nightstand Assembly Instruction
Page 1
Customer Service 800-967-6696 | http://www.crateandbarrel.com
PACIFIC NIGHTSTAND
Thank you for purchasing the Pacific Night
Stand. This page lists all the contents included
in the box. Please take time to identify the
hardware as well as the individual components
of this product. As you unpack and prepare for
assembly, place the contents on a carpeted or
padded area to protect them from damage.
TOOLS REQUIRED
Phillips head screwdriver
Flat head screwdriver
COMPONENTS
1 - drawer
bottom
Made in Lithuania - r05
1 - right side panel1 - left side panel
1 - drawer front
1 - drawer back
HARDWARE
16 - cams
4- small
wood screws
L
1 - left case glide
(marked with an "L")
1 - left drawer glide
Missing hardware? Please call 800.606.6387 for replacements.
1 - large
bolt
4 - large
wood screws
1 - bottom panel
1 - top panel
1 - left
drawer side
16 - cam
screws
16 - cam
covers
1 - right case glide
(marked with an "R")
1 - right drawer glide
1 - right
drawer side
4 - machine
screws
1 - drawer
knob
R
Page 1 of 3
Page 2
Customer Service 800-967-6696 | http://www.crateandbarrel.com
PACIFIC NIGHTSTAND
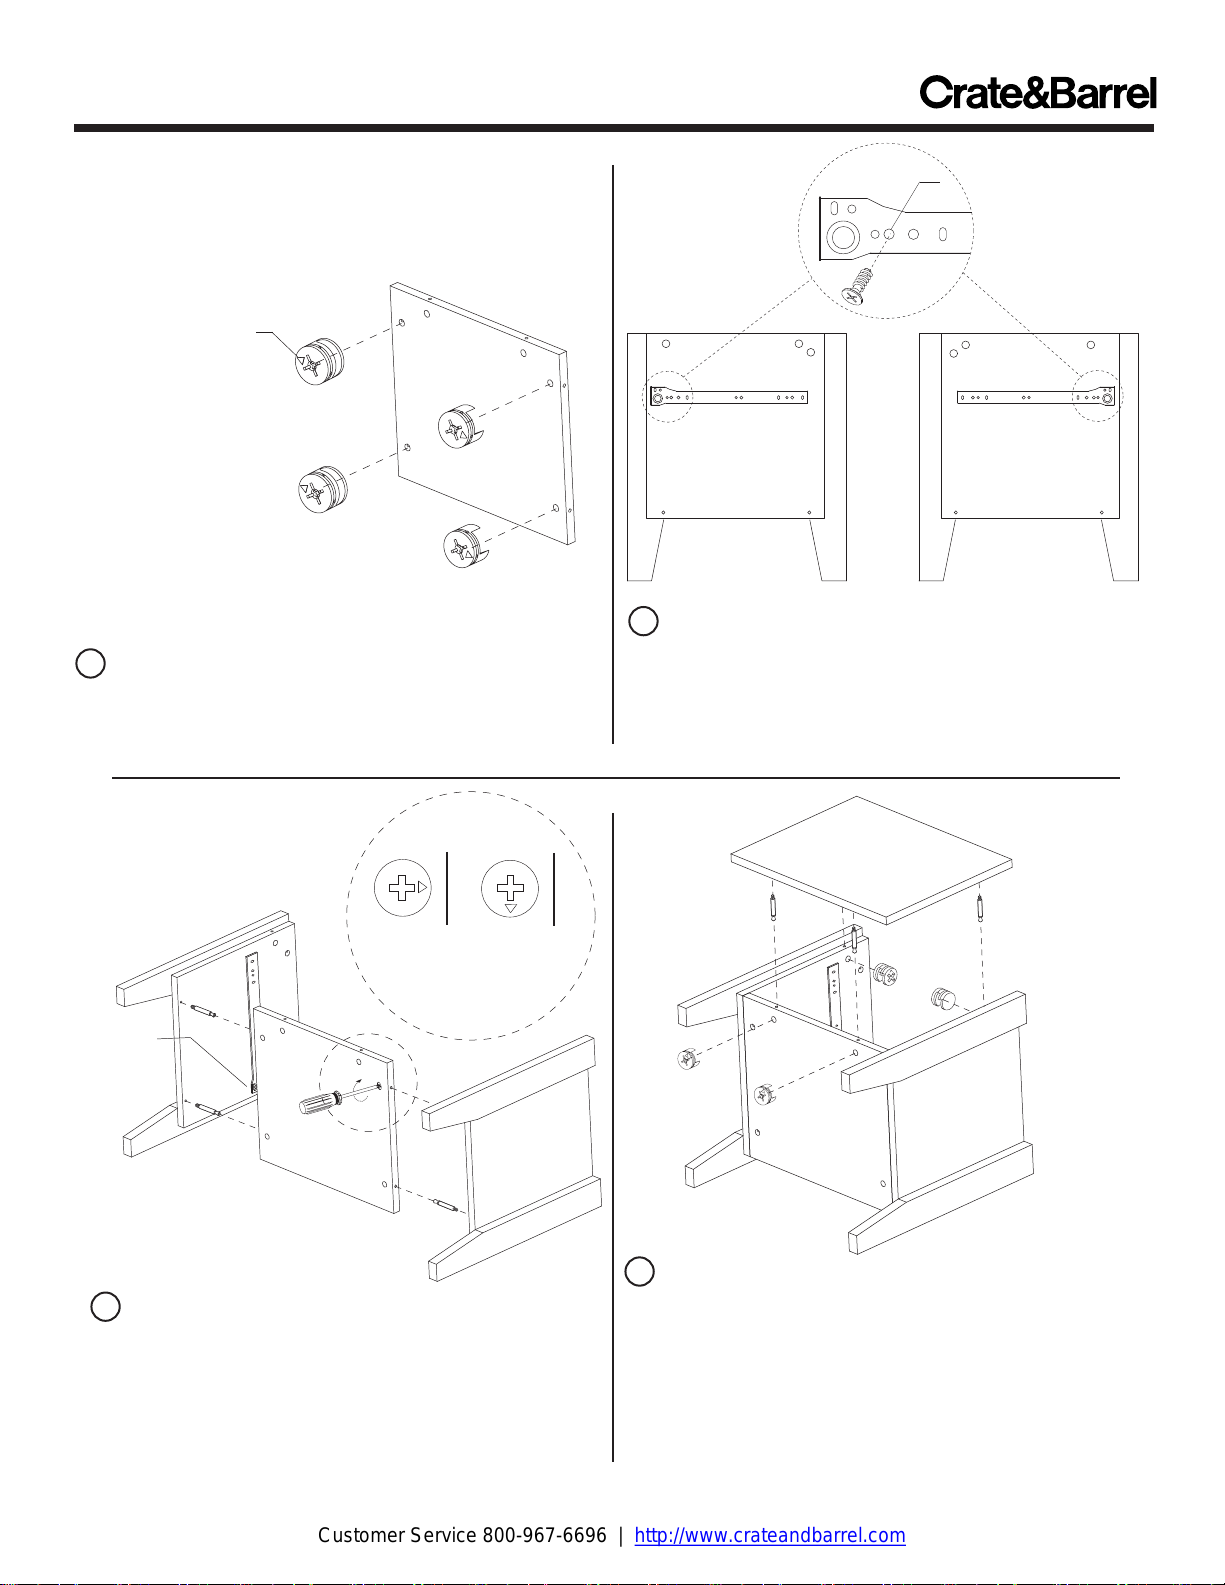
Make sure this
arrow points
towards the shelf edge
Bottom Shelf
(underside)
1 Insert 4 cams into the underside of the bottom
shelf, making sure arrows on each cam point towards
the shelf edge as shown.
Make sure
roller wheel
is towards
the front
A
B
Cam in
unlocked
position
Cam in
locked
position
3 A. Using a flat head screwdriver, fasten 2 cam
screws into the outer holes of the left side panel.
B. Using a phillips head screwdriver, turn 2 cams
clockwise to secure bottom panel to the left side panel.
Repeat Steps A and B for the right side panel.
Made in Lithuania - r05
NOTE:
Do not over
tighten the
screws.
Back
Left Panel
2 Atttach left case glide (marked "L") to the left side
panel and the right case glide (marked "R") to the right
side panel as shown. Be sure the wheel on each glide
faces toward the front of each panel. Secure each glide
with 2 machine screws and a phillips head
screwdriver. Do not overtighten the screws.
back panel
The first screw goes in this hole
Right Panel
A
C
B
4 A. Insert 4 cam screws into the underside of the back
panel and secure with a flat head screwdriver.
B. Insert 2 cams into the remaining holes of the bottom
shelf. Make sure arrows point towards the edge.
C. Insert 2 cams into the holes closest to the back edge
of the side panels as shown.
Fit back panel into position and secure all cams by turning
each clockwise with a phillips head screwdriver.
Page 2 of 3
Page 3
Customer Service 800-967-6696 | http://www.crateandbarrel.com
PACIFIC NIGHTSTAND
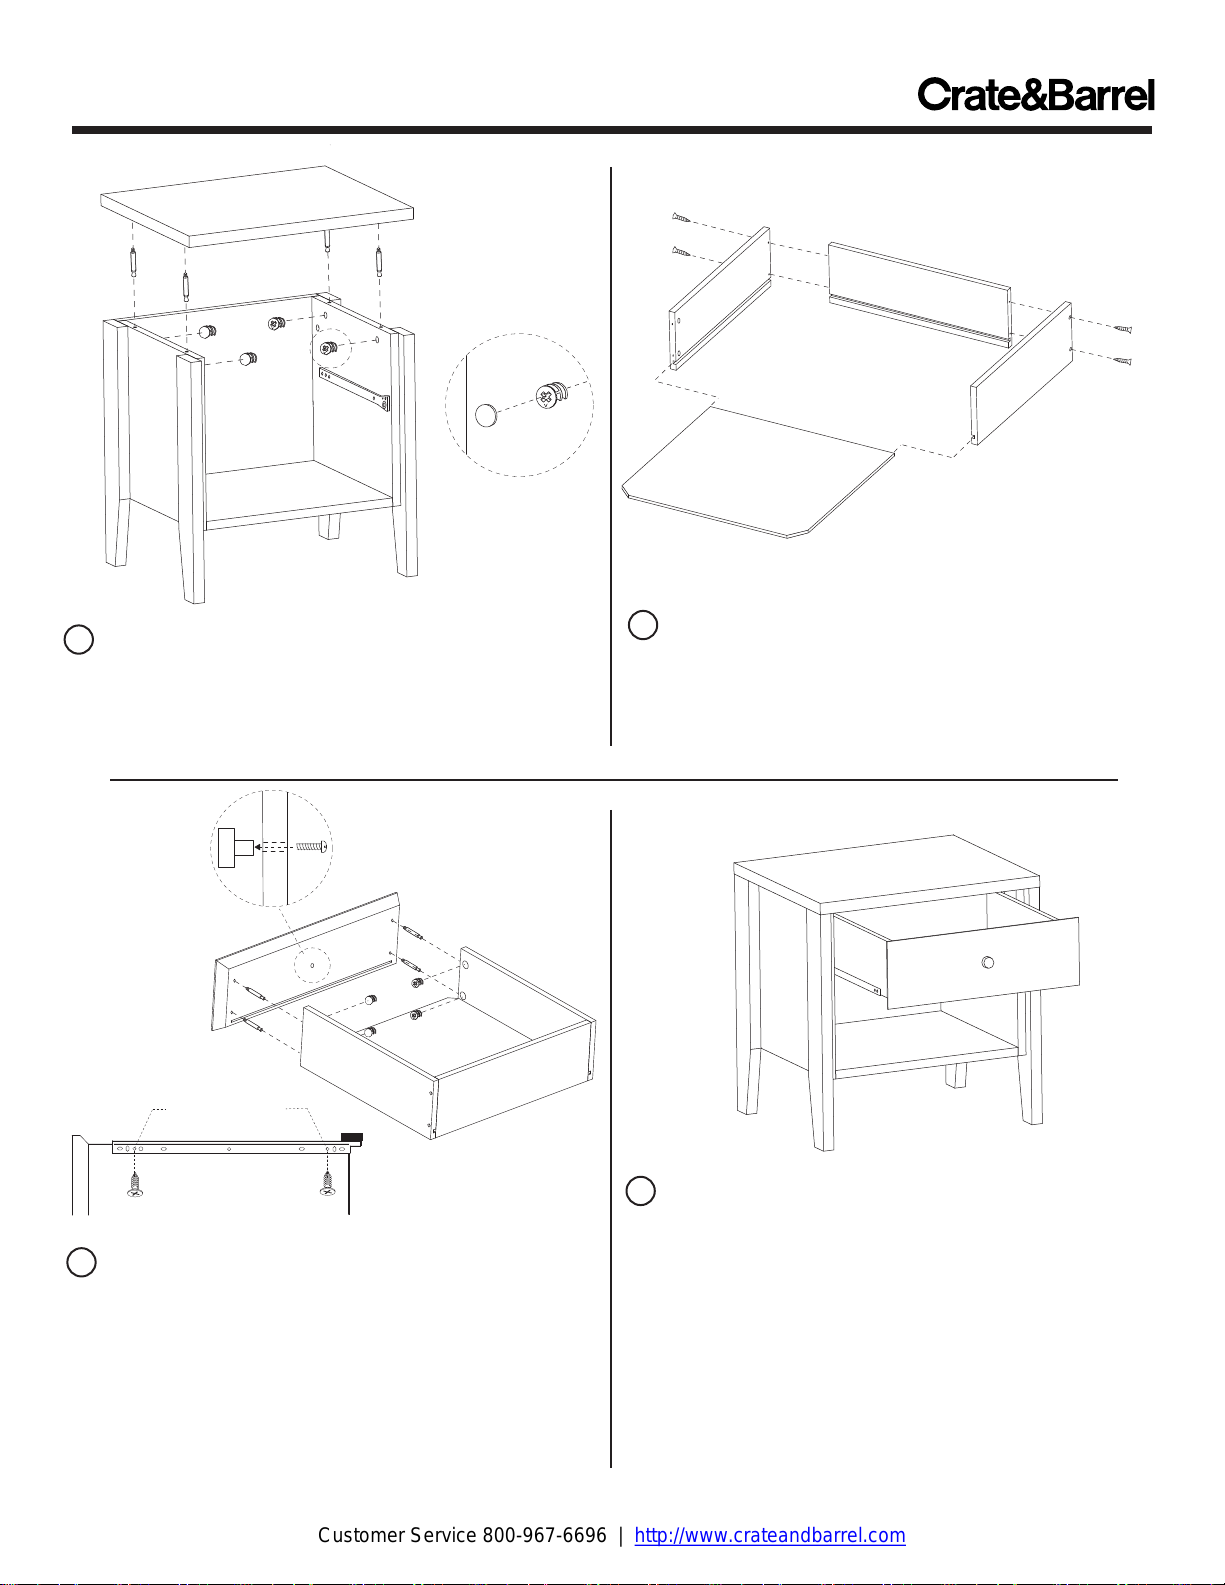
A
B
C
5 A. Insert 4 cam screws into the top panel and secure
with a flat head screwdriver.
B. Insert 4 cams into the tops of side panels. Fit top
panel into position and secure all cams with a phillips head
screwdriver.
C. Conceal all cams by inserting cam covers into all cams.
C
A
B
Only these
2 holes are used
D
View from
underside of
drawer assembly
7 A. Insert 4 cams into holes in the front of the drawer
side panels.
B. Insert 4 cam screws into the drawer front. Fit drawer
front into position and secure all cams with a screwdriver.
C. Hold drawer knob in place while using a phillips head
screwdriver to tighten the large bolt.
D. Turn drawer assembly upside down and attach right
and left drawer glides with 4 small wood screws. Make
sure the wheels extend beyond the drawer back as shown.
Made in Lithuania - r05
A
B
drawer
bottom panel
6 A. Attach left & right drawer sides to drawer
back with 4 large wood screws. Do not overtighten
the screws.
B. Slide drawer bottom panel into grooves in drawer
side and back panels. Make sure the cut-off corners
of the bottom panel face out as illustrated.
8 Insert drawer assembly into case, aligning wheels of
drawer glides with rail of case glides.
Assembly is now complete.
CLEANING AND CARE
Clean surfaces with a dry or damp soft cloth. Do not use
abrasive cleaners. Do not use furniture wax or polish as the
wood is finished with a protective clear lacquer.
Page 3 of 3
 Loading...