

Craftsman 919.763500 User Manual

OWNER'S MANUAL
CRflFTSMQN
ii ■% n r I jv 1^1 n 1^
13.0 Horsepower
3500 PSI 3 GPM
High Pressure Washer
Model No:
919.763500
©
WARNING: Before using this
product, read this manual
and follow all Safety Rules
and Operating Instructions.
Sears, Roebuck and Co., Hoffman Estates, IL 60179 U.S.A.
MGI»-763500 1/3S/«8
PRESSURE WASHER
CUSTOMER
HELPLINE
1-800-245-5873
• Safety
• Assembly
• Operation
• Maintenance
• Parts List
• Español

Warranty.
.......................
TABLE OF CONTENTS
.
.
................. 2
Service and Adjustments....
....................
14
Safety Guidelines
Assembly
Operation
Maintenance
...
.............................
............................
.............................
...........
............... 3-5 Storage
.
............... 5-6
.
.
................
............... 11-13
7-10
Troubleshooting
Parts,..........................-
How to Order Parts
Español
.....................................
....
...................
...............
....
.............
LIMITED ONE YEAR WARRANTY ON CRAFTSMAN HIGH PRESSURE WASHER
For one year from the date of purchase, when this Craftsman High Pressure Washer is main
tained and operated according to the instructions in the owner’s manual, Sears will repair, free of
charge, any defect in material and workmanship.
if your Craftsman Pressure Washer is used for commercial or rental purposes, this warranty
applies only for 90 days from the date of purchase.
.....................
......................15
...Back Cover
14
LIMITED ONE YEAR WARRANTY ON CRAFTSMAN ENGINE
For one year from the date of purchase, when this Craftsman engine is maintained and operated
according to the instructions in the owner’s manual. Sears will repair, free of charge, any defect
in material and workmanship.
If your Craftsman engine is used for commercial or rental purposes, this warranty applies only
for 90 days from the date of purchase. This warranty does not cover; Expendable items such as
spark plugs and air filters, which become worn during norma! use.
Repairs necessary because of operator abuse or negligence, including damage resulting from
no water being supplied to pump or failure to maintain the equipment according to the instruc
tions contained in the owner’s manual, are not covered under warranty.
WARRANTY SERVICE IS AVAILABLE BY RETURNING THE HIGH PRESSURE WASHER TO THE
NEAREST SEARS SERVICE CENTER/DEPARTMENTTHROUGHOUTTHE UNITED STATES.
This, warranty gives you specific legal rights and you may also have other rights, which vary
from state to state.
Sears, Roebuck and Co., D/817 WA, Hoffman Estates, IL 60179

SAFETY GUIDELINES - DEFINITIONS
This manua! contains information that is important for you to know and understand. This information relates to protecting
YOUR SAFETY and PREVENTING EQUIPMENT PROBLEMS. To help you recognize this information, we use the symbols
below. Please read the manual and pay attention to these sections. SAVE THESE DEFINiTIONS/iNSTRUCTIONS.
A WARNING indicates a potentially hazardous
situation which, if not avoided, could result in
death or serious iniurv.
A CAUTION indicates a potentially hazardous situation
which, if not avoided, mav result in minor or moderate
A DANGER indicates an imminently hazardous
situation which, if not avoided, will result in
death or serious iniurv.
iniurv.
10/2/97
IMPORTANT SAFETY INSTRUCTIONS
ikWAHNING
Improper operation or maintenance of this product could result in serious injury and property damage. Read
and understand alt warnings and operating instructions before using.
HAZARD > WHAT CAN HAPPEN
A DANGER
RISK OF EXPLOSION
OR FIRE
Spilled gasoline and its vapors can
become ignited from cigarette
sparks, electrical arcing, exhaust
gases, and hot engine components
such as the muffler.
Heat will expand fuel in the tank
which could result in spillage and
possible fire explosion.
Operating the pressure washer in an
explosive environment could result
in a fire.
Materials placed against or near the
pressure washer can interfere with
its proper ventilation features
causing overheating and possible
ignition of the materials.
Improperly stored fuel could lead to
accidental ignition. Fuel improperly
secured could get into the hands of
children or other unqualified persons.
HOW TO PREVENT IT
Shut off engine and allow it to cool
before adding fuel to the tank.
Use care in filling tank to avoid
spilling fuel. Move pressure washer
away from fueling area before
starting engine.
Keep maximum fuel level V2” below
top of tank to allow for expansion.
Operate and fuel equipment in well
ventilated areas free from obstruc
tions. Equip areas with fire
extinguishers suitable for gasoline
fires.
Never operate pressure washer in an
area containing dry brush or weeds.
• Store fuel in container approved for
gasoline, in a secure location away
from work area.
Adanger
RISK TO BREATHING
Breathing exhaust fumes will cause
serious injury or death.
Some cleaning fluids contain sub
stances which could cause injury to
skin, eyes, or lungs.
Operate pressure washer in a we!!
ventilated area. Avoid enclosed areas
such as garages, basements ,etc.
Never operate unit in a location
occupied by humans or animals.
Use only cleaning fluids specifically
recommended for high pressure
washers. Follow manufacturers
recommendations.

IMPORTANT SAFETY INSTRUCTIONS (contad)
HAZARD
WHAT CAN HAPPEN HOW TO PREVENT IT
AWARNING
RISK OF UNSAFE
OPERATION
Awarning
RISK OF INJURY FROM
SPRAY
Unsafe operation of your pressure
washer could lead to serious injury
or death to you or others.
The spray gun/wand is a powerful
cleaning tool that could look like a
toy to a child.
Reactive force of spray will cause
gun/wand to move, and could cause
the operator to slip or fall, or
misdirect the spray. Improper control
of gun/wand can result in injuries to
self and others.
High velocity fluid spray can cause
objects to break, propelling particles
at high speed.
Light or unsecured objects c^ become
hazardous projectiles.
Become familiar with the operation
and controls of the pressure washer.
Keep children away from the
pressure washer at ail times.
Never defeat the safety features of this
product.
Do not operate machine with missing,
broken, or unauthorized parts.
Never leave wand unattended white
unit is running.
Keep work area free of obstacles.
Stand on a stable surface and grip gun/
wand firmly. Expect the gun to kick
when triggered.
Always wear ANSI approved Z87 safety
glasses. Wear protective clothing to
protect against accidental spraying.
Never point wand at, or spray people or
animals.
Always secure trigger lock when wand
is not in service to prevent accidental
operation.
Never permanently secure trigger in pull
back (open) position.
Awarning
RÏSK OF
ELECTRICAL
SHOCK
Awarning
RISK OF FLUID INJECTION
Awarning
RISK OF CHEMICAL BURN
Spray directed at electrical outlets or
switches, or objects connected to an
electrical circuit, could result in a fatal
electrical shock.
Your washer operates at fluid
pressures and velocities high enough
to penetrate human and animal flesh,
which could result in amputation or
other serious injury. Leaks caused by
loose fittings or worn or damaged
hoses can result in injection injuries.
DO NOTTREAT FLUID INJECTION AS
A SIMPLE CUT! See a physician
immediately!
Relieve system pressure before
attempting maintenance or disassem
bly of equipment.
Use of acids, toxic or corrosive
chemicals, poisons, insecticides, or
any kind of flammable solvent with this
product could result in serious injury
or death.
Unplug any electrically operated
product before attempting to clean It.
Direct spray away from electric outlets
and switches.
Never place hands in front of nozzle.
Direct spray away from self and others.
Make sure hose and fittings are
tightened and in good condition. Never
hold onto the hose or fittings during
operation.
Do not allow hose to contact muffler.
Never attach or remove wand or hose
fittings while system is pressurized.
Use only hose and high pressure
accessories rated for 2000 PSl service.
To relieve system pressure, shut off
engine, turn off water supply, and puli
gun trigger until water stops flowing.
Do not use acids, gasoline, kerosene, or
any other flammable materials in this
product. Use only household
detergents, cleaners and degreasers
recommended for use in pressure
washers.
Wear protective clothing to protect
eyes and skin from contact with
sprayed materials.
_______________

IMPORTANT SAFETY INSTRUCTIONS {contad)
HAZARD
WHAT CAN HAPPEN
HOWTO PREVENT IT
Awarning
RISK OF HOT SURFACES
International
Symbols
Contact with hot surfaces, such as
engines exhaust components, could
result in serious burn.
Safety Atefi - Read
Owner s Marquai
o
On Off
During operation, touch only the control
surfaces of the pressure washer. Keep
children away from the pressure washer
at all times. They may not be able to
recognize the hazards of this product.
Stop
Fuel
Shutoff
r-K
Fuel X Choke
m'
¡MPORTAN"n
The powerful spray from your pressure washer is capable of causing damage to fragile surfaces such as: wood, glass,
automobile paint, auto stripping and trim, and delicate objects such as flowers and shrubs. Before spraying, check the
item to be cleaned to assure yourself that it is robust enough to resist damage from the force of the spray. Avoid the
use of the concentrated spray stream except for very strong surfaces like concrete and steel.
Operating unit with water supply shut off without flow of water will result in equipment damage. You should never run
this pressure washer for more than 2 minutes without pulling the trigger to allow cool water to enter the pump and the
heated (recirculated) water to exit. Running the pressure washer with water supply shut off will void your warranty.
ASSEMBLY
Carton Contents
• Main Unit pressure washer with wheels
• Handle
• High Pressure Hose
• Chemical Pickup Hose and Filter
• Bag Containing
Video Cassette
Owners’ Manual
Nozzle Cleaning Kit and Replacement 0-Rings
Rubber Isolator and Mounting Hardware
• Box Containing
Gun
Wand
Engine Oil
Handle Mounting Hardware
• Chemical Basket
NOTE: The hose is located at the bottom of the box.
Preparing the Pressure Washer for First Use
• Note: Included with your pressure washer is a video
tape on how to prepare your unit for operation. It is
recommended you view this tape before performing
the next steps.
Place handle on frame.
1.
Insert bolts into holes provided in handle.
Line up handle and bolts with the holes provided
on frame.
Insert bolts through holes in frame.
Place washers and over inserted bolts. Next place
nuts over bolts and tighten with adjustable wrench
turning in clockwise direction.
Tools Required for Assembly
Adjustable wrenchS
1/2” Socket wrench
Remove Pressure Washer from Carton
• Open box from the top. Locate and remove from
box, the parts box, which includes gun. handle,
wand, oil, nuts bolts and washers for handle
installation.
• Cut carton along dotted lines.
• Remove all carton inserts.
• Roll unit through opening in carton.
Attach chemical basket to the pressure washer
2.
frame opposite side of muffler. Holes are
provided on frame.

3. • Remove wood plank from the frame of the unit.
An adjustable wrench is required. Discard bolt
and board.
4. • Mount the rubber isolator to the frame. To
mount isolator place threaded end of bolt
through the washer. Next with washer on bolt
place threaded end of bolt through the rubber
isolator. Place threaded portion of bolt
through the same hole location the wood plank
was mounted to on the pressure washer. Next
place lockwasher over threaded portion of bolt
that has been placed through the mounting hole
in the pressure washer and use nut to tighten
isolator to the frame. Tighten nut with an
adjustable wrench. AH isolator parts are
supplied in parts 5ag.
8. • Connect high pressure hose to the quick connect
outlet on pressure washer.
NOTE: Keep hose away from engine muffler.
9. • Place assembled gun and wand on pressure
washer holder.
5. • Connect wand with nozzle extension to gun. To
tighten, turn knob in clockwise direction. Hand
tighten.
6. Cut tie wrap off of high pressure hose. Unwind
high pressure hose to attach the threaded end to
the gun using two adjustable wreches.
NOTE: Do not remove Teflon tape on threads.
7. • Connect chemical hose to the chemical injector
nipple on the pump.
NOTE: Your unit’s pump is shipped with a temporary
plug that must be replaced with a breather cap. This
plug is located over the pump’s oil port. Unscrew
and remove this plug and discard. Remove the
breather cap from the bag attached to the plug and
install it in the pump’s oil port.
BREATHER
CAP\^
A CAUTION: Failure to replace the plug will result
in serious pump damage.
Checklist
Before going any further please review the following:
• Be sure you have completed assembly instruction.
• Double check all fittings to be sure they are tight.
IMPORTANT: Before any attempt to start your
pressure washer be sure to check engine oil {See
Operation under Adding Engine Oil.)

OPERATION
Know Your High Pressure Washer
Read this Owner^s Manual and Safety Rules before
operation of your High Pressure Washer Compare
this illustration with our pressure washer to familiarize
yourself with the location of various controls and
adjustments. Save this manual for future reference.
PUMP- Develops high pressure.
OIL FILL- Place where engine oil is poured.
PRESSURE REGULATOR- Allows you to adjust the
pressure of the outlet stream.
ENGINE RUN/STOP SWITCH- Sets engine in starting
mode for recoil starter — Stops running engine.
OIL DIP STICK
RECOIL STARTER- Used for starling the engine
manually.
SPRAY GUN ASSEMBLY- Controls the application of
water onto cleaning surface with trigger device.
PUMP OIL FILL- Port where pump oil is poured and
breather cap is located.
GAS TANK/CAP- Cap is removed and unleaded
gasoline is poured.
CHEMICAL INJECTION TUBE AND FILTER- Mixes
water and detergent in outlet water flow.
HIGH PRESSURE OUTLET- Connection for high pres
sure hose.
CHOKE- Lever used for starting unit.
CHOKE
THROTTLE
CONTROL
LEVER
GUN WAND BASKET
HANDLE
HIGH PRESSURE
HOSE
CHEMICAL GAS CAP
ASSEMBLY
MUFFLER
CHEMICAL INJECTION
TUBE & FILTER
CHEMICAL
AJUSTMENT
KNOB
WATER HOSE
INLET
HIGH PRESSURE
OUTLET
A Warning: Read Owner’s Manual. Do not attempt
to operate equipment until you have read Owners
ManualforSafe^, Operation, and Maintenance
Instructions.
Note: Included with your unit is a video cassette that
demonstrates how to operate your pressure washer,
if you have a video cassette recorder you should
view the video before operation.
A Warning: Never adjust spray pattern when spray
ing. Never put hands in front of spray nozzle to
adjust spray pattern because you could be injured.
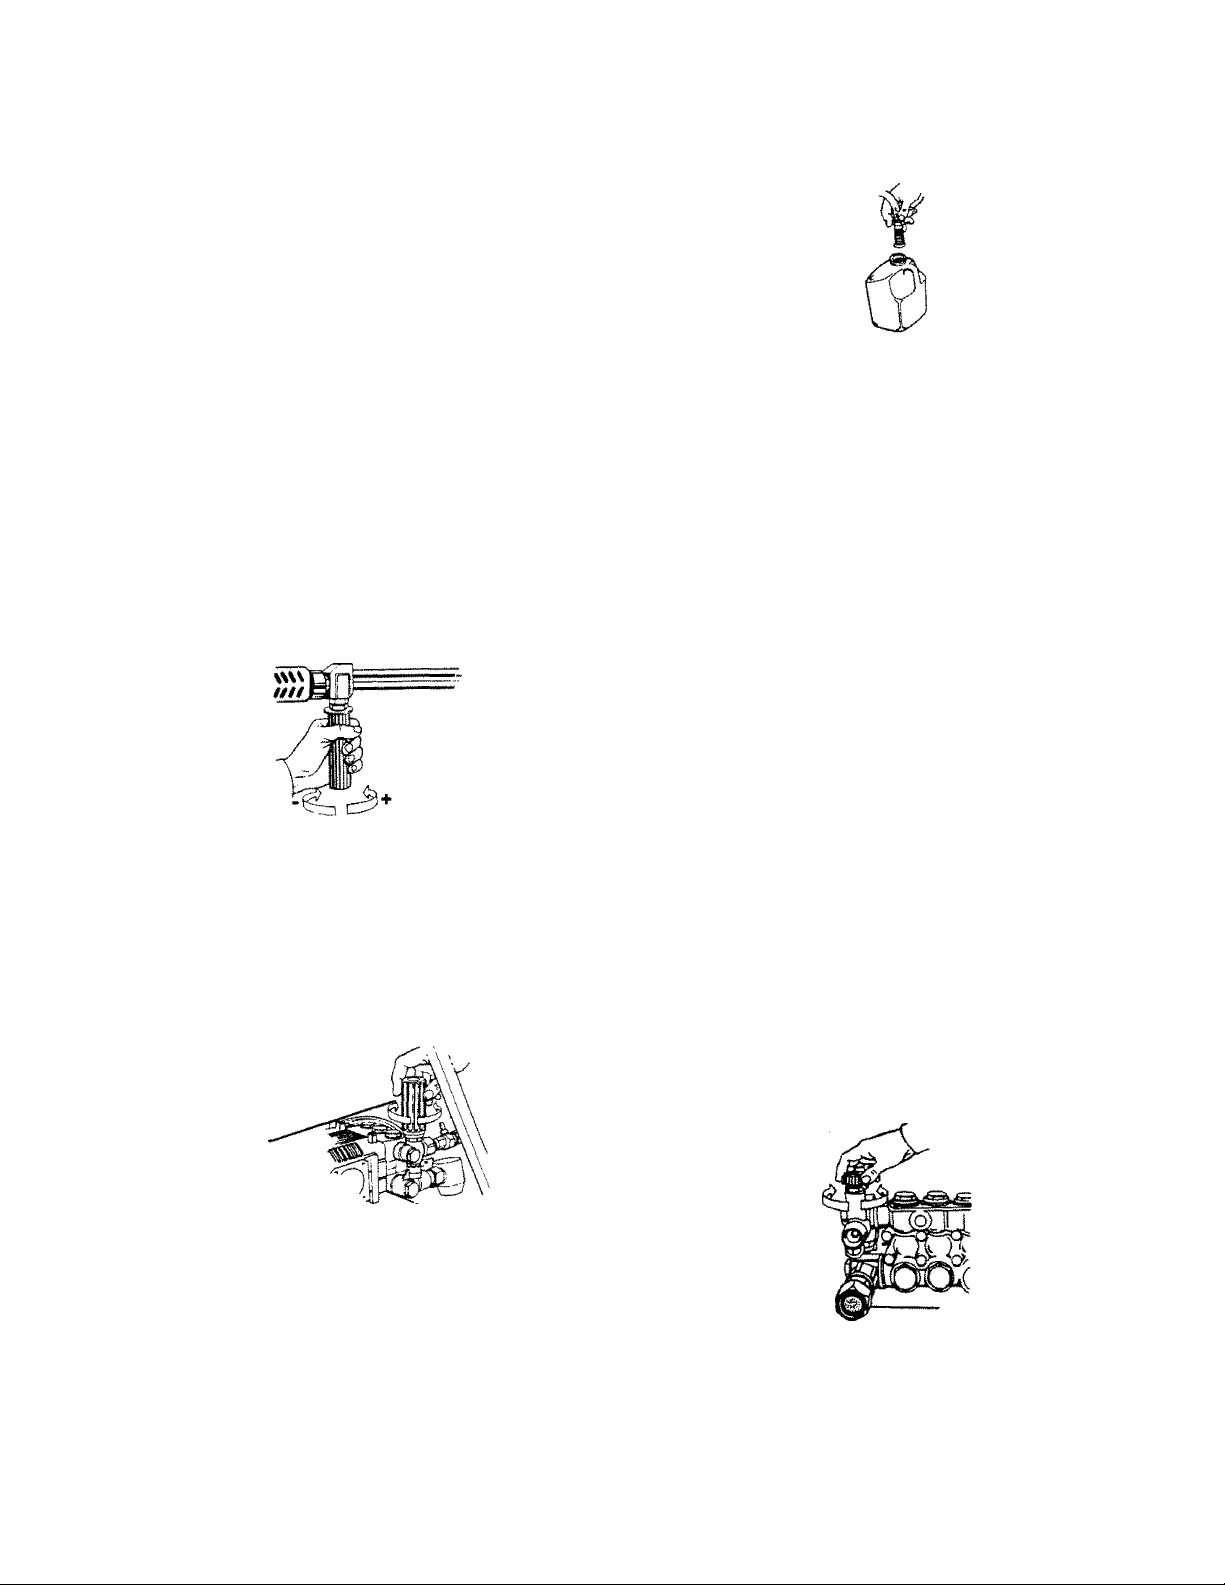
How To Use Your Pressure Washer
On the end of your spray gun is a handle that you can
twist from side to side. With this handle you can adjust
the spray pattern to either high pressure or low
pressure.
Л.
* Twist the handle in a clockwise direction to achieve
low pressure. Twist handle counterclockwise for high
pressure.
• For most effective cleaning, keep spray nozzle
between 8 and 24 inches of cleaning surface.
IMPORTANT: If you get spray nozzle too dose,
especially on high pressure, you may damage the
cleaning surface.
• The pressure control knob is located on the pump.
You can increase the pressure by turning the knob
clockwise or decrease the pressure by turning the
knob counterclockwise.
PRESSURE
CONTROL
KNOB
Prepare the soap/chemical as required by your job.
Insert soap/chemical line into your container
{soap/chemicals not included).
NOTE: The first step involves applying an appropriate
soap/chemical solution to penetrate and loosen grime.
The soap/chemical applied at low pressure to avoid
splashing, over spray and waste. Leave the solution
on surface for 3 to 5 minutes to allow solution to work.
NOTE: The second step involves cleaning the surface
you have prepared with the pressure washer and then
rinsing it clean.
• Turn the adjustable nozzle counter clockwise to low
pressure mode. Soap/chemicals cannot be applied
with nozzle in high pressure position.
• Review the use of the adjustable nozzle.
• Connect garden hose to water inlet {see 'To Start Your
Pressure Washer”), check that high pressure hose is
connected to spray gun and pump {see Assembly),
and start engine.
• Apply soap/chemicals to dry surface, starting from tl^H
bottom and working up.
• Allow the soap/chemicals to soak in between 3-5
minutes before washing and rinsing.
• For cleaning, start at lower portion of area to be
washed and work upward, using long, even over
lapping strokes.
Your pressure washer is equipped with a chemical
injector adjustment knob. With the knob fully opened
you will get a 7 to 1 water to chemical ratio. With knob
fully closed you will get no chemical draw. Turn knob in
counterclockwise direction to achieve more chemical
draw and clockwise for less chemical draw.
NOTE: The maximum pressure for the unit is factory
adjusted. Do not attempt to adjust beyond this factory
setting.
Using Soaps/Chenriicals
IMPORTANT: Use soaps and chemicals that are
designed specifically for use with pressure washers. To
apply soap/chemicals follow these steps:
• Prepare the soap/chemical as required by your job.
• Insert soap/chemical line into your container (soap/
chemicals not included).
After using the pressure washer, it is recommended
the pump, chemical injector and chemical line be
flushed with clear water. To do so, simply place
chemical injector hose in water and siphon for 1 to 2^B
minutes.

stopping Your Pressure Washer
A CAUTION: Do not run pump without the water
supply connected and turned on. Failure to do so
will result in pump damage.
To turn pressure washer off place the throttle control to
the off position.
• Simply shutting OFF engine will not release pressure
in the system. Squeeze the trigger on the spray gun
for about 3 seconds to relieve pressure. Spray
stream will decrease in length.
IMPORTANT: This unit is equipped with a thermal relief
valve. If unit is allowed to run for several minutes
without pressing the t/igger on the spray gun, several
drops of water may be released through this valve to
coo! the unit. This small amount of water will drip from
the bottom of the pump.
Engine Oil
Your unit has been shipped without oil in the engine.
A bottle of 10W-30 weight oil is included in the
carton. Remove oil dip stick located on the side of
engine. The oil dip stick is clearly marked with a
lines that tells you when unit has enough oil. Do not
fill above this point. Pour slowly.
NOTE: When adding oil to the engine crankcase, use
a high quality detergent oil classified “For Service
SG or SH rated 10W-30 weight. Use no special
additives. Select the oil’s viscosity grade according
to you expected operating temperatures.
RKCOMIiXMI>KD »AC VISCOSITY
in
BEFORE STARTING THE ENGINE
To operate the engine you wilt need to do the following.
A CAUTION: Always check engine oil level before
every start. Running engine low of oil or out of oil
could result in serious damage.
______________
A CAUTION: Always check pump oil level before
every start. Running pump low on oil could result
in pump damage.
Adding Pump Oil
Before running the high pressure washer, check the
pump oil level by viewing the sight glass on the side of
the pump. When properly filled, the oil will be at the
half way point marked by the two triangles. Your
pressure washer pump is shipped with oil. Add only if
oil level is lower than the half way point on the sight
glass. Do not ovetfill. Use 30 weight non-detergent oil
if necessary.
*Us« Of synmettc oil having SW-20 or 5W-30 rating is
acceptable, up to
*"Synthettc oils wilt provide better starting in extreme
cokJ (below -10'F)
Gasoline
Your pressure washer engine is 4 cycle. Use unleaded
fuel only.
A CAUTION: Do not overfill the fuel tank. Always
allow room for fuel expansion.
A WARNING: Never fill fuel tank indoors. Never
fill fuel tank when engine is running or hot. Do
not smoke or have open flame when filling fuel
tank.
For best results use only clean, fresh unleaded
gasoline with a pump sticker octane rating of 87 or
higher. In countries using the Research method, it
should be 90 octane minimum.
A CAUTION: Do Not use engine oil that has been
shipped with your unit in your pump. Engine oil is
detergent and your pump uses a non-detergent
oil. Detergent oil can cause damage to your pump.
 Loading...