

Page 1

D30333 Rev. 0 11/03/03
Owner’s Manual
5.5 Horsepower
2500 PSI
2.5 GPM
PRESSURE WASHER
• Safety Guidelines
• Assembly
• Operation
• Maintenance
• Storage
• Troubleshooting
• Repair Parts
Model No.
919.672190
CAUTION: Read the Safety Guidelines
and All Instructions Carefully Before
Operating.
Sold by Sears Canada, Inc. Toronto, Ont. M5B 2B
Page 2
2- ENG
D30333
TABLE OF CONTENTS
WARRANTY . . . . . . . . . . . . . . . . . . . . . . . . . . . . . . . . . . . . . . . . . . . . . . . .2
SPECIFICATION CHART . . . . . . . . . . . . . . . . . . . . . . . . . . . . . . . . . . . . .3
SAFETY GUIDELINES- DEFINITIONS . . . . . . . . . . . . . . . . . . . . . . . . . . .3
CONSUMER SAFETY INFORMATION . . . . . . . . . . . . . . . . . . . . . . . . . . .3
IMPORTANT SAFETY INSTRUCTIONS . . . . . . . . . . . . . . . . . . . . . . . .3-7
BOX CONTENTS . . . . . . . . . . . . . . . . . . . . . . . . . . . . . . . . . . . . . . . . . . . .7
ASSEMBLY . . . . . . . . . . . . . . . . . . . . . . . . . . . . . . . . . . . . . . . . . . . . . . .8-9
OPERATION . . . . . . . . . . . . . . . . . . . . . . . . . . . . . . . . . . . . . . . . . . . .10-15
MAINTENANCE . . . . . . . . . . . . . . . . . . . . . . . . . . . . . . . . . . . . . . . . .15-18
STORAGE . . . . . . . . . . . . . . . . . . . . . . . . . . . . . . . . . . . . . . . . . . . . . .19-20
TROUBLESHOOTING GUIDE . . . . . . . . . . . . . . . . . . . . . . . . . . . . . .21-23
REPAIR PARTS . . . . . . . . . . . . . . . . . . . . . . . . . . . . . . . . . . . . . . . . .24-39
HOW TO ORDER REPAIR PARTS . . . . . . . . . . . . . . . . . . . . . .Back Cover
WARRANTY
FULL ONE YEAR WARRANTY ON PRESSURE WASHERS
If this pressure washer fails due to a defect in material or workmanship within
one year from the date of purchase, RETURN IT TO THE NEAREST SEARS
SERVICE CENTER THROUGHOUT CANADA AND SEARS WILL REPAIR IT,
FREE OF CHARGE.
If this pressure washer is used for commercial or rental purposes, the warranty
will apply for ninety days (90) from the date of purchase.
This Craftsman pressure washer warranty gives you specific legal rights and you
may have other rights which vary from province to province.
Sears Canada, Inc., Toronto, Ont. M5B 2B8
Page 3
3- ENG
D30333
This product may not be equipped with a spark arresting
muffler. If the product is not equipped and will be used
around flammable materials, or on land covered with materials such as
agricultural crops, forest, brush, grass, or other similar items, then an approved spark arrester must be installed and is legally required in the state of
California. It is a violation of California statutes section 130050 and/or sections 4442 and 4443 of the California Public Resources Code, unless the
engine is equipped with a spark arrester, as defined in section 4442, and
maintained in effective working order. Spark arresters are also required on
some U.S. Forest Service land and may also be legally required under other
statutes and ordinances.
Engine exhaust contains chemicals known, in certain
quantities, to cause cancer, birth defects or other
reproductive harm.
CONSUMER SAFETY INFORMATION
Model No. 919.672190
Pressure Washer
Pressure 2500 PSI
Flow Rate 2.5 GPM
Cleaning Units (PSI x GPM) 6250
Engine
RPM 3600
Rated Horsepower 5.5
Spark Plug Gap .030” (0.76mm)
Gasoline Capacity .29 gallons (1.1 liters)
Oil .58 quarts ( .55 liters) capacity SAE 30 weight
SAFETY GUIDELINES - DEFINITIONS
Indicates an imminently
hazardous situation
which, if not avoided, will
result in death
or serious injury.
Indicates a potentially
hazardous situation
which, if not avoided, could
result in death
or serious injury
.
Indicates a potentially
hazardous situation
which, if not avoided, may
result in minor
or moderate injury.
Used without the safety
alert symbol indicates a
potentially hazardous situation which, if
not avoided, may result in pr
operty
damage.
This manual contains information that is important for you to know and understand.
This information relates to protecting YOUR SAFETY and PREVENTING
EQUIPMENT PROBLEMS. To help you recognize this information, we use the
symbols below. Please read the manual and pay attention to these symbols.
SPECIFICATION CHART
Page 4

4- ENG
D30333
IMPORTANT SAFETY INSTRUCTIONS
Read Operators Manual. Do not operate equipment until you
have read operators Manual for Safety, Assembly, Operation, and
Maintenance Instructions.
RISK OF EXPLOSION OR FIRE
HAZARD
WHAT CAN HAPPEN
HOW TO PREVENT IT
• Spilled gasoline and it’s vapors can become ignited from cigarette sparks,
electrical arcing, exhaust gases, and hot
engine components such as the muffler.
• Shut off engine and allow it to cool before
adding fuel to the tank.
• Use care in filling tank to avoid spilling fuel.
Move pressure washer away from fueling area
before starting engine.
• Heat will expand fuel in the tank which
could result in spillage and possible fire
explosion.
• Keep maximum fuel level ½” below top of
tank to allow for expansion.
• Operating the pressure washer in an explosive environment could result in a fire.
• Operate and fuel equipment in well ventilated
areas free from obstructions. Equip areas with
fire extinguisher suitable for gasoline fires.
• Materials placed against or near the pressure washer can interfere with its proper
ventilation features causing overheating
and possible ignition of the materials.
• Never operate pressure washer in an area
containing dry brush or weeds.
• Muffler exhaust heat can damage painted
surfaces, melt any material sensitive to
heat (such as siding, plastic, rubber, or
vinyl), and damage live plants.
• Always keep pressure washer a minimum of
four feet away from surfaces (such as houses,
automobiles, or live plants) that could be damaged from muffler exhaust heat.
• Improperly stored fuel could lead to accidental ignition. Fuel improperly secured
could get into the hands of children or
other unqualified persons.
• Store fuel in an OSHA approved container,
in a secure location away from work area.
• Use of acids, toxic or corrosive chemicals,
poisons, insecticides, or any kind of flammable solvent with this product could result in serious injury or death.
• Do not spray flammable liquids.
• Never fill cleaning solution tanks with
gasoline or other flammable solvent.
• Breathing exhaust fumes will cause serious
injury or death!
• Operate pressure washer in a well ventilated
area. Avoid enclosed areas such as garages,
basements, etc.
• Never operate unit in a location occupied by
humans or animals.
• Some cleaning fluids contain substances
which could cause injury to skin, eyes, or
lungs.
• Use only cleaning fluids specifically recommended for high pressure washers. Follow
manufacturers recommendations. Do not
use chlorine bleach or any other corrosive
compound.
RISK TO BREATHING
HAZARD
WHAT CAN HAPPEN
HOW TO PREVENT IT
READ AND SAVE THESE INSTRUCTIONS
Page 5

5- ENG
D30333
• Fuel or oil can leak or spill and could
result in fire or breathing hazard, serious
injury or death can result. Fuel or oil leaks
will damage carpet, paint or other
surfaces in vehicles or trailers.
• If pressure washer is equipped with a fuel
shut-off valve, turn the valve to the off
position before transporting to avoid fuel
leaks. If pressure washer is not equipped
with a fuel shut-off valve, drain the fuel from
tank before transporting. Only transport fuel
in an OSHA approved container. Always
place pressure washer on a protective mat
when transporting to protect against damage to vehicle from leaks. Remove pressure
washer from vehicle immediately upon arrival
at your destination.
• Your washer operates at fluid pressures
and velocities high enough to penetrate
human and animal flesh, which could
result in amputation or other serious injury.
Leaks caused by loose fittings or worn or
damaged hoses can result in injection
injuries. DO NOT TREAT FLUID
INJECTION AS A SIMPLE CUT! See a
physician immediately!
• Never place hands in front of nozzle.
• Direct spray away from self and others.
• Make sure hose and fittings are tightened
and in good condition. Never hold onto the
hose or fittings during operation.
• Do not allow hose to contact muffler.
• Never attach or remove wand or hose
fittings while system is pressurized.
• Do not use acids, gasoline, kerosene, or
any other flammable materials in this
product. Use only household detergents,
cleaners and degreasers recommended for
use in pressure washers.
• Read and understand all warnings and
instructions supplied by cleaning solution
manufacturer.
• Wear protective clothing to protect eyes
and skin from contact with sprayed
materials.
• Use of acids, toxic or corrosive chemicals,
poisons, insecticides, or any kind of flammable solvent with this product could result in serious injury or death.
RISK OF INJURY OR PROPERTY DAMAGE
WHEN TRANSPORTING OR STORING
HAZARD
WHAT CAN HAPPEN
HOW TO PREVENT IT
RISK TO FLUID
INJECTION
HAZARD
WHAT CAN HAPPEN
HOW TO PREVENT IT
• Injuries can result if system pressure is not
reduced before attempting maintenance or
disassembly.
RISK OF
CHEMICAL
BURN
HAZARD
WHAT CAN HAPPEN
HOW TO PREVENT IT
• To relieve system pressure, shut off engine,
turn off water supply, and pull gun trigger
until water stops flowing.
• Use only hoses and accessories rated for
pressure higher than your pressure
washer's p.s.i.
Page 6

6- ENG
D30333
• Reactive force of spray will cause
gun/wand to move, and could cause the
operator to slip or fall, or misdirect the
spray. Improper control of gun/wand can
result in injuries to self and others.
• Do not overreach or stand on an unstable
support. Grip gun/wand firmly with both
hands. Expect the gun to kick when triggered.
• If proper starting procedure is not
followed, engine can kickback causing
serious hand and arm injury.
• If engine does not start after two pulls,
squeeze trigger of gun to relieve pump
pressure. Pull starter cord slowly until
resistance is felt. Then pull cord rapidly
to avoid kickback and prevent hand or
arm injury.
• The spray gun/wand is a powerful cleaning tool that could look like a toy to a
child.
• Keep children away from the pressure
washer at all times.
• Contact with hot surfaces, such as
engines exhaust components, could
result in serious burn.
• During operation, touch only the control
surfaces of the pressure washer. Keep
children away from the pressure washer at all
times. They may not be able to recognize the
hazards of this product.
• Spray directed at electrical outlets or
switches, or objects connected to an
electrical circuit, could result in a fatal
electrical shock.
• Unplug any electrically operated product
before attempting to clean it. Direct spray
away from electric outlets and switches.
RISK OF UNSAFE OPERATION
HAZARD
WHAT CAN HAPPEN
HOW TO PREVENT IT
• Unsafe operation of your pressure washer
could lead to serious injury or death to
you or others.
• Do not use chlorine bleach or any other
corrosive compound.
• Become familiar with the operation and controls of the pressure washer.
• Keep operating area clear of all persons,
pets, and obstacles.
• Do not operate the product when fatigued
or under the influence of alcohol or drugs.
Stay alert at all times.
• Never defeat the safety features of this
product.
• Do not operate machine with missing,
broken, or unauthorized parts.
• Never leave wand unattended while unit is
running.
RISK OF
ELECTRICAL SHOCK
HAZARD
WHAT CAN HAPPEN
HOW TO PREVENT IT
RISK OF HOT
SURFACES
HAZARD
WHAT CAN HAPPEN
HOW TO PREVENT IT
Page 7

7- ENG
D30333
BOX CONTENTS
Handle
Part No. D22316 with
Screws Part No. D22901
High Pressure
Hose
Part No. D28094
Chemical Hose
Part No. H140
The powerful spray from your pressure washer is capable of causing
damage to surfaces such as wood, glass, automobile paint, auto
striping and trim, and delicate objects such as flowers and shrubs. Before spraying,
check the item to be cleaned to assure yourself that it is strong enough to resist damage
from the force of the spray. Avoid the use of the concentrated spray stream except for
very strong surfaces like concrete and steel.
Operating without flow of water will result in equipment damage. Operating the pressure
washer with water supply shutoff will void your warranty. You should never run this pressure washer for more than 2 minutes without pulling the trigger to allow cool water to
enter the pump and the heated (recirculated) water to exit.
RISK OF INJURY FROM SPRAY
HAZARD
WHAT CAN HAPPEN
HOW TO PREVENT IT
• High velocity fluid spray can cause
objects to break, propelling particles at
high speed.
• Light or unsecured objects can become
hazardous projectiles.
• Always wear ANSI approved Z87 safety
glasses.Wear protective clothing to protect
against accidental spraying.
• Never point wand at, or spray people or
animals.
• Always secure trigger lock when wand is not
in service to prevent accidental operation.
• Never permanently secure trigger in pull
back (open) position.
Bagged Parts
Engine Oil
Accessories Panel
Part No. D25081
Bagged Accessories Panel
Engine Frame, Wheel
Assembly, and Dual
Tank Cleaning System
English/
French
Owners
Manual
Knobs
Part No.
16471
Saddle
Bolts Part
No. D23196
Nozzle
Cleaning
Kit
Allen Wrench Part No. 16797
Cleaning Tool Part No. NCT001
Spray Gun
Part No. D27858
Multi-Adjustable Spray Wand
Part No. D23314
Page 8

8- ENG
D30333
ASSEMBLY
3. Connect wand to gun. Tighten
securely.
4. Attach high pressure hose to gun.
Tighten securely.
2. Place handle assembly onto frame
and connect handle to frame.
NOTE: Knobs are assembled to
the outside of frame.
5. To Assemble Accessories Panel
a. Remove top screws on
handle assembly.
b. Loosen bottom screws on
handle assembly.
c. Place grooves in accessories
panel assembly onto screws
and slide panel assembly into
place.
Loosen
Remove
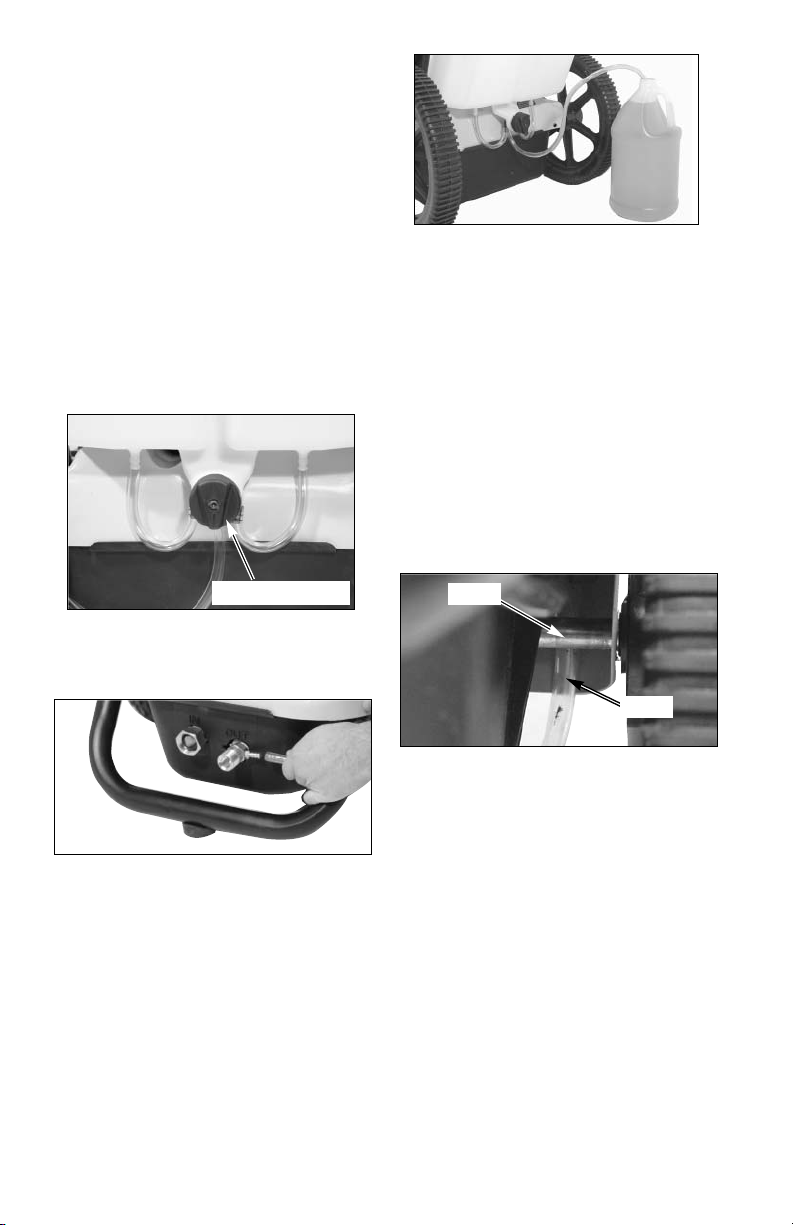
1. Remove cleaning solution tanks
from frame assembly. Slide tanks up
and away from frame assembly.
Screws
Page 9

9- ENG
D30333
7. Attach cleaning solution hose to
barb fitting on control valve located
at the rear of unit.
d. Place screws (removed
earlier) into the top holes and
secure accessories panel
assembly to handles. Do not
overtighten.
6. Reinstall cleaning solution tanks.
Tilt cleaning solution tanks toward
engine, slide onto handles, and
snap into place.
barb fitting
Page 10

10- ENG
D30333
OPERATION
High
Pressure
Pump
Engine
High
Pressure
Hose
Spray
Gun
MultiAdjustable
Spray Wand
Hand
Grip
Air Filter
Fuel Valve
Lever
Choke
Control
Throttle
Control
Chemical Injector Rinsing Hose (not
shown): Rinses the chemical injector
after use of cleaning solution.
Dual Tank Cleaning System: Allows
easily switching from one cleaning
solution to another depending on the
cleaning task by simply turning the
control valve knob.
ENGINE
Choke Control: Opens and closes
carburetor choke valve
Throttle Control Lever: Controls
engine speed.
Starter Grip: Pulling starter grip
operates recoil starter to crank engine.
Fuel Valve Lever: Opens and closes
connection between fuel tank and
carburetor.
PRESSURE WASHER
High Pressure Pump (located inside
the shroud): Increases the pressure of
the water supply.
Engine: Drives the high pressure
pump.
High Pressure Hose: Carries the
pressurized water from the pump to
the gun and spray wand.
Spray Gun: Connects with spray wand
to control water flow rate, direction,
and pressure.
Multi-Adjustable Spray Wand: Has a
spray nozzle which adjusts from a
pencil stream (0°) to a wide angle fan
spray (40°). The spray can be adjusted
by twisting the nozzle clockwise
and/or counterclockwise. Also, the
high and low pressure settings can be
controlled by moving the nozzle in and
out. See Operation section. See How
To Use Spray Wand paragraph in this
section.
READ THIS OPERATION MANUAL AND SAFETY RULES BEFORE OPERATING
YOUR UNIT. Compare the illustrations with your unit to familiarize yourself with
the location of various controls and adjustments. Save this manual for future
reference.
Dual Tank
Cleaning
System
Page 11

11- ENG
D30333
HOW TO USE SPRAY WAND:
Your pressure washer is equipped with
a multi-adjustable spray wand with
both high and low pressure settings.
The high pressure setting is for
cleaning and rinsing, the low pressure
setting is for applying cleaning
solutions to surfaces.
When using the high
pressure setting, DO
NOT allow the jet-like spray to come
in contact with unprotected skin,
eyes, or with any pets or animals.
Serious injury can occur.
Risk of injection or
injury to person. DO
NOT direct discharge stream toward
persons.
For high pressure operation, pull back
the nozzle of the multi-adjustable
spray wand as shown.
TO ADJUST PRESSURE
The pressure setting is preset at the
factory to achieve optimum pressure
and cleaning. If you need to lower the
pressure, it can be accomplished by
these methods.
1. Back away from the surface to be
cleaned. The further away you are,
the less the pressure will be on
the surface to be cleaned.
2. Rotate the nozzle at the end of
the multi-adjustable spray wand
to widen the fan spray. The wider
fan spray will minimize the
pressure on the surface to be
cleaned.
DO NOT attempt to
increase pump
pressure. A higher pressure setting
than the factory set pressure may
damage pump.
HOW TO USE
IMPORTANT: Read and understand
how to use the pressure washer
before operating.
PRESSURE WASHER
TERMINOLOGY
PSI: Pounds per Square Inch. The unit
of measure for water pressure. Also
used for air pressure, hydraulic
pressure, etc.
GPM: Gallons Per Minute. The unit of
measure for the flow rate of water.
CU: Cleaning Units. GPM multiplied by
PSI.
Bypass Mode: In Bypass Mode, the
pump is recirculating water because
the trigger of the spray gun is not
pulled. If unit is left in bypass mode for
more than two (2) minutes, the water
temperature will rise to a dangerous
level and could damage internal
components of the pump. Any
damage to pump due to these causes
will not be covered under warranty.
DO NOT allow your
unit to operate in
bypass mode for more than two
minutes at any time. Overheating of
pump can cause damage to pump.
Thermal Relief Valve: In an effort to
prevent extreme damage, pumps are
equipped with a thermal relief valve.
This valve will open when the
temperature inside the pump rises too
high. This valve will then release a
gush of water in an effort to lower the
temperature inside the pump.
Immediately after this occurs, the
valve will close. The thermal relief
valve is part of the pump and is not
visible to the user.
Chemical Injection System: Mixes
cleaners or cleaning solvents with the
water to improve cleaning
effectiveness.
Water Supply: All pressure washers
must have a source of water. The
minimum requirements for a water
supply are 20 PSI and 5 gallons per
minute.
high
pressure
Page 12

12- ENG
D30333
3. Fill cleaning solution tanks with
desired cleaning solution. Each
tank holds approximately 1.25
gallon. NOTE: The cleaning
solution/water ratio is 7:1, for
every 7 gallons of water pumped,
1 gallon of cleaning solution will
be used.
Never fill cleaning
solution tanks with
gasoline or other flammable solvent.
4. Turn control valve knob toward
tank with desired cleaning
solution.
5. Set multi-adjustable nozzle to low
pressure setting. See How To Use
Spray Wand paragraph in this
section.
6. After use of cleaning solution the
chemical injector MUST be rinsed,
follow the instructions in the
Shutting Down paragraph after
each use.
NOTE: Cleaning solutions will not
siphon when spray wand is in the high
pressure setting.
DUAL TANK CLEANING
SOLUTION TIPS
1. Each tank may be filled with
different cleaning solutions
depending on the task to be
performed. Example: deck and
driveway. Fill one tank with deck
cleaning solution and the other
with driveway cleaning solution.
Clean the deck with the deck
cleaning solution and then simply
turn the control knob toward the
driveway cleaning solution and
clean the driveway.
The nozzle at the end of the multiadjustable spray wand can be rotated
to change the high pressure spray
pattern from a narrow jet to a 40º fan
shape, as shown. Markings have been
placed on the nozzle to help you
select the spray pattern.
For low pressure operation, extend the
nozzle of the multi-adjustable spray
wand as shown.
40º fan spray
narrow jet stream
HOW TO USE THE DUAL TANK
CLEANING SYSTEM
NOTE: Use only soaps and cleaning
solutions designed for pressure
washer use. Do not use bleach.
To apply cleaning solutions:
1. Make sure cleaning solution tanks
are assembled and all hoses are
connected.
2. Turn control valve knob arrow to
the down (off) position as shown.
Control Valve Knob
Tank to
be used
low
pressure
Page 13

13- ENG
D30333
TO SHUT DOWN
IMPORTANT: Read and understand
how to shut down the pressure
washer before operating.
1. After use of cleaning solution the
chemical injector MUST be rinsed in
order to prevent pump damage
caused by solution build up. The
warranty will not cover pumps that
are damaged because the chemical
injector was not properly rinsed.
To rinse chemical injector using
chemical injector rinsing hose
a. Remove cleaning solution
hose from chemical injector
barb fitting.
b. Push chemical injector rinsing
hose onto the chemical
injector barbed fitting.
2. If only one cleaning solution is
being used both tanks may be
filled with the same solution to
double the capacity before refilling
tanks.
3. If only one cleaning solution is
being used the second tank may
be filled with clean water to
conveniently rinse the chemical
injector after use.
c. Place other end of chemical
injector rinsing hose into
container of clean water and
depress trigger to draw at least
one gallon of clean water
through chemical injection
system to rinse system
thoroughly.
d. Before reconnecting cleaning
solution hose to chemical
injector barb fitting make sure
that any remaining cleaning
solution has been completely
drained from the cleaning
solution hose.
To rinse chemical using cleaning
solution system tank
a. Turn control valve knob arrow
to the down (off) position.
b. Fill one of the cleaning
solution system tanks with
clean water.
c. Turn control valve knob
toward tank with clean water.
d. Depress trigger to draw clean
water through chemical
injection system to rinse
system thoroughly.
2. Turn engine off by placing the
throttle control in the OFF
position.
NOTE: NEVER turn the water off
with the engine running.
Control Valve Knob
Tank to
be used
Page 14

14- ENG
D30333
1. In a well ventilated outdoor area
add fresh, high quality, unleaded
gasoline with a pump octane
rating of 86 or higher. Do not
overfill. Wipe up spilled fuel before
starting the engine.
2. Remove filler cap/dipstick and
add engine oil (supplied) to
engine. NOTE: There will be a
slight amount of oil in the engine
from factory testing. Always check
oil level before each start-up.
3. Verify the filter screen is in water
inlet of pump. NOTE: Cone side
faces out.
4. Connect high pressure hose to
pump outlet.
5. Connect water source to pump
inlet.
NOTE: Water source must provide a
minimum of 5 gallons per minute at
20 p.s.i.
Water
Source
High
Pressure
Hose
Filter Screen
BEFORE STARTING
Read and understand all Important
Safety Instructions in the front of
this manual and the following
Cautions and Warnings before
starting the pressure washer.
• Never fill fuel tank completely.
Fill tank to 1/2" below bottom of
filler neck to provide space for
fuel expansion. Wipe any fuel
spillage from engine and
equipment before starting
engine.
• Never fill fuel tank indoors.
Never fill fuel tank when engine
is running or hot. Do not smoke
when filling fuel tank.
• Never run engine indoors or in
enclosed, poorly ventilated
areas. Engine exhaust contains
carbon monoxide, an odorless
and deadly gas.
• Never turn water supply off
while pressure washer engine is
running or damage to pump will
result.
• DO NOT use hot water, use cold
water only.
• DO NOT stop spraying water for
more than two minutes at a
time.
Filler cap/dipstick
3. Turn the fuel valve to the OFF
position if engine will not be
restarted soon.
4. Turn water source off.
5. Pull trigger on spray gun to relieve
any water pressure in hose or
spray gun.
6. See Storage section in this
manual for proper storage
procedures. NOTE: Cleaning
solution must be removed from
cleaning solution tanks if storing
unit longer than 30 days, see
Storage section for correct
procedure.
Page 15

15- ENG
D30333
6. If applying a cleaning solution, see
How To Use the Dual Cleaning
Solution System in Operation
section of this manual.
7. Turn water source on.
NOTE: Failure to do so could cause
damage to the pump.
8. Turn fuel valve to the ON position,
1/4 turn counterclockwise.
9. Move the choke control lever to
the CHOKE ON position and
the throttle control to the FAST
position. NOTE: No choke is
needed to start a warm engine.
10. Pull starter grip slowly until you
feel resistance, then pull briskly.
Return starter grip gently. Pull
rope with a rapid full arm stroke.
Let rope rewind slowly. Repeat if
necessary.
Fuel Valve Knob
Choke
Control
Throttle
Control
If the engine does
not start after two
pulls, pull the trigger to relieve the
pressure.
11. If the choke was used to start the
engine, move the choke lever to
the OFF position.
12. Depress trigger on gun to start
water flow. NOTE: Stand on a
stable surface and grip
gun/spray wand firmly with both
hands. Expect the gun to kick
back when triggered.
13. Release trigger to stop water flow.
14. Adjust nozzle spray for the task
being performed. See How To
Use Spray Wand instructions in
this section.
DO NOT let hoses
come in contact with
very hot engine muffler during or
immediately after use of your
pressure washer.
MAINTENANCE
When performing maintenance, you may be exposed to hot
surfaces, water pressure, or moving parts that can cause
serious injury or death!
Before performing any maintenance or repair, disconnect spark plug wire,
let engine cool and release all water pressure. The engine contains
flammable fuel. DO NOT
smoke or work near open flames while performing
maintenance.
To ensure efficient operation and longer life of your pressure washer, a routine
maintenance schedule should be prepared and followed. If the pressure washer is
used in unusual conditions, such as high-temperatures or dusty conditions, more
frequent maintenance checks will be required.
Page 16

16- ENG
D30333
CUSTOMER RESPONSIBILITIES TABLE
MAINTENANCE TASK
PRESSURE WASHER
ENGINE
check/clean inlet screen
check high pressure hose
check soap and chemical
hose and filter
check gun and wand for leaks
check oil level
change oil
check air filter
clean/replace spark plug
prepare for storage
Before
each use
Every 25
hours or
yearly
Every 50
hours or
yearly
Every 100
hours or
yearly
Prepare unit for storage if it is to remain idle for longer
than 30 days
X
X
X
X
X
X
X
X
ENGINE
To Check Oil
1. Shut down engine and place on a
level surface.
2. Remove filler cap/dipstick and wipe
it clean.
3. Insert and remove the filler
cap/dipstick without screwing it
into the filler neck. Check the oil
level shown on the dipstick.
Filler cap/dipstick
4. If the oil level is low, fill to the edge
of the oil filler hole with the SAE
10W-30 oil.
NOTE: Other viscosities shown in the
chart may be used when the average
temperature in your area is within the
recommended range.
Oil Filler
Cap/Dipstick
Upper Limit
Lower Limit
SAE Viscosity Grades
**
*
Synthetic 5W-30, 10W-30
-20 0 20 40 60 80 100
F
-30 -20 -10 0 10 20 30 40
C
STARTING TEMPERATURES RANGE
ANTICIPATED BEFORE NEXT OIL CHANGE
32
Page 17

17- ENG
D30333
To Change Oil
Drain the engine oil when the engine is
warm. Warm oil drains quickly and
completely.
1. Turn the fuel valve to the OFF
position, 1/4 turn clockwise.
2. Place a suitable container next to
the engine to catch the used oil.
3. Remove filler cap/dipstick and
drain the oil into the container by
tipping the engine toward the oil
filler neck.
NOTE: Please dispose of used motor
oil in a manner that is compatible with
the environment. It is recommended to
take used oil in a sealed container to
your local recycling center or service
station for reclamation. Do not throw it
in the trash or pour it on the ground or
down a drain.
4. With the engine in a level position,
fill to the upper limit mark on the
dipstick with SAE 10W-30 oil.
Engine oil capacity is 0.58 quart
(.055 liter). NOTE: Other viscosities
shown in the chart in the “To
Check Oil” paragraph may be
used.
5. Replace the oil filler cap/dipstick
securely.
Upper Limit
Lower Limit
Oil Filler Neck
Oil Filler
Cap/Dipstick
Air Cleaner
A dirty air cleaner will restrict air flow to
the carburetor and cause poor engine
performance. Inspect the filter each
time the engine is operated. Clean the
filter more frequently if the engine is
operated in very dusty areas.
NOTICE: Operating the engine without
a filter, will allow dirt to enter the
engine, causing rapid engine wear. This
type of damage is not covered under
the warranty.
Inspect
1. Press the latch tabs on the top of
the air cleaner cover and remove
the cover. Check the filter to be
sure it is clean and in good
condition.
2. Reinstall the filter and air cleaner
cover.
Cleaning
1. Tap the filter several times on a
hard surface to remove dirt or
blow compressed air [not
exceeding 30 psi (207kPa, 1.2
kg/cm
2
) through the filter from the
clean side that faces the engine.
Never try to brush off dirt.
Brushing will force dirt into the
fibers.
2. Wipe dirt from the air cleaner body
and cover using a moist rag. Be
careful to prevent dirt from
entering the air duct that leads to
the carburetor.
Air Cleaner Body
Filter
Air
Cleaner
Cover
Latch
Tabs
Lower
Tabs
Air Duct
Page 18

18- ENG
D30333
3. Pull trigger on gun handle to
relieve any water pressure.
4. Disconnect the wand from the
gun.
5. Remove the nozzle from the end
of the wand with the 2mm allen
wrench provided as shown.
6. Clean the nozzle using the nozzle
cleaner provided or a straightened
paper clip. Insert into the nozzle
end and work back and forth until
obstruction is removed.
7. Direct water supply into nozzle
end to backflush loosened
particles for 30 seconds.
8. Reconnect spark plug wire.
9. Reassemble the nozzle to the
wand. Tighten securely to prevent
leaks.
10. Reconnect wand to gun and turn
on water supply.
11. Start pressure washer and place
wand into high pressure setting to
test.
NOZZLE CLEANING
If the nozzle becomes clogged with
foreign materials, such as dirt,
excessive pressure may develop. If the
nozzle becomes partially clogged or
restricted, the pump pressure will
pulsate. Clean the nozzle immediately
using the nozzle kit supplied and the
following instructions:
1. Shut off the pressure washer and
turn off the water supply.
2. Disconnect spark plug wire.
Clean and Replace Spark Plug
Change the spark plug every 100 hours
of operation or once each year,
whichever comes first. This will help
your engine to start easier and run
better.
Resistor
.030” (0.76 MM)
Wire Gauge
PUMP
This screen filter should be checked
periodically and cleaned if necessary.
1. Remove filter by grasping end and
removing it from water inlet of
pump as shown.
2. Clean filter by flushing it with water
on both sides.
3. Re-insert filter into water inlet of
pump. NOTE: Cone side faces
out.
NOTE: Do not operate pressure
washer without filter properly installed.
Filter Screen
Page 19

19- ENG
D30333
ENGINE
IMPORTANT: It is important to prevent
gum deposits from forming in essential
fuel system parts such as the
carburetor, fuel filter, hose or tank
during storage. Also, experience
indicates that alcohol-blended fuels
(called gasohol or using ethanol or
methanol) can attract moisture which
leads to separation and formation of
acids during storage. Acidic gas can
damage the fuel system of an engine
while in storage. To avoid engine
problems, the fuel system should be
emptied before storage of 30 days or
longer. Never use engine or carburetor
cleaner products in the fuel tank or permanent damage may occur.
Engine Preparation
1. First add a fuel stabilizer to the
fuel tank.
2. Run pressure washer for a full 5
minutes to allow fuel stabilizer to
enter the fuel system.
While preparing the
engine make sure
water supply is turned on and
flowing to the unit. NEVER run unit
without water supply running
through pump. Failure to do so will
cause pump damage.
3. Next shut off engine and
disconnect the water supply.
4. Disconnect the spark plug wire
and remove the spark plug.
5. Add one teaspoon of oil through
the spark plug hole.
6. Place rag over spark plug hole and
pull the recoil a few times to
lubricate the combustion chamber.
7. Replace the spark plug, but do not
connect the spark plug wire.
PUMP
1. Drain all water from high
pressure hose, coil it, and store it
in cradle of the pressure washer
handle.
2. Drain all water from spray gun
and spray wand by holding spray
gun in a vertical position with
nozzle end pointing down and
squeezing trigger. Store in
gun/hose holder.
3. Store chemical injector rinsing
hose, high pressure hose, spray
gun, and spray wand so they are
protected from damage, such as
being run over.
It is recommended that you follow
these steps to protect the internal seals
of the pressure washer when STORING
THE UNIT FOR MORE THAN 30 DAYS
AND/OR WHEN FREEZING
TEMPERATURES ARE EXPECTED.
*RV antifreeze needs to be run through
the pump as outlined in the steps
below.
4. Obtain a funnel, six ounces of *RV
antifreeze, and approximately 36
inches of garden hose with a male
hose connector attached to one
end.
Use only RV
antifreeze. Any other
antifreeze is corrosive and can
damage pump.
5. Disconnect spark plug wire.
6. Connect 36 inch length of hose
to water inlet of pump.
STORAGE
Page 20
20- ENG
D30333
4. Turn control valve toward tank to
be drained.
5. Repeat steps 3-4 to drain second
tank.
6. Turn control valve knob to the
down (off) position.
7. Fill tanks with clean water.
8. Turn valve toward tank and drain
water from tank. Repeat on
second tank. NOTE: This will rinse
cleaning solution tanks.
9. Route the cleaning solution hose
over the axle and reconnect
cleaning solution hose to chemical
injector for future use.
7. Add *RV antifreeze to hose as
shown.
8. Pull engine starter rope slowly
several times until antifreeze
comes out of high pressure hose
connection of pump.
9. Remove short hose from water
inlet of pump.
10. Reconnect spark plug wire.
* Windshield washer fluid may also be
used
DUAL TANK CLEANING
SYSTEM
1. Turn control valve knob to the
down (off) position.
2. Remove cleaning solution hose at
chemical injector and pull it over
the axle and to the rear of the unit.
3. Place end of cleaning solution
hose into a suitable container to
drain cleaning solution.
Control Valve Knob
Axle
Hose
Page 21
21- ENG
D30333
TROUBLESHOOTING GUIDE
PROBLEM
CAUSE
CORRECTION
Engine will not
start
1. No fuel.
2. Pressure builds up after
two pulls on the recoil
starter or after initial use.
4. Spark plug wire not
attached.
5. Choke lever in the
"Choke" position on a
"hot" engine or an engine
that has been exposed to
thermal heat for a long
period of time.
6. Fuel valve closed
1. Add Fuel.
2. Squeeze gun trigger to
relieve pressure.
4. Attach spark plug wire.
5. Move choke to the "No
Choke" position.
6. Move the fuel valve knob to
the "Open" position.
No or low
pressure
(initial use)
1. Wand not in high
pressure.
1. See How to Use Spray
Wand paragraph in the
Operation Section.
2. Low water supply.
2. Water supply must be at
least 5 GPM @ 20 PSI.
3. Leak at high pressure
hose fitting.
3. Tighten. Apply sealant tape
if necessary.
4. Nozzle obstructed.
5. Water filter screen
clogged.
5. Remove and clean filter.
4. See Spray Wand
paragraph in the
Maintenance section for
the correct procedure.
3. Choke lever in the “No
Choke” position.
3. Move choke to the
“Choke” position.
Page 22

22- ENG
D30333
6. Air in hose.
6. Turn off the engine, then the
water source. Disconnect
the water source from the
pump inlet and turn the
water source on to remove
all air from the hose. When
there is a steady stream of
water present, turn water
source off. Reconnect water
source to pump inlet and
turn on water source.
Squeeze trigger to remove
remaining air.
7. Choke lever in the
"Choke" position.
8. Throttle control lever is
not in the "Fast" position.
9. High pressure hose is too
long.
7. Move choke to the "No
Choke" position.
8. Move throttle control lever to
the "Fast" position.
9. Use high pressure hose
under 100 feet.
PROBLEM
CAUSE
CORRECTION
No or low
pressure
(initial use)
(continued)
6. Chemical build up in
chemical injector.
Will not draw
cleaning solution
1. Wand not in low
pressure.
2. Filter clogged on
chemical injector rinsing
hose.
3. Screen on end of
chemical injector rinsing
hose not in water
4. Chemical too thick
5. Pressure hose is too long
2. Clean filter.
3. Make sure end of chemical
injector rinsing hose is fully
submerged into clean water.
4. Dilute chemical. Chemical
should be the same
consistency as water.
5. Lengthen water supply hose
instead of high pressure
hose.
6. Have parts cleaned or
replaced by AWSC.
1. See Spray Wand paragraph
in the Maintenance section
for the correct procedure.
7. Hoses are not
connected.
7. Make sure all hoses are
connected at valve.
8. Control valve is in the
down (off) position or
pointed toward the tank
not being uses.
8. Turn control valve toward
tank being used.
Page 23
23- ENG
D30333
PROBLEM
CAUSE
CORRECTION
No or low
pressure (after
period of normal use.)
Water leaking
at gun/wand
connection
Water leaking
at pump
1. Worn seal or packing.
2. Worn or obstructed
valves.
3. Worn unloader piston.
1. Worn or broken o-ring.
2. Loose hose connection.
1. Loose connections.
2. Piston packings worn.
3. Worn or broken o-rings.
4. Pump head or tubes
damaged from freezing.
1. Have replaced by AWSC.
2. Have replaced by AWSC.
3. Have replaced by AWSC.
1. Check and replace.
2. Tighten.
1. Tighten.
2. Have replaced by AWSC.
3. Have replaced by AWSC.
4. Have replaced by AWSC.
1. Nozzle obstructed.
1. See Spray Wand paragraph
in the Maintenance section
for the correct procedure.
Pump
Pulsates
Page 24

24- ENG
D30333
REPAIR PARTS
Pressure Washer Model Number 919.672190
Key# Part # Description
2 D23124 Label, Danger
3 D23125 Label, Hot Surface
4 * Pump Kit
5 D27152 Screw, 5/16-24
10 D27956 Screw, 3/8-16-18 x 1.25
14 D22267 Plug
16 D21963 Wheel
17 D22268 Isolator
18 D23208 Screw, 1/4-20
19 W137 Pal Nut
23 D21630 Pump Shroud
26 D27959 Dual Tank Cleaning System
* See Breakdown for individual Parts
26
3
2
14
16
19
16
5
Torque to
120 - 240
in.-lbs.
10
Torque to
120 - 240
in.-lbs.
23
4
17
18
Page 25

25- ENG
D30333
Key# Part # Description
1 * Engine, Honda GCV160A
2 17050 Label, Danger
3 D23125 Label, Hot Surface
6 D22908 Frame
7 D25074 Base
8 D22904 Label, Moving Parts
9 D23099 Axle
12 D22308 Screw, 5/16-18
15 D22692 Nut, 5/16-18
24 D25087 Label, Warning
25 D27926 Cleaning Solution H ose
Not Shown
D30333 Manual, Owners
* See Breakdown for individual Parts
REPAIR PARTS
Pressure Washer Model Number 919.672190
6
24
9
15
Torque to
120-240 in.-lbs.
25
1
3
2
12
7
8
Page 26

26- ENG
D30333
REPAIR PARTS
Key# Part # Description
1 D20998 Hose, 3/8 x 18”
2 18139 Unloader Assembly
3 16848 Thermal Relief Valve
4 H061 Swivel Nut, Garden Hose
5 H068 Swivel, 3/8”
6 D29372 Chemical Injector
7 F187 Inlet ScreenFilter
8 D25006 Set Screw
Not Shown:
H140 Chemical Hose
Pressure Pump Model Number D28703
2
1
3
5
4
6
7
8
Page 27

27- ENG
D30333
REPAIR PARTS
Honda Engine Model Number GCV160A
Ref Description Part Number H/C Qty
1 Cylinder Assembly 12000-ZL8-405 6315691 1
2 Clip, Valve Guide 12216-ZE5-300 2399780 1
3 Cover, Head 12311-ZL8-000 5579990 1
4 Cover, Breather
(Breather Valve Assy) 12355-ZL8-000 5580006 1
5 Bolt, Flange (6x12) (CT200) 90013-883-000 0636845 4
6 Bolt, Flange (6x14) 90014-952-000 0803619 1
7 Oil Seal (25.4x62x6) 91201-ZL8-003 5581038 1
8 Spark Plug (BPR6ES)(NGK) 98079-56846 1441112 1
CYLINDER BARREL
Page 28

28- ENG
D30333
REPAIR PARTS
Honda Engine Model Number GCV160A
Ref Description Part Number H/C Qty
1 Pan Assembly, Oil (SAE) 11300-ZOL-820 6696686 1
2 Gasket, Oil Filler Cap 15625-ZE1-003 4497947 1
4 Shaft, Governor Holder 16508-ZM0-010 6384341 1
5 Governor Assembly 16510-ZM0-010 6384333 1
6 Weight Governor 16511-ZL8-000 5580287 2
7 Holder, Governor Weight 16512-ZM0-000 5580295 1
8 Pin, Governor Weight 16513-ZE1-000 1427244 2
9 Slider, Govenor 16531ZE1-000 1427251 1
10 Shaft, Governor Arm 16541-ZM0-000 5580303 1
11 Bolt, Flange (6x14) 90014-952-000 0803619 1
12 Bolt, Flange (6x25) 90121-952-000 0748111 8
13 Washer, Thrust (28x41.25x6) 90451-ZE1-000 2413862 1
14 Clip, Governor Holder 90602-ze1-000 2456697 1
15 Oil Seal (28x41.25x6) 91202-ZM0-V31 6315865 1
16 Washer, Plain (6mm) 94101-06800 0345900 1
17 Pin, Lock (8mm) 94251-08000 0115527 1
18 Pin, Dowel 98c20) 94301-08200 1417369 2
19 Gauge Assy., Oil Level 15650-ZM0-003 5722996 1
20 Bolt, Drain Plug 90131-896-650 1986231 1
21 Washer, Drain Plug 94109-12000 0171868 1
OIL PAN
Page 29

29- ENG
D30333
REPAIR PARTS
Honda Engine Model Number GCV160A
Ref Description Part Number H/C Qty
5 Washer, Thrust 90402-ZL8-000 5581012 1
6 Crankshaft 13310-Z0L-650 6696702 1
CRANKSHAFT
Page 30

30- ENG
D30333
REPAIR PARTS
Honda Engine Model Number GCV160A
Ref Description Part Number H/C Qty
1 Piston 13101-ZL8-000 5580014 1
2 Pin, Piston 13111-ZE0-000 1426576 1
3 Rod Assy., Connecting 13200-ZL8-000 5580022 1
4 Bolt, Connecting Rod 90001-ZE1-000 1431055 2
5 Clip, Pistion Pin (13mm) 90551-ZE0-000 2605517 2
6 Ring Set, Piston (TEIKOKU) 13010-ZL8-014 6315717 1
CRANKSHAFT
Page 31

31- ENG
D30333
REPAIR PARTS
Honda Engine Model Number GCV160A
Ref Description Part Number H/C Qty
1 Pulley, Camshaft 14320-ZL8-000 5580055 1
2 Shaft, Cam Pulley 14324-ZL8-000 5580063 1
3 Belt, Timing (84HU7 G-200) 14400-Z0J-004 6637417 1
4 Arm, In. Valve Rocker 14431-ZL8-000 5580089 1
5 Arm, EX. Valve Rocker 14441-ZL8-000 5580097 1
6 Shaft, Rocker Arm 14461-ZL8-000 5580105 2
7 Valve, In. 14711-ZL8-000 5580113 1
8 Valve, Ex 14721-ZL8-000 5580121 1
9 Spring, Valve 14751-ZL8-000 5580139 2
10 Retainer, In. Valve Spring 14771-ZE1-000 1426980 2
11 Screw, Tappet Adj. 90012-333-000 0294819 2
12 Nut, Tappet Adj. 90206-001-000 0004598 2
13 O-Ring (6.8x1.9) 91301-ZM0-V31 6315873 1
CRANKSHAFT PULLEY
Page 32

32- ENG
D30333
REPAIR PARTS
Honda Engine Model Number GCV160A
Ref Description Part Number H/C Qty
1 Starter Assy., Recoil *NH1*
(black) 28400-ZL8-013ZA 6061204 1
2 Knob, Recoil Starter 28461-ZL8-003 5580634 1
3 Rope, Recoil Starter 28462-ZL8-003 5611454 1
4 Nut, Flange (6mm) 90201-ZM0-000 6478812 3
CRANKSHAFT PULLEY
Page 33

33- ENG
D30333
REPAIR PARTS
Honda Engine Model Number GCV160A
Ref Description Part Number H/C Qty
1 Rubber, Supporter (107mm) 16854-ZH8-000 3683646 1
2 Petcock Assy. (MAN) 16950-ZG9-M02 5028923 1
3 Bracket, Petcock 16956-ZM0-000 5580394 1
4 Cap Assy., Fuel Tank 17620-ZL8-013 6673289 1
5 Tube, Fuel 17702-ZM0-000 5580469 1
6 Cover, Fan *NH1*(black) 19610-ZM0-010ZA 6132989 1
8 Collar, Fr. Turn Signal 33600-GK4-620 2499440 1
9 Bolt, Stud 90043-ZL8-000 5581004 3
10 Screw-Washer (5x10) 93891-05010-08 0671636 1
11 Bulk Hose, Fuel (5.5x800) (5.5x150) 95001-55008-40M 2449593 1
12 Clip, Tube (B8) 95002-02080 0250647 1
13 Clip, Tube (B10) 95002-02100 0250985 2
14 Clip, Tube (C9) 95002-50000 0053447 1
FAN COVER
Page 34

34- ENG
D30333
REPAIR PARTS
Honda Engine Model Number GCV160A
Ref Description Part Number H/C Qty
1 Gasket Set 16010-883-015 3088416 1
2 Float Set 16013-ZL1-003 5580162 1
3 Chamber Set, Float 16015-887-782 3465879 1
4 Screw Set 16016-ZG0-W00 4481818 1
5 Screw Set B 16028-ZE0-005 1441518 1
6 Screw Set 16029-ZG0-901 5580170 1
7 Carburetor Assembly (BB62B D) 16100-ZM0-803 6212849 1
8 Valve, Float 16155-ZM0-003 5580212 1
9 Nozzle, Main 16166-ZM0-003 5580220 1
10 Insulator, Carburetor 16211-ZL8-000 5580238 1
11 Gasket, Insulator 16212-ZL8-000 5580246 1
12 Gasket, Carburetor 16221-883-800 4581120 2
13 Gasket, Carburetor (Choke Side) 16228-ZL8-000 5580253 1
14 Guide, Air 19650-ZM0-000 5580535 1
15 Screw, Pan (5x6) 93500-05006-0H 0639419 1
16 Jet, Main (#60) 99101-124-0600 0635474 1
Jet, Main (#62) 99101-124-0620 0635482 1
Jet, Main (#65) 99101-124-0650 0636126 1
17 Screw Set, Drain 16024-ZE1-811 1672187 1
CARBURETOR
Page 35

35- ENG
D30333
REPAIR PARTS
Honda Engine Model Number GCV160A
Ref Description Part Number H/C Qty
1 Tube Breather 15721-ZM0-000 5580154 1
2 Element, Air Cleaner 17211-ZL8-000 5580402 1
3 Case Assembly, Air Cleaner 17220-ZM0-000 5580410 1
5 Gasket, Air Cleaner 17228-ZM0-000 5664560 1
6 Cover, Air Cleaner 17231-X0L-000 6673255 1
7 Bolt, Flange (6x86) (CT200) 90003-Z0L-000 5580964 2
8 Bolt, Flange (6x14) 95701-06014-08 2374742 1
AIR CLEANER
Page 36

36- ENG
D30333
REPAIR PARTS
Honda Engine Model Number GCV160A
Ref Description Part Number H/C Qty
1 Muffler 18310-ZM0-000 5580485 1
2 Protector, Muffler 18321-ZL8-000 5580501 1
3 Bolt, Flange (6x79) (CT200) 90004-ZL8-000 5580972 2
4 Bolt, Flange (6x12) (CT200) 90013-883-000 0636845 3
5 Gasket, Muffler 18381-ZL8-305 5737457 1
MUFFLER
Page 37

37- ENG
D30333
REPAIR PARTS
Honda Engine Model Number GCV160A
Ref Description Part Number H/C Qty
1 Key, Special Woodruff (25x18) 13331-357-000 0348433 1
2 Coil Assembly, Ignition 30500-ZL8-004 5580659 1
4 Wire, Stop Watch 32195-ZM0-800 6315816 1
10 Bolt, Flange (6x20) (CT200) 90022-888-010 0671552 1
11 Nut, Special (14MM) 90201-878-003 0442038 1
12 Clip, Cable (A) 90681-959-003 1824630 1
15 Plate Side 19612-ZM0-000 6315782 1
16 Bolt, Flange (6x12) (CT200) 90013-883-000 0636845 2
17 Flywheel 31110-ZL8-004 5656053 1
FLYWHEEL
Page 38

38- ENG
D30333
REPAIR PARTS
Honda Engine Model Number GCV160A
Ref Description Part Number H/C Qty
1 Arm, Governor 16551-ZM0-000 5580311 1
2 Rod, Governor 16555-ZM0-000 5580329 1
3 Spring, Governor 16561-ZM0-V30 6315725 1
4 Spring, Throttle Return 16562-ZM0-000 5580352 1
5 Spring, Lever 16574-ZE1-000 1427384 1
6 Washer, Control Lever 16575-ZE2-W00 3678679 1
7 Plate, Lever Center 16577-ZM0-V30 6315741 1
8 Spacer, Control Lever 16578-ZE1-000 1427400 1
9 Base Control 16580-ZM0-V30 6315758 1
10 Lever, Choke 16612-ZM0-V30 6315766 1
11 Rod, Choke 16674-ZM0-V30 6315774 1
12 Collar (9.2x15x20.5) 91501-ZM0-V30 6363733 1
13 Switch Assembly, Engine Stop (N.0) 35120-ZL8-003 5611520 1
14 Mark, Throttle Indication 87532-ZM0-V30 6315832 1
15 Bolt, Governor Arm 90015-ZE5-010 2418671 1
16 Bolt, Flange (6x32) 90017-883-000 0636076 1
17 Bolt, Special (6x45) 90016-ZM0-V30 6315840 1
18 Nut, Self-Lock (6MM) 90114-SA0-000 1410182 1
19 Nut, Self-Lock (5MM) 90136-SM4-901 3596095 1
20 Screw-Washer (4x12) 93892-04012-00 0485946 1
21 Nut, Flange (6MM) 94050-06000 0471623 1
22 Washer, Plain (4MM) 94103-04000 1510361 1
CONTROL (2)
Page 39

39- ENG
D30333
REPAIR PARTS
Honda Engine Model Number GCV160A
Ref Description Part Number H/C Qty
1 Mark, Emblem (5.5) 87101-ZM0-000 5580865 1
LABELS
Page 40

40- FR
D30333
TABLE DES MATIÈRES
GARANTIE . . . . . . . . . . . . . . . . . . . . . . . . . . . . . . . . . . . . . . . . . . . . . . . . . . . .40
TABLEAU DES SPÉCIFICATIONS . . . . . . . . . . . . . . . . . . . . . . . . . . . . . . . . .41
MESURES DE SÉCURITÉ – DÉFINITIONS . . . . . . . . . . . . . . . . . . . . . . . . . .41
RENSEIGNEMENTS SUR LA SÉCURITÉ DU CONSOMMATEUR . . . . . . . . . . . . . . .41
MESURES DE SÉCURITÉ IMPORTANTES . . . . . . . . . . . . . . . . . . . . . . .42-45
CONTENU DE LA BOÎTE . . . . . . . . . . . . . . . . . . . . . . . . . . . . . . . . . . . . . . . .45
ASSEMBLAGE . . . . . . . . . . . . . . . . . . . . . . . . . . . . . . . . . . . . . . . . . . . . . .46-47
UTILISATION . . . . . . . . . . . . . . . . . . . . . . . . . . . . . . . . . . . . . . . . . . . . . . .48-53
ENTRETIEN . . . . . . . . . . . . . . . . . . . . . . . . . . . . . . . . . . . . . . . . . . . . . . . .53-56
ENTREPOSAGE . . . . . . . . . . . . . . . . . . . . . . . . . . . . . . . . . . . . . . . . . . . . .57-58
GUIDE DE DÉPANNAGE . . . . . . . . . . . . . . . . . . . . . . . . . . . . . . . . . . . . . .59-61
PIÈCES DE RECHANGE . . . . . . . . . . . . . . . . . . . . . . . . . . . . . . . . . . . . . .62-77
COMMANDE DES PIÈCES DE RECHANGE . . . . . . . . . . . .Couverture arrière
GARANTIE COMPLÈTE DE UN AN SUR LES LAVEUSES À PRESSION
Si cette laveuse à pression arrête de fonctionner à cause d’un défaut de fabrication ou de
main-d’œuvre dans une période d’un an à compter de la date d’achat, RETOURNEZ-LA
AU CENTRE DE SERVICE APRÈS-VENTE SEARS LE PLUS PROCHE AU CANADA ET
SEARS LA RÉPARERA SANS FRAIS.
Si cette laveuse à pression est utilisée à des fins commerciales ou comme appareil de
location, la garantie ne s’applique que pour une période de quatre-vingt-dix (90) jours à
compter de la date d’achat.
Cette garantie sur la laveuse à pression de Craftsman vous donne des droits particuliers. Il
se peut que vous ayez d’autres droits qui varient d’une province à l’autre.
Sears Canada, Inc., Toronto, Ont. M5B 2B8
GARANTIE
Page 41

41- FR
D30333
N° de modèle 919.672190
Laveuse à pression
Pression 2 500 lb/po
2
Débit 2,5 gal./min
Unités de nettoyage (gal./min x lb/po
2
) 5 250
Moteur
Tr./min 3 600
Puissance nominale en chevaux 5,5
Écartement de la bougie d’allumage 0,030 po (0,76 mm)
Capacité du réservoir à carburant 0,29 gallon (1,1 litre)
Capacité d’huile : 0,58 pinte (0,55 litre) SAE 30
TABLEAU DES SPÉCIFICATIONS
Il se peut que ce produit ne soit pas équipé d’un silencieux
à pare-étincelles. Si le produit n’en est pas équipé, et s’il
est utilisé près de matériaux inflammables ou sur de la terre couverte de produits
agricoles, forêts, broussailles, gazon ou autres articles semblables, un pare-étincelles
approuvé doit être posé, et est exigé par la loi en Californie. Selon la section 130050
de la loi de la Californie, et les sections 4442 et 4443 du Code sur les ressources
publiques de la Californie, ce produit ne peut pas être utilisé en Californie, à moins
que le moteur ne soit équipé d’un pare-étincelles, tel que décrit dans la section 4442,
et à moins que l’appareil ne soit maintenu en bon état de fonctionnement. Des pareétincelles sont également requis sur certaines terres forestières des États-Unis et
peuvent être exigés légalement sous certains autres lois et arrêtés.
Les gaz d’échappement du moteur contiennent des
produits chimiques qui, dans certaines quantités, peuvent
causer le cancer, les anomalies congénitales ou d’autres maux de reproduction.
RENSEIGNEMENTS SUR LA SÉCURITÉ DU CONSOMMATEUR
MESURES DE SÉCURITÉ - DÉFINITIONS
Indique un danger
imminent qui, s'il n'est
pas évité, causera de graves blessures
ou la mort.
Indique la
possibilité
d’un danger qui, s’il n’est pas évité,
pourrait causer de graves blessures ou
la mort.
Ce guide contient des renseignements importants que vous deviez bien saisir. Cette
information porte sur VOTRE SÉCURITÉ et sur LA PRÉVENTION DE PROBLÈMES
D'ÉQUIPEMENT. Afin de vous aider à identifier cette information, nous avons utilisé les
symboles ci-dessous. Veuillez lire attentivement ce guide en portant une attention particulière
à ces symboles.
Indique la possibilité
d'un
danger qui, s'il n'est pas évité, peut causer
des blessures mineures ou moyennes.
Sans le symbole d’alerte.
Indique la possibilité d’un
danger qui, s’il n’est pas évité, peut causer
des dommages à la propriété.
Page 42

42- FR
D30333
Lisez le Guide de l’utilisateur. Ne tentez pas d’utiliser cet
appareil avant d’avoir lu les directives sur la sécurité,
l’assemblage, l’utilisation et l’entretien de ce Guide de l’utilisateur.
RISQUE
PRÉVENTION
• Ne pas vaporiser des liquides inflammables.
• Ne remplissez jamais les réservoirs de solution de
nettoyage avec de l'essence ou autres solvants
inflammables.
• Couper le moteur et le laisser refroidir avant d'ajouter
de carburant au réservoir.
• Prendre des précautions lors du remplissage du
réservoir pour éviter le déversement de carburant.
Placer la laveuse à pression loin du lieu de
remplissage avant de démarrer le moteur.
• Toujours garder la laveuse à pression à une distance
minimum de quatre pieds 1,2 m (4 pieds) des surfaces
qui pourraient être endommagées par les gaz
d'échappement du silencieux (telles que les maisons,
automobiles ou plantes).
MESURES DE SÉCURITÉ IMPORTANTES
• L'essence répandue par déversement et les vapeurs
qui en émanent risquent de s'enflammer en présence
d'étincelles provenant d'une cigarette allumée, d'un
arc électrique, de gaz d'échappement et de pièces
chaudes du moteur, telles que le silencieux.
RISQUE D'EXPLOSION OU D’INCENDIE
DANGER
RISQUE PAR INHALATION
DANGER
LISEZ ET CONSERVEZ CES INSTRUCTIONS
• La chaleur peut causer l'expansion de carburant
dans le réservoir pouvant aboutir à un déversement
et provoquer un incendie ou une explosion.
• Maintenir le niveau maximal de carburant à
environ13mm (½ po) du haut du réservoir afin de
permettre l'expansion de l'essence.
• Le fait d'utiliser la laveuse à pression dans un milieu
explosif peut aboutir à un incendie.
• Faire le plein et utiliser l'équipement dans un endroit
bien aéré et libre de toutes obstructions. Équiper ces
lieux d'extincteurs appropriés pour combattre les
incendies comprenant à base d'essence.
• Des matières placées contre ou à proximité de la
laveuse à pression peuvent nuire à une ventilation
adéquate provoquant ainsi une surchauffe et un
risque d'inflammation de ces matières.
• Ne jamais faire fonctionner la laveuse à pression dans
un endroit comprenant des herbes ou buissons secs.
• La chaleur des gaz d'échappement du silencieux
peut endommager les surfaces peintes, faire fondre
des matériaux sensibles à la chaleur (tels que le
revêtement d'extérieur, le plastique, le caoutchouc et
le vinyle) et endommager les plantes.
• Un entreposage inapproprié du carburant peut
causer une inflammation accidentelle. Le carburant
qui n'est pas rangé de façon sécuritaire peut tomber
entre les mains d'un enfant ou autres personnes non
compétentes.
• Placer le carburant dans un contenant approuvé par
l'OSHA et le ranger dans un lieu sûr, loin de l'aire de
travail.
• L'utilisation d'acides, de produits chimiques toxiques
ou corrosifs, de poisons, d'insecticides ou de toute
sorte de solvant inflammable dans ce produit pourrait
provoquer des blessures graves ou la mort.
•
Certains nettoyeurs liquides contiennent des
substances pouvant causer des lésions à la peau, aux
yeux et aux poumons.
• Utiliser la laveuse à pression dans un endroit bien
aéré. Éviter les endroits clos tels que les garages,
sous-sols, etc.
• Ne jamais utiliser l'appareil dans un endroit occupé
par d'autres personnes ou des animaux.
• N'utiliser que des liquides de nettoyage recommandés
pour des laveuses à pression. Suivre les
recommandations du fabricant. Ne pas utiliser d'eau
de Javel ou tout autre produit corrosif.
•
L'inhalation des émanations d'échappement peut
causer de graves blessures ou la mort !.
RISQUE
PRÉVENTION
Page 43

43- FR
D30333
• L'utilisation d'acides, de produits chimiques
toxiques ou corrosifs, de poisons, d'insecticides ou
de toute sorte de solvant inflammable dans ce
produit pourrait provoquer des blessures graves ou
la mort.
• Ne pas utiliser d'acides, d'essence, de kérosène ou
toute autre matière inflammable avec cet appareil.
N'employer que des détergents, nettoyeurs ou
dégraisseurs d'entretien ménager qui sont
recommandés pour une utilisation avec une laveuse à
pression.
• Lire attentivement tous les avertissements et
instructions fournis par le fabricant de la solution de
nettoyage.
• Porter un équipement et des vêtements de protection
pour se protéger les yeux et la peau contre tout
contact avec des matières vaporisées.
RISQUE DE BLESSURES ET DE DOMMAGES À LA PROPRIÉTÉ
PENDANT LE TRANSPORT OU L'ENTREPOSAGE
RISQUE D'INJECTION D'UN FLUIDE
RISQUE DE BRÛLURES CHIMIQUES
RISQUE
DANGER
RISQUE
PRÉVENTION
DANGER
RISQUE
PRÉVENTION
DANGER
• Des fuites ou des déversements de carburant ou
d'huile peuvent se produire et entraîner des risques
d'incendie ou des problèmes aux voies respiratoires,
des blessures graves ou la mort. Des fuites de
carburant ou d'huile endommagent les tapis, la
peinture et d'autres surfaces dans les véhicules et les
remorques.
• Si la laveuse à pression est munie d'une soupape
d'arrêt, tourner la soupape à la position fermée avant
le transport pour éviter tout risque de fuite. Si l'appareil
n'est pas muni d'une soupape d'arrêt, vidanger le
carburant du réservoir avant le transport. Ne
transporter le carburant que dans des contenants
approuvés par l'OSHA. Pour le transport, toujours
placer la laveuse à pression sur un tapis protecteur
pour éviter l'endommagement du véhicule par des
fuites. Retirer la laveuse à pression du véhicule
immédiatement à l'arrivée.
• La laveuse à pression fonctionne à une pression et à
une vitesse suffisamment élevées pour faire pénétrer
le fluide dans la peau de personnes ou d'animaux et
causer des blessures graves ou la nécessité d'une
amputation. Une fuite causée par des raccords
relâchés ou usés ou par un boyau endommagé peut
aboutir à une blessure par injection. NE PAS
TRAITER L'INJECTION D'UN FLUIDE COMME UNE
SIMPLE COUPURE ! Consulter immédiatement un
médecin !
• Ne jamais placer la main devant la buse.
• Diriger le jet de vaporisation loin de soi et d'autrui.
• S'assurer que le boyau et les raccords sont bien
serrés et en bon état. Ne jamais se cramponner au
boyau ou aux raccords lors de l'utilisation de
l'appareil.
• Éviter tout contact du boyau avec le silencieux.
• Ne jamais mettre ni enlever les raccords de la lance
ou du boyau lorsque l'appareil est pressurisé.
• On risque de subir des blessures si la pression du
système n'est pas diminuée avant de tenter tout
entretien ou démontage.
• Pour dégager la pression de l’appareil, couper le moteur,
couper l’alimentation d’eau et enfoncer la détente du
pistolet jusqu’à ce que l’eau arrête de s’écouler.
• N'utiliser qu'un boyau et des accessoires à haute
pression classés pour un service nominal plus élevé
que la puissance nominale (lb/po
2
) de l'appareil.
PRÉVENTION
Page 44

44- FR
D30333
•
Si le moteur ne démarre pas après deux essais,
appuyer sur la détente du pistolet afin de dégager la
pression de la pompe. Tirer lentement sur le cordon
de démarrage jusqu'à ce qu'on sente une
résistance. Tirer ensuite rapidement sur le cordon
pour éviter les contre-coups et les blessures aux
mains ou aux bras.
• La force de rétroaction du jet fait déplacer le
pistolet/la lance et peut faire glisser ou tomber
l'utilisateur ou provoquer un changement de direction
du jet. Une mauvaise maîtrise du pistolet/de la lance
peut causer des blessures à l'utilisateur ou à d'autres
personnes.
• Ne pas trop éloigner le pistolet du corps et ne pas se
tenir sur une surface instable. Saisir le pistolet/la lance
fermement avec les deux mains. S'attendre à ressentir
un contre-coup lors du déclenchement.
• Le contact avec les surfaces chaudes, telles que les
pièces d'échappement du moteur, peut provoquer
des brûlures graves.
• Durant le fonctionnement de l'appareil, ne toucher
qu'aux surfaces de commande de la laveuse à
pression. Garder les enfants loin de la laveuse à
pression en tout temps. Les enfants ne sont pas
nécessairement capables de reconnaître les dangers
que comporte cet appareil.
RISQUE D'UNE UTILISATION NON SÉCURITAIRE
DANGER
RISQUE DE CHOCS ÉLECTRIQUES
DANGER
RISQUE DE SURFACES CHAUDES
DANGER
RISQUE
PRÉVENTION
RISQUE
PRÉVENTION
RISQUE
PRÉVENTION
• Une utilisation de la laveuse à pression qui n'est pas
conforme aux mesures de sécurité peut causer de
graves blessures ou la mort de l'utilisateur ou
d'autres personnes.
• Ne pas utiliser d'eau de Javel ou tout autre produit
corrosif.
• S'habituer au fonctionnement et aux commandes de la
laveuse à pression.
• Garder toutes les personnes non autorisées, les
animaux domestiques et les obstacles loin de l'aire de
vaporisation.
• Ne pas utiliser l'appareil lorsque vous êtes fatigué ou
sous l'effet de boissons alcooliques ou de drogues.
Restez alerte à tout moment.
• Ne jamais contourner un dispositif de sécurité de cet
appareil.
• Ne jamais utiliser un appareil auquel il manque des
pièces, qui comprend des pièces brisées ou non
autorisées par le fabricant.
• Ne jamais s'éloigner de la lance lorsque l'appareil est en
marche.
• Si la procédure de démarrage appropriée n'est
pas suivie, le moteur peut provoquer des contrecoups et causer des blessures graves aux mains
ou aux bras.
• Le pistolet/la lance de vaporisation est un outil de
nettoyage puissant qui peut ressembler à un jouet
aux yeux d'un enfant.
• Garder les enfants éloignés de la laveuse à pression à
tout moment.
• Une vaporisation dirigée vers des prises de courant,
des interrupteurs ou des objets branchés sur un
circuit électrique peut causer des chocs électriques
mortels.
• Débrancher tout appareil électrique avant de tenter de
le nettoyer. Diriger le jet de vaporisation loin de toutes
prises de courant et interrupteurs.
Page 45

45- FR
D30333
CONTENU DE LA BOÎTE
Poignée
n
o
de pièce D22316
avec vis - node pièce D22901
Pièces dans un sac
Trousse de nettoyage
de la buse
Boutons de
selle n
o
de
pièce D23196
Ensemble de châssis
de moteur avec roues
Boyau à haute
pression
n
o
de pièce
D22166
Boyau de
produit chimique
n
o
de pièce H140
Huile à moteur
Pistolet de vaporisation
n
o
de pièce 17780
Lance de vaporisation à réglages multiples
node pièce D22837
Tableau d'accessoires
n
o
de pièce D25081
Boutons
node
pièce
16471
Clé Allen - no de pièce 16767
Outil de nettoyage - n
o
de pièce NCT001
Le puissant jet de la laveuse à pression est capable d'endommager les
surfaces fragiles telles que le bois, le verre, la peinture d'automobiles, les
garnitures d'auto ainsi que les objets délicats tels que les fleurs et arbustes. Avant de vaporiser,
vérifiez l'objet à nettoyer afin de vous assurer qu'il est assez robuste pour résister à la puissance
du jet sans subir de dommages. Évitez d'utiliser le jet à débit concentré sauf pour des surfaces
très résistantes telles que le béton ou l'acier.
Le fait de faire fonctionner l'appareil sans alimentation d'eau endommagera l'appareil. L'utilisation
de l'appareil sans alimentation d'eau annulera la garantie. Vous ne devez jamais faire fonctionner
l'appareil plus de deux (2) minutes sans appuyer sur la détente du pistolet afin de permettre à l'eau
fraîche d'entrer dans la pompe et à l'eau chauffée (recirculée) d'en sortir.
D
RISQUE DE BLESSURES PAR VAPORISATION
DANGER
RISQUE
PRÉVENTION
• Un fluide vaporisé à haute vélocité peut
causer le bris d’objets et la propulsion de
particules à vitesse élevée.
• Les objets légers ou qui ne sont pas fixés
peuvent devenir de dangereux projectiles.
• Toujours porter des lunettes de sécurité Z87
homologuées par l’ANSI. Porter des vêtements
de protection pour se protéger contre toute
vaporisation accidentelle.
• Ne jamais vaporiser ni pointer la lance en
direction de personnes ou d’animaux.
• Toujours s’assurer que la détente est verrouillée
lorsque la lance n’est pas utilisée afin de
prévenir toute mise en marche accidentelle.
• Ne jamais fixer la détente en position enfoncée
(ouverte) de façon permanente.
Tableau d’accessoires dans un sac
Guide de
l'utilisateur
en anglais et
français
MISE EN GAR
Page 46

46- FR
D30333
ASSEMBLAGE
3. Attachez la lance au pistolet et bien
serrer.
2. Placez l’ensemble de poignée sur le
châssis et attachez la poignée au
châssis. REMARQUE : Les boutons
doivent être fixés à l'extérieur du
châssis.
1. Retirez de l'ensemble de châssis les
réservoirs de solution de nettoyage.
Glissez les réservoirs vers le haut et
éloignez-les de l'ensemble de châssis.
4. Attachez le boyau à haute pression
au pistolet et bien serrer.
5. Assemblage du tableau
d’accessoires:
a. Retirez les vis supérieures de
l'ensemble de poignée.
b. Desserrez les vis inférieures de
l'ensemble de poignée
.
c. Positionnez les rainures du
tableau d'accessoires sur les vis
et mettez le tableau en place.
Retirer
Desserer
Vis
Page 47

47- FR
D30333
d. Insérez les vis (retirées plus tôt)
dans les trous supérieures et
fixez le tableau d'accessoires sur
les poignées. Ne pas trop serrer.
6. Remettez en place les réservoirs de
solution de nettoyage. Inclinez les
réservoirs de solution de nettoyage vers
le moteur, glissez-les sur les poignées
et enclenchez-les en place.
Raccord cannelé
7. Fixez le boyau de solution de
nettoyage au raccord cannelé de la
soupape de commande, située à
l'arrière de l'appareil.
Page 48

48- FR
D30333
MOTEUR
Commande d'étrangleur : Ouvre et ferme la
soupape de l'étrangleur dans le carburateur.
Levier de commande des gaz : Commande la
vitesse du moteur.
Poignée du démarreur : Tirer sur la poignée du
démarreur fait fonctionner le lanceur à rappel
pour démarrer le moteur.
Levier de la soupape de carburant : Ouvre et
ferme la connexion entre le réservoir de
carburant et le carburateur.
UTILISATION
LISEZ CE GUIDE DE L’UTILISATEUR ET TOUTES LES MESURES DE SÉCURITÉ AVANT
D’UTILISER CET APPAREIL. Comparez les illustrations avec votre appareil afin de vous
familiariser avec l’emplacement des commandes et des réglages. Conservez ce guide pour
les références futures.
Pompe à
haute
pression
Moteur
Boyau à
haute
pression
Pistolet de
vaporisation
Poignée du
démarreur
Levier de la
soupape de
carburant
Commande
d'étrangleur
Commande
des gaz
Boyau de rinçage d'injecteur de produit
chimique (non illustré) : Utilisé pour rincer
l'injecteur de produit chimique après
l'utilisation d'une solution de nettoyage.
Système de nettoyage à deux réservoirs :
Permet de passer facilement d'une solution
de nettoyage à une autre, selon les travaux
de nettoyage à accomplir ; il suffit de tourner
le bouton de la soupape de commande.
Filtre à air
Lance de vaporisation
à réglages multiples
Système de
nettoyage à
deux
réservoirs
LAVEUSE À PRESSION
Pompe à haute pression (située à l’intérieur
du bouclier) : Augmente la pression de la
source d’eau.
Moteur : Entraîne la pompe à haute pression.
Boyau à haute pression :
Achemine l'eau
sous pression de la pompe vers le pistolet
et la lance de vaporisation.
Pistolet de vaporisation : S'attache à la lance
pour régler le débit d'eau, la direction et la
pression.
Lance à réglages multiples : Comporte une
buse de vaporisation réglable d'un jet de
l'épaisseur d'un crayon (0°) jusqu'à un jet en
éventail à angle large (40°). Le réglage de la
vaporisation est effectué en tournant la buse
dans le sens des aiguilles d'une montre ou dans
le sens contraire. De plus, le réglage de haute
ou de basse pression s'effectue en tirant la buse
vers l'intérieur ou en la poussant vers l'extérieur.
Voir le paragraphe intitulé " Utilisation de la
lance " de cette section.
Page 49

49- FR
D30333
RÉGLAGE DE LA PRESSION
La pression est préréglée à l'usine afin d'obtenir
une pression ainsi qu'un nettoyage optimums.
La pression peut être diminuée de deux façons
différentes.
1. Éloignez-vous de la surface à nettoyer.
Plus vous êtes éloigné, moins sera la
pression sur la surface à nettoyer.
2. Réduisez la vitesse du moteur à essence
(tr/min). Lorsque la vitesse du moteur est
réduite, la pression d'eau est diminuée
aussi.
NE tentez PAS
d'augmenter la
pression de la pompe. Une pression plus
élevée que celle réglée à l'usine peut
endommager la pompe.
UTILISATION
IMPORTANT :
Lisez attentivement la
section sur l’utilisation de la laveuse à
pression avant d’utiliser l’appareil.
UTILISATION DE LA LANCE
Votre laveuse à pression est équipée d'une
lance à réglages multiples avec positions
de haute et de basse pression. La position
de haute pression est utilisée pour le
nettoyage et le rinçage et la position de
basse pression est utilisée pour
l'application de solutions de nettoyage sur
une surface.
Lorsque l'appareil est
réglé pour une
vaporisation à haute pression, ne dirigez
jamais le jet de vaporisation vers la peau nue,
les yeux ou vers tout animal domestique ou
autre. Cela risque de provoquer des blessures
graves.
Risque
d'injection ou de
blessures corporelles. Ne dirigez pas le jet de
vaporisation vers d'autres personnes.
Pour la vaporisation à haute pression, tirez vers
l'arrière la buse de la lance à réglages multiples,
tel qu'illustré.
TERMINOLOGIE DES LAVEUSES À
PRESSION
lb/po2: livres par pouce carré. Une unité de
mesure de pression d'eau. Également utilisé
pour la pression d'air, la pression hydraulique,
etc.
GPM :
Gallons par minute. L'unité de
mesure du débit d'eau.
CU : Unités de nettoyage. gal./min x lb/po2.
Mode de dérivation : En mode de dérivation, la
pompe recircule simplement l’eau car la détente
du pistolet de vaporisation n’est pas tirée. Si
l’appareil demeure en mode de dérivation
pendant plus de deux (2) minutes, la
température de l’eau augmentera jusqu’à un
niveau dangereux et endommagera des
composantes internes de la pompe. Les
dommages à la pompe causés par une telle
situation ne sont pas couverts par la garantie.
NE faites PAS
fonctionner votre
appareil en mode de dérivation pendant plus
de deux minutes à la fois. Toute surchauffe
de la pompe entraînera des dommages à la
pompe.
Soupape de décharge thermique : Afin
d'empêcher des dommages, les pompes sont
équipées d'une soupape de décharge
thermique. Cette soupape s'ouvrira lorsque la
température à l'intérieur de la pompe devient
trop élevée. Elle dégagera alors un jet d'eau afin
d'abaisser la température à l'intérieur de la
pompe et se refermera toute suite après.
La
soupape de décharge thermique constitue
une partie de la pompe et elle n'est pas
visible pour l'utilisateur.
Injection d'un produit chimique :
Mélange les
nettoyants et les solvants de nettoyage
avec l'eau pour améliorer l'efficacité de
nettoyage.
Source d'eau : Tous les appareils de lavage
sous pression ont besoin d'une source d'eau.
Les exigences minimums pour la source d'eau
sont de 20 lb/po2et de 5 gallons (19 litres) à la
minute.
haute
pression
MISE EN GARDE
MISE EN GARDE
Page 50

50- FR
D30333
3. Versez la solution de nettoyage
désirée dans les réservoirs. Chaque
réservoir a une capacité d'environ
4,7 litres (1,25 gallon). REMARQUE :
Le rapport de solution de
nettoyage/eau devrait être 7 à 1. Pour
7 gallons d'eau pompée, 1 gallon de
solution de nettoyage sera utilisé.
Ne remplissez jamais les
réservoirs de solution de
nettoyage avec de l'essence ou autres solvants
inflammables.
4. Tournez le bouton de la soupape de
commande vers le réservoir avec la
solution de nettoyage désiré.
5. Réglez la lance à réglages multiples
à la position de pression basse.
Consultez le paragraphe intitulé «
Utilisation de la lance » de cette
section.
6. Après avoir utilisé une solution de
nettoyage, vous DEVEZ rincer
l'injecteur de produit chimique.
Après chaque utilisation, suivez les
directives du paragraphe intitulé «
Arrêt de la laveuse à pression ».
REMARQUE : La solution de nettoyage ne
peut pas être siphonnée si la lance de
vaporisation est réglée à la position de
haute pression.
CONSEILS POUR L'UTILISATION DES
DEUX RÉSERVOIRS DE SOLUTION DE
NETTOYAGE
1. Chacun des réservoirs peut être rempli
avec une solution de nettoyage
différente, selon les travaux de
nettoyage à accomplir. Par exemple :
Versez une solution de nettoyage pour
terrasses dans un réservoir et une
solution de nettoyage pour entrées
dans l'autre. Nettoyez la terrasse avec
la solution de nettoyage pour
terrasses et tournez ensuite le bouton
de commande vers le réservoir
contenant la solution de nettoyage
d'entrées pour nettoyer l'entrée.
jet en éventail de 40°
jet mince
La buse à l'extrémité de la lance à réglages
multiples peut être tournée pour changer le jet
de vaporisation à haute pression d'un jet mince
jusqu'à un jet en éventail de 40°, tel qu'illustré.
Les marques sur la buse vous aideront à choisir
le type de jet désiré.
Pour la vaporisation à basse pression, poussez
la buse de la lance à réglages multiples vers
l'avant, tel qu'illustré.
UTILISATION DU SYSTÈME DE
NETTOYAGE À DEUX
RÉSERVOIRS
REMARQUE : Utilisez seulement des
savons et des solutions de nettoyage
conçus pour l'usage dans une laveuse à
pression. N'utilisez pas de l'eau de Javel.
Application des solutions de nettoyage :
1. Assurez-vous que les réservoirs de
solution de nettoyage sont montés
et que tous les boyaux sont
connectés.
2. Placez la flèche du bouton de la
soupape de commande à la position
basse (off), tel qu'illustré.
Bouton de soupape de commande
Réservoir
à utiliser
basse
pression
Page 51

51- FR
D30333
ARRÊT DE LA LAVEUSE À PRESSION
IMPORTANT : Lisez attentivement comment
arrêter la laveuse à pression avant de l’utiliser.
1.
Après avoir utilisé une solution de
nettoyage, vous DEVEZ rincer l'injecteur
de produit chimique afin d'empêcher les
dommages à la pompe causés par une
accumulation de solution. La garantie ne
couvre pas les pompes endommagées
parce que l'injecteur de produit
chimique n'a pas été rincé de manière
appropriée.
Rinçage de l'injecteur de produit chimique
à l'aide du boyau de rinçage d'injecteur :
a. Retirez le boyau de solution de
nettoyage du raccord cannelé
d'injecteur de produit chimique.
b. Poussez le boyau de rinçage
d'injecteur sur le raccord cannelé
d'injecteur de produit chimique.
2. Si vous utilisez seulement une solution
de nettoyage, vous pouvez remplir les
deux réservoirs avec la même solution
afin de doubler la capacité avant de
remplir les réservoirs de nouveau.
3. Si vous utilisez seulement une solution
de nettoyage, vous pouvez remplir le
deuxième réservoir avec de l'eau
propre pour rincer facilement
l'injecteur de produit chimique après
l'usage.
c. Plongez l'autre extrémité du
boyau de rinçage d'injecteur de
produit chimique dans un
récipient d'eau propre et appuyez
sur la détente pour aspirer au
moins
4 litres (1 gallon) d'eau propre à
travers le système d'injection de
produit chimique pour bien rincer
le système.
d. Avant de reconnecter le boyau de
solution de nettoyage au raccord
cannelé d'injecteur de produit
chimique, assurez-vous que toute
solution de nettoyage restante a
été complètement vidangée du
boyau.
Rinçage du produit chimique à
l'aide du réservoir du système de
solution de nettoyage :
a. Placez la flèche du bouton de la
soupape de commande à la
position basse (off).
b. Versez de l'eau propre dans un
des réservoirs du système de
solution de nettoyage.
c. Tournez le bouton de la soupape
de commande vers le réservoir
contenant l'eau propre.
d. Appuyez sur la détente pour
aspirer de l'eau propre à travers
le système d'injection de produit
chimique pour bien rincer le
système
2.
Arrêtez le moteur en plaçant la commande
des gaz à la position d’arrêt
« OFF ».
REMARQUE : NE fermez JAMAIS le robinet
d'eau lorsque le moteur tourne.
3.
Placez la soupape de carburant à la
position d’arrêt « OFF » si vous n’avez pas
l’intention de redémarrer le moteur bientôt.
4.
Fermez le robinet de la source d'eau.
5.
Appuyez sur la détente du pistolet de
vaporisation pour dégager toute pression
d'eau dans le boyau ou dans le pistolet.
6.
Consultez la section sur l'entreposage de
ce guide pour connaître les procédures
d'entreposage appropriées.
REMARQUE : Si vous devez
entreposer l'appareil pendant plus de
30 jours, vous devez vidanger la
solution de nettoyage des réservoirs.
Consultez la section « Entreposage »
pour connaître la procédure
appropriée.
Page 52

52- FR
D30333
3. Assurez-vous que l'écran filtrant est dans
l'orifice d'entrée d'eau de la pompe, tel
qu'illustré.
REMARQUE : Le côté
conique doit être dirigé vers l'extérieur.
4.
Attachez le boyau à haute pression à la
sortie de la pompe.
5.
Branchez la source d'eau à l'orifice
d'entrée de la pompe.
REMARQUE : La source d'eau doit fournir un
minimum de 5 gallons par minute à 20 lb/po
2
.
6.
Si vous voulez appliquer une solution
de nettoyage, consultez la partie
intitulée « Utilisation du système de
nettoyage à deux réservoirs » de la
section « Utilisation » de ce guide.
7.
Ouvrez le robinet de la source d'eau.
REMARQUE : Assurez-vous que le robinet de
la source d'eau est ouvert.
8. Placez la soupape de carburant à la position
de marche « ON » en tournant un quart de
tour dans le sens inverse des aiguilles d’une
montre.
Source
d’eau
Boyau à
haute
pression
Écran filtrant
AVANT LE DÉMARRAGE
Lisez attentivement toute la section
intitulée « Mesures de sécurité
importantes » au début de ce guide, ainsi
que les mises en garde et
avertissements suivants, avant de
démarrer la laveuse à pression.
•
Ne jamais remplir le réservoir à
carburant
jusqu'au bout. Remplissez-le
jusqu'à ½ po en dessous du bas du
culot de remplissage afin de permettre
l'expansion du carburant. Essuyez tout
carburant versé sur le moteur ou sur
l'appareil avant de démarrer le moteur.
•
Ne remplissez jamais le réservoir à
carburant à l'intérieur ni lorsque le
moteur est en marche. Ne jamais fumer
en remplissant le réservoir à carburant.
•
Ne mettez jamais le moteur en marche à
l’intérieur ou dans un espace fermé
sans aération adéquate. Les gaz
déchappement du moteur contiennent
du monoxide de carbone, un gaz
inodore et mortel.
• Ne fermez jamais le robinet de la source
d'eau lorsque le moteur de l'appareil de
lavage sous pression est en marche
puisque cela risque d'endommager la
pompe.
• N'utilisez PAS d'eau chaude. Utilisez
seulement de l'eau froide.
• N’arrêtez PAS de vaporiser pendant plus
de deux minutes à la fois.
1. Ajouter de l’essence pure, sans plomb, de
haute qualité et ayant un indice d’octane
de 86 ou plus. Ne pas trop remplir.
Essuyez l’essence déversée avant de
démarrer le moteur.
2. Retirez le bouchon de remplissage/jauge
d’huile et ajoutez de l’huile à moteur
(fournie) au moteur. REMARQUE : Une
petite quantité d’huile a été versée dans le
moteur pour effectuer les essais à l’usine.
Vérifiez toujours le niveau d’huile avant le
démarrage.
Bouchon de remplissage/jauge d’huile
MISE EN GARDE
Page 53

53- FR
D30333
Si le moteur ne
démarre pas
après deux essais, appuyez sur la détente afin
de dégager la pression.
11. Si vous avez utilisé la commande
d’étrangleur lors du démarrage, replacez le
levier d’étrangleur à la position d’arrêt
« OFF ».
12. Appuyez sur la détente du pistolet pour
commencer la vaporisation d'eau.
REMARQUE : Tenez-vous sur une
surface stable et saisissez le pistolet/la
lance fermement avec les deux mains.
Attendez-vous à ressentir un contrecoup lors du déclenchement.
13. Relâchez la détente pour l'arrêter.
14. Réglez le jet de vaporisation de la buse pour
correspondre à la tâche à effectuer.
Consultez les directives intitulées
« Utilisation de la lance » de cette section.
NE laissez PAS
les boyaux entrer
en contact avec le silencieux du moteur qui est
extrêmement chaud, lors de l’utilisation de la
laveuse à pression ou tout de suite après.
ENTRETIEN
En effectuant l'entretien, vous pouvez être exposé à des surfaces
chaudes, à l'eau sous pression ou à des pièces en mouvement qui
peuvent causer des blessures graves ou la mort !
Avant d'effectuer tout entretien ou toute réparation, débranchez le fil de la bougie
d'allumage, attendez jusqu'à ce que le moteur soit refroidi et dégagez l'eau sous
pression. Le moteur contient du carburant inflammable. NE FUMEZ PAS et ne
travaillez pas près d'une flamme nue en effectuant l'entretien
Afin d'assurer le bon fonctionnement et une durée de vie prolongée de votre laveuse à
pression, vous devez préparer et suivre un calendrier d'entretien régulier. Si votre laveuse à
pression est utilisée dans un environnement défavorable, tel qu'à des températures élevées
ou des conditions poussiéreuses, les vérifications d'entretien doivent être exécutées plus
souvent.
9. Placez le levier de commande d’étrangleur à
la position « CHOKE ON » et la
commande des gaz à la position rapide
« FAST » REMARQUE : L’étrangleur
n’est pas nécessaire pour démarrer un
moteur chaud.
10. Tirez lentement la prise du démarreur jusqu’à
ce que vous sentiez une résistance et tirez
brusquement ensuite. Relâchez doucement la
prise du démarreur. Tirez le cordon en
effectuant un mouvement rapide et complet
du bras. Laissez le cordon s’enrouler
lentement. Répétez au besoin.
Bouton de la
soupape de
carburant
Commande
d'étrangleur
Commande
des gaz
Page 54

54- FR
D30333
4. Si le niveau d’huile est bas, ajoutez de
l’huile SAE 10W-30 jusqu’au rebord du
trou de remplissage d’huile.
REMARQUE : Une huile d’une autre
viscosité que celle indiquée dans le tableau
peut être utilisée lorsque la température
moyenne de votre région est dans les
limites recommandées.
TABLEAU DES RESPONSABILITÉS DU CLIENT
TACHE D’ENTRETIEN
LAVEUSE À PRESSION
MOTEUR
Avant
chaque
utilisation
Toutes les 25
heures ou
annuellement
Toutes les 50
heures ou
annuellement
Toutes les 100
heures ou
annuellement
X
X
X
X
X
X
X
X
MOTEUR
Vérification du niveau d’huile
1. Coupez le moteur et placez-le sur une
surface de niveau.
2. Retirez le bouchon de
remplissage/jauge d’huile et
essuyez-le.
3. Insérez et retirez le bouchon de
remplissage/jauge d’huile sans le
visser sur le culot de remplissage.
Vérifiez le niveau d’huile indiqué sur la
jauge d’huile.
Bouchon de remplissage/jauge d’huile
Bouchon de vidange d’huile
Bouchon de
remplissage/jauge d’huile
Limite supérieure
Limite inférieure
Vérification/nettoyage de l’écran
filtrant de l’arrivée d’eau
Vérification du boyau à haute pression
Vérification du boyau de savon/produit
chimique et du filtre
Vérification du pistolet et de la lance pour
déceler des fuites
Vérification du niveau d’huile
Changement de l’huile moteur
Vérification du filtre à air
Préparation pour l’entreposage
Préparer l’appareil pour l’entreposage s’il ne sera pas
utilisé pendant 30 jours ou plus.
Nettoyage/remplacement de la bougie d’allumage
Degré de viscosité SAE
**
*
5W-30, 10W-30 synthétique
-20 0 20 40 60 80 100
F
-30 -20 -10 0 10 20 30 40
C
GAMME DE TEMPÉRATURES ANTICIPÉES LORS DES
DÉMARRAGES AVANT LA PROCHAINE VIDANGE D'HUILE
32
Page 55

55- FR
D30333
Filtre à air
Un filtre à air sale réduira le débit d’air au
carburateur et entraînera un rendement
médiocre du moteur. Inspectez le filtre après
chaque utilisation. Nettoyez le filtre plus souvent
si le moteur est utilisé dans un lieu très
poussiéreux.
REMARQUE : Si vous faites tourner le moteur
sans le filtre, les saletés entreront dans le
moteur et entraîneront une usure prématurée du
moteur. Les dommages de ce genre ne sont pas
couverts par la garantie.
Inspection
1. Poussez sur les pattes de verrouillage sur
le haut du couvercle du filtre à air et retirez
le couvercle. Inspectez le filtre pour vous
assurer qu’il est propre et en bon état.
2. Remettez en place le filtre et le couvercle
du filtre à air.
Nettoyage
1. Tapez le filtre sur une surface dure à
plusieurs reprises pour libérer la saleté ou
soufflez de l’air comprimé [ne dépassant
pas 30 lb/po
2
(207 kPa, 1,2 kg/cm2)] à
travers le filtre, à partir de la surface propre
qui fait face vers le moteur. N’essayez
jamais de brosser la saleté puisque cela
fait pénétrer la saleté dans les fibres.
2. Essuyez la saleté du corps du filtre à air et
du couvercle à l’aide d’un chiffon humide.
Faites attention afin d’empêcher la saleté
d’entrer dans la conduite d’air menant au
carburateur.
Changement de l’huile
Vidangez l’huile à moteur lorsque le moteur est
chaud. L’huile se vidange plus rapidement et
complètement lorsqu’elle est chaude.
1. Placez la soupape de carburant à la
position d’arrêt « OFF » en tournant un
quart de tour dans le sens des aiguilles
d’une montre.
2. Placez un récipient approprié à côté du
moteur pour attraper l’huile usée.
3. Retirez le bouchon de remplissage/jauge
d’huile et vidangez l’huile dans le récipient
en inclinant le moteur vers le culot de
remplissage d’huile.
REMARQUE : Veuillez disposer de l’huile usée
d’une manière écologique. Nous vous
recommandons de mettre l’huile usée dans un
contenant scellé et de l’apporter à un centre de
recyclage local ou à une station service pour la
récupération. Ne jetez pas l’huile dans les
déchets et ne la versez pas sur le sol ou dans
un égout.
4. En maintenant le moteur de niveau, versez
de l’huile SAE 10W-30 jusqu’à la marque
de limite supérieure de la jauge d’huile. La
capacité d’huile est de 0,58 pinte (0,55
litre). REMARQUE : On peut également
utiliser une des autres viscosités d’huile
figurant dans le tableau suivant le
paragraphe intitulé « Vérification du niveau
d’huile ».
5. Remettez en place le bouchon de
remplissage/jauge d’huile et serrez-le
fermement.
Limite supérieure
Limite inférieure
Culot de
remplissage
Corps du
filtre à air
Filtre
Couvercle du
filtre à air
Pattes de
verrouillage
Pattes
inférieures
Conduite
d’air
Bouchon de
remplissage/jauge
d’huile
Page 56

56- FR
D30333
1. Arrêtez la laveuse à pression et fermez le
robinet de la source d'eau.
2. Débranchez le fil de la bougie d'allumage.
3. Appuyez sur la détente du pistolet afin de
dégager la pression d'eau.
4. Détachez la lance du pistolet.
5. Retirez la buse de l'extrémité de la lance
en vous servant de la clé Allen de 2 mm
fournie, tel qu'indiqué ci-dessous.
6. Nettoyez la buse en vous servant du
dispositif de nettoyage fourni ou d'un
trombone redressé en ligne droite. Insérezle dans l'extrémité de la buse et déplacezle dans un mouvement d'aller-retour pour
libérer l'obstruction.
7. Dirigez la source d'eau dans la buse et
rincez les particules libérées pendant 30
secondes.
8. Rebranchez le fil de la bougie d’allumage
9. Réassemblez la buse sur la lance. Serrez
fermement afin d'empêcher des fuites.
10. Attachez la lance au pistolet et ouvrez le
robinet de la source d'eau.
11. Démarrez la laveuse à pression et réglez la
lance à la position de haute pression pour
l’essayer.
LANCE DE VAPORISATION
Si la buse devient obstruée par des matériaux
étrangers comme la poussière, une pression
excessive peut se développer. Si la buse devient
partiellement obstruée ou le débit est restreint,
la pression de la pompe commencera à pulser.
Nettoyez la buse immédiatement en vous
servant de la trousse de nettoyage de buse
fournie et en suivant les directives suivantes :
Résistance
Calibre de fil
0,030 po (0.76 mm)
POMPE
Cet écran filtrant devrait être vérifié
périodiquement et nettoyé au besoin.
1. Saisissez l'extrémité du filtre et retirez-le
de l'orifice d'entrée d'eau de la pompe,
tel qu'illustré.
2. Nettoyez le filtre en le rinçant à l'eau sur
les deux côtés.
3. Réinsérez le filtre dans l'orifice d'entrée
d'eau de la pompe.
REMARQUE : Le
côté conique doit être dirigé vers
l'extérieur.
REMARQUE : N'utilisez pas la laveuse à
pression lorsque le filtre n'est pas posé de
façon appropriée.
Écran filtrant
Nettoyage et remplacement de la
bougie d’allumage
Remplacez la bougie d’allumage à toutes
les 100 heures de fonctionnement ou une
fois par an, selon la première situation qui
se présente. Cela facilite le démarrage et
améliore le rendement du moteur.
Page 57

57- FR
D30333
POMPE
1. Vidangez toute l'eau du boyau à haute
pression, enroulez-le et rangez-le dans
le berceau de la poignée de la laveuse
à pression.
2. Vidangez toute l'eau du pistolet et de
la lance. Pour ce faire, maintenez le
pistolet en position verticale, en
dirigeant la buse vers le bas, et
appuyez sur la détente du pistolet.
Rangez ces pièces dans le portepistolet/boyau.
3. Entreposez le boyau de rinçage
d'injecteur de produit chimique, le
boyau à haute pression, le pistolet de
vaporisation et la lance en les
protégeant contre les dommages,
surtout les dommages causés en
roulant sur ces pièces.
Nous vous recommandons de suivre les
étapes ci-dessous pour protéger les joints
d'étanchéité internes de la laveuse à
pression LORSQUE VOUS DEVEZ
ENTREPOSER L'APPAREIL PENDANT
PLUS DE 30 JOURS ET(OU) LORSQUE
DES TEMPÉRATURES DE GEL SONT
PRÉVUES.
* Vous devez également passer de l'antigel
pour véhicules récréatifs à travers la pompe,
tel que stipulé dans les étapes ci-dessous.
4. Obtenez un entonnoir, 6 oz (177 ml)
d'antigel pour véhicules récréatifs ou
de liquide de lave-glace, un boyau
d'arrosage d'une longueur d'environ 12
po (30 cm) doté d'un raccord mâle à
une extrémité.
N'utilisez que
de l'antigel pour
véhicules récréatifs. Tout autre antigel
est corrosif et risque d'endommager
la pompe.
5. Débranchez le fil de la bougie
d'allumage.
6. Connectez le boyau d'arrosage de 12
po (30 cm) à l'orifice d'entrée de la
pompe.
MOTEUR
IMPORTANT:
Il est important d’empêcher la
formation de dépôts de gomme sur les
parties essentielles du système d’injection,
telles que le carburateur, le filtre à carburant,
le boyau ou le réservoir durant l’entreposage.
De plus, l’expérience indique que les
essences mélangées avec des alcools
(connues sous le nom d’essence-alcool ou
essences utilisant de l’éthanol ou du
méthanol) peuvent attirer l’humidité, ce qui
entraîne la séparation du mélange et la
formation d’acides durant l’entreposage. Les
essences acides peuvent endommager le
système d’injection d’un moteur lors de
l’entreposage. Pour éviter des problèmes du
moteur, le système d’injection doit être purgé
avant un entreposage d’une durée de trente
(30) jours ou plus. N’utilisez jamais de
nettoyeurs pour moteurs ou carburateurs
dans le réservoir à essence en raison d’un
risque de dommages permanents.
Préparation du moteur
1. Ajoutez un agent de stabilisation de
carburant au réservoir.
2. Mettez la laveuse à pression en
marche et faites-la fonctionner pendant
un bon 5 minutes pour permettre à
l’agent de stabilisation d’entrer dans le
système d’injection.
Lors de la
préparation du
moteur, assurez-vous que le robinet de la
source d’eau est ouvert et que l’eau
arrive à l’appareil. N’utilisez JAMAIS
l’appareil lorsqu’il n’y a aucun débit d’eau
à travers la pompe car cela
endommagera la pompe.
3. Coupez ensuite le moteur et
déconnectez la source d’alimentation
d’eau.
4. Débranchez le fil de la bougie
d’allumage et retirez la bougie.
5. Ajoutez une cuillère à thé d’huile dans
l’orifice pour bougie d’allumage.
6. Placez un chiffon sur l’orifice pour
bougie d’allumage et tirez sur la corde
à rappel à quelques reprises pour
lubrifier la chambre de combustion.
7. Remettez la bougie d’allumage mais
sans brancher le fil de la bougie.
ENTREPOSAGE
MISE EN GARDE
MISE EN GARDE
Page 58

58- FR
D30333
3. Placez l'extrémité du boyau de
solution de nettoyage dans un
récipient convenable et vidangez la
solution de nettoyage.
4. Tournez la soupape de commande
vers le réservoir à vidanger.
5. Répétez les étapes 3 et 4 pour
vidanger le deuxième réservoir.
6. Tournez le bouton de la soupape de
commande à la position basse (off).
7. Remplissez les réservoirs avec de
l'eau propre.
8. Tournez la soupape vers le réservoir et
vidangez l'eau du réservoir. Répétez
cette étape pour le deuxième réservoir.
REMARQUE : Ceci rince les réservoirs
de solution de nettoyage.
9. Acheminez le boyau de solution de
nettoyage au-dessus de l'essieu et
reconnectez ce boyau à l'injecteur de
produit chimique pour l'usage futur.
7. Ajoutez l’antigel pour véhicules
récréatifs ou le liquide de lave-glace,
tel qu'illustré.
8. Tirez à plusieurs reprises sur le cordon
de démarrage du moteur, jusqu'à ce
que l'antigel ou le liquide de laveglace déborde du raccord du boyau à
haute pression de la pompe.
9. Retirez le boyau court de l'orifice
d'entrée de la pompe.
10.
Rebranchez le fil de la bougie d’allumage.
* Vous pouvez également utiliser du liquide
de lave-glace.
SYSTÈME DE NETTOYAGE À DEUX
RÉSERVOIRS
1. Tournez le bouton de la soupape de
commande à la position basse (off).
2. Retirez le boyau de solution de
nettoyage de l'injecteur de produit
chimique et tirez-le au-dessus de
l'essieu, vers la partie arrière de
l'appareil.
Bouton de la soupape de commande
Essieu
Boyau
Page 59

59- FR
D30333
GUIDE DE DÉPANNAGE
PROBLÈME
CAUSE
CORRECTION
Le moteur ne
démarre pas
1. Aucun carburant.
2. Accumulation de pression
après avoir tiré deux fois sur
le cordon de démarrage.
3. Le levier d'étrangleur est en
position sans étranglement
" No Choke ".
4. Le fil de la bougie
d’allumage n’est pas
branché.
5. Le levier d’étranglement est
en position « Choke »
lorsque le moteur est chaud
ou lorsque le moteur a été
exposé à une source de
chaleur pour une période
prolongée.
6. Soupape de carburant
fermée
1. Ajoutez du carburant.
2. Appuyez sur la détente du
pistolet pour dégager la
pression.
3. Le levier d'étrangleur est en
position sans étranglement
" No Choke ".
4. Branchez le fil de la bougie
d’allumage.
5. Déplacez le levier
d’étranglement à la position
sans étranglement.
6. Réglez la soupape de
carburant à la position ouverte.
Aucune pression
ou basse pression
(à l’utilisation
initiale)
1. Consultez le paragraphe "
Utilisation de la lance " de la
section " Utilisation ".
2. La source d’eau doit acheminer
au moins 5 gal./min à 20 lb/po
2
.
3. Serrez le raccord. Appliquez du
ruban d'étanchéité au besoin.
4. Consultez le paragraphe "
LANCE DE VAPORISATION "
dans la section " Entretien "
pour connaître la procédure
correcte
.
5. Retirez le filtre et nettoyez-le.
1. La lance n’est pas en
position de haute pression.
2. Alimentation en eau
insuffisante.
3. Fuite au raccord de boyau à
haute pression.
4. La buse est obstruée.
5. Écran de filtrage d’eau
obstrué.
Page 60

60- FR
D30333
6. De l’air se trouve dans le
boyau.
7. Le levier d’étrangleur est en
position « Choke ».
8. Le levier de commande des
gaz n’est pas à la position
rapide « Fast ».
9. Le boyau à haute pression
est trop long.
6. Arrêtez le moteur et fermez
ensuite le robinet de la
source d’eau. Débranchez la
source d’eau de l’orifice
d’entrée de la pompe et
ouvrez le robinet de la source
d’eau pour purger l’air du
boyau. Lorsqu’un jet continu
d’eau paraît, fermez le robinet
de la source d’eau.
Rebranchez la source d’eau à
l’orifice d’entrée de la pompe
et ouvrez la source d’eau.
Appuyez sur la détente pour
purger l’air qui reste.
7. Réglez le levier d’étrangleur à
la position « No Choke ».
8. Réglez le levier de
commande des gaz à la
position rapide « Fast ».
9. Utilisez un boyau à haute
pression d’une longueur
inférieure à 100 pieds.
PROBLÈME
CAUSE
CORRECTION
Aucune pression
ou basse pression
(à l’utilisation
initiale)
(suite)
Aucune aspiration
de solution de
nettoyage
La lance n’est pas en
position de basse pression.
1.
Consultez le paragraphe «
Utilisation de la lance » de la
section « Utilisation ».
2. Le filtre du boyau de rinçage
d'injecteur de produit
chimique est obstrué.
2. Nettoyez le filtre.
3. L'écran filtrant à l'extrémité du
boyau de rinçage d'injecteur de
produit chimique n'est pas
dans l'eau.
3. Assurez-vous que l'extrémité
du boyau de rinçage d'injecteur
de produit chimique est
complètement submergée
dans l'eau propre.
4. Le produit chimique est trop
épais.
4. Diluez le produit chimique. Le
produit chimique devrait avoir
la consistance d’eau.
5. Le boyau à haute pression
est trop long.
5.
Utilisez un boyau d'eau plus long
au lieu d'un boyau à haute pression
plus long.
6. Une accumulation de
produit chimique dans
l’injecteur de produit
chimique.
6. Apportez les pièces à un
CSGA pour le nettoyage ou
le remplacement.
7. Les boyaux ne sont pas
connectés.
7. Assurez-vous que tous les
boyaux sont connectés au
niveau de la soupape.
8. La soupape de commande
en réglé à la position basse
(off) ou vers le réservoir non
utilisé.
8. Tournez la soupape de
commande vers le réservoir
à utiliser.
Page 61

61- FR
D30333
PROBLÈME
CAUSE
CORRECTION
Aucune pression
ou basse
pression (après
un certain temps
d’utilisation
normale)
Fuite d’eau au
niveau de la
connexion du
pistolet/lance
Fuite d’eau au
niveau de la
pompe
1. Joint d’étanchéité ou
garniture usés.
2. Soupapes usées ou
obstruées.
3. Piston de déchargeur usé.
1. Joint torique usé ou brisé.
2. Connexion de boyau
desserrée.
1. Connexions desserrées.
2. Garnitures de piston usées.
3. Joints toriques usés.
4. La tête de la pompe ou les
tubes sont endommagés à
cause du gel.
1. Faire remplacer par un
CSGA.
2. Faire remplacer par un
CSGA.
3. Faire remplacer par un
CSGA.
1. Vérifiez et remplacez.
2. Serrez.
1. Serrez.
2. Faire remplacer par un
CSGA.
3. Faire remplacer par un
CSGA.
4. Faire remplacer par un
CSGA.
CSGA = Centre de service sous garantie autorisé
1. Buse obstruée.
1. Consultez le paragraphe "
LANCE DE VAPORISATION
" dans la section " Entretien
" pour connaître la
procédure correcte.
La pompe
fonctionne de
façon pulsée
Page 62

62- FR
D30333
N° de modèle de la laveuse à pression 919.672190
PIÈCES DE RECHANGE
Couple à
120-240
po.-lbs.
N° d’article N° de pièce Description
2 D23124 Étiquette de danger
3 D23125 Étiquette de surface chaude
4 * Trousse de pompe
5 D27152 Vis, 5/16-24 x .75
10 D27956 Vis, 3/8-1116 x 1,25
14 D22267 Bouchon
16 D21963 Roue
17 D22268 Isolateur
18 D23208 Vis, 1/4-20
19 W137 Écrou Pal
23 D21630 Flasque de pompe
26 D27959 Système de nettoyage à deux réservoirs
* Voir la vue éclatée pour identifier les pièces particulières
Couple à
120-240
po.-lbs.
26
3
2
14
16
4
19
17
16
Torque to
120 - 240
in.-lbs.
10
5
Torque to
120 - 240
in.-lbs.
18
23
Page 63

63- FR
D30333
N° de modèle de la laveuse à pression 919.672190
PIÈCES DE RECHANGE
N° d’article N° de pièce Description
1 * Moteur Honda GCV160A
2 17050 Étiquette de danger
3 D23125 Étiquette de surface
chaude
6 D22908 Châssis
7 D25074 Base
8 D22904 Étiquette de pièces mobiles
9 D23099 Essieu
12 D22308 Vis, 5/16-18
15 D22692 Écrou, 5/16-18
24 D25087 Étiquette d’avertissement
25 D27926 Boyau de solution de nettoyage
Non illustré
D30333 Guide de l’utilisateur
* Voir la vue éclatée pour identifier les pièces particulières
Couple à
120-240
po.-lbs.
6
24
9
15
Torque to
120-240 in.-lbs.
25
1
3
2
12
7
8
Page 64

64- FR
D30333
N° d’article N° de pièce Description
1 D20998 Boyau, 3/8 x 18 po
2 18139 Ensemble de dispositif de marche à vide, 2 200 lb/po
2
3 16848 Soupape de décharge thermique
4 H061 Écrou tournant de tuyau d’arrosage
5 H068 Joint articulé, 3/8 po
6 D29372 Injecteur de produit chimique
7 F187 Écran pour tuyau d’arrosage
8 D25006 Vis de fixation
Non illustré :
H140 Boyau de produit chimique
N° de modèle de la pompe refoulante D28703
PIÈCES DE RECHANGE
2
1
3
5
4
6
7
8
Page 65

65- FR
D30333
PIÈCES DE RECHANGE
Node modèle du moteur HONDA GCV160A
Réf Description N° de pièce H/C Qté
1 Ensemble de cylindre 12000-ZL8-405 6315691 1
2 Attache de guide de soupape 12216-ZE5-300 2399780 1
3 Couvercle de culasse 12311-ZL8-000 5579990 1
4 Couvercle de reniflard
(ens. de soupape de reniflard) 12355-ZL8-000 5580006 1
5 Écrou à embase (6x12) (CT200) 90013-883-000 0636845 4
6 Écrou à embase (6x14) 90014-952-000 0803619 1
7 Joint d’huile (25,4x62x6) 91201-ZL8-003 5581038 1
8 Bougie d’allumage
(BPR6ES) (NGK) 98079-56846 1441112 1
CORPS DE CYLINDRE
A
V
A
N
T
Page 66

66- FR
D30333
PIÈCES DE RECHANGE
Node modèle du moteur HONDA GCV160A
Réf Description N° de pièce H/C Qté
1 Ens. de carter d’huile (SAE) 11300-ZOL-820 6696686 1
2 Joint d’étanchéité de bouchon
de remplissage d’huile 15625-ZE1-003 4497947 1
4 Arbre de support de régulateur 16508-ZM0-010 6384341 1
5 Ens. de régulateur 16510-ZM0-010 6384333 1
6 Poids de régulateur 16511-ZL8-000 5580287 2
7 Support de poids de régulateur 16512-ZM0-000 5580295 1
8 Goupille de poids de régulateur 16513-ZE1-000 1427244 2
9 Tiroir de régulateur 16531ZE1-000 1427251 1
10 Arbre de bras de régulateur 16541-ZM0-000 5580303 1
11 Écrou à embase (6x14) 90014-952-000 0803619 1
12 Écrou à embase (6x25) 90121-952-000 0748111 8
13 Rondelle de butée (6 mm) 90451-ZE1-000 2413862 1
14 Attache de support de régulateur 90602-ze1-000 2456697 1
15 Joint d’huile (28x41,25x6) 91202-ZM0-V31 6315865 1
16 Rondelle ordinaire (6 mm) 94101-06800 0345900 1
17 Goupille d’arrêt (8 mm 94251-08000 0115527 1
18 Goupille cylindrique (8x20) 94301-08200 1417369 2
19 Ens. de jauge d’huile 15650-ZM0-003 5722996 1
20 Boulon de bouchon de vidange 90131-896-650 1986231 1
21 Rondelle de bouchon de vidange
(12 mm) 94109-12000 0171868 1
CARTER D’HUILE
A
V
A
N
T
Page 67

67- FR
D30333
PIÈCES DE RECHANGE
Node modèle du moteur HONDA GCV160A
Réf Description N° de pièce H/C Qté
5 Rondelle de butée 90402-ZL8-000 5581012 1
6 Vilebrequin 13310-Z0L-650 6696702 1
VILEBREQUIN
A
V
A
N
T
Page 68

68- FR
D30333
PIÈCES DE RECHANGE
Node modèle du moteur HONDA GCV160A
Réf Description N° de pièce H/C Qté
1 Piston 13101-ZL8-000 5580014 1
2 Axe de piston 13111-ZE0-000 1426576 1
3 Ensemble de bielle 13200-ZL8-000 5580022 1
4 Boulon de bielle 90001-ZE1-000 1431055 2
5 Attache d’axe de piston (13 mm) 90551-ZE0-000 2605517 2
6 Jeu de segments de piston
(TEIKOKU) 13010-ZL8-014 6315717 1
VILEBREQUIN
A
V
A
N
T
Page 69

69- FR
D30333
PIÈCES DE RECHANGE
Node modèle du moteur HONDA GCV160A
Réf Description N° de pièce H/C Qté
1 Poulie d’arbre à cames 14320-ZL8-000 5580055 1
2 Arbre de poulie d’arbre à cames 14324-ZL8-000 5580063 1
3 Courroie de distribution
(84HU7 G-200) 14400-Z0J-004 6637417 1
4 Bras de culbuteur int. 14431-ZL8-000 5580089 1
5 Bras de culbuteur ext. 14441-ZL8-000 5580097 1
6 Arbre de culbuteur 14461-ZL8-000 5580105 2
7 Soupape int. 14711-ZL8-000 5580113 1
8 Soupape ext. 14721-ZL8-000 5580121 1
9 Ressort de soupape 14751-ZL8-000 5580139 2
10 Pièce de retenue de ressort
de soupape 14771-ZE1-000 1426980 2
11 Vis de réglage de poussoir 90012-333-000 0294819 2
12 Écrou de réglage de poussoir 90206-001-000 0004598 2
13 Joint torique (6,8x1,9) 91301-ZM0-V31 6315873 1
POULIE D’ARBRE À CAMES
AVANT
Page 70

70- FR
D30333
PIÈCES DE RECHANGE
Node modèle du moteur HONDA GCV160A
Réf Description N° de pièce H/C Qté
1 Ens. de démarreur à rappel
*NH1* (noir) 28400-ZL8-013ZA 6061204 1
2 Poignée de démarreur à rappel 28461-ZL8-003 5580634 1
3 Cordon de démarreur à rappel 28462-ZL8-003 5611454 1
4 Écrou à embase (6 mm) 90201-ZM0-000 6478812 3
DÉMARREUR À RAPPEL
A
V
A
N
T
Page 71

71- FR
D30333
PIÈCES DE RECHANGE
Node modèle du moteur HONDA GCV160A
Réf Description N° de pièce H/C Qté
1 Support en caoutchouc (107 mm) 16854-ZH8-000 3683646 1
2 Ens. de robinet de petit diam. (MAN) 16950-ZG9-M02 5028923 1
3 Support de robinet 16956-ZM0-000 5580394 1
4 Ens. de bouchon du réservoir 17620-ZL8-013 6673289 1
5 Tube à carburant 17702-ZM0-000 5580469 1
6 Couvercle de ventilateur *NH1* (noir) 19610-ZM0-010ZA 6132989 1
8 Collet de clignotant avant 33600-GK4-620 2499440 1
9 Goujon 90043-ZL8-000 5581004 3
10 Vis à rondelle (5x10) 93891-05010-08 0671636 1
11 Boyau à carburant
(5,5x8000) (5,5x150) 95001-55008-40M 2449593 1
12 Collier de boyau (B8) 95002-02080 0250647 1
13 Collier de boyau (B10) 95002-02100 0250985 2
14 Collier de boyau (C9) 95002-50000 0053447 1
COUVERCLE DE VENTILATEUR
A
V
A
N
T
Page 72

72- FR
D30333
PIÈCES DE RECHANGE
Node modèle du moteur HONDA GCV160A
Réf Description N° de pièce H/C Qté
1 Jeu de joints d’étanchéité 16010-883-015 3088416 1
2 Ensemble de flotteur 16013-ZL1-003 5580162 1
3 Ensemble de cuve à niveau 16015-887-782 3465879 1
4 Jeu de vis 16016-ZG0-W00 4481818 1
5 Jeu de vis B 16028-ZE0-005 1441518 1
6 Jeu de vis 16029-ZG0-901 5580170 1
7 Ens. de carburateur (BB62B D) 16100-ZM0-803 6212849 1
8 Soupape à flotteur 16155-ZM0-003 5580212 1
9 Gicleur principal 16166-ZM0-003 5580220 1
10 Isolateur de carburateur 16211-ZL8-000 5580238 1
11 Joint d’étanchéité d’isolateur 16212-ZL8-000 5580246 1
12 Joint d’étanchéité de carburateur 16221-883-800 4581120 2
13 Joint d’étanchéité de carburateur
(côté de l’étrangleur) 16228-ZL8-000 5580253 1
14 Dispositif de guidage d’air 19650-ZM0-000 5580535 1
15 Vis de carter (5x6) 93500-05006-0H 0639419 1
16 Jet principal (#60) 99101-124-0600 0635474 1
Jet principal (#62) 99101-124-0620 0635482 1
Jet principal (#65) 99101-124-0650 0636126 1
17 Jeu de vis de vidange 16024-ZE1-811 1672187 1
CARBURATEUR
A
V
A
N
T
Page 73

73- FR
D30333
PIÈCES DE RECHANGE
Node modèle du moteur HONDA GCV160A
Réf Description N° de pièce H/C Qté
1 Tube de reniflard 15721-ZM0-000 5580154 1
2 Élément de filtre à air 17211-ZL8-000 5580402 1
3 Ens. de boîtier de filtre à air 17220-ZM0-000 5580410 1
5 Joint d’étanchéité de filtre à air 17228-ZM0-000 5664560 1
6 Couvercle de filtre à air 17231-X0L-000 6673255 1
7 Boulon à embase (6x86) (CT200) 90003-Z0L-000 5580964 2
8 Boulon à embase (6x14) 95701-06014-08 2374742 1
FILTRE À AIR
A
V
A
N
T
Page 74

74- FR
D30333
PIÈCES DE RECHANGE
Node modèle du moteur HONDA GCV160A
Réf Description N° de pièce H/C Qté
1 Silencieux 18310-ZM0-000 5580485 1
2 Protecteur de silencieux 18321-ZL8-000 5580501 1
3 Boulon à embase (6x79) (CT200) 90004-ZL8-000 5580972 2
4 Boulon à embase (6x12) (CT200) 90013-883-000 0636845 3
5 Joint d’étanchéité de silencieux 18381-ZL8-305 5737457 1
SILENCIEUX
A
V
A
N
T
Page 75

75- FR
D30333
PIÈCES DE RECHANGE
Node modèle du moteur HONDA GCV160A
Réf Description N° de pièce H/C Qté
1 Clavette woodruff spéciale
(25x18) 13331-357-000 0348433 1
2 Ens. de bobine d’allumage 30500-ZL8-004 5580659 1
4 Fil d’interrupteur d’arrêt 32195-ZM0-800 6315816 1
10 Boulon à embase (6x20) (CT200) 90022-888-010 0671552 1
11 Écrou spécial (14 mm) 90201-878-003 0442038 1
12 Collier de câble (A) 90681-959-003 1824630 1
15 Plaque latérale 19612-ZM0-000 6315782 1
16 Boulon à embase (6x12) (CT200) 90013-883-000 0636845 2
17 Volant moteur 31110-ZL8-004 5656053 1
VOLANT MOTEUR
A
V
A
N
T
Page 76

76- FR
D30333
PIÈCES DE RECHANGE
Node modèle du moteur HONDA GCV160A
Réf Description N° de pièce H/C Qté
1 Bras de régulateur 16551-ZM0-000 5580311 1
2 Tige de régulateur 16555-ZM0-000 5580329 1
3 Ressort de régulateur 16561-ZM0-V30 6315725 1
4 Ressort de rappel du papillon 16562-ZM0-000 5580352 1
5 Ressort de levier 16574-ZE1-000 1427384 1
6 Rondelle de levier de commande 16575-ZE2-W00 3678679 1
7 Plaque centrale de levier 16577-ZM0-V30 6315741 1
8 Entretoise de levier de commande 16578-ZE1-000 1427400 1
9 Base de commande 16580-ZM0-V30 6315758 1
10 Levier d’étrangleur 16612-ZM0-V30 6315766 1
11 Tige d’étrangleur 16674-ZM0-V30 6315774 1
12 Collet (9,2x15x20,5) 91501-ZM0-V30 6363733 1
13 Ens. d’interrupteur de moteur (N.O) 35120-ZL8-003 5611520 1
14 Marque indicatrice du papillon 87532-ZM0-V30 6315832 1
15 Boulon de bras de régulateur 90015-ZE5-010 2418671 1
16 Boulon à embase (6x32) 90017-883-000 0636076 1
17 Boulon spécial (6x45) 90016-ZM0-V30 6315840 1
18 Écrou autobloquant (6 mm) 90114-SA0-000 1410182 1
19 Écrou autobloquant (5 mm) 90136-SM4-901 3596095 1
20 Vis à rondelle (4x12) 93892-04012-00 0485946 1
21 Écrou à embase (6 mm) 94050-06000 0471623 1
22 Rondelle ordinaire (4 mm) 94103-04000 1510361 1
COMMANDE (2)
A
V
A
N
T
Page 77

77- FR
D30333
PIÈCES DE RECHANGE
Node modèle du moteur HONDA GCV160A
Réf Description N° de pièce H/C Qté
1 Étiquette d’emblème (5,5) 87101-ZM0-000 5580865 1
ÉTIQUETTES
Page 78

78- FR
D30333
NOTES
Page 79

79- FR
D30333
NOTES
Page 80

e
Get it fixed, at your home or ours!
Your Home
For repair – in your home – of all major brand appliances,
lawn and garden equipment, or heating and cooling systems,
no matter who made it, no matter who sold it!
For the replacement parts, accessories and
owner’s manuals that you need to do-it-yourself.
For Sears professional installation of home appliances
and items like garage door openers and water heaters.
1-800-4-MY-HOME
(1-800-469-4663) (U.S.A. and Canada)
www.sears.com www.sears.ca
For repair of carry-in products like vacuums, lawn equipment,
and electronics, call or go on-line for the nearest
Sears Parts and Repair Center.
1-800-488-1222
To purchase a protection agreement (U.S.A.)
or maintenance agreement (Canada) on a product serviced by Sears:
1-800-827-6655
(U.S.A.) 1-800-361-6665 (Canada)
®
Anytime, day or night
Our Hom
Anytime, day or night (U.S.A. only)
www.sears.com
Para pedir servicio de reparación
Au Canada pour service en français:
a domicilio, y para ordenar piezas:
1-888-SU-HOGAR
(1-888-784-6427)
© Sears, Roebuck and Co.
® Registered Trademark /
® Marca Registrada /
MC
Marque de commerce /MD Marque déposée de Sears, Roebuck and Co.
TM
Marca de Fábrica /SMMarca de Servicio de Sears, Roebuck and Co.
SM
TM
Trademark /SMService Mark of Sears, Roebuck and Co.
1-800-LE-FOYER
(1-800-533-6937)
www.sears.ca
MC
 Loading...