

Page 1

Owner’s Manual
5.0 Horsepower
2400 PSI
2.2 GPM
PRESSURE WASHER
• Safety Guidelines
• Assembly
• Operation
• Maintenance
• Storage
• Troubleshooting
• Repair Parts
Model No.
919.672180
CAUTION: Read the Safety Guidelines
and All Instructions Carefully Before
Operating.
Sold by Sears Canada, Inc. Toronto, Ont. M5B 2B8
D30339 Rev. 1 9/10/04
Page 2

2- ENG
D30339
FULL ONE YEAR WARRANTY ON PRESSURE WASHERS
If this pressure washer fails due to a defect in material or workmanship within
one year from the date of purchase, RETURN IT TO THE NEAREST SEARS
SERVICE CENTER THROUGHOUT CANADA AND SEARS WILL REPAIR IT,
FREE OF CHARGE.
If this pressure washer is used for commercial or rental purposes, the
warranty will apply for ninety days (90) from the date of purchase.
This Craftsman pressure washer warranty gives you specific legal rights and
you may have other rights which vary from province to province.
Sears Canada, Inc., Toronto, Ont. M5B 2B8
TABLE OF CONTENTS
WARRANTY . . . . . . . . . . . . . . . . . . . . . . . . . . . . . . . . . . . . . . . . . . . . . . . .2
SPECIFICATION CHART . . . . . . . . . . . . . . . . . . . . . . . . . . . . . . . . . . . . .3
SAFETY GUIDELINES- DEFINITIONS . . . . . . . . . . . . . . . . . . . . . . . . . . .3
IMPORTANT SAFETY INSTRUCTIONS . . . . . . . . . . . . . . . . . . . . . . . .3-7
BOX CONTENTS . . . . . . . . . . . . . . . . . . . . . . . . . . . . . . . . . . . . . . . . . . . .8
ASSEMBLY . . . . . . . . . . . . . . . . . . . . . . . . . . . . . . . . . . . . . . . . . . . . . . .8-9
OPERATION . . . . . . . . . . . . . . . . . . . . . . . . . . . . . . . . . . . . . . . . . . . .10-14
MAINTENANCE . . . . . . . . . . . . . . . . . . . . . . . . . . . . . . . . . . . . . . . . .14-17
STORAGE . . . . . . . . . . . . . . . . . . . . . . . . . . . . . . . . . . . . . . . . . . . . . .18-19
TROUBLESHOOTING GUIDE . . . . . . . . . . . . . . . . . . . . . . . . . . . . . .19-21
REPAIR PARTS . . . . . . . . . . . . . . . . . . . . . . . . . . . . . . . . . . . . . . . . .22-35
FRANÇAIS . . . . . . . . . . . . . . . . . . . . . . . . . . . . . . . . . . . . . . . . . . . . .36-69
HOW TO ORDER REPAIR PARTS . . . . . . . . . . . . . . . . . . . . . .Back Cover
WARRANTY
Page 3

3- ENG
D30339
SPECIFICATION CHART
Model No. 919.672180
Pressure Washer
Pressure 2400 PSI
Flow Rate 2.2 GPM
Cleaning Units (PSI x GPM) 5280
Engine
RPM 3600
Rated Horsepower 5.0
Spark Plug Gap .030” (0.76mm)
Gasoline Capacity 1 quart (0.95 liters)
Oil 20 oz. ( 0.6 liters) capacity SAE 30 weight
This product may not be equipped with a spark arresting muffler. If
the product is not equipped and will be used around flammable
materials, or on land covered with materials such as agricultural crops, forest,
brush, grass, or other similar items, then an approved spark arrester must be
installed and is legally required in the state of California. It is a violation of California
statutes section 130050 and/or sections 4442 and 4443 of the California Public
Resources Code, unless the engine is equipped with a spark arrester, as defined in
section 4442, and maintained in effective working order. Spark arresters are also
required on some U.S. Forest Service land and may also be legally required under
other statutes and ordinances.
Engine exhaust contains chemicals known, in certain quantities, to
cause cancer, birth defects or other reproductive harm.
CONSUMER SAFETY INFORMATION
SAFETY GUIDELINES - DEFINITIONS
Indicates an
imminently hazardous
situation which, if not avoided, will
result
in death or serious injury.
Indicates a potentially
hazardous situation
which, if not avoided, could result in
death or serious injury.
Indicates a potentially
hazardous situation
which, if not avoided, may
result in
minor or moderate injury.
Used without the safety
alert symbol indicates a
potentially hazardous situation which, if not
avoided, may result in pr
operty damage
.
This manual contains information that is important for you to know and understand. This
information relates to protecting YOUR SAFETY and PREVENTING EQUIPMENT
PROBLEMS. To help you recognize this information, we use the symbols below. Please read
the manual and pay attention to these symbols.
Page 4

4- ENG
D30339
IMPORTANT SAFETY INSTRUCTIONS
Read Operators Manual. Do not operate equipment until you
have read operators Manual for Safety, Assembly, Operation,
and Maintenance Instructions.
RISK OF EXPLOSION OR FIRE
HAZARD
WHAT CAN HAPPEN
HOW TO PREVENT IT
• Spilled gasoline and it’s vapors can become ignited from cigarette sparks,
electrical arcing, exhaust gases, and hot
engine components such as the muffler.
• Shut off engine and allow it to cool before
adding fuel to the tank.
• Use care in filling tank to avoid spilling fuel.
Move pressure washer away from fueling area
before starting engine.
• Heat will expand fuel in the tank which
could result in spillage and possible fire
explosion.
• Keep maximum fuel level ½” below top of
tank to allow for expansion.
• Operating the pressure washer in an explosive environment could result in a fire.
• Operate and fuel equipment in well ventilated
areas free from obstructions. Equip areas with
fire extinguisher suitable for gasoline fires.
• Materials placed against or near the pressure washer can interfere with its proper
ventilation features causing overheating
and possible ignition of the materials.
• Never operate pressure washer in an area
containing dry brush or weeds.
• Muffler exhaust heat can damage painted
surfaces, melt any material sensitive to
heat (such as siding, plastic, rubber, or
vinyl), and damage live plants.
• Always keep pressure washer a minimum of
four feet away from surfaces (such as houses,
automobiles, or live plants) that could be damaged from muffler exhaust heat.
• Improperly stored fuel could lead to
accidental ignition. Fuel improperly
secured could get into the hands of
children or other unqualified persons.
• Store fuel in an OSHA approved container, in a secure location away from
work area.
• Use of acids, toxic or corrosive chemicals, poisons, insecticides, or any kind of
flammable solvent with this product
could result in serious injury or death.
• Do not spray flammable liquids.
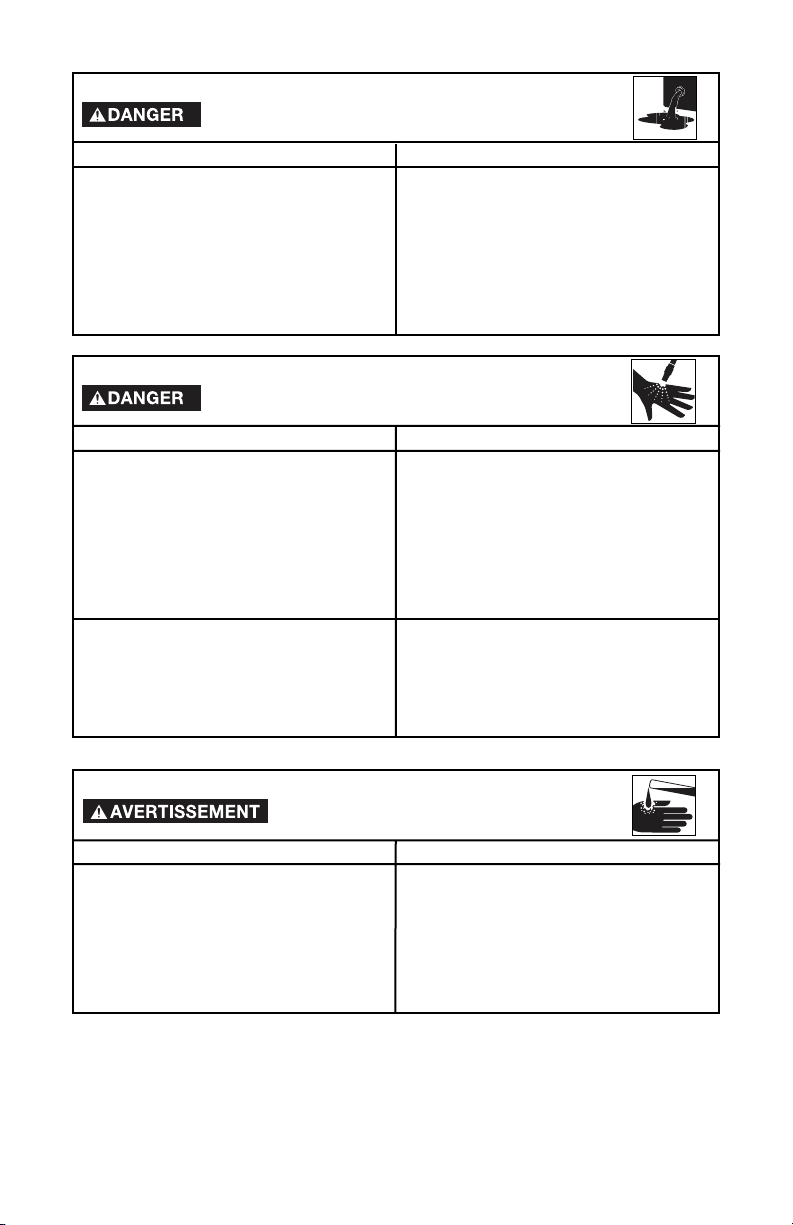
• Breathing exhaust fumes will cause serious injury or death!
• Operate pressure washer in a well
ventilated area. Avoid enclosed areas such
as garages, basements, etc.
• Never operate unit in a location occupied
by humans or animals.
• Some cleaning fluids contain substances
which could cause injury to skin, eyes, or
lungs.
• Use only cleaning fluids specifically recommended for high pressure washers.
Follow manufacturers recommendations.
Do not use chlorine bleach or any other
corrosive compound.
RISK TO BREATHING
HAZARD
WHAT CAN HAPPEN
HOW TO PREVENT IT
READ AND SAVE THESE INSTRUCTIONS
Page 5

5- ENG
D30339
• Fuel or oil can leak or spill and could
result in fire or breathing hazard, serious
injury or death can result. Fuel or oil
leaks will damage carpet, paint or other
surfaces in vehicles or trailers.
• If pressure washer is equipped with a fuel
shut-off valve, turn the valve to the off
position before transporting to avoid fuel
leaks. If pressure washer is not equipped
with a fuel shut-off valve, drain the fuel
from tank before transporting. Only
transport fuel in an OSHA approved
container. Always place pressure washer
on a protective mat when transporting to
protect against damage to vehicle from
leaks. Remove pressure washer from
vehicle immediately upon arrival at your
destination.
• Your washer operates at fluid pressures
and velocities high enough to penetrate
human and animal flesh, which could
result in amputation or other serious
injury. Leaks caused by loose fittings or
worn or damaged hoses can result in
injection injuries. DO NOT TREAT FLUID
INJECTION AS A SIMPLE CUT! See a
physician immediately!
• Never place hands in front of nozzle.
• Direct spray away from self and others.
• Make sure hose and fittings are tightened
and in good condition. Never hold onto the
hose or fittings during operation.
• Do not allow hose to contact muffler.
• Never attach or remove wand or hose
fittings while system is pressurized.
• Do not use acids, gasoline, kerosene, or
any other flammable materials in this
product. Use only household detergents,
cleaners and degreasers recommended
for use in pressure washers.
• Wear protective clothing to protect eyes
and skin from contact with sprayed
materials.
• Use of acids, toxic or corrosive chemicals, poisons, insecticides, or any kind of
flammable solvent with this product
could result in serious injury or death.
RISK OF INJURY OR PROPERTY DAMAGE
WHEN TRANSPORTING OR STORING
HAZARD
WHAT CAN HAPPEN
HOW TO PREVENT IT
RISK TO FLUID
INJECTION
HAZARD
WHAT CAN HAPPEN
HOW TO PREVENT IT
• Injuries can result if system pressure is
not reduced before attempting
maintenance or disassembly.
RISK OF
CHEMICAL
BURN
HAZARD
WHAT CAN HAPPEN
HOW TO PREVENT IT
• To relieve system pressure, shut off
engine, turn off water supply, and pull gun
trigger until water stops flowing.
• Use only hoses and accessories rated for
pressure higher than your pressure
washer's p.s.i.
Page 6

6- ENG
D30339
• Reactive force of spray will cause
gun/wand to move, and could cause the
operator to slip or fall, or misdirect the
spray. Improper control of gun/wand can
result in injuries to self and others.
• Do not overreach or stand on an unstable
support. Grip gun/wand firmly with both
hands. Expect the gun to kick when
triggered.
• If proper starting procedure is not
followed, engine can kickback causing
serious hand and arm injury.
• If engine does not start after two pulls,
squeeze trigger of gun to relieve pump
pressure. Pull starter cord slowly until
resistance is felt. Then pull cord rapidly
to avoid kickback and prevent hand or
arm injury.
• The spray gun/wand is a powerful cleaning tool that could look like a toy to a
child.
• Keep children away from the pressure
washer at all times.
• Contact with hot surfaces, such as
engines exhaust components, could
result in serious burn.
• During operation, touch only the control
surfaces of the pressure washer. Keep
children away from the pressure washer at
all times. They may not be able to
recognize the hazards of this product.
• Spray directed at electrical outlets or
switches, or objects connected to an
electrical circuit, could result in a fatal
electrical shock.
• Unplug any electrically operated product
before attempting to clean it. Direct spray
away from electric outlets and switches.
RISK OF UNSAFE OPERATION
HAZARD
WHAT CAN HAPPEN
HOW TO PREVENT IT
• Unsafe operation of your pressure washer
could lead to serious injury or death to
you or others.
• Do not use chlorine bleach or any other
corrosive compound.
• Become familiar with the operation and
controls of the pressure washer.
• Keep operating area clear of all persons,
pets, and obstacles.
• Do not operate the product when fatigued
or under the influence of alcohol or drugs.
Stay alert at all times.
• Never defeat the safety features of this
product.
• Do not operate machine with missing,
broken, or unauthorized parts.
• Never leave wand unattended while unit
is running.
RISK OF
ELECTRICAL SHOCK
HAZARD
HOW TO PREVENT IT
RISK OF HOT
SURFACES
HAZARD
WHAT CAN HAPPEN
HOW TO PREVENT IT
WHAT CAN HAPPEN
Page 7

7- ENG
D30339
The powerful spray from your pressure washer is capable of causing
damage to surfaces such as wood, glass, automobile paint, auto
striping and trim, and delicate objects such as flowers and shrubs. Before spraying,
check the item to be cleaned to assure yourself that it is strong enough to resist
damage from the force of the spray. Avoid the use of the concentrated spray stream
except for very strong surfaces like concrete and steel.
Operating without flow of water will result in equipment damage. Operating the
pressure washer with water supply shutoff will void your warranty. You should never
run this pressure washer for more than 2 minutes without pulling the trigger to allow
cool water to enter the pump and the heated (recirculated) water to exit.
RISK OF INJURY FROM SPRAY
HAZARD
WHAT CAN HAPPEN
HOW TO PREVENT IT
• High velocity fluid spray can cause
objects to break, propelling particles at
high speed.
• Light or unsecured objects can become
hazardous projectiles.
• Always wear ANSI approved Z87 safety
glasses.Wear protective clothing to protect
against accidental spraying.
• Never point wand at, or spray people or
animals.
• Always secure trigger lock when wand is
not in service to prevent accidental
operation.
• Never permanently secure trigger in pull
back (open) position.
Page 8

8- ENG
D30339
2. Connect wand to gun. Tighten
securely.
3. Attach high pressure hose to gun.
Tighten securely.
ASSEMBLY
1. Place handle assembly onto
frame and connect handle to
frame.
Handle
Part No. D22316 with
Screws Part No. D22901
High Pressure
Hose
Part No. D28094
Chemical
Hose
Part No.
H140
Knobs
Part No.
16471
Saddle
Bolts Part
No. D23196
Allen Wrench Part No. 16797
Cleaning Tool Part No. NCT001
Bagged Parts
Engine Frame and
Wheel Assembly
Engine Oil
Accessories Panel
Part No. D25081
CARTON CONTENTS
Bagged Accessories Panel
English/
French
Owners
Manual
Spray Gun
Part No. D27858
Multi-Reg Wand
Part No. A06120
Page 9
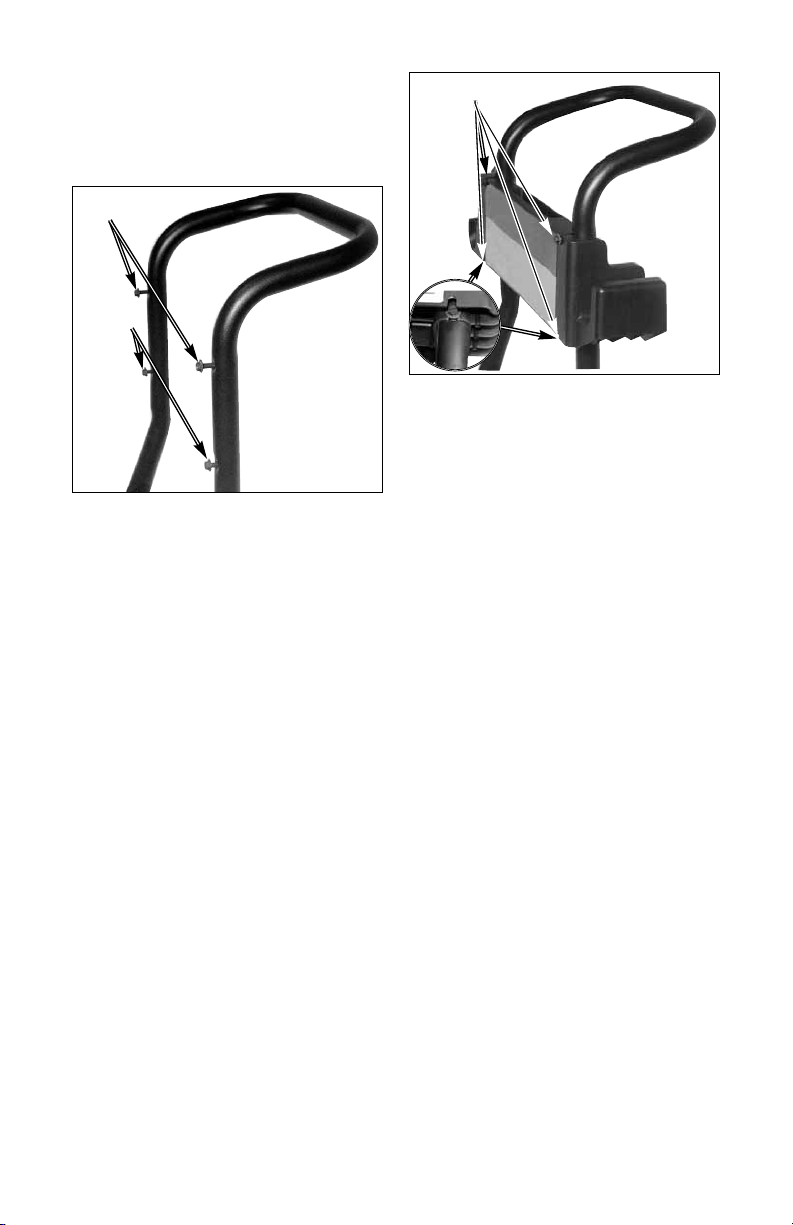
5. To Assemble Accessories Panel
a. Remove top screws on
handle assembly.
b. Loosen bottom screws on
handle assembly.
c. Place grooves in accessories
panel assembly onto screws
and slide panel assembly
into place.
9- ENG
D30339
d. Place screws (removed
earlier) into the top holes
and secure accessories
panel assembly to handles.
Do not overtighten.
Loosen
Remove
Screws
Page 10

10- ENG
D30339
PRESSURE WASHER
High Pressure Pump (located
inside the shroud): Increases the
pressure of the water supply.
Engine: Drives the high pressure
pump.
High Pressure Hose: Carries the
pressurized water from the pump to
the gun and spray wand.
Spray Gun: Connects with spray
wand to control water flow rate,
direction, and pressure.
Multi-Adjustable Spray Wand: Has a
spray nozzle which adjusts from a
pencil stream (0°) to a wide angle fan
spray (40°). The spray can be
adjusted by twisting the nozzle
clockwise and/or counterclockwise.
ENGINE
Choke Control: Opens and closes
the choke valve in carburetor.
Throttle Control Lever: Controls
engine speed.
Starter Grip: Pulling starter grip
operates recoil starter to crank
engine.
Also, the high and low pressure
settings can be controlled by moving
the nozzle in and out. See Operation
section. See How To Use Wand
paragraph in this section.
Chemical Hose: Feeds cleaning
agents into the pump to mix with the
pressurized water. See How To Apply
Chemicals/Cleaning Solvents in
Operation section of this manual.
OPERATION
Know Your Pressure Washer
READ THIS OWNER’S MANUAL AND SAFETY RULES BEFORE OPERATING
YOUR UNIT. Compare the illustrations with your unit to familiarize yourself with
the location of various controls and adjustments. Save this manual for future
reference.
High
Pressure
Pump
Engine
High
Pressure
Hose
Spray
Gun
Multi-Reg
Wand
Chemical
Hose
Hand
Grip
Air Filter
Choke
Control
Throttle Control
Oil
Fill
Page 11

11- ENG
D30339
TO ADJUST PRESSURE
The pressure setting is preset at the
factory to achieve optimum pressure
and cleaning. If you need to lower the
pressure, it can be accomplished by
these methods.
1. Back away from the surface to be
cleaned. The further away you
are, the less the pressure will be
on the surface to be cleaned.
2. Reduce the speed of the
gasoline engine (RPM). Slow the
engine down and the water
pressure will go down with it.
DO NOT attempt to
increase pump
pressure. A higher pressure
setting than the factory set
pressure may damage pump.
HOW TO USE
IMPORTANT: Read and understand
how to use the pressure washer
before operating.
HOW TO USE SPRAY WAND:
Your pressure washer is equipped with
a multi-adjustable spray wand with
both high and low pressure settings.
The high pressure setting is for
cleaning and rinsing, the low pressure
setting is for applying chemicals or
cleaning solutions to surfaces.
When using the high
pressure setting,
DO NOT allow the jet-like spray to
come in contact with unprotected
skin, eyes, or with any pets or
animals. Serious injury can occur.
Risk of injection or
injury to person.
DO NOT direct discharge stream
toward persons.
For high pressure operation, pull back
the nozzle of the multi-adjustable
spray wand as shown.
PRESSURE WASHER
TERMINOLOGY
PSI: Pounds per Square Inch. The
unit of measure for water pressure.
Also used for air pressure, hydraulic
pressure, etc.
GPM: Gallons Per Minute. The unit of
measure for the flow rate of water.
CU: Cleaning Units. GPM multiplied
by PSI.
Bypass Mode: In Bypass Mode, the
pump is recirculating water because
the trigger of the spray gun is not
pulled. If unit is left in bypass mode
for more than two (2) minutes, the
water temperature will rise to a
dangerous level and could damage
internal components of the pump.
Any damage to pump due to these
causes will not be covered under
warranty.
DO NOT allow your
unit to operate in
bypass mode for more than two
minutes at any time. Overheating
of pump can cause damage to
pump.
Thermal Relief Valve: In an effort to
prevent extreme damage, pumps are
equipped with a thermal relief valve.
This valve will open when the
temperature inside the pump rises
too high. This valve will then release a
gush of water in an effort to lower the
temperature inside the pump.
Immediately after this occurs, the
valve will close. The thermal relief
valve is part of the pump and is not
visible to the user.
Chemical Injection System: Mixes
cleaners or cleaning solvents with the
pressurized water to improve
cleaning effectiveness.
Water Supply: All pressure washers
must have a source of water. The
minimum requirements for a water
supply are 20 PSI and 5 gallons per
minute.
high
pressure
Page 12

12- ENG
D30339
D30339D30339
TO SHUT DOWN
IMPORTANT: Read and understand
how to shut down the pressure
washer before operating.
1. If you have applied chemicals,
place chemical hose into container
of clean water and draw clean
water through chemical injection
system to rinse system thoroughly.
NOTE: Failure to do so could
cause damage to the pump.
2. Turn engine off by placing the
throttle control in the STOP
position.
NOTE: NEVER turn the water off
with the engine running.
3. Turn water source off.
4. Pull trigger on spray gun to
relieve any water pressure in
hose or spray gun.
5. See Storage section in this
manual for proper storage
procedures.
The nozzle at the end of the multiadjustable spray wand can be rotated
to change the high pressure spray
pattern from a narrow jet to a 40º fan
shape, as shown. Markings have
been placed on the nozzle to help
you select the spray pattern.
For low pressure operation, extend
the nozzle of the multi-adjustable
spray wand as shown.
40º fan spray
narrow jet stream
HOW TO APPLY CHEMICALS
AND CLEANING SOLVENTS
Applying chemicals or cleaning
solvents is a low pressure operation.
NOTE: Use only soaps and
chemicals designed for pressure
washer use. Do not use bleach.
To Apply chemicals:
1. Press chemical hose onto barbed
fitting located near high pressure
hose connection of pump as
shown.
2. Place other end of chemical hose
with filter on it into container
holding chemical/cleaning solution.
NOTE: The chemical/water ratio is
7:1, for every 7 gallons of water
pumped 1 gallon of
chemical/cleaning solution will be
used.
3. Set multi-adjustable nozzle to low
pressure setting. See How To Use
Wand paragraph in this section.
4. After use of chemicals, place
chemical hose into container of
clean water and draw clean water
through chemical injection system
to rinse system thoroughly. If
chemicals remain in the pump it
could be damaged. Pumps
damaged due to chemicals will not
be covered under warranty.
NOTE: Chemicals and soaps will not
siphon when spray wand is in the high
pressure setting.
Barb fitting
low
pressure
Page 13

13- ENG
D30339
D30339
2. Remove filler cap/dipstick and
add engine oil (supplied) to
engine.
NOTE: There will be a slight amount
of oil in the engine from factory
testing.
3. Oil level should be at the FULL
line on dipstick. Always check oil
level before each start-up.
4. Verify the filter screen is in water
inlet of pump, as shown.
5. Connect high pressure hose to
pump outlet.
6. Connect water source to pump
inlet.
NOTE: Water source must provide
a minimum of 5 gallons per minute
at 20 p.s.i.
Water
Source
High
Pressure
Hose
Filter Screen
BEFORE STARTING
Read and understand all Important
Safety Instructions in the front of
this manual and the following
Cautions and Warnings before
starting the pressure washer.
• Never fill fuel tank completely.
Fill tank to 1/2" below bottom
of filler neck to provide space
for fuel expansion. Wipe any
fuel spillage from engine and
equipment before starting
engine.
• Never fill fuel tank indoors.
Never fill fuel tank when engine
is running or hot. Do not
smoke when filling fuel tank.
• Never run engine indoors or in
enclosed, poorly ventilated
areas. Engine exhaust contains carbon monoxide, an
odorless and deadly gas.
• Never turn water supply off
while pressure washer engine
is running or damage to pump
will result.
• DO NOT use hot water, use
cold water only.
• DO NOT stop spraying water
for more than two minutes at a
time.
NOTE: Remove and discard blue
plug in fuel fill.
1. Add fresh high quality unleaded
gasoline with a pump octane
rating of 86 or higher. Do not
overfill. Wipe up spilled fuel
before starting the engine.
Filler cap/
dipstick
Fuel
Fill
Page 14
14- ENG
D30339
D30339D30339
MAINTENANCE
When performing maintenance, you may be exposed to hot
surfaces, water pressure, or moving parts that can cause
serious injury or death!
Before performing any maintenance or repair, disconnect spark plug wire,
let engine cool and release all water pressure. The engine contains
flammable fuel. DO NOT smoke or work near open flames while
performing maintenance.
To ensure efficient operation and longer life of your pressure washer, a routine
maintenance schedule should be prepared and followed. If the pressure washer
is used in unusual conditions, such as high-temperatures or dusty conditions,
more frequent maintenance checks will be required.
10. Pull starter grip slowly until you
feel resistance, then pull briskly.
Return starter grip gently. Pull
rope with a rapid full arm stroke.
Let rope rewind slowly. Repeat if
necessary.
If the engine does
not start after two
pulls, pull the trigger to relieve the
pressure.
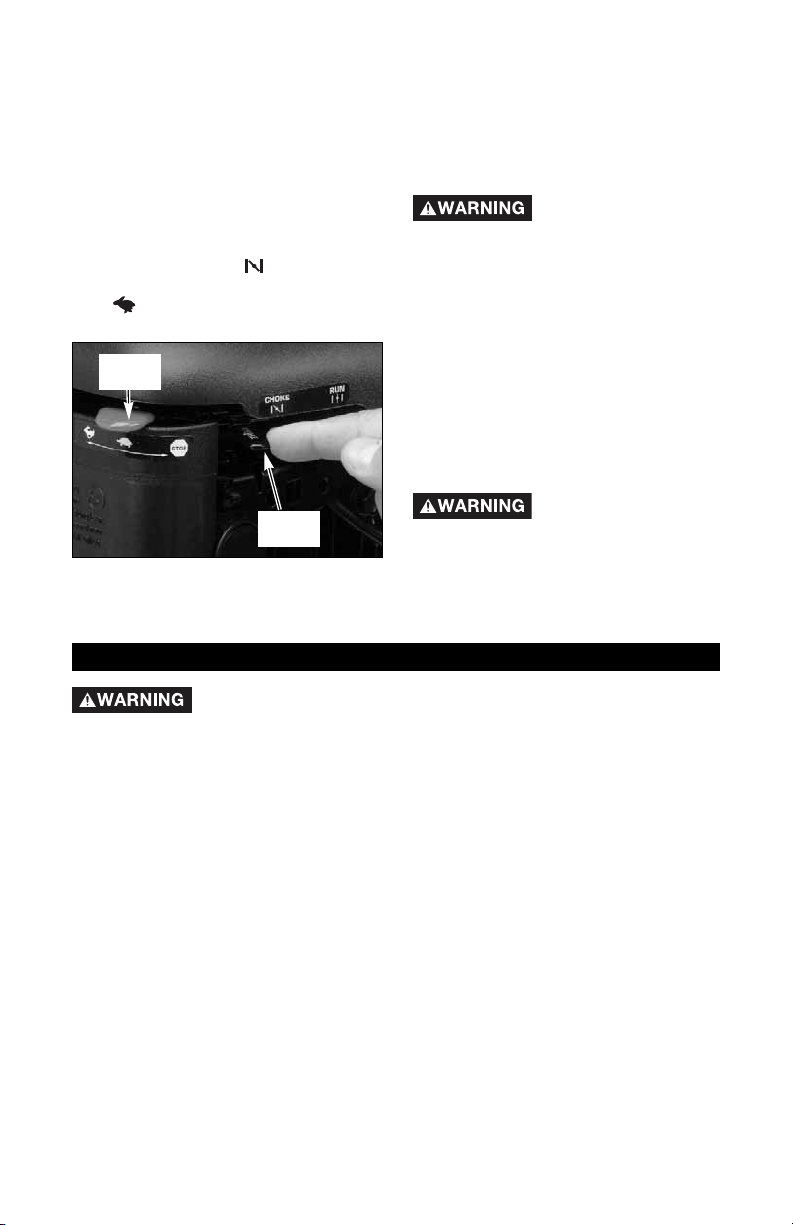
11. If the choke was used to start
the engine, move the choke lever
to the OFF position.
12. Depress trigger on gun to start
water flow. Release trigger to
stop water flow.
13. Adjust nozzle spray for the task
being performed. See How To
Use Spray Wand instructions in
this section.
DO NOT let hoses
come in contact
with very hot engine muffler during
or immediately after use of your
pressure washer.
7. If you are applying a chemical or
cleaning solution, See How To
Apply Chemicals and Cleaning
Solvents in Operation section of
this manual.
8. Turn water source on.
NOTE: Make sure water supply is
turned on.
9. Move the choke control lever to
the CHOKE ON position and
the throttle control to the FAST
position. NOTE: No choke is
needed to start a warm engine.
Choke
Control
Throttle
Control
Page 15

15- ENG
D30339
CUSTOMER RESPONSIBILITIES TABLE
MAINTENANCE TASK
PRESSURE WASHER
ENGINE
check/clean inlet screen
check high pressure hose
check soap and chemical
hose and filter
check gun and wand for leaks
check oil level
change oil
check air cleaner
clean/replace spark plug
prepare for storage
Before
each use
Every 25
hours or
yearly
Every 50
hours or
yearly
Every 100
hours or
yearly
Prepare unit for storage if it is to remain idle for longer
than 30 days
X
X
X
X
X
X**
X*
X
clean debris
X
clean air cooling system
X
clean combustion chamber
X
* Change oil after first 5 to 8 hours of use, then every 50 hours or every
season. Change oil every 25 hours when operating the engine under heavy
load or in high temperatures.
** Clean more often under conditions of dust or airborne debris. Replace air
cleaner parts, if very dirty.
5. If needed, add oil slowly and
recheck. Do not over fill.
NOTE: Use a high quality detergent oil
classified “For Service SF, SG, SH,
SJ” or higher, such as SAE 30.
NOTE: Other viscosities shown in the
chart may be used when the average
temperature in your area is within the
recommended range.
6. Replace filler cap/dipstick.
ENGINE
To Check Oil
1. Shut down engine and place on a
level surface.
2. Remove filler cap/dipstick and
wipe it clean.
3. Replace and tighten dipstick.
Remove and check oil level.
4. Oil level should be at the FULL
line on dipstick.
Filler cap/
dipstick
SAE Viscosity Grades
**
*
Synthetic 5W-30, 10W-30
-20 0 20 40 60 80 100
F
-30 -20 -10 0 10 20 30 40
C
STARTING TEMPERATURES RANGE
ANTICIPATED BEFORE NEXT OIL CHANGE
32
Page 16

16- ENG
D30339
Air Cleaner
To Remove
1. Loosen screw and tilt cover
down.
2. Remove air cleaner.
3. Reinstall clean (or new) air
cleaner assembly inside cover.
Lip of pre-cleaner must be at
bottom of cartridge pleats.
4. Insert cover’s tabs into slots in
bottom of base.
5. Tilt cover up into place and
tighten screw.
To Clean
Separate pre-cleaner from cartridge
and wash in liquid detergent and
water. Air dry thoroughly. Do not oil.
Reassemble dry pre-cleaner on clean
cartridge.
Do not use pressurized air or solvents
to clean cartridge. Pressurized air can
damage cartridge; solvents will
dissolve cartridge.
Clean and Replace Spark Plug
Change the spark plug every 100
hours of operation or once each year,
whichever comes first. This will help
your engine to start easier and run
better.
Resistor
.030” (0.76 MM)
Wire Gauge
To Change Oil
Drain the engine oil when the engine
is warm. Warm oil drains quickly and
completely.
1. Before tipping engine or
equipment to drain oil, drain fuel
from tank by running engine until
fuel tank is empty.
2. Disconnect spark plug wire and
keep it away from spark plug.
3. With engine OFF but still warm
remove filler cap/dipstick.
4. Place a suitable container next
the engine to catch the used oil.
5. Keeping air cleaner above oil
outlet, drain oil.
NOTE: Please dispose of used motor
oil in a manner that is compatible with
the environment. It is recommended
to take used oil in a sealed container
to your local recycling center or
service station for reclamation. Do not
throw it in the trash or pour it on the
ground or down a drain.
6. With the engine in a level
position, fill to the FULL line on
the dipstick with SAE 10W-30 oil.
Engine oil capacity is 20 oz. (0.6
liter).
NOTE: Other viscosities shown in the
chart in the “To Check Oil” paragraph
may be used.
7. Replace the oil filler cap/dipstick
securely.
Cartridge
PreCleaner
Tabs
and
Slots
Cover
Base
Pre-Cleaner Lip
Air Cleaner
Drain Oil
Screw
Cartridge Lip
Page 17

17- ENG
D30339
D30339
NOZZLE CLEANING
If the nozzle becomes clogged with
foreign materials, such as dirt,
excessive pressure may develop. If
the nozzle becomes partially clogged
or restricted, the pump pressure will
pulsate. Clean the nozzle
immediately using the nozzle kit
supplied and the following
instructions:
1. Shut off the pressure washer and
turn off the water supply.
2. Disconnect spark plug wire.
3. Pull trigger on gun handle to
relieve any water pressure.
4. Disconnect the wand from the
gun.
5. Remove the nozzle from the end
of the wand with the 2mm allen
wrench provided as shown.
6. Clean the nozzle using the nozzle
cleaner provided or a
straightened paper clip. Insert
into the nozzle end and work
back and forth until obstruction
is removed.
7. Direct water supply into nozzle
end to backflush loosened
particles for 30 seconds.
8. Reconnect spark plug wire.
9. Reassemble the nozzle to the
wand. Tighten securely to
prevent leaks.
10. Reconnect wand to gun and turn
on water supply.
11. Start pressure washer and place
wand into high pressure setting
to test.
PUMP
This screen filter should be checked
periodically and cleaned if necessary.
1. Remove filter by grasping end
and removing it from water inlet
of pump as shown.
2. Clean filter by flushing it with
water on both sides.
3. Install filter into water inlet of
pump
Filter Screen
Cleaning Debris
Engine parts should be kept clean to
reduce the risk of overheating and
ignition of accumulated debris.
NOTE: Do not use water to clean
engine parts. Water could
contaminate fuel system. Use a brush
or dry cloth.
Combustion Deposits
Every 100-300 hours an Authorized
Warranty Service Center should
remove combustion deposits from the
cylinder, cylinder head, top of piston,
and around valves.
Air Cooling System
Over time debris may accumulate in
cylinder cooling fins and cannot be
observed without partial engine
disassembly. For this reason an
Authorized Warranty Service Center
should clean the air cooling system
per recommended intervals.
Page 18

18- ENG
D30339
D30339
ENGINE
IMPORTANT: It is important to prevent
gum deposits from forming in essential
fuel system parts such as the
carburetor, fuel filter, hose or tank
during storage. Also, experience
indicates that alcohol-blended fuels
(called gasohol or using ethanol or
methanol) can attract moisture which
leads to separation and formation of
acids during storage. Acidic gas can
damage the fuel system of an engine
while in storage. To avoid engine
problems, the fuel system should be
emptied before storage of 30 days or
longer. Never use engine or carburetor
cleaner products in the fuel tank or
permanent damage may occur.
Engine Preparation
• First add a fuel stabilizer to the
fuel tank.
• Run pressure washer for a full 5
minutes to allow fuel stabilizer to
enter the fuel system.
While preparing the
engine make sure
water supply is turned on and
flowing to the unit. NEVER run unit
without water supply running
through pump. Failure to do so will
cause pump damage.
• Next shut off engine and
disconnect the water supply.
• Disconnect the spark plug wire
and remove the spark plug.
• Add one teaspoon of oil through
the spark plug hole.
• Place rag over spark plug hole
and pull the recoil a few times to
lubricate the combustion
chamber.
• Replace the spark plug, but do
not connect the spark plug wire.
PUMP
It is recommended that you follow
these steps to protect the internal
seals of the pressure washer when
storing the unit for an extended
period and WHEN FREEZING
TEMPERATURES ARE EXPECTED.
NOTE: If storing the unit for more
than 30 days RV antifreeze or
windshield washer fluid needs to be
run through the pump. This helps
prevent damage within the pump
head. RV antifreeze or windshield
washer fluid is not only added for
winterizing, but for proper lubrication regardless of temperature or
environment. Storing the pump less
than 30 days does not require the
RV antifreeze or windshield washer
fluid.
1. Obtain a funnel, six ounces of RV
antifreeze or windshield washer
fluid, and approximately 12 inches
of garden hose with a male hose
connector attached to one end.
Use only RV
antifreeze. Any
other antifreeze is corrosive and can
damage pump.
2. Disconnect spark plug wire.
3. Disconnect high pressure hose
from pump and from spray gun.
4. Connect 12 inch length of hose to
water inlet of pump.
5. Add RV antifreeze or windshield
washer fluid to hose as shown.
STORAGE
Page 19

19- ENG
D30339
D30339
6. Pull engine starter rope slowly
several times until antifreeze or
windshield washer fluid comes
out of high pressure hose connection of pump.
7. Remove short hose from water
inlet of pump.
8. Install spark plug into spark plug
hole and tighten securely, then
reconnect spark plug wire.
9. Drain all water from high pressure
hose, coil it, and store it in cradle
of the pressure washer handle.
10. Drain all water from spray gun
and wand by holding spray gun in
a vertical position with nozzle end
pointing down and squeezing
trigger. Store in gun/hose holder.
11. Store chemical hose, high
pressure hose, spray gun, and
wand so they are protected from
damage, such as being run over.
TROUBLESHOOTING GUIDE
PROBLEM
CAUSE
CORRECTION
Engine will not
start
1. No fuel.
2. Pressure builds up after
two pulls on the recoil
starter or after initial use.
3. Not choked.
4. Spark plug wire not
attached.
5. Choke lever in the
"Choke" position on a
"hot" engine or an engine
that has been exposed to
thermal heat for a long
period of time.
1. Add Fuel.
2. Squeeze gun trigger to
relieve pressure.
3. Choke engine, place
engine in the choke
position.
4. Attach spark plug wire.
5. Move choke to the "No
Choke" position.
No or low
pressure
(initial use)
1. Wand not in high
pressure.
1. See How to Use Spay
Wand paragraph in the
Operation Section.
2. Low water supply.
2. Water supply must be at
least 5 GPM @ 20 PSI.
3. Leak at high pressure
hose.
3. Repair leak. Apply sealant
tape if necessary.
4. Nozzle obstructed.
4. Clean nozzle with paper
clip or nozzle cleaning
tool, pour water into nozzle end to flush out obstruction.
5. Water filter screen
clogged.
5. Remove and clean filter.
Page 20

20- ENG
D30339
D30339
6. Air in hose.
6. Turn off the engine, then
the water source.
Disconnect the water
source from the pump
inlet and turn the water
source on to remove all air
from the hose. When there
is a steady stream of
water present, turn water
source off. Reconnect
water source to pump inlet
and turn on water source.
Squeeze trigger to remove
remaining air.
7. Choke lever in the
"Choke" position.
8. Throttle control lever is
not in the "Fast" position.
9. High pressure hose is too
long.
7. Move choke to the "No
Choke" position.
8. Move throttle control lever
to the "Fast" position.
9. Use high pressure hose
under 100 feet.
PROBLEM
CAUSE
CORRECTION
No or low
pressure
(initial use)
(continued)
6. Chemical build up in
chemical injector.
Will not draw
chemicals
1. Wand not in low
pressure.
2. Chemical filter clogged.
3. Chemical screen not in
chemical
4. Chemical too thick
5. Pressure hose is too long
2. Clean filter.
3. Insure end of chemical
hose is fully submerged
into chemical.
4. Dilute chemical. Chemical
should be the same
consistency as water.
5. Lengthen water supply
hose instead of pressure
hose.
6. Have parts cleaned or
replaced by AWSC.
1. See How to Use Spay
Wand paragraph in the
Operation Section.
Page 21

21- ENG
D30339
D30339
PROBLEM
CAUSE
CORRECTION
No or low
pressure (after
period of normal use.)
Water leaking
at gun/wand
connection
Water leaking
at pump
1. Worn seal or packing.
2. Worn or obstructed
valves.
3. Worn unloader piston.
1. Worn or broken o-ring.
2. Loose hose connection.
1. Loose connections.
2. Piston packings worn.
3. Worn or broken o-rings.
4. Pump head or tubes
damaged from freezing.
1. Have replaced by AWSC.
2. Have replaced by AWSC.
3. Have replaced by AWSC.
1. Check and replace.
2. Tighten.
1. Tighten.
2. Have replaced by AWSC.
3. Have replaced by AWSC.
4. Have replaced by AWSC.
Page 22

22- ENG
D30339
REPAIR PARTS
Pressure Washer Model Number 919.672180
Key# Part # Description
3 D23125 Label, Hot Surface
4 * Pump Kit
5 D27152 Screw, 5/16-24 (qty 4)
8 D22305 Wheel Bracket
9 D22206 Axle
10 D27956 Bolt, 3/8-16 x 1.75 Self Tapping (qty 3)
14 D22267 Plug (qty 2)
16 D28123 Tire (qty 2)
17 D22268 Isolator
18 D28397 Screw, 1/4-20
19 W137 Pal Nut
22 D28397 Screw 1/4-20 x .75
23 D21630 Pump Shroud
* See Breakdown for individual Parts
TORQUE TO
150 - 175 IN-LBS
19
16
22
14
TORQUE TO
5
120 - 240 IN-LBS
12
4
8
9
3
10
TORQUE TO
450-650 IN-LBS
17
TORQUE TO
18
15 - 30 IN-LBS
23
Page 23

23- ENG
D30339
REPAIR PARTS
Pressure Washer Model Number 919.672180
Key# Part # Description
1 * Engine, Briggs & Stratton
2 17050 Label, Danger
6 D22908 Frame
7 D25074 Base
12 D22308 Screw, 5/16-18 x 2 (qty 4)
15 D22692 Nut, 5/16-18
24 D25087 Label, Warning
Not Shown
D30339 Manual, Owners
* See Breakdown for individual Parts
1
12
15
TORQUE TO
50 - 70 IN-LBS
TORQUE TO
130 - 150 IN-LBS
2
6
7
24
Page 24

24- ENG
D30339
REPAIR PARTS
Pressure Pump Model Number D28703
Key#
Part # Description
1 D20998 Hose, 3/8 x 18”
2 D29540 Unloader Assembly
4 H061 Swivel Nut, Garden Hose
5 H068 Swivel, 3/8”
6 V161 Chemical Injector
7 F187 Inlet ScreenFilter
8 D25006 Set Screw
Not Shown:
H140 Chemical Hose,
2
1
5
4
8
Page 25

25- ENG
D30339
REPAIR PARTS
Briggs & Stratton Engine Model Number 128812-3112-D2
Key# Part# Description
1 697322 Cylinder Assembly
2 399269 Kit–Bushing/Seal
(Magneto Side)
3 ★ 299819 Seal–Oil
(Magneto Side)
5 691160 Head–Cylinder
7 ★ 692249 Gasket–Cylinder Head
8 695250 Breather Assembly
9 696125 Gasket–Breather
10 691125 Screw
(Breather Assembly)
11 691781 Tube–Breather
13 690912 Screw
(Cylinder Head)
50 497465 Manifold–Intake
51 ★ 272199 Gasket–Intake
54 691650 Screw
(Intake Manifold)
287 690940 Screw
(Dipstick Tube)
306 690450 Shield–Cylinder
307 690345 Screw (Cylinder Shield)
337 802592 Plug–Spark
383 89838 Wrench–Sparkplug
523 495264 Dipstick
524 ★ 692296 Seal–Dipstick Tube
525 495265 Tube–Dipstick
584 692342 Cover–Breather
Passage
585 ★ 691879 Gasket–Breather
Passage
635 66538 Boot–Spark Plug
684 690345 Screw
(Breather Passage
Cover)
718 690959 Pin–Locating
842 ★ 691031 Seal–O Ring
(Dipstick Tube)
847 692017 Dipstick/Tube
Assembly
869 691155 Seat–Valve
(Intake)
870 690380 Seat–Valve (Exhaust)
871 262001 Bushing–Valve Guide
(Exhaust Valve)
––––––– Note –––––
63709 Bushing–Valve-Guide
(Intake Valve)
1019 494256 Kit–Label
★ Included in Engine Gasket Set–See Ref. No. 358.
✦ Included in Carburetor Overhaul Kit–See Ref. No. 121.
● Included in Carburetor Gasket Set–See Ref. No. 977.
Assemblies include all parts shown in frames.
Key# Part# Description
1
684
869
7
870
1019 LABEL KIT
50
383
635
584
585
54
51
5
337
13
307
2
3
306
871
718
8
9
847
523
287
842
525
524
11
10
Page 26

26- ENG
D30339
REPAIR PARTS
★ Included in Engine Gasket Set–See Ref. No. 358.
✦ Included in Carburetor Overhaul Kit–See Ref. No. 121.
● Included in Carburetor Gasket Set–See Ref. No. 977.
Assemblies include all parts shown in frames.
Briggs & Stratton Engine Model Number 128812-3112-D2
Key# Part# Description
16 691455 Crankshaft
24 222698 Key–Flywheel
25 499429 Piston Assembly
(Standard)
––––––– Note –––––
499430 Piston Assembly
(.010” Oversize)
499431 Piston Assembly
(.020” Oversize)
499432 Piston Assembly
(.030” Oversize)
26 499425 Ring Set (Standard)
––––––– Note –––––
499426 Ring Set
(.010” Oversize)
499427 Ring Set
(.020” Oversize)
499428 Ring Set
(.030” Oversize)
27 691866 Lock–Piston Pin
28 499423 Pin–Piston (Standard)
––––––– Note –––––
29 499424 Rod–Connecting
(Standard)
32 691664 Screw
(Connecting Rod)
32A 695759 Screw
(Connecting Rod)
33 262651 Valve–Exhaust
34 262652 Valve–Intake
35 691270 Spring–Valve (Intake)
36 691270 Spring–Valve
(Exhaust)
40 692194 Retainer–Valve
45 690548 Tappet–Valve
146 690979 Key–Timing
741 691830 Gear–Timing
Key# Part# Description
16
24
741
146
45
40
35
34
36
33
45
40
25
26
28
27
27
29
32
32A
Page 27

27- ENG
D30339
★ Included in Engine Gasket Set–See Ref. No. 358.
✦ Included in Carburetor Overhaul Kit–See Ref. No. 121.
● Included in Carburetor Gasket Set–See Ref. No. 977.
Assemblies include all parts shown in frames.
Briggs & Stratton Engine Model Number 128812-3112-D2
Key# Part# Description
4 498983 Sump–Engine
12 ★ 692232 Gasket–Crankcase
15 691680 Plug–Oil Drain
20 ★ 399781 Seal–Oil (PTO Side)
22 691092 Screw (Engine Sump)
43 691997 Slinger–Governor/Oil
46 691449 Camshaft
Key# Part# Description
REPAIR PARTS
46
43
4
12
15
20
22
Page 28

28- ENG
D30339
★ Included in Engine Gasket Set–See Ref. No. 358.
✦ Included in Carburetor Overhaul Kit–See Ref. No. 121.
● Included in Carburetor Gasket Set–See Ref. No. 977.
Assemblies include all parts shown in frames.
Briggs & Stratton Engine Model Number 128812-3112-D2
Key# Part# Description
95 691636 Screw
(Throttle Valve)
97 493267 Shaft–Throttle
104 ● 691242 Pin–Float Hinge
108 691182 Valve–Choke
109 498593 Shaft–Choke
117 498978 Jet–Main
(Standard)
118 498975 Jet–Main
(High Altitude)
125 499059 Carburetor
127 ● 694468 Plug–Welch
130 691203 Valve–Throttle
133 398187 Float–Carburetor
134 ● 398188 Kit–Needle/Seat
137 ●✦ 693981 Gasket–Float Bowl
163 ★●✦ 272653 Gasket–Air
Cleaner
276 ●✦ 271716 Washer–Sealing
365 692524 Screw (Carburetor)
617 ●✦ 270344 Seal–O Ring
(Intake Manifold)
633 ●✦ 691321 Seal–
Choke/Throttle
Shaft
633A 693867 Seal–
Choke/Throttle
Shaft
692 690572 Spring–Detent
975 493640 Bowl–Float
Key# Part# Description
REPAIR PARTS
125
365
118
276
163
109
108
127
633A
130
692
97
633
95
617
134
133
975
117
104
137
276
276
Page 29

29- ENG
D30339
★ Included in Engine Gasket Set–See Ref. No. 358.
✦ Included in Carburetor Overhaul Kit–See Ref. No. 121.
● Included in Carburetor Gasket Set–See Ref. No. 977.
Assemblies include all parts shown in frames.
Briggs & Stratton Engine Model Number 128812-3112-D2
Key# Part# Description
188 690877 Screw
(Control Bracket)
202 691829 Link–Mechanical
Governor
209 691291 Spring–Governor
222 692150 Bracket–Control
227 690783 Lever–Governor
Control
333 802574 Armature–Magneto
334 691061 Screw
(Magneto Armature)
356 692390 Wire–Stop
404 690272 Washer
(Governor Crank)
505 231082 Nut (Governor
Control Lever)
562 92613 Bolt (Governor
Control Lever)
615 690340 Shaft–Retainer
Governor
616 691308 Crank–Governor
621 692310 Switch–Stop
668 ★ 493823 Spacer
(Includes 2)
843 691895 Sleeve–Lever
(Choke)
843A 691884 Sleeve–Lever
(Speed Control)
851 493880 Terminal–Sparkplug
Key# Part# Description
REPAIR PARTS
615
404
616
356
227
562
505
843
209
333
334
851
843A
202
188
222
621
668
Page 30

30- ENG
D30339
★ Included in Engine Gasket Set–See Ref. No. 358.
✦ Included in Carburetor Overhaul Kit–See Ref. No. 121.
● Included in Carburetor Gasket Set–See Ref. No. 977.
Assemblies include all parts shown in frames.
Briggs & Stratton Engine Model Number 128812-3112-D2
Key# Part# Description
187 691050 Line–Fuel
(Cut to Required
Length)
190 690940 Screw
(Fuel Tank)
601 95162 Clamp–Hose
670 692294 Spacer–Fuel Tank
957 397974 Cap–Fuel Tank
972 495224 Tank–Fuel
1059 692311 Kit–Screw/Washer
Key# Part# Description
REPAIR PARTS
190
972
957
1059
670
187
601
Page 31

31- ENG
D30339
★ Included in Engine Gasket Set–See Ref. No. 358.
✦ Included in Carburetor Overhaul Kit–See Ref. No. 121.
● Included in Carburetor Gasket Set–See Ref. No. 977.
Assemblies include all parts shown in frames.
Briggs & Stratton Engine Model Number 128812-3112-D2
Key# Part# Description
81 691740 Lock–Muffler Screw
159 691753 Bracket–Air Cleaner
Primer
163 ★●✦ 272653 Gasket–Air Cleaner
300 496106 Muffler
425 690670 Screw
(Air Cleaner Cover)
443 692523 Screw
(Air Cleaner Primer
Base)
445 491588 Filter–Air Cleaner
Cartridge
529 691923 Grommet
613 691340 Screw (Muffler)
832 499034 Guard–Muffler
836 690664 Screw
(Muffler Guard)
966 496116 Base–Air Cleaner
Primer
968 692298 Cover–Air Cleaner
970 691669 Screw
(Air Cleaner Primer
Bracket)
976 694395 Primer–Carburetor
Key# Part# Description
REPAIR PARTS
966
425
968
445
443
529
163
159
970
976
300
81
613
832
836
Page 32
32- ENG
D30339
★ Included in Engine Gasket Set–See Ref. No. 358.
✦ Included in Carburetor Overhaul Kit–See Ref. No. 121.
● Included in Carburetor Gasket Set–See Ref. No. 977.
Assemblies include all parts shown in frames.
Briggs & Stratton Engine Model Number 128812-3112-D2
Key# Part# Description
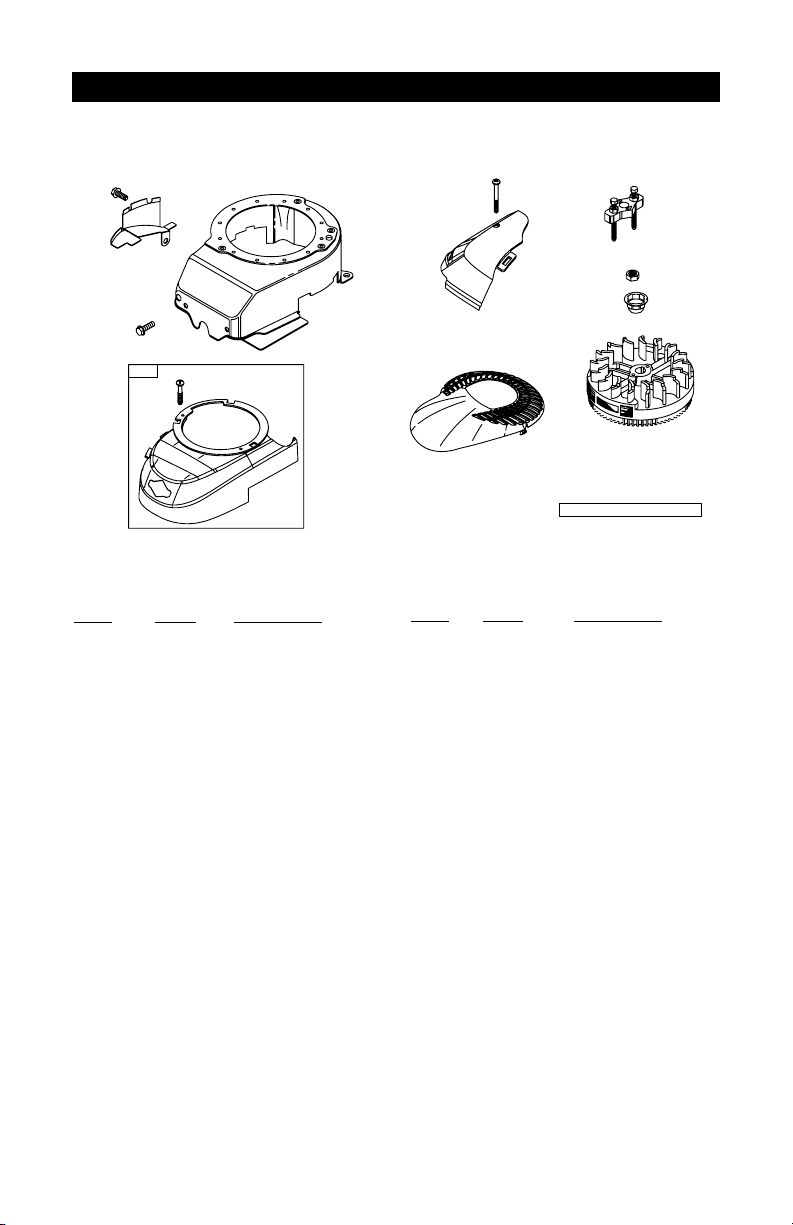
23 691992 Flywheel
37 694086 Guard–Flywheel
78 691108 Screw
(Flywheel Guard)
304 493294 Housing–Blower
305 691108 Screw
(Blower Housing)
332 690662 Nut (Flywheel )
363 19069 Flywheel Puller
455 695161 Cup–Flywheel
564 691142 Screw
(Control Cover)
604 691344 Cover–Control
921 695886 Cover–Blower
Housing
930 691345 Guard–Rewind
969 691138 Screw
(Blower Housing
Cover)
1036 697378 Label–Emission
Key# Part# Description
REPAIR PARTS
78
37
304
305
921
969
564
363
604
930
x
332
455
23
1036 EMISSION LABEL
Page 33

33- ENG
D30339
★ Included in Engine Gasket Set–See Ref. No. 358.
✦ Included in Carburetor Overhaul Kit–See Ref. No. 121.
● Included in Carburetor Gasket Set–See Ref. No. 977.
Assemblies include all parts shown in frames.
Briggs & Stratton Engine Model Number 128812-3112-D2
Key# Part# Description
55 691421 Housing–Rewind
Starter
58 692259 Rope–Starter
(Cut To Required
Length)
60 281434 Grip–Starter Rope
65 690837 Screw
(Rewind Starter)
456 692299 Plate–Pawl Friction
459 281505 Pawl–Ratchet
592 690800 Nut
(Rewind Starter)
597 691696 Screw
(Pawl Friction Plate)
608 497680 Starter–Rewind
689 691855 Spring–Friction
1210 498144 Pulley/Spring
Assembly (Pulley)
1211 498144 Pulley/Spring
Assembly (Spring)
Key# Part# Description
REPAIR PARTS
608
65
592
58
60
55
1211
1210
459
689
456
597
Page 34
34- ENG
D30339
★ Included in Engine Gasket Set–See Ref. No. 358.
✦ Included in Carburetor Overhaul Kit–See Ref. No. 121.
● Included in Carburetor Gasket Set–See Ref. No. 977.
Assemblies include all parts shown in frames.
Briggs & Stratton Engine Model Number 128812-3112-D2
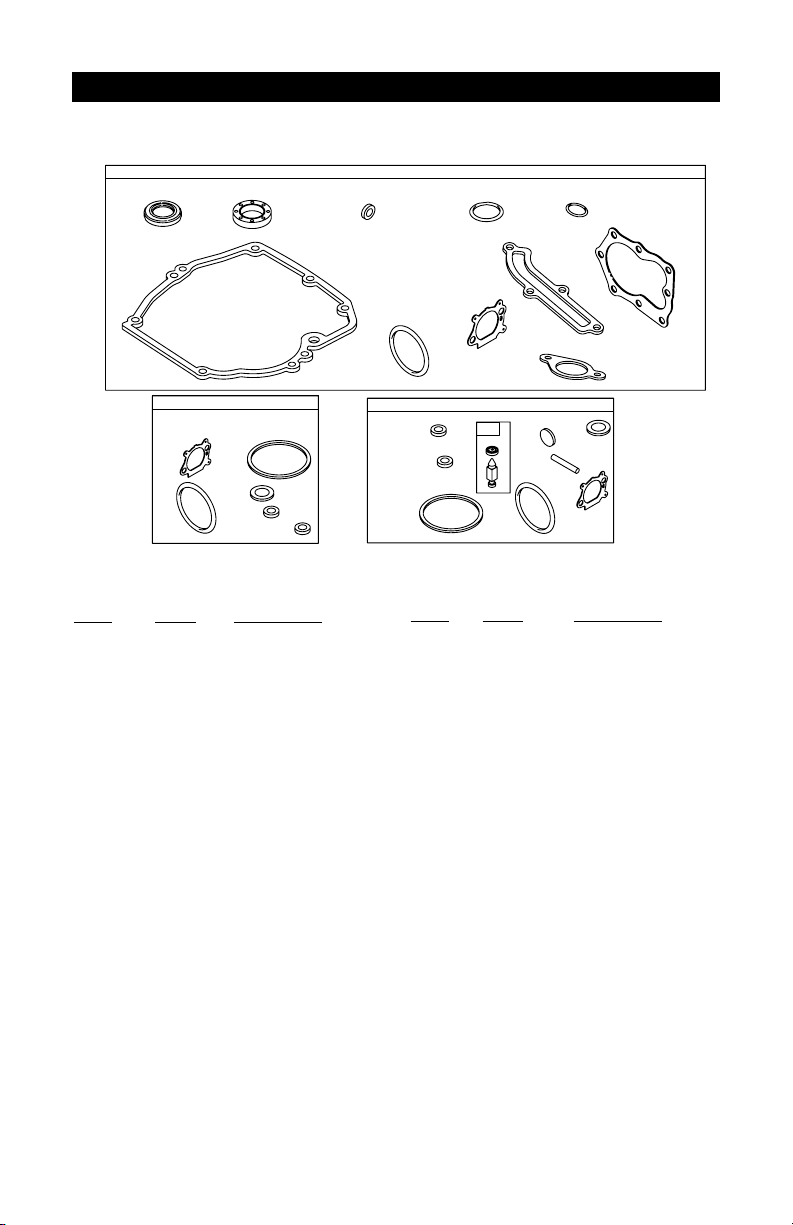
Key# Part# Description
3 ★ 299819 Seal–Oil
(Magneto Side)
7 ★Ø 692249 Gasket–Cylinder
Head
9 ★Ø 272481 Gasket–Breather
12 ★ 692232 Gasket–Crankcase
20 ★ 399781 Seal–Oil
(PTO Side)
51 ★ 272199 Gasket–Intake
104 ● 691242 Pin–Float Hinge
121 498260 Kit–Carburetor
Overhaul
127 ● 694468 Plug–Welch
134 ● 398188 Kit–Needle/Seat
137 ●✦ 693981 Gasket–Float Bowl
163 ★●✦ 272653 Gasket–Air Cleaner
276 ●✦ 271716 Washer–Sealing
358 497316 Gasket Set–Engine
524 ★ 692296 Seal–Dipstick Tube
585 ★ 691879 Gasket–Breather
Passage
617 ★●✦ 270344 Seal–O Ring
(Intake Manifold)
633 691321 Seal–Choke/Throttle
Shaft
633A ●✦ 693867 Seal–Choke/Throttle
Shaft
668 ★ 493823 Spacer
(Includes 2)
842 ★ 691031 Seal–O Ring
(Dipstick Tube)
977 498261 Gasket
Set–Carburetor
1095 498528 Gasket Set–Valve
Key# Part# Description
REPAIR PARTS
358 ENGINE GASKET SET
3
12
20
977 CARBURET OR GASKET SET
163
617
137
276
633A
633
668 842
524
7
51
276
104
163
163
617
121 CARBURET OR OVERHAUL KIT
633A
633
137
585
134
127
617
Page 35

35- FR
D30339
TABLE DES MATIÈRES
GARANTIE . . . . . . . . . . . . . . . . . . . . . . . . . . . . . . . . . . . . . . . . . . . . . . . . . . .36
TABLEAU DES SPÉCIFICATIONS . . . . . . . . . . . . . . . . . . . . . . . . . . . . . . . .37
MESURES DE SÉCURITÉ – DÉFINITIONS . . . . . . . . . . . . . . . . . . . . . . . . .37
MESURES DE SÉCURITÉ IMPORTANTES . . . . . . . . . . . . . . . . . . . . . .38-41
CONTENU DE LA BOÎTE . . . . . . . . . . . . . . . . . . . . . . . . . . . . . . . . . . . . . . .42
ASSEMBLAGE . . . . . . . . . . . . . . . . . . . . . . . . . . . . . . . . . . . . . . . . . . . . .42-43
UTILISATION . . . . . . . . . . . . . . . . . . . . . . . . . . . . . . . . . . . . . . . . . . . . . .44-48
ENTRETIEN . . . . . . . . . . . . . . . . . . . . . . . . . . . . . . . . . . . . . . . . . . . . . . .48-51
ENTREPOSAGE . . . . . . . . . . . . . . . . . . . . . . . . . . . . . . . . . . . . . . . . . . . .52-53
GUIDE DE DÉPANNAGE . . . . . . . . . . . . . . . . . . . . . . . . . . . . . . . . . . . . .53-55
PIÈCES DE RECHANGE . . . . . . . . . . . . . . . . . . . . . . . . . . . . . . . . . . . . .56-69
COMMANDE DES PIÈCES DE RECHANGE . . . . . . . . . . . .Couverture arrière
GARANTIE COMPLÈTE DE UN AN SUR LES LAVEUSES À PRESSION
Si cette laveuse à pression arrête de fonctionner à cause d’un défaut de fabrication ou
de main-d’œuvre dans une période d’un an à compter de la date d’achat,
RETOURNEZ-LA AU CENTRE DE SERVICE APRÈS-VENTE SEARS LE PLUS PROCHE
AU CANADA ET SEARS LA RÉPARERA SANS FRAIS.
Si cette laveuse à pression est utilisée à des fins commerciales ou comme appareil de
location, la garantie ne s’applique que pour une période de quatre-vingt-dix (90) jours à
compter de la date d’achat.
Cette garantie sur la laveuse à pression de Craftsman vous donne des droits
particuliers. Il se peut que vous ayez d’autres droits qui varient d’une province à l’autre.
Sears Canada, Inc., Toronto, Ont. M5B 2B8
GARANTIE
Page 36

36- FR
D30339
N° de modèle 919.672180
Laveuse à pression
Pression 2 400 lb/po
2
Débit 2,2 gal./min
Unités de nettoyage (gal./min x lb/po
2
) 5 280
Moteur
Tr./min 3 600
Puissance nominale en chevaux 5,0
Écartement de la bougie d’allumage 0,030 po (0,76 mm)
Capacité du réservoir à carburant 1 pinte (0,95 litre)
Capacité d’huile : 20 oz (0,6 litre) SAE 30
TABLEAU DES SPÉCIFICATIONS
Il se peut que ce produit ne soit pas équipé d’un
silencieux à pare-étincelles. Si le produit n’en est pas
équipé, et s’il est utilisé près de matériaux inflammables ou sur de la terre couverte
de produits agricoles, forêts, broussailles, gazon ou autres articles semblables, un
pare-étincelles approuvé doit être posé, et est exigé par la loi en Californie. Selon
la section 130050 de la loi de la Californie, et les sections 4442 et 4443 du Code sur
les ressources publiques de la Californie, ce produit ne peut pas être utilisé en
Californie, à moins que le moteur ne soit équipé d’un pare-étincelles, tel que décrit
dans la section 4442, et à moins que l’appareil ne soit maintenu en bon état de
fonctionnement. Des pare-étincelles sont également requis sur certaines terres
forestières des États-Unis et peuvent être exigés légalement sous certains autres
lois et arrêtés.
Les gaz d’échappement du moteur contiennent des
produits chimiques qui, dans certaines quantités, peuvent
causer le cancer, les anomalies congénitales ou d’autres maux de reproduction.
RENSEIGNEMENTS SUR LA SÉCURITÉ DU CONSOMMATEUR
MESURES DE SÉCURITÉ - DÉFINITIONS
Indique un danger
imminent qui, s'il n'est
pas évité, causera de graves blessures
ou la mort.
Indique la
possibilité
d’un danger qui, s’il n’est pas évité,
pourrait causer de graves blessures ou
la mort.
Ce guide contient des renseignements importants que vous deviez bien saisir. Cette
information porte sur VOTRE SÉCURITÉ et sur LA PRÉVENTION DE PROBLÈMES
D'ÉQUIPEMENT. Afin de vous aider à identifier cette information, nous avons utilisé les
symboles ci-dessous. Veuillez lire attentivement ce guide en portant une attention
particulière à ces symboles.
Indique la
possibilité d'un
danger qui, s'il n'est pas évité, peut
causer des blessur
es mineures ou
moyennes.
Sans le symbole
d’alerte. Indique la
possibilité d’un danger qui, s’il n’est pas
évité, peut causer des dommages à la
propriété.
Page 37

37- FR
D30339
Lisez le Guide de l’utilisateur. Ne tentez pas d’utiliser cet
appareil avant d’avoir lu les directives sur la sécurité,
l’assemblage, l’utilisation et l’entretien de ce Guide de l’utilisateur.
RISQUE
PRÉVENTION
• Ne pas vaporiser des liquides inflammables.
• Couper le moteur et le laisser refroidir avant
d'ajouter de carburant au réservoir.
• Prendre des précautions lors du remplissage du
réservoir pour éviter le déversement de carburant.
Placer la laveuse à pression loin du lieu de
remplissage avant de démarrer le moteur.
• Toujours garder la laveuse à pression à une
distance minimum de quatre pieds 1,2 m (4 pieds)
des surfaces qui pourraient être endommagées par
les gaz d'échappement du silencieux (telles que les
maisons, automobiles ou plantes).
MESURES DE SÉCURITÉ IMPORTANTES
RISQUE D'EXPLOSION OU D’INCENDIE
DANGER
RISQUE PAR INHALATION
DANGER
LISEZ ET CONSERVEZ CES INSTRUCTIONS
• La chaleur peut causer l'expansion de carburant
dans le réservoir pouvant aboutir à un déversement
et provoquer un incendie ou une explosion.
• Maintenir le niveau maximal de carburant à
environ13mm (½ po) du haut du réservoir afin de
permettre l'expansion de l'essence.
• Le fait d'utiliser la laveuse à pression dans un
milieu explosif peut aboutir à un incendie.
• Faire le plein et utiliser l'équipement dans un
endroit bien aéré et libre de toutes obstructions.
Équiper ces lieux d'extincteurs appropriés pour
combattre les incendies comprenant à base
d'essence.
• Des matières placées contre ou à proximité de la
laveuse à pression peuvent nuire à une ventilation
adéquate provoquant ainsi une surchauffe et un
risque d'inflammation de ces matières.
• Ne jamais faire fonctionner la laveuse à pression
dans un endroit comprenant des herbes ou
buissons secs.
• Un entreposage inapproprié du carburant peut
causer une inflammation accidentelle. Le carburant
qui n'est pas rangé de façon sécuritaire peut
tomber entre les mains d'un enfant ou autres
personnes non compétentes.
• Placer le carburant dans un contenant approuvé
par l'OSHA et le ranger dans un lieu sûr, loin de
l'aire de travail.
• L'utilisation d'acides, de produits chimiques toxiques
ou corrosifs, de poisons, d'insecticides ou de toute
sorte de solvant inflammable dans ce produit
pourrait provoquer des blessures graves ou la mort.
•
Certains nettoyeurs liquides contiennent des
substances pouvant causer des lésions à la peau,
aux yeux et aux poumons.
• Utiliser la laveuse à pression dans un endroit bien
aéré. Éviter les endroits clos tels que les garages,
sous-sols, etc.
• Ne jamais utiliser l'appareil dans un endroit occupé
par d'autres personnes ou des animaux.
• N'utiliser que des liquides de nettoyage
recommandés pour des laveuses à pression. Suivre
les recommandations du fabricant. Ne pas utiliser
d'eau de Javel ou tout autre produit corrosif.
•
L'inhalation des émanations d'échappement peut
causer de graves blessures ou la mort !.
RISQUE
PRÉVENTION
• L'essence répandue par déversement et les
vapeurs qui en émanent risquent de s'enflammer
en présence d'étincelles provenant d'une cigarette
allumée, d'un arc électrique, de gaz
d'échappement et de pièces chaudes du moteur,
telles que le silencieux.
• La chaleur des gaz d'échappement du silencieux
peut endommager les surfaces peintes, faire
fondre des matériaux sensibles à la chaleur (tels
que le revêtement d'extérieur, le plastique, le
caoutchouc et le vinyle) et endommager les
plantes.
Page 38
38- FR
D30339
• L'utilisation d'acides, de produits chimiques
toxiques ou corrosifs, de poisons, d'insecticides ou
de toute sorte de solvant inflammable dans ce
produit pourrait provoquer des blessures graves ou
la mort.
• Ne pas utiliser d'acides, d'essence, de kérosène
ou toute autre matière inflammable avec cet
appareil. N'employer que des détergents,
nettoyeurs ou dégraisseurs d'entretien ménager
qui sont recommandés pour une utilisation avec
une laveuse à pression.
• Porter un équipement et des vêtements de
protection pour se protéger les yeux et la peau
contre tout contact avec des matières vaporisées.
RISQUE DE BLESSURES ET DE DOMMAGES À LA
PROPRIÉTÉ PENDANT LE TRANSPORT OU L'ENTREPOSAGE
RISQUE D'INJECTION D'UN FLUIDE
RISQUE DE BRÛLURES CHIMIQUES
RISQUE
DANGER
RISQUE
PRÉVENTION
DANGER
RISQUE
PRÉVENTION
DANGER
• Des fuites ou des déversements de carburant ou
d'huile peuvent se produire et entraîner des risques
d'incendie ou des problèmes aux voies
respiratoires, des blessures graves ou la mort. Des
fuites de carburant ou d'huile endommagent les
tapis, la peinture et d'autres surfaces dans les
véhicules et les remorques.
• Si la laveuse à pression est munie d'une soupape
d'arrêt, tourner la soupape à la position fermée
avant le transport pour éviter tout risque de fuite.
Si l'appareil n'est pas muni d'une soupape d'arrêt,
vidanger le carburant du réservoir avant le
transport. Ne transporter le carburant que dans
des contenants approuvés par l'OSHA. Pour le
transport, toujours placer la laveuse à pression sur
un tapis protecteur pour éviter l'endommagement
du véhicule par des fuites. Retirer la laveuse à
pression du véhicule immédiatement à l'arrivée.
• La laveuse à pression fonctionne à une pression et
à une vitesse suffisamment élevées pour faire
pénétrer le fluide dans la peau de personnes ou
d'animaux et causer des blessures graves ou la
nécessité d'une amputation. Une fuite causée par
des raccords relâchés ou usés ou par un boyau
endommagé peut aboutir à une blessure par
injection. NE PAS TRAITER L'INJECTION D'UN
FLUIDE COMME UNE SIMPLE COUPURE !
Consulter immédiatement un médecin !
• Ne jamais placer la main devant la buse.
• Diriger le jet de vaporisation loin de soi et d'autrui.
• S'assurer que le boyau et les raccords sont bien
serrés et en bon état. Ne jamais se cramponner au
boyau ou aux raccords lors de l'utilisation de
l'appareil.
• Éviter tout contact du boyau avec le silencieux.
• Ne jamais mettre ni enlever les raccords de la
lance ou du boyau lorsque l'appareil est
pressurisé.
• On risque de subir des blessures si la pression du
système n'est pas diminuée avant de tenter tout
entretien ou démontage.
• Pour dégager la pression de l’appareil, couper le
moteur, couper l’alimentation d’eau et enfoncer la
détente du pistolet jusqu’à ce que l’eau arrête de
s’écouler.
• N'utiliser qu'un boyau et des accessoires à haute
pression classés pour un service nominal plus élevé
que la puissance nominale (lb/po
2
) de l'appareil.
PRÉVENTION
Page 39

39- FR
D30339
•
Si le moteur ne démarre pas après deux essais,
appuyer sur la détente du pistolet afin de
dégager la pression de la pompe. Tirer lentement
sur le cordon de démarrage jusqu'à ce qu'on
sente une résistance. Tirer ensuite rapidement
sur le cordon pour éviter les contre-coups et les
blessures aux mains ou aux bras.
• La force de rétroaction du jet fait déplacer le
pistolet/la lance et peut faire glisser ou tomber
l'utilisateur ou provoquer un changement de
direction du jet. Une mauvaise maîtrise du
pistolet/de la lance peut causer des blessures à
l'utilisateur ou à d'autres personnes.
• Ne pas trop éloigner le pistolet du corps et ne pas
se tenir sur une surface instable. Saisir le
pistolet/la lance fermement avec les deux mains.
S'attendre à ressentir un contre-coup lors du
déclenchement.
• Le contact avec les surfaces chaudes, telles que les
pièces d'échappement du moteur, peut provoquer
des brûlures graves.
• Durant le fonctionnement de l'appareil, ne toucher
qu'aux surfaces de commande de la laveuse à
pression. Garder les enfants loin de la laveuse à
pression en tout temps. Les enfants ne sont pas
nécessairement capables de reconnaître les
dangers que comporte cet appareil.
RISQUE D'UNE UTILISATION NON SÉCURITAIRE
DANGER
RISQUE DE CHOCS ÉLECTRIQUES
DANGER
RISQUE DE SURFACES CHAUDES
DANGER
RISQUE
PRÉVENTION
RISQUE
PRÉVENTION
RISQUE
PRÉVENTION
• Une utilisation de la laveuse à pression qui n'est
pas conforme aux mesures de sécurité peut causer
de graves blessures ou la mort de l'utilisateur ou
d'autres personnes.
• Ne pas utiliser d'eau de Javel ou tout autre produit
corrosif.
• S'habituer au fonctionnement et aux commandes de
la laveuse à pression.
• Garder toutes les personnes non autorisées, les
animaux domestiques et les obstacles loin de l'aire
de vaporisation.
• Ne pas utiliser l'appareil lorsque vous êtes fatigué ou
sous l'effet de boissons alcooliques ou de drogues.
Restez alerte à tout moment.
• Ne jamais contourner un dispositif de sécurité de
cet appareil.
• Ne jamais utiliser un appareil auquel il manque des
pièces, qui comprend des pièces brisées ou non
autorisées par le fabricant.
• Ne jamais s'éloigner de la lance lorsque l'appareil
est en marche.
• Si la procédure de démarrage appropriée n'est
pas suivie, le moteur peut provoquer des contrecoups et causer des blessures graves aux mains
ou aux bras.
• Le pistolet/la lance de vaporisation est un outil de
nettoyage puissant qui peut ressembler à un jouet
aux yeux d'un enfant.
• Garder les enfants éloignés de la laveuse à
pression à tout moment.
• Une vaporisation dirigée vers des prises de
courant, des interrupteurs ou des objets branchés
sur un circuit électrique peut causer des chocs
électriques mortels.
• Débrancher tout appareil électrique avant de
tenter de le nettoyer. Diriger le jet de vaporisation
loin de toutes prises de courant et interrupteurs.
Page 40

40- FR
D30339
Le puissant jet de la laveuse à pression est capable d'endommager les
surfaces fragiles telles que le bois, le verre, la peinture d'automobiles, les
garnitures d'auto ainsi que les objets délicats tels que les fleurs et arbustes. Avant de vaporiser,
vérifiez l'objet à nettoyer afin de vous assurer qu'il est assez robuste pour résister à la
puissance du jet sans subir de dommages. Évitez d'utiliser le jet à débit concentré sauf pour
des surfaces très résistantes telles que le béton ou l'acier.
Le fait de faire fonctionner l'appareil sans alimentation d'eau endommagera l'appareil.
L'utilisation de l'appareil sans alimentation d'eau annulera la garantie. Vous ne devez jamais
faire fonctionner l'appareil plus de deux (2) minutes sans appuyer sur la détente du pistolet afin
de permettre à l'eau fraîche d'entrer dans la pompe et à l'eau chauffée (recirculée) d'en sortir.
D
RISQUE DE BLESSURES PAR VAPORISATION
DANGER
RISQUE
PRÉVENTION
• Un fluide vaporisé à haute vélocité peut
causer le bris d’objets et la propulsion de
particules à vitesse élevée.
• Les objets légers ou qui ne sont pas fixés
peuvent devenir de dangereux projectiles.
• Toujours porter des lunettes de sécurité Z87
homologuées par l’ANSI. Porter des
vêtements de protection pour se protéger
contre toute vaporisation accidentelle.
• Ne jamais vaporiser ni pointer la lance en
direction de personnes ou d’animaux.
• Toujours s’assurer que la détente est
verrouillée lorsque la lance n’est pas utilisée
afin de prévenir toute mise en marche
accidentelle.
• Ne jamais fixer la détente en position
enfoncée (ouverte) de façon permanente.
MISE EN GAR
Page 41

41- FR
D30339
2. Attachez la lance au pistolet et bien
serrer.
3. Attachez le boyau à haute pression au
pistolet et bien serrer.
ASSEMBLAGE
1. Placez l’ensemble de poignée sur le
châssis et attachez la poignée au
châssis.
CONTENU DE LA BOÎTE
Pièces dans un sac
Ensemble de châssis de
moteur avec roues
Boyau à haute
pression
n° de pièce
D28094
Lance à réglages multiples
n° de pièce A06120
Poignée
n° de pièce D22316 avec
vis - n° de pièce D22901
Huile à
moteur
Tableau d’accessoires
n° de pièce D25081
Bagged Accessories Panel
Guide de
l'utilisateur
en anglais
et français
Boyau de
produit
chimique
n° de pièce
H140
Pistolet de vaporisation
n° de pièce D27858
Boutons
n° de
pièce
16471
Boulons de selle
n° de pièce
D23196
Clé Allen - n° de pièce 16767
Outil de nettoyage –
n° de pièce NCT001
Page 42

42- FR
D30339
d. Insérez les vis (retirées plus tôt)
dans les trous supérieures et
fixez le tableau d'accessoires
sur les poignées. Ne pas trop
serrer.
4. Assemblage du tableau
d’accessoires:
a. Retirez les vis supérieures de
l'ensemble de poignée.
b. Desserrez les vis inférieures de
l'ensemble de poignée
.
c. Positionnez les rainures du
tableau d'accessoires sur les vis
et mettez le tableau en place.
Vis
Retirer
Desserer
Page 43

43- FR
D30339
UTILISATION
Familiarisez-vous avec votre laveuse à pression
LISEZ CE GUIDE DE L’UTILISATEUR ET TOUTES LES MESURES DE SÉCURITÉ AVANT
D’UTILISER CET APPAREIL. Comparez les illustrations avec votre appareil afin de vous
familiariser avec l’emplacement des commandes et des réglages. Conservez ce guide
pour les références futures.
Pompe à
haute
pression
Moteur
Boyau à
haute
pression
Pistolet de
vaporisation
Lance à
réglages
multiples
Boyau de
produit
chimique
Poignée du
démarreur
Filtre à air
Commande
d'étrangleur
Commande des gaz
Bouchon de remplissage d’huile
MOTEUR
Commande d'étrangleur : Ouvre et ferme la
soupape de l'étrangleur dans le carburateur.
Levier de commande des gaz : Commande la
vitesse du moteur.
Poignée du démarreur : Tirer sur la poignée
du démarreur fait fonctionner le lanceur à
rappel pour démarrer le moteur.
LAVEUSE À PRESSION
Pompe à haute pression (située à l’intérieur
du bouclier) : Augmente la pression de la
source d’eau.
Moteur : Entraîne la pompe à haute pression.
Boyau à haute pression :
Achemine l'eau
sous pression de la pompe vers le pistolet
et la lance de vaporisation.
Pistolet de vaporisation : S'attache à la lance
pour régler le débit d'eau, la direction et la
pression.
Lance à réglages multiples : Comporte une
buse de vaporisation réglable d'un jet de
l'épaisseur d'un crayon (0°) jusqu'à un jet en
éventail à angle large (40°). Le réglage de la
vaporisation est effectué en tournant la buse
dans le sens des aiguilles d'une montre ou
dans le sens contraire. De plus, le réglage de
haute ou de basse pression s'effectue en
déplaçant la buse vers l'intérieur vers
l'extérieur.
Voir le paragraphe intitulé «
Utilisation de la lance » de cette section.
Boyau de produit chimique :
Alimente les
agents de nettoyage dans la pompe pour
les mélanger avec l'eau sous pression.
Voir le paragraphe « Application des
produits chimiques/solvants de nettoyage
» de la section « Utilisation » de ce guide
Page 44
44- FR
D30339
TERMINOLOGIE DES LAVEUSES À
PRESSION
PSI : livres par pouce carré. Une unité de
mesure de pression d'eau. Également
utilisé pour la pression d'air, la pression
hydraulique, etc.
GPM : Gallons par minute. L'unité de mesure
du débit d'eau.
CU : Unités de nettoyage. gal./min x PSI.
Mode de dérivation : Lorsque l'appareil
est en mode de dérivation, la pompe est
en train de recirculer l'eau parce que la
détente du pistolet de vaporisation n'a
pas été tirée. Si l'appareil est laissé en
mode de dérivation pendant plus de deux
(2) minutes, la température de l'eau
augmentera à un niveau dangereux ce qui
pourrait endommager les composants
internes de la pompe. Tout dommage à la
pompe causé par une telle situation ne
sera pas couvert par la garantie.
NE faites PAS
fonctionner votre
appareil en mode de dérivation
pendant plus de deux minutes à la fois.
Toute surchauffe de la pompe
entraînera des dommages à la pompe.
Soupape de décharge thermique : Afin
d'empêcher des dommages graves, les
pompes sont équipées d'une soupape de
décharge thermique. Cette soupape
s'ouvrira lorsque la température à
l'intérieur de la pompe devient trop
élevée. Elle dégagera alors un jet d'eau
afin d'abaisser la température à l'intérieur
de la pompe et se refermera toute suite
après. La soupape de décharge
thermique constitue une partie de la
pompe et elle n'est pas visible pour
l'utilisateur.
Système d'injection de produit
chimique : Mélange les nettoyants et les
solvants de nettoyage avec l'eau pour
améliorer l'efficacité de nettoyage.
Source d'eau : Toutes les laveuses à
pression ont besoin d'une source d'eau.
Les exigences minimums pour la source
d'eau sont de 20 PSI et de 19 litres (5
gallons) à la minute.
UTILISATION
IMPORTANT :
Lisez attentivement la
section sur l’utilisation de la laveuse à
pression avant d’utiliser l’appareil.
RÉGLAGE DE LA PRESSION
La pression est préréglée à l'usine afin
d'obtenir une pression ainsi qu'un nettoyage
optimums. La pression peut être diminuée de
deux façons différentes.
1. Éloignez-vous de la surface à nettoyer.
Plus vous êtes éloigné, moins sera la
pression sur la surface à nettoyer.
2. Réduisez la vitesse du moteur à essence
(tr/min). Lorsque la vitesse du moteur est
réduite, la pression d'eau est diminuée
aussi.
NE tentez PAS
d'augmenter la
pression de la pompe. Une pression plus
élevée que celle réglée à l'usine peut
endommager la pompe.
UTILISATION DE LA LANCE
Votre laveuse à pression est équipée
d'une lance à réglages multiples avec
positions de haute et de basse pression.
La position de haute pression est utilisée
pour le nettoyage et le rinçage et la
position de basse pression est utilisée
pour l'application de solutions de
nettoyage sur une surface.
Lors de la vaporisation
à haute pression, NE
laissez PAS le jet d'eau entrer en contact
avec la peau non protégée, les yeux ou
les animaux domestiques. Cela risque
de causer des blessures graves.
Risque
d'injection ou
de blessures corporelles. NE dirigez
PAS le jet de vaporisation vers une
personne.
Pour la vaporisation à haute pression, tirez
vers l'arrière la buse de la lance à réglages
multiples, tel qu'illustré.
haute
pression
MISE EN GARDE
MISE EN GARDE
Page 45

45- FR
D30339
La buse à l'extrémité de la lance à
réglages multiples peut être tournée pour
changer le jet de vaporisation à haute
pression d'un jet mince jusqu'à un jet en
éventail de 40°, tel qu'illustré. Les
marques sur la buse vous aideront à
choisir le type de jet désiré.
Pour la vaporisation à basse pression,
poussez la buse de la lance à réglages
multiples vers l'avant, tel qu'illustré.
jet en éventail de 40°
jet mince
Raccord
cannelé
APPLICATION DES PRODUITS
CHIMIQUES/SOLVANTS DE
NETTOYAGE
L'application des solutions de nettoyage
devrait être effectuée à basse pression.
REMARQUE : Utilisez seulement des savons ou
des produits chimiques qui sont conçus
spécialement pour une laveuse à pression. Ne
pas utiliser de l'eau de Javel.
Application de produits chimiques
1. Poussez le boyau de produit chimique dans
le raccord cannelé, près du point de
connexion du boyau à haute pression de la
pompe, tel qu'illustré.
2. Placez l'autre extrémité du boyau de
produit chimique (l'extrémité avec le filtre)
dans le contenant avec le produit
chimique/solution de nettoyage.
REMARQUE : Le rapport de produit
chimique/eau devrait être 7 à 1. Pour 7
gallons d'eau pompée, 1 gallon de
produit chimique/solution de nettoyage
sera utilisé.
3. Réglez la buse à réglages multiples
à la position de basse pression.
Consultez le paragraphe intitulé «
Utilisation de la lance » de cette
section.
4.
Après avoir utilisé un produit
chimique, placez le boyau de produit
chimique dans un récipient d'eau
propre et aspirez de l'eau propre à
travers le système d'injection de
produit chimique pour bien rincer le
système. Si les produits chimiques
restent dans la pompe, celle-ci pourrait
être endommagée. Les pompes
endommagées par un produit chimique
ne sont pas couvertes par la garantie.
REMARQUE :
Les produits chimiques et
savons ne peuvent pas être siphonnés lorsque
la lance est réglée à la position de haute
pression.
ARRÊT DE LA LAVEUSE À PRESSION
IMPORTANT : Lisez attentivement comment
arrêter la laveuse à pression avant de
l’utiliser.
1. Si vous avez utilisé des produits
chimiques, siphonnez un seau d'eau
propre à travers le boyau de produit
chimique. REMARQUE : Si vous
n'exécutez pas cette étape, la pompe
sera endommagée.
2.
Arrêtez le moteur en plaçant la
commande des gaz à la position d’arrêt
« STOP ».
REMARQUE : NE fermez JAMAIS le robinet
d'eau lorsque le moteur tourne.
3.
Fermez le robinet de la source d'eau.
4.
Appuyez sur la détente du pistolet de
vaporisation pour dégager toute pression
d'eau dans le boyau ou dans le pistolet.
5.
Consultez la section sur l'entreposage de
ce guide pour connaître les procédures
d'entreposage appropriées.
basse
pression
Page 46

46- FR
D30339
2. Retirez le bouchon de remplissage/jauge
d’huile et ajoutez de l’huile à moteur
(fournie) au moteur.
REMARQUE : Une petite quantité d’huile a
été versée dans le moteur pour effectuer les
essais à l’usine.
3. Le niveau d’huile devrait être à la marque
« FULL » sur la jauge d’huile. Vérifiez
toujours le niveau d’huile avant le
démarrage.
4. Assurez-vous que l’écran filtrant est dans
l’orifice d’entrée d’eau de la pompe, tel
qu’illustré.
5.
Attachez le boyau à haute pression à la
sortie de la pompe.
6. Branchez la source d'eau à l'orifice d'entrée
de la pompe.
REMARQUE : La source d’eau doit fournir un
minimum de 5 gallons par minute à 20 lb/po
2
.
AVANT LE DÉMARRAGE
Lisez attentivement toute la section intitulée
« Mesures de sécurité importantes » au
début de ce guide, ainsi que les mises en
garde et avertissements suivants, avant de
démarrer la laveuse à pression.
•
Ne jamais remplir le réservoir à
carburant
jusqu'au bout. Remplissez-le
jusqu'à ½ po en dessous du bas du
culot de remplissage afin de permettre
l'expansion du carburant. Essuyez tout
carburant versé sur le moteur ou sur
l'appareil avant de démarrer le moteur.
•
Ne remplissez jamais le réservoir à
carburant à l'intérieur ni lorsque le
moteur est en marche. Ne jamais fumer
en remplissant le réservoir à carburant.
• Ne mettez jamais le moteur en marche
à l’intérieur ou dans un espace fermé
sans aération adéquate. Les gaz
déchappement du moteur contiennent
du monoxide de carbone, un gaz
inodore et mortel.
•
Ne fermez jamais le robinet de la
source d'eau lorsque le moteur de
l'appareil de lavage sous pression est
en marche puisque cela risque
d'endommager la pompe.
•
N'utilisez PAS d'eau chaude. Utilisez
seulement de l'eau froide.
• N’arrêtez PAS de vaporiser
pendant plus de deux minutes à la
fois.
REMARQUE : Retirez le bouchon bleu de
l’ouverture de remplissage de carburant et
jetez-le.
1. Ajouter de l’essence pure, sans plomb,
de haute qualité et ayant un indice
d’octane de 86 ou plus. Ne pas trop
remplir. Essuyez l’essence déversée
avant de démarrer le moteur.
Source
d’eau
Boyau à haute
pression
Écran filtrant
Bouchon de
remplissage/jauge d’huile
Ouverture de
remplissage
de carburant
MISE EN GARDE
Page 47

47- FR
D30339
7. Si vous appliquez un produit chimique ou
une solution de nettoyage, consultez le
paragraphe intitulé « Application des
produits chimiques/solvants de nettoyage »
de la section sur l’utilisation de ce guide.
8. Ouvrez le robinet de la source d’eau.
REMARQUE : Assurez-vous que la source
d’eau est ouverte.
9. Placez le levier de commande d’étrangleur
à la position « CHOKE ON » et la
commande des gaz à la position rapide
« FAST »
Commande
d'étrangleur
Commande
des gaz
10. Tirez lentement la prise du démarreur
jusqu’à ce que vous sentiez une résistance
et tirez brusquement ensuite. Relâchez
doucement la prise du démarreur. Tirez le
cordon en effectuant un mouvement rapide
et complet du bras. Laissez le cordon
s’enrouler lentement. Répétez au besoin.
Si le moteur ne
démarre pas
après deux essais, appuyez sur la détente afin
de dégager la pression.
11. Si vous avez utilisé la commande
d’étrangleur lors du démarrage, replacez le
levier d’étrangleur à la position d’arrêt
« OFF ».
12. Appuyez sur la détente du pistolet pour
commencer la vaporisation d'eau. Relâchez
la détente pour l'arrêter.
13. Réglez le jet de vaporisation de la buse
pour correspondre à la tâche à effectuer.
Consultez les directives intitulées
« Utilisation de la lance » de cette section.
NE laissez PAS
les boyaux
entrer en contact avec le silencieux du moteur
qui est extrêmement chaud, lors de l’utilisation
de la laveuse à pression ou tout de suite après.
ENTRETIEN
Afin d'assurer le bon fonctionnement et une durée de vie prolongée de votre laveuse à
pression, vous devez préparer et suivre un calendrier d'entretien régulier. Si votre laveuse
à pression est utilisée dans un environnement défavorable, tel qu'à des températures
élevées ou des conditions poussiéreuses, les vérifications d'entretien doivent être
exécutées plus souvent.
En effectuant l'entretien, vous pouvez être exposé à des
surfaces chaudes, à l'eau sous pression ou à des pièces en
mouvement qui peuvent causer des blessures graves ou la mort !
Avant d'effectuer tout entretien ou toute réparation, débranchez le fil de la bougie
d'allumage, attendez jusqu'à ce que le moteur soit refroidi et dégagez l'eau sous
pression. Le moteur contient du carburant inflammable. NE FUMEZ PAS et ne
travaillez pas près d'une flamme nue en effectuant l'entretien.
Page 48

48- FR
D30339
Vérification du niveau d’huile
Changement de l’huile moteur
Vérification du filtre à air
Nettoyage/remplacement de la bougie d’allumage
Nettoyage des débris
Nettoyage du système de refroidissement par air
Nettoyage de la chambre de combustion
Bouchon de
remplissage/jauge d’huile
5. Si le niveau d’huile est bas, ajoutez
lentement de l’huile et revérifiez le
niveau ensuite. Ne pas trop remplir.
REMARQUE : Utilisez une huile
détergente de haute qualité, classée
« pour service SF, SG, SH, SJ » ou plus
élevé, telle que l’huile SAE 30.
REMARQUE : Une huile d’une autre
viscosité que celle indiquée dans le
tableau peut être utilisée lorsque la
température moyenne de votre région est
dans les limites recommandées.
6. Remettez en place le bouchon de
remplissage/jauge d’huile.
TABLEAU DES RESPONSABILITÉS DU CLIENT
TACHE D’ENTRETIEN
LAVEUSE À PRESSION
MOTEUR
Avant
chaque
utilisation
Toutes les 25
heures ou
annuellement
Toutes les 50
heures ou
annuellement
Toutes les 100
heures ou
annuellement
X
X
X
X
X**
X*
X
MOTEUR
Vérification du niveau d’huile
1. Coupez le moteur et placez-le sur
une surface de niveau.
2. Retirez le bouchon de
remplissage/jauge d’huile et
essuyez-le.
3. Remettez en place la jauge d’huile et
serrez-le. Retirez-la encore une fois et
vérifiez le niveau d’huile.
4. Le niveau d’huile devrait être à la
marque « FULL » de la jauge d’huile.
Vérification/nettoyage de l’écran
filtrant de l’arrivée d’eau
Vérification du boyau à haute pression
Vérification du boyau de savon/produit
chimique et du filtre
Vérification du pistolet et de la lance pour
déceler des fuites
Préparation pour l’entreposage
Préparer l’appareil pour l’entreposage s’il ne sera pas
utilisé pendant 30 jours ou plus.
* Remplacez l’huile après les premières 5 à 8 heures d’utilisation, et à toutes les 50 heures ou à
chaque saison ensuite. Changez l’huile à toutes les 25 heures lorsque le moteur fonctionne dans
des conditions à charge lourde ou à des températures élevées.
** Nettoyez l’appareil plus souvent s’il est utilisé dans des conditions poussiéreuses ou s’il y a des
débris suspendus dans l’air. Remplacez les pièces du filtre à air si elles sont extrêmement sales.
X
X
X
X
Degré de viscosité SAE
5W-30, 10W-30 synthétique
-20 0 20 40 60 80 100
F
-30 -20 -10 0 10 20 30 40
C
GAMME DE TEMPÉRATURES ANTICIPÉES LORS DES
DÉMARRAGES AVANT LA PROCHAINE VIDANGE D'HUILE
**
*
32
Page 49
49- FR
D30339
Filtre à air
Retrait
1. Desserrez la vis et inclinez le couvercle
vers le bas.
2. Retirez le filtre à air.
3. Posez un ensemble de filtre à air propre
(ou neuf) dans le couvercle. La lèvre du
pré-filtre doit être en bas des plis de la
cartouche.
4. Insérez les pattes du couvercle dans les
fentes situées dans la partie inférieure de
la base.
5. Remettez en place le couvercle et serrez
la vis.
Nettoyage
Séparez le pré-filtre de la cartouche et
lavez-le dans une solution d’eau et de
détergent liquide. Laissez-le sécher à l’air.
Ne pas appliquer de l’huile. Posez le préfiltre sec dans la cartouche propre.
N’utilisez pas de l’air sous pression ou
des solvants pour nettoyer la cartouche.
L’air sous pression peut endommager la
cartouche et les solvants dissoudront la
cartouche.
Nettoyage et remplacement de la
bougie d’allumage
Remplacez la bougie d’allumage à toutes
les 100 heures d’utilisation ou une fois par
an, selon le premier cas qui se présente.
Ceci aide à faciliter le démarrage et assure
un rendement optimum du moteur.
Résistance
Calibre de fil
0,030 po (0,76 mm)
Cartouche
Préfiltre
Pattes et
fentes
Lèvre de la
cartouche
Changement de l’huile
Vidangez l’huile moteur lorsque le moteur est
chaud. L’huile se vidange plus rapidement et
complètement lorsqu’elle est chaude.
1. Avant d’incliner le moteur ou l’appareil
pour vidanger l’huile, vidangez le
carburant du réservoir en faisant tourner
le moteur jusqu’à ce que le réservoir soit
vide.
2. Débranchez le fil de la bougie d’allumage
et gardez-le éloigné de la bougie.
3. Avec le moteur arrêté mais encore chaud,
retirez le bouchon de remplissage/jauge
d’huile
4. Placez un récipient approprié à côté du
moteur pour attraper l’huile usée.
5. Tout en gardant le filtre à air au-dessus
de la sortie d’huile, vidangez l’huile dans
le récipient.
REMARQUE : Veuillez disposer de l’huile usée
d’une manière écologique. Nous vous
recommandons de mettre l’huile usée dans un
contenant scellé et de l’apporter à un centre
de recyclage local ou à une station service
pour la récupération. Ne jetez pas l’huile dans
les déchets et ne la versez pas sur le sol ou
dans un égout.
6. En maintenant le moteur de niveau,
versez de l’huile SAE 10W-30 jusqu’à la
marque « FULL » de la jauge d’huile. La
capacité d’huile est de 20 oz (0,6 litre).
REMARQUE : On peut également utiliser une
des autres viscosités d’huile figurant dans le
tableau suivant le paragraphe intitulé
« Vérification du niveau d’huile ».
7. Remettez en place le bouchon de
remplissage/jauge d’huile et serrez-le
fermement
.
Filtre à air
Vidange d’huile
Bouchon de
remplissage/jauge d’huile
Limite supérieure
Limite inférieure
Page 50

50- FR
D30339
NETTOYAGE DE LA BUSE
Si la buse devient obstruée par des matériaux
étrangers comme la poussière, une pression
excessive peut se développer. Si la buse
devient partiellement obstruée ou le débit est
restreint, la pression de la pompe commencera
à pulser. Nettoyez la buse immédiatement en
vous servant de la trousse de nettoyage de
buse fournie et en suivant les directives
suivantes :
1. Arrêtez la laveuse à pression et fermez le
robinet de la source d'eau.
2. Débranchez le fil de la bougie d'allumage.
3. Appuyez sur la détente du pistolet afin de
dégager la pression d'eau.
4. Détachez la lance du pistolet.
5. Retirez la buse de l'extrémité de la lance
en vous servant de la clé Allen de 2 mm
fournie, tel qu'indiqué ci-dessous.
6. Nettoyez la buse en vous servant du
dispositif de nettoyage fourni ou d'un
trombone redressé en ligne droite.
Insérez-le dans l'extrémité de la buse et
déplacez-le dans un mouvement d'allerretour pour libérer l'obstruction.
7. Dirigez la source d'eau dans la buse et
rincez les particules libérées pendant 30
secondes.
8. Rebranchez le fil de la bougie d’allumage
9. Réassemblez la buse sur la lance. Serrez
fermement afin d'empêcher des fuites.
10. Attachez la lance au pistolet et ouvrez le
robinet de la source d'eau.
11. Démarrez la laveuse à pression et réglez
la lance à la position de haute pression
pour l’essayer.
Ecran Filtrant
POMPE
Cet écran filtrant devrait être vérifié
périodiquement et nettoyé au besoin.
1. Saisissez l'extrémité du filtre et retirez-le
de l'orifice d'entrée d'eau de la pompe,
tel qu'illustré.
2. Nettoyez le filtre en le rinçant à l'eau sur
les deux côtés.
3. Réinsérez le filtre dans l'orifice d'entrée
d'eau de la pompe.
Nettoyage des débris
Gardez les pièces du moteur propres afin
de réduire le risque de surchauffe et de
l’allumage des débris accumulés.
REMARQUE : N’utilisez pas de l’eau pour
nettoyer les pièces du moteur. L’eau peut
contaminer le système de carburant.
Utilisez une brosse ou un chiffon sec.
Système de refroidissement par air
Après un certain temps, des débris
peuvent s’accumuler dans les ailettes de
refroidissement du cylindre. Ce
phénomène n’est pas visible à moins
d’avoir partiellement démonté le moteur.
Nous vous recommandons donc
d’apporter l’appareil à un Centre de
service sous garantie approuvé, à des
intervalles recommandés, afin de faire
nettoyer le système de refroidissement par
air.
Résidus de combustion
À toutes les 100 à 300 heures d’utilisation,
vous devriez apporter l’appareil à un
Centre de service sous garantie pour faire
nettoyer les résidus de combustion du
cylindre, de la culasse, de la surface
supérieure du piston et de la région autour
des soupapes.
Page 51
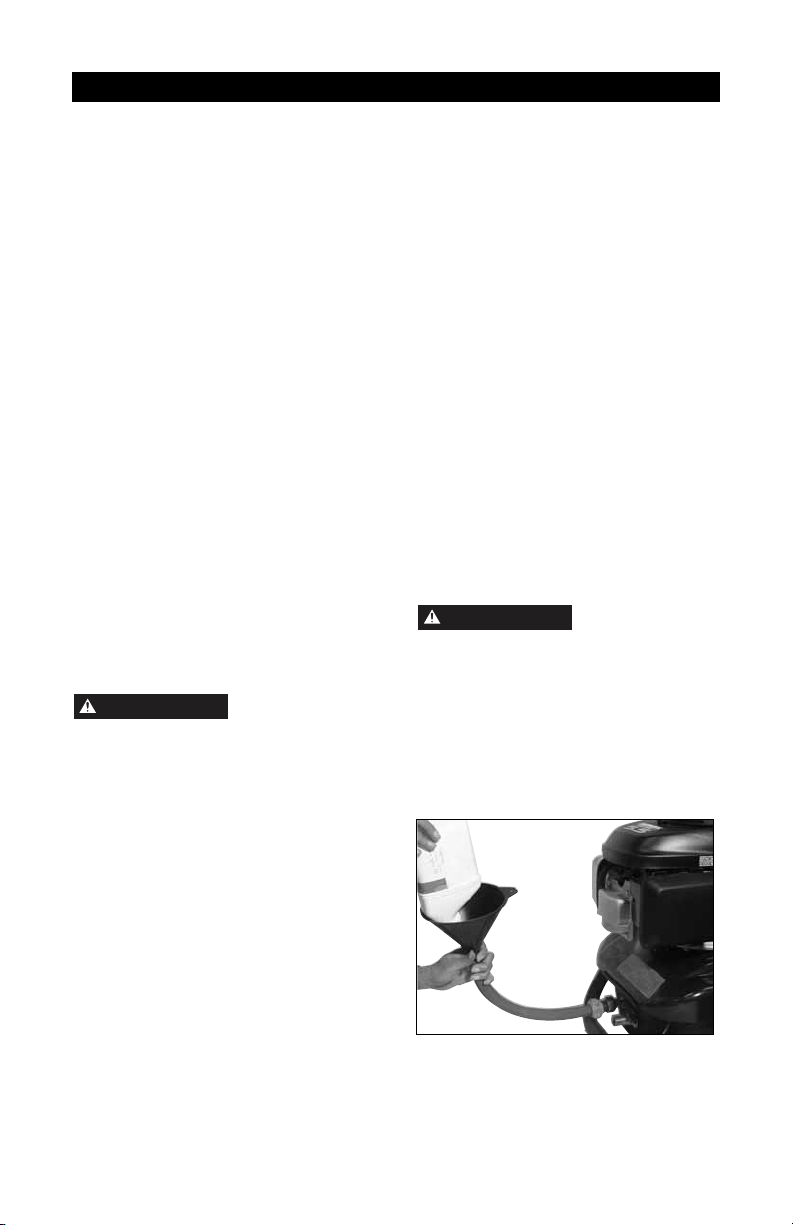
51- FR
D30339
POMPE
Nous vous recommandons de suivre les étapes cidessous afin de protéger les joints d’étanchéité
internes de la laveuse à pression lorsqu’elle est
entreposée pendant une période prolongée et
LORSQUE DES TEMPÉRATURES
INFÉRIEURES À 0° C (32° F) SONT PRÉVUES.
REMARQUE : Si vous devez entreposer
l’appareil pendant plus de 30 jours, il faut
pomper de l’antigel pour véhicules récréatifs
ou du liquide de lave-glace à travers la
pompe. Cette pratique aide à éviter des
dommages ou le liquide de lave-glace à
l’intérieur de la tête de la pompe. L’antigel
sert non seulement à préparer l’appareil pour
l’hiver, mais également à assurer une
lubrification appropriée à toute température
et dans tout environnement. Si l’appareil est
entreposé pour une période de moins de 30
jours, aucun antigel pour véhicules récréatifs
ni liquide de lave-glace n’est requis.
1. Obtenez un entonnoir, 6 oz (177 ml)
d'antigel pour véhicules récréatifs ou de
liquide de lave-glace, un boyau d'arrosage
d'une longueur d'environ 12 po (30 cm)
doté d'un raccord mâle à une extrémité.
N'utilisez que
de l'antigel
pour véhicules récréatifs. Tout autre antigel
est corrosif et risque d'endommager la
pompe.
2. Débranchez le fil de la bougie d'allumage.
3. Débranchez le boyau à haute pression de
la pompe et du pistolet de vaporisation.
4. Connectez le boyau d'arrosage de 12 po
(30 cm) à l'orifice d'entrée de la pompe.
5. Ajoutez l’antigel pour véhicules récréatifs
ou le liquide de lave-glace, tel qu'illustré.
6. Tirez à plusieurs reprises sur le cordon de
démarrage du moteur, jusqu'à ce que
l'antigel ou le liquide de lave-glace
déborde du raccord du boyau à haute
pression de la pompe.
ENTREPOSAGE
MOTEUR
IMPORTANT :
Il est important d’empêcher
la formation de dépôts de gomme sur les
parties essentielles du système d’injection,
telles que le carburateur, le filtre à
carburant, le boyau ou le réservoir durant
l’entreposage. De plus, l’expérience indique
que les essences mélangées avec des
alcools (connues sous le nom d’essencealcool ou essences utilisant de l’éthanol ou
du méthanol) peuvent attirer l’humidité, ce
qui entraîne la séparation du mélange et la
formation d’acides durant l’entreposage.
Les essences acides peuvent endommager
le système d’injection d’un moteur lors de
l’entreposage. Pour éviter des problèmes
du moteur, le système d’injection doit être
purgé avant un entreposage d’une durée de
trente (30) jours ou plus. N’utilisez jamais de
nettoyeurs pour moteurs ou carburateurs
dans le réservoir à essence en raison d’un
risque de dommages permanents.
Préparation du moteur
• Ajoutez un agent de stabilisation de
carburant au réservoir.
• Mettez la laveuse à pression en
marche et faites-la fonctionner
pendant un bon 5 minutes pour
permettre à l’agent de stabilisation
d’entrer dans le système d’injection.
Lors de la
préparation du
moteur, assurez-vous que le robinet de
la source d’eau est ouvert et que l’eau
arrive à l’appareil. N’utilisez JAMAIS
l’appareil lorsqu’il n’y a aucun débit
d’eau à travers la pompe car cela
endommagera la pompe.
• Coupez ensuite le moteur et
déconnectez la source d’alimentation
d’eau.
• Débranchez le fil de la bougie
d’allumage et retirez la bougie.
• Ajoutez une cuillère à thé d’huile dans
l’orifice pour bougie d’allumage.
• Placez un chiffon sur l’orifice pour
bougie d’allumage et tirez sur la
corde à rappel à quelques reprises
pour lubrifier la chambre de
combustion.
• Remettez la bougie d’allumage mais
sans brancher le fil de la bougie.
MISE EN GARDE
MISE EN GARDE
Page 52

52- FR
D30339
GUIDE DE DÉPANNAGE
7. Retirez le boyau court de l'orifice d'entrée
de la pompe.
8. Insérez la bougie d'allumage dans le trou
de bougie et bien la serrer. Branchez
ensuite le fil de la bougie d'allumage.
9. Vidangez toute l'eau du boyau à haute
pression, enroulez-le et rangez-le dans le
berceau de la poignée de la laveuse à
pression.
10. Vidangez toute l'eau du pistolet et de la
lance. Pour ce faire, maintenez le pistolet
en position verticale, en dirigeant la buse
vers le bas, et appuyez sur la détente du
pistolet. Rangez ces pièces dans le
porte-pistolet/boyau.
11. Rangez le boyau de produits chimiques,
le boyau à haute pression, le pistolet de
vaporisation et la lance en les protégeant
contre les dommages, surtout les
dommages causés en roulant sur ces
pièces.
PROBLÈME
CAUSE
CORRECTION
Le moteur ne
démarre pas
1. Aucun carburant.
2. Accumulation de pression
après avoir tiré deux fois sur
le cordon de démarrage.
3. L’appareil n’est pas
étranglé.
4. Le fil de la bougie
d’allumage n’est pas
branché.
5. Le levier d’étranglement est
en position « Choke »
lorsque le moteur est chaud
ou lorsque le moteur a été
exposé à une source de
chaleur pour une période
prolongée.
1. Ajoutez du carburant.
2. Appuyez sur la détente du
pistolet pour dégager la
pression.
3. Utilisez la commande
d’étrangleur. Mettez le moteur
en position d’étranglement.
4. Branchez le fil de la bougie
d’allumage.
5. Déplacez le levier
d’étranglement à la position
sans étranglement.
Aucune pression
ou basse pression
(à l’utilisation
initiale)
1. La lance n’est pas en
position de haute pression.
2. Alimentation en eau
insuffisante.
3. Fuite dans le boyau à haute
pression.
4. La buse est obstruée.
5. Écran de filtrage d’eau
obstrué.
1. Consultez le paragraphe
« Utilisation de la lance »
dans la section sur
l’utilisation.
2. La source d’eau doit
acheminer au moins 5
gal./min à 20 lb/po
2
.
3. Réparez la fuite. Appliquez
du ruban d’étanchéité au
besoin.
4. Nettoyez la buse à l’aide
d’un trombone ou de l’outil
de nettoyage; versez de
l’eau dans l’extrémité de la
buse pour libérer
l’obstruction.
5. Retirez le filtre et nettoyez-le.
Page 53

53- FR
D30339
6. De l’air se trouve dans le
boyau.
7. Le levier d’étrangleur est en
position « Choke ».
8. Le levier de commande des
gaz n’est pas à la position
rapide « Fast ».
9. Le boyau à haute pression
est trop long.
1. La lance n’est pas en
position de basse pression.
2. Le filtre de produit chimique
est obstrué.
3. L’écran de filtrage de produit
chimique n’est pas
submergé dans le produit
chimique.
4. Le produit chimique est trop
épais.
5. Le boyau à haute pression
est trop long.
6. Une accumulation de produit
chimique dans l’injecteur de
produit chimique.
6. Arrêtez le moteur et fermez
ensuite le robinet de la
source d’eau. Débranchez la
source d’eau de l’orifice
d’entrée de la pompe et
ouvrez le robinet de la source
d’eau pour purger l’air du
boyau. Lorsqu’un jet continu
d’eau paraît, fermez le robinet
de la source d’eau.
Rebranchez la source d’eau à
l’orifice d’entrée de la pompe
et ouvrez la source d’eau.
Appuyez sur la détente pour
purger l’air qui reste.
7. Réglez le levier d’étrangleur à
la position « No Choke ».
8. Réglez le levier de
commande des gaz à la
position rapide « Fast ».
9. Utilisez un boyau à haute
pression d’une longueur
inférieure à 100 pieds.
1. Consultez le paragraphe
« Utilisation de la lance »
dans la section sur
l’utilisation.
2. Nettoyez le filtre.
3. Assurez-vous que l’embout
du boyau de produit chimique
est entièrement submergé
dans le produit chimique.
4. Diluez le produit chimique. Le
produit chimique devrait avoir
la consistance d’eau.
5. Utilisez un boyau d’eau plus
long au lieu d’un boyau à
haute pression plus long.
6. Apportez les pièces à un
CSGA pour le nettoyage ou le
remplacement.
PROBLÈME
CAUSE
CORRECTION
Aucune
pression ou
basse
pression (à
l’utilisation
initiale)
(suite)
Aucun produit
chimique n’est
aspiré
Page 54

54- FR
D30339
PROBLÈME
CAUSE
CORRECTION
Aucune pression
ou basse
pression (après
un certain temps
d’utilisation
normale)
Fuite d’eau au
niveau de la
connexion du
pistolet/lance
Fuite d’eau au
niveau de la
pompe
1. Joint d’étanchéité ou
garniture usés.
2. Soupapes usées ou
obstruées.
3. Piston de déchargeur usé.
1. Joint torique usé ou brisé.
2. Connexion de boyau
desserrée.
1. Connexions desserrées.
2. Garnitures de piston usées.
3. Joints toriques usés.
4. La tête de la pompe ou les
tubes sont endommagés à
cause du gel.
1. Faire remplacer par un
CSGA.
2. Faire remplacer par un
CSGA.
3. Faire remplacer par un
CSGA.
1. Vérifiez et remplacez.
2. Serrez.
1. Serrez.
2. Faire remplacer par un
CSGA.
3. Faire remplacer par un
CSGA.
4. Faire remplacer par un
CSGA.
CSGA = Centre de service sous garantie autorisé
Page 55

55- FR
D30339
TORQUE TO
120 - 240 IN-LBS
TORQUE TO
15 - 30 IN-LBS
4
5
8
9
12
14
16
3
18
19
22
23
17
TORQUE TO
150 - 175 IN-LBS
TORQUE TO
450-650 IN-LBS
10
PIÈCES DE RECHANGE
N° de modèle de la laveuse à pression 919.672180
N° d’article
N° de pièce Description
3 D23125 Étiquette de surface chaude
4 * Trousse de pompe
5 D27152 Vis, 5/16-24 x 0.75 (qté : 4)
8 D22305 Support de roue
9 D22206 Essieu
10 D27956 Boulon, 3/8-16 x 1.75 (qté : 3)
13 16087 Écrou à embase
14 D22267 Bouchon (qté : 2)
16 D28123 Pneu (qté : 2)
17 D22268 Isolateur
18 D28397 Vis, 1/4-20
19 W137 Écrou Pal
22 D28397 Vis, 1/4-20 x 0.75
23 D21630 Flasque de pompe
* Voir la vue éclatée pour identifier les pièces particulières
SERRER À UN
COUPLE DE
15 À 50 LB-PO
SERRER À UN
COUPLE DE
150 À 175 LB-PO
SERRER À UN
COUPLE DE 120 À
240 LB-PO
SERRER À UN COUPLE
DE 120 À 240 LB-PO
Page 56
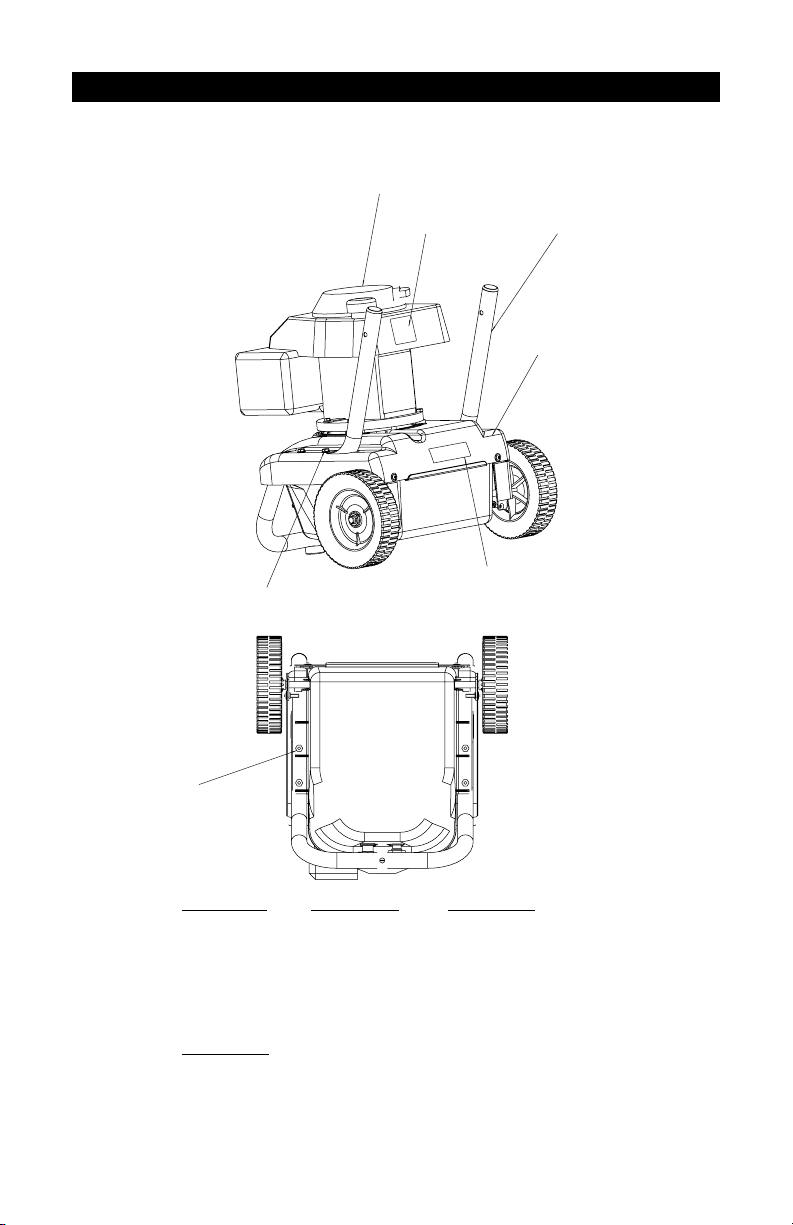
56- FR
D30339
PIÈCES DE RECHANGE
N° de modèle de la laveuse à pression 919.672180
TORQUE TO
130 - 150 IN-LBS
TORQUE TO
50 - 70 IN-LBS
1
6
7
24
12
15
2
N° d’article N° de pièce Description
1 * Moteur Briggs & Stratton
2 17050 Étiquette de danger
6 D22908 Châssis
7 D25074 Base
12 D22308 Vis, 5/16-18 x 2 (qté : 4)
15 D22692 Écrou, 5/16-18
24 D25087 Étiquette d’avertissement
Non illustré
D30339 Guide de l’utilisateur
* Voir la vue éclatée pour identifier les pièces particulières
SERRER À UN COUPLE
DE 130 À 150 LB-PO
SERRER À UN COUPLE
DE 50 À 70 LB-PO
Page 57
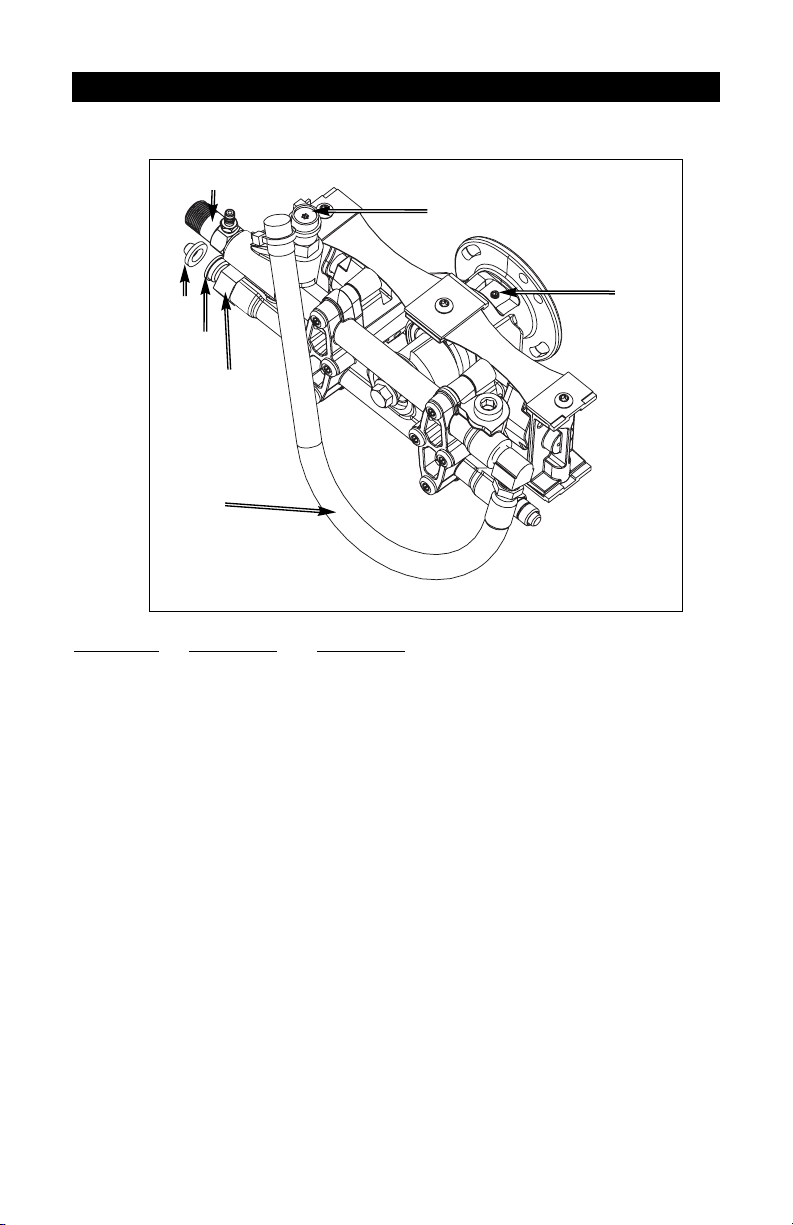
57- FR
D30339
PIÈCES DE RECHANGE
N° de modèle de la pompe refoulante D28703
N° d’article
N° de pièce Description
1 D20998 Boyau, 3/8 x 18 po
2 D29540 Ensemble de dispositif de marche à vide, 2 200 lb/po
2
4 H061 Écrou tournant de tuyau d’arrosage
5 H068 Joint articulé, 3/8 po
6 V161 Injecteur de produit chimique
7 F187 Écran pour tuyau d’arrosage
8 D25006 Vis de fixation
Non illustré :
H140 Boyau de produit chimique
2
1
5
4
6
7
8
Page 58

58- FR
D30339
PIÈCES DE RECHANGE
N° de modèle du moteur Briggs & Stratton 128812-3112-D2
Description
1 697322
Ensemble de cylindre
2 399269
Trousse de coussinet/joint
(côté du magnéto)
3 ★ 299819
Joint d’huile
(côté du magnéto)
5 691160
Culasse
7 ★ 692249
Jointe d’étanchéité de culasse
8 695250
Ensemble de reniflard
9 696125
Joint d’étanchéité de reniflard
10 691125
Vis (Ensemble de reniflard)
11 691781
Tube de reniflard
13 690912
Vis (Culasse)
50 497465
Tubulure d’admission
51 ★ 272199
Joint d’étanchéité d’admission
54 691650
Vis (Tubulure d’admission)
287 690940
Vis (Tube de jauge d’huile)
306 690450
Bouclier de cylindre
307 690345
Vis (Bouclier de cylindre)
337 802592
Bougie d’allumage
383 89838
Clé de bougie d’allumage
523 495264
Jauge d’huile
524 ★ 692296
Joint de tube de jauge d’huile
525 495265
Tube de jauge d’huile
584 692342
Couvercle de passage
de reniflard
585 ★ 691879
Joint d’étanchéité de
passage de reniflard
635 66538
Soufflet de bougie d’allumage
684 690345
Vis (Couvercle de
passage de reniflard)
718 690959
Goupille de position
842 ★ 691031
Joint torique
(Tube de jauge d’huile)
847 692017
Ensemble de jauge
d’huile/tube
869 691155
Siège de soupape (admission)
870 690380
Siège de soupape
(échappement)
871 262001
Coussinet de guide de
soupape
(Soupape d’échappement)
––––––– Remarque –––––
63709
Coussinet de guide de
soupape
(Soupape d’admission)
1019 494256
Trousse d’étiquettes
★ Fourni dans le jeu de joints d’étanchéité du moteur - Voir Réf. n° 358.
✦ Fourni dans la trousse de remise en état du carburateur – Voir Réf. n° 121
● Fourni dans le jeu de joints d’étanchéité du carburateur - Voir Réf. n° 977
Les ensembles comprennent toutes les pièces illustrées dans les cadres.
Description
N°
d’article
N° de
pièce
N°
d’article
N° de
pièce
847
523
287
842
524
11
10
584
585
54
50
51
383
5
337
635
13
1
684
869
7
870
307
1019 LABEL KIT
2
3
871
306
718
8
9
525
Page 59

59- FR
D30339
PIÈCES DE RECHANGE
★
Fourni dans le jeu de joints d’étanchéité du moteur - Voir Réf. n° 358
✦
Fourni dans la trousse de remise en état du carburateur - Voir Réf. n° 121
●
Fourni dans le jeu de joints d’étanchéité du carburateur - Voir Réf. n° 977
Les ensembles comprennent toutes les pièces illustrées dans les cadres.
N° de modèle du moteur Briggs & Stratton 128812-3112-D2
Description
16 691455
Arbre de vilbrequin
24 222698
Clavette de volant moteur
25 499429
Ensemble de piston
(standard)
––––––– Remarque –––––
499430
Ensemble de piston
(0,010 po surdimensionné)
499431
Ensemble de piston
(0,020 po surdimensionné)
499432
Ensemble de piston
(0,030 po surdimensionné)
26 499425
Jeu de segments
(standard)
––––––– Remarque –––––
499426
Jeu de segments
(0,010 po surdimensionné)
499427
Jeu de segments
(0,020 po surdimensionné)
499428
Jeu de segments
(0,030 po surdimensionné)
27 691866
Verrou d’axe de piston
28 499423
Axe de piston (standard)
––––––– Remarque –––––
29 499424
Bielle (standard)
32 691664
Vis (Bielle)
32A 695759
Vis (Bielle)
33 262651
Soupape d’échappement
34 262652
Soupape d’admission
35 691270
Ressort de soupape
(admission)
36 691270
Ressort de soupape
(échappement)
40 692194
Pièce de retenue de
soupape
45 690548
Poussoir de soupape
146 690979
Clavette de distribution
741 691830
Engrenage de distribution
Description
N°
d’article
N° de
pièce
N°
d’article
N° de
pièce
16
24
741
146
45
40
35
34
33
40
36
28
27
25
26
45
27
29
32
32A
Page 60

60- FR
D30339
★ Fourni dans le jeu de joints d’étanchéité du moteur - Voir Réf. n° 358
✦ Fourni dans la trousse de remise en état du carburateur - Voir Réf. n° 121
● Fourni dans le jeu de joints d’étanchéité du carburateur - Voir Réf. n° 977
Les ensembles comprennent toutes les pièces illustrées dans les cadres.
N° de modèle du moteur Briggs & Stratton 128812-3112-D2
Description
4 498983
Carter d’huile du moteur
12 ★ 692232
Joint d’étanchéité
de carter
15 691680
Bouchon de vidange
d’huile
20 ★ 399781
Joint d’huile
(côté de la prise de
mouvement)
22 691092
Vis (Carter d’huile du
moteur)
43 691997
Déflecteur d’huile du
régulateur
46 691449
Arbre à cames
Description
PIÈCES DE RECHANGE
N°
d’article
N° de
pièce
N°
d’article
N° de
pièce
46
43
4
12
15
20
22
Page 61

61- FR
D30339
★ Fourni dans le jeu de joints d’étanchéité du moteur - Voir Réf. n° 358
✦ Fourni dans la trousse de remise en état du carburateur - Voir Réf. n° 121
● Fourni dans le jeu de joints d’étanchéité du carburateur - Voir Réf. n° 977
Les ensembles comprennent toutes les pièces illustrées dans les cadres.
N° de modèle du moteur Briggs & Stratton 128812-3112-D2
Description
95 691636
Vis (Papillon
des gaz)
97 493267
Arbre du papillon
des gaz
104 ● 691242
Axe de charnière
de flotteur
108 691182
Soupape d’étrangleur
109 498593
Arbre d’étrangleur
117 498978
Jet principal
(standard)
118 498975
Jet principal
(haute altitude)
125 499059
Carburateur
127 ● 694468
Bouchon obturateur
130 691203
Papillon des gaz
133 398187
Flotteur de
carburateur
134 ● 398188
Trousse
d’aiguille/siège
137 ●✦ 693981
Joint d’étanchéité de
cuvette de flotteur
163 ★●✦ 272653
Joint d’étanchéité de
filtre à air
276 ●✦ 271716
Rondelle d’étanchéité
365 692524
Vis (Carburateur)
617 ●✦ 270344
Joint torique
(Tubulure d’admission)
633 ●✦ 691321
Joint d’arbre
d’étrangleur/papillon
des gaz
633A 693867
Joint d’arbre
d’étrangleur/papillon
des gaz
692 690572
Ressort de détente
975 493640
Cuvette de flotteur
Description
PIÈCES DE RECHANGE
N°
d’article
N° de
pièce
N°
d’article
N° de
pièce
125
365
118
276
109
163
108
127
633A
130
692
97
633
95
617
134
133
975
117
137
276
276
104
Page 62

62- FR
D30339
★ Fourni dans le jeu de joints d’étanchéité du moteur - Voir Réf. n° 358
✦ Fourni dans la trousse de remise en état du carburateur - Voir Réf. n° 121
● Fourni dans le jeu de joints d’étanchéité du carburateur - Voir Réf. n° 977
Les ensembles comprennent toutes les pièces illustrées dans les cadres.
N° de modèle du moteur Briggs & Stratton 128812-3112-D2
Description
188 690877
Vis (Support de
commande)
202 691829
Liaison de régulateur
mécanique
209 691291
Ressort de régulateur
222 692150
Support de commande
227 690783
Levier de commande
du régulateur
333 802574
Armature de magnéto
334 691061
Vis
(Armature de magnéto)
356 692390
Fil d’arrêt
404 690272
Rondelle
(Manivelle du régulateur)
505 231082
Écrou (Levier de
commande du
régulateur)
562 92613
Boulon (Levier de
commande du
régulateur)
615 690340
Arbre de retenue
du régulateur
616 691308
Manivelle de régulateur
621 692310
Interrupteur d’arrêt
668 ★ 493823
Entretoise
(2 fournies)
843 691895
Manchon de levier
(Étrangleur)
843A 691884
Manchon de levier
(Commande de vitesse)
851 493880
Borne de bougie
d’allumage
Description
PIÈCES DE RECHANGE
N°
d’article
N° de
pièce
N°
d’article
N° de
pièce
404
356
615
616
227
562
505
843
209
333
334
851
843A
222
202
188
621
668
Page 63
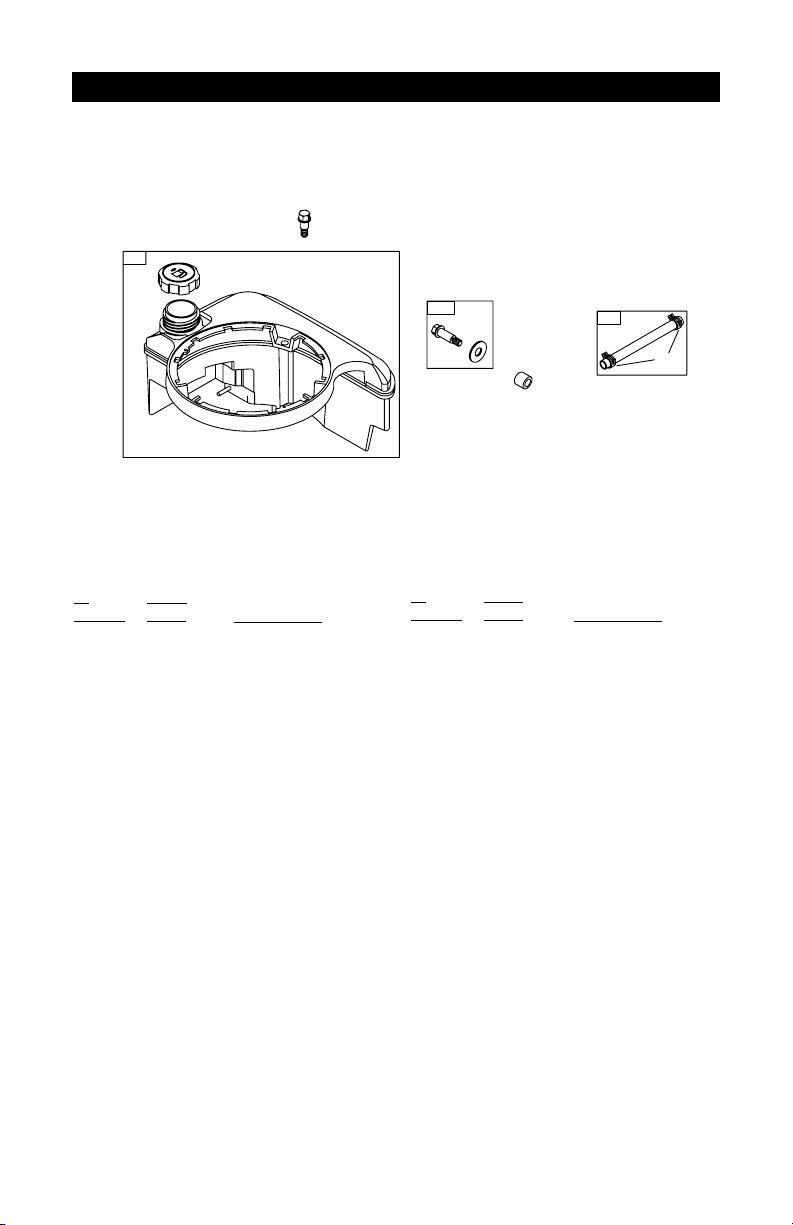
63- FR
D30339
★ Fourni dans le jeu de joints d’étanchéité du moteur - Voir Réf. n° 358
✦ Fourni dans la trousse de remise en état du carburateur - Voir Réf. n° 121
● Fourni dans le jeu de joints d’étanchéité du carburateur - Voir Réf. n° 977
Les ensembles comprennent toutes les pièces illustrées dans les cadres.
N° de modèle du moteur Briggs & Stratton 128812-3112-D2
Description
187 691050
Canalisation de
carburant
(à couper à la
longueur requise)
190 690940
Vis
(Réservoir à carburant)
601 95162
Collier de boyau
670 692294
Entretoise de réservoir
à carburant
957 397974
Bouchon de réservoir
à carburant
972 495224
Réservoir à carburant
1059 692311
Trousse de
vis/rondelle
Description
PIÈCES DE RECHANGE
N°
d’article
N° de
pièce
N°
d’article
N° de
pièce
190
972
957
1059
670
187
601
Page 64
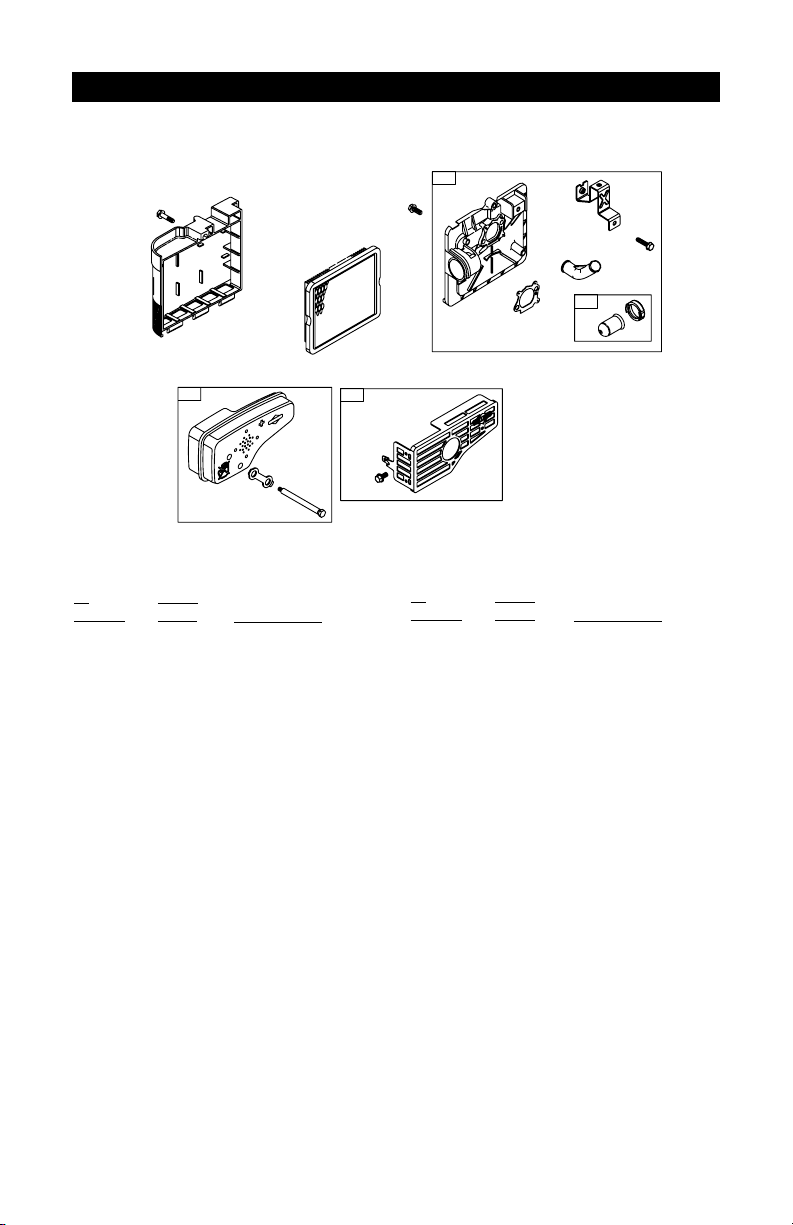
64- FR
D30339
★ Fourni dans le jeu de joints d’étanchéité du moteur - Voir Réf. n° 358
✦ Fourni dans la trousse de remise en état du carburateur - Voir Réf. n° 121
● Fourni dans le jeu de joints d’étanchéité du carburateur - Voir Réf. n° 977
Les ensembles comprennent toutes les pièces illustrées dans les cadres.
N° de modèle du moteur Briggs & Stratton 128812-3112-D2
Description
81 691740
Verrou de vis de
silencieux
159 691753
Support d’amorceur
de filtre à air
163 ★●✦ 272653
Joint d’étanchéité de
filtre à air
300 496106
Silencieux
425 690670
Vis (Couvercle
de filtre à air)
443 692523
Vis (Base d’amorceur
de filtre à air)
445 491588
Filtre de cartouche
de filtrage d’air
529 691923
Oeillet
613 691340
Vis (Silencieux)
832 499034
Protecteur de
silencieux
836 690664
Vis (Protecteur de
silencieux)
966 496116
Base d’amorceur de
filtre à air
968 692298
Couvercle de filtre
à air
970 691669
Vis (Support
d’amorceur de filtre
à air)
976 694395
Amorceur de
carburateur
Description
PIÈCES DE RECHANGE
N°
d’article
N° de
pièce
N°
d’article
N° de
pièce
966
159
425
968
445
443
529
163
970
976
300
81
613
832
836
Page 65
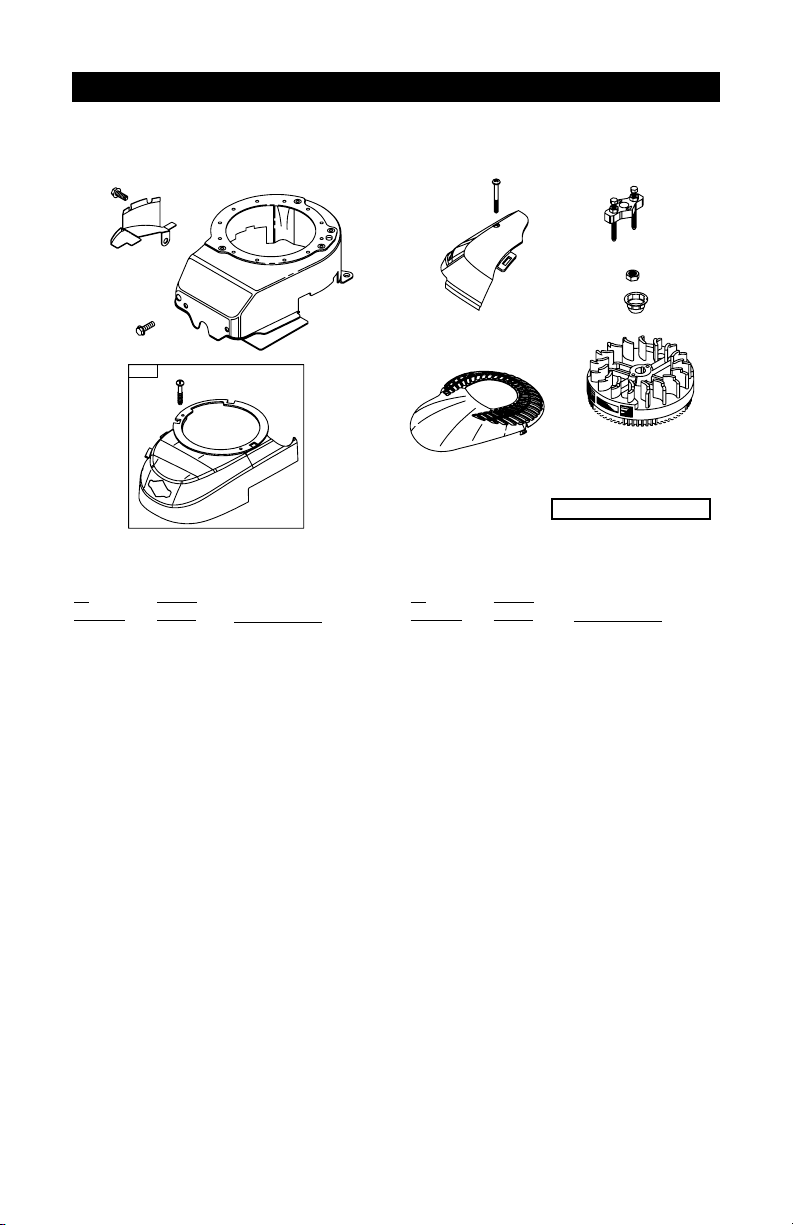
65- FR
D30339
★ Fourni dans le jeu de joints d’étanchéité du moteur - Voir Réf. n° 358
✦ Fourni dans la trousse de remise en état du carburateur - Voir Réf. n° 121
● Fourni dans le jeu de joints d’étanchéité du carburateur - Voir Réf. n° 977
Les ensembles comprennent toutes les pièces illustrées dans les cadres.
N° de modèle du moteur Briggs & Stratton 128812-3112-D2
Description
23 691992
Volant moteur
37 694086
Protecteur de volant
moteur
78 691108
Vis (Protecteur de
volant moteur)
304 493294
Logement de
soufflerie
305 691108
Vis
(Boîtier de soufflante)
332 690662
Écrou (Volant moteur)
363 19069
Extracteur de volant
moteur
455 695161
Cuvette de volant
moteur
564 691142
Vis (Couvercle des
commandes)
604 691344
Couvercle des
commandes
921 695886
Couvercle de boîtier
de soufflante
930 691345
Protecteur de
dispositif de rappel
969 691138
Vis (Couvercle de
boîtier de soufflante)
1036 697378
Étiquette des
émissions
Description
PIÈCES DE RECHANGE
N°
d’article
N° de
pièce
N°
d’article
N° de
pièce
1036 ÉTIQUETTE DES ÉMISSIONS
78
37
304
305
921
969
564
604
930
x
23
1036 EMISSION LABEL
363
332
455
Page 66
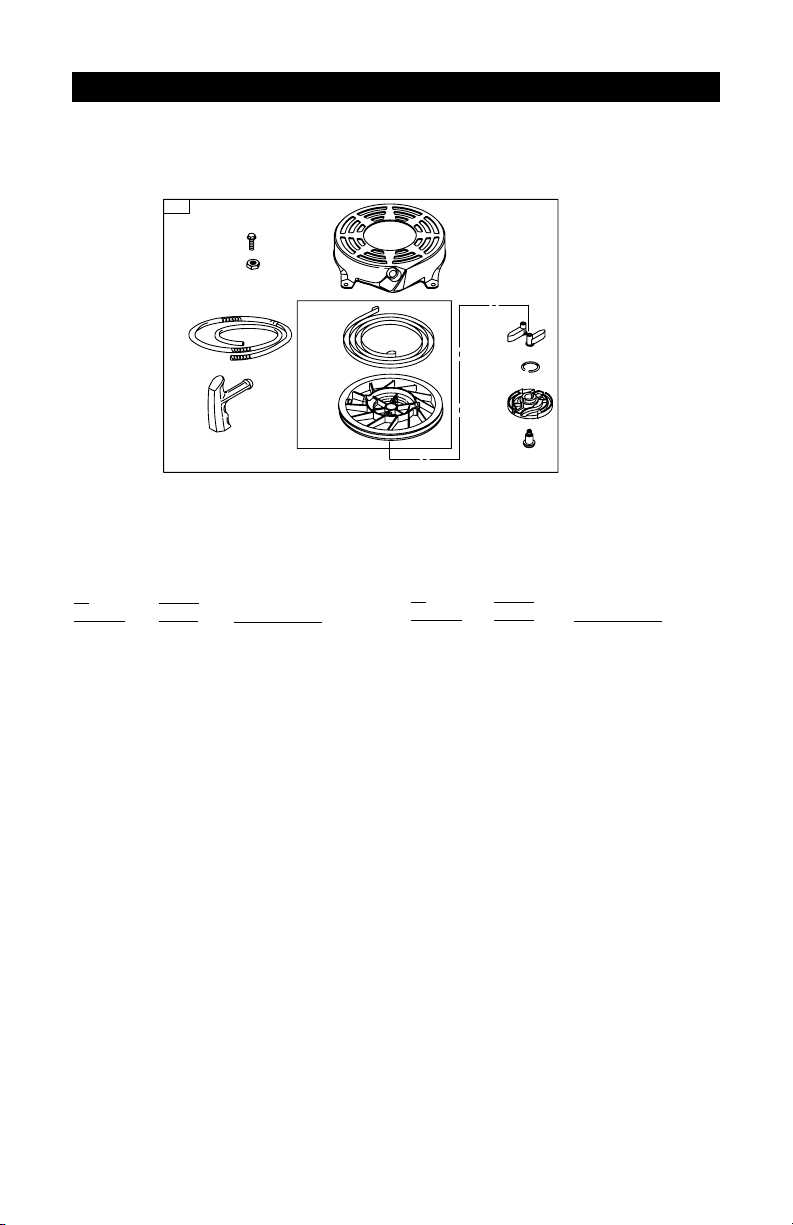
66- FR
D30339
★ Fourni dans le jeu de joints d’étanchéité du moteur - Voir Réf. n° 358
✦ Fourni dans la trousse de remise en état du carburateur - Voir Réf. n° 121
● Fourni dans le jeu de joints d’étanchéité du carburateur - Voir Réf. n° 977
Les ensembles comprennent toutes les pièces illustrées dans les cadres.
N° de modèle du moteur Briggs & Stratton 128812-3112-D2
Description
55 691421
Boîtier de démarreur
à rappel
58 692259
Cordon de démarreur
(à couper à la
longueur requise)
60 281434
Prise de cordon de
démarreur
65 690837
Vis (Démarreur
à rappel)
456 692299
Plaque de friction
de cliquet
459 281505
Cliquet
592 690800
Écrou
(Démarreur à rappel)
597 691696
Vis (Plaque de
friction de cliquet)
608 497680
Démarreur à rappel
689 691855
Ressort de friction
1210 498144
Ensemble de
poulie/ressort
(Poulie)
1211 498144
Ensemble de
poulie/ressort
(Ressort)
Description
PIÈCES DE RECHANGE
N°
d’article
N° de
pièce
N°
d’article
N° de
pièce
608
65
592
58
60
55
1211
1210
459
689
456
597
Page 67

67- FR
D30339
★ Fourni dans le jeu de joints d’étanchéité du moteur - Voir Réf. n° 358
✦ Fourni dans la trousse de remise en état du carburateur - Voir Réf. n° 121
● Fourni dans le jeu de joints d’étanchéité du carburateur - Voir Réf. n° 977
Les ensembles comprennent toutes les pièces illustrées dans les cadres.
N° de modèle du moteur Briggs & Stratton 128812-3112-D2
Description
3 ★ 299819
Joint d’huile
(côté du magnéto)
7 ★Ø 692249
Joint d’étanchéité
de culasse
9 ★Ø 272481
Joint d’étanchéité
de reniflard
12 ★ 692232
Joint d’étanchéité
de carter
20 ★ 399781
Joint d’huile
(côté PTO)
51 ★ 272199
Joint d’étanchéité
d’admission
104 ● 691242
Axe de charnière
de flotteur
121 498260
Trousse de remise
en état du carburateur
127 ● 694468
Bouchon obturateur
134 ● 398188
Trousse
d’aiguille/siège
137 ●✦ 693981
Joint d’étanchéité
de cuvette de flotteur
163 ★●✦ 272653
Joint d’étanchéité de
filtre à air
276 ●✦ 271716
Rondelle d’étanchéité
358 497316
Jeu de joints
d’étanchéité
du moteur
524 ★ 692296
Joint de tube de
jauge d’huile
585 ★ 691879
Joint d’étanchéité
de passage
de reniflard
617 ★●✦270344
Joint torique
(tubulure d’admission)
633 691321
Joint d’arbre
d’étrangleur/papillon
des gaz
633A ●✦ 693867
Joint d’arbre
d’étrangleur/papillon
des gaz
668 ★ 493823
Entretoise (2 fournies)
842 ★ 691031
Joint torique
(Tube de jauge d’huile)
977 498261
Jeu de joints
d’étanchéité du
carburateur
1095 498528
Jeu de joints
d’étanchéité de soupape
Description
PIÈCES DE RECHANGE
N°
d’article
N° de
pièce
N°
d’article
N° de
pièce
358 JEU DE JOINTS D’ÉTANCHÉITÉ DU MOTEUR
977 JEU DE JOINTS D’ÉTANCHÉITÉ DU CARBURATEUR
121 TROUSSE DE REMISE EN ÉTAT DU CARBURATEUR
358 ENGINE GASKET SET
3
12
20
977 CARBURET OR GASKET SET
163
617
137
276
633A
633
668 842
163
617
121 CARBURET OR OVERHAUL KIT
633A
633
137
134
585
617
524
7
51
276
127
104
163
Page 68

e
Get it fixed, at your home or ours!
Your Home
For repair – in your home – of all major brand appliances,
lawn and garden equipment, or heating and cooling systems,
no matter who made it, no matter who sold it!
For the replacement parts, accessories and
owner’s manuals that you need to do-it-yourself.
For Sears professional installation of home appliances
and items like garage door openers and water heaters.
1-800-4-MY-HOME
(1-800-469-4663) (U.S.A. and Canada)
www.sears.com www.sears.ca
For repair of carry-in products like vacuums, lawn equipment,
and electronics, call or go on-line for the nearest
Sears Parts and Repair Center.
1-800-488-1222
®
Anytime, day or night
Our Hom
Anytime, day or night (U.S.A. only)
www.sears.com
To purchase a protection agreement (U.S.A.)
or maintenance agreement (Canada) on a product serviced by Sears:
1-800-827-6655
Para pedir servicio de reparación
a domicilio, y para ordenar piezas:
1-888-SU-HOGAR
(1-888-784-6427)
© Sears, Roebuck and Co.
® Registered Trademark /
® Marca Registrada /
MC
Marque de commerce /MD Marque déposée de Sears, Roebuck and Co.
TM
(U.S.A.) 1-800-361-6665 (Canada)
Au Canada pour service en français:
SM
TM
Trademark /SMService Mark of Sears, Roebuck and Co.
Marca de Fábrica /SMMarca de Servicio de Sears, Roebuck and Co.
1-800-LE-FOYER
(1-800-533-6937)
www.sears.ca
MC
 Loading...