

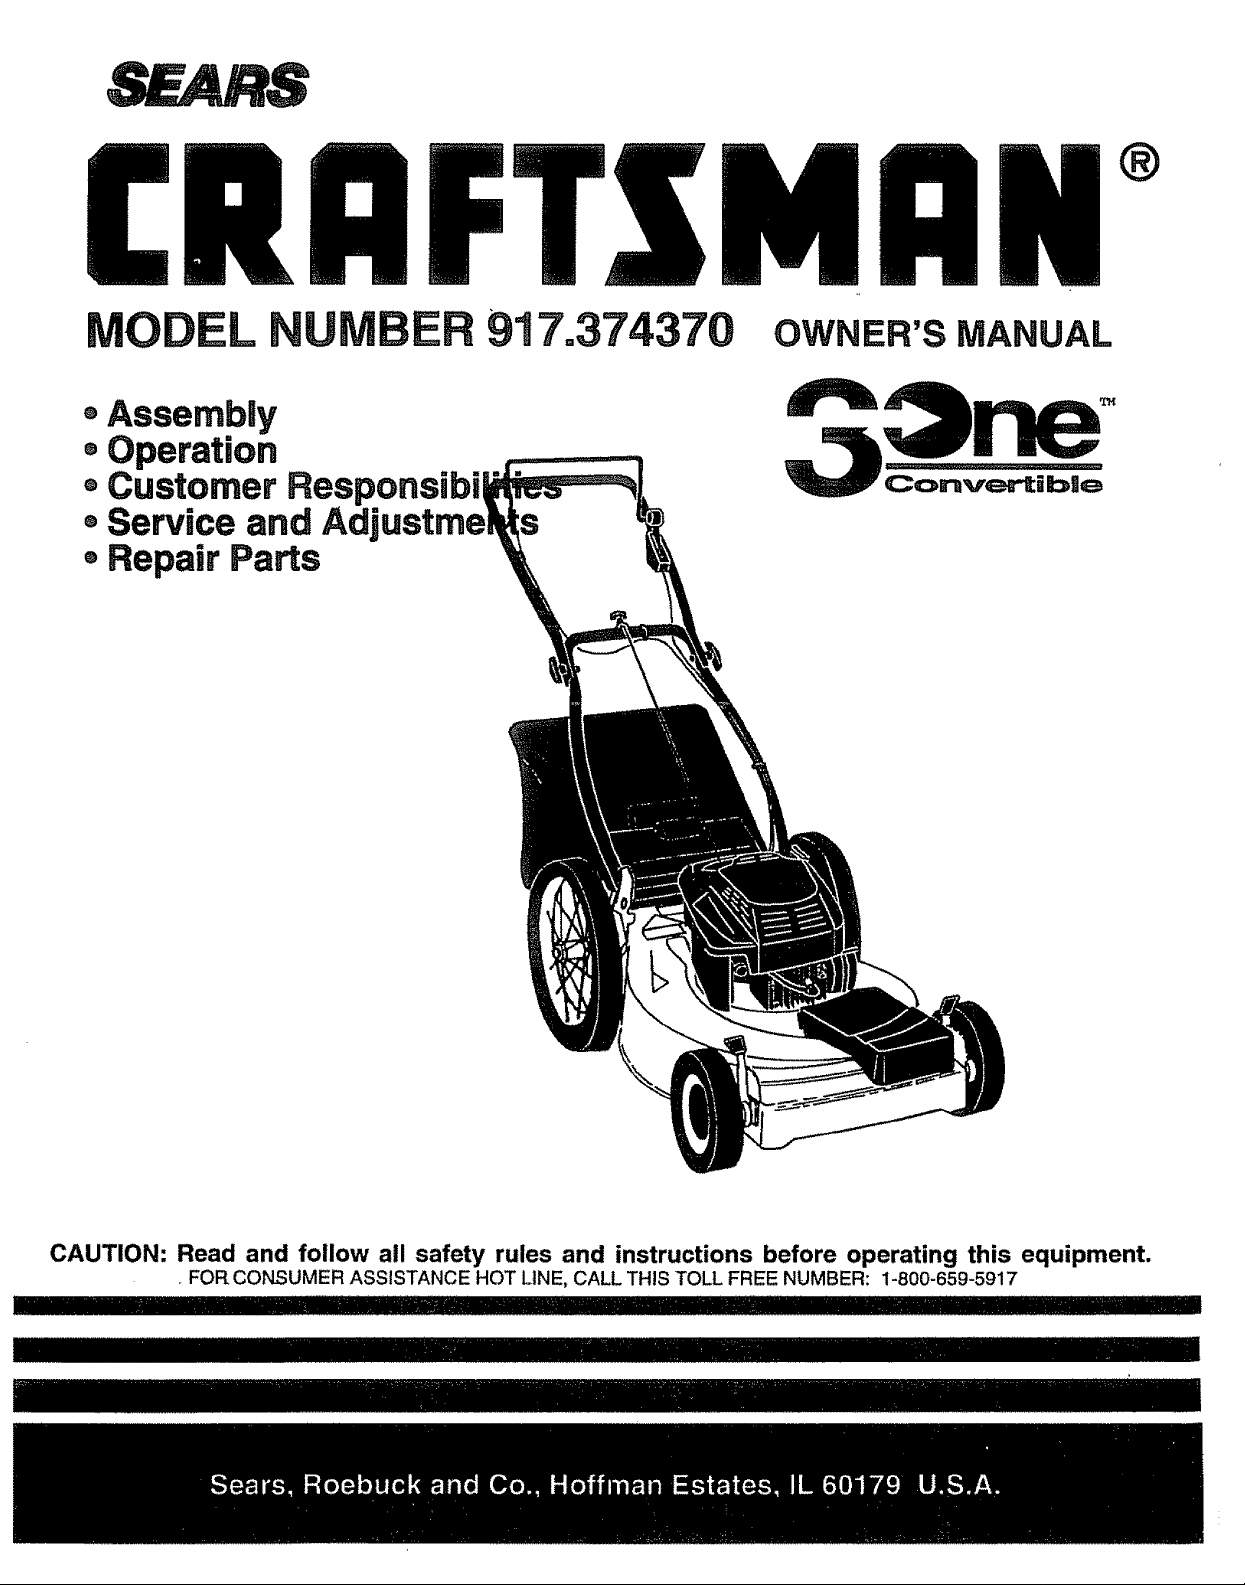
Craftsman 917374370 Owner’s Manual
®Assembly
®Operation
®Customer Responsibi
®Service and Adjustme
- Repair Parts
®
917'.374370
S
CAUTION: Read and follow all safety rules and instructions before operating this equipment.
r FOR CONSUMER ASSISTANCE HOT LINE, CALL THIS TOLL FREE NUMBER: 1-800-659-5917

SAFETY RULES
PLUG TO PREVENT ACCIDENTAL STARTINGWHEN SETTING UP, TRANSPORTING, ADJUSTING OR MAKING
REPAIRS°
CAUTION: ALWAYSDISCONNECTSPARK PLUGWIREANDPLACEWIREWHEREITCANNOTCONTACT SPARK &
IMPORTANT
SAFETY STANDARDS REQUIRE OPERATOR PRESENCE CONTROLS TO MINIMIZE THE RISK OF INJURY. YOUR UNIT IS EQUIPPED WITH
SUCH CONTROLS. DO NOT ATTEMPT TO DEFEAT THE FUNCTION OF THE OPERATOR PRESENCE CONTROLS UNDER ANY CIRCUM-
STANCES,
TRAINING:
• Read this operator's manual carefully° Become familiar with
the controls and know how to operate your mower properly_
Learn how to quickly stop mower,
• Do not allow children to use your mower_ Never allow adults
to use mower without proper instructions.,
• Keep the area of operation clear of all persons, especially
small children and pets_
• Use mower only as the manufacturer intended and as de.
scribed in this manual
• Do not operate mower if it has been dropped or damaged in
any manner., Always have damage repaired before using
your mower.
• Do not use accessory attachments that are not recom-
mended by the manufacturer. Use of such attachments may
be hazardous.,
Be aware that the mower blade turns when the engine is
running_
PREPARATION:
• Always thoroughly check the area to be mowed and clear it
of all stones, sticks, wires, bones, and other foreign objects_
These objects will be thrown by the blade and can cause
severe injury.
• Always wear safety glasses or eye shields when starting and
while using your mower.
• Dress properly.. Do not operate mower when barefoot or
wearing open sandals° Wear only solid shoes with good
traction when mowing.
• Check fuel tank before starting engine. Do not fil! gas tank
indoors, when the engine is running or when the engine ishot.
Allow the engine to cool for several minutes before filling the
gas tank. Clean off any spilled gasoline before starting the
engine.
= Always make wheel height adjustments before starting your
mower. Never attempt to do this while the engine is running
• Mow only in daylight or good artificial light°
OPERATION:
° Keep your eyes and mind on your mower and the area being
cut.. Do not let other interests distract you.
• Do not mow wet or slippery grass. Never run while operating
your mower. Always be sure of your footing- keep a firm hold
on the handles and walk.
Do not put hands or feet near or under rotating parts. Keep
clear of the discharge opening at all times.
• Always stop the engine whenever you leave or are not using
your mower, or before crossing driveways, walks, roads, and
any gravel-covered areas_
° Never direct discharge of material toward bystanders nor
allow anyone near the mower while you are operating it.
° Before cleaning, inspecting, or repairing your mower, stop
the engine and make absolutely sure the blade and all
moving parts have stopped, Then disconnect the spark plug
wire and keep it away from the spark plug to prevent
accidental starting,
• Do not continue to run your mower if you hit a foreign object.
Follow the procedure outlined above, then repair any dam-
age before restarting and operating you mower,
• Do not change the governor settings or overspeed the
engine. Engine damage or personal injury may result.
° Do not operate your mower ifit vibrates abnormally. Exces-
sive vibration is an indication of damage; stop the engine,
safely checkfor the cause of vibration and repair as required..
• Do not run the engine indoors° Exhaust fumes are danger-
ous,.
• Never cut grass by pulling the mower towards you.. Mow
acrosstheface ofslopes, never upanddownoryoumight
lose your footing_ Do not mow excessivelysteep slopes.
Usecautionwhenoperatingthemoweronuneven terrainor
whenchangingdirections _maintain goodfooting..
• Never operateyourmower withoutproperguards, plates,
grasscatcherorothersafety devices in place
MAINTENANCE AND STORAGE:
° Check the blade and the engine mounting bolts often to be
sure they are tightened properly..
• Check all bolts, nuts and screws at frequent intervals for
proper tightness to be sure mower is in safe working condi-
tion°
° Keep all safety devices in place and working.
• To reduce fire hazard, keep the engine free of grass, leaves
or excessive grease and oil.,
• Check grass catcher often for deterioration and wear and
replace worn bags. Use only replacement bags that are
recommended by and comply with specifications of the
manufacturer of your mower.
• Always keep a sharp blade on your mower.
° Allow engine to cool before storing in any enclosure_
° Never store mower' with fuel in the tank inside a building
where fumes may reach an open flame or an ignition source
such as a hot water heater, space heater, clothes dryer', etc.
,,,, ,,,,,, ,,,,,, ,,,,,,,,,,,,,,,,,
LOOK FOR THIS SYMBOL TO POINT OUT IMPORTANT SAFETY PRECAUTIONS.IT MEANS - ATTENTION!!! BECOME ALERT!!! YOUR SAFETY IS INVOLVED.
CONGRATULATIONS on your purchase of a Sears Lawn
Mower. It has been designed, engineered and manufac-
tured to give you the best possible dependability and
performance,
Should you experience any problem you cannot easily
remedy, please contact your nearest Sears Authorized
Service CentedDepartmenL We have competent, welF
trained technicians and the proper tools to service or repair
this lawn mower.
Please read and retain this manual. The instructions will
enable you to assemble and maintain your lawn mower
properly. Always observe the "SAFETY RULES"°
MODEL
NUMBER 917°374370
SERIAL
NUMBER
DATEOFPURCHASE
THE MODELAND SERIAL NUMBERS WILL BE FOUND
ON A DECAL ATTACHED TO THE REAR OF THE
LAWN MOWER HOUSING
YOU SHOULD RECORD BOTH SERIAL NUMBER AND
DATE OF PURCHASE AND KEEP IN A SAFE PLACE
FOR FUTURE REFERENCE°
PRODUCT SPECIRCATIONS
HORSEPOWER: 5,5
DISPLACEMENT: 9.,0CU IN.,
GASOLINE CAPACITY 1o6QUARTS
AND TYPE: UNLEADED REGULAR
OIL TYPE (API-SG): SAE 30 (ABOVE 32_F)
SAE 5W-30 (below 32°F)
OIL CAPACITY: 20 OZS
SPARK PLUG: CHAMPION RJI9-LM
(GAP: °030") STD361458
VALVE CLEARANCE: INTAKE: °008"
EXHAUST: _008"
SOLID STATE IGNITION
AIR GAP: o0125INn
BLADE BOLT TORQUE: 35-40 FT. LBS_
MAINTENANCE AGREEMENT
A Sears Maintenance Agreement is available on this product. Contact your nearest Sears store for details.
CUSTOMER RESPONSIBILITIES
o Read and observe the safety rules..
° Follow a regular schedule in maintaining, caring for and using your lawn mower..
° Follow the instructions under "Customer Responsibilities" and "Storage" sections of this owner's manual.
LIMITED TWO YEAR WARRANTY ON CRAFTSMAN POWER MOWER
For two years from date of purchase, when this Craftsman Lawn Mower is maintained, lubricated, and tuned up
according to the operating and maintenance instructionsin the owner's manual, Sears will repair free of charge any
defect in material or workmanship.
If this Craftsman Lawn Mower is used for commercial or rental purposes, this warranty applies for only 90 days from
the date of purchase.
This Warranty does not cover:
° Expendable items which become worn during normal use, such as rotary mower blades, blade adapters, belts,
air cleaners and spark plug.
° Repairs necessary because of operator abuse or negligence, including bent crankshafts and the failure to maintain
the equipment according to the instructions contained in the owner's manual.
WARRANTY SERVICE IS AVAILABLE BY RETURNING THE CRAFTSMAN POWER MOWER TO THE NEAREST
SEARS SERVICE CENTER/DEPARTMENT IN THE UNITED STATES. THIS WARRANTY APPLIES ONLY WHILE
THIS PRODUCT IS IN USE tN THE UNITED STATES.
This Warranty gives you specific legal rights, and you may also have other rights which vary from state to staten
SEARS, ROEBUCK AND CO,.,D/817 WA, HOFFMAN ESTATES, ILLINOIS 60179
3
............ : i iillll ,, .............. ,........................................................... ,..............................................
TABLE OF CONTENTS
ill
SAFETY RULES ............................................................ 2
PRODUCT SPECIFICATIONS ....................................... 3
CUSTOMER RESPONSIBILITIES ..................... 3, 12-14
WARRANTY ................................................................... 3
ASSEMBLY .................................................................... 6
OPERATION .................................................................. 8
MAINTENANCE SCHEDULE ...................................... 12
SERVICE AND ADJUSTMENTS ................................. 15
STORAG E .................................................................... 18
TROUBLESHOOTING ................................................. 19
REPAIR PARTS - LAWN MOWER ........................ 20-24
REPAIR PARTS - ENGINE .................................... 25-30
PARTS ORDERING/SERVICE ................ BACK COVER
INDEX
A
Accessories ..........................................5
Adjustments:
Carburetor ................................ 17
Drive Belt ..........................................15
Engine Speed ..............................17
Handle Height ........................... 16
Height of Cut ...................................9
Air Filter:
Replacement .................................14
Service ...............................................14
Assembly ..............................................6
B
Blade:
Sharpening ..................................13
Replacement .................................13
C
Controls:
Drive Control .....................................8
Engine Zone Control ...................8
Engine Speed Control ....................8
Operator Presence
Control Bar ....................................8
Customer Responsibilities ....3, 12-14
Air' Filter ................................... 14
Blade Care/Replacement ........13
Drive Wheels ...............................13
Engine ....................................... 14
Lubrication ................................ t4
Spark Plug ................................ 14
Cutting Levels ................................... 9
E
Engine:
Air Filter ........................................14
Oil Change ..................................14
Oil Level ...........................................14
Oil Type .................................... 14
Starting ........................................10
Stopping .......................................10
Storage .........................................18
F
Fuel:
Capacity .............................................3
Storage ...............................................18
Type ................................................10
H
Handle Adjustment:
Assembly ..........................................6
Cutting Height .............................16
L
Lubrication:
Engine .........................................14
Lawn Mower'. .................................12
M
Maintenance Agreement ...................3
Maintenance Schedule .................. 12
Mowing Tips ............................................10
O
Oil:
Engine ..........................................12
Storage ...............................................18
Operation:
Drive Control .............................. 9
Engine Control ...............................9
Grass Catcher'. ..................................9
Mower' .............................................9
Operator Presence
Control Bar. ........................................9
Options:
Accessories ................................. 5
R
Repair Parts:
Engine ........................................25-30
Lawn Mower ............................20-24
Responsibilities, Customer oo3, 12-14
S
Safety Rules ........................................ 2
Service and Adjustments .................15
Carburetor ................................. 17
Drive Belt ................................... 15
Engine Speed ............................17
Handle ..........................................16
Spark Plug ..........................................14
Specifications .................................... 3
Speed Control:
Engine ........................................ 8
Starting the Engine ........................ 10
Stopping the Engine ..........................10
Storage ..................................................18
T
Trouble Shooting Chart ....................19
W
Warranty ..............................................3
4
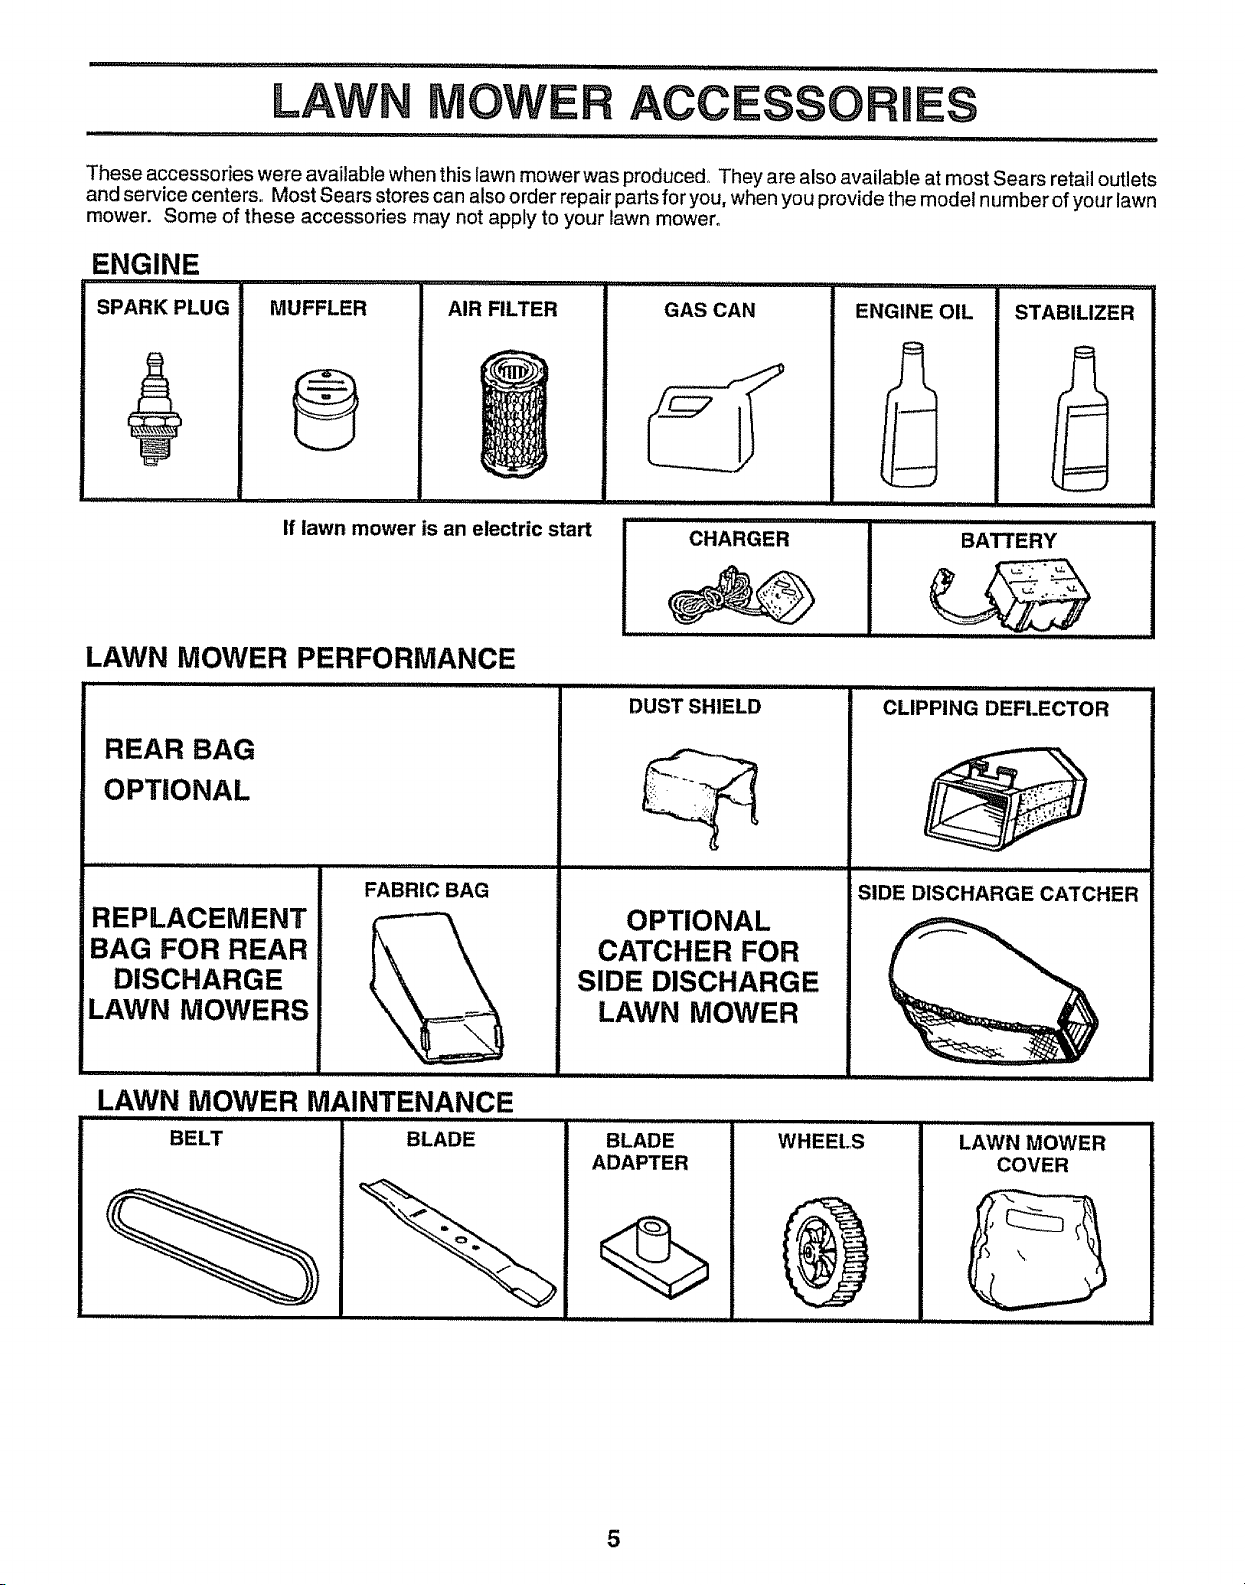
LAWN
These accessories were available when this lawn mowerwas produced. They are also available at most Sears retail outlets
and service centers,. Most Sears stores can also order repair parts for you, when you provide the model number of your lawn
mower. Some of these accessories may not apply to your lawn mower°
ACCESSORtES
H...............................
ENGINE
SPARK PLUG MUFFLER
i,l,lll,lllii
If lawn mower is an electric start
LAWN MOWER PERFORMANCE
': ............... ii.......
REAR BAG
OPTIONAL
i,ii MI'I II''llll '
GAS CAN
CHARGER
DUST SHIELD
r_,ll_L,ii ill ,, _'1
ENGINE OIL
" ,ill ,i
ii,ll i i,,ll,ii,ii ii,
STABILIZER
.........BATTERY
CLIPPING DEFLECTOR
FABRIC BAG
REPLACEMENT
BAG FOR REAR
DISCHARGE
t
LAWN MOWERS
LAWN MOWER MAINTENANCE
BELT BLADE
i,,ll, ,Hi,,, ,
OPTIONAL
CATCHER FOR
SIDE DISCHARGE
LAWN MOWER
BLADE
ADAPTER
WHEELS
SIDE DISCHARGE CATCHER
HII
LIIlllI II IlllII
LAWN MOWER
COVER
5
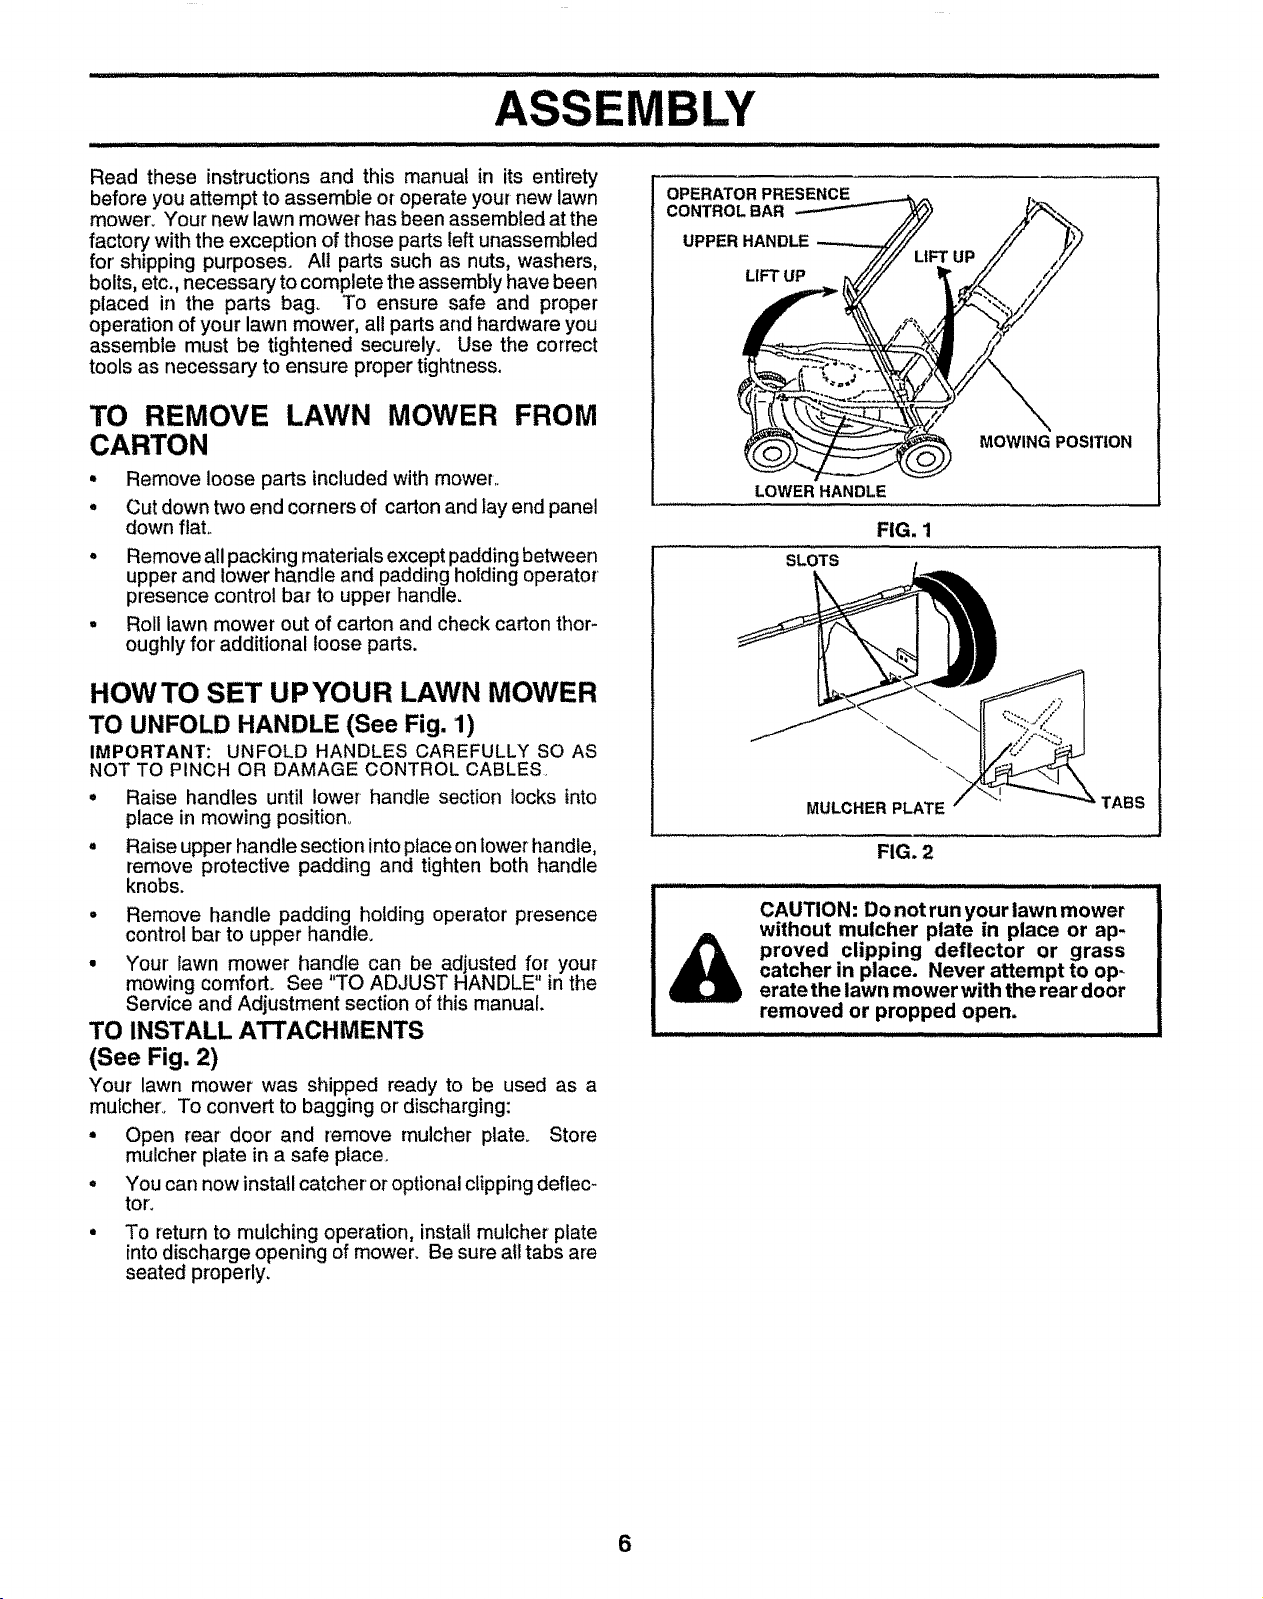
Read these instructions and this manual in its entirety
before you attempt to assemble or operate your new lawn
mower. Your new lawn mower has been assembled atthe
factory with the exception of those parts left unassembled
for' shipping purposes. All parts such as nuts, washers,
bolts, etc., necessary to complete the assembly have been
placed in the parts bag_ To ensure safe and proper
operation of your lawn mower, all parts and hardware you
assemble must be tightened securely. Use the correct
tools as necessary to ensure proper tightness.
TO REMOVE LAWN MOWER FROM
CARTON
• Remove loose parts included with mower.
• Cut down two end corners of carton and lay end panel
down flat.
• Remove atl packing materials except padding between
upper and lower handle and padding holding operator
presence control bar to upper handle.
• Roll lawn mower out of carton and check carton thor-
oughly for additional loose parts.
HOW TO SET UP YOUR LAWN MOWER
TO UNFOLD HANDLE (See Fig. 1)
IMPORTANT: UNFOLD HANDLES CAREFULLY SO AS
NOT TO PINCH OR DAMAGE CONTROL CABLES_
° Raise handles until lower handle section locks into
place in mowing position°
° Raise upper handle section into place on lower handle,
remove protective padding and tighten both handle
knobs.
° Remove handle padding holding operator presence
control bar to upper handle.
• Your lawn mower handle can be adjusted for your
mowing comfort. See TO ADJUST HANDLE" in the
Service and Adjustment section of this manual.
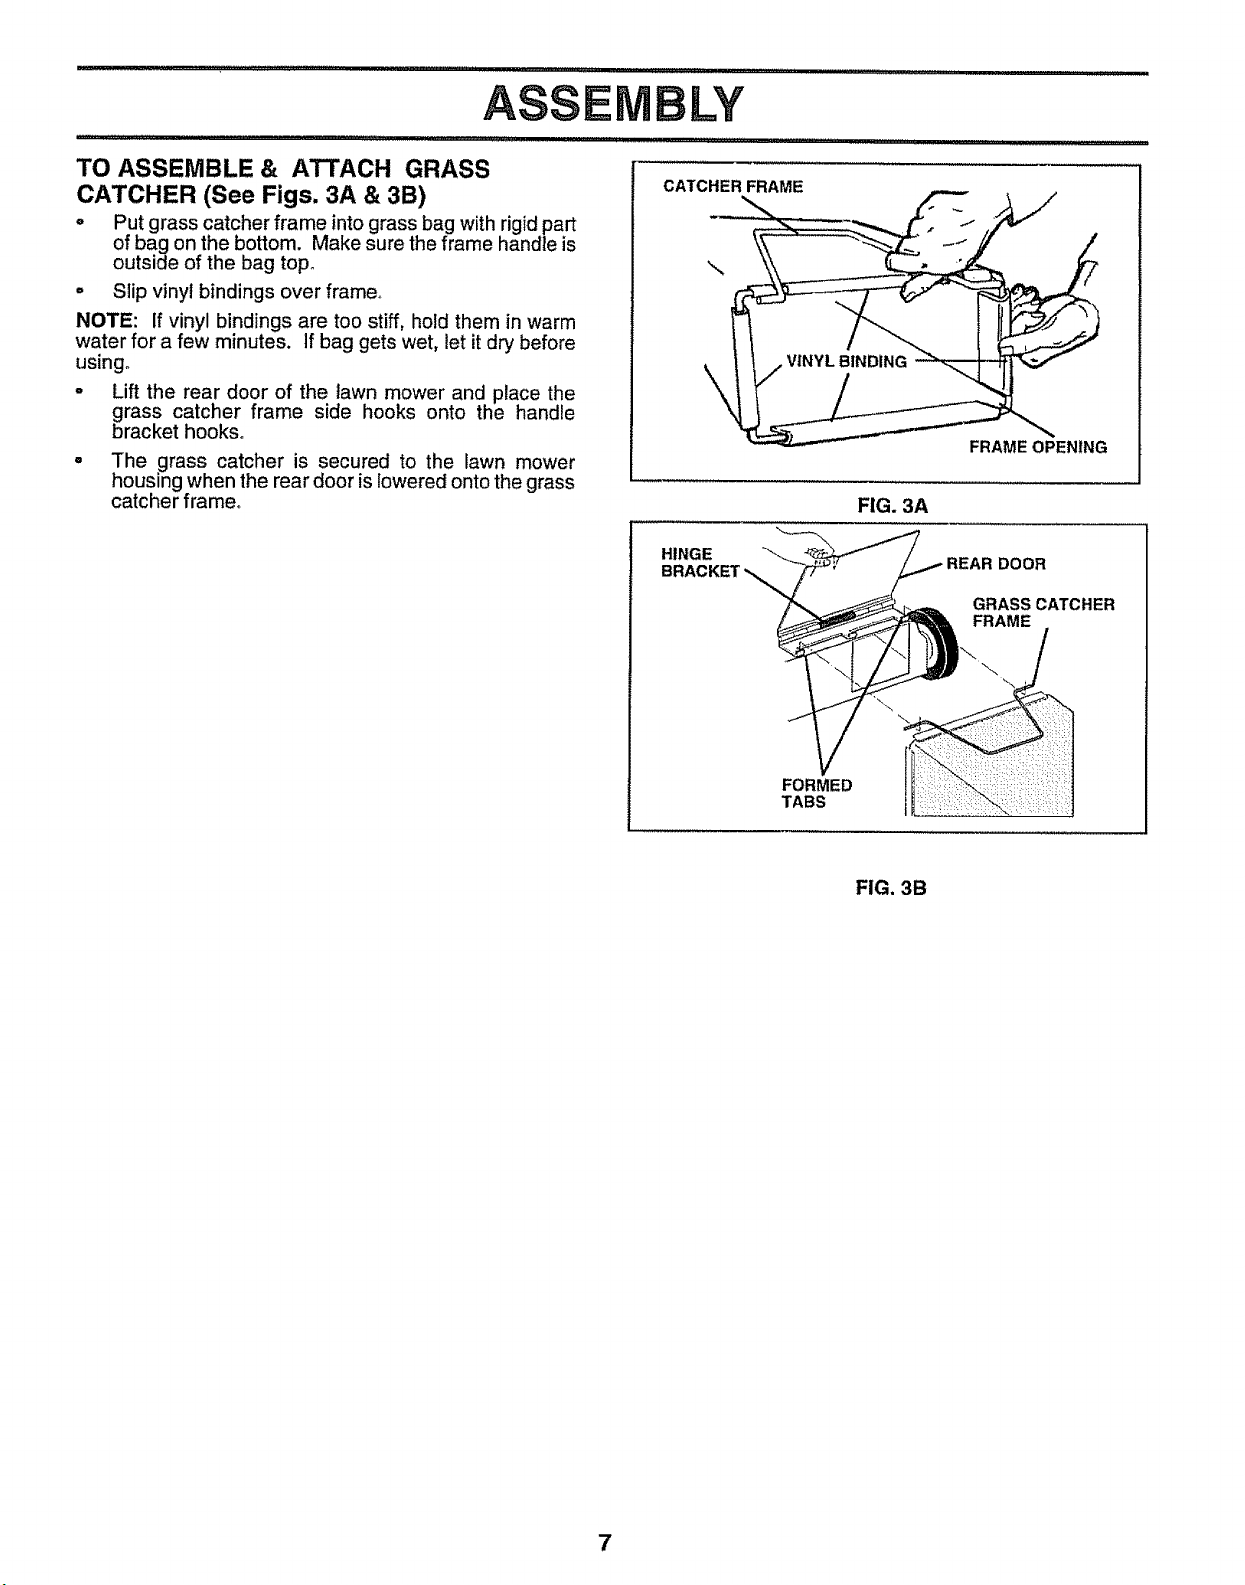
TO INSTALL ATTACHMENTS
(See Fig, 2)
Your lawn mower was shipped ready to be used as a
mutchero To convert to bagging or discharging:
° Open rear door and remove mulcher plate. Store
mulcher plate in a safe place.
° You can now install catcher' or optional clipping deflec-
tor.
• To return to mulching operation, install mulcher plate
into discharge opening of mower. Be sure alt tabs are
seated properly,
OPERATOR PRESENCE
CONTROL BAR
UPPER HANDLE
LIFT UP
LOWER HANDLE
SLOTS
MULCHER PLATE_ TABS
CAUTION: Do not run your lawn mower
without mulcher plate in place or ap-
catcher in place. Never attempt to op-
proved clipping deflector or grass
erate the lawn mower with the rear door
removed or propped open.
MOWING POSITION
FIG. 1
FIG. 2
,.... , ,,, ................................. ,,,,
6
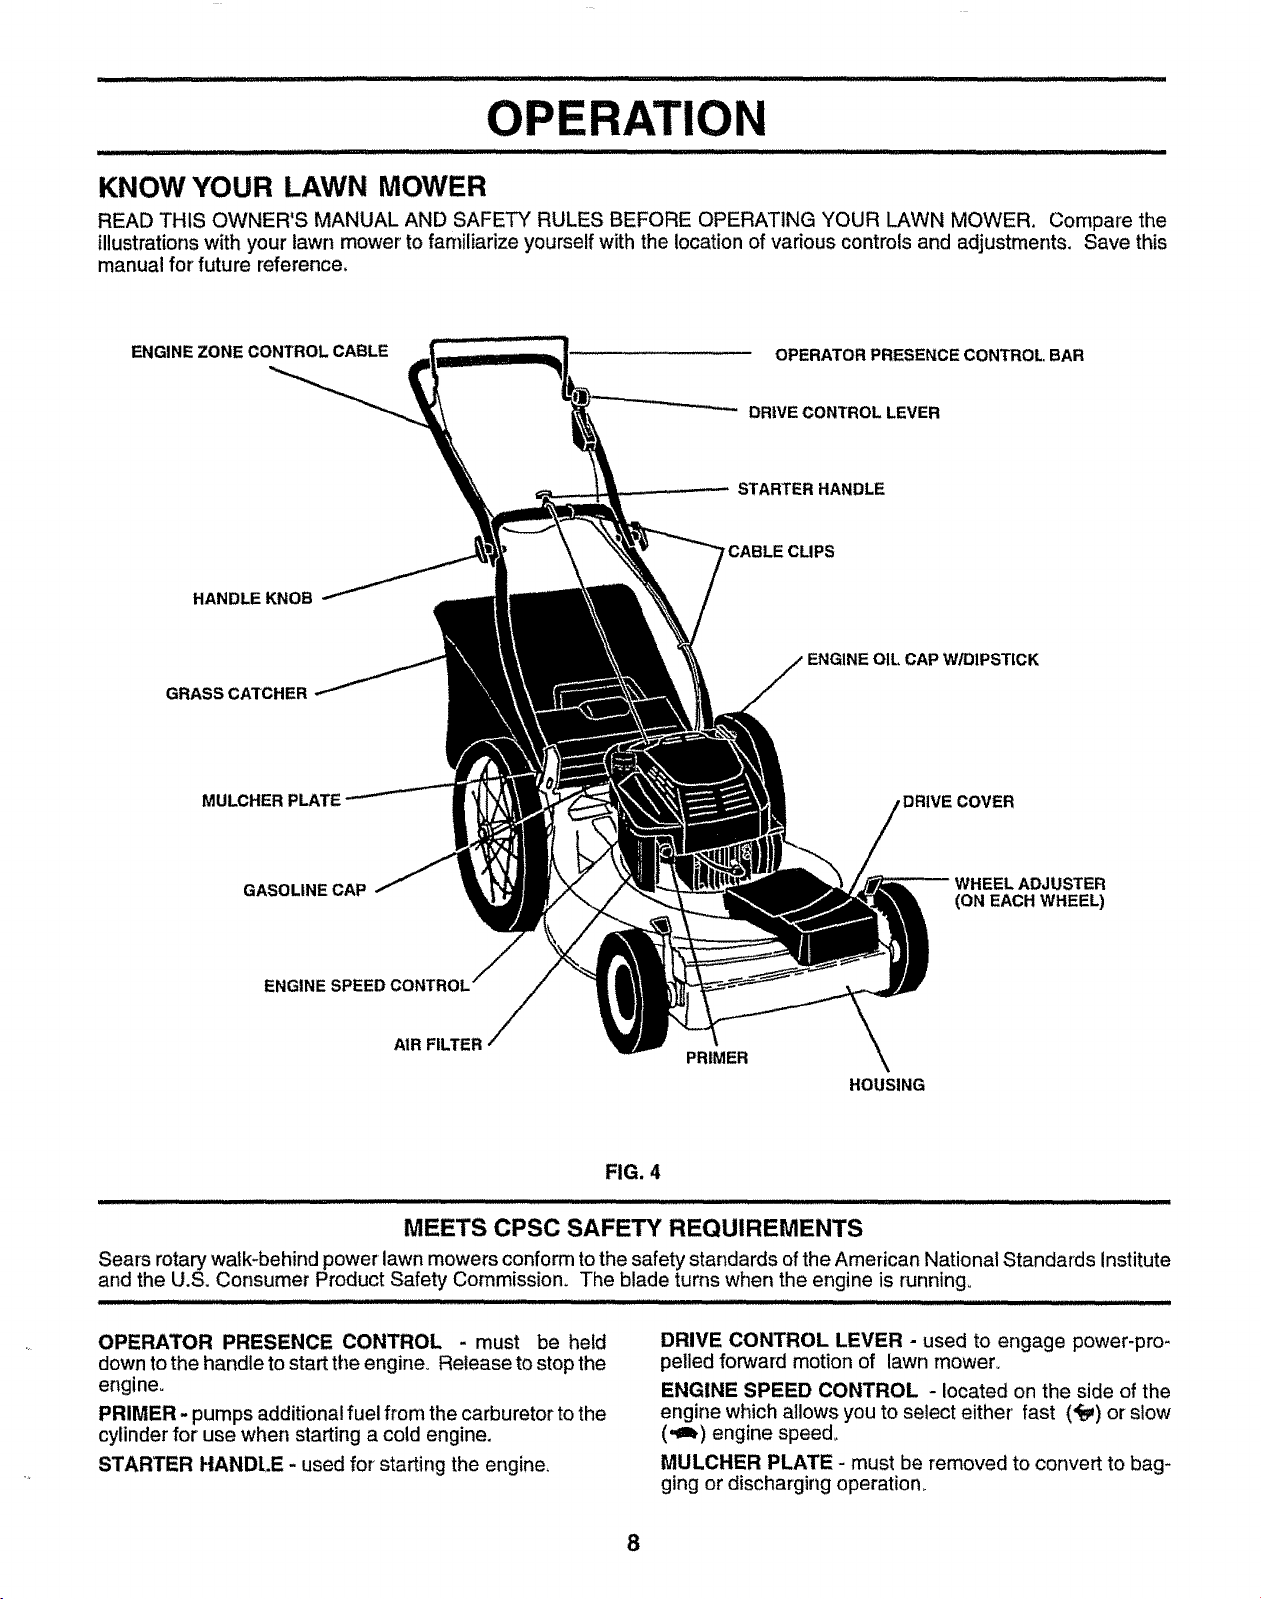
ASSEMBLY
TO ASSEMBLE & ATTACH GRASS
CATCHER (See Figs. 3A & 3B)
o Put grass catcher frame into grass bag with rigidpart
of bag on the bottom. Make sure the frame handle is
outside of the bag top°
° Slip vinyl bindings over frame°
NOTE: if vinyl bindings are too stiff, hold them in warm
water for a few minutes. If bag gets wet, let it dry before
using°
o Lift the rear door of the lawn mower and place the
grass catcher frame side hooks onto the handle
bracket hooks°
• The grass catcher is secured to the lawn mower
housing when the rear door is lowered onto the grass
catcher frame°
CATCHER FRAME
\
FRAME OPENING
FIG. 3A
HINGE
GRASS CATCHER
FRAME
FORMED
TABS
FIG. 3B
7
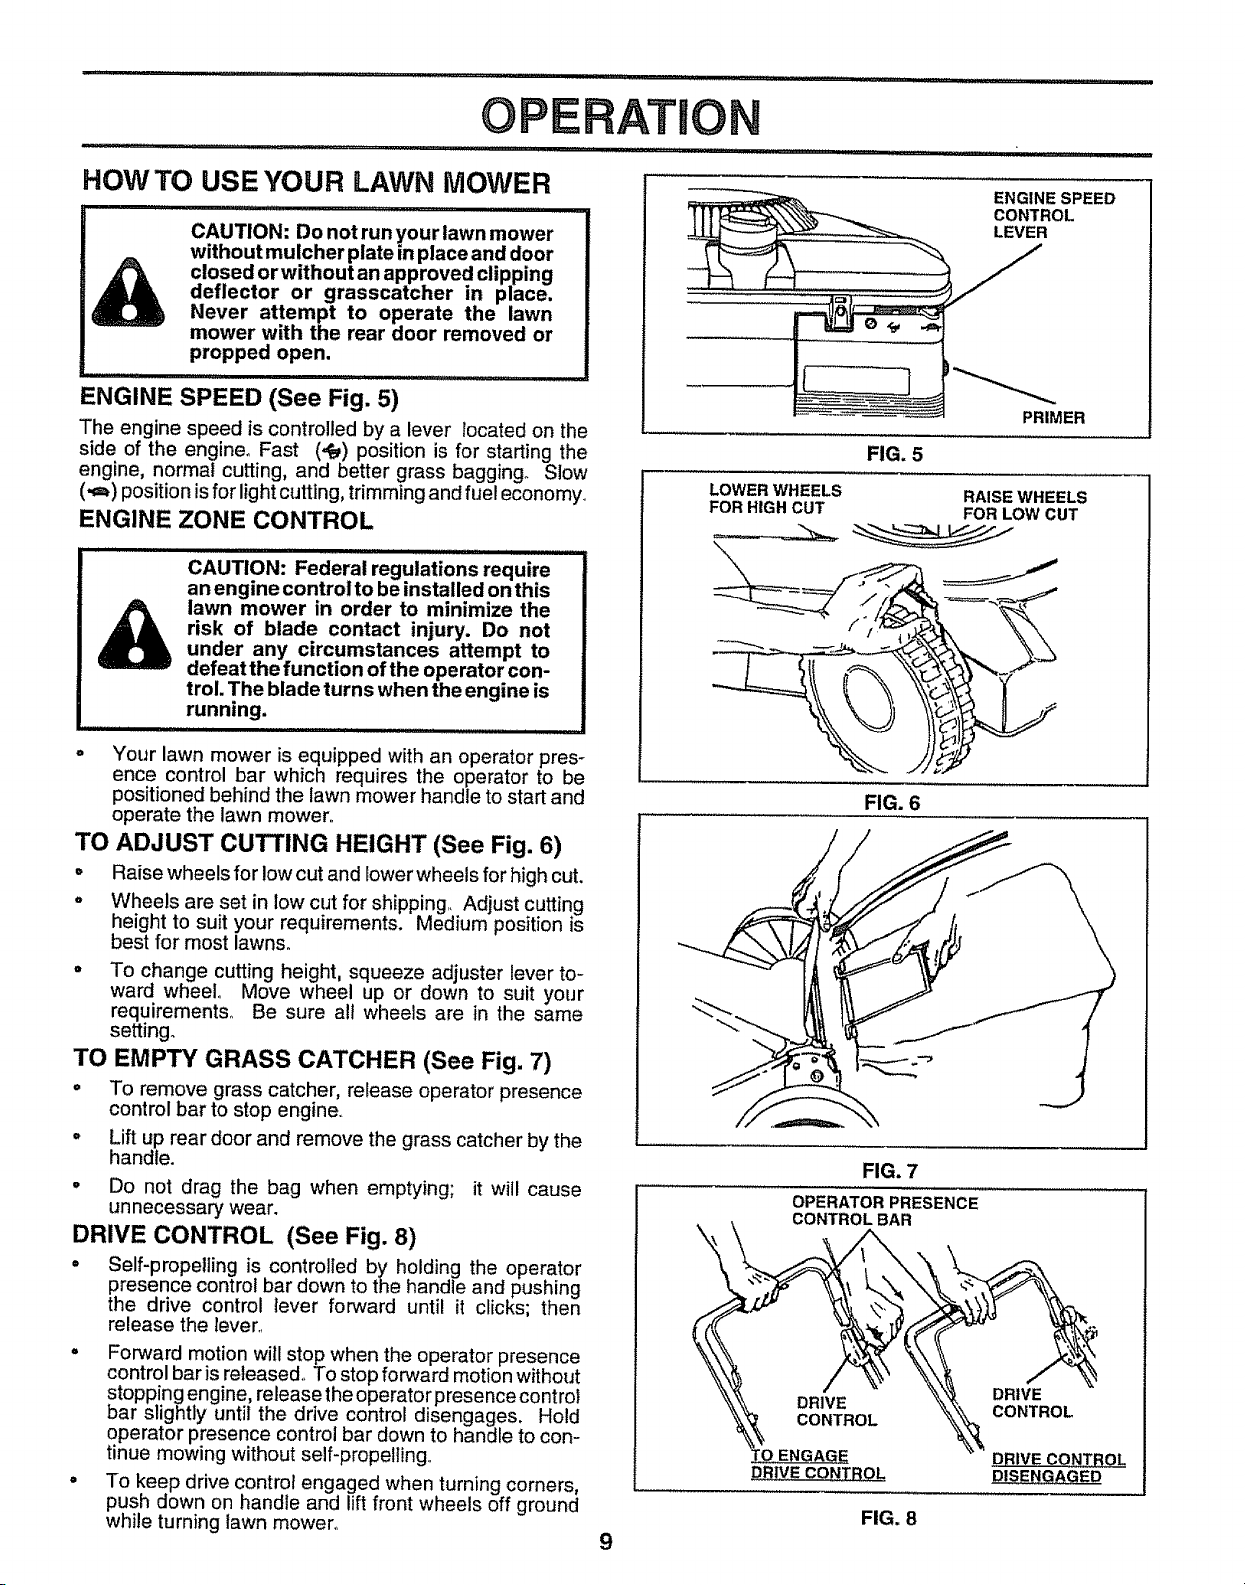
OPERATION
Nil IlL - ........ : ............................................
KNOW YOUR LAWN MOWER
READ THIS OWNER'S MANUAL AND SAFETY RULES BEFORE OPERATING YOUR LAWN MOWER. Compare the
illustrations with your lawn mower to familiarize yourself with the location of various controls and adjustments, Save this
manual for'future reference,
ENGINE ZONE CONTROL CABLE
HANDLE KNOB
GRASS CATCHER
MULCHER PLATE
GASOLINE CAP JSTER
OPERATOR PRESENCE CONTROL, BAR
DRIVE CONTROL LEVER
STARTER HANDLE
rCABLE CLIPS
ENGINE OIL, CAP W/DIPSTICK
,DR1VECOVER
(ON EACH WHEEL)
ENGINE
AtR FILTER
PRIMER
HOUSING
FIG. 4
till iiiiii ii iiiilllll .............................. , ,,,, ,,,,,,,,,,,,,,, ,,, ,, ,,,, .....................................................
MEETS CPSC SAFETY REQUIREMENTS
Sears rotary walk-behind power lawn mowers conform to the safety standards of the American National Standards Institute
and the U.S+ Consumer Product Safety Commission+ The blade turns when the engine is running_
I Hill III .................................... IIIIIIII II I IJ IIIIIIII,HI I IIIIII IIIII III iiiiiiiiiiii II
OPERATOR PRESENCE CONTROL - must be held
down to the handle to start the engine+ Release to stop the
engine+
PRIMER - pumps additionalfuel from the carburetor to the
cylinder for use when starting a cold engine,
STARTER HANDLE - used for starting the engine,
DRIVE CONTROL LEVER - used to engage power-pro-
pelled forward motion of lawn rnower+
ENGINE SPEED CONTROL - located on the side of the
engine which allows you to select either' fast (,¢,_)or slow
(,_1_) engine speed°
MULCHER PLATE - must be removed to convert to bag+
ging or discharging operation,.
8
O ERATION
HOW TO USE YOUR LAWN MOWER
CAUTION: Do not run your lawn mower
without mulcher plate in place and door
deflector or grasscatcher in place.
closed or without an approved clipping
Never attempt to operate the lawn
mower with the rear door removed or
propped open.
ENGINE SPEED (See Fig. 5)
The engine speed is controlled by a lever located on the
side of the engine° Fast (,t_) position is for starting the
engine, normal cutting, and better grass bagging. Slow
(._=_)positionis for light cutting, trimming and fuel economy..
ENGINE ZONE CONTROL
cAUTIoN: Federal regulations require
an engine control to be installed on this
lawn mower in order to minimize the
risk of blade contact injury. Do not
under any circumstances attempt to
defeat the function of the operator con-
trol. The blade turns when the engine is
running.
o Your lawn mower is equipped with an operator pres-
ence control bar which requires the operator to be
positioned behind the lawn mower handle to start and
operate the lawn mower,.
TO ADJUST CUTTING HEIGHT (See Fig. 6)
o Raise wheels for low cut and lower wheels for high cut.
° Wheels are set in low cut for shipping., Adjust cutting
height to suit your requirements. Medium position is
best for most lawns.
° To change cutting height, squeeze adjuster lever to-
ward wheel° Move wheel up or down to suit your
requirements., Be sure all wheels are in the same
setting°
TO EMPTY GRASS CATCHER (See Fig. 7)
= To remove grass catcher, release operator presence
control bar to stop engine..
- Lift up rear door and remove the grass catcher by the
handle.
° Do not drag the bag when emptying; it will cause
unnecessary wear.
DRIVE CONTROL (See Fig. 8)
° Self-propelling is controlled by holding the operator
presence control bar down to the handle and pushing
the drive control lever forward until it clicks; then
release the lever..
° Forward motion will stop when the operator presence
control baris released., To stop forward motion without
stoppingengine, release the operator presence control
bar slightly until the drive control disengages. Hold
operator presence control bar down to handle to con-
tinue mowing without self-propelling.
° To keep drive control engaged when turning corners,
push down on handle and lift front wheels off ground
while turning lawn mower,.
ENGINE SPEED
CONTROL
LEVER
PRIMER
FIG. 5
LOWER WHEELS
FOR HIGH CUT
RAISE WHEELS
FOR LOW CUT
FIG. 6
_A
FIG. 7
OPERATOR PRESENCE
CONTROLBAR
DRIVE
CONTROL
rOENGAGE
DBIVECONTROL
DRIVE
CONTROL
.DRIVE CONTRO__L.L
DISENGAGED
FIG. 8
9
" ,llrll,lll IJlIlUl Illlll I iil,l,,i ,,:, ............
OPERATION
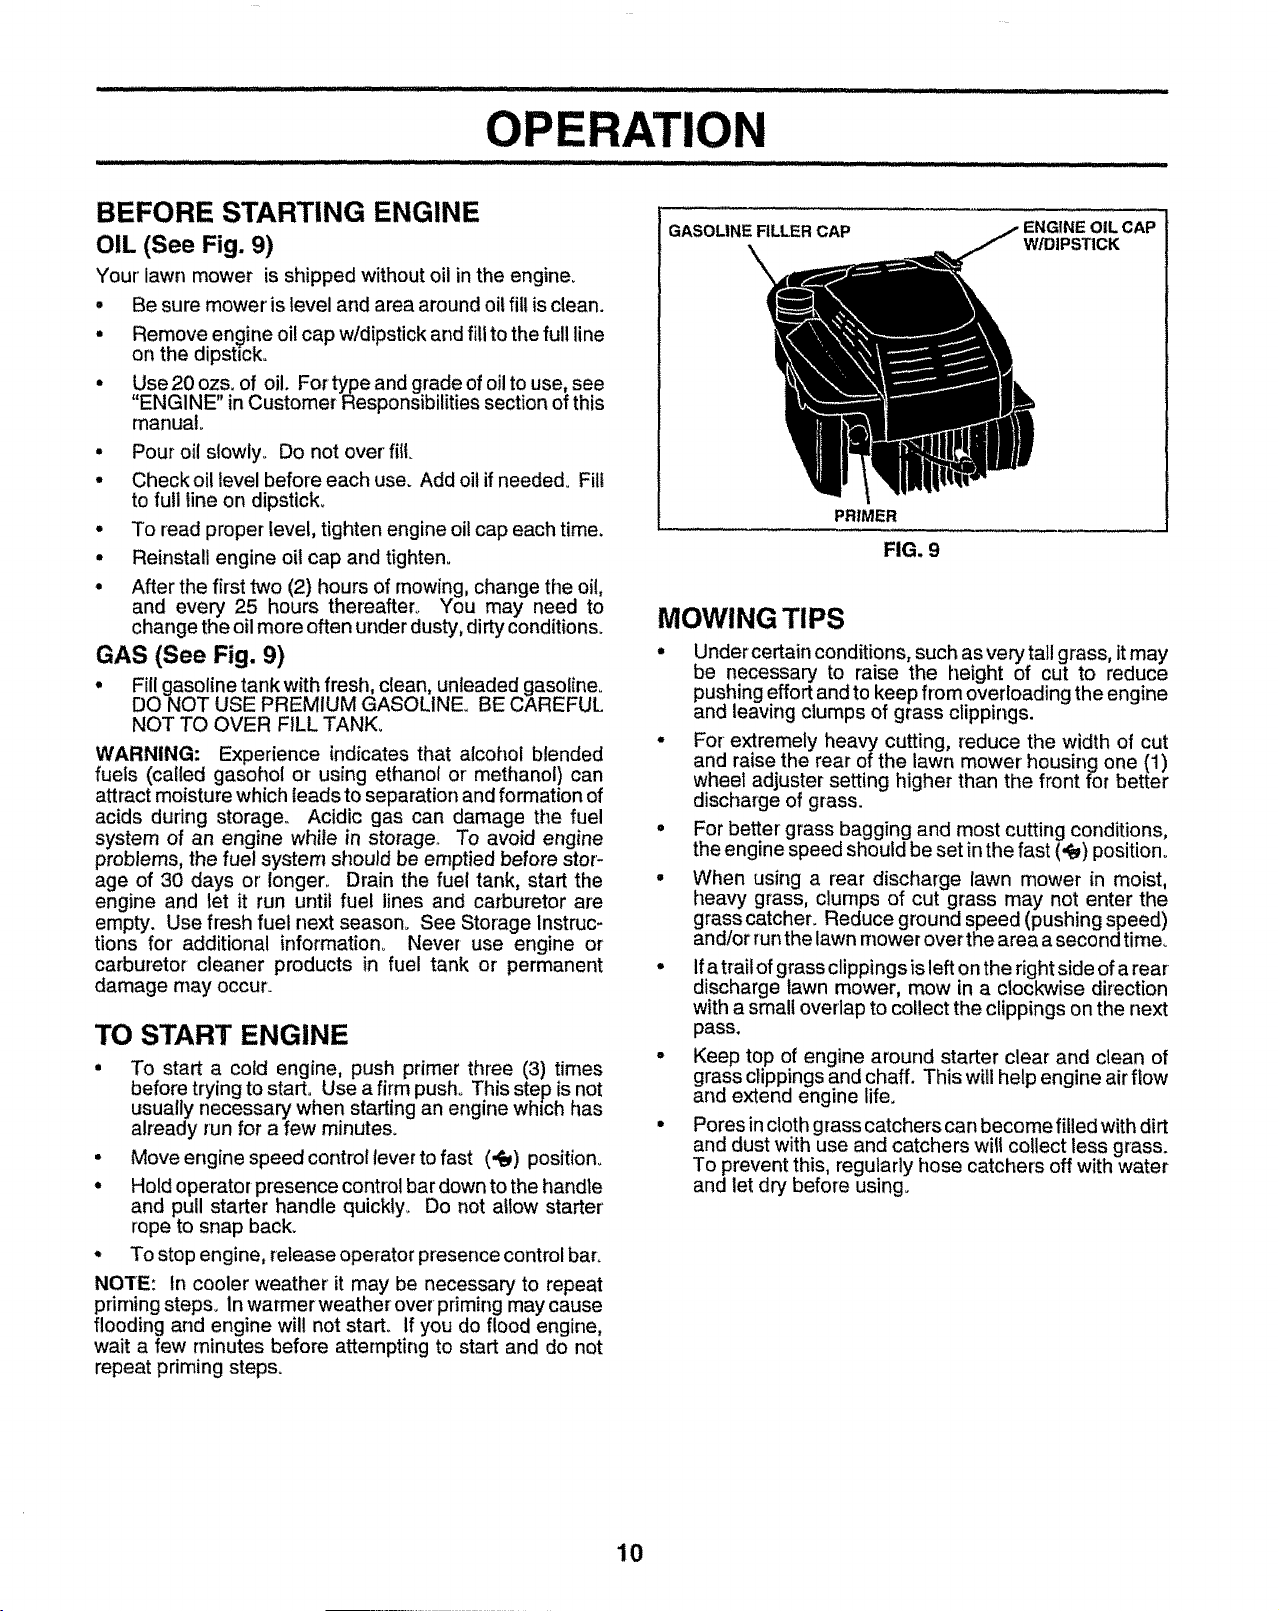
BEFORE STARTING ENGINE
OIL (See Fig. 9)
Your' lawn mower is shipped without oil in the engine.
° Be sure mower is level and area around oil fill is clean.
° Remove engine oi! cap w/dipstick and fill to the full Une
on the dipstick.
° Use 20 ozs. of oil. For type and grade of oil to use, see
ENGINE" in Customer Responsibilities section of this
manual
• Pour oil slowly° Do not over' fill.
° Check oil level before each use. Add oit ifneeded° Fill
to full line on dipstick.
• To read proper level, tighten engine oi! cap each time.
° Reinstall engine oil cap and tighten.
° After the first two (2) hours of mowing, change the oil,
and every 25 hours thereafter° You may need to
change the oilmore often under dusty', dirty conditions.
GAS (See Fig. 9)
• Fill gasoline tank with fresh, clean, unleaded gasoline°
DO NOT USE PREMIUM GASOLINE. BE CAREFUL
NOT TO OVER FILL TANK.
WARNING: Experience indicates that alcohol blended
fuels (caIled gasohol or using ethanol or methanol) can
attract moisture which leads to separation and formation of
acids during storage.. Acidic gas can damage the fuel
system of an engine while in storage. To avoid engine
problems, the fuel system should be emptied before stor-
age of 30 days or' longen Drain the fuel tank, start the
engine and let it run until fuel lines and carburetor are
empty. Use fresh fuel next season. See Storage Instruc-
tions for additional information° Never use engine or
carburetor cleaner products in fuel tank or permanent
damage may occur.
TO START ENGINE
• To start a cold engine, push primer three (3) times
before trying to start. Use a firm push. This step isnot
usually necessary when starting an engine which has
already run for a few minutes.
• Move engine speed control lever to fast (,re) position.
• Hold operator presence control bar down to the handle
and pull starter handle quickty_ Do not allow starter
rope to snap back.
• To stop engine, release operator presence control bar.
NOTE: tn cooler weather it may be necessary to repeat
priming steps. In warmer weather over priming maycause
flooding and engine will not start, if you do flood engine,
wait a few minutes before attempting to start and do not
repeat priming steps.
GASOLINE FILLER CAP
\
PRIMER
FIG. 9
ENGINE OIL CAP
W/DIPSTICK
MOWING TIPS
• Under certain conditions, such as very' tall grass, itmay
be necessary to raise the height of cut to reduce
pushing effort and to keep from overloading the engine
and leaving clumps of grass ctippings.
• For extremely heavy cutting, reduce the width of cut
and raise the rear of the lawn mower' housing one (1)
wheel adjuster setting higher than the front for better
discharge of grass.
° For better grass bagging and most cutting conditions,
the engine speed should be set in the fast (,_) position°
° When using a rear discharge lawn mower in moist,
heavy grass, clumps of cut grass may not enter the
grass catcher. Reduce ground speed (pushing speed)
and/or run the lawn mower over the area a second time.
° Ifatrait of grass clippingsis left on the right side of a rear
discharge lawn mower, mow in a clockwise direction
with a small overlap to collect the clippings on the next
pass.
° Keep top of engine around starter clear and clean of
grass clippings and chaff. This will help engine air flow
and extend engine life.
° Pores in cloth grass catchers can become filled with dirt
and dust with use and catchers wi41collect less grass.
To prevent this, regularly hose catchers off with water
and let dry before using.
10
 Loading...