

Craftsman 917271133 Owner’s Manual

Owner's Manual
16.5 HP
ELECTRIC START
42" MOWER
6 SPEED TRANSAXLE
LAWN TRACTOR
Model No.
917.271133
• Safety
• Assembly
• Operation
• Maintenance
• Repair Parts
EZ3
This product has a low emission engine which operates
differently from previously built engines. Before you start the en-
glne, read end understand this Owner's Manual.
CAUTION:
Read and followall Safety
Rules and Instructionsbefore
operating this equipment.
Sears, Roebuck and Co., Hoffman Estates, II 60179
Visit our Craftsmanwebsite:www.sears.com/craftsman
For answers to your questions
about this product, Call:
1-800-659-5917
Sears Craftsman Help Line
5 am - 5 pm, Mort - Sat
Warranty ............................................... 2
Safety Rules ......................................... 3
Product Specifications .......................... 5
Assembly .............................................. 7
Operation ............................................ 10
Maintenance Schedule ...................... 16
Serviceand Adjustments....................20
Storage ...............................................26
Troubleshooting.................................27
Repair Parts........................................32
PadsOrdedng .....................Back Cover
LIMITEDTWOYEAR WARRANTYON CRAFTSMAN RIDING EQUIPMENTPARTS
Fortwo (2) years from the dateof purchase,if thisCraftsmanRidingEquipmentis
maintained,lubricatedandtuned up accordingto the instructionsinthe owner's
manual,Searswill repairor replace,free of charge,any partsfound tobe defectivein
matedal orworkmanship.Warrantyserviceis availablefree of chargebytakingyour
Craftsmanridingequipmentto yournearestSearsServiceCenter. In-homewarranty
serviceisavailablebuta tripcharge willapply.This warrantyappliesonlywhilethis
productis inthe UnitedStates.
This Warranty does not cover:.
• Expendable items which become wom during normal use, such as blades, spark
plugs, air cleaners, belts and oil filters.
• Tire replacement or repair caused by punctures from outside objects, such as nails,
thorns, stumps, or glass.
• Rapairs necessary because of operator abuse, including but not limited to, damage
caused by towing objects beyond the capability of the dding equipment, impacting
objects that bend the frame or crankshaft, or over speeding the engine.
• Rapairs necessary because of operator negligence, including but not limited to,
electdcal and mechanical damage caused by improper storage, failure to use the
proper grade and amount of engine oil, failure to keep the deck clear of flammable
debds, or the failure to maintain the equipment according to the instructionscon-
tained in the owner's manual.
• Engine (fuel system) cleaning or repairs caused by fuel determined to be contami-"
hated or oxidized (stale). In general, fuel should be used within thirty (30) days of its
purchase date.
• Riding equipment used for commemial or rental purposes.
LIMITED 90 DAYWARRANTY ON BATTERY
Forninety(90) days from dateof purchase,ifany batteryincludedwiththisriding
equipment provesdefectiveinmaterialor workmanshipand our testingdeterminesthe
batterywillnotholda charge,Searswillreplacethe batteryat no charge.Warranty
serviceisavailablefree of chargeby takingyourCraftsmanddingequipmenttoyour
nearestSears ServiceCenter. In-homewarrantyserviceisavailablebuta tdp charge
willapply.This warrantyappliesonlywhilethisproductis inthe UnitedStates.
TO LOCATE THE NEAREST SEARS SERVICE CENTER OR TO SCHEDULE IN-HOME
WARRANTY SERVICE, SIMPLY CONTACT SEARS AT 1-800-4-MY-HOME
This Warranty gives you specific legal rights, and you may also have other dghts which
may vary from state to state.
Sears, Roebuckand Co., D/817 WA, HoffmanEstates,IL 60179
IMPORTANT: This cutting machine is capable of amputating hands and feet and
throwing objects. Failure to observe the following safety instructions could result in
serious injury or death.
I. GENERAL OPERATION
• Read, understand, and follow all
instructions in the manual and on the
machine before starting.
• Only allow responsible adults, who are
familiar with the instructions, to operate
the machine.
• Clear the area of objects such as
rocks, toys, wire, etc., which could be
picked up and thrown by the blade.
• Be sure the area is clear of other
people before mowing. Stop machine
if anyone enters the area.
• Never carry passengers.
• Do not mow in reverse unless abso-
lutely necessary. Always look down
and behind before and while backing.
• Be aware of the mower discharge
direction and do not point it at anyone.
Do not operate the mower without
either the entire grass catcher or the
guard in place.
• Slow down before turning.
• Never leave a running machine
unattended. Always turn off blades, set
parking brake, stop engine, and
remove keys before dismounting.
• Turn off blades when not mowing.
• Stop engine before removing grass
catcher or unclogging chute.
• Mow only in daylight or good artificial
light.
• Do not operate the machine while
under the influence of alcohol or drugs.
• Watch for traffic when operating near or
crossing roadways.
• Use extra care when loading or
unloading the machine into a trailer or
truck.
• Data indicates that operators, age 60
years and above, are involved in a
large percentage of riding mower-
related injuries. These operators
should evaluate their ability to operate
the riding mower safely enough to
protect themselves and others from
serious injury.
II. SLOPE OPERATION
Slopes are a major factor related to loss-of-
control and tipover accidents, which can
result in severe injury or death. All slopes
require extra caution. Ifyou cannot back up
the slope or if you feel uneasy on it, do not
mow it.
DO:
• Mow up and down slopes, not across.
• Remove obstacles such as rocks, tree
limbs, etc.
• Watch for holes, ruts, or bumps.
Uneven terrain could overturn the
machine. Tall grass can hide obstacles.
• Use slow speed. Choose a lowgear
so that you will not have to stop or shift
while on the slope.
• Follow the manufacturer's recommen-
dations for wheel weights or counter-
weights to improve stability.
• Use extra care with grass catchers or
other attachments. These can change
the stability of the machine.
• Keep all movement on the slopes slow
and gradual. Do not make sudden
changes in speed or direction.
• Avoid starting or stopping on a slope. If
tires lose traction, disengage the
blades and proceed slowly straight
down the slope.
DO NOT:
• Do not turn on slopes unless neces-
sary, and then, turn slowly and gradu-
ally downhill, if possible.
• Do not mow near drop-offs, ditches, or
embankments. The mower could
suddenly turn over if a wheel is over
the edge of a cliff or ditch, or if an edge
caves in.
• Do not mow on wet grass. Reduced
traction could cause sliding.
• Do not try to stabilize the machine by
putting your foot on the ground.
• Do not use grass catcher on steep
slopes.
3
III.CHILDREN
Tragicaccidentscanoccurif the operator
isnot alertto the presenceof children.
Childrenare oftenattractedto the
machine and the mowing activity. Never
assumethat childrenwillremainwhere
you lastsaw them.
• Keep childrenout ofthe mowingarea
and underthe watchfulcareof another
responsibleadult.
• 8e alert and turnmachineoffif children
enterthe area.
• Beforeand when backing,look behind
and downfor smallchildren.
• Nevercarrychildren.They may fall off
and be sadously injuredor interfere
with safe machineoperation,
• Never allowchildrento operate the
machine.
• Use extracare whenapproachingblind
comers,shrubs,trees, or otherobjects
thatmay obscurevision.
IV. SERVICE
• Use extra care in handlinggasoline
and otherfuels. They are flammable
and vaporsare explosive.
-Use onlyan approvedcontainer.
-Never removegascap or add fuel
withthe enginerunning. Allow
engineto cool before refueling.Do
notsmoke.
*Never refuelthe machineindoors.
oNeverstorethe machineor fuel
containerinsidewherethere isan
openflame, suchas a water heater.
• Never run a machine inside a closed
area.
• Keep nuts and bolts, especially blade
attachment bolts, tight and keep
equipment in good condition.
• Never tamper with safety devices.
Check their proper operation regularly.
• Keep machine free of grass, leaves, or
other debris build-up. Clean oilor fuel
spillage. Allow machine to cool before
storing.
• Stop and inspect the equipment if you
strike an object, Repair, if necessary,
before restarting.
• Never make adjustments or repairs
with the engine running.
• Grass catcher components are subject
to wear, damage, and deterioration,
which coutd expose moving parts or
allow objects to be thrown. Frequently
check components and replace with
manufacturer's recommended pads,
when necessary.
• Mower blades are sharp and can cut.
Wrap the blade(s) or wear gloves, and
use extra caution when servicing them.
• Check brake operation frequently.
Adjust and service as required.
• Be surethearea is clear ofother
peoplebeforemowing.Stop machineif
anyoneentersthe area.
• Never camJpassengemor children
evenwiththe bladesoff.
• Do not mowin reverseunleSSabso-
lutelynecessary.Alwayslookdown
and behindbeforeand while backing.
• Never carrychildren.They may fall off
and be seriouslyinjuredor interfere
with safe machine operation.
• Keep childrenout of the mowing area
and underthe watchful care of another
responsible adult.
• Be alert and turn machine off if childre
enter the area.
• Before and when backing, look behin(
and down for small children.
• Mow up and down slopes (15° Max),
not across.
• Remove obstacles such as rocks, tree
limbs, etc.
• Watch for holes, ruts, or humps.
Uneven terrain could overturn the
machine. Tall grass can hide obstacle.'
• Use slowspeed.Choosea lowgear so
thatyouwillnothaveto stopor shift
whiteon theslope.
• Avoidstartingorstoppingon a slope. If
tires losetraction,disengagethe
bladesand proceedslowlystraight
downthe slope.
• If machinestopswhilegoing uphill,
disengageblades,shift into reverse
and backdownslowly.
• Do notturnon slopes unlessneces-
sary,and then,turnslowlyand gradu-
ally downhill,if possible.
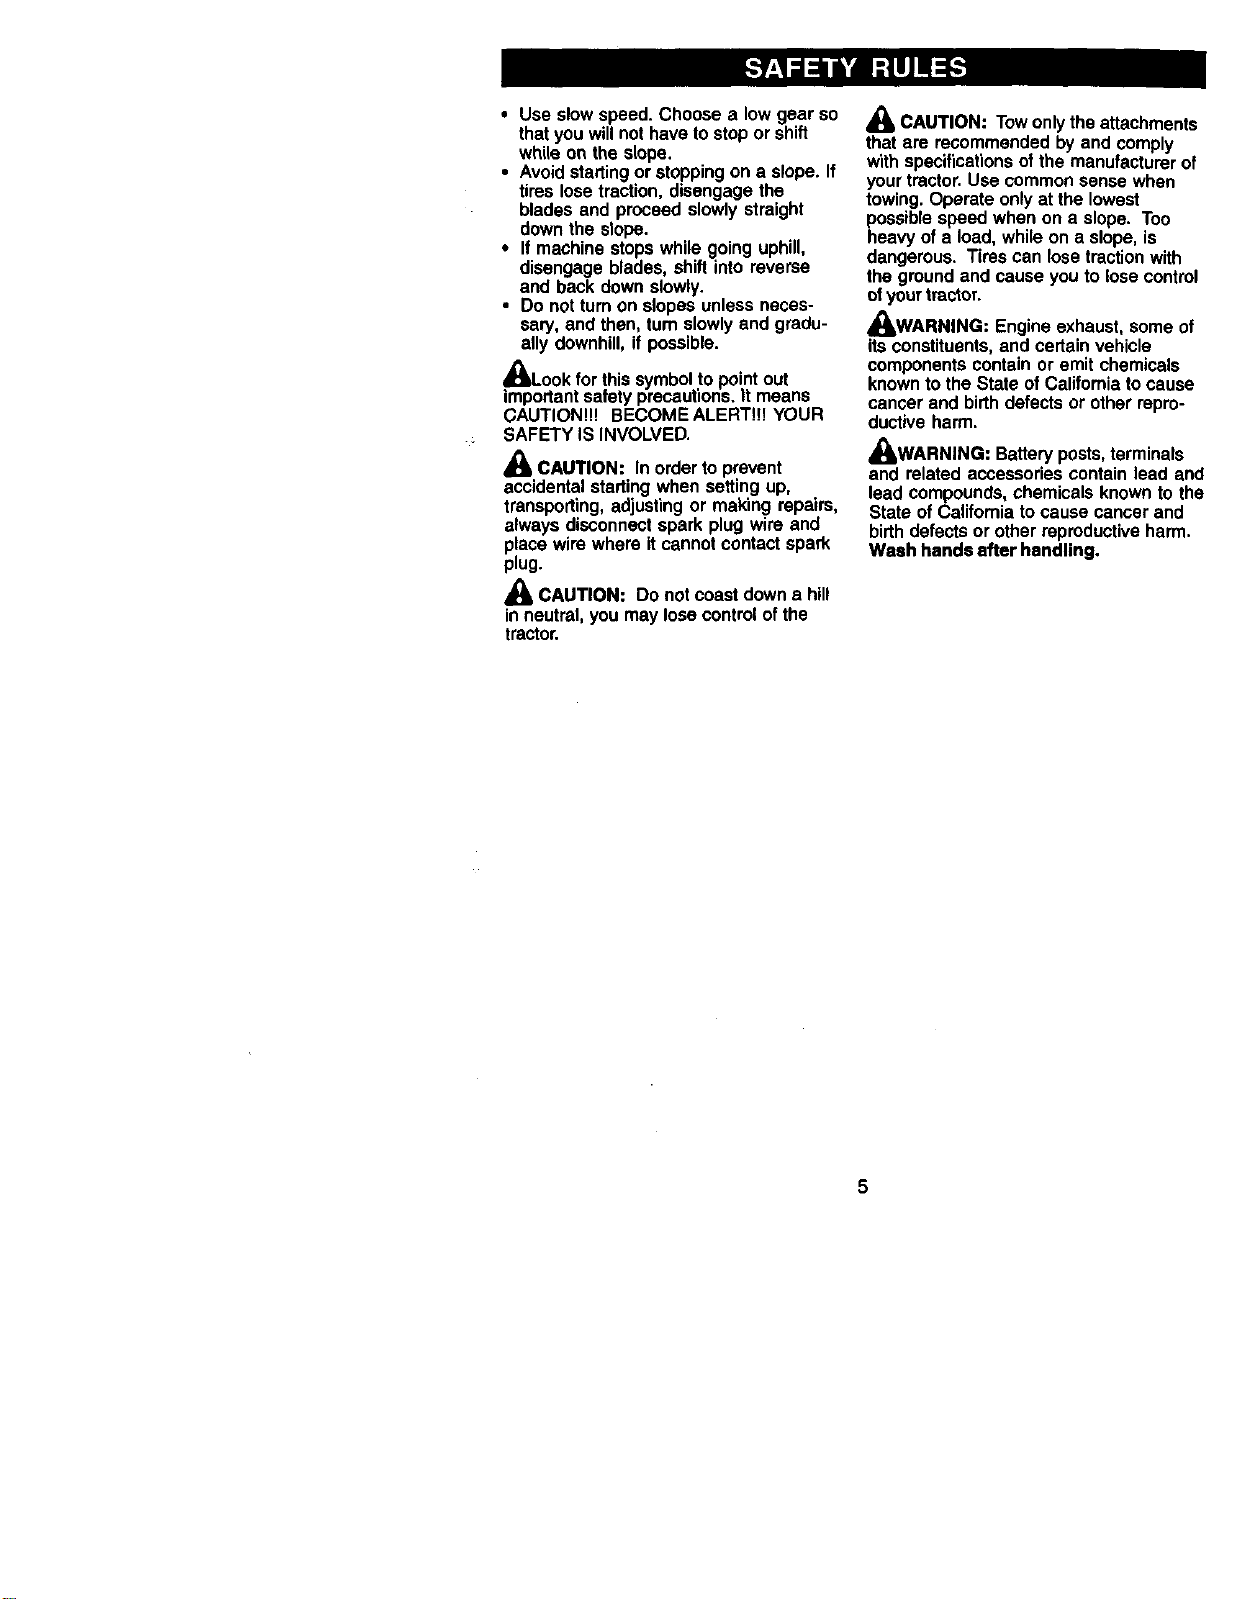
_bLook for thissymbolto pointout
importantsafetyprecautions.It means
CAUTION!!! BECOMEALERT!!!YOUR
SAFETYIS INVOLVED.
,_& CAUTION: Inorderto prevent
accidentalstartingwhensettingup,
transporting,adjustingor makingrepairs,
always disconnectsparkplugwire and
placewirewhere itcannotcontactspark
plug.
_, CAUTION: Do not coastdown a hill
in neutral, you maylose controlofthe
tractor.
_,L CAUTION: Tow only the attachments
that are recommended by and comply
with specifications of the manufacturer of
your tractor. Use common sense when
towing. Operate only at the lowest
possible speed when on a slope. Too
heavy of a load, while on a slope, is
dangerous. Tires can lose traction with
the ground and cause you to lose control
of your tractor.
,_WARNING: Engine exhaust, some of
its constituents, and certain vehicle
components contain or emit chemicals
known to the State of California to cause
cancer and birth defects or other repro-
ductive harm.
,_WARNING: Battery posts, terminals
and related accessories contain lead and
lead compounds, chemicals known to the
State of California to cause cancer and
birth defects or other reproductive harm.
Wash hands after handling,
5
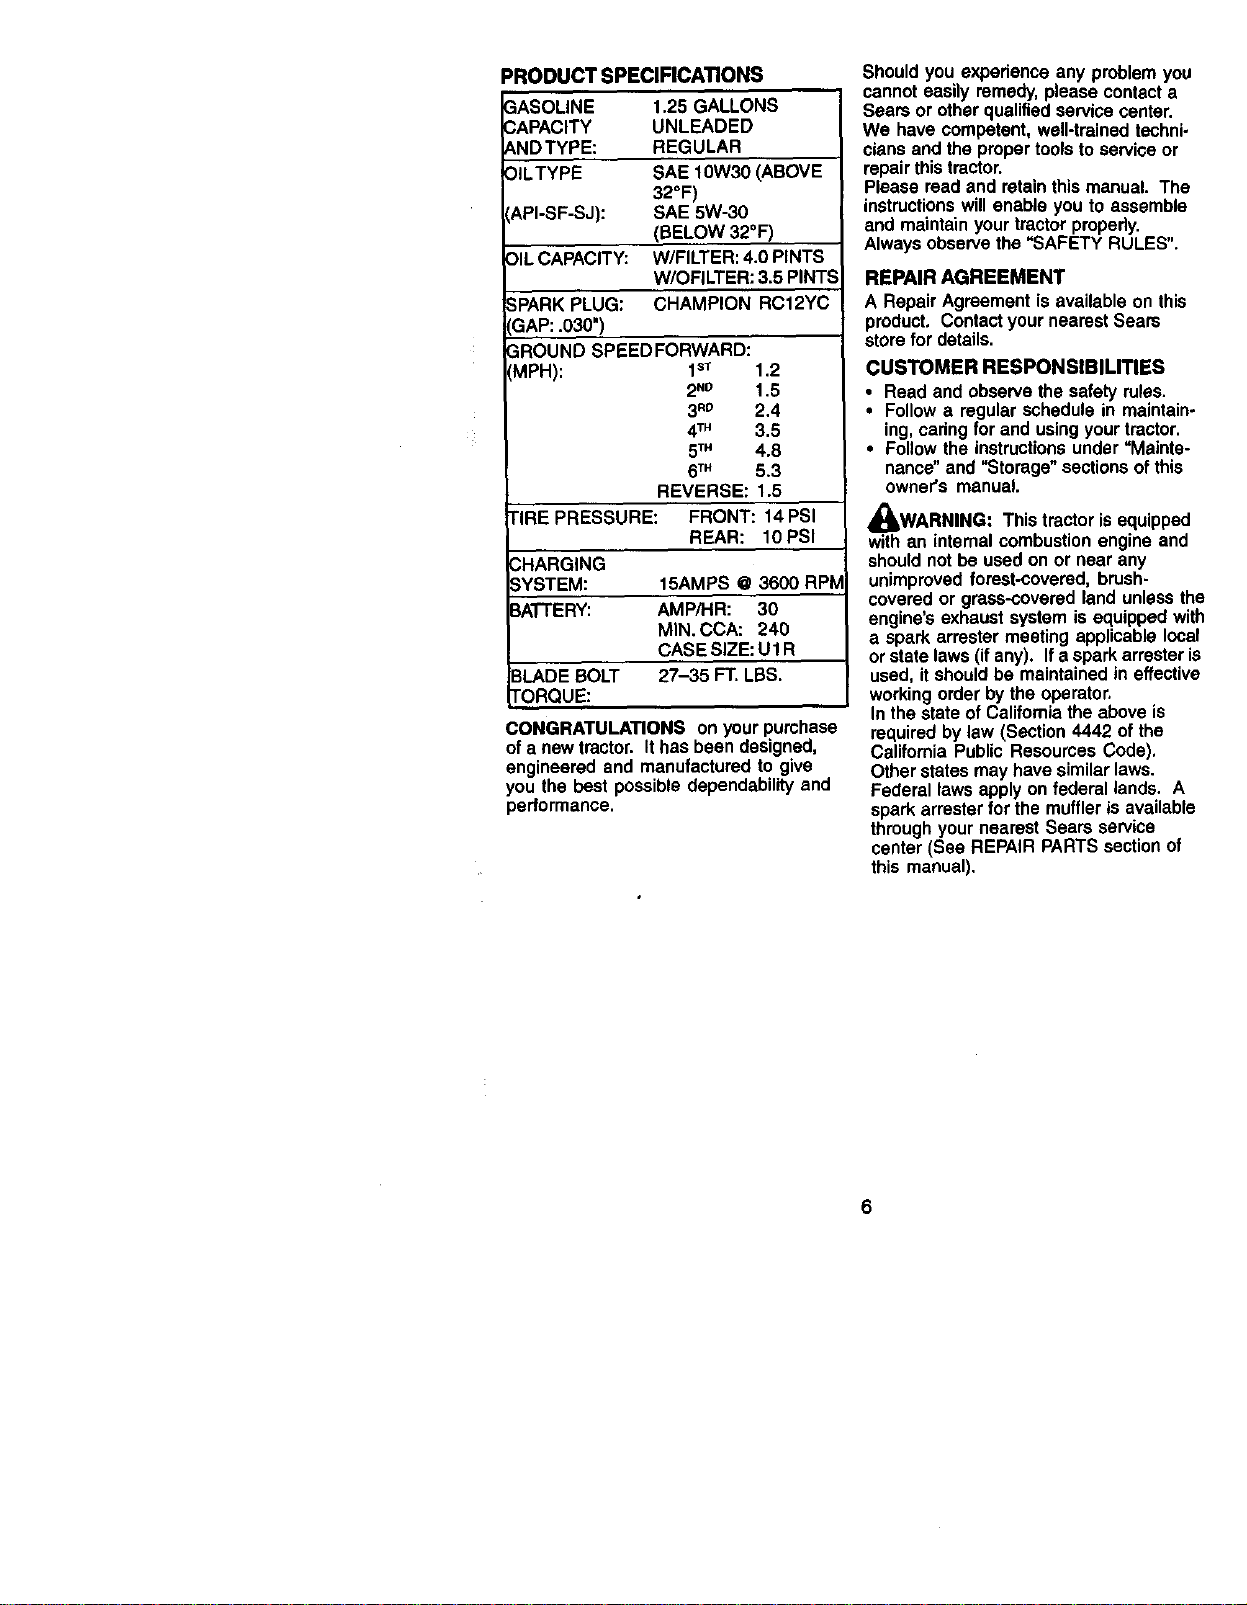
PRODUCT SPECIRCATIONS
GASOLINE
CAPACITY
_NDTYPE:
OILTYPE
API-SF-SJ): SAE 5W-30
)IL CAPACITY: W/FILTER: 4.0 PINTS
;PARK PLUG: CHAMPION RC12YC
GAP: .030")
3ROUND SPEED FORWARD:
1.25 GALLONS
UNLEADED
REGULAR
SAE 10W30 (ABOVE
32°F)
(BELOW 32°F)
W/OFILTER: 3.5 PINTS
MPH): 1sT 1.2
2N° 1.5
3_° 2.4
4TM 3.5
5TM 4.8
6TM 5.3
REVERSE: 1.5
tIRE PRESSURE: FRONT: 14 PSI
REAR: 10 PSI
3HARGING
3YSTEM: 15AMPS @ 3600 RPM
3ATTERY: AMP/HR: 30
MIN. CCA: 240
CASE SJZE: Uf R
3LADE BOLT 27-35 FT. LBS.
rORQUE:
CONGRATULATIONS on yourpurchase
ofa newtractor. Ithas been designed,
engineeredand manufactured to give
you the best possibledependabilityand
performance.
Shouldyou experienceany problem you
cannoteasilyremedy,please contacta
Searsor otherqualifiedservicecenter.
We havecompetent,well-trainedtechni-
ciansand thepropertoolsto serviceor
repairthistractor.
Pleaseread and retainthismanual. The
instructionswillenableyou to assemble
and maintainyourtractorproperly.
Alwaysobservethe "SAFETY RULES".
REPAIR AGREEMENT
A RepairAgreementisavailableon this
product. Cc_qtactyournearestSeats
storefor details.
CUSTOMER RESPONSIBILITIES
• Read and observe the safety rules.
• Follow a regular schedule in maintain-
ing, caring for and using your tractor.
• Follow the instructions under "Mainte-
nance" and =Storege" sections of this
owner's manual.
WARNING: This tractor is equipped
with an intemal combustion engine and
should not be used on or near any
unimproved forest-covered, brush.
covered or grass-covered land unless th
engine's exhaust system is equipped wil
a spark arrester meeting applicable Ioc_
or state laws (if any). If a spark arrester i,
used, it should be maintained in effectiw
working order by the operator,
In the state of California the above is
required by law (Section 4442 of the
California Public Resources Code).
Other states may have similar laws.
Federal laws apply on federal lands, A
spark arrester for the muffler is available
through your nearest Sears service
center (See REPAIR PARTS section of
this manual).
6
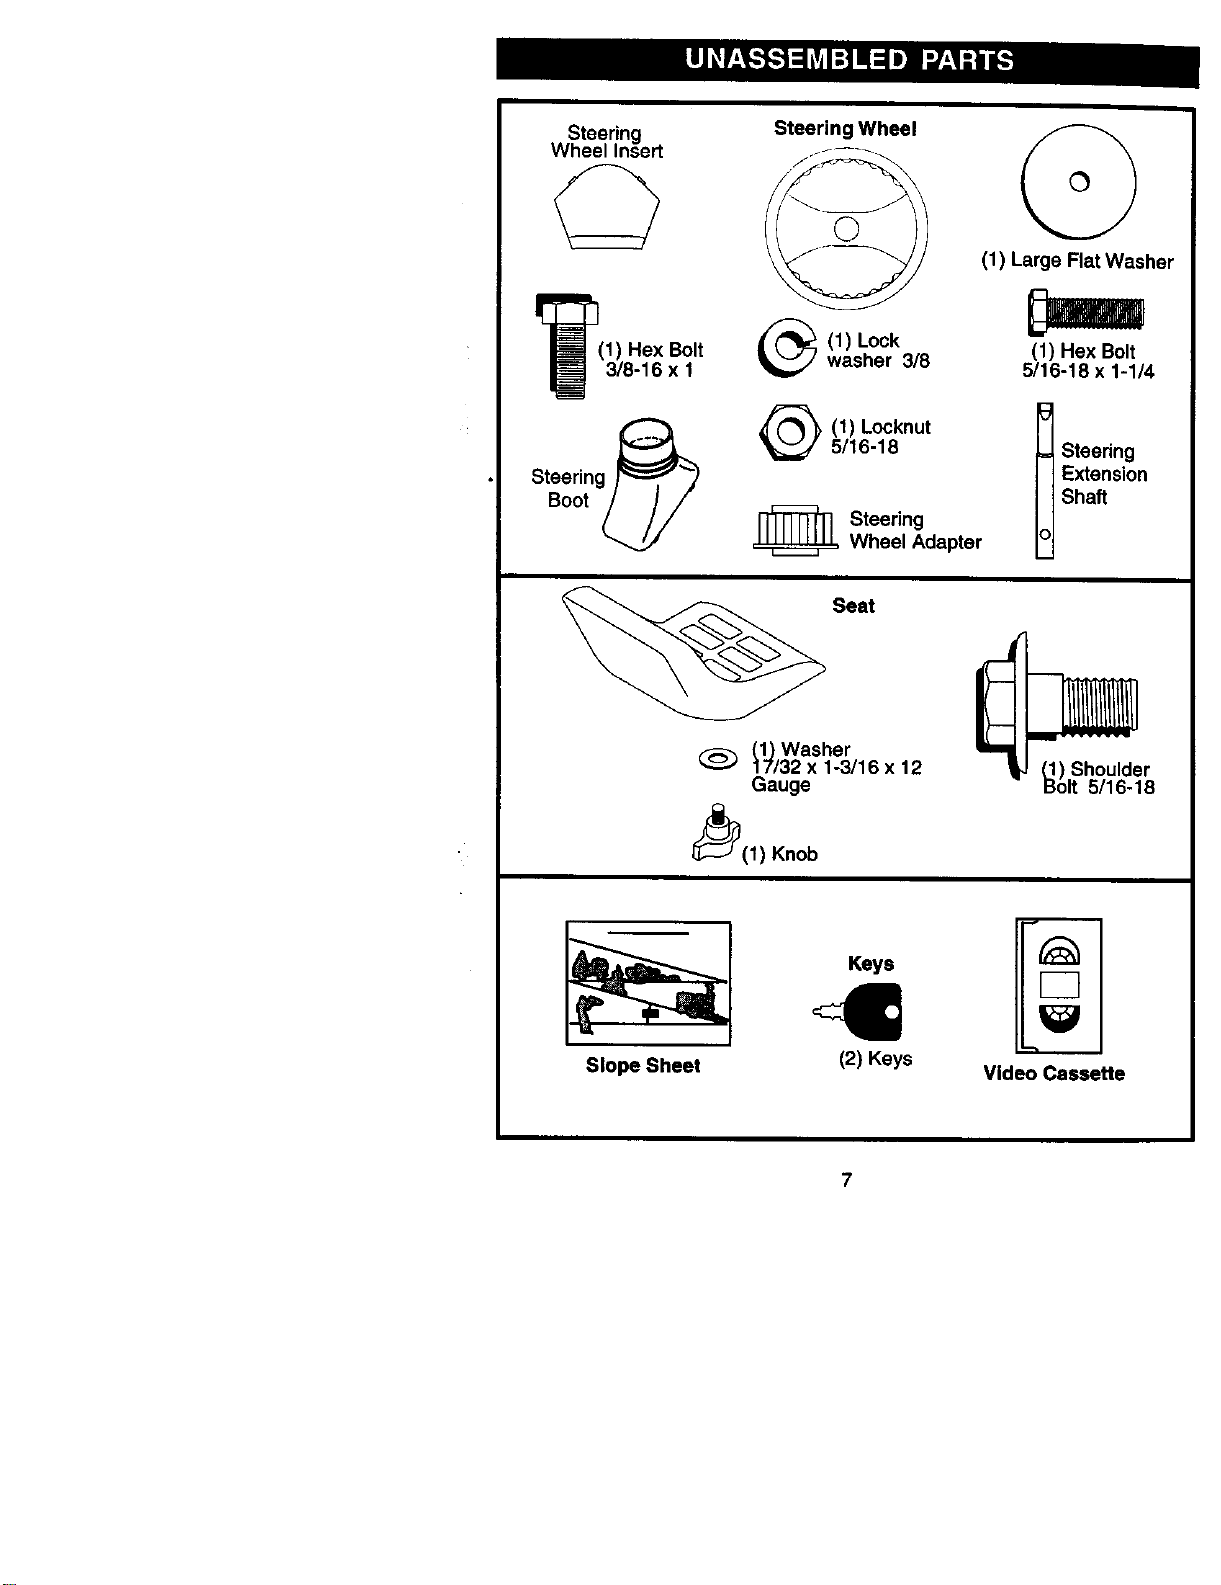
Steering
Wheel Insert
Steering Wheel
(1) Large FlatWasher
Steering
Boot _/"
(1) Hex Bolt
3/8-16 x 1
_ Steering
(_Washer
17/32 x 1-3/16 x 12
Gauge
_(1) Knob
(1) Lockwasher 3/8
(1) Locknut
5/16-18
Wheel Adapter
Seat
(1) Hex Bolt
5/16-18 x 1-1/4
Steedng
Extension
Shaft
(_) Shoulder
olt 5/16-18
Slope Sheet
Keys
(2) Keys
Video Cassette

Yournewtractorhasbeen assembledat thefactory withexceptionofthosepartsleft
unassembledfor shippingpurposes.To ensuresafe and properoperationof your
tractorallparts and hardwareyouassemblemustbe tightenedsecurelY.Usethe
correcttoolsas necessaryto insurepropertightness.
TOOLS REQUIRED FOR ASSEMBLY
A socket wrench set will make assembly
easier. Standard wrench sizes are listed.
(1) 9/16"wrench (1) Pliers
(21 1/2" wrench (1) Utility knife
(1) 3/4" socket with (1) Tire pressure
drive ratchet gauge
When right or left hand is mentioned in
this manual, it means when you are in
the operating position (seated behind
the steedng wheel).
TO REMOVETRACTOR FROM
CARTON
UNPACK CARTON
1. Remove all accessible loose parts
and pads cartons from carton.
2. Cut, from top to bottom, along lines
on all four comers of carton, and lay
panels flat.
3. Remove mower and packing mated-
als.
4. Check for any additional loose parts
or cartons and remove.
BEFORE REMOVINGTRACTOR
FROM SKID
ATTACH STEERING WHEEL
ASSEMBLEEXTENSION SHAFTAND
SOOT
1. Slideextensionshaft ontolower
steedngshaft. Alignmountingholes
in extensionand lowershaftsand
install5/16 he)( boltand Iocknut.
Tightensecurely.
2. Place tabsof steeringbootovertab
slotsindash and pushdownto
secure.
INSTALLSTEERING WHEEL
3. Positionfrontwheelsofthe tractorso
theyare pointingstraightforward.
4. Removesteeringwheel adapterfrom
steeringwheel and slide adapteronto
steedngshaft extension.
5. Positionsteeringwheel socrossbars
are horizontal(leftto dght)and slide
insidebootand ontoadapter.
6. Assemblelarge flatwasher,3/8 lock
washer,3/8 hex boltand tighten
securely.
7. Snap steeringwheel insertintocenter
of steeringwheel.
8. Remove protectivematerialsfrom
tractorhoodand grill
IMPORTANT: Checkfor and removeany
staplesinskidthatmay puncturetires
wheretractoris to rolloffskid.
_81 n:::Bol t
/_ LLaC_Wea;h_ r
- Wssher
SteedngWheel
Tabs
Adapter_ Shaft
Lower ' "" ", "
Steering ,. _
Shaft _ "-. . _ Tab
HOWTO SET UPYOURTRACTOR
CHECK BATTERY
1. Lift seat pan to raised position and
open battery box door.
NOTE: Ifthis battery is put into service
after month and year indicated on label
(label located between terminals) charge
battery for minimum of one hour at 6-10
amps. (See "BATTERY" in Maintenance
section of this manual for charging
instructions).
Extension
5/16 Hex Bolt
-i
- , Slots
8
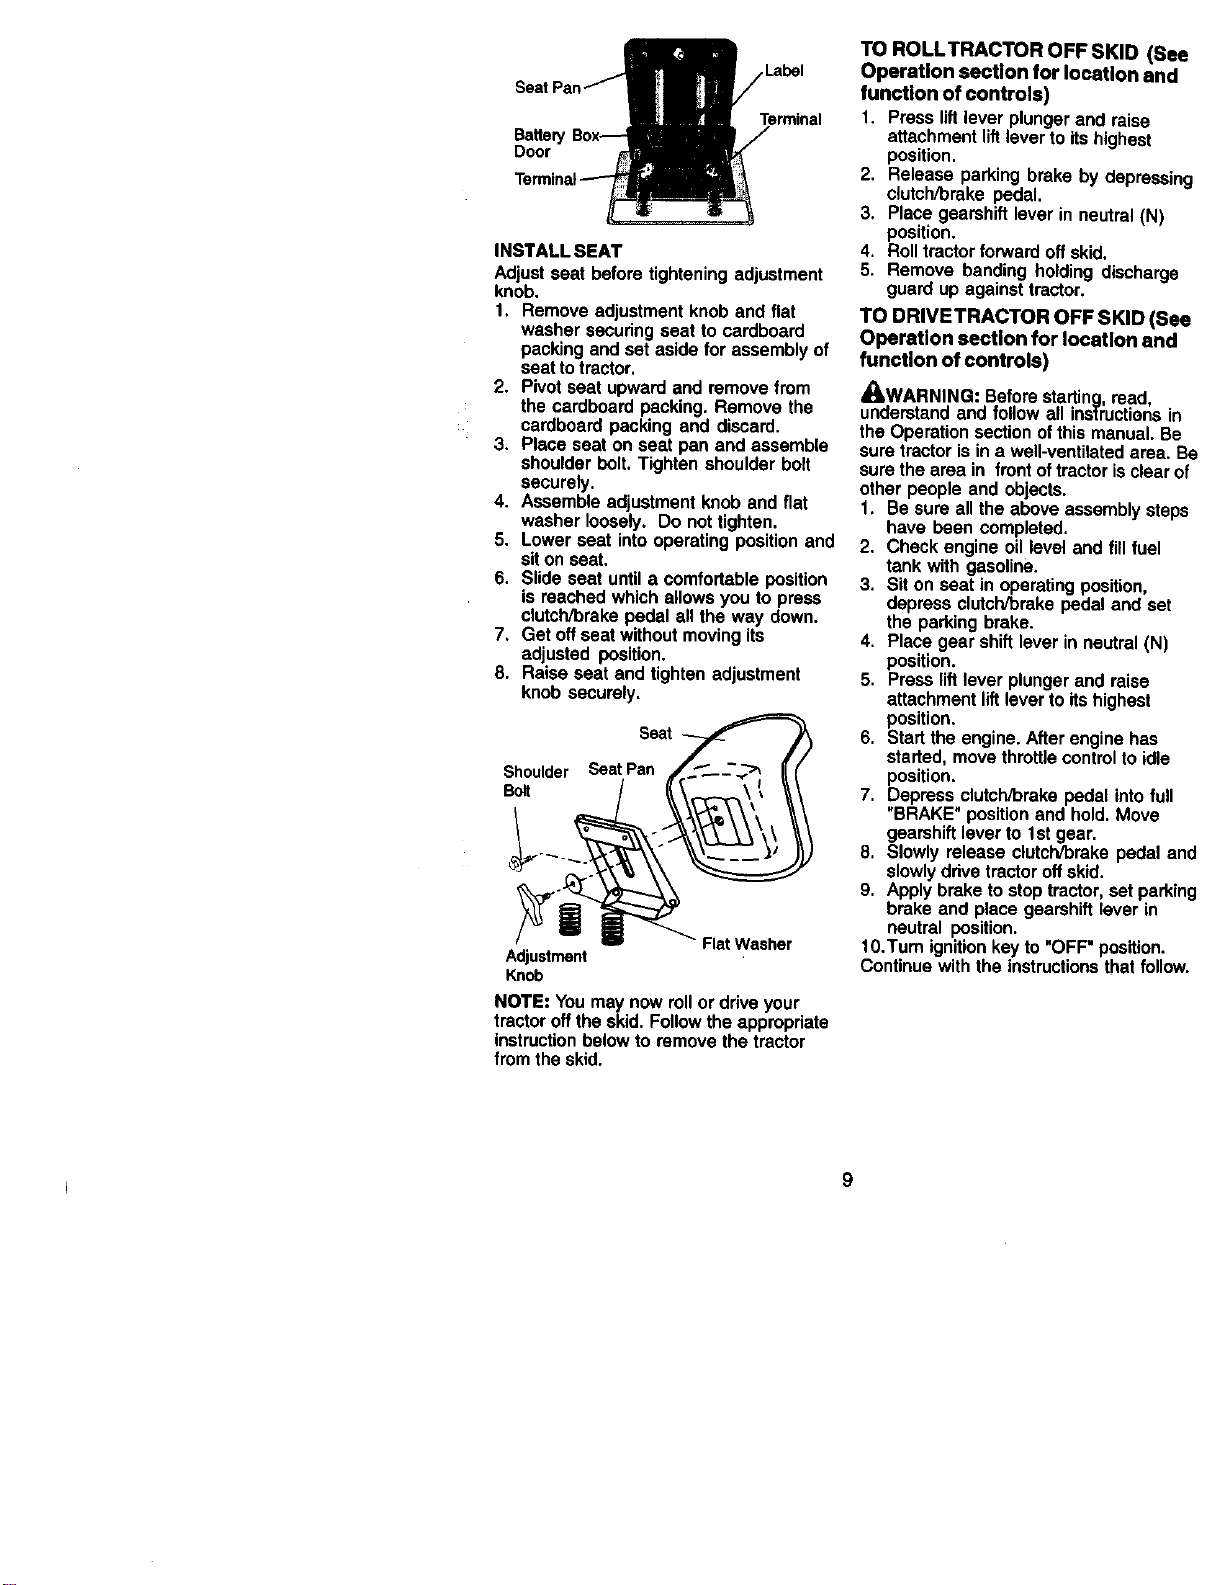
Label
Battery
Door
INSTALL SEAT
Adjustseat beforetighteningadjustment
knob.
1. Removeadjustmentknoband flat
washersecuringseat to cardboard
packingand set aside for assemblyof
seattotractor.
2. Pivotseat upwardand removefrom
the cardboardpacking.Remove the
cardboardpackingand discard.
3. Place seat on seat pan and assemble
shoulderbolt. Tightenshoulderbolt
securely,
4. Assembleadjustmentknob and flat
washerloosely. Do nottighten.
5. Lowerseat intooperatingpositionand
sitonseat.
6. Slide seat untila comfortableposition
isreached whichallowsyou to press
clutch/brakepedal all the way down.
7. Get offseat withoutmovingits
adjustedposition.
8. Raise seat and tightenadjustment
knobsecurely.
Seat
Shoulder Seat Pan
Bolt
Adjustment
Knob
Fiat Washer
NOTE: Youmaynow rollordrive your
tractoroffthe skid.Followthe appropriate
instructionbelowto removethe tractor
from theskid,
TO ROLLTRACTOR OFF SKID (See
OperaUon section for location and
function of controls)
1. Press lift lever plunger and raise
attachment lift lever to its highest
position.
2. Release parking brake by depressing
clutch/brake pedal.
3. Place gearshift lever in neutral (N)
position.
4. Roll tractor forward off skid,
5. Remove banding holding discharge
guard up against tractor.
TO DRIVETRACTOR OFF SKID (See
Operation section for location and
function of controls)
_I=WARNING: Before starting, read,
understand and fo_ow all insfructio_nsin
the Operation section of this manual. Be
sure tractor is in a well-ventilated area. Be
sure the area in front of tractor is clear of
other people and objects.
1. Be sure all the above assembly steps
have been completed.
2. Check engine oil level and fillfuel
tank with gasoline.
3. Sit on seat in operating position,
depress clutch/brake pedal and set
the parking brake.
4. Place gear shift lever in neutral (N)
position.
5. Press lift lever plunger and raise
attachment lift lever to its highest
position.
6. Start the engine. After engine has
started, move throttle control to idle
position.
7. Depress clutch/brake pedal into full
"BRAKE" position and hold. Move
gearshift lever to 1st gear.
8. Slowly release clutch/brake pedal and
slowly drive tractor off skid.
9. Apply brake to stop tractor, set parking
brake and place gearshift lever in
neutral position.
10.Tum ignition key to "OFF" position.
Continue with the instructions that follow.
J
9
INSTALL MULCHER PLATE
(If previously removed)
1. Raise and holddeflectorshieldin
uprightposition.
2. Place frontof mulcher plateoverfront
of mowerdeck openingand slide into
place,as shown.
3. Hookfrontlatchintoholeonfrontof
mower deck.
4. Hook rearlatchintoholeon backof
mowerdeck.
_I_CAUTION: Do notremovedeflector
shieldfrom mower.Raise and holdshield
when attachingmulcher plate and allowit
to rest on platewhile inoperation.
Mulcher
Plate
Shield
Latch
Hooks
TO CONVERTTO BAGGING OR
DISCHARGING
Simplyremovemulcherplateand store in
a safe place.Yourmoweris nowreadyfor
dischargingor installationof optional
grasscatcheraccessory.
NOTE: It isnotnecessarytochange
blades. The mulcherbladesare de-
signedfor dischargingand baggingalso,
CHECKTIRE PRESSURE
The tireson your tractorwere ovednflated
at thefactory for shippingpurposes.
Correcttirepressureisimportantfor best
cuttingperformance.
• Reducetire pressureto PSI shownin
=PRODUCTSPECIFICATIONS"section
ofthismanual.
CHECK DECK LEVELNESS
For bestcuttingresults,mowerhousing
shouldbe propedyleveled. See "TO
LEVEL MOWER HOUSING"in the
Serviceand Adjustmentssectionofthis
manual.
CHECK FOR PROPER POSITION OF
ALL BELTS
See thefiguresthatare shownfor
replacingmotionand mowerblade drive
beltsin theServiceand Adjustments
sectionofthismanual. Verifythatthe
beltsare routedcorrectly.
CHECK BRAKE SYSTEM
Afteryou learnhowto operateyour
tractor,checkto see thatthebrakeis
propedyadjusted. See "TO ADJUST
BRAKE"inthe Serviceand Adjustments
sectionof thismanual.
,/'CHECKLIST
Before you operate and enjoy your new
tractor, we wish to assure that you receive
the best performance and satisfaction
from this Quality Product.
Please review the following checklist:
v'AII assembly instructions have been
completed.
,/No remaining loose parts in carton.
v"Battery is properly prepared and
charged. (Minimum 1 hour at 6 amps).
v" Seat is adjusted comfortably and
tightened securely.
,/'All tires are properly inflated. (For
shipping purposes, the tires were
ovednflated at the factory).
./Be sure mower deck is propedy leveled
side-to-side/front-to-rear for best cutting
results. (Tires must be propedy inflated
for leveling).
v'Check mower and drive belts. Be sure
they are routed properly around pulleys.
and inside all belt keepers.
,/'Check wiring. See that all connections
are still secure and wires are properly
clamped.
While learning how to use your tractor,
pay extra attention to the following
important items:
V"Engine oil is at proper level.
v" Fuel tank is filled with fresh, clean.
regular unleaded gasoline.
v"Become familiar with all controls - their
location and function. Operate them
before you start the engine.
,/Be sure brake system is in safe
operating condition.
10
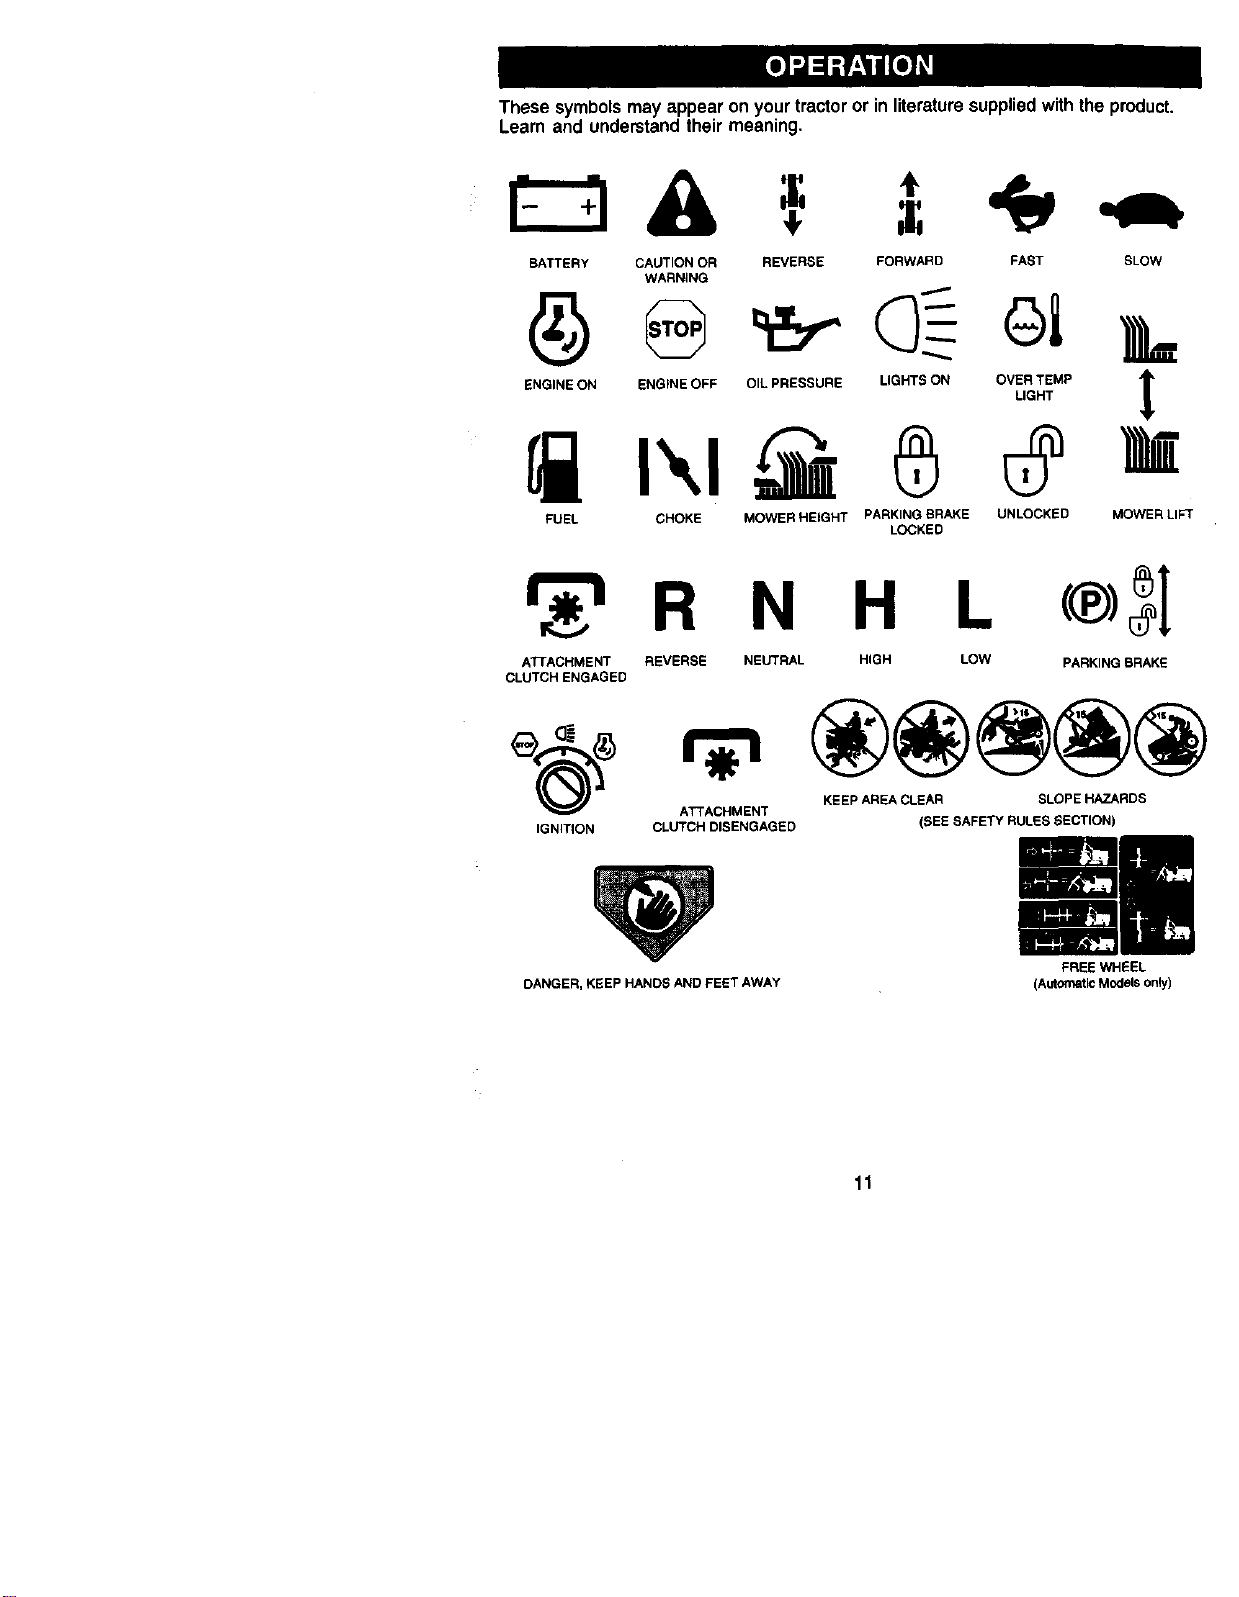
These symbolsmayappear onyour tractoror inliteraturesuppliedwiththeproduct.
Learn and understandtheirmeaning.
BATTERY CAUTION OR
WARNING
ENGINE ON ENGINE OFF
FUEL CHOKE
REVERSE FORWARD FAST SLOW
OIL PRESSURE LIGHTS ON OVER TEMP
MOWER HEtGHT PARKING BRAKE UNLOCKED MOWER LIFT
LOCKED
LIGHT
r_'_ R N H L
ATTACHMENT REVERSE NEUTRAL HIGH LOW PARKING BRAKE
CLUTCH ENGAGED
IGNITION CLUTCH DISENGAGED (SEE SAFETY RULES SECTION)
ATTACHMENT
KEEP AREA CLEAR SLOPE HAZARDS
L
DANGER, KEEP HANDS AND FEET AWAY
FREE WHEEL
(AutOmaticModels only)
11
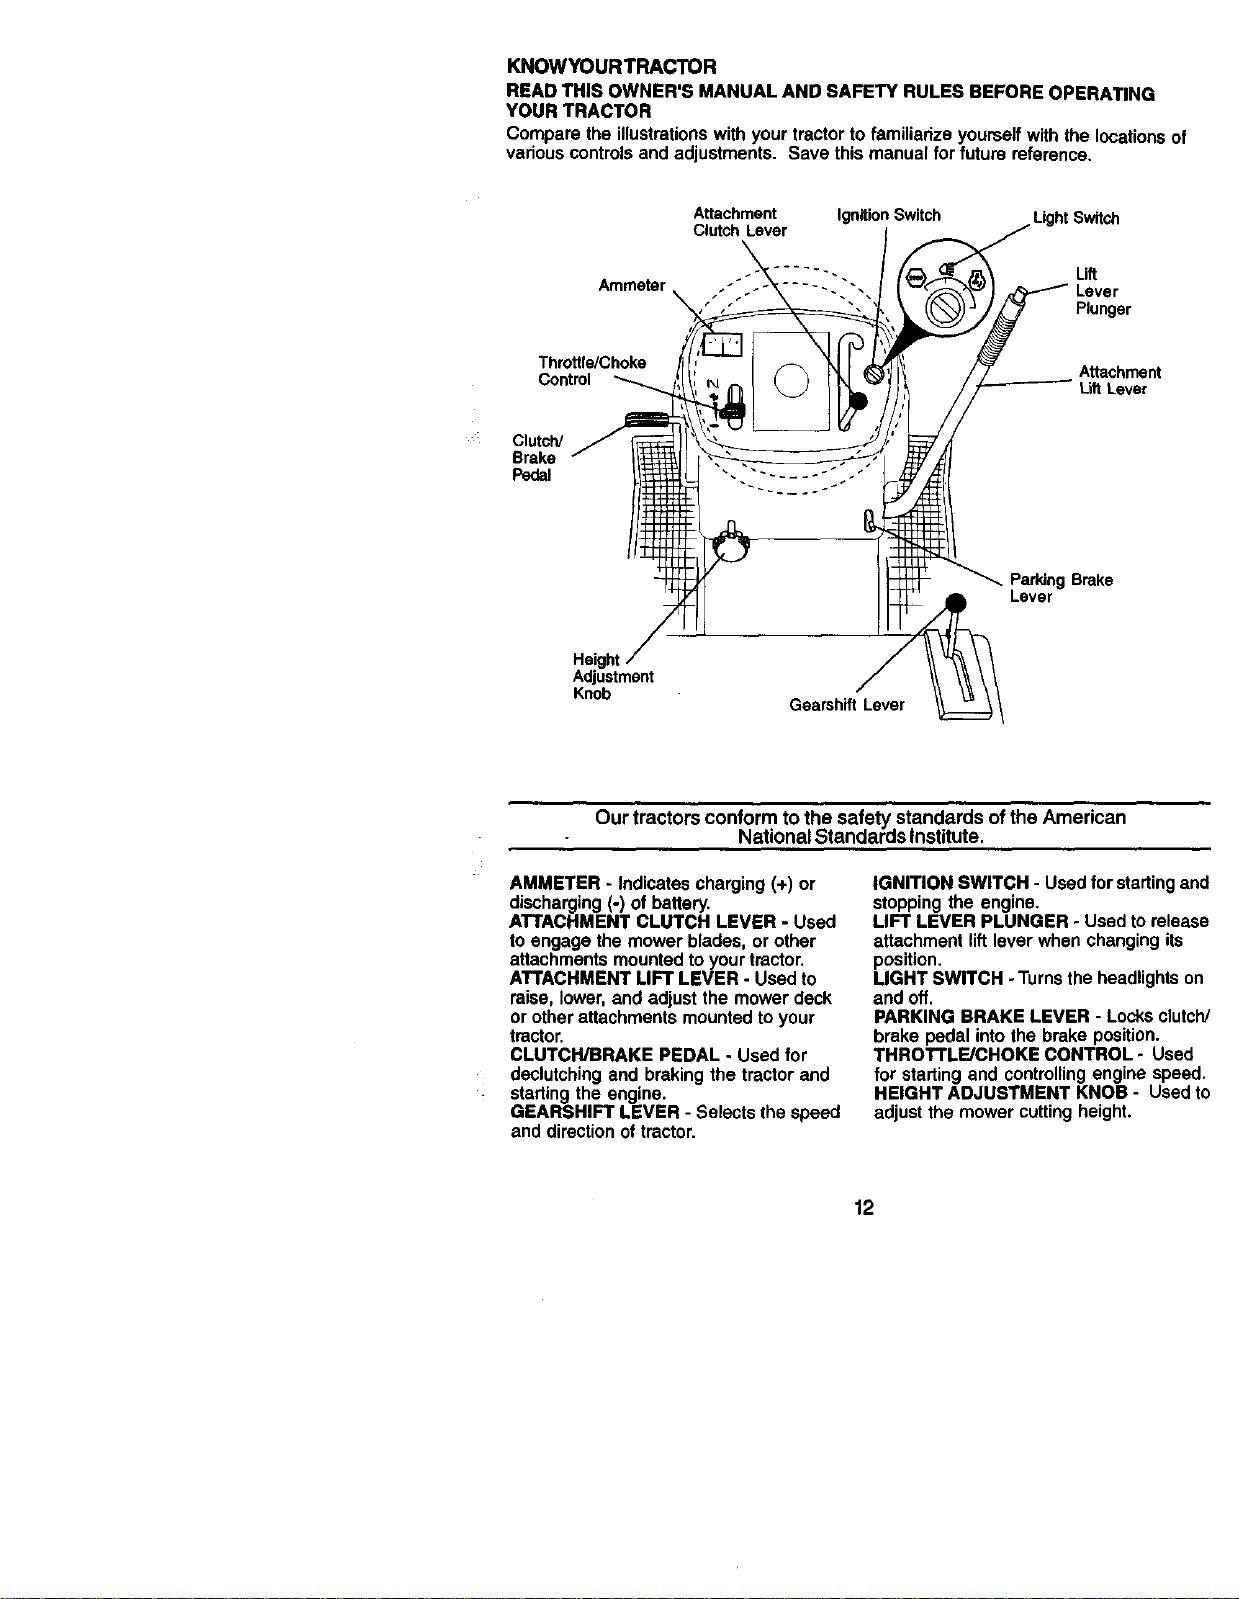
KNOWYOURTRACTOR
READ THIS OWNER'S MANUAL AND SAFETY RULES BEFORE OPERATING
YOUR TRACTOR
Compare the illustrations with your tractor to familiarize yourself with the locations of
various controls and adjustments. Save this manual for future reference.
Throttle/Choke
Control
': Clutch/
Brake
Pedal
Amme_r
Heigt
Adjustment
Knob
Attachment Ignition Switch
Clutch Lever
Gearshift Lever
Light Switch
Lift
Plunger
Attachment
U_ Lever
Parking Brake
Lever
Our tractors conform to the safety standards of the American
National Standards Institute.
AMMETER - Indicatescharging(+) or
discharging(-) of battery.
ATTACHMENTCLUTCH LEVER - Used
to engage themowerblades, or other
attachmentsmountedtoyourtractor.
ATTACHMENTLIFT LEVER - Usedto
raise,lower,and adjustthe mowerdeck
or otherattachmentsmountedtoyour
tractor.
CLUTCH/BRAKE PEDAL - Usedfor
doclutchingand brakingthe tractorand
startingtheengine.
GEARSHIFT LEVER - Selectsthe speed
and directionoftractor.
IGNITION SWITCH - Used for starting and
stopping the engine,
LIFT LEVER PLUNGER - Used to release
attachment lift lever when changing its
position,
LIGHT SWITCH - Turns the headlights on
and off,
PARKING BRAKE LEVER - Locks clutch/
brake pedal into the brake position.
THROTTLE/CHOKE CONTROL - Used
for starting and controlling engine speed.
HEIGHT ADJUSTMENT KNOB - Used to
adjust the mower cutting height.
12
The operation of any tractor can result in foreign objects thrown into the
eyes, which can result in severe eye damage. Always wear safety
glasses or eye shields while operating your tractor or performing any
adjustments or repairs. We recommend a wide vision safety mask over
spectacles or standard safety glasses.
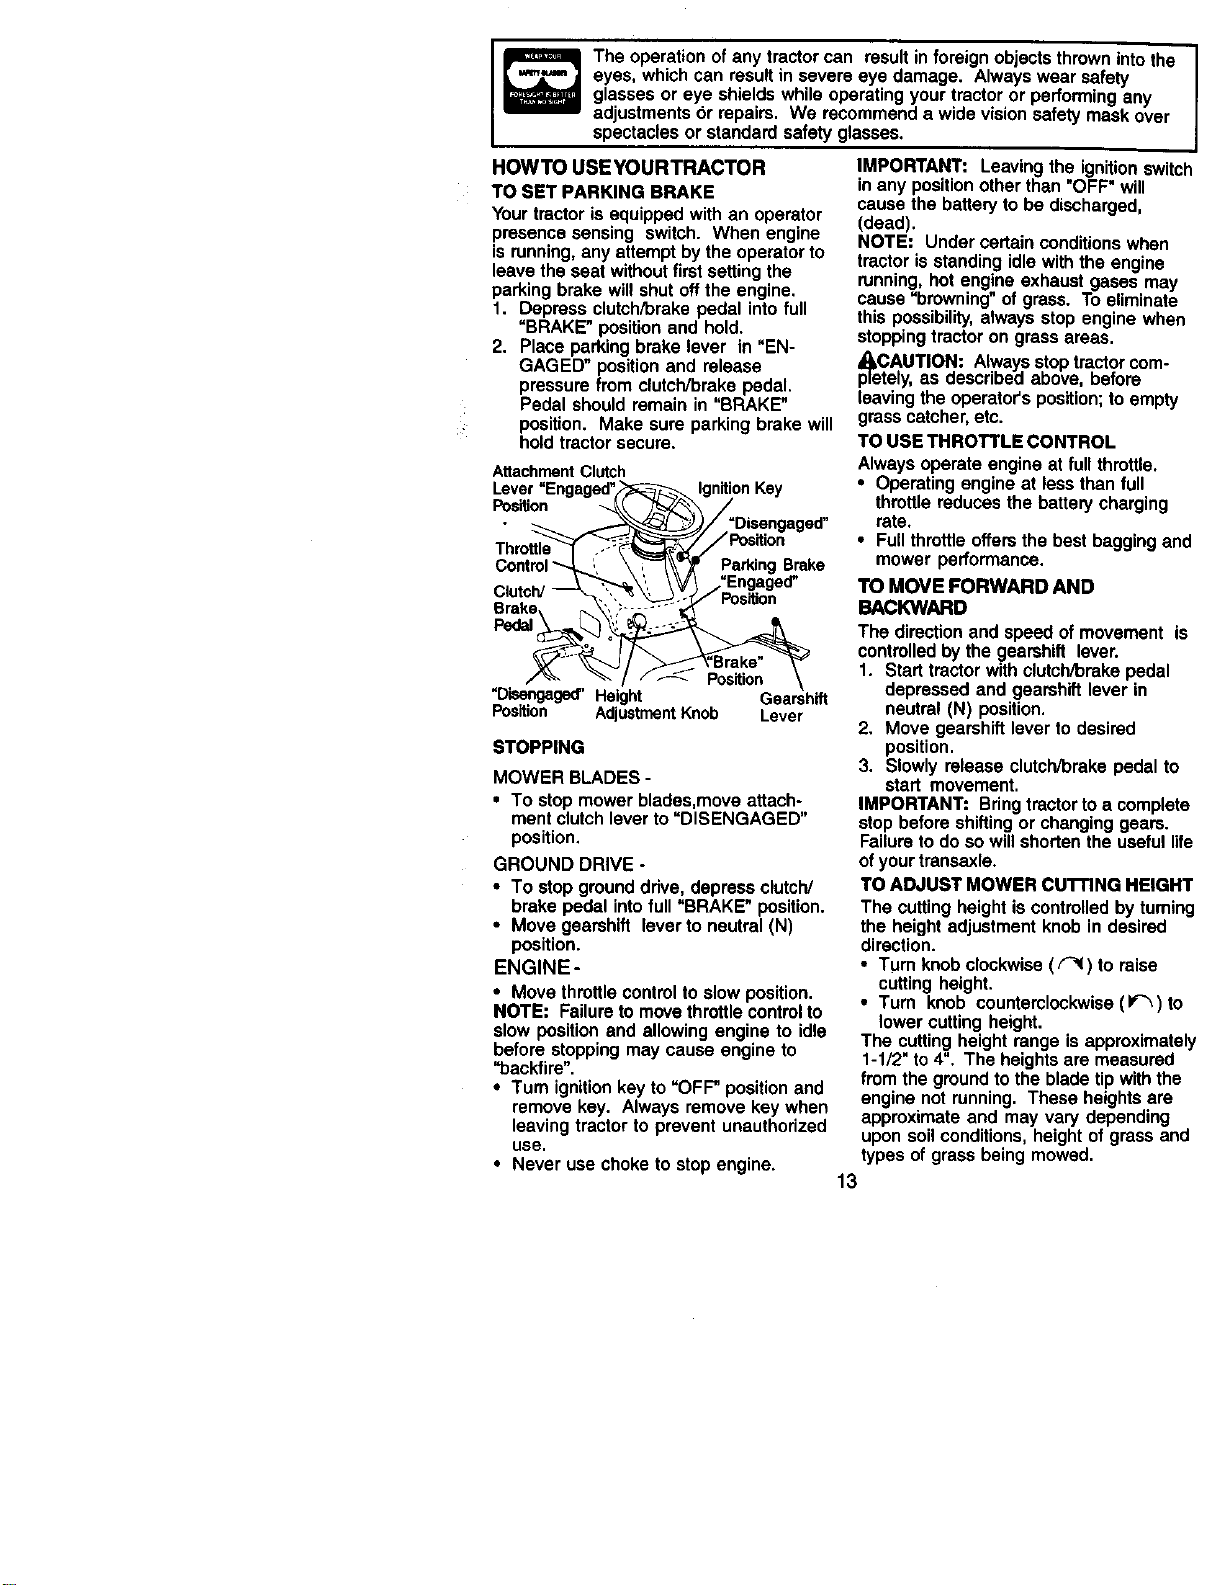
HOWTO USEYOURTRACTOR
TO SET PARKING BRAKE
Your tractor is equipped with an operator
presence sensing switch. When engine
is running, any attempt by the operator to
leave the seat without first setting the
parking brake will shut off the engine,
1. Depress clutch/brake pedal into full
"BRAKE" position and hold.
2. Place parking brake lever in "EN-
GAGED" position and release
pressure from clutch/brake pedal,
Pedal should remain in "BRAKE"
position. Make sure parking brake will
hold tractor secure.
A_achmentClutch
Lever "Engaged"
Position
Thro_
Control
Clutch/_',_
Brake,, r-_',
"Disengaged' Height
Position AdjustmentKnob
;_/gnition Key
/ :o,oongo0ed
\ ,-"_"_" P,_a.rkingBroke
.\'\ \V\ _Engaged"
Gearshift
Lever
STOPPING
MOWER BLADES -
• To stop mower blades,move attach-
ment clutch lever to =DISENGAGED"
position,
GROUND DRIVE -
• To stop ground drive, depress clutch/
brake pedal into full "BRAKE" position.
• Move gearshift lever to neutral (N)
position.
ENGINE-
• Move throttle control to slow position.
NOTE: Failure to move throttle control to
slow position end allowing engine to idle
before stopping may cause engine to
backfire".
• Turn ignition key to "OFP' position and
remove key. Always remove key when
leaving tractor to prevent unauthorized
use.
• Never use choke to stop engine.
IMPORTANT: Leaving the ignition switch
in any position other than "OFF= will
cause the battery to be discharged,
(dead).
NOTE: Under certain conditions when
tractor is standing idle with the engine
running, hot engine exhaust gases may
cause "browning"of grass. To eliminate
this possibility, always stop engine when
stopping tractor on grass areas.
p_eCAUTION: Always stop tractor com-
tely, as described above, before
leaving the operator's position; to empty
grass catcher, etc.
TO USE THROTTLE CONTROL
Always operate engine at full throttle.
• Operating engine at less than full
throttle reduces the battery charging
rate.
• Full throttle offers the best bagging and
mower performance.
TO MOVE FORWARD AND
BACKWARD
The direction and speed of movement is
controlled by the gearshift lever.
1. Start tractor with clutch/brake pedal
depressed and gearshift lever in
neutral (N) position.
2. Move gearshift lever to desired
position.
3. Slowly release clutch/brake pedal to
start movement.
IMPORTANT: Bring tractor to a complete
stop before shifting or changing gears.
Failure to do so will shorten the useful life
of your transaxle.
TO ADJUST MOWER CUI"I'ING HEIGHT
The cutting height is controlled by tuming
the height adjustment knob in desired
direction.
•Tum knob clockwise ( F_ ) to raise
cutting height.
•Tum knob counterclockwise (1_'_) to
lower cutting height.
The cutting height range is approximately
1-1/2" to 4". The heights are measured
from the ground to the blade tip with the
engine not running. These heights are
approximate and may vary depending
upon soil conditions, height of grass and
types of grass being mowed.
13
• The average lawn should be cut to
approximately 2-1/2 inches during the
cool season and to over 3 inches
during hot months. For healthier and
better looking lawns, mow often and
after moderate growth.
• For best cutting performance, grass
over 6 inches in height should be
mowed twice. Make the first cut
relatively high; the second to desired
height.
TO ADJUST GAUGE WHEELS
Gauge wheels are properly adjusted
when they are slightly off the ground
when mower is at the desired cutting
height in operating position. Gauge
wheels then keep the deck in proper
position to help prevent scalping in most
terrain conditions.
NOTE: Adjust gauge wheels with tractor
on a fiat level surface.
1. Adjust mower to desired cutting height
(See "TO ADJUST MOWER CUTTING
HEIGHT" in the Operation section of
this manual).
2. With mower in desired height of cut
position, gauge wheels should be
assembled so they are slightly off the
ground. Install gauge wheel in
appropdate hole with shoulder bolt, 3/
8 washer, and 3/8-16 Iocknut and
tighten securely,
3. Repeat for opposite side installing
gauge wheel in same adjustment
hole.
Gauge -_
Wheel /2_1,,.._-_" _
Mounting ¢
Brscket "_ _- _
L_l_ut
3/8-16 ..._.._...__
3/8 Washer_, ,_.ShoulderBolt
Gauge Wheel f -- _
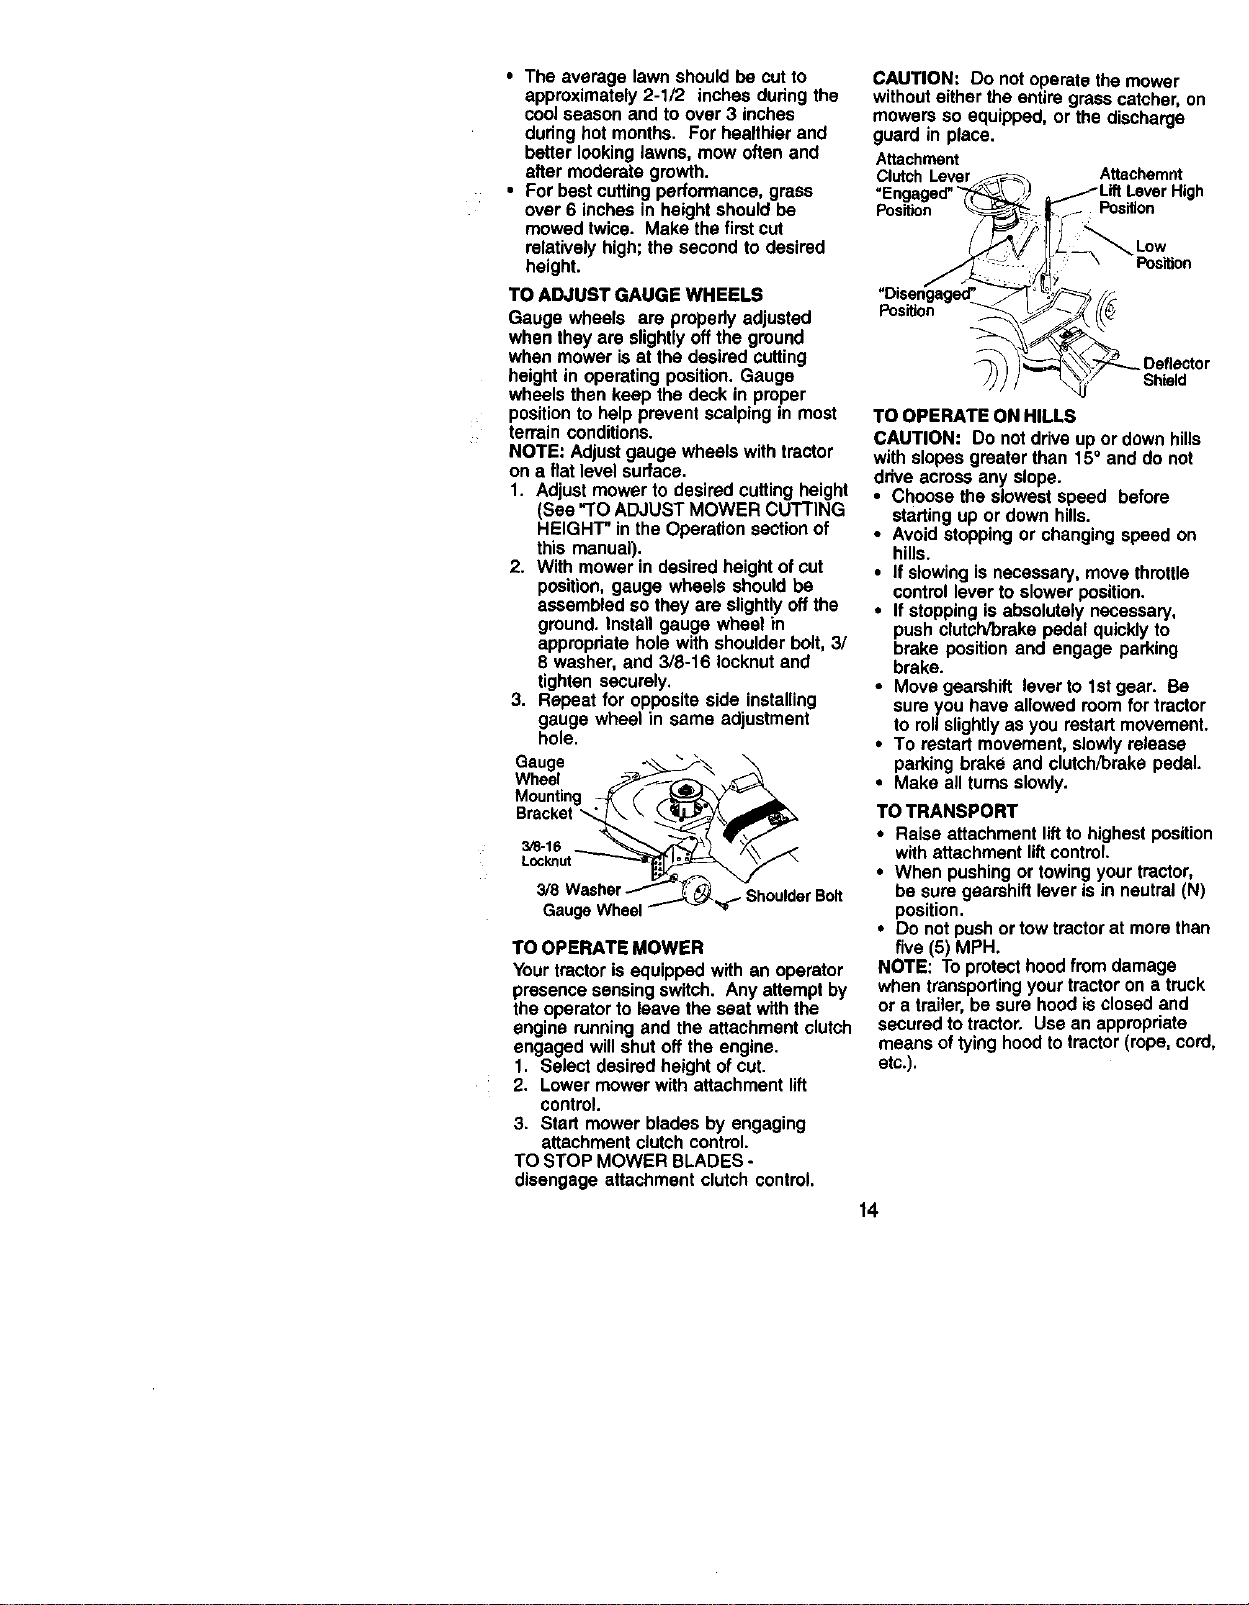
TO OPERATE MOWER
Your tractor is equipped with an operator
presence sensing switch. Any attempt by
the operator to leave the seat with the
engine running and the attachment clutch
engaged will shut off the engine.
1. Select desired height of cut.
2. Lower mower with attachment lift
control.
3. Start mower blades by engaging
attachment clutch control.
TO STOP MOWER BLADES -
disengage attachment clutch control.
CAUTION: Do not operate the mower
without either the entire grass catcher, on
mowers so equipped, or the discharge
guard in place.
Attachment
ClutchLever ._ Attachemnt
,Engaged__/) ,1/Lift Lever High
Position _i,_ _¢_ Position
_-_:". j_ _ Position
"Disengaged" _ _'/_b_//_
TO OPERATE ONHILLS
CAUTION: Do notdriveup ordown hills
withslopesgreaterthan 15° and do not
driveacrossany slope.
• Choosethe slowestspeed before
startingup or down hills.
• Avoidstoppingor changingspeed on
hills.
• If slowingis necessary,movethrottle
controlleverto slowerposition.
• If stoppingis absolutelynecessary,
pushclutch/brakepedalquicklyto
brake position and engage parking
brake.
• Movegearshift leverto1stgear. Be
sureyou haveallowedroomfor tractor
to rollslightlyas you restartmovement.
• To restartmovement,slowlyrelease
parkingbrake and clutch/brakepedal.
• Makeall turnsslowly.
TO TRANSPORT
• Raise attachment liftto highest position
with attachment liftcontrol.
• When pushing or towing your tractor,
be sure gearshift lever is in neutral (N)
position.
• Do not push or tow tractor at more than
five (5) MPH.
NOTE: To protect hood from damage
when transporting your tractor on a truck
or a trailer, be sure hood is closed and
secured to tractor. Use an appropriate
means of tying hood to tractor (rope, cord,
etc.).
14
TOWING CARTS AND OTHER
ATTACHMENTS
Tow only the attachments that are
recommended by and comply with
specifications of the manufacturer of your
tractor. Use common sense when towing.
Too heavy of a load, while on a slope, is
dangerous. Tires can lose traction with the
ground end cause you to lose control of
your tractor.
BEFORE STARTINGTHE ENGINE
CHECK ENGINE OIL LEVEL
The engine in your tractor has been
shipped, from the factory, already filled
with summer weight oil.
1. Check engine oil with tractor on level
ground.
2. Unthread and remove oil fill cap/
dipstick; wipe oil off. Reinsert the
dipstick into the tube and rest oil fill
cap on the tube. Do not thread the
cap onto the tube. Remove and read
oil level. If necessary, add oil until
=FULL" mark on dipstick is reached.
Do not overfiU.
• For cold weather operation you should
change oil for easier starting (See "OIL
VISCOSITY CHART" in the Mainte-
nance section of this manual).
• To change engine oil, see the Mainte-
nance section in this manual.
ADD GASOLINE
• Fill fuel tank. Use fresh, clean, regular
unleaded gasoline with a minimum of
87 octane. (Use of leaded gasoline
will increase carbon and lead oxide
deposits and reduce valve life). Do not
mix oil with gasoline. Purchase fuel in
quantities that can be used within 30
days to assure fuel freshness.
IMPORTANT: When operating in
temperatures below32°F(0°C), use fresh,
clean winter grade gasoline to help
insure good cold weather starting.
_)&WARNING: Experience indicates that
alcohol blended fuels (called gasohol or
using ethanol or methanol) can attract
moisture which leads to separation and
formation of acids during storage. Acidic
gas can damage the fuel system of an
engine while in storage. To avoid engine
problems, the fuel system should be
emptied before storage of 30 days or
longer. Drain the gas tank, start the
engine and let it run until the fuel lines
and carburetor are empty.
Use fresh fuel next season. See Storage
Instructions for additional information.
Never use engine or carburetor cleaner
products in the fuel tank or permanent
damage may occur.
_I=CAUTION: Fillto bottom of gas tank
filler neck. Do not overfill. Wipe off any
spilled oil or fuel. Do not store, spill or
use gasoline near an open flame.
TO START ENGINE
When starlingtheengine forthe firsttime orif
the engine has mn out offuel, itwUltake extta
crankingtimeto move fuel from the tankto
the engine.
1. Sit on seat in operating position,
depress clutch/brake pedal and set
parking brake.
2. Place gear shift lever in neutral (N)
position.
3. Move attachment clutch to "DISEN-
GAGED" position.
4. Move throttle control to choke position.
NOTE: Before starting,read the warm and
coldstarting proceduresbelow.
5. Insert key into ignition and tum key
clockwise to =START" position and
release key as soon as engine starts.
Do not run starter continuously for
more than fifteen seconds per minute.
If the engine does not start after
several attempts, move throttle control
to fast position, wait a few minutes and
try again. If engine still does not start,
move the throttle control back to the
choke position and retry.
WARM WEATHER STARTING (50° F and
above)
6. When engine starts, move the throttle
control to the fast position.
• The attachments and ground drive can
now be used. If the engine does not
accept the load, restart the engine and
allow it to warm up for one minute
using the choke as described above.
COLD WEATHER STARTING ( 50° F and
below)
6. When engine starts, allow engine to
run with the throttle control in the
choke position until the engine runs
roughly, then move throttle control to
fast position. This may require an
engine warm-up period from several
seconds to several minutes, depend-
ing on the temperature.
15

• The attachments can also be used
during the engine warm-up period.
NOTE: tfat a highaltitude(above 3000 feet)
or incold temperatures (below32 F) the
carburetorfuel mixturemay need to be
adjustedforbest sngine performance. See
"TO ADJUST CARBURETOR" in the SeMce
and Adjustmentssectionof this manual.
MOWING TIPS
• Tire chains cannot be used when the
mower housing is attached to tractor.
• Mower should be properly leveled for
best mowing performance. See "TO
LEVEL MOWER HOUSING" in the
Service and Adjustments section of this
manual.
• The left hand side of mower should be
used for trimming.
• Drive so that clippings are discharged
onto the area that has been cut. Have
the cut area to the right of the tractor.
This will result in a more even distribu-
tion of clippings and more uniform
cutting.
• When mowing large areas, start by
tuming to the right so that clippings will
discharge away from shrubs, fences,
driveways, etc. After one or two
rounds, mow in the opposite direction
making left hand turns until finished.
• If grass is extremely tall, it should be
mowed twice to reduce load and
possible fire hazard from dried clip-
pings. Make first cut relatively high; the
second to the desired height.
• Do not mow grass when it is wet. Wet
grass will plug mower and leave
undesirable clumps. Allow grass to dry
before mowing.
• Always operate engine at full throttle
when mowing to assure better mowing
performance and proper discharge of
material. Regulate ground speed by
selecting a low enough gear to give the
mower cutting performance as well as
the quality of cut desired.
• When operating attachments, select a
ground speed that will suit the terrain
and give best performance of the
attachment being used.
f
MULCHING MOWING TIPS
IMPORTANT: For best performance,
keep mower housing free of built-up
grass and trash. Clean after each use.
• The special mulching blade will recut
the grass clippings many times and
reduce them in size so that as they fall
onto the lawn they will disperse into the
grass and not be noticed. Also, the
mulched grass will biodegrade quickly
to provide nutrients for the lawn.
Always mulch with your highest engine
(blade) speed as this will provide the
best recutting action of the blades.
• Avoid cutting your lawn when it is wet.
Wet grass tends to form clumps and
interferes with the mulching action.
The best time to mow your lawn is the
early afternoon. At this time the grass
has dried and the newly cut area will
not be exposed to the direct sun.
• For best results,adjust the mower
cutting height so that the mower cuts off
only the top one-third of the grass
blades. For extremely heavy mulching,
reduce your width of cut on each pass
and mow slowly.
• Certain types of grass and grass
conditions may require that an area be
mulched a second time to completely
hide the clippings. When doing a
second cut, mow across or perpendicu-
lar to the first cut path.
• Change your cutting pattem from week
to week. Mow north to south one week
then change to east to west the next
week. This will help prevent matting
and graining of the lawn.
16
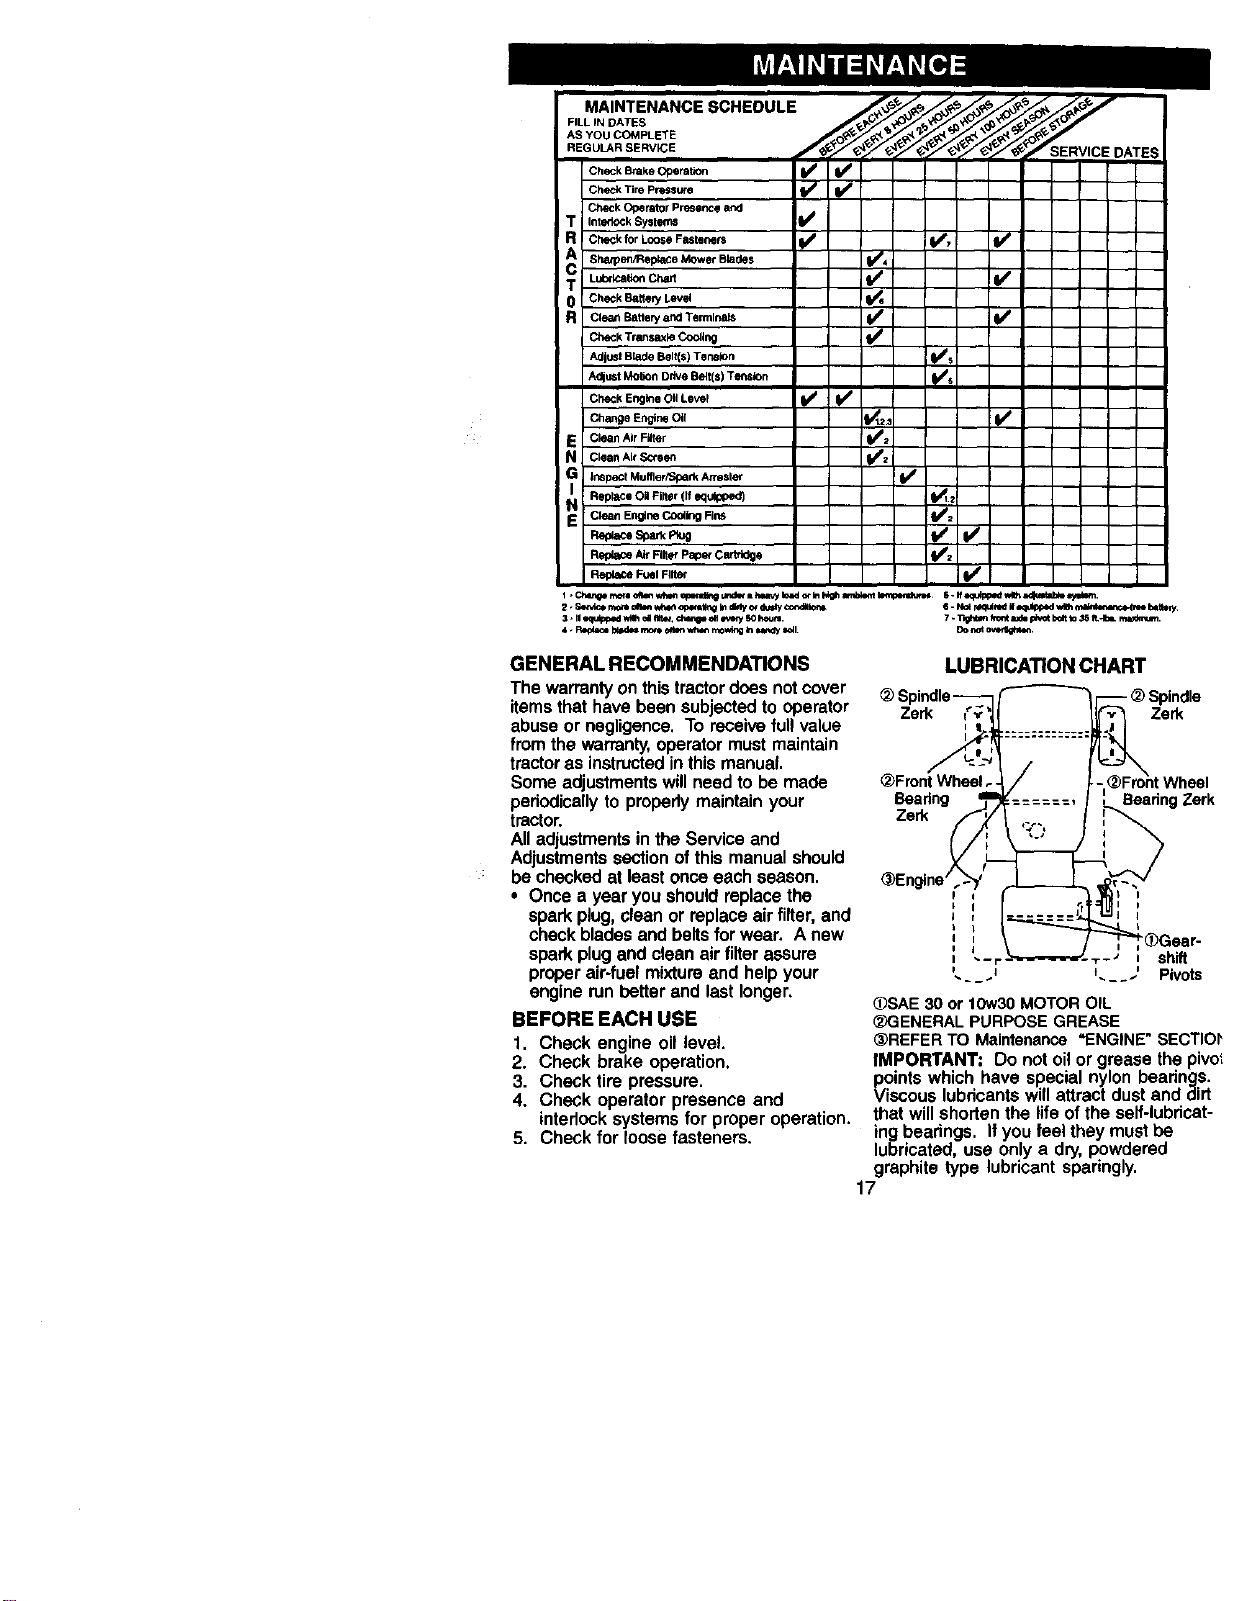
FILL IN DATES _ _ _
MA,NTE.A.CESC.EOULE
AS YOU COMPLETE
CheckSakeOpera,on IV!
C_ckTirePr_s,_re I/ I_
Check Operato_ Pre_ence and
i Inte_ioCk SyslelX'_
j ku_ C_ V'
R Clea_ Battery atxI Terminals if I I_
CheckTransax_eCooling II/
Adjust BkJde Belt(s) Tension 114/s
Adjust Me,on DriVe Belt(s) Tension _
Ci_c_EngbnoOilLevm _ I_
C_angee,,_r_Oil II_t2_ I,/
I E Clean Air F_ter _
]r_pectMuffler_perkArrester I_
ReplaceOilFilter(ffequ_ (1_2
CkmnEn_neCoollngFins
ReplaceAirR_terPeperC_e II/_
I
GENERAL RECOMMENDATIONS
The warrantyon thistractordoesnotcover
itemsthathavebeensubjectedto operator
abuseor negligence.Toreceiveful!value
fromthewarranty,operatormustmaintain
tractorasinstructedinthismanual.
Someadjustmentswillneedto be made
periodicallyto properlymaintain your
tractor.
Alladjustmentsinthe Serviceand
Adjustmentssectionofthismanualshould
be checkedatleast onceeachseason.
• Once a year youshouldreplacethe
sparkplug,cleanor replaceairfilter,and
checkbladesand beltsforwear. A new
sparkplugandcleanair filterassure
properair-fuelmixtureand helpyour
enginerunbetterand lastlonger,
BEFORE EACH USE
1. Checkengine oil level.
2. Check brake operation.
3. Checktire pressure.
4. Check operatorpresenceand
interlocksystemsfor properoperation.
5. Checkfor loosefasteners.
LUBRICATION CHART
Zerk Zerk
_Front Wheel
Beadng
Zerk
I I
I
', shift
.... . Pivots
_SAE 30 or 10w30 MOTOR OIL
_)GENERAL PURPOSE GREASE
(_REFER TO Maintenance "ENGINE" SECTIOI'
IMPORTANT: Do not oil or grease the pivo_
points which have special nylon bearings.
Viscous lubricants will attract dust and dirt
that will shorten the life of the serf-lubricat-
ing bearings. If you feel they must be
lubricated, use only a dry, powdered
graphite type lubricant sparingly.
-_) Spindle
Beadng Zerk
17
TRACTOR
Always observe safety rules when
performing any maintenance.
BRAKE OPERATION
If tractor requires more than six (6) feet
stopping distance at high speed in
highest gear, then brake must be ad-
justed. (See TO ADJUST BRAKE" in the
Service and Adjustments section of this
manual).
TIRES
• Maintain proper air pressure in all tires
(See "PRODUCT SPECIFICATIONS"
section of this manual).
• Keep tires free of gasoline, oil, or insect
control chemicals which can harm
rubber.
• Avoid stumps, stones, deep ruts, sharp
i:i_i
objects and other hazards that may
cause tire damage.
NOTE: To seal tire punctures and prevent
flat tires due to slow leaks, tire sealant
may be pumhased from your local parts
dealer. Tire sealant also prevents tire dry
rot and corrosion.
OPERATOR PRESENCE SYSTEM
Be sure operator presence and interlock
systems are working properly. If your
tractor does not function as descdbed,
repair the prebiem immediatety.
• The engine should not start unless the
clutch/brake pedal is fully depressed
and attachment clutch control is in the
disengaged position.
• When the engine is running, any
attempt by the operator to leave the
seat without first setting the parking
brake shoutd shut off the engine.
• When the engine is running and the
attachment clutch is engaged, any
attempt by the operator to leave the
seat should shut off the engine.
• The attachment clutch should never
operate unless the operator is in the
seat.
BLADE CARE
For best results mower blades must be
kept sharp. Replace bent or damaged
blades.
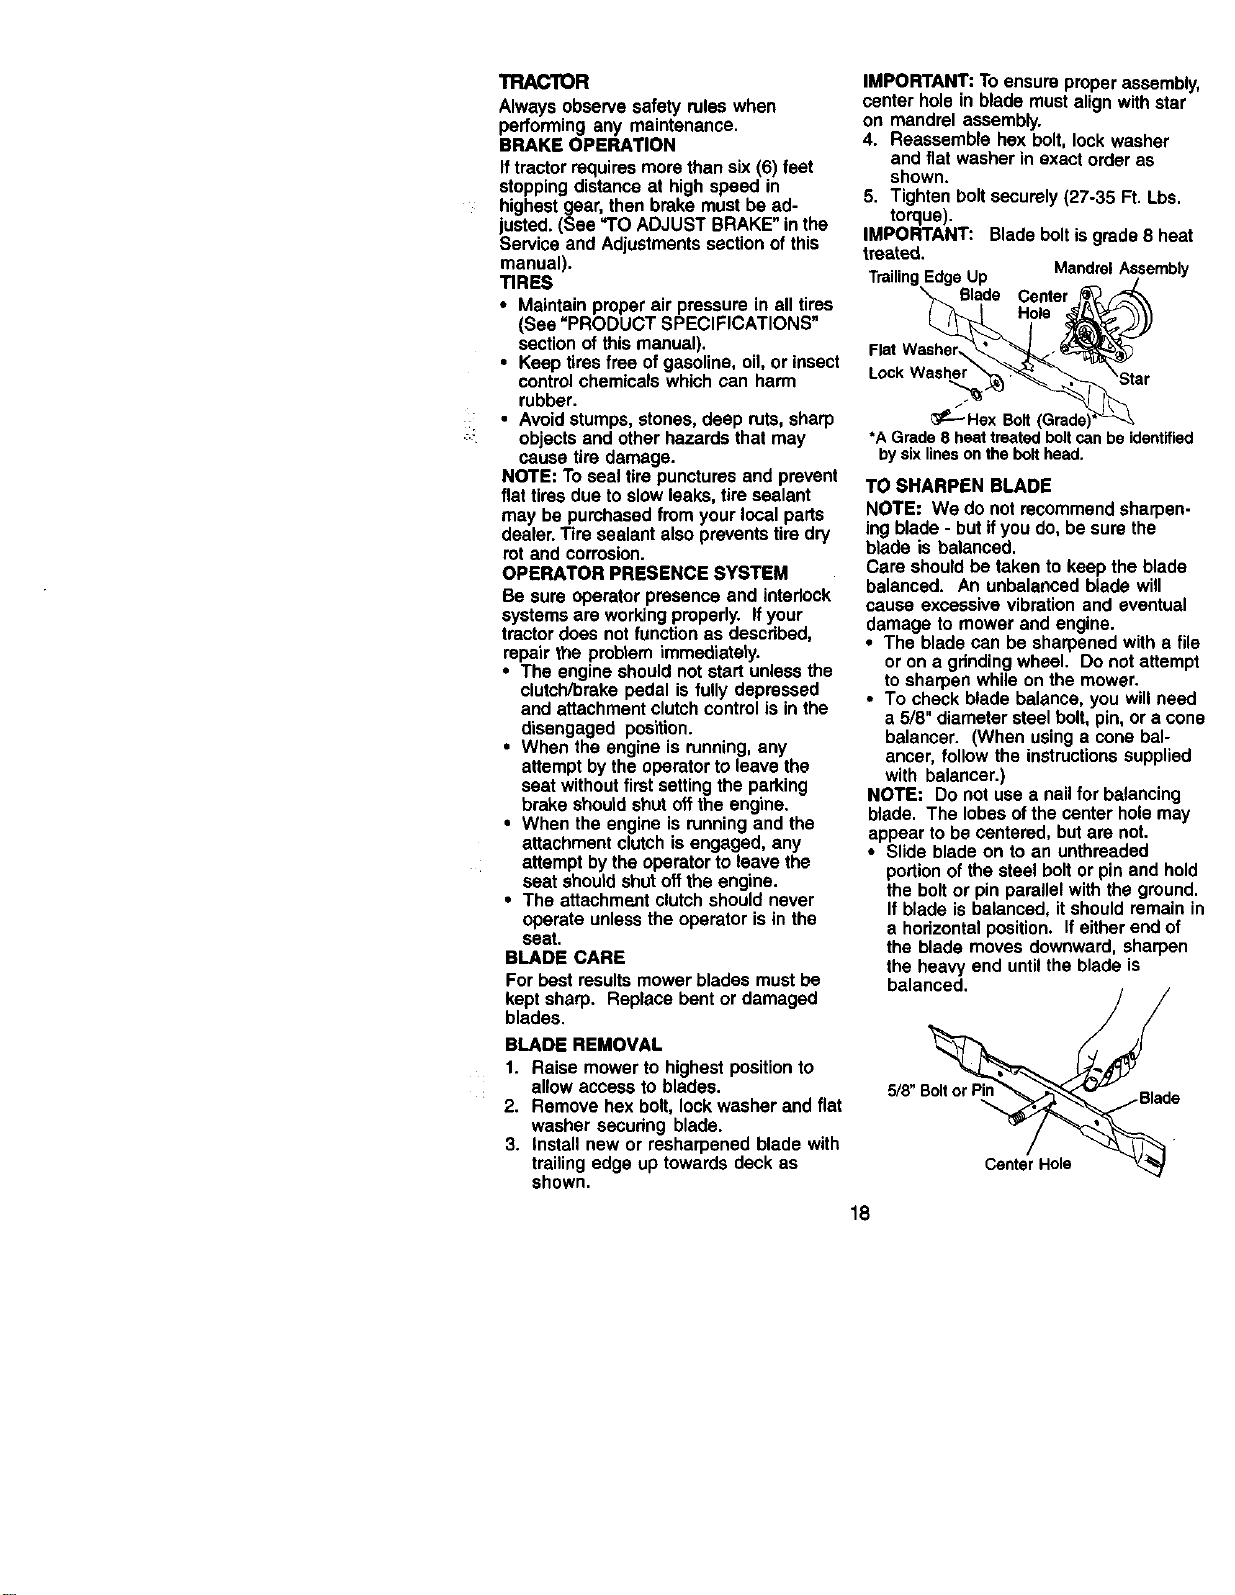
BLADE REMOVAL
I. Raisemowerto highest positionto
allow access to blades.
2. Removehex bolt,lookwasherand flat
washer securingblade.
3. Installnew or resharpenedblade with
trailingedge up towardsdeckas
shown.
IMPORTANT: To ensure proper assembly,
center hole in blade must align with star
on mandrel assembly.
4. Reassemble hex bolt, lock washer
and fiat washer in exact order as
shown.
5. Tighten bolt securely (27-35 Ft. Lbs.
torque).
IMPORTANT: Blade bolt is grade 8 heat
treated.
Trailin Edge Up
Blade Center
Flat Washer,
Lock Washe
_--- Hex Bolt
*A Grade 8 heat treatedboltcan be identified
by sixlineson the bolthead.
TO SHARPEN BLADE
NOTE: We do not recommend sharpen-
ing blade - but if you do, be sure the
blade is balanced.
Care should be taken to keep the blade
balanced. An unbalanced blade will
cause excessive vibration and eventual
damage to mower and engine.
• The blade can be sharpened with a file
or on a grinding wheel. Do not attempt
to sharpen while on the mower.
• To check blade balance, you will need
a 5/8" diameter steel bolt, pin, or a cone
balancer. (When using a cone bal-
ancer, follow the instructions supplied
with balancer.)
NOTE: Do not use a nail for balancing
blade. The lobes of the center hole may
appear to be centered, but are not.
• Slide blade on to an unthreaded
portion of the steel bolt or pin and hold
the bolt or pin parallel with the ground.
If blade is balanced, it should remain in
a horizontal position. If either end of
the blade moves downward, sharpen
the heavy end until the blade is
balanced.
5/8" B_d e
Center Hole
MandrelAssembly
Hole
18
 Loading...