

Page 1
I:RRFTXMI:IN°
cf/ .259060
e
Instruction manual
P_ease read these instructions
carefuUy and make sure you
understand them before using this
machine.
Mantlel d'instructions
Merci de tire tr_,sattentivement le
manuel d'instructions. Assurez-
vous d'avior tout compris event
d'utiliser ce tracteur.
Manuale di istruzioni
Prima di utitizzare ta macchina
leggete queste istruzioni con
attenzione ed accertatevi di
avede comprese bene.
Anleitungshandbuch
Ditte lesen Sie diese Anieitungen
sorgf&ttig dutch und vergewissem
Sie sich, daP_Sie diese verstehen,
bevor Sie die Maschine in Betdeb
nehmen.
Manual de las instruoeiones
Por favor lea cuidadosamente y
cemprenda estas intruceiones
antes de usar esta maquina.
Instructieboekje
Lees deze instructies aandachtig
en zofg dat u ze begfijpt voordet
u deze machine gebruikt.
Page 2
1
2
3
4
5
6
7
8
Safety specifications.
Sicherheitsbestimmungen.
Consignes de s_curite.
Assembly.
Zusammenbau.
Montage.
Functional description.
Funktionsbeschreibung.
Description du fonctionnement._
Procedure before start.
MaBnahmen vor dem Anlassen.
Avant de d_marrer.
Driving.
Betrieb.
Conduite.
Maintenance, adjustment.
Instandhaltung, Einstellung.
Entretien, r_glages.
Faulttracing.
StSrungssuche.
Recherche des pannes.
Storage.
Aufbewahrung.
RangemenL
Normas de seguridad.
Norme di sicurezza.
Veiligheidsvoorschriften.
Montaje.
Istruzioni per il montaggio.
Montage.
Descripci6n del funcionamiento.
Comandi.
Beschrijving van functies.
Antes del arranque.
Prima della partenza.
Instructies alvorens te rijden.
Conducci6n.
Guida.
Rijden.
Mantenimiento, ajuste.
Messa a punto e manutenzione.
Onderhound, afstelling.
B_squeda de averias.
Ricerca guasti.
Het opsporen van storingen.
Almacenaie.
Rimessagio.
Stallen.
3
18
25
33
36
45
64
67
We reserve the right to changes without prior notice.
/_nderungen ohne vorherige Mitteilung sind vorbehalten.
Nous nous reservons le droit d'apporter des modifications sans avis prealable.
Nos reservamos el derecho a introducir modificaciones sin previo aviso.
Ci riserviamo il diritto di modifiche o cambiamenti senza preawiso.
Wij houden ons het recht voor om veranderingen aan te brengen zonder voorafgaande mededeting.
2
Page 3
1. Safety Rules &
Safe Operation Practices for Ride-On Mowers
IMPORTANT: THIS CUTTING MACHINE IS CAPABLE OF AMPUTATING HANDS AND FEET AND THROWING OBJECTS.
FAILURE TO OBSERVE THE FOLLOWING SAFETY INSTRUCTIONS COULD RESULT IN SERIOUS INJURY OR DEATH.
@
I. Training
Read the instructions carefully. Be familiar with the
controls and the proper use of the equipment.
Never allow children or people unfamiliar with the ins-
tructions to use the lawnmower. Local regulations may
restdct the age of the operator.
Never mow while people, especially children, or pets are
nearby.
Keep in mind that the operator or user isresponsible for
accidents or hazards occurring to other people or their
property.
All ddvers should seek and obtain professional and
practical instruction, Such instruction should empha-
size:
- the need for care and concentration when working
with ride-on machines;
- control of a ride-on machine sliding on a slope will
not be regained by the application of the brake.
The main reasons for loss of control are:
a) insufficient wheel grip;
b) being driven too fast;
c) inadequate braking;
d) the type of machine is unsuitable for its task;
e) lack of awareness of the effect of ground
conditions,especially slopes;
f) incorrect hitching and load distribution.
II. Preparation
While mowing, always wear substantial footwear and
long trousers. Do not operate the equipment when
barefoot or wearing open sandals.
Thoroughly inspect the area where the equipment is to
be used and remove all objects which may be thrown by
the machine.
WARNING - Petrel is highly flammable.
Store fuel in containers specifically designed for this
purpose.
Refuel outdoors only and do not smoke while refu-
eling.
Add fuel before starting the engine. Never remove
the cap of the fuel tank or add petrol while the engine
is running or when the engine is hot.
- If petrol is spilled, do not attempt to start the engine
but move the machine away from the area of spillage
and avoid creating any source of ignition until petrol
vapors have dissipated.
- Replace all fuel tanks and container caps securely.
Replace faulty silencers.
Before using, always visually inspect to see that the
blades, blade bolts and cutter assembly are not worn or
damaged. Replace worn or damaged blades and bolts
in sets to preserve balance.
On multi-bladed machines, take care as rotating one
blade can cause other blades to rotate.
3
IlL Operation
Do not operate the engine in a confined space where
dangerous carbon monoxide fumes can collect.
Mow only in daylight or in good adificial light.
Before attemptingto start the engine, disengage all blade
attachment clutches and shift into neutral.
Do not use on slopes of more than 10°.
Remember there isnosuchthingas a =safe" slope. Travel
on grass slopes requires padicular care. To guard
against oveduming;
- do not stop or start suddenly when going up or
downhill;
engage clutch slowly, always keep machine in gear,
especially when traveling downhill;
machine speeds should be kept low on slopes and
during tight turns;
stay alert for humps and hollows and other hidden
hazards;
- never mow across the face of the slope, unless the
lawnmower is designed for this purpose.
Use care when pulling loads or using heavy equipment.
- Use only approved drawbar hitch points.
- Limit loads to those you can safely control.
- Do not turn sharply. Use care when reversing.
- Use counterweight(s) or wheel weights when sug-
gested in the instruction handbook.
Watch out for traffic when crossing or near roadways.
Stop the blades from rotating before crossing surfaces
other than grass.
When using any attachments, never direct discharge of
matedal towardbystanders nor allow anyone near the
machine while in operation.
Never operate the lawnmower with defective guards,
shields or without safety protective devices in place.
Do not change the engine governor settings or overspeed
the engine. Operating the engine at excessive speed
may increase the hazard of personal injury.
Before leaving the operator's position:
- disengage the power take-off and lower the attach-
ments;
- change into neutral and set the parking brake;
- stop the engine and remove the key.
Disengage ddve to attachments, stop the engine, and
disconnect the spark plug wire(s) or remove the ignition
key
before cleaning blockages or unclogging chute;
before checking, cleaning or working on the
lawnmower;
after striking aforeign object. Inspect thelawnmower
for damage and make repairs before restarting and
operating the equipment;
- if the machine starts to vibrate abnormally (check
immediately).
Disengage drive to attachments when transpoding or not
in use.
Stop the engine and disengage ddve to attachment
- before refueling;
- before removing the grass catcher;
- before making height adjustment unless adjust-
ment can be madefrom the operator's position.
Page 4
&
Reduce the throttle setting during engine ran-out and,
ifthe engine is provided witha shut-off valve, turnthe fuel
off at the conclusion of mowing.
IV. Maintenance and Storage
Keep all nuts, bolts and screws tight to be sure the
equipment is in safe working condition.
Never store the equipment with petrol in the tank inside
a building where fumes may reach an open flame or
spark.
Allow the engine to cool before storing in any enclosure.
To reduce the fire hazard, keep the engine, silencer,
battery compartment and petrol storage area free of
grass, leaves, or excessive grease.
Check the grass catcher frequently for wear or deterio-
ration.
Replace worn or damaged parts for safety.
If the fuel tank has to be drained, this should be done
outdoors.
On multi-bladed machines, take care as rotating one
blade can cause other blades to rotate.
When machine isto be parked, stored or leftunattended,
lower the cutting means unless a positive mechanical
lock is used.
CAUTION: Always disconnect spark plug wire and
place wire where it cannot contact spark plug in
order to prevent accidental starting when setting
up, transporting, adjusting or making repairs.
4
Page 5
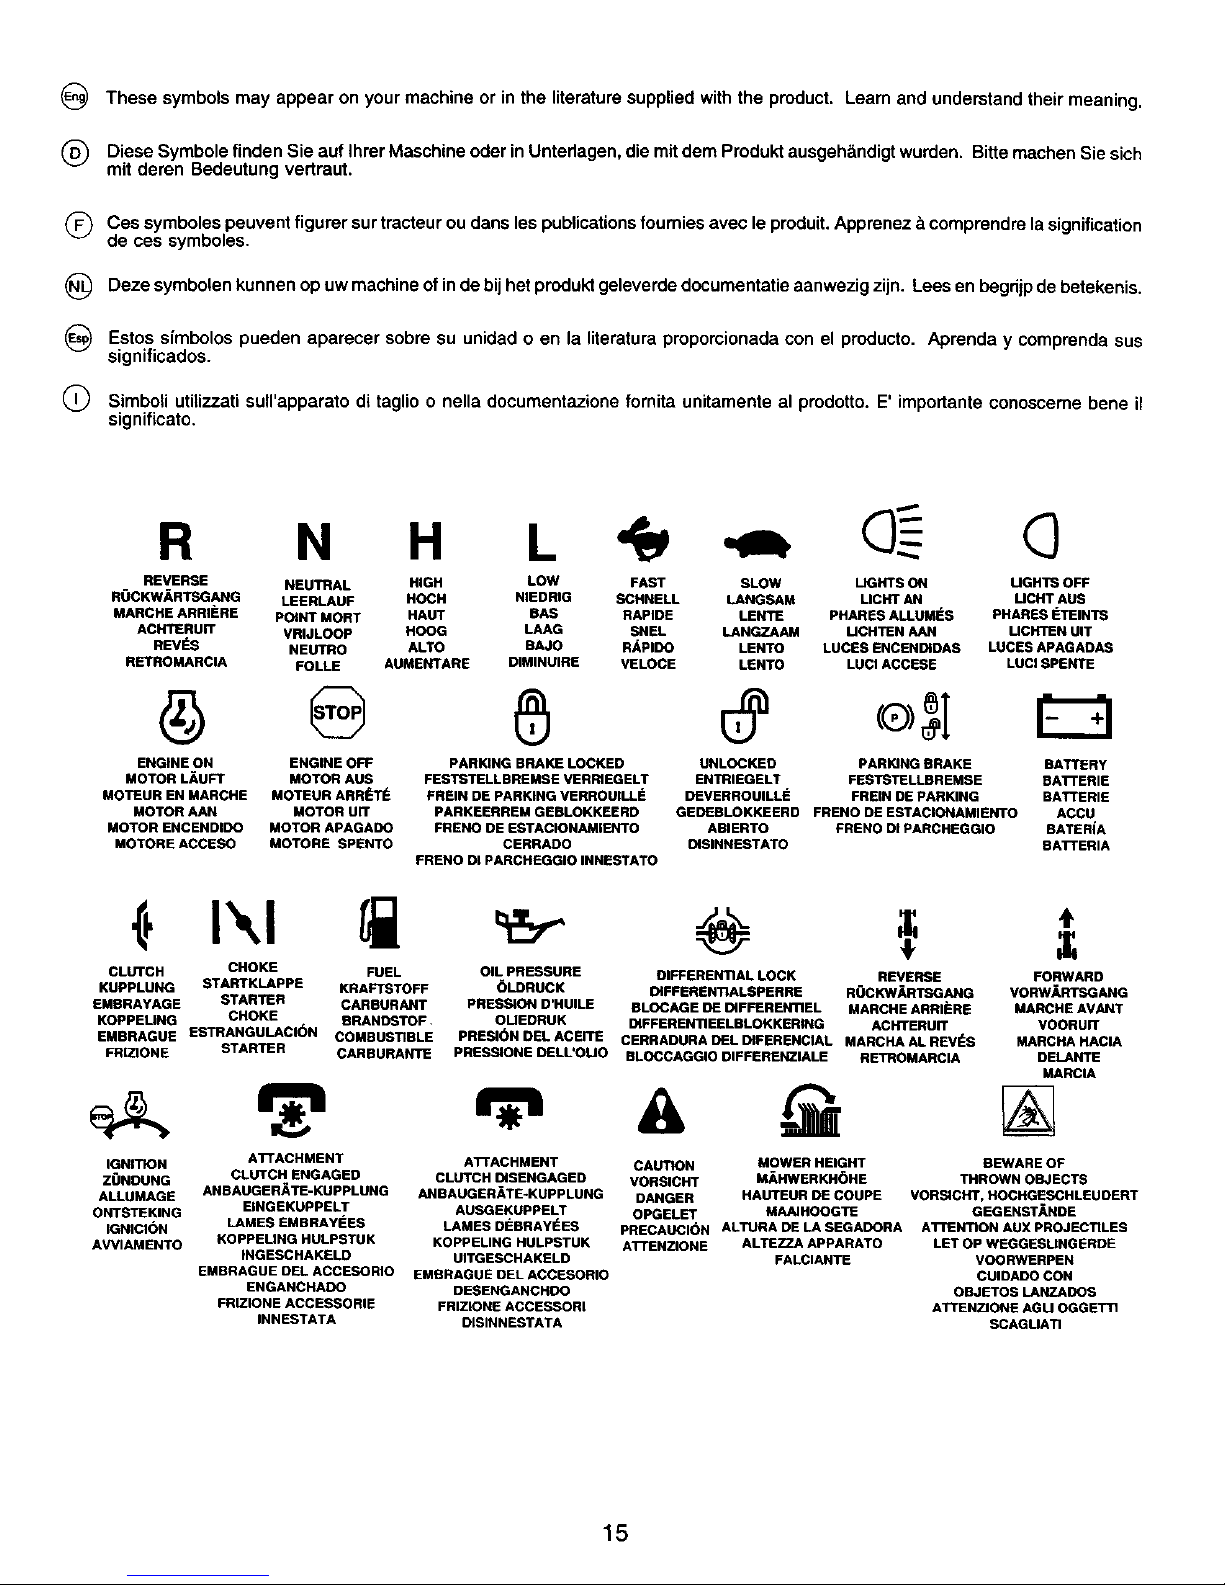
(_ These symbols may appear on your machine or in the literature supplied with the product. Learn and understand their meaning.
(_) Diese Symbole finden Sie auf Ihrer Maschine oder in Untedagen, die mit dem Produkt ausgeh'&ndigtwurden. Bitte machen Sie sich
mit deren Bedeutung vertraut.
(_ Ces symboles peuvent figurer sur tracteur ou darts les publicationsfoumies avec le produit. Apprenez _.comprendre la signification
de ces symboles.
(_ Deze symbolen kunnen op uw machine of inde bij het produkt geleverde documentatie aanwezig zijn. Lees en begdjp de betekenis.
_) Estos simbolos pueden aparecer sobre su unidad o en la literatura proporcionada con el producto. Aprenda y comprenda sus
significados.
(_ Simboli utitizzati sull'apparato di taglio o nella documentazione fomita unitamente al prodotto. E' importante conosceme bene il
significato.
R N H L
REVERSE NEUTRAL HIGH LOW FAST SLOW LIGHTS ON UGH'IS OFF
ROCKW/_RTSGANG LEERLAUF HOCH NIEDRIG SCHNELL LANGSAM LICHT AN UCHT AUS
MARCHE ARRII_RE POINT MORT HAUT BAS RAPIDE LENTE PHARES ALLUMES PHARES _'EINTS
ACHTERUIT VRIJLOOP HOOG LAAG SNEL LANGZAAM UCHTEN AAN UCHTEN UIT
REV_S NEUTRO ALTO BAJO RAPIDO LENTO LUCES EHCENDIDAS LUCES APAGADAS
RETROMARCIA FOLLE AUMENTARE DIMINUIRE VELOCE LENTO LUCl ACCESE LUCl SPENTE
ENGINE ON ENGINE OFF PARKING BRAKE LOCKED UNLOCKED PARKING BRAKE BATTERY
MOTOR LAUFT MOTOR AUS FESTRTELLBREMSE VERRIEGELT EN'ITIIEGELT FESTSTELLBREMSE EATrERIE
MOTEUR EN MARCHE MOTEUR ARR_rI_ FREIN DE PARKING VERROUILLI_ DEVERROUILL I_ FREIN DE PARKING BATTERIE
MOTOR AAN MOTOR UIT PARKEERREM GEBLOKKEERD GEDEBLOKKEERD FRENO DE ESTACIONAMIEHTO ACCU
MOTOR ENCENDIDO MOTOR APAGADO FRENO OE ESTACIONAMIENTO ABIERTO FRENO DI PARCHEGGIO BATERIA
MOTORE ACCESO MOTORE SPENTO CERRADO DISINNESTATO EA'I'rERIA
FRENO DI PARCHEGGIO INNESTATO
CLUTCH CHOKE FUEL OIL PRESSURE DIFFERENTIAL LOCK REVERSE FORWARD
KUPPLUNG STARTKLAPPE KRAFTSTOFF OLDRUCK DIFFEREN'RALSPERRE ROCKW_,RTSGANG VORW,_RTSGANG
EMERAYAGE STARTER CARBURART PRESSION D'HUILE BLOCAGE DE D4PFEREN_IEL MARCHE ARRI_RE MARSHE AVANT
KOPPEMNG CHOKE ERANDSTOF. OUEDRUK DIFFERENTI EELBLOKKERING ACHTERUIT VOORUrr
EMBRAGUE ESTRANGULACI6N COMBUSTIBLE PRESI(_N DEL ACEITE CERRADURA DEL DIFERENCIAL MARSHA AL REVI_S MARCRA HACIA
FRIZlONE STARTER CARSURAN'rE PRESSIONE DELL*OUO BLOCCAGGIO DIFFI=REt_[IALE RETROMARCIA DELANTE
MARCIA
IGNITION
ZUNDUNG
ALLUMAGE
OHTSTEKING
IGNICI(_N
AWIAMENTO
ATTACHMENT
CLUTCH ENGAGED
ANBAUGER._TE-KUPPLUNG
EINGEKUPPELT
LAMES EMBRAYEES
KOPPEUNG HULPSTUK
INGESCHAKELD
EMBRAGUE DEL ACCESORIO
ENGANCHADO
FRIZIONE ACCESSORIE
INNESTATA
ATrACHMENT
CLUTCH D_SENGAGED
ANBAUGERATE*KUPPLUHG
AUSGEKUPPELT
LAMES DI_BRAYI_ES
KOPPELING HULPSTUK
UITGESCHAKELD
EMSRAGUE DEL ACCESORIO
DESENGANCHDO
FRIZIONE ACCESSORI
DISINNESTATA
CAUTION MOWER HEIGHT BEWARE OF
VOHSICHT M,_HWERKH(_HE THROWN OBJECTS
DANGER HAUTEUR DE COUPE VORSICHT, HOCHGESCHLEUOERT
OPGELET MAAIHOOGTE GEGENST/_NDE
PRECAUCION ALTURA DE LA SEGADORA A'ITIENTIGN AUX PROJECTILES
AI"rENZIONE ALTEZZA APPARATO LET OP WEGGESMNGERDE
FALCIARTE VOORWERPEN
CUIDADO CON
OBJETOS LANZADOS
ATI'ENZJONE AGU OGGE'rTI
SCAGUATI
15
Page 6

(_ These symbols may appear on your machine or in the literature supplied with the product. Learn and understand their meaning.
(_ Diese Symbole finden Sie auf Ihrer Maschine oder in Untedagen, die mit dem Produkt ausgeh_ndigt wurden. Bitte machen Sie sich
mit deren Bedeutung vertraut.
Q Ces symboles peuvent figurer surtracteur oudans les publications foumies avec le produit. Apprenez _ comprendre la signification
de ces symboles.
(_ Deze symbolen kunnen op uw machine of in de bij het produkt geleverde documentatie aanwezig zijn. Lees en begrijpde betekenis.
(_ Estos simbolos pueden aparecer sobre su unidad o en la literatura proporcionada con el producto. Aprenda y comprenda sus
significados.
Q Simboli utilizzati sull'apparato di taglio o nella documentazione fomita unitamente al prodotto. E' importante conosceme bene il
significato.
NO OPERATION
ON SLOPES MORE THAN 10 _
NICHT AUF ABH_NGEN MIT TENIR LES PASSANTS _ DISTANCE
MEHR ALS 10° STEIGUNG RETREIBEH OMSTANOERS UIT OE
NE PAS UTILISER SUR DES BUURT HOUDEN
PENTES DE PLUS DE 10° GU/_RDESE LEJOS DE GENTE
NIET OP HELLINGEN VAN MEER DAN TENERE LONTANI I PASSAHTI
10° GEBRUIKEN
NO OPERE SOBRE PENDIENTES
DE M_S DE 10°
NON USARE SU PENDII CON
UN'INCMNAZIONE DI OLTRE 10°
KEEP BYSTANDERS AWAY READ OWNERS MANUAL
ZUSCHAUER FERNHALllEN BETRIEBSANLEITUNG LESEN
LIRE LE MANUEL
D1NSTRUCTIONS
GEBRUIKERSHANDLEIDING
LEZEN
LEA EL MANUAL DE
INSTRUCCIONES
LEGGERE |L MANUALE
DELL'OPERATORE
EUROPEAN MACHINERY WARNING
DIRECTIVE FOR SAFETY WARNUNO
EUROP/_ISCHE VERORDNUNG OANGER
FOR MASCH|NEN-SICHERHEIT WAARSCHUWING
CONFORME AUX NORMES OE ATENCI_N
SI_CURIT_ EUROPI_ENNES AWERTENZA
VEILIGHEIOSRICHTLIJN VOOR
EUROPESE MACHINES
DIRECTIVO DE MAQUINARIA
EUROPEO PARA LA SEGURIDAD
NORMATIVE AHTINFORTUNISTICHE
EUROPEE PER MACCHINARI
MOWER LIFT
MAHWERKHUR
RELEVAGE DE LqJNITI_ DE COUPE
MA/UHOOGTEREGELJNG
LEVANTAMIENTO DE LA SEGADORA
SOLLEVAMENTO AFPARATO FALCIANTE
DANGER. KEEP HANDS AND FEET AWAY
GEFAHR, HANDE UNO FOSSE FERNHALTEN
DANGER, GARDEZ LES MAINS ET LES PIEDS AU LOIN
GEVAAR, HANDEN EN VOETEN UIT DE BUURT HOUDEN
PELIORO, MANTENGA LAS MANOS Y LOS PIES LEJOS
PERICOLO. TENERE LONTANI MANI PIEDI
FREE WHEEL
FREILAUF
ROUE UBRE
FREEWHEEL
RUEDA UBRE
COMANDO DISINNESTO
DO NOT OPERATE WITHOUT BAGGER OR DEFLECTOR
NICHT IN BETRIEB NEHMEN OHNE GRASFANGBOX ODER DEFIJEKTOR
NE JAMAIS UTIUSER SANS BAC OU DEFLECTEUR.
NONAZIONARE LA MACCHINA SENZA |L CESTO O SENZO IL DEFLEI-rORE DI SCARICO
NO PONGA EN MARCHA SIN HECOGEDOR O DEFLECTOR
ZONDER STORTGOOT OF AFWIJKEHOE SPATDOEK NIET OPEREREN
16
Page 7

.CIGARE'R'ES
®
GEFAHR
AUGEN SCHOTZEN
EXPLOSIVE GASE
KQ)NNEN ERBLINDUNG
UND
KORPERVERLETZUNGEN
VERURSAC-HEN.
(_ GEVAAR
OGEN SESCHERMEN
EXPLOSIEVEGASSEN
KUNNEN BLINDHEID
OFLETSEL
VEROORZAKEN.
PELIGROPROTEJE SUS OJOS
GASES EXPLOSIVOS
PUEDEN CAUSAR
CEGUE-DAD O
LESIONES.
Q PERICOLO
RIPARARE GLI OCCHI
VAPORI ESPLOSIVI
PUO'PROVOCARE
CECITA'OLESIONI
BRULURES GRAVES.
@
ZU VERMEIDEN:
• FUNKEN
FEUER
• RAUCHEN
GEEN
• VONKEN
VUUR
• ROKEN
NO
CHISPAS
• LLAMAS
FUMAR
DIVIETO
SCINTILLE
FIAMME
• SIGARETTE
SCHWEFELSAURE
KANN ERBLINDUNG
ODEB SCHWERE
VERATZUNGEN
VERURSACHEN.
ZWAVELZUUR
KAN BLINDHEID OF ERN-
STIGE BRANDWONDEN
VER-OORZAKEN.
ACIDO SULFURICO
PUEDEN CAUSAR
CEGUE-DAD O
QUEMADURAS MUY
GRAVES.
AClDOSOLFORICO
PUO'PROVOCARELA
CECITA'OD USTIONI
GRAVI.
AUGEN
UNVERZ0GLICH MIT
WASSER AUSSPULEN.
SOFORT ARZTLICHE
HILFE AUFSUCHEN.
OGENONMIDDELLIJK
METWATER SPOELEN.
SNEL MEDISCHE HULP
INROE-PEN.
L|MPIESELOSOJOS
CON UN CHORRO DE
AGUA.OBTENGA
AYUDAMEDICA
RAPIDAMENTE.
LAVARE
IMMEDIATAMENTEGLI
OCCHICON ACQUA.
SOTTOPORREALPIU'
PRESTO ALLE CURE
DEL MEDICO.
17
Page 8
2. Assembly• 2• Zusammenbau. 2• Montage. 2. Montaje
2. Montaggio. 2. Montage•
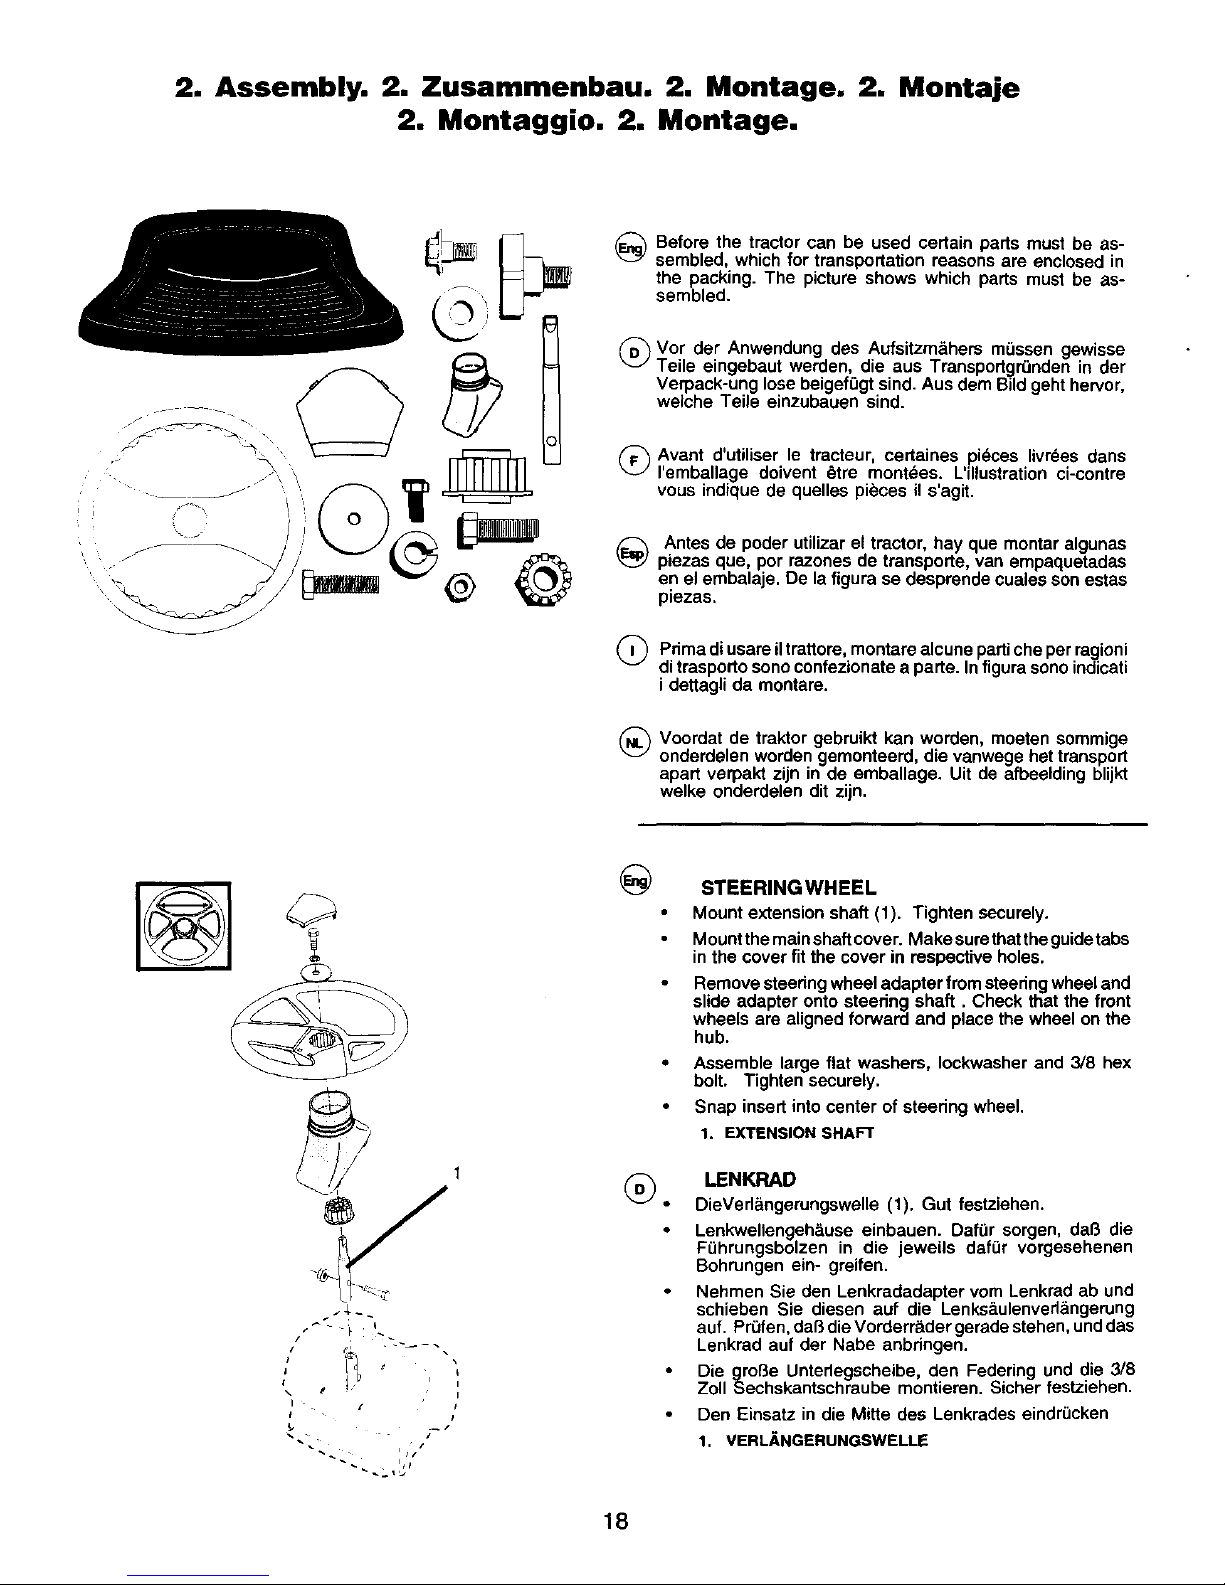
(_ Before the tractor can be used certain parts must be as-
sembled, which for transportation reasons are enclosed in
the packing. The picture shows which parts must be as-
sembled.
(_Vor der Anwendung des Aufsitzm&hers mDssen gewisse
Teile eingebaut werden, die aus Transportgr(_nden in der
Veqoack-ung lose beigefDgt sind. Aus dem Bild geht hervor,
welche Teile einzubauen sind.
(_) Avant d'utiliser le tracteur, certaines pi_ces livr_es dans
I'emballage doivent 6tre mont_es. L'illustration ci-contre
vous indique de quelles pieces il s'agit.
(_ Antes de poder utilizar el tractor, hay que montar algunas
piezas que, por razones de transporte, van empaquetadas
en el embalaje. De la figura se desprende cuales son estas
piezas.
(_ Prima di il montare alcune che
usare trattore,
patti per ragioni
di trasporto sono confezionate a parte. Infigura sono indicati
i dettagli da montare.
(_ Voordat de traktor gebruikt kan worden, moeten sommige
onderdelen worden gemonteerd, die vanwege her transport
apart verpakt zijn in de emballage. Uit de afbeelding blijkt
welke onderdelen dit zijn.
/
I!'
g I
\1 I
i f II
STEERING WHEEL
Mount extension shaft (1). Tighten securely,
Mount the main shaft cover. Make sure that the guidetabs
in the cover fit the cover in respective holes.
Remove steering wheel adapter from steering wheel and
slide adapter onto steering shaft. Check that the front
wheels are aligned forward and place the wheel on the
hub.
Assemble large flat washers, Iockwasher and 3/8 hex
bolt. Tighten securely.
Snap insert into center of steering wheel.
1. EXTENSION SHAFT
LENKRAD
DieVerl&ngerungswelle (1). Gut festziehen.
Lenkwellengeh&use einbauen. Daf0r sorgen, dab die
FLthrungsbolzen in die jeweils defer vorgesehenen
Bohrungen ein- greifen.
Nehmen Sie den Lenkradadapter vom Lenkrad ab und
schieben Sie diesen auf die Lenks_.ulenved&ngerung
auf. PrOfen, dab die Vorderr&der gerade stehen, und das
Lenkrad auf der Nabe anbdngen.
Die groBe Unterlegscheibe, den Federing und die 3/8
Zoll Sechskantschreube montieren. Sicher festziehen.
Den Einsetz in die Mitte des Lenkrades eindrL_cken
1. VERLANGERUNGSWELLE
18
Page 9
2
\
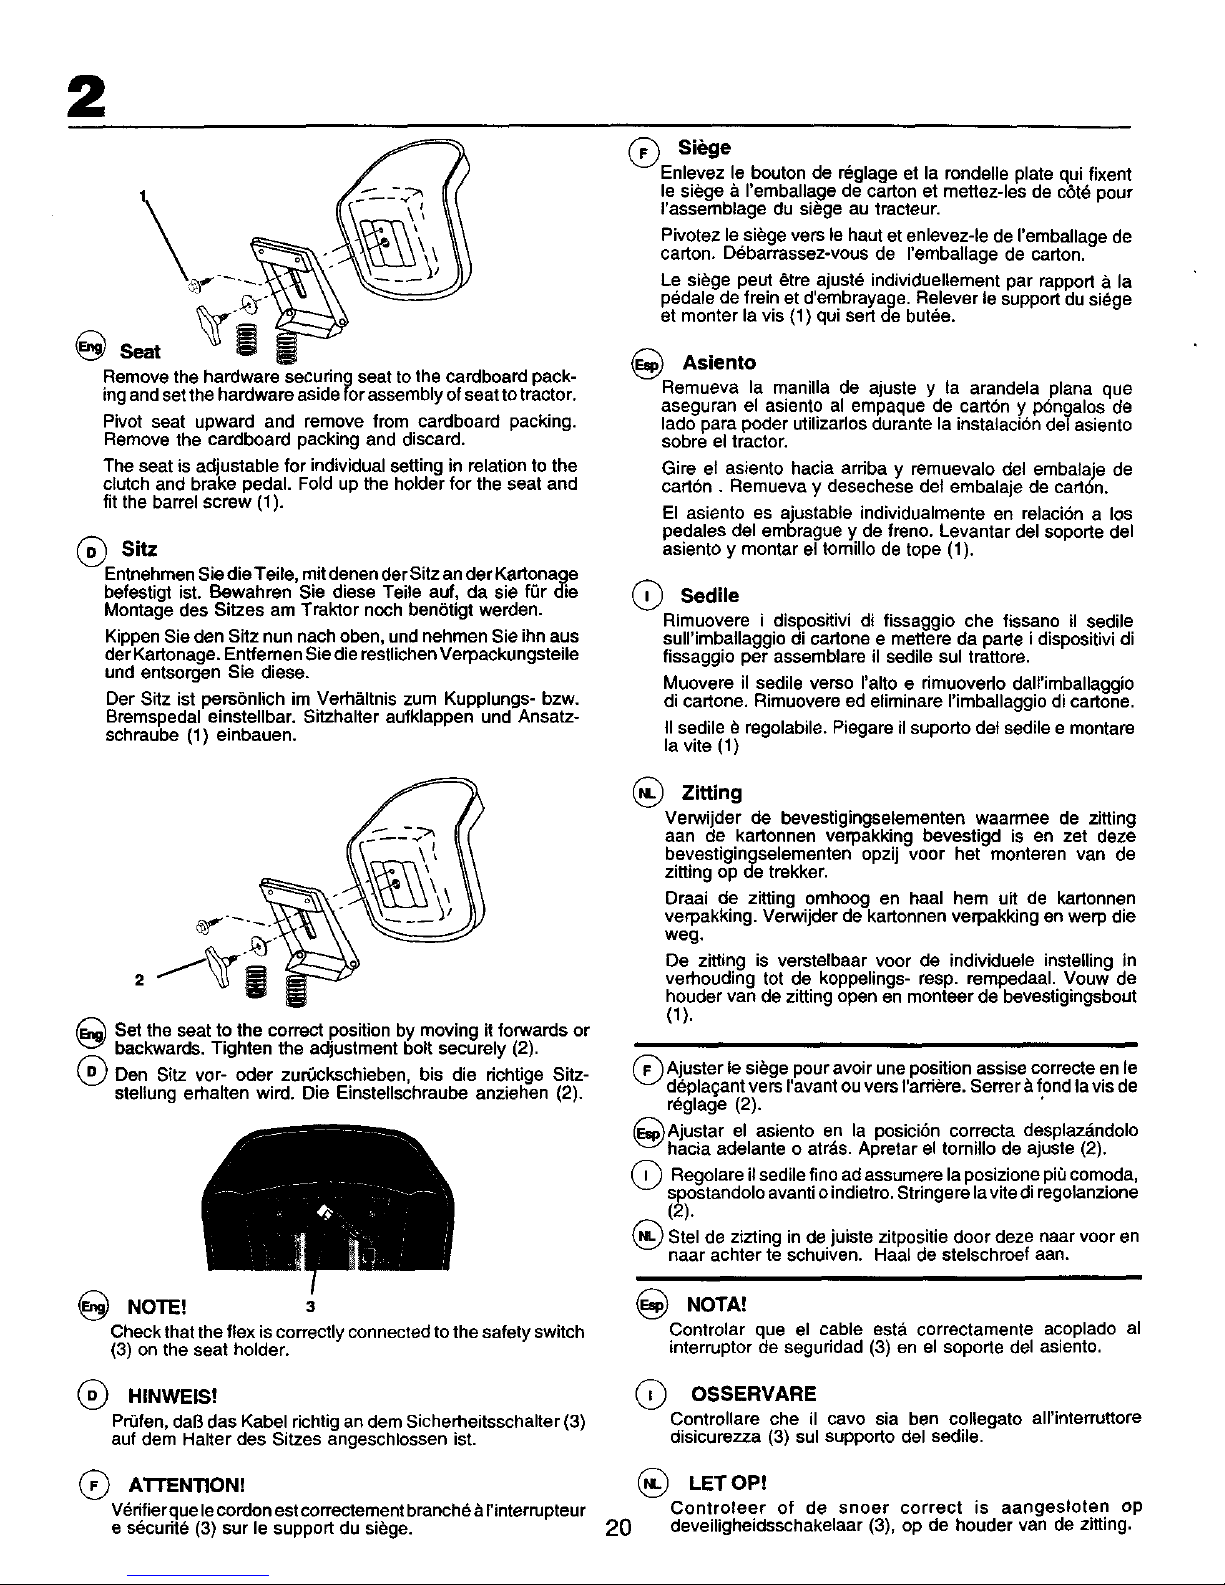
Seat
Remove the hardware securing seat to the cardboard pack-
ing and set the hardware aside for assembly of seat to tractor.
Pivot seat upward and remove from cardboard packing.
Remove the cardboard packing and discard.
The seat is adjustable for individual setting in relation to the
clutch and brake pedal. Fold up the holder for the seat and
fit the barrel screw (1).
(_ Sitz
Entnehmen Sie dieTeile, mit denen der Sitz an der Kartonage
befestigt ist. Bewabren Sie diese Teile auf, da sie f0r die
Montage des Sitzee am Traktor noch ben_tigt werden.
Kippen $ie den Sitz nun nach oben, und nehmen Sie ihn aus
der Kartenage. Enffemen $ie die restlichen Verpackungsteile
und entsorgen Sie dieee.
Der $itz ist persSnlich im Verh<nis zum Kupplungs- bzw.
Bramspedal einstellbar. Sitzhalter aufklappen und Ansatz-
schraube (1) einbauen.
(_ Si_ge
Enlevez le bouton de reglage et la rendeUe plate qui fixent
le singe ;_remballage de carton et mettez-les de cbt_ pour
I'aesemblage du singe au trecteur.
Pivotez le singe vet's le haut et enlevez-le de I'emballage de
carton. D_barrassez-vous de I'emballage de carton.
Le singe peut _tre ajust_ individuellement par rapport a la
pedale de frein et d'embrayage. Relever le support dusiege
et monter la vis (1) qui eert de butee.
Asiento
Remueva la manilla de ajuste y la arandela plana que
aseguran el asiento al empaque de carton y p6ngalos de
lado para poder utilizarlos durante la instalacion del asiento
sobre el tractor.
Gire el asiento hacia arriba y remuevalo del embalaje de
carton. Remueva y desechese det embalaje de cart6n.
El asiento es ajustable individualmente en relacibn a los
pedales del embrague y de freno. Levantar del soporte del
asiento y montar el tomillo de tope (1).
(_ Sedile
Rimuovere i dispositivi di fissaggio che fissano il eedile
sull'imballaggio di cartone e mettere da parte i dispositividi
fissaggio per assemblare il sedile sul trattora.
Muovere il sedile verso ralto e dmuoverlo dall'imballaggio
di cartone. Rimuovere ed eliminate I'imballaggio di cartone.
II sedile _ regolabile. Piegare il suporto def sedile e montara
la vite (1)
_Set the seat to the correct position by moving it fo_ards or
backwards. Tighten the adjustment bolt securely (2).
(_Den Sitz vor- oder zur0ckschieben, bis die richtige Sitz-
stellung erhalten wird. Die Einstellschraube anziehen (2).
(_ Zitting
Verwijder de bevestigingselementen waarrnee de zitting
aan de kartonnen verpakking bevestigd is en zet deze
bevastigingselementen opzij voor her monteren van de
zitting op de trekker.
Draai de zitting omhoog en haal hem uit de kartonnen
verpakking. Verwijder de kartonnen verpakking en werp die
weg.
De zitting is verstelbaar voor de individuele instelling in
verhouding tot de koppelings- resp. rempedaal. Vouw de
houder van de zitting open en monteer de bevestigingsbout
(1).
(_ Ajuster le ei_=gepour avoir une position assise correcte en le
d_plac,_antvers ravant ouvers I'ardere. Serrer &fond lavis de
r_glage (2).
(_)Ajustar el asiento en la posici6n correcta desplaz&ndolo
hacia adelante o atr&s. Apretar el tomillo de ajuste (2).
(_) Regolare il sedile fino ad assumere la posizione pi_ comoda,
spostandolo avanti o indietre. Stringere lavite di regolanzione
(2).
(_) Stel de zizting in de juiste zitpositie door deze naar voor en
naar achter te schuiven. Haal de stelschroef aan.
NOTE! 3
Check that the flex iscorrectly connected tothe safety switch
(3) on the seat holder.
(_) HINWEIS!
Pr0fen, dab das Kabel richtig an dem Sicherheitsschalter (3)
auf dem Halter des Sitzes angaschlossen ist.
Q A'I-rENTION?
Vdritierque le cordon ast correctement branch6 a rinterrupteur
e securite (3) eur le support du singe.
(_) NOTA!
Contrelar que el cable est& correctamente acoplado al
interruptor de seguridad (3) en el soporte del asiento.
(_ OSSERVARE
Controllare che il cavo sia ben collegato all'interruttore
disicurezza (3) sul supporto del sedile.
(_ LET OP!
Controleer of de snoer correct is aangesloten op
20 deveiligheidsscbakelaar (3), op de houder van de zitting.
Page 10

2
@
®
1. Seat pan
2. Battery box door
3. Cable
4. Cable
A. Front of tractor
5. Fender
6. Battery terminal
7. Battery
1. Sitzwanne
2. Battedekasten_,ffnung
3. Kabel
4. Kabel
A. Vorderseite des Rasenm&hers
5. Schutzblech
6. Battedepol
7. Batterie
\
_) Install battery
NOTE: If battery is put into service after month and year
indicated on label, charge battery for minimum of one
hour at 6-10 amps.
,_ WARNING: Before installing battery remove metal brace-
lets,wrist watchbands, rings, etc. fromyour person. Touching
these items to battery could result in bums.
Lift seat pan, and open battery box.
Einbau der Batterie
HINWEIS: Falls diese Battene nach dem auf dem Aufkteber
angegebenen Datum (Monat und Jahr) in Betdeb genommen
wird, die Batterie mindestens eine Stunde lang mit 6 bis 10
Ampere aufladen.
,_ WARNUNG! Vordem Einbau der Battede Metallarmb&nder,
Uhrarmb&nder, Ringe und dgL ablegen. Wenn diese
Gegenst&nde mit der Battede in Ber_hrung kommen, k6nnte
dies Brandvedetzungen verursachen.
Sitzwanne abnehmen und Battedekasten 6ffnen.
G Miee en place de la batterie
REMARQUE: Si la baftede estmise en service apres le mois
et I'annee indiqu_e sur I'_tiquefte, charger la battede durant
une heure au moins & 6-10 amps.
__ DANGER: Avant d'instaUer la battede, prenez la precaution
d'enlever gourmette, montre-bracelet, bague, etc, Leur
contact avec la battede pourrait causer des br01ures.
Lever la plaque de fixation du siege puis ouvdr la boite
de battede.
21
(_1. Plaque de fixation du si_ge
2. Pode de la bofte de battede
3. C&ble
4. C&ble
A. Avant du vdhicule
5. Carrossede
6. Plots de batterie
7. Battede
Page 11
2
i
I
@A
@A
GA
Q A
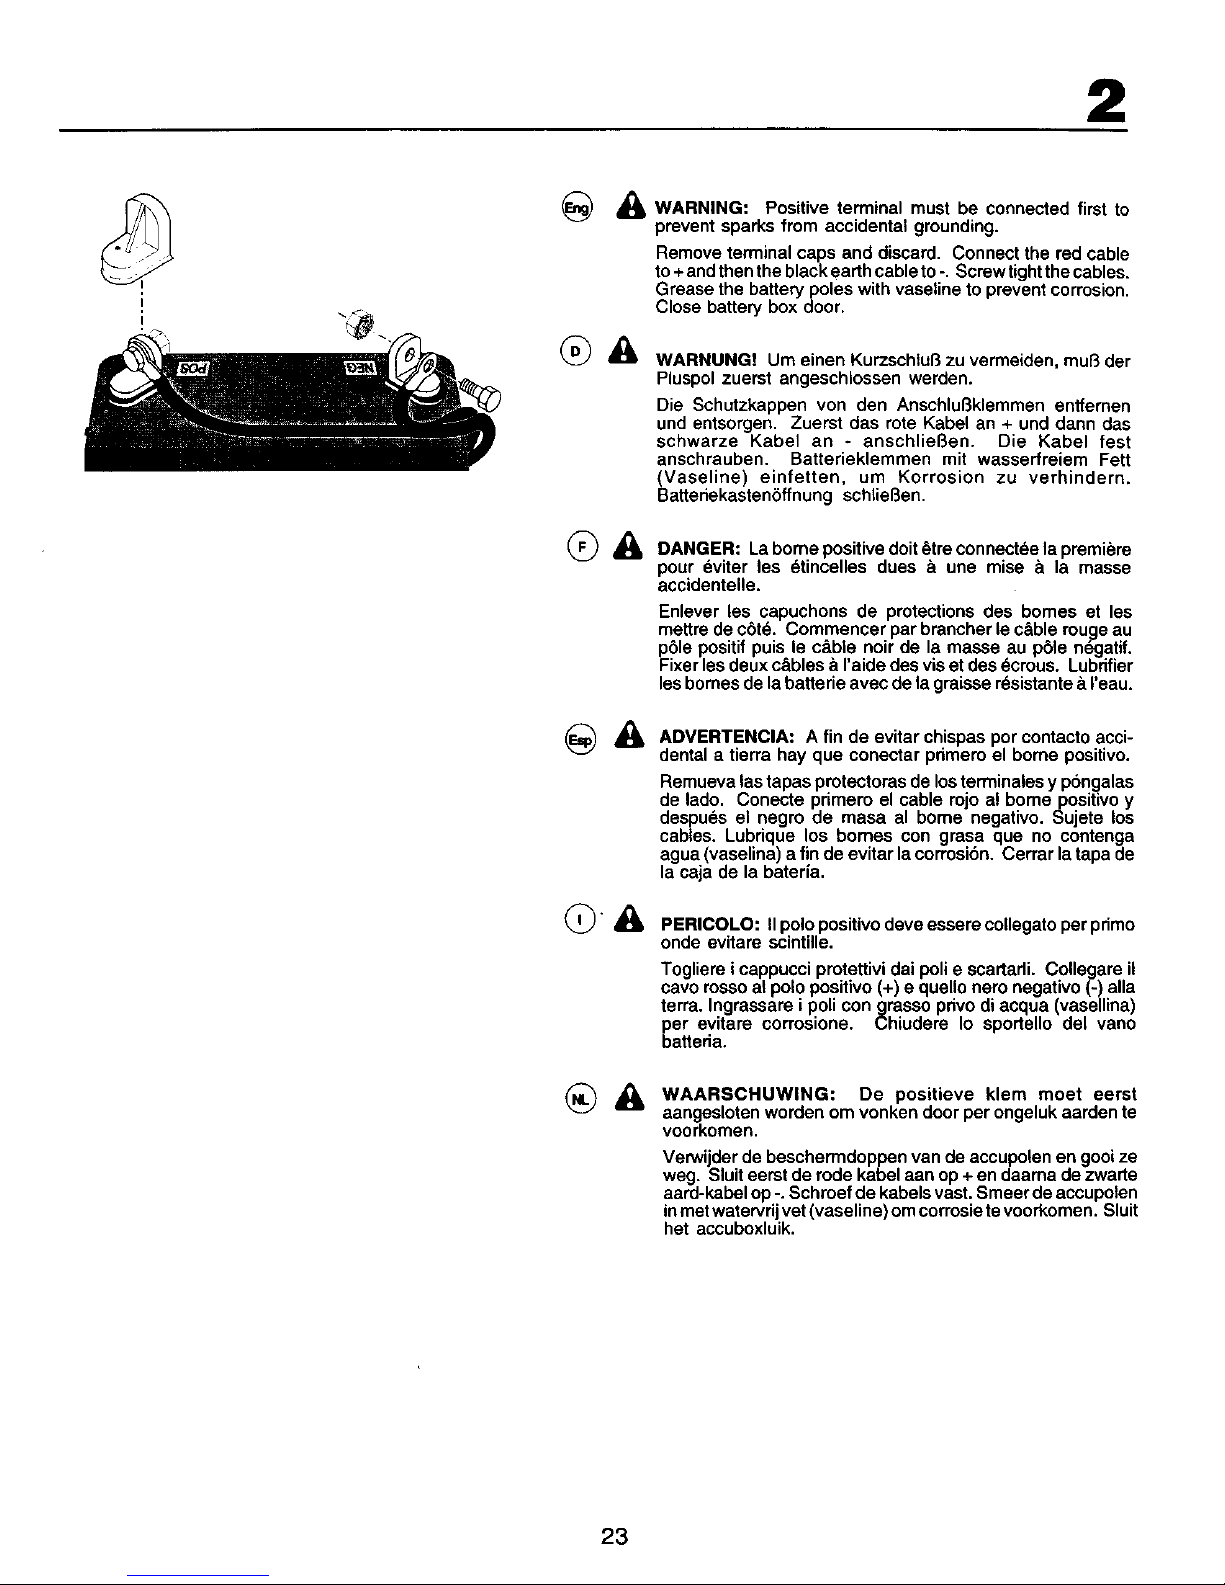
WARNING: Positive terminal must be connected first to
prevent sparks from accidental grounding.
Remove terminal caps and discard, Connect the red cable
to+ and then the black earth cable to -, Screw tightthe cables.
Grease the battery poles with vaseline to prevent corrosion,
Close battery box door.
WARNUNG! Um einen Kurzschlul3 zu vermeiden, mu8 der
Pluspol zuerst angeschlossen werden.
Die Schutzkappen von den Anschlul3klemmen enffemen
und entsorgen. Zuerst das rote Kabel an + und dann das
schwarze Kabel an - anschlieSen. Die Kabel fest
anschrauben. Batterieklemmen mit wasserfreiem Fett
(Vaseline) einfetten, um Korrosion zu verhindern.
Battedekasten6ffnung schlieSen.
DANGER: La borne positive dolt _.tre connect_e la premiere
pour eviter les _tincelles dues & une mise a la masse
accidentelle.
Enlever les capuchons de protections des bomes et les
mettre de c6td. Commencer par brancper le c&ble rouge au
p61e positif puis le c&ble noir de la masse au p61e negatif.
Fixer les deux c&bles & I'aide des vis et des dcrous. Lubrifier
les homes de la batterie avec de la graisse r_sistante & I'eau.
ADVERTENClA: A fin de evitar chispas por contacto acci-
dental a tierra hay que conectar primere el borne positivo.
Remueva lastapas protectoras de los terminales y pbn_lalas
de lade. Conecte pdmero el cable rojo a! bomepositEvo y
despues el negro de masa al borne negativo. Sujete los
cables. Lubrique los bomes con grasa que no contenga
agua (vaselina) afin de evitar la cormsi6n. Cerrar la tapa de
la caja de la bateHa.
PERICOLO: II polo positivo deve essere collegato per primo
onde evitare scintille.
Togliere i cappucci protettivi dai polle scartadi. Collegare il
cavo rosso at polo positivo (+) e quello nero negativo (-) alia
terra. Ingrassare i poll con grasso privo di acqua (vasellina)
per evitare corrosione. Chiudere Io sportello del vano
batteria.
WAARSCHUWlNG: De positieve klem moet eerst
aangesloten worden om vonken door per ongeluk aarden te
voorkomen.
Verwi der de beschermdoppen van de accupolen en gooi ze
weg. Suit eerst de rode kabe aan op + en daama de zwarte
aard-kabel op -. Schroef de kabels vast. Smeer de accupolen
in met watervrij vet (vaseline) om corrosie tevoorkomen. Sluit
het accuboxluik.
23
Page 12
2
@
@
®
4,r
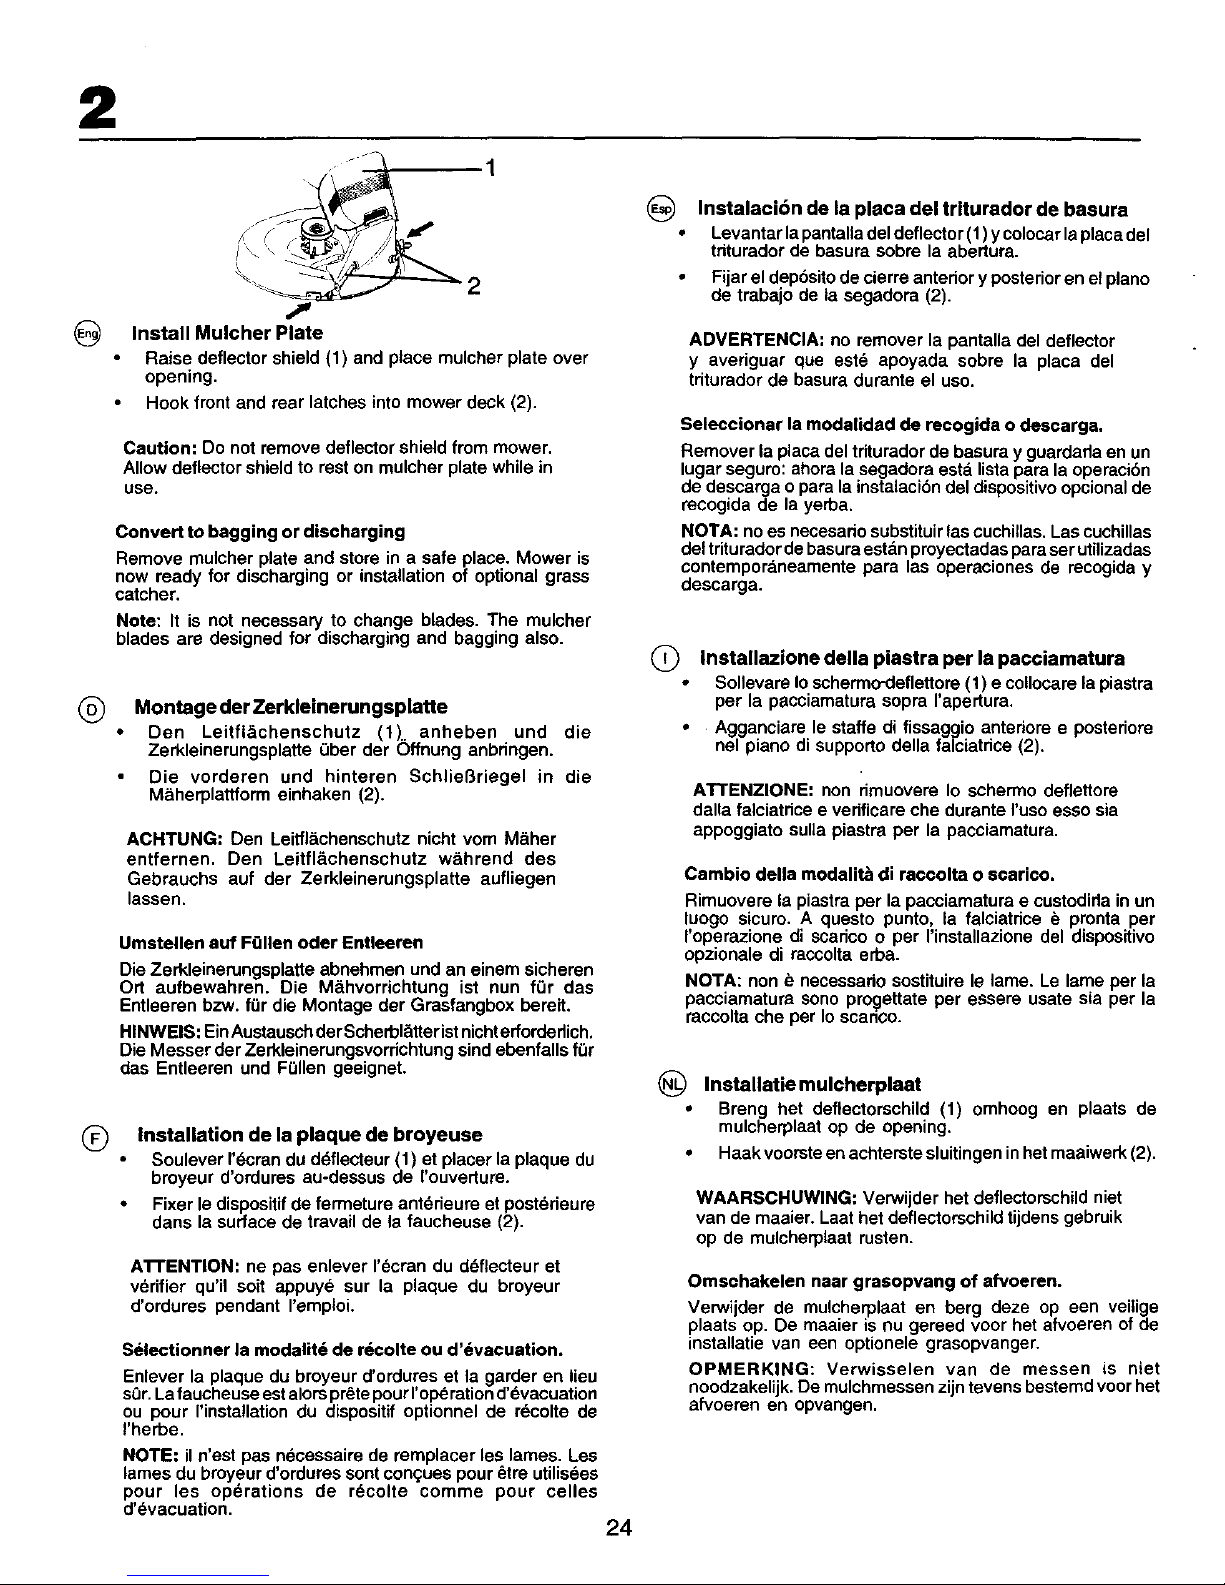
Install Mulcher Plate
I
2
Raise deflector shield (1) and place mulcher plate over
opening.
Hook front and rear latches into mower deck (2).
Caution: Do not remove deflector shield from mower.
Allow deflector shield to rest on mulcher plate while in
use.
Convert to bagging or discharging
Remove mulcher plate and store in a safe place. Mower is
now ready for discharging or installation of optional grass
catcher.
Note: It is not necessary to change blades. The mulcher
blades are designed for discharging and bagging also.
Montage der Zerkleinerungsplatte
Den Leitfl&chenschutz (1).. anheben und die
Zerkleinerungsplatte Qber der Offnung anbringen.
Die vorderen und hinteren SchlieSriegel in die
M&herplattform einhaken (2).
ACHTUNG: Den Leiffl&chenschutz nicht vom M&her
entfernen. Den Leitfl&chenschutz w&hrend des
Gebrauchs auf der Zerkleinerungsplatte aufliegen
lassen.
Umstellen auf FOllen oder EnUeeren
Die Zerkleinerungsplatte abnehmen und an einem sicheren
Ort aufbewahren. Die M&hvorrichtung ist nun for das
Entleeren bzw. fQr die Montage der Grasfangbox bereit.
HINWEIS: EinAustauschder Scherbl&tterist nichterfordedich,
Die Messer der Zerkleinerungsvordchtung sind epenfalls for
das Entleeren und F011engeeignet.
Installation de la plaque de broyeuse
Soulever i%&crandu ddflecteur (1) et placer la plaque du
broyeur d'ordures au-dessus de rouverture.
Fixer le dispositif de fermeture anterieure et postddeure
dans Is surface de travail de la faucheuse (2).
A'rrENTION: ne pas enlever I'ecran du ddflecteur et
verifier qu'il soit appuy_ sur la plaque du broyeur
d'ordures pendant I'emploi.
Selectionner la modalit_ de rdcolte ou d'_vacuation.
Enlever la plaque du broyeur d'ordures et la garder en lieu
st3r.Lafaucheuse est alorsprete pour I'operationd'_vacuation
ou pour I'insta!lation du dispesitif optionnel de r6colte de
I'herbe.
NOTE: il n'est pas necessaire de remplacer les lames. Lea
lames du breyeur d'ordures sont con_:ues pour _tre utilisees
pour les operations de r_colte comme pour celles
d'&vacuation.
24
(_ Instalaci6n de la placa del trlturador
de
basura
• Levantarlapantalladeldeflector(1)ycolocarlaplacadel
triturador de basura sobrela abertura.
Fijar el depbsitode cierre anterior y posterior en el piano
de trabajo de la segadora (2).
ADVERTENCIA: no remover la pantalla del deflector
y averiguar que est6 apoyada sobre la placa del
tdturador de basura durante el uso.
Seleccionar la modalidad de recogida o descarga,
Remover la placa del tdturador de basura y guardada en un
lugar seguro: ahors la segadora esta lista para la operaci6n
de descarga o para la instalacibn del dispositivo opcional de
recogida de la yerba.
NOTA: no es neoesado substituir las cuchillas, Las cuchillas
del triturador de basurs estan proyectadas parsser utilizadas
contempordneamente psra las operaciones de recogida y
deecarga.
Q Installazione della piastra per la pacciamatura
• Sollevare I0 schermo-deflettore (1) e collocare la piastra
per la paociamatura sopra I'apertura,
• Agganciara le staffe di fissaggio antedore e postedore
nel piano di supperto della falciatdce (2).
ATTENZIONE: non dmuovere Io schermo deflettore
dalla falciatdce e vedficare che durante ruso esso sis
appoggiato sulla piastra per la pacciamatura,
Cambio della modalit_ di raccolta o scarico.
Rimuovere la piastra per la pacciamatura e custodida in un
luogo sicuro. A questo punto, la falciatdce e pronta per
roperazione di scarico o per rinstallazione del dispesitivo
opzionale di raccolta erba.
NOTA: non e necessario sostituire le lame. Le lame per Is
paociamatura sono pro_]ettate per essere usate sia per la
raccolta che per Io scanco.
Inatallatie mulcherplaat
• Breng her deflectorschild (1) omhoog en plaats de
mulcherplaat op de opening.
• Haak voomte en achterste sluitingen inhet maaiwerk (2).
WAARSCHUWING: Verwijder het deflectorschild niet
van de maaier. Laat het deflectorschild tijdens gebruik
op de muleherplaat rusten.
Omschakelen naar grasopvang of afvoeren.
Verwijder de mulcherplaat en berg deze op een veitige
plaats op, De maaier is nu gereed voor het afvoeren of de
installatie van een optionele grasopvanger.
OPMERKING: Verwisselen van de messen is niet
noodzakelijk, De mulchmessen zijn tevens bestemd voor het
afvoeren en opvangen.
Page 13
3. Functional description. 3. Funktionsbeschreibung.
3. Description du fonctionnement.
3. Descripci6n del funcionamiento. 3. Funzionamento.
3. Beschrijving van de functies
\ \
o
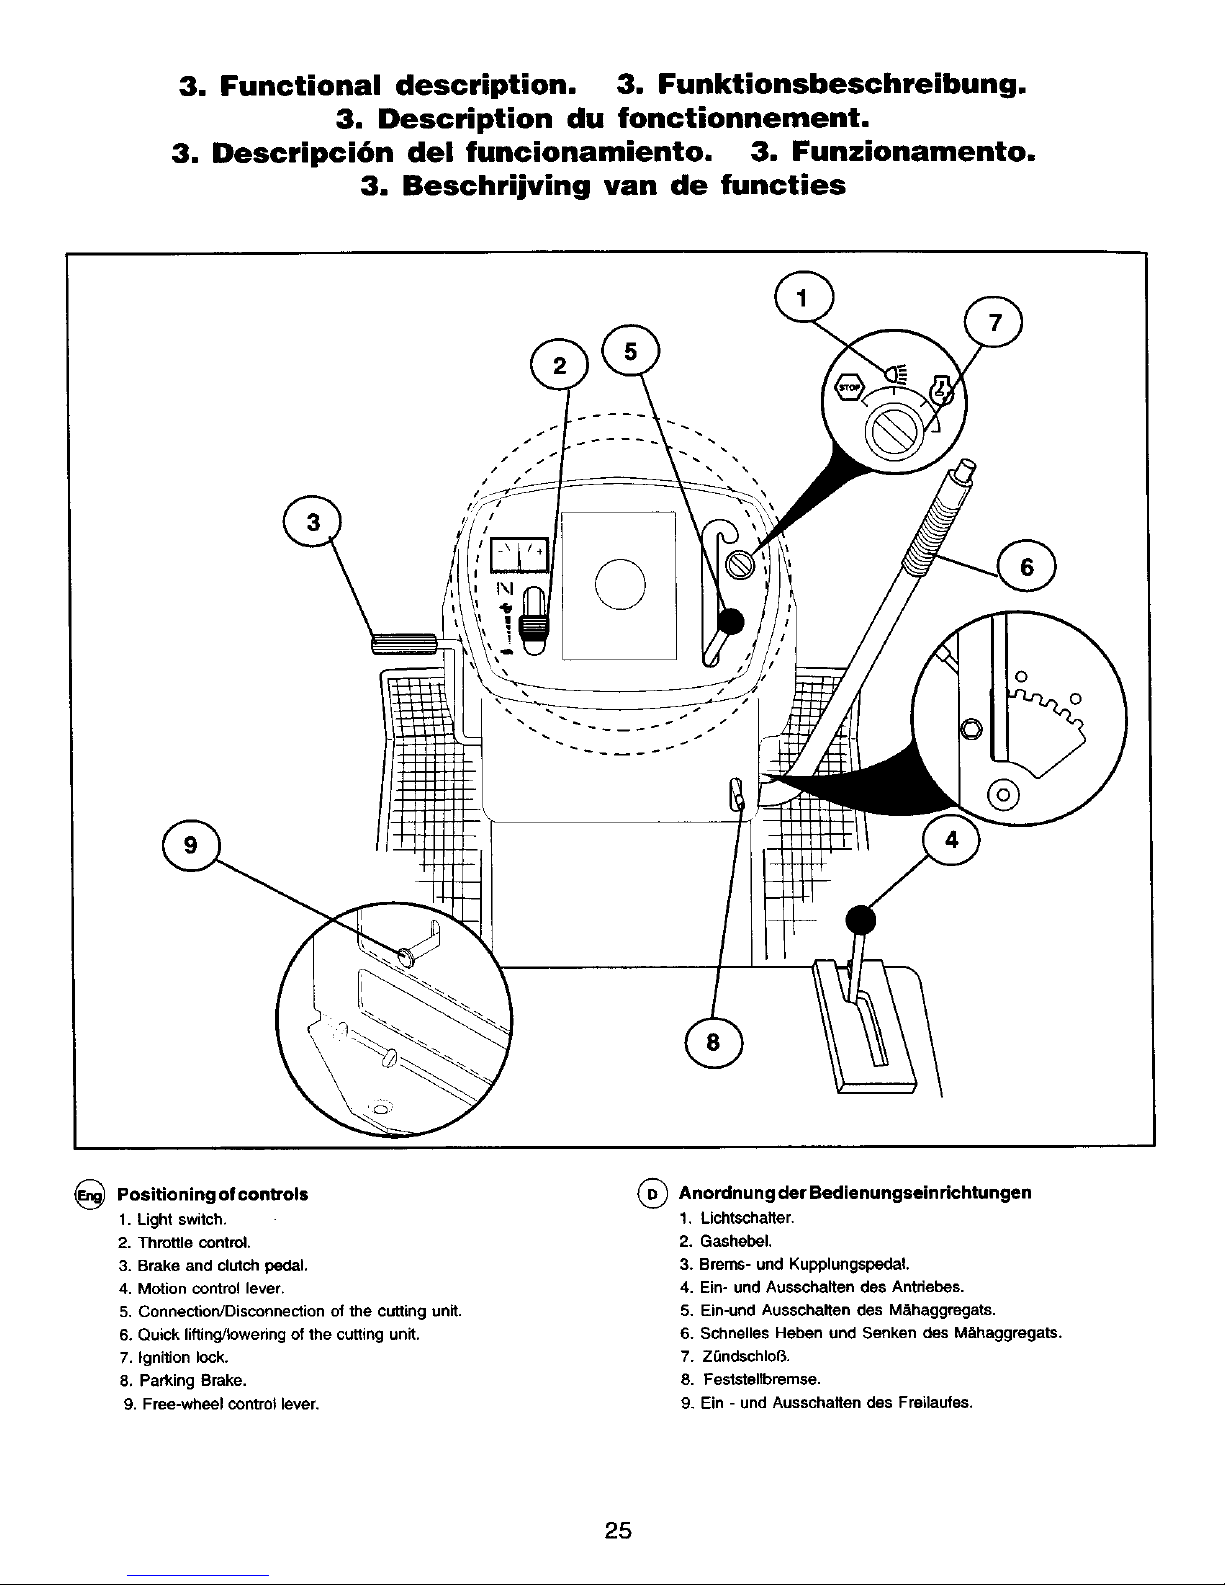
Positio ning of controls
1. Light switch.
2. Throttle control.
3. Brake and clutch pedal.
4. Motion control lever.
5, Connection/Disconnection of the cutting unit.
6. Quick lifting/lowering of the cutting unit.
7. Ignition lock.
8. Parking Brake.
9. Free-wheel control lever,
_ Anordnung der Bedienungseinrichtungen
1, Lichtschalter.
2. Gashebel.
3. Brems- und KupplungspedaL
4. Ein- und Ausschalten des Antdebes.
5, Ein-und Ausschaltee des M&haggregats.
6. Schnelles Hebee und Senken des M&haggregats.
7. Zt_ndschloP_.
8. Feststeltbremse.
9. Ein - und Ausschalten des Fregaufes.
25
Page 14
3
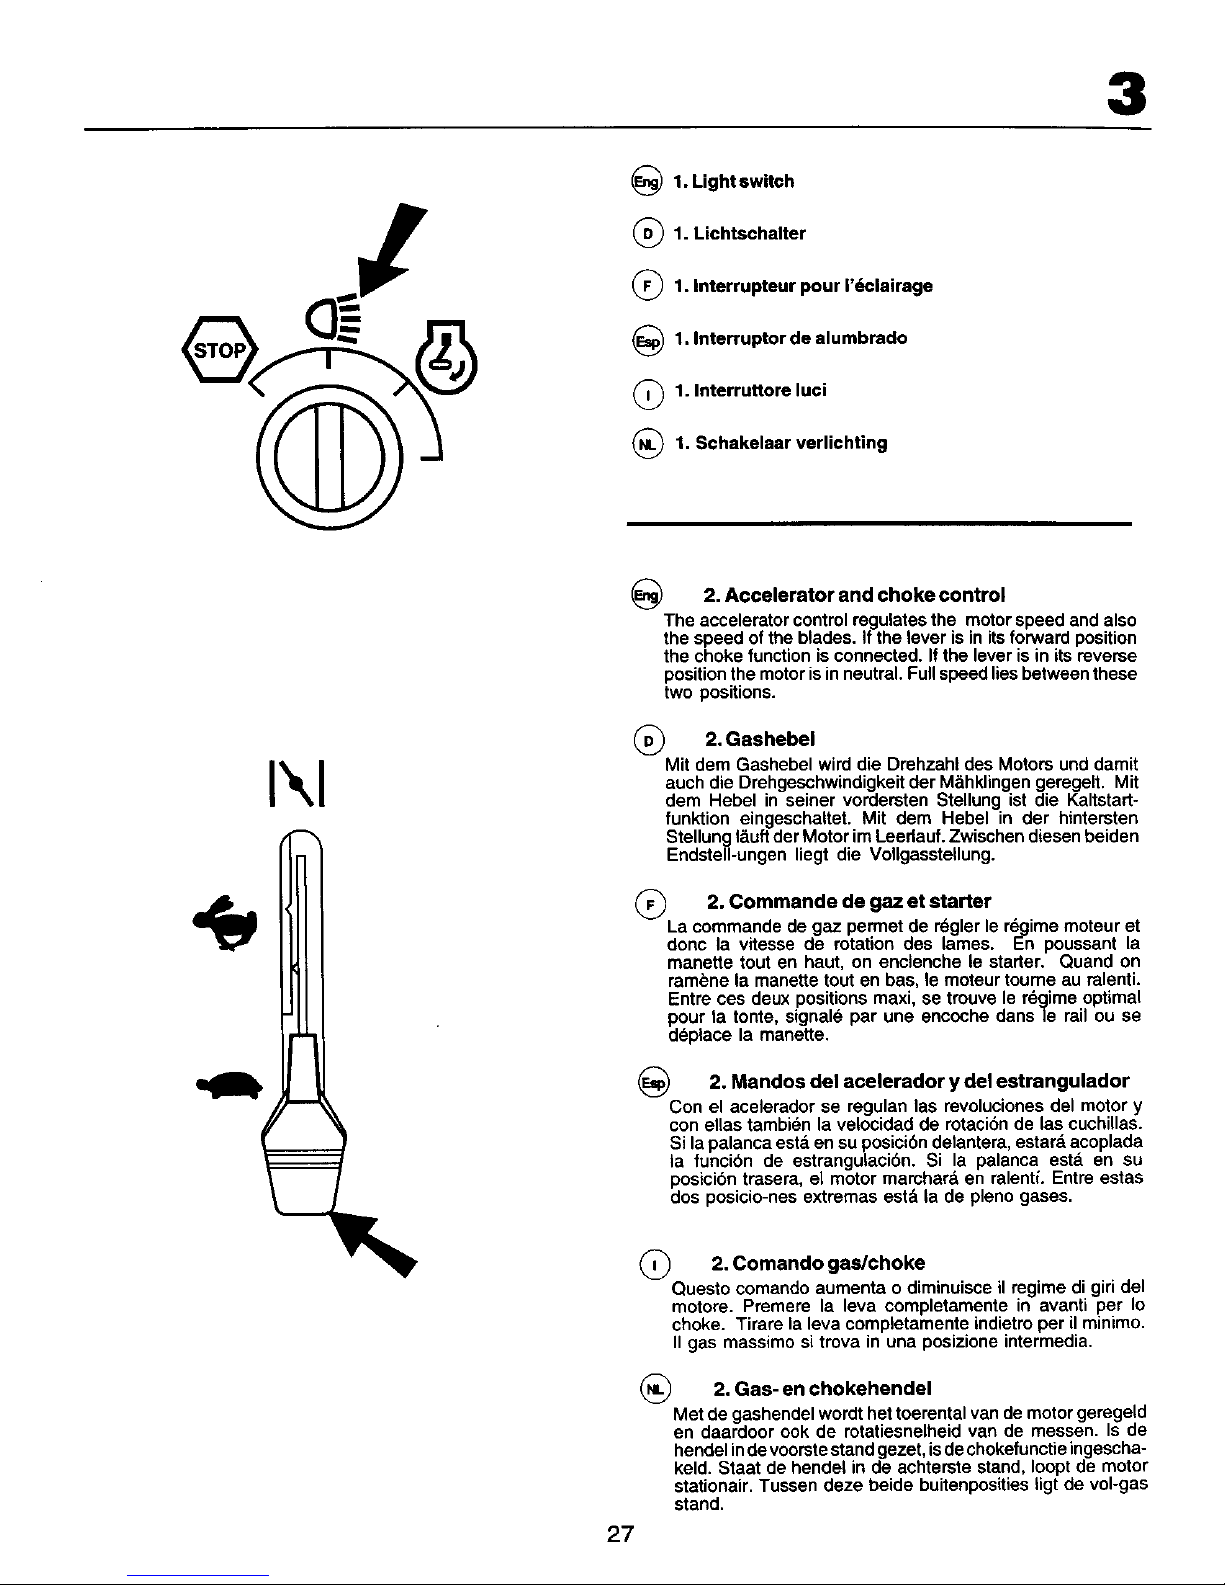
_ 1. Light switch
_1. Lichtschalter
_1. Interrupteur pour |'_clairage
_1, Interruptor de alumbrado
_1. Interruttore luoi
_1. Schakelaar verlichting
I\1
2. Accelerator and choke control
The accelerator control regulates the motorspeed and also
the speed of the blades. If the lever is in its forward position
the choke function is connected. If the lever is in its reverse
position the motor is in neutral. Full speed lies between these
two positions.
(_ 2. Gashebel
Mit dem Gashebel wird die Drehzahl des Motors und damit
auch die Drehgeschwindigkeit der M&hklingen geregelt. Mit
dem Hebel in seiner vordersten Stellung ist die Kaltstart-
funktion eingeschaltet. Mit dem Hebel in der hintersten
Stellung I&uftder Motor im Leedauf. Zwischen diesen beiden
Endstell-ungen liegt die Vollgasstellung.
(_ 2. Commande de et starter
gaz
La commande de gaz permet de rdgler le r6qime moteur et
done la vitesse de rotation des lames. En poussant la
manette tout en haut, on enclenche le starter. Quand on
rambne la manette tout en bas, le moteur toume au ralenti.
Entre ces deux positions maxi, se trouve le r6gime optimal
pour la tonte, signal6 par une encoche dans le rail ou se
d6place la manette.
(_ 2. Mandos del acelerador del
Y estrangulador
Con el acelerador se regulan las revoluciones del motor y
con elias tambi_n la velocidad de rotaci6n de las cuchillas.
Si la palanca estd en su pesici6n delantera, estard acoplada
la funcibn de estrangulacibn. Si la palanca esta en su
posici6n trasera, el motor marchard en ralenti. Entre estas
dos posicio-nes extremas estd la de pleno gases.
27
(_ 2. Comando
gas/choke
Questocomandoaumentao diminuisceilregimedigiridel
motore. Premere la leva completamentein avanti per Io
choke. Tirare lalevacompletamenteindietreperilminimo.
II gas massimo si trova in una posizioneintermedia.
(_ 2. en
Gas- chokehendel
Met de gashendel wordt het toerental van de motor geregeld
en daardoor ook de rotatiesnelheid van de messen. Is de
hendel indevoorste stand gezet, isde chokefunctie ingescha-
keld. Staat de hendel in de achterste stand, Ioopt de motor
stationair. Tussen deze beide buitenposities ligt de vol-gas
stand.
Page 15
3
Q 3. Pedale freno/frizione
Premendo il pedale il trattore si frena, il motore va in folle e
cessa la trazione.
(_ 3. Rem- en koppelingspedaal
AIsde pedaalingedrukt wordt, remthetvoertuig. Tegelijkertijd
wordt de motor ontkoppeld en stopt de aanddjving.
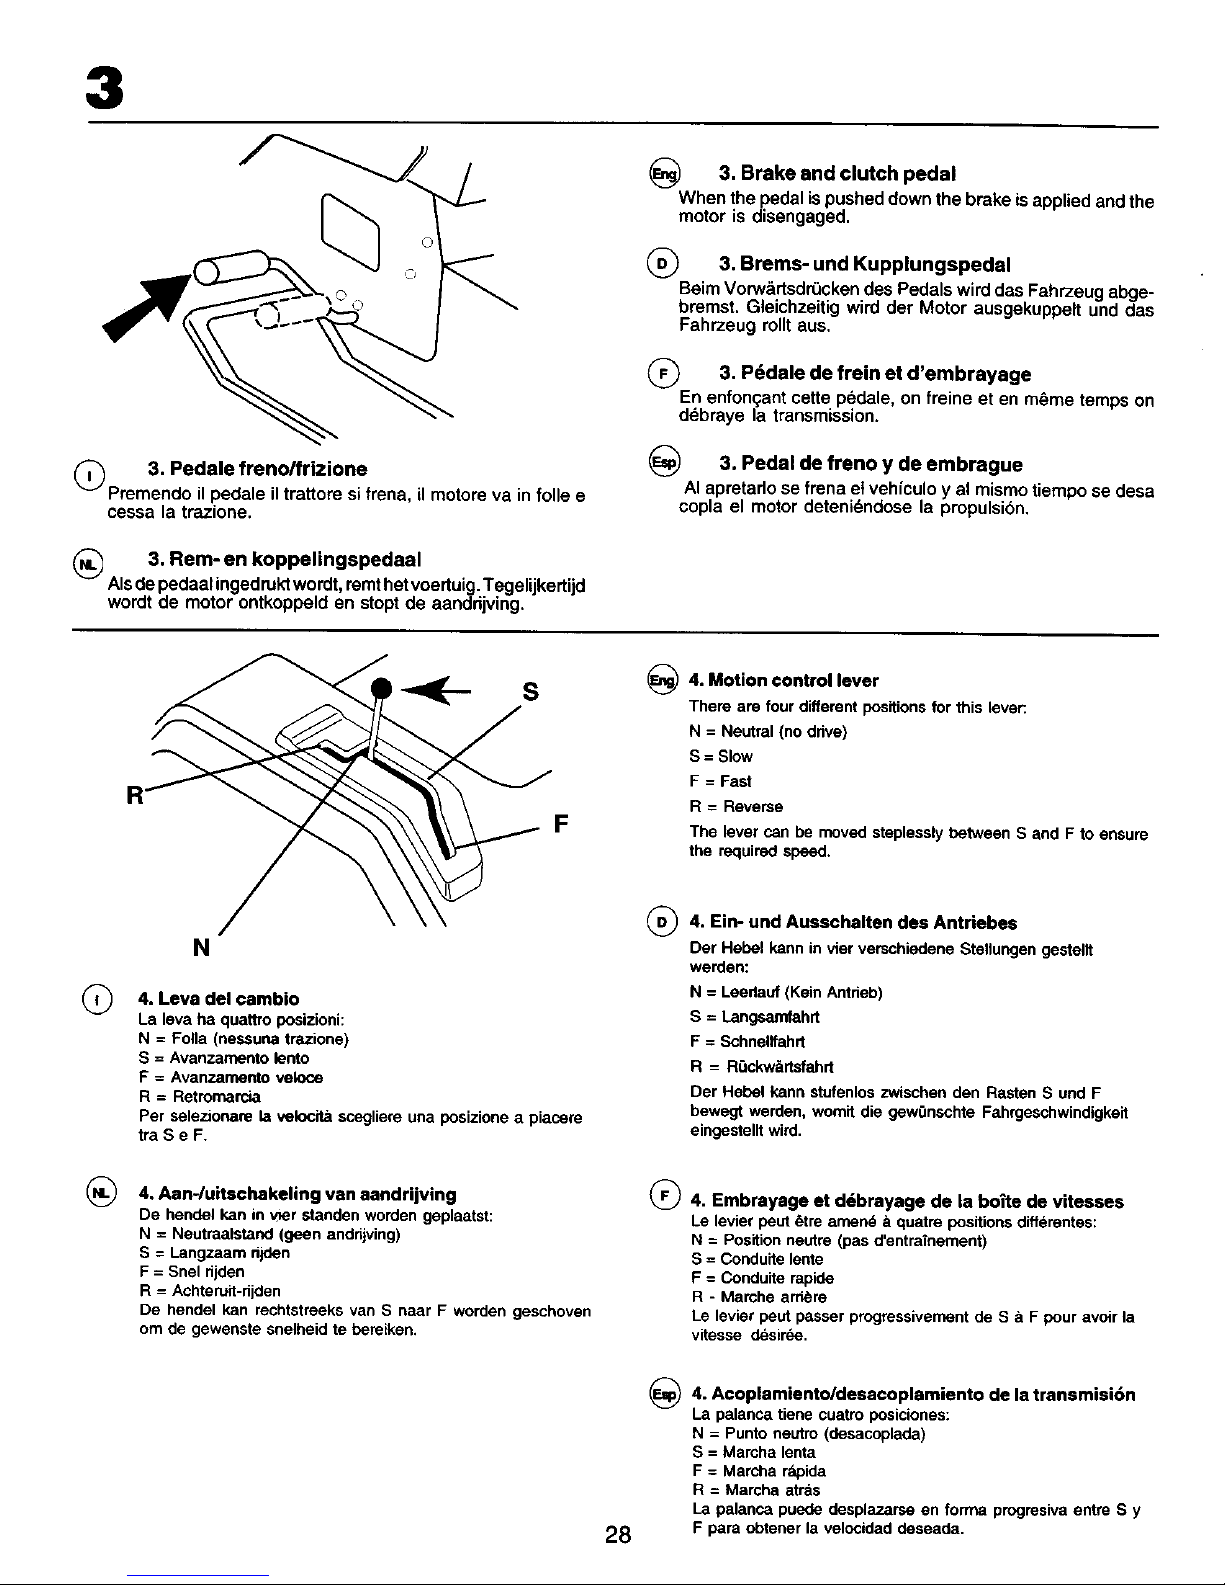
_) 3. and clutch pedal
Brake
Whenthe pedalispusheddownthe brakeisappliedandthe
motoris disengaged,
(_ 3. Brems- und Kupplungspedal
Beim Vorw&rtsdr0cken des Pedals wird das Fahrzeug abge-
bremst, Gleichzeitig wird der Motor ausgekuppelt und das
Fahrzeug rollt aus,
3. Pddale de frein
et
d'embrayage
Enenfon_:antcette pedale,on freineet en m_me tempson
ddbraye la transmission.
3, Pedal de freno y de embrague
AI apretarlo se frena et vehiculo y al mismo tiempo se desa
copla el motor deteni_ndose la propulsi6n.
Q
N
4. Leva del cambio
La leva ha quattro posizioni:
N = Folla (nessuna traziono)
S = Avanzamento lento
F = Avanzarnento veloce
R = Retromaroa
Per selezionare la velocita scegliere una posizione a piacere
tra S e F.
@
®
4. Motion control lever
There are four different positions for this lever:
N = Neutral (no drive)
S = Slow
F = Fast
R = Reverse
The lever can be moved steplessly between S and F to ensure
the required speed.
4. Ein- und Aussohalten des Antriebes
Der Hebel kann in vier verschiedene Stellungen gestelit
werden:
N = Leedauf (Koin Antrieb)
S = Langsamfahrt
F = Schnellfahrt
R = R0ckw_rtsfahrt
Der Hehal kann stufenlos zwischen den Rasten S und F
bewegt werden, womit die gew0nschte Fahrgeschwindigkeit
eingestelit wird.
4. Aan-/uitschakeling van aandrijving
De henclel kan in ,._er standon worden geplaatst:
N = Neutraalstand (geen andrijving)
S = Langzaam njden
F = Snol rijden
R = Achteruit-rijden
De hendel kan rechtstraeks van S naar F worden geschovon
om do gewenste snelheid te hareiken.
®
4. Embrayage et d_brayage de la bo;te de vitesses
Le levier pout _tre amen_ _ quatre positions diff_rentes:
N = Position neutre (pas d'entrainement)
S = Conduite lente
F = Conduite rapide
R - Marche arr_re
Le levier pout passer progressivement de S ;i F pour avoir la
vitesse desirde.
28
4. Acoplamiento/desacoplamiento de la transmisi6n
La palanca tiene cuatro posicionos:
N = Punto neutro (desacopleda)
S = Maroha lenta
F = Marcha r;_oida
R = Marcha atras
La palanca puede desplazarse en forrna progresiva entre S y
F para obtener la velocided deseada.
Page 16

3
(_ 5. Embrayage/d6brayage du de
groupe coupe
Amener le levier vers I'avant pour enclencher raccouplement
du groupe de coupe. Lee courroies d'entraTnement sont alors
tendues et lee couteaux commencent & toumer. Amener le
levier vers I'ardere pour d_brayer le groupe de coupe, lee
couteaux sont alors freines par lee sabots qui viennent contre
lee poulies.
(_) Acoplamiento y desacoplamiento
5. del
equipo de corte
Lleve la palanca hacia adelante para acoplar ia propulsi6n
del equipo de code. Se tensardn entonces las correas
propulsoras y empezar&n a girar las cuchillas. Si la palanca
se Ileva hacia atr&s se desacopia la propulsi6n al mismo
tiempo que la rotaci6n de las cuchiUas es frenada por las
zapatas de freno que apdetan las ruedas de las correas,
5. Connection/disconnection of the cutting
unit
Move the lever forwards to connect the drive to the cutting
unit, whereby the ddve belt istensioned and the blades begin
to rotate. If the lever is moved backwards the drive will be
disconnected and the rotation of the blades slowed down by
the action of the brake shoes on the pulley.
®
5. Ein- und Ausschalten des M_ihaggregats
Den Hebel nach vom f0hren, um den Antdeb des M&hers
ein-zukuppeln. Dabei wird der Antdebsriemen gespannt
und die Riemen beginnen sich zu drehen. Wenn der Hebel
zur'.3ckge-zogen wird, wird der Antdeb ausgekuppeit und die
Drehung der Klingen wird durch an die Riemenrollen
angesetzte BremsklSt-ze gebremst.
2
1
3
6. Quick liffing/Iowering of the cutting unit
Pull the lever backwards to quickly liftthe cutting unit when
passing over irregularities in the lawn, etc. During transporta-
tion the cutting unit shall be in the highest position. Pull the
lever back until it locks. To lower the unit: Pull the lever
backwards (1). Push inthe button (2) and then move the lever
forwards (3).
(_ 6. Schnelles Heben und Senken des
M:_haggregats
Den Hebel zurOckziehen, um das M&haggregat schnell bei
der Fahd Oberz.B. unebene Stellen des Rasens anzuheben.
Bei Transportfahrt sol1 das M_haggregat in der h_chsten
Steltung stehen. Den Hebel zur_ckziehen, bisdiesergesperd
wird. Senken des Aggrogats: Hebel zur_ckziehen (1). Knopf
(2) dr_cken und danach den Hebel (3) nach vorn fOhren.
Q
29
5. Leva inserimento tagliaerba.
Premere in avanti la leva per awiare iltagliaerba. Lacinghia
entra in tensione e is lame cominciano a girare. Tirando
indietro la leva il tagliaerba viene disinsedto e le lame
vengono frenate dalle ganasce dei freni che agiscono contre
la puleggia.
5. Koppelen en ontkoppelen van de maaikast
Breng de hendel naar voren om de aanddjving van de
maaikast te koppelen. Daarbij wordt de aanddjfdem gesteld
en de messen beginnen te roteren. Wordt de hendel naar
achteren gebracht, wordt tegelijkedijd de rotatie van de
messen afgeremd, doordat de remblokken tegen de poelie
Iopen.
(_ 6. Abaissement et relevage du plateau de
coupe
Tirer le levier vers I'ard_re pour relever rapidement le carter
de coupe quand il passe sur une surface accidentee. Pour
le transport, le carter de coupe dolt _tre dane sa position la
plushaute (relevd au maximum). Pourcela, tirerIs levier vers
I'arriere jusqu'& ce qu'il se bloque. Pour abaisser le carter de
coupe, tirer tout d'abord le levier vers I'arriere (1), puis
enfoncer le bouton poussoir positionn_ au dessus du levier
(2), et enfin rarnener le levier vere ravant (3).
(_) 6. Elevaci6n/descenso r:_pidos del equipo de
corte
Tire de la palanca hacia atras para levantar rdpidamente el
equipo de corte al pasar sobre irreguladdades del terreno,
etc. AI transpodar la mdquina, el equipo de corte ha de estar
en la posici6n mds alta. Tire de la palanca hacia atrds hasta
que se bloquee. Para descender el equipo de corte:Tire de
la palanca hacia atrds (1). Apdete el botbn (2) y Ileve despu_s
la palanca hacia adelante (3).
(_ 6. Sollevamento/abbassamento del tagliaerba
Per sollevare il tagliaerba quando sia necessado, tirare
indietro la leva. In caso ditraspodo il tagliaerba deve essere
sollevato. Per abbassare il tagliaerba: Tirare indietro la
leva(1 ). Premere il pulsante (2) e portare poi la leva in avanti
(3).
(_ 6. Snelle verhogingiverlaging van maaikast
Breng de hendel naar achteren om de maaikast snel te doen
verhogen bij her passeren van oneffenheden in het gazon.
Bij transport dient de maaikast in zijn hoogste stand te staan.
Zet de hendel achteruit, totdat deze vergrendeld is. Om de
kast te doen vedagen: Zet de hendel achteruit (1). Druk de
knop in (2) en breng daama de hendel naar voren (3).
Page 17

3
OFF ON START
(_ 7. Cerradura de encendido
La Ilave de encendido pueda hallarse en tres posiciones
diferentes:
OFF: CORRIENTE EL_:CTRICA CORTADA
ON: CORRIENTE ELI_CTRICA CONECTADA
START: MOTOR DE ARRANQUE ACOPLADO
ADVERTENCIA!
Siabandona la maquina sinvigilancia, nodeje nunca la Ilave
en la cerradura.
7. Ignition Lock
There are three different positions for the ignition key:
OFF ALL ELECTRIC CURRENT BROKEN.
ON ELECTRIC CURRENT CONNECTED.
START START MOTOR CONNECTED.
WARNING!
Never leave the key in the ignition lock when leaving the
machine on its own.
(_ 7. ZQndschloB
Der ZOndschlQssel hat drei Rasten:
OFF STROM AUSGESCHALTET
ON STROM EINGESCHALTET
START ANLASSER EINGESCHALTET
WARNUNG!
Niemals dan ZOndschlOssal im ZOndschloB lassen, wenn die
Maschine unbeaufsichtigt vedassen wird.
(_) 7. Serrure de contact
La cld de contact peut _tre b trois positions :
OFF LE COURANT ELECTRIQUE EST COUP#
ON LE COURANT I_LECTRIQU E EST BRANCHI_
START LE DI_MARREUR EST EN CIRCUIT
A'N'ENTION!
Quand la machine reste sans surveillance, ne jamais laisser
la clef de contact dans le contacteur.
(_ Chiave di accensione
7.
La chiave ha tre posizioni:
OFF I CIRCUITI ELETTRICI SONO INTERROTTI
ON ATTIVAZION E DELCISRCUITO ELE'I-I'RICO
START INSERIMENTO DEL MOTORINO DI
AVVlAMENTO.
A'B'ENZIONEI
Prima di lasciara la macchina, togliere sempre la chiave.
7. Stuurslot/contact
De sleutel voor het stuurslot/contact kan in drie standen
wordan gezet:
OFF ALLE ELEKTRISCHE STROOM
UITGESCHAKELD
ON DE ELEKTRISCHE STROOM
INGESCHAKELD
START STARTMOTOR INGESCHAKELD
LETOP!
Laat nooit de sleutel in het contact zitten, wanneer de
machine zonder toezicht wordt achtergelatan,
3O
Page 18

3
_) 8. Parking brake
Connect the parking brake in the following way:
1. Press down the brake pedal to bottom position.
2. Move the parking brake lever upwards and hold in this
position.
3. Release the brake pedal.
To release the parking brake all that is necessary is to push
down the brake pedal.
(_ 8. Feststellbremse
Die Feststellbremse wie folgt ansetzen:
1. Bremspedal ganz durchtreten.
2. Feststellbremshebel nach oben f_hren und in dieser
Stellung halten.
3. Bremspedal loslassen.
Die Feststellbremse wird durch einfache Bet&tigung des
Bremspedals wieder gel_st.
(_ 8. Frein de parking
Pour enclencher le frein de parking :
1. Enfoncer & fond la pedale de frein/embrayage.
2. En m_me temps, relever vers lehaut le levier du frein de
parking et le maintenir dans cette position.
3. Rel&cher la pedale de frein.
Pour deserrer le frein de parking, il suffit ensuite d'enfoncer
nouveau la p6dale de frein/embrayage.
(_ 8. Freno de estacionamiento
Aplique el freno de estacionamiento de la manera siguiente:
1. Apdete el pedal del freno hasta el rondo.
2. Tire de la palanca de freno hacia arriba y mantengala
en esta posicibn.
3. Suelte el pedal.
Para desaplicar el freno de estecionamiento sblo es necesa-
rio apretar el pedal del freno.
Q 8. Freno di parcheggio
Azionare il freno di parcheggio nel modo seguente:
1. Premere il pedale fmno/fdzione a fondo.
2. Tirare verso ralto la leva del freno e.
3. Rilasciare il pedale.
Per disattivare il freno di parcheggio premere il pedale.
(_ 8. Parkeerrem
Schakel de parkeerrem in als volgt:
1. Druk de rempedaal in tot op de bodem.
2. Breng de parkeerremhendel naar boven en houdt hem
in deze stand.
3. Laat de rempedaal _os.
Om de parkeerrem vrij te maken, behoeft u alleen de
rempedaa[ in te drukken.
31
Page 19

3
(_ 9. Free-wheel Control Lever
To towor move thetractorwithouttheaidof the engine, the free-
wheel control knob must be pulled out and locked in position.
(_) Ein-und Ausschalten des Freilaufes
9.
Um den Traktor ohne Motorkraft abzuschleppen oder
anzuschieben, muB der Freilauf-Steuerungaknopf
herausgezogen,
(_ 9. Bloquage et Ddbloquage de Roue Libre
Pour remorquer ou deplacer le tracteur sans aide du moteur,
le bouton de la commande de la roue libra doit Otre tir_ et
bloqu_ en position.
(_ 9. Acoplamientoy Desacoplamiento de Rueda
Libre
Para empujar o arrastrar su tractor sin la ayuda del motor, el
bot6n de control de rueda libra debe ser tirado hacia afuera
y puesto en su posicibn.
_p 9. Inserimento/Disinserimento Rouote
er trainare o spingere U trattore senza servirsi del motore:
estrarre la manopola di ruota libera e bloccaria inpoaizione.
_O 9. Aan-en Uitschakeliong van Vrijwiel
m de tractor te trekken of te verplaatsen zonder de hulp van
de motor, moet de vrijwielbedieningsknop worden
uitgetrokken.
32
Page 20

4. Before starting. 4. MaBnahmen vor dem Anlassen.
4. Avant de d6marrer, 4. Antes del arranque.
4. Prima delravviamento. 4. Maatregelen v66r het starten.
Filling up
The engine should be run of pure (not oil mixed) unleaded
petrol. Do not fillbeyond the lower edge of the fillinghole. Do
not fill over max level.
WARNING!
Petrol ishighlyinflammable. Proceed with care and fill upwith
petrol outdoors. Do not smoke when filling with petrol or fill
up when the engine is warm. Do not overfill the tank since the
pertrol can expand and overflow. Make sure that the petrol
cap is securely tightened after filling. Store petrol in a cool
place in an appropriate container for engine fuel. Check the
petrol tank and pipes.
Tanken
Der Motor istmit reinem, bleifreiem Benzin (nicht6igemischt)
zu fahren. Das Benzin darf hGchstenshis zur Unterkante der
Einf_llGffnung gefQIIt warden.
WARNUNG!
Benzin ist sehr feuergef_.hdich. Mit Vorsicht vorgehen und
nur im Freien Tanken. Beim Tanken nicht rauchen. Nicht
Benzin einf0flen, wenn der Motor warm ist. Den Tank nicht so
viel f011en,dal3sichdas Benzin ausdehnen kann und dadurch
QberflieP_t.Darauf achten, daP_der Tankverschlu8 nach dem
Tanken gutfestgezogen wird. Benzin an einer kGhlen Ste!le
in Motorbenzinkanistern verwahren. Benzintank und
Leitungen regelm_13ig pr,".fen.
Plain d'essence
Utiliser de I'essence pure (pas de mdlange d'huile) sans
plomb. Faire le plein d'essence jusqu'au bord inf6rieur de
I'orifice de remplissage, pas au dela
ATTENTION?
L'essenoe est un produit inflammable. Prendra lee
fpr_cautions n_cessaires et faire le plain & I'exterieur. Ne pas
umer a proximitd et ne pas faire leplein Iorsque le moteur est
chaud. Ne pas trop remplir le reservoir, penser _ I'expansion
de I'essence qui risquerait de deborder. Conserver I'essence
dans un endroit frais et dans un r6servoir sp_cialement
con_u _,cet usage. V_dfier le reservoir d'essence et le circuit
de distribution du carburant.
Reposici6n de combustible
El motor ha de funcionar con gasolina pura (sin mezcia de
aceite), sin plomo. El nivel no ha de sobrepasar el borde
inferior del orificio de Ilenado.
ADVERTENCIA!
La gasolina es muy inflamable. Proceda con cuidado _/haga
la reposicibn al aire libre. No fume durante la reposlcton y
noponga gasolina cuando el motor estfi caliente. No Ilene
demasiado el depbsito, puesto que la gasoiina puede
expansio narse y rebesar. Despu_s del repostado asegdrese
de que la tapa del deposito esta bien apretada. Almaeene el
combustible en un lugarfresco yen un recipiente destinado
a este fin, Controle el depbsito y tuberias de combustible.
Rifornimento.
Usare benzina senza piombo, non miscela. Rifomire fine al
bordo inferiore del bocchettone di rffomimento.
ATTENZlONE!
Non fumare e non fare rifomimento a motore caldo. Non
riempire troppo per evitare fuoriuscite di benzina. Chiudere
bene il tappo del serbatoio. Conservare il acrburante al
fresco. Controflare tubazioni e serbatoio.
Tanken
De motor dient te Iopen op schone (niet met eli gemeng de)
Ioodvrije benzine. Tank niet meer benzine dan tot de
onderste rand van het vulgat.
LET OP!
De benzine is zeer brandgevaadijk. Wees voorzichtig en
tank buitenshuis. Rook niet bij het tanken en vul niet bij,
wanneer de motor warm is. Doe niet te veal in de tank, daar
de benzine kan expanderen en overstromen. Zorg dat na het
tanken de benzinedop er goed op zit. Bewaar de brandstof
op een koele plaats in een jerrycan voor motorbrandstof.
Controleer benzinetank en brandstofleidingen.
33
Page 21

4
Oil level
The combined oil refilling cap and the oil stick is accessible
when the bonnet is lifted forwards. The oil level inthe engine
should be checked before each run. Make sure that the tractor
is horizontal. Unscrew the oil stick and wipe clean. Replace
the oil stick and screw tight. Remove again and check the
level.
(_ 61stand
Der mit dem MeBstab kombinierte (51einf011deckel ist nach
Aufklappen der Motorhaube zug&nglich. Den Olstand im
Motor vor jeder Fahrt pr0fen..Dabei darauf achten, daR d e
Maschine waagrecht steht. OlmeBstab herausschrauben
und abwischen. Mef3stab wieder lest einschrauben,
nochmals herausnehmen und den (51standablesen.
Niveau d'huile
L'orifice de remplissage d'huile, quicontient aussi la auge
est accessible apres avoir fait basculer e capot moteur vers
ravant. Le niveau d'huile dans le moteur dolt _tre vddfi_ &
chaque utilisation. S'assurer que la machine est bien sur
terrain plat, Ddvisser le bouchon, retirer la auge d'huile et
I'essuyer. Remettre a auge, a visser. L'enlever de nouveau
et relever le niveau d'huile sur la jauge.
Nivel de aceite
La tapa combinada para el Ilenado de aceite y para lavarilla
de nivel queda accesible despuds de haber levantado
hacia adelante el cap5 del motor. Elnivel de aceite del motor
debe controlarse cada vez que se pone en marcha.
Asegdrese de que la m&quina esta horizontal.
Descenresque la varilla y sequela. Vuelvala a colocar.
Enrbsquela. Quffela otra vez y lea el nivel de aceite.
(_ Livello dell'olio
Sollevare il cofano per accedere al tappo/asticella delt'olio.
ControUare sempre I'olio prima di avviare il motore. La
macohina deve essere in piano. Svitare I'asticelta e
asciugaria. Rimontare e awitare. Togliere di nuovo e
contrellare il livello.
(_ Oliepeil
De gecombineerde olie-bijvuldop en peilstok worden
bereikbaar, nadat de motorkap is opengeklapt. Her oliepeil
inde motordient v6br ieder gebruik te worden gecontroleerd.
Zorg ervoor dat de maaier horizontaal staat. Schreef de
oliepeilstok eruit en maak hem schoon. Schroef de peilstok
er opnieuw in. Draai vast en haal hem er weer uitenlees het
oliepeil af.
ADD "_
*--FULLCAUTION - DO
_)The oil level should lie between the two markings on the oil
stick. If more oil is needed add SAE 30 oil to the "FULL"
marking. SAE 5W-30 oil should be used during the winter
(below freezing point).
(_Der Olstand soil zwischen den beiden Marken auf dem
Mef_stab liegen. Wenn dies nicht der Fall ist, MotorSI SAE
30 biszur Marke "FULL" einfOllen.ImWinter (bei Frostgefahr)
ist Motor61 SAE 5W-30 anzuwenden.
(_) Le niveau d'huile dolt se trouver entre lea deux rep_res sur
la jauge. Sinon, faire I'appoint avec de rhuile moteur SAE
30 jusqu'au repere maxi (FULL). En hiver (au-dessous de
0°), i! faut utiliserde I'huile moteur SAE 5 W-30.
El nivel de aceite ha de estar entre las dos mamas de la
varilla. Si no es este el caso, afiadir aceite pare motor SAE
30 hasta la marca de "FULL" (lleno). En invierno (a
temperatures bajo cero) hay que utilizar aceite de motor
SAE 5W-30.
Q L'olio deve essere tra i due contrassegni sulrasticella. Se
necessario rifornire con olio SAE 30, fino al segno "FULL".
In invemo (sotto 0°) usare olio SAE 5W-30.
(_Het oliepeil dient tussen de beide markeringen op de stok
te liggen. AIs dit niet het geval is, moet u met SAE 30 tot het
FULL'-merk b"vullen. S-w'nters (onder her vnespunt) dent
motorolie SAE 5W-30 te worden gebruikt.
34
Page 22

4
Tire air pressure
Check the tyre pressure regularly. The pressure in the front
tyres should be 1 bar (14 PSI) and 0.8 bar (12 PSI) inthe back
tyres.
(_ Reifendruck
Den Luffdruck in den Reifen regelm_13igprfifen. Der Druck
in den Vorderreifen soil 1 bar betragen, in den Hinterreifen
0.8 bar.
Pression de des
gonflage pneus
Vedfier regulierement la pression de gonflage des pneus. La
pression d'air clans les pneus doit_tre de 1bar & ravant et de
0,8 bar & I'arrier.
(_ Presi6n de inflado de los neum,tticos
Comprobar regularmente la presibn de infladode los neumdti-
cos. En los delanteros ha de set de I baryen lostraseros de
0,8 bar.
Q Pressione pneumatici
Controllare la pressione con regoladta. Pneumatici anteriod
1 bar e postedori 0,8 bar
(_ De luchtdruk in de banden
Controleer regelmatig de luchtdruk in de banden. De druk in
de voorbanden dient 1 bar en in de achterbanden 0,8 bar te
zijn.
35
Page 23

5. Driving. 5. Betrieb. 5. Conduite. 5. Conducci6n.
5. Guida. 5, Rijden.
Starting of motor
Make sure that the cutting unitisin the transpod position (top
position) and that the lever for connection/disconnection of
the cutting unit is in the disconnection position.
(_ Anlassen des Motors
Darauf achten, dai3 das MShaggregat in Transpodstellung
(obere Steltung) steht und dab der Hebel f_r Ein- und Aus-
schalten des M&haggregats auf ausgeschaltet" steht.
D_marrage du moteur
S'assurer que lecarte de coupe est on position de transport
(en position sup_deure) et que le levier pour rembrayage/
debrayage du carte de coupe est en position de d_brayage.
Arranque del motor
Aseg_rese de que el equipo de corte estd en la posici6n de
transporte (en posicibn superior) y que la palanca para el
acoplamiento/desecoplamiento del equipo de code estd en
la posicibn de desacopfamiento.
Q
Awiamento del motore
II tagliaerba deve essere sollevato in posizione di traspodo
ela leva di inserimento/disinserimento deve essere in
•posizione"disinserito".
(_ Het starten van de motor
Zorg ervoor dat de maaikast intransportstand staat (hoogste
stand) en dat de hendel voor aaniuitschakeling van de
maaikast in uitgeschakelde stand staat.
Q Enfoncer compl_tement la p6dale de frein/dObrayage.
S'assurer que le levier de vitesses est en position neutre.
_) Press down the clutch/brake pedal completely hold
and
down. Make sure thatthe motioncontrol lever isin neutral "N".
(_ Pise hasta elfondo el pedal de embrague/freno y mant_ngalo
presionado. Asegurarse de que la planca de embrague/
desembrague de la transmisibn est& en punto neutro,
(_ Premere ilpedale freno/fnzione a fondo tenendolo premuto.
Portare la leva del cambio su "N", in folle.
(o_) Kuppiungs- und Bremspedal ganz durchtreten und in dieser
Stellung halten. Pr0fen, daf3 der Hebel fur das Ein- und
Ausschalten des Antriebes auf Leerlauf steht.
_Druk de koppelings/rempedaal geheel in en houdt hem
ingedrukt. Controleer of de hendel voor aan-/uitschakelen
van de aandrijving in de neutrale stand staat.
36
Page 24

5
I\1
_Cold motor: Push the gas control up to end positon choke
€IXD.
(_Bei kaltem Motor: Gashebel in die Endstellung choke (N)
schieben.
(_) Avec un moteur froid: pousser I'acc_l_rateur vers le haut b la
limite du starter choke (1\1).
(_Con el motor frio: Empuje el acelerador hacia arriba hasta la
posicibn choke (N) [estrangulacibn].
(_ Motore freddo: Portare il comando del gas su choke (l\l).
(_Bij een koude motor:. Schuif de gashendel naar boven tot de
eindpositie choke (N).
I\1
@
®
®
Q
Warm motor: Push the gas control half-way to full gass
position ",_".
Bei warmem Motor:. Gashebel in die Vollgasstellung ",1_"
schieben.
Avec un moteur chaud: pousser I'acc_lerateur & mi-chemin
vers la position d'acc_l_rateur maximale ",_".
Moter caliente: Empuje el acelerador hasta la mitad de su
recorrido hacia la posicibn de plenos gases "4""
Motore caldo: Portare il comando del gas sul massimo ",_".
Bij een warme motor: Schuif de gashendel halvenNege naar
de volgaspositie ",_y".
37
Page 25

5
Turn the ignition key to =START position".
NOTE!
Do not runthe start motor more than 5seconds at once. If the
engine wilt not start, wait about 10 seconds before the next
t_/.
ZSndschlOssel auf "START" drehen.
HINWEIS!
Den Anlasser nichtjeweils I&nger als ca. 5 Sekunden bet&ti-
gen. Wenn der Motor nicht anspdngt, vor dem n_ichsten
AnlaBversuch ca. 10 Sekunden warten.
®
Toumer la clef de contact en post on de d_}marrage"START".
ATI'ENTION!
Ne pas faire toume rledemarreur pendant plus de 5secondes
& la fois. Si le moteur ne demarre pas, attendre une dizaine
de secondes avant de refaire un essai de d_marrage.
Ponga Ilave de encendido en la posici6n de arranque
la
"START".
Q
@
NOTA!
No haga funcionar el motor de arranque m_.s de unos 5
segundos a la vez. Si el motor no arranca, espere unos 10
segundos antes de hacer otra tentativa.
Girare la chiave su "STAR]".
OSSERVARE!
Non inserireil motorinodi awiamento per pi0 di 5 secondi
per volta. Se il motore nonparte attendereuna decinadi
secondiprimadi riprovare.
Draai de startsleutel naar "START"-positie
LETOP|
Laat de startmotor niet langer dan ca 5 sek. per keer draaien.
AIs de motor niet start, wacht dan ca 10 sek voordat u
volgende poging doet.
ignition key retum to the "ON" position when the
Let the
engine has started Push the gas control to the required
speed. For cutting: fult gas.
Nach Anspringen des Motors den Z0ndschl_ssel in die
Stellung "ON" zur0ckgehen lassen. Den Gashebel auf die
gew0nschte Motordrehzahl stellen. Bei M&hen: Vollgas.
®
@
@
@
Laisser revenir la clef de contact & la position "ON" Iorsque
le moteur a demarrd. Amener la manette de gaz & la position
de regime moteur d_sird. Pour la coupe, positionner la
manette dans I'encoche correspondant au regime moteur
optimal pour la tonte (acceleration maximale du moteur).
Dejar que ta Ilave de encendido vuelva a la posicibn "ON"
cuando ha arrancado el motor. Ponga el acelerador en la
posici6n deseada. AI cortar, a plenos gases.
Dopo I'awiamento, riportare la chiave su "ON". Regolare il
gas sul regime desiderato. Per il taglio: massimo regime "F".
Draai de startsleutel terug in "ON"-posotie. Schuif de
gashendel naar het gewenste toerental. Bij maaien: vol gas.
38
Page 26

5
IMPORTANT! COLD STARTING FOR HYDRO
IMPORTANT: COLD STARTING FOR HYDRO (BELOW 40°F[4°C]) -
AFTER STARTING ENGINE AND BEFORE DRIVING, LET
TRANSMISSION WARM UP FOR ONE (1) MINUTE BY PLACING
MOTION CONTROL LEVER IN NEUTRAL (N) POSITION AND
RELEASING CLUTCH/BRAKE PEDAL.
(_ WICHTIG! KALTSTARTEN FOR MASCHINEN MIT
HYDROSTATISCHEM GETRIEBE
FOR TEMPERATUREN UNTERHALB VON 40° (4°C). NACH DEM
ANLASSEN DES MOTORS DAS GETRIEBE (1) MINUTE LANG
AUFWARMEN LASSEN, BEVOR LOSGEFAHREN WIRD. HIERZU
DAS SCHALTGETRIEBE IN.
(_ IMPORTANT? DEMARRAGE FROID POUR UNE
HYDROSTATIQUE
POUR LES TEMPI_RATURES AU-DESSOUS DE 40°F/4,44°C: APRF:S
DI_MARRER LE MOTEUR ET AVANT DE CONDUIRE, LA
TRANSMISSION DOlT SE RECHAUFFER PENDANT UNE (1) MINUTE
EN D'EPLA(,3ANT LE LEVIER DU CHANGEMENT DE VITESSE ,_ LA
POSITION POINT MORT ET EN RELACHANT LA PI_DALE DE FREIN/
EMBRAYAGE.
(_) ilMORTANTE! EMPIESO EN FRiO PARA HIDROSTATICO
PARA TEMPERATURA MENOR QUE 40°F (4°C). DESPU¢:S DE
HABER EMPESADO EL MOTOR Y ANTES DE CONDUCIR, DEJE QUE
LA TRASMICK_N SE CAL{ENTE DURANTE (1) MINUTO PONIENDO
EL DISPOSITIVO DE DAMBIO A NEUTRO (N) Y SOLTANDO EL
PEDAL DEL EMBRAGUF-JFRENO.
Q IMORTANTE? AWIAMENTOAFREDDOPERTRASMISSION!
PER TEMPERATURE INFERIORI AL40°F (4°C). DOPP AVER AWIATO
IL MOTORE, E PRIMA DI METTERLO IN AVANZAMEHTO, LASClARE
RISCALDARE IL GRUPPO TRASMISSIONE PER UN (1) MINUTO
METFENDO IL CAMBIO IN FOLLE E DlStNNESTANDO IL PEDALE
DEL FRENO/FRIZIONE,
(_ BELANGRMK?LOUD STARTEN VOOR HYDRO
VOOR TEMPERATUREN ONDER 40°F (4°C). NA HET STARTEN VAN
DE MOTOR EN VOOR HET RUDEN DE TRANSMISSIE (1) MINUUT
WARM LATEN LOPEN DOOR DE VERSNELLINGSHENDEL IN
NEUTRAAL TE PLAATSEN EN HET REM/KOPPELINGSPEDAAL LOS
TELATEN.
PURGE TRANSMISSION
To ensure proper operation and performance, it is recom-
mended that the transmission be purged before operating
tractor for the first time. This procedure wilt remove any
trapped air inside the transmission which may have devel-
oped during shipping of your tractor.
IMPORTANT: SHOULD YOUR TRANSMISSION REQUIRE
REMOVAL FOR SERVICE OR REPLACEMENT, ITSHOULD
BE PURGED AFTER REIN STALLATION BEFORE OPER-
ATING THE TRACTOR.
Park tractor on level surface so it will not roll in any
direction. Parking brake must be disengaged for the
following procedure. 39
Disengage transmission by placing freewheel control in
freewheeling position,
Start engine and move throttle controlto slowposition. Be
sure parking brake is not engaged.
Move motion control lever to full forward position and
hold for five (5) seconds. Move lever to full reverse
position and hold for five (5) seconds. Repeat this
procedure three (3) times.
Move motion control lever to neutral (N) position.
Stop tractor by turning ignition key to "OFF" position,
Engage transmission by placing freewheel control in
driving position.
Start engine and move throttle control to slow position.
Drive tractor forward for approximatety five feet then
backwards for five feet. Repeat this driving procedure
three times.
Your tractor is now ready for normal operation.
(_ ENTLOFTEN DES GETRIEBES
Um vorschriftsm&Bigen Betrieb und einwandfreie
Leistungsf&higkeit des Getriebes zu gew&hdeisten, sollte
dieses vor der ersten Inbetriebnahme des Traktors entlQffet
werden. Auf diese Weise wird sichergestellt, dal3 s&mUiche
Luftblasen, die sich w&hrend des Transports des Traktors im
Getdepe gebildet haben k6nnten, enffemt werden.
WlCHTIG: FALLS DAB GETRIEBE FOR ETWAIGE
WARTUNGSARBEITEN ODER ZUM ERSATZAUSGEBAUT
WERDEN MUSS, SO LLTE ES NACH DEM WIEDEREINBAU
IM TRAKTOR ENTLUFTET WERDEN, BEVOR DIESER IN
BETRIEB GENOMMEN WIRD.
Den Traktor auf ebenem Boden abstellen und
sicherstellen, dal3 er nicht ins Rollen kommen kann. F0r
diesen Vorgang kann die Feetstellbremse nicht eingelegt
werden.
Das Getriebe auskuppeln, indem die Freilauf-Schaltung
auf Freilauf geschaltet wird.
Den Motor anlassen und die Gasbedienung auf
langsamen Leerlauf stellen. Sicherstellen, dal3 die
Fsststellbremse nicht eingelegt let.
Den Gangschalthebel ganz in die Vorw&rtsstellung
n3cken und fOnf (5) Sekunden festhalten. Dann den
Hebel ganz in die RGckw&rtsste!lung rOckenundebeefalls
fGnf (5) Sekunden lang festhalten. Diesss Verfahren
dreimal (3) wiederholen.
Den Gangschalthebel auf die NeutraI-Stellung (N)
r_cken.
Den Traktor abstellen, indem der ZQndschlGssel in die
"AUS" (OFF) Stellung gedreht wird.
Die Freilauf-Schaltung in die Fahrtstellung r_cken, um
das Getriebe einzukuppeln.
Den Motor anlassen und die Gasbedienung auf
langsamen Leerlauf stellen.
Den Traktor etwa 1,50 m (5 ft) welt nach vome fahren und
dann um etwa 1,50 m (5ft) zun3cksetzen. Dieses Verfahren
dreimal wiederholen.
Der Traktor ist jetzt normal betriebsbereit.
(_ PURGER LA TRANSMISSION
Pour assurer I'utilisation correcte et le rendement, il est
recommande que la transmission soit purgee avant d'utiliser
le trecteur pour la premiere fois. Ce procdd_ enl_vera rair
emprisonn_ & I'intdrieur de la transmission qui se
ddvelopperait pendant rexp_dition de votre tracteur.
Page 27

5
(_ NOTE!
The machine is equipped with a safety switch which
immediately breaks the current to the engine if the driver
leaves the seat with engine running and with the connec-
tion/disconnection lever in position "connection".
(_) HINWEIS!
Die Maschine ist mit einem Sicherheitsschalter
ausger0stet, der den Strom zum Motor sofort unterbricht,
wenn der Fahrer den Sitzbei laufendem Motor verl&]3t,und
dabei der Schalthebel for das M&haggregat auf
"eingeschaltet" steht.
(_ ATTENTION!
La machine est 6quip6e d'un interrupteur de secudt6 qui
arr_te imm_diatement le moteur si celui-ci toume encore
Iorsque le conducteur quitte son siege.
(_ NOTA!
La maquina tiene un interrupter de seguddad que corta
la corriente al motor si el conductor sale del asiento con
el motor en mamha y con la palanca de acoplamiento/
desacoptamiento en la posici6n de acoptamiento.
Q OSSERVARE!
La macchina _ dotata di interruttore di sicurezza che
interrom pe I'alimentazione di corrente al motore quando
I'operatore lascia il sedile con il motore acceso e il
tagliaerba inserito.
(_) LET OPt
De machine is uitgerust met een veiligheidsschakelaar,
die onmiddellijk de stroom naar de motor verbreekt,
wanneer de bestuurder zijn plaats vedaat, terwil de
motor oopt en deaan/u tschake hende op" ngeschakeld"
staat,
I\1
(_) Driving
Lower the cuttingunit by moving the lever forwards. Release
the brake/clutch pedal slowly. Connect the cutting unit and
move the motion control lever to the required position.
Choose a ddving speed which suits the terrain and required
cutting results.
Betrieb
Das M&haggregat dutch Vorw&rtsf0hren des Hebels
absenken. Kupplungs- und Bremspedal langsam
zurOckfedem lassen. Das M&haggregat einkuppeln und den
hebel for das Ein- und Ausschalten des Antdebes in die
gewOnschte Stellung stellen. Eine an des Gel&nde und des
gew,",nschte M&hergebnis angepaBte Geschwindigkeit
w_.hlen.
(_ Conduite
Abaisser lecarter de coupe en ramenant lelevier vers ravant.
Rel&cherdoucement la pL=dalede frein/embrayage. Embrayer
les lames et amener le levier de vitesses &la positiond_sir_e.
Bien verifier, pendant la ton!e, que la commande de gaz se
trouve bien darts rencoche correspondent au r_gime moteur
optimal pour la tonte
_D Conducci6n
escender la unidad de corte empujando la palanca
haciaadelante. Soltar lentamente el pedal de embrague/
freno. Acoplar la unided de corte y poner la palanca de
desembrague de la transmisibn en la posicibn deseada.
Etegir la velocidad adecuada al terreno y al corte deseado.
(_ Guida
Abbassare ildispositivo di taglio springendo in avanti la leva
relativa. Rilasciare lentamente il pedale freno/frizione.
Insedre il tagliaerba e posizionare la leva del cambio sulla
posizione desiderata. Selezionare una velocit& di guida
adeguata al terreno e al risultato di taglio desiderato.
(_ Rijden
Vedaag de maaikast doorde hendel naar voren te brengen.
Laat de koppelings-/rempedaal langzaam omhoogkomen,
Schakel de maaikast in enbreng de hendel voor aan-/
uitschakelen van de aandrijving in de gewenste stand. Kies
een rijsnelheid die geschikt is voor het terrein en voor het
gewenste maairesultat.
41
Page 28

5
®
®
Cutting tips
Clear the lawn from stones and other objects which can be
thrown away by the blades.
Localize and mark stones and other fixed objects to avoid
collision.
Begin with a high cutting height and reduce until the required
cutting result is obtained.
The cutting result is best with high engine speed (blades rotate
quickly) and low gear (machine goes slowly), ff the grass is too
long and thick the drive speed can be increased by selecting a
higher gear or reducing the motor speed, without affecting the
cutting result.
The best lawn is achieved if the grass is cut often. Cutting
becomes more even and the cut grass is more evenly distrib-
uted over the surface. Total time taken is not greater, since
higher dave speed can be selected without affecting the cutting
results.
Avoid cutting wet grass. The cutting results will be worse since
the wheels will sink into the soft lawn.
Spray the cutting unit with water underneath after use.
Ratschlttge zum Rasenmtihen
Steine und andere Gegenst_nde vom Rasen enftemen, da
diese sonst von den M._hkUngen weggeschleudett werden.
GreBe Steine und andere Gegenst_mde im M_hbereich
kennzeichnen, um ein Auffahren zu vermeiden.
Mit hoher M_,hh_he beginnen und diese dane senken, bis das
gewOnschte Ergebnis erzielt wird.
Das M&hergebnis ist am besten mit hoher Motordrehzahl (die
Klingen rotieren schnell) und niedrigem Gang (die Maschine
f&hrt langsam). Wenn das Gras nicht allzu hoch und dicht ist,
kann die Fahrgeschwlndigkeit erh6ht werden, indem ein h6herer
Gang gew&hti wird, oder men senkt die Motordrehzahl, ohne
dei3 das MAhergebnis merkbar schlechter wird.
Der Rasen wlrd am sch<_nsten,wene er oft gemSht wird. Das
Gras wlrd dadurch gleichmSI3iger gem&ht und des gem&hte
Gras wlrd gleichrn_l_iger 0her die Oberft_che verteilt. Der
gesamte Zeitaufwand ist nicht gr66er, da eine h6here
Fahrgeschwindigkeit gew_hlt werden kann, ohne daR schlechter
gem_ht wird.
Wenn n'K3glich,keinen nassen Rasen re&hen. Das M_her-
gebnis wlrd schlechter, dedie R&der imweichen Rased einsinken.
Nach jedem Einsatz ist des M_ihaggregat yon unten mit Wasser
abzusp,'.len.
Coneeils de tonte
Enlever lea pierres et autres objets se treuvant sur la pelouse
et dsquant de devenir des projectiles au contact des lames.
Looaliser lea pierres et autres obstacles b _viter pendent le
parcours.
Commencer par tondre haut puis diminuer progressivement la
hauteur de coupe jusqu'b obtank le resuttat voulu.
Le moilleur rdsultat s'obtient au rdgime moteur maxi (lea lames
toument vite) et b petite vitesse. Si I'herbe n'est pas trop haute,
ni trop dure, la vitesse de toute peut-_tre augmentde sans
modifier notablement la qualit/_ de coupe.
Lea plus belies pelouses sont les pelouses regulierement
tondues. La coupe eat plus reguliere tout comme la repertition
de I'herbe. Le temps pass_ a tondre n'est pas n_=cessairement
plus important puisque la vitesse de conduite peut-_tre
augmentde sans que t'aspect de la pelouse ne s'en ressente.
Eviter de toedre une pelouse mouiUbe. La pelouse ne peutdtre
tondue correctement car lea roues du tracteur s'enfoncont dane
le sol.
Neftoyer le carter de coupe apres chaque utilisation, de
prOfdrenee avec une raclette pour deculler herbe fra_che rest_=e
dens le carter et la geulotte d'#jection.
Consejos para el eorte
Limple el c_sped de piedras y otros objetos que puedan ser
proyectades por las cuchillas.
42
Localice y marque pledras y otres objetos a fin de evitar el
choque con ellos.
Emplece con una aitura de corte alta y vaya disminuydndola
hasta alcanzar el resultado deseado.
El resultado es mejor si se utiliza un rdgimen elevado del motor
(las cuchillas giran rbpidamente) y una marcha baja (la mdquina
se desplaza lentamente). Si la hierba es demaslado alta y muy
densa, puede aumentarse la velocidad de marcha eligiende una
relacibn de cambios rnds aita o reduclando las revoluciones del
motor, sin que el resultade del core se empeore.
Elcesped mejor se obtiene cortandolo a menudo. El corte sera
n_s uniforme y la hierba corlada quedard distdbuida mas
unitormemente por teda la superficie. El tiempo de core noserd
mayor, puesto que puede elegirse una velocidad de marcha
rnas alta sin empeorar el resultado del cotte.
Evite cottar et c_specl si esta mojedo, pues el resultade seria
peor al hundirse las meqas en el suele blando.
Despots de cade use, limpleel eqeipo de core rocidndoloa
chorro de aguapor la pare inferior.
(_. Consigli per il taglio dell'erba
Pulire il prato de pietre e altri corpi estranei.
Individuare ostacoli fissi,
Cominciare con un'aitezza di taglio elevata e scendere
progressivamente.
I migliod dsultati si ottengono con un elevato regime del motore
(lame che girano veloci) e marcia bassa (la macchina si muive
lentamente). Se I'erba non b alta o folta e possibile passare ad
una marcia superiore o diminuire il regime senza peggiorare
sensibilmenta il risuitato.
•1miglled prati sono quelli tagllati spesso. II taglio b pi,',uniforme
e iltagliato sidistribuiscepiuuniformemente sututtala superficle.
II tempo necossario cornplessivo b uguale.
Evitare ditagllare un pretobagnato. il dsultato non bsoddisfaciente
deto che le ruote affondano nella superfice del tappeto erboso.
Lavare il tagUaerba con acqua dope egni uso.
Meeitips
Verwijder stenen en andere veerwerpen van bet gazon, die
weggeworpen kuneen worden door de massen.
Localiseer en markeer grotere stenen of andere
vastevoorwerpen, om ze bij bet naaien te kunnen vermijden.
Star met een hoge maaihoogte en vedeag deze tot gewenste
maairesultaat is verkregen.
Het maairesultaat wordt het beste met een hoeg toerental (de
rnessen reteren snel) en een lage versneUing (de machine
beweegt zich langzaam). Is het gras nlet al te hneg en dicht
begroeid, Pan de rijsnelheid toenemen door een hogere
versnelling te kiezen, ofdoor het teerental te veda-gen, zonder
det her meairesultaat merkbaar minder wordt.
Het rnooiste gazon wordt verkregen, dis hetvaak wordtgemeaid.
Het maaien geschladt getijkmatiger en hutge-maaide gras wordt
eek gelijkmatiger over het oppervlak verdeeld. Her totale
tijdsbestek voor bet maaien wordt niet langer, dear een gretere
njsnelheid kan worden toegebast, zoeder Oat het maairesuitaat
minder wordt.
Vermijd een nat gazon te maaien. Het maairesuitaat wordt
minder, deer de wlelen in de zachte grasmat zakken.
Spoel de oederkant van de maaikast na iedere maai-beurt
schoon met water.
Page 29

5
WARNING!
Do not drive in terrain at an angle of more than max. I0 °.
The dsk for spark-over backwards is large.
In steep terrain the nsk for tipping is considerable.
Avoid stopping and starting in sloping terrain.
Only change gear when the machine is standing still to
avoid damaging the gear box.
WARNUNG!
Fahren Sie nicht in Gel_.nde mit einer h_heren Neigung
als h_chstens 10% Bei Bergauffahrt besteht in diesem
FalldieGefah r,dart die Maschine nach hinten0berschl>.
Fahren Sie euch nicht quer zum Hang, da die Maschine
seitlich umkippen kann.
Vermeiden Sie, auf dem Hang anzufahren oder
anzuhalten.
Schalten Sie nur, wenn die Maschine ganz stillsteht, um
Besch&digung des Getriebes zu vermeiden.
o.
ATTENTION, DANGER!
Ne pas conduire sur un terrain inclind de plus de 10°. Le
risque de se renverser est tres important,
Ne jamais conduire le tracteur parallelement b la pente
b cause du risque de se renverser, Toujours conduire le
tracteur perpendiculairement b la pente, pour reenter
comme pour descendre.
Ne jamais arr_ter ou demarrer le tracteur sur une pente.
Sur une pente, immobiliser le traceur pour passer les
vitesses. Le changement de vitesse, si le tracteur n'est
pas a I'arr_t, peut detenorer la boffe de vitesses.
(_i ADVERTENCIA!
No conduzca por terreno de inclinacion superior a 10°,
pues hay riesgo de sobrepeso en la parte posterior.
No conduzca por los bordes de terrenos inclinados,
puesto que es entonces muy grande el riesgo de vuelco.
Evite el parer o arrancar la mdquina en terreno inclinado.
Cambie de marcha _3nicamente cuando la mdquina esta
to talmente parada, a fin de evitar darios en la caja de
camhios.
(_o ATTENZIONE!
Non affrontare pendi superiori a 10 ° gradi
Non procedere mai trasversalmente alia linea di massima
penclenza.
• Evitare fermate o partenze su terreni in pendio.
Camnbiare solo quando la macchina _ ferma, per non
danneggiare la scatola del cambio.
WAARSCHUWING!
Rij niet op een terrein met een heUingvan meer dan10 °.
Het risico om achterover te slaan is zeer greet.
Rij niet schuin over een hellend terrein, daar het
kanteldsico dan groot is.
Vermijd te stoppen of te starten op een hellend terrein.
Schakel slechts, wanneer de machine geheel stil staat,
om baschadigingen aan de versnellingsbakte verkomen.
J
®
®
43
Drive in rightturns so that the cut grass isthrown away
from flower beds and paths, etc. For larger lawns the
drive direction should be changed after 3-3 turns so that
the cut grass isthrown towards the area that has already
been cut as shown in the illustration.
In Rechtskurven fahren, damit das gem&hte Gras von
Beeten, G&ngen usw. weggeschleudert wird.
Auf einem gr61_eren Rasen soil die Fahrtdchtung nach
2-3 Runden ge&ndert werden, damit das gem&hte Gras
auf die bereits gem&hte Fl&che geschleudert wird,
siehe Bild.
Tondre en tournant & droite pour rejefter rherbe loin des
massifs et des alleas. Pour les 9randas pelouses,
changer de sens de rotation apres deux ou trois tours
pour que rherbe soit rejettee vers la surface d_ja tondue
comme le montre riUustra-tion.
Conduzca dando vueltas hacia la derecha a fin de que
la hierba cortada sea lanzada fuera de parterres,
senderos, etc. En superficies grandes, el sentido de
marcha ha de cambiarse despu_s de 2-3 vueltas pare
que la hierba cortada sea lanzada contra la superficie
ya cortada, como se ve en la ilustracidn.
Page 30

5
f
Switching off the engine
Movethegascontrolto=-ll, ". Disconnectthecuttingunitby
moving the connect/discon-nect leverdownwards. Liftupthe
cutting unit and turn the ignitionkey to "OFF" position. Allow
the engine to idle for 1-2 minutes to cool down before
switching off after a hard work.
Al_tellen des Motors
Gashebel nach unten auf =.ill," f0hren. M&haggregat durch
Abw&rtsfOhren des Aggregatschalthebels auskuppeln.
M&haggregat anheben und den Zi3ndschltassel auf "OFF"
drehen. Den Motor 1-2 Minuten im Leedauf arbeiten lassen,
damit dieser nach I&ngerem M&hbetrieb abk(_hlen kann.
G
Avanzare ad elevato regime per togliere il tagliato da
aiuole,vialetti e simili.
Dopo due o tre gid, su tappeti di maggiori dimensioni,
cambiare ilsenso di marcia come da figure per smaltire
il tagUato sulla supefficie gi& tagliata.
Rijd rechtse mnden, zodat het gemaaide gras wordt
weggeworpen van borders, paden etc.
Bij grotere gazons dient u de djrichting na 2-3 ronden
te veranderen, zodat het gemaaide gras wordt
weggeworpen op het gedeelte, dat reeds gemaaid is
(zie illustratie).
Arr6t du moteur
Amener la comande de gaz en position (ralenti), vers le bas
L"_I,"- Debrayer les lames, Relever le carter de coupe,
amsserle moteur toumer au ralenti pendant 1 _. 2 minutes
pour qu'il refreidisse avant de I'arr_ter apres un travail
p_nible, puis toumer la clef de contact en position (off).
_L Parada del motor
leve el acelerador hacia abe o hasta la posicibn ".ll".
Desacop e e equipo decorte Ilevando hacia abajo la pal_n'ca
de acoplamiento/desacoplamiento. Levante el equipo de
corte y ponga la ,ave de encendido en la posici6n =OFF'
(apagado). Deje funcionar el motor en ralent{ t-2 minutos
para que se enfrie antes de parado despues de untiempe de
uso intenso.
Arresto del motore
Portare il comando del gas su =,_" (lento). Portare la leva
di azionamento del dispesitivo di taglio su =disinsedto", verso
ilbasso. Sollevare il tagliaerba e girare la ehiave su "off'. Far
girare un paio di minuti il motore al minimo per raffreddaflo
prima di spengerlo definitivamente dope un pesante tumo di
lavoro.
Het stoppen van de motor
reng de gashendel naar beneden tot stand "NNI,". Schakel
de maaikast uit, door de aan/uitschakelhendel naar beneden
te brengen. Verhoog de maaikast en zet de contactsleutel in
positie =OFF". Laat de motor 1-2 minuten stationair Iopen om
af te koelen, voordat deze uitgezet wordt.
WARNING!
Do not fleave the ignition key in the machine when not in use
to prevent children and other aunauthorized persons starting
the engine.
WARNUNG!
Den Z0ndschl_ssel niemals im ZL_ndschlol) sitzen lassen,
wenn die Machine unbeaufsichtigt vedassen wird, damit
nicht Kinder und unbefugte Personen den Motor anlassen
k6nnen.
_) ATTENTION!
Ne jamais laisser lacl_ de contact surla machine Ioresqu'elle
reste sans surveillance afin d'_viter que des enfants ou
autres personnes non autorisees ne puissent demarrer
routil.
(_ ADVERTENCIA!
Nunca deje laIlave de encendido en lamdquina sinvigilancia,
a fin de evitar aue ni_os u otras personas ajenas peedan
arrancar el motor.
ATTENZIONE!
Prima di lasciare la macchina, togliere sempre la chiave.
(_ WAARSCHUWING!
Laat nooit de contactsleutel er inzitten, wanneer de machine
onbemand wordt achtergelaten, om te voorkomen dat
kinderen en onbevoegden de motor starten.
44
Page 31

6. Maintenance, adjustment• 6. Wartung (Instandhaltung),
Einstellung. 6. Entretien, r6glages. 6. Mantenimiento, ajuste.
6. Manutenzione. 6. Onderhoud, afstelling.
_ WARNING!
Before servicing the engine or cutting unitthe following shall
be carded Out:
• Press down the clutch/brake pedal and engage the
parking brake lever.
• Put gear lever in neutral.
• Move connection/disconnection lever to disengaged
position,
• Switch off engine.
• Remove the ignition cable from the plug.
_ WARNUNG?
Vor WartungsmaBnahmen an Motor oder M&haggregat sind
folgende MaBnahmen durchzuft3hren:
• Kupplungs-/Bremspedal durchtreten und
Feststellbremse ansetzen.
Getdebeschalthebel auf Leerlauf stellen.
Schalthebel des M&haggregats in ausgekuppelte
Stetlung stellen.
Motor abstellen.
ZGndkabel vonder Z_ndkerze abnehmen.
(_ ATTENTION, DANGER?
Avant route intervention sur te moteur ou runit_ de coupe
suivre les instructions ci-apres:
Enfoncer la p_dale de freiniembrayage pour mettre le
frein de parking.
Mettre le levier de vitesses sur la position neutre.
Debrayer les lames.
Arr6fer le moteur.
Ddbrancher le c_.ble d'aflumage de la boogie.
ADVERTENCIA?
Antes de proceder a efectuar elservicio en el motor o en e[
equipo de corte, hay que hacer Io siguiente:
• Apretar el pedal del embrague/freno y acoplar el freno
de estacionamiento.
• Poner la palanca de cambios en punto neutro.
Poner la palanca de embrague en posicion
desembragada.
Parar el motor.
Quitar el cable de encendide de la bujfa.
_ AI-I'ENZIONE?
Prima di ogni intervento effettuare quanto segue:
• Premere il pedale freno/fnzione e indserire il freno di
parcheggio.
Mettere la leva del cambio in folle.
• Disinsedre il tagliaerba.
• Spengere il motore.
Staccare la candela.
(_) LET OP!
Voordat service-we rkzaamheden aan de motorofmaaikast
worden verdcht, dient men het volgende te deem
• Druk de koppelings/rempedaal in en trek de
parkeerremhendel aan.
• Zet de versnellingshendel in neutrale stand.
Breng de koppelingshendel in ontkoppelde stand.
• Zet de motoraf.
Verwijder de ontstekingskabel van de bougie.
_) (1) Hood
(2) Headlight wire connector
(_ (1)
Motorhaube
(2) Scheinwerferanschlul3
Engine hood
• Raise hood.
Unsnap headlight wire connector.
• Stand in front of tractor. Grasp hood at sides, tilt forward
and lift off of tractor.
• To reinstall, slide hood pivotbrackets into slots in frame.
• Reconnect headlight wire connector and close hood.
(_) Motorhaube
• Motorhaube hochklappen.
ScheinwerferanschluB 15sen.
_or den M&her treten. Motorhaube an den Seiten
anfassen, nach vorn kippen und aus dem M&her
herausheben.
Beim Wiedereinsetzen die StL_tzstreben der Motorhaube
in die Schlitze des Rahmens schieben.
• ScheinwerferanschluFJ wieder anschlieBen und die
Motorhaube schlieBen.
45
Page 32

6
®
@
k
/,_\ "4\
(1) Capot
(2) Connexion des phares
(1) Cubierta
(2) Conector de cables de los fares delanteros
(1) Cofano
(2) Connettorecavo luci
(1) Motorkap
(2) Aansluitkabelkoplampen
(_ Capot moteur
Soulever le capet.
• Deconnecter les phares,
Se player devant le tracteur, prendre le capot par les
c6tes, I'incliner & I'avant, puis le soulever pour le lib_rer
des encoches qui le fixent au ch&ssis,
• Pour r_installer le capot, repositionner les ergots du
capot dans les encoches r_serv_es & cet effet,
Rebrancher la connexion des phares et refermer le
capot.
Cubierta del motor
Levante la cubierta.
Desenchufe elconector decables delos faros delanteros.
Coloquese delante del tractor. Mueva la cubierta hacia
ambos lados, incl/nela hacia delante y extrdigala.
Para volver a ponerla, debe introducir los ejes de giro en
las ranuras correspondientes del chasis.
Enchufe el conector de cables de los faros delanteros y
cierre la cubierta.
(_ Cofano Motore
Sollevare il cofano.
• Staccare il contatto del cave delle luci.
• Dal davanti deltrattore. Spingere di latoilcofano, ribaltare
in avanti e sollevarlo dal trattore.
Per rimontare, infilare le staffe helle guide sul telaio.
• Ricollegare il cavo principale e chiudere il cofano.
(_ Motorkap
• Open de motorkap.
Ontkoppel de aansluitkabel van de koplampen.
• Ga recht voor de trekker staan. Pak de motorkap aan
beide zijden vast, kantel hem naar voren en til hem van
de trekker.
Plaats bij het monteren van de kap de schamierbeugels
in de betreffende openingen in her chassis.
Sluit de aansluitkabel van de koplampen weer aan en
sluit de motorkap,
46
Page 33

6
Maintenance
NOTE: Periodic maintenance should be performed on a
regular basis in order to keep your tractor in good running
condition.
_b WARNING: Disconnect spark plug wire to prevent acciden-
tal starting before attempting any repair, inspection, or
Entretien
ATrENTION: L'engin dolt 6tre periodiquement entretenu
afin d'en obtenir un rendement efficace.
_ DANGER: Avant toute intervention: reparation, examen ou
mesure d'entretien, d_brancher le fil de bougie pour _viter
toute mise en marche intempestive.
maintenance.
Before each use:
• Check oil, lubricate pivot points as necessary.
• Check to see allbolts, nuts, and cotter pins are inplace and
secure.
• Check the battery, terminals and vents.
• Recharge slowly at 6 amperes if needed.
• Clean air screen.
• Keep tractor free of dirt and chaff to prevent engine
damage or overheating.
• Check brake operation.
Avant chaque usage:
• Vddfier le niveau d'huile, et lubrifier au besoin les points
d'articulation.
• Vdrifier que tousle _=crous,boulons et goupiUes sont en
place et solidement fixes.
• Vedfier les la battede, les plots et le bouchon filtre.
• Recharger au besoin & 6 A.
• Nettoyer le tamis d'aeration.
• Enlever du v_hicule toute poussiere, menue paille et
brindilles risquant d'endommager le moteur ou de
provoquer un _chauffement.
• V_rifier I'dtat des freins.
(_) Wartung
ACHTUNG! Der M&her sollte ragelm&Sig gewartet werden,
um einen einwandfreien Betrieb des M&hers zu
gew&hrleisten.
,_WARNUNG! Vor Reparatur-, Inspektions- und
Wartungsarbeiten mu8 das Z,",ndkerzenkabel entfernt
werden, umein pl6tzlichesStarten desM&hers zu verhindem.
Onderhoud
OPMERKING: Om uw tractor in goede conditie te houden,
moeten er regelmatig onderhoudsbeurten uitgevoerd
worden.
_A WAARSCHUWING: Schakel altijd eerst de bougieleiding
uit voor u herstellingen, inspecties of onderhoud uitvoert.
Dit om te voorkomen dat de machine per ongeluk start.
Vor dem Gebrauch:
• (_lstand kontrollieren, wenn erfoderlich sind die
Zapfenstellen zu schmieren.
• Kontrollieren, ob sich s&mtliche Bolzen, Muttem und
Sicherungsstifte an ihrem Platz befinden und festgezogen
sind.
• Die Batterieklemmen und EntlL_fterder Batterie prOfen.
• Wenn erforderlich, ist die Batterie bei einer Stromst&rke
von 6 A langsam aufzuladen.
• Luffgitter reinigen.
• Den M&her von Schmutz und H&cksel freihalten, um
Motorschaden oder Uberhitzung zu vermeiden.
• Funktion der Bramsen kontroilieren.
Voor elk gebruik:
• Controleer het oliepeil en smeer de draaipunten indien
nodig.
• Controleer of alle bouten, moeren en splitpennen op hun
plaats zitten en goed vast zitten.
• Controleer de accupolen en ontluchtingsopeningen.
• Laad voorzichtig op bij 6 ampere indien nodig.
• Maak het luchtscherm schoon.
• Zorg dater geen vuil en kaf open in de tractor zit, zodat de
motor niet beschadigd of oververhit raakt.
• Controleer de wet'king van de remmen.
47
Page 34

6
SERVICE RECORD
FILL IN DATES AS YOU COMPLETE REGULAR SERVICE
Every
200 hours
As Every 8 Every Every Every
Needed hours 25 hours 50 hours t00 hours
Change engine oil ........................................................................... •
Lubricate pivot points ...................................................................... •
Check brake operation ............................. •
Clean air screen ........................................................... •
Clean air filter and pre-cleaner ................................... •
Replace air cleaner paper cartridge ........................................................................................ •
Clean engine cooling fins .................................................................................... •
Replace spark plug ................................................................................................................... •
Check tire pressure .................................. •
Replace fuel filter ........................................................................................................................................ •
Clean battery and terminals ............................................................ •
Check muffler ..................................
Lubricate ball joints .........................
Toe-in adjustment ...........................
Carburetor adjustment ....................
®
WARTUNGSNACHWEIS
DATUM NACH ABSCHLUI3 DER WARTUNG EINFULLEN
Wenn Alle 8 Alle 25 Alle 50 Alle 100
erforderlich Stunden Stunden Stunden Stunden
Motor61 wechseln ............................................................................. •
Zapfenstellen schrnleren' .................................................................. •
Funktion der Brernsen kontrollieren ....... •
Luftgiter reinigen .......................................................... •
Luftfilter und Vorfilter reinigen ...................................... •
Papierpatrone des Luftfilters
auswechseln .......................................................................................................................... •
K0hllarnellen des Motors reinigen ....................................................................... •
Z0ndkerze wechseln ................................................................................................................. •
Reifendruck kontrotlieren ..........................
Kraaffstoffilter auswechseln ......................................................................................................................... •
Batterie und Batteriepole reinigen .................................................. •
Schalld&mpfer kontrollieren ................................................................................. •
Kugellageverbindungen schmieran ........................................................................................ •
Achssturz-Einstellung ............................... •
Vergaser-Einstellung ................................ •
Alle 200
Stunden
49
Page 35

6
(_ Messerbalken
FOr beste M&hergebnisse mLissen die Messerbalken immer
opti mal geschliffen sein. Wechseln Sie verbogene oder
besch&digte Messerbalken sofort aus. Sie werden mit einer
Feile oder einer Schleifscheibe gesch&rft.
HINWEIS: Um eine Unwucht zu vermeiden, m0ssen beide
Seiten der Messerbalken gleichm&Big gesch_rft und auf
Unwucht geprOft werden.
WECHSELN DER MESSERBALKEN:
Fahren Sie das M&hdeck in die h6chste Position, um
Zugriff zu den Messerbalken zu bekommen.
L6sen Sie die Sechskantschraube, die
Sicherungsscheibe und die Unterlegscheibe, die den
Messerbalken fixieren.
Montieren Sie den neuen bzw. den neu gesch&rften
Messerbalken, wobei die hintere (Hilfschneid-) Kante
wie abgebildet nach oben zur Plattform zeigen muB.
Wichtig: Um eine richtige Montage zu gew&hdeisten, mul3
die Zentrierbohrung des Messerbalkens mit der
Messeraufnahme _3bereinstimmen.
Montieren Sie nun in der beschriebenen Reihenfolge
die Sechskantschraube, die Sichemngsscheibe sowie
die Untedegscheibe.
• Ziehen Sie die Schrauben gut fest (Drehmoment: 27-37
Nm.)
Hinweis: Die Sechskantschraube des Messerbalkens ist
w&rmebehandelt.
_) Blades
For best results mower blades mustbe kept sharp. Replace
bent or damaged blades. Sharpening can be carried out with
a file or gdnding disc.
NOTE! It is very impodant that both blades are sharpened
equally to avoid imbalance.
BLADE REMOVAL:
• Raise mower to highest position to allow access to
b_ades.
Remove hex bolt, lock washer and flat washer secudng
blade.
Install new or resharpened blade with trailing edge up
towards deck as shown.
IMPORTANT:: To ensure proper assembly, center hole in
blade must align with star on mandrel assembly.
Reassemble hex bolt, lock washer and flat washer in
exact order as shown.
Tighten bolt securely (27-35 Ft. Lbs. torque).
IMPORTANT: Blade bolt is grade 8 heat treated
(_ Lames:
Pour avoir une bonne qualite de coupe, il est indispensable
d'avoir des lames bien aff0tees. Changer les lames
ddfectueuse ou torduee. L'afft3tage peut se faire avec une
lime ou avec une meule.
ATTENTION! II est trbs important d'aff_ter en m6me temps
et de fa_on identique les deux extr_mit_s de la lame pour
eviter tout d6s_quilibrage.
POUR RETIRER LES LAMES:
Relevez la machine sa position la plus haute pour avoir
acc_s aux lames coupantes.
Desserrer le boulon a t_te hexagonale, le cimlip et la
rendelle plate fixant la lame sur le moyeu.
Installer une nouvelle lame ou la lame d'odgine rdaffutee
avec le tranchant tourne vers le haut du carter comme
indique sur le dessin
A'I'rENTION: Pour que la lame soit bien mont_e, I'odfice
central en forme d'_tiol de la lame dolt _tre parfaitement
emboff_ sur I'_toile du moyeu.
Remonter le boulon & t6te hexagonale, le cimlip et la
rondelle plate darts I'order exact, comme indique.
Resserer le boulon avec un couple de serrage de 3,7 &
4,9 mKg.
ATTENTION: Le bouton de lame a dtd treite thermiquement
- classe 8. Bien respecter le couple de serrage.
52
Page 36

6
I
--]
Brakes
The brakes are located reside the nght rear wheel. The whee_
should be dismantled for best access•
• Press down the clutch/brake pedal and engage the
parking brake.
Bremse
Die Bremse sitzt innerhalb des rechten Hinterrades. FOr
beste Zug&nglichkeit ist das Rad auszubauen.
Kupplungs-/Bremspedal durchtreten und die
Feststellbremse einschalten.
Reglage du Frein
Le frein se situe & I'avant de la roue arri_re cStd droit. La roue
dolt 6tre d_pos_e pour avoir une bonne accessibilitY.
Avant toute intervention enfoncer la pddale de frein/
embrayage et engager le frein de parking.
Freno
El freno se halla por dentro de la rueda posterior der6cha.
Esta puede desmontarse a fin de mejorar la accesibilidad.
Apretar el pedal de ernbrague/freno yacoplar el freno de
estacionamiento.
Frsno
11freno _ montato la posteriors consiglia
dietro ruota destra. Si
di smontare la mota.
Premere il pedale freno/frizione e inserire il freno di
parcheggio
@
1.
2.
3.
1.
2.
Rem
De rern zitaan de binnenkant van her rechter achterwiel. Orn
ergoad bijte kunnen komen, dient hat wiel te worden gemon-
teerd.
3,
Druk de koppelings/rempedaal in en trek de parkeerrem
aao.
Measure the distance between the brake lever and the
adjuster nut.
The distance should be 40 mm (1.56").
Adjust the distance if necessary byfirst loosening the lock
nut (2) and then adjusting with the nut (1).
Abstand zwischen Bremshebel und Stellmutter messen.
Der Abstand soil 40 rnm betragen.
Den Abstand wenn erfordedich einstellen, indem zuerst
die Sicherungsmutter (2) gelSst und danach die Mutter
(1) verstellt wird.
1. Mesurer la distance entre le levier de frein et I'_crou de
reglage.
2. La disstance dolt _tre de 40 mm.
3. Si necessaire, a uster la distance en commengant par
d_visser I ecrou de verrou age (2) pus en rdglant avec
I'ecrou (1).
1.
2.
3.
1.
2.
3.
1.
2.
3.
Medir la separaci6n entre la palanca de freno y la tuerca
de ajuste.
La distancia ha de ser de 40mm.
En case necesario ajustar laseparacibn quitando pdmero
la contratuerca (2) y ajustando despu_s con la tuerca (1).
Misurare la distanza tra la leva del freno eil dado di
regolazione.
La distanza deve eesere di 40rnm.
Se necessario regolare allentando il dado (2) e agendo
poi sul dado (t).
Meet de afstand tussen de remnokas en de stelrnoer.
De afstand dient 40mm te zijn.
Stel zonodig de afstand bij, door eerst borgmoer (2) los
te draaien en daama bijstellen met stelrnoer (1).
WARNING!
DO notforget to tighten the lock nut after completing adjust-
ment.
WARNUNG!
Nicht vergessen, die Sicherungsmutter nach durchgefOhder
Einstellung anzuziehen.
ATTENTION!
Ne pas oublier de serrer I'ecreu de verrouillage apr(_s le
reglage.
ADVERTENCIAI
Despu_s del ajuste, noolvidarse de apretar lacontratuerca.
ATTENZIONE!
Dopo la regolazione ristringere il dado di bloccaggio.
LET OP!
Vergeet niet de moeren aan te draaien na het bijstellen.
54
Page 37

6
Dismantling of the cutting unit
Work from the right side of the machine.
1. Take offthe belt frem the engine pulley (1).
2. Remove the small retainer spring(2) and liftclutch spnng
off the pulley bolt.
3. Remove the large retainer spring (3), slide collar off and
push housing guide out of the bracket.
4. Remove the two rear retainer springs (4) and knock off
the axle taps with a hammer.
Demontage des M_hdecks
Arbeiten Sie auf der rechten Seite der Maschine.
1. Entfernen Sie den Riemen yon der Keilriemenscheibe
des Motors (1).
2. Entfemen Sie den kleinen Splint (2) und ziehen Sie die
Kupplungsfeder yon der Achse des Riemenrades ab.
3. Entfernen Sie den groSen Splint (3), ziehen Sie den
Kranz ab, und drOcken Sie das F_hrungsgeh&use aus
der Verankerung heraus.
4. Enffernen Sie die beiden hinteren Federklammern (4)
und entfemen Sie die beiden Bolzen.
Depose du Carter de Coupe
Travailler a partir du c6te droit du tracteur.
1. D_'poser ensuite la courroie de la poulie du moteur (1).
2. Enlevez le petit ressort de retenue (2), et soulevez le
ressort d'embrayage hors de le boulon de la poulie.
3. Enlevezlegrandressortderetenue(3),glissezlecollier
hors et poussez la guide de Iogement hors du support.
4. Entever les duex ressorts arri_re en forme d'_pingle &
cheveux (4) et chasser les axes un marteau.
(_ Desmontaje de la unidad de torts
Trabajar desde el lado derecho de la maquina.
1. Quitar despues la correa de la polea del motor (1).
2. Remueva el resorte de retencion pequeho (2), y levante
el resorts del embrague hacia fuera del pemo de la
polea.
3. Remueva el resorte de retenci6n grande (3), deslice el
collar hacia fuera y empuje la guia del bastidor hacia
afuera del soporte.
4. Quitar los dos resortes posteriores (4) y golpear con un
martillo los muSones de eje hasta sacarlos.
Q Smontaggio piatto taglio
del di
Lavorare sut lato destro della macchina.
1. Togliere la cinghia dalla puleggia del motore (1).
2. Rimuovere la piccola molla di fermo (2) e rimuovere,
sollevando, la molla della frizione dal bullone della
puleggia.
3. Rimuovere la grande molla difermo (3), estrarre ilcollare
e spingere la guida delralloggiamento fuori dalla staffa.
4. Togliere le due coppi_]lie (4) posteriori e con un martello
togliere anche i pemt.
(_) Demonterhen van de maaikast
Werk vanaf de rechter kant van de machine.
1. Haal daama de riem van de poelie van de motor (1).
2. Verwijder de kleine borgveer (2) en licht de veer van de
aandrijfkoppeling omhoog van de katrolbout af.
3. Verwijder de grote borgveer (3), schuif de kraag eraf en
duw de geleider van de behuizing uit de beugel.
4. Verwijder de twee achterste haarpinveren (4) en sla met
een hamer de twee as-pennen los.
55
Page 38

6
@
5. Quitar los resortes (5), (6), (7) y los ejes respectivos.
6. Tirar hacia atr&s de la palanca para la elavacibn y
descenso de la unidad de corte.
7. Extraer la unidad de corte de la m_quina.
ATENClON: Si cualquier otro accesorio qur no sea la
segadora tiene que ser montado en el tractor, se deben
remover los brazos de suspensibn del lado derecho y del
lado izquierdo y el puntal de suspension delantero (8).
Q
5. Togliere le coppiglie (6), (6), (7) e i relativi pemi.
6. Tirare alrindietre la leva di sollevamento/abbassamento
del piatto di taglio.
7. Staccare il piatto dalla macchina.
A'I-FENZIONE: Se un accessorio diverso dal piano di taglio
viene montato sul trattore, rimuovere le articolazioni anteriori
e agganciare la molla della frizione al fore quadrato nel telaio
(8).
(_ 5. Remove the retainer springs (5), (6), (7) and axles.
6. Pull the lever for lifting/lowering the cutting unit back-
wards.
7. Pull out the cutting unit from the machine.
IMPORTANT: If an attachment other than the mower deck is
to be mounted on the tractor, remove the front links and hook
the clutch spring into square hole in frame (8).
@
5. Verwijder de haarpinveren (5), (6), (7) en resp. assen.
6. Zet de hendel voor verhogen/verlagen van de maaikast
naar achteren.
7. Trek de maaikast van de machine af.
BELANGRIJK: Indien er een ander aanzetstuk dan het
maaidek op de trekker gemonteerd moet worden, varwijder
dan de voorste verbindingen en haak de veer van de
aandrijfkoppeling in het vierkante gat in de frame (8).
(_) 5. DieFederklammem(5),(6),(7)unddiejeweiligenBolzen
ausbauen.
6. Hebel f0r Heben/Senken des M&hdecks zur0ckziehen.
7. M&hdeck aus ber Maschine herausziehen.
WlCHTIG: Wenn stattdem M&hwerk einanderas ZubehSrteil •
am Traktor angebracht werden soN, so sind die vorderen
Verbindungsstt3cke abzunehmen und die Kupplungsfeder
ist in das eckige Loch des Rahmens (8) einzusetzen.
(_ 5. Enlever les ressorts en forme d'epingle b cheveaux (5),
(6), (7) et les axes respectifs.
6. Tirer le levier pour lever/abaisser le groupe de coupe
vers rarriera.
7. Retirer le groupe de coupe de la machine.
ATTENTION: S iunaccessoire autre que le carter de tondeuse
dolt 6tre montde sur le tracteur, enlevez les raccords
antdrieurs et accrochez le ressort d'embrayage dans le trou
carr6 du chassis (8).
_) Assembly of the cutting unit
• Push in the cutting unit under the machine. The ejector
opening should be to the right.
Assemble in the reverse order to dismantling.
(_ Einbau des Mihdecks
• M&hdecks unter den Traktor schieben.
Auswurfoffnung mu8 nach rechts.
• Der Einbau effolgt in umgekehrter Reihenfolge.
Die
(_ Montage du groupe de coupe
Pousserle _roupe de coupe sousla machine, L'ouverture
de rejet dolt 6tre toumd_evers le c6te droit.
• Le montage se fait dans rordre inverse au demontage,
@
Montaje de la unidad de corte
Introducir la unidad de code dabajo de la maquina. La
abertura de expulsion ha de estar hacia la derecha.
El montaje se hace en orden inverso al desmontaje,
Q
Montaggio del piatto di taglio
Ricollocare il piatto sotto la macchina. L'apertura di
scarico dell'erba deve restare a destra.
Precedere in ordine inverso.
56
Monteren van de maalkast
Schuif de maaikast onder de machine. De uitwerp-
opening is naar rechta gedcht.
• Het monteren vindt in omgekeerde volgorde van bet
demonteren.
Page 39

6
Changement de la courroie d'entrainment du carter de
coupe
1. Deposer le carter de coupe (voir chapitre pr_c6dent).
2. Retirer la courroie en pertant de la poulie gauche du
carter de coupe, puis des autres poulies.
3. Retirer ensuite la courroie de I'unite de coupe.
4. Monter la courroie neuve darts rordre inverse. Verifier
que la courroie est correctement positionn_e devant tous
les guides.
Cambio de ia correa propulsora del equipo de corte
1. Desmontar el equipo de corte del tractor.
2. Quitar la polea izquierda de la unidad y despues de las
otras poleas.
3. Quitar despu6s la correa de la unidad de corte.
4. Montar la nueva correa en el orden inverso. Controlar
que la correa nueva se halla por dentro de todas la guias.
Replacement of drive belt for cutting unit
1. Dismantle the cutting unit as described previousley.
2. Work off the belt from the unit's left pulley and then from
the other wheels.
3. Pull the belt away from the cutting unit.
4. The new belt is mounted inthe reverse order. Check that
the belt lies inside all the belt guides.
Sostituzione della cinghia di movimento lame
1. Smontare il piatto.
2. Togliere la cinghia dalla puleggia di sinistra e poi
successivamente dane aitre.
3,
4.
Togliere [a cinghia dal piatto.
Montare la nuova cinghia in ordine inverso. Controllare
che la cinghia sia correttamente posizionata in tutte le
guide.
Auswechsein des Treibriemens f,-,r des M_haggregat
1. M&hdeck ausbauen.
2,
3.
4.
Riemen vom dedinken Keilriemenscheibe des M&hdecks
und danaeh von den 0bdgen Riemenscheiben abbauen.
Danach den Keilriemen vom M_.hdeck entfemen.
Den neuen Keilriemen in umgekehrter Reihenfolge
einbauen. Pr,",fen, dab der Keilriemen in allen
RiemenfL_hrungen korrekt in Position sitzt.
Vervanghen van de aandrijfriem voor de maaikast
(_)1. Verwijder de maaikast van de trekker.
2. Trekderiemeerstvandelinkerdemschijfvandemaaikast
af en daama van de overige schijven.
3. Trek daama de riem van de maaikast af.
4. De nieuwe riem wordt in omgekeerde volgorde
9emonteerd. Controleer of de riem binnen age
nemgeleiders ligt.
57
Page 40

6
o o
@
Adjustment of the cutting unit
A. In the direction of travel
1. Check that the air pressure is correct in all four tyres.
2. Make sure that the machine is on a horizontal surface.
3. Liftup the cutting unit to its highest position.
4. Measure the distances A and B.
1.
2.
3.
4.
Einstellung des Miihaggregats
A. In Fahrrichtung
Pn3fen, dab der Luftdruck an allen vier Reifen richtig ist.
PrOfen, dab die Maschine auf einer ebenen Unterlage
steht.
M&haggregat in die oberste Lage anheben.
Abst&nde A und B messen.
R_-.glugedu carter de coupe
A. Reglage lateral
1. Vdfifier que lapression est correct dans les quatre pneus.
2, S'assurer que la machine est sur un terrain plat.
3, Relever lecarter de coupe dans la position la pus haute.
4. Mesurer les distances A et B,
Ajuste de la unidad de corte
A. En el sentido de la murcha
1. Controlar que la presion de inflado as la correcta en los
cuatro neumaticos.
2. Asegurarse de que la maquina est&sobre suelo horizon-
tal
3. Levantar la unidad de corte hasta su posici6n m&s
elevada.
4. Medir la distancia A y B.
Q Regolazione del tagliaerba
A. Nel senso di mercia
1. Controllare la pressione dei pneumatici.
2. La macchina deve essere inpiano,
3. Sollevare al massimo il tagliaerba.
4. Misurare le distanze A e B,
(_ Het instellen van de maaikast
A. In de rijrichting
1. Controleer of de luchtdruk in alle vier de banden juist is.
2. Zorg ervoor dat de machine op een vlakke ondergrond
staat.
3. Zet de maaikast in de hoogste stand.
4, Meet de afstanden A en B.
®
®
Q
58
To achieve best cuttingresultsthe cutting unit'sfront edge (B
should be about 10 mm (0.375") lower than the back edge
(A). Adjust in the following way to raise the back edge:
1. Loosen the nut (1) on both the left and right levers.
2. Screw the nut (2) the same number of tums on both
levers.
3. When the correct distance (A) is obtained this setting is
locked with the nut (1).
Fi_r bestes M&hergebnis mul3 die Vorderkante des
M&haggregats (B) ca. 10 mm tiefer lie_en als die Hinterkante
(A). EinsteUung zur ErhShung der Hmterkante:
1. Mutter (1) am linken und rechten Hebe115sen
2. Mutter (2) gleich viele Drehungen an beiden Hebeln
verstellen.
3. Wenn tier richtige Abstand (A) erhalten wird, sind die
Einsteltungen mit der Mutter (1) zu sperren.
Pour avoir le meilleur r_sultat de coupe, le bord avant du
carter de coupe (B) doit _tre de 10 mm en dessous du bord
arri_re (A). Pour relever le bord arriere, proc_der dela fagon
suivante:
1. Ddvisser I'dcmu (1) sur les supports avant gauche et
droit du carter de coupe.
2. Visser exactement de la m_me fagon les ecrous (2) sur
les supports avant du carter de coupe
3. Lorsque la distance (A) est correcte, bloquer le rdglage
avec I'_crou (1).
Para obtener el mejor resultado de corte, el extremodelantero
(B) de la unidad de corte ha de estar unos 10 mm (0,375")
mds bajo que el extremo posterior (A). Ajustar de la manera
siguiente para elevar el extremo posterior:
1. Quitar la tuema (1) en las palancas izquierda y derecha.
2. Enmscar la tuema (2) el mismo n_Jmemde vueltas en las
dos palanca.
3. Cuando se ha obtenido la distancia correcta (a), el ajuste
se bloquea con la tuerca (1).
Per ottenere imigliofi risultati,ilbordo anteriore del tagliaerba
(B) dave essere cima 10 mm piObasso diquelo anteriore (A).
Regolare nel modo sequente:
1. Allentare il dado (1) sui bracci destro e sinistro.
2. Awitare ildado (2) di un nuemero identico digirisui due
bracci.
3. Dopo aver raggiunto la distanza corretta (A) bloccare
stringendo il dado (1).
Om hat beste maairesultaat te bereiken, dient de voorkant
(B) van de maaikast ca. 10 mm (0,375") lager te staan dan
de achterkant (A). Ter verhoging van de achterkant als volgt
instellen:
1. Draai moer (1) los op linker en rechter hafboom.
2. Draai moer (2) op de beide hefbomen evenveel slagen.
3. Wanneer dejuiste afstand (A) isbereikt, wordtde instelling
met de moer (1) vastgezet.
Page 41

6
_)(1) Bottom edge of mower
(2) Lift link adjustment nut
(_(1) Unterkante des M&hwerks
(2) Hubstangen-Stellmutter
(_(1) Fond du bord de la tondeuse
(2) I_crou de r_glage du raccord de levage
(_) (1) Parle infedor de la esquina de la segadora
(2) Tuerca de ajuste del v_.dllaje de levantamiento
(_(1) Bordo inferiore del tagliaerba
(2) Dado di regolazione dell'articolazione di sollevamento
(_)(1) Onderkant van de maaimachine
(2) Bijstelmoer
SIDE-TO-SIDE ADJUSTMENT
Raise mower to highest position.
At the midpoint of both sides of mower, measure height
from bottom edge of mower to ground. Distance "A"
should be the same or within 6mm (1/4") of each other.
• If adjustment is necessary, make adjustment on one side
of mower only.
To raise one side ofmower, tighten liftlinkadjustment nut
on that side.
To lower oneside of mower, loosen lift link adjustment nut
on that side.
NOTE: Three full tums ofadjustment nut will change mower
height about 1/8".
• Recheck measurements after adjusting.
SEITLICHE EINSTELLUNG
• Das M&hwerk auf die hOchste Position einstellen.
Auf beiden Seiten des M&hwerks inder Mitte den Abstand
yon der Unterkante des M&hwerks zum Boden messen.
DerAbstand "A" sollte auf den beiden Seiten um h6chstens
6 mm (1/4') voneinander abweichen.
Falls eine Einstellung notwendig sein sollte, die
Einstellung nur auf eine rSeite des M&hwerks vorneh men.
Um eine Seite des M&hwerks anzuheben, die
Hubstangen-Stellmutter auf der jeweiligen Seite
festziehen.
Um eine Seite des M_.hwerks abzusenken, die
Hubstangen -Stellmutter auf der jeweiiigen Seite 18sen.
NOTE: Drei voile Umdrehungen der Stellmutter ver&ndem
die HShe des M&hwerks um etwa 3 mm (1/8").
Nach der Einstellung die Abst&nde emeut pr,3fen
o
REGLAGE TRANSVERSAL
Relever lecarter de coupe dans sa position la plus haute,
Calculer la distance au sol &partir des milieux des bords
exterieurs gauche et droite du carter de coupe.
La distance A dolt _tre la m_ne des deux cSt_s a 6 mm
pres.
Si le r_glage est necessaire, ne regler qu'un seul des
deux cSt_s pr rapport & I'autre.
Soulever ou baisser un cOt_ de la tondeuse en ajustant
I'ecrou de reglage sur ce c6te.
REMARQUE: Chaque trois tour de I'_crou de r_glage
changera a hauteur de la tondeuse environ 0,3 cm (1/8").
Reverifier la distance au sol apres le reglage.
ADJUSTE DE LADO A I.ADO
Levante la segadora a su posici6n mas alta.
A media distancia de ambos lados de la segadora, mida
laaltura desde la parle inferiordel extremo dela segadora
al suelo. La distancia "A" debe ser la misma o dentro de
6mm (1/4") de la una a la otra.
Si el ajuste es necesado, haga el ajuste en un lado de la
segadora solamente.
Levante un lado de la segadora por apretar la tuerca de
ajuste del vdrillaje de levantamiento en ese lado.
Baje un lado de la segadora por desapretar la tuerca de
ajuste del vadllaje de levantamiento en ese lado.
AVISO: Cada tres vueltas completas de la tuerca de ajuste
cambiard laaltura de la segadora en aproximadamente (1/
8").
Vuelva a revisar las medidas despu_s del adjuste.
(_). REGOLAZlONE FIANCO A FIANCO
Alzare il tagliaerba nella posizione pi0 atta.
Sui punti centrali di entrabi i lati del tagliaerba, misurare
I'altezza dal bordo infedore del tagliaerba al suolo. La
distanza "A"deve essere la stessa o diversa non pi0 di
circa 6mm (1/4 di pollice).
Se necessario, fare la regolazione su un solo lato del
tagliaerba.
• Per alzare un lato del tagliaerba, stringere il dado di
regolazione dell'arlicolazione di sollevamento su quel
lato.
Per abbassare un lato del tagliaerba, allentare il dado di
regolazione dell'articalazione di sollevamento su quel
lato.
NOTA: Tre girl completi del dado di regolazione cambiano
I'aitezza del tagliaerba di circa 3 mm (1/8 di pollice).
Dopo aver fatto laregolazione, ricontmllare le misurazioni.
LINKS/RECHTS BIJSTELLEN
Zet de maaimachine in de hoogste stand.
Meet vervolgens in het midden tussen beide zijkanten
van de maaimachine de hoogte van de onderkant van de
maaimachine tot de grond. Afstand "A" moet ofwel
hetzelfde zijn, ofwel binnen 6 mm (1/4") van elkaar
liggen.
Indien bijstellen nodig is, mag dit slechts aan _n kant
van de maaimachine gebeuren,
Draai de bijstelmoer vaster aan de kant van de
maaimachine die u hoger wilt instellen.
Draai de bijstelmoer looser aan de kant van de
maaimachine die u lager wilt instellen.
LET OP: Drei slagen van de bijstetmoer veranderen de
hoogte ongeveer 3 mm (1/8"),
• Controleer na het bijstellen de hoogte opnieuw.
59
Page 42

6
Replacement of drive belt
Dismantle the cutting unit as described previously
Engage the parking brake and work off the belt upwards from
the pulley (1), the clutch pulley (2) and the engine's drive
wheel (3). Push the belt up between two fan blades and rotate
the fan clockwise untilthe belt comes loose (4).
(_ Auswechsein des Treibriemens
M&haggregat ausbauen.
Feststellbremse ansetzen undden Riemen vom Laufrad (1),
dem Kupplungsriemenrad (2) und dem Motorantrieberad (3)
abbauen. Den Reimen zwischen zwei L£lfterbl&ttern
einfL_hrenund den L"fter nach linksdrehen, bis der Riemen
frei geht (4).
®
Echange de la courroie d'entra'inement
D_poser le groupe de coupe de la machine.
Serrer le frein de stationnement et enlever la courroie en
partant de la poulie de guidage (1), la poulie pour la courroie
d'embrayage (2) et le pignon de'entraTnement pour le moteur
(3). Faire passer la courroie entre les deux palettes du
ventilateur et faire tourner te ventilateur et faire tourner le
ventilateur dans le sens inverse des aiguilles d'une montre
pour d_gager la courroie (4).
_) Cambio de correa propulaora
Desmontar el equipo de corte del tractor.
Aplicar el freno de estacionamiento y tirar hacia arriba de la
correa para sacada de la rueda libre (1), de la acoplamiento
(2) y de la propulsora del motor (3). Introducir lacorrea entre
dos aspas del ventilador yhacer girar date a izquierdas hasta
que queda libre la correa (4).
(_ Sostituzione della cinghia trazione
di
Smontare il tagliaerba.
Inserire il freno di parcheggio e staccare la cinghia dalla
puleggia (t), da quella della frizione (2) e da quella del
motore (3). Passare la cinghia tra due pale della ventola e
ruotare laventola insenso antiorario fino ache la cinghia non
sia libera (4).
(_ Vervangen van aandrijfriem
de
Verwijder de rnaaikast van de tractor.
Trek de handrem aan en trek de riem omhoog van het
Ioopwiel (1), de koppelingswielschijf (2) en het aanddjfwiel
van de motor (3). Leid de dem tussen twee ventilatorbladen
door endraai deventilator tegende klok intotde riem vrij komt
(4).
(_ Assemble in the order to Check that the
reverse dismantling.
belt lies inside all the belt guides. Use original belts only when
replacing!
(_) Der Einbau erfolgt in umgekehrter Reihenfolge. Pn3fen,
daf]
der Riemen innerhalb aller RiemenfL_hrer liegt. Beim
Auswechseln nur Odginaldemen verwenden!
(_)Le montage se fair dans I'ordre inverse au ddmontage.
Verifier que la courroie est bien positionnee devant tousles
tendeurs. Utiliser seulement une courroie d'origine pour
l'_change!
_)EI montae se hace en el orden inverso al desmontaje.
Controlar que lacorrea se ha a por dentro de todas as gu_as.
Montar Onicamente correas originales.
Q II montaggio awiene in ordine inverso, che
Controillare la
cinghia sia dietro ai guida-cinghia, Usare solo cinghie
originali!
(_) De montering vindt in omgekeerde volgorde plaats als de
demontering. Controleer of de snaar binnen alle dem-
geleiders ligt. Gebruik uitsluitend originele riemen bij
vervanging!
60
Page 43

6
1. Motion Control Lever
2, Neutral Look Gate
3. Adjustment Bolt
(_ 1. SteuerknOppel
2. Verschlussporre in Leedaufstellung
3. Einstellbelzen
(_ 1. Leiver De Controle Du Mouvernent
2. Point Mort Vanne De Fermeture
3. Boulon De Reglago
TRANSAXLE MOTION CONTROL LEVER
ADJUSTMENT
The motion control lever has been preset at the factory and
adjustment should not be necessary.
Loosen adjustment bolt in front of the right roar wheel, and
lightly tighten.
Start engine and move motion control lever until tractor does
not move forward or backward.
Hold motion control lever in that position and turn engine off.
While holding motion control lever in place, loosen the
adjustment bolt.
Move motion control lever to the neutral (N) (took gate)
position.
Tighten adjustment belt securely.
NOTE: If add_onal clearance is needed to get to adjustment
belt, move mower deck height to the lowest position.
After above adjustment is mode, if the tractor still creeps
forward or backward while motion control lever is in neutral
position, follow these steps:
Loosen the adjustment belt.
Move the motion control lever 1/4 to !/2 inch in the direction
it is trying to creep.
Tighten adjustment bolt securely.
Start engine and test.
If tractor still creeps, repeat above steps until satisfied.
EINSTELLUNG DES STEUERKNUPPELS DES
SCHALTGETR|EBES
Der SteuerknSppe_ wird von der Herstefiertirma im Werk
voroingestellt und erfordert daher in der Regel keine weiteron
Einstellungen.
Den vome auf dem rechten Hinterrod befindlichen
Einstellbelzen 16sen und wieder leicht anziehen;
Den Motor antassen und den SteuerknOppel verschieben,
bis sich der Traktor weder vorw_rts nooh n3ckw_rts bewegt;
Den SteuerknQppel in dieser Stellung lassen und den Motor
ausschalten;
Nun den Einstellbolzen ganz Ibsen, w&hrond der
SteuerknSppol nach wie vor in der genannten Stellung bleibt;
Den Steuerkn'3ppel in die Leerlaufsteliong (N)
(VerschluBsperro) bringen.
Den Eiostellbolzen wieder fest anziehen.
HINWEIS: Falls eine gr_Bero Bewegungsfreiheit ben(3tigt
wird, urn an den Einstellbelzen zu gelangen, istes ratsem, die
M&herplattform in die niedngste Stellung abzusenken.
Sollte der Traktor nach der Durchf0hrung dieser Einsteliong
weiterhin leicht nach vom oder hinten rutschen, wenn sich der
Schalthebel in Leerlaufstellung pefindet, so mul_ wie folgt
vorgegangen werden:
Den Einsteflbolzen R3sen;
Den SteuerknOpbel um 1/4 his 1/2 Zoll in Richtung der
Rutschneigung verschieben;
• Den Einstenbelzen lest anziehen;
Den Motor anlassen und die Einstellung Qberpr0fen;
Sollte der Troktor weiterhin wegrutschen, so muB der
Vorgang so lange wiederholt werden, bis ein
zufriedenstellendes Ergebnis erzleit wird.
(_ REGLAGE DU LEVIER DE CONTROLE DU
MOUVEMENT DE LA BOITE DE VITESSES
Le levier de contr61e du mouvement de la beite de vitesses est
r_gld au moment de la fabrication et n'a donc pas besein
d'autros r_glages.
Desserrer I_.:_J_romontle beuion de r_glage sur _a pane
ant_rieuro de la roue post_rieuro drolte;
Fake demarrer le moteur et d@placer la levier de contrSle du
mouvemont de la be'Re de vltesses m_canique jusqu'&
ramener dans une position clanslaquetle il ne puisse _tro
deplac_ ni vers I'avant ni vers rarri_ro;
Garder le levier de contrSle du mouvemont de la boffe de
vitesses darts cette position et eteindro le moteur;
Garder le levier dens la position susdite, desserror le boulon
de r_=glage;
D_placer le levier de contr61e du mouvemont an position de
point mort (N) (vanne de fermeturo),
• Visser a fond le boulon de reglage,
ATTENTION: deptacer le niveau de travail de la faucheuse
dans la position la plus basse pour augmenter le jeu atin
d'acceder au beuion de reglage.
Si le tracteur continue _ glisser progressivemont en avant ou
en arri_ro apr_s co r_glage et avec le tevier au point mort,
effectuer Ces operations decritas ci dessous:
Desserror le boulon de reglage
Deplacer les Iovior de contr61e du mouvement de1/4 ou 1/2
pouse dens la direction du glissement;
Visser & fond le beulon de r_:Jlage,
Fairo demarrer le moteur et rossayer.
Si le tracteur continue a glisser, repeter les opdrotions
susdites )usqu'a atteindro los r_sultats desires.
61
Page 44

6
TRANSAXLE COOLING
The fan and cooling fins of transmission should be kept clean to
assure prober cooling.
Do not attempt to clean fan or transmission while engine is running or
while the transmission is hot.
Inspect cooling fan to be sure fan blades are intact and clean.
Inspect cooling fins for dirt, grass clippings and other materials.
TRANSAXLE PUMP FLUID
The transaxle was sealed at the factory and fluid maintenance is not
required. Should the transaxle ever leak or require servicing, contact
your nearest authorized service center/department.
(_ TRANSACHSEN-KUHLUNG
Das Gebl_tse unde die KOhlriippen des Getriebes sellten sauber
gehalten werden, um einwandfreie K0hlung zu gew&hrleisten.
Nicht versuchen, das Gebl_se oder das Getriebe zu reinigen, sotange
der Motor I&uft bzw, solange das Getrieb hei8 ist.
Das KDhlgebl_se untersuchen und sicherstellen, dab die
Gebl&seflOgel unbesch&digt und sauber sind.
Die K0hlrippen auf Schmutz, Schnittgut oder anderen Unrat
untersuchen.
TRANSACHSEN-PUMPENFLUSSIGKEIT
Die Transachse wurde yam Werk abgedichtet und normalerweise
sollte in Bezug auf die FIt3ssigkeit keine Wartung notwendig sein.
Sollte die Transachse undicht werden oder aus anderen GrOnden
Wartung ben_tigen, sollte die 6diche Vertragswed_statt bzw.
Vertrags-Kundendienstabteilung aufgesucht werden.
(_ REFROIDISSEMENT DE LA TRANSMISSION
Le ventilateur et les ailettes de refreidissement de la transmission
devraient _tre conservees propres pour assurer le refreidissement
correct.
N'essayez pas de nettoyer la ventilateur ou la transmission pendant
que le motaur fonctionne ou pendant que la transmission soit chaude.
Inspectez le ventilateur de refroidissement pour s'assurer que les
lames de ventilateur soient propres at intactes.
Inspectez les ailattes do refroidissement pour la saletd, rherbe
coupee et les autres mat_raux. Pour ernp_cher ravarie aux joints
d'eetanchoite, n'utilisez pas I'air comprirn_ ou le pulvodssteur
haute pression pour nettoyer les ailettes de refroidissement.
FLUIDE DE LA POMPE DE LA TRANSMISSION
Latransmission a ere scelle a I'usine et I'entretien de fluide n'est pas exigee
pour la durabilitd de la transmission. Si la transmission devrait avoir une
fuite ou demande de la r_paration, contactez votrae centre d'entretien
autods_ le plus proche.
La_sa ENFRIAMIENTO DEL TRANSEJE
letas de enfriamiento y el ventilador de la transmisibn tienen que
mantenerse limpios para asegurar el enfriamiento adecuade.
No trate de limpiar el ventUedor o la transmision cuando el motor est_
funcionando o mientras la transmision est_ caliente.
Inspeccione el ventilador de enfriamiento para asegurarse que
las aspas del ventilador estOn intactas y limpias. Para impredir
dahos a los sellos, no use un rocidader de aire compresado o
de alta pression para iimpiar las aletas de anfdamiento.
Inspeccione las aletas de enthamiento para vedficar si hay
mugra, recortes de cesped u otros materiaios.
NIVEL DEL FLUlDO DE LA BOMBA DEL TRANSEJE
El transeje ha sido sellade en la fabrica y el mantenimiento del fluido
no es necesario para la vida del transeje. En el case de que el
transeje se filtrase o necesitase servicio, haga el favor de ponerse en
contacto con su cectro/departamento de servicio autorizado mds
cercano.
(_ RAFFREDDAMENTO ASSE-TRAZlONE
II ventilatore e le alette di raffreddamento della trasmissione devono
essere tenuti puliti per assicurare il giusto raffreddamento.
Non tantare di pulire il ventiiatore o la trasmissione quando il motore b
in funzione o quando la trasmissione b calda.
Controllare il ventilatore per acsertare che le lame siano intatte e
pulite.
Contrellare le alette di raffreddamento per verificare che non vi
siano tracce di impuritY, di erba o di altri materiali.
POMPA FLUIDO - TRASMISSIONE E TRAZlONE ANTERIORE
La trasmissione a la trazione anteriore seno state sigillate in fabbrica e
pertanto non richiedono operazioni di intervento concementi i fluidL Be
la trasrnissiona e la trazione anteriore dovessero perdere o
nesessitare di intervento tecnico, contattara il piOvicino sentro di
assistenza tacnico autorizzato.
(_ TRANSMISSIEKOELING
De ventilator en koetdbben van de transmissie moetan schoon
gehouden worden om voora de juiste koeling te zorgen.
Tracht niet de ventilator of de transmissie te reinigen terwijl de motor
draait of terwijl de transmissie heet is.
Controleer de koelventilator om u ervan te overtuigen dat de
bladen intact en schoon zijn.
Controleer de koelribben op vuil, gras en ander materiaal.
TRANSMISSIEKOELING
De transmissie is in de fabriek verzegeld en vloeistofonderhoud is niet
nedig. AIs de transmissie ooit mocht lekken of een onderhoudsbeurt
nedig hebben, dient u een bevoegd servicecentmm of -afdeling te
raadplegen.
63
Page 45

7
7. Fault Tracing. 7. St6rungssuche.
Engine will not start
1. No fuel in fuel tank.
2. Plug defective.
3. Plug connection defective.
4. Dirt in carbumftor or fuel pipe.
Start motor will not turn engine
1. Battery flat.
2. Poor contact between cable and battery pole.
3. Connection/disconnection level in wrong position.
4. Main fuse defective.
5. Ignition lock defective.
6. Safety contact for clutch/Drake pedal defective.
7. Clutch/brake pedal not pushed down.
Engine runs unevenly
1. Gear tee high.
2. Plug defective.
3. Carbureftor incorrectly set.
4. Air filter blocked.
5. Fuel tank ventilation blocked.
6. ignition setting defective.
7. Dirt in fuel pipe.
Engine feels weak
1. Air filter blocked.
2. Plug defective.
3. Dirt in carburettor or fuel pipe.
4. Carburettor incorrectly set.
Engine overheats
t. Engine overloaded.
2. Air inlet or cooling fins blocked.
3. Fan damaged.
4. Tee littleor no oil in engine.
5. Ignition setting defective.
6. Plug defective.
Battery does not charge
1. Fuse defective.
2. One or several calls defective.
3. Poor contact between battery poles and cables.
Lighting does not function
1. Bulbs defective.
2. Switch defective.
3. Short-circuit in cable.
The machine vibrates
1. Blades loose.
2. Engine loose.
3. Unbalance in one or both blades resulting from damage or
poor balancing after sharpening.
Uneven cutting results
1. Blades blunt.
2. Cutting unit skew.
3. Long or wet grass.
4. Grass stuck under cover.
5. Different air pressures in tyres on left and right side.
6. Gear too high.
7. Drive belt slipping.
® Motor springt nicht an
1. Kraftstoff fehlt im Kraftstofftank.
2. Defekte ZOndkerze.
3. Defekter Z0ndkerzenanschluS.
4. Schmutz in Vergaser oder Kraftstoffleitung.
Anlasser dreht den Motor nicht durch
1. Battede entladen.
2. Schlachter Kontakt zwischen Kabel und Bafteriepol.
3. Schalthebel des M_haggregats in falscher Stetlung.
4. Defekte Hauptsicherung.
5. Defektes Z0ndschloS.
6. Sicherheitskontakt ft3r Kupplungs-/Bremspedal defekt.
7. Kupplungs-/Bremspedal nicht durchgetreten.
Motor arbeitet tmgleichm&Sig
1. Zu hoher Gang.
2. Defekte Z0ndkerze.
3. Falsch eingesteliter Vergaser.
4. Verstopftes Lufffilter.
5. Verstopfte Kraftstoffiankenth3ftung.
6. Falsche Zt3ndeinstallung.
7. Schmutz in der Kraffstoffieitung.
Motor ist schwach
1. Verstopffes Lultfiltar.
2. Defekte Z_ndkerze.
3, Schmutz im Vergaser oder Kraftstoffleitung.
4. Vergaser falsch eingestelit.
Motor wird Oberhitzt
1. 0berbelastater Motor.
2. Verstopfte LufteinlSsse eder K0hlflansche.
3. Besch&digter L_ter.
4. Zu wenig eder kein OI im Motor.
5. Falsche Z0ndeinstellung,
6. Defekte Z0ndkerze,
Batterie wird nicht aufgeladen
1. Defekte Sicherung.
2. Eine oder mehrere Bafferiezellen besch&digt.
3. Schlechter Kontakt zwlachen Battedepcten und Kabeln.
Beleuchtung funktioniert nicht
1. Defekte GI0hlampen.
2. Defekter Schalter.
3. KurzschluB in einer Leitung,
Maschine vibriert
1. Die M&hklingen sind lose.
2. Der Motor ist lose.
3. Unwucht einer oder beider M&hklingen, verursacht durch
Besch&digung crier schlechte Auswuchtung nach dem
Schleifen.
Schlechtes M;_hen
1. Stumpfe M_hklingen.
2. Schr_g eingestalites M&haggregat.
3. Zu langes oder nasses Gras.
4. Anh&ufung yon Gras unter dem M_hgeh_use.
5. Verschiedene Reifendr0cke an linker und mchter Seite.
6. Zu hoher Gang.
7. Treibriemen rutscht durch.
64
Page 46

8
8. Storage. 8. Aufbewahrung. 8. Rangement. 8, Conservaci6n.
The following steps should be taken when mowing season is
over:
• Clean the entire machine, especially underneath the
cutting unit cover.
• Touch up all chipped paint surfaces inorder to avoid
corrosion.
• Change engine oil.
• Drain the fuel tank, Start the engine and allow itto run unti_
it is out of fuel.
• Remove the spark plug and pour one table spoon of
engine oil into the cylinder, Pull the engine over in order to
distribute the oil. Retum the spark plug.
• Remove the battery. Recharge and store it in a cool, dry
place. Protect the battery from low temperatures.
• The machine should be stored indoors in a dry. dust-free
place.
WARNING!
Never use gasolinewhen cleaning,Use degreasingdetergent
and warm water instead.
Service
When ordering, we need the following information:
Date of purchase, model, type and serial number of the
mower.
Always use original spare parts.
Contact your local dealer of distributor for warranty service
and repairs.
®
Suivre ta procedure suivante une fois la saison terminde:
• Nettoyer toute la machine, specialement sous le carter
de coupe. Faire les retouches de peinture nOcessaires
pour evitar la rouille.
• Fair la vidange motaur.
• Vider le r_servoir d'essence. Mettre le motaur en route
et Le laisser toumer jusqu'_ ce que te cerburateur soit
vide.
• Deposer la boogie et verser une cuill_re a soupe d'huile
dens le moteur. Faire toumer le mcteur a la main pour
r_partir I'huUe et remettre la bougie an place.
• Demonter la batterie. La mettre dens un endroit frais
apres I'avoir chargee. La prot_ger du grand froid.
• Ranger la machine au sec et a.I'abri.
AVERTISSEMENT!
Ne jarnais utiliser d'essence pour le nettoyage. L'essence
contient du plomb et du benzene. Utiliser un autre produit de
degreissage et de reau chaude.
Etretien et rdparations
thdiquer le nora, rannde d'echat, l'ann_e de fabrication, le
madele et le nurn_ro de s_rie de la machine _ la commande
de pieces detach_res. Prendre contact avec vofre revendeur
le plus preche pour les r_visions sous garantie et pour les
reparetlons. Teujeurs utiliser des pk_ces detachees d'origine.
(_ Nach Saisonende sollten folgende Massnahmenergriffen
werden:
• Die gesamta Maschine reinigen, besonders unter den
MShdeckel.
• LackschSden ausbessem, um Rostangriff zu
vermeiden.
• MotonSI auswechselo.
• Den Kraftstofftank entloeren. Den Motor starten und
laofen lassen, bis auch der Vergaser keinen Kraftstoff
mehr enth&tt,
• Die Z0ndkerze abnehman und einen ERISffel Mctor6! in
den Zylinder tr_iufeln. Das Schwungrad drehen, demit
dasOI im Motor verteiit wird und die Z0ndkerze wieder
ein-schrauben.
• Die Batterie enffemen, aufladen und an einem k_hlen
Platz auroewahren, Die Batterie vor niedrigen Temperetu
ren sch0tzen (unter dem Gefiterpunkt).
• Die Maschine an einem treckenen Platz im Haus
abstellen.
WARNUNG!
Bei der Reinigung niemals Benzin benutzen. Benzin enth_It
Blei und Benzol. Start dessen Enffettungsmittel und warmes
Wasser verwenden.
Service
Bei Bostellung der ErsatzteHe sollen der Maschinentyp und
des Kaufsjahr, sewie Mode,-, Typen- und Seriennummer
angegeban werden. FOr Garentieservice und Repareturen
wenden Sie sich an Ihren autorisierten H_ndler. Verwenden
Sie immer OdginaI-Ersatzteile.
Una vez terminada la temporada de certe de hierba, se
deben tomar (as siguientes medides:
• Limpiar toda la rndquina, especialmente por debajo de la
cubierta de la unidad de certe.
• Arreglar las averfas en el lacede bare evitar la formacion
de oxide.
• Cambiar el aceite del motor.
• Vaciar el depbsito de gasolina. Poner el motor en
marcha y dejado funcionar hasta que se acabe la
gasolina del carburedor.
• Sacar la bujfa y verter una cucharede sopere de eceite
de motor en el cilindre. Hacer girer el motor para qce se
distribuya el eceite y volver a enroscer la bujla.
• Sacar la baterfa. Cargada y guardada en un lugar
fresco. Preteger la bateria de tas bajas temporeturas
(pot debajo del punto de congelacibn).
• Guarder la maquina en un interior seco.
iATENCI()N!
No utiLizarnuncegaselinapara ofectuar laUmpieza.Utilizar
detergentedesengrasantey agua caliente,
Servicio
AI hacer pedidos de recambios es necesario indicar el aho
de compra de la maquina, el modelo, el tipo y el numero de
eerie.
Para los servicios de garantJa y reparacion, ponganse en
contacto con el distribuidor, Se deben utilizar siempre
recambios originales.
67
Page 47

69
Page 48

70
Page 49

71
Page 50

CRAFTS[MAN+173705 Rev. 1 1.14.00 MH Printedin U.S.A.
 Loading...