

Page 1

Sears. Roebuck and Co., Chicago, IE. 60684 US. A.
8209S00101 4/88
PRINTED IN JAPAN
Page 2

/ ,i‘‘
.....
' \ у» .'7 \ X г'i^.N X.>''"*'KV,X yX-;*—‘V-.X
■' ■ ■ - r ■ ^ ,. ,fr-:^ \/г - ,, . -/‘¡fy • V,XX ‘‘-"i.. • ''
^ Щ ^ Щ 0!^
•i»r
TWO YEAR LIMITED WARRANTY ON CRAFTSMAN
BUSHWACKER 836.796670
For two years from date of purchase, when this BUSHWACKER is maintained, lubricated, and tuned up accordtrtg to the
operating and maintenence instructions in the owner's manuai. Sears will repair free of charge any defect in material or
workmanship
This warranty excludes blades, spark plug., and air cleaner; which ara expendable parts and become worn durlno normoi
use.
If this BUSHWACKER is used for commercie! Or rental purposes, this warranty applies for only 30 days from the data of
g purchase.
WARRANTY SERVICE IS AVAILABLE BY CONTACTING THE NEAREST SEARS SERVICE CENTER/DEPART-
« (WENT IN THE UNITED STATES. This warranty applies only while this product is in use in the United States.
This warranty gives you specific legal rights, and you may also have other rights which very from state to state
SAFETY RULES AMD PRECAUTIOMS
1 Before each operation, make sure that the screws are not
loose or missing, that the components are not damaged,
and that the blades are not chipped off or cracked. If a
blade is chipped or cracked replace it with a new one.
2, Do not attempt engine or blade adjustments or refuel
ing before allowing the engine and muffler to cool,
a. Do not remove the fuel tank cap while the engine is
running or when it is still hot.
b. Clean off fuel tank cap area before refueling,. Do not
smoke white refueling.
c. Take care not to spilt any fuel. If it is spilled, wipe it
off.
d. Never operate on gasoline only As this engine is of
2-cycle type, use mixed fuel whose mixture ratio is
16:1 (1 gal, gasoline to 8 oz. oil) and a proper lubri
cation oil such as Sears Catalog Number 36555,
3. Do not operate the machine when your physical condi
tion is not good. Never touch the plug cap during opera
tion to protect yourself from electric shock.
4 Never operate the machine wherever ventilation is not
enough,
5 Before starting the engine, make sure that the blade does
not touch anything In startup of the engine, be careful
not to turn the blade toward bystranders. Position
BUSHWACKER securely.(in startup, place BUSHWACK
ER in a level place so as to prevent the blade from
moving )
6 Wear sale clothes (safety shoes, goggles, earmuffs, gloves,
etc i Never wear loose clothing or jewelry while operat
ing your BUSHWACKER,
SEARS, ROEBUCK AND CO '
DEPT.698/731A
SEARS TOWER
CHICAGO, ILLINOIS вОбВЛ
7. Do not admit any persons or animals within the working
area (30 feet or lass from the site). When plural operators
work together in the same place, maintain at least a
30 feet distance from each other and exchange warning
shouts if necessary. Pay special attention to keep by
standers, especially children away from the working site.
8 Stop the engine and pay special attention to the blades
whenever you carry the BUSHWACKER from one place
to the next before and after operation.
9
Never let any child handle the machine.
10.
Use BUSHWACKER only for cutting of young trees,
grass, etc. of which diameter is 0.2" or less. Never use
BUSHWACKER to cut metals or other hard materials.
11.
Never operate BUSHWACKER In a bad weather condi
tion (rain, snow, strong wind, abnormal atmospheric
temperature, etc )
12.
Keep this manual in place so that one can refer to it
repeatedly for safety operation and to teach possible
users how to operate the machine.
VUFAR VOUn
CAUTION: The operation of any BUSH
WACKER can result in Foreign objects
being thrown into the eyes, which can
result in severe eye damage. Always wear
safety glasses or eye shields before com
mencing power tool operation., We re
commend Wide Vision Safety Mask for over spectacles or
standard safeb/ glasses, available at Sears Retail or Catalog
Stores,
Page 3
Know ¥OyR BUSHWACKER
Your new BUSHWACKER has been carefuhy packed at the factory to prevent damage during shipping and storage,
however, even with the best of preventative measures, damage does sometimes occur It is recommended that you follow the
check out procedures listed below: _
Remove all items from the carton, lay them out and check the parts to be sure that you have everything required for
assembly. Also check carefully for any visible damage.. (IN THE EVENT THAT SOMETHING IS DAMAGED OR MISSING
OR BOTH, NOTIFY YOUR SEARS STORE IMMEDIATELY )
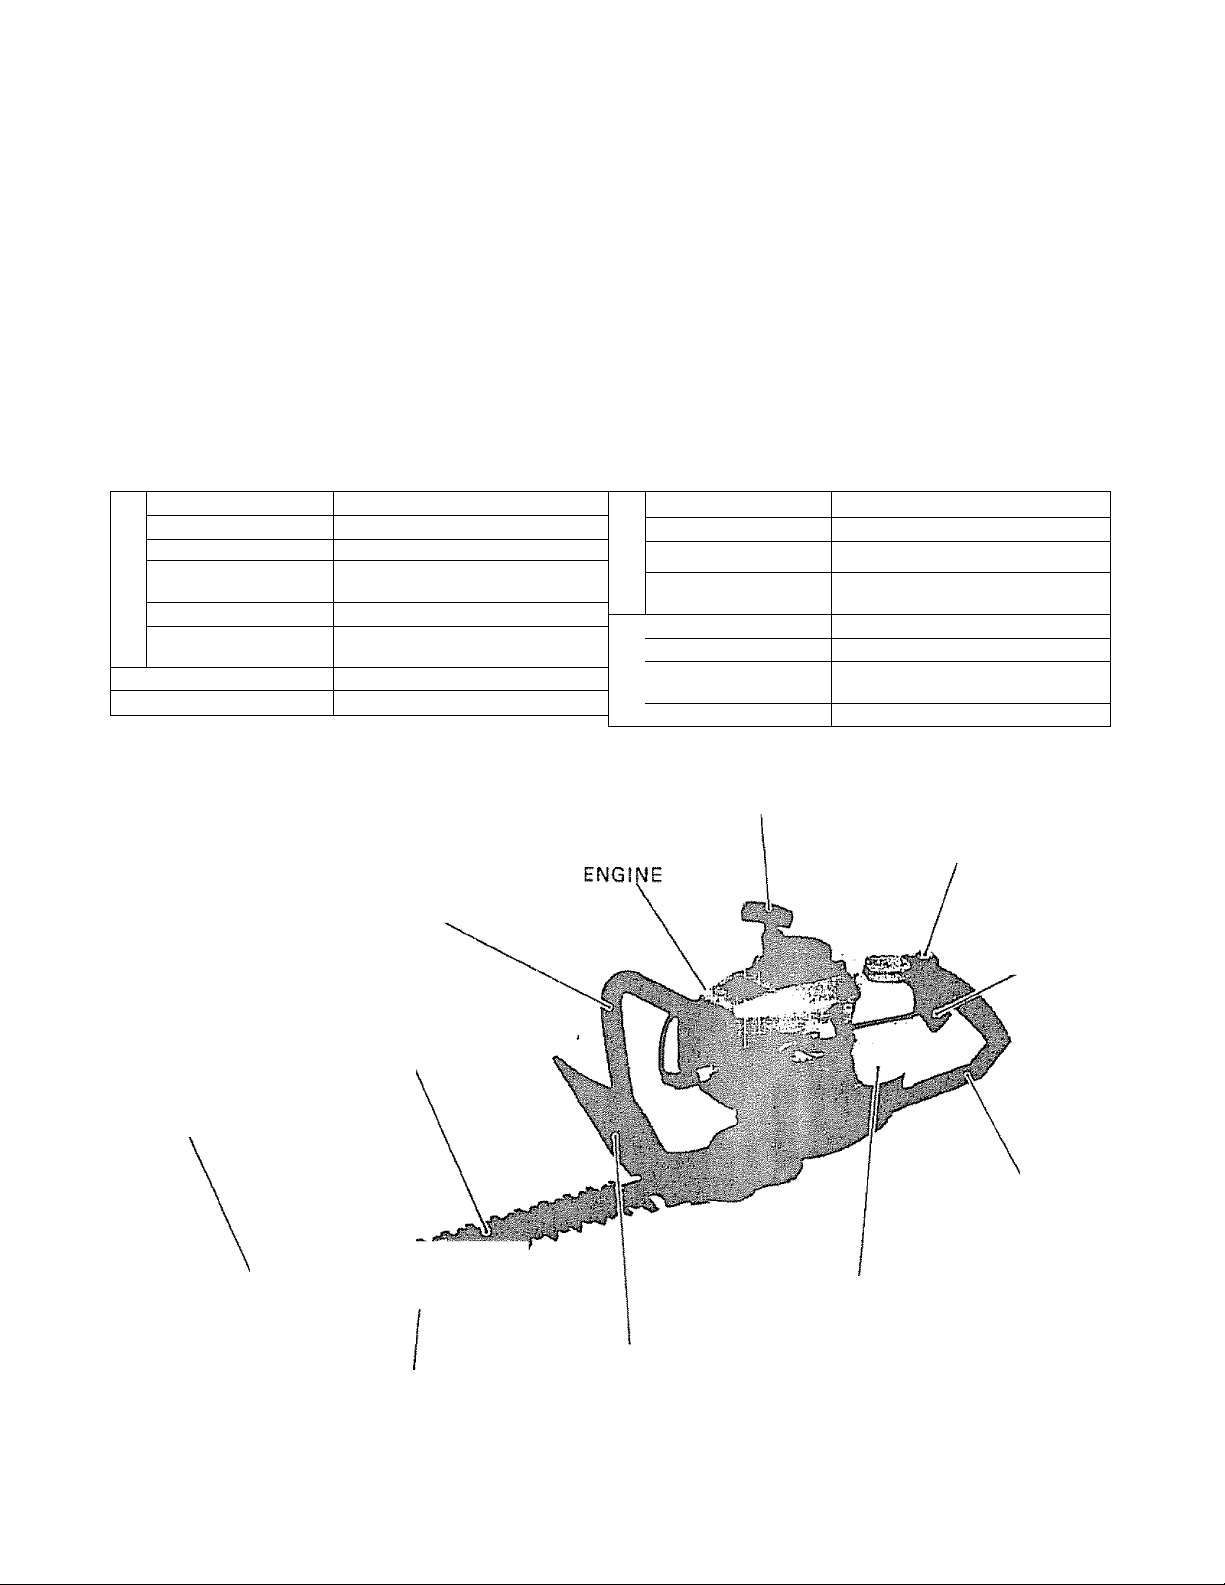
You should familiarize yourself with the various parts of your BUSHWACKER before attempting to assemble or operate
the unit Refer to drawing below.
SPECIFICATIONS
TYPE 2 cycle air-cooled
DISPLACEMENT
Ш
CARBURETOR Diaphragm type
s
FUELTANK
5
CAPACITY
z
LU
SPARKPLUG ■
20.3 cc {1.24 Cu. In.)
17.5 U.S. ft. oz, {0.5E1
NGK BM7A or CHAMPION CJ 6«
LUBRICATION Fuel oil Mixed 16 to 1
{1 gal. gasoline to 8 oz. oil)
DRYWEIGHT
DIMENSION
10.5 lbs (4.8 kg)
35.5 X 8.7 X 8.6 in.
‘SEARS CATALOG NUMBER-36402
FRONT HANDLE
GUIDE PLATE
OVERALL LENGTH
Ш
TOOTH PITCH 0.98"
LJ
<
ENGINE RPM
Ш
CUTTING STROKES
PER MINUTE
DRIVE SYSTEM
CLUTCH TYPE
CLUTCH ENGAGE.
MENT
BLADE DRIVE
STARTER KNOB
18"
8000 rpm
32 2 times/sec (8000 rpm)
Dry Centrifugal
3800 rpm ±200 rpm
Double cam drive
START/STOP SWITCH
THROTTLE
LEVER
UPPER BLADE
REAR HANDLE
FUEL TANK
SHIELD
LOWER BLADE
Specifications are subject to change without notice.
Page 4
PREP4B1MG FOR OPERATIOM
Fuai and oil mixture
inspect the fuel tank and fill with clean, fresh fuel of
the proper mixture This engine requires a mixture of
16 parts gasoline to 1 part oil |1 gal gasoline to 8 oz
oil) Use 71-36555 Craftsman Engine Oil or a high grade
two cycle engine oil.
WARNING: Experience indicates that alcohol blended fuels
(called gasohol or using ethanol or methanol) cart attract
moisture which leads to separation and formation of acids
during storage Acidic gas can damage the fuel system of an
engine while in storage.
To avoid engine problems, the fuel system should be emptied
before storage for 30 days or longer. Drain the gas tank, start
the engine and let it run until the fuel lines and carburetor
are empty,- Use fresh fuel next season See Storage Instructions
for additional information
Never use engine or carburetor cleaner products in the fuel
tank or permanent damage may occur.
DO NOT MIX GASOLINE AND OIL DIRECT
LY IN THE ENGINE FUEL TANK.
IMPORTANT: Failure to follow proper fuel mix
instructions could result in serious damage to
the engine
5, To avoid a burn, do not touch the engine during the
operation or immediately after stopping, the engine.
Handle the engine after it is completely cooled.
6, Never operate BUSHWACKER on unstable ground or
standing on tiptoe Never use it while climbing a ladder,
7, Do not use the BUSHWACKER continuously for a long
time. It is normal to take a break of 10 to 20 minutes
after every 50-minute operation.
8, Never leave the BUSHWACKER running unattended,
9, if there is any trouble during operation, be sure to stop
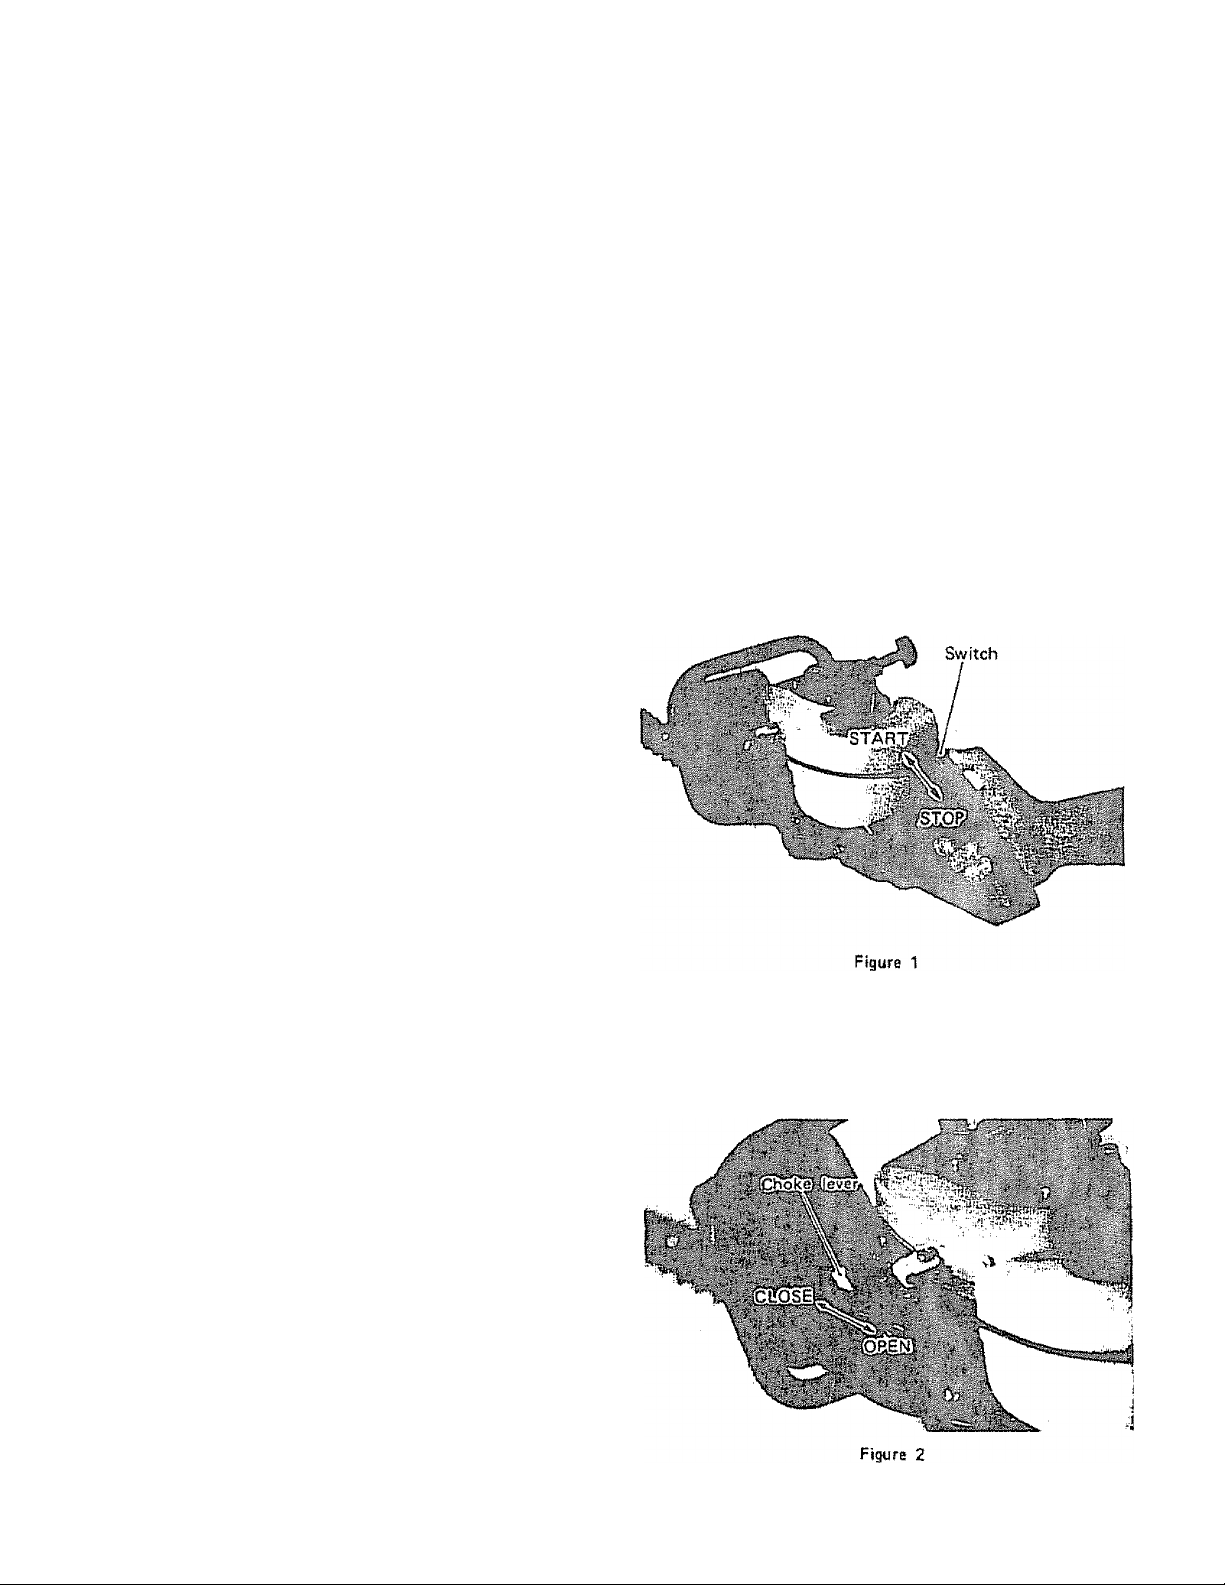
the engine first, (Move the switch to STOP )
STARTIMCi AUD STOPPING
1, When starting the engine, set the switch to START.
(Figure 1)
CAUTION:
When preparing fuel mixture, mix only the amount needed
for the job you are to do Do not use fuel mixture that has
been stored longer than two (2) months Fuel mixture
stored longer than this will cause hard starting and poor
performance If fuel mix has been stored longer thart this
time it should be replaced and filled with a fresh mixture.
CAUTION! NEVER over Fill Fuel Tank
NEVER add fuel to the tank in a closed un-ventilated area,
00 NOT add fuel to this unit near an open fire or sparks.
BE SURE to wipe off spilled fuel before attempting to start
the engine,
DO NOT attempt to refuel an extremely hot engine.
Check paints before operation
CHECK for loose bolts, nuts and fittings
Clean the air filter of all dirt, etc before the operation.
PRECAyTIOMS I3UR1MG OPERATIOIS
1. if the blades have stopped orr account of a branch
caught during the trimming, be sure to stop the engine
and eliminate the branch. Refrain from cutting too
hard or too thick a branch lover X" in diameter),
2. When the machine is running, never touch the blades
Never point the blades toward a person.
3 Hold BUSHWACKER firmly with both hands.
The choke control is a "Lever" type, (See. Figure 2). To
2
choke the engine, push the choke lever to "Close"
position, NOTE: If the engine is warm, it may be
started with the choke lever mid-way between "OPEN"
and "CLOSE", depending on the individual engine.
4, The engine speed must not be excessive but just enough
to do the cutting
Page 5
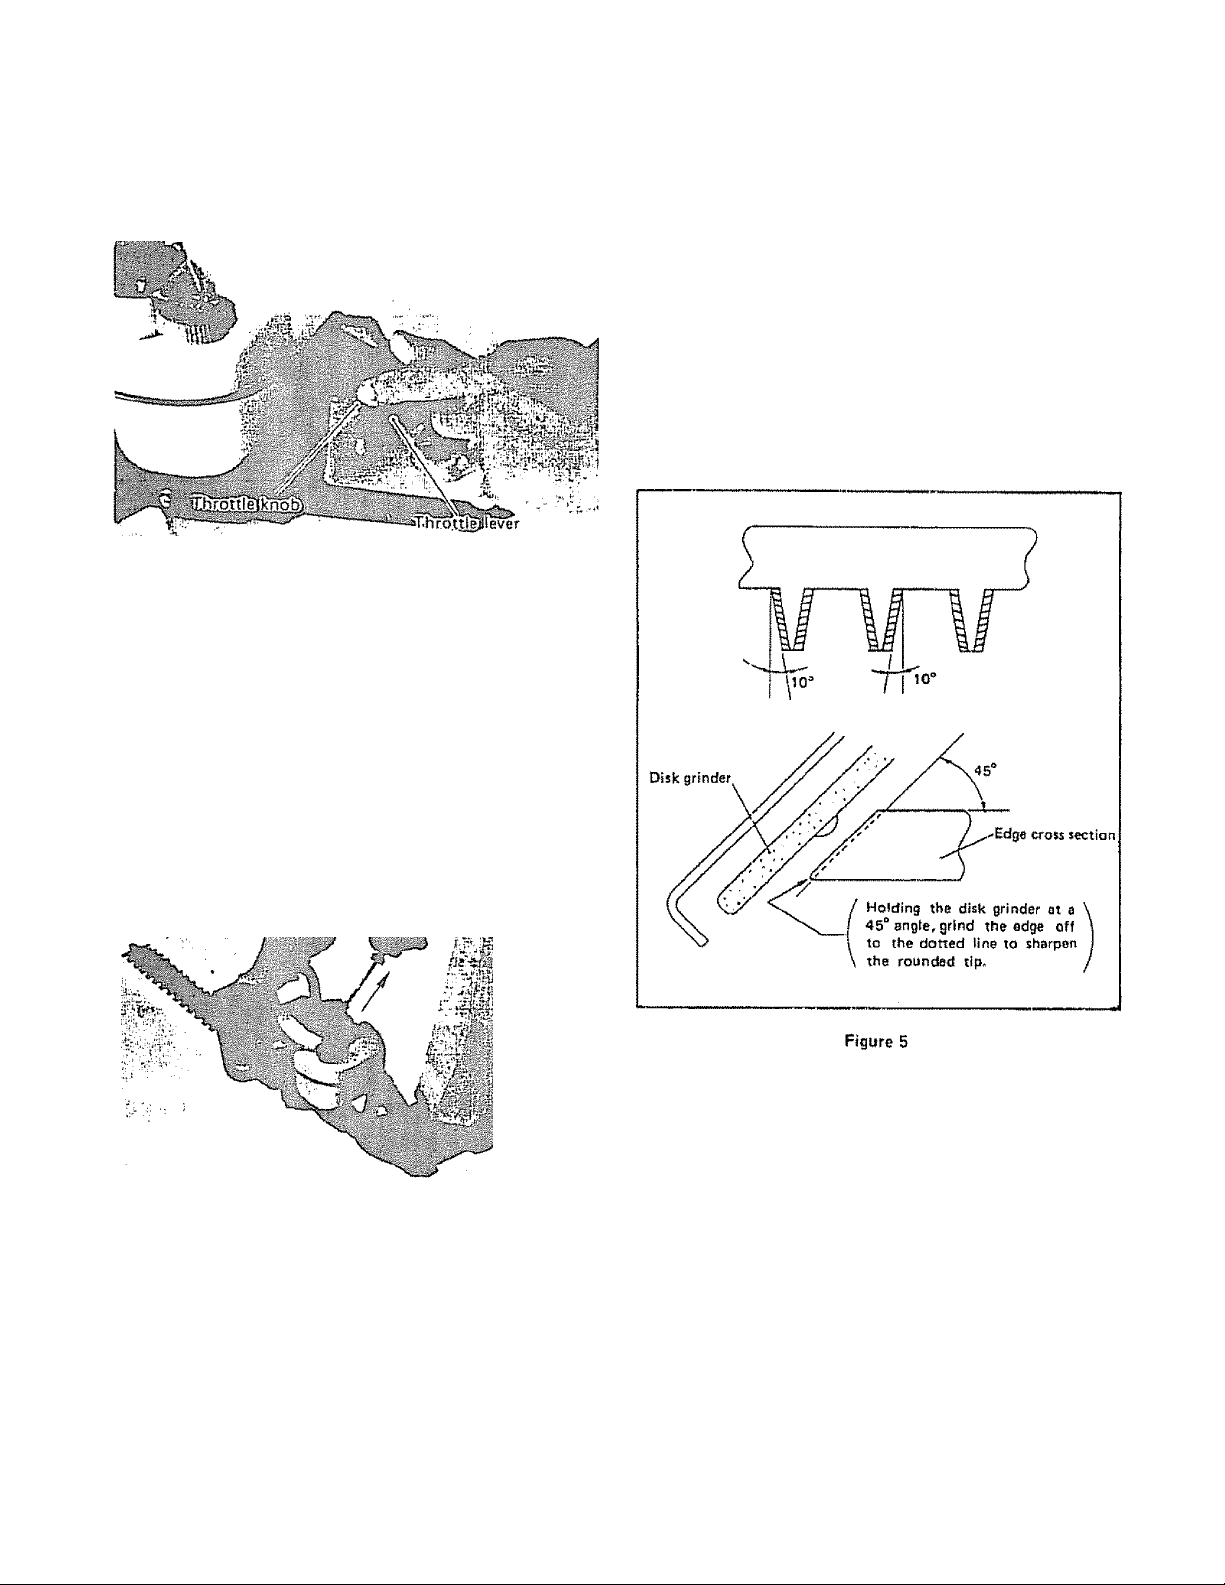
3. Puii the throttle lever a little, push the throttle knob
. and lock the throttle lever at the starting position,
(Figure 31
Figure 3
4, Pull the recoil starter several times. (At this time, hold
the machine securely so as to keep it fixed,)
(Figure 4)
The carburetor is not filled with fuel. Pull the starter 7 to
8 times to feed up fuel from tank to carburetor.
without a load, otherwise the engine will run at a high
speed reducing engine life.
Stopping the Engine
1 Reduce the engine rpm to idle by releasing the throttle
2, Set the stop switch to stop. (Figure 1)
Blade sharpening
If the edges are rounded and do not cut well arty more,
grind off only the shaded portions. Do not grind the
contact surfaces (sliding surfaces) of the top and bottom
edges. (Figure 5)
Caution: — Never let go of the starter rope from its fully ex
tended state. Return the starter rope to its original
position while holding it securely.
— Be careful not to break the starter rope.
■
'■-I
Figure 4
5. After starting, open the choke lever by degrees to the full
. and reset the throttle lever to the low speed, while check
ing the engine operating state.
Caution: — In starting of the engine and during operation, be
fully careful to keep bystanders or obstacles off
the operating side and confirm safety requirements
for operation.
6, After starting the engine, warm up the engine (for about
■ 5 minutes at medium speed). Immediately after starting,
speed up the engine slowly Never open the throttle fully
Note: 1) Before grinding, be sure to secure die blade
firmly
2) Wear gloves, protective glasses, etc.
3) An edge ground too much at a time or ground
many times will loose its hardened layer It
becomes rounded and dull very quickly in
use. Order replacement blades from Sears Re
pair parts.
Adjustments
SPARK PLUG MAINTENANCE - If the spark plug
electrode area has an excess of carbon buildup, the
efficiency of the plug will be seriously reduced.
REMOVE THE CARBON WITH A SPARK PLUG
CLEANER OR WIRE BRUSH
After cleaning the spark plug RESET THE
ELECTRODE GAP TO 024- 028 .
Page 6

Carburetor
Proper adjustment of the carburetor is very important to
the operation of this engine. The carburetor has been
carefully adjusted at the factory and therefore should
not require any further adjustment,.
Adjustment of Engine Idling
If the blade happens to run in idling, adjust the cable
adjuster of the throttle wire to stop blade movement in
idling.
SLAiSB AWUSTMSMT
(Performed with engine stopped.)
The blades wear with use when you notice a decrease in
cutting performance adjust the blades as follows.
(1) Loosen lock nut.
(2) Tighten truss head screw lightly until it stops
turning. Then turn it back one-fourth to one half
turn.
(3) Tighten lock nut. Lubricate the blades after adjust
ments.
STORAGE AFTER OP6RATIOÜ
1 Clean every part, repair faulty sections, and apply a thin
coat of oil on metal parts to prevent rust. In cleaning
the machine, always use a dean cloth. Never use strong
solvents, such as gasoline
2, If the BUSHWACKER will not be used for a long
period of time, drain the fuel from the tank, then start
the engine and keep the engine running until it consumes
all the fuel left in the carburetor.
3. Store the BUSHWACKER in a clean and dry place.
Always keep children away from the machine.
4 Remove the spark plug, inject a small amount of engine
oil through the spark plug hole. Then puli the recoil
starter a few times to put a thin coat of oil on the cylin
der, Install the spark plug again when the piston has
stopped at a top dead center.
It is important to prevent gum deposits from forming in
essential fuel system parts such as the carburetor, fuel filter,
fuel hose, or tank during storage Also, experience indicates
that alcohol blended fuels (called gasohol or using ethanol or
methatiol) can attract moisture which leads to separation and
formation of acids during storage Acidic gas can damage the
fuel system of Jtv engine while in storage
To avoid irrobleitrs, the fuel system should be emptied
before stor.itji; ni 30 days or ¡onoer. Follow these instructions:
(4) Start the engine and operate the blades at high
the speed for a minute or so,
(5) Stop the engine and carefully feel the blades with
your hand. If they are just warm to the touch, you
have made the proper adjustments, but if they are
too hot for you to keep touching them, repeat
steps #1. #2 and #3 above backing off slightly more
on the screw
Note; Never fail to stop the engine before making the
adjustments.
PRS¥BMTATiVl ^AlMTEIIATOl CHECK
LIST AMO STORAGE TIPS
Be sure the engine and all other parts are dean.
Check all nuts, bolts, screws, etc. making sure they are
tightened and secured as they should be.
inspect carefully for any fuel or oil leaks.
Check the air cleaner assembly for excessive dust or dirt.
If the filter requires cleaning, use the following
procedure: Remove the filter and wash in soap and
water or blow off with compressed air. DO NOT clean
filter in gasoline or other flammable solvent,
Inspect the muffler exhaust port (tall pipe). If there Is
any clogging, remove carbon particles adhering to it.
Page 7

mSMTEH^WeE
1, In every 10--20 hours. Inject one or two ounces of
grease through a grease nipple installed in the gear case
of the BUSHWACKER- Be sure the engine is stopped
while greasing the gear case
iiiiiiiiiiiiiiininiiiiti!iniiiiii!ii!iiiiiiii!iifMini!iiii!iiiiiiimiiiiii[iii!ii[inmmiitiiiiii!iii!nmiimim!iti(iiimiiiimmiiii!i!itiimi!mimt!!tiii(fiifiH!iiiitmmmm!iiitiimmi!iminiitti
2 Stop the engine before lubricating the blades during the
cutting c>peration. Frequent lubrication using a light
weight oil during cutting will greatly add to blade life.
MEMO
Page 8

SEARS BUSHWACKER PARTSLIST-MODEL 636. 796670
Figure 7
Page 9

SEARS BUSHWACKER PARTSLIST-MOOEL 636.786670
FiBure 7
KEY
NO.
1
2 900-140/0
3
4
5
6
7
8 118-112
9
10
11
12
13
14 118-108
IS
16
17
18
19
20
21
22
23
24 027-146
25
26
27
28 900-340
29
30
31
32
33
34
35
36
37 118-131
38
39 118-100
40 900-256
41
42
118-110
118-121 1
118-111
118-001
118-115 1
302-050
118-114 1
118-113
118-109
SOO-141/1. 5
900-142''
MO-100/ 6
900-321'
900-320'
900-348
900-301
900-321900-320
900-347 1
027-142
118-103
900-349
118-130
900-203
900-301 2
900-3EX)
118-132
902-001
901-101
901-061
118-102
118-135
900-255
118-133 1
PART
NO,
QTY
1
-1
1
1
1
1
1
1
1 Screw (M4 X 30)
1
1
1
1
1
1
1
1
1 Drum collar
1 Uppercase
2 Bolt (M6 X SQHWasher/Sprlng washer 8c washer!
1
2
2 Flange nut {M5J
3
1
1 Nipple, grease (M5)
1
1
1
1
1
2
1
2
DESCRIPTION
Rear handle asi'y Unci. 2—15)
Screw (M4 X 10) 44 9QQ-04Q
Holder, cable
Plate, wire
START/STOP «witch
Throttle lovar
Snap ring
Pin,lever 50 900-258 2 Bolt iM5 X 20)(Washer/Spfing washer)
Spring 51
Fixing knob 52 008-247
Roar handle (U
Screw (M4 X 16)
Rear handle (R)
Hexagon nut (M4)
Plain washer (M6)
Spring washer {M!6)
Bolt (M6 X 50)
Hexagon nutCM6)
Plain washer (M6)
Spring washer (MS)
Boit(M6x40)
Drum
Front handle (incl, shield!
Bolt (M6 X 15)iV¥ashof/Spring washer)
• Lock nut (M6)
Hexagon U-not tM6)
Guide plate
Bearing
Bearing
Pinion
Gear, crank
Crank
Rod BSs’y
Screw {MS X 10)
Screw (M5 X 16)
Upper blade
KEY PART
NO. NO.
43 901-061
45 030-110
47
48
49 900-257 5
118-101 1
118-134
118-104
008-250
OTY
2
2 Screw (M3 X S)
1
1
1
3 Washer
3 Screw
DESCRIPTION
Bearing
Plato, rcxf slide
Fell
Lower blade
Lower case
Bolt {M5 X leHWasher/Spring washer)
Page 10

SEARS BUSHWACKER PARTSLIST-MODEL 636.796670
Page 11

SEARS BUSHWACKER PARTSLIST-MODEl. 638.796670
Fi^re B
KEY PART
NO.
1 EC02E-S0120A
2 CmO-l 2999-1 2
3
4 EC026-1103A
S EC02ER-1107B
6
7
8
9
10
It
12
13 0565D7999-0 2 Clip
14 EC02ER-5119-RB 1 Fun covar
15 EC02E-0512 1 Recoil starter compì.
17
18
19
20
21
22
23
24 5215005150
25
26
27
28
29
30
31
32
33
34
35
36
3?
38
39
40
41 1140-0470000 1 Ignition coil
42
43
44
45
0600-12M2-0
0650-14981-0 f
EC02E-1104B 1
EC02ERÌ116A-RB 1 Cylinder cover
EC02E-0201D 1 Crank shoft compì.
EC02E-2104B 1 Piston
ECXI2E-2106
EC02E-2107 2 Piston ring
5216005140 t
5215005020
521S005130
5215005030
5215005040 1
5215005010 1 Stoner case
5215005050 1 Wave washer
5216(K)5110 1
521|№12p 1 Washer
521S00506Ò
EC02ERT1312 1
EC01A-302Q 2
EC02EF-3164 2
EC02ER-3133A-TA
EO)2E.3145/1 1 Spark arrester
EC02ER-6106B
5216004002 1
ECOlR-6501 1 Spacer
ÉC02ER-0610 1 Rubber tube
EC01A-6070 1
EC06A-O412 1 Clamp
EC02ER-0702
11104)340000 1
EC02-0S0B
EC01A-7001 1 Gromet
0654-00998-2 1
EC06A-0726 1 Lead compì. (B)
NO. QTY. DESCRIPTION
1
2
1
1
1
1 Piston pm
1 Spiral spring
1
1 Ree!
1
1
1 Muffler cover
1 Fuel tank
1
1 Plug cap compì. {Incl. 44)
Crank ease compì, iincl. 2 ~41
Oil sea!
Ball bearing
Crank case packing
Cylinder
Spark plug (NGK BM7Aor CHAMPION CJ 6 )
Cylinder packing
Cincl. 17 — 27)
Starter knob
Starter rope
Doa
Starter puilev
Retainer
Center screw ¡M5I
Muffler ass'v
Muffler gasket
Muffler clamping bolt
Fuel tank cap compì.
Hose clamp
Magneto comp!, find. 40,41)
Fly wheel
P)ug cap spring
KEY
NO. NO.
46
47
48 EC02ER-3128A 1 Heat msuiaior packing
49 EC02E-3112A 1 Gasket fWY)
50
51 EC02E-S111/1 1 Plate
52 00532-0310-1 1 Woodruff key
53
54
55 43-53
56
5? 108-147 1
58 106-17 1 Packing filter
59
60
61 EC02E-S113 1 Tapping screw ÌB) (M5x20)
62
63 00113-0616-0) 1 Bolt Bss’y CM6x16l
64 00312-0600-0 1 Washer ÌM6)
65 (»431-0516-0 2
66
67 00436-0518-0
68 0119-05987-0 2 Bolt (Socket head) (M6x18)
71
72
73
74 ÈC02ER-5121
75
76
77 NB02A-201A
78 NB26-2102
79
80
81 NS02A-206 2
82 NBQ2A-207
83
84
PART
EC02ET1309A
00217-0500-0 2
118-124
EC01A-6040
5-2328
125-59 1 Filter felt
NB23-2001
EC02E-S102 2 Tappmg screw ÌAÌ ¡M5xl6)
EC03F-399S A. 2
00435-0525» 3
00411-0620-0 2
EC02-9522
EC02JR-5120 1
EC02ER-0903
N816-2051
NB26-2103 2
NB16F-2104
00312-0500-0
EC04-9112
QTY,
1 Heat insulator (incl. 47)
1 Spacer
1
1
1
1
8
2 ±Seraw ass’v (M5k22)
1 Label
1
1
1 Holder
2
) Spring (Clutch)
2 Washer (B)
i
1
DESCRIPTION
Nut (M5)
Filter
Body ass’v filter
Clip filter
Retainer filter
Holder clamping holt ass’v (M6x14)
Washer
Screw (M5x16l
Screw ass'v (M5x25)
Screw ass’v iMSxf 8)
Screw (M6x20!
Labe!
Throttle wire
Clutch compì, (incl. 73 '-'-83)
Clutch shoe
Clutch bolt
Washer (A)
Washer (M5)
Label
Page 12

SEARS BUSHWACKER PARTSLIST-MODEL 636.796670
Figure Э
26
Page 13

SEARS BUSHWACKER PARTSLIST4W0DEL 636.736670
Figure 3
KEY
NO.
•1
*2
3
4
S 95-99
5
7
8
9
10
11
12 16-103
13 112-183
14 16-104 1 Bing-''0"
15 16-71
16
17
18
19 98-323
20 96-314
21
22
23 EC02E-3123
24 EO)2E-3104a
2S EC02E-3108 2
26
27
28 ECQ1A-3072A
29
30
31 00436-a512-0 h) 1 Screw assembly (M5k12}
32
33
PART
NO.
EC02ER-0606
34Í14 1
S-2238
92-258
157-280 1
92-257 1
92-146. 1 Gaskat-moterína diaphragm
95-526
21-168
122-211 2
136-90
52-30 1
167-91
96-323Y
96-325Ì^
EC02E-3141A 1
EC02E-3114A 1
eC02E-310G
EC02ER-3130
00217-05000 N
00431-0555-0 M
QTY. DESCRIPTION
1 Carbursior compì, (¡nel. 2 —27}
1 8odv aisembly-pump
1 Goskot-pump
1
1 Diaphragm assembly-matering
t
1
1 Jatí^l
1 Ring-ípring nitainíng
1 Washar
1
1
1 ScrBw-idla adjust
2 Scraw-coJIar throttfa
4 Scraw-mctoring covar
1
1 Air claanor píate
1 Pravaot píate
1
1
1
2
Valva asiombiv-throttle
Diaphregm-purop
PlBte-pump
Goikat-plBta
Covor-metanng diaphragm
Slaova-mounting
Ring-packing
Swival
Bnikat-idle adjust
Spring idlo adjust
Wire holdar
Spacer
Choka levar
Rubbor soat
Elamont
Air cleaner cap
Nut (M5Í
Screw assamhly (M5k65l
KEY
NO. NO.
1
2 ÉC01A-0904
PART
5a)9500101
OTY.
1
1
DESCRIPTION
Owner’s manual
Toot kit
Page 14

The Model Number will be found on the top of recoil starter. Always
mention the Model Number when requesting service or repair parts
for your unit.
All parts listed herein may be ordered from any SEARS, ROEBUCK
AND CO. OR SIMPSONS'SEARS LIMITED service units or most
retail stores.
WHEN ORDERING REPAIR PARTS, ALWAYS GIVE THE
FOLLOWING INFORMATION AS SHOWN IN THIS LIST
MODEL NO.
636.796670
How to Order
Repair Parts
1. ThePART NUMBER
2 The MODEL NUMBER
of the Bushwacker
3 The PART DESCRIPTION
4, The NAME OF ITEM-
20.3cc Gas Bushwacker
63B. 796670
If the parts you need are not stocked locally, your order will be
electronically transmitted to a Sears Repair Parts Distribution center
for expedited handling
When you buy merchandise
from Sears you get an extra
something that nobody else
can offer . . Sears Service.
Across town or across the
country. Sears Service follows
you, providing trustworthy,
competent service technicians
using only Sears specified
factory parts
SIAtS SERVICE
IS AT YOUR SERVICE
52flaaomoi 4/8s
Your Sears Merchandise takes on added value when you discover
that Sears has Service Units throughout the country, Each is staffed
by SearsTtained, professional technicians using Sears approved
methods.
Sears, Roebtick and Co., Cbicago, ILL 60684 US.A.
PRINTED IN JAPAN
 Loading...