

Craftsman 536773520 Owner’s Manual

6.5 Horsepower
KEY START
HIGHWHEEL WEEDTRIMMER:
MODEL NO.
536.773520
Caution:
Read and follow all Safety Rules
and Operating Instructions before
first use of this product,
SEARS, ROEBUCK AND CO., Hoffman Estates, IL 60179 U.S
712344 02/10/99

TABLE OF CONTENTS
WARRANTY STATEMENT ...... 2
SAFETY RULES ............... 3
INTERNATIONAL SYMBOLS .... 5
ASSEMBLY ................... 6
OPERATION ................... 9
MAINTENANCE ................ 13
SERVICE AND ADJUSTMENT .., 16
TROUBLE SHOOTING CHART .. 21
SLOPE GUIDE ................. 23
REPAIR PARTS ................ 24
ENGINE REPAIR PARTS ........ 29
SPANISH (ESPANOL) .......... 38
PARTS ORDERING/SERVICE ... 64
WARRANTY STATEMENT
LIMITED TWO-YEAR WARRANTY ON CRAFTSMAN WEEDTRIMMER
Fortwoyearsfrom the date ofpurchase,whenthisCraftsmanWeedtrimmerismaintained,
lubricated,and tuned ,up accordingto the operatingand maintenance instructionsin the
owner'smanual, Craftsman wiltrepair,free of charge, any defect in material or workman-
ship.
Ifthis CraftsmanWeedtrimmerisused forcommercialorrental purposes,thiswarrantyap-
pliesfor only90 daysfrom thedate of purchase.
This warranty does not cover the following;
Expendable items which become worn during normal use, such as spark plugs, etc.
• Repairnecessary because ofoperatorabuse or negligence,includingbentcrankshafts
and the failureto maintainthe equipmentaccordingtothe instructionscontainedinthe
owner's manual.
WARRANTY SERVICE IS AVAILABLE BY RETURNING THE CRAFTSMAN WEED°
TRIMMER TO THE NEAREST CRAFTSMAN SERVICE CENTER/DEPARTMENT IN THE
UNITED STATES. THIS WARRANTY APPLIES ONLYWHILE THIS PRODUCT IS IN USE
IN THE UNITED STATES.
This warranty gives you specific legal rights, and you may also have other rights which may
vary from state to state.
Sears, Roebuck and Co., D81"7WA, Hoffman Estates. IL 60179
of to cause cancer, birth
defects or other reproductive harm.
IMPORTANT: This unit |a equipped with an internal combustion engine and must not be
used on or near any unimproved forest-covered, brush-covered or grass-covered land
unless the engine's exhaust system is equipped with a spark arrester meeting
applicable local or state laws (if any). If a spark arrester is used, it must be maintained in
effective working order by the operator.
In the State of California the above is required by law (Section 4442 of the California
Public Resources Coda). Other states may have similar laws. Federal laws apply on fed-
eral lands. See an Authorized Service Center for a spark arrester for the muffler,
712344 2
tP

SAFETY RULES
Safe Operation Practices for Trimmer.
A ARNING: Look for this symbol to point out important safety precautions.
L General Operation
It means: "Attention! Become Alert! Your Safety Is Involved."
Only use accessories approved by the
manufacturer.
1. Read, understand, and follow all instruc-
tions on the machine and in the manual(s).
Be thoroughly familiar with the controls and
the proper use of the trimmer before start-
ing.
2. Familiarize yourself with all of the safety
and operating decals on th_s equipment
and on any of its attachments or accesso-
ries.
3. Do not puthands orfeet near or under rotat-
ing parts,
4. Only allow responsible individuals, who are
femi{iar with the instructions, to operate the
trimmer.
5. _nspect the area where the trimmer is to be
used. Your equipment can propel small ob-
jects at high speed causing personal injury
or property damage. Stay away from
breakable objects, such as house win-
dows, auto glass, greenhouses, etc,
6. Keep the area of operation clear of all per-
sons, particularly small children, end pets.
7, Wear appropriate clothing such as a long-
sleeved shirt or jacket, Also wear long trou-
sers or slacks, Do not wear shorts,
8. Do not wear loose clothing which could get
caught in this equipment.
9. Always wear safety goggles or safety
glasses with side shields when operating
trimmer to protect your eyes from foreign
objects which can be thrown from the unit.
10. Always wear work gloves and sturdy foot-
wear. Leather work shoes or short boots
work well for most people. These will pro-
tect the operator's ankles and shins from
smell sticks, splinters, and other debris,
and improve traction.
11. It is advisable to wear protective headgear
to prevent the possibility of being struck by
small flying particles, or being struck by low
hanging branches, twigs, or other objects
which may be unnoticed by the operator.
12, Do not operate the trimmer without proper
guards or other safety protective devices
in place.
13, Use this equipment for its intended pur-
pose only.
14. See manufacturer's instructions for proper
operation and installation of accessories.
712344 3
15. Operate only in daylight or good artificial
light.
16. Do not operatethe trimmer whileunder the
influence of alcohol,drugs orother medica-
tion which can cause drowsiness or effect
your abilityto operate this machinesafely.
17. Never operate trimmer in wet grass. Al-
ways be sure of your footing; keep a firm
holdon thehandle and walk; never run.
18. Before each use, inspectthe throttlecon-
trot lever end cable. Make sure that the
cable isfree and that the lever is notdam-
aged. Also checkthecablelinkagerunning
to the carburetorfor kinks, loose fittings,
end obstructions. Verify that the control
bailis working properly.
19. Stopthe rotatingtrimmerheadwhen cross-
inggravel drives, walks, or roads. Waitfor
thecuttinglinesto stop rotating.
20. Watch for traffic when operating near, or
when crossing roads.
21. Stop the engine (motor) whenever you
leave the equipment, before cleaning re-
pairing or inspecting the unit, be sure the
trimmer head and all moving parts have
stopped. Let the engine cool, disconnect
the spark plugwire and move it away from
the spark plug.
22. If the equipmentshouldstart to vibrate ab-
normally,stop the engine (motor),discon-
nectthe sparkplugwire and prevent itfrom
touchingthesparkplug. Check immediate-
ly for the cause. Vibration is generally a
warningof trouble.
23. Afterstriking a foreign object,stop the en-
gine (motor). Remove the wire from the
spark plug. Inspect the trimmer for dam-
age. If damaged, repairbeforestartingand
operatingthe trimmer.
24. Never leave the trimmer unattendedwhen
the engine is running. Remove the wire
from thespark plug.
25. Regularly inspectthe trimmer. Make sure
partsare notbent, damaged or loose.
II. Slope Operation
Slopesare a majorfactor related to slip and fall
accidentswhich can resultin severe injury,All

SAFETY RULES
slopes require extra caution. If you feel uneasy
on a slope, do nottrim it,
Do trim across the face of slopes; never up and
down. Do not trim excessively steep slopes
(ma.%lmum 15 degrees) or areas where the
ground is very rough. See the "Guide" in the
back ofthis manual to check a slope. Exercise
extreme caution when changing direction on
slopes.
Do remove objects such as rocks, tree limbs,
etc.
Do watch for holes, ruts, or bumps. Tall grass
can hide obstacles.
Do not trim near drop-offs, ditches, or embank-
ments. The operator could lose footing or bal-
ance,
Do not trim excessivelysteep slopes.
Do not trim on wet grass. Reduced footing
couldcauseslipping,
IlL Children
Tragic accidents can occur ifthe operator is not
alert to the presence of children. Children are
often attracted to the trimmer and the trimming
activity. Never assume that children will remain
where you last saw them,
1. Keep children out of the trimming area and
under the watchful care of a responsible
adult.
2. Be alert and turn trimmer off if children en-
ter the area.
3. Before and while moving backwards, look
behind and down for small children.
4. Nev_ allow children to operate the trim-
mer.
5. Use extra care when approaching blind
corners, shrubs, trees, or other objects that
may obscure vision.
6. On electric start models, remove the igni-
tion key to prevent accidental starting when
the trimmer is not is use.
IV. Service
1.
Use extra care in hand$inggaso$ineand
other fuels: They are flammable and va-
porsare explosive.
a. Use onlyan approvedcontainer.
b. Neverremove gas cap oradd fuel with
the engine running. Allow engine to
coolbefore refueling.Do not smoke.
c. Never refuelthe machine indoors,
d. Never store the machine or fuel con-
tainer inside where there is an open
flame, such as a water heater,
2. Never run an engine indoors or inside a
closed area.
3. Never make adjustments or repairs with
the engine (motor) running. Disconnect the
spark plug wire, and keep the wire away
from the plug to prevent accidental starting
(remove the ignition key if equipped with an
electric start), Always wear eye protection
when you make adjustments or repairs.
4. Check the trimmer head and engine
mounting bolts at frequent intervals for
proper tightness.
5. Keep all nuts and bolts tight and keep
equipment in good condition. Check
mounting hardware on trimmer head every
time you change trimmer line and prior to
each use.
6. Never tamper with safety devices. Check
their proper operation regularly.
7. When servicing or repairing the trimmer, do
not tip the machine over or up unless spe-
cifically instructed to do so in this Manual.
Service and repair procedures can be done
with the trimmer in an upright position.
Some procedures will be easier if the ma-
chine is lifted on a raised platform or work-
ing surface.
8. To reduce fire hazard, keep trimmer free of
grass, leaves, or other debris build-up.
Clean up oil or fuel spillage. Allow trimmer
to cool before storing.
9. Stop and inspect the equipment if you
strike an object. Repair, if necessary, be-
fore restarting.
10. Always disconnect spark plug wire before
cleaning, repairing, or adjusting.
11. Do not change the engine governor setting
or over-speed the engine,
12. Clean and replace safety and instruction
decals as necessary.
13. To guard against engine over-heating, al-
ways hav_ engine debris lister mounted
and clean.
14, Inspect trimmer before storage.
15, Use only original equipment or authorized
replacement parts.
712344 4

SAFETY RULES
INTERNATIONAL SYMBOLS
IMPORTANT: Many of the following symbols are located on your unit or on literature sup-
plied with the product. Before you operate the unit, learn and understand the purpose for
each symbol.
ControlAndOperatingSymbols
Slow Fast Fuel OII
SafetyWarningSymbols
A
WARNING
Thrown Objects.
Keep Bystanders Away.
IMPORTANT
Read Owner's Manual
Before Operating
This Machine.
WARNING
Never Operate Up Or
Down Slopes. Operate
Across Slopes.
WARNING
Rotating Parts. Stop Engine.
Disconnect Spark Wire Before
Making Adjustments.
WARNING
Wear Eye Protection
WARNING
STOP
712344 5
ASSEMBLY
ASSEMBLY
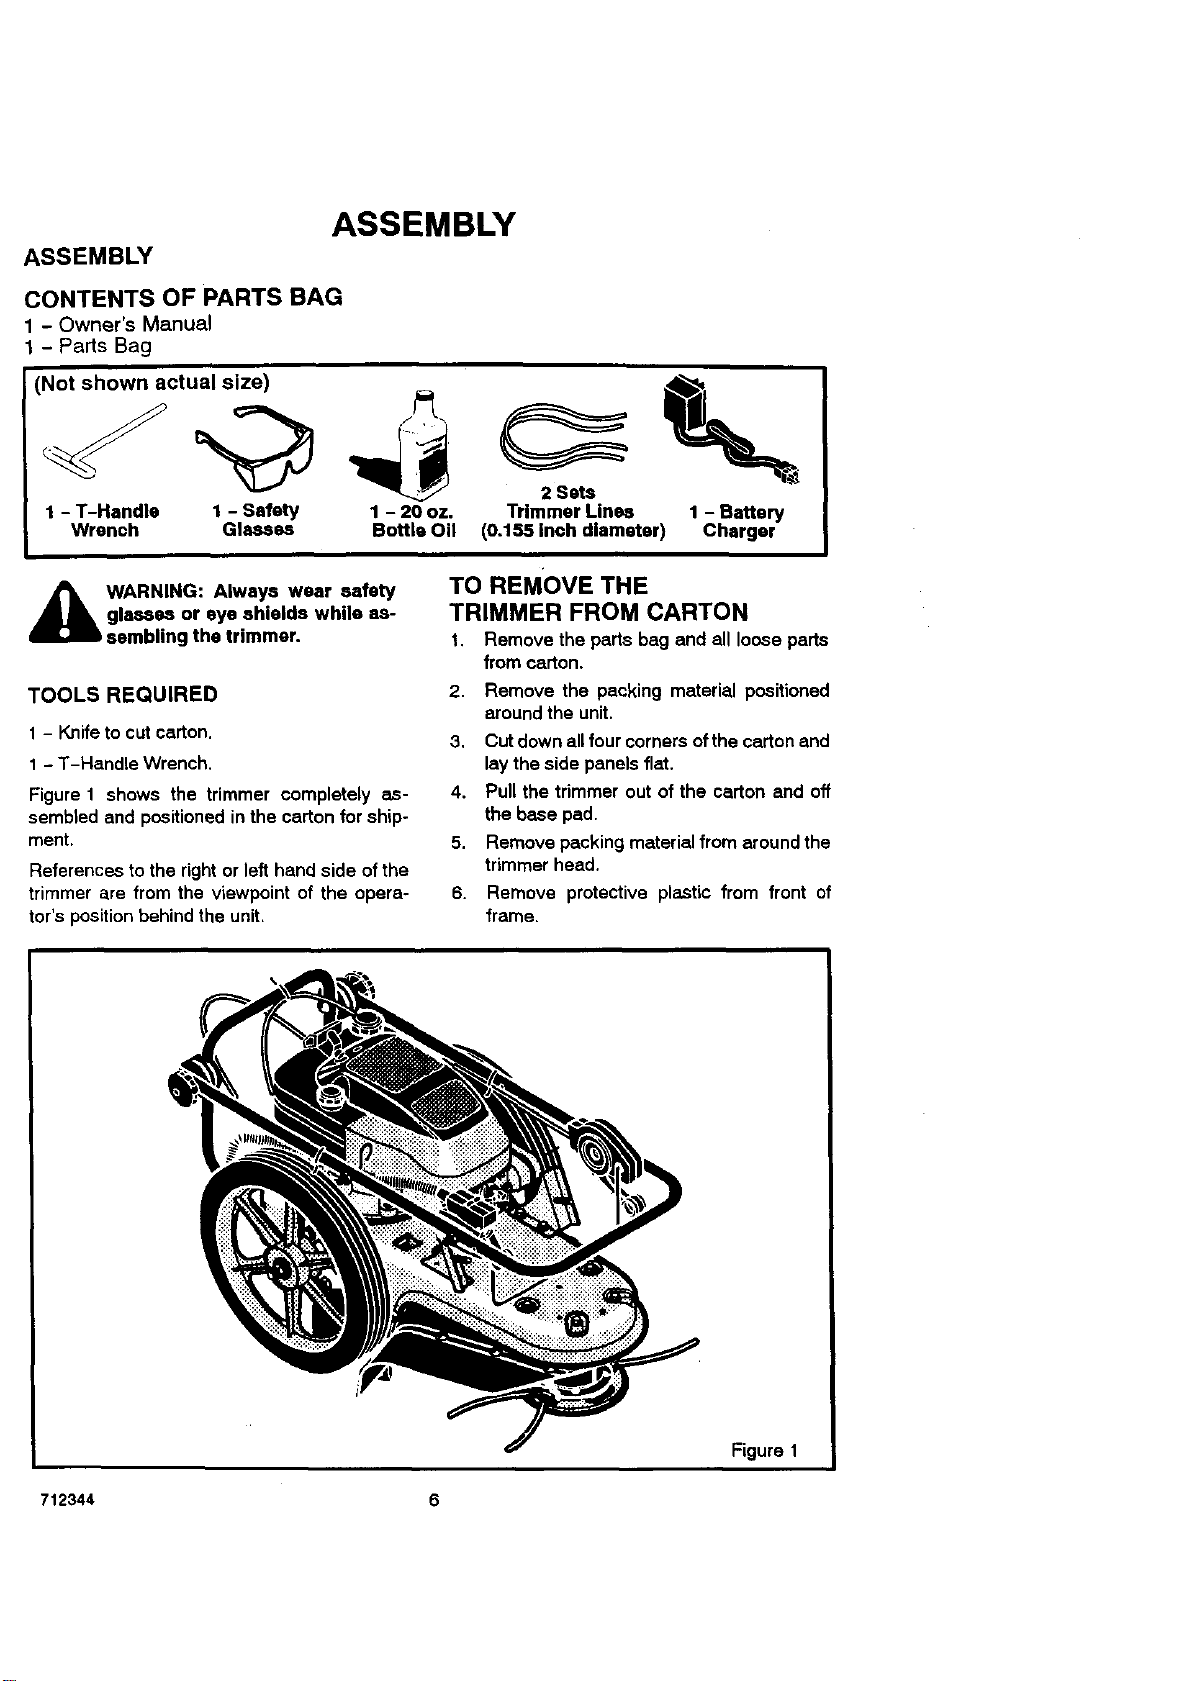
CONTENTS OF PARTS BAG
1 Owner's Manual
- Parts Bag
(Not shown actual size) I
1-wTr-...2,,a- '
TO REMOVE THE
glasses or eye shields while as-
WARNING: Always wear safety
sembling the trimmer.
TOOLS REQUIRED
1 - Knife to cut carton.
1 - T-Handle Wrench.
Figure 1 shows the trimmer completely as-
sembled and positioned in the carton for ship-
ment.
References to the right or left hand side of the
trimmer are from the viewpoint of the opera-
tor's position behind the unit,
TRIMMER FROM CARTON
1. Remove the parts bag and all looseparts
from carton.
2. Remove the packing material positioned
aroundthe unit.
3. Cut down allfour cornersof the cartonand
laythe side panelsflat.
4. Pull the trimmerout of the carton and off
the base pad.
5. Remove packingmaterialfrom aroundthe
trimmerhead.
6. Remove protective plastic from front of
frame.
I
712344
Figure 1
6
ASSEMBLY
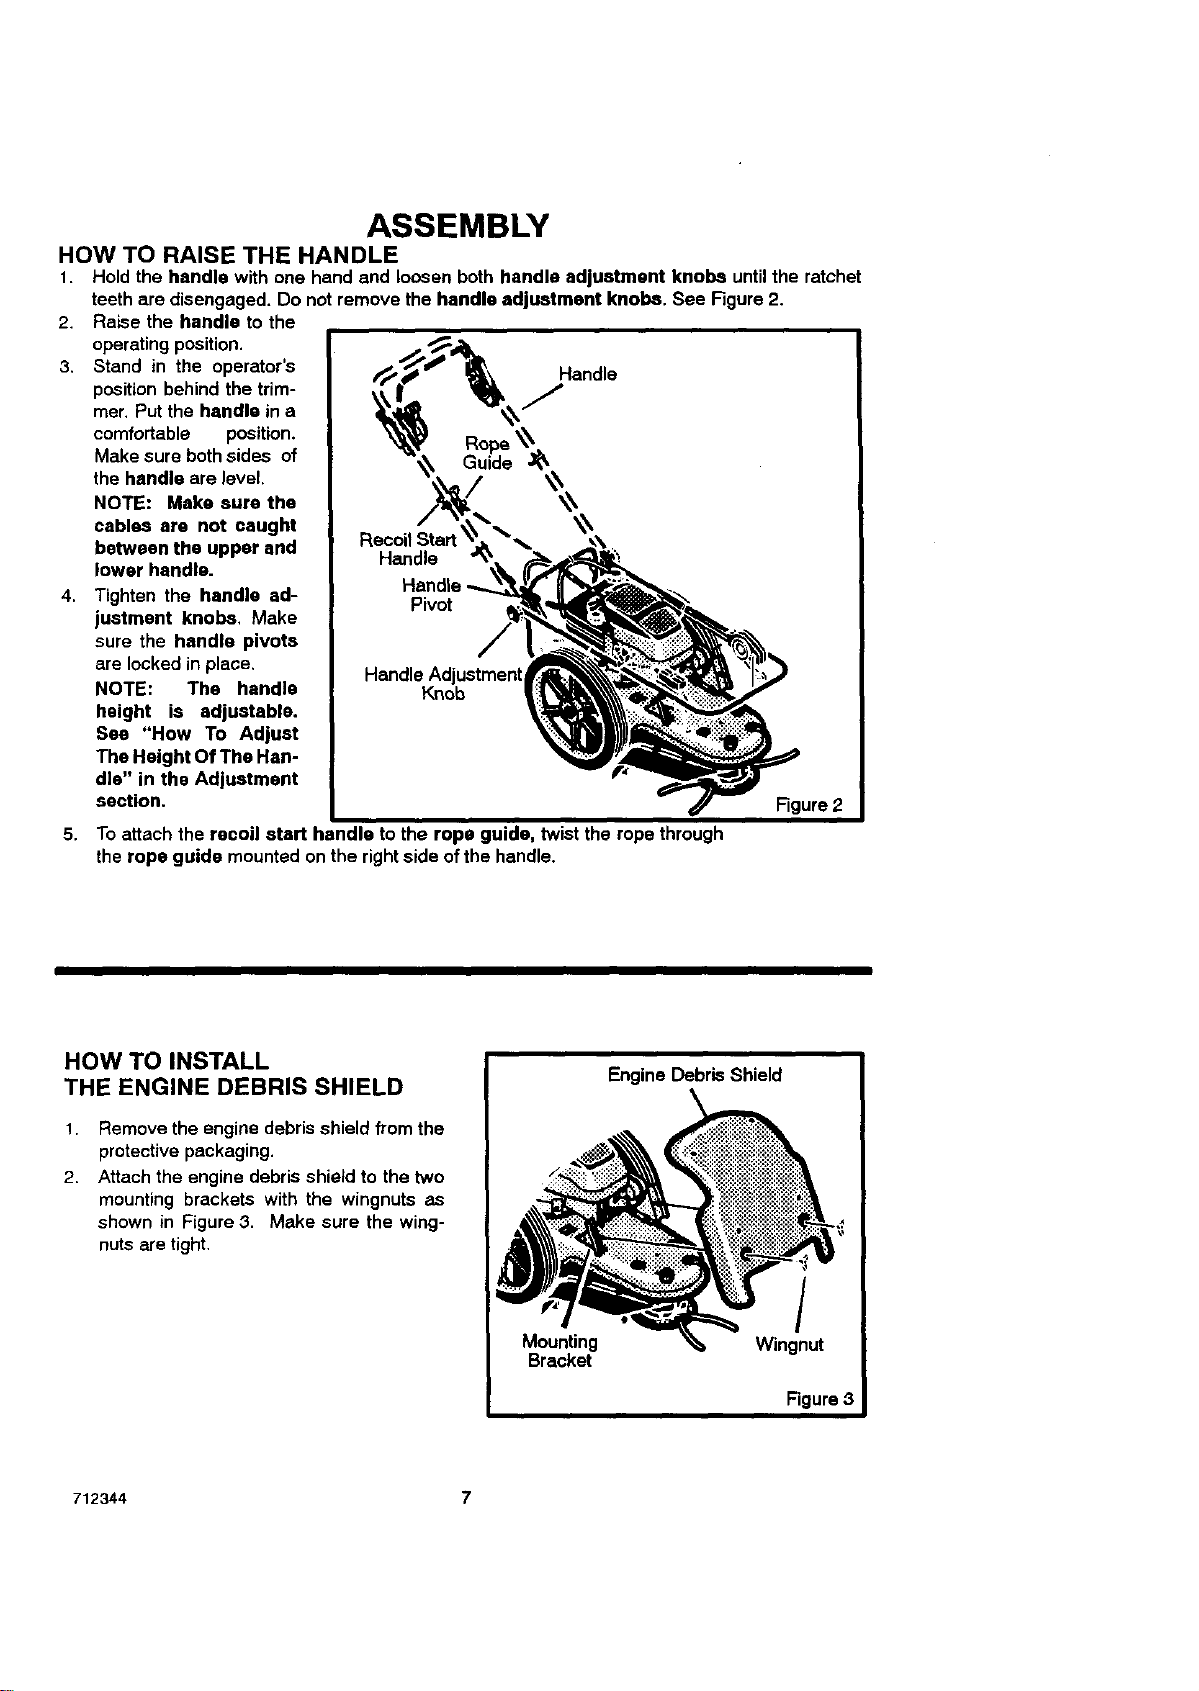
HOW TO RAISE THE HANDLE
1. Hold the handle with one hand and loosen both handle adjustment knobs until the ratchet
teeth are disengaged. Do not remove the handle adjustment knobs. See Figure 2.
2. Raise the handle to the
operating position.
3. Stand in the operator's
position behind the trim-
mer. Put the handle in a
comfortable position.
Make sure both sides of
the handle are level.
NOTE: Make sure the
cables are not caught
between the upper and
lower handle.
4. Tighten the handle ad-
justment knobs, Make
sure the handle pivots
are locked in place,
NOTE: The handle
height is adjustable.
Sea "How To Adjust
The Height Of The Han-
dle" in the Adjustment
section.
Recoil Start
Handle
Handle
Pivot
Handle Adjustment
Knob
5. Toattach the recoil start handle to the rope guide, twistthe ropethrough
therope guide mountedon the rightside of the handle.
Handle
Rgure 2
HOW TO INSTALL
THE ENGINE DEBRIS SHIELD
1.
Remove the engine debris shield from the
protective packaging.
2.
Attach the engine debris shield to the two
mounting brackets with the wingnuts as
shown in Figure 3. Make sure the wing-
nuts are tight.
712344 7
Mounting
Bracket
Engine Debris Shield
/
Wingnut
Figure3
ASSEMBLY
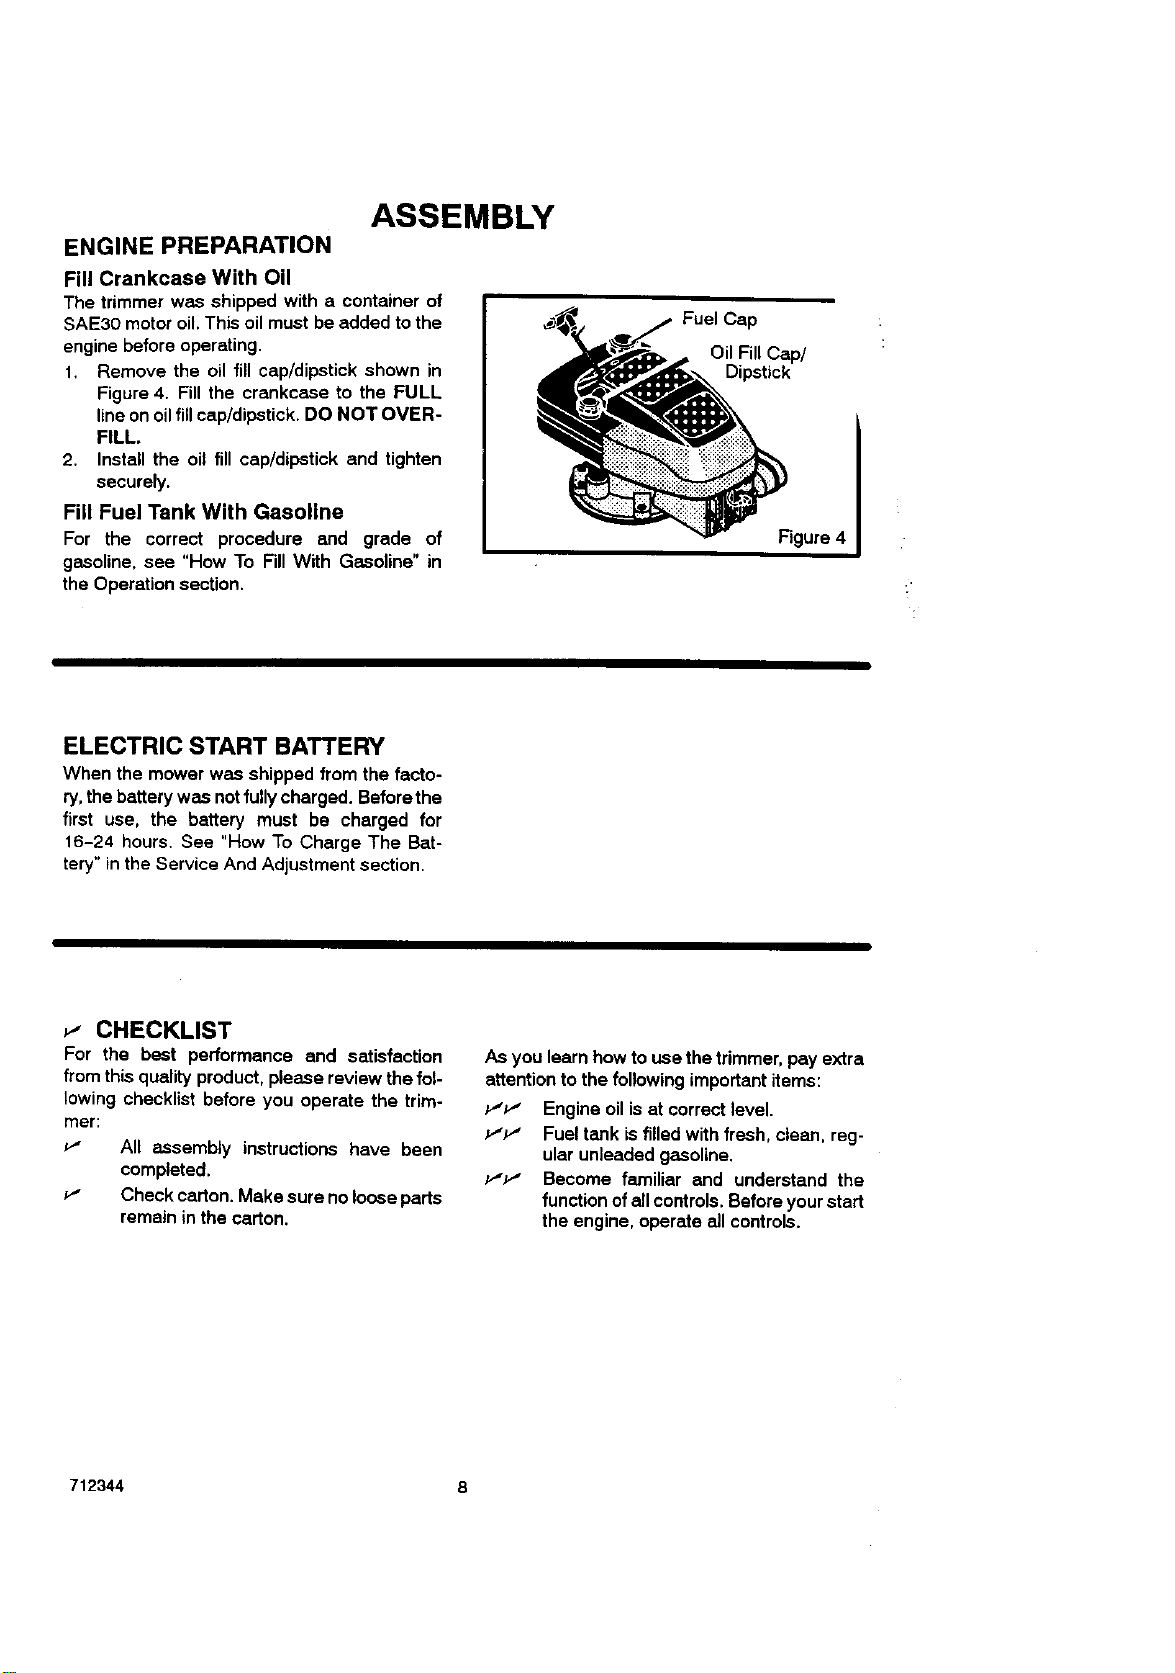
ENGINE PREPARATION
Fill Crankcase With Oil
The trimmer was shipped with a container of
SAE30 motor oil. This oil must be added to the
engine before operating.
1, Remove the oil fill cap/dipstick shown in
Figure 4. Fill the crankcase to the FULL
line on oilfill cap/dipstick. DO NOT OVER-
FILL.
2. Install the oil fill cap/dipstick and tighten
securely.
Fill Fuel Tank With Gasoline
For the correct procedure and grade of
gasoline, see "How To Fill With Gasoline" in
the Operation section.
ELECTRIC START BATTERY
When the mower was shipped from the facto-
ry, the battery was not fully charged. Before the
first use, the battery must be charged for
16-24 hours. See "How To Charge The Bat-
tery" in the Service And Adjustment section.
Fuel Cap
Oil Fill Cap/
Dipstick
Figure 4
_" CHECKLIST
For the best performance and satisfaction
from this quality product, please review the fol-
lowing checklist before you operate the trim-
mer:
P" All assembly instructions have been
completed.
•_" Check carton. Make sure no louse parts
remain in the carton.
712344 8
As you learn how to use the trimmer, pay extra
attention to the following important items:
r_P" Engine oil is at correct level.
J."_,_" Fuel tank is filled with fresh, clean, reg-
ular unleaded gasoline.
P",_" Become familiar and understand the
function of all controls. Before your start
the engine, operate all controls.

OPERATION
KNOW YOUR TRIMMER
READ THE OWNER'S MANUAL AND ALL SAFETY RULES BEFORE YOU OPERATE the trim-
mer, To familiarize yourself with the location of the controls, compare the illustrations with your trim-
mer. Save this manual for future reference,
Control Bail
Ignition Switch
Throttle Control Lever
Recoil Starter Handle
Handle Adjustment Knob
Trimmer Head Drive Lever
Dipstick
Shield Edge Guard _"
Handle
Fuel Cap
Engine DebrisShield
Trimmer Head
Figure5
Trimmer Head Drive Lever - Engages
the rotation ofthe trimmer head.
Control Ball - Release to stop the rotation
of the trimmer head.
Throttle Control Lever - Controls the
speed or stops the engine.
Primer Button - Injects fuel directty into the
carburetor manifold for fester starts. See
Figure 8.
EYE PROTECTION
WARNING: Debris thrown from
the trimmer can resuR in foreign
eyes, which can cause severe
objects being thrown into the
eye damage. Always wear safety
glasses or eye shields when op-
erating the trimmer.
Always wear safety glasses. If you wear eye
glasses, put a Wide Vision Safety Mask over
your eye glasses.
712344
Recoil Starter Handle - The engine is
equippedwithan easy pullrecoilstarter.
Ignition Switch - Use on key-start engine.
Shield Edge Guard - Protects the shield
by automaticallycuttingthe line to the correct
length.
Engine Debris Shield - Protectsthe en-
gine from debris. Can be easily removed to
servicethe engine.
HOW TO STOP
THE TRIMMER HEAD
1. Release tl_econtrol bell. Itwill return to its
open position and disengage the trimmer
head,
HOW TO STOP THE ENGINE
1. Move the throttle control lever com-
pletely back to the STOP position,
9
OPERATION
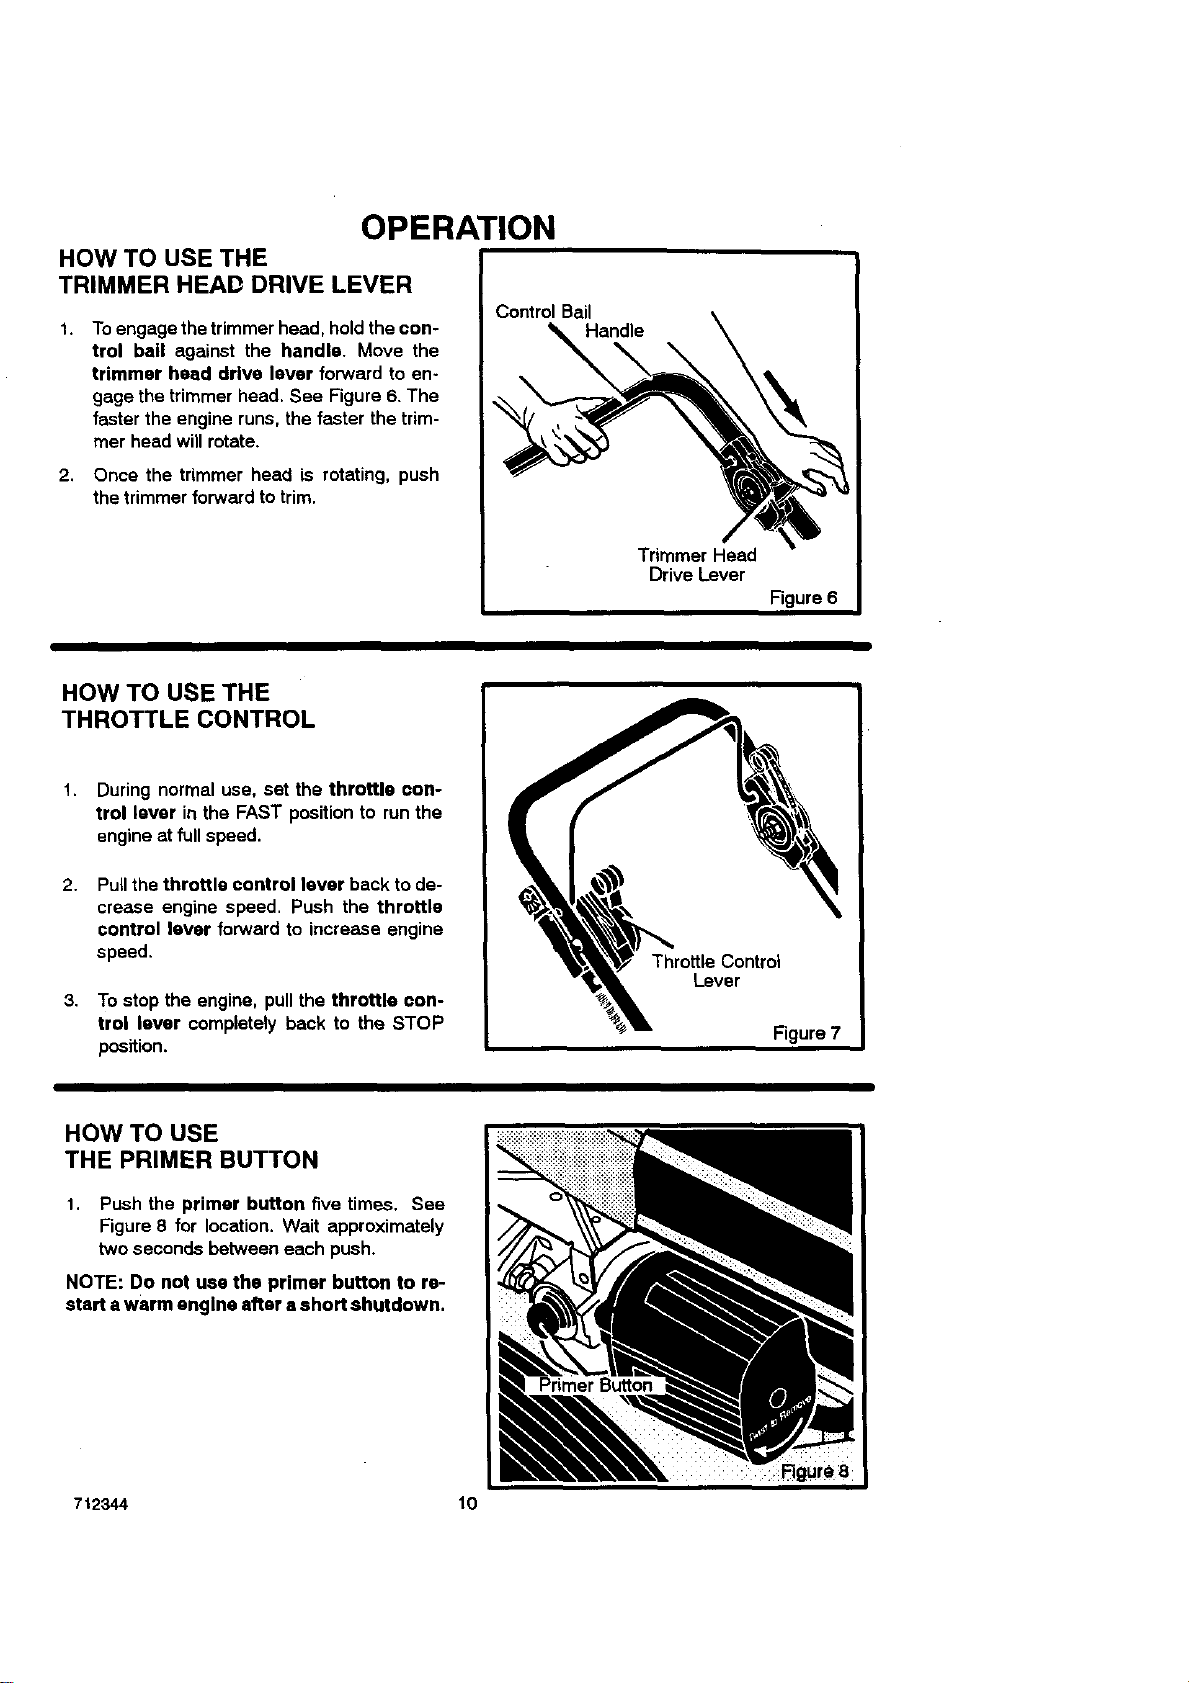
HOW TO USE THE
TRIMMER HEAD DRIVE LEVER
1.
Toengage the trimmer head, hold the con-
trol bail against the handle. Move the
trimmer head drive lever forward to en-
gage the trimmer head. See Figure 6. The
faster the engine runs, the fester the trim-
mer head will rotate.
2.
Once the trimmer head is rotating,push
thetrimmerforwardto trim.
HOW TO USE THE
THROTTLE CONTROL
1. During normal use, set the throttle con-
trol lever in the FAST position to run the
engine at full speed.
2, Pull the throttle control lever back to de-
crease engine speed. Push the throttle
control lever forward to increase engine
speed.
3. To stop the engine, pullthe throttle con-
trol lever completely back to the STOP
position.
HOW TO USE
THE PRIMER BUTTON
1. Push the primer button five times. See
Figure 8 for location. Wait approximately
two seconds between each push.
NOTE: Do not use the primer button to re-
start awarm engine after a short shutdown.
ThrottleControl
Lever
Figure7
712344 10
OPERATION
BEFORE STARTING THE ENGINE
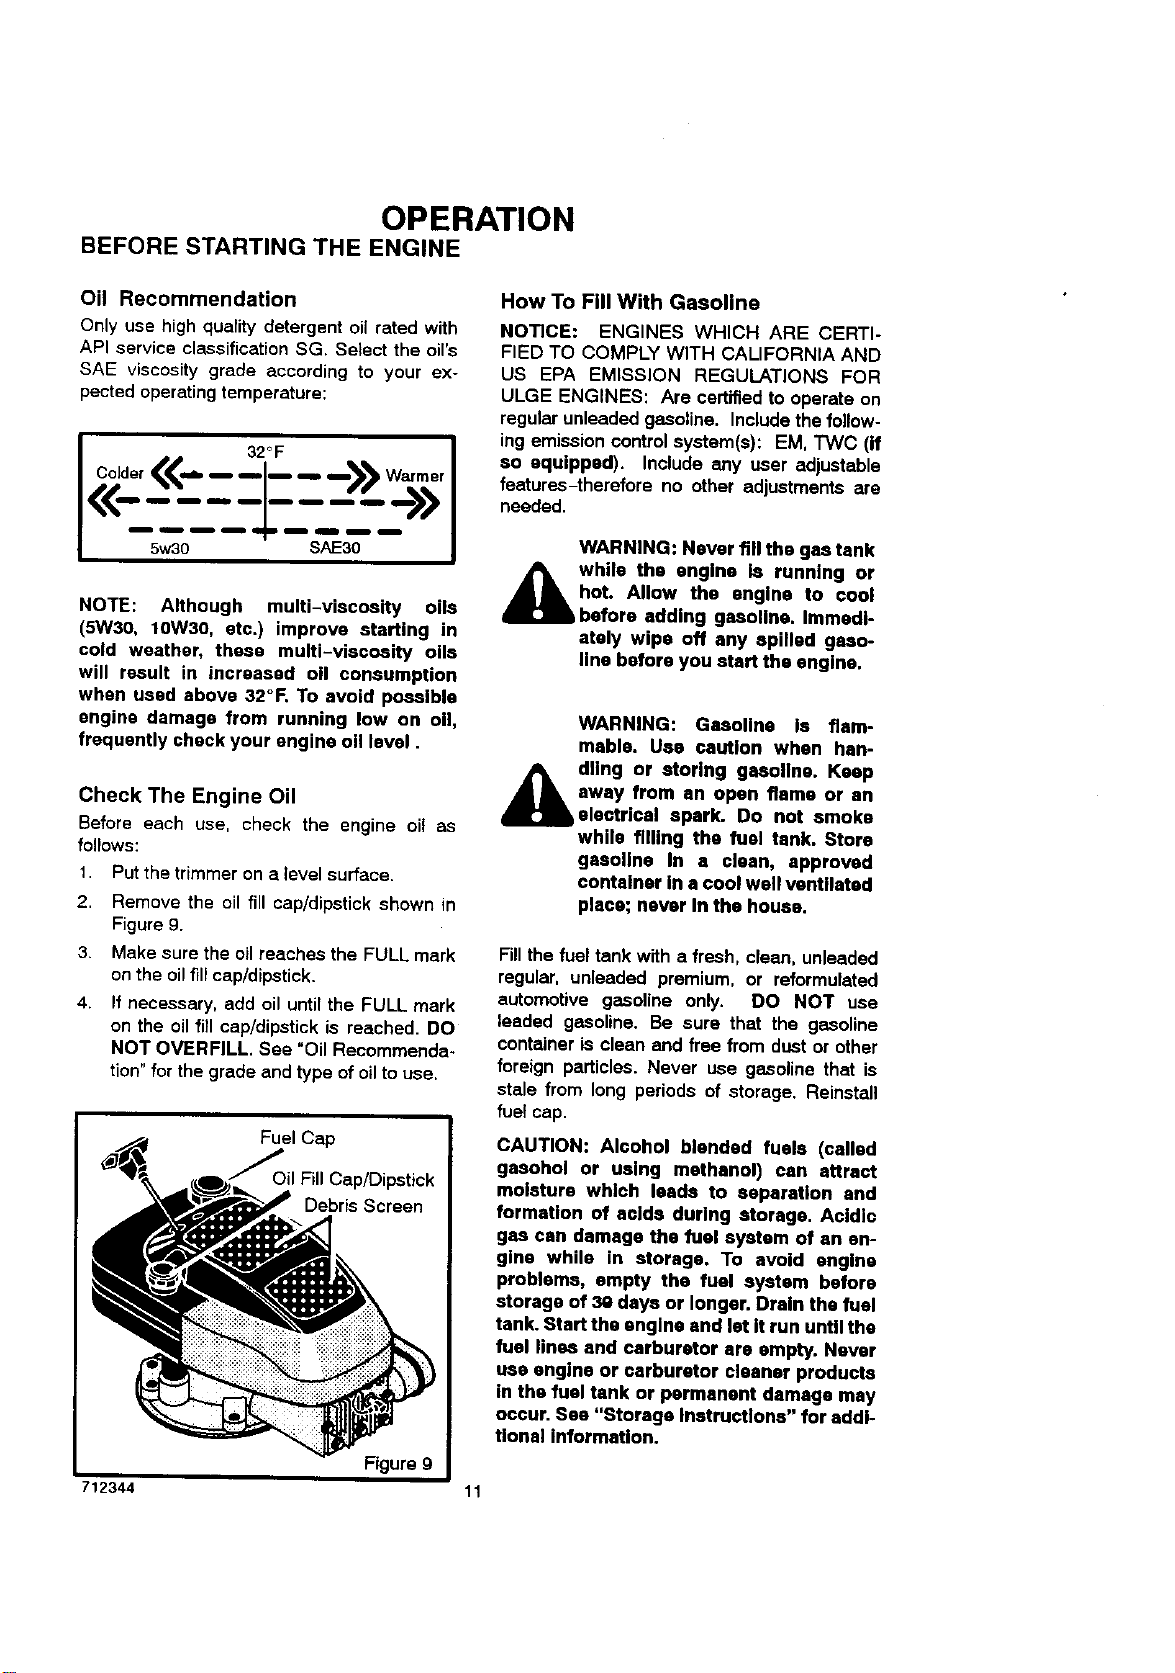
Oil Recommendation
Only use high quality detergent oil rated with
API service classification SG. Select the oil's
SAE viscosity grade according to your ex-
pected operating temperature:
I 32OF I
Colder _,_ -- _I-- _,b --_ Warmer I
<(--'---1---"-->> I
=m, f '==' == I
5w30 SAE30 [
NOTE: Although multi-viscosity oils
(5W30, 10W30, etc.) improve starting in
cold weather, these multi-viscosity oils
will result in increased oll consumption
when used above 32°F. To avoid possible
engine damage from running low on oil,
frequently check your engine oil level.
Check The Engine Oil
Before each use, check the engine oi_ as
follows:
1. Put the trimmer on a level surface.
2. Remove the oil fill cap/dipstick shown in
Figure 9.
3. Make sure the oil reaches the FULL mark
on the oil fill cap/dipstick.
4. If necessary, add oil until the FULL mark
on the oil fill cap/dipstick is reached. DO
NOT OVERFILL. See "Oil Recommenda-
tion" for the grade and type of oil to use.
Fuel Cap
Oil Fill Cap/Dipstick
Debris Screen
Figure g
712344
How To Fill With Gasoline
NOTICE: ENGINES WHICH ARE CERTI-
FIED TO COMPLY WITH CALIFORNIA AND
US EPA EMISSION REGULATIONS FOR
ULGE ENGINES: Are certified to operate on
reguisr unleaded gasoline, include the follow-
ing emission control system(s): EM, TWC (if
so equipped). Include any user adjustable
features-therefore no other adjustments are
needed.
WARNING: Never fill the gas tank
hot. Allow the engine to cool
while the engine Is running or
before adding gasoline. Immedi-
ately wipe off any spilled gaso-
line before you start the engine.
WARNING: Gasoline Is flam-
mable. Usa caution when han-
A llng or storing gasoline. Keep
away from an open flame or an
electrical spark. Do not smoke
while filling the fuel tank. Store
gasoline In a clean, approved
container In a cool well ventilated
place; never In the house.
Fill the fuel tank with a fresh, clean, unleaded
regular, unleaded premium, or reformulated
automotive gasoline only. DO NOT use
leaded gasoline. Be sure that the gasoline
container is clean and free from dust or other
foreign particles. Never use gasoline that is
stale from long periods of storage. Reinstall
fuel cap.
CAUTION: Alcohol blended fuels (called
gasohol or using methanol) can attract
moisture which leads to separation and
formation of acids during storage. Acidic
gas can damage the fuel system of an en-
gine while in storage. To avoid engine
problems, empty the fuel system before
storage of 30 days or longer. Drain the fuel
tank. Start the engine and let it run until the
fuel lines and carburetor are empty. Never
usa engine or carburetor cleaner products
in the fuel tank or permanent damage may
occur. See "Storage Instructions" for addi-
tional information.
11
OPERATION
HOW TO START THE ENGINE
NOTE: DO NOT BE ALARMED, your engine
will smoke the first time it is started. It is
burning off the protective coating that is on
the internal engine parts.
A WARNING: Never leave the trim-
mer unattended whil the engine
is runngln. Wait for the trimmer
lines to stop rotation.
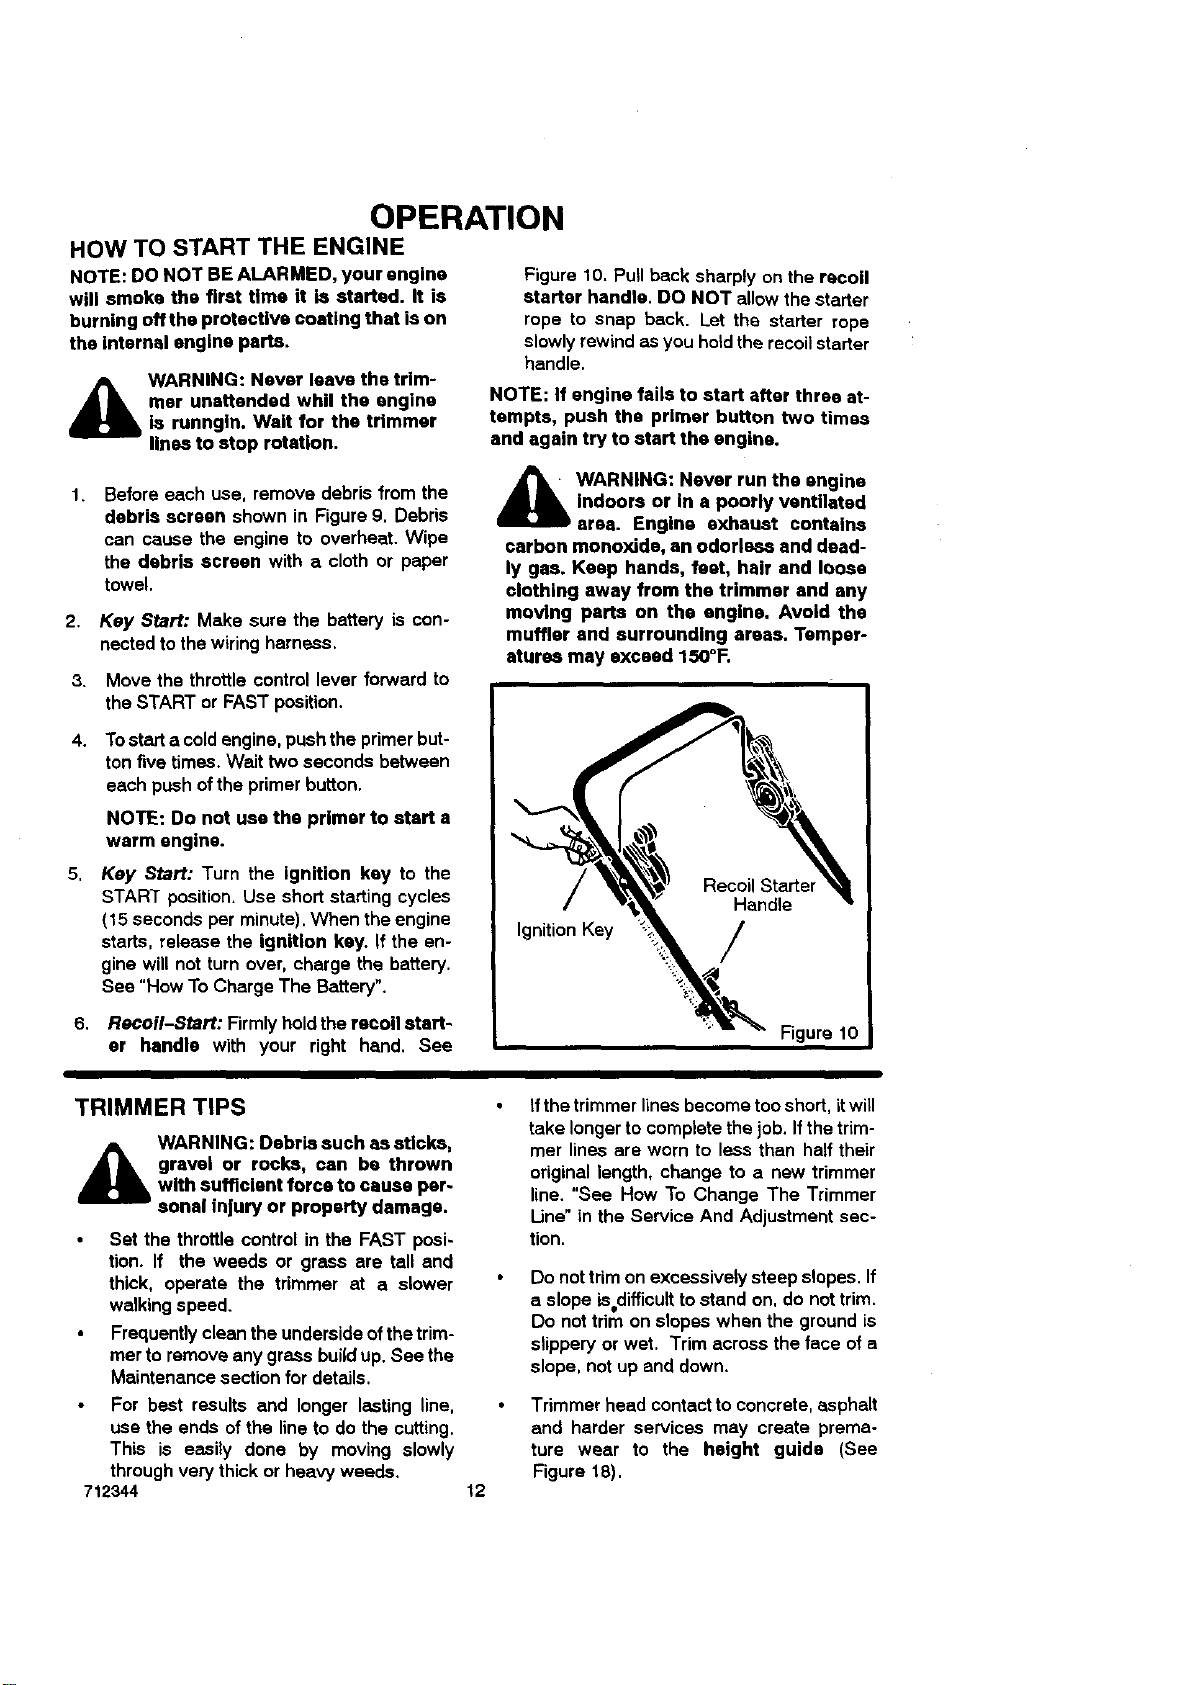
Figure 10. Pull back sharply on the recoil
starter handle. DO NOT allow the starter
rope to snap back. Let the starter rope
slowly rewind as you hold the recoil starter
handle.
NOTE: If engine fails to start etter three at-
tempts, push the primer button two times
and again try to start the engine.
Beforeeach use, remove debris fromthe
debris screen shownin Figure9. Debris
can cause the engine to overheat.Wipe
the debris screen with a cloth or paper
towel.
2. Key Start: Make sure the battery is con-
nected to the wiring harness.
3. Move the throttle control lever forward to
the START or FAST position.
4,
Tostarta coldengine,pushthe primerbut-
ton five times. Wait twosecondsbetween
eachpush of the primerbutton.
NOTE: Do not use the primer to start a
warm engine.
5,
Key Start: Turn the ignition key to the
START position. Use short starting cycles
(15 seconds per minute). When the engine
starts, release the ignition key. If the en-
gine will not turn over, charge the battery.
See "How To Charge The Battery".
6. Recoil-Start: Firmly hold the recoil start-
er handle with your right hand, See
_k WARNING: Never run the engine
indoors or in a poorly ventilated
area. Engine exhaust contains
carbon monoxide, an odorless and dead-
ly gas. Keep hands, feet, hair and loose
clothing away from the trimmer and any
moving parts on the engine. Avoid the
muffler and surrounding areas. Temper-
atures may exceed 150°1=.
Ignition Key /
Figure 10
TRIMMER TIPS
A WARNING: Debris such assticks,
712344
gravel or rocks, can be thrown
with sufficient force to cause per-
sonal injury or property damage.
Set the throttle control in the FAST posi-
tion. If the weeds or grass are tall and
thick, operate the trimmer at a slower
walking speed.
Frequently clean the underside of the trim-
mer to remove any grass build up. See the
Maintenance section for details.
For best results and longer lasting line,
use the ends of the line to do the cutting.
This is easily done by moving slowly
through very thick or heavy weeds.
Ifthe trimmer lines become too short, it will
take longer to complete the job. If the trim-
mer lines are worn to less than half their
original length, change to a new trimmer
line. "See How To Change The Trimmer
Line" in the Service And Adjustment sec-
tion.
Do not trim on excessively steep slopes. If
a slope isdifficult to stand on, do nottrim.
Do not trim on slopes when the ground is
slippery or wet. Trim across the face of a
slope, not up and down.
Trimmer head contact to concrete, asphalt
and harder services may create prema-
ture wear to the height guide (See
Figure 18).
12
 Loading...