

Craftsman 536773510 Owner’s Manual

6.5 Horsepower
HIGHWHEEL WEEDTRIMM_L_
MODEL NO.
536.773510
Caution:
Read and follow all Safety Rules
and Operating instructions before
first use of this product.
SEARS, ROEBUCK AND CO., Hoffman Estates, IL 60179 U.S.A
712490 02/17/99

TABLE OF CONTENTS
WARRANTY STATEMENT ...... 2
SAFETY RULES ................ 3
INTERNATIONAL SYMBOLS .... 5
ASSEMBLY ......................... 6
OPERATION ...................... 9
MAINTENANCE ................. 13
SERVICE AND ADJUSTMENT . , o 16
,1,, rr,,r ....,r,,,_,r,,,
TROUBLE SHOOTING CHART ._ 20
SLOPE GUIDE ................. 22
REPAIR PARTS .................... 23
ENGINE REPAIR PARTS ......... 28
SPANISH (ESPA_IOL) ........... 34
PARTS ORDERING/SERVICE ... 56
WARRANTY STATEMENT
LIMITED TWO-YEAR WARRANTY ON CRAFTSMAN WEEDTRIMMER
For two years from the date of purchase, when this Craftsman Weedtrimmer is maintained,
lubricated, and tuned up according to the operating and maintenance instructions in the
owner's manual, Craftsman will repair, free of charge, any defect in material or workman-
ship
If this Craftsman Weedtrimmer is used for commercial or rental purposes, this warranty ap-
plies for only 90 days from the date of purchase
This warranty does not cover the following:
Expendable items which become worn during normal use, such as spark plugs eta
Repair necessary because of operator abuse or negligence, including bent crankshafts
and the failure to maintain the equipment according to the instructions contained in the
owner's manual
WARRANTY SERVICE IS AVAILABLE BY RETURNING THE CRAFTSMAN WEED-
TRIMMER TO THE NEAREST CRAFTSMAN SERVICE CENTER/DEPARTMENT IN THE
UNITED STATES. THIS WARRANT'( APPLIES ONLY WHILE THIS PRODUCT IS IN USE
IN THE UNITED STATES.
This warranty gives you specific legal rights, and you may also have other rights which may
vary from state to state
Sears, Roebuck and Co, D817WA, Hoffman Estates ]L 60179
IMPORTANT: This unit is equipped with an internal combustion engine and must not be
used on or near any unimproved forest-covered, brush-covered or grass-covered land
unless the engine's exhaust system is equipped with a spark arrester meeting
applicable local or state laws (if any). If a spark arrester is used, it must be maintained in
effective working order by the operator.
In the State of California the above is required by law (Section 4442 of the California
Public Resources Code), Other states may have similar laws. Federal laws apply on fed-
eral lands. See an Authorized Service Center for a spark attester for the muffler°
712490 2

SAFETY RULES
Safe Operation Practices for Trimmer.
_ ARNING: Look for this symbol to point out important safety precautions,It means: "Attention! Become Alert! Your Safety Is involved."
I General Operation
1 Read. understand, and follow al! instruc-
tions on the machine and in the manual(s)
Be thoroughly familiar with the controls and
the proper use of the trimmer before start-
ing
2 Familiarize yourself with all of the safety
and operating decals on this equipment
and on any of its attachments or accesso-
ries
3 Do not put Inands or feet near or under rotat-
ing parts
4 Only allow responsible individuals, who are
familiar with the instructions, to operate the
trimmer
5 Inspect the area where the trimmer is to be
used Your equipment can propel small ob-
jects at high speed causing personal injury
or property damage Stay away from
breakable objects, such as house win-
dows. auto glass, greenhouses, etc
6 Keep the area of operation clear of al! per-
sons particularly small children, and pets
7 Wear appropriate clothing such as a !ong-
sleeved shirt or jacket Also wear long trou-
sers or slacks Do not wear shorts
8 Do not wear loose clothing which could get
caught in this equipment
9 Always wear safety goggles or safety
glasses with side shields when operating
trimmer to protect your eyes from foreign
oblects which can be thrown from the unit
10 Always wear work gloves and sturdy foot-
wear Leather work shoes or short boots
work well for most people These will pro-
tect the operators ankles and shins from
small sticks, splinters, and other debris
and improve traction
11 It is advisable to wear protective headgea_
to prevent the possibility of being struck by
small flying particles, or being struck by low
hanging branches, twigs, or other objects
which may be unnoticed by the operator
12 Do not operate tlne trimmer without proper
guards or other safety protective devices
in place
t3 Use this equipment for its intended pur-
pose only
14 See manufacturer's instructions for proper
operation and installation of accessories
712490
Only use accessories approved by the
manufacturer
15 Operate only in daylight or good artificial
light
16 De not operate the trimmer while under the
influence of alcohol, drugs or other medica-
tion which can cause drowsiness or affect
your ability to operate this machine safely
17 Never operate trimmer in wet grass Al-
ways be sure of y_ Jr footing; keep s firm
hold on the handle and walk; never run
18 Before each use, inspect the throttle con-
trol lever and cable Make sure that the
cable is free and that the lever is not dam_
aged Also check the cable linkage running
to the carburetor for kinks, loose fittings,
and obstructions Verify that the control
bail is working properly
19 Stop the rotating trimmer head when cross-
ing gravel drives, walks, or roads Wait for
the cutting lines to stop rotating
20 Watch for traffic when operating near, or
when crossing roads
21 Stop the engine (motor) whenever you
leave the equipment, before cleaning re-
pairing or inspecting the unit. be sure the
trimmer head and all moving parts have
stopped Let the engine cool, disconnect
the spark plug wire and move it away from
the spark plug
22 If the equipment should start to vibrate ab-
normally, stop the engine (motor), discon-
nect the spark plug wire and prevent it from
touching the spark plug Check immediate-
ly for the cause Vibration is generally a
warning of trouble
23 After striking a foreign object, stop the en-
gine (motor) Remove the wire from the
spark plug Inspect the trimmer for dam-
age If damaged, repair before starting and
operating the trimmer
24 Never leave the trimmer unattended when
the engine is running Remove the wire
from the spark plug
25 Regularly inspect the trimmer Make sure
parts are not bent, damaged or loose
IL Slope Operation
Slopes are a major factor related to slip and fall
accidents which can result in severe injury All

SAFETY RULES
slopes require extra caution If you feel uneasy
on a slope, do not trim it
De trim across the face of slopes; never up and
down Do net trim excessively steep slopes
(maximum 15 degrees) or areas where the
ground is very rough See the "Guide" in the
back of this manual to check e slope Exercise
extreme caution when changing direction on
slopes
De remove objects such as rocks, tree limbs,
etc
Do watch for holes, ruts, or bumps Tell grass
can hide obstacles
Do not trim near drep-offs, ditches, o_embank-
ments The operator could lose footing or bal-
ance
Do not trim excessively steep slopes
De not trim on wet grass Reduced footing
could cause slipping,
IlL Children
Tragic accidents can occur if the operator is not
alert to the presence of children Children ere
often attracted to the trimmer and the trimming
activity Never assume that children will remain
where you last sew them
1 Keep children out of the trimming area and
under the watchful care of a responsible
adult
2 Be alert and turn trimmer oft if children en-
ter the area
3 Before and while moving backwards, look
behind and down for small children
4 Never allow children to operate the trim-
mer
5 Use extra care when approaching blind
corners, shrubs, trees, or other objects that
may obscure vision
6 On electric start models, remove the igni-
tion key to prevent accidental starting when
the trimmer is net is use
IV, Service
Use extra care in handling gasoline and
ether fuels They are flammable and va-
pors are explosive
a Use only an approved container
b Never remove gas cap or add fuelwith
the engine running AlLow engine to
cool before refueling Do net smoke
c Never refuel the machine indoors
d Never store the machine or fuel con-
tainer inside where there is an open
flame, such as a water heater,
2. Never run an engine indoors or inside a
closed area.
.3 Never make adjustments or repairs with
the engine (motor) running Disconnect the
spark plug wire, and keep the wire away
from the plug to prevent accidental starting
(remove the ignition key ifequipped with an
electric start) Always wear eye protection
when you make adjustments or repairs
4 Check the trimmer head end engine
mounting bolts at frequent intervals for
proper tightness
5 Keep all nuts and bolts tight and kee F
equipment in good condition Chec_
mounting hardware on trimmer head ever_
time you change trimmer line and prior tc
each use
6 Never tamper with safety devices Checl
their proper operation regularly
7 When servicing or repairing the trimmer, dc
not tip the machine over or up unless spe
cificaUy instructed to do so in this Manual
Service and repair procedures can be done
with the trimmer in an upright position
Some procedures will be easier if the ma
chine is lifted on a raised platform or work
ing surface
8 To reduce fire hazard, keep trimmer free e
grass, leaves, or other debris build-up
Clean up oil or fuel spillage Al!ow trimme
to cool before storing
9 Stop and inspect the equipment if ym
strike an object Repair, if necessary, be
fore restarting
1(3 Always disconnect spark plug wire bafor_
cleaning, repairing, or adjusting
11 Do not change the engine governor settinc
or over-speed the engine
12 Clean and replace safety and instructior
decals as necessary
13 To guard against engine over-heating, a
ways have engine debris filter meunte
and ctean
14 Inspect trimmer before storage.
15 Use only original equipment or authorize
replacement parts
71249O 4

SAFETY RULES
INTERNATIONAL SYMBOLS
IMPORTANT: Many of the following symbols are located on your unit or on literature sup-
plied with the producL Before you operate the unit, learn and understand the purpose for
each symbol.
Control And Operating Symbols
Slow Fast
Safety Warning Symbols
WARNING
Thrown Objects.
Keep Bystanders Away.
IMPORTANT
Read Owner's Manual
Before Operating
This Machine.
Disconnect Spark Wire Before
Fuel
WARNING
Rotating Parts. Stop Engine.
Making Adjustments.
WARNING
Wear Eye Protection
Oil
WARNING
STOP
WARNING
Never Operate Up Or
Down Slopes. Operate
Across Slopes.
712490 5

ASSEMBLY
ASSEMBLY
CONTENTS OF PARTS BAG
1 Owner's Manual
- Parts Bag
Not shown actual size) _,._
1 - T-Handle Wrench 1 - Safety Glasses 1 - 20 oz, Bottle Oil
TO REMOVE THE
glasses or eye shields while as-
WARNING: Always wear safety
sembling the trimmer.
TOOLS REQUIRED
1- Knife to cut carton
1- T-Handle Wrench
Figure 1 shows the trimmer completely as-
sembled and positioned in the carton for ship-
ment
References to the right or left hand side of the
trimmer are from the viewpoint of the opera-
tors position behind the unit
TRIMMER FROM CARTON
1 Remove the bottle of oil and parts bag
from carton
2 Remove the packing material positioned
around the unit
3 Cut down all four corners of the carton and
lay the side panels flat
4 Pull the trimmer out of the carton and off
the base pad
5 Remove packing matenal from around the
trimmer head
6 Remove protective plastic from front of
frame
2 Sets - Trimmer Lines
(0.155 inch diameter)
71249O 6
Figure 1
ASSEMBLY
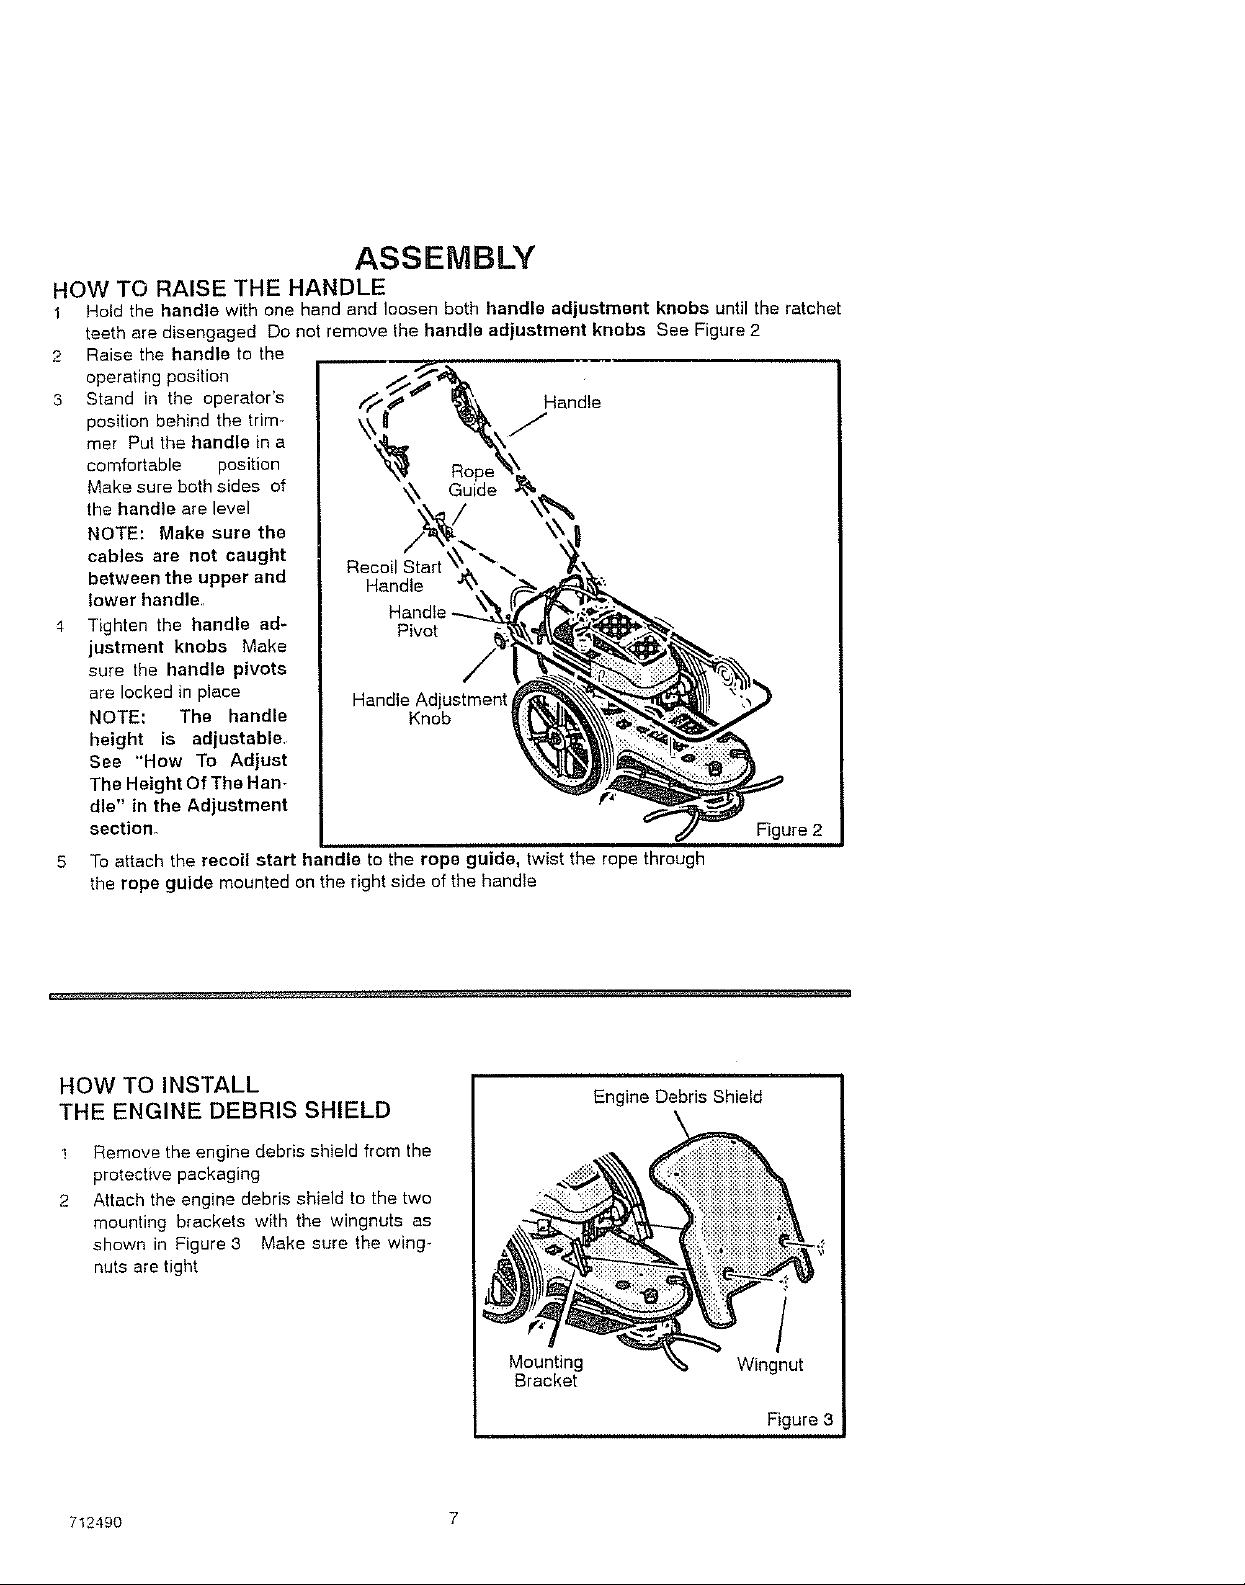
HOW TO RAISE THE HANDLE
1 Hold the handle with one hand and loosen both handle adjustment knobs until the ratchet
teeth are disengaged Do not remove the handle adjustment knobs See Figure 2
2 Raise the handle to the
operating position
3 Stand in the operator's
poMtion behind the trim-
mer Put the handle in a
comfortable position
Make sure both sides of
the handle are level
NOTE: Make sure the
cables are not caught
between the upper and
lower handle,,
Tighten the handle ad-
justment knobs Make
sure the handle pivots
are locked in place
NOTE: The handle
height is adjustable,
See "How To Adjust
The Height Of The Han-
dle" in the Adjustment
section.
5 To attach the recoil start handle to the rope guide, twist the rope through
the rope guide mounted on the right side of the handle
Handle Adjustment
Knob
Figure 2
HOW TO INSTALL
THE ENGINE DEBRIS SHIELD
!
Remove the engine debris shield from the
protective packaging
2
Attach the engine debris shield to the two
mounting brackets with the wingnuts as
shown in Figure 3 Make sure the wing-
nuts are tight
71249O 7
 Loading...