

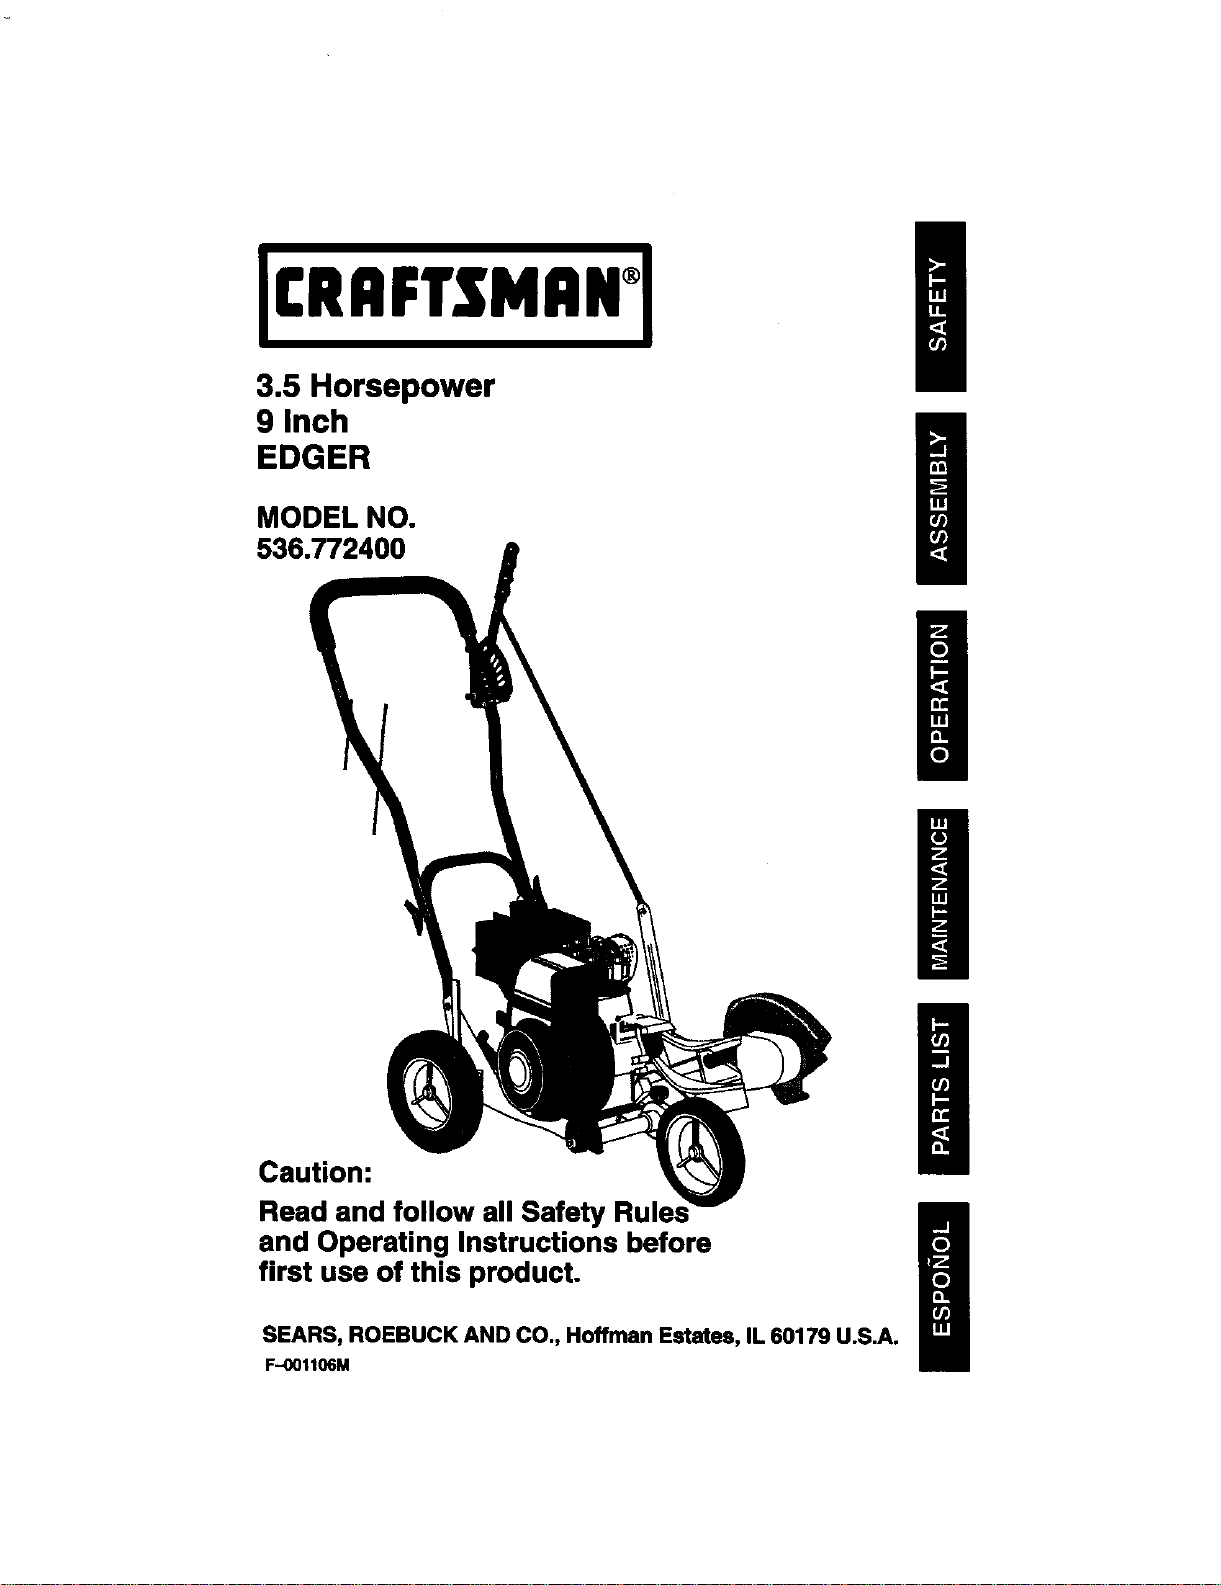
3.5 Horsepower
9 Inch
EDGER
MODEL NO.
536.772400
a
g
a
Caution:
Read and follow all Safety
and Operating Instructions before
first use of this product.
SEARS, ROEBUCK AND CO., Hoffman Estates, IL 60179 U.S.A.
F-001106M
g
a
g
TABLE OF CONTENTS
WARRANTY STATEMENT
SAFETY RULES
INTERNATIONAL SYMBOLS
ASSEMBLY
OPERATION
MAINTENANCE
2 SERVICE AND ADJUSTMENT 19
S TROUBLE SHOOTING CHART 22
5 EDGER REPAIR PARTS 23
6 ENGINE REPAIR PARTS 31
10 SPANISH (ESPAI_OL) 37
16 PARTS AND SERVICE BACK COVER
WARRANTY STATEMENT
LIMITED TWO-YEAR WARRANTY ON CRAFTSMAN EDGER
Fortwoyearsfromthe dateofpurchase,whenthis CraftsmanEdgerismaintained,lubri-
cated,andtunedup accordingtotheoperalJngandmaintenanceinstructionsintheowner's
manual,Searswill repair,freeofcharge,anydefectinmaterialor workmanship.
IfthisCraftsmanEdgerisusedforcommercialorrentalpurposes,this warrantyappliesfor
Only90 daysfromthe data ofpurchase.
Thiswarrantydoesnotcover the following:
• Expendableitemswhichbecomewom duringnormaluse,suchas sparkplugs,etc.
• Repairsnecessarybecauseofaperatorabuseor nsgliganoe,includingbentcrankshafts
andthe failureto maintainthe equipmentaccordingto theinstructionscontainedinthe
owner'smanual.
WARRANTY SERVICEIS AVAILABLEBY RETURNING THE CRAFTSMAN EDGER TO
THE NEAREST SEARS SERVICE CENTER/DEPARTMENT IN THE UNITED STATES.
THIS WARRANTY APPLIES ONLYWHILE THIS PRODUCT IS IN USE INTHE UNITED
STATES.
Thiswarrantygivesyouspecificlegalrights,andyoumayalsohaveotherrightswhichvary
fromstateto state.
Sears, Roebuck and Co., D817WA, Hoffman Estates, IL 60179
Engine Exhaust, some of Its constituents, and certain vehicle
components contain or emit chemicals known to the State of
California to cause cancer and birth defects or other repro-
ductive harm,
Battery posts, terminals and related accessories contain
lead and lead compounds, chemicals known to the State of
California to cause cancer and birth defects or other repro-
ductlve harm. WASH HANDS AFTER HANDLING.
F-OO11coM 2
A
SAFETY RULES
Safe Operation Pmctlcee for Edger.
WARNING: Look for this symbol to point out Important safety precaul_ons,
It means: "Attention! Become AtarttYour Safety Is Invohmd,"
A ARNING: To prevent eccldan-
tat atmllng whim setting-up,
transporting, adjusting or mak-
Ing repairs, atwsys dteconnect spmk
plug wire end put wire whom it cannot
contact the spark plug.
Before Use
• Rendthe owner'sman_ c_e_|y. Be
thoroughlyfamiliarwiththe controlsand
theproperuse _ the Edger.Knowhowto
stop the Edgerand disengagethe controls
gui_.
• Donotoperatethe Edgerwithoutweadng
adequateoutergarments.Wearfootwear
_t willimprovefootingonslipperysur-
faces.
• Keeptheareaofoperationdear of allper-
sons,particularlysmallchildrenand pets.
• Thoroughlyinspectthe area wherethe
Edgaris to be usedand removeallforeign
objects.
Fuel Safety
• Handlefuelwithcare;itishighlyflam-
mable.
• Usean approvedcontainer.
• Checkfuelsupplybeforeeachuse,allow-
ingspaceforexpansionas the heatofthe
engineand/or suncancausefuelto ex-
pand.
• FillfueltankoutdoorswithexVemecare.
Neverfillfuel tank indoors.Replacefuel
tankcap securelyandwipe upspilledfuel
• Never removethefuel tank cap oraddfuel
toa runningorhotengine.
• Never store fuel or Edger with fuel in the
tank inside a bu_k_n9where fumes moy
reach an open llama.
F-001106M
OperaUng Safety
• Neverellow childrenoryoungteanagereto
operatethe Edger. Keepthem away while
it isoperating.Neveratfowadultsto obef-
atethe Edgerwithoutproperinstru_on,
• Do notoperatethis machineifyouaretak-
thg drugsorothermedicationwhichcan
causedrowsinessor affectyourabilityto
operatethismachine,
• Do notusethis machineifyouare mentally
orphysicallyunabletooperatethisma-
chinesafely.
• Alwayswearsafetyglassesoreye shields
dm_,goperatk3rtorwhileperforming an
adjustmentorrepairto protectyoureyes
fromforeign objectsthatmay be thrown
fromthe Edger,
• Do notputhandsorteat nearor underro-
tatingparts.
• Exerciseextremecaution whenoperating
on o_crossinggravelddves,walks,or
reads.Stay alertfor hiddenhazardsor
traffic.
• ExemicacauUontoavoidslippingorfelling.
• Neveroperatethe Edgerwithout proper
guards,plates,or othereafaty protective
devicesinplace.
• Never operate the Edgar at high transport
speeds on slippery surfaces. Look behind
and usa care when backing.
• Neverallo',_bystanders_)sr the Edger.
• Keep children and pets away while
operating.
• Never operate the Edger without gond _si-
billly or light.
• Do not run the engine indoors, The ex-
hanst fumes are dangerous, containing
CARBON MONOXIDE, an ODORLESS
and DEADLY GAS.
• Takeallpossibleprecautionswhen leaving
the Edgerunattended.Stopthe engine.
• Do notovedoedff_eEdgercapacitybyat-
temptingtotilltoodeepattoofasta rate,
SAFETY RULES
Safe Storage
• Nways refertothe owner'smanualinstruc-
tionsforimportantdetailsifthe Edgeristo
be storedforan extendedperiod.
• Neverstorethe Edgerwithfuel Inthe fuel
tankinsidea buildingwhereIgnition
soumes are presentsuchas waterand
spaceheaters,clothesdryers,andthe like.
Allowthe enginetocoolbeforestoringin
anyenclosure.
• Keepthe Edgerinsafeworkingcondition.
Checkallfastenemat frequentintervalsfor
propertightness.
Repair / Adjustments Safety
• Afterstrikingaforeignobject,stopthe en-
gine.Removethewire fromthe sparkplug.
and keepthe wireawayfromthe plugto
preventaccidentalstarting.Thoroughlyin-
specttheEdgerfor any damage,and re-
pairthe damagebeforerestartingand
operatingit.
IfEdgershouldstarttovibrateabnormally.
stopengineandcheckimmediatelyforthe
cause.Vibrationisganemllya warningof
trouble.
Stopthe enginewheneveryouleave the
operatingposition.Also,disconnectthe
sparkplugwire beforeuncloggingthe
bladeandwhen makinganyrepairs,ad-
jsstments,orinspections.
Whencleaning,repairing,or inspecUng,
shutoffthe engineand make certainall
movingparts have stopped.
Neverattempttomakeanyadjustments
while the engineisrunningexceptwhen
specificallyrecommendedby the manufac-
turer.
F-001106M 4
SAFETY RULES
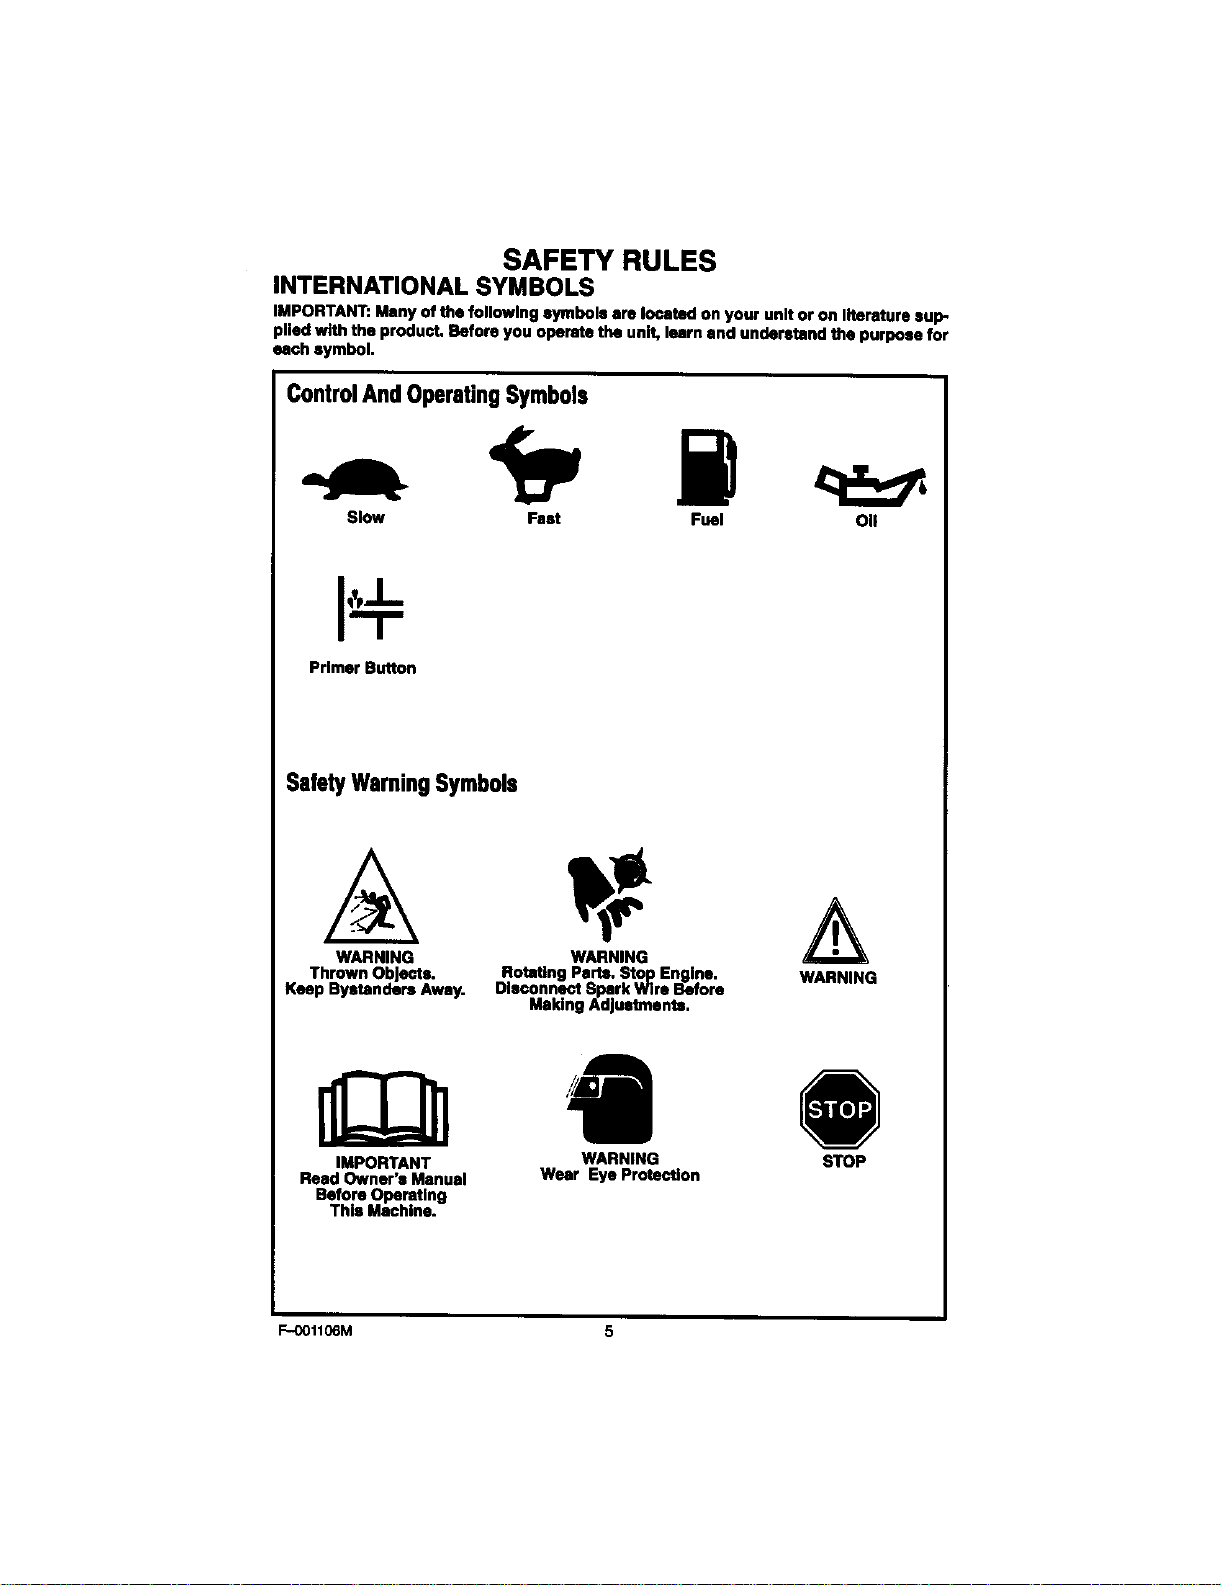
INTERNATIONAL SYMBOLS
IMPORTANT: Many of the following symbols are located on your unit or on literature sup-
plied with the product. Before you operate the unit, learn and understand the purpose for
each symbol.
ControlAndOperatingSymbols
Slow Fast Fuel OII
Primer Button
SafetyWarningSymbols
WARNING WARNING
Thrown Objects. Rotating Parts. Stop Engine. WARNING
Keep Bystanders Away. Disconnect Spark Wire Before
IMPORTANT
Read Owner's Manual
Before Operating
This Machine.
F-001106M 5
Making AdJeabnenta.
WARNING STOP
Wear Eye Protection
ASSEMBLY
ASSEMBLY
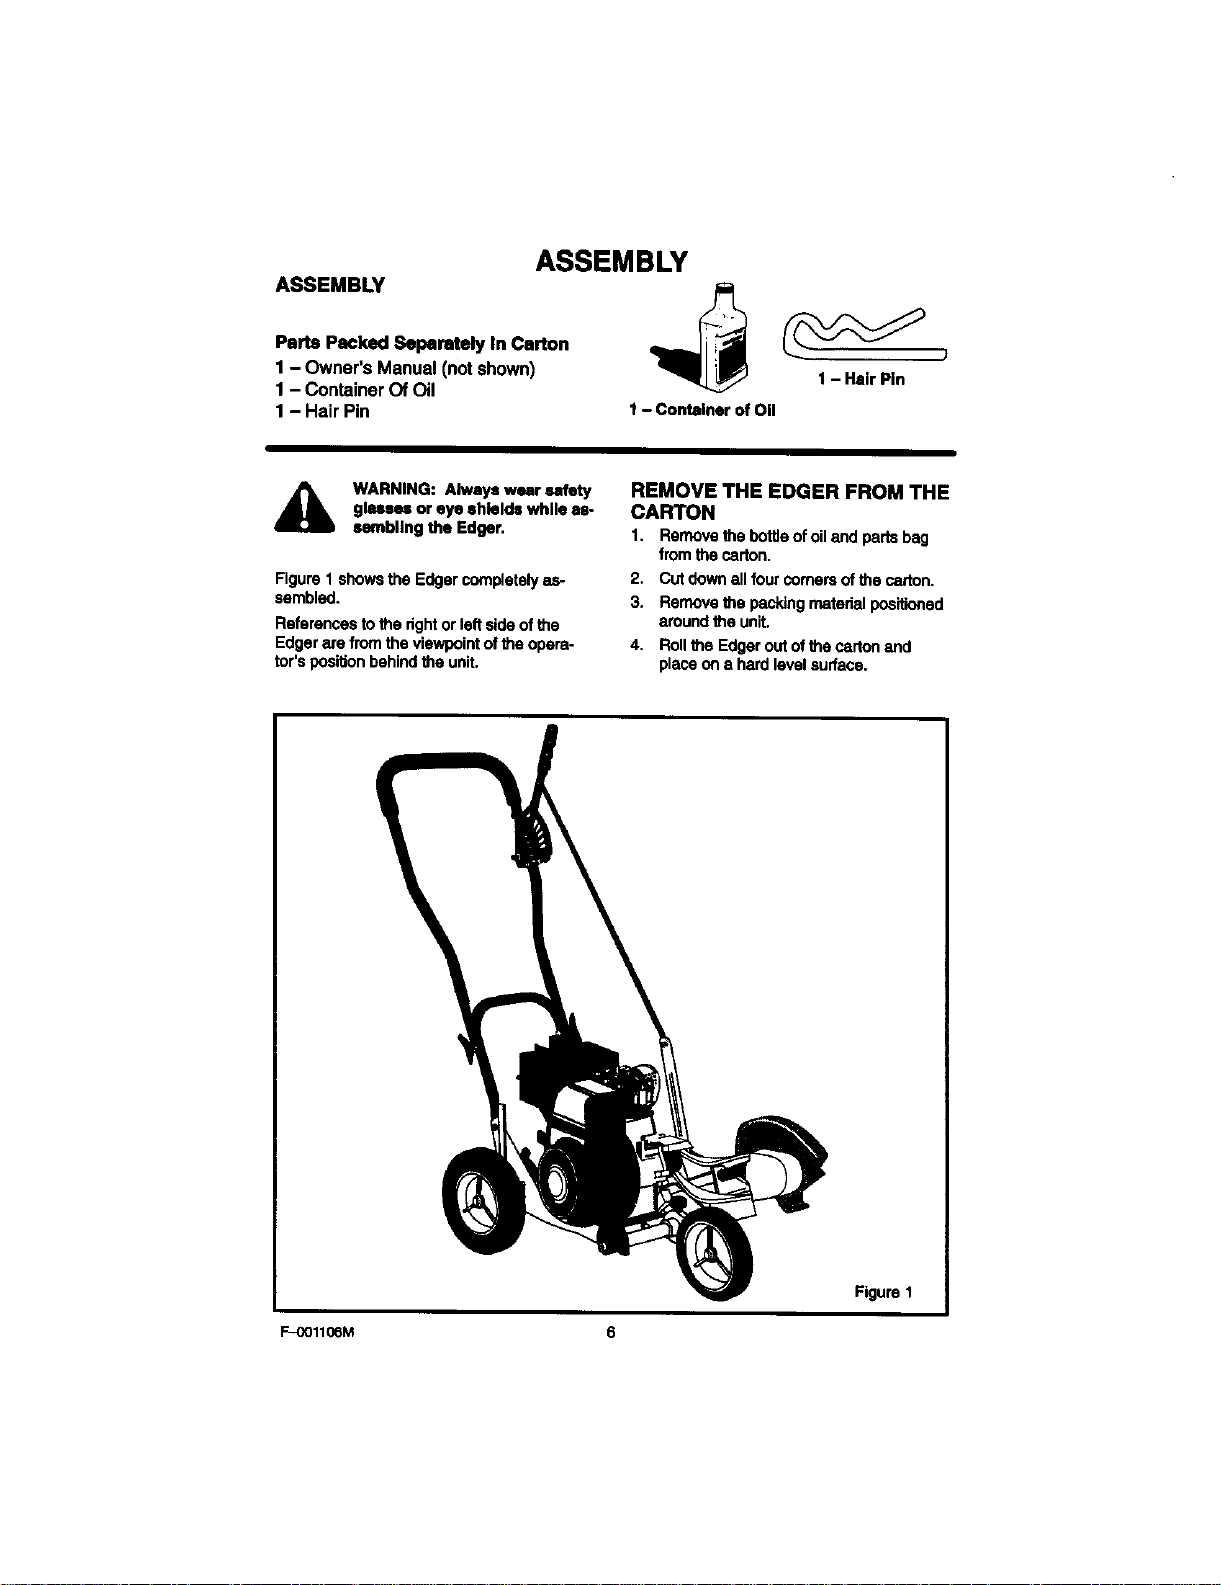
Parts PackedSeparately InCarton
1 - Owner's Manual(notshown)
1 - ContainerOf Oil
1 - Hair Pin
1- Hair Pin
1- Container of Oil
A WARNING: Always wear safety
Figure1 showstheEdgercompletelyas-
sembled.
Referencestothe rightor leftsideof the
Edgerare fromthe viewpointof the opam-
tor'spositionbehindthe unit.
glasses or eye ahlelds while aa-
eambllng the Edger.
REMOVE THE EDGER FROM THE
CARTON
1. Removethebottleofoilandpartsbag
fromthe carton,
2. Cut down all four comers of the carton.
3. Remove the packing material positioned
around the unit.
4. Roll the Edger out of the carton and
place on a hard level surface.
F-OO1106M 6
Figure 1
ASSEMBLY
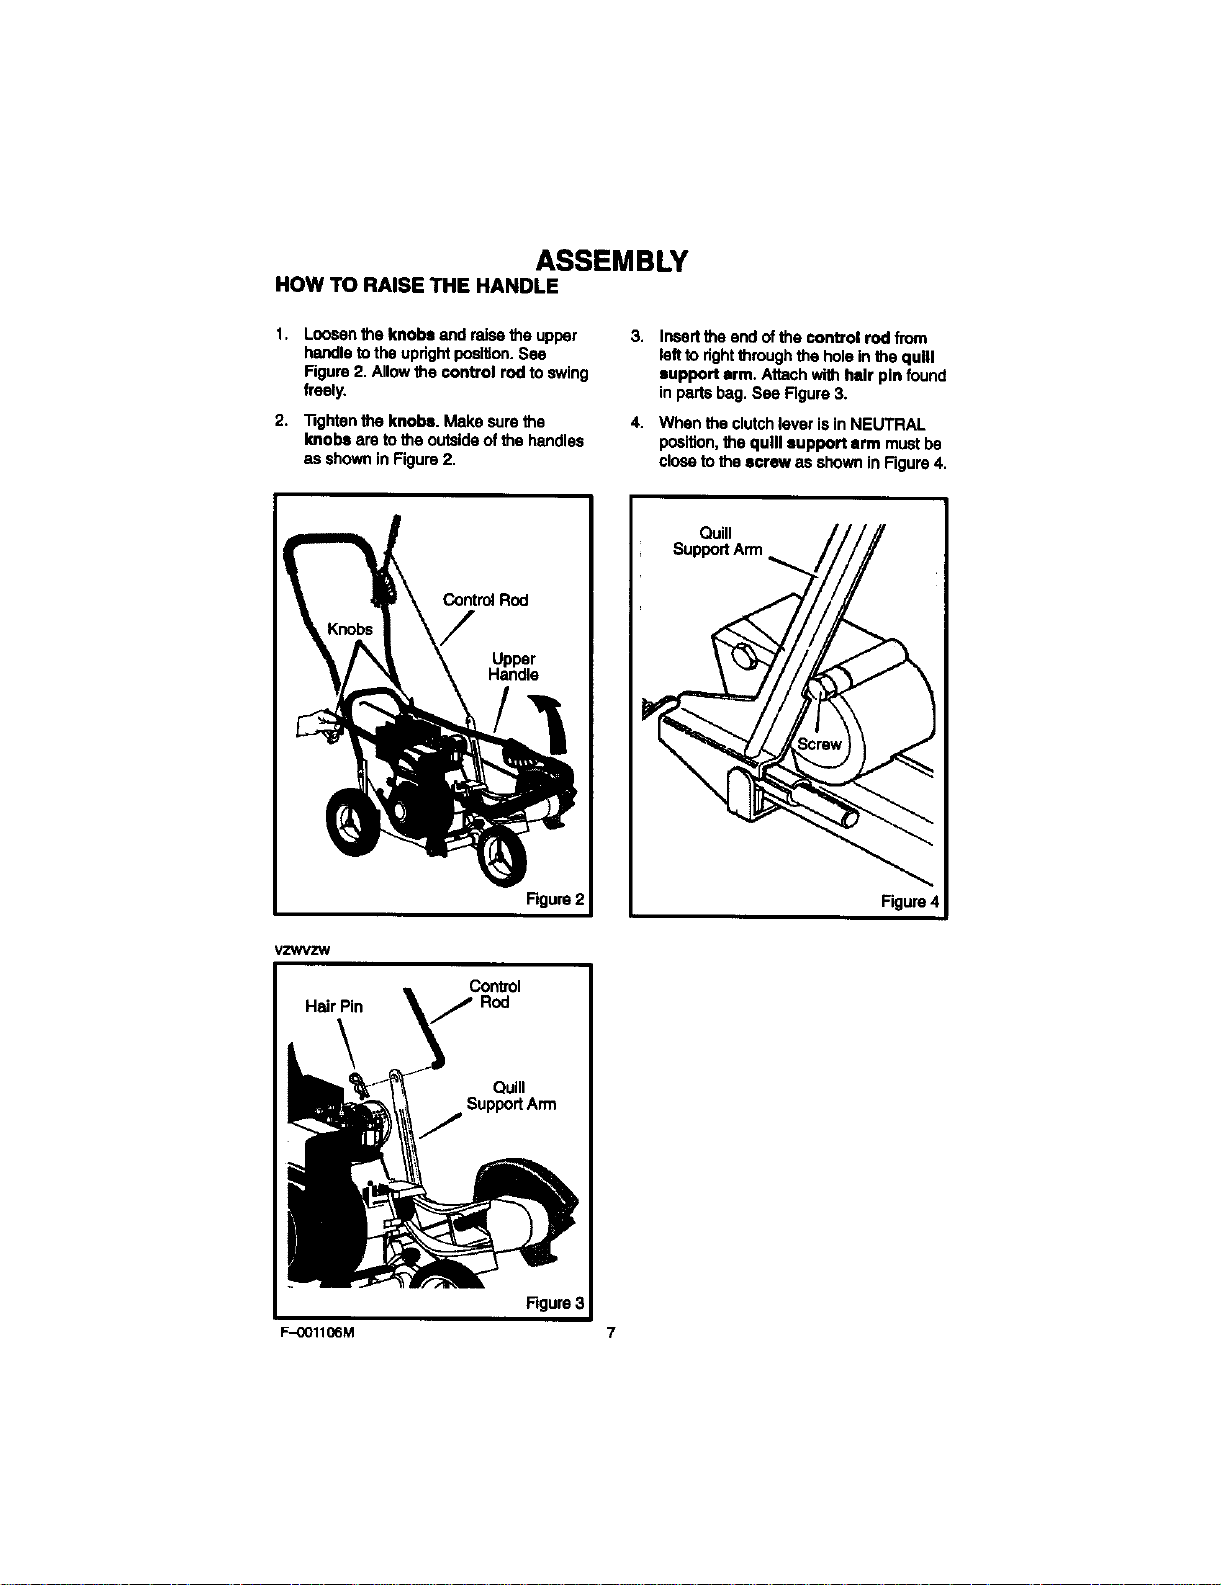
HOW TO RAISE THE HANDLE
1. Loosenthe knobs and raisethe upper
handletothe uprightposltlon.See
Figure2. Allowthe control rod to swing
freely.
2. "nghtenthe knobs. Makesum the
knobsam to the outsideofthe handles
as showninFigure2.
ControlRod
Upper
Handle
Rgure 2
3. Insertthe endofthe €ontrol rod from
leftto rightthroughthe hole inthequill
support arm. Attachwithheir pinfound
in partsbag.See Figure3.
4. Whenthe clutchleverisin NEUTRAL
position,the quill support arm mustbe
closeto the screw as shownin Figure4.
vzwvzw
Hair Pin Rod
F-OO1106M 7
Control
Quill
SupportArm
Figure3

ASSEMBLY
HOW TO PREPARE THE ENGINE
Fill With OII
ThisEdgerwasshippedwitha 20 ounce
containerofSAE30motoroil.Addthis oilto
the engine beforeoperating.Tofill thecrank-
case,removethe oilfill cap/dipstickand add
the SAE30 motoroil. DO NOT OVERFILL,
NOTE: The engine may contain a small
amount of oil When adding o11,frequently
Insertthe oil fill celddlpetiek end check
the amount of oll In the engine. DO NOT
OVERFILl,
OII Recommendations
Only use high quality detergent oil rated with
API service classification SG. Select the oil's
SAE viscosity grade according to your ex-
pected operating temperature. Although mul-
ti-viscasity oils (5W30, 10W30, etc.) improve
starting in cold weather, these multi-viscosity
otis will result in increased oil coflsumption
when used above 32 degrees. Check the
engine oil level more frequently to avoid pos-
sible engine damage from running the en-
gine low on oil,
<-
Colder_._ ,-_ --Warmer
<-
32+ I
'l
How To Add The Engine OII
1. PuttheEdgerona levelsurface.
2. Removethe oilfillcap (Figure5).
3. Slowlyfillthe enginecrankcase.DO NOT
OVERFILL.
How To Fill With Gasoline
Makesurethatthe gasolinecontaineris
cleanandfreefromdustorotherforeignma-
terial.Neverusegasolinethatcouldbe stale
fromlongperiodsofstorage.
1. Removethe fuelcap.
2. FIll the fuel tank with clean, fresh, un-
leaded grade automotive gasoline.
A ARNING: Always use e safety
NOTE: ENGINES WHICH ARE CERTIFIED
TO COMPLY WITH CAUFORNIA AND US
EPA EMISSION REGULATIONS FOR
ULGE ENGINES, ere certified to operate
on regular unleaded gasoline. Include the
following emieslon control system(s):
EM, TWC (if so equipped). Include any
user adjustable features - therefore no
other adjustments are needed.
fuel container. Do not smoke
when adding the fuel mixture to
the engine. When Inside an enclosure,
do not fill the fuel tank. Before you add
the fuel mixture, stop the engine. Let the
engine cool for several mlnutce.
Oil Fill
Cap
/
F-001106M 8
Fuel
Cap
Fuel Tank Figure 5

ASSEMBLY
CHECKUST
Forthe bestperforrnenoeandsatisfaction
fromthis qualityproduct,pleasemvlawthe
followingchecklistbeforeyouoperatethe
Edger:.
P" All assemblyinstmctionshavebeen
completed.
p,
Checkcarton.Make sure no loose
padsremaininthe carton.
v"
Allfastanershavebeenpropedytight-
ened.
Asyoulearnhowto use the Edger,pay extra
attentiontothe followingimportantitems:
_"P" Engineoilisat properlevel.
J_'J," Fueltankisfilledwitha fresh,dean,
regularUnleadedgaso|ine.
_'_" Becomefamiliarandunderstandthe
functionof allconb'ols.Beforeyour
startthe engine,operateallconbols.
IMPORTANT: This unit is equipped with an internal combustion engine end must not be
used on or near any unimproved foreet--covered, brush-covered or grees-covered land
unleee the engine's exhaust system is equipped with a spark errester meeting
applicable local or state laws (If any). If a spark arreeter Is used, It must be maintained In
effective woridng order by the operator.
In the State of California the above la required by law (Section 4442 of the California
Public Resources Code). Other etstee may have similar laws. Federal laws apply on fed-
eral lands. A el}ark arrester/muffier is avellabla through your nearest Sears Service Can-
ter (see the REPAIR PARTS section In this manual).
F-OO1106M 9

OPERATION
KNOW YOUR EDGER
READTHE OWNER'S MANUALAND ALL SAFETY RULES BEFORE YOU OPERATE the
Edger.Tofamiliarize yourselfwiththe locationof the controls,comparethe illustrationswith
yourEdger. Save thie manual for future reference.
ENGINE
ClutchLever
ControlRod
PrimerButton
Tl_rodle
BladeGuard
AdjustableRearWheel
AdjustableFrontWheel
Throttle Control - Controlsthe engine
speed.
Primer Button - Injectsfueldimly into
the carburetorforfasterstarts.
Clutch Lever - Useto startandstopthe
bladeandcontrolthe depthof cut.
Adjustable Rear Wheal - Rightrear
wheelisadjustable to levelthe Edgerwhen
edgingalonga curb(curb-hopping).
Adjustable Front Wheal - Frontwheel
isadjustablefromside-to-side for balance.
EYE PROTECTION
Alwayswearsafetyglasses.Ifyouweareye
glasses,puta WideVisionSafety Maskover
youreye glasses.
F-001106M lO
VIEW OF BLADE AREA
Blade
The frontwheel can alsobe adjusteddown
for curb-hopping.
Recoil Starter Handle - The engine is
equippedwithan easypullrecoilstarter.
Blade Guard - Use to preventstonesor
othermatadalfrombeingthrownatthe oper-
ator,
Index Lever - Permitsadjustmentfrom
theedging(vertical)positionto the tdmming
(horizontal)position. Tochangepoaltion,pull
the indexleverand rotatethe quillassembly
to the desiredangleorposition,
A ARNING: Debris thrown from
eyes, which can cause severe eye dam-
age. Always wear eafety Blame or eye
shields when operating the Edger.
the Edger can result In foreign
objects being thrown Intothe
Figure6

OPERATION
HOW TO STOP THE EDGER
1. Move theclutch lever backtothe DIS-
ENGAGEDposition.Then, movethe
throttle control to the STOP position.
See Figure7.
A WARNING: Never leave the
EDGER unattendedwhile the
engine Is running. Always die-
engage the cutting blade and stop the
engine.
HOW TO USE
THE THRO'I'I'LE CONTROL
1. Dudng normal use, run the engine at full
speed.
2. Move the throttle control up to increase
engine speed, or down to decrease en-
gine speed (see Rgure 7).
HOW TO USE
THE PRIMER BUTTON
Whenstartingacoldengine,pushthe prim-
er button five times (see Figure8). Walt
approximatelytwosecondsbetweeneach
push.
IMPORTANT:Whenatartlng • warm engine,
do not use the primer button.
HOW TO USE
THE CLUTCH LEVER
1. Starttheengine.
2. Toengagethe cuttingblade,movethe
clutch lever forward (see Figure9).
3. Select the edging depth you need. There
are five selections down to approximate-
ly 2-3/4 inches deep.
NOTE: For deep edging, first cut at shallow
depths. Then, cot at greater depths until
the desired depth is obtained.
F-001106M 11
ClutchLevsr_

OPERATION
HOW TO USE THE INDEX LEVER
1. Stopthe engineand disconnectthe
sparkplugwirefromthe sparkplug.
2. Loosen the front wheel knob shown in
Figure 10. Slide the front wheal allthe
way to the right side.
3. Securely Ughten the front wheal knob.
NOTE: To prevent the blade from hit-
ting the wheel while trimming, make
sure the front wheal is set in the ex-
treme right position.
4. Disengagethe index lever (see
Figure11).Movethe Index lever to the
notchmarked90°.
5. Reconnectthe sparkplugwireto the
sparkplug.
6. Start the engine.
7, Move the clutch lever to the desired trim-
ming height.
A WARNING: While the engine is
running, never leave the Edger.
Before you adjust the wheels or
change the blade position, always dis-
engage the cutting blade end stop the
engine.
F-OO1106M 12

OPERATION
HOW TO USE THE CURB-HOPPING FEATURE
Because the front wheel and the dght rear wheal until the front wheel is level with
wheel are adjustable, the Edger can be used the left rear wheel and the unit Is setting
cn uneven surfasas, such as the curb shown on the curb as shown in Figure 12.
in Figure 12. Set the wheel positions as fol-
lows. 7. Loosen the rear wheal knob.
1. Stopthe engine.
2. Disconnectthe sparkplugwirefromthe
sparkplug.
3. Loosenthefront wheal knob.
4, Slidethefront wheel fo the bast posi-
tionto clearthecurbandbalancethe
unit,
5. Securely tighten the front wheel knob.
6. Use the curb height adjust lever to
lower the front wheal. Lower the front
8. Lower the right rear wheel unUlthe
Edger is level and the left rear wheel is
on the curb.
9. Securelytightenthe rear wheel knob,
10. Connectthe sparkplugwiretothe spark
plug.
A ARNING: Keep away from the
rotating blade. The blade can
cause Injury.
Support Rod
Rear Wheel Knob
F-001106M 13
BladeGuard
Front
WheelKnob
Front Wheel
Figure12

OPERATION
HOW TO STOP THE ENGINE
To stop the engine, move the clutch lever all
the way back tothe DISENGAGED poeition.
Then, push the throffie control lever down to
the STOP position.
If the engine will notstop,hold a screwdriver
againstthe sparkplugand againstthe engine
coolingfins.The sparkwillgo to groundand
theenginewillstop.
HOW TO START THE ENGINE
IMPORTANT: Before you start the engine,
operate the controls several times. Make
sure all controls move freely.
1. Checkthe oil.
2. Fillthe fueltankwithmgulm unleaded
gasoline,Makesurethegasolineis
clean.Leadedgasolinewillincreasede-
positsandshortenthelife of the valves.
NOTE: Do not use gasoholor methanol.Do
not use premium unleaded gasoline.
A ARNING: Always use s safety
3. Makesurethe sparkplugwireiscon-
4. Pullthe clutchleverall the waybackto
5. Movethe throttle controlleverto the
6, Some models have a primer button on
F-OO1106M
gasoline container. Do not
smoke when adding gasoline to
the fuel tank. When inside an encieaure,
do not add gasoline. Before you add
gasoline, stop the engine andlet the en-
gine cool for several minutes.
nectedto the sparkplug.
raiseand disengagethe blade.
FASTposition.
the that or side of the engine (Figure 13).
Every time you push the primer button,
wait two seconds. For the number of
times required to push the primer but-
ton, see the engine manufacturer's in-
struc_ons.
NOTE: Do not usatheprimerbuttontostart
awarm engine.
7. TO start engine, hold the recoil starter
handle firmly with your right hand.
8. Holdtheedger handlefirmlywithyour left
hand.
Quicklypullthe recoilstarter handle.DO
NOTallowthe starterrope to snap back.
Letthe starterropeslowlyrewind.If an-
ginsfailsto startafterthree pulls,push
primerbuttontwotimesand again pull
the recoilstarterhandle.
10.Whan the engine starts, move the throttle
control lever up (FAST p<_ition) to in-
crease speed or down to decrease
speed. During normal usa keep the
throttle in the FAST position.
11.Ifthe enginedoesnotstartin 5 or 6 ties,
Seethe"Problemand Repair"Instruc-
tions.
NOTE: The cutting blade speed la con-
trolled by the engine speed. To reduce the
cutting blade speed, push down on the
throttle control lever, To increase the cut-
ring blade speed, pull up on the throttle
control lever.
A ARNING: Never run the engine
Indoors or in s poorly ventilated
area. Engine exhaust contains
carbon monoxide, an odorless and
deadly gas. Keephands, feet, hairand
looseclothing away from any moving
parts. Avoidthe muffler and surround-
ingareas. Temperaturescan exceed 150
degrees.
14

OPERATION
EDGING TIPS
• Edging is best performed when cor_liUo_s
are dry. If the soil is to wet, dirt becomes
packed around the blade causing prema-
ture belt wear and decreased partor-
mancs.
• If dirt does become packed around the
blade, stop the engine and remove the
wire from the spark plug. Remove the
packed dirt and debris from the blade.
• Fordeapedging,firstcutat shallow
depths.Then,cutatgreaterdepthsuntil
the desireddepthisobtained.
• Foruniformedging, makesuretheblade
guideddesonthe surface.
• Edgingcanbecustomizedby varyingthe
numberofpassesandby thedistancethe
bladeisfromthe surtaca.
A ARNING: Read the Owner's
all safety devices end shleids in place,
Never allow children or unlnstruofed
adults to operate Edger. Shut off engine
before unclogging blade or making re-
palre. Keep bystanders away from me.
chine. Keep away from the blade all ro-
tetlng parts, which cause injury.
F-OO1106M 15
manuel. Know location and
functions of all controls. Keep

MAINTENANCE
CUSTOMER RESPONSIBILITIES
SERVICE
RECORDS
Fillindatesasyou Before Every Every Before
completeregular Each tO 25 Each Before SERVICE
service, use Often Hours Hours Season Storage DATES
Lubricate Wheel
Axles _/ ._
Change Engine Oil _/ _/
Check Spark Plug _/ _/
• ghten All Fasteners _/
Lubricate Quill Rod/ _/ _
tube
PRODUCT SPECIFICATIONS
Model No.: 536.772400
Date Of Purchase:
Horse Power: 3.5
Dlsplaoement: 10 cu. in.
(163 cc.)
Oil Capacity: 20 oz. SAE-30W
Spark Plug: Champion
RJ17LM
Spark Plug Gap: 0.030 inch
F-001106M 16
GENERALRECOMMENDA_ONS
The warranty on this Edger does not cover
items _t have been subjected to operator
abuse or negligence. To receive full value
from the warranty, the operator must main-
tain the Edger as instructed in this manual.
Someadjustments mustbe made periodical-
lyto propedymaintainyourEdger.
All adjustments in the Service and Adjust-
ments section of this manual must be
checked at least once each season.

MAINTENANCE
LUBRICATION
Aftereach 25 hours,applya smallamountof
engineoil to all movingparts,particularlythe
wheels.
How To Change The Engine OII
Change theoilinthe enginecrankcaseafter
each 25 hoursof use.
NOTE:The oil will drain more freely when
the engine Is warm.
1. Disconnectthe sparkplugwirefromthe
sparkplug.
2. Removethe oil drain plug (see
Figure14).Drainthe oilintoafiat pan.
3. Afterdrainingallthe oil,installand tight-
an the oll dreln plug.
4. Removethe oll fill cap (see Figure15).
Fillthe enginecrankcase.Pourslowly.
Donotoverfill.See "ProductSpecifica-
tions"foramountandtypeofoil.Install
the oll fill cap.
5. Connectthe sparkplugwireto the spark
plug.
Oil Fill Cap
/
Figure1_=
HOWTOCHANGETHEAIRRLTER
Replacethe air filteroncea year;more often
in dustyor dirtyconditions.
NOTE: DO NOT clean or oll the air filter.
The air filter Is not serviceable and must
be replaced.
1. Disconnect the spark plug wire from the
spark plug.
2. Turn the cover to the left (counterclock-
wise). Remove the cover and the air fil-
ter from the flange, (see Figure 16).
3. Discardthe sir filter.
4. Cleanthe cover andthe flange.
5. Installa new air filter intothecover,
6. Pushthecover firmlyagainstthe
flange. Tum the cover to the right
(clockwise)untiltight.Make surethe re-
telnere are lockedaroundthe flange.
7. Connect the spark plug wire to the spark
plug.
F-OO1106M 17
CAUTION: Never run the engine without
the air filter. A defective air filter will
cause • lose of engine power. If dirt or
dust enters the engine through the earbu-
retor, the result will be exceealve wear or
damage to the engine. Replace a dam-
aged or clogged air cleaner Immediately.
Flange
Cover

MAINTENANCE
SPARK PLUG
Checkthe spark plug every25 hoops.Re-
placethe spark plug ifthe electrodesare
pitted,bumed,orifthe pomelainiscracked.
moval._ghten the sparkplugtoa torque
of 15foot-pounds.
Make sure the spark plug is clean.
Clean the spark plug by carefully scrap-
ing the electrodes (do not sand blast or
usa a wire brush).
2. Checkthe spark plug gap witha feeler
gauge.
3. Before installing the spark plug, coat
the threads lightlywith oil for easy re-
CARBURETOR ADJUSTMENT
Nevermakeunnecessaryadjustmentsto the
carburetor.The carburetorwassetat the
factoryto operateefficientlyundermostap-
plications.However,if adjustmentsarere-
quired,we recommendyoucontactyour
nearestSears ServiceCenter.
A WARNING:The engine gover-
Over speeding the engine above the fac-
tory setting can be dangerous. If you
think the engine governor needs an sd-
|ustment, contact your nearest Sears
Service Center.
nor Is set at the factory. Do not
change the governor setting,
I
Feeler0.030"Gauge I
F-001106M 18

SERVICE AND ADJUSTMENT
HOW TO REMOVE THE BELT
The beltmadeofa specialcompound.Ifthe
beltbecomeswomorbreaks,replacethe
beltwithan odglnalequipmentbelt.
1. Disconnectthe sparkplugwirefromthe
sparkplug.
2. Pull the clutch lever back to release the
tension from the belt.
3.
Removethetwoecrews end spa(ere
fromthe top of the engine pulley cover.
Removethe engine pulley cover (see
Figure18).
4. Loosen,do notremove,the ecrewthat
holdsthe belt guide. Then, movethe
belt guide away fromthebelt.
5. Removethe twoscrews fromthebelt
guard (see Figure19).
6. Removethe oldbelt fi'omtheengine
andquillassemblypulleys.Replacewith
an odglnalequipmentbelt.
7. Toinstalla newbelt, reversethe above
steps.
F-OO1106M 19
BeltGuard
Screw
Figure19

SERVICE AND ADJUSTMENT
HOW TO REPLACE THE BLADE
The bladeissubjecttowear and damage,
suchas nicksanddents.Thiswillnotgener-
allyaffectitsfunction,
The blade is designed to not require sharp.
ening. Do not attempt to sharpen the blade.
The blade isalso reversible. If nicks or
dents are excessive, remove the blade and
tum it around. This will provide a fresh cut-
ting edge. Replace the blade if both sides
are wom or damaged.
1. Disconnectthe sparkplugwirefromthe
sparkplug.
2. Removetheblade Iocknut that holds
the blade to the ddveshaft.
A ARNING: To remove or tigh-
Figure 20. Always position the holding
wrench on the nut behind the blade.
3. Remove the blade.
ten the blade Iocknut, always
use the method shown In
A ARNING: Do not sharpen the
which can cause Injury to yourself or to
others.
blade. Sharpening can damage
the blade end cause it to break,
Toreplacethe blade, followthe stepsbelow.
4. Install a new blade and blade look.nut.
Tighten the blade tocknut to a torque of
40-45 foot pounds.
5. Connectthe sparkplugwiretothespark
plug.
TumWrench
To"nghtenLocknut
Hold NUt,
Do Not Turn
F-(]O1106M 20
Blade Looknut
Rgure 20

SERVICE AND ADJUSTMENT
STORAGE
A ARNING: Never store the
closed, poorly ventilated area where
fumes could reachan open flame, a
spark or • pilot light as on a furnace, ws.
tar heater or clothes dryer.
Edgor indoors with fuel In the
fuel tank. Never store In an en-
partssuch as the carburetor, fuel filter,
fuel hose, and tank during storage. Also,
using alcohol-blended fuels (called gaso-
hoi, ethanol or methanol) can attract
molsturs which leads to aeparstlon end
formation of acids during storage. Acidic
gas can damage the fuel system of an an-
gins while In storage.
A ARNING: Do not remove gaS-
Gasoline fumes can cause an explosion
or a fire.
When the Edger is put in storage for thirty
days or more, follow the steps below to
make sure the Edger is in good condition the
following season.
oline while inside a building,
near a fire, or while you smoke.
Edger
Completelycleanthe Edger.
ChecktheEdgerfor wom ordamaged
pads.Tightenallloosehardware.
Applya smallamountofengineoilto all
movingpads, psrticulady the wheels.
Putthe Edgerin a buildingthat has good
vanttiation.
Coverthe Edgerwitha suitableprotec-
tive coverthatdoesnot retainmoisture.
Donotuseplastic.
IMPORTANT: Never cover the Edgarwhile
the engine and exhaust areas are still
warm.
NOTE: A yearly checkup or tune-up by a
Sears Service Center is a good way to
make sure that your Edger will _ovldo
maximum performance for the next sea-
son.
Engine
IMPORTANT:It Is important to prevent
gum deposits from forming Infuel system
To prevent engine damage when the Edger
is in storage for 30 days or more, follow the
steps below:
Let the engine run until it is out of gaso-
line.
If youdonotwantto removethegaso-
line.adda fuelstabilizerto anygasoline
leftinthe fueltank. A fuel stabilizerwill
minimizegumdepositsandacids.Ifthe
fueltank is almostempty,mixthefuel
stabilizerwithfreshgasolineina sepa-
ratecontainerand addthe mixturetothe
fuel tank.Alwaysfollowthe instructions
onthe stabilizercontainer.Startthe an-
gins.Letthe enginerunfor 10minutes
toallow the mixtureto roachthe carbu-
rotor.
Change the engine oil. See "How To
Change The Engine Oil" in the Mainte-
nance section.
Lubdcatathe piston/cylindarares. This
can bedonebyfirstremovingthe spark
plugandsquirtings smallamountof
cleanengineoilintothe sparkplughole.
Then, coverthesparkplugholewitha
ragto absorboilspray.Next,rotatathe
engineby pullingthestartertwoorthroe
Umes. Finally,installthesparkplugand
attachthe sparkplugwire.
Storethe Edgerintheoperatingposition
withthe wheelsdown.Ifthe Edgeris
storedinanyotherposition,oilfrom the
crankcasewillenterthe cylinderand
causeasentise problem.
F-001106M 21

TROUBLE SHOOTING CHART
TROUBLE
Enginedifficult to start
or
Engine runs ermticelly
or
Enginewill not run st full
speed
Engine smokes
excesaively
Cutting blade will not
rotate
Blade will not cut properly
CAUSE
Stalefuel
Cloggedfuel filter
Dirtinfueltank oroutof fuel
Carburetoroutofadjustment
Fouledsparkplug
Dirty air filter
Plugged air filter
Debris interfering with blade
Loose blade
Defec_ve V-belt
Defective quill beadngs
Damage or worn blade
CORRECTION
Drainfuel tank. Fillwithfresh
fuel.
Replacefuelfilter
Cleanfuel tank.
Takeunitto a Sears Service
Center.
Cleanandset sparkplug
gap.
Replaceairfilter.
Replaceairfilter.
Clean debris from blade.
"nghtenbladenut.
ReplaceV-bait.
Replacethe quillassembly.
Reversethe bladeor replace
the blade.
Excessive vibration
F-O01106M 22
Looseparts
Stopengineimmediately.
Tightenallfasteners.If
vibrationcontinues,takethe
unitto a Sears Service
Center.
 Loading...