

Craftsman 517798580 Owner’s Manual

SW S
25cc 2-cycle Engine
17" Swath Gasoline
WEEDWACKER ®
Model No.
517.798580
Operator's Manual
®
Consumer Helpline
Telephone Numbers
located on Page 32.
Caution;
Read and Follow all Safety
Rules and Instructions Before
Operating This Equipment.
Sears, Roebuck and Co., Hoffman Estates, IL 60179 U.S.A.
2/28/96 P/N 19816 Rev. 0

Tableof Contents.................................2
SafetyRules& SymbolDefinition ....2,3
Warranty..............................................3
Index ....................................................4
Assembly.............................................5
Operation..........................................6-8
Maintenance...................................9-10
Service& Adjustments.......................10
Storage..............................................10
Troubleshooting............................11-12
Parts..............................................14-19
Spanish.........................................20-3t
SYMBOL DEFINITION:
Indicates Warning,
A
@
O
Q o not install any type of
OPERATION
• Do not allow children or untrained
individuals to use this unit.
• Use this trimmer for cutting weeds and
grass only. Do not use for any other
purpose.
• Never start or run the engine inside a
closed area; breathing exhaust fumes
can kill.
° Clear the work area before each use.
Remove all objects such as rocks,
broken glass, nails, wire, or string
which can be thrown or become
entangled in the stringhead.
° Product users on United States
forest service land, and In some
states, must comply with fire
prevention regulations.
Danger, and Caution
Read all Safety, Operating
and Maintenance
Instructions.
Wear eye and hearing
protection when operating
this equipment.
Keep all bystanders at
least 50 feet (15m)
away.
Danger
of Ricochet
blade on this unit
This product is equipped with a
spark arrestor; however, other user
requirements may apply. Check with
your Federal, State, or local authori-
ties.
° Follow these instructions to reduce
the risk of injury:
° Wear full eye and hearing protec-
tion while operating this trimmer.
° Wear heavy long pants, shoes, and
gloves.
. Keep all bystanders, children, and
pets at least 50 feet (15m) away.
, Do not wear loose clothing, or
jewelry.
° Secure long hair so it is above the
shoulder.
° Do not operate this trimmer when
you are tired, ill, or under the
influence of alcohol, drugs, or
medication.
° Do not operate in poor lighting.
° Keep firm footing and balance. Do
not overreach.
° Keep all parts of your body away
from the stringhead and hot sur-
faces. Keep stringhead below waist
level.
• Always stop engine and remove
spark plug wire before making any
adjustments or repairs except
carburetor adjustments.
MAINTENANCE
o Use only Manufacturer's replacement
parts. Failure to do so may cause poor
performance and possible injury, and
may void your warranty.
• Inspect unit before each use for loose
fasteners, fuel leaks, etc. Replace
damaged pads. Replace stringhead if
cracked, chipped, or damaged in any
way. Be sure the stringhead is
properly installed and securely
fastened. Failure to do so can cause
serious injury.
2
• Make sure all deflectors and handles
are properly and securely attached.
° Use only monofilament string in the
cutting head. Do not use any other
cutting attachment.
• The stringhead will spin during
carburetor adjustments. Wear
protective equipment and observe all
safety instructions.
• Before storing, allow the engine to
cool.
• Empty the fuel tank and restrain the
trimmer from moving before transport-
ing in a vehicle.
REFUELING (DO NOT SMOKE!)
• Mix and store fuel in a container
approved for gasoline.
° Mix fuel outdoors where there are no
sparks or flames.
• Select bare ground, stop engine and
allow to cool before refueling.
• Loosen fuel cap slowly to release
pressure and to keep fuel from
escaping around the cap.
_, Wipe spilled fuel from the unit, Move
10 feet (3m) away from refueling site
before starting engine.
WARNING
The engine exhaust from this
product contains chemicals
known to the State of California
to cause cancer, birth defects
or other reproductive harm.
CALIFORNIA PROPOSITION 65
FULL ONE-YEAR WARRANTY ON CRAFTSMAN ® WEEDWACKER ®
LINE TRIMMER
For one (1) year from date of purchase, when this Craftsman Gas Powered
WeedwackeP Line Trimmer is maintained, lubricated, and tuned up according to
the operating and maintenance instructions in the Operator's Manual, Sears will
repair, free of charge, any defect in materials or workmanship.
This warranty excludes nylon line, spark plug, spool retainer, and air filter, which
are expendable parts and become worn during normal use.
If this WeedwackeP Line Trimmer is used for commercial purposes, this warranty
applies for only 90 days from date of purchase. If this WeedwackeP Line
Trimmer is used for rental purposes, this warranty applies for only 30 days from
the date of purchase. This warranty applies only while this product is in use in the
United States.
WARRANTY SERVICE AVAILABLE BY RETURNING THE WEEDWACKER ®
TO THE NEAREST SEARS SERVICE CENTER IN THE UNITED STATES.
This warranty gives you specific legal rights, and you may also have other rights
which vary from state to state.
Sears, Roebuck and Co., 1:)/817 WA, Hoffman Estates, IL 60179
A
Adjustments:
Carburetor ................................. 11,12
Air Filter:
Cleaning ......................................... 10
B
Before Starting Engine ........................ 7
C
Carton contents ................................... 5
Controls:
Choke Lever ..................................... 8
Primer Bulb ...................................... 8
Throttle Trigger ................................. 8
Stop Button ...................................... 8
Customer Responsibilities:
Air Filter .......................................... 10
Carburetor Adjustment .............. 11,12
Fuel Cap Filter ................................ 10
Spark Plug ...................................... 10
Stringhead ..................................... 8,9
E
Engine:
Before Starting Engine ..................... 7
Fuel .................................................. 7
Starting and Stopping ...................... 8
Storage ........................................... 10
F
Filter, Air ............................................. 10
Filter, Fuel Cap .................................. 10
Fuel ...................................................... 7
G
Grass Deflector .................................... 5
H
Handle .................................................. 5
I
Index .................................................... 4
M
Maintenance Schedule ........................ 8
O
Oil:
Type ..... See Fuel .............................. 7
Operation:
Before Starting Engine ..................... 7
Starting ............................................. 8
Stopping ........................................... 8
P
Product Specifications ......................... 4
R
Repair Parts .................................. 14-19
S
Safety Rules ..................................... 2,3
Spark Plug ......................................... 10
Starting ................................................. 8
Stopping ............................................... 8
Storage .............................................. 10
Stringhead:
Advance ........................................ 8,9
Installation ..................................... 8,9
Symbol Definitions ............................... 2
T
Table of Contents ................................. 2
Troubleshooting ............................ 11,12
W
Warranly .............................................. 3
MODEL
NUMBER 517.798580
SERIAL
NUMBER
DATE OF
PURCHASE
The model and serial numbers will be
found on a decal attached to the back
side of the crankcase cover.
You should record both serial number
=and date of purchase and keep in a
safe place for future reference.
4
PRODUCT SPECI FICATIO N S
Weight 9.5 Ibs.
Displacement 25cc
Fuel Capacity 23 oz.
Gasoline/Oil Mix
Spark Plug Champion
(Gap .025") DJ7Y
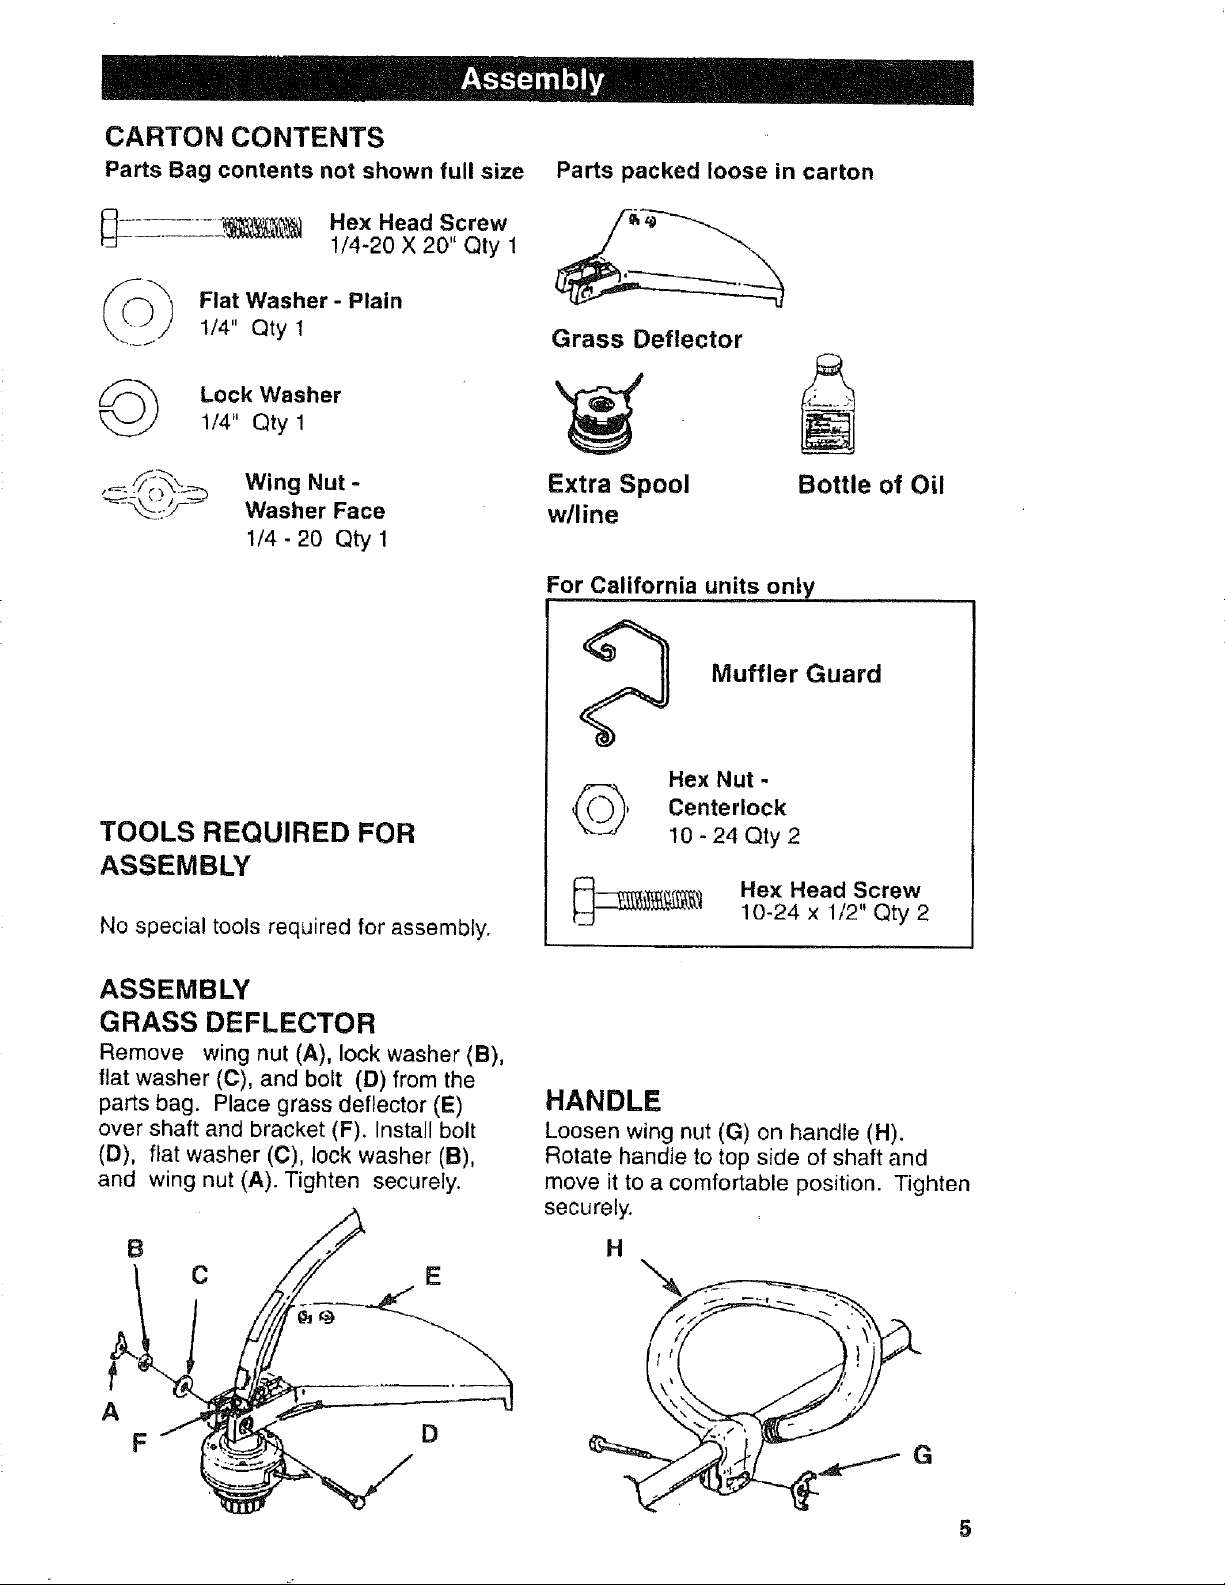
CARTON CONTENTS
Parts Bag contents not shown full size Parts packed loose in carton
_: ........ _ Hex Heal0, Screw
Flat Washer - Plain
1/4" Qty 1
(_) Lock Washer _'/ _
1/4" Qty 1
1/4-20 X Qty 1
Grass Deflector
,-../_-_ Wing Nut Extra Spool Bottle of Oil
"_-_-._-_ Washer Face w/line
1/4- 20 Qty 1
For California units only
Muffler Guard
Hex Nut -
Centerlock
TOOLS REQUIRED FOR
10 - 24 Qty 2
ASSEMBLY
Hex Head Screw
10-24 x 1/2" Qty 2
No special tools required for assembly.
ASSEMBLY
GRASS DEFLECTOR
Remove wing nut (A), lock washer (B),
flat washer (C), and bolt (D) from the
parts bag. Place grass deflector (E)
over shaft and bracket (F). install bolt
(D), flat washer (C), lock washer (B),
and wing nut (A). Tighten securely.
f
A
HANDLE
Loosen wing nut (G) on handte (H).
Rotate handJe to top side of shaft and
move it to a comfortable position. Tighten
securely.
H

KNOW YOUR STRING TRIMMER
READ THIS OWNER'S MANUALAND SAFETY RULES BEFORE OPERATING
YOUR TRIMMER. Compare the illustrations with your Trimmer to familiarize yourself
with the location of various controls and adjustments. Save this manual for future
reference.
4
3
5
2
6
7
1. Throttle trigger
2. Fuel cap
3. Muffler
4, Air filter
5. Choke
6. Engine housing
7. Grip
8, Front handle
9. Drive shaft housing
10 Stringhead
11, Deflector
10
11
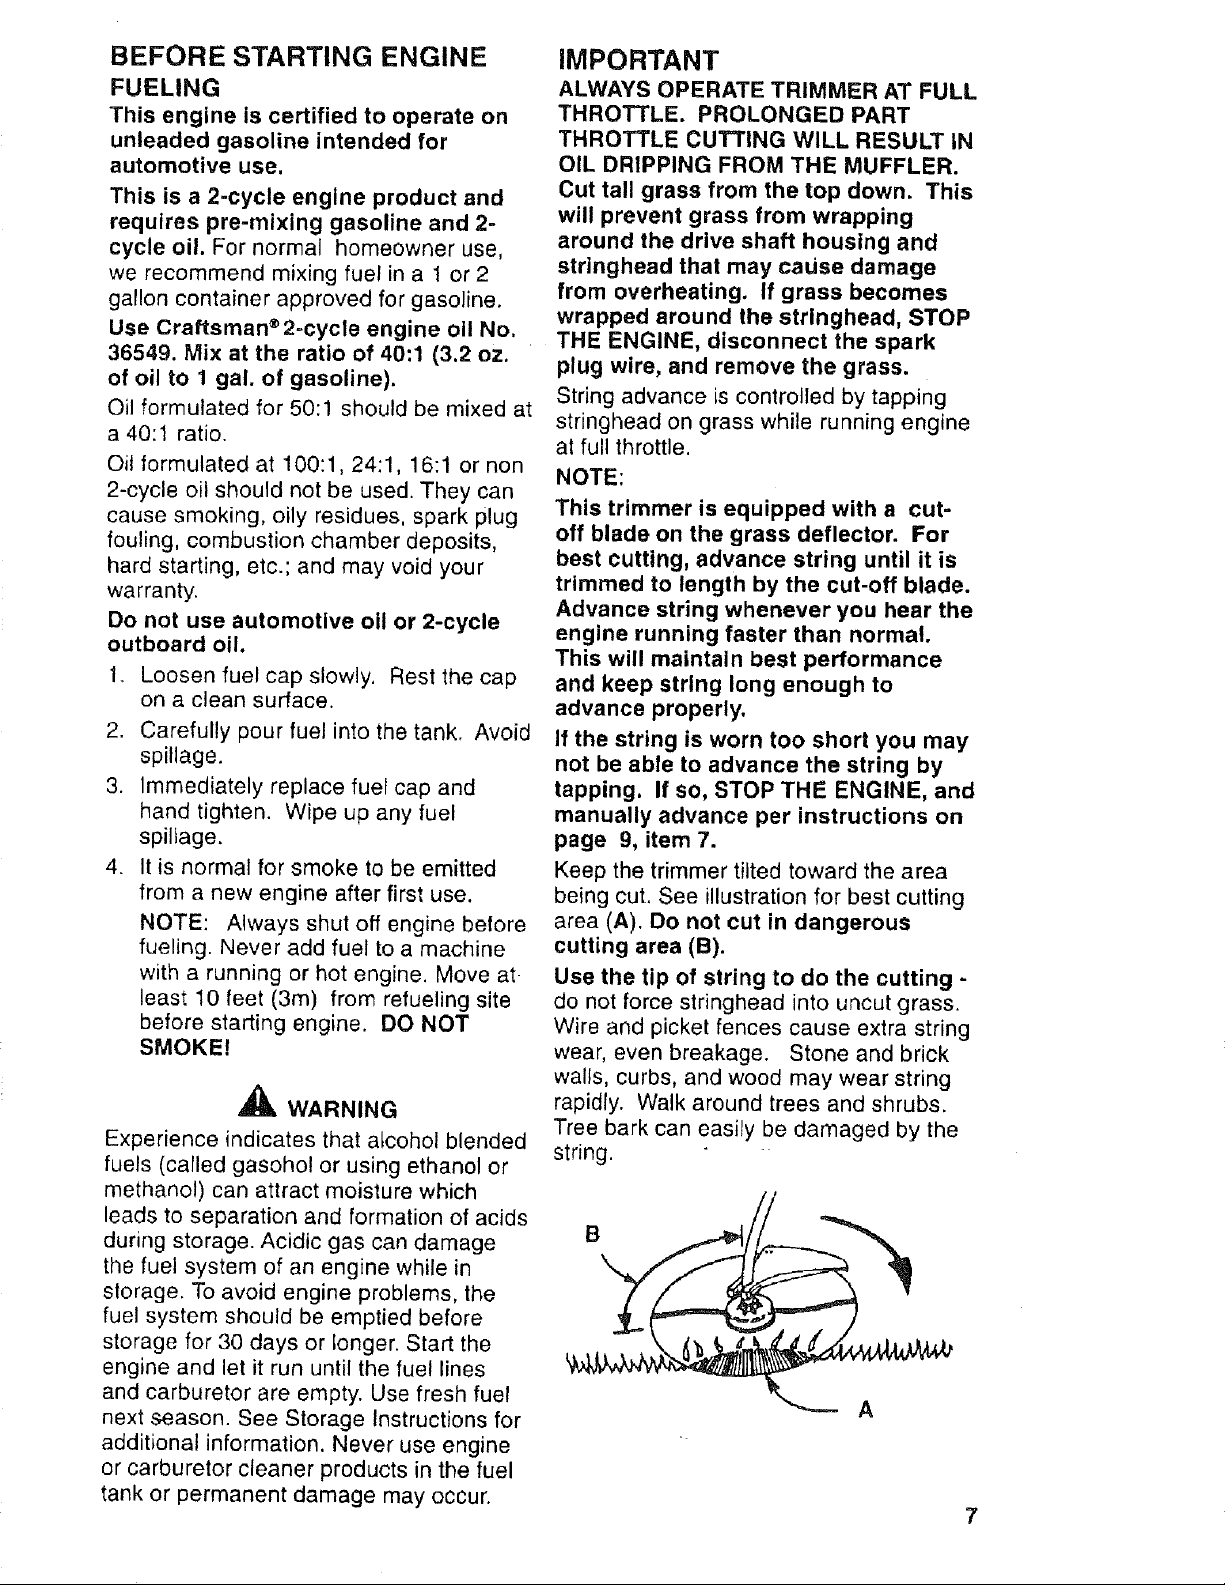
BEFORE STARTING ENGINE
FUELING
This engine is certified to operate on
unleaded gasoline intended for
automotive use.
This is a 2-cycle engine product and
requires pre-mixing gasoline and 2-
cycle oil. For normal homeowner use,
we recommend mixing fuel in a 1 or 2
gallon container approved for gasoline.
Use Craftsman®2=cycle engine oll No.
36549. Mix at the ratio of 40:1 (3.2 oz.
of oil to 1 gal. of gasoline).
Oil formulated for 50:1 should be mixed at
a 40:1 ratio.
Oil formulated at 100:1,24:1, 16:1 or non
2-cycle oil should not be used. They can
cause smoking, oily residues, spark plug
fouling, combustion chamber deposits,
hard starting, etc.; and may void your
warranty.
Do not use automotive oil or 2-cycle
outboard oil.
1. Loosen fuel cap slowly. Rest the cap
on a clean surface.
2. Carefully pour fuel into the tank. Avoid
spillage.
3. Immediately replace fuel cap and
hand tighten. Wipe up any fuel
spillage.
4. It is normal for smoke to be emitted
from a new engine after first use.
NOTE: Always shut off engine before
fueling. Never add fuel to a machine
with a running or hot engine. Move at
least 10 feet (3m) from refueling site
before starting engine. DO NOT
SMOKE!
_, WARNING
Experience indicates that atcohol blended
fuels (called gasohol or using ethanol or
methanol) can attract moisture which
leads to separation and formation of acids
during storage. Acidic gas can damage
the fuel system of an engine while in
storage. To avoid engine problems, the
fuel system should be emptied before
storage for 30 days or longer. Start the
engine and let it run until the fuel lines
and carburetor are empty. Use fresh fuel
next season. See Storage instructions for
additional information. Never use engine
or carburetor cleaner products in the fuel
tank or permanent damage may occur.
IMPORTANT
ALWAYS OPERATE TRIMMER AT FULL
THROTTLE. PROLONGED PART
THROTTLE CUTTING WILL RESULT IN
OIL DRIPPING FROM THE MUFFLER.
Cut tall grass from the top down. This
will prevent grass from wrapping
around the drive shaft housing and
stringhead that may cause damage
from overheating. If grass becomes
wrapped around the stringhead, STOP
THE ENGINE, disconnect the spark
plug wire, and remove the grass.
String advance is controlled by tapping
stringhead on grass while running engine
at full throttle.
NOTE:
This trimmer is equipped with a cut-
off blade on the grass deflector. For
best cutting, advance string until it is
trimmed to length by the cut-off blade.
Advance string whenever you hear the
engine running faster than normal.
This will maintain best performance
and keep string long enough to
advance properly,
If the string is worn too short you may
not be able to advance the string by
tapping, If so, STOP THE ENGINE, and
manually advance per instructions on
page 9, item 7.
Keep the trimmer tilted toward the area
being cut. See illustration for best cutting
area (A). Do not cut in dangerous
cutting area (B).
Use the tip of string to do the cutting -
do not force stringhead into uncut grass.
Wire and picket fences cause extra string
wear, even breakage. Stone and brick
walls, curbs, and wood may wear string
rapidly. Walk around trees and shrubs.
Tree bark can easily be damaged by the
string.
B
A
7
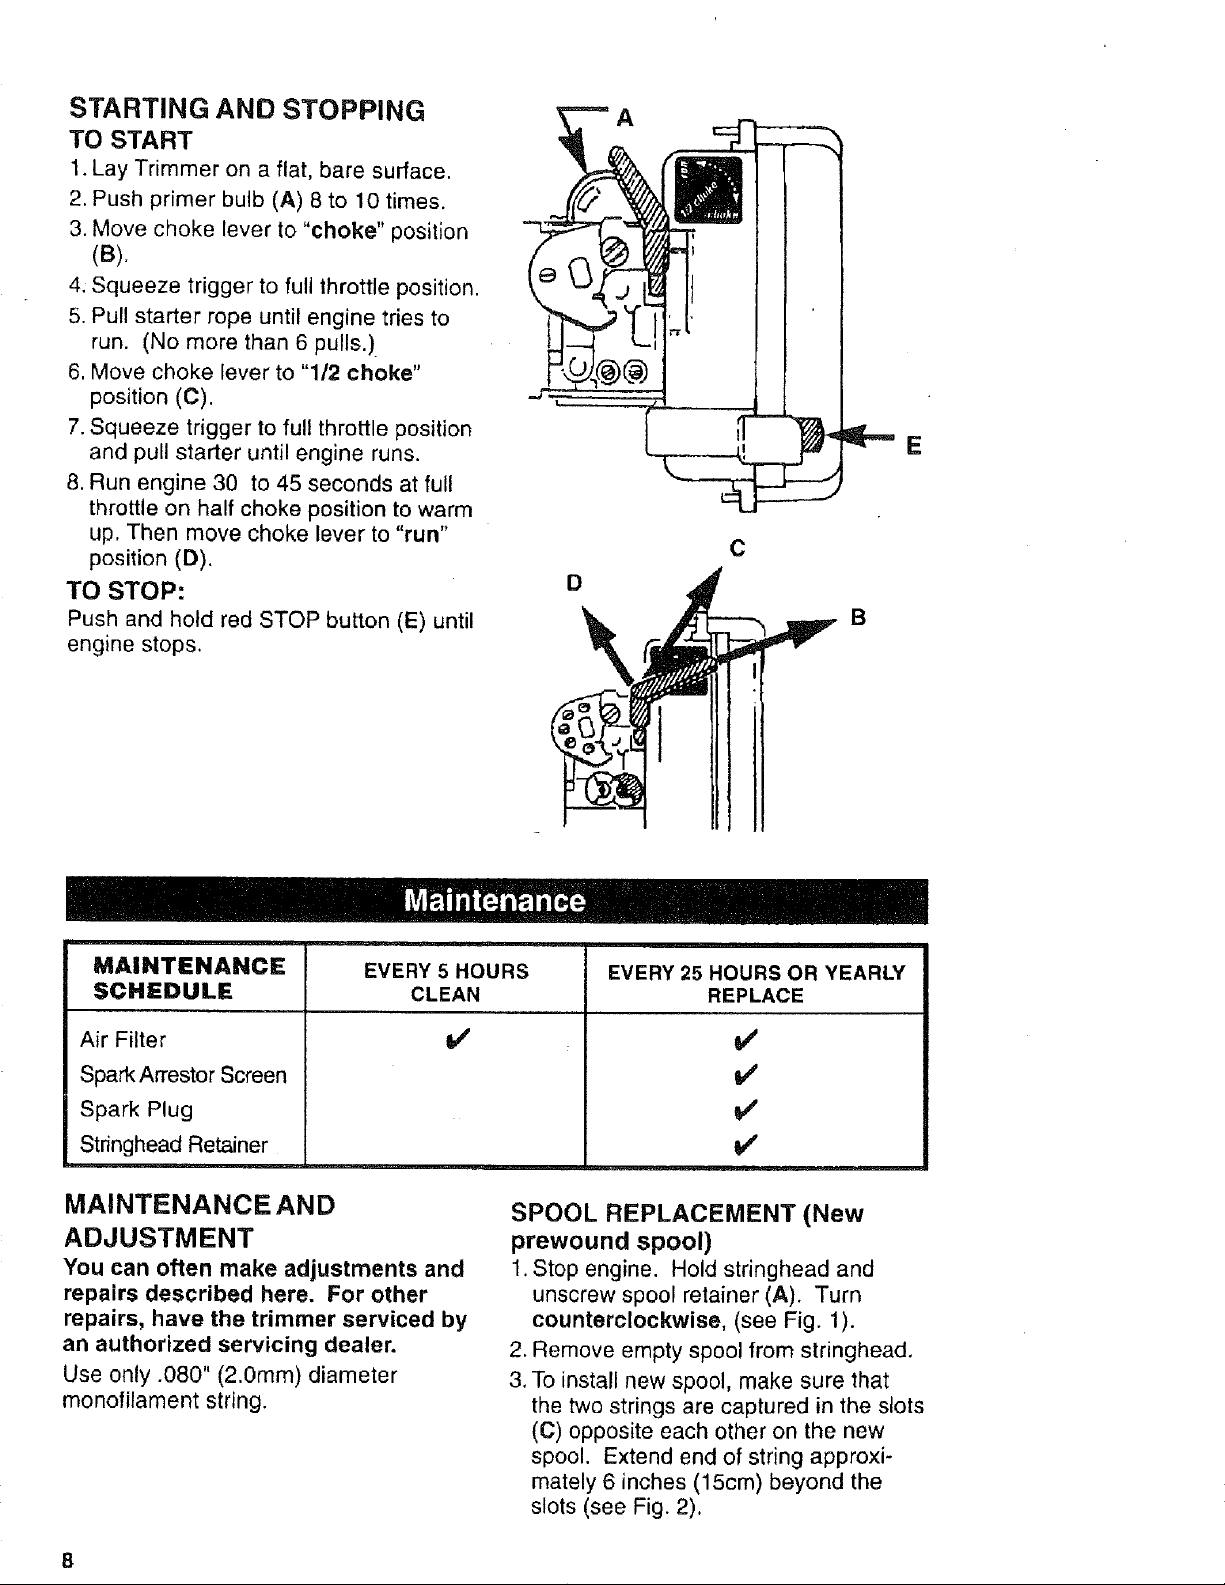
STARTING AND STOPPING
TO START
1. Lay Trimmer on a flat, bare surface.
2. Push primer bulb (A) 8 to 10 times.
3. Move choke lever to "choke" position
(B).
4. Squeeze trigger to full throttle position.
5. Pull starter rope until engine tries to
run. (No more than 6 pulls.)
6, Move choke lever to "1/2 choke"
position (C).
7. Squeeze trigger to full throttle position
and pull starter until engine runs.
8, Run engine 30 to 45 seconds at full
throttle on half choke position to warm
up, Then move choke lever to "run"
position (D).
TO STOP:
Push and hold red STOP button (E) until
engine stops.
A
E
C
D
B
MAINTENANCE
SCHEDULE
EVERY 5 HOURS
CLEAN
Air Filter
Spark Arrestor Screen
Spark Plug
Stringhead Retainer
MAINTENANCE AND
ADJUSTMENT
You can often make adjustments and
repairs described here. For other
repairs, have the trimmer serviced by
an authorized servicing dealer.
Use only .080" (2.0ram) diameter
monofilament string.
v'
EVERY25 HOURS OR YEARLY
REPLACE
is'
v'
v'
v'
SPOOL REPLACEMENT (New
prewound spool)
1.Stop engine. Hold stringhead and
unscrew spool retainer (A). Turn
counterclockwise, (see Fig. 1).
2. Remove empty spool from stringhead.
3. To install new spool, make sure that
the two strings are captured in the stots
(C) opposite each other on the new
spool. Extend end of string approxi-
mately 6 inches (15cm) beyond the
slots (see Fig. 2),
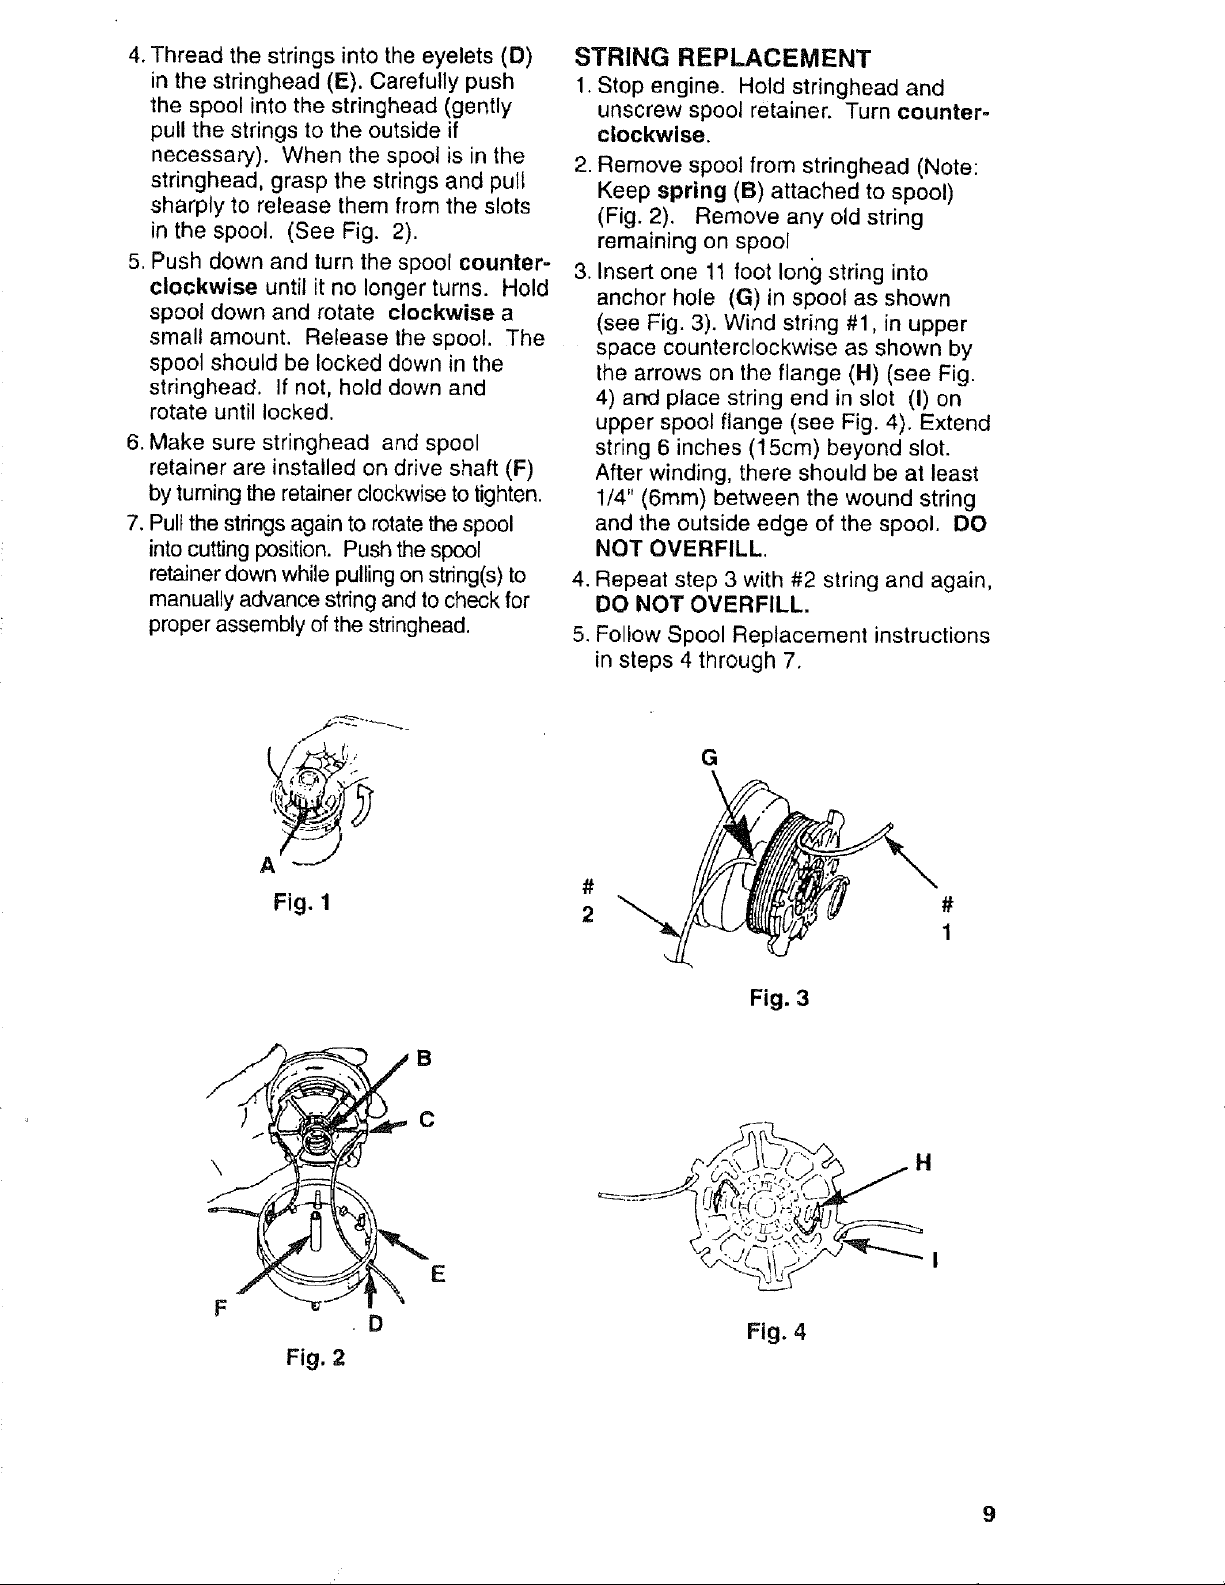
4. Thread the strings into the eyelets (D)
in the stringhead (E). Carefully push
the spool into the stringhead (gently
pull the strings to the outside if
necessary). When the spool is in the
stringhead, grasp the strings and putt
sharply to release them from the slots
in the spool. (See Fig. 2).
5. Push down and turn the spool counter-
clockwise until it no longer turns. Hold
spool down and rotate clockwise a
small amount. Release the spool. The
spool should be locked down in the
stringhead. If not, hold down and
rotate until locked.
6. Make sure stringhead and spool
retainer are installed on drive shaft (F)
by turning the retainer clockwise to tighten.
7. Pull the strings again to rotate the spool
into cutting position. Push the spool
retainer down while pulling on string(s) to
manually advance string and to check for
proper assembly of the stringhead.
STRING REPLACEMENT
1. Stop engine. Hold stringhead and
unscrew spool retainer. Turn counter-
clockwise.
2. Remove spool from stringhead (Note:
Keep spring (B) attached to spool)
(Fig. 2). Remove any old string
remaining on spool
3. Insert one 11 foot long string into
anchor hole (G) in spool as shown
(see Fig. 3). Wind string #1, in upper
space counterclockwise as shown by
the arrows on the flange (H) (see Fig.
4) and place string end in slot (I) on
upper spool flange (see Fig. 4). Extend
string 6 inches (15cm) beyond slot.
After winding, there should be at least
1/4" (6ram) between the wound string
and the outside edge of the spool. DO
NOT OVERFILL.
4. Repeat step 3 with #2 string and again,
DO NOT OVERFILL.
5. Follow Spool Replacement instructions
in steps 4 through 7.
\
F
A "--t"
Fig. 1
Fig. 2
G
\
#
2
Fig. 3
B
C
E
Fig. 4
#
1
FUEL CAP FILTER
WARNING
A leaking fuel cap is a fire hazard and
must be replaced immediately.
The fuel cap contains a non-serviceable
filter and a check valve. A clogged fuel
filter'will cause poor engine performance.
If performance improves when the fuel
cap is loosened, check valve may be
faulty or filter clogged. Replace fuel cap
if required.
SPARK PLUG
This engine uses a Champion DJ-7Y
with .025" (0,63mm) electrode gap.
an exact replacement and replace
annually.
Use
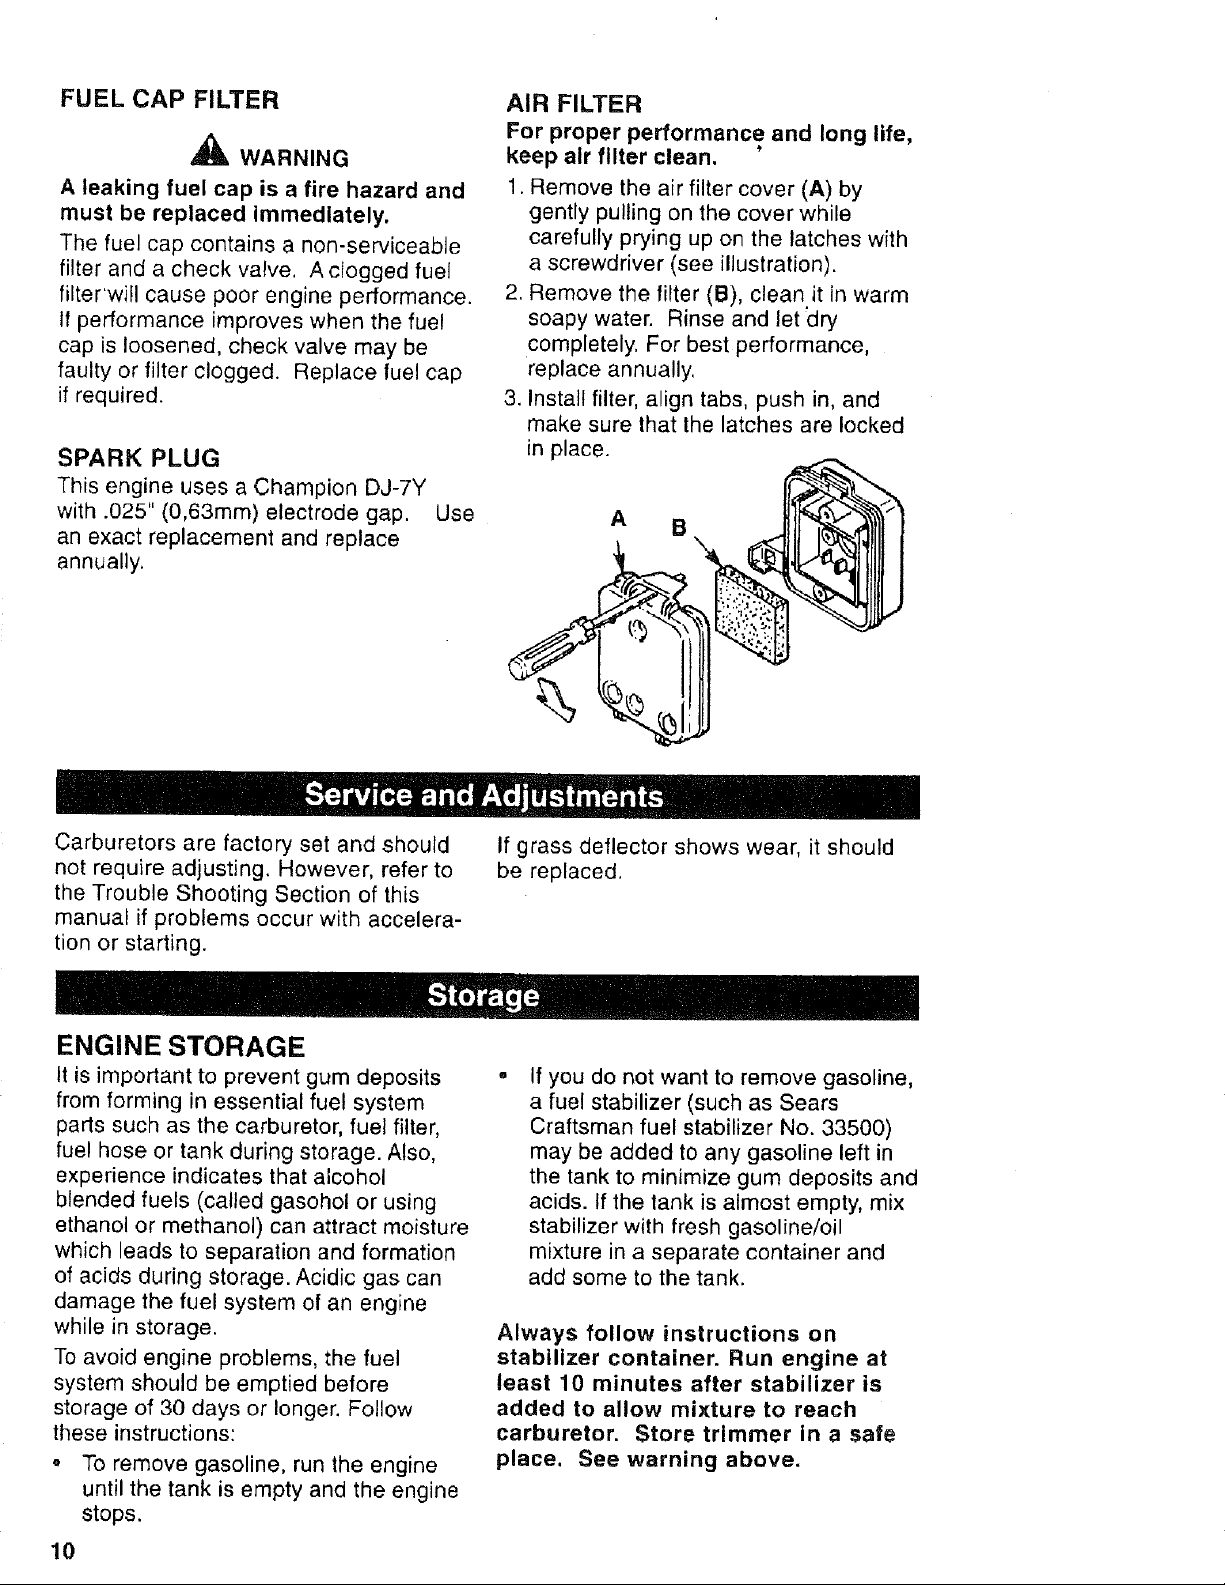
AIR FILTER
For proper performance and long life,
keep air filter clean. '
1. Remove the air filter cover (A) by
gently pulling on the cover while
carefully prying up on the latches with
a screwdriver (see illustration).
2. Remove the filter (B), clean it in warm
soapy water. Rinse and let 'dry
completely. For best performance,
replace annually.
3. Install filter, align tabs, push in, and
make sure that the latches are locked
in place.
A B
Carburetors are factory set and should
not require adjusting. However, refer to
the Trouble Shooting Section of this
manual if problems occur with accelera-
tion or starting.
ENGINE STORAGE
It _simportant to prevent gum deposits
from forming in essential fuel system
parts such as the carburetor, fuel filter,
fuel hose or tank during storage. Also,
experience indicates that alcohol
blended fuels (called gasohol or using
ethanol or methanol) can attract moisture
which leads to separation and formation
of acids during storage. Acidic gas can
damage the fuel system of an engine
while in storage.
To avoid engine problems, the fuel
system should be emptied before
storage of 30 days or longer. Follow
these instructions:
To remove gasoline, run the engine
until the tank is empty and the engine
stops.
If grass deflector shows wear, it should
be replaced.
If you do not want to remove gasoline,
a fuel stabilizer (such as Sears
Craftsman fuel stabilizer No. 33500)
may be added to any gasoline left in
the tank to minimize gum deposits and
acids. If the lank is almost empty, mix
stabilizer with fresh gasoline/oil
mixture in a separate container and
add some to the tank.
Always follow instructions on
stabilizer container. Run engine at
least 10 minutes after stabilizer is
added to allow mixture to reach
carburetor. Store trimmer in a safe
place. See warning above.
10
 Loading...