

I
1 6+16!i i iii I
L4{HOf I ,%:,_." = _,
i Is_@ _T! !iI'3'=_= ¢-_A"= "
=__,_.e li.,%i°.=llo,,l _IIs_ If,
JA993695
C IsslOllSel
£_v ell tge
CAUTION: ALWAYS DISCChh.,'N ECT SPARK PLUG WiRE AND PLACE WIRE \,VHERE IT CANNOT
CONTACT SPARK PLUG TO PREVENT ACCIDENTAL STARTING WHEN SE17"ING-UP,
TRANSPORTING, ADJUSTIh_G OR MAKllqG REPAIRS TO YOUR MOWER.
FEDERAL REGULATIONS REQUIRE OPERATOR PRESENCE BLADE STOP CONTROLS TO MINIMIZE THE RISK
OF CONTACT !N JURY. YOUR MOWER IS EQUIPPED W1TH SUCH COkTROLS, DO NOT ATTEMPT TO DEFEAT
THE FUNCTION OF TH, E OPERATOR PRESENCE CON] ROL UNDER ANY CIRCUMSTANCES,
TRAININg:
e Read the owner's manual car@uliy. Became ta,,mitiar
with !he eonlrots and know how to Operate this mower
properly. Learn how to stop the mower quick%
e DO NOT allow childran Io use this mower. Never allow
adults to use the mower without p_oper instRictians.
e Keep the area of operalion clear of all persons, espe ÷
cially smait children end petS,
e Use the mower only as the man[ facturer intended and
as described in _}s manual.
e When not using your mower, slore it indoors in a do',
high or locked-up place - out of reach, of ehiidren.
DO NOT nperale mower if it bee been dropped or
damaged in any manner. Always have damage repaired
before using the mower, o
DO NOY use acce£soq.., atlachments not recommended
by the manufacturer- it may be hazardous.
e Use only product manufacturer's genuine replacement
paris Failure to do so may cause poor fit and possible
iniuo'
PAEPARAT!ON:
60biects struc¢ by the lawn mower s, I! be thrown ann
can cause severe iniuo_ _o pel-sdns. Atways check the
a_ea to ee mowed and cleariiof aHstones, sticks, wres,
bones, eta
_ Dress properly - Wear onJy solid shoes when mowing
Neve mow when barefoot or wearing open eandaJs
e Ah',ays wear safety glasses or eye shields when staRmg
and whi!e USir,g your lawn mower
e DO NOT til! gas tank when the engine is running
indoors or when engme is _ot. Allow 1he engine to coo
for several min,u_es before fi!iing Ue gas tank Cean off
any spilted gasoline before starling the engine.
Never make wt/ee height adjustrneuls while the engine
is fur n ng
e Mow only in day! ght or good adificial light.
e DO NOT operate mower in wet grass. Always be sure of
your fodung -keep a f rm ..... on the handies and walL-
hey'or run
OPERATION:
e DO 'IOT change ,_negovernor settings or overspeed the
eT_gir'e
_* DO NOT put hands or feel near or under rotat::ng parts
Keeocea ottned}sch_rgeopening at all tines.
¢ Stop the engine whey, ever you cave Abe ii]ower, mefo_e
crossing drives, ,*,,a!t s o_ reeds.
I _ ,,y .-¢.,- o..... s._-., T©__OC,., P_R THIS oV ,,_8,JL POlr,,rT
OU]- , .'_Oc"T_v_._, .,-,'rT,. S/kFFTY_ ........ _'
TIONS tT _,m"..__,-s,_'d_...,_ ATTENT!OtU u_.. B i:-_
L,L)'",,-_'_:ALEA-{ !! YOt.IR SAFE] "_ iS
t , OL,' L_,
_" DO IIOTcontinueto rut YOUr. mowerif you bil. a Ioreign
o,.-,l-_-_. Stop the _ngine. make ebsoiutety sure tee blade
and all moving paris have stopped, disconnect tP,e spark
plug vdre .from the spar_ plug lo preven_ aGoident_i
sta£ing, then inspect tee mower for damage and repair
before reata,qing and operating the mower
e if the mower should start te vibrate heavily, slop tee
eng he, check for the cause and repair. Remember,
heavy vibration is generally a sign ef trouble
e Stop the engine, wait _or blade and all moving parts to
stop, before cleani rig, unclogging chute, ren_oving grass
caLcher, repa_rng or inepecling ihe mower, Always
disconnect the spark piog wire and keepaway from plug
to prevent accidental starting.
e DO N©T run engine indoors - exhaust fumes are
dan,2ereus
6 Never cu_ grass s).'p'_lli_glhe mower towards you Mow
grass across the face o[ slopes, never up and down or
you cou!dioseyourfootin_ DO NOT mow excessively
steep sh',pes. Use caution when or)crating the mower on
unever: terrain or whe_ changing direction - mainta n
good footing
e Never aperafe _he mower without p_oper guards, pieces
or olher safety devices i-_ place.
OUSTOf_IERAESPONSIR4LITISS AND S'_ORAG6
¢ Check the blade and the engine mounting ba!ts often to
be sure they ae tightened sroper 7
Check atl bo)ts, nuts and screws at frequent intervais for
prooer _ightness to be sure mower is in safe working
condition.
e N_-ver s_ore mower with fuelinthe tank inside abuiidmg
where ignition sources are p_esent such as i_et water
hen,tar and space heeters, clothes dryers, and the !iRe
AI!os7 engine to cool before storing in any enclosure.
To reduce fro hazard, keep the engine _ree of grass,
leaves or excess va grease and oil,
if grass catcher is used with your mowe_, check it often
far deterioration end wear and repla, ce worn bags. Use
only rap adamant bags tha_ are recommended by and
comply wth specif ceticns of the n,,anufaclurer Oi your
mower
e )teen a sharp bade Or_ your morner
Tqe cuttinge_ges o!the mower b_ade are sharp and car"
tacerale (cut} skin lissue Care should be taken when
doing any repair work r:n or a,_'ound t',e mower blade. TO
p everH injury, _t_s recommended t_et gloves bewern or
the cutting edge be w_apped wit: newspaper or any
01her _u labia inatena_ when working on the blade.
l
1

COfdGRATULATIONS on your purchase of a Sea_s
Craftsman Lawn Mower. It has beeq designed, en-
.0 neered and manufactured to give you the best pos-
sib!e dependability and performance.
Should you experience any problem you cannot easily
remedy, please contact your nearest Sears Service
Center!Department. We r_ave competent, welt-trained
te;chnicians and the proper tools to service Or repair th is
unit.
Please read and retain this manual. The instructions will
enable you to assemble and ma:,ntain your mower
properly. Always observe the "SAFETY RULES",
A Sears Maintenance Agreerner_! is availabie or _,tIqs
product Contac yournearestSearssterefordelails.
e Read and observe thesafety rules,
e Fo!Iow a reguiar schedule in maintaining, caring
for and using your mower.
e Follow the instructions under"Customer Respon-
sibilities'" and "Storage" seclions of this Owner's
Manual.
MODEL
PRO©UC SPECI - u,£ IOHS
IiUMBER 517.372529
SERIAL
NUMBEFI
DATE OF
PURCHASE
THE MODEL AND SERIAL NUMBERS WiLL
BE FOUND ON A DECAL ATTACHED TO
THE REAR OFTHE MOWER DECK.
YOU SHOULD RECORD BOTH SERIAL
NUMBER AND DATE OF PURCHASE AND
KEEP IN A SAFE PLACE FOR FUTURE
REFERENCE.
For one year lrom the date of purchase, when this Craftsman Lawn Mower is maintained, lubricated and
_uned-up a,_cord ng to lhe instructions in the owner's manua!, Saars will repair, tree o, ch_.rge, ony detect in
matedM and workmanship.
Iflhis Craftsman Lawn Moweris used forcommercialor rental purposes, lhiswarrantyappliesforonly90 days
from the date of purchase.
HORSE POWER 4.0
DISPLAC, EM ENT: 171.9cc
FUEL TANK CAPACITY 48 oz. (!.42 liters)
OIL CAPACITY 20 oz. (.59 liter).___
SPARK PLUG (GAP 039 in): Champion
(.76ram) RJ-19LM
{o_ equivalent)
SOL!D STATE IGNiT ON
AIR GAP: .0125 m.
L32mml
BLADE BOLT TORQUE: 35-40fl Is,s.
(47 5-54.2Nrn)
This warranty does not cover:
Expendable iIems which become worn during norms.I use,-such as rotary mower blades, b_ade
adaptors, belts, air cleaners and spa_k plug
Repairs necessary because of operator abuse or negligence, including bent cranks "_afts and fine
lailureto maintain the equipmentaccordi g to the instructions contained in the owner's ma_lua!
WARRANTY SERVICE IS AVAILABLE BY RETURNING THE CRAFTSMAN POWER MOWER TO THE
NEAR EST SEARS SERVICE CEN FER/DEPARTMENT !i',._TIdE UNITED STATES. TH! S WARRANTY APPLIES
ONLY WHILE THIS PRODUCT/S _N USE IN THE UNITED STATES.
i his warranty gwes you specific legai Hgl]ts and you may also have other rigsts which vary from state to state.
_<Rt n,.,,o,._,,.,_,FniIOw,_,tSD r'_epa£ment DT31CR WSearsTowsr, Chcaqo Iii 80684
T/- ,tsLL OF CONTE TS
SAFETY RULES ............................... 2
PRODUCT SPECIFICATIONS ................... 3
CUS! O_'.tiER RESPONSIBILiTiES . . , 3,11,12,13,14,15
WAR£ANTy ................................. 3
TABLE ©P CONTENTS ........................ 4
I[,!@EX ....................................... 4
MOWER ACCeSSORiES ....................... 4
A8 SI.E_,_BL"¢ .................................. 5
OPERATtOht .......................... 6,7,8,9110
$E£VtCE AND ADJUB"t°ME_;IT . ............. 16;,17
STORAGE ................................. I8
SERVICE F_ECO L'_;M_ N OAT tO}_,8S ............... 1I
TROUBLE S F_,OOTU4G ........................ 19
REPAIR PARTS - _'_4OWER.................. 20-24
REPAIR PAR"¢8 o ENG[_2E .................. 25-27
PARTS ©RDER_F_G/S_RVICE ......... BACK PAGE
A
Accessories ..................... 4
Adjustments:
C8rburdtor .................. ! 7
Engine Speed ................. !7
Height of Cut .................. 8
Wheel Adiuster ................. 8
Air Pilter ....................... 14
Assembly:
Handie ........................ 5
B
Blade:
Replacement .................. 12
Sharpening ................... 13
Controls:
Operator P_'esence Control Bar ., .7
Customer Responsibilities ......... 3
Air Filter ...................... 14
Blade Care/Replacement ........ 12
Engine ....................... 14
Lu bric_:ion ................... 1S
Spark Ptu:8.................... 14
Gear Reducer ................. 13
Cut[b_g Heights .................. 8
E
Engh_.e:
©i} Change ................... 1£
Specifications ................. 3
Starting ....................... 8
Storage ...................... 18
F
Filter, Air ....................... 14
G
Gasoline:
Storage ...................... 18
Tank Capacity .................. 3
Tyr_.e.......................... 8
Gear Reducer ................... "i3
L
Lubrication:
Engine ....................... 15
Gear Reducer ................. 1:3
Wheels ....................... 14
M
Maintenance:
Agreement ..................... 3
Mowing Tips .................... 1[)
O
Oii:
Change ...................... 15
Storage ...................... 18
Type .......................... 8
Operating Mower ........... 7,8,9,10
Operato_ Presence Controt ......... ?
P
Prm_er .......................... ,B
R
Repair!Rep:acement Par(s ..... 20-27
Responsibilities. Customer ......... 3
S
Safety Rules ..................... 2
Sen, ice and Adjustments:
Blade ..................... t2,!3
C_rbure_or .................... 17
Cutting Heig.ht ................. 8
H_ndle Height .................. 5
Engine ....................... !7
Rear Trail Shield ............... t7
Gear Reducer ................. 13
Se_ic_ Recorr_mendations ........ 11
Spark Plug ..................... 14
Specifica_;ons .................... 3
Starting the r_ngi_e ............... 8
Stopping the Mower .............. 8
Slot&go ........................ 18
T
Table of ContenLs ................ 4
1 rouble Shooting Paints .......... 19
W
Warranty ........................ 3
Wheels:
Adjusting }-ieighi ................ 8
L_;bricatiOn ................... 14
These accessories were eva.i able when (qe mowe_ was pufc_ased. They ate also availsb!e at _os _,Sears retail outlets cBtatog 8r_d
seP,'ice centers. ]'/os_ SeB_s storms can order repair parts for yo,_, when yOLs ero,,,ide tRe _odel n_ tuber of your rno¢_l"
8PARK P_UG " "I
f'_" I
AIR FILTQR MUFFLER GAS C;_4
L ....
_.NGtN £ OIL
I_- t
I
t 9TABiLIZL:R
t
I
J
LEF_
SIDE
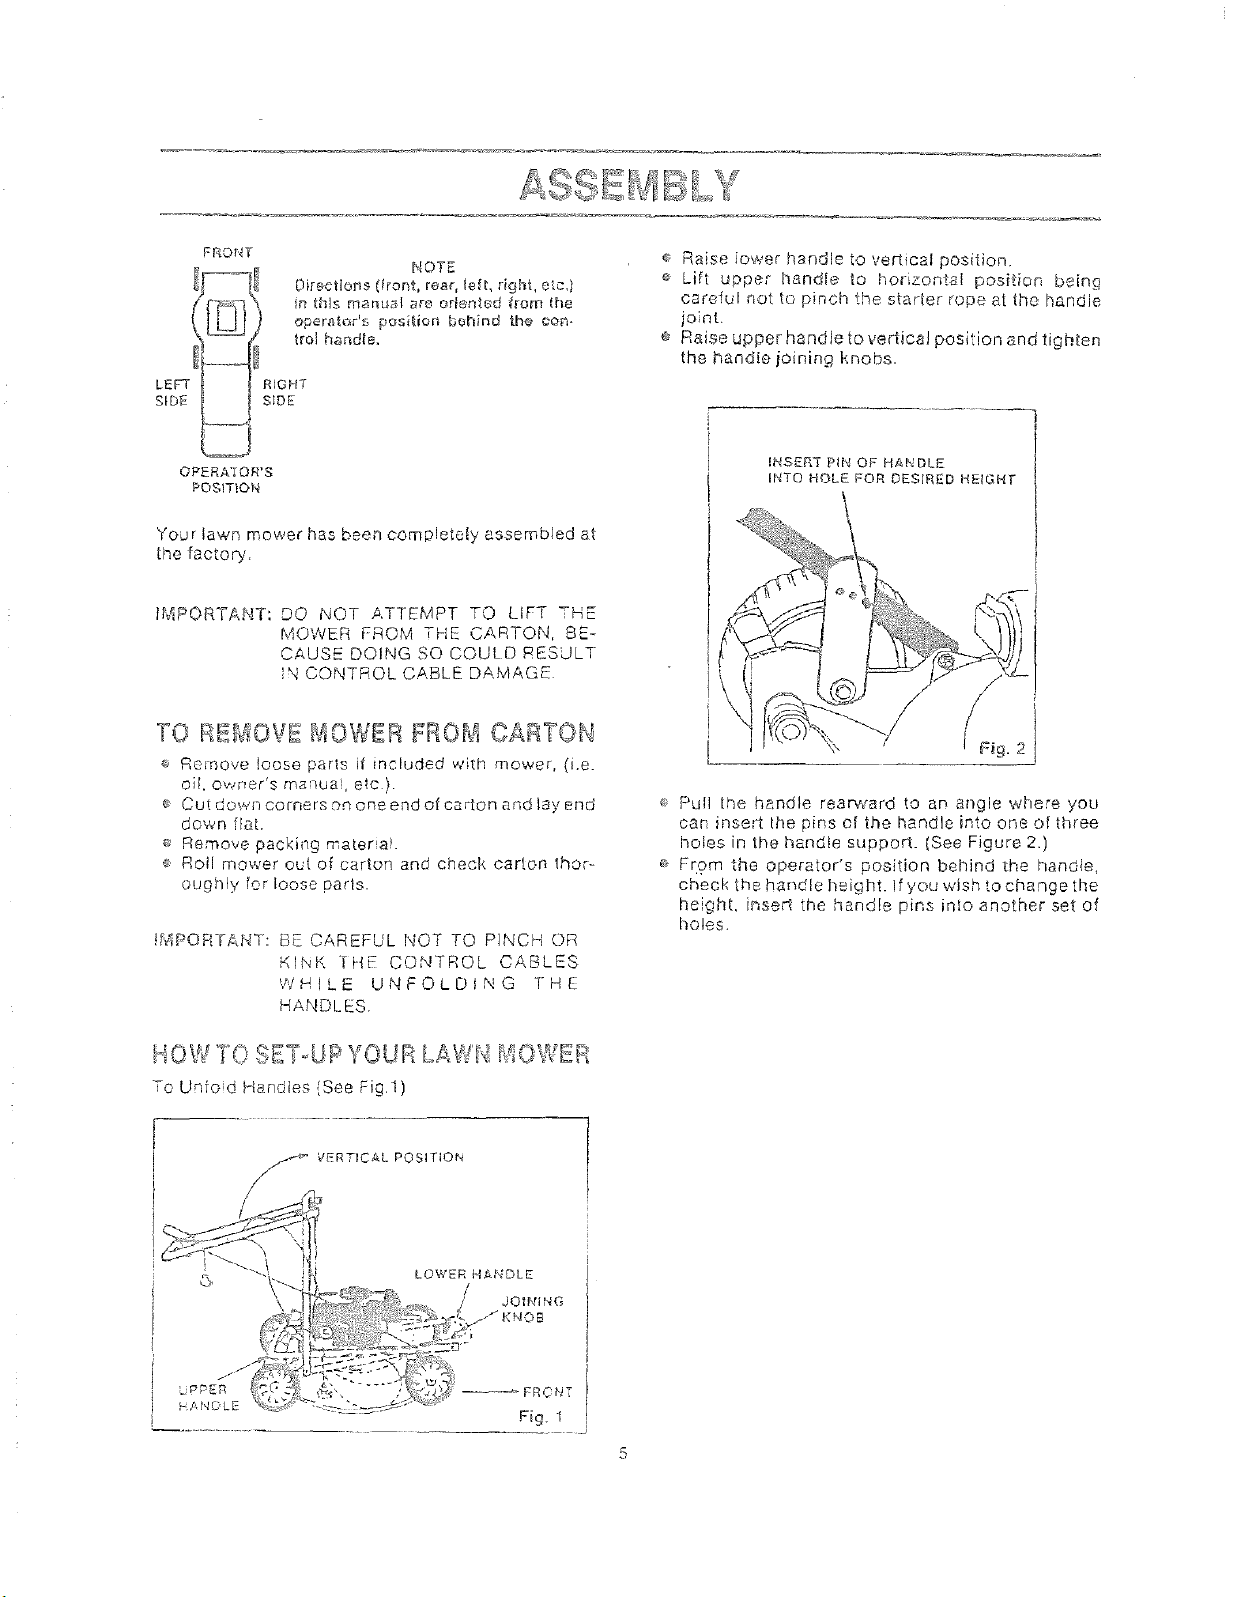
NOTE
Directions (Fron_, rear, le_t, right, etej
in tBIs manu_l are orbnt_d from _h_
operat_Ps position behind the com-
_rol handte.
RIGHT
SiDE
e Raise iower handle to vedical position.
¢ LiFt upper handle to horizontal position being
careful not to pinch the starlet rope at the handle
joint.
e Raise upper handle to vedical position and tighten
the isandle joining knobs.
O PE RA'I'O R'S
POSiTiON
Your lawn mower has been completely assembled at
the faotoo,.
iMPORTANT: DO NOT ATTEMPT TO LIFT THE
MOWER FROM THE CARTON, BE-
CAUSE DOING SO COULD RESULT
IN CONTROL CABLE DAMAGE
TO REB¢OVE _\40WER FROB_ CARTON
_, Remove loose paris if inchJded with mower, (i.e.
oil, owner's manual, e_o}.
e Cut down corrters on one end of carton and lay end
down flaL
Remove packing mater aL
¢ Roll mower out of carton and cheek carton lhor-
oughly for loose parts.
!MPORTANT: BE CAREFUL NOT TO PINCH OR
K!NK THE CONTROL CABLES
WHILE UNFOLDING ]HE
HANDLES.
!NSERE PIN OF HANDLE
INTO HOLE FOR DESIRED HEIGHT
\ / /
\,, I Fb. 2
Pull the handle rearward to an angle where you
can insed the pins of the handle into one of three
holes in the handle support. (See Figure 2.)
_o From the operator's position behind the handte,
check the handle height. If you wish to change the
heighL inset1 the handb pins inlo another set of
holes.
qOW TO SE _oUPYOUR _p,w_ i_/iO_AEh
To Unfod Handtes {See Fig1)
,_-{_ VERTICAL POSITION
........................ j
Fig. 1
5

Kh OW YOUi: , LAWN !'¢:OWBB
READ THES OWNER'S I_4ANUAL AND SAFETY RULES B£FORE OPERAT!NG YOUR ROTARY
F4OWER. ©ompare the il!ustrstions with your Rotary Mower to familiarize yourself with the
location of various controls arid adjustments. Save finis manual for future reference.
\
DECK
Fin s
Sears Rotar,i Waik-Beisind PO,i,tc:r v1ovv_rs conform to lh® safety slands_.'s o lhe American ' "_'_"'
institute, and t.he U.S. Consumer Product Saleb' Commission. _he btadc turns when the engine is running.
OPERATOR PRESENCE CONTROL SAR - m[;st 0e
held down ko the handle to sta'i and run the en ne
Release ',ostop the engne
RECOIL STARTER HANDLE used lot start ng _,he
engir, e
' * _ IXati__. d_ Standards
F R I_s,ER - pumps additional fuel from the carburetor
_o t',_ cylinr_'e for Llge '_ 'hr_,ff_ 8_:_r-i- no _: Co_d ei-'giJ_e.
DR',k,'E CONTROL LLVE-_, used tO el?gage forward
ruction cf £]ower,
BEFOREUSINGYOURLAWNMOWERREFERTOFHE"SAFETYRULES"ASaHO_TN_'.4 _ONPAGEO_OFTHIS
MANdffLALWAYSBECAREFUL.
•TheoperationetanyLawnMowercanresultinIoreignob.;ecsben,9thownriteheeyes,whieilcan
_esuttin_eve_eeyedamage.Alwaysweersafety9_Ess_soreyeahieJd8beforesl_rtingpowertool
operationorwhilepedorminganyadiuslmentsorrepairs.WerecommendWideVtsionSafelyMask
foroverspectaclesorstandardglasses_vahabLatSearsRetailorCatalogStores,
I IOWTO USEYOUR !:s OWER
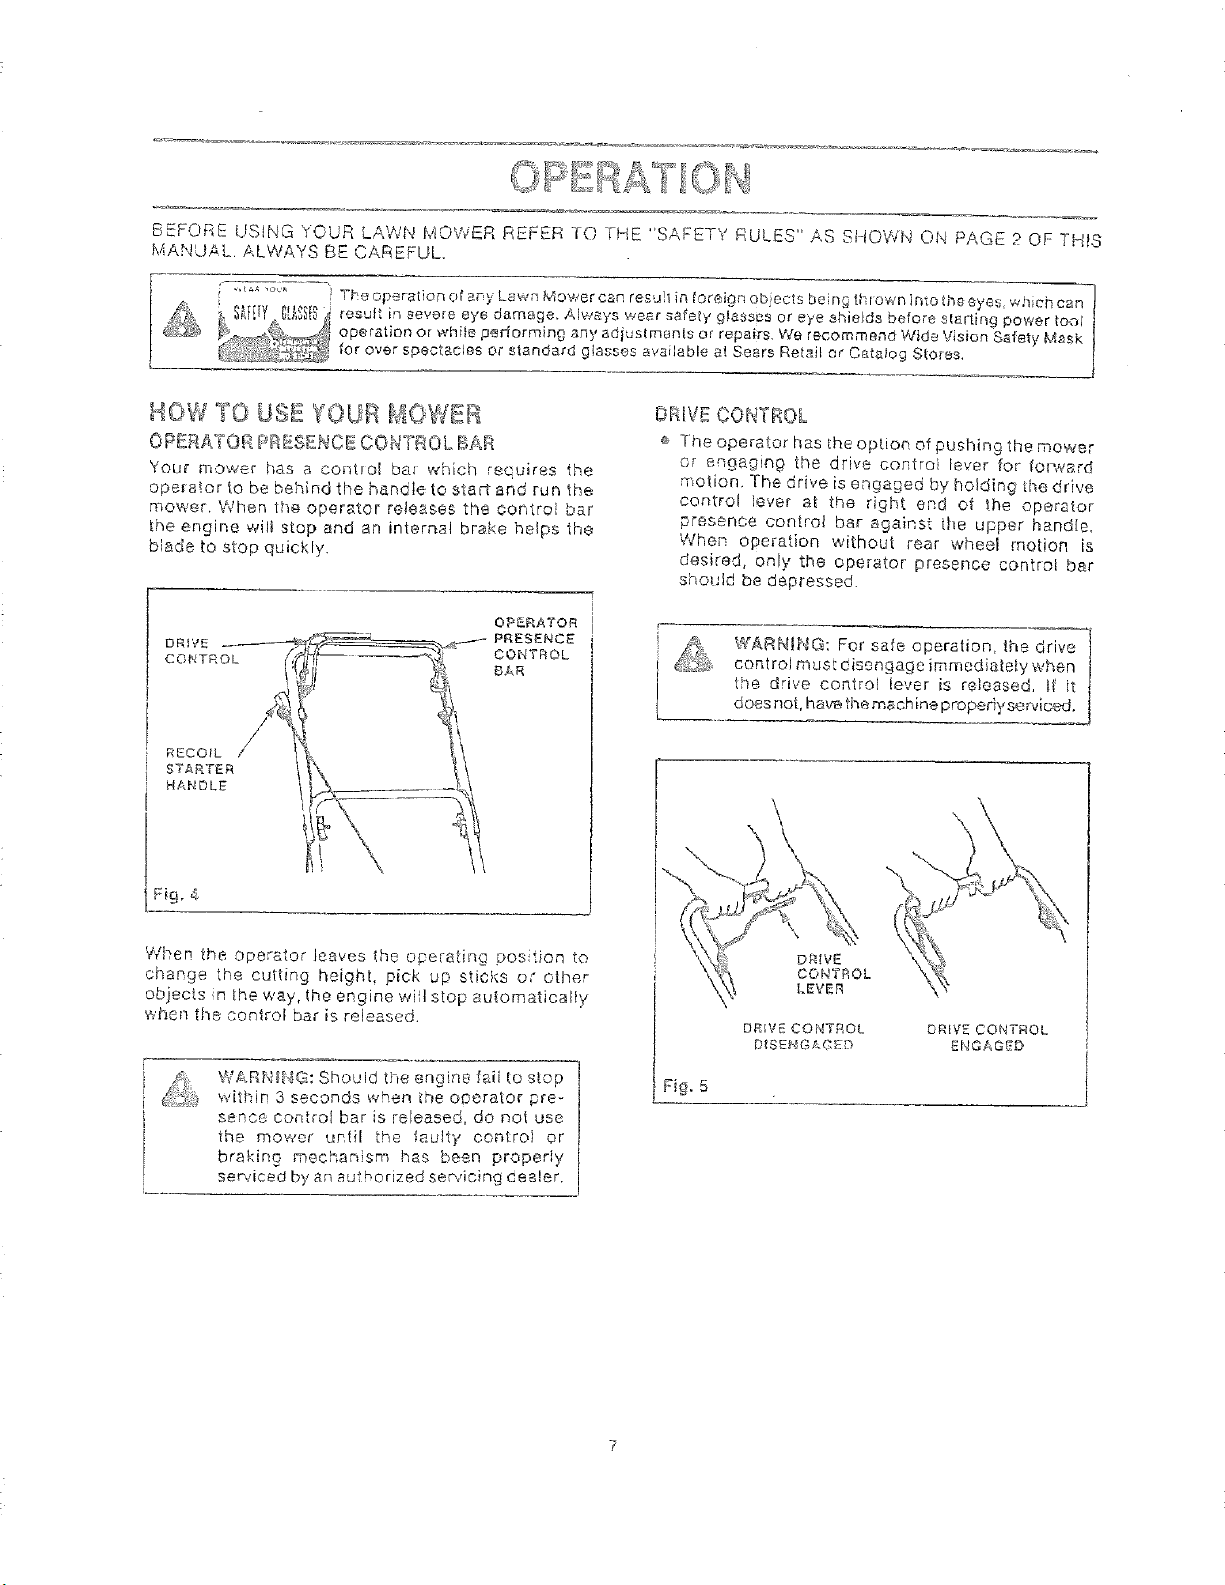
0 P_£RATOt_PR[£Sg})CECO_ITROL BAR
Your mower t;as a control ba_ which requires the
opera',or to be behind the handteto slart and run the
mower. When the operator rebases the control bar
the engine wilt stop and an internal brake helps the
blade to stop quickly.
When the operetor leaves the operating position to
change the cutting height, pick up sticks o," other
objects n_heway, lheenginewilstopaulomaticaHy
when tile eonlrol bar is released.
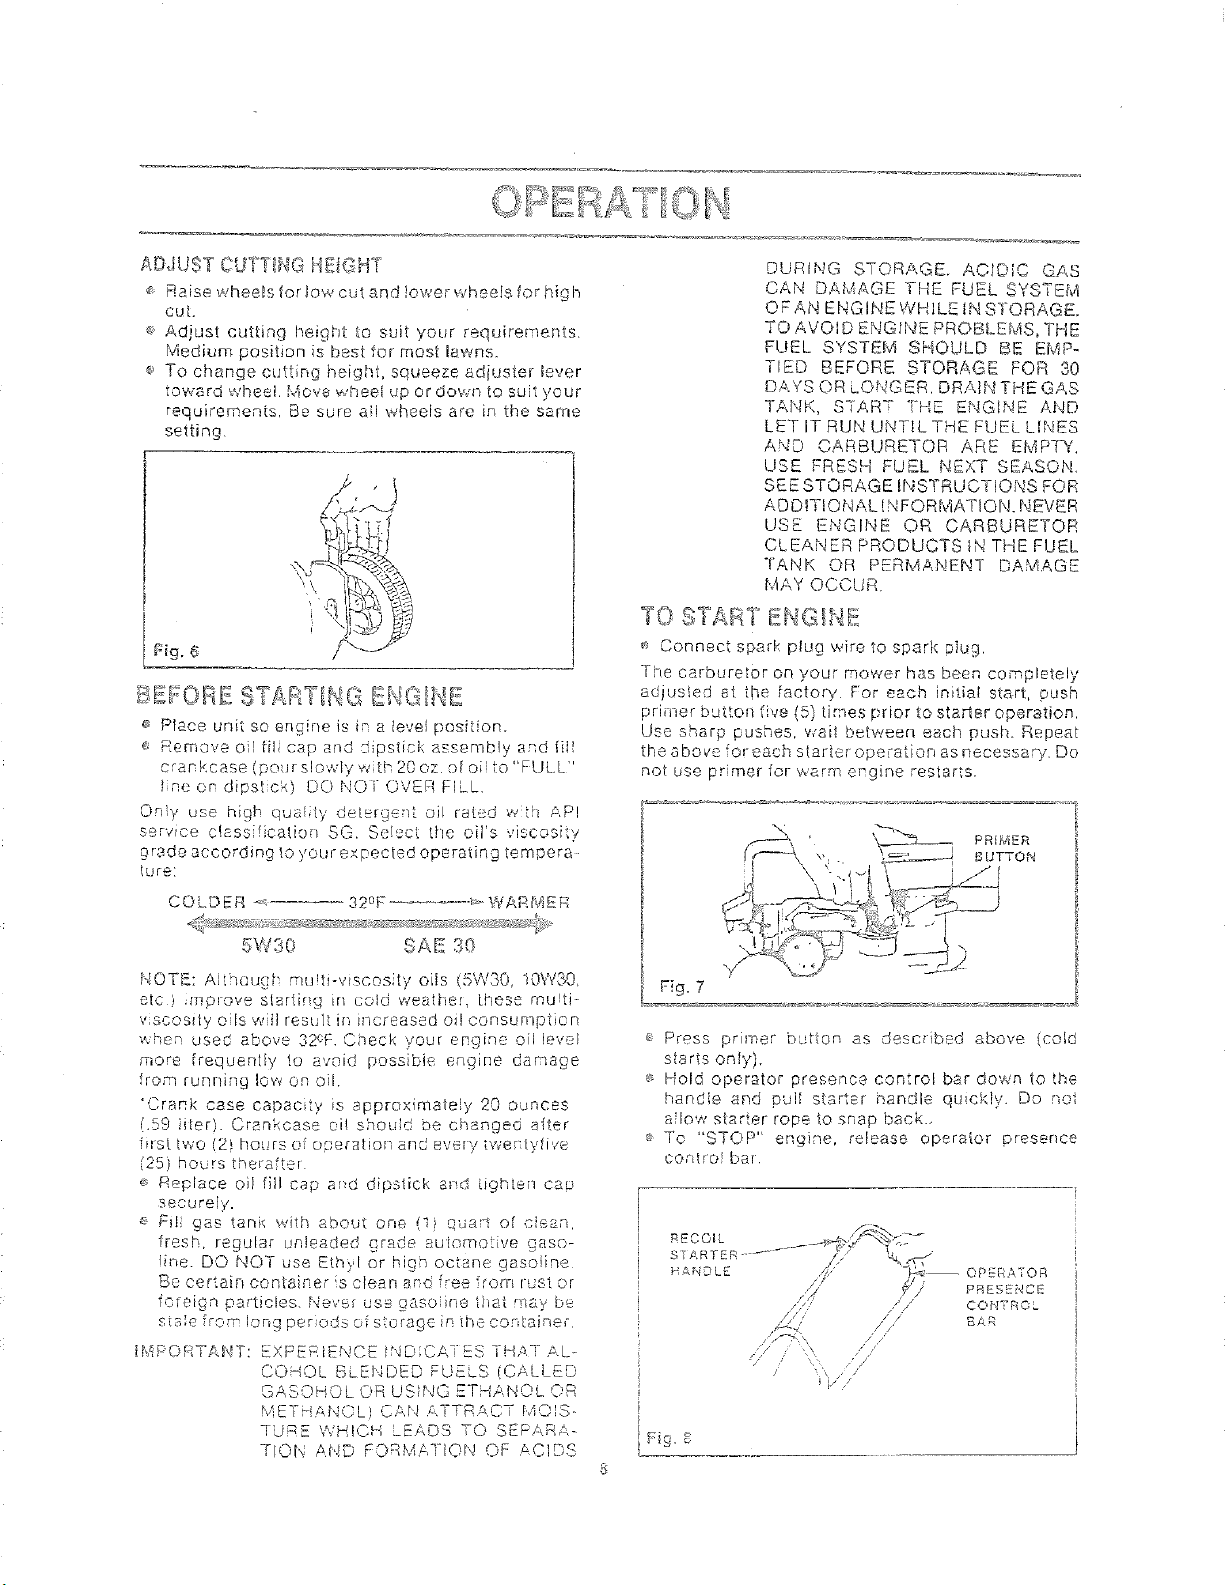
DRIVE CONTROL
e -[he operator has [he option of pushing the mower
or engE..ging the drive control lever for to,ward
motion.-[he drive is engaged by holding the drive
control !ever at the right end ot the operator
presence control bar against the upper handle,
When operation without rear wheei motion is
desired, only the operator presence control bar
should be depressed.
WARNING: For safe operation, the drive
control must disengage immedialeiy when
the drive controi lever is released, _f it
does not, hays the mash ine properly ser,tlced.
\
\
\
DR_V£ CON'fROL
D_SENGAGEF>
O_;_IVE CONTROL
EWGAG_D
WARN_,_G: Should the _;ngin9 faU to stop
within 3 seconds when Ihe operator pre-
sence control bar is released, do not use
the mower until the faulty control or
braking mechanism !has been properly
sere/iced by an authorized sem4cing cos!or
Fi#. 5
ADJUST CUTT_G HEI{_HT
_: Raise wheeDsiorlowcut and!owerwheelsforhi 9h
cut.
(0 Ad)ust cutting height o suit your requirements.
Medium positiDFI iS beet for most I_wns.
t To change cutting height, squeeze adiuster lever
toward wheel, Move wheel up or down to suit your
requirements, Be sure al wheeis are in the same
setting.
_0 _,r_Lsc; sAm_ IthacaENGINe
_s Place unit so engine is in a tevel position.
(; Remove oil fil cap and sipslick assembly and fill
crankcase (pour slowly wth 20 oz ol oil to "FULL"
Incor dipstck) DO NOFOVER FILL.
Ony use high qual;ty detergent oil rated wt_ API
serwce class fication SO. So!act the oil's viscosity
grade according _Oyourexpected operating tempera
Lure:
COLDER _ ...... 32°F ............... io"WARMER
DURING STORAGE. ACID;C GAS
CAN DAMAGE THE FUEL SYSTEM
O F AN ENG INE WHILE IN STORAGE.
TO AVOID EFqGII-,_E PROBLEMS, THE
FUEL SYSTEM SHOULD BE EMP-
TIED BEFORE STORAGE FOR 30
DAYS OR LONGER. DRAIN THE GAS
TANK, STAR T °_HE ENGtNF AND
LET IT RUN UNTIL THE FUEL LINES
AND CARBURETOR ARE EMPTh',
USE FRESH FUEL NEXT SEASON,
SEE STORAGE INSTRUCTIONS FOR
AD DIT_ONAL INFORMATION. NEVER
USE ENGINE OR CARBURETOR
CLEANER PRODUCTS iN TiRE FUEL
"rANK OR PERMANENT DAMAGE
MAY OCCUR_
TO STAR
_ Connect spark plug wire tO spark piug.
The carburetor on your mower has been completely
adjusted at the [actory For each initial start, push
primer bu_ton five {5) times prior to sta_er operation.
Use sharp pushes, wan between each push. Repeat
the above forgach starter operation as necessar},. Do
not use primer for warm engine restarts.
5W30 SAE 30
NOTE: Althougf mu!ti-viscosty oils (5W30, 10W30,
etc) mp_ove slatting mcotd weather, these rnu!ti-
v:scosdy oils w]il result in increased oi! consumption
when used above 32CF. Gheck your engine oil !oval
more [requent!y to avoid possibie engine damage
from running low on oil.
"CraRk case capsc_:y _s approximately 20 ounces
(.59 iiterl. Crankcase oi! should be changed alter
first two (2_ hours of ose_-a_ion and every twertytive
('25) hours therafte_
® Replace oii fill cap arid dipstick a_d tighten Cat
securely.
,_ Fill gas tank with about one (si qua'S of c!ean,
fresh, regular unleaded grade automotive gaso-
!ine. DO NOT use Ethyl or high octane gasoline
Be certain contsiRer s clean ard free ftorn rust or
foreign particles, Nave use gaso',}ne that may b_
stare from long per ods of storage inthe container
IMPORT'ANT: EXPERIENCE !NDCATES THATAL-
COHOL BLENDED FUELS (GALLED
GASOHOL OR USING ETHANOL C.'R
b_ETHANOLI CAN t, TTR/*CT MOIS.,
7URE WHICH LEADS TO SEPAR/,-
TiOIq AND FORMATION OF ACIDS
F,_g. 7
c Press primer button as desc,nbed above (cold
starts only).
_ Hold operator presence control bar down to the
handle and pulI starter isandle quickly. Do not
slow slarter rope to snap back.,
To "STOP" engine, release operator presence
cont_ Ol bat
RECOIL
STARTER ....
HANDLE
a/
, .!
pRESENCE
CONTROL
BAR
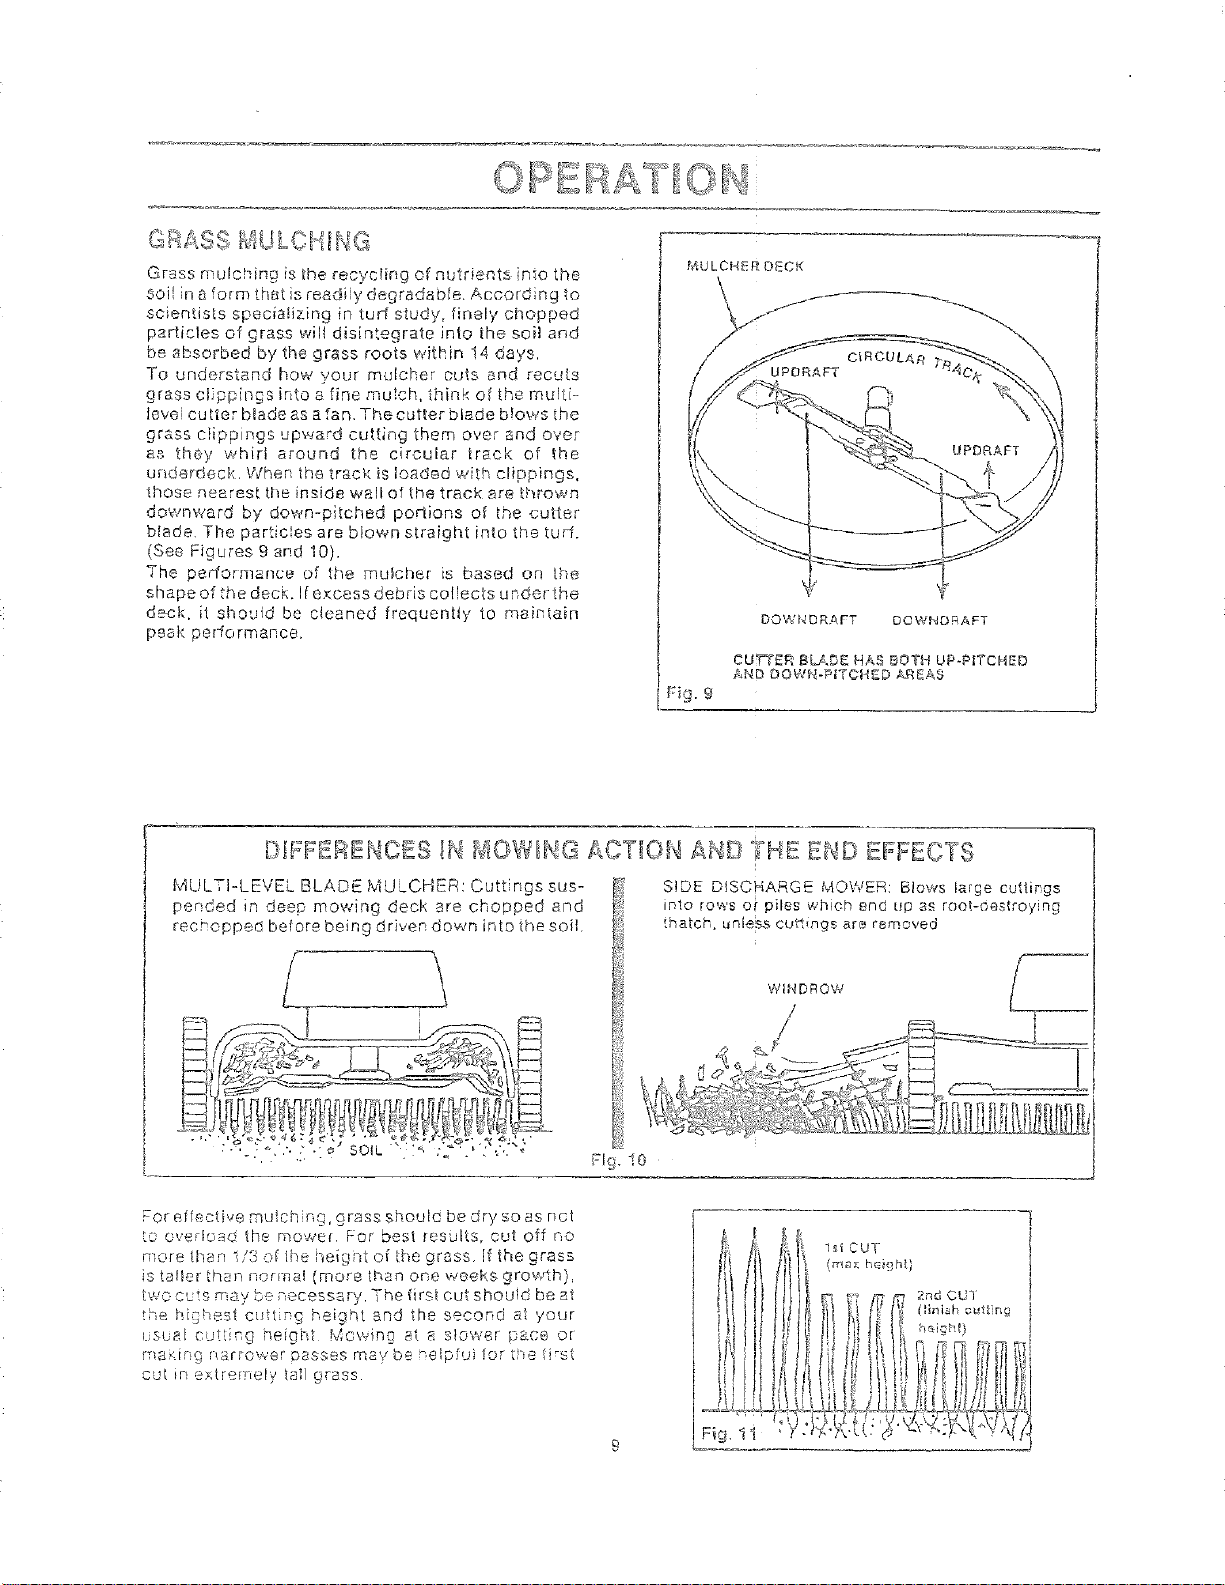
GRASS k' ULC
Grass mulching is the recycling of nutrients into the
Soft in a form thtt is readily degradabFe. Acco{ding to
scientists specia!izing in turf study, finely chopped
particles of grass wilt disintegrate into the soit and
be absorbed by the grass roots within t4 days,
To understand how your mulcher cuts and recurs
grass clippings into a fine mu_ch, tiqnk of the mu!tP
love cu tie r b_ade as a fan. The cutter bl3.de b!ows the
grass clippings upward cutting them over and ore, _
as they whirl around the circular track of the
undardeck. When the _raek is loaded wi,_h clippings,
1i_ose nearest the inside, wall of the track are _hrown
downward by down-pi_ched portions of the cutter
bIade. The particles are blown straight into the tud.
(See Figures 9 and 10).
The performance of the mulcher is based on the
shape of the deck. If excess debris col}ec_:s u nder the
deck. it shouid be c_eaned frequently to maintain
peak perfformance.
Mu LCHEFZDECK
\
fA! FtSA NCc s IN #IOW NG ACTION A, D THE END - F,'ECTS
MULTi-LEVEL BLADE. MULCHER: Cutbngs sun- SIDE DISCHARGE MOWER: B_ows large cuttings
pended is deep mowing deck are chopped and into rows ot piles which end up as root-destroyin#
reersopped before being driven down into the soil. thatch, u nle'._ cudcings are removed
FI9, 10
FOr effective mulching, grass should be dry so as nct
to overloc_d the mowe_. For best results, cut off no
more H_an "_/3 of/he heig-_t o_the grass. If _he grass
is taller _han normal (more than one weeks gro%rth)i
tv/o cuts may be necessary. The firsl cut shouid be at
the highesl curt r_g height and the second at your
LSLal cut_in{t height Mo,_ving _:t s slower pace o[
mad _!::r_arrower _asses may be ',elpfu:, !or _-e first
cut in ex(remely tall grass.
I
WINDROW

OVERLAPP_[_G 3 I_[ERUNS
Overlap each run for r;-_aximum width wi_h a minimum
ot wheel tracks, Run the inside of _he front wheei
a_ong edge of uncul grass.
On hi/iside hsowina,_ when possible, P_-,_., air cleal]er
and carburetor on the uphilt side (see Figure 12_
Make sure tha_ the crank case is pro_er_y fil!ed wltl_
oil
Fig, 12
CAUTION: THE LEAST DANGEROUS
l
METHOD FOR MOWING ON HILLS
AND TEF;RACES IS TO CUT HORIZON-
TALLY ALONG THE SLOPE (AS IN FIG-
URE 12) INSTEAD OF UP AND DOWN
(AS IN FIGURE i3). I-HIS WILL PLACE
YOU AWAY FROM THE MOWER IFYOU
SLIP. IT WILL ALSO REDUCE SCALP-
tNG ON CROWNS OF H!LLS. EXERCISE
EXTREME CAUTION TO AVOID SLIP-
PING AND CONTACTING THE ROTAT-
ING BLADEWHILE MOWING ON HILLS.
BECAUSE OF THE INCREASED DANG ER
OF SLIPPING {EVEN ON LEVEL SUR-
FACES) NEVER MOW WHEN GRASS IS
WET OR DAMP. ALWAYS WEAR ADE-
QUATE FOOTWEAR.
\
\
\
CORRECT
CUT ALOHG "ri4E S:IO_
C,_: I4tLL (HORIZONTALLY)
If the mowing pstlerp and di,_ection o_
progress are char:ged each time
eve O, cutting wl help 1o eliminate
msttin 9, g_aning ant corrugation
lherebyenh_ncingtheappearanceof
your lawn. P,siead of curt}rig m crde5
icy ht_ various mo_ving pe(ternsshown
: : . _._ .-_ i_,i_l!llki:l;
i 'i_'' i : :1l
10

GEN!EFIAL RECO _R_E8',,_DAT_O I,_
_ C!ean the b'ndc,rside of your c,eck aite_- eaci_ use.
_,sOnce a year or every 25 operating hours you
should _eplace the spark plug, air |liter, and check
blade for wear. A new spark plug ar, d air fiiter
assures proper air-fuel mixture and helps your
engine run better and last longer.
® Cheek all fasteners and be sure they are tight.
e Follow the Service Recommendation Schedule.
DA_,[GEB: BEFORE TURNING THE
%
DECK ON THE LEFT SIDE, EMPTY YHE 1
_-,. EL tANK IN A ,_UIS,,,uLE CON- !
TAflqER. WEAR GLOVES TO PROTECT
AGAINST SHARP BLADE AND EDGES I
SERVICE RBCORB
Fi!l dates as you complete
service
Blade Sharpened
Blade Replaced
Engine Oil Change
Engine Oil Check
Air Fi!(er Repl,eced
Lubricate Mower t
Cleaning 1
Grass Calcher (ff applicabie)
Muffler
Gear Recucer Checked
Rear Wheels Lubrication
Drivebe!l Checked
S_arr, Ptug Replaced
SERVICE RBCOI_II'_:ENDATIONS $O_48DULE
First Evary
2 10
Hours Hours
EveQ_
25
H Ours
[j'_¢
E_,c,,_, Eveo'
50 Use
Hours
J
i
T
1 J
SERVICE DATES
t
!
J
Y i
(_. SAE 30W MOTOR OiL
(5W30)
@ SPRAY LUBRICANT
@ GREASE
TYPE "F" AUTOMATIC TRANSI,4ISS_ON
FLUID
//
@ i
& PII41ON
(COVEREP_ BY DUST SIIIELD)

CLEAI:4_t,!G
_T.We recommend that you clean ihe underside of
your mower afler each use
CAUT!ON: DISCONNECT SPARK PLUG|
WIRE FROM SPARK PLUG AND PLACE
WIRE WHERE IT CANNOT COME IN
CONTACT WITH THE SPARK PLUG. .
iNSPECTiNG CUTTER BLADE
® Cutter btade must be straight {see Figure 14).
Any _mpact severe enough to bend a blade has
also caused m_croscopic cracks in the blade.
Bent blades should be replaced because the
cracked portions could break off, becomi;_g
dangerous and capable of inflicbng serious
iniuries.
l
J
Fig. 15
_ The cutting ends of the blade should be in-
spected _or cracks developing at points marked
"A" s.nd i'B" in Figure t5. Tb, ese are developing
poin[s, either from ursharpened to sharpened
edges ot flora rounded to fiat areas of the bade.
Abraswe parhctes cause cracks by weanng the
steel during wowing. At the first sign of a crack,
the cutter blade should be replaced
CioIANG_NGBLADE
_:,Set [he mower on a driveway or concrete floor,
disconnect spark plug wire and _[p it over on its
left side so crank case oil will not draJr into the
carburetor and air filter,
e Put on gloves for protection against the blade
edges.
e As shows in Figure 16, use a piec,s of 2" x 4"
lumber about 14" long (rough metric equivalent:
4 _: 9 _. 3_ on} _s a stop. insert the step between
the cutler blade and the floor.
': L_se a wrench to remove the mounting bolt, lock-
washer and c_tter blade
® ins,'811 sharp curlier bade as shown in Figures i6
and 7. ,3e surebiade is correctlymeunted on the
adaptor inst_ the iockwasher aRd bo!t a.nd
make the bolt fnger tight
® Reinsert lhe 2 _:4stop between Use floor and the
cutter blade, but this time at the front ol the deck,
Tighten !he bolt with a wrench (to 35A0 ft. IbS. or
47.5--542 Nrn)
12

BLADE SHAF{PBN NG
r_ When sharpening the cutting edges o! the s,lade,
do not fm!iow the orig nsl angle of grind as shown
in "A" of Figure 18 !nstead, grind new ct;ttin 9
edges on a diaqonal as showr' in "B." Make sure
that each culting edge recek, es an amount of
g indin 9 necessary for the b:ade to remain
balanced
e_The remaining straight edge por_on of the blade
may be smoothed just enoug:; _o remove burrs.
¢ TO cheek balance, suspe_d blade on a screwdriver
or drill shank at center ho_e If one end hangs
down, gr nd more steel from _.hat end until blade
balances
ORIGINAL
EDGE
DO NOT RESHARPE_4 TO THIS PATTERN
V__ (1.3 cm)
M ;_ _:icTiUrCi _er£Ov_l
000
t
REQUIRED RESHARPENING PAT_;ERN
Fig. 18
Fief,i7
WARNING:ALOOSE8LADECANBE
DANGERO_.JSANDMAYMAKE]HE
ENGINEHARD] 0START.FAILURE]0
PROP!RLYASSEMBLE1"14ECU"TEF!
BLADEN _iHEADAPTORMAYRESULT
_;",CRACKStNTHECUTTERBLAOEOR
LOOSENI'-;GOFTHE MOUNTING
BOLT.E',-!qEROFTHESEDEVELOP-
I/,ENTSCOULDRESUiTfNSERIOUS
BODEYII'IJtIRYFPOMPIECESBEHqG
DSCHAiqG!:[)[-ROMUN©ERNEATH
TbiE_,40WER
!3
WARNING; INCORRECT RESHARPEN-
tNG OF CUTTER BLADE AS DISPLAYED
IN "A" OF FIGURE i8, COULD CAUSE
-_P'IE BLADE TIPS TO BREAK OFF
AFTER A SUDDEN IMPACT OF THE
B]_ADE WITI-t A FOREIGN OBJECT
DUR;NG OPERATION. BROKEN
PIECES OF THE BLADE T_iROWN
FROM THE MOWER COULD INFLICT
SERIOUS BODILY INJURY.
GEAR REDUCER OF
POWEE-@ROPELLED _/iODEL
The gear r_d_ce _s filled wth el at the iactory
Additional oJi will rot be required unoer _-ermal use.
E'er':,'25,'flours o: f leakage is apparent., remove the
pipep!_g(seeFg _9) Ire' evel is _ebw the hole. fll
untii el is Ie_e wills bet!era el ho!e Use Type _'F'
A::temafie TiafhsrrlfE.sior Fld_d
D: rot subs,iitute !dbricafi_ if rep£r is necessary, see
yoL suthorzed se_'.',c_r',(_ deaer
IMPORTAiqT: O_,er dlh_g or use oi-rnproper
uc,_,cani wilt ca,use prer_]a_u_e
.::ear red Jeer fa_ ure

_iI CABLE
--#--- t
FORWARD
i t 34-
CABLE
_!_GEAR R_DUCER
Fig. ,_
FRONT WHEELS
Lubrisa_e wheels and the supporl shafts once a
month or every 40 operating hours with SAP=- 30 oil.
Tip mower on _ls side and apply oil to axle and hub
Spin wheel to allow oil to move into bearing. Oil the
wheel stJppoF_ shafts at point where they enter dec},,.
,k,_ove indexing levers of height ,_djuslers beck and
forth to allow oil to move into bearing surfaces.
In extremely dusty condilions, wheels may become
light because of d,Js_ in bearing area. When this
condition occurs, remove the wheels.Olean a×le and
wheat bearing, surfaces with solvent or emery cloth.
then oil and reassemble. Torque to 190-285 in. tbs. (2
to 32 Nm)
REAR WHEELS,
Atfhe beginning of each season (or ever'i 50 operab
ins hours) lubricate the wneelsand pinions. Block up
mower at rear of deck u_til the rear wheels are clear
from ground.
\
PIN
AXLE
li Fig. 21
DRIVE SHAFT
HEIGHT ADo_US'TER
To avoid stiffnessi_ the height adjuster% IubrTcate
sdius_ers once every season or every 25 operating
hours with SAE 30 oil,A_pplya fiberalamount of o[ion
the washer _nd spacer of each adjuster. Move the
adjusters b_k and forth Io loosen if stiffness has
occurred.
SPARK PLUG
Change Your spark piug each year (or every 25
operaling hours) 1o make your engine saH eaa er and
_un better. Set spark ptua _p at .030 inches (.76rl+_m).
AIR .... '
F1Lt E__i
Yuur enoine will not run properly and may be datr, aoed
usiP 9 a clirt}l air fii_er. _ " +
i
COLLAR
!
i
i
r
fit, place theyr filler every 'fear (or every 25 operating
hours), moqe often if you mow in ve_ dusty, dirty
conditions. 0o not wash air filter.
TO CHANGE AIR _iLTER
¢ <:_emove iU-te air filter cover by lurning coun_er-
c!ockwise to the slot and pull away from collar
® Re_qove fiiter from inside of cover.
e Clean tb? inside of the coyer and the cotla_ to
remove tinY dirt, accurnJlation.
¢ Insert new filter into cover.
Put _.ir filier cover and filter into celia relignh_g the
_ab with the slot
e Push in on cover and turn clockwise to tighten.
Removelheax_e screwsand pul' off tnewhee!s. Apply
a liberal ar-_ount OI crease to pimon, line gear, whee
hub, and axle (see Fig 20).
Reir_stall the _heeb, makng sure lhe pmiar an,g
gears mesh properly. Be careful to insta!l the p_nions
on _ne sroper sides, as they are not interchangeab;e
Propulsion wil occur on!y if parts are correctly
installed (see F}g 21 )
SLOT ¢
Fig. 22
14
i
<
TO TIGHTEN
I
AIR F{L] ER COVER

t:K,MNE kUBRICATJO}I
You must change .'.he oil in the crank case _.fter the
first two (2) hours of operation and aher each 25
h,')urs of use thereafter. CHANGE THE OIL MORE
FR _QUENTL_' IF USED !l',_ SANDY OR E_UST¥ CON-
DIT_ONS.
CAUTION: DISCONNECT SPARK PLUG
W!RE FROM SPARK PLUG AND PLACE
WIRE WHERE IT CANNOT COME IN
CO,,, ACT WFFH SPARK PLUG
@AU,'T_ON; D ISCONN ECT SPAR K PLUG i
WIRE FROM SPARK PLUG AND PLACEI
WIRE WHE, RE IT CANNOT COME IN f
GONTACT ¢,J;-FHTHE SPARK PLUG, j
e Turn mower on its side with carburetor up.
e Okan the undersideolyour mower by scraping tO
remove build-up of grass and trash.
_,!OTE: We recommend that you clean the underside
of your mower after each use.
e (}rain the gas tank and then turn the mower on its
side with the carburetor side up and remove oil
drain plug
QIL OPd_IN PLUG
BOTTOb_ OF ENGraVE Fig. 23
_, Set the mower down and d¢ain oil into a flat pan
NOTE: Oil wUI drain more free y when warm
e Replace oil drain plug being sure to tighten iirr_dy
e RefilcranKcasewithot. Re_erto"BEFORESTART-
ING ENGINE" in operation secton on sage 8
o! this manual.
e Wipe up shy spilted oi! on mower
e Recornecl spark plug w_re to spark plug.
_PORTANT; !f liquid fertilizer is applied to the lawn,
wash underneath your deck after cul-
ring the lawn for the f}rst time after
fertilizing The fertiUze_ o_ the grass
clippings contains caustic potash
which is EXTREMELY CORROSIVE to
the aluminum deck. The deck will be
damaged if these clippings are not
washed awa?.
_ Clean yo,ur mower and engine oftente keep build-
up of trash from accumulating around engine. A
clogged _ngine runs hotter and shortens engine
tire.
I
NOT_:We Be NO F recommend using a garden hose
to c_ear_ rne_'_er urdees the electrical system, muffler,
air tilter andicarbu rotor are covered to keep water out.
Water in enqine car] result m shortening engine tile
Frequent!y ren eve grass clipp rigs, dirt and debris
from cooling fins a_r mlake screen and levers and
tint age. "This wi!} help ensure adequate cooling and
correct engine speed
!5

I
J
[
CAUTION; D!SCONNECT SPARK PLUG l
WiRE FROM SPAP, K PLUG AND PLACE I
WIRE WHERE t-T CANNOT COME tn
CONTACT WITH SPARK PLUG.
BELT REPLACE_FI_.HT
Inspect bel every 25 hour,S for wear Replacement
belts are available from your aulhorized sewicing
dealer. Follow the procedure given below.
e Oisconnecl soark plug wire trom the spa_k plug
_, Remove the bolts holding the belt cover to the
deck. Then slide out the cover.
e Slip the belt over and of 1 the gear reducer pulley
6- Tip the mower en its lelt side letting it rest on its
handles.
CAUTIOH: Do this procedure with iess
txan 1/4 tank of gasoine and the oil
diost c< must be tight.
_:, P_;l!_he beltthrough stot{n deck so that entire bait
is under deck.
_ Slip belt over end of blade and remove.
e Reverse the above procedure to install new belt
i
PULLEY
e Push cab@ into s!ot and tighten cable clamp
scFew
e lnstaiI spark p_ug wire on spark ph@.
e Tesl drive adjustment. If mower drive does not
release reaSjusi adding slack te the system.
If_(PORTAHT:
AFTER TIPPING MOWER UP FOR IN-
SPECTION OR ANY OTHER REASON
DO NOT ATTEMPT TO START ENGINE
UNT!L MOWER tS ALLOWED TO SET
iN NORMAL UPRIGHT POSITION FOR
AT LEAST 3 TO 5 MINUTES IT IS
IMPORTANT ""O GIVE OIL ENOUGH
TIME TO DRAIN BACK INTO ORANK
GASE iF AFTER 5 IvtlIUUTES, STARTER
©ORD STILL DOES NOT PULL EASILY,
@EMOVE THE SPARK PLUG, SLOWLY
©RANK ENGINE TO EXPEL ANY OIL
STILL TRAPPED _N CYLINDER, AND
REINSTAL_L SPARK PLUG. ENGINE
MAY NOW BE STARTED.
i
TRA8] I0!_ DRIVE ADJUSTL:_EHT
Parts wear or stretching of tXe _raction control cable
eventua b] may czuse excessive slipping whrcl_ Nrst
becomes apparent durrg maximum loading situa-
tions such as L!phi I rtowir!g.
e Disconnec8 he spark plug wre.
® Loosen CaD!e damp screw.
e PL;S) cabief omtses!otintheNa,'npand mes'e
to ti_e rght unli the slack _s removed from the
cable
I6,

BEAR TRAIL 9HIELD
The rear trail shield, attached between the rear
wheels of your mower, is provided to miIliiTilZe the
possiNlky that objects w!l be thrown ou_ the rear of
the mower into the operator mowing position.
if the shield becomes damaged, il should be replaced.
E_GiNB SPL_BD
Your ertgine speed has been factory set. Do not
attempt to irtcrease engine speed or it may res@_ in
personal injury. If you believe t,hst the engine is
running too !ast or too slow, take your mower to _n
authorized Sears Service Center for repair and
adjustment.
CARBURETOR
Your carburetor has a non-adjuslable fixed main tel
Ior mixture co,trot. If your engine does not operale
properly due to suspected carburetor problems, take
your mowerioan authorized Sears Service Center for
repair aPd adjustmen_
WARNING: CARBURETOR ADJUST-
MENT REQUIRES HIGH SPEED OP-
ERATION OF THE ENGINE DURING
_HE PROCESS. tT IS, ACCORDINGLY,
REQUIRED THAT A MATURE PERSON,
WELL-ACQUAINTED WITH THE DAN-
GERS OF IIvIPROPER PROCEDURE.
ASSIST BY CONTRO[ LING THE
ENGINE FROM THE OPERATOR'S PO -
S}TION WHILE T_-4E ADJ'jSTMENTS
ARE BEING MADE DO NOT PUT
RINGERS OR TOES NEAR THE MOWER
DECK DURING THIS ADJUSTMENT.
17

Your rnower and engine, should be p_-epared for cfl
season siorsge as follows:
MOWER
Clean underside of mower deck (See 'CLEAN-
IF;G" in Customer Responsibilities section of
manual}.
e Inspect and replace/sharpen blade, Jf required
(see "BLADE CARE" in Customer Responsibililies
section of e_anual).
e Lubricate as shown in Service Recommendation
chart on page 11 of manual.
HANDLE
e Whiie supporting the lower handle, press h,sndle
support in and down to release handle lrom the
suopo_:
¢ Loosen handle knobs. Fold upper handle rearward
lo horizontal position. Make sure !ower handie is
slightfy tilted back to prevent the cable from
stretching.
_' Bring lower handle over engine unl-il the upper
handle and tower h_xnd!e are in the lowest position
Make sure cables are not sharply bent.
FOt. D UPPER
HANDLE 3"0
PRESS IN z
SUPPORT / LOOSEN
BRACKETS KNOBS
t ,/1
REAR
i kJ
_RO_ G WAY, YOU MAY DAM-
AGE THE CONTROL CABLES
(SEE FIG. 27).
e Change oil (see "To Change Oi!" _q Customer
Responsibi!ities section of manua O.
@ Drain fudt and run engine untit _uel system is
empty.
FqPoRTANT:
IT/S tMPORTANr iO PREVENT
GUM DEPOSITS FROM. FORM-
ING iN ESSENTIAL FUEL SYS o
TEM PARTS SUCHASTHECAR.
BURETOR, FUEL FILTER, FUEL
HOSE, OR TANK DURING STOR-
AGE ALSO, EXPERIENCE iNDF
CATES THAT ALCOHOL BLEND °
ED FUELS (CALLED GASOHOL
OR US}NG ETHANOL OR ME-
THA NOL) CAN ATTRACT Me IS-
TURE WHICH LEADS TO SEPA-
RATION AND FORMATION OF
ACIDS DURING STORAGE. ACiD-
IC GAS CAN DAMAGETHE FUEL
S"_STEM OF AN ENGINEWHILE
1N STORAGE.
OTHER
@ Do not store gasoline from one season to
another
¢ Replace you_ _qasoiiP.e ca," ',_your can steals _o
rust. Rust an@or dirt in your gasoline can
caus_ problerns,
_ Do nol s[ore your mower under any plastic
eeve_-. Plastic cannoi breathe which allows
cor_densation !o form and can cause your
me'wen to rust
Fig. _,:.,:,,
F_n 27
iMisORTANT; W_-=_,_,-. FOLDING THE !HANDLE
PORTSTION, BE SURETC) FOLD
THE HANDLE AS SHOV';.N IN
F_G 26. IF "_._,_ FOLD TP:E UP-
PE,_ -ADDLE SECTION T:'4E
NEVERSTORE LTV a
MO!fLER WITPi GASOL NE lq THE TANK I
!NSI:_E A BUILDING WHERE PUMESI
t4AY REACH AN OPEN FLAME OR I
SPARK. ALLOW THE ENGINE TO COOL I
BEFORE STORINL'_ IN ANY ENCLO- I
SURE J
18

i
I
Too much Vtbre_o_
$tadar Rop= H_,_rd_o P_slt
_*rt_c_or_Drh'
H_rd to Push
1 girly Air Filter.
2 Out olgasoline.
3 Staie Gt_soline,
4 Spark plug wire is disconnecled.
5 Bed spark plug
6 W_ter in gasoline.
7 Loose blade or broken blade adaptor
8 Operator Preeer',ce Comtrol Bar in released
position.
9, Operator Presence Control Bar detective.
1 Rear of mower deckiblada dragging in
heavy grass.
2 Cuttmg too much grass.
3. Dirty air filter.
4 Build-up of grass, leaves, and trash under
mower deck.
5. Walkmg speed _o0 test
6 Too much oilin engine
1. Worn, bent or loo_e blade.
2 Wheel heights uneven.
3. Low engine speed.
4. Build-up of graSs, leaves and trash under
mower d_sk.
1 Worn or bent blade
2. Loose btade,
3 Benl engine crank sh,_ft
t qywheel brake is on when Operalor Presence
Control Bar is released
2. Bent engine crank shall
3. Blade adaptor sheared,
Blade dragging ir_ grass
1. Broken or discc_neet_:_ cable
2. Slipping or _!OW 6ngagemenk
3. Bell out ol pulley groove Or broken.
4 Pinion Or pin reve_d {no drive or free-
wheeling).
L High Grass or cutting beig_t too low
2 Rear of mower deeWblade
dragging it" h&_vy gra_
3 Handie ne,ght position nol right for you.
Replace Air Filter.
21
Fill gasoline tank.
Drain gas and refill with fresh gasoline.
4!
Connect wi_e to sp_.rk p!ug.
Replace spark plug.
6i
Drain tank and refill wilh h-esh, clean
gasoline.
Tighten blade nut _nd/or replace
btade adaptor.
Depress Operator Presence Control Bar.
!
Contact Se_rs Service Department.
I
ti
Raise rea_ of mower deck one (I) settir_g
higher than front.
2i
Set in ' Higher Cut" position
31
Clean or replace air filter.
Disconnect spark pug wire and clean
i
underside of mower housing.
5_
Cut at slower walking sDeed.
Ch_ck engine oil level
i
Replaceb_de Tighten bladenut.
Set all wheels at same height.
2j
Contact Sears Service DeeartmenL
3i
41
Disconnec_ spark plug wire & clean
I
underside ol mower housing.
!
Replace blade
Tighten blade nut,
31
Contact Sears Service Dep_rtmen[.
Depress Operator Presence Control Bar _o
t!
t@per handle before putiing on starter' rope.
Cow,tact Sears Service Department
Replace blade adaptor
-?i
Gel o','er tow grass and/o_ hard surface
to star( engirie.
iJ Contact Sea_ Sewice Dept_rtmenL
2. Adius(Traction Drive.
3 Sea"BELT REPLACEMENTS'
4 See page 14
Rai_ cutting height.
RMse rear of mower deo_ one (1) se_ing
higher than trent.
Adjust handle height to suit.

27
/
?
\22
4_
29

NO. PART NO, DESCRIPTION QTY,
i JA-99295-5 ° AXL E- WheeJ supped 4
2 JA-9937t- 1 NUT- He_ 4
3 JA-359_ 8-0 BOLT- H@i _dj 2
4 JA.-99128-7 ARM- Wheel hut. ad i. 2
5 JA-99364-0 WHEEL & TIRE 2
6 JA-9£3"65-6 SPRING* _ndex {ielt ff,ar_t} 1
JA-99365-7 SPRING* inde× (right front,', I
? JA-33662-3 KNOB- index spring 4
8 JA-99372-0 NUT- Hex flange {5/16-16} 2
9 [_,JA-99395-0 DECK- 29" PP I
[
10 jeJA-9940-0 DECAL- Wa;ning t
11 I_JA-33946-0 DECAL- CPSC warning 1
12 L_JA-99368-3 DECAL- 20" Mulcher 1
13 04098 ADAPTOR B[ ADE 1
I4 JA-40887-6 SCR _'V- Thd. forming 3
15 JA-40887÷8 SCREW- HeX waeher 5
16 JA--33654-4 D_FLECTOR REAR 1
I7 JA-35836 2 SPACER- Wheel _l. aai. 2
18 84001 WASHER- (5/16") 2
19 A-O4297 BLADE- Mulcher Kit 1
20 JA-44614-2 WASHER- Lock (3/8"}
21 JA-40120-9 SCREW, Ha× hd. I
22 JA-,q9367-3 DRIVE WHEEL 2
23 JA-99_80 I PINION (L N.) I
J,a-99480-0 PINION (R H) I
lnc!ud_:
{328-I6 _ I 1t2"}
',1/4-29 _ 3!4")
_3/8-24 x 2")
t
P A[_'f " FO, DE$CBIP:TIDN QTY.
NO,
24
J A 199471,',_0 PIN- Drh, e 2
25
JA-35107-7 WASHER 2
jA-99,0_7 ,1 SUPPORT- Drive wheel 2
2_
27
JA-9935_5-6 SPRING- index (left rear) 1
JA-99386-5 SPRING- ;nde× (righ[ rear} I
28
JA-35£1_-I SPACER- Real h!. a0i 2
29
JA-35B46-9 SR£1NG 1
JA 3Eg2"3-0 BRACKET !
30
31
JA-99_ 811-9 PULLEY- Odve 1
32
JA-42"25b-5 SCREW- S,¢,! {I/4-20 × 3!8") 1
33
34
35
36
37
39
4Q
41
_2
43
44
46
47
48
,_ _ , GEAR REDUCER (Nole se,wice 1
JA-3757,1-8 SPRING
0390_ BELT- Drive 1
JA-39507-8 COVEN- Orwe I
JA-45845-I EATON RING 1
JA-35340-6 WASHEgl 2
JA-3281 #- 7 WASHER AiR
JA-46z-03-T WASHER- Sprin9 2
jA-4169 -1 SCREW- Tnd zolHng I
3A-_053-3 C.AB LB - Tractior,
JA-35950-0 WASHER- Hardened 2
J#-99367 2 DECAL- Power propel ed
JA-46136-I P:N- RoII !
JA-99496-3 P{ ATE- Backing 1
JA 46302-9 KEY- Woodruff 2
jA-99,497 i CLAMP- Traction cable 1
143.424.3_2 ENGINE !
part See b,'eakdown.)
i
_'NOI _: See psg_- 24 for Gear Reducer 8reU_.dewr_
_']OT ILL_JSTRATED: O_,_[4_RS f_;AIMU_,L 18116
2I

i /_7
\
\
\
/
£3
/
\
\
\
\
\
\
\
\
\
\
\
\\
\
/

NO. PART NO. 8ESCRIPTION QTY.
1 JA-993B5- 0 OPERATOR PRESENCE 1
2 JA-993-5-5-0 DRIVE CONTROL LEVER 3
3 JA-gg3-GT-O BUSHING- Drive cOnlrol 2
JA-99373-I WAS,_ER -Ext. lock I
5 JA-991_5-2 EYEBOL T. ( I/4-20) I
8 JA-99rJ53- 3 CABLE- Traction 1
7 ,IA-g.q370_! NUT- Fle_ c/lock (1/4-20) i
8 JA-_EB-7 CABLE- Engine control I
9 J A-99363-8 HANDLE- Upper !
10 JA-g94104D HANDLE_ t o,_ver w/Pin 1
11 JA-44310-6 NUT- Hex (5/16-IB) 2
12 JA-3,.395543 HANDLE- Knob 2
13 JA-35910-2 BOLl-- Hat, die joining 2
14 JA-99056_7 STOP- Rope i
15 JA-9_9370-0 BOLT- Handle mtg. 2
16 JA-99372-0 NUT- Hex flange (5115 18) 4
11 JA-35923-9 SUPPORT 2
18 ,IA-45402-5 WASHER 2
lg JA 99371-0 BOLT- Handle suppcr[ 2
_) JA-gg368-2 SLEEVE- Dr, ve control I
21 JA-99163-6 TIE- Plastic !
22 JA-g9373-5 SCREW- (114-20 × 1 1/2") 1
23 JA-99373-0 NUT- (1/4÷20)
CONTROL BAR
23

_7
2
28
/
!
15
I
9
8
%
13
25
!3
!
QTY.
1
1
I
1
1
1
I
1
1
!
I
2
i
i
i
2
4
!
24

4_0
f4OBE[ _._!S{BIAL
f
I£4\
3t0
370D
x) _ 178
2_
2_
25

[ s£@:AIR P,&B i,5 LIsT
Ref'. P,u-t I _ =
No, No. Part Name i No,
Cylinder Assy. {incl Nos, 2 a 20)
I 26727
7 34214A
8 "33735
B 30200
1ZA 34,91}5
12B 33&58
!4 28277
t 5 3 {'6_
i6 31_A
17 31:_5
18 859548
19 31361
20 32600
•,_ 35905
48 35545
4,0 35_
41 35541
41 3CR5.42
41 3654.3
42 35547
42 35_48
42 35-r-49
43 20381
45 32875
46 32610A
48 27241
62 29914
70 3/-.3 si C
72 3c{72
73 ' 2%_ 3
75 27897
_1 30574
81 3,0030 A
82 335.91
83 30S'aBA
92 650815
93 Bf_>8i 6
00 %443 A
10! 6_.CI £
103 66(84
110 34861
119 aS0* 5&
I20 34342
125 :92:3C
i25 2935£
i26 293 ":S
I26 293:5C
:]O 0021:.
135 ?C895
33734
33148A
_35261
29!.9.3
65,9,_88
6"t 1C45¢
61fli2
Pin, Dowel
E!ement, Breather
Breather Assy. {IncL Non. B. 8, 9, 1_
S- /28)
Gasket. Breather
Screw, Hex washer hd. se f-tap Be:--_s,
10-24 x 9/16
Elbow, Breather tube
Tube. Breetbe_
Washer. Ftal
Red, Governer (Incl. No 14)
Lever. Governor
Ciamp, Governor lever
Screw. H,ex washer hd., 8-32 × 5/16
Spring, Extension
Seal, Oi!
C_ankshah Assy
Piston, Pin (I' Ring ,#,say, (Std.)
HncL Nos. 41, 42. 6" 43)
P{si.on, Pin & Rin£_ Assy. (,0_0 over-
sac) lind. Nos. 4_, 42. & 43)
Piston, Pin 8" Ring Aesy. (.020 ever
_ize) {Incl. Nee. 41, 42 8 43)
Piston 8- Pin Aaey. (Std_) Ilncl. No 43)
Piston 8- Pin Asey 8010 oversize)
(incl. No_ 43)
Piston S_ Pin Asey (.O2#l owweize)
(Incl. No. _3j
Ring Set, Pis:on (S[d.)
Pi W Set, Piston i.Ol0 oversize)
Ring Set, Pis:en tO20 overeizei
Ring. Piston _n retaining
Rod Assy., Connecting (Incl.No. 46}
Bolt. Connecting rod
VMve, Lifte_
Ca_.shafl (Mo_O]. C.cmpr-d._on Reicase)
Pump Ass'f. Oil
Gasket, Mounting flange
Flange, Mounting (inc!.Nes 72, 73,76
6 80)
Ptg, Oi drain {inct, No. 73)
Gasket, Oil piug {Not requirec with
ptastic eilplug)
See[ Oil
Shaft, Gevemo
Washer. Fta!
Gear Assy., Governor (tnci 40. 81}
Spool, Governer
Ring. Retaining
Screw, Hex hd. Soma, 1/4 20 x i-1 r4
Key, Fip<vhea[
:i%,vheel
Washer, BNtevile
Nut, Fhe,_hee{
Selki State Assv.
Cover. Spark plug
Scot-w. TOoK T-15 hex was_er hd.
Seres I0-24 × 1
Wire G r'.,_ rid
Gasket, CyHnder head
Head, Cy inder
Viva, _x>adel lard) InCi No 15]
"/a!ve, _.,haust (1'32' oversze} (bcl
Ne 15! }
is!re, !n:ake (Std) ilncl _s 161}
'Jalve, trial 9 ilz7,2 ' overs ze
ncl b,_e 157i
Screw He× fia,-ge i,o, 5 16 18 *, i i 2
Bp rk Pu'£ Resls',Or {Char'_aie< RJ-
19_@ Or enuk,alent
±€,_l
151
169
!72
174
178
182
184
185
186
1_O
t91
192
193
194
196
207
216
228
_4
23<i
23_
24
245
25O
260
261
262
275
277
28£
287
2_b
292
298
3COD
301
3(,",3
303
307
3(-8
310
313
327
370A
370D
eL-is
°_J..... _' _ L:_BEL I43o424352
Par{
] No.
316772
316"73
_27284A
327_
_631_
297_
_201
--287e5
31,38-4A
32658
65-0_¢ _
3sSS_
350-_3B
3&S_3B
349_5
3Z:.1¢C9
618973
84336
33085
863451
*34._,0A
65g_&2
o34_S8
357_,7
3BOGS
35055
3_2_83
3020J
3570-8
850795
:_C'60
8_3314
30795
28430
287_
3430A
35355
35577
"342_
35@8
6_2
3_578
34C2SI
3E392
34346
34144
8_688
590_6
36207
S[Jb_qg, \/ave
..... Lower valve spring
Gasket, Va}ve apdng box
Cover, Vave sprlnq box
Screw, He:: hd, Seres, 10-24 x ii2
Nut ;t'; Lockwasher, t/4-28
Screw, He× hd. I.'4-28 _.:7/8
Gasket, Carburetor
Pipe, ln_ake(Inal No. 224)
Lin,% Govt:rnor spring
Screw, HBx washe[ hd. Powedok,
14-20 x 3/8
Lever, Brake
Bracket, SE Brake (lr_cl. No. I_%)
Lnr., Cor_trol
Spring, Extensien
Ring, Retaining
Terminal As_f.
½nk- Throlt_
Letc..-,rR PM, Adib._l_ng
Screw, Hex hal. Seres, 1/4-20 x l
Gasket. _ntake pipe
Saree.', Hex washer hd. shou!der,
10-32 _ &q/_
Gasket, Air cleaner
Celat, Ai_ cleaner
Fi]ter, Air cleaner (Paper)
Cover, Air cleaner
Hous no. Blower
Screw, He_:washer hd. selBtao Sen*s,
10-24 x 9,'iG
t :-cad. "[/4 20 x 15/32 ]
MufflerAssy. (Inci No. 2_J
Screw. Hex hd., 1/4-20 x 2d/4
Hub, Starlet
Screw, Hex wasqer hd., 8-32 K 1/2
Line, Fuel
Clamp, Fuel line
Screw. Hex washer hd shakeDroof,
10-32 x 35/64
i
Fank Assy !nCl NO-; 292 _ 301)
Cap, Fuel
Tube, Oil fil!
Gaskel, F[}i hbe
"Q" Ring
_cra_s', HeX washer nd ehakeproof
10-22 × i/2
D pstick, Oi! fill
Spacer, Flywheel key
Plug, Starter
Decal, Inelr:_ct on
Decal, Primer
Carburetor {ncl. No 184)
S_e'. Rewied
Geske'. Set Nncl items marked "l
RPM Settiqg
High Spe_:: 3300_3500
"{ridicules Pa;'te Inc1udad m
Gasket St;t, Re; No a49
P_t Name
Hex washer hd. Powan'okScrew.
26

REWIND STARTER NO, 5fl_&21
NO,
25
27
28
2.9
31
35
40
44
48
16
]
2
4
5
6
7
631615
_1767
_t 184
8S_97_
83'i616
693_0B
6s_527
831700
6s_o2_
632019
83_02_
@31O22
_o47
632"67!
Bale34
D_SCR_PTION
Throttle Shaft S" Lever Ass'i.
Throttle Return Spring
Dus( Seal Washer
Dust Sea_
Th _od:le Shutter
Throttle Shutter Screw
Fuel Fitting
F_oei Bowt
FJoat Shah
Float
-0"" Ring, @oat Bov,'l to body
Intel Needle, Seat B" Clip (tncl. No.
31)
Spring Clip
Primer Bulb/Relaine_ Ring
Nigh Speed BOWl Nut
8ov_,[ Nut Washer
We_ch Plug, Atmospheric Ver!l
PART
I2
I0
£
_._,[ r,'O. i
"5_ S_arter, Rewind
1 580_J.99_ Pin, Sptln 9 (Incl. No. 4)
2 Washer
3 Reteinez
4 Washer
5 F._GS£8 Spring, B:ake
6 5_0816 Doq, S_arler
7 %O.317 S bring, Do#
8
59_!8 PLIley
9
_0_i9 Spring, Rewind
10
5.90_ O Cover, SDrin_
tl
'_'_10¢_.2 Housing Ass,_ , Btarte_
590%35 Rope, Ste,'xe,_ "Length _q' 6 9;64"
13
59_ Handla, Staq_r
8ia.;
DESCRlPTIOH
27
 Loading...